Blog

  • Slow Cooker Sauerbraten Beef

    Slow Cooker Sauerbraten Beef


    Introduction to Slow Cooker Sauerbraten Beef

    I know as well as any busy mom the trials of trying to get anything approaching a wholesome meal onto the table after a long day. So here comes my Slow Cooker Sauerbraten Beef to make a weeknight ordinary something special. Not just dinner, mind you pa is an experience. Savory smells will waft through your house all evening long with only a little bit of planning to have it come to perfect cooking temperature. Imagine your family sitting around the table, good comfort food; it’s at that moment that kitchens are made the heart of the home.

    Why You’ll Love This Slow Cooker Sauerbraten Beef

    You’re going to adore how easy this Slow Cooker Sauerbraten Beef is to prepare. With minimal hands-on time, it practically cooks itself while you tackle other busy life demands. The rich, tangy flavors meld beautifully during the slow cooking process, leaving you with a fork-tender roast that melts in your mouth. Plus, it’s a fantastic way to bring your family together around a warm, comforting meal.

    Ingredients for Slow Cooker Sauerbraten Beef

    Let’s dive into the key ingredients for this delicious Slow Cooker Sauerbraten Beef. Each item brings its unique flavor and texture, making this dish extraordinary. You’ll find the exact quantities listed at the bottom of the article for easy printing.

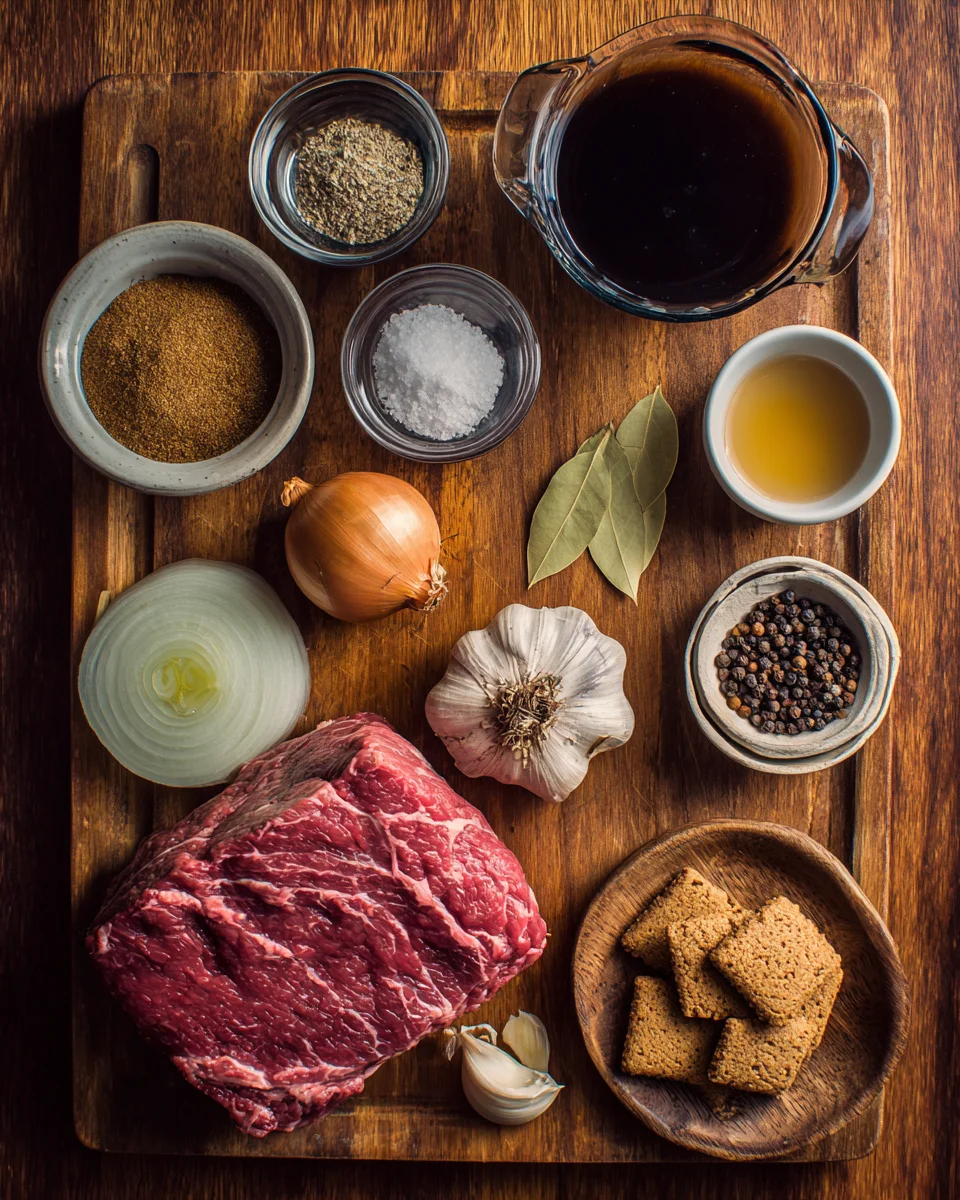
    • Beef Roast: Look for a bottom round or chuck roast. It’s well-marbled, making it perfect for slow cooking and ensuring tenderness.
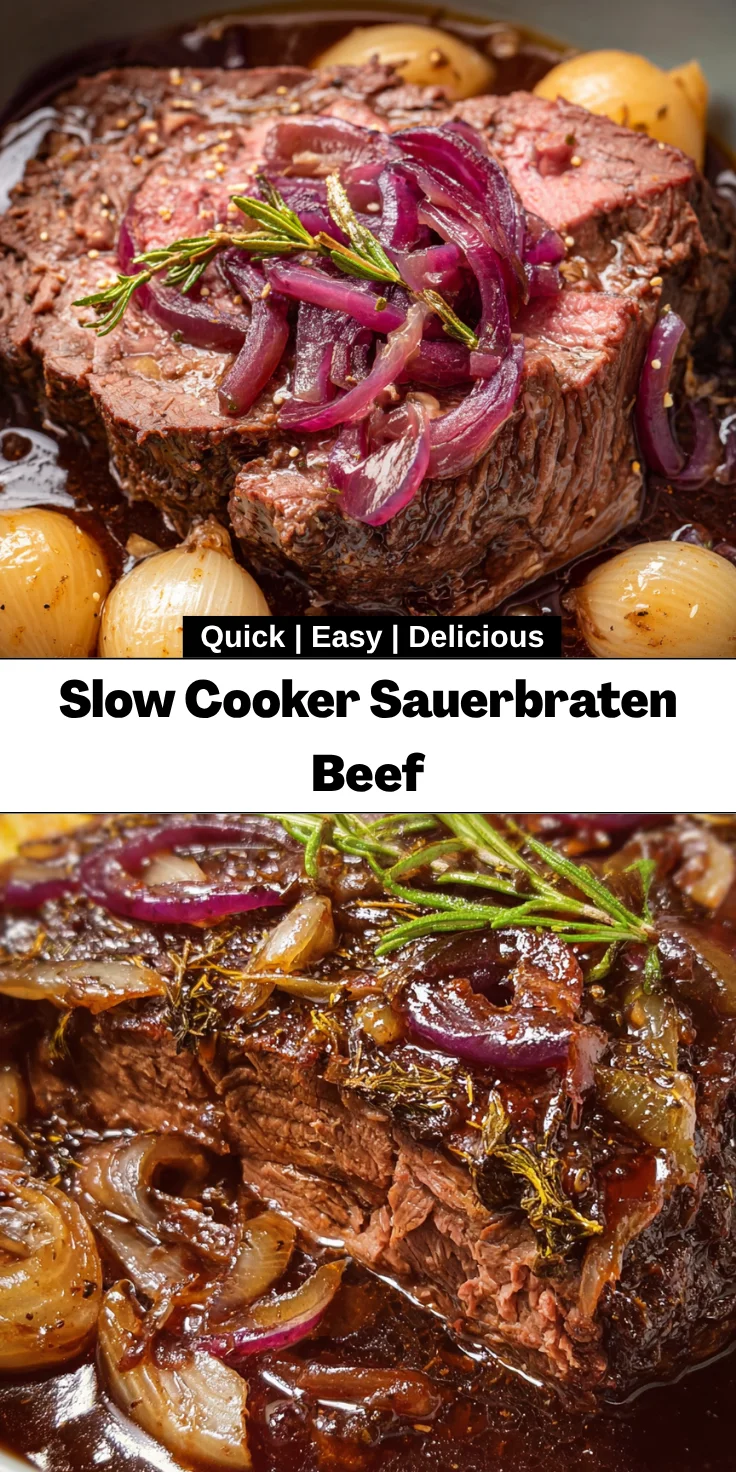
    • Onion: A medium onion, sliced, adds sweetness and depth to the marinade and final dish.
    • Garlic: One clove of minced garlic gives a fragrant kick that enhances the overall flavor profile.
    • Red Wine Vinegar: This tangy ingredient helps tenderize the beef and brings a pleasant acidity to balance the richness of the dish.
    • Beef Broth: Use a good quality broth for added richness. Homemade is great, but store-bought works well too.
    • Brown Sugar: The sweetness from brown sugar balances the acidic vinegar and enhances the savory notes.
    • Whole Cloves: These spices add a warm, aromatic touch with their bold flavor, which works beautifully with the marinade.
    • Bay Leaf: A bay leaf imparts a gentle herbal flavor, elevating the overall taste of the dish.
    • Salt and Black Peppercorns: Essential seasoning to enhance all the flavors in this pot roast.
    • Gingersnap Cookies: Crushed gingersnaps contribute a unique sweetness and depth to the gravy—don’t skip this tasty element!
    • All-Purpose Flour: Used to thicken the gravy, giving it a luscious texture that clings to every bite of beef.
    • Water: Just a simple addition to create a smooth slurry with the flour for a perfect gravy consistency.
    • Vegetable Oil: A small amount for searing the beef, which locks in flavors and ensures a beautiful crust.

    How to Make Slow Cooker Sauerbraten Beef

    Prepare the Marinade

    Start by making a delicious marinade. In a large bowl, combine red wine vinegar, beef broth, sliced onion, minced garlic, brown sugar, whole cloves, a bay leaf, salt, and whole black peppercorns. Use a whisk to blend everything until sugar and salt dissolve completely. The aromatic mixture sets the stage for your beef’s transformation.

    Marinate the Beef

    Next, it’s time to marinate! Place your beef roast in a resealable plastic bag or a non-reactive container. Pour that flavorful marinade over the beef, ensuring it gets coated well. Seal it up and pop it in the fridge for at least 4 hours, but, for the best results, let it marinate overnight. Flip the meat occasionally to make sure every inch absorbs the flavors. This step is crucial for achieving tender, flavorful Slow Cooker Sauerbraten Beef.

    Sear the Beef

    After marinating, take the beef out and set aside the marinade. Pat the beef dry with paper towels to ensure a nice sear. Heat vegetable oil in a skillet over medium-high heat. Searing the beef for 2–3 minutes on each side until it’s deep golden brown locks in those mouthwatering juices. Trust me, this extra step is well worth the effort!

    Slow Cook the Beef

    Now comes the magical slow cooking! Transfer the browned beef to your slow cooker, making sure it’s a 6-liter size or larger. Pour the reserved marinade with all those aromatic goodies over the beef. Sprinkle crushed gingersnap cookies evenly on top; they’ll add a special sweetness. Cover it up and set your slow cooker to LOW for 8 hours or HIGH for 4 hours. When the beef is fork-tender, you’ll know it’s ready.

    Create the Gravy

    About 30 minutes before serving, carefully remove the beef and cover it with foil to keep it warm. Pour the cooking liquid into a saucepan, straining out the solids. Skim off any excess fat on the surface for a leaner gravy. In a small bowl, mix the flour and water to create a slurry. Gradually whisk this into the strained liquid over medium heat, stirring constantly until thickened. This creamy gravy is pure bliss!

    Serve the Dish

    Finally, it’s serving time! Slice or shred the beef and place it on a plate. Generously cover it with that luscious gingersnap gravy you’ve just created. You can almost hear the cheers of delight from your family! Serving this Slow Cooker Sauerbraten Beef hot will surely create lasting memories around your dinner table.

    Tips for Success

    • Marinate overnight for maximum flavor—trust me, it makes a world of difference!
    • Use a meat thermometer to check for doneness; ideal internal temperature is 145°F for roast beef.
    • Feel free to experiment with the spices—adding allspice or juniper berries can elevate the dish!
    • For an extra rich gravy, add a splash of cream to the finished product.
    • Leftovers? They make fantastic sandwiches or even a beef stew!

    Equipment Needed

    • Slow Cooker: A 6-liter slow cooker works best; you can use any larger model for this recipe.
    • Skillet: A non-stick or cast-iron skillet is ideal for searing the beef.
    • Mixing Bowl: Use a large bowl to prepare your marinade.
    • Measuring Cups and Spoons: Ensure accuracy in ingredient amounts.
    • Resealable Plastic Bag: This is perfect for marinating your beef.

    Variations

    • Gluten-Free Option: Substitute all-purpose flour with cornstarch or a gluten-free flour blend to thicken the gravy without gluten.
    • Herb Twist: Add fresh herbs like thyme or rosemary to the marinade for an aromatic flair that compliments the beef beautifully.
    • Spicy Kick: Incorporate a dash of red pepper flakes or a splash of hot sauce for a zesty version of this classic dish.
    • Additional Vegetables: Toss in some carrots or potatoes into the slow cooker for a complete one-pot meal that tenderizes alongside the beef.
    • Different Cut of Beef: Try using brisket for a different texture or even a pork roast for a twist on flavor while still being hearty.

    Serving Suggestions

    • Traditional Sides: Pair your Slow Cooker Sauerbraten Beef with red cabbage or buttery egg noodles for a classic German meal.
    • Fresh Salad: A crisp green salad with a tangy vinaigrette balances the richness of the meat beautifully.
    • Comforting Drink: Serve with a glass of hearty red wine or a light German beer.
    • Presentation: Garnish the dish with fresh parsley for a pop of color and freshness.

    FAQs about Slow Cooker Sauerbraten Beef

    Can I use a different cut of beef for this recipe?
    Absolutely! While bottom round or chuck roast is preferred for its tenderness, you can also use brisket or even pork roast for a delightful twist. Just be sure to adjust cooking times as necessary to achieve that fork-tender consistency.

    How long can I store leftover Sauerbraten Beef?
    Leftover Slow Cooker Sauerbraten Beef can be stored in an airtight container in the refrigerator for up to 3–4 days. To extend its life, consider freezing it for 2–3 months. Simply reheat before serving.

    What can I serve with Sauerbraten Beef?
    Traditionally, Sauerbraten pairs wonderfully with red cabbage, egg noodles, or hearty bread. A fresh green salad adds a nice contrast and balance, too. Don’t forget a refreshing drink choice, like a crisp white wine or light German beer!

    How do I know when my beef is done?
    Using a meat thermometer is the best way to check for doneness. You want the internal temperature to reach around 145°F for perfectly cooked roast beef. If it’s fork-tender, you’re in great shape!

    Can I make this recipe ahead of time?
    Yes! The beauty of Slow Cooker Sauerbraten Beef is its make-ahead potential. You can marinate the beef a day in advance, and the flavors only get better. Cook it ahead of time, and simply reheating it before serving works wonders!

    Final Thoughts

    Cooking Slow Cooker Sauerbraten Beef is more than just a meal; it’s a delightful experience that fills your home with wonderful aromas and invites your loved ones to the table. The joy of watching as the beef transforms into tender bliss is truly rewarding. Each bite, drizzled with luscious gingersnap gravy, tells a story of warmth and comfort. This recipe is perfect for busy moms like us, bringing families together around a hearty dish. I hope it becomes a staple in your home, making every dinner a cherished moment filled with laughter and love.


    Print

    clock clock iconcutlery cutlery iconflag flag iconfolder folder iconinstagram instagram iconpinterest pinterest iconfacebook facebook iconprint print iconsquares squares iconheart heart iconheart solid heart solid icon

    Description

    Slow Cooker Sauerbraten Beef is a delicious and tender German pot roast dish made with marinated beef, aromatic spices, and served with a rich gingersnap gravy.


    • 900 g beef roast (bottom round or chuck), trimmed
    • 1 medium onion, sliced
    • 1 clove garlic, minced
    • 160 ml red wine vinegar
    • 160 ml beef broth
    • 2 tablespoons brown sugar
    • 6 whole cloves
    • 1 bay leaf
    • 1 teaspoon salt
    • 1 teaspoon whole black peppercorns
    • 80 g gingersnap cookies, crushed
    • 2 tablespoons all-purpose flour
    • 2 tablespoons water
    • 1 tablespoon vegetable oil

    1. In a large bowl, combine the red wine vinegar, beef broth, sliced onion, minced garlic, brown sugar, whole cloves, bay leaf, salt, and peppercorns. Whisk until the sugar and salt are fully dissolved.
    2. Place the beef roast in a resealable plastic bag or non-reactive container. Pour the marinade over the beef, ensuring it is fully coated. Seal and refrigerate for at least 4 hours, preferably overnight, turning the meat occasionally for even marination.
    3. Remove the beef from the marinade, reserving the liquid. Pat the beef dry with paper towels. Heat the vegetable oil in a skillet over medium-high heat. Sear the beef on all sides until deep golden brown, about 2–3 minutes per side.
    4. Transfer the browned beef to a slow cooker (6 litres or larger). Pour the reserved marinade with aromatics over the meat. Sprinkle the crushed gingersnaps evenly on top. Cover and cook on LOW for 8 hours, or on HIGH for 4 hours, until the beef is very tender.
    5. About 30 minutes before serving, carefully remove the cooked beef and cover with foil to keep warm. Strain the cooking liquids into a saucepan, discarding solids. Skim excess fat from the surface. In a small bowl, mix the flour and water until smooth, forming a slurry. Gradually whisk the slurry into the strained liquid over medium heat, stirring constantly until thickened, about 5 minutes. Adjust seasoning with additional salt and pepper if needed.
    6. Slice or shred the beef and serve covered with the gingersnap gravy. Enjoy hot.

    Notes

    • For best flavor, marinate the beef overnight.
    • You can substitute the gingersnap cookies with crushed ginger cookies if needed.
    • Adjust the cooking time based on your slow cooker model.
    • Prep Time: 4 hours (plus overnight marination)
    • Cook Time: 8 hours on LOW or 4 hours on HIGH
    • Category: Main Dish
    • Method: Slow Cooking
    • Cuisine: German

    Nutrition

    • Serving Size: 1 serving
    • Calories: 450
    • Sugar: 6 g
    • Sodium: 800 mg
    • Fat: 20 g
    • Saturated Fat: 5 g
    • Unsaturated Fat: 10 g
    • Trans Fat: 0 g
    • Carbohydrates: 50 g
    • Fiber: 2 g
    • Protein: 32 g
    • Cholesterol: 100 mg

    Sharing is caring!

  • Green Smoothie with Spinach Avocado

    Green Smoothie with Spinach Avocado


    Introduction to Green Smoothie with Spinach Avocado

    Hey there, fellow home cooks! If you’re anything like me, some days it feels like I’m juggling a hundred things at once. A green smoothie with spinach avocado swoops in like a superhero, ready to boost my energy and keep me on my toes. This refreshing drink is not just a quick, healthy solution for a busy day; it’s a delightful way to treat yourself and your loved ones. Packed with nutrients, it’s a fabulous choice for breakfast or a mid-afternoon pick-me-up. Let’s dive into this delicious adventure together!

    Why You’ll Love This Green Smoothie with Spinach Avocado

    You’re going to fall head over heels for this green smoothie with spinach avocado. It’s incredibly easy to whip up in just 10 minutes—ideal for my fellow busy moms and professionals! Not to mention, the creamy texture and vibrant flavors dance on your taste buds. This nutrient-packed drink not only fuels your body, but also leaves you feeling refreshed and ready to tackle whatever comes your way.

    Ingredients for Green Smoothie with Spinach Avocado

    Gathering the right ingredients is half the fun! Here’s what you’ll need for this delicious green smoothie with spinach avocado:

    • Fresh spinach: This leafy green is a powerhouse of vitamins and minerals, perfect for adding a nutrient boost.
    • Ripe avocado: Its creamy texture enriches the smoothness of the drink while providing healthy fats.
    • Frozen banana: This natural sweetener adds richness and a hint of sweetness, perfect for a delightful balance.
    • Unsweetened almond milk: This dairy-free option keeps the smoothie light, making it ideal for all diets.
    • Green apple: Chopped and juicy, it contributes a refreshing flavor that cuts through the creaminess.
    • Chia seeds or flaxseed: These tiny powerhouses introduce healthy omega-3s and a bit of crunch.
    • Fresh lemon juice: A splash brightens the flavors and adds a zesty kick to the mix.
    • Grated ginger: This zingy root not only adds a warm spice but also has wonderful health benefits.
    • Optional toppings: Feel free to jazz it up with sliced banana, granola, coconut flakes, or hemp seeds for extra flair!

    Don’t forget, the exact quantities can be found at the bottom of the article for your convenience. Get ready to blend up this nutritious creation!

    How to Make Green Smoothie with Spinach Avocado

    Prepare the Ingredients

    Let’s kick things off by prepping our fresh ingredients! First, rinse the spinach thoroughly under cold water to remove any dirt. Then, grab your ripe avocado. Cut it in half, remove the pit, and scoop out the creamy flesh with a spoon. Next, take your frozen banana and let it thaw for a couple of minutes before slicing. If you’re using a green apple, wash it and chop it into small chunks, discarding the core. Measure out the chia seeds or flaxseed, lemon juice, and ginger, so they’re ready to go. The better prepared you are, the smoother the blending will be!

    Blend the Mixture

    Now it’s time to turn all those fresh ingredients into a refreshing green smoothie with spinach avocado. Start by pouring the unsweetened almond milk into your blender first. This helps the blades move freely. Next, add in the fresh spinach, followed by the avocado. Then toss in that frozen banana and the chopped green apple. Sprinkle in the chia seeds or flaxseed, followed by the zesty lemon juice and grated ginger. Blend on high until everything is smooth and creamy. Don’t be shy—stop the blender a couple of times to scrape down the sides, ensuring everything mixes evenly. You want every sip to be just as delicious as the last!

    Adjust Consistency

    The beauty of a smoothie lies in its versatility. If you prefer a thinner texture, simply add a splash more almond milk and blend again until you reach your desired consistency. Craving a chill? Toss in a few ice cubes before blending for an extra frosty delight. Conversely, if you like your smoothie thicker, throw in an additional frozen fruit or even a spoonful of yogurt. It’s all about crafting the perfect sip that suits your taste buds!

    Serve Immediately

    Once that blender stops whirring, it’s time for the grand reveal! Pour your vibrant smoothie into glasses, allowing its luscious green color to shine through. Want to make it Instagram-ready? Garnish with optional toppings like sliced banana, a sprinkle of granola, coconut flakes, or hemp seeds. Not only do these add crunch, but they also make for a stunning presentation. Serve immediately for the best flavor and texture, and enjoy your nutrient-packed creation as a fabulous treat any time of the day!

    Tips for Success

    • Use frozen fruit to enhance creaminess without needing ice.
    • Always wash produce thoroughly, especially leafy greens.
    • Experiment with different toppings for added flavor and texture.
    • Blend in batches if you have a smaller blender to ensure a smooth mixture.
    • Keep any leftovers in an airtight container to maintain freshness.

    Equipment Needed for Green Smoothie with Spinach Avocado

    • Blender: A high-speed blender works best, but any blender will do.
    • Measuring cups: Handy for precise ingredient measurement.
    • Cutting board and knife: Essential for chopping your fruits and veggies.
    • Glassware: Use tall glasses or jars for serving.

    Variations on Green Smoothie with Spinach Avocado

    • Add protein: Incorporate a scoop of your favorite protein powder, such as pea or whey, to make it more filling.
    • Change the greens: Swap spinach for kale, swiss chard, or even romaine for a different taste and nutrient profile.
    • Mix in berries: Add a handful of fresh or frozen berries—like strawberries, blueberries, or raspberries—for added sweetness and antioxidants.
    • Nut butter twist: Blend in a tablespoon of almond or peanut butter for an extra creamy smoothie that boosts healthy fats.
    • Spicy kick: If you love a little heat, add a pinch of cayenne pepper or a few slices of jalapeño. It pairs surprisingly well with the creamy avocado!
    • Herbal infusion: Blend in a handful of fresh herbs like mint or basil for a refreshing twist that elevates each sip.
    • Non-dairy yogurt: For a tangy twist, mix in a scoop of non-dairy yogurt, like coconut or almond yogurt, for creaminess and probiotics.

    Serving Suggestions

    • Pair your green smoothie with a slice of whole-grain toast topped with avocado or nut butter.
    • For a complete breakfast, serve alongside a hard-boiled egg for protein boost.
    • Complement with a handful of mixed nuts for added crunch and energy.
    • Serve in mason jars for a rustic touch, perfect for on-the-go sipping!

    FAQs about Green Smoothie with Spinach Avocado

    Curious minds often have questions about this delightful green smoothie with spinach avocado. Here are some common inquiries I’ve come across that might help clear things up:

    Can I make this smoothie ahead of time?
    Absolutely! You can prepare this smoothie and refrigerate it for up to 24 hours. Just give it a quick stir or shake before enjoying to bring it back to its creamy goodness.

    Is this smoothie vegan-friendly?
    Yes! This green smoothie with spinach avocado is vegan since it uses almond milk and plant-based ingredients. It’s perfect for those following a vegan lifestyle or anyone looking to eat healthier.

    What if I don’t have a blender?
    If you don’t own a blender, you can use a food processor as an alternative. Just remember to chop all ingredients finely before adding them to ensure everything mixes well.

    Can I use other greens besides spinach?
    Certainly! Feel free to swap out spinach for kale, swiss chard, or even collard greens. Each green will bring a unique flavor profile and nutrient boost to your smoothie.

    How can I make it sweeter?
    If you prefer a sweeter green smoothie with spinach avocado, try adding a little honey, agave syrup, or a medjool date. You can also incorporate ripe fruit, like more bananas or a splash of orange juice, for that extra sweetness!

    Final Thoughts

    Whipping up a green smoothie with spinach avocado is simply a joy! It’s not just a drink; it’s a vibrant splash of health you can pour into your day. Each sip feels like a refreshing hug that energizes both body and soul, preparing you to tackle life’s hurdles. Whether it’s a busy morning or a relaxing afternoon refreshment, this smoothie fits seamlessly into any routine. With endless variations and the ability to customize flavors, you’ll never tire of this nutritious gem. Embrace the deliciousness and let yourself feel revitalized with every sip!


    Print

    clock clock iconcutlery cutlery iconflag flag iconfolder folder iconinstagram instagram iconpinterest pinterest iconfacebook facebook iconprint print iconsquares squares iconheart heart iconheart solid heart solid icon

    Description

    A refreshing and nutrient-packed green smoothie featuring spinach and avocado, perfect for boosting your energy levels.


    • 1 cup fresh spinach, packed
    • ½ ripe avocado
    • 1 frozen banana
    • 1 cup unsweetened almond milk
    • ½ green apple, chopped
    • 1 tbsp chia seeds or flaxseed
    • 1 tsp fresh lemon juice
    • ½ tsp grated ginger
    • Sliced banana (optional)
    • Granola (optional)
    • Coconut flakes (optional)
    • Hemp seeds (optional)

    1. Add all ingredients to a blender in the following order: almond milk, spinach, avocado, banana, apple (if using), seeds, lemon juice, and ginger.
    2. Blend on high until smooth and creamy, scraping down sides as needed.
    3. Taste and adjust: add more milk for a thinner texture, or a few ice cubes for extra chill.
    4. Pour into glasses and serve immediately, or refrigerate up to 24 hours.

    Notes

    • For a thicker smoothie, add more frozen fruit.
    • Customize with your favorite toppings if serving as a smoothie bowl.
    • This smoothie can be kept in the refrigerator for up to 24 hours.
    • Prep Time: 10 minutes
    • Cook Time: 0 minutes
    • Category: Beverage
    • Method: Blending
    • Cuisine: Health

    Nutrition

    • Serving Size: 1 cup
    • Calories: 250
    • Sugar: 8g
    • Sodium: 120mg
    • Fat: 12g
    • Saturated Fat: 1.5g
    • Unsaturated Fat: 10g
    • Trans Fat: 0g
    • Carbohydrates: 34g
    • Fiber: 10g
    • Protein: 5g
    • Cholesterol: 0mg

    Sharing is caring!

  • Homemade Easy Cheesy Pizza Pockets

    Homemade Easy Cheesy Pizza Pockets


    Introduction to Homemade Easy Cheesy Pizza Pockets

    As a busy mom, I know how the days can zoom by, leaving little time for elaborate meals. That’s why I absolutely adore these Homemade Easy Cheesy Pizza Pockets! They’re a quick solution for those chaotic evenings or a fun twist for your next family movie night. Just imagine warm, cheesy goodness wrapped in light, flaky dough! Whether you’re feeding a crowd or just treating yourself, these delightful pockets bring smiles in every bite. Trust me, once you try this recipe, it’ll be a cherished go-to for creating delicious moments in your home.

    Why You’ll Love This Homemade Easy Cheesy Pizza Pockets

    These Homemade Easy Cheesy Pizza Pockets aren’t just tasty; they’re a lifesaver for busy days! They come together in under 35 minutes, making mealtime feel effortless. You’ll love how customizable they are, catering to every family’s taste. Plus, the delightful aroma that fills your kitchen while they bake is an experience you won’t want to miss. It’s a cozy meal that everyone will look forward to, making family time even more special!

    Ingredients for Homemade Easy Cheesy Pizza Pockets

    Let’s gather our ingredients for these delightful Homemade Easy Cheesy Pizza Pockets! Each one is carefully selected to create that cheesy, irresistible pull that we all adore. Here’s what you’ll need:

    • Pizza Dough: The base of our pizza pockets. You can use store-bought or homemade dough, depending on your time and taste.
    • Shredded Mozzarella Cheese: The star of the show! Melty and stretchy, it provides that classic pizza flavor.
    • Pizza Sauce: A spoonful is all you need for that tangy kick. Feel free to use store-bought or whip up a quick homemade version for extra freshness.
    • Pepperoni Slices: These little circles add a savory, meaty twist. If you prefer a vegetarian option, swap in your favorite veggies like bell peppers or olives!
    • Grated Parmesan Cheese: For an extra sprinkle of umami. It enriches our pockets with a nice, cheesy finish.
    • Egg: A beaten egg is brushed on top for that beautiful glossy finish. It helps create a golden crust that’s simply irresistible.

    If you’re looking to bring in some creative spin, feel free to play with the fillings! You can add mushrooms, bell peppers, or even swap out the cheese for a dairy-free alternative.

    Exact quantities for all these ingredients are provided at the end of the article, ready for printing whenever you are!

    How to Make Homemade Easy Cheesy Pizza Pockets

    Preheat the Oven for Your Pizza Pockets

    First things first, let’s preheat that oven! Set it to 400°F (200°C). This temperature is key for achieving that perfect golden crust. While it heats up, you’ll have time to prepare your dough, making the process even smoother. Trust me; your kitchen will love that warm ambiance!

    Prepare Your Dough

    Now, take your pizza dough and roll it out on a lightly floured surface. Aim for an even thickness, about ¼ inch. This ensures your pizza pockets cook through perfectly. Use a rolling pin to make it easy. The more evenly you roll, the better your dough will hold the filling. You’ve got this!

    Create Perfect Dough Circles

    Using a round cookie cutter or a glass, cut the rolled dough into circles. Each circle should be about 4 inches in diameter. Keep them as uniform as you can for even cooking. Don’t worry if they aren’t perfect; homemade always has that charming touch. Just think of it as art in the kitchen!

    Fill Each Dough Circle

    Time for the fun part! Take a spoonful of pizza sauce and spread it on one half of each dough circle. Then, sprinkle a generous amount of shredded mozzarella cheese on top. Layer on the pepperoni slices, followed by a dash of grated Parmesan. Just imagine how gooey and delicious they’ll taste! Now fold the dough over the filling to create a half-moon shape.

    Seal Your Pizza Pockets

    Before sealing them, let the filling cool for a moment. This prevents soggy pockets. Then, press the edges together. To ensure a tight seal, use a fork to press down along the edges. This not only helps keep the filling inside but adds a nice touch to your pizza pockets. Get ready for those cheesy bites!

    Brush and Bake

    For a glossy finish, brush the tops of your sealed pockets with a beaten egg. This creates that gorgeous golden color while baking. Place your pizza pockets on a baking sheet lined with parchment paper and pop them into your preheated oven. Bake for 15 to 20 minutes until they are beautifully browned. Your kitchen will smell heavenly!

    Cooling Before Serving

    Once out of the oven, let the pizza pockets cool for a few moments. This helps prevent burns and allows the cheesy filling to set just a bit. Trust me, the wait is worth it for those perfect, gooey bites! Enjoy your delicious Homemade Easy Cheesy Pizza Pockets!

    Tips for Success

    • Always roll your dough evenly to ensure even baking.
    • Let your filling cool slightly before sealing to avoid soggy pockets.
    • Experiment with different cheeses or fillings to make it your own!
    • For a crispy bottom, bake on a preheated baking sheet.
    • Brush the dough with olive oil for added flavor and richness.

    Equipment Needed

    • Rolling Pin: Essential for flattening the dough; a wine bottle works in a pinch!
    • Cookie Cutter or Glass: Use for cutting dough circles; any round object will do.
    • Baking Sheet: A must-have for baking; line it with parchment paper for easy cleanup.
    • Fork: Great for sealing your pockets; a spoon can also help!
    • Mixing Bowl: Handy for beating the egg; any bowl you have will work just fine.

    Variations of Homemade Easy Cheesy Pizza Pockets

    • Veggie Delight: Swap pepperoni for a colorful mix of bell peppers, mushrooms, and spinach for a fresh, vegetarian option.
    • Hawaiian Twist: Add diced pineapple and Canadian bacon for a sweet and savory fusion that will please everyone!
    • Buffalo Chicken: Use shredded cooked chicken mixed with buffalo sauce and a sprinkle of blue cheese for a spicy kick.

    • Mexican Flair: Include taco-seasoned ground beef, black beans, and cheddar cheese for a fun twist on traditional flavors.
    • Cheesy Spinach: A delightful touch can be made by adding a filling of ricotta mixed with sautéed garlic and fresh spinach.
    • Breakfast Pockets: Crack an egg mixed with cheese and cooked sausage or bacon for a hearty breakfast alternative.

    Serving Suggestions for Homemade Easy Cheesy Pizza Pockets

    • Pair with a fresh garden salad for a colorful, nutritious side.
    • Serve alongside marinara or ranch dipping sauce for extra flavor!
    • A chilled sparkling water or fruit-infused lemonade complements the meal perfectly.
    • For a fun presentation, stack pizza pockets on a wooden board.
    • Add a sprinkle of fresh herbs for added flair and color.

    FAQs about Homemade Easy Cheesy Pizza Pockets

    Curious about making these delightful Homemade Easy Cheesy Pizza Pockets? Let’s address some common questions that you might have!

    Can I freeze Homemade Easy Cheesy Pizza Pockets?

    Absolutely! After baking, let them cool completely, then wrap each pocket tightly in plastic wrap and foil. They can be frozen for up to two months. When you’re ready to enjoy, simply reheat them in the oven for a quick, satisfying meal!

    What if I don’t have pizza dough?

    No worries at all! You can use crescent roll dough or even puff pastry as an alternative. Both options will still give you that delicious, flaky exterior, ensuring your pizza pockets remain wonderfully cheesy!

    How do I make these pizza pockets healthier?

    For a healthier twist, opt for whole wheat pizza dough, low-fat cheese, and plenty of veggies. Adding ingredients like spinach or zucchini not only increases nutrition but also adds a lovely color and flavor contrast!

    Can I make these pizza pockets ahead of time?

    Yes! You can assemble the pockets earlier in the day, place them in the fridge, and bake them when you’re ready. This way, you’ll have a hassle-free, cheesy snack waiting when hunger strikes!

    What should I serve with pizza pockets?

    Serve your Homemade Easy Cheesy Pizza Pockets with marinara sauce for dipping, a light salad, or some crunchy veggies to balance out the meal. A refreshing drink like iced tea or lemonade pairs perfectly, too!

    Final Thoughts

    Making Homemade Easy Cheesy Pizza Pockets has been one of the most joyful culinary adventures in my kitchen. The smell of baking dough and melting cheese fills the air, creating a cozy atmosphere that feels like a warm hug. Every pocket is a little burst of happiness, perfect for family gatherings or a quick snack. This recipe brings us together, opening doors to laughter and enjoyment around the table. So, whether you’re cooking solo or involving the kids, these delightful pockets will sprinkle some joy into your day—one cheesy bite at a time!


    Print

    clock clock iconcutlery cutlery iconflag flag iconfolder folder iconinstagram instagram iconpinterest pinterest iconfacebook facebook iconprint print iconsquares squares iconheart heart iconheart solid heart solid icon

    Description

    Delicious homemade cheesy pizza pockets filled with mozzarella, pepperoni, and pizza sauce, baked to perfection.


    • 1 package pizza dough
    • 1 cup shredded mozzarella cheese
    • 1/2 cup pizza sauce
    • 1/2 cup pepperoni slices
    • 1/4 cup grated Parmesan cheese
    • 1 large egg

    1. Set oven temperature to 400°F.
    2. Roll out pizza dough on a lightly floured surface until even in thickness.
    3. Use a round cookie cutter or glass to divide dough into even circles.
    4. Place a spoonful of pizza sauce, mozzarella cheese, Parmesan, and pepperoni on one half of each dough circle.
    5. Fold dough circles in half to enclose filling and press edges closed with a fork to seal.
    6. Brush tops of each pocket with beaten egg for a glossy finish.
    7. Arrange on baking sheet and bake in the preheated oven for 15 to 20 minutes until golden brown.
    8. Allow pizza pockets to cool slightly before serving.

    Notes

    • Make sure the pizza dough is thawed if using frozen dough.
    • You can substitute pepperoni with vegetables for a vegetarian option.
    • Prep Time: 15 minutes
    • Cook Time: 20 minutes
    • Category: Snack
    • Method: Baking
    • Cuisine: Italian

    Nutrition

    • Serving Size: 1 pizza pocket
    • Calories: 250
    • Sugar: 2g
    • Sodium: 400mg
    • Fat: 12g
    • Saturated Fat: 5g
    • Unsaturated Fat: 7g
    • Trans Fat: 0g
    • Carbohydrates: 28g
    • Fiber: 1g
    • Protein: 10g
    • Cholesterol: 30mg

    Sharing is caring!

  • Italian Parmesan Chicken Tortellini

    Italian Parmesan Chicken Tortellini


    Introduction to Italian Parmesan Chicken Tortellini

    As a passionate home cook, I understand the importance of finding meals that are both quick and delicious, especially when life gets busy. That’s where my Italian Parmesan Chicken Tortellini comes in. This creamy delight is the perfect answer for those hectic weeknights or when you want to impress your loved ones without spending hours in the kitchen. It combines tender chicken, cheesy tortellini, and a mouthwatering sauce in under 35 minutes. Trust me, this recipe will soon become a cherished part of your dinner rotation!

    Why You’ll Love This Italian Parmesan Chicken Tortellini

    This Italian Parmesan Chicken Tortellini is not just another meal; it’s a game-changer for busy days! You’ll savor the rich, creamy flavors while knowing that it’s quick to prepare, making it perfect for any schedule. Plus, that cheesy sauce? Oh, my goodness! It’s an instant crowd-pleaser. Whether you’re feeding a family or hosting friends, this dish is bound to impress without keeping you tied to the stove for hours!

    Ingredients for Italian Parmesan Chicken Tortellini

    Gathering the right ingredients is the first step toward creating this mouthwatering Italian Parmesan Chicken Tortellini. Here’s what you’ll need:

    • Boneless skinless chicken breasts: Tender and easy to work with, they’re a great source of protein.
    • Italian dressing: This adds a wonderful zing and depth of flavor when marinating the chicken.
    • Onion powder: A sprinkle of this brings sweetness and savory notes without the hassle of chopping onions.
    • Garlic powder: Perfect for that beloved garlicky flavor, easy and no peeling involved!
    • Black pepper: Just a touch to enhance all the flavors throughout the dish.
    • Tortellini: The star of the dish! You can use cheese-filled or chicken tortellini; both work beautifully.
    • Olive oil: Essential for cooking the chicken, it also adds flavor and prevents sticking.
    • Butter: This creates a rich, creamy base for the cheese sauce—because butter makes everything better!
    • Shredded Parmesan cheese: For that salty, nutty cheese hit that makes the sauce divine.
    • Shredded mozzarella cheese: Adds an oozy stretchiness that’s too good to resist.
    • Heavy whipping cream: This is what makes the sauce luxuriously creamy, enveloping each bite in richness.
    • All-purpose flour: Used for thickening the sauce, giving it that perfect creamy consistency.
    • Salt and black pepper: Essential for seasoning to taste—don’t forget to adjust these for your liking!

    Feel free to add vegetables, like spinach or bell peppers, to sneak in some extra nutrition. You can also explore using whole wheat or gluten-free tortellini if desired! If you’re ready to get cooking, the exact measurements are at the bottom of this article, ready for you to print.

    How to Make Italian Parmesan Chicken Tortellini

    Marinate the Chicken

    Begin by tossing diced chicken into a large bowl. Add the Italian dressing, onion powder, garlic powder, and black pepper. Mix everything well, ensuring the chicken is well-coated. Let it marinate for at least 15 minutes; this will infuse wonderful flavors! If you have time, consider marinating it longer, even in the fridge. Trust me, that extra time is worth it!

    Cook the Tortellini

    While the chicken marinates, bring a large pot of salted water to a boil. Once boiling, add the tortellini and cook according to package instructions, usually about 3-5 minutes. Drain the tortellini carefully, then drizzle some olive oil to prevent sticking. This step is crucial for keeping your pasta from clumping together!

    Cook the Chicken

    In a large skillet over medium-high heat, add a splash of olive oil. Once hot, add the marinated chicken pieces. Cook until the internal temperature reaches 165°F (74°C), which usually takes about 6-8 minutes. Stir occasionally for even cooking. Don’t rush this step; perfectly cooked chicken will elevate your dish’s flavors!

    Prepare the Cheese Sauce

    Reduce the skillet heat to medium after removing the chicken. Add butter until melted, then whisk in flour to create a roux. Cook this for 1-2 minutes until lightly golden. Gradually add the heavy whipping cream, whisking continuously until the sauce thickens and starts to simmer. Stir in the shredded Parmesan and mozzarella until fully melted and combined. Season with salt and black pepper to taste. This sauce is your creamy canvas, so make it delightful!

    Combine Ingredients

    Add the cooked chicken and tortellini into the cheese sauce. Stir everything together until well-coated. Ensure that each piece of tortellini is drenched in that luscious cheese sauce for maximum flavor. It’s the perfect harmony of chicken and pasta every bite!

    Tips for Success

    • Prep ingredients ahead of time to save valuable minutes during cooking.
    • Taste and adjust seasonings as you go—your palate knows best!
    • For added texture, consider sautéing some veggies along with the chicken.
    • Let the sauce simmer gently to bring out flavors without burning.
    • Leftovers? Reheat gently and add a splash of cream for creaminess!

    Equipment Needed

    • Large mixing bowl: Any big bowl will do for marinating the chicken.
    • Pot: A large pot for boiling tortellini; a deep saucepan works well too.
    • Skillet: A sturdy skillet for cooking chicken and sauce; non-stick is best.
    • Whisk: Ideal for blending the sauce, but a wooden spoon can work too!
    • Meat thermometer: Handy for checking chicken doneness; if you don’t have one, just slice it open to check.

    Variations

    • Add vegetables: Incorporate spinach, bell peppers, or broccoli to boost nutrition and color.
    • Swap the protein: Try shrimp or diced turkey instead of chicken for a unique twist.
    • Go meatless: Replace chicken with a plant-based protein or omit it entirely for a vegetarian delight.
    • Change the cheese: Mix different cheeses like Gouda or Cheddar for a new flavor profile.
    • Spice it up: Add crushed red pepper flakes for a touch of heat in your creamy sauce.

    Serving Suggestions for Italian Parmesan Chicken Tortellini

    • Fresh green salad: Serve with a simple side salad dressed in balsamic vinaigrette for a crisp contrast.
    • Garlic bread: Crunchy, buttery garlic bread makes for a hearty side to soak up every bit of that creamy sauce.
    • Wine pairing: Enjoy a glass of Chardonnay or Sauvignon Blanc to complement the rich flavors.
    • Presentation: Garnish with fresh parsley or basil to add a pop of color and freshness.

    FAQs about Italian Parmesan Chicken Tortellini

    Can I make this dish gluten-free?

    Absolutely! Swap regular tortellini for gluten-free tortellini, and you’re good to go. Just ensure the other ingredients are gluten-free as well.

    What can I substitute for heavy whipping cream?

    If you’re looking for a lighter option, use half-and-half or a mix of milk and cream. Keep in mind, though, the sauce won’t be as thick and creamy!

    How can I store leftovers?

    Store any leftovers in an airtight container in the fridge for up to 3 days. Simply reheat gently in a skillet, adding a splash of cream if needed for moisture.

    Can I freeze Italian Parmesan Chicken Tortellini?

    Yes! Freeze the dish in an airtight container. It keeps for about 2 months. Thaw in the fridge overnight before reheating on the stove.

    What can I add for extra flavor?

    Consider mixing in fresh herbs like basil or rosemary, or even a squeeze of lemon juice to brighten the flavors. A sprinkle of red pepper flakes can also add some delightful heat!

    Final Thoughts on Italian Parmesan Chicken Tortellini

    This Italian Parmesan Chicken Tortellini is truly more than just a meal; it’s a warm hug on a plate. The creamy sauce, tender chicken, and flavorful tortellini come together so perfectly, creating a dish that warms the heart and satisfies the soul. Whether you’re gathering the family around the table or prepping a weeknight dinner, this recipe is your ticket to happiness. I hope it brings you as much joy in the kitchen as it has brought me. Here’s to delicious moments shared with loved ones—bon appétit!


    Print

    clock clock iconcutlery cutlery iconflag flag iconfolder folder iconinstagram instagram iconpinterest pinterest iconfacebook facebook iconprint print iconsquares squares iconheart heart iconheart solid heart solid icon

    Description

    A creamy and delightful Italian dish featuring chicken and tortellini in a rich cheese sauce.


    • 34 boneless skinless chicken breasts, diced
    • 1 cup Italian dressing
    • 1/2 tablespoon onion powder
    • 1/2 tablespoon garlic powder
    • 1/4 teaspoon black pepper
    • 12 ounces tortellini pasta
    • 1 tablespoon olive oil
    • 3 tablespoons butter
    • 1 cup shredded Parmesan cheese
    • 1 cup shredded mozzarella cheese
    • 2 cups heavy whipping cream
    • 2 tablespoons all-purpose flour
    • Salt and black pepper to taste

    1. Add diced chicken to a large bowl and mix with Italian dressing, onion powder, garlic powder, and black pepper. Allow to marinate for at least 15 minutes.
    2. Bring a large pot of water to boil. Cook the tortellini according to package instructions. Drain and drizzle a little olive oil on the pasta to prevent sticking.
    3. In a large skillet over medium-high heat, add olive oil and cook the chicken pieces until the internal temperature reaches 165°F (74°C). Remove from the skillet.
    4. Reduce skillet heat to medium and add butter. Once melted, whisk in all-purpose flour and cook for 1-2 minutes. Gradually add heavy whipping cream while whisking until the sauce thickens and begins to simmer. Stir in Parmesan and mozzarella cheeses until combined into a thick, cheesy sauce. Season with salt and black pepper.
    5. Add the cooked chicken and tortellini to the cheese sauce in the skillet. Stir to combine, then serve and enjoy.

    Notes

    • Ensure chicken is fully cooked to an internal temperature of 165°F (74°C).
    • Feel free to add vegetables such as spinach or bell peppers for added nutrition.
    • Prep Time: 15 minutes
    • Cook Time: 20 minutes
    • Category: Main Course
    • Method: Skillet Cooking
    • Cuisine: Italian

    Nutrition

    • Serving Size: 1 serving
    • Calories: 600
    • Sugar: 3g
    • Sodium: 800mg
    • Fat: 35g
    • Saturated Fat: 20g
    • Unsaturated Fat: 10g
    • Trans Fat: 0g
    • Carbohydrates: 50g
    • Fiber: 3g
    • Protein: 30g
    • Cholesterol: 120mg

    Sharing is caring!

  • Cajun Mac Cheese Andouille Sausage

    Cajun Mac Cheese Andouille Sausage


    Introduction to Cajun Mac Cheese Andouille Sausage

    As a busy mom, I know firsthand how chaotic life can get. One moment you’re enjoying a sunny afternoon, and the next, you’re juggling work deadlines and dinner prep. This is why I can’t wait to share my delightful Cajun Mac Cheese Andouille Sausage recipe with you! This hearty pasta dish blends a creamy cheese sauce with smoky Andouille sausage, creating pure comfort. It comes together quickly, making it the perfect solution for those bustling weeknights when you need to serve up something irresistible without a fuss.

    Why You’ll Love This Cajun Mac Cheese Andouille Sausage

    This Cajun Mac Cheese Andouille Sausage is a game-changer for your dinner routine. It’s incredibly simple to whip up, taking just 45 minutes from prep to table. The rich, creamy cheese sauce pairs perfectly with the flavorful Andouille sausage, creating a dish that’s both satisfying and delicious. Plus, it’s a hit with the whole family, making dinner nights a joyful affair instead of a battle. Who can resist comfort food like this?

    Ingredients for Cajun Mac Cheese Andouille Sausage

    Gathering the right ingredients is key to creating a flavorful Cajun Mac Cheese Andouille Sausage. Here’s what you’ll need:

    • Elbow macaroni: The classic choice for mac and cheese, it holds onto the cheese sauce beautifully.
    • Andouille sausage: This spicy, smoky sausage adds a punch of flavor, taking our dish to the next level.
    • Unsalted butter: Essential for making a rich roux and creamy cheese sauce. Always a staple in my kitchen!
    • All-purpose flour: Used to thicken the cheese sauce, giving it that lovely, velvety texture.
    • Whole milk: The base for our cheese sauce, adding creaminess and richness. You could also use half-and-half for a more decadent touch.
    • Sharp cheddar cheese: A must-have for its bold flavor and melty goodness.
    • Monterey Jack cheese: This smooth cheese contributes additional creaminess without overpowering the dish.
    • Smoked Gouda cheese: Infuses a delightful smokiness that pairs perfectly with the Andouille.
    • Dijon mustard: Just a splash enhances the cheese sauce with a bit of tang; trust me, it’s worth it!
    • Garlic powder and onion powder: These spices add depth and subtle flavors to the sauce without overwhelming it.
    • Cajun seasoning: This is where the magic happens! Adjust it to your taste to get that desired spice level.
    • Smoked paprika: Adds a whisper of smokiness, enhancing the entire flavor profile.
    • Salt and black pepper: Essential for seasoning to taste; don’t skip this step!
    • Panko breadcrumbs: These provide a nice crunchy topping that contrasts beautifully with the creamy pasta.
    • Grated Parmesan cheese: Elevates the breadcrumb topping with an extra layer of flavor and richness.
    • Fresh parsley (optional): A sprinkle of green on top adds a pop of color and freshness.

    You can find exact measurements for each ingredient listed at the bottom of the article, along with a printable version for your convenience!

    How to Make Cajun Mac Cheese Andouille Sausage

    Now that we’ve gathered our ingredients, the fun begins! Making this Cajun Mac Cheese Andouille Sausage is an adventure in the kitchen. Follow these steps for a flawless, creamy masterpiece your family will adore!

    Step 1: Preheat and Prepare

    First things first, let’s preheat our oven to 400°F (200°C). This ensures our dish will bake evenly, resulting in that beautiful golden crust we all crave.

    Next, grease a large baking dish. This helps prevent the mac and cheese from sticking, ensuring a lovely serving experience. Trust me, no one wants to wrestle with their dish at dinner time!

    Step 2: Cook the Macaroni

    Bring a large pot of salted water to a rolling boil. You want it salty enough to taste like the ocean; it really enhances the flavor of the macaroni!

    Add the elbow macaroni and cook according to package instructions until it’s al dente. This means it should still have a slight bite to it. We don’t want it mushy, right? Once done, drain and rinse it under cold water to stop the cooking process.

    Step 3: Brown the Andouille Sausage

    In a large skillet, add your sliced Andouille sausage over medium heat. Let it cook for about 3-4 minutes until browned and slightly crispy.

    This browning step is crucial—it unlocks that smoky flavor that will blend uniquely with the creamy cheese sauce. Keep an eye on it; it’s hard to resist sneaking a taste!

    Step 4: Create the Cheese Sauce Base

    Now for the magical cheese sauce! In a large saucepan, melt the unsalted butter over medium heat. Whisk in the flour to create a roux, stirring frequently for about 1-2 minutes. We want a smooth paste without any browning.

    Gradually, whisk in the whole milk. Continue stirring until the mixture thickens slightly, about 4-5 minutes. Reduce the heat to low, then slowly add in the cheddar, Monterey Jack, and smoked Gouda cheese.

    Keep those elbows moving until everything melts smoothly together. Then, stir in your Dijon mustard, garlic powder, onion powder, Cajun seasoning, smoked paprika, salt, and black pepper. Sample your sauce and adjust the seasonings as needed for a personalized flavor!

    Step 5: Combine Ingredients

    With everything in the mix, it’s time to bring our dish together. Gently fold the cooked macaroni and browned Andouille sausage into the cheese sauce.

    Make sure every bit of macaroni is coated in that luscious sauce. It’s like giving your pasta a warm hug, and trust me, they’ll appreciate it!

    Step 6: Prepare for Baking

    Carefully transfer this cheesy goodness into your greased baking dish. Spread it out evenly so it bakes properly.

    In a separate bowl, mix panko breadcrumbs and grated Parmesan cheese with a splash of melted butter. This will create that crunchy topping we love. Evenly sprinkle it over the mac and cheese mixture for that perfect texture contrast!

    Step 7: Baking Time

    Slide your dish into the preheated oven and let it bake for 18-20 minutes. The top should become golden and bubbly, creating an irresistible crust.

    Once done, let it rest for 5 minutes before diving in. This gives it time to set up a bit; otherwise, your first bite could be a cheese explosion!

    Tips for Success

    • Keep an eye on the macaroni; overcooked pasta can ruin the texture.
    • For added spice, sprinkle extra Cajun seasoning directly into the cheese sauce.
    • Let the dish cool for a few minutes before serving to meld flavors beautifully.
    • Mix in veggies like spinach or bell peppers for extra nutrients.
    • Double the recipe for leftovers that reheat well during the week!

    Equipment Needed

    • Large pot: Ideal for boiling macaroni; a stockpot works too.
    • Skillet: Use a non-stick for easy browning of sausage; any skillet can work.
    • Large saucepan: Necessary for making the cheese sauce; a Dutch oven is a great alternative.
    • Baking dish: A 2-quart glass or ceramic dish is perfect.
    • Whisk: Essential for mixing the sauce; a spoon can do in a pinch!

    Variations on Cajun Mac Cheese Andouille Sausage

    • Swap the sausage: Try chicken sausage or turkey sausage for a lighter option without losing flavor.
    • Make it vegetarian: Replace the Andouille sausage with sautéed mushrooms or roasted veggies for a delicious meatless version.
    • Add heat: Stir in diced jalapeños or hot sauce if you’re looking to spice things up even more!

    • Cheese swaps: Experiment with other cheeses like pepper jack for a kick or parmesan for a nuttier flavor.
    • Gluten-free option: Use gluten-free elbow pasta and ensure your flour and breadcrumbs are gluten-free for a tasty dish for everyone!

    Serving Suggestions

    • Pair with a green salad: A fresh, zesty salad balances the richness of the Cajun Mac Cheese Andouille Sausage.
    • Serve with garlic bread: Crunchy, buttery garlic bread is perfect for soaking up all that creamy goodness.
    • Complement with lemonade: A refreshing glass of lemonade adds a lovely contrast to the dish.
    • Garnish with extra parsley: A sprinkle of fresh parsley brightens the plate, making it visually appealing.

    FAQs about Cajun Mac Cheese Andouille Sausage

    Got questions? Don’t worry; I’ve got answers! Here are some FAQs about my delightful Cajun Mac Cheese Andouille Sausage recipe to help you alongside your cooking adventure.

    Can I make Cajun Mac Cheese Andouille Sausage ahead of time?

    Absolutely! You can prepare the dish in advance, cover it tightly, and store it in the refrigerator. Just pop it in the oven to bake when you’re ready for serving!

    How can I store leftovers?

    Leftover Cajun Mac Cheese Andouille Sausage can be stored in an airtight container in the refrigerator for 3-4 days. It reheats nicely in the microwave or the oven.

    Can I freeze this dish?

    Yes! This dish freezes well. Just make sure it’s cooled completely before transferring to a freezer-safe container. When you’re ready to enjoy it, thaw in the fridge overnight and bake as instructed.

    What if I don’t have Andouille sausage?

    No problem! You can substitute Andouille sausage with chicken sausage, turkey sausage, or even vegetarian options. The flavors will still be fabulous!

    How spicy is this dish?

    The spice level can vary based on the amount of Cajun seasoning you add. Start with a tablespoon and adjust according to your family’s taste preferences. It’s all about finding that perfect kick!

    Final Thoughts

    As you gather around the table to enjoy this Cajun Mac Cheese Andouille Sausage, I hope the warmth and flavors bring a smile to your face. Cooking this dish is more than just following a recipe; it’s about creating moments with your loved ones. The smoky Andouille, rich cheese, and crunchy topping make each bite a comforting delight. Whether it’s a busy weeknight or a special family gathering, this dish promises satisfaction. Trust me, it will become a cherished favorite, infusing your mealtimes with joy and a lot of delicious chaos!


    Print

    clock clock iconcutlery cutlery iconflag flag iconfolder folder iconinstagram instagram iconpinterest pinterest iconfacebook facebook iconprint print iconsquares squares iconheart heart iconheart solid heart solid icon

    Description

    Cajun Mac Cheese Andouille Sausage is a delicious and hearty pasta dish that combines creamy cheese sauce with flavorful Andouille sausage and a crunchy breadcrumb topping.


    • 400 g (14 oz) elbow macaroni
    • 300 g (10 oz) Andouille sausage, sliced into 1/4-inch rounds
    • 3 tbsp unsalted butter
    • 3 tbsp all-purpose flour
    • 720 ml (3 cups) whole milk
    • 200 g (7 oz) sharp cheddar cheese, shredded
    • 100 g (3.5 oz) Monterey Jack cheese, shredded
    • 60 g (2 oz) smoked Gouda cheese, shredded
    • 1 tsp Dijon mustard
    • 1/2 tsp garlic powder
    • 1/2 tsp onion powder
    • 1 tbsp Cajun seasoning (adjust to taste)
    • 1/2 tsp smoked paprika
    • Salt and black pepper, to taste
    • 60 g (1/2 cup) panko breadcrumbs
    • 30 g (1/4 cup) grated Parmesan cheese
    • 1 tbsp unsalted butter, melted
    • 2 tbsp chopped fresh parsley (optional, for garnish)

    1. Preheat oven to 200°C (400°F). Grease a large baking dish (about 2 liters or 2 quarts).
    2. Bring a large pot of salted water to a boil. Cook the macaroni according to package instructions until al dente. Drain, rinse with cold water, and set aside.
    3. In a large skillet over medium heat, add the sliced Andouille sausage. Cook for 3–4 minutes until browned. Remove sausage and set aside.
    4. In a large saucepan, melt 3 tbsp butter over medium heat. Add flour and whisk constantly for 1–2 minutes to form a roux (do not let it brown).
    5. Gradually whisk in the milk, stirring constantly until smooth and slightly thickened, about 4–5 minutes. Reduce heat to low. Add cheddar, Monterey Jack, and smoked Gouda cheese, stirring until melted and smooth. Stir in Dijon mustard, garlic powder, onion powder, Cajun seasoning, smoked paprika, salt, and pepper. Adjust seasoning to taste.
    6. Add cooked macaroni and Andouille sausage to the cheese sauce. Stir until evenly coated.
    7. Pour the mixture into the prepared baking dish.
    8. In a small bowl, combine panko breadcrumbs, Parmesan cheese, and melted butter. Sprinkle evenly over the macaroni mixture.
    9. Bake for 18–20 minutes, or until the top is golden and bubbling.
    10. Remove from oven and let rest for 5 minutes. Garnish with fresh parsley, if desired. Serve hot.

    Notes

    • Adjust the amount of Cajun seasoning according to your spice preference.
    • Garnish with fresh parsley for added flavor and color.
    • This dish can be made ahead and baked just before serving.
    • Prep Time: 15 minutes
    • Cook Time: 30 minutes
    • Category: Main Course
    • Method: Baking
    • Cuisine: Cajun

    Nutrition

    • Serving Size: 1 cup
    • Calories: 550
    • Sugar: 5 g
    • Sodium: 850 mg
    • Fat: 32 g
    • Saturated Fat: 15 g
    • Unsaturated Fat: 10 g
    • Trans Fat: 0 g
    • Carbohydrates: 48 g
    • Fiber: 2 g
    • Protein: 22 g
    • Cholesterol: 75 mg

    Sharing is caring!

  • Bacon Jalapeño Popper Eggrolls

    Bacon Jalapeño Popper Eggrolls


    Introduction to Bacon Jalapeño Popper Eggrolls

    Hey there, fellow food lovers! If you’re looking for a snack that’s both wildly delicious and eye-catching, let me introduce you to my favorite treat: Bacon Jalapeño Popper Eggrolls. These crispy delights are perfect for busy days when you need a quick win in the kitchen. Seriously, they not only satisfy your cravings but also impress anyone lucky enough to snag one. Whether it’s game night or just a cozy evening at home, this recipe is bound to become your go-to. Trust me, once you taste them, you’ll find it hard to stop at just one!

    Why You’ll Love This Bacon Jalapeño Popper Eggrolls

    These Bacon Jalapeño Popper Eggrolls deliver the perfect blend of flavor and texture, all wrapped up in a crispy shell. They come together quickly, making them a lifesaver on busy weeknights or last-minute gatherings. Plus, the combination of creamy cheese, smoky bacon, and a kick of heat from jalapeños will have your taste buds dancing. They’re sure to please both picky eaters and adventurous foodies alike!

    Ingredients for Bacon Jalapeño Popper Eggrolls

    Gathering your ingredients is the first step to making these irresistible Bacon Jalapeño Popper Eggrolls! Here’s what you’ll need:

    • Cream Cheese: A smooth base that gives these eggrolls their creamy, rich texture. You can always swap it with a soft cheese like mascarpone for a twist.
    • Shredded Cheddar Cheese: This adds a sharp, melty goodness. Feel free to experiment with flavors, like pepper jack for some extra heat!
    • Bacon: Who doesn’t love crispy bacon? It provides a smoky flavor that balances out the spices. You could use turkey bacon as a leaner option.
    • Fresh Jalapeños: Finely chopped for that delightful kick! Adjust the number based on your preferred spice level—more for daring souls, less for the faint of heart.
    • Eggroll Wrappers: These are the vessels for our tasty filling. Look for them in the refrigerated section of your grocery store. If you’re feeling adventurous, consider using rice paper wrappers for a lighter alternative.
    • Vegetable Oil: Essential for frying to golden perfection! You can also use canola or peanut oil, both great for frying.

    Exact quantities and print-friendly instructions can be found at the bottom of this article, so no worries on that front!

    How to Make Bacon Jalapeño Popper Eggrolls

    Now, let’s dive into the heart of the matter: making these scrumptious Bacon Jalapeño Popper Eggrolls! Each step is simple and straightforward, so grab your apron and let’s get started!

    Step 1: Prepare the Filling

    First, we need to bring our filling to life! In a large bowl, combine the softened cream cheese and shredded cheddar cheese. Mix them until smooth and creamy; it’s like creating a delicious blank canvas. Now, add the crumbled bacon and finely chopped jalapeños. Season with some salt and pepper. Don’t be shy with the flavors! Give everything a good stir until well combined. Your filling should be rich and tempting, like a cozy hug on a plate.

    Step 2: Assemble the Eggrolls

    Now it’s time to wrap these goodies up. Grab an eggroll wrapper and lay it flat on a clean surface, like a little pillow waiting to be filled. Spoon about two tablespoons of your filling onto the center. It’s like tucking a treasure into a blanket! Lightly moisten the edges of the wrapper with water to help seal it. Fold the bottom corner over the filling, tuck in both sides, and carefully roll it up tightly, just like you would wrap a gift. Repeat this until you’ve used all your filling—don’t worry; it goes faster than you think!

    Step 3: Heat the Oil

    Now comes the sizzling part! In a heavy skillet, pour enough vegetable oil to cover the bottom by about an inch. Heat it over medium-high heat until it reaches 350°F—you want it hot enough to make those eggrolls crispy and golden. If you drop a little bit of filling into the oil and it bubbles up right away, you’re good to go. Be cautious, though! Safety first in the kitchen.

    Step 4: Fry the Eggrolls

    Once the oil is hot, it’s time to fry! Carefully place your eggrolls in the skillet, making sure not to overcrowd them. Fry for 2 to 3 minutes on each side, or until they turn a beautiful golden brown. It’s like watching a glorious transformation unfold. Use tongs to flip them gently, and once they’re done, transfer them to a paper towel-lined plate to drain off any excess oil. Your kitchen will smell absolutely divine during this step!

    Tips for Success

    • Make sure the cream cheese is softened—this makes mixing a breeze.
    • Don’t overfill the eggrolls; they need room to puff and crisp up!
    • Keep a close eye on the oil temperature for perfectly fried eggrolls.
    • Consider batch frying to keep the oil temperature consistent.
    • Serve with your favorite dipping sauce for that extra zing!

    Equipment Needed

    • Heavy Skillet: A deep skillet works great for frying. A wide pot also does the trick.
    • Mixing Bowl: Use any size that holds your filling comfortably.
    • Tongs: Handy for flipping the eggrolls! A slotted spoon can work as an alternative.
    • Paper Towels: Essential for draining excess oil after frying.

    Variations

    • Cheesy Spinach: Swap out some of the bacon for fresh spinach. This adds color and a delightful earthy flavor!
    • Sweet and Spicy: Add a tablespoon of honey or brown sugar to the filling for a sweet twist that complements the heat from the jalapeños.
    • BBQ Chicken: Substitute the bacon with shredded rotisserie chicken and mix in some barbecue sauce for a fun twist!

    • Vegetarian Delight: Leave out the bacon and add more veggies, like corn or black beans, for a tasty meat-free option.
    • Gluten-Free Option: Pot for gluten-free eggroll wrappers or make your own using rice paper!

    Serving Suggestions for Bacon Jalapeño Popper Eggrolls

    • Pair with a zesty ranch or creamy avocado dip to elevate the flavor.
    • Serve alongside fresh vegetable sticks for a crunchy contrast.
    • Enjoy with a refreshing soda or a chilled margarita for a festive touch.
    • Arrange on a colorful platter for an appealing presentation.

    FAQs about Bacon Jalapeño Popper Eggrolls

    Can I make Bacon Jalapeño Popper Eggrolls ahead of time?
    Absolutely! You can prepare the filling and assemble the eggrolls in advance. Just cover them tightly and store them in the fridge for a few hours or overnight. When you’re ready to eat, simply fry them up. They’re perfect for a last-minute snack!

    What can I serve with these eggrolls?
    These delicious Bacon Jalapeño Popper Eggrolls pair wonderfully with a variety of dips, like ranch, sour cream, or guacamole. You might even consider a sweet chili sauce for that perfect touch of contrast.

    Are these eggrolls spicy?
    The spice level depends on the number of jalapeños you use. For a milder version, use fewer jalapeños or consider removing the seeds entirely. But if you love the heat, feel free to load them up!

    Can I bake these instead of frying?
    Yes, if you’re looking for a healthier twist, baking is an option! Brush them with a little oil and place them on a baking sheet. Bake at 400°F for about 15-20 minutes or until golden brown, flipping halfway through.

    How can I store leftovers?
    Store any leftover eggrolls in an airtight container in the fridge for up to three days. Just reheat in the oven for a few minutes to restore their crispiness. Enjoying them again feels like a little bonus treat!

    Final Thoughts

    Making Bacon Jalapeño Popper Eggrolls isn’t just about whipping up a tasty snack; it’s a joyful culinary adventure! I love the satisfying crunch when you take your first bite, coupled with that creamy, cheesy filling and a hint of smokiness from the bacon. These eggrolls are more than just food; they’re a reason to gather friends and family for laughter and conversation. Plus, watching others relish your creation is pure happiness! So, put on your apron and embark on this delicious journey. I promise these little bundles of joy will quickly become a staple in your kitchen.


    Print

    clock clock iconcutlery cutlery iconflag flag iconfolder folder iconinstagram instagram iconpinterest pinterest iconfacebook facebook iconprint print iconsquares squares iconheart heart iconheart solid heart solid icon

    Description

    Delicious and crispy eggrolls filled with a creamy mixture of cheese, bacon, and jalapeños, perfect for a snack or party appetizer.


    • 8 ounces cream cheese, softened
    • 1 cup shredded cheddar cheese
    • 6 slices bacon, cooked and crumbled
    • 4 to 5 fresh jalapeños, seeds removed and finely chopped
    • 15 eggroll wrappers
    • Vegetable oil, for frying

    1. In a large mixing bowl, blend softened cream cheese with shredded cheddar cheese until smooth. Add crumbled bacon and finely chopped jalapeños, then season with salt and pepper to taste. Mix thoroughly to combine all ingredients.
    2. Place an eggroll wrapper on a clean surface. Spoon approximately 2 tablespoons of the filling onto the center of the wrapper. Lightly moisten the edges with water. Fold the bottom corner over the filling, fold in both sides, and roll tightly to enclose the filling.
    3. Pour vegetable oil into a heavy skillet to a depth of about 1 inch. Heat the oil over medium-high heat until it reaches 350°F.
    4. Working in batches, fry the assembled eggrolls for 2 to 3 minutes per side or until the wrappers are golden brown and crisp. Transfer to a paper towel-lined plate to drain excess oil.

    Notes

    • Ensure the oil is hot enough before frying to achieve a crispy texture.
    • Adjust the number of jalapeños based on your desired spice level.
    • Prep Time: 20 minutes
    • Cook Time: 15 minutes
    • Category: Appetizer
    • Method: Frying
    • Cuisine: American

    Nutrition

    • Serving Size: 1 eggroll
    • Calories: 160
    • Sugar: 1g
    • Sodium: 300mg
    • Fat: 10g
    • Saturated Fat: 4g
    • Unsaturated Fat: 5g
    • Trans Fat: 0g
    • Carbohydrates: 15g
    • Fiber: 1g
    • Protein: 5g
    • Cholesterol: 20mg

    Sharing is caring!

  • Pumpkin S’mores Cookies

    Pumpkin S’mores Cookies


    Introduction to Pumpkin S’mores Cookies

    As the crisp autumn air settles in, I can’t help but think of the delightful comfort food that the season brings. That’s where my Pumpkin S’mores Cookies come in—an irresistible treat combining the cozy flavors of pumpkin with gooey chocolate and marshmallows. This recipe is perfect for busy moms or professionals looking for a quick, yet delightful dessert to impress loved ones or savor after a long day. In just 30 minutes, you’ll have a batch of warm cookies that not only taste amazing but also fill your kitchen with the inviting aroma of fall.

    Why You’ll Love This Pumpkin S’mores Cookies

    These Pumpkin S’mores Cookies truly capture the spirit of fall with their incredible flavor and mouthwatering aroma. They’re easy to whip up, making them a fantastic choice for those busy weeknights when you crave something sweet. Plus, the combination of pumpkin, chocolate, and marshmallow is a crowd-pleaser, ensuring you’ll have happy faces around the kitchen table. Fast, fun, and unbelievably tasty—what’s not to love?

    Ingredients for Pumpkin S’mores Cookies

    Gathering the right ingredients is the first step toward your baking success. For your Pumpkin S’mores Cookies, you’ll need the following essentials:

    • Pumpkin puree: This creamy goodness adds moisture and a warm flavor that screams fall. You can use canned for convenience or make your own by roasting fresh pumpkins!
    • All-purpose flour: The backbone of your cookie dough, giving it structure. You can swap half for whole wheat flour for a healthier twist.
    • Granulated sugar and brown sugar: They provide the sweetness and help achieve that chewy texture. Brown sugar adds a hint of caramel flavor, which I adore!
    • Butter: For richness, a classic choice is unsalted butter. If you want to elevate your cookies, consider using brown butter for a deeper flavor.
    • Egg: This not only binds everything together but also helps the cookies rise beautifully. If you have an egg allergy, a flaxseed egg can work as a substitute.
    • Vanilla extract: It enhances the overall taste, making these cookies even more irresistible. Always opt for pure vanilla extract if you can!
    • Cinnamon, nutmeg, and cloves: These spices evoke the essence of fall in every bite. Feel free to adjust based on your taste preferences.
    • Baking soda: This little leavening agent ensures your cookies rise properly. It’s essential for that soft, fluffy texture.
    • Salt: A pinch enhances the sweetness and balances flavors beautifully.
    • Mini marshmallows: These tiny pillows of sweetness bring the classic s’mores vibe. You can find them in most grocery stores or online.
    • Chocolate chips: The star of the show! Whether you prefer milk, dark, or even white chocolate, choose what makes your taste buds dance.
    • Graham cracker crumbs: They add that signature crunch and taste of traditional s’mores. You can make your own or buy pre-made crumbs to save time.

    Exact measurements for each ingredient? You’ll find them at the bottom of this article, ready for easy printing. Let’s get those ovens fired up, shall we?

    How to Make Pumpkin S’mores Cookies

    Now that you’ve gathered your ingredients, it’s time to dive into making these delightful Pumpkin S’mores Cookies! Trust me, the process is just as rewarding as the final treat. Let’s get started!

    Step 1: Preheat the Oven

    Preheating your oven is the first essential step. It ensures that your cookies bake evenly and rise beautifully. I like to set my oven to 350°F (175°C) before I start mixing. This way, by the time I’m done with the dough, my oven is ready to go. Perfect timing makes all the difference!

    Step 2: Prepare the Wet Ingredients

    In a large mixing bowl, combine your pumpkin puree, softened butter, granulated sugar, brown sugar, egg, and vanilla extract. Whip it all together until everything is beautifully blended. The mixture should be smooth and creamy! I love the rich color the pumpkin gives, hinting at the deliciousness to come.

    Step 3: Combine the Dry Ingredients

    In another bowl, mix together your all-purpose flour, cinnamon, nutmeg, cloves, baking soda, and salt. It’s important to blend these dry ingredients well. This ensures that the spices are evenly distributed throughout your dough. You’ll want every cookie bursting with fall flavors!

    Step 4: Mix Wet and Dry Ingredients

    Now it’s time to bring our two mixtures together. Slowly add the dry ingredients to the bowl with the wet ingredients. Mix gently—over-mixing can lead to tough cookies, and we want them soft and chewy! Just stir until combined; some lumps are perfectly fine.

    Step 5: Fold in the Extras

    Using a spatula, it’s time to gently fold in those mini marshmallows, chocolate chips, and graham cracker crumbs. This is where the magic really happens! Each bite will have a delightful mix of flavors and textures, just like a classic s’more. Just be careful not to crush the marshmallows!

    Step 6: Scoop and Bake

    Use a cookie scoop or a spoon to drop dough onto your baking sheets lined with parchment paper. Leave some space between the dough balls, as they’ll spread a bit while baking. Keep an eye on them and bake for 12 to 15 minutes. You’ll want those cookies to turn a golden brown, but be careful not to over-bake—slightly underdone gives that chewy bite we all love!

    Step 7: Cool and Enjoy

    Once they’re out of the oven, let your cookies cool on the baking sheet for a few minutes. The aroma filling your kitchen will make it hard to resist. After that, transfer them to a wire rack to cool completely. Don’t rush this step; the anticipation only adds to the pleasure of enjoying these scrumptious treats!

    Tips for Success

    • Make sure your butter is softened for easy mixing.
    • Don’t skip the preheating step—this ensures even baking.
    • For extra pumpkin flavor, use pumpkin pie spice in place of individual spices.
    • Store leftover cookies in an airtight container to maintain freshness.
    • Experiment with different chocolate types for unique flavors.

    Equipment Needed

    • Mixing bowls: You’ll need at least two. Alternatively, a large pot can work in a pinch!
    • Cookie scoop: For evenly sized cookies. A tablespoon works just as well.
    • Baking sheets: Use two for efficiency; parchment paper helps prevent sticking.
    • Spatula: A silicone one is great for folding in ingredients and scooping dough.
    • Wire rack: Perfect for cooling. If you don’t have one, a plate will do the trick!

    Variations for Pumpkin S’mores Cookies

    • Nutty Twist: Add chopped nuts, like walnuts or pecans, for crunch and added flavor.
    • Gluten-Free Option: Substitute all-purpose flour with a gluten-free blend for a similar texture!
    • Vegan Version: Replace the egg with a flaxseed or chia seed egg and use vegan butter.
    • Flavor Boost: Swap the chocolate chips for butterscotch chips or toffee bits for a unique taste.
    • Spicy Kick: Add a pinch of cayenne pepper or black pepper for a surprising flavor profile!

    Serving Suggestions for Pumpkin S’mores Cookies

    • Warm Beverage Pairing: Serve alongside hot chocolate or spiced apple cider for a cozy autumn experience.
    • Pretty Presentation: Stack cookies on a fall-themed platter, garnished with mini pumpkins or autumn leaves for a festive touch.
    • Ice Cream Sandwiches: For a special treat, sandwich a scoop of vanilla ice cream between two cookies!

    FAQs about Pumpkin S’mores Cookies

    Here are some frequently asked questions that might come to mind as you embark on making these delightful Pumpkin S’mores Cookies.

    Can I use homemade pumpkin puree?

    Absolutely! Homemade pumpkin puree can add a fresher flavor and is a great way to use up your fall pumpkins. Just ensure it’s well blended for a smooth texture.

    How should I store these cookies?

    Store your Pumpkin S’mores Cookies in an airtight container at room temperature. They’ll stay fresh for up to a week. If you want to save them longer, you can freeze them!

    Can I make the dough ahead of time?

    You can! Prepare the dough and store it in the refrigerator for up to 24 hours. Just let it come to room temperature before scooping and baking.

    Are these cookies safe for those with nut allergies?

    Yes, the base recipe is nut-free! Just make sure to check your chocolate chips and any optional ingredients for nut traces to ensure they’re safe.

    Can I use different types of chocolate in these cookies?

    Definitely! Feel free to use dark, white, or even flavored chocolate chips. Each type will lend a unique twist to your Pumpkin S’mores Cookies.

    Final Thoughts

    Making Pumpkin S’mores Cookies is more than just baking; it’s about creating joyful moments with loved ones. The process fills your kitchen with delicious scents, makes the heart feel warm, and brings everyone together. Each bite is a reminder of cozy fall evenings spent by the fire, sharing stories and laughter. Whether you’re baking for your family or serving friends, these cookies evoke a sense of nostalgia and happiness. So, roll up your sleeves, embrace the pumpkin flavor, and dive into this delightful treat. You’ll find that these cookies are the perfect way to celebrate the season!


    Print

    clock clock iconcutlery cutlery iconflag flag iconfolder folder iconinstagram instagram iconpinterest pinterest iconfacebook facebook iconprint print iconsquares squares iconheart heart iconheart solid heart solid icon

    Description

    Pumpkin S’mores Cookies are a delicious fall treat that combines the flavors of pumpkin, chocolate, and marshmallows, creating a delightful twist on the classic s’mores.


    • 1 cup pumpkin puree
    • 2 cups all-purpose flour
    • 1/2 cup granulated sugar
    • 1/2 cup brown sugar
    • 1/2 cup butter
    • 1 egg
    • 1 tsp vanilla extract
    • 1 tsp cinnamon
    • 1/2 tsp nutmeg
    • 1/4 tsp cloves
    • 1/2 tsp baking soda
    • 1/4 tsp salt
    • 1 cup mini marshmallows
    • 1/2 cup chocolate chips
    • 1/2 cup graham cracker crumbs

    1. Preheat oven to 350°F (175°C).
    2. Mix pumpkin puree, butter, sugars, egg, and vanilla in a bowl.
    3. Combine flour, spices, baking soda, and salt in another bowl.
    4. Gradually add dry ingredients to wet ingredients.
    5. Fold in marshmallows, chocolate chips, and graham cracker crumbs.
    6. Scoop dough onto baking sheets.
    7. Bake for 12-15 minutes.
    8. Cool before serving.

    Notes

    • For a richer flavor, use brown butter instead of regular butter.
    • These cookies can be stored in an airtight container for up to a week.
    • Experiment with different types of chocolate chips, such as dark or white chocolate.
    • Prep Time: 15 minutes
    • Cook Time: 15 minutes
    • Category: Dessert
    • Method: Baking
    • Cuisine: American

    Nutrition

    • Serving Size: 1 cookie
    • Calories: 160
    • Sugar: 10g
    • Sodium: 65mg
    • Fat: 6g
    • Saturated Fat: 4g
    • Unsaturated Fat: 2g
    • Trans Fat: 0g
    • Carbohydrates: 24g
    • Fiber: 1g
    • Protein: 2g
    • Cholesterol: 25mg

    Sharing is caring!

  • Chicken Bacon Ranch Bread

    Chicken Bacon Ranch Bread


    Introduction to Chicken Bacon Ranch Bread

    Let me tell you about a dish that has quickly become a favorite in my home: Chicken Bacon Ranch Bread. With a busy schedule balancing work and family, finding a quick solution for a satisfying dinner can feel like a daunting task. However, this recipe allows me to whip up something hearty and delicious in just 40 minutes! Whether you’re hosting friends or simply treating your loved ones, this dish brings comfort and joy to the table. I promise, each bite holds gooey cheese and savory flavors that’ll leave everyone asking for seconds!

    Why You’ll Love This Chicken Bacon Ranch Bread

    This Chicken Bacon Ranch Bread is a game-changer for busy evenings. With its effortless preparation and mouthwatering taste, it’s a dish that checks all the boxes! It brings together tender chicken, crispy bacon, and rich ranch dressing, all melted beneath gooey cheese. The best part? It’s quick to make, so you can spend less time in the kitchen and more time enjoying moments with your family. Once you try it, you’ll be hooked!

    Ingredients for Chicken Bacon Ranch Bread

    Here’s what you’ll need to create this delicious Chicken Bacon Ranch Bread. Gather these simple ingredients, and get ready for a flavor explosion!

    • French bread: The perfect base, it’s crusty on the outside and soft on the inside, ideal for holding all that tasty filling.
    • Cooked chicken: Shredded chicken adds protein and tenderness. You can use leftover rotisserie chicken, grilled chicken, or even canned chicken if you’re in a pinch.
    • Cooked bacon: Crispy bacon provides a rich, smoky flavor. You can substitute turkey bacon for a lighter option, or even skip it for a vegetarian twist!
    • Ranch dressing: This is the magic ingredient, bringing creamy, zesty goodness to your dish. Store-bought is convenient, but feel free to whip up your own if you have a favorite recipe.
    • Mozzarella cheese: Shredded mozzarella melts beautifully, creating that ooey-gooey texture we all crave.
    • Cheddar cheese: This adds a sharp flavor that complements the mild mozzarella. You can use any cheese you love, such as pepper jack for added kick!
    • Green onions: Chopped green onions provide a fresh pop of color and a subtle onion flavor that brightens every bite.
    • Melted butter: Brushing this on the bread gives it a golden finish and enhances the richness of the dish.
    • Garlic powder: Just a dash infuses the bread with warm, aromatic flavors that elevate the entire meal.
    • Dried parsley: A sprinkle of this aromatic herb adds a touch of color and freshness without overpowering the other flavors.

    Ready to assemble? Remember, exact measurements for your Chicken Bacon Ranch Bread are listed at the bottom of the article for easy printing. Get inspired and customize the filling to suit your taste buds!

    How to Make Chicken Bacon Ranch Bread

    Step 1: Prepare Your Oven

    To kick off this delicious adventure, preheat your oven to 350°F (175°C). It’s crucial to get the oven nice and warm, so your Chicken Bacon Ranch Bread bakes evenly and develops that golden crust we all adore. While it’s heating up, you can focus on preparing the bread and filling. Multitasking can save you a few valuable minutes! Trust me; your taste buds will appreciate it!

    Step 2: Prepare the Bread

    Next, grab that fresh loaf of French bread and slice it in half lengthwise. Don’t worry about making it perfect; the filling will cover any imperfections. Hollow out the center of each half gently, leaving about a 1-inch shell. This creates a cozy abode for all that tasty filling. It’s like making little boats, destined to sail into a sea of flavor! Set the hollowed bread aside for now.

    Step 3: Make the Filling

    Now for the fun part! In a large bowl, combine the shredded chicken, crispy bacon, ranch dressing, shredded mozzarella, and green onions. Mix everything together until every ingredient is well-coated and resembles a creamy dream. This step is where the flavors truly come alive! You can even sneak a taste to check if it’s seasoned well! The combination is a delightful symphony of flavors that will make your mouth water.

    Step 4: Stuff the Bread

    It’s time to fill those bread boats! Spoon the chicken and bacon mixture into the hollowed-out halves. Press it down gently to pack it in and make room for more gooey goodness. Be generous with the filling—it’s the star of the show! Evenly distribute it between the two halves to ensure everyone gets this flavorful mix in every bite. Your kitchen will start to smell divine!

    Step 5: Add Toppings

    Now, we can’t forget the toppings! Sprinkle the shredded cheddar cheese generously over the top of each filled bread half. Then, in a small bowl, mix the melted butter with garlic powder and dried parsley. Brush this mixture over the filled bread to add flavor and that beautiful shine. It’s like giving a little TLC to your Chicken Bacon Ranch Bread before it heads into the oven!

    Step 6: Bake the Bread

    Finally, place the stuffed bread halves on a baking sheet and pop them into your preheated oven. Bake for about 20-25 minutes or until the cheese is melted and bubbly, and the bread is lightly golden. Keep an eye on it, as every oven behaves differently! Once done, let it cool slightly before slicing. You’ll want to enjoy all that goodness while it’s still warm!

    Tips for Success

    • Use leftover chicken to save time—it adds extra flavor!
    • For an extra crispy crust, broil the bread for the last 1-2 minutes of baking.
    • Let the bread cool slightly before slicing to avoid a gooey mess.
    • Feel free to adjust the amount of ranch dressing to your taste preferences.
    • Pack the filling tightly to ensure every bite is packed with flavor.

    Equipment Needed

    • Baking sheet: If you don’t have one, a large oven-safe dish works too.
    • Mixing bowl: Any large bowl will do, even a pot if you’re in a pinch.
    • Knife: A sharp bread knife ensures smooth slicing.
    • Butter brush: Use a spoon or your fingers to apply the butter mixture.

    Variations for Chicken Bacon Ranch Bread

    • Spicy Kick: Add jalapeños or crushed red pepper flakes to the filling for a fiery bite that will liven up every mouthful.
    • Veggie Lovers: Swap chicken for sautéed vegetables like bell peppers, zucchini, or mushrooms for a hearty vegetarian version that’s just as satisfying.
    • Buffalo Style: Incorporate buffalo sauce into the ranch dressing for a tangy twist. Top with bleu cheese for a true buffalo flavor experience!
    • Cheesy Delight: Mix different cheeses like gouda, provolone, or pepper jack with the mozzarella to diversify the flavors and make it extra cheesy!
    • Gluten-Free Option: Use gluten-free bread to make your Chicken Bacon Ranch Bread accessible for everyone needing dietary adjustments.

    Serving Suggestions for Chicken Bacon Ranch Bread

    • Fresh Salad: Pair your Chicken Bacon Ranch Bread with a crisp garden salad for a refreshing contrast.
    • Dip It: Serve with extra ranch dressing or marinara sauce for dipping—yum!
    • Cold Beverages: Enjoy with iced tea or lemonade to balance the richness.
    • Plating: Slice the bread into smaller pieces for easy sharing at gatherings.

    FAQs about Chicken Bacon Ranch Bread

    Can I make Chicken Bacon Ranch Bread ahead of time? Absolutely! You can prepare the filling and stuff the bread up to a day in advance. Just cover it and store it in the refrigerator. When you’re ready to serve, bake it as directed. It’s a fantastic way to save time!

    What if I have picky eaters? No worries! You can customize the filling to suit their taste. If someone isn’t a fan of onions, leave them out. You can also reduce the amount of ranch dressing or even serve it on the side. It’s all about making it work for your family’s preferences.

    Can I freeze leftovers? Yes! Wrap any leftover Chicken Bacon Ranch Bread in plastic wrap and then in foil before placing it in the freezer. When you’re ready for a tasty treat, just thaw and reheat in the oven until warmed through!

    What should I serve with this dish? Chicken Bacon Ranch Bread pairs wonderfully with a light salad or some crunchy carrot sticks. You could also serve it with a side of ranch or marinara for dipping, making it even more delightful!

    Can I substitute the ranch dressing? Certainly! If you’re not a fan of ranch, you could try using a creamy Caesar dressing or even a homemade garlic mayo for a different flavor profile. The key is to keep it creamy and flavorful!

    Final Thoughts

    Creating Chicken Bacon Ranch Bread is an adventure that fills my kitchen with warmth and laughter. Every bite is a delicious journey, filled with the flavors of savory chicken, crispy bacon, and rich cheese. It’s comforting food that brings families together, making even the busiest evenings feel special. As you watch your loved ones savor each slice, you’ll understand why this recipe is a cherished gem in my home. I can’t wait for you to experience the joy this dish brings—it’s sure to become a staple in your kitchen as well!


    Print

    clock clock iconcutlery cutlery iconflag flag iconfolder folder iconinstagram instagram iconpinterest pinterest iconfacebook facebook iconprint print iconsquares squares iconheart heart iconheart solid heart solid icon

    Description

    A delicious and easy-to-make Chicken Bacon Ranch Bread recipe that’s perfect for any occasion.


    • 1 loaf of French bread
    • 2 cups cooked chicken, shredded
    • 1 cup cooked bacon, chopped
    • 1 cup ranch dressing
    • 2 cups shredded mozzarella cheese
    • 1/2 cup shredded cheddar cheese
    • 1/4 cup green onions, chopped
    • 1 tablespoon butter, melted
    • 1/2 teaspoon garlic powder
    • 1/2 teaspoon dried parsley

    1. Preheat the oven to 350°F (175°C) to ensure it’s ready for baking.
    2. Slice the loaf of French bread in half lengthwise. Hollow out the center of each half, leaving about a 1-inch shell to create a cavity for the filling.
    3. In a large bowl, combine shredded chicken, chopped bacon, ranch dressing, mozzarella cheese, and green onions. Mix well to coat evenly.
    4. Spoon the filling mixture into the hollowed-out bread halves, pressing it down gently to pack it in.
    5. Sprinkle the shredded cheddar cheese over the top of the stuffed bread for added flavor.
    6. In a small bowl, mix melted butter with garlic powder and dried parsley. Brush this mixture over the top of the bread.
    7. Place the stuffed bread halves on a baking sheet and bake for 20-25 minutes, or until the cheese is melted and bubbly.
    8. Let the bread cool slightly before slicing and serving. Enjoy the gooey, savory flavors with every bite.

    Notes

    • Feel free to customize the filling with your favorite ingredients.
    • This recipe can be easily doubled for a larger crowd.
    • Prep Time: 15 minutes
    • Cook Time: 25 minutes
    • Category: Appetizer
    • Method: Baking
    • Cuisine: American

    Nutrition

    • Serving Size: 1/4 of bread
    • Calories: 500
    • Sugar: 2g
    • Sodium: 900mg
    • Fat: 30g
    • Saturated Fat: 10g
    • Unsaturated Fat: 15g
    • Trans Fat: 0g
    • Carbohydrates: 40g
    • Fiber: 2g
    • Protein: 30g
    • Cholesterol: 90mg

    Sharing is caring!

  • Spinach Cheese Stuffed Portobello

    Spinach Cheese Stuffed Portobello


    Introduction to Spinach Cheese Stuffed Portobello

    Hey there, fellow food lovers! If you’re looking for a delightful dish that combines health, flavor, and ease, let me introduce you to my go-to recipe: Spinach Cheese Stuffed Portobello. These hearty mushrooms are not just a treat for the eyes; they’re bursting with a delicious filling that’ll have your family asking for seconds. As a busy mom myself, I know how precious time is. This recipe is perfect when you want something impressive yet quick to whip up in the kitchen—ideal for those frantic weeknight dinners or casual get-togethers with friends!

    Why You’ll Love This Spinach Cheese Stuffed Portobello

    This Spinach Cheese Stuffed Portobello is everything you need in a meal—quick, satisfying, and bursting with flavor! In just under 40 minutes, you can create a dish that looks gourmet. These mushrooms are not only delicious but also filling, making them perfect for busy nights when cooking feels overwhelming. Whether it’s a weeknight dinner or a weekend feast, these stuffed mushrooms will wow everyone at your table!

    Ingredients for Spinach Cheese Stuffed Portobello

    Gathering fresh ingredients is the first step to ensuring your Spinach Cheese Stuffed Portobello shines on the dinner table. Here’s a rundown of what you’ll need:

    • Portobello mushrooms: These large, meaty mushrooms are the star of the dish. Look for firm, blemish-free ones for the best flavor and texture.
    • Olive oil: Use a good quality extra virgin olive oil to enhance the mushrooms’ natural taste. It adds richness and depth to each bite.
    • Salt and black pepper: Simple yet essential for seasoning. They bring out the flavors of the dish, so don’t skip these!
    • Garlic: Fresh minced garlic gives a fragrant kick to the sautéed spinach. You can also use garlic powder in a pinch if you’re short on fresh cloves.
    • Fresh spinach: The heart of the stuffing! Look for vibrant green leaves. You can also use frozen spinach if you’re in a bind, just be sure to thaw and drain it well.
    • Ricotta cheese: This creamy cheese adds a comforting texture, making each bite feel indulgent. Substitute with cottage cheese for a lighter version.
    • Mozzarella cheese: Shredded mozzarella adds gooeyness that melts beautifully. Feel free to use low-moisture mozzarella for extra stretch!
    • Parmesan cheese: Grated Parmesan lends a nutty, salty flavor. A little goes a long way, but it’s worth every sprinkle!
    • Italian seasoning: A mix of herbs like oregano and basil, this seasoning elevates the flavor profile. You can swap it for fresh herbs based on your preference.
    • Fresh basil leaves (optional): These add a pop of color and a burst of herbaceous freshness right before serving.

    Don’t worry—quantities for these ingredients are available at the end of the article, easy for printing or jotting down for your grocery list!

    How to Make Spinach Cheese Stuffed Portobello

    Prepare the Oven and Mushrooms

    It all begins with getting that oven nice and toasty. Preheat your oven to 375°F; this ensures that everything bakes evenly. While that’s happening, take a moment to clean your portobello mushrooms. A damp paper towel works wonders here; just gently wipe them down. Remove the stems and use a spoon to scoop out the gills, creating a little cavity for your tasty filling. This step not only makes room for all that cheesy goodness but also lets the flavors shine. Place the mushrooms gill side up on a lined baking sheet, and you’re all set to move forward!

    Sauté the Spinach Mixture

    Now, let’s get to the heart of this Spinach Cheese Stuffed Portobello! In a skillet over medium heat, drizzle in a tablespoon of olive oil. Add minced garlic and take in that heavenly aroma as it cooks for about a minute. Once fragrant, toss in your chopped spinach. Sauté until the leaves are wilted, which should take around 2 to 3 minutes. You want it bright green, not soggy! This quick cooking elevates the spinach’s taste and keeps a slight texture. Then, off the heat it goes—ready to blend with the cheese mixture!

    Combine Cheese Mixture

    In a mixing bowl, bring together your ricotta, mozzarella, and Parmesan cheese. I love the way these cheeses work together, melding into a creamy, dreamy filling. Now, gently fold in the sautéed spinach mixture. Give it a good mix until everything is well combined. This is the moment to taste! Adjust the seasoning if needed—after all, we want a rich and flavorful filling. The texture should be creamy yet thick enough to hold itself when stuffed. Now, we’re ready to fill those mushrooms!

    Stuff the Mushrooms

    With your mixture ready, it’s time to stuff those gorgeous mushrooms! Spoon the spinach and cheese filling evenly into each mushroom cap. Don’t be shy—pack it in there for a delicious punch of flavor! Be sure to distribute it as evenly as possible to ensure each bite is a delight. If there are any drips, no worries; just let them soak into the baking sheet for extra flavor. Once filled, they’re all primed for the oven. Let’s get them baking!

    Bake and Serve

    Return the stuffed mushrooms to the oven and let them bake for about 12 to 15 minutes. You’ll know they’re done when the cheese is melted and bubbling! The aroma wafting through your kitchen will be simply irresistible. This is the time to let those flavors mingle and meld beautifully. Once removed from the oven, if you’re feeling fancy, sprinkle some fresh basil on top before serving. This dish is best enjoyed warm with friends or family, creating memories over a delightful meal!

    Tips for Success

    • Choose firm, smooth portobello mushrooms without blemishes for best flavor and texture.
    • Make sure to squeeze excess moisture from the spinach to avoid a runny filling.
    • Experiment with cheese varieties—try goat cheese or feta for a tangy twist!
    • For an Italian flair, add red pepper flakes to the filling for a spicy kick.
    • Keep an eye on baking time to prevent overcooking—cheese should be bubbling but not burnt.

    Equipment Needed

    • Baking sheet: A standard baking sheet will do, but a cast iron skillet works great too!
    • Parchment paper: Helps with easy cleanup; foil can be a decent substitute if you’re out.
    • Mixing bowls: Use any size you have on hand—just make sure it’s big enough for mixing!
    • Skillet: A sturdy skillet for sautéing; a non-stick option will make cleanup easier.

    Variations

    • Swap the cheeses: Experiment with different cheese combinations like gouda or cavatappi for unique flavors.
    • Add protein: Toss in some cooked chicken or sausage to the stuffing for a heartier option.
    • Go dairy-free: Use cashew cheese or nutritional yeast for a vegan twist without sacrificing flavor.
    • Spice it up: Incorporate red pepper flakes or smoked paprika for an extra kick.
    • Grill instead of bake: Brush the mushrooms with olive oil and grill for a smoky flavor that enhances the dish!

    Serving Suggestions

    • Pair with a fresh salad: A crisp arugula or mixed greens salad balances the richness of the mushrooms perfectly.
    • Serve with crusty bread: Warm, lightly toasted bread can be perfect for mopping up any melted cheese.
    • Complement with wine: A light white wine like Sauvignon Blanc enhances the flavors wonderfully.
    • Garnish thoughtfully: Fresh basil or a squeeze of lemon adds brightness and color to your presentation.

    FAQs about Spinach Cheese Stuffed Portobello

    How do I store leftover Spinach Cheese Stuffed Portobello?
    You can store any leftovers in an airtight container in the refrigerator for up to three days. Just make sure they cool completely before sealing to keep them fresh. When you’re ready to enjoy them again, simply reheat in the oven at 350°F until warmed through.

    Can I freeze Spinach Cheese Stuffed Portobello?
    Absolutely! These delicious stuffed mushrooms freeze beautifully. Just make sure to wrap them tightly in plastic wrap and place them in a freezer-safe container. To reheat, thaw in the refrigerator overnight, then bake until heated through.

    What should I serve as a side with this dish?
    A fresh garden salad pairs perfectly with Spinach Cheese Stuffed Portobello! You could also serve it alongside garlic bread for a heartier meal. Don’t forget a nice glass of white wine to elevate the experience.

    Can I use different greens instead of spinach?
    Yes! You can swap spinach for other leafy greens like kale, Swiss chard, or even arugula if you prefer. Just remember to adjust the cooking time slightly based on the leafy green you choose.

    What other fillings can I use for stuffed portobello mushrooms?
    Get creative! You can add cooked quinoa, sun-dried tomatoes, or even different types of cheese. Use your favorite vegetables or proteins to craft a filling that suits your taste. The sky’s the limit!

    Final Thoughts

    Cooking should be a joyful experience, and my Spinach Cheese Stuffed Portobello brings just that to the table. This dish is not only versatile—perfect for casual weeknight dinners or elegant gatherings—but also simple enough for anyone to master. Each bite is a warm embrace of flavors that invites you to savor the moment. I encourage you to give this recipe a try, share it with your loved ones, and create your own culinary memories. Cooking can be a delightful adventure, so gather your ingredients and enjoy every delicious minute of it!


    Print

    clock clock iconcutlery cutlery iconflag flag iconfolder folder iconinstagram instagram iconpinterest pinterest iconfacebook facebook iconprint print iconsquares squares iconheart heart iconheart solid heart solid icon

    Description

    A delicious and hearty dish featuring large portobello mushrooms stuffed with a flavorful mixture of spinach and various cheeses.


    • 4 large portobello mushrooms
    • 3 tablespoons olive oil, divided
    • Salt, to taste
    • Freshly ground black pepper, to taste
    • 2 cloves garlic, minced
    • 4 cups fresh spinach, chopped
    • 1 cup ricotta cheese
    • 1 cup mozzarella cheese, shredded
    • 1/4 cup Parmesan cheese, grated
    • 1 teaspoon Italian seasoning
    • Fresh basil leaves, for garnish (optional)

    1. Set oven to 375°F. Line a baking sheet with parchment paper.
    2. Gently clean portobello mushrooms with a damp paper towel. Detach stems and use a spoon to carefully scrape out the gills.
    3. Place mushrooms gill side up on the prepared baking sheet. Drizzle with 2 tablespoons olive oil and season with salt and black pepper. Bake for 10 to 12 minutes until just tender.
    4. Heat 1 tablespoon olive oil in a skillet over medium heat. Add minced garlic and cook for 1 minute until fragrant. Add chopped spinach and sauté for 2 to 3 minutes until wilted. Remove from heat.
    5. In a mixing bowl, combine ricotta cheese, shredded mozzarella, grated Parmesan, and Italian seasoning. Stir in the sautéed spinach mixture until fully incorporated.
    6. Remove mushrooms from oven and tilt to drain any excess liquid from the cavities. Spoon the cheese and spinach mixture evenly into each mushroom cap.
    7. Return the filled mushrooms to the oven. Bake for 12 to 15 minutes, or until the cheese is fully melted and bubbling.
    8. Remove from oven and top with fresh basil leaves before serving, if desired.

    Notes

    • Ensure mushrooms are cleaned gently to avoid damage.
    • Feel free to add more spices based on personal preference.
    • Can substitute spinach with other leafy greens if desired.
    • Serve warm for the best flavor and texture.
    • Prep Time: 15 minutes
    • Cook Time: 25 minutes
    • Category: Main Dish
    • Method: Baking
    • Cuisine: Italian

    Nutrition

    • Serving Size: 1 mushroom cap
    • Calories: 245
    • Sugar: 2g
    • Sodium: 450mg
    • Fat: 16g
    • Saturated Fat: 8g
    • Unsaturated Fat: 6g
    • Trans Fat: 0g
    • Carbohydrates: 11g
    • Fiber: 2g
    • Protein: 14g
    • Cholesterol: 40mg

    Sharing is caring!

  • Dark Chocolate Raspberry Cheesecake

    Dark Chocolate Raspberry Cheesecake


    Introduction to Dark Chocolate Raspberry Cheesecake

    There’s something undeniably special about a rich, creamy dessert to wrap up a busy day. When it comes to indulging, this Dark Chocolate Raspberry Cheesecake is my absolute go-to. It combines luscious chocolate and vibrant raspberries to create a symphony of flavors that dance on your palate. Perfect for impressing loved ones or simply treating yourself, this cheesecake is surprisingly easy to whip up. Whether you’re hosting a gathering or enjoying a quiet evening at home, this delightful dessert is sure to bring smiles and sweet satisfaction to your table.

    Why You’ll Love This Dark Chocolate Raspberry Cheesecake

    This Dark Chocolate Raspberry Cheesecake is a delightful blend of convenience and indulgence. With its simple steps, even the busiest of moms can pull it off without breaking a sweat. The rich chocolate complements the tangy raspberries perfectly, creating a dessert that feels sophisticated yet approachable. Plus, it’s a crowd-pleaser! You’ll effortlessly impress friends and family while satisfying your sweet tooth at the same time.

    Ingredients for Dark Chocolate Raspberry Cheesecake

    Making a delicious Dark Chocolate Raspberry Cheesecake starts with gathering the right ingredients. Here’s what you’ll need:

    • Crushed chocolate cookies: These form the crust, bringing a delightful chocolaty base to the cheesecake. You can use any chocolate cookie you love, including Oreos or even homemade options.
    • Melted unsalted butter: This binds the cookie crumbs together and adds richness to the crust. Using unsalted butter helps control the saltiness in your dessert.
    • Full-fat cream cheese: The star of the show! Full-fat cream cheese gives the cheesecake its creamy texture. Make sure it’s softened for easy blending; I usually leave it out at room temperature for about an hour.
    • Granulated sugar: Adds sweetness to balance the dark chocolate richness. You can reduce it a bit if you prefer less sweetness.
    • Melted dark chocolate: I opt for chocolate with 60-72% cocoa for a perfect balance of sweetness and bitterness. It adds depth to the filling that elevates the entire cheesecake.
    • Vanilla extract: Enhances all the flavors and adds warmth. A high-quality vanilla extract can make a noticeable difference in taste.
    • Large eggs: They act as the binding agent, giving the cheesecake structure and stability as it bakes. Remember to add them one at a time to keep the mixture smooth.
    • Fresh raspberries: The burst of tangy flavor from these berries complements the chocolate beautifully. You can also use frozen raspberries, but ensure they are thawed and drained before adding.

    If you’re interested in the specific amounts for these ingredients, you can find them at the bottom of this article, ready for easy printing!

    How to Make Dark Chocolate Raspberry Cheesecake

    Now that we’ve gathered our ingredients, it’s time to dive into the steps of making this heavenly Dark Chocolate Raspberry Cheesecake. I promise it’s easier than it sounds! Just follow along, and before you know it, the enticing aroma of chocolate and raspberries will fill your kitchen.

    Step 1: Preheat the Oven

    First things first, preheating the oven is a must! Set it to 160°C (320°F) so it’s ready to go when your cheesecake is. This ensures even baking and a lovely texture. While the oven is heating up, prepare your 23 cm springform pan by greasing it or lining it with parchment paper. You want to make sure the cheesecake slides out smoothly when it’s time to serve!

    Step 2: Prepare the Crust

    Next, we need to create that delicious crust. In a bowl, combine the crushed chocolate cookies with the melted unsalted butter. Mix until all the crumbs are wet and clumpy. Transfer this mixture to the prepared springform pan. With the back of a measuring cup or your hands, press it firmly into the bottom to create a solid base. It’s essential to make it even so it holds together beautifully when you slice.

    Step 3: Make the Filling

    Now, let’s get to the creamy filling! In a mixing bowl, beat together the softened cream cheese and granulated sugar until it’s silky smooth. Imagine getting rid of all those lumps! Then, pour in the melted dark chocolate and vanilla extract. Mix again until everything is combined. The smell of that chocolate will surely make you wish you could dive in right away!

    Step 4: Add the Eggs

    Time to add those eggs! Crack them in one at a time, mixing on low speed after each addition. The key here is gentle—overmixing can lead to cracks later. We want a smooth batter, not a workout for your mixer! Just stir until you see no more streaks of egg.

    Step 5: Fold in Raspberries

    Hold your horses! Before we pour the filling into the crust, we need to fold in those lovely fresh raspberries. Using a spatula, gently scoop and lift the batter, incorporating the raspberries while keeping them intact. This way, you’ll have beautiful bursts of flavor in every slice, and they’ll look gorgeous peeking through the cheesecake.

    Step 6: Bake the Cheesecake

    Pour the cheesecake filling over the crust and smooth the top with your spatula. Before popping it into the oven, give the pan a light tap on the counter to release any trapped air bubbles. Bake it for about 60 minutes. You’ll know it’s done when the edges are set, but the center has a slight jiggle. Trust me; that jiggle is where all the magic is!

    Step 7: Cooling and Refrigeration

    Once it’s out of the oven, let the cheesecake cool at room temperature. This step is vital to avoid condensation when you refrigerate it. Allow at least an hour of cooling, then cover and pop it in the fridge for a minimum of 4 hours—or overnight if you can resist! This waiting period will firm it up and deepen those flavors.

    Step 8: Serving the Cheesecake

    When you’re ready to serve, take the cheesecake out of the springform pan. For a touch of elegance, garnish with additional raspberries, a drizzle of melted chocolate, or a sprinkle of powdered sugar. Slice it up and watch your family and friends swoon. This Dark Chocolate Raspberry Cheesecake is sure to bring smiles all around!

    Tips for Success

    • Always use room temperature cream cheese for a smoother batter.
    • Pot for high-quality dark chocolate for richer flavor.
    • Be gentle when folding in raspberries to keep them whole.
    • Let the cheesecake cool completely before refrigerating to avoid a soggy top.
    • For easier slicing, run a knife under hot water before cutting.

    Equipment Needed

    • 23 cm springform pan (a regular cake pan works in a pinch, but may be harder to remove)
    • Mixing bowls (select a large one for the filling)
    • Electric mixer (a whisk can work if you’re feeling adventurous!)
    • Spatula (a rubber one is best for folding)
    • Measuring cups and spoons (accurate measurements matter!)

    Variations on Dark Chocolate Raspberry Cheesecake

    • Gluten-Free Option: Swap crushed chocolate cookies with gluten-free chocolate crumbs or almond flour for those avoiding gluten.
    • Vegan Version: Use a vegan cream cheese alternative and flax eggs (1 tablespoon ground flaxseed mixed with 2.5 tablespoons of water per egg) to create a plant-based cheesecake.
    • Fruit Alternatives: Replace raspberries with strawberries, blueberries, or cherries for a different fruit experience while keeping the taste fresh and fruity.
    • Chocolate Swirl: Before baking, swirl some additional melted chocolate into the cheesecake filling for a marbled effect and extra chocolate goodness.
    • Cheesecake Bites: Make mini cheesecakes in muffin tins for bite-sized treats. Adjust the baking time to about 20-25 minutes.

    Serving Suggestions for Dark Chocolate Raspberry Cheesecake

    • Pair with a dollop of freshly whipped cream for an extra creamy treat.
    • Serve alongside a scoop of vanilla ice cream for a delightful contrast.
    • Accompany with a light berry coulis for a splash of color and flavor.
    • Enjoy with a glass of dessert wine or coffee to balance the sweetness.
    • Garnish with mint leaves for a fresh, elegant presentation.

    FAQs about Dark Chocolate Raspberry Cheesecake

    Can I use different types of chocolate in this cheesecake?
    Absolutely! You can experiment with milk chocolate for a sweeter flavor or even use white chocolate for a unique twist. Just keep in mind that the taste and texture will change depending on the chocolate you choose.

    How long will the cheesecake last in the fridge?
    When stored properly in an airtight container, this Dark Chocolate Raspberry Cheesecake can last up to one week in the fridge. But let’s be honest—having leftovers might be a rare treat!

    Can I make this cheesecake ahead of time?
    Yes! In fact, making it a day in advance enhances the flavors as it sets. Just be sure to cover it well after it cools to prevent any odors from the fridge affecting its taste.

    What should I do if my cheesecake cracks while baking?
    A cracked cheesecake can happen, especially if it’s overbaked. If this occurs, don’t fret! Your cheesecake will still taste amazing. You can cover it with whipped cream or fresh raspberries to hide any imperfections.

    Can I freeze Dark Chocolate Raspberry Cheesecake?
    Definitely! Wrap it tightly in plastic wrap and then in aluminum foil. It can be frozen for up to three months. Just thaw it in the fridge overnight before serving for the best texture.

    Final Thoughts on Dark Chocolate Raspberry Cheesecake

    Every slice of this Dark Chocolate Raspberry Cheesecake embodies pure joy. The rich, creamy texture melds beautifully with the tart raspberries, creating a delightful contrast that makes this dessert irresistible. Whether you’re celebrating a special occasion or just indulging on a weeknight, this cheesecake brings people together. I love watching my family relish each bite, knowing that I crafted something truly special. With easy steps and satisfying flavors, this recipe is bound to become a cherished favorite in your home. So, gather your loved ones, slice that cheesecake, and create sweet memories together!


    Print

    clock clock iconcutlery cutlery iconflag flag iconfolder folder iconinstagram instagram iconpinterest pinterest iconfacebook facebook iconprint print iconsquares squares iconheart heart iconheart solid heart solid icon

    Description

    Indulge in the rich and creamy texture of this Dark Chocolate Raspberry Cheesecake, a perfect balance of chocolate and berries.


    • 200 grams crushed chocolate cookies
    • 60 milliliters melted unsalted butter
    • 680 grams full-fat cream cheese, softened
    • 100 grams granulated sugar
    • 60 milliliters melted dark chocolate (60-72% cocoa)
    • 5 milliliters vanilla extract
    • 3 large eggs
    • 125 grams fresh raspberries

    1. Preheat the oven to 160°C. Grease a 23 cm springform pan or line it with parchment paper.
    2. Combine crushed chocolate cookies with melted butter. Press firmly and evenly into the bottom of the pan to create the crust layer.
    3. Beat the softened cream cheese and sugar together until smooth and creamy. Incorporate melted dark chocolate and vanilla extract, blending thoroughly.
    4. Add eggs one at a time, mixing on low speed after each addition until just combined to avoid overmixing.
    5. Gently fold fresh raspberries into the batter to distribute without crushing them.
    6. Pour the filling over the crust and smooth the surface. Tap the pan gently to release trapped air. Bake for 60 minutes, until the center is mostly set yet slightly jiggly.
    7. Allow the cheesecake to cool to room temperature, then refrigerate for at least 4 hours or preferably overnight to fully set.
    8. Slice and serve chilled, optionally garnished with additional raspberries, melted chocolate, or a dusting of powdered sugar.

    Notes

    • Ensure the cream cheese is at room temperature for easier blending.
    • For a richer flavor, use high-quality dark chocolate.
    • Allow the cheesecake to fully cool before refrigerating to avoid condensation.
    • Prep Time: 30 minutes
    • Cook Time: 60 minutes
    • Category: Dessert
    • Method: Baking
    • Cuisine: American

    Nutrition

    • Serving Size: 1 slice
    • Calories: 350
    • Sugar: 22 grams
    • Sodium: 320 milligrams
    • Fat: 24 grams
    • Saturated Fat: 14 grams
    • Unsaturated Fat: 8 grams
    • Trans Fat: 0 grams
    • Carbohydrates: 30 grams
    • Fiber: 2 grams
    • Protein: 5 grams
    • Cholesterol: 85 milligrams

    Sharing is caring!