Blog

  • Blueberry Peach Feta Salad

    Blueberry Peach Feta Salad


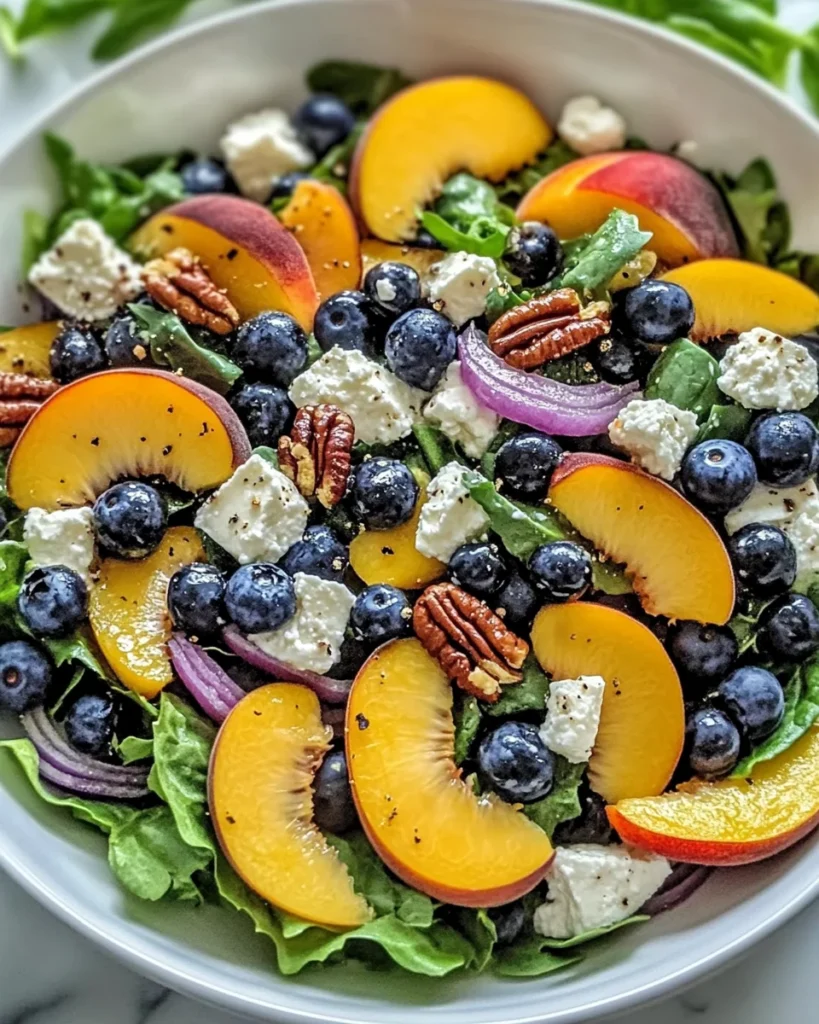
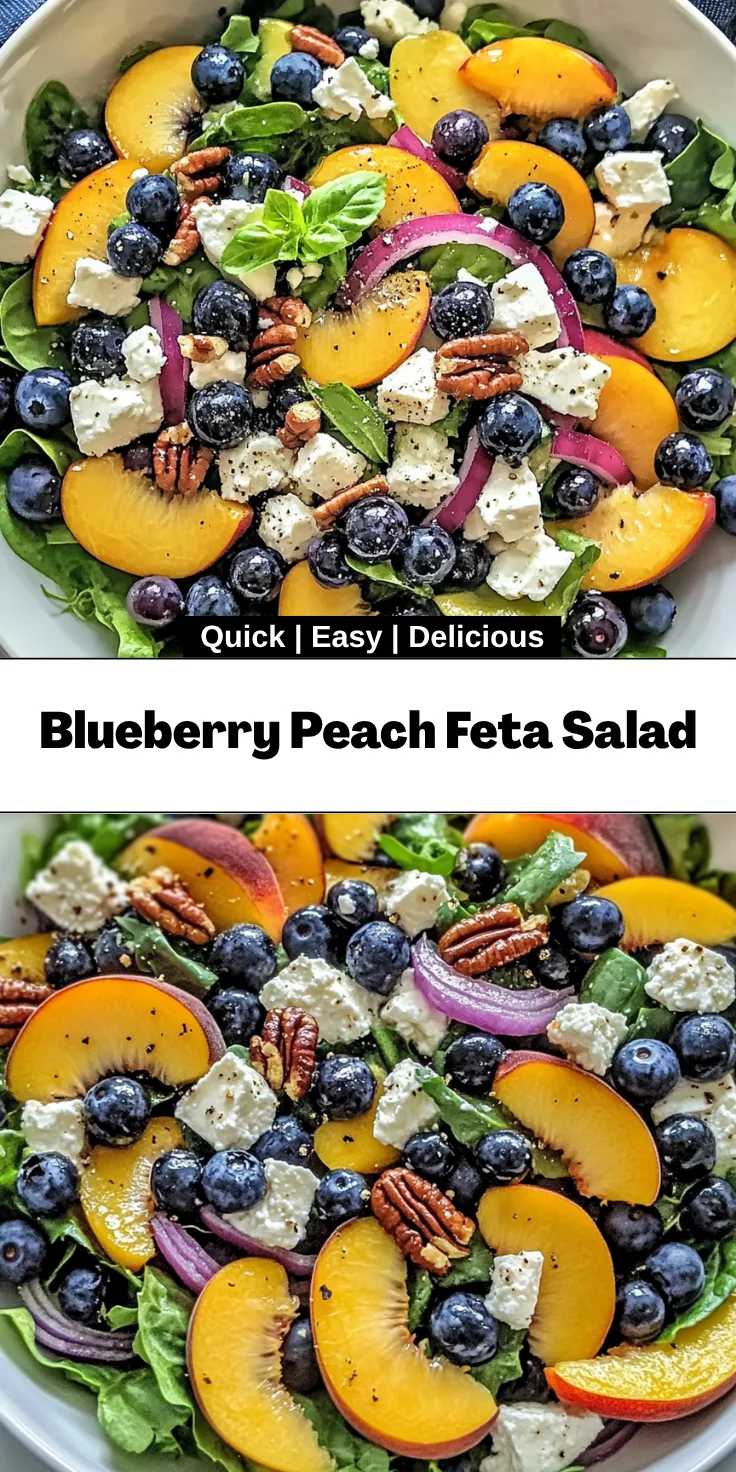
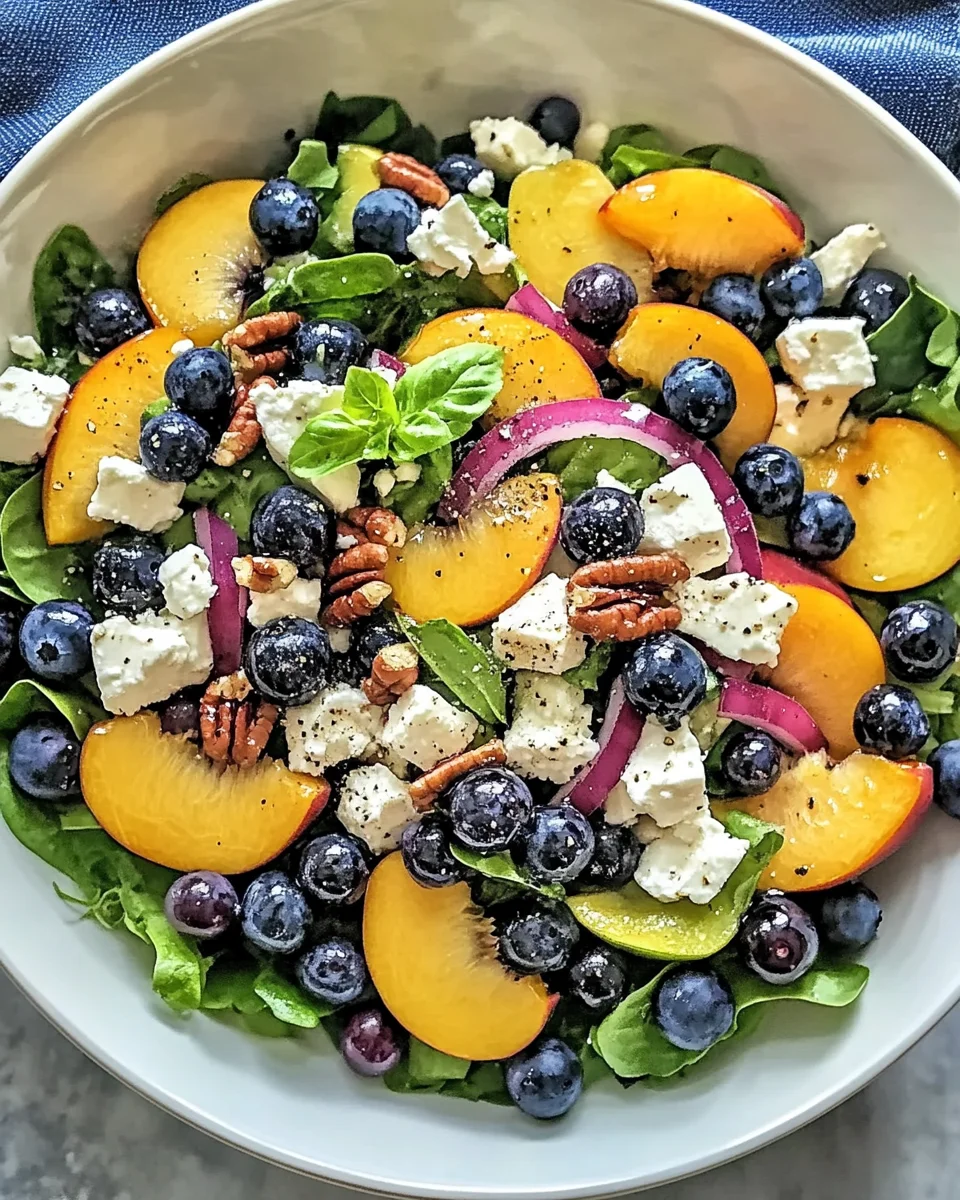
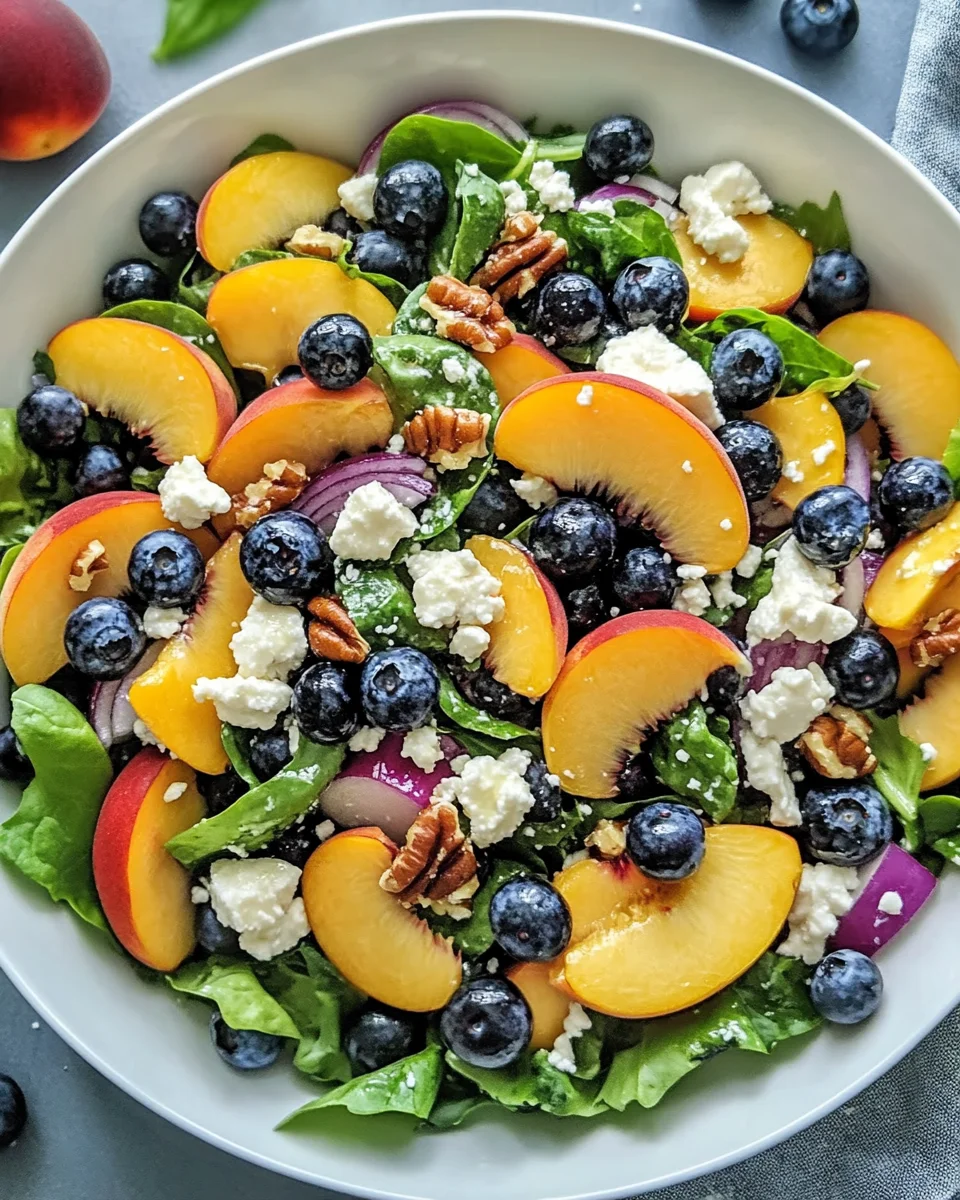
    Introduction to Blueberry Peach Feta Salad

    As a busy mom and home cook, I know how essential it is to whip up a meal that feels refreshing yet doesn’t require a long time in the kitchen. That’s where my Blueberry Peach Feta Salad steps in! This vibrant dish beautifully combines the sweetness of ripe peaches and juicy blueberries with the creamy tang of feta cheese. It’s not just a salad; it’s a celebration on a plate! Whether you need a quick solution for a weeknight dinner or a stunning dish to impress guests, this salad is here to brighten your table and your mood.

    Why You’ll Love This Blueberry Peach Feta Salad

    There’s so much to adore about this Blueberry Peach Feta Salad! First off, it’s incredibly easy to prepare. In just 15 minutes, you’ll serve up a colorful dish packed with flavor, making it perfect for those busy days. The sweet and savory balance is a delight for your taste buds. Plus, it’s nutritious! What’s better than a salad that feels indulgent and is good for you? Everyone will be asking for seconds!

    Ingredients for Blueberry Peach Feta Salad

    Gathering the right ingredients is key to creating my Blueberry Peach Feta Salad. Here’s what you’ll need:

    • Peaches: Ripe and juicy, they provide sweetness and a beautiful color. Look for fragrant ones at your local farmer’s market.
    • Fresh Blueberries: These tiny gems are bursting with flavor. They add a natural sweetness and are packed with antioxidants.
    • Mixed Greens: A blend of spinach, arugula, or spring mix gives a fresh crunch. Feel free to mix it up based on what’s in your fridge!
    • Crumbled Feta Cheese: The creamy texture and tang of feta creates a delicious contrast to the fruit. It’s a must for that savory kick!
    • Red Onion: Thinly sliced, this adds a flavorful bite. If you’re sensitive to onion, you can skip it or use green onions instead.
    • Pecans or Walnuts: A delightful crunch that’s entirely optional. These nuts bring healthy fats and can be toasted for extra flavor.
    • Olive Oil: A good quality oil acts as the base for your dressing, adding richness and depth.
    • Honey: This natural sweetener balances the tanginess of the salad. Substitute it with maple syrup for a vegan option.
    • Lemon Juice: Freshly squeezed juice brightens up the flavors. A splash of acidity makes everything pop!
    • Salt & Pepper: Essential for seasoning. A little sprinkle goes a long way in enhancing the flavors.

    For specific quantities, you’ll find measurements at the bottom of the article, ready for you to print out for easy reference!

    How to Make Blueberry Peach Feta Salad

    Making my Blueberry Peach Feta Salad is a breeze, and I promise every step is filled with flavor! All you need is a little time, some fresh ingredients, and a knack for tossing. Let’s jump right into it, shall we?

    Step 1: Combine the Fruits and Greens

    First, grab a large bowl; this is where all the magic happens. Toss the sliced peaches and fresh blueberries into the bowl. Next, add the mixed greens; they create the perfect base for this colorful salad. Then, crumble the feta cheese over everything, ensuring it’s evenly distributed. I like to give it a gentle mix, allowing the juices to mingle while being cautious not to mash the fruit. The combination of these ingredients creates a summer symphony right in your bowl!

    Step 2: Prepare the Dressing

    For the dressing, take a small bowl and whisk together the olive oil, honey, and freshly squeezed lemon juice. This mixture should become smooth and slightly emulsified. Remember, the olive oil adds richness, while the honey sweetens and the lemon adds brightness. Season with a pinch of salt and a dash of pepper to enhance all those lovely flavors. I always taste it, just to make sure it’s up to snuff before drizzling it over my salad!

    Step 3: Dress the Salad

    Now for the moment we’ve been waiting for! Just before serving, drizzle that delicious dressing over your salad. Be sure to do this right before you serve it; trust me, you want those ingredients to stay fresh and vibrant. With gentle hands, toss everything together until it’s beautifully coated. Every piece of fruit, green, and crumbly feta should be enveloped by that flavorful dressing. It’s a sight to behold and, oh boy, a taste to remember!

    Tips for Success

    • Choose ripe, fragrant peaches for the best flavor.
    • Rinse and dry your blueberries to keep them fresh and plump.
    • Toast nuts in a dry skillet for added crunch and flavor.
    • Make the dressing ahead of time for an even quicker prep.
    • For a meal prep option, keep the dressing separate until serving.

    Equipment Needed

    • Large Bowl: For mixing the salad. A salad spinner works too!
    • Small Bowl: For whisking the dressing. A jar with a lid can substitute.
    • Whisk: For blending the dressing. A fork can do in a pinch!
    • Knife: To slice the peaches and onions. A sturdy chopping board helps.

    Variations

    • For a protein boost, add grilled chicken or chickpeas for a heartier meal.
    • Substitute feta with goat cheese for a creamier, tangier flavor.
    • Make it vegan by omitting cheese and using maple syrup instead of honey.
    • For a spicy kick, mix in sliced jalapeños or a dash of cayenne pepper in the dressing.
    • Add fresh herbs like mint or basil for an extra layer of flavor and freshness.

    Serving Suggestions

    • Pair the salad with grilled shrimp or chicken for a complete meal.
    • Serve with a side of crusty bread to soak up any extra dressing.
    • A chilled glass of white wine enhances the flavors beautifully.
    • Present it in a large bowl for a family-style dinner or in individual servings for a fancy touch.

    FAQs about Blueberry Peach Feta Salad

    Here are some common questions I often hear about my Blueberry Peach Feta Salad. I hope these help you make your culinary adventure even smoother!

    Can I make the salad in advance?
    Absolutely! You can prepare the salad a few hours ahead. Just remember to keep the dressing separate until you’re ready to serve. This keeps everything fresh and crisp!

    What other fruits can I add to this salad?
    Feel free to experiment! Strawberries, raspberries, or even diced apples can add a delightful twist. Each fruit brings its unique flavor and pairs beautifully with feta.

    Is this salad gluten-free?
    Yes, my Blueberry Peach Feta Salad is naturally gluten-free! It’s perfect for those with dietary restrictions, making it a versatile addition to your meal options.

    Can I use frozen blueberries?
    While fresh blueberries shine in this salad, if you only have frozen, they can work! Just be sure to thaw them and drain any excess liquid to avoid sogginess.

    What can I add to make it more filling?
    To turn this salad into a full meal, consider adding grilled chicken, quinoa, or chickpeas. They provide added protein and make the salad more satisfying.

    Final Thoughts

    Creating the Blueberry Peach Feta Salad is more than just preparing a meal; it’s about embracing fresh flavors and vibrant colors. The joy of combining sweet peaches and tangy feta, all wrapped in a light dressing, feels like a mini celebration on your plate. This salad not only delights your palate but also nourishes your body, making it a win-win dish. Whether enjoyed as a refreshing side or a light main dish, it brings smiles to the dinner table. So go ahead, whip it up, and savor the moment with your loved ones!


    Print

    clock clock iconcutlery cutlery iconflag flag iconfolder folder iconinstagram instagram iconpinterest pinterest iconfacebook facebook iconprint print iconsquares squares iconheart heart iconheart solid heart solid icon

    Description

    A refreshing and vibrant salad combining the sweetness of blueberries and peaches with the creaminess of feta and a light dressing.


    • 2 ripe peaches, sliced
    • 1 cup fresh blueberries
    • 4 cups mixed greens (spinach, arugula, or spring mix)
    • ½ cup crumbled feta cheese
    • ¼ cup red onion, thinly sliced
    • ¼ cup chopped pecans or walnuts (optional)
    • 2 tbsp olive oil
    • 1 tbsp honey
    • 1 tbsp lemon juice
    • Salt & pepper to taste

    1. In a large bowl, toss together peaches, blueberries, greens, red onion, and feta. Add nuts if using.
    2. Whisk olive oil, honey, lemon juice, salt, and pepper in a small bowl to make the dressing.
    3. Drizzle dressing over the salad just before serving. Gently toss to coat.

    Notes

    • This salad can be served as a side or a light main dish.
    • For added protein, consider adding grilled chicken or chickpeas.
    • This salad is best served fresh but can be made a few hours in advance; keep the dressing separate until serving.
    • Prep Time: 15 minutes
    • Cook Time: 0 minutes
    • Category: Salad
    • Method: Tossing
    • Cuisine: American

    Nutrition

    • Serving Size: 1 serving
    • Calories: 250
    • Sugar: 15g
    • Sodium: 200mg
    • Fat: 16g
    • Saturated Fat: 4g
    • Unsaturated Fat: 11g
    • Trans Fat: 0g
    • Carbohydrates: 23g
    • Fiber: 4g
    • Protein: 6g
    • Cholesterol: 20mg

    Sharing is caring!

  • Garlic Parmesan Herb Bread

    Garlic Parmesan Herb Bread


    Introduction to Garlic Parmesan Herb Bread

    There’s something utterly magical about the aroma of freshly baked bread filling your home. It’s like a warm hug on a cool day! Today, I’m excited to share my recipe for Garlic Parmesan Herb Bread, a delightful twist on traditional bread that’s so easy to make. This recipe is perfect for busy moms and professionals juggling countless responsibilities. Whether you want to impress your loved ones at dinner or simply enjoy a slice with soup after a hectic day, this bread is your go-to solution. Trust me, they’ll be asking for seconds!

    Why You’ll Love This Garlic Parmesan Herb Bread

    This Garlic Parmesan Herb Bread is a game-changer. It’s remarkably easy to whip up, even for the busiest of cooks. In just a little over an hour, you can have warm, aromatic loaves ready to share. The delightful combination of garlic and parmesan makes every bite taste like a gourmet treat. Plus, it pairs beautifully with soups or salads, making it a versatile addition to any meal!

    Ingredients for Garlic Parmesan Herb Bread

    Gathering the right ingredients is half the fun of baking! Here’s what you’ll need to create this delicious Garlic Parmesan Herb Bread:

    • Salt: A crucial seasoning that enhances the flavors. Makes everything taste better!
    • Warm Water: This is where the magic starts. It activates the yeast, so don’t make it too hot!
    • Granulated Sugar: A little sugar helps feed the yeast, giving your bread a nice rise.
    • Instant Dry Yeast: This makes the bread fluffy. The instant variety is super user-friendly.
    • Dried Basil: This adds a hint of Italian charm and earthiness to the bread.
    • Dried Oregano: Another herb that complements the garlic and parmesan perfectly!
    • Dried Rosemary: Its fragrant nature gives a lovely aroma and flavor contrast.
    • Garlic: Freshly minced for that robust flavor. It’s the star of the show!
    • All-Purpose Flour: The backbone of your bread, creating structure and texture.
    • Parmesan Cheese: Grated for a cheesy, savory punch that you can’t resist.
    • Butter: A touch for topping – because who doesn’t love buttery goodness?
    • Olive Oil: To keep things moist and flavorful; plus, it helps the dough rise beautifully.

    You’ll find exact quantities for each ingredient at the bottom of the article, ready for you to print. Dive in, and get imaginative! Feel free to swap in your favorite herbs or cheeses for a personal touch.

    How to Make Garlic Parmesan Herb Bread

    Prepare the Yeast Mixture

    Let’s get things bubbling! Start by pouring warm water into a large bowl. It should feel cozy but not scalding, about 100-110°F. Sprinkle in granulated sugar and instant dry yeast. Stir it gently, then let it sit for about five minutes. You’ll know it’s ready when it gets foamy and bubbly like a mini volcano! This foam is your secret weapon, as it means the yeast is active and raring to go!

    Combine Ingredients

    Now for the fun part! Stir in the salt, minced garlic, and dried herbs until everything is saturated with flavor. Next, gently mix in two cups of all-purpose flour and the grated parmesan cheese. You want a sticky dough, almost like wet sand, sticking to your fingers just a bit. If it’s not there yet, you can always add more flour, but we’ll save that for the next step!

    Knead the Dough

    Time to get your hands in there! Lightly flour your countertop, and dump the dough out. Start kneading it, stretching and folding for about eight to ten minutes. The dough should begin to feel soft and stretchy, like a rubber band. Add more flour gradually if it seems too tacky. The goal is to achieve that lovely, smooth texture that feels good to the touch. You get to work those arms, and trust me, it’ll be worth it!

    Let the Dough Rise

    Once kneaded, place your beautiful dough in an oiled bowl. Turn it around so it’s lightly coated in oil, which prevents sticking. Now, cover it with a damp towel or plastic wrap. Find a cozy spot for it to rise—like a warm kitchen corner without drafts. Patience is key! Let it rise for about an hour, until it’s doubled in size. This is when the dough becomes fluffy and light!

    Shape the Loaves

    When the dough is ready, give it a gentle punch to release the air. Divide the dough into two equal pieces, and shape each piece into a round ball. As you create these charming loaves, place them on a greased baking sheet, leaving some space in between. They’ll puff up when they rise again, making each loaf the star of your dinner table!

    Final Rise and Bake

    Cover those lovely loaves again and let them rise for another 15-20 minutes. Meanwhile, preheat your oven to 375°F. Right before baking, brush them with melted butter for that irresistible golden tint. Bake for 18-20 minutes, until they’re golden brown and sound hollow when tapped on the bottom. The aroma? Pure bliss! Once done, let them cool slightly on a rack before slicing. Enjoy the warm, garlic-infused goodness!

    Tips for Success

    • Ensure your water temperature is just right for yeast activation—it should feel warm, not hot.
    • Don’t rush the rising process; give the dough time to double in size for fluffy bread.
    • Experiment with herbs and cheeses based on your family’s favorites.
    • If the dough feels too sticky, gradually add flour until it reaches the right texture.
    • Brushing with butter right before baking enhances flavor and color.

    Equipment Needed

    • Large Mixing Bowl: A versatile bowl; you can also use a Dutch oven if available.
    • Measuring Cups and Spoons: Essential for accuracy; a kitchen scale works as an alternative.
    • Baking Sheet: Any flat baking surface will do!
    • Kitchen Towel: A clean napkin works well to cover the dough.
    • Pastry Brush: Ideal for buttering your loaves; a spoon can substitute.

    Variations on Garlic Parmesan Herb Bread

    • Cheesy Garlic Bread: Add extra mozzarella or cheddar cheese for a gooey, cheesy twist.
    • Herb-Infused Olive Oil: Brush the loaves with herb-infused olive oil instead of butter for a unique flavor.
    • Whole Wheat Flour: Substitute half of the all-purpose flour with whole wheat for a heartier texture.
    • Spicy Kick: Mix in red pepper flakes or black pepper for a hint of spice that complements the garlic.
    • Chopped Green Onions: Fold in some chopped green onions for a fresh flavor burst in every bite.
    • Sun-Dried Tomatoes: Incorporate chopped sun-dried tomatoes for a Mediterranean flair.
    • Gluten-Free Option: Use a gluten-free flour blend to make this bread suitable for those with gluten sensitivities.

    Serving Suggestions

    • Serve slices warm with a generous spread of butter for a comforting treat.
    • Pair with a hearty bowl of soup, like tomato basil or minestrone, for a complete meal.
    • Enjoy alongside a fresh green salad sprinkled with feta cheese.
    • For a fun twist, serve them with garlic-infused olive oil for dipping.
    • Presentation tip: Arrange the loaves on a rustic wooden board, garnished with fresh herbs.

    FAQs about Garlic Parmesan Herb Bread

    Can I use fresh herbs instead of dried?

    Absolutely! Fresh herbs can enhance the flavor even more. Just remember to use about three times the amount of fresh herbs as you would dried.

    How do I store leftover Garlic Parmesan Herb Bread?

    Store any leftovers in an airtight container at room temperature for up to three days. If you want to keep it longer, slice and freeze the bread for up to three months.

    Can I double the recipe?

    Yes! This easy bread recipe is perfect for doubling. Just keep your rising space in mind, as it might take a bit more room on your counter.

    What can I serve with Garlic Parmesan Herb Bread?

    This bread is fantastic with soups, salads, or as a side to your favorite pasta dish. It’s quite versatile and adds an aromatic touch to any meal!

    Can I add other cheeses to this recipe?

    Absolutely! Feel free to mix in your favorite cheeses like mozzarella or provolone for a unique twist on this homemade bread.

    Final Thoughts

    There’s something special about creating your own Garlic Parmesan Herb Bread. The way it fills your home with warmth and inviting scents is truly delightful. As you slice into the crusty exterior, every bite holds a melody of garlic, herbs, and that irresistible cheese. This bread not only makes ordinary meals feel extraordinary; it also brings family and friends together around the table. The joy of baking this delicious treat is matched only by the smiles it brings to those you share it with. Trust me, once you try it, you’ll be making it again and again!


    Print

    clock clock iconcutlery cutlery iconflag flag iconfolder folder iconinstagram instagram iconpinterest pinterest iconfacebook facebook iconprint print iconsquares squares iconheart heart iconheart solid heart solid icon

    Description

    A deliciously easy recipe for Garlic Parmesan Herb Bread that combines flavors of garlic and parmesan with a hint of herbs.


    • 1 teaspoon salt
    • 1 cup warm water (about 100-110°F)
    • 1 tablespoon granulated sugar
    • 1 tablespoon instant dry yeast
    • 1 teaspoon dried basil
    • 1 teaspoon dried oregano
    • 2 teaspoons dried rosemary
    • 6 cloves garlic, finely chopped
    • 2 to cups all-purpose flour
    • ⅓ cup parmesan cheese, grated
    • 1 tablespoon butter (split for topping)
    • 2 tablespoons olive oil

    1. Combine yeast, sugar, and warm water in a large bowl and let it sit for a minute until foamy.
    2. Stir in salt, herbs, and garlic until well blended.
    3. Add 2 cups of flour and parmesan cheese to the bowl and mix to form a sticky dough.
    4. Gradually add more flour while mixing until the dough is soft and stretchy.
    5. Oil a bowl and place the dough inside, covering it with a towel or plastic wrap. Let it rise for about an hour until doubled in size.
    6. Preheat the oven to 375°F (190°C) and grease a baking sheet with olive oil.
    7. Gently punch down the dough and divide it into two balls, shaping them into rounds and placing them on the baking sheet.
    8. Cover loosely and let them rise for an additional 15-20 minutes.
    9. Brush half a tablespoon of butter on top of each dough round before baking.
    10. Bake for 18-20 minutes until golden and hollow-sounding when tapped underneath.
    11. Remove from the oven, transfer to a cooling rack, and allow to cool slightly before slicing and serving warm with butter or soup.

    Notes

    • Make sure the water is warm, not hot, to activate the yeast properly.
    • You can adjust the herbs according to your taste preference.
    • For extra flavor, consider adding other cheeses or herbs.
    • Prep Time: 15 minutes
    • Cook Time: 20 minutes
    • Category: Bread
    • Method: Baking
    • Cuisine: Italian

    Nutrition

    • Serving Size: 1 slice
    • Calories: 120
    • Sugar: 1g
    • Sodium: 200mg
    • Fat: 5g
    • Saturated Fat: 2g
    • Unsaturated Fat: 2g
    • Trans Fat: 0g
    • Carbohydrates: 15g
    • Fiber: 1g
    • Protein: 4g
    • Cholesterol: 10mg

    Sharing is caring!

  • Taco Stuffed Sweet Potatoes

    Taco Stuffed Sweet Potatoes


    Introduction to Taco Stuffed Sweet Potatoes

    As a busy mom, I know how important it is to whip up dinners that are both tasty and easy to make. Enter Taco Stuffed Sweet Potatoes—my go-to recipe for a hearty meal! These vibrant sweet potatoes bring together the earthy sweetness of baked potatoes with the rich flavors of taco filling. You won’t believe how comforting and satisfying they are! Plus, they’re a hit with my kids, so I’m constantly encouraging them to eat their veggies. Let me show you how to create this delightful dish that fits right into a hectic weeknight.

    Why You’ll Love This Taco Stuffed Sweet Potatoes

    Taco Stuffed Sweet Potatoes really are a game changer in the kitchen. They’re quick to prepare, bursting with flavor, and perfect for busy nights. Not to mention, they’re a healthy twist on traditional tacos! The combination of sweet potatoes and savory filling makes them utterly satisfying. Plus, they’re versatile enough for everyone’s taste buds, so even picky eaters will ask for seconds!

    Ingredients for Taco Stuffed Sweet Potatoes

    Gathering the right ingredients can transform your Taco Stuffed Sweet Potatoes into a delightful feast. Here’s what you’ll need:

    • Sweet potatoes: These earthy gems are the star of the dish, adding natural sweetness and a creamy texture.
    • Olive oil: A drizzle of this handy oil enhances the sweetness of the potatoes while ensuring they roast perfectly.
    • Salt and pepper: Simple seasonings that elevate the flavors—don’t underestimate their importance!
    • Ground beef or turkey: Choose your protein here! Ground turkey is a great leaner option, keeping it healthy without sacrificing flavor.
    • Taco seasoning: Get ready for a flavor explosion! This spice mix melds perfectly with the meat for a savory kick.
    • Canned black beans: Packed with fiber and nutrients, they’re a fantastic, filling addition that complements the meat.
    • Corn kernels: This is optional but adds a sweet crunch to your dish. Fresh, frozen, or canned—whatever you have on hand.
    • Water: Just a splash helps thicken the filling to a delicious consistency.
    • Shredded cheese: A sprinkle on top adds melty goodness and decadence! Use your favorite kind.
    • Diced tomatoes: Fresh, juicy tomatoes make a bright, zesty topping, perfect for that fresh burst of flavor.
    • Sliced avocado or guacamole: Creamy avocado pulls everything together and adds that extra layer of lusciousness.
    • Sour cream or Greek yogurt: A dollop brings a tangy balance to the rich flavors—both delicious options!
    • Chopped cilantro: Fresh herbs add a pop of color and enhance the dish with vibrant flavor.
    • Jalapeño slices: If you like it spicy, these add a kick! Don’t worry, you can skip them if you prefer mild.
    • Lime wedges: A squeeze of lime juice brightens the entire dish with a zesty finish.

    Exact measurements for these ingredients are at the bottom of the article, available for printing. Feel free to mix and match according to your tastes and what you have in your pantry!

    How to Make Taco Stuffed Sweet Potatoes

    Preheat and Prepare the Sweet Potatoes

    Let’s kick things off by preheating your oven to 400°F. This is the perfect temperature to get those sweet potatoes meltingly tender. While that’s warming up, grab your sweet potatoes and give them a good rinse to remove any dirt. Then, using a fork, prick each potato several times—this will help steam escape while they bake. Now, rub them down with a tablespoon of olive oil and sprinkle salt and pepper to taste. I love the contrast of the crispy skin with the sweet, creamy inside. Pop them on a baking sheet and slide them into the oven. Roast for about 45–50 minutes until they’re fork-tender. Your kitchen will smell heavenly!

    Cook the Taco Filling

    While your sweet potatoes are softening away, it’s time to work on that scrumptious taco filling! Grab a skillet and heat a tablespoon of olive oil over medium heat. Once hot, add your choice of ground beef or turkey. Sauté it until it’s browned and cooked through—about 6–8 minutes. Don’t forget to drain any excess fat; we want the filling flavorful, not greasy! Now, sprinkle in the taco seasoning and mix it well. Toss in the black beans and corn if you’re using them, along with a splash of water to thicken everything up. Let it simmer for about 5–7 minutes—this is where the magic happens, and the flavors meld together beautifully!

    Combine and Stuff the Potatoes

    Once your sweet potatoes are tender and the taco filling is ready, take them out of the oven and let them cool for a few moments. Slice each potato open lengthwise, being careful not to cut all the way through. Using a fork, gently mash the inside flesh. This will create a cozy bed for your taco filling. Spoon the savory mixture generously into each potato, letting it overflow just a tad—because who doesn’t love an extra helping? Each bite will be a melody of sweet and savory! If you catch yourself sneaking a spoonful of that filling, I won’t blame you one bit!

    Add Toppings and Serve

    Now for my favorite part—adding the toppings! Sprinkle shredded cheese on top, letting it melt gloriously. Then add diced tomatoes, creamy avocado, sour cream or Greek yogurt, and fresh cilantro to your heart’s content. For a spicy kick, don’t forget jalapeño slices! Before serving, add a squeeze of fresh lime juice for that zesty finish. These Taco Stuffed Sweet Potatoes are not just a meal; they’re a delicious work of art! Serve them hot to enjoy all the flavors that come together, making your family ask for more.

    Tips for Success

    • Don’t rush the roasting! Tender sweet potatoes make all the difference.
    • For busy nights, prep the taco filling in advance and store it in the fridge.
    • Experiment with different toppings to keep things exciting for your family.
    • Microwave sweet potatoes if you’re short on time; they’ll cook in about 10-15 minutes.
    • Make sure to taste the filling before stuffing—adjust seasonings to your liking!

    Equipment Needed

    • Baking sheet: A regular one works fine, or use a lined sheet for easy cleanup.
    • Skillet: A non-stick skillet is great, but any frying pan will do!
    • Fork: Perfect for pricking the sweet potatoes and mashing the flesh.
    • Sharp knife: For slicing open the potatoes when they’re ready.
    • Measuring spoons: Helpful for measuring oil and seasonings, though a good eye works too!

    Variations

    • Vegetarian option: Swap the ground beef or turkey for quinoa or lentils for a protein-packed, plant-based filling.
    • Spicy twist: Add a tablespoon of diced chipotle peppers in adobo sauce to the taco mixture for a smoky heat.
    • Cheesy delight: Mix in cream cheese or a dollop of refried beans to the taco filling for extra creaminess.
    • Global flair: Try adding diced bell peppers and onion to the filling for a more colorful and flavorful mix.
    • Keto-friendly: Replace sweet potatoes with halved zucchini or bell peppers for a low-carb alternative.

    Serving Suggestions

    • Pair with a crisp green salad for a refreshing contrast.
    • Serve with tortilla chips and salsa for a fun appetizer combo.
    • A cold glass of agua fresca or iced tea complements the flavors perfectly.
    • Garnish with extra cilantro and lime wedges for beautiful presentation.
    • Offer spicy pickled vegetables on the side for an added zing!

    FAQs about Taco Stuffed Sweet Potatoes

    Can I make Taco Stuffed Sweet Potatoes ahead of time?

    Absolutely! You can prepare the taco filling in advance and reheat it when you’re ready to serve. The sweet potatoes can also be baked beforehand; just store them in the fridge and stuff just before serving.

    What if I don’t have taco seasoning?

    No worries! If you’re out of taco seasoning, you can mix your own using chili powder, cumin, garlic powder, and onion powder to get that familiar flavor profile.

    Are Taco Stuffed Sweet Potatoes healthy?

    Yes, they actually are! With rich fiber from the sweet potatoes and black beans, plus lean protein, they make a nutritious meal option. They’re also gluten-free, making them a great choice for various diets.

    Can I roast sweet potatoes in the microwave instead?

    Yes! If you’re short on time, just pierce the sweet potatoes with a fork and microwave them for around 10-15 minutes. Be sure to check for tenderness!

    How can I customize the toppings for Taco Stuffed Sweet Potatoes?

    The sky’s the limit! Use your favorite toppings, like salsa, jalapeños, chopped scallions, or even a spicy sauce. Let your creativity shine!

    Final Thoughts

    Cooking is not just about nourishment; it’s about creating moments and memories. Taco Stuffed Sweet Potatoes do just that for my family! The delightful blend of flavors and textures brings smiles to our dinner table. Whether it’s a cozy weeknight or a casual gathering, this dish is a hit. Each bite is a reminder of how simple ingredients can transform into something truly special. I hope you find as much joy in making these as I do. Here’s to more delicious meals that bring us together laughter and love!


    Print

    clock clock iconcutlery cutlery iconflag flag iconfolder folder iconinstagram instagram iconpinterest pinterest iconfacebook facebook iconprint print iconsquares squares iconheart heart iconheart solid heart solid icon

    Description

    As a busy mom, I know how important it is to whip up dinners that are both tasty and easy to make. Enter Taco Stuffed Sweet Potatoes—my go-to recipe for a hearty meal! These vibrant sweet potatoes bring together the earthy sweetness of baked potatoes with the rich flavors of taco filling. You won’t believe how comforting and satisfying they are! Plus, they’re a hit with my kids, so I’m constantly encouraging them to eat their veggies. Let me show you how to create this delightful dish that fits right into a hectic weeknight.


    • 4 medium sweet potatoes
    • 1 tablespoon olive oil
    • Salt and pepper, to taste
    • 1 tablespoon olive oil
    • 1 lb ground beef (or turkey)
    • 1 tablespoon taco seasoning
    • 1/2 cup canned black beans, drained and rinsed
    • 1/2 cup corn kernels (optional)
    • 1/4 cup water
    • Shredded cheese (optional topping)
    • Diced tomatoes (optional topping)
    • Sliced avocado or guacamole (optional topping)
    • Sour cream or Greek yogurt (optional topping)
    • Chopped cilantro (optional topping)
    • Jalapeño slices (optional topping)
    • Lime wedges (optional topping)

    1. Preheat oven to 400°F (200°C). Prick each sweet potato with a fork several times, then rub with olive oil and season with salt and pepper. Place on a baking sheet and roast for 45–50 minutes, or until tender.
    2. While potatoes are roasting, heat olive oil in a skillet over medium heat. Add ground beef and cook until browned. Drain excess fat. Stir in taco seasoning, black beans, corn (if using), and water. Simmer for 5–7 minutes until thickened.
    3. Once sweet potatoes are cooked, slice them open and gently mash the flesh with a fork. Spoon the taco mixture evenly into each one.
    4. Add your favorite toppings like cheese, avocado, sour cream, cilantro, and a squeeze of lime juice.
    5. Serve hot as a hearty main dish or meal prep for later.

    Notes

    • This dish can be made with ground turkey as a leaner option.
    • Feel free to customize toppings based on your preferences.
    • These can be prepared ahead of time and reheated.
    • Prep Time: 10 minutes
    • Cook Time: 50 minutes
    • Category: Main Dish
    • Method: Roasting and Skillet Cooking
    • Cuisine: Mexican

    Nutrition

    • Serving Size: 1 stuffed sweet potato
    • Calories: 400
    • Sugar: 8g
    • Sodium: 600mg
    • Fat: 15g
    • Saturated Fat: 5g
    • Unsaturated Fat: 8g
    • Trans Fat: 0g
    • Carbohydrates: 55g
    • Fiber: 10g
    • Protein: 20g
    • Cholesterol: 70mg

    Sharing is caring!

  • High Protein Crispy Garlic Chicken Fried Rice

    High Protein Crispy Garlic Chicken Fried Rice


    Introduction to High Protein Crispy Garlic Chicken Fried Rice

    After a long, bustling day, who has time to whip up an elaborate meal? That’s why I absolutely adore my High Protein Crispy Garlic Chicken Fried Rice! This dish is a delicious way to combine health and convenience. With crispy chicken and flavorful garlic, it’s a quick solution for busy moms and professionals alike. Plus, it’s packed with protein to keep you energized. Trust me; your family will be asking for seconds. Let’s dive in, and I’ll show you how to make this satisfying meal that everyone will love!

    Why You’ll Love This High Protein Crispy Garlic Chicken Fried Rice

    This recipe is the perfect blend of ease and flavor, making it a go-to for weeknight dinners. It comes together in just 30 minutes, which is a game-changer for my busy schedule. The crispy chicken adds a delightful crunch, while the garlic tantalizes your taste buds. It’s also so customizable, allowing you to sneak in extra veggies your kids love or enjoy it as is. It’s a real win-win!

    Ingredients for High Protein Crispy Garlic Chicken Fried Rice

    Getting the right ingredients is key to making my High Protein Crispy Garlic Chicken Fried Rice sing with flavor. Here’s what you need:

    • Cooked jasmine or basmati rice: Day-old rice works best for that perfect, non-sticky fried rice texture.
    • Boneless, skinless chicken breast: Lean protein that absorbs flavors beautifully, ensuring every bite is juicy.
    • Garlic: The aromatic backbone of this dish! Freshly minced garlic elevates the taste.
    • Olive oil or sesame oil: Both oils provide a rich flavor; sesame oil adds an authentic Asian twist!
    • Frozen peas and carrots: A colorful mix that adds sweetness and nutrition; convenient to use straight from the freezer.
    • Green onions: These fragrant slices finish the dish with a fresh crunch, giving it a pop of color.
    • Large eggs: Perfect for scrambling in, adding creamy texture and protein.
    • Low-sodium soy sauce: This sauce infuses the rice with savory goodness without being too salty.
    • Oyster sauce (optional): For an extra layer of umami, it enhances the overall flavor, but you can skip it if preferred.
    • Ground black pepper: A pinch of this spice brings all the flavors together with a mild kick.
    • Cornstarch: Essential for coating the chicken, giving it that irresistible crispy texture when cooked.
    • Water: Just enough to create a slurry with the cornstarch, ensuring it adheres to the chicken pieces.

    For exact measurements, check the bottom of the article for easy printing! Feel free to customize this ingredient list based on your family’s preferences.

    How to Make High Protein Crispy Garlic Chicken Fried Rice

    Now that we have our ingredients ready, let’s jump into the cooking process for my High Protein Crispy Garlic Chicken Fried Rice! I’ll guide you through each step, sharing little tips along the way to make your cooking experience even more enjoyable. Let’s get cooking!

    Prepare the Chicken

    Start by tossing the chicken pieces in cornstarch. This is crucial for achieving that delightful crispy texture later on.

    Make sure each piece is coated evenly. It may seem like a small step, but trust me, it makes a big impact on the final crunch!

    Cook the Chicken

    Next, heat one tablespoon of oil in a large skillet over medium-high heat. This is where the magic begins!

    Add the chicken when the oil is shimmering, and let it cook for about 5 to 7 minutes. You’re looking for golden-brown perfection!

    Don’t crowd the pan; work in batches if needed. Once it’s crispy, set the chicken aside. We want to keep it crunchy!

    Sauté the Garlic

    In the same skillet, add another tablespoon of oil. Scrape up any browned bits left from the chicken; that’s packed with flavor!

    Now, toss in the minced garlic. Listen for that satisfying sizzle! Sauté for about 30 seconds until it’s fragrant. Just watch carefully to avoid burning!

    Scramble the Eggs

    Push the garlic to one side of the pan, and pour in your beaten eggs. Stir gently until they form soft curds.

    This step adds creaminess and boosts the protein in your meal. It won’t take long—just a minute or two!

    Stir-Fry Everything

    Now, it’s time to bring all those vibrant colors and flavors together! Add the cooked rice, peas, carrots, and green onions into the skillet.

    Drizzle in the soy sauce and oyster sauce. Stir-fry everything for a few minutes, making sure to break any rice clumps. Let those flavors mingle!

    Bring Back the Chicken

    Return the crispy chicken to the pan. This is where you’ll really get that satisfying crunch!

    Give everything a good toss, ensuring the chicken stays crispy while getting coated in the savory goodness of your fried rice.

    Finish and Serve

    Finally, sprinkle with ground black pepper and taste. Adjust the seasoning if needed.

    Serve your High Protein Crispy Garlic Chicken Fried Rice hot, and watch your family dig in with delight! Enjoy this delicious meal, knowing you’ve packed it full of flavor and nutrition!

    Tips for Success

    • Use day-old rice for the best texture; it helps prevent clumping.
    • Prep your ingredients before cooking to streamline the process.
    • Don’t overcrowd the pan when cooking the chicken for better crispiness.
    • Feel free to sneak in more veggies for added nutrients.
    • Adjust the soy sauce according to your family’s taste preferences!

    Equipment Needed

    • Large skillet or wok: A non-stick pan is ideal for easy cleanup.
    • Spatula: A sturdy spatula helps stir and toss ingredients with ease.
    • Mixing bowl: For coating the chicken in cornstarch.
    • Measuring spoons: Handy for precise ingredient amounts.
    • Cutting board and knife: Essential for chopping ingredients efficiently.

    Variations

    • For a vegetarian option, substitute the chicken with tofu or tempeh, and add extra veggies like bell peppers or mushrooms.
    • Want a spicy kick? Add sliced jalapeños or a sprinkle of red pepper flakes to heat things up!
    • For a whole grain twist, use brown rice or cauliflower rice for a lower-carb option.
    • If you’re watching your sodium intake, consider using coconut aminos instead of soy sauce for a sweeter flavor.
    • Mix in your favorite herbs like cilantro or basil for a fresh finish!

    Serving Suggestions for High Protein Crispy Garlic Chicken Fried Rice

    • Pair this dish with a light cucumber salad for a refreshing crunch.
    • Serve it with a side of steamed edamame or vegetable spring rolls for added texture.
    • A glass of iced green tea complements the flavors beautifully!
    • Garnish with extra green onions or sesame seeds for an eye-catching presentation.

    FAQs about High Protein Crispy Garlic Chicken Fried Rice

    Can I use other proteins in this recipe?

    Absolutely! For a different flavor, you can swap the chicken for shrimp, beef, or even tofu for a vegetarian version. Each protein brings its own unique taste!

    How can I store leftovers?

    Store any leftover High Protein Crispy Garlic Chicken Fried Rice in an airtight container in the fridge for up to 3 days. Reheat it in a skillet or microwave for quick meals.

    Is it possible to make this dish gluten-free?

    Yes! Simply use gluten-free soy sauce or tamari instead of regular soy sauce. It’ll still be delicious and satisfy those cravings!

    Can I make this meal ahead of time?

    Definitely! You can prepare the chicken and veggies in advance. Just stir-fry everything together when you’re ready to eat for a quick prep time.

    What can I substitute for minced garlic?

    If you’re not a fan of garlic, consider using garlic powder instead. Start with a small amount; it still gives a nice flavor without the strong punch!

    Final Thoughts

    Making my High Protein Crispy Garlic Chicken Fried Rice brings me sheer joy! It’s not just a meal—it’s a celebration of flavors and a way to create lasting memories with my family. The crunch of the chicken, the fragrant garlic, and the colorful veggies all come together to make a dish that everyone enjoys. Plus, it fits effortlessly into my busy lifestyle, making dinner feel a little less hectic. Every time I serve it, I’m reminded that cooking at home can be simple, nutritious, and oh-so-satisfying. You’ll love it too, I promise!


    Print

    clock clock iconcutlery cutlery iconflag flag iconfolder folder iconinstagram instagram iconpinterest pinterest iconfacebook facebook iconprint print iconsquares squares iconheart heart iconheart solid heart solid icon

    Description

    A delicious and nutritious high protein meal featuring crispy garlic chicken mixed with fried rice, perfect for a satisfying dinner.


    • 2 cups cooked jasmine or basmati rice (preferably day-old)
    • 1 lb boneless, skinless chicken breast, cut into small pieces
    • 4 cloves garlic, minced
    • 2 tbsp olive oil or sesame oil
    • 1 cup frozen peas and carrots, thawed
    • 3 green onions, sliced
    • 2 large eggs, lightly beaten
    • 3 tbsp low-sodium soy sauce
    • 1 tbsp oyster sauce (optional)
    • ½ tsp ground black pepper
    • 1 tsp cornstarch (for chicken coating)
    • 1 tbsp water (for cornstarch slurry)

    1. Prep the chicken: Toss the chicken pieces with the cornstarch, ensuring they’re evenly coated. This step is key to creating that crispy texture when pan-fried.
    2. Cook the chicken: Heat 1 tablespoon of oil in a large skillet or wok over medium-high heat. Add the chicken and cook until golden and crispy, about 5–7 minutes. Remove the chicken and set aside.
    3. Sauté the garlic: In the same pan, add the remaining tablespoon of oil. Toss in the minced garlic and let it sizzle for about 30 seconds, just until fragrant — be careful not to let it burn.
    4. Scramble the eggs: Push the garlic to the side and pour in the beaten eggs. Stir gently until they just set into soft curds.
    5. Stir-fry everything: Add the cooked rice, peas, carrots, and green onions. Drizzle in the soy sauce and oyster sauce. Stir-fry for a few minutes, breaking up any rice clumps and letting the flavors mingle.
    6. Bring back the chicken: Finally, add the crispy chicken back into the pan. Give everything a good toss, ensuring the chicken stays crunchy but coated in the savory goodness.
    7. Finish and serve: Sprinkle with black pepper, adjust seasoning if needed, and serve hot.

    Notes

    • Using day-old rice improves the texture and flavor of the fried rice.
    • You can customize the vegetables according to your preference.
    • For extra heat, consider adding red pepper flakes or sliced chili peppers.
    • Prep Time: 15 minutes
    • Cook Time: 15 minutes
    • Category: Main Course
    • Method: Stir-fry
    • Cuisine: Asian

    Nutrition

    • Serving Size: 1 cup
    • Calories: 450
    • Sugar: 2g
    • Sodium: 600mg
    • Fat: 14g
    • Saturated Fat: 2g
    • Unsaturated Fat: 10g
    • Trans Fat: 0g
    • Carbohydrates: 56g
    • Fiber: 3g
    • Protein: 30g
    • Cholesterol: 200mg

    Sharing is caring!

  • Raspberry Cinnamon Rolls with Lemon Glaze that Delight!

    Raspberry Cinnamon Rolls with Lemon Glaze that Delight!


    Introduction to Raspberry Cinnamon Rolls with Lemon Glaze

    There’s something magical about pulling freshly baked Raspberry Cinnamon Rolls with Lemon Glaze from the oven. Just the smell alone can transform a busy morning into a delightful treat! As a mom juggling multiple tasks, I know how precious time can be, and this recipe is a lovely solution. It effortlessly combines comfort and indulgence, making it perfect for breakfast, brunch, or even a special treat for loved ones. You’ll find that these fluffy rolls, bursting with juicy raspberries and topped with a zesty lemon glaze, bring smiles to the busiest of mornings.

    Why You’ll Love This Raspberry Cinnamon Rolls with Lemon Glaze

    These Raspberry Cinnamon Rolls with Lemon Glaze are a delightful blend of flavor and simplicity. They come together quickly, making them a fantastic option for busy moms like us. The sweet and tangy filling of fresh raspberries paired with the lemony glaze creates a mouthwatering experience. Plus, there’s nothing quite like surprising your family with homemade treats that are not only beautiful but also incredibly delicious!

    Ingredients for Raspberry Cinnamon Rolls with Lemon Glaze

    Let’s dive into the delightful components that make these Raspberry Cinnamon Rolls with Lemon Glaze truly special. Each ingredient plays a vital role, from the mouthwatering dough to the sweet-tart filling and luscious glaze.

    • All-purpose flour: This forms the backbone of our rolls, giving them structure and fluffiness.
    • Granulated sugar: Sweetens the dough and filling, helping to create those irresistible layers.
    • Instant yeast: A crucial player in getting those rolls to rise beautifully, providing a light texture.
    • Salt: Just a pinch adds balance, enhancing the flavors of the rolls.
    • Lukewarm milk: This helps activate the yeast and keeps the dough moist and tender.
    • Unsalted butter: Adds richness and flavor; I love using it straight from the oven without brown bits.
    • Vegetable oil: Keeps the dough soft and adds moisture to those layers of cinnamon goodness.
    • Eggs: Essential for structure, they contribute to the roll’s tenderness and flavor.

    For the exquisite raspberry filling, we have:

    • Granulated sugar: Again, sweetness is key here, balancing the tartness of the berries.
    • Ground cinnamon: A must-have for that warm, comforting flavor that complements the raspberries.
    • Fresh raspberries: Juicy and vibrant, they bring a wonderful tang and color—feel free to substitute with frozen if you prefer!

    And don’t forget the bright lemon glaze, which consists of:

    • Powdered sugar: Provides the sweetness and creamy texture that’s perfect for drizzling.
    • Fresh lemon juice: Adds tanginess, making the glaze bright and refreshing.
    • Lemon zest: Intensifies the flavor and aroma of our lovely glaze.
    • Vanilla extract: A little warmth and depth to elevate the entire experience.

    For exact measurements and quantities, check the bottom of the article—perfect for printing and having on hand while you bake!

    How to Make Raspberry Cinnamon Rolls with Lemon Glaze

    Let’s embark on this delightful journey of creating Raspberry Cinnamon Rolls with Lemon Glaze! Each step is simple, yet they gather into something extraordinary. Follow along, and soon, your kitchen will be filled with irresistible aromas. Let’s dive in!

    Step 1: Prepare the Dough

    Start by combining the all-purpose flour, granulated sugar, instant yeast, and salt in a large bowl. Mix these dry ingredients well so that the yeast is evenly distributed.

    In a separate bowl, whisk together the lukewarm milk, melted butter, vegetable oil, and eggs until everything is well-blended. Gradually add this mixture to the dry ingredients, stirring until a dough begins to form. The magic is unfolding!

    Step 2: Knead the Dough

    Time to get your hands a bit floury! Turn out the dough onto a floured surface. Knead it for about 8-10 minutes. The goal is to get it smooth and elastic. If it’s sticky, don’t be shy with the flour—just a bit will do!

    Step 3: Let the Dough Rise

    Now that you have a soft dough, place it in a greased bowl. Cover it with a damp cloth and set it in a warm spot. Let it rise for about 1 hour, or until the dough doubles in size. Patience is key here, and the wait will be oh-so-worth it!

    Step 4: Prepare the Raspberry Filling

    While the dough rises, let’s whip up that luscious filling! In a small bowl, mix the granulated sugar and ground cinnamon together. This combination is heavenly!

    Gently toss in the finely chopped fresh raspberries. The sugar and cinnamon will cling to the berries, making them extra sweet and flavorful.

    Step 5: Roll Out the Dough

    Once the dough has risen beautifully, punch it down to release the air. Roll it out on a floured surface into a 12×18 inch rectangle. Spread the raspberry filling evenly over the dough, leaving a border on the edges. It’s time to let those berries shine!

    Step 6: Shape the Rolls

    Starting from one long side, carefully roll the dough tightly into a log. It’s like wrapping a present for your taste buds! Once rolled, cut the log into 12 equal slices. Arrange the slices cut side up in a greased baking pan. This is where the magic happens!

    Step 7: Second Rise

    Cover the rolls with a damp cloth again and let them rise for another 30 minutes. This gives them a final boost, making each bite fluffy and tender.

    Step 8: Bake the Rolls

    Preheat your oven to 375°F (190°C). Once the rolls have risen, pop them in the oven and bake for about 25 minutes or until they are golden brown. You’ll know they’re ready when your kitchen smells like a bakery!

    Step 9: Make the Lemon Glaze

    While the rolls bake, let’s prepare that zesty lemon glaze. In a medium bowl, whisk together the powdered sugar, fresh lemon juice, lemon zest, and vanilla extract. Adjust the lemon juice if you prefer a thicker or thinner glaze.

    Step 10: Drizzle and Serve

    Once the rolls are out of the oven, let them cool for about 10 minutes. Then, drizzle that refreshing lemon glaze generously over the warm rolls. Now, your Raspberry Cinnamon Rolls with Lemon Glaze are ready to delight! Serve warm and relish the smiles around your table.

    Tips for Success

    • Measure flour correctly; spoon it into the cup and level off for precision.
    • For fluffy rolls, ensure your yeast is fresh and active.
    • Use room temperature ingredients for a smoother dough.
    • Experiment with filling variations, like adding a splash of vanilla to the raspberries.
    • Don’t rush the rising times; they’re crucial for that perfect texture.

    Equipment Needed for Raspberry Cinnamon Rolls with Lemon Glaze

    • Large mixing bowl: Any mixing bowl works; just ensure it’s big enough for rising dough.
    • Floured surface: A clean countertop or a cutting board will do just fine.
    • Rolling pin: If you don’t have one, a wine bottle can work in a pinch!
    • Baking pan: Use a 9×13 inch pan, or try individual ramekins for fun servings!
    • Whisk: A fork can substitute, especially for making the glaze.

    Variations of Raspberry Cinnamon Rolls with Lemon Glaze

    • Berry Medley: Swap out raspberries for a mix of blueberries, strawberries, and blackberries for a colorful twist.
    • Nutty Delight: Add chopped walnuts or pecans to the raspberry filling for an extra crunch and flavor depth.
    • Vegan Option: Substitute eggs with a flaxseed meal mixture and use plant-based milk and butter to create a vegan-friendly version.
    • Gluten-Free: Replace all-purpose flour with a gluten-free flour blend to cater to gluten sensitivities.
    • Spiced Up: Add a pinch of nutmeg or cardamom to the cinnamon filling for an exotic flavor profile.

    Serving Suggestions for Raspberry Cinnamon Rolls with Lemon Glaze

    • Serve warm rolls with a side of whipped cream for added indulgence.
    • A cup of freshly brewed coffee or tea complements the sweet and tangy flavors perfectly.
    • For a brunch spread, pair with fresh fruit and yogurt.
    • Consider a light dusting of powdered sugar for a fancy presentation.

    FAQs about Raspberry Cinnamon Rolls with Lemon Glaze

    Can I use frozen raspberries for this recipe?

    Yes, frozen raspberries work well! Just make sure to thaw them and drain any excess liquid before tossing them with the sugar and cinnamon. This will help maintain the texture of your delicious rolls.

    How do I store leftover Raspberry Cinnamon Rolls with Lemon Glaze?

    Store any leftovers in an airtight container at room temperature. They’ll keep well for a day or two. If you want to extend their freshness, you can refrigerate them for up to a week.

    Can I make the dough ahead of time?

    Absolutely! You can prepare the dough and let it rise, then place it in the fridge overnight. The next day, just roll it out, shape the rolls, and let them rise again before baking!

    What’s a good substitute for lemon juice in the glaze?

    If you’re looking for an alternative to lemon juice, try using orange juice for a different citrusy twist. Just note that it will change the flavor profile slightly, but it will still be delicious!

    Can I make these roles gluten-free?

    Yes! Simply replace the all-purpose flour with a gluten-free flour blend. Be sure to check the brand for appropriate rising agents since some blends contain ingredients to help with that!

    Final Thoughts

    There’s something uniquely satisfying about creating Raspberry Cinnamon Rolls with Lemon Glaze from scratch. Watching your family’s eyes light up as they take that first bite is a heartwarming moment I’ll always cherish.

    Whether you whip these up on a Sunday morning or as a surprise after a long day, they bring joy and comfort to the table. The delightful combination of sweet raspberries and zesty lemon glaze creates a flavor experience that feels like a warm hug. Enjoy every bite, and remember—there’s always room for a little sweetness in our busy lives!


    Print

    clock clock iconcutlery cutlery iconflag flag iconfolder folder iconinstagram instagram iconpinterest pinterest iconfacebook facebook iconprint print iconsquares squares iconheart heart iconheart solid heart solid icon

    Description

    Delicious raspberry cinnamon rolls drizzled with a refreshing lemon glaze.


    • 4 cups all-purpose flour
    • 1/4 cup granulated sugar
    • 2 teaspoons instant yeast
    • 1 teaspoon salt
    • 1 1/4 cups milk, lukewarm
    • 1/4 cup + 1 tablespoon unsalted butter, melted
    • 1 tablespoon vegetable oil
    • 2 large eggs
    • For the Raspberry Filling:
    • 1/2 cup granulated sugar
    • 2 teaspoons ground cinnamon
    • 1 cup fresh raspberries, finely chopped or minced
    • For the Lemon Glaze:
    • 1 cup powdered sugar
    • 1 tablespoon fresh lemon juice
    • Zest of 1 lemon
    • 1/2 teaspoon vanilla extract

    1. In a large bowl, combine flour, sugar, yeast, and salt.
    2. In a separate bowl, whisk together milk, melted butter, vegetable oil, and eggs.
    3. Gradually add the wet ingredients to the dry ingredients, mixing until a dough begins to form.
    4. Turn the dough onto a floured surface and knead for 8-10 minutes, until smooth and elastic.
    5. Place in a greased bowl, cover with a damp cloth, and let rise in a warm place until doubled in size, about 1 hour.
    6. Mix sugar with cinnamon in a small bowl and toss raspberries in the mixture.
    7. Roll out the dough into a 12×18 inch rectangle and spread the raspberry mixture evenly over it. Roll it tightly into a log.
    8. Cut the log into 12 equal slices and arrange them cut side up in a greased baking pan. Let rise for 30 minutes.
    9. Preheat the oven to 375°F (190°C).
    10. Bake for 25 minutes, until golden brown.
    11. While baking, whisk together powdered sugar, lemon juice, lemon zest, and vanilla extract for the glaze.
    12. After baking, let the rolls cool for 10 minutes and drizzle with the lemon glaze. Serve warm.

    Notes

    • You can adjust the thickness of the glaze by adding more lemon juice.
    • Ensure the dough is in a warm place for the best rise.
    • Fresh raspberries can be substituted with frozen, but make sure they are thawed and drained.
    • Prep Time: 30 minutes
    • Cook Time: 25 minutes
    • Category: Breakfast
    • Method: Baking
    • Cuisine: American

    Nutrition

    • Serving Size: 1 roll
    • Calories: 220
    • Sugar: 10g
    • Sodium: 150mg
    • Fat: 8g
    • Saturated Fat: 5g
    • Unsaturated Fat: 2g
    • Trans Fat: 0g
    • Carbohydrates: 32g
    • Fiber: 1g
    • Protein: 4g
    • Cholesterol: 40mg

    Sharing is caring!

  • Cauliflower ‘Potato’ Salad

    Cauliflower ‘Potato’ Salad


    Introduction to Cauliflower ‘Potato’ Salad

    Hey there, fellow food lovers! If you’re on the hunt for a refreshing and guilt-free dish, let me introduce you to my Cauliflower ‘Potato’ Salad. This delightful recipe offers all the creamy goodness of traditional potato salad, but with a low-carb twist that fits perfectly into your busy lifestyle. As a mom who understands the whirlwind of family life, I promise this dish will impress your loved ones without keeping you in the kitchen for hours. So let’s roll up our sleeves and create a filling and scrumptious salad that everyone will adore!

    Why You’ll Love This Cauliflower ‘Potato’ Salad

    You’ll adore this Cauliflower ‘Potato’ Salad for its incredible simplicity and scrumptious taste. It comes together in just a snap, making it a lifesaver on busy weeknights or during that weekend barbecue. Plus, it’s a crowd-pleaser that balances indulgence and health beautifully. Imagine serving a dish that’s both satisfying and complements your low-carb lifestyle—now that’s something to cheer about!

    Ingredients for Cauliflower ‘Potato’ Salad

    Gathering the right ingredients is like assembling a dream team for your cooking adventure. Here’s what you’ll need to whip up a sensational Cauliflower ‘Potato’ Salad:

    • Cauliflower: The star of the show! A head of cauliflower, cut into small bites, serves as the perfect low-carb base, mimicking the texture of potatoes.
    • Hard-boiled eggs: Three large eggs provide protein and creaminess, making every bite oh-so-satisfying.
    • Mayonnaise: A generous scoop of mayonnaise adds that luscious, creamy texture we all love in traditional potato salad.
    • Red onion: Minced red onion brings a zingy flavor and vibrant color, enhancing the salad’s appeal.
    • Dill pickles: Minced dill pickles add a delightful crunch and tang, brightening up the salad with each forkful.
    • Apple cider vinegar: A splash of this tangy vinegar helps to enhance flavors and adds a refreshing punch.
    • Dijon mustard: Just a touch of Dijon mustard lends a bit of kick and depth to the dressing.
    • Celery salt: This seasoning balances the flavors and makes the salad taste truly authentic.
    • Dried dill: This herb amplifies the salad’s freshness and gives it a classic taste.
    • Salt and black pepper: Simple seasonings that bring out the best in all the flavors, ensuring your salad dances on your palate.

    For a little creative flair, think about tossing in some chopped chives or parsley for an extra burst of flavor. And remember, you can find the exact measurements for these ingredients at the bottom of the article, where you can easily print the recipe. Let the flavor journey begin!

    How to Make Cauliflower ‘Potato’ Salad

    Let’s dive into the fun part—making this scrumptious Cauliflower ‘Potato’ Salad! Each step is designed to be simple and straightforward, ensuring a tasty final product without overwhelming you. So grab your apron, and let’s get started!

    Step 1: Prepare the Cauliflower

    (Steam or microwave cauliflower until tender.)

    First, we want to make our cauliflower the perfect tender texture. You can either steam or microwave the cauliflower bites until they’re soft but not mushy, about 8-10 minutes. If you’re using the microwave, try adding a splash of water and covering the bowl with a lid. This helps create steam and speeds up the process. Remember, we don’t want soggy veggies—just tender bites that will blend beautifully with the other ingredients!

    Step 2: Mix the Vegetables

    (In a large bowl, combine dill pickles, red onion, and eggs.)

    While your cauliflower is cooling, it’s time to bring together the burst of flavors! In a large bowl, combine the minced dill pickles, red onion, and chopped hard-boiled eggs. Each ingredient here plays a vital role; that crunch from the pickles and the zing from the onion make all the difference! Together, they create a symphony of flavors that will have everyone asking for seconds.

    Step 3: Make the Dressing

    (Mix mayonnaise, apple cider vinegar, and Dijon mustard.)

    Now, let’s craft that creamy dressing! In another bowl, whisk together the mayonnaise, apple cider vinegar, and Dijon mustard until smooth. This dressing is the secret to the salad’s deliciousness—it’s rich, tangy, and oh-so-satisfying! Feel free to taste it and adjust the seasonings according to your preference. I always sneak a little extra mustard for that kick!

    Step 4: Combine Ingredients

    (Toss the warm cauliflower with the vegetable mix and dressing.)

    With everything prepped, let’s mix it all up! Add the warm cauliflower to your veggie mixture. Then, pour the dressing over it and gently toss everything together. The warmth of the cauliflower helps the dressing sink into every nook and cranny, ensuring that each bite is bursting with flavor. Just remember to be gentle, we want everything well combined without mashing our beautiful cauliflower!

    Step 5: Chill

    (Refrigerate for at least one hour before serving.)

    Lastly, it’s time for the salad to chill out! Cover your bowl and pop it in the refrigerator for at least one hour. This not only helps flavors meld together perfectly but also allows the salad to cool down, making it incredibly refreshing. Trust me; the wait is worth it! Just imagine the wonderful things that await you after that hour is up!

    Cauliflower ‘Potato’ Salad


    Tips for Success

    • Always cut your cauliflower into uniform bites for even cooking.
    • Allow the cauliflower to cool completely before mixing to avoid a soggy salad.
    • Tweak the dressing ingredients to suit your taste—more vinegar for tang or extra pickles for crunch!
    • Try making the salad a day in advance; it enhances the flavor.
    • Don’t forget to taste before serving; adjustments make all the difference!

    Equipment Needed

    • Large pot or microwave-safe bowl: For steaming your cauliflower. A simple bowl works perfectly in the microwave!
    • Mixing bowls: You’ll need a couple for combining ingredients and making the dressing.
    • Whisk or fork: For mixing the dressing—easy whisking guaranteed!
    • Cutting board and knife: Essential for chopping veggies and eggs.

    Variations on Cauliflower ‘Potato’ Salad

    • Add bacon: Crispy bacon bits can bring a delightful smokiness and crunch, elevating the flavor profile dramatically.
    • Make it vegan: Substitute the mayonnaise with vegan mayo and hard-boiled eggs with diced avocado for a creamy texture.
    • Spicy twist: Incorporate some diced jalapeños or a dash of hot sauce to give the salad a kick of heat.
    • Herbed version: Fresh herbs like parsley, cilantro, or chives can take the flavor to a whole new level while adding freshness.
    • Sweet element: For a unique taste, consider adding diced apples or raisins for a sweet crunch alongside the savory components.

    Serving Suggestions for Cauliflower ‘Potato’ Salad

    • Pair this salad with grilled chicken or fish for a satisfying, balanced meal.
    • Serve it alongside fresh garden greens for a colorful and nutritious spread.
    • Dress up your serving bowl with fresh herbs for a beautiful presentation.
    • Try it with your favorite low-carb wrap or sandwich!

    FAQs about Cauliflower ‘Potato’ Salad

    Can I make Cauliflower ‘Potato’ Salad ahead of time?

    Absolutely! Preparing this salad a day in advance enhances the flavors and makes it perfect for meal prep. Just remember to store it in an airtight container in the fridge.

    Is this recipe suitable for a keto diet?

    Yes! This Cauliflower ‘Potato’ Salad is low in carbs, making it an excellent choice for anyone following a keto or low-carb lifestyle.

    What can I use instead of mayonnaise?

    If you’re looking for a lighter option, consider Greek yogurt or avocado as substitutes. They add creaminess while keeping it healthy!

    How can I store leftovers?

    Store any leftover salad in an airtight container in the refrigerator. It should last for about 3-5 days, but I doubt it will last that long!

    Can I freeze Cauliflower ‘Potato’ Salad?

    While you technically can freeze it, I recommend against it. The texture may change once thawed, so it’s best enjoyed fresh or stored in the fridge.

    Final Thoughts

    In a world where time often slips through our fingers, this Cauliflower ‘Potato’ Salad brings a ray of culinary joy into the hustle and bustle of life. It delivers all the flavors of a classic potato salad while keeping things light and healthy. Whether you’re sharing it at a family picnic, a holiday gathering, or simply enjoying it at home, this dish has a way of bringing everyone together. I hope you find as much delight in making and savoring this salad as I do. So go ahead, dive into this creamy goodness—you deserve it!


    Print

    clock clock iconcutlery cutlery iconflag flag iconfolder folder iconinstagram instagram iconpinterest pinterest iconfacebook facebook iconprint print iconsquares squares iconheart heart iconheart solid heart solid icon

    Description

    A delicious and creamy cauliflower ‘potato’ salad that’s perfect for those looking for a low-carb alternative to traditional potato salad.


    • 1 head of cauliflower (cut into small bites)
    • 3 large hard-boiled eggs (chopped)
    • 3/4 cup mayonnaise
    • 1/4 cup red onion (minced)
    • 3 tablespoons dill pickles (minced)
    • 2 tablespoons apple cider vinegar
    • 2 teaspoons Dijon mustard
    • 1/2 teaspoon celery salt
    • 1/2 teaspoon dried dill
    • 1/4 teaspoon salt
    • 1/4 teaspoon ground black pepper

    1. Steam or microwave cauliflower florets until tender, about 8-10 minutes.
    2. In a large bowl, combine minced dill pickles, red onion, and chopped eggs.
    3. In another bowl, mix mayonnaise, apple cider vinegar, Dijon mustard, and seasonings.
    4. Add warm cauliflower to the vegetable mixture and pour the dressing over it; toss gently to coat.
    5. Chill in the refrigerator for at least one hour before serving.

    Notes

    • For extra flavor, you can add chopped chives or parsley.
    • Ensure the cauliflower is well-drained to avoid excess liquid in the salad.
    • Prep Time: 10 minutes
    • Cook Time: 10 minutes
    • Category: Salad
    • Method: Mixing
    • Cuisine: American

    Nutrition

    • Serving Size: 1 serving
    • Calories: 180
    • Sugar: 3g
    • Sodium: 500mg
    • Fat: 15g
    • Saturated Fat: 2g
    • Unsaturated Fat: 10g
    • Trans Fat: 0g
    • Carbohydrates: 8g
    • Fiber: 3g
    • Protein: 6g
    • Cholesterol: 100mg

    Sharing is caring!

  • Jalapeño Popper Deviled Eggs Delight

    Jalapeño Popper Deviled Eggs Delight


    Introduction to Jalapeño Popper Deviled Eggs Delight

    Welcome to my kitchen! If you’re anything like me, you love a dish that’s quick, flavorful, and guaranteed to impress. That’s where my Jalapeño Popper Deviled Eggs Delight comes in! This recipe combines the creamy, zesty flavors of jalapeño poppers with the classic comfort of deviled eggs. It’s perfect for busy days or spontaneous gatherings. Imagine serving a plate full of these delicious bites at your next get-together—your family and friends will be begging for the recipe! Let’s dive into this delightful twist on a beloved favorite.

    Why You’ll Love This Jalapeño Popper Deviled Eggs Delight

    This Jalapeño Popper Deviled Eggs Delight is the perfect blend of ease and flavor. It comes together in just 30 minutes, making it ideal for busy moms and professionals like us. The creamy, spicy filling is a crowd-pleaser, ensuring compliments at every gathering. Plus, these little beauties can be made ahead of time, freeing you from kitchen stress during your busy week. Who doesn’t love a hassle-free recipe that delivers big on taste?

    Ingredients for Jalapeño Popper Deviled Eggs Delight

    Let’s get right to the star of the show! To whip up these tasty Jalapeño Popper Deviled Eggs Delight, you’ll need a few key ingredients that blend perfectly for a sensational flavor explosion.

    • Eggs: The foundation of our dish. Feel free to use large eggs for the best results.
    • Mayonnaise: Adds creaminess and rich flavor to the filling. You can swap it with Greek yogurt for a lighter option.
    • Sour Cream: This brings a tangy kick. If you’re feeling adventurous, try adding a hint of lime juice for a zesty twist.
    • Cream Cheese: Soften it for easier mixing. It contributes to that luxurious texture we all love.
    • Shredded Cheddar Cheese: Offers a savory, cheesy taste. Sharp cheddar works wonders if you enjoy a bolder flavor.
    • Finely Chopped Jalapeños: The star for spice and crunch! Adjust the amount based on your heat preference.
    • Garlic Powder: Enhances the flavor profile. Fresh garlic can also be used, but consider sautéing it a bit first.
    • Smoked Paprika: Infuses a smoky depth. If you only have regular paprika, that will do just fine.
    • Salt and Black Pepper: Essential for seasoning and bringing all the flavors together.
    • Optional Toppings: Additional shredded cheddar, sliced jalapeños, and fresh cilantro make beautiful garnishes while adding extra flavor.

    For exact measurements and a handy printable version of the ingredients, keep scrolling down to the recipe section at the bottom!

    How to Make Jalapeño Popper Deviled Eggs Delight

    Step 1: Boil the Eggs

    To start, place the eggs in a large pot. Cover them with cold water about an inch above the eggs. Bring the water to a rolling boil over medium-high heat. Once boiling, reduce the heat to low and let the eggs simmer for about 10 minutes. This gentle cooking method helps ensure the yolks are beautiful and creamy. Plus, it makes peeling them so much easier later!

    Step 2: Cool and Peel

    After your eggs have simmered, drain the hot water from the pot. Rinse the eggs under cold water for a minute or two, stopping the cooking process. This trick also helps loosen the shells. Let them cool completely before peeling. The more patience you have here, the better the peeling results!

    Step 3: Prepare the Filling

    Once your eggs are peeled, slice them in half lengthwise. Gently pop out the yolks and place them in a mixing bowl. Using a fork, mash the yolks until they’re crumbly. Then add in mayo, sour cream, cream cheese, and shredded cheddar cheese. Stir in the finely chopped jalapeños, garlic powder, smoked paprika, salt, and black pepper. Mix until everything is creamy and evenly blended. This filling is rich, flavorful, and a touch spicy—just like a jalapeño popper should be!

    Step 4: Fill the Egg Whites

    Now comes the fun part! Use a spoon or a piping bag to fill each egg white half with the yolk mixture. If using a spoon, push the filling down gently to avoid overflow. For a fancy touch, you can use a piping bag fitted with a star tip to create a beautiful swirl on top. Each egg half should be generously filled, as we’re going for indulgence here!

    Step 5: Garnish

    Finally, it’s time to dress up your Jalapeño Popper Deviled Eggs Delight! Add a sprinkle of shredded cheddar cheese on top for extra crunch and color. If you’re feeling adventurous, garnish with sliced jalapeños for an added kick, and finish with fresh cilantro. Not only do these garnishes enhance the flavor, but they also make your dish visually appealing!

    Tips for Success

    • For easy peeling, use eggs that are a few days old—fresh eggs are trickier!
    • Let eggs come to room temperature before boiling for more even cooking.
    • Use a piping bag to achieve a professional look with your filling.
    • Feel free to customize the spice level by adjusting jalapeño amounts.
    • Make these deviled eggs a day ahead; they taste even better after chilling!

    Equipment Needed

    • Large Pot: For boiling the eggs. A deep saucepan also works.
    • Mixing Bowl: To combine the filling ingredients. Any medium bowl is fine.
    • Fork: For mashing the yolks. A potato masher can be used too.
    • Spoon or Piping Bag: To fill the egg whites with the mixture.
    • Sharp Knife: To slice the eggs in half easily.

    Variations

    • Spicy Version: Add diced jalapeños or a dash of hot sauce for an extra kick!
    • Herb-Infused: Mix in fresh herbs like dill or chives for added freshness and a burst of flavor.
    • Guacamole Twist: Incorporate mashed avocado into the filling for a creamy, unique taste that’s sure to please!
    • Low-Carb Option: Swap out the mayonnaise and sour cream with Greek yogurt or avocado for a lighter take.
    • Dairy-Free Delight: Use plant-based cream cheese and mayonnaise for a delicious dairy-free alternative.

    Serving Suggestions for Jalapeño Popper Deviled Eggs Delight

    • Pair with Fresh Veggies: Serve alongside a colorful veggie platter for a vibrant presentation.
    • Perfect Drink Match: Enjoy with a crisp white wine or a refreshing iced tea to balance the spice.
    • Display Creatively: Arrange the eggs on a serving plate with fresh cilantro and lime wedges for an attractive touch.

    FAQs about Jalapeño Popper Deviled Eggs Delight

    Can I make Jalapeño Popper Deviled Eggs ahead of time?

    Absolutely! I often prepare these deviled eggs a day before my gatherings. Just store them in an airtight container in the refrigerator. They taste even more delightful after chilling!

    How spicy are these deviled eggs?

    The spice level really depends on how many jalapeños you add. For a mild version, start with just a little. You can always add more if you’re feeling adventurous!

    Can I substitute any ingredients for Jalapeño Popper Deviled Eggs?

    Yes! Feel free to swap out mayonnaise for Greek yogurt if you’re looking for a lighter option. You can also use different cheeses or add in some herbs for extra flavor!

    How do I prevent my egg yolks from getting green?

    This happens when eggs are cooked too long or at too high a temperature. Stick to the simmering time and cool them quickly under cold water to avoid that greenish hue!

    What can I serve with Jalapeño Popper Deviled Eggs Delight?

    These eggs pair wonderfully with a refreshing salad, some crispy tortilla chips, or even a hearty charcuterie board. The possibilities are endless!

    Final Thoughts

    Creating my Jalapeño Popper Deviled Eggs Delight truly elevates any gathering. The burst of flavors combines creamy richness with that delightful kick of spice, making them an immediate crowd favorite. I love how easy they are to whip up, even on my busiest days. These deviled eggs are not just an appetizer; they’re a conversation starter, a reason to gather, and a delight to share. Treat your family and friends to this fantastic twist on a classic, and watch as smiles light up the room. Trust me, it’s a joy you’ll keep coming back to time and again!


    Print

    clock clock iconcutlery cutlery iconflag flag iconfolder folder iconinstagram instagram iconpinterest pinterest iconfacebook facebook iconprint print iconsquares squares iconheart heart iconheart solid heart solid icon

    Description

    A delicious twist on classic deviled eggs, combining the flavors of jalapeño poppers with creamy egg filling.


    • 12 large eggs
    • 1⁄2 cup mayonnaise
    • 1⁄4 cup sour cream
    • 1⁄4 cup cream cheese, softened
    • 1⁄4 cup shredded cheddar cheese
    • 2 tbsp finely chopped jalapeños
    • 1 tsp garlic powder
    • 1⁄2 tsp smoked paprika
    • 1⁄4 tsp salt
    • 1⁄4 tsp black pepper
    • Additional shredded cheddar cheese for topping (optional)
    • Sliced jalapeños for garnish (optional)
    • Fresh cilantro for garnish (optional)

    1. Place the eggs in a large pot and cover them with cold water. Bring the water to a boil, then reduce the heat to low and let the eggs simmer for about 10 minutes.
    2. Drain the hot water and rinse the eggs under cold water to cool them down.
    3. Peel the eggs and slice them in half lengthwise. Remove the yolks and place them in a bowl.
    4. Mash the egg yolks with a fork until smooth.
    5. Add the mayonnaise, sour cream, cream cheese, shredded cheddar cheese, chopped jalapeños, garlic powder, smoked paprika, salt, and black pepper to the bowl. Mix well until fully combined and creamy.
    6. Spoon or pipe the filling back into the egg white halves.
    7. Optional: Top with additional shredded cheddar cheese, sliced jalapeños, and fresh cilantro.
    8. Serve the Jalapeño Popper Deviled Eggs Delight chilled. Enjoy your delicious and indulgent treat!

    Notes

    • Ensure eggs are at room temperature for easier peeling.
    • Adjust the amount of jalapeños to taste for desired spiciness.
    • These deviled eggs can be made a day in advance and stored in the refrigerator.
    • Prep Time: 20 minutes
    • Cook Time: 10 minutes
    • Category: Appetizer
    • Method: Boiling, Mixing, Assembling
    • Cuisine: American

    Nutrition

    • Serving Size: 1 egg half
    • Calories: 120
    • Sugar: 1g
    • Sodium: 150mg
    • Fat: 10g
    • Saturated Fat: 3g
    • Unsaturated Fat: 7g
    • Trans Fat: 0g
    • Carbohydrates: 1g
    • Fiber: 0g
    • Protein: 6g
    • Cholesterol: 186mg

    Sharing is caring!

  • Crockpot Mediterranean Chicken

    Crockpot Mediterranean Chicken


    Introduction to Crockpot Mediterranean Chicken

    There’s something incredibly heartwarming about the smell of a delicious, homemade meal wafting through the house. When life gets busy and time slips away, my go-to solution is often my trusty crockpot. This Crockpot Mediterranean Chicken is a perfect example of comfort food that requires little fuss but delivers big on flavor. It’s ideal for those hectic evenings when you need a wholesome meal without all the hassle. Just toss the ingredients in, and let the magic happen. Trust me, at the end of a long day, this dish can transform dinner into a cherished moment of relaxation.

    Why You’ll Love This Crockpot Mediterranean Chicken

    This Crockpot Mediterranean Chicken is a game-changer for anyone juggling a busy life. With its simple preparation, just a few minutes of hands-on time, and vibrant, flavor-packed ingredients, it’s a lifesaver for hectic weeknights. I love how the crockpot allows me to serve a nutritious meal without sacrificing taste. It’s rewarding to gather around the table, knowing I’ve provided my family with something healthy and delicious.

    Ingredients for Crockpot Mediterranean Chicken

    To create this delightful Crockpot Mediterranean Chicken, you’ll need a few key ingredients that come together to sing in harmony. Start with boneless chicken thighs or breasts, which provide a tender, juicy base for the dish. Next, diced tomatoes add a luscious, tangy sweetness, while pitted Kalamata olives introduce a briny depth. Roasted red peppers offer a hint of smokiness and sweetness that elevates the dish.

    Don’t forget a small red onion for its aromatic flavor, complemented by the zest of minced garlic. Dried oregano and basil bring in classic Mediterranean spices, making each bite a flavor-packed experience. Season with salt and black pepper for balance. A splash of olive oil enriches the texture, and if you’d like a touch of briny goodness, capers are a fantastic option. Feel free to experiment with other veggies like zucchini or spinach. Specific measurements can be found at the bottom of the article.

    How to Make Crockpot Mediterranean Chicken

    Making this Crockpot Mediterranean Chicken is as easy as pie, and the best part? You get to enjoy all the magic without spending hours in the kitchen. Let’s dive into the steps for creating this flavorful dish that will have your family raving!

    Step 1: Prepare the Chicken

    Start by placing the boneless, skinless chicken thighs or breasts at the bottom of your crockpot. I find that thighs tend to be more tender and flavorful, but breasts work just fine too. Make sure they lie flat to cook evenly. This initial step lays a delicious foundation for the rest of the dish!

    Step 2: Add Vegetables and Spices

    Now comes the fun part! Layer your diced tomatoes, halved Kalamata olives, chopped roasted red peppers, and sliced red onion right on top of the chicken. Sprinkle those aromatic minced garlic, dried oregano, and basil over the top for that Mediterranean flair. Along with a pinch of salt and black pepper, each ingredient’s unique flavor will combine beautifully as it cooks!

    Step 3: Mix and Cook

    With all your ingredients in the crockpot, gently stir everything together. The goal is to ensure the chicken is well-coated with the vibrant vegetables and spices. Once mixed, cover the crockpot and set it to cook on LOW for 5 to 6 hours or HIGH for 2.5 to 3 hours. You’ll appreciate the way the flavors meld together as they slowly cook.

    Step 4: Serve and Enjoy

    When the cooking time is up, it’s time to serve your masterpiece! I love pairing this Crockpot Mediterranean Chicken with fluffy couscous or quinoa. A fresh green salad also adds a nice crunch. Gather your loved ones around the table, and watch their smiles grow as they dig into this delightful meal. Sharing delicious food is always a heartwarming experience!

    Tips for Success

    To take your Crockpot Mediterranean Chicken to the next level, consider marinating the chicken in olive oil and herbs for a few hours before cooking. Don’t hesitate to customize with your favorite veggies—zucchini or spinach work wonders! If you’re looking for a touch of creaminess, stir in some feta cheese right before serving. And remember, a fresh squeeze of lemon juice brightens up the flavors beautifully!

    Equipment Needed

    To whip up this Crockpot Mediterranean Chicken, you’ll need a few essential tools:

    • Crockpot/Slow Cooker: The star of the show, perfect for hands-off cooking.
    • Cutting Board: Ideal for prepping your vegetables and chicken.
    • Chef’s Knife: For slicing, dicing, and chopping with ease.
    • Measuring Cups: Useful for accurate ingredient portions, especially for liquids.
    • Wooden Spoon: Perfect for mixing ingredients gently without scratching your crockpot.

    Variations

    Feel free to get creative with your Crockpot Mediterranean Chicken! Here are some fun variations to consider:

    • Substitute chicken with turkey, or for a vegetarian option, try chickpeas or lentils.
    • Mix in seasonal vegetables like zucchini, eggplant, or spinach for added nutrition.
    • Swap Kalamata olives for green olives if that’s your preference.
    • Add a splash of white wine for a richer flavor profile.
    • Experiment with different herbs like thyme or rosemary for a unique twist.

    Serving Suggestions

    To elevate your Crockpot Mediterranean Chicken experience, consider these delightful serving suggestions:

    • Fluffy couscous or quinoa as a hearty base.
    • Crunchy green salad drizzled with a light vinaigrette.
    • Warm pita bread for scooping up the delicious sauce.
    • A refreshing glass of iced herbal tea or white wine.
    • Fresh herb garnish for a pop of color and flavor.

    FAQs about Crockpot Mediterranean Chicken

    Can I use frozen chicken in this recipe? Yes, you can throw frozen chicken into the crockpot! Just make sure to extend the cooking time slightly.

    How can I store leftovers? Store any leftovers in an airtight container in the fridge for up to three days. Reheat gently in the microwave or on the stovetop.

    Can I double this recipe? Absolutely! Just ensure your crockpot is large enough to accommodate the extra ingredients.

    What sides pair well with this dish? Couscous, quinoa, or a vibrant side salad works beautifully with Crockpot Mediterranean Chicken.

    Is this recipe gluten-free? Yes, it’s naturally gluten-free, making it a perfect option for gluten-sensitive individuals!

    Final Thoughts

    As I gather around the dinner table, serving this Crockpot Mediterranean Chicken always brings a warm glow to my heart. The joy of sharing a homemade meal with loved ones can’t be overstated. Each bite not only delivers a burst of flavor but also creates memories that linger in our minds long after the plates are cleared. Cooking is about connection, and this dish embodies that spirit beautifully. It reminds us that even on the busiest days, we can pause, savor the moment, and enjoy the love and laughter that food brings into our lives.


    Print

    clock clock iconcutlery cutlery iconflag flag iconfolder folder iconinstagram instagram iconpinterest pinterest iconfacebook facebook iconprint print iconsquares squares iconheart heart iconheart solid heart solid icon

    Description

    A flavorful and easy-to-make crockpot recipe featuring chicken, olives, and Mediterranean spices.


    • 2 lbs boneless, skinless chicken thighs or breasts
    • 1 (14.5 oz) can diced tomatoes, drained
    • 1/2 cup pitted Kalamata olives, halved
    • 1/2 cup roasted red peppers, chopped
    • 1 small red onion, sliced
    • 3 cloves garlic, minced
    • 1 tsp dried oregano
    • 1 tsp dried basil
    • 1/2 tsp salt
    • 1/2 tsp black pepper
    • 2 tbsp olive oil
    • 2 tbsp capers (optional)
    • Fresh parsley or basil, for garnish

    1. Place chicken in the crockpot.
    2. Top with tomatoes, olives, red peppers, onion, garlic, oregano, basil, salt, pepper, olive oil, and capers if using.
    3. Stir gently to mix.
    4. Cover and cook on LOW for 5–6 hours or HIGH for 2.5–3 hours.
    5. Serve with couscous, quinoa, or a green salad, garnished with fresh herbs.

    Notes

    • Feel free to add other vegetables like zucchini or spinach for added nutrition.
    • This dish can be served with various sides to suit your preference.
    • Prep Time: 15 minutes
    • Cook Time: 5-6 hours on LOW or 2.5-3 hours on HIGH
    • Category: Main Dish
    • Method: Slow Cooking
    • Cuisine: Mediterranean

    Nutrition

    • Serving Size: 1 serving
    • Calories: 350
    • Sugar: 3g
    • Sodium: 800mg
    • Fat: 15g
    • Saturated Fat: 2g
    • Unsaturated Fat: 11g
    • Trans Fat: 0g
    • Carbohydrates: 15g
    • Fiber: 4g
    • Protein: 40g
    • Cholesterol: 100mg

    Sharing is caring!

  • Marinated Grilled Mushroom Skewers

    Marinated Grilled Mushroom Skewers


    Introduction to Marinated Grilled Mushroom Skewers

    There’s something truly magical about the way food can bring us together. When I think of warm gatherings with family and friends, I can’t help but envision a plate of Marinated Grilled Mushroom Skewers stealing the show. These skewers are not just a delicious appetizer; they’re a beacon of warmth on a busy day, effortlessly impressing loved ones yet simple enough for those rushed weeknights.

    With minimal prep time, these savory delights are perfect for anyone looking to add a little pizzazz to their table without a lot of fuss. Let’s dive into this culinary adventure together!

    Why You’ll Love This Marinated Grilled Mushroom Skewers

    What’s not to love about Marinated Grilled Mushroom Skewers? They’re a breeze to prepare, making them perfect for busy moms or professionals like us. Just a quick marinade and some grilling, and voila! You have a tasty dish everyone will adore. Plus, they pack a flavor punch that even picky eaters can’t resist. Whether it’s a family dinner or a casual gathering, these skewers are always a hit!

    Ingredients for Marinated Grilled Mushroom Skewers

    Creating your own Marinated Grilled Mushroom Skewers is as simple as gathering these delightful ingredients. Here’s what you’ll need to whip up this tasty dish:

    • Olive oil: This brings richness and moisture to the mushrooms.
    • Soy sauce: Adds umami and a savory depth that perfectly complements the mushrooms.
    • Balsamic vinegar: A touch of sweetness and acidity to balance the flavors.
    • Worcestershire sauce: Boosts the overall taste with a unique tangy zest.
    • Garlic: Freshly minced, it fills the marinade with aromatic goodness.
    • Dijon mustard: Provides a slight kick and depth of flavor.
    • Honey or maple syrup: Both are excellent for adding a hint of sweetness; choose your preference!
    • Dried thyme and dried rosemary: These herbs bring a fragrant earthiness that pairs beautifully with grilled veggies.
    • Smoked paprika: A spice that introduces a subtle smokiness to evoke outdoor grilling vibes.
    • Salt and freshly ground black pepper: Essential for enhancing all the delicious flavors in your marinade.
    • Button mushrooms: The star of the show! These small, tender mushrooms soak up the marinade perfectly.
    • Wooden or metal skewers: Use whatever you have on hand! If you choose wood, just don’t forget to soak them first!

    Feel free to mix and match or add other veggies to your skewers, such as bell peppers or zucchini, for an extra burst of color and nutrition. If you want exact measurements, check the bottom of the article where they are available for printing.

    How to Make Marinated Grilled Mushroom Skewers

    Making Marinated Grilled Mushroom Skewers is easier than you might think! Follow these simple steps for a flavorful and satisfying dish that will please everyone at your table.

    Prepare the Marinade

    Start by grabbing a mixing bowl. Combine the olive oil, soy sauce, balsamic vinegar, and Worcestershire sauce. Whisk them together until they’re well-blended. Next, add in the minced garlic, Dijon mustard, and honey (or maple syrup). Don’t forget about the dried thyme, rosemary, and smoked paprika! Season with salt and pepper. This marinade is aromatic and will make your mushrooms sing with flavor.

    Marinate the Mushrooms

    Place your cleaned button mushrooms in a resealable bag or a shallow dish. Then, pour that luscious marinade over them. Gently toss to coat each mushroom evenly. Seal the bag or cover the dish with plastic wrap. Let it marinate in the fridge for at least 30 minutes, but if you have the time, go for 2 to 3 hours. This ensures maximum flavor, turning your mushrooms into little bursts of joy when grilled!

    Soak the Skewers

    If you’re using wooden skewers, it’s a good idea to soak them in water for about 30 minutes. This will help prevent them from burning on the grill. If you go the metal route, there’s no need for soaking, saving you a little extra time.

    Preheat the Grill

    While your mushrooms are soaking up all that marinade goodness, preheat your grill to medium-high heat. This way, it will be nice and hot when your skewers are ready to sizzle. Preparing your grill in advance ensures those mushrooms will get that perfect char while keeping them juicy.

    Assemble the Skewers

    Now, it’s time for the best part! Take the marinated mushrooms out of the fridge and thread them onto the skewers. If you’re feeling adventurous, consider mixing in colorful veggies like bell peppers or red onions for extra flair. Not only do they add great flavor, but the colors make your dish more visually appealing!

    Grill the Mushrooms

    Place the skewers on the hot grill. Let them cook for about 10 to 12 minutes, turning occasionally. Brush them with any leftover marinade during grilling for even more flavor. Keep an eye on them to avoid overcooking. You want them beautifully charred yet perfectly tender.

    Serve and Enjoy

    Once your skewers are grilled to perfection, take them off the heat and let them cool slightly. Then, serve them on a lovely platter. These skewers are not just a feast for the palate but also for the eyes. Enjoy the burst of flavors and show off your culinary handiwork to friends and family!

    Tips for Success

    • For the best flavor, marinate your mushrooms for 2-3 hours.
    • If you’re short on time, a quick 30-minute soak will still add great taste.
    • Experiment with different vegetables on the skewers, like zucchini or cherry tomatoes.
    • Always check the grill temperature—medium-high heat is key for perfect grilling.
    • Use a meat thermometer to ensure your mushrooms are cooked to perfection!

    Equipment Needed

    • Grill: A gas or charcoal grill works wonders for these skewers.
    • Skewers: Use metal skewers for convenience, or soak wooden ones beforehand.
    • Mixing Bowl: Handy for combining your marinade ingredients.
    • Whisk: A simple tool to blend the marinade smoothly.
    • Measuring Cups: Great for precise ingredient quantity if needed.

    Variations

    • Spicy Kick: Add a pinch of red pepper flakes or some diced jalapeños to the marinade for a fiery flavor boost.
    • Herbal Infusion: Switch out dried herbs for fresh ones! Fresh thyme, rosemary, or even basil can make a delightful difference.
    • Mushroom Medley: Feel free to mix different types of mushrooms, such as portobello or shiitake, for a wonderful variety of textures and flavors.
    • Vegan Friendly: Use maple syrup instead of honey in the marinade to keep the recipe completely plant-based.
    • Asian Twist: Incorporate sesame oil instead of olive oil, and add some sesame seeds before grilling for a nutty, aromatic touch.

    Serving Suggestions

    • Fresh Salad: Pair your skewers with a crisp, green salad tossed in a light vinaigrette for a refreshing contrast.
    • Grains: Serve with fluffy quinoa or couscous to soak up those delicious juices.
    • Drinks: A chilled white wine or sparkling water with lemon complements these flavors beautifully.
    • Presentation: Arrange skewers on a colorful platter, garnished with fresh herbs, for that restaurant-quality flair.

    FAQs about Marinated Grilled Mushroom Skewers

    I know when I dive into a new recipe, I always have questions floating around. So, here are a few common queries about Marinated Grilled Mushroom Skewers that might just pop into your mind.

    Can I use different types of mushrooms for this recipe?

    Absolutely! While button mushrooms are my go-to, you can experiment with portobello, shiitake, or even cremini mushrooms. Each brings a unique flavor and texture, making your skewers even more delightful.

    How long can I marinate the mushrooms?

    You can marinate the mushrooms for as little as 30 minutes, but for the best flavor, aim for 2 to 3 hours. Just be careful not to leave them too long; otherwise, the marinade can overpower the natural mushroom taste.

    Can I make these skewers ahead of time?

    Yes! You can marinate the mushrooms a day in advance. Just remember to grill them the day you want to serve to enjoy that fresh, smoky flavor. But don’t forget to keep them sealed in the fridge!

    What can I serve with these grilled skewers?

    These skewers pair perfectly with a fresh salad, grains like quinoa or couscous, or even as a topping on pizza. The possibilities are endless!

    Are these skewers suitable for a vegan diet?

    Yes! Just swap honey for maple syrup in the marinade, and you’re all set for a delicious vegan dish that everyone will love.

    Final Thoughts

    Cooking is not just about feeding our bodies; it’s about nourishing our souls. These Marinated Grilled Mushroom Skewers are a delightful way to do just that, combining simplicity with spectacular flavors. I love how they offer a bit of adventure while being ridiculously easy to make. Whether you’re hosting a gathering or enjoying a quiet family dinner, these skewers are sure to spark joy and excitement. So, grab your grill, invite some friends over, and relish the warm, smoky goodness. Before you know it, these skewers will become a beloved staple in your home!


    Print

    clock clock iconcutlery cutlery iconflag flag iconfolder folder iconinstagram instagram iconpinterest pinterest iconfacebook facebook iconprint print iconsquares squares iconheart heart iconheart solid heart solid icon

    Description

    Delicious marinated grilled mushroom skewers that are perfect for any occasion.


    • 1/4 cup olive oil
    • 1/4 cup soy sauce
    • 2 tablespoons balsamic vinegar
    • 2 tablespoons Worcestershire sauce
    • 2 cloves garlic, minced
    • 1 tablespoon Dijon mustard
    • 1 tablespoon honey or maple syrup
    • 1 teaspoon dried thyme
    • 1 teaspoon dried rosemary
    • 1/2 teaspoon smoked paprika
    • Salt and freshly ground black pepper to taste
    • 1 pound button mushrooms, cleaned and stems trimmed
    • Wooden or metal skewers

    1. Prepare the Marinade: Combine the olive oil, soy sauce, balsamic vinegar, and Worcestershire sauce in a bowl. Mix thoroughly, then add garlic, Dijon mustard, honey (or maple syrup), thyme, rosemary, smoked paprika, salt, and pepper. Whisk until smooth.
    2. Marinate the Mushrooms: Place mushrooms in a resealable bag or shallow dish. Pour marinade over them and coat evenly. Seal or cover and let marinate in the fridge for 30 minutes to 3 hours.
    3. Soak the Skewers: If using wooden skewers, soak them in water for 30 minutes to prevent burning.
    4. Preheat the Grill: Preheat to medium-high heat.
    5. Assemble the Skewers: Remove mushrooms from marinade and thread onto skewers, optionally alternating with other vegetables.
    6. Grill the Mushrooms: Cook skewers on the grill for 10–12 minutes, turning occasionally. Brush with remaining marinade for extra flavor.
    7. Serve and Enjoy: Once grilled, let cool slightly, then serve on a platter and enjoy!

    Notes

    • For best flavor, marinate mushrooms for 2–3 hours.
    • Use metal skewers if you prefer not to soak them.
    • Feel free to add other vegetables to the skewers for variety.
    • Prep Time: 10 minutes
    • Cook Time: 12 minutes
    • Category: Appetizer
    • Method: Grilling
    • Cuisine: American

    Nutrition

    • Serving Size: 1 skewer
    • Calories: 150
    • Sugar: 3g
    • Sodium: 400mg
    • Fat: 10g
    • Saturated Fat: 1.5g
    • Unsaturated Fat: 8.5g
    • Trans Fat: 0g
    • Carbohydrates: 8g
    • Fiber: 1g
    • Protein: 3g
    • Cholesterol: 0mg

    Sharing is caring!

  • Cowboy Pasta Salad

    Cowboy Pasta Salad


    Introduction to Cowboy Pasta Salad

    As a busy mom, I understand the daily struggle of figuring out what to put on the table. That’s where my Cowboy Pasta Salad comes in—a delightful twist on classic flavor that’s both hearty and satisfying. With a medley of fresh ingredients and savory ground beef, this dish not only feeds the family but can impress unexpected guests too! Whether you’re looking for a quick solution for dinner or a tasty side for a summer cookout, this pasta salad is the answer. Trust me, your taste buds will be saying thank you!

    Why You’ll Love This Cowboy Pasta Salad

    This Cowboy Pasta Salad is a lifesaver for hectic weekdays! With its blend of flavors, it brings everyone to the table with smiles. It’s quick to prepare, taking just about 30 minutes from start to finish. Plus, it’s a one-dish meal that ticks all the boxes: hearty, filling, and packed with nutrients. And the best part? It tastes even better the next day, making leftovers feel like a treat!

    Ingredients for Cowboy Pasta Salad

    This Cowboy Pasta Salad boasts a delightful mix of ingredients that come together harmoniously. Here’s what you’ll need:

    • Ground beef: The heartiness you crave. Feel free to substitute with ground turkey or chicken for a leaner option.
    • Chili powder: This spice adds warmth and depth. You can adjust the amount for your desired heat level.
    • Garlic powder: A quick dash of flavor without the hassle of fresh garlic. Perfect for busy days!
    • Rotini or elbow pasta: Either shape works! Just use what you have on hand or your family’s favorite.
    • Salt & pepper: Essential for elevating all the flavors. Season to taste.
    • Bacon: Crumbled crispy bacon gives a wonderful crunch. Vegan bacon or roasted chickpeas make great alternatives.
    • Cherry tomatoes: These sweet bites add freshness and color. Use any variety of ripe tomatoes you prefer.
    • Corn: Fresh, canned, or frozen corn adds a hint of sweetness—ideal for summer! Make sure it’s thawed if using frozen.
    • Red onion: Dice these for a zesty bite. If the flavor is too strong, soak them in cold water for a milder taste.
    • Shredded cheddar cheese: For that creamy richness. Try queso fresco or feta for a different spin.
    • Fresh cilantro or parsley: Optional, but adds a lovely herbaceous note that lifts the entire dish!
    • Mayonnaise: Acts as a base for the dressing, providing creaminess and richness. Greek yogurt is a great substitute.
    • Sour cream: For tanginess! You can swap this out for cottage cheese for a lighter touch.
    • Dijon mustard: This adds a bit of zesty depth. Honey mustard can be used for sweetness.
    • Apple cider vinegar: A dash of acidity balances the richness; lemon juice works in a pinch.
    • Smoked paprika: Infuses a smoky flavor that rounds out the dish beautifully.

    All these ingredients meld into a tasty medley that your family will love. If you want exact measurements, they’re listed at the bottom of the article and are available for printing.

    How to Make Cowboy Pasta Salad

    Now that we have all the ingredients ready, let’s dive into how to make this Cowboy Pasta Salad. It’s so simple that you’ll feel like a culinary rockstar in no time! Follow these easy steps, and you’ll be on your way to serving up a flavorful dish.

    Step 1: Cook the Pasta

    Start by cooking the pasta according to the package directions. I recommend using rotini or elbow pasta, but feel free to experiment! Once it’s al dente, rinse under cold water to stop the cooking process. Drain well and set aside to cool.

    Step 2: Brown the Ground Beef

    In a skillet over medium heat, brown the ground beef. Sprinkle in the chili powder, garlic powder, salt, and pepper. This combination infuses the meat with an irresistible flavor! Drain any excess fat once it’s cooked, and let it cool. You don’t want it to steam the salad when combined.

    Step 3: Prepare the Dressing

    In a separate bowl, whisk together the mayonnaise, sour cream, Dijon mustard, apple cider vinegar, smoked paprika, and a pinch of salt and pepper. It should turn into a creamy delight that will coat the salad beautifully. Adjust the seasoning to your liking—don’t be shy!

    Step 4: Combine Ingredients

    In a large bowl, add the cooled pasta, browned ground beef, crumbled bacon, cherry tomatoes, corn, diced red onion, and shredded cheddar cheese. Pour that dressing over the top. Gently toss everything until all the ingredients are well coated. This is where the magic happens!

    Step 5: Chill and Serve

    Once combined, cover the bowl and chill your Cowboy Pasta Salad in the refrigerator for at least 30 minutes. This allows the flavors to meld together, making each bite even more delicious! Serve chilled and garnish with fresh cilantro or parsley if desired. Now sit back and watch as your family digs in—what a scene that is!

    Tips for Success

    • Always cool the cooked pasta and meat before mixing. This prevents the salad from becoming mushy.
    • Season with salt and pepper gradually; you can always add more, but it’s hard to take away!
    • Feel free to prep the salad a day in advance. Just make sure it’s well-covered in the fridge.
    • Experiment with different veggies like bell peppers or avocado for extra color and flavor.

    Equipment Needed

    • Large pot: For cooking the pasta. Any heavy-bottomed pot will work.
    • Skillet: A non-stick skillet is ideal for browning the beef, but any skillet will do.
    • Mixing bowl: A big bowl to combine all the ingredients. A salad bowl is perfect!
    • Whisk: Use for mixing the dressing. A fork can do in a pinch!

    Variations of Cowboy Pasta Salad

    • Vegetarian Delight: Swap out the ground beef for black beans or lentils. This is an excellent way to add protein and fiber while keeping it meat-free.
    • Spicy Kick: Add diced jalapeños or a splash of hot sauce to the dressing for an extra layer of heat. Your taste buds will dance!
    • Southwest Twist: Incorporate diced bell peppers, roasted corn, and a handful of crushed tortilla chips for a delightful crunch and a flavor fiesta.
    • Cheesy Goodness: Try different cheese varieties like pepper jack for a zesty flavor or mix in some feta for a Mediterranean spin.
    • Pasta Choice: Switch things up with farfalle or fusilli instead of rotini. The possibilities are endless with pasta shapes!

    Serving Suggestions

    • Fresh Green Salad: Pair the Cowboy Pasta Salad with a light arugula or mixed greens salad to balance flavors.
    • Cold Beverages: Serve with iced tea or lemonade for a refreshing complement on warm days.
    • Presentation: Serve in a colorful bowl, garnished with extra parsley or cilantro for a vibrant touch.

    FAQs about Cowboy Pasta Salad

    If you’re still curious about this Cowboy Pasta Salad, I’ve got some answers to common questions that might pop into your mind!

    Can I make Cowboy Pasta Salad ahead of time?

    Absolutely! This dish is ideal for meal prep. You can make it a day in advance. Just keep it covered in the fridge, and it’ll taste even better the next day as the flavors blend together.

    What can I serve with Cowboy Pasta Salad?

    This salad pairs beautifully with grilled meats or seafood. You can also serve it alongside a crisp green salad or some garlic bread for a complete meal.

    Is Cowboy Pasta Salad gluten-free?

    Yes, if you use gluten-free pasta, this Cowboy Pasta Salad can be enjoyed without worry. Just check the pasta packaging to ensure it meets your dietary needs.

    Can I use different proteins in the salad?

    Sure thing! Ground turkey, chicken, or even shredded rotisserie chicken works beautifully and keeps the dish light yet satisfying.

    How long will leftovers last?

    Leftovers can be kept in an airtight container for about 3-4 days in the fridge. Just give it a good stir before serving again!

    Final Thoughts on Cowboy Pasta Salad

    This Cowboy Pasta Salad is more than just a meal; it’s a celebration of flavors and family. It brings everyone together, making mealtimes feel special, even on the busiest days. With its hearty ingredients and delightful crunch, you’ll find smiles all around the table. There’s something truly satisfying about sharing a dish that’s both easy to prepare and bursting with taste. Plus, it’s a lifesaver for leftovers! So go ahead, make it your go-to recipe when you want quick goodness without sacrificing flavor. Trust me, your family will love it as much as mine does!


    Print

    clock clock iconcutlery cutlery iconflag flag iconfolder folder iconinstagram instagram iconpinterest pinterest iconfacebook facebook iconprint print iconsquares squares iconheart heart iconheart solid heart solid icon

    Description

    A delicious twist on classic flavor with a hearty combination of pasta, ground beef, and flavorful ingredients.


    • 1/2 lb ground beef
    • 1 tsp chili powder
    • 1/2 tsp garlic powder
    • 8 oz rotini or elbow pasta, cooked and cooled
    • Salt & pepper, to taste
    • 6 slices bacon, cooked and crumbled
    • 1 cup cherry tomatoes, halved
    • 1 cup corn (fresh, canned, or thawed frozen)
    • 1/2 red onion, diced
    • 1/2 cup shredded cheddar cheese
    • 1/4 cup chopped fresh cilantro or parsley (optional)
    • 1/2 cup mayonnaise
    • 1/4 cup sour cream
    • 1 tbsp Dijon mustard
    • 1 tbsp apple cider vinegar
    • 1/2 tsp smoked paprika

    1. Cook the pasta according to the package directions. Rinse under cold water and drain well.
    2. Brown the ground beef in a skillet with chili powder, garlic powder, salt, and pepper. Drain excess fat and cool.
    3. In a bowl, whisk together mayonnaise, sour cream, mustard, vinegar, paprika, salt, and pepper to make the dressing.
    4. In a large bowl, combine pasta, beef, bacon, tomatoes, corn, red onion, and cheese. Toss with dressing until well coated.
    5. Chill for at least 30 minutes before serving. Garnish with cilantro or parsley if desired.

    Notes

    • Make sure to cool the ground beef before adding it to the salad.
    • You can use any type of pasta you prefer.
    • This salad can be made a day in advance; just be sure to cover it well in the fridge.
    • Prep Time: 15 minutes
    • Cook Time: 15 minutes
    • Category: Salad
    • Method: Mixing
    • Cuisine: American

    Nutrition

    • Serving Size: 1 cup
    • Calories: 450
    • Sugar: 2g
    • Sodium: 750mg
    • Fat: 27g
    • Saturated Fat: 9g
    • Unsaturated Fat: 11g
    • Trans Fat: 0g
    • Carbohydrates: 37g
    • Fiber: 2g
    • Protein: 20g
    • Cholesterol: 45mg

    Sharing is caring!