Blog

  • Southwest Chicken Salad Bowl

    Southwest Chicken Salad Bowl


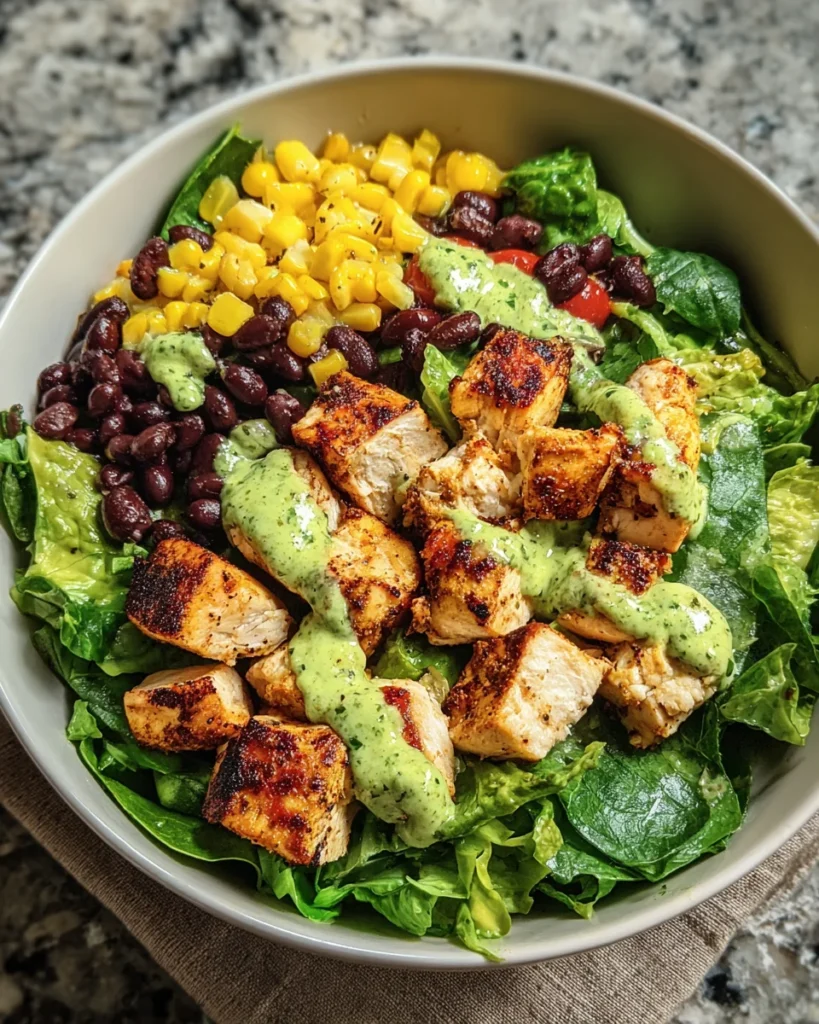
    Introduction to Southwest Chicken Salad Bowl

    Hey there, fellow kitchen enthusiasts! If you’re anything like me, juggling a busy schedule can often make meal prep feel overwhelming. That’s why I’m thrilled to share my delightful Southwest Chicken Salad Bowl with you! This dish is not only packed with fresh flavors and vibrant colors, but it’s also a quick solution for those long days when you need a nutritious meal fast. Imagine all the goodness of protein-rich chicken, crisp greens, and zesty dressing coming together in a bowl—perfect for impressing your family or simply enjoying a quiet moment to yourself.

    Why You’ll Love This Southwest Chicken Salad Bowl

    This Southwest Chicken Salad Bowl is a game changer for busy moms and professionals alike. It comes together in just 10 minutes, leaving you time for more important things—like soaking up a few moments of peace. The combination of protein from the chicken and fiber from the beans makes it satisfying and nourishing. Plus, every bite bursts with fresh flavors, making healthy eating feel like a treat, not a chore!

    Ingredients for Southwest Chicken Salad Bowl

    Let’s dive into the vibrant ingredients that make up this delicious Southwest Chicken Salad Bowl! Each component plays a role in delivering flavor and nutrition.

    • Cooked Chicken: I love using diced grilled chicken; it’s packed with protein and keeps you full longer. You can use leftover rotisserie chicken for convenience!
    • Mixed Greens: This is the base of our salad. I prefer a mix of romaine, spinach, and arugula for a touch of peppery bite. Feel free to swap for whatever greens you have on hand.
    • Black Beans: Rinsed black beans not only add fiber but also a hearty texture. They’re also an excellent source of plant-based protein, making the salad even more satisfying.
    • Corn Kernels: Fresh or frozen corn brings sweetness and crunch. If you’re using frozen, just thaw it and throw it in. It adds a lovely color too!
    • Avocado Lime Dressing: The star of the show! A zesty avocado lime dressing ties everything together. You can make your own or find a store-bought option that suits your taste.

    Feel free to jazz up your bowl with additional toppings like cherry tomatoes, shredded cheese, or a dollop of salsa for extra flavor. For the exact quantities, don’t forget to check the bottom of the article where they’re available for printing!

    How to Make Southwest Chicken Salad Bowl

    Step 1: Prepare Your Ingredients

    Before we dive in, let’s talk about the importance of fresh ingredients. Using crisp greens and vibrant vegetables makes all the difference! Start by washing your mixed greens thoroughly. This removes any dirt and ensures a fresh crunch in every bite. If you are using frozen corn, thaw it under cool running water. Diced chicken should be freshly cooked or from a reliable source, like rotisserie chicken. Storing your ingredients correctly is essential—keep greens in the fridge wrapped in a damp paper towel to maintain freshness. Now, you’re ready to get started!

    Step 2: Layer the Salad

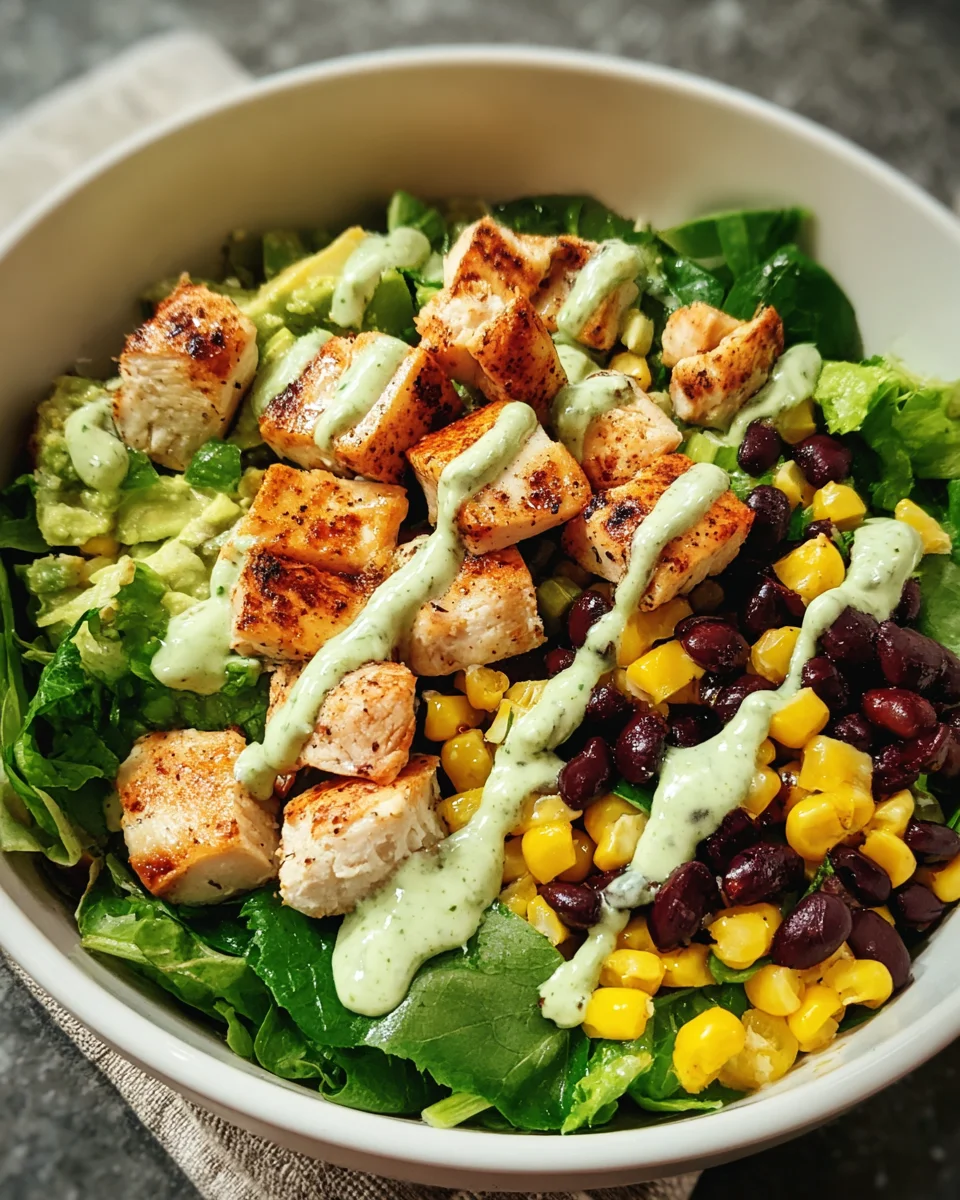
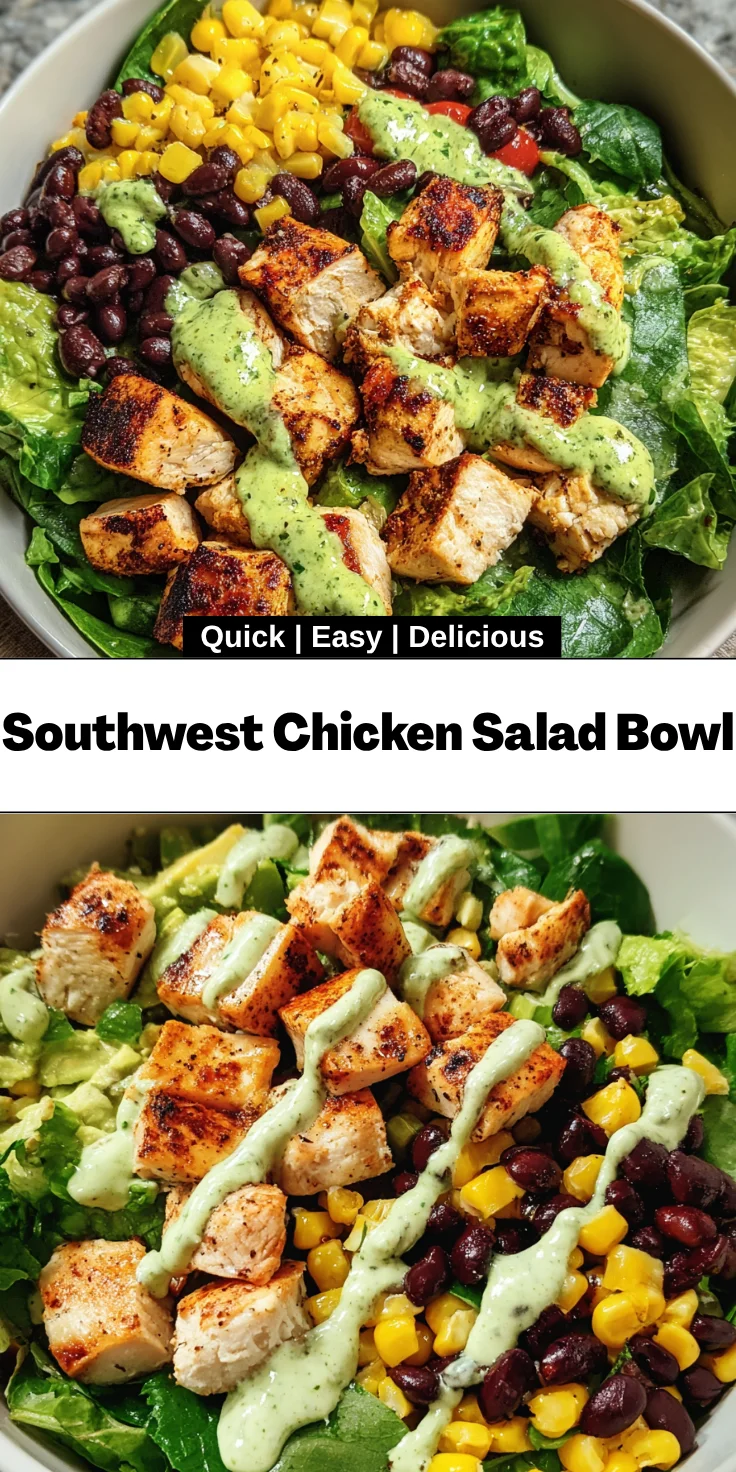
    Layering your salad is key to maximizing flavor and presentation. Start with a generous bed of mixed greens as your base. Next, evenly distribute the diced chicken, black beans, and corn on top of the greens. This not only creates a visually appealing dish but also ensures that each bite is a delightful mix of textures. The fresh, crunchy greens serve as a backdrop, while the chicken adds heartiness. Plus, the vibrant colors invite you to dig in! Trust me; a well-layered bowl elevates the whole eating experience.

    Step 3: Drizzle with Dressing

    Now for one of the best parts—dressing your salad! The right avocado lime dressing ties everything together with its zesty kick. When drizzling, start with a modest amount so you can taste the salad’s ingredients. You can always add more if needed! I recommend tossing the salad gently to coat everything evenly without wilting the greens. The dressing should enhance the flavors, not overwhelm them. By the end of this step, you’ll have a vibrant, flavorful Southwest Chicken Salad Bowl ready to enjoy!

    Tips for Success

    • Prep ingredients in advance for an even quicker assembly time.
    • Use fresh produce to get the best flavor—a little effort goes a long way!
    • Taste as you go! Adjust seasoning and dressing to fit your flavor preferences.
    • Experiment with toppings; add things like nuts, seeds, or different dressings to keep it exciting.
    • Store leftovers in airtight containers to keep everything fresh for the next day.

    Equipment Needed

    • Cutting board: A sturdy surface for chopping up your ingredients; a plate works too.
    • Sharp knife: Essential for dicing chicken and chopping veggies; scissors can work in a pinch!
    • Mixing bowl: A large bowl to hold your salad; a pot can also do the trick.
    • Serving spoons: For serving salad easily; measuring cups are a great alternative.

    Variations on Southwest Chicken Salad Bowl

    • Spicy Kick: Add diced jalapeños or a sprinkle of cayenne pepper for an extra kick of heat!
    • Vegetarian Option: Replace chicken with grilled tofu or tempeh, and add extra beans for protein.
    • Southwest Fiesta: Toss in some chopped bell peppers and cherry tomatoes for added freshness and crunch.
    • Mediterranean Twist: Swap out avocado lime dressing for a zesty tahini or lemon vinaigrette for a different flavor palate.
    • Low-Carb Version: Use a base of shredded cabbage instead of mixed greens to lower carb count while maintaining crunch.
    • Fruit Fusion: Add diced mango or pineapple for a touch of sweetness that complements the savory ingredients.

    Serving Suggestions for Southwest Chicken Salad Bowl

    • Pair with tortilla chips for a crunchy contrast that enhances the meal.
    • A refreshing iced tea or sparkling water complements the flavors beautifully.
    • Consider a side of grilled corn on the cob for that perfect summer vibe.
    • Garnish with fresh cilantro for a pop of color and extra flavor.

    FAQs about Southwest Chicken Salad Bowl

    Can I make the Southwest Chicken Salad Bowl ahead of time? Yes! You can prep all the ingredients beforehand. Just keep the dressing separate until you’re ready to serve. This way, your salad stays fresh and crunchy!

    How can I add more flavor to my chicken? Marinating the chicken beforehand in lime juice, garlic, and spices gives it a delightful burst of flavor. Try seasoning it with southwest spices for an extra zing!

    Is this recipe suitable for meal prep? Absolutely! This Southwest Chicken Salad Bowl is perfect for meal prep. Just assemble in containers, and you have delicious, healthy meals ready for the week!

    What can I substitute for black beans? If black beans aren’t your favorite, feel free to swap them for chickpeas or kidney beans. They’ll offer a different taste but will maintain the protein boost.

    Is this salad gluten-free? Yes! The Southwest Chicken Salad Bowl is naturally gluten-free. Just ensure any dressing or added toppings you use also comply with gluten-free guidelines.

    Final Thoughts on the Southwest Chicken Salad Bowl

    Creating this Southwest Chicken Salad Bowl is more than just a recipe; it’s a heartfelt experience. Each bite brings a burst of flavor, combining the crunch of fresh greens with the warmth of seasoned chicken. It’s a swift meal solution that doesn’t compromise on taste or nutrition. Whether you’re enjoying it solo or sharing with loved ones, it’s a delightful way to embrace healthy eating without the fuss. Plus, the joy of crafting this colorful bowl brings a sense of accomplishment. So, let’s dig in and savor the delicious moments together!


    Print

    clock clock iconcutlery cutlery iconflag flag iconfolder folder iconinstagram instagram iconpinterest pinterest iconfacebook facebook iconprint print iconsquares squares iconheart heart iconheart solid heart solid icon

    Description

    A delicious and healthy Southwest Chicken Salad Bowl packed with protein and fresh ingredients.


    • 2 cups cooked chicken, diced
    • 4 cups mixed greens
    • 1/2 cup black beans, rinsed
    • 1/2 cup corn kernels
    • 1/4 cup avocado lime dressing

    1. Layer greens, chicken, black beans, and corn in each bowl.
    2. Drizzle with avocado lime dressing.

    Notes

    • Feel free to add additional toppings like cheese or salsa for extra flavor.
    • Can be made ahead of time; just keep the dressing separate until serving.
    • Prep Time: 10 minutes
    • Cook Time: 0 minutes
    • Category: Salad
    • Method: No-cook
    • Cuisine: American

    Nutrition

    • Serving Size: 1 bowl
    • Calories: 350
    • Sugar: 2g
    • Sodium: 500mg
    • Fat: 15g
    • Saturated Fat: 2g
    • Unsaturated Fat: 12g
    • Trans Fat: 0g
    • Carbohydrates: 30g
    • Fiber: 8g
    • Protein: 30g
    • Cholesterol: 85mg

    Sharing is caring!

  • Asparagus Pasta Salad

    Asparagus Pasta Salad


    Introduction to Asparagus Pasta Salad

    I can’t tell you how many times I’ve found myself scrambling for a meal, only to remember that a vibrant, mouthwatering Asparagus Pasta Salad is just a stir away! This dish is all about freshness and flavor, effortlessly transforming a busy day into a delightful culinary adventure.

    With minimal effort, it serves as both a delightful side or a hearty main, making it perfect for casual family dinners or elegant summer gatherings. Imagine the crunch of radishes combined with the tender asparagus in every bite—it’s like a party for your palate!

    Why You’ll Love This Asparagus Pasta Salad

    This Asparagus Pasta Salad is a game changer for any busy mom or professional.

    It’s quick to whip up—under 30 minutes, and it bursts with color and flavor.

    You don’t need to be a gourmet chef to impress your family or friends.

    Plus, it’s packed with nutrients, making it a guilt-free choice.

    It’s versatile too, allowing for exciting additions or swaps based on what you have on hand.

    Ingredients for Asparagus Pasta Salad

    This Asparagus Pasta Salad is as delightful to make as it is to devour. Here’s what you’ll need to create this refreshing dish. The ingredients are simple and easy to find, setting the stage for a beautiful, vibrant plate.

    • Pasta: I love using fusilli or rotini for their fun shapes and ability to hold dressing well. You could swap in whole grain or gluten-free pasta if you prefer!
    • Asparagus: This star ingredient adds a tender-crisp texture and a lovely green hue. Fresh is best, but frozen works in a pinch!
    • Green peas: Whether fresh or thawed from frozen, they add a pop of sweetness. Plus, they’re packed with vitamins!
    • Radishes: Their crunch and peppery flavor elevate this salad. Try using colorful varieties for an extra visual kick!
    • Extra virgin olive oil: This dressing base infuses healthy fats and a signature Italian flavor.
    • Lemon juice: A splash adds acidity that brightens up all the flavors. Freshly squeezed is always best!
    • Lemon zest (optional): For an aromatic touch, consider adding this fragrant layer. It’s like a little burst of sunshine!
    • Dijon mustard: Tangy and slightly spicy, it enhances the dressing. A must for the extra zing!
    • Garlic: One clove, minced, lends savory depth. If you love garlic, don’t hold back!
    • Salt and pepper: These kitchen staples help to bring out the flavors of your ingredients. Adjust to your taste!
    • Feta cheese: Crumbled feta adds creaminess and salty goodness. If you’re feeling adventurous, try goat cheese instead!
    • Chopped parsley: A sprinkle of fresh herbs elevates your dish. Fresh chives or dill are fantastic alternatives!

    You can find more detailed measurements at the bottom of the article, available for printing. Enjoy the colorful journey of taste with these ingredients!

    How to Make Asparagus Pasta Salad

    Cooking the Pasta

    Start by boiling a large pot of salted water. Once it reaches a rolling boil, add your fusilli or rotini pasta.

    Cook according to the package instructions until it’s al dente. Remember, you want it firm enough to hold up in your salad.

    Once done, drain the pasta and give it a quick rinse under cold water. This stops the cooking process and keeps the pasta from getting mushy.

    Preparing the Vegetables

    Next, it’s time to work on our vibrant veggies!

    Take your bunch of fresh asparagus and chop it into bite-sized pieces.

    In a separate pot, bring water to a boil for blanching. Add the chopped asparagus and green peas, then let them cook for just 2 to 3 minutes.

    You want them bright and crisp—overcooking will dull their vibrant color.

    After that, immediately transfer them to an ice bath to lock in that fresh crunch.

    Once cooled, drain and set aside.

    Making the Dressing

    Now, let’s whip up a quick dressing that’ll bring everything together.

    In a small bowl, combine extra virgin olive oil, lemon juice, and zest if you’re using it.

    Add in Dijon mustard, minced garlic, salt, and pepper to taste.

    Whisk until it’s nice and emulsified.

    This zesty dressing adds a delightful zing to your Asparagus Pasta Salad, so make sure every ingredient is mixed well!

    Combining All Ingredients

    In a large mixing bowl, combine the cooked pasta, blanched asparagus, green peas, and thinly sliced radishes.

    It’s like a rainbow in there—so colorful and inviting!

    Next, pour your freshly made dressing over the top.

    Gently toss everything together, ensuring the dressing evenly coats each piece without breaking anything apart.

    Final Touches

    Last but not least, sprinkle crumbled feta cheese and chopped parsley on top for that finishing touch.

    Lightly toss again, allowing the feta to mingle with the pasta and veggies.

    Give it a taste and adjust any seasonings if necessary, adding more salt or pepper as desired.

    For an extra refreshing touch, consider chilling your salad for an hour before serving.

    Enjoy every bite of this delicious Asparagus Pasta Salad that’s sure to delight!

    Tips for Success

    • Make sure your pasta is al dente for the perfect texture; it’ll absorb the dressing better!
    • Don’t skip the ice bath for your veggies; it keeps their colors vibrant and crunch intact.
    • Feel free to tailor the dressing to your taste; add more lemon or mustard for an extra kick.
    • If you’re in a hurry, use pre-chopped veggies or frozen peas!
    • This salad is a make-ahead option; it tastes even better after a few hours in the fridge.

    Equipment Needed

    • Large pot: For boiling pasta. A deep saucepan works too!
    • Colander: To drain the pasta. A fine-mesh sieve can also do the job.
    • Mixing bowl: A big bowl for combining ingredients. Any large bowl will suffice!
    • Whisk: For mixing the dressing. A fork works just as well!

    Variations

    • Add proteins: Toss in grilled chicken, shrimp, or chickpeas for a heartier meal.
    • Go vegan: Simply omit the feta cheese, and add avocado for creaminess and healthy fats.
    • Seasonal swaps: Swap in seasonal vegetables like bell peppers, zucchini, or even cherry tomatoes for added freshness.
    • Herb infusions: Experiment with fresh herbs like basil, mint, or cilantro to change the flavor profile.
    • Nutty crunch: Add toasted pine nuts or walnuts for a delightful crunch and extra nutrition.

    Serving Suggestions

    • Serve chilled: Enjoy the salad cold for a refreshing dish on hot days.
    • Pair with grilled meats: It complements grilled chicken, steak, or even fish beautifully.
    • Presentation: Serve in a large, clear glass bowl to showcase the colorful ingredients.
    • Drink pairing: A crisp white wine or sparkling water with lemon enhances the meal.
    • Perfect for picnics: Pack it in individual containers for easy grab-and-go servings.

    FAQs about Asparagus Pasta Salad

    I often get questions about this delightful dish, so let’s tackle some of the most common ones together!

    Can I make asparagus pasta salad ahead of time?

    Absolutely! This Asparagus Pasta Salad tastes even better after sitting for a while.

    Prepare it a few hours or even a day in advance, then chill it in the fridge.

    The flavors will have time to meld beautifully—just give it a gentle toss before serving!

    Can I substitute the pasta?

    Sure! You can use whole grain, gluten-free, or even spiralized vegetables like zucchini or carrots for a low-carb option.

    Just be mindful of cooking times, especially with fresh veggies!

    What if I don’t like feta cheese?

    No problem! You can leave it out or replace it with goat cheese, which adds a similar creaminess.

    If you want a vegan twist, try diced avocado for that luscious mouthfeel.

    How can I add more flavor to the dressing?

    If you’re craving a little extra zest, consider adding a splash of balsamic vinegar or a teaspoon of honey for sweetness.

    Herbs like oregano or thyme can also make your dressing sing!

    Is this salad kid-friendly?

    Absolutely! The colorful veggies and pasta make it eye-catching for kids.

    You can also make the salad more appealing by letting them pick their favorite add-ins or mix-ins, like colorful peppers or even cheese cubes!

    Final Thoughts

    This Asparagus Pasta Salad is more than just a dish; it’s a celebration of summer flavors and vibrant colors that bring joy to the table.

    Each bite offers a refreshing crunch and a burst of zest that transports you straight to sunny picnics and gatherings.

    As a busy mom, I find comfort in its simplicity and versatility.

    Whether it’s a quick weeknight dinner or a stunning side for guests, this salad never disappoints.

    So, roll up your sleeves and dive into this delicious adventure—your taste buds will thank you for the delightful journey!


    Print

    clock clock iconcutlery cutlery iconflag flag iconfolder folder iconinstagram instagram iconpinterest pinterest iconfacebook facebook iconprint print iconsquares squares iconheart heart iconheart solid heart solid icon

    Description

    A refreshing and colorful asparagus pasta salad perfect for summer gatherings.


    • 12 oz fusilli or rotini pasta
    • 1 bunch asparagus, trimmed and chopped
    • 1 cup green peas (fresh or thawed frozen)
    • 45 radishes, thinly sliced
    • 1/4 cup extra virgin olive oil
    • 2 tbsp lemon juice
    • 1 tsp lemon zest (optional)
    • 1 tsp Dijon mustard
    • 1 garlic clove, minced
    • Salt and pepper to taste
    • 1/3 cup crumbled feta cheese
    • 2 tbsp chopped parsley
    • Optional: chives or dill for added herbs

    1. Boil pasta until al dente, then rinse under cold water and drain.
    2. Blanch asparagus and peas in boiling water for 2–3 minutes. Transfer to ice water, then drain.
    3. In a small bowl, whisk olive oil, lemon juice, zest, mustard, garlic, salt, and pepper.
    4. Combine pasta, asparagus, peas, radishes, and herbs in a large bowl.
    5. Pour dressing over and toss gently.
    6. Add feta cheese and give a light toss.
    7. Taste and adjust seasoning. Chill before serving if desired.

    Notes

    • This salad can be served immediately or chilled for a refreshing taste.
    • Feel free to add other vegetables or proteins like grilled chicken or shrimp for variation.
    • Make it vegan by omitting the feta cheese.
    • Prep Time: 15 minutes
    • Cook Time: 10 minutes
    • Category: Salad
    • Method: Mixed
    • Cuisine: Mediterranean

    Nutrition

    • Serving Size: 1/4 of recipe
    • Calories: 280
    • Sugar: 2g
    • Sodium: 250mg
    • Fat: 15g
    • Saturated Fat: 3g
    • Unsaturated Fat: 10g
    • Trans Fat: 0g
    • Carbohydrates: 30g
    • Fiber: 4g
    • Protein: 8g
    • Cholesterol: 10mg

    Sharing is caring!

  • Chocolate Chip Zucchini Bars

    Chocolate Chip Zucchini Bars


    Introduction to Chocolate Chip Zucchini Bars

    Have you ever struggled to get your family excited about vegetables? I know I have! That’s why I adore these Chocolate Chip Zucchini Bars. They’re moist, flavorful, and incredibly easy to whip up, even on the busiest of days. This recipe is perfect for satisfying a sweet tooth while sneaking in some nutritious zucchini. Whether it’s for a quick dessert or a snack on the go, these bars will definitely impress your loved ones. Trust me, you won’t believe how deliciously satisfying they are!

    Why You’ll Love This Chocolate Chip Zucchini Bars

    Honestly, who doesn’t love a delicious dessert that doubles as a sneaky way to get veggies in? These Chocolate Chip Zucchini Bars are not only quick and easy to make but also bursting with flavor. With just a handful of ingredients, they come together in no time, making them perfect for busy moms like us. Plus, the chocolate chips add that irresistible sweetness, making it a treat that everyone will cherish!

    Ingredients for Chocolate Chip Zucchini Bars

    Gathering your ingredients for these Chocolate Chip Zucchini Bars is half the fun! Here’s what you’ll need:

    • Shredded zucchini: This is the star of the show! It adds moisture and a hint of veggie goodness.
    • All-purpose flour: The base that holds everything together. You can also use whole wheat flour for a healthier twist.
    • Baking soda and baking powder: These little leavening agents help your bars rise beautifully. Make sure they’re fresh for the best results!
    • Salt: Just a pinch enhances all the flavors and balances the sweetness.
    • Cinnamon: This warm spice adds extra flavor. You can substitute with nutmeg for a different, but delightful, twist.
    • Melted unsalted butter: This gives your bars a rich taste and texture. You can swap it with coconut oil for a dairy-free version.
    • Vegetable oil: For moisture without overpowering flavors. Feel free to use canola oil if that’s what you have on hand.
    • Granulated and brown sugar: Combining these sweeteners results in a perfect balance of flavor and depth. You can experiment with honey or maple syrup, but adjust your liquid ingredients accordingly.
    • Large egg: This helps bind everything together. For a vegan option, you can use a flax egg.
    • Vanilla extract: A splash of this goodness takes your bars over the top. Pure vanilla extract is best for flavor.
    • Chocolate chips: The crowning jewel! Use semi-sweet or dark chocolate chips depending on your preference. If you’re feeling adventurous, add some chopped nuts for a delightful crunch!

    For exact measurements, check the bottom of the article where they’re available for printing. Happy baking!

    How to Make Chocolate Chip Zucchini Bars

    Making these Chocolate Chip Zucchini Bars is a joyful experience that even the busiest of moms can conquer! Each step brings you closer to a delicious treat. Let’s dive into the process!

    Step 1: Preheat and Prepare

    Start by preheating your oven to 350°F (175°C). While that’s heating up, grease a 9×13 inch baking pan or line it with parchment paper. Trust me, parchment makes for easier removal later on!

    Step 2: Mix Dry Ingredients

    In a medium bowl, combine the flour, baking soda, baking powder, salt, and cinnamon. Whisking these dry ingredients together ensures they’re evenly distributed. Once mixed, set them aside for later.

    Step 3: Combine Wet Ingredients

    In a large bowl, pour in your melted butter and vegetable oil. Add both granulated and brown sugar, then beat the mixture until it’s smooth and creamy. This step is key for building flavor!

    Step 4: Add Egg and Vanilla

    Next, crack in the large egg and add the vanilla extract. Stir well until everything is blended and combined. The fragrance of vanilla will have you smiling already!

    Step 5: Fold in Zucchini

    Now, gently fold in that shredded zucchini. It’s like sneaking in a little veggie magic to your sweet dessert! Make sure it’s evenly mixed, but don’t overdo it.

    Step 6: Combine Mixtures

    Slowly incorporate your dry ingredients into the wet mixture. Gently stir until just combined. Overmixing can lead to tough bars, which we definitely want to avoid!

    Step 7: Add Chocolate Chips

    Time for the fun part! Fold in those chocolate chips, ensuring they’re evenly spread throughout the batter. The sight of melted chips peeking through is pure heaven!

    Step 8: Spread and Bake

    Spread your lovely batter evenly into the prepared baking pan. Pop it into your preheated oven and bake for 25-30 minutes. You’ll know they’re done when a toothpick inserted comes out clean or with just a few moist crumbs.

    Step 9: Cool and Serve

    Once baked, allow the bars to cool in the pan on a wire rack. After they’re cool enough to handle, cut them into squares. Enjoy these scrumptious Chocolate Chip Zucchini Bars with your family or save them for a sweet treat later!

    Tips for Success

    • Make sure to well-drain your shredded zucchini to avoid excess moisture in the batter.
    • For added flavor, consider adding a touch of nutmeg along with cinnamon.
    • Keep a close eye on your bars while baking; ovens can vary in temperature!
    • Let the bars cool completely before cutting them for cleaner slices.
    • Store leftovers in an airtight container to maintain freshness!

    Equipment Needed

    • Baking pan: A 9×13 inch is ideal, but you can also use multiple smaller pans.
    • Mixing bowls: One large and one medium for easy separation of wet and dry ingredients.
    • Whisk: A whisk or fork to mix your dry ingredients well.
    • Spatula: A rubber spatula makes folding ingredients simple.
    • Oven mitts: Essential for safely handling hot pans!

    Variations

    • Nutty Delight: Add 1/2 cup of chopped walnuts or pecans for an extra crunch and flavor.
    • Spiced Up: Try adding a dash of nutmeg or allspice for a different spice profile that complements the chocolate beautifully.
    • Gluten-Free Option: Substitute all-purpose flour with a 1:1 gluten-free baking blend to make these bars suitable for gluten-sensitive friends.
    • Fruity Zucchini Bars: Incorporate 1/2 cup of shredded carrots or even mashed bananas for a fun flavor twist!
    • Vegan Variation: Replace the egg with a flax egg (1 tablespoon flaxseed meal + 2.5 tablespoons water) for a plant-based version.

    Serving Suggestions

    • Pair these Chocolate Chip Zucchini Bars with a scoop of vanilla ice cream for a decadent dessert.
    • Serve with a dollop of whipped cream and a sprinkle of cinnamon for added delight.
    • Consider a side of fresh fruit, like berries or sliced strawberries, for a refreshing contrast.
    • For a drink, enjoy with a warm cup of tea or a cold glass of milk.
    • Present on a beautiful platter, garnished with a sprig of mint for a pop of color!

    FAQs about Chocolate Chip Zucchini Bars

    Can I use frozen zucchini for these bars?

    Absolutely! Just make sure to thaw and thoroughly drain the frozen zucchini before adding it to the batter. This will help keep the texture perfect in your Chocolate Chip Zucchini Bars.

    How do I store leftover bars?

    Once cooled, store your Chocolate Chip Zucchini Bars in an airtight container at room temperature for up to 3 days. If you want them to last longer, refrigerate them for up to a week.

    Can I add nuts to the recipe?

    Yes, you can! Adding nuts like walnuts or pecans will introduce a delightful crunch. Feel free to mix in about 1/2 cup when folding in the chocolate chips.

    What’s the best way to know when they’re done baking?

    The easiest way is to insert a toothpick into the center. If it comes out clean or with a few moist crumbs, your Chocolate Chip Zucchini Bars are ready to come out of the oven!

    Can I adjust the sweetness of the bars?

    For sure! If you prefer less sweetness, you can reduce the sugar slightly. Just keep in mind that the balance of flavors may change a little, but the bars will still be delicious!

    Final Thoughts

    These Chocolate Chip Zucchini Bars aren’t just a dessert; they’re a delightful experience for the whole family. Every bite offers a warm hug of flavor, blending chocolatey sweetness with a hint of wholesome zucchini. I love how they can transform a simple ingredient into something people crave. Whether it’s an afternoon snack or a dessert after dinner, these bars bring smiles. Plus, they’re an effortless way to sneak in some veggies! So, roll up your sleeves and indulge in the joy of baking these delicious bars. You won’t regret it!


    Print

    clock clock iconcutlery cutlery iconflag flag iconfolder folder iconinstagram instagram iconpinterest pinterest iconfacebook facebook iconprint print iconsquares squares iconheart heart iconheart solid heart solid icon

    Description

    Delicious chocolate chip zucchini bars that are moist and flavorful, perfect for a sweet treat.


    • 1 1/2 cups shredded zucchini
    • 1 cup all-purpose flour
    • 1/2 teaspoon baking soda
    • 1/2 teaspoon baking powder
    • 1/4 teaspoon salt
    • 1/2 teaspoon cinnamon
    • 1/4 cup melted unsalted butter
    • 1/4 cup vegetable oil
    • 1/2 cup granulated sugar
    • 1/4 cup brown sugar
    • 1 large egg
    • 1 teaspoon vanilla extract
    • 1 cup chocolate chips

    1. Preheat your oven to 350°F (175°C). Grease a 9×13 inch baking pan or line it with parchment paper for easier removal.
    2. In a medium bowl, mix the flour, baking soda, baking powder, salt, and cinnamon. Set aside.
    3. In a large bowl, combine the melted butter, vegetable oil, granulated sugar, and brown sugar. Beat until smooth and creamy.
    4. Add the egg and vanilla extract to the wet mixture and mix well.
    5. Gently fold in the shredded zucchini until evenly distributed.
    6. Slowly incorporate the dry ingredients into the wet mixture, stirring just until combined. Do not overmix.
    7. Fold in the chocolate chips evenly throughout the batter.
    8. Spread the batter evenly in the prepared baking pan.
    9. Bake for 25-30 minutes, or until a toothpick inserted into the center comes out clean or with a few moist crumbs.
    10. Allow the bars to cool in the pan on a wire rack before cutting into squares.

    Notes

    • Ensure the zucchini is well-drained to avoid excess moisture in the batter.
    • These bars can be stored in an airtight container for up to 3 days.
    • Feel free to add nuts for extra crunch if desired.
    • Prep Time: 15 minutes
    • Cook Time: 30 minutes
    • Category: Dessert
    • Method: Baking
    • Cuisine: American

    Nutrition

    • Serving Size: 1 bar
    • Calories: 150
    • Sugar: 10g
    • Sodium: 150mg
    • Fat: 8g
    • Saturated Fat: 3g
    • Unsaturated Fat: 4g
    • Trans Fat: 0g
    • Carbohydrates: 20g
    • Fiber: 1g
    • Protein: 2g
    • Cholesterol: 30mg

    Sharing is caring!

  • Raspberry Mini Cheesecakes

    Raspberry Mini Cheesecakes


    Introduction to Raspberry Mini Cheesecakes

    Life can be a whirlwind, especially when you’re juggling work, kids, and everything in between. That’s why I’m excited to share my recipe for Raspberry Mini Cheesecakes! These delightful treats are not only a quick solution for a busy day but also a way to impress your loved ones. With a creamy filling and a vibrant raspberry swirl, they’re perfect for any occasion. Trust me, you’ll feel like a culinary hero when you serve these elegant desserts, all while spending minimal time in the kitchen!

    Why You’ll Love This Raspberry Mini Cheesecakes

    These Raspberry Mini Cheesecakes are a dream come true for busy moms and professionals alike! They come together in no time, perfect for surprising your family or impressing friends at a gathering. The combination of creamy cheesecake with a tangy raspberry twist creates a flavor explosion. Plus, they’re effortlessly portioned, making dessert serving a breeze. You’ll love how they practically sell themselves!

    Ingredients for Raspberry Mini Cheesecakes

    To create these scrumptious Raspberry Mini Cheesecakes, you’ll need some vital ingredients. Each plays a key role in crafting the perfect balance of flavors and textures. Here’s what you’ll need:

    • Cream cheese: The star of the show! It provides that luscious, creamy base. Make sure to use softened cream cheese for easy mixing.
    • Granulated sugar: This will sweeten the filling just right. You can adjust the amount based on your personal taste.
    • Vanilla extract: A splash adds warmth and depth to the flavor profile, transforming ordinary into extraordinary!
    • Fresh raspberries: These add the fruity flair! You’ll fold some into the filling and reserve the rest for topping. Using fresh berries gives a vibrant taste.
    • Lemon juice: A squeeze brightens the flavors and complements the raspberries beautifully.
    • Graham cracker crumbs: These form the buttery, crunchy crust. You can use store-bought or crush your own for extra freshness.
    • Unsalted butter: Melting this helps bind the crumbs together while adding richness to the crust.
    • Brown sugar: This contributes a hint of caramel-like sweetness to the crust, enriching its flavor.
    • Heavy cream: Whipping this creates a light and airy texture in the filling that elevates the cheesecake experience.
    • Fresh mint leaves: Just for garnish! They add a lovely pop of color and a refreshing touch.

    For those who may have allergies or dietary preferences, consider low-fat cream cheese or dairy-free alternatives. The beauty of these Raspberry Mini Cheesecakes is how adaptable they can be. If you’re not a fan of raspberries, blueberries or strawberries make fantastic substitutes. The exact measurements for these ingredients can be found at the bottom of the article, where you can conveniently print them out.

    How to Make Raspberry Mini Cheesecakes

    Making these delightful Raspberry Mini Cheesecakes is as easy as pie—well, easier if I’m honest! Just follow my simple steps, and you’ll be well on your way to creating a dessert that will have everyone singing your praises.

    Step 1: Prepare the Crust

    First things first, let’s get that crust ready! In a medium bowl, combine graham cracker crumbs, melted butter, and brown sugar. Stir until it looks like wet sand. This mixture should stick together when pressed. Then, grab your lined muffin tin and firmly press the mixture into the bottom of each cup. Aim for a nice, even layer. It’s okay to get your hands in there! After that, pop the crusts in the refrigerator while you work on the filling.

    Step 2: Make the Cheesecake Filling

    Now, onto the star of the show! Take a large mixing bowl and beat your softened cream cheese until it’s smooth and fluffy. It’s like whipping up clouds! Gradually add in granulated sugar and vanilla extract while continuing to beat. This step is key for creating a creamy texture. Once combined, mix in fresh lemon juice. Finally, fold in the whipped heavy cream until it’s all beautifully incorporated. A spatula works best for this—think gentle folding, not stirring!

    Step 3: Fold in the Raspberries

    Here comes the fun part! Gently fold in 1 cup of fresh raspberries into your cheesecake mixture. You want some to break slightly, creating those gorgeous swirls. But be careful! We’re aiming for a marbled effect, not a mush. Reserve the remaining raspberries for topping later. This is what makes your no-bake cheesecake so visually appealing—and delicious, of course!

    Step 4: Fill the Crusts

    With your crusts set and filling ready, it’s time to assemble these treats. Spoon or pipe the cheesecake mixture onto your prepared crusts. Fill them almost to the top and smooth the surface with a spatula. Look at you, being all fancy! Once done, cover the muffin tin loosely and set it in the fridge to firm up.

    Step 5: Chill the Mini Cheesecakes

    This is the hardest part—waiting! Allow the cheesecakes to chill for at least 4 hours, but overnight is even better. This step is essential for achieving the perfect texture. While you wait, you could binge-watch your favorite show, take a bubble bath, or bask in the anticipation of that first delicious bite!

    Step 6: Serve with Toppings

    When you’re ready to serve, carefully remove each mini cheesecake from the muffin tin. Top with the reserved fresh raspberries for that final flourish, and don’t forget a small mint leaf for garnish. Present them on a pretty platter, and voilà! You’ve just created a stunning and delectable dessert that will surely impress.

    Tips for Success

    • Always use softened cream cheese for the best consistency; it makes mixing a breeze.
    • For a slightly sweeter cheesecake, feel free to adjust the sugar to your preference.
    • If you’re short on time, these beauties can be assembled a day in advance!
    • Make sure to chill them long enough for the best texture—no one likes a mushy cheesecake!
    • Experiment with different toppings, like chocolate shavings or nuts, for added flair.

    Equipment Needed

    • Muffin tin: Essential for making individual cheesecakes. A silicone muffin pan works well too!
    • Mixing bowls: You’ll need at least two—one for the crust and one for the filling.
    • Electric mixer: A hand mixer or stand mixer saves time when beating the cream cheese.
    • Spatula: Perfect for folding in ingredients and smoothing the cheesecake mixture.
    • Measuring cups and spoons: These are crucial for recipe accuracy.

    Variations

    • Berry Medley: Swap out raspberries for a mix of berries like blueberries, strawberries, or blackberries for a colorful twist!
    • Chocolate Drizzle: For chocolate lovers, add a drizzle of melted chocolate over each cheesecake before serving.
    • Nutty Substitution: If you’re a fan of crunch, mix in some crushed nuts like almonds or pecans into the crust or filling.
    • Gluten-Free Option: Use gluten-free graham crackers or almond flour for the crust to make these cheesecakes suitable for a gluten-free diet.
    • Vegan Alternative: Substitute cream cheese with vegan cream cheese and use coconut cream instead of heavy cream for a compassionate version.

    Serving Suggestions

    • Coffee or Tea: Pair these Raspberry Mini Cheesecakes with a steaming cup of coffee or herbal tea for a delightful afternoon treat.
    • Colorful Platter: Serve on a vibrant platter and scatter some fresh berries around for an eye-catching display.
    • Whipped Cream: Add a dollop of freshly whipped cream on top for an extra creamy experience!
    • Celebrate with Extras: Consider serving with a scoop of vanilla ice cream for a fabulous dessert experience.

    FAQs about Raspberry Mini Cheesecakes

    Can I make Raspberry Mini Cheesecakes a day in advance?

    Absolutely! These little delights actually taste better when made ahead. Just ensure they are covered well and chilled in the fridge overnight. They’ll be perfectly set and ready to impress when it’s time to serve!

    What can I substitute for cream cheese?

    If you’re looking for alternatives, vegan cream cheese works great! You can also try ricotta cheese for a different texture, or blended silken tofu for a dairy-free option. Both will yield a unique but delicious flavor in your no-bake cheesecake.

    How do I store leftover mini cheesecakes?

    Store any leftovers in an airtight container in the fridge. They should stay fresh for up to 3 days. You might want to keep any toppings separate until you’re ready to enjoy them again, to prevent sogginess!

    Can I freeze these mini cheesecakes?

    Yes, you can freeze them! Wrap each cheesecake individually in plastic wrap and place them in a freezer-safe container. They’ll maintain their flavor and texture for up to two months. Just thaw them in the fridge overnight before enjoying!

    What is the best way to serve these cheesecakes?

    For an impressive presentation, serve them on a pretty platter, topped with fresh raspberries and a mint leaf. A dollop of whipped cream nearby doesn’t hurt either. Your friends and family will be amazed!

    Final Thoughts

    There’s something truly special about pulling off these delightful Raspberry Mini Cheesecakes. Not only do they dazzle the eyes, but they also delight the taste buds. The joy of crafting these treats lies in their simplicity and elegance, making them perfect for any occasion. Every bite bursts with flavor, offering a satisfying balance of creamy and tangy goodness. I hope you enjoy making these mini delights as much as I do. They’re a fantastic way to show love through food—because let’s be honest, desserts have a magical way of bringing people together!


    Print

    clock clock iconcutlery cutlery iconflag flag iconfolder folder iconinstagram instagram iconpinterest pinterest iconfacebook facebook iconprint print iconsquares squares iconheart heart iconheart solid heart solid icon

    Description

    A delicious and easy-to-make dessert, these Raspberry Mini Cheesecakes are perfect for any occasion, offering a creamy filling with a tangy raspberry swirl.


    • 16 oz cream cheese, softened
    • 2/3 cup granulated sugar
    • 1 tsp vanilla extract
    • 2 cups fresh raspberries, divided
    • 1 tbsp lemon juice
    • 1 1/2 cups graham cracker crumbs
    • 6 tbsp unsalted butter, melted
    • 1/4 cup brown sugar
    • 1/2 cup heavy cream, whipped
    • Fresh mint leaves for garnish

    1. In a medium bowl, combine graham cracker crumbs, melted butter, and brown sugar. Mix until the texture resembles wet sand. Press firmly into the bottom of a lined muffin tin, creating 12 individual crusts. Refrigerate while preparing the filling.
    2. In a large mixing bowl, beat the softened cream cheese until smooth and fluffy. Add granulated sugar and vanilla extract, continuing to beat until well combined. Mix in lemon juice and fold in whipped heavy cream until fully incorporated.
    3. Gently fold 1 cup of fresh raspberries into the cream cheese mixture, allowing some to break slightly to create beautiful swirls of color. Reserve the remaining raspberries for topping.
    4. Spoon or pipe the cheesecake mixture onto the prepared crusts, filling each cup almost to the top. Smooth the surfaces with a spatula. Cover loosely and refrigerate for at least 4 hours or overnight until completely set.
    5. Once set, carefully remove each mini cheesecake from the muffin tin. Top each with fresh raspberries and garnish with a small mint leaf. Serve chilled for the best flavor and texture.

    Notes

    • Ensure the cream cheese is at room temperature for easy mixing.
    • For a sweeter cheesecake, consider adding more sugar.
    • These mini cheesecakes can be made a day in advance.
    • Prep Time: 30 minutes
    • Cook Time: 0 minutes
    • Category: Dessert
    • Method: Refrigeration
    • Cuisine: American

    Nutrition

    • Serving Size: 1 mini cheesecake
    • Calories: 250
    • Sugar: 15g
    • Sodium: 160mg
    • Fat: 18g
    • Saturated Fat: 10g
    • Unsaturated Fat: 5g
    • Trans Fat: 0g
    • Carbohydrates: 20g
    • Fiber: 1g
    • Protein: 3g
    • Cholesterol: 60mg

    Sharing is caring!

  • Peppermint Mocha Cookies

    Peppermint Mocha Cookies


    Introduction to Peppermint Mocha Cookies

    As the holidays approach, my kitchen often fills with the warm scents of baking and cheer. I know how hectic this time can be for busy moms and professionals. That’s why I’m excited to share my recipe for Peppermint Mocha Cookies! These delightful treats are not just a quick solution for a busy day; they encapsulate the flavors of the season in every bite. Imagine soft, chewy cookies infused with chocolate, coffee, and a hint of refreshing peppermint. They’re perfect for gifting, holiday get-togethers, or even enjoying with a cup of hot cocoa.

    Why You’ll Love This Peppermint Mocha Cookies

    These Peppermint Mocha Cookies are a holiday dream come true! Not only are they incredibly easy to whip up, but they also come together in under 30 minutes. The delightful combination of rich chocolate, invigorating peppermint, and a hint of coffee makes each bite an indulgence. Trust me, your family and friends will be clamoring for the recipe. Plus, they make festive gifts that spread joy and warmth!

    Ingredients for Peppermint Mocha Cookies

    Gathering the right ingredients is a crucial part of any baking adventure. For these Peppermint Mocha Cookies, let’s explore what you’ll need to create these delightful treats:

    • All-Purpose Flour: The backbone of our cookies, giving them that perfect texture.
    • Unsweetened Cocoa Powder: This adds depth, providing a rich chocolate flavor without extra sugar.
    • Instant Coffee Granules: A dash of coffee elevates the chocolate, making the flavors sing.
    • Baking Soda: This leavening agent gives cookies that lovely rise and prevents them from being too dense.
    • Salt: Just a pinch enhances overall flavor and balances sweetness.
    • Unsalted Butter: Softened to perfection, it’s essential for achieving a light and fluffy texture.
    • Granulated Sugar: This sweetens the cookies and helps create a crisp edge.
    • Packed Brown Sugar: Adds moisture and a hint of caramel flavor, taking your cookies to the next level.
    • Large Egg: The binder that holds everything together while contributing to a soft texture.
    • Vanilla Extract: This classic flavor enhances sweetness and complements the chocolate beautifully.
    • Peppermint Extract: A must-have for that festive touch, adding a refreshing minty kick.
    • Semisweet Chocolate Chips: These little indulgences provide a delicious melty goodness in every bite.
    • Crushed Candy Canes or Peppermint Candies: Perfect for topping off your cookies with extra holiday flair!
    • Dark Chocolate or Chocolate Chips for Drizzling: This adds a decadent finish and elevates the visual appeal of your cookies.

    Don’t forget, all ingredient quantities are listed at the end of this article and are easily printable. As you gather these elements, let the holiday spirit inspire you!

    How to Make Peppermint Mocha Cookies

    Now that you have all your ingredients ready, it’s time to dive into the fun part—making these delightful Peppermint Mocha Cookies! With each step, I’ll guide you through, ensuring you create cookies that not only taste heavenly but also look fabulous.

    Preheat Your Oven and Prepare Baking Sheet

    First things first, preheat your oven to 350°F (175°C). This step is crucial as it ensures your cookies bake evenly and come out perfectly fluffy. While the oven warms up, line a baking sheet with parchment paper. This prevents sticking and makes clean-up a breeze. Trust me; it’s worth it!

    Mix the Dry Ingredients

    In a medium bowl, whisk together the all-purpose flour, cocoa powder, instant coffee granules, baking soda, and salt. Mixing these dry ingredients helps distribute the cocoa and coffee evenly, ensuring that every cookie bursts with taste. Once mixed, set it aside; this will be the foundation of your cookie joy!

    Cream the Butter and Sugars

    In a large bowl, it’s time to cream the softened butter with the granulated and brown sugars. Using an electric mixer, beat until light and fluffy. This creates air pockets, giving your cookies that lovely soft texture we all crave. Aim for a pale, creamy consistency, and don’t rush this step—it makes all the difference!

    Incorporate the Egg and Extracts

    Next, add in the large egg, vanilla extract, and peppermint extract to your butter-sugar mixture. Blend well until everything is beautifully combined. Mixing thoroughly here is vital; it ensures that the egg emulsifies with the sugar and butter, creating a smooth cookie dough. Ah, the aroma already is magical!

    Combine Dry and Wet Ingredients

    Now it’s time to bring the dry ingredients into play. Gradually add the flour mixture to your wet ingredients, gently mixing until just combined. Be careful not to overwork the dough; we want fluffy cookies, not dense bricks! Use a spatula to fold and ensure everything comes together harmoniously.

    Add Chocolate Chips

    Time for the best part—fold in those semisweet chocolate chips! Use a spatula to mix them evenly throughout the dough. This way, you’ll have chocolatey bursts in every bite. Feel free to add more if you’re a true chocolate lover; I won’t judge!

    Portion the Cookie Dough

    Using a cookie scoop or a tablespoon, drop rounded portions of dough onto the prepared baking sheet, leaving about 2 inches between them. This space is essential because these cookies will spread as they bake. Aim for uniform sizes so they bake evenly; think of them as little holiday mounds of joy!

    Bake the Cookies

    Pop your baking sheet into the oven and bake for 10-12 minutes. Keep an eye on them—you’ll know they’re ready when the edges are set, but the centers still look slightly soft. Remember, they’ll continue to cook a bit once out of the oven, so don’t wait until they’re completely firm!

    Cool and Drizzle with Chocolate

    Once baked, remove the cookies from the oven and allow them to cool on the baking sheet for about 5 minutes. This extra time helps them firm up. Then, transfer them to a wire rack to cool completely. To finish, drizzle melted chocolate over the cooled cookies and sprinkle with crushed candy canes. What a festive touch!

    Tips for Success

    • Always use room temperature butter for easier creaming.
    • Don’t skip the chilling step—30 minutes in the fridge can improve texture!
    • For uniform cookies, use a cookie scoop for even portions.
    • Watch the bake time closely; cookies may look underdone but will firm up as they cool.
    • Experiment with toppings, like white chocolate or sprinkles, for a fun twist!

    Equipment Needed for Peppermint Mocha Cookies

    • Mixing bowls: Use any size, but make sure they’re large enough for blending.
    • Electric mixer: A hand mixer will do, but a stand mixer saves time.
    • Baking sheet: A cookie sheet works great, or use any flat baking pan.
    • Parchment paper: Wax paper is a great substitute, but it’s not non-stick.
    • Cookie scoop or tablespoon: A spoon works too; just aim for even portions!

    Variations for Peppermint Mocha Cookies

    • Gluten-Free: Substitute all-purpose flour with a gluten-free baking blend for a delicious gluten-free version.
    • Vegan: Use plant-based butter and a flax egg instead of the large egg for a vegan-friendly treat.
    • Add Spices: Enhance the flavor by incorporating a dash of cinnamon or nutmeg for a warm twist.
    • Mint Chocolate Swirl: Mix in mint chocolate chips along with the semisweet ones for a double chocolate treat.
    • Experiment with Nuts: Add chopped walnuts or pecans for a delightful crunch and extra flavor.

    Serving Suggestions

    • Pair your Peppermint Mocha Cookies with a warm cup of hot cocoa or coffee for a cozy treat.
    • Serve them on a festive platter, garnished with extra crushed candy canes for color.
    • These cookies also make a perfect gift when wrapped in a holiday-themed tin!

    FAQs about Peppermint Mocha Cookies

    Can I use different types of chocolate in Peppermint Mocha Cookies?

    Absolutely! Feel free to experiment with dark chocolate, white chocolate, or even mint chocolate chips. Each option adds a unique twist to your Peppermint Mocha Cookies!

    How should I store Peppermint Mocha Cookies?

    To keep your cookies fresh, store them in an airtight container at room temperature. They’ll remain delicious for about a week, but I doubt they’ll last that long!

    Can I freeze Peppermint Mocha Cookies?

    You bet! Freeze them in a single layer on a baking sheet, then transfer to an airtight container. They can last up to three months. Just thaw at room temperature before enjoying!

    What’s the best way to drizzle chocolate on the cookies?

    The easiest way to drizzle chocolate is by using a piping bag or a zip-top bag with a corner snipped off. This gives you more control and creates a lovely design!

    Can I make the dough ahead of time?

    Yes! You can prepare the cookie dough and refrigerate it for up to 24 hours. Just let it sit at room temperature for a few minutes before scooping and baking. This is a great time-saver for busy days!

    Final Thoughts

    Creating Peppermint Mocha Cookies is more than just baking; it’s about bringing joy into your home during the festive season. As the warm aroma fills your kitchen, you’ll be reminded of all the magical moments shared with family and friends. Every bite of these cookies is a delightful blend of flavors—rich chocolate, invigorating peppermint, and a hint of coffee that sparkles like holiday lights. Whether you’re indulging yourself or gifting these treats, they’ll surely spread laughter and cheer. So roll up your sleeves, embrace the holiday spirit, and let the baking adventures begin!


    Print

    clock clock iconcutlery cutlery iconflag flag iconfolder folder iconinstagram instagram iconpinterest pinterest iconfacebook facebook iconprint print iconsquares squares iconheart heart iconheart solid heart solid icon

    Description

    Delicious Peppermint Mocha Cookies infused with holiday flavors of mint and chocolate.


    • 1 3/4 cups all-purpose flour
    • 1/4 cup unsweetened cocoa powder
    • 1 tsp instant coffee granules
    • 1/2 tsp baking soda
    • 1/4 tsp salt
    • 1/2 cup unsalted butter, softened
    • 1 cup granulated sugar
    • 1/4 cup packed brown sugar
    • 1 large egg
    • 1 tsp vanilla extract
    • 1/2 tsp peppermint extract
    • 1/2 cup semisweet chocolate chips
    • Crushed candy canes or peppermint candies
    • 1/4 cup dark chocolate or chocolate chips, for drizzling

    1. Preheat your oven to 350°F (175°C) and line a baking sheet with parchment paper.
    2. In a medium bowl, whisk together the flour, cocoa powder, instant coffee, baking soda, and salt. Set aside.
    3. In a large bowl, cream together the softened butter, granulated sugar, and brown sugar until light and fluffy.
    4. Add the egg, vanilla extract, and peppermint extract to the butter-sugar mixture. Mix well to combine.
    5. Gradually add the dry ingredients to the wet ingredients, mixing until just combined. Be careful not to overmix.
    6. Fold in the chocolate chips until evenly distributed throughout the dough.
    7. Using a cookie scoop or tablespoon, drop rounded portions of dough onto the prepared baking sheet, spacing them about 2 inches apart.
    8. If desired, gently press down on each cookie with the back of a spoon to slightly flatten.
    9. Bake in the preheated oven for 10-12 minutes, or until the edges are set but the centers are still slightly soft.
    10. Remove from the oven and allow the cookies to cool on the baking sheet for 5 minutes, then transfer them to a wire rack to cool completely.
    11. In a microwave-safe bowl, melt the 1/4 cup of semisweet chocolate chips in the microwave in 30-second intervals, stirring in between, until smooth and melted.
    12. Drizzle the melted chocolate over the cooled cookies using a spoon or piping bag.
    13. Sprinkle crushed candy canes or peppermint candies on top of the chocolate drizzle for added peppermint flavor and decoration.
    14. Allow the chocolate drizzle to set before serving or storing the cookies.

    Notes

    • Store cookies in an airtight container to maintain freshness.
    • Can substitute ingredients for vegan versions if desired.
    • Prep Time: 20 minutes
    • Cook Time: 12 minutes
    • Category: Dessert
    • Method: Baking
    • Cuisine: American

    Nutrition

    • Serving Size: 1 cookie
    • Calories: 150
    • Sugar: 10g
    • Sodium: 100mg
    • Fat: 7g
    • Saturated Fat: 4g
    • Unsaturated Fat: 2g
    • Trans Fat: 0g
    • Carbohydrates: 22g
    • Fiber: 1g
    • Protein: 2g
    • Cholesterol: 15mg

    Sharing is caring!

  • Lemon Garlic Chicken Delight

    Lemon Garlic Chicken Delight


    Introduction to Lemon Garlic Chicken Delight

    Welcome to my kitchen, where flavor meets simplicity! If you’re like me, juggling busy days with family dinners, the Lemon Garlic Chicken Delight is your new best friend. This recipe is a delightful burst of citrus and garlic, making even the most ordinary weeknight feel special. It requires minimal prep, allowing you to spend more time with your loved ones and less time slaving over the stove. Plus, the tender chicken practically melts in your mouth. With just a few ingredients, you can create a meal that’s not only delicious but also a crowd-pleaser!

    Why You’ll Love This Lemon Garlic Chicken Delight

    This Lemon Garlic Chicken Delight is truly a game changer for busy days! It’s easy to prepare, allowing you to throw everything in the slow cooker and walk away. The vibrant flavors of lemon and garlic not only tantalize your taste buds but also fill your kitchen with an inviting aroma. Plus, it’s a healthy choice packed with protein to fuel your family, making dinnertime both nourishing and enjoyable!

    Ingredients for Lemon Garlic Chicken Delight

    Gathering the right ingredients is key to creating a mouthwatering Lemon Garlic Chicken Delight. Here’s what you’ll need to whip up this delightful dish:

    • Boneless, skinless chicken breasts: The star of this dish! They’re lean and tender, soaking up all the wonderful flavors.
    • Olive oil: This adds richness and helps the garlic infuse its flavor into the chicken.
    • Garlic: Freshly minced, the garlic packs a punch, lending a warm and aromatic taste to the dish.
    • Lemons: You’ll need both juice and zest. The juice brightens up the meal while the zest adds a layer of citrusy zestiness.
    • Dried oregano: A classic herb that complements the lemon and chicken beautifully with its slightly sweet and peppery flavor.
    • Dried thyme: Earthy and fragrant, thyme rounds out the flavors while elevating the dish.
    • Salt and pepper: Simple seasonings that elevate the dish. Adjust to your taste.
    • Fresh parsley: For garnish, this adds a splash of color and freshness to your plate.
    • Lemon slices: Optional garnishment, but they make for a beautiful presentation and a touch of elegance.

    You can find all these ingredients at your local grocery store. They’re common pantry staples, but if you’re looking for alternatives, feel free to tweak the herbs or use bone-in chicken for added flavor. For exact quantities, check the bottom of the article, where they’re available for easy printing!

    How to Make Lemon Garlic Chicken Delight

    Now, let’s get cooking! Making this Lemon Garlic Chicken Delight is as easy as pie—no, easier! Just follow these simple steps, and you’ll have the most delicious meal ready to go.

    Step 1: Prepare the Marinade

    Start by whisking together the olive oil, minced garlic, lemon juice, lemon zest, dried oregano, dried thyme, salt, and pepper in a bowl.

    This marinade is like a love letter to your chicken, so don’t rush it! The combination of fragrant garlic and zesty lemon creates a flavor explosion that’ll have your family begging for seconds. If you have time, you can let this sit for a few minutes to let those flavors meld beautifully.

    Step 2: Combine Chicken and Marinade

    Next, take those lovely chicken breasts and place them in your slow cooker. Pour all of that luscious lemon-garlic mixture over the chicken, ensuring each piece is coated.

    This step is where the magic happens—each chicken breast will absorb all those divine flavors. It’s so easy, almost like letting the slow cooker do the work while you tend to other tasks!

    Step 3: Cooking the Chicken

    Cover the slow cooker and set it to cook. You can choose low for 6-7 hours if you want to let it simmer slowly, or high for 3-4 hours if you’re in more of a rush.

    During cooking, the chicken will become tender and juicy. You’ll know it’s done when it reaches an internal temperature of 165°F. Trust me; the wait will be worth it!

    Step 4: Final Touches

    Once cooked, take a moment to admire your culinary creation. Serve the chicken garnished with fresh parsley and those beautiful lemon slices you saved for presentation.

    Pair it with a side of rice or a vibrant salad, and you’ve got yourself the perfect weeknight dinner. Enjoy the compliments; you deserve them!

    Tips for Success

    • Marinate your chicken for a few hours or overnight for even more flavor.
    • If you don’t have a slow cooker, an oven at 350°F works too—just cover the dish!
    • Try adding vegetables like bell peppers or carrots in the slow cooker for a complete meal.
    • Adjust the seasoning based on your family’s preferences; don’t be afraid to experiment!

    Equipment Needed

    • Slow Cooker: Essential for this recipe. If you don’t have one, an oven-safe dish covered with foil works well too.
    • Whisk: For mixing the marinade. A fork can also do the trick in a pinch.
    • Measuring cups: To ensure proper ingredient ratios—optional if you’re comfortable eyeballing it!
    • Serving platter: Makes for a lovely presentation, but any plate will work!

    Variations

    • Lemon Herb Chicken Delight: Add fresh herbs like rosemary or basil for a garden-fresh twist.
    • Spicy Lemon Garlic Chicken: Incorporate red pepper flakes into the marinade for a kick of heat.
    • Honey Lemon Garlic Delight: Mix in a tablespoon of honey to balance the acidity with a touch of sweetness.
    • Vegetarian Option: Substitute chicken with chickpeas or tofu for a plant-based version of this recipe.
    • Citrus Medley: Use a combination of citrus fruits, like oranges or limes, for a unique flavor profile.

    Serving Suggestions for Lemon Garlic Chicken Delight

    • Pair your chicken with fluffy rice or couscous to soak up the delicious sauce.
    • Serve alongside a light, vibrant salad with mixed greens, cherry tomatoes, and a citrus vinaigrette.
    • A cold glass of white wine or sparkling water complements the dish beautifully.
    • For a pop of color, add slices of grilled zucchini or bell peppers on the side.

    FAQs about Lemon Garlic Chicken Delight

    As you venture into making this delightful dish, you might have a few questions. Here are some common queries about Lemon Garlic Chicken Delight that may help clear things up:

    Can I use frozen chicken breasts for this recipe?

    Absolutely! Just make sure to adjust the cooking time. Frozen chicken may need an extra hour in the slow cooker, so keep an eye on it.

    What can I serve with Lemon Garlic Chicken Delight?

    This dish pairs beautifully with rice, quinoa, or a fresh salad. You could also serve it alongside roasted vegetables for heartiness.

    How do I store leftovers?

    Store any leftovers in an airtight container in the fridge. They should stay fresh for up to 3 days. Reheat gently to maintain the chicken’s tenderness.

    Can I meal prep this Lemon Garlic Chicken Delight?

    Yes! This dish is perfect for meal prepping. Simply cook it ahead of time, then divide it into portions for easy grab-and-go meals during the week.

    How can I make this dish less tangy?

    If you find the lemon flavor strong, reduce the amount of lemon juice or zest you use. You might also mix in a little honey to balance the acidity.

    Final Thoughts

    Cooking the Lemon Garlic Chicken Delight isn’t just about creating a meal; it’s about making memories. The aroma fills your home, beckoning family to gather around the table. The smiles on their faces as they savor each bite remind me why I cook. This recipe is a testament that, with just a few simple ingredients, you can whip up something extraordinary with minimal effort. Whether it becomes a weeknight staple or a special occasion dish, this flavorful chicken will surely hold a special place in your heart and in your family’s bellies!


    Print

    clock clock iconcutlery cutlery iconflag flag iconfolder folder iconinstagram instagram iconpinterest pinterest iconfacebook facebook iconprint print iconsquares squares iconheart heart iconheart solid heart solid icon

    Description

    A flavorful and tender chicken dish made with lemon, garlic, and herbs, perfect for any meal.


    • 4 boneless, skinless chicken breasts
    • 1/4 cup olive oil
    • 4 cloves garlic, minced
    • Juice and zest of 2 lemons
    • 1 teaspoon dried oregano
    • 1 teaspoon dried thyme
    • Salt, to taste
    • Pepper, to taste
    • Fresh parsley, chopped (for garnish)
    • Lemon slices (optional, for garnish)

    1. In a bowl, whisk together olive oil, garlic, lemon juice, lemon zest, dried oregano, dried thyme, salt, and pepper.
    2. Place the chicken breasts in the slow cooker and pour the lemon-garlic mixture over them.
    3. Cover and cook on low for 6-7 hours or on high for 3-4 hours, until the chicken is cooked through and tender.
    4. Serve the chicken garnished with fresh parsley and lemon slices, alongside rice or a light salad.

    Notes

    • For added flavor, marinate the chicken in the lemon-garlic mixture for a few hours before cooking.
    • This dish pairs well with a side of steamed vegetables or quinoa.
    • Prep Time: 15 minutes
    • Cook Time: 6-7 hours on low or 3-4 hours on high
    • Category: Main Course
    • Method: Slow Cooker
    • Cuisine: American

    Nutrition

    • Serving Size: 1 chicken breast
    • Calories: 300
    • Sugar: 1g
    • Sodium: 200mg
    • Fat: 16g
    • Saturated Fat: 2g
    • Unsaturated Fat: 14g
    • Trans Fat: 0g
    • Carbohydrates: 5g
    • Fiber: 0g
    • Protein: 32g
    • Cholesterol: 80mg

    Sharing is caring!

  • Cajun Lobster, Crab, and Salmon Alfredo

    Cajun Lobster, Crab, and Salmon Alfredo


    Introduction to Cajun Lobster, Crab, and Salmon Alfredo

    Hey there, fellow food lovers! If you’re like me, juggling family dinners with a busy schedule can feel like a high-wire act. That’s where my love for Cajun Lobster, Crab, and Salmon Alfredo comes in! This dish is an absolute game changer for weeknight meals or a special occasion. The creamy Cajun Alfredo sauce hugs each piece of pasta like a warm embrace, making it perfect for impressing loved ones or treating yourself. With just a splash of spice and a medley of seafood, this meal is sure to bring smiles around the dinner table!

    Why You’ll Love This Cajun Lobster, Crab, and Salmon Alfredo

    This Cajun Lobster, Crab, and Salmon Alfredo is not just a meal; it’s an experience! With minimal prep time and quick cooking, it’s perfect for those hectic evenings. The rich, creamy sauce pairs beautifully with the fresh seafood, delivering flavors that dance on your palate. Plus, it’s a surefire way to impress family and friends without spending hours in the kitchen. You’ll be their culinary hero in just 40 minutes!

    Ingredients for Cajun Lobster, Crab, and Salmon Alfredo

    Gathering the right ingredients is key to whipping up this delightful dish. Let’s get familiar with what you’ll need for the Cajun Lobster, Crab, and Salmon Alfredo. Here’s the lowdown on each of them:

    • Lobster tail: The star of the show! Cooked and chopped lobster adds a touch of luxury and sweetness.
    • Crab meat: Make sure to pick over for any shells. It contributes a delicate flavor that complements the other seafood beautifully.
    • Salmon fillets: Skin removed and cut into chunks, salmon adds richness and a hint of smokiness that enhances the dish.
    • Pasta: Fettuccine or penne works great. Choose whatever you love best! This is the backbone of the meal.
    • Olive oil: Perfect for sautéing the salmon. It adds just the right amount of flavor without overpowering the other ingredients.
    • Unsalted butter: Essential for creating a rich, creamy Alfredo sauce that binds everything together.
    • Garlic: Minced fresh garlic brings in a wonderful aromatic depth that elevates the dish to new heights.
    • Heavy cream: The key to that luscious sauce. It makes the Alfredo silky smooth and utterly decadent.
    • Parmesan cheese: Grated and added to the sauce, this cheese transforms it into something truly indulgent.
    • Cajun seasoning: This spice blend infuses your dish with a delightful kick. Feel free to adjust to your spice preference!
    • Salt and pepper: Simple seasoning but crucial for enhancing all the flavors in the dish.
    • Fresh parsley: Chopped and used for garnish, it adds a pop of color and fresh taste.

    You’ll find exact measurements for each of these ingredients at the bottom of this article, perfect for easy printing!

    How to Make Cajun Lobster, Crab, and Salmon Alfredo

    Step 1 – Cook the Pasta

    Start by bringing a large pot of salted water to a rolling boil. Trust me, salting the water is crucial—it enhances the pasta’s flavor!

    Once it’s boiling, add your fettuccine or penne and cook according to the package instructions until it’s al dente. You want it to have a slight bite.

    When it’s done, drain the pasta and set it aside. This is the base for your rich, creamy sauce. Get ready for the deliciousness!

    Step 2 – Sauté the Salmon

    Now, grab a skillet and heat up some olive oil over medium heat. Just enough to coat the bottom.

    Season your salmon chunks with Cajun seasoning, giving them that spicy kick!

    Cook the salmon for about 3-4 minutes on each side until it’s golden and cooked through. When it’s perfectly flaky, set the salmon aside. You want it just right!

    Step 3 – Prepare the Alfredo Sauce

    In the same skillet, melt the unsalted butter over medium heat. The smell of that butter will make your kitchen feel like a cozy haven!

    Add minced garlic and sauté it for 1-2 minutes until fragrant. Be careful not to burn it!

    Pour in the heavy cream and bring it to a gentle simmer. The sauce will begin to thicken as it heats.

    Gradually stir in the Parmesan cheese until it melts and mixes well. You’re creating a silky, dreamy sauce now!

    Step 4 – Add Seafood and Pasta

    Time to incorporate your star ingredients! Stir in the chopped lobster, crab meat, and that beautifully sautéed salmon.

    Now, toss the cooked pasta into the Alfredo sauce. Make sure everything is coated in that creamy goodness. It’s a whirlwind of flavors, and I can’t wait for you to taste it!

    Step 5 – Serve

    To serve, generously garnish with freshly chopped parsley for a touch of color.

    Don’t forget to offer extra Parmesan on the side. Your family and friends will appreciate the finishing touch!

    Tips for Success

    • Always taste the sauce before serving to adjust seasoning if needed.
    • For a creamier sauce, add a splash more heavy cream if desired.
    • Don’t rush the cooking process; let flavors develop for a richer dish.
    • Use freshly grated Parmesan for the best flavor and texture.
    • If you’re short on time, use pre-cooked seafood to save on prep!

    Equipment Needed

    • Large pot: For boiling pasta; you can use any deep saucepan if you don’t have a big pot.
    • Skillet: A non-stick sauté pan works wonders, or use a regular one with a little more oil.
    • Colander: Essential for draining pasta; a slotted spoon can also do the trick.
    • Measuring cups: Handy for precise amounts of cream and cheese; you can eyeball if you’re comfortable!
    • Wooden spoon: Perfect for stirring; any sturdy spatula can work in its place.

    Variations

    • Spicy Cajun Twist: Add diced jalapeños or a dash of hot sauce to give your dish an extra kick.
    • Vegetarian Delight: Replace seafood with sautéed mushrooms and bell peppers for a hearty, meat-free option.
    • Gluten-Free Option: Use gluten-free pasta and ensure all ingredients, like seasoning and cream, are gluten-free certified.
    • Coconut Cream Alfredo: Swap heavy cream with coconut cream for a tropical, dairy-free version.
    • Herbed Alfredo: Experiment with fresh herbs like dill or basil to elevate flavor profiles and add freshness.

    Serving Suggestions for Cajun Lobster, Crab, and Salmon Alfredo

    • Pair your Alfredo with a crisp green salad tossed in a light vinaigrette for a refreshing contrast.
    • A chilled glass of Sauvignon Blanc complements the creamy sauce beautifully.
    • Consider garlic bread on the side; it’s perfect for scooping up that decadent sauce.
    • Serve the dish in shallow bowls to showcase those vibrant colors and textures.

    FAQs about Cajun Lobster, Crab, and Salmon Alfredo

    Can I use frozen seafood for this recipe? Absolutely! Frozen lobster, crab, and salmon can work just fine. Just make sure to thaw them completely before cooking. It’s a huge time saver!

    How can I adjust the spice level of the Alfredo? If you prefer a milder dish, reduce the amount of Cajun seasoning. You can also omit it entirely. For those who love heat, consider adding a dash of cayenne pepper or extra hot sauce!

    Is there a way to make this dish lighter? Yes! You can swap the heavy cream with half-and-half to reduce the fat content. Additionally, using less butter and cheese can help lighten the sauce while retaining flavor.

    What sides pair well with Cajun Lobster, Crab, and Salmon Alfredo? A simple green salad with a citrus vinaigrette or roasted vegetables can complement the richness of the dish nicely. Garlic bread is also a fan favorite!

    Can I prepare this meal ahead of time? While it’s best enjoyed fresh, you can make the Alfredo sauce ahead and store it in the fridge. Just reheat gently and add the seafood and pasta right before serving.

    Final Thoughts

    Cooking is more than just following a recipe; it’s about creating memories and savoring moments with loved ones. This Cajun Lobster, Crab, and Salmon Alfredo truly captures that essence! Imagine the joy on your family’s faces when they dig into this scrumptious, creamy dish. The way the buttery sauce envelops the seafood and pasta is pure magic, turning an ordinary evening into something extraordinary. Whether it’s a special occasion or a cozy weeknight dinner, this dish is sure to warm every heart around your table. Trust me, you’ll find this recipe will become a cherished favorite in your home!


    Print

    clock clock iconcutlery cutlery iconflag flag iconfolder folder iconinstagram instagram iconpinterest pinterest iconfacebook facebook iconprint print iconsquares squares iconheart heart iconheart solid heart solid icon

    Description

    A luxurious dish combining lobster, crab, and salmon in a creamy Cajun Alfredo sauce served over pasta.


    • 1 lobster tail, cooked and chopped
    • 1/2 lb crab meat, picked over for shells
    • 2 salmon fillets, skin removed and cut into chunks
    • 12 oz fettuccine or penne pasta
    • 2 tbsp olive oil
    • 4 tbsp unsalted butter
    • 3 garlic cloves, minced
    • 2 cups heavy cream
    • 1 cup grated Parmesan cheese
    • 1 tbsp Cajun seasoning
    • Salt and pepper to taste
    • 1/4 cup fresh parsley, chopped (for garnish)

    1. Cook the Pasta: Bring a large pot of salted water to a boil. Cook the pasta according to the package instructions until al dente. Drain and set aside.
    2. Sauté the Salmon: In a skillet, heat olive oil over medium heat. Season the salmon chunks with Cajun seasoning and cook for 3-4 minutes per side until golden and cooked through. Set aside.
    3. Prepare the Alfredo Sauce: In the same skillet, melt butter over medium heat. Add minced garlic and sauté for 1-2 minutes. Pour in the heavy cream and bring to a gentle simmer. Gradually stir in Parmesan cheese until melted and the sauce thickens.
    4. Add Seafood and Pasta: Stir in the chopped lobster, crab meat, and cooked salmon into the Alfredo sauce. Toss the cooked pasta into the sauce until fully coated.
    5. Serve: Garnish with freshly chopped parsley and serve hot with extra Parmesan cheese.

    Notes

    • For a spicier dish, add additional Cajun seasoning or a dash of hot sauce.
    • Fresh seafood is recommended, but frozen can also be used.
    • This dish pairs well with a crisp white wine.
    • Prep Time: 15 minutes
    • Cook Time: 25 minutes
    • Category: Main Course
    • Method: Sautéing
    • Cuisine: American

    Nutrition

    • Serving Size: 1 serving
    • Calories: 680
    • Sugar: 2g
    • Sodium: 750mg
    • Fat: 45g
    • Saturated Fat: 25g
    • Unsaturated Fat: 15g
    • Trans Fat: 0g
    • Carbohydrates: 45g
    • Fiber: 2g
    • Protein: 30g
    • Cholesterol: 150mg

    Sharing is caring!

  • Deep Hamburger Sausage And Pepperoni Pie: A Flavorful Delight!

    Deep Hamburger Sausage And Pepperoni Pie: A Flavorful Delight!


    Introduction to Deep Hamburger Sausage And Pepperoni Pie

    Gather ’round, friends! Today, I’m thrilled to share my beloved recipe for Deep Hamburger Sausage And Pepperoni Pie. This dish is like a warm hug on a plate—perfect for busy days when time feels short, yet you still want to impress your family or friends. Imagine a deliciously flaky crust cradling a hearty filling of seasoned meats and melty cheeses. It’s comfort food at its finest! This pie is not just satisfying; it’s a quick solution for a hectic evening or a weekend gathering that will leave everyone asking for seconds.

    Why You’ll Love This Deep Hamburger Sausage And Pepperoni Pie

    If you’re like me, juggling a thousand things at once, this pie is a true lifesaver. It comes together easily, with minimal prep work, making it a fantastic choice for those busy evenings. Plus, each bite bursts with flavor, marrying the rich meat and gooey cheese in perfect harmony. Not to mention, it’s a hit with both kids and adults alike. You’ll have an impressive dish ready in no time!

    Ingredients for Deep Hamburger Sausage And Pepperoni Pie

    Let’s gather the stars of our culinary show! For the Deep Hamburger Sausage And Pepperoni Pie, you’ll need:

    • All-purpose flour: The foundation for our flaky crust. It gives structure and texture, ensuring every bite has a delightful crunch.
    • Salt: A pinch of this magic ingredient elevates all the flavors. It’s essential for balancing the rich fillings.
    • Cold unsalted butter: Cold butter makes the crust flaky. Thanks to its solid state, it’ll create those lovely layers that break apart beautifully.
    • Ice water: This helps the dough come together without overworking it, preserving that coveted flakiness.
    • Ground beef: A hearty base for our filling. It offers a rich, savory element that pairs perfectly with our other meats.
    • Italian sausage: This adds a robust flavor profile. Look for the kind that’s mildly spiced to complement, rather than overpower.
    • Pepperoni: Who can resist those delicious, slightly spicy slices? They add a fun pop of flavor and that classic pizza vibe!
    • Onion: Finely chopped onions bring sweetness and depth, transforming our pie into something even more savory.
    • Garlic: A must-have in my kitchen! It enhances the aromas and adds a warm, inviting taste.
    • Tomato sauce: Adds moisture and a tangy burst. Look for a good quality brand for the best flavor.
    • Dried oregano and basil: These herbs are like the dream team for Italian dishes, providing fragrant notes that tie everything together.
    • Black pepper: A simple, yet impactful addition that rounds out the overall flavors.
    • Shredded mozzarella cheese: Melty, gooey goodness! Mozzarella ties the pie together and brings that comforting factor.
    • Grated Parmesan cheese: The finishing touch that adds a savory, nutty flavor, enhancing our cheesy layers.

    For ingredient amounts and printing, peek at the bottom of this article. Let’s dive in and make this amazing pie come to life!

    How to Make Deep Hamburger Sausage And Pepperoni Pie

    Now, let’s embark on our culinary adventure and bring the Deep Hamburger Sausage And Pepperoni Pie to life! Follow my step-by-step instructions; I promise it’ll be easier than you think.

    Step 1: Prepare the Pie Crust

    The foundation of our pie starts here! In a large bowl, combine the flour and salt. Next, add your cold cubed butter. Using a pastry cutter or your fingertips, mix until it resembles coarse crumbs—think of sandy beaches. It’s crucial to use cold butter; this is your secret to a flaky crust.

    Once you reach that crumbly texture, gradually add the ice water. Mix until it just comes together. Shape the dough into a ball, wrap it in plastic wrap, and pop it in the fridge for about 30 minutes. This chilling time is key for that beautiful flakiness.

    Step 2: Cook the Meats

    While your dough chills, let’s work on the filling! Heat a large skillet over medium heat. Cook the ground beef and Italian sausage together until they’re nice and browned. Make sure to break up the meat as it cooks for even browning.

    Once cooked, drain any excess fat. Nobody wants a greasy pie, right? Just a little fat is fine for moisture, but we don’t want it swimming in grease.

    Step 3: Sauté the Aromatics

    Now, it’s time to add layers of flavor! Toss in your finely chopped onion and minced garlic into the skillet. Sauté these beauties until they become soft and fragrant. Oh, the aroma is heavenly!

    These little ingredients pack a powerful punch, bringing sweetness and depth to your meat mixture. You’ll soon be embracing the spirit of Italian cooking!

    Step 4: Make the Filling

    After the aromatics are ready, stir in the tomato sauce along with the dried oregano, basil, and black pepper. Allow this mixture to simmer for about ten minutes.

    This step lets the flavors meld beautifully. Picture that savory, rich essence filling your kitchen and making everyone hungry for pie!

    Step 5: Assemble the Pie

    Let the assembly begin! Roll out your chilled dough on a floured surface. Fit it into your 9-inch deep-dish pie pan and trim the excess.

    Start layering by adding half of your meat mixture into the crust first. Next, sprinkle half of the mozzarella and Parmesan cheeses on top. Repeat with the remaining meat mixture, followed by the pepperoni slices that bring that classic flavor we love.

    Finish by sprinkling the remaining cheese on top. Trust me, this is where it gets extra cheesy and mouthwatering!

    Step 6: Bake the Pie

    Preheat your oven to 375°F (190°C) if you haven’t already. Place your pie in the oven, and bake it for 45 to 50 minutes. Keep an eye on it; the crust should turn golden brown, and the filling will bubble to perfection.

    To know it’s ready, look for that delightful browning on top and a hint of excitement from the filling bubbling over. Your deep-dish masterpiece is almost here!

    Tips for Success

    • Use cold butter to ensure a flaky pie crust—don’t skip this step!
    • Chill the dough; it helps retain that wonderful texture.
    • Feel free to mix in extra vegetables like bell peppers or mushrooms for added flavor and nutrition.
    • Check the pie a few minutes before the timer—ovens can vary!
    • Let the pie cool for about 10 minutes before slicing to avoid messy pieces.

    Equipment Needed

    • 9-inch deep-dish pie pan: A necessity for shaping our pie; a regular pie pan will work in a pinch.
    • Large mixing bowl: For combining those magical ingredients.
    • Pastry cutter or fork: To mix the butter into the flour; your hands can do the job too!
    • Skillet: For browning the meats and sautéing the aromatics.
    • Rolling pin: To roll out that beautiful pie crust; a wine bottle works if you’re in a pinch!

    Variations

    • Vegetarian version: Replace the meats with a mix of mushrooms, bell peppers, and zucchini for a hearty veggie option. Add some black beans or lentils for protein!
    • Spicy twist: Add jalapeños or spicy sausage to kick up the heat. For a little extra flavor, sprinkle crushed red pepper flakes on top before baking.
    • Cheesy delight: Swap out the mozzarella for gouda or provolone for a smoky flavor. Mixing different cheeses will give you a unique taste.
    • Gluten-free crust: Use a gluten-free all-purpose flour blend to create a pie crust that everyone can enjoy, keeping the same delicious fillings.
    • Make it a breakfast pie: Use breakfast sausage and add eggs to the filling for a hearty morning dish that’s perfect for brunch!

    Serving Suggestions for Deep Hamburger Sausage And Pepperoni Pie

    • Serve with a crisp green salad dressed with a light vinaigrette for a refreshing contrast.
    • Pair it with garlic bread or breadsticks to soak up the delicious flavors.
    • A nice chilled soda or iced tea complements the pie beautifully.
    • For presentation, garnish with fresh parsley or basil to add a pop of color.

    FAQs about Deep Hamburger Sausage And Pepperoni Pie

    Can I make the Deep Hamburger Sausage And Pepperoni Pie ahead of time?
    Absolutely! You can prepare the pie in advance and refrigerate it before baking. Just be sure to cover it tightly. When you’re ready to bake, add a few extra minutes to the cooking time to ensure it heats through properly.

    What can I substitute for the meat?
    If you’re looking for a lighter option, feel free to use ground turkey or chicken instead of beef and sausage. Alternatively, you can load it up with vegetables or even try a meat-free meat substitute to create a delicious vegetarian version.

    How do I store leftovers?
    Leftover Deep Hamburger Sausage And Pepperoni Pie can be covered and stored in the fridge for up to three days. Simply reheat individual slices in the microwave or oven until warmed through. It’s just as tasty the next day!

    Can I freeze this pie?
    You can freeze the pie before baking it. Wrap it tightly in plastic wrap and then in aluminum foil. When you’re ready to enjoy it, just bake it directly from the freezer, adding a bit more time to the cooking process.

    What side dishes pair well with this pie?
    A fresh salad with a light dressing pairs wonderfully with the rich flavors of the pie. Additionally, serving some garlic bread or roasted vegetables can make your meal even more delightful.

    Final Thoughts

    Creating the Deep Hamburger Sausage And Pepperoni Pie is more than just making a meal; it’s about gathering loved ones around the table to share good food and laughter. This pie wraps comfort in every bite, inviting everyone to savor those delectable layers of flavor. Trust me, the joy radiating from your family as they dive into a slice is truly priceless. I hope this dish brings warmth and happiness to your home, just as it has to mine. Let each slice remind you that sometimes, it’s the simplest recipes that create the happiest memories.


    Print

    clock clock iconcutlery cutlery iconflag flag iconfolder folder iconinstagram instagram iconpinterest pinterest iconfacebook facebook iconprint print iconsquares squares iconheart heart iconheart solid heart solid icon

    Description

    A delicious deep-dish pie filled with ground beef, Italian sausage, pepperoni, and a blend of cheeses, perfect for any gathering.


    • 2 cups all-purpose flour
    • 1 tsp salt
    • 1 cup unsalted butter, cold and cubed
    • 1/4 cup ice water
    • 1 lb ground beef
    • 1 lb Italian sausage, casings removed
    • 1 cup pepperoni, sliced
    • 1 onion, finely chopped
    • 2 cloves garlic, minced
    • 1 can (15 oz) tomato sauce
    • 1 tsp dried oregano
    • 1 tsp dried basil
    • 1/2 tsp black pepper
    • 1 cup shredded mozzarella cheese
    • 1/2 cup grated Parmesan cheese

    1. Preheat the oven to 375°F (190°C).
    2. In a large bowl, combine flour and salt. Cut in the cold butter until the mixture resembles coarse crumbs. Gradually add ice water, mixing until the dough comes together. Form into a ball, wrap in plastic, and refrigerate for 30 minutes.
    3. In a large skillet, cook ground beef and Italian sausage over medium heat until browned. Drain excess fat.
    4. Add onion and garlic to the skillet and cook until softened. Stir in tomato sauce, oregano, basil, and black pepper. Simmer for 10 minutes.
    5. Roll out the dough on a floured surface to fit a 9-inch deep-dish pie pan. Press the dough into the pan and trim the edges.
    6. Layer half of the meat mixture into the crust. Top with half of the mozzarella and Parmesan cheeses. Add the remaining meat mixture and top with pepperoni slices.
    7. Sprinkle the remaining cheeses over the top.
    8. Bake in the preheated oven for 45-50 minutes, or until the crust is golden and the filling is bubbly.
    9. Let the pie cool for 10 minutes before slicing and serving.

    Notes

    • Ensure the butter is cold for a flaky crust.
    • You can add more vegetables like bell peppers or mushrooms for extra flavor.
    • Allowing the pie to cool helps in slicing it neatly.
    • Prep Time: 30 minutes
    • Cook Time: 50 minutes
    • Category: Main Course
    • Method: Baking
    • Cuisine: American

    Nutrition

    • Serving Size: 1 slice
    • Calories: 380
    • Sugar: 2g
    • Sodium: 900mg
    • Fat: 24g
    • Saturated Fat: 12g
    • Unsaturated Fat: 8g
    • Trans Fat: 1g
    • Carbohydrates: 30g
    • Fiber: 2g
    • Protein: 20g
    • Cholesterol: 70mg

    Sharing is caring!

  • Cherry Cobbler Muffins are a must-try treat today!

    Cherry Cobbler Muffins are a must-try treat today!


    Introduction to Cherry Cobbler Muffins

    When life gets busy, having quick and delightful treats like Cherry Cobbler Muffins on hand can make all the difference. I mean, who doesn’t need a little sweetness to brighten their day? These muffins are not just a convenient snack; they’re also a celebration of flavors. Imagine biting into a warm, buttery muffin bursting with juicy cherries and topped with a crumbly sweet goodness. They are perfect for breakfast, an afternoon pick-me-up, or a dessert to surprise your loved ones. Trust me, once you taste these, they’ll become your new favorite go-to treat!

    Why You’ll Love This Cherry Cobbler Muffins

    Cherry Cobbler Muffins are not just easy to make; they’re also bursting with flavor. In just 40 minutes, you can whip up a batch that resonates with both warmth and nostalgia. The combination of sweet cherries and buttery muffin goodness creates a delightful treat your family will adore. Plus, these muffins are versatile enough for breakfast or dessert. With each bite, you’ll be reminded that simple can be absolutely superb!

    Ingredients for Cherry Cobbler Muffins

    When it comes to baking these delightful Cherry Cobbler Muffins, having the right ingredients is key. Here’s what you’ll need:

    • All-purpose flour: This forms the base of our muffins. It gives them that perfect structure, keeping them light and fluffy.
    • Baking powder: A little lift is necessary, and this ingredient helps our muffins rise beautifully.
    • Baking soda: This adds additional leavening power, ensuring our muffins are wonderfully airy.
    • Salt: Just a pinch enhances the overall flavors, balancing the sweetness of the cherries and sugar.
    • Unsalted butter: Using softened butter provides richness and moisture, making all the difference in the final texture.
    • Granulated sugar: This sweetener infuses the muffins with sweetness. You can adjust to taste if you’d like a less sugary treat.
    • Large eggs: They not only bind the ingredients but also contribute to the muffins’ structure and moisture.
    • Vanilla extract: A splash of this adds warmth and enhances the overall flavor of the muffins.
    • Buttermilk: This ingredient keeps the muffins tender and adds a subtle tanginess that complements the cherries.
    • Cherries: You can use fresh or frozen, and they add that delicious burst of flavor! Just make sure to pit and halve them.
    • Crumble topping ingredients: Another dash of flour, sugars, and cold butter come together to create a delightful textural contrast on top.
    • Optional substitutions: Feel free to swap cherries for other fruits like blueberries or raspberries for variety!

    For precise measurements and more detailed instructions, check the portion at the bottom of the article, where they’re conveniently listed for printing. Happy baking!

    How to Make Cherry Cobbler Muffins

    Step 1: Preheat the Oven and Prepare the Muffin Tin

    Let’s start by setting the scene! Preheat your oven to 375°F (190°C). This step is crucial because the muffins need that heat to rise perfectly. While the oven is warming up, line your muffin tin with paper liners. This not only makes cleanup a breeze but also gives your muffins a pretty presentation. Trust me, your family will be impressed!

    Step 2: Mix the Dry Ingredients

    In a medium bowl, whisk together the all-purpose flour, baking powder, baking soda, and salt. This is where the magic begins! Mixing these dry ingredients ensures that our leavening agents are evenly distributed. A good blend will help our Cherry Cobbler Muffins rise beautifully. Set this bowl aside for now while we move on to the next step of our exciting muffin-making adventure.

    Step 3: Cream the Butter and Sugar

    Now, grab a large bowl and cream the softened butter with sugar until it’s light and fluffy. I love using a hand mixer for this task, but you can also use a sturdy spatula. This process is essential as it adds air into the mixture, ensuring our muffins have a lovely texture. Just imagine how delicious they’ll be with that perfect buttery sweetness!

    Step 4: Add Eggs and Vanilla

    With the butter and sugar creamed, it’s time to incorporate the eggs, one at a time. Make sure to mix well after each addition. Then, add a splash of vanilla extract. My kitchen begins to smell heavenly at this point! The vanilla adds that warmth that pairs so well with our cherries. This mixture is coming together beautifully!

    Step 5: Combine Dry Ingredients and Buttermilk

    Now, we’re going to alternate adding our dry mixture with the buttermilk. Start with a bit of the dry mix, then pour in some buttermilk. Keep mixing just until combined; overmixing can make the muffins tough. We want them light and fluffy. Think of it like an intricate dance, just a little back and forth will do!

    Step 6: Fold in the Cherries

    Here comes the fun part—folding in the cherries! Gently add your halved cherries to the batter. Take your time here and be careful not to overmix. You want those juicy beauties to stay nice and intact, creating sweet pockets of flavor in each muffin. The colorful cherries add both taste and a pop of color!

    Step 7: Fill Muffin Cups

    Using a scoop or a spoon, fill each muffin cup about three-quarters full with the batter. This gives them room to rise without overflowing. The perfect fill will create those lovely dome shapes. Just picture the soft, fluffy tops you’ll get. It’s all about finding that sweet spot!

    Step 8: Prepare the Crumble Topping

    In a small bowl, mix together the flour, sugars, and a pinch of salt for our crumble topping. Then, it’s time to cut in the cold butter. You want to create a crumbly texture, resembling coarse sand. Use your fingers or a pastry cutter for this. This topping will give our muffins that irresistible crunch!

    Step 9: Bake the Muffins

    Lastly, sprinkle a generous amount of crumble topping over each muffin. It adds an extra layer of yum. Pop them into the preheated oven and bake for 20 to 25 minutes. Keep an eye on them! Insert a toothpick in the center; it should come out clean when they’re ready. The aroma of delicious muffins will fill your kitchen, making it hard to wait!

    Tips for Success

    • Use room temperature ingredients for better mixing.
    • Don’t overmix the batter; it should be slightly lumpy.
    • Fresh cherries are fantastic, but frozen work just as well—no need to thaw!
    • Test muffins for doneness a minute early to avoid overbaking.
    • Let them cool in the tin for a few minutes for easy removal.

    Equipment Needed

    • Muffin tin: A standard 12-cup muffin tin works perfectly for this recipe.
    • Mixing bowls: Use a large bowl for wet ingredients and a medium one for dry ingredients.
    • Whisk: A simple whisk does wonders for mixing dry ingredients.
    • Hand mixer: Ideal for creaming butter and sugar; a sturdy spatula is also a good substitute.
    • Scoop or spoon: For filling the muffin cups with just the right amount of batter.

    Variations

    • Berry Delight: Replace cherries with a mix of blueberries and raspberries for a vibrant twist.
    • Peachy Keen: Fresh or canned peaches can be substituted for a summery muffin experience.
    • Nutty Crunch: Add chopped walnuts or almonds to the muffin batter for extra texture and flavor.
    • Gluten-Free Option: Use a gluten-free all-purpose flour blend for a gluten-free version of these muffins.
    • Vegan Adaptation: Substitute eggs with flax eggs and use plant-based butter or coconut oil for a vegan-friendly treat.

    Serving Suggestions for Cherry Cobbler Muffins

    • Serve warm with a dollop of whipped cream or a scoop of vanilla ice cream for a delightful dessert.
    • Pair these muffins with a steaming cup of coffee or tea for a cozy breakfast.
    • Presentation tip: Dust with powdered sugar for a charming touch at your next brunch!

    FAQs about Cherry Cobbler Muffins

    Can I use frozen cherries for Cherry Cobbler Muffins?

    Absolutely! Frozen cherries work wonderfully and save you prep time. Just be sure not to thaw them before adding them to the batter. They’ll blend in beautifully as the muffins bake.

    How can I store leftover Cherry Cobbler Muffins?

    To keep your muffins fresh, store them in an airtight container at room temperature for up to three days. If you want to keep them longer, consider freezing them in a freezer-safe bag for future enjoyment!

    What can I substitute for buttermilk in this recipe?

    If you don’t have buttermilk on hand, don’t worry! You can easily make a substitute by combining regular milk with a squeeze of lemon juice or vinegar—let it sit for about five minutes to thicken.

    Are Cherry Cobbler Muffins suitable for breakfast?

    Yes, indeed! These muffins are perfect for breakfast, offering a sweet yet satisfying start to your day. Pair them with a side of fruit or yogurt for a balanced meal.

    Can I make these muffins gluten-free?

    Of course! Just swap out the all-purpose flour with a gluten-free all-purpose flour blend. This way, everyone can indulge in these delicious Cherry Cobbler Muffins!

    Final Thoughts

    As you savor each bite of these Cherry Cobbler Muffins, you’ll discover the joy of simple pleasures. Baking these delightful treats brings a sprinkle of warmth to any day, filling your home with irresistible aromas. Whether you’re sharing them with loved ones or enjoying a quiet moment with a cup of coffee, these muffins are more than just a delicious snack—they’re a way to create cherished memories. So roll up your sleeves, gather your ingredients, and embrace the joy of home baking. Life’s a little sweeter with Cherry Cobbler Muffins on the table!


    Print

    clock clock iconcutlery cutlery iconflag flag iconfolder folder iconinstagram instagram iconpinterest pinterest iconfacebook facebook iconprint print iconsquares squares iconheart heart iconheart solid heart solid icon

    Description

    Cherry Cobbler Muffins are a deliciously sweet treat, combining fresh or frozen cherries with a buttery muffin base and a crumbly topping.


    • 2 cups all-purpose flour
    • 1 tablespoon baking powder
    • 1/2 teaspoon baking soda
    • 1/2 teaspoon salt
    • 1/2 cup unsalted butter, softened
    • 3/4 cup granulated sugar
    • 2 large eggs
    • 1 teaspoon vanilla extract
    • 3/4 cup buttermilk
    • 1 1/2 cups pitted fresh or frozen cherries, halved
    • 1/2 cup all-purpose flour (for crumble topping)
    • 1/4 cup granulated sugar (for crumble topping)
    • 1/4 cup brown sugar (for crumble topping)
    • 1/4 cup unsalted butter, cold and cubed (for crumble topping)
    • Pinch of salt (for crumble topping)

    1. Preheat your oven to 375°F (190°C) and line a muffin tin with paper liners.
    2. In a medium bowl, whisk together the flour, baking powder, baking soda, and salt.
    3. In a large bowl, cream the butter and sugar together until light and fluffy.
    4. Beat in the eggs, one at a time, then add vanilla extract.
    5. Gradually alternate adding the dry ingredients and buttermilk to the wet mixture, mixing just until combined.
    6. Gently fold in the halved cherries, being careful not to overmix.
    7. Scoop the batter evenly into the prepared muffin cups, filling each about 3/4 full.
    8. For the crumble topping: In a small bowl, combine the flour, sugars, and salt. Cut in the cold butter using a pastry cutter or your fingers until crumbly.
    9. Sprinkle the crumble topping generously over each muffin.
    10. Bake for 20–25 minutes or until a toothpick inserted into the center comes out clean.
    11. Let the muffins cool for a few minutes before transferring to a wire rack.

    Notes

    • These muffins are best enjoyed warm.
    • Store any leftovers in an airtight container for up to 3 days.
    • Feel free to substitute the cherries with other fruits like blueberries or raspberries.
    • Prep Time: 15 minutes
    • Cook Time: 25 minutes
    • Category: Dessert
    • Method: Baking
    • Cuisine: American

    Nutrition

    • Serving Size: 1 muffin
    • Calories: 210
    • Sugar: 14g
    • Sodium: 180mg
    • Fat: 9g
    • Saturated Fat: 5g
    • Unsaturated Fat: 2g
    • Trans Fat: 0g
    • Carbohydrates: 30g
    • Fiber: 1g
    • Protein: 3g
    • Cholesterol: 50mg

    Sharing is caring!

  • Cherry Banana Muffins: A Delicious Twist You’ll Love!

    Cherry Banana Muffins: A Delicious Twist You’ll Love!


    Introduction to Cherry Banana Muffins

    Imagine waking up to the enticing aroma of freshly baked Cherry Banana Muffins wafting through your home. It’s the perfect way to start your day, don’t you think? As a busy mom, I understand the struggle of juggling breakfast prep while getting the kids ready for school. These muffins are a quick solution that marries the sweetness of ripe bananas with the tart burst of juicy cherries. They’re not only delicious but also a delightful way to impress loved ones during your weekend brunch. Trust me; once you try these, you’ll be hooked!

    Why You’ll Love This Cherry Banana Muffins

    What’s not to love about Cherry Banana Muffins? They’re incredibly easy to whip up, making them perfect for those busy mornings when time is of the essence. The combination of flavors brings a smile to everyone’s face, even the pickiest eaters. Plus, these muffins freeze beautifully, allowing you to savor that delightful taste any day of the week. Honestly, each bite is like a warm hug in muffin form!

    Ingredients for Cherry Banana Muffins

    Gathering the right ingredients is like assembling the pieces of a delicious puzzle. Let’s take a quick look at what you’ll need for these delightful Cherry Banana Muffins.

    • All-purpose flour: This is the backbone of your muffins, giving them that fluffy texture. Use unbleached for a more wholesome option.
    • Granulated sugar: It sweetens your batter and balances the tartness from the cherries. Feel free to swap some for brown sugar for a deeper flavor.
    • Baking powder: The leavening agent that helps your muffins rise, keeping them light and airy.
    • Baking soda: Works with the baking powder to create that perfect lift. Together, they’re a dynamic duo!
    • Salt: A pinch enhances all the flavors and cuts through the sweetness, making each bite even more enjoyable.
    • Mashed ripe bananas: Ripe bananas add natural sweetness and moisture. Choose ones with a few brown spots for the best flavor.
    • Unsalted butter: It brings richness to the recipe. Melted butter creates a tender crumb, essential for perfect muffins.
    • Large egg: Eggs help bind everything together, providing structure to your muffins. For a lighter option, you can use a flax egg.
    • Vanilla extract: It adds a warm, sweet aroma that complements the fruit perfectly; always opt for pure vanilla if possible.
    • Cherries: Fresh or frozen, they offer that delightful tartness. Don’t forget to pit and chop them for even distribution.
    • Optional nuts: Chopped walnuts or pecans can be folded in for added crunch. These also introduce a wonderful nutty flavor.

    For exact measurements, please check the detailed recipe at the bottom of the article, where you can also find a printable version!

    How to Make Cherry Banana Muffins

    Now that you have all your ingredients lined up, let’s dive into making these scrumptious Cherry Banana Muffins! Follow these simple steps, and you’ll have a warm batch in no time.

    Prepare Your Oven and Muffin Tin

    First things first, preheat your oven to 350°F (175°C). This step is crucial for even baking.

    While the oven warms up, grab your muffin tin. You can line it with paper liners or lightly grease it with non-stick spray. This will ensure your muffins pop right out without any fuss!

    Mix Your Dry Ingredients

    In a large bowl, whisk together the all-purpose flour, baking powder, baking soda, salt, and granulated sugar. I love to use a whisk; it aerates the flour and helps everything mix evenly. Remember, this is key for fluffy muffins!

    Combine Wet Ingredients

    In another bowl, mix the mashed ripe bananas, melted butter, egg, and vanilla extract. Stir until it’s fabulously combined, and the bananas are nicely broken down. The aroma from the vanilla is just heavenly!

    Incorporate Dry and Wet Ingredients

    Now comes the fun part! Add the wet ingredients to the dry mixture.

    Gently stir everything together until just combined. You don’t want to overmix here; that’s a surefire way to get dense muffins. A few lumps are perfectly fine—think of it as character!

    Fold in Cherries

    Carefully fold in the chopped cherries and, if you’re using them, the chopped nuts. Use a spatula to gently turn the mixture so you don’t mush the cherries too much. You want that colorful burst in every bite!

    Pour Into Muffin Cups

    Divide the batter evenly among the muffin cups, filling each about three-quarters full. This allows room for them to rise without overflowing. Trust me, it’s so much easier than cleaning up a muffin explosion!

    Bake to Perfection

    Place your muffin tin in the preheated oven and bake for 20-25 minutes. You’ll know they’re done when they turn golden brown and a toothpick inserted into the center comes out clean. That’s the moment of joy that tells you muffins are ready to make a grand entrance!

    Cool and Enjoy

    After baking, let the muffins cool in the pan for about 5 minutes. This makes them easier to handle. Then, transfer them to a wire rack to cool completely. But let’s be honest, I usually sneak a warm muffin right away!

    Tips for Success

    • Use overripe bananas for maximum sweetness and moisture.
    • Handle the batter gently to keep your muffins light and fluffy.
    • Experiment with different nuts or even chocolate chips for added flavor.
    • Don’t skip the cooling time—it enhances texture and flavor.
    • Store any leftovers in an airtight container to keep them fresh!

    Equipment Needed

    • Muffin tin: A standard 12-cup tin works perfectly, but a mini version is fun too!
    • Mixing bowls: Use a large bowl for dry ingredients and a medium bowl for wet ingredients.
    • Whisk: A simple whisk helps incorporate air into your dry ingredients.
    • Spatula: Ideal for folding in ingredients gently without overmixing.
    • Wire rack: Perfect for cooling your muffins to prevent sogginess.

    Variations on Cherry Banana Muffins

    • Berry Blast: Substitute cherries with a mix of blueberries and raspberries for a juicy twist.
    • Chocolate Chip Delights: Add semi-sweet chocolate chips into the batter for a decadent treat!
    • Whole Wheat Goodness: Use whole wheat flour instead of all-purpose for added fiber and nutrition.
    • Vegan Version: Replace the egg with a flax egg and use a plant-based butter for a dairy-free option.
    • Spiced Up: Add a teaspoon of cinnamon or nutmeg to lend warmth and cozy flavors.

    Serving Suggestions

    • Pair with a dollop of whipped cream for a decadent treat.
    • Serve alongside a fresh fruit salad for a burst of color and flavor.
    • Enjoy with a hot cup of coffee or a refreshing iced tea.
    • For added flair, dust with powdered sugar before serving!

    FAQs about Cherry Banana Muffins

    Can I use frozen cherries in Cherry Banana Muffins?

    Absolutely! Frozen cherries work just as well. Just remember to thaw and chop them before adding to your batter. They’ll add that delightful tartness and keep your muffins delicious!

    How can I store leftover Cherry Banana Muffins?

    Store any leftovers in an airtight container at room temperature for up to three days. For longer storage, pop them in the freezer, and they’ll stay fresh for up to three months. When you crave a muffin, just thaw and enjoy!

    Can I make Cherry Banana Muffins healthier?

    Sure thing! Consider using whole wheat flour for added fiber or reduce the sugar by half to cut calories. You can even use applesauce as a replacement for some of the butter. It’s all about making it your own!

    What should I serve with Cherry Banana Muffins?

    These muffins are delightful on their own but can be even more special with a side of yogurt or creamy whipped cheese. A hot cup of coffee or a refreshing smoothie pairs beautifully too!

    How do I know when my muffins are done baking?

    Check for doneness by inserting a toothpick into the center of a muffin. If it comes out clean or with just a few crumbs, you’re all set. A golden-brown top is also a good sign of perfectly baked muffins!

    Final Thoughts

    Every bite of these Cherry Banana Muffins is like a little celebration in your mouth. They’re perfect for starting your day with a smile or as a sweet afternoon pick-me-up. The blend of tart cherries and sweet bananas creates a symphony of flavor that delights young and old alike. As I pull a warm muffin from the oven, I can’t help but feel a surge of joy knowing I’ve created something so simple yet so loved. Try this recipe, and I promise it’ll become a cherished staple in your home—just like it has in mine!


    Print

    clock clock iconcutlery cutlery iconflag flag iconfolder folder iconinstagram instagram iconpinterest pinterest iconfacebook facebook iconprint print iconsquares squares iconheart heart iconheart solid heart solid icon

    Description

    Delicious cherry banana muffins that combine the sweetness of ripe bananas with the tartness of cherries, perfect for breakfast or a snack.


    • 1 ½ cups all-purpose flour
    • ¾ cup granulated sugar
    • 1 teaspoon baking powder
    • ½ teaspoon baking soda
    • ¼ teaspoon salt
    • 1 cup mashed ripe bananas (about 23 medium bananas)
    • ½ cup unsalted butter, melted
    • 1 large egg
    • 1 teaspoon vanilla extract
    • ¾ cup cherries, pitted and chopped (fresh or frozen)
    • Optional: ½ cup chopped walnuts or pecans

    1. Preheat your oven to 350°F (175°C) and line a muffin tin with paper liners or lightly grease it.
    2. In a large bowl, whisk together the flour, sugar, baking powder, baking soda, and salt.
    3. In another bowl, mix the mashed bananas, melted butter, egg, and vanilla extract until well combined.
    4. Add the wet ingredients to the dry ingredients, stirring until just combined. Be careful not to overmix.
    5. Fold in the chopped cherries (and nuts if using), distributing evenly throughout the batter.
    6. Divide the batter evenly among the muffin cups, filling each about ¾ full.
    7. Bake for 20-25 minutes, or until a toothpick inserted into the center comes out clean.
    8. Let the muffins cool in the pan for 5 minutes before transferring them to a wire rack to cool completely.

    Notes

    • For best results, use ripe bananas for added sweetness.
    • Cherries can be substituted with other fruits like blueberries or raspberries if desired.
    • Prep Time: 15 minutes
    • Cook Time: 25 minutes
    • Category: Baked Goods
    • Method: Baking
    • Cuisine: American

    Nutrition

    • Serving Size: 1 muffin
    • Calories: 180
    • Sugar: 12g
    • Sodium: 150mg
    • Fat: 8g
    • Saturated Fat: 4g
    • Unsaturated Fat: 3g
    • Trans Fat: 0g
    • Carbohydrates: 24g
    • Fiber: 1g
    • Protein: 2g
    • Cholesterol: 30mg

    Sharing is caring!