Blog

  • Strawberry Crunch Cheesecake Tacos

    Strawberry Crunch Cheesecake Tacos


    Introduction to Strawberry Crunch Cheesecake Tacos

    There’s something magical about a dessert that combines two beloved treats.
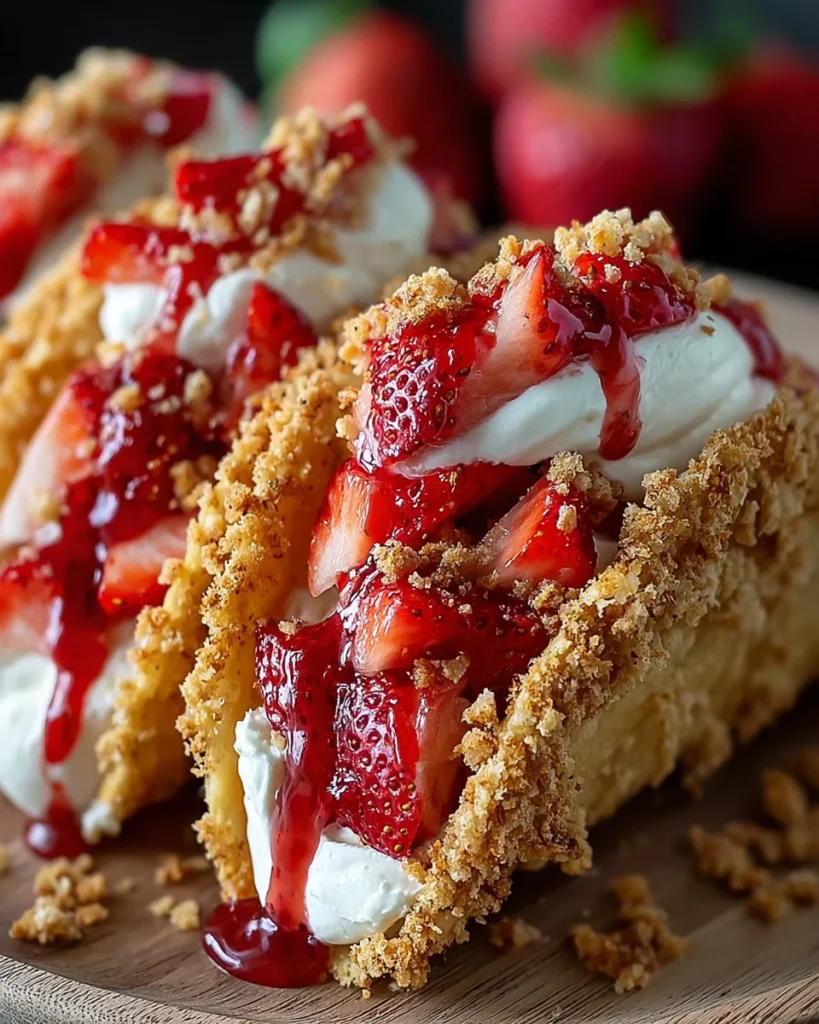
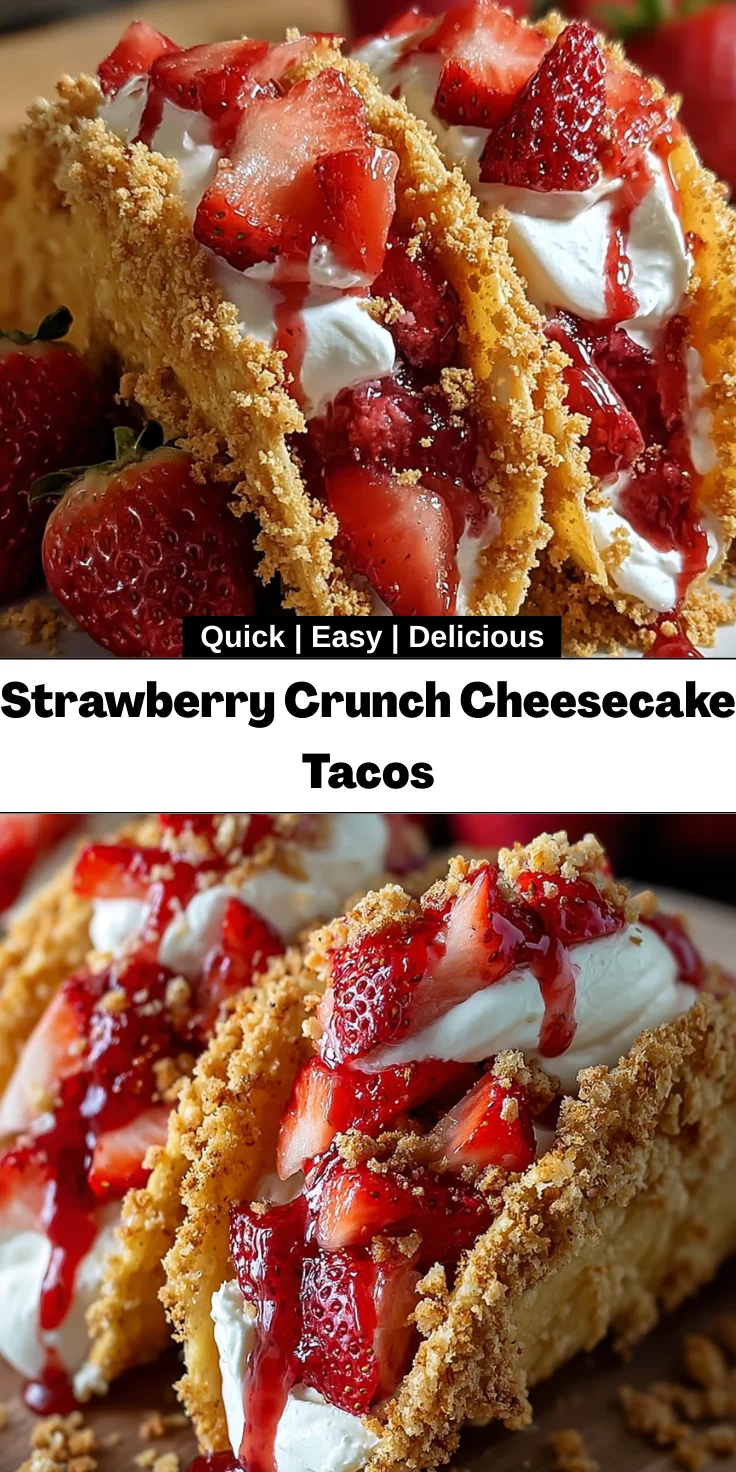
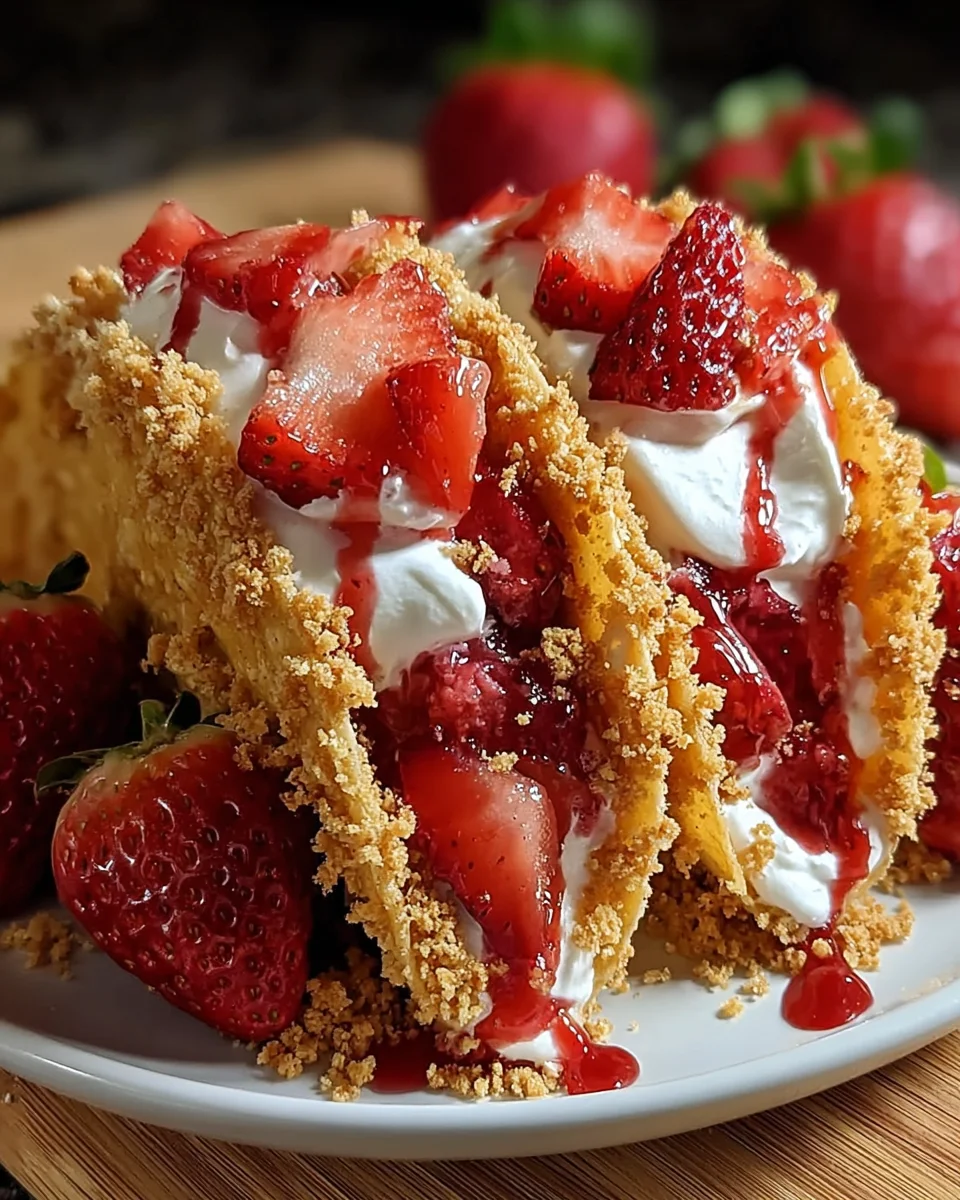
    Strawberry Crunch Cheesecake Tacos are just that! Picture creamy cheesecake cradled in a crunchy graham cracker shell, topped with fresh strawberries.
    It’s a delightful fusion that’s perfect for our busy lives. Whether you’re looking for a quick treat to satisfy those late-night cravings or a show-stopping dessert for your next gathering, these tacos fit the bill. I can already hear your kids asking for seconds, and trust me, your loved ones will be impressed!

    Why You’ll Love This Strawberry Crunch Cheesecake Tacos

    These Strawberry Crunch Cheesecake Tacos are a breeze to whip up, making them perfect for busy moms and professionals. They come together in just 30 minutes, with minimal fuss and no baking involved. Plus, their charming presentation makes them a hit with kids and adults alike. The combination of creamy, fruity, and crunchy textures creates a flavor explosion that will leave everyone wanting more. It’s a dessert that brings joy without the stress!

    Ingredients for Strawberry Crunch Cheesecake Tacos

    Let’s dive into the delicious components that make these Strawberry Crunch Cheesecake Tacos a reality!
    Each ingredient plays a vital role, contributing to the overall harmony of flavors and textures.

    • Cream Cheese: The star of the show! Softened cream cheese provides a creamy and rich base for the cheesecake filling.
    • Granulated Sugar: A natural sweetener that balances the tanginess of the cream cheese, making every bite delightful.
    • Vanilla Extract: Pure magic in a bottle! It adds a warm, comforting flavor that enhances the entire dessert.
    • Heavy Cream: This thick, luscious cream helps to create a silky-smooth texture. It takes the filling to the next level!
    • Fresh Strawberries: Juicy and vibrant, fresh strawberries are the star fruit in these tacos, bursting with flavor.
    • Graham Cracker Crumbs: The base for our taco shells. They provide a crunchy, sweet contrast to the creamy filling.
    • Unsalted Butter: This binds the crumbs together, ensuring that each shell holds its shape beautifully.
    • Chopped Toasted Pecans: Optional but oh-so-delicious! They add a nutty crunch that enhances the overall flavor.
    • Additional Strawberries for Garnish: More fresh strawberries on top not only look stunning but also add a burst of freshness.

    I’ve included the exact measurements below this section for easy access and printing.
    Feel free to get creative! Substitute the strawberries with other berries if you like.
    These delicious ingredients come together perfectly for a treat you won’t forget!

    How to Make Strawberry Crunch Cheesecake Tacos

    Step 1: Prepare the Cheesecake Filling

    Let’s start by making the luscious cheesecake filling, the heart of these Strawberry Crunch Cheesecake Tacos.
    In a medium bowl, grab that softened cream cheese and beat it until it’s smooth and creamy, like a dreamy cloud.
    Add in the granulated sugar and vanilla extract, mixing until everything unites in creamy perfection.
    You really want the cream cheese to be softened; it makes all the difference in creating that velvety texture.
    Give it a good five minutes, the more you mix, the more delightful the filling becomes.
    Trust me, you’ll be diving into this goodness in no time!

    Step 2: Fold in Strawberries and Heavy Cream

    Now for the fun part!
    Gently fold in those finely chopped strawberries and heavy cream into your heavenly mixture.
    Take care to do this gently, or you might crush those vibrant strawberries—no one wants a strawberry puree here!
    The heavy cream should blend in nicely, creating a silky filling that’s rich with strawberry goodness.
    This will be the treat that makes your tacos truly irresistible.

    Step 3: Make the Taco Shells

    Let’s create those crunchy taco shells!
    In a separate bowl, combine your graham cracker crumbs with melted butter.
    Mix until the crumbs are evenly coated and resemble a sandy beach—crunchy and ready for loading.
    Now, it’s time to form those shells!
    Using small taco-shaped molds or a muffin tin, carefully divide the crumb mixture, pressing it firmly into the sides and bottom of each mold.
    You want the walls sturdy enough to hold your creamy filling without crumbling apart.
    Trust me; this part is satisfying and sets the foundation for a fantastic dessert.

    Step 4: Chill the Taco Shells

    Now that your taco shells are formed, the next step is super important: chilling!
    Pop those molds in the refrigerator for at least 2 hours.
    This chilling phase gives the shells time to firm up and provides the maximum crunch factor.
    When they come out, they’ll be perfectly ready to hold all that creamy goodness you created earlier.
    It’s hard to resist peeking in, but just let them chill for now.
    The wait will be worth it!

    Step 5: Fill the Taco Shells

    With the taco shells chilled and firm, it’s time to fill them with your delightful cheesecake mixture.
    Carefully spoon or pipe the filling into each shell, making sure they get an even share of that creamy, strawberry goodness.
    Be gentle; we don’t want a taco disaster!
    If you’re feeling fancy, you can use a piping bag for a neat look.
    Just be cautious not to overfill, or they might spill over.
    Each taco deserves its fair share of creamy joy!

    Step 6: Garnish and Serve

    Finally, let’s dress up these beautiful tacos!
    Sprinkle them with some chopped toasted pecans for a tasty crunch, if you wish.
    Then, top with additional fresh strawberries for that pop of color and flavor.
    When it’s time to serve, present them on a nice platter, and watch everyone’s faces light up.
    These Strawberry Crunch Cheesecake Tacos are best enjoyed chilled, so keep them cool until you’re ready to dig in.
    Trust me, each bite will have everyone swooning!

    Tips for Success

    • Ensure your cream cheese is at room temperature for a silky filling.
    • Don’t skip the chilling step—it’s key for the perfect taco shell.
    • Use a gentle hand when folding in the strawberries to keep their shape.
    • Have fun with garnishes! Nuts and extra fruit add flair.
    • Preparing ahead? Store your taco shells and filling separately to maintain freshness.

    Equipment Needed

    • Medium mixing bowl: Any large bowl will do for mixing your filling.
    • Hand mixer or whisk: A whisk works fine if you’re feeling strong!
    • Taco-shaped molds or muffin tin: Use any small, round mold to create taco shapes.
    • Refrigerator: Essential for chilling your creations.
    • Spoon or piping bag: Perfect for filling those taco shells with creamy goodness.

    Variations of Strawberry Crunch Cheesecake Tacos

    • Berry Medley: Substitute fresh strawberries with a mix of blueberries, raspberries, and blackberries for a colorful treat bursting with different flavors.
    • Chocolate Drizzle: Add a drizzle of melted chocolate on top for a decadent twist that chocolate lovers will adore.
    • Lemon Zest: Incorporate some finely grated lemon zest into the cheesecake filling for a zesty brightness that complements the strawberries beautifully.
    • Gluten-Free Option: Use gluten-free graham cracker crumbs for the taco shells to make this dessert suitable for gluten-sensitive individuals.
    • Dairy-Free Delight: Substitute cream cheese and heavy cream with vegan alternatives, ensuring everyone can enjoy these delicious tacos.

    Serving Suggestions

    • Pair these Strawberry Crunch Cheesecake Tacos with a scoop of vanilla ice cream for an indulgent experience.
    • Serve alongside a fresh fruit salad to add a refreshing contrast to the rich flavors.
    • A sparkling lemonade or fruity iced tea makes for a delightful drink pairing.
    • Present them on a colorful platter and garnish with mint leaves for an appealing touch.

    FAQs about Strawberry Crunch Cheesecake Tacos

    You may have some burning questions about these delightful Strawberry Crunch Cheesecake Tacos.
    Let’s tackle the most common ones together!

    Can I make Strawberry Crunch Cheesecake Tacos ahead of time?

    Absolutely! These tacos can be prepped a day in advance. Just keep the taco shells and filling separate until you’re ready to serve.
    This ensures maximum freshness and prevents sogginess.

    What if I don’t have graham cracker crumbs?

    No worries! You can use crushed cookies, such as digestive or vanilla wafers, as a delicious alternative.
    They’ll still deliver that satisfying crunch.

    Can I use frozen strawberries instead of fresh?

    Certainly! Just thaw the frozen strawberries and drain any excess liquid before folding them into the cheesecake filling.
    This way, you won’t get a watery mixture, maintaining that creamy texture.

    How do I store leftover Strawberry Crunch Cheesecake Tacos?

    Store any leftovers in an airtight container in the fridge. They’re best enjoyed within 24 hours for optimal flavor and texture.
    Don’t worry if they don’t all get eaten right away; they still taste fantastic!

    Can I modify the sweetness of the filling?

    Yes! Feel free to adjust the granulated sugar to your taste.
    You can even use natural sweeteners like honey or maple syrup for a different flavor profile.
    Just remember, a little goes a long way!

    Final Thoughts

    Making Strawberry Crunch Cheesecake Tacos is more than just a cooking experience; it’s a joyful journey filled with tasty memories.
    This delightful dessert brings people together, sparking smiles and sweet moments that linger long after the last bite.
    I love how it transforms ordinary ingredients into an extraordinary treat, perfect for any occasion.
    Whether you’re celebrating a birthday, hosting a casual gathering, or just indulging on a busy weeknight, these tacos are bound to impress.
    So roll up your sleeves, gather your loved ones, and enjoy every scrumptious bite of these irresistible treats!


    Print

    clock clock iconcutlery cutlery iconflag flag iconfolder folder iconinstagram instagram iconpinterest pinterest iconfacebook facebook iconprint print iconsquares squares iconheart heart iconheart solid heart solid icon

    Description

    A delicious fusion of cheesecake and tacos featuring a strawberry filling and crunchy graham cracker shells.


    • 8 ounces (226g) cream cheese, softened
    • 1/2 cup (100g) granulated sugar
    • 1 teaspoon vanilla extract
    • 1/4 cup (60ml) heavy cream
    • 1 cup (150g) fresh strawberries, finely chopped
    • 1 1/2 cups (180g) graham cracker crumbs
    • 1/4 cup (50g) unsalted butter, melted
    • 1/4 cup (35g) chopped toasted pecans (optional)
    • Additional chopped strawberries for garnish (optional)

    1. In a medium bowl, beat the softened cream cheese until smooth and creamy. Add the granulated sugar and vanilla extract, and continue mixing until well combined.
    2. Fold in the heavy cream and finely chopped strawberries until the mixture is evenly distributed.
    3. In a separate bowl, combine the graham cracker crumbs and melted butter until the mixture is well-coated and resembles a coarse sand-like texture.
    4. Divide the graham cracker mixture evenly into 8 small taco-shaped molds or a muffin tin, pressing the mixture firmly into the sides and bottom to create the taco shells.
    5. Place the prepared graham cracker taco shells in the refrigerator and chill for at least 2 hours, or until the shells are firm and hold their shape.
    6. Remove the chilled taco shells from the refrigerator. Carefully spoon or pipe the cheesecake filling into the center of each taco shell, being sure to fill them evenly.
    7. Top the cheesecake filling with a sprinkle of chopped toasted pecans, if desired.
    8. Garnish the Strawberry Crunch Cheesecake Tacos with additional chopped fresh strawberries, if desired.
    9. Serve the tacos chilled and enjoy the irresistible combination of creamy cheesecake, crunchy graham cracker, and juicy strawberries in every bite!

    Notes

    • For a deeper flavor, let the cheesecake filling sit for a short while before filling the taco shells.
    • These tacos can be made ahead of time but are best served within 24 hours.
    • Feel free to substitute other berries for the strawberries based on preference.
    • Prep Time: 30 minutes
    • Cook Time: 0 minutes
    • Category: Dessert
    • Method: Refrigeration
    • Cuisine: American

    Nutrition

    • Serving Size: 1 taco
    • Calories: 250
    • Sugar: 10g
    • Sodium: 150mg
    • Fat: 15g
    • Saturated Fat: 7g
    • Unsaturated Fat: 6g
    • Trans Fat: 0g
    • Carbohydrates: 25g
    • Fiber: 1g
    • Protein: 4g
    • Cholesterol: 30mg

    Sharing is caring!

  • Halloween Oreo stuffed chocolate chip cookies

    Halloween Oreo stuffed chocolate chip cookies


    Introduction to Halloween Oreo Stuffed Chocolate Chip Cookies

    As fall blankets the world in hues of orange and gold, I find myself yearning for cozy kitchen moments. One delightful creation I can’t resist is Halloween Oreo stuffed chocolate chip cookies. These gems combine the classic hits of gooey chocolate chip cookies with the irresistible crunch of Oreo cookies—talk about a heavenly duo! If you’re a busy mom or a professional whose schedule echoes ‘no time to spare,’ this recipe serves up quick fun for the family. It’s a treat that’s perfect for Halloween gatherings or just making your loved ones smile!

    Why You’ll Love This Halloween Oreo Stuffed Chocolate Chip Cookies

    These Halloween Oreo stuffed chocolate chip cookies are a delightful blend of flavors and textures. They’re easy to whip up when the clock’s ticking, making them perfect for busy weeknights. Imagine the joy on your kids’ faces when they discover the hidden Oreo surprise inside! Plus, with just a few simple ingredients, you can create a spooky treat that’ll impress everyone. Fun, fast, and oh-so-delicious—what’s not to love?

    Ingredients for Halloween Oreo Stuffed Chocolate Chip Cookies

    Gathering the right ingredients is half the fun! For these Halloween Oreo stuffed chocolate chip cookies, you’ll need a few pantry staples alongside some festive goodies. Here’s what you’ll need:

    • Butter: A little melted love that gives cookies their rich flavor. Slightly softened butter works best for mixing.
    • Brown Sugar: It’s the key to that chewy texture we adore! It adds moisture and depth to the cookies.
    • Granulated Sugar: This helps our cookies spread just right while giving a sweet contrast to the brown sugar.
    • Egg: It binds everything together, lending moisture and a light richness.
    • Vanilla Extract: A splash of this magical potion elevates the flavor to dreamy heights.
    • Flour: All-purpose flour is your go-to here, ensuring the perfect balance of structure and tenderness.
    • Corn Starch: A secret ingredient that helps make the cookies extra soft and melt-in-your-mouth delicious.
    • Baking Soda: This little helper provides lift and a bit of puffiness to the cookies.
    • Salt: Just a pinch enhances all the flavors, creating a harmonious sweet-and-salty balance.
    • Chocolate Chips: Semi-sweet chocolate chips add rich, gooey pockets of chocolatey goodness.
    • Halloween Oreos: The star of this show! These festive cookies bring a spooky crunch right in the center, adding to the magic.
    • Halloween Sprinkles: They offer a dash of color and fun—because who doesn’t love a little sparkle?

    Remember, the specific measurements for these ingredients can be found at the bottom of the article for easy printing. Get ready to whip up some spooky delights!

    How to Make Halloween Oreo Stuffed Chocolate Chip Cookies

    Let’s dive into the delicious process of making these Halloween Oreo stuffed chocolate chip cookies! With just a few steps, you’ll create a cookie that’s the ultimate combination of spooky and sweet. Ready? Let’s get started!

    Step 1: Preheat the Oven

    First off, you want that oven to be nice and hot. Preheat it to 350°F. While it’s warming up, line a baking sheet with parchment paper or a Silpat. This keeps your cookies from sticking and makes cleanup a breeze—trust me, your future self will thank you!

    Step 2: Cream the Butter and Sugars

    Time to put our butter and sugars to work! In a medium-sized bowl, cream together the slightly softened butter, brown sugar, and granulated sugar. You want to mix until everything is smooth and well-combined. Imagine a fluffy cloud of sweetness—that’s what you’re going for!

    Step 3: Add Wet Ingredients

    Next, let’s add some wet love to our mix. Crack in the egg and pour in the vanilla extract. Mix until it’s all well incorporated. Just think of it as a little potion that brings everything together, creating a rich foundation for our cookies.

    Step 4: Mix Dry Ingredients

    Now for the dry stuff! Sprinkle in the all-purpose flour, corn starch, baking soda, and salt over the wet mixture. Gently stir everything together until it’s just combined—remember not to over-mix! You want those cookies to be soft and tender, not tough.

    Step 5: Combine Chocolate Chips and Sprinkles

    Here’s where the fun begins! Fold in the semi-sweet chocolate chips along with the cheerful Halloween sprinkles. This mix adds colorful spots of holiday cheer and delightful pockets of chocolatey goodness. Your dough should look vibrant and inviting!

    Step 6: Stuff the Oreos

    Grab a large cookie scoop (about ¼ cup) to make your cookie dough balls. Scoop out a portion and flatten it between your palms. Place the Halloween Oreo in the center and gently fold the cookie dough over it. Roll it into a ball, sealing the Oreo inside. It’s like hiding a treasure in the cookie!

    Step 7: Bake

    Place your stuffed cookies on the prepared baking sheet, spacing them out a bit. Bake them in your preheated oven for about 10 minutes. They might look a little underdone or gooey in the middle. Don’t worry! They’ll continue cooking as they cool, ensuring a perfectly soft and chewy cookie.

    Tips for Success

    • Always measure your ingredients accurately for consistent results.
    • Don’t skip the chilling step if you have time; it helps the cookies hold their shape.
    • For added richness, consider using a mix of chocolate chips—semi-sweet and dark chocolate!
    • Use an ice cream scoop for uniform cookie sizes, ensuring even baking.
    • Keep an eye on your cookies; every oven is different!

    Equipment Needed

    • Baking sheet: A sturdy one is ideal, but you can use any oven-safe tray.
    • Parchment paper or Silpat: These ensure cookies don’t stick; foil works in a pinch.
    • Mixing bowls: At least two bowls, one for wet and one for dry ingredients.
    • Cookie scoop: A large cookie scoop or ice cream scoop helps create uniform cookies.
    • Measuring cups and spoons: Essential for precise ingredient measurements.

    Variations

    • For a nutty twist, add some chopped walnuts or pecans to the cookie dough for added crunch.
    • Try using pumpkin-flavored Oreos for a seasonal spin that enhances the Halloween theme!
    • Make them gluten-free by substituting all-purpose flour with a gluten-free flour blend.
    • For a dairy-free option, use plant-based butter and dairy-free chocolate chips.
    • Add a dash of cinnamon or nutmeg to the dough for a warm spice flavor that complements the chocolate.

    Serving Suggestions

    • Serve these Halloween Oreo stuffed chocolate chip cookies warm with a scoop of vanilla ice cream on the side.
    • Pair them with a chilled glass of milk or a warm cup of pumpkin spice latte for a seasonal twist.
    • Presentation tip: Stack cookies on a festive Halloween-themed plate and sprinkle with extra sprinkles for a fun touch!

    FAQs about Halloween Oreo Stuffed Chocolate Chip Cookies

    Got questions about these delightful Halloween Oreo stuffed chocolate chip cookies? You’re not alone! Here are some of the most common queries I hear, along with practical answers to guide your baking adventure.

    Can I freeze these cookies?
    Absolutely! You can freeze the unbaked cookie dough balls. Just scoop and freeze them on a baking sheet, then transfer to a freezer bag. When you’re ready, bake them straight from the freezer, adding a minute or two to the baking time.

    What can I substitute for the butter?
    If you need a dairy-free option, use plant-based butter or coconut oil. They work just as well and won’t alter the cookies’ nice, rich flavor.

    Can I use regular Oreos instead of Halloween Oreos?
    Definitely! Regular Oreos will still taste fantastic. However, the Halloween-themed ones add a festive touch, which is perfect for this spooky season.

    How do I store leftover cookies?
    Store your Halloween Oreo stuffed chocolate chip cookies in an airtight container at room temperature. They’ll stay fresh for about five days, but I doubt they’ll last that long!

    What if my dough is too sticky?
    If your dough feels a bit too sticky to handle, try chilling it in the refrigerator for 15-30 minutes. This makes it easier to scoop and stuff, giving your cookies a perfect shape.

    Final Thoughts

    Nothing quite compares to the joy of baking these Halloween Oreo stuffed chocolate chip cookies. With each bite, you’re met with warm chocolate, crunchy Oreos, and a sprinkle of festive fun! They transform any ordinary day into something special, delighted squeals echoing through your home as the magic unfolds. And the best part? They’re easy to make, letting you spend more time enjoying the sweetness with those you love. So, gather your ingredients, roll up your sleeves, and let the kitchen become your haunted haven of deliciousness this Halloween. Happy baking!


    Print

    clock clock iconcutlery cutlery iconflag flag iconfolder folder iconinstagram instagram iconpinterest pinterest iconfacebook facebook iconprint print iconsquares squares iconheart heart iconheart solid heart solid icon

    Description

    Halloween Oreo stuffed chocolate chip cookies delightfully combine spooky fun and sweet flavor!


    • ½ cup butter, slightly softened
    • ½ cup brown sugar
    • ⅓ cup granulated sugar
    • 1 egg
    • 1 tsp vanilla extract
    • 1 & ¾ cup flour
    • 3 tablespoon corn starch
    • ½ tsp baking soda
    • ¼ tsp salt
    • ⅔ cup semi sweet chocolate chips (more for topping)
    • 9 Halloween Oreo
    • ¼ cup Halloween sprinkles

    1. Preheat the oven to 350F, then line a baking sheet with parchment paper or silpat.
    2. In a medium bowl, cream the butter and both sugars together.
    3. Add in the vanilla and egg and mix until everything is smooth and well incorporated.
    4. Add in the dry ingredients over the wet mixture, starting with the flour, corn starch, baking soda, and salt. Stir just until combined.
    5. Fold in the chocolate chips and the sprinkles, then using a large cookie scoop (¼ cup cookie dough), scoop out the cookie dough, flatten it between the palm of your hand and place the Oreo in the center. Fold the cookie dough over the Oreo and roll to seal.
    6. Place them on the prepared baking sheet and bake for 10 minutes. Don’t worry if they look underdone or gooey in the middle; they will continue to bake even after you pull them out of the oven to cool.
    7. Top the cookies with extra chocolate chips as soon as they come out of the oven, cool on the cookie sheet for 5 minutes, then transfer to a cooling rack.

    Notes

    • For a more chocolatey flavor, feel free to add more chocolate chips on top.
    • These cookies can be stored in an airtight container for several days.
    • Optional: Add festive Halloween-themed decorations for extra fun!
    • Prep Time: 15 minutes
    • Cook Time: 10 minutes
    • Category: Dessert
    • Method: Baking
    • Cuisine: American

    Nutrition

    • Serving Size: 1 cookie
    • Calories: 180
    • Sugar: 12g
    • Sodium: 85mg
    • Fat: 8g
    • Saturated Fat: 5g
    • Unsaturated Fat: 3g
    • Trans Fat: 0g
    • Carbohydrates: 23g
    • Fiber: 1g
    • Protein: 2g
    • Cholesterol: 20mg

    Sharing is caring!

  • Mediterranean Chicken Recipe with Lemons & Olives

    Mediterranean Chicken Recipe with Lemons & Olives


    Introduction to Mediterranean Chicken Recipe with Lemons & Olives

    Welcome, fellow food lovers! If you’re searching for a flavorful yet uncomplicated dinner option, you’ve just stumbled upon the perfect gem: the Mediterranean Chicken Recipe with Lemons & Olives. It’s a delightful dish that captures the essence of Mediterranean cooking, combining vibrant flavors that awaken your taste buds. Whether you’re racing against the clock after a busy day or hoping to impress dinner guests with your culinary prowess, this recipe serves as your trusty ally. Get ready to savor every bite and bring a slice of sunshine to your table!

    Why You’ll Love This Mediterranean Chicken Recipe with Lemons & Olives

    This Mediterranean Chicken Recipe with Lemons & Olives is a lifesaver for busy moms and professionals alike. It’s quick to whip up, taking just 45 minutes from prep to table. The bright flavors of lemon and the savory punch of olives dance together beautifully, creating a dish that’s not only delicious but also cheerful. Plus, it’s gluten-free! Your family will think you spent hours in the kitchen!

    Ingredients for Mediterranean Chicken Recipe with Lemons & Olives

    Gathering the right ingredients is the first step toward creating your Mediterranean Chicken Recipe with Lemons & Olives. Here’s what you’ll need:

    • Garlic paste or minced garlic: This aromatic base infuses the chicken with flavor. Use fresh garlic for a robust taste.
    • Dried oregano: A staple in Mediterranean cuisine, it adds a warm, aromatic touch.
    • Italian seasoning: A blend of herbs such as basil, thyme, and rosemary will complement the dish beautifully.
    • Salt and fresh ground black pepper: Essential for enhancing all the flavors in your dish.
    • Skinless boneless chicken thighs: Tender and juicy, they’re perfect for absorbing all those tasty flavors.
    • Olive oil: Rich and healthy, this oil helps to sear the chicken and brings a fruity note.
    • Yellow onion: Finely diced, it adds sweetness and depth to the sautéed base.
    • Minced garlic: More garlic means more flavor! Don’t skimp on this delightfully pungent ingredient.
    • Lemon: Thinly sliced, it adds brightness and acidity, perfectly balancing the richness of the dish.
    • White wine: Great for deglazing, it brings out the caramelized bits from the pan, enhancing the sauce.
    • Chicken broth: A savory liquid that provides moisture and flavor as the dish simmers.
    • Marinated olives: These little gems offer a briny kick that ties all the flavors together.

    Feel free to get creative! You can substitute chicken thighs with breasts for a leaner option or use different types of olives if you have a preference.

    For exact quantities, scroll down to the bottom of the article where you can find the full ingredient list available for printing.

    How to Make Mediterranean Chicken Recipe with Lemons & Olives

    Making the Mediterranean Chicken Recipe with Lemons & Olives is like embarking on a culinary adventure! The best part? It only takes a few simple steps. Let’s dive into the delicious process.

    Step 1: Prepare Your Marinade and Chicken

    Start by grabbing a large bowl. Combine the garlic paste, dried oregano, Italian seasoning, salt, and pepper. Mix it well until it’s all blended together. This marinade is the magic that flavors your chicken. Now, take those chicken thighs and rub the marinade onto them, coating every nook and cranny. Set them aside to soak up all that goodness.

    Step 2: Sear the Chicken Thighs

    Next, heat up some olive oil in a large nonstick skillet over medium heat. Once the oil shimmers, it’s showtime! Add the chicken thighs and cook for about 5 to 6 minutes on one side. You want them to develop a lovely golden-brown color—this is where the flavor deepens. Then, flip them over and cook for another 5 minutes. Once browned, remove the chicken from the skillet and set it aside. This step locks in moisture while building that beautiful flavor.

    Step 3: Sauté Onions and Garlic

    With your chicken resting, it’s time to create a flavorful base. Toss the diced onions and minced garlic into the same skillet. Sprinkle a pinch of salt for seasoning. Sauté these for about 3 minutes or until the onions are tender and translucent. Stir often to prevent burning. You’ll notice the kitchen filling up with amazing aromas!

    Step 4: Add Flavors with Lemon and Wine

    Now for the fun part! Lower the heat a tad and add those lovely lemon slices and white wine to the skillet. This helps deglaze the pan, scraping up all the delicious browned bits. Cook this mix for about 3 minutes, allowing those flavors to meld and deepen, turning your dish into a fragrant masterpiece.

    Step 5: Combine and Simmer

    Time to bring it all together! Pour in the chicken broth and return the seared chicken to the skillet. Raise the heat until it comes to a boil, then lower it to a gentle simmer. This is where the chicken becomes super tender. Let it simmer for about 5 minutes, allowing the chicken to soak up the tasty broth.

    Step 6: Finish with Olives and Serve

    Finally, stir in those delicious marinated olives and let the mixture simmer for an additional 10 minutes. This step makes those olives perfectly warm and incorporated. When you’re ready to serve, ladle olives and the tasty sauce over each chicken thigh. For a lovely presentation, consider garnishing with fresh parsley. Your Mediterranean Chicken with Lemons & Olives is ready to wow your family and friends!

    Tips for Success

    • Always let your chicken marinate for at least 30 minutes for maximum flavor.
    • Use a meat thermometer; chicken is perfectly cooked at 165°F.
    • Feel free to add veggies like bell peppers or zucchini for extra nutrition.
    • For a bolder taste, use sun-dried tomatoes as an additional garnish.
    • Always taste and adjust seasoning throughout cooking for best results.

    Equipment Needed

    • Large nonstick skillet: Essential for searing and sautéing. You can use a regular skillet, but it may require more oil.
    • Bowl: To mix the marinade. A resealable bag works well, too!
    • Meat thermometer: Helps ensure your chicken is perfectly cooked. A fork can also do the trick!

    Variations

    • Herb Swap: Try swapping oregano for fresh thyme or rosemary for a different flavor profile.
    • Veggie Burst: Add bell peppers, spinach, or artichokes for extra nutrition and color.
    • Citrus Twist: Include orange slices along with lemon for a sweeter citrus note.
    • Spicy Kick: Sprinkle in red pepper flakes for a little heat to enliven the dish.
    • Low-Carb Option: Serve over zoodles (zucchini noodles) instead of traditional sides for a lighter meal.

    Serving Suggestions for Mediterranean Chicken Recipe with Lemons & Olives

    • Serve the chicken alongside fluffy couscous or buttery rice to soak up the flavorful sauce.
    • Pair with a fresh Greek salad for a light and crunchy contrast.
    • A crisp white wine, like Sauvignon Blanc, complements the dish beautifully.
    • For an elegant touch, garnish with fresh parsley and lemon wedges.

    FAQs about Mediterranean Chicken Recipe with Lemons & Olives

    As you embark on your culinary journey with the Mediterranean Chicken Recipe with Lemons & Olives, you might have a few questions bubbling up in your mind. Let’s address some common queries that can make your cooking experience even smoother!

    Can I use chicken breasts instead of thighs?
    Absolutely! Chicken breasts are a great alternative if you prefer lean meat. Just adjust the cooking time, as breasts may take a little less time to cook through.

    What type of olives should I use?
    Feel free to use any marinated olives you enjoy, such as Kalamata, green, or even a mix. Each variety offers a unique flavor that can accentuate the dish.

    Can I make this dish ahead of time?
    Yes, you can prepare the Mediterranean Chicken. Cook the dish, let it cool, and store it in the fridge. Just reheat it gently before serving—your kitchen will still smell amazing!

    Is it possible to make this Mediterranean Chicken in a slow cooker?
    You bet! For a slow cooker version, follow the initial steps of searing the chicken. Then transfer everything to the slow cooker and cook on low for 4-6 hours. The results will be tender and flavorful!

    How do I store leftovers?
    Store any leftovers in an airtight container in the fridge. They’ll last for up to three days. Just reheat gently on the stove or in the microwave when you’re ready to enjoy them again!

    Final Thoughts on Mediterranean Chicken Recipe with Lemons & Olives

    This Mediterranean Chicken Recipe with Lemons & Olives is more than just a meal; it’s an experience that brings joy to the dinner table. The bright flavors of lemon and the earthy richness of olives create a delightful harmony that dances on your palate. Every bite transports you to sun-drenched shores and bustling markets, reminding us that good food nourishes the soul. Whether you’re sharing it with family on a busy weeknight or serving it at a cozy gathering, this dish is sure to impress and evoke cherished memories, making cooking feel like a warm embrace.


    Print

    clock clock iconcutlery cutlery iconflag flag iconfolder folder iconinstagram instagram iconpinterest pinterest iconfacebook facebook iconprint print iconsquares squares iconheart heart iconheart solid heart solid icon

    Description

    A delicious Mediterranean chicken dish flavored with lemons and olives, cooked to perfection.


    • 1 tablespoon garlic paste, or minced garlic
    • ½ teaspoon dried oregano
    • ½ teaspoon Italian Seasoning
    • salt and fresh ground black pepper, to taste
    • 6 pieces skinless boneless chicken thighs
    • 2 tablespoons Olive Oil
    • 1 small yellow onion, finely diced
    • 2 cloves garlic, minced
    • 1 small lemon, thinly sliced
    • ¼ cup white wine
    • 1 cup chicken broth
    • 1 cup marinated olives

    1. Combine garlic paste, oregano, Italian seasoning, salt, and pepper in a large bowl; mix until thoroughly incorporated.
    2. Add the chicken thighs to the bowl and rub the paste into the chicken until evenly coated; set aside.
    3. Heat olive oil in a large nonstick skillet or pan over medium heat.
    4. Remove previously prepared chicken thighs from the bowl and add them to the hot oil. Cook for 5 to 6 minutes, or until chicken begins to brown; turn them over and continue to cook for about 5 more minutes, or until browned.
    5. Remove chicken thighs from skillet and set aside.
    6. Add the onions and garlic to the pan; season with salt and cook for about 3 minutes, or until onions are soft. Stir frequently.
    7. Lower heat to medium and add the lemon slices and wine, stirring to loosen any browned bits stuck to the bottom; cook for 3 minutes.
    8. Add the chicken broth, return the thighs to the skillet, and bring to a boil; lower heat to a simmer and continue to cook for 5 minutes.
    9. Add the olives and continue simmering for 10 minutes.
    10. Remove from heat and let stand 5 to 7 minutes, or until most of the liquid is absorbed, but not all of it.
    11. Serve chicken and ladle olives and liquid over the chicken thighs.

    Notes

    • For an extra touch, garnish with fresh parsley before serving.
    • This dish pairs well with rice or crusty bread.
    • Leftovers can be stored in an airtight container in the refrigerator for up to 3 days.
    • Prep Time: 15 minutes
    • Cook Time: 30 minutes
    • Category: Main Course
    • Method: Skillet
    • Cuisine: Mediterranean

    Nutrition

    • Serving Size: 1 thigh with sauce
    • Calories: 350
    • Sugar: 1g
    • Sodium: 650mg
    • Fat: 20g
    • Saturated Fat: 3g
    • Unsaturated Fat: 16g
    • Trans Fat: 0g
    • Carbohydrates: 8g
    • Fiber: 1g
    • Protein: 32g
    • Cholesterol: 100mg

    Sharing is caring!

  • Loaded Baked Potato Steak Bites

    Loaded Baked Potato Steak Bites


    Introduction to Loaded Baked Potato Steak Bites

    When life gets busy, I crave comfort food that brings warmth to my table, like these Loaded Baked Potato Steak Bites. This dish combines the hearty charm of baked potatoes with gourmet steak bites, topped off with a rich parmesan cream sauce. It’s a wonderful centerpiece for family dinners or a casual get-together with friends. As a busy mom myself, I appreciate how easily this recipe comes together, bringing flavor and joy in just over an hour. Let’s dive into this delightful culinary adventure that’s sure to impress!

    Why You’ll Love This Loaded Baked Potato Steak Bites

    You’ll adore these Loaded Baked Potato Steak Bites for their incredible ease and speed. With just an hour of prep and cooking time, you can whip up a dish that’s bursting with flavor. The combination of tender steak, fluffy potatoes, and creamy parmesan sauce creates a crowd-pleaser that will satisfy everyone at the table. Perfect for busy nights, this recipe doesn’t sacrifice taste, making it a go-to favorite!

    Ingredients for Loaded Baked Potato Steak Bites

    Gathering the right ingredients is the first step to cooking these delicious Loaded Baked Potato Steak Bites. You’ll need large russet potatoes for a fluffy interior, seasoned with olive oil and sea salt for that perfect skin. Choose your favorite steak cut—NY strip, ribeye, sirloin, or tenderloin—each bringing its unique flavor. Cajun seasoning adds a delightful kick, while heavy cream and parmesan cheese create a rich sauce that ties everything together. Don’t forget the garlic, butter, and fresh parsley, which elevate the dish. Exact quantities are at the bottom of the article for your convenience!

    How to Make Loaded Baked Potato Steak Bites

    Step 1: Bake the Potatoes

    Preheat and Prepare

    Start by preheating your oven to 220°C (425°F). Line a baking pan with parchment paper to make cleanup easy. Next, take your scrubbed russet potatoes and rub them down with olive oil. Be generous! Then sprinkle sea salt over them on all sides. Place the potatoes on the prepared pan without piercing the skin. This seals in all that fluffy goodness. Bake for 50-60 minutes, or until tender when pierced with a fork.

    Step 2: Prepare the Steak

    Season and Sear

    While your potatoes are baking, let’s focus on the steak. Start by trimming any excess fat and silver skin from your chosen cut of steak. Cut it into bite-sized pieces, about 5 cm. Drizzle 2 tablespoons of avocado oil over the steak and generously sprinkle cajun seasoning to enhance the flavor. In a hot cast iron skillet, heat 2 tablespoons of avocado oil over medium-high heat. Sear the steak bites for 2 minutes until they’re beautifully browned. Flip them, cook for another minute, then reduce the heat to low for one more minute. This gives you a delicious crust!

    Step 3: Make the Garlic Butter

    Adding Flavor

    Once your steak is seared to perfection, move the bites to one side of the skillet. Add 2 tablespoons of softened butter and 1 tablespoon of minced garlic to the pan. Sauté this until it’s fragrant and heavenly! Then, toss the steak bites in that glorious garlic butter for an additional minute, coating each piece evenly. Transfer the steak to a bowl and cover it with foil to keep warm while we work on the sauce.

    Step 4: Create the Parmesan Cream Sauce

    Sauce Perfection

    In the same sizzling skillet, melt the remaining 2 tablespoons of butter. Sauté the last tablespoon of garlic until it’s aromatic. Then, gradually whisk in the heavy cream and bring it to a gentle simmer. Let it reduce for 3-5 minutes, allowing those rich flavors to meld. Stir in red pepper flakes and parmesan cheese, whisking until the sauce thickens to perfection. Season with kosher salt and freshly cracked black pepper. Off the heat, add fresh parsley and a squeeze of lemon juice for that zesty kick.

    Step 5: Assemble the Loaded Baked Potato Steak Bites

    Final Touches

    Now it’s time to transform those fluffy baked potatoes into a masterpiece! Lift each potato and gently drop it back onto the baking pan to loosen the interior. Slice them down the center and fluff the insides using a fork. Spread a little of the reserved butter inside for extra richness. Then, evenly divide the steak bites among the potatoes, generously draping the rich parmesan cream sauce over the top. Serve these hot, and watch the smiles light up around the table!

    Tips for Success

    To ensure your Loaded Baked Potato Steak Bites turn out perfectly, remember these quick tips:

    Use a meat thermometer to check if the steak reaches 130°F for medium-rare, ensuring juiciness. If you’re short on time, microwave the potatoes for a few minutes before baking to speed up the process. And, don’t rush the sauce; let it simmer gently to achieve that thick, creamy texture. These small tweaks make a big difference!

    Equipment Needed

    To whip up these Loaded Baked Potato Steak Bites, you’ll need a few essential tools:

    • Oven and baking pan
    • Cast iron skillet (or any heavy skillet)
    • Cutting board and sharp knife
    • Whisk for the sauce
    • Meat thermometer (optional, but helpful!)

    No worries if you don’t have a cast iron skillet! A non-stick skillet works just fine.

    Variations

    Get creative with your Loaded Baked Potato Steak Bites! Here are some flavorful adaptations for different tastes and dietary preferences:

    • For a vegetarian twist, replace steak with sautéed mushrooms or grilled portobello caps. Their umami flavor adds depth!
    • Experiment with different seasonings—try taco seasoning or garlic herb blends to change up the taste.
    • For a smoky flavor, add a dash of smoked paprika or chipotle powder to your steak seasoning.
    • Serve with a variety of dipping sauces like ranch, horseradish aioli, or a zesty chimichurri for extra zing.
    • Make it a fully loaded meal by adding toppings like crumbled bacon, sour cream, or shredded cheese over the potatoes.

    Serving Suggestions

    Pair your Loaded Baked Potato Steak Bites with a fresh garden salad or steamed vegetables for balance. A crisp white wine or sparkling water with lemon enhances the meal’s flavors beautifully. For presentation, sprinkle some extra parsley on top, making each plate look as delightful as it tastes!

    FAQs about Loaded Baked Potato Steak Bites

    Curious about your Loaded Baked Potato Steak Bites? Here are some frequently asked questions to help you through the cooking process:

    Can I use other cuts of steak? Absolutely! While I love a good ribeye, you can substitute it with NY strip, sirloin, or tenderloin. Just remember, each cut will offer a slightly different flavor and tenderness.

    What if I have leftovers? If you’re lucky enough to have some steak bites left over, store them in an airtight container in the fridge for up to 3 days. Reheat them in the microwave or a skillet to maintain their deliciousness!

    How can I make this dish gluten-free? Great news! This Loaded Baked Potato Steak Bites recipe is already gluten-free! Just ensure that your cajun seasoning doesn’t contain any gluten. Most brands are safe, but it’s always good to check the label!

    Can I prepare the potatoes in advance? Yes, you can! Bake the potatoes ahead of time, but keep them whole until you’re ready to serve. When you reheat, fluff them up with a fork and proceed with the steak and sauce.

    What are some delicious variations for the sauce? If you want to mix things up, try adding some diced jalapeños for spice or a splash of Worcestershire sauce for depth. You could also add some sautéed mushrooms for an earthy flavor boost!

    Final Thoughts

    The joy of serving Loaded Baked Potato Steak Bites is truly unmatched. This dish effortlessly combines rich flavors, comforting textures, and a sprinkle of gourmet flair, making it perfect for any gathering. Whether it’s a busy weeknight dinner or a festive occasion, the ease of preparation ensures you spend more time with loved ones and less in the kitchen. Each bite encapsulates warmth and satisfaction, creating memories around the table. With a recipe this delightful, you’ll impress your family and friends, making every meal a cherished experience that everyone will look forward to enjoying together!


    Print

    clock clock iconcutlery cutlery iconflag flag iconfolder folder iconinstagram instagram iconpinterest pinterest iconfacebook facebook iconprint print iconsquares squares iconheart heart iconheart solid heart solid icon

    Description

    A delicious combination of baked potatoes and seasoned steak bites, topped with a rich parmesan cream sauce.


    • 4 large russet potatoes, scrubbed clean and patted dry
    • 4 tablespoons olive oil
    • 1.5 tablespoons sea salt
    • 900 grams (2 lbs) NY strip, ribeye, sirloin, or tenderloin steak
    • 2 teaspoons kosher salt
    • 2 tablespoons cajun seasoning, low sodium preferred
    • 4 tablespoons avocado oil, divided
    • 6 tablespoons unsalted butter, softened, divided
    • 2 tablespoons garlic, minced (about 810 cloves), divided
    • 360 ml (1 1/2 cups) heavy cream
    • 60 grams (2/3 cup) parmesan cheese, grated
    • 2 tablespoons fresh parsley, minced
    • Juice of 2 lemon wedges
    • 0.51 teaspoon red pepper flakes
    • 1 teaspoon freshly cracked black pepper

    1. Preheat the oven to 220°C. Line a baking pan with parchment paper. Rub potatoes with olive oil and sprinkle with sea salt on all sides. Arrange on the prepared pan without piercing the skin. Bake for 50-60 minutes or until tender when pierced with a fork.
    2. While the potatoes bake, trim excess fat and silver skin from the steak. Cut into 5 cm pieces. Drizzle with 2 tablespoons of avocado oil and season generously with cajun seasoning. Heat 2 tablespoons of avocado oil in a cast iron skillet over medium-high heat. Sear steak bites uncovered for 2 minutes until deeply browned. Flip once, cook 1 minute, reduce heat to low, and cook 1 more minute.
    3. Move steak to one side of the pan. Add 2 tablespoons butter and 1 tablespoon minced garlic to the pan. Sauté until fragrant, then toss steak bites to coat evenly in the garlic butter for an additional minute. Transfer steak to a bowl and tent with foil to keep warm.
    4. In the same skillet with pan drippings, melt remaining 2 tablespoons butter and sauté final 1 tablespoon garlic until aromatic. Gradually whisk in heavy cream and bring to a simmer. Reduce gently for 3-5 minutes. Add red pepper flakes and parmesan, whisking until the sauce thickens. Season with salt and black pepper. Off the heat, stir in parsley and lemon juice.
    5. Lift and drop each potato onto the pan to loosen the interior. Slice down the center and fluff with a fork, spreading a little of the reserved butter inside. Divide steak bites evenly among potatoes. Top generously with parmesan cream sauce and serve while hot.

    Notes

    • For a spicier sauce, increase the amount of red pepper flakes.
    • Choose steak cuts according to preference; ribeye offers more marbling for juiciness.
    • Ensure potatoes are fully baked before slicing for optimal fluffiness.
    • Prep Time: 15 minutes
    • Cook Time: 1 hour
    • Category: Main Dish
    • Method: Baking and Searing
    • Cuisine: American

    Nutrition

    • Serving Size: 1 serving
    • Calories: 720
    • Sugar: 2g
    • Sodium: 950mg
    • Fat: 45g
    • Saturated Fat: 18g
    • Unsaturated Fat: 22g
    • Trans Fat: 0g
    • Carbohydrates: 60g
    • Fiber: 5g
    • Protein: 30g
    • Cholesterol: 115mg

    Sharing is caring!

  • Witch Hat Halloween Cookies

    Witch Hat Halloween Cookies


    Introduction to Witch Hat Halloween Cookies

    There’s something wonderfully magical about Halloween, isn’t there? I’m always on the lookout for fun, festive treats that bring a sprinkle of joy to my family. That’s where these Witch Hat Halloween Cookies come into play! They’re not just cookies; they’re delightful little bites of whimsy that everyone can enjoy. With their rich peanut butter flavor and charming chocolate hugs, they’re the perfect quick fix for busy moms like me. Whether you’re hosting a Halloween gathering or looking to surprise your kids after school, these cookies will surely cast a sweet spell!

    Why You’ll Love This Witch Hat Halloween Cookies

    These Witch Hat Halloween Cookies are a revelation for any busy mom or professional. They come together in just a few simple steps, making baking stress-free. Plus, the combination of creamy peanut butter and melty chocolate hugs creates a flavor that’s utterly irresistible. You’ll love how your kitchen fills with enticing aromas, and the smiles on your loved ones’ faces will make every second worthwhile. Who knew Halloween treats could be this easy?

    Ingredients for Witch Hat Halloween Cookies

    Creating Witch Hat Halloween Cookies requires some delightful ingredients, each adding to the spooky charm. Here’s what you’ll need:

    • All-purpose flour: The foundation of your cookies, giving them structure and a soft bite.
    • Cornstarch: This little gem lightens the dough, making it extra chewy and tender.
    • Baking powder & baking soda: They help these cookies puff up to the perfect shape, creating that lovely, cracked top.
    • Salt: A pinch is essential! It enhances the sweetness, balancing the flavors beautifully.
    • Unsalted butter: Softened for creaming, it gives the cookies richness and moisture.
    • Granulated sugar: This sweetener not only adds sweetness but also contributes to the cookies’ crisp edges.
    • Egg: It binds everything together, ensuring a soft and chewy interior.
    • Vanilla extract: A splash is a must! It elevates the flavor profile, making each bite even more delicious.
    • Creamy peanut butter: The star ingredient! Its rich, nutty taste brings joy to every mouthful.
    • Purple gel food coloring: Optional but a fun way to achieve that spooky look. Get creative with colors!
    • Hugs or chocolate kisses: These are the magical toppers, transforming your cookies into witch hats.
    • Halloween sprinkles or purple sanding sugar: For a festive finish, adding a delightful crunch and color.

    For specific amounts, check the bottom of the article where the recipe is available for printing. It’s a fun way to make Halloween special, and trust me, your loved ones will appreciate the witchy twist!

    How to Make Witch Hat Halloween Cookies

    Now that you have all the ingredients ready, let’s dive into the step-by-step process of making these delightful Witch Hat Halloween Cookies. You’ll find it’s easier than you think, and soon your kitchen will be filled with the delicious aroma of baking cookies!

    Preparing the Dough

    Mixing Dry Ingredients

    Start by whisking together the all-purpose flour, cornstarch, baking powder, baking soda, and salt in a medium bowl. This blend is crucial; it creates the perfect cookie texture. I always find that whisking well ensures even distribution, and there’s something oddly satisfying about seeing everything come together in that bowl!

    Creaming the Butter and Sugar

    Next, grab your mixer. In a large bowl, cream the softened unsalted butter and granulated sugar together until it’s light and fluffy—about two minutes should do the trick. Don’t rush this step; it’s where the magic happens! Take a moment to scrape down the sides of the bowl to ensure everything is mixed evenly. You’ll want to inhale that buttery, sugary goodness!

    Adding the Other Ingredients

    Now, add the egg and vanilla extract to your butter-sugar mixture and mix until just combined. Then, toss in that creamy peanut butter, blending it in until you can’t see any streaks. The nutty scent will hit you, and trust me, it’s heavenly! Once that’s smooth, it’s time to bring in your dry ingredients. Gently mix those in on low speed until everything is just combined. We don’t want to over-mix, as that can make the cookies tough.

    Chilling the Dough

    Now for a little patience—cover your dough with plastic wrap and chill it for at least two hours. If you have time, overnight is even better! Chilling helps the dough firm up, making it easier to scoop. I often make the dough at night, so it’s ready for cookie-baking fun after a busy day!

    Baking the Cookies

    When you’re ready to bake, preheat your oven to 350°F. Line two large baking sheets with silicone mats or parchment paper—this will prevent sticking. Using a small cookie scoop or spoon, portion the chilled dough into balls, about a tablespoon each, rolling them in Halloween sprinkles or purple sanding sugar for a festive touch! Place them about two inches apart on the baking sheet. Bake for 8 to 10 minutes, or until they start to puff and crack but aren’t browning. You want that perfect chewy center!

    Decorating the Cookies

    As soon as your cookies come out of the oven, gently press a Hugs or chocolate kiss into the center of each. This step is always a hit with the kids! They look just like witch hats already. Pop the baking sheets in the freezer for about 10 minutes to let the chocolate set without melting. Once that’s done, transfer your masterpieces to a wire cooling rack. They’re now ready to be enjoyed, and trust me, the anticipation makes them even tastier!

    Tips for Success

    • For chewier cookies, bake for a minute or two less.
    • Experiment with other flavors of gel food coloring to match your Halloween theme.
    • Use a cookie scoop for uniform sizes, ensuring even baking.
    • Keep your butter at room temperature for better creaming.
    • Store cookies in an airtight container to keep them fresh for longer.

    Equipment Needed

    • Baking sheets – Silicone mats or parchment paper work as great alternatives!
    • Mixing bowls – Use any size, but I love having a large one for easier mixing.
    • Hand mixer or stand mixer – A whisk can work too, but it takes longer.
    • Cookie scoop – A tablespoon can substitute if you don’t have one.
    • Wire cooling rack – A plate can do the trick in a pinch!

    Variations

    • For a gluten-free option, substitute all-purpose flour with a 1:1 gluten-free blend.
    • Try using almond or cashew butter instead of peanut butter for a nutty twist.
    • Add a pinch of cinnamon or nutmeg for an extra layer of warmth and spice.
    • Make them vegan by using flax eggs and coconut oil in place of egg and butter.
    • Swap out chocolate Hugs for caramel-filled candies for a unique surprise!

    Serving Suggestions

    • Pair these cookies with a glass of cold milk for a classic treat.
    • Serve them alongside a fun Halloween punch for a festive flair.
    • Display on a spooky platter decorated with cobwebs and plastic spiders.
    • Offer as party favors in treat bags for a fun surprise!

    FAQs about Witch Hat Halloween Cookies

    When it comes to baking these delightful Witch Hat Halloween Cookies, you might have a few questions. Here are some of the most common inquiries I receive, along with handy hints to help you along the way!

    Can I use a different nut butter?
    Absolutely! You can swap peanut butter for almond, cashew, or even sunflower seed butter for a nut-free option. Keep in mind that it may alter the flavor a bit, but it’s a fun twist!

    How long will these cookies stay fresh?
    If stored in an airtight container, these cookies are good for about a week. However, I bet they won’t last that long in your house!

    Can I freeze Witch Hat Halloween Cookies?
    Yes! You can freeze the cookies before adding the chocolate kisses. Just store them in a single layer in an airtight container. When you want to enjoy them again, let them thaw, then top with chocolate and sprinkles.

    What can I use instead of Hugs or chocolate kisses?
    You can get creative! Try using caramel-filled candies, or even peanut butter cups for a sweeter surprise. You could also check out spooky chocolate eyeballs for a fun Halloween twist!

    What’s the best way to decorate these cookies?
    Besides adding chocolate Hugs, you can drizzle melted chocolate on top or use different colored sprinkles. Let your imagination run wild!

    Final Thoughts

    Making Witch Hat Halloween Cookies is more than just baking; it’s about creating sweet memories and sharing joy with loved ones. The thrill of sprinkling colored sugar and pressing those chocolate hugs onto warm cookies brings out the child in all of us. These treats are perfect for festive gatherings or a cozy evening at home. They’ll not only satisfy your sweet tooth but also ignite smiles around the table. So, let the aroma of these delightful cookies fill your kitchen, and enjoy the laughter and love that follows. Happy baking and happy Halloween!


    Print

    clock clock iconcutlery cutlery iconflag flag iconfolder folder iconinstagram instagram iconpinterest pinterest iconfacebook facebook iconprint print iconsquares squares iconheart heart iconheart solid heart solid icon

    Description

    Witch Hat Halloween Cookies are delightful and spooky treats made with peanut butter and topped with chocolate hugs, perfect for Halloween celebrations.


    • 1 ½ cups all-purpose flour
    • 2 teaspoons cornstarch
    • ¼ teaspoon baking powder
    • ½ teaspoon baking soda
    • ¼ teaspoon salt
    • ½ cup unsalted butter, softened
    • 1 cup granulated sugar
    • 1 egg, room temperature
    • 1 teaspoon vanilla extract
    • ¾ cup creamy peanut butter
    • purple gel food coloring
    • 30 Hugs or chocolate kisses, carefully unwrapped
    • Halloween sprinkles or purple sanding sugar

    1. In a medium bowl, whisk together the flour, baking powder, baking soda, cornstarch, and salt together. Set aside.
    2. Using a hand mixer or stand mixer, cream the butter and sugar together until creamy, about 2 minutes, scraping down the sides of the bowl as needed.
    3. Add the egg and vanilla extract and mix until combined.
    4. Add the peanut butter to the mixture and mix until combined, again scraping down the sides of the bowl as needed.
    5. Add the dry ingredients to the wet ingredients and mix on low just until combined.
    6. Add violet or purple gel food coloring to the dough until you reach the desired color, ensuring thorough incorporation.
    7. Cover and chill the dough for 2 hours or overnight. If chilling overnight, let it sit at room temperature for about 15 minutes before scooping.
    8. Preheat the oven to 350°F. Line two large baking sheets with silicone baking mats or parchment paper and set aside.
    9. Place colored sugar or sprinkles in a small bowl.
    10. Use a small cookie scoop or spoon to scoop about 1 tablespoon of cookie dough and roll into a ball. Roll the ball in the sugar and place on the prepared baking sheet about 2 inches apart.
    11. Bake for 8 to 10 minutes or until the cookies begin to puff up and show small cracks without browning. Remove from the oven and cool for 5 minutes on the baking sheet.
    12. Gently press a hug or kiss into the center of each cookie.
    13. Place the cookie sheet directly into the freezer for 10 minutes to prevent the chocolate from melting. Transfer to a wire cooling rack while baking the remaining cookies.

    Notes

    • For chewier cookies, under-bake slightly.
    • Experiment with different colors of gel food coloring.
    • Store cookies in an airtight container to maintain freshness.
    • Prep Time: 20 minutes
    • Cook Time: 10 minutes
    • Category: Dessert
    • Method: Baking
    • Cuisine: American

    Nutrition

    • Serving Size: 1 cookie
    • Calories: 120
    • Sugar: 10g
    • Sodium: 60mg
    • Fat: 6g
    • Saturated Fat: 3g
    • Unsaturated Fat: 3g
    • Trans Fat: 0g
    • Carbohydrates: 15g
    • Fiber: 1g
    • Protein: 2g
    • Cholesterol: 15mg

    Sharing is caring!

  • Slow Cooked Summer Beef Casserole

    Slow Cooked Summer Beef Casserole


    Introduction to Slow Cooked Summer Beef Casserole

    As a busy mom, I know how challenging it can be to find time to prepare a delicious meal. That’s where my Slow Cooked Summer Beef Casserole comes to the rescue! This hearty dish brings together tender chunks of beef, vibrant vegetables, and a rich sauce, all simmered to perfection. It’s the kind of recipe that warms not just the belly but the heart, making it the ideal choice for a family dinner or a cozy night in. Plus, it’s simple enough to whip up without taking precious time away from your day!

    Why You’ll Love This Slow Cooked Summer Beef Casserole

    This Slow Cooked Summer Beef Casserole is a lifesaver for busy evenings. It’s a hands-off recipe, allowing you to enjoy your day while the oven works its magic. The blend of tender beef and fresh veggies creates a symphony of flavors that everyone at the table will cherish. Plus, it’s perfect for those picky eaters, thanks to the delicious sauce that brings everything together beautifully!

    Ingredients for Slow Cooked Summer Beef Casserole

    When it comes to creating an unforgettable Slow Cooked Summer Beef Casserole, quality ingredients make all the difference. Here’s what you’ll need:

    • Olive oil: This golden nectar adds richness while helping to brown the beef, sealing in all those delectable juices.
    • Braising beef: Look for well-marbled cuts, like chuck beef, which become fork-tender during slow cooking.
    • Plain flour: Dusting the meat with flour helps create a lovely sauce that thickens as it cooks.
    • Salt and pepper: These basic seasonings amplify flavors and ensure every bite is scrumptious.
    • Garlic: Minced garlic brings aromatic depth and a hint of warmth to the dish.
    • Guinness or other ale: This adds a robust depth of flavor, elevating the beef with a delightful nutty undertone.
    • Beef stock: A good quality stock provides a flavorful base for the sauce, contributing to that rich, hearty taste.
    • Red and green bell peppers: These colorful veggies not only brighten the dish but also add sweetness and crunch.
    • Courgette/zucchini: Sliced into chunky pieces, zucchini cooks quickly and maintains a pleasant texture.
    • Parmesan cheese: A sprinkle of grated parmesan just before serving offers a savory finish, enhancing the overall flavor.
    • Fresh parsley: Chopped parsley not only adds a pop of green but also a refreshing brightness to each serving.
    • Red onion: Thinly sliced red onion gives a sharpness that contrasts well with the richness of the casserole.
    • Couscous: Serve your casserole over warm couscous for added texture and a delicious grain to soak up that luscious sauce.

    For anyone interested in precise amounts, you’ll find the details at the bottom of the article, available for easy printing. Feel free to get creative with the vegetables or even toss in some mushrooms or carrots for extra flavors!

    How to Make Slow Cooked Summer Beef Casserole

    Step 1: Preheat and Prepare

    To start, preheat your oven to 325°F (160°C). This step gets your cooking environment ready for the magic that’s about to happen. While the oven warms up, grab your Dutch oven or heavy-based pan. Once it’s preheated, it will help cook your Slow Cooked Summer Beef Casserole evenly. Make sure to keep it on the stove to start the browning process. The anticipation builds as the wonderful aromas are about to fill your kitchen!

    Step 2: Seasoning the Beef

    Next, it’s time to add flavor to your beef. In a large bowl or bag, toss the chopped braising beef with plain flour, salt, and pepper. This quick coating not only flavors the meat but also helps to thicken the sauce later on. Imagine each piece of beef being embraced in a flavorful blanket. Once well-coated, it’s ready to be transformed into the star of this casserole.

    Step 3: Browning the Meat

    Now comes the fun part! Heat the olive oil in your Dutch oven over medium-high heat. Add the seasoned beef chunks and brown them all over. This process usually takes about 6-8 minutes. Browning seals in those delicious juices and gives a lovely caramel finish. Picture that wonderful texture as you flip the meat! It’s the first step toward building depth in your Slow Cooked Summer Beef Casserole.

    Step 4: Adding Aromatics and Liquids

    Once the beef is beautifully browned, it’s time for the aromatics. Add the minced garlic and stir, letting it cook for about a minute. Then pour in the Guinness and beef stock. This splash of liquid creates a rich sauce that seeps into the meat. As the liquid heats up, the fragrance will swirl around you, promising warmth and comfort in every bite. Just imagine how delicious your casserole will be!

    Step 5: Slow Cooking Process

    Now it’s time for the slow cooking magic to happen! Cover the Dutch oven with a lid and place it in your preheated oven. Set a timer for 3 hours and let the flavors meld together. Remember to check on it every hour, stirring gently and adding a splash of water if it starts looking dry. That gentle stirring encourages the beef to absorb all that enriched goodness, creating your comforting masterpiece.

    Step 6: Adding Vegetables

    After 3 hours, the time has finally come to add your lovely veggies! Open the oven carefully. Toss in the chopped red and green bell peppers, along with the zucchini chunks. Cover the pot again and place it back in the oven for just 5 minutes. This helps the vegetables warm up while keeping their delightful crunch intact. Can you visualize that vibrant pop of color mingling with the beef? It’s about to get even better!

    Step 7: Final Touches

    When the timer goes off, your kitchen will feel like a cozy haven. Remove the casserole from the oven and garnish with grated parmesan cheese, freshly chopped parsley, and thin slices of red onion. These final touches elevate the dish’s presentation, adding freshness and depth. Picture serving this hearty Slow Cooked Summer Beef Casserole with a warm bowl of couscous. Everyone will be asking for seconds!

    Tips for Success

    • Check the beef regularly to ensure it stays moist and tender during cooking.
    • Feel free to mix and match vegetables based on what you have in your fridge.
    • For an extra flavor kick, marinate the beef in Guinness overnight.
    • Make it a day ahead; it tastes even better the next day.
    • Pair with flavored couscous for an exciting twist!

    Equipment Needed

    • Dutch oven: This heavy pot is perfect for slow cooking, but if you don’t have one, a slow cooker will do!
    • Wooden spoon: Ideal for stirring, but any sturdy spatula will work.
    • Measuring cups and spoons: Essential for adding precise ingredients, or use your trusty eyeball method if you prefer!

    Variations of Slow Cooked Summer Beef Casserole

    • Spicy Kick: Add diced jalapeños or a dash of cayenne pepper to spice things up!
    • Herb Infusion: Experiment with fresh herbs like rosemary or thyme for a fragrant twist.
    • Vegetarian Delight: Substitute beef with hearty mushrooms or lentils for a delicious vegetarian option.
    • International Flair: Incorporate ingredients like soy sauce for an Asian-inspired version or taco seasoning for a Tex-Mex take.
    • Chunky Veggie Medley: Use root vegetables like carrots and parsnips for a heartier assortment!

    Serving Suggestions

    • Pair the Slow Cooked Summer Beef Casserole with warm, fluffy couscous to soak up all that delicious sauce.
    • Add a fresh garden salad drizzled with a light vinaigrette to brighten the meal.
    • A glass of robust red wine complements the flavors beautifully.
    • For a cozy touch, serve in individual bowls with a crusty baguette on the side.

    FAQs about Slow Cooked Summer Beef Casserole

    Can I use a different type of meat for this casserole?

    Absolutely! While braising beef is the star here, cuts like pork or lamb can add a unique twist. Just remember, adjustments in cooking time may be needed depending on the meat’s tenderness and type!

    Is this Slow Cooked Summer Beef Casserole freezer-friendly?

    You bet! This casserole freezes beautifully. I recommend storing it in airtight containers. Just reheating it for a cozy meal later will remind you of all those delicious flavors.

    Can I make this casserole in a slow cooker?

    Simplifying life is key! You can totally make this casserole in a slow cooker. Just follow the same steps and cook on low for 6-8 hours. Enjoy those delicious smells while it patiently cooks!

    How can I make this dish more filling?

    If you’re feeding a crowd or just want extra heartiness, consider adding more vegetables or serving it over a bed of rice or quinoa alongside the couscous. It makes each bite even more satisfying!

    What alternatives can I use for the beer in the recipe?

    No worries if beer isn’t your thing! Replace it with beef broth or even apple cider for a different flavor profile. Trust me, it’ll still be delicious!

    Final Thoughts

    Cooking my Slow Cooked Summer Beef Casserole has always been a heartwarming experience. There’s something so comforting about the aroma wafting through my kitchen, promising a meal filled with love and warmth. As I serve it to family and friends, their smiles of delight bring me immense joy. It’s truly more than just a comforting dish; it’s a creation that fosters connection and warmth at the dinner table. So why not embrace this delicious adventure and treat your loved ones to a delightful meal with this casserole? Enjoy every moment, because cooking is a celebration of life!


    Print

    clock clock iconcutlery cutlery iconflag flag iconfolder folder iconinstagram instagram iconpinterest pinterest iconfacebook facebook iconprint print iconsquares squares iconheart heart iconheart solid heart solid icon

    Description

    A delicious and hearty slow-cooked beef casserole that brings together tender chunks of beef with vibrant vegetables and a rich sauce.


    • 2 tbsp olive oil
    • 600 g (1.3 lbs) braising beef, chopped into chunks
    • 2 tbsp plain (all-purpose) flour
    • ½ tsp salt
    • ½ tsp pepper
    • 2 cloves garlic, peeled and minced
    • 330 ml (11 oz) Guinness or other ale
    • 360 ml (1 1/2 cups) beef stock
    • 1 red bell pepper, chopped
    • 1 green bell pepper, chopped
    • 1 small courgette/zucchini, chopped into chunks
    • 3 tbsp grated parmesan cheese
    • Freshly chopped parsley (to serve)
    • ¼ red onion, peeled and thinly sliced (to serve)
    • Cooked couscous (to serve)

    1. Preheat the oven to 160C/325F (fan).
    2. Heat the oil on a medium-high heat in a Dutch oven or other heavy-based pan.
    3. Place the beef in a bowl or bag and add the flour, salt, and pepper. Toss together to coat, then add the beef to the pan. Brown the meat all over (should take about 6-8 minutes).
    4. Add the garlic, stir and cook for one minute, then add the Guinness and stock.
    5. Bring to the boil, stir and place a lid on the pan. Place in the oven and cook for 3 hours (check every hour and top up with a splash of water if it’s starting to look a little dry).
    6. After 3 hours, add in the chopped peppers and courgette. Place the lid on and place back in the oven for 5 minutes to ensure the veg stays crunchy but is warmed through.
    7. Take out of the oven, sprinkle on the parmesan, parsley, and red onion slices, then serve with warm couscous.

    Notes

    • This casserole pairs well with flavored couscous like Ainsley Harriott’s Spice Sensation.
    • Check the beef every hour during cooking to maintain moisture.
    • Prep Time: 30 minutes
    • Cook Time: 3 hours 5 minutes
    • Category: Main Course
    • Method: Slow Cooking
    • Cuisine: American/Irish

    Nutrition

    • Serving Size: 1 serving
    • Calories: 450
    • Sugar: 2g
    • Sodium: 800mg
    • Fat: 20g
    • Saturated Fat: 7g
    • Unsaturated Fat: 10g
    • Trans Fat: 0g
    • Carbohydrates: 30g
    • Fiber: 3g
    • Protein: 35g
    • Cholesterol: 90mg

    Sharing is caring!

  • Greek Chicken Quinoa Gyro Bowl

    Greek Chicken Quinoa Gyro Bowl


    Introduction to Greek Chicken Quinoa Gyro Bowl

    Hello there, lovely food enthusiasts! If you’re anything like me, juggling a busy schedule while trying to keep your family happy and healthy is quite the challenge. That’s where my delightful Greek Chicken Quinoa Gyro Bowl comes in—a delicious and nutritious dish that’s as simple as it is satisfying! Packed with vibrant flavors and wholesome ingredients, this bowl is a quick solution for those hectic days when time is limited, yet you still want to impress your loved ones with something special. Trust me; they won’t be able to resist this flavorful delight!

    Why You’ll Love This Greek Chicken Quinoa Gyro Bowl

    This Greek Chicken Quinoa Gyro Bowl is more than just a meal; it’s a treasure trove of flavors. With its zesty chicken and creamy tzatziki, your taste buds will dance with delight! Plus, it’s a breeze to whip up—perfect for those days when you’re short on time. Whether you’re looking to impress guests or satisfy your family, this bowl has got you covered, all while keeping things healthy and delicious!

    Ingredients for Greek Chicken Quinoa Gyro Bowl

    Gathering the right ingredients is half the fun! This Greek Chicken Quinoa Gyro Bowl is loaded with fantastic flavors and textures that come together beautifully. Let’s dive into what you’ll need:

    • Chicken breast: The star of your dish! Marinated in lemon juice, garlic, and oregano, it burst with flavor and keeps things juicy.
    • Cooked quinoa: A protein-packed base that brings a nutty flavor and fluffy texture, making it an excellent substitute for rice!
    • Sliced cucumbers: These add refreshing crunch and a light, crisp taste. Feel free to use pickled cucumbers for an extra zing!
    • Halved cherry tomatoes: Juicy and sweet, they introduce a burst of brilliance that balances the dish.
    • Crumble feta cheese: Adding creamy saltiness, feta gives your gyro bowl that authentic Greek twist.
    • Greek yogurt: The creamy base for your tzatziki sauce, it’s not just delicious but also good for the gut!
    • Lemon juice: Freshly squeezed lemon brings a tart brightness to the tzatziki, elevating your bowl to another level.
    • Minced garlic: An essential flavor booster in the tzatziki sauce, adding aromatic depth with each bite.

    Feel free to mix things up! Consider adding bell peppers, olives, or even avocado for extra flair. Vegetarian? Swap the chicken for grilled tofu, and you’re golden! Check out the bottom of the article for exact quantities available for printing.

    How to Make Greek Chicken Quinoa Gyro Bowl

    Now that you have all your ingredients, it’s time to dive into the actual cooking! Trust me, this part is where the magic happens. Let’s break it down step by step, so you can create your own delicious Greek Chicken Quinoa Gyro Bowl!

    Step 1: Prepare the Chicken

    First, let’s bring that chicken to life! If you haven’t marinated it yet, no worries! Just toss your chicken breast in lemon juice, garlic, and oregano, and let it soak up all those flavors for at least 30 minutes.

    Once marinated, you can grill or pan-sear the chicken until it’s cooked through. I usually aim for a golden sear on each side to lock in the juices. This will take about 6-7 minutes per side depending on thickness. When done, slice the chicken thinly to make it easy to incorporate into the bowl.

    Step 2: Cook Quinoa

    While your chicken is cooking, let’s get that quinoa going! If you haven’t cooked quinoa yet, it’s incredibly easy. Rinse 1 cup of quinoa under cold water, then add it to a pot with 2 cups of water or broth. Bring it to a boil, then cover and simmer on low for about 15 minutes. When it’s fluffy and all the liquid is absorbed, it’s ready!

    Add a squeeze of lemon juice and a pinch of salt at the end for an extra flavor boost!

    Step 3: Slice Vegetables

    Now, let’s bring in the fresh veggies! Grab your cucumbers and cherry tomatoes, and slice them up. I like to use a mandolin for even slices on the cucumbers, but a knife works just as well. Halve those cherry tomatoes for a pop of color and flavor in every bite. These vibrant veggies add freshness and crunch, balancing the meal perfectly!

    Step 4: Assemble the Gyro Bowl

    Here comes the fun part—assembly! Start with a generous scoop of quinoa at the bottom of your bowl. Layer the sliced chicken right on top, followed by your colorful cucumbers and cherry tomatoes. If you’re feeling fancy, sprinkle some crumbled feta on top for that creamy flavor burst!

    Don’t forget, this is your bowl, so feel free to add more veggies or toppings as you like!

    Step 5: Add Tzatziki Sauce

    Finally, it’s time to add the tzatziki sauce! To make it, mix the Greek yogurt, lemon juice, and minced garlic together in a bowl. Then, drizzle this creamy goodness over your assembled gyro bowl with abandon. You can even dollop it on top for a beautiful finish.

    If you like, garnish with some fresh herbs like dill or parsley for that authentic Greek touch! Your Greek Chicken Quinoa Gyro Bowl is now ready to enjoy!

    Tips for Success

    • Marinate your chicken overnight for maximum flavor absorption.
    • Cook quinoa in vegetable or chicken broth for extra richness.
    • Use a vegetable peeler for even cucumber slices.
    • For a spicy kick, add diced jalapeños to your gyro bowl.
    • Make extra tzatziki sauce; it’s great as a dip for snacks!

    Equipment Needed

    • Grill or pan: Either works well for searing your chicken.
    • Pot: A medium-sized pot for cooking quinoa; you can also use a rice cooker.
    • Knife: A sharp knife for slicing vegetables with ease.
    • Cutting board: A sturdy surface for all your prep work.
    • Mixing bowl: A bowl for combining tzatziki ingredients.

    Variations

    • Add grilled shrimp or lamb for a different protein twist.
    • Make it vegan by replacing chicken with grilled tofu and using dairy-free yogurt.
    • Incorporate roasted vegetables like zucchini, eggplant, or bell peppers for added flavor.
    • Switch up the grains by using farro, bulgur, or brown rice instead of quinoa.
    • Experiment with different herbs like mint or oregano for a fresh flavor boost.

    Serving Suggestions for Greek Chicken Quinoa Gyro Bowl

    • Pair your gyro bowl with warm pita bread for a filling meal.
    • Serve alongside a light Greek salad, featuring olives and red onion.
    • Complement with a chilled glass of sparkling water with lemon slices.
    • For presentation, use colorful bowls to make the dish pop!

    FAQs about Greek Chicken Quinoa Gyro Bowl

    As you prepare to create your own Greek Chicken Quinoa Gyro Bowl, you might have some questions. Don’t worry! I’ve got you covered with answers to common queries.

    Can I make the tzatziki sauce ahead of time?
    Absolutely! Preparing the tzatziki sauce a day in advance will meld the flavors beautifully. Just store it in the refrigerator in an airtight container.

    What can I substitute for quinoa?
    If you’re looking to switch things up, farro or bulgur makes a fantastic alternative! Both grains add a deliciously chewy texture to your bowl.

    How long does leftover chicken last in the fridge?
    Leftover grilled chicken should stay fresh for about 3-4 days when stored properly in the fridge. Just reheat it thoroughly before trying!

    Can I make this dish vegetarian?
    Of course! Simply swap the chicken for grilled tofu or chickpeas. You’ll still enjoy all those delightful flavors while catering to your dietary preferences!

    Is the Greek Chicken Quinoa Gyro Bowl gluten-free?
    Yes! This dish is naturally gluten-free, making it a great choice for those following a gluten-sensitive diet. Enjoy every last bite without worry!

    Final Thoughts

    Creating a Greek Chicken Quinoa Gyro Bowl is like taking a mini-vacation for your taste buds! The vibrant colors, fresh flavors, and delightful textures make it a feast for both the eyes and the palate. Whether you’re whipping it up for a busy weeknight dinner or an impressive lunch for guests, this recipe is bound to become a cherished favorite.

    It combines health and flavor without fuss, allowing you to enjoy home-cooked goodness that fits perfectly into your hectic lifestyle. Dive in and savor every bite—that’s what cooking is all about!


    Print

    clock clock iconcutlery cutlery iconflag flag iconfolder folder iconinstagram instagram iconpinterest pinterest iconfacebook facebook iconprint print iconsquares squares iconheart heart iconheart solid heart solid icon

    Description

    A delicious and healthy Greek Chicken Quinoa Gyro Bowl, packed with flavors and nutrients!


    • 1 lb chicken breast, marinated in lemon juice, garlic, and oregano
    • 2 cups cooked quinoa
    • 1/2 cup sliced cucumbers
    • 1/2 cup halved cherry tomatoes
    • 1/4 cup crumbled feta
    • 1/2 cup Greek yogurt (for tzatziki sauce)
    • 1 tbsp lemon juice (for tzatziki sauce)
    • 1 garlic clove, minced (for tzatziki sauce)

    1. Grill or pan-sear chicken until cooked through. Slice thinly.
    2. Assemble bowls with quinoa, chicken, and veggies.
    3. Drizzle with tzatziki sauce.
    4. Garnish with fresh herbs, if you like.

    Notes

    • Feel free to add more veggies or toppings as desired.
    • You can substitute the chicken with grilled tofu for a vegetarian option.
    • Make sure to marinate the chicken for at least 30 minutes for better flavor.
    • Prep Time: 10 minutes
    • Cook Time: 15 minutes
    • Category: Lunch/Dinner
    • Method: Grilling/Pan-searing
    • Cuisine: Greek

    Nutrition

    • Serving Size: 1 bowl
    • Calories: 450
    • Sugar: 4g
    • Sodium: 600mg
    • Fat: 18g
    • Saturated Fat: 5g
    • Unsaturated Fat: 10g
    • Trans Fat: 0g
    • Carbohydrates: 45g
    • Fiber: 6g
    • Protein: 36g
    • Cholesterol: 75mg

    Sharing is caring!

  • Avocado, Pickled Red Onion & Everything Bagel Cottage Cheese Salad

    Avocado, Pickled Red Onion & Everything Bagel Cottage Cheese Salad


    Introduction to Avocado, Pickled Red Onion & Everything Bagel Cottage Cheese Salad

    Hey there, fellow kitchen adventurers! If you’re searching for a light, refreshing meal that satisfies both your taste buds and your busy schedule, look no further than this Avocado, Pickled Red Onion & Everything Bagel Cottage Cheese Salad. Seriously, it’s like a hug in a bowl! The creamy cottage cheese paired with ripe avocado and tangy pickled red onions creates a flavor explosion. Plus, it’s quick to whip up—perfect for those days when time slips through your fingers like sand. Your loved ones will be swooning over this colorful, vibrant dish!

    Why You’ll Love This Avocado, Pickled Red Onion & Everything Bagel Cottage Cheese Salad

    Let me tell you, this salad is a game-changer! In just 10 minutes, you can whip up a dish that not only sings with flavor but is also packed with nutrition. The creamy cottage cheese is rich in protein, while avocados add healthy fats. It’s indulgent yet guilt-free, making it perfect for a refreshing lunch or as a side at dinner. Plus, no cooking means more time for the things you love!

    Ingredients for Avocado, Pickled Red Onion & Everything Bagel Cottage Cheese Salad

    Gathering the right ingredients is the first step towards a fantastic salad! Here’s what you’ll need:

    • Cottage Cheese: Choose full-fat or low-fat for a creamy base. This is the heart of your salad, rich in protein and texture.
    • Avocado: Ripe, creamy avocado slices add richness and healthy fats. Look for avocados that yield slightly when gently pressed.
    • Pickled Red Onions: They bring a delightful tanginess to the salad. You can buy them store-bought or make homemade pickled onions if you’re feeling adventurous!
    • Everything Bagel Seasoning: A sprinkle of this blend transforms your salad, adding flavors of sesame, garlic, and onion. It’s like magic in a jar!
    • Fresh Lemon Juice: A splash of fresh lemon juice brightens the flavors and balances the creaminess. Fresh is best for that zesty kick.
    • Extra Virgin Olive Oil: This helps to enhance the flavor and adds richness. Ensure you’re using a good quality oil for the best taste.
    • Chopped Fresh Chives: Optional, but they add a pop of color and a mild onion flavor that sings alongside the other ingredients.
    • Freshly Ground Black Pepper: Just a dash provides that little extra depth of flavor. Adjust to taste!

    Remember, you can find the exact measurements at the bottom of this article, ready for printing. Happy prepping!

    How to Make Avocado, Pickled Red Onion & Everything Bagel Cottage Cheese Salad

    Ready to see how easy it is to create this delightful salad? Follow these simple steps, and you’ll be enjoying your Avocado, Pickled Red Onion & Everything Bagel Cottage Cheese Salad in no time!

    Step 1: Spoon in the Cottage Cheese

    Begin by taking a generous scoop of cottage cheese. This will be the base of your salad. Nestle it into a beautiful serving bowl or plate. Its creamy texture is the canvas for all the flavors to come.

    Step 2: Arrange the Avocado

    Next, grab a ripe avocado. Carefully cut it open, remove the pit, and slice it into wedges. Lay these buttery slices over the cottage cheese. Opt for a design that’s pleasing to the eye; after all, we eat with our eyes first!

    Step 3: Add Pickled Red Onions

    Now it’s time for those tangy pickled red onions! Scatter them evenly on top of the avocado. Their vibrant color and flavor will grab attention and add a delightful crunch to the dish.

    Step 4: Sprinkle Everything Bagel Seasoning

    Here’s where the magic happens. Shake that everything bagel seasoning generously over your salad. It’s packed with flavors like sesame seeds, garlic, and onion, all complementing each other beautifully!

    Step 5: Drizzle with Lemon Juice and Olive Oil

    To enhance the flavors, drizzle fresh lemon juice and a splash of extra virgin olive oil over the entire salad. This adds brightness and richness that will make every bite sing!

    Step 6: Add Black Pepper

    Don’t forget the freshly ground black pepper! Just a sprinkle will elevate the dish’s flavors. It’s like adding the perfect finishing touches to a masterpiece.

    Step 7: Garnish with Chives

    If you’re feeling fancy, add some chopped fresh chives on top. They provide a lovely pop of green and a mild onion flavor that beautifully complements the other ingredients.

    Step 8: Enjoy Your Salad

    The best part? Dig in! Enjoy this refreshing salad as is or scoop it up with crackers, pita chips, or crisp cucumber slices. Each bite is a flavorful journey, and trust me—you’ll be coming back for seconds!

    Tips for Success

    • Ensure your avocado is perfectly ripe for a creamy texture.
    • Give store-bought pickled onions a quick taste test; they vary in tanginess!
    • Feel free to adjust the everything bagel seasoning to your liking—go heavy or light!
    • Prepare this salad just before serving to keep everything fresh.
    • Pair it with a light white wine for a delightful lunch treat!

    Equipment Needed

    • Mixing Bowl: A medium-sized bowl works wonders for combining ingredients.
    • Cutting Board: For safely slicing your avocado and onions.
    • Sharp Knife: Ensures smooth cutting of the avocado and vegetables.
    • Spoon: For serving and plating the cottage cheese.
    • Measuring Spoons: Helpful for precise seasoning and dressing.

    Variations of Avocado, Pickled Red Onion & Everything Bagel Cottage Cheese Salad

    • Protein Boost: Add cooked shrimp or grilled chicken for extra protein and heartiness to the salad.
    • Leafy Greens: Mix in fresh spinach or arugula for added nutrients and a pop of color.
    • Vegan Option: Swap cottage cheese for a plant-based alternative like almond or soy yogurt.
    • Spice It Up: Add sliced jalapeños or a dash of hot sauce for a kick if you love heat!
    • Nutty Flavor: Toss in some toasted sunflower seeds or chopped walnuts for crunch and healthy fats.

    Serving Suggestions

    • Pair this salad with whole grain crackers for a satisfying crunch.
    • Serve alongside a light soup, like tomato basil, for a complete meal.
    • Present in a mason jar for a charming picnic option.
    • Accompany with a refreshing iced tea or sparkling water.
    • Add a colorful salad plate for an eye-catching presentation!

    FAQs about Avocado, Pickled Red Onion & Everything Bagel Cottage Cheese Salad

    Got questions about this vibrant salad? You’ve come to the right place! Here are some common queries answered to help you make the most of your culinary adventure.

    Can I make this salad in advance?

    While it’s best enjoyed fresh, you can prepare the ingredients ahead of time. Just store the cottage cheese, sliced avocado, pickled onions, and everything bagel seasoning separately. Assemble them just before serving to maintain that delightful freshness.

    What can I substitute for cottage cheese?

    If you’re not a fan of cottage cheese, you can try Greek yogurt or a plant-based yogurt. Both alternatives provide creaminess and a tangy flavor that complements all the other ingredients nicely!

    How long will leftovers last?

    Leftovers of this salad are best eaten within 24 hours. Store them in an airtight container in the fridge. Keep in mind the avocado may brown, but a squeeze of lemon juice can help prevent that!

    Can I customize the seasoning in this salad?

    Absolutely! If you don’t have everything bagel seasoning on hand, mix up your own using sesame seeds, garlic powder, onion powder, and a pinch of salt. It’ll add a lovely flavor twist!

    Is this salad filling enough for a meal?

    This salad is a great light lunch or side dish. However, if you’re looking for something more substantial, try adding protein, like grilled chicken or chickpeas, to make it a heartier meal.

    Final Thoughts

    Creating this Avocado, Pickled Red Onion & Everything Bagel Cottage Cheese Salad is truly a joyful experience. The vibrant colors and refreshing flavors can turn any hectic day into a delightful one. Each bite celebrates the creaminess of the cottage cheese, the richness of avocado, and the zing of pickled onions. It’s not just about nourishment; it’s also about adding a little pleasure back into your busy life. So, whether enjoying it solo or sharing it with family and friends, this salad is sure to bring smiles and satisfied bellies to your table. Enjoy every bite!


    Print

    clock clock iconcutlery cutlery iconflag flag iconfolder folder iconinstagram instagram iconpinterest pinterest iconfacebook facebook iconprint print iconsquares squares iconheart heart iconheart solid heart solid icon

    Description

    A refreshing salad combining creamy cottage cheese, creamy avocado, tangy pickled red onions, and everything bagel seasoning for a flavorful dish.


    • 1 cup cottage cheese (full-fat or low-fat)
    • 1 small avocado, sliced
    • ¼ cup pickled red onions (store-bought or homemade)
    • 1 tsp everything bagel seasoning
    • 1 tbsp fresh lemon juice
    • 1 tbsp extra virgin olive oil
    • 2 tbsp chopped fresh chives (optional, for garnish)
    • Freshly ground black pepper, to taste

    1. Spoon the cottage cheese into a serving bowl or onto a plate.
    2. Arrange the sliced avocado over the top.
    3. Scatter the pickled red onions evenly across the salad.
    4. Sprinkle everything bagel seasoning generously over the top.
    5. Drizzle with fresh lemon juice and olive oil.
    6. Add a little black pepper for extra depth.
    7. Garnish with chopped chives if using.
    8. Enjoy as is, or scoop it up with crackers, pita chips, or cucumber slices.

    Notes

    • This salad can be served as a light lunch or a side dish.
    • Prep Time: 10 minutes
    • Cook Time: 0 minutes
    • Category: Salad
    • Method: No Cook
    • Cuisine: American

    Nutrition

    • Serving Size: 1 bowl
    • Calories: 250
    • Sugar: 3g
    • Sodium: 300mg
    • Fat: 15g
    • Saturated Fat: 3g
    • Unsaturated Fat: 12g
    • Trans Fat: 0g
    • Carbohydrates: 10g
    • Fiber: 5g
    • Protein: 20g
    • Cholesterol: 10mg

    Sharing is caring!

  • Cottage Cheese Mediterranean Couscous Salad

    Cottage Cheese Mediterranean Couscous Salad


    Introduction to Cottage Cheese Mediterranean Couscous Salad

    As a busy mom juggling countless responsibilities, I’m always on the lookout for quick, healthy meals that warm the heart and feed the soul. That’s where my Cottage Cheese Mediterranean Couscous Salad comes into play! This refreshing dish is not just a salad; it’s a burst of Mediterranean sunshine, perfect for light lunches or delightful side dishes. With vibrant ingredients coming together in just 20 minutes, it’s an ideal solution for those hectic weekdays or casual family gatherings. Trust me, you’ll have your loved ones raving about this colorful plate!

    Why You’ll Love This Cottage Cheese Mediterranean Couscous Salad

    This Cottage Cheese Mediterranean Couscous Salad is truly a lifesaver! It comes together in mere minutes, making it perfect for those chaotic evenings when time seems to slip away. Not only is it a feast for the eyes but also a delightful dance of flavors. Plus, it’s packed with protein and fiber to keep you satisfied. You’ll love how refreshing it tastes, proving that healthy can be downright delicious!

    Ingredients for Cottage Cheese Mediterranean Couscous Salad

    Gathering fresh ingredients is the first step in creating our Cottage Cheese Mediterranean Couscous Salad. Each element plays a role in crafting a dish that’s vibrant, nutritious, and utterly irresistible. Here’s what you’ll need:

    • Cooked couscous: The base of our salad, couscous brings a lovely, fluffy texture. Use whole grain or even quinoa for a healthier twist.
    • Cherry tomatoes: These little bursts of sweetness add color and freshness. They can be halved or quartered depending on your preference.
    • Cucumber: Bright and crunchy, cucumbers are perfect for adding a refreshing crunch. Opt for English cucumbers for fewer seeds.
    • Kalamata olives: Their rich, briny flavor enhances the Mediterranean vibe of this salad. De-stone them for easier eating!
    • Red onion: A touch of sharpness that elevates every bite. Soaking them in cold water for a bit can mellow their flavor.
    • Feta cheese: Adds a creamy, tangy element that complements the other ingredients beautifully. Crumble it for easy mixing.
    • Cottage cheese: The star of the show! It provides a creamy texture loaded with protein. Feel free to use low-fat or full-fat based on your preference.
    • Olive oil: A drizzle of this golden liquid not only helps in dressing the salad but also adds a layer of flavor. Choose high-quality extra virgin for the best taste.
    • Lemon juice: A splash adds a bright, zesty zing that enhances the freshness of the vegetables. Use freshly squeezed for maximum flavor.
    • Salt and black pepper: Basics of seasoning! They bring out the natural flavors of the fresh ingredients.
    • Fresh herbs: Optional, but highly recommended! Parsley or dill can be sprinkled for an herbal flourish.

    Don’t fret about getting these quantities exactly right. Feel free to experiment with your favorite veggies or adjust the toppings to suit your taste. The specifics for each ingredient can be found at the bottom of this article for your convenience. Happy chopping!

    How to Make Cottage Cheese Mediterranean Couscous Salad

    Now that we’ve gathered our fresh ingredients, it’s time to bring everything together to create this vibrant and nutritious Cottage Cheese Mediterranean Couscous Salad. Follow these simple steps for a dish that’s bursting with flavor!

    Step 1: Prepare the Ingredients

    Start by washing all your vegetables to ensure they’re clean and ready to shine in your salad. Slice the cherry tomatoes, dice the cucumber, and finely chop the red onion. It’s best to handle everything gently to preserve their freshness. Remember, fresh ingredients make all the difference in flavor and texture!

    Step 2: Mix the Base Ingredients

    In a large bowl, combine your cooled couscous, halved cherry tomatoes, diced cucumber, Kalamata olives, chopped red onion, and crumbled feta. Take your time here; gently toss the ingredients together until they’re evenly mixed. This is where the salad starts to come to life with all those vibrant colors and textures!

    Step 3: Dress the Salad

    Once the base is mixed, it’s time to add some flavor! Drizzle olive oil and freshly squeezed lemon juice over the salad. Sprinkle salt and black pepper to taste. Toss everything again to coat all those beautiful ingredients with the dressing. This simple dressing will elevate the dish and give it that Mediterranean flair.

    Step 4: Add Cottage Cheese

    Now comes the star of our salad: cottage cheese! Divide the salad into two bowls, then spoon ¼ cup of cottage cheese on top of each serving. The cottage cheese not only adds creamy richness but also packs a protein punch. It complements the veggies and grains perfectly!

    Step 5: Garnish and Serve

    If you love a bit of extra flavor, add chopped fresh herbs like parsley or dill on top for a pop of color. This not only makes the salad look gorgeous but also adds an aromatic touch. Serve immediately for the freshest taste, or pop it in the fridge for a cool, refreshing lunch later. I promise, leftovers are even better!

    Tips for Success

    • Prep all ingredients in advance to save time during assembly.
    • Allow couscous to cool completely before mixing to maintain the crunch of the vegetables.
    • Taste the salad after dressing; adjust the seasoning as needed for your preference.
    • For added nutrition, toss in other veggies like bell peppers or spinach!
    • Refrigerate leftovers in an airtight container to keep them fresh for up to three days.

    Equipment Needed

    • Mixing bowl: A large bowl works best, but any bowl can do.
    • Cutting board: Essential for chopping, a flexible mat can serve as an alternative.
    • Knife: A sharp knife ensures easy slicing; a simple paring knife will work too.
    • Measuring cups: Handy for portioning ingredients; use standard cups or simply eyeball it!
    • Serving spoons: Any large spoon will suffice for mixing and serving.

    Variations

    • Protein Boost: Add grilled chicken, chickpeas, or shrimp for extra protein and heartiness.
    • Gluten-Free Option: Substitute couscous with quinoa or brown rice for a gluten-free twist.
    • Herb Variations: Experiment with different herbs like basil, mint, or thyme for unique flavor profiles.
    • Veggie Add-Ins: Toss in bell peppers, artichokes, or roasted zucchini for additional textures and colors.
    • Spicy Kick: For a little heat, add sliced jalapeños or sprinkle with red pepper flakes!

    Serving Suggestions for Cottage Cheese Mediterranean Couscous Salad

    • Pair the salad with grilled chicken or fish for a complete meal.
    • Enjoy it alongside warm pita bread and hummus for a Mediterranean feast.
    • Serve with a chilled glass of white wine or sparkling water for a refreshing touch.
    • For presentation, serve in brightly colored bowls that highlight the vibrant ingredients.
    • Garnish with extra herbs to elevate the visual appeal!

    FAQs about Cottage Cheese Mediterranean Couscous Salad

    Can I make this Cottage Cheese Mediterranean Couscous Salad ahead of time?

    Absolutely! This salad is perfect for meal prep. You can make it a few hours in advance, just wait to add the cottage cheese until you’re ready to serve. This keeps the texture fresh and delicious!

    What can I use instead of couscous?

    If you’re looking for a gluten-free option, quinoa or brown rice work wonderfully! They still offer a delightful texture, while maintaining that Mediterranean vibe.

    How should I store leftovers of the Cottage Cheese Mediterranean Couscous Salad?

    Store leftovers in an airtight container in the fridge. It will stay fresh for up to three days, making it a handy lunch option for busy days!

    Is this salad suitable for vegetarians?

    Yes, this salad is a vegetarian delight! Packed with protein from the cottage cheese and feta cheese, it’s a wholesome meal for anyone following a vegetarian diet.

    What are some great pairings for this salad?

    This salad goes well with grilled meats, warm pita, or a side of roasted veggies. It’s versatile enough to fit into any meal you have planned.

    Final Thoughts

    Creating this Cottage Cheese Mediterranean Couscous Salad has been a delightful culinary journey for me, one that I cherish sharing with all of you. The fresh flavors and vibrant colors make every bite a celebration of taste. It’s perfect for busy days, and the added protein keeps us fueled and satisfied. Whether served at a family gathering or enjoyed as a light lunch, this salad never fails to impress. I hope it brings you as much joy and nourishment as it does for my family. Embrace the simplicity and magic of this Mediterranean treasure!


    Print

    clock clock iconcutlery cutlery iconflag flag iconfolder folder iconinstagram instagram iconpinterest pinterest iconfacebook facebook iconprint print iconsquares squares iconheart heart iconheart solid heart solid icon

    Description

    A refreshing and nutritious cottage cheese Mediterranean couscous salad that is perfect for a light meal or a side dish.


    • 1 cup cooked couscous (cooled)
    • ½ cup cherry tomatoes, halved
    • ½ cucumber, diced
    • ¼ cup Kalamata olives
    • ¼ cup red onion, finely chopped
    • ¼ cup crumbled feta
    • ½ cup cottage cheese
    • 1 tablespoon olive oil
    • 1 tablespoon lemon juice
    • Salt and black pepper, to taste
    • Optional: fresh parsley or dill, chopped, for garnish

    1. In a large bowl, toss together the cooked couscous, tomatoes, cucumber, olives, red onion, and feta.
    2. Drizzle with olive oil and lemon juice. Season with salt and pepper, and toss to combine.
    3. Divide between two bowls and spoon ¼ cup of cottage cheese on top of each serving.
    4. Sprinkle with fresh herbs if desired. Serve immediately or refrigerate for a refreshing lunch later.

    Notes

    • Make sure the couscous is cooled before mixing to prevent wilting the fresh vegetables.
    • You can substitute quinoa for couscous for a gluten-free option.
    • This salad can be made a few hours ahead; just wait to add the cottage cheese until serving.
    • Prep Time: 10 minutes
    • Cook Time: 10 minutes
    • Category: Salad
    • Method: Mixing
    • Cuisine: Mediterranean

    Nutrition

    • Serving Size: 1 bowl
    • Calories: 350
    • Sugar: 5g
    • Sodium: 600mg
    • Fat: 15g
    • Saturated Fat: 4g
    • Unsaturated Fat: 10g
    • Trans Fat: 0g
    • Carbohydrates: 35g
    • Fiber: 5g
    • Protein: 20g
    • Cholesterol: 15mg

    Sharing is caring!

  • Greek-Style Jacket Potato with Cottage Cheese Delight!

    Greek-Style Jacket Potato with Cottage Cheese Delight!


    Introduction to Greek-Style Jacket Potato with Cottage Cheese

    There’s something magical about the simplicity of a baked potato, right? When I discovered the Greek-Style Jacket Potato with Cottage Cheese, I felt like I’d struck gold in my kitchen. This dish is not just a quick solution for busy days but also a delightful way to impress your loved ones. Imagine tender, fluffy potatoes topped with creamy cottage cheese and vibrant Mediterranean flavors. It’s a meal that nourishes both your body and soul, making it perfect for a relaxing dinner or a bustling weeknight feast. Your taste buds will thank you!

    Why You’ll Love This Greek-Style Jacket Potato with Cottage Cheese

    This recipe is a lifesaver for busy schedules. It takes minimal prep time and just one delicious hour in the oven. You can whip it up while managing the chaos of daily life. Plus, it’s versatile enough to cater to picky eaters! The creamy cottage cheese pairs perfectly with fresh veggies, making each bite a delightful experience. You’ll savor every morsel while knowing you’ve prepared a healthy meal.

    Ingredients for Greek-Style Jacket Potato with Cottage Cheese

    To create a sensational Greek-Style Jacket Potato with Cottage Cheese, you’ll need a handful of simple yet flavorful ingredients. Each component complements the others, crafting a dish that’s both nourishing and delicious.

    • Baking potatoes: Medium-sized potatoes are best. Their fluffy texture holds up well when baked, providing the perfect base for your toppings.
    • Olive oil: A touch of this golden liquid adds flavor and helps create a delightful crispy skin. It’s also packed with healthy fats!
    • Salt: Just a sprinkle enhances flavor, transforming the humble potato into something extraordinary.
    • Cottage cheese: This creamy delight is high in protein and brings a luscious texture to balance the vibrant toppings.
    • Cherry tomatoes: Their juicy sweetness bursts with Mediterranean flavor. Choose ripe, vibrant ones for the best taste.
    • Cucumber: Diced cucumbers add crunch and freshness, making each bite feel crisp and refreshing.
    • Kalamata olives: These tangy, briny beauties are quintessential to Greek cuisine, giving your dish a robust flavor.
    • Red onion: Finely chopped, it adds a sharpness that cuts through the creaminess of the cottage cheese.
    • Fresh parsley: A sprinkle of this aromatic herb introduces a bright note, elevating your dish with vibrancy.
    • Dried oregano: A staple in Mediterranean cooking, it lends an earthy depth of flavor that can’t be missed.
    • Optional ingredients: Consider adding a squeeze of lemon juice for zing or crumbled feta for an extra tangy bite!

    For exact measurements, check at the bottom of the article. You can also print them out for your next cooking adventure!

    How to Make Greek-Style Jacket Potato with Cottage Cheese

    Creating a delicious Greek-Style Jacket Potato with Cottage Cheese is a delightful journey that begins in your kitchen. Dive into these easy steps to bring this hearty dish to life!

    Step 1: Preheat and Prepare

    Start by preheating your oven to 400°F (200°C). While it heats, give your baking potatoes a good scrub under cold water to remove any dirt. Pricking them with a fork is essential; it prevents steam from building up in the potatoes. Then, rub each potato with olive oil and sprinkle salt all over. This not only enhances flavor but also helps create that perfectly crispy skin you’ll love!

    Step 2: Bake the Potatoes

    With your oven preheated, place the prepared potatoes directly on the oven rack. Bake them for about 45–50 minutes. Halfway through, do a quick probe with a fork; they should be firm yet soft when done. The skin will be crispy, and the insides will be fluffy, almost beckoning you to top them!

    Step 3: Prep Your Toppings

    While those potatoes are baking, let’s get the toppings prepped! Dice the cucumber, halve the cherry tomatoes, chop the red onion, and pit the Kalamata olives. Fresh ingredients are the heartbeat of this dish; they add vibrancy and amazing flavor. A little extra love goes a long way in making each bite a taste of the Mediterranean!

    Step 4: Assemble Your Greek-Style Jacket Potato

    Once your potatoes are perfectly baked, take them out with oven mitts and let them cool for a minute. Slice each potato open lengthwise and fluff the insides with a fork for that dreamy texture. Now, it’s time to pile on the cottage cheese – a hearty scoop on each potato is just the beginning. Then, arrange your fresh toppings on top, sprinkle with parsley, and finish with oregano. If you’re feeling fancy, add a squeeze of lemon or some crumbled feta to elevate the flavor explosion!

    Tips for Success

    • Choose medium-sized potatoes for even cooking; they bake perfectly fluffy.
    • Don’t skip scrubbing the potatoes; cleanliness adds to the overall taste.
    • Keep an eye on the baking time; adjust as needed for your oven’s quirks.
    • Prep all toppings while potatoes bake for a well-timed assembly.
    • Experiment with toppings based on seasonal veggies or family favorites!

    Equipment Needed for Greek-Style Jacket Potato with Cottage Cheese

    • Oven: Essential for baking those potatoes. A toaster oven works too!
    • Baking sheet: For easy handling; a simple rack will do, too.
    • Fork: To prick the potatoes and fluff them later.
    • Sharp knife: For slicing open the baked potatoes with ease.
    • Mixing bowl: Useful for tossing your fresh toppings together.

    Variations of Greek-Style Jacket Potato with Cottage Cheese

    • Spicy Greek-Style: Add sliced jalapeños or a sprinkle of red pepper flakes for a kick that’ll awaken your taste buds.
    • Herb-Infused: Mix in fresh dill or mint with the parsley for a unique twist that brings a fresh garden taste.
    • Protein-Packed: Top your potato with grilled chicken or chickpeas for a heartier meal that satisfies hunger.
    • Vegan Version: Swap cottage cheese for a creamy plant-based alternative, like cashew or tofu ricotta for a vegan twist.
    • Loaded Style: Go beyond the basics by adding sautéed spinach, roasted red peppers, or artichokes for gourmet flair.
    • Cheesy Delight: Sprinkle your assembled potato with shredded mozzarella or a handful of grated parmesan before serving for an indulgent touch.

    Serving Suggestions for Greek-Style Jacket Potato with Cottage Cheese

    • Side Salad: A fresh Greek salad with cucumbers, tomatoes, and feta pairs beautifully.
    • Beverage Pairing: Enjoy with a chilled glass of white wine or sparkling water with lemon.
    • Presentation: Serve on a colorful plate, with a sprinkle of fresh herbs for an inviting look.

    FAQs about Greek-Style Jacket Potato with Cottage Cheese

    Can I prepare the Greek-Style Jacket Potato in advance?

    Absolutely! You can bake the potatoes ahead of time. Just store them in the refrigerator after they’re cooled. When you’re ready to serve, reheat them in the oven for a few minutes before topping with cottage cheese and fresh veggies.

    Can I use other types of cheese instead of cottage cheese?

    Yes! If cottage cheese isn’t your favorite, feel free to try ricotta or Greek yogurt for a similar creamy texture. These alternatives can add a different flavor while maintaining the dish’s delightful character.

    Is this Greek-Style Jacket Potato suitable for meal prep?

    Definitely! Once you’ve prepared your ingredients, you can bake multiple potatoes at once. Just portion the toppings into individual containers. This makes for quick and nutritious meals throughout the week!

    How can I make this recipe gluten-free?

    The Greek-Style Jacket Potato with Cottage Cheese is naturally gluten-free! Just ensure all your toppings, like olives and feta, are gluten-free, and you’re ready to enjoy a guilt-free meal.

    What are some other toppings I can use on this potato?

    The sky’s the limit! Consider adding sautéed mushrooms, roasted vegetables, or even a sprinkle of nuts for added texture. Don’t be afraid to get creative with your toppings!

    Final Thoughts on Greek-Style Jacket Potato with Cottage Cheese

    There’s truly something magical about creating a Greek-Style Jacket Potato with Cottage Cheese. It’s not just a meal; it’s a celebration of flavors and freshness that lifts your spirits after a long day. As you savor each creamy bite, you’ll feel proud of the wholesome ingredients you’ve chosen. Plus, it’s a wonderful option that the whole family can enjoy together. Whether it’s a quick dinner or a gathering of friends, this dish shines brightly at any table. Embrace the joy of cooking, and let this delightful recipe take center stage in your kitchen adventures!


    Print

    clock clock iconcutlery cutlery iconflag flag iconfolder folder iconinstagram instagram iconpinterest pinterest iconfacebook facebook iconprint print iconsquares squares iconheart heart iconheart solid heart solid icon

    Description

    A delicious Greek-style dish featuring baked potatoes topped with creamy cottage cheese and fresh Mediterranean ingredients.


    • 2 medium baking potatoes
    • 1 teaspoon olive oil
    • ½ teaspoon salt
    • 1 cup cottage cheese
    • ½ cup cherry tomatoes, halved
    • ¼ cup cucumber, diced
    • ¼ cup Kalamata olives, pitted
    • 2 tablespoons red onion, finely chopped
    • 1 tablespoon fresh parsley, chopped
    • ½ teaspoon dried oregano
    • Optional: squeeze of lemon juice, crumbled feta

    1. Preheat oven to 400°F (200°C). Scrub the potatoes, prick them with a fork, rub with olive oil, and sprinkle with salt. Bake directly on the oven rack for 45–50 minutes, or until fork-tender and crispy on the outside.
    2. While the potatoes bake, prep the cucumber, tomatoes, olives, onion, and parsley.
    3. Once the potatoes are ready, slice them open and fluff the insides with a fork. Top each with ½ cup cottage cheese, then pile on the cherry tomatoes, cucumber, olives, and onion.
    4. Sprinkle with parsley and a pinch of oregano. Add a squeeze of lemon juice or a little crumbled feta, if desired. Serve warm.

    Notes

    • Choose potatoes of similar size for even cooking.
    • For a tangier flavor, consider adding more lemon juice or feta cheese.
    • This dish can be served as a main or a side.
    • Prep Time: 10 minutes
    • Cook Time: 50 minutes
    • Category: Main Course
    • Method: Baking
    • Cuisine: Greek

    Nutrition

    • Serving Size: 1 potato
    • Calories: 350
    • Sugar: 3g
    • Sodium: 500mg
    • Fat: 10g
    • Saturated Fat: 2g
    • Unsaturated Fat: 8g
    • Trans Fat: 0g
    • Carbohydrates: 50g
    • Fiber: 6g
    • Protein: 15g
    • Cholesterol: 10mg

    Sharing is caring!