Blog

  • California Roll Sushi Bowls

    California Roll Sushi Bowls


    Introduction to California Roll Sushi Bowls

    There’s something magical about enjoying sushi flavors right at home, isn’t there? That’s where California Roll Sushi Bowls come in—an easy and delightful way to savor the fresh, vibrant tastes of sushi without the fuss. As a busy mom myself, I appreciate a meal that’s quick to prepare yet feels special. Picture this: a colorful bowl filled with tender sushi rice, creamy avocado, and succulent crab meat. It’s a dish that can impress your loved ones while also being a wholesome option for your family. Let’s dive into this culinary adventure together!

    Why You’ll Love This California Roll Sushi Bowls

    These California Roll Sushi Bowls are a busy cook’s dream come true! They come together in just 40 minutes, making them perfect for weeknight dinners. The vibrant ingredients bring a rainbow of flavors, and you can tailor each bowl to your family’s tastes. Plus, they’re a great way to sneak in fresh veggies. You’ll serve a gourmet meal that feels restaurant-worthy, all without stepping foot outside!

    Ingredients for California Roll Sushi Bowls

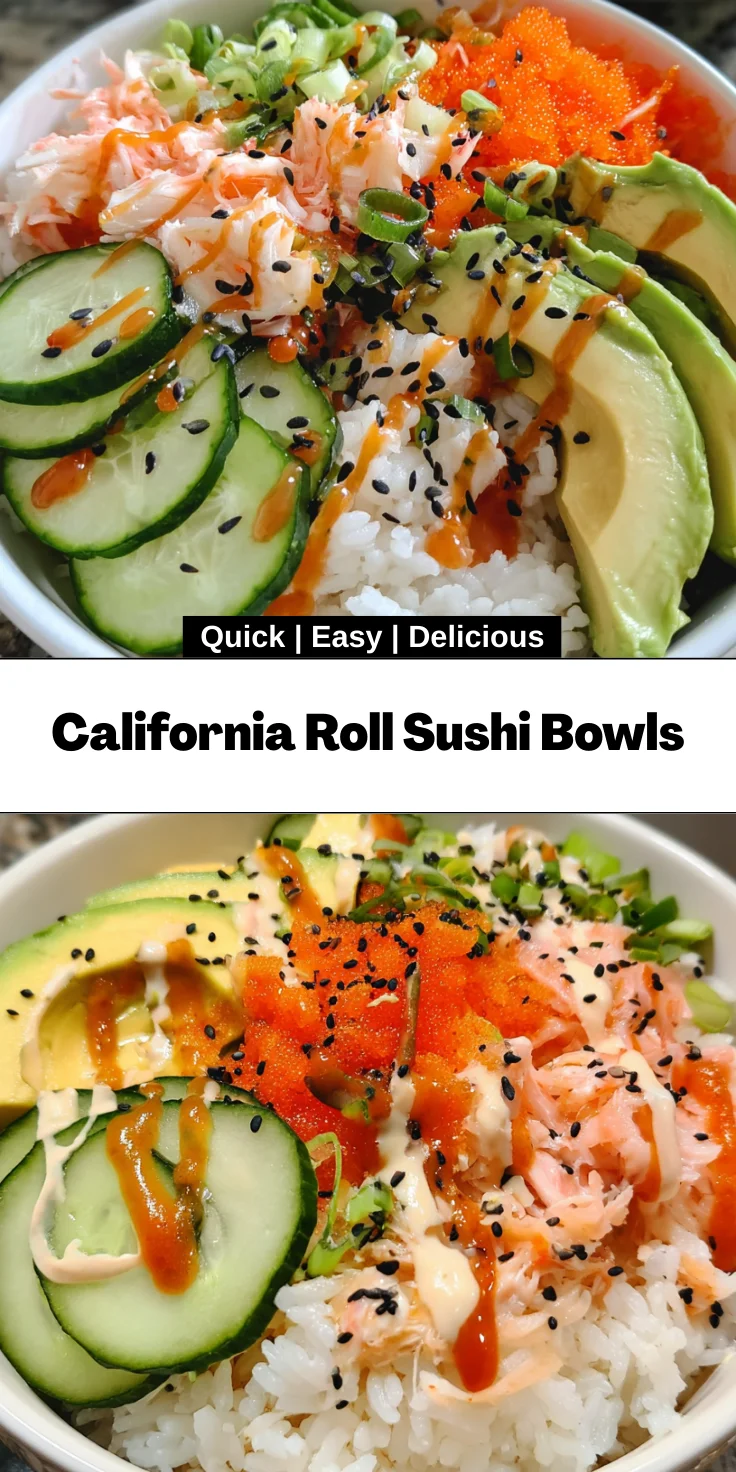
    When it comes to creating California Roll Sushi Bowls, you’ll want to gather a vibrant mix of fresh ingredients. Each component plays a vital role in delivering that signature sushi flavor. Let me walk you through what you’ll need:

    • Short-grain sushi rice: This starchy grain is the foundation of our bowls, giving that delicious chewy texture.
    • Water: Necessary for cooking the rice, ensuring it’s fluffy and tender.
    • Rice vinegar: This adds authentic sushi flavor, giving a hint of tanginess to the rice.
    • Sugar: A touch of sweetness to balance the vinegar’s acidity, enhancing the overall taste.
    • Salt: Just a pinch brings all the flavors together.
    • Imitation crab meat: This tender seafood option delivers that classic sushi essence without breaking the bank.
    • Cucumber: Adds a refreshing crunch, perfect for balancing the creamy avocado.
    • Avocado: A creaminess that elevates each bite, plus it’s packed with healthy fats!
    • Low-sodium soy sauce: A savory drizzle that enhances flavors without overwhelming them.
    • Sriracha: For those who enjoy a spicy kick, this optional ingredient adds a fiery flair to your bowls.

    For convenience, I’ve provided exact measurements at the bottom of the article so you can easily gather everything you need for this delightful dish. Happy cooking!

    How to Make California Roll Sushi Bowls

    Making California Roll Sushi Bowls is easier than you think! Follow these simple steps, and soon you’ll have a delicious meal that feels like a culinary masterpiece. Trust me; your family will be impressed!

    Step 1: Prepare the Sushi Rice

    Start by rinsing the sushi rice thoroughly under cold running water.

    Keep rinsing until the water runs clear; this removes excess starch for a perfect texture.

    In a saucepan, combine the rinsed rice with water, following the package instructions for cooking.

    Once finished, allow the rice to sit covered for about 10 minutes to steam and become tender.

    Finally, transfer the cooked rice to a wide bowl and let it cool to room temperature.

    Step 2: Mix the Rice Seasoning

    While the rice cools, it’s time to make it special!

    In a small bowl, whisk together rice vinegar, sugar, and salt.

    This combination brings that authentic sushi flavor right to your bowls.

    Once the rice is cool, gently fold in the seasoning mixture, ensuring every grain is coated.

    Step 3: Prepare the Toppings

    Next, let’s get those toppings ready!

    Thinly slice the cucumber; aim for evenly sized pieces to keep things attractive.

    Then, take a ripe avocado and dice it. The creaminess of avocado is a delightful contrast to the other ingredients.

    Lastly, shred the imitation crab meat, or separate it into bite-sized pieces.

    Step 4: Assemble the Sushi Bowls

    Now comes the fun part—building your sushi bowls!

    Start by dividing the seasoned sushi rice evenly between two bowls.

    Next, artfully arrange the cucumber slices, diced avocado, and imitation crab on top of the rice.

    It’s like painting a delicious canvas—let your creativity flow!

    Step 5: Serve with Sauce

    To finish off, drizzle each bowl with low-sodium soy sauce.

    If you’re feeling adventurous, add a touch of sriracha for a spicy kick.

    Your California Roll Sushi Bowls are now ready to be enjoyed while the ingredients are fresh and vibrant!

    Tips for Success

    • Rinse the sushi rice thoroughly for a fluffy texture that’s not gummy.
    • Let the rice cool completely before mixing in the seasoning to ensure perfect flavor.
    • Use fresh ingredients for vibrant taste and maximum crunch.
    • Adjust the level of sriracha based on your family’s spice tolerance.
    • Feel free to double the recipe for meal prep or leftovers.

    Equipment Needed

    • Medium saucepan: To cook your sushi rice. A larger pot can work, too.
    • Small mixing bowl: For combining vinegar, sugar, and salt. Any bowl will do!
    • Measuring cups and spoons: For precise ingredient measurements; a kitchen scale can work if preferred.
    • Cutting board and knife: Essential for slicing fresh veggies and crab meat.
    • Serving bowls: To present your beautiful sushi bowls, any bowl works fine.

    Variations

    • Avocado Swap: If you’re not a fan of avocado, try diced mango for a sweet twist!
    • Switch the Protein: For a seafood experience, use cooked shrimp or diced tuna in place of imitation crab.
    • Veggie Boost: Add shredded carrots or bell peppers for extra crunch and color.
    • Gluten-Free Option: Substitute low-sodium soy sauce with tamari for a gluten-free alternative.
    • Vegan Delight: Replace crab with marinated tofu, providing a plant-based protein punch.

    Serving Suggestions

    • Fresh Side Salad: Pair with a light cucumber and seaweed salad for added crunch.
    • Drink Pairing: Serve with green tea or a refreshing cucumber lemonade for a Japanese-inspired experience.
    • Garnish Ideas: Sprinkle sesame seeds on top for taste and visual appeal.
    • Beautiful Bowls: Use colorful bowls to showcase the vibrant ingredients for an eye-catching presentation.

    FAQs about California Roll Sushi Bowls

    Can I use regular rice instead of sushi rice?

    While it’s best to use short-grain sushi rice for that signature sticky texture, you can use regular rice if you’re in a pinch. Just keep in mind it won’t have quite the same consistency!

    How can I store leftovers?

    If you have any leftover California Roll Sushi Bowls, store them in the fridge in an airtight container. Just be sure to eat them within a day or two, as the avocado can brown quickly.

    What can I substitute for imitation crab meat?

    If you’re not a fan of imitation crab, feel free to use cooked shrimp, diced tuna, or even grilled chicken for a different twist. Each option brings its own unique flavor!

    Can I make California Roll Sushi Bowls ahead of time?

    Absolutely! You can prepare the rice and toppings ahead of time and assemble the bowls right before serving. It’s a great way to save time on busy nights!

    Is this recipe suitable for kids?

    Yes! The California Roll Sushi Bowls are kid-friendly and customizable. Let your children help assemble their bowls to make it a fun cooking activity!

    Final Thoughts

    Making California Roll Sushi Bowls isn’t just about the meal—it’s about creating moments of joy with your family. This recipe brings the lively spirit of sushi to your kitchen, allowing you to enjoy restaurant-quality flavors in a fraction of the time. As you layer each vibrant ingredient, you’ll find satisfaction in both the creativity and the nourishment you provide. Whether it’s a busy weeknight or a special occasion, these bowls are sure to leave smiles all around. Dive into this culinary adventure and make mealtime something truly special with a taste of homemade sushi!


    Print

    clock clock iconcutlery cutlery iconflag flag iconfolder folder iconinstagram instagram iconpinterest pinterest iconfacebook facebook iconprint print iconsquares squares iconheart heart iconheart solid heart solid icon

    Description

    A delicious and fresh California Roll Sushi Bowls recipe that brings the flavors of sushi to your home.


    • 200 g short-grain sushi rice
    • 375 ml water
    • 3 tablespoons rice vinegar
    • 2 tablespoons sugar
    • 1 teaspoon salt
    • 115 g imitation crab meat
    • 1 medium cucumber, thinly sliced
    • 1 ripe avocado, diced
    • 2 tablespoons low-sodium soy sauce
    • Sriracha, to taste (optional)

    1. Rinse the sushi rice under cold running water until the water runs clear. Combine the rice and measured water in a saucepan and cook according to package instructions or until the water is absorbed and the rice is tender.
    2. Transfer the cooked rice to a wide bowl. Gently fold in the rice vinegar, sugar, and salt while the rice is still warm, ensuring even distribution. Allow the rice to cool to room temperature.
    3. Thinly slice the cucumber and dice the avocado. Set aside. Shred or separate the imitation crab meat as desired.
    4. Divide the prepared sushi rice evenly between two serving bowls. Arrange the cucumber slices, diced avocado, and imitation crab on top of the rice.
    5. Drizzle each bowl with low-sodium soy sauce and sriracha if desired. Serve immediately while the ingredients remain fresh.

    Notes

    • Ensure the sushi rice is cooked properly for the best texture.
    • You can add additional toppings such as sesame seeds or seaweed for extra flavor.
    • This recipe can be easily doubled or adjusted to serve more people.
    • Prep Time: 20 minutes
    • Cook Time: 20 minutes
    • Category: Main Dish
    • Method: Stovetop
    • Cuisine: Japanese

    Nutrition

    • Serving Size: 1 bowl
    • Calories: 460
    • Sugar: 2 g
    • Sodium: 600 mg
    • Fat: 18 g
    • Saturated Fat: 2 g
    • Unsaturated Fat: 16 g
    • Trans Fat: 0 g
    • Carbohydrates: 63 g
    • Fiber: 6 g
    • Protein: 12 g
    • Cholesterol: 10 mg

    Sharing is caring!

  • Peanut Butter Cup Dump Cake

    Peanut Butter Cup Dump Cake


    Introduction to Peanut Butter Cup Dump Cake

    Hey there, fellow peanut butter lovers! If you’re like me, you know that life can get pretty hectic. That’s where this delightful Peanut Butter Cup Dump Cake comes in—it’s the perfect quick solution for busy days when you want to whip up something delicious without spending hours in the kitchen. Imagine layers of creamy peanut butter, sweet chocolate, and decadent candy all melting together in one gooey dish. Whether you’re looking to impress loved ones or treat yourself after a long day, this recipe is sure to bring smiles and satisfied taste buds!

    Why You’ll Love This Peanut Butter Cup Dump Cake

    This Peanut Butter Cup Dump Cake is not just a dessert; it’s an experience wrapped in layers of flavor. You’ll adore how quick it is—prep takes only 15 minutes! The taste? Oh, it’s a dreamy combination of chocolate and nutty goodness that hits all the right notes. Plus, it’s a crowd-pleaser, so whether you’re hosting or just indulging, this recipe will surely satisfy everyone’s cravings. Easy, fast, and tasty—what more could you want?

    Ingredients for Peanut Butter Cup Dump Cake

    Let’s gather the delightful ingredients for our Peanut Butter Cup Dump Cake! Each element plays a crucial role in creating that heavenly blend of flavors and textures. Here’s what you’ll need:

    • Creamy peanut butter: This is the star of the show! It gives our cake a rich, nutty base and adds depth to every bite.
    • Chopped peanut butter cups: These sweet pieces are the delightful surprise within the cake, offering bursts of chocolate and peanut butter flavor that everyone loves.
    • Sweetened condensed milk: This ingredients add a layer of moisture and sweetness, enriching the cake’s texture, making it fabulously gooey.
    • Chocolate cake mix: A quick and easy way to ensure a moist cake, it creates a soft, chocolatey base that balances perfectly with the peanut butter.
    • Unsalted butter: Melted butter adds a beautiful richness, helping to merge all layers while also providing a slight crisp on top.
    • Milk chocolate chips: These little morsels bring extra chocolatey goodness to the cake, melting to create delightful pockets of flavor.
    • Optional ingredients: Consider whipped cream or vanilla ice cream for serving, adding a refreshing touch to the warm cake.

    For exact quantities, just scroll down to the bottom of the article to find everything you need—printable and ready for your baking adventure!

    How to Make Peanut Butter Cup Dump Cake

    Now, let’s dive into creating this delightful Peanut Butter Cup Dump Cake. It’s simple and straightforward, even for the busiest of hands. Follow these easy steps to create a dessert that will leave everyone wanting more!

    Step 1: Preheat the Oven

    First things first, we need to preheat our oven to 350°F (175°C). This step is crucial! Preheating allows the cake to rise evenly and bake beautifully. You want that perfect fluff with every slice, and starting off with a properly heated oven sets the stage for success.

    Step 2: Prepare the Baking Dish

    Next, grab your trusty 9×13-inch baking dish. Grease it generously with butter or a non-stick spray. This ensures our cake doesn’t cling to the dish, making serving a whole lot easier. Trust me, you want every gooey bit to come out cleanly!

    Step 3: Spread Peanut Butter

    Time to get hands-on! Spread that creamy peanut butter evenly over the bottom of your prepared baking dish. This layer is the heart of our cake, creating a brilliant base that mixes beautifully with the other ingredients. Make sure it reaches the corners for maximum flavor!

    Step 4: Add Peanut Butter Cups

    Now, sprinkle half of those chopped peanut butter cups over the peanut butter layer. Distributing them evenly is key! Each bite should be a delightful explosion of peanut butter and chocolate. Who doesn’t want that?

    Step 5: Pour Sweetened Condensed Milk

    This is when the magic begins! Pour the sweetened condensed milk evenly over the candy layer. This luscious ingredient adds richness and moisture, giving our cake that gooey texture. It’s like a warm hug for your taste buds!

    Step 6: Add Chocolate Cake Mix

    Next, grab your box of chocolate cake mix. Sprinkle it evenly over the entire dish—but hold on! Do not mix it! Keeping the layers separate is crucial for achieving that famous dump cake texture. Each bite should be a delightful surprise.

    Step 7: Drizzle with Butter

    Here’s where it gets indulgent. Drizzle the melted butter over the cake mix. Try to cover as much of the surface as possible. This buttery goodness will melt down into the cake mix as it bakes, enriching the flavor of our dessert.

    Step 8: Sprinkle Remaining Ingredients

    Sprinkle the remaining chopped peanut butter cups and milk chocolate chips on top. This final layering adds texture and elevates the chocolatey goodness. You want those chunks to melt perfectly, making every forkful a heavenly experience.

    Step 9: Bake and Cool

    Now, it’s time to pop that masterpiece into the oven! Bake for about 35 to 40 minutes, or until the top is bubbly and slightly crisp. To check for doneness, gently shake the dish. If it jiggly in the center, it’s not quite ready. Let it cool for about 10–15 minutes before serving. This cooling time allows the layers to settle beautifully, preparing it for the grand reveal!

    Tips for Success

    • Use creamy peanut butter for a smooth texture—chunky can add bits, but the creaminess makes it dreamy.
    • Let the cake cool before serving so the flavors meld together beautifully.
    • For a complete treat, serve with a scoop of vanilla ice cream or a dollop of whipped cream.
    • Keep extra peanut butter cups on hand for extra sprinkles on top!
    • Store leftovers in the fridge for up to three days—if there are any left!

    Equipment Needed

    • 9×13-inch baking dish (a glass or metal dish works well)
    • Patching tool for greasing (use a paper towel or pastry brush for butter)
    • Mixing bowl for melted butter
    • Spatula for spreading peanut butter
    • Measuring cups for ingredients

    Variations

    • Nut Allergies: Substitute the creamy peanut butter with sunflower seed butter for a nut-free option that still offers creaminess.
    • Dark Chocolate Lovers: Swap milk chocolate chips for dark chocolate chips to add a richer, more intense flavor.
    • Gluten-Free Version: Use a gluten-free chocolate cake mix to cater to gluten-sensitive eaters.
    • Fruit Additions: Enhance your dump cake with sliced bananas or a layer of raspberries for a fruity twist.
    • Loaded Toppings: Top the baked cake with crushed nuts, caramel drizzle, or extra chocolate sauce for that extra layer of indulgence.

    Serving Suggestions

    • Pair your warm Peanut Butter Cup Dump Cake with a scoop of vanilla ice cream for a delightful contrast of temperatures.
    • Serve with a dollop of whipped cream and a sprinkle of chopped peanuts for added crunch.
    • For a cozy touch, enjoy it with a cup of hot cocoa or a strong coffee to enhance the chocolate flavor.

    FAQs about Peanut Butter Cup Dump Cake

    Do you have questions about this delicious Peanut Butter Cup Dump Cake? You’re not alone! Here are some frequently asked questions that can help you navigate your baking adventure:

    Can I make this cake ahead of time?

    Absolutely! You can prepare the cake a day in advance and store it in the fridge. Just rewarm it in the oven for a few minutes before serving to restore that melty goodness.

    What can I use instead of sweetened condensed milk?

    If you’re looking for alternatives, evaporated milk mixed with a touch of sugar can work. Some have even tried coconut cream for a unique twist!

    Can I freeze leftover dump cake?

    Yes, you can freeze this cake! Just cover it tightly with plastic wrap and foil. It can stay fresh for up to three months. Simply thaw in the fridge before serving.

    Can I customize the candy used in this cake?

    Definitely! Try substituting with other types of candy that you love, such as chocolate bars, or even cookie pieces. The world is your candy oyster!

    How do I know when the cake is done baking?

    Look for a bubbly top with slight crispness. Gently shake the baking dish—if it jiggles in the center, it needs more time. A gentle golden-brown hue is also a good sign!

    Final Thoughts

    Oh, the joy of creating a Peanut Butter Cup Dump Cake! This dessert is more than just a treat; it’s an experience brimming with warmth, comfort, and nostalgia. With just a few simple ingredients and some love, you transform an ordinary day into something special. Watching family and friends indulge in this gooey delight is absolutely priceless. Each slice holds a little bit of happiness, offering that perfect blend of flavors that make life sweeter. So, gather your loved ones, whip up this cake, and create your own delicious memories—it’s time to indulge and celebrate together!


    Print

    clock clock iconcutlery cutlery iconflag flag iconfolder folder iconinstagram instagram iconpinterest pinterest iconfacebook facebook iconprint print iconsquares squares iconheart heart iconheart solid heart solid icon

    Description

    Indulge in this easy Peanut Butter Cup Dump Cake that’s rich and delicious with layers of peanut butter, chocolate cake mix, and candy.


    • 1 cup creamy peanut butter
    • 1.5 cups chopped peanut butter cups, plus extra for garnish
    • 1 can (400 g) sweetened condensed milk
    • 1 box (432 g) chocolate cake mix, dry
    • 115 g unsalted butter, melted
    • 175 g milk chocolate chips
    • Optional: whipped cream or vanilla ice cream, for serving

    1. Preheat your oven to 175°C (350°F). Grease a 23×33 cm (9×13-inch) baking dish with butter or non-stick spray.
    2. Spread the creamy peanut butter evenly over the bottom of the prepared baking dish.
    3. Sprinkle half of the chopped peanut butter cups over the peanut butter layer.
    4. Pour the sweetened condensed milk evenly over the candy layer.
    5. Sprinkle the dry chocolate cake mix evenly over the top. Do not mix.
    6. Drizzle the melted butter over the cake mix, covering as much surface as possible.
    7. Sprinkle the milk chocolate chips and the remaining chopped peanut butter cups over the top.
    8. Bake for 35–40 minutes, or until the top is bubbly and slightly crisp.
    9. Allow the cake to cool for 10–15 minutes before serving. Serve warm, topped with whipped cream or vanilla ice cream if desired.

    Notes

    • For a richer flavor, consider using dark chocolate chips instead of milk chocolate.
    • Make sure not to mix the cake mix with the other ingredients for the best texture.
    • Prep Time: 15 minutes
    • Cook Time: 35-40 minutes
    • Category: Dessert
    • Method: Baking
    • Cuisine: American

    Nutrition

    • Serving Size: 1 slice
    • Calories: 400
    • Sugar: 32g
    • Sodium: 180mg
    • Fat: 20g
    • Saturated Fat: 10g
    • Unsaturated Fat: 8g
    • Trans Fat: 0g
    • Carbohydrates: 47g
    • Fiber: 2g
    • Protein: 6g
    • Cholesterol: 30mg

    Sharing is caring!

  • Snickerdoodle Bundt Cake

    Snickerdoodle Bundt Cake


    Introduction to Snickerdoodle Bundt Cake

    Picture this: It’s a busy afternoon, and you want to create something special for your loved ones without spending the entire day in the kitchen. Enter the Snickerdoodle Bundt Cake! This delightful treat takes the classic cookie flavors we all adore and transforms them into a soft, moist cake that’s perfect for any occasion.

    Whether it’s a family gathering, a midweek pick-me-up, or even a cozy evening with a book, this cake is just what you need. Trust me, everyone will love it, and you’ll feel like a star baker, all while keeping it simple!

    Why You’ll Love This Snickerdoodle Bundt Cake

    This Snickerdoodle Bundt Cake is a game-changer for busy days! Not only is it incredibly easy to whip up, but it also bakes up lovely and fluffy in about an hour. Plus, the flavors of cinnamon and sugar create that warm, comforting taste we all crave. It’s the ultimate crowd-pleaser, perfect for both special occasions and simple weeknight desserts. You’ll be savoring every bite—your family will too!

    Ingredients for Snickerdoodle Bundt Cake

    Let’s gather our stars for this delightful Snickerdoodle Bundt Cake! Each ingredient plays a crucial role, so let’s break them down.

    • All-purpose flour: This forms the cake’s structure. For a lighter cake, consider using cake flour instead.
    • Baking powder: A leavening agent that helps the cake rise, giving it that fluffy texture we love.
    • Baking soda: Also contributes to leavening, ensuring a light crumb and perfect rise.
    • Salt: A pinch enhances flavor, balancing the sweetness of the cake.
    • Ground cinnamon: The star flavor of snickerdoodles! It gives the cake that warm, cozy essence.
    • Unsalted butter: Provides richness and moisture. Ensure it’s softened for easy mixing.
    • Granulated sugar: Sweetens the cake and helps create a tender crumb.
    • Large eggs: They bind the ingredients together while adding moisture and richness.
    • Vanilla extract: For that delicious, aromatic flavor that complements the cinnamon beautifully.
    • Sour cream: Contributes to the cake’s moistness and keeps it soft. Greek yogurt works as a good substitute!
    • Milk: Like sour cream, it helps maintain moisture and adds tenderness.
    • Cinnamon-sugar mixture: A delightful blend of sugar and cinnamon that adds flavor in layers.
    • Optional cream cheese: For a lush glaze! It’s rich and adds an extra dimension of taste.
    • Powdered sugar: Sweetens the glaze and gives it a smooth finish.
    • Milk (for glaze): Thin out the glaze to your desired consistency.

    For the exact measurements of these ingredients, scroll down to the bottom of the article where you can find them available for printing. Each one contributes to a cake that feels like a warm hug! Happy baking!

    How to Make Snickerdoodle Bundt Cake

    Now, let’s dive into making this delightful Snickerdoodle Bundt Cake step by step! Each part is simple and fun, making it an enjoyable experience right in your kitchen.

    Step 1: Preheat and Prepare Pan

    First, preheat your oven to 350°F (175°C). This way, it’s hot and ready when your cake is mixed. Also, don’t forget to generously grease your bundt pan with non-stick spray or a butter-flour combo. This ensures your cake slides out perfectly!

    Step 2: Combine Dry Ingredients

    In a medium bowl, whisk together all your dry ingredients: flour, baking powder, baking soda, salt, and ground cinnamon. Mixing these together first ensures even distribution throughout your cake, preventing any surprise pockets of flavor!

    Step 3: Cream Butter and Sugar

    In a large mixing bowl, cream the softened butter with the granulated sugar. Use a hand mixer or stand mixer to beat them until fluffy, about 3-4 minutes. This important step incorporates air, helping your cake achieve that perfect light and airy texture we all crave!

    Step 4: Add Eggs and Vanilla

    Now, one at a time, add in your eggs, mixing well after each addition. Then stir in the vanilla extract. This method allows the eggs to blend evenly, creating a batter that’s smooth and oh-so-delicious!

    Step 5: Alternate Mixing Dry and Wet Ingredients

    Gradually add your dry flour mixture to the wet ingredients, alternating with the sour cream and milk. Start and end with the flour. Mixing this way prevents overworking the batter, ensuring your cake remains fluffy and tender—just how we want a Snickerdoodle Bundt Cake to be!

    Step 6: Create Cinnamon-Sugar Mixture

    In a small bowl, combine the cinnamon and granulated sugar. This sweet and spicy mixture is what adds those signature snickerdoodle flavors to each bite, making your cake irresistible!

    Step 7: Layer Batter and Cinnamon-Sugar

    Pour half of your cake batter into the prepared bundt pan. Next, sprinkle half of the cinnamon-sugar mixture on top. Carefully pour the remaining batter over the cinnamon-sugar, repeating with the last sprinkle. This layering creates a beautiful marbled effect, bringing both texture and flavor.

    Step 8: Bake

    Bake your cake in the preheated oven for about 50-60 minutes. To check for doneness, insert a toothpick into the center; it should come out clean. This is the moment you’ll want to savor—your kitchen will smell heavenly!

    Step 9: Cool and Drizzle Glaze

    Once baked, let the cake cool in the pan for about 20 minutes. Then invert it onto a wire rack to cool completely. If you’d like to add a little extra luxury, whip up a cream cheese glaze and drizzle it over the cooled cake for that perfect finishing touch!

    Tips for Success

    • Make sure your butter is at room temperature for effortless mixing.
    • Don’t overmix the batter; it can lead to a dense cake.
    • For extra flavor, add a pinch of nutmeg to the cinnamon-sugar mixture.
    • Test for doneness with a toothpick in the thickest part of the cake.
    • Let the cake cool completely before adding glaze for a better finish.

    Equipment Needed

    • Bundt pan: A traditional choice; silicone pans work well for easy release.
    • Mixing bowls: Use medium and large bowls for mixing dry and wet ingredients. Ceramic or glass is great!
    • Whisk: Essential for combining dry ingredients; a fork works in a pinch.
    • Hand or stand mixer: For creaming butter and sugar effortlessly; a whisk can be used if you’re up for it!
    • Measuring cups and spoons: Accurate measurements ensure the best results.
    • Cooling rack: Allows air circulation for even cooling; a plate can work too.

    Variations

    • Gluten-Free: Substitute all-purpose flour with a gluten-free flour blend. Ensure the blend contains xanthan gum for optimal texture.
    • Dairy-Free: Use plant-based butter and an unsweetened non-dairy yogurt instead of sour cream for a delicious dairy-free alternative.
    • Nutty Addition: Fold in 1/2 cup of finely chopped pecans or walnuts into the batter for added crunch and flavor.
    • Chocolate Twist: Add 1/2 cup of mini chocolate chips to the batter for a delightful chocolate surprise in every bite.
    • Spiced Version: Enhance the flavor by adding a pinch of nutmeg or allspice to the dry ingredient mixture for a warm, spiced kick.

    Serving Suggestions

    • Pair your Snickerdoodle Bundt Cake with a scoop of vanilla ice cream for a delightful dessert experience.
    • Serve with freshly brewed coffee or spiced chai tea to enhance the cozy flavors.
    • For a festive touch, dust with powdered sugar before serving or add cinnamon sticks as a garnish.

    FAQs about Snickerdoodle Bundt Cake

    Can I make this Snickerdoodle Bundt Cake ahead of time?

    Absolutely! This cake stays moist for several days, making it perfect for prepping in advance. Just store it in an airtight container at room temperature once completely cooled.

    What can I substitute for sour cream?

    If you don’t have sour cream on hand, plain Greek yogurt works beautifully as a substitute. You can also try buttermilk for similar results!

    Can I freeze Snickerdoodle Bundt Cake?

    Yes, it freezes well! Wrap slices or the whole cake tightly in plastic wrap, then place it in a freezer bag. Thaw it in the fridge before serving for the best texture.

    How do I know when the cake is done baking?

    When the toothpick method is your best friend! Insert a toothpick into the center; if it comes out clean or with a few crumbs, your cake is ready to come out of the oven.

    What toppings can I add to the Snickerdoodle Bundt Cake?

    You can get creative! A dusting of powdered sugar, a drizzle of cream cheese glaze, or even a scoop of ice cream will elevate this cake to delightful new heights.

    Final Thoughts

    Baking this Snickerdoodle Bundt Cake is more than just preparing a dessert; it’s about creating memories and sharing joy with those you love. Each bite is a warm embrace, reminiscent of cozy family gatherings and happy moments. The delightful swirl of cinnamon and sugar not only satisfies your sweet tooth but also fills your home with a heavenly scent that wraps around you like a hug. Whether enjoyed with friends or savored alone, this cake truly transforms any ordinary day into something special. So, roll up your sleeves and let your kitchen become a happy place filled with love and laughter!


    Print

    clock clock iconcutlery cutlery iconflag flag iconfolder folder iconinstagram instagram iconpinterest pinterest iconfacebook facebook iconprint print iconsquares squares iconheart heart iconheart solid heart solid icon

    Description

    This Snickerdoodle Bundt Cake combines the classic cookies’ flavors into a delightful cake that is soft, moist, and perfect for any occasion.


    • 2 ½ cups all-purpose flour
    • 1 ½ teaspoons baking powder
    • 1 teaspoon baking soda
    • 1 teaspoon salt
    • 1 tablespoon ground cinnamon
    • ¾ cup unsalted butter, softened
    • 1 ½ cups granulated sugar
    • 3 large eggs
    • 1 tablespoon vanilla extract
    • 1 cup sour cream
    • ½ cup milk
    • ¼ cup granulated sugar (for coating)
    • 1 tablespoon ground cinnamon (for coating)
    • Optional: 8 oz cream cheese, 2 cups powdered sugar, 2-3 tablespoons milk (for cream cheese glaze)

    1. Preheat your oven to 350°F (175°C) and generously grease a 10-12 cup bundt pan with non-stick spray or butter and flour.
    2. In a medium bowl, whisk together the flour, baking powder, baking soda, salt, and 1 tablespoon of ground cinnamon. Set aside.
    3. In a large mixing bowl, cream together the softened butter and 1 ½ cups of granulated sugar until light and fluffy, about 3-4 minutes using a hand mixer or stand mixer.
    4. Add the eggs one at a time, mixing well after each addition, and then stir in the vanilla extract.
    5. Gradually add the dry flour mixture to the wet ingredients, alternating with the sour cream and milk, starting and ending with the flour mixture. Mix until just combined.
    6. In a small bowl, combine the ¼ cup granulated sugar and 1 tablespoon cinnamon.
    7. Pour half of the batter into the prepared bundt pan, then sprinkle half of the cinnamon-sugar mixture on top. Carefully pour the remaining batter over it and repeat with the remaining cinnamon-sugar mixture.
    8. Use a skewer or knife to gently swirl the batter for a marbled effect, but do not overmix.
    9. Bake in the preheated oven for 50-60 minutes or until a toothpick inserted into the center comes out clean.
    10. Once baked, let the bundt cake cool in the pan for 20 minutes before inverting onto a wire rack to cool completely.
    11. For an extra touch, whisk together the cream cheese glaze ingredients (cream cheese, powdered sugar, and milk) until smooth and drizzle it over the cooled bundt cake.

    Notes

    • Ensure your butter is softened at room temperature for better mixing.
    • Do not overmix the batter to keep the cake light and fluffy.
    • The cream cheese glaze is optional but adds a delightful richness.
    • Prep Time: 20 minutes
    • Cook Time: 60 minutes
    • Category: Dessert
    • Method: Baking
    • Cuisine: American

    Nutrition

    • Serving Size: 1 slice
    • Calories: 300
    • Sugar: 18g
    • Sodium: 250mg
    • Fat: 14g
    • Saturated Fat: 8g
    • Unsaturated Fat: 4g
    • Trans Fat: 0g
    • Carbohydrates: 38g
    • Fiber: 1g
    • Protein: 4g
    • Cholesterol: 50mg

    Sharing is caring!

  • Cheesy Ground Turkey Enchilada Bake

    Cheesy Ground Turkey Enchilada Bake


    Introduction to Cheesy Ground Turkey Enchilada Bake

    As a busy mom, I completely understand the struggle of putting a wholesome dinner on the table after a long day. That’s where my Cheesy Ground Turkey Enchilada Bake comes to the rescue! This dish is not just a meal; it’s an experience that brings warmth and comfort to your family. Imagine a cheesy, savory delight bubbling away in the oven, filling your home with irresistible aromas. It’s perfect for busy weeknights, and trust me, your loved ones will be begging for seconds! Let’s explore this culinary adventure together!

    Why You’ll Love This Cheesy Ground Turkey Enchilada Bake

    This Cheesy Ground Turkey Enchilada Bake is a total game-changer for busy weeknights. It’s easy to prepare and packs a punch of flavor that your whole family will adore. Plus, it requires just one baking dish, making cleanup a breeze. With protein from the turkey and fiber from the beans, it offers a balanced meal that is both satisfying and delicious. You’ll love how quickly it comes together!

    Ingredients for Cheesy Ground Turkey Enchilada Bake

    Gathering all the ingredients for your Cheesy Ground Turkey Enchilada Bake is half the fun! Here’s what you’ll need to create this comforting dish:

    • Ground turkey: A lean source of protein that keeps the dish healthy without sacrificing flavor.
    • Onion: Diced onion adds sweetness and depth; sautéing it first brings out its best flavors.
    • Garlic: Minced garlic offers a robust aroma and richness that elevates the entire dish.
    • Black beans: Canned and rinsed, they provide fiber and a hearty texture. They also bring an earthy flavor that balances the cheese.
    • Enchilada sauce: Choose between red or green based on your preference. This sauce is the flavorful base that ties all the ingredients together.
    • Corn: Fresh or frozen corn adds a touch of sweetness and a delightful pop in every bite.
    • Bell peppers: Any color adds vibrant hues and crunch. Feel free to mix and match based on what you have.
    • Mexican blend cheese: This melty goodness is the star of the show! Use your favorites for that cheesy, comforting finish.
    • Corn tortillas: The foundation of your enchilada bake—these keep everything together and soak up all the delicious juices.
    • Cumin and chili powder: These spices add warmth and a little kick—perfect for adding depth to your savory flavors.
    • Salt and black pepper: Essential for enhancing the overall flavor, so sprinkle a little of each to taste.
    • Fresh cilantro: A fresh garnish that adds brightness and freshness at the end, making the dish pop!
    • Sour cream: Optional but highly recommended for serving, it’s creamy and cool—a perfect contrast to the hot, cheesy bake.

    You’ll find exact measurements for these ingredients at the bottom of the article, making it convenient for printing. Customize by swapping out vegetables or even using ground beef if turkey isn’t your thing! The possibilities are endless!

    How to Make Cheesy Ground Turkey Enchilada Bake

    Now, let’s dive into making your Cheesy Ground Turkey Enchilada Bake! This is the fun part, and I promise it’s simple. Just follow these easy steps, and soon you’ll have a delicious dish that your family will love!

    Step 1: Preheat the Oven

    First things first, preheat your oven to 375°F (190°C). This allows for even cooking of your Cheesy Ground Turkey Enchilada Bake, ensuring every bit of cheese melts perfectly!

    Step 2: Sautéing the Base

    In a large skillet, drizzle a bit of olive oil over medium heat. Add your diced onion and let it sauté for about 3 minutes until it becomes translucent. This step fills your kitchen with comforting aromas. Then, toss in minced garlic and cook for another minute until fragrant. Your base is on its way to tasty perfection!

    Step 3: Cooking the Turkey

    Next, add the ground turkey to your skillet. Break it up with a spatula as you cook, ensuring it’s browned evenly—about 5 to 7 minutes. Stir in the cumin, chili powder, salt, and black pepper. This will give the turkey a lovely depth of flavor, making it irresistible!

    Step 4: Combining Ingredients

    Once the turkey is nicely cooked, it’s time to mix things up! Stir in the black beans, corn, and diced bell peppers along with half of your enchilada sauce. Combine everything well, letting it cook together for 2 to 3 minutes until everything is heated through. Your mouth will water at this point!

    Step 5: Layering the Dish

    Grab a 9×13 inch baking dish and spread a thin layer of enchilada sauce at the bottom. Layer 4 corn tortillas, slightly overlapping to cover the base. Next, spread half of your turkey mixture over the tortillas, followed by 1 cup of shredded cheese. Repeat this layering with the remaining tortillas, turkey mixture, and top it all off with the last of the enchilada sauce and cheese. Get ready for the cheesy magic!

    Step 6: Baking

    Cover your dish with aluminum foil and place it in the oven. Bake for 20 minutes, then remove the foil and bake for an additional 10 to 15 minutes. Just wait until the cheese is melted and bubbly—it’s like a warm hug for your taste buds!

    Step 7: Serving

    Finally, take your enchilada bake out of the oven and let it cool for a few minutes. Garnish with fresh cilantro for a pop of color. Serve it with a dollop of sour cream on the side, if you like. Now, gather your loved ones around the table and enjoy this delightful dish together!

    Tips for Success

    • Prep your ingredients beforehand to save time during cooking.
    • Feel free to swap ground turkey with chicken or beef for a different flavor.
    • Use fresh vegetables for added crunch and nutrition.
    • Let your Cheesy Ground Turkey Enchilada Bake rest before serving to allow flavors to meld.
    • Make it ahead of time and store in the fridge; just pop it in the oven when ready.

    Equipment Needed for Cheesy Ground Turkey Enchilada Bake

    • Large skillet: Essential for sautéing the onion and turkey. A frying pan works too!
    • 9×13 inch baking dish: Perfect for layering your bake; a casserole dish is a great alternative.
    • Wooden spatula: Ideal for breaking up the turkey. A sturdy spoon can also do the job.
    • Aluminum foil: Use this to cover the dish while baking. Parchment paper is another option.
    • Measuring cups: Helpful for portioning ingredients, but eyeballing works too if you’re comfortable!

    Variations on Cheesy Ground Turkey Enchilada Bake

    • Vegetarian Option: Substitute the ground turkey with black beans, lentils, or sautéed mushrooms for a hearty vegetarian dish.
    • Spicy Twist: Add diced jalapeños or chopped green chiles for an extra kick of heat. You can also use spicy enchilada sauce.
    • Low-Carb Variation: Swap corn tortillas with zucchini or eggplant slices for a low-carb approach that’s still delicious!
    • Cheese Lovers: Mix different kinds of cheese—try pepper jack for a little heat or a blend with smoked gouda for added flavor.
    • Grain-Free Version: Use cauliflower rice instead of tortillas for a grain-free meal filled with all the great enchilada flavors.

    Serving Suggestions for Cheesy Ground Turkey Enchilada Bake

    • Serve with Mexican rice: A side of fluffy Mexican rice complements the flavors beautifully.
    • Fresh salad: A crisp avocado and tomato salad adds brightness and balances the richness.
    • Pair with margaritas: Enjoy a refreshing margarita or mocktail for a festive touch.
    • Presentation: Garnish with extra cilantro and lime wedges for a pop of color.

    FAQs about Cheesy Ground Turkey Enchilada Bake

    Can I make Cheesy Ground Turkey Enchilada Bake ahead of time?
    Absolutely! You can prepare it a day in advance and store it in the fridge. Just pop it in the oven when you’re ready to bake. This makes it a great option for busy weeknights!

    What can I substitute for ground turkey?
    If you prefer another protein, ground chicken or even lean beef works beautifully in this recipe. For a vegetarian option, try using black beans or lentils.

    Can I freeze leftovers?
    Yes! Leftovers can be stored in an airtight container and frozen for up to 3 months. Just thaw in the fridge before reheating to enjoy this cozy dish later on.

    What sides pair well with this dish?
    Serve this Cheesy Ground Turkey Enchilada Bake with a fresh salad or some Mexican rice for a complete meal. Adding tortilla chips and salsa on the side also enhances the experience!

    How spicy is the Cheesy Ground Turkey Enchilada Bake?
    The spice level depends on the type of enchilada sauce you choose and any additional spices you add. For extra heat, consider using spicy enchilada sauce or add diced jalapeños into the turkey mixture!

    Final Thoughts

    Cooking has always been a joyful adventure for me, and sharing my Cheesy Ground Turkey Enchilada Bake with loved ones elevates that experience. This dish not only satisfies the hunger pangs but also brings smiles and laughter around the table. The harmony of flavors, the comforting aroma, and the cheesy goodness make each bite a delightful embrace. I hope you find as much joy and connection in making this recipe as I do. What’s better than sharing a hearty meal with those you care about? So grab your apron and let the love pour into your kitchen!


    Print

    clock clock iconcutlery cutlery iconflag flag iconfolder folder iconinstagram instagram iconpinterest pinterest iconfacebook facebook iconprint print iconsquares squares iconheart heart iconheart solid heart solid icon

    Description

    A delicious and comforting Cheesy Ground Turkey Enchilada Bake that is perfect for family dinners and gatherings.


    • 1 lb ground turkey
    • 1 medium onion, diced
    • 2 cloves garlic, minced
    • 1 can (15 oz) black beans, rinsed and drained
    • 1 can (10 oz) enchilada sauce (red or green based on preference)
    • 1 cup corn (fresh or frozen)
    • 1 cup bell peppers, diced (any color)
    • 2 cups Mexican blend cheese, shredded
    • 8 corn tortillas
    • 1 tsp cumin
    • 1 tsp chili powder
    • ½ tsp salt
    • ½ tsp black pepper
    • Fresh cilantro, chopped (for garnish)
    • Sour cream (for serving, optional)

    1. Preheat your oven to 375°F (190°C).
    2. In a large skillet over medium heat, add a splash of olive oil. Once hot, add the diced onion and sauté for about 3 minutes until translucent. Add minced garlic and cook for an additional 1 minute until fragrant.
    3. Add the ground turkey to the skillet. Break it up with a spatula and cook until browned, about 5-7 minutes. Stir in cumin, chili powder, salt, and black pepper.
    4. Once the turkey is fully cooked, stir in black beans, corn, bell peppers, and half of the enchilada sauce. Mix well until everything is evenly combined and heated through (about 2-3 minutes).
    5. In a 9×13 inch baking dish, spread a thin layer of enchilada sauce on the bottom. Layer 4 corn tortillas, overlapping them slightly to cover the base. Spread half of the turkey mixture over the tortillas, then sprinkle with 1 cup of shredded cheese. Repeat the layers with the remaining tortillas, turkey mixture, and top with the remaining enchilada sauce and cheese.
    6. Cover the dish with aluminum foil and bake in the preheated oven for 20 minutes. After 20 minutes, remove the foil and bake for an additional 10-15 minutes, or until the cheese is melted and bubbly.
    7. Remove from the oven and let it cool for a few minutes. Garnish with chopped fresh cilantro and serve with a dollop of sour cream if desired.

    Notes

    • Feel free to customize the vegetables based on your preference.
    • This dish can be prepared ahead of time and baked just before serving.
    • Leftovers can be stored in an airtight container in the refrigerator for up to 3 days.
    • Prep Time: 15 minutes
    • Cook Time: 35-40 minutes
    • Category: Main Course
    • Method: Baking
    • Cuisine: Mexican

    Nutrition

    • Serving Size: 1 slice
    • Calories: 350
    • Sugar: 2g
    • Sodium: 800mg
    • Fat: 15g
    • Saturated Fat: 7g
    • Unsaturated Fat: 8g
    • Trans Fat: 0g
    • Carbohydrates: 30g
    • Fiber: 5g
    • Protein: 25g
    • Cholesterol: 70mg

    Sharing is caring!

  • Cajun Shrimp Crab Mac Cheese

    Cajun Shrimp Crab Mac Cheese


    Introduction to Cajun Shrimp Crab Mac Cheese

    Welcome to a culinary adventure that effortlessly marries comfort and sophistication! Let me introduce you to my Cajun Shrimp Crab Mac Cheese—a dish that’s more than just macaroni and cheese; it’s an invitation to savor a creamy, cheesy delight bursting with flavors. Whether you’re juggling a chaotic week or hosting a gathering, this recipe is your quick solution to impressing your loved ones. The hint of Cajun spice dances harmoniously with shrimp and crab, making it a crowd-pleaser for any occasion. You’ll find yourself creating memories as delicious as the dish!

    Why You’ll Love This Cajun Shrimp Crab Mac Cheese

    This Cajun Shrimp Crab Mac Cheese is a game changer for busy nights. It comes together quickly, with minimal fuss, making it a fantastic choice for last-minute meals. The combination of creamy cheese and succulent seafood creates a delightful burst of flavor in every bite. Plus, it’s a meal that pleases both kids and adults alike, turning dinnertime into a memorable feast that everyone will rave about!

    Ingredients for Cajun Shrimp Crab Mac Cheese

    Gather your ingredients and let’s get cooking! This dish is a treasure trove of flavors, and each component plays a delicious role. Here’s what you’ll need:

    • Shrimp: Fresh, plump, and peeled to perfection, shrimp are the stars of this dish. They soak up the Cajun seasoning beautifully, making each bite heavenly.
    • Olive Oil: This adds a light richness and helps in sautéing the shrimp to a delightful golden hue.
    • Cajun Seasoning: The magic ingredient! A sprinkle or two transforms the shrimp into a spicy delight. Adjust according to your taste—some days call for a little heat!
    • Elbow Macaroni: The beloved classic pasta shape that holds all the gooey cheese and seafood goodness. A staple for any mac and cheese lover!
    • Crab Meat: Use either sweet, fresh crab legs for an indulgent experience or budget-friendly imitation crab. Both bring a delightful taste.
    • Basil: Fresh or dried, basil adds a pop of flavor. It complements the seafood beautifully, bringing a touch of herbal freshness.
    • Milk and Evaporated Milk: This duo creates the creamy sauce that clings to the pasta, making you feel all warm inside.
    • Paprika: Just a hint of this spice adds color and flavor depth. It’s a secret weapon in the cheese sauce!
    • Cayenne Pepper: For those who like their dishes with a kick! Adjust it based on how adventurous you’re feeling.
    • Cheese: It’s a mac and cheese, after all! Sharp cheddar for tang, mild cheddar for creaminess, and a Colby and Monterey Jack blend for extra richness are perfection in this dish.
    • Parmesan Cheese: A sprinkle of this hard cheese gives a savory crunch to the top. Trust me, it’s worth it!

    All the exact quantities can be found at the bottom of the article for your convenience. So, let’s get ready to whip up this mouthwatering Cajun Shrimp Crab Mac Cheese that everyone will adore!

    How to Make Cajun Shrimp Crab Mac Cheese

    Prepare the Shrimp

    Let’s kick things off with the shrimp! In a medium bowl, toss the peeled and deveined shrimp with olive oil, Cajun seasoning, salt, and black pepper. I recommend using your hands to make sure every shrimp gets a nice coating of that spicy goodness. Heat a large skillet over medium heat. Once hot, add the seasoned shrimp and cook them for about 4 to 6 minutes. You’ll know they’re done when they turn pink and opaque. This is where the magic happens—your kitchen will smell heavenly! Once cooked, remove the shrimp from the skillet and set them aside. This first step sets the tone for your delicious Cajun Shrimp Crab Mac Cheese!

    Cook the Pasta

    Next up: the macaroni! Bring a large pot of salted water to a boil over high heat. When it’s bubbling like a hot spring, add the elbow macaroni. Cook it until al dente according to the package instructions. This means it should be just firm enough to still have a bite. Trust me, you don’t want mushy pasta! Once it’s cooked, drain the macaroni thoroughly and transfer it to a huge mixing bowl. The pasta is now ready to become the base of this flavor-packed dish.

    Combine Ingredients

    Now it’s time for the fun part! Gently fold the cooked Cajun shrimp into the pasta, along with the crab meat and basil. Stir slowly to avoid breaking the shrimp or crab. The idea here is to let all those delicious flavors mingle together. Imagine the shrimp and crab getting cozy with the macaroni! Once well mixed, you’ll see how the seafood beautifully complements the pasta. Set this medley aside while we whip up the cheese sauce.

    Create the Cheese Sauce

    Now for the heart of the dish—the creamy cheese sauce! In a large bowl, combine the whole milk and evaporated milk. This duo is your secret weapon for creaminess. Sprinkle in the paprika and cayenne, tasting as you go to adjust the heat level. Whisk in the beaten eggs until they’re fully incorporated. Next, reserve some shredded sharp cheddar, Colby, Monterey Jack, and Parmesan cheese for topping later. Add the remaining cheeses to the milk mixture, stirring until everything is melted and blended. When the cheese sauce is thick and luscious, it’s ready to embrace the pasta and seafood. Hold onto your forks; it’s about to get decadent!

    Assemble and Bake

    Let’s bring it all together! Start by pouring that rich cheese sauce into the bowl with the pasta and seafood. Give it a good stir to ensure everything is coated generously. Next, spoon the mixture into a lightly buttered 9×13-inch baking dish. Now, scatter the reserved cheeses on top—this is where it gets cheesy! For a finishing touch, sprinkle extra Cajun seasoning or herbs if you desire. Preheat your oven to 350°F (177°C) and bake for 45 to 55 minutes. When the top is golden and bubbly, remove it from the oven, and let it sit for about 25 to 30 minutes. This will help the dish thicken up perfectly!

    Tips for Success

    • Use fresh shrimp for the best flavor; frozen works in a pinch!
    • Don’t overcook the pasta; al dente is key for the best texture.
    • Let the dish rest after baking; it helps the cheese sauce thicken and set.
    • Feel free to adjust the Cajun seasoning to suit your family’s taste preferences.
    • Make it ahead! This dish can be assembled and refrigerated before baking.

    Equipment Needed

    • Large Skillet: A non-stick or cast-iron skillet works wonders for cooking the shrimp.
    • Large Pot: Essential for boiling the macaroni; any sturdy pot will do.
    • Mixing Bowls: A couple of medium to large bowls for mixing ingredients.
    • Baking Dish: A 9×13-inch baking dish is ideal; any comparable size will work.
    • Whisk: Perfect for blending your cheese sauce; a fork can also suffice.

    Variations on Cajun Shrimp Crab Mac Cheese

    • Spicy Seafood Twist: Add diced jalapeños or chopped serrano peppers for an extra kick that’ll ignite your taste buds.
    • Veggie Delight: Toss in some steamed broccoli or spinach for a pop of green and added nutrition. It’s a sneaky way to blend healthy with indulgent!
    • Gluten-Free Option: Use gluten-free elbow pasta to make this dish suitable for gluten-sensitive diets. It’s a delicious alternative that everyone will love.
    • Different Cheeses: Experiment with your cheese blend! Try adding Gouda or pepper jack for a unique flavor profile that elevates the dish.
    • Crusty Topping: For some crunch, mix breadcrumbs with a little melted butter and sprinkle them on top before baking. A golden crust adds delightful texture.

    Serving Suggestions for Cajun Shrimp Crab Mac Cheese

    • Pair with a crisp green salad tossed in a tangy vinaigrette to balance the richness.
    • A glass of chilled white wine like Sauvignon Blanc complements the seafood beautifully.
    • For a fun presentation, serve it in individual ramekins topped with fresh basil.
    • Add a side of garlic bread for extra deliciousness and a little crunch.
    • Finish with a sprinkle of chili flakes for an attractive touch and added heat!

    FAQs about Cajun Shrimp Crab Mac Cheese

    Can I make Cajun Shrimp Crab Mac Cheese ahead of time?
    Absolutely! You can prepare the dish and assemble it in the baking dish, then cover and refrigerate it for up to 24 hours. Just be sure to bake it covered with foil to prevent over-browning.

    What can I substitute for fresh crab meat?
    If fresh crab meat isn’t available, imitation crab meat works wonderfully as a budget-friendly alternative. Just chop it up into bite-sized pieces, and you’re all set!

    How can I adjust the spice level in this dish?
    You can easily tailor the spice level by adjusting the Cajun seasoning. For a milder flavor, start with a smaller amount and taste as you go. If you’re feeling adventurous, add more cayenne pepper!

    Is Cajun Shrimp Crab Mac Cheese gluten-free?
    Yes! By using gluten-free elbow pasta, you can enjoy this decadent dish without any gluten. The flavors remain just as delightful!

    Can I use a different type of cheese?
    Certainly! While the blend of cheddar and Monterey Jack is delicious, feel free to experiment. Gouda, pepper jack, or even mozzarella can give your dish a new twist!

    Final Thoughts

    Cajun Shrimp Crab Mac Cheese isn’t just a meal; it’s a celebration of flavors and textures that brings everyone together. Picture cozy family dinners where laughter mingles with the aroma of this scrumptious dish, tickling your taste buds with every bite. The creamy cheese sauce embraces the shrimp and crab, creating a symphony of satisfaction. Whether you’re feeding hungry kids or entertaining friends, this dish is bound to impress. So roll up your sleeves and let the cooking magic unfold in your kitchen—it’s more than a recipe; it’s a delicious experience waiting to happen!


    Print

    clock clock iconcutlery cutlery iconflag flag iconfolder folder iconinstagram instagram iconpinterest pinterest iconfacebook facebook iconprint print iconsquares squares iconheart heart iconheart solid heart solid icon

    Description

    Cajun Shrimp Crab Mac Cheese is a deliciously creamy and cheesy pasta dish packed with flavorful shrimp, crab, and a hint of Cajun spice, perfect for impressing your guests.


    • 2 pounds shrimp, peeled and deveined
    • 2 tablespoons olive oil
    • 1 to 2 tablespoons Cajun seasoning
    • Pinch of salt
    • Pinch of freshly ground black pepper
    • 3 cups uncooked elbow macaroni
    • 2 pounds cooked fresh crab legs or 2 ½ cups diced imitation crab meat
    • ¼ cup fresh or dried basil, plus more for topping
    • 1 cup whole milk
    • 2 to 2 ⅔ cups evaporated milk
    • ½ to 1 teaspoon paprika, or to taste
    • ¼ to ½ teaspoon cayenne pepper, or to taste
    • ½ teaspoon salt, or to taste
    • ½ teaspoon freshly ground black pepper, or to taste
    • 2 large eggs, beaten
    • 4 cups sharp cheddar cheese, grated
    • 2 cups mild cheddar cheese, grated
    • 2 cups Colby and Monterey Jack cheese blend, grated
    • ½ cup Parmesan cheese, grated
    • Cajun seasoning for topping

    1. Heat a large skillet over medium heat. In a medium bowl, combine shrimp, olive oil, Cajun seasoning, salt, and black pepper. Toss to coat shrimp evenly.
    2. Add shrimp to the hot skillet and cook, stirring constantly, until pink and opaque, about 4 to 6 minutes. Remove from heat and set aside.
    3. Preheat oven to 350°F (177°C). Lightly butter a 9×13-inch baking dish and set aside.
    4. Bring a large pot of salted water to a boil over high heat. Add elbow macaroni and cook until al dente according to package instructions. Drain thoroughly and transfer pasta to a large bowl.
    5. Add cooked Cajun shrimp, crab meat, and basil to the drained pasta. Stir gently to combine. Set aside.
    6. In a large bowl, whisk together whole milk and evaporated milk. Add paprika, cayenne pepper, salt, and black pepper; taste and adjust seasoning as desired.
    7. Whisk in beaten eggs until fully incorporated. Reserve 1 cup sharp cheddar, ½ cup Colby and Monterey Jack blend, and ½ cup Parmesan cheese separately. Add the remaining cheeses to the milk mixture and stir until combined.
    8. Pour cheese and milk mixture into the bowl with pasta and seafood. Stir thoroughly to combine.
    9. Transfer the mixture into the prepared baking dish. Top evenly with the reserved cheeses. Optionally sprinkle additional basil, paprika, salt, pepper, and Cajun seasoning on top.
    10. Bake for 45 to 55 minutes until the top is golden and bubbly. At about 35 to 40 minutes, cover with foil loosely to prevent over-browning without touching the cheese.
    11. Remove from oven and let rest for 25 to 30 minutes before serving.

    Notes

    • Use fresh crab legs for the best taste.
    • Adjust the amount of Cajun seasoning based on your spice preference.
    • Allow the dish to sit before serving to thicken up slightly.
    • Prep Time: 20 minutes
    • Cook Time: 60 minutes
    • Category: Main Course
    • Method: Bake
    • Cuisine: Creole

    Nutrition

    • Serving Size: 1 cup
    • Calories: 620
    • Sugar: 3g
    • Sodium: 950mg
    • Fat: 30g
    • Saturated Fat: 15g
    • Unsaturated Fat: 10g
    • Trans Fat: 0g
    • Carbohydrates: 55g
    • Fiber: 2g
    • Protein: 36g
    • Cholesterol: 170mg

    Sharing is caring!

  • White Chocolate Peppermint Cheesecake

    White Chocolate Peppermint Cheesecake


    Introduction to White Chocolate Peppermint Cheesecake

    Ah, holiday season! A time when our kitchens transform into bustling hubs of flavor and warmth. When those chilly nights creep in, there’s nothing quite like a slice of White Chocolate Peppermint Cheesecake to wrap around you like a cozy blanket. This delightful dessert is not just a treat; it’s a celebration in every bite. Whether you’re looking for a quick solution amidst the chaos or a show-stopping dish to impress your loved ones, this creamy cheesecake is just what you need. Ready to bring a little festive joy to your table?

    Why You’ll Love This White Chocolate Peppermint Cheesecake

    This White Chocolate Peppermint Cheesecake isn’t just another dessert; it’s a game changer! It’s easy to whip up, making it perfect for busy moms or professionals juggling a million tasks. Plus, the combination of creamy white chocolate and refreshing peppermint creates a heavenly flavor that dances on your taste buds. You’ll be amazed at how quickly it disappears—your family won’t be able to resist it! It’s festive, fun, and oh-so-delicious!

    Ingredients for White Chocolate Peppermint Cheesecake

    Gathering the right ingredients is the first step toward creating your own White Chocolate Peppermint Cheesecake. Here’s what you’ll need:

    • Cream cheese: This gives your cheesecake its creamy base. Make sure it’s softened for easy mixing.
    • Granulated sugar: Adds sweetness and helps achieve that delightful balance of flavors.
    • Peppermint extract: Infuses that refreshing holiday cheer into your dessert. You can adjust the amount if you want a bolder flavor.
    • Vanilla bean paste or extract: Enhances the richness of the cheesecake. Vanilla really complements the white chocolate, making it extra decadent.
    • All-purpose flour: This is used in the cookie dough to create that amazing, chewy texture.
    • Baking soda: Helps the cookie dough rise slightly, giving it a soft bite.
    • Salt: A pinch of salt balances the sweetness beautifully.
    • Unsalted butter: Use softened butter to create a fluffy cookie dough. The unsalted variety lets you control the saltiness.
    • Brown sugar: Adds moisture and a deeper flavor profile to the cookie dough.
    • Egg yolks: These enrich the dough and keep it tender and delightful.
    • Crushed candy canes: A festive touch! They add color, crunch, and that signature peppermint flavor.
    • White chocolate chips: Melted bliss! They create that luscious texture and flavor in the cheesecake filling.
    • Granulated sugar for rolling: Rolling the dough balls in sugar gives them a beautiful exterior and added sweetness.
    • Extra crushed candy canes (optional): Perfect for garnish, adding even more seasonal flair to your cheesecake!

    For exact measurements, check the end of this article where you’ll find everything laid out for easy printing!

    How to Make White Chocolate Peppermint Cheesecake

    Now comes the fun part—making your very own White Chocolate Peppermint Cheesecake! With each step, you’ll be able to delight your senses and get a taste of the festive season. Follow along, and let’s create something magical!

    Step 1 – Prepare the Cheesecake Filling

    Start by taking that softened cream cheese and putting it into a bowl. Add the granulated sugar, peppermint extract, and vanilla. Use an electric mixer on medium-high speed, and beat it all together until it’s fluffy and smooth. You want that mixture to feel like a cloud, light and airy.

    This should take about 2 minutes. Now, scoop out 16 portions, about 2 teaspoons each, and place them on a parchment-lined tray. This is where your cheesecake bites begin! Pop them in the freezer until they become firm, which usually takes about 30 minutes.

    Step 2 – Mix the Cookie Dough

    While you’re waiting, let’s whip up the cookie dough. In a medium bowl, whisk together the all-purpose flour, baking soda, and salt. Set it aside—this mixture is essential for that chewy texture.

    In another bowl, cream together the softened butter with the granulated and brown sugar. Use the electric mixer on high speed until it’s light and fluffy, and remember to scrape the sides of the bowl as needed. Once you get that dreamy texture, mix in the egg yolks, peppermint extract, and vanilla. Keep mixing until it’s all well combined and fluffy.

    Finally, blend the flour mixture into the wet ingredients on low speed until just combined. Don’t overdo it! It’s essential to keep that dough light, as you’re gonna fold in the crushed candy canes and white chocolate chips gently by hand.

    Step 3 – Combining Cheesecake and Cookie Dough

    Now, let’s wrap that heavenly cheesecake filling in the cookie dough! Divide your cookie dough into 16 portions, using about 2 tablespoons for each. Flatten each piece slightly and place a frozen cheesecake ball right in the center. It’s like a cozy blanket for your cheesecake!

    Carefully wrap the dough around the cheesecake ball, ensuring that it’s completely encased. Don’t forget to roll each ball in granulated sugar for a sweet, sparkly finish. This step adds not just flavor, but a lovely visual appeal as well!

    Step 4 – Bake and Cool

    It’s baking time! Place up to six dough balls on a parchment-lined baking sheet. Pop them in the preheated oven set at 350°F. Bake for 12-14 minutes until they turn lightly golden. Keep an eye on them; you want that perfectly golden hue, but be careful not to overbake!

    Once they’re done, let them cool on the sheet for about 10 minutes. After that, transfer them to a wire rack to cool completely. As you wait, the delightful aroma will surely fill your home, tempting anyone who walks by!

    Tips for Success

    • Ensure your cream cheese is perfectly soft for seamless mixing.
    • Chill the cookie dough if it becomes too sticky or soft to handle.
    • Use a kitchen scale for accurate ingredient measurements when possible.
    • Experiment with different peppermint extract brands for unique flavors.
    • Add more or fewer crushed candy canes based on your taste preference.

    Equipment Needed

    • Electric mixer: A hand mixer works fine if you don’t have a stand mixer.
    • Mixing bowls: Glass or stainless steel bowls are ideal.
    • Parchment paper: Essential for easy cleanup; you can use a silicone mat as a substitute.
    • Baking sheet: A regular baking pan will do if you don’t have a cookie sheet.
    • Wire rack: This cools your cheesecake bites quickly; a cutting board can also work.

    Variations

    • Gluten-free option: Substitute all-purpose flour with a gluten-free flour blend for a delightful treat everyone can enjoy.
    • Chocolate chip mint version: Swap white chocolate chips for semi-sweet chocolate chips for a delicious twist.
    • Lower sugar: Reduce the granulated sugars slightly or use a sugar substitute to lighten the sweetness.
    • Vegan alternative: Use dairy-free cream cheese and coconut oil in place of butter to create a vegan-friendly version.
    • Other flavors: Experiment with different extracts like almond or orange for a unique flavor profile.

    Serving Suggestions for White Chocolate Peppermint Cheesecake

    • Pair with a warm cup of cocoa or peppermint tea for a cozy treat.
    • Serve with a dollop of whipped cream on top for extra creaminess.
    • Garnish with more crushed candy canes for a festive touch.
    • Add a drizzle of chocolate syrup for a rich contrast.
    • Present on a charming platter with holiday decorations for a delightful festive display.

    FAQs about White Chocolate Peppermint Cheesecake

    Can I make White Chocolate Peppermint Cheesecake ahead of time?

    Absolutely! You can prepare and freeze the cheesecake balls in advance. Just bake them the day you plan to serve for the freshest taste. They’re perfect for surprising guests at holiday gatherings!

    How should I store leftover cheesecake bites?

    Store any leftovers in an airtight container in the fridge for up to a week. They’ll stay delicious and ready for snacking—if they last that long!

    Can I use a different flavor of extract?

    Of course! While peppermint is a star here, you could swap in other extracts like vanilla or almond for a unique twist. Just remember to adjust amounts to taste!

    What do I do if my dough is too sticky?

    If your cookie dough becomes sticky, just pop it in the fridge for a bit to chill. This will make it easier to handle, ensuring your beautiful cheesecake layers stay intact.

    How do I know when the cheesecake bites are perfectly baked?

    Look for a light golden color on the edges. The centers might seem a bit soft, but they will firm up as they cool on the rack. It’s about finding that sweet balance between soft and firm!

    Final Thoughts

    The joy of making this White Chocolate Peppermint Cheesecake goes beyond just satisfying your sweet tooth. It’s about creating festive memories with your family and friends, filling your home with delightful aromas and laughter. Each bite offers a taste of nostalgia, bringing everyone together, and I can assure you, they won’t be able to resist coming back for more! It’s like a hug in dessert form, perfect for holiday gatherings or cozy nights in. So, roll up your sleeves and embrace the festive spirit—your taste buds and loved ones will thank you!


    Print

    clock clock iconcutlery cutlery iconflag flag iconfolder folder iconinstagram instagram iconpinterest pinterest iconfacebook facebook iconprint print iconsquares squares iconheart heart iconheart solid heart solid icon

    Description

    A delightful and festive cheesecake with a white chocolate and peppermint flavor, encased in a cookie dough.


    • 8 oz cream cheese, softened
    • 1/4 cup granulated sugar
    • 1/2 tsp peppermint extract
    • 1 tsp vanilla bean paste or vanilla extract
    • 1 1/3 cups all-purpose flour
    • 1/2 tsp baking soda
    • 1/4 tsp salt
    • 1/2 cup unsalted butter, softened
    • 1/4 cup granulated sugar
    • 3/4 cup brown sugar, packed
    • 2 large egg yolks, room temperature
    • 1/2 tsp peppermint extract
    • 1 tsp vanilla bean paste or vanilla extract
    • 1/2 cup crushed candy canes (about 6 candy canes)
    • 1/2 cup white chocolate chips
    • Additional granulated sugar for rolling dough balls
    • Extra crushed candy canes for garnish (optional)

    1. Combine softened cream cheese, granulated sugar, peppermint extract, and vanilla in a small bowl. Beat with an electric mixer on medium-high speed until fluffy and sugar dissolves, about 2 minutes. Portion into sixteen 2-teaspoon scoops onto parchment-lined tray. Freeze until firm.
    2. In a medium bowl, whisk together flour, baking soda, and salt. Set aside.
    3. Using an electric mixer, cream softened butter with granulated and brown sugar on high speed until light and fluffy, about 2 minutes. Scrape bowl sides as needed.
    4. Mix in egg yolks, peppermint extract, and vanilla on medium speed for 1 minute until well combined and fluffy.
    5. Add flour mixture to wet ingredients and blend on low speed until just combined.
    6. Using a rubber spatula, fold crushed candy cane pieces and white chocolate chips evenly into the dough.
    7. Divide dough into sixteen 2-tablespoon portions. Flatten each portion slightly, place a frozen cheesecake ball in the center, then wrap dough around to fully encase. Roll each ball in granulated sugar.
    8. Place up to six dough balls on parchment-lined baking sheet. Bake in a preheated oven at 350°F for 12-14 minutes, until lightly golden. Cool on sheet for 10 minutes, then transfer to wire rack to cool completely. Sprinkle with additional crushed candy cane pieces before serving.

    Notes

    • Ensure the cream cheese is very soft for easy mixing.
    • For best results, use a kitchen scale to measure ingredients accurately.
    • Chill the cookie dough if it becomes too soft to handle.
    • Crushed candy canes can be adjusted based on preference.
    • Prep Time: 30 minutes
    • Cook Time: 14 minutes
    • Category: Dessert
    • Method: Baking
    • Cuisine: American

    Nutrition

    • Serving Size: 1 cookie
    • Calories: 200
    • Sugar: 15g
    • Sodium: 150mg
    • Fat: 10g
    • Saturated Fat: 6g
    • Unsaturated Fat: 3g
    • Trans Fat: 0g
    • Carbohydrates: 25g
    • Fiber: 1g
    • Protein: 2g
    • Cholesterol: 30mg

    Sharing is caring!

  • Mummy Oreo Balls Delight

    Mummy Oreo Balls Delight


    Introduction to Mummy Oreo Balls Delight

    As a busy mom, I know the hustle of preparing festive treats can sometimes feel overwhelming. But fear not! The Mummy Oreo Balls Delight is here to save the day. This quick and easy Halloween treat combines the rich flavors of creamy filling with a sweet white chocolate coating, making it perfect for busy October evenings. Not only will your family and friends love these adorable little mummies, but they also require minimal effort and time. Get ready to impress your loved ones with a delightful dessert that can be whipped up in just 30 minutes!

    Why You’ll Love This Mummy Oreo Balls Delight

    This delightful treat brings together speed, simplicity, and irresistible taste, making it a win-win for any busy household. With just a handful of ingredients, you can craft these charming mummies in no time at all. Plus, the creamy and sweet combo creates a bite that’s simply out of this world! Trust me, when everyone sees your festive creations, they’ll be buzzing with excitement and begging for more.

    Ingredients for Mummy Oreo Balls Delight

    Ready to dive into the ingredients that bring these spooky delights to life? Here’s what you’ll need to make Mummy Oreo Balls Delight:

    • Golden Sandwich Cookies: I prefer blonde Oreos for a unique flavor twist, but any vanilla sandwich cookies work well too.
    • Cream Cheese: Softened at room temperature, this gives a rich creaminess to the filling. It’s what makes these balls downright irresistible!
    • White Chocolate Candy Melts: These melt beautifully and create the perfect coating for your mummies. Dipping wafers are another tasty option!
    • Candy Eyes: The finishing touch to give your mummies personality! You can find them easily at craft stores or online.

    For those looking for variations or fun extras, try adding a pinch of sea salt to the chocolate or using gluten-free cookies! Remember, the exact quantities of each ingredient are at the bottom of the article for easy reference and printing.

    How to Make Mummy Oreo Balls Delight

    Let’s get you started on creating these adorable Mummy Oreo Balls Delight! Follow these simple steps to bring a festive twist to your table without breaking a sweat.

    Step 1: Prepare the Cookie Crumbs

    First things first—grab your food processor and toss in those golden sandwich cookies. Pulse them until they turn into fine crumbs. It should look like sandy powder. This step is essential for getting that perfect texture in our delicious filling.

    Step 2: Combine with Cream Cheese

    Next, take your cookie crumbs and scoop them into a mixing bowl. Add the softened cream cheese. Using a spatula or a mixer, blend everything together until it’s fully incorporated and smooth. You want it to combine excellently, like a sweet, creamy cloud.

    Step 3: Form the Balls

    Now for some fun! Grab a cookie scoop or your hands and start forming 1-inch balls from the mixture. Place these little mummies on a baking sheet lined with parchment paper. Leave some space between them so they don’t stick together. Once you’ve got all the balls made, pop them in the freezer for 30 minutes. This helps them firm up nicely!

    Step 4: Melt the Chocolate

    While the cookie balls are chilling, let’s melt that white chocolate. Follow the package instructions for your candy melts or dipping wafers. Typically, you’ll microwave them in short intervals, stirring in between until they’re smooth and fluid. Keep an eye on it; you don’t want to burn the chocolate!

    Step 5: Coat the Oreo Balls

    Once your cookie balls are nice and chilled, it’s time to coat them! Dip each ball into the smooth melted white chocolate. Use a fork to lift them out, tapping gently to remove any excess coating. This will help avoid a chocolate pool on your baking sheet!

    Step 6: Decorate the Mummies

    Here comes the creative part! Drizzle any leftover melted white chocolate over each coated ball. This simulates the mummy’s bandages. While the chocolate is still wet, place two candy eyes on each ball to bring them to life. How cute will those little mummies be?

    Step 7: Chill Before Serving

    Finally, place your decorated Mummy Oreo Balls back in the refrigerator. Let them chill for about 20 minutes or until the coating has set fully. This ensures your treats will hold their shape and be ready to impress your guests!

    Tips for Success

    • Use room-temperature cream cheese for easy mixing.
    • Don’t rush the chilling process; it helps maintain the ball’s shape.
    • For a smoother coating, ensure your chocolate is fully melted and without lumps.
    • Experiment with flavored chocolate melts for a unique twist!
    • Be creative with the decorations—try adding sprinkles or edible glitter for extra fun!

    Equipment Needed

    • Food Processor: A great tool for making cookie crumbs easily. A zip-top bag and rolling pin works too!
    • Baking Sheet: Use any flat baking sheet lined with parchment paper to prevent sticking.
    • Mixing Bowl: A large bowl for combining your ingredients. A sturdy plastic or glass bowl will do.
    • Cookie Scoop: For consistent balls, but you can use your hands as well!
    • Microwave-Safe Bowl: Perfect for melting your chocolate—glass or ceramic works best.

    Variations of Mummy Oreo Balls Delight

    • Chocolate Oreo Balls: Swap the golden sandwich cookies for classic chocolate Oreos for a deeper chocolate flavor.
    • Nut Butter Balls: For a rich twist, mix in a spoonful of almond or peanut butter with the cream cheese.
    • Vegan Option: Use vegan cream cheese and dairy-free chocolate melts for a plant-based treat everyone can enjoy.
    • Gluten-Free Version: Pot for gluten-free sandwich cookies to accommodate dietary restrictions without sacrificing taste.
    • Spiced Variation: Add a dash of cinnamon or pumpkin spice to the mixture for a seasonal flavor kick that screams fall!

    Serving Suggestions for Mummy Oreo Balls Delight

    • Serve on a Festive Platter: Arrange the Mummy Oreo Balls on a spooky-themed tray for a fun presentation.
    • Pair with Hot Cocoa: These treats go perfectly with a warm cup of hot cocoa or apple cider.
    • Use Fun Decorations: Surround the balls with candy corn or pumpkin decorations for a festive touch.
    • Offer with Fruit: Serve alongside fresh fruits like apple slices for a balanced treat.
    • Let Kids Decorate: Set up a decorating station with extra candy eyes and sprinkles for added fun!

    FAQs about Mummy Oreo Balls Delight

    Can I make Mummy Oreo Balls in advance?

    Absolutely! You can make these delightful treats a day or two ahead. Just store them in an airtight container in the refrigerator to keep them fresh. They’ll be waiting for you when it’s time to celebrate!

    What can I use instead of cream cheese?

    If you’re not a fan of cream cheese, you can try using Greek yogurt or a dairy-free cream cheese alternative. Both will lend a different yet delicious flavor to your Mummy Oreo Balls Delight!

    How do I store leftovers?

    Any leftovers can be stored in an airtight container in the refrigerator for up to a week. Just make sure they’re fully cooled and set before packing away, so they stay adorable and delicious!

    Can I freeze Mummy Oreo Balls?

    Yes, you can freeze these treats! Just ensure they’re well-wrapped or placed in a freezer-safe container. Thaw them in the fridge when you’re ready to enjoy!

    How do I make these gluten-free?

    To make Mummy Oreo Balls Delight gluten-free, simply swap in gluten-free sandwich cookies. They’ll taste just as delightful without those pesky gluten concerns!

    Final Thoughts

    Creating Mummy Oreo Balls Delight is not just about baking; it’s about making memories. These adorable treats bring smiles and laughter to the table, making them a perfect addition to your Halloween festivities. I love how they combine simplicity with a touch of creativity that everyone in the family can enjoy. Whether you’re hosting a party or simply looking for a tasty dessert to share, these mummies will make any occasion feel special. So gather your loved ones, whip up this delightful recipe, and experience the joy that each delicious bite brings. Happy Halloween baking!


    Print

    clock clock iconcutlery cutlery iconflag flag iconfolder folder iconinstagram instagram iconpinterest pinterest iconfacebook facebook iconprint print iconsquares squares iconheart heart iconheart solid heart solid icon

    Description

    Mummy Oreo Balls Delight is a quick and easy Halloween treat that combines creamy filling and a sweet white chocolate coating, decorated to look like mummies.


    • 1 package (15.35 oz) golden sandwich cookies (blonde Oreos preferred)
    • 8 oz cream cheese, softened to room temperature
    • 12 oz white chocolate candy melts or white dipping wafers
    • candy eyes, approximately 24 pieces

    1. Pulse the golden sandwich cookies in a food processor until they become fine crumbs.
    2. Mix the cookie crumbs with softened cream cheese until fully incorporated and smooth.
    3. Use a cookie scoop to form 1-inch balls from the mixture, place them on a baking sheet lined with parchment, and freeze for 30 minutes to set.
    4. Melt the white chocolate candy melts according to package instructions until smooth and fluid.
    5. Dip each chilled ball into the melted white chocolate, remove excess coating by tapping gently, then transfer back to the parchment-lined baking sheet.
    6. Drizzle remaining melted white chocolate over each coated ball to simulate mummy bandages and place two candy eyes on each while chocolate is still wet.
    7. Refrigerate the decorated balls for 20 minutes until the coating is fully set before serving.

    Notes

    • For best results, use blonde Oreos for a unique flavor.
    • Make sure the cream cheese is at room temperature for easier mixing.
    • Store any leftovers in an airtight container in the refrigerator.
    • Prep Time: 20 minutes
    • Cook Time: 10 minutes
    • Category: Dessert
    • Method: No-Bake
    • Cuisine: American

    Nutrition

    • Serving Size: 1 ball
    • Calories: 120
    • Sugar: 10g
    • Sodium: 35mg
    • Fat: 7g
    • Saturated Fat: 4g
    • Unsaturated Fat: 2g
    • Trans Fat: 0g
    • Carbohydrates: 15g
    • Fiber: 0g
    • Protein: 1g
    • Cholesterol: 10mg

    Sharing is caring!

  • Cinnamon Roll Protein Muffins

    Cinnamon Roll Protein Muffins


    Introduction to Cinnamon Roll Protein Muffins

    As a busy mom balancing work and family life, I know how important it is to find quick solutions for those hectic mornings. That’s where my Cinnamon Roll Protein Muffins come in! Not only are they deliciously satisfying, but they also pack a protein punch that can help fuel your day. Imagine the aroma of warm cinnamon filling your kitchen while you whip up a batch of these muffins. They are perfect for breakfast on the go or an afternoon snack for you and your loved ones. Trust me, you’ll want to keep this recipe handy!

    Why You’ll Love This Cinnamon Roll Protein Muffins

    Your mornings deserve a little sweetness, don’t they? These Cinnamon Roll Protein Muffins are not just easy to make; they’re a delightful treat your family will adore. With a quick prep time, you can indulge in a warm muffin in under 40 minutes. Plus, the combination of oats and protein will keep you fuller for longer, making them the perfect fuel for your busy day ahead. Who knew healthy could taste this good?

    Ingredients for Cinnamon Roll Protein Muffins

    Gathering your ingredients is the first exciting step to creating these delightful Cinnamon Roll Protein Muffins. Here’s what you’ll need:

    • Large eggs: These bind everything together and add moisture. You can substitute with flax eggs for a vegan option.
    • Plain Greek yogurt: A creamy base that provides protein without added fats. Opt for nonfat or low-fat versions for a healthier twist.
    • Unsweetened almond milk: For that hint of nuttiness, use almond milk or any favorite non-dairy milk.
    • Unsweetened applesauce: This acts as a natural sweetener and a substitute for oil, keeping your muffins low in fat.
    • Maple syrup or honey: These natural sweeteners bring that classic cinnamon roll flavor. Adjust to your sweetness preference.
    • Vanilla extract: A splash of this elevates the overall flavor profile, making your muffins irresistible.
    • Oat flour: This is the star ingredient! Ground oats create a wholesome texture without gluten.
    • Vanilla protein powder: Adds a protein boost. Choose your favorite whey or plant-based option.
    • Coconut flour: A little goes a long way! It helps absorb moisture and enhances texture.
    • Baking powder and baking soda: These buddies help your muffins rise perfectly, giving them that fluffy consistency.
    • Salt: Just a pinch enhances the flavors and balances the sweetness.
    • Coconut sugar or brown sugar: These create a delightful cinnamon-sugar swirl, enhancing that homemade feel.
    • Ground cinnamon: The star of the show! It delivers that warm, cozy aroma and flavor we all love.
    • Optional toppings: For an extra treat, blend softened cream cheese with Greek yogurt and maple syrup for a creamy drizzle.

    Remember, the exact quantities for each ingredient are available at the bottom of this article for easy reference and printing.

    How to Make Cinnamon Roll Protein Muffins

    Now comes the fun part—making those amazing Cinnamon Roll Protein Muffins! Follow these simple steps, and you’ll have a batch ready to enjoy in no time.

    Step 1: Preheat and Prepare

    First, let’s get things heated up! Preheat your oven to 350°F (175°C). While it warms up, line a 12-cup muffin tin with paper liners or give each cup a light coat of cooking spray. This helps prevent sticking and makes cleanup a breeze.

    Step 2: Mix Wet Ingredients

    In a large mixing bowl, combine your eggs, Greek yogurt, almond milk, applesauce, maple syrup, and vanilla extract. Whisk these together until the mixture is smooth and well blended. Trust me, this creamy base is key to those moist muffins!

    Step 3: Combine Dry Ingredients

    Now, grab another bowl and add the oat flour, vanilla protein powder, coconut flour, baking powder, baking soda, and salt. Mix these dry ingredients well to ensure everything is evenly distributed. This little step makes a big difference in the final texture!

    Step 4: Combine Wet and Dry Mixtures

    Time to bring it all together! Slowly fold the dry ingredients into the wet mixture. Gently stir until just combined. Be careful not to overmix; we want to keep those muffins light and fluffy!

    Step 5: Create the Cinnamon Swirl

    For that irresistible cinnamon flavor, mix the coconut sugar and ground cinnamon in a small bowl. This will be your cinnamon-sugar swirl. The magic really happens when we layer it into the muffins.

    Step 6: Fill Muffin Tins

    Spoon the batter into the muffin cups, filling each one halfway. Then, sprinkle a layer of the cinnamon-sugar mix over the batter. Top off with the remaining batter and give it a gentle swirl with a toothpick to create that beautiful marbled effect. Ah, just wait until you see the swirls peek through when they bake!

    Step 7: Bake to Perfection

    Place your muffin tin in the preheated oven and bake for 18 to 22 minutes. Keep an eye on them! When a toothpick inserted in the center comes out clean, you know these beauties are done. Let them cool in the tin for a few minutes before transferring to a wire rack.

    Step 8: Optional Creamy Topping

    Want to take your muffins to the next level? Blend softened cream cheese, Greek yogurt, and maple syrup until you get a creamy drizzle. Once your muffins are cool, add this topping for an extra treat. It’s totally worth it for that added indulgence!

    Tips for Success

    • Always check the freshness of your baking powder and soda; stale leaveners can lead to flat muffins.
    • For added flavor, consider spices like nutmeg or ginger in addition to the cinnamon.
    • Store any leftovers in an airtight container to keep them moist and delicious.
    • Mix in your favorite nuts or dried fruits for extra texture and flavor.
    • If you prefer, you can adjust the sweetness by reducing the maple syrup or honey.

    Equipment Needed

    • Muffin tin: A standard 12-cup tin works, but mini muffin tins are great for bite-sized treats.
    • Mixing bowls: Use at least two; one for wet ingredients and one for dry.
    • Whisk: A whisk makes combining ingredients easy, but a fork will do!
    • Spoon or spatula: For folding and mixing.
    • Toothpick: Perfect for testing doneness.

    Variations on Cinnamon Roll Protein Muffins

    • Chocolate Chip Delight: Add a handful of dark chocolate chips for a rich, indulgent twist.
    • Nutty Banana: Substitute half the applesauce with mashed banana for natural sweetness and a slight banana flavor.
    • Pumpkin Spice: Replace some of the Greek yogurt with pumpkin puree and add pumpkin pie spice for a fall-inspired treat.
    • Gluten-Free Option: Use certified gluten-free oat flour and ensure all other ingredients are gluten-free for a healthy gluten-free muffin.
    • Berry Burst: Add fresh or frozen berries like blueberries or raspberries for a fruity twist.

    Serving Suggestions for Cinnamon Roll Protein Muffins

    • Pair these muffins with a hot cup of coffee or herbal tea for a delightful breakfast experience.
    • Serve warm, topped with a dollop of Greek yogurt for added creaminess.
    • Add fresh fruit on the side, like sliced strawberries or bananas, for a refreshing touch.
    • For an extra indulgent treat, drizzle with a light glaze made from maple syrup and Greek yogurt.

    FAQs about Cinnamon Roll Protein Muffins

    Can I make these muffins vegan? Yes! To make your Cinnamon Roll Protein Muffins vegan, substitute the large eggs with flax eggs and the Greek yogurt with a plant-based alternative. Use almond milk or any other non-dairy milk, and feel free to swap the honey with maple syrup.

    How do I store leftover muffins? To keep your muffins fresh, store them in an airtight container at room temperature for up to four days. You can also freeze them! Just wrap each muffin tightly and place them in a freezer-safe bag for up to three months.

    Can I use different types of protein powder? Absolutely! Choose your favorite flavor of protein powder, whether it’s whey or plant-based, to customize the taste of your Cinnamon Roll Protein Muffins. Just make sure it’s compatible with baking.

    How can I add more flavor to the muffins? Consider adding extra spices, like nutmeg or ginger. You can also mix in some chopped nuts, dried fruits, or chocolate chips for a delightful twist. The addition of cocoa powder can create chocolatey goodness!

    What’s the nutritional info for each muffin? Every muffin contains approximately 150 calories, with 7g of protein and 6g of sugar. They’re a nutritious choice, making them perfect for busy mornings or a post-workout snack.

    Final Thoughts

    Baking these Cinnamon Roll Protein Muffins is more than just a recipe; it’s part of a comforting routine that fills your home with warmth and delicious aromas. From mixing the ingredients to savoring the first bite, each step is a little adventure. These muffins not only satisfy your sweet cravings but also provide the nourishment you need to tackle your busy day. Whether shared with family or enjoyed solo over a coffee break, they bring joy and a sense of accomplishment. So go ahead, whip up a batch, and let the happiness unfold in your kitchen!


    Print

    clock clock iconcutlery cutlery iconflag flag iconfolder folder iconinstagram instagram iconpinterest pinterest iconfacebook facebook iconprint print iconsquares squares iconheart heart iconheart solid heart solid icon

    Description

    Healthy and delicious cinnamon roll protein muffins made with oats, protein powder, and a cinnamon swirl.


    • 2 large eggs
    • 240 ml plain Greek yogurt (nonfat or low-fat)
    • 80 ml unsweetened almond milk
    • 60 ml unsweetened applesauce
    • 60 ml maple syrup or honey
    • 2 teaspoons vanilla extract
    • 100 grams oat flour (or finely ground oats)
    • 60 grams vanilla protein powder (whey or plant-based)
    • 35 grams coconut flour
    • 1 1/2 teaspoons baking powder
    • 1/2 teaspoon baking soda
    • 1/4 teaspoon salt
    • 2 tablespoons coconut sugar or brown sugar
    • 1 1/2 teaspoons ground cinnamon
    • 60 grams low-fat cream cheese, softened (optional topping)
    • 30 grams Greek yogurt (optional topping)
    • 15 ml maple syrup (optional topping)

    1. Preheat the oven to 175°C. Line a 12-cup muffin tin with paper liners or lightly grease the wells.
    2. In a large mixing bowl, whisk together the eggs, Greek yogurt, almond milk, applesauce, maple syrup, and vanilla extract until the mixture is well combined and smooth.
    3. In a separate bowl, blend the oat flour, vanilla protein powder, coconut flour, baking powder, baking soda, and salt until evenly mixed.
    4. Gradually fold the dry ingredients into the wet mixture until just incorporated. Avoid overmixing to ensure tender muffins.
    5. In a small bowl, combine coconut sugar with ground cinnamon to create the swirl mixture.
    6. Spoon batter to fill each muffin cup halfway. Sprinkle a portion of the cinnamon-sugar mixture over the batter, then top with the remaining batter. Swirl gently with a toothpick to create a marbled effect.
    7. Bake for 18 to 22 minutes, or until a toothpick inserted into the center comes out clean. Allow muffins to cool in the tin for several minutes before transferring to a wire rack.
    8. For a creamy topping, blend softened cream cheese, Greek yogurt, and maple syrup until smooth. Drizzle over cooled muffins before serving, if desired.

    Notes

    • Store muffins in an airtight container for up to 4 days.
    • Can be frozen for later enjoyment.
    • Feel free to adjust the sweetness according to your taste.
    • Prep Time: 15 minutes
    • Cook Time: 22 minutes
    • Category: Breakfast
    • Method: Baking
    • Cuisine: American

    Nutrition

    • Serving Size: 1 muffin
    • Calories: 150
    • Sugar: 6g
    • Sodium: 120mg
    • Fat: 4g
    • Saturated Fat: 2g
    • Unsaturated Fat: 0g
    • Trans Fat: 0g
    • Carbohydrates: 22g
    • Fiber: 3g
    • Protein: 7g
    • Cholesterol: 70mg

    Sharing is caring!

  • Mozzarella Biscuit Bombs

    Mozzarella Biscuit Bombs


    Introduction to Mozzarella Biscuit Bombs

    Have you ever had one of those days when dinner feels like a mountain to climb? Trust me, I’ve been there! That’s why I adore making Mozzarella Biscuit Bombs. They’re the perfect solution for a busy day, coming together in just 20 minutes! Imagine biting into a warm, flaky biscuit that bursts with gooey mozzarella cheese and lovingly topped with savory garlic butter. Doesn’t it sound heavenly? These cheesy delights not only bring smiles to my family but are also fantastic for impressing unexpected guests. Let’s dive into this delightful culinary adventure together!

    Why You’ll Love This Mozzarella Biscuit Bombs

    These Mozzarella Biscuit Bombs are truly a game changer for any home cook. First off, they’re incredibly easy to whip up — perfect for those busy weeknights. Plus, they come together in mere minutes, leaving you with more time to enjoy your loved ones. And let’s not forget the taste! Each bite is a warm explosion of cheesy goodness that will make everyone at the table swoon.

    Ingredients for Mozzarella Biscuit Bombs

    Let’s gather our ingredients for these delightful Mozzarella Biscuit Bombs! Here’s what you’ll need:

    • Mozarrella string cheese sticks: These ooze cheesy goodness when baked. Feel free to switch it up and use any melty cheese you love!
    • Pillsbury Grands buttermilk dough: The star of our biscuit base. Flaky and buttery, it’s essential for that perfect texture.
    • Fresh parsley: This not only adds color but an herbaceous note that brightens the dish. Dried parsley works too, though fresh is preferred.
    • Fine sea salt: Just a pinch improves the overall flavor, enhancing the cheese and butter while keeping it light.
    • Unsalted butter: Adds richness and helps create a delectable glaze. You can balance flavors by substituting with olive oil if you prefer.
    • Minced garlic: This provides an aromatic, savory punch that takes your bombs to the next level. Use garlic powder for convenience if needed.

    For exact quantities and a handy printable version, be sure to scroll down to the recipe card at the end of the article!

    How to Make Mozzarella Biscuit Bombs

    Now, let’s roll up our sleeves and make these delightful Mozzarella Biscuit Bombs! I’ll guide you through each step, ensuring you’ll have a delicious treat in no time. Follow along, and don’t worry; I’m here to share some tips that’ll make this process a breeze!

    Step 1: Preheat the Oven

    First things first, preheat your oven to a toasty 400°F. This ensures your Mozzarella Biscuit Bombs bake evenly and perfectly. Preheating creates that lovely golden finish and keeps the cheese gooey inside. So, while you prepare the ingredients, let your oven work its magic!

    Step 2: Prepare the Biscuit Dough

    Now it’s time to open the biscuit package. This can be a bit tricky, but don’t worry. Carefully split each biscuit into two. I usually give the tube a gentle squeeze to pop it open. Then, flatten them out using your hands or a rolling pin until they’re about a quarter-inch thick. Keep the shapes nice and round. This will be the cozy blanket for your gooey cheese!

    Step 3: Make the Garlic Butter Mixture

    Next, let’s whip up that tasty garlic butter mixture! In a small bowl, combine the melted butter, minced garlic, chopped parsley, and a pinch of salt. Give it a good stir! This mixture is not just for brushing; it infuses your Mozzarella Biscuit Bombs with flavor. The warmth of the butter and garlic is truly irresistible!

    Step 4: Assemble the Cheese Bombs

    Here comes the fun part: assembling your cheese bombs! Place two pieces of mozzarella in the center of each flattened dough circle. Wrap the dough around the cheese completely, making sure to pinch the edges well. This seals in all that cheesy goodness! Place the bombs seam-side down on your baking sheet, ready for their buttery coat.

    Step 5: Bake the Mozzarella Biscuit Bombs

    Now, it’s time for the oven to do its thing! Brush each cheese-filled dough ball generously with the garlic butter mixture. Pop the baking sheet in the preheated oven for about 8 to 10 minutes. Keep an eye on them! You want them to be golden brown and puffy. If you hear a bubbling sound, that’s your mozzarella melting away—delicious!

    Step 6: Serve and Enjoy

    Ah, the moment we’ve all been waiting for! Once they’re out of the oven, brush any leftover garlic butter over those warm, fluffy biscuits. Serve them up while they’re still hot. Watch out for that gooey cheese— it can be a bit messy, but oh so worth it! I love a good dipping sauce with mine; it adds an extra layer of flavor!

    Tips for Success

    • Keep an eye on the baking time! Every oven is different.
    • Don’t rush the preheating. It’s key to getting that perfect, golden finish.
    • Experiment with different cheeses—add a slice of pepper jack for a spicy kick!
    • Seal your dough tightly to prevent cheese leakage during baking.
    • Serve immediately for the best gooey experience; they’re even better warm!

    Equipment Needed

    • Oven: Essential for baking your Mozzarella Biscuit Bombs to perfection.
    • Baking sheet: A standard sheet will do; a parchment-lined one can help with easy cleanup.
    • Mixing bowl: Needed for combining the garlic butter mixture.
    • Pastry brush: For spreading the garlic butter glaze; a spoon works too!
    • Rolling pin: Optional for flattening the dough.

    Variations

    • Cheesy Herb Delight: Add dried oregano or basil to the garlic butter for an extra herb kick that complements the cheese beautifully.
    • Spicy Twist: Incorporate diced jalapeños or crushed red pepper flakes into the cheese for a spicy surprise.
    • Meat Lover’s Bombs: For a heartier option, include pieces of pepperoni or diced ham along with the mozzarella.
    • Gluten-Free Option: Substitute the biscuit dough with gluten-free alternatives available at most grocery stores.
    • Vegan Version: Use vegan biscuit dough and replace the mozzarella with a plant-based cheese substitute for a dairy-free treat.

    Serving Suggestions

    • Fresh Salad: Pair with a crisp green salad dressed in a light vinaigrette for a refreshing contrast.
    • Garlic Dipping Sauce: Serve with marinara or a zesty garlic aioli for extra flavor.
    • Wine Pairing: A glass of white wine, like Pinot Grigio, complements these cheesy bites beautifully.
    • Presentation: Arrange the biscuits on a wooden cutting board for a rustic feel.

    FAQs about Mozzarella Biscuit Bombs

    As I embarked on my journey of making Mozzarella Biscuit Bombs, I realized there are a few questions that often pop up. Here are answers to those burning inquiries!

    Can I use a different type of cheese? Absolutely! While mozzarella offers that delightful gooeyness, feel free to experiment with other cheeses like provolone or cheddar. Just keep in mind that some cheeses might melt differently.

    How do I store leftovers? If you have any leftovers, simply place them in an airtight container and refrigerate. They’re best enjoyed fresh, but you can reheat them in the oven for a few minutes to get that melty texture back.

    Can I make these ahead of time? Yes, you can assemble the Mozzarella Biscuit Bombs ahead of time! Just cover them and keep them in the fridge. Bake them right before serving for that fresh-from-the-oven experience.

    What can I serve with these cheesy delights? Mozzarella Biscuit Bombs pair wonderfully with a side salad, marinara sauce for dipping, or even on a charcuterie board. They’re super versatile!

    Are these biscuits gluten-free? While traditional biscuit dough contains gluten, you can easily find gluten-free biscuit mixes to make these biscuit bombs suitable for your dietary needs!

    Final Thoughts

    Making Mozzarella Biscuit Bombs is more than just preparing a snack; it’s about creating joyful moments in the kitchen. There’s something magical about gathering everyone around the table to share warm, cheesy biscuits fresh from the oven. The ooey-gooey goodness paired with savory garlic butter brings smiles all around. Whether you’re surprising your family on a busy weeknight or impressing friends at a casual get-together, these delightful bites are sure to be a hit. So, roll up your sleeves and take a culinary adventure that promises warmth, laughter, and the delicious taste of home!


    Print

    clock clock iconcutlery cutlery iconflag flag iconfolder folder iconinstagram instagram iconpinterest pinterest iconfacebook facebook iconprint print iconsquares squares iconheart heart iconheart solid heart solid icon

    Description

    Mozzarella Biscuit Bombs are delicious, cheesy bites made with flaky biscuit dough and gooey mozzarella cheese, all topped with a savory garlic butter glaze.


    • 4 mozzarella string cheese sticks, sliced into 8 pieces each
    • 1 pack (8 biscuits) Pillsbury Grands buttermilk dough
    • 2 tablespoons chopped fresh parsley
    • Pinch of fine sea salt for seasoning
    • 4 tablespoons melted, unsalted butter
    • 1 tablespoon garlic, minced finely

    1. Preheat your oven to 400°F so it’s ready to go when you are.
    2. Open the biscuit package, then carefully split each piece into two. Flatten them using your hands or a rolling pin until they’re about a quarter-inch thick, keeping the shape nice and round.
    3. In a small bowl, stir together the melted butter, parsley, minced garlic, and a pinch of salt. This will act as both flavor and a glaze.
    4. Place two bits of mozzarella in the middle of each flattened dough circle. Wrap the dough around the cheese completely, pinch the edges to seal, and set them seam-side down on a baking sheet.
    5. Generously coat each cheese-filled dough ball with the butter mixture using your pastry brush, then bake on the sheet for 8–10 minutes, or until they turn golden.
    6. Right after taking them out of the oven, brush any leftover garlic butter over the hot biscuits for extra yumminess. Serve warm so the cheese stays gooey.

    Notes

    • For extra flavor, consider adding spices to the garlic butter.
    • These biscuits are best enjoyed fresh out of the oven.
    • Experiment with different types of cheese for variation.
    • Prep Time: 10 minutes
    • Cook Time: 10 minutes
    • Category: Appetizer
    • Method: Baking
    • Cuisine: Italian

    Nutrition

    • Serving Size: 1 biscuit
    • Calories: 180
    • Sugar: 1g
    • Sodium: 300mg
    • Fat: 12g
    • Saturated Fat: 7g
    • Unsaturated Fat: 3g
    • Trans Fat: 0g
    • Carbohydrates: 14g
    • Fiber: 0g
    • Protein: 4g
    • Cholesterol: 30mg

    Sharing is caring!

  • Avocado Toast with Lemon & Egg

    Avocado Toast with Lemon & Egg


    Introduction to Avocado Toast with Lemon & Egg

    When life gets hectic, I find comfort in quick and delicious meals, like Avocado Toast with Lemon & Egg. This vibrant dish has become my go-to solution for busy mornings or light lunches. The creamy avocado combined with the zesty lemon and soft poached eggs creates a lovely harmony of flavors. Plus, it’s not only easy to prepare, but it also impresses family and friends! Whether you need a nutritious breakfast before a long day or a simple brunch treat, this delightful recipe always brings joy—and satisfaction—to the table!

    Why You’ll Love This Avocado Toast with Lemon & Egg

    This Avocado Toast with Lemon & Egg is a lifesaver for busy days. It’s quick to make, taking just 16 minutes from start to finish. The fresh flavors burst with every bite, making it delicious and satisfying. Plus, the combination of healthy fats and protein will keep you full while giving you the energy to tackle your day. You’ll fall in love!

    Ingredients for Avocado Toast with Lemon & Egg

    To create the mouthwatering Avocado Toast with Lemon & Egg, gather the following ingredients:

    • Whole grain or sourdough bread: These hearty options provide a nutritious base. Toast them to perfection for a delightful crunch.
    • Ripe avocado: Look for one that yields slightly when you press it. This creamy gem is rich in healthy fats and makes every bite satisfying.
    • Lemon zest: The zest adds a fragrant brightness. It enhances flavor and brings a refreshing touch to the dish.
    • Fresh lemon juice: Adding zesty lemon juice balances the creaminess of the avocado. It adds a tangy punch that’ll wake up your taste buds.
    • Salt and freshly ground black pepper: Simple seasonings make a world of difference. A dash of salt and some pepper elevate the dish!
    • Olive oil (optional): Drizzling in some olive oil makes the avocado even creamier and more luxurious.
    • Eggs: Poaching the eggs adds a silky smooth element. They also contribute protein, making this toast a complete meal.
    • Chili flakes (optional): For those who enjoy a little kick, sprinkle some chili flakes on top to spice things up.
    • Fresh herbs (parsley, chives, or cilantro): These herbs add a pop of color and flavor. Choose your favorite to enhance the dish even further.

    For exact measurements, check the bottom of the article where you can print the recipe for your convenience!

    How to Make Avocado Toast with Lemon & Egg

    Making Avocado Toast with Lemon & Egg is a delightful experience! Here’s a step-by-step guide to help you create this delicious dish with ease. Let’s turn those fresh ingredients into a masterpiece!

    Step 1: Poaching the Eggs

    First, bring a small pot of water to a gentle simmer.

    Add a splash of vinegar to help the egg whites set nicely. Crack each egg into a small cup to make the transfer easier.

    Swirl the simmering water gently. Carefully slide one egg into the center. Poach it for about 3 minutes, or until the white is set but the yolk remains soft. Repeat this for the second egg.

    Tips for Perfect Poached Eggs

    Keep the water at a gentle simmer; boiling water can cause the eggs to break apart.

    Using fresh eggs will yield better results. They hold shape better when poached!

    Timing is crucial; stick around to check your eggs to ensure they’re perfectly poached.

    Step 2: Preparing the Avocado Mixture

    While your eggs are poaching, grab a bowl and mash the ripe avocado. Add lemon zest and fresh lemon juice to it.

    Season with salt and freshly ground black pepper for an extra flavor boost.

    If you like, drizzle in some olive oil for added creaminess and richness.

    Enhancing Flavor

    The zesty lemon juice is a game changer! It balances the creaminess of the avocado while also adding a bright note.

    Feel free to throw in some extra herbs or spices if you’re feeling adventurous!

    Step 3: Assembling the Toast

    Now it’s time to bring everything together! Spread the creamy avocado mixture generously over your toasted bread slices.

    Top each toast with a poached egg, letting it sit like a crown on a royal dish!

    Finally, sprinkle with chili flakes and freshly chopped herbs for a pop of flavor and color.

    Creative Serving Tips

    Serve immediately for the best texture. Pair it with a side salad or fresh fruit to complete your meal. You can also plate it creatively to impress family and friends!

    Tips for Success

    • Always choose ripe avocados for the creamiest texture.
    • Pre-toast your bread while preparing the avocado for a seamless experience.
    • Use fresh eggs for better poaching results.
    • Don’t skip the vinegar; it helps the eggs hold their shape.
    • Get creative with toppings; try adding feta or tomatoes for extra flavor.

    Equipment Needed

    • Small pot: A saucepan works perfectly to poach the eggs.
    • Slotted spoon: Use this to gently lift the poached eggs out of the water.
    • Bowl: A mixing bowl for mashing your avocado.
    • Toaster: For getting that perfect toast on your bread.
    • Cutting board and knife: Essential for slicing and prepping ingredients.

    Variations of Avocado Toast with Lemon & Egg

    • Spicy Avocado Toast: Add diced jalapeños or a drizzle of hot sauce for an extra kick.
    • Caprese Twist: Top your toast with sliced fresh mozzarella and tomatoes for a Caprese-style delight.
    • Smoked Salmon: For a luxurious touch, layer thin slices of smoked salmon on top of the poached egg.
    • Veggie Boost: Add sliced radishes, cucumber, or arugula for a refreshing crunch.
    • Cheesy Delight: Sprinkle crumbled feta or goat cheese on top for a rich, tangy flavor.
    • Herbed Avocado: Mix in different herbs like dill or basil to change the flavor profile.
    • Mexican Flair: Incorporate black beans and corn for a hearty, Southwest twist.

    Serving Suggestions for Avocado Toast with Lemon & Egg

    • Fresh Fruit: Serve with a side of seasonal fruit for a refreshing touch.
    • Green Salad: Pair it with a light mixed green salad for added crunch.
    • Herbal Tea: Enjoy with a cup of herbal tea or a refreshing iced beverage.
    • Beautiful Plate: Arrange your toast on a colorful plate to make it visually appealing.

    FAQs about Avocado Toast with Lemon & Egg

    Can I make Avocado Toast with Lemon & Egg ahead of time?

    It’s best to serve this toast fresh for optimal taste and texture. However, you can prep the avocado mixture a few hours in advance. Just remember to sprinkle a little extra lemon juice on top to prevent browning.

    What kind of bread works best for this recipe?

    Whole grain or sourdough bread are fantastic choices! Both provide a hearty base with great flavor and texture. Feel free to use your favorite bread that toasts well.

    Can I use scrambled eggs instead of poached?

    Absolutely! If poaching feels intimidating, you can easily scramble the eggs instead. Just remember to season them well for the best flavor.

    Is Avocado Toast with Lemon & Egg a healthy breakfast option?

    Yes, this dish is packed with healthy fats from the avocado and protein from the eggs. It’s a satisfying way to kickstart your day!

    Can I customize the herbs used in this recipe?

    Definitely! Fresh herbs like dill, basil, or even mint can add exciting flavors. Experiment with different combinations to discover your perfect match!

    Final Thoughts

    Creating Avocado Toast with Lemon & Egg is not just about the food; it’s an experience that nurtures both the body and soul. The vibrant colors and delightful flavors bring a smile to my face every time I make it. This recipe allows me to reconnect with my love for cooking while providing a nourishing meal in mere minutes. Whether enjoyed alone or shared with loved ones, each bite reminds us that simple ingredients can create magic in the kitchen. Give this recipe a try, and let the joyful flavors transform your busy mornings into something special!


    Print

    clock clock iconcutlery cutlery iconflag flag iconfolder folder iconinstagram instagram iconpinterest pinterest iconfacebook facebook iconprint print iconsquares squares iconheart heart iconheart solid heart solid icon

    Description

    Avocado Toast with Lemon & Egg is a must-try delight that combines creamy avocado, zesty lemon, and perfectly poached eggs on toasted bread.


    • 2 slices whole grain or sourdough bread, toasted
    • 1 ripe avocado
    • 1 tsp lemon zest
    • 1 tbsp fresh lemon juice
    • Salt and freshly ground black pepper, to taste
    • 1 tbsp olive oil, optional
    • 2 eggs
    • Pinch of chili flakes, optional
    • Fresh herbs (parsley, chives, or cilantro), chopped

    1. Bring a small pot of water to a gentle simmer. Add a splash of vinegar (optional) to help the egg whites set. Crack each egg into a small cup. Swirl the simmering water, gently slide one egg into the center, and poach for 3 minutes or until the white is set but the yolk remains soft. Repeat for the second egg.
    2. In a bowl, mash the avocado with lemon zest, lemon juice, salt, and pepper. Add olive oil if desired for extra creaminess.
    3. Spread the avocado mixture generously over the toasted bread slices. Top each toast with a poached egg, then sprinkle with chili flakes and fresh herbs. Serve immediately.

    Notes

    • For a creamier texture, incorporate more olive oil into the avocado mixture.
    • Adjust seasoning according to personal preference.
    • Serve immediately for the best texture and flavor.
    • Prep Time: 10 minutes
    • Cook Time: 6 minutes
    • Category: Breakfast
    • Method: Poaching
    • Cuisine: American

    Nutrition

    • Serving Size: 1 toast with egg
    • Calories: 350
    • Sugar: 1g
    • Sodium: 320mg
    • Fat: 22g
    • Saturated Fat: 3g
    • Unsaturated Fat: 19g
    • Trans Fat: 0g
    • Carbohydrates: 30g
    • Fiber: 6g
    • Protein: 12g
    • Cholesterol: 210mg

    Sharing is caring!