Blog

  • Asian Glazed Turkey Meatballs

    Asian Glazed Turkey Meatballs


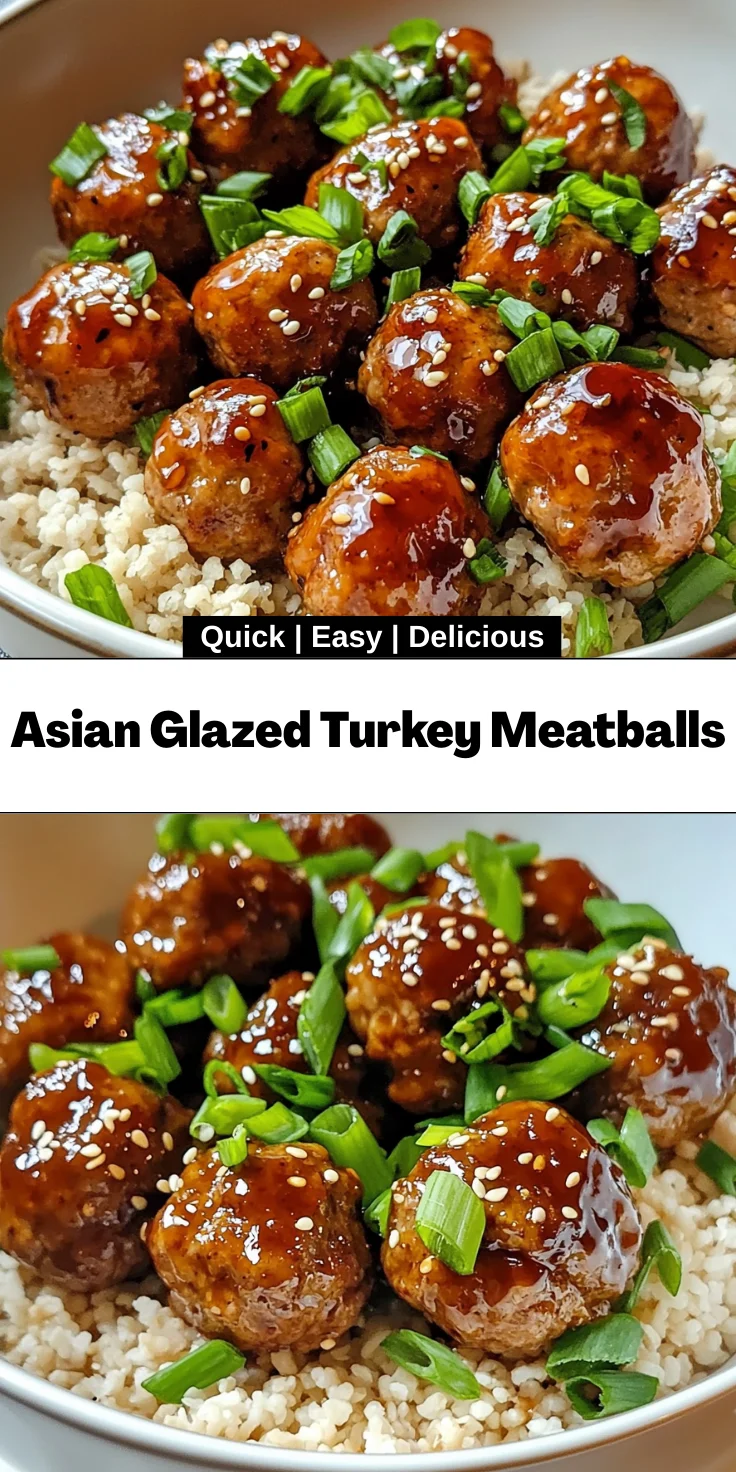
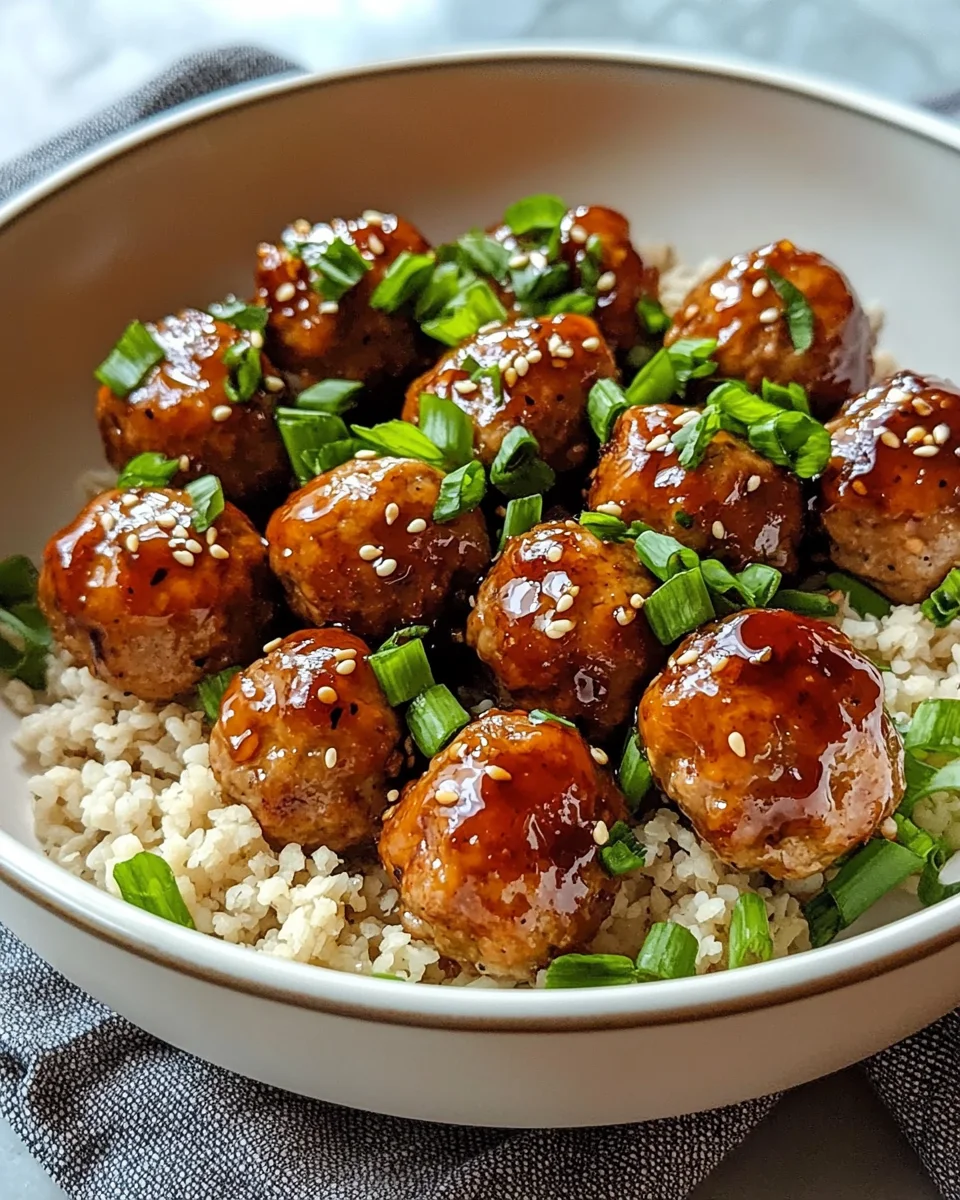
    Introduction to Asian Glazed Turkey Meatballs

    As a busy mom, I know the challenge of finding time to whip up a delicious dinner while juggling a hundred other tasks. That’s why I adore these Asian glazed turkey meatballs! They’re not just quick to prepare; they burst with flavor and are sure to impress your family or guests. Picture this: succulent meatballs drizzled in a sweet and savory glaze, perched on fluffy rice. It’s the kind of meal that not only fills the belly but also warms the heart. So, let’s dive into this tasty delight that makes dinner a breeze!

    Why You’ll Love This Asian Glazed Turkey Meatballs

    These Asian glazed turkey meatballs are a lifesaver for any busy kitchen! They come together in just 30 minutes, making them perfect for weeknight dinners. Plus, the flavor is incredible. Each bite is a harmonious blend of savory and sweet that pleases even the pickiest of eaters. You’ll find they’re not just easy to make, but also a delightful treat that leaves your family asking for seconds!

    Ingredients for Asian Glazed Turkey Meatballs

    Gathering the right ingredients is key to making these scrumptious Asian glazed turkey meatballs. Here’s what you’ll need:

    • Ground turkey: This lean meat keeps the meatballs juicy and flavorful. You can swap it for ground chicken, pork, or beef if you prefer.
    • Whole wheat panko breadcrumbs: These provide a delightful crunch while adding a nutty flavor. They’re healthier than regular breadcrumbs, which is always a bonus.
    • Egg: A binding agent that holds the meatballs together. Plus, it adds richness to the mixture.
    • Low-sodium soy sauce: This brings a fantastic savory depth without overwhelming saltiness. It’s perfect for that authentic Asian flavor.
    • Fresh grated ginger: Just a touch of this adds warmth and spice to the meatballs. You can use ground ginger in a pinch!
    • Garlic: Minced, of course! It infuses each meatball with a punch of flavor we all love.
    • Green onions: These add a lovely fresh crunch and a hint of oniony bite. They’re as vibrant as they are flavor-packed!
    • Optional extras: For an added crunch, sprinkle extra green onions and sesame seeds for garnish.
    • For the glaze: You’ll use more low-sodium soy sauce, beef broth or water for a lighter option, and honey for that sweet touch. Sesame oil adds richness, and additional garlic and ginger ensure every bit sings with flavor.
    • Crushed red chili flakes: Add these if you crave a bit of heat! Just adjust according to your taste.
    • Cornstarch: This is optional but recommended if you prefer a thicker sauce. It transforms a simple glaze into something luxurious.

    Don’t worry, all the exact quantities for these ingredients are at the bottom of the article for your convenience. Happy cooking!

    How to Make Asian Glazed Turkey Meatballs

    Step 1: Preheat and Prepare

    Let’s get cooking by preheating your oven to 400°F. While that’s warming up, line a baking sheet with parchment paper. This not only prevents sticking but also simplifies cleanup, which we all appreciate, right? You could also lightly grease it with cooking spray. The goal here is to ensure those delicious Asian glazed turkey meatballs slide off effortlessly after baking!

    Step 2: Mix the Meatball Ingredients

    In a large bowl, combine the ground turkey, whole wheat panko breadcrumbs, egg, soy sauce, ginger, garlic, and green onions. I like to use my hands for this. It’s the easiest way to get everything well-mixed. As you blend them together, think of it as creating a flavorful masterpiece! Ensure there are no dry pockets; this mixture should be cohesive and ready to become tasty meatballs.

    Step 3: Form the Meatballs

    Now comes the fun part—forming the meatballs! Using a cookie scoop or your hands, shape the mixture into 1-inch balls. Aim for even sizes; this helps them cook uniformly. Place them on the prepared baking sheet, making sure to leave some space between each one. Each time you roll a perfect meatball, imagine the deliciousness that’s about to ensue at dinner!

    Step 4: Bake the Meatballs

    Slide your baking sheet into the preheated oven and bake those beauties for about 13 to 15 minutes. You’ll know they’re done when they’re lightly browned and cooked through. An internal temperature of 165°F is what you’re looking for. Keep an eye on them towards the end for that perfect golden finish! The aroma wafting through your kitchen will be hard to resist!

    Step 5: Make the Glaze

    While the meatballs are baking, it’s time to whip up that mouthwatering glaze. In a small saucepan, combine the soy sauce, honey, beef broth (or water), sesame oil, garlic, ginger, and black pepper. Heat this over medium heat until it starts to boil—don’t walk away! Once boiling, reduce the heat and let it simmer for about 5 minutes. This concentrated mixture will transform into a glaze your meatballs will love!

    Step 6: Coat the Meatballs

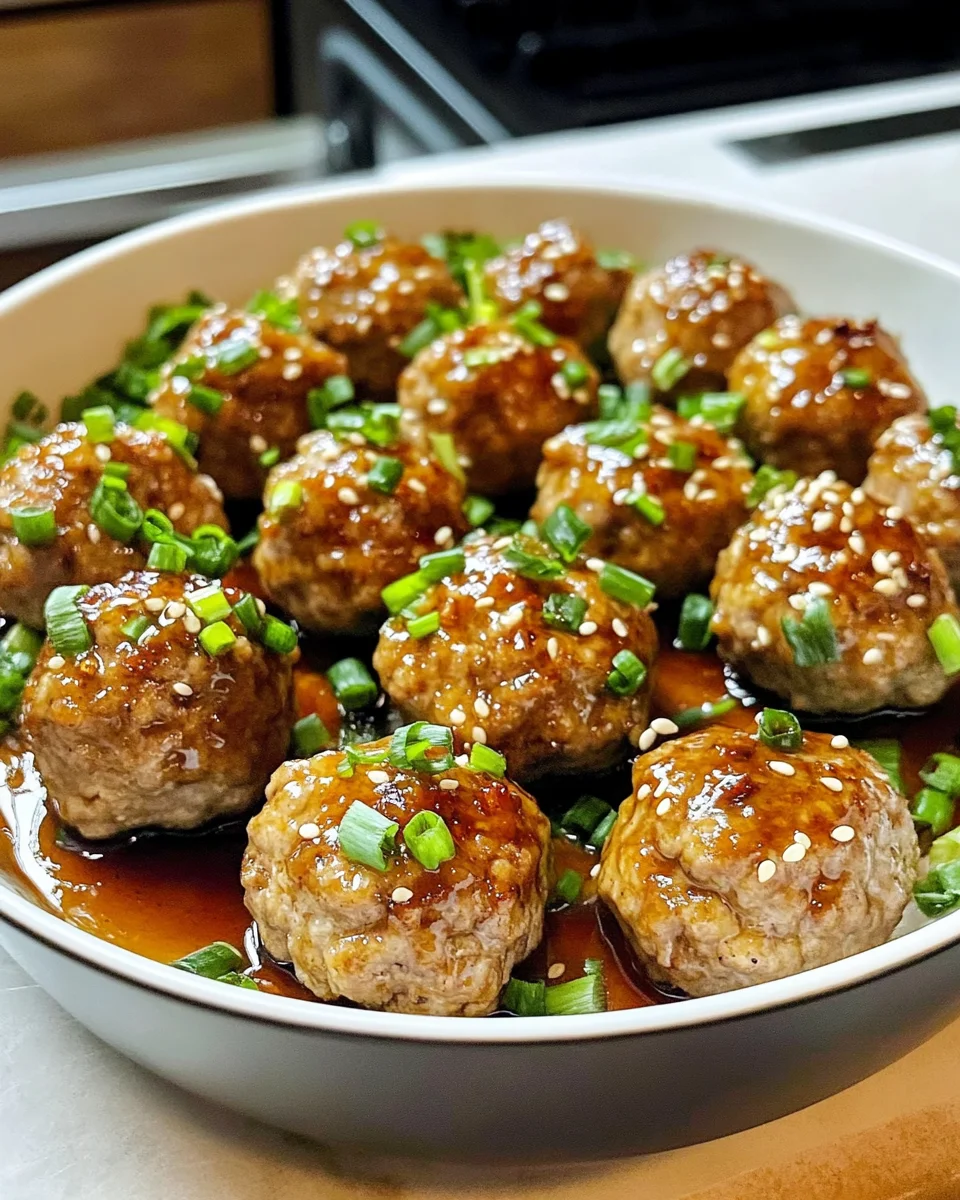
    Once the meatballs are baked to perfection, transfer them to a large bowl or leave them on the baking sheet. Pour the shimmering glaze over the meatballs, ensuring they’re generously coated. Gently toss them together; you want every meatball to be enveloped in that sticky goodness. Oh, the joy of that sweet and savory combination—each bite will explode with flavor!

    Step 7: Serve and Enjoy

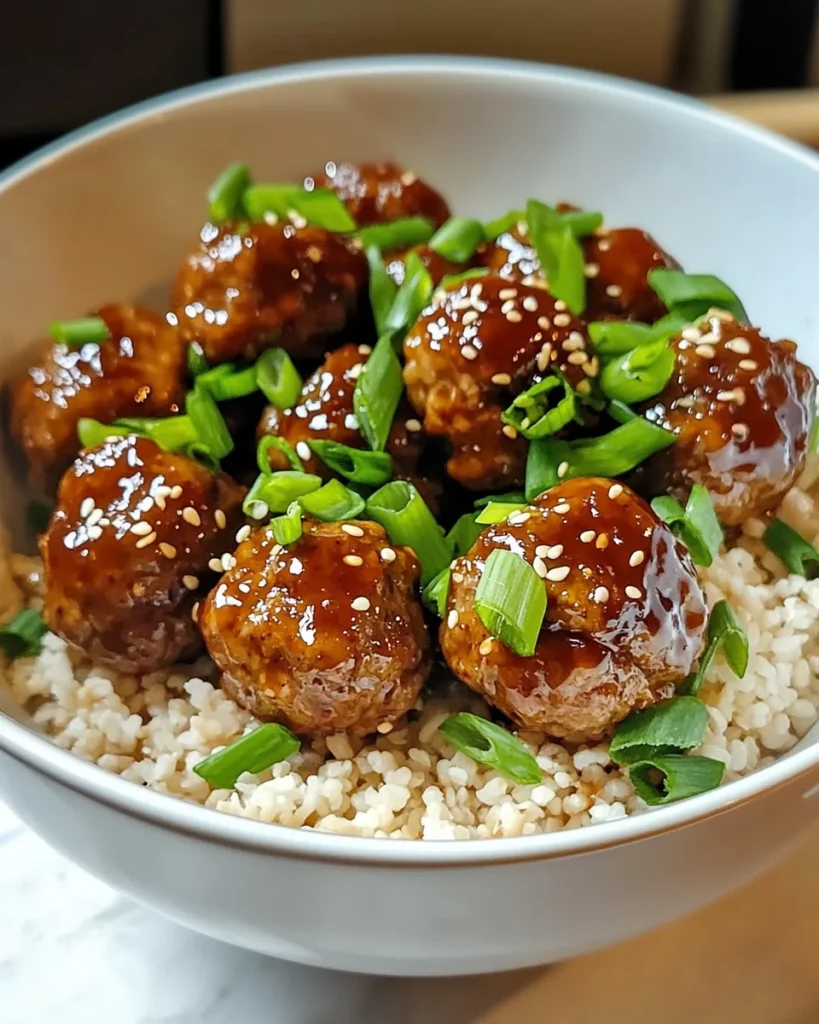
    Now it’s time to serve up these delightful creations! Spoon the coated meatballs over a bed of fluffy brown rice or your favorite grain. Drizzle any leftover sauce on top for an extra burst of flavor. For the final touch, sprinkle on some sliced green onions and sesame seeds. This colorful presentation not only makes the dish pop but also adds freshness. Gather your loved ones and dig in!

    Tips for Success

    • Keep your hands slightly wet when forming meatballs to prevent sticking.
    • For extra flavor, marinate the meat mixture for 30 minutes before baking.
    • If you have leftovers, store them in an airtight container for up to 3 days.
    • Feel free to double the recipe; they freeze beautifully!
    • Experiment with different meats or add chopped veggies for variety.

    Equipment Needed

    • Baking sheet: A standard one will do, but a rimmed baking sheet catches any drips.
    • Parchment paper: Great for easy cleanup. Foil or a silicone baking mat works too!
    • Large bowl: Any mixing bowl will suffice, just ensure it’s big enough for your ingredients.
    • Cookie scoop or your hands: For shaping even meatballs. A spoon can work in a pinch!
    • Small saucepan: Perfect for making that delicious glaze—just make sure it doesn’t overflow!

    Variations on Asian Glazed Turkey Meatballs

    • Meat Substitute: Try using ground chicken for a lighter option, or ground pork for a richer flavor.
    • Veggie Power: Incorporate finely chopped vegetables like bell peppers, carrots, or spinach into the meat mixture for added nutrition and color.
    • Spicy Kick: For those who love heat, add minced jalapeños or a dash of Sriracha to the meatball mixture or glaze.
    • Gluten-Free Option: Substitute regular breadcrumbs with gluten-free panko breadcrumbs and ensure the soy sauce is gluten-free as well.
    • Herb Infusion: Experiment with fresh herbs like cilantro, parsley, or basil for a unique twist on flavor.
    • Sweet Variations: Swap honey with maple syrup or agave nectar for a different level of sweetness in the glaze.

    Serving Suggestions for Asian Glazed Turkey Meatballs

    • Serve over fluffy brown rice for a satisfying meal.
    • Pair with steamed broccoli or snap peas for a colorful, crunchy side.
    • A sprinkle of sesame seeds and chopped cilantro adds visual appeal.
    • Try a light cucumber salad dressed with rice vinegar for a refreshing contrast.
    • Pair with a chilled glass of sparkling water or green tea.

    FAQs about Asian Glazed Turkey Meatballs

    Can I use ground turkey substitutes for this recipe?

    Absolutely! While ground turkey is the star here, feel free to swap it with ground chicken, pork, or even beef. Each option will bring its own unique flavor to the table.

    How do I store leftovers of Asian glazed turkey meatballs?

    Store leftover meatballs in an airtight container in the fridge. They’ll stay fresh for up to three days. You can also freeze them for up to three months. Just reheat gently when you’re ready to enjoy them again!

    Can I make the glaze ahead of time?

    Yes, you can make the glaze in advance! Just store it in the fridge in an airtight container. When you’re ready to use it, give it a quick warm-up on the stove or in the microwave.

    What can I do with leftover glaze?

    The leftover glaze is perfect for drizzling over stir-fried vegetables, grilled chicken, or even as a dipping sauce for egg rolls. It’s too good to waste!

    Can I adjust the spice level in this recipe?

    Definitely! If you prefer a milder flavor, leave out the crushed red chili flakes. On the other hand, if you enjoy some heat, feel free to add extra for a delightful kick. Adjust to your taste!

    Final Thoughts

    Creating these Asian glazed turkey meatballs feels like a hug from the inside out. With their delightful blend of savory and sweet, they bring the family together, making every meal a celebration. This recipe not only saves time but adds joy to dinner prep—transforming a hectic evening into a delightful culinary adventure. Each bite is a reminder that cooking can be simple yet gratifying. So, whether it’s a busy weeknight or a special gathering, these meatballs will surely make your heart—and your dinner table—full. Enjoy the smiles and satisfaction they bring!


    Print

    clock clock iconcutlery cutlery iconflag flag iconfolder folder iconinstagram instagram iconpinterest pinterest iconfacebook facebook iconprint print iconsquares squares iconheart heart iconheart solid heart solid icon

    Description

    As a busy mom, I know the challenge of finding time to whip up a delicious dinner while juggling a hundred other tasks. That’s why I adore these Asian glazed turkey meatballs! They’re not just quick to prepare; they burst with flavor and are sure to impress your family or guests. Picture this: succulent meatballs drizzled in a sweet and savory glaze, perched on fluffy rice. It’s the kind of meal that not only fills the belly but also warms the heart. So, let’s dive into this tasty delight that makes dinner a breeze!


    • 1 lb ground turkey (you could also use ground chicken, pork or beef)
    • 1/3 cup whole wheat panko breadcrumbs
    • 1 egg
    • 1 Tbsp low-sodium soy sauce
    • 1 tsp fresh grated ginger, or 1/4 tsp ground ginger
    • 1 clove garlic, minced
    • 2 green onions, sliced
    • Extra green onions and sesame seeds for garnish
    • 1/2 cup low-sodium soy sauce (for sauce)
    • 1/3 cup beef broth, or water (for sauce)
    • 1/4 cup honey (for sauce)
    • 1 tsp sesame oil (for sauce)
    • 4 cloves garlic, minced (for sauce)
    • 2 tsp fresh grated ginger, or 1/2 tsp ground ginger (for sauce)
    • 1/4 tsp black pepper (for sauce)
    • 1/4 to 1/2 tsp crushed red chili flakes (optional)
    • 1/2 Tbsp cornstarch (optional)
    • 1/2 Tbsp water (optional)

    1. Preheat oven to 400°F and line a baking sheet with parchment paper or lightly grease it.
    2. In a large bowl, mix together ground turkey, breadcrumbs, egg, soy sauce, ginger, garlic and green onions until well combined. Using a cookie scoop, form the mixture into 1-inch sized balls (about 25-26 meatballs) and place them on the prepared baking sheet.
    3. Bake in the preheated oven for 13 to 15 minutes, until the meatballs are lightly browned and cooked through.
    4. While the meatballs are baking, combine soy sauce, honey, beef broth, sesame oil, garlic, ginger, and pepper in a small saucepan. Bring the mixture to a boil over medium heat, then reduce heat and let simmer for about 5 minutes to thicken slightly.
    5. For a thicker sauce, mix 1/2 tablespoon cornstarch with 1/2 tablespoon water in a small bowl to make a slurry. Pour this into the simmering sauce and stir until thickened. Add crushed red chili flakes if using, then turn off the heat.
    6. Transfer the baked meatballs to a large bowl (or keep them on the baking sheet) and pour the sticky sauce over them. Gently toss until all meatballs are evenly coated with the glaze.
    7. Spoon meatballs over fluffy brown rice, drizzling with extra sauce. Garnish with sliced green onions and sesame seeds before serving.

    Notes

    • Ground chicken, pork, or beef can be used in place of ground turkey.
    • Adjust the amount of crushed red chili flakes based on your spice preference.
    • Prep Time: 15 minutes
    • Cook Time: 15 minutes
    • Category: Main Dish
    • Method: Baking
    • Cuisine: Asian

    Nutrition

    • Serving Size: 1 meatball
    • Calories: 100
    • Sugar: 3g
    • Sodium: 250mg
    • Fat: 4g
    • Saturated Fat: 1g
    • Unsaturated Fat: 2g
    • Trans Fat: 0g
    • Carbohydrates: 8g
    • Fiber: 1g
    • Protein: 8g
    • Cholesterol: 50mg

    Sharing is caring!

  • Grape Juice Ice Cream

    Grape Juice Ice Cream


    Introduction to Grape Juice Ice Cream

    As a busy mom, I often find myself longing for a sweet escape amidst the hustle and bustle of daily life. That’s where this delightful Grape Juice Ice Cream comes in! It’s such a refreshing treat, made with just a few simple ingredients, and it cools you down on those hot, sticky afternoons. Imagine sitting on your porch, enjoying a scoop of homemade ice cream, while your kids laugh and play nearby. This recipe is a perfect blend of nostalgia and ease, bringing joy to busy days without drowning in the kitchen. Let’s dive into this delicious adventure!

    Why You’ll Love This Grape Juice Ice Cream

    This Grape Juice Ice Cream is everything a busy mom could want: quick to whip up and utterly delicious! You can have a delightful dessert ready in no time, making it the perfect answer to hot summer days or surprise company. With its vibrant, fruity flavor and creamy texture, it’s a crowd-pleaser for both kids and adults. Plus, knowing it’s made with 100% pure grape juice makes every scoop even sweeter!

    Ingredients for Grape Juice Ice Cream

    Gathering the right ingredients is the first step in creating this refreshing Grape Juice Ice Cream. Here’s what you’ll need:

    • Grape Juice: 100% pure, no added sugar is ideal. It gives the ice cream its delightful fruity base.
    • Heavy Cream: Adds a rich, velvety texture that screams indulgence. Plus, who can resist that creaminess?
    • Whole Milk: Balances the heaviness of the cream and helps create that perfectly scoopable texture.
    • Granulated Sugar: Essential for sweetness, but don’t worry—you can adjust this to your taste!
    • Vanilla Extract: While optional, a teaspoon can elevate the flavor, adding warmth and depth.
    • Lemon Juice: Also optional, but just a tablespoon will brighten the grape flavor, making it pop.

    Feel free to choose organic or locally sourced ingredients when possible. They can really enhance the flavor and quality of your ice cream. Exact quantities are beautifully outlined at the bottom of the article, making it easy for you to print and take into the kitchen for your next sweet adventure!

    How to Make Grape Juice Ice Cream

    Let’s get those creative juices flowing and make this delightful Grape Juice Ice Cream! Follow these simple steps, and you’ll have a creamy treat that’s perfect for cooling down on hot days. We’ve got this!

    Step 1: Mix the Juices

    In a large mixing bowl, start whisking together the grape juice and granulated sugar. Make sure the sugar dissolves completely; this might take a minute, but it’s worth it. If you’re using lemon juice, add that in too! It’ll brighten up the flavor and make the grape notes dance. Plus, who doesn’t love a little zing in their dessert?

    Step 2: Combine Cream and Milk

    Next, take that rich heavy cream and whole milk, and gently pour them into the bowl. You can use a whisk or a spatula—whichever you have handy works just fine! If you’re adding that optional vanilla extract, toss it in now for an enchanting aroma. It’ll make your kitchen smell like a sweet haven!

    Step 3: Churn the Mixture

    Now, it’s time for the fun part! Pour your creamy concoction into an ice cream maker. Churn it according to the manufacturer’s instructions; usually, this takes about 20–25 minutes. You’ll know it’s ready when it reaches a soft-serve consistency. It’s like magic watching it transform from liquid to a whimsical treat!

    Step 4: Freeze for Firmness

    After churning, transfer the mixture into an airtight container. Cover it up and let it freeze for about 4–6 hours until solid. This step is crucial to achieving that scoopable firmness we all love. In the meantime, why not sip on a cool drink while waiting? Good things come to those who wait!

    Step 5: Final Touches

    Just before serving, take the ice cream out of the freezer for about five minutes. This little trick softens it up slightly and makes scooping a breeze. Now you can enjoy your homemade Grape Juice Ice Cream! Scoop into bowls or cones and watch everyone’s eyes light up—it’s pure joy in every bite!

    Tips for Success

    • Always use fresh, high-quality grape juice for the best flavor.
    • If you don’t have an ice cream maker, stir every 30 minutes during the freezing process for silky-smooth results.
    • Consider adding a pinch of salt for depth in flavor—it makes a world of difference!
    • Experiment with flavored extracts like almond or lemon to create a twist on the classic.
    • For extra creaminess, let the heavy cream sit at room temperature for a bit before using.

    Equipment Needed

    • Ice Cream Maker: Ideal for perfect consistency. If you don’t have one, a freezer-safe container works too!
    • Mixing Bowls: Use any large bowl that can handle some whisking and mixing.
    • Whisk or Spatula: To combine ingredients smoothly—both are kitchen essentials!
    • Airtight Container: For storing your ice cream; a zip-top bag can work in a pinch!

    Variations

    • Mixed Fruit Medley: Blend 100% pure grape juice with other juices like apple or pear for a fruity fusion.
    • Dairy-Free Option: Substitute heavy cream and whole milk with coconut cream and almond milk for a vegan treat!
    • Chocolate Twist: Swirl in a few tablespoons of chocolate syrup or cocoa powder for a surprising flavor boost.
    • Herb-Infused: Infuse your grape juice with fresh herbs like mint or basil before mixing for an aromatic twist!
    • Nutty Delight: Add crushed nuts, like walnuts or almonds, in the final stages for a crunchy texture contrast.

    Serving Suggestions

    • Serve your Grape Juice Ice Cream in colorful bowls or fun waffle cones to add a pop of joy!
    • Pair it with fresh berries for a vibrant, fruity side that balances the sweetness.
    • Drizzle some chocolate or caramel sauce on top for an extra indulgent touch.
    • Garnish with mint leaves for a refreshing finish that looks beautiful.
    • Enjoy alongside a chilled glass of sparkling water or lemonade to refresh the palate.

    FAQs about Grape Juice Ice Cream

    Can I use other fruit juices instead of grape juice?
    Absolutely! This recipe is versatile. You can swap grape juice for any 100% pure fruit juice you love, like apple or cherry. Each fruit brings its own delightful taste, so don’t hesitate to experiment!

    How can I make Grape Juice Ice Cream without an ice cream maker?
    If you don’t have an ice cream maker, follow the no-churn method. Pour the mixture into a shallow container and freeze. Stir with a fork every 30 minutes for 3-4 hours to break up ice crystals and achieve that creamy texture.

    How should I store leftover ice cream?
    Keep any uneaten Grape Juice Ice Cream in an airtight container to prevent freezer burn. It should last for about 2 weeks, but trust me, it’ll probably disappear much sooner!

    Can I make this recipe sugar-free?
    Yes! You can substitute granulated sugar with a sugar substitute, like stevia or erythritol, creating a sugar-free treat. Just adjust the amount according to the product’s instructions to maintain the sweet taste.

    Is Grape Juice Ice Cream suitable for kids?
    Absolutely! This ice cream is made with wholesome ingredients, making it a fun and refreshing treat for kids and adults alike. Plus, kids can even help in the kitchen—what a bonus!

    Final Thoughts

    Creating Grape Juice Ice Cream is not just about making a dessert; it’s about crafting sweet memories with those you love. Each scoop is a reminder of lazy summer afternoons and shared laughter, mingling with the fruity aroma that dances through your kitchen.

    It’s a simple, delightful way to cool off, savoring the wholesome ingredients as a family. Whether you’re indulging solo or sharing with friends, this refreshing treat is bound to bring smiles all around. So, grab your grape juice and let’s make some delicious memories together—one spoonful at a time!


    Print

    clock clock iconcutlery cutlery iconflag flag iconfolder folder iconinstagram instagram iconpinterest pinterest iconfacebook facebook iconprint print iconsquares squares iconheart heart iconheart solid heart solid icon

    Description

    As a busy mom, I often find myself longing for a sweet escape amidst the hustle and bustle of daily life. That’s where this delightful Grape Juice Ice Cream comes in! It’s such a refreshing treat, made with just a few simple ingredients, and it cools you down on those hot, sticky afternoons. Imagine sitting on your porch, enjoying a scoop of homemade ice cream, while your kids laugh and play nearby. This recipe is a perfect blend of nostalgia and ease, bringing joy to busy days without drowning in the kitchen. Let’s dive into this delicious adventure!


    • 2 cups grape juice 100% pure, no added sugar
    • 1 cup heavy cream
    • 1 cup whole milk
    • ¾ cup granulated sugar
    • 1 teaspoon vanilla extract (optional, for added depth of flavor)
    • 1 tablespoon lemon juice (optional, enhances grape flavor)

    1. In a large mixing bowl, whisk together grape juice, sugar, and lemon juice (if using) until the sugar dissolves completely.
    2. Add the heavy cream, whole milk, and vanilla extract, then whisk until well combined.
    3. Pour the mixture into an ice cream maker and churn according to the manufacturer’s instructions (about 20–25 minutes) until it reaches a soft-serve consistency.
    4. Transfer the churned ice cream to an airtight container, cover, and freeze for 4–6 hours until firm.
    5. Pour the mixture into a shallow freezer-safe container if not using an ice cream maker.
    6. Freeze for 45 minutes, then stir with a fork or whisk to break up any ice crystals.
    7. Repeat the stirring process every 30 minutes for 3–4 hours, until the mixture becomes smooth and creamy.
    8. Remove the ice cream from the freezer 5 minutes before serving to soften slightly.
    9. Scoop into bowls or cones, and enjoy this refreshing grape juice ice cream!

    Notes

    • For a richer flavor, you may add a pinch of salt.
    • Experiment with different fruits by modifying the juice used.
    • Prep Time: 15 minutes
    • Cook Time: 0 minutes
    • Category: Dessert
    • Method: Churned or No-Churn
    • Cuisine: American

    Nutrition

    • Serving Size: 1/2 cup
    • Calories: 250
    • Sugar: 21g
    • Sodium: 60mg
    • Fat: 14g
    • Saturated Fat: 8g
    • Unsaturated Fat: 4g
    • Trans Fat: 0g
    • Carbohydrates: 27g
    • Fiber: 0g
    • Protein: 3g
    • Cholesterol: 45mg

    Sharing is caring!

  • Ground Turkey Stuffed Sweet Potatoes

    Ground Turkey Stuffed Sweet Potatoes


    Introduction to Ground Turkey Stuffed Sweet Potatoes

    There are days when life feels like a whirlwind, leaving little time to whip up something tasty and satisfying. Enter Ground Turkey Stuffed Sweet Potatoes! This dish is a delightful fusion of sweet and savory, and it’s perfect for busy moms and professionals alike. It not only brings comfort food to the table, but it also offers a healthy twist that everyone can enjoy. Imagine serving a colorful plate that your loved ones can’t resist—all in just over an hour! It’s a quick solution for hectic weeknights or a meal to impress at gatherings.

    Why You’ll Love This Ground Turkey Stuffed Sweet Potatoes

    This dish is a culinary dream come true for those of us racing against the clock! Ground Turkey Stuffed Sweet Potatoes come together in no time, yet each bite bursts with flavor. They’re a nutritious option packed with protein and fiber that won’t leave you feeling sluggish. Plus, the sweet and savory filling keeps even picky eaters coming back for more. It’s the kind of meal that brings everyone to the table with smiles!

    Ingredients for Ground Turkey Stuffed Sweet Potatoes

    Gathering ingredients is half the fun! For this delightful dish, you’ll need a harmony of flavors that come together beautifully. Here’s what you’ll be using:

    • Sweet Potatoes: The star of the show! These sweet gems bring natural sweetness and a vibrant color to your meal.
    • Olive Oil: A healthy fat for sautéing our flavorful filling. It adds richness without overwhelming the dish.
    • Onion: Finely diced, onions provide a savory depth, making everything taste cozy and warm.
    • Garlic: Minced garlic infuses a lovely aroma and enhances the savory notes of the turkey.
    • Ground Turkey: Lean and versatile, ground turkey is packed with protein. You can swap it with ground chicken or beef if you prefer.
    • Smoked Paprika: This spice adds a lovely smoky flavor, transporting your taste buds to a distant kitchen.
    • Chili Powder: A sprinkling of heat; it perfectly complements the sweetness of the potatoes.
    • Cumin: Earthy and warm, it brings an exotic touch to your dish.
    • Sea Salt and Black Pepper: Essential seasonings to enhance all the other flavors in your filling.
    • Black Beans: A nutritious addition that adds protein and texture. Rinsing them helps remove excess sodium.
    • Canned Corn: Sweet and crunchy, it gives a lovely pop of flavor and color.
    • Diced Tomatoes: These juicy morsels add moisture and brightness to the turkey mixture.
    • Cilantro: Freshly chopped for a burst of color and flavor. Feel free to skip it if you’re not a fan!
    • Shredded Cheese: A melty topping that binds everything together. Cheddar or a Mexican blend works wonderfully.
    • Plain Greek Yogurt or Sour Cream: Optional, yet highly recommended for a creamy finish on top.

    For exact quantities, you can find the details at the bottom of the article, ready for printing. Happy cooking!

    How to Make Ground Turkey Stuffed Sweet Potatoes

    Step 1: Bake the Sweet Potatoes

    Start with the sweet potatoes, our flavorful base! Preheat your oven to 400°F (200°C) to get it nice and hot. Give your sweet potatoes a good wash and then pierce them a few times with a fork. This little trick helps steam escape while they bake. Lay them directly on the oven rack and let them bake for 45 to 50 minutes. When they’re soft, they’ll be fork-tender and ready to scoop!

    Step 2: Prepare the Turkey Filling

    While the sweet potatoes are roasting away, let’s whip up the savory filling. In a skillet, heat a tablespoon of olive oil over medium heat. Toss in your finely diced onion and let it sizzle for about 3 to 4 minutes until it turns translucent. Next, add minced garlic and cook for just 30 seconds, allowing that delightful aroma to fill the air. Now, stir in 1 pound of lean ground turkey. Cook it until it’s nice and browned, breaking up any clumps. Trust me, this filling is where the magic starts!

    Step 3: Season and Combine Ingredients

    Now, it’s time to bring all those glorious flavors together. Season the browned turkey with smoked paprika, chili powder, ground cumin, sea salt, and black pepper. Stir to coat the meat evenly with all those zesty spices. Then, stir in a half cup each of black beans, canned corn, and diced tomatoes. Let everything simmer for about 5 to 7 minutes. This allows the flavors to meld beautifully, creating a filling that’s bursting with taste!

    Step 4: Assemble the Stuffed Sweet Potatoes

    Once your sweet potatoes are baked to perfection, it’s time to assemble! Carefully slice each sweet potato down the center. Gently mash the flesh a bit with a fork to create space for our filling. Spoon the turkey mixture generously into each potato, making sure to pack it in. There’s no such thing as too much filling here!

    Step 5: Bake Again

    To finish off this delightful dish, sprinkle shredded cheese on top of each stuffed sweet potato. Pop them back into the oven for an additional 5 minutes. This way, the cheese gets melty and bubbly—just how we love it! Your Ground Turkey Stuffed Sweet Potatoes are now ready to steal the show!

    Tips for Success

    • Choose sweet potatoes of uniform size for even cooking.
    • Don’t skip the piercings! They help sweet potatoes cook evenly and prevent bursting.
    • Feel free to customize the filling—add bell peppers or your favorite veggies!
    • If you’re short on time, microwave sweet potatoes for 8-10 minutes instead of baking.
    • Top with fresh avocado for added creaminess and flavor!

    Equipment Needed

    • Baking Sheet: Use this for the sweet potatoes. A simple oven-safe dish works too.
    • Skillet: A non-stick skillet makes cooking the filling a breeze. Any frying pan will do.
    • Fork: Essential for piercing sweet potatoes and mashing their insides.
    • Knife: A sharp knife is perfect for slicing the sweet potatoes.
    • Measuring Cups: Useful for measuring out your ingredients.

    Variations of Ground Turkey Stuffed Sweet Potatoes

    • Spicy Kick: Add chopped jalapeños or a few dashes of hot sauce to the turkey mixture for heat that warms the soul.
    • Vegetarian Delight: Substitute the ground turkey with cooked quinoa or lentils for a hearty, plant-based meal.
    • Cheesy Twist: Mix in cream cheese or crumbled feta cheese with the turkey filling for a richer taste experience.
    • Southwestern Style: Incorporate black olives, diced green chiles, and a dash of lime juice for a fresh, zesty flavor.
    • Herbal Infusion: Experiment with fresh herbs, such as oregano or parsley, for a garden-fresh taste!

    Serving Suggestions

    • Pair your Ground Turkey Stuffed Sweet Potatoes with a crisp green salad dressed with lemon vinaigrette.
    • Serve with a refreshing iced tea or sparkling water to uplift the meal.
    • For a colorful presentation, arrange the stuffed potatoes on a vibrant platter garnished with extra cilantro.
    • A sprinkle of crushed tortilla chips on top adds a delightful crunch!

    FAQs about Ground Turkey Stuffed Sweet Potatoes

    Can I prep the filling in advance?

    Absolutely! You can cook the ground turkey filling a day ahead. Just store it in the fridge, then assemble and bake your stuffed sweet potatoes when you’re ready. This makes weeknight dinners a breeze!

    What can I use instead of ground turkey?

    If ground turkey isn’t your thing, feel free to swap it out for ground chicken, beef, or even plant-based options like quinoa or lentils. Each variation brings its own delightful flavor profile!

    How do I know when sweet potatoes are done?

    The best indicator is to gently pierce them with a fork. If it slides in easily, you’re good to go! They should be soft and tender all the way through when cooked to perfection.

    Can I freeze the stuffed sweet potatoes?

    Yes! These stuffed sweet potatoes freeze well. Just make sure they are fully cooled before wrapping them tightly in plastic wrap and placing them in an airtight container. Reheat them in the oven when you’re ready to enjoy!

    What sides pair well with this dish?

    For a balanced meal, consider serving a simple side salad or some steamed broccoli. A fresh fruit salad can also complement the sweet and savory flavors wonderfully!

    Final Thoughts

    Cooking is more than just preparing a meal; it’s a chance to connect with our loved ones and create lasting memories. Ground Turkey Stuffed Sweet Potatoes bring joy to the table, combining health, flavor, and ease. Each bite is a celebration of creativity and comfort, showcasing how simple ingredients can make a satisfying dish. Whether you’re rushing through a busy weeknight or gathering for a family feast, this recipe is your go-to hero! Trust me, the smiles and compliments you receive will make all the effort worth it. So grab your ingredients and let the deliciousness unfold!


    Print

    clock clock iconcutlery cutlery iconflag flag iconfolder folder iconinstagram instagram iconpinterest pinterest iconfacebook facebook iconprint print iconsquares squares iconheart heart iconheart solid heart solid icon

    Description

    There are days when life feels like a whirlwind, leaving little time to whip up something tasty and satisfying. Enter Ground Turkey Stuffed Sweet Potatoes! This dish is a delightful fusion of sweet and savory, and it’s perfect for busy moms and professionals alike. It not only brings comfort food to the table, but it also offers a healthy twist that everyone can enjoy. Imagine serving a colorful plate that your loved ones can’t resist—all in just over an hour! It’s a quick solution for hectic weeknights or a meal to impress at gatherings.


    • 4 medium sweet potatoes
    • 1 tablespoon olive oil
    • 1 small onion, finely diced
    • 2 garlic cloves, minced
    • 1 pound lean ground turkey
    • 1 teaspoon smoked paprika
    • 1 teaspoon chili powder
    • 1 teaspoon ground cumin
    • ½ teaspoon sea salt
    • ¼ teaspoon black pepper
    • ½ cup black beans (drained and rinsed)
    • ½ cup canned corn (drained)
    • ½ cup diced tomatoes
    • ¼ cup chopped fresh cilantro
    • ½ cup shredded cheese (cheddar or Mexican blend)
    • Plain Greek yogurt or sour cream, for topping (optional)

    1. Preheat oven to 400°F (200°C). Wash and pierce sweet potatoes with a fork. Bake directly on the oven rack for 45–50 minutes, until fork-tender.
    2. While the sweet potatoes are baking, heat olive oil in a skillet over medium heat. Add diced onions and cook for 3–4 minutes, until translucent.
    3. Add garlic and cook for another 30 seconds. Stir in ground turkey and cook until browned.
    4. Season the turkey with smoked paprika, chili powder, cumin, salt, and pepper. Stir to coat evenly.
    5. Add black beans, corn, and diced tomatoes. Simmer for 5–7 minutes, allowing flavors to meld.
    6. When sweet potatoes are ready, remove them from the oven. Slice each down the center and gently mash the flesh with a fork to make space for the filling.
    7. Spoon the turkey mixture into each sweet potato. Top with shredded cheese and return to the oven for 5 minutes until melted.
    8. Garnish with fresh cilantro and a dollop of Greek yogurt or sour cream if desired.

    Notes

    • Feel free to substitute ground turkey with ground chicken or beef if preferred.
    • You can add other vegetables to the turkey mixture, such as bell peppers or zucchini.
    • For a spicier version, add some chopped jalapeños or hot sauce to the filling.
    • Prep Time: 15 minutes
    • Cook Time: 50 minutes
    • Category: Main Dish
    • Method: Baking and Sautéing
    • Cuisine: American

    Nutrition

    • Serving Size: 1 stuffed sweet potato
    • Calories: 350
    • Sugar: 6g
    • Sodium: 480mg
    • Fat: 10g
    • Saturated Fat: 3g
    • Unsaturated Fat: 7g
    • Trans Fat: 0g
    • Carbohydrates: 45g
    • Fiber: 8g
    • Protein: 25g
    • Cholesterol: 70mg

    Sharing is caring!

  • Bacon Chicken Croissant

    Bacon Chicken Croissant


    Introduction to Bacon Chicken Croissant

    I’m a home cook at heart, so I love quick solutions that still feel special. The Bacon Chicken Croissant is my go-to recipe when life gets hectic. It marries crispy savoriness from the bacon with juicy chicken in its interior, all snuggled into a buttery croissant. Perfect for busy days or a ‘fancy’ lunch when you’re wooing a special someone- that’s how this ‘gourmet’ bit enters your daily chore. Hence, if you’re at work or at home looking forward to an exciting lunch, here’s an easy way to get exactly what you’re craving!

    Why You’ll Love This Bacon Chicken Croissant

    This Bacon Chicken Croissant recipe is delightfully simple to prepare, making it perfect for busy lives. The combination of flavors is a mouthwatering treat, with crispy bacon and tender chicken harmonizing beautifully. Plus, it takes under 40 minutes to whip up! Whether you’re crafting a quick lunch or impressing guests, this dish effortlessly balances speed and taste. Trust me, everyone will be asking for seconds!

    Ingredients for Bacon Chicken Croissant

    Creating a Bacon Chicken Croissant starts with high-quality ingredients. Here’s what you’ll need to make this delightful dish shine:

    • Croissants: Pot for large, preferably day-old croissants. They hold up better and enhance the texture. If you can’t find croissants, consider using flaky pastries or even sandwich bread.
    • Chicken Breasts: Choose boneless, skinless chicken breasts for ease in cooking. Grilled, poached, or even rotisserie chicken are great alternatives for a quicker option.
    • Bacon: Thick-cut bacon is best for this recipe. The crispy factor really elevates the experience. If you prefer a healthier option, turkey bacon works, though it might not be as savory.
    • Lettuce: Fresh lettuce leaves, like Romaine or Butter lettuce, add a nice crunch. You could substitute them with spinach for a more nutrient-rich bite.
    • Mixed Herbs: Fresh parsley, chives, and thyme bring a burst of freshness. If you don’t have fresh herbs on hand, dried herbs can work, but adjust the quantity since they’re more potent.
    • Butter: Softened butter is perfect for brushing on toasted croissants. For a dairy-free option, use olive oil or a dairy-free spread.
    • Garlic Powder: This adds depth to the chicken flavor. Fresh minced garlic is another option, but be careful not to overpower the dish.
    • Black Pepper: Freshly cracked black pepper gives just the right amount of spice. Adjust based on your family’s preference.

    The exact quantities for each ingredient are provided at the bottom of the article for your convenience. Enjoy the process—and remember, the magic happens in your kitchen!

    How to Make Bacon Chicken Croissant

    Now that you have all your ingredients ready, let’s dive into making the delicious Bacon Chicken Croissant! Follow these steps, and you’ll have a mouthwatering sandwich that’s perfect for lunch or any time you crave something special.

    Step 1: Prepare the Chicken

    Start by seasoning your boneless chicken breasts. Sprinkle one teaspoon of garlic powder, salt, and black pepper on both sides. Don’t rush here; let your chicken rest for about 10 minutes. This allows the flavors to soak in, making each bite more satisfying.

    Step 2: Cook the Bacon

    Next up, it’s time for the bacon! Grab a large skillet and heat it over medium heat. Lay down the strips of thick-cut bacon, letting them sizzle away. Cook for around 6-8 minutes until the bacon becomes crispy and golden brown. Once done, transfer the bacon to a plate lined with paper towels to drain any excess grease.

    Step 3: Grill the Chicken

    Using the same skillet, we’ll take advantage of that lovely bacon fat. Increase the heat to medium-high, and add your seasoned chicken breasts. Grill each side for about 6-7 minutes until the internal temperature hits 165°F. If you have a meat thermometer, it’s a handy tool here. Let the chicken rest for about 5 minutes before slicing. This helps to lock in moisture and keeps it tender.

    Step 4: Toast the Croissants

    Now let’s give a little love to those croissants! Slice them horizontally, being careful not to cut all the way through. Lightly toast them in the oven or a toaster. A perfect touch is to spread some softened butter on the insides. This richness adds flavor, making your sandwich feel even more indulgent.

    Step 5: Assemble Your Sandwich

    Finally, it’s time for the pièce de resistance—assembling your sandwich! Take the bottom half of each toasted croissant and layer it with fresh lettuce, followed by your sliced chicken and those crispy bacon strips. Finish with a sprinkle of fresh herbs. Top off with the other half of the croissant, and voilà! Your Bacon Chicken Croissant is ready to devour!

    Tips for Success

    • Always let your chicken rest after seasoning to enhance flavor.
    • Keep an eye on the bacon while cooking to prevent burning; crispy is key!
    • Use a meat thermometer to ensure chicken is cooked perfectly without drying out.
    • Brush the croissants with butter just before toasting for extra richness.
    • Feel free to play with herbs and spices for a personalized touch.

    Equipment Needed

    • Skillet: A large skillet is essential. If you don’t have one, a grill pan works too.
    • Meat Thermometer: Handy for checking the chicken’s doneness. A cut knife works if you don’t have one.
    • Chef’s Knife: Perfect for slicing chicken and croissants easily.
    • Toaster or Oven: Needed to toast the croissants. Either will do the job!

    Variations

    • Turkey Bacon: Swap in turkey bacon for a leaner option that still gives you that crispy goodness.
    • Add Cheese: Layer on some cheddar or Swiss cheese before the top croissant half for a gooey, cheesy delight.
    • Vegetarian Delight: Substitute the chicken with grilled vegetables like zucchini, bell peppers, or even avocado for a fresh twist.
    • Spicy Kick: Add sliced jalapeños or a drizzle of hot sauce to give your croissant a fiery flavor.
    • Fresh Fruit: Serve with a side of sliced strawberries or a fruit salad to balance the savory elements.
    • Herb Variations: Experiment with different herbs such as cilantro or basil for a unique flavor profile.

    Serving Suggestions for Bacon Chicken Croissant

    • Side Salad: Pair with a light mixed greens salad drizzled with balsamic vinaigrette for a refreshing contrast.
    • Chips: Serve with a side of crispy potato chips or homemade sweet potato fries for a satisfying crunch.
    • Drink: Complement your meal with a chilled iced tea or sparkling lemonade for a delightful refreshment.
    • Presentation: Arrange on a colorful plate and garnish with extra herbs for an appealing touch that impresses.

    FAQs about Bacon Chicken Croissant

    Can I prepare the Bacon Chicken Croissant in advance?

    While I recommend enjoying it fresh, you can cook the chicken and bacon ahead of time. Store them separately in the fridge. Assemble your croissant right before serving for that fresh taste!

    What can I use instead of croissants?

    If croissants aren’t available, don’t fret! You can use flaky pastries or even a good quality sandwich bread. Just make sure they’re sturdy enough to hold all the goodies.

    How should I store leftovers?

    To keep your Bacon Chicken Croissant fresh, store each component in airtight containers. The chicken and bacon should last 3-4 days in the fridge. Reheat gently before assembling.

    Can I make this recipe gluten-free?

    Absolutely! Just swap the croissants with gluten-free versions available at most grocery stores. The rest of the ingredients are naturally gluten-free!

    What should I do if I don’t have fresh herbs on hand?

    If fresh herbs aren’t available, feel free to use dried herbs. Just remember, they’re more potent, so use about one-third of the amount. Your flavor will still be delicious!

    Final Thoughts

    The joy of making a Bacon Chicken Croissant goes beyond delicious flavors; it’s about creating memories around the table. With each crispy bite, you’re not just savoring the ingredients, but also the moments spent with family and friends. I love how this recipe is a delightful escape from the ordinary lunch routine, bringing a touch of gourmet experience right into your kitchen. Whether it’s a busy weekday or a special gathering, this dish always hits the spot. So, gather your loved ones and enjoy the magic that happens when good food meets heartwarming connections!


    Print

    clock clock iconcutlery cutlery iconflag flag iconfolder folder iconinstagram instagram iconpinterest pinterest iconfacebook facebook iconprint print iconsquares squares iconheart heart iconheart solid heart solid icon

    Description

    A delicious twist on lunch featuring juicy chicken and crispy bacon sandwiched in a buttery croissant.


    • 2 large croissants, preferably day-old
    • 2 chicken breasts, boneless and skinless
    • 6 strips thick-cut bacon
    • 4 leaves fresh lettuce, washed and dried
    • 2 tablespoons fresh mixed herbs (parsley, chives, thyme)
    • 2 tablespoons butter, softened
    • 1 teaspoon garlic powder
    • Fresh black pepper to taste

    1. Season chicken breasts with garlic powder, salt, and black pepper. Let them rest at room temperature for 10 minutes to absorb the seasonings.
    2. In a large skillet over medium heat, cook bacon strips until crispy, about 6-8 minutes. Remove and drain on paper towels, reserving 1 tablespoon of bacon fat.
    3. Heat a grill pan or skillet with the reserved bacon fat over medium-high heat. Cook chicken breasts for 6-7 minutes per side until internal temperature reaches 165°F. Let rest for 5 minutes, then slice.
    4. Slice croissants horizontally and lightly toast them. Brush the inside with softened butter for extra richness and flavor.
    5. Layer the bottom half of each croissant with lettuce, sliced chicken, crispy bacon, and fresh herbs. Top with the other croissant half and serve immediately.

    Notes

    • For added flavor, consider marinating the chicken overnight.
    • Feel free to substitute the herbs based on your preference.
    • This sandwich is best served fresh but can be stored in the refrigerator for up to a day.
    • Prep Time: 15 minutes
    • Cook Time: 15 minutes
    • Category: Lunch
    • Method: Grilling/Skillet
    • Cuisine: American

    Nutrition

    • Serving Size: 1 sandwich
    • Calories: 700
    • Sugar: 2g
    • Sodium: 1200mg
    • Fat: 42g
    • Saturated Fat: 15g
    • Unsaturated Fat: 25g
    • Trans Fat: 0g
    • Carbohydrates: 45g
    • Fiber: 2g
    • Protein: 34g
    • Cholesterol: 120mg

    Sharing is caring!

  • Lemon Meringue Pie Cannolis

    Lemon Meringue Pie Cannolis


    Introduction to Lemon Meringue Pie Cannolis

    Welcome to a scrumptious twist on a classic that I can’t help but rave about—Lemon Meringue Pie Cannolis! Trust me, these little delights will make your taste buds dance. Picture this: a crispy cannoli shell filled with creamy lemon-ricotta goodness, all topped with a fluffy meringue. This dessert is not only a delightful treat but also perfect for busy moms and professionals like us who crave something special without a five-hour kitchen commitment. Whether you’re celebrating a special occasion or just need to impress your family on a Wednesday evening, these cannolis are your new go-to dessert!

    Why You’ll Love This Lemon Meringue Pie Cannolis

    Let me tell you why this recipe will quickly become a favorite in your home. First, it’s unbelievably easy to whip up, making it perfect for those hectic weekdays. Second, the taste is a refreshing explosion of citrusy delight. With creamy lemon-ricotta filling and crisp shells, it’s a combination that delights everyone. Plus, the impressive presentation is sure to wow guests, making you the star of your next gathering!

    Ingredients for Lemon Meringue Pie Cannolis

    Gathering the right ingredients is the first exciting step in making these Lemon Meringue Pie Cannolis. Here’s what you’ll need:

    • Cannoli shells: You can find prepared cannoli shells at your local grocery store, or if you’re feeling adventurous, you can make them at home. The crispy texture is essential for balancing the creamy filling.
    • Ricotta cheese: Ensure you choose well-drained ricotta to maintain a perfect texture. This creamy cheese provides a rich base for the filling.
    • Lemon curd: This is the star ingredient, infusing a bright and tangy flavor. You can buy it or easily whip up your own at home with fresh lemons.
    • Powdered sugar: A little sweetness goes a long way. It helps to balance the tartness of the lemon curd and adds a velvety touch to the filling.
    • Egg whites: Fresh egg whites give the meringue its delightful fluffiness. Make sure they’re at room temperature for the best results.
    • Granulated sugar: This sweetener is crucial for stabilizing the meringue, creating those beautiful glossy peaks that you’ll love!

    For those wanting extra zest, consider adding some lemon zest into the filling for an intensified flavor burst. And remember, if you’re pressed for time, using store-bought lemon curd can save you some precious minutes.

    Exact quantities of these ingredients can be found at the bottom of the article and are available for printing. Happy cooking!

    How to Make Lemon Meringue Pie Cannolis

    Making Lemon Meringue Pie Cannolis is easier than you might think! Follow these simple steps, and you’ll be serving this impressive dessert in no time.

    Step 1: Prepare the Ricotta Filling

    Start by combining the ricotta cheese and powdered sugar in a mixing bowl. Use a sturdy spatula or a mixer to blend them together until the mixture is completely smooth. The goal here is to banish any lumps. This smooth, creamy filling is key to delightful cannolis!

    Step 2: Fold in the Lemon Curd

    Next, gently fold in the luscious lemon curd. This requires a delicate touch, so use a spatula to mix it in without deflating the ricotta. You want a beautiful, creamy blend of flavors that makes your mouth water!

    Step 3: Whip the Egg Whites

    Now it’s time to whip the egg whites! In a clean bowl, start beating them until soft peaks form. Gradually add granulated sugar while continuing to whip. Keep going until you see those gorgeous stiff, glossy peaks appear. This meringue will be the crowning glory of your cannolis!

    Step 4: Fill the Cannoli Shells

    Grab your prepared cannoli shells and fill them with the lemon-ricotta mixture. You can use a piping bag or a simple spoon to get that filling in there. Don’t be shy—pack them well for maximum flavor in every bite!

    Step 5: Add the Meringue Topping

    Now comes the fun part! Dollop or pipe the fluffy meringue on top of each filled shell. You want a nice, generous amount to create that delightful cloud effect. The more meringue, the merrier!

    Step 6: Torch the Meringue

    If you’re feeling adventurous, use a kitchen torch to carefully toast the meringue. Just a quick pass is all it takes for that beautiful golden-brown hue. But be cautious! A little can go a long way. If you want to add even more flair, sprinkle some lemon zest or powdered sugar on top before serving. Enjoy your stunning Lemon Meringue Pie Cannolis!

    Tips for Success

    • Make sure your ricotta is well-drained; excess moisture can ruin your filling.
    • Use room temperature egg whites for the best volume when whipping meringue.
    • Don’t rush the meringue process; sugar should be added slowly for stability.
    • Fill the cannoli shells just before serving to keep them crispy.
    • Experiment with flavors—add zest or even a splash of vanilla for a twist!

    Equipment Needed

    • Mixing bowls: A standard set works great, or use any large bowls you have on hand.
    • Hand mixer or whisk: A hand mixer saves time, but a good old whisk will do the trick.
    • Piping bag: If you don’t have one, a zip-top bag with the corner snipped off works perfectly.
    • Kitchen torch: This is optional; a broiler can also achieve that toasty finish.
    • Spoon or spatula: Essential for mixing and filling your cannoli shells smoothly.

    Variations

    • Chocolate Dipped Cannoli: Dip the ends of the filled cannoli in melted chocolate for an extra layer of flavor.
    • Berry Bliss: Fold in fresh berries like blueberries or raspberries into the lemon-ricotta mixture for a fruity twist.

    • Gluten-Free Option: Use gluten-free cannoli shells to make this dessert suitable for gluten-sensitive friends.
    • Dairy-Free Alternative: Substitute ricotta with a dairy-free cream cheese for a lactose-free version.
    • Herbal Infusion: Add a hint of fresh basil or mint to the filling for a refreshing herbal note.

    Serving Suggestions

    • Fresh Berries: Serve your cannolis with a side of mixed berries for a burst of color and flavor.
    • Refreshing Beverages: Pair with iced tea or lemon-infused sparkling water to enhance the citrus experience.
    • Presentation: Arrange the cannolis on a beautiful platter, garnish with mint leaves, and dust with powdered sugar for an elegant touch.

    FAQs about Lemon Meringue Pie Cannolis

    Can I make Lemon Meringue Pie Cannolis ahead of time?

    While the filling can be prepared a day in advance, I recommend filling the cannoli shells just before serving. This keeps the shells crispy. If you fill them too early, they may become soggy.

    What can I substitute for ricotta cheese?

    If you want a different flavor, you can use mascarpone cheese. It’s creamy and rich! For a dairy-free alternative, try using a dairy-free cream cheese for a lovely texture.

    How do I store leftover cannolis?

    If you have any leftovers, store the cannoli shells and filling separately in airtight containers. Filled cannolis are best eaten fresh, so try to assemble them just before serving.

    Can I use store-bought lemon curd?

    Absolutely! Using store-bought lemon curd is a fantastic timesaver. Just check the ingredients to ensure it’s as fresh and tasty as homemade!

    Is there a way to make the filling lower in sugar?

    You can reduce the amount of powdered sugar in the filling. However, keep in mind that sweetness balances the tartness of the lemon curd. Use your taste buds to find the right amount for you!

    Final Thoughts

    Creating Lemon Meringue Pie Cannolis is not just about dessert; it’s about making enduring memories in the kitchen. The process of folding, whipping, and filling brings a sense of joy and accomplishment that’s hard to match. With the sweet, creamy filling and the delicate crunch of the shells, every bite is a little moment of happiness. Whether you’re sharing them with loved ones or treating yourself after a long day, these cannolis are sure to bring smiles. So, let’s embrace those delicious moments—this delightful twist on a classic is waiting just for you!


    Print

    clock clock iconcutlery cutlery iconflag flag iconfolder folder iconinstagram instagram iconpinterest pinterest iconfacebook facebook iconprint print iconsquares squares iconheart heart iconheart solid heart solid icon

    Description

    Lemon Meringue Pie Cannolis are a delightful twist on the classic dessert, combining the creamy tartness of lemon curd with the rich flavor of ricotta cheese, all encased in a crispy cannoli shell and topped with a light meringue.


    • 12 prepared cannoli shells
    • 1 cup ricotta cheese, well drained
    • 1 cup lemon curd
    • 1/2 cup powdered sugar
    • 3 large egg whites
    • 1/2 cup granulated sugar

    1. Combine ricotta cheese and powdered sugar in a bowl, mixing until completely smooth.
    2. Gently fold lemon curd into the ricotta mixture until well blended and creamy.
    3. Whip egg whites in a clean bowl until soft peaks form. Gradually add granulated sugar and continue whipping until stiff, glossy peaks are achieved.
    4. Fill each cannoli shell with the lemon-ricotta mixture, then pipe or dollop meringue on top of each filled shell.
    5. Torch the meringue briefly if desired, being careful not to burn. Optionally, garnish with lemon zest or a light dusting of powdered sugar. Serve immediately.

    Notes

    • Ensure the ricotta cheese is well-drained to prevent a watery filling.
    • Using a kitchen torch for the meringue adds a nice caramelization, but be cautious of burning.
    • For a more intense lemon flavor, add additional lemon zest to the filling.
    • These cannolis are best served immediately for optimal crispness.
    • Prep Time: 30 minutes
    • Cook Time: 10 minutes
    • Category: Dessert
    • Method: Baking
    • Cuisine: Italian

    Nutrition

    • Serving Size: 1 cannoli
    • Calories: 220
    • Sugar: 15g
    • Sodium: 50mg
    • Fat: 7g
    • Saturated Fat: 3g
    • Unsaturated Fat: 3g
    • Trans Fat: 0g
    • Carbohydrates: 35g
    • Fiber: 1g
    • Protein: 5g
    • Cholesterol: 30mg

    Sharing is caring!

  • Chimichurri Chicken Garlic Bowl

    Chimichurri Chicken Garlic Bowl


    Introduction to Chimichurri Chicken Garlic Bowl

    Hey there, fellow food lovers! If you’re anything like me, juggling a busy schedule while wanting to whip up something delicious can feel like a tightrope walk. That’s where my go-to recipe, the Chimichurri Chicken Garlic Bowl, comes into play. It’s a quick solution for those hectic days and still manages to impress your loved ones with vibrant flavors. Picture juicy grilled chicken drizzled with zesty chimichurri and creamy garlic sauce, all served over fresh greens—such a treat! Trust me, this dish is bound to become a family favorite in no time.

    Why You’ll Love This Chimichurri Chicken Garlic Bowl

    This Chimichurri Chicken Garlic Bowl is a lifesaver for busy moms and professionals. It’s not just quick to make, but bursting with flavor that will make you savor every bite. The vibrant chimichurri elevates ordinary grilled chicken into something special, making it perfect for family dinners or even impressing guests. Plus, it’s a healthy option that leaves you feeling fulfilled without the guilt. Who doesn’t love that?

    Ingredients for Chimichurri Chicken Garlic Bowl

    Let’s gather our ingredients for this delectable Chimichurri Chicken Garlic Bowl! Each ingredient plays a crucial role in adding flavor and nutrition, making this dish a winner.

    • Boneless chicken breasts: The star of our dish! They’re lean, versatile, and grill beautifully.
    • Fresh parsley: A must for chimichurri; it adds a bright, herby flavor and vibrant color.
    • Garlic: This humble bulb elevates our dish with a punchy, aromatic touch—perfect for both the chimichurri and the creamy garlic sauce.
    • Red wine vinegar: It adds a tangy kick, balancing the richness of the chicken and sauces.
    • Extra virgin olive oil: Not just for flavor, it’s also a healthy fat that keeps everything juicy.
    • Red pepper flakes: For those who enjoy a bit of heat; adjust this based on your spice tolerance.
    • Mayonnaise: Adds creaminess to the garlic sauce, making it luscious and indulgent.
    • Sour cream or Greek yogurt: A tangy counterpart to mayo; opt for Greek yogurt for a healthier twist!
    • Fresh lemon juice: A squeeze of brightness to cut through the richness of the sauces.
    • Diced fresh tomatoes: These are fresh and juicy to add a burst of flavor to our bowls.
    • Fresh spinach or arugula: Tasty greens that complement the chicken and add nutrients.
    • Salt and freshly ground black pepper: Essential for seasoning and enhancing all the flavors.

    For exact measurements, you can check the end of the article, where all the quantities are provided for your convenience.

    How to Make Chimichurri Chicken Garlic Bowl

    Now that we have our ingredients ready, let’s get cooking! This recipe is so straightforward that even on a busy weeknight, you can pull it off with panache.

    Step 1: Marinate the Chicken

    Start by taking those boneless chicken breasts and plunging them into flavor! In a medium bowl, whisk together olive oil, minced garlic, chopped parsley, red wine vinegar, salt, and pepper.

    Once blended, add the chicken and make sure it’s thoroughly coated with the marinade. Cover and let it marinate for at least 30 minutes. For best results, let it soak up those flavors for a couple of hours or even overnight. This is what makes the chicken burst with flavor!

    Step 2: Prepare the Chimichurri Sauce

    While the chicken is marinating, let’s whip up that zesty chimichurri sauce! Grab your food processor and combine the remaining parsley, garlic, red pepper flakes, red wine vinegar, olive oil, and a pinch of salt.

    Pulse until it’s well mixed but retains a slightly chunky texture. This sauce is not just a topping; it brings life to your entire bowl. Set it aside to let the flavors meld.

    Step 3: Make the Garlic Sauce

    Next is the creamy garlic sauce, which adds that irresistible richness. In a separate bowl, blend together mayonnaise, sour cream (or Greek yogurt), a squeeze of lemon juice, minced garlic, and a dash of salt.

    Mix well until everything is smooth and creamy. Pop this in the fridge until you’re ready to serve. Trust me, a dollop of this sauce will make your taste buds dance!

    Step 4: Grill the Chicken

    Now it’s time to fire up the grill! Preheat it to medium-high heat. Take the marinated chicken out and grill each breast for about 5-7 minutes on each side. You want that beautiful char and the chicken’s internal temperature should reach 165°F (74°C).

    Once done, remove the chicken and let it rest for about 5 minutes. This helps keep it tender! Then, slice it into strips that will easily nestle atop your greens.

    Step 5: Assemble Your Bowl

    Finally, it’s presentation time! Divide the fresh spinach or arugula between your serving bowls. Lay the sliced grilled chicken on top, drizzle generously with chimichurri sauce, and add a sprinkling of diced tomatoes for a fresh touch.

    As a finishing touch, add a hearty dollop of the creamy garlic sauce. Your Chimichurri Chicken Garlic Bowl is ready to be served! Enjoy this flavorful delight with your family or friends.

    Tips for Success

    • For maximum flavor, marinate the chicken overnight if possible.
    • Adjust the garlic and red pepper flakes based on your spice preference.
    • Keep chimichurri sauce chunky for an authentic texture.
    • Use fresh ingredients for the best taste—especially herbs and greens.
    • Serve immediately for the freshest experience, but leftovers still taste great!

    Equipment Needed

    • Grill: A standard outdoor grill works great. Alternatively, you can use a grill pan on the stovetop.
    • Mixing bowls: Use any medium and small bowls to whisk and combine sauces.
    • Food processor: A blender can work in a pinch for the chimichurri sauce.
    • Meat thermometer: Ensures chicken is fully cooked; a knife can also check doneness.

    Variations

    • Herb Swaps: Experiment with other herbs like cilantro or mint for a unique twist on the chimichurri.
    • Spicy Kick: Add jalapeños or a dash of hot sauce to the garlic sauce for those who love heat!
    • Vegetarian Option: Swap chicken for grilled portobello mushrooms for a hearty and satisfying meal.
    • Whole Grain Boost: Serve over quinoa or farro instead of greens for added texture and nutrients.
    • Low-Fat Choices: Use Greek yogurt exclusively in place of mayonnaise for a lighter garlic sauce.

    Serving Suggestions for Chimichurri Chicken Garlic Bowl

    • Side Salads: Pair with a refreshing cucumber and feta salad for extra crunch.
    • Drink Pairing: A chilled glass of Sauvignon Blanc complements the zesty flavors beautifully.
    • Garnish: Add a sprinkle of feta or avocado slices for creaminess.
    • Presentation: Serve in clear bowls to showcase those vibrant colors!

    FAQs about Chimichurri Chicken Garlic Bowl

    Can I make the Chimichurri Chicken Garlic Bowl in advance?

    Absolutely! You can marinate the chicken ahead of time and store it in the fridge. The chimichurri sauce can also be prepared a day prior. Just give everything a quick grill and assemble your bowl when you’re ready to eat!

    How can I make this dish spicier?

    If you’re craving a little heat, simply increase the amount of red pepper flakes in the chimichurri sauce. You can also add fresh jalapeños to the garlic sauce for an extra spicy twist!

    Can I substitute other proteins?

    Definitely! If chicken isn’t your thing, boneless turkey breasts or even shrimp would work great on the grill. Just adjust cooking times based on the protein you choose!

    What’s the best way to store leftovers?

    Store any leftovers in an airtight container in the fridge. The chicken will stay tasty for up to 3 days, and you can reheat it gently on the grill or stove.

    Can I freeze the Chimichurri Chicken Garlic Bowl?

    You can freeze the marinated chicken for up to 3 months. Just be sure to thaw it completely before grilling. However, I recommend making the chimichurri fresh each time for the best flavor!

    Final Thoughts

    Creating the Chimichurri Chicken Garlic Bowl is more than just preparing a meal; it’s about bringing joy to your table. With each vibrant layer of flavor, you’re not just satisfying your hunger; you’re creating memories with loved ones. The ease of this dish allows for more time spent with family and less stress in the kitchen. Plus, who can resist the colorful presentation and delicious aroma? This recipe is a delicious reminder that healthy can be fun, exciting, and, most importantly, a culinary experience to share. So go ahead, savor every bite and enjoy the smiles!


    Print

    clock clock iconcutlery cutlery iconflag flag iconfolder folder iconinstagram instagram iconpinterest pinterest iconfacebook facebook iconprint print iconsquares squares iconheart heart iconheart solid heart solid icon

    Description

    A Flavorful Delight featuring grilled chicken topped with homemade chimichurri and garlic sauce, served over fresh greens and tomatoes.


    • 2 boneless chicken breasts
    • 1 cup fresh parsley, finely chopped
    • 2 cloves garlic, minced
    • ¼ cup red wine vinegar
    • ½ cup extra virgin olive oil
    • ½ teaspoon red pepper flakes
    • 1 cup mayonnaise
    • ½ cup sour cream or Greek yogurt
    • 1 tablespoon fresh lemon juice
    • 1 cup diced fresh tomatoes
    • 2 cups fresh spinach or arugula
    • Salt and freshly ground black pepper to taste

    1. In a medium bowl, whisk together 2 tablespoons olive oil, 2 cloves minced garlic, 2 tablespoons chopped parsley, 2 tablespoons red wine vinegar, ½ teaspoon salt, and ¼ teaspoon black pepper. Add chicken breasts and coat thoroughly. Marinate for at least 30 minutes, preferably 2 hours or overnight in the refrigerator.
    2. Combine remaining fresh parsley, garlic, red pepper flakes, red wine vinegar, olive oil, and ½ teaspoon salt in a food processor. Pulse until ingredients are well combined but still maintaining a slightly chunky texture. Transfer to a small bowl and set aside.
    3. In a separate bowl, blend mayonnaise, sour cream (or Greek yogurt), lemon juice, remaining minced garlic, and a pinch of salt until smooth. Refrigerate until ready to serve.
    4. Preheat grill to medium-high heat (approximately 200°C). Remove chicken from marinade and grill for 5-7 minutes per side until charred and internal temperature reaches 74°C. Allow to rest for 5 minutes before slicing into strips.
    5. Divide fresh greens between serving bowls. Top with sliced grilled chicken. Drizzle generously with chimichurri sauce. Add diced tomatoes and finish with a dollop of garlic sauce. Serve immediately.

    Notes

    • For the best flavor, marinate the chicken for longer if possible.
    • The chimichurri sauce can be made a day ahead and stored in the fridge.
    • Adjust the spiciness of the chimichurri by varying the amount of red pepper flakes.
    • Prep Time: 15 minutes
    • Cook Time: 15 minutes
    • Category: Main Course
    • Method: Grilling
    • Cuisine: Argentinian

    Nutrition

    • Serving Size: 1 bowl
    • Calories: 600
    • Sugar: 5g
    • Sodium: 450mg
    • Fat: 45g
    • Saturated Fat: 7g
    • Unsaturated Fat: 25g
    • Trans Fat: 0g
    • Carbohydrates: 20g
    • Fiber: 3g
    • Protein: 35g
    • Cholesterol: 85mg

    Sharing is caring!

  • Crème Brûlée Cheesecake Bars

    Crème Brûlée Cheesecake Bars


    Introduction to Crème Brûlée Cheesecake Bars

    Hey there, fellow dessert lovers! If you’re anything like me, life just seems to keep getting busier. Between work, family, and everything in between, finding time to indulge in something sweet can feel like a dream. That’s where my Crème Brûlée Cheesecake Bars come in—a heavenly treat that marries the luxurious flavors of crème brûlée with the creaminess of cheesecake. These bars are impressively simple to whip up and guaranteed to win over everyone at your table. Whether it’s a last-minute gathering or a cozy night in, these bars are a sweet solution sure to delight!

    Why You’ll Love This Crème Brûlée Cheesecake Bars

    There’s something magical about these Crème Brûlée Cheesecake Bars that makes them utterly irresistible. First off, they’re a breeze to make—perfect for busy moms like us! The creamy texture and caramelized toffee bits create a heavenly explosion of taste in every bite. Plus, these bars hold the spotlight at any gathering, ensuring you receive countless compliments. They’re not just a dessert; they’re a stress-buster, turning even the busiest day into a sweet triumph!

    Ingredients for Crème Brûlée Cheesecake Bars

    Let’s dive into what makes these Crème Brûlée Cheesecake Bars so delicious! Here’s the lineup of ingredients you’ll need:

    • Sugar cookie mix: This forms the sweet, buttery base of the bars.
    • Instant French vanilla pudding mix: Adds creaminess and enhances the vanilla flavor.
    • Unsalted butter: Melting it gives richness to the crust.
    • Egg: Acts as a binder, giving the crust structure.
    • Light brown sugar: Infuses a caramel-like sweetness into the crust.
    • Vanilla extract: A must for that classic vanilla taste that complements everything beautifully.
    • Cream cheese: This is the key player in the cheesecake filling, providing its signature richness.
    • Sour cream: Adds a tangy contrast that balances the sweetness.
    • Granulated sugar: Sweetens the cheesecake layer perfectly.
    • Toffee bits: Sprinkled on top, they give that delightful crunchy texture reminiscent of crème brûlée.

    If you’re feeling adventurous, you can try a different crust base, like graham cracker crumbs, instead of the sugar cookie mix for a twist. You’ll find exact measurements at the bottom of this article, ready for printing! Keep reading to whip up these mouthwatering bars that everyone will love!

    How to Make Crème Brûlée Cheesecake Bars

    Now, let’s get down to the fun part: making these fabulous Crème Brûlée Cheesecake Bars! Follow along, and soon you’ll be savoring the joys of creamy cheesecake and those crunchy toffee bits. Here’s how to do it, step by step!

    Step 1: Preheat the Oven and Prepare the Pan

    First things first, preheat your oven to 350°F (177°C). This is crucial for proper baking. While that’s warming up, grab a 9×13-inch baking pan and line it with aluminum foil. Trust me; this makes cleanup a breeze! Coat the foil with nonstick cooking spray for easy removal later. A well-prepped pan lays the foundation for successful bars.

    Step 2: Mix the Crust Ingredients

    In a large bowl, it’s time to combine your ingredients for the crust. Toss in the sugar cookie mix, instant French vanilla pudding mix, melted butter, one egg, light brown sugar, and vanilla extract. Mix everything thoroughly. You want a thick, cohesive dough that holds together well. This crust is a game-changer, bringing sweetness and texture to each bite.

    Step 3: Press the Crust into the Pan

    Now it’s time to form the crust. Take that luscious dough and evenly press it into your prepared baking pan. Use your fingers or a spatula to create a flat, smooth base. Remember, a well-pressed crust holds everything together, so give it a little love. Make sure it reaches the edges of the pan for that crispy, golden finish.

    Step 4: Prepare the Cheesecake Filling

    After you’ve set the crust aside, wipe out the mixing bowl. Grab your softened cream cheese and add it to the bowl. Beat in the remaining egg, three egg yolks, sour cream, granulated sugar, and vanilla extract. Mix on high speed until the filling is perfectly smooth. The creaminess of this layer is key to achieving that classic cheesecake texture!

    Step 5: Combine the Layers

    Now comes the fun part—combining the layers! Pour that creamy cheesecake filling evenly over your prepared crust. Using a spatula, gently smooth the surface to ensure even cooking. Each bite should be a delightful marriage of crust and cheesecake. This step is essential for getting those layers just right!

    Step 6: Bake the Bars

    Pop your pan into the oven and bake for 40 to 45 minutes. Keep an eye on it! I usually start checking for doneness at the 30-minute mark. What you’re looking for is a firm center that’s set and no longer jiggly. Each oven behaves differently, so trust your instincts here.

    Step 7: Add Toppings and Cool

    As soon as you pull the bars from the oven, sprinkle the toffee bits evenly over the top. This is where the crème brûlée magic happens! Once cooled at room temperature for about 30 minutes, cover your masterpiece and let it chill in the fridge for at least three hours. Cooling is crucial—it lets flavors meld and makes slicing easier later on!

    Tips for Success

    • Make sure your cream cheese is fully softened for the smoothest filling.
    • Keep an eye on the bars towards the end of baking to prevent overcooking.
    • For extra flavor, consider adding a pinch of sea salt to the toffee bits.
    • Let the bars chill overnight for even better taste and texture.
    • Experiment with different toppings like chocolate chips or caramel drizzle!

    Equipment Needed

    • 9×13-inch baking pan: A classic choice; you can also use a glass dish if you prefer.
    • Mixing bowls: Easy to handle; consider using one large and one medium for efficiency.
    • Handheld electric mixer: Perfect for smooth fillings; a whisk works too, but with more effort.
    • Spatula: Ideal for spreading and smoothing; a large spoon can work in a pinch.
    • Aluminum foil: Helps with easy cleanup; parchment paper is a great alternative.

    Variations

    • For a Chocolate Twist: Add cocoa powder to the crust mixture to create a chocolatey base.
    • Healthier Version: Substitute low-fat cream cheese and Greek yogurt for the filling for a lighter option.
    • Fruit Infusion: Fold in fresh berries or sliced peaches into the cheesecake layer for a fruity touch.
    • Nutty Crunch: Replace toffee bits with chopped nuts, such as pecans or almonds, for added texture.
    • Seasonal Spice: Add a dash of pumpkin spice or cinnamon for a seasonal flavor boost during fall.

    Serving Suggestions

    • Serve your Crème Brûlée Cheesecake Bars with fresh berries on the side for a pop of color.
    • A dollop of whipped cream adds a creamy finish to each bar.
    • Pair with a rich cup of coffee or a dessert wine for a delightful experience.
    • Garnish with a drizzle of caramel or chocolate sauce for added flair.
    • Consider serving on a beautiful platter to highlight their elegance!

    FAQs about Crème Brûlée Cheesecake Bars

    Can I make Crème Brûlée Cheesecake Bars ahead of time?

    Absolutely! These bars are great for making in advance. Just allow them to chill in the refrigerator for at least three hours, or overnight for optimal flavor. They’ll be ready to impress whenever you are!

    How should I store leftovers?

    Store any leftover Crème Brûlée Cheesecake Bars in an airtight container in the refrigerator. They’ll stay fresh for up to one week. Just be prepared for your family to sneak a few bites!

    Can I freeze these cheesecake bars?

    Yes, you can freeze them! Slice the bars into individual servings, wrap them tightly in plastic wrap, and then place them in a freezer-safe container. Thaw them in the fridge when you’re ready to enjoy a sweet treat.

    What other toppings can I use instead of toffee bits?

    Feel free to get creative! Chopped nuts, chocolate chips, or even crushed cookies make excellent substitutes. Just think about combining flavors that will elevate the creamy cheesecake experience!

    Are these bars suitable for special diets?

    While these Crème Brûlée Cheesecake Bars are inherently vegetarian, you can adapt them for special diets. Gluten-free versions can be made with gluten-free cookie mixes, and dairy-free alternatives exist for cream cheese and sour cream. Enjoy experimenting!

    Final Thoughts

    Creating these Crème Brûlée Cheesecake Bars was truly a delightful journey. The process is simple yet rewarding, perfect for any day that needs a little sweetness. They’re not just dessert but a moment of indulgence that can bring smiles and joy to your loved ones. As you slice into those creamy layers topped with crunchy toffee, you’ll witness firsthand the delight it brings. Sharing these bars at a gathering or enjoying them solo feels like a small celebration. Trust me, you’ll cherish every bite and the happiness it adds to your busy life!


    Print

    clock clock iconcutlery cutlery iconflag flag iconfolder folder iconinstagram instagram iconpinterest pinterest iconfacebook facebook iconprint print iconsquares squares iconheart heart iconheart solid heart solid icon

    Description

    Indulge in the delightful flavor of Crème Brûlée Cheesecake Bars, a delicious dessert that combines the classic taste of crème brûlée with creamy cheesecake.


    • 1 (17.5 ounce) pouch sugar cookie mix
    • 1 (3.5 ounce) box instant French vanilla pudding mix
    • 1/2 cup unsalted butter, melted
    • 1 large egg
    • 2 tablespoons light brown sugar
    • 2 teaspoons vanilla extract
    • 2 (8-ounce) blocks cream cheese, softened to room temperature
    • 1 large egg
    • 3 large egg yolks
    • 1/2 cup sour cream
    • 1/2 cup granulated sugar
    • 2 teaspoons vanilla extract
    • 1/2 cup toffee bits

    1. Preheat the oven to 350°F (177°C). Line a 9×13-inch baking pan with aluminum foil and coat with nonstick cooking spray. Set aside.
    2. In a large bowl, combine the sugar cookie mix, instant French vanilla pudding mix, melted unsalted butter, egg, light brown sugar, and vanilla extract. Mix thoroughly until a thick dough forms.
    3. Evenly press the crust dough into the lined baking pan, creating a flat, smooth base. Set aside.
    4. Wipe out the mixing bowl if necessary. Add the cream cheese, egg, egg yolks, sour cream, granulated sugar, and vanilla extract. Beat at high speed with a handheld electric mixer until the mixture is completely smooth and fully blended.
    5. Pour the cheesecake filling evenly over the prepared crust. Smooth the surface using a spatula.
    6. Bake the bars in the preheated oven for 40 to 45 minutes, or until the center is set and no longer jiggly. Begin checking for doneness at 30 minutes, and continue baking as needed based on your oven.
    7. Remove from the oven and immediately sprinkle the toffee bits evenly over the top. Let the bars cool at room temperature for approximately 30 minutes.
    8. Cover and refrigerate the bars for at least 3 hours, or until thoroughly chilled before slicing and serving. Store airtight in the refrigerator for up to 1 week.

    Notes

    • For best results, ensure the cream cheese is at room temperature before mixing.
    • Adjust the baking time based on your oven’s performance.
    • These bars can be garnished with caramel sauce or extra toffee bits if desired.
    • Prep Time: 20 minutes
    • Cook Time: 45 minutes
    • Category: Dessert
    • Method: Baking
    • Cuisine: American

    Nutrition

    • Serving Size: 1 bar
    • Calories: 320
    • Sugar: 20g
    • Sodium: 180mg
    • Fat: 17g
    • Saturated Fat: 10g
    • Unsaturated Fat: 5g
    • Trans Fat: 0g
    • Carbohydrates: 36g
    • Fiber: 1g
    • Protein: 5g
    • Cholesterol: 80mg

    Sharing is caring!

  • Bourbon Maple Bacon Stuffed Toast

    Bourbon Maple Bacon Stuffed Toast


    Introduction to Bourbon Maple Bacon Stuffed Toast

    As a busy mom, I know just how chaotic mornings can get. When your to-do list feels heavier than a brick, finding time for breakfast can feel impossible. That’s where this Bourbon Maple Bacon Stuffed Toast comes in! It’s the perfect way to start your day with a little bit of indulgence and a whole lot of flavor. Imagine waking up to the aroma of crispy bacon and sweet maple syrup filling your kitchen—it’s pure bliss! This recipe not only satisfies your cravings but also impresses your loved ones, making breakfast feel special even on the most hectic days.

    Why You’ll Love This Bourbon Maple Bacon Stuffed Toast

    Let’s be honest—who doesn’t love a breakfast that feels like a treat? This Bourbon Maple Bacon Stuffed Toast is a game-changer in the morning chaos. It’s quick to whip up, taking just 45 minutes from start to finish. With its rich flavors and gooey texture, it’s perfect for both cozy family gatherings and busy workdays. You’ll find yourself smiling after every bite, guilt-free indulgence at its finest!

    Ingredients for Bourbon Maple Bacon Stuffed Toast

    Gathering the right ingredients for this Bourbon Maple Bacon Stuffed Toast is half the fun! Here’s what you’ll need:

    • Brioche or Challah Bread: Choose thick-cut slices for a fluffy and rich base that holds all the deliciousness.
    • Thick-Cut Bacon: Using thick strips ensures that each bite is loaded with flavor. You can opt for turkey bacon for a healthier twist.
    • Large Eggs: These create the custard that soaks into the bread, making it rich and creamy.
    • Whole Milk: This adds a velvety texture to the custard mixture. You can experiment with almond or oat milk if you prefer.
    • Vanilla Extract: A splash of this adds depth and sweetness to both the custard and the glaze.
    • Ground Cinnamon: Just a pinch gives a warm spice note, making every bite comforting and cozy.
    • Unsalted Butter: This is perfect for cooking your stuffed toast to golden perfection. Use ghee or coconut oil as alternatives.
    • Cream Cheese: Softened, this is blended with bacon for a luscious filling that contrasts wonderfully with the sweet syrup.
    • Pure Maple Syrup: A must for that classic sweetness. High-quality syrup will take your dish to the next level!
    • Bourbon: Just a splash elevates the maple glaze to something truly special, adding a hint of warmth.
    • Pinch of Fine Salt: Balances out the sweetness, enhancing all the other flavors.

    For the exact quantities and more details, feel free to check the bottom of the article where they’re listed for easy printing!

    How to Make Bourbon Maple Bacon Stuffed Toast

    Step 1: Bake the Bacon

    First things first, preheat your oven to 400°F. Line a baking tray with foil and place a wire rack on top. Arrange the thick-cut bacon slices on the rack, ensuring they’re not overlapping. This little trick lets the fat drip away, giving you crispy bacon in no time. Bake for about 15 minutes, or until they’re beautifully crisp. Once done, place them on paper towels to absorb extra grease, then finely chop.

    Step 2: Prepare the Custard

    In a shallow bowl, whisk together the large eggs, whole milk, vanilla extract, and ground cinnamon. You want to beat it just enough until everything is blended into a smooth custard. This mixture is the heart of our Bourbon Maple Bacon Stuffed Toast, soaking into the bread and imparting rich flavor.

    Step 3: Make the Filling

    In a small bowl, mix the softened cream cheese with the finely chopped bacon. Combine them well until you have a delightful filling that’s creamy and savory. It should look inviting and tempting—a perfect match for the sweet maple glaze ahead!

    Step 4: Stuff the Bread

    Using a sharp knife, take each thick-sliced brioche or challah and create a pocket. Be gentle; you want to preserve the outer edge while making enough space for the filling. Spoon in the creamy bacon mixture and press the bread together carefully, sealing in that delicious goodness.

    Step 5: Soak the Bread

    Now it’s time to soak! Take each stuffed bread slice and carefully dip it into the custard mixture. Turn it gently, ensuring all sides are coated. Let the excess liquid drip off—nobody likes soggy bread! This soaking step is crucial for that decadent texture we’re aiming for.

    Step 6: Cook the Stuffed Toast

    Heat a non-stick skillet over medium heat and melt the unsalted butter until bubbly. Place the soaked stuffed slices in the skillet, cooking them for 3 to 4 minutes per side. You’re looking for a golden-brown color, which will give your toast that beautiful crust, while the inside remains creamy.

    Step 7: Make the Maple Bourbon Glaze

    In a small saucepan, combine pure maple syrup, bourbon, an extra splash of vanilla extract, and a pinch of salt. Warm it over low heat for about 2 minutes, stirring constantly. The glaze will smell heavenly as it thickens slightly. This is the finishing touch that will elevate your Bourbon Maple Bacon Stuffed Toast to pure bliss!

    Tips for Success

    • Use a high-quality maple syrup for the best flavor.
    • Be careful not to over-soak the bread to avoid sogginess.
    • Keep your skillet at medium heat for even cooking.
    • Experiment with different cheeses for unique flavors.
    • Consider topping with fresh berries or whipped cream for added texture.

    Equipment Needed

    • Baking Tray: A standard one works; a rimmed sheet pan is a great alternative.
    • Wire Rack: Essential for crisping bacon; you can use parchment paper if needed.
    • Skillet: A non-stick skillet or cast iron pan yields the best results.
    • Whisk: For blending the custard; a fork can also do the trick.
    • Sharp Knife: Necessary for pocketing the bread; a serrated knife makes it easier.

    Variations

    • Cheese Swap: Instead of cream cheese, try mascarpone or goat cheese for a tangy twist.
    • Fruit Additions: Add sliced bananas or strawberries to the filling for a fruity bite.
    • Nutty Twist: Incorporate chopped pecans or walnuts in the filling for added crunch.
    • Spice it Up: Mix in a dash of nutmeg or pumpkin spice to the custard for a fall-inspired flavor.
    • Gluten-Free Option: Substitute with gluten-free bread for a deliciously safe adaptation.

    Serving Suggestions for Bourbon Maple Bacon Stuffed Toast

    • Fresh Fruit: Serve with sliced strawberries or blueberries for a burst of freshness.
    • Hot Beverage: Pair it with a hot cup of coffee or a comforting chai latte.
    • Garnish: Top with a sprinkle of chopped nuts or a dollop of whipped cream for extra flair.
    • Presentation: Arrange on a rustic wooden platter to impress your guests!

    FAQs about Bourbon Maple Bacon Stuffed Toast

    Curiosity is always brewing in the kitchen! Here are some common questions I’ve encountered about Bourbon Maple Bacon Stuffed Toast.

    Can I use a different type of bread?

    Absolutely! While brioche and challah work best, feel free to experiment with French bread or even whole wheat options for a healthier twist.

    What can I substitute for bourbon?

    If you want to skip the bourbon, a splash of apple cider vinegar or extra vanilla extract can still give your glaze a delightful flavor without the alcohol.

    Can I make this ahead of time?

    You can! Prepare the filling and bread ahead of time, then assemble and cook when you’re ready. This cuts down on morning stress!

    Is this recipe suitable for meal prep?

    Indeed! You can batch-cook the Bourbon Maple Bacon Stuffed Toast and store leftovers in the fridge for a quick reheat. Just pop it in the toaster or oven for a crispy finish!

    How do I store leftovers?

    Wrap any leftover stuffed toast in plastic wrap and place it in the fridge. It’s best enjoyed within 2 days, but reheating can bring back its delicious texture.

    Final Thoughts

    There’s something incredibly special about starting your day with a plate of Bourbon Maple Bacon Stuffed Toast. Each bite is a delightful harmony of flavors, blending the savory richness of bacon with the sweet comfort of maple syrup. It’s a breakfast that invites you to pause, savor, and share moments with loved ones. Whether it’s a rushed weekday morning or a leisurely weekend brunch, this recipe brings joy and a touch of indulgence to the table. Trust me, once you try it, you’ll keep coming back for more, your heart and taste buds will thank you!


    Print

    clock clock iconcutlery cutlery iconflag flag iconfolder folder iconinstagram instagram iconpinterest pinterest iconfacebook facebook iconprint print iconsquares squares iconheart heart iconheart solid heart solid icon

    Description

    Bourbon Maple Bacon Stuffed Toast is a decadent breakfast treat featuring thick-cut bacon, creamy cheese, and a sweet bourbon maple glaze, all encased in rich brioche or challah bread.


    • 8 slices brioche or challah bread, cut thick
    • 6 slices thick-cut bacon
    • 4 large eggs
    • 1/2 cup whole milk
    • 1 tablespoon vanilla extract
    • 1/4 teaspoon ground cinnamon
    • 2 tablespoons unsalted butter
    • 2 ounces cream cheese, softened
    • 1 cup pure maple syrup
    • 2 tablespoons bourbon
    • 1 teaspoon vanilla extract
    • Pinch fine salt

    1. Arrange bacon slices on a wire rack over a baking tray and bake at 400°F for 15 minutes until deeply crisp. Place on paper towels, then finely chop.
    2. In a shallow bowl, vigorously whisk eggs with milk, vanilla extract, and cinnamon until thoroughly blended.
    3. Mix softened cream cheese with chopped bacon in a small bowl until fully incorporated.
    4. Using a sharp knife, create a pocket in each bread slice. Fill each with bacon-cream cheese mixture and press to close.
    5. Dip each stuffed bread slice into the custard, turning to evenly coat all sides.
    6. Melt butter in a non-stick skillet over medium heat. Cook stuffed slices for 3 to 4 minutes per side until deeply golden and cooked through.
    7. In a small saucepan, warm maple syrup, bourbon, vanilla extract, and a pinch of salt over low heat for 2 minutes, stirring until fragrant.
    8. Arrange French toast on serving plates and drizzle generously with warm maple bourbon glaze. Serve immediately.

    Notes

    • For a healthier option, you can use turkey bacon.
    • Use a high-quality maple syrup for best flavor.
    • Be careful not to overcook the French toast to keep it moist inside.
    • Prep Time: 20 minutes
    • Cook Time: 25 minutes
    • Category: Breakfast
    • Method: Baking and Cooking on Skillet
    • Cuisine: American

    Nutrition

    • Serving Size: 1 slice
    • Calories: 450
    • Sugar: 20g
    • Sodium: 800mg
    • Fat: 25g
    • Saturated Fat: 10g
    • Unsaturated Fat: 8g
    • Trans Fat: 0g
    • Carbohydrates: 40g
    • Fiber: 2g
    • Protein: 12g
    • Cholesterol: 150mg

    Sharing is caring!

  • Pickle-Brined Chicken Quesadillas

    Pickle-Brined Chicken Quesadillas


    Introduction to Pickle-Brined Chicken Quesadillas

    Are you searching for a quick yet delicious meal that your family will love? Look no further than these Pickle-Brined Chicken Quesadillas! They are simple to whip up, making them the perfect solution for busy evenings filled with homework or work deadlines. Plus, who can resist that savory combination of tangy pickle-brined chicken and ooey-gooey cheese? I’ve made these quesadillas countless times, and they’ve never failed to impress! With just a few common ingredients and minimal prep, you’ll have a mouthwatering dish that brings everyone to the table. Let’s get cooking!

    Why You’ll Love This Pickle-Brined Chicken Quesadillas

    These Pickle-Brined Chicken Quesadillas are a delightful blend of ease and flavor. With a straightforward recipe, even the busiest of moms can whip them up in under 30 minutes. The tangy chicken is a wonderful surprise, turning a simple weeknight meal into a culinary treat. Plus, the kids will love them! Trust me, these quesadillas will become your go-to comfort food!

    Ingredients for Pickle-Brined Chicken Quesadillas

    Gathering the right ingredients is key to making these Pickle-Brined Chicken Quesadillas truly shine. Here’s what you’ll need:

    • Boneless, skinless chicken breasts: The star of our dish! They soak up the pickle juice beautifully, keeping them juicy.
    • Dill pickle juice: This magical liquid is what brings the zing! Use your favorite brand for the best flavor.
    • Garlic powder: Adds a lovely depth of flavor without the fuss of fresh garlic.
    • Ground black pepper: A sprinkle will elevate all the flavors in this recipe.
    • Flour tortillas: These soft shells are perfect for wrapping around your fillings and provide that comforting quesadilla experience.
    • Monterey Jack and cheddar cheese: For a cheesy, melty goodness. You can mix up your cheese choices for different flavors!
    • Unsalted butter: This helps give the quesadillas a golden crisp when cooking.
    • Red onion: Adds a nice crunch and a hint of sweetness. Feel free to swap it out for green onions if preferred.
    • Fresh dill: This herb complements the pickle flavor and brightens the dish. Fresh is best!
    • Sliced pickles: Optional, but they bring an extra kick and a delightful crunch.
    • Sour cream and mayonnaise: These create the base of our tangy dill sauce that pairs perfectly with the quesadillas.
    • Fresh lemon juice: A splash adds brightness to the sauce and balances flavors.
    • Onion powder: This complements the garlic powder for a flavor punch in our sauce.
    • Salt and black pepper: Always taste as you go! A sprinkle will enhance all the lovely flavors.

    For exact ingredient amounts, check out the bottom of this article, where you can find quantities for printing. Happy cooking!

    How to Make Pickle-Brined Chicken Quesadillas

    Let’s dive into the delightful journey of creating these Pickle-Brined Chicken Quesadillas. Following these simple steps will lead you to a cheesy, tangy masterpiece that’s sure to impress. Ready? Let’s get cooking!

    Step 1: Marinate the Chicken

    Start by marinating the chicken to really enhance the flavor. In a resealable bag or shallow dish, combine the boneless, skinless chicken breasts with dill pickle juice, garlic powder, and ground black pepper. Aim for at least an hour in the fridge, though 4 hours is ideal if you have the time. This marinade will transform your chicken, infusing it with a tangy goodness that’s just divine!

    Step 2: Cook the Chicken

    Once marinated, it’s time to cook! Remove the chicken from the marinade and pat it dry with paper towels. This helps achieve that lovely sear. Heat a skillet or grill over medium heat, and cook each breast for 5 to 6 minutes per side, or until the internal temperature reaches 165°F. Let the chicken rest for 5 minutes after cooking. This step is crucial for keeping the chicken juicy and tender. Then, slice it thinly and get ready to layer!

    Step 3: Prepare the Tangy Dill Sauce

    Next up is the tangy dill sauce that perfectly complements our quesadillas! In a small bowl, mix together sour cream, mayonnaise, fresh lemon juice, and both chopped dill and finely chopped pickles. Sprinkle in some garlic powder and onion powder for an extra flavor kick. Season it with salt and black pepper to taste. This zesty sauce will add a delightful creaminess to your finished dish!

    Step 4: Assemble the Quesadillas

    Now, let’s put everything together! Lay out four tortillas on a clean surface. Start layering by distributing the sliced chicken evenly over each tortilla. Next, sprinkle on both Monterey Jack and cheddar cheese, followed by red onion, chopped dill, and optional sliced pickles. Place a second tortilla on top of each filled tortilla, creating a comforting sandwich of flavor.

    Step 5: Cook the Quesadillas

    Finally, it’s time to cook the quesadillas! In a large skillet, melt some unsalted butter over medium heat. Cook each quesadilla for about 2 to 3 minutes per side, pressing gently to ensure even cooking. You want that perfect golden exterior with gooey, melted cheese inside. Once ready, transfer them to a cutting board and slice into wedges. Serve hot with that tangy dill sauce on the side for dipping. Enjoy every bite!

    Tips for Success

    • Don’t skip the marinating step! It makes a world of difference.
    • Always measure the chicken’s internal temperature to ensure it’s cooked through.
    • Try to prep ingredients ahead of time for a quicker cooking process.
    • Feel free to customize your cheeses for different flavor profiles.
    • When pressing down on quesadillas, use a spatula for even cooking.

    Equipment Needed

    • Skillet or Grill: A non-stick skillet is ideal, but any grill or frying pan works.
    • Resealable Bag: For marinating chicken; a shallow dish can be a great alternative.
    • Spatula: Essential for flipping your quesadillas to achieve that perfect golden brown.
    • Cutting Board: A must-have for slicing those delicious quesadilla wedges.

    Variations of Pickle-Brined Chicken Quesadillas

    • Spicy Kick: Add jalapeños or your favorite hot sauce to the filling for an extra zing that spicy food lovers will savor.
    • Veggie Delight: Throw in some sautéed bell peppers, mushrooms, or zucchini for a flavorful boost and a pop of color!
    • Cheese Overload: Experiment with different cheeses, like pepper jack or gouda, to mix up the flavor profile and keep things interesting.
    • Gluten-Free Option: Use gluten-free tortillas to make this dish accessible for those with dietary restrictions.
    • BBQ Twist: Replace the dill pickle juice with barbecue sauce for a smoky flavor, along with grilled chicken to excite your taste buds.

    Serving Suggestions

    • Pair with a fresh side salad drizzled with a light vinaigrette for a refreshing contrast.
    • Serve alongside crispy sweet potato fries for a delicious twist on classic comfort food.
    • Prepare a vibrant fruit salsa to add a sweet touch to every bite.
    • A chilled glass of lemonade or iced tea perfectly complements the tangy flavors.
    • For an elegant presentation, slice quesadillas into wedges and arrange on a colorful platter.

    FAQs about Pickle-Brined Chicken Quesadillas

    Can I use leftover chicken for these quesadillas? Absolutely! Leftover grilled or roasted chicken works wonders. Just slice it thin and skip the marinating step.

    What can I serve with Pickle-Brined Chicken Quesadillas? These quesadillas pair beautifully with a simple side salad, fresh fruit salsa, or even some spicy jalapeño poppers for a fun twist!

    Are Pickle-Brined Chicken Quesadillas kid-friendly? Yes, my kids adore them! The gooey cheese and flavorful chicken make them a hit. Just be cautious with the dill pickles if you have picky eaters.

    Can I make these quesadillas ahead of time? While best enjoyed fresh, you can assemble them ahead and store in the fridge. Just cook them up when you’re ready to eat!

    How can I store leftovers? Place any leftover quesadillas in an airtight container in the fridge for up to three days. Reheat in a pan to retain that glorious crispiness!

    Final Thoughts

    Bringing these Pickle-Brined Chicken Quesadillas to your dinner table not only satisfies hunger but also creates a joyful experience for the whole family. The zing from the pickle juice alongside melty cheese forms an unforgettable flavor combination. Plus, the ease of preparation means you can spend more time sharing stories rather than stressing in the kitchen. So, whether it’s a regular weeknight or a get-together with friends, these quesadillas will certainly wow everyone. Trust me; once you try them, they’ll become a beloved favorite that keeps your spirits bright and your taste buds dancing!


    Print

    clock clock iconcutlery cutlery iconflag flag iconfolder folder iconinstagram instagram iconpinterest pinterest iconfacebook facebook iconprint print iconsquares squares iconheart heart iconheart solid heart solid icon

    Description

    Delicious quesadillas made with pickle-brined chicken, combined with melty cheese and a tangy dill sauce.


    • 2 large boneless, skinless chicken breasts
    • 1 cup dill pickle juice
    • 1 teaspoon garlic powder
    • 1/2 teaspoon ground black pepper
    • 8 medium flour tortillas
    • 1 1/2 cups shredded Monterey Jack cheese
    • 1 cup shredded cheddar cheese
    • 1 tablespoon unsalted butter
    • 1/2 cup thinly sliced red onion
    • 1/4 cup chopped fresh dill
    • 1/2 cup sliced pickles
    • 1/2 cup sour cream
    • 2 tablespoons mayonnaise
    • 1 tablespoon fresh lemon juice
    • 2 tablespoons chopped fresh dill
    • 1 tablespoon finely chopped pickles
    • 1/2 teaspoon garlic powder
    • 1/2 teaspoon onion powder
    • Salt and black pepper, to taste

    1. Combine chicken breasts with pickle juice, garlic powder, and black pepper in a resealable bag or shallow dish. Seal and refrigerate for at least 1 hour, or up to 4 hours for increased flavor infusion.
    2. Remove chicken from marinade and pat dry with paper towels. Grill or cook in a skillet over medium heat for 5 to 6 minutes per side, or until an internal temperature of 165°F is reached. Let rest 5 minutes before slicing thinly.
    3. In a small bowl, mix sour cream, mayonnaise, lemon juice, chopped dill, finely chopped pickles, garlic powder, and onion powder. Season with salt and black pepper. Refrigerate until serving.
    4. Arrange 4 tortillas on a work surface. Distribute sliced chicken, Monterey Jack cheese, cheddar cheese, red onion, chopped dill, and optional sliced pickles evenly. Cover each with a second tortilla.
    5. Heat butter in a large skillet over medium heat. Cook each quesadilla for 2 to 3 minutes per side, pressing gently, until tortillas are golden and cheese is fully melted. Transfer to a cutting board and cut into wedges.
    6. Serve quesadilla wedges hot with chilled tangy dill sauce on the side.

    Notes

    • For a spicier version, add jalapeños or hot sauce to the filling.
    • Make sure to let the chicken rest after cooking to keep it juicy.
    • You can substitute other cheeses if desired.
    • Prep Time: 15 minutes
    • Cook Time: 15 minutes
    • Category: Main Course
    • Method: Grilling/Skillet
    • Cuisine: Mexican

    Nutrition

    • Serving Size: 1 quesadilla
    • Calories: 450
    • Sugar: 3g
    • Sodium: 800mg
    • Fat: 25g
    • Saturated Fat: 12g
    • Unsaturated Fat: 10g
    • Trans Fat: 0g
    • Carbohydrates: 35g
    • Fiber: 2g
    • Protein: 25g
    • Cholesterol: 75mg

    Sharing is caring!

  • Hairy Bikers Panacalty Bake

    Hairy Bikers Panacalty Bake


    Introduction to Hairy Bikers Panacalty Bake

    As a busy mom, I cherish meals that bring my family together, meals like the Hairy Bikers Panacalty Bake. This dish is pure comfort; think warm, layered potatoes mingling with savory corned beef and fresh vegetables. It’s that hearty meal I turn to, especially after a long day. With just a bit of prep and a dash of love, this recipe transforms into a delightful dinner that satisfies both the tummy and the soul. Trust me, once you pull this bake from the oven, you’ll feel accomplished and ready to tackle whatever comes next!

    Why You’ll Love This Hairy Bikers Panacalty Bake

    This Hairy Bikers Panacalty Bake is a lifesaver for busy nights! With simple ingredients and minimal prep, it’s ready in under two hours, making it perfect for families on the go. The balance of flavors will have everyone asking for seconds. Plus, it’s a one-dish wonder, meaning less cleanup for you. Save precious time and enjoy the moments around the dinner table with this delicious, comforting bake!

    Ingredients Hairy Bikers Panacalty Bake

    Gathering the right ingredients is the first step toward making this delightful Hairy Bikers Panacalty Bake. You’ll need:

    • Potatoes: The star of the show! Go for large, starchy varieties for that fluffy texture.
    • Onion: Adds sweetness and depth; it’s key for flavor layering.
    • Carrots: A colorful crunch! They bring a natural sweetness that pairs beautifully with the beef.
    • Corned Beef: This is the heart of the dish. Look for good-quality slices to elevate your bake.
    • Beef Stock: This brings everything together, keeping the bake moist and flavorful. Homemade is best, but store-bought works fine too.
    • Unsalted Butter: A drizzle of melted butter on top brings a golden crispiness.
    • Salt and Black Pepper: Essential seasonings! Adjust to your taste, adding a little more for extra flavor.
    • Crusty Bread: Perfect for scooping up every last bite of this hearty dish. Think of it as the edible hustle-buddy for your bake!

    Want some variations? Try adding herbs like thyme or rosemary for an aromatic twist. Or, if you prefer, swap the corned beef for another protein, like chicken or turkey. The exact quantities of all these ingredients are listed at the bottom of the article for your convenience—and available for printing!

    How to Make Hairy Bikers Panacalty Bake

    Getting started with the Hairy Bikers Panacalty Bake is straightforward, and it’s such a joy to make. Follow these simple steps, and don’t worry! I’ll guide you through the process like a trusty sous-chef.

    Step 1: Preheat and Prepare

    First things first, preheat your oven to 180°C. This is where the magic happens!

    While it’s warming up, grab that big ovenproof casserole dish, and grease it generously. Trust me, this helps those layers slide right out later. It’s all about making dinner cleanup a breeze!

    Step 2: Layer the Ingredients

    Now, let’s get layering! Start with a quarter of your thinly sliced potatoes. Lay them down as if you’re creating a cozy bed for the next ingredients.

    Next, sprinkle a third of the onions, carrots, and corned beef on top. A light dash of salt and pepper here makes a world of difference. Repeat this two more times, and finish with that final layer of potatoes on top.

    Step 3: Pour the Stock and Butter

    Here comes the secret sauce—literally! Pour the beef stock evenly over those glorious layers. This will infuse the bake with incredible flavor. Then, brush melted butter over the top layer of potatoes. It’ll help them crisp up beautifully during baking.

    Step 4: Cover and Bake

    Cover your dish with parchment paper followed by foil. This keeps everything nice and moist while it bakes. Place it in your preheated oven and let it bake for a comfy 50 minutes.

    Step 5: Crisp the Top

    After 50 minutes, it’s time for the grand reveal! Carefully remove the parchment and foil. Let those potato layers breathe. Bake for another 15 to 20 minutes. We want that golden, crispy top that calls for seconds (or thirds!).

    Step 6: Serve and Enjoy

    Once it’s had a chance to crisp up, take it out and let it rest for a few minutes. Then scoop generous portions onto plates. Serve it hot with crusty bread on the side. Trust me, everyone will be reaching for more!

    And there you have it! Your Hairy Bikers Panacalty Bake is ready to bring warmth and joy to your family dinner table.

    Tips for Success

    • Ensure potatoes are sliced thin for even cooking; thick slices may remain raw.
    • Use a mix of different colored vegetables for added nutritional value and visual appeal.
    • Feel free to experiment with spices or herbs to suit your taste.
    • Let the dish rest before serving; this helps the flavors meld beautifully.
    • Pair with a simple salad for a complete meal!

    Equipment Needed

    • Ovenproof Casserole Dish: Essential for baking. A deep baking tray can work as an alternative.
    • Sharp Knife: For slicing potatoes and veggies. A mandoline also makes quick work of this task.
    • Cutting Board: A sturdy surface for prep. A clean countertop is a fine substitute.
    • Baking Foil and Parchment Paper: These help with covering. If you don’t have parchment, extra foil will do.

    Variations

    • Herb-Infused: Add fresh thyme or rosemary between the layers for an aromatic twist.
    • Veggie Delight: Substitute sliced potatoes with sweet potatoes or add in bell peppers and peas for a colorful boost.
    • Meat-Free Option: Swap corned beef for lentils or chickpeas to make a hearty, vegetarian bake.
    • Cheesy Goodness: Sprinkle grated cheese between layers and on top for a gooey, indulgent finish.
    • Spicy Kick: Add a dash of hot sauce or some diced jalapeños for those who enjoy a bit of heat!

    Serving Suggestions

    • Pair your Hairy Bikers Panacalty Bake with a crisp green salad for a refreshing contrast.
    • A side of steamed broccoli or green beans adds vibrant color and nutrition.
    • For drinks, a light-bodied red wine or sparkling water with lemon slices complements the dish perfectly.
    • Garnish with fresh parsley for an attractive presentation!

    FAQs about Hairy Bikers Panacalty Bake

    Can I make the Hairy Bikers Panacalty Bake ahead of time?

    Absolutely! You can prepare it a day in advance and store it covered in the fridge. Just reheat until warmed through before serving. It’s a great way to save time on busy weeknights.

    What can I serve with the Hairy Bikers Panacalty Bake?

    I recommend crusty bread for that perfect dunking experience! A simple green salad or some sautéed veggies also make great side dishes, adding freshness to each hearty bite.

    Can I freeze leftovers of the Panacalty Bake?

    Yes, you can freeze leftovers! Just ensure it’s cooled completely, then transfer it to an airtight container. It’ll keep well for up to three months. Reheat thoroughly from frozen for best results.

    Is there a vegetarian version of Hairy Bikers Panacalty Bake?

    Definitely! Swap the corned beef for lentils or chickpeas and use vegetable stock instead of beef stock. You can even pack in more veggies for a delicious vegetarian option.

    How long does the Hairy Bikers Panacalty Bake last in the fridge?

    This dish remains delicious for about three to four days in the fridge. Just make sure it’s stored in an airtight container to keep it fresh!

    Final Thoughts

    The Hairy Bikers Panacalty Bake is more than just dinner; it’s a heartwarming tradition brought to life with every layer. This dish embodies comfort, filling both bellies and hearts with warmth. When I serve it, I see my family’s smiles, and that’s what makes it special. The aroma fills the kitchen, wrapping everyone in a cozy embrace, making it a go-to for busy nights. I hope you savor every bite and create cherished memories at your dinner table. Let it bring you joy, laughter, and a sense of togetherness that lasts long after the plates are empty.


    Print

    clock clock iconcutlery cutlery iconflag flag iconfolder folder iconinstagram instagram iconpinterest pinterest iconfacebook facebook iconprint print iconsquares squares iconheart heart iconheart solid heart solid icon

    Description

    A hearty and comforting bake featuring layered potatoes, corned beef, and vegetables, topped with golden, crispy potatoes.


    • 4 large potatoes, peeled and thinly sliced
    • 1 large onion, thinly sliced
    • 3 carrots, peeled and thinly sliced
    • 680 g corned beef, sliced
    • 550 ml beef stock
    • 50 g unsalted butter, melted
    • Salt, to taste
    • Freshly ground black pepper, to taste
    • Crusty bread, to serve

    1. Preheat the oven to 180°C. Generously grease a large ovenproof casserole dish.
    2. Arrange a quarter of the sliced potatoes in the bottom of the dish, followed by a third of the onions, carrots, and corned beef. Season lightly with salt and black pepper. Repeat two additional times, finishing with a final layer of potatoes on top.
    3. Pour the beef stock evenly over the layered ingredients. Brush the top potato layer with melted butter.
    4. Cover the dish with a sheet of parchment paper followed by foil. Bake in the preheated oven for 50 minutes.
    5. Remove the parchment and foil. Continue baking for 15–20 minutes, or until the potatoes are golden and crisp on top.
    6. Let rest for a few minutes. Serve hot in generous portions with crusty bread on the side.

    Notes

    • Ensure the potatoes are thinly sliced for even cooking.
    • For extra flavor, you can add herbs such as thyme or rosemary.
    • Prep Time: 20 minutes
    • Cook Time: 1 hour 5 minutes
    • Category: Main Course
    • Method: Baking
    • Cuisine: British

    Nutrition

    • Serving Size: 1 portion
    • Calories: 450
    • Sugar: 5g
    • Sodium: 900mg
    • Fat: 20g
    • Saturated Fat: 8g
    • Unsaturated Fat: 10g
    • Trans Fat: 0g
    • Carbohydrates: 50g
    • Fiber: 6g
    • Protein: 25g
    • Cholesterol: 70mg

    Sharing is caring!