Blog

  • Thai Peanut Chicken Buddha Bowl

    Thai Peanut Chicken Buddha Bowl


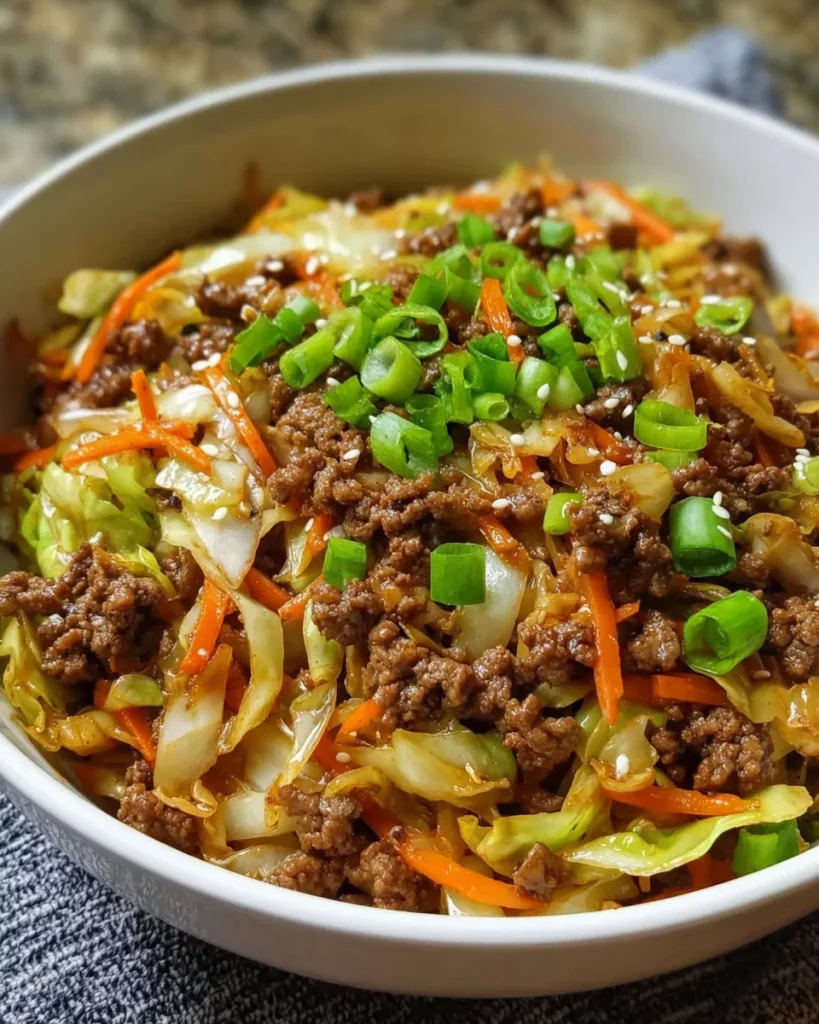
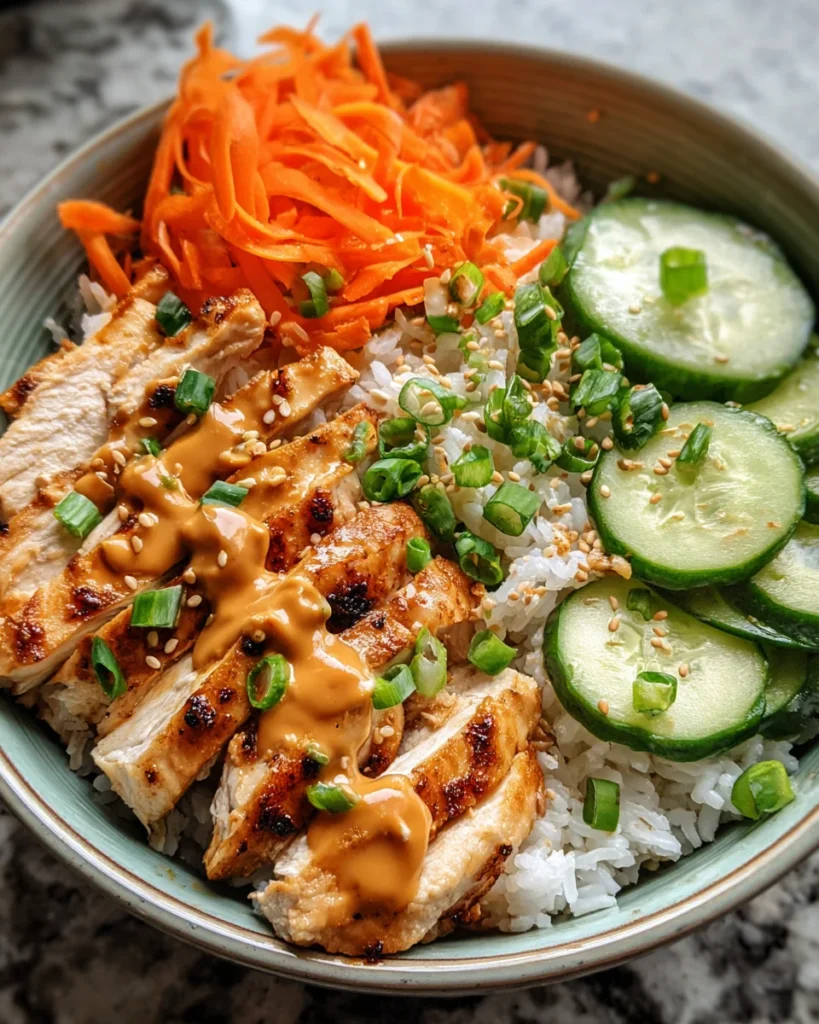
    Introduction to Thai Peanut Chicken Buddha Bowl

    Let’s be real, life can get hectic! With the kids’ activities, work deadlines, and dinner prep looming, it’s easy to feel overwhelmed. That’s where my Thai Peanut Chicken Buddha Bowl comes to the rescue! This dish is not just a quick solution for a busy day; it’s a delightful way to treat yourself and your loved ones. Picture a vibrant bowl filled with tender chicken, colorful veggies, and a luscious peanut sauce! It’s a nutritious meal that doesn’t skimp on flavor, making it an ideal choice for any day of the week.

    Why You’ll Love This Thai Peanut Chicken Buddha Bowl

    This Thai Peanut Chicken Buddha Bowl is the answer to your mealtime prayers! It’s quick to whip up, taking just 25 minutes from start to finish. Not only is it easy, but it’s also packed with flavors that will have your family begging for seconds. Plus, you can customize it to fit your mood or what’s in the fridge. Trust me, this bowl will quickly become a hero in your busy kitchen!

    Ingredients for Thai Peanut Chicken Buddha Bowl

    Here’s what you’ll need to create your delicious Thai Peanut Chicken Buddha Bowl. Each ingredient plays a crucial role in crafting a vibrant and tasty meal.

    • Chicken breast: Sliced and seasoned, this lean protein is the star of the bowl, adding taste and substance.
    • Cooked rice or quinoa: These whole grains serve as the hearty base, giving you that satisfying feel. Both options work well, depending on your preference.
    • Shredded carrots: They add a sweet crunch and a pop of color. Plus, they’re loaded with vitamins!
    • Sliced cucumbers: These refreshing bites provide a cool contrast to the warmth of the chicken and grains.
    • Peanut sauce: The creamy, nutty goodness ties everything together, enhancing flavors with its rich texture.

    If you’re curious about the specific quantities, don’t worry! You’ll find those at the bottom of this article, along with a handy printable version.

    How to Make Thai Peanut Chicken Buddha Bowl

    Ready to dive into the deliciousness? Making your Thai Peanut Chicken Buddha Bowl is a breeze! Follow these steps, and you won’t just have a meal; you’ll have a culinary experience that’ll leave your family smiling.

    Step 1: Cook the Chicken

    Start by heating a non-stick skillet over medium heat. Add a splash of oil, then toss in your seasoned chicken breast. Sizzle it until it’s golden and cooked through, which should take about 7-10 minutes. Don’t forget to flip it occasionally to ensure even cooking. Nothing beats that crispy, slightly charred goodness! When it’s done, remove it from the heat and let it rest for a few minutes. Trust me, this will keep it juicy!

    Step 2: Prepare the Rice or Quinoa

    While the chicken is cooking, you can prepare your rice or quinoa. If you have pre-cooked rice or quinoa hanging out in your fridge, you’re in luck! Just warm it up in the same skillet for about 2-3 minutes. If you’re cooking from scratch, follow the package instructions. The fluffy grains will act like a cozy bed for all your toppings!

    Step 3: Assemble the Buddha Bowl

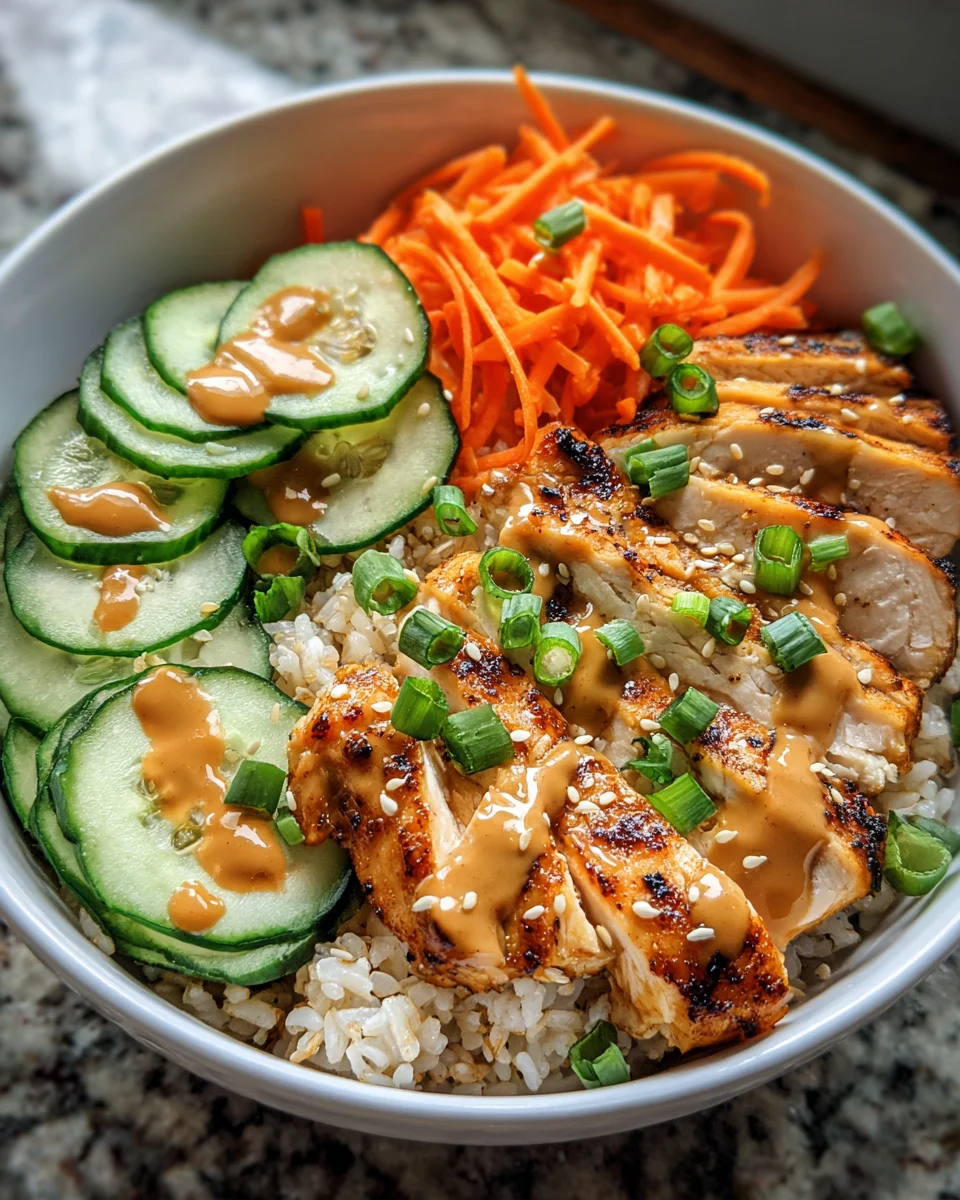
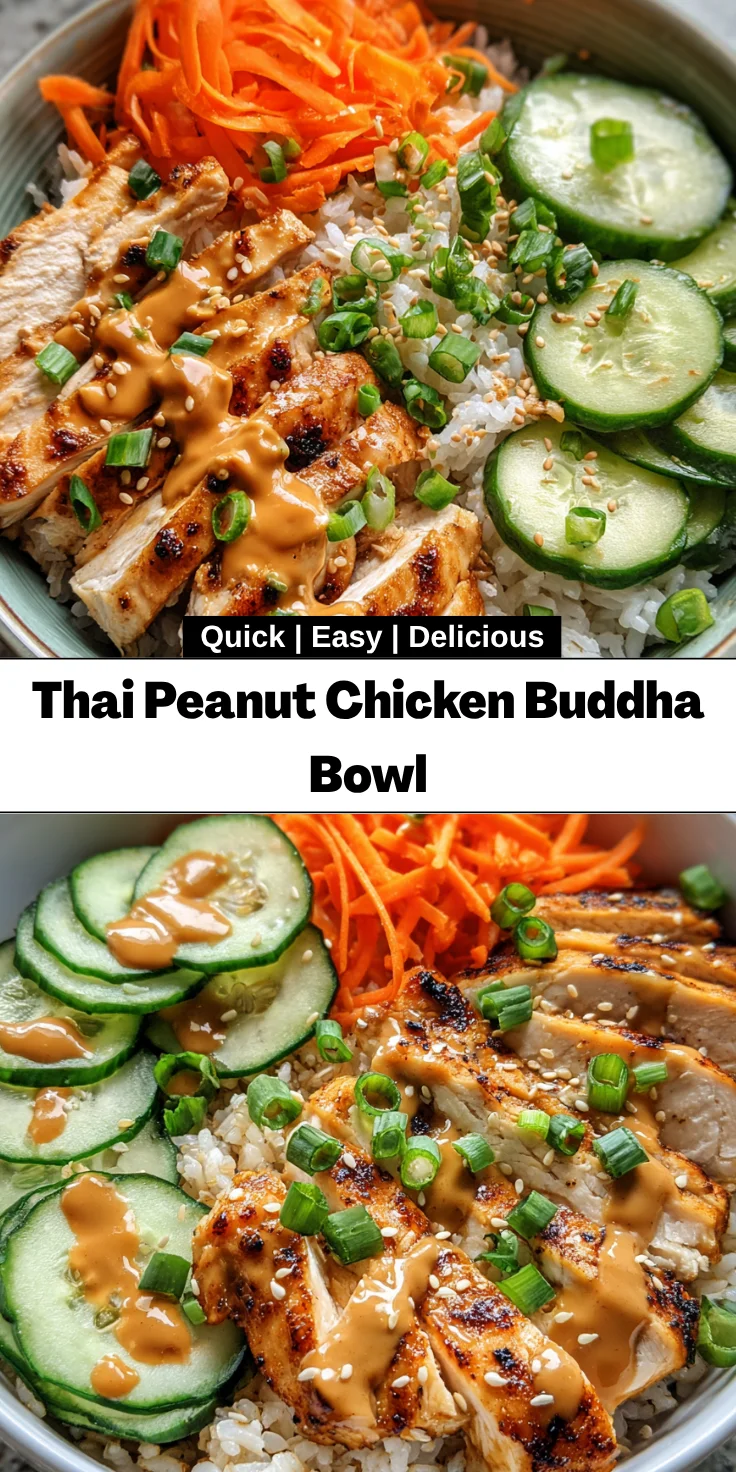
    Now comes the fun part—assembly! In a bowl, layer the warmed rice or quinoa as your base. Top it with your beautiful, sliced chicken, alongside those vibrant shredded carrots and crunchy cucumber slices. Feel free to get creative and pile on more veggies if you like. The beauty of a Buddha bowl is that it’s all about balance and presentation!

    Step 4: Garnish and Serve

    Finally, drizzle your beloved peanut sauce generously over the top. Don’t skimp here; it adds a luscious touch! For an extra kick, garnish with freshly chopped green onion and a sprinkle of sesame seeds. This will give your bowl that restaurant-quality flair! Serve immediately and savor the flavors!

    Tips for Success

    • Prep all your ingredients beforehand to streamline the cooking process.
    • Use cooked rotisserie chicken for a time-saving shortcut without sacrificing flavor.
    • Experiment with different vegetables based on what’s in season or your family’s favorites.
    • Make extra peanut sauce to keep on hand for future bowls or dressings!
    • Serve in colorful bowls to make the meal even more appealing.

    Equipment Needed

    • Non-stick skillet: A must for cooking the chicken evenly. A regular skillet works too if you use a little extra oil.
    • Cutting board and knife: Essential for slicing your veggies and chicken.
    • Bowl: Any size will do for assembling your Buddha bowl.
    • Measuring cups: Handy for portioning out your grains and sauce.

    Variations of Thai Peanut Chicken Buddha Bowl

    • Vegetarian Option: Swap the chicken for crispy tofu or tempeh. Both options add protein without losing that satisfying crunch.
    • Add a Spicy Twist: Mix in some sliced jalapeños or a drizzle of sriracha to spice things up! It’s perfect for those who love a bit of heat.
    • Healthy Greens: Incorporate fresh spinach, kale, or even zoodles (zucchini noodles) for an extra boost of nutrients and flavor.
    • Nut-Free Version: Use sunflower seed butter instead of peanut sauce to cater to those with nut allergies while still keeping it creamy.
    • Quinoa Variations: Try swapping your rice for other grains like farro or barley for unique textures and flavors.

    Serving Suggestions for Thai Peanut Chicken Buddha Bowl

    • Pair your bowl with a light cucumber salad for a refreshing contrast.
    • Serve alongside steamed edamame for an extra protein punch.
    • Enhance the experience with a cold iced tea or lemonade.
    • Garnish with lime wedges for a zesty finish.

    FAQs about Thai Peanut Chicken Buddha Bowl

    Here are some common questions that might pop up about this tasty Thai Peanut Chicken Buddha Bowl. Don’t worry, I’ve got you covered!

    Can I make this bowl ahead of time? Absolutely! You can pre-cook the chicken and other ingredients. Just store them separately and assemble your bowl when you’re ready to eat. This makes for easy meal prep!

    What can I substitute for peanut sauce? If you’re not a fan of peanuts, try using sesame sauce or tahini. Both options will add a creamy texture and delicious flavor to your bowl.

    Is this recipe gluten-free? Yes, indeed! As long as you ensure your peanut sauce is gluten-free (many are), this Thai Peanut Chicken Buddha Bowl fits perfectly into a gluten-free diet.

    Can I use different proteins? Of course! Feel free to swap the chicken for grilled shrimp, beef, or even chickpeas for a vegetarian alternative.

    How do I store leftovers? Store any leftovers in an airtight container in the fridge for up to three days. The flavors will meld together beautifully!

    Final Thoughts

    Creating this Thai Peanut Chicken Buddha Bowl is more than just whipping up a meal; it’s a celebration of flavors, colors, and nourishment. Every scoop brings a smile, reminding me that cooking can be both simple and enjoyable. I love how this recipe transforms a chaotic night into a moment of togetherness around the table. Plus, it’s a dish full of personality, perfect for sharing stories and laughter. So, whether you’re feeding a crowd or treating yourself, embrace the joy this bowl brings. Trust me, it will quickly become a cherished favorite in your kitchen!


    Print

    clock clock iconcutlery cutlery iconflag flag iconfolder folder iconinstagram instagram iconpinterest pinterest iconfacebook facebook iconprint print iconsquares squares iconheart heart iconheart solid heart solid icon

    Description

    A delicious and nutritious Thai Peanut Chicken Buddha Bowl perfect for a wholesome meal.


    • 1 lb chicken breast, sliced and seasoned
    • 3 cups cooked rice or quinoa
    • 1 cup shredded carrots
    • 1/2 cup sliced cucumbers
    • 1/4 cup peanut sauce

    1. Cook chicken until golden and cooked through.
    2. Assemble bowls with rice, chicken, veggies, and peanut sauce.
    3. Garnish with chopped green onion and sesame seeds.

    Notes

    • Feel free to add other vegetables as per your preference.
    • This bowl can be meal-prepped for the week.
    • Prep Time: 10 minutes
    • Cook Time: 15 minutes
    • Category: Main Course
    • Method: Stovetop
    • Cuisine: Thai

    Nutrition

    • Serving Size: 1 bowl
    • Calories: 450
    • Sugar: 5g
    • Sodium: 300mg
    • Fat: 15g
    • Saturated Fat: 3g
    • Unsaturated Fat: 10g
    • Trans Fat: 0g
    • Carbohydrates: 50g
    • Fiber: 5g
    • Protein: 30g
    • Cholesterol: 70mg

    Sharing is caring!

  • Chocolate Zucchini Brownies

    Chocolate Zucchini Brownies


    Introduction to Chocolate Zucchini Brownies

    Welcome, fellow chocoholics! If you’re anything like me, the thought of indulging in rich, fudgy chocolate zucchini brownies sends your taste buds into a joyful frenzy. This recipe is not only a delectable treat, but it’s also a fabulous way to sneak in some veggies, making it a guilt-free option for busy days. Imagine serving these to your family or friends, and watching their eyes light up as they savor each bite. Best of all, you can whip these up in no time, so let’s dive into the delicious world of chocolate zucchini brownies!

    Why You’ll Love This Chocolate Zucchini Brownies

    These chocolate zucchini brownies are a delightful blend of convenience and indulgence. They come together in just 45 minutes, making them perfect for a busy mom like myself. The rich, chocolatey flavor is so satisfying, your family won’t even notice the hidden veggies! Plus, they’re a nutritious way to satisfy your sweet tooth without feeling guilty. Trust me, everyone will be asking for seconds!

    Ingredients for Chocolate Zucchini Brownies

    Gathering the right ingredients is key to crafting the perfect chocolate zucchini brownies! Here’s a rundown of what you’ll need to create this delightful treat. Each ingredient plays a special role, so let’s explore them together:

    • All-purpose flour: The foundation of your brownies, providing structure and a chewy texture. If you prefer a gluten-free option, substitute with a gluten-free blend.
    • Unsweetened cocoa powder: This is where the rich, chocolatey flavor comes from! Opt for dark cocoa powder for a more intense flavor if you really want to impress.
    • Baking soda: This little helper works to give your brownies some lift, ensuring they’re not too dense. A must for that delightful brownie rise!
    • Salt: A pinch of salt amplifies sweetness and balances out the rich flavors in cocoa.
    • Unsalted butter: Melting the butter adds moisture and a luscious texture. You can also use coconut oil for a dairy-free alternative.
    • Granulated sugar: Sweet and satisfying, this is what brings balance to the cocoa’s bitterness. You can also consider substituting with coconut sugar for a healthier twist.
    • Vanilla extract: A splash of vanilla adds depth and warmth to the flavor profile, making your brownies irresistible.
    • Finely shredded zucchini: The secret ingredient! It adds moisture without overpowering the flavor, plus a nutritional boost. Make sure to squeeze out excess moisture for the best texture.
    • Chocolate chips: These little morsels of joy are what make every bite luscious and chocolaty. Feel free to use dark chocolate or even milk chocolate, depending on your taste!

    All these ingredients with exact measurements are detailed at the bottom of the article, ready for printing. Let’s get cooking!

    How to Make Chocolate Zucchini Brownies

    Step 1: Preheat and Prepare

    First things first, let’s get that oven warmed. Preheat your oven to 350°F (175°C). While it’s heating up, grab a 9×13 inch baking dish. Grease it well with butter or line it with parchment paper. This prevents your chocolate zucchini brownies from sticking and makes clean-up a breeze. Trust me, you’ll thank yourself later when you dive into these fudgy masterpieces!

    Step 2: Combine Dry Ingredients

    In a medium bowl, whisk together the all-purpose flour, unsweetened cocoa powder, baking soda, and salt. This step ensures your dry ingredients are well mixed, helping them blend perfectly into your batter. The cocoa powder gives it that deep chocolate flavor while the baking soda makes sure your brownies rise beautifully. Mix thoroughly until everything looks like a beautiful chocolatey blend. Your kitchen will start smelling divine!

    Step 3: Mix Wet Ingredients

    Now, it’s time to focus on the wet ingredients. In a large mixing bowl, combine the melted butter, granulated sugar, and vanilla extract. Use a whisk or an electric mixer to blend it until the mixture is smooth and creamy. This will create a luscious base that gives your brownies a rich texture. It’s like creating a joyful dance between ingredients. You’re doing great!

    Step 4: Combine Wet and Dry Mixtures

    Once your wet mixture is ready, it’s time to bring the two together. Gradually add the dry ingredients to the wet mixture. Stir gently until just combined—don’t overmix! You want a thick batter that’s slightly lumpy; it will bake up perfectly fudgy. Watching the transformation from two bowls to one delicious batter is truly a magical moment!

    Step 5: Fold in Zucchini and Chocolate Chips

    Now, for the best part! Gently fold in the finely shredded zucchini and chocolate chips into the batter. The zucchini will give moisture while remaining hidden, making it a delightful surprise. Use a spatula to ensure everything is mixed evenly—this way, every bite will be a heavenly combination of rich chocolate and secret veggie goodness. My kids never suspect a thing!

    Step 6: Bake the Brownies

    Transfer your fabulous batter into the prepared baking dish, smoothing it out with a spatula. Slip the dish into your preheated oven and let these brownies bake for about 25-30 minutes. The aroma in your home will be tantalizing! You’ll know they’re ready when a toothpick inserted into the center comes out clean. Let them cool a bit before slicing; the wait will be worth it.

    Tips for Success

    • Make sure to squeeze out excess moisture from the zucchini for perfectly textured brownies.
    • For a richer flavor, try using dark chocolate chips or dark cocoa powder.
    • Keep an eye on your baking time; ovens vary, so check for doneness a few minutes early.
    • Let the brownies cool completely before slicing; this helps them hold their shape.
    • Double the recipe and share with friends or neighbors for a sweet surprise!

    Equipment Needed

    • Mixing bowls: Use any size, but I recommend one large and one medium for ease.
    • Whisk: A whisk is essential for mixing. A fork works in a pinch!
    • Spatula: To fold in those delicious ingredients and spread the batter smoothly.
    • Baking dish: A 9×13 inch dish is ideal, but a smaller dish will work too—just adjust baking time.
    • Sharp knife: To slice the brownies into perfect squares—don’t forget to use a serrated knife!

    Variations for Chocolate Zucchini Brownies

    • Nutty Delight: Add chopped walnuts or pecans for a crunchy texture. They pair wonderfully with chocolate!
    • Sweetened with Love: Substitute granulated sugar with maple syrup or honey for a natural sweetness.
    • Vegan Option: Replace the butter with coconut oil and use a flaxseed meal mixed with water instead of eggs. This keeps it plant-based!
    • Spice it Up: A teaspoon of cinnamon or a dash of cayenne pepper can elevate the flavor profile, giving your brownies a unique twist.
    • Fruit Fusion: Mix in mashed bananas or applesauce for extra moisture and a hint of fruity goodness.
    • Gluten-Free Version: Use almond flour or a gluten-free baking blend to cater to dietary needs.

    Serving Suggestions

    • Serve warm with a scoop of vanilla ice cream for an indulgent dessert experience.
    • Pair with a rich cup of coffee or a chilled glass of almond milk for a delightful treat.
    • Dust with powdered sugar or drizzle with melted chocolate for an elegant presentation.
    • Top with fresh berries or a dollop of whipped cream for a refreshing twist!

    FAQs about Chocolate Zucchini Brownies

    Can I taste the zucchini in these brownies?

    Not at all! The finely shredded zucchini adds moisture without overpowering the rich chocolate flavor. Your family will be too busy enjoying the fudgy goodness to notice those hidden veggies!

    How should I store my chocolate zucchini brownies?

    Store them in an airtight container at room temperature for up to three days. If you want to keep them longer, refrigerate for up to a week. Trust me, they make an irresistible snack!

    Can I freeze chocolate zucchini brownies?

    You absolutely can! Wrap them tightly in plastic wrap or foil, then place them in a freezer-safe container. They’ll stay fresh for up to three months—perfect for a quick dessert fix later!

    What can I use as a substitute for cocoa powder?

    If you find yourself out of cocoa powder, don’t worry! You can use unsweetened carob powder as a substitute. It has a similar flavor and will give you delicious brownies!

    Are these brownies suitable for a gluten-free diet?

    Yes! You can swap the all-purpose flour with a gluten-free baking blend. Just make sure to check the flour blend’s instructions for the best results.

    Final Thoughts

    There’s something truly magical about baking chocolate zucchini brownies. It’s not just about satisfying that sweet tooth; it’s about creating cherished moments with family and friends. From the rich aroma filling your kitchen to the joy on your loved ones’ faces, this recipe is a celebration of indulgence wrapped in healthy goodness. As a busy mom, I cherish recipes that allow me to enjoy the culinary journey without sacrificing taste. So go ahead, gather those ingredients, and make some memories. Trust me, these brownies will not only delight your taste buds but also nourish your heart!


    Print

    clock clock iconcutlery cutlery iconflag flag iconfolder folder iconinstagram instagram iconpinterest pinterest iconfacebook facebook iconprint print iconsquares squares iconheart heart iconheart solid heart solid icon

    Description

    Indulge in these delicious and healthy chocolate zucchini brownies that are rich in flavor and packed with hidden nutrients.


    • 2 cups of all-purpose flour
    • 1⁄2 cup of unsweetened cocoa powder
    • 1 1/2 teaspoons of baking soda
    • 1 teaspoon of salt
    • 1⁄2 cup of unsalted butter, melted
    • 1 1/2 cups of granulated sugar
    • 2 teaspoons of vanilla extract
    • 2 cups of finely shredded zucchini
    • 3⁄4 cup of chocolate chips

    1. Preheat your oven to 350°F (175°C) and grease a 9×13 inch baking dish.
    2. In a medium bowl, whisk together the flour, cocoa powder, baking soda, and salt until well combined.
    3. In a large bowl, mix the melted butter, sugar, and vanilla extract until smooth and creamy.
    4. Gradually add the dry ingredients to the wet ingredients, mixing until just combined. The batter will be thick.
    5. Gently fold in the shredded zucchini and chocolate chips until evenly distributed throughout the batter.
    6. Transfer the batter to the prepared baking dish, spreading it evenly with a spatula.
    7. Bake in the preheated oven for 25-30 minutes, or until a toothpick inserted into the center of the brownies comes out clean.
    8. Remove from the oven and allow the brownies to cool in the pan on a wire rack before slicing and serving.

    Notes

    • For a more intense chocolate flavor, use dark cocoa powder.
    • Store leftovers in an airtight container at room temperature for up to 3 days.
    • You can use gluten-free flour as a substitute for all-purpose flour if needed.
    • Prep Time: 15 minutes
    • Cook Time: 30 minutes
    • Category: Dessert
    • Method: Baking
    • Cuisine: American

    Nutrition

    • Serving Size: 1 brownie
    • Calories: 180
    • Sugar: 14g
    • Sodium: 150mg
    • Fat: 7g
    • Saturated Fat: 4g
    • Unsaturated Fat: 2g
    • Trans Fat: 0g
    • Carbohydrates: 26g
    • Fiber: 2g
    • Protein: 3g
    • Cholesterol: 15mg

    Sharing is caring!

  • Lemon Poppy Seed Zucchini Bread

    Lemon Poppy Seed Zucchini Bread


    Introduction to Lemon Poppy Seed Zucchini Bread

    Is there anything more comforting than the smell of freshly baked bread wafting through your home? I don’t think so! That’s why I’m excited to share my recipe for Lemon Poppy Seed Zucchini Bread. This delightful treat combines the brightness of lemon with the subtle crunch of poppy seeds and the hidden goodness of zucchini. It’s perfect for busy days when you’re juggling a million things or as a centerpiece for brunch with loved ones. Trust me, once you take that first blissful bite, you’ll want to make this your go-to recipe!

    Why You’ll Love This Lemon Poppy Seed Zucchini Bread

    This Lemon Poppy Seed Zucchini Bread is a true kitchen superhero! It comes together quickly, making it perfect for those hectic mornings or when friends drop by unexpectedly. The bright lemon flavor is refreshing, while poppy seeds add a delightful crunch. Plus, with the moisture from the zucchini, every bite is incredibly moist and satisfying. Who knew sneaky veggies could taste so good? Your family will be begging for more!

    Ingredients for Lemon Poppy Seed Zucchini Bread

    Gathering the right ingredients is half the fun of baking! Here’s what you’ll need to whip up this delightful Lemon Poppy Seed Zucchini Bread:

    • Large eggs: They help bind the ingredients and give the bread a lovely texture.
    • Vegetable oil: A gentle fat that keeps the bread moist and tender. You can also use melted coconut oil or applesauce for a healthier twist.
    • Lemon zest: This little powerhouse adds a burst of bright, citrus flavor without the acidity. Freshly grated zest is always best!
    • Lemon juice: A splash of tangy goodness that brightens the overall flavor. Make sure it’s fresh for maximum taste!
    • Granulated sugar: Sweetness is key! You can experiment with brown sugar or honey for a different flavor profile.
    • Baking powder: This leavening agent helps the bread rise. Double-check that it’s fresh for the best results.
    • Baking soda: Works in tandem with baking powder for that perfect lift.
    • Salt: Just a pinch enhances all the flavors, making them sing harmoniously.
    • All-purpose flour: This forms the main structure of the bread. You can substitute with whole wheat flour or gluten-free blends if desired.
    • Shredded zucchini: The secret weapon! Not only does it add moisture, but it also sneaks in some veggies. Drain it well to avoid a soggy loaf.
    • Poppy seeds: Fun little crunchers that add visual appeal and a nutty flavor. Feel free to add more if you love their texture!
    • For the glaze: Powdered sugar for sweetness and lemon juice, or a mix of lemon juice and milk to get the right consistency. Adjust to your taste preference!

    I’ll provide exact measurements towards the bottom of the article for your convenience. Happy baking!

    How to Make Lemon Poppy Seed Zucchini Bread

    Step 1: Preheat and Prepare

    Let’s kick things off by preheating your oven to 350°F. This ensures our Lemon Poppy Seed Zucchini Bread bakes evenly from the get-go.

    While that’s warming up, grab a 9×5 loaf pan. Grease it lightly with some vegetable oil or butter. For extra confidence, line it with parchment paper. Trust me, that little trick makes removing the bread a breeze!

    Step 2: Whisk Wet Ingredients

    In a sizeable mixing bowl, take your whisk and combine the eggs, oil, lemon zest, lemon juice, and sugar. It’s like a bright sunbeam on gray days! Stir until everything is well mixed and smooth.

    For the best results, beat those eggs first before adding other ingredients. This little technique gives your batter a fluffier texture.

    Step 3: Combine Dry Ingredients

    Next up, let’s whisk in the baking powder, baking soda, and salt. Mixing these first is crucial. It helps to ensure they’re well distributed throughout the batter, so the bread rises perfectly!

    Step 4: Fold in Flour

    Now, it’s time to gently fold in the all-purpose flour. Do this with care! Overmixing can lead to a dense loaf, and we want it light and fluffy. Just mix until you have no dry pockets left.

    Step 5: Add Zucchini and Poppy Seeds

    Once your flour is incorporated, it’s zucchini time! Gently fold in the shredded zucchini and poppy seeds. Ensure they’re evenly mixed, but remember, we’re keeping it gentle to maintain that lovely texture.

    Step 6: Bake the Bread

    Pour your beautifully mixed batter into the prepared loaf pan, smoothing it out with a spatula to ensure even baking. Pop it into the oven and set your timer for about 60-65 minutes.

    To check for doneness, insert a toothpick into the center. If it comes out clean with just a few crumbs, it’s ready to shine!

    Step 7: Cooling Process

    Once baked, remove the pan from the oven and let the bread cool for about 10 minutes. This step is essential; it helps the loaf maintain its shape.

    After that, carefully remove it from the pan and place it on a baking rack to cool completely. Letting it cool fully prevents sogginess and helps those delightful flavors develop.

    Step 8: Making the Glaze

    With your bread cooling, let’s whip up that zesty glaze! In a mixing bowl, whisk together the powdered sugar with lemon juice until you achieve a pourable but thick consistency.

    Here’s a tip: adjust the tartness by mixing in a bit of milk with the lemon juice if you prefer a sweeter glaze!

    Step 9: Glazing the Bread

    Once your bread is completely cool, pour the glaze over the top. Spread it out gently with a spatula if needed.

    Allow the glaze to set for a few minutes before slicing. This adds a beautiful, glossy finish that will leave everyone wanting more!

    Tips for Success

    • Ensure the zucchini is well-drained to avoid excess moisture, ensuring a perfect texture.
    • Use fresh lemon juice and zest for the best flavor impact—don’t skimp on freshness!
    • Keep an eye on the baking time; ovens can vary, so check for doneness a few minutes early.
    • Let the bread cool completely before glazing for a beautiful, non-soggy finish.
    • Adjust the glaze tartness by tweaking the lemon juice amount according to your taste.

    Equipment Needed

    • 9×5 loaf pan: Essential for baking, but any similar-sized pan will work.
    • Mixing bowls: A large bowl for the wet ingredients and a medium for the dry ones. You can also use a single bowl if you’re short on space.
    • Whisk: Perfect for mixing, but a fork or spoon can do the job too.
    • Spatula: Great for folding in ingredients and spreading the glaze.
    • Baking rack: If you don’t have one, a plate will work for cooling.

    Variations

    • Whole Wheat Option: Swap out half the all-purpose flour for whole wheat flour. This adds a nuttier flavor and boosts fiber!
    • Nutty Delight: Add 1/2 cup of chopped walnuts or pecans for an extra crunch and delightful flavor.
    • Fruit Infusion: Mix in 1/2 cup of blueberries or raspberries for a fruity twist that pairs wonderfully with lemon.
    • Dairy-Free: Use almond or coconut milk in the glaze to keep it dairy-free while still being delicious.
    • Spicy Kick: Add a teaspoon of cinnamon or a pinch of nutmeg to the batter for a warm, spicy undertone.

    Serving Suggestions

    • Coffee or Tea: Pair your Lemon Poppy Seed Zucchini Bread with a steaming cup of coffee or herbal tea for a delightful afternoon treat.
    • Fresh Fruit: Serve with a side of fresh berries or slices of citrus fruits to enhance the lemony goodness.
    • Presentation: Slice the bread and serve on a beautiful platter, garnished with lemon slices and a sprig of mint for an inviting look.

    FAQs about Lemon Poppy Seed Zucchini Bread

    Can I use frozen zucchini for this recipe?

    Absolutely! Just make sure to thaw and drain the zucchini thoroughly to avoid excess moisture in your Lemon Poppy Seed Zucchini Bread.

    How do I store leftovers?

    Store your cooled bread in an airtight container at room temperature for up to three days. For longer storage, wrap it tightly in plastic wrap and refrigerate for up to a week.

    Can I make this bread ahead of time?

    You can! This Lemon Poppy Seed Zucchini Bread stays delicious for several days, making it perfect for meal prep or special occasions. It also freezes beautifully, so feel free to double the recipe!

    What can I substitute for poppy seeds?

    If you’re not a fan of poppy seeds, you can easily substitute them with chia seeds or even sunflower seeds for a bit of crunch.

    Is this recipe easily adaptable for dietary restrictions?

    You bet! By making a few swaps, such as using gluten-free flour or dairy-free milk in the glaze, you can cater this Lemon Poppy Seed Zucchini Bread to various dietary needs.

    Final Thoughts

    Creating this Lemon Poppy Seed Zucchini Bread is more than just baking—it’s about savoring life’s little moments. With its vibrant flavors and moist texture, this bread is sure to brighten up any day. Whether you’re enjoying a quiet afternoon slice or sharing it with friends at brunch, it brings joy to the table. Plus, knowing that you’re sneaking in some veggies makes it even better! Give this delightful recipe a try, and I promise it’ll become a cherished staple in your home, bringing smiles and warmth to your loved ones. Happy baking!


    Print

    clock clock iconcutlery cutlery iconflag flag iconfolder folder iconinstagram instagram iconpinterest pinterest iconfacebook facebook iconprint print iconsquares squares iconheart heart iconheart solid heart solid icon

    Description

    Lemon Poppy Seed Zucchini Bread is a moist and flavorful bread featuring bright lemon flavor, crunchy poppy seeds, and the goodness of zucchini.


    • 2 large eggs
    • 1/2 cup vegetable oil
    • 2 tsp lemon zest (zest from 1 large lemon)
    • 3 Tbsp lemon juice (1 large lemon)
    • 1 cup granulated sugar
    • 1 tsp baking powder
    • 1/2 tsp baking soda
    • 1/2 tsp salt
    • 2 cups all-purpose flour
    • 2 cups lightly packed shredded zucchini
    • 3 Tbsp poppy seeds
    • FOR THE GLAZE: 1 1/2 cups powdered sugar
    • 2 Tbsp lemon juice, or a mixture of lemon juice and milk (or cream) to thin

    1. Preheat oven to 350°F and grease a 9×5 loaf pan. Line with parchment paper for easy removal after baking.
    2. In a large mixing bowl, whisk together the eggs, oil, lemon zest, lemon juice, and sugar until well combined.
    3. Whisk in the baking powder, baking soda, and salt.
    4. Fold in the flour and mix just until everything is well incorporated and there are no dry pockets of flour left.
    5. Gently fold in the shredded zucchini and poppy seeds.
    6. Pour the batter into your prepared loaf pan and smooth it out to fill the pan evenly. Bake for about 60-65 minutes until risen, golden on top, and a toothpick inserted into the center comes out without wet batter.
    7. Allow the bread to cool in the pan for about 10 minutes before removing and allowing to cool fully on a baking rack.
    8. Once cool, make the glaze by whisking powdered sugar with lemon juice until pourable but still thick. Use all lemon juice for a tart glaze or a mixture of lemon juice and milk for a less tart glaze.
    9. Pour the glaze over the cooled bread and spread it over the top. Allow the glaze to harden before slicing.

    Notes

    • Ensure your zucchini is well-drained to avoid excess moisture.
    • The glaze can be adjusted in tartness by modifying the amount of lemon juice.
    • Prep Time: 15 minutes
    • Cook Time: 65 minutes
    • Category: Baking
    • Method: Baking
    • Cuisine: American

    Nutrition

    • Serving Size: 1 slice
    • Calories: 210
    • Sugar: 14g
    • Sodium: 140mg
    • Fat: 8g
    • Saturated Fat: 1g
    • Unsaturated Fat: 7g
    • Trans Fat: 0g
    • Carbohydrates: 33g
    • Fiber: 1g
    • Protein: 3g
    • Cholesterol: 40mg

    Sharing is caring!

  • Cottage Cheese Breakfast Muffins

    Cottage Cheese Breakfast Muffins


    Introduction to Cottage Cheese Breakfast Muffins

    Hey there, busy moms and professionals! Are you tired of the same old breakfast routine? Let me share my secret weapon: Cottage Cheese Breakfast Muffins! These little wonders are not just delicious; they pack a nutritious punch that will keep you fueled throughout your morning. Imagine starting your day with a warm muffin that’s loaded with protein and fresh veggies. Perfect for those hectic mornings or when you want to impress your loved ones, these muffins are a delightful choice. Let’s dive into this simple and satisfying recipe that takes breakfast to the next level!

    Why You’ll Love This Cottage Cheese Breakfast Muffins

    Cottage Cheese Breakfast Muffins are your go-to solution for a busy morning. They come together in just 40 minutes, making them perfect for meal prep! The burst of flavors from the veggies combined with the cheesy goodness is simply irresistible. They’re gluten-free and can be easily customized to suit picky eaters or dietary needs. Plus, you can enjoy them warm or as a quick snack on the go!

    Ingredients for Cottage Cheese Breakfast Muffins

    Gathering the right ingredients is key to whipping up these delightful Cottage Cheese Breakfast Muffins. Here’s what you’ll need:

    • Cottage cheese: This creamy base packs a protein punch and adds moisture to our muffins, making them fluffy and tasty.
    • Eggs: These little wonders are the binding agents, providing structure and richness while boosting the protein content.
    • Almond flour: Perfect for gluten-free baking, almond flour adds texture and a nutty flavor, elevating every bite.
    • Shredded cheddar cheese: This sharp cheese gives a delicious tang that pairs wonderfully with the other ingredients.
    • Shredded mozzarella cheese: Melts beautifully, adding creaminess and pulling everything together in gooey goodness.
    • Spinach: Packed with nutrients, spinach offers a burst of color and vital vitamins, making your muffins healthier.
    • Red bell pepper: Sweet and crunchy, this adds a nice crunch and vibrant visuals to the muffins.
    • Green onions: These add a mild onion flavor that complements the cheese and veggies perfectly.
    • Mushrooms: Earthy and savory, mushrooms contribute to the depth of flavor, making your muffins hearty.
    • Garlic powder: A pinch of garlic powder brings a warm, savory note; it’s a game-changer in any savory muffin!
    • Salt and pepper: Essential for flavor, they season the muffins and bring out the best in every ingredient.
    • Olive oil: Helps prevent sticking in the muffin tin and aids in achieving that lovely, golden-brown top.

    For the precise quantities, check the ingredient list at the bottom of the article for easy printing. Feel free to get creative! Substitute veggies, or swap out cheeses according to what’s in your fridge or your family’s taste preferences. The beauty of these muffins is their versatility!

    How to Make Cottage Cheese Breakfast Muffins

    Ready to whip up your Cottage Cheese Breakfast Muffins? It’s as easy as pie—or should I say, muffin? Just follow these simple, practical steps, and you’ll be on your way to a delicious start to your day!

    Step 1: Preheat and Prepare

    First things first, preheat your oven to 350°F (175°C). This step is crucial for baking your muffins evenly. While that’s heating up, grease your muffin tin with a little olive oil or cooking spray. You don’t want your muffins sticking around when it’s time to serve them!

    Step 2: Mix Wet Ingredients

    In a large bowl, whisk together the eggs and cottage cheese until the mixture is smooth and creamy. This combination serves as the lovely base of our muffins. The eggs provide structure, while the cottage cheese brings moisture and fluffiness. Trust me; this step is where the magic begins!

    Step 3: Add Dry Ingredients

    Now it’s time to stir in the almond flour, shredded cheddar, and mozzarella cheese. Combining these dry ingredients creates a fantastic texture and brings that cheesy goodness that’ll make your taste buds do a happy dance. Make sure everything is incorporated well—no clumps allowed!

    Step 4: Fold in Veggies

    Here comes the fun part! Gently fold in the chopped spinach, red bell pepper, green onions, and mushrooms. These colorful veggies not only bring flavor but also add a nutrition boost. Don’t rush; take your time mixing them in thoroughly to spread those vibrant flavors evenly throughout the muffin mix.

    Step 5: Season to Taste

    Next, sprinkle in the garlic powder, salt, and pepper. This is your chance to adjust the flavor profile—taste it! Adjust the seasoning according to your preference. A little extra garlic can amplify the savory notes, so test as you go.

    Step 6: Fill and Bake

    Carefully fill each muffin cup about 3/4 full with your delicious mixture. This gives them room to rise without overflowing. Once you’ve filled the tin, pop it into your preheated oven. Bake for 20-25 minutes or until the tops are firm and lightly golden. Your kitchen will smell amazing during this time!

    Step 7: Cool and Serve

    After baking, let your muffins cool for a few minutes in the pan. This makes them easier to handle. Once cool enough, gently remove them from the tin. Serve them warm and watch your family dig in! These muffins are perfect for breakfast or any time you need a nutritious snack.

    Tips for Success

    • Use fresh ingredients for the best flavor and nutrition.
    • Measure your ingredients carefully to maintain the perfect texture.
    • Let the muffins cool before storing them for better durability.
    • Experiment with different veggies and cheeses to find your favorite combo.
    • Consider doubling the recipe for extra muffins to freeze for later.

    Equipment Needed

    • Muffin tin: If you don’t have one, use silicone muffin cups for easy removal.
    • Mixing bowl: A large bowl is essential; alternatively, a stand mixer works well.
    • Whisk: A fork can substitute for simple blending.
    • Measuring cups and spoons: Essential for accurate ingredient quantities.
    • Spatula: A rubber spatula helps incorporate everything without leaving clumps.

    Variations on Cottage Cheese Breakfast Muffins

    • Herb-Infused: Add chopped fresh herbs like parsley, basil, or dill for a flavor explosion!
    • Spicy Kick: Toss in some diced jalapeños or red pepper flakes for those who like a bit of heat.
    • Cheese Lovers: Mix different types of cheese such as feta or goat cheese for a gourmet twist.
    • Sweet Option: For a sweeter muffin, incorporate some mashed bananas or grated zucchini, reducing the veggies slightly.
    • Protein Boost: Add cooked and crumbled turkey bacon or sausage for extra protein and flavor.
    • Grainy Goodness: Mix in a handful of oats or quinoa for added texture and health benefits.

    Serving Suggestions for Cottage Cheese Breakfast Muffins

    • Pair with fresh fruit, like berries or sliced bananas, for a refreshing balance.
    • Serve with a dollop of Greek yogurt for an extra protein boost.
    • A hot cup of herbal tea or coffee complements these muffins perfectly.
    • Top with a sprinkle of fresh herbs for a touch of elegance.
    • Enjoy alongside a green smoothie for a wholesome breakfast experience.

    FAQs about Cottage Cheese Breakfast Muffins

    Can I make these muffins ahead of time? Absolutely! Cottage Cheese Breakfast Muffins are ideal for meal prep. You can make them on the weekend, store them in the fridge for up to three days, or freeze them for longer storage. They’re perfect for busy mornings!

    Are Cottage Cheese Breakfast Muffins gluten-free? Yes! As long as you use almond flour, these muffins are totally gluten-free. You can enjoy them without worrying about gluten sensitivities!

    What can I substitute if I don’t have cottage cheese? If cottage cheese isn’t on hand, you can try ricotta cheese or Greek yogurt as an alternative. Each option will bring its unique texture and flavor to the muffins.

    Can kids enjoy these muffins? Of course! These muffins pack in the nutrition while being super tasty. You can even let your kids help mix in their favorite veggies for a fun cooking session.

    How do I reheat leftover muffins? Simply pop them in the microwave for about 15-20 seconds or warm them in the oven at 350°F for about 5 minutes. Enjoy them warm for the best taste!

    Final Thoughts

    Embracing the joy of baking Cottage Cheese Breakfast Muffins has been a delightful journey for me! Each muffin is a warm hug on a busy morning, filled with nutritious ingredients that fuel both body and spirit. Whether you’re rushing off to work or gathering with family, these muffins bring a tasty twist to breakfast. Plus, their flexibility means you can easily adapt them to your family’s preferences. I hope you find as much excitement in creating and savoring these muffins as I do. A fresh batch is always just a whisk away!


    Print

    clock clock iconcutlery cutlery iconflag flag iconfolder folder iconinstagram instagram iconpinterest pinterest iconfacebook facebook iconprint print iconsquares squares iconheart heart iconheart solid heart solid icon

    Description

    Cottage Cheese Breakfast Muffins are a nutritious and delicious way to start your day, packed with protein, veggies, and great flavors.


    • 1 cup cottage cheese
    • 6 large eggs
    • 1/2 cup almond flour
    • 1/4 cup shredded cheddar cheese
    • 1/4 cup shredded mozzarella cheese
    • 1/2 cup spinach, chopped
    • 1/4 cup red bell pepper, diced
    • 1/4 cup green onions, chopped
    • 1/4 cup mushrooms, chopped
    • 1/2 tsp garlic powder
    • Salt and pepper to taste
    • 1 tbsp olive oil

    1. Preheat your oven to 350°F (175°C) and grease a muffin tin with olive oil or cooking spray.
    2. In a large bowl, whisk together the eggs and cottage cheese until smooth and well-blended.
    3. Stir in the almond flour, cheddar cheese, and mozzarella cheese.
    4. Fold in the chopped spinach, red bell pepper, green onions, and mushrooms.
    5. Sprinkle in the garlic powder, salt, and pepper, and mix until well-combined.
    6. Evenly pour the mixture into the prepared muffin tin, filling each cup about 3/4 full.
    7. Bake in the preheated oven for 20-25 minutes or until firm and lightly golden on top.
    8. Let the muffins cool for a few minutes before removing them from the tin and serve warm.

    Notes

    • For a vegetarian option, ensure that the cheeses used are vegetarian-friendly.
    • Feel free to substitute or add any vegetables as per your preference.
    • These muffins can be stored in the fridge for up to 3 days or frozen for longer storage.
    • Prep Time: 15 minutes
    • Cook Time: 25 minutes
    • Category: Breakfast
    • Method: Baking
    • Cuisine: American

    Nutrition

    • Serving Size: 1 muffin
    • Calories: 120
    • Sugar: 1g
    • Sodium: 150mg
    • Fat: 6g
    • Saturated Fat: 2g
    • Unsaturated Fat: 4g
    • Trans Fat: 0g
    • Carbohydrates: 6g
    • Fiber: 1g
    • Protein: 9g
    • Cholesterol: 150mg

    Sharing is caring!

  • Healthy Sweet Potato Burrito Bowl

    Healthy Sweet Potato Burrito Bowl


    Introduction to Healthy Sweet Potato Burrito Bowl

    As a busy mom, I cherish meals that bring flavor and nutrition without demanding hours in the kitchen. That’s where my Healthy Sweet Potato Burrito Bowl shines! It’s the perfect quick solution for those hectic days when you need something satisfying yet wholesome. Just imagine roasted sweet potatoes, vibrant veggies, and creamy guacamole coming together in a vibrant bowl. This dish not only packs a flavor punch but also delights my family, making it an ideal choice to impress your loved ones. Let’s dive into this culinary adventure together!

    Why You’ll Love This Healthy Sweet Potato Burrito Bowl

    This Healthy Sweet Potato Burrito Bowl is more than just a meal; it’s a delightful escape from daily chaos! With its quick prep time, you’ll have dinner ready in under 45 minutes. Each bite is a burst of flavors, thanks to the roasted sweet potatoes and fresh toppings. Plus, it’s a nourishing option that satisfies even the pickiest of eaters. A bowl of happiness awaits!

    Ingredients for Healthy Sweet Potato Burrito Bowl

    Let’s gather our colors and flavors for the Healthy Sweet Potato Burrito Bowl. Here’s a quick look at the ingredients you’ll need:

    • Sweet potatoes: These beauties are the star of the show, packed with vitamins and that natural sweetness we love.
    • Olive oil: A drizzle enhances flavors while giving the sweet potatoes that golden roast.
    • Smoked paprika: This spice adds a warm, smoky depth that elevates the dish to another level.
    • Cumin: A pinch brings a lovely earthiness; it’s like a hug for your taste buds.
    • Garlic powder: Instant flavor boost without the fuss—who doesn’t love garlic?
    • Salt: Just enough to bring out all the other flavors; it really makes a difference.
    • Black beans: A fantastic source of protein that adds a hearty touch and a lovely creamy texture.
    • Corn kernels: Fresh or frozen, they bring sweetness and crunch, balancing the softness of everything else.
    • Romaine or mixed greens: They add a crisp, refreshing element; think of them as a bed of love for your other ingredients.
    • Diced tomatoes: Juicy and bright, they bring a freshness that contrasts beautifully with the roasted flavors.
    • Chopped cilantro: This herb adds a burst of freshness and a touch of vibrancy—perfect for that vibrant bowl.
    • Guacamole: Creamy and rich, it’s the crowning jewel of your burrito bowl, turning everything delicious!
    • Lime wedges: Along with the guacamole, a squeeze of lime can elevate the flavors, adding zest.

    Got customizable taste buds? Feel free to swap in your favorite toppings, like jalapeños for heat or cheese for a creamier texture. For exact measurements and easy printing, check the bottom of the article!

    How to Make Healthy Sweet Potato Burrito Bowl

    Preparing the Sweet Potatoes

    Preheat the Oven

    First things first, let’s get that oven toasty! Preheating it to 400°F (200°C) is crucial. This step ensures that your sweet potatoes roast evenly, giving them that glorious caramelization we all crave. There’s nothing like the aroma of deliciously roasted veggies filling your kitchen, right?

    Roasting Process

    Tossing the Sweet Potatoes

    Now, let’s bring those sweet potatoes to life! In a large bowl, toss your diced sweet potatoes with olive oil, smoked paprika, cumin, garlic powder, and salt. Each spice plays a unique role—smoked paprika adds a hint of warmth, while cumin brings in that earthy depth. Together, they create a beautiful flavor party! Spread your seasoned sweet potatoes in a single layer on a baking sheet, making sure they have room to breathe. Nobody likes overcrowded veggies!

    Assembling the Burrito Bowl

    Layering Ingredients

    Once your sweet potatoes are golden and tender, it’s time to layer your burrito bowl. Start with a generous handful of those crisp romaine or mixed greens at the bottom of your bowl. I love how they act as a fresh canvas for all the other ingredients. Then, arrange roasted sweet potatoes, black beans, corn, and diced tomatoes around the greens. Think of it as a colorful work of art! The vibrant hues will make anyone’s mouth water.

    Adding Toppings

    Guacamole & Garnish

    Here comes the star of the show—guacamole! Add a generous scoop right in the center of your burrito bowl. Not only does it add creamy richness, but its luscious green color pops against the other elements. For the finishing touch, sprinkle chopped cilantro over everything for a burst of freshness. If you want to elevate the experience, don’t forget a squeeze of lime for that zesty kick. Serve immediately and watch as everyone digs into this vibrant feast!


    Tips for Success

    • Prep your ingredients ahead of time to save precious minutes when cooking.
    • Store leftover roasted sweet potatoes in an airtight container for easy meal prep.
    • Feel free to mix up the spices based on your family’s preferences.
    • Experiment with different greens, like spinach or arugula, for a fresh spin.
    • Make extra guacamole—it’s always a hit at the table!

    Equipment Needed

    • Baking sheet: A sturdy tray where the magic happens—use parchment paper for easy cleanup.
    • Mixing bowl: For tossing your sweet potatoes; a large bowl ensures everything fits comfortably.
    • Measuring spoons: For precise seasoning; feel free to eyeball if you’re comfortable!
    • Knife and cutting board: Essential for dicing those sweet potatoes and chopping veggies.

    Variations of Healthy Sweet Potato Burrito Bowl

    • Quinoa Twist: Swap rice or greens for quinoa. It adds protein and a lovely nutty flavor.
    • Spicy Kick: Top with sliced jalapeños or a drizzle of your favorite hot sauce for heat.
    • Protein Boost: Add grilled chicken, shrimp, or tofu for a heartier meal.
    • Dairy Lovers: Sprinkle crumbled feta or shredded cheese on top for extra creaminess.
    • Vegan Delight: For a pure vegan option, use dairy-free cheese and ensure your guacamole is made with a squeeze of lime.

    Serving Suggestions for Healthy Sweet Potato Burrito Bowl

    • Side Salad: Serve with a light side salad drizzled with lemon vinaigrette for a refreshing contrast.
    • Refreshing Beverage: Pair it with iced herbal tea or a zesty lime soda to complement the flavors.
    • Presentation: Use colorful bowls to enhance the vibrant appearance of your burrito bowl—it’s all about the visual appeal!

    FAQs about Healthy Sweet Potato Burrito Bowl

    Can I make the Healthy Sweet Potato Burrito Bowl ahead of time?

    Absolutely! You can roast the sweet potatoes and prep the beans and veggies in advance. Just keep everything in airtight containers in the fridge. When it’s meal time, simply assemble your bowl with fresh greens and guacamole!

    What can I substitute for black beans?

    If black beans aren’t your thing, feel free to use pinto beans, chickpeas, or even lentils. They all bring a different texture and flavor but keep the meal deliciously nutritious.

    Is the Healthy Sweet Potato Burrito Bowl gluten-free?

    Yes! This bowl is naturally gluten-free, making it a great option for anyone with gluten sensitivities. Just be sure any toppings like sauces or extras are gluten-free as well.

    How can I store leftovers?

    Leftover bowls can be stored in the fridge for about 3 days. Keep the components separate until you’re ready to enjoy them again to maintain freshness. Reheat the sweet potatoes in the oven or microwave, and skip the greens since they’ll lose their crispness.

    Can I add extra toppings to this burrito bowl?

    Definitely! This Healthy Sweet Potato Burrito Bowl is versatile. You can add shredded cheese, avocado slices, olives, or even roasted veggies. Let your creativity shine!

    Final Thoughts

    This Healthy Sweet Potato Burrito Bowl is more than just a meal; it’s a celebration of flavors and nourishment wrapped into one vibrant dish. With each bite, I feel the joy of cooking for my family, knowing I’m sharing something truly wholesome. It’s not just about satisfying hunger; it’s about creating memories around the dinner table. Whether you’re enjoying it warm or fresh from the fridge, this bowl brings comfort and delight. I can’t wait for you to experience the love and happiness this recipe brings to your own kitchen. Happy cooking!


    Print

    clock clock iconcutlery cutlery iconflag flag iconfolder folder iconinstagram instagram iconpinterest pinterest iconfacebook facebook iconprint print iconsquares squares iconheart heart iconheart solid heart solid icon

    Description

    A nutritious and flavorful burrito bowl featuring roasted sweet potatoes and fresh toppings.


    • 2 medium sweet potatoes, peeled and diced
    • 1 tbsp olive oil
    • 1 tsp smoked paprika
    • ½ tsp cumin
    • ½ tsp garlic powder
    • ½ tsp salt
    • 1 cup cooked black beans (drained and rinsed)
    • 1 cup corn kernels (fresh, frozen, or canned)
    • 1 cup chopped romaine or mixed greens
    • ½ cup diced tomatoes
    • ¼ cup chopped cilantro
    • ½ cup guacamole
    • Lime wedges, optional

    1. Preheat oven to 400°F (200°C). Toss diced sweet potatoes with olive oil, paprika, cumin, garlic powder, and salt. Spread on a baking sheet and roast for 25-30 minutes, flipping halfway.
    2. While potatoes roast, rinse and drain the beans and corn. Dice the tomatoes, chop the cilantro and greens.
    3. If making fresh guacamole, mash avocados with salt and lime juice.
    4. To assemble, start with greens in a bowl. Arrange sweet potatoes, black beans, corn, tomatoes, and cilantro around the bowl.
    5. Add a generous scoop of guacamole in the center.
    6. Squeeze lime over the top and enjoy immediately.

    Notes

    • This dish can be served warm or cold.
    • Feel free to add other toppings like jalapeños or cheese.
    • Prep Time: 15 minutes
    • Cook Time: 30 minutes
    • Category: Main Dish
    • Method: Roasting
    • Cuisine: Mexican

    Nutrition

    • Serving Size: 1 bowl
    • Calories: 350
    • Sugar: 5g
    • Sodium: 400mg
    • Fat: 12g
    • Saturated Fat: 1.5g
    • Unsaturated Fat: 10.5g
    • Trans Fat: 0g
    • Carbohydrates: 55g
    • Fiber: 10g
    • Protein: 10g
    • Cholesterol: 0mg

    Sharing is caring!

  • Maple Pecan Salmon

    Maple Pecan Salmon


    Introduction to Maple Pecan Salmon

    As a busy mom, I know how precious dinner time can be. That’s why I love recipes like Maple Pecan Salmon! This deliciously glazed salmon dish is a gift from the culinary gods, combining sweet maple syrup and crunchy pecans for a flavor explosion. It’s not just quick and easy; it’s a meal that makes you shine in the kitchen. Whether you’re trying to whip up a weekday family dinner or impressing friends on the weekend, this recipe has your back. Trust me, your loved ones will be raving about it!

    Why You’ll Love This Maple Pecan Salmon

    This Maple Pecan Salmon is the ultimate solution for hectic weeknights. It takes just 25 minutes from start to finish, ensuring you spend less time in the kitchen and more time with your family. With its irresistible sweet and nutty glaze, this dish will elevate your dinner game without adding stress. Plus, it’s a healthy option that doesn’t skimp on flavor—perfect for busy moms like us who crave both convenience and taste!

    Ingredients for Maple Pecan Salmon

    Now, let’s gather everything we need for this delicious Maple Pecan Salmon. Below is a list of ingredients that will turn your dinner into a delightful experience. Don’t worry; you’ll find precise measurements at the bottom of this article for easy printing!

    • Salmon fillets: Choose skin-on or skinless, depending on your preference. Salmon is packed with omega-3 fatty acids, making it a healthy choice for your family.
    • Garlic powder: This adds a savory depth to the salmon. If you’re a garlic lover, feel free to adjust the amount!
    • Kosher salt and pepper: Essentials for seasoning, enhancing the overall flavor of the dish.
    • Olive oil: A versatile oil that helps the seasoning stick to the salmon, ensuring every bite is flavorful. Avocado oil is an excellent alternative if you prefer it.
    • Pecans: Chopped pecans bring a delightful crunch and nutty flavor, elevating the glaze.
    • Maple syrup: This is the star of the show! Its natural sweetness balances beautifully with the nuttiness of the pecans.
    • Apple cider vinegar: A splash of tanginess that complements the sweetness of the maple syrup, creating a harmonious glaze.
    • Dijon mustard: This adds a subtle bite, tying all the flavors together. If you prefer milder mustard, regular yellow mustard works too.

    With these ingredients, you’re well on your way to creating an unforgettable meal that’s simple yet sophisticated!

    How to Make Maple Pecan Salmon

    Now that you have your ingredients ready, let’s dive into the steps to create this delightful Maple Pecan Salmon! Each step is straightforward, making it easy for any home cook to tackle. I promise you’ll feel like a kitchen rockstar by the end!

    Step 1: Preheat the Oven

    Preheating the oven to 400ºF is your first move. This simple yet essential step ensures that the salmon cooks evenly, keeping it moist and tender. A hot oven helps seal in the flavors and gives your dish that perfect flaky texture.

    Step 2: Prepare the Salmon Fillets

    Next, let’s season those salmon fillets! Rub them with garlic powder, kosher salt, and pepper. This seasoning mix is key to enhancing the salmon’s natural flavors. Don’t be shy—get your hands in there for a good coating! The garlic powder adds a savory touch that really elevates the dish.

    Step 3: Bake the Salmon

    Time to bake! Place the seasoned salmon fillets in a rectangular baking dish and pop them in the oven. Bake for about 12 to 15 minutes. The secret to knowing they’re done? The salmon should flake easily with a fork. That tender, juicy texture is what we’re after!

    Step 4: Make the Maple Pecan Glaze

    While the salmon bakes, let’s whip up that delightful glaze. Start by heating a tablespoon of olive oil in a small pan over medium heat. Add the chopped pecans and toast them for 3-4 minutes while stirring often. Watch closely—they can burn quickly! Once they start to darken, add the maple syrup, apple cider vinegar, and Dijon mustard. Allow this mixture to bubble and thicken for about 3-4 more minutes, creating a rich glaze that’s bursting with flavor.

    Step 5: Combine Glaze with Salmon

    When the salmon is perfectly cooked, carefully remove it from the oven. Now comes the fun part: spoon that gorgeous maple pecan glaze over each fillet. Drizzle generously, making sure every side gets covered in that sweet, nutty goodness. Your Maple Pecan Salmon is now ready to shine on your dinner table!

    Tips for Success

    • Keep an eye on the pecans while toasting to prevent burning.
    • For a crispier texture, broil the salmon for the last minute after glazing.
    • Let the salmon rest for a minute before serving to allow the juices to redistribute.
    • Feel free to experiment with seasonings; lemon zest adds a refreshing twist!
    • Always taste the glaze before adding it to ensure it’s to your liking.

    Equipment Needed for Maple Pecan Salmon

    • Baking dish: A rectangular or glass baking dish works well. If you don’t have one, a sheet pan will do in a pinch.
    • Small pan: For preparing the glaze, any non-stick skillet will suffice.
    • Mixing bowl: Use this for tossing the salmon with seasonings.
    • Measuring spoons: Helpful for precise ingredient proportions.

    Variations of Maple Pecan Salmon

    • Sweet and Spicy: Add a pinch of cayenne pepper or red pepper flakes to the glaze for a kick! The heat contrasts beautifully with the sweetness of the maple syrup.
    • Herb-Infused: Mix in fresh herbs like thyme or rosemary into the glaze. This twist brings an aromatic layer that brightens the dish.
    • Citrus Zing: Incorporate a splash of fresh orange or lemon juice into the glaze for a refreshing citrus flavor. It complements the sweetness wonderfully!
    • Nut-Free Option: Replace the pecans with sunflower seeds or pumpkin seeds. They offer a nice crunch without the nuts, perfect for those with allergies!
    • Maple Mustard Glaze: Skip the pecans altogether and ramp up the Dijon mustard for a sharper, tangy glaze that pairs well with the richness of the salmon.

    Serving Suggestions for Maple Pecan Salmon

    • Steamed Vegetables: Pair with vibrant steamed broccoli or asparagus for a lovely color contrast.
    • Fluffy Rice: Serve over a bed of jasmine or brown rice to soak up the delicious glaze.
    • Wine Pairing: A chilled white wine, like Sauvignon Blanc, complements the dish beautifully.
    • Garnish: Finish with a sprinkle of freshly chopped parsley for a pop of freshness!

    FAQs about Maple Pecan Salmon

    Got questions about this delectable Maple Pecan Salmon? Don’t worry, I’ve got you covered! Here are some frequently asked questions to help you along your cooking journey.

    Can I use frozen salmon for this recipe?

    Absolutely! Just make sure to thaw it completely before cooking. Frozen salmon can be just as tasty as fresh when prepared right.

    How do I know when the salmon is done cooking?

    The best way to check is by gently flaking the salmon with a fork. If it easily separates, it’s perfectly cooked! It should also have a nice, opaque color.

    Can I prepare the glaze in advance?

    Yes, you can! Make the maple pecan glaze ahead of time and store it in the fridge. Just warm it up briefly before drizzling it over the salmon.

    What sides pair well with Maple Pecan Salmon?

    This delicious dish goes hand-in-hand with steamed vegetables, a leafy salad, or fluffy rice. It’s quite versatile!

    Is this recipe suitable for meal prep?

    You bet! Simply cook the salmon and glaze, then store them separately. This way, you can enjoy your Maple Pecan Salmon throughout the week without losing flavor.

    Final Thoughts

    There’s something magical about making Maple Pecan Salmon. It’s not just a meal; it’s an experience filled with warmth and love. This dish brings smiles to the dinner table and creates beautiful memories that we cherish long after the meal is over. Imagine the laughter and sweet conversations shared over a delicious plate of salmon, perfectly glazed in that sweet, nutty goodness.

    Whether it’s a weeknight family dinner or a special occasion, this recipe effortlessly combines convenience and flavor. Try it out, and I promise it’ll soon become a beloved staple in your home!


    Print

    clock clock iconcutlery cutlery iconflag flag iconfolder folder iconinstagram instagram iconpinterest pinterest iconfacebook facebook iconprint print iconsquares squares iconheart heart iconheart solid heart solid icon

    Description

    A deliciously glazed salmon recipe featuring a sweet and nutty maple pecan glaze.


    • 4 salmon fillets, skin on or skinless
    • 1 teaspoon garlic powder
    • Kosher salt and pepper, to taste
    • 1 tablespoon olive oil
    • Glaze:
    • 1 tablespoon olive oil, or avocado oil
    • 2/3 cup pecans, chopped
    • 1/3 cup maple syrup
    • 2 tablespoons apple cider vinegar
    • 1 tablespoon Dijon mustard

    1. Preheat the oven to 400ºF.
    2. Rub the 4 salmon fillets with 1 teaspoon garlic powder, Kosher salt and pepper, and 1 tablespoon olive oil.
    3. Place the filets in a rectangular baking dish and bake for 12-15 minutes, or until flaky.
    4. Meanwhile, in a small pan, heat the 1 tablespoon olive oil for the glaze over medium heat. Add the 2/3 cup pecans and cook, stirring often, until they start to darken, around 3-4 minutes.
    5. Add the 1/3 cup maple syrup, 2 tablespoons apple cider vinegar, and 1 tablespoon Dijon mustard. Allow the sauce to bubble for 3-4 minutes, until it thickens to coat the back of a spoon.
    6. Once the salmon is done baking, remove from the oven and spoon over the maple pecan glaze.
    7. Garnish with freshly chopped parsley, if desired.

    Notes

    • Adjust the amount of garlic powder based on preference.
    • Make sure to monitor the pecans while toasting to prevent burning.
    • This dish pairs well with steamed vegetables or rice.
    • Prep Time: 10 minutes
    • Cook Time: 15 minutes
    • Category: Main Course
    • Method: Baking
    • Cuisine: American

    Nutrition

    • Serving Size: 1 salmon fillet
    • Calories: 350
    • Sugar: 10g
    • Sodium: 240mg
    • Fat: 20g
    • Saturated Fat: 3g
    • Unsaturated Fat: 15g
    • Trans Fat: 0g
    • Carbohydrates: 18g
    • Fiber: 2g
    • Protein: 25g
    • Cholesterol: 70mg

    Sharing is caring!

  • Soulful Ukrainian Cabbage Meat Rolls

    Soulful Ukrainian Cabbage Meat Rolls


    Introduction to Soulful Ukrainian Cabbage Meat Rolls

    Welcome to the wonderful world of Soulful Ukrainian Cabbage Meat Rolls! If you’re anything like me, life gets busy, and sometimes, we need a warm, comforting dish to bring everyone together. These rolls are a little hug on a plate, combining tender cabbage leaves with a lovingly seasoned filling of minced meat and rice. Perfect for a cozy family dinner or an impressive dish for guests, this recipe will not only satisfy your taste buds but also make your kitchen smell amazing. Let’s embark on this culinary adventure together!

    Why You’ll Love This Soulful Ukrainian Cabbage Meat Rolls

    You’re going to adore these Soulful Ukrainian Cabbage Meat Rolls for so many reasons! First off, they’re effortless to make, making them perfect for busy days. With just a bit of prep, you’ll have a hearty meal simmering away, filling your home with irresistible aromas. Plus, they’re versatile! You can customize the filling to suit your family’s preferences, making every bite a delightful surprise.

    Ingredients for Soulful Ukrainian Cabbage Meat Rolls

    To craft these delightful Soulful Ukrainian Cabbage Meat Rolls, gather the following ingredients:

    • Granulated garlic: Adds a punch of flavor without the hassle of peeling fresh cloves.
    • Paprika powder: Brings a subtle smokiness that warms your taste buds.
    • Ground coriander: A fragrant complement that enhances the savory notes.
    • Salt: Essential for drawing out the natural flavors of the ingredients.
    • Egg: Acts as a binding agent, keeping your filling together for a perfect roll.
    • Cooked rice: A hearty base that adds texture and helps stretch the filling.
    • Minced meat: Choose from chicken, beef, turkey, or pork—whatever suits your taste!
    • Grated carrot: Adds a touch of sweetness and beautiful color to the mix.
    • Chopped onion: Infuses a rich, aromatic flavor, making your filling irresistible.
    • Cabbage leaves: The star of the show, providing a tender wrap for your delicious filling.
    • Sour cream: Adds creaminess and tang; enjoy it as a garnish, too!
    • Tomato sauce: The savory base that keeps everything moist and flavorful.
    • Vegetable oil: For sautéing the onions and carrots, infusing even more flavor.

    Feel free to make substitutions based on what you have on hand, or to cater to dietary preferences. For example, you can replace the meat with lentils or a plant-based substitute for a vegetarian option!

    For exact measurements, check the end of this article where you’ll find a printable recipe.

    How to Make Soulful Ukrainian Cabbage Meat Rolls

    Prepare the Cabbage Filling

    Let’s start by making the filling! Grab a large mixing bowl and add the minced meat, cooked rice, egg, granulated garlic, salt, ground coriander, and paprika. Take a deep breath and dive in with your hands or a sturdy fork. Don’t be shy; mix everything well until all the ingredients are fully blended. This is where the magic happens! By combining these ingredients together, you get a harmonious filling that’s bursting with flavor. And here’s a helpful tip: letting this mixture chill in the fridge for about 30 minutes allows the flavors to develop even more.

    Sauté the Vegetables

    Next, let’s get those veggies cooking! Heat a skillet over medium-high heat and drizzle in some vegetable oil. Once the oil is hot, toss in the grated carrots and chopped onions. Stir them around for about five minutes, or until they soften up and give off a delightful aroma. The sweetness of the carrots coupled with the rich flavor of the onions will set the stage for the dish. Trust me; it’s worth the wait!

    Blanch the Cabbage Leaves

    Now, let’s tenderize those cabbage leaves. Bring a large pot of water to a rolling boil. Carefully drop each cabbage leaf into the boiling water one by one. Allow them to cook for about 3 to 4 minutes — enough time to soften without falling apart. You want them pliable, like a cozy blanket wrapping around your filling. Once they’re ready, drain them gently and set aside. Remember, patience is key here; it will ensure your rolls hold together perfectly.

    Assemble the Rolls

    Time for the fun part—assembling those delicious rolls! Take a cabbage leaf and lay it flat on your workspace. Spoon about 2 to 3 hearty tablespoons of your filling near the base of the leaf. Now, fold in the sides to embrace the filling, then roll it up tightly, much like you would a burrito. If you’re feeling fancy, tie them up with kitchen twine. Don’t worry if it feels tricky at first; practice makes perfect! Repeat until every last bit of filling is gone, and admire the little bundles of joy you’ve created.

    Layer and Simmer

    Lastly, let’s bring everything together. Take a big pot and spoon half of your sautéed onions and carrots into the bottom. Now, gently place the cabbage rolls on top—feel free to stack a couple of layers if needed. Pour the remaining sautéed veggies over the rolls for extra flavor. In a separate bowl, mix sour cream with the tomato sauce until smooth. Drizzle this creamy goodness over the cabbage rolls, covering them completely. Cover the pot with a lid and let them simmer on low heat for about 40 minutes. The rolls will become tender and the flavors will blend beautifully. Your kitchen is about to smell heavenly!

    Tips for Success

    • Make sure to chill the filling for deeper flavor before using it.
    • Use a large pot to accommodate multiple layers of rolls comfortably.
    • Mix and match meats for a unique flavor, or go vegetarian with beans.
    • Feel free to add garlic or herbs to the sauce for extra zest.
    • Let the rolls rest for a few minutes before serving to enhance the flavors.

    Equipment Needed

    • Large mixing bowl: A sturdy bowl for combining the filling. A sturdy plastic or glass bowl works well too.
    • Skillet: For sautéing veggies. Any frying pan will do!
    • Large pot: To simmer your cabbage rolls. A Dutch oven is perfect if you have one!
    • Colander: For draining the cabbage leaves. A slotted spoon can be a handy alternative.
    • Kitchen twine: If tying the rolls, regular string works in a pinch!

    Variations on Soulful Ukrainian Cabbage Meat Rolls

    • Vegetarian Option: Swap the minced meat for lentils or a plant-based ground meat substitute for a hearty vegetarian dish.
    • Spicy Twist: Add some crushed red pepper flakes or a dash of hot sauce to the filling for a little heat!
    • Herbal Infusion: Mix in fresh herbs like dill or parsley to add a fragrant, fresh note to the rolls.
    • Cheesy Delight: For a cheesy goodness, sprinkle some shredded cheese into the filling before rolling.
    • Asian Influence: Substitute soy sauce for salt and add ginger to the filling for an Asian-inspired flavor.

    Serving Suggestions for Soulful Ukrainian Cabbage Meat Rolls

    • Pair with a light, tangy salad for a refreshing contrast.
    • Serve with crusty bread or soft dinner rolls to soak up the delicious sauce.
    • A dollop of extra sour cream adds a lovely creaminess.
    • Enjoy with a glass of chilled white wine or sparkling water.
    • Garnish with fresh herbs for a vibrant touch.

    FAQs about Soulful Ukrainian Cabbage Meat Rolls

    As you dive into making these Soulful Ukrainian Cabbage Meat Rolls, you might have a few questions. Here are some common ones along with helpful answers.

    Can I make the rolls ahead of time?

    Absolutely! These delicious rolls can be prepared in advance and stored in the fridge, covered, for a day or two. Just simmer as directed when you’re ready to eat. They’re even tastier the next day!

    What can I substitute for cabbage leaves?

    If cabbage isn’t your jam, consider using Swiss chard or collard greens. Both provide a similar wrap and add their unique flavors. Just be sure to blanch them like you would with cabbage leaves!

    How do I store leftovers?

    Leftover rolls can be stored in an airtight container in the fridge for up to three days. They reheat beautifully in the microwave or on the stovetop with a splash of water to keep them moist.

    Can I freeze these rolls?

    Definitely! Assemble the rolls and place them in the freezer before cooking. When you’re ready to enjoy, simply thaw them in the fridge overnight and then simmer as directed. Easy-peasy!

    What is the best way to serve these rolls?

    These Soulful Ukrainian Cabbage Meat Rolls shine when served warm, topped with a generous dollop of sour cream and a sprinkle of fresh herbs. A side of crusty bread or a tangy salad takes the meal to new heights!

    Final Thoughts

    Cooking these Soulful Ukrainian Cabbage Meat Rolls is like wrapping a piece of home in a cozy blanket. As the aromas fill your kitchen, you can’t help but feel a sense of warmth and nostalgia. This dish is not just about the flavors; it’s about sharing moments with loved ones around the table, swapping stories, and creating lasting memories. Whether it’s a busy weeknight or a special occasion, these rolls offer comfort and satisfaction. Embrace the joy of making them, and remember, every roll comes with a side of love. Enjoy your culinary adventure!


    Print

    clock clock iconcutlery cutlery iconflag flag iconfolder folder iconinstagram instagram iconpinterest pinterest iconfacebook facebook iconprint print iconsquares squares iconheart heart iconheart solid heart solid icon

    Description

    Soulful Ukrainian Cabbage Meat Rolls are a comforting dish filled with a mixture of minced meat, rice, and spices, all wrapped in tender cabbage leaves and simmered in a savory sauce.


    • 0.5 teaspoon granulated garlic
    • 0.5 teaspoon paprika powder
    • 0.5 teaspoon ground coriander
    • 0.5 teaspoon salt
    • 1 egg
    • 50 g cooked rice
    • 450 g minced meat (chicken, beef, turkey, or pork)
    • 1 medium carrot, grated
    • 1 medium onion, chopped
    • 810 big cabbage leaves
    • 45 g sour cream (plus more to serve)
    • 240 ml tomato sauce
    • 1 tablespoon vegetable oil for frying

    1. Toss your ground meat, rice, egg, granulated garlic, coriander, salt, and paprika into a big bowl. Use your hands or a fork to mash and stir everything together until blended.
    2. Pop a lid or plastic wrap over the bowl and stash it in your fridge. This gives the filling a chance to sit while you sort out everything else.
    3. Get a skillet hot over medium-high. Pour in oil, then drop the grated carrot and chopped onion in. Stir and cook for about 5 minutes. They should soften up and smell nice.
    4. Drop each cabbage leaf into boiling water, one by one. Let them wilt for about 3 or 4 minutes so they’re soft but don’t fall apart. Drain them after.
    5. Spoon some meat mixture (about 2 or 3 hearty spoonfuls) at the end of a cabbage leaf. Fold the sides in, then roll it up tight like a burrito. If you want, tie them up with kitchen twine. Keep going until all your filling is used up.
    6. Spoon half your fried onion and carrot into the bottom of a big pot. Stack the cabbage rolls on top—one or two layers thick is fine. Dump the rest of the onion-carrot mix over your rolls.
    7. Mix sour cream and tomato sauce together in a little bowl until smooth. Drizzle it over the rolls inside the pot so everything’s covered.
    8. Cover the pot with a lid and let it simmer gently on low heat about 40 minutes. The cabbage should get tender and the meat will be cooked through.
    9. Move the warm cabbage rolls onto a plate. Top with an extra scoop of sour cream and sprinkle with chopped herbs if you feel like it.

    Notes

    • Feel free to use any type of minced meat you prefer.
    • Letting the filling sit in the fridge enhances the flavors.
    • Garnish with fresh herbs for added flavor.
    • Prep Time: 30 minutes
    • Cook Time: 40 minutes
    • Category: Main Dish
    • Method: Simmering
    • Cuisine: Ukrainian

    Nutrition

    • Serving Size: 1 roll
    • Calories: 250
    • Sugar: 3g
    • Sodium: 400mg
    • Fat: 12g
    • Saturated Fat: 4g
    • Unsaturated Fat: 7g
    • Trans Fat: 0g
    • Carbohydrates: 20g
    • Fiber: 2g
    • Protein: 15g
    • Cholesterol: 50mg

    Sharing is caring!

  • Peanut Butter Sandwich Cookies

    Peanut Butter Sandwich Cookies


    Introduction to Peanut Butter Sandwich Cookies

    There’s something magical about the aroma of freshly baked cookies wafting through the house.
    These Peanut Butter Sandwich Cookies are my go-to treat when I want to indulge my family without spending hours in the kitchen.
    Soft, delectable, and stuffed with a creamy filling, they’re perfect for those busy evenings when you want a quick solution to a snack craving.
    Trust me, whether you’re a frazzled mom after a long day or a professional looking for a little pick-me-up,
    this recipe will earn you some serious “wow” points. Let’s dive into this delightful adventure!

    Why You’ll Love This Peanut Butter Sandwich Cookies

    What’s not to love about a cookie that embodies comfort and nostalgia? These Peanut Butter Sandwich Cookies come together in a snap, making them ideal for busy days. With their chewy texture and rich flavor, they’ll satisfy even the pickiest eaters in your family. Plus, the creamy filling is like a hug in dessert form. In just over half an hour, you can whip up a batch that will truly impress!

    Ingredients for Peanut Butter Sandwich Cookies

    Gathering the ingredients is the first step toward cookie bliss. Here’s what you’ll need for these delightful Peanut Butter Sandwich Cookies:

    • Unsalted Butter: Softened butter adds richness and flavor. You can substitute with margarine if you’re in a pinch.
    • Brown Sugar: This gives the cookies a lovely moisture and depth of flavor. Use light or dark according to your preference.
    • Granulated Sugar: It balances the sweetness and helps with the cookie’s texture.
    • Smooth Peanut Butter: Your nutty superstar! You can opt for crunchy if you enjoy a bit of texture or even almond butter for something different.
    • Large Egg: This binds everything together while providing a touch of moisture. If you’re egg-free, a flaxseed meal substitute can work.
    • Vanilla Extract: A little splash of vanilla enhances the flavors of the other ingredients. No extract? Vanilla essence will do!
    • All-Purpose Flour: This forms the base of the cookies, aiding in structure. Whole wheat flour works too if you’re feeling health-conscious.
    • Baking Soda: Essential for leavening, it helps the cookies rise. Don’t skip this; your cookies will miss the lift!
    • Salt: Just a pinch to elevate the sweet flavors and balance the taste.
    • Quick Oats: These add texture and chewiness. You can swap them for rolled oats, just pulse them a bit into smaller bits.
    • For the Filling:
    • Unsalted Butter: Again, for smoothness in your filling.
    • Smooth Peanut Butter: Bring this back for a double dose of peanutty goodness!
    • Powdered Sugar: This creates a sweet and creamy filling. Feel free to adjust to your taste for a sweeter or milder finish.
    • Whipping Cream or Milk: To achieve that perfect creamy consistency. Use what you have on hand!

    You can find the exact measurements for these ingredients toward the bottom of the article, ready for printing. Let’s get cooking!

    How to Make Peanut Butter Sandwich Cookies

    Step 1: Preheat and Prepare

    Let’s kick things off by preheating your oven to 350°F (180°C). While that’s warming up, grab your cookie sheets and line them with parchment paper or a baking mat. This will prevent sticking and make cleanup a breeze. Trust me, using parchment paper is a game-changer! It gives your cookies a lovely base to sit on. Also, be sure to set your space up for success. A tidy kitchen makes all the difference!

    Step 2: Cream the Base Ingredients

    In a large mixing bowl, combine the softened butter, light brown sugar, and granulated sugar. Using an electric mixer, beat them together until they become light and fluffy—about 3-4 minutes. Don’t rush this step; the fluffiness will help your cookies rise and maintain that soft texture we all adore. Once mixed, add in smooth peanut butter. This nutty wonder adds the irresistible flavor that makes these Peanut Butter Sandwich Cookies so delicious!

    Step 3: Incorporate the Egg and Vanilla

    Now, it’s time to elevate our mixture! Crack in one large egg and pour in a teaspoon of vanilla extract. Give everything a good mix until well-combined. This step helps bind our cookie dough together while enhancing that classic cookie flavor. The sweet aroma of the vanilla is already hinting at what’s to come!

    Step 4: Combine Dry Ingredients

    In a separate bowl, whisk together the all-purpose flour, baking soda, and salt. Once that’s done, gradually add this flour mixture to your creamed ingredients. Mix on low speed to avoid a cloud of flour in your face! Lastly, fold in the quick oats—I like to mix until just combined for a smooth texture, ensuring no flour streaks remain. This creates a delightful chewiness that’s essential for our cookies.

    Step 5: Form and Bake Cookie Dough

    Let’s bring those cookies to life! Using a tablespoon, scoop out dough and roll into balls. Aim for about 1 to 1.5 tablespoons each. Place them about 2 inches apart on your prepared baking sheets. A slightly wet hand helps to flatten them gently; this way, they’ll bake evenly. Bake in your preheated oven for 8-11 minutes until the tops look set. Your kitchen will be filled with the most delightful smell as they bake!

    Step 6: Cool the Cookies

    After baking, let the cookies cool on the baking sheets for about 10-15 minutes. This cooling time is crucial! It allows them to firm up, making them easier to transfer to a wire rack without falling apart. After that, let them cool completely before frosting; this keeps the filling from melting. Patience, friends, it’s so worth it!

    Step 7: Prepare the Peanut Butter Filling

    While your cookies cool, let’s whip up that creamy peanut butter filling! In a separate bowl, beat the softened butter until it’s smooth. Then, blend in the smooth peanut butter until well mixed. Gradually add powdered sugar, starting on low speed to avoid a sugary explosion. Finally, mix in whipping cream or milk, a tablespoon at a time, until you achieve that divine creamy consistency. It should be thick but spreadable—a true dream come true!

    Step 8: Assemble the Sandwich Cookies

    The moment of truth has arrived—assembly time! Take one cookie and spread about a tablespoon of the luscious peanut butter filling on the bottom. Top it off with another cookie and gently press down to create your sandwich. Repeat until all your cookies are filled. You’ve created a delectable treat that your family will absolutely adore!

    Tips for Success

    • Always use room temperature ingredients for better mixing and fluffiness.
    • Measure flour accurately; spoon it into the cup and level it off.
    • Chill the dough for 30 minutes if it’s too sticky to handle.
    • Experiment with add-ins like chocolate chips or nuts for extra flavor.
    • For a crunchier texture, bake a minute longer.

    Equipment Needed

    • Mixing Bowls: Use a large bowl for mixing; any bowl will do in a pinch!
    • Electric Mixer: A hand mixer is great; a sturdy whisk works too with a bit more effort.
    • Baking Sheets: Cookie sheets are ideal; you can use any flat baking dish.
    • Parchment Paper: This helps prevent sticking; silicone mats are a neat alternative.
    • Cooling Rack: Essential for cooling; a simple plate can work if you’re in a hurry.

    Variations on Peanut Butter Sandwich Cookies

    • Chocolate Peanut Butter Sandwich Cookies: Add cocoa powder to the dough for a chocolatey twist. Use dark chocolate for the filling.
    • Nutty Oatmeal Filling: Replace half of the peanut butter in the filling with almond or cashew butter for a new flavor profile.
    • Gluten-Free Option: Substitute all-purpose flour with a gluten-free flour blend to enjoy these cookies without the gluten.
    • Vegan Adaptation: Use a plant-based butter substitute and replace the egg with a flax egg or applesauce for a delicious vegan treat.
    • Spiced Cookies: Add cinnamon or nutmeg to the cookie dough for a warm flavor that dances on your taste buds.

    Serving Suggestions for Peanut Butter Sandwich Cookies

    • Pair with a cold glass of milk for that classic combo!
    • Serve alongside a hot cup of coffee or tea for a cozy afternoon treat.
    • For an extra touch, dust with powdered sugar before serving.
    • Wrap them in decorative parchment paper for a lovely gift presentation.

    FAQs about Peanut Butter Sandwich Cookies

    Can I use crunchy peanut butter instead of smooth?
    Absolutely! Crunchy peanut butter adds an extra layer of texture to your Peanut Butter Sandwich Cookies. It’s a fun twist that many love!

    How should I store these cookies?
    To maintain freshness, store your Peanut Butter Sandwich Cookies in an airtight container at room temperature. They’ll stay soft and delicious for up to a week. If you prefer, you can refrigerate them for a longer shelf life—just let them come to room temperature before enjoying!

    Can I freeze the cookies?
    Yes, you can! Just freeze the assembled cookies between layers of parchment paper in a freezer-safe container. They can last for up to three months. To enjoy, simply let them thaw at room temperature.

    What can I substitute for the egg?
    If you’re looking for an egg substitute in these cookies, a flaxseed meal mixed with water works wonderfully! Use 1 tablespoon of ground flaxseed mixed with 2.5 tablespoons of water, let it sit for a few minutes, and you’re good to go.

    How can I make the filling sweeter?
    If you like your filling extra sweet, simply increase the amount of powdered sugar in the peanut butter filling. Start by adding an extra tablespoon and taste until it reaches your desired level of sweetness.

    Final Thoughts

    There’s something undeniably special about sharing these Peanut Butter Sandwich Cookies with loved ones. Each bite, filled with creamy goodness, evokes memories of childhood and warmth. Not only do they come together quickly, but they also deliver a burst of happiness with every nibble. Whether it’s a safe haven after a busy day or an unexpected treat for a friend, these cookies effortlessly bring smiles. So, roll up your sleeves, mix your ingredients, and embark on this delightful baking journey. You’ll find that the joy of creating and sharing these cookies is the sweetest treat of all!


    Print

    clock clock iconcutlery cutlery iconflag flag iconfolder folder iconinstagram instagram iconpinterest pinterest iconfacebook facebook iconprint print iconsquares squares iconheart heart iconheart solid heart solid icon

    Description

    These Peanut Butter Sandwich Cookies are a delightful treat, combining two soft peanut butter cookies with a creamy filling.


    • 1/2 cup unsalted butter (112 grams), softened
    • 1/2 cup brown sugar (100 grams), light or dark
    • 1/3 cup granulated sugar (66 grams)
    • 1/2 cup smooth peanut butter
    • 1 large egg
    • 1 teaspoon vanilla extract
    • 3/4 cup all-purpose flour (94 grams)
    • 1/2 teaspoon baking soda
    • 1/4 teaspoon salt
    • 1 1/4 cup quick oats
    • 2 tablespoons unsalted butter (28 grams) for filling
    • 1/2 cup smooth peanut butter for filling
    • 1 cup powdered sugar (110 grams) for filling
    • 45 tablespoons whipping cream (5075 ml), or milk for filling

    1. Preheat the oven to 350F (180C) degrees. Line cookie sheets with parchment paper or baking mats.
    2. In a large bowl, beat the butter, brown sugar, and white sugar until fluffy. Mix in the peanut butter.
    3. Mix in the egg and vanilla extract.
    4. With the mixer on low speed, mix in the flour, baking soda, and salt. Then mix in the oats.
    5. Spoon the dough into balls with about 1 – 1.5 tablespoons of dough each. Place 2 inches apart on the lined cookie sheets and flatten just slightly.
    6. Bake in the preheated oven for 8-11 minutes, or until the tops look set.
    7. Remove from the oven. Cool for 10-15 minutes on the cookie sheet, then transfer to a cooling rack.
    8. For the Peanut Butter Filling, beat the butter until smooth, then mix in the peanut butter.
    9. Mix in the powdered sugar starting with the mixer on low speed.
    10. Beat in the cream (or milk) about 1 tablespoon at a time until the mixture is a smooth consistency.
    11. Frost the bottom of 1 cookie with about 1 tablespoon of filling, then sandwich a second cookie on top.

    Notes

    • You can adjust the amount of powdered sugar in the filling to your taste.
    • Store cookies in an airtight container to maintain freshness.
    • Prep Time: 20 minutes
    • Cook Time: 11 minutes
    • Category: Dessert
    • Method: Baking
    • Cuisine: American

    Nutrition

    • Serving Size: 1 cookie
    • Calories: 150
    • Sugar: 10g
    • Sodium: 60mg
    • Fat: 7g
    • Saturated Fat: 3g
    • Unsaturated Fat: 4g
    • Trans Fat: 0g
    • Carbohydrates: 18g
    • Fiber: 1g
    • Protein: 4g
    • Cholesterol: 20mg

    Sharing is caring!

  • Sweet Savory Pancakes Delight

    Sweet Savory Pancakes Delight


    Introduction to Sweet Savory Pancakes Delight

    Hey there, fellow food lovers! If you’re on the hunt for something that wraps sweet and savory into a cozy breakfast hug, look no further than my Sweet Savory Pancakes Delight. Trust me, as a busy mom myself, I know how challenging mornings can be. This recipe is not only a quick solution for chaotic days but also a dish that your loved ones will rave about. Imagine fluffy pancakes crowned with crispy bacon, creating a delightful contrast of flavors that dances on your taste buds. It’s a breakfast that brings joy in every bite!

    Why You’ll Love This Sweet Savory Pancakes Delight

    There’s something magical about combining sweet and savory elements, and these pancakes deliver just that! They’re incredibly easy to whip up, making them perfect for busy mornings or lazy weekends. In just 30 minutes, you can have a mouthwatering breakfast that pleases even the pickiest eaters. Plus, the crispy bacon adds a rich depth of flavor that pairs beautifully with a drizzle of syrup! What’s not to love?

    Ingredients for Sweet Savory Pancakes Delight

    Let’s gather all the goodies to make these pancakes! Here’s what you’ll need:

    • Baking soda: This helps our pancakes rise, keeping them light and fluffy.
    • Baking powder: A great partner to baking soda for that perfect pancake lift!
    • Brown sugar: It adds a subtle caramel sweetness that complements the bacon beautifully.
    • Salt: A pinch elevates all flavors—sweet and savory.
    • All-purpose flour: The base for our batter, making everything come together.
    • Eggs: They bind everything while adding richness and moisture.
    • Milk: This gives our batter smoothness. Non-dairy milk works just as well!
    • Vanilla extract: A splash adds a lovely sweetness that balances the bacon’s flavor.
    • Butter: For cooking and added richness, ensuring a perfect golden brown on your pancakes.
    • Diced, cooked bacon: This is the star! Crispy bits add flavor and crunch in every bite.

    You’ll find the precise quantities at the bottom of the article, so don’t worry about writing them down just yet. Let’s keep things flowing smoothly!

    How to Make Sweet Savory Pancakes Delight

    Step 1: Blend the Batter

    Let’s kick things off! Start by grabbing your blender. In it, combine the eggs, milk, and a splash of vanilla extract. Then, sprinkle in the baking powder, baking soda, salt, and brown sugar. Blend it just enough to mix the ingredients smoothly. Next, add the all-purpose flour and pulse it lightly. Remember, don’t overdo it! A few lumps in the batter keep your pancakes fluffy and delightful.

    Step 2: Cook the Bacon

    While the blender works its magic, time to tackle that bacon! Dice your cooked bacon into bite-sized pieces. Heat a skillet over medium heat and toss in the crispy bacon bits. Cook until they’re golden and the aroma fills your kitchen. It’s like a hug from your frying pan! Once crispy, spoon out the bacon, but don’t dump the grease. We’ll use that smoky goodness to enhance our pancakes!

    Step 3: Cook the Pancakes

    Now for the fun part! With the skillet still warm, add a dollop of butter if needed. Pour a generous amount of your batter into the skillet. Sprinkle those crispy bacon bits right on top. Watch them sink slightly into the batter, teasing a delicious surprise for your first bite! Wait until bubbles form on the surface—this is a sign it’s time to flip. If you can’t resist, give it a little peek! Flip it over gently and cook the other side until it’s golden brown.

    Step 4: Serve and Enjoy

    You did it! Now it’s time to taste the fruits of your labor. Stack those glorious pancakes high, drizzling them with pure maple syrup or a pat of butter. If you’re feeling adventurous, toss on a few more bacon bits for that extra crunch. Serve them warm, and don’t be surprised when your loved ones ask for seconds. Happiness is just a pancake away!

    Tips for Success

    • Use room temperature eggs and milk for a smoother batter.
    • Don’t overmix! A few lumps keep pancakes nice and fluffy.
    • Preheat your skillet properly to avoid uneven cooking.
    • Experiment with adding spices like cinnamon for a unique twist.
    • Keep pancakes warm in a low oven while cooking multiple batches.

    Equipment Needed

    • Blender: A handy tool for mixing batter. You can also use a whisk for a more textured finish.
    • Skillet: A non-stick or cast iron skillet works perfectly for cooking pancakes.
    • Spatula: Essential for flipping those golden pancakes without a mess!
    • Measuring cups and spoons: Helpful for accurate ingredients, but you can eyeball it too!

    Variations

    • Sweet and Spicy: Add chopped jalapeños or crushed red pepper flakes for a fiery kick!
    • Herbed Pancakes: Incorporate fresh herbs like chives or parsley into the batter for an aromatic twist.
    • Gluten-Free: Swap all-purpose flour with a gluten-free blend for those with dietary restrictions.
    • Vegetarian Option: Replace bacon with sautéed mushrooms or spinach for a delicious, meatless alternative.
    • Nutty Flavor: Fold in chopped nuts like pecans or walnuts for added texture and taste.

    Serving Suggestions for Sweet Savory Pancakes Delight

    • Serve alongside crispy fried eggs for a protein-packed breakfast!
    • A side of fresh fruit salad adds a refreshing touch to your meal.
    • Pair with a warm cup of maple coffee or herbal tea for a cozy vibe.
    • For presentation, stack pancakes high and garnish with fresh herbs or extra bacon bits.
    • Don’t forget a drizzle of honey for an extra layer of sweetness if desired!

    FAQs about Sweet Savory Pancakes Delight

    Can I make these pancakes ahead of time?

    Absolutely! You can whip up the batter and keep it stored in the fridge for up to 24 hours. Just give it a quick stir before cooking. If you’re in a rush, you can also cook the pancakes in advance, then reheat them in the toaster or oven to enjoy later.

    What can I substitute for bacon?

    If bacon’s not your thing, there are plenty of tasty alternatives! Try sautéed mushrooms for a savory twist or even diced bell peppers for a fresh crunch. You could also go with crispy tofu for a plant-based option that still delivers great texture.

    Can I freeze Sweet Savory Pancakes Delight?

    Definitely! These pancakes freeze beautifully. Just place cooked pancakes in a single layer on a baking sheet and freeze until solid. Then, stack them in an airtight container. When you’re ready to indulge, pop them in the toaster or microwave for a quick breakfast treat!

    What toppings pair well with these pancakes?

    Think beyond syrup! A dollop of Greek yogurt adds creaminess, while fresh berries bring a pop of bright flavor. Try drizzle of honey or a sprinkle of nuts for added texture. Mix and match until you find your favorite combination!

    Can I make a gluten-free version of these pancakes?

    Final Thoughts

    As a passionate home cook, there’s something genuinely rewarding about flipping the perfect pancake. My Sweet Savory Pancakes Delight isn’t just a recipe; it’s an invitation to create warm memories around the breakfast table. Each bite is a comforting mix of sweetness and savory goodness, proving that breakfast can be both satisfying and easy. Whether you’re feeding a crowd or enjoying a quiet morning, these pancakes deliver joy every time. So grab your skillet and let’s make some magic happen together in the kitchen—because life is too short for boring breakfasts!


    Print

    clock clock iconcutlery cutlery iconflag flag iconfolder folder iconinstagram instagram iconpinterest pinterest iconfacebook facebook iconprint print iconsquares squares iconheart heart iconheart solid heart solid icon

    Description

    A delightful pancake recipe that combines sweet and savory flavors with the addition of crispy bacon.


    • 1 tsp baking soda
    • 1 tsp baking powder
    • 2 tbsp brown sugar
    • 1/4 tsp salt
    • 2 cups all-purpose flour
    • 2 small eggs
    • 1 cup milk (works great with non-dairy options too)
    • 1 tsp vanilla extract
    • 3 tbsp butter for cooking
    • 8 oz diced, cooked bacon strips

    1. In a blender, combine eggs, milk, a splash of vanilla, baking powder, soda, salt, and brown sugar. Blend slightly. Then, add the flour and pulse it just until smooth. Don’t overdo the mixing, so your pancakes stay fluffy.
    2. Dice the bacon, toss it into a hot skillet, and cook until it’s golden and crunchy. Spoon out the bacon bits and hold on to that smoky grease.
    3. Warm up the skillet over medium-low heat and add a bit of butter if needed. Pour some batter in and sprinkle bacon bits on the batter. Let it sizzle until bubbles form on top, then flip.
    4. Enjoy the pancakes hot with maple syrup, butter, or additional bacon bits. Keep them warm in an oven if making multiple batches.

    Notes

    • Use a blender for a smoother batter or whisk by hand for a more textured pancake.
    • Adjust the amount of bacon to taste.
    • For a dairy-free version, opt for non-dairy milk.
    • Prep Time: 10 minutes
    • Cook Time: 20 minutes
    • Category: Breakfast
    • Method: Skillet cooking
    • Cuisine: American

    Nutrition

    • Serving Size: 2 pancakes
    • Calories: 350
    • Sugar: 5g
    • Sodium: 600mg
    • Fat: 18g
    • Saturated Fat: 8g
    • Unsaturated Fat: 8g
    • Trans Fat: 0g
    • Carbohydrates: 42g
    • Fiber: 2g
    • Protein: 10g
    • Cholesterol: 120mg

    Sharing is caring!

  • Egg Roll in a Bowl

    Egg Roll in a Bowl


    Introduction to Egg Roll in a Bowl

    Hey there! If you’re like me, juggling a busy life can sometimes make dinner feel like a daunting task. That’s where my favorite recipe, Egg Roll in a Bowl, comes to the rescue. This dish captures all the incredible flavors of traditional egg rolls but without the fuss of wrappers. It’s a quick solution for a busy day, ideal for any weeknight. Plus, it’s so delicious that it’ll impress your loved ones, even the picky eaters! Trust me, you’ll want to add this to your weekly rotation.

    Why You’ll Love This Egg Roll in a Bowl

    This Egg Roll in a Bowl is a dream come true for busy moms and professionals alike. It’s not just quick to whip up; it’s packed with flavor and nutrition. In about 30 minutes flat, you’ll have a hearty meal on the table that’s fresh and satisfying. Plus, it’s all one pan—less mess, more time to enjoy with your family. Who wouldn’t love that?

    Ingredients for Egg Roll in a Bowl

    Gathering the right ingredients makes cooking a breeze! For this delightful dish, you’ll need:

    • 1 lb lean ground beef (85/15): A flavorful protein that keeps the dish hearty.
    • 1 Tbsp olive oil: Adds richness and helps sauté the ingredients to perfection.
    • ½ tsp fine sea salt: Enhances the overall taste—adjust according to your preference.
    • ¼ tsp black pepper: A touch of spice to elevate the flavors.
    • ½ medium onion, finely diced: Brings sweetness and depth to the meal.
    • 1 medium carrot, julienned or coarsely grated: Adds color and crunch.
    • 3 garlic cloves, minced: Infuses the dish with delightful aroma and flavor.
    • 3 cups green cabbage, thinly sliced: The heart of your egg roll, giving freshness.
    • 1 tsp ground ginger: Provides warmth and zest.
    • ¼ cup low-sodium soy sauce: Offers that unmistakable umami taste.
    • 2 tsp sesame oil: Delivers a nutty fragrance that ties it all together.
    • ½ tsp granulated sugar: Balances flavors beautifully.
    • 1 Tbsp chopped green onion (optional): For a pop of color and freshness on top.
    • ¼ tsp sesame seeds (optional): Adds a delightful crunch and garnish.

    The exact quantities are available at the bottom for easy printing, making your shopping run even simpler!

    How to Make Egg Roll in a Bowl

    Ready to dive into this delicious egg roll in a bowl? Follow these simple steps, and soon you’ll be enjoying a meal that’s bursting with flavor!

    Step 1: Cook the Ground Beef

    First things first, heat a tablespoon of olive oil over medium-high heat in a large skillet. Once the oil glimmers like sunshine, it’s time to add in the ground beef. Break it apart with a spatula. Cook for about five minutes until it’s beautifully browned and no longer pink. Season the beef with fine sea salt and black pepper to taste. That aroma? Isn’t it just heavenly?

    Step 2: Sauté Onions and Carrots

    Next, toss in the finely diced onion and your julienned or grated carrot. These colorful ingredients will add vibrancy to your dish. Cook for about five to seven minutes, stirring occasionally until the onion turns soft and slightly translucent. Watching those veggies soften just brings a smile to my face—they’re going to soak up all that beefy goodness!

    Step 3: Add Garlic

    In goes the minced garlic! You’ll want to stir this in for about 30 seconds. The moment you do, a delightful fragrance will fill your kitchen. It’s like a culinary hug that welcomes you home after a long day. Be sure to stir constantly to avoid burning the garlic. Trust me, you don’t want that bitter flavor creeping in!

    Step 4: Stir in Cabbage and Seasonings

    Now, it’s the cabbage’s time to shine! Add those three cups of thinly sliced green cabbage into your skillet along with ground ginger, low-sodium soy sauce, sesame oil, and granulated sugar. Sauté this mixture for five to seven minutes until the cabbage is tender and slightly wilted. The vibrant colors mingling in the pan can only be described as a food artist’s masterpiece!

    Step 5: Remove from Heat and Garnish

    Finally, remove the skillet from heat and admire your creation. Top with chopped green onions and a sprinkle of sesame seeds if you like. It’s like putting a cherry on top of a sundae! Serve this warm, and prepare yourself for the rave reviews. With each bite, you’ll know you’ve brought home the taste of a classic egg roll, sans the hassle of wrappers.

    Tips for Success

    • Don’t be afraid to customize! Add your favorite veggies like bell peppers or snap peas for extra color and nutrition.
    • If you prefer more spice, a dash of sriracha sauce can ramp up the flavor.
    • For meal prep, make a double batch and store leftovers for tasty lunches throughout the week.
    • Consider using ground turkey or chicken as a lighter protein alternative.
    • Embrace the one-pan goodness—less clean-up means more family time!

    Equipment Needed

    To create this scrumptious Egg Roll in a Bowl, you’ll need just a few essential tools:

    • Large skillet: A non-stick option makes for easy cooking and cleanup.
    • Spatula: Perfect for breaking apart the ground beef and stirring.
    • Knife and cutting board: For chopping veggies like cabbage, onions, and carrots.
    • Measuring spoons: Ensure precise ingredient proportions for the best flavor.

    Variations

    • Vegetarian option: Substitute ground beef with crumbled tofu or tempeh for a plant-based twist.
    • Add more veggies: Toss in bell peppers, snap peas, or mushrooms for added flavor and nutrition.
    • Spice it up: For a kick, add red pepper flakes or a splash of hoisin sauce.
    • Gluten-free: Ensure soy sauce is labeled gluten-free if needed.
    • Low-carb: Use shredded zucchini or cauliflower instead of cabbage for a lighter version.

    Serving Suggestions

    • Rice or Quinoa: Serve over fluffy jasmine rice or quinoa for extra heartiness.
    • Your Favorite Beverage: Pair with green tea or a light beer to complement the flavors.
    • Fresh Side Salad: A crisp garden salad adds a refreshing crunch.
    • Presentation: Garnish with additional green onions for a beautiful finish.

    FAQs about Egg Roll in a Bowl

    You’re probably wondering if this Egg Roll in a Bowl is as flexible as it sounds. Let me answer your burning questions!

    • Can I make this dish vegetarian? Absolutely! Simply swap the ground beef for tofu or tempeh, and you’ll have a delicious plant-based meal.
    • How do I store leftovers? Store any extras in an airtight container in the fridge for up to three days. Reheat gently in a skillet.
    • Can I freeze this meal? Yes, this dish freezes beautifully! Make sure it’s cooled completely before transferring it to a freezer-safe container.
    • What other veggies can I add? Feel free to experiment! Bell peppers, snap peas, or mushrooms work wonderfully.
    • Is it gluten-free? Ensure you use gluten-free soy sauce if you’re avoiding gluten.

    Final Thoughts

    Making Egg Roll in a Bowl is like inviting a warm embrace into your kitchen. This dish brings together convenience and flavor in the most delightful way. In just 30 minutes, you can whip up a satisfying meal that echoes the deliciousness of traditional egg rolls while skipping the fuss. It’s a recipe that unites family around the table, sparking joy with every bite. So whether you’re a busy mom or a professional on-the-go, this hearty meal is just what you need to turn a chaotic weeknight into a simple culinary celebration. Enjoy the flavors and the togetherness!


    Print

    clock clock iconcutlery cutlery iconflag flag iconfolder folder iconinstagram instagram iconpinterest pinterest iconfacebook facebook iconprint print iconsquares squares iconheart heart iconheart solid heart solid icon

    Description

    A quick and easy weeknight meal that captures the flavors of traditional egg rolls without the wrapper.


    • 1 lb lean ground beef (85/15)
    • 1 Tbsp olive oil
    • ½ tsp fine sea salt, or to taste
    • ¼ tsp black pepper, or to taste
    • ½ medium onion, finely diced
    • 1 medium carrot, julienned or coarsely grated
    • 3 garlic cloves, minced
    • 3 cups green cabbage, thinly sliced
    • 1 tsp ground ginger
    • ¼ cup low-sodium soy sauce
    • 2 tsp sesame oil
    • ½ tsp granulated sugar
    • 1 Tbsp chopped green onion (optional, for garnish)
    • ¼ tsp sesame seeds (optional, for garnish)

    1. Heat olive oil in a large skillet over medium-high heat. Add ground beef and cook for about 5 minutes, breaking it apart with a spatula, until browned and no longer pink. Season with salt and pepper.
    2. Stir in the diced onion and grated carrot. Cook for 5–7 minutes, stirring occasionally, until the onion is soft.
    3. Add the minced garlic and cook for another 30 seconds, stirring constantly.
    4. Add the cabbage, ground ginger, soy sauce, sesame oil, and sugar. Continue to sauté for 5–7 minutes, or until the cabbage is tender and slightly wilted.
    5. Remove from heat and garnish with chopped green onions and sesame seeds, if using. Serve warm.

    Notes

    • For a vegetarian version, substitute ground beef with tofu or tempeh.
    • Feel free to add other vegetables like bell peppers or snap peas for more flavor and nutrition.
    • Prep Time: 10 minutes
    • Cook Time: 20 minutes
    • Category: Main Dish
    • Method: Stovetop
    • Cuisine: Asian

    Nutrition

    • Serving Size: 1 cup
    • Calories: 350
    • Sugar: 2g
    • Sodium: 600mg
    • Fat: 21g
    • Saturated Fat: 8g
    • Unsaturated Fat: 10g
    • Trans Fat: 0g
    • Carbohydrates: 16g
    • Fiber: 4g
    • Protein: 25g
    • Cholesterol: 70mg

    Sharing is caring!