Blog

  • Slow Cooker Beef Stew: A Hearty Comfort Food Delight

    Slow Cooker Beef Stew: A Hearty Comfort Food Delight


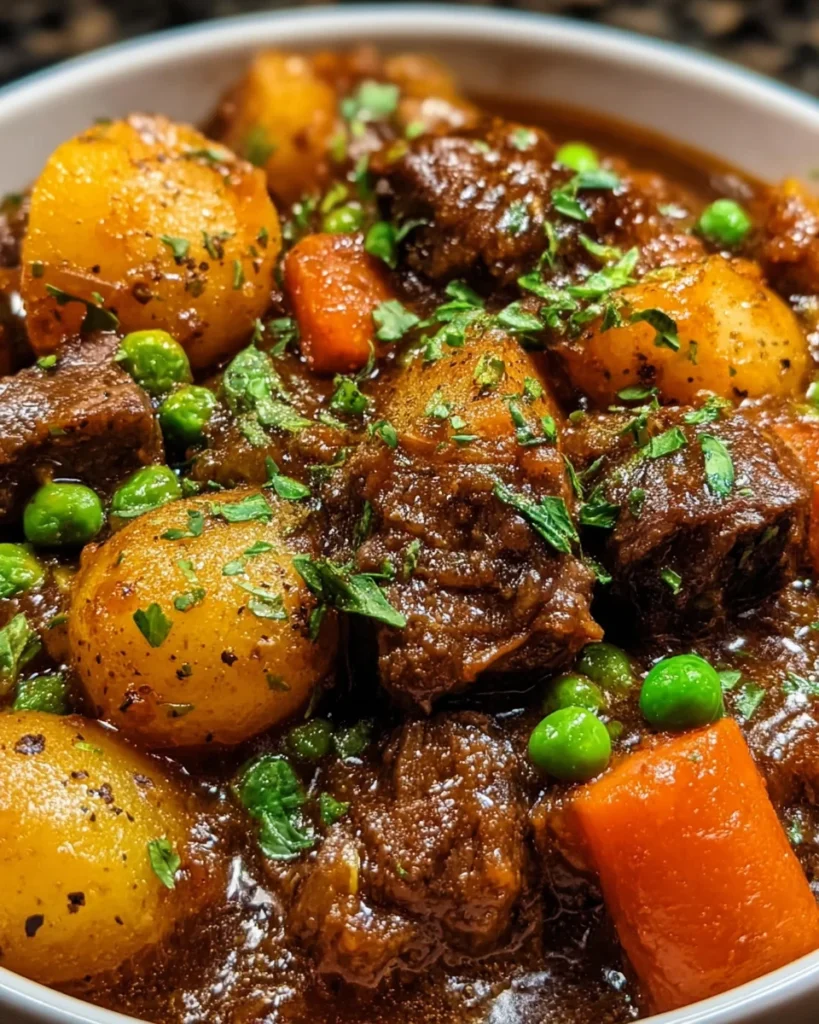
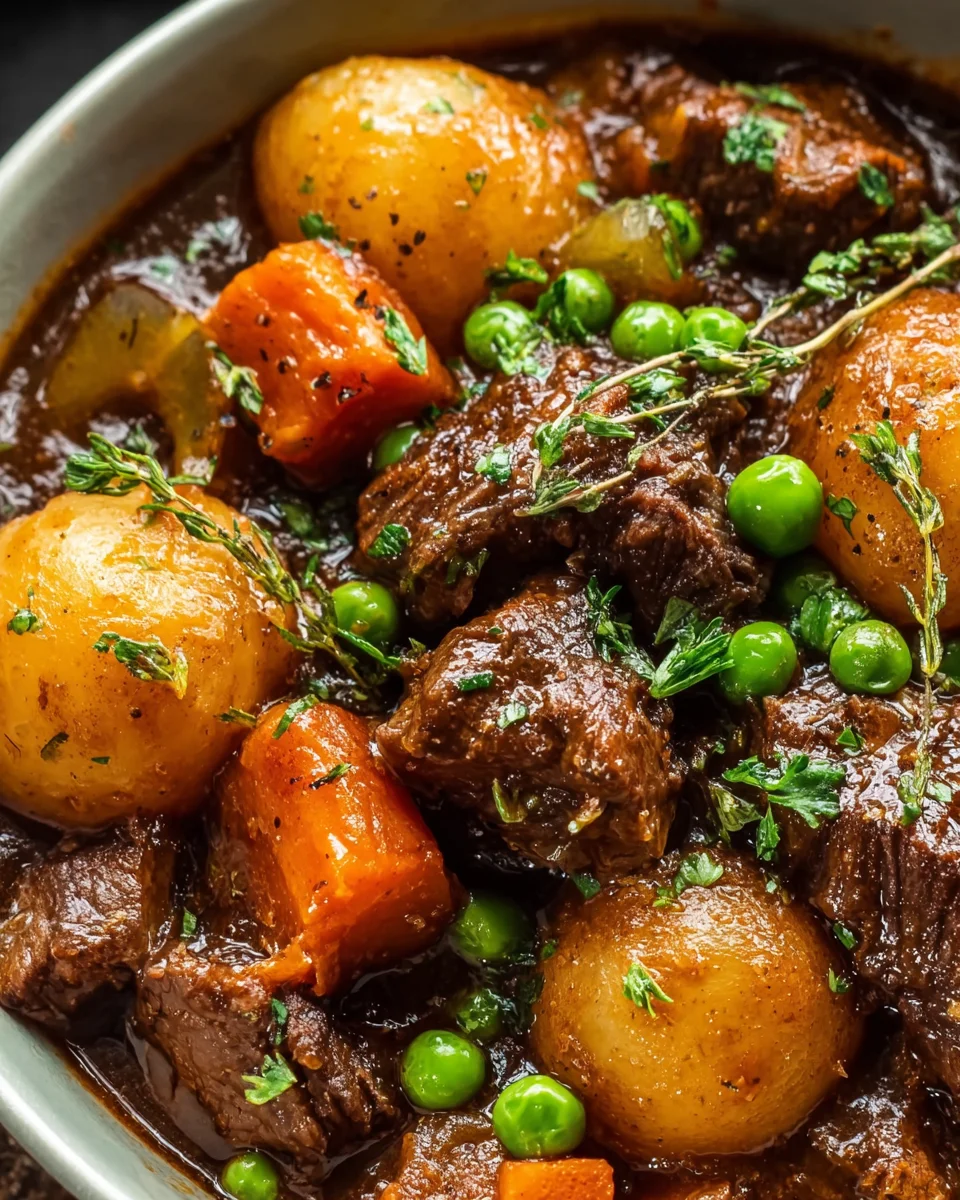
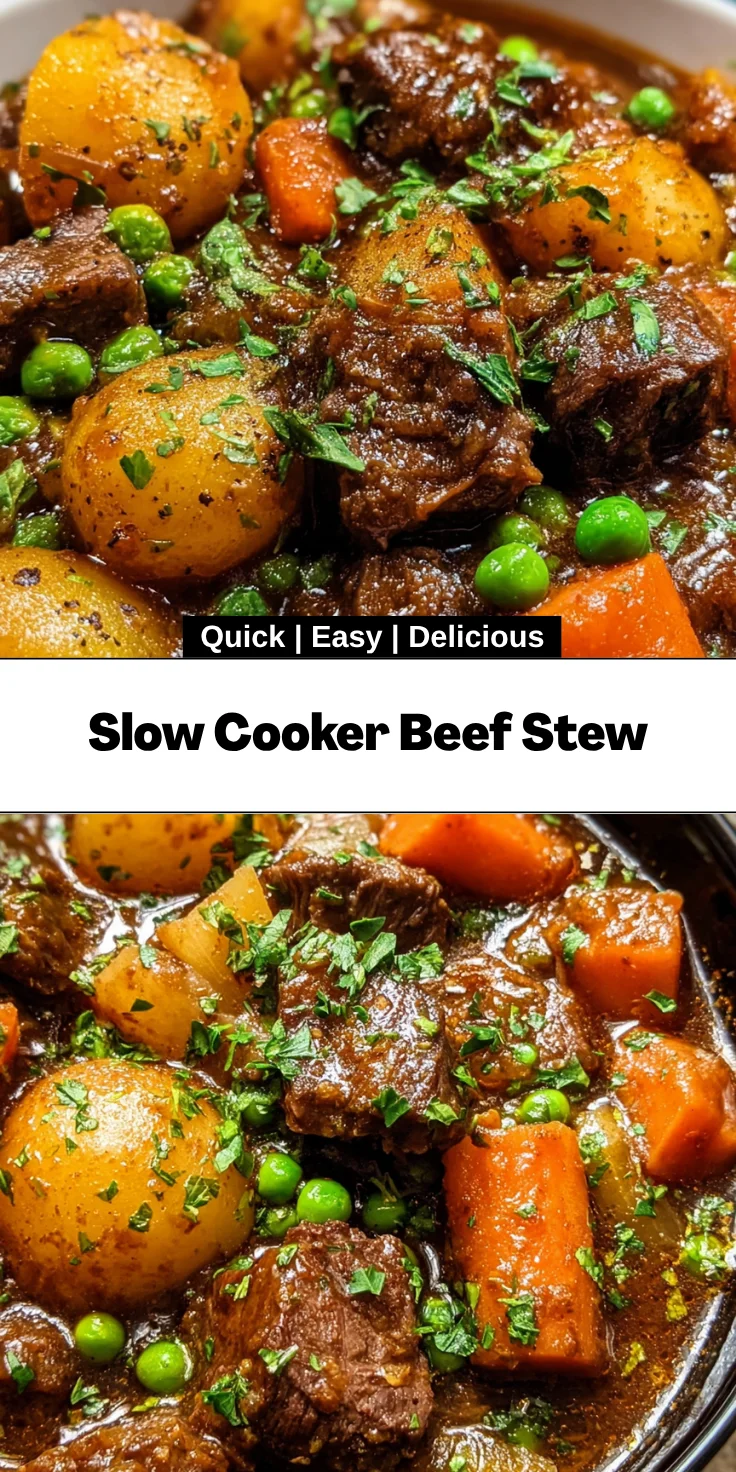
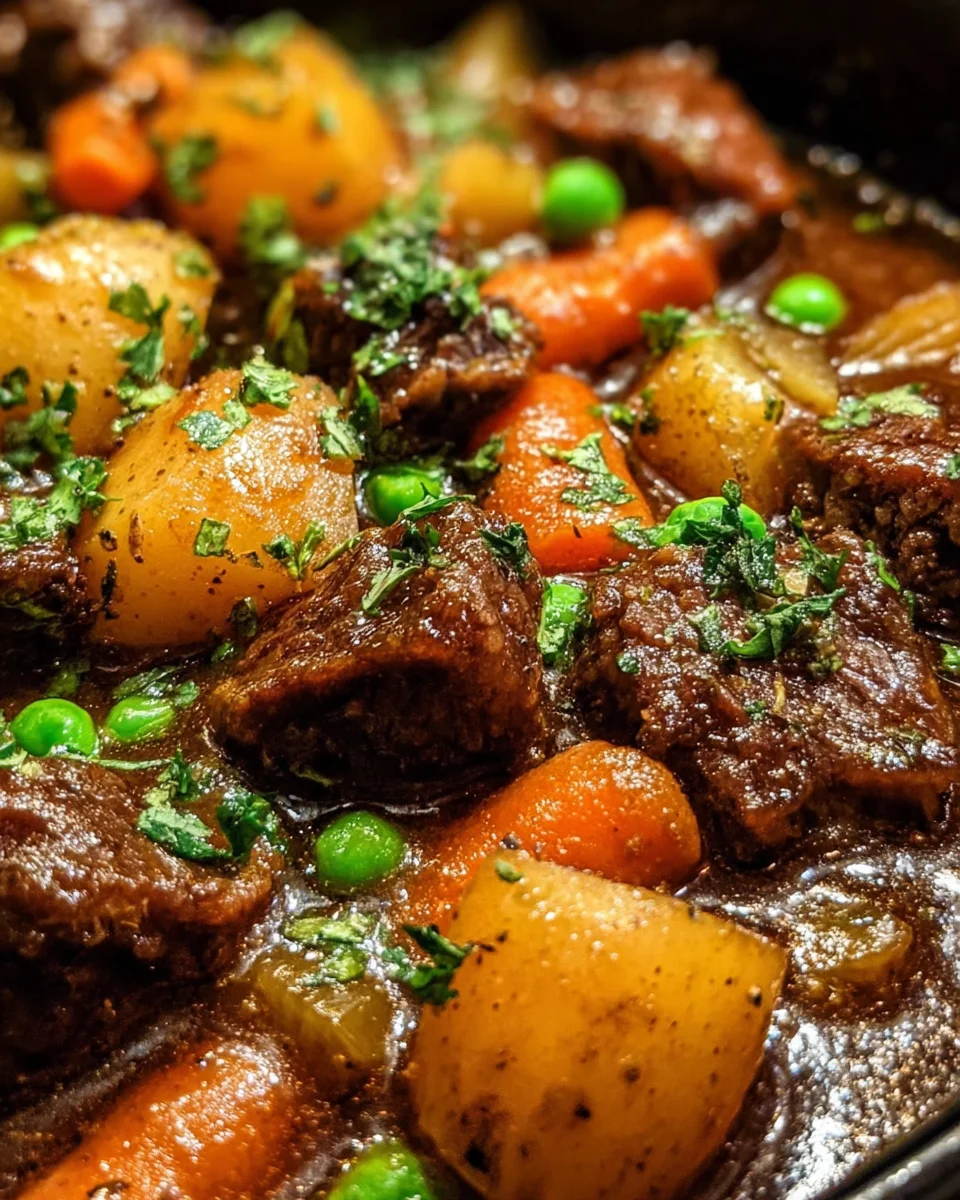
    Introduction to Slow Cooker Beef Stew

    Ah, the beauty of coming home to a warm bowl of Slow Cooker Beef Stew after a long day! There’s something incredibly comforting about the hearty combination of tender beef and vibrant vegetables simmering gently. As a busy mom, I often find myself juggling countless tasks while craving a meal that isn’t just quick but satisfying too. This recipe delivers both. Whether it’s a chilly evening or simply a hectic day, this stew wraps you in warmth, making meals a cherished moment for everyone at the table.

    Why You’ll Love This Slow Cooker Beef Stew

    This Slow Cooker Beef Stew is a lifesaver for busy families! Firstly, it practically cooks itself while you go about your day. Just toss the ingredients in, and let that magic happen! The rich flavors meld beautifully over time, so it’s incredibly tasty. Plus, it fills your home with an irresistible aroma, making dinner not just a meal, but a moment to savor together.

    Ingredients for Slow Cooker Beef Stew

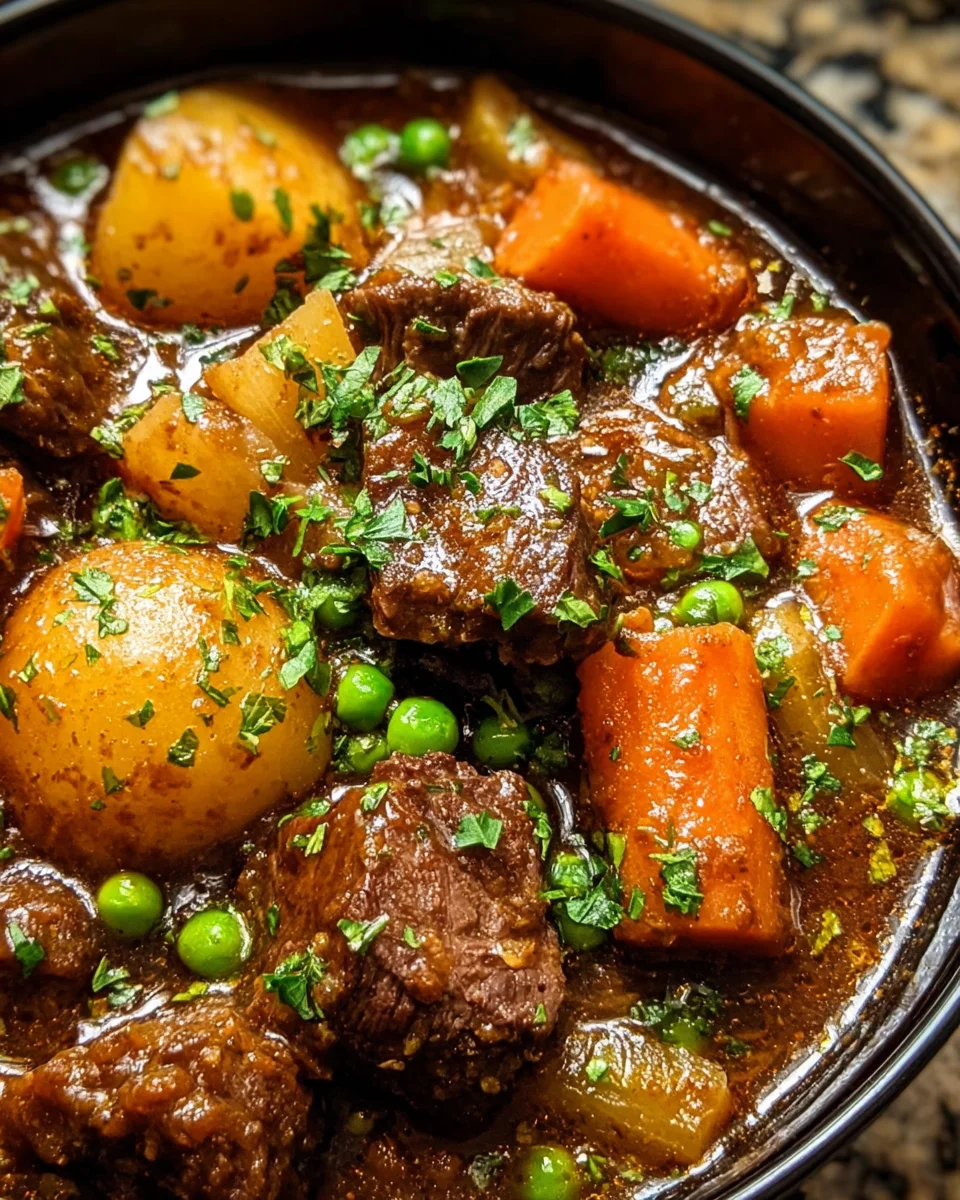
    To create this cozy Slow Cooker Beef Stew, you’ll need a hearty lineup of ingredients that come together to make magic in your slow cooker.

    • Beef stew meat: Tender cuts like chuck roast or round are perfect. They cook to buttery tenderness as they simmer.
    • Carrots: These vibrant veggies add natural sweetness and a pop of color. Feel free to swap for parsnips if you’re feeling adventurous!
    • Yukon Gold potatoes: Their creamy texture works wonders in stews. They soak up flavors beautifully while remaining firm.
    • Onion: A staple for flavor base. It adds depth and aroma to the dish.
    • Celery: This crunchy vegetable adds a fresh note and balances the richness of the stew.
    • Garlic: My go-to for any savory dish, garlic infuses the stew with a lovely warmth.
    • Tomato paste: A touch of this enriches the sauce, providing both color and depth of flavor.
    • Beef broth: Low-sodium versions let you control the salt while enhancing the rich beefy taste.
    • Worcestershire sauce: This adds a hint of tanginess and complexity. You’d be surprised at the difference it makes.
    • Red wine: (optional) Adds a layer of depth; you can replace this with extra beef broth if preferred.
    • Frozen peas: Save these for the final touch. They add a pop of color and sweetness at the end!
    • Bay leaves: These impart a lovely herbal note, making the stew even cozier.
    • Dried thyme and rosemary: Essential herbs that enhance the stew’s flavor with their aromatic qualities.
    • Salt and pepper: Essential for highlighting the flavors; adjust these to your taste before serving.
    • Olive oil: Optional for browning the beef, adding a rich layer of flavor to the dish.
    • All-purpose flour: Also optional; this is for dredging the beef to give it a slight crust and extra thickness to the stew.
    • Fresh parsley: Use this for garnishing, bringing a fresh brightness to the final dish.

    If you want exact quantities for each ingredient, don’t worry! You’ll find everything you need at the bottom of the article, ready for printing. Enjoy gathering these ingredients, as they promise to create something truly delightful.

    How to Make Slow Cooker Beef Stew

    Creating a delicious Slow Cooker Beef Stew is as simple as it gets. Let’s jump into the steps that will help you fill your kitchen with warm, comforting aromas while the flavors meld together beautifully.

    Step 1: Brown the Beef (Optional)

    First, let’s talk about browning the beef. This optional step adds a nice depth of flavor. Start by patting the beef dry. Once that’s done, toss it with some flour, salt, and pepper.

    In a skillet, heat some olive oil over medium-high heat. When it’s hot, brown the beef cubes for about 2-3 minutes per batch. This step may seem trivial, but it enhances the overall taste of the stew.

    Step 2: Build the Stew

    Next up, it’s time to add all those vibrant veggies and aromatic herbs to your slow cooker. Add the carrots, potatoes, onions, celery, and garlic to the pot. Each ingredient brings its unique flavor, making the stew truly special.

    Now, stir in the tomato paste, Worcestershire sauce, and optional red wine if you’re using it. Then sprinkle your herbs—thyme, rosemary, and drop in those bay leaves. Lastly, pour the beef broth over everything, stirring well to combine. Your stew is already starting to come alive!

    Step 3: Cook

    Now, it’s time to be patient and let your slow cooker work its magic. Cover the slow cooker and set it on LOW for about 7-8 hours or on HIGH for 4-5 hours. The beef should be fork-tender and the vegetables perfectly cooked. You’ll know it’s ready when that mouthwatering aroma fills the room, making your stomach rumble!

    Step 4: Finish

    Let’s add the finishing touches! About 30 minutes before you’re ready to serve, toss in the frozen peas. They bring a lovely sweetness and color to the dish.

    Before serving, remember to fish out those bay leaves. Adjust the seasoning with salt and pepper as needed, then give it a gentle stir. Garnish with fresh parsley for the perfect presentation!

    Tips for Success

    • Prep your veggies the night before and store them in the fridge for an even quicker dinner prep!
    • If time allows, brown the beef for deeper flavor, but it’s not necessary.
    • Don’t rush cooking; the longer, the better when it comes to slow-cooked flavors.
    • Feel free to mix in your favorite veggies, like bell peppers or green beans!
    • Serve with crusty bread to soak up every last bit of that delicious sauce.

    Equipment Needed

    • Slow Cooker: Essential for this recipe; alternatives include an Instant Pot or stovetop Dutch oven.
    • Skillet: For browning beef, but you can skip this if you prefer.
    • Cutting Board: A must for chopping veggies safely.
    • Knife: A sharp chef’s knife makes prep easy and enjoyable.
    • Measuring Cups & Spoons: Helpful for accuracy, especially with broth and seasonings.

    Variations of Slow Cooker Beef Stew

    • Italian Beef Stew: Add diced tomatoes, Italian seasoning, and a splash of balsamic vinegar for a delightful twist.
    • Chunky Vegetable Stew: Load up on veggies! Toss in bell peppers, mushrooms, or even butternut squash for extra nutrition.
    • Spicy Beef Stew: Spice things up with jalapeños or add a teaspoon of chili powder or smoked paprika for a warm kick!
    • Keto-Friendly Stew: Substitute potatoes with cauliflower or zucchini to keep it low-carb while still enjoying the hearty flavor.
    • Herb-Infused Stew: Experiment with fresh herbs like parsley, dill, or basil to bring out vibrant flavors that dance on your palate.
    • Asian-Inspired Stew: Swap in soy sauce and sesame oil, and add bok choy for a delightful twist on traditional beef stew.

    Serving Suggestions for Slow Cooker Beef Stew

    • Crusty Bread: Serve with a side of crusty bread to soak up all that delightful sauce.
    • Salad: Pair with a fresh green salad for a balanced meal.
    • Red Wine: A glass of red wine complements the rich flavors beautifully.
    • Garnish: Sprinkle extra parsley on top before serving for a pop of color.

    FAQs about Slow Cooker Beef Stew

    As a passionate home cook, I often get asked questions about my favorite Slow Cooker Beef Stew recipe. Let me share some common queries to help you on your culinary journey!

    Can I use a different cut of beef? Yes! While chuck roast is a great choice, you can also use round or bottom sirloin. Just ensure the meat has enough marbling to stay tender during cooking.

    Can I make this stew ahead of time? Absolutely! You can prepare the stew the night before and store it in the fridge. Just reheat on the stove or in the slow cooker to enjoy a warm meal.

    What can I substitute for red wine? If you’re not using red wine, simply add more beef broth for a similar depth of flavor. You could also opt for grape juice or balsamic vinegar as alternatives!

    How can I thicken the stew? If you prefer a thicker stew, you can mix a tablespoon of cornstarch with water to form a slurry. Stir this into the stew in the last 30 minutes of cooking.

    Is this stew gluten-free? Yes! As long as you skip the flour for dredging, this Slow Cooker Beef Stew is naturally gluten-free and perfect for those with dietary restrictions.

    Final Thoughts on Slow Cooker Beef Stew

    There’s just something magical about a steaming bowl of Slow Cooker Beef Stew shared with loved ones. This recipe encapsulates comfort and warmth, perfect after a long day. Watching the flavors develop as it simmers brings a deep satisfaction like no other. Using simple ingredients transforms them into a hearty meal you’ll cherish. As you gather around the table to enjoy the fruits of your labor, you’ll feel the joy that comes from nurturing family bonds over food. This stew isn’t just a meal—it’s a delicious reminder of what home truly feels like.


    Print

    clock clock iconcutlery cutlery iconflag flag iconfolder folder iconinstagram instagram iconpinterest pinterest iconfacebook facebook iconprint print iconsquares squares iconheart heart iconheart solid heart solid icon

    Description

    A hearty and comforting slow cooker beef stew made with tender beef, vibrant vegetables, and aromatic herbs, perfect for a cozy meal.


    • 2 lbs beef stew meat (chuck roast or round), cut into 1-inch cubes
    • 4 medium carrots, peeled and chopped
    • 4 Yukon Gold potatoes, diced
    • 1 large onion, chopped
    • 2 celery stalks, sliced
    • 4 garlic cloves, minced
    • 3 tbsp tomato paste
    • 4 cups beef broth (low-sodium preferred)
    • 2 tbsp Worcestershire sauce
    • 1/2 cup red wine (optional; substitute more broth if desired)
    • 1 cup frozen peas (add at the end)
    • 2 bay leaves
    • 1 tsp dried thyme
    • 1 tsp dried rosemary
    • Salt and pepper to taste
    • 2 tbsp olive oil (for optional browning)
    • 1/4 cup all-purpose flour (for dredging, optional)
    • Fresh parsley, for garnish

    1. Brown the Beef (Optional): Pat beef dry, toss with flour, salt, and pepper. Heat olive oil in a skillet and brown beef on all sides (2–3 minutes per batch). Transfer to slow cooker.
    2. Build the Stew: Add carrots, potatoes, onion, celery, and garlic to slow cooker. Stir in tomato paste, Worcestershire sauce, wine (if using), thyme, rosemary, bay leaves, and beef broth. Mix well.
    3. Cook: Cover and cook on LOW for 7–8 hours or HIGH for 4–5 hours, until beef and veggies are tender.
    4. Finish: Add frozen peas 30 minutes before serving. Remove bay leaves, season to taste, and garnish with fresh parsley.

    Notes

    • For richer flavor, browning the meat is recommended but optional.
    • Adjust seasoning to your taste before serving.
    • Consider serving with crusty bread for a complete meal.
    • Prep Time: 20 minutes
    • Cook Time: 8 hours (Low) or 5 hours (High)
    • Category: Main Dish
    • Method: Slow Cooking
    • Cuisine: American

    Nutrition

    • Serving Size: 1 cup
    • Calories: 350
    • Sugar: 3g
    • Sodium: 600mg
    • Fat: 15g
    • Saturated Fat: 5g
    • Unsaturated Fat: 8g
    • Trans Fat: 0g
    • Carbohydrates: 35g
    • Fiber: 5g
    • Protein: 25g
    • Cholesterol: 80mg

    Sharing is caring!

  • Tuscan Artichoke Tomato Salad

    Tuscan Artichoke Tomato Salad


    Introduction to Tuscan Artichoke Tomato Salad

    Hey there, fellow food lovers! Let’s talk about a delightful dish that’s perfect for a busy day—the Tuscan Artichoke Tomato Salad. This vibrant salad not only dazzles your taste buds, but it also helps you whip up a healthy meal in just 15 minutes. Whether you’re racing against the clock or simply looking to impress your loved ones, this salad is bound to steal the show at your table. With its refreshing flavors and colorful ingredients, it’s a quick solution that brings joy without the hassle.

    Why You’ll Love This Tuscan Artichoke Tomato Salad

    This Tuscan Artichoke Tomato Salad is the epitome of simplicity. It’s quick to prepare, so even on the busiest days, you can enjoy a healthy meal. With the perfect balance of savory and tangy flavors, your taste buds will thank you. Plus, it’s versatile! You can serve it as a side or toss it onto a bed of greens for a fulfilling lunch. What’s not to love?

    Ingredients for Tuscan Artichoke Tomato Salad

    Gathering the right ingredients is half the fun of making a dish, don’t you think? Here’s what you’ll need for the vibrant Tuscan Artichoke Tomato Salad:

    • Cherry tomatoes: These bite-sized beauties add sweetness and a pop of color to your salad.
    • Red onion: This brings a tangy crunch that complements the other flavors perfectly.
    • Marinated artichoke hearts: They infuse the salad with a savory depth, transporting you right to Italy.
    • Chickpeas: Packed with protein, they make this dish hearty enough to stand alone. Plus, they’ve got that lovely nutty flavor.
    • Fresh basil: With its aromatic notes, it’s like you’ve added a dash of sunshine to your bowl.
    • Chives: These little green wonders deliver a mild onion flavor that enhances every bite.
    • Capers: They contribute a delightful brininess that dances on your palate.
    • Olive oil: This golden liquid is key to a rich dressing, delivering heart-healthy fat.
    • Red wine vinegar: It brightens up the salad with a tangy zing that perfectly balances the whole dish.
    • Dried parsley: For that extra hint of earthiness that ties all the flavors together.
    • Salt and pepper: Essential for elevating flavors. Adjust them to your preference.
    • Garlic powder or fresh garlic: Either adds that punch of flavor we often crave.

    Now, if you’re ready to make this delightful salad, don’t forget that the specific quantities are listed at the bottom of the article for you to print later. Happy cooking!

    How to Make Tuscan Artichoke Tomato Salad

    Ready to dive into making this scrumptious Tuscan Artichoke Tomato Salad? Let’s break it down step by step. It’s truly as simple as it sounds, and I promise you’ll enjoy every moment. So, grab your ingredients, roll up those sleeves, and let’s get cooking!

    Step 1: Prep Your Veggies and Chickpeas

    First things first, let’s prep those vibrant veggies and chickpeas. Start by cutting the cherry tomatoes in half. Their juicy sweetness will be the star of the show!

    Next, thinly slice the red onion to bring a tangy crunch to your salad.

    Then, finely chop the chives; they add a mild onion flavor that’s delightful!

    Take your fresh basil and cut it into long, thin strips. The aroma alone is enough to elevate your culinary experience.

    Finally, rinse the chickpeas under cold water, then pat them dry. They’re your secret weapon for making this salad hearty.

    Step 2: Make the Tuscan Vinaigrette

    Now, let’s whip up the Tuscan vinaigrette that ties this salad together. In a bowl, combine the olive oil and red wine vinegar—a classic marriage of flavors!

    Add in the dried parsley, salt, garlic powder (or minced garlic), and ground black pepper. Whisk it all together until the mixture is well-combined. This dressing will ensure every bite of your salad is bursting with flavor.

    Step 3: Combine All Ingredients

    Time to bring everything together! In a large mixing bowl, toss in the cherry tomatoes, red onion, chives, basil, marinated artichoke hearts, chickpeas, and capers.

    Now, drizzle that luscious vinaigrette over the top. Gently mix all the ingredients until everything is beautifully coated. Your Tuscan Artichoke Tomato Salad is starting to look and smell incredible!

    Step 4: Chill or Serve Immediately

    Now, here’s a little pro tip: If you want to boost those flavors even more, place the salad in the fridge for about 1-2 hours before serving. The ingredients will get cozy, and trust me, it will be worth the wait!

    If you’re in a hurry, no need to fret; you can serve it right away and still enjoy a delicious meal. Either way, you’re in for a treat!

    Tips for Success

    • Chill your salad for a couple of hours to enhance the flavors—trust me, it makes a difference!
    • For a unique twist, add some crumbled feta or avocado for creaminess.
    • If you’re short on time, use pre-chopped veggies to speed up prep.
    • Fresh herbs will always elevate your dish, so don’t skimp!
    • Make a big batch! This salad makes for great leftovers and lunches.

    Equipment Needed

    • Large mixing bowl: Any bowl will do, but a glass or ceramic one is preferred for mixing.
    • Cutting board and knife: A sharp knife will make chopping veggies a breeze.
    • Whisk or fork: Use these to mix your vinaigrette—get creative!
    • Measuring spoons: To ensure the right flavor balance; you can eyeball it, too!

    Variations of Tuscan Artichoke Tomato Salad

    • Add some protein: Toss in grilled chicken or shrimp for a heartier meal.
    • Make it gluten-free: This salad is naturally gluten-free, making it a great option for those with dietary restrictions.
    • For a Mediterranean twist: Swap the chickpeas for feta cheese and olives for a briny flavor boost.
    • Spice it up: If you love heat, try adding diced jalapeños or a pinch of red pepper flakes.
    • Vegan option: Simply leave out the chickpeas and substitute with more veggies, like diced bell peppers or zucchini.

    Serving Suggestions for Tuscan Artichoke Tomato Salad

    • Pair with crusty bread: A warm slice of sourdough or ciabatta complements the salad perfectly.
    • Add a refreshing drink: A chilled glass of white wine or sparkling water with lemon works wonders.
    • Presentation tip: Serve the salad in a beautiful bowl topped with extra basil for a pop of color.

    FAQs about Tuscan Artichoke Tomato Salad

    Can I prepare the Tuscan Artichoke Tomato Salad ahead of time?

    Absolutely! You can make this salad a few hours in advance. Just chill it in the fridge, allowing those flavors to mingle beautifully. It tastes even better after a little time together!

    Is this salad suitable for a vegetarian or vegan diet?

    You bet! This Tuscan Artichoke Tomato Salad is a delightful vegetarian dish. To make it vegan, simply make sure your chickpeas are from a can without added ingredients. You’re all set to enjoy!

    What can I substitute for chickpeas?

    If chickpeas aren’t your thing, no worries! You can swap them for white beans or black olives for a different flavor and texture. Both are tasty alternatives!

    How can I store leftover Tuscan Artichoke Tomato Salad?

    To keep your salad fresh, store it in an airtight container in the fridge. It should last for about 2-3 days, making it perfect for quick lunches throughout the week.

    Can I add more vegetables to this salad?

    Definitely! Feel free to throw in whatever veggies you have on hand. Bell peppers, cucumber, or even zucchini would add a wonderful crunch to your Tuscan Artichoke Tomato Salad.

    Final Thoughts

    Making the Tuscan Artichoke Tomato Salad truly feels like a joyful culinary adventure. The burst of freshness, vibrant colors, and delightful flavors are sure to wow your taste buds and those of your family. As a busy mom, I love how this quick recipe brings everyone to the table without much fuss. Plus, it keeps well and makes great leftovers for lunch! Whether you whip it up for a casual dinner or a get-together, this salad’s warmth and zest are bound to create lasting memories. Happy cooking and enjoy every bite!


    Print

    clock clock iconcutlery cutlery iconflag flag iconfolder folder iconinstagram instagram iconpinterest pinterest iconfacebook facebook iconprint print iconsquares squares iconheart heart iconheart solid heart solid icon

    Description

    A refreshing and vibrant salad featuring artichokes, tomatoes, and chickpeas, dressed in a Tuscan vinaigrette.


    • 10 ounces cherry tomatoes cut in half
    • ½ medium red onion thinly sliced
    • 1 12 ounce jar of marinated artichoke hearts strained from water/marinade
    • 1 15 ounce can of cooked chickpeas strained, rinsed, and dried (about 1 ½ cups cooked chickpeas)
    • 2 Tablespoons fresh basil cut into thin strips
    • 2 Tablespoons fresh chives finely diced
    • 1 Tablespoon capers
    • ¼ cup olive oil
    • 2 Tablespoons red wine vinegar
    • 1 teaspoon dried parsley
    • ¼1/2 teaspoon salt add more or less depending on preference
    • ½ teaspoon garlic powder or 1 garlic clove finely minced
    • ¼ teaspoon ground black pepper

    1. First, prep the veggies, herbs, and chickpeas. Cut the cherry tomatoes in half, thinly slice the red onion, finely chop the chives, and cut the basil into long thin strips. Strain the artichoke hearts from the liquid they are sitting in and set aside. Lastly, strain and rinse the canned chickpeas and then pat them dry before adding to the salad.
    2. Next, make the Tuscan vinaigrette. Add the olive oil, red wine vinegar, dried parsley, salt, garlic powder, and black pepper to a bowl and whisk together.
    3. To finish, put everything together. Add the chopped tomatoes, red onion, chives, basil, marinated artichoke hearts, chickpeas, capers, and vinaigrette to a bowl. Then mix together until all the veggies are coated.
    4. Serve immediately or chill for 1-2 hours for an even better flavor. Enjoy!

    Notes

    • Chilling the salad for a couple of hours will enhance the flavors.
    • Feel free to adjust the amount of salt and pepper according to your taste.
    • This salad can also be served on a bed of greens for added nutrition.
    • Prep Time: 15 minutes
    • Cook Time: 0 minutes
    • Category: Salad
    • Method: Mixing
    • Cuisine: Italian

    Nutrition

    • Serving Size: 1 serving
    • Calories: 250
    • Sugar: 3g
    • Sodium: 450mg
    • Fat: 14g
    • Saturated Fat: 2g
    • Unsaturated Fat: 10g
    • Trans Fat: 0g
    • Carbohydrates: 30g
    • Fiber: 8g
    • Protein: 8g
    • Cholesterol: 0mg

    Sharing is caring!

  • Mediterranean Lemon Chicken with Artichokes & Olives

    Mediterranean Lemon Chicken with Artichokes & Olives


    Introduction to Mediterranean Lemon Chicken with Artichokes & Olives

    Life can be a whirlwind, can’t it? Between work, family, and everything in between, it sometimes feels like there’s no time left for a home-cooked dinner. That’s where this delightful Mediterranean Lemon Chicken with Artichokes & Olives comes in. It’s my go-to recipe for busy evenings when I need a quick yet impressive meal. With zesty lemon and savory artichokes, this dish transforms basic chicken into something spectacular. Whether you’re cooking for your family or hosting friends, this recipe is sure to leave everyone asking for seconds!

    Why You’ll Love This Mediterranean Lemon Chicken with Artichokes & Olives

    This Mediterranean Lemon Chicken with Artichokes & Olives is not just a meal; it’s a lifesaver! In just 40 minutes, you can serve up a dish that’s bursting with flavor and color. The combination of juicy chicken, tangy lemon, and briny olives creates a symphony of tastes that’s simply irresistible. Plus, it’s one-pot cooking—which means fewer dishes and more time to enjoy with your loved ones. Who says delicious has to be complicated?

    Ingredients for Mediterranean Lemon Chicken with Artichokes & Olives

    Let’s gather our vibrant ingredients for this Mediterranean Lemon Chicken with Artichokes & Olives. Each one plays a crucial role in this delicious dish. Don’t worry about the exact measurements yet; those are at the bottom of the article for your convenience.

    • Boneless, skinless chicken breasts or bone-in, skin-on thighs: The star of our show! Chicken breasts are lean, while thighs bring extra moisture and flavor.
    • Olive oil: For sautéing and bringing richness. Choose extra virgin for a lovely flavor boost.
    • Salt & black pepper: These simple seasonings enhance every single bite, making the dish pop.
    • Dried oregano: A staple in Mediterranean cooking, it adds earthy notes that complement the chicken beautifully.
    • Smoked paprika: This brings a subtle smokiness that complements the chicken and pairs perfectly with the other flavors.
    • Garlic: Minced for that aromatic kick! Fresh is best, but jarred works in a pinch.
    • Onion: Finely chopped, it adds sweetness and depth to the base of your sauce.
    • White wine or chicken broth: Use wine for a richer flavor, but broth is a fantastic alcohol-free alternative.
    • Chicken broth: This is key for a savory sauce that ties everything together.
    • Fresh lemon juice and zest: You just can’t beat the fresh, tangy brightness of lemon in this dish!
    • Dijon mustard: This adds a nice sharpness and complexity that melds beautifully with the sauce.
    • Red pepper flakes: Optional, but they add a delightful warmth if you’re feeling adventurous!
    • Artichoke hearts: Canned or jarred, they bring a unique, earthy flavor and delightful texture.
    • Olives: Green or Kalamata olives bring briny goodness, enhancing the Mediterranean flair.
    • Capers: Another optional ingredient for an extra pop of briny flavor that ties the dish together.
    • Fresh parsley or basil: These make for a lovely garnish and add a fresh note when served.

    With these ingredients on hand, you’re all set to create a meal that’s not only delicious but also captivating. Let’s get cooking!

    How to Make Mediterranean Lemon Chicken with Artichokes & Olives

    Now that we have all our ingredients for this Mediterranean Lemon Chicken with Artichokes & Olives, it’s time to get cooking. Follow these simple steps, and you’ll have a dish that enchants everyone at the table.

    Step 1: Season the Chicken

    This is where we start getting cozy with our chicken. Season the chicken with salt, black pepper, dried oregano, and smoked paprika. Don’t rush—make sure each piece is coated evenly. This seasoning is your flavor foundation.

    Step 2: Sear the Chicken

    Heat 1 tablespoon of olive oil in a large skillet over medium-high heat. Once it’s shimmering, carefully place the chicken in the pan. Sear the chicken for about 3-4 minutes on each side until it turns golden brown. The goal is to lock in that juicy goodness. After browning, remove the chicken from the pan and set it aside; it will finish cooking later.

    Step 3: Sauté the Onions and Garlic

    In the same pan, add another tablespoon of olive oil. Toss in the finely chopped onion and minced garlic. Sauté these aromatic ingredients for about 2-3 minutes until they’re soft and fragrant. This step builds a flavor base that’s downright heavenly!

    Step 4: Create the Sauce

    Now it’s time to add some pizzazz! Pour in the white wine (or chicken broth if you’re skipping alcohol), scraping the bottom of the pan to pick up those flavorful browned bits. Let it simmer for a minute or two to reduce slightly. After that, add the chicken broth, fresh lemon juice, lemon zest, Dijon mustard, and red pepper flakes if you want some extra heat. Stir it all together until it’s nicely combined.

    Step 5: Combine with Chicken

    Reintroduce the seared chicken into the pan. Nestle it into the sauce, letting it mingle and soak up all those juicy flavors. This is where the magic really begins!

    Step 6: Add Artichokes and Olives

    Time to elevate our dish even further with artichokes and olives. Scatter the drained, quartered artichoke hearts and halved olives around the chicken. They’ll lend their unique flavors, making this Mediterranean Lemon Chicken with Artichokes & Olives a true delight!

    Step 7: Final Simmer and Serve

    Cover the skillet and let it simmer over medium-low heat for about 10-15 minutes. You want the chicken to reach an internal temperature of 165°F (75°C). Once it’s ready, it’s showtime! Garnish with fresh parsley or basil and serve with lemon slices for that extra flair; trust me, it looks as good as it tastes.

    Tips for Success

    • Don’t crowd the pan when searing the chicken; work in batches if necessary.
    • For a deeper flavor, marinate the chicken in the seasoning for an hour or overnight.
    • Use fresh herbs for a vibrant finish; they brighten up the dish beautifully.
    • If you want a thicker sauce, let it simmer uncovered for a few extra minutes.
    • Experiment with different olives or artichoke varieties for unique flavor twists!

    Equipment Needed

    • Large Skillet: A nonstick skillet works well, but a heavy-duty pan is great for browning.
    • Cutting Board: Essential for chopping veggies and prepping your ingredients.
    • Knife: A sharp chef’s knife makes prep quicker and safer.
    • Meat Thermometer: Optional but helpful for ensuring the chicken is perfectly cooked.
    • Measuring Cups and Spoons: Handy for accurate ingredient portions.

    Variations of Mediterranean Lemon Chicken with Artichokes & Olives

    • Swap the Protein: Consider using shrimp or salmon for a seafood twist. Both cook quickly and pair beautifully with the lemony sauce.
    • Go Vegetarian: Use hearty mushrooms or chickpeas as the base instead of chicken, making it a delightful, plant-based dish.
    • Spice it Up: Try adding a pinch of cumin or coriander for an earthy depth that enhances the dish’s Mediterranean flair.
    • Change the Greens: Substitute spinach or kale for artichokes for a different texture and additional nutrients.
    • Or Starch it Up: Serve it over stuffed peppers or zucchini boats, adding a new layer of flavor and fun presentation.

    Serving Suggestions for Mediterranean Lemon Chicken with Artichokes & Olives

    • Couscous or Quinoa: Serve this dish over fluffy couscous or protein-packed quinoa for a wholesome meal.
    • Roasted Vegetables: Pair with seasonal roasted veggies for a colorful, nourishing side.
    • Fresh Salad: A crisp Greek salad adds a refreshing crunch and contrasts beautifully.
    • White Wine: Enjoy with a chilled glass of white wine to elevate your dining experience.


    FAQs about Mediterranean Lemon Chicken with Artichokes & Olives

    I’m sure you’ve got some questions buzzing in your mind as you prepare for this delightful Mediterranean Lemon Chicken with Artichokes & Olives. Let me shed some light on a few frequently asked questions!

    Can I use frozen chicken for this recipe?

    Absolutely! Just make sure to defrost it completely before seasoning and cooking. Frozen chicken can take a bit longer to cook, so use a meat thermometer for that perfect 165°F (75°C) finish.

    What if I can’t find fresh artichokes?

    No worries! Canned or jarred artichoke hearts are excellent substitutes. Just drain and quarter them as outlined in the recipe. It’s a great shortcut without sacrificing flavor!

    Can I make this dish ahead of time?

    You sure can! Prepare the recipe up until the final simmer. Allow it to cool completely, then store it in an airtight container. When you’re ready to serve, simply reheat it on the stove until warmed through. Easy peasy!

    What can I serve with Mediterranean Lemon Chicken?

    This dish pairs wonderfully with couscous or quinoa, offering a hearty base. You can also serve it alongside crusty bread to soak up the zesty sauce. A fresh Greek salad adds a refreshing contrast!

    Is this dish suitable for meal prep?

    Yes, it’s perfect for meal prep! Just store portions in airtight containers in the fridge. This delicious recipe will keep well for up to three days, and the flavors only get better!

    Final Thoughts on Mediterranean Lemon Chicken with Artichokes & Olives

    With its vibrant flavors and simple preparation, this Mediterranean Lemon Chicken with Artichokes & Olives truly does shine! It’s a delightful reminder that even on the busiest of days, you can create a meal that feels special and comforting. The combination of tangy lemon, tender chicken, and briny olives transports you to a sun-kissed Mediterranean getaway. Plus, the joy of sharing this dish with dear friends and family warms your heart. So go ahead and savor every bite; it’s more than just dinner—it’s a culinary adventure waiting to be discovered!


    Print

    clock clock iconcutlery cutlery iconflag flag iconfolder folder iconinstagram instagram iconpinterest pinterest iconfacebook facebook iconprint print iconsquares squares iconheart heart iconheart solid heart solid icon

    Description

    Life can be a whirlwind, can’t it? Between work, family, and everything in between, it sometimes feels like there’s no time left for a home-cooked dinner. That’s where this delightful Mediterranean Lemon Chicken with Artichokes & Olives comes in. It’s my go-to recipe for busy evenings when I need a quick yet impressive meal. With zesty lemon and savory artichokes, this dish transforms basic chicken into something spectacular. Whether you’re cooking for your family or hosting friends, this recipe is sure to leave everyone asking for seconds!


    • 4 boneless, skinless chicken breasts (or 6 bone-in, skin-on thighs for extra flavor)
    • 2 tbsp olive oil
    • 1 tsp salt
    • 1/2 tsp black pepper
    • 1 tsp dried oregano
    • 1 tsp smoked paprika (or regular paprika)
    • 3 cloves garlic (minced)
    • 1 small onion (finely chopped)
    • 1/2 cup white wine (or chicken broth for a non-alcoholic version)
    • 1 cup chicken broth
    • Juice of 1 lemon (plus extra lemon slices for garnish)
    • 1 tsp lemon zest
    • 1 tsp Dijon mustard
    • 1/2 tsp red pepper flakes (optional, for a bit of heat)
    • 1 cup canned or jarred artichoke hearts (drained and quartered)
    • 1/2 cup green or Kalamata olives (pitted and halved)
    • 2 tbsp capers (optional, for extra briny flavor)
    • Fresh parsley or basil (for garnish)

    1. Season the chicken with salt, pepper, oregano, and paprika.
    2. Heat 1 tbsp olive oil in a large skillet over medium-high heat. Sear the chicken for 3-4 minutes per side until golden brown. Remove and set aside.
    3. In the same pan, add 1 tbsp olive oil, then sauté the onion and garlic until softened (about 2-3 minutes).
    4. Pour in the white wine, scraping up any browned bits from the pan. Let it simmer for 1-2 minutes to reduce.
    5. Add chicken broth, lemon juice, zest, Dijon mustard, and red pepper flakes. Stir to combine.
    6. Return the chicken to the pan, nestling it into the sauce.
    7. Add the artichokes, olives, and capers around the chicken.
    8. Cover and simmer over medium-low heat for 10-15 minutes, until the chicken is cooked through (internal temp 165°F/75°C).
    9. Garnish with fresh parsley or basil and lemon slices before serving.

    Notes

    • Serve with couscous, quinoa, or orzo for a Mediterranean touch.
    • Pair with roasted potatoes or crusty bread to soak up the sauce.
    • Add a side of Greek salad or grilled vegetables for a refreshing contrast.
    • Prep Time: 15 minutes
    • Cook Time: 25 minutes
    • Category: Dinner
    • Method: Skillet Cooking
    • Cuisine: Mediterranean

    Nutrition

    • Serving Size: 1 serving
    • Calories: 370
    • Sugar: 2g
    • Sodium: 550mg
    • Fat: 15g
    • Saturated Fat: 2g
    • Unsaturated Fat: 10g
    • Trans Fat: 0g
    • Carbohydrates: 5g
    • Fiber: 1g
    • Protein: 49g
    • Cholesterol: 150mg

    Sharing is caring!

  • Greek Turkey Meatballs with Tzatziki Sauce

    Greek Turkey Meatballs with Tzatziki Sauce


    Introduction to Greek Turkey Meatballs with Tzatziki Sauce

    Welcome to my kitchen! Today, I’m excited to share my recipe for Greek Turkey Meatballs with Tzatziki Sauce. If you’re like me, finding quick and tasty meals can be a challenge. But these meatballs? They’re perfect for busy days, and they’ll impress your family and friends alike! The combination of tender turkey and aromatic spices, paired with the cool, refreshing tzatziki, is a match made in heaven. Plus, they’re healthy, delicious, and ready in just 30 minutes! Let’s create some culinary magic that will make your taste buds dance!

    Why You’ll Love This Greek Turkey Meatballs with Tzatziki Sauce

    These Greek Turkey Meatballs with Tzatziki Sauce strike the perfect balance between flavor and ease. In just 30 minutes, you can create a satisfying meal that doesn’t skimp on taste. They’re healthy, filling, and make for a wonderful weeknight dinner or a casual get-together. Plus, the tzatziki adds a refreshing twist that elevates every bite. Trust me, this dish will quickly become a family favorite!

    Ingredients for Greek Turkey Meatballs with Tzatziki Sauce

    To whip up these Greek Turkey Meatballs with Tzatziki Sauce, you’ll need a handful of ingredients that come together beautifully. Let’s dive into what you’ll require!

    • Ground Turkey: A lean protein that serves as the base. It keeps the meatballs healthy and light while being packed with flavor.
    • Bread Crumbs: These provide texture and help bind the meatballs. You can use regular or gluten-free options; both work well!
    • Egg: The magic ingredient that holds everything together. Don’t skip it! It ensures your meatballs stay moist and juicy.
    • Dried Oregano: Adding a touch of Mediterranean flair, this herb brings a lovely aroma and earthy flavor to your meatballs.
    • Garlic Powder: A sprinkle is all you need for that unmistakable savory essence without the fuss of fresh garlic.
    • Chopped Parsley: Fresh parsley is a wonderful way to add a pop of color and freshness. It also gives a nice contrast to the rich flavors!
    • Tzatziki Sauce: The star of the show! A creamy cucumber-yogurt sauce that complements the meatballs perfectly. You can buy it pre-made or whip up your own at home.

    These ingredients craft not just a meal, but a delightful experience. For exact measurements, check the bottom of the article where you’ll find everything ready for printing. Happy cooking!

    How to Make Greek Turkey Meatballs with Tzatziki Sauce

    Creating the perfect Greek Turkey Meatballs with Tzatziki Sauce is easier than you think! Follow these simple steps, and I promise your family will be raving about this dish for days!

    Step 1: Prepare the Meatball Mixture

    First things first! In a large mixing bowl, you’ll want to combine your ground turkey, breadcrumbs, and the egg. This is where the magic begins! Add in the dried oregano and garlic powder, stirring gently to incorporate those bold flavors. Now, don’t forget that lovely chopped parsley; it not only adds color but also freshness! I like to use my hands here to really blend everything together. Get in there and mix until everything is evenly combined. Just be careful not to overmix—this will make the meatballs tough. You want them to be as tender as a hug!

    Step 2: Form the Meatballs

    Once your mixture is ready, it’s time to roll! Start by grabbing a handful of the meat mixture; the size is up to you. I usually aim for about the size of a golf ball. This makes them easy to cook and serve. As you roll, ensure each meatball is uniform; this helps them cook evenly. Place them on a baking sheet lined with parchment paper. If you want a quick tip, wet your hands slightly before rolling to prevent sticking. Plus, who doesn’t want a little less mess in the kitchen?

    Step 3: Cook the Meatballs

    Cooking time! You have two options here. If you’re feeling like a baking pro, preheat your oven to 400°F and bake those meatballs for about 20 minutes. This method is easier and less messy, plus it allows for even cooking. If you prefer that golden crisp, heat a skillet over medium-high heat with a bit of olive oil. Carefully place the meatballs in the skillet and pan-fry them until they’re golden brown and fully cooked through—about 10-12 minutes. Either way, rest assured you’ll have heavenly meatballs that are juicy and full of flavor!

    Step 4: Make the Tzatziki Sauce

    A homemade tzatziki can elevate your meal! In a bowl, combine Greek yogurt, grated cucumber (make sure to squeeze out excess water), a clove of minced garlic, a squeeze of lemon juice, and a drizzle of olive oil. A little chopped dill adds fantastic flavor, too! Mix everything until smooth, then taste it. Adjust the lemon and garlic to your liking. Trust me, this refreshing sauce makes each bite of meatball a succulent experience!

    Step 5: Serve it Up

    Now comes the fun part—plating! Arrange your perfectly cooked Greek Turkey Meatballs on a serving platter. Add a generous dollop of tzatziki sauce on the side, and to take it up a notch, garnish with some extra parsley or even lemon wedges. The burst of freshness brightens the dish. Serve with a fresh Greek salad for a delightful Mediterranean feast. Enjoy every flavorful bite!

    Tips for Success

    • Don’t overmix the meatball mixture; gentle hands create tender meatballs.
    • Using a cookie scoop can help form uniform meatballs quickly.
    • For extra flavor, let the meatball mixture rest in the fridge for 30 minutes before rolling.
    • Cook a few meatballs first to test seasoning; adjust if needed.
    • Store leftover meatballs in an airtight container for up to 3 days.

    Equipment Needed for Greek Turkey Meatballs with Tzatziki Sauce

    • Mixing Bowl: A large bowl for mixing your ingredients. A sturdy pot can also work!
    • Baking Sheet: Use a rimmed baking sheet for baking. Alternatively, a cast-iron skillet is great for frying!
    • Cooking Spoon: A wooden or silicone spatula for mixing. A regular spoon will do in a pinch!
    • Meat Thermometer: To ensure your meatballs are cooked through. A knife can help check doneness too!
    • Measuring Cups and Spoons: For accurate portions. Feel free to eyeball ingredients if you’re comfortable!

    Variations of Greek Turkey Meatballs with Tzatziki Sauce

    • Spinach and Feta: Add fresh spinach and crumbled feta cheese to the mixture for a burst of flavor and extra nutrients.
    • Zucchini Meatballs: Substitute half of the turkey with grated zucchini for a veggie-packed twist that keeps them moist.
    • Spicy Kick: Mix in a pinch of red pepper flakes or chopped jalapeños for those who love a little heat!
    • Herb Variations: Swap parsley for fresh mint or basil to change the flavor profile.
    • Keto Friendly: Use almond flour instead of breadcrumbs for a low-carb alternative.

    Serving Suggestions for Greek Turkey Meatballs with Tzatziki Sauce

    • Greek Salad: Serve vibrant cucumbers, tomatoes, and olives drizzled with olive oil for a refreshing side.
    • Pita Bread: Warm pita bread is perfect for scooping up meatballs and tzatziki!
    • Wine Pairing: A crisp white wine, like Sauvignon Blanc, complements the flavors beautifully.
    • Herb Garnishes: Fresh herbs, like dill or mint, add a pop of color and flavor on top.
    • Rice or Quinoa: A side of lemon-infused rice or quinoa makes for a hearty meal.

    FAQs about Greek Turkey Meatballs with Tzatziki Sauce

    Can I make Greek Turkey Meatballs ahead of time? Absolutely! You can prepare the meatballs ahead of time. Form them, then freeze them raw or cooked. Just add a few extra minutes to the cooking time if baking directly from frozen.

    What can I serve with Greek Turkey Meatballs? These meatballs shine alongside a fresh Greek salad or warm pita bread. You can also pair them with a simple cucumber and tomato salad for a light meal.

    How do I store leftovers? Store any leftovers in an airtight container in the fridge for up to three days. You can also freeze them for up to three months for a quick meal later on!

    Is the Tzatziki Sauce easy to make? Yes, making tzatziki at home is simple! Combining Greek yogurt, grated cucumber, garlic, lemon juice, and herbs takes just a few minutes!

    Can I make these meatballs gluten-free? Of course! Just use gluten-free breadcrumbs, and you’re all set. You’ll still have the same delicious taste without the gluten!

    Final Thoughts

    Making Greek Turkey Meatballs with Tzatziki Sauce brings joy to my kitchen, and I hope it does the same for you! The aroma wafting through your home, the quick prep time, and the delicious outcome are all part of this delightful experience. Every bite is a burst of flavors that transport you to sunny Mediterranean shores. Plus, the smile on your family’s faces? Priceless. So, roll up your sleeves and give it a try! You’ll soon find this recipe is not just a meal; it’s a moment to savor, share, and enjoy together!


    Print

    clock clock iconcutlery cutlery iconflag flag iconfolder folder iconinstagram instagram iconpinterest pinterest iconfacebook facebook iconprint print iconsquares squares iconheart heart iconheart solid heart solid icon

    Description

    Delicious and healthy Greek Turkey Meatballs served with a refreshing Tzatziki sauce.


    • 1 lb ground turkey
    • 1/2 cup breadcrumbs
    • 1 egg
    • 1 tsp dried oregano
    • 1/2 tsp garlic powder
    • 1/4 cup chopped parsley
    • Tzatziki sauce, for serving

    1. Mix turkey, breadcrumbs, egg, oregano, garlic powder, and parsley. Roll into meatballs.
    2. Bake at 400°F for 20 minutes or pan-fry until golden and cooked through.
    3. Serve with a generous dollop of tzatziki and a fresh Greek salad.

    Notes

    • Adjust seasoning according to taste.
    • Meatballs can be made ahead and frozen for later use.
    • Prep Time: 10 minutes
    • Cook Time: 20 minutes
    • Category: Main Course
    • Method: Baking or Pan-frying
    • Cuisine: Greek

    Nutrition

    • Serving Size: 1 serving
    • Calories: 250
    • Sugar: 1g
    • Sodium: 300mg
    • Fat: 10g
    • Saturated Fat: 2g
    • Unsaturated Fat: 7g
    • Trans Fat: 0g
    • Carbohydrates: 14g
    • Fiber: 2g
    • Protein: 27g
    • Cholesterol: 90mg

    Sharing is caring!

  • Spring Mix Salad with Balsamic Honey Dressing

    Spring Mix Salad with Balsamic Honey Dressing


    Introduction to Spring Mix Salad with Balsamic Honey Dressing

    Ah, the beauty of a fresh salad! I can’t help but feel excited when I whip up a vibrant Spring Mix Salad with Balsamic Honey Dressing. It’s not just a dish; it’s a colorful embrace of flavors and textures. As a busy mom, I know how precious time is, and this salad is my go-to quick solution for those hectic days. Whether it’s a family dinner or a gathering with friends, this salad impresses without the stress. Plus, it’s a delightful way to sneak in some greens without anyone noticing—they’ll be too busy enjoying the taste!

    Why You’ll Love This Spring Mix Salad with Balsamic Honey Dressing

    This Spring Mix Salad with Balsamic Honey Dressing is a breeze to prepare, taking just 15 minutes from start to finish. The sweet and tangy dressing elevates fresh greens and fruity goodness, making it an instant favorite. Whether you’re trying to eat healthier or just want a light dish, this salad satisfies and delights. Plus, it’s versatile enough to pair with almost any meal!

    Ingredients for Spring Mix Salad with Balsamic Honey Dressing

    Creating a delicious Spring Mix Salad with Balsamic Honey Dressing is all about using fresh, vibrant ingredients. Here’s what you’ll need:

    • Spring mix greens: This delightful blend often includes baby spinach, arugula, and baby lettuces. It’s the star of the salad, offering a fresh base with diverse textures.
    • Sliced strawberries: Their sweetness adds a pop of color and flavor, making your salad feel like spring on a plate. If strawberries aren’t in season, consider using blueberries or apples.
    • Crumpled goat cheese (or feta): This creamy cheese brings a tangy contrast to the fruity notes. If you’re looking for a dairy-free option, there are excellent plant-based cheeses available.
    • Candied pecans or walnuts: These nuts add a delightful crunch and a hint of sweetness. Feel free to skip the candying for a healthier option or use roasted nuts for a savory touch.
    • Thinly sliced red onion: The mild flavor of red onion complements the sweetness of the dressing while adding an aromatic touch. You can use green onions or shallots if you prefer a milder taste.
    • Sunflower seeds (optional): If you’re looking to boost the nutrition factor, these seeds add a nutty flavor and extra crunch. They’re also great for a protein punch!
    • Olive oil: A rich source of healthy fats, it forms the base of our dressing. Extra virgin olive oil is ideal for a robust taste.
    • Balsamic vinegar: This vinegar contributes the tangy edge and depth of flavor in our dressing. Its sweetness harmonizes beautifully with the salad’s fruits.
    • Honey: Adding a touch of natural sweetness, honey balances the acidity in the dressing. You can use maple syrup for a vegan option.
    • Dijon mustard: This ingredient aids in emulsifying the dressing, creating a smooth consistency. If you’re not a mustard fan, you can reduce or omit it.
    • Minced garlic: Just a hint adds a lovely warm flavor to the dressing, enhancing its overall appeal. Adjust based on your taste.
    • Salt and black pepper: To bring all the flavors together, sprinkle with these essential seasonings to let each component shine.

    Don’t forget, you can find the precise measurements at the bottom of this article, perfect for printing and convenience!

    How to Make Spring Mix Salad with Balsamic Honey Dressing

    Whipping up this Spring Mix Salad with Balsamic Honey Dressing is as simple as it is satisfying. With just a few steps, you’ll have a fresh, flavorful dish that your whole family will love. Let’s dive in!

    Step 1: Make the Dressing

    First things first, let’s start with the dressing. In a small bowl or jar, combine the olive oil, balsamic vinegar, honey, Dijon mustard, minced garlic, salt, and black pepper.

    Whisk or shake until everything is well blended. This will take just a minute—trust me, it’s worth it! The goal is a smooth mixture that’s sweet, tangy, and oh-so-delicious. Take a moment to taste it; your palate will thank you!

    Step 2: Assemble the Salad

    Now, grab a large bowl. Start by adding the spring mix greens, those beautiful leafy gems that are full of goodness. Toss in the sliced strawberries, red onion, crumbled goat cheese, and candied pecans.

    Gently mix the ingredients together, ensuring everything is evenly distributed. This step is key because each bite should have a bit of everything! Feel free to customize this area by adding those optional sunflower seeds for an extra crunch.

    Step 3: Dress the Salad

    Here comes the fun part! Drizzle your homemade balsamic honey dressing over the salad. It should glisten as it cascades down the greens and toppings.

    Now, toss the salad lightly, making sure each component is well-coated in that sweet-tangy goodness. Don’t over-mix; we want the colors to pop and the textures to shine!

    Step 4: Serve the Salad

    Your Spring Mix Salad with Balsamic Honey Dressing is almost ready! For a finishing touch, sprinkle sunflower seeds if you’re using them. This adds not only flavor but also a beautiful presentation.

    Serve immediately for the freshest taste. Gather your loved ones and enjoy this delightful dish together. It’s a celebration of flavors right in your kitchen!

    Tips for Success

    • Use fresh, high-quality ingredients for the best flavor.
    • Make the dressing ahead of time and store it in the fridge for up to a week.
    • For extra flavor, let the salad sit for a few minutes after dressing it.
    • If you’re meal prepping, keep the dressing separate until serving.
    • Experiment with different fruits based on the season!

    Equipment Needed

    • Large bowl: A mixing bowl is essential. Alternatively, use a salad spinner for easy tossing.
    • Small bowl or jar: Perfect for making the dressing. A mason jar works wonderfully!
    • Whisk or fork: These tools help blend the dressing. A shake will do if you’re in a hurry!
    • Cutting board and knife: Necessary for slicing fruits and veggies.

    Variations for Spring Mix Salad with Balsamic Honey Dressing

    • Fruit swaps: Switch up the berries! Use blueberries or sliced apples for a unique twist.
    • Cheese alternatives: Try feta or a plant-based cheese for a different flavor profile or dietary needs.
    • Nut options: Substitute candied pecans with almonds or sunflower seeds for a crunchy kick without added sweetness.
    • Add protein: Incorporate grilled chicken, chickpeas, or quinoa to make it a heartier meal.
    • Herbs and greens: Toss in fresh herbs like basil or mint for an aromatic layer, or mix in kale for more nutrients.

    Serving Suggestions for Spring Mix Salad with Balsamic Honey Dressing

    • Pair with grilled chicken or shrimp for a satisfying dinner.
    • Serve alongside crusty bread or a baguette for a complete meal.
    • Enjoy with a chilled glass of white wine or sparkling water.
    • Dress the salad platter with edible flowers for an eye-catching presentation.
    • Add a sprinkle of microgreens on top for a gourmet touch.

    FAQs about Spring Mix Salad with Balsamic Honey Dressing

    What can I substitute for balsamic vinegar in the dressing?
    If balsamic vinegar isn’t on hand, red wine vinegar or apple cider vinegar can work in a pinch. However, they might alter the flavor slightly.

    Can I prepare the Spring Mix Salad in advance?
    Absolutely! You can wash and mix the greens and toppings ahead of time. Just keep the dressing separate until you’re ready to serve to maintain freshness.

    How long does the balsamic honey dressing last?
    Stored in an airtight container in the fridge, your homemade dressing can last up to a week. Just give it a shake before using, as it may separate over time.

    Is this salad suitable for a vegan diet?
    Yes! Simply swap the goat cheese for a plant-based cheese or leave it out entirely for a refreshing vegan dish that everyone can enjoy.

    What other toppings can I add to my Spring Mix Salad?
    Feel free to get creative! Avocado, roasted vegetables, or even crispy bacon bits can elevate your salad even further while adding delightful textures.

    Final Thoughts on Spring Mix Salad with Balsamic Honey Dressing

    There’s something truly magical about making a Spring Mix Salad with Balsamic Honey Dressing. It’s more than just a meal; it’s a celebration of fresh ingredients and uncomplicated joy. The combination of sweet strawberries, creamy cheese, and crunchy nuts dances on your palate, inviting smiles with every bite. As a busy mom, I cherish recipes that are quick yet deliver such delightful flavors. This salad has become a staple on our table, bringing the family together. I know it’ll become a favorite in your home, too, transforming ordinary evenings into something special!


    Print

    clock clock iconcutlery cutlery iconflag flag iconfolder folder iconinstagram instagram iconpinterest pinterest iconfacebook facebook iconprint print iconsquares squares iconheart heart iconheart solid heart solid icon

    Description

    A fresh and vibrant Spring Mix Salad topped with a sweet and tangy Balsamic Honey Dressing.


    • 6 cups spring mix greens (baby spinach, arugula, and baby lettuces)
    • ½ cup strawberries, sliced
    • ¼ cup crumbled goat cheese (or feta)
    • ¼ cup candied pecans or walnuts
    • ¼ small red onion, thinly sliced
    • ¼ cup sunflower seeds (optional)
    • ¼ cup olive oil
    • 2 tbsp balsamic vinegar
    • 1 tbsp honey
    • 1 tsp Dijon mustard
    • 1 small garlic clove, minced
    • ¼ tsp salt
    • ¼ tsp black pepper

    1. Make the dressing: In a small bowl or jar, whisk together the olive oil, balsamic vinegar, honey, Dijon mustard, garlic, salt, and pepper until smooth. Set aside.
    2. Assemble the salad: In a large bowl, add the spring mix greens, sliced strawberries, red onion, goat cheese, and candied pecans. Toss gently to combine.
    3. Dress the salad: Drizzle the balsamic honey dressing over the salad and toss lightly to coat.
    4. Serve: Sprinkle with sunflower seeds (if using) and serve immediately for the freshest taste.

    Notes

    • For a vegan option, substitute the goat cheese with a plant-based alternative.
    • Feel free to add other fruits such as blueberries or apples for extra flavor.
    • Prep Time: 15 minutes
    • Cook Time: 0 minutes
    • Category: Salad
    • Method: No-cook
    • Cuisine: American

    Nutrition

    • Serving Size: 1 serving
    • Calories: 250
    • Sugar: 8g
    • Sodium: 200mg
    • Fat: 20g
    • Saturated Fat: 3g
    • Unsaturated Fat: 15g
    • Trans Fat: 0g
    • Carbohydrates: 16g
    • Fiber: 3g
    • Protein: 5g
    • Cholesterol: 10mg

    Sharing is caring!

  • High Protein Cheesy Buffalo Chicken

    High Protein Cheesy Buffalo Chicken


    Introduction to High Protein Cheesy Buffalo Chicken

    Welcome, fellow food lovers! If you’re anything like me, you juggle a million things each day, from work deadlines to family shenanigans. That’s why I’m thrilled to share my recipe for High Protein Cheesy Buffalo Chicken. This hearty dish packs delicious flavors into a quick meal, ready in just 20 minutes. Whether you’re looking for a dinner that pleases picky eaters or a dish to impress your loved ones, this recipe is your new go-to. Trust me; your taste buds will thank you, and so will your busy schedule!

    Why You’ll Love This High Protein Cheesy Buffalo Chicken

    This High Protein Cheesy Buffalo Chicken recipe is the ultimate lifesaver for busy weekdays!

    It’s easy, quick, and absolutely packed with flavor.

    In just 20 minutes, you can whip up a meal that’s not only satisfying but also guilt-free, thanks to the protein-rich ingredients.

    Plus, the creamy buffalo sauce mixed with shredded chicken creates a mouthwatering combination that everyone will adore.

    Say goodbye to mealtime stress!

    Ingredients for High Protein Cheesy Buffalo Chicken

    Let’s dive into the delightful ingredients for this High Protein Cheesy Buffalo Chicken! Each one plays a starring role in creating this scrumptious dish. Here’s what you’ll need:

    • Cooked shredded chicken breast: The heart of the dish! Using pre-cooked chicken saves time and keeps your meal hassle-free.
    • Buffalo sauce: Add some spice! Choose mild if you’re sensitive to heat or hot for a fiery kick.
    • Plain Greek yogurt: This creamy ingredient boosts protein and gives your dish a rich texture.
    • Garlic powder: A sprinkle of garlic elevates the flavors. Feel free to use fresh garlic if you prefer.
    • Smoked paprika: This adds a subtle smokiness that enhances the overall taste profile.
    • Salt and black pepper: Essential seasonings that bring all the flavors together. Adjust to your preference.
    • Low-calorie whole wheat tortillas: Perfect for wrapping your filling! They offer a healthier alternative without sacrificing taste.
    • Shredded reduced-fat cheddar cheese: For that cheesy goodness! It melts beautifully and adds richness.
    • Optional toppings: Feel free to jazz up your burritos with shredded lettuce, chopped tomatoes, avocado slices, or a drizzle of light ranch dressing for extra flavor.

    Don’t worry, I’ve included specific measurements at the bottom of the article for easy printing. With these ingredients, you’re well on your way to creating a hearty, high-protein meal that will impress your family!

    How to Make High Protein Cheesy Buffalo Chicken

    Now, let’s get cooking with this High Protein Cheesy Buffalo Chicken! Follow these easy steps, and you’ll be savoring your delicious creation in no time.

    Step 1: Prepare the Chicken

    First things first: the chicken! I recommend using pre-cooked shredded chicken for speed. You can easily grab a rotisserie chicken from the grocery store. If you prefer, you can cook your own chicken breast. Just boil or bake it until fully cooked, then shred it using two forks. Trust me, this step sets the stage for a fabulous meal!

    Step 2: Make the Buffalo Sauce Mixture

    Next, it’s time to create that creamy buffalo sauce mixture. In a small bowl, combine the buffalo sauce and plain Greek yogurt. Whisk them together until smooth. The yogurt adds a delightful creaminess, balancing out the heat from the sauce. If you’re worried about the spice level, start with a little buffalo sauce and adjust as needed.

    Step 3: Combine Ingredients

    Now, grab that large mixing bowl with your shredded chicken. Pour the buffalo-yogurt mixture over the chicken, and use a spatula or spoon to mix everything together thoroughly. You want every bit of chicken coated in that luscious sauce. The flavors blend beautifully, creating a tantalizing filling for our burritos.

    Step 4: Prepare Tortillas

    Time to soften those tortillas! Pop them in the microwave for about 15–20 seconds. This little trick makes them pliable and easy to roll up later. If you don’t have a microwave, you can warm them in a skillet over low heat for a minute. Just be careful not to let them get too crispy!

    Step 5: Assemble Your Burritos

    Let’s bring it all together! Lay a tortilla flat on your counter. Spoon a generous amount of the buffalo chicken mixture onto the center of the tortilla, leaving some space at the edges. Sprinkle shredded reduced-fat cheddar cheese on top. Now, here’s the fun part: fold the sides of the tortilla inward and roll it up tightly from the bottom. Voila! Your burrito is ready for cooking.

    Step 6: Cook for Texture

    For that perfect golden and crispy finish, it’s time to cook your burritos! Spray a non-stick skillet with cooking spray and heat it over medium heat. Place the burritos seam-side down in the pan. Cook for 1–2 minutes on each side, until they’re beautifully browned. This step adds a delightful texture that makes each bite irresistible!

    Step 7: Serve and Enjoy

    Your High Protein Cheesy Buffalo Chicken burritos are ready to impress! Slice them in half and serve warm. For an extra pop, you can add your favorite toppings. Think chopped tomatoes, slices of creamy avocado, or a drizzle of light ranch dressing. Present them on a colorful plate, and watch your family dive in!

    Tips for Success

    • Make ahead! You can prepare the buffalo chicken mixture in advance and store it in the fridge for easy meals throughout the week.
    • Experiment with spices! Add more garlic powder or even a dash of cayenne pepper for an extra kick.
    • Don’t skip the cooking step! This gives the burritos a crispy finish that takes the flavor to the next level.
    • Use non-stick spray generously to prevent sticking and ensure even cooking.

    Equipment Needed

    • Large mixing bowl: For combining all your ingredients. A simple salad bowl will do the trick!
    • Small bowl: Essential for whisking the buffalo sauce mixture. Any medium-sized bowl works here.
    • Spatula or spoon: For mixing the chicken and sauce. A sturdy wooden spoon is my favorite!
    • Non-stick skillet: Perfect for cooking the burritos. If you don’t have one, use a regular pan with a bit more oil.

    Variations of High Protein Cheesy Buffalo Chicken

    • Vegetarian Option: Swap the shredded chicken for roasted cauliflower or chickpeas. This gives you a delicious, plant-based twist!
    • Spicy Twist: Add diced jalapeños or crushed red pepper flakes for an extra zing. Perfect for spice lovers!
    • Different Sauces: Experiment with barbecue sauce or even a taco sauce for a unique flavor profile. The possibilities are endless!
    • Low-Carb Alternative: Use lettuce wraps instead of tortillas. This keeps the meal light while still satisfying!
    • Dairy-Free Version: Substitute Greek yogurt and cheddar cheese with plant-based alternatives to make it dairy-free without losing flavor.

    Serving Suggestions for High Protein Cheesy Buffalo Chicken

    • Pair with a refreshing green salad topped with cherry tomatoes and cucumbers for a light side.
    • Serve with a side of crispy sweet potato fries for a deliciously satisfying crunch.
    • Complement your meal with a chilled sparkling water or a light beer for a fun twist.
    • Garnish plates with fresh cilantro or parsley for a vibrant presentation that looks as good as it tastes!

    FAQs about High Protein Cheesy Buffalo Chicken

    As you dive into this delicious world of High Protein Cheesy Buffalo Chicken, you might have a few questions. Don’t worry; I’ve got you covered! Here are some frequently asked questions that might pop into your mind while whipping up this scrumptious dish.

    Can I use frozen chicken instead of cooked chicken?

    Absolutely! Just make sure to cook the frozen chicken thoroughly before shredding it. You can boil, bake, or even use a pressure cooker for faster results.

    Is this dish low in calories?

    Yes! Each burrito contains around 250 calories, making it a great option for those looking to enjoy a hearty meal without the guilt. Plus, it’s packed with protein!

    Can I make this High Protein Cheesy Buffalo Chicken ahead of time?

    Definitely! You can prepare the buffalo chicken mixture in advance and store it in the fridge. Just warm it up when you’re ready to assemble and cook the burritos!

    How can I customize my burritos?

    Feel free to get creative! Add different spices, swap out the toppings, or even use different kinds of tortillas. The possibilities are endless!

    Can I make this recipe gluten-free?

    Yes, simply choose gluten-free tortillas, and you’ll have a delightful gluten-free meal! Ensure any sauces used are also gluten-free.

    Final Thoughts

    As I savor the last bite of my High Protein Cheesy Buffalo Chicken burrito, I’m reminded of why I love cooking. The joy of sharing a delicious, nutritious meal with my family brings warmth to any busy evening. This recipe is not just about filling bellies; it’s about creating moments!

    Whether it’s a weeknight dinner or a weekend gathering, these burritos will satisfy and impress. I hope you find as much joy in making and sharing this dish as I do. Here’s to flavorful adventures in your kitchen and many happy mealtimes ahead!


    Print

    clock clock iconcutlery cutlery iconflag flag iconfolder folder iconinstagram instagram iconpinterest pinterest iconfacebook facebook iconprint print iconsquares squares iconheart heart iconheart solid heart solid icon

    Description

    A delicious and hearty meal that combines shredded chicken with a spicy buffalo sauce, blended with Greek yogurt for extra creaminess and high protein content.


    • 2 cups cooked shredded chicken breast
    • 1/2 cup mild or hot buffalo sauce
    • 1/4 cup plain Greek yogurt
    • 1/4 teaspoon garlic powder
    • 1/4 teaspoon smoked paprika
    • Salt and black pepper, to taste
    • 4 low-calorie whole wheat tortillas
    • 1/2 cup shredded reduced-fat cheddar cheese
    • Optional Toppings: shredded lettuce, chopped tomatoes, avocado slices, light ranch dressing

    1. Shred cooked chicken breast into bite-sized pieces and place in a large mixing bowl.
    2. In a separate small bowl, whisk together buffalo sauce, plain Greek yogurt, garlic powder, smoked paprika, and a pinch of salt and pepper until smooth.
    3. Pour the buffalo-yogurt sauce over the shredded chicken and toss until thoroughly combined and chicken is evenly coated.
    4. Heat whole wheat tortillas in the microwave for 15–20 seconds to soften for easy rolling.
    5. Lay each tortilla flat and spoon buffalo chicken mixture onto the center. Sprinkle with shredded reduced-fat cheddar cheese. Add optional toppings if desired.
    6. Fold the sides of each tortilla inward, then roll up tightly from the bottom to enclose the filling.
    7. For extra texture, spray a non-stick skillet with cooking spray. Cook burritos seam-side down over medium heat for 1–2 minutes per side until golden and crisp.
    8. Slice burritos in half and serve warm with preferred accompaniments.

    Notes

    • Feel free to adjust the level of spiciness by choosing mild or hot buffalo sauce.
    • These burritos can be made ahead of time and reheated.
    • Substitute Greek yogurt with sour cream for a different flavor.
    • Prep Time: 10 minutes
    • Cook Time: 10 minutes
    • Category: Main Dish
    • Method: Stovetop
    • Cuisine: American

    Nutrition

    • Serving Size: 1 burrito
    • Calories: 250
    • Sugar: 3g
    • Sodium: 600mg
    • Fat: 8g
    • Saturated Fat: 3g
    • Unsaturated Fat: 5g
    • Trans Fat: 0g
    • Carbohydrates: 30g
    • Fiber: 5g
    • Protein: 20g
    • Cholesterol: 60mg

    Sharing is caring!

  • Jalapeño Cheddar Sourdough Bread

    Jalapeño Cheddar Sourdough Bread


    Introduction to Jalapeño Cheddar Sourdough Bread

    Welcome to a culinary journey where spice meets comfort! Let me tell you about my favorite creation: jalapeño cheddar sourdough bread. As a busy mom, I know how challenging it can be to whip up something delightful that pleases everyone. This delicious bread achieves just that! The warmth of sourdough combined with lively jalapeños and sharp cheddar brings a smile to every meal. Whether it’s brunch, a snack, or even a party appetizer, this bread is a quick solution for a busy day or a thoughtful gesture to impress loved ones. Ready to bake?

    Why You’ll Love This Jalapeño Cheddar Sourdough Bread

    This jalapeño cheddar sourdough bread is a delightful blend of simplicity and flavor. It’s surprisingly easy to make, even for those of us balancing a busy life. The spicy kick of jalapeños dances perfectly with the rich, creamy cheddar, creating a taste experience that’s hard to resist. Plus, the aroma wafting through your kitchen? It’s pure magic, bringing everyone to the table in no time!

    Ingredients for Jalapeño Cheddar Sourdough Bread

    Gathering the right ingredients is essential for crafting a delightful jalapeño cheddar sourdough bread. Here’s what you’ll need:

    • Active Sourdough Starter: The heart of this recipe, your starter awakens the bread’s unique flavors.
    • All-Purpose Flour: This versatile flour adds a light texture, perfect for your bread’s crumb.
    • Whole Wheat Flour: Adding this helps enhance the flavor and gives a slightly nutty taste.
    • Bread Flour: High in protein, it strengthens the dough, contributing to that lovely chewy crust.
    • Water: Hydration is key! It helps activate the yeast and flour, making for a wonderful dough consistency.
    • Fine Sea Salt: This is a flavor enhancer. It balances the bread’s flavors and strengthens the dough.
    • Sliced Jalapeños: Whether fresh or pickled, these add a spicy surprise to every bite. Feel free to use as much or little as you like!
    • Sharp Cheddar Cheese: A must for that cheesy goodness! It melts beautifully and adds a rich flavor, making this bread extra special.

    For exact measurements, be sure to check the bottom of the article where you can find printable details. This way, you’ll have everything you need to create this scrumptious loaf with ease!

    How to Make Jalapeño Cheddar Sourdough Bread

    Ready to dive into the delightful world of baking? Follow these clear and simple steps to create your own jalapeño cheddar sourdough bread. You’ll feel like a pro in no time!

    Step 1: Prepare Your Sourdough Starter

    Begin by feeding your sourdough starter about 12 hours before you plan to mix the dough. This ensures it’s active and bubbly. A lively starter is the secret to great sourdough!

    Step 2: Mix the Dough

    In a mixing bowl, combine 330 grams of water with 100 grams of your active sourdough starter. Next, add 50 grams of whole wheat flour and 450 grams of bread flour. Mix until everything is combined; the dough will feel shaggy but that’s perfect!

    Step 3: Allow the Dough to Rest

    Now, let your dough rest for one hour. This period is often called “autolyse.” It allows the flour to absorb water, aiding in gluten formation and flavor.

    Step 4: Add Salt and Continue Mixing

    Dissolve 10 grams of fine sea salt in the remaining 30 grams of water. Add it to the dough and mix until incorporated. This step is crucial as salt strengthens the structure, making your bread chewy.

    Step 5: Stretch and Fold

    Over the next 1.5 hours, perform three sets of stretch and folds. Every 30 minutes, pull a corner of the dough upwards and fold it over. Repeat this for all four sides. During the second set, sprinkle in the cheese and jalapeños, folding them into the dough gently.

    Step 6: Bulk Rise

    Cover your dough with a damp cloth and let it rise at room temperature for about 2 to 3 hours. Keep an eye on it! The dough should double in size, creating those beautiful air pockets.

    Step 7: Shape the Dough

    Once your dough has risen, transfer it to a lightly floured surface. Gently turn it out and shape it into a round ball. This step is all about capturing that wonderful airiness!

    Step 8: Final Rise

    Place your shaped dough into a floured proving basket. Allow it to rise for another 2 to 3 hours at room temperature. Alternatively, you can refrigerate it for up to 36 hours! This longer rise enhances flavor.

    Step 9: Preheat the Oven

    About 30 minutes before you’re ready to bake, preheat your oven to 500°F. Don’t forget to place your Dutch oven inside to heat up! This helps create the perfect crust.

    Step 10: Score and Bake

    When the oven is ready, carefully transfer your dough onto parchment paper. Score the top with a sharp knife; this allows for proper expansion while baking. Bake the bread in the Dutch oven at 450°F for 30 minutes with the lid on, then remove the lid and bake for another 20-25 minutes until golden brown.

    Step 11: Cool and Slice

    Once baked, let your beautiful loaf cool on a rack for at least 2 hours before slicing. I know it’s tempting, but be patient! Cooling allows the flavors to develop fully.

    Tips for Success

    • Make sure your sourdough starter is bubbly and active for the best results.
    • Measure your ingredients accurately for consistent flavor and texture.
    • Keep your workspace clean and use plenty of flour when shaping the dough.
    • Patience is key! Allowing adequate rising time enhances flavor and texture.
    • Don’t rush the cooling process; warm bread can negatively affect the crumb.

    Equipment Needed

    • Mixing Bowl: A standard bowl will do, but a larger one helps with mixing and folding.
    • Kitchen Scale: Essential for precise measurements; a measuring cup works but isn’t as accurate.
    • Spatula: Ideal for mixing ingredients and scraping the bowl.
    • Dutch Oven: Crucial for baking; if unavailable, use a baking stone and a steaming tray.
    • Proving Basket: For shaping; a bowl lined with a floured cloth is a great alternative.

    Variations

    • Herbed Jalapeño Cheddar: Add fresh herbs like rosemary or thyme for an aromatic twist.
    • Spicy Cheese Blend: Substitute sharp cheddar with pepper jack or gouda for extra heat and richness.
    • Whole Wheat Twist: Replace some of the bread flour with whole wheat flour for a nuttier taste and added nutrition.
    • Vegan Option: Leave out the cheese or use a vegan cheese alternative for a dairy-free version.
    • Olive Topping: Add a handful of chopped olives to the dough for a briny punch.
    • Sweet and Spicy: Mix in some diced roasted red peppers along with jalapeños for a sweet contrast.

    Serving Suggestions

    • Pair with Soups: This bread pairs perfectly with spicy tortilla or hearty chili for a complete meal.
    • Enjoy with Dips: Serve with cream cheese or avocado spread; the flavors meld beautifully!
    • Perfect for Sandwiches: Use it as out-of-the-ordinary bread for turkey or veggie sandwiches.
    • Serve Warm: Slice and enjoy slightly warm to enhance its cheesy aroma.
    • Accompany with Drinks: Enjoy alongside a craft beer or a glass of chilled Sauvignon Blanc for a delightful experience.

    FAQs about Jalapeño Cheddar Sourdough Bread

    Can I use a different type of cheese in this recipe?
    Absolutely! Feel free to be adventurous! Pepper jack cheese adds more spicy flavor, while gouda can provide a creamy, sweet note. Use what you have on hand or what fits your taste.

    What if my sourdough starter isn’t active enough?
    If your starter isn’t bubbly, it may need more time to ferment. Feed it with flour and water and give it about 6-12 hours before using it in the recipe. A happy starter is key to successful jalapeño cheddar sourdough bread!

    Can I add more jalapeños for extra heat?
    Of course! Spice it up! Add as many jalapeños as your family can handle. Just keep in mind that too many can affect the dough’s consistency, so start with a little and adjust according to your heat preference.

    What should I do if my bread doesn’t rise well?
    Rising issues often stem from an inactive starter or cool environment. Make sure your starter is lively and consider placing your dough in a warm spot for better results. It’s all about creating the right environment for that fantastic rise!

    How should I store leftover jalapeño cheddar sourdough bread?
    For freshness, wrap it tightly in plastic wrap or place it in a sealed bag. Alternatively, you can freeze it for up to three months. Just let it thaw completely before slicing to enjoy that delicious freshness once more!

    Final Thoughts

    Cooking is more than just nourishment; it’s about creating wonderful memories. This jalapeño cheddar sourdough bread delivers warmth with each slice, becoming the perfect companion for meals or cozy gatherings. Every bite is a delightful explosion of flavor, making even ordinary days feel special. It’s an adventure that brings comfort to the kitchen and joy to the palate. Whether you’re enjoying it straight from the oven or sharing slices with family and friends, this recipe offers a simple way to spread love and deliciousness all around. Happy baking!


    Print

    clock clock iconcutlery cutlery iconflag flag iconfolder folder iconinstagram instagram iconpinterest pinterest iconfacebook facebook iconprint print iconsquares squares iconheart heart iconheart solid heart solid icon

    Description

    A delicious and spicy jalapeño cheddar sourdough bread, perfect for any occasion.


    • ½ CUP (100 G) OF ACTIVE SOURDOUGH STARTER
    • 1 tablespoon (15 g) sourdough starter
    • ⅓ cup + 1 tablespoon (50 g) all-purpose flour
    • 3 ½ tablespoons (50 g) water
    • ½ cup (100 g) sourdough starter (active)
    • 1 ½ cups (360 g) water (30 grams divided)
    • ⅓ cup + 1 tablespoon (50 g) whole wheat flour
    • 3 ¾ cups (450 g) bread flour
    • 2 teaspoons (10 g) fine sea salt
    • ¼ cup (60 g) sliced jalapeños (pickled or fresh)
    • 4 oz. (113 g) sharp cheddar cheese (shredded)

    1. Feed your sourdough starter 12 hours before mixing the dough.
    2. In a mixing bowl, combine 330 grams of water and 100 grams of active sourdough starter, then add 50 grams whole wheat flour and 450 grams bread flour.
    3. Let the dough rest for 1 hour.
    4. Add salt to the remaining 30 grams of water, stir to dissolve, and add to the dough.
    5. Perform 3 sets of stretch and folds at 30-minute intervals over 1.5 hours, adding cheese and jalapeños during the second set.
    6. Cover the dough and let it rise for 2-3 hours at room temperature.
    7. Turn the dough onto a floured surface, shape it into a ball, and place it in a floured proving basket.
    8. Let it rise for another 2-3 hours at room temperature or refrigerate for up to 36 hours.
    9. Preheat the oven to 500°F with the Dutch oven inside for 30 minutes.
    10. Score the dough and bake it in the Dutch oven at 450°F for 30 minutes, then remove the lid and bake for an additional 20-25 minutes.
    11. Allow the bread to cool on a rack for 2 hours before slicing.

    Notes

    • Ensure your sourdough starter is active before beginning.
    • Using a Dutch oven helps create a steamy environment for better crust.
    • Cooling time is essential for flavor development.
    • Prep Time: 12 hours
    • Cook Time: 1 hour
    • Category: Bread
    • Method: Baking
    • Cuisine: American

    Nutrition

    • Serving Size: 1 slice
    • Calories: 180
    • Sugar: 1 g
    • Sodium: 220 mg
    • Fat: 7 g
    • Saturated Fat: 4 g
    • Unsaturated Fat: 2 g
    • Trans Fat: 0 g
    • Carbohydrates: 23 g
    • Fiber: 1 g
    • Protein: 6 g
    • Cholesterol: 15 mg

    Sharing is caring!

  • Crispy Bacon Chicken Ranch Wraps That You’ll Love!

    Crispy Bacon Chicken Ranch Wraps That You’ll Love!


    Introduction to Crispy Bacon Chicken Ranch Wraps

    Hey there, fellow food lovers! If you’re a busy mom or a professional juggling a million things, let me introduce you to a game-changer in your kitchen: Crispy Bacon Chicken Ranch Wraps. Trust me, these wraps are not just another meal; they’re a delightful experience wrapped in a tortilla. With cheesy chicken, crispy bacon, and a tangy ranch dressing, they’re the ideal answer to those hectic weeknights. They’re quick, easy, and oh-so-satisfying. Imagine the joy of serving your family an irresistible dinner that takes just 30 minutes to whip up!

    Why You’ll Love This Crispy Bacon Chicken Ranch Wraps

    You’re going to adore these Crispy Bacon Chicken Ranch Wraps for so many reasons! First off, they come together in just 30 minutes—perfect for those busy evenings. Plus, they’re incredibly delicious, combining flavors you’ll crave. Each bite delivers a satisfying crunch, creamy cheese, and a burst of ranch goodness. Whether it’s for lunch or a quick dinner, these wraps truly fit into your hectic schedule while impressing everyone at the table!

    Ingredients for Crispy Bacon Chicken Ranch Wraps

    Let’s gather our ingredients for these mouthwatering Crispy Bacon Chicken Ranch Wraps! You’ll need some basic staples from your kitchen that come together to create magic.

    • Unsalted butter: This is to create a rich base for our sauce.
    • Garlic: Fresh minced garlic adds a fragrant punch that elevates the flavor.
    • All-purpose flour: This helps thicken our cheese sauce to creamy perfection.
    • Whole milk & heavy cream: These give the sauce a luxurious texture and richness.
    • Shredded mature cheddar cheese: A must for that melty, cheesy goodness.
    • Cooked bacon: Crispy, crumbled bacon adds texture and savory delight.
    • Ranch dressing: The star ingredient, bringing that tangy, herby flair.
    • Chopped green onions: A fresh and mild flavor that complements the wraps.
    • Shredded cooked chicken: Your protein source, flavorful and filling.
    • Seasonings: Don’t forget salt, pepper, and parsley for that extra zing!
    • Flour tortillas: The vessel that holds all this deliciousness together.

    For variations, you could swap whole milk for almond milk, or add veggies like lettuce or bell peppers for a crunchy twist. All ingredient quantities are detailed at the bottom of the article for your convenience!

    How to Make Crispy Bacon Chicken Ranch Wraps

    Ready to dive into the deliciousness of Crispy Bacon Chicken Ranch Wraps? Let’s get cooking! I’ll guide you through every step, making it super simple.

    Prepare the Cheese Sauce

    Start by melting unsalted butter in a medium saucepan over medium heat. Add the minced garlic and let it sizzle for about a minute until it becomes fragrant. Next, whisk in the all-purpose flour. Cook this mixture for another minute while stirring; it’ll create a smooth paste. Slowly pour in the whole milk and heavy cream, whisking continuously to avoid lumps. Keep cooking for 3 to 4 minutes until the sauce thickens beautifully.

    Add Flavorful Ingredients

    Now, it’s time for the cheese magic! Stir the shredded mature cheddar cheese into the thickened sauce until it melts completely. Then, mix in the crispy crumbled bacon, ranch dressing, and chopped green onions. To finish, sprinkle in salt, pepper, and parsley. This combination will create a rich and flavorful blend that your family will love!

    Combine with Chicken

    Take your shredded chicken and gently fold it into the cheesy mixture. Ensure every piece gets a delightful coat of that luscious sauce. This is where the magic happens!

    Assemble the Wraps

    Now grab your large flour tortillas. Spoon an even amount of the cheesy chicken filling into the center of each tortilla. Fold in the sides and roll them up tightly, securing all that tasty goodness inside. Trust me; you want to keep it all contained!

    Toast the Wraps

    Heat a nonstick skillet over medium heat. Place each wrap seam-side down in the skillet, allowing them to toast for 2 to 3 minutes on each side. Press gently as they cook until they’re golden and crispy. This step is magical—it creates the perfect crunch!

    Tips for Success

    • Prep all your ingredients beforehand to streamline the cooking process.
    • Don’t skip the toasting step; it ensures a crispy, golden wrap.
    • If your mixture is too thick, add a splash of milk to loosen it.
    • Experiment with your favorite cheeses for a unique flavor twist.
    • Make these wraps ahead of time and store them in the fridge for easy lunches.

    Equipment Needed

    • Medium saucepan: A sturdy one works best for sauces; a Dutch oven could substitute.
    • Whisk: Essential for mixing; a fork can do the job in a pinch.
    • Nonstick skillet: Ideal for toasting; cast iron or regular pans can be used if greased.
    • Cutting board: Any clean surface will do for preparing ingredients.
    • Spatula: Helpful for flipping wraps; tongs can also work if you’re careful.

    Variations on Crispy Bacon Chicken Ranch Wraps

    • Vegetarian Option: Replace the chicken with sautéed mushrooms or a mix of your favorite vegetables for a meatless delight.
    • Spicy Kick: Add sliced jalapeños or a dash of hot sauce to the filling for some heat.
    • Gluten-Free: Use gluten-free tortillas to enjoy this dish without gluten concerns.
    • Herb Twist: Mix in fresh herbs like cilantro or dill with the ranch for a fresh flavor.
    • Pasta Wrap: Swap out tortillas for cooked pasta sheets for a unique twist on this classic!

    Serving Suggestions for Crispy Bacon Chicken Ranch Wraps

    • Pair with a salad: A light garden salad brightens up the meal and adds freshness.
    • Serve with dipping sauces: Extra ranch or a zesty barbecue sauce enhances the flavor.
    • Enjoy with fresh fruit: Berries or sliced apples make a sweet complement to the savory wraps.
    • Drinks: Consider pairing with iced tea, lemonade, or a light beer for a casual feel.
    • Presentation: Cut wraps in half and arrange them on a colorful platter for a vibrant display.

    FAQs about Crispy Bacon Chicken Ranch Wraps

    Let’s address some common questions you might have about these mouthwatering Crispy Bacon Chicken Ranch Wraps.

    Can I prepare these wraps ahead of time? Absolutely! You can make them in advance and store them in the refrigerator. Just toast them right before serving for that crispy finish.

    What can I substitute for chicken? If you’re not a fan of chicken, feel free to swap it out with shredded turkey or even a plant-based protein like tofu. Both options taste amazing in these wraps!

    How do I make these wraps healthier? To lighten things up, use low-fat cheese and ranch dressing. Additionally, switching to whole grain tortillas can give you extra fiber without sacrificing flavor.

    Can I freeze the wraps? Yes, you can freeze them! Just make sure to wrap each one tightly in plastic before placing them in a freezer bag. To reheat, simply toast them straight from the freezer.

    Why is it important to toast the wraps? Toasting not only gives them a delicious golden crisp but also enhances the flavors, creating a delightful contrast to the creamy filling inside!

    Final Thoughts

    In the busy whirlwind of life, finding a quick yet delicious meal option can feel like a treasure hunt. But with Crispy Bacon Chicken Ranch Wraps, you’ve got a gold mine! This recipe isn’t just about filling your belly; it’s about creating joy around the dinner table. The delightful crunch, creamy cheese, and savory bacon combine to provide comfort and satisfaction in every bite. Plus, your family will cherish the flavors, making it a meal worth repeating. So why not add this delightful dish to your weekly rotation? Happiness truly does come wrapped in deliciousness!


    Print

    clock clock iconcutlery cutlery iconflag flag iconfolder folder iconinstagram instagram iconpinterest pinterest iconfacebook facebook iconprint print iconsquares squares iconheart heart iconheart solid heart solid icon

    Description

    Crispy Bacon Chicken Ranch Wraps are deliciously packed with cheesy chicken, crispy bacon, and ranch dressing, all wrapped in a crispy tortilla.


    • 60 ml unsalted butter
    • 2 cloves garlic, finely minced
    • 32 g all-purpose flour
    • 240 ml whole milk
    • 120 ml heavy cream
    • 100 g shredded mature cheddar cheese
    • 100 g cooked bacon, crumbled
    • 120 ml ranch dressing
    • 2 green onions, finely chopped
    • 300 g cooked chicken breast, shredded
    • Salt, freshly ground black pepper, and chopped parsley to taste
    • 4 large flour tortillas

    1. In a medium saucepan over medium heat, melt unsalted butter. Add minced garlic and cook for 1 minute, stirring regularly until fragrant.
    2. Whisk all-purpose flour into melted butter and garlic. Continue to cook for 1 minute, stirring to form a smooth paste.
    3. Gradually pour in whole milk and heavy cream, whisking continuously. Cook for 3–4 minutes, stirring constantly, until the mixture thickens.
    4. Stir in shredded cheddar cheese until fully melted, then add crumbled bacon, ranch dressing, chopped green onions, and season with salt, pepper, and parsley. Mix until well combined.
    5. Add shredded chicken to the cheesy mixture and fold gently to ensure all chicken is thoroughly coated.
    6. Spoon an even amount of the chicken filling into the center of each flour tortilla. Fold in the sides and roll tightly to enclose the filling.
    7. Heat a nonstick skillet over medium heat. Place wraps seam-side down and toast for 2–3 minutes per side, pressing gently, until golden and crisp.
    8. Slice each wrap in half and present warm, with additional ranch dressing available for dipping if desired.

    Notes

    • For extra crunch, consider adding lettuce or other vegetables to the filling.
    • These wraps can be made ahead of time and stored in the refrigerator for a quick meal.
    • Prep Time: 15 minutes
    • Cook Time: 15 minutes
    • Category: Lunch
    • Method: Stovetop
    • Cuisine: American

    Nutrition

    • Serving Size: 1 wrap
    • Calories: 450
    • Sugar: 2g
    • Sodium: 800mg
    • Fat: 30g
    • Saturated Fat: 15g
    • Unsaturated Fat: 8g
    • Trans Fat: 0g
    • Carbohydrates: 30g
    • Fiber: 2g
    • Protein: 25g
    • Cholesterol: 100mg

    Sharing is caring!

  • Garlic Parmesan Chicken and Potatoes

    Garlic Parmesan Chicken and Potatoes


    Introduction to Garlic Parmesan Chicken and Potatoes

    Hey there, fellow busy bees! If you’re like me, your days are often a whirlwind of work, chores, and endless juggling acts. But fear not! I’m here to share my go-to recipe: Garlic Parmesan Chicken and Potatoes. Trust me, it’s a delightful dish that fits perfectly into your hectic schedule. Imagine succulent chicken infused with garlicky goodness, paired with tender, crispy potatoes. It’s an easy meal, packed with flavor, and sure to impress your family after a long day. Let’s dive in and whip up something special that brings comfort to our dinner table!

    Why You’ll Love This Garlic Parmesan Chicken and Potatoes

    This Garlic Parmesan Chicken and Potatoes dish is a real lifesaver! It’s not just about the melt-in-your-mouth flavors, but also the simplicity and speed. In just 45 minutes, you can have a delicious meal ready to hit the table. Plus, it’s a multi-tasker. It cooks everything on one sheet, making cleanup a breeze. Trust me, once you try it, you’ll want this recipe on repeat for those busy weeknights!

    Ingredients for Garlic Parmesan Chicken and Potatoes

    To create this mouthwatering Garlic Parmesan Chicken and Potatoes, you’ll need a handful of fresh ingredients that come together beautifully.

    • Boneless, skinless chicken breasts: Tender and lean, they soak up the flavors wonderfully. You can even use thighs for a juicier option.
    • Baby Yukon Gold or red potatoes: These little gems are creamy and sweet. Their natural sweetness pairs perfectly with garlic and cheese.
    • Garlic: Fresh cloves bring a punch of flavor that’ll make your kitchen smell heavenly. Garlic powder can be used in a pinch, but fresh is best.
    • Grated Parmesan cheese: This star ingredient adds richness and a salty bite. Feel free to swap it for Pecorino Romano for a different twist!
    • Olive oil: A drizzle of this liquid gold helps everything roast to perfection. You can substitute with avocado oil if you like.
    • Italian seasoning: A blend of herbs like basil, oregano, and thyme that brings warmth to the dish. If you’re adventurous, try mixing your own herb blend!
    • Smoked paprika: This adds a lovely depth and a hint of smokiness. You can replace it with regular paprika if needed.
    • Salt and black pepper: Essential for seasoning, they enhance all the other flavors. Always adjust to your taste!

    For precise measurements, check out the bottom of the article for a handy printable version. Ready to gather these ingredients and get cooking?

    How to Make Garlic Parmesan Chicken and Potatoes

    Preheat the Oven

    First things first, let’s get that oven heating up! Preheat it to 400°F (200°C). This step is crucial, as a hot oven ensures our chicken and potatoes roast beautifully. While it’s warming up, you can prep the chicken and potatoes, saving some valuable time!

    Prepare the Chicken

    Now, let’s focus on the chicken. Pat the boneless, skinless chicken breasts dry with a paper towel. This simple action helps create a delicious, golden crust. In a small bowl, mix olive oil, Italian seasoning, smoked paprika, salt, and black pepper. Rub this flavorful concoction all over the chicken. Trust me, every bite will be bursting with flavor.

    Toss the Potatoes

    Next up, the potatoes! Halve your baby Yukon Gold or red potatoes, then toss them in a bowl with olive oil, minced garlic, grated Parmesan, salt, and pepper. This mixture gives them a heavenly garlic-Parmesan flavor. Don’t skimp on that wonderful Parmesan! This will make the crispy edges you crave.

    Arrange on the Baking Sheet

    Time to get everything on the baking sheet! Line a large baking sheet with parchment paper for easy cleanup. Place the seasoned chicken breasts on one side and spread the garlicky potatoes on the other. Make sure they have enough space to roast evenly. Snug but not crowded is the goal!

    Roast to Perfection

    Slide that baking sheet into the oven and roast for 25-30 minutes. The chicken should reach an internal temperature of 165°F (74°C). While it cooks, the aroma that fills your kitchen will have your family flocking to the table! Later, check if the potatoes are crispy and golden; that’s when you’ll know they’re ideal!

    Optional Broiling for Crispy Finish

    If you want an extra crispy skin on the chicken and potatoes—who doesn’t?—turn on the broiler for the last 5 minutes. Just keep an eye on it, as broilers can turn things from golden to burnt in a flash. Once they’re to your liking, take the tray out and allow it to rest for a few minutes before serving.

    Tips for Success

    • Always pat the chicken dry to achieve that golden crust.
    • If you have time, marinate the chicken for 30 minutes for enhanced flavor.
    • Cut the potatoes uniformly for even cooking.
    • Feel free to mix and match herbs! Fresh herbs can brighten the dish.
    • Use a meat thermometer for perfect chicken every time.
    • Save leftovers for a tasty lunch or dinner the next day!

    Equipment Needed

    • Baking sheet: A standard size works great, but a larger one allows for more space.
    • Parchment paper: It prevents sticking—aluminum foil is a good substitute.
    • Mixing bowls: One for chicken, one for potatoes; any bowls will do!
    • Meat thermometer: Useful for ensuring perfectly cooked chicken; a simple knife can check doneness too.

    Variations for Garlic Parmesan Chicken and Potatoes

    • Herb Swap: Substitute the Italian seasoning with fresh rosemary or thyme for a fragrant twist.
    • Cheese Change: Try using feta or cheddar instead of Parmesan for a different cheese profile.
    • Spicy Kick: Add a pinch of red pepper flakes to the seasoning mix for a flavorful heat.
    • Vegetable Boost: Mix in other veggies, like bell peppers or broccoli, for a colorful and nutritious addition.
    • Pesto Variation: Toss the potatoes and chicken in pesto before roasting for an Italian flair.
    • Dairy-Free Option: Use nutritional yeast instead of cheese and a dairy-free oil to keep it light and dairy-free.

    Serving Suggestions

    • Fresh Salad: A light mixed greens salad drizzled with vinaigrette complements the richness of the chicken and potatoes.
    • Bread Pairing: Serve with warm crusty bread or garlic knots to soak up all the delicious juices.
    • Wine Selection: Pair with a glass of chilled white wine, like Sauvignon Blanc, to elevate the meal.

    FAQs about Garlic Parmesan Chicken and Potatoes

    Can I use frozen chicken for this recipe? Absolutely! Just make sure to thaw it completely before cooking. Otherwise, the chicken might not cook evenly.

    What can I serve with Garlic Parmesan Chicken and Potatoes? This dish pairs beautifully with a fresh salad or some roasted vegetables. You could also serve it alongside some garlic bread to soak up all that delicious flavor!

    Can I prep this dish in advance? Yes, you can marinate the chicken and prepare the potatoes a day ahead. Just store them in the refrigerator until you’re ready to cook. This makes dinner time even easier!

    What makes this Garlic Parmesan Chicken so flavorful? The combination of fresh garlic, Italian seasoning, and Parmesan cheese creates a flavor explosion! Plus, roasting the ingredients brings out their natural sweetness and depth.

    Is this recipe suitable for kids? Definitely! Kids usually adore anything cheesy and crispy. Plus, you can adapt the seasonings to suit their taste preferences!

    Final Thoughts

    Cooking Garlic Parmesan Chicken and Potatoes is like wrapping your family in a warm, comforting hug. This delightful dish not only nourishes but also brings everyone together around the dinner table. The aroma of roasted garlic and crispy potatoes transforms your kitchen into a cozy haven. Plus, it’s simple enough for a busy weeknight yet elegant enough to impress! Whether it’s a hectic Tuesday or a family gathering, this recipe guarantees smiles and satisfied appetites. I hope you enjoy every delicious bite as much as I do, and may it become a cherished favorite in your home!


    Print

    clock clock iconcutlery cutlery iconflag flag iconfolder folder iconinstagram instagram iconpinterest pinterest iconfacebook facebook iconprint print iconsquares squares iconheart heart iconheart solid heart solid icon

    Description

    Garlic Parmesan Chicken and Potatoes is a simple yet delicious meal that combines tender chicken with flavorful roasted potatoes.


    • 4 boneless, skinless chicken breasts
    • 1.5 pounds baby Yukon Gold or red potatoes
    • 4 cloves garlic
    • ⅓ cup grated Parmesan cheese
    • Olive oil
    • 1 teaspoon Italian seasoning
    • ½ teaspoon smoked paprika
    • ½ teaspoon salt
    • ¼ teaspoon black pepper

    1. Preheat oven to 400°F (200°C). Line a large baking sheet with parchment paper.
    2. Pat chicken dry and season with olive oil, Italian seasoning, smoked paprika, salt, and pepper.
    3. In a bowl, toss halved potatoes with olive oil, minced garlic, Parmesan cheese, salt, and pepper.
    4. Place seasoned chicken on one side of the baking sheet and spread potatoes on the other side.
    5. Roast for 25-30 minutes until chicken reaches 165°F (74°C) internal temperature and potatoes are crispy.
    6. Optional: Broil in the last 5 minutes for extra crispiness. Garnish with fresh parsley before serving.

    Notes

    • For extra flavor, let the chicken marinate for 30 minutes before cooking.
    • You can substitute other herbs for Italian seasoning, such as oregano or thyme.
    • This recipe can easily be doubled for a larger crowd.
    • Prep Time: 15 minutes
    • Cook Time: 30 minutes
    • Category: Main Course
    • Method: Baking
    • Cuisine: American

    Nutrition

    • Serving Size: 1 serving
    • Calories: 400
    • Sugar: 2g
    • Sodium: 600mg
    • Fat: 18g
    • Saturated Fat: 4g
    • Unsaturated Fat: 11g
    • Trans Fat: 0g
    • Carbohydrates: 30g
    • Fiber: 4g
    • Protein: 36g
    • Cholesterol: 100mg

    Sharing is caring!

  • Crockpot Coconut Lime Chicken

    Crockpot Coconut Lime Chicken


    Introduction to Crockpot Coconut Lime Chicken

    As a passionate home cook, I understand the whirlwind of a busy day. The kids are bustling about, and dinner seems like an overwhelming mountain to climb. That’s where this Crockpot Coconut Lime Chicken comes to the rescue! This dish is not only packed with enchanting flavors, but it also brings the ease of a slow cooker right to your kitchen. Imagine coming home to the delightful aroma of tender chicken simmered in creamy coconut lime sauce, ready to serve over rice. It’s a comforting meal that will impress your loved ones without demanding hours of your time!

    Why You’ll Love This Crockpot Coconut Lime Chicken

    This Crockpot Coconut Lime Chicken stands out for its incredible ease and speedy preparation. With just a few steps, you can set it and forget it! The lush, creamy coconut sauce, brightened with zesty lime, elevates simple chicken into something truly special. Plus, it’s perfect for busy moms and professionals, allowing you to enjoy a homemade meal with minimal fuss. It’s a flavorful shortcut to delightful dining!

    Ingredients for Crockpot Coconut Lime Chicken

    Let’s dive into the vibrant ingredients that make this Crockpot Coconut Lime Chicken sing with flavor! Each component brings something unique to the table; trust me, you’ll want to savor each bite.

    • Boneless, skinless chicken breasts or thighs: These are the stars of our dish! They cook to tender perfection in the crockpot.
    • Coconut milk: Opt for full fat for extra creaminess or light for a lighter version. Either way, coconut milk adds richness that beautifully balances the lime.
    • Lime: Fresh lime zest and juice brighten up the dish, adding a zesty kick that pairs wonderfully with the coconut.
    • Garlic: Minced garlic lends an aromatic depth to the coconut lime sauce, giving your dish that comforting home-cooked taste.
    • Honey: Just a touch of sweetness from honey rounds out the flavors. Feel free to adjust it to your taste!
    • Ground cumin: This earthy spice adds warmth and a subtle complexity that enhances the overall experience of the dish.
    • Salt and black pepper: Simple yet essential; they enhance all the other flavors in this delightful recipe.
    • Fresh cilantro: A handful of chopped cilantro stirred in at the end brings freshness and color to your meal. Garnish with more for a beautiful finish!

    You’ll find the exact quantities for each ingredient at the bottom of the article, making it easy for you to print out and keep handy. Enjoy gathering these ingredients and get ready to create a meal that’s both nourishing and incredibly delicious!

    How to Make Crockpot Coconut Lime Chicken

    Making this Crockpot Coconut Lime Chicken is a breeze! Follow these simple steps, and you’ll have a delicious meal ready to enjoy.

    Step 1: Prepare the Chicken

    Start by washing your boneless, skinless chicken breasts or thighs under cold water. Pat them dry using a paper towel. This step helps in achieving that perfect texture during cooking. Once dried, place the chicken directly into your crockpot.

    Step 2: Make the Coconut Lime Sauce

    In a medium bowl, whisk together your can of coconut milk, lime zest, and lime juice. Add in the minced garlic, honey, ground cumin, salt, and black pepper. This creamy sauce is the heart of our dish! Whisk well until everything is combined and smooth. It should smell heavenly already!

    Step 3: Combine Chicken and Sauce

    Pour that luscious coconut lime sauce over the chicken in the crockpot, making sure to cover it well. The sauce hugs each piece of chicken, promising deliciousness. Give it a gentle stir to make sure everything is coated.

    Step 4: Cook in the Crockpot

    Cover your crockpot and set it to cook on LOW for 5-6 hours or HIGH for 2.5-3 hours. This is the time for magic to happen! The chicken will soak up all those tropical flavors while becoming tender and juicy. Try not to sneak peeks too often; the aroma will be tempting!

    Step 5: Final Touches Before Serving

    Once cooking time is up, take off the lid and stir in the chopped fresh cilantro. This adds a pop of fresh flavor to the dish. Serve your beautiful Crockpot Coconut Lime Chicken over rice or quinoa, garnished with extra cilantro. Enjoy the compliments—you’ve earned them!

    Tips for Success

    • Try marinating the chicken in the coconut lime sauce for a few hours before cooking for even more flavor.
    • Use a meat thermometer to check that chicken reaches an internal temperature of 165°F before serving.
    • If you prefer a thicker sauce, remove the lid during the last hour of cooking to let it reduce.
    • Feel free to customize your veggies; throw in bell peppers or snap peas for added color and nutrition.
    • Leftovers can be stored in an airtight container in the fridge for up to 3 days!

    Equipment Needed

    • Crockpot: The essential tool for this recipe. You can use any size, but a 6-quart works well!
    • Measuring cups and spoons: To ensure precise quantities, especially for the coconut milk and lime juice.
    • Mixing bowl: A medium-sized bowl for whisking the sauce ingredients together.
    • Wooden spoon: Ideal for stirring the chicken and sauce—plus, it’s gentle on your crockpot!

    Variations

    • Spicy Kick: Add a diced jalapeño or a sprinkle of red pepper flakes to the sauce for a hint of heat.
    • Vegetarian Option: Swap chicken for chickpeas or tofu to create a satisfying plant-based version of this dish.
    • Lime Lovers: Increase the lime zest and juice for an even more pronounced citrus flavor!
    • Extra Veggies: Toss in some diced sweet potatoes or broccoli halfway through cooking for added nutrients and texture.
    • Herb Alternatives: If you’re not a cilantro fan, try fresh basil or mint for a unique flavor profile.

    Serving Suggestions

    • Serve over fluffy rice: Jasmine or basmati rice pairs beautifully with the creamy sauce.
    • Quinoa option: For a healthier twist, serve over cooked quinoa for a protein-packed meal.
    • Brighten the plate: Garnish with fresh lime wedges and additional cilantro for a pop of color.
    • Complementary drink: Enjoy with a chilled coconut water, lime soda, or a refreshing iced tea.

    FAQs about Crockpot Coconut Lime Chicken

    I know you might have a few questions about making this delicious Crockpot Coconut Lime Chicken. Let’s dive into some common inquiries that can help make your cooking experience even better!

    Can I use frozen chicken for this recipe?
    Absolutely! You can use frozen chicken, but be sure to increase the cooking time by about 1 hour. Always ensure the chicken reaches an internal temperature of 165°F before serving.

    How do I store leftovers?
    Store any leftovers in an airtight container in the fridge. They’ll last up to 3 days. Reheat gently in the microwave or on the stove until warmed through.

    What can I serve with this dish?
    This Crockpot Coconut Lime Chicken pairs wonderfully with rice or quinoa. You can also serve it alongside a mixed green salad for a light meal option!

    Can I make this recipe dairy-free?
    Yes! This recipe is naturally dairy-free thanks to the coconut milk. It’s a perfect option for those avoiding dairy!

    What if I want a thicker sauce?
    If you prefer a thicker sauce, simply remove the lid for the last hour of cooking. This allows the sauce to reduce and concentrate in flavor.

    Final Thoughts

    Cooking should be a joy, not a chore, and this Crockpot Coconut Lime Chicken encapsulates that philosophy perfectly. With every bite, you’ll taste the harmonious blend of coconut and lime, bringing a little slice of tropical paradise to your dinner table.

    The ease of preparation allows you to focus on what truly matters—spending time with loved ones.

    Whether it’s a hectic weeknight or a cozy family gathering, this dish impresses without the fuss. Trust me, your taste buds—and your family—will thank you for this delightful addition to your dinner rotation!


    Print

    clock clock iconcutlery cutlery iconflag flag iconfolder folder iconinstagram instagram iconpinterest pinterest iconfacebook facebook iconprint print iconsquares squares iconheart heart iconheart solid heart solid icon

    Description

    A flavorful and easy-to-make crockpot dish featuring tender chicken cooked in a creamy coconut lime sauce.


    • 2 lbs boneless, skinless chicken breasts or thighs
    • 1 (14 oz) can coconut milk (full fat or light)
    • Zest and juice of 2 limes
    • 3 cloves garlic, minced
    • 1 tbsp honey
    • 1 tsp ground cumin
    • 1/2 tsp salt
    • 1/2 tsp black pepper
    • 1/4 cup chopped fresh cilantro (plus more for garnish)

    1. Place chicken in the crockpot.
    2. In a bowl, whisk together coconut milk, lime zest and juice, garlic, honey, cumin, salt, and pepper.
    3. Pour mixture over chicken.
    4. Cover and cook on LOW for 5–6 hours or HIGH for 2.5–3 hours.
    5. Stir in cilantro before serving. Serve over rice and garnish with extra cilantro.

    Notes

    • This dish goes well with rice or quinoa for a complete meal.
    • Prep Time: 10 minutes
    • Cook Time: 5-6 hours
    • Category: Dinner
    • Method: Crockpot
    • Cuisine: Asian

    Nutrition

    • Serving Size: 1 serving
    • Calories: 350
    • Sugar: 5g
    • Sodium: 400mg
    • Fat: 17g
    • Saturated Fat: 9g
    • Unsaturated Fat: 7g
    • Trans Fat: 0g
    • Carbohydrates: 8g
    • Fiber: 1g
    • Protein: 40g
    • Cholesterol: 100mg

    Sharing is caring!