Blog

  • Chocolate, Coconut Caramel Krispy Treats

    Chocolate, Coconut Caramel Krispy Treats


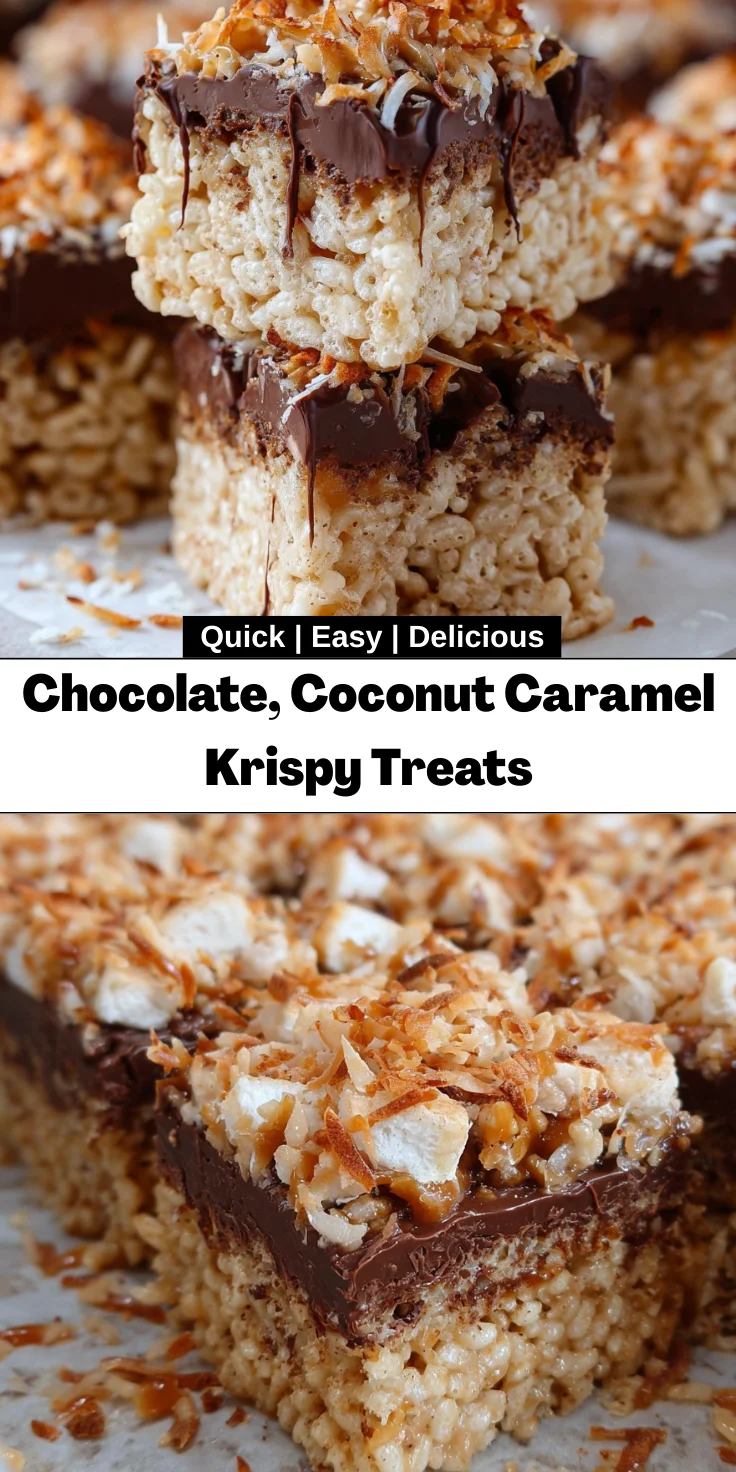
    Introduction to Chocolate, Coconut Caramel Krispy Treats

    Hey there, fellow chocolate lovers! If you’re like me, your busy days often leave little room for elaborate baking endeavors. That’s where these Chocolate, Coconut Caramel Krispy Treats come to the rescue! They’re not just easy to whip up; they’re the perfect bite-sized delights to satisfy those sweet cravings without taking up all your time. Whether you’re surprising your kids after school or looking to impress your friends at a gathering, these treats are sure to bring smiles all around. Let’s dive in!

    Why You’ll Love This Chocolate, Coconut Caramel Krispy Treats

    These Chocolate, Coconut Caramel Krispy Treats are a game-changer for any busy mom or professional. They mix sweetness with just the right crunch, making them irresistibly delicious. Plus, the recipe takes only 30 minutes from start to finish! You can prepare them quickly, and with minimal mess, creating a treat that will have everyone asking for seconds. Trust me, once you try them, they’ll become a staple in your home.

    Ingredients for Chocolate, Coconut Caramel Krispy Treats

    Gathering the right ingredients is essential for our delicious Chocolate, Coconut Caramel Krispy Treats. This recipe combines familiar pantry staples with a few delightful surprises!

    • Rice Krispies cereal: The backbone of our treats, adding that satisfying crunch we love.
    • Mini marshmallows: These sweet little puffs give that gooey texture and are easy to melt.
    • Butter: Adds richness and helps bind everything together perfectly.
    • Caramels: Unwrap these for an indulgent, chewy element that brings the flavors together.
    • Kosher salt: Just a pinch enhances the sweetness and brings out the flavors beautifully.
    • Coconut: Toasted coconut adds a delightful nutty flavor and a hint of tropical paradise.
    • Semi-sweet chocolate chips: The crowning glory, these melt perfectly on top and provide extra sweetness.
    • Vegetable oil: Just a touch helps the chocolate melt smoothly and makes it easy to spread.

    For this recipe, make sure to check the quantities for each ingredient, which I’ve provided below. You might also consider using dark chocolate chips for a richer flavor or unsweetened coconut flakes for a different taste. Enjoy the flexibility to make this your own!

    How to Make Chocolate, Coconut Caramel Krispy Treats

    Now that you have your ingredients ready, let’s get started on making these delightful Chocolate, Coconut Caramel Krispy Treats! Each step is simple and fun, making this a great recipe to do with kids or even by yourself as a relaxing cooking activity.

    Step 1: Toast the Coconut

    Preheat Your Oven

    First things first, preheat your oven to 350 degrees F. While it’s heating up, spread the coconut evenly on a large baking sheet. This little step intensifies the coconut flavor and adds a beautiful golden color. Keep an eye on it, stirring once or twice, until it turns fragrant and lightly browned—about 7 to 8 minutes is perfect!

    Step 2: Prepare the Baking Dish

    Line your Casserole Dish

    Next, grab a 13″x9″ casserole dish and line it with parchment paper or foil. This step is golden because it prevents sticking and makes cleanup a breeze. Don’t forget to spray it lightly with non-stick cooking spray for extra insurance. Now, set it aside; you’ll need it shortly!

    Step 3: Combine Rice Krispies and Marshmallows

    Mixing the Cereal

    In a large bowl, spray a bit of non-stick cooking spray, then pour in the Rice Krispies cereal. Set this delectable crunch aside. You’ll mix it with your gooey goodness soon! Trust me, this cereal brings the magic!

    Step 4: Melt Ingredients

    The Secret to a Smooth Mixture

    In a large pot over medium heat, melt the butter gently. Once it’s melted, add about 7 cups of those fluffy mini marshmallows and the caramels. Stir often until everything is beautifully melted and smooth, which takes about 4 to 5 minutes. Be patient; the combination is truly a delightful sight!

    Step 5: Mix and Press

    Incorporating the Krispy Mixture

    Pour your melted masterpiece over the Rice Krispies, then toss in the remaining marshmallows and 1 cup of the toasted coconut. Using a sprayed silicone spatula, gently mix until every morsel is coated. This is where the magic really begins! Once combined, press the mixture evenly into your prepared dish, making sure it’s packed tightly.

    Step 6: Prepare the Chocolate Topping

    Melting the Chocolate Safely

    In a microwave-safe bowl, combine the chocolate chips and vegetable oil. Heat it in the microwave for 1 to 2 minutes, stirring every 20 seconds until it’s melted and smooth. The oil helps it spread easily later. It’s like liquid gold waiting to adorn your treats!

    Step 7: Add Finishing Touches

    Topping with More Coconut

    Once your chocolate is ready, pour it over the pressed Rice Krispie mixture, spreading it evenly with your spatula. Finally, sprinkle the remaining toasted coconut on top for that extra crunch and flavor. Let it cool completely before cutting out your bars—trust me, the wait is worth it!

    Tips for Success

    • Keep an eye on the coconut while toasting to ensure it doesn’t burn.
    • Use a silicone spatula for easy mixing and pressing, as it won’t stick.
    • Let the chocolate topping cool slightly before spreading to prevent it from melting the krispy base.
    • For quick cleanup, line your baking dish generously with parchment.
    • Store any leftovers in an airtight container to keep them fresh for longer.

    Equipment Needed

    • Baking sheet: A large one for toasting coconut; a regular sheet works well, too.
    • Casserole dish: A 13″x9″ dish; any similar size will do in a pinch.
    • Large pot: A 3-quart pot for melting ingredients efficiently.
    • Silicone spatula: For easy mixing and pressing; a wooden spoon can be a great alternative.
    • Microwave-safe bowl: Essential for melting chocolate; any heat-proof bowl works, too.

    Variations on Chocolate, Coconut Caramel Krispy Treats

    • Nutty Delight: Add chopped nuts like almonds or pecans for an extra crunch that pairs beautifully with the coconut.
    • Peanut Butter Bliss: Swirl in some creamy peanut butter with the melted chocolate for a heavenly combination.
    • Fruit Fusion: Mix in dried fruits like cranberries or apricots for a chewy texture and burst of flavor.
    • Gluten-Free Option: Use gluten-free rice cereal to make this a treat for everyone, even those with dietary restrictions.
    • Minty Fresh: Add mint extract to the melted chocolate for a refreshing twist that’s perfect for special occasions.
    • Dark Chocolate Variation: Swap out semisweet chips for dark chocolate for a richer, bold flavor.

    Serving Suggestions

    • Pair these Chocolate, Coconut Caramel Krispy Treats with a glass of cold milk for a delicious contrast.
    • Serve them alongside fresh fruit like strawberries or bananas for a colorful plate.
    • Cut them into fun shapes using cookie cutters for a more festive presentation.
    • Wrap individual bars in cellophane tied with twine for a personal touch when gifting.
    • Offer them at your next gathering or bake sale for an irresistible treat that everyone will love.

    FAQs about Chocolate, Coconut Caramel Krispy Treats

    Got questions about making these scrumptious Chocolate, Coconut Caramel Krispy Treats? Don’t worry; I’ve got you covered! Here are some common queries that pop up when making this delightful dessert.

    Can I make these treats ahead of time?

    Absolutely! These treats can be made a day in advance. Just store them in an airtight container to keep them fresh. They make excellent snacks for on-the-go busy days!

    What if I don’t have Rice Krispies?

    No problem! You can substitute them with another puffed rice cereal or even use popcorn for a fun twist. Just make sure to adjust the melting process as needed.

    How do I store leftovers?

    Keep any leftover Chocolate, Coconut Caramel Krispy Treats in an airtight container at room temperature. They’ll stay fresh for about a week—if they last that long!

    Can I use different types of chocolate?

    Sure! Feel free to experiment with white chocolate, dark chocolate, or even flavored chocolates. Each brings a unique taste to your treats!

    What can I do with the leftovers from the recipe?

    If there are any ingredients left, use them creatively! You can sprinkle extra toasted coconut on ice cream or mix leftover melted chocolate with fruits for a tasty dip!

    Final Thoughts

    Creating these Chocolate, Coconut Caramel Krispy Treats is more than just baking; it’s about making memories. The joy of pulling together such a simple recipe, only to end up with something so delightful, is truly rewarding. They have a way of brightening even the busiest of days, offering that perfect balance of sweetness and crunch. Whether you enjoy them during a cozy family night or share them with friends, these treats will undoubtedly become a cherished addition to your recipe collection. Trust me, you’ll find yourself making them over and over again!


    Print

    clock clock iconcutlery cutlery iconflag flag iconfolder folder iconinstagram instagram iconpinterest pinterest iconfacebook facebook iconprint print iconsquares squares iconheart heart iconheart solid heart solid icon

    Description

    Delicious and easy-to-make chocolate, coconut caramel krispy treats that are perfect for a sweet snack.


    • 8 cups Rice Krispies cereal
    • 10 cups mini marshmallows divided (almost 2 10 ounce bags)
    • 8 tablespoons butter
    • 1 11-ounce package caramels unwrapped, or caramel bits
    • 3 teaspoons kosher salt divided
    • 2 cups coconut toasted and divided
    • 2 cups Semisweet chocolate chips
    • 2 tablespoons vegetable oil

    1. Preheat oven to 350 degrees F. Spread coconut on a large baking sheet in an even layer. Toast in the oven, stirring at least once, until golden brown; about 7-8 minutes.
    2. Line a 13″x9″ casserole dish with parchment paper or foil. Spray with non-stick cooking spray and set aside.
    3. Spray a large bowl with non-stick cooking spray and pour rice krispies cereal into the bowl. Set aside.
    4. Melt butter in a large, 3 quart pot over medium heat. Add about 7 cups of marshmallows and the caramels. Stir often until completely melted and smooth; about 4-5 minutes. Stir in 1 teaspoon of kosher salt and 1 cup of the toasted coconut.
    5. Pour marshmallow mixture over the cereal in the large bowl and add the remaining marshmallows. With a silicone spatula that has been sprayed with non-stick cooking spray, stir well until coated.
    6. Press the mixture into the prepared casserole dish and press into an even layer.
    7. Place the chocolate and vegetable oil in a microwave-safe bowl and heat for 1 to 2 minutes, stirring every 20 seconds, until melted and smooth.
    8. Spread the melted chocolate evenly over the rice krispie treats. Sprinkle with remaining 1 cup of toasted coconut.
    9. Cool completely before cutting into bars.

    Notes

    • Make sure to keep an eye on the coconut while it toasts to avoid burning.
    • Use a silicone spatula to avoid sticking when mixing and pressing the ingredients.
    • Store leftovers in an airtight container for freshness.
    • Prep Time: 15 minutes
    • Cook Time: 15 minutes
    • Category: Dessert
    • Method: Baking
    • Cuisine: American

    Nutrition

    • Serving Size: 1 bar
    • Calories: 250
    • Sugar: 10g
    • Sodium: 150mg
    • Fat: 9g
    • Saturated Fat: 4g
    • Unsaturated Fat: 3g
    • Trans Fat: 0g
    • Carbohydrates: 40g
    • Fiber: 1g
    • Protein: 2g
    • Cholesterol: 20mg

    Sharing is caring!

  • Pumpkin Patch Cookies

    Pumpkin Patch Cookies


    Introduction to Pumpkin Patch Cookies

    There’s something magical about the flavors of fall that make my heart skip a beat. One recipe that truly captures that warmth and joy are these delightful Pumpkin Patch Cookies. They not only look festive but also taste oh-so-good! As a busy mom, I know how important it is to have quick, fun treats that can impress the family without taking up too much time. Whether you’re preparing for a Halloween party or a cozy evening at home, these easy cookies are the perfect solution for your sweet cravings!

    Why You’ll Love This Pumpkin Patch Cookies

    These Pumpkin Patch Cookies are a breeze to make, perfect for those of us juggling busy schedules! With just a handful of ingredients, you’ll whip them up in no time, all while creating memories with your kids. The delightful chocolate and seasonal pumpkin flavor combo will have everyone asking for seconds. Plus, they make for a great Halloween treat that’s both fun and festive! What’s not to love?

    Ingredients for Pumpkin Patch Cookies

    Let’s gather our ingredients to create these delightful Pumpkin Patch Cookies! Here’s what you’ll need to get started:

    • Oreos: You can use regular chocolate Oreos or go for golden ones for a festive look. They’re the perfect base and add a great crunch!
    • White melting chocolate: This sweet coating binds everything together and creates that delicious, creamy texture. Choose good-quality melting chocolate for the best flavor.
    • Orange food coloring: This adds the vibrant orange hue reminiscent of pumpkins. Feel free to adjust the shade according to your preference!
    • Mellowcreme pumpkin candies: These treats are the cherry on top! They give the finishing touch to your cookies while bringing that fall spirit alive.

    You’ll find all the exact quantities at the bottom of the article, making it easy for you to print the recipe and have it on hand while you bake.

    How to Make Pumpkin Patch Cookies

    Step 1 – Prepare Your Baking Station

    First things first, let’s create a tidy workspace. Line a baking sheet with parchment paper. This step is crucial, as it keeps the cookies from sticking. Gather all your ingredients so they’re easily accessible. Trust me; it makes everything smoother as you whip this recipe up!

    Step 2 – Crumble the Oreos

    Now it’s time for some Oreo fun! Take 2-3 Oreos and twist them apart to remove the sweet cream filling. Set the cream aside (or devour it!). Crush the cookie halves into a fine powder and place them in a bowl. This crumbly wonder will become a delightful topping!

    Step 3 – Melt the Chocolate

    In a microwave-safe bowl, add your white melting chocolate. Heat it in 15-second bursts, stirring in between. This helps prevent the chocolate from burning. Once melted and silky smooth, you’re ready to create magic with your Pumpkin Patch Cookies. Keep an eye on it—you don’t want any chocolate disasters!

    Step 4 – Add Color to the Chocolate

    To achieve that festive pumpkin look, here comes the fun part! Slowly add drops of orange food coloring to your melted chocolate. Stir well, gauging the color until you reach your desired shade. Remember, it’s easier to add more color than to take it away—so go easy at first!

    Step 5 – Coat the Oreos

    Now, let’s dip those Oreos in your vibrant chocolate! Submerge each Oreo, making sure both sides are coated. Let the excess chocolate drip off and neatly place them on the parchment paper. It’s like dressing your cookies in a cozy chocolate blanket—perfectly festive!

    Step 6 – Decorate and Chill

    While the chocolate remains wet, sprinkle your crushed Oreos on top generously. Then, nestle a mellowcreme pumpkin candy right in the center of each cookie. Pop the tray in the refrigerator for about 10-15 minutes to let the chocolate set. It’s like a mini adventure waiting for you!

    Tips for Success

    • Keep all your ingredients ready before you start to simplify the process.
    • Ensure the chocolate is smooth and melted evenly without overheating.
    • Add a few drops of orange food coloring, mixing until you achieve the right hue.
    • For a creative touch, consider using different shapes of candies instead of pumpkins!
    • Refrigerate cookies until chocolate hardens for the best texture and taste.

    Equipment Needed

    • Baking sheet: A sturdy one is best, but any flat pan will do.
    • Parchment paper: This helps prevent sticking; wax paper is a good alternative.
    • Microwave-safe bowl: Any microwaveable dish works; just ensure it’s deep enough for melting chocolate.
    • Mixing bowl: Use any medium bowl for crumbling Oreos.
    • Spoon or fork: For stirring and coating your cookies—for fun, use a skewer for dipping!

    Variations of Pumpkin Patch Cookies

    • Nutty Surprise: Add crushed nuts like almonds or pecans for a delightful crunch in your cookies.
    • Gluten-Free Option: Swap out Oreos for gluten-free cookies to cater to dietary restrictions.
    • Chocolate Drizzle: After the chocolate coating, drizzle with dark chocolate for an extra layer of decadence.
    • Spicy Kick: Mix in a touch of pumpkin spice to your melted chocolate for that autumn warmth!

    Serving Suggestions for Pumpkin Patch Cookies

    • Pair these cookies with a warm cup of spiced chai or pumpkin spice latte for a cozy fall snack.
    • Serve them on a festive platter garnished with mini pumpkins and autumn leaves for a seasonal touch.
    • For a fun family treat, include a selection of other Halloween goodies along with the cookies.

    FAQs about Pumpkin Patch Cookies

    You might be wondering about a few things before diving into these delightful treats. Let’s address some common questions about Pumpkin Patch Cookies to ease your baking journey!

    Can I store Pumpkin Patch Cookies?
    Absolutely! These cookies can be stored in an airtight container in the refrigerator for a few days. They’ll retain their deliciousness, but they’re best enjoyed fresh.

    What can I use instead of mellowcreme pumpkin candies?
    If you can’t find mellowcreme pumpkin candies, feel free to use candy corn or chocolate-covered pretzels instead. Both add a fun touch to your Cookie Patch!

    How do I prevent chocolate from hardening too quickly?
    One simple trick is to keep your workspace warm! You can melt the chocolate just before you’re ready to coat the Oreos. If chocolate hardens, just give it a quick zap in the microwave for a few seconds.

    Can I make these cookies in advance for a party?
    Definitely! You can prepare them a day or two ahead. Just chill them in the fridge before serving to keep that chocolate coating nice and firm.

    Are Pumpkin Patch Cookies suitable for kids?
    Yes, they’re perfect for kids! These cookies are fun and simple to make, offering a delightful activity. Plus, who can resist a cookie dressed up like a pumpkin?

    Final Thoughts

    Baking these Pumpkin Patch Cookies is not just about the end result; it’s all about the joy and laughter along the way. The kids love getting involved—whether it’s dipping Oreos or adding the finishing touches. Each bite offers a delightful crunch combined with a splash of sweetness, instantly transporting me to cozy autumn days. These cookies aren’t just treats; they’re memories waiting to be made. So, gather your family and let the spirit of fall inspire your kitchen adventures. Trust me, these cheerful cookies will bring a smile to everyone’s face!


    Print

    clock clock iconcutlery cutlery iconflag flag iconfolder folder iconinstagram instagram iconpinterest pinterest iconfacebook facebook iconprint print iconsquares squares iconheart heart iconheart solid heart solid icon

    Description

    Enjoy these delightful Pumpkin Patch Cookies, perfect for fall with their festive appearance and delicious taste.


    • 18 Oreos (chocolate or golden)
    • 8 ounces white melting chocolate (two 4-ounce baking bars)
    • Orange food coloring
    • 18 mellowcreme pumpkin candies

    1. Line a baking sheet with parchment paper and set aside.
    2. Take 2-3 Oreos and remove the cream from between the cookies. Crush the cookies into a powder and place in a bowl.
    3. In a small microwaveable bowl, melt the 8 ounces of chocolate, stirring every 15 seconds until fully melted.
    4. Add orange food coloring to the melted chocolate a few drops at a time until the desired color is reached.
    5. Submerge each Oreo into the orange-colored chocolate, ensuring both sides are covered. Remove excess chocolate and place on the parchment paper.
    6. While the chocolate is still wet, sprinkle the chocolate cookie crumbs on top and place a pumpkin candy in the middle.
    7. Refrigerate the cookies for 10-15 minutes or until the chocolate hardens, then serve.

    Notes

    • Ensure not to overheat the chocolate while melting.
    • You can adjust the amount of orange food coloring to achieve your desired shade.
    • These cookies are best enjoyed fresh, but can be stored in an airtight container in the refrigerator for a few days.
    • Prep Time: 30 minutes
    • Cook Time: 15 minutes
    • Category: Dessert
    • Method: No-bake
    • Cuisine: American

    Nutrition

    • Serving Size: 1 cookie
    • Calories: 120
    • Sugar: 10g
    • Sodium: 35mg
    • Fat: 7g
    • Saturated Fat: 4g
    • Unsaturated Fat: 2g
    • Trans Fat: 0g
    • Carbohydrates: 15g
    • Fiber: 1g
    • Protein: 1g
    • Cholesterol: 0mg

    Sharing is caring!

  • Cinnamon Apple Pie Oatmeal

    Cinnamon Apple Pie Oatmeal


    Introduction to Cinnamon Apple Pie Oatmeal

    There’s something magical about waking up to the smell of freshly baked apples and warm cinnamon in the morning.

    As a busy mom, I know how precious those peaceful moments can be, even if they are few and far between.

    That’s why I love making this Cinnamon Apple Pie Oatmeal.

    It’s a cozy, comforting dish that not only warms your belly but also fills your heart with nostalgia.

    Whether you’re bustling through the morning rush or enjoying a leisurely weekend, this oatmeal is the perfect start to your day!

    Why You’ll Love This Cinnamon Apple Pie Oatmeal

    This Cinnamon Apple Pie Oatmeal is a delightful blend of flavors that feels like a warm hug on a busy morning.

    Not only is it super easy to whip up in just 25 minutes, but it’s also packed with nutrients.

    You can quickly cook this wholesome breakfast on the stovetop, making it a convenient choice for any day.

    Plus, the aromatic spices and sweet apples offer a taste of home that will satisfy both your hunger and your soul!

    Ingredients for Cinnamon Apple Pie Oatmeal

    To create your cozy Cinnamon Apple Pie Oatmeal, you’ll need a few simple yet delightful ingredients. Here’s what you’ll gather:

    • Old-fashioned rolled oats: These oats cook up creamy and provide a hearty base. Instant oats won’t give the same texture, so stick with the rolled kind.
    • Milk: Whether dairy or a plant-based alternative, milk adds richness to your oatmeal. Almond or oat milk works wonders!
    • Water: A bit of water helps to achieve the right consistency when cooking your oats.
    • Vanilla extract: A touch of vanilla adds sweetness and depth to the overall flavor.
    • Apples: Choose a variety that’s firm and sweet, like Honeycrisp or Granny Smith. Fresh apples bring that essential flavor!
    • Unsalted butter: This will add a bit of richness and helps to soften the apples. If you prefer a vegan option, simply omit it!
    • Brown sugar: It enhances the sweetness and caramel flavor of your apples. Feel free to swap with maple syrup if you’re looking for a different sweetness.
    • Ground cinnamon: The star spice in this recipe! It gives that classic warm, cozy flavor.
    • Pinch of salt: Just a pinch enhances all the other flavors—don’t skip it!
    • Chopped toasted pecans or walnuts: These are optional but add a nice crunch and healthy fats. Toasting them first brings out their nutty essence.
    • Extra cinnamon: For that finishing touch, a sprinkle over the top is always welcome!
    • Maple syrup or honey: Drizzle to taste for extra sweetness, as desired.

    You can find exact measurements for each ingredient at the bottom of this article for easy reference or printing!

    How to Make Cinnamon Apple Pie Oatmeal

    Step 1: Sauté the Apples

    Start your journey by melting unsalted butter in a small saucepan over medium heat.

    Once the butter is bubbling and fragrant, toss in your diced apples.

    Add brown sugar, ground cinnamon, and a pinch of salt to elevate those heavenly flavors.

    Sauté the apples for about 3 to 4 minutes until they soften and release their sweet aroma.

    Trust me, this step sets the mood for an unforgettable breakfast and makes your kitchen smell divine!

    Step 2: Prepare the Oats

    In a separate medium saucepan, combine your old-fashioned rolled oats, milk, water, and a splash of vanilla extract.

    Stir it all together gently, and bring this delightful mixture to a gentle simmer over medium heat.

    Don’t rush this step; give it a minute or two, stirring occasionally.

    That’s the secret to a creamy texture, which is what we all want in our Cinnamon Apple Pie Oatmeal, isn’t it?

    Step 3: Cook the Oats

    Once your oats reach a simmer, reduce the heat to low and keep stirring frequently.

    You want to cook them for about 7 to 10 minutes, watching them transform into a lush, creamy delight.

    The oats should be tender yet still slightly chewy, almost like a warm hug in a bowl.

    This is where the magic happens, turning simple oats into something truly comforting!

    Step 4: Combine Ingredients

    Now, it’s time for the star of the show!

    Gently fold in half of the sautéed cinnamon apples into the pot of oatmeal, mixing well.

    Cook for an additional minute or two, letting those sweet apple flavors mingle with the oats.

    Then, remove the pot from heat, and prepare yourself for the best part—serving!

    Step 5: Serve and Enjoy

    It’s time to divvy up your creation into two bowls.

    Top each serving with the remaining sautéed apples, a sprinkle of extra cinnamon, and those crunchy toasted pecans or walnuts if you fancy them.

    Feel free to drizzle some maple syrup or honey on top to sweeten the deal.

    With each bite, you’ll be transported back to that cozy apple pie moment—enjoy every spoonful!

    Tips for Success

    • Measure your ingredients accurately for best results.
    • Allow oats to soak briefly before cooking; it enhances texture.
    • Stir regularly while cooking to prevent sticking.
    • Use a non-stick pan if possible for easy cleanup.
    • Customize sweetness gradually to suit your taste.
    • For creamier oats, add a splash more milk while cooking.

    Equipment Needed

    • Small saucepan: For sautéing apples; a skillet can work too.
    • Medium saucepan: Essential for cooking the oatmeal; consider using a non-stick version for easy cleanup.
    • Measuring cups and spoons: To ensure perfect ingredient proportions.
    • Wooden spoon or spatula: Great for stirring and mixing ingredients.

    Variations for Cinnamon Apple Pie Oatmeal

    • Nut butters: Swirl in some almond or peanut butter for added creaminess and protein.
    • Different fruits: Swap out apples for pears, peaches, or even berries for a refreshing twist.
    • Spice it up: Add a pinch of nutmeg or ginger for an extra layer of warmth and flavor.
    • Chia seeds: Incorporate chia seeds for added fiber and a satisfying texture. They can help thicken the oatmeal, too!
    • Chocolate lovers: Stir in some cocoa powder or dark chocolate chips for a decadent touch.
    • Plant-based options: Go completely vegan by using plant-based milk and skipping the butter.

    Serving Suggestions

    • Pair your Cinnamon Apple Pie Oatmeal with a dollop of Greek yogurt for a creamy texture.
    • Serve with a side of fresh fruit, like berries or sliced bananas, to balance the sweetness.
    • Enjoy with a warm cup of spiced chai or herbal tea for a comforting breakfast experience.
    • Present in your favorite bowls, topped with extra apples and nuts for an inviting look!

    FAQs about Cinnamon Apple Pie Oatmeal

    Can I make Cinnamon Apple Pie Oatmeal ahead of time? Absolutely! You can prepare the oatmeal and store it in the fridge for up to three days. Just reheat with a splash of milk for a cozy breakfast on the go.

    Is this oatmeal gluten-free? Yes, it can be made gluten-free! Just be sure to use certified gluten-free oats to keep it safe for those with gluten sensitivities.

    Can I use instant oats instead of rolled oats? While you can use instant oats, they will yield a different texture. For a creamy and hearty bowl, I recommend sticking with old-fashioned rolled oats.

    What can I add for extra protein? You can stir in some Greek yogurt or a scoop of protein powder before serving. Nut butters, like almond or peanut, are also great options for a protein boost!

    How do I adjust sweetness to my preference? If you prefer your Cinnamon Apple Pie Oatmeal sweeter, simply add more brown sugar, honey, or maple syrup until it reaches your desired level of sweetness. Taste as you go for best results!

    Final Thoughts

    Creating a bowl of Cinnamon Apple Pie Oatmeal is not just about the flavors; it’s a delightful experience that brings warmth and joy to your mornings.

    Every spoonful is a reminder of cozy kitchens and cherished family moments.

    This recipe is my go-to for those busy days when I need comfort in a bowl.

    So, whether you savor it alone or share it with loved ones, this oatmeal will wrap you in a hug of nostalgia and sweetness.

    Give it a try, and watch it become a favorite at your breakfast table!


    Print

    clock clock iconcutlery cutlery iconflag flag iconfolder folder iconinstagram instagram iconpinterest pinterest iconfacebook facebook iconprint print iconsquares squares iconheart heart iconheart solid heart solid icon

    Description

    A cozy and comforting oatmeal dish infused with cinnamon and apples, perfect for a wholesome breakfast.


    • 1 cup old-fashioned rolled oats
    • 2 cups milk (dairy or unsweetened plant-based)
    • 1/2 cup water
    • 1/2 teaspoon vanilla extract
    • 1 large apple, peeled, cored, and diced
    • 1 tablespoon unsalted butter
    • 1 tablespoon brown sugar
    • 1 teaspoon ground cinnamon
    • Pinch of salt
    • 2 tablespoons chopped toasted pecans or walnuts (optional)
    • Extra cinnamon, for sprinkling
    • Maple syrup or honey, to taste

    1. In a small saucepan over medium heat, melt the butter. Add the diced apple, brown sugar, cinnamon, and a pinch of salt. Sauté for 3–4 minutes until the apples are soft and fragrant. Remove from heat and set aside.
    2. In a separate medium saucepan, combine oats, milk, water, and vanilla extract. Bring to a gentle simmer over medium heat, stirring occasionally.
    3. Reduce heat to low and cook, stirring frequently, for 7–10 minutes until the oats are creamy and tender.
    4. Stir in half of the cooked cinnamon apples. Cook for 1–2 more minutes, then remove from heat.
    5. Divide the oatmeal between two bowls. Top with the remaining cinnamon apples, toasted nuts, a sprinkle of cinnamon, and a drizzle of maple syrup or honey if desired.

    Notes

    • For a vegan option, use plant-based milk and omit honey.
    • Feel free to adjust the sweetness according to your preference.
    • Can be made gluten-free by using certified gluten-free oats.
    • Prep Time: 10 minutes
    • Cook Time: 15 minutes
    • Category: Breakfast
    • Method: Stovetop
    • Cuisine: American

    Nutrition

    • Serving Size: 1 bowl
    • Calories: 300
    • Sugar: 14g
    • Sodium: 150mg
    • Fat: 8g
    • Saturated Fat: 3g
    • Unsaturated Fat: 5g
    • Trans Fat: 0g
    • Carbohydrates: 50g
    • Fiber: 7g
    • Protein: 10g
    • Cholesterol: 10mg

    Sharing is caring!

  • Chicken and Sweet Potato Casserole

    Chicken and Sweet Potato Casserole


    Introduction to Chicken and Sweet Potato Casserole

    There’s something incredibly comforting about a warm plate of Chicken and Sweet Potato Casserole.

    It feels like a cozy hug on a busy day, doesn’t it?

    As a busy mom, I often find myself searching for meals that are not just quick, but also nourishing for my family.

    This dish checks all the boxes!

    Whipping up tender chicken thighs with sweet potatoes means happiness at the dinner table.

    It’s simple yet impressive, perfect for a weeknight dinner or a way to gather loved ones around.

    Let’s dive into this delectable family delight!

    Why You’ll Love This Chicken and Sweet Potato Casserole

    You’re going to fall in love with this Chicken and Sweet Potato Casserole, trust me on this!

    It’s simple to prepare, requiring just a handful of ingredients that pack a flavor punch.

    This dish becomes your best friend on frantic weeknights, offering a hearty meal in just over an hour.

    Plus, the blend of savory chicken and sweet potatoes creates a delightful harmony that will have your family asking for seconds!

    Ingredients for Chicken and Sweet Potato Casserole

    Gathering the right ingredients is half the fun!

    For this tasty Chicken and Sweet Potato Casserole, you’ll need:

    • Chicken Thighs: I love using skin-on, bone-in thighs for their juicy flavor and tenderness. You could substitute with chicken breasts if you prefer, but thighs really shine here.
    • Sweet Potatoes: These beauties add a natural sweetness and creaminess to the dish. You can use yams if you can’t find sweet potatoes, but the flavors will vary.
    • Onion: A medium onion adds depth and aroma. I prefer yellow onions, but white or red work well too!
    • Garlic: It’s the secret superhero of flavors! Minced garlic gives that satisfying aroma and taste. Fresh is best, but garlic powder can be a backup.
    • Olive Oil: For greasing and added flavor, olive oil does wonders. You can also use vegetable oil if that’s what you have on hand.
    • Ground Paprika: This spice brings a lovely color and mild warmth. Feel free to experiment with smoked paprika for an extra twist!
    • Dried Thyme: A staple herb that complements the chicken nicely. You could swap it for Italian seasoning if you’re in a pinch.
    • Salt and Black Pepper: Essential for seasoning. Adjust according to your taste—we all have different preferences!
    • Chicken Broth: This keeps everything moist and adds rich flavor. Use low-sodium broth for a healthier option.
    • Fresh Parsley: A touch of chopped parsley at the end brightens the dish and adds visual appeal. You could replace it with chives or even omit it if you’re short on time.

    For exact quantities of each ingredient, don’t forget to check the bottom of the article.

    Feel free to have fun experimenting! Cooking should be all about joy, after all.

    How to Make Chicken and Sweet Potato Casserole

    Now, let’s get into the heart of this recipe.

    Making Chicken and Sweet Potato Casserole is as straightforward as pie, and I promise you’ll appreciate my tips along the way!

    Let’s roll up our sleeves and dive into these simple steps.

    Step 1: Prepare the Oven and Baking Dish

    Start by preheating your oven to 190°C.

    This temperature ensures your casserole cooks evenly and thoroughly!

    While the oven warms up, grab a large oven-safe baking dish and lightly grease it with olive oil.

    A well-coated dish keeps things from sticking and makes cleanup a breeze.

    Step 2: Season the Chicken

    Next, it’s time to add flavor to our chicken.

    Rub the chicken thighs with paprika, thyme, salt, and pepper on both sides.

    Get your hands in there; it’s the best way to ensure even seasoning!

    This simple act transforms the chicken into a flavor powerhouse that complements the sweet potatoes beautifully.

    Step 3: Arrange the Ingredients in the Dish

    Now comes the fun part—arranging!

    Place the seasoned chicken thighs skin-side up in the baking dish.

    Then, scatter the cubed sweet potatoes and chopped onion around the chicken.

    Don’t forget to sprinkle the minced garlic over everything for that aromatic kick.

    This colorful arrangement not only looks beautiful but sets the stage for deliciousness!

    Step 4: Pour in the Chicken Broth

    Grab your chicken broth and gently pour it around the chicken and veggies.

    Make sure you don’t wash off the seasonings—nobody wants flavorless food!

    The broth adds moisture and helps everything cook together, creating a tantalizing harmony of flavors as it bakes.

    Step 5: Bake Covered

    Cover the dish with aluminum foil and pop it into the oven for 45 minutes.

    This step locks in moisture and prevents the chicken from drying out.

    You want your chicken to be nice and tender by the time it’s done.

    Step 6: Bake Uncovered for Crispiness

    Once the 45 minutes are up, it’s time for a fabulous transformation!

    Carefully remove the foil and let it bake for another 15 minutes.

    This is when the chicken skin gets all crispy and golden, while the sweet potatoes soften beautifully.

    Can you just picture it? It’s heavenly!

    Step 7: Garnish and Serve

    After baking, remove the dish from the oven and sprinkle fresh parsley on top.

    This little green touch adds freshness and color—it’s like the cherry on top!

    Now, serve your Chicken and Sweet Potato Casserole hot, and watch those smiles bloom at the dinner table.

    It’s a cozy meal that assures your family they are loved.

    Tips for Success

    • Prep all ingredients before starting for a smoother cooking experience.
    • Let the chicken marinate in seasonings for extra flavor if time allows.
    • Use a meat thermometer; chicken should reach 165°F for perfect doneness.
    • Feel free to sneak in veggies like carrots or bell peppers for added nutrition.
    • Store leftovers in the fridge for up to three days for easy reheating.

    Equipment Needed

    • Oven-safe Baking Dish: A 9×13 inch dish works wonders. You can also use a cast-iron skillet if that’s what you have handy.
    • Aluminum Foil: Essential for covering the dish while baking. Don’t have any? A lid works too!
    • Measuring Cups: Handy for measuring broth and seasoning. A good old-fashioned eyeball works in a pinch!
    • Mixing Bowl: Useful for mixing your seasonings. Or, just use the baking dish if you’re short on time!

    Variations on Chicken and Sweet Potato Casserole

    • Add Greens: Toss in some spinach or kale before baking for a pop of color and nutrition.
    • Spicy Kick: Add a pinch of cayenne pepper or red pepper flakes for a delightful heat that tantalizes the taste buds.
    • Cheesy Goodness: Sprinkle shredded cheese like cheddar or mozzarella on top during the last 10 minutes of baking for a melty finish.
    • Different Proteins: Swap chicken for ground turkey or shredded rotisserie chicken for quicker prep time.
    • Vegan Version: Replace chicken with chickpeas and use vegetable broth; add a splash of balsamic vinegar for depth.
    • Herb Variations: Experiment with rosemary or oregano instead of thyme for a different aromatic profile.

    Serving Suggestions for Chicken and Sweet Potato Casserole

    • Side Salad: A fresh green salad with vinaigrette complements the hearty casserole perfectly.
    • Wine Pairing: A light white wine, such as Sauvignon Blanc, enhances the flavors beautifully.
    • Presentation Tip: Serve in individual bowls for a cozy dining experience!
    • Steamed Veggies: Add a side of steamed broccoli or green beans for extra nutrition.

    FAQs about Chicken and Sweet Potato Casserole

    You might have some questions buzzing around in your mind as you think about this Chicken and Sweet Potato Casserole.

    Don’t worry, I’ve got you covered!

    Here are some of the most common queries along with their answers.

    Can I use other vegetables in this casserole?

    Absolutely! Veggies like carrots, bell peppers, or even green beans can be great additions.

    They not only add fiber but also enhance the dish’s flavor and color.

    How do I store leftovers?

    Leftovers can be stored in an airtight container in the fridge for up to three days.

    You can reheat them in an oven for best results or microwave them for a quicker option!

    Can I freeze this casserole?

    Yes, you can! Just freeze it before baking for up to three months.

    Make sure to wrap it well. When you’re ready, simply thaw and follow the baking instructions!

    What sides pair well with this dish?

    A fresh green salad or roasted veggies complement the rich flavors beautifully.

    You might even consider a glass of white wine to elevate your dining experience!

    Can this dish be made in advance?

    Definitely! You can prepare the casserole up to a day ahead and leave it covered in the fridge.

    Just pop it in the oven when you’re ready for a cozy dinner with minimal fuss!

    Final Thoughts

    There’s nothing quite like the joy of pulling a Chicken and Sweet Potato Casserole out of the oven, the aroma wrapping around you like a warm blanket.

    This dish is not just a meal; it’s a heartfelt way to nourish your family, creating memories around the dinner table.

    As you gather everyone to savor the comforting flavors, you’ll find laughter, storytelling, and love being shared.

    Embrace this culinary adventure, making it your own, and let it become a cherished staple.

    I can guarantee it’ll bring smiles and possibly seconds from those you hold dear!


    Print

    clock clock iconcutlery cutlery iconflag flag iconfolder folder iconinstagram instagram iconpinterest pinterest iconfacebook facebook iconprint print iconsquares squares iconheart heart iconheart solid heart solid icon

    Description

    A Cozy Family Delight featuring tender chicken thighs and sweet potatoes baked to perfection.


    • 4 chicken thighs, skin-on and bone-in
    • 2 large sweet potatoes, peeled and cubed
    • 1 medium onion, chopped
    • 3 cloves garlic, minced
    • 1 tablespoon olive oil
    • 1 teaspoon ground paprika
    • 1 teaspoon dried thyme
    • Salt and black pepper, to taste
    • 240 ml chicken broth
    • 2 tablespoons fresh parsley, chopped

    1. Set oven to 190°C for even and thorough cooking.
    2. Grease a large oven-safe baking dish with olive oil, ensuring the base is evenly coated.
    3. Rub chicken thighs with paprika, thyme, salt, and pepper on both sides for balanced seasoning.
    4. Arrange seasoned chicken thighs skin-side up in the baking dish. Distribute cubed sweet potatoes and chopped onion around the chicken, then scatter minced garlic over all ingredients.
    5. Pour chicken broth gently around the arrangement, ensuring even distribution without washing off seasonings.
    6. Cover the dish with aluminum foil and bake in the preheated oven for 45 minutes.
    7. Remove foil and bake for an additional 15 minutes, allowing the chicken skin to brown and sweet potatoes to soften completely.
    8. Remove dish from oven. Sprinkle with fresh chopped parsley and serve immediately while hot.

    Notes

    • Feel free to adjust the seasoning according to your taste preferences.
    • This dish pairs well with a side salad or steamed vegetables.
    • Prep Time: 15 minutes
    • Cook Time: 1 hour
    • Category: Main Course
    • Method: Baking
    • Cuisine: American

    Nutrition

    • Serving Size: 1 serving
    • Calories: 420
    • Sugar: 5g
    • Sodium: 600mg
    • Fat: 22g
    • Saturated Fat: 6g
    • Unsaturated Fat: 12g
    • Trans Fat: 0g
    • Carbohydrates: 35g
    • Fiber: 5g
    • Protein: 25g
    • Cholesterol: 80mg

    Sharing is caring!

  • Tomato Sausage Goat Cheese Pasta

    Tomato Sausage Goat Cheese Pasta


    Introduction to Tomato Sausage Goat Cheese Pasta

    As a passionate home cook, I know how hectic life can get, especially for those of us juggling family, work, and social events. That’s why I’m excited to share my Tomato Sausage Goat Cheese Pasta! This creamy delight is not just delicious; it’s a quick solution for busy days when you want to impress your loved ones without sacrificing time. The vibrant flavors of sautéed sausage, parmesan, and tangy goat cheese create a comforting dish that satisfies both hunger and heart. Let’s dive into this culinary adventure that’s sure to warm both your kitchen and your family’s hearts!

    Why You’ll Love This Tomato Sausage Goat Cheese Pasta

    This Tomato Sausage Goat Cheese Pasta is perfect for anyone who craves comfort food without endless prep time. It’s quick to whip up, making it a lifesaver for busy weeknights. You’ll love the creamy texture, courtesy of goat cheese, paired with the savory flavors of sausage and herbs. Plus, it’s a crowd-pleaser, ensuring no one leaves the table hungry!

    Ingredients for Tomato Sausage Goat Cheese Pasta

    Gathering the right ingredients can feel like embarking on a little treasure hunt, and I promise you’ll find some delightful gems for this dish! Here’s what you need:

    • Ground sausage: This forms the hearty base of your sauce, bringing richness and flavor. Choose pork or turkey based on your preference.
    • Shallot or small onion: A hint of sweetness from shallots enhances the overall flavor, but an onion works just as well!
    • Garlic: No Italian dish is complete without garlic. It adds a fragrant touch that elevates the sauce.
    • Olive oil: Extra virgin olive oil is ideal for sautéing. It adds depth and marvelous flavor to the dish.
    • Diced tomatoes: Canned diced tomatoes make this sauce quick and easy. They’re juicy and full of flavor!
    • Dried pasta: Choose your favorite kind! From penne to spaghetti, this is versatile enough to suit any preference.
    • Sugar: Just a pinch balances out the acidity of the tomatoes, rounding out the flavors beautifully.
    • Salt: A bit of salt enhances all the ingredients. Include extra for seasoning the pasta water.
    • Balsamic vinegar: This adds a tangy sweetness that pairs so well with the sausage and tomatoes.
    • Oregano and thyme: Fresh or dried, these herbs bring that signature Italian flavor that makes this dish sing!
    • Red pepper flakes: Optional, but if you enjoy a kick, sprinkle some in for added heat.
    • Goat cheese: The star of the dish! Creamy and tangy, it turns the sauce into a luxurious delight.
    • Parmesan cheese: A finishing touch that adds salty richness as a topping—absolutely delicious!

    For exact measurements, check the bottom of the article where you can print the ingredient list. Happy cooking!

    How to Make Tomato Sausage Goat Cheese Pasta

    Cooking this Tomato Sausage Goat Cheese Pasta is a joyful experience that fills your kitchen with tantalizing aromas. Here’s a step-by-step guide to help you on this culinary journey!

    Prepare the Ingredients

    Start by thinly slicing the shallot or onion and finely chopping the garlic cloves. Prepping your ingredients gives you everything needed right at your fingertips. Trust me, it makes cooking so much smoother!

    Sauté the Vegetables

    Next, heat olive oil in a large skillet over medium heat. Toss in the sliced shallot along with a bit of sugar and salt. Sauté for about 5 minutes, or until softened and fragrant. This step brings out flavors that will form the base of your sauce!

    Cook the Sausage

    Now it’s time to add the ground sausage. Break it into small pieces and cook for around 10 minutes, stirring occasionally. You want it evenly browned. Don’t forget to drain any excess fat if necessary—no one likes a greasy sauce!

    Flavor the Sauce

    Once the sausage is browned, stir in the chopped garlic, balsamic vinegar, oregano, and thyme. Cook for just 1 minute until those wonderful aromas fill the air. This is where the magic truly begins, infusing flavors that dance together beautifully!

    Simmer the Sauce

    Pour in the diced tomatoes along with their juices. Stir to combine everything, then cover the skillet. Let it simmer on low heat for about 30 minutes. This allows the flavors to intensify and meld together—trust me, it’s worth the wait!

    Cook the Pasta

    While the sauce is simmering, bring a large pot of salted water to a boil. Add your dried pasta and cook according to the package instructions until al dente. Drain when it’s ready, but don’t forget to reserve a little pasta water just in case!

    Combine and Finish

    Now for the grand finale! Stir the creamy goat cheese into the simmering sauce, along with red pepper flakes if you like a little heat. Once creamy, toss in your cooked pasta and gently mix until everything is well-coated. Serve it up hot, with extra goat cheese and grated Parmesan sprinkled on top. Enjoy every delicious bite!

    Tips for Success

    • Always taste your sauce as it cooks. Adjust seasoning if needed for a perfect balance.
    • If you want extra creaminess, reserve a bit of pasta water to add when mixing.
    • For a pop of freshness, garnish with fresh herbs like basil or parsley before serving.
    • Don’t rush the simmering step; it truly helps develop rich flavors.
    • Make it your own! Feel free to add veggies like spinach or bell peppers for added nutrition.

    Equipment Needed

    • A large skillet: Use a non-stick skillet for easy cleanup.
    • A pot for boiling pasta: Any large pot works fine.
    • A wooden spoon: Great for stirring and breaking up sausage.
    • A cutting board and knife: Essential for prepping your ingredients.
    • A colander: Perfect for draining pasta once it’s cooked.

    Variations

    • Vegetarian option: Replace the sausage with a plant-based meat substitute or sautéed mushrooms for a hearty alternative.
    • Adding veggies: Toss in spinach, zucchini, or bell peppers during the sautéing process for extra nutrition and color.
    • Whole wheat pasta: Pot for whole wheat pasta to boost fiber content and make it a bit healthier.
    • Different cheeses: Experiment with cream cheese or ricotta as a substitute for goat cheese for a different creamy flavor.
    • Herb variations: Try adding fresh basil or parsley just before serving for a fresh burst of flavor.

    Serving Suggestions

    • Pair with a crisp green salad dressed in a light vinaigrette for a refreshing contrast.
    • A glass of chilled white wine, like a Sauvignon Blanc, complements the dish beautifully.
    • Serve the pasta in shallow bowls, topped with fresh herbs for a lovely presentation.
    • Crusty garlic bread makes for a perfect side to soak up the delicious sauce!

    FAQs about Tomato Sausage Goat Cheese Pasta

    Can I make Tomato Sausage Goat Cheese Pasta ahead of time?
    Absolutely! You can prepare the sauce a day in advance. Store it in the fridge and simply reheat while you cook your pasta. This saves you time during busy weeknights.

    What if I don’t have goat cheese?
    No problem at all! You can substitute with cream cheese or ricotta for a similar creamy texture. Just adjust the quantity to taste.

    Can I freeze the leftovers?
    Yes! This Tomato Sausage Goat Cheese Pasta freezes well. Allow it to cool completely, then store in airtight containers for up to 3 months. Reheat when you’re ready to enjoy it again!

    Is this pasta recipe gluten-free?
    Yes, if you use gluten-free pasta! Many varieties are available, and they will work beautifully with the sauce while keeping the dish gluten-free.

    Can I add more vegetables to this dish?
    Definitely! Feel free to include spinach, bell peppers, or even sun-dried tomatoes. The more colorful it is, the more inviting it becomes!

    Final Thoughts

    There’s something magical about the warmth a homemade meal brings, and my Tomato Sausage Goat Cheese Pasta is no exception. This dish embraces both comfort and creativity, effortlessly transforming a busy weeknight into a special occasion. The creamy goat cheese melds with the hearty sausage, creating a symphony of flavors that your family will crave again and again. Plus, it’s quick and easy, making it a joy to whip up even on your busiest days. So, discover the happiness in each bite, and enjoy creating beautiful memories around your dinner table!


    Print

    clock clock iconcutlery cutlery iconflag flag iconfolder folder iconinstagram instagram iconpinterest pinterest iconfacebook facebook iconprint print iconsquares squares iconheart heart iconheart solid heart solid icon

    Description

    A creamy delight featuring ground sausage, diced tomatoes, goat cheese, and herbs, served over your choice of pasta.


    • 450 g ground sausage
    • 1 shallot or small onion, thinly sliced
    • 3 cloves garlic, finely chopped
    • 30 ml olive oil
    • 15 oz (425 g) diced tomatoes, canned
    • 425 g dried pasta of choice
    • 13 g sugar
    • 2.5 ml salt, plus extra for pasta water
    • 30 ml balsamic vinegar
    • 5 ml fresh or dried oregano
    • 5 ml fresh or dried thyme
    • 0.5 g red pepper flakes (optional)
    • 85 g goat cheese
    • Parmesan cheese, finely grated, for topping

    1. Thinly slice the shallot or onion and finely chop the garlic cloves.
    2. Heat olive oil in a large skillet over medium heat. Add the shallot along with sugar and salt. Sauté for 5 minutes until softened.
    3. Add the ground sausage to the pan. Break into small pieces and cook for approximately 10 minutes, or until evenly browned. Drain excess fat if needed.
    4. Add chopped garlic, balsamic vinegar, oregano, and thyme to the pan. Stir and cook for 1 minute to release aromas.
    5. Pour in the diced tomatoes with their juices. Stir to combine, cover, and leave to simmer on low heat for 30 minutes, allowing flavors to concentrate.
    6. Meanwhile, bring a large pot of salted water to a boil. Add dried pasta and cook according to the package instructions until al dente. Drain when done.
    7. Stir the goat cheese and red pepper flakes, if using, into the sauce until creamy. Add cooked pasta to the pan and gently toss to thoroughly coat.
    8. Plate the pasta, topping with extra goat cheese and a generous sprinkle of grated Parmesan cheese. Serve immediately.

    Notes

    • For a spicier dish, increase the amount of red pepper flakes.
    • This dish can be made with whole wheat pasta for added fiber.
    • If you prefer a vegetarian option, replace sausage with a meat substitute.
    • Prep Time: 10 minutes
    • Cook Time: 55 minutes
    • Category: Main Course
    • Method: Stovetop
    • Cuisine: Italian

    Nutrition

    • Serving Size: 1 plate
    • Calories: 650
    • Sugar: 4 g
    • Sodium: 800 mg
    • Fat: 35 g
    • Saturated Fat: 10 g
    • Unsaturated Fat: 20 g
    • Trans Fat: 0 g
    • Carbohydrates: 60 g
    • Fiber: 3 g
    • Protein: 30 g
    • Cholesterol: 80 mg

    Sharing is caring!

  • Outrageous Chocolate Coconut Cheesecake

    Outrageous Chocolate Coconut Cheesecake


    Introduction to Outrageous Chocolate Coconut Cheesecake

    Let me tell you about this Outrageous Chocolate Coconut Cheesecake that will leave you swooning! As a busy mom juggling work and family, I know how precious dessert time can be. This decadent treat is not just delicious; it’s a quick solution for those moments when you need to impress loved ones. With its rich brownie base, creamy coconut layers, and luscious chocolate frosting, it’s practically a celebration on a plate. Whether it’s a birthday, special occasion, or just a midweek pick-me-up, this dessert will surely uplift your spirits and fill your home with joy!

    Why You’ll Love This Outrageous Chocolate Coconut Cheesecake

    This Outrageous Chocolate Coconut Cheesecake checks all the boxes for a delightful dessert! It’s easy to make, which is a lifesaver on busy days. Each layer bursting with flavor is pure indulgence, balancing rich chocolate and creamy coconut. Plus, it looks stunning on any table, making it a wonderful centerpiece for gatherings. In just a few hours, you’ll have a show-stopping dessert that will wow your friends and family!

    Ingredients for Outrageous Chocolate Coconut Cheesecake

    Gathering ingredients for this Outrageous Chocolate Coconut Cheesecake is half the fun of baking! Here’s what you’ll need to create this indulgent dessert:

    • Chocolate Cake: All-purpose flour forms the base, while granulated sugar sweetens the deal. You’ll need some cocoa powder for that rich chocolate flavor, and a touch of baking soda and baking powder helps it rise. Salt brings all the flavors together. Whole milk, vegetable oil, and a large egg white add moisture, making the cake soft and delightful. Hot water mixes in to create that perfect batter consistency.
    • Coconut Pecan Filling: Egg yolks form the rich custard-like base. Sweetened with evaporated milk and granulated sugar, it gains creaminess from cubed unsalted butter. Shredded coconut adds texture, while toasted pecans bring crunch and a nutty taste.
    • Brownie: This layer brings deep chocolate goodness with granulated sugar and melted unsalted butter. A couple of eggs add richness, while all-purpose flour, cocoa powder, baking powder, and salt round out this indulgent layer.
    • Coconut Chocolate Chip Cheesecake: Cream cheese contributes smoothness, while sugar and flour help stabilize the filling. Sour cream adds tang, and coconut extract brings that lovely tropical twist. Eggs, mixed in one at a time, ensure the perfect texture, and don’t forget the chocolate chips for a delightful surprise.
    • Chocolate Frosting: To create this sweet crown, you’ll need unsalted butter and melted chocolate for that luxurious taste. Powdered sugar ensures sweetness, and heavy whipping cream achieves a perfectly spreadable consistency.

    Feeling adventurous? Customize your cheesecake with additional coconut or chocolate chips as toppings. For those watching their sugar intake, consider substituting with sugar alternatives or using dark chocolate for a richer flavor.

    Exact quantities for all these ingredients are at the bottom of the article and are available for printing, ensuring your baking experience is as smooth as possible!

    How to Make Outrageous Chocolate Coconut Cheesecake

    Ready to dive into creating this Outrageous Chocolate Coconut Cheesecake? Let’s go through the steps together! Each layer is bursting with flavors that will make your taste buds dance. Follow along for delightful results!

    Step 1: Preheat and Prepare

    First things first, let’s preheat that oven to 176°C (350°F). While it’s warming up, grab your 23 cm springform pan. Line the bottom with parchment paper and grease the sides. These steps ensure your cheesecake will slide out smoothly, making it presentation-ready. Trust me, a little prep goes a long way!

    Step 2: Bake the Chocolate Cake Base

    In a medium bowl, whisk together flour, sugar, cocoa, baking soda, baking powder, and salt. This mix really brings that chocolate flavor to life. In a separate bowl, combine milk, oil, vanilla, and egg white. Then, add the dry ingredients to the wet mixture. Stir until smooth, and don’t forget to pour in the hot water for that perfect thin batter.

    Transfer the batter into your prepared pan and bake for about 12–15 minutes. The cake should come out just set, with a toothpick revealing a few moist crumbs. Allow it to cool on a rack while you shift your focus to the next layers!

    Step 3: Create the Coconut Pecan Filling

    Time to whip up the luscious coconut pecan filling! In a large saucepan, whisk egg yolks, evaporated milk, and vanilla extract together. Then, add in sugar and cubed butter, cooking over medium heat. Keep stirring for about 12–15 minutes until the mixture thickens and turns golden.

    Once it’s beautifully thickened, mix in the shredded coconut and toasted pecans. It adds such a lovely texture! After mixing, let it cool in the fridge until it’s completely chilled.

    Step 4: Prepare the Brownie Layer

    Now for the chocolate brownie layer—who doesn’t love brownies? In a bowl, blend granulated sugar and melted butter together until smooth. Then, add in your vanilla extract and eggs. Next, stir in flour, cocoa powder, baking powder, and salt until well blended. It should be thick and glossy!

    Spread the brownie batter evenly in the previously prepared pan and bake for 20–25 minutes. A toothpick inserted should come out with a few moist crumbs. It’s brownie perfection! Allow this layer to cool slightly before moving on.

    Step 5: Mix the Coconut Chocolate Chip Cheesecake Batter

    Let’s make the star of this dessert—the cheesecake batter! In a large mixing bowl, blend cream cheese, sugar, and flour until smooth. Be sure to scrape down the bowl sides to catch any lumps.

    Slowly mix in sour cream and coconut extract, then add eggs one by one. Mix gently to avoid air bubbles. Finally, fold in those delightful chocolate chips for that extra burst of flavor!

    Step 6: Layer and Bake

    It’s layering time! Spread a third of the cooled coconut pecan filling evenly over your baked brownie. Pour the cheesecake batter right on top. This is where the magic happens! Wrap the pan in foil and place it inside a larger pan filled with warm water halfway up the side. This unique water bath method keeps the cheesecake creamy.

    Bake at 148°C (300°F) for about 45 minutes. The center should be set but still slightly jiggly. Once done, turn off the oven and let the cheesecake cool inside with the door closed for another 30 minutes. Trust me, this cooling will help it firm up beautifully!

    Step 7: Cool and Set

    Essential to cheesecake success: let it cool completely! After your cheesecake has cooled in the oven, remove it from the water bath and refrigerate for at least 5–6 hours, or preferably overnight. This cooling time helps to firm up the cake structure, making it easier to slice later. Patience is a virtue, after all!

    Step 8: Make the Chocolate Frosting

    What’s a cheesecake without glorious frosting? In a mixing bowl, beat softened butter until it’s creamy. Then, blend in your melted chocolate until everything is evenly combined. Gradually add powdered sugar while mixing, then adjust the consistency with heavy cream. You want it smooth and spreadable, perfect for layering on your cheesecake.

    Step 9: Assemble and Decorate

    Time for the grand finale! Place your cooled brownie-cheesecake layer on a lovely serving plate. Spread a generous layer of coconut pecan filling over it, followed by the chocolate cake layer.

    Frost the sides with your rich chocolate frosting and press mini chocolate chips into it. For an elegant finish, pipe swirls of frosting around the edge and fill the center with additional coconut pecan filling. Refrigerate until you’re ready to dazzle your guests!

    Tips for Success

    • Read through all the steps before starting to ensure smooth sailing.
    • Make sure all ingredients are at room temperature for better mixing.
    • Use a toothpick to check brownies and cheesecake; it should come out with a few moist crumbs.
    • Allow ample cooling time—it’s critical for the perfect slice!
    • Get creative with toppings like extra coconut flakes or chocolate drizzle!

    Equipment Needed

    • 23 cm Springform Pan: Essential for cheesecakes; a regular cake pan works but makes removal tricky.
    • Mixing Bowls: Use a set of various sizes; a stand mixer is handy but a hand mixer does the job.
    • Whisk: Needed for blending ingredients; a fork can work in a pinch!
    • Rubber Spatula: Great for scraping bowls clean; you can also use a wooden spoon.
    • Parchment Paper: Helps with easy release; aluminum foil can be used if you’re in a jam.

    Variations of Outrageous Chocolate Coconut Cheesecake

    • Gluten-Free: Substitute all-purpose flour with a gluten-free baking blend for a delightful gluten-free version that everyone can enjoy!
    • Lower Sugar: Consider using a sugar alternative like erythritol or monk fruit in place of granulated sugar. It still delivers that sweetness you love without the extra calories.
    • Nut-Free: Omit the toasted pecans in the coconut filling for a nut-free option. You can replace them with sunflower seeds for a crunchy texture instead.
    • Dairy-Free: Swap cream cheese with a dairy-free alternative like cashew cream. Use coconut cream in your frosting to maintain that lusciousness.
    • Fruit Twist: Add a layer of raspberries or strawberries between the cheesecake and brownie layers for a fruity explosion! It gives an unexpected fresh taste that complements the richness.

    Serving Suggestions for Outrageous Chocolate Coconut Cheesecake

    • Pair with fresh berries like strawberries or raspberries for a burst of color and flavor.
    • Serve with a dollop of whipped cream for an extra creamy touch.
    • Enjoy alongside a warm cup of coffee or a rich hot chocolate.
    • Presentation tip: Place slices on colorful plates to enhance the visual appeal.

    FAQs about Outrageous Chocolate Coconut Cheesecake

    Curious minds often have questions, especially before diving into an extravagant dessert like this Outrageous Chocolate Coconut Cheesecake. Here are some common queries you might have:

    Can I make the cheesecake ahead of time?

    Absolutely! In fact, letting it sit in the refrigerator overnight enhances the flavors and ensures a firmer texture. Perfect for busy moms like us!

    How do I store leftover cheesecake?

    Store any leftovers in an airtight container in the fridge for up to five days. It’s just as delicious the next day (if it lasts that long)!

    Is it possible to freeze this cheesecake?

    You can freeze this decadent cheesecake! Wrap individual slices tightly in plastic wrap and then in foil. Thaw in the fridge overnight before serving.

    Can I substitute ingredients for dietary needs?

    Of course! You can use gluten-free flour for a gluten-free version, or opt for dairy-free ingredients to make it suitable for those with dietary restrictions. It’s a versatile recipe!

    What’s the secret to a creamy cheesecake texture?

    Room temperature ingredients and the gentle mixing of eggs ensures a smooth batter, resulting in that rich, creamy texture we all crave. Avoid overmixing to prevent air bubbles!

    Final Thoughts on Outrageous Chocolate Coconut Cheesecake

    Creating this Outrageous Chocolate Coconut Cheesecake is more than just baking; it’s an experience that brings joy and satisfaction. The combination of rich chocolate, creamy coconut, and crunchy pecans delivers a flavor explosion that will captivate everyone at the table. It’s the perfect dessert for any occasion or a delightful treat on a busy weeknight. As you slice into this masterpiece, the smiles on your family’s faces will remind you of the love and happiness that good food brings. So, roll up your sleeves, embrace the mess, and enjoy every bite of this indulgent creation!


    Print

    clock clock iconcutlery cutlery iconflag flag iconfolder folder iconinstagram instagram iconpinterest pinterest iconfacebook facebook iconprint print iconsquares squares iconheart heart iconheart solid heart solid icon

    Description

    A decadent dessert combining chocolate cake, coconut pecan filling, brownie, and cheesecake, topped with rich chocolate frosting and mini chocolate chips.


    • Chocolate Cake
      • 56 g all-purpose flour
      • 104 g granulated sugar
      • 21 g natural unsweetened cocoa powder
      • 0.5 tsp baking soda
      • 0.125 tsp baking powder
      • 0.25 tsp salt
      • 60 ml whole milk
      • 30 ml vegetable oil
      • 0.25 tsp vanilla extract
      • 1 large egg white
      • 60 ml hot water
    • Coconut Pecan Filling
      • 6 egg yolks
      • 354 ml evaporated milk
      • 1.5 tsp vanilla extract
      • 310 g granulated sugar
      • 168 g unsalted butter, cubed
      • 227 g sweetened shredded coconut
      • 1.25 cups chopped toasted pecans
    • Brownie
      • 207 g granulated sugar
      • 140 g unsalted butter, melted
      • 1 tsp vanilla extract
      • 2 large eggs
      • 98 g all-purpose flour
      • 43 g natural unsweetened cocoa powder
      • 0.25 tsp baking powder
      • 0.25 tsp salt
    • Coconut Chocolate Chip Cheesecake
      • 452 g cream cheese, room temperature
      • 138 g granulated sugar
      • 16 g all-purpose flour
      • 153 g sour cream, room temperature
      • 2 tsp coconut extract
      • 2 large eggs, room temperature
      • 86 g chocolate chips
    • Chocolate Frosting
      • 168 g unsalted butter
      • 169 g semisweet chocolate chips, melted
      • 345 g powdered sugar
      • 6075 ml heavy whipping cream
      • 340 g mini chocolate chips

    1. Preheat oven to 176°C. Line a 23 cm springform pan with parchment paper and grease the sides.
    2. In a medium bowl, whisk flour, sugar, cocoa, baking soda, baking powder, and salt until thoroughly blended.
    3. In a separate bowl, whisk together milk, oil, vanilla extract, and egg white until well incorporated.
    4. Gradually add the dry mixture to wet ingredients and whisk till smooth. Pour in hot water and whisk; the batter will be thin.
    5. Transfer batter to prepared pan and bake for 12–15 minutes, or until a toothpick inserted comes out with a few crumbs. Let cool on a rack.
    6. In a large saucepan, whisk egg yolks, evaporated milk, and vanilla extract. Add sugar and butter. Cook over medium heat for 12–15 minutes, stirring constantly, until thick and golden.
    7. Remove mixture from heat, stir in shredded coconut and toasted pecans. Refrigerate until completely cooled.
    8. Preheat oven to 176°C. Line the same 23 cm springform pan with parchment and grease sides.
    9. In a bowl, combine flour, cocoa powder, baking powder, and salt. Set aside.
    10. In a second bowl, blend melted butter, sugar, and vanilla extract. Add in eggs, mixing thoroughly.
    11. Add dry ingredients to the wet and mix just until smooth. Spread batter evenly in the prepared pan.
    12. Bake for 20–25 minutes or until a toothpick comes out with a few moist crumbs. Allow to cool slightly in the pan.
    13. In a large mixing bowl, blend cream cheese, sugar, and flour on low speed until smooth. Scrape bowl sides.
    14. Mix in sour cream and coconut extract on low until incorporated. Add eggs one at a time, mixing gently and scraping down after each. Fold in chocolate chips.
    15. Spread one-third of cooled coconut pecan filling over baked brownie. Pour cheesecake batter evenly on top.
    16. Wrap the pan with foil. Place inside a larger pan and fill outer pan with warm water halfway up the springform side. Bake at 148°C for 45 minutes until center is set but slightly jiggly.
    17. Turn off oven and let cheesecake sit inside with door closed for 30 minutes. Crack open oven door for another 30 minutes to cool further. Remove from oven and water bath; refrigerate until firm, at least 5–6 hours or overnight. Remove from springform once cold and set.
    18. Beat softened butter until creamy. Blend in melted chocolate until combined. Gradually add powdered sugar, mixing to a smooth frosting. Add just enough cream to achieve spreadable consistency.
    19. Place cooled brownie-cheesecake layer on a serving plate. Spread a layer of coconut pecan filling, then top with chocolate cake layer.
    20. Frost sides with chocolate frosting, pressing mini chocolate chips into frosting. Pipe swirls of remaining frosting around the edge and fill the center with remaining coconut pecan filling. Refrigerate until ready to serve.

    Notes

    • Make sure all ingredients are at room temperature for best results.
    • Refrigerating the cheesecake overnight is recommended for optimal texture.
    • Use high-quality chocolate for the frosting to enhance flavor.
    • Prep Time: 30 minutes
    • Cook Time: 2 hours
    • Category: Dessert
    • Method: Baking
    • Cuisine: American

    Nutrition

    • Serving Size: 1 slice
    • Calories: 600
    • Sugar: 48 g
    • Sodium: 250 mg
    • Fat: 36 g
    • Saturated Fat: 20 g
    • Unsaturated Fat: 10 g
    • Trans Fat: 1 g
    • Carbohydrates: 60 g
    • Fiber: 4 g
    • Protein: 8 g
    • Cholesterol: 120 mg

    Sharing is caring!

  • Cookie Dough Cheesecake-Stuffed Churros

    Cookie Dough Cheesecake-Stuffed Churros


    Introduction to Cookie Dough Cheesecake-Stuffed Churros

    As a busy mom, I understand the struggle of finding the time to whip up something delightful. That’s why I’m excited to share my recipe for Cookie Dough Cheesecake-Stuffed Churros! These sweet treats are the perfect combination of crispy and creamy, making them a fun twist on a Mexican favorite. Whether you need a quick dessert for a family gathering or a show-stopping snack to impress your friends, these churros deliver joy in every bite!

    With minimal prep and ingredients you likely already have at home, you can’t go wrong. The only challenge? Trying not to eat them all at once!

    Why You’ll Love This Cookie Dough Cheesecake-Stuffed Churros

    These Cookie Dough Cheesecake-Stuffed Churros are a dream come true! They’re quick and easy to prepare, making them perfect for hectic days. Plus, the delightful combination of crispy churros and rich, creamy filling will elevate your dessert game. Whether you’re hosting a get-together or simply craving a treat, these sweet bites will have everyone raving. Grab those ingredients and get ready for some delicious fun!

    Ingredients for Cookie Dough Cheesecake-Stuffed Churros

    Let’s gather our ingredients for these Cookie Dough Cheesecake-Stuffed Churros. Each component plays an important role in creating that delightful combination of crispy and creamy. Here’s what you’ll need:

    • Water: Essential for hydrating the dough; it helps bring everything together.
    • Unsalted Butter: Adds richness and helps create that decadent flavor and texture.
    • Granulated Sugar: Just a touch to sweeten the dough; this helps balance the spiciness of the cinnamon later.
    • Salt: A small amount enhances the overall flavor, making everything taste even better.
    • All-Purpose Flour: This is the backbone of your churro dough, providing structure.
    • Large Eggs: These bring moisture and stability to the dough, making it easier to pipe and fry.
    • Cream Cheese: The creamy base for our delicious filling; it gives that cheesecake flavor.
    • Powdered Sugar: Adds sweetness to the filling and helps achieve that smooth texture.
    • Edible Cookie Dough: The star of the filling! You can use store-bought or whip up a quick batch yourself if you’re feeling adventurous.
    • Oil (Vegetable or Canola): Necessary for frying these churros to a golden perfection.
    • Granulated Sugar and Cinnamon Mixture: This crunchy coating brings in that classic churro flavor—sweet and spiced!

    Exact measurements for each ingredient are available at the bottom of this article if you want to print them out. Now that we have everything we need, it’s time to roll up our sleeves and get cooking!

    How to Make Cookie Dough Cheesecake-Stuffed Churros

    Now that we have our ingredients ready, let’s dive into making these scrumptious Cookie Dough Cheesecake-Stuffed Churros. I’ll guide you through each step to ensure you’re right on track. Trust me, once you get started, the aroma of these churros will fill your kitchen, and your family will be cheering you on!

    Prepare the Churro Dough

    Let’s kick things off by making that glorious churro dough. In a medium saucepan, combine one cup of water, a quarter cup of unsalted butter, granulated sugar, and salt. Bring the mixture to a boil over medium heat.

    As soon as it bubbles, stir in the all-purpose flour. Keep mixing until it forms a ball of dough that pulls away from the sides of the pan. This took me a few minutes, but it’s so satisfying to watch. Once you’ve formed that dough ball, remove it from the heat and let it cool for about 10 minutes. This is a good time to enjoy a quick breather or sip some tea!

    Make the Cookie Dough Cheesecake Filling

    Now let’s create the filling that brings everything together. In a separate bowl, beat the cream cheese until it’s smooth and creamy—like a fluffy cloud!

    Next, mix in the powdered sugar and edible cookie dough. Just a friendly reminder: the cookie dough adds that perfect sweetness and texture. Combine until everything is nicely blended and creamy. You might have to resist the temptation to dive in with a spoon—it’s that good!

    Pipe the Churros

    It’s time for the fun part! Load the churro dough into a piping bag. If you’re like me, you might consider using a piping tip with a large opening, but hey, no pressure! Pipe 3-4 inch lengths onto a parchment-lined baking sheet. Keeping them spaced out will help them fry evenly without getting tangled.

    Don’t worry if they aren’t all perfectly shaped; that adds to their charming homemade vibe. They’ll taste fantastic no matter what!

    Fill the Churros

    Now, here comes the best part: filling those churros! Take another piping bag filled with your cookie dough cheesecake mixture. Insert the tip into one end of the churro and gently squeeze to fill it. You want to see some of that filling poking out of both ends.

    If you really want to channel your inner pastry chef, go ahead and use a toothpick to poke any air bubbles. It’s a small step, but it can help ensure an even filling throughout. Can you smell the deliciousness yet?

    Fry the Churros

    Heat the oil in a deep fryer or a pot to 375°F (190°C). This is the temperature that will help them turn golden brown without absorbing too much oil. Carefully fry the churros in batches for about 2-3 minutes on each side. Watch them closely; they can go from golden to burnt in a flash!

    Once cooked, lay them on paper towels to drain excess oil. As you fry, you’ll feel like a culinary wizard. Just wait until you taste your creations!

    Coat the Churros

    Finally, roll the warm churros in a mixture of granulated sugar and cinnamon. This coating adds a delightful crunch and that classic churro flair. Make sure every inch of those sweet treats gets some love!

    And voilà! You’ve just made Cookie Dough Cheesecake-Stuffed Churros. Prepare yourself for applause, because these beauties are destined to steal the show!

    Tips for Success

    • Keep your oil temperature steady at 375°F for even frying.
    • Don’t overcrowd the pot; fry in small batches for the best results.
    • Use a candy thermometer to monitor oil temperature accurately.
    • Make sure to fill churros while they are still warm for easier piping.
    • Feel free to experiment with different flavors of cookie dough in the filling!

    Equipment Needed

    • Piping bags: Use plastic zip-top bags as a substitute if you don’t have piping bags.
    • Medium saucepan: Any medium-sized pot will work just fine.
    • Deep fryer or large pot: A deep pot works well for frying; just be cautious with hot oil.
    • Thermometer: A candy thermometer is best, but an instant-read meat thermometer can also do the job.
    • Parchment paper: If you don’t have any, a greased baking sheet will also suffice.

    Variations on Cookie Dough Cheesecake-Stuffed Churros

    • Chocolate Chip Cookie Dough: Swap the regular cookie dough with chocolate chip for an extra indulgent twist!
    • Nut-Free Option: Use sunbutter or soy nut butter instead of traditional cookie dough if you need to avoid nuts.
    • Gluten-Free Churros: Substitute all-purpose flour with a gluten-free blend for those with dietary restrictions.
    • Fruity Filling: Add crushed berries or fruit puree to the cheesecake filling for a refreshing change.
    • Spiced Churros: Mix some pumpkin pie spice into the churro dough for a seasonal flavor that warms the soul.

    Serving Suggestions for Cookie Dough Cheesecake-Stuffed Churros

    • Serve warm churros with a side of chocolate or caramel sauce for dipping.
    • Pair with freshly brewed coffee or milk for a delightful treat.
    • Garnish with whipped cream and a sprinkle of chocolate shavings for a fancy presentation.
    • Top with a scoop of vanilla ice cream for an indulgent dessert.
    • Present churros on a colorful platter for a cheerful dessert display.

    FAQs about Cookie Dough Cheesecake-Stuffed Churros

    As we dive into this delicious adventure, I know you might have a few questions about these irresistible Cookie Dough Cheesecake-Stuffed Churros! Let’s tackle some of the most common queries I’ve come across in my baking journey, and I’ll share my favorite insights.

    Can I make the churro dough in advance?

    Absolutely! You can prepare the churro dough ahead of time and store it in the refrigerator for up to 24 hours. Just be sure to let it sit at room temperature before you pipe and fry!

    What if I don’t have edible cookie dough?

    No worries at all! If you can’t find edible cookie dough, you can whip up a simple version at home. Just mix together some flour, butter, sugar, and vanilla extract to create your own cookie dough that doesn’t require baking.

    How should I store leftover churros?

    If you have any churros left (though I doubt it!), store them in an airtight container in the refrigerator. They can last for up to two days. Just reheat them in the oven for a few minutes to bring back that crispy texture!

    Can I freeze these churros?

    Yes! You can freeze the uncooked churros before frying. Just pipe and cut them according to the recipe, lay them on a baking sheet, freeze until firm, then transfer to a freezer bag. Fry them directly from frozen, adding a minute or two to the cooking time.

    What drinks pair well with these churros?

    For a delicious pairing, a warm cup of coffee or hot chocolate complements these churros beautifully. For something refreshing, serve them with a large glass of cold milk; they blend perfectly!

    Final Thoughts

    Creating these Cookie Dough Cheesecake-Stuffed Churros is a delightful experience that fills your kitchen with warmth and joy. Each bite offers a glorious mix of textures, transporting you to a sweet wonderland. Whether you’re celebrating a special occasion or enjoying a cozy night in, these churros bring smiles to faces of all ages.

    They aren’t just a treat; they’re a fun adventure in the kitchen! Embrace the joy of cooking with your loved ones and indulge in this scrumptious recipe. You’ll find that the exercise of making them is just as rewarding as that first, delightful bite.


    Print

    clock clock iconcutlery cutlery iconflag flag iconfolder folder iconinstagram instagram iconpinterest pinterest iconfacebook facebook iconprint print iconsquares squares iconheart heart iconheart solid heart solid icon

    Description

    Delicious churros filled with cookie dough cheesecake, offering a perfect blend of crispy and creamy textures.


    • 1 cup water
    • ¼ cup (½ stick) unsalted butter
    • 1 tablespoon granulated sugar
    • ¼ teaspoon salt
    • 1 cup all-purpose flour
    • 2 large eggs
    • 8 ounces cream cheese, softened
    • ¼ cup powdered sugar
    • ½ cup edible cookie dough (either store-bought or homemade)
    • Oil (vegetable or canola), for frying
    • ½ cup granulated sugar mixed with 1 tablespoon cinnamon, for coating

    1. In a medium saucepan, combine water, unsalted butter, granulated sugar, and salt. Bring to a boil over medium heat.
    2. Stir in for all-purpose flour until it forms a ball and then remove from heat.
    3. Add eggs one at a time and fully incorporate each before adding the next.
    4. For the filling, beat cream cheese until smooth, then mix in powdered sugar and cookie dough until creamy.
    5. Load churro dough into a piping bag and pipe 3-4 inch lengths onto a parchment-lined baking sheet.
    6. Fill each churro with the cookie dough cheesecake mixture using a separate piping bag.
    7. Heat oil in a deep fryer or pot to 375°F (190°C) and fry churros in batches for 2-3 minutes per side.
    8. Drain fried churros on paper towels.
    9. Roll warm churros in a mixture of granulated sugar and cinnamon to coat.

    Notes

    • Ensure the oil temperature is maintained for even frying.
    • You can substitute homemade cookie dough if preferred.
    • Prep Time: 30 minutes
    • Cook Time: 20 minutes
    • Category: Dessert
    • Method: Frying
    • Cuisine: Mexican

    Nutrition

    • Serving Size: 1 churro
    • Calories: 250
    • Sugar: 10g
    • Sodium: 180mg
    • Fat: 15g
    • Saturated Fat: 8g
    • Unsaturated Fat: 6g
    • Trans Fat: 0g
    • Carbohydrates: 25g
    • Fiber: 1g
    • Protein: 3g
    • Cholesterol: 40mg

    Sharing is caring!

  • Easy Hamburger Rice Casserole

    Easy Hamburger Rice Casserole


    Introduction to Easy Hamburger Rice Casserole

    Life can get so hectic, can’t it? Amidst juggling work, family, and everything else, the last thing you want is dinner prep to add stress. That’s where my favorite Easy Hamburger Rice Casserole comes in! It’s quick, satisfying, and full of flavors that your family will adore. Imagine gathering around the table, sharing stories over a cheesy, hearty dish that warms not only your belly but your heart. This casserole is perfect for busy nights or when you simply want a comforting meal without the fuss!

    Why You’ll Love This Easy Hamburger Rice Casserole

    This Easy Hamburger Rice Casserole is the solution for busy moms and professionals alike. It’s a one-dish wonder that saves you precious time in the kitchen. With minimal prep and straightforward steps, you’ll have a steaming meal ready in just 45 minutes! Plus, its mouthwatering blend of flavors will please even the pickiest eaters. Trust me, your family will leave the table happy and satisfied, wanting seconds!

    Ingredients for Easy Hamburger Rice Casserole

    Getting the right ingredients is crucial for a mouthwatering Easy Hamburger Rice Casserole, and luckily, these essentials are easy to find!

    • Ground beef: This forms the base of our casserole and provides a hearty protein. You can use lean ground beef or ground turkey for a healthier twist.
    • Onion: Chopped onions add a savory sweetness, enhancing the flavor of the entire dish. If you’re not an onion fan, try shallots for a milder taste.
    • Green bell pepper: This bright, crunchy veggie adds color and nutrition. Feel free to swap it with red or yellow bell peppers for a sweeter variation.
    • Cream of mushroom soup: This ingredient creates a creamy texture and rich flavor. If you’re looking for a healthier option, consider low-fat versions or make your own using fresh mushrooms!
    • Cream of chicken soup: A staple ingredient that complements the mushroom soup and adds layers of taste, securing a wonderful creamy base.
    • Sour cream: This adds tanginess and creaminess, making it irresistible. Greek yogurt can be a great substitute if you want a healthier option.
    • Cooked white rice: The carbohydrate that ties it all together! Use brown rice for added fiber or any leftover rice you have handy.
    • Shredded cheddar cheese: The gooey cheese on top balances out the casserole perfectly. Feel free to mix it up with Monterey Jack or a spicy pepper jack for a kick.
    • Garlic powder: A sprinkle of garlic flavor enhances the savory notes throughout the dish. Freshly minced garlic could work wonders too!
    • Salt and pepper: Essential seasonings that bring out the dish’s flavors. Adjust according to your taste.
    • Fresh parsley (optional): A sprinkle of parsley brightens up the casserole and adds a pop of color. You can use other herbs like thyme or basil for different flavor profiles!

    For exact measurements and printing, just scroll down to the end of the article!

    How to Make Easy Hamburger Rice Casserole

    Step 1: Preheat Your Oven

    First things first, let’s preheat that oven to 350°F (175°C). This ensures your Easy Hamburger Rice Casserole cooks evenly. While it’s warming up, lightly grease a 9×13-inch baking dish. A little spray or butter will help prevent sticking, making cleanup a breeze!

    Step 2: Cook the Ground Beef

    In a large skillet, cook your ground beef over medium heat. Add in the chopped onion and green bell pepper. Cook until the meat is browned and the veggies are soft, which should take about 8 minutes. Be sure to drain any excess fat after cooking. This helps keep the dish lighter while maximizing flavor!

    Step 3: Combine Ingredients

    Now, it’s time to bring all that deliciousness together! In a large mixing bowl, combine the cooked beef and veggie mixture with the cream of mushroom soup, cream of chicken soup, sour cream, cooked rice, garlic powder, salt, and pepper. Mix everything thoroughly to ensure the flavors meld. Trust me; this step makes all the difference in your Easy Hamburger Rice Casserole!

    Step 4: Bake the Casserole

    Pour your hearty mixture into the greased baking dish and spread it out evenly. Don’t be shy when covering the top with shredded cheddar cheese; after all, who doesn’t love gooey goodness? Bake in the preheated oven for 25–30 minutes, until the cheese is melted and bubbly. Your kitchen will smell heavenly!

    Tips for Success

    • Always pre-cook your rice. This saves time and ensures it’s fluffy in the casserole.
    • For extra flavor, season the ground beef with some Italian herbs while cooking.
    • Don’t skip draining the fat after browning the meat; it keeps your dish lighter.
    • Feel free to make it ahead of time—refrigerate it before baking, then pop it in the oven when ready!
    • Get creative with leftovers; toss in whatever veggies are in your fridge!

    Equipment Needed

    • Large skillet: A non-stick option makes cooking and cleanup easier.
    • Baking dish: Use a 9×13-inch dish or any similar-sized casserole dish you have.
    • Mixing bowl: A large bowl to combine all your ingredients, glass or plastic works fine.
    • Wooden spoon or spatula: Great for stirring and mixing your casserole ingredients.
    • Measuring cups: Helpful for accurately measuring your ingredients, though you can estimate if you’re in a pinch!

    Variations for Easy Hamburger Rice Casserole

    • Vegetarian twist: Swap the ground beef for black beans or lentils for a hearty plant-based option.
    • Spicy kick: Add diced jalapeños or a splash of hot sauce to bring some heat to your Easy Hamburger Rice Casserole.
    • Mexican flair: Incorporate taco seasoning and top with salsa and avocado before serving for a fiesta vibe!
    • Lower-carb option: Substitute cauliflower rice instead of white rice to create a satisfying, low-carb casserole.
    • Cheesy variations: Mix in different cheeses like mozzarella or add cream cheese for extra creaminess!

    Serving Suggestions for Easy Hamburger Rice Casserole

    • Fresh salad: Pair with a crisp green salad topped with vinaigrette for a refreshing contrast.
    • Breadsticks: Serve with buttery garlic breadsticks or rolls to soak up the yummy casserole.
    • Fruit dish: Add a side of seasonal fruit for a light, sweet finish to the meal.
    • Fun drinks: Offer lemonade or iced tea for a delightful pairing.
    • Garnish: Don’t forget a sprinkle of fresh parsley for a pop of color on your table!

    FAQs about Easy Hamburger Rice Casserole

    Can I prepare Easy Hamburger Rice Casserole ahead of time? Absolutely! You can mix all the ingredients together and refrigerate the casserole before baking. Just pop it in the oven when you’re ready to serve. This is a lifesaver for busy evenings!

    What can I use instead of ground beef? If you want to switch things up, you can use ground turkey, chicken, or even plant-based crumbles. This Easy Hamburger Rice Casserole is versatile, so feel free to tailor it to your taste!

    How should I store leftovers? Store any remaining casserole in an airtight container in the fridge. It can stay fresh for up to three days. Just reheat it in the oven or microwave until warmed through.

    Can I freeze Easy Hamburger Rice Casserole? Yes, you can! This dish freezes well. Just make sure to let it cool completely before wrapping it tightly and freezing. Reheat it directly from the freezer; it may take a bit longer.

    What side dishes go well with this casserole? Pair it with a fresh salad, garlic breadsticks, or even some seasoned vegetables. They all complement the flavors in the Easy Hamburger Rice Casserole beautifully!

    Final Thoughts on Easy Hamburger Rice Casserole

    Creating the Easy Hamburger Rice Casserole is more than just making dinner; it’s about bringing your family together at the table. The aroma wafting through your kitchen will draw everyone in, eager for a bite. As you gather around, sharing stories and laughter, you’ll realize that this dish isn’t just a meal—it’s a moment of connection. Quick to prepare and absolutely satisfying, this casserole can easily become a beloved family tradition. So, next time you’re in a crunch, remember that a delicious, comforting meal is just a bake away!


    Print

    clock clock iconcutlery cutlery iconflag flag iconfolder folder iconinstagram instagram iconpinterest pinterest iconfacebook facebook iconprint print iconsquares squares iconheart heart iconheart solid heart solid icon

    Description

    A quick and delicious casserole made with ground beef, rice, and cheese, perfect for a family meal.


    • 1 lb ground beef
    • 1 medium onion, chopped
    • 1 green bell pepper, chopped
    • 10.5 oz cream of mushroom soup (1 can)
    • 10.5 oz cream of chicken soup (1 can)
    • 1 cup sour cream
    • 1.5 cups cooked white rice
    • 1 cup shredded cheddar cheese
    • 0.5 teaspoon garlic powder
    • to taste salt and pepper
    • fresh parsley, chopped (optional for garnish)

    1. Preheat oven to 350°F (175°C) and lightly grease a 9×13-inch baking dish.
    2. In a large skillet, cook ground beef over medium heat until browned. Add onion and green bell pepper, cooking until softened. Drain excess fat.
    3. In a large mixing bowl, combine the cooked beef and vegetable mixture, cream of mushroom soup, cream of chicken soup, sour cream, cooked rice, garlic powder, salt, and pepper. Stir thoroughly.
    4. Pour the combined mixture into the greased baking dish, spreading it out evenly. Sprinkle shredded cheddar cheese over the top.
    5. Bake in the preheated oven for 25-30 minutes, or until cheese is melted and bubbly.
    6. Garnish with chopped fresh parsley if desired, and serve hot.

    Notes

    • Feel free to add your favorite vegetables for extra nutrition.
    • This dish can be prepared ahead of time and stored in the refrigerator before baking.
    • Leftovers can be kept in the fridge for up to 3 days.
    • Prep Time: 15 minutes
    • Cook Time: 30 minutes
    • Category: Main Course
    • Method: Baking
    • Cuisine: American

    Nutrition

    • Serving Size: 1 serving
    • Calories: 450
    • Sugar: 3g
    • Sodium: 800mg
    • Fat: 25g
    • Saturated Fat: 12g
    • Unsaturated Fat: 10g
    • Trans Fat: 0g
    • Carbohydrates: 35g
    • Fiber: 2g
    • Protein: 25g
    • Cholesterol: 90mg

    Sharing is caring!

  • Oatmeal Chocolate Chip Bread

    Oatmeal Chocolate Chip Bread


    Introduction to Oatmeal Chocolate Chip Bread

    Ah, the joy of baking! There’s nothing quite like the aroma of fresh bread wafting through your home. Oatmeal Chocolate Chip Bread is a delightful concoction that blends wholesome oats with the sweet surprise of chocolate chips. This bread is more than just a treat; it’s a quick solution for those busy mornings or a lovely snack to impress your loved ones at the dinner table. With just a few simple ingredients, you can create a warm, comforting loaf that drinks back memories of cozy kitchens and family gatherings. Let’s get baking!

    Why You’ll Love This Oatmeal Chocolate Chip Bread

    This Oatmeal Chocolate Chip Bread is truly a lifesaver for busy moms and professionals alike. It’s not only easy to make but also comes together quickly, meaning you can knead it into your daily routine without breaking a sweat. The combination of hearty oats and sweet chocolate chips creates a flavor explosion that your whole family will adore. Plus, it makes the perfect companion for breakfast, a snack, or even a sweet treat after dinner!

    Ingredients for Oatmeal Chocolate Chip Bread

    Before we dive into the mixing bowl, let’s gather all the ingredients you’ll need for this delightful Oatmeal Chocolate Chip Bread. Each component plays its part in creating that perfect blend of flavor and texture.

    • All-purpose flour: The backbone of the bread, providing structure and bulk.
    • Quick oats: These give the bread a lovely texture and added nutritional benefits. They absorb moisture beautifully.
    • Granulated sugar: A touch of sweetness to balance the richness of the chocolate.
    • Light brown sugar: Adds a rich, caramel-like flavor that elevates the overall taste.
    • Mini chocolate chips: Because who can resist the joy of chocolate? They melt beautifully throughout the loaf.
    • Baking powder: This helps the bread rise, creating a light and airy texture.
    • Baking soda: Works alongside the baking powder for a fluffy finish.
    • Ground cinnamon: A warm spice that adds a comforting flavor. Perfect for cozy mornings!
    • Salt: A pinch brings out all the flavors and balances the sweetness.
    • Buttermilk: This keeps the bread moist and tender, with a lovely tangy touch.
    • Egg: Acts as a binder to hold everything together, adding richness to the loaf.
    • Melted butter: Adds moisture and a rich flavor; who doesn’t love butter?

    For those of you looking to customize your bread, feel free to toss in some chopped nuts for an extra crunch or even swap the chocolate chips for dried fruit. If you’re in a pinch for buttermilk, a quick mix of milk and vinegar works just fine!

    You can find the exact measurements at the bottom of the article, ready for printing. Let’s get to the fun part—mixing these delightful ingredients!

    How to Make Oatmeal Chocolate Chip Bread

    Now that we’ve gathered our ingredients, let’s roll up our sleeves and dive into making this scrumptious Oatmeal Chocolate Chip Bread. Follow these simple steps, and soon enough, your kitchen will be filled with the comforting aroma of sweet, baked goodness!

    Step 1: Prepare the Oven and Loaf Pan

    First things first, preheat your oven to 350℉. This step is crucial for achieving that perfect rise! Next, grab a 9\”x5\” loaf pan. Coat it well with cooking spray or line it with parchment paper. This little trick helps keep the bread from sticking, making it easy to slice later on.

    Step 2: Combine the Dry Ingredients

    In a large mixing bowl, let’s whisk together the all-purpose flour, quick oats, granulated sugar, light brown sugar, mini chocolate chips, baking powder, baking soda, ground cinnamon, and salt. Make sure everything is well blended and evenly distributed. This is where the magic starts! The combination of these dry ingredients creates a blissful base, full of flavor and texture.

    Step 3: Mix the Wet Ingredients

    In another bowl, whisk together the buttermilk, egg, and melted butter until well combined. The beauty of this step lies in the simplicity. The buttermilk adds moisture, while the egg provides binding, giving our bread that lovely texture we crave.

    Step 4: Combine Wet and Dry Mixes

    Now it’s time to unite our mixtures! Gently pour the wet ingredients into the bowl with the dry ones. Using a rubber spatula, stir just until you no longer see any flour streaks. Avoid overmixing; we want to keep that bread light and fluffy. A few lumps are perfectly okay—don’t worry!

    Step 5: Transfer to Loaf Pan

    Carefully spread the batter into your prepared loaf pan. Use the spatula to smooth the top, making it pretty and even. If you’re feeling playful, sprinkle a few extra mini chocolate chips and oats on top. This adds a lovely touch and hints at the delight waiting inside!

    Step 6: Bake the Bread

    Pop your loaf pan into the preheated oven and bake for 40-50 minutes. To check for doneness, insert a toothpick in the center. If it comes out clean, you’re golden! The aroma wafting through your home will be utterly irresistible, and you might just find it hard to wait.

    Step 7: Cool and Slice

    Once baked to perfection, remove the bread from the oven and let it cool inside the loaf pan for about 10-15 minutes. This crucial step allows the bread to set, ensuring it maintains the right texture. After cooling, slice it up, and prepare to enjoy this warm and delicious creation!

    Tips for Success

    • Make sure ingredients are at room temperature for better mixing.
    • Don’t skip the parchment paper; it ensures easy removal.
    • Mix the wet and dry ingredients just until combined; this keeps the loaf from being too dense.
    • Try using a kitchen thermometer to check your loaf’s internal temperature; it should be around 190℉ when done.
    • Allow the bread to cool before slicing for the best texture.

    Equipment Needed

    • 9″x5″ loaf pan: If you don’t have one, any similar-sized pan will do.
    • Mixing bowls: Use one large and one medium bowl for convenience.
    • Whisk: You can also use a fork or a spoon for mixing.
    • Rubber spatula: A wooden spoon works well too for combining ingredients.
    • Parchment paper (optional): Aluminum foil is a suitable alternative.

    Variations

    • Add ½ cup of chopped nuts, such as walnuts or pecans, for added crunch and flavor.
    • Substitute half the all-purpose flour with whole wheat flour for a heartier bread that adds fiber.
    • Use dried fruits like cranberries or raisins instead of chocolate chips for a healthier twist.
    • For a spiced version, incorporate nutmeg along with the cinnamon for a deeper aroma.
    • Try swapping out buttermilk with applesauce or yogurt for a lighter option with extra moisture.
    • Make it gluten-free by using a gluten-free all-purpose flour blend in place of traditional flour.

    Serving Suggestions for Oatmeal Chocolate Chip Bread

    • Enjoy a slice with a smear of softened cream cheese for a delightful breakfast.
    • Pair it with a cup of coffee or tea for a cozy afternoon treat.
    • Serve with fresh fruit or yogurt on the side for a balanced meal.
    • For a festive touch, sprinkle powdered sugar on top before serving.

    FAQs about Oatmeal Chocolate Chip Bread

    As you embark on your baking adventure with Oatmeal Chocolate Chip Bread, you might have a few questions along the way. Don’t worry! I’m here to help clarify some common queries.

    Can I use rolled oats instead of quick oats?
    Absolutely! Rolled oats can be used, but keep in mind they may alter the texture slightly. Quick oats absorb moisture faster, creating a softer bread.

    How should I store leftover bread?
    To keep your Oatmeal Chocolate Chip Bread fresh, wrap it in plastic wrap or aluminum foil. It’ll stay good at room temperature for a couple of days, or you can refrigerate it for a longer shelf life.

    Can I freeze the bread?
    Yes! This bread freezes beautifully. Once cooled, wrap it tightly in plastic wrap, then store in a freezer bag. It can last for up to three months. Just thaw it at room temperature when you’re ready to enjoy.

    What can I substitute for buttermilk?
    If you don’t have buttermilk handy, simply mix one cup of milk with a tablespoon of vinegar or lemon juice. Let it sit for about 5-10 minutes, and voilà! You have a substitute.

    Is this recipe easily adaptable for dietary restrictions?
    Yes! You can make this Oatmeal Chocolate Chip Bread gluten-free by using a gluten-free all-purpose flour blend. Additionally, you can swap sugar for a sugar substitute to make it lower in calories.

    Final Thoughts

    Baking Oatmeal Chocolate Chip Bread is more than just a culinary task—it’s an adventure filled with delightful aromas and heartwarming moments. The joy of slicing into a warm, tender loaf, revealing pockets of sweet chocolate, is simply irreplaceable. Each bite reminds me of cozy gatherings and loving family connections. Plus, it allows you to impress loved ones without spending hours in the kitchen. Whether it’s for breakfast or a snack, this recipe brings a sprinkle of happiness to every day. So, grab your ingredients, and let’s create some magical memories together!


    Print

    clock clock iconcutlery cutlery iconflag flag iconfolder folder iconinstagram instagram iconpinterest pinterest iconfacebook facebook iconprint print iconsquares squares iconheart heart iconheart solid heart solid icon

    Description

    Oatmeal Chocolate Chip Bread is a delightful and moist bread infused with the goodness of oats and the sweetness of chocolate chips.


    • 1⅓ cup all-purpose flour
    • 2/3 cup quick oats
    • 1/3 cup granulated sugar
    • 1/3 cup light brown sugar packed
    • 1/3 cup mini chocolate chips
    • 1½ teaspoons baking powder
    • 1 teaspoon baking soda
    • ½ teaspoon ground cinnamon
    • ½ teaspoon salt
    • 1 cup buttermilk
    • 1 large egg
    • 3 tablespoons butter melted

    1. Heat the oven to 350℉. Prepare a large loaf pan (9″x5″) and spray it with cooking spray, or line with parchment paper for easy removal for slicing. Set aside.
    2. In a large mixing bowl, whisk together the all-purpose flour, quick oats, granulated sugar, light brown sugar, mini chocolate chips, baking powder, baking soda, cinnamon, and salt until well combined.
    3. In a separate smaller bowl, whisk the buttermilk, egg, and melted butter until combined.
    4. Add the wet ingredients into the larger bowl of dry ingredients, and stir gently with a rubber spatula just until no flour streaks remain in the batter.
    5. Evenly spread the batter into the prepared loaf pan and smooth out the top. Sprinkle a few additional mini chocolate chips and quick oats on top (optional).
    6. Bake for 40-50 minutes or until a toothpick inserted into the center comes out clean.
    7. Remove the bread from the oven and allow it to cool inside the loaf pan before slicing.

    Notes

    • This bread is delicious eaten warm or at room temperature.
    • You can add nuts for extra crunch if desired.
    • Prep Time: 15 minutes
    • Cook Time: 50 minutes
    • Category: Baking
    • Method: Baking
    • Cuisine: American

    Nutrition

    • Serving Size: 1 slice
    • Calories: 180
    • Sugar: 10g
    • Sodium: 250mg
    • Fat: 5g
    • Saturated Fat: 3g
    • Unsaturated Fat: 2g
    • Trans Fat: 0g
    • Carbohydrates: 30g
    • Fiber: 2g
    • Protein: 3g
    • Cholesterol: 30mg

    Sharing is caring!

  • Honey Garlic Meatball Rice Bake

    Honey Garlic Meatball Rice Bake


    Introduction to Honey Garlic Meatball Rice Bake

    As a busy mom, I understand the struggle of getting dinner on the table after a long day. That’s where my Honey Garlic Meatball Rice Bake comes in! This dish is not only mouthwateringly delicious, but it’s also a one-pan wonder that eliminates the mess of multiple pots and pans. Picture tender meatballs enveloped in a sticky honey garlic sauce, nestled atop fluffy rice and vibrant veggies. It’s the kind of comforting meal that’ll have your family gathered around the table, sharing smiles and laughter after the hustle of the day. Perfect, right?

    Why You’ll Love This Honey Garlic Meatball Rice Bake

    This Honey Garlic Meatball Rice Bake is a lifesaver for busy evenings. With a prep time of just 20 minutes, it’s a quick solution that doesn’t skimp on flavor! The combination of savory meatballs and sweet sauce creates a delightful taste explosion. Plus, it’s all baked together into one cohesive dish, making cleanup a breeze. Your family will dive in, and you’ll feel like a culinary rockstar without spending hours in the kitchen!

    Ingredients for Honey Garlic Meatball Rice Bake

    Gathering the right ingredients is the first step to your delightful Honey Garlic Meatball Rice Bake. Here’s what you’ll need:

    • Ground beef or ground chicken: This is the essential protein base for your meatballs. Feel free to choose whichever you prefer—both work beautifully!
    • Breadcrumbs: Helps bind the meatball mixture, giving them a lovely texture. You can use regular or gluten-free breadcrumbs based on your needs.
    • Egg: Acts as a binder, holding everything together while adding moisture to the meatballs.
    • Onion: Freshly chopped, it adds a subtle sweetness and flavor depth to your meatballs.
    • Garlic: Minced for that aromatic kick! Fresh cloves are a must for that irresistible taste.
    • Soy sauce: Adds umami richness; feel free to use low-sodium for a healthier option.
    • Sesame oil: Optional but highly recommended for an extra layer of flavor.
    • Black pepper and salt: Basic seasoning essentials to enhance the meatball taste.

    Now for the scrumptious honey garlic sauce:

    • Honey: The star ingredient that gives this dish its delightful sweetness.
    • Ketchup: Adds tang and enhances the sauce’s texture.
    • Water: To adjust the sauce’s consistency; just a little helps it mingle with the meat.
    • More garlic: Yep, it’s that good—a pinch more garlic for that extra flavor boost!
    • Cornstarch: Optional thickening agent if you’d like your sauce to have a richer consistency.

    For the rice bake part:

    • White rice: Long grain or jasmine rice works best; it cooks up beautifully as it bakes.
    • Chicken broth or vegetable broth: Use this to enhance the rice’s flavor—broth adds a nice depth!
    • Olive oil or butter: A drizzle here gives everything a lovely richness and helps in cooking.
    • Bell peppers: Diced and colorful, they bring a pop of color and sweetness.
    • Frozen peas: These add a sweet crunch and vivid green to the bake—no need to thaw!
    • Green onions: Optional garnish that adds a fresh finish when served.

    For exact measurements, don’t miss the details at the end of the article, where you can find everything listed for easy printing!

    How to Make Honey Garlic Meatball Rice Bake

    Step 1: Preheat Your Oven

    First things first, let’s get that oven preheating to 375°F (190°C). This way, it’s nice and hot when your dish is ready to go in. A warm oven ensures everything bakes evenly, making your Honey Garlic Meatball Rice Bake irresistible.

    Step 2: Prepare the Meatballs

    In a large mixing bowl, gently combine your ground beef or chicken, breadcrumbs, egg, chopped onion, minced garlic, soy sauce, sesame oil, black pepper, and salt. Be cautious not to overmix! You want the meatballs tender, so just enough mixing to bring it all together. Once mixed, shape the mixture into small meatballs, around 1 to 1.5 inches wide. As you roll them, you can think of them as little flavor bombs!

    Step 3: Sear the Meatballs

    Now, heat a skillet over medium heat and add a splash of oil. Carefully place the meatballs into the skillet and sear them for about 2-3 minutes on each side until they’re nicely browned. This step adds a wonderful depth of flavor! If it gets a little crowded, don’t worry—just cook them in batches until they’re all golden brown.

    Step 4: Make the Honey Garlic Sauce

    In a small saucepan, combine honey, soy sauce, ketchup, water, and minced garlic. Cook this over medium heat, stirring until it begins to bubble gently. If you’re a sauce lover like me, you might want it thicker. For that, dissolve cornstarch in a tablespoon of water and stir it into the bubbling mixture. Cook for another minute to let it thicken, then take it off the heat. Ah, the scent will have you dreaming of dinner!

    Step 5: Assemble the Rice Bake

    Grab your greased baking dish and spread out the uncooked rice evenly across the bottom. Scatter the diced bell peppers and frozen peas over the rice like confetti—so colorful! Then, drizzle olive oil or melted butter across everything. Pour the chicken broth over it, giving everything a gentle stir to spread it out. Next, nestle those beautifully browned meatballs into the mixture, pressing them down slightly so they’re partly submerged. This is where the magic happens!

    Step 6: Bake to Perfection

    Now, pour the honey garlic sauce evenly over the meatballs and rice. Cover the dish tightly with aluminum foil—this helps everything cook evenly. Bake in your preheated oven for 40 minutes. After that time, remove the foil and let it bake for another 10-15 minutes. You’ll want to keep an eye on it until the rice is tender and the meatballs are thoroughly cooked.

    Step 7: Let it Rest

    Once your Honey Garlic Meatball Rice Bake is out of the oven, let it sit for about 5-10 minutes before serving. This little pause allows the flavors to deepen and makes serving much easier. For a finishing touch, sprinkle some chopped green onions on top for a fresh crunch. Now you’re ready to dig in!

    Tips for Success

    • Don’t skip the searing step—it adds fantastic flavor!
    • Use day-old rice for an even fluffier texture if you have it on hand.
    • Feel free to swap in your favorite veggies or throw in whatever’s in the fridge.
    • Double the honey garlic sauce for extra gooey goodness, it never hurts!
    • Let leftovers cool completely before storing them. They’ll be great the next day!

    Equipment Needed

    • Baking Dish: I recommend a 9×13 inch dish, but any oven-safe dish will work.
    • Mixing Bowl: A large bowl for your meatball mixture—feel free to use a sturdy one.
    • Skillet: A non-stick skillet is great for searing the meatballs.
    • Small Saucepan: Perfect for whisking up that honey garlic sauce.
    • Measuring Cups and Spoons: Essential for getting those ingredient quantities just right!

    Variations

    • Swap the Protein: Try using ground turkey or plant-based meat alternatives for a lighter option.
    • Veggie-Packed: Add shredded carrots, zucchini, or diced mushrooms to the meatball mixture for extra nutrition.
    • Spicy Kick: Incorporate a splash of sriracha or red pepper flakes into the honey garlic sauce for some heat.
    • Whole Grain Rice: Use brown rice or quinoa instead of white rice for a healthier grain alternative.
    • Herb Infusion: Experiment with fresh herbs like cilantro or basil for a vibrant flavor twist.

    Serving Suggestions for Honey Garlic Meatball Rice Bake

    • Pair with a Crisp Salad: A simple green salad with a light vinaigrette complements the dish perfectly.
    • Serve with Steamed Broccoli: Tender steamed broccoli adds a great crunch and nutrition to your meal.
    • Enjoy with Iced Tea: A refreshing glass of iced tea balances the sweetness of the bake.
    • Garnish Well: Sprinkle extra green onions or sesame seeds on top for an elegant touch.
    • Consider Dinner Rolls: Soft dinner rolls are perfect for scooping up the delicious sauce!

    FAQs about Honey Garlic Meatball Rice Bake

    Can I prepare the Honey Garlic Meatball Rice Bake ahead of time?

    Absolutely! You can prep the meatballs and assemble everything a day in advance. Just cover it tightly and store it in the fridge. You might need to add a few extra minutes to the bake time if it’s chilled.

    Is this dish suitable for meal prep?

    Yes! This Honey Garlic Meatball Rice Bake is perfect for meal prep. It stores well in the fridge, and you can easily reheat it for quick lunches or dinners throughout the week.

    Can I make this dish gluten-free?

    Definitely! Just use gluten-free breadcrumbs and ensure the soy sauce you choose is gluten-free. This way, everyone can enjoy this delicious meal!

    How do I store leftovers?

    Let leftovers cool completely before transferring them to an airtight container. They can be stored in the refrigerator for up to 3-4 days. For longer storage, consider freezing individual portions!

    What can I serve with this Honey Garlic Meatball Rice Bake?

    This dish pairs wonderfully with a green salad, steamed vegetables, or even some soft dinner rolls. The options are endless! Enjoy!

    Final Thoughts

    Every time I make Honey Garlic Meatball Rice Bake, I’m reminded of the joy of sharing a meal with my family. It’s not just dinner; it’s a gathering, a time for connection amid our busy lives. The sweet and savory notes of the sauce combined with tender meatballs and fluffy rice create a symphony of flavors that warms my heart. Plus, it’s a breeze to prepare, making it a go-to recipe on those hectic days. I hope this dish brings as much happiness to your table as it does to mine!


    Print

    clock clock iconcutlery cutlery iconflag flag iconfolder folder iconinstagram instagram iconpinterest pinterest iconfacebook facebook iconprint print iconsquares squares iconheart heart iconheart solid heart solid icon

    Description

    Honey Garlic Meatball Rice Bake is a flavorful and hearty dish, combining tender meatballs in a sticky honey garlic sauce over a bed of rice and vegetables. Perfect for a family dinner!


    • For the Meatballs:
    • 1 lb (450g) ground beef or ground chicken
    • 1/4 cup breadcrumbs
    • 1 egg
    • 2 tablespoons finely chopped onion
    • 2 cloves garlic, minced
    • 1 tablespoon soy sauce
    • 1 teaspoon sesame oil (optional but recommended)
    • 1/2 teaspoon black pepper
    • 1/4 teaspoon salt
    • For the Honey Garlic Sauce:
    • 1/3 cup honey
    • 1/4 cup soy sauce (low sodium preferred)
    • 3 tablespoons ketchup
    • 2 tablespoons water
    • 2 cloves garlic, finely minced
    • 1 teaspoon cornstarch (optional, for thickening)
    • For the Rice Bake:
    • 1 cup uncooked white rice (long grain or jasmine)
    • 2 cups chicken broth (or vegetable broth)
    • 1 tablespoon olive oil or butter
    • 1/2 cup diced bell peppers (any color)
    • 1/2 cup frozen peas (no need to thaw)
    • 1/4 cup chopped green onions (optional for garnish)

    1. Start by preheating your oven to 375°F (190°C). Lightly grease a 9×13 inch (or similar-sized) baking dish with cooking spray or a small amount of oil.
    2. In a large bowl, combine the ground meat, breadcrumbs, egg, chopped onion, garlic, soy sauce, sesame oil, pepper, and salt. Mix well until everything is fully incorporated, but avoid overmixing to keep the meatballs tender. Form the mixture into small meatballs, about 1 to 1.5 inches in diameter.
    3. In a skillet over medium heat, add a splash of oil and sear the meatballs just until browned on the outside—about 2-3 minutes per side.
    4. In a small saucepan, combine honey, soy sauce, ketchup, water, and garlic. Stir over medium heat until it begins to bubble gently. If you want a thicker sauce, dissolve the cornstarch in a tablespoon of water and stir it in. Cook for another minute until the sauce thickens slightly. Remove from heat.
    5. In your greased baking dish, spread the uncooked rice evenly across the bottom. Scatter in the diced bell peppers and frozen peas. Drizzle the olive oil or melted butter over the rice and veggies.
    6. Carefully pour the chicken broth over everything. Give it a light stir to ensure the rice is evenly distributed. Then, nestle the browned meatballs into the mixture, pressing them down slightly so they’re partly submerged.
    7. Pour the honey garlic sauce evenly over the top of the meatballs and rice.
    8. Cover the dish tightly with aluminum foil. Bake in the preheated oven for 40 minutes. After that, remove the foil and bake for an additional 10-15 minutes.
    9. Let the bake rest for 5-10 minutes before serving. Sprinkle chopped green onions over the top for a fresh, vibrant finish.

    Notes

    • Your internal temperature for cooked meatballs should reach 165°F (74°C).
    • You can use any variety of bell peppers for color and flavor.
    • This dish is great for meal prep and leftovers!
    • Prep Time: 20 minutes
    • Cook Time: 55 minutes
    • Category: Main Dish
    • Method: Baking
    • Cuisine: American

    Nutrition

    • Serving Size: 1 serving
    • Calories: 450
    • Sugar: 14g
    • Sodium: 800mg
    • Fat: 16g
    • Saturated Fat: 5g
    • Unsaturated Fat: 10g
    • Trans Fat: 0g
    • Carbohydrates: 56g
    • Fiber: 2g
    • Protein: 25g
    • Cholesterol: 70mg

    Sharing is caring!