Blog

  • Garlic Broccoli Stir Fry: A Delightfully Easy Recipe!

    Garlic Broccoli Stir Fry: A Delightfully Easy Recipe!


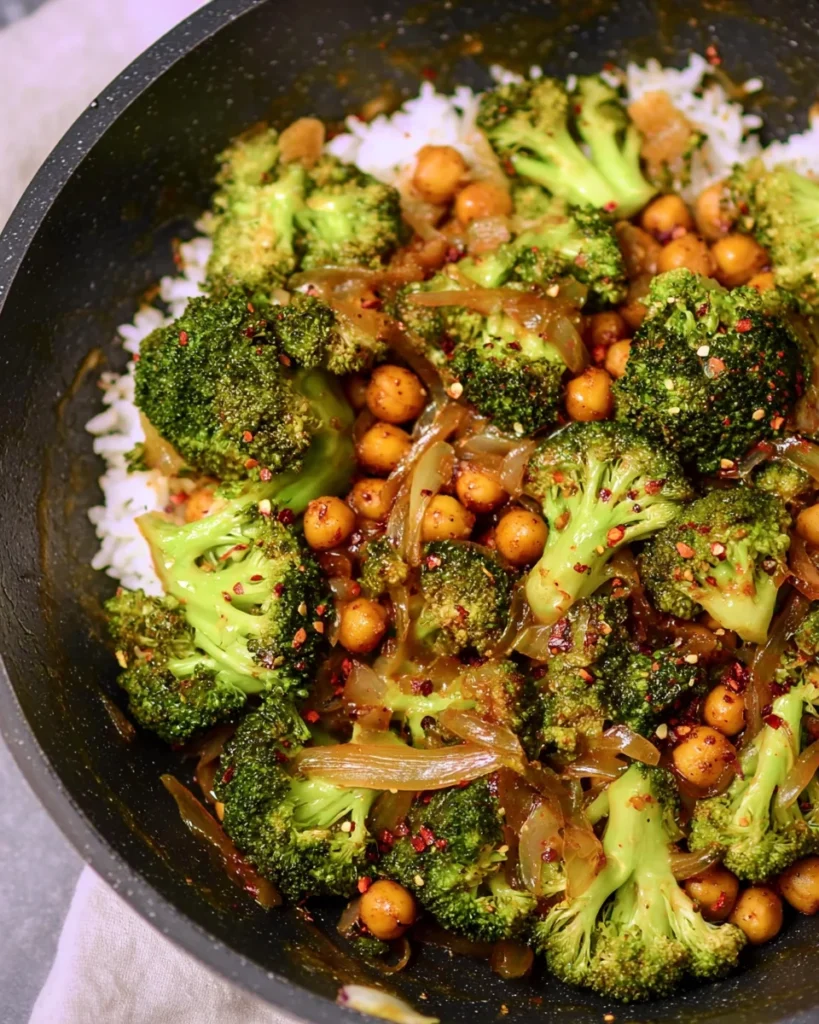
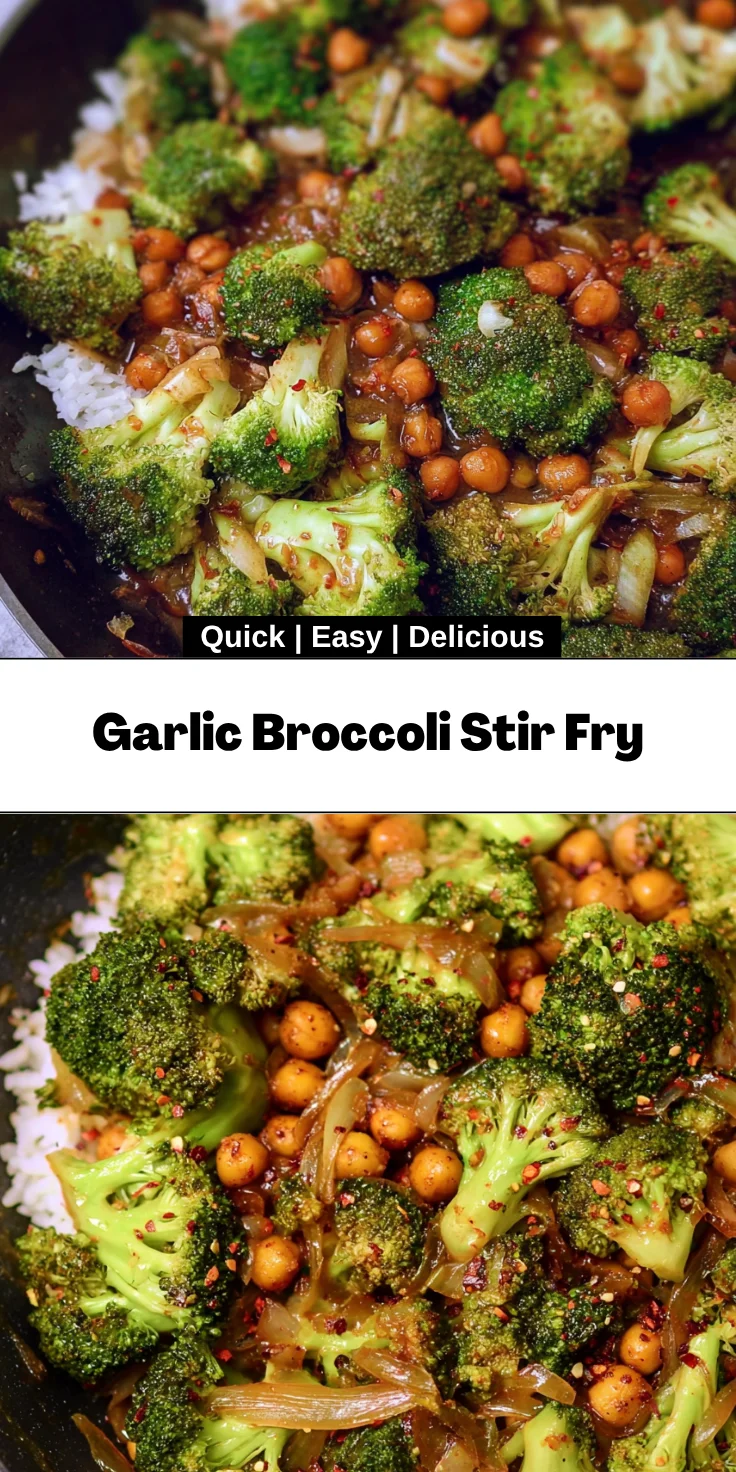
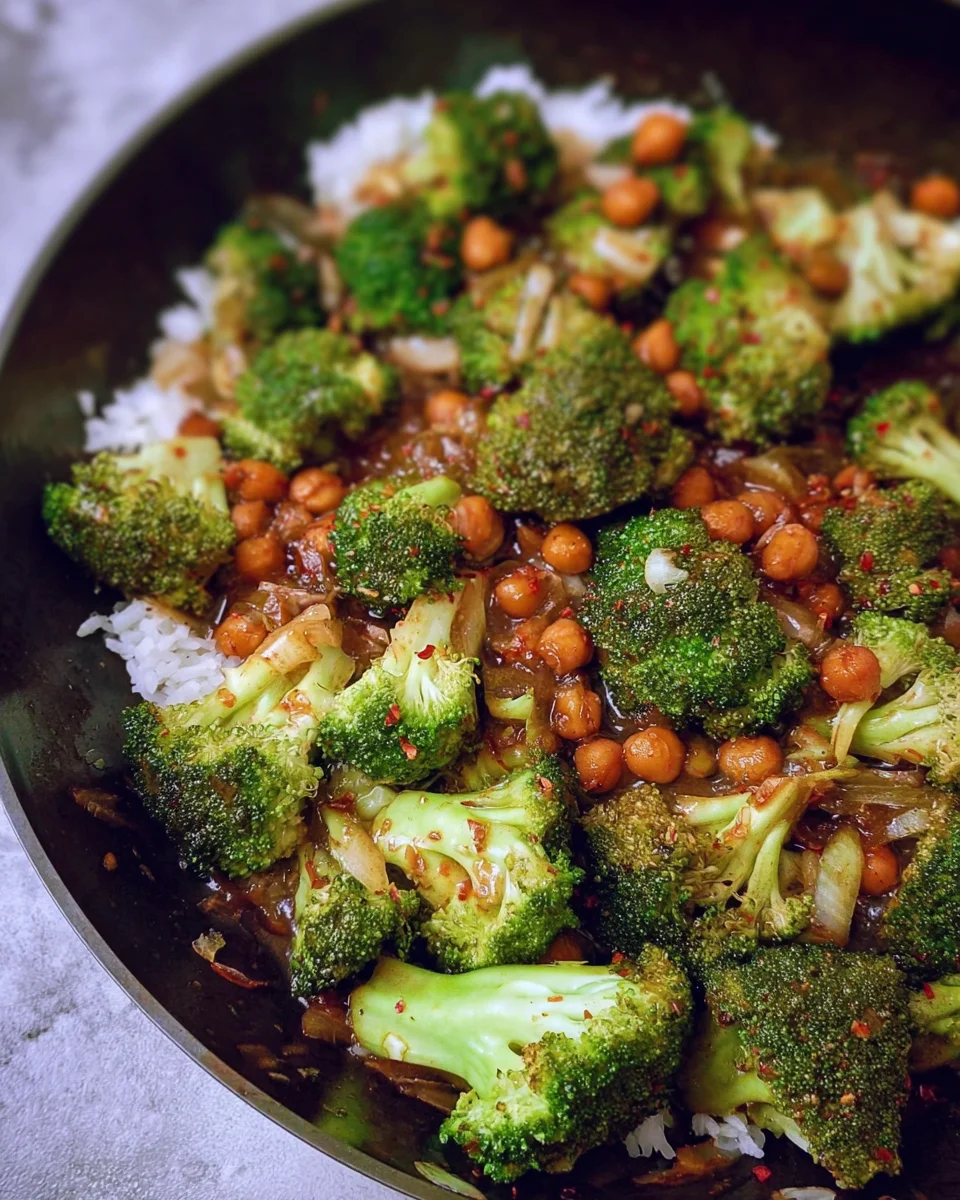
    As a busy mom, I get it—some days, you just need a quick, delicious meal that doesn’t require a culinary degree. Enter my Garlic Broccoli Stir Fry! This vibrant dish is not just simple; it’s packed with flavors that dance on your taste buds. With fresh garlic and tender broccoli, it transforms everyday ingredients into a delightful dinner in just 30 minutes. Plus, it’s perfect for those nights when you want to eat healthy but don’t have hours to spare. Join me in savoring this easy-to-make masterpiece that your family will love!

    Why You’ll Love This Garlic Broccoli Stir Fry

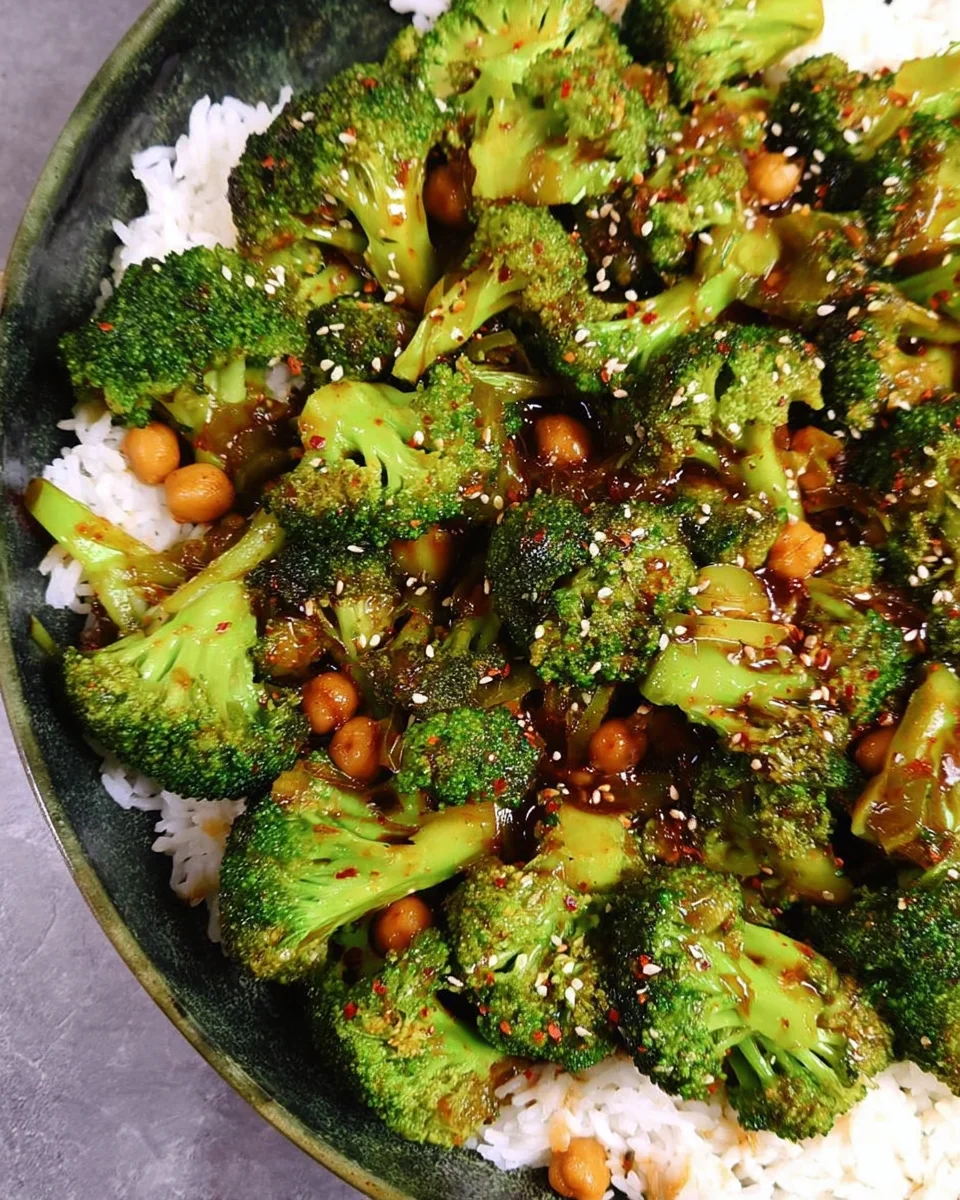
    This Garlic Broccoli Stir Fry is a game changer for busy nights! It’s not only quick to make but bursting with flavor. In just 30 minutes, you can enjoy a nutritious meal that satisfies both kids and adults. You won’t believe how easy it is to whip up this dish, and it’s loaded with healthy ingredients. Perfect for a delightful weeknight dinner, this recipe easily fits into your hectic life!

    Ingredients for Garlic Broccoli Stir Fry

    With a handful of ingredients, creating this Garlic Broccoli Stir Fry is a breeze! Here’s what you’ll need:

    • Oil: I prefer using olive or sesame oil for their rich flavor, but feel free to use what you have on hand!
    • Onion: Diced onions add a sweet and savory background that ties everything together.
    • Garlic: The hero of this dish! Fresh garlic cloves give a striking aroma and robust flavor.
    • Fresh Ginger: Minced ginger adds a zesty kick that complements the garlic beautifully.
    • Onion Powder: A little pinch enhances the onion flavor, enriching your stir fry.
    • Paprika: Regular and smoked paprika gives both sweetness and a touch of smokiness.
    • Black pepper and sea salt: To taste, they elevate the flavors of all ingredients.
    • Cayenne Pepper: Just a pinch adds a delightful warmth; you can adjust as needed!
    • Broccoli: Fresh broccoli florets are the stars! They provide crunch and are full of nutrients.
    • Vegetable Broth: This adds moisture and richness to the dish without overpowering it.
    • Chickpeas: Rinsed and drained, they deliver protein, making this dish filling and healthy!
    • Cooked Rice: A perfect base for the stir fry, pick your favorite rice or grain for serving.
    • Water: Helps create the sauce’s right consistency when mixed in later.
    • Soy Sauce: This adds savory depth; opt for gluten-free if that’s your preference.
    • Rice Vinegar or Balsamic Vinegar: Either will add a tangy touch to the overall flavor.
    • Maple Syrup: A natural sweetener; you can substitute with honey or agave if desired.
    • Cornstarch: This helps thicken the sauce, giving it that delightful gloss.

    The exact quantities can be found at the bottom of the article for easy printing. Cook up these ingredients, and you’re already halfway to a delicious dinner!

    How to Make Garlic Broccoli Stir Fry

    Step 1: Heat the Oil and Sauté Aromatics

    Start by heating your oil in a large skillet over medium heat. As it warms, you’ll notice that delicious aroma starting to fill your kitchen!

    Add the diced onion, minced ginger, and garlic.

    Sprinkle in your spices—onion powder, paprika, and a dash of salt.

    Sauté everything for about 3-4 minutes until the onion becomes translucent and fragrant.

    Trust me, that smell alone is enough to make your stomach growl!

    Step 2: Add Broccoli and Vegetable Broth

    Now it’s time to bring in the stars of the show: the broccoli florets! Toss them into the skillet along with the vegetable broth.

    Give everything a gentle stir to coat the broccoli in those beautiful spices.

    Let the mixture simmer for about 10 minutes, ensuring the broccoli cooks until it’s tender but still crisp.

    You want that perfect crunch, so keep an eye on it!

    Step 3: Prepare the Sauce

    While the broccoli cooks, let’s whip up a tasty sauce!

    In a medium bowl, mix together the water, soy sauce, rice vinegar, and maple syrup.

    Add in the cornstarch, whisking until smooth.

    This won’t just bring flavor; it’ll create a lovely, glossy sauce that ties everything together.

    Set it aside for just a bit, we’re almost there!

    Step 4: Combine Everything

    Pour that wonderful sauce into the skillet and gently fold in the rinsed chickpeas.

    This is where the magic really happens!

    Bring the heat up just a notch and let everything come to a boil.

    Cook for a few minutes, allowing the sauce to thicken and coat all those delicious ingredients.

    Taste and feel free to adjust the flavors to your liking—it’s all about balance!

    Step 5: Final Adjustments

    Now take a moment to taste your stir fry.

    This is your chance to add a pinch of salt, pepper, or cayenne if you’d like a little extra kick.

    Trust your taste buds to guide you!

    Step 6: Serving Suggestions

    To serve, spoon the Garlic Broccoli Stir Fry over your favorite cooked rice or grain.

    Pair it with a sprinkle of sesame seeds or fresh herbs if you’re feeling fancy.

    Enjoy the burst of flavors and the joy of a simple, nourishing meal!

    Tips for Success

    • Chop broccoli into even florets; this helps them cook uniformly.
    • Feel free to customize spices according to your taste—add a splash of soy sauce for more depth!
    • For extra crunch, you can toss in some toasted nuts or seeds just before serving.
    • Don’t skimp on the garlic; it’s the star ingredient!
    • Always taste as you go to ensure balanced flavors.

    Equipment Needed

    • Large skillet: A non-stick pan works wonders for easy cooking and cleanup.
    • Wooden spoon or spatula: Great for stirring without scratching your skillet.
    • Medium bowl: For mixing your delicious sauce; any bowl will do!
    • Measuring cups and spoons: Essential for accuracy, but can also eyeball if you’re adventurous.

    Variations

    • Protein Swaps: Replace chickpeas with tofu, tempeh, or shrimp for different protein options.
    • Add More Veggies: Throw in some bell peppers, snap peas, or carrots for extra color and nutrition!
    • Spicy Kick: Add a splash of sriracha or chili paste to the sauce for an extra fiery flavor.
    • Low-Carb Option: Serve over cauliflower rice or zoodles instead of traditional rice for a lighter meal.
    • Herb Infusion: Mix in fresh basil or cilantro just before serving for a refreshing twist!

    Serving Suggestions for Garlic Broccoli Stir Fry

    • Serve with a side of steamed jasmine rice or fluffy quinoa for a wholesome meal.
    • Pair with a crisp cucumber salad dressed in rice vinegar for refreshing contrast.
    • A chilled herbal iced tea complements the savory flavors perfectly.
    • Garnish with sesame seeds or chopped scallions to add a pop of color.
    • For extra protein, add grilled chicken or shrimp on the side!

    FAQs about Garlic Broccoli Stir Fry

    What can I substitute for chickpeas?

    If chickpeas aren’t your thing, no worries! You can swap them out for tofu or tempeh for a protein punch.

    Shrimp or chicken work beautifully if you’re not strictly vegetarian.

    Even edamame adds a delightful twist while keeping it vibrant and nutritious.

    Choose what fits your dietary preferences and enjoy this Garlic Broccoli Stir Fry your way!

    Can I make this dish ahead of time?

    Absolutely! This Garlic Broccoli Stir Fry is perfect for meal prepping. You can whip it up in advance and store it in an airtight container in the fridge for up to three days. Reheat it in the microwave or on the stovetop, adding a splash of water or broth to keep it moist. Your busy weeknights just got a whole lot easier!

    Is Garlic Broccoli Stir Fry suitable for vegetarians?

    Yes! This Garlic Broccoli Stir Fry is not just suitable; it’s a vegetarian delight! With protein-packed chickpeas, it makes for a wholesome meal that veggies will love. Feel free to add any other vegetables or legumes to amp up the nutrition even more. It’s a fabulous way to enjoy a hearty and delicious dish without any meat!

    Final Thoughts

    Cooking this Garlic Broccoli Stir Fry feels like a warm hug after a long day.

    It captures the joys of home-cooked meals—simple yet satisfying.

    The vibrant colors and fresh aromas bring life to any dinner table.

    Tossing vegetables together is not just a meal; it’s a moment of love for myself and my family.

    As each bite bursts with flavor, I am reminded that healthy cooking doesn’t have to be complicated.

    So pull out your skillet, and let’s celebrate the little joy of cooking this delightful dish!


    Print

    clock clock iconcutlery cutlery iconflag flag iconfolder folder iconinstagram instagram iconpinterest pinterest iconfacebook facebook iconprint print iconsquares squares iconheart heart iconheart solid heart solid icon

    Description

    A delightful and easy recipe for Garlic Broccoli Stir Fry that combines healthy ingredients for a delicious meal.


    • 1 tablespoon oil
    • 1 onion diced
    • 5 garlic cloves minced
    • 1 heaped tablespoon fresh ginger minced
    • 1 teaspoon onion powder
    • 1 teaspoon paprika
    • ½ teaspoon smoked paprika
    • Black pepper & sea salt to taste
    • Pinch of cayenne pepper
    • 1 (450 g) medium head of broccoli cut into small florets
    • ⅓ cup (80 ml) vegetable broth
    • 1 (15 oz) can of chickpeas rinsed and drained
    • Cooked rice of choice for serving
    • ½ cup (120 ml) of water
    • 3 tablespoons soy sauce (gluten-free if needed)
    • 2 tablespoons rice vinegar or balsamic vinegar
    • 2 tablespoons maple syrup or any other sweetener
    • 1 tablespoon cornstarch

    1. Heat oil in a pan over medium heat. Add onion, ginger, garlic, and all spices. Sauté for 3-4 minutes.
    2. Add broccoli florets and vegetable broth. Fry until the broccoli is tender but not soft, about 10 minutes.
    3. Meanwhile, prepare the sauce: In a medium bowl, combine water, soy sauce, vinegar, maple syrup, and cornstarch. Whisk.
    4. Pour the sauce in the pan and add chickpeas.
    5. Bring to a boil until the sauce simmers. Fry for a further few minutes.
    6. Taste and adjust seasonings. Add more salt/pepper/cayenne pepper if needed.
    7. Serve alone or with cooked rice. Enjoy!

    Notes

    • Use gluten-free soy sauce for a gluten-free option.
    • Adjust the sweetness with different sweeteners as per preference.
    • Prep Time: 10 minutes
    • Cook Time: 20 minutes
    • Category: Main Course
    • Method: Stir Fry
    • Cuisine: Asian

    Nutrition

    • Serving Size: 1 serving
    • Calories: 320
    • Sugar: 5g
    • Sodium: 700mg
    • Fat: 10g
    • Saturated Fat: 1g
    • Unsaturated Fat: 8g
    • Trans Fat: 0g
    • Carbohydrates: 45g
    • Fiber: 10g
    • Protein: 12g
    • Cholesterol: 0mg

    Sharing is caring!

  • Ranch Roasted Chickpeas: Crunchy Snack You’ll Love!

    Ranch Roasted Chickpeas: Crunchy Snack You’ll Love!


    Introduction to Ranch Roasted Chickpeas

    As a passionate home cook, I know how hectic life can get, especially for busy moms and professionals. That’s where these Ranch Roasted Chickpeas come to the rescue! Looking for a quick solution for snacking that won’t leave you feeling guilty? These crunchy morsels are not only delicious but also incredibly easy to whip up. With every bite, you’ll be delighted by the burst of ranch flavor. Perfect for munching on while working, watching a movie, or simply grabbing a quick snack, these chickpeas are a game-changer for satisfying cravings!

    Why You’ll Love This Ranch Roasted Chickpeas

    These Ranch Roasted Chickpeas are a delightfully simple snack that packs a punch in flavor. They come together in under 40 minutes, making them a quick solution for busy days. The best part? They’re healthy, so you can enjoy them guilt-free! Each crunchy bite is infused with ranch goodness, making them a surefire hit with kiddos and adults alike—perfect for sharing or savoring all by yourself!

    Ingredients for Ranch Roasted Chickpeas

    Gathering the perfect ingredients is key to making the best Ranch Roasted Chickpeas. Here’s a rundown of what you’ll need:

    • Chickpeas: The star of the show! These little legumes are packed with protein and fiber, making them a healthy choice.
    • Olive Oil: This adds richness and helps the spices stick. Plus, it contributes healthy fats to your snack.
    • Ranch Seasoning Mix: You can use store-bought or make your own. This blend brings that iconic ranch flavor everyone loves.
    • Garlic Powder: A dash of garlic powder enhances the overall flavor, giving it that savory punch.
    • Onion Powder: This adds depth and sweetness without any chunks of onion, keeping the texture smooth.
    • Smoked Paprika: For a hint of smokiness, this spice turns the chickpeas into a snack that dances on your taste buds.
    • Salt and Black Pepper: These staples enhance the flavor and balanced seasoning. Adjust these to suit your taste!
    • Fresh Parsley: A sprinkle before serving adds a pop of color and freshness, making your snacks even more appetizing.

    For exact quantities, you’ll find them at the bottom of the article, ready for you to print or take note of!

    How to Make Ranch Roasted Chickpeas

    Step 1 – Preheat the Oven

    Start by preheating your oven to 400°F (200°C). This step is crucial for cooking the Ranch Roasted Chickpeas evenly. An adequately warmed oven ensures they become perfectly crispy and golden rather than soggy. Trust me, the right temperature makes all the difference!

    Step 2 – Prepare the Chickpeas

    After draining and rinsing your chickpeas, spread them on a clean kitchen towel or paper towel. Pat them dry thoroughly! This drying process is vital for achieving that coveted crunch. The drier your chickpeas, the better they’ll roast!

    Step 3 – Season the Chickpeas

    In a medium-sized mixing bowl, toss your dried chickpeas with olive oil and the ranch seasoning mix, along with garlic powder, onion powder, smoked paprika, salt, and pepper. Make sure each chickpea is well coated with oil and spices. This ensures every bite bursts with flavor!

    Step 4 – Arrange for Roasting

    Spread the seasoned chickpeas in a single layer on a baking sheet lined with parchment paper. Make sure they’re not crowded! Space is key to allowing the air to circulate, helping your chickpeas attain that delightful crunch.

    Step 5 – Roast in the Oven

    Roast your chickpeas in the preheated oven for 25-30 minutes. Be sure to stir them halfway through for even cooking. This way, they’ll become uniformly crispy and golden brown. Your patience will be rewarded with a crunchy, tasty snack!

    Step 6 – Cool and Garnish

    After removing them from the oven, let the chickpeas cool slightly. Cooling enhances their crunchiness! Lastly, garnish your ranch roasted chickpeas with fresh parsley for a touch of color and a burst of freshness before serving!

    Tips for Success

    • Make sure your chickpeas are as dry as possible for maximum crunch.
    • Feel free to experiment with different seasonings like cayenne for heat or nutritional yeast for a cheesy kick.
    • Don’t skip the stirring halfway through; it ensures even roasting!
    • Store leftovers in an airtight container to keep them crispy.
    • Keep an eye on them towards the end to avoid over-browning.

    Equipment Needed

    • Baking Sheet: A standard baking sheet works well, but you can also use a roasting pan if that’s what you have.
    • Parchment Paper: This keeps the chickpeas from sticking, but aluminum foil can work too in a pinch.
    • Mixing Bowl: A medium-sized bowl is perfect; use any bowl you have accessible.
    • Measuring Spoons: Necessary for accurate seasoning, but you can use an approximate method if needed!

    Variations

    • Spicy Ranch: Add a pinch of cayenne pepper or red pepper flakes to the seasoning mix for a fiery twist!
    • Southwestern Style: Mix in some chili powder and cumin for a zesty flavor reminiscent of the Southwest.
    • Herbed Variation: Try adding dried herbs like dill or oregano for a fresh herbaceous note.
    • Cheesy Chickpeas: Sprinkle nutritional yeast over the chickpeas after roasting for a cheesy flavor without dairy.
    • Lemon Zest: Add a bit of lemon zest before roasting for a refreshing citrus kick that brightens the flavor.

    Serving Suggestions

    • Pair your Ranch Roasted Chickpeas with hummus or yogurt dip for a delightful snack platter.
    • Enjoy them alongside a fresh salad for an extra crunch and added protein.
    • Serve with iced tea or sparkling water for a refreshing drink combination.
    • Present in a colorful bowl, garnished with additional parsley for a pop of freshness.
    • Pack in lunchboxes for a nutritious, on-the-go snack that everyone will love!

    FAQs about Ranch Roasted Chickpeas

    Can I use dried chickpeas instead of canned?

    Yes, you can! Just make sure to soak and cook them beforehand. Dried chickpeas require extra time and effort, but the result will be just as delicious!

    How do I store leftover Ranch Roasted Chickpeas?

    Store any leftovers in an airtight container at room temperature. This helps maintain their delightful crunch! Avoid refrigeration, as it can make them soggy.

    Can I adjust the seasoning in my Ranch Roasted Chickpeas?

    Absolutely! Feel free to tweak the spices to suit your taste. Experimenting with different flavors allows you to perfect your personalized crunchy snack!

    How long can I keep the Ranch Roasted Chickpeas?

    They’ll stay fresh for about 3-5 days if stored properly in an airtight container. However, they’re best enjoyed within the first couple of days for optimal crunchiness!

    What are some healthy dipping options to pair with Ranch Roasted Chickpeas?

    You can serve them with hummus, tzatziki, or a yogurt-based dip. These pair nicely with the crunch and flavor of the chickpeas, making for a fulfilling snack!

    Final Thoughts

    Making Ranch Roasted Chickpeas isn’t just about whipping up a snack; it’s about creating a joyful experience in the kitchen. Every crunchy bite filled with zesty ranch flavor takes me back to simple moments with loved ones, sharing laughs and stories. This recipe is a delightful reminder that healthy snacking can also be incredibly satisfying. Whether you’re munching during a busy workday or serving them at a gathering, these chickpeas are bound to shine. So, gather your ingredients and join me in this crunchy adventure—your taste buds will thank you!


    Print

    clock clock iconcutlery cutlery iconflag flag iconfolder folder iconinstagram instagram iconpinterest pinterest iconfacebook facebook iconprint print iconsquares squares iconheart heart iconheart solid heart solid icon

    Description

    Ranch Roasted Chickpeas are a crunchy, flavorful snack that’s easy to make and sure to satisfy your cravings.


    • 1 can (15 oz) chickpeas, drained and rinsed
    • 2 tablespoons olive oil
    • 2 teaspoons ranch seasoning mix (store-bought or homemade)
    • 1 teaspoon garlic powder
    • ½ teaspoon onion powder
    • ½ teaspoon smoked paprika
    • ¼ teaspoon salt (adjust to taste)
    • ¼ teaspoon black pepper
    • Fresh parsley, chopped (for garnish)

    1. Preheat your oven to 400°F (200°C).
    2. After rinsing the chickpeas, spread them out on a clean kitchen towel or paper towel and pat them dry. The drier they are, the crunchier they will become.
    3. In a medium-sized mixing bowl, combine the dried chickpeas, olive oil, ranch seasoning mix, garlic powder, onion powder, smoked paprika, salt, and black pepper. Toss until the chickpeas are well coated.
    4. Spread the seasoned chickpeas in a single layer on a baking sheet lined with parchment paper.
    5. Roast in the preheated oven for about 25-30 minutes, stirring halfway through, until the chickpeas are golden brown and crispy.
    6. Once roasted, remove them from the oven and let them cool slightly.
    7. Garnish with chopped parsley for a fresh touch before serving.

    Notes

    • Adjust the seasoning according to your taste preference.
    • Store any leftovers in an airtight container to maintain crunchiness.
    • Prep Time: 10 minutes
    • Cook Time: 30 minutes
    • Category: Snacks
    • Method: Roasting
    • Cuisine: American

    Nutrition

    • Serving Size: 1/2 cup
    • Calories: 120
    • Sugar: 2g
    • Sodium: 200mg
    • Fat: 5g
    • Saturated Fat: 0.5g
    • Unsaturated Fat: 3g
    • Trans Fat: 0g
    • Carbohydrates: 18g
    • Fiber: 6g
    • Protein: 6g
    • Cholesterol: 0mg

    Sharing is caring!

  • Shrimp and Spinach Stuffed Pasta Rolls

    Shrimp and Spinach Stuffed Pasta Rolls


    Introduction to Shrimp and Spinach Stuffed Pasta Rolls with Roasted Red Pepper Cream

    Let’s face it—juggling work, family, and personal time can feel like a circus act! But fear not, because these Shrimp and Spinach Stuffed Pasta Rolls with Roasted Red Pepper Cream are here to save the day. Not only do they look stunning on the plate, but they’re also a delightful balance of flavor and comfort. Imagine pulling a pan of these golden, gooey rolls out of the oven, and everyone’s eyes lighting up. Whether it’s a busy weeknight or a gathering of loved ones, this dish is sure to impress and satisfy everyone at your table!

    Why You’ll Love This Shrimp and Spinach Stuffed Pasta Rolls with Roasted Red Pepper Cream

    These Shrimp and Spinach Stuffed Pasta Rolls not only taste heavenly, but they’re also surprisingly easy to whip up. With a prep time of just 30 minutes, you can create a restaurant-quality meal without the fuss. The creamy roasted red pepper sauce adds a delightful layer of flavor, making each bite a taste sensation. Plus, this dish is perfect for impressing your guests or satisfying your family’s cravings for comfort food!

    Ingredients for Shrimp and Spinach Stuffed Pasta Rolls with Roasted Red Pepper Cream

    To create these Shrimp and Spinach Stuffed Pasta Rolls with Roasted Red Pepper Cream, you’ll need a medley of vibrant ingredients that come together beautifully. Here’s what you’ll gather:

    • Lasagna sheets (or large pasta shells/cannelloni) – This is the delicious outer layer that holds all the goodness inside. Choose fresh or dried, based on convenience.
    • Shrimp – Peeled and deveined, this protein adds a delightful bite and brings a taste of the sea to your dish. You can use fresh or frozen, just make sure to thaw if frozen!
    • Fresh spinach – Chopped spinach adds a pop of color and nutrients. It’s also great for sneaking in some greens!
    • Ricotta cheese – Creamy and rich, it helps bind the filling together while giving a smooth texture.
    • Parmesan cheese – Aged and salty, this cheese adds depth of flavor. You can also sprinkle additional on top for a savory crust.
    • Mozzarella cheese – Shredded mozzarella melts beautifully, making each bite ooey-gooey delicious.
    • Egg – Lightly beaten, it acts as a binding agent, holding together the filling so it doesn’t fall out during baking.
    • Garlic – Minced garlic brings an aromatic punch that rounds out the flavor profile.
    • Lemon zest – This bright adds a refreshing flavor that contrasts wonderfully with the richness of the cheese.
    • Salt & Black pepper – Cubes of flavor bringing seasoning to life! Adjust according to your taste preference.
    • Red pepper flakes (optional) – If you like a little kick, these flakes are the perfect spicy addition.
    • Roasted red peppers – Chopped and sweet, they’re the star of the creamy sauce that tops your pasta rolls.
    • Butter – For sautéing and adding richness to your sauce.
    • Onion – Diced finely, onions add sweetness and depth to the flavor base of your sauce.
    • Heavy cream – This creates the luxuriously creamy consistency we all love!
    • Chicken or vegetable broth – Helps balance the creaminess with some savory depth; you can even use homemade broth for extra flavor.
    • Smoked paprika – This smoky spice enhances the overall taste, giving a subtle warmth to the dish.
    • Fresh herbs (like basil or parsley) – For garnish, these herbs add a fresh finish and make the dish look stunning on your table.

    You can find exact quantities at the bottom of this article, ready for printing when you’re set to tackle this delicious recipe.

    How to Make Shrimp and Spinach Stuffed Pasta Rolls with Roasted Red Pepper Cream

    Step 1: Boil the Pasta

    Start by bringing a large pot of salted water to a boil. Add your lasagna sheets and cook until they’re al dente. This usually takes about 8-10 minutes, but check the package instructions to be sure. Once they’re perfectly cooked, drain and lay them flat on a greased baking sheet. This way, they won’t stick together while you prepare the filling!

    Step 2: Cook the Shrimp

    Next, heat a skillet over medium heat and melt a tablespoon of butter. Toss in the minced garlic and let it sizzle for a minute. Then, add the chopped shrimp to the skillet. Cook them just until they turn pink, which usually takes about 3-4 minutes. Don’t overcook—nobody likes rubbery shrimp! Once done, remove from heat and set aside.

    Step 3: Prepare the Filling

    In a large mixing bowl, combine the creamy ricotta, grated parmesan, shredded mozzarella, and the lightly beaten egg. Stir in the lemon zest, salt, black pepper, and red pepper flakes for a bit of kick if you want. Lastly, fold in the cooked shrimp and chopped spinach until it’s all mixed together. This filling will be the heart of your delightful pasta rolls!

    Step 4: Make the Sauce

    Time for the sauce! In the same skillet, melt another tablespoon of butter and add diced onions. Sauté them until they’re soft and translucent. Toss in the chopped roasted red peppers, broth, and smoked paprika. Let it simmer for about 5 minutes to marry the flavors. Then, blend it all until smooth. Stir in the heavy cream and sprinkle in parmesan, simmering until the sauce thickens nicely. Ahh, the delightful aroma will make your kitchen feel like an Italian bistro!

    Step 5: Fill and Roll the Pasta

    Now comes the fun part! Spread a layer of that velvety sauce in a greased baking dish. Take each lasagna sheet, scoop a generous amount of the shrimp and spinach filling, and roll it up tightly. Place the rolls seam-side down into the dish. Don’t worry about being perfect—rustic charm is always welcome in home cooking!

    Step 6: Bake to Perfection

    Pour the remaining sauce lovingly over your pasta rolls. Sprinkle with mozzarella and additional parmesan cheese for that golden crust. Cover the dish with foil and bake at 375°F for 20 minutes. After that, remove the foil and let it bake for another 10 minutes. When the cheese is beautifully golden and bubbly, it’s time to take it out and let it cool for a moment. Garnish with fresh herbs, and voila! You’ve created a dish that’s both comforting and impressively delicious!

    Tips for Success

    • Prep all your ingredients before starting—the easier it is, the more fun you’ll have!
    • If using frozen shrimp, ensure they’re completely thawed and patted dry for best results.
    • Don’t skimp on the cheese—it’s the star! Add extra for a gooey topping.
    • Adjust spices according to your family’s preference—more heat or less?
    • Allow the dish to cool slightly before serving, as the flavors will deepen.

    Equipment Needed

    • Large pot – A big one helps with boiling pasta efficiently. A Dutch oven works too!
    • Skillet – Essential for cooking shrimp and making the sauce. Non-stick is ideal for easy cleanup.
    • Baking dish – Use a casserole dish for assembling and baking your pasta rolls.
    • Mixing bowl – Any size will do, just ensure it’s big enough for mixing all your filling ingredients.
    • Spatula – Handy for mixing and transferring your delicious pasta rolls.

    Variations

    • Substitute proteins: Try using crab meat or chicken instead of shrimp for a different flavor profile.
    • Make it vegetarian: Omit the shrimp and add more veggies like mushrooms, zucchini, or artichokes for a hearty, meatless option.
    • Gluten-free option: Use gluten-free pasta sheets or shells to make this dish suitable for a gluten-sensitive diet.
    • Spice it up: Add jalapeños or chipotle peppers to the filling for a zesty twist.
    • Cheese swap: Experiment with different cheeses like feta or goat cheese for unique flavor combinations!

    Serving Suggestions

    • Side salad: A crisp Caesar or mixed green salad pairs beautifully, adding freshness to your meal.
    • Wine pairing: Enjoy a chilled Sauvignon Blanc or a light Pinot Grigio for a delightful contrast.
    • Presentation: Garnish with fresh basil or parsley for a vibrant finish that will wow your guests!

    FAQs about Shrimp and Spinach Stuffed Pasta Rolls with Roasted Red Pepper Cream

    Can I use frozen shrimp for this recipe?

    Absolutely! Just make sure to thaw your frozen shrimp completely before cooking. Pat them dry to avoid any excess moisture, ensuring they cook perfectly in your dish.

    What can I serve with Shrimp and Spinach Stuffed Pasta Rolls?

    These pasta rolls pair beautifully with a fresh side salad or some garlic bread. You can also double down on the Italian theme with a light vegetable medley or roasted asparagus!

    Can I make the sauce ahead of time?

    Yes, you can! The roasted red pepper cream sauce can be prepared a day in advance. Just store it in the refrigerator and warm it up when you’re ready to assemble the rolls.

    How long will leftovers last in the fridge?

    Leftover Shrimp and Spinach Stuffed Pasta Rolls should be stored in an airtight container. They’ll stay good for about 3-4 days—if they last that long!

    Can I freeze the stuffed pasta rolls?

    Yes! These rolls freeze wonderfully. Assemble them, then cover tightly for freezing. When you’re ready to enjoy them, thaw in the fridge overnight, then bake as usual.

    Final Thoughts

    In the hustle and bustle of life, creating a dish like Shrimp and Spinach Stuffed Pasta Rolls with Roasted Red Pepper Cream brings me such joy. It’s more than just a meal; it’s a chance to gather around the table with loved ones, sharing laughter and stories. These rolls are a delightful balance of creamy goodness and satisfying flavors that will leave everyone craving more. Whether it’s a cozy family dinner or an inviting gathering with friends, this dish is bound to create lasting memories. Trust me, your taste buds will thank you!


    Print

    clock clock iconcutlery cutlery iconflag flag iconfolder folder iconinstagram instagram iconpinterest pinterest iconfacebook facebook iconprint print iconsquares squares iconheart heart iconheart solid heart solid icon

    Description

    Delicious shrimp and spinach stuffed pasta rolls topped with a creamy roasted red pepper sauce, perfect for impressing guests.


    • 12 lasagna sheets (or large pasta shells/cannelloni)
    • 1 pound shrimp, peeled & deveined (chopped into small pieces)
    • 2 cups fresh spinach (chopped)
    • 1 cup ricotta cheese
    • ½ cup parmesan cheese (grated)
    • 1 cup mozzarella cheese (shredded)
    • 1 egg (lightly beaten)
    • 2 cloves garlic (minced)
    • 1 teaspoon lemon zest
    • ½ teaspoon salt
    • ¼ teaspoon black pepper
    • ½ teaspoon red pepper flakes (optional)
    • 2 roasted red peppers (drained and chopped)
    • 1 tablespoon butter
    • 1 small onion (diced)
    • 1 cup heavy cream
    • ½ cup chicken or vegetable broth
    • ½ cup parmesan cheese (grated)
    • ½ teaspoon smoked paprika
    • ½ teaspoon salt
    • ¼ teaspoon black pepper
    • ½ cup mozzarella cheese (shredded)
    • ¼ cup parmesan cheese (grated)
    • Fresh basil or parsley (for garnish)

    1. Bring a large pot of salted water to a boil. Cook the lasagna sheets until al dente, then drain and lay flat on a greased baking sheet.
    2. Heat a skillet and melt 1 tablespoon of butter. Add garlic and shrimp, cooking until shrimp turn pink. Remove from heat.
    3. In a mixing bowl, combine ricotta, parmesan, mozzarella, egg, lemon zest, salt, black pepper, and red pepper flakes. Stir in shrimp and spinach.
    4. In the skillet, melt another tablespoon of butter, sauté onion and garlic until soft, then add roasted red peppers, broth, and smoked paprika. Simmer for 5 minutes, blend until smooth, then stir in cream and parmesan, simmering until thickened.
    5. Spread a layer of sauce in a greased baking dish. Take each lasagna sheet, add filling, roll tightly, and place seam-side down in the dish.
    6. Pour remaining sauce over pasta rolls, sprinkle with mozzarella and parmesan. Cover and bake at 375°F for 20 minutes, remove foil, and bake another 10 minutes until cheese is golden.
    7. Garnish with fresh basil or parsley and serve hot.

    Notes

    • Use fresh or frozen shrimp, ensuring they are fully thawed before cooking.
    • The red pepper sauce can be made ahead and refrigerated for convenience.
    • Experiment with other cheeses for different flavors.
    • Consider adding more spices or herbs according to personal taste.
    • Prep Time: 30 minutes
    • Cook Time: 35 minutes
    • Category: Main Course
    • Method: Baking
    • Cuisine: Italian

    Nutrition

    • Serving Size: 1 roll
    • Calories: 350
    • Sugar: 3g
    • Sodium: 600mg
    • Fat: 20g
    • Saturated Fat: 10g
    • Unsaturated Fat: 8g
    • Trans Fat: 0g
    • Carbohydrates: 30g
    • Fiber: 2g
    • Protein: 18g
    • Cholesterol: 150mg

    Sharing is caring!

  • Bacon Grilled Cheese

    Bacon Grilled Cheese


    Introduction to Bacon Grilled Cheese

    There’s something undeniably comforting about a classic Bacon Grilled Cheese. It’s like a warm hug on a plate, don’t you think? This delicious dish combines crispy bacon and gooey cheddar cheese, all nestled between two slices of Texas Toast. Whether you’re racing against the clock after a long day or looking to impress a loved one with a simple yet mouthwatering meal, this recipe is your go-to. In just 20 minutes, you can whip up a plate of pure joy that the whole family will devour!

    Why You’ll Love This Bacon Grilled Cheese

    This Bacon Grilled Cheese is not just a sandwich; it’s a lifesaver in the kitchen! With just a handful of ingredients, you’ll have a meal ready in 20 minutes. The crispy bacon brings a delightful crunch that pairs perfectly with melting cheese.

    Plus, it’s endlessly customizable. You can dress it up or keep it classic, making it a family favorite on busy weeknights or cozy weekends!

    Ingredients for Bacon Grilled Cheese

    Let’s gather the ingredients that will make your Bacon Grilled Cheese a crispy, cheesy masterpiece! Here’s what you’ll need:

    • Texas Toast: Thick, fluffy slices of bread that offer the perfect balance of crunch and softness. They can hold up against all that gooey cheese!
    • Bacon: The star of the show! Smoky, crunchy, and oh-so-delicious, bacon adds a salty richness that transforms this sandwich.
    • Cheddar Cheese: Sharp, creamy, and melts beautifully. Feel free to mix it up with other varieties like Monterey Jack or Swiss for added flavor!
    • Mayonnaise: This secret ingredient lends a creamy texture and helps create that perfect golden crust. Trust me, it’s a game changer!

    Want to kick it up a notch? Consider adding fresh tomatoes or creamy avocado for an extra punch of flavor. You can also sub the mayo for butter if you prefer a richer taste.

    For exact quantities, check the end of the article where everything’s clearly laid out for you, available for printing!

    How to Make Bacon Grilled Cheese

    Now that we’ve gathered our ingredients, let’s dive into creating this delicious Bacon Grilled Cheese. Follow these simple steps to ensure you get a perfectly crispy, melty sandwich every time!

    Step 1: Preheat the Skillet

    Begin by preheating your skillet over medium-high heat. This is essential for achieving that golden crust on your bread. A hot skillet helps to seal in the flavors and guarantees that the bacon and cheese get that lovely, inviting warmth.

    Step 2: Prepare the Bread

    Next, spread mayonnaise on one side of each slice of Texas Toast. This creamy layer does more than just add flavor; it creates a wonderfully crispy crust when cooked. Trust me; spreading that mayo is a small step with a big impact!

    Step 3: Cook the Bacon

    Now it’s time to cook the bacon! Place it in the hot skillet and cook it to your desired doneness—crispy or chewy, the choice is yours. Make sure to flip it halfway through for an even cook. Once done, transfer the bacon to a plate lined with paper towels to absorb the extra grease.

    Step 4: Assemble the Sandwich

    Now, let’s put it all together! Reduce the skillet heat to low. Place one slice of bread in the skillet, mayo side down. Layer on two slices of cheddar cheese, followed by two crispy strips of bacon. Finally, top it off with another piece of bread, this time with the mayo side facing up. This layering approach maximizes flavor and texture, resulting in pure deliciousness!

    Step 5: Cook the Sandwich

    Cook the sandwich for 2-4 minutes or until the bottom is beautifully golden brown. Keep an eye on it! Gently flip the sandwich and let the other side cook for another 2-4 minutes. The goal is to send your senses into overdrive with the sound of sizzling and that irresistible aroma filling the kitchen!

    Step 6: Let it Rest

    Once the sandwich is perfectly browned, transfer it to a plate and let it rest for 2-3 minutes. This resting period allows the cheese to firm up slightly, meaning it won’t ooze out when you cut into it. Trust me, it’s worth the wait!

    Step 7: Serve and Enjoy

    Finally, it’s time to cut your sandwich in half, revealing its cheesy, bacon-y glory! Serve it up with a side of pickles or a simple salad for balance. And don’t forget to savor each bite—you’ve earned it!

    Tips for Success

    • Use fresh bacon for better flavor and texture. Crispy is the way to go!
    • Experiment with cheese—try a blend of your favorites for a unique twist.
    • Keep an eye on the heat. Too high can burn the bread before the cheese melts.
    • For an extra crispy crust, work a little butter in with the mayo.
    • Letting the sandwich rest truly makes a difference in that first bite!

    Equipment Needed

    • Large Skillet: A good non-stick skillet will make flipping a breeze. If you don’t have one, a regular skillet works too!
    • Spatula: A sturdy spatula helps you expertly flip your sandwich without a meltdown.
    • Plate: Perfect for resting your sandwich after cooking. You can use any plate or cutting board!

    Variations of Bacon Grilled Cheese

    • Spicy Kick: Add jalapeños or a drizzle of hot sauce for a kick of heat that complements the richness of bacon and cheese.
    • Veggie Delight: Layer in fresh spinach, sliced tomatoes, or avocados for a refreshing crunch and extra nutrients.
    • Herb-infused: Sprinkle fresh herbs like basil or chives inside for a garden-fresh flavor boost.
    • Cheese Mix: Experiment with different cheeses like pepper jack, gouda, or even blue cheese for a unique taste.
    • Sourdough Twist: Swap out Texas Toast for sourdough bread. Its tangy flavor pairs beautifully with the savory components.

    Serving Suggestions for Bacon Grilled Cheese

    • Pair with Soup: A bowl of creamy tomato soup creates the perfect dipping experience.
    • Crunchy Additions: Serve with crispy potato chips or a side salad for a delightful crunch.
    • Refreshing Beverage: Complement your sandwich with a cold glass of iced tea or lemonade.
    • Presentation Tip: Cut the sandwich diagonally and arrange on a colorful plate for a visually appealing meal!

    FAQs about Bacon Grilled Cheese

    As you embark on your culinary journey with Bacon Grilled Cheese, you might have a few questions in mind. I’ve gathered some of the most common queries and provided answers to help you navigate your way to deliciousness!

    Can I make Bacon Grilled Cheese ahead of time?

    Absolutely! You can cook the bacon and prepare the sandwich layers in advance. When you’re ready to enjoy, just grill until golden and melty. This tip is excellent for busy days!

    What’s the best way to reheat leftovers?

    The best way to reheat is in a skillet over low heat. This method keeps the bread crispy and the cheese delightful. Microwaving can leave you with a soggy mess, so avoid that!

    Can I use other types of bread for this grilled cheese?

    Yes, you definitely can! While Texas Toast is fantastic, other breads like sourdough or even whole grain bring different flavors and textures to the classic Bacon Grilled Cheese. Explore and find your favorite!

    Is there a vegetarian option for this sandwich?

    Sure! You can substitute the bacon with crispy sautéed mushrooms or roasted veggies to add richness without the meat. The cheese will still shine in this delightful twist!

    How can I make my Bacon Grilled Cheese lower in calories?

    To lighten it up, use low-fat cheese and turkey bacon. You can also cut back on mayonnaise or use a light spread. The flavor might change slightly, but it’ll still satisfy your cravings!

    Final Thoughts

    Your journey into the world of Bacon Grilled Cheese is bound to be filled with joy and satisfaction! This dish doesn’t just fill your belly; it warms your heart and brings a smile to your face.

    The crispy bacon and melted cheese are a symphony of flavors that everyone can savor. Whether you’re sharing it with your family after a long day or enjoying it all by yourself on a quiet afternoon, this sandwich is a reminder of life’s simple pleasures. So, go ahead, make it your own, and relish every delightful bite!


    Print

    clock clock iconcutlery cutlery iconflag flag iconfolder folder iconinstagram instagram iconpinterest pinterest iconfacebook facebook iconprint print iconsquares squares iconheart heart iconheart solid heart solid icon

    Description

    Bacon Grilled Cheese is the ultimate comfort dish featuring crispy bacon and melted cheddar cheese sandwiched between two slices of Texas Toast.


    • 8 slices Texas Toast
    • 8 slices bacon
    • 8 slices cheddar cheese
    • 4 Tablespoons mayonnaise

    1. Preheat a large skillet over medium high heat.
    2. Spread the mayonnaise on 1 side of each piece of bread.
    3. Place the bacon on the skillet and cook to your desired doneness. Once cooked, place the bacon on a plate lined with a paper towel.
    4. Reduce the heat to low and drain off any extra grease. Then place one half of the bread onto the skillet with the mayonnaise side down.
    5. Top the bread with 2 slices of cheese, then 2 slices of bacon and then place the other piece of bread on top of cheese with mayonnaise side up.
    6. Heat the sandwich for 2-4 minutes until the bottom piece of bread is golden brown. Flip and cook the opposite side sandwich for 2-4 minutes.
    7. Remove the sandwich to a plate. Let the sandwich rest for 2-3 minutes so that the cheese is not too hot.
    8. Cut in half and enjoy!

    Notes

    • Feel free to customize by adding your favorite ingredients like tomatoes or avocado.
    • For an extra crispy texture, consider grilling the sandwich with additional butter.
    • Prep Time: 10 minutes
    • Cook Time: 10 minutes
    • Category: Sandwich
    • Method: Grilling
    • Cuisine: American

    Nutrition

    • Serving Size: 1 sandwich
    • Calories: 550
    • Sugar: 2g
    • Sodium: 1200mg
    • Fat: 36g
    • Saturated Fat: 12g
    • Unsaturated Fat: 15g
    • Trans Fat: 0g
    • Carbohydrates: 36g
    • Fiber: 2g
    • Protein: 20g
    • Cholesterol: 50mg

    Sharing is caring!

  • Pepperoni Pizza Pasta Salad

    Pepperoni Pizza Pasta Salad


    Introduction to Pepperoni Pizza Pasta Salad

    Welcome, fellow food lovers! If you’re like me, juggling work, kids, and everyday life can feel like a circus act. That’s why I’m excited to share this delightful Pepperoni Pizza Pasta Salad with you. This dish is all about effortless cooking, delivering a burst of flavor that’s bound to impress your family. With vibrant colors and the irresistible taste of pizza, it’s perfect for busy days when dinner needs to be both quick and satisfying. Let’s dive into this delightful twist on traditional pizza and make mealtime a celebration!

    Why You’ll Love This Pepperoni Pizza Pasta Salad

    This Pepperoni Pizza Pasta Salad is a game-changer! It’s incredibly easy to prepare, making it a perfect fit for busy weeknights or potlucks. Just boil some pasta, toss in the flavors of pizza, and you’re done! The combination of creamy cheeses and savory pepperoni creates a taste sensation that delights every palate. Plus, it’s a make-ahead dish that can brighten your lunch or dinner, giving you more time to relax!

    Ingredients for Pepperoni Pizza Pasta Salad

    Gather these vibrant ingredients that come together to create a flavor-packed dish! You’ll find everything you need for this Pepperoni Pizza Pasta Salad, making mealtime a breeze.

    • Fusilli pasta: This spiral-shaped pasta holds onto dressings and flavors beautifully, adding texture to your salad.
    • Basil pesto: A little goes a long way! This aromatic blend of basil, nuts, and cheese brings freshness and depth.
    • Italian dressing: Load up your salad with this zesty dressing. It balances the richness of the cheeses wonderfully.
    • Pepperoni slices: Quartered bits of this spicy, savory meat mimic the flavors of your favorite pizza, adding a delightful crunch.
    • Mozzarella cheese: Shredded Mozzarella melts in your mouth, creating that gooey, comforting flavor we all adore.
    • Cheddar cheese: A splash of sharpness adds an exciting twist to the cheese blend—perfectly complementing the pepperoni!
    • Parmesan cheese: This grated cheese brings umami notes and a bit of nuttiness, elevating every bite.
    • Cherry tomatoes (optional): For those who love a burst of freshness, these juicy tomatoes add color and a lovely tartness.

    For exact measurements of these delightful ingredients, simply scroll down to the bottom of the article, where you’ll find everything you need to print out!

    How to Make Pepperoni Pizza Pasta Salad

    Bringing this Pepperoni Pizza Pasta Salad to life is as easy as pie. Just follow these simple steps, and you’ll have a delicious, colorful dish that everyone will love. Get your favorite apron on, and let’s get cooking!

    Step 1: Cook the Fusilli Pasta

    First, bring a large pot of salted water to a rolling boil. Add 1 pound of fusilli pasta and cook according to the package instructions. I like to set a timer to ensure it doesn’t go mushy!

    After about 8-10 minutes, taste a piece. It should be al dente, tender with just a little bite. Once done, drain the pasta in a colander and rinse it with cold water to halt the cooking process and cool it down. This step is key to keeping your salad refreshing!

    Step 2: Combine with Basil Pesto and Dressing

    In a large mixing bowl, add the cooled fusilli pasta. Now, it’s time to bring some flavor! Scoop in 2 tablespoons of basil pesto and 1/4 cup of Italian dressing. Toss until the pasta is well-coated.

    The pesto adds a fragrant burst of herbs, while the dressing contributes that essential zip. Trust me, your taste buds are going to thank you later!

    Step 3: Add Remaining Ingredients

    Next up, it’s all about making this salad a flavor extravaganza. Toss in 20 quartered pepperoni slices, 1 cup of shredded Mozzarella, 1/4 cup of shredded Cheddar, and 1/4 cup of grated Parmesan cheese. If you’re up for it, throw in a 1/2 cup of quartered cherry tomatoes for added freshness!

    Pour in the remaining 1/4 cup of Italian dressing and stir everything together thoroughly. Aim for even distribution so each bite is a delightful pop of flavor!

    Step 4: Chill and Serve

    Finally, cover the bowl with plastic wrap or a lid and tuck it into the refrigerator. This dish is best served chilled, allowing the flavors to mingle beautifully. Let it sit for at least 30 minutes to an hour if you can wait!

    Once it’s time to serve, simply scoop it onto plates or in bowls. This Pepperoni Pizza Pasta Salad is ready to steal the show at any meal!

    Tips for Success

    • Cook pasta al dente for the perfect texture in your salad.
    • Chill the salad for at least 30 minutes for flavors to meld.
    • Customize with your favorite veggies like bell peppers or olives.
    • Use fresh basil or spinach for an added touch of freshness.
    • For a kick, try adding a sprinkle of red pepper flakes.

    Equipment Needed

    • Large pot: Perfect for boiling pasta. A sturdy saucepan can also work.
    • Colander: Essential for draining pasta. You could use a fine mesh strainer if needed.
    • Mixing bowl: A spacious bowl to combine ingredients. A large serving bowl works well too.
    • Measuring cups: Handy for precise ingredient quantities. Any standard measuring tool will do!
    • Plastic wrap or lid: To cover your salad while it chills. A dishcloth can suffice in a pinch.

    Variations of Pepperoni Pizza Pasta Salad

    • For a vegetarian twist, exclude the pepperoni and add roasted vegetables like zucchini and bell peppers.
    • Replace fusilli with whole wheat or gluten-free pasta to accommodate dietary preferences.
    • For a spicy kick, consider using spicy Italian sausage in place of pepperoni.
    • Add olives, artichokes, or fresh spinach for an even more vibrant flavor and added nutrients.
    • Switch out basil pesto for sun-dried tomato pesto for a smoky alternative.

    Serving Suggestions

    • Pair this refreshing Pepperoni Pizza Pasta Salad with crusty garlic bread for a delightful meal.
    • Serve alongside a light green salad for added crunch and nutrients.
    • Enhance with a chilled glass of iced tea or lemonade to balance flavors.
    • For presentation, use colorful bowls and garnish with fresh basil or parsley.
    • Enjoy at picnics or barbecues; it’s always a crowd-pleaser!

    FAQs about Pepperoni Pizza Pasta Salad

    Can I make Pepperoni Pizza Pasta Salad ahead of time?

    Absolutely! This salad is perfect for meal prep. You can prepare it a day in advance for the best flavor. Just keep it chilled in the refrigerator until meal time.

    Is Pepperoni Pizza Pasta Salad gluten-free?

    Yes, it can be gluten-free! Simply substitute fusilli pasta with a gluten-free version. The flavors will still shine, keeping all the deliciousness intact!

    What other cheeses can I use in this salad?

    You can definitely mix it up! Feel free to experiment with cheeses like feta for a tangy twist or Provolone for a smoky flavor. Limitless possibilities await!

    Can I add more vegetables to this recipe?

    Definitely! Incorporating veggies is a great idea. You could throw in bell peppers, olives, or even pepperoncini for a spicy kick. Customize to fit your family’s tastes!

    How long can I store leftovers?

    This Pepperoni Pizza Pasta Salad stays fresh in the fridge for up to 3 days. Just give it a good stir before serving to re-coat everything in the delicious dressing!

    Final Thoughts

    There you have it! This Pepperoni Pizza Pasta Salad is a recipe that beautifully marries the joy of pizza with the ease of a pasta salad. Each bite brings a tasty combination that’s sure to create smiles around your dinner table. I love how this dish transforms the ordinary into something extraordinary, making mealtimes feel special without the fuss. Whether you’re packing lunch for the kids or hosting a casual gathering, this salad is bound to impress. It’s not just a meal; it’s a memorable experience that brings everyone together with a splash of flavor!


    Print

    clock clock iconcutlery cutlery iconflag flag iconfolder folder iconinstagram instagram iconpinterest pinterest iconfacebook facebook iconprint print iconsquares squares iconheart heart iconheart solid heart solid icon

    Description

    A delightful and refreshing twist on traditional pizza, this Pepperoni Pizza Pasta Salad combines pasta, pepperoni, and cheeses for a perfect summer dish.


    • 1 pound Fusilli pasta
    • 2 tablespoons basil pesto
    • 1/2 cup Italian dressing (divided)
    • 20 pepperoni slices, quartered
    • 1 cup shredded Mozzarella cheese
    • 1/4 cup shredded Cheddar cheese
    • 1/4 cup grated Parmesan cheese
    • 1/2 cup cherry tomatoes, quartered (optional)

    1. Cook the fusilli pasta according to the package instructions. Drain and rinse with cold water to stop the cooking process and cool the pasta.
    2. In a large mixing bowl, combine the cooled pasta with basil pesto and 1/4 cup of Italian dressing. Toss until the pasta is evenly coated.
    3. Add the pepperoni, Mozzarella, Cheddar, Parmesan, and cherry tomatoes (if using). Pour in the remaining 1/4 cup of dressing and stir to combine thoroughly.
    4. Cover the bowl with plastic wrap or a lid and refrigerate until ready to serve. This dish is best served chilled and can be stored in the refrigerator for up to 3 days.

    Notes

    • This salad can be made a day ahead of time, making it perfect for meal prep.
    • Feel free to add other vegetables like bell peppers or olives for extra flavor.
    • Prep Time: 15 minutes
    • Cook Time: 10 minutes
    • Category: Salad
    • Method: No-Cook
    • Cuisine: Italian

    Nutrition

    • Serving Size: 1 cup
    • Calories: 320
    • Sugar: 2g
    • Sodium: 740mg
    • Fat: 18g
    • Saturated Fat: 7g
    • Unsaturated Fat: 8g
    • Trans Fat: 0g
    • Carbohydrates: 28g
    • Fiber: 2g
    • Protein: 12g
    • Cholesterol: 35mg

    Sharing is caring!

  • Reuben Pinwheels

    Reuben Pinwheels


    Introduction to Reuben Pinwheels

    When it comes to gatherings, I can’t help but think of the joy that delicious appetizers like Reuben Pinwheels bring to the table. They’re an effortless way to wow your friends and family without spending the entire day in the kitchen. With just a handful of ingredients, you can whip up these delightful bites that meld creamy, savory, and tangy flavors into every cheerful mouthful. Plus, they’re perfect for those busy days when you need something quick yet impressive. Trust me, once you serve these, your loved ones will keep coming back for more!

    Why You’ll Love This Reuben Pinwheels

    Let’s face it, we all cherish recipes that save time and deliver on taste. These Reuben Pinwheels are a culinary dream for busy moms and professionals alike. They’re incredibly easy to prepare, taking just 20 minutes from start to finish. Plus, with their rich flavors, every bite feels indulgent—making it simple to impress your guests. You’ll love how they disappear quickly at any gathering!

    Ingredients for Reuben Pinwheels

    To make these delightful Reuben Pinwheels, you’ll need a handful of ingredients that come together like a match made in culinary heaven:

    • Cream cheese: This is the creamy base that brings everything together, adding richness to each bite. It’s best softened to room temperature, making it easy to blend.
    • Thousand Island dressing: This tangy dressing is what gives your pinwheels that classic Reuben flavor. If you’re feeling adventurous, you can try Russian dressing for a slightly different twist!
    • Sauerkraut: Rinsed and well-drained, sauerkraut adds a zesty crunch. It’s the star ingredient that gives these pinwheels their tangy punch.
    • Shredded Swiss cheese: Melty, savory, and slightly nutty, this cheese complements the other flavors beautifully. You could swap it out for provolone if you prefer something a bit milder.
    • Deli corned beef: Thinly sliced and piled high, this adds protein and a delectable savory depth. Feel free to use turkey or roast beef for a lighter option.
    • Flour tortillas: These serve as the canvas for your pinwheels. Pot for whole wheat or spinach tortillas for a health boost or more vibrant presentation!

    You can find the exact measurements for these ingredients listed at the bottom of the article, where they’re available for printing. Trust me, you’ll want to keep this recipe close at hand!

    How to Make Reuben Pinwheels

    Step 1: Prepare the Cream Cheese Mixture

    First up, let’s mix our creamy base! In a medium bowl, combine the softened cream cheese, Thousand Island dressing, and sauerkraut. I like to use a hand mixer for this—it’s quick and easy, but a fork or spoon works just fine too. Blend everything until it’s smooth and well incorporated. You want a luscious mixture that is uniform in texture. Taste it to ensure that the flavors are just right. Adjust the dressing or sauerkraut if you wish. Trust me; getting this right sets the stage for wonderful Reuben Pinwheels.

    Step 2: Assemble the Pinwheels

    Now it’s time to build these little flavor-packed beauties! Take a flour tortilla and place it flat on a clean surface. Scoop about two heaping tablespoons of the cream cheese mixture onto one side of the tortilla, spreading it evenly across. Almost reach the edges but leave a little space. Next, sprinkle 1/4 cup of shredded Swiss cheese over the cream cheese, allowing it to melt into the goodness. Now, lay down two slices of corned beef, tearing if needed to fit perfectly on top. I usually like to play with the layers, sometimes even adding extra cheese for a richer bite. Repeat the process for the remaining tortillas, creating a delicious assembly line!

    Step 3: Chill and Slice

    Once your pinwheels are assembled, it’s time for a little cool-down period. Place the assembled pinwheels in the refrigerator for about 30 minutes. This step helps them hold their shape when you slice them. After chilling, use a sharp knife to cut the tortillas into pinwheels, aiming for about one-inch slices. I love arranging these on a platter, perhaps with a sprinkle of parsley on top for a pop of color. The presentation, my friends, is half the fun!

    Tips for Success

    • Always soften the cream cheese for easy blending; it makes a huge difference in texture.
    • Rinse and drain the sauerkraut well to avoid soggy pinwheels.
    • Experiment with spices like garlic powder or dill for an added flavor kick!
    • Use a sharp knife for clean cuts when slicing your pinwheels.
    • Prepare them a few hours in advance for easier entertaining!

    Equipment Needed

    • Medium bowl: Use this for mixing your ingredients. A large bowl works too!
    • Hand mixer or fork: A hand mixer speeds things up, but a fork will do the job just fine.
    • Sharp knife: Essential for slicing your pinwheels neatly. A pizza cutter can work in a pinch!
    • Cutting board: This handy surface is perfect for your assembly line.
    • Plastic wrap: Handy for covering and chilling your assembled pinwheels.

    Variations on Reuben Pinwheels

    • Vegetarian Reuben Pinwheels: Replace corned beef with roasted vegetables or grilled portobello mushrooms for a fresh twist.
    • Spicy Reuben Pinwheels: Add sliced jalapeños or a sprinkle of red pepper flakes to the cream cheese mixture for a nice kick!
    • Low-Carb Reuben Pinwheels: Use lettuce wraps instead of tortillas, making them a great option for those watching their carbs.
    • Buffalo Chicken Reuben Pinwheels: Swap corned beef with shredded buffalo chicken for a spicy, tangy variation that packs flavor.
    • Caprese Reuben Pinwheels: For a summery twist, use fresh basil, mozzarella, and tomatoes with the original mixture for a delightful combination.

    Serving Suggestions for Reuben Pinwheels

    • Pair with a crunchy pickle platter to complement the tangy flavors of the pinwheels.
    • Serve alongside a creamy coleslaw for a refreshing contrast.
    • For drinks, try pairing with a light beer or an iced tea for a casual vibe.
    • Presentation tip: Arrange on a colorful platter with toothpicks for easy snacking!

    FAQs about Reuben Pinwheels

    Can I make Reuben Pinwheels ahead of time?

    Absolutely! You can prepare the Reuben Pinwheels a few hours in advance and keep them in the refrigerator. Just make sure to cover them well with plastic wrap to keep them fresh!

    How do I store leftover pinwheels?

    Store any leftover pinwheels in an airtight container in the fridge. They’ll last for about 2 to 3 days—if they last that long!

    Can I substitute the corned beef with something else?

    Yes! If you’re looking for alternatives, you can use turkey, chicken, or even roast beef. Each option provides a unique twist while keeping the flavor profile intact.

    Are Reuben Pinwheels gluten-free?

    They can be made gluten-free by using gluten-free tortillas. Just be sure to check the labels on all of your ingredients to ensure they’re suitable for your dietary needs.

    What can I serve alongside Reuben Pinwheels?

    These pinwheels pair wonderfully with a side of chips, pickles, or a fresh salad. They also go well with a variety of drinks, from iced tea to light beers, making them perfect for any gathering!

    Final Thoughts

    Making Reuben Pinwheels is more than just whipping up a tasty appetizer; it’s about creating moments of joy around the table. With their vibrant flavors and effortless preparation, these pinwheels are sure to be a hit at your next gathering. Whether you’re hosting an elegant dinner or a casual get-together, they bring a slice of comfort that everyone loves. I adore watching smiles spread across faces with each delicious bite! So, gather your loved ones, share some laughter, and enjoy these delightful treats that turn any occasion into a memorable feast!


    Print

    clock clock iconcutlery cutlery iconflag flag iconfolder folder iconinstagram instagram iconpinterest pinterest iconfacebook facebook iconprint print iconsquares squares iconheart heart iconheart solid heart solid icon

    Description

    Reuben Pinwheels are a delicious and easy appetizer made with cream cheese, sauerkraut, and corned beef, perfect for any gathering.


    • 8 ounces cream cheese, softened to room temperature
    • 1/2 cup Thousand Island dressing
    • 1/2 cup packed sauerkraut, rinsed and well drained
    • 2 cups shredded Swiss cheese
    • 12 ounces thinly sliced deli corned beef (16 slices)
    • 8 (9-inch) flour tortillas

    1. In a medium bowl, blend together the cream cheese, Thousand Island dressing, and sauerkraut until smooth and well incorporated.
    2. Scoop 2 heaping tablespoons of the cream cheese mixture onto one side of a tortilla; spread evenly almost to the edges.
    3. Sprinkle with 1/4 cup of the shredded cheese. Lay 2 slices of the corned beef (tearing the slices to make fit, if necessary) on top of the cheese.

    Notes

    • Chill the pinwheels in the refrigerator for 30 minutes before slicing to help them hold their shape.
    • Feel free to add more spices or ingredients to suit your taste.
    • Prep Time: 20 minutes
    • Cook Time: 0 minutes
    • Category: Appetizer
    • Method: No-cook
    • Cuisine: American

    Nutrition

    • Serving Size: 1 pinwheel
    • Calories: 150
    • Sugar: 1g
    • Sodium: 500mg
    • Fat: 10g
    • Saturated Fat: 5g
    • Unsaturated Fat: 3g
    • Trans Fat: 0g
    • Carbohydrates: 10g
    • Fiber: 1g
    • Protein: 7g
    • Cholesterol: 30mg

    Sharing is caring!

  • Raw Cauliflower Salad

    Raw Cauliflower Salad


    Introduction to Raw Cauliflower Salad

    Welcome to the refreshing world of Raw Cauliflower Salad! If you’re like me, there are days when cooking feels like a mountain to climb amidst the hustle and bustle of life. This salad is a quick solution for a busy day. Packed with vibrant veggies and crunchy goodness, it not only pleases the palate but also impresses loved ones. Imagine the delight on your family’s faces when you serve this healthy dish, effortlessly combining flavor and nutrition. Let’s dive into this beautiful bowl of freshness and discover how easy it is to create something spectacular!

    Why You’ll Love This Raw Cauliflower Salad

    This Raw Cauliflower Salad is a lifesaver for busy moms and professionals alike. It comes together in just 15 minutes without any cooking! The freshness of crunchy vegetables, paired with a zesty dressing, makes each bite a taste sensation. Plus, it’s versatile enough for any meal, whether as a side dish or a light lunch. You’ll love the burst of colors and flavors that brighten up your table and your day!

    Ingredients for Raw Cauliflower Salad

    Gathering the ingredients for this delightful Raw Cauliflower Salad is part of the fun! Here’s what you’ll need to create this colorful, crunchy dish:

    • Cauliflower: The star of the show! This crisp vegetable adds a refreshing crunch and absorbs the dressing beautifully.
    • Sea Salt: Enhances flavors, helping bring out the natural sweetness of the vegetables.
    • Ground Black Pepper: A dash of spice to lift the flavor profile, making each bite zesty and enjoyable.
    • Purple Cabbage: Adds a pop of color and a lovely crunch. It’s also packed with nutrients!
    • Scallions: Both the white and green parts offer a mild onion flavor, adding another layer of taste to your salad.
    • Celery: Crisp and slightly sweet, this addition contributes a lovely texture and is full of fiber.
    • Pistachios: For that extra crunch! They also introduce healthy fats and a delightful nutty flavor.
    • Fresh Parsley: A touch of herbaceous freshness, brightening up the salad while providing antioxidants.
    • Frozen Green Peas: These little gems add a sweet burst and vibrant color. Plus, they’re convenient as they’re always on hand!
    • Medjool Dates: Sweet, chewy, and nutrient-dense, they offer a wonderful counterbalance to the salad’s crunchiness.
    • Olive Oil: The base of the dressing, delivering healthy fats and a smooth texture when blended.
    • Lime: Juice and zest bring a bright tang that ties all the flavors together, invigorating the salad.
    • Garlic: A little garlic goes a long way! It adds depth to the dressing without overpowering.
    • Shallot: Sweet and milder than regular onions, shallots enrich the dressing with a subtle flavor.

    Make sure to check the recipe at the bottom of the article for precise measurements. Feel free to customize your ingredients or even look for fresh, local produce to make this salad your own!

    How to Make Raw Cauliflower Salad

    Now that you have all the ingredients ready, let’s turn your kitchen into a mini culinary studio! Making this Raw Cauliflower Salad is as easy as pie—well, at least easier than making pie. Follow along as I take you through each step, providing fun tips along the way!

    Step 1: Prepare the Cauliflower

    First things first, let’s get that cauliflower ready! Cut it in half, and remove the leaves. Rinse it well under cold water to wash off any dirt or traces of pesticide. Pat it dry gently with a towel; moisture should not be your sidekick in this recipe.

    Step 2: Shave the Cauliflower

    Next, grab a knife or a food processor with a shredding disc. Shaving the cauliflower into thin, even slices gives it that perfect texture. Aim for pieces no thicker than a quarter-inch. This increases surface area, allowing the crunchy goodness to soak up all the dressing. Trust me; your taste buds will thank you!

    Step 3: Season the Cauliflower

    Once your cauliflower is neatly shaved, toss it into a large bowl. Sprinkle it with sea salt and ground black pepper. This simple step not only enhances the flavor but also prepares the cauliflower to absorb the dressing later on. Give it a gentle toss to coat every glorious piece.

    Step 4: Make the Dressing

    Time to bring some zing into our salad! In a smaller bowl, combine olive oil, diced shallot, lime zest, lime juice, and crushed garlic. Whisk it vigorously like you’re training for the culinary Olympics! If you prefer, you can shake it all up in a jar with a tight lid for easy mixing. The goal is to get that creamy consistency and wonderful aroma.

    Step 5: Combine Salad Ingredients

    Now, let’s add a burst of color! Gradually mix in the purple cabbage, scallions, diced celery, chopped pistachios, fresh parsley, frozen green peas, and diced medjool dates into the bowl with your seasoned cauliflower. Use your hands or spoon to combine everything gently—you want harmony in every bite!

    Step 6: Dress the Salad

    Time to pour that tangy dressing over the salad! Drizzle it all on top, and then toss the salad again. Make sure every single piece of that colorful mixture gets its fair share of the dressing. This is where the magic happens—the taste and freshness come together as one!

    Step 7: Let It Rest

    Patience, my friend! Allow the salad to sit for 10 to 15 minutes before serving. This short break lets the flavors mingle beautifully, creating a display of deliciousness that’s simply irresistible! You can serve it at room temperature or chill it in the fridge for a refreshing bite.

    Tips for Success

    • Use a sharp knife for clean cuts and to make slicing the cauliflower easier.
    • Want a little extra crunch? Add some sunflower seeds or almonds!
    • Don’t skip the resting period; it truly enhances the flavors.
    • Mix your dressing in advance for a quick assembly when you’re ready to serve.
    • Taste and adjust seasoning before serving; everyone’s palate is different!

    Equipment Needed

    • Cutting Board: A sturdy surface is essential. You can use any flat surface as an alternative.
    • Sharp Knife: A chef’s knife works perfectly. Any sharp knife will do for easier slicing.
    • Large Bowl: Any mixing bowl will work. Just make sure it’s big enough for tossing your ingredients.
    • Small Bowl: Ideal for mixing the dressing. A mason jar or cup can work, too.
    • Whisk or Jar with a Lid: Enhance mixing with a whisk. A jar for shaking works well too!

    Variations

    • Add Protein: Toss in chickpeas or grilled chicken for a heartier salad.
    • Switch Up the Nuts: Use walnuts or almonds instead of pistachios for a different flavor profile.
    • Incorporate Seasonal Veggies: Feel free to add grated carrots or bell peppers to enhance color and crunch.
    • Spice it Up: A sprinkle of red pepper flakes can give your salad a little heat if you like it zesty.
    • Vegan Option: Replace honey with maple syrup for a plant-based sweetener in your dressing.

    Serving Suggestions

    • Pair with Grilled Chicken: This salad complements a juicy, grilled chicken breast beautifully.
    • Serve with Crusty Bread: A side of warm, crusty bread makes for a satisfying meal.
    • Chill for a Refreshing Bite: Refrigerate before serving for a cool, delightful contrast.
    • Garnish with Extra Nuts: Top with additional pistachios or parsley for added flair.
    • Enjoy with a Light White Wine: A crisp Sauvignon Blanc pairs wonderfully with the flavors.

    FAQs about Raw Cauliflower Salad

    Can I use cooked cauliflower instead of raw?
    While raw cauliflower gives a delightful crunch, using cooked cauliflower can change the texture and taste of the salad. If you prefer cooked, steam it lightly and let it cool before mixing. However, I truly recommend trying it raw for that refreshing crispness!

    How long can I store this salad?
    This Raw Cauliflower Salad is best enjoyed fresh. However, you can store leftovers in an airtight container in the fridge for up to two days. Just remember, the veggies may lose some crunch over time, but the flavors will still be delightful!

    Can I make this salad in advance?
    Absolutely! Feel free to prepare the salad a few hours ahead of time. Just make sure to keep the dressing separate until you’re ready to serve to maintain the salad’s crunchiness. Mix it right before serving to ensure everything stays fresh!

    What can I substitute for pistachios?
    If you’re not a fan of pistachios or have nut allergies, consider using sunflower seeds or pumpkin seeds. They add a great crunch and are packed with nutrients. Plus, they’re a fun twist that keeps the salad healthy!

    Is Raw Cauliflower Salad suitable for meal prep?
    Yes! This salad is wonderful for meal prep. Just prep all your ingredients and store them separately. When you’re ready to eat, toss them together with the dressing for a fresh, quick meal anytime!

    Final Thoughts

    Creating this Raw Cauliflower Salad feels like a vibrant celebration in my kitchen. With every crunchy, colorful bite, I’m reminded of the joy that simple, fresh ingredients can bring into our lives. This quick yet delightful dish transforms busy days into opportunities for nourishment and connection. Whether you’re enjoying it solo or sharing it with loved ones, each serving is a feast for the senses. So, roll up your sleeves and embrace the beauty of this salad. It brings not just flavor, but a refreshing hug of health to your table, creating joyful moments to savor together!


    Print

    clock clock iconcutlery cutlery iconflag flag iconfolder folder iconinstagram instagram iconpinterest pinterest iconfacebook facebook iconprint print iconsquares squares iconheart heart iconheart solid heart solid icon

    Description

    A refreshing and crunchy salad made with raw cauliflower and a variety of colorful vegetables, nuts, and a tangy dressing.


    • 1 medium head of cauliflower
    • ½ teaspoon sea salt
    • ½ teaspoon ground black pepper
    • 2 cups chopped purple cabbage
    • 1 bunch scallions (white and green parts sliced thin)
    • 2 large stalks celery (diced)
    • ⅓ cup chopped pistachios
    • ½ cup chopped fresh parsley
    • 1½ cups frozen green peas
    • 3 medjool dates (pits removed and diced)
    • ¼ cup olive oil
    • 1 lime (zested and juiced)
    • 1 clove garlic
    • 1 small shallot (thinly sliced)

    1. Cut cauliflower in half, trim off the leaves, and wash well.
    2. Pat it dry then shave into thin slices using a knife or shredding disc in a food processor.
    3. Place shaved cauliflower in a large bowl and sprinkle with salt and pepper.
    4. In a small bowl, combine olive oil, sliced shallot, lime zest, lime juice, and grated garlic.
    5. Whisk the dressing well or shake in a jar with a tight lid until blended.
    6. Add cabbage, scallions, celery, pistachios, parsley, peas, and dates to the bowl with cauliflower.
    7. Pour dressing over the top and toss everything together until evenly coated.
    8. Let sit 10 to 15 minutes before serving for best flavor.
    9. Serve at room temperature or chilled.

    Notes

    • For added crunch, consider using additional nuts or seeds.
    • This salad can be made a few hours in advance; however, it’s best served fresh.
    • Prep Time: 15 minutes
    • Cook Time: None
    • Category: Salad
    • Method: No cooking required
    • Cuisine: American

    Nutrition

    • Serving Size: 1 cup
    • Calories: 180
    • Sugar: 5g
    • Sodium: 200mg
    • Fat: 14g
    • Saturated Fat: 2g
    • Unsaturated Fat: 8g
    • Trans Fat: 0g
    • Carbohydrates: 15g
    • Fiber: 5g
    • Protein: 5g
    • Cholesterol: 0mg

    Sharing is caring!

  • Pineapple Spinach Salad

    Pineapple Spinach Salad


    Introduction to Pineapple Spinach Salad

    I know how it feels to juggle a million tasks while trying to whip up a healthy meal. That’s why I absolutely love making a Pineapple Spinach Salad. This vibrant dish brings together the sweetness of fresh pineapple and the crispness of spinach, creating a delightful experience in every bite. It’s not just quick to prepare; it’s also packed with flavor and nutrients. Whether you need a side for dinner or a light lunch, this salad is your answer to deliciousness without the fuss. Trust me, your taste buds will thank you!

    Why You’ll Love This Pineapple Spinach Salad

    This Pineapple Spinach Salad shines in its simplicity. It comes together in just 20 minutes, making it a perfect solution for those hectic weekdays. The combination of sweet pineapple, creamy feta, and crunchy pecans creates a symphony of flavors, all while keeping it healthy. Plus, it’s versatile enough to fit various meals or occasions, leaving you feeling accomplished without spending hours in the kitchen.

    Ingredients for Pineapple Spinach Salad

    This delightful Pineapple Spinach Salad features a beautiful mix of fresh ingredients, perfect for any occasion. Here’s what you’ll need:

    • Garlic: Adds aromatic depth to the dressing. Fresh is always best, but minced jars work in a pinch.
    • Olive oil: A healthy fat that enhances flavors and helps to bind the dressing. Use extra virgin for a fruity finish.
    • Apple cider vinegar or lemon juice: Both add a tangy kick. Choose lemon if you prefer a more citrus-forward taste.
    • Sugar: Balances the acidity in the dressing. You can adjust this to your taste or use honey as a natural alternative.
    • Salt and pepper: Essential seasonings to bring out the best in your ingredients. Adjust these for personal preference!
    • Dry mustard (optional): Adds a little warmth and complexity to the dressing. A little goes a long way!
    • Butter: Used to candy the pecans, creating a rich flavor. If you prefer, coconut oil is a nice substitute.
    • Pecan halves: Bring delightful crunch and sweetness. Almonds or walnuts can work as substitutes if you desire.
    • Brown sugar: The star of candied pecans, giving them a caramelized texture. You can use coconut sugar or maple syrup for a different twist.
    • Spinach: The leafy base that’s both nutritious and fresh. Feel free to mix it with kale or arugula for a twist!
    • Pineapple: Fresh pineapple is best here, adding a juicy sweetness. Canned pineapple can work if you’re in a pinch, but it won’t be as vibrant.
    • Feta cheese: Creamy and slightly tangy, it pairs perfectly with the sweet elements. Go for goat cheese if you want a little different flavor.

    For exact quantities, check the bottom of the article, where you’ll find all the details ready for printing!

    How to Make Pineapple Spinach Salad

    Making this Pineapple Spinach Salad is a breeze! Follow these simple steps, and you’ll have a plate full of fresh flavors ready to enjoy. Let’s dive right in!

    Step 1 – Make the Dressing

    Start by gathering your ingredients for the dressing. In a mason jar or tupperware, combine minced garlic, olive oil, apple cider vinegar (or lemon juice), sugar, salt, pepper, and dry mustard if you choose. Seal it tightly and shake vigorously until all the ingredients meld together beautifully. This doesn’t just dress the salad; it brings it to life!

    Step 2 – Candy the Pecans

    Now, let’s turn our attention to the pecans. In a pan over medium-high heat, melt the butter. Once melted, add the pecan halves and give them a stir to coat. Sprinkle brown sugar over the top and let it heat for about 2-5 minutes. Watch closely as the sugar caramelizes and turns golden. Remove them from the heat and place them on wax paper to cool. You’ll love the crunch they add!

    Step 3 – Prepare the Salad

    With the dressing and pecans sorted, it’s time for the greens! In a large bowl, add the fresh spinach, chopped pineapple, and crumbled feta cheese. Gently toss everything together so that the colors and flavors mingle. The vibrant greens with the golden pineapple look almost like a tropical getaway in a bowl!

    Step 4 – Assemble the Salad

    Finally, let’s bring it all together. Sprinkle those cooled candied pecans generously over your salad. For the best experience, serve the dressing on the side. This way, everyone can drizzle it just before diving in. Trust me, the moment you take that first bite of this Pineapple Spinach Salad, it’ll be pure bliss!

    Tips for Success

    • Always use fresh spinach for the best flavor and texture.
    • Adjust the sweetness of the dressing and pecans to suit your taste buds.
    • You can prep the dressing and candied pecans in advance for quicker assembly.
    • Feel free to add other fruits like strawberries or apples for a twist.
    • Store leftovers in an airtight container, but enjoy fresh for optimal taste.

    Equipment Needed

    • Mason jar or tupperware: Perfect for shaking your dressing. A whisk also works if you prefer.
    • Non-stick pan: Ideal for candying the pecans. You can use any skillet you have on hand.
    • Large mixing bowl: Great for combining all your salad ingredients.
    • Wax paper: Useful for cooling your pecans. Parchment paper is a suitable alternative.

    Variations of Pineapple Spinach Salad

    • Vegan option: Omit feta cheese and substitute with avocado or chickpeas for added creaminess and protein.
    • Grilled pineapple: For a smoky flavor, grill the pineapple chunks before adding them to the salad. It amps up the tropical vibe!
    • Nut-free version: Skip the candied pecans and use sunflower seeds or pumpkin seeds for the crunch without the nuts.
    • Fruit mix-ins: Add other fruits like strawberries, blueberries, or mandarin oranges for more colorful and flavorful bites.
    • Protein power: Toss in grilled chicken or shrimp for a hearty meal that’s still light and refreshing.

    Serving Suggestions for Pineapple Spinach Salad

    • Pair this salad with grilled chicken or shrimp for a satisfying meal.
    • Serve alongside crispy garlic bread or a light quiche for a delightful brunch.
    • Drizzle with a balsamic glaze for an elegant presentation.
    • Enjoy with a refreshing glass of iced tea or lemonade to complement the flavors!

    FAQs about Pineapple Spinach Salad

    Curious about this delightful Pineapple Spinach Salad? Here are some common questions I often hear, along with answers that aim to help you whip up the best salad ever!

    Can I prepare Pineapple Spinach Salad ahead of time?

    Absolutely! You can make the dressing and candied pecans in advance. Just toss the salad ingredients together right before serving for the freshest taste.

    How long does the salad stay fresh?

    To maintain flavor and texture, enjoy the salad within a day of preparation. Leftovers can be stored in an airtight container, but the spinach may wilt over time.

    Can I make a gluten-free version?

    Yes, all the ingredients in this Pineapple Spinach Salad are naturally gluten-free! Just be sure to check the labels of the vinegar and any nuts you use.

    What other cheeses can I use besides feta?

    If feta isn’t your thing, goat cheese or even crumbled blue cheese can add a delicious twist. Each brings a unique flavor profile that complements the pineapple beautifully!

    Is this salad suitable for meal prep?

    It can be! Just keep the dressing separate until you’re ready to enjoy it. This way, you’ll keep the salad crisp and fresh all week long!

    Final Thoughts

    Every time I prepare this Pineapple Spinach Salad, it feels like a mini celebration of flavors. The combination of sweet, savory, and crunchy elements dances on my palate, making me smile with every bite. It’s a breeze to whip up, even on the busiest days. Plus, it’s a hit with my family, bringing everyone to the table with excitement. Whether you’re looking for a refreshing side dish or a light main course, this salad delivers joy in abundance. So, gather your ingredients and indulge in this vibrant experience; I promise you’ll savor every moment!


    Print

    clock clock iconcutlery cutlery iconflag flag iconfolder folder iconinstagram instagram iconpinterest pinterest iconfacebook facebook iconprint print iconsquares squares iconheart heart iconheart solid heart solid icon

    Description

    A refreshing salad combining the sweetness of pineapple, the richness of feta cheese, and the crunch of candied pecans, all tossed with nutrient-rich spinach.


    • 2 cloves garlic, minced
    • ⅓ cup olive oil
    • ⅓ cup apple cider vinegar (or lemon juice)
    • 1 tablespoon sugar
    • ½ teaspoon salt
    • Pepper to taste
    • to ¼ teaspoon dry mustard (optional)
    • 2 tablespoons butter
    • 1 cup pecan halves
    • 2 tablespoons brown sugar
    • 1013 ounces spinach
    • 1 pineapple, chopped into bite-size pieces
    • 6 ounces feta cheese

    1. Make the dressing: Combine garlic, olive oil, apple cider vinegar, sugar, salt, pepper, and dry mustard (if using) in a mason jar or tupperware. Seal and shake until well combined. Set aside.
    2. Candy the pecans: In a pan, melt butter over medium-high heat. Add pecans, stir to coat, and sprinkle brown sugar over them. Cook for 2-5 minutes until the sugar starts to caramelize. Place on a wax paper-lined sheet to cool.
    3. Prepare the salad: In a large bowl, add spinach, pineapple, and feta cheese. Toss gently to combine.
    4. Assemble the salad: Sprinkle cooled candied pecans over the salad. Serve with dressing on the side, drizzling it over the salad just before serving.

    Notes

    • For a vegan version, omit feta cheese and use alternative ingredients.
    • Adjust the sweetness by varying the amount of sugar in the dressing and candied pecans.
    • Prep Time: 15 minutes
    • Cook Time: 5 minutes
    • Category: Salad
    • Method: Mixing and cooking
    • Cuisine: American

    Nutrition

    • Serving Size: 1 serving
    • Calories: 320
    • Sugar: 10g
    • Sodium: 300mg
    • Fat: 25g
    • Saturated Fat: 4g
    • Unsaturated Fat: 20g
    • Trans Fat: 0g
    • Carbohydrates: 30g
    • Fiber: 4g
    • Protein: 6g
    • Cholesterol: 10mg

    Sharing is caring!

  • Tangy Lemon Meringue Tart

    Tangy Lemon Meringue Tart


    Introduction to Tangy Lemon Meringue Tart

    There’s something utterly delightful about a slice of Tangy Lemon Meringue Tart that just brightens up your day. Whether you’re winding down after a busy week or looking to impress guests with a homemade dessert, this tart is your answer. The combination of the fluffy meringue and the zesty lemon filling creates a refreshing experience that’s hard to resist.

    In just a bit, I’ll guide you through how to create this citrus bliss. It’s simple enough that even on your busiest of days, this tart can be baked and served with love. Let’s dive in!

    Why You’ll Love This Tangy Lemon Meringue Tart

    This Tangy Lemon Meringue Tart is a real game-changer for busy days. Not only is it quick to prepare, but it also delivers vibrant flavors that will leave your family asking for seconds. The balance of sweet meringue and tart lemon creates a symphony in your mouth.

    Plus, this dessert makes a stunning centerpiece for gatherings, making you the star of any event without the stress. You’ll love how easy it is to elevate your dessert game!

    Ingredients for Tangy Lemon Meringue Tart

    Let’s gather our ingredients for this delightful Tangy Lemon Meringue Tart. Here’s a list of what you’ll need to whip up this zesty dessert:

    • All-purpose flour: This is the base for your tart crust. It provides the perfect structure.
    • Unsalted butter: Cold and cubed, it creates a tender crust. Make sure it’s chilly for the best texture!
    • Granulated sugar: You’ll need this for both the crust and the filling; it balances the tartness of the lemons.
    • Salt: A pinch elevates all the flavors. Don’t skip it!
    • Egg yolk: This adds richness to the dough, making it flaky.
    • Ice-cold water: Helps bring the crust dough together without warming it up too much.
    • Fresh lemon juice: The star of the recipe! It gives that unmistakably tangy flavor.
    • Eggs: These thicken your lemon curd and lend it a silky texture.
    • Cold unsalted butter: Stirred into the curd, it adds smoothness and richness.
    • Lemon zest: Freshly grated, it enhances the lemon flavor immensely.
    • Egg whites: Essential for the meringue topping, they whip up beautifully into fluffy peaks.
    • Cream of tartar: This stabilizes the meringue, ensuring it holds its shape when baked.
    • Vanilla extract: Just a hint adds depth to the meringue.
    • Fresh lemon zest and mint leaves (optional): These are lovely garnishes for a pop of color and flavor.

    For the exact measurements of these ingredients, you can find them at the bottom of this article. Now, gather these goodies, and let’s get baking!

    How to Make Tangy Lemon Meringue Tart

    Now that we have our ingredients ready, let’s dive into the step-by-step process of creating this delicious Tangy Lemon Meringue Tart!

    Prepare the Tart Crust

    First things first—let’s make the crust! In a large mixing bowl, combine the all-purpose flour, cold cubed butter, granulated sugar, and a pinch of salt. Use your fingertips to rub the butter into the flour until the mixture resembles coarse crumbs. This is crucial!

    The cold butter is what helps us get that tender, flaky crust. Once you achieve the right texture, add the egg yolk and start incorporating the ice-cold water, one tablespoon at a time. You’ll only want to mix until the dough comes together. Wrap it in plastic and refrigerate for at least an hour to chill.

    Roll Out the Dough

    After the dough has chilled, it’s time to roll it out! Dust a clean surface with flour and carefully roll the dough to about a 1/4-inch thickness. Be gentle; you don’t want to overwork it! Once rolled, press the dough into a 9-inch tart pan, making sure the sides are well covered. Prick the bottom with a fork to prevent puffing while baking.

    Bake the Tart Crust

    With the crust shaped nicely, preheat your oven to 350°F (175°C). Bake the tart crust for about 15-20 minutes or until it’s golden brown. Check it occasionally to avoid over-baking. Once baked, let it cool completely on a wire rack.

    Prepare the Lemon Curd

    While the crust cools, let’s whip up the lemon curd! In a saucepan, mix the fresh lemon juice, granulated sugar, eggs, and lemon zest together. Cook over medium heat, stirring constantly. You want it to thicken enough to coat the back of a spoon—this should take about 10 minutes.

    Once thickened, remove it from the heat and stir in cold cubed butter until melted and smooth. Pour this luscious lemon curd into your cooled crust, spreading it evenly.

    Prepare the Meringue Topping

    Now for the magical meringue! In a clean bowl, beat your egg whites until frothy. Gradually add in the granulated sugar while continuing to beat. Keep going until stiff peaks form—that’s when the meringue stands strong and proud on the whisk.

    Add the cream of tartar and a splash of vanilla extract, beating until the mixture is glossy. This will create the perfect topping for our tart!

    Assemble the Tart

    Time to bring it all together! Spoon the fluffy meringue over the lemon curd filling. Use the back of a spoon to create swirls and peaks in the meringue. I love making my topping look as artistic as possible, so feel free to get creative!

    Bake the Tart

    Preheat your oven to 375°F (190°C) for the final bake. Place your assembled tart back in the oven for 10-12 minutes, or until the meringue is golden brown and lightly toasted. Keep an eye on it, folks! Once done, remove it from the oven and let it cool completely.

    Garnish and Serve

    For that final touch, garnish your Tangy Lemon Meringue Tart with fresh lemon zest and mint leaves if desired. This will not only enhance its look but also add a splash of flavor. Slice it up and serve immediately. This tart is sure to wow everyone at your table!

    Tips for Success

    • Make sure your butter remains cold for a flaky crust and airy meringue.
    • Use fresh lemons for the best flavor; bottled juice doesn’t compare!
    • Let the tart cool completely to ensure clean slices.
    • Experiment with meringue textures; peaks can be tall or swirled based on your style.
    • Store leftovers covered in the fridge, but enjoy it fresh if possible!

    Equipment Needed

    • Tart pan: A 9-inch tart pan with a removable bottom works best. You can also use a pie dish.
    • Mixing bowls: Have at least two—one for the crust and another for the filling.
    • Electric mixer: Perfect for whipping the meringue, but a whisk will do in a pinch!
    • Rubber spatula: Great for spreading the lemon curd and meringue evenly.

    Variations

    • Fruit Variations: Replace lemon with lime or other citrus juices for a unique twist.
    • Gluten-Free Option: Substitute all-purpose flour with a gluten-free flour blend for those with dietary restrictions.
    • Sweetener Swap: Use honey or maple syrup in place of sugar for a natural sweetening option.
    • Coconut Meringue: Add shredded coconut to the meringue for added texture and flavor.
    • Herbal Infusion: Steep fresh herbs like basil or mint in the lemon curd for a refreshing herbal note.

    Serving Suggestions

    • Pair your Tangy Lemon Meringue Tart with a dollop of whipped cream for added richness.
    • A refreshing iced tea or lemonade complements the tartness beautifully.
    • Serve individual slices on colorful plates for a fun presentation.
    • Add fresh berries on the side for a pop of color and extra flavor.

    FAQs about Tangy Lemon Meringue Tart

    Can I use bottled lemon juice for the filling?
    While you can, I truly recommend fresh lemon juice. The flavor from fresh lemons is undeniable and makes all the difference in your Tangy Lemon Meringue Tart.

    How do I store leftovers?
    To keep your tart fresh, cover it with plastic wrap and store it in the fridge. However, it’s best enjoyed within a couple of days!

    Can I make the crust ahead of time?
    Absolutely! You can prepare the tart crust a day in advance. Just remember to keep it wrapped and refrigerated until you’re ready to make the filling.

    What can I do if my meringue doesn’t hold its shape?
    If your meringue isn’t holding peaks, it might be due to fat residue on your mixing bowl. Ensure your bowl is thoroughly clean and free from any grease before whipping your egg whites.

    Is this Tangy Lemon Meringue Tart suitable for special diets?
    While this tart is vegetarian, you can customize it to fit gluten-free or lower-sugar diets by using appropriate substitutes for the flour and sugar.

    Final Thoughts

    Baking this Tangy Lemon Meringue Tart is more than just a culinary endeavor; it’s a joyful experience that fills your kitchen with warmth and delightful aromas. Each slice embodies the perfect blend of tart and sweet, leaving your taste buds dancing.

    Sharing this dessert with family and friends creates cherished moments that linger long after the last bite. Whether it’s a casual weeknight treat or a centerpiece for a gathering, this tart brings smiles and satisfaction. Embrace the joy of baking, and let this tangy masterpiece brighten up your days!


    Print

    clock clock iconcutlery cutlery iconflag flag iconfolder folder iconinstagram instagram iconpinterest pinterest iconfacebook facebook iconprint print iconsquares squares iconheart heart iconheart solid heart solid icon

    Description

    A refreshing and delightful dessert featuring a tangy lemon filling topped with fluffy meringue.


    • 1 1⁄2 cups all-purpose flour
    • 1⁄2 cup unsalted butter, cold and cubed
    • 1⁄4 cup granulated sugar
    • 1⁄4 teaspoon salt
    • 1 large egg yolk
    • 23 tablespoons ice-cold water
    • 1 cup fresh lemon juice
    • 1 cup granulated sugar
    • 4 large eggs
    • 1⁄2 cup unsalted butter, cold and cubed
    • Zest of 2 lemons
    • 4 large egg whites
    • 1 cup granulated sugar
    • 1⁄2 teaspoon cream of tartar
    • 1⁄2 teaspoon vanilla extract
    • Fresh lemon zest (optional)
    • Fresh mint leaves (optional)

    1. Prepare the Tart Crust: In a large bowl, combine the flour, cold cubed butter, sugar, and salt. Using your fingertips, rub the butter into the flour mixture until it resembles coarse crumbs. Add the egg yolk and ice-cold water, one tablespoon at a time, mixing just until the dough comes together. Wrap the dough in plastic wrap and refrigerate for at least 1 hour to chill.
    2. Roll Out the Dough: On a lightly floured surface, roll out the chilled dough to about 1/4-inch thickness. Press the dough into a 9-inch tart pan with a removable bottom, ensuring the sides are well-covered. Prick the bottom of the tart crust with a fork to prevent puffing.
    3. Bake the Tart Crust: Preheat your oven to 350°F (175°C). Bake the tart crust for 15-20 minutes, or until golden brown. Allow the tart crust to cool completely.
    4. Prepare the Lemon Curd: In a saucepan, combine the lemon juice, sugar, eggs, and lemon zest. Cook over medium heat, stirring constantly, until the mixture thickens and coats the back of a spoon. Remove from heat and stir in the cold cubed butter until melted and smooth. Pour the lemon curd into the cooled tart crust and spread evenly.
    5. Prepare the Meringue Topping: In a clean bowl, beat the egg whites until frothy. Gradually add the sugar, beating until stiff peaks form. Add the cream of tartar and vanilla extract, beating until the meringue is glossy and holds stiff peaks.
    6. Assemble the Tart: Spread the meringue topping over the lemon curd, creating swirls and peaks with the back of a spoon.
    7. Bake the Tart: Preheat your oven to 375°F (190°C). Bake the tart for 10-12 minutes, or until the meringue is golden brown and lightly toasted. Allow the tart to cool completely.
    8. Garnish and Serve: Garnish the tart with fresh lemon zest and mint leaves, if desired. Serve immediately and enjoy!

    Notes

    • For best results, ensure that the butter is cold when making the crust and meringue.
    • Let the tart cool completely before slicing to set the filling.
    • This tart can be made a day in advance; just keep it covered in the refrigerator.
    • Prep Time: 30 minutes
    • Cook Time: 40 minutes
    • Category: Dessert
    • Method: Baking
    • Cuisine: American

    Nutrition

    • Serving Size: 1 slice
    • Calories: 320
    • Sugar: 25g
    • Sodium: 150mg
    • Fat: 16g
    • Saturated Fat: 10g
    • Unsaturated Fat: 4g
    • Trans Fat: 0g
    • Carbohydrates: 40g
    • Fiber: 1g
    • Protein: 4g
    • Cholesterol: 100mg

    Sharing is caring!

  • Fudgy Memorial Day Brownies with Red, White & Blue Toppings

    Fudgy Memorial Day Brownies with Red, White & Blue Toppings


    Introduction to Fudgy Memorial Day Brownies with Red, White & Blue Toppings

    Memorial Day is just around the corner, and if you’re anything like me, you’re juggling a busy schedule while trying to whip up something special. Enter my Fudgy Memorial Day Brownies with Red, White & Blue Toppings! These brownies are not only delicious but also simple to make, making them the perfect treat for family gatherings or backyard barbecues. Their rich, fudgy texture topped with festive sprinkles will surely impress your loved ones. And the best part? You can whip them up in no time, even on your busiest days!

    Why You’ll Love This Fudgy Memorial Day Brownies with Red, White & Blue Toppings

    These brownies are pure crowd-pleasers! They’re incredibly easy to make, so you can squeeze them into your hectic day without stress. The rich chocolate flavor combines with the playful colors of red, white, and blue—making them the star of any celebration. Plus, they’re perfect for satisfying sweet cravings while bringing a festive touch to your Memorial Day festivities. What’s not to love?

    Ingredients for Fudgy Memorial Day Brownies with Red, White & Blue Toppings

    Let’s dive into the delightful ingredients that come together to create these scrumptious Fudgy Memorial Day Brownies with Red, White & Blue Toppings. Each component plays a crucial role in delivering that rich, chocolaty goodness we all adore. Here’s what you’ll need:

    • Unsalted butter: This gives the brownies a rich and creamy texture. Unsalted is best so you can control the saltiness.
    • Granulated sugar: The sweetener that brings out the chocolate flavor and keeps the brownies moist. You can substitute with brown sugar for added depth.
    • Large eggs: Eggs help bind the ingredients together, creating that fudgy consistency. You can use flax eggs as a vegan alternative.
    • Vanilla extract: A splash of vanilla enhances the overall flavor, adding warmth and sweetness.
    • All-purpose flour: This helps structure the brownies while keeping them soft and chewy.
    • Cocoa powder: The star ingredient for that rich chocolate taste. For a more intense flavor, opt for Dutch-processed cocoa powder.
    • Salt: A tiny pinch balances the sweetness and enhances the chocolate flavor.
    • Red, white, and blue sprinkles: These are not just for decoration! They add a festive flair, making your brownies perfect for Memorial Day.

    For exact measurements, check the bottom of the article where you can also find these details available for printing. Remember, a little creativity in your ingredient choices can make these brownies uniquely yours!

    How to Make Fudgy Memorial Day Brownies with Red, White & Blue Toppings

    Now that you have your ingredients ready, let’s dive into the delightful process of making these Fudgy Memorial Day Brownies with Red, White & Blue Toppings. I promise, it’s easier than baking a pie! Follow along, and you’ll have a batch of brownies that will make your family cheer.

    Step 1: Preheat the Oven and Prepare the Pan

    First things first, preheat your oven to 350°F (175°C). This ensures your brownies bake evenly. While the oven warms up, grease a 9×13 inch baking pan. You can use cooking spray or butter. Trust me, this little bit of prep keeps your brownies from sticking and makes cleanup a breeze!

    Step 2: Melt the Butter

    Time to melt that butter! In a large saucepan, place the unsalted butter over low heat. Stir it occasionally to prevent burning. Once it’s fully melted, remove it from the heat. The sweet aroma will start floating in the air—just wait and see!

    Step 3: Combine Ingredients

    In the same pan, stir in the granulated sugar. This mix is best done while everything is still warm! Toss in the eggs one at a time, along with the vanilla extract. Beat everything together until it’s smooth and creamy. Then, gently fold in the all-purpose flour, cocoa powder, and salt. Mix until just combined, but don’t overdo it—there’s no need for extra muscles here!

    Step 4: Spread and Top the Batter

    Now for the fun part! Pour the luscious brownie batter into your prepared pan. Use a spatula to spread it evenly; you want each bite to be just as scrumptious as the last. Finally, sprinkle those festive red, white, and blue sprinkles on top. It’s like giving your brownies a patriotic makeover!

    Step 5: Bake to Perfection

    Slide the pan into your preheated oven and set a timer for 30 minutes. The edges should firm up, while the center remains delectably soft. Keep an eye on them toward the end—every oven is a bit different! A toothpick inserted should come out with a few moist crumbs, not wet batter.

    Step 6: Cool and Cut

    Once baked, let your brownies cool in the pan. This step is crucial! Cooling completely will make cutting into perfect squares a breeze. Trust me, your patience will pay off in a nice, clean cut—no crumbles here!

    Tips for Success

    • Always use room temperature eggs for a smoother batter.
    • Don’t overmix after adding flour; it makes the brownies tough.
    • For extra fudginess, underbake by a couple of minutes.
    • Let the brownies cool completely for clean cuts.
    • Store in an airtight container to maintain freshness.

    Equipment Needed

    • 9×13 inch baking pan: A glass or metal pan works well, ensuring even baking.
    • Large saucepan: Use a heavy-bottomed one to distribute heat evenly.
    • Spatula: A silicone or rubber spatula is perfect for mixing and spreading.
    • Mixing spoon: Wooden or plastic spoons do the trick.
    • Measuring cups and spoons: Essential for accuracy in baking.

    Variations

    • Nutty Addition: Stir in some chopped walnuts or pecans for added texture and flavor.
    • Chocolate Chips: Add semi-sweet or milk chocolate chips to the batter for an extra chocolatey treat.
    • Vegan Option: Substitute eggs with flax eggs and use a plant-based butter for a delicious vegan version.
    • Gluten-Free: Swap all-purpose flour with a gluten-free baking blend for a tasty gluten-free brownie.
    • Minty Fresh: Incorporate a few drops of mint extract for a refreshing twist.

    Serving Suggestions

    • Pair your brownies with a scoop of vanilla ice cream for a delightful contrast.
    • Serve alongside fresh strawberries or blueberries for a fruity touch.
    • Drizzle with chocolate sauce or caramel for an extra indulgent experience.
    • Present them on a festive platter to impress your guests.
    • Enjoy with a hearty cup of coffee or iced tea for the ultimate treat!

    FAQs about Fudgy Memorial Day Brownies with Red, White & Blue Toppings

    Can I use different sprinkles?

    Absolutely! While I recommend red, white, and blue sprinkles for a festive touch, feel free to use any colors or toppings you adore. Get creative!

    How should I store my brownies?

    Store your brownies in an airtight container at room temperature. They’ll stay fresh for about a week. For longer storage, freeze them wrapped tightly in plastic wrap.

    Can I make these brownies ahead of time?

    Definitely! You can bake them a day in advance. Just let them cool completely before storing, and they’ll still taste fabulous on the big day.

    What’s the best way to cut brownies for clean edges?

    For the neatest cuts, use a sharp knife and wipe it clean between cuts. This helps prevent any crumbly mess and keeps those brownie squares looking beautiful!

    Can I substitute ingredients for dietary restrictions?

    Sure! You can easily make a gluten-free version by using a gluten-free flour blend. Additionally, flax eggs can replace regular eggs for a vegan treat that everyone will enjoy.

    Final Thoughts

    Preparing these Fudgy Memorial Day Brownies with Red, White & Blue Toppings brings a wave of happiness as you gather with family and friends. The joy of sharing these soft, chocolatey treats, adorned with festive sprinkles, feels like a warm hug on a sunny day. Baking these brownies isn’t just about dessert; it’s about creating memories and connecting with loved ones. Whether you’re hosting a backyard barbecue or just enjoying a quiet moment at home, these delightful brownies remind us that the simplest things often bring the most joy. Happy baking!


    Print

    clock clock iconcutlery cutlery iconflag flag iconfolder folder iconinstagram instagram iconpinterest pinterest iconfacebook facebook iconprint print iconsquares squares iconheart heart iconheart solid heart solid icon

    Description

    Fudgy Memorial Day Brownies adorned with red, white, and blue sprinkles, perfect for celebrating the holiday.


    • 1 cup unsalted butter
    • 2 cups granulated sugar
    • 4 large eggs
    • 1 teaspoon vanilla extract
    • 1 cup all-purpose flour
    • 1/2 cup cocoa powder
    • 1/2 teaspoon salt
    • 1 cup red, white, and blue sprinkles

    1. Preheat your oven to 350°F (175°C) and grease a 9×13 inch baking pan.
    2. In a large saucepan, melt the butter over low heat. Remove from heat and stir in sugar, eggs, and vanilla.
    3. Beat in flour, cocoa, and salt until the batter is smooth and well combined.
    4. Spread the batter evenly into the prepared pan and sprinkle with red, white, and blue sprinkles.
    5. Bake in the preheated oven for 30 minutes or until the edges are firm and the center is set.
    6. Allow to cool before cutting into squares and serving.

    Notes

    • Make sure to let the brownies cool completely for easier cutting.
    • These brownies can be stored in an airtight container at room temperature for up to one week.
    • Prep Time: 15 minutes
    • Cook Time: 30 minutes
    • Category: Dessert
    • Method: Baking
    • Cuisine: American

    Nutrition

    • Serving Size: 1 brownie
    • Calories: 200
    • Sugar: 18g
    • Sodium: 150mg
    • Fat: 10g
    • Saturated Fat: 6g
    • Unsaturated Fat: 4g
    • Trans Fat: 0g
    • Carbohydrates: 25g
    • Fiber: 1g
    • Protein: 2g
    • Cholesterol: 50mg

    Sharing is caring!