Blog

  • Meatball Lasagna Roll-Ups

    Meatball Lasagna Roll-Ups


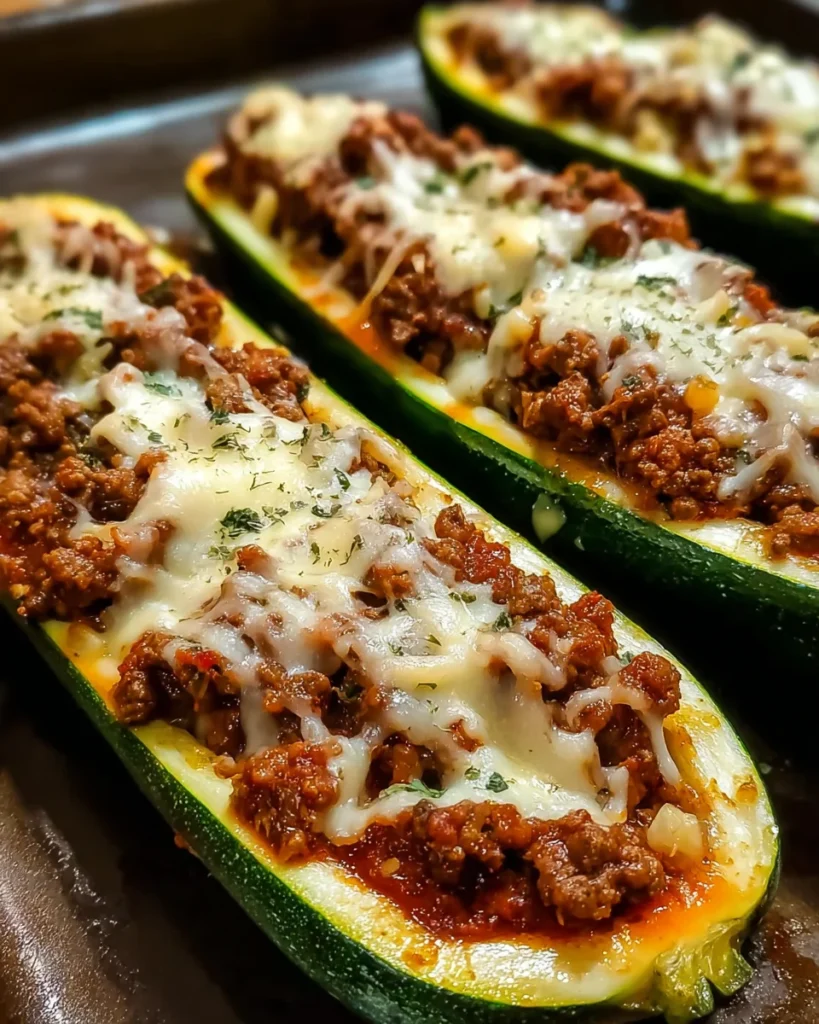
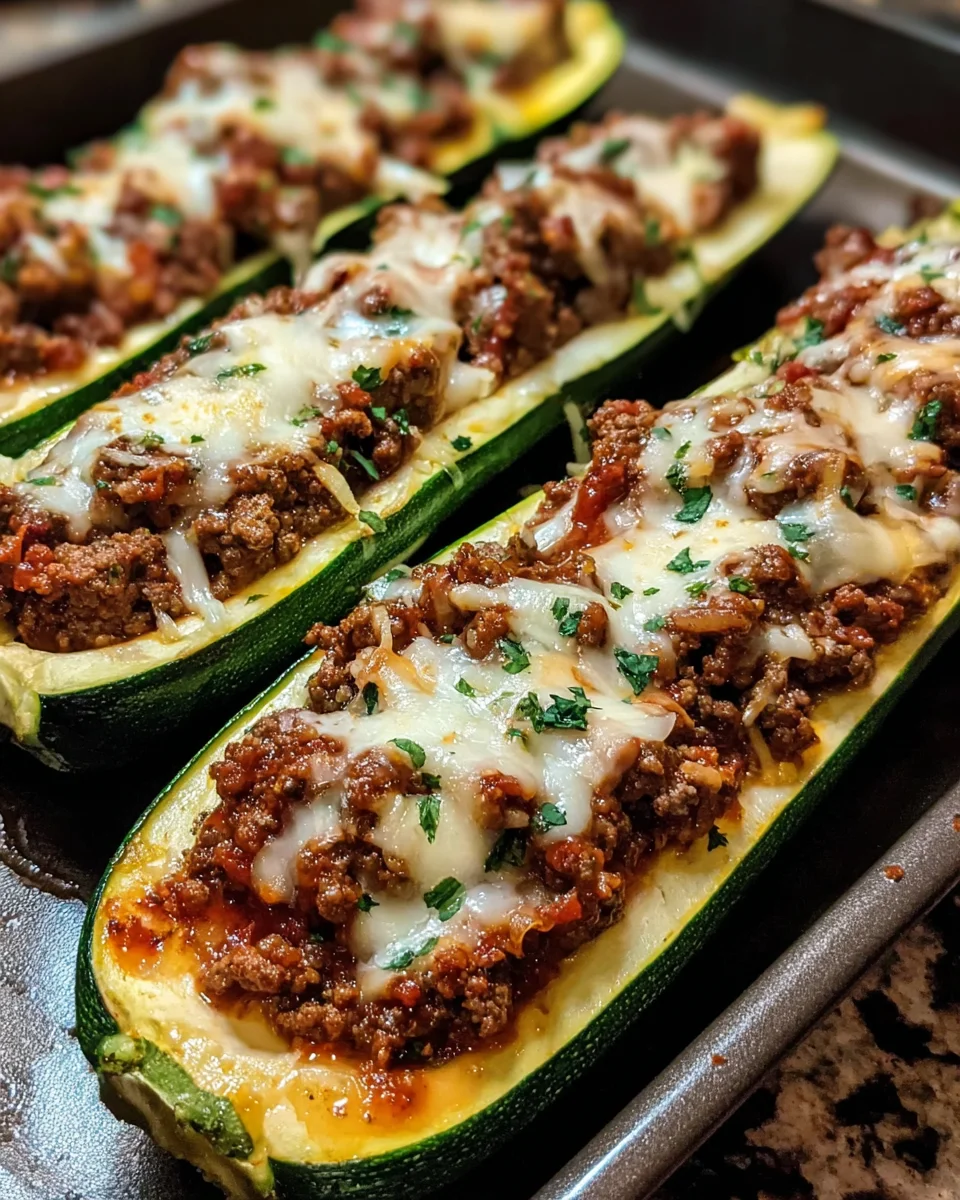
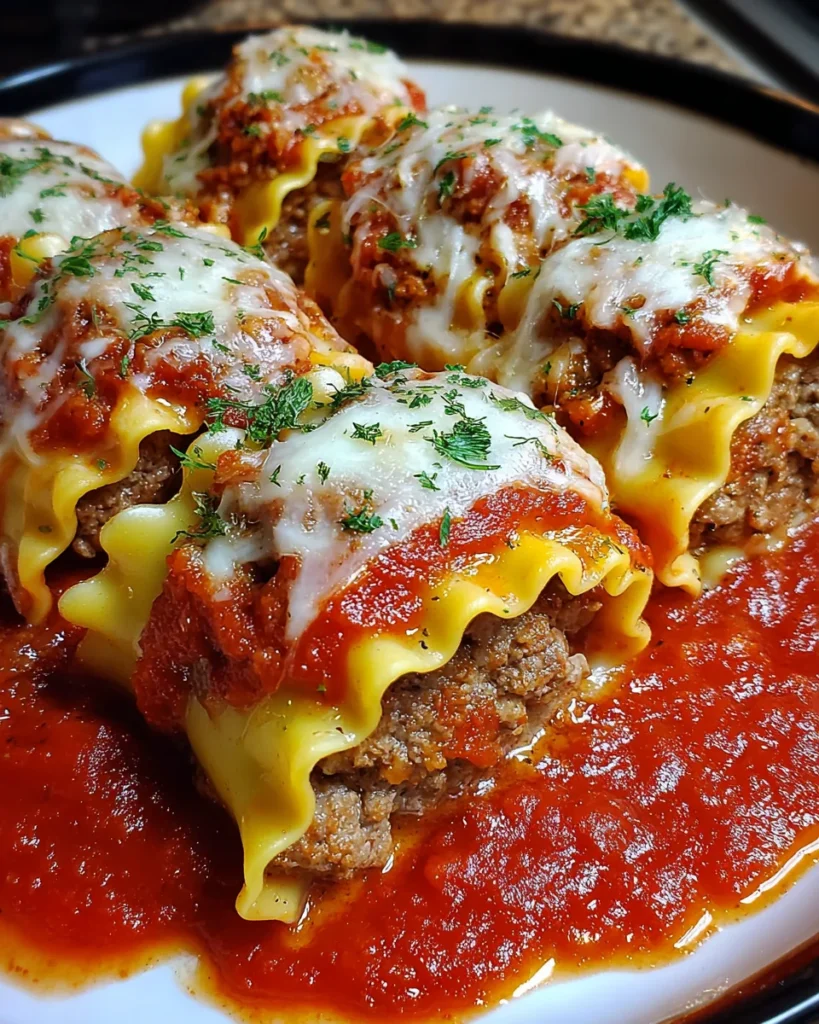
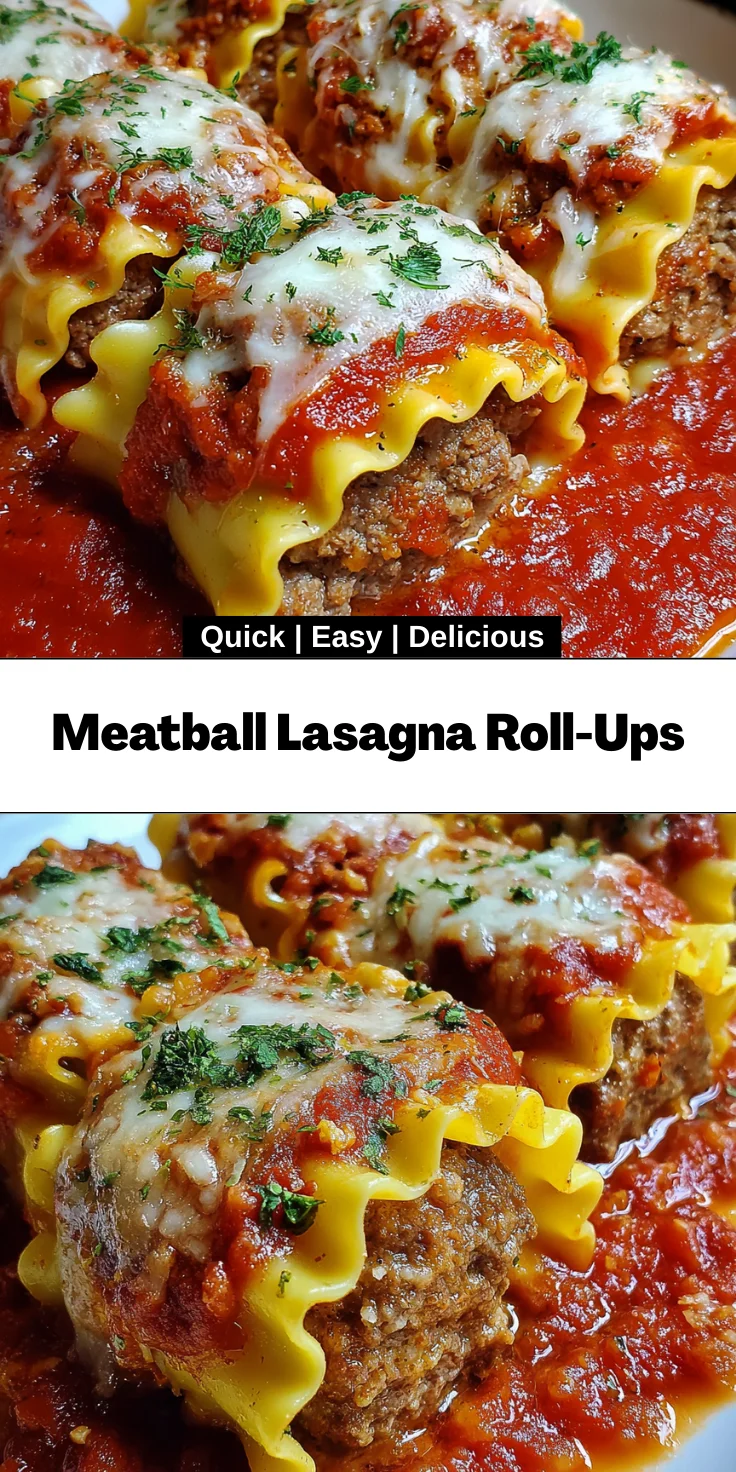
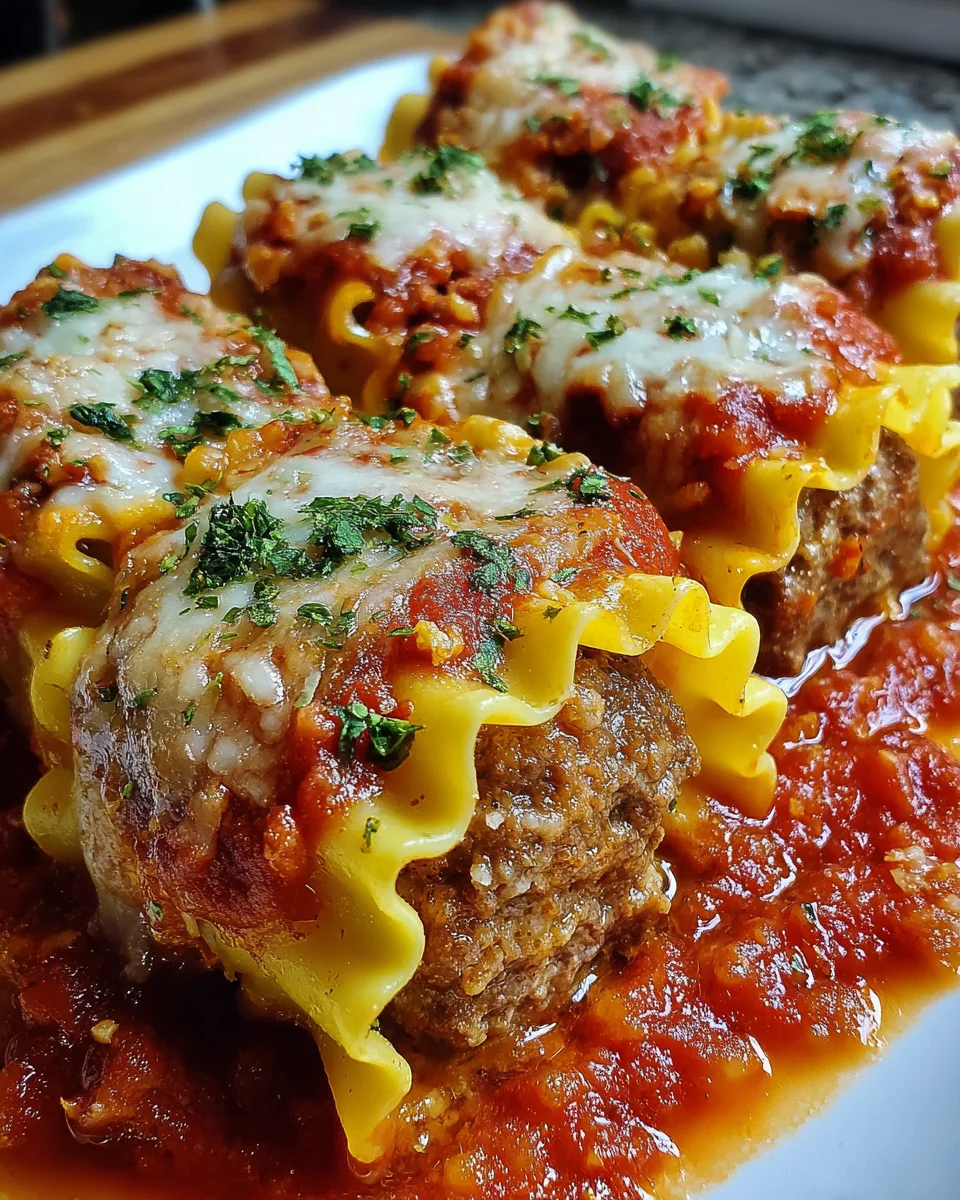
    Introduction to Meatball Lasagna Roll-Ups

    As a busy mom, I know the struggle of needing a quick solution for dinner without sacrificing flavor. That’s where my Meatball Lasagna Roll-Ups come in—it’s the perfect dish to impress your loved ones without spending hours in the kitchen. Imagine rolling up savory meatballs and creamy cheeses inside tender lasagna noodles, all topped with rich marinara sauce and melted mozzarella. It’s like a warm hug on a plate! Plus, these roll-ups are a fun way to bring the family together, turning mealtime into a little culinary adventure.

    Why You’ll Love This Meatball Lasagna Roll-Ups

    These Meatball Lasagna Roll-Ups are not just delicious; they’re a total game-changer for busy nights! With minimal prep time and a simple baking process, dinner can be ready in less than an hour. The bursts of flavor from seasoned meatballs and gooey cheese will have your family asking for seconds. Plus, they’re versatile—perfect for a quick weeknight meal or special occasions. Who doesn’t love comfort food that’s also a little fancy?

    Ingredients for Meatball Lasagna Roll-Ups

    Gathering your ingredients for Meatball Lasagna Roll-Ups is half the fun. Each one adds a little something special to the dish. Here’s what you’ll need:

    • Lasagna noodles: The base of our roll-ups, these stretchy sheets hold everything together!
    • Ground beef or Italian sausage: This is where the meatball magic begins! You can also use turkey or chicken for a leaner option.
    • Breadcrumbs: They help bind the meatballs and add a bit of texture.
    • Grated Parmesan cheese: A sprinkle of nutty flavor to elevate your meatballs!
    • Egg: Acts as the magic glue for those meatballs, keeping everything in place.
    • Garlic: A must-have for that aromatic punch! Fresh minced garlic works best.
    • Italian seasoning: A blend of herbs that brings depth to your meatballs. Feel free to adjust to taste!
    • Salt and black pepper: Essential for seasoning and enhancing all those yummy flavors.
    • Ricotta cheese: Adds creaminess to the filling, making each bite satisfying.
    • Shredded mozzarella cheese: It wouldn’t be lasagna without a generous layer of melty mozzarella on top!
    • Marinara sauce: A rich and tangy sauce that ties the whole dish together; choose your favorite store-bought or homemade version.
    • Olive oil: A splash for sautéing and adding flavor to the roll-ups.

    If you’re looking to customize, don’t hesitate to toss in different herbs or veggies! Also, the ingredients with exact quantities can be found below, making it easy to grab and cook right away.

    How to Make Meatball Lasagna Roll-Ups

    Now that we’ve gathered our ingredients, let’s roll up our sleeves and get to cooking! Making Meatball Lasagna Roll-Ups is a delightful process, and I’m excited to guide you through each step.

    Preheating and Preparation

    First, let’s start by preheating the oven to 190°C (375°F). A hot oven means perfectly baked roll-ups!

    While the oven warms up, grease a large baking dish with olive oil or nonstick spray. This will prevent our delicious creation from sticking later on. Set the dish aside, and we’ll come back to it soon!

    Making the Meatballs

    Next, it’s time to create those savory meatballs. In a large mixing bowl, combine the ground beef or Italian sausage with breadcrumbs, grated Parmesan, and the beaten egg. The egg acts as a binding agent, holding everything together!

    Add the minced garlic, Italian seasoning, salt, and black pepper to the mix. As you blend these ingredients, take a moment to appreciate the aromas wafting up. It’s like a cozy hug from your kitchen!

    Now, shape the mixture into small, uniform meatballs. I find that using a cookie scoop helps with portioning, making them all about the same size. It ensures even cooking!

    Heat olive oil in a skillet over medium heat. Brown the meatballs for about 8–10 minutes, turning occasionally until they’re fully cooked. Once done, transfer them to a plate and set aside. You’re halfway there!

    Assembling the Roll-Ups

    Time for the fun part! Lay each cooked lasagna noodle flat on a clean surface. Spread a thin layer of ricotta cheese across each noodle. This creamy goodness adds richness!

    Now, place 2 to 3 cooked meatballs at one end of the noodle. Feel free to add a sprinkle of mozzarella for some extra cheese goodness. Roll each noodle tightly from the meatball end and place them seam-side down in the prepared baking dish.

    Once all the roll-ups are nestled in the dish, pour about 240 ml of marinara sauce over them, ensuring they’re nicely covered. Finally, sprinkle the remaining mozzarella cheese on top. Cheese really makes everything better, doesn’t it?

    Baking the Roll-Ups

    Cover the dish tightly with aluminum foil to keep all those delicious flavors locked in. Bake for 25 minutes in your preheated oven. The anticipation will have your mouth watering!

    After 25 minutes, carefully remove the foil and continue baking for an additional 10 minutes until the cheese is golden and bubbling. The sight of that melted cheese is like music to my eyes!

    Once done, let the roll-ups cool for several minutes before serving. Trust me; the wait is worth it! Your Meatball Lasagna Roll-Ups are ready to impress!

    Tips for Success

    • Prep your ingredients ahead of time to make the assembly smoother.
    • Use a sharp knife to cut through lasagna noodles for neat roll-ups.
    • Get creative—add spinach or mushrooms to the ricotta filling!
    • Make extra meatballs and freeze them for future meals.
    • Keep an eye on the cheese while baking to achieve that perfect golden color!

    Equipment Needed

    • Baking dish: A 9×13 inch dish works well; use any large oven-safe dish.
    • Skillet: A nonstick skillet is great, but any skillet will do for browning.
    • Mixing bowl: Any large bowl for combining ingredients is perfect.
    • Cookie scoop: For easy meatball shaping; a spoon works, too!
    • Aluminum foil: Essential for covering the dish while baking.

    Variations

    • Vegetarian Option: Substitute meat with cooked lentils or plant-based meat alternatives for a tasty vegetarian dish.
    • Extra Veggies: Add sautéed spinach, zucchini, or mushrooms to the ricotta filling for added nutrition and flavor.
    • Spicy Kick: Mix in some crushed red pepper flakes with the meat mixture for flavorful spice.
    • Cheesy Twist: Experiment with different cheeses like Gouda or fontina for a unique taste.
    • Gluten-Free: Use gluten-free lasagna noodles and breadcrumbs to accommodate dietary restrictions.

    Serving Suggestions

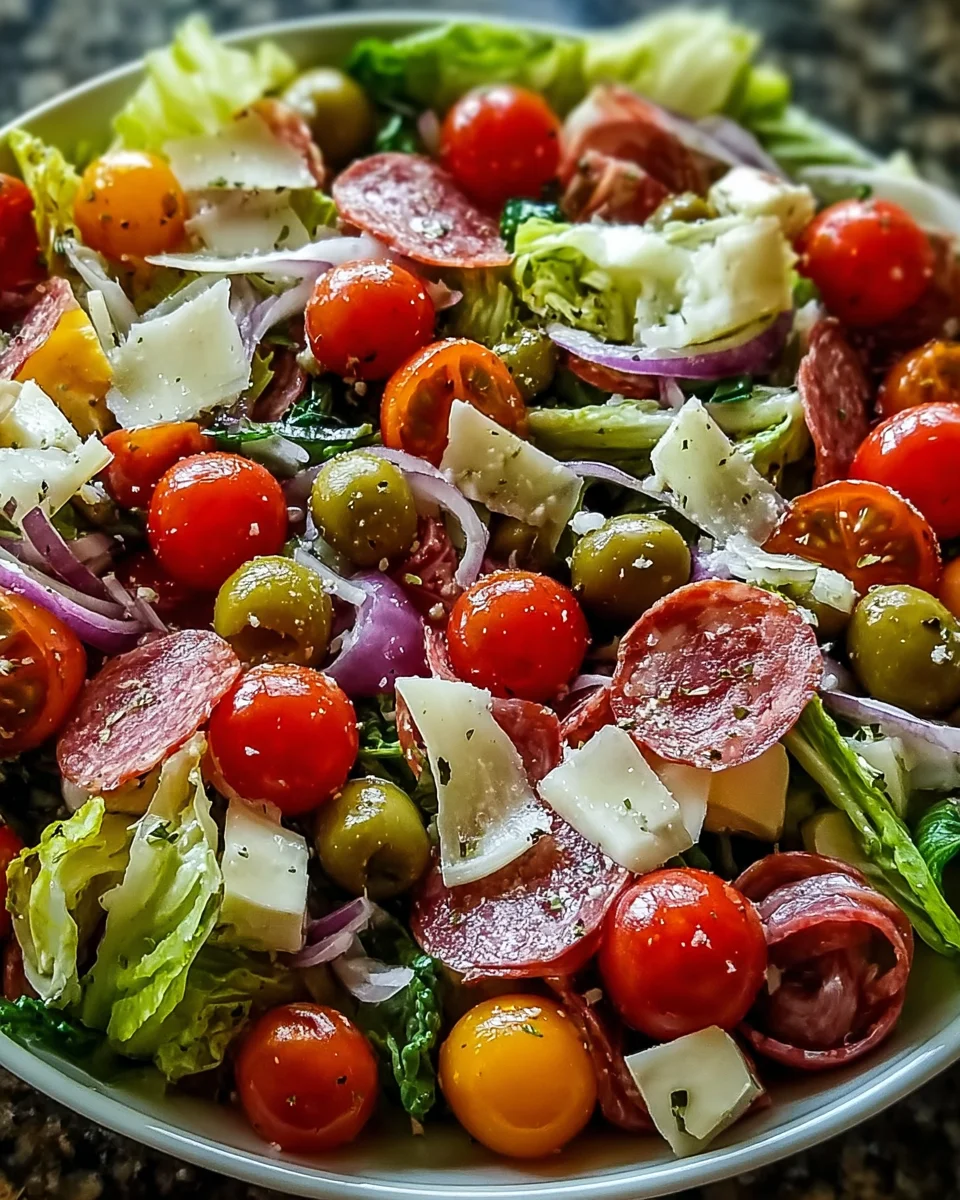
    • Pair these Meatball Lasagna Roll-Ups with a fresh green salad for a balanced meal.
    • A side of garlic bread is perfect for soaking up that delicious marinara sauce.
    • Consider serving with a light white wine, like Pinot Grigio, for a delightful pairing.
    • For presentation, garnish with fresh basil or parsley for a pop of color!

    FAQs about Meatball Lasagna Roll-Ups

    Can I prepare Meatball Lasagna Roll-Ups in advance?
    Absolutely! You can assemble these delicious roll-ups ahead of time and refrigerate them for later. Just cover your baking dish tightly with plastic wrap or aluminum foil.

    What can I substitute for ricotta cheese?
    If you don’t have ricotta, cream cheese or cottage cheese can work in a pinch. Each brings a unique flavor and texture to your Meatball Lasagna Roll-Ups.

    How can I make these roll-ups gluten-free?
    You can easily adapt this recipe to be gluten-free by using gluten-free lasagna noodles and breadcrumbs. You’ll still enjoy all that comforting goodness without any hassle!

    Can I use frozen meatballs for this recipe?
    Sure! Using frozen meatballs is a fantastic time-saver. Just heat them according to package instructions and then follow the assembly steps.

    What sides go well with Meatball Lasagna Roll-Ups?
    These roll-ups pair beautifully with a simple side salad or garlic bread. It’s the perfect way to round out your meal!

    Final Thoughts

    Making Meatball Lasagna Roll-Ups is more than just cooking; it’s about weaving memories around the dinner table. Each bite is a comforting embrace that brings the family together, turning an ordinary weeknight into something special. These roll-ups offer a chance to showcase your culinary creativity while keeping it practical for those busy days. You might even find yourself laughing and chatting with loved ones as you enjoy this delightful dish. So roll up those noodles, soak in the good times, and relish each delicious moment that Meatball Lasagna Roll-Ups bring to your home!


    Print

    clock clock iconcutlery cutlery iconflag flag iconfolder folder iconinstagram instagram iconpinterest pinterest iconfacebook facebook iconprint print iconsquares squares iconheart heart iconheart solid heart solid icon

    Description

    Meatball Lasagna Roll-Ups are a delicious twist on traditional lasagna, featuring rolled lasagna noodles filled with seasoned meatballs and cheeses, topped with marinara sauce and melted mozzarella.


    • 12 cooked lasagna noodles
    • 450 g ground beef or Italian sausage
    • 60 g breadcrumbs
    • 25 g grated Parmesan cheese
    • 1 egg, beaten
    • 2 cloves garlic, minced
    • 1 teaspoon Italian seasoning
    • 0.5 teaspoon salt
    • 0.25 teaspoon ground black pepper
    • 120 g ricotta cheese
    • 170 g shredded mozzarella cheese
    • 480 ml marinara sauce
    • 1 tablespoon olive oil

    1. Preheat oven to 190°C. Grease a large baking dish with olive oil or nonstick spray.
    2. In a large mixing bowl, combine ground beef or Italian sausage, breadcrumbs, grated Parmesan, beaten egg, minced garlic, Italian seasoning, salt, and black pepper. Mix until evenly blended.
    3. Shape the mixture into small, uniform meatballs. Heat olive oil in a skillet over medium heat. Brown the meatballs on all sides, cooking through, for about 8–10 minutes. Transfer to a plate and set aside.
    4. Lay each cooked lasagna noodle flat on a clean surface. Spread a thin layer of ricotta cheese along each noodle. Place 2 to 3 cooked meatballs along one end, then roll up tightly.
    5. Pour 240 ml marinara sauce into the prepared baking dish. Arrange the roll-ups seam-side down in a single layer.
    6. Spoon the remaining marinara sauce over the roll-ups and sprinkle evenly with shredded mozzarella cheese.
    7. Cover the dish tightly with aluminum foil. Bake for 25 minutes, then uncover and continue baking for an additional 10 minutes until cheese is golden and bubbling.
    8. Allow the roll-ups to cool for several minutes before serving.

    Notes

    • Feel free to add other herbs and spices to customize the flavor.
    • These roll-ups can be prepared ahead of time and refrigerated before baking.
    • For a vegetarian version, substitute the meat with plant-based alternatives.
    • Prep Time: 20 minutes
    • Cook Time: 35 minutes
    • Category: Main Course
    • Method: Baking
    • Cuisine: Italian

    Nutrition

    • Serving Size: 1 roll-up
    • Calories: 400
    • Sugar: 5 g
    • Sodium: 900 mg
    • Fat: 20 g
    • Saturated Fat: 8 g
    • Unsaturated Fat: 7 g
    • Trans Fat: 0 g
    • Carbohydrates: 36 g
    • Fiber: 2 g
    • Protein: 22 g
    • Cholesterol: 70 mg

    Sharing is caring!

  • Chicken Blueberry Feta Salad

    Chicken Blueberry Feta Salad


    Introduction to Chicken Blueberry Feta Salad

    Summer is the season for vibrant flavors and fresh ingredients, and when it comes to salads, the Chicken Blueberry Feta Salad shines bright! As a busy mom, I totally understand the struggle of whipping up something nutritious that everyone will love. This salad is not only a quick solution for a hectic day, but it also impresses your loved ones with its colorful presentation and delightful taste. The combination of juicy grilled chicken, tangy blueberries, and creamy feta creates a delightful harmony that’s simply irresistible. Trust me, you’ll want to make this again and again!

    Why You’ll Love This Chicken Blueberry Feta Salad

    This Chicken Blueberry Feta Salad is a game-changer in my kitchen! It’s quick to prepare, taking just over half an hour, which means less time in the kitchen and more time with family. The sweet blueberries complement the savory chicken and salty feta beautifully, making each bite a burst of flavor. Plus, it’s a healthy option that checks all the boxes, satisfying both picky eaters and health-conscious members of your family.

    Ingredients for Chicken Blueberry Feta Salad

    Gathering the right ingredients is essential for creating this delicious Chicken Blueberry Feta Salad. Here’s what you’ll need:

    • Boneless, skinless chicken breasts: The star of this dish! They are lean, easy to grill, and full of protein.
    • Spring mix greens: A blend of tender lettuce varieties adds a light, fresh base for our salad.
    • Blueberries: Juicy and sweet, these tiny gems add a wonderful burst of flavor and health benefits, too!
    • Feta cheese: Creamy and salty, feta provides a delightful contrast to the salad’s sweetness.
    • Dried cranberries: For an extra touch of sweetness and texture, these add a lovely chewy bite.
    • Red onion: This adds a bit of crunch and sharpness, balancing the sweeter ingredients perfectly.
    • Cucumber: Crisp and refreshing, cucumber enhances the salad’s overall freshness.
    • Olive oil: A must for our vinaigrette, it adds richness and helps to meld the flavors.
    • Balsamic vinegar: This adds a tangy depth that beautifully complements the sweetness of the blueberries.
    • Garlic: Just a hint, but it packs a flavorful punch in our homemade vinaigrette.
    • Honey: A little natural sweetness to balance the acidity of the vinaigrette.
    • Salt and pepper: Essential seasonings to enhance the flavors across the board.

    For exact quantities, check the end of the article where you can find a printable version of this recipe.

    How to Make Chicken Blueberry Feta Salad

    Now for the fun part—bringing all these beautiful ingredients together! Making this Chicken Blueberry Feta Salad is easier than you might think. Follow my simple steps below, and you’ll have a stunning dish ready in no time.

    Step 1: Prepare the Vinaigrette

    Let’s kick things off with the vinaigrette. In a bowl or a mason jar, combine the olive oil, balsamic vinegar, minced garlic, honey, salt, and pepper. If you have kids, let them give it a good shake or whisk it together—it’s a fun little activity!

    Once it’s well mixed, set the vinaigrette aside. This tangy dressing will tie all the flavors together beautifully once we layer the salad.

    Step 2: Grill the Chicken

    Next, it’s time for the chicken! Season those chicken breasts generously with salt and pepper. Preheat your grill to high heat, and place the chicken on it. Grill them for about 6 to 8 minutes on each side until cooked through, or when they reach an internal temperature of 165°F.

    After grilling, let the chicken rest for a few minutes. This allows the juices to redistribute, resulting in juicier bites! Once rested, slice the chicken into thin strips so it can nestle nicely atop our salad.

    Step 3: Assemble the Salad

    In a large bowl, start layering the spring mix greens. It’s like building a canvas for your masterpiece! Top the greens with the blueberries, dried cranberries, chopped red onion, cucumber, and crumbled feta cheese. Finally, add those stunning slices of grilled chicken.

    As you assemble, feel free to arrange the ingredients artfully—after all, we eat with our eyes first!

    Step 4: Drizzle with Vinaigrette

    Now for the finishing touch! Just before serving, drizzle your homemade vinaigrette over the top of the salad. This is where the magic happens. Toss everything gently to mix. You want every ingredient to get a taste of that delicious dressing!

    And there you have it! This Chicken Blueberry Feta Salad is ready to be savored. Trust me, you’re going to love how fresh and flavorful it is!

    Tips for Success

    • Marinate the chicken in the vinaigrette for a few hours to enhance flavor.
    • Use fresh, ripe blueberries for the best taste and texture.
    • Prep your ingredients ahead of time to save time during meal prep.
    • Keep the vinaigrette separate until serving to maintain fresh greens.
    • Feel free to substitute feta with goat cheese for a different flavor twist!

    Equipment Needed

    • Grill or Grill Pan: Essential for that perfect grilled chicken. A stovetop grill pan works too!
    • Mixing Bowl or Mason Jar: For preparing the vinaigrette; a jar adds a fun twist!
    • Cutting Board: To slice your chicken and veggies easily.
    • Sharp Knife: For clean cuts in your ingredients, making prep a breeze!
    • Salad Serving Bowl: A large bowl to beautifully showcase your Chicken Blueberry Feta Salad.

    Variations

    • Fruit Swaps: Try adding sliced strawberries or raspberries instead of blueberries for a twist.
    • Nuts for Crunch: Toss in some chopped walnuts or almonds for added texture and a healthy fat boost.
    • Herb Infusion: Mix in fresh herbs like basil or mint for an aromatic freshness that elevates the salad.
    • Grilled Veggies: Consider adding grilled zucchini or bell peppers for a smoky flavor and extra nutrients.
    • Vegan Option: Substitute chicken with grilled tofu or chickpeas and use a plant-based feta cheese.

    Serving Suggestions for Chicken Blueberry Feta Salad

    • Pair with Crusty Bread: Serve with a side of crusty baguette or garlic bread for a delightful crunch.
    • Refreshing Drink: Complement with a chilled glass of sparkling lemonade or iced tea for a refreshing sip.
    • Garnish with Fresh Herbs: Top with freshly chopped mint or basil for a pop of flavor and color.
    • Presentation: Use a large, vibrant salad bowl to showcase the colorful ingredients beautifully.

    FAQs about Chicken Blueberry Feta Salad

    Can I make Chicken Blueberry Feta Salad ahead of time?

    Yes! Prepare all the ingredients in advance and store them separately. Just add the vinaigrette just before serving to keep the greens fresh and vibrant.

    What can I substitute for feta cheese?

    If feta isn’t your thing, goat cheese is a fantastic alternative. You could also try crumbled ricotta for a creamy twist.

    How many calories are in a serving of this salad?

    Each serving of the Chicken Blueberry Feta Salad contains about 350 calories, making it a nutritious option that won’t wreck your diet.

    Can I use frozen blueberries?

    While fresh blueberries are best for flavor and texture, you can use frozen blueberries in a pinch. Just make sure to thaw and drain them before adding to the salad to avoid excess moisture.

    Is this Chicken Blueberry Feta Salad gluten-free?

    Absolutely! This salad is naturally gluten-free, making it a safe choice for those with gluten sensitivities or celiac disease.

    Final Thoughts

    Creating this Chicken Blueberry Feta Salad feels like a culinary adventure, a delightful journey through fresh, vibrant ingredients. Each bite offers a harmonious blend of textures and flavors that brightens any meal. It’s the simple joys, like tossing a salad with loved ones or enjoying a warm summer evening on the patio, that make life more delightful.

    Whether you’re prepping for a family dinner or a sunny picnic, this salad is sure to impress. Trust me, it brings smiles and satisfied bellies every time! You and your family deserve this refreshing dish in your lives.


    Print

    clock clock iconcutlery cutlery iconflag flag iconfolder folder iconinstagram instagram iconpinterest pinterest iconfacebook facebook iconprint print iconsquares squares iconheart heart iconheart solid heart solid icon

    Description

    A refreshing and nutritious salad combining grilled chicken, blueberries, feta cheese, and a homemade vinaigrette, perfect for summer.


    • 1 lb boneless, skinless chicken breasts
    • 4 cups spring mix greens
    • 1 1/4 cups blueberries
    • 1/2 cup crumbled feta cheese
    • 1/2 cup dried cranberries
    • 1/2 cup chopped red onion
    • 1 cup chopped cucumber
    • 6 tbsp olive oil
    • 1/4 cup balsamic vinegar
    • 1/2 clove garlic, minced
    • 1 tbsp honey
    • 1/4 tsp salt
    • 1/8 tsp pepper

    1. Prepare the vinaigrette by whisking together olive oil, balsamic vinegar, minced garlic, honey, salt, and pepper in a bowl or mason jar.
    2. Season the chicken breasts with salt and pepper. Grill over high heat for 6-8 minutes on each side until cooked through (165°F). Let rest before slicing.
    3. In a large bowl, layer spring mix greens. Top with blueberries, cranberries, red onion, cucumber, feta cheese, and sliced chicken.
    4. Drizzle with vinaigrette just before serving.

    Notes

    • For extra flavor, marinate the chicken in the vinaigrette for a few hours before grilling.
    • This salad can be prepared ahead of time; just add the vinaigrette right before serving to keep the greens fresh.
    • Prep Time: 15 minutes
    • Cook Time: 16 minutes
    • Category: Salad
    • Method: Grilling
    • Cuisine: American

    Nutrition

    • Serving Size: 1 serving
    • Calories: 350
    • Sugar: 10g
    • Sodium: 300mg
    • Fat: 20g
    • Saturated Fat: 4g
    • Unsaturated Fat: 16g
    • Trans Fat: 0g
    • Carbohydrates: 25g
    • Fiber: 4g
    • Protein: 25g
    • Cholesterol: 70mg

    Sharing is caring!

  • Ground Beef Zucchini Boats

    Ground Beef Zucchini Boats


    Introduction to Ground Beef Zucchini Boats

    Hey there, fellow home cooks! Are you juggling a busy family schedule and still trying to whip up something healthy? If so, you’ll adore these Ground Beef Zucchini Boats. They’re like little edible canoes that are savory, satisfying, and oh-so-simple to make! With flavorful ground beef nestled into tender zucchini, it’s a meal that hugs your taste buds and warms your heart. This dish is not just quick but also a fun way to sneak in some veggies for the picky eaters at home. Let’s dig into this delicious recipe that promises to impress your loved ones!

    Why You’ll Love This Ground Beef Zucchini Boats

    These Ground Beef Zucchini Boats are a game-changer for your dinner rotation. They combine speed and simplicity, making them perfect for busy weekdays. Plus, they’re adaptable and delicious, with savory flavors that make everyone at the table happy. And let’s face it: who doesn’t love a meal that looks as good as it tastes? You’ll find yourself making this recipe again and again!

    Ingredients for Ground Beef Zucchini Boats

    Let’s gather our ingredients for the tasty Ground Beef Zucchini Boats. This dish isn’t just healthy; it’s also a delightful way to use up some fresh veggies. Here’s what you’ll need:

    • Zucchinis: Four medium zucchinis, which will be transformed into your “boats.” Look for firm zucchinis with a vibrant skin for the best flavor.
    • Ground Beef: A pound of ground beef adds protein and heartiness to the dish. You can opt for lean ground beef or even turkey if you’re looking for a lighter version.
    • Onion: One small diced onion brings sweetness and depth to the flavor. Yellow or white onions work beautifully here.
    • Garlic: Two cloves of minced garlic add that irresistible aroma. Fresh garlic is a must for the best taste!
    • Tomato Sauce: One cup of tomato sauce ties everything together with its rich flavor. Choose a good-quality sauce or even homemade, if you have some on hand.
    • Cheese: A cup of shredded cheese (mozzarella, cheddar, or parmesan) offers gooey goodness. Feel free to mix cheeses for a delicious combo!
    • Olive Oil: Just a tablespoon adds richness and helps in sautéing the veggies. Extra virgin is the best choice for flavor.
    • Italian Seasoning: One teaspoon of this blend adds herbs and spices, giving a comforting taste of Italy.
    • Paprika: A half teaspoon brings a mild warmth and color to the dish. Smoked paprika is a great option for an extra layer of flavor.
    • Salt and Pepper: To taste! These two pantry staples enhance all the other flavors.

    For those looking to play around, remember you can add different vegetables or spices. If you’re short on zucchini, bell peppers also make adorable boats! You’ll find the exact quantities at the bottom of the article, so you can easily print the full recipe.

    How to Make Ground Beef Zucchini Boats

    Ready to dive into the kitchen? Making these Ground Beef Zucchini Boats is like a culinary adventure that’s sure to thrill both you and your family. Let’s walk through each step together, transforming simple ingredients into a delicious feast!

    Step 1: Preheat the Oven

    First things first: preheat your oven to 375°F (190°C). This step ensures your zucchini boats cook evenly and helps to melt the cheese into gooey perfection!

    Step 2: Prepare the Zucchini

    Next, grab your zucchinis. Slice them in half lengthwise, then scoop out the center with a spoon. Make sure to leave a little flesh so they hold their shape. You want them to resemble little boats ready to be filled with the savory goodness!

    Step 3: Pre-bake the Zucchini

    Now, brush those zucchini halves with a bit of olive oil. Place them cut-side up on a baking sheet. Pre-bake in the oven for 5-7 minutes. This softens the zucchini and makes it the perfect vessel for your filling.

    Step 4: Sauté the Vegetables

    While the zucchinis are pre-baking, heat a tablespoon of olive oil in a skillet over medium heat. Add in the diced onion. Sauté until translucent, stirring occasionally. The aroma of onions cooking is truly heartwarming, isn’t it?

    Step 5: Cook the Ground Beef

    Once the onion has softened, toss in the minced garlic. Cook for about 30 seconds until fragrant. Then, add the pound of ground beef to the skillet. Brown the beef, breaking it apart with a spatula. Drain any excess fat when browned; we want the dish to be hearty, not greasy!

    Step 6: Combine the Mixture

    Now, it’s time for the secret sauce. Stir in the cup of tomato sauce along with the Italian seasoning, paprika, salt, and pepper. Let this simmer for about 5 minutes. The flavors combine beautifully, creating a rich filling.

    Step 7: Fill the Zucchini Boats

    With the filling ready, it’s time to get creative! Spoon the savory mixture into the pre-baked zucchini boats. Be generous! Make sure to pack it in, leaving room to sprinkle cheese on top.

    Step 8: Bake and Serve

    Sprinkle that delicious shredded cheese on top of each filled zucchini boat. Return them to the oven and bake for an additional 15 minutes. You’ll know they’re done when the cheese is melted and bubbly. Your kitchen will smell divine! Serve these warm, garnished with fresh herbs if you’re feeling fancy.

    Tips for Success

    • Use firm zucchinis to avoid soggy boats.
    • For extra flavor, consider adding some red pepper flakes to the beef mixture.
    • Experiment with different cheeses like feta or gouda for a unique twist.
    • Ensure that your ground beef is browned well for a richer taste.
    • Get creative! Add bell peppers or mushrooms to the mixture for added veggies.

    Equipment Needed

    • Baking Sheet: A sturdy baking sheet to hold your zucchini boats. Any large, flat oven-safe dish can work too.
    • Skillet: A non-stick skillet is ideal for sautéing. But if you don’t have one, a regular pan will do.
    • Spoon: A simple spoon is great for scooping out the zucchini pulp.
    • Knife: A sharp knife will make cutting the zucchinis easy.

    Variations

    • Turkey or Chicken: Substitute ground beef with ground turkey or chicken for a lighter version that’s equally delicious.
    • Vegetarian Delight: Replace the meat with diced mushrooms, spinach, or black beans for a hearty vegetarian alternative.
    • Spicy Kick: Add diced jalapeños or a sprinkle of crushed red pepper flakes for an added layer of heat.
    • Cheese Lovers: Experiment with different cheeses like feta, provolone, or goat cheese for a unique flavor twist.
    • Grain Fillers: Mix in cooked quinoa or brown rice to the beef mixture for added texture and a boost in fiber.

    Serving Suggestions

    • Pair the Ground Beef Zucchini Boats with a light salad, like a classic Caesar or mixed greens, for a refreshing complement.
    • A glass of chilled white wine, such as Sauvignon Blanc, enhances the savory flavors beautifully.
    • For a fun presentation, serve on a colorful platter and garnish with fresh parsley or basil.

    FAQs about Ground Beef Zucchini Boats

    Can I use other ground meats for zucchini boats? Absolutely! Ground turkey or chicken works beautifully in this recipe as a lighter option. You could even try ground lamb for a bit of a Mediterranean twist.

    How long can I store leftovers? You can store leftovers in an airtight container in the refrigerator for up to three days. They make for a quick and delicious lunch option!

    What if I can’t find zucchini? Don’t fret! Bell peppers or even eggplants can serve as delightful substitutes. Simply cut them in half and scoop out some of their insides to fill.

    Can I prepare these in advance? Yes! You can assemble the zucchini boats the day before and pop them into the oven when you’re ready to eat. They’ll taste just as delicious!

    What toppings can I add to enhance the flavor? Fresh herbs, like parsley or basil, add a burst of flavor. A drizzle of balsamic glaze can also elevate the dish beautifully!

    Final Thoughts

    Making Ground Beef Zucchini Boats has been such a joyful experience for me, and I hope it brings you the same delight! They effortlessly combine health and taste, making them a wonderful dinner option you can feel good about serving. Whether you’re cooking for family or hosting friends, these boats are sure to steal the show. The satisfaction of seeing everyone enjoy the meal is truly priceless. Plus, knowing you packed in veggies makes the hearts (and tummies) of your loved ones happier. Dive into this recipe and savor every moment of deliciousness!


    Print

    clock clock iconcutlery cutlery iconflag flag iconfolder folder iconinstagram instagram iconpinterest pinterest iconfacebook facebook iconprint print iconsquares squares iconheart heart iconheart solid heart solid icon

    Description

    Ground Beef Zucchini Boats are a delicious and healthy dinner option, featuring zucchini halves filled with a savory mixture of ground beef, tomatoes, and cheese.


    • 4 medium zucchinis, halved lengthwise and scooped out
    • 1 pound ground beef
    • 1 small onion, diced
    • 2 cloves garlic, minced
    • 1 cup tomato sauce
    • 1 cup shredded cheese (mozzarella, cheddar, or parmesan)
    • 1 tablespoon olive oil
    • 1 teaspoon Italian seasoning
    • ½ teaspoon paprika
    • Salt and pepper to taste

    1. Preheat the oven to 375°F (190°C).
    2. Slice the zucchinis in half lengthwise and scoop out the center to create boats.
    3. Brush zucchini halves with olive oil and place on a baking sheet.
    4. Pre-bake zucchini for 5-7 minutes to soften.
    5. In a skillet, heat olive oil and sauté diced onion until translucent.
    6. Add minced garlic and cook for 30 seconds.
    7. Stir in ground beef and cook until browned, breaking it apart.
    8. Drain excess fat and mix in tomato sauce, Italian seasoning, paprika, salt, and pepper.
    9. Simmer the mixture for 5 minutes.
    10. Spoon beef mixture into pre-baked zucchini boats and sprinkle with cheese.
    11. Bake for 15 minutes until cheese is melted and bubbly.
    12. Garnish with fresh herbs and serve immediately.

    Notes

    • Feel free to customize the cheese used based on your preference.
    • Add additional vegetables to the beef mixture for a healthier option.
    • Leftovers can be stored in an airtight container in the refrigerator for up to 3 days.
    • Prep Time: 15 minutes
    • Cook Time: 25 minutes
    • Category: Main Course
    • Method: Baking
    • Cuisine: American

    Nutrition

    • Serving Size: 1 zucchini boat
    • Calories: 320
    • Sugar: 5g
    • Sodium: 600mg
    • Fat: 20g
    • Saturated Fat: 7g
    • Unsaturated Fat: 13g
    • Trans Fat: 0g
    • Carbohydrates: 10g
    • Fiber: 3g
    • Protein: 25g
    • Cholesterol: 70mg

    Sharing is caring!

  • Caramelized Onion Sourdough Bread

    Caramelized Onion Sourdough Bread


    Introduction to Caramelized Onion Sourdough

    Welcome to the delicious world of caramelized onion sourdough! If you’re anything like me, juggling a busy schedule and family life can sometimes leave you craving comfort food that feels both indulgent and wholesome. This recipe is a gem for those days when you want to impress loved ones or treat yourself to something special without spending hours in the kitchen. The rich, savory flavor of caramelized onions paired with the tangy sourdough makes for a delightful loaf that’s perfect for any occasion. Trust me, your taste buds will thank you!

    Why You’ll Love This Caramelized Onion Sourdough

    This caramelized onion sourdough is a delightful blend of simplicity and flavor. It’s an easy way to elevate your baking skills while creating a heartwarming dish. You’ll love how the sweet, tender onions enhance the tangy sourdough, giving it an irresistible taste. Plus, the heavenly aroma wafting through your kitchen will make your family come running! It’s comfort food at its finest while still being straightforward and quick to make.

    Ingredients for Caramelized Onion Sourdough

    Gathering the right ingredients is key to making a delightful caramelized onion sourdough. Here’s what you’ll need:

    • Sourdough starter: This lively mixture gives the bread its signature tangy taste and helps it rise beautifully.
    • Caramelized onions: These sweet, golden gems add depth and a savory flavor to the bread, transforming it from ordinary to extraordinary.
    • Asiago cheese: A nutty, slightly sharp cheese that complements the sweetness of the onions perfectly. Feel free to substitute with your favorite cheese!
    • Bread flour: This ingredient provides the structure we need for a chewy, satisfying loaf. It’s a must for that perfect texture.
    • Water: Hydration is crucial! This helps combine all the ingredients and develops gluten for a great chew.
    • Salt: Enhances flavor and strengthens the dough. It’s the secret ingredient that ties everything together.
    • Olive oil: A touch of richness that tenderizes the dough and adds a lovely flavor, making every bite satisfying.

    Every ingredient here contributes to a symphony of flavor and texture, ensuring your bread is simply divine. For exact quantities, make sure to check the bottom of this article where you can find a handy print version of the recipe!

    How to Make Caramelized Onion Sourdough

    Prepare the Sourdough Starter

    Before you dive into baking, ensure your sourdough starter is active and bubbly. Feeding it with equal parts flour and water a few hours before using it is crucial. Aim for a fermentation time of about 6-12 hours, until you see bubbles and it has doubled in size. This lively mixture provides that distinctive flavor, giving your caramelized onion sourdough that delightful tang. Just remember, the more active your starter, the better your bread will rise!

    Caramelize the Onions

    To achieve perfectly caramelized onions, start by heating olive oil in a pan over medium heat. Add your chopped onions and stir occasionally. The magic happens when they turn golden brown and sweet! This process usually takes 20-30 minutes, so patience is key. Don’t rush it; let them slowly caramelize to enhance their flavor. The sweet notes they bring to your sourdough will make a world of difference!

    Mix the Dough

    Now it’s time to bring it all together! In a large mixing bowl, combine your active sourdough starter, bread flour, water, and salt. Use a spatula or wooden spoon to stir until the ingredients form a shaggy dough. Don’t worry about getting it perfect just yet; a little messiness is part of the process. This is where the real fun starts!

    Knead the Dough

    After mixing, sprinkle some flour on your work surface and turn out the dough. Knead it for about 10 minutes until it feels smooth and elastic. You’ll know it’s ready when it springs back lightly when pressed. This step builds the gluten that gives your sourdough the perfect chew. It’s like a mini workout, and you’ll love the results!

    Incorporate Caramelized Onions and Asiago Cheese

    Once your dough is kneaded, it’s time to fold in those delicious caramelized onions and the nutty Asiago cheese. Gently flatten the dough on your work surface and sprinkle the onions and cheese over the top. Fold the dough over itself to incorporate the ingredients without overworking them. This technique ensures the flavors are evenly distributed but keeps your dough light and airy!

    Proof the Dough

    Next up is proofing! Place your dough in a lightly oiled bowl and cover it with a damp cloth. Let it rise in a warm spot for about 4-6 hours, or until it doubles in size. Keep an eye on the temperature of your kitchen, as cooler areas will slow down the rise. This is where the magic happens, turning your mixture into a fluffy loaf!

    Shape the Dough

    Once your dough has risen, gently turn it out onto a floured surface. Shape it into a round or oval loaf, tucking the edges under. The goal is to create a smooth surface on top. Allow it to rest for about 30 minutes while you preheat your oven. This resting time helps relax the gluten, making it easier to work with.

    Bake the Bread

    Time to bake! Preheat your oven to 450°F (230°C). Carefully place your dough in the oven and bake for about 30-40 minutes. You’ll know it’s done when it turns golden brown and sounds hollow when tapped on the bottom. The aroma will fill your kitchen, bringing everyone to the table!

    Cool the Bread

    Cooling is a crucial step, even if it’s tempting to slice right into it. Transfer your freshly baked loaf to a wire rack and let it cool completely before cutting. This ensures the crumb sets properly. Slice your sourdough with a serrated knife, and enjoy the delightful blend of flavors in every piece!

    Tips for Success

    • Always use an active sourdough starter for the best rise and flavor.
    • Take your time caramelizing onions—patience leads to deeper sweetness.
    • If the dough feels sticky, lightly flour your hands and working surface.
    • Keep your kitchen warm during proofing; a turned-off oven with the light on works great!
    • Don’t rush cooling; it makes a world of difference in texture.

    Equipment Needed

    • Mixing bowl: A large bowl works, but a KitchenAid stand mixer can save time.
    • Spatula or wooden spoon: Use either to combine ingredients; a dough whisk is also great!
    • Floured surface: Your countertop is fine, or try a silicone baking mat.
    • Oven: An oven is necessary; a Dutch oven creates a lovely crust!
    • Cooling rack: This helps prevent sogginess; you can use any wire rack.

    Variations

    • Herbed Twist: Add fresh herbs like rosemary or thyme to your caramelized onions for an extra flavor punch.
    • Spicy Kick: Introduce diced jalapeños or red pepper flakes while mixing the dough for a hint of heat.
    • Cheese Swap: Experiment with different cheeses like cheddar, feta, or gouda for unique flavor profiles.
    • Whole Wheat Option: Substitute half of the bread flour with whole wheat flour for a heartier texture and added nutrition.
    • Vegan Version: Replace Asiago cheese with a dairy-free alternative and use vegetable oil instead of olive oil.

    Serving Suggestions

    • Serve warm with a drizzle of olive oil and a sprinkle of sea salt for extra flavor.
    • Pair with a fresh arugula salad tossed in a light vinaigrette for a delightful contrast.
    • Enjoy alongside a hearty soup or stew to create a comforting meal.
    • A glass of crisp white wine pairs wonderfully, enhancing the savory notes.
    • Slice the bread and arrange it on a rustic wooden board for a beautiful presentation.

    FAQs about Caramelized Onion Sourdough

    Can I use store-bought caramelized onions in this recipe?

    Absolutely! If you’re short on time, store-bought caramelized onions are a convenient substitute. Just ensure they are of good quality to maintain that depth of flavor.

    What’s the best way to store my caramelized onion sourdough?

    To keep your bread fresh, store it in a paper bag at room temperature. This helps maintain the crust’s crispiness while keeping the inside soft.

    Can I freeze caramelized onion sourdough?

    Yes, you can freeze your sourdough! Wrap the cooled loaf tightly in plastic wrap and aluminum foil, then freeze. Just remember to thaw it at room temperature before slicing.

    How do I know when my bread is done baking?

    Your caramelized onion sourdough is done when it’s golden brown and sounds hollow when tapped on the bottom. If you have a thermometer, aim for an internal temperature of about 200°F (93°C).

    What if my sourdough isn’t rising during proofing?

    If your dough isn’t rising, it might be due to an inactive starter or too cold of an environment. Be sure to use a bubbly, active starter and find a warm spot for proofing, like a turned-off oven with the light on.

    Final Thoughts

    Baking caramelized onion sourdough is more than just making bread; it’s an invitation to savor the moment. Your kitchen becomes a haven filled with the sweet aroma of caramelized onions and fresh bread, relaxing all who enter. This recipe connects you with loved ones, as each slice serves as a warm hug on a plate. Plus, it’s easy enough to whip up even on your busiest days. You’ll want to share this delight with family and friends, turning ordinary meals into extraordinary memories. So roll up your sleeves and enjoy the delightful journey of baking!


    Print

    clock clock iconcutlery cutlery iconflag flag iconfolder folder iconinstagram instagram iconpinterest pinterest iconfacebook facebook iconprint print iconsquares squares iconheart heart iconheart solid heart solid icon

    Description

    Delicious caramelized onion sourdough bread with a rich flavor profile.


    • Sourdough starter: provides tangy flavor and rise
    • Caramelized onions: add sweetness and savory flavor
    • Asiago cheese: brings a nutty, slightly sharp flavor
    • Bread flour: gives structure and chewiness
    • Water: hydrates the dough
    • Salt: enhances flavor and strengthens dough
    • Olive oil: helps tenderize the dough and adds richness

    1. Prepare the sourdough starter if you haven’t already. Combine flour and water, and let it ferment for 7–10 days until bubbly.
    2. Caramelize the onions: Heat olive oil in a pan over medium heat, then cook chopped onions until golden brown and soft, about 20–30 minutes. Let cool.
    3. Mix the dough: In a large bowl, combine the sourdough starter, bread flour, water, and salt. Stir until the dough forms.
    4. Knead the dough: Knead on a floured surface for 10 minutes until smooth and elastic.
    5. Incorporate the caramelized onions and Asiago cheese: Gently fold them into the dough until evenly distributed.
    6. Proof the dough: Place the dough in a lightly oiled bowl, cover, and let rise for 4–6 hours until doubled in size.
    7. Shape the dough: Shape it into a round or oval loaf and let rest for 30 minutes while preheating the oven.
    8. Bake the bread: Preheat the oven to 450°F (230°C) and bake for 30–40 minutes until golden brown and hollow when tapped.
    9. Cool the bread: Let the bread cool completely before slicing.

    Notes

    • Ensure the sourdough starter is active for the best results.
    • You can substitute Asiago cheese with any cheese of your preference.
    • Store the bread in a paper bag to maintain crustiness.
    • Prep Time: 10 minutes
    • Cook Time: 40 minutes
    • Category: Bread
    • Method: Baking
    • Cuisine: American

    Nutrition

    • Serving Size: 1 slice
    • Calories: 200
    • Sugar: 2g
    • Sodium: 250mg
    • Fat: 6g
    • Saturated Fat: 2g
    • Unsaturated Fat: 4g
    • Trans Fat: 0g
    • Carbohydrates: 30g
    • Fiber: 2g
    • Protein: 7g
    • Cholesterol: 10mg

    Sharing is caring!

  • Cinnamon Sugar Twist Donuts

    Cinnamon Sugar Twist Donuts


    Introduction to Cinnamon Sugar Twist Donuts

    There’s nothing quite like the smell of fresh donuts wafting through your kitchen, right? These Cinnamon Sugar Twist Donuts are fluffy, delicious, and infused with that warm, inviting taste we all adore. They’re a wonderful treat whether you’re trying to impress your family at brunch or just need a quick pick-me-up on a busy day. Trust me, it’s hard to resist the allure of a soft, sugar-coated donut that was made with love. Plus, whipping them up is not only fun, but it’s also a great way to create memories with your loved ones.

    Why You’ll Love This Cinnamon Sugar Twist Donuts

    These Cinnamon Sugar Twist Donuts are the answer to your sweet cravings without the fuss! They’re incredibly easy to make, allowing you to whip up a batch even on a hectic morning. The delightful combination of fluffy dough and cinnamon sugar coating delivers mouthwatering flavor that warms the heart. Plus, who doesn’t love a homemade treat that makes your kitchen smell heavenly? They’re perfect for family gatherings or simply as a cozy indulgence for yourself!

    Ingredients for Cinnamon Sugar Twist Donuts

    Gathering the right ingredients is half the fun of making these Cinnamon Sugar Twist Donuts. Here’s what you’ll need:

    • Warm Milk: This activates the yeast, making for a fluffy donut. Let it be just warm enough to touch, but not hot.
    • Active Dry Yeast: Vital for that perfect rise, look for a fresh packet for best results!
    • Large Egg: Adds moisture and richness to the dough. Use it at room temperature for better mixing.
    • Unsalted Butter: Melted and cooled, it incorporates into the dough beautifully. You could substitute it with vegetable oil if needed.
    • Vanilla Extract: This brings a lovely warmth and depth of flavor. Opt for pure vanilla whenever possible for the best taste.
    • All-Purpose Flour: The backbone of any donut! You may use a blend with whole wheat for added nutrition, just keep an eye on dough texture.
    • Granulated Sugar: Sweetness is key! It’s not just for flavor; it helps with the donut’s texture too.
    • Fine Sea Salt: Enhances the sweetness. Don’t skip it, or your donuts may taste bland.
    • Ground Cinnamon: This iconic spice is the star of the show! Give your donuts that classic flavor we all love.
    • Cinnamon Sugar Coating: A mix of granulated and brown sugar with more cinnamon to coat the fried donuts, making them irresistible!

    You’ll find the exact measurements for all these ingredients at the bottom of the article, available for printing. This way, you can keep your kitchen organized while you create these delightful treats!

    How to Make Cinnamon Sugar Twist Donuts

    Now comes the exciting part—creating your Cinnamon Sugar Twist Donuts! Follow these simple steps to turn that list of ingredients into a delicious batch of homemade joy.

    Activate the Yeast

    Start by stirring the warm milk and yeast together in a bowl. Let it sit for about five minutes. You’ll know it’s ready when it becomes frothy and bubbly—this means the yeast is alive and ready to help your donuts rise!

    Prepare the Wet Ingredients

    In a separate bowl, whisk together the egg, melted butter, and vanilla extract. Combining these ingredients gives your donuts a rich flavor and creamy texture. Set this bowl aside; its turn will come soon.

    Mix Dry Ingredients

    In your stand mixer bowl (or a large mixing bowl), combine three cups of flour, granulated sugar, fine sea salt, and ground cinnamon. Stir this dry mix a few times to ensure everything is evenly distributed. This step is essential for balanced flavor throughout your donuts!

    Combine Wet and Dry Mixtures

    Once the yeast mixture is foamy, pour it into the bowl with your wet ingredients. Mix thoroughly. Then add this wet mixture to the bowl with the dry ingredients. Stir until the dough starts to come together. If the dough feels too sticky, add a bit more flour, but do it slowly—up to half a cup should suffice.

    Knead the Dough

    Now, switch your mixer to medium-low speed and knead the dough for about five minutes. You’re looking for a soft, slightly sticky, and smooth texture. If you don’t have a mixer, you can knead it by hand on a floured surface for the same amount of time. It’s a good workout too!

    Let the Dough Rise

    Lightly spray a large bowl with cooking spray, then place the kneaded dough inside. Flip it over to coat all sides—this helps prevent it from drying out. Cover the bowl with plastic wrap and let it rise in a warm spot for about an hour, or until it’s doubled in size. This is where the magic happens!

    Shape the Donuts

    Once the dough has risen, lightly flour a clean surface. Knead the dough a few times to remove any pesky air bubbles. Then, return it to the bowl, covering it again for another hour of rising. After the second rise, cut the dough into 16 even pieces. Roll each piece into a thin rope and twist it, pinching the ends together to seal them. This twisting adds that lovely texture to your donuts!

    Heat the Oil

    In a Dutch oven or deep fryer, heat three to four inches of oil to 325°F. Use a thermometer to make sure the temperature is just right; you’ll want your donuts to fry perfectly without becoming greasy.

    Prepare the Cinnamon Sugar Coating

    While your oil heats, mix together granulated sugar, packed light brown sugar, and ground cinnamon in a bowl. This tantalizing blend is what makes biting into these donuts so irresistible!

    Fry the Donuts

    Fry the donuts in batches, making sure they don’t overcrowd the pot. Each piece will need about five minutes of frying, so flip them until they’re golden brown. Once cooked, immediately toss them in the cinnamon sugar mixture. This gives your donuts that signature sweet coating that’s simply heavenly!

    Cool and Serve

    After frying, place the donuts on a wire rack so they can cool slightly and maintain their crispiness. Serve them warm for the best experience. You’ll love the combination of fluffy dough and sweet cinnamon sugar!

    Tips for Success

    • Make sure your yeast is fresh for the best rise.
    • Don’t skimp on the rising time; patience is key for fluffy donuts.
    • Keep the dough covered to prevent it from drying out during the rises.
    • Use a candy thermometer to monitor oil temperature for perfectly fried donuts.
    • Serve your Cinnamon Sugar Twist Donuts warm for maximum flavor and enjoyment!

    Equipment Needed

    • Stand Mixer: While it makes kneading easier, you can use your hands if you prefer.
    • Dutch Oven or Deep Fryer: Both work well for frying; a heavy pot can substitute if needed.
    • Candy Thermometer: This ensures your oil is at the right temperature; a simple kitchen thermometer will do too.
    • Mixing Bowls: Have a few various sizes on hand for different mixes.
    • Wire Rack: To cool your donuts; a baking sheet lined with paper towels can work as a substitute.

    Variations of Cinnamon Sugar Twist Donuts

    • Chocolate Drizzle: After coating in cinnamon sugar, drizzle melted chocolate on top for a decadent twist!
    • Maple Glaze: Instead of cinnamon sugar, dip the donuts in a maple glaze for a sweet and autumnal flavor.
    • Stuffed Donuts: Before sealing, fill the twisted dough with jam, chocolate, or cream cheese for an exciting surprise inside.
    • Whole Wheat Flour: Use whole wheat flour instead of all-purpose for a healthier option while keeping the delicious flavor.
    • Dairy-Free Version: Swap milk and butter for almond milk and coconut oil to make these donuts dairy-free and just as tasty!

    Serving Suggestions for Cinnamon Sugar Twist Donuts

    • Pair with Coffee: Enjoy your donuts alongside a hot cup of coffee or a latte for a delightful treat.
    • Add Fresh Fruit: Serve with mixed berries or sliced bananas to add a refreshing contrast to the sweetness.
    • Presentation: Arrange the donuts on a colorful platter, dusting with extra cinnamon sugar for a touch of flair.
    • Ice Cream Delight: Serve warm donuts topped with vanilla ice cream for an indulgent dessert.

    FAQs about Cinnamon Sugar Twist Donuts

    Can I make Cinnamon Sugar Twist Donuts ahead of time?

    Absolutely! You can prepare the dough the night before and store it in the fridge. Just allow it to come to room temperature before shaping and frying. This makes for a quicker morning treat!

    What’s the best way to store leftover donuts?

    Store your Cinnamon Sugar Twist Donuts in an airtight container at room temperature for up to two days. If they last beyond that, consider refrigerating them to keep them fresh longer. Just remember to reheat them slightly for the best texture!

    Can I freeze these donuts?

    You can freeze the donuts before frying. Just shape them and place them on a baking sheet to freeze individually. Once frozen, transfer them to a zip-top bag. When ready to enjoy, fry them straight from the freezer—just add a couple of extra minutes to the cooking time!

    Why are my donuts greasy?

    Greasy donuts usually happen when the oil temperature is too low. Make sure to maintain that 325°F mark while frying. A candy thermometer can really help with this. Getting it right guarantees wonderfully fluffy donuts without the grease!

    Can I use a different flavor of cinnamon?

    Of course! While classic ground cinnamon is my go-to, feel free to experiment. You can try a mix of spices like nutmeg or even use flavored cinnamon for a unique twist. The possibilities are really endless!

    Final Thoughts

    There’s something truly special about making Cinnamon Sugar Twist Donuts at home. The joy on your family’s faces when they take that first warm, sugary bite is priceless. This recipe not only fills your kitchen with delightful aromas, but also creates cherished memories with each twist of the dough. As you indulge in these fluffy, sweet treats, you’re savoring not just the flavors but also the love that goes into making them. So why not treat yourself and your loved ones to this delightful experience? It’s a sweet embrace for your taste buds and your heart!


    Print

    clock clock iconcutlery cutlery iconflag flag iconfolder folder iconinstagram instagram iconpinterest pinterest iconfacebook facebook iconprint print iconsquares squares iconheart heart iconheart solid heart solid icon

    Description

    These Cinnamon Sugar Twist Donuts are fluffy, twisted, and coated in a delicious cinnamon sugar mixture, making them an irresistible treat for any occasion.


    • 1 cup warm milk (110°F)
    • 2 ¼ teaspoon active dry yeast
    • 1 large egg
    • 3 Tablespoons unsalted butter, melted and cooled
    • 2 teaspoons vanilla
    • 33 ½ cups all-purpose flour
    • ⅔ cup granulated sugar
    • ¾ teaspoons fine sea salt
    • ½ teaspoon ground cinnamon
    • For the coating:
    • ½ cup granulated sugar
    • 3 Tablespoons light brown sugar, packed
    • 1 ½ Tablespoon ground cinnamon

    1. Stir together the milk and the yeast and let it sit until activated and foamy, about 5 minutes.
    2. Whisk together the egg, butter, and vanilla in a medium-sized bowl, set aside.
    3. Place 3 cups of the flour, sugar, salt, and cinnamon in a stand mixer bowl, and stir a few times to mix the dry ingredients.
    4. Once the yeast is foamy, add the milk mixture to the other wet ingredients and whisk to combine. Add the wet mixture to the dry ingredients.
    5. Stir until the ingredients start to combine, then mix on medium-low speed until the dough starts to form and cleans the sides of the bowl. Add more flour if necessary, up to ½ cup more.
    6. Knead the dough in the mixer for 5 minutes until it is soft and slightly sticky but smooth.
    7. Lightly spray a large bowl with cooking spray, add the dough, flip it to coat, cover with plastic wrap, and set in a warm place to double in size, about 1 hour.
    8. After the rising time, lightly flour a clean surface, knead the dough a few times to remove air bubbles, and return it to the bowl, covering it again to rise for another hour.
    9. Line a sheet tray with parchment paper and set aside.
    10. After the second rise, cut the dough into 16 even pieces. Roll each piece into a thin rope and twist it, then pinch the ends together to seal.
    11. Place the twists on the prepared sheet tray, cover with a clean kitchen towel, and let them rest for 30 minutes.
    12. Heat 3-4 inches of oil in a Dutch oven or deep fryer to 325°F.
    13. In a bowl, mix the sugar, brown sugar, and cinnamon for the topping.
    14. Fry the donuts in batches for about 5 minutes, flipping until golden brown. Toss them in the cinnamon sugar immediately after frying.
    15. Place fried donuts on a wire rack to keep crisp and serve immediately.

    Notes

    • Ensure the oil is at the correct temperature to avoid greasy donuts.
    • Keep the donuts covered before frying to prevent them from drying out.
    • Serve warm for the best flavor and texture.
    • Prep Time: 2 hours
    • Cook Time: 30 minutes
    • Category: Dessert
    • Method: Frying
    • Cuisine: American

    Nutrition

    • Serving Size: 1 donut
    • Calories: 180
    • Sugar: 12g
    • Sodium: 70mg
    • Fat: 7g
    • Saturated Fat: 4g
    • Unsaturated Fat: 2g
    • Trans Fat: 0g
    • Carbohydrates: 25g
    • Fiber: 1g
    • Protein: 2g
    • Cholesterol: 30mg

    Sharing is caring!

  • Sweet Chili Meatballs

    Sweet Chili Meatballs


    Introduction to Sweet Chili Meatballs

    As a busy mom, I often find myself searching for quick yet delicious meals. Sweet Chili Meatballs have become my go-to recipe for those hectic evenings. They’re not just easy to whip up, but they’re bursting with flavor too! Imagine hearty meatballs coated in a magical sweet and spicy sauce that tantalizes your taste buds. Whether you’re preparing dinner for the family or hosting a casual get-together, this dish will surely impress. It’s the kind of recipe that brightens your day and brings smiles to the dinner table, even after a whirlwind week.

    Why You’ll Love This Sweet Chili Meatballs

    Sweet Chili Meatballs are the perfect blend of ease and flavor. They come together quickly, making them ideal for busy weeknights. The best part? Even picky eaters can’t resist their sweet and savory taste! Plus, they’re baked instead of fried, so you can feel good about enjoying them. This dish brings comfort food vibes while being a breeze to make. It truly checks all the boxes for a satisfying meal!

    Ingredients for Sweet Chili Meatballs

    Gathering the right ingredients is crucial for making mouthwatering Sweet Chili Meatballs. This recipe features a delightful mix of flavors and textures that come together seamlessly. Here’s what you’ll need:

    • Ground Chicken: Leaner than beef, ground chicken gives the meatballs a light and tender texture, making them perfect for soaking up that delicious sauce.
    • Breadcrumbs: These are essential for binding the meatballs. They help hold everything together while adding a bit of crunch. Feel free to use gluten-free breadcrumbs if you prefer!
    • Egg: This ingredient acts as a binder, ensuring your meatballs don’t fall apart during cooking. Plus, it helps give them a rich flavor.
    • Sweet Chili Sauce: The star of the show! This sauce adds the perfect balance of sweetness and heat. If you like it spicier, look for versions with added chili flakes or heat.
    • Soy Sauce: This savory sauce packs in extra umami flavor, enhancing every bite of your meatballs. You can substitute with tamari for a gluten-free option.

    These are the main ingredients, perfect for a tasty dinner that’s simple to make. You’ll find exact quantities at the end of this article, ready for printing when you’re ready to cook!

    How to Make Sweet Chili Meatballs

    Making Sweet Chili Meatballs is a breeze! Follow these simple steps for a dish that’s sure to impress. With a few ingredients and just a bit of time, you’ll have meatballs bursting with flavor that your family will love.

    Step 1: Prepare the Meatball Mixture

    Start by combining the ground chicken, breadcrumbs, and the egg in a large bowl. I love using my hands for this part! It’s a bit messy, but you can really feel the textures blend. The ground chicken creates a lightness, while the breadcrumbs add a satisfying crunch. The egg acts as a glue, keeping everything together. Trust me, it makes all the difference in the world!

    Step 2: Form the Meatballs

    Once your mixture is well combined, it’s time to form the meatballs. Aim for about one and a half inches in diameter—think about the size of a golf ball. Consistency is key! Making them uniform helps them cook evenly, so none end up overdone while others are still raw. If you find the mixture sticking to your hands, a little olive oil can work wonders.

    Step 3: Bake the Meatballs

    Preheat your oven to 375°F. Arrange the meatballs on a baking sheet lined with parchment paper. This makes for easy cleanup, and who doesn’t love that? Bake them for about 20 minutes. You’ll know they’re done when they’re golden and cooked through. You can check their doneness with a meat thermometer—160°F is the magic number for chicken. Plus, baking reduces the fat content compared to frying—a win-win!

    Step 4: Create the Sweet Chili Sauce Coating

    While the meatballs are baking, let’s whip up that luscious sauce! In a medium saucepan, collide the sweet chili sauce and soy sauce over medium heat. Stir it occasionally, and let it simmer for a few minutes. The magic happens here! The flavors meld together beautifully, creating that sweet and savory essence that makes this dish so special.

    Step 5: Coat the Meatballs

    Once your meatballs are out of the oven, it’s time for the fun part! Gently toss the meatballs in the warm sauce until they’re fully coated. I like to use a spatula for this to avoid breaking them. Make sure every meatball gets a loving coat of that delicious sauce. This final touch guarantees maximum flavor in each bite!

    Tips for Success

    • Use an ice cream scoop for consistent meatball size—no more guesswork!
    • Don’t overcrowd the baking sheet; give each meatball space for even cooking.
    • Spray your measuring cups with cooking oil before adding sweet chili sauce for easy pouring.
    • Experiment with adding chopped herbs, like cilantro or green onions, for extra freshness.
    • Try these meatballs on a bed of jasmine rice to soak up that sauce!

    Equipment Needed for Sweet Chili Meatballs

    • Mixing Bowl: A large bowl for combining ingredients. A sturdy pot can work in a pinch.
    • Baking Sheet: A flat baking sheet lined with parchment paper for easy cleanup. You could use a cast-iron skillet if needed.
    • Meat Thermometer: To check doneness for peace of mind. A simple knife can also help—look for clear juices!
    • Spatula: For tossing meatballs in the sauce. A wooden spoon can also do the trick!

    Variations on Sweet Chili Meatballs

    • Ground Turkey: Swap out the ground chicken for ground turkey for a different flavor profile. It’s also a leaner option!
    • Vegetarian Version: Use chickpeas or black beans instead of meat. Combine with breadcrumbs and spices for a hearty alternative.
    • Spicy Kick: Add diced jalapeños or red pepper flakes to the meat mixture for an extra layer of heat!
    • Asian-Inspired: Mix in minced garlic and ginger to the meatball mixture for a burst of Asian flavor that complements the sauce beautifully.
    • Herb Infusion: Incorporate fresh herbs like basil or cilantro into the meatball mix for a refreshing twist.
    • Pineapple Addition: Toss in some crushed pineapple into the sweet chili sauce, creating a tangy, tropical vibe!

    Serving Suggestions for Sweet Chili Meatballs

    • Pair with fluffy jasmine rice to soak up extra sauce and add a comforting base.
    • Serve alongside steamed broccoli or sugar snap peas for a crisp, colorful plate.
    • Add a light Asian-inspired salad with sesame dressing for a refreshing complement.
    • Drizzle extra sweet chili sauce on top for an eye-catching presentation.
    • For drinks, a crisp white wine or cucumber-infused water enhances the meal beautifully.

    FAQs about Sweet Chili Meatballs

    Can I use ground beef instead of chicken? Absolutely! While this recipe focuses on ground chicken, using ground beef will give you a rich flavor. Just remember to adjust the cooking time if necessary.

    How do I store leftovers? Store any leftover Sweet Chili Meatballs in an airtight container in the fridge. They’ll stay fresh for up to three days. For longer storage, freeze them, and they can last for up to three months!

    Can I make these meatballs in advance? Of course! You can prepare the meatball mixture a day before and keep it in the fridge. Just form and bake them when you’re ready to eat.

    What can I serve with Sweet Chili Meatballs? These meatballs pair wonderfully with rice or noodles. You can also add them to a salad or serve as appetizers with toothpicks!

    Are Sweet Chili Meatballs suitable for kids? Yes! Kids love the sweet and slightly spicy flavor of these meatballs. You can adjust the heat by using milder sweet chili sauce, making them perfect for family dinners.

    Final Thoughts on Sweet Chili Meatballs

    Sweet Chili Meatballs have a special place in my heart, and I hope they do in yours too! They effortlessly combine ease and flavor, making them a weeknight hero. Each bite transports you to a world of comforting warmth, perfect for sharing with family and friends. The delightful sweet and spicy sauce coats each meatball, bringing joy to every meal. I love that you can easily adapt the recipe to suit your tastes, ensuring there’s something for everyone. This dish not only nourishes but also sparks moments of connection around the dinner table. Give it a try; you won’t regret it!


    Print

    clock clock iconcutlery cutlery iconflag flag iconfolder folder iconinstagram instagram iconpinterest pinterest iconfacebook facebook iconprint print iconsquares squares iconheart heart iconheart solid heart solid icon

    Description

    A tasty and easy recipe for Sweet Chili Meatballs that features ground chicken and a sweet sauce.


    • 1 lb ground chicken
    • 1/4 cup breadcrumbs
    • 1 egg
    • 1/2 cup sweet chili sauce
    • 2 tbsp soy sauce

    1. Combine chicken, breadcrumbs, and egg. Form into meatballs.
    2. Bake at 375°F for 20 minutes, or until cooked through.
    3. Simmer sweet chili sauce and soy sauce in a pan. Toss in meatballs and coat.

    Notes

    • Adjust the sweetness by adding more or less sweet chili sauce.
    • Serve with rice or noodles for a complete meal.
    • Prep Time: 15 minutes
    • Cook Time: 20 minutes
    • Category: Main Dish
    • Method: Baking
    • Cuisine: Asian

    Nutrition

    • Serving Size: 4 meatballs
    • Calories: 250
    • Sugar: 6g
    • Sodium: 600mg
    • Fat: 8g
    • Saturated Fat: 2g
    • Unsaturated Fat: 5g
    • Trans Fat: 0g
    • Carbohydrates: 20g
    • Fiber: 1g
    • Protein: 20g
    • Cholesterol: 80mg

    Sharing is caring!

  • Brownie Fruit Pizza

    Brownie Fruit Pizza


    Introduction to Brownie Fruit Pizza

    Welcome to a sweet treat that’s sure to delight: Brownie Fruit Pizza! As a busy mom, I know how challenging it can be to whip up desserts that impress without taking up too much time. This recipe combines the richness of brownies with the freshness of fruits, creating a stunning dish that looks as good as it tastes. Imagine it as the perfect solution for a spontaneous gathering, or just a fun way to bring smiles to your family’s faces after dinner. Trust me, this dessert will quickly become a favorite!

    Why You’ll Love This Brownie Fruit Pizza

    If you’re looking for a dessert that’s both easy and delicious, look no further! Brownie Fruit Pizza comes together in no time, making it a lifesaver for busy days. It’s foolproof, so even if baking isn’t your strong suit, you’ll shine like a star. The combination of fudgy brownie and vibrant fruits makes every bite a burst of happiness. Plus, it’s a fun way to bond with kids in the kitchen!

    Ingredients for Brownie Fruit Pizza

    Let’s gather the delightful ingredients for our Brownie Fruit Pizza! This list includes everything you need to bring this sweet masterpiece to life. You can find the exact measurements at the bottom of the article, perfect for printing!

    • Brownie mix: The heart of our dessert! It adds that rich, chocolatey goodness that everyone loves.
    • Large eggs: Essential for binding the brownie mix and giving it that chewy texture we’re all after.
    • Unsalted butter: Melted butter brings richness to the brownie base, enhancing the flavors without any salty surprises.
    • Fresh strawberries: Sweet and juicy, they add color and a fresh taste to balance the chocolatey brownie.
    • Fresh blueberries: These little gems provide a burst of sweetness and a delightful pop of color.
    • Kiwi: This tangy fruit adds a unique flavor and eye-catching green slices, making your pizza stand out.
    • Whipped cream: Whether store-bought or homemade, it creates a luscious layer that ties it all together.
    • Chocolate sauce: Drizzled on top, it not only looks gorgeous but elevates the dessert with a touch of extra chocolatey goodness.

    Feeling adventurous? Feel free to swap in your favorite fruits like bananas or peaches. The possibilities are endless. Get creative and tailor it to your family’s tastes!

    How to Make Brownie Fruit Pizza

    Preheat and Prepare the Pan

    First things first, let’s get our oven warmed up! Preheat it to 350°F (175°C). This step is crucial for ensuring that our Brownie Fruit Pizza bakes evenly and rises perfectly. While the oven is heating, grease a pizza pan or baking dish with a bit of butter or cooking spray. This will help our brownie pop right out of the pan later, making cleanup a breeze. Remember, safety is key—don’t forget to keep an eye on your hot oven!

    Make the Brownie Batter

    Now it’s time to create that luscious brownie batter! In a large mixing bowl, combine your brownie mix with two large eggs and a half-cup of melted unsalted butter. I like to use a whisk for this—it mixes everything together beautifully. When you’re blending, make sure to incorporate all the dry mix thoroughly. No one wants a clump of brownie mix! The batter should be smooth and glossy, a promise of the deliciousness that’s about to unfold. Just looking at it makes my heart happy!

    Bake the Brownie Base

    Pour the brownie batter into your prepared pan, spreading it out evenly with a spatula. This helps to ensure that it bakes uniformly. Pop it into the preheated oven and let it bake for about 20 to 25 minutes. To check if it’s ready, insert a toothpick into the center. If it comes out clean or with just a few moist crumbs, you’re good to go! If not, give it a little more time, but keep a watchful eye. Your home will smell incredible during these moments!

    Cool the Brownie

    Once your brownie is baked to perfection, let it cool completely before moving on to the next step! Cooling is crucial to avoid a melty disaster with the whipped cream. A wire rack works wonders here, allowing air to circulate all around. In just a short while, you’ll have a perfectly cooled base, ready for all those delightful toppings.

    Add the Whipped Cream

    Now comes one of my favorite parts: spreading the whipped cream! Grab your chilled whipped cream and gently spread it over the cooled brownie using an offset spatula or the back of a spoon. Aim for an even layer—the more creamy goodness, the better! Make sure to cover the entire surface, creating a fluffy white canvas for our fruity masterpiece. Trust me, it’s going to look stunning!

    Arrange the Fresh Fruits

    Alright, it’s time to get creative with our fruits! Start with the sliced strawberries, then add a sprinkle of fresh blueberries, and finally, place the kiwi slices beautifully on top. Don’t be shy—arrange them however you like! Imagine each slice as a piece of art, creating a rainbow of colors and flavors on your Brownie Fruit Pizza. You can even swap out fruits based on the season or what’s in your fridge. The fun is in the customization!

    Drizzle with Chocolate Sauce

    To finish, let’s drizzle on some chocolate sauce! Using a spoon or squeeze bottle, make artistic swoops across the top of your fruit-covered pizza. This final touch not only looks fabulous but pulls the whole dish together with an added layer of chocolatey flavor. Just picture it: vibrant fruits atop a rich brownie, all crowned with luscious chocolate. I guarantee it will be hard to resist digging in!

    Tips for Success

    • Always check the brownie with a toothpick to avoid overbaking—it should come out clean.
    • Let the brownie cool completely to keep the whipped cream from melting.
    • For a fun twist, try using flavored whipped cream or yogurt instead!
    • Experiment with different fruits and toppings for seasonal variations.
    • Make it ahead of time; just add the toppings closer to serving for freshness!

    Equipment Needed

    • Pizza pan or baking dish: A round pizza pan works best, but a square baking dish is a great alternative.
    • Mixing bowl: Any large bowl will do; I love using glass for easy visibility.
    • Whisk or spatula: A whisk for batter and a spatula for spreading whipped cream!
    • Toothpick: Essential for checking brownie doneness; you can also use a knife.
    • Wire rack: Helps cool the brownies quickly; however, a plate can suffice in a pinch.

    Variations of Brownie Fruit Pizza

    • Nutty Delight: Add chopped nuts such as walnuts or pecans to the brownie batter for a crunchy texture.
    • Chocolate Chip Twist: Mix in a handful of chocolate chips into the batter before baking for extra chocolatey goodness.
    • Berry Medley: Swap in raspberries or blackberries for a different fruity experience.
    • Vegan Option: Use a vegan brownie mix and substitute eggs with flaxseed meal and water.
    • Seasonal Flavors: Experiment with fruits like peaches in summer or apples in fall!

    Serving Suggestions

    • Pair your Brownie Fruit Pizza with a scoop of vanilla ice cream for an indulgent treat.
    • For a refreshing drink, serve it alongside iced tea or a fruity lemonade.
    • To elevate presentation, slice it into wedges and serve on colorful plates.
    • Garnish with extra fruits or mint leaves for an eye-catching look!

    FAQs about Brownie Fruit Pizza

    Can I store leftover Brownie Fruit Pizza?
    Absolutely! You can store leftover Brownie Fruit Pizza in an airtight container in the refrigerator for up to three days. Just keep in mind that the whipped cream may lose some of its fluffiness over time.

    What fruits can I use for my Brownie Fruit Pizza?
    Feel free to mix and match your favorite fruits! Besides strawberries, blueberries, and kiwi, bananas, peaches, and even pineapple can add delicious flavors. The beauty of this dessert is its versatility!

    Can I make the brownie base ahead of time?
    Yes! You can bake the brownie base a day in advance and store it wrapped in plastic wrap at room temperature. Just add the whipped cream and fruits when you’re ready to serve.

    Is Brownie Fruit Pizza suitable for parties?
    Definitely! Brownie Fruit Pizza is a showstopper at any gathering. Its stunning appearance and delightful taste will impress your guests, making it an ideal dessert for celebrations.

    Can I use a gluten-free brownie mix?
    Absolutely! Many grocery stores carry gluten-free brownie mixes, so you can easily adapt this recipe to suit your dietary needs without compromising flavor.

    Final Thoughts

    Creating Brownie Fruit Pizza is more than just making a dessert; it’s about bringing joy and connection to those we love. Whether it’s a quick treat for a busy weeknight or the star attraction of a festive gathering, this recipe promises smiles all around. The perfect marriage of rich chocolate and fresh fruits creates a delightful explosion of flavors. Plus, it’s a wonderful way to encourage creativity in the kitchen, especially with kids. Trust me, you’ll find yourself wanting to make this again and again—a true crowd-pleaser that warms the heart and the belly!


    Print

    clock clock iconcutlery cutlery iconflag flag iconfolder folder iconinstagram instagram iconpinterest pinterest iconfacebook facebook iconprint print iconsquares squares iconheart heart iconheart solid heart solid icon

    Description

    A delicious dessert that combines the rich taste of brownie with fresh fruits and whipped cream, perfect for any occasion.


    • 1 box (18.3 oz) brownie mix
    • 2 large eggs
    • 1/2 cup unsalted butter, melted
    • 1 cup fresh strawberries, sliced
    • 1 cup fresh blueberries
    • 1 medium kiwi, peeled and sliced
    • 1 cup whipped cream (store-bought or homemade)
    • 1/4 cup chocolate sauce (for drizzling)

    1. Preheat your oven to 350°F (175°C) and grease a pizza pan or baking dish.
    2. In a mixing bowl, combine brownie mix, eggs, and melted butter until well blended.
    3. Pour the brownie batter into the prepared pan and spread evenly; bake for 20-25 minutes until a toothpick comes out clean.
    4. Allow the brownie to cool completely on a wire rack.
    5. Spread whipped cream over the cooled brownie base.
    6. Arrange sliced strawberries, blueberries, and kiwi on top of the whipped cream.
    7. Drizzle with chocolate sauce before serving.

    Notes

    • Make sure the brownie is completely cooled before adding whipped cream and fruits to prevent them from melting.
    • Feel free to use any other fruits you prefer, such as bananas or peaches.
    • Prep Time: 15 minutes
    • Cook Time: 25 minutes
    • Category: Dessert
    • Method: Baking
    • Cuisine: American

    Nutrition

    • Serving Size: 1 slice
    • Calories: 280
    • Sugar: 20g
    • Sodium: 150mg
    • Fat: 12g
    • Saturated Fat: 7g
    • Unsaturated Fat: 5g
    • Trans Fat: 0g
    • Carbohydrates: 38g
    • Fiber: 3g
    • Protein: 4g
    • Cholesterol: 40mg

    Sharing is caring!

  • Italian Chopped Salad

    Italian Chopped Salad


    Introduction to Italian Chopped Salad

    Have you ever found yourself in the kitchen, yearning for something vibrant yet simple? Let me introduce you to my delightful Italian Chopped Salad. This colorful medley of chopped vegetables, meats, and cheese brings a refreshing twist, perfect for those busy weeknights or family gatherings. It’s like a hug in a bowl, offering nourishment and satisfaction with minimal effort. Whether you’re a busy mom or a professional juggling life’s demands, this recipe is your quick solution for a delicious, impressive meal everyone will love!

    Why You’ll Love This Italian Chopped Salad

    This Italian Chopped Salad not only bursts with flavor, but it’s also a breeze to make! In just 15 minutes, you can whip up a meal that’s both nutritious and satisfying. It’s a versatile dish that caters to picky eaters and busy schedules alike. Plus, every bite is a tantalizing mix of textures and tastes. Trust me, this will become your go-to recipe for gatherings and quick weeknight dinners!

    Ingredients for Italian Chopped Salad

    Let’s gather the delightful ingredients that will create your stunning Italian Chopped Salad. Each element, fresh and flavorful, plays a vital role in this culinary masterpiece.

    • Romaine lettuce: This crunchy base adds a refreshing crispness, perfect for balancing the other rich ingredients.
    • Cherry tomatoes: Their sweetness bursts in your mouth. You can use any variety of tomatoes you have on hand.
    • Cucumber: Crisp and hydrating, cucumbers bring a cool crunch, making every bite refreshing.
    • Red onion: Sliced thin, red onion adds a sharp bite, enriching the salad’s flavor with its vibrant color.
    • Pepperoncini: These tangy, slightly spicy peppers give the salad a delightful kick. If you’re not up for spice, sweet bell peppers are a nice substitute.
    • Black olives: Salty and savory, sliced olives deepen the flavor of the salad and pair beautifully with the other ingredients.
    • Salami: This adds a rich, meaty element to the dish. Feel free to swap in turkey or another deli meat for a lighter option.
    • Provolone cheese: Creamy and slightly nutty, provolone enhances the salad’s indulgence, but mozzarella or feta can work just as well.
    • Parmesan cheese: A sprinkle of grated Parmesan on top elevates the flavors, bringing a salty, umami punch.
    • Italian dressing: This zesty dressing ties everything together, bringing all the flavors to life. For a healthier option, you can whip up a homemade version using olive oil, vinegar, and herbs.
    • Salt and pepper: Essential for taste, they elevate all the ingredients without overpowering them.

    If you like experimenting, feel free to throw in additional vegetables like bell peppers or carrots, or even proteins like grilled chicken! For exact quantities and a printable version, look at the bottom of this article. Happy chopping!

    How to Make Italian Chopped Salad

    Now, it’s time to bring this Italian Chopped Salad to life! Follow these simple steps, and soon you’ll have a beautiful dish that’s bursting with flavor. I promise, it’s as easy as pie!

    Step 1: Prepare the Vegetables

    First things first, let’s wash all those colorful veggies. I like to rinse the romaine lettuce, cherry tomatoes, cucumber, and red onion under cool water. This ensures everything is fresh and clean.

    Next, chop the romaine lettuce into bite-sized pieces; think of them as nature’s little green gems! Halve the cherry tomatoes and dice the cucumber. For the onion, slice it as thin as you can to avoid overpowering the salad. Remember, fresh ingredients make a world of difference!

    Step 2: Combine Salad Ingredients

    Grab a large bowl and toss in your chopped romaine, tomatoes, cucumber, red onion, pepperoncini, black olives, diced salami, and provolone cheese. It’s like a vibrant rainbow of health!

    Gently mix everything together. I love using my hands for this step; it feels like I’m embracing all that freshness! But a salad spoon works just as well. Make sure every bite will be a delightful mix of flavors and textures.

    Step 3: Dress the Salad

    Now, here comes the magic! Drizzle your Italian dressing over the salad. I usually start with about a quarter cup, then adjust based on my taste. Toss everything gently to ensure that each piece is perfectly coated.

    It’s like dressing your salad in a flavorful cloak! The tangy notes from the dressing will elevate all those fresh ingredients. Make sure to give it a good toss; you want the dressing to work its way into every corner of your delicious creation.

    Step 4: Serve and Enjoy

    Your Italian Chopped Salad is almost ready! To finish, sprinkle the grated Parmesan cheese on top. This adds a lovely salty touch that brings all the flavors together.

    Serve immediately for the best taste and freshness. I find that a colorful serving dish makes it look even more inviting. Grab some forks, gather your family, and enjoy the vibrant explosion of flavors in each bite!

    Tips for Success

    • Always opt for fresh ingredients; they enhance flavor and nutrition.
    • Adjust portion sizes based on your gathering—smaller salads for intimate dinners, larger for parties.
    • Experiment with ingredient substitutions to fit dietary needs—try chickpeas for protein or vegan cheese for a dairy-free option.
    • Use seasonal vegetables for variety and to save on costs.
    • Double the recipe for meal prep—perfect for quick lunches throughout the week!

    Use Fresh Ingredients

    Fresh produce is the star of this show! The better the ingredients, the tastier your Italian Chopped Salad.

    Perfect Portioning

    Don’t worry about leftovers. You can easily adjust the size of your salad based on the number of guests or meal plans.

    Ingredient Substitutions

    If someone has dietary restrictions, feel free to swap out ingredients. The salad is versatile and accommodating!

    Equipment Needed

    • Large mixing bowl: A salad bowl works perfectly if you don’t have one.
    • Cutting board: Any flat surface will do, even a plate in a pinch.
    • Sharp knife: A good kitchen knife is essential for easy chopping.
    • Salad tongs or spoon: Hands work, but tongs help with easy serving.
    • Measuring cup (optional): To measure out dressing if desired.

    Variations of Italian Chopped Salad

    • Grain Boost: Add cooked quinoa or farro for a hearty touch and extra fiber.
    • Vegetarian Twist: Swap out salami for chickpeas or grilled vegetables for a protein-packed option.
    • Vegan Delight: Use vegan cheese and a plant-based dressing for a completely dairy-free salad.
    • Pasta Addition: Mix in cooked pasta like rotini or bowties for a Mediterranean-inspired dish.
    • Spicy Kick: Add jalapeños or a splash of hot sauce to the dressing for an extra burst of heat.

    Serving Suggestions for Italian Chopped Salad

    • Pair with crusty Italian bread or garlic knots for an authentic touch.
    • Serve alongside grilled chicken or shrimp for a complete meal.
    • For drinks, an Italian red wine like Chianti complements the flavors beautifully.
    • Use colorful serving bowls to showcase the vibrant salad.
    • Garnish with fresh basil or parsley for a touch of elegance.

    FAQs about Italian Chopped Salad

    As you dive into making your delightful Italian Chopped Salad, you may have some questions. Let’s tackle a few common ones to ensure your salad experience is as smooth as possible!

    Can I make this salad ahead of time?

    Absolutely! While this Italian Chopped Salad is best served fresh, you can prepare the ingredients ahead. Just store everything separately in the fridge and mix it together when you’re ready.

    What dressing goes well with Italian Chopped Salad?

    An Italian dressing is a classic choice, but feel free to experiment! A balsamic vinaigrette or homemade lemon olive oil dressing can bring a delightful twist.

    How long does Italian Chopped Salad last in the fridge?

    This salad is best enjoyed within a few hours of preparation. However, it can be refrigerated for up to a day. Just be aware, it may lose some of its crispiness.

    Can I customize the ingredients for my dietary needs?

    Definitely! The beauty of this Italian Chopped Salad is its versatility. You can swap meats, cheeses, and veggies based on what you love or any dietary restrictions.

    Is this salad gluten-free?

    Yes, this Italian Chopped Salad is gluten-free! As long as you choose a compliant Italian dressing, you’re good to go. Enjoy the wholesome goodness without worries!

    Final Thoughts

    Creating this Italian Chopped Salad is not just about mixing ingredients; it’s about sharing joy and flavor with loved ones. Each colorful bite brings a refreshing crunch that delights the senses. You’ll savor the balance of textures and tastes, from the crisp lettuce to the zesty dressing. This salad effortlessly brightens up any meal, turning a simple gathering into a delightful feast. Whether it’s a busy weeknight dinner or a special occasion, the happiness this dish brings is truly invaluable. I hope it becomes a cherished staple in your home, just as it has in mine!


    Print

    clock clock iconcutlery cutlery iconflag flag iconfolder folder iconinstagram instagram iconpinterest pinterest iconfacebook facebook iconprint print iconsquares squares iconheart heart iconheart solid heart solid icon

    Description

    A refreshing and colorful Italian salad filled with chopped vegetables, meats, and cheese, perfect for any occasion.


    • 1 head romaine lettuce, chopped
    • 1 cup cherry tomatoes, halved
    • 1 cucumber, diced
    • 1/2 red onion, thinly sliced
    • 1/2 cup pepperoncini, sliced
    • 1/2 cup black olives, sliced
    • 1/2 cup salami, diced
    • 1/2 cup provolone cheese, diced
    • 1/4 cup grated Parmesan cheese
    • 1/4 cup Italian dressing
    • Salt and pepper to taste

    1. In a large bowl, combine the romaine lettuce, cherry tomatoes, cucumber, red onion, pepperoncini, black olives, salami, and provolone cheese.
    2. Drizzle the Italian dressing over the salad and toss until all ingredients are well coated.
    3. Sprinkle the grated Parmesan cheese over the top.
    4. Season with salt and pepper to taste.
    5. Serve immediately and enjoy!

    Notes

    • Feel free to add other vegetables or proteins if desired.
    • This salad is best served fresh but can be stored in the refrigerator for a few hours.
    • Prep Time: 15 minutes
    • Cook Time: 0 minutes
    • Category: Salad
    • Method: Mixing
    • Cuisine: Italian

    Nutrition

    • Serving Size: 1 serving
    • Calories: 250
    • Sugar: 3g
    • Sodium: 600mg
    • Fat: 18g
    • Saturated Fat: 6g
    • Unsaturated Fat: 8g
    • Trans Fat: 0g
    • Carbohydrates: 15g
    • Fiber: 3g
    • Protein: 10g
    • Cholesterol: 25mg

    Sharing is caring!

  • Grilled Cheese Burrito

    Grilled Cheese Burrito


    Introduction to Grilled Cheese Burrito

    If you’re a busy mom juggling family dinners and a whirlwind schedule, the Grilled Cheese Burrito is here to save the day! It combines the comforting cheesiness of a grilled sandwich with the hearty satisfaction of a burrito, making it a meal everyone will rave about. It’s perfect for those nights when you need a quick yet fulfilling dinner that brings smiles around the table. Imagine biting into a crispy exterior, revealing a warm, melty filling that will have everyone asking for seconds. Let’s dive into this flavor explosion together!

    Why You’ll Love This Grilled Cheese Burrito

    This Grilled Cheese Burrito is a dream come true for busy kitchens. It’s incredibly quick to whip up—ideal for those hectic evenings when time is of the essence. With its delightful blend of gooey cheese, savory beef, and vibrant toppings, it’s a taste sensation that will please even the pickiest eaters. Plus, clean-up is a breeze, leaving you more time to relax and enjoy family moments after dinner.

    Ingredients for Grilled Cheese Burrito

    Gathering the right ingredients makes crafting the Grilled Cheese Burrito a delightful experience. You’ll need ground beef for a savory base that pairs flawlessly with the other ingredients. Diced onions add sweetness and texture, while olive oil helps cook everything to perfection.

    Don’t forget the tortillas, which serve as the hearty wrap, and the spicy mayo, bringing a zing that elevates the flavors. Fried rice and nacho cheese sauce contribute a wonderful creaminess, making every bite divine. Optionally, throw in some tortilla chips for added crunch. Precise quantities are available below for printing.

    How to Make Grilled Cheese Burrito

    Step 1: Prepare the Vegetables

    Start by heating a drizzle of olive oil in a large skillet over medium heat. Once shimmering, add the diced onions. Sauté them for about 5 minutes until they’re soft and translucent, beckoning a sweet aroma that fills your kitchen. This sets a flavorful base for your delicious Mexican food adventure!

    Step 2: Cook the Ground Beef

    Next, toss in the ground beef with the softened onions. Use a spatula to break apart the meat and let it cook until it’s beautifully browned. As it sizzles, season with salt, ground black pepper, smoked paprika, and dried oregano. Stir well and let those spices bloom for a full minute, creating a deliciously savory mixture that you just can’t resist.

    Step 3: Build the Burrito Filling

    Now, it’s time to bring everything together! Pour in the tomato sauce and let the beef mixture simmer gently for about 5 minutes. While that’s happening, lay out your flour tortillas on a clean surface. Spread about a tablespoon of spicy mayo along each tortilla’s center. Then add a scoop of the seasoned beef, followed by fried rice, a generous drizzle of nacho cheese, a dollop of sour cream, and finally, some crunchy tortilla chips for that delightful texture contrast.

    Step 4: Roll the Burrito

    Carefully fold the sides of the tortilla inward, creating a secure pocket to hold all those tasty fillings. Then, grab the bottom edge of the tortilla and roll it up tightly, ensuring the filling stays protected. This is where the magic happens—you’re encasing all that flavor in a warm blanket of deliciousness!

    Step 5: Grill the Burrito

    Heat a non-stick skillet or griddle over medium heat. Optionally, sprinkle some shredded Mexican cheese blend onto the pan for an extra cheesy layer. Place the burrito seam-side down and grill for 2–3 minutes on each side until it turns golden and crispy. Flip carefully using a spatula for the best result—crispy outsides are a must!

    Tips for Success

    Here are a few quick tips to ensure your Grilled Cheese Burrito is a hit:

    • Prep your ingredients ahead of time to save precious minutes.
    • Try using leftover cooked chicken or beans as a protein alternative.
    • Don’t skimp on the seasoning; it really amps up the flavor!
    • Experiment with different cheeses for fun variations.
    • Serve with salsa or guacamole for an extra kick.

    Equipment Needed

    To make your Grilled Cheese Burrito a delightful success, here’s what you’ll need:

    • A large skillet (or a non-stick frying pan works just as well)
    • A spatula for flipping the burritos
    • A cutting board for assembling your ingredients
    • Measuring cups for accurate ingredient amounts
    • Optional: Griddle for an extra crispy finish

    Variations

    Don’t be afraid to get creative with your Grilled Cheese Burrito! Here are some flavorful adaptations to suit every palate:

    • For a vegetarian twist, use black beans or lentils in place of ground beef, adding diced bell peppers for crunch.
    • Stuff your burrito with grilled chicken or shrimp for a protein-packed alternative that’s just as satisfying.
    • Add some heat by incorporating jalapeños or a dash of hot sauce to the filling.
    • Switch up the cheese—try cheddar, pepper jack, or even a creamy queso for a different flavor profile.
    • Go gluten-free by using corn tortillas or lettuce wraps instead of flour tortillas.
    • Mix in some fresh spinach or avocado for a pop of freshness and creaminess.
    • For an indulgent touch, sprinkle some crumbled bacon or chorizo into your filling before rolling.

    Serving Suggestions

    Enjoying your Grilled Cheese Burrito can be elevated with these delightful ideas:

    • Serve with a side of crispy tortilla chips and fresh salsa for a classic touch.
    • Add a refreshing salad with lime vinaigrette to balance the richness.
    • Pair with a chilled glass of sweet iced tea or a zesty margarita.
    • Present on a colorful plate and garnish with fresh cilantro for a pop of color.

    FAQs about Grilled Cheese Burrito

    Here are some common questions I often hear about the Grilled Cheese Burrito that might help you feel more confident in the kitchen:

    Can I store leftovers, and how should I do it?

    Absolutely! You can store leftovers in an airtight container in the fridge for up to three days. Just make sure to let them cool completely beforehand. When you’re ready to enjoy them again, reheating in a skillet helps restore that crispy texture!

    Can I freeze Grilled Cheese Burritos?

    Yes, you can! Wrap each burrito tightly in plastic wrap and then place them in a freezer-safe bag. They’ll keep well for about three months. When you’re craving one, thaw it in the fridge overnight and reheat in a skillet.

    What can I substitute if I can’t find certain ingredients?

    If you’re unable to find ground beef, turkey or chicken make great substitutes. For a vegetarian option, try black beans or lentils as alternatives that pack a punch. You can also use any type of cheese you enjoy for that melty goodness!

    How can I make the burrito spicier?

    To kick up the heat, simply add sliced jalapeños into the filling or increase the amount of smoked paprika. A drizzle of your favorite hot sauce works wonders too—if you dare!

    How can I make a gluten-free version?

    For a gluten-free Grilled Cheese Burrito, just swap out the flour tortillas for corn tortillas or use large lettuce leaves to wrap the fillings. You won’t miss a beat in flavor!

    Final Thoughts

    Ah, the Grilled Cheese Burrito—more than just a meal, it’s a comforting hug that wraps around your busy family like a warm blanket. This dish is perfect for sparking lively conversations around the dinner table, making every bite full of flavor and togetherness. Its versatile nature allows for endless variations, catering to every taste preference. Whether you’re a mom juggling schedules or a professional seeking quick family dining, this burrito promises satisfaction that resonates. Embrace the joy it brings and let it transform your meal times into delightful experiences everyone will cherish.


    Print

    clock clock iconcutlery cutlery iconflag flag iconfolder folder iconinstagram instagram iconpinterest pinterest iconfacebook facebook iconprint print iconsquares squares iconheart heart iconheart solid heart solid icon

    Description

    A delicious and hearty Grilled Cheese Burrito packed with flavors and textures, perfect for a satisfying meal.


    • 450 g ground beef
    • 15 ml olive oil
    • 1 medium onion, diced
    • 1 teaspoon salt, plus ground black pepper to taste
    • 1 teaspoon smoked paprika
    • 1 teaspoon dried oregano
    • 120 ml tomato sauce
    • 4 large flour tortillas
    • 45 ml spicy mayo
    • 250 g fried rice
    • 250 ml nacho cheese sauce
    • 250 ml sour cream
    • 50 g tortilla chips

    1. Heat olive oil in a large skillet over medium heat. Add diced onion and cook for 5 minutes until softened and translucent.
    2. Add ground beef to the skillet. Cook, breaking up lumps, until evenly browned and cooked through. Season with salt, black pepper, smoked paprika, and dried oregano. Stir well and allow spices to bloom for 1 minute.
    3. Add tomato sauce to the beef mixture. Reduce heat and let simmer for 5 minutes to meld the flavors together.
    4. Lay out each flour tortilla. Spread approximately 1 tablespoon of spicy mayo along the center of each tortilla.
    5. Top with a portion of fried rice and drizzle nacho cheese sauce over the rice. Add a generous dollop of sour cream and sprinkle with crispy tortilla chips. Spoon the seasoned beef mixture on top.
    6. Fold in the sides of the tortilla, then roll it up tightly from the bottom, enclosing the filling securely.
    7. Heat a non-stick skillet or griddle over medium heat. Optionally, scatter shredded Mexican cheese blend onto the pan. Place each burrito seam-side down and grill for 2–3 minutes on each side, until the exterior is golden and crisp.
    8. Serve immediately with additional spicy mayo on the side for dipping.

    Notes

    • For extra flavor, consider adding avocado or jalapeños.
    • Adjust spices according to your heat preference.
    • Try using different types of cheese for the grilling step.
    • Prep Time: 15 minutes
    • Cook Time: 20 minutes
    • Category: Entree
    • Method: Grilling
    • Cuisine: Mexican

    Nutrition

    • Serving Size: 1 burrito
    • Calories: 700
    • Sugar: 4 g
    • Sodium: 1200 mg
    • Fat: 40 g
    • Saturated Fat: 15 g
    • Unsaturated Fat: 25 g
    • Trans Fat: 0 g
    • Carbohydrates: 60 g
    • Fiber: 5 g
    • Protein: 25 g
    • Cholesterol: 80 mg

    Sharing is caring!

  • Mexican Street Corn Brussels

    Mexican Street Corn Brussels


    Introduction to Mexican Street Corn Brussels

    As a busy mom and a passionate home cook, I know how precious our time can be in the kitchen. Enter Mexican Street Corn Brussels, a delightful dish that combines the beloved flavors of traditional Mexican street corn with the wholesome goodness of Brussels sprouts. It’s quick to prepare and full of vibrant flavors, making it perfect for a busy weeknight dinner or impressing friends at your next gathering. With just a few simple ingredients, this colorful side dish will not only please your family but become a staple in your home cooking repertoire!

    Why You’ll Love This Mexican Street Corn Brussels

    This Mexican Street Corn Brussels dish is a game-changer for busy nights! It’s incredibly easy to make, taking just 45 minutes from prep to plate. The vibrant flavors of roasted Brussels sprouts mixed with the mouthwatering “elote” topping create a taste explosion that everyone will adore. Plus, it’s vegan-friendly! You can serve it warm or at room temperature, making it versatile for any occasion.

    Ingredients for Mexican Street Corn Brussels

    Gathering the right ingredients is the first step to crafting these Mexican Street Corn Brussels. Each one adds character and nuance, ensuring mouthwatering bites with every forkful. Here’s what you’ll need:

    • Brussels sprouts: The stars of our dish! Trimmed and halved, they become tender and crisp when roasted. You can quarter them if they’re larger for quicker cooking.
    • Olive oil: A must for roasting. It brings out the natural flavors of the sprouts while helping them to brown beautifully.
    • Salt and black pepper: Essential seasonings that enhance all the flavors. Adjust to your taste preference.
    • Mayonnaise: This ingredient gives our sauce a creamy base. If you want a lighter option, consider a vegan mayo or leave it out for a simpler version.
    • Mexican crema: Smooth and tangy, it elevates the sauce’s silkiness. For a lighter alternative, you can use sour cream – it works just as well!
    • Cotija cheese: A crumbly cheese that adds a punch of flavor. If you need a vegan option, consider nutritional yeast for a cheesy vibe.
    • Fresh cilantro: This vibrant herb brings freshness to the dish. If you’re not a fan, parsley works as a milder substitute.
    • Lime: Juicing a fresh lime brightens all the flavors. Don’t skip it—it’s like a splash of sunshine!
    • Chili powder, smoked paprika, and cayenne pepper: These spices create the signature “elote” taste. Adjust them according to your spice tolerance or skip the cayenne for a milder version.
    • Corn: Fresh or frozen, it offers sweetness and a pop of color. Just make sure it’s cooked until tender!
    • Butter: Used to sauté the corn and garlic, adding rich flavor. If you want to keep it vegan, coconut oil is a great substitute.
    • Garlic: Minced for flavor, it adds depth and aroma to our corn topping.

    For exact measurements, check the bottom of the article where you can find everything you need for printing. Happy cooking!

    How to Make Mexican Street Corn Brussels

    Ready to dive into the delicious process of making Mexican Street Corn Brussels? Let’s get our hands dirty and create something magical in the kitchen! Follow these simple steps, and you’ll have a vibrant dish that’s sure to impress!

    Prepare Brussels Sprouts

    First, let’s get those Brussels sprouts prepped! Start by trimming the ends and removing any outer leaves that look a bit worn. Now, halve or quarter them—this allows for even cooking and maximizes caramelization. More surface area means more flavor when they roast! Trust me, this step is key to achieving that irresistible texture.

    Roast Brussels Sprouts

    Time to roast! Preheat your oven to 400°F (200°C). Toss your prepared Brussels sprouts in olive oil, salt, and pepper. I love getting in there with my hands—it’s therapeutic! Spread them out in a single layer on a baking sheet, ensuring there’s not too much crowding. Place in the oven and roast for 20-25 minutes, flipping them halfway through. This ensures they turn golden brown and perfectly tender. Keep an eye on them; the aroma will be your guide!

    Make “Elote” Topping

    While the sprouts are roasting, let’s whip up the “elote” topping that makes this dish shine! In a medium skillet, melt some butter over medium heat. Toss in the minced garlic and sauté for about 30 seconds. The smell will be heavenly! Add your corn kernels next, cooking for about 5-7 minutes. Stir them occasionally until they soften and get a lovely golden color. This is where the magic happens, adding rich flavor and a hint of sweetness!

    Prepare Creamy Sauce

    Now it’s time to create that creamy sauce that will tie everything together perfectly. In a small bowl, whisk together the mayonnaise, Mexican crema, lime juice, chili powder, smoked paprika, and, if you like a kick, cayenne pepper. Taste it as you go—you want to adjust it to your liking! A dash more lime? Go for it! The balance should sing.

    Assemble

    Let’s bring it all together! In a large bowl, add your roasted Brussels sprouts. Toss in that beautifully cooked corn—which adds warmth and sweetness. Pour over the creamy sauce and gently toss everything to coat. You want every piece of sprout and corn to get in on that flavor party!

    Serve

    It’s time for the grand reveal! Transfer your vibrant mixture onto a serving platter or bowl. Top it off with crumbled Cotija cheese and a sprinkle of fresh cilantro for that pop of color and flavor. This dish screams to be served warm, but you can absolutely enjoy it at room temperature as well. Set it on the table and watch it disappear!

    Tips for Success

    • Don’t overcrowd your baking sheet when roasting. Give those sprouts some space to caramelize.
    • To enhance the sauce’s flavor, try adding lime zest for an extra zing.
    • If you prefer a smoky flavor, use smoked paprika instead of regular paprika.
    • Keep a close eye on the corn while cooking; stirring helps it brown evenly.
    • Adjust spice levels according to your family’s taste buds.

    Equipment Needed

    • Baking sheet: For roasting the Brussels sprouts. A large cast-iron skillet also works well.
    • Medium skillet: For sautéing the corn and garlic. A saucepan can serve as an alternative.
    • Mixing bowls: For tossing ingredients together. Any large bowl will do!
    • Whisk: To combine the creamy sauce. A fork can work in a pinch.

    Variations

    • Spicy Kick: For those who love heat, add diced jalapeños or a few dashes of hot sauce to the corn topping.
    • Smoky Flavor: Incorporate chipotle powder into the creamy sauce for a smoky twist that will elevate the dish.
    • Nutty Crunch: Sprinkle some toasted pumpkin seeds or sunflower seeds on top for an added crunch and nutrition boost.
    • Herb Swap: If cilantro isn’t your thing, try fresh basil or dill for a different herbaceous flavor profile.
    • Gluten-Free: This dish is naturally gluten-free, but for added assurance, choose brands of mayonnaise and crema that are certified gluten-free.
    • Protein Boost: Toss in some black beans or chickpeas for added protein, making this a heartier dish.

    Serving Suggestions

    • Pair your Mexican Street Corn Brussels with grilled chicken or tofu for a complete meal.
    • Serve alongside a zesty quinoa salad for an added nutrition kick.
    • Enjoy with a refreshing margarita or sparkling water infused with lime.
    • For presentation, use a vibrant platter for a colorful display.
    • Garnish with extra cilantro for that wow factor!

    FAQs about Mexican Street Corn Brussels

    If you’re curious about making the most of Mexican Street Corn Brussels, you’re in the right place! Here are some common questions I get asked, along with helpful answers.

    Can I make Mexican Street Corn Brussels ahead of time?

    Absolutely! You can roast the Brussels sprouts and prepare the corn topping in advance. Just assemble everything before serving. This makes it a fantastic option for meal prep!

    Is this dish suitable for a vegan diet?

    Yes, Mexican Street Corn Brussels is entirely vegan when you choose plant-based mayonnaise and skip the Cotija cheese or substitute it with nutritional yeast. It’s packed with flavors without any animal products!

    Can I use frozen Brussels sprouts?

    While fresh Brussels sprouts yield the best results, you can use frozen ones. Just remember to thaw and drain them well before roasting. They may not get as crispy, but they’ll still be tasty!

    What can I serve with Mexican Street Corn Brussels?

    This dish pairs beautifully with grilled meats or veggie tacos. It can also shine on its own as a robust vegan side at any gathering.

    Can I adjust the spiciness of the dish?

    Definitely! You can play with the chili powder and cayenne pepper. Start with less and taste as you go, so you can find your perfect heat level!

    Final Thoughts

    Cooking Mexican Street Corn Brussels is more than just preparing a dish; it’s about crafting moments around the table. Each vibrant bite takes you on a flavorful journey, blending the earthy tones of Brussels sprouts with that distinct kick of “elote.” Whether it’s a weeknight meal for your family or an impressive side at a gathering, this dish fits perfectly into any scenario. I’ve seen the joy on my loved ones’ faces as they savor it. And honestly, isn’t that what home cooking is all about? Let’s keep making delicious memories together!


    Print

    clock clock iconcutlery cutlery iconflag flag iconfolder folder iconinstagram instagram iconpinterest pinterest iconfacebook facebook iconprint print iconsquares squares iconheart heart iconheart solid heart solid icon

    Description

    Mexican Street Corn Brussels is a delightful vegan dish that combines roasted Brussels sprouts with a creamy elote-inspired topping for a burst of flavor.


    • 1 pound Brussels sprouts, trimmed and halved (or quartered if large)
    • 2 tablespoons olive oil
    • 1/2 teaspoon salt
    • 1/4 teaspoon black pepper
    • 1/4 cup mayonnaise
    • 1/4 cup Mexican crema (or sour cream)
    • 1/4 cup crumbled Cotija cheese
    • 1/4 cup chopped fresh cilantro
    • 1 lime, juiced
    • 1/2 teaspoon chili powder
    • 1/4 teaspoon smoked paprika
    • Pinch of cayenne pepper (optional, for extra heat)
    • 1 ear of corn, kernels removed (about 1 cup)
    • 1 tablespoon butter
    • 1 clove garlic, minced

    1. Prepare Brussels Sprouts: Preheat oven to 400°F (200°C). Trim and halve (or quarter) Brussels sprouts.
    2. Roast Brussels Sprouts: In a large bowl, toss Brussels sprouts with olive oil, salt, and pepper. Spread in a single layer on a baking sheet. Roast for 20-25 minutes, flipping halfway through, until tender and browned.
    3. Make “Elote” Topping: If using frozen corn, thaw it. In a medium skillet, melt butter over medium heat. Add minced garlic and cook for 30 seconds until fragrant. Add corn kernels and cook for 5-7 minutes, stirring occasionally, until tender and slightly browned. Remove from heat.
    4. Prepare Creamy Sauce: In a small bowl, whisk together mayonnaise, Mexican crema (or sour cream), lime juice, chili powder, smoked paprika, and cayenne pepper (if using). Taste and adjust seasonings.
    5. Assemble: Transfer roasted Brussels sprouts to a large bowl. Add cooked corn. Pour creamy sauce over Brussels sprouts and corn, and toss gently to coat.
    6. Serve: Transfer to a serving platter or bowl. Sprinkle with crumbled Cotija cheese and chopped fresh cilantro. Serve immediately.

    Notes

    • For an extra kick, add more cayenne pepper to taste.
    • This dish is best served immediately after preparation for optimal flavor and texture.
    • Prep Time: 15 minutes
    • Cook Time: 25 minutes
    • Category: Side Dish
    • Method: Roasting
    • Cuisine: Mexican

    Nutrition

    • Serving Size: 1 serving
    • Calories: 220
    • Sugar: 2g
    • Sodium: 300mg
    • Fat: 15g
    • Saturated Fat: 3g
    • Unsaturated Fat: 10g
    • Trans Fat: 0g
    • Carbohydrates: 20g
    • Fiber: 6g
    • Protein: 6g
    • Cholesterol: 10mg

    Sharing is caring!