Blog

  • Strawberry Crunch Rice Krispie Treats

    Strawberry Crunch Rice Krispie Treats


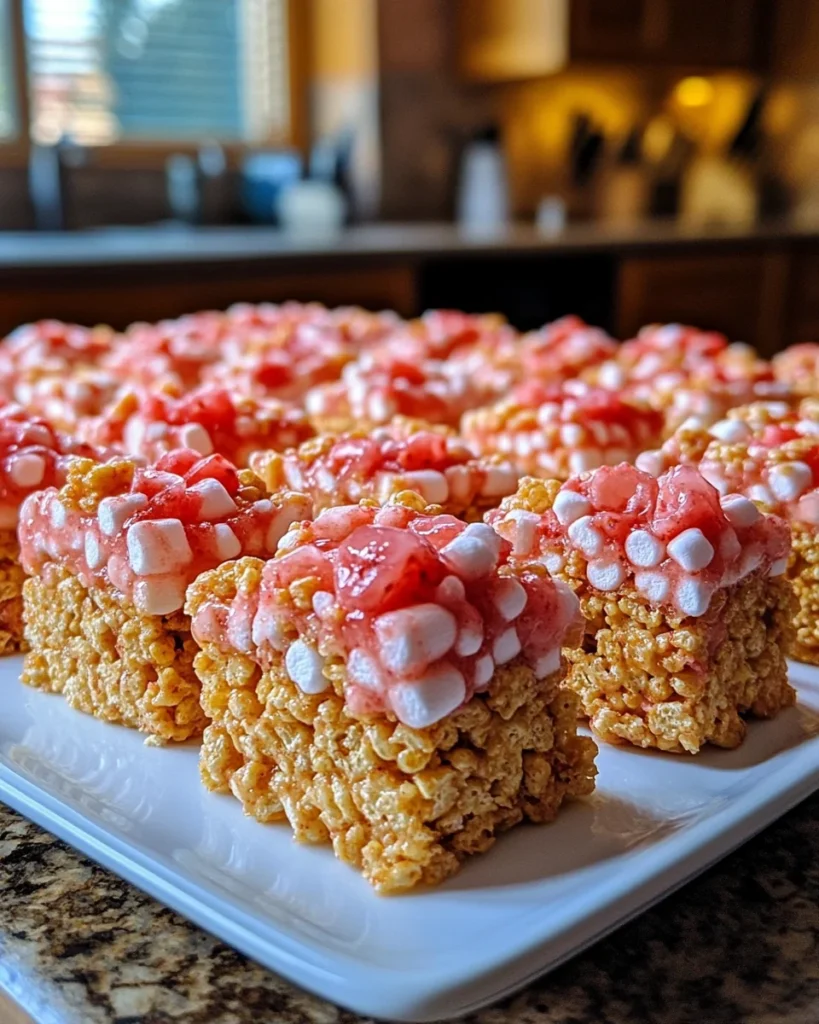
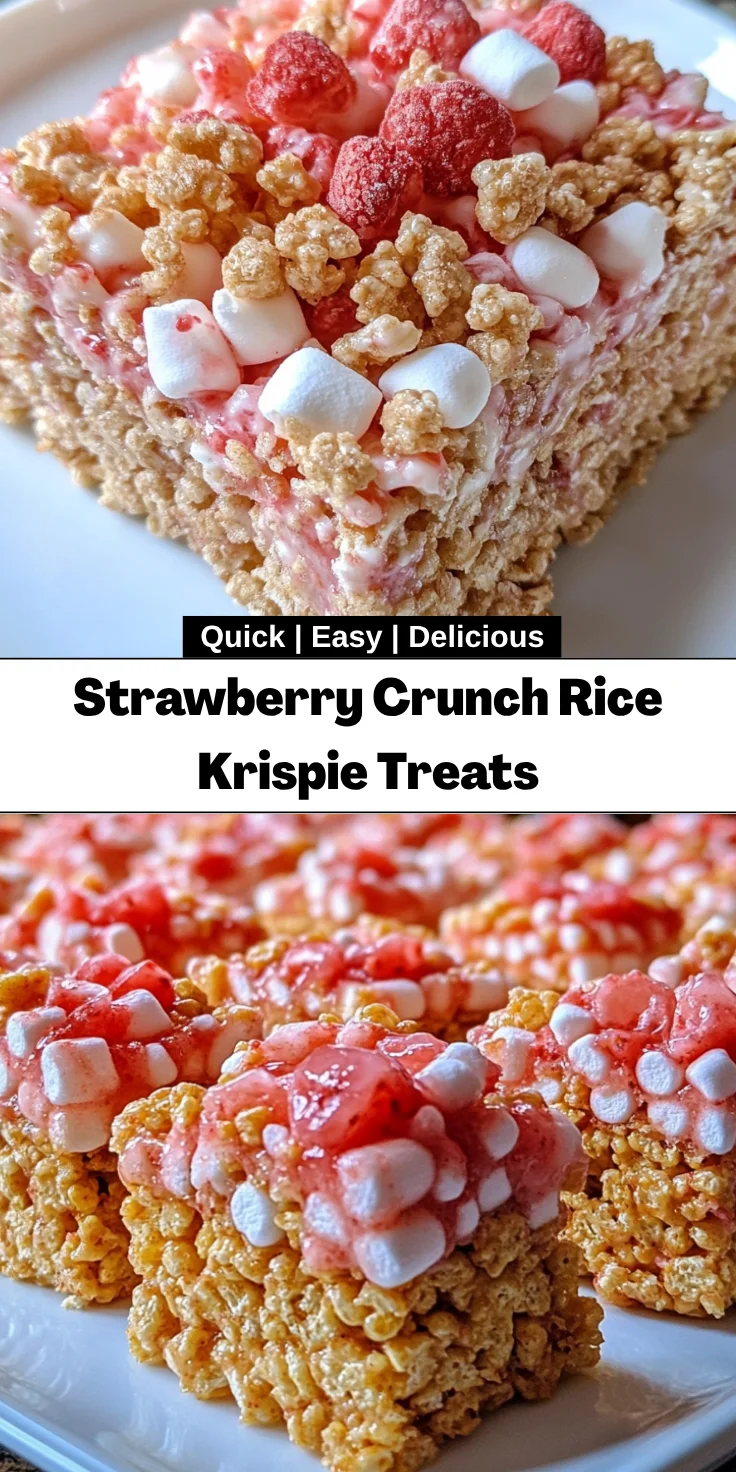
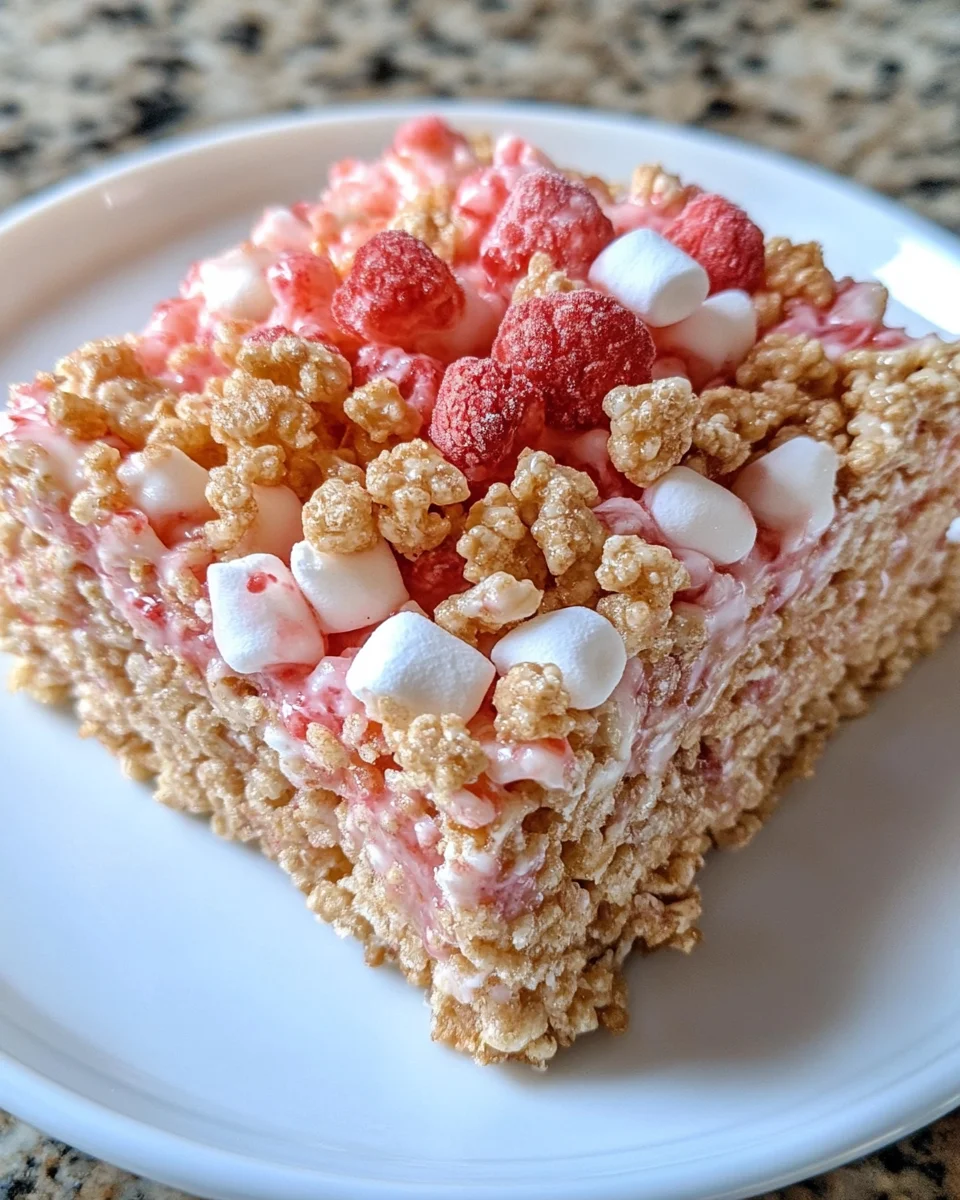
    Introduction to Strawberry Crunch Rice Krispie Treats

    Hi there, fellow food lovers! If you’re anything like me, your days can be a whirlwind of activities, leaving little time for complicated desserts. That’s why I’m excited to share my Strawberry Crunch Rice Krispie Treats recipe. These delightful, no-bake treats are not only a quick solution for a busy day but also a fantastic way to impress family and friends. Imagine the sweet aroma of strawberries filling your kitchen while you whip up a batch of these delicious delights. Trust me, once you try them, you’ll keep this recipe in your back pocket for all occasions!

    Why You’ll Love This Strawberry Crunch Rice Krispie Treats

    Let’s be honest: life can get hectic, and finding the time to bake something amazing feels like a luxury. That’s where these Strawberry Crunch Rice Krispie Treats shine. They’re incredibly easy to make, requiring minimal effort and ingredients. Plus, the joyful combination of strawberry and crunchy textures is utterly irresistible. Whether for a family movie night or a last-minute treat, these desserts will have everyone grinning from ear to ear!

    Ingredients for Strawberry Crunch Rice Krispie Treats

    To whip up a batch of these enchanting Strawberry Crunch Rice Krispie Treats, you’ll need a handful of ingredients, easily accessible at any grocery store. Let’s break it down:

    • Rice Krispies: These are the stars of the show, offering that delightful crunch that pairs perfectly with sweetness.
    • Butter: Adds richness and helps bind the ingredients together. I often use unsalted butter for better control over the sweetness.
    • Marshmallows: These sweet puffs create a gooey, delicious texture. Mini marshmallows melt faster, but regular ones work great too.
    • Strawberry-flavored gelatin or puree: This ingredient imparts that luscious strawberry flavor. Gelatin provides a stronger flavor punch, while puree gives a fresher taste.
    • Crushed freeze-dried strawberries: For an extra crunch and intensified fruitiness, these beauties sprinkle a bit of nature’s sweetness throughout the treats.
    • Optional toppings: Feel free to get creative! Chocolate chips or white chocolate drizzle can add a lovely contrast and take the treats to another level.
    • Substitutions: If you’re short on ingredients, you can switch regular marshmallows for vegan options. Brown rice cereal can replace Rice Krispies for a healthier twist.

    You can find specific quantities for each ingredient at the bottom of the article, ready for you to print out and take to the kitchen!

    How to Make Strawberry Crunch Rice Krispie Treats

    Step 1: Prepare Your Ingredients

    Before diving into making these delicious Strawberry Crunch Rice Krispie Treats, let’s prep what you need. Start by measuring out your Rice Krispies, marshmallows, and butter. This makes your cooking process seamless and enjoyable. You won’t be scrambling to find things mid-recipe. Don’t forget to have your strawberry flavoring and freeze-dried strawberries ready to go. Trust me, this bit of organization will save you time and make your kitchen feel like a calm oasis, even amidst the chaos of a busy day!

    Step 2: Melt the Ingredients

    Now, onto the fun part—melting! Begin by placing a saucepan on low heat and adding the butter. It’ll melt slowly, giving off buttery goodness. As the butter starts to melt, gradually add in the marshmallows. Stir continuously to prevent sticking. The key is to keep the heat low; burnt marshmallows are a disaster we want to avoid! Once the marshmallows are gooey and smooth, remove the pan from heat. This mixture is the heart of your Strawberry Crunch Rice Krispie Treats, and it should look like a silky cloud of sweetness!

    Step 3: Combine Rice Krispies and Strawberry Flavor

    Next up, it’s time to incorporate that heavenly strawberry flavor. In a large mixing bowl, pour in the Rice Krispies. Then, add your melted marshmallow-butter goodness right on top. Stir gently but thoroughly to coat every crispy piece. If you’re using strawberry gel or puree, toss it in now, mixing until evenly combined. You want each bite to sing with that delightful strawberry essence. Watch closely; the transformation of your ingredients is incredibly satisfying!

    Step 4: Press the Mixture into a Pan

    Got your mixture ready? Awesome! Now it’s time to transfer it to a greased, flat pan. Using a spatula or your hands (a little mess never hurt anyone), gently press down the mixture, ensuring it’s evenly distributed. For a smoother finish, lightly dampen your fingers with water to avoid sticking. This prevents them from becoming a gooey disaster! Once it’s all packed in, these treats will take shape and become a solid base for your strawberry crunch.

    Step 5: Create the Crunch Topping

    Let’s make the magic happen! In a separate bowl, take your crushed freeze-dried strawberries and mix them with some Rice Krispies. This crunchy topping adds an exhilarating texture. Sprinkle this vibrant mixture generously over the pressed treats in the pan. Gently press it down just a little to ensure it sticks. This adds both a pop of flavor and a delightful crunch that transforms your treats from good to extraordinary!

    Step 6: Finish and Chill

    Almost there! To finalize your Strawberry Crunch Rice Krispie Treats, place the pan into the refrigerator. Let them chill for at least 30 minutes to firm up. Once they’re set, take them out and cut into squares or rectangles. Use a sharp knife for clean edges. The hardest part is waiting to dig in! Once you take that first bite, you’ll understand why these treats are a hit with everyone!

    Tips for Success

    • For easy cleanup, spray your measuring cups with non-stick spray before measuring sticky ingredients like marshmallows.
    • Keep your heat low when melting, as high heat can lead to burnt marshmallows.
    • For a fun twist, try other flavored gelatin or add a drizzle of melted chocolate on top.
    • Let the treats cool completely for a cleaner cutting experience.
    • Store leftovers in an airtight container to maintain freshness.

    Equipment Needed

    • Large mixing bowl: If you don’t have one, any big bowl will do.
    • Medium saucepan: A pot works just as well for melting.
    • Spatula: A spoon can substitute for mixing and pressing.
    • Measuring cups and spoons: Use any handy kitchen measuring tools.
    • Refrigerator-safe pan: A baking dish works beautifully for chilling.

    Variations of Strawberry Crunch Rice Krispie Treats

    • Chocolate Delight: Add a layer of melted chocolate over the top for a rich twist that pairs beautifully with strawberries.
    • Nutty Addition: Stir in chopped nuts like almonds or pecans for extra crunch and flavor.
    • Vegan Version: Use coconut oil instead of butter and vegan marshmallows to create a plant-based treat.
    • Gluten-Free Option: Substitute regular Rice Krispies with gluten-free versions available at health stores.
    • Mix and Match Fruit: Try using different freeze-dried fruits like raspberries or blueberries to change up the flavor profile.

    Serving Suggestions

    • Pair these Strawberry Crunch Rice Krispie Treats with a tall glass of cold milk for a classic combo.
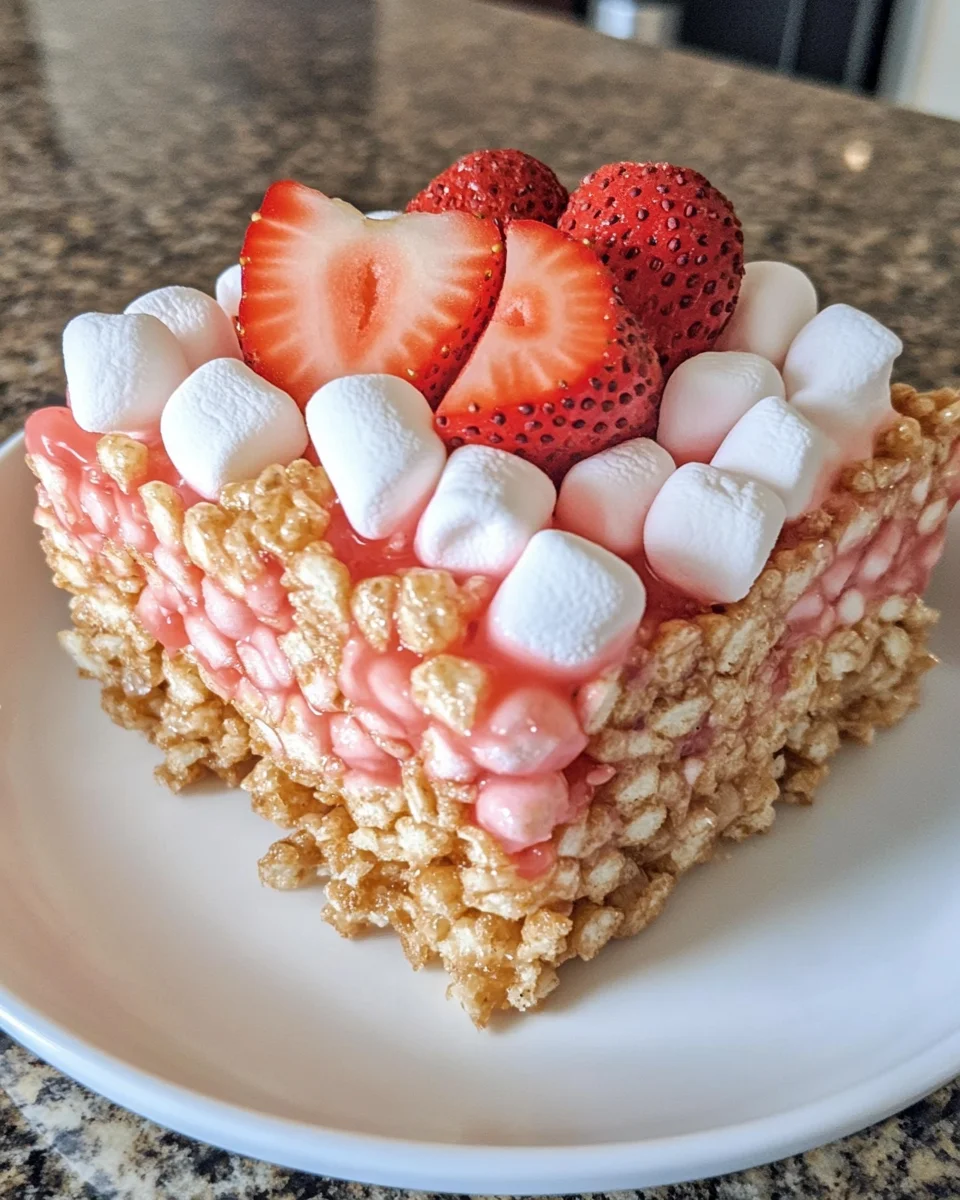
    • Present them on a colorful plate, garnished with fresh strawberries for a pop of color.
    • Serve alongside a fruity smoothie for a delightful afternoon snack.
    • For gatherings, cut them into fun shapes using cookie cutters for added charm.

    FAQs about Strawberry Crunch Rice Krispie Treats

    As I dive deeper into the world of Strawberry Crunch Rice Krispie Treats, I often receive questions from fellow home cooks excited to try this recipe. Here, I’ll answer some of the most common queries that can help you nail this sweet creation!

    Can I use fresh strawberries instead of freeze-dried?
    While fresh strawberries are delicious, they contain more moisture, which can affect the texture of your treats. I recommend sticking with freeze-dried strawberries for the crunch factor!

    How should I store my Strawberry Crunch Rice Krispie Treats?
    Keep your treats in an airtight container at room temperature. They’ll last about 3-5 days, but I guarantee they’ll disappear much sooner than that!

    Can I make these ahead of time?
    Absolutely! You can prepare your Strawberry Crunch Rice Krispie Treats a day in advance. Just store them as mentioned above, and you’ll be all set for your gathering.

    What if I don’t have Rice Krispies?
    No worries! You can use any puffed rice cereal or even a gluten-free cereal as a substitute. The key is keeping that delightful crunch.

    Can I add more strawberry flavor?
    Definitely! If you want an even stronger flavor, consider using strawberry extract in addition to the gelatin or puree. It elevates the taste and gives your treats a punch!

    Final Thoughts

    Creating these Strawberry Crunch Rice Krispie Treats brings a delightful sense of joy to my busy days. As I watch my family devour them, their smiles remind me of the simple pleasures in life. The blend of crunchy and sweet is irresistible, making these treats perfect for any occasion. Whether it’s a family movie night or a potluck gathering, they deliver happiness in every bite. I hope you find as much joy in making these scrumptious treats as I do. Enjoy! You’ve earned a little sweetness in your life.


    Print

    clock clock iconcutlery cutlery iconflag flag iconfolder folder iconinstagram instagram iconpinterest pinterest iconfacebook facebook iconprint print iconsquares squares iconheart heart iconheart solid heart solid icon

    Description

    A delicious and colorful treat combining strawberry-flavored Rice Krispies and a crunchy topping made from Golden Oreos and strawberry Jell-O.


    • 6 cups strawberry-flavored Rice Krispies cereal (or regular Rice Krispies)
    • 1 (10 oz) bag mini marshmallows
    • 4 tbsp (60g) unsalted butter
    • 1 tsp vanilla extract
    • 10 Golden Oreos, crushed
    • 3 tbsp strawberry Jell-O powder
    • 3 tbsp melted butter

    1. In a bowl, mix crushed Golden Oreos, strawberry Jell-O powder, and melted butter. Stir until combined and set aside.
    2. In a large pot, melt butter over low heat. Add mini marshmallows, stirring until fully melted. Stir in vanilla extract. Remove from heat and fold in Rice Krispies cereal until fully coated.
    3. Lightly grease a 9×13-inch (23x33cm) baking dish and press the Rice Krispie mixture evenly into the pan. Sprinkle the strawberry crunch mix evenly over the top, pressing gently so it sticks.
    4. Let set for 30 minutes, then slice into squares and enjoy!

    Notes

    • For an extra kick, try adding fresh strawberries on top before serving.
    • Make sure to press the Rice Krispie mixture firmly into the baking dish for better slicing.
    • Prep Time: 15 minutes
    • Cook Time: 10 minutes
    • Category: Dessert
    • Method: No-bake
    • Cuisine: American

    Nutrition

    • Serving Size: 1 square
    • Calories: 180
    • Sugar: 12g
    • Sodium: 80mg
    • Fat: 7g
    • Saturated Fat: 4g
    • Unsaturated Fat: 2g
    • Trans Fat: 0g
    • Carbohydrates: 25g
    • Fiber: 0g
    • Protein: 1g
    • Cholesterol: 15mg

    Sharing is caring!

  • Garlic Butter Chicken Wings

    Garlic Butter Chicken Wings


    Introduction to Garlic Butter Chicken Wings

    If you’re anything like me, life gets busy, and finding time to whip up something delicious can feel like a challenge.
    That’s why I absolutely adore my Garlic Butter Chicken Wings!
    These wings are not just a snack; they’re a flavor explosion that pairs beautifully with any gathering.
    Imagine golden-brown, crispy chicken enveloped in rich garlic butter, all ready in under an hour.
    It’s the perfect dish to impress your loved ones or to serve as a quick solution on a hectic weeknight.
    With just a handful of simple ingredients, you’re moments away from a plate of pure bliss!

    Why You’ll Love This Garlic Butter Chicken Wings

    You’re going to fall head over heels for these Garlic Butter Chicken Wings.
    They’re incredibly easy to prepare, making them perfect for busy evenings or spontaneous get-togethers.
    Plus, the taste is simply out of this world! The buttery garlic goodness seeps into each wing, creating a cozy culinary hug in every bite.
    Whether you’re serving them for game night or a family dinner, they’re sure to be a hit!

    Ingredients for Garlic Butter Chicken Wings

    Making these Garlic Butter Chicken Wings is a breeze, thanks to some readily available ingredients.
    Here’s what you’ll need:

    • Chicken Wings: The star of the show. Choose fresh or frozen, but ensure to thaw if frozen. They should be plump and juicy!
    • Unsalted Butter: This rich fat enhances the garlic flavor without overpowering. If you’re on a dairy-free diet, swap in a vegan butter substitute.
    • Garlic: The real magic ingredient! Fresh garlic gives an aromatic punch that dried garlic simply can’t match.
      For a twist, try roasted garlic for a sweeter flavor.
    • Salt: A must for flavor enhancement. Use kosher salt for a more balanced taste.
      Alternatively, try seasoned salt for an extra flavor boost!
    • Black Pepper: Freshly cracked black pepper brings a hint of heat.
      If you prefer a milder flavor, feel free to use white pepper instead.
    • Paprika: A versatile spice that adds depth and a touch of smokiness.
      Smoked paprika can give your wings an even richer flavor.
    • Fresh Parsley: This vibrant herb adds a pop of color and freshness. If you’re short on time, use dried parsley, but fresh is always best!
    • Lemon Juice: A squeeze of lemon at the end brightens everything up. You could also use lime juice for a different twist.

    For exact measurements, check at the bottom of this article, where you can also find a printable version.
    Gather these ingredients, and let’s make magic happen in the kitchen!

    How to Make Garlic Butter Chicken Wings

    Now that we have all the ingredients lined up, it’s time to dive into the hands-on part of this flavorful adventure!
    Each step is simple, guiding you toward a plate of Garlic Butter Chicken Wings that will make your taste buds sing!
    Let’s break it down step by step, shall we?

    Step 1: Preheat the Oven

    First things first, preheat your oven to 400°F (200°C).
    Preheating is crucial because it ensures that your chicken wings cook evenly and get that crispy texture we all love.
    You don’t want to toss cold wings in a cold oven; that’s a recipe for sogginess!

    Step 2: Season the Wings

    In a large bowl, combine your chicken wings with salt, black pepper, and paprika.
    Toss them well until they are evenly coated.
    This step is key—seasoning infuses delicious flavors right into the meat, ensuring every bite is packed with taste.
    Trust me, your taste buds will thank you!

    Step 3: Prepare the Baking Sheet

    Line a baking sheet with aluminum foil and place a wire rack on top.
    This setup helps your wings cook perfectly.
    The foil makes cleanup easy, while the wire rack allows hot air to circulate around the wings, giving you that lovely crisp!

    Step 4: Bake the Wings

    Spread the seasoned wings in a single layer on the wire rack and pop them in the preheated oven.
    Bake for 40-45 minutes, flipping them halfway through.
    Flipping ensures both sides get that golden-brown goodness.
    Your kitchen will be filled with mouthwatering aromas that might make waiting hard!

    Step 5: Create the Garlic Butter Sauce

    While the wings are baking, let’s make that scrumptious garlic butter sauce.
    In a small saucepan over low heat, melt the unsalted butter, then add the minced garlic.
    Stir it around and let it cook for about 2-3 minutes.
    Fresh garlic is a game changer here, giving depth and aromatic punch to the wings.

    Step 6: Combine Wings and Sauce

    Once your wings are done baking, transfer them to a large mixing bowl.
    Pour the garlic butter sauce over the hot wings and toss them gently.
    Make sure each wing gets a lovely coating of that rich, buttery goodness.
    Just imagine that mouthwatering flavor mingling with crispy chicken!

    Step 7: Optional Lemon Juice

    If you want to elevate the flavor even more, add a squeeze of fresh lemon juice.
    This brightens up the rich garlic butter and balances the flavors perfectly.
    It’s like a culinary hug—warm and refreshing all at once!

    Step 8: Serve the Wings

    Finally, arrange your Garlic Butter Chicken Wings on a serving platter.
    Garnish with a sprinkle of fresh parsley for a pop of color.
    Serve immediately while hot, and watch them disappear as your family and friends dig in!

    Tips for Success

    • Make sure your chicken wings are thoroughly dried before seasoning. This helps achieve maximum crispiness!
    • If time allows, marinate the wings overnight with garlic and spices for deeper flavor.
    • For extra crispy wings, broil them for 2-3 minutes at the end.
    • Use high-quality butter for the sauce—it’s worth the extra taste!
    • Get creative with toppings: consider adding grated Parmesan or hot sauce.

    Equipment Needed for Garlic Butter Chicken Wings

    • Baking Sheet: A rimmed baking sheet works best for catching drips. If you don’t have one, any oven-safe tray will do!
    • Wire Rack: This helps wings cook evenly. You can use a cooling rack as an alternative.
    • Large Mixing Bowl: Essential for tossing the wings. A large pot can work in a pinch.
    • Small Saucepan: For melting the butter and garlic. A microwave-safe bowl is a great alternative.

    Variations of Garlic Butter Chicken Wings

    • Spicy Garlic Butter Wings: Add red pepper flakes to the garlic butter for a spicy kick. This adds warmth and excitement!
    • Honey Garlic Butter Wings: Drizzle some honey into the butter sauce for a sweet twist. The sweetness complements the garlic beautifully.
    • Lemon Pepper Wings: Instead of regular seasoning, mix lemon zest and cracked black pepper for a zesty flavor profile.
    • Herb-Infused Butter Wings: Incorporate fresh herbs like thyme or rosemary into the butter sauce for an earthy depth of flavor.
    • Gluten-Free Option: Ensure your spices and sauces are certified gluten-free to cater to dietary restrictions without sacrificing taste!

    Serving Suggestions for Garlic Butter Chicken Wings

    • Fresh Veggies: Pair the wings with crunchy celery and carrot sticks for a refreshing contrast.
    • Dipping Sauces: Serve with ranch or blue cheese dressing for extra flavor and creaminess.
    • Cold Beverages: Ice-cold beer or homemade lemonade complements the wings perfectly.
    • Presentation: Arrange wings on a rustic wooden board, garnished with fresh herbs for a charming look.
    • Side Dishes: Consider serving with crispy fries or a light salad for balance.

    FAQs about Garlic Butter Chicken Wings

    Here are some frequently asked questions about my beloved Garlic Butter Chicken Wings!
    Whether you’re a first-timer or a seasoned cook, these answers should help you make the most of this recipe.

    Can I use frozen chicken wings for this recipe?

    Absolutely! Just make sure to thaw them completely before seasoning and cooking.
    It ensures even cooking and crispy skin, which we all crave!

    How can I make these wings spicier?

    For a spicy kick, add red pepper flakes to the garlic butter or mix in some hot sauce after tossing.
    Your taste buds will feel the fire!

    Can I make Garlic Butter Chicken Wings in an air fryer?

    Yes, you can! Preheat the air fryer to 375°F (190°C) and cook for about 20-25 minutes.
    Shake the basket halfway through for even crispiness.

    What’s the best way to store leftovers?

    Store leftover wings in an airtight container in the refrigerator for up to 3 days.
    Reheat them in the oven or air fryer for that crispy texture to return!

    Can I use different spices?

    Of course! Feel free to experiment with your favorite seasonings.
    Garlic powder, onion powder, or even BBQ seasoning can turn this dish into your own signature wings.

    Final Thoughts

    Cooking should be a joy, not a chore, and my Garlic Butter Chicken Wings embody this spirit!
    They offer a scrumptious escape from the everyday hustle.
    In just under an hour, you can create an unforgettable dish that delights your family and friends.
    Each bite is a warm hug, celebrating simple yet rich flavors.
    So next time you’re in a pinch for a quick meal or craving something special, remember these wings!
    Dive into this culinary adventure, and let the irresistible taste bring joy to your table!


    Print

    clock clock iconcutlery cutlery iconflag flag iconfolder folder iconinstagram instagram iconpinterest pinterest iconfacebook facebook iconprint print iconsquares squares iconheart heart iconheart solid heart solid icon

    Description

    Garlic Butter Chicken Wings are irresistibly delicious and full of rich flavors from garlic and butter, making them a perfect appetizer.


    • 2 pounds chicken wings
    • 1/2 cup unsalted butter
    • 6 cloves garlic, minced
    • 1 teaspoon salt
    • 1/2 teaspoon black pepper
    • 1 teaspoon paprika
    • 1 tablespoon fresh parsley, chopped
    • 1 tablespoon lemon juice

    1. Preheat your oven to 400°F (200°C).
    2. In a large bowl, combine the chicken wings with salt, black pepper, and paprika. Toss the wings until they are evenly coated with the seasonings.
    3. Line a baking sheet with aluminum foil and place a wire rack on top. Spread the seasoned wings in a single layer on the wire rack.
    4. Bake the wings in the preheated oven for 40-45 minutes, flipping them halfway through.
    5. While the wings are baking, prepare the garlic butter sauce. In a small saucepan over low heat, melt the unsalted butter. Add the minced garlic and stir. Cook for about 2-3 minutes.
    6. Once the wings are done baking, remove them from the oven and transfer them to a large mixing bowl. Pour the garlic butter sauce over the wings and toss until they are well coated.
    7. If desired, add a squeeze of fresh lemon juice to the wings and toss again.
    8. Arrange the wings on a serving platter and garnish with chopped fresh parsley. Serve immediately while hot.

    Notes

    • For extra crispy wings, you can broil them for 2-3 minutes after baking.
    • Leftover wings can be stored in an airtight container in the refrigerator for up to 3 days.
    • Prep Time: 10 minutes
    • Cook Time: 45 minutes
    • Category: Appetizer
    • Method: Baking
    • Cuisine: American

    Nutrition

    • Serving Size: 4 wings
    • Calories: 310
    • Sugar: 0g
    • Sodium: 600mg
    • Fat: 22g
    • Saturated Fat: 10g
    • Unsaturated Fat: 8g
    • Trans Fat: 0g
    • Carbohydrates: 1g
    • Fiber: 0g
    • Protein: 25g
    • Cholesterol: 85mg

    Sharing is caring!

  • Marry Me Salmon

    Marry Me Salmon


    Introduction to Marry Me Salmon

    Let me tell you, there’s something truly magical about Marry Me Salmon. Picture this: a cozy evening, and you’re looking to impress someone special (or just treat yourself!). This creamy salmon dish, with its rich garlic and sun-dried tomato flavors, can sweep anyone off their feet. I’ve been there—juggling a busy life, feeling the urge to whip up something extraordinary, yet simple. This recipe delivers on all fronts—easy, quick, and delicious! So, let’s embark on this cooking adventure together and create a meal that truly feels like love at first bite.

    Why You’ll Love This Marry Me Salmon

    This Marry Me Salmon recipe is not just a dish; it’s an experience wrapped in creamy goodness. First, it’s incredibly easy, making it perfect for busy evenings. You don’t need to be a master chef to nail this one! The best part? It cooks up quickly, too, ready in just 40 minutes. Each bite bursts with flavor, making it an irresistible meal for any occasion—romantic or simply satisfying your cravings!

    Ingredients for Marry Me Salmon

    Gathering the right ingredients is half the fun! Here’s what you’ll need to create your Marry Me Salmon:

    • Salmon fillets: Use skinless fillets for a tender bite. Wild-caught options are always a great choice when available.
    • Olive oil: This rich oil adds flavor and helps in pan-searing. Extra virgin olive oil can elevate the dish even more.
    • Dried Italian seasoning: A mix of dried herbs like basil, oregano, and thyme—perfect for enhancing the salmon’s flavor.
    • Kosher salt: Essential for seasoning, it helps to bring out the salmon’s natural taste.
    • Cracked black pepper: A pinch adds that zing, complementing the creaminess of the dish.
    • Butter: Rich and creamy, it’s the base for the delicious sauce you’ll make!
    • Garlic: Minced garlic adds a punch of flavor. Fresh is best, but jarred works in a pinch!
    • Flour: This thickens your sauce to create that luscious creaminess everyone loves.
    • Chicken broth: Use low-sodium for a flavor boost without excess salt. Homemade adds a personal touch!
    • Heavy cream: This divinely creamy ingredient is what makes the sauce rich and indulgent.
    • Parmesan cheese: Grated and included for an unctuous depth. Freshly grated is always best.
    • Sun-dried tomatoes: These little gems add a sweet and tangy kick to your sauce.
    • Lemon zest: It brightens up the dish with a refreshing hint of citrus.
    • Fresh basil: A garnish that adds a pop of color and a lovely aroma!

    Check the bottom of the article for exact quantities if you’re ready to get cooking!

    How to Make Marry Me Salmon

    Now, let’s dive into the delicious journey of making Marry Me Salmon! This step-by-step guide will make it a breeze. Don’t worry! Each step is simple, ensuring you can create this creamy salmon dish with ease. Let’s get started!

    Preparing the Salmon

    First things first, we need to prep that lovely salmon! Start by brushing each skinless fillet with olive oil. This not only adds flavor but also prevents sticking. Then, sprinkle them generously with Italian seasoning, kosher salt, and cracked black pepper. Make sure to coat both sides for even seasoning. Letting them sit for a few minutes helps the flavors mingle beautifully. Trust me, it’ll be worth it!

    Cooking the Salmon

    Time to bring out the skillet! Heat one tablespoon of olive oil over medium-high heat. Once hot, carefully place the salmon fillets in the pan. Sear them for about three minutes on one side until they turn a gorgeous golden brown. Flip the fillets gently and cook another three minutes. To check if they’re done, look for that lovely, flaky texture. If they need a bit more time, reduce the heat and let them finish cooking through. Remove them from the pan and set aside.

    Making the Creamy Sauce

    In the same skillet, add three tablespoons of butter and melt it over medium heat. As it melts, toss in the minced garlic and sauté for about thirty seconds until it’s fragrant. Next, whisk in the flour to create a paste, combining until smooth. Gradually pour in the chicken broth, stirring gently until it simmers. This step is key to ensuring no lumps form! Now, add in the heavy cream and whisk away until the sauce looks rich and creamy. Stir in the grated Parmesan and let it melt into the sauce for extra deliciousness. Finally, mix in the chopped sun-dried tomatoes, Italian seasoning, and lemon zest. Give it a little taste and adjust the salt and pepper if needed. Your sauce is now ready to embrace the salmon!

    Final Assembly

    Now, let’s put everything together! Gently nestle the cooked salmon fillets back into the creamy sauce. Make sure they’re well coated for that luxurious feel. Allow them to simmer together on low heat for about ten minutes. This lets the salmon soak up all those incredible flavors. When serving, don’t forget to sprinkle fresh basil for a pop of color and flavor. Serve your Marry Me Salmon over pasta, rice, or your favorite veggies. Enjoy every delightful bite!

    Tips for Success

    • Always use fresh salmon if possible; it makes a world of difference in flavor!
    • Let the salmon sit at room temperature for about 15 minutes before cooking for even cooking.
    • Don’t rush the sauce! Allow it to simmer for that rich, creamy texture.
    • Keep taste-testing the sauce, adjusting seasoning as you go.
    • Serve immediately for the best texture and taste!

    Equipment Needed

    • Large skillet: A non-stick or cast-iron skillet works great for even cooking.
    • Whisk: Essential for mixing the sauce smoothly and avoiding lumps.
    • Measuring spoons: Perfect for precise ingredient measurements, though you can always eyeball it!
    • Spatula: Use it to flip the salmon gently while cooking.
    • Cutting board and knife: For chopping the sun-dried tomatoes and mincing garlic.

    Variations for Marry Me Salmon

    • Herb-infused oil: Swap regular olive oil for herb-infused oil for an extra aromatic twist.
    • Spice it up: Add a pinch of red pepper flakes to the sauce for a hint of heat!
    • Vegetarian option: Replace salmon with firm tofu or portobello mushrooms for a delightful plant-based meal.
    • Low-carb version: Serve over zucchini noodles instead of pasta for a lighter, low-carb alternative.
    • Try different cheeses: Substitute Parmesan with feta or goat cheese for a different flavor profile.

    Serving Suggestions for Marry Me Salmon

    • Side dishes: Pair with garlic mashed potatoes or a fresh garden salad for a balanced meal.
    • Drinks: A crisp Sauvignon Blanc or a light Pinot Grigio complements the creamy flavors beautifully.
    • Presentation: Serve the salmon on a bed of sautéed spinach or over quinoa for added texture and color.

    FAQs about Marry Me Salmon

    Can I use frozen salmon for this recipe?
    Absolutely! Just make sure to thaw it completely before cooking. This will help achieve that lovely, flaky texture we all love.

    What can I substitute for heavy cream?
    If you’d like a lighter option, you can use half-and-half or even coconut milk. Keep in mind that the flavor profile might shift a bit.

    How can I store leftover Marry Me Salmon?
    Store any leftovers in an airtight container in the fridge for up to three days. Reheat gently on the stovetop to maintain that creamy sauce texture.

    Can I make Marry Me Salmon ahead of time?
    You can prepare the sauce ahead of time. Just cook the salmon fresh before serving for optimal flavor and texture!

    What sides go best with Marry Me Salmon?
    This dish pairs wonderfully with a light salad, garlic bread, or pasta. The creamy sauce complements these sides perfectly!

    Final Thoughts

    As I sit back and savor the last spoonful of Marry Me Salmon, I’m reminded of all the lovely moments this dish creates. It brings joy not just from its creamy, rich flavor, but also from the connection it fosters around the dinner table. Whether it’s a romantic date night or a well-deserved treat for yourself, every bite is a pleasure. Cooking this meal together becomes part of the experience, leaving behind laughter and cherished memories. I encourage you to whip up this dish and discover the love it brings to your kitchen!


    Print

    clock clock iconcutlery cutlery iconflag flag iconfolder folder iconinstagram instagram iconpinterest pinterest iconfacebook facebook iconprint print iconsquares squares iconheart heart iconheart solid heart solid icon

    Description

    Marry Me Salmon is a delicious and creamy salmon dish that combines the rich flavors of garlic, sun-dried tomatoes, and Parmesan cheese, making it a perfect romantic meal.


    • 4 salmon fillets (skinless)
    • 2 tablespoons olive oil (divided)
    • 2 teaspoons dried Italian seasoning
    • ½ teaspoon Kosher salt
    • ¼ teaspoon cracked black pepper
    • FOR THE SAUCE:
    • 3 tablespoons butter
    • 2 teaspoons garlic (minced)
    • 3 tablespoons flour
    • 1 ½ cups chicken broth
    • ¾ cup heavy cream
    • ½ cup Parmesan cheese (grated)
    • ½ cup sun-dried tomatoes (drained and chopped)
    • 1 teaspoon dried Italian seasoning
    • 1 teaspoon lemon zest
    • Fresh basil (for garnish)

    1. Brush 1 tablespoon olive oil over each salmon fillet. Sprinkle with Italian seasoning, salt, and pepper.
    2. In a large skillet, heat 1 tablespoon olive oil over medium-high heat.
    3. Place salmon fillets in the pan and cook for about 3 minutes per side until golden brown. Reduce heat to medium-low and cook until the salmon is done. Remove and set aside.
    4. In the same skillet, melt 3 tablespoons butter over medium heat.
    5. Add minced garlic and cook for 30 seconds until fragrant.
    6. Stir in 3 tablespoons flour to form a paste.
    7. Slowly whisk in the chicken broth and let it simmer.
    8. Stir in heavy cream and Parmesan cheese, whisking until smooth.
    9. Mix in sun-dried tomatoes, Italian seasoning, and lemon zest. Adjust salt and pepper to taste.
    10. Nestle the salmon fillets into the sauce.
    11. Let everything cook together on low heat for 10 minutes.
    12. Sprinkle with fresh basil and serve warm over pasta, rice, or vegetables.

    Notes

    • This dish is great for a romantic dinner or special occasion.
    • Feel free to add your favorite vegetables to the dish.
    • Can be served with a side of salad for a complete meal.
    • Prep Time: 15 minutes
    • Cook Time: 25 minutes
    • Category: Main Course
    • Method: Pan-Seared and Simmered
    • Cuisine: American

    Nutrition

    • Serving Size: 1 fillet with sauce
    • Calories: 520
    • Sugar: 2g
    • Sodium: 460mg
    • Fat: 35g
    • Saturated Fat: 18g
    • Unsaturated Fat: 14g
    • Trans Fat: 0g
    • Carbohydrates: 8g
    • Fiber: 1g
    • Protein: 43g
    • Cholesterol: 120mg

    Sharing is caring!

  • Shrimp Fajitas

    Shrimp Fajitas


    Introduction to Shrimp Fajitas

    There’s something delightful about cooking up a storm in the kitchen, especially when it involves Shrimp Fajitas. Imagine savoring tender shrimp, perfectly marinated, dancing with vibrant peppers and onions. It’s not just a meal; it’s an experience that can brighten any busy day!

    This recipe comes to the rescue for those of us juggling family, work, and everything in between. In just 25 minutes, you’ll have a quick, mouthwatering solution that impresses your loved ones and sparks joy at the dinner table. Let’s dive into this flavorful adventure!

    Why You’ll Love This Shrimp Fajitas

    You’ll adore these Shrimp Fajitas for their incredible speed and convenience. In just 25 minutes, you’ll go from prep to plate, making it ideal for those hectic evenings. The taste? Absolutely captivating! The flavorful marinated shrimp combined with crisp veggies creates a little fiesta in your mouth. Plus, it’s easy to customize for picky eaters or health-conscious family members, so everyone can enjoy this delightful dish!

    Ingredients for Shrimp Fajitas

    Gathering your ingredients is the fun part! For these Shrimp Fajitas, you’ll need:

    • Shrimp: Fresh or frozen, peeled and deveined shrimp are the stars of this dish. They soak up all the fabulous flavors!
    • Olive oil: This adds richness and helps cook the shrimp and veggies beautifully. You can substitute it with avocado oil if you fancy.
    • Red and green bell peppers: These colorful veggies not only taste great but also add a pop of color. Feel free to mix in yellow or orange peppers for extra sweetness!
    • Onion: A medium onion brings a hint of sweetness and pairs perfectly with the spices.
    • Garlic: Freshly minced garlic elevates the dish with its aromatic flavor. You can use garlic powder if that’s what you have on hand.
    • Lime juice: This gives a zesty brightness that makes everything sing! Fresh lime is best, but bottled works too.
    • Chili powder, cumin, paprika, and garlic powder: These spices create a flavorful fiesta that adds depth to the shrimp.
    • Cayenne pepper: Optional for those who love a kick! Adjust it to suit your heat preference.
    • Salt and pepper: These staples enhance all the beautiful flavors in your fajitas.
    • Tortillas: Warm flour or corn tortillas serve as the perfect vessel for your yummy filling.
    • Fresh cilantro: A garnish that adds freshness and color, making the dish pop!
    • Sour cream, salsa, and guacamole: Optional toppings that take these fajitas to the next level.

    For specific quantities of each ingredient, please check the bottom of the article where you’ll find a handy printable version!

    How to Make Shrimp Fajitas

    Marinate the Shrimp

    Start by grabbing a medium bowl. Toss in the shrimp, along with olive oil, lime juice, and all those irresistible spices. That’s the chili powder, cumin, paprika, garlic powder, and if you’re feeling bold, cayenne pepper. Sprinkle in some salt and pepper too!

    Now, give everything a good mix. You want the shrimp to be coated evenly. Let it marinate for about 10-15 minutes. This step is crucial; it infuses the shrimp with delicious flavor, so don’t rush it!

    Sauté the Vegetables

    While the shrimp is soaking up those zesty flavors, heat a large skillet over medium heat. Add in another tablespoon of olive oil and let it warm up. Once it’s shimmering, toss in the sliced bell peppers and onion.

    Cook these beauties for about 4-5 minutes. You want them to soften and get a bit of char—that’s where the magic happens! Then, toss in the minced garlic and let it sizzle for another 30 seconds. The aroma will have your mouth watering!

    Cook the Shrimp

    Now it’s shrimp time! Push the veggies to the side of the skillet and add the marinated shrimp. Cook them for approximately 2-3 minutes on each side. You’ll know they’re ready when they turn a lovely pink and opaque. Remember, don’t overcrowd the skillet; it’s about beautiful, tender shrimp, not a blender!

    Combine and Serve

    Once your shrimp are cooked, mix them back in with the sautéed veggies. Give everything a gentle toss to combine and heat through. At this stage, your kitchen will feel like a vibrant Mexican fiesta!

    To serve, lay out warm tortillas and fill each one with the flavorful shrimp and vegetable mixture. Add toppings like chopped cilantro, sour cream, salsa, or guacamole, just the way you like it. Bon appétit!

    Tips for Success

    • Prep all ingredients beforehand to make cooking a breeze.
    • Don’t skimp on marinating time; it makes the shrimp truly flavorful.
    • Keep the skillet at medium heat to avoid overcooking the shrimp.
    • Feel free to swap in your favorite veggies for a personal touch.
    • Serve with a squeeze of fresh lime for an extra zing!

    Equipment Needed

    • Skillet: A large non-stick skillet works wonders. If you don’t have one, a regular skillet will do, just ensure you monitor for sticking.
    • Mixing Bowl: Any medium bowl for marinating your shrimp will suffice.
    • Spatula: A sturdy spatula helps toss everything together beautifully.
    • Measuring Spoons: For portion control on spices, although eyeballing it can be fun too!

    Variations for Shrimp Fajitas

    • Vegetable Fajitas: Leave out the shrimp and replace it with your favorite hearty vegetables, such as zucchini, mushrooms, and asparagus for a delicious vegetarian option.
    • Spicy Shrimp Fajitas: Elevate the heat by adding diced jalapeños or extra cayenne pepper to your marinade.
    • Grilled Shrimp Fajitas: Take your fajitas to the grill! Marinate the shrimp as you normally would and grill them for a smoky flavor that brings out the best in this dish.
    • Whole Wheat Tortillas: Swap traditional tortillas for whole wheat to make your fajitas a healthier choice.
    • Low-Carb Option: For a keto-friendly meal, use lettuce wraps instead of tortillas to keep the flavor while cutting carbs.

    Serving Suggestions for Shrimp Fajitas

    • Mexican Rice: Serve alongside fluffy Mexican rice to soak up those delicious juices.
    • Black Beans: A side of seasoned black beans adds protein and complements the fajitas.
    • Fresh Salad: Pair with a light salad of mixed greens, avocado, and lime vinaigrette.
    • Cocktails: Enjoy with refreshing drinks like margaritas or sparkling water with lime.
    • Colorful Presentation: Arrange your tortillas in a basket with vibrant garnishes for an eye-catching display!

    FAQs about Shrimp Fajitas

    Can I use frozen shrimp for this recipe? Absolutely! Frozen shrimp work just fine. Just make sure to thaw them completely and pat them dry before marinating. This ensures that they soak up all those amazing flavors!

    How can I make Shrimp Fajitas spicier? If you enjoy a little heat, try adding more cayenne pepper or toss in some fresh diced jalapeños during cooking. You can also take it up a notch with a spicy salsa as a topping!

    What can I substitute for tortillas? If you’re looking for a low-carb or gluten-free option, consider using lettuce wraps instead. They’re a fresh and healthy alternative that still wraps around all the delicious flavors of the shrimp and veggies!

    Can I prepare the shrimp fajitas in advance? I recommend marinating the shrimp ahead of time to save on prep work. However, for the best taste and texture, cook them fresh right before serving!

    What are some good toppings for Shrimp Fajitas? The classics include sour cream, salsa, and guacamole. But feel free to experiment! Shredded cheese, diced avocado, or even a drizzle of ranch dressing can add a unique twist to your fajita experience.

    Final Thoughts

    There’s something undeniably special about cooking and enjoying Shrimp Fajitas. This vibrant dish is like a warm hug after a long day, offering both flavor and flexibility. Whether you’re hosting friends or just feeding your family, these fajitas bring everyone together. They promise a little fiesta at your dinner table without the fuss! Plus, with so many options for customization, you’ll never get bored. So, roll up your sleeves, dive into this delightful recipe, and create memories that will linger long after the last bite. Happy cooking, my fellow culinary enthusiasts!


    Print

    clock clock iconcutlery cutlery iconflag flag iconfolder folder iconinstagram instagram iconpinterest pinterest iconfacebook facebook iconprint print iconsquares squares iconheart heart iconheart solid heart solid icon

    Description

    A delicious and easy recipe for shrimp fajitas that combines marinated shrimp with sautéed peppers and onions, perfect for a quick meal.


    • 1 lb (450g) large shrimp, peeled and deveined
    • 2 tablespoons olive oil
    • 1 red bell pepper, thinly sliced
    • 1 green bell pepper, thinly sliced
    • 1 medium onion, thinly sliced
    • 2 cloves garlic, minced
    • 1 tablespoon lime juice
    • 1 tablespoon chili powder
    • 1 teaspoon cumin
    • 1/2 teaspoon paprika
    • 1/2 teaspoon garlic powder
    • 1/4 teaspoon cayenne pepper (optional, for heat)
    • Salt and pepper, to taste
    • Warm tortillas (flour or corn) for serving
    • Fresh cilantro, chopped (optional, for garnish)
    • Sour cream, salsa, guacamole (optional, for topping)

    1. In a medium bowl, combine the shrimp with 1 tablespoon of olive oil, lime juice, chili powder, cumin, paprika, garlic powder, cayenne pepper (if using), and salt and pepper. Toss to coat the shrimp evenly. Let the shrimp marinate for 10-15 minutes.
    2. Heat 1 tablespoon of olive oil in a large skillet over medium heat. Add the sliced bell peppers and onions, cooking for 4-5 minutes, until the vegetables begin to soften and char slightly. Add the minced garlic and cook for another 30 seconds, until fragrant. Remove the vegetables from the skillet and set them aside.
    3. In the same skillet, add the seasoned shrimp and cook for 2-3 minutes per side, or until the shrimp turn pink and opaque.
    4. Add the cooked vegetables back into the skillet with the shrimp and toss everything together to combine and heat through.
    5. Serve the shrimp and vegetable mixture in warm tortillas. Garnish with fresh cilantro and serve with sour cream, salsa, or guacamole, if desired.

    Notes

    • Feel free to customize the vegetables based on your preference.
    • You can adjust the level of spice by adding more or less cayenne pepper.
    • Prep Time: 15 minutes
    • Cook Time: 10 minutes
    • Category: Main Dish
    • Method: Stovetop
    • Cuisine: Mexican

    Nutrition

    • Serving Size: 1 serving
    • Calories: 300
    • Sugar: 4g
    • Sodium: 600mg
    • Fat: 15g
    • Saturated Fat: 2g
    • Unsaturated Fat: 10g
    • Trans Fat: 0g
    • Carbohydrates: 25g
    • Fiber: 2g
    • Protein: 25g
    • Cholesterol: 200mg

    Sharing is caring!

  • Strawberry Banana Cheesecake Salad

    Strawberry Banana Cheesecake Salad


    Introduction to Strawberry Banana Cheesecake Salad

    As a busy mom, I know how precious time can be, especially during the rush of weekdays. That’s why I adore my Strawberry Banana Cheesecake Salad—it’s a delightful treat that comes together in just minutes! This refreshing dessert combines vibrant strawberries and sweet bananas, all enveloped in a creamy cheesecake dressing. It’s perfect for surprising your family or impressing friends at potlucks. Not only is it a quick solution for a busy day, but it also brings joy to every bite. Trust me, this salad is a win-win for every occasion!

    Why You’ll Love This Strawberry Banana Cheesecake Salad

    This Strawberry Banana Cheesecake Salad is a lifesaver for those hectic days when you crave something sweet yet simple. It takes minimal effort to whip up, so you can focus on enjoying your time at the table. Who wouldn’t love the creamy texture paired with the natural sweetness of fruit? It’s not only a treat for your taste buds but also a feast for the eyes—vibrant colors that even picky eaters can’t resist!

    Ingredients for Strawberry Banana Cheesecake Salad

    Let’s gather everything we need for this delightful Strawberry Banana Cheesecake Salad!

    • Strawberries: Fresh, vibrant strawberries bring sweetness and a beautiful color to the salad. Look for bright red, firm berries for the best flavor.
    • Bananas: Ripe bananas add a creamy texture and natural sweetness. Choose bananas with a few brown spots for maximum flavor.
    • Cream Cheese: The star of the show! Softened cream cheese creates that luscious cheesecake dressing we all love. For a lighter option, low-fat cream cheese works wonders.
    • Powdered Sugar: This sweetener blends effortlessly into the cream cheese, adding just the right touch of sweetness.
    • Milk: A splash of milk helps achieve a smooth consistency in the dressing. You can opt for regular milk or even a non-dairy alternative.
    • Vanilla Extract: This little ingredient adds a kick of flavor, reminiscent of classic cheesecake. Pure vanilla extract is always my go-to!

    Feel free to get creative with your ingredients. Mix and match with other fruits like blueberries or even peaches to add extra flair! The exact quantities for these ingredients can be found at the bottom of the article—printable for your convenience!

    How to Make Strawberry Banana Cheesecake Salad

    Now that we have our ingredients ready, let’s dive into making this Strawberry Banana Cheesecake Salad! Follow these simple steps, and soon you’ll be relishing this delightful treat. Don’t worry; I promise it won’t take long!

    Step 1: Prepare the Fruits

    First things first, let’s get those strawberries and bananas ready. For the strawberries, rinse them under cold water to remove any dirt. Pat them dry carefully, then slice off the green tops. Next, chop them into bite-sized pieces to make them easy to enjoy.

    Now, onto the bananas! Peel them and slice them into thin rounds. A sharp knife helps get neat cuts, and don’t worry about being too precise—this salad is all about casual enjoyment!

    Step 2: Make the Cheesecake Dressing

    In a separate mixing bowl, it’s time to create our creamy cheesecake dressing. Add the softened cream cheese and blend it with an electric mixer. Start on a low speed to prevent splatters, then gradually increase until it’s smooth and creamy.

    Next, sprinkle in the powdered sugar. This will sweeten your dressing beautifully. Pour in the milk, which helps to loosen the mixture, and add a splash of vanilla extract for that true cheesecake flavor. Beat it all together until everything is well-combined and silky smooth.

    Step 3: Combine the Ingredients

    Now that we have our dressing ready, it’s time for the magic! Take your chopped strawberries and bananas and place them in a large mixing bowl.

    Gently pour the creamy cheesecake dressing over the fruit. Use a spatula or a spoon to fold everything together carefully. You want to coat the fruit but also keep it looking lovely. It’s like wrapping your fruit in a sweet, creamy hug!

    Step 4: Chill the Salad

    The final step is crucial—chilling! Cover your bowl with plastic wrap or a lid and pop it in the fridge. Let it chill for at least 30 minutes before serving. This time allows the flavors to mingle and intensify, making every bite that much more delightful!

    Tips for Success

    • Always use ripe fruit for the best flavor; overripe can get mushy.
    • Soften your cream cheese completely for easy mixing; leave it out for about 30 minutes.
    • Mix gently to avoid bruising the fruit; a light hand keeps everything intact.
    • Chill the salad longer for deeper flavor; it’s worth the wait!
    • Double the recipe for gatherings; this salad disappears fast!

    Equipment Needed

    • Mixing Bowls: You’ll need one for the fruit and another for the dressing. Alternatively, use a large bowl for everything if you prefer less cleanup!
    • Electric Mixer: A handheld mixer works best for achieving a smooth dressing. A whisk will do if you prefer a workout!
    • Spatula or Spoon: Use this for combining the ingredients gently. A rubber spatula is great for scraping every bit of goodness!

    Variations of Strawberry Banana Cheesecake Salad

    • Berry Blast: Switch out some strawberries for blueberries or raspberries for a colorful medley. The tartness of berries pairs wonderfully with the creaminess of the dressing.
    • Tropical Twist: Add diced pineapple or mango for a tropical flair. These fruits will create a delightful contrast with the creamy cheesecake dressing.
    • Nutty Crunch: Stir in some chopped nuts, like pecans or walnuts, for added texture and a nutty flavor that complements the sweetness of the fruit.
    • Gluten-Free Delight: This salad is naturally gluten-free! Just ensure your powdered sugar is gluten-free, and you’re set!
    • Vegan Option: Substitute the cream cheese with a vegan cream cheese alternative and use a plant-based milk to create a vegan-friendly version of this delightful salad.

    Serving Suggestions for Strawberry Banana Cheesecake Salad

    • Pair with a light, refreshing beverage like lemonade or iced tea for a perfect summer spread.
    • Serve on a fancy dish to impress guests; a glass bowl showcases the vibrant colors beautifully.
    • Consider adding a sprinkle of graham cracker crumbs on top for a delightful crunch.
    • Include alongside grilled meats or sandwiches for a well-rounded meal experience.

    FAQs about Strawberry Banana Cheesecake Salad

    As with any lovely recipe, questions tend to pop up. Here are some common queries about our delightful Strawberry Banana Cheesecake Salad.

    Can I make this salad ahead of time?

    Absolutely! The salad can be made a few hours in advance. Just remember to keep it chilled until serving time. The flavors blend beautifully as it sits!

    How long will the salad last in the fridge?

    This salad is best enjoyed within 2-3 days. After that, the fruit may start to get mushy. Trust me, no one wants a sad salad!

    Can I use frozen fruit instead?

    While fresh fruit tastes best, you can use thawed frozen strawberries and bananas in a pinch. Just ensure to drain excess moisture before adding them to the salad.

    Is this dessert suitable for kids?

    Absolutely! The creamy sweetness is a hit with kids and adults alike. With its vibrant colors, it’s sure to entice even the pickiest eaters!

    Can I modify the dressing to be lower in fat?

    Yes! You can substitute low-fat cream cheese or Greek yogurt for a lighter dressing. It’ll still taste delicious while being a healthier option!

    Final Thoughts

    As I reflect on my journey with this Strawberry Banana Cheesecake Salad, I can’t help but feel joy. This delightful treat not only brings a burst of sweetness but also offers a chance to create lasting memories with loved ones. Plus, its simplicity makes it the ideal companion in busy times. I love how it brightens up the table and leaves everyone smiling. So, whether you’re whipping it up for a family gathering or simply treating yourself, I assure you, each spoonful will be filled with happiness. Enjoy every delicious bite—it’s truly a labor of love!


    Print

    clock clock iconcutlery cutlery iconflag flag iconfolder folder iconinstagram instagram iconpinterest pinterest iconfacebook facebook iconprint print iconsquares squares iconheart heart iconheart solid heart solid icon

    Description

    As a busy mom, I know how precious time can be, especially during the rush of weekdays. That’s why I adore my Strawberry Banana Cheesecake Salad—it’s a delightful treat that comes together in just minutes! This refreshing dessert combines vibrant strawberries and sweet bananas, all enveloped in a creamy cheesecake dressing.


    • 1 cup diced strawberries
    • 1 cup diced bananas
    • 1 cup cream cheese, softened
    • 1/4 cup powdered sugar
    • 1/4 cup milk
    • 1/4 teaspoon vanilla extract

    1. In a bowl, combine the diced strawberries and bananas.
    2. In a separate bowl, beat the cream cheese, powdered sugar, milk, and vanilla extract until smooth.
    3. Pour the cream cheese mixture over the fruit and mix well.
    4. Chill for at least 30 minutes before serving.

    Notes

    • For a lighter version, you can use low-fat cream cheese.
    • Make sure to chill the salad to enhance the flavors.
    • Prep Time: 10 minutes
    • Cook Time: 0 minutes
    • Category: Dessert
    • Method: Mixing
    • Cuisine: American

    Nutrition

    • Serving Size: 1 serving
    • Calories: 180
    • Sugar: 14g
    • Sodium: 150mg
    • Fat: 8g
    • Saturated Fat: 5g
    • Unsaturated Fat: 2g
    • Trans Fat: 0g
    • Carbohydrates: 22g
    • Fiber: 2g
    • Protein: 3g
    • Cholesterol: 30mg

    Sharing is caring!

  • Roasted Carrots with Hot Honey

    Roasted Carrots with Hot Honey


    Introduction to Roasted Carrots with Hot Honey

    Hey there, fellow food lovers! If you’re looking for a dish that marries sweet and spicy in the most delightful way possible, then you’re in the right place. These Roasted Carrots with Hot Honey are not only easy to whip up, but they also bring an explosion of flavors to the table. Imagine tender carrots, perfectly caramelized and drizzled with a luscious hot honey sauce. It’s a delightful treat that even the pickiest eaters will enjoy! Plus, it only takes about 35 minutes to make, so it’s perfect for busy nights.

    Why You’ll Love This Roasted Carrots with Hot Honey

    Let me tell you, these Roasted Carrots with Hot Honey are a game-changer. They’re incredibly simple to make, taking just 35 minutes from start to finish. The balance of sweet and spicy is out of this world! Plus, they make a stunning side dish that adds color and nutrition to any meal. Impress your family or guests without breaking a sweat. Trust me, they won’t be able to resist asking for seconds!

    Ingredients for Roasted Carrots with Hot Honey

    Let’s dive into the scrumptious world of Roasted Carrots with Hot Honey! Here’s what you’ll need to create this stunning dish. I’ll describe each ingredient so you know what to look for when shopping. The exact measurements are at the bottom of the article for your convenience.

    • Baby Carrots or Heirloom Carrots: Sweet and tender, these carrots are the stars of our dish. Heirloom carrots can provide an array of colors for a beautiful presentation.
    • Olive Oil: This adds moisture and helps caramelize the carrots. Extra virgin olive oil gives a lovely flavor too.
    • Maple Syrup: A touch of natural sweetness that enhances the overall flavor. You can substitute it with honey if you’re in a pinch.
    • Ground Cumin: This warm spice adds depth and a hint of earthiness, perfectly complementing the sweetness of the carrots.
    • Smoked Paprika: A dash of smokiness that elevates the dish. Regular paprika works if you can’t find smoked.
    • Salt and Pepper: Essential staples to bring all the flavors together. Don’t skip this step!
    • Ricotta Cheese: Creamy and mild, it offers a wonderful contrast to the roasted carrots. You can use cottage cheese for a lighter option.
    • Heavy Cream: This enriches the ricotta, giving it a luxurious texture. You could swap it out for Greek yogurt for a lighter version.
    • Lemon Zest: Brightens up the whipped ricotta and adds a zesty aroma. Make sure to use fresh lemon zest for the best flavor.
    • Honey: The star of our hot honey drizzle! Ensures that sweet-spicy combo steals the spotlight. Choose raw honey if possible to maximize flavor.
    • Red Pepper Flakes: Adds the heat in this dish. Adjust the quantity to match your heat preference.
    • Apple Cider Vinegar: A splash of acidity that balances out the sweetness and brings everything together.
    • Pistachios: These crunchy nuts provide a lovely texture contrast and a nutty flavor that’s simply irresistible.
    • Fresh Thyme Leaves: These earthy herbs brighten the dish. You could substitute dried thyme, but fresh will elevate it.
    • Fresh Parsley (optional): Sprinkling fresh parsley adds a pop of color and freshness. It’s optional, but highly recommended!

    Gather these ingredients, and you’re all set to embark on a culinary adventure that’ll wow your taste buds with these Roasted Carrots with Hot Honey.

    How to Make Roasted Carrots with Hot Honey

    Now that we have our ingredients lined up, let’s get cooking! These Roasted Carrots with Hot Honey are as fun to make as they are to eat. Follow these easy steps, and you’ll impress everyone with your culinary skills!

    Step 1: Preheat the Oven

    First up, preheating the oven is crucial. I always set mine to 400°F (200°C). This ensures that the carrots roast evenly, getting that lovely caramelization. Think of it as a warm welcome for our veggies, preparing them for their flavor transformation.

    Step 2: Toss the Carrots

    In a spacious bowl, toss the baby or heirloom carrots with olive oil, maple syrup, ground cumin, smoked paprika, salt, and pepper. I like to make sure each carrot is well-coated with those delicious flavors. Don’t be shy—get in there and mix with your hands! The warmth and moisture help everything meld together beautifully.

    Step 3: Roast the Carrots

    Now it’s time to roast! Spread the coated carrots in a single layer on a baking sheet. Pop them into the preheated oven for about 20-25 minutes. Remember to flip them halfway through! This little flip ensures all sides get that golden, caramelized finish. To check for doneness, poke them with a fork; they should be tender yet firm.

    Step 4: Prepare the Whipped Ricotta

    While the carrots are roasting, let’s whip up the ricotta! In a food processor, combine ricotta, heavy cream, lemon zest, and a pinch of salt. Blend until smooth and creamy. This step is like giving the ricotta a spa day! It should be silky, light, and utterly indulgent. Set it aside for now, but resist the urge to taste it all, just yet!

    Step 5: Make the Hot Honey Mixture

    In a small saucepan, warm up the honey and red pepper flakes over low heat. I usually do this for about 1-2 minutes while stirring. This gentle heating helps the flavors infuse beautifully. Once warm, mix in the apple cider vinegar, and let it cool slightly. This sweet-spicy concoction is the magic touch that drizzles joy over our roasted carrots.

    Step 6: Assemble the Dish

    Finally, let’s bring everything together! Spread the whipped ricotta on a serving platter and arrange the roasted carrots on top—like a colorful rainbow on a canvas. Drizzle that irresistible hot honey over the carrots, and sprinkle with chopped pistachios and fresh thyme leaves. If you’re feeling fancy, a sprinkle of parsley adds a lovely finishing touch. Your guests will be absolutely in awe!

    Tips for Success

    • Use fresh ingredients for the best flavor. Fresh herbs and young carrots make a world of difference.
    • Don’t overcrowd the baking sheet. A single layer allows for even roasting and caramelization.
    • Keep an eye on the carrots as they roast. Ovens can vary, and you want them golden but not burnt.
    • Taste as you go! Adjust seasonings based on your preference—get involved!
    • Serve immediately for the best texture and flavor experience.

    Equipment Needed

    • Baking Sheet: A standard half-sheet pan works well. If you don’t have one, any oven-safe dish will do.
    • Bowl: A large mixing bowl is perfect for tossing the carrots. A deep plate can work in a pinch!
    • Food Processor: This is essential for a creamy ricotta. A whisk and bowl can also get the job done.
    • Small Saucepan: Ideal for warming up the honey. A microwave-safe bowl is a quick alternative!

    Variations

    • Spicy Alternative: For an extra kick, add more red pepper flakes or include sliced fresh jalapeños in the roasting process.
    • Vegan Option: Swap ricotta and heavy cream for cashew cream or silken tofu blended with lemon juice for a creamy texture without dairy.
    • Nut-Free Version: Omit pistachios and replace them with sunflower seeds or pumpkin seeds for crunch without the nuts.
    • Citrus Zing: Add a splash of orange juice or zest to the whipped ricotta for a citrusy twist that pairs wonderfully with the carrots.
    • Herb Variations: Experiment with different herbs like rosemary or dill instead of thyme for diverse flavor profiles.

    Serving Suggestions

    • Pair with a simple green salad for a fresh and balanced meal.
    • Serve alongside grilled chicken or roasted salmon for a heartier option.
    • A crisp white wine, like Sauvignon Blanc, complements the sweet and spicy flavors perfectly.
    • For presentation, garnish the dish with extra thyme or edible flowers for that restaurant-style look!

    FAQs about Roasted Carrots with Hot Honey

    Can I use regular carrots instead of baby or heirloom carrots?

    Absolutely! Regular carrots work just fine. Just cut them into uniform pieces to ensure even cooking. The key is to make certain they are tender and caramelized, just like the baby carrots.

    How can I make the hot honey less spicy?

    If you’re looking to tone down the heat, simply reduce the amount of red pepper flakes. You can also add more honey to balance out the spice and give it a sweeter profile for your taste buds.

    Can this dish be prepared ahead of time?

    While I recommend serving Roasted Carrots with Hot Honey fresh for the best texture, you can roast the carrots ahead of time. Just reheat them gently in the oven before drizzling with hot honey and serving!

    What other side dishes pair well with roasted carrots?

    These carrots go wonderfully with a variety of sides like creamy mashed potatoes, quinoa salad, or even a simple rice pilaf. They’re versatile and complement many flavors!

    Is this recipe gluten-free?

    Yes! This dish is naturally gluten-free, making it a fantastic option for those following a gluten-free diet. Enjoy the sweet-spicy goodness without worry!

    Final Thoughts

    Every time I prepare these Roasted Carrots with Hot Honey, I’m reminded of the beauty in simplicity. The sweet-spicy contrast dances on your palate, igniting a feast of flavors. It’s heartwarming to see my family gather around the table, drawn in by the aroma and vibrant colors. This dish transforms any meal into a special occasion without requiring endless hours in the kitchen. So, whether it’s a weeknight dinner or a festive gathering, these carrots make every bite feel like a celebration. I hope you experience this joy in your own kitchen!


    Print

    clock clock iconcutlery cutlery iconflag flag iconfolder folder iconinstagram instagram iconpinterest pinterest iconfacebook facebook iconprint print iconsquares squares iconheart heart iconheart solid heart solid icon

    Description

    Hey there, fellow food lovers! If you’re looking for a dish that marries sweet and spicy in the most delightful way possible, then you’re in the right place. These Roasted Carrots with Hot Honey are not only easy to whip up, but they also bring an explosion of flavors to the table. Imagine tender carrots, perfectly caramelized and drizzled with a luscious hot honey sauce. It’s a delightful treat that even the pickiest eaters will enjoy! Plus, it only takes about 35 minutes to make, so it’s perfect for busy nights.


    • 1 lb (450g) baby carrots or heirloom carrots
    • 2 tbsp olive oil
    • 1 tbsp maple syrup
    • 1 tsp ground cumin
    • 1/2 tsp smoked paprika
    • Salt and pepper, to taste
    • 1 cup (225g) ricotta cheese
    • 2 tbsp heavy cream
    • 1 tsp lemon zest
    • 1/4 cup (60ml) honey
    • 1/2 tsp red pepper flakes
    • 1 tsp apple cider vinegar
    • 2 tbsp chopped pistachios
    • 1 tsp fresh thyme leaves
    • Fresh parsley (optional)

    1. Preheat the oven to 400°F (200°C).
    2. In a bowl, toss carrots with olive oil, maple syrup, cumin, smoked paprika, salt, and pepper.
    3. Spread the carrots on a baking sheet in a single layer. Roast for 20-25 minutes, flipping halfway through, until tender and caramelized.
    4. In a food processor, combine ricotta, heavy cream, lemon zest, and a pinch of salt. Blend until smooth and creamy. Set aside.
    5. In a small saucepan over low heat, warm honey and red pepper flakes for 1-2 minutes, stirring frequently.
    6. Remove from heat and stir in apple cider vinegar. Allow to cool slightly.
    7. Spread whipped ricotta on a serving platter. Arrange roasted carrots on top.
    8. Drizzle the hot honey over the carrots. Sprinkle with chopped pistachios, fresh thyme, and parsley (optional).
    9. Serve warm as a side dish or appetizer.

    Notes

    • Adjust the level of heat by varying the amount of red pepper flakes.
    • Make sure to serve immediately for the best flavor and texture.
    • Prep Time: 10 minutes
    • Cook Time: 25 minutes
    • Category: Side Dish
    • Method: Roasting
    • Cuisine: American

    Nutrition

    • Serving Size: 1 serving
    • Calories: 250
    • Sugar: 10g
    • Sodium: 200mg
    • Fat: 10g
    • Saturated Fat: 5g
    • Unsaturated Fat: 3g
    • Trans Fat: 0g
    • Carbohydrates: 36g
    • Fiber: 5g
    • Protein: 6g
    • Cholesterol: 20mg

    Sharing is caring!

  • Beet and Orange Salad

    Beet and Orange Salad


    Introduction to Beet and Orange Salad

    Life can often feel like a whirlwind, especially for busy moms and professionals juggling countless responsibilities. Amidst that chaos, finding time to prepare a nourishing yet vibrant dish is essential. That’s where this Beet and Orange Salad shines, offering a colorful and refreshing escape. The way the sweet, earthy beets harmonize with the zesty burst of oranges is a joy to experience. Plus, its simple preparation allows you to spend less time in the kitchen and more time savoring moments with loved ones. Let’s dive into this delightful recipe!

    Why You’ll Love This Beet and Orange Salad

    This Beet and Orange Salad dazzles with its vibrant colors, making it a feast for the eyes as well as the palate. The refreshing taste cuts through the heaviness of everyday meals, bringing a burst of energy to your table. Plus, its straightforward preparation means you can whip it up quickly for family gatherings, light lunches, or even just a simple weeknight dinner. Deliciousness made easy!

    Ingredients for Beet and Orange Salad

    To create this vibrant Beet and Orange Salad, you’ll need a handful of fresh ingredients. First, choose your beets—red, golden, or a mix for added color. Juicy oranges bring a sweet zing to the dish. For a creamy touch, crumbled feta or tangy goat cheese can be delightful options. Add a crunchy element with chopped walnuts or pecans. A bit of thinly sliced red onion adds flavor depth, while the dressing of olive oil, balsamic vinegar, honey, and Dijon mustard ties it all together beautifully. Exact quantities are at the bottom of the article for your convenience!

    How to Make Beet and Orange Salad

    Making this Beet and Orange Salad is as easy as pie! I’ll guide you through each step, ensuring you whip up a gorgeous, healthy salad in no time. Grab your apron, and let’s get started!

    Step 1: Prepare the Beets

    First things first, you’ll want to prepare the beets. Start by washing them under cool water, scrubbing off any dirt. The earthy aroma of fresh beets fills the air—it’s delightful! Trim off the leafy stems, leaving about an inch intact.

    This will help keep the beets juicy as they roast. You can use a mix of red and golden beets to create a stunning color palette for your salad!

    Step 2: Roast the Beets

    Now it’s time for one of my favorite parts—roasting the beets! Preheat your oven to 400°F (200°C). Wrap each beet individually in aluminum foil, like little presents ready for roasting. Place the wrapped beets on a baking sheet.

    Roast them for 45 to 60 minutes until they’re tender. The best test? A fork should slide right through. The warmth fills your kitchen with an inviting aroma, making your home feel cozy. Once done, let them cool slightly before peeling off the skin—this part always feels like a mini culinary adventure!

    Step 3: Prepare the Oranges

    While the beets are roasting, it’s the perfect time to prepare the oranges. Slice off the top and bottom of each orange, then carefully peel away the skin. Be cautious—juicy oranges can be slippery little devils! I often find that blood oranges add a beautiful pop of color.

    After peeling, slice the oranges into rounds or segments, depending on your preference. As you do this, don’t forget to catch any juice that may escape—this sweet liquid can be a lovely addition to your dressing!

    Step 4: Make the Dressing

    Now, let’s whip up a delightful dressing that brings everything together! In a small bowl, whisk together two tablespoons of olive oil, one tablespoon of balsamic vinegar, one teaspoon of honey, and half a teaspoon of Dijon mustard. Sprinkle in some salt and pepper to taste.

    If you managed to catch orange juice earlier, whisk a splash in for extra flavor. This dressing is rich and tangy, perfectly balancing the sweetness of the oranges and the earthiness of the beets. Trust me—this healthy salad dressing will have you drizzling it on everything!

    Step 5: Assemble the Salad

    Now comes the fun part—assembling your stunning salad! On a beautiful serving platter, arrange your roasted beet slices and juicy orange segments. A colorful display never fails to impress guests!

    Top with sliced red onion, crumbled feta, and chopped walnuts. The crunch of the nuts adds excitement to each bite! Finally, drizzle your homemade dressing over everything and garnish with fresh mint or parsley. It’s a visual feast, and trust me, a vegetarian salad like this one is sure to delight anyone!

    Tips for Success

    To ensure your Beet and Orange Salad is a masterpiece, keep these tips in mind:

    • Use gloves when handling beets to avoid staining your hands.
    • Chill the salad for about 15 minutes before serving for a refreshing taste.
    • Toast the walnuts or pecans for an extra layer of flavor.
    • Mix in some greens, like arugula or spinach, for added texture.
    • Experiment with different cheeses for variety and taste.

    Equipment Needed

    Gathering the right tools makes creating your Beet and Orange Salad a breeze! Here’s what you’ll need:

    • Oven for roasting the beets
    • Baking sheet or roasting pan
    • Aluminum foil for wrapping the beets
    • Sharp knife for slicing
    • Cutting board to keep your workspace organized
    • Mixing bowl for the dressing
    • Whisk or fork for blending

    Variations of Beet and Orange Salad

    This Beet and Orange Salad is wonderfully versatile! You can play with flavors and textures to make it your own. Here are some delightful variations to consider:

    • Add different nuts, like hazelnuts or almonds, for a unique crunch.
    • Try goat cheese or blue cheese instead of feta for a bold twist.
    • Incorporate avocado slices for a creamy texture.
    • For a vegan option, skip the cheese and use maple syrup in the dressing.
    • Mix in some roasted sweet potatoes for extra heartiness.

    Serving Suggestions for Beet and Orange Salad

    Elevate your dining experience with these delightful pairings for your Beet and Orange Salad:

    • Serve it alongside grilled chicken or fish for a complete meal.
    • Pair with a light white wine, like Sauvignon Blanc, for a refreshing complement.
    • Dress the salad in a beautiful bowl to highlight its vibrant colors.
    • Garnish with additional citrus slices for an extra pop of freshness.

    FAQs about Beet and Orange Salad

    Curious about this delightful Beet and Orange Salad? Here are some frequently asked questions to help you out!

    Can I prepare the salad ahead of time?

    Absolutely! You can roast the beets and prepare the oranges a day in advance. Just keep everything stored separately in airtight containers. Assemble the salad and drizzle on the dressing just before serving for maximum freshness.

    How do I store leftovers?

    If you have any leftovers, store them in the refrigerator in an airtight container. The flavors will blend beautifully overnight, although you may want to wait to add nuts until you’re ready to enjoy it again. Typically, leftovers last about 2-3 days.

    Is this Beet and Orange Salad healthy?

    Yes! This salad is not only vibrant but also a healthy option. With beets providing essential nutrients and oranges adding vitamin C, it’s a fantastic vegetarian salad choice, perfect for boosting energy. Plus, the healthy fats from the walnuts make it even more nourishing!

    Can I change the cheese in the salad?

    Of course! Feel free to swap feta for goat cheese or even omit it altogether for a vegan twist. You can get creative and try some creamy blue cheese instead for a bolder flavor.

    What can I serve alongside the salad?

    This refreshing salad pairs wonderfully with grilled proteins such as chicken or fish. It also compliments light soups or crusty bread beautifully, making it a versatile dish for any meal!

    Final Thoughts

    This delightful Beet and Orange Salad truly brings joy to any occasion! The vibrant colors and refreshing flavors create a beautiful symphony on your plate, captivating both the eyes and taste buds. As you mix the earthy sweetness of beets with the zesty brightness of oranges, you’re not just creating a salad, but a nourishing feast.

    Packed with health benefits, it’s the perfect way to elevate your meals and impress your guests. I hope you feel inspired to whip up this vibrant salad and share it with your loved ones. Enjoy the magic of mixing flavors today!


    Print

    clock clock iconcutlery cutlery iconflag flag iconfolder folder iconinstagram instagram iconpinterest pinterest iconfacebook facebook iconprint print iconsquares squares iconheart heart iconheart solid heart solid icon

    Description

    Life can often feel like a whirlwind, especially for busy moms and professionals juggling countless responsibilities. Amidst that chaos, finding time to prepare a nourishing yet vibrant dish is essential. That’s where this Beet and Orange Salad shines, offering a colorful and refreshing escape. The way the sweet, earthy beets harmonize with the zesty burst of oranges is a joy to experience. Plus, its simple preparation allows you to spend less time in the kitchen and more time savoring moments with loved ones. Let’s dive into this delightful recipe!


    • 4 medium beets (red, golden, or a mix)
    • 2 large oranges (navel, blood orange, or mandarin)
    • ¼ cup crumbled feta cheese (or goat cheese) optional
    • ¼ cup chopped walnuts (or pecans)
    • ¼ cup red onion, thinly sliced
    • 2 tablespoons extra virgin olive oil
    • 1 tablespoon balsamic vinegar (or red wine vinegar)
    • 1 teaspoon honey (or maple syrup for a vegan option)
    • ½ teaspoon Dijon mustard
    • Salt and black pepper to taste
    • Fresh mint or parsley for garnish

    1. Preheat the oven to 400°F (200°C). Wash the beets and trim off the stems, leaving about an inch.
    2. Wrap each beet in aluminum foil and place on a baking sheet. Roast for 45-60 minutes until tender.
    3. Let the beets cool slightly, then peel off the skins and slice into wedges or rounds.
    4. While the beets are roasting, prepare the oranges by slicing off the top and bottom, then peeling away the skin. Slice into rounds or segments.
    5. In a small bowl, whisk together olive oil, balsamic vinegar, honey, Dijon mustard, salt, and pepper. Add reserved orange juice if available.
    6. Arrange roasted beet slices and orange segments on a serving platter. Scatter sliced red onion, crumbled feta, and walnuts on top.
    7. Drizzle the dressing over the salad and garnish with fresh mint or parsley.

    Notes

    • For a vegan option, use maple syrup instead of honey and omit the cheese.
    • Feel free to substitute walnuts with pecans or other nuts to taste.
    • Prep Time: 20 minutes
    • Cook Time: 60 minutes
    • Category: Salad
    • Method: Roasting, Mixing
    • Cuisine: Mediterranean

    Nutrition

    • Serving Size: 1 serving
    • Calories: 200
    • Sugar: 8g
    • Sodium: 180mg
    • Fat: 12g
    • Saturated Fat: 3g
    • Unsaturated Fat: 8g
    • Trans Fat: 0g
    • Carbohydrates: 22g
    • Fiber: 5g
    • Protein: 5g
    • Cholesterol: 10mg

    Sharing is caring!

  • Honey Garlic Turkey Meatballs

    Honey Garlic Turkey Meatballs


    Introduction to Honey Garlic Turkey Meatballs

    Welcome to a culinary adventure that will make your kitchen the heart of your home! I’m thrilled to share my Honey Garlic Turkey Meatballs with you, a dish that feels like a warm hug during a hectic week. These flavorful bites are perfect for busy days, transforming simple ingredients into something extraordinary. Whether you need a quick solution for dinner or want to impress your family and friends, these meatballs won’t let you down. Just imagine the delightful aroma filling your home as they bake, bringing everyone together.

    Why You’ll Love This Honey Garlic Turkey Meatballs

    These Honey Garlic Turkey Meatballs are a lifesaver for busy moms and professionals alike. Not only are they quick to whip up in just 35 minutes, but they also burst with flavor. The sweet and savory sauce is irresistible, even for picky eaters. Plus, they’re versatile enough to serve as an appetizer or a main dish, making them perfect for any occasion. Your family will be asking for seconds!

    Ingredients for Honey Garlic Turkey Meatballs

    Gathering the right ingredients for my Honey Garlic Turkey Meatballs is easy and oh-so-rewarding! Here’s a quick rundown of what you’ll need:

    • Ground turkey: The star of the show, perfect for a lean protein that stays juicy and tender.
    • Breadcrumbs: They help bind everything together—choose regular or go whole wheat for added health benefits.
    • Egg: Essential for binding the meatballs, making them stable and less crumbly.
    • Garlic: Freshly minced for a punch of flavor. Garlic brings warmth and aroma, making everything better!
    • Onion: Finely diced, they add a subtle sweetness and enhance the overall taste.
    • Paprika: This spice adds a hint of smokiness and a beautiful color to your meatballs.
    • Salt and black pepper: Classic seasonings to enhance the flavors without overpowering them.
    • Honey: The star of the sauce, lending its natural sweetness to balance the savory notes.
    • Soy sauce: Adds depth and umami, making every bite unforgettable. Low-sodium options are great if you’re watching your salt intake.
    • Rice vinegar or apple cider vinegar: Just a splash creates a wonderful tang that brightens up the sauce.
    • Sesame oil: Optional, but it adds a rich, nutty flavor if you’re feeling adventurous!
    • Cornstarch mixed with water: This thickens the sauce beautifully, ensuring it clings to each meatball perfectly.
    • Sesame seeds: A delightful garnish that not only looks pretty but adds a light crunch.
    • Chopped green onions: A fresh topping that brings color and a slight bite to the dish.

    For exact quantities, head down to the end of the article where you’ll find printable details. Happy cooking!

    How to Make Honey Garlic Turkey Meatballs

    Preheat the Oven

    Start by preheating your oven to 400°F (200°C). This is a crucial step for achieving that perfectly baked meatball texture. Your kitchen will soon smell amazing! Meanwhile, you can get everything else ready.

    Prepare the Meatball Mixture

    In a large mixing bowl, mix together the ground turkey, breadcrumbs, and the rest of the ingredients. I find that using a fork or your hands works best for this task. Just be gentle! Overmixing can make the meatballs tough, and nobody wants a rubbery bite. Aim for a well-combined mixture that’s still a bit springy.

    Form the Meatballs

    Now the fun part—shaping the meatballs! Use a cookie scoop or your hands to create balls about 1.5 inches in diameter. Place each meatball on your lined baking sheet, leaving about an inch between them. This spacing ensures they bake evenly and don’t stick together.

    Bake the Meatballs

    Slide your baking sheet into the preheated oven and bake these gems for 18-20 minutes. You’ll know they’re done when they’re golden brown and reach an internal temperature of 165°F. Use a meat thermometer if you have one; it takes the guesswork out of cooking!

    Prepare the Honey Garlic Sauce

    While your meatballs are baking, it’s time to whip up the honey garlic sauce. In a small saucepan, combine the honey, soy sauce, minced garlic, and rice vinegar. Bring this to a gentle simmer over medium heat. Stir occasionally until it starts bubbling, which usually takes about 3-5 minutes.

    Coat the Meatballs

    After the meatballs are baked to perfection, it’s time to bring everything together! Transfer the meatballs into a large bowl and pour the warm honey garlic sauce on top. Toss them gently until each meatball is generously coated in that sweet, sticky goodness.

    Serve and Garnish

    Finally, it’s time to serve these delightful meatballs! Plate them warm, and if you like, sprinkle some sesame seeds and chopped green onions on top for an extra pop of flavor and color. They’re ready for everyone to enjoy!

    Tips for Success

    • Don’t overmix the meatball mixture—less is more for tenderness!
    • Use a meat thermometer to ensure perfect doneness at 165°F.
    • Let the meatballs rest for a few minutes after baking to retain moisture.
    • Experiment with your favorite herbs for a unique flavor twist.
    • Store leftovers in an airtight container for up to 3 days for easy reheating.

    Equipment Needed

    • Baking sheet: A sturdy one, or a cast-iron skillet works too!
    • Parchment paper or silicone mat: Perfect for easy cleanup.
    • Mixing bowl: Any large bowl will do, even your trusty old one.
    • Cookie scoop: Use your hands if you don’t have a scoop!
    • Small saucepan: Essential for making that delicious sauce.

    Variations

    • Spicy Kick: Add a teaspoon of red pepper flakes to the meatball mixture for a delightful heat.
    • Herb Infusion: Incorporate fresh herbs like parsley or cilantro for a burst of freshness.
    • Vegetable Boost: Mix in finely grated zucchini or carrot to sneak in extra veggies without anyone noticing.
    • Gluten-Free Option: Substitute breadcrumbs with gluten-free options or ground oats for a similar texture.
    • Asian Twist: Use hoisin sauce instead of honey for a different flavor profile and serve with rice.

    Serving Suggestions

    • Pair with fluffy jasmine rice for a complete meal that soaks up the delicious sauce.
    • Add steamed broccoli or green beans for a colorful and nutritious side.
    • Serve as an appetizer with toothpicks for easy snacking during game night.
    • Pair with a fresh cucumber salad to balance the sweetness.
    • For drinks, consider a light white wine or a refreshing iced tea to complement the flavors.

    FAQs about Honey Garlic Turkey Meatballs

    Can I make these meatballs ahead of time?
    Absolutely! You can prepare the meatballs in advance and store them in an airtight container in the fridge for up to 2 days. Just bake them before serving!

    What can I serve with Honey Garlic Turkey Meatballs?
    These meatballs pair wonderfully with steamed rice, roasted vegetables, or a fresh salad. They also make a great appetizer with toothpicks for parties!

    Can I freeze the meatballs?
    Yes! Freeze them before baking for up to three months. When you’re ready to enjoy, bake from frozen, just add a few extra minutes to the cooking time.

    How can I adjust the sweetness of the sauce?
    If you prefer a less sweet sauce, simply reduce the amount of honey. You can also add a splash more soy sauce to balance the flavor.

    Can I use a different type of meat?
    Definitely! Ground chicken or lean beef can substitute well in this recipe. Just remember that cooking times may vary slightly!

    Final Thoughts

    Making Honey Garlic Turkey Meatballs is not just about cooking; it’s about creating cherished memories in your home. As you gather around the table, laughter and conversation flow, all thanks to these drool-worthy bites. Knowing they’re made with love and wholesome ingredients makes every mouthful even sweeter. Whether it’s a busy weeknight or a special gathering, these meatballs bring joy and satisfaction to everyone. You can feel proud serving them, as they are not only delicious but also a fantastic way to brighten up your family’s dinner routine. Trust me, they’ll savor every single bite!


    Print

    clock clock iconcutlery cutlery iconflag flag iconfolder folder iconinstagram instagram iconpinterest pinterest iconfacebook facebook iconprint print iconsquares squares iconheart heart iconheart solid heart solid icon

    Description

    Welcome to a culinary adventure that will make your kitchen the heart of your home! I’m thrilled to share my Honey Garlic Turkey Meatballs with you, a dish that feels like a warm hug during a hectic week. These flavorful bites are perfect for busy days, transforming simple ingredients into something extraordinary. Whether you need a quick solution for dinner or want to impress your family and friends, these meatballs won’t let you down. Just imagine the delightful aroma filling your home as they bake, bringing everyone together.


    • 1 lb ground turkey
    • 1/2 cup breadcrumbs (regular or whole wheat)
    • 1 large egg
    • 2 cloves garlic, minced
    • 1/4 cup finely diced onion
    • 1 tsp paprika
    • 1/2 tsp salt
    • 1/4 tsp black pepper
    • 1/3 cup honey
    • 1/4 cup soy sauce (low-sodium if preferred)
    • 2 cloves garlic, minced
    • 1 tbsp rice vinegar or apple cider vinegar
    • 1 tbsp sesame oil (optional, for extra flavor)
    • 1 tsp cornstarch mixed with 2 tbsp water (to thicken the sauce)
    • Sesame seeds
    • Chopped green onions

    1. Preheat your oven to 400°F (200°C) and line a baking sheet with parchment paper or a silicone baking mat.
    2. In a large mixing bowl, combine the ground turkey, breadcrumbs, egg, garlic, onion, paprika, salt, and pepper. Mix gently until just combined—don’t overmix, or the meatballs will become tough.
    3. Use a cookie scoop or your hands to form the mixture into meatballs, about 1.5 inches in diameter. Place them on the prepared baking sheet, spacing them about an inch apart.
    4. Bake in the preheated oven for 18-20 minutes, or until the meatballs are golden brown and cooked through (the internal temperature should reach 165°F).
    5. While the meatballs are baking, make the honey garlic sauce. In a small saucepan, combine the honey, soy sauce, garlic, rice vinegar, and sesame oil (if using). Heat over medium heat until the mixture starts to simmer.
    6. Stir in the cornstarch mixture and cook for 2-3 minutes, stirring constantly, until the sauce thickens. Remove from heat.
    7. Once the meatballs are done, transfer them to a large bowl and toss them with the honey garlic sauce until evenly coated.
    8. Serve hot, garnished with sesame seeds and chopped green onions if desired.

    Notes

    • Ensure the meatballs are not overcooked to maintain moisture.
    • Can be served as an appetizer or a main dish.
    • Adjust the level of garlic according to taste.
    • Prep Time: 15 minutes
    • Cook Time: 20 minutes
    • Category: Main Course
    • Method: Baking
    • Cuisine: American

    Nutrition

    • Serving Size: 4 meatballs
    • Calories: 300
    • Sugar: 12g
    • Sodium: 500mg
    • Fat: 10g
    • Saturated Fat: 2g
    • Unsaturated Fat: 8g
    • Trans Fat: 0g
    • Carbohydrates: 36g
    • Fiber: 2g
    • Protein: 20g
    • Cholesterol: 100mg

    Sharing is caring!

  • Creamy Spinach Turkey Meatballs

    Creamy Spinach Turkey Meatballs


    Introduction to Creamy Spinach Turkey Meatballs

    As a busy mom, I know how challenging it can be to put dinner on the table, especially after a long day. That’s why I’m excited to share my Creamy Spinach Turkey Meatballs recipe—it’s a delightful dinner option that packs both flavor and nutrition. This dish not only brings the family together but it’s also quick enough for a weeknight meal. Imagine juicy turkey meatballs smothered in a creamy spinach sauce that makes your taste buds dance! Trust me, your family will be asking for seconds, and you’ll feel like a culinary superstar.

    Why You’ll Love This Creamy Spinach Turkey Meatballs

    What’s not to love about a quick and tasty meal that’s also healthy? These Creamy Spinach Turkey Meatballs are incredibly easy to make, perfect for busy evenings. With just a handful of ingredients, you can whip up a dinner that shines on the dinner table. Plus, the creamy sauce brings a comforting flavor that everyone will enjoy. Say goodbye to mealtime stress and hello to cheers around the table!

    Ingredients for Creamy Spinach Turkey Meatballs

    Gathering fresh ingredients is one of my favorite parts of cooking; it feels like preparing a little treasure hunt in my kitchen! For these Creamy Spinach Turkey Meatballs, here’s what you’ll need:

    • Ground turkey: A lean meat option that keeps these meatballs healthy without sacrificing flavor.
    • Shredded mozzarella cheese: Melts beautifully to add a creamy texture and enhance the flavor.
    • Garlic: Freshly grated garlic infuses the meatballs with bold, aromatic flavor.
    • Italian seasoning: A blend of herbs that brings a burst of Italian flavor to the dish.
    • Red crushed chili flakes (optional): Adds a kick of heat, so feel free to adjust for your family’s palate.
    • Bouillon cube (optional): Enhances the savory notes in your sauce; a little goes a long way.
    • Fresh parsley or cilantro: Brightens up the meatballs and adds a pop of color.
    • Olive oil & butter: A combination that results in wonderfully browned meatballs; choose extra virgin olive oil for added health benefits.
    • Onion: Diced onion brings fragrance and sweetness to the sauce.
    • Sun-dried tomatoes: They add a tangy depth of flavor that complements the cream sauce beautifully.
    • Vegetable broth: Forms the base of our sauce, adding moisture and taste; you can use low-sodium if preferred.
    • Heavy cream: Creates the luscious, creamy texture that makes this dish so comforting.
    • Salt and black pepper: Essential for bringing out all the other delicious flavors.
    • Baby spinach: Chopped and wilted down, it adds nutrients and a lovely green color.
    • Grated Parmesan cheese: The final touch, enhancing the sauce with a cheesy and salty note.

    For precise measurements, you’ll find the details at the bottom of the article, along with a printable version. Explore these ingredients, and let your culinary creativity shine! Happy cooking!

    How to Make Creamy Spinach Turkey Meatballs

    Now that you have your ingredients ready, let’s dive into the delightful process of making these Creamy Spinach Turkey Meatballs! This recipe is simple yet rewarding, perfect for busy evenings or when you want to impress your family with a home-cooked meal. Here’s how to bring it all together:

    Step 1: Prepare the Meatball Mixture

    In a mixing bowl, combine the ground turkey, shredded mozzarella, and grated garlic. It’s like inviting all those amazing flavors to a party!

    Add in your Italian seasoning, red crushed chili flakes (if using), and the crumbled bouillon cube. Don’t forget the freshly chopped parsley; it adds brightness!

    Mix everything gently until it comes together. Avoid overmixing, as it could make the meatballs tough. Just think of it as a gentle hug for your turkey.

    Step 2: Form the Meatballs

    Now it’s time to roll the mixture. With clean hands, shape the turkey mixture into medium-sized meatballs.

    Here’s a tip: Wet your hands slightly to prevent sticking. This little trick makes the rolling so much easier, and who doesn’t love a smooth meatball?

    Step 3: Cook the Meatballs

    In a large skillet, heat your olive oil and butter over medium heat. It should sizzle and dance when it’s ready!

    Add the meatballs gently, giving them space to brown on all sides. Cook for about 8–10 minutes, turning occasionally. You want them golden brown and fully cooked. Remember, safety first—check that they reach an internal temperature of 165°F!

    Step 4: Create the Creamy Sauce

    After the meatballs are done, transfer them to a plate and set aside. In the same skillet, melt another tablespoon of butter over medium heat.

    Now, toss in the diced onion and minced garlic. Sauté until they become translucent. Your kitchen will smell heavenly!

    Stir in the sun-dried tomatoes and cook for another minute. Then, pour in the vegetable broth, scraping the skillet to pick up all those tasty bits.

    Lower the heat and mix in the heavy cream, letting it simmer for just a few minutes. Season with salt and black pepper to taste.

    Step 5: Combine Meatballs with Sauce

    Add the chopped baby spinach into the creamy sauce. Stir until it wilts and turns vibrant green, infusing the dish with nutrients.

    Finally, return the meatballs to the skillet, spooning the sauce generously over them. Let everything simmer together for another 2-3 minutes, allowing those flavors to meld beautifully.

    Garnish with fresh parsley before serving! And just like that, your Creamy Spinach Turkey Meatballs are ready to impress!

    Tips for Success

    • Keep your meat mixture cool; it helps maintain shape while cooking.
    • Don’t overcrowd the skillet when cooking meatballs; they need room to brown.
    • Use a meat thermometer to ensure doneness—aim for 165°F.
    • Feel free to add some cooked pasta directly to the sauce for a one-pan meal.
    • Experiment with spices to match your family’s taste preferences.

    Equipment Needed

    • Large skillet: A non-stick version works wonders for easy cleanup.
    • Mixing bowl: Use a large bowl for combining ingredients; any size works.
    • Spoon or spatula: A sturdy one helps with meatball flipping.
    • Meat thermometer: Optional, but great for checking doneness.

    Variations for Creamy Spinach Turkey Meatballs

    • Swap the Meat: Try ground chicken or lean beef for a different flavor profile.
    • Add Vegetables: Incorporate finely chopped mushrooms or bell peppers for extra nutrition and taste.
    • Change the Cheese: Substitute mozzarella with feta or goat cheese for a tangy twist.
    • Herb Variations: Experiment with dried oregano, basil, or even a hint of dill for unique flavors.
    • Gluten-Free Options: Use gluten-free breadcrumbs or ground oats to bind the meatballs.

    Serving Suggestions for Creamy Spinach Turkey Meatballs

    • Serve over a bed of pasta or cauliflower rice for a hearty meal.
    • Pair with a fresh garden salad to add crunch and freshness.
    • Drizzle with extra Parmesan and sprinkle with more parsley for a beautiful presentation.
    • A glass of white wine complements the creamy sauce wonderfully.

    FAQs about Creamy Spinach Turkey Meatballs

    As I’ve cooked these Creamy Spinach Turkey Meatballs countless times, I often hear a few common questions. Let’s dive into some FAQs that might help you on your culinary journey!

    Can I make these meatballs ahead of time?

    Absolutely! You can prepare the meatballs and store them in the fridge for up to a day or freeze them. Just remember to thaw them before cooking.

    What’s the best way to store leftovers?

    Store any leftovers in an airtight container in the fridge. They’re best enjoyed within 3–4 days. Reheat gently on the stove with a splash of cream to keep them moist.

    Can I use another type of meat?

    Yes! Feel free to swap ground turkey for ground chicken or lean beef if that suits your family’s taste better. Each option adds its unique flavor!

    How do I make this dish dairy-free?

    To make these meatballs dairy-free, use dairy-free cheese alternatives and coconut cream instead of heavy cream. The flavors will still shine through!

    Can I add other vegetables to the sauce?

    Definitely! Feel free to toss in other veggies you have on hand, such as mushrooms, zucchini, or bell peppers. Get creative and customize to your family’s preferences!

    Final Thoughts

    Making Creamy Spinach Turkey Meatballs is more than just a cooking task; it’s a moment of joy in the hustle of daily life. This recipe transforms simple ingredients into something extraordinary, inviting smiles around the dinner table. I love how it brings my family closer, creating not just meals, but memories. The creamy sauce wraps around those tender meatballs like a warm hug, comforting everyone after a long day. Whether it’s a busy weeknight or a special occasion, these meatballs are sure to impress. Trust me, they’ll quickly become a treasured favorite in your home!


    Print

    clock clock iconcutlery cutlery iconflag flag iconfolder folder iconinstagram instagram iconpinterest pinterest iconfacebook facebook iconprint print iconsquares squares iconheart heart iconheart solid heart solid icon

    Description

    As a busy mom, I know how challenging it can be to put dinner on the table, especially after a long day. That’s why I’m excited to share my Creamy Spinach Turkey Meatballs recipe—it’s a delightful dinner option that packs both flavor and nutrition. This dish not only brings the family together but it’s also quick enough for a weeknight meal. Imagine juicy turkey meatballs smothered in a creamy spinach sauce that makes your taste buds dance! Trust me, your family will be asking for seconds, and you’ll feel like a culinary superstar.


    • 1 lb ground turkey
    • 1/2 cup shredded mozzarella cheese
    • 2 cloves garlic, grated
    • 1 teaspoon Italian seasoning
    • 1/2 teaspoon red crushed chili flakes (optional)
    • 1 bouillon cube, crumbled (optional)
    • 2 tablespoons fresh parsley or cilantro, chopped
    • 1 tablespoon olive oil
    • 1 tablespoon butter
    • 1 small onion, diced
    • 2 cloves garlic, minced
    • 1/4 cup sun-dried tomatoes, chopped
    • 1/2 cup vegetable broth
    • 1 cup heavy cream
    • Salt and black pepper, to taste
    • 2 cups baby spinach, chopped
    • 1/2 cup grated Parmesan cheese

    1. In a mixing bowl, combine ground turkey, mozzarella cheese, grated garlic, Italian seasoning, red pepper flakes, crumbled bouillon cube, and chopped parsley.
    2. Mix until just combined, then shape the mixture into medium-sized meatballs.
    3. Heat olive oil and butter in a large skillet over medium heat.
    4. Cook the meatballs for 8-10 minutes, turning occasionally, until golden brown and fully cooked.
    5. Transfer the meatballs to a plate and set aside.
    6. In the same skillet, melt 1 tablespoon butter over medium heat.
    7. Add diced onion and minced garlic, sautéing until translucent.
    8. Stir in sun-dried tomatoes and cook for another 1-2 minutes.
    9. Pour in vegetable broth, scraping the bottom of the skillet to deglaze.
    10. Lower the heat and stir in heavy cream, letting it simmer for 2-3 minutes.
    11. Season with salt and black pepper to taste.
    12. Add chopped baby spinach, stirring until wilted.
    13. Stir in grated Parmesan cheese until fully melted.
    14. Return the meatballs to the skillet, spooning the sauce over them.
    15. Let everything simmer for 2-3 minutes to blend flavors.
    16. Garnish with fresh parsley and serve warm.

    Notes

    • Ensure the meatballs are cooked through before serving.
    • Feel free to customize the sauce by adding other vegetables, such as mushrooms or bell peppers.
    • Can be served over pasta, rice, or zucchini noodles for a low-carb option.
    • Prep Time: 15 minutes
    • Cook Time: 25 minutes
    • Category: Dinner
    • Method: Skillet
    • Cuisine: American

    Nutrition

    • Serving Size: 1 serving
    • Calories: 450
    • Sugar: 3g
    • Sodium: 800mg
    • Fat: 30g
    • Saturated Fat: 15g
    • Unsaturated Fat: 10g
    • Trans Fat: 0g
    • Carbohydrates: 10g
    • Fiber: 2g
    • Protein: 35g
    • Cholesterol: 110mg

    Sharing is caring!

  • Easy Gooey Brownie Pie

    Easy Gooey Brownie Pie


    Introduction to Easy Gooey Brownie Pie

    Welcome to my kitchen, where I believe every day deserves a little indulgence! If you’re like me, balancing life’s many facets can feel like spinning plates sometimes. That’s where this Easy Gooey Brownie Pie comes in—a quick solution for when those chocolate cravings hit hard! Rich, fudgy, and oh-so-decadent, this dessert not only satisfies your sweet tooth but also makes for a delightful treat to impress friends and family. Picture this: warm slices topped with a scoop of vanilla ice cream, creating moments that linger long after the dessert is gone. Let’s dive into this heavenly creation!

    Why You’ll Love This Easy Gooey Brownie Pie

    This Easy Gooey Brownie Pie is a dream come true for busy moms and professionals alike. It whips up in no time, making it perfect for last-minute gatherings or cozy nights at home. With its rich chocolatey goodness that melts in your mouth, it’s a guaranteed hit with everyone—even the pickiest of eaters! Plus, you can cut it into generous slices, making it easy to share and savor every moment. Who wouldn’t love that?

    Ingredients for Easy Gooey Brownie Pie

    Before we embark on our chocolate journey, let’s gather our treasure trove of ingredients! This Easy Gooey Brownie Pie calls for some classic components, each playing a vital role in creating that fudge-like magic.

    • Unsalted Butter: The backbone of any brownie. It provides richness and moisture, making our pie delectably gooey.
    • Semi-sweet Chocolate Chips: These delectable morsels add that essential chocolate flavor. Plus, they give our pie that charming, melted consistency.
    • Eggs: Eggs bring structure to your brownie pie. They fluff it up while adding to that heavenly texture we all crave.
    • Granulated Sugar: Sweetness is a must! It not only sweetens but also contributes to the brownie’s lovely, shiny top.
    • Vanilla Extract: Just a splash of this liquid gold elevates the flavors to a whole new level, leaving you wanting more.
    • All-purpose Flour: This staple helps bind everything together without overwhelming the chocolaty goodness.
    • Baking Powder: A tiny pinch gives our brownie pie a gentle lift, making it slightly airy but still delightfully fudge-like.
    • Salt: A sprinkle of salt balances sweetness and enhances overall flavor, making the chocolate sing!

    For those who want to take a creative spin, consider adding nuts, alternate chocolate types, or even a hint of peppermint extract. You’ll find the exact measurements at the bottom of the article, ready for easy printing!

    How to Make Easy Gooey Brownie Pie

    Step 1: Preheat and Prepare

    Let’s kick things off by preheating your oven to 350°F (177°C). This step is crucial to ensure even baking and to achieve that glorious fudginess we all seek. While the oven warms up, it’s time to prep your pie dish! If you’re using a standard pie plate or a 9-inch springform pan, give it a good coat of nonstick spray or butter. This little step ensures our brownie pie releases easily, avoiding any sticky situations. Trust me; no one wants a brownie pie disaster!

    Step 2: Melt Butter and Chocolate

    Now, let’s melt our unsalted butter and chocolate chips. Grab a heat-safe bowl and either set it over a double boiler or use the microwave. If using the microwave, heat it at 50% power in 30-second intervals, stirring until it’s smooth and silky. This step is essential since melted chocolate combines better with sugar and eggs, creating that luscious texture we crave. Let the mixture cool to room temperature to avoid scrambling those eggs in the next step. Patience pays off here!

    Step 3: Mix Eggs and Sugar

    In a stand mixer or using a handheld mixer, it’s time to beat those eggs and granulated sugar together. Whip them on medium-high speed until the mixture turns pale and fluffy—about three minutes. This is where the magic happens! The air that gets whipped in will lighten the texture of our Easy Gooey Brownie Pie. You want it to look airy and soft, giving our brownies that melt-in-your-mouth quality we’re all after. Don’t skip this step; trust me!

    Step 4: Combine Wet and Dry Ingredients

    With the mixer on low speed, gently blend the cooled chocolate mixture into the egg and sugar mix until fully combined. Next, it’s time to fold in the all-purpose flour, baking powder, and salt. Use a spatula and be gentle, as we don’t want to deflate all that air we worked so hard to create. It’s important to stop once you no longer see streaks of flour. Finally, stir in the remaining chocolate chips. This will enhance that rich chocolate flavor in every bite!

    Step 5: Bake the Pie

    Now, let’s pour the beautiful batter into your prepared pie dish. Spread it evenly, making sure no batter is left behind. Pop it into your preheated oven and bake for 35 to 40 minutes. Look for a puffed center and a cracking surface, which are signs of doneness. The edges will set while the center remains gooey and fudgy—exactly what we want for our Easy Gooey Brownie Pie. Once the aroma fills your kitchen, you’ll know it’s almost time!

    Step 6: Cool and Serve

    After baking, take the pie out of the oven and let it cool completely on a wire rack. This patience pays off, trust me! Slicing into warm brownies can be messy, and cooling helps them set beautifully. Once cooled, slice it up and serve it as is, or top with hot fudge and a scoop of vanilla ice cream for an extra treat. Picture that gooey chocolate goodness—pure bliss awaits!

    Tips for Success

    • Let the butter and chocolate cool before mixing with eggs to avoid scrambling.
    • Use room temperature eggs for better incorporation.
    • Mix gently when adding the flour to maintain that fudgy texture.
    • Check for doneness by looking for cracks on the surface; it’s a good sign!
    • Cool completely before slicing for cleaner edges.

    Equipment Needed

    • Mixing Bowl: A large bowl works well, but any sizable bowl will do the trick.
    • Hand Mixer or Stand Mixer: If you don’t have a mixer, a whisk and good old elbow grease will suffice!
    • Spatula: Essential for folding ingredients; a silicone one is great.
    • Pie Dish or Springform Pan: Any oven-safe dish that fits the batter will work perfectly!
    • Wire Rack: To cool your delicious pie, a cutting board can also serve nicely.

    Variations on Easy Gooey Brownie Pie

    • Nutty Delight: Add chopped walnuts or pecans for a crunchy texture that complements the gooey chocolate.
    • Minty Fresh: Stir in a teaspoon of peppermint extract for a refreshing twist that’s perfect for the holidays.
    • Peanut Butter Swirl: Drizzle warm peanut butter over the baked brownie pie before it cools, then swirl it in for an indulgent peanut butter flavor.
    • Gluten-Free Option: Substitute all-purpose flour with almond flour or a gluten-free baking mix for a deliciously chewy brownie pie.
    • Vegan Version: Replace eggs with flax eggs (1 tablespoon flaxseed meal + 2.5 tablespoons water per egg) and use dairy-free chocolate chips for a plant-based treat.

    Serving Suggestions

    • Vanilla Ice Cream: A scoop of creamy vanilla ice cream complements the rich chocolate beautifully.
    • Whipped Cream: Light and airy whipped cream adds a perfect contrast to the fudgy texture.
    • Fresh Berries: Serve with raspberries or strawberries for a fruity, refreshing balance.
    • Espresso or Coffee: A warm cup of coffee enhances the chocolate flavor for a cozy treat.
    • Presentation: Dust with powdered sugar or drizzle with hot fudge for an eye-catching finish!

    FAQs about Easy Gooey Brownie Pie

    Can I use cocoa powder instead of chocolate chips?
    Absolutely! If you’re in a pinch, you can use unsweetened cocoa powder. Just blend ½ cup with 2 tablespoons of melted butter to replace every ounce of chocolate chips.

    How do I store leftover brownie pie?
    Store your Easy Gooey Brownie Pie in an airtight container at room temperature for up to three days. For longer storage, keep it in the refrigerator, and gently reheat before serving.

    Can I freeze the brownie pie?
    Yes! Wrap slices in plastic wrap and place them in a freezer-safe bag for up to three months. Just thaw in the fridge when you’re ready to enjoy them!

    Is it possible to make this recipe dairy-free?
    Certainly! You can substitute the butter with coconut oil or a dairy-free margarine. For chocolate chips, opt for dairy-free varieties. You’re only a few swaps away from a delicious treat!

    Can I make this brownie pie without eggs?
    Yes, you can use flax eggs as an egg substitute! Mix 1 tablespoon of ground flaxseed with 2.5 tablespoons of water for each egg. This will maintain that rich fudginess you love!

    Final Thoughts

    Making this Easy Gooey Brownie Pie is an experience that warms my heart. Each slice is like a hug from the inside, a reminder that even the busiest days can end with something sweet. Sharing it with loved ones transforms a simple dessert into a cherished memory, where laughter mixes with chocolate. The best part? It’s easy enough to whip up on any given day, yet impressive enough to serve at special occasions. Whether you enjoy it solo or with family, this fudgy delight promises joy in every bite. So go ahead, indulge a little—you deserve it!


    Print

    clock clock iconcutlery cutlery iconflag flag iconfolder folder iconinstagram instagram iconpinterest pinterest iconfacebook facebook iconprint print iconsquares squares iconheart heart iconheart solid heart solid icon

    Description

    A rich and fudgy brownie pie that melts in your mouth, perfect for any chocolate lover.


    • 6 tablespoons unsalted butter
    • 3 cups semi-sweet chocolate chips, divided
    • 3 large eggs
    • 1 cup granulated sugar
    • 1 teaspoon vanilla extract
    • 1/2 cup all-purpose flour
    • 1/4 teaspoon baking powder
    • 1/4 teaspoon salt

    1. Preheat oven to 350°F (177°C). Grease a standard pie plate or 9-inch springform pan with nonstick spray or butter.
    2. In a heat-safe bowl, melt butter and 2 cups of chocolate chips using a double boiler or microwave at 50% power in 30-second intervals, stirring until smooth. Allow mixture to cool to room temperature.
    3. In a stand mixer or with a handheld electric mixer, beat eggs, granulated sugar, and vanilla extract on medium-high speed until mixture becomes pale and fluffy, about 3 minutes.
    4. With the mixer on low speed, blend in the cooled chocolate mixture until fully combined.
    5. Gently fold in all-purpose flour, baking powder, and salt just until no streaks of flour remain. Incorporate the remaining 1 cup chocolate chips by hand.
    6. Transfer the batter to the prepared pan and spread evenly. Bake for 35 to 40 minutes or until the center is puffed and the surface shows cracking.
    7. Remove pan from oven and allow to cool completely on a wire rack. Slice and serve topped with hot fudge if desired.

    Notes

    • For extra richness, serve with a scoop of vanilla ice cream.
    • Ensure that the brownies cool completely before slicing for a cleaner edge.
    • Store leftovers in an airtight container at room temperature for up to 3 days.
    • Prep Time: 15 minutes
    • Cook Time: 40 minutes
    • Category: Dessert
    • Method: Baking
    • Cuisine: American

    Nutrition

    • Serving Size: 1 slice
    • Calories: 300
    • Sugar: 25g
    • Sodium: 150mg
    • Fat: 15g
    • Saturated Fat: 9g
    • Unsaturated Fat: 5g
    • Trans Fat: 0g
    • Carbohydrates: 35g
    • Fiber: 2g
    • Protein: 4g
    • Cholesterol: 90mg

    Sharing is caring!