Blog

  • Oreo Pancakes with Cream Cheese Drizzle

    Oreo Pancakes with Cream Cheese Drizzle


    Introduction to Oreo Pancakes with Cream Cheese Drizzle

    Hey there, fellow food lovers! Today, let’s dive into a delicious treat that will have everyone at the breakfast table smiling—Oreo Pancakes with Cream Cheese Drizzle. Picture this: a stack of fluffy pancakes infused with crunchiness from Oreo cookies, all topped with a silky cream cheese drizzle. It’s an easy, quick solution for a busy morning or a sweet way to impress your loved ones on special occasions. Trust me, these pancakes are more than just a meal; they’re a delightful experience waiting to happen!

    Why You’ll Love This Oreo Pancakes with Cream Cheese Drizzle

    These Oreo Pancakes with Cream Cheese Drizzle will quickly become a staple in your kitchen. They are unbelievably easy to whip up, which is perfect for those rushed mornings. In just 30 minutes, you can serve up something as delightful as it is delicious. Plus, the kids will adore these sweet pancakes, and trust me, friends and family won’t stop raving about the cream cheese drizzle! What’s not to love?

    Ingredients for Oreo Pancakes with Cream Cheese Drizzle

    Let’s gather what we need to make these delicious Oreo Pancakes with Cream Cheese Drizzle. The ingredients are simple and often found in your kitchen. Here’s what you’ll need:

    • All-purpose flour: This is the backbone of our pancakes, providing structure and fluffiness. You can also swap it with whole wheat flour for a healthier twist.
    • Granulated sugar: A little sweetness is essential, and it enhances the flavor of the Oreo. Use coconut sugar for a lower glycemic index if you prefer.
    • Baking powder: This magical ingredient helps your pancakes rise beautifully, making them light and airy.
    • Salt: Just a pinch! It balances the sweetness and amplifies all those fabulous flavors.
    • Large egg: Eggs add moisture and richness—crucial for those tender bites. A flax egg can be a great egg-free alternative!
    • Milk: This helps create a creamy batter. For a richer flavor, go for whole milk; almond or oat milk can be tasty dairy-free substitutes.
    • Unsalted butter: Melted butter adds that irresistible buttery taste. You can use coconut oil for a dairy-free option.
    • Vanilla extract: A dash of vanilla elevates the flavor like a warm hug—always a wonderful addition to baked goods.
    • Oreo cookies: The star of the show! They add a delightful crunch and sweetness. Feel free to experiment with different Oreo flavors!
    • Cream cheese: This is what makes the drizzle creamy and delectable. For a twist, mascarpone is a fantastic substitute.
    • Powdered sugar: Added to the cream cheese for sweetness and smoothness in our drizzle.
    • Extra vanilla extract and milk: These enhance the cream cheese drizzle’s flavor and help achieve the perfect consistency.

    For exact measurements, check towards the bottom of the article where you’ll find the recipe ready for printing! Now, let’s get cooking!

    How to Make Oreo Pancakes with Cream Cheese Drizzle

    Now that we’ve rounded up our ingredients, it’s time to dive into the fun part: cooking! Making these Oreo Pancakes with Cream Cheese Drizzle is straightforward, even on the busiest mornings. So, let’s roll up our sleeves and get started!

    Step 1: Prepare the Dry Ingredients

    In a large bowl, whisk together the all-purpose flour, granulated sugar, baking powder, and salt.

    Mixing these dry ingredients thoroughly ensures that the baking powder is evenly distributed. This will help in achieving fluffy pancakes that rise nicely!

    Step 2: Mix the Wet Ingredients

    In a separate bowl, whisk together the egg, milk, melted butter, and vanilla extract.

    Remember, that melted butter should not be too hot; we don’t want scrambled eggs! This mixture will bring all the creamy goodness to our pancakes.

    Step 3: Combine Wet and Dry Ingredients

    Pour the wet ingredients into the dry ingredients, using a spatula to gently fold them together.

    Be careful here! We want to avoid overmixing; a few lumps in the batter are perfectly okay. Now, gently incorporate the crushed Oreo cookies. They bring such a delightful crunch!

    Step 4: Cook the Pancakes

    Preheat your non-stick skillet or griddle over medium heat. Lightly grease it with butter or cooking spray.

    Pour about 1/4 cup of batter onto the skillet for each pancake. Watch for bubbles to form on the surface, which is your cue to flip! Cook for 1-2 minutes on the other side until golden brown. You’re crafting pancakes that not only taste delicious but look divine!

    Step 5: Prepare the Cream Cheese Drizzle

    In a medium bowl, beat the softened cream cheese with powdered sugar and vanilla extract until smooth and creamy.

    Gradually add the milk, one tablespoon at a time, mixing until the drizzle reaches your desired consistency. Taste it—if you want it sweeter, sprinkle in some extra powdered sugar!

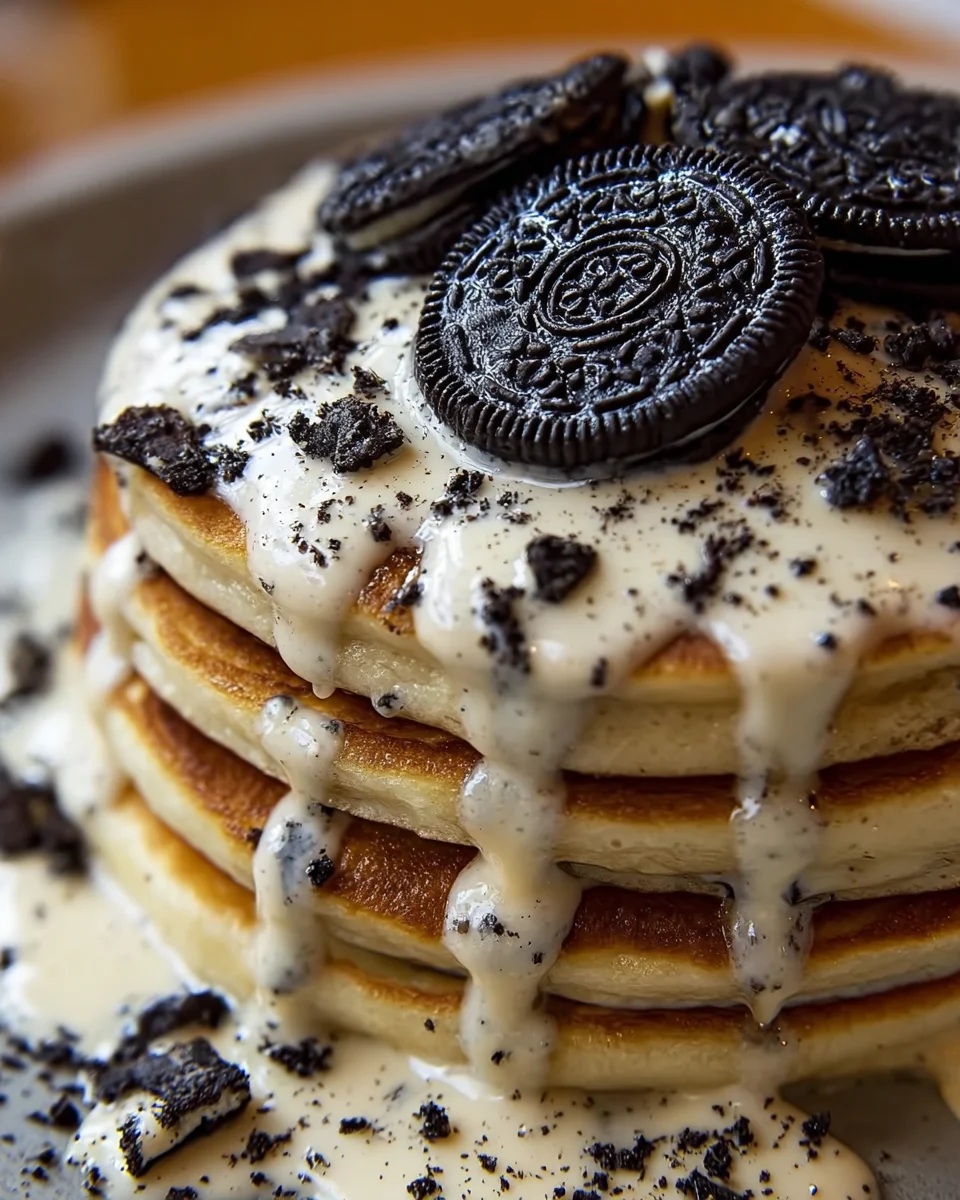
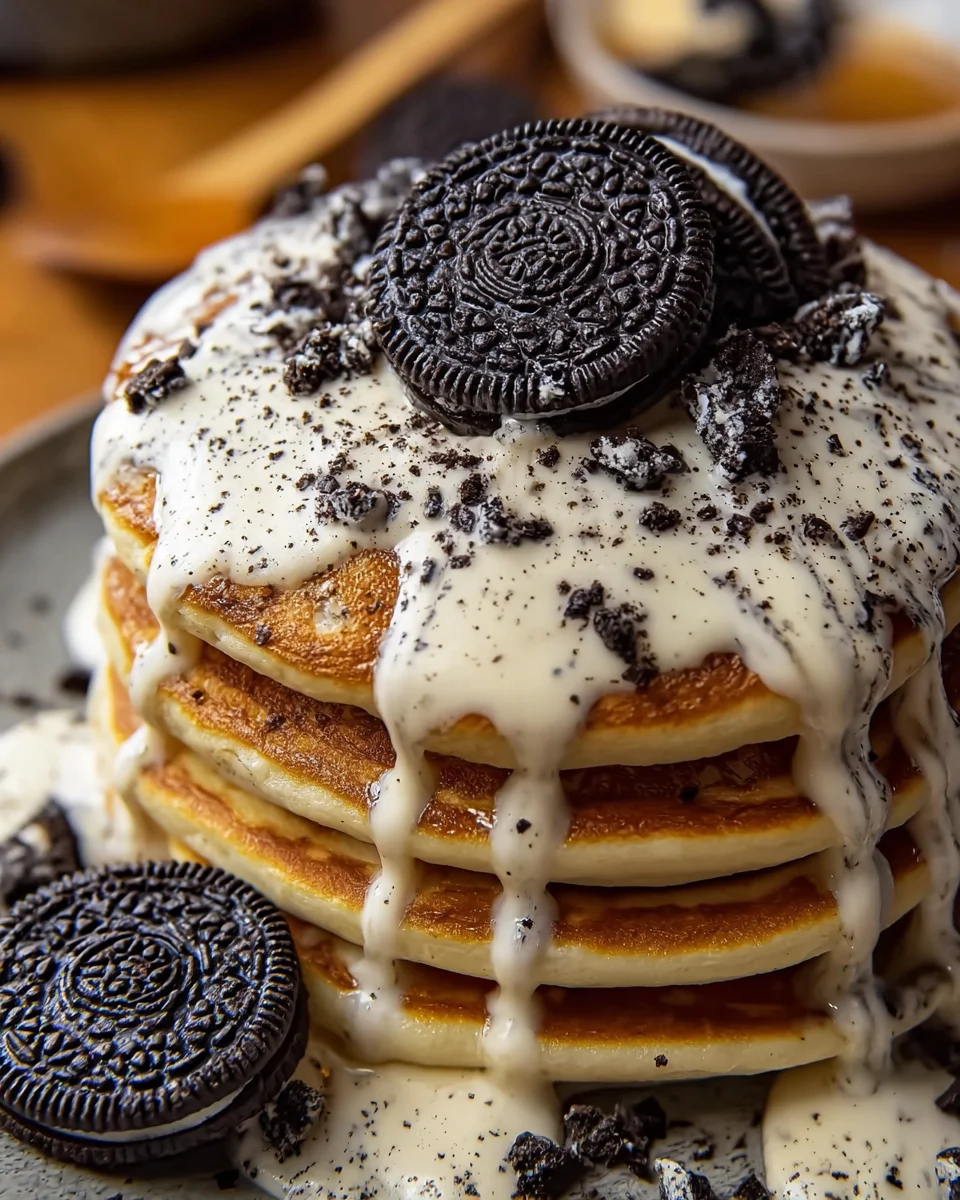
    Step 6: Serve the Pancakes

    Now, let’s stack those fluffy pancakes on a serving plate!

    Generously drizzle that creamy cream cheese mixture over the pancakes. For extra flair, garnish with additional crushed Oreo cookies, whipped cream, or even a drizzle of chocolate syrup if you’re feeling fancy.

    Serve immediately; there’s nothing quite like warm pancakes to start your day right!

    Tips for Success

    • Measure ingredients accurately for the best results; use a kitchen scale if possible.
    • Let your batter rest for a few minutes before cooking to enhance fluffiness.
    • Use a non-stick skillet to prevent sticking and make flipping easier!
    • Adjust the heat as needed; too high and your pancakes may burn.
    • Have fun with toppings! Fresh fruit, nuts, or chocolate chips can add a delightful twist.

    Equipment Needed

    • Mixing bowls: Essential for combining ingredients. Any size will work.
    • Whisk: Great for mixing dry and wet ingredients. A fork can substitute in a pinch.
    • Non-stick skillet or griddle: Perfect for cooking. A regular skillet with a bit of oil can also do the trick.
    • Spatula: Handy for flipping pancakes without disaster. A wooden spoon is a good alternative!
    • Measuring cups and spoons: For accurate ingredient amounts; even a food scale can help!

    Variations of Oreo Pancakes with Cream Cheese Drizzle

    • Mint Oreo Pancakes: Add crushed mint Oreos for a refreshing twist; the mint flavor pairs beautifully with cream cheese!
    • Peanut Butter Cups: Swirl in some peanut butter or top with Reese’s pieces for a delightful flavor explosion!
    • Gluten-Free Option: Use a gluten-free all-purpose flour blend for a delicious gluten-free version that everyone can enjoy.
    • Vegan Version: Substitute egg with a flax egg, use almond milk, and swap cream cheese for a coconut yogurt to make it plant-based.
    • Double Chocolate Oreo Pancakes: Enhance chocolatey goodness by adding cocoa powder to the batter for decadent chocolate pancakes.

    Serving Suggestions for Oreo Pancakes

    • Fruits: Serve with fresh strawberries or bananas for a pop of color and flavor.
    • Drinks: Pair with a warm cup of coffee or a chilled glass of milk for the ultimate experience.
    • Presentation: Stack high and dust with powdered sugar to create a beautiful breakfast centerpiece.
    • Additional Toppings: Drizzle with chocolate syrup or top with whipped cream for an indulgent treat.

    FAQs about Oreo Pancakes with Cream Cheese Drizzle

    Can I make Oreo pancakes ahead of time?

    Absolutely! You can prepare the batter in advance and store it in the fridge for up to 24 hours. Just give it a stir before cooking. Or, you can make the pancakes and freeze them. Simply reheat in the toaster or microwave when you’re ready to enjoy!

    What can I substitute for cream cheese in the drizzle?

    If you’re not a fan of cream cheese, mascarpone is a fantastic alternative, providing a rich flavor. Greek yogurt can also work well if you’re looking for a tangy twist—just add a bit of sweetener to balance the flavors.

    How do I store leftover Oreo pancakes?

    Leftover pancakes can be stored in an airtight container in the refrigerator for up to two days. You can also freeze them by separating each pancake with parchment paper to prevent sticking. They’ll be ready whenever you need a quick breakfast treat!

    Can I add chocolate chips to the pancake batter?

    Yes, yes, yes! Adding chocolate chips to the batter can elevate your Oreo pancakes to a whole new delight. Just fold them into the batter right before cooking for a melty chocolate surprise in every bite!

    Can these pancakes be made gluten-free?

    Definitely! Use a gluten-free all-purpose flour blend to make these Oreo Pancakes with Cream Cheese Drizzle. They’ll still pack the same delicious flavors without the gluten, making them perfect for everyone to enjoy!

    Final Thoughts

    Creating Oreo Pancakes with Cream Cheese Drizzle is like a sweet hug on a plate. Each bite delivers a delightful crunch paired with creamy goodness that feels like a little celebration. Whether it’s a busy weekday or a leisurely weekend, these pancakes are a joyful treat that brings smiles to my family. I hope this recipe fills your kitchen with laughter and love. Don’t be surprised if they become a favorite in your house, just like they have in mine! So grab those Oreos and let the fun begin—you won’t regret it!


    Print

    clock clock iconcutlery cutlery iconflag flag iconfolder folder iconinstagram instagram iconpinterest pinterest iconfacebook facebook iconprint print iconsquares squares iconheart heart iconheart solid heart solid icon

    Description

    Delicious Oreo pancakes topped with a creamy cream cheese drizzle for a sweet treat!


    • 1 1/2 cups all-purpose flour
    • 2 tablespoons granulated sugar
    • 2 teaspoons baking powder
    • 1/2 teaspoon salt
    • 1 large egg
    • 1 1/4 cups milk
    • 2 tablespoons unsalted butter, melted
    • 1 teaspoon vanilla extract
    • 10 Oreo cookies, crushed
    • 4 oz cream cheese, softened
    • 1/4 cup powdered sugar
    • 1/2 teaspoon vanilla extract
    • 2 tablespoons milk (or more for desired consistency)

    1. In a large bowl, whisk together the flour, sugar, baking powder, and salt.
    2. In a separate bowl, whisk together the egg, milk, melted butter, and vanilla extract.
    3. Pour the wet ingredients into the dry ingredients and stir until just combined. Be careful not to overmix; it’s okay if the batter is slightly lumpy.
    4. Gently fold in the crushed Oreo cookies.
    5. Heat a non-stick skillet or griddle over medium heat and lightly grease with butter or cooking spray.
    6. Pour 1/4 cup of batter onto the skillet for each pancake. Cook until bubbles form on the surface, then flip and cook for another 1-2 minutes until golden brown. Repeat with the remaining batter.
    7. Set the pancakes aside and keep warm.
    8. In a medium bowl, beat the softened cream cheese with powdered sugar and vanilla extract until smooth and creamy.
    9. Gradually add the milk, one tablespoon at a time, until you reach a drizzle-able consistency. If needed, add a little more milk to thin it out.
    10. Taste and adjust sweetness by adding more powdered sugar if desired.
    11. Stack the pancakes on a serving plate.
    12. Drizzle the cream cheese mixture generously over the top of the pancakes.
    13. Garnish with additional crushed Oreo cookies, whipped cream, and chocolate syrup if desired.
    14. Serve immediately while the pancakes are warm.

    Notes

    • For a richer flavor, use whole milk instead of skim milk.
    • Can substitute cream cheese with mascarpone for a different taste.
    • Store leftover pancakes in the refrigerator for up to 2 days.
    • Prep Time: 15 minutes
    • Cook Time: 15 minutes
    • Category: Breakfast, Dessert
    • Method: Griddling
    • Cuisine: American

    Nutrition

    • Serving Size: 2 pancakes with drizzle
    • Calories: 450
    • Sugar: 28g
    • Sodium: 400mg
    • Fat: 22g
    • Saturated Fat: 12g
    • Unsaturated Fat: 8g
    • Trans Fat: 0g
    • Carbohydrates: 55g
    • Fiber: 2g
    • Protein: 7g
    • Cholesterol: 60mg

    Sharing is caring!

  • Crock Pot Mississippi Chicken Sliders

    Crock Pot Mississippi Chicken Sliders


    Introduction to Crock Pot Mississippi Chicken Sliders

    Hey there, fellow food lovers! If you’ve ever found yourself racing against the clock, trying to whip up a meal that your family will devour, then Crock Pot Mississippi Chicken Sliders might just become your new best friend. This delightful dish is perfect for those busy days when you want to spend less time in the kitchen and more time enjoying life. Imagine tender, juicy chicken mingling with zesty ranch seasoning, all snuggled up in soft Hawaiian rolls. It’s a flavor-packed treat that’s bound to impress your loved ones without requiring hours of fuss. Trust me; your taste buds will thank you!

    Why You’ll Love This Crock Pot Mississippi Chicken Sliders

    Let’s be real—life can get hectic, and finding a meal that’s easy, fast, and truly delicious is like discovering a pot of gold! These sliders check all those boxes. The beauty of the Crock Pot Mississippi Chicken Sliders lies in their simplicity. Just toss everything into the slow cooker, and in a few hours, you’ll have a scrumptious feast ready to serve. Plus, they’re packed with flavor that will have your family asking for seconds. What’s not to love?

    Ingredients for Crock Pot Mississippi Chicken Sliders

    Gathering the right ingredients is half the fun! For these delightful Crock Pot Mississippi Chicken Sliders, you’ll need a hearty selection that brings out the best flavors. Here’s what you’ll require:

    • Skinless chicken thighs: Whether you choose bone-in or boneless, thighs are juicy and perfect for shredding.
    • Dry ranch seasoning: This brings that creamy, herbaceous zing that complements the chicken beautifully.
    • Butter: A couple of tablespoons will help to create a rich flavor, making the chicken even more luscious.
    • Whole pepperoncini peppers: These tangy little gems add heat and sweet notes, elevating your sliders immensely.
    • Red chili flakes: If you love a kick, this is your friend! Adjust it to suit your palate.
    • Hawaiian dinner rolls: Soft and sweet, they’re the ultimate vehicle for your flavorful filling.
    • Mayonnaise: A creamy spread that enhances flavor and adds moisture.
    • Spicy mustard: For those who enjoy a zesty punch in every bite.
    • Gouda cheese: Melty and delicious, Gouda makes these sliders utterly irresistible. Provolone works well too!
    • Dried parsley: A sprinkle brings freshness and color to your sliders.

    Don’t worry about measurements just yet—those are listed at the bottom of the article, perfect for printing. Gather these ingredients, and let’s dive into the magic of making these Crock Pot Mississippi Chicken Sliders! You’ll be thrilled with the flavors ready to unfold.

    How to Make Crock Pot Mississippi Chicken Sliders

    Ready to dive into the delicious world of Crock Pot Mississippi Chicken Sliders? Let’s get started with some easy steps that will make you feel like a culinary rock star. Trust me, you’ll love how simple this is!

    Step 1: Prepare the Chicken

    First, grab your crock pot and place 6-8 skinless chicken thighs inside. Don’t worry; bone-in works too! Now, sprinkle over about 3 tablespoons of dry ranch seasoning. Picture it—those aromatic herbs coming together to coat the chicken in flavor!

    Next, toss in a half jar of whole pepperoncini peppers along with half the juice from the jar. This adds a tangy zip that will have your taste buds dancing! Then, throw in 8 tablespoons of butter and sprinkle on a teaspoon of red chili flakes. This gives just the right amount of kick!

    Step 2: Slow Cook to Perfection

    Cover your crock pot with its lid, sealing in all that savory goodness. Set your slow cooker to cook on LOW for 6 hours or HIGH for 4 hours. During this time, the chicken will soak in all the great flavors, transforming into a tender, juicy masterpiece.

    Step 3: Shred the Chicken

    Once the cooking time is up, carefully remove the chicken from the crock pot. It’ll be super tender, so shredding it with two forks will be a breeze! Just think of it as a little workout for your arms while you unleash that tasty chicken goodness.

    Step 4: Build the Sliders

    Now comes the fun part—slicing those soft Hawaiian rolls in half horizontally! Lay the bottoms on a baking sheet. Spread a generous amount of spicy mustard and creamy mayonnaise on both cut sides of the rolls. These spreads are the secret agents in ensuring every bite bursts with flavor!

    Step 5: Assemble Sliders

    Time to layer! Evenly distribute the shredded chicken over the bottom halves of the rolls, allowing the flavors to shine through. Add slices of Gouda cheese on top, melting into ooey-gooey goodness as they bake. Placing the tops of the rolls over the chicken and cheese will cap off this slider building extravaganza!

    Step 6: Brush with Butter Mixture

    In a small bowl, melt 3 tablespoons of butter, then mix in 1 tablespoon of ranch seasoning and 1 tablespoon of dried parsley. This is your flavor-packed brushing mixture! Gently brush it over the tops of the assembled sliders. Your kitchen is about to smell heavenly!

    Step 7: Bake for the Perfect Finish

    Cover your sliders with aluminum foil and pop them into a preheated 350-degree oven. Bake for 15 minutes, allowing everything to meld together beautifully. Then, remove the foil, brush any remaining butter mixture over the tops, and let them bake for an additional 5 minutes. The perfect golden finish is just around the corner!

    Tips for Success

    • Feel free to adjust the spice by adding more or fewer chili flakes according to your taste.
    • For extra tang, add a splash of vinegar to the slow cooker along with the pepperoncini.
    • Make sure to shred the chicken while it’s hot; it’s much easier that way!
    • For a crunchier texture, toast the rolls before assembling the sliders.

    Equipment Needed

    • Crock Pot: A must-have for this recipe. If you don’t have one, a Dutch oven can work too.
    • Baking Sheet: For baking the sliders; a casserole dish serves as a great alternative.
    • Mixing Bowl: Used for combining butter and seasonings. You can also use a small measuring cup.
    • Forks: Two for shredding the chicken—alternatively, you can use a meat shredder.

    Variations

    • Spicy Chipotle Version: Swap in chipotle peppers for a smoky kick that elevates the flavor profile!
    • Low-Carb Option: Use lettuce wraps instead of Hawaiian rolls for a lighter, gluten-free slider.
    • Vegetarian Delight: Substitute chicken with jackfruit or shredded tofu for a plant-based version of these sliders.
    • Herbed Up: Add fresh herbs like cilantro or basil to the chicken for an aromatic twist.
    • Sweet and Savory: Mix in some honey with the butter mixture for a delightful contrast.

    Serving Suggestions

    • Crunchy Coleslaw: A fresh and tangy side that complements the sliders perfectly.
    • Potato Chips: Simple and satisfying for some extra crunch on the side.
    • Ice-cold Lemonade: A refreshing drink that balances the sliders’ savory flavor.
    • Presentation Tip: Serve sliders on a wooden board for a rustic, inviting look!

    FAQs about Crock Pot Mississippi Chicken Sliders

    Can I use chicken breasts instead of thighs?
    Absolutely! While I love the richness of chicken thighs, using boneless skinless chicken breasts will still yield tasty Crock Pot Mississippi Chicken Sliders. Just make sure to adjust the cooking time slightly since breasts can dry out more easily.

    What can I serve with the sliders?
    These sliders are fantastic with sides like crunchy coleslaw, potato chips, or even a vibrant salad. A glass of sweet tea or an ice-cold lemonade also pairs beautifully!

    Can I make these sliders ahead of time?
    Definitely! You can prepare the chicken and store it in the fridge for up to three days before assembling the sliders. When you’re ready, just build and bake them!

    How do I store leftovers?
    After enjoying your delicious Crock Pot Mississippi Chicken Sliders, you can store any leftovers in an airtight container in the fridge for up to three days. Reheat them gently in the oven or microwave for best results.

    Can these be frozen?
    Yes, you can freeze the shredded chicken mixture before placing it onto the rolls. Just thaw it in the fridge overnight before using it to make sliders, and you’ll be back to slider heaven in no time!

    Final Thoughts

    Crock Pot Mississippi Chicken Sliders are more than just a meal; they’re the delightful answer to a busy mom’s prayers. From the satisfying aroma wafting through your home to the joyous laughter shared around the table, these sliders are a tasty reminder that deliciousness can be simple. I truly cherish how this dish brings family and friends together without hours of kitchen stress. Each tender bite wrapped in buttery goodness is a little piece of culinary heaven. So go ahead and create your own slider magic—trust me, you’ll be grateful for every savory moment!


    Print

    clock clock iconcutlery cutlery iconflag flag iconfolder folder iconinstagram instagram iconpinterest pinterest iconfacebook facebook iconprint print iconsquares squares iconheart heart iconheart solid heart solid icon

    Description

    Crock Pot Mississippi Chicken Sliders are a flavorful and tender chicken dish cooked in a savory mixture of ranch seasoning and pepperoncini peppers, served on soft Hawaiian rolls with Gouda cheese.


    • 68 skinless chicken thighs (bone-in or boneless)
    • 3 tablespoons dry ranch seasoning (about 1 and ½ packets)
    • 8 tablespoons butter
    • ½ 16 ounce jar whole pepperoncini peppers with juice
    • 1 teaspoon red chili flakes
    • 2 packages Hawaiian dinner rolls, sliced in half horizontally
    • ½ cup mayonnaise
    • ¼ cup spicy mustard
    • 24 slices Gouda cheese (or provolone)
    • 3 tablespoons butter
    • 1 tablespoon dry ranch seasoning
    • 1 tablespoon dried parsley

    1. Place chicken in the crock pot. Sprinkle over ranch seasoning. Place pepperoncini peppers and half the juice from the jar around the chicken. Add butter and sprinkle on red chili flakes.
    2. Cover and cook on LOW for 6 hours or HIGH for 4 hours.
    3. When chicken is done, remove from crock pot and shred with 2 forks.
    4. Slice Hawaiian dinner rolls in half, horizontally. Spread spicy mustard and mayonnaise on the cut side of the bottom and top of rolls.
    5. Place shredded chicken evenly on the bottom of dinner rolls. Layer on cheese and place top of rolls over the chicken and cheese.
    6. Melt 3 tablespoons of butter and add 1 tablespoon of ranch seasoning along with 1 tablespoon of parsley. Brush mixture over top of rolls.
    7. Cover with aluminum foil and bake in a 350-degree oven for 15 minutes.
    8. Remove foil, brush with any remaining butter, and place in the oven for 5 additional minutes.
    9. Remove sliders from the oven and let cool for 5 minutes. Cut rolls into individual portions and serve warm.

    Notes

    • You can adjust the amount of chili flakes based on your heat preference.
    • Provolone cheese can be used as an alternative to Gouda.
    • Use leftover shredded chicken for other recipes or freeze for later use.
    • Prep Time: 15 minutes
    • Cook Time: 6 hours
    • Category: Appetizer
    • Method: Slow Cooker
    • Cuisine: American

    Nutrition

    • Serving Size: 1 slider
    • Calories: 350
    • Sugar: 3g
    • Sodium: 800mg
    • Fat: 20g
    • Saturated Fat: 10g
    • Unsaturated Fat: 8g
    • Trans Fat: 0g
    • Carbohydrates: 30g
    • Fiber: 1g
    • Protein: 15g
    • Cholesterol: 75mg

    Sharing is caring!

  • Sweet Corn Salad Peaches

    Sweet Corn Salad Peaches


    Introduction to Sweet Corn Salad Peaches

    As the sun shines brighter and the days stretch longer, my thoughts drift to colorful dishes that scream summer. That’s when I whip up my Sweet Corn Salad Peaches, a deliciously refreshing treat that perfectly marries the sweetness of fresh corn with ripe, juicy peaches. As a busy mom, I know how hectic life can be, especially when you need a quick and satisfying meal. This salad not only brightens up your table but also requires minimal prep. It’s the ideal fit for summer gatherings or those delightful evenings spent outdoors with loved ones.

    Why You’ll Love This Sweet Corn Salad Peaches

    This Sweet Corn Salad Peaches is a breeze to make, taking only about 25 minutes from start to finish. The blend of bright flavors and textures makes it an instant crowd-pleaser. Not only is it fresh and healthy, but it’s also incredibly versatile. Whether it’s a summer barbecue or a quick weeknight dinner, this salad brings the taste of summer right to your table, making any meal feel festive and fun!

    Ingredients for Sweet Corn Salad Peaches

    Gathering the right ingredients is part of the fun in creating this Sweet Corn Salad Peaches. Here’s what you’ll need:

    • Sweet corn – This is the star of the show! Look for fresh, plump ears that are bright yellow, as they pack the most flavor.
    • Peaches – Ripe and juicy, they add a luscious sweetness. Feel free to substitute nectarines if you’re in a pinch.
    • Red onion – Finely chopped, it adds a sharp bite that balances the sweetness of the corn and peaches.
    • Cilantro – Fresh cilantro provides a vibrant, herbaceous note that elevates the dish.
    • Jalapeño – Heating things up with a touch of spice! If you prefer milder flavors, you can swap this out for bell peppers.
    • Avocados – Creamy and rich, they round out the salad beautifully, but can be omitted for a lower-fat option.
    • Lime juice – This adds a zesty brightness, cutting through the richness of the ingredients.
    • Honey – A hint of sweetness, helping to marry the flavors together. Maple syrup is a great alternative if you prefer.
    • Salt and black pepper – Essential seasonings that enhance every bite.

    Exact measurements for these ingredients can be found for printing at the bottom of the post.

    How to Make Sweet Corn Salad Peaches

    Step 1: Cook and Prepare Corn

    Let’s kick things off with the corn! You have a few fun options to cook it:

    • Boiling: Bring a pot of salted water to a rolling boil. Add the corn and let it cook for about 5-7 minutes. This is the quickest method and keeps it tender.
    • Grilling: Fire up the grill for a smoky flavor! Toss the ears of corn directly on the grates, turning occasionally for about 10-15 minutes until it’s lightly charred.
    • Roasting: Preheat your oven to 425°F. Place the corn on a baking sheet and roast for around 20 minutes. This method gives it a sweet, slightly caramelized taste.

    After cooking, let the corn cool completely. Once cooled, use a sharp knife to cut off the kernels. Add those juicy kernels to a large bowl, and your base is ready!

    Step 2: Make the Dressing

    Now, let’s blend together a zesty dressing! In a small bowl, whisk the lime juice and honey until the honey dissolves completely. This step is crucial as the lime provides acidity while the honey adds subtle sweetness.

    Don’t forget a sprinkle of cracked black pepper to enhance the flavor. The balance of tang from the lime and sweetness from the honey creates a tasty vinaigrette that dances over the fresh ingredients. It’s like a tiny celebration in your bowl!

    Step 3: Combine Main Ingredients

    With the corn and dressing ready, it’s time to bring everything together! In your large bowl with corn, gently add in the peaches, red onion, cilantro, and jalapeño. Love your ingredients, and take your time as you toss them together. You want to keep that fresh look!

    Drizzle the lime-honey dressing over the top, and then toss gently to coat every delicious bit. The key here is to mix without bruising the peaches or the herbs. A little finesse goes a long way, ensuring that every bite is packed with flavor while retaining that beautiful texture.

    Step 4: Serve and Enjoy

    Finally, it’s time to serve! You have a choice here with the avocado. You can choose to add it directly into the salad for a creamy touch. This makes the dish even more satisfying!

    On the other hand, if some family members prefer their avocado on the side, slice it up and serve it alongside. This way, everyone can enjoy their Sweet Corn Salad Peaches just the way they like it! Grab a bowl, and dig in—summer is officially here!

    Tips for Success

    To elevate your Sweet Corn Salad Peaches, here are some quick tips that’ll keep your salad bursting with flavor:

    • Choose sweet corn that’s bright and plump for the best taste.
    • Look for peaches that give slightly when squeezed; this means they’re ripe and juicy!
    • Chill the salad for at least 10 minutes for enhanced flavors.
    • Consider adding black beans or diced cucumbers for extra crunch.

    Equipment Needed

    Before diving into the preparation of your Sweet Corn Salad Peaches, ensure you have the following tools on hand:

    • Large mixing bowl – Any bowl will do, even a sturdy salad bowl.
    • Sharp knife – A must for cutting corn kernels and other ingredients.
    • Cutting board – Helps keep your kitchen organized while chopping.
    • Whisk – For mixing the dressing, but a fork works too!
    • Can opener – If you decide to use canned corn instead of fresh.

    Variations

    One of the best things about my Sweet Corn Salad Peaches is how easily it can be customized to fit different tastes and dietary needs. Here are some delicious variations to inspire your culinary creativity:

    • Add black beans for a hearty protein boost, perfect for a filling lunch.
    • Swap out the lime juice for lemon for a different citrus twist that’s equally refreshing.
    • Make it vegetarian by omitting the jalapeños, or use bell peppers for a milder flavor.
    • For a creamy version, mix in Greek yogurt or sour cream for a luscious texture.
    • Enhance the sweetness by adding fresh basil or a sprinkle of crumbled feta cheese for a Mediterranean flair.

    Feel free to experiment with these suggestions, and make this salad your own masterpiece!

    Serving Suggestions

    Elevate your Sweet Corn Salad Peaches with these delicious pairings and presentation tips:

    • Serve alongside grilled chicken or fish for a complete meal.
    • Pair with crisp tortilla chips for a fun crunch.
    • Enjoy with a refreshing glass of iced tea or lemonade.
    • For an attractive presentation, serve in a colorful bowl or layer in mason jars.

    FAQs about Sweet Corn Salad Peaches

    Can I use frozen corn for this Sweet Corn Salad Peaches?

    Absolutely! Frozen corn is a great time-saver. Just make sure to thaw and drain it before mixing it in. It can taste almost as sweet as fresh corn in this salad!

    How long does the Sweet Corn Salad Peaches stay fresh?

    This salad is best enjoyed within a day or two. If stored in an airtight container in the fridge, it can last up to 3 days. Just keep in mind that the peaches might soften over time.

    Can I make Sweet Corn Salad Peaches ahead of time?

    Yes, you can! I often prepare it a few hours in advance for gatherings. Just remember to add the avocado right before serving to keep it fresh and vibrant!

    What can I substitute for peaches if they’re not in season?

    You can swap peaches for nectarines or even diced mango! Both bring a similar sweetness and juicy texture, making them delightful alternatives in this salad.

    Is this salad suitable for vegan diets?

    Yes! The Sweet Corn Salad Peaches is vegan-friendly as it contains no animal products. Just ensure to use plant-based honey alternatives if you’re avoiding honey!

    Final Thoughts

    There’s something magical about a salad bursting with flavor, and my Sweet Corn Salad Peaches embodies the spirit of summer! It’s a delightful dish that not only pleases the palate but also invites smiles around the table. Whether you’re hosting a gathering or enjoying a quiet evening at home, this refreshing salad adds a touch of sunshine to every meal. Easy to prepare and simply irresistible, it makes summer cooking feel effortless. So, grab those fresh ingredients, and let this vibrant salad be your summer staple. Celebrate the season, one bite at a time!


    Print

    clock clock iconcutlery cutlery iconflag flag iconfolder folder iconinstagram instagram iconpinterest pinterest iconfacebook facebook iconprint print iconsquares squares iconheart heart iconheart solid heart solid icon

    Description

    A refreshing summer salad made with sweet corn, ripe peaches, and a zesty lime dressing.


    • 4 ears of corn
    • 2 peaches, sliced or diced
    • 1/4 cup red onion, finely chopped
    • 3 tablespoons cilantro, chopped
    • 1 medium jalapeño, deseeded and thinly sliced or diced
    • 12 large avocados, diced
    • 3 tablespoons lime juice
    • 3 teaspoons honey
    • Salt and black pepper, to taste

    1. Cook the corn cobs using your preferred method and let them cool completely. Once cooled, cut the kernels off and add them to a large bowl.
    2. Whisk the lime juice and honey together until the honey dissolves. Add cracked black pepper to taste.
    3. Add peaches, red onion, cilantro, and jalapeño to the bowl with corn. Gently toss the ingredients with the vinaigrette until fully coated. Season with salt to taste and toss again. Cover and chill in the refrigerator for 10-20 minutes.
    4. Top each individual bowl with avocado and serve immediately. Alternatively, mix the avocado into the entire salad right before serving.

    Notes

    • For a spicier version, leave some seeds in the jalapeño.
    • This salad can be made a few hours in advance.
    • Use fresh, ripe peaches for the best flavor.
    • Prep Time: 15 minutes
    • Cook Time: 10 minutes
    • Category: Salad
    • Method: Mixing
    • Cuisine: American

    Nutrition

    • Serving Size: 1 cup
    • Calories: 250
    • Sugar: 10g
    • Sodium: 200mg
    • Fat: 14g
    • Saturated Fat: 2g
    • Unsaturated Fat: 11g
    • Trans Fat: 0g
    • Carbohydrates: 30g
    • Fiber: 6g
    • Protein: 4g
    • Cholesterol: 0mg

    Sharing is caring!

  • Mexican Street Corn Cottage Cheese Salad

    Mexican Street Corn Cottage Cheese Salad


    Introduction to Mexican Street Corn Cottage Cheese Salad

    As a busy mom, finding quick and delicious meals can feel like searching for a needle in a haystack. That’s why I’m excited to share my Mexican Street Corn Cottage Cheese Salad! This refreshing salad combines the creamy goodness of cottage cheese with the sweet, smoky flavors of charred corn, taking a cue from the beloved Mexican street food. It’s not just a salad; it’s a flavor explosion that pleases both kids and adults alike. Ready in just 15 minutes, it’s the perfect dish to brighten up any meal while making your life just a bit easier!

    Why You’ll Love This Mexican Street Corn Cottage Cheese Salad

    This Mexican Street Corn Cottage Cheese Salad is a game-changer for busy moms! It’s incredibly easy to whip up, taking only 15 minutes from start to finish. The fresh flavors dance on your palate, thanks to the charred corn and zesty lime. Plus, it’s healthy! Use it as a vibrant side dish, a dip for your favorite tortilla chips, or even a topping for grilled meats. Versatility at its best!

    Ingredients in Mexican Street Corn Cottage Cheese Salad

    This salad comes together with just a handful of ingredients, each bringing its own charm to the mix. You’ll need cottage cheese for that creamy base, providing a luscious texture that balances the dish.

    Corn kernels, whether fresh, canned, or frozen, add sweet bursts of flavor, enhanced by the smoked paprika and chili powder, which introduce a hint of smokiness and warmth. The crumbled cotija cheese adds a salty kick that’s essential to a Mexican-inspired dish, while fresh cilantro brightens everything up with its herbaceous notes. A squeeze of lime juice elevates the flavors, lending a zesty zing.

    As for substitutions, feel free to use Greek yogurt instead of mayonnaise for extra creaminess, and if cotija isn’t available, feta does the trick beautifully. You can find these ingredients at your local grocery store or farmers market!

    How to Make Mexican Street Corn Cottage Cheese Salad

    Let’s dive into the delightful process of creating this Mexican Street Corn Cottage Cheese Salad! It’s so simple that even your kids could help! Ready? Here we go!

    Step 1: Char the Corn

    Start by heating a tablespoon of olive oil in a large skillet over medium-high heat. When the oil shimmers, toss in the corn kernels, then sprinkle with smoked paprika and chili powder. Stir occasionally and watch as the corn transforms into a golden delight, lightly charred and fragrant. This step should take about 3-4 minutes. The smoky aroma and vibrant color will have everyone eagerly anticipating the final dish!

    Step 2: Assemble the Salad

    Once your corn has cooled slightly, grab a sizable serving bowl and scoop in the cottage cheese. Now, it’s time to blend! Add the charred corn you just prepared, along with the crumbled cotija cheese and chopped cilantro. Don’t forget to squeeze in the fresh lime juice and, if you like, a dollop of mayonnaise or Greek yogurt for creamy goodness. Mix everything together until well combined. You’re creating layers of flavor, so make sure each ingredient gets to shine!

    Step 3: Garnish & Serve

    Now for the fun part! Sprinkle some extra chili powder and more cotija cheese on top for an eye-catching presentation. You can serve this salad as a crunchy dip with tortilla chips, a lively side salad, or a topping over grilled meats. Each bite is a burst of flavor that’s sure to impress family and friends alike. Gather everyone around, and watch them dig in!

    Tips for Success

    • For the best charred corn, don’t overcrowd the skillet; let the kernels breathe for that perfect smoky flavor.
    • Feel free to swap out ingredients! Try adding diced avocado for creaminess or jalapeños for a spicy kick.
    • If using frozen corn, make sure to thaw and drain it prior to charring for optimal texture.
    • For added freshness, mix in some diced tomatoes or bell peppers.

    Equipment Needed

    • Large skillet for charring the corn. A non-stick pan works well.
    • Cutting board and knife for chopping cilantro and other ingredients.
    • Mixing bowl for combining the salad.
    • Wooden spoon or spatula for stirring ingredients.
    • Measuring cups and spoons to ensure accurate portions.

    Variations

    • For a vegan option, switch the cottage cheese for a cashew or tofu-based alternative. This makes the salad creamy and delicious!
    • Add some diced avocado for an extra layer of richness and healthy fats. It’s a match made in heaven!
    • Mix in chopped red onion or bell peppers for a crunchy texture and vibrant color.
    • Add diced jalapeños or a splash of hot sauce for those who crave some heat!

    Serving Suggestions

    • Pair this salad with crispy tortilla chips or pita bread for a delightful crunch.
    • Serve alongside grilled chicken, steak, or fish for a flavorful main course.
    • For drinks, consider serving with a refreshing limeade or a cold beer.
    • Present the salad in a colorful bowl and garnish with extra cilantro for an inviting look.

    FAQs about Mexican Street Corn Cottage Cheese Salad

    Have questions about this vibrant Mexican Street Corn Cottage Cheese Salad? I’ve got you covered!

    Can I make this salad ahead of time? Absolutely! You can prepare it a few hours in advance. Just add the lime juice and toppings right before serving to keep everything fresh.

    How do I store leftovers? Any corn salad leftovers can be stored in an airtight container in the fridge for up to three days. Just give it a good stir before serving again!

    Are there any allergens? This salad contains dairy from cottage cheese and cotija. If you have lactose intolerance, opt for dairy-free alternatives to keep enjoying this delicious meal.

    What else can I serve with it? This salad pairs well with grilled meats, quesadillas, or even tacos. Use it as a zesty dip with tortilla chips for a fun twist!

    Enjoy your cooking adventure with this delightful dish!

    Final Thoughts

    This Mexican Street Corn Cottage Cheese Salad is more than just a dish; it’s a celebration of flavors and a testament to simplicity. With its refreshing taste, it’s a breeze to prepare, making it the perfect addition to any busy household. Whether you serve it as a lively side, a dip for gatherings, or a topping on grilled goodies, it brings everyone together, creating smiles and satisfied appetites. So, embrace the joy this salad offers and let it enhance your mealtimes with family and friends. Trust me; once you try it, it’ll quickly become a favorite!


    Print

    clock clock iconcutlery cutlery iconflag flag iconfolder folder iconinstagram instagram iconpinterest pinterest iconfacebook facebook iconprint print iconsquares squares iconheart heart iconheart solid heart solid icon

    Description

    A refreshing and flavorful salad that combines the creamy textures of cottage cheese with the sweetness of charred corn, inspired by Mexican street corn.


    • 1 cup cottage cheese (full-fat or low-fat)
    • 1½ cups corn kernels (fresh, canned, or frozen)
    • 1 tbsp olive oil
    • ¼ tsp smoked paprika
    • ¼ tsp chili powder (plus extra for garnish)
    • ¼ cup cotija cheese (or feta), crumbled
    • 1 tbsp fresh cilantro, chopped
    • 1 tbsp fresh lime juice
    • 1 tbsp mayonnaise or Greek yogurt (optional, for extra creaminess)
    • Salt & black pepper, to taste

    1. Char the Corn: Heat olive oil in a large skillet over medium-high heat. Add the corn, smoked paprika, and chili powder, stirring occasionally, until the corn is lightly charred (about 3-4 minutes). Remove from heat and let cool slightly.
    2. Assemble the Salad: Spoon the cottage cheese into a serving bowl. Stir in the charred corn, crumbled cotija cheese, and cilantro. Add lime juice and mayonnaise/Greek yogurt if using, and mix until well combined.
    3. Garnish & Serve: Sprinkle with extra chili powder and more cotija cheese for a bold finish. Serve immediately as a dip with tortilla chips, a side salad, or even a topping for grilled meats.

    Notes

    • Feel free to customize with your favorite toppings or add ingredients like diced avocado or jalapeños for extra flavor.
    • This salad can be made a few hours ahead; just add the lime juice and garnish right before serving.
    • Prep Time: 10 minutes
    • Cook Time: 5 minutes
    • Category: Salad
    • Method: Stovetop
    • Cuisine: Mexican

    Nutrition

    • Serving Size: 1 serving
    • Calories: 210
    • Sugar: 4g
    • Sodium: 350mg
    • Fat: 10g
    • Saturated Fat: 4g
    • Unsaturated Fat: 5g
    • Trans Fat: 0g
    • Carbohydrates: 18g
    • Fiber: 3g
    • Protein: 12g
    • Cholesterol: 20mg

    Sharing is caring!

  • Butterfinger Cupcakes

    Butterfinger Cupcakes


    Introduction to Butterfinger Cupcakes

    Sometimes you just need a little indulgence in your life, and these Butterfinger Cupcakes are the perfect answer! Imagine the rich, chocolate brownie base paired with creamy peanut butter frosting—heavenly, right? As a busy mom, finding time to create something special can be a challenge. That’s why I love this recipe! It’s not only a quick fix for a sweet craving but also a delightful treat that will impress your loved ones. Whether it’s a family gathering or a quiet night in, these cupcakes will surely bring joy to your day!

    Why You’ll Love This Butterfinger Cupcakes

    These Butterfinger Cupcakes are incredibly easy to whip up, even on the busiest of days. You only need about 30 minutes of prep time, making them a fantastic choice for last-minute gatherings. Plus, the combination of rich chocolate and creamy peanut butter creates a flavor explosion that will satisfy any sweet tooth. Trust me, it’s the kind of treat that can turn an ordinary day into something special!

    Ingredients for Butterfinger Cupcakes

    To create these delightful Butterfinger Cupcakes, you’ll need a handful of ingredients that come together to make pure magic. Here’s the rundown:

    • Salted sweet cream butter: Adds richness and flavor to both the cupcake base and frosting.
    • Chopped semi-sweet chocolate baking bar: A must for that deep chocolate flavor that complements the cupcakes beautifully. You can use chocolate chips if that’s what you have on hand.
    • Granulated sugar: Sweetens the cupcake while working in harmony with the brown sugar.
    • Light brown sugar: The molasses in brown sugar gives the cupcakes that soft, chewy texture we all love.
    • Large eggs: Eggs help bind everything together and add moisture, essential for that perfect cupcake. Just make sure they’re at room temperature for the best results!
    • Pure vanilla extract: Enhances all the flavors in your cupcakes, making them irresistible.
    • All-purpose flour: This helps provide structure to the cupcakes. Spoon and level it for accuracy!
    • Milk chocolate chips: These little gems bring extra chocolatey goodness, making each bite decadent.
    • Creamy peanut butter: The star of the show in the frosting! Use a quality brand for rich flavor.
    • Powdered sugar: Essential for frosting, it sweetens and thickens, creating that smooth texture we adore.
    • Heavy cream: Adds just the right amount of creaminess to the frosting, ensuring it pipes beautifully.
    • Crushed Butterfinger candy: A sprinkle on top adds a crunchy finish and extra flavor to your cupcakes.
    • Halved fun-size Butterfinger candies: Perfect for garnishing your cupcakes, they’re a fun surprise with every bite!

    For exact quantities, check the bottom of the article where they are detailed and available for printing. Enjoy gathering these ingredients; each one plays its part in creating your delightful Butterfinger Cupcakes!

    How to Make Butterfinger Cupcakes

    Making these Butterfinger Cupcakes is a joyous adventure that anyone can undertake! Follow these straightforward steps and watch as your kitchen fills with the delightful aroma of chocolate and peanut butter.

    Step 1: Preheat and Prepare

    Before diving in, preheat your oven to 350°F. This is an essential first step, as it ensures your cupcakes will bake evenly. Line a standard muffin pan with cupcake liners, which not only makes clean-up a breeze but also adds a touch of fun! If you’re feeling fancy, choose colorful liners that match the mood of your occasion.

    Step 2: Melt the Chocolate and Butter

    Now, let’s get decadent! In a microwave-safe bowl, combine the butter and chopped chocolate baking bar. Heat this mixture in 30-second intervals, stirring well between each. This method prevents scorching the chocolate and helps it melt evenly. The goal is a smooth, shiny mixture—almost like a warm hug!

    Step 3: Mix in the Sugars

    Once your chocolate and butter are melted, it’s time to add the granulated and light brown sugars. Stir them in until fully incorporated, and watch as they blend with that luscious chocolate. This is where the sweetness starts to take shape, creating that mouthwatering base to your Butterfinger Cupcakes!

    Step 4: Incorporate the Eggs and Vanilla

    Add the eggs next, one at a time, mixing well after each addition. This ensures a rich, fluffy batter. Then, stir in the vanilla extract. It’s amazing how just a splash can elevate flavors! The batter should be looking creamy and inviting—perfectly smooth and ready for the next step.

    Step 5: Add the Dry Ingredients

    Time to bring in the flour! Gently fold the all-purpose flour into the batter until just combined. Remember, overmixing can lead to dense cupcakes, and we’re aiming for light and fluffy here. A few small lumps are perfectly okay!

    Step 6: Fold in the Chocolate Chips

    Now, let’s add an extra punch of sweetness with the milk chocolate chips. Gently fold them into the batter, ensuring they’re evenly distributed. This delicate folding keeps your batter airy and allows those chocolate nuggets to shine in every bite!

    Step 7: Bake the Cupcakes

    Scoop the batter evenly into your lined muffin cups, filling them about two-thirds full. Bake for 22 to 25 minutes, or until a toothpick inserted into the center comes out with just a few moist crumbs. While they bake, get ready—the aroma will have your family flocking to the kitchen!

    Step 8: Prepare the Peanut Butter Frosting

    While your cupcakes cool, let’s whip up that creamy peanut butter frosting! In a mixing bowl, beat together the creamy peanut butter, softened butter, and vanilla extract for about 1 to 1½ minutes. Add the powdered sugar and heavy cream gradually, mixing until smooth. The frosting should be thick yet spreadable, like a soft cloud of deliciousness!

    Step 9: Frost the Cupcakes

    Once the cupcakes have cooled completely, it’s time for the fun part—frosting! Fill a piping bag fitted with a star tip or use a ziplock bag with the corner snipped off. Hold the bag about ½ inch from the cupcake’s center, squeeze, and swirl. Make it as fancy or simple as you like! Finally, sprinkle on some crushed Butterfinger candy and top with a halved fun-size Butterfinger for that perfect finishing touch.

    Tips for Success

    • Always use room temperature ingredients for a smoother batter.
    • Don’t overmix the batter; a few lumps are okay.
    • Consider using parchment paper liners for easy removal.
    • If you’re short on time, make the frosting while the cupcakes are baking!
    • Taste your frosting! Adjust sweetness as needed.
    • Experiment with different toppings—try crushed nuts or drizzle chocolate!

    Equipment Needed for Butterfinger Cupcakes

    • Standard muffin pan: You can also use a silicone cupcake mold for easy release.
    • Microwave-safe bowl: A regular mixing bowl works too, just use a stovetop method to melt the chocolate and butter.
    • Piping bag & tip: A ziplock bag with a snipped corner will do the trick!
    • Mixing spoons: Use a rubber spatula for folding in ingredients.

    Variations of Butterfinger Cupcakes

    • Gluten-Free Option: Substitute all-purpose flour with a 1:1 gluten-free flour blend for a delicious gluten-free treat. Just make sure your baking powder is also gluten-free!
    • Healthier Frosting: Swap out the creamy peanut butter for a natural nut butter or Greek yogurt for a lighter frosting option. You’ll still get that creamy texture with a twist!
    • Chocolate Lovers: Use dark chocolate instead of semi-sweet for an extra rich flavor. Dark chocolate pairs beautifully with peanut butter!
    • Nutty Twist: Add chopped nuts like pecans or walnuts into the batter to create a delightful crunch throughout the cupcakes.
    • Mini Cupcakes: Adjust the baking time and make these treats mini-sized for bite-sized indulgence! They’re perfect for parties or school events.
    • Dairy-Free Version: Use dairy-free chocolate and nut butter to cater to lactose-intolerant or vegan friends, ensuring everyone can enjoy these sweet bites!

    Serving Suggestions for Butterfinger Cupcakes

    • Pair with a glass of cold milk for a classic combination that never fails.
    • Serve alongside fresh berries for a tart contrast to the sweetness.
    • For a festive touch, display on a tiered cupcake stand at parties.
    • Garnish with chocolate drizzle for an extra indulgent finish.

    FAQs about Butterfinger Cupcakes

    Can I use other candies instead of Butterfinger?
    Absolutely! While Butterfinger adds a unique flavor and crunch, feel free to experiment with other candies. Snickers or Milky Way bars would work wonderfully, giving a delightful twist to your cupcakes!

    How do I store leftover Butterfinger Cupcakes?
    If you have any leftovers (which is rare!), store your cupcakes in an airtight container at room temperature for up to 3 days. If the weather is warm, refrigerate them for longer freshness. Just bring them to room temperature before serving!

    Can I freeze Butterfinger Cupcakes?
    Yes, you can freeze these cupcakes! It’s best to freeze them without frosting. Wrap them tightly in plastic wrap and store them in a freezer-safe bag for up to 2 months. Thaw overnight in the fridge when you’re ready to enjoy!

    What can I substitute for heavy cream in frosting?
    If you need a substitute for heavy cream, try whole milk or a milk alternative mixed with a little cornstarch to thicken it. It won’t be quite as rich, but it’ll still create a delicious frosting!

    Why are my cupcakes dense?
    Dense cupcakes can happen for several reasons. Most commonly, it’s from overmixing the batter or using cold ingredients. Make sure everything is at room temperature and mix until just combined for the fluffiest results!

    Final Thoughts on Butterfinger Cupcakes

    There’s something truly special about crafting these Butterfinger Cupcakes. They encapsulate comfort, joy, and a hint of nostalgia, reminiscent of childhood treats. Every bite is a glorious combination of rich chocolate and creamy peanut butter, topped with the delightful crunch of Butterfinger candies. Whether you’re preparing for a family gathering or just indulging yourself, these cupcakes effortlessly bring smiles to faces. They’re more than just a dessert; they’re a sweet moment to share. I hope you find as much happiness in baking and enjoying them as I do. Trust me, your taste buds will thank you!


    Print

    clock clock iconcutlery cutlery iconflag flag iconfolder folder iconinstagram instagram iconpinterest pinterest iconfacebook facebook iconprint print iconsquares squares iconheart heart iconheart solid heart solid icon

    Description

    Indulge in a decadent treat with these rich Butterfinger Cupcakes, featuring a chocolate brownie base and creamy peanut butter frosting topped with crushed Butterfinger candies.


    • ½ cup salted sweet cream butter
    • 2 tablespoons salted sweet cream butter
    • 4 ounces chopped semi-sweet chocolate baking bar
    • ½ cup granulated sugar
    • ½ cup light brown sugar (tightly packed)
    • 2 large eggs (room temperature)
    • 2 teaspoons pure vanilla extract
    • ½ cup all-purpose flour (spooned and leveled)
    • 2 tablespoons all-purpose flour
    • 1¼ cups milk chocolate chips
    • 1 cup creamy peanut butter
    • ⅔ cup salted sweet cream butter (softened)
    • 1 teaspoon pure vanilla extract
    • 2 cups powdered sugar
    • 3 tablespoons heavy cream
    • ½ cup crushed Butterfinger candy (garnish)
    • 6 halved fun-size Butterfinger candies (garnish)

    1. Preheat the oven to 350°F. Line a standard muffin pan with cupcake liners. Set it aside.
    2. Add the butter and chopped chocolate baking bar to a microwave-safe bowl. Heat in 30-second intervals, stirring well after each interval, until the butter and chocolate are melted and smooth.
    3. Stir in the granulated and light brown sugar.
    4. Stir in the eggs, mixing well after each egg, until well incorporated.
    5. Stir in the vanilla extract.
    6. Add the flour and stir just until combined. Be sure not to overmix the batter.
    7. Fold in the chocolate chips. Divide the batter evenly between the lined muffin cups. Bake for 22 to 25 minutes, or until a toothpick inserted comes away with a few moist crumbs. Allow the cupcakes to cool completely.
    8. Using either a stand mixer or a medium-sized mixing bowl and a handheld mixer on medium-high speed, beat together the creamy peanut butter, softened butter, and vanilla extract for 1 to 1½ minutes until smooth.
    9. Add the powdered sugar ½ cup at a time, alternating with the heavy cream until completely incorporated and smooth.
    10. Once the cupcakes are completely cooled, fill a piping bag fitted with an open star tip or a gallon-size ziplock bag with the corner snipped off with the frosting.
    11. To frost the cupcakes, hold the piping bag about ½ inch from the center surface of the cupcake. Use even pressure, and squeeze to form the center of the star swirl. Keeping the tip elevated and using the same pressure, follow the outer line of the star-swirl, making a C shape around the star-swirl until the outer swirl lines connect. Repeat for the remaining cupcakes. Sprinkle the frosting with the crushed Butterfinger candy and top with a halved fun-size Butterfinger.

    Notes

    • Ensure all ingredients are at room temperature before starting.
    • Do not overmix the batter to keep the cupcakes light and fluffy.
    • Use a good quality peanut butter for the frosting for the best flavor.
    • Prep Time: 30 minutes
    • Cook Time: 25 minutes
    • Category: Dessert
    • Method: Baking
    • Cuisine: American

    Nutrition

    • Serving Size: 1 cupcake
    • Calories: 350
    • Sugar: 25g
    • Sodium: 210mg
    • Fat: 18g
    • Saturated Fat: 7g
    • Unsaturated Fat: 9g
    • Trans Fat: 0g
    • Carbohydrates: 45g
    • Fiber: 2g
    • Protein: 5g
    • Cholesterol: 45mg

    Sharing is caring!

  • German Chocolate Cupcakes

    German Chocolate Cupcakes


    Introduction to German Chocolate Cupcakes

    Oh, the joy of baking! There’s something so magical about whipping up a batch of German Chocolate Cupcakes, especially when life gets hectic. These delightful cupcakes are not only an indulgent treat but also a quick solution for those busy weeks. The rich chocolate flavor paired with luscious caramel coconut frosting is sure to impress your loved ones. I often find myself reaching for this recipe when I crave comfort and sweetness, and I bet you will too! So let’s embark on this delicious adventure together, shall we?

    Why You’ll Love This German Chocolate Cupcakes

    You’ll adore these German Chocolate Cupcakes for their incredible taste and swift preparation. Life can be overwhelming, and whipping up these treats will make you feel like a culinary superhero. They are deceptively easy to make, requiring just a few simple steps. Plus, the combination of rich chocolate and creamy coconut topping is pure heaven. Whether it’s a special occasion or a cozy night in, these cupcakes never disappoint.

    Ingredients for German Chocolate Cupcakes

    Before we dive into baking, let’s gather our essential ingredients. Making German Chocolate Cupcakes starts with a simple pantry list that you likely already have at home. Each ingredient plays a key role in creating those mouthwatering cupcakes we crave.

    • Chocolate Chips: These are the heart and soul of the cupcake, adding rich chocolate flavor.
    • Buttermilk: It keeps the cupcakes moist and adds a lovely tang. If you don’t have buttermilk, you can substitute with regular milk mixed with a little vinegar.
    • Espresso Powder: This optional ingredient enhances the chocolate flavor, giving it a deeper richness.
    • All-Purpose Flour: The base of the cupcakes, providing structure. You can use gluten-free flour as a substitute.
    • Granulated Sugar: For sweetness and a delicate crumb. Brown sugar works too for a richer taste.
    • Cocoa Powder: Essential for that deep chocolate taste; opt for unsweetened for the best results.
    • Baking Soda: This leavening agent helps the cupcakes rise perfectly.
    • Salt: A pinch of salt enhances the overall flavors.
    • Vegetable Oil: It adds moisture. You can swap this for melted coconut oil for a delicious hint of coconut flavor.
    • Eggs: They help bind everything together. Use room temperature eggs for the best mixing.
    • Vanilla Extract: A splash of vanilla adds warmth and sweetness.
    • Vinegar: This ingredient contributes to the cupcakes’ light texture when combined with baking soda.
    • Evaporated Milk: Used for the luscious topping, it gives a creamy and thick consistency. Sweetened condensed milk can be used in a pinch.
    • Egg Yolks: They make the topping rich and custardy.
    • Brown Sugar: Adds a caramel-like flavor to the topping. You can use light or dark, depending on your preference.
    • Unsalted Butter: It’s the base for both the topping and the buttercream, giving a smooth and rich taste.
    • Shredded Coconut: For that classic coconut flavor in your topping, it adds texture and chewiness.
    • Chopped Pecans: An optional addition for a lovely crunch and nuttiness.
    • Cocoa Powder (for buttercream): Just a sprinkle adds depth to the frosting.
    • Heavy Cream: To achieve that perfect silkiness in your buttercream.
    • Melted Dark Chocolate: This adds richness and indulgence to your buttercream. Use good quality chocolate for best flavor.

    For exact measurements, check the bottom of this article. Now that we have our ingredients ready, let’s bring these cupcakes to life!

    How to Make German Chocolate Cupcakes

    Preparing the Cupcake Batter

    Let’s kick off the fun by preparing the cupcake batter! Start by melting the chocolate chips, buttermilk, and optional espresso powder in a saucepan over low heat, stirring until smooth. This mixture is essential for a rich chocolate flavor.

    In a separate bowl, sift together the flour, sugar, cocoa powder, baking soda, and salt. This step aerates your dry ingredients, ensuring a fluffy cupcake.

    Now, combine the wet and dry ingredients. Beat in the eggs, vegetable oil, vinegar, and vanilla extract until everything is just mixed—don’t overdo it! The batter should be smooth but with a few lumps. Remember, a gentle hand makes for a tender cupcake, so treat it with care!

    Baking the German Chocolate Cupcakes

    With the batter ready, it’s time to bake! Preheat your oven to 350°F (175°C) and line your cupcake pan with liners. Fill each liner about two-thirds full to allow room for rising. Bake the cupcakes for about 18 to 20 minutes.

    You’ll know they’re done when a toothpick inserted in the center comes out clean. Once baked, let them cool completely on a wire rack before adding any toppings. That’s crucial for keeping everything from melting together!

    Making the Coconut Caramel Topping

    Now comes the rewarding part—creating that rich coconut caramel topping! In a medium saucepan, combine the evaporated milk, egg yolks, brown sugar, and unsalted butter. Cook this mixture over medium heat, stirring constantly until it thickens and bubbles just a bit.

    Once thickened, remove it from the heat and gently fold in your shredded coconut and pecans, if using. Take your time with this step! It’s easy to burn the mixture, so constant stirring is essential. Allow this heavenly topping to cool slightly before you spread it on the cooled cupcakes. This is where you’ll want to resist the urge to eat it all—just a little will go on the cupcakes!

    Preparing the Chocolate Buttercream

    Let’s make that luscious chocolate buttercream! Start by beating the unsalted butter until it’s creamy and fluffy. Gradually mix in the powdered sugar and cocoa powder to avoid a sugary cloud—trust me, I’ve learned that the hard way!

    Once combined, drizzle in the heavy cream and melted dark chocolate. Keep mixing until your buttercream is smooth and silky. If it seems too thick, add a splash more cream to reach your desired texture. Remember, you want it spreadable yet firm enough to pipe beautifully. Taste the buttercream—if it feels like heaven on your tongue, you’re ready to go!

    Assembling the Cupcakes

    Finally, it’s time to bring everything together! First, scoop a generous amount of the coconut caramel topping onto each cooled cupcake. Don’t be shy; it’s the star of the show!

    Next, pipe the chocolate buttercream on top of the caramel. You can use a simple round tip for a classic look or get creative with a star tip for a fancy finish. For the cherry on top (so to speak), feel free to sprinkle extra coconut and chopped pecans for presentation. Your German Chocolate Cupcakes are ready to dazzle you and your guests!

    Tips for Success

    • Use room temperature ingredients for even mixing and better texture.
    • Don’t skip sifting the dry ingredients for a lighter cupcake.
    • For the perfect rise, fill the liners only two-thirds full.
    • Let the cupcakes cool completely before adding toppings to prevent melting.
    • For a richer taste, opt for high-quality cocoa and chocolate.
    • Store leftovers in an airtight container to keep them fresh.

    Equipment Needed

    • Mixing Bowls: A large mixing bowl and a medium one will do just fine.
    • Measuring Cups: Make sure to have both liquid and dry measurement cups for accuracy.
    • Whisk: A whisk helps combine ingredients smoothly.
    • Cupcake Pan: Standard muffin tins are perfect for baking these cupcakes.
    • Cupcake Liners: Use paper or silicone liners to make clean-up a breeze.
    • Spatula: A rubber spatula is handy for scraping down the sides of the bowl.

    Variations of German Chocolate Cupcakes

    • Gluten-Free: Substitute the all-purpose flour with a gluten-free flour blend to cater to gluten-sensitive friends or family.
    • Vegan: Use flax eggs (1 tablespoon ground flaxseed mixed with 2.5 tablespoons water per egg), dairy-free milk, and coconut oil to create a completely vegan version.
    • Nut-Free: Omit the chopped pecans or replace them with sunflower seeds for that crunchy texture without using nuts.
    • Chocolate Hazelnut: Incorporate a swirl of chocolate hazelnut spread into the batter for an added sumptuous layer of flavor.
    • Mint Chocolate: Add a teaspoon of mint extract into the batter for a fresh chocolate mint twist that will elevate your cupcakes!
    • Coconut Macaroon: Top each cupcake with a traditional macaroon made from shredded coconut and sweetened condensed milk for extra coconut goodness.

    Serving Suggestions for German Chocolate Cupcakes

    • Pair with a rich cup of coffee or a glass of cold milk to enhance the chocolate experience.
    • Serve alongside vanilla ice cream for an indulgent dessert fusion.
    • Add fresh berries like strawberries or raspberries for a pop of color and tartness.
    • For presentation, arrange on a cake stand for an inviting display.
    • Consider gifting a few cupcakes in a decorative box for friends or neighbors.

    FAQs about German Chocolate Cupcakes

    Can I make German Chocolate Cupcakes ahead of time?
    Absolutely! These cupcakes can be baked a day in advance. Just store them in an airtight container once they cool. Wait to add the toppings until right before serving for the best texture and flavor.

    What makes German Chocolate different from regular chocolate?
    German chocolate refers to a specific type of dark-baking chocolate, not the country. It has a distinct sweetness and richness, particularly when combined with coconut and pecans in classic recipes.

    Can I use milk chocolate instead of dark chocolate?
    Sure! While it will change the flavor profile, using milk chocolate can add a creamy sweetness that many enjoy. If you decide to try it, just adjust the sugar levels to balance the sweetness.

    How do I get the frosting to pipe perfectly?
    Make sure your chocolate buttercream is smooth and at room temperature. If it’s too thick, add a little more cream, and if it’s too thin, add powdered sugar until you reach the desired consistency.

    Are there any substitutions for coconut in the topping?
    Yes! If you’re not a fan of coconut, you can try using finely chopped dried fruits like apricots or raisins for a different texture and sweetness. Just remember to adjust the sweetness levels of the caramel topping accordingly.

    Final Thoughts on Enjoying German Chocolate Cupcakes

    There’s something undeniably satisfying about creating these German Chocolate Cupcakes from scratch. The joy of transforming simple ingredients into a heavenly treat is a delightful experience. Each bite is a symphony of rich chocolate, sweet caramel, and chewy coconut, bringing comfort and happiness to any occasion.

    Whether you share them at a family gathering or savor them with a cup of coffee, these cupcakes provide a sweet escape from the everyday hustle. So take a moment, indulge, and let these little delights remind you why we bake in the first place—pure joy!


    Print

    clock clock iconcutlery cutlery iconflag flag iconfolder folder iconinstagram instagram iconpinterest pinterest iconfacebook facebook iconprint print iconsquares squares iconheart heart iconheart solid heart solid icon

    Description

    Indulge in the rich and delightful taste of German Chocolate Cupcakes, topped with a luscious caramel coconut frosting and chocolate buttercream.


    • ½ cup chocolate chips
    • ½ cup buttermilk
    • 1 teaspoon espresso powder (optional)
    • 1 cup all-purpose flour
    • ¾ cup granulated sugar
    • ⅓ cup cocoa powder
    • ½ teaspoon baking soda
    • ¼ teaspoon salt
    • ¼ cup vegetable oil
    • 2 large eggs
    • 1 teaspoon vanilla extract
    • 1 teaspoon vinegar
    • ¾ cup evaporated milk (for topping)
    • 3 egg yolks
    • ½ cup brown sugar
    • ½ cup unsalted butter
    • 1 cup shredded coconut
    • ¾ cup chopped pecans
    • 1 teaspoon vanilla extract
    • ½ cup unsalted butter (for buttercream)
    • 2 cups powdered sugar
    • ¼ cup cocoa powder
    • 3 tablespoons heavy cream
    • ¼ cup melted dark chocolate

    1. Preheat oven to 350°F (175°C) and line a cupcake pan with liners.
    2. Heat buttermilk, chocolate chips, and espresso powder until melted and smooth.
    3. Sift flour, sugar, cocoa powder, baking soda, and salt together.
    4. Combine wet and dry ingredients, then mix in eggs, oil, vinegar, and vanilla.
    5. Fill cupcake liners ⅔ full and bake for 18-20 minutes. Let cool.
    6. For the topping, heat evaporated milk, egg yolks, brown sugar, and butter over medium heat until thickened.
    7. Remove from heat and fold in shredded coconut, pecans, and vanilla. Let cool.
    8. For the buttercream, beat butter, then mix in powdered sugar, cocoa powder, and vanilla.
    9. Blend in heavy cream and melted dark chocolate until smooth.
    10. Scoop caramel coconut topping onto cooled cupcakes, then pipe chocolate buttercream over the top.
    11. Garnish with additional coconut and pecans if desired.

    Notes

    • For a richer chocolate flavor, consider using high-quality dark chocolate chips.
    • Ensure the eggs are at room temperature for better mixing.
    • The espresso powder enhances the chocolate flavor but is optional.
    • Prep Time: 30 minutes
    • Cook Time: 20 minutes
    • Category: Dessert
    • Method: Baking
    • Cuisine: German

    Nutrition

    • Serving Size: 1 cupcake
    • Calories: 350
    • Sugar: 25g
    • Sodium: 200mg
    • Fat: 20g
    • Saturated Fat: 10g
    • Unsaturated Fat: 5g
    • Trans Fat: 0g
    • Carbohydrates: 40g
    • Fiber: 2g
    • Protein: 4g
    • Cholesterol: 70mg

    Sharing is caring!

  • Fireworks Blondies

    Fireworks Blondies


    Introduction to Fireworks Blondies

    As a busy mom, I know how challenging it can be to whip up something special after a long day. That’s where my Fireworks Blondies come in! These chewy, gooey, and colorful treats are not only a delight to the taste buds but also incredibly easy to make. Whether you need a quick solution for a family gathering or a sweet surprise for your loved ones, this recipe fits the bill perfectly. Plus, the vibrant sprinkles and M&Ms turn any ordinary day into a mini celebration, making it impossible not to smile with each bite!

    Why You’ll Love This Fireworks Blondies

    If you’re looking for a dessert that’s quick and satisfying, Fireworks Blondies are your answer! They require minimal prep time, making them perfect for those bustling weeknights. With a delightful mix of chewy textures and festive flavors, every bite feels like a celebration. Plus, you can customize them to fit any occasion! Impress your family and friends with these vibrant blondies without spending hours in the kitchen.

    Ingredients for Fireworks Blondies

    Gathering the right ingredients is an essential part of creating your delicious Fireworks Blondies. Here’s a list of what you’ll need, along with some hints and tips for substitutes or variations:

    • Unsalted Butter: This is the rich, creamy base for your blondies. You can also use coconut oil for a dairy-free version.
    • Brown Sugar: Using packed brown sugar gives your blondies that signature chewy texture and caramel-like flavor. You can substitute with half white sugar, half brown if needed.
    • Large Eggs: Eggs bind the mixture together and contribute to the fudgy consistency. For a vegan alternative, consider using flaxseed meal mixed with water.
    • Vanilla Extract: This adds a warm sweetness to the recipe. I always opt for pure vanilla, but imitation works in a pinch!
    • Salt: Salt enhances all the flavors, making sweet even sweeter. Don’t skip this; it’s essential!
    • Baking Powder: This helps the blondies rise and gives them a light texture. Baking soda can be used instead in a 1:1 ratio, but be cautious; it’s stronger.
    • All-Purpose Flour: A key player for the structure of your blondies. If you’re feeling adventurous, whole wheat flour or a gluten-free blend can work as substitutes.
    • Red, White, and Blue M&Ms: These not only provide bursts of sweetness but also give your blondies that festive look. Feel free to swap them for your favorite chocolate or candies based on the occasion!
    • Patriotic Sprinkles: These fun decorations make your blondies pop with color. You can use any color sprinkles you have on hand to match different themes.

    For exact measurements, check the bottom of the article where you can find the printable version of the recipe.

    How to Make Fireworks Blondies

    Now that you have your ingredients ready, let’s dive into making these irresistible Fireworks Blondies. Follow my step-by-step guide, and you’ll have a batch of gooey, chewy treats in no time!

    Step 1: Preheat Your Oven

    The first step is to preheat your oven to 350°F (175°C). This ensures even baking and gives your blondies that perfect golden crust. While the oven heats, it’s a great time to get your pan ready for action!

    Step 2: Cream Butter and Sugar

    In a mixing bowl, cream together the unsalted butter and packed brown sugar. Use a stand mixer or a hand mixer to beat until it looks crumbly and well-combined. This process helps to incorporate air into the mixture, giving your blondies a lovely texture.

    Step 3: Add Eggs and Vanilla

    Next, add the large eggs one at a time, mixing well after each addition. Then pour in the vanilla extract. This mixture should resemble a smooth and creamy batter. I always get excited at this stage because the sweet aroma of vanilla fills my kitchen!

    Step 4: Combine Dry Ingredients

    In a separate bowl, whisk together the salt, baking powder, and all-purpose flour. Gradually add these dry ingredients to your wet mixture. Mix until just combined; be careful not to overmix, as this can make your blondies tougher.

    Step 5: Mix in M&Ms and Sprinkles

    Time to get festive! Gently fold in your red, white, and blue M&Ms and patriotically colorful sprinkles. I always save a handful of M&Ms for topping. It makes your Fireworks Blondies look even more appealing!

    Step 6: Spread and Bake

    Spread the blondie mixture evenly into your prepared 9×13” pan. Here’s a helpful tip: spray your hands with cooking spray to smooth the dough without it sticking. Bake for about 22-25 minutes, until the edges turn golden and the center is set. Remember, err on the side of underbaking; they’ll continue to firm up as they cool!

    Tips for Success

    • Always measure your ingredients accurately for the best results. A kitchen scale can be a game-changer!
    • For extra gooey blondies, take them out slightly underbaked; they’ll firm up while cooling.
    • Use room temperature ingredients for better blending and texture.
    • Experiment with mix-ins like nuts or different candies to create your own signature version!
    • Let the blondies cool completely before cutting them for clean edges.

    Equipment Needed

    • 9×13” baking pan: A standard size, but you can use a smaller pan for thicker blondies.
    • Mixing bowls: Use any size you have on hand; just ensure they’re sturdy!
    • Hand or stand mixer: A whisk works too, but it’s more elbow grease.
    • Rubber spatula: Perfect for folding in those festive M&Ms!

    Variations on Fireworks Blondies

    • Nutty Delight: Add a cup of chopped nuts, like walnuts or pecans, for an extra crunch!
    • Chocolate Chip Twist: Substitute half of the M&Ms with chocolate chips for a rich, chocolaty explosion.
    • Gluten-Free Option: Use a gluten-free flour blend to accommodate dietary restrictions. Your blondies will be just as delightful!
    • Fruity Fun: Mix in dried fruits like cranberries or cherries for a tart sweetness that balances the flavors.
    • Spice it Up: Add a pinch of cinnamon or nutmeg for a warm spice flavor that’ll remind you of cozy fall baking.

    Serving Suggestions for Fireworks Blondies

    • Pair with a scoop of vanilla ice cream for a decadent dessert experience.
    • Serve warm, drizzled with caramel or chocolate sauce for a touch of indulgence.
    • Accompany with fresh fruit like strawberries or raspberries for a refreshing contrast.
    • Present on a colorful platter and top with extra sprinkles for extra festivity.

    FAQs about Fireworks Blondies

    Can I make Fireworks Blondies ahead of time?

    Absolutely! You can make these blondies a day in advance. Just store them in an airtight container at room temperature. They’ll stay soft and delicious, making them perfect for preparing ahead for celebrations!

    How do I know when the blondies are done?

    Your blondies are perfect when the edges are golden and the center is just set. If a toothpick inserted in the center comes out with a few moist crumbs, you’re good to go! Remember, they’ll continue cooking as they cool.

    Can I use different types of M&Ms?

    Sure! You can substitute the red, white, and blue M&Ms for any color you like, or even use seasonal flavors if you want to celebrate different holidays. The choice is yours to fit any occasion!

    Are Fireworks Blondies suitable for a crowd?

    Yes! This recipe yields 12 to 16 servings, making it ideal for parties. Cut them into smaller squares to serve more guests, or enjoy a delicious treat just for yourself. Who could resist?

    What if I want to make them vegan?

    No problem! You can replace the eggs with flaxseed meal mixed with water for binding, and use coconut oil instead of butter. These adjustments will still give you scrumptious Fireworks Blondies!

    Final Thoughts

    There’s something truly magical about the joy that Fireworks Blondies bring to any gathering. The vibrant colors and gooey texture create an inviting atmosphere, making every bite a celebration of togetherness. As I gather around the table with family and friends, these blondies always spark smiles and warmth. They’re not just a sweet treat; they’re a delicious way to make moments memorable. So whether it’s a backyard BBQ or a cozy night in, try making these delightful blondies. You won’t just make a dessert; you’ll create lasting memories filled with laughter and love!


    Print

    clock clock iconcutlery cutlery iconflag flag iconfolder folder iconinstagram instagram iconpinterest pinterest iconfacebook facebook iconprint print iconsquares squares iconheart heart iconheart solid heart solid icon

    Description

    A deliciously gooey and festive blondie made with M&Ms and sprinkles, perfect for celebrations.


    • ½ cup (113g) unsalted butter
    • 2 cups (400g) packed brown sugar
    • 2 large eggs
    • 1 teaspoon vanilla extract
    • ½ teaspoon salt
    • 1 teaspoon baking powder
    • 2 cups (248g) all purpose flour
    • 2 cups red white, and blue M&Ms
    • ½ cup patriotic sprinkles

    1. Preheat oven to 350°F. Line a 9×13” pan with foil and spray well with cooking spray.
    2. Mix butter and brown sugar with a stand or a hand mixer until crumbly.
    3. Mix in eggs and vanilla until smooth.
    4. Mix in salt, baking powder, then flour.
    5. Stir in M&Ms and sprinkles.
    6. Spread in prepared pan; spray your hands with cooking spray to smooth the dough into an even layer.
    7. Top with extra M&Ms if desired.
    8. Bake for about 22-25 minutes until they start to turn golden. Err on the side of under baked, as they will continue to cook while cooling.

    Notes

    • These blondies are best slightly under baked for a chewy texture.
    • You can customize the color of M&Ms and sprinkles for different occasions.
    • Prep Time: 10 minutes
    • Cook Time: 25 minutes
    • Category: Dessert
    • Method: Baking
    • Cuisine: American

    Nutrition

    • Serving Size: 1 blondie
    • Calories: 210
    • Sugar: 18g
    • Sodium: 120mg
    • Fat: 8g
    • Saturated Fat: 5g
    • Unsaturated Fat: 2g
    • Trans Fat: 0g
    • Carbohydrates: 32g
    • Fiber: 1g
    • Protein: 2g
    • Cholesterol: 40mg

    Sharing is caring!

  • Crockpot Cilantro Lime Chicken

    Crockpot Cilantro Lime Chicken


    Introduction to Crockpot Cilantro Lime Chicken

    As a busy mom, I’ve learned that life can move at lightning speed. That’s why I cherish recipes like my Crockpot Cilantro Lime Chicken. It’s a lifesaver on those hectic days when dinner seems impossibly far away. This dish combines the bright flavors of lime and fresh cilantro, turning simple chicken into something spectacular. Plus, it’s a fantastic option to impress your loved ones without spending hours in the kitchen. Just set it, forget it, and enjoy the delightful aroma that fills your home!

    Why You’ll Love This Crockpot Cilantro Lime Chicken

    This Crockpot Cilantro Lime Chicken is not just another meal; it’s your ticket to stress-free cooking! With minimal prep and a set-it-and-forget-it approach, you can easily juggle the chaos of daily life while it simmers away perfectly. The vibrant flavors will tantalize your taste buds, making it a delicious hit at the dinner table. Plus, it’s versatile for tacos, rice, or even by itself, ensuring every bite feels like a celebration!

    Ingredients for Crockpot Cilantro Lime Chicken

    When it comes to crafting this delightful Crockpot Cilantro Lime Chicken, you’ll need a few simple yet powerful ingredients. Let’s break it down:

    • Boneless, skinless chicken breasts: The star of the show. Lean and juicy, providing a solid protein base.
    • Salsa: Adds depth and a burst of flavor, bringing a lovely tanginess along with spices. Choose your favorite variety for an extra kick!
    • Lime juice and zest: Brightens the dish with a refreshing citrus zing. It’s all about that flavor boost!
    • Fresh cilantro: This fragrant herb complements the lime beautifully, giving the dish its vibrant, fresh taste.
    • Taco seasoning: A mix of spices that enhances the flavor profile, making your chicken taste like a fiesta!
    • Corn: Sweet, juicy corn kernels add texture and a pop of sweetness. Use fresh or frozen; either works perfectly!
    • Black beans: Packed with protein and fiber, they add heartiness and a lovely contrast to the dish. Always a nutritious choice!

    For those adventurous home cooks, feel free to get creative with your ingredients! You can swap chicken for turkey or even add colorful bell peppers for a twist. Remember, all ingredient measurements are at the bottom of the article and available for printing, ensuring you can whip this up effortlessly!

    How to Make Crockpot Cilantro Lime Chicken

    Ready to create a dish that will make your family smile? Let’s dive into the steps to perfect my Crockpot Cilantro Lime Chicken. Trust me, it’s as easy as pie!

    Step 1: Prepare the Chicken

    First, start with two pounds of boneless, skinless chicken breasts. You don’t need to fuss over the details. Just place them at the bottom of your crockpot. If you’re like me and love a little adventure, you can even give them a gentle pat with your favorite seasoning. It’s a great way to add extra flair!

    Step 2: Add Ingredients to the Crockpot

    Next, it’s time to layer in the good stuff. Pour a cup of salsa over the chicken, followed by the juice and zest of two limes. The citrus will really make your dish pop! Then, sprinkle in half a cup of chopped cilantro and a packet of taco seasoning. Toss in half a cup of corn and a can of drained black beans too. Each ingredient brings its unique flavor, creating a symphony in your crockpot.

    Step 3: Cooking Time and Technique

    Now, comes the magic part: cooking! Cover your crockpot and choose either LOW for 5–6 hours or HIGH for 2.5–3 hours. I often go with LOW, letting the flavors blend beautifully. The longer cooking time allows every bit of that cilantro lime goodness to seep into the chicken. So, while you’re busy with other tasks, your dinner is becoming a masterpiece!

    Step 4: Shredding Chicken and Mixing

    Once the cooking time is up, it’s time to check on your creation. Remove the chicken and shred it with two forks, letting those tantalizing juices soak into the meat. Mix everything back together in the crockpot; the vibrant colors and fragrances will have your mouth watering. Voila! Your Crockpot Cilantro Lime Chicken is ready to be served!

    Just picture the smiles when you serve this deliciousness. Whether it’s wrapped in a taco or served over rice, it’s sure to be a hit.

    Tips for Success

    • Keep your chicken thawed for even cooking – frozen chicken can take longer to reach safe temperatures.
    • Don’t skip on the lime zest; it packs a flavor punch that lifts the whole dish.
    • For extra spice, consider adding sliced jalapeños to the crockpot.
    • Leftovers? This dish tastes even better the next day, making great lunch wraps!
    • Feel free to adjust the seasonings based on your family’s taste – make it your own!

    Equipment Needed

    • Crockpot: The star of the show! Use any size, but a 6-quart is ideal for this recipe.
    • Cutting board: Essential for prepping your chicken and chopping ingredients.
    • Knife: A sharp knife makes slicing a breeze.
    • Large spoon: For mixing everything together after cooking.

    Variations

    • Spicy Kick: Add diced fresh jalapeños or a splash of hot sauce to ignite some heat in your dish!
    • Lime and Avocado Twist: Top your serving with diced avocado, enhancing the richness and flavor.
    • Vegetarian Version: Swap chicken for portobello mushrooms or chickpeas for a hearty plant-based alternative.
    • Low-Carb Option: Serve over cauliflower rice for a delicious, guilt-free meal that still packs flavor!
    • Herb Medley: Experiment with fresh herbs like mint or basil to customize the herb profile in your dish.

    Serving Suggestions for Crockpot Cilantro Lime Chicken

    • Serve in warm corn tortillas for a delightful taco night.
    • Pair with avocado slices and fresh pico de gallo for a colorful plate.
    • Enjoy over fluffy white or brown rice to soak up the delicious juices.
    • A crisp green salad makes a refreshing side.
    • Complement with a chilled glass of iced tea or fruity mocktail!

    FAQs about Crockpot Cilantro Lime Chicken

    Can I use frozen chicken for this recipe?

    Yes, you can! However, keep in mind that using frozen chicken may extend the cooking time. To ensure that your chicken cooks evenly, I recommend thawing it beforehand whenever possible.

    How do I store leftovers of Crockpot Cilantro Lime Chicken?

    Leftovers can be stored in an airtight container in the fridge for up to 3 days. You can also freeze them for up to 3 months. Just remember, flavors often intensify, making the leftovers even tastier!

    What is the best way to serve Crockpot Cilantro Lime Chicken?

    This dish is incredibly versatile! Serve it in tacos, over rice, or as lettuce wraps. You could even pile it on a salad for a light yet hearty meal!

    Can I make this dish ahead of time?

    Absolutely! You can prep all the ingredients the night before and store them in the fridge. In the morning, just throw everything into the crockpot and savor the delightful aromas when you come home!

    What can I pair with Crockpot Cilantro Lime Chicken?

    For sides, I recommend chips and guacamole, a fresh salad, or even roasted vegetables. And don’t forget a refreshing drink like mango iced tea to complement the zest of the dish!

    Final Thoughts

    The joy of preparing Crockpot Cilantro Lime Chicken lies not just in its simplicity, but in the love that fills your home with fantastic aromas. This recipe is a reminder that cooking doesn’t have to be complicated to be delightful. Whether you’re gathering with family or enjoying a cozy night, this dish creates memorable moments around the table. So grab your crockpot, embrace the vibrant flavors, and let each bite take you on a culinary adventure. You’ll find that both the taste and the experience are worth writing home about!


    Print

    clock clock iconcutlery cutlery iconflag flag iconfolder folder iconinstagram instagram iconpinterest pinterest iconfacebook facebook iconprint print iconsquares squares iconheart heart iconheart solid heart solid icon

    Description

    A flavorful slow-cooked chicken recipe infused with lime and cilantro, perfect for tacos, rice, or lettuce wraps.


    • 2 lbs boneless, skinless chicken breasts
    • 1 cup salsa
    • Juice and zest of 2 limes
    • 1/2 cup chopped fresh cilantro
    • 1 packet taco seasoning
    • 1/2 cup corn kernels (fresh or frozen)
    • 1 (15 oz) can black beans, drained and rinsed

    1. Add chicken to the crockpot. Top with salsa, lime juice/zest, cilantro, taco seasoning, corn, and black beans.
    2. Cover and cook on LOW for 5–6 hours or HIGH for 2.5–3 hours.
    3. Shred chicken and stir to combine.
    4. Serve in tacos, over rice, or in lettuce wraps.

    Notes

    • If using frozen corn, add it directly to the crockpot without thawing.
    • Adjust lime juice to taste for desired tanginess.
    • Prep Time: 10 minutes
    • Cook Time: 5-6 hours on LOW or 2.5-3 hours on HIGH
    • Category: Main Dish
    • Method: Crockpot
    • Cuisine: Mexican

    Nutrition

    • Serving Size: 1 serving
    • Calories: 320
    • Sugar: 2g
    • Sodium: 400mg
    • Fat: 6g
    • Saturated Fat: 1.5g
    • Unsaturated Fat: 4.5g
    • Trans Fat: 0g
    • Carbohydrates: 30g
    • Fiber: 7g
    • Protein: 30g
    • Cholesterol: 80mg

    Sharing is caring!

  • Big Mac Pasta Salad

    Big Mac Pasta Salad


    Introduction to Big Mac Pasta Salad

    Hey there, fellow food lovers! If you’re like me, your life can get pretty chaotic between work, family, and everything in between. That’s why I couldn’t wait to share my Big Mac Pasta Salad with you. It beautifully merges the classic flavors of a Big Mac with the freshness of a pasta salad. It’s quick, tasty, and perfect for those busy days when you’re scrambling for something everyone will love. Whether it’s a family dinner or a potluck, this dish is sure to impress loved ones and make your life just a bit easier!

    Why You’ll Love This Big Mac Pasta Salad

    This Big Mac Pasta Salad is a lifesaver for anyone pressed for time but still wanting to serve hearty and delicious meals. The combination of familiar flavors and textures creates a delightful culinary experience that’s easy to whip up in just 35 minutes! Plus, it’s a hit with both kids and adults, making it the perfect dish for busy families or gatherings. What’s not to love?

    Ingredients for Big Mac Pasta Salad

    Let’s dive into the ingredients that make this Big Mac Pasta Salad shine! Each component packs a punch of flavor while bringing something special to the table.

    • Ground Beef: I use lean ground beef for a healthier twist. You can opt for turkey or plant-based meat if you want a lighter option.
    • Worcestershire Sauce: This little bottle adds depth and umami to the beef, making it taste even juicier.
    • Chickpea Pasta: A fantastic gluten-free alternative, chickpea pasta boosts protein and fiber in your meal while still being creamy and satisfying.
    • Grape Tomatoes: Their sweetness bursts in your mouth, giving a fresh contrast to the hearty salad.
    • Romaine Lettuce: A crunchy element that brings a garden-fresh feel to every bite.
    • Red Onion: This adds a zesty crunch. You can also use green onions for a milder flavor.
    • Sharp Cheddar Cheese: It’s all about that tang! This cheese goes wonderfully with the salad and gives it a comforting, cheesy factor.
    • Dill Pickles: A must-have for that classic Big Mac taste! Their crunch and tang will keep you coming back for more.
    • Greek Yogurt and Light Mayonnaise: These combine to create a creamy dressing that’s healthier than traditional mayo-heavy options.
    • Ketchup and Yellow Mustard: These classic condiments enhance the Big Mac flavor profile and bring the recipe together.
    • Dill Pickle Juice: Just a splash adds a punch of flavor and amplifies the salad’s zing!
    • Garlic Powder, Onion Powder, and Paprika: Essential spices that create the savory depth you crave in every bite.
    • Optional Garnish – White Sesame Seeds: These add a fun finishing touch and a bit of nutty flavor.

    You’ll find the exact quantities for each of these ingredients at the bottom of the article for those who want to print the recipe. Now, let’s get cooking!

    How to Make Big Mac Pasta Salad

    Now that we have our ingredients ready, it’s time to bring this Big Mac Pasta Salad to life! Follow these simple steps, and you’ll have a delicious and hearty meal in no time. Let’s dive in!

    Brown the Ground Beef

    Start by heating a skillet over medium heat. Add the lean ground beef and let it sizzle away. Stir occasionally to break it into small pieces as it cooks. Once it’s browned and fully cooked—around 8 to 10 minutes—drain any excess grease.

    Next, stir in a tablespoon of Worcestershire sauce, along with a teaspoon of salt and half a teaspoon of pepper. Let the beef cool in the skillet while you prepare the pasta. This extra flavor truly boosts the taste!

    Prepare the Chickpea Pasta

    Meanwhile, bring a pot of water to a boil and add your chickpea pasta. Cook according to the package instructions, usually about 7 to 9 minutes. Give it a stir occasionally, ensuring the pasta doesn’t stick together.

    Once it’s tender but firm (al dente), drain the pasta and rinse it under cold water. We want to stop the cooking process and cool it down. This will let the salad remain fresh and delightful!

    Make the Dressing

    In a small bowl, you’ll whip up the creamy dressing. Combine Greek yogurt, light mayonnaise, ketchup, yellow mustard, and dill pickle juice. This mixture is key to mimicking that familiar Big Mac flavor while keeping it healthier!

    Add in the garlic powder, onion powder, and paprika for that savory goodness. Whisk everything together until it’s smooth and creamy. Taste and adjust any ingredients if needed. This dressing is versatile, so feel free to go a little wild!

    Combine the Salad Ingredients

    In a large mixing bowl, combine the cooled chickpea pasta, browned ground beef, grape tomatoes, diced pickles, cheddar cheese, and red onion. The colors and textures are starting to promise a flavor explosion!

    Toss everything gently together. Just be careful not to squish the tomatoes; we want those juicy bursts in every forkful!

    Add the Dressing

    Pour your prepared dressing over the salad mixture. Gently fold everything together until each ingredient is evenly coated. This dressing brings everything alive and makes each bite that much more enjoyable. Yum!

    Fold in the Romaine Lettuce

    Your salad should be looking vibrant and hearty by now! Just before serving, add in the chopped romaine lettuce. This last-minute addition keeps the lettuce crisp and fresh, providing a nice crunch!

    Garnish and Serve

    If you’re feeling fancy, sprinkle some white sesame seeds on top for that extra touch. Not only does it make your dish look more appealing, but it also adds a nutty flavor!

    And voila! Your Big Mac Pasta Salad is ready to be served. Enjoy it immediately, or refrigerate it for a bit to let those flavors meld. It’s a showstopper and sure to please!

    Tips for Success

    • Always use lean ground beef for a healthier option; turkey or plant-based substitutes also work well.
    • Don’t overcook the chickpea pasta; al dente is key for a great texture.
    • Chill your salad for at least 30 minutes before serving for flavors to meld wonderfully.
    • Adjust dressing ingredients to suit your taste – add more mustard or pickles if you’re feeling adventurous!
    • This salad is great as a make-ahead meal; store it in an airtight container for up to three days.

    Equipment Needed

    • Skillet: A non-stick skillet works wonders, but a regular pan will do just fine.
    • Large Mixing Bowl: Any big bowl will help combine all those delicious ingredients!
    • Small Bowl: Useful for whisking up that creamy dressing.
    • Pot: A medium pot for boiling the chickpea pasta.
    • Colander: This helps drain the pasta, but you can use a slotted spoon if needed.

    Variations

    • Swap the Pasta: If you’re not a fan of chickpea pasta, feel free to use whole wheat or gluten-free pasta for similar deliciousness.
    • Vegetarian Delight: Replace the ground beef with sautéed mushrooms or lentils to create a hearty vegetarian version that’s still bursting with flavors.
    • Add More Veggies: Consider tossing in bell peppers, cucumbers, or grated carrots for an extra crunch and nutrients.
    • Spicy Kick: If you love a bit of heat, add sliced jalapeños or a dash of hot sauce to the dressing for a spicy twist.
    • Cheese Variety: Experiment with different cheeses! Feta or pepper jack can bring a completely new flavor profile to this salad.

    Serving Suggestions

    • Pair with crispy potato chips or sweet potato fries for a fun crunch.
    • A slice of whole-grain bread can balance the meal and soak up any dressing.
    • Serve alongside a refreshing cucumber salad for added freshness.
    • For drinks, iced tea or a light lemonade complements this dish perfectly.

    FAQs about Big Mac Pasta Salad

    Can I make this salad ahead of time?
    Absolutely! This Big Mac Pasta Salad is perfect for prepping ahead of time. You can store it in the refrigerator for up to three days. Just be sure to add the romaine lettuce just before serving to keep it crisp!

    Is this dish suitable for kids?
    Definitely! Kids love the familiar Big Mac flavors, and the fun textures will have them coming back for more. It’s a great way to sneak in some healthy ingredients without them even noticing!

    Can I use different types of pasta?
    Of course! While I love chickpea pasta for its health benefits, you can absolutely swap it out for whole wheat pasta or even regular pasta if you prefer. Just cook it according to the package instructions for the best results.

    How can I make this recipe vegetarian?
    For a vegetarian take, you can replace the ground beef with sautéed mushrooms or lentils. They add a lovely heartiness while keeping the flavor profile exciting!

    What can I serve with this pasta salad?
    This delicious Big Mac Pasta Salad pairs wonderfully with crispy potato chips, a refreshing cucumber salad, or even grilled veggies. It’s versatile enough to complement your meal beautifully!

    Final Thoughts

    Creating this Big Mac Pasta Salad has been a joy, combining comfort food with a fresh twist. It reminds me of family gatherings, laughter, and the joy of sharing meals. Each bite delivers a familiar flavor that feels like a warm hug. I love how it brings everyone together, making mealtimes a little more special. Plus, the simplicity of preparation means it fits into our busy lives without compromising taste. So next time you need a convenient yet satisfying dish, give this salad a try. Trust me, your taste buds—and your family—will thank you!


    Print

    clock clock iconcutlery cutlery iconflag flag iconfolder folder iconinstagram instagram iconpinterest pinterest iconfacebook facebook iconprint print iconsquares squares iconheart heart iconheart solid heart solid icon

    Description

    A delicious twist on the classic Big Mac, this pasta salad combines the flavors of a traditional Big Mac burger with a healthy pasta salad.


    • 1 lb 96% lean ground beef
    • 1 tbsp Worcestershire sauce
    • 8 oz dry chickpea pasta e.g., Banza
    • 1 cup grape tomatoes halved
    • 1 cup romaine lettuce chopped
    • 1/3 cup red onion diced
    • 1/2 cup sharp cheddar cheese 2%, 56g, shredded or cubed
    • 1/3 cup dill pickles diced
    • 3/4 cup nonfat plain Greek yogurt 170g
    • 1/4 cup light mayonnaise 60g
    • 4 tbsp no-sugar-added ketchup 64g
    • 1 1/2 tbsp yellow mustard 20g
    • 1 1/2 tbsp dill pickle juice
    • 1 tsp garlic powder
    • 1 tsp onion powder
    • 1 tsp paprika
    • Optional garnish: White sesame seeds

    1. In a skillet, brown the ground beef over medium heat until fully cooked.
    2. Stir in Worcestershire sauce, 1 tsp salt, and 1/2 tsp pepper. Set aside to cool.
    3. Cook the chickpea pasta according to package instructions. Drain and allow it to cool completely.
    4. In a small bowl, whisk together Greek yogurt, light mayo, ketchup, mustard, dill pickle juice, garlic powder, onion powder, and paprika until smooth.
    5. In a large mixing bowl, combine the cooled pasta, cooked ground beef, grape tomatoes, pickles, cheddar cheese, and red onion.
    6. Add the prepared dressing and toss until everything is evenly coated.
    7. Just before serving, gently fold in the romaine lettuce to maintain its crispness.
    8. Garnish with white sesame seeds, if desired.

    Notes

    • Feel free to adjust the level of seasoning based on your preference.
    • This dish can be made ahead of time and stored in the refrigerator for up to 3 days.
    • A great option for potlucks and family gatherings.
    • Prep Time: 20 minutes
    • Cook Time: 15 minutes
    • Category: Salad
    • Method: Mixing and Cooking
    • Cuisine: American

    Nutrition

    • Serving Size: 1 serving
    • Calories: 320
    • Sugar: 3g
    • Sodium: 450mg
    • Fat: 15g
    • Saturated Fat: 5g
    • Unsaturated Fat: 10g
    • Trans Fat: 0g
    • Carbohydrates: 30g
    • Fiber: 6g
    • Protein: 25g
    • Cholesterol: 70mg

    Sharing is caring!

  • Crab Cottage Cheese Bowl

    Crab Cottage Cheese Bowl


    Introduction to Crab Cottage Cheese Bowl

    There are days when I need a meal that doesn’t just taste good but also comes together in a flash. That’s where my Crab Cottage Cheese Bowl shines! This delightful dish is refreshing and packed with flavor, making it the perfect solution for a busy day. Whether you’re looking for a quick lunch or an eye-catching appetizer to wow your guests, this bowl combines creamy cottage cheese with luscious crab and vibrant veggies. It’s the kind of recipe that not only nourishes you but also lifts your spirits. Trust me, you’re going to love this one!

    Why You’ll Love This Crab Cottage Cheese Bowl

    This Crab Cottage Cheese Bowl is the answer to your busy schedule. It’s not just quick to prepare—taking only about ten minutes! It’s also a delightful explosion of flavors and textures that feels like a treat. Imagine creamy cottage cheese hugging fresh crab, complemented by crisp veggies. Plus, it’s a wholesome, low-calorie option that won’t leave you feeling guilty. Simplicity and satisfaction come together perfectly!

    Ingredients for Crab Cottage Cheese Bowl

    Gathering the right ingredients is the first step to a successful Crab Cottage Cheese Bowl. Let’s dive into what you need:

    • Cottage Cheese: The star of the dish! It adds a creamy texture and a punch of protein. Choose low-fat for a lighter option, or go full-fat for extra richness.
    • Lump Crab Meat: Sweet and succulent, this is the key flavor player. Canned or fresh crab will work, but fresh always wins my heart! Look for high-quality crab to elevate the dish.
    • Avocado: Creamy and nourishing, avocado contributes healthy fats. Plus, it adds a lovely green hue. If you’re short on time, pick up pre-diced avocado from the store!
    • Cherry Tomatoes: These little gems burst with flavor. Halving them enhances their sweetness while adding vibrant color. They are perfect if you’re looking for that fresh touch!
    • Cucumber: Crisp and refreshing, cucumber adds a wonderful crunch. Feel free to use mini cucumbers for convenience, as they’re often sweeter and easier to slice.
    • Lemon Juice: A splash of this zesty joy brightens up the bowl. I often alternate with lime juice for a twist. Freshly squeezed is always best for a zingy kick!
    • Fresh Dill: This herb offers a fragrant and tangy flavor that pairs beautifully with crab. If dill isn’t your thing, consider fresh parsley or cilantro for a different vibe!

    Want to get the exact quantities? Check at the bottom of this article for easy-to-print measurements!

    How to Make Crab Cottage Cheese Bowl

    Creating a Crab Cottage Cheese Bowl is a breeze, making it the ideal go-to dish for anyone pressed for time. Follow these simple and enjoyable steps to whip up this delightful meal.

    Step 1: Combine Ingredients

    In a bowl, start with the cottage cheese. This creamy base will be our canvas!

    Next, gently fold in the lump crab meat, taking care not to break it apart too much.

    Add the diced avocado, halved cherry tomatoes, and diced cucumber.

    Each of these ingredients brings fantastic flavor and texture. The key is to have everything mixed together, but don’t overdo it; we want to keep that lovely chunky vibe!

    Step 2: Add Seasoning

    Now, let’s elevate those flavors! Drizzle fresh lemon juice over the mixture. This zesty addition will brighten everything up and make your taste buds dance.

    Then, sprinkle the chopped fresh dill evenly across the top. If you adore an aromatic touch, this herb is a must.

    For an extra twist, you could even swap the lemon juice for lime juice if you’re craving a more tropical flair!

    Step 3: Toss and Serve

    Here’s the fun part! Using a spatula or a big spoon, gently toss all the ingredients together. You’re just aiming to combine everything; be careful not to squash the avocado!

    Once well mixed, your Crab Cottage Cheese Bowl is ready to shine. Serve it immediately for the freshest taste, and feel free to divide it into two bowls if you’re sharing—or if you’re treating yourself! You deserve it!

    Tips for Success

    • Use fresh ingredients for the best flavor; they really make a difference!
    • Prep your veggies ahead of time to save even more time during busy days.
    • If you love spice, add a pinch of red pepper flakes for a kick!
    • Try pairing with whole-grain crackers for added crunch and fiber.
    • Feel free to customize! Swap in your favorite veggies or proteins.

    Equipment Needed

    • Bowls: A medium mixing bowl for combining ingredients. A large bowl is great for serving.
    • Cutting Board: Essential for chopping veggies. Use any clean surface; a plastic one is easy to clean!
    • Knife: A sharp knife helps slice through avocado, tomatoes, and cucumbers with ease.
    • Spatula or Spoon: Ideal for gently tossing the ingredients together.

    Variations

    • Spicy Version: Add diced jalapeños or a splash of hot sauce for a fiery twist.
    • Vegan Option: Swap cottage cheese with a plant-based alternative like almond or soy yogurt, and use seasoned jackfruit instead of crab.
    • Healthy Greens: Toss in baby spinach or arugula for extra vitamins and a nutritious crunch.
    • Fruit Twist: Add diced mango or pineapple for a sweet contrast that pairs well with the savory flavors.
    • Herb Variations: Experiment with basil or mint instead of dill to freshen things up with a different herby kick.

    Serving Suggestions

    • Pair with whole-grain crackers or toasted baguette for a satisfying crunch.
    • Serve alongside a light mixed greens salad drizzled with vinaigrette for extra freshness.
    • A glass of iced herbal tea complements the flavors beautifully.
    • For added color, garnish with lemon wedges or extra dill on top.

    FAQs about Crab Cottage Cheese Bowl

    Can I make this Crab Cottage Cheese Bowl ahead of time?
    Yes, you can prepare the ingredients in advance. Just keep the mixture in the fridge until you’re ready to serve! I recommend adding the avocado and dressing just before eating to maintain their freshness.

    How can I make this recipe lower in calories?
    To cut calories, opt for low-fat cottage cheese and use less avocado. You can also load up on veggies like cucumbers and tomatoes, which keep it light while boosting volume!

    What other proteins work with this recipe?
    If crab isn’t your favorite, consider using shrimp or diced chicken. Both proteins pair wonderfully with cottage cheese and add a satisfying element to your bowl.

    Can I include other vegetables?
    Absolutely! Feel free to get creative. Bell peppers, radishes, or even shredded carrots can add color and crunch to your Crab Cottage Cheese Bowl.

    Is this Crab Cottage Cheese Bowl suitable for my kids?
    Definitely! The combination of flavors is friendly for children, and it makes for a nutritious option. Involve your kids in the preparation to make it a fun kitchen activity!

    Final Thoughts

    Creating a Crab Cottage Cheese Bowl is more than just throwing together ingredients; it’s about relishing a moment of freshness in your busy life. Each bowl brings a burst of ocean flavor and vibrant colors to your table, lifting your mood with every bite. Whether it’s a lunch to fuel your day or a light dinner on a warm evening, this dish celebrates simplicity and joy. I hope it inspires you to explore new flavors and enjoy a delicious, wholesome meal that’s easy to make and share. So grab your bowl and dig in—you deserve this treat!


    Print

    clock clock iconcutlery cutlery iconflag flag iconfolder folder iconinstagram instagram iconpinterest pinterest iconfacebook facebook iconprint print iconsquares squares iconheart heart iconheart solid heart solid icon

    Description

    A refreshing and tasty bowl combining the creaminess of cottage cheese with the sweetness of crab and fresh veggies.


    • 1/2 cup cottage cheese
    • 1/2 cup lump crab meat
    • 1/2 avocado, diced
    • 1/2 cup cherry tomatoes, halved
    • 1/2 cucumber, diced
    • 1 tablespoon lemon juice
    • 1 teaspoon fresh dill, chopped

    1. In a bowl, combine cottage cheese, crab meat, avocado, cherry tomatoes, and cucumber.
    2. Drizzle with lemon juice and sprinkle with fresh dill.
    3. Toss gently to combine and serve immediately.

    Notes

    • For added flavor, consider using lime juice instead of lemon.
    • Can be served chilled or at room temperature.
    • Great as a light lunch or appetizer.
    • Prep Time: 10 minutes
    • Cook Time: 0 minutes
    • Category: Salad
    • Method: No-cook
    • Cuisine: American

    Nutrition

    • Serving Size: 1 bowl
    • Calories: 250
    • Sugar: 3g
    • Sodium: 400mg
    • Fat: 12g
    • Saturated Fat: 3g
    • Unsaturated Fat: 6g
    • Trans Fat: 0g
    • Carbohydrates: 18g
    • Fiber: 5g
    • Protein: 20g
    • Cholesterol: 50mg

    Sharing is caring!