Blog

  • Bourbon Maple Bacon Cinnamon Rolls: A Sweet Indulgence Awaits!

    Bourbon Maple Bacon Cinnamon Rolls: A Sweet Indulgence Awaits!


    Introduction to Bourbon Maple Bacon Cinnamon Rolls

    Ah, the bliss of enjoying a fresh pastry while sipping your morning coffee! Let me tell you, nothing quite compares to the warm, decadent embrace of Bourbon Maple Bacon Cinnamon Rolls. Isn’t it comforting to have a recipe that’s not only a crowd-pleaser but also a delightful treat for yourself? Whether you’re in need of a quick indulgence on a busy day or are planning to impress guests for brunch, these rolls fit the bill perfectly. Each bite layers the sweetness of maple with savory bacon, making them a memorable experience that invites everyone to the table.

    Why You’ll Love This Bourbon Maple Bacon Cinnamon Rolls

    Honestly, what’s not to love? These Bourbon Maple Bacon Cinnamon Rolls are an extraordinary blend of flavors that will make your mornings shine. They’re surprisingly easy to whip up, making them perfect for busy moms or anyone scrambling to juggle their day. Plus, the delightful aroma that fills your kitchen while they bake is irresistible. It’s not just about taste; it’s about creating sweet memories with loved ones, even on the most hectic days.

    Ingredients for Bourbon Maple Bacon Cinnamon Rolls

    Gathering the right ingredients is like gathering your friends for a cozy dinner party—each one adds its unique flair to the final experience. Here’s what you’ll need to make these amazing Bourbon Maple Bacon Cinnamon Rolls:

    • Smoked Bacon: This is the star of the show! It brings a savory crunch that perfectly complements the sweetness of the rolls. Feel free to use thick-cut for extra chewiness.
    • Light Brown Sugar: Its molasses flavor adds depth. If you’re in a pinch, dark brown sugar can also work.
    • Pure Maple Syrup: Try to use real maple syrup for that authentic taste. The richer flavor elevates the sweetness, adding a natural touch.
    • Bourbon Whiskey: This gives a warm and cozy flavor base. If you’re not a fan of bourbon, you could swap it for a splash of vanilla extract.
    • Freshly Cracked Black Pepper: It adds a surprising yet delightful kick to the sweet combination, enhancing the bacon’s flavor.
    • All-Purpose Flour: Essential for the dough, this gives structure and texture. You can use whole wheat flour for a nuttier flavor if desired.
    • Granulated Sugar: A touch of sweetness that balances the other ingredients. It can easily be substituted with coconut sugar for a healthier option.
    • Instant Yeast: This causes the dough to rise beautifully without the need for proofing ahead of time. Active dry yeast can work too, but it will require some extra steps.
    • Fine Sea Salt: A must for balancing flavors. Avoid coarse salt, as it won’t dissolve as well in the dough.
    • Whole Milk: Room temperature milk creates a smoother dough. You could use almond milk if you want a dairy-free version.
    • Large Egg: Helps bind the ingredients together, providing moisture and richness. A flax egg can be a substitute for a vegan option.
    • Unsalted Butter: Added in both the dough and frosting, it lends that rich flavor we all crave. If you’re watching saturated fats, try using a butter alternative.
    • Cinnamon: This is what gives these rolls their comforting aroma. You can experiment with adding nutmeg or cardamom for a twist.
    • Cream Cheese: Essential for the frosting, it adds a tangy richness. You can use Greek yogurt for a lighter alternative.
    • Powdered Sugar: This sweetens the frosting perfectly. If you need a sugar-free option, you can use powdered erythritol.
    • Candied Bacon: This is used for both crumb topping and garnishing. You can easily make candied bacon ahead and enjoy it in other dishes too!

    Curious about specific measurements? Don’t worry! You can find the detailed quantities for each ingredient at the bottom of the article, along with a handy print option.

    How to Make Bourbon Maple Bacon Cinnamon Rolls

    Ready to embark on the delicious journey of creating Bourbon Maple Bacon Cinnamon Rolls? Let’s dive into each step together! This is where the magic happens. As you follow these steps, just remember to have a little fun—don’t be afraid to get your hands a bit sticky!

    Step 1: Prepping the Bacon

    Start by preheating your oven to 375°F (190°C). While it’s heating up, line a baking sheet with parchment paper.

    Next, lay out your slices of smoked bacon on the tray, making sure they’re not overlapping. This is going to be the star of our indulgent rolls!

    Step 2: Making the Bourbon Maple Mixture

    In a bowl, combine light brown sugar, pure maple syrup, bourbon, and freshly cracked black pepper. The mixture should feel sticky, almost like a sweet hug for the bacon.

    This blend is what makes the bacon caramelized and tasty, so don’t be shy with mixing it well!

    Step 3: Baking the Bacon

    Spread your bourbon maple mixture evenly over the bacon, coating each strip generously. Pop the tray in the oven and bake for about 30-40 minutes. Oh, the aroma that will fill your kitchen—pure heaven!

    When the bacon is richly caramelized and crispy, remove it from the oven. Let it sit on a wire rack to cool completely before chopping it into fine crumbs.

    Step 4: Preparing the Tang Zhong

    In a small saucepan, whisk together water and all-purpose flour until smooth. Bring it to medium heat, stirring constantly until it thickens into a creamy paste—that’s your tang Zhong!

    Once it achieves a wallpaper paste-like consistency, transfer it to a bowl and let it cool completely. This will help keep your dough soft.

    Step 5: Mixing the Dough

    Now it’s time to gather in the stand mixer! Combine remaining all-purpose flour, granulated sugar, instant yeast, and fine sea salt in the mixer bowl.

    Add the cooled tang Zhong, room temperature milk, and the egg. Attach the dough hook and mix on low speed for about 2 minutes until it begins to come together.

    Step 6: Kneading the Dough

    With the mixer running, gradually add the softened butter in small increments. Allow each bit to integrate fully before adding more. Knead the dough for about 8-10 minutes.

    The dough should be smooth and elastic, easily pulling away from the bowl’s sides. If it seems too sticky, you can add a bit more flour—just don’t go overboard!

    Step 7: First Rise of the Dough

    Form the dough into a nice smooth ball and place it seam-side down in a large, lightly buttered bowl. Cover it with a clean kitchen towel.

    Find a warm spot in your kitchen to let it rise for about 1 hour or until it’s doubled in size. Maybe put it near the sunny window for a little extra love!

    Step 8: Rolling Out the Dough

    Once your dough has risen, turn it onto a lightly floured surface. Roll it out into a rectangle roughly 15 x 18 inches—or about the size of a small yoga mat!

    Make sure the dough is about ¼ inch thick; this will help the rolls rise beautifully.

    Step 9: Adding the Filling

    In a separate bowl, mix room temperature butter, light brown sugar, and ground cinnamon until smooth. It should spread like a creamy dream over the dough.

    Using an offset spatula, spread this delicious filling evenly over the rolled-out dough, leaving a small border along the top edge.

    Step 10: Adding the Bacon

    Here comes the best part! Sprinkle the crumbled candied bacon over your cinnamon sugar filling, spreading it well across the surface.

    This step is pure joy and takes the flavor to another level.

    Step 11: Cutting and Shaping the Rolls

    Using a sharp pizza cutter, slice the dough into twelve 1.5-inch wide strips. Roll each strip away from you, tucking it in snugly as you go.

    Arrange the rolls in a parchment-lined baking pan. This is where you start to see the beauty come together!

    Step 12: Second Rise of the Rolls

    Cover your pan with plastic wrap and let those rolls proof for another hour at room temperature until they puff up beautifully.

    This second rise is essential for soft, fluffy rolls—just think of those airy brioche textures!

    Step 13: Baking the Rolls

    While the rolls are rising, you can preheat your oven to 325°F (162°C). Once they’re done rising, bake them in the center of your oven for 24-30 minutes.

    Look for a golden-brown top; that’s when you know they’re ready to come out. Your house will smell divine!

    Step 14: Making the Frosting

    In a medium bowl, blend softened butter and cream cheese together until creamy. Next, add in the powdered sugar and mix until smooth.

    Lastly, whisk in the maple syrup and bourbon, adjusting the bourbon for that perfect flavor! This frosting is the final touch that every roll needs!

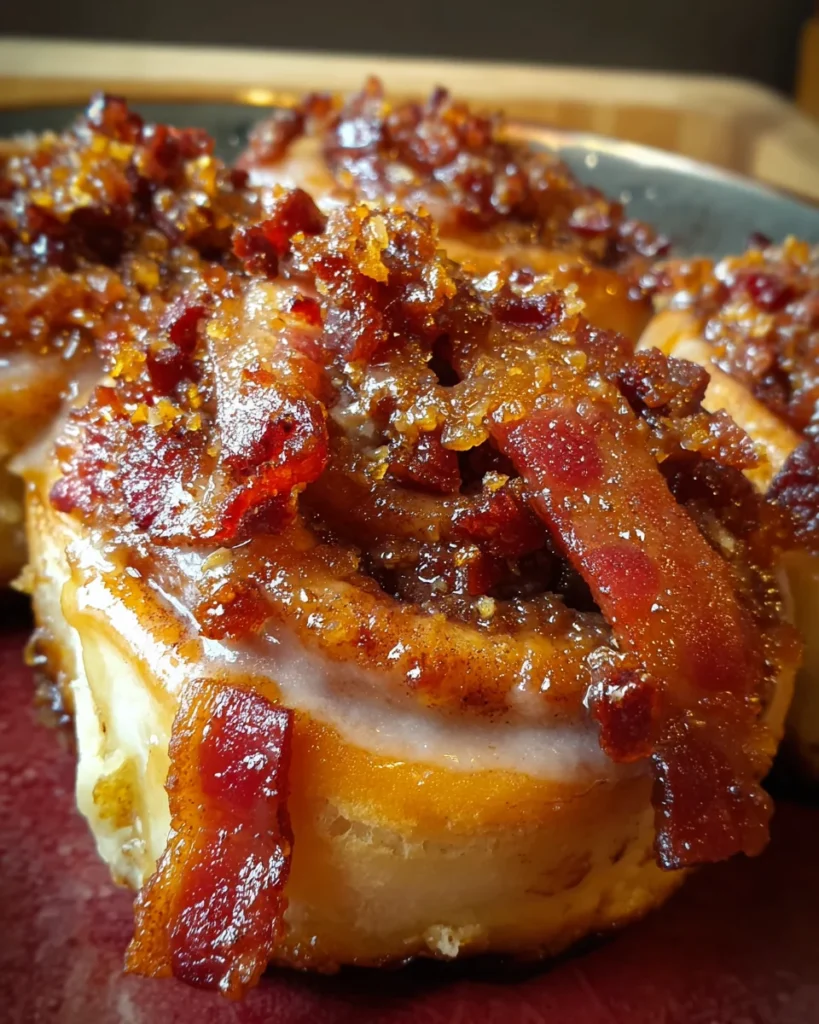
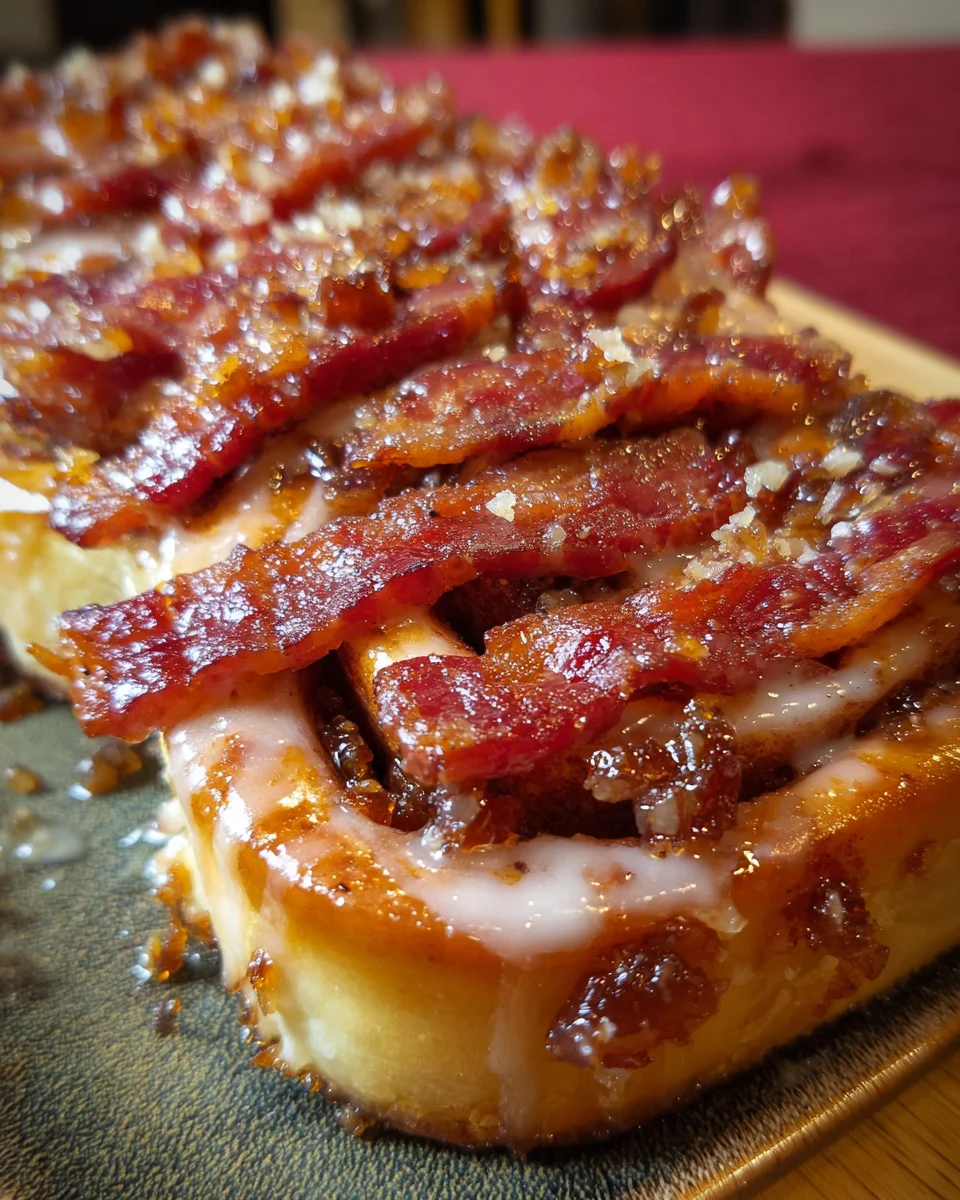
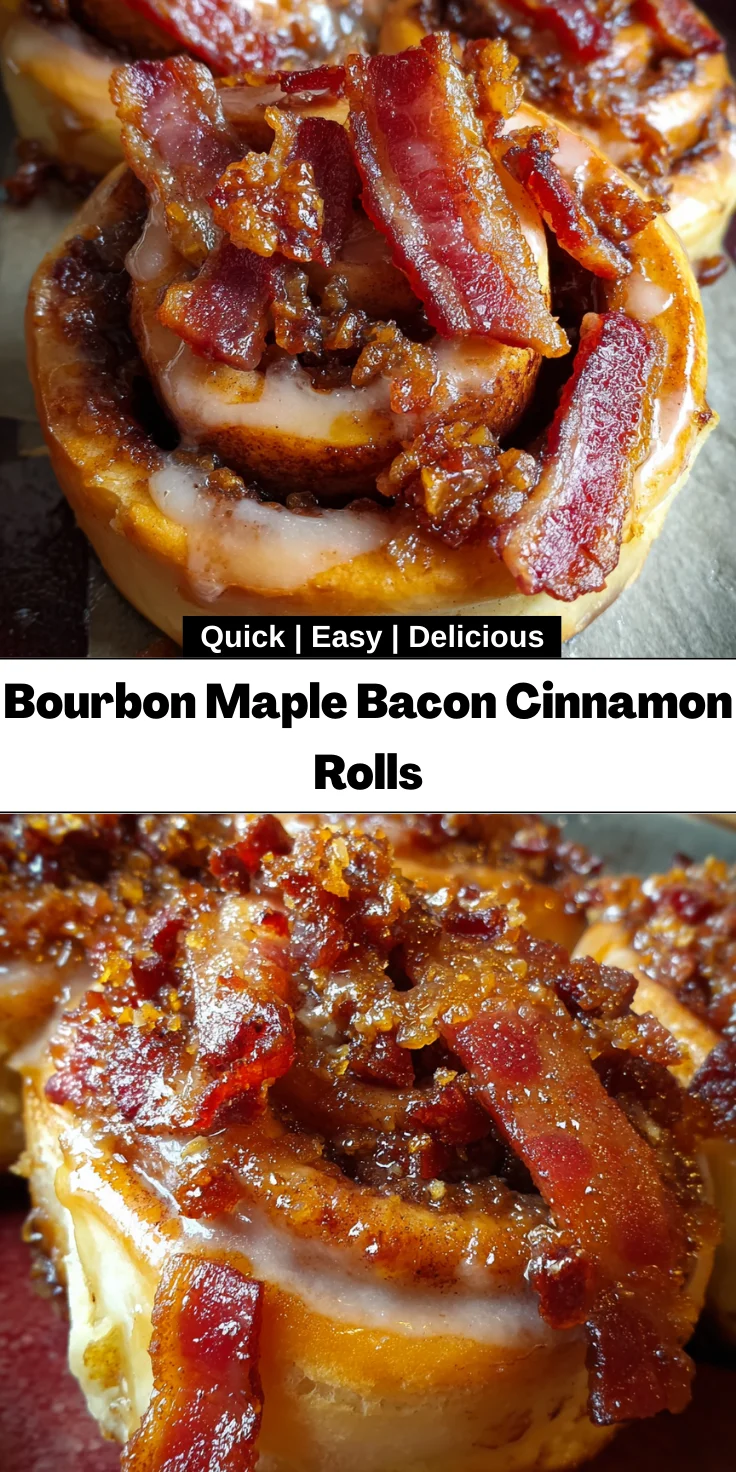
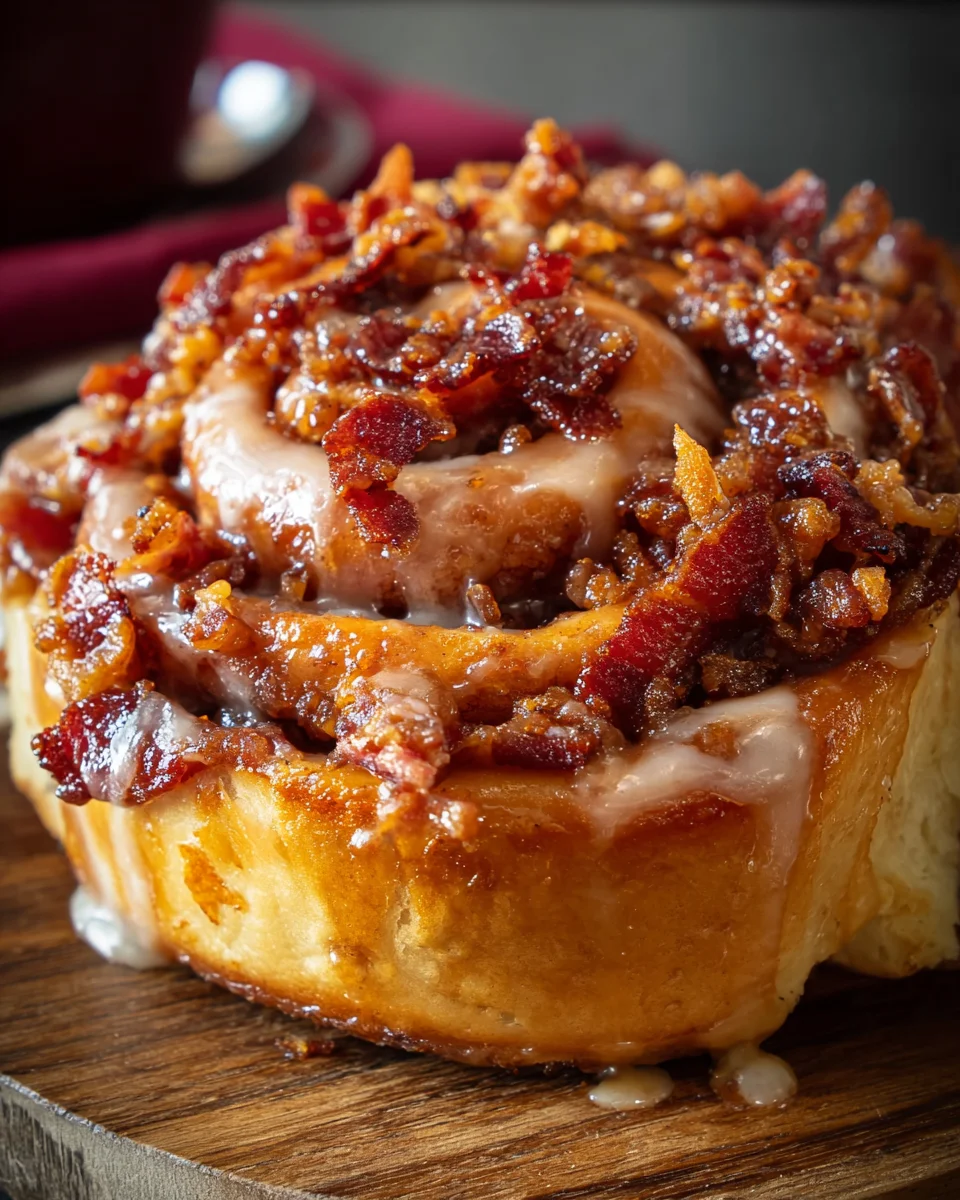
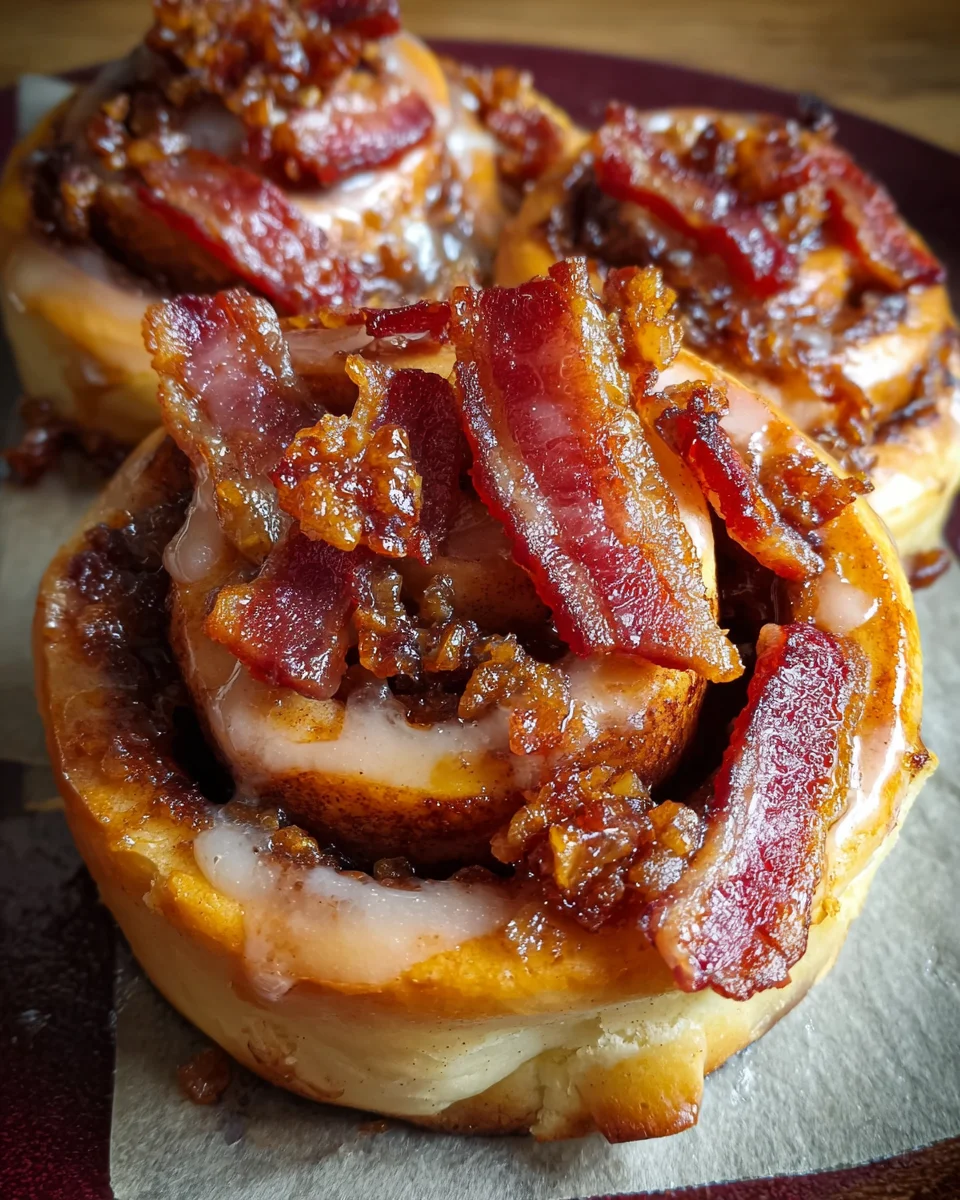
    Step 15: Frosting and Serving

    Once your rolls have cooled for a few minutes, spread the luscious frosting overhead. It should melt slightly over the warm rolls, creating an inviting glaze.

    For the finishing touch, garnish with those reserved bacon strips and serve them up immediately. Believe me, nobody will be able to resist!

    Tips for Success

    • Make sure your ingredients, especially eggs and milk, are at room temperature for better mixing.
    • Let your bacon caramelize well; it enhances flavor and texture.
    • When rolling out dough, keep it even for consistent baking.
    • Be patient during rising times; it makes all the difference in fluffiness.
    • For extra gooey rolls, store leftovers in an airtight container.

    Equipment Needed

    • Oven: Essential for baking your rolls. Any conventional oven will do.
    • Baking Sheet: A good-quality sheet for bacon; use a rimmed pan if possible.
    • Stand Mixer: If you don’t have one, a large bowl and a whisk will work for mixing the dough.
    • Rolling Pin: Essential for rolling out dough. A wine bottle can serve as a great substitute!
    • Offset Spatula: Helps spread filling smoothly; a butter knife works well in a pinch.

    Variations on Bourbon Maple Bacon Cinnamon Rolls

    • Maple Pecan Variation: Swap out the bacon for chopped pecans for a nutty crunch. Drizzle with maple syrup for added sweetness.
    • Vegan Option: Use almond milk, coconut oil, and a flax egg instead of dairy ingredients. Pot for maple syrup and coconut sugar to keep it plant-based.
    • Cinnamon Sugar Only: For a simpler roll, skip the bacon and bourbon. Just layer brown sugar and cinnamon for a classic flavor.
    • Chocolate Chip Delight: Add chocolate chips to the filling for a decadent twist—who doesn’t love chocolate?
    • Spiced Rum Alternative: Replace bourbon with spiced rum for a different, warm flavor profile—perfect for cozy mornings!

    Serving Suggestions for Bourbon Maple Bacon Cinnamon Rolls

    • Fresh Fruit: Serve with a side of seasonal berries or sliced bananas for a refreshing contrast.
    • Coffee or Latte: Pair with your favorite coffee or a creamy latte to enhance the indulgence.
    • Festive Presentation: Arrange rolls on a rustic wooden board, drizzle with extra maple syrup for a beautiful centerpiece.
    • Whipped Cream: Top with a dollop of whipped cream for an extra touch of sweetness.

    FAQs about Bourbon Maple Bacon Cinnamon Rolls

    Can I make Bourbon Maple Bacon Cinnamon Rolls ahead of time?

    Absolutely! You can prepare the rolls the night before and leave them in the fridge covered. Let them rise in the morning for about 30 minutes before baking. This way, you can have fresh rolls ready for breakfast with less morning chaos.

    What can I substitute for bourbon in the frosting?

    If bourbon isn’t your thing, feel free to swap it out for vanilla extract or even a splash of maple extract. This will still give your frosting a sweet and delightful flavor, keeping it rich and tasty without the alcohol.

    How should I store leftover Bourbon Maple Bacon Cinnamon Rolls?

    Store any leftover rolls in an airtight container at room temperature for up to 2 days. If you want them to stay fresh longer, wrap them tightly and place them in the fridge. You can also freeze them for 1-2 months—just thaw and reheat when you’re ready to enjoy!

    Can I use different types of bacon?

    You sure can! While smoked bacon gives a lovely flavor profile, feel free to use turkey bacon or even vegetarian bacon if you’re looking for a healthier or meat-free option. The taste will be different but delightful in its own way!

    What is tang Zhong, and why do I need it?

    Tang Zhong is a cooked flour-and-water mixture that helps keep your dough soft and moist. It’s a simple way to elevate your rolls and ensure they stay fluffy for days. Trust me, it’s worth the extra step!

    Final Thoughts

    These Bourbon Maple Bacon Cinnamon Rolls are not just a recipe; they’re an experience that brings joy to your kitchen and your heart. Each bite encapsulates sweet nostalgia while inviting you to create new memories with loved ones. Imagine the smiles as you share a warm roll, freshly frosted and topped with crispy bacon, over a cozy breakfast. This recipe has the power to transform an ordinary day into something extraordinary. Whether it’s a special occasion or just a Saturday morning, these rolls become the centerpiece of happiness, love, and deliciousness.


    Print

    clock clock iconcutlery cutlery iconflag flag iconfolder folder iconinstagram instagram iconpinterest pinterest iconfacebook facebook iconprint print iconsquares squares iconheart heart iconheart solid heart solid icon

    Description

    A deliciously indulgent treat combining sweet bourbon maple and crispy bacon in cinnamon rolls.


    • 450 g smoked bacon
    • 110 g light brown sugar
    • 60 ml pure maple syrup
    • 30 ml bourbon whiskey
    • 1 tsp freshly cracked black pepper
    • 30 g all-purpose flour
    • 180 ml water
    • 440 g all-purpose flour
    • 67 g granulated sugar
    • 2 tsp instant yeast
    • 0.75 tsp fine sea salt
    • 120 ml whole milk, room temperature
    • 1 large egg, room temperature
    • 4 tbsp unsalted butter, softened
    • 113 g unsalted butter, room temperature
    • 135 g light brown sugar
    • 2 tsp ground cinnamon
    • 1 cup crumbled candied bacon, reserved
    • 56 g unsalted butter, room temperature
    • 57 g cream cheese, room temperature
    • 95 g powdered sugar
    • 2.55 ml bourbon whiskey
    • 30 ml pure maple syrup
    • 0.5 cup candied bacon strips, reserved

    1. Preheat oven to 190°C and line a baking sheet with parchment paper. Arrange bacon slices on the prepared tray.
    2. In a bowl, combine brown sugar, maple syrup, bourbon, and black pepper. Evenly spread mixture over bacon. Bake on the centre rack for 30–40 minutes until bacon is richly caramelised and crisp. Remove from oven and transfer strips to a wire rack to cool fully. Reserve 0.5 cup of strips for finishing, chop remaining bacon into fine crumbs.
    3. In a small saucepan, whisk together water and flour, then cook over medium heat, whisking constantly, for 4–5 minutes until a thick slurry forms. Transfer tangzhong to a bowl and allow to cool.
    4. In a stand mixer bowl, combine remaining flour, sugar, yeast, and salt. Add egg, milk, and cooled tangzhong. Mix on low speed with dough hook for 2 minutes until a cohesive dough forms.
    5. With mixer running, add softened butter in 0.5-tablespoon increments, letting each integrate before adding the next. Continue kneading dough for 8–10 minutes until smooth and elastic, sticking only to the bottom of the bowl. Adjust with flour or milk if necessary for optimal texture.
    6. Form dough into a smooth ball. Place seam-side down in a large, lightly buttered bowl. Cover and let rise in a warm area for 1 hour or until doubled in size.
    7. Turn dough onto a lightly floured surface. Roll out a rectangle measuring approximately 38 x 46 cm, with the long side closest to you.
    8. In a mixing bowl, thoroughly combine room temperature butter, brown sugar, and cinnamon until smooth. Using an offset spatula, evenly spread filling over dough, leaving a 2.5 cm border along the top edge.
    9. Sprinkle crumbled candied bacon evenly over cinnamon sugar filling.
    10. Slice dough into twelve 4 cm wide strips using a pizza cutter. Roll each strip away from you and arrange in a parchment-lined 23 x 33 cm pan.
    11. Cover the pan with plastic wrap and let rolls proof for 1 hour at room temperature until nearly doubled in volume. Meanwhile, preheat oven to 162°C.
    12. Bake rolls on centre rack for 24–30 minutes or until golden brown on top. Let cool in pan set over a wire rack.
    13. In a medium bowl, blend butter and cream cheese until creamy. Incorporate powdered sugar, then whisk in maple syrup and bourbon, adjusting bourbon to taste for desired flavour intensity.
    14. Spread frosting over lukewarm rolls. Garnish with reserved candied bacon strips and serve immediately.

    Notes

    • Ensure the bacon is well-caramelized for the best flavor.
    • Let the dough rise in a warm place for optimal texture.
    • Adjust the bourbon amount in frosting to taste.
    • Prep Time: 90 minutes
    • Cook Time: 1 hour
    • Category: Dessert
    • Method: Baking
    • Cuisine: American

    Nutrition

    • Serving Size: 1 roll
    • Calories: 450
    • Sugar: 20 g
    • Sodium: 700 mg
    • Fat: 25 g
    • Saturated Fat: 10 g
    • Unsaturated Fat: 10 g
    • Trans Fat: 0 g
    • Carbohydrates: 40 g
    • Fiber: 2 g
    • Protein: 12 g
    • Cholesterol: 75 mg

    Sharing is caring!

  • Chickpea Greek Salad

    Chickpea Greek Salad


    Introduction to Chickpea Greek Salad

    Hey there, kitchen warriors! If you’re juggling a packed schedule but still want to whip up something truly delightful, let me introduce you to my Chickpea Greek Salad. This vibrant dish is a refreshing way to bring the flavors of the Mediterranean right to your table, all while being super easy to make. It’s the perfect solution for those busy days when you want to impress your family without spending hours in the kitchen. Trust me, once you try this salad, you won’t want to keep it a secret!

    Why You’ll Love This Chickpea Greek Salad

    This Chickpea Greek Salad is a life-saver for busy moms and professionals like us! It comes together in just 15 minutes, making it a quick meal option during hectic weekdays. The blend of crisp cucumbers, juicy tomatoes, and savory feta creates a burst of flavor in every bite. Plus, it’s not just delicious; it’s packed with nutrition to keep us energized. Who said healthy eating had to be time-consuming?

    Ingredients for Chickpea Greek Salad

    Before diving into this delicious Chickpea Greek Salad, let’s gather our ingredients. It’s a colorful medley that not only adds flavor but also packs a nutritious punch. Below are the essentials you’ll need:

    • Canned chickpeas: The star of the show! These little legumes are protein-packed and hearty, giving the salad its robust texture. Rinsed and drained, they ensure no extra salt sneaks in.
    • Cucumber: Fresh and crisp, diced cucumber adds a refreshing crunch. You can also opt for English cucumbers, as they have fewer seeds.
    • Cherry tomatoes: Halved cherry tomatoes bring sweetness and vibrant color to your salad. Feel free to swap them for any tomato variety if that’s what you have on hand!
    • Red onion: Thinly sliced red onion provides just the right amount of bite. If your family isn’t a fan, you could replace it with green onions or skip it entirely.
    • Kalamata olives: These briny olives enhance the Mediterranean flavor. You can use other olives if you prefer; black olives work well too!
    • Feta cheese: Crumbled feta adds a creamy tanginess that beautifully complements the other ingredients. If you’re dairy-free, you could use a plant-based feta.
    • Fresh parsley: Chopped parsley gives a burst of freshness and a lovely green hue. Basil works too if you want to switch things up!
    • Extra-virgin olive oil: This premium oil is essential for that rich, smooth dressing that coaxes out the flavors.
    • Red wine vinegar: A splash of red wine vinegar helps cut through the richness of the salad, adding brightness. Apple cider vinegar is a nice substitute if you’re out.
    • Lemon juice: A touch of acidity is a game-changer. Freshly squeezed is best, but bottled will work in a pinch.
    • Dried oregano: This classic herb amplifies the Mediterranean theme, infusing a warm, earthy flavor.
    • Salt and black pepper: These simple seasonings elevate all the flavors, so don’t forget to season to your taste.

    For exact measurements, check the bottom of the article for a handy printable version. Happy cooking!

    How to Make Chickpea Greek Salad

    Ready to dive into the delightful process of crafting this Chickpea Greek Salad? Let’s break it down into simple steps. The beauty of this recipe lies in its accessibility and freshness. Gather your ingredients, and let’s get started!

    Step 1: Combine the Ingredients

    In a large mixing bowl, toss together the rinsed chickpeas, diced cucumber, halved cherry tomatoes, sliced red onion, and kalamata olives.

    Don’t be shy with the feta cheese! Add it in liberally, along with the chopped parsley.

    Give everything a gentle stir, making sure all the ingredients are mixed evenly.

    You want each bite to be a beautiful blend of colors and flavors!

    Step 2: Make the Dressing

    In a separate small bowl, let’s whip up a zesty dressing.

    Whisk together the extra-virgin olive oil, red wine vinegar, lemon juice, and dried oregano.

    Season with salt and black pepper to taste.

    You’re looking for a harmonious balance of creamy and tangy—take a little taste to see if it’s to your liking. Adjust as needed.

    Step 3: Combine Salad and Dressing

    Now, pour that fabulous dressing over your salad mixture.

    Using a spatula or wooden spoon, toss everything gently until every ingredient is well-coated with that tangy dressing.

    This is where the magic happens! The flavors will begin to marry beautifully.

    Step 4: Let it Rest

    Patience is key here! Allow your salad to sit for at least 15 minutes.

    This resting time is essential, as it lets the flavors meld together like old friends at a reunion.

    If you can wait a bit longer, even better! Just cover it and pop it in the fridge.

    Step 5: Serve and Enjoy

    When you’re ready to serve, give the salad another gentle toss.

    This Chickpea Greek Salad can be enjoyed chilled or at room temperature.

    Present it in a beautiful bowl, and watch your family dig in with smiles on their faces.

    You’ve just created a dish that’s not only healthy but bursting with Mediterranean flair!

    Tips for Success

    • Chill your salad for about 30 minutes to enhance the flavors.
    • Use quality extra-virgin olive oil for the best taste.
    • Don’t skip the resting time; it makes a huge difference!
    • Feel free to customize the vegetables based on your family’s preferences.
    • Make this ahead of time for an even more flavorful dish!

    Equipment Needed

    • Large mixing bowl: Essential for combining your salad ingredients. A sturdy pasta bowl works great too!
    • Small bowl: Perfect for whisking the dressing. A coffee cup can do the trick in a pinch.
    • Whisk or fork: To mix the dressing. Don’t hesitate to use a spoon if that’s all you have.
    • Spatula or wooden spoon: Ideal for tossing the salad. A pair of tongs can also be handy!

    Variations on Chickpea Greek Salad

    • Add some protein: Toss in grilled chicken or shrimp for a heartier meal.
    • Spice it up: Add diced jalapeños or sprinkle red pepper flakes for a kick of heat.
    • Change the cheese: Swap feta for crumbled goat cheese or a dairy-free alternative for a different flavor profile.
    • Get creative with greens: Mix in arugula, spinach, or kale for added nutrition.
    • Incorporate grains: Add quinoa or couscous for a more filling option, turning the salad into a hearty main course.
    • Herb it up: Experiment with fresh dill, mint, or chives for an aromatic twist.
    • Add fruits: Chopped bell peppers, avocados, or even diced apples can provide vibrant color and sweetness.

    Serving Suggestions for Chickpea Greek Salad

    • Pair your salad with crusty whole-grain bread for a satisfying meal.
    • A glass of chilled rosé or sparkling water adds a refreshing touch.
    • For presentation, serve on a beautiful platter garnished with extra parsley.
    • Set out bowls of assorted olives and sliced radishes for a colorful spread.
    • Consider wrapping the salad in pita bread for a fun, portable lunch option!

    FAQs about Chickpea Greek Salad

    Can I make Chickpea Greek Salad ahead of time?

    Absolutely! This salad is perfect for meal prep and can be made a day in advance. Just store it in the refrigerator. The flavors will actually deepen, making it even more delicious!

    Is Chickpea Greek Salad suitable for a vegan diet?

    Yes, you can easily make this Chickpea Greek Salad vegan by omitting the feta cheese or replacing it with a plant-based alternative. You’ll still get a vibrant and satisfying dish.

    How can I store leftovers?

    Leftovers should be kept in an airtight container in the fridge. They can last up to two days. The salad may get a bit watery, so just give it a good stir before serving again!

    Can I add dressing separately if I want to meal prep?

    Definitely! If you’re prepping for the week, consider keeping the dressing separate until you’re ready to eat. This keeps the salad fresh and prevents sogginess.

    What are some great sides to serve with Chickpea Greek Salad?

    This salad pairs wonderfully with grilled meats, falafel, or a simple rice pilaf. A side of hummus and pita chips makes for a great Mediterranean-themed meal!

    Final Thoughts

    Whipping up this Chickpea Greek Salad is like inviting a sunny Mediterranean breeze into your home, no matter the season. It embodies freshness, vibrancy, and nutrition, all in one bowl! I love how versatile it is—perfect for a light lunch or as a dazzling side at dinner. Plus, the joy of watching my family dive into a dish filled with goodness brings a delightful satisfaction that’s hard to beat. So, whether it’s a busy weekday or a leisurely weekend, this salad is sure to become a cherished recipe that brightens your table and warms your heart!


    Print

    clock clock iconcutlery cutlery iconflag flag iconfolder folder iconinstagram instagram iconpinterest pinterest iconfacebook facebook iconprint print iconsquares squares iconheart heart iconheart solid heart solid icon

    Description

    A refreshing and nutritious Chickpea Greek Salad that combines vibrant vegetables and a tangy dressing.


    • 2 cups canned chickpeas, rinsed and drained
    • 1 cup cucumber, diced
    • 1 cup cherry tomatoes, halved
    • 1/2 cup red onion, thinly sliced
    • 1/2 cup kalamata olives, pitted and sliced
    • 1/2 cup feta cheese, crumbled
    • 1/4 cup fresh parsley, chopped
    • 1/4 cup extra-virgin olive oil
    • 2 tablespoons red wine vinegar
    • 1 tablespoon lemon juice
    • 1 teaspoon dried oregano
    • Salt and black pepper to taste

    1. In a large mixing bowl, combine the chickpeas, cucumber, cherry tomatoes, red onion, kalamata olives, feta cheese, and chopped parsley. Toss to mix well.
    2. In a small bowl, whisk together the olive oil, red wine vinegar, lemon juice, dried oregano, salt, and black pepper until emulsified.
    3. Pour the dressing over the chickpea mixture and toss gently until all ingredients are well coated in the dressing.
    4. Let the salad sit for at least 15 minutes to allow the flavors to meld together.
    5. Serve chilled or at room temperature as a refreshing side dish or light main course.

    Notes

    • Feel free to customize the salad by adding other vegetables such as bell peppers or radishes.
    • This salad can be made ahead of time and stored in the refrigerator for up to 2 days.
    • Prep Time: 15 minutes
    • Cook Time: 0 minutes
    • Category: Salad
    • Method: Mixing
    • Cuisine: Mediterranean

    Nutrition

    • Serving Size: 1 cup
    • Calories: 300
    • Sugar: 5g
    • Sodium: 600mg
    • Fat: 18g
    • Saturated Fat: 4g
    • Unsaturated Fat: 14g
    • Trans Fat: 0g
    • Carbohydrates: 28g
    • Fiber: 8g
    • Protein: 10g
    • Cholesterol: 20mg

    Sharing is caring!

  • Garlic Butter Pan Seared Pork Chops

    Garlic Butter Pan Seared Pork Chops


    Introduction to Garlic Butter Pan Seared Pork Chops

    Hey there, fellow home cooks! If you’re anything like me, you know how challenging it can be to whip up something delicious on a busy weeknight. That’s where these Garlic Butter Pan Seared Pork Chops come to the rescue! Imagine the sizzle of pork chops in a hot pan, infused with the inviting aroma of garlic and buttery goodness. This dish isn’t just quick; it’s a delightful way to impress your family at the dinner table. Juicy, flavorful, and utterly satisfying, these pork chops are perfect for busy days or cozy weekend nights!

    Why You’ll Love This Garlic Butter Pan Seared Pork Chops

    These Garlic Butter Pan Seared Pork Chops are truly a lifesaver! Not only are they super easy to prepare, but they also cook up in just 25 minutes. The taste? Out of this world! That perfect sear combined with buttery garlic makes each bite a flavor explosion. Whether you’re cooking for your family or having a quiet night in, this dish brings satisfaction without fuss. It’s truly a delicious win!

    Ingredients for Garlic Butter Pan Seared Pork Chops

    Gathering the right ingredients for your Garlic Butter Pan Seared Pork Chops is simple and satisfying. Here’s what you need:

    • Pork Chops: Bone-in or boneless, about an inch thick. Bone-in chops tend to be juicier and packed with flavor.
    • Garlic: Freshly minced or finely chopped garlic adds a robust flavor that really shines in this dish.
    • Unsalted Butter: This helps in basting the chops, bringing a rich, creamy taste without the added salt that can overwhelm.
    • Olive Oil: Used for heating the pan and getting that gorgeous sear. It’s a healthier fat choice!
    • Salt and Pepper: Essential for enhancing the natural flavors of the pork. Season generously!
    • Smoked Paprika (Optional): Adds depth and a smoky flavor to the chops. If you’re a fan of bold flavors, don’t skip this!
    • Fresh Herbs (Optional): Parsley or thyme can elevate your dish not just in taste but also in presentation.

    Don’t worry about exact measurements right now. You can find them down below for easy printing. With just these few ingredients, you’re on your way to an amazing meal!

    How to Make Garlic Butter Pan Seared Pork Chops

    Preparing the Pork Chops

    Let’s start by prepping our pork chops. First, trim any excess fat to avoid a greasy dish. Pat the chops dry with a paper towel. This step is crucial for a stunning sear! The drier the surface, the better the browning. I’ve learned this the hard way, and trust me, it makes a world of difference. Once they’re dry, set them aside while you gather your other ingredients. We want them ready for action!

    Seasoning the Chops

    Now comes the fun part: seasoning! Generously sprinkle salt and pepper on both sides of each chop. This enhances the flavor beautifully. If you’re using smoked paprika, a light dusting on each side adds that extra oomph! I always say, don’t be shy with the seasonings — they’re your best friends in the kitchen. Make sure the flavors get all cozy with the meat.

    Searing the Pork Chops

    Heat a cast iron skillet or a heavy-bottomed pan over medium-high heat. Add olive oil, letting it shimmer like the sun on a summer day. Once hot, carefully place the pork chops in the pan, ensuring they have room to breathe and aren’t overcrowded. Sear for 3 to 4 minutes until a glorious golden crust forms. Resist the urge to flip too soon; that crust is key! After the first side is charred, flip them and brown the other side for another 3 to 4 minutes. It should smell divine by now!

    Adding Flavor with Garlic Butter

    Reduce the heat to medium and add the unsalted butter to the pan. Let it melt and mingle with all those delicious drippings. Then, stir in the minced garlic. Oh, the aroma that fills your kitchen! Using a spoon, baste the chops with the garlic butter mixture. This infuses the meat with rich flavors and keeps it moist. Enjoy this moment; it’s pure kitchen magic at work!

    Checking for Doneness

    Now, let’s ensure our pork chops are perfectly cooked. Use a meat thermometer to check that the internal temperature hits 145°F. This step is crucial for juicy chops that aren’t overcooked. Once done, remove them from the skillet and let them rest for 5 minutes. Resting allows the juices to redistribute, meaning every bite is tender and flavorful. Patience is a virtue when it comes to perfectly cooked meat!

    Tips for Success

    • Always let your pork chops come to room temperature before cooking for even cooking.
    • Use a good quality cast iron skillet for optimal heat retention and searing.
    • Don’t rush the resting period; it’s essential for juicy chops.
    • Feel free to experiment with different herbs and spices that you love!
    • And finally, enjoy the process — cooking should be fun!

    Equipment Needed for Garlic Butter Pan Seared Pork Chops

    • Cast Iron Skillet: Perfect for even heat distribution. If you don’t have one, a heavy-bottomed nonstick pan works well too.
    • Meat Thermometer: Essential for checking doneness. If you’re without one, you can use a fork to test tenderness.
    • Paper Towels: Handy for drying the chops before cooking!

    Variations of Garlic Butter Pan Seared Pork Chops

    • Herb-Infused Butter: Mix in your favorite fresh herbs like rosemary or sage with the butter for a fragrant twist.
    • Spicy Kick: Add red pepper flakes to the garlic butter for a spicy variation that brings the heat!
    • Lemon Zest: Incorporate lemon zest into the garlic butter for a refreshing citrusy flavor profile.
    • Mustard Glaze: Brush the pork chops with Dijon mustard before searing for a tangy kick.
    • Honey Garlic Glaze: Drizzle honey into the garlic butter for a sweet and savory combo that’s irresistible.

    Serving Suggestions for Garlic Butter Pan Seared Pork Chops

    • Roasted Vegetables: Pair with seasonal veggies like asparagus or Brussels sprouts for a crunchy contrast.
    • Mashed Potatoes: Creamy mashed potatoes soak up the delicious garlic butter.
    • Salad: A light arugula salad adds freshness to the meal.
    • Wine: Enjoy a glass of Chardonnay or Pinot Noir to complement the dish.

    FAQs about Garlic Butter Pan Seared Pork Chops

    Can I use other cuts of pork for this recipe? Absolutely! While I love using chops, you can also try this recipe with pork tenderloin or rib chops for variation.

    How do I store leftovers? Store any leftover Garlic Butter Pan Seared Pork Chops in an airtight container in the fridge for up to three days. Just reheat gently to keep them tender!

    Can I make this recipe without garlic? If garlic isn’t your thing, feel free to omit it! The pork chops are still delicious with just the butter, salt, and spices.

    What sides pair best with these pork chops? Great options include roasted veggies, creamy mashed potatoes, or a fresh salad. Each one complements the flavors beautifully!

    Can I marinate the pork chops ahead of time? Yes, marinating adds flavor! You can mix the seasonings with olive oil and let the chops sit for 30 minutes to a few hours before cooking.

    Final Thoughts

    Cooking doesn’t have to be a chore, and these Garlic Butter Pan Seared Pork Chops prove it! With just a few simple ingredients and steps, you can create a flavorful dish that brings joy to your table. Picture the smiles on your family’s faces as they savor every juicy bite. Whether you’re a busy mom or a professional juggling a packed schedule, this recipe is your ticket to a stress-free, satisfying dinner. Trust me, once you try this, it’ll be a go-to in your kitchen. Let’s cook and create delicious memories together!


    Print

    clock clock iconcutlery cutlery iconflag flag iconfolder folder iconinstagram instagram iconpinterest pinterest iconfacebook facebook iconprint print iconsquares squares iconheart heart iconheart solid heart solid icon

    Description

    Garlic Butter Pan Seared Pork Chops are juicy and flavorful, perfect for a quick and delicious dinner.


    • 2 Pork chops bone-in or boneless, about 1 inch thick
    • 3 cloves Garlic minced or finely chopped
    • 2 tbsp Unsalted butter
    • 1 tbsp Olive oil
    • Salt to taste
    • Pepper to taste
    • 1 tsp Smoked paprika optional
    • Fresh herbs parsley or thyme, for garnish – optional

    1. Trim any excess fat and pat the chops dry with a paper towel to ensure a good sear.
    2. Season generously with salt, pepper, and smoked paprika on both sides.
    3. Use a cast iron skillet or heavy-bottomed pan for even heat distribution.
    4. Heat olive oil over medium-high heat until shimmering.
    5. Place the pork chops in the pan without overcrowding.
    6. Sear for 3-4 minutes on each side, or until a golden crust forms. Avoid flipping too often.
    7. Reduce heat to medium and add butter to the pan.
    8. Stir in minced garlic and baste the chops with the melted butter for 1-2 minutes.
    9. Use a meat thermometer to ensure the internal temperature reaches 145°F.
    10. Remove the chops from the pan and let them rest for 5 minutes before serving.

    Notes

    • Let the pork chops rest before cutting to retain juices.
    • Feel free to customize seasonings based on your preferences.
    • Prep Time: 10 minutes
    • Cook Time: 15 minutes
    • Category: Main Course
    • Method: Pan Seared
    • Cuisine: American

    Nutrition

    • Serving Size: 1 pork chop
    • Calories: 350
    • Sugar: 0g
    • Sodium: 500mg
    • Fat: 25g
    • Saturated Fat: 10g
    • Unsaturated Fat: 15g
    • Trans Fat: 0g
    • Carbohydrates: 1g
    • Fiber: 0g
    • Protein: 30g
    • Cholesterol: 80mg

    Sharing is caring!

  • Creamy Garlic Mushroom Stuffed Shells

    Creamy Garlic Mushroom Stuffed Shells


    Introduction to Creamy Garlic Mushroom Stuffed Shells

    As a busy mom, I totally understand the struggle of whipping up dinner that’s both quick and delicious. That’s why I’m excited to share my go-to recipe for Creamy Garlic Mushroom Stuffed Shells. This dish is not only easy to prepare, but it also brings a comforting, homey feel that makes any evening feel special. Imagine cozying up with your family around the table, savoring those melt-in-your-mouth shells stuffed with a rich, creamy filling. Whether it’s a weeknight meal or an occasion to impress loved ones, this recipe is sure to be a hit!

    Why You’ll Love This Creamy Garlic Mushroom Stuffed Shells

    If you’re searching for a dish that marries simplicity with exquisite flavor, look no further. Creamy Garlic Mushroom Stuffed Shells check all the boxes. They’re quick to assemble, making them perfect for those hectic weeknights. Plus, the creamy mushroom filling delivers a burst of flavor in every bite, while the gooey cheese on top is simply irresistible. It’s a meal that leaves everyone feeling satisfied and loved—what more could you ask for?

    Ingredients for Creamy Garlic Mushroom Stuffed Shells

    Gathering the right ingredients for Creamy Garlic Mushroom Stuffed Shells is half the fun! Here’s what you’ll need:

    • Jumbo pasta shells: These large pasta pockets are perfect for stuffing. They hold all the delicious fillings snugly, making every bite delightful.
    • Ricotta cheese: This creamy cheese adds richness to the filling. It balances perfectly with the mushrooms and other flavors.
    • Grated Parmesan cheese: This cheese brings a slightly nutty flavor and adds depth. It also helps bind the filling together.
    • Cooked mushrooms: I love using finely chopped cooked mushrooms for that earthy flavor. They add a lovely texture and enhance the dish’s savory profile.
    • Egg: A beaten egg helps to hold the filling together. It gives the mixture a creaminess that makes it irresistible.
    • Alfredo sauce: The luxurious sauce coats the shells, adding creaminess and flavor on top of the filling. You can use store-bought or homemade!
    • Garlic powder: This spice provides a handy punch of garlic flavor without the hassle of fresh garlic.
    • Salt and black pepper: These basic seasonings enhance the dish’s taste and bring all the flavors to life.
    • Shredded mozzarella cheese: The melty topping on your baked shells that makes it all feel decadent and delicious.

    Feel free to get creative! You can throw in other vegetables or proteins to tailor the filling to your family’s tastes. All the exact measurements are at the bottom of the article, so you can easily print them out when you’re ready to cook!

    How to Make Creamy Garlic Mushroom Stuffed Shells

    Step 1: Prepare the Pasta

    Start by cooking the jumbo pasta shells according to the package instructions. Keep an eye on the time; overcooked pasta can tumble into a sticky mess. To prevent sticking, add a splash of olive oil to the boiling water. Once the shells are al dente, drain them and give them a quick rinse under cold water to stop the cooking. Set them aside carefully, lying them flat on a baking sheet or plate. This ensures they don’t stick together while you prepare the filling.

    Step 2: Make the Filling

    In a large mixing bowl, combine the ricotta cheese, grated Parmesan, and finely chopped cooked mushrooms. Add the beaten egg, garlic powder, salt, and pepper. I like to mix everything until well combined, but be gentle to keep that lovely creamy texture. If your mixture is too thick, a splash of water or broth can help achieve a smoother consistency. Tasting a tiny spoonful is crucial—adjust the seasoning so every bite will be perfectly flavored.

    Step 3: Stuff the Shells

    Grab your cooked pasta shells and a spoon or small cookie scoop for easy stuffing. Generously fill each shell with the mushroom mixture, pressing gently to ensure they’re nicely packed but not overflowing. Placing the filled shells upright can be a game changer! It not only makes it easier to transport them to the baking dish but also adds a fun presentation style when it’s all done.

    Step 4: Assemble the Dish

    Preheat your oven while you layer the dish—this step is so important for even baking! Spread about 1 cup of Alfredo sauce on the bottom of a baking dish, creating a creamy bed for the cheesy shells. Carefully arrange the stuffed shells on top of the sauce, then pour the remaining Alfredo over them. Sprinkle that shredded mozzarella generously on top for a glorious melty finish. Just picture that bubbling cheese!

    Step 5: Bake the Shells

    Now, cover your baking dish with aluminum foil to keep the moisture in and bake in the preheated oven at 375°F (190°C) for about 25 minutes. After that, carefully remove the foil and bake for an additional 10 minutes, until the cheese is beautifully golden and bubbling. To check for doneness, poke a fork into one shell; it should be warm throughout. Can you smell that? It’s heavenly!

    Step 6: Serve

    Once out of the oven, let the shells rest for about 5 minutes. This little pause is essential for perfect serving and helps the sauce settle. When ready, garnish with freshly chopped parsley for color and a touch of freshness. Serve the Creamy Garlic Mushroom Stuffed Shells with a side salad or crusty bread for a meal that’s sure to impress family and friends alike. Enjoy every creamy, flavorful bite!

    Tips for Success

    • Use a non-stick spray on your baking dish to ensure easy removal of the shells.
    • Prepare the filling in advance; it can sit in the fridge for a day!
    • Experiment with herbs like basil or thyme to elevate the flavor.
    • If you have picky eaters, consider adding cooked spinach for extra nutrients!
    • Serve with extra Alfredo sauce on the side for those who want more creaminess.

    Equipment Needed

    • Baking dish: A 9×13 inch dish works best, but an oven-safe skillet can be a great substitute.
    • Mixing bowl: Any large bowl will do. I love using glass for easy visibility.
    • Spoon or cookie scoop: For stuffing, a small scoop simplifies the process.
    • Aluminum foil: Essential for baking; don’t forget it to keep moisture in!

    Variations for Creamy Garlic Mushroom Stuffed Shells

    • Spinach and Feta: Add fresh spinach and crumbled feta cheese to the filling for a Mediterranean twist that brings a burst of flavor and nutrition.
    • Meat Lovers: Incorporate cooked Italian sausage or ground beef into the mushroom filling for a heartier dish that meat-lovers will adore.
    • Gluten-Free Option: Use gluten-free jumbo pasta shells for a delicious alternative that everyone can enjoy without worry.
    • Extra Veggies: Experiment with zucchini, bell peppers, or artichokes in the filling to boost the veggie quota and add vibrant colors.
    • Herb-Infused: Stir in fresh herbs like basil or parsley into the filling for a burst of freshness and aromatic appeal.

    Serving Suggestions

    • Side Salad: A crisp Caesar or mixed greens salad balances the richness of the shells.
    • Garlic Bread: Serve warm, buttery garlic bread for a comforting touch that complements the flavors.
    • Wine Pairing: A light Pinot Grigio or Chardonnay enhances the creamy dish beautifully.
    • Presentation: Serve in individual ramekins for an elegant touch, garnished with extra parsley.

    FAQs about Creamy Garlic Mushroom Stuffed Shells

    Can I make Creamy Garlic Mushroom Stuffed Shells ahead of time? Absolutely! You can prepare the stuffed shells a day in advance. Just store them in the refrigerator before baking. When you’re ready to cook, you may need to add a few extra minutes to the baking time.

    Can I freeze the stuffed shells? Yes! If you’re looking for a quick meal later, freeze the unbaked shells. Just assemble them, cover tightly, and store. When you’re ready, bake from frozen; just add about 10 extra minutes to the baking time.

    Are these stuffed shells vegetarian? They sure are! The Creamy Garlic Mushroom Stuffed Shells are meat-free, making them an excellent choice for vegetarians or anyone wanting a meatless meal option.

    What sides pair well with this dish? These shells pair wonderfully with a simple side salad or garlic bread. The crispness of the salad cuts through the creaminess, while garlic bread adds a comforting touch.

    Can I substitute the Alfredo sauce? Of course! If you’re feeling adventurous, a light marinara or homemade pesto can add exciting flavor twists. Go ahead and experiment with what you love!

    Final Thoughts

    Crafting Creamy Garlic Mushroom Stuffed Shells in your kitchen is more than just whipping up a meal—it’s an opportunity to create lasting memories. The joy on your family’s faces as they savor those rich, creamy bites is priceless. Whether it’s a busy weeknight or an intimate gathering, this dish has a way of bringing everyone together. With just a dash of love and a sprinkling of cheese, you can elevate any dining experience. So roll up your sleeves, enjoy the cooking adventure, and relish the heartwarming moments that come with serving this delightful dish!


    Print

    clock clock iconcutlery cutlery iconflag flag iconfolder folder iconinstagram instagram iconpinterest pinterest iconfacebook facebook iconprint print iconsquares squares iconheart heart iconheart solid heart solid icon

    Description

    Delicious jumbo pasta shells stuffed with a creamy garlic mushroom filling, topped with Alfredo sauce and mozzarella cheese.


    • 20 jumbo pasta shells, cooked according to package instructions
    • 1 cup ricotta cheese
    • 1/2 cup grated Parmesan cheese
    • 1 cup cooked mushrooms, finely chopped
    • 1 egg, beaten
    • 2 cups Alfredo sauce
    • 1 tsp garlic powder
    • 1/2 tsp salt
    • 1/2 tsp black pepper
    • 1/4 cup shredded mozzarella cheese

    1. Cook the jumbo pasta shells according to package instructions. Drain and set aside.
    2. In a large bowl, mix ricotta cheese, grated Parmesan, chopped cooked mushrooms, egg, garlic powder, salt, and pepper until well combined.
    3. Spoon the mushroom mixture into each pasta shell, filling them generously.
    4. Preheat the oven to 375°F (190°C). Spread 1 cup of Alfredo sauce on the bottom of a baking dish.
    5. Arrange the stuffed shells in the baking dish. Pour the remaining 1 cup of Alfredo sauce over the shells.
    6. Sprinkle shredded mozzarella cheese over the top of the shells.
    7. Cover the dish with aluminum foil and bake for 25 minutes. Remove the foil and bake for an additional 10 minutes, or until the cheese is bubbly and golden.
    8. Let the shells rest for 5 minutes before serving. Garnish with extra chopped parsley if desired.

    Notes

    • Feel free to add other vegetables or proteins to the filling for added flavor.
    • Store leftovers in an airtight container in the refrigerator for up to 3 days.
    • These shells can also be frozen before baking for a quick meal later.
    • Prep Time: 15 minutes
    • Cook Time: 35 minutes
    • Category: Main Dish
    • Method: Baking
    • Cuisine: Italian

    Nutrition

    • Serving Size: 1 serving
    • Calories: 450
    • Sugar: 3g
    • Sodium: 800mg
    • Fat: 25g
    • Saturated Fat: 12g
    • Unsaturated Fat: 8g
    • Trans Fat: 0g
    • Carbohydrates: 40g
    • Fiber: 3g
    • Protein: 20g
    • Cholesterol: 80mg

    Sharing is caring!

  • Corn Tomato Feta Salad

    Corn Tomato Feta Salad


    Introduction to Corn Tomato Feta Salad

    There’s something about summer that just begs for fresh, vibrant flavors, doesn’t it? I can almost hear the clinking of ice-cold drinks while deciding what to whip up for dinner. That’s where this delightful Corn Tomato Feta Salad enters the scene. It’s not just a salad; it’s a celebration of the season! Perfect for busy days when you want something quick and easy, yet elegant enough to impress your loved ones. You won’t believe how simple it is to create a dish that bursts with summer joy, tantalizing tastes, and wholesome goodness.

    Why You’ll Love This Corn Tomato Feta Salad

    This Corn Tomato Feta Salad is a breath of fresh air during hot summer days. It’s quick to prepare, taking only about 25 minutes from start to finish! The combination of crunchy corn, juicy tomatoes, and creamy feta creates a delightful medley of flavors and textures. Plus, it’s a fantastic way to use fresh summer produce. You’ll appreciate how it pairs perfectly with just about any main dish!

    Ingredients for Corn Tomato Feta Salad

    Gathering fresh ingredients is the first step to creating this vibrant Corn Tomato Feta Salad! Each component contributes its own unique flavor, making this salad not just nutritious, but also a feast for the senses. Here’s what you’ll need:

    • Fresh Corn: Sweet, juicy corn is the star of the show. Look for ears that are bright yellow and plump for the best flavor.
    • Cherry Tomatoes: These bite-sized gems bring a pop of color and sweetness. Their juicy nature complements the crispness of the corn beautifully.
    • Red Onion: Thinly sliced red onion adds a lovely sharpness, balancing the sweetness of the other ingredients. You can also substitute with green onions for a milder flavor.
    • Feta Cheese: Crumbled feta contributes a creamy, tangy element that ties everything together. Feel free to use reduced-fat feta if you’re watching your calories!
    • Fresh Basil Leaves: Aromatic basil gives a refreshing herbal note. If you don’t have basil, parsley could be a nice substitute.
    • Olive Oil: A good quality extra virgin olive oil adds richness and depth. It’s also a healthier fat choice that’s perfect for drizzling.
    • Red Wine Vinegar: This vinegar brings in a tangy acidity. You can swap it with apple cider vinegar if preferred.
    • Dijon Mustard: Just a hint of Dijon gives the dressing a flavorful kick. It’s optional, but it really enhances the overall taste.
    • Minced Garlic: A touch of minced garlic adds an aromatic layer. Use fresh garlic for the best flavor, but garlic powder works in a pinch.
    • Salt and Freshly Ground Black Pepper: Season to taste! These staples enhance the flavors of the salad. Always go easy with the salt until you’ve tasted the final mix.
    • Optional Jalapeño: If you enjoy a little heat, adding diced jalapeño can kick things up a notch! Adjust the amount based on your spice preference.

    Remember, the exact quantities of these ingredients can be found at the bottom of the article and are available for you to print. Happy prepping!

    How to Make Corn Tomato Feta Salad

    Now that you have all your vibrant ingredients ready, let’s dive into making this luscious Corn Tomato Feta Salad. Each step is simple, yet leads to a dish that promises delightful flavor and joy. Grab your apron, and let’s get cooking!

    Step 1: Prepare the Corn

    Start by grilling or boiling the fresh corn. If you’re grilling, let those ears sit on the grill until they’re perfectly charred. If boiling, just a few minutes will do! Once done, let the corn cool for a moment, then stand each ear upright on a cutting board. Carefully cut off the kernels with a sharp knife. That sweet spurt of corn juice is simply irresistible!

    Step 2: Combine Fresh Ingredients

    Dump all those beautiful corn kernels into a large mixing bowl. Next, take your cherry tomatoes and halve them before adding them in. Then, it’s time for the thinly sliced red onion. If you opt for jalapeño, this is the moment to toss that in as well. Finally, sprinkle in the freshly chopped basil. Just looking at this colorful mix will make your heart sing!

    Step 3: Whisk the Dressing

    Grab a small bowl and whisk together the olive oil, red wine vinegar, Dijon mustard, and minced garlic. This dressing is simple yet zesty. Season it with a pinch of salt and freshly ground black pepper to taste. You can’t go wrong here—this is your chance to infuse flavors right into the salad!

    Step 4: Mix Everything Together

    Now for the fun part! Pour that tangy dressing over your bowl of vibrant veggies. Gently toss everything together using two big spoons. You want each flavorful nugget to be coated without bruising your ingredients. Crumble the feta cheese over the top and toss gently once more. Oh, the creaminess of the feta is like a luxurious embrace!

    Step 5: Taste and Adjust

    Before you dive in, take a moment to taste your salad. Does it need more salt or pepper? A tad more mustard? This step is crucial, as it helps you find the perfect balance of flavors. It’s like tuning a musical instrument—just a little tweak can make a world of difference!

    Step 6: Serve or Chill

    Here comes the exciting part. You can serve this corn tomato feta salad right away for a fresh crunch, or you have the option to chill it for later. Chilling for an hour or two deepens the flavors, but remember to add the feta just before serving if you choose to refrigerate it. Either way, it’s going to be a hit!

    Tips for Success

    • Use the freshest corn you can find for the best flavor—nothing beats that summer sweetness!
    • Season your dressing with care. Start small and adjust to your taste.
    • For an even fresher taste, make the salad a few hours in advance and chill it.
    • Feel free to experiment with ingredients based on your family’s preferences!
    • Don’t forget to reserve some feta for garnish to make it look appealing.

    Equipment Needed

    • Sharp Knife: Essential for cutting corn and veggies. A chef’s knife will do the trick.
    • Cutting Board: Use a sturdy surface to safely chop your ingredients.
    • Large Mixing Bowl: Perfect for combining all your salad components.
    • Small Bowl: Ideal for whisking together the dressing ingredients.
    • Whisk or Fork: You’ll need this to mix your dressing up nicely.

    Variations of Corn Tomato Feta Salad

    • Grilled Vegetables: Add grilled zucchini or bell peppers for a smoky twist and extra nutrition.
    • Quinoa Booster: Incorporate cooked quinoa for added protein and a heartier texture.
    • Vegan Option: Substitute feta with crumbled tofu or avocado for a creamy consistency without dairy.
    • Bean Mix: Toss in black beans or chickpeas for additional protein and a satisfying crunch.
    • Herb Variation: Experiment with fresh dill or mint in place of basil for a different herby flavor.

    Serving Suggestions for Corn Tomato Feta Salad

    • Perfect Pairing: This salad shines alongside grilled chicken or fish, enhancing the flavors of your main dish.
    • Drink Match: Serve with a chilled glass of white wine or sparkling water to balance the salad’s zest.
    • Presentation: Consider serving in a colorful bowl and top with extra basil for a lovely touch!

    FAQs about Corn Tomato Feta Salad

    As you prepare to whip up this delightful Corn Tomato Feta Salad, you might have a few questions. Here are some common queries and helpful answers to make your cooking experience even better!

    Can I use frozen corn instead of fresh? Absolutely! While fresh corn offers the best flavor, frozen corn is a convenient alternative. Just thaw it before adding to the salad.

    How long can I store leftovers? If stored in an airtight container in the fridge, this salad can last about 2-3 days. Just remember to add the crumbled feta before serving to keep it fresh.

    What can I substitute for feta cheese? If you’re looking for a different flavor profile, try using goat cheese or a vegan option like avocado or crumbled tofu. Each will give a unique twist to the salad!

    Can I make it ahead of time? Yes! This Corn Tomato Feta Salad is perfect for making ahead. Just mix everything except the feta and chill it. Add the cheese just before serving for the best texture.

    How spicy does it get with jalapeño? The spice level can be adjusted based on your taste. Use half a jalapeño for mild heat or a whole for more kick. Feel free to skip it altogether if preferred!

    Final Thoughts

    Every bite of this Corn Tomato Feta Salad transports me straight to sunny picnics and backyard barbecues. The mix of sweet corn, juicy tomatoes, and tangy feta creates a melody of summer flavors that feels like a warm hug. Whether you whip this up as a quick weeknight side or impress your guests at a gathering, it brings people together over vibrant tastes. Plus, making it is an adventure in itself, and that’s what cooking is all about! So grab your ingredients, and let the magic of this salad unfold at your next meal.


    Print

    clock clock iconcutlery cutlery iconflag flag iconfolder folder iconinstagram instagram iconpinterest pinterest iconfacebook facebook iconprint print iconsquares squares iconheart heart iconheart solid heart solid icon

    Description

    A refreshing summer salad made with fresh corn, cherry tomatoes, feta cheese, and a zesty dressing.


    • 6 ears of fresh corn, shucked
    • 1 pint cherry tomatoes, halved
    • 1 red onion, thinly sliced
    • 8 ounces feta cheese, crumbled
    • 1/4 cup fresh basil leaves, chopped
    • 2 tablespoons olive oil
    • 1 tablespoon red wine vinegar
    • 1 teaspoon Dijon mustard
    • 1 clove garlic, minced
    • Salt and freshly ground black pepper to taste
    • Optional: 1 jalapeño, seeded and finely diced

    1. Grill or boil the corn.
    2. Stand each ear of corn upright on a cutting board and carefully cut the kernels off the cob with a sharp knife. Place kernels in a large bowl.
    3. Halve the cherry tomatoes and add to the bowl. Thinly slice the red onion and add to the bowl. If using jalapeño, seed and finely dice it, then add to the bowl. Chop the fresh basil leaves and add to the bowl.
    4. In a small bowl, whisk together the olive oil, red wine vinegar, Dijon mustard, and minced garlic. Season with salt and pepper to taste.
    5. Pour the dressing over the corn, tomatoes, red onion, jalapeño (if using), and basil in the large bowl. Gently toss to coat evenly. Crumble the feta cheese over the salad and gently toss again to incorporate the feta.
    6. Taste the salad and adjust the seasonings as needed.
    7. Serve immediately or chill for later. If chilling, add the feta just before serving.

    Notes

    • For a spicier kick, adjust the amount of jalapeño used.
    • Chilling the salad enhances the flavor.
    • Prep Time: 15 minutes
    • Cook Time: 10 minutes
    • Category: Salad
    • Method: Mixing
    • Cuisine: American

    Nutrition

    • Serving Size: 1 cup
    • Calories: 250
    • Sugar: 5g
    • Sodium: 300mg
    • Fat: 15g
    • Saturated Fat: 5g
    • Unsaturated Fat: 10g
    • Trans Fat: 0g
    • Carbohydrates: 25g
    • Fiber: 3g
    • Protein: 8g
    • Cholesterol: 20mg

    Sharing is caring!

  • Healthy Italian Broccoli Salad

    Healthy Italian Broccoli Salad


    Introduction to Healthy Italian Broccoli Salad

    Hey there, fellow food lovers! I’m so excited to share this Healthy Italian Broccoli Salad with you. If you’re anything like me, finding nutritious meals that are quick and full of flavor can be a challenge. We all lead busy lives, juggling work and family, but that doesn’t mean we have to compromise on our health or taste. This vibrant salad is the perfect solution. Packed with crunchy broccoli, zesty lemon, and a hint of garlic, it brings a refreshing twist to your table. So, let’s dive in and bring some Italian flair to your lunch or dinner!

    Why You’ll Love This Healthy Italian Broccoli Salad

    This Healthy Italian Broccoli Salad is not just easy to make, it’s a delight for the taste buds! With only a handful of ingredients, you’ll whip it up in no time. It’s perfect for those hectic weeknight dinners or even as a refreshing side for a weekend gathering. You’ll savor the vibrant flavors while knowing you’re nourishing your body with every crunchy bite. A healthy win-win, right?

    Ingredients for Healthy Italian Broccoli Salad

    Gathering fresh ingredients is key to this Healthy Italian Broccoli Salad. Here’s what you’ll need:

    • Broccoli: Start with a head of bright green broccoli. This leafy green is packed with vitamins and minerals, making it the star of our salad.
    • Lemon peel: A tablespoon of grated lemon peel adds a burst of citrusy brightness, enhancing the salad’s flavor profile.
    • Garlic: Five cloves of minced garlic bring an aromatic and robust kick to the dressing, elevating your salad experience.
    • Extra virgin olive oil: Using a half-cup of high-quality olive oil is a must. It adds richness and healthy fats, making every bite delightful.
    • Fresh lemon juice: A quarter cup of fresh lemon juice delivers that tangy zing to perfectly balance the flavors.
    • Hot red pepper flakes: Just a touch of these spicy flakes, about a quarter teaspoon, will awaken your palate, but feel free to adjust to your heat preference!
    • Dijon mustard: A teaspoon of this adds depth, creating a creamy texture in your dressing that’s simply irresistible.

    And don’t forget, you can mix and match ingredients based on what you have on hand! For example, if you’re short on broccoli, try using cauliflower for a unique twist. The exact measurements for each ingredient are available at the bottom of this article for easy printing. Happy cooking!

    How to Make Healthy Italian Broccoli Salad

    Step 1: Prepare the Broccoli

    First things first, let’s get that broccoli ready. Bring a large pot of water to a rolling boil. I always like to give my broccoli a good wash first to remove any dirt. Once the water is bubbling away, carefully drop in the small florets. You want to cook them until they are almost tender, which usually takes about 5 to 6 minutes. Keep an eye on them; overcooking can make them mushy!

    After they reach that perfect al dente texture, drain them and set them aside. There’s no need to rinse them with cold water, as we want them to stay warm. This warmth helps the dressing cling better to the broccoli, making every bite irresistibly tasty.

    Step 2: Make the Dressing

    Now for the fun part—crafting that zesty dressing! In a medium bowl, combine your minced garlic, grated lemon peel, dijon mustard, fresh lemon juice, and extra virgin olive oil. After that, sprinkle in those hot red pepper flakes. Use a whisk (or a fork if that’s all you have) to blend these ingredients together until they are well emulsified. The dressing should look smooth and inviting, like a tangy hug for our broccoli!

    Step 3: Combine and Toss

    With the broccoli still slightly warm, toss it into a large bowl. Next, drench it with your freshly whisked dressing and the lemon zest. Gently mix everything together until the broccoli is happily coated in that vibrant dressing. Taste test it—this is a crucial step! Add salt to your liking, or a bit more lemon juice if you crave extra tang. If your taste buds enjoy a kick, sprinkle in more hot red pepper flakes.

    Step 4: Let It Rest

    Once combined, it’s time for the salad to chill. Cover the bowl and let it sit in the refrigerator for at least one hour. This resting period allows the vibrant flavors to meld beautifully, making it taste even better! For those who can plan ahead, letting it sit overnight creates a flavor explosion that’s not to be missed.

    When you’re ready to serve, just pull it out, toss it gently once more, and enjoy your delightful Healthy Italian Broccoli Salad!

    Tips for Success

    • Always use fresh broccoli for the best flavor and crunch.
    • Make the salad a day ahead to enhance the flavors.
    • Experiment with other veggies like cherry tomatoes or bell peppers for added color and taste.
    • Storing leftovers? Keep them in an airtight container to maintain freshness.
    • Don’t skip the resting time; it’s key for flavor development.

    Equipment Needed

    • Large Pot: A good pot to boil your broccoli. Any heavy-bottomed pot will do.
    • Medium Bowl: For mixing your dressing. A mixing bowl or even a large mason jar works!
    • Whisk: This helps blend your dressing. If you don’t have one, a fork is a great substitute.
    • Knife and Cutting Board: Essential for chopping and slicing ingredients. Any reliable kitchen knife will get the job done!

    Variations of Healthy Italian Broccoli Salad

    • Nutty Addition: Toss in some toasted pine nuts or walnuts for a crunchy twist that adds healthy fats.
    • Creamy Option: If you’re a fan of creaminess, mix in a bit of hummus or avocado for a richer texture.
    • Cheesy Flavor: Sprinkle some nutritional yeast or vegan Parmesan for a cheesy flavor without the dairy.
    • Protein Boost: Add chickpeas or white beans to make it more filling, perfect for a light lunch!
    • Herb Variation: Incorporate fresh herbs like basil or parsley for an aromatic touch; they brighten the entire dish.

    Serving Suggestions

    • Pair your Healthy Italian Broccoli Salad with grilled chicken or shrimp for a delightful protein boost.
    • Serve it alongside whole-grain bread or pita for a satisfying meal.
    • Consider a light, chilled white wine like Pinot Grigio to complement the tangy flavors.
    • For presentation, garnish with lemon wedges and fresh herbs for a pop of color!

    FAQs about Healthy Italian Broccoli Salad

    Can I make the Healthy Italian Broccoli Salad ahead of time?

    Absolutely! In fact, making it a day ahead allows the flavors to meld beautifully. Just keep it in the fridge until you’re ready to serve!

    Is this salad suitable for meal prep?

    Yes! This Healthy Italian Broccoli Salad holds up well in the fridge for a few days. It’s perfect for quick lunches or dinners during the week.

    Can I add other vegetables to this salad?

    Definitely! Feel free to add in cherry tomatoes, bell peppers, or even some carrots. They’ll bring in more color and texture, enhancing your salad.

    What can I substitute for lemon juice in the dressing?

    If you don’t have lemon juice, apple cider vinegar or balsamic vinegar can work as a flavorful alternative. Just adjust to your taste!

    Is this salad vegan-friendly?

    Yes! This Healthy Italian Broccoli Salad is entirely vegan, making it a perfect option for anyone following a plant-based diet.

    Final Thoughts

    Creating this Healthy Italian Broccoli Salad has truly been a delightful journey for me. Each time I make it, I’m reminded of the joy a simple salad can bring to the table. The vibrant colors, the zesty flavors, and the satisfying crunch create an experience that’s both refreshing and nourishing. It’s a recipe that gathers my family around, inviting conversation and laughter. I hope it inspires you to bring a little Italian sunshine into your meals, proving that healthy eating can be enjoyable and beautiful. So grab those ingredients and let’s make mealtime memorable!


    Print

    clock clock iconcutlery cutlery iconflag flag iconfolder folder iconinstagram instagram iconpinterest pinterest iconfacebook facebook iconprint print iconsquares squares iconheart heart iconheart solid heart solid icon

    Description

    A refreshing and healthy twist on a classic Italian salad featuring broccoli, garlic, and a tangy lemon dressing.


    • 1 head of broccoli (trim off the bottom 2 inches, break the rest into small florets)
    • 1 tablespoon grated lemon peel
    • 5 cloves minced garlic
    • 1/2 cup (120g) extra virgin olive oil
    • 1/4 cup (60g) fresh lemon juice
    • 1/4 teaspoon hot red pepper flakes
    • 1 teaspoon dijon mustard

    1. Start by bringing a large pot of water to a boil.
    2. Once the water is boiling, add the broccoli.
    3. Cook the broccoli until it is almost tender, which should take about 5-6 minutes.
    4. Once cooked, drain the broccoli but do not rinse it with cool water.
    5. Allow it to stay warm, which will help it absorb the dressing better.
    6. While the broccoli is cooking, begin preparing the dressing by whisking together your dressing ingredients until they are well emulsified.
    7. In a large bowl, toss the warm, drained broccoli with the freshly prepared dressing and lemon zest until the broccoli is well-coated.
    8. Taste test your broccoli salad and season with salt as needed.
    9. If you desire a bit more tang, add more lemon juice.
    10. For added heat, consider incorporating hot pepper flakes to taste.
    11. Once the broccoli is combined with the dressing, let the salad sit in the refrigerator for at least 1 hour to allow the flavors to meld.
    12. For a more robust flavor, refrigerate overnight if possible.
    13. Serve and enjoy your flavorful broccoli salad!

    Notes

    • For best flavor, use fresh ingredients.
    • This salad can be made a day ahead for enhanced taste.
    • Adjust the spicy heat to your preference by varying the amount of hot red pepper flakes.
    • Prep Time: 15 minutes
    • Cook Time: 6 minutes
    • Category: Salad
    • Method: Boiling and Tossing
    • Cuisine: Italian

    Nutrition

    • Serving Size: 1 cup
    • Calories: 245
    • Sugar: 2g
    • Sodium: 135mg
    • Fat: 27g
    • Saturated Fat: 3g
    • Unsaturated Fat: 24g
    • Trans Fat: 0g
    • Carbohydrates: 9g
    • Fiber: 4g
    • Protein: 4g
    • Cholesterol: 0mg

    Sharing is caring!

  • Crispy Philly Cheesesteak Grilled Wraps

    Crispy Philly Cheesesteak Grilled Wraps


    Introduction to Crispy Philly Cheesesteak Grilled Wraps

    As a passionate home cook, I know how hectic life can get, especially for busy moms and professionals. That’s where these Crispy Philly Cheesesteak Grilled Wraps come in—they’re the perfect solution for a quick, satisfying meal on a weeknight. Imagine wrapping tender steak, sautéed peppers, and onions in a warm tortilla, all smothered in gooey cheese. Not only are they delicious, but they also allow you to impress your loved ones without spending hours in the kitchen. Trust me, this recipe will quickly become a favorite in your home!

    Why You’ll Love This Crispy Philly Cheesesteak Grilled Wraps

    Diving into these Crispy Philly Cheesesteak Grilled Wraps is like wrapping yourself in a cozy blanket of flavor. They’re incredibly easy to whip up, making dinner a breeze. With just a handful of ingredients, you can have a scrumptious meal on the table in less than 40 minutes. The delightful combination of tender steak and sautéed veggies will make your taste buds dance, while the crispy exterior is pure comfort food bliss!

    Ingredients for Crispy Philly Cheesesteak Grilled Wraps

    Gathering the right ingredients is key to creating these mouth-watering Crispy Philly Cheesesteak Grilled Wraps. Here’s what you’ll need:

    • Thinly sliced steak (ribeye, flank, or sirloin): The star of the dish that brings rich flavors and tender texture.
    • Olive oil: Perfect for sautéing the vegetables and adding a touch of healthy fat to the mix.
    • Green and red bell peppers: These vibrant veggies add color, crunch, and a hint of sweetness.
    • Onion: Thinly sliced to caramelize beautifully, bringing depth to your wrap.
    • Garlic powder: A simple way to infuse your steak with delicious, aromatic flavor.
    • Worcestershire sauce: A savory boost that perfectly complements the beef.
    • Salt and pepper: Essential seasonings to enhance each ingredient’s natural taste.
    • Provolone cheese: Gooey, melty cheese that ties all the flavors together; feel free to substitute your favorite cheese!
    • Flour tortillas: These hold everything together; opt for large ones for a generous wrap.
    • Butter or olive oil: Used for grilling, resulting in that crispy, golden-brown texture.

    You can also customize your fillings! Consider throwing in sautéed mushrooms or fresh spinach for added nutrition. Don’t hesitate to check the bottom of the article for exact ingredient measurements, available for printing. It’s all about making this meal fit into your unique family preferences!

    How to Make Crispy Philly Cheesesteak Grilled Wraps

    Now, let’s dive into how to make these delightful Crispy Philly Cheesesteak Grilled Wraps! Follow these simple steps for a quick and delicious meal. Each part of this process is easy, fun, and will have your family asking for seconds.

    Step 1: Sauté the Vegetables

    First things first, heat a tablespoon of olive oil in a large skillet over medium heat. You’ll want it hot enough to cook the veggies without burning them.

    Next, toss in your sliced green and red bell peppers, along with the onions. Sauté these beauties for about 5 to 7 minutes. The goal here? You want them beautifully tender with just a hint of caramelization.

    Once the veggies are soft, push them to one side of the skillet to make room for the star of the show—the steak!

    Step 2: Cook the Steak

    Now, add your thinly sliced steak to the skillet. The sizzling sound is music to my ears! Sprinkle in garlic powder, a splash of Worcestershire sauce, and season everything with salt and pepper.

    Cook until the steak is nicely browned, about 4 to 5 minutes should do the trick. Stir everything together—I find mixing the steak and veggies makes the flavors blend perfectly.

    Step 3: Assemble the Wraps

    Ready to roll? Lay a flour tortilla flat on your clean surface. Place a slice of provolone cheese right in the center—this will melt into cheesy goodness as it cooks.

    Add a generous scoop of your steak and veggie mixture right on top. Then, fold in the sides of the tortilla and roll it tightly, burrito-style. Repeat until you’ve used up all your fillings. It’s easier than it sounds, I promise!

    Step 4: Grill the Wraps

    Heat a griddle or grill pan over medium heat, and add a smidge of butter or olive oil—about a tablespoon should do it.

    Place your wraps seam-side down on the hot surface. Grill each side for 2 to 3 minutes, pressing gently with a spatula. You want them golden brown and crispy. Trust me, your kitchen will smell divine!

    Carefully cut the wraps in half for easy serving. Enjoy them warm, and don’t forget your favorite dipping sauce on the side. After all, what’s a wrap without a good dip?

    Tips for Success

    • Preheat your skillet or grill pan to ensure even cooking and a crispy texture.
    • Don’t overcrowd the pan; cook the steak and veggies in batches if needed.
    • Let the wraps rest for a minute after grilling for easier slicing.
    • Experiment with different cheeses like cheddar or pepper jack for added flavor.
    • Use leftover steak or chicken for a quicker meal—time-saver alert!

    Equipment Needed

    • Large skillet: Essential for sautéing. A non-stick pan works wonders.
    • Griddle or grill pan: Perfect for getting that crispy exterior. You can also use a regular frying pan if needed.
    • Spatula: For flipping the wraps; a slotted one helps too!
    • Knife and cutting board: For slicing veggies and wraps with ease.

    Variations for Crispy Philly Cheesesteak Grilled Wraps

    • Mushroom Lovers: Add sautéed mushrooms for an earthy flavor that pairs wonderfully with the steak.
    • Spicy Kick: Incorporate jalapeños or a drizzle of sriracha for those who like a bit of heat!
    • Healthy Option: Swap in whole wheat or spinach tortillas for a nutritious twist.
    • Vegetarian Delight: Use sautéed portobello mushrooms and extra peppers instead of steak for a tasty plant-based option.
    • Cheddar Twist: Experiment with different cheese types, like sharp cheddar or pepper jack, to switch up the flavor.

    Serving Suggestions for Crispy Philly Cheesesteak Grilled Wraps

    • Side Salad: A fresh garden salad adds a crunchy contrast to the warm wraps.
    • Steak Fries: Crispy steak fries make a satisfying accompaniment for that classic feel.
    • Dipping Sauces: Serve with ranch, barbecue sauce, or even homemade garlic aioli.
    • Iced Tea: A refreshing glass of iced tea pairs perfectly with these wraps.
    • Plating: Cut the wraps in half and arrange on a platter for a festive presentation.

    FAQs about Crispy Philly Cheesesteak Grilled Wraps

    If you’re curious about these Crispy Philly Cheesesteak Grilled Wraps, you’re not alone! Here are some questions I often hear, along with friendly answers to make your cooking experience even better.

    Can I use different types of meat for these wraps?

    Absolutely! While I love the tender steak ribeye, flank, or sirloin, you can use grilled chicken or turkey as a lighter option. Even shredded beef leftovers would taste amazing!

    Are these wraps freezer-friendly?

    Yes, they are! You can prepare the wraps and freeze them before grilling. Just let them thaw in the fridge overnight before cooking for a quick meal anytime!

    How do I make the wraps healthier?

    For a healthier twist, opt for whole wheat tortillas, use less cheese, or add more veggies. You could even swap in a low-fat cheese to cut down on calories without sacrificing flavor.

    What should I serve with the wraps?

    Consider serving them with a fresh side salad or crispy fries. Dipping sauces like ranch or salsa enhance the experience and add a kick of flavor!

    Can I prepare the filling in advance?

    Definitely! You can sauté the veggies and cook the steak ahead of time. Simply store them in the fridge, and assemble the wraps when you’re ready to enjoy!

    Final Thoughts

    Whether it’s a busy weeknight or a cozy weekend, these Crispy Philly Cheesesteak Grilled Wraps bring joy and satisfaction to the dinner table. With their delightful combination of flavors, they become not just a meal but a comforting hug for your taste buds. The ease of preparation means you can focus on spending time with loved ones instead of stressing in the kitchen. Plus, the endless customization options allow everyone to enjoy their perfect wrap. So don your apron, gather your ingredients, and create a delicious, memorable mealtime experience that will leave everyone asking for seconds!


    Print

    clock clock iconcutlery cutlery iconflag flag iconfolder folder iconinstagram instagram iconpinterest pinterest iconfacebook facebook iconprint print iconsquares squares iconheart heart iconheart solid heart solid icon

    Description

    These Crispy Philly Cheesesteak Grilled Wraps are a quick and delicious meal, perfect for a busy weeknight or a satisfying lunch.


    • 1 pound thinly sliced steak ribeye, flank, or sirloin
    • 1 tablespoon olive oil
    • 1 green bell pepper sliced
    • 1 red bell pepper sliced
    • 1 medium onion thinly sliced
    • 1 teaspoon garlic powder
    • 1 teaspoon Worcestershire sauce
    • Salt and pepper to taste
    • 6 slices provolone cheese or your preferred cheese
    • 4 large flour tortillas
    • 2 tablespoons butter or olive oil for grilling

    1. Heat olive oil in a large skillet over medium heat. Add the sliced peppers and onions and sauté until tender, about 5–7 minutes. Push the vegetables to one side of the skillet.
    2. Add the sliced steak to the skillet. Season with garlic powder, Worcestershire sauce, salt, and pepper. Cook until the steak is browned and cooked through, about 4–5 minutes. Mix the vegetables back in with the steak and remove from heat.
    3. Lay a tortilla flat on a clean surface. Place a slice of cheese in the center, then add a generous portion of the steak and vegetable mixture. Fold in the sides of the tortilla and roll tightly into a burrito-style wrap. Repeat with the remaining tortillas and filling.
    4. Heat a griddle or grill pan over medium heat. Add butter or a little olive oil. Place the wraps seam-side down and grill for 2–3 minutes per side, pressing gently with a spatula, until golden brown and crispy.
    5. Cut the wraps in half for easy serving and enjoy warm with your favorite dipping sauces or sides.

    Notes

    • Feel free to customize the fillings with other vegetables such as mushrooms or spinach.
    • These wraps can also be made in advance and stored in the fridge for a quick meal later.
    • Pair with a side salad or fries for a complete meal.
    • Prep Time: 15 minutes
    • Cook Time: 20 minutes
    • Category: Main Dish
    • Method: Grilling
    • Cuisine: American

    Nutrition

    • Serving Size: 1 wrap
    • Calories: 500
    • Sugar: 3g
    • Sodium: 900mg
    • Fat: 26g
    • Saturated Fat: 10g
    • Unsaturated Fat: 12g
    • Trans Fat: 0g
    • Carbohydrates: 45g
    • Fiber: 3g
    • Protein: 24g
    • Cholesterol: 80mg

    Sharing is caring!

  • California Roll Cucumber Salad

    California Roll Cucumber Salad


    Introduction to California Roll Cucumber Salad

    Ah, the beauty of a California Roll Cucumber Salad! It’s like the sun shining through your kitchen, lifting your spirits even on the busiest of days. Whenever I whip up this refreshing salad, I can’t help but smile. It’s the perfect solution for those frantic evenings when dinner feels like an uphill battle. This recipe combines crunchy cucumbers, creamy avocado, and delightful imitation crab into a light dish that’s not only a breeze to make but a joy to eat. Trust me, your taste buds and your family will thank you!

    Why You’ll Love This California Roll Cucumber Salad

    This California Roll Cucumber Salad is not just quick; it’s an absolute game-changer for your busy schedule. With only 15 minutes of preparation, it makes a delightful, healthy side dish that your family will adore. The wonderful flavors come together so effortlessly, satisfying both your palate and your busy lifestyle. Plus, it’s gluten-free, making it a fantastic option for any dietary needs. What’s not to love?

    Ingredients for California Roll Cucumber Salad

    Gathering your ingredients is part of the fun! Here’s what you’ll need to create your delicious California Roll Cucumber Salad. Dive into the world of flavors with these lovely components:

    • Cucumbers: The star of the show! Crunchy and refreshing, they add a delightful crunch.
    • Avocado: This creamy fruit not only brings richness but also healthy fats, making the dish satisfying.
    • Imitation Crab Meat: A nod to the classic California roll, it adds a unique seafood flavor without the fuss.
    • Sesame Seeds (optional): These tiny beads pack a nutty flavor and can add a nice crunch as a garnish.
    • Rice Vinegar: A sweet and tangy touch! It brings brightness to the dressing.
    • Soy Sauce: I prefer low-sodium for a lighter touch but regular works too. This adds a savory depth.
    • Sesame Oil: A couple of drops give the salad a fragrant, nutty undertone.
    • Honey or Sugar (optional): Add a hint of sweetness to balance the tang. You could skip this if you like it sharp!
    • Ground Ginger (optional): A little spice can elevate the salad, giving it a flavorful kick.
    • Green Onions: These add a nice pop of color and fresh flavor. They’re perfect as a garnish!

    Feel free to switch up any ingredients to suit your taste! You can find exact measurements for these components at the bottom of the article for easy printing.

    How to Make California Roll Cucumber Salad

    Step 1: Prepare the Cucumbers

    First things first, let’s get those cucumbers ready! Use a sharp knife or a mandolin to slice them thinly. If you want an extra crispy crunch, you can lightly salt the slices and let them sit for about five minutes. This little trick helps draw out any excess water. After that, give them a pat dry with some paper towels.

    Step 2: Mix the Main Ingredients

    Now, grab a large bowl and toss in your prepared cucumbers. Next, add the diced avocado and the shredded imitation crab meat. I personally love to mix these ingredients gently, so you keep the creamy texture of the avocado intact. Every bite is a burst of flavor! That combination immediately brings a smile to my face.

    Step 3: Whisk the Dressing

    It’s dressing time! In a small bowl, whisk together the rice vinegar, soy sauce, sesame oil, honey (if you’re using it for sweetness), and ground ginger. Give it a good mix! Adjust the seasoning if you like, especially if you prefer a little more sweetness or tang. It’s all about making it your own!

    Step 4: Combine Everything

    Pour the delicious dressing over the cucumber, avocado, and crab mix. This is where the magic happens! Toss everything gently to ensure every ingredient is coated. The vibrant colors and flavors blend beautifully together. It’s like a tasty party in a bowl!

    Step 5: Serve and Enjoy

    Finally, sprinkle sesame seeds and chopped green onions on top for a lovely finish. You can serve this salad right away or let it chill in the fridge for 15 to 30 minutes for an even cooler taste. Whichever way, your California Roll Cucumber Salad is now ready to impress!

    Tips for Success

    • Use fresh, ripe avocados for the creamiest texture.
    • Slice cucumbers just before serving to keep them crunchy.
    • Experiment with flavored sesame oil for added depth.
    • Feel free to switch imitation crab with real crab or shrimp for a different twist.
    • For a spicy kick, add a dash of sriracha to the dressing!

    Equipment Needed

    • Sharp knife or mandolin – A mandolin gives uniform slices, but a knife works too.
    • Large mixing bowl – Any large bowl will do for tossing ingredients together.
    • Small whisk or fork – Perfect for blending your dressing smoothly.
    • Measuring spoons – Handy for precision with your dressing ingredients.

    Variations of California Roll Cucumber Salad

    • Add diced mango or pineapple for a tropical twist that brightens the flavor.
    • Swap the imitation crab with shredded chicken or tofu for a protein-packed option.
    • Include seaweed salad for an authentic Japanese touch. It adds a delightful umami flavor!
    • Incorporate shredded carrots for crunch and a pop of color. It’s a simple way to boost nutrition.
    • For a vegan alternative, omit the crab and use chickpeas instead. They provide a great source of protein!

    Serving Suggestions for California Roll Cucumber Salad

    • Serve alongside grilled chicken or fish for a complete meal.
    • Pair it with sushi for an exciting Japanese-inspired feast.
    • Accompany with chilled sake or green tea for a refreshing touch.
    • Garnish with sliced radishes or edible flowers for a stunning presentation.
    • Chill in individual bowls for an elegant touch at gatherings.

    FAQs about California Roll Cucumber Salad

    Can I make this salad ahead of time?

    Absolutely! You can prepare the ingredients and mix them without the dressing a few hours in advance. Just add the dressing just before serving to keep everything fresh and crunchy.

    Is this California Roll Cucumber Salad suitable for a gluten-free diet?

    Yes! By using low-sodium soy sauce or a gluten-free alternative, you can easily make this salad gluten-free. It’s a delicious option for everyone!

    What can I substitute for imitation crab in this salad?

    If you’re not a fan of imitation crab, feel free to switch it out for shrimp, shredded chicken, or even tofu. Each brings its own unique flavor!

    How long will leftovers last in the fridge?

    This salad is best enjoyed fresh, but if you have leftovers, they can last in the fridge for one to two days. Just keep in mind that the cucumbers may lose some crunchiness over time.

    Can I add more veggies to the salad?

    Of course! Feel free to experiment by adding shredded carrots, bell peppers, or even snap peas. The more veggies, the more vibrant and nutritious your California Roll Cucumber Salad becomes!

    Final Thoughts

    This California Roll Cucumber Salad is more than just a meal; it’s a delightful escape into a sunny culinary adventure. With each bite, you’ll savor the refreshing crunch of cucumbers, the creaminess of avocado, and the subtle seafood notes of imitation crab. It’s a dish that brings together flavors and textures, creating a beautiful harmony on your plate. Perfect for busy moms like me, it’s quick to whip up and loved by the whole family. So, gather your ingredients and experience the joy of making this vibrant salad. You won’t regret it!


    Print

    clock clock iconcutlery cutlery iconflag flag iconfolder folder iconinstagram instagram iconpinterest pinterest iconfacebook facebook iconprint print iconsquares squares iconheart heart iconheart solid heart solid icon

    Description

    A refreshing salad inspired by the California roll, combining cucumber, avocado, and imitation crab with a light dressing.


    • 2 large cucumbers, thinly sliced
    • 1 ripe avocado, diced
    • 1/2 cup imitation crab meat, shredded
    • 1 tbsp sesame seeds (optional, for garnish)
    • 2 tbsp rice vinegar
    • 1 tbsp soy sauce (low-sodium preferred)
    • 1 tsp sesame oil
    • 1 tsp honey or sugar (optional, for sweetness)
    • 1/2 tsp ground ginger (optional)
    • 1 tbsp chopped green onions (for garnish)

    1. Slice the cucumbers thinly using a sharp knife or mandolin. If desired, lightly salt the cucumbers and let them sit for 5 minutes to draw out excess water, then pat dry with paper towels.
    2. In a large bowl, combine the sliced cucumbers, diced avocado, and shredded imitation crab meat. Gently toss to combine.
    3. In a small bowl, whisk together the rice vinegar, soy sauce, sesame oil, honey, and ground ginger (if using). Adjust seasoning to taste.
    4. Pour the dressing over the cucumber, avocado, and crab mixture. Toss gently to coat all ingredients evenly.
    5. Sprinkle sesame seeds and chopped green onions over the top for garnish. Serve immediately or refrigerate for 15-30 minutes for a cooler taste.

    Notes

    • Optional to salt the cucumbers to reduce water content.
    • Adjust sweetness and saltiness of the dressing based on personal preference.
    • Serve immediately for optimal freshness.
    • Prep Time: 15 minutes
    • Cook Time: 0 minutes
    • Category: Salad
    • Method: Mixing
    • Cuisine: Japanese

    Nutrition

    • Serving Size: 1 serving
    • Calories: 180
    • Sugar: 2g
    • Sodium: 400mg
    • Fat: 10g
    • Saturated Fat: 1.5g
    • Unsaturated Fat: 8.5g
    • Trans Fat: 0g
    • Carbohydrates: 17g
    • Fiber: 5g
    • Protein: 6g
    • Cholesterol: 20mg

    Sharing is caring!

  • Tuna Salad Cottage Cheese Bowl

    Tuna Salad Cottage Cheese Bowl


    Introduction to Tuna Salad Cottage Cheese Bowl

    When life gets hectic, I often find myself craving a meal that’s not only quick but also nourishing. That’s where my Tuna Salad Cottage Cheese Bowl comes to the rescue! It’s one of those delightful recipes that effortlessly combines convenience and health. In just 10 minutes, you’ll have a vibrant, protein-packed dish that tastes fresh and fabulous. Whether you’re managing a busy schedule or simply looking for an easy and satisfying lunch, this bowl is here to satisfy those cravings while keeping your health in check!

    Why You’ll Love This Tuna Salad Cottage Cheese Bowl

    This Tuna Salad Cottage Cheese Bowl ticks all the boxes for busy moms and professionals alike. It’s incredibly easy to whip up, making it a perfect meal for those rushed days. Plus, with its creamy texture and zesty flavor, you won’t feel like you’re sacrificing taste for speed. Whether it’s a light lunch or a quick dinner, this healthy dish is sure to become a staple in your home!

    Ingredients for Tuna Salad Cottage Cheese Bowl

    Here’s what you’ll need to create this delicious dish. I keep things simple with fresh and accessible ingredients that you might already have in your pantry or fridge!

    • Tuna: Canned tuna is the star of the show! It’s packed with protein and a fabulous source of omega-3 fatty acids. Just be sure to drain it well to keep the dish light.
    • Cottage Cheese: This creamy ingredient boosts the protein content and adds a delightful texture. You can use low-fat or full-fat, depending on your preference.
    • Celery: Crunchy and refreshing, diced celery adds a nice contrast to the creamy textures. It’s also a fantastic source of vitamins and fiber.
    • Red Onion: A touch of diced red onion brings a zesty bite to your bowl. If you prefer milder flavors, you can soak the onion in cold water to reduce the sharpness.
    • Bell Peppers: Use any color you love! These sweet, vibrant veggies add color and sweetness while being low in calories.
    • Lemon Juice: A little citrus elevates the flavors and adds a refreshing zing. It also helps in keeping the ingredients fresh.
    • Black Pepper: A dash of black pepper adds warmth and depth to the dish. You can adjust it according to your taste.

    For optional ingredients, consider adding chopped herbs like parsley or dill to enhance the flavor even more. And if you’re in the mood for something different, top it with sliced avocado or a sprinkle of hot sauce!

    Remember, the exact measurements are available towards the bottom of the article for your convenience—feel free to print them out for easy reference!

    How to Make Tuna Salad Cottage Cheese Bowl

    Creating your Tuna Salad Cottage Cheese Bowl is a breeze, taking just a few steps to whip up a nutritious meal. I promise you’ll feel like a culinary rock star in your own kitchen! Let’s dive into the simple process that makes this dish shine.

    Step 1: Combine Key Ingredients

    Start by grabbing a bowl—anything will do. Add the drained tuna and cottage cheese first. The creaminess of the cottage cheese works perfectly with the tuna. Next, toss in the diced celery, red onion, and bell peppers. The vibrant colors will make your bowl look inviting! Mix gently to just combine everything. No need to get too crazy; a soft touch keeps it all intact.

    Step 2: Drizzle with Lemon Juice

    Now, it’s time for that burst of freshness. Drizzle your lemon juice over the combined ingredients. The acid brightens the flavors, giving your tuna salad an irresistible edge. Plus, it keeps everything nice and fresh. I like using fresh lemon juice for the best taste, but bottled works too if you’re short on time. Just a little squeeze goes a long way!

    Step 3: Season and Toss

    Finish off your creation by seasoning it with black pepper. This adds a subtle warmth that elevates the whole dish. Gently toss everything again, making sure the lemon juice and pepper coat all the ingredients evenly. Now, take a moment, inhale the delicious aroma, and get ready to serve your healthy meal! Trust me; your taste buds will thank you!

    Tips for Success

    • Always drain the tuna thoroughly to avoid watery salad.
    • Chill your ingredients beforehand for a refreshing dish.
    • Experiment with spices; a pinch of paprika or garlic powder can add great depth.
    • Make it a meal prep star by storing in airtight containers for a quick grab-and-go option.
    • Pair it with whole-grain crackers for an extra crunch!

    Equipment Needed

    • Bowl: Any mixing bowl will do! A larger bowl is handy for combining everything.
    • Fork: Use a fork to mix your ingredients gently and flake the tuna.
    • Cutting Board and Knife: Essential for dicing your veggies with ease.
    • Measuring Cups: Helpful if you want precise ingredient amounts; otherwise, eyeballing works too!

    Variations

    • Spicy Tuna Salad: Add a dollop of sriracha or hot sauce for an exciting kick!
    • Greek Twist: Incorporate olives and feta cheese for a Mediterranean flair.
    • Vegan Option: Substitute tuna with chickpeas and use a vegan cottage cheese alternative.
    • Herbs Galore: Try mixing in fresh herbs like cilantro or basil for added depth of flavor.
    • Fruit Fusion: Add diced apples or grapes for a sweet and savory combo.

    Serving Suggestions

    • Serve your Tuna Salad Cottage Cheese Bowl on a bed of mixed greens for a colorful presentation.
    • Pair it with whole-grain crackers or pita chips for a satisfying crunch.
    • A glass of iced lemon water complements the bowl perfectly.
    • For a fun twist, serve in avocado halves for added creaminess.

    FAQs about Tuna Salad Cottage Cheese Bowl

    How long does Tuna Salad Cottage Cheese Bowl last in the fridge?

    This delightful dish stays fresh for about 2 to 3 days in the fridge. Just make sure it’s stored in an airtight container to maintain its flavors. Even on day two, the flavors meld beautifully!

    Can I make this salad ahead of time?

    Absolutely! Prep the ingredients in advance and store them separately. Combine before serving to retain that fresh taste. It’s great for meal prep for busy days!

    What else can I add to my Tuna Salad Cottage Cheese Bowl?

    Feel free to get creative! You can toss in chopped pickles, capers, or even some diced apple for a punch of flavor. Every addition can make it uniquely yours!

    Is this Tuna Salad Cottage Cheese Bowl gluten-free?

    Yes, it is! As long as you are mindful of the crackers or sides, this bowl is a gluten-free option. Just ensure that any added ingredients align with your dietary needs.

    Can I eat this Tuna Salad Cottage Cheese Bowl for breakfast?

    Why not? The protein-packed goodness makes it a satisfying option to kickstart your day. Serve it with whole-grain toast for a hearty breakfast!

    Final Thoughts

    Finding time to prepare a healthy meal can feel like a race against the clock, but my Tuna Salad Cottage Cheese Bowl makes it so much easier. It’s a delightful blend of flavors and textures, giving you that energy boost without the fuss. Every bite feels like a hearty hug, nourishing both body and soul. Plus, it’s versatile enough to keep things interesting day after day. Trust me, when you make this dish, you’re not just feeding your family—you’re creating joy in every spoonful. So grab your ingredients and enjoy the simple pleasure of cooking something truly wholesome!


    Print

    clock clock iconcutlery cutlery iconflag flag iconfolder folder iconinstagram instagram iconpinterest pinterest iconfacebook facebook iconprint print iconsquares squares iconheart heart iconheart solid heart solid icon

    Description

    A quick and healthy tuna salad bowl featuring cottage cheese, perfect for a nutritious meal.


    • 1 can tuna, drained
    • 1/2 cup cottage cheese
    • 1/4 cup diced celery
    • 1/4 cup diced red onion
    • 1/4 cup diced bell peppers
    • 1 tablespoon lemon juice
    • 1/2 teaspoon black pepper

    1. In a bowl, combine tuna, cottage cheese, celery, red onion, and bell peppers.
    2. Drizzle with lemon juice and season with black pepper.
    3. Toss gently to combine and serve immediately.

    Notes

    • For extra flavor, consider adding chopped herbs like parsley or dill.
    • This salad can be served on its own or with crackers.
    • Prep Time: 10 minutes
    • Cook Time: 0 minutes
    • Category: Salad
    • Method: No-cook
    • Cuisine: American

    Nutrition

    • Serving Size: 1 serving
    • Calories: 250
    • Sugar: 5g
    • Sodium: 600mg
    • Fat: 10g
    • Saturated Fat: 4g
    • Unsaturated Fat: 6g
    • Trans Fat: 0g
    • Carbohydrates: 15g
    • Fiber: 2g
    • Protein: 30g
    • Cholesterol: 70mg

    Sharing is caring!

  • Key Lime Pie Rice Krispie Treats

    Key Lime Pie Rice Krispie Treats


    Introduction to Key Lime Pie Rice Krispie Treats

    Hey there, busy moms and professionals! If you’re like me, juggling work, family, and everything in between, you’ll love this recipe for Key Lime Pie Rice Krispie Treats. It’s a delightful twist on a classic dessert, marrying the refreshing zest of key lime pie with the crunchy goodness of Rice Krispies. Think of it as a quick solution for those hectic days when you want to whip up something special without spending hours in the kitchen. This treat is sure to impress your loved ones while being effortless to make!

    Why You’ll Love This Key Lime Pie Rice Krispie Treats

    These Key Lime Pie Rice Krispie Treats are a game-changer for your dessert lineup. First, they come together in under 30 minutes, making them the perfect quick fix. Plus, the bright, tangy flavor of key lime pairs beautifully with the sweet marshmallows and crunchy Rice Krispies. It’s like a delicious vacation in every bite! Trust me; your family will be clamoring for seconds, and you’ll be the star of dessert time!

    Ingredients for Key Lime Pie Rice Krispie Treats

    Gathering your ingredients is half the fun! These Key Lime Pie Rice Krispie Treats come together with a few staple items that you might already have in your pantry. Here’s what you’ll need:

    • Rice Krispies cereal: This classic cereal gives the treats their signature crunch. Any brand will do, but the original Rice Krispies have that perfect texture.
    • Mini marshmallows: They provide that delightful gooeyness. Can’t find mini ones? Regular marshmallows cut into smaller pieces work too!
    • Unsalted butter: It adds richness and helps melt the marshmallows. Unsalted is preferred to control the overall saltiness of the treat.
    • Key lime juice: Fresh or bottled, this is the star of the show! It imparts that iconic tangy flavor. If you can’t find key limes, regular lime juice makes a great substitute.
    • Key lime zest: Adds another layer of bright flavor. If you’re short on fresh limes, just skip it, but I highly recommend it for that extra zing.
    • Graham cracker crumbs: These bring the classic pie crust flavor. Crush some graham crackers yourself or buy them ready-made for convenience.
    • White chocolate chips: For a sweet drizzle on top, white chocolate complements the key lime wonderfully. Dark or milk chocolate wouldn’t hurt either if that’s what you have.
    • Coconut oil: Just a bit helps the chocolate drizzle to be nice and smooth. If you’re out, you can skip this step, but it really helps the consistency!
    • Optional Add-ins: Feel free to jazz it up! Coconut flakes add a tropical twist, crushed nuts bring crunch, and a few drops of green food coloring can elevate the visual appeal.

    Curious about the exact quantities? Not to worry! They’re at the bottom of the article and ready for printing when you’re set to bake!

    How to Make Key Lime Pie Rice Krispie Treats

    Now, let’s dive into the fun part—making these delicious Key Lime Pie Rice Krispie Treats! The process is straightforward and rewarding. Follow my steps, and soon, you’ll be enjoying a sweet treat that tastes like sunshine!

    Step 1: Melt Butter and Marshmallows

    To start, grab a large saucepan and melt the unsalted butter over low heat. Keep an eye on it, so it doesn’t brown. Once the butter is melted, add the mini marshmallows. Stir the mixture continuously until the marshmallows become smooth and gooey. The buttery marshmallow mix forms the glue for our treats—just heavenly!

    Step 2: Add Key Lime Flavor

    Here comes the fun! Stir in the key lime juice and zest, mixing well. This step truly makes your Key Lime Pie Rice Krispie Treats shine with flavor! The tangy lime adds that refreshing zest we crave. If you’re feeling adventurous, consider adding a few drops of green food coloring for that pop of color!

    Step 3: Combine with Rice Krispies

    In a large mixing bowl, pour the crispy Rice Krispies cereal. Gently fold in the melted marshmallow mixture, making sure every piece is coated. Use a silicone spatula or your hands (be careful, it might be hot!) to mix well. This is where the magic happens, transforming ordinary cereal into a key lime delight!

    Step 4: Ready the Mixture

    Once everything is nicely combined, take a parchment-lined baking dish—this helps with easy removal later. Spread the mixture evenly into the dish. Press it down gently with your hands or a spatula; just don’t over-pack it. We want these treats to stay light and airy!

    Step 5: Add Graham Cracker Crumbs

    Next, sprinkle a generous layer of graham cracker crumbs on top of your rice Krispie mixture. This gives the impression of that famous pie crust and adds a delightful crunch. Feel free to get creative—layer some coconut flakes or chopped nuts here if you like!

    Step 6: Prepare White Chocolate Drizzle

    To finish off our masterpiece, prepare a drizzle of white chocolate. Melt the white chocolate chips with a bit of coconut oil in the microwave, stirring every 30 seconds until smooth. Once melted, grab a spoon and drizzle the chocolate generously over the top. Pure bliss!

    Step 7: Chill and Slice Treats

    Finally, pop the dish in the refrigerator for about 30 minutes. This will help the treats set perfectly. After they chill, slice them into squares and serve. These Key Lime Pie Rice Krispie Treats are great for any occasion, or just because you deserve a sweet reward!

    Tips for Success

    • Use fresh key limes if possible; the flavor is unbeatable.
    • Be gentle when mixing the Rice Krispies; over-mixing can lead to tough treats.
    • For a clean cut, use a sharp knife warmed under hot water when slicing.
    • Store the treats in an airtight container to keep them fresh for longer.
    • Feel free to experiment with flavors; adding a splash of coconut extract works wonders!

    Equipment Needed

    • Large saucepan: Any heavy-bottomed pot will do, but a non-stick pan is ideal for easy cleanup.
    • Mixing bowl: A large mixing bowl ensures you have space to combine everything without spills.
    • Spatula: A silicone or rubber spatula helps fold in the ingredients smoothly.
    • Parchment paper: Use it to line your baking dish for effortless removal.
    • Microwave-safe bowl: Essential for melting the chocolate; glass works great!

    Variations of Key Lime Pie Rice Krispie Treats

    • Coconut Delight: Add ½ cup of coconut flakes for a tropical twist that enhances the key lime flavor.
    • Nuts about Key Lime: Include ¼ cup of crushed nuts, like pecans or macadamia nuts, for that extra crunch and nutty flavor.
    • Chocolate Lovers: Instead of white chocolate, try dark chocolate chips for a richer drizzle that pairs wonderfully with the tangy lime.
    • Build Your Own: Personalize your treats with favorite extras like dried fruit, M&Ms, or even a sprinkle of cinnamon for warmth.
    • Gluten-Free Option: Use gluten-free crispy rice cereal and ensure that your graham cracker crumbs are also gluten-free!

    Serving Suggestions for Key Lime Pie Rice Krispie Treats

    • Pair with a refreshing glass of iced tea or lemonade to enhance the citrus flavor.
    • Serve alongside fresh fruit like berries or pineapple for a vibrant, colorful presentation.
    • Plating on a fun, colorful platter adds a festive touch to any gathering.
    • Top with a dollop of whipped cream or a drizzle of lime sauce for an extra treat!
    • Consider garnishing with a sprinkle of key lime zest for an eye-catching finish.

    FAQs about Key Lime Pie Rice Krispie Treats

    Can I make these Key Lime Pie Rice Krispie Treats ahead of time?

    Absolutely! These treats can be made a day or two in advance. Just store them in an airtight container in the fridge to keep them fresh. They’ll still taste amazing when you serve them!

    What if I can’t find key limes?

    No worries! Regular limes do the trick beautifully. While the flavor might be slightly different, it will still give you that zesty kick. Just remember to use fresh juice for the best results!

    How do I store leftovers?

    After your gathering, you can store leftover Key Lime Pie Rice Krispie Treats in an airtight container. They can be kept at room temperature for a couple of days or in the fridge for a week. Just don’t let them sit too long—they’re too delicious for that!

    Can I change the consistency of the treats?

    If you prefer softer treats, try adding a little more marshmallow mixture. Conversely, if you want them firmer, you can reduce the marshmallows slightly. Adjustments give you control over the treat’s texture!

    What can I use instead of white chocolate?

    If white chocolate isn’t your favorite, try drizzling dark or milk chocolate on top! Each type brings a different flavor to the treats, creating a delightful twist. Your taste buds will thank you!

    Final Thoughts on Key Lime Pie Rice Krispie Treats

    Making Key Lime Pie Rice Krispie Treats isn’t just about whipping up a dessert; it’s about sharing joy and creating memories with those you love. This delightful recipe combines nostalgia and innovation, resulting in a treat that reflects sunny days and happy gatherings. Each bite bursts with refreshing flavors, bringing smiles all around the table. Plus, it’s a quick and easy recipe that fits seamlessly into our busy lives. So whether you’re celebrating a special occasion or just treating yourself, these treats will surely brighten your day and satisfy your sweet cravings!


    Print

    clock clock iconcutlery cutlery iconflag flag iconfolder folder iconinstagram instagram iconpinterest pinterest iconfacebook facebook iconprint print iconsquares squares iconheart heart iconheart solid heart solid icon

    Description

    Delicious and refreshing Key Lime Pie Rice Krispie Treats that combine the classic flavors of key lime pie with the crunchy texture of Rice Krispies.


    • 5 cups Rice Krispies cereal
    • 10 cups mini marshmallows
    • 5 tablespoons unsalted butter
    • 1/2 cup key lime juice fresh or bottled
    • 2 tablespoons key lime zest
    • 1 cup graham cracker crumbs
    • 1 cup white chocolate chips
    • 1/2 teaspoon coconut oil for smooth chocolate drizzle
    • Optional Add-ins: ½ cup coconut flakes, ¼ cup crushed nuts, A few drops green food coloring

    1. In a large saucepan, melt the butter over low heat. Add marshmallows and stir continuously until smooth.
    2. Stir in key lime juice and lime zest.
    3. Pour the melted marshmallow mixture over the Rice Krispies cereal in a large bowl. Fold gently until fully coated.
    4. Spread the mixture evenly into a parchment-lined baking dish. Press gently without over-packing.
    5. Sprinkle graham cracker crumbs on top.
    6. Melt white chocolate chips with coconut oil, drizzle over the top, and refrigerate for 30 minutes.
    7. Slice into squares and enjoy!

    Notes

    • For added flavor, consider including coconut flakes or crushed nuts as optional toppings.
    • Adjust the green food coloring to achieve the desired shade if using.
    • Store leftover treats in an airtight container for freshness.
    • Prep Time: 15 minutes
    • Cook Time: 10 minutes
    • Category: Dessert
    • Method: No-Bake
    • Cuisine: American

    Nutrition

    • Serving Size: 1 square
    • Calories: 180
    • Sugar: 15g
    • Sodium: 60mg
    • Fat: 7g
    • Saturated Fat: 4g
    • Unsaturated Fat: 0g
    • Trans Fat: 0g
    • Carbohydrates: 27g
    • Fiber: 0g
    • Protein: 1g
    • Cholesterol: 15mg

    Sharing is caring!