Blog

  • Mediterranean Steak Bowl

    Mediterranean Steak Bowl


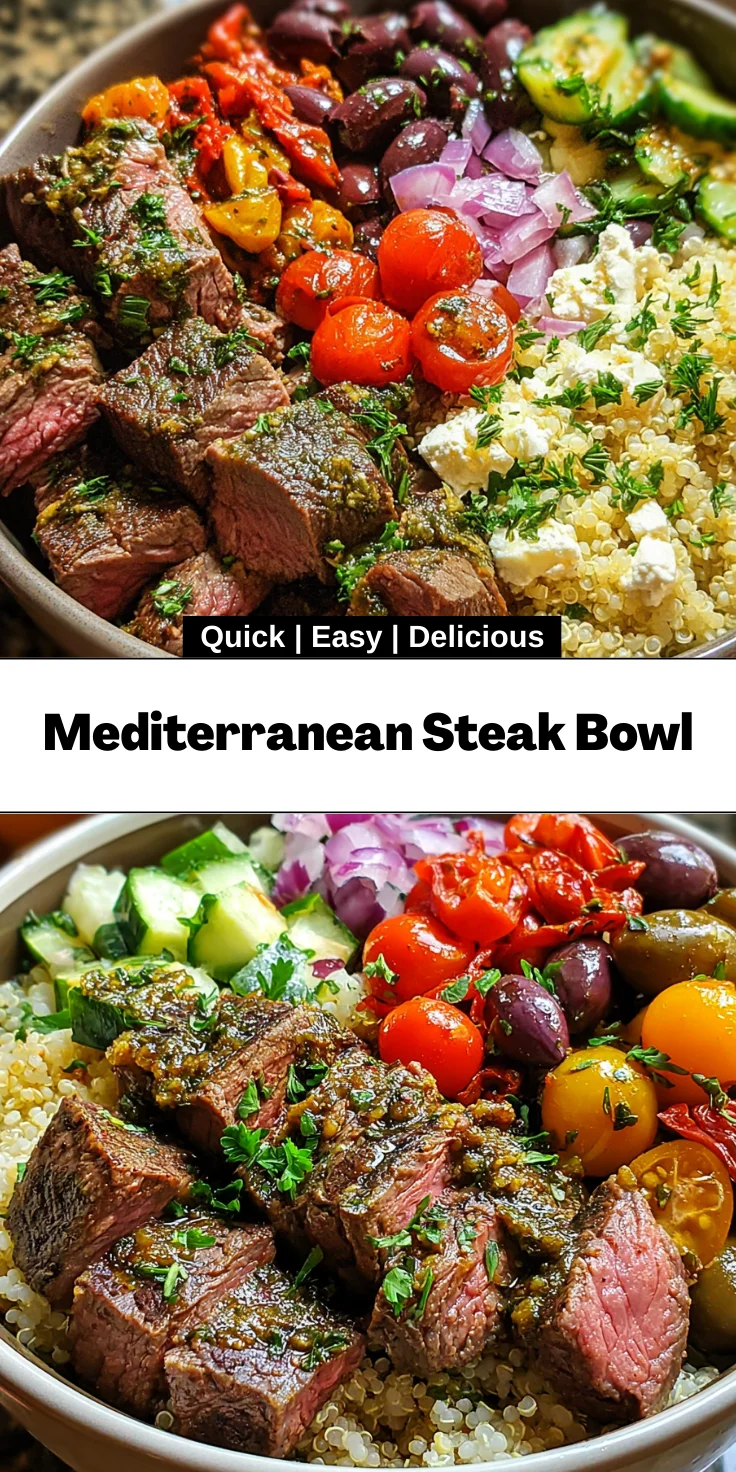
    Introduction to Mediterranean Steak Bowl

    Welcome, fellow food lovers! If you’re searching for a delightful and vibrant dish that meets the demands of a busy day, look no further than the Mediterranean Steak Bowl. I know how hectic life can get, especially when you’re juggling work, kids, and everything in between. This recipe is not only quick to prepare but also loaded with flavor and wholesome ingredients. With tender sirloin, fresh veggies, and a tangy vinaigrette, it’s a meal that will impress your loved ones while nourishing your body. Let’s dive into this culinary adventure together!

    Why You’ll Love This Mediterranean Steak Bowl

    This Mediterranean Steak Bowl checks all the boxes for a perfect meal. It’s easy to whip up, taking just 30 minutes from start to finish! The vibrant flavors will dance on your palate, making healthy eating a joy instead of a chore. Plus, it’s highly customizable, so you can cater to picky eaters or dietary preferences, ensuring everyone at your table leaves happy!

    Ingredients for Mediterranean Steak Bowl

    Gathering fresh ingredients is the first step to building your Mediterranean Steak Bowl masterpiece. Here’s what you’ll need:

    • Sirloin steak: This cut is perfect for its tenderness and flavor. You can substitute with flank steak for a leaner option.
    • Olive oil: A staple in Mediterranean cooking, it enhances flavor and keeps the steak juicy. Feel free to use avocado oil if you’re looking for a different taste.
    • Dried oregano: This herb adds an aromatic punch that complements the other ingredients beautifully.
    • Dried thyme: Earthy and fragrant, thyme pairs well with the steak and veggies, bringing depth to the dish.
    • Garlic powder: For a quick burst of flavor, garlic powder is a lifesaver. Fresh garlic is a great alternative if you have it on hand.
    • Salt and black pepper: These essential seasonings enhance the natural flavors of the steak and other ingredients. Don’t hesitate to adjust for your taste preferences!
    • Cooked quinoa: This nutty grain is both nutritious and filling. You can swap it for brown rice or couscous if you prefer.
    • Chopped cucumber: Fresh and crisp, cucumbers add a refreshing crunch and coolness to your bowl. Zucchini could work as an alternative.
    • Chopped tomatoes: Juicy tomatoes contribute sweetness and acidity. Cherry tomatoes are a fun substitute, bursting with flavor!
    • Kalamata olives: Their briny taste enhances the flavor profile of the bowl. Green olives can be used if you prefer a milder flavor.
    • Crumbled feta cheese: This tangy cheese brings creaminess and pairs perfectly with the other ingredients. If you’re looking for a dairy-free option, try almond feta!
    • Sun-dried tomatoes: These add a concentrated sweetness and depth. You can omit them if you’re not a fan, but they’re worth a try!
    • Thinly sliced red onion: Sharp and slightly sweet, red onions elevate the flavor. You can use green onions for a milder crunch.
    • Chopped fresh parsley: This herb not only garnishes your dish but also adds freshness and beauty to the bowl.
    • Lemon juice: The zesty acidity brightens up every bite. Lime juice can be a great substitute if you want a twist.
    • Dijon mustard: This gives the vinaigrette a flavor boost. Honey mustard works if you’re looking for something sweeter.

    Exact measurements for each ingredient can be found towards the bottom of the article, along with a printable version of the recipe.

    How to Make Mediterranean Steak Bowl

    Now that you have all your ingredients gathered, let’s dive into the cooking process! I promise, making your Mediterranean Steak Bowl is as easy as pie. Follow these clear steps, and you’ll have a delightful meal ready in no time.

    Preparing the Steak

    First, take your sirloin steak and cut it into 1-inch cubes. This allows for even cooking, ensuring each bite is tender and juicy. Next, place the steak cubes in a medium bowl. Drizzle olive oil over the meat, then sprinkle in dried oregano, thyme, garlic powder, salt, and black pepper.

    Mix everything well to coat the steak cubes. It’s like giving the meat a warm hug of flavor! Let this marinate for a few minutes while you heat up the skillet.

    Cooking the Steak

    Heat a large skillet over medium-high heat. Once it’s hot, add the seasoned steak cubes to the skillet. You’ll hear that wonderful sizzle! Cook the steak cubes for about 3 to 5 minutes per side, or until they’re cooked to your desired doneness. I usually aim for medium-rare, which keeps the steak nice and juicy.

    Once the steak is cooked, remove it from the skillet and let it rest for about 5 minutes. This allows the juices to redistribute, making each bite extra delicious. When it’s time, slice the steak into smaller pieces for easy serving.

    Making the Vinaigrette

    While your steak is resting, let’s whip up that tangy lemon-herb vinaigrette! In a small bowl, combine olive oil, lemon juice, chopped parsley, Dijon mustard, salt, and black pepper. Whisk this mixture until it’s smooth and well combined. This vinaigrette is the magic that brings everything together!

    Assembling the Bowl

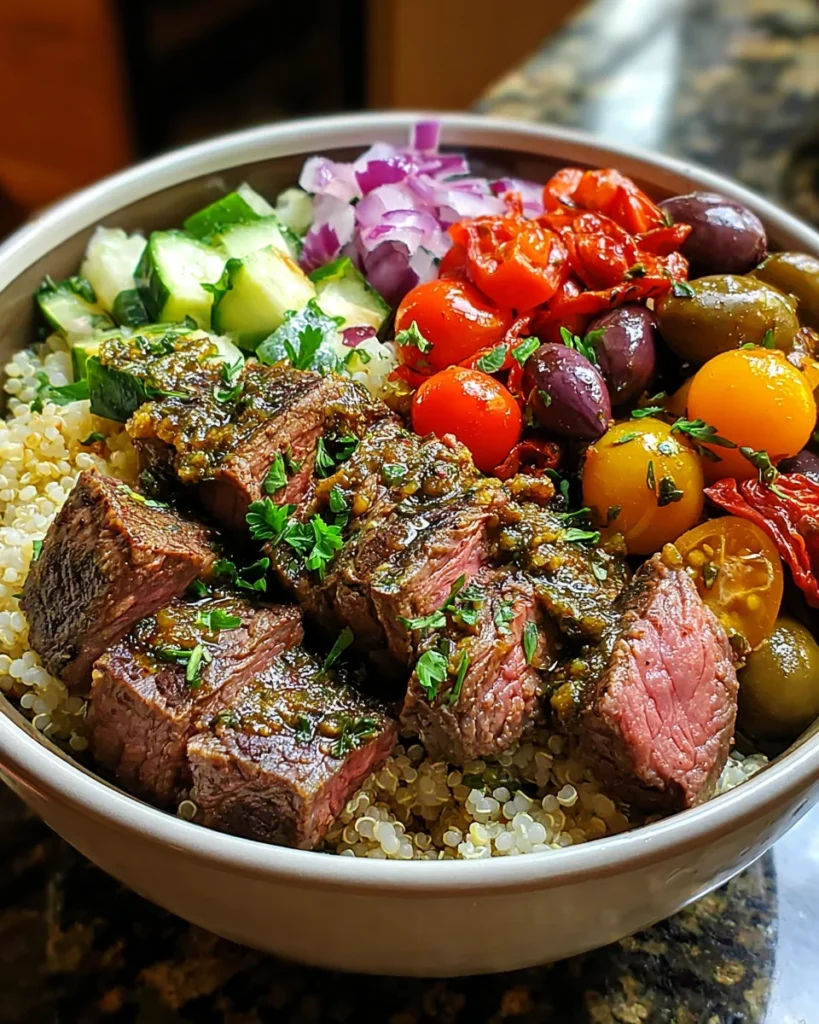
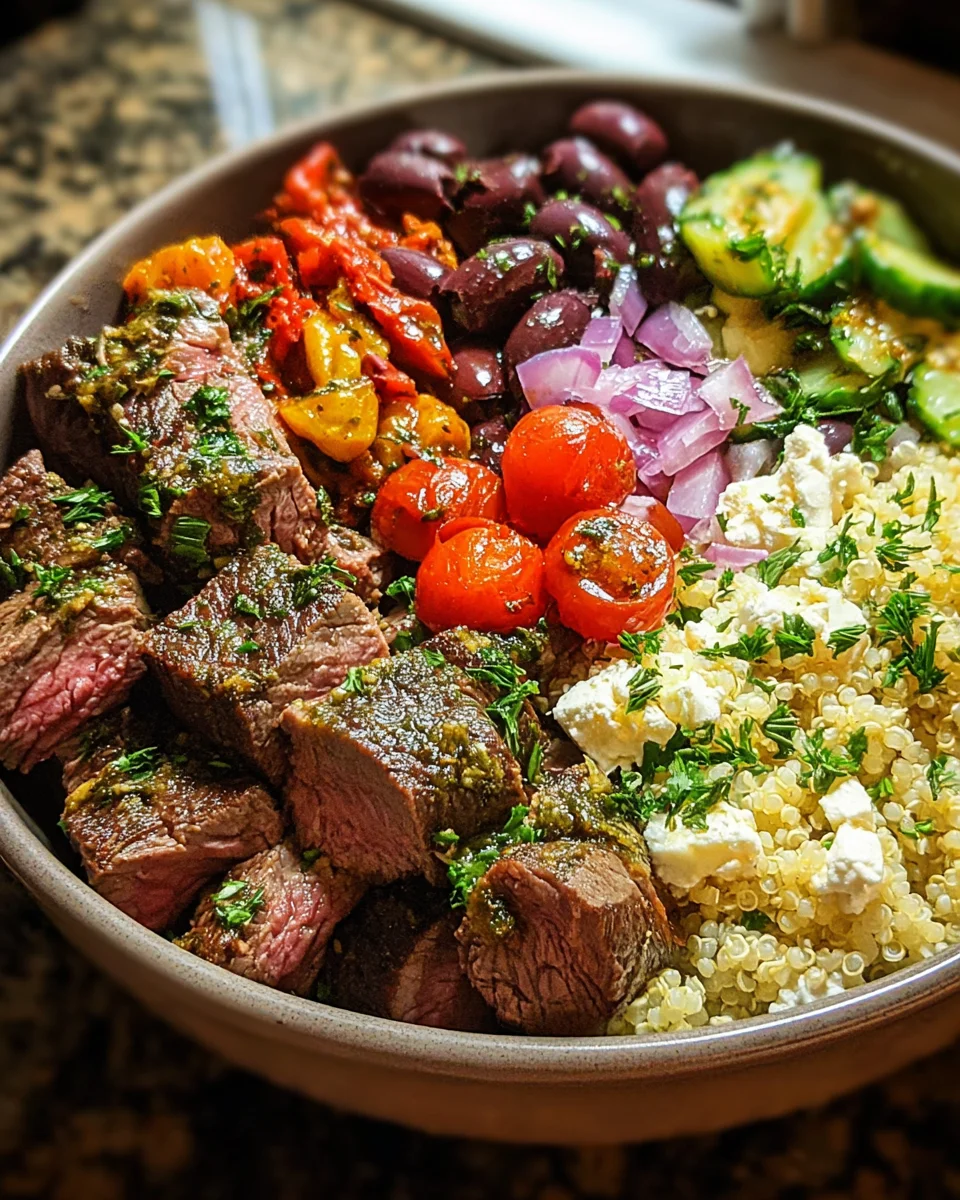
    Now comes the fun part—assembling your Mediterranean Steak Bowl! Start by dividing the cooked quinoa among four bowls. On top of each quinoa base, add chopped cucumber, diced tomatoes, halved Kalamata olives, crumbled feta cheese, chopped sun-dried tomatoes, and rings of red onion.

    Finally, arrange the sliced steak on top, then drizzle the lemon-herb vinaigrette over each bowl. Finish with a sprinkle of fresh parsley for that burst of color and flavor. Serve it up, and watch everyone rave about this beautiful meal!

    Tips for Success

    • For even cooking, let the steak sit at room temperature for about 30 minutes before cooking.
    • Don’t overcrowd the skillet; it helps achieve a nice sear on the steak.
    • Feel free to customize your bowl with seasonal vegetables or your favorite salad greens.
    • Store leftover vinaigrette in the fridge for up to a week—it’s great on other salads!
    • Garnish with extra herbs for a fresh and vibrant finish.

    Equipment Needed

    • Large skillet: A non-stick skillet works wonders for searing the steak without sticking.
    • Medium bowl: Great for mixing your steak marinade; any mixing bowl will do.
    • Whisk: Handy for blending the vinaigrette; a fork can serve as a substitute.
    • Cutting board and knife: Essential for chopping veggies and slicing the steak.
    • Measuring cups and spoons: Useful for precise ingredient measurements, though you can estimate visually if you’re in a hurry.

    Variations

    • Grains: Swap quinoa for brown rice, couscous, or even farro for different textures.
    • Vegetarian option: Replace steak with grilled chickpeas or marinated tofu for a plant-based twist.
    • Extra veggies: Try adding roasted bell peppers, artichokes, or sautéed spinach for added nutrients and flavors.
    • Spicy kick: Toss in some red pepper flakes or diced jalapeños to the steak for heat.
    • Herb variations: Experiment with fresh basil or mint in the vinaigrette for a refreshing twist.
    • Cheese alternatives: Use goat cheese or nutritional yeast for a different flavor profile, especially for dairy-free needs.

    Serving Suggestions

    • Pair your Mediterranean Steak Bowl with a light, crisp white wine like Sauvignon Blanc for a delightful pairing.
    • Serve it alongside a side of garlic bread or warm pita for a comforting touch.
    • Top with a dollop of tzatziki sauce for extra flavor.
    • Add a simple arugula salad with lemon vinaigrette for a refreshing crunch.
    • For vibrant presentation, serve in clear glass bowls to showcase the colorful ingredients!

    FAQs about Mediterranean Steak Bowl

    As with any beloved recipe, you might have some questions swirling around in your mind. Here are a few common queries about the Mediterranean Steak Bowl, along with some tasty answers!

    Can I make this dish ahead of time?

    Absolutely! You can prepare the ingredients and store them separately in the fridge. Just assemble your bowls when you’re ready to eat for the freshest flavor!

    What can I substitute for quinoa?

    If quinoa isn’t your favorite, you can easily swap it for brown rice, couscous, or even a bed of mixed greens for a lighter option.

    How can I store leftovers?

    To keep your Mediterranean Steak Bowl fresh, store it in an airtight container in the fridge. Consume within 3-4 days for the best taste.

    Is the Mediterranean Steak Bowl gluten-free?

    Yes! This dish is naturally gluten-free, making it a fantastic choice for anyone avoiding gluten in their diet.

    Can I adjust the spiciness?

    Of course! If you love a little heat, add some red pepper flakes to the steak marinade or include some sliced jalapeños atop your bowl. It’s all about your palate!

    Final Thoughts

    Creating a Mediterranean Steak Bowl is more than just cooking; it’s about bringing joy to the table. The burst of flavors, colors, and textures in each bite is sure to delight everyone in your family. Plus, I love that it’s a dish that can easily adapt to different tastes or dietary needs. Whether you’re rushed after a long day or want to impress guests, this recipe has you covered. Enjoying this vibrant bowl is a celebration of fresh ingredients and heartwarming moments. So, gather your loved ones, and dive into a fantastic culinary experience together!
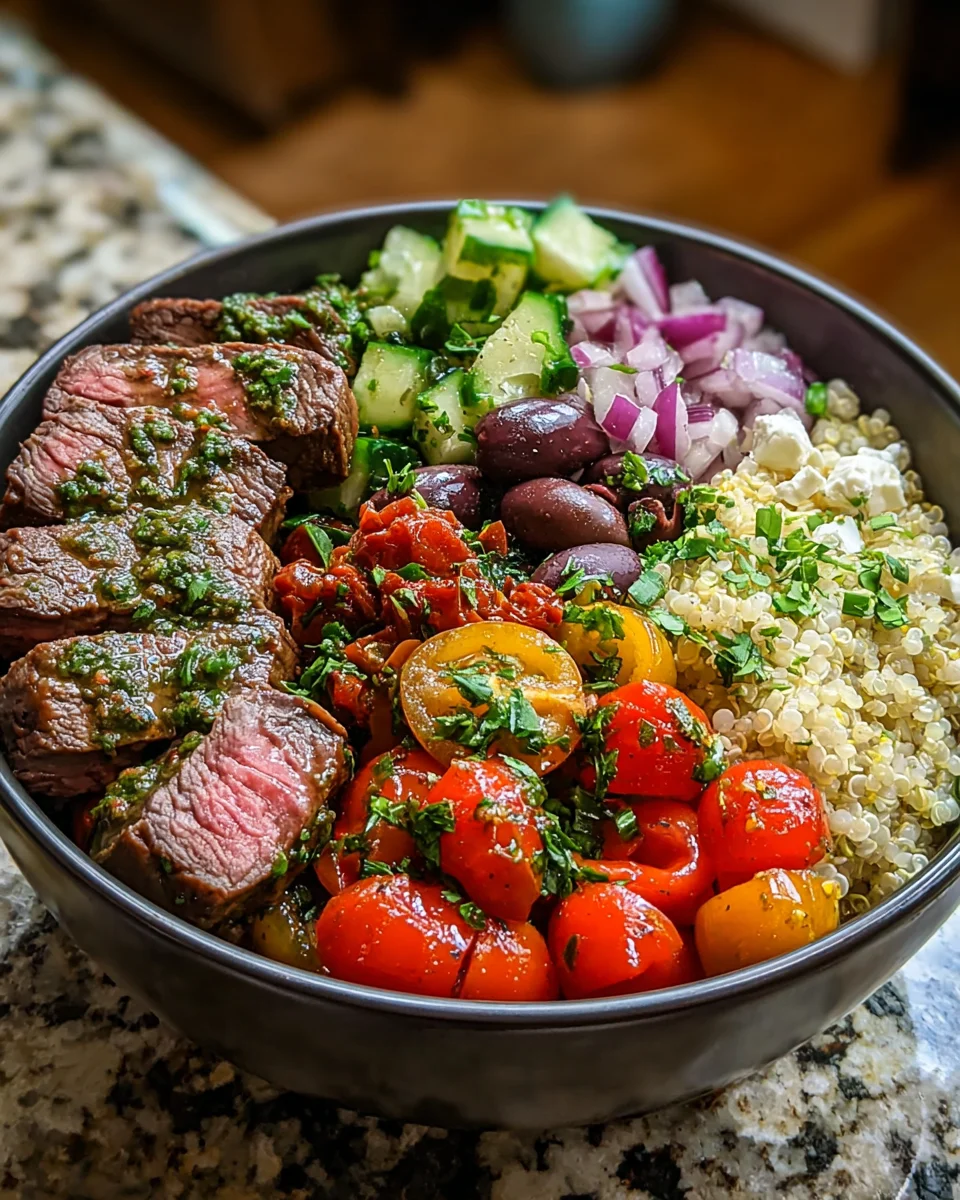

    Print

    clock clock iconcutlery cutlery iconflag flag iconfolder folder iconinstagram instagram iconpinterest pinterest iconfacebook facebook iconprint print iconsquares squares iconheart heart iconheart solid heart solid icon

    Description

    A flavorful Mediterranean Steak Bowl featuring tender sirloin steak, fresh vegetables, and a zesty vinaigrette, perfect for a nutritious meal.


    • 1 lb Sirloin steak, cut into 1-inch cubes
    • 1 tbsp Olive oil
    • 1 tsp Dried oregano
    • 1 tsp Dried thyme
    • 1/2 tsp Garlic powder
    • 1/2 tsp Salt
    • 1/4 tsp Black pepper
    • 1 cup Cooked quinoa
    • 1 cup Chopped cucumber
    • 1 cup Chopped tomatoes
    • 1/2 cup Kalamata olives, halved
    • 1/2 cup Crumbled feta cheese
    • 1/4 cup Sun-dried tomatoes, oil-packed, drained and chopped
    • 2 tbsp Thinly sliced red onion
    • 2 tbsp Chopped fresh parsley (for garnish)
    • 1/4 cup Olive oil (for vinaigrette)
    • 2 tbsp Lemon juice
    • 1 tbsp Chopped fresh parsley (for vinaigrette)
    • 1 tsp Dijon mustard
    • 1/4 tsp Salt (for vinaigrette)
    • 1/4 tsp Black pepper (for vinaigrette)

    1. In a medium bowl, toss the steak cubes with olive oil, oregano, thyme, garlic powder, salt, and pepper. Mix well to coat.
    2. Heat a large skillet over medium-high heat. Add the steak cubes and cook, stirring occasionally, until cooked to your desired doneness (about 3-5 minutes per side for medium-rare).
    3. Remove the steak from the skillet and let it rest for 5 minutes before cutting into smaller pieces.
    4. While the steak rests, whisk together the olive oil, lemon juice, parsley, Dijon mustard, salt, and pepper in a small bowl to make the vinaigrette.
    5. Divide the cooked quinoa among four bowls. Top with cucumber, tomatoes, olives, feta cheese, sun-dried tomatoes, and red onion.
    6. Add the sliced steak to each bowl.
    7. Drizzle the lemon-herb vinaigrette over each bowl. Garnish with fresh parsley and serve immediately.

    Notes

    • For best results, use grass-fed steak for enhanced flavor.
    • You can customize the vegetables based on your preference or seasonal availability.
    • This dish can be made ahead of time; just keep the components separate until ready to serve.
    • Prep Time: 15 minutes
    • Cook Time: 15 minutes
    • Category: Main Course
    • Method: Skillet cooking
    • Cuisine: Mediterranean

    Nutrition

    • Serving Size: 1 bowl
    • Calories: 550
    • Sugar: 4g
    • Sodium: 800mg
    • Fat: 30g
    • Saturated Fat: 7g
    • Unsaturated Fat: 18g
    • Trans Fat: 0g
    • Carbohydrates: 40g
    • Fiber: 6g
    • Protein: 35g
    • Cholesterol: 80mg

    Sharing is caring!

  • Tasty Spicy Cajun Shrimp

    Tasty Spicy Cajun Shrimp


    Introduction to Tasty Spicy Cajun Shrimp

    Hey there, fellow home cooks! If you’re like me, you’re always on the lookout for quick, delicious meals that won’t leave you frazzled. Well, let me introduce you to my Tasty Spicy Cajun Shrimp! This dish is like a party for your taste buds, bursting with bold flavors and just the right amount of spice. Perfect for a busy weeknight or an effortless weekend gathering, it not only cooks up in about 40 minutes but also brings that much-needed zing to your dinner table. Dive into this flavorful adventure with me!

    Why You’ll Love This Tasty Spicy Cajun Shrimp

    This Tasty Spicy Cajun Shrimp recipe is a lifesaver for busy moms and professionals like us. It’s incredibly easy to whip up, bursting with flavors that make every bite feel like a mini-vacation. Plus, it comes together in just about 40 minutes! Whether you’re cooking for yourself or a crowd, this dish is sure to impress and bring smiles all around the table.

    Ingredients for Tasty Spicy Cajun Shrimp

    Gathering the ingredients for your Tasty Spicy Cajun Shrimp is part of the fun! Here’s what you’ll need:

    • Spice Mix: This will include paprika, chili powder, dried oregano, cumin, garlic powder, brown sugar, salt, and pepper. These spices are the heart and soul, creating that delightful Cajun kick.
    • Shrimp: Fresh or frozen, peeled shrimp is the star of this dish. If you’re using frozen, make sure to thaw them beforehand.
    • Olive Oil: A little olive oil adds richness and helps achieve that perfect sear.
    • Garlic: Freshly chopped garlic will infuse the shrimp with an irresistibly aromatic flavor.
    • Garnish: Fresh cilantro and lime wedges enhance the dish beautifully, adding brightness and freshness.

    Don’t worry; the specific quantities are listed at the end for easy printing. Let’s get cooking!

    How to Make Tasty Spicy Cajun Shrimp

    Now that you have all your ingredients, let’s dive into the cooking process! I promise, it’s as simple as making a cup of coffee. Follow these steps to bring your Tasty Spicy Cajun Shrimp to life!

    Step 1: Prepare the Cajun Spice Mix

    Start by grabbing a small bowl. Combine all the spices: paprika, chili powder, oregano, cumin, garlic powder, brown sugar, salt, and pepper. Whisk it together until it’s a beautiful, vibrant mix. This could be the moment you realize you’ve got magic in your hands!

    Step 2: Coat the Shrimp

    Next, in a larger bowl, toss your peeled shrimp with the Cajun spice mix. Get in there with your hands (it’s okay to make a mess)! Make sure the shrimp are evenly covered. Let them rest for about 30 minutes. This little wait allows the flavors to mingle and develop. It’s worth every second, I promise!

    Step 3: Sauté the Shrimp

    Now, heat a tablespoon of olive oil in a non-stick skillet over medium heat. When the oil is hot, add the spiced shrimp to the pan. Cook them for about two minutes on each side. You’ll know they’re ready when they turn a gorgeous pink color. It’s like watching fireworks explode with flavor!

    Step 4: Add Garlic and Garnish

    Just when you think it can’t get better, toss in the finely chopped garlic. Stir it all for about 30 seconds; beware, your kitchen will smell like heaven! Once fragrant, take your flavorful creation off the heat. Sprinkle fresh cilantro on top and serve it up with lime wedges for that extra zing. Enjoy the burst of flavors as you bite into this Cajun delight!

    Tips for Success

    • Make sure your shrimp is thoroughly thawed and patted dry; this helps them sear beautifully.
    • For a stronger kick, feel free to add cayenne pepper to your spice mix.
    • Experiment with the spice mix; adjust it to your taste for a perfect balance.
    • Serving it over rice or with a side salad makes for an amazing meal.
    • Always serve with lime wedges; they brighten up the dish remarkably!

    Equipment Needed

    • Non-stick skillet or frying pan: If you don’t have one, a regular pan will work; just use a bit more oil.
    • Mixing bowls: Any sizes will do; use what you have on hand.
    • Measuring spoons: An ordinary tablespoon will serve just as well.
    • Spatula: A wooden spoon or tongs can also be handy for flipping the shrimp.

    Variations

    • Add diced bell peppers or onions for a colorful, veggie-packed version.
    • Swap shrimp for scallops or chicken for a different protein option.
    • Make it a Cajun pasta dish by tossing the shrimp with cooked noodles and a splash of cream.
    • For a lighter meal, serve over zoodles (zucchini noodles).

    Serving Suggestions for Tasty Spicy Cajun Shrimp

    • Pair with fluffy white rice or quinoa for a filling meal.
    • Serve alongside a fresh green salad to balance the spice.
    • A cold glass of sweet iced tea complements the flavors perfectly.
    • For presentation, garnish with extra cilantro and lime wedges.
    • Serve in a colorful bowl to make it pop on your table!

    FAQs about Tasty Spicy Cajun Shrimp

    Can I use frozen shrimp for this recipe? Absolutely! Just make sure to thaw and drain them before coating with the Cajun spice mix.

    How can I make this dish less spicy? If you prefer a milder flavor, reduce the amount of chili powder and skip the cayenne pepper from the spice mix.

    What side dishes pair well with Tasty Spicy Cajun Shrimp? This shrimp dish goes wonderfully with fluffy rice, crusty bread, or a crisp salad.

    Can I prepare the spice mix ahead of time? Yes, you can make the spice mix in advance and store it in an airtight container for up to a month.

    What’s the best way to store leftovers? Keep leftovers in an airtight container in the fridge for up to two days. Reheat gently to maintain texture.

    Final Thoughts

    Preparing Tasty Spicy Cajun Shrimp isn’t just about cooking; it’s about creating moments. Picture your family gathered around the dinner table, laughter mingling with the aroma of spices in the air. Each bite is a celebration of flavors that connect us, reminding us of joy in the kitchen amidst our busy lives. This dish transforms any ordinary evening into something special, where everyone shares stories over a heaping plate of goodness. So grab your ingredients and dive into this culinary adventure! You’ll be boosting your weeknight dinners and delighting taste buds all at once.


    Print

    clock clock iconcutlery cutlery iconflag flag iconfolder folder iconinstagram instagram iconpinterest pinterest iconfacebook facebook iconprint print iconsquares squares iconheart heart iconheart solid heart solid icon

    Description

    A bold and flavorful dish featuring shrimp tossed in a spicy Cajun spice mix, cooked to perfection and garnished with fresh cilantro and lime.


    • Spice Mix
    • 1 tablespoon paprika
    • 1 tablespoon chili powder
    • 1 teaspoon dried oregano
    • 1 teaspoon cumin
    • 1 teaspoon garlic powder
    • 2 teaspoons brown sugar
    • 1 teaspoon salt
    • ½ teaspoon pepper
    • Main
    • pounds raw peeled shrimp
    • 1 tablespoon olive oil
    • 4 cloves garlic, finely chopped
    • Garnish
    • Fresh cilantro, chopped
    • Wedges of lime

    1. Combine all spices and toss with shrimp until fully covered. Let sit for 30 minutes.
    2. Warm oil in pan. Toss in shrimp and cook about 2 minutes on each side.
    3. Throw in garlic, stir for 30 seconds. Top with fresh cilantro and serve with lime.

    Notes

    • For extra spice, add cayenne pepper to the spice mix.
    • Can be served over rice or with a side salad.
    • Prep Time: 30 minutes
    • Cook Time: 10 minutes
    • Category: Main Course
    • Method: Sautéing
    • Cuisine: Southern Cajun

    Nutrition

    • Serving Size: 1 serving
    • Calories: 220
    • Sugar: 2g
    • Sodium: 800mg
    • Fat: 10g
    • Saturated Fat: 1.5g
    • Unsaturated Fat: 8g
    • Trans Fat: 0g
    • Carbohydrates: 5g
    • Fiber: 0g
    • Protein: 30g
    • Cholesterol: 150mg

    Sharing is caring!

  • Apple Broccoli Cauliflower Salad With Lemon

    Apple Broccoli Cauliflower Salad With Lemon


    Introduction to Apple Broccoli Cauliflower Salad With Lemon

    Are you ever in a rush, wanting to whip up something both nutritious and delicious? I totally get it! That’s why I love this Apple Broccoli Cauliflower Salad With Lemon. It’s a simple yet refreshing dish that’s perfect for busy days or those last-minute gatherings. The crunchy textures and zesty dressing come together beautifully, offering a delightful balance that will impress your loved ones. I promise this salad isn’t just nutritious but also packed with vibrant flavors. It’s the kind of recipe that can brighten your week, making mealtime feel special again!

    Why You’ll Love This Apple Broccoli Cauliflower Salad With Lemon

    This Apple Broccoli Cauliflower Salad With Lemon is a game-changer for your kitchen routine! It’s incredibly quick to prepare, taking just 15 minutes from start to finish. The combination of crisp veggies, sweet apples, and a zesty lemon dressing provides a burst of flavor in every bite. Plus, it’s versatile enough to be a side for dinner or a light lunch, making it a perfect addition to your meal rotation.

    Ingredients in Apple Broccoli Cauliflower Salad With Lemon

    This delightful Apple Broccoli Cauliflower Salad With Lemon features a vibrant mix of fresh ingredients that work wonderfully together. Let’s break down what you’ll need:

    • Broccoli florets: These crunchy green gems are not only full of nutrients but also add that satisfying crunch we all love.
    • Cauliflower florets: A great addition for creaminess without the actual cream, cauliflower brings a mild taste and a comforting bite.
    • Apple: Choose your favorite variety for a hint of sweetness that balances the savory flavors. Crisp varieties like Honeycrisp or Fuji work wonders!
    • Red onion: For a slight bite and colorful touch, red onion elevates the salad’s visual appeal and taste.
    • Celery: This adds refreshing crunch and a slight earthiness, making each forkful exciting.
    • Green onion: These bring a milder onion flavor and a lovely pop of color.
    • Dried cranberries: A sweet and tangy touch that pairs beautifully with the other ingredients.
    • Feta cheese: Creamy and salty, feta enhances the salad’s richness. Omit it for a dairy-free version!
    • Roasted almonds: These add a nutty crunch. Feel free to swap with walnuts, pecans, or sunflower seeds if you prefer.

    The dressing is equally important! You’ll need:

    • Mayo: This forms the creamy base of your dressing. Use egg-free mayo for a vegan option!
    • Olive or avocado oil: These healthy fats enrich the dressing while enhancing flavor.
    • Lemon juice: Freshly squeezed lemon juice brightens everything up with its refreshing zest.
    • Honey: A dash of sweetness ties the dressing together; swap it for maple syrup if you’re vegan.
    • Garlic powder: To add depth to the flavor, this staple is fantastic in dressings.
    • Salt and black pepper: Just the right seasonings to make everything pop!

    You can find the exact amounts for each ingredient towards the bottom of this article, ready for you to print out! Enjoy this versatile salad that allows for customization based on your taste preferences.

    How to Make Apple Broccoli Cauliflower Salad With Lemon

    Making this Apple Broccoli Cauliflower Salad With Lemon is simple and quick, perfect for even the busiest of days. With just a few steps, you’ll create a vibrant and refreshing dish. Let’s dive right in!

    Step 1: Make the Dressing

    Start by preparing the dressing. In a small bowl, combine mayo, your choice of oil, fresh lemon juice, honey, garlic powder, salt, and pepper. Grab a whisk and blend everything together. This mix should be creamy, zesty, and luxurious! Set it aside for now and let those flavors get cozy with one another.

    Step 2: Combine the Salad Ingredients

    Now, it’s time to bring your salad to life! In a large mixing bowl, toss together the broccoli florets, cauliflower florets, diced apple, red onion, diced celery, and green onion. Don’t forget about the dried cranberries and feta cheese. Finally, add in those crunchy almonds. With each ingredient, stir gently, allowing their colors and textures to shine!

    Step 3: Toss in the Dressing

    Pour the dressing over your beautiful salad mixture. Use a large spoon or spatula to toss everything together gently. Your goal is to ensure that each piece of broccoli and cauliflower is perfectly coated without smashing the delicate ingredients. The dressing should coat everything evenly, bringing all those lovely flavors together.

    Step 4: Refrigerate and Serve

    Here’s a tip: if you want even tastier bites, let the salad sit in the fridge for about 30 minutes. This allows the veggies to soak in the zesty lemon goodness! When you’re ready to serve, simply spoon it out into a colorful bowl or onto festive plates. This Apple Broccoli Cauliflower Salad With Lemon is not just refreshing, but it also looks like a garden party on your table!

    Tips for Success

    • Prep your ingredients in advance to save time during busy weekdays.
    • Feel free to swap ingredients based on what you have on hand. Nutritional value is still retained!
    • Chill your salad for at least 30 minutes to let flavors meld beautifully.
    • Experiment with different nuts or dried fruit for unique variations.
    • Add a splash of lemon juice before serving for a refreshing boost!

    Equipment Needed

    • Mixing bowl: A large bowl is essential for tossing your salad ingredients; a deep platter can work too.
    • Whisk: Use this for blending your dressing; a fork can also do the trick if needed.
    • Cutting board and knife: These are crucial for chopping your veggies and apple.
    • Spoon or spatula: Use one of these for gently mixing the salad.

    Variations

    • Nut-Free: Swap roasted almonds for sunflower seeds or pumpkin seeds to make it nut-free while still adding a crunch!
    • Fruit Alternatives: Try adding diced pears or grapes for a different sweetness, or even orange segments for a citrusy twist!
    • Vegan Version: Use vegan mayo and substitute honey with maple syrup to keep it plant-based and delicious.
    • Cheese-Free: Omit feta cheese or use a dairy-free cheese alternative for a lighter option.
    • Herbed Up: Toss in fresh herbs like parsley or dill to add an aromatic flair and depth of flavor!

    Serving Suggestions

    • Pair with grilled chicken or fish for a complete meal that’s both satisfying and healthy.
    • Serve alongside a warm quinoa bowl or hearty soup for a cozy dinner.
    • Garnish with fresh parsley or lemon wedges for a beautiful presentation.
    • Enjoy with a glass of sparkling water or iced tea for a refreshing combo.

    FAQs about Apple Broccoli Cauliflower Salad With Lemon

    Can I make this salad ahead of time?
    Absolutely! You can prepare the Apple Broccoli Cauliflower Salad With Lemon a day in advance. Just keep the dressing separate until you’re ready to serve, as this keeps the veggies crispy and fresh.

    What can I substitute for the mayo in the dressing?
    If you’re looking for a healthier option, try using Greek yogurt instead of mayo. For a vegan version, opt for tofu-based or avocado mayo to maintain that creamy texture.

    How long will leftovers last?
    Stored in an airtight container, this salad can last up to four days in the fridge. However, if it sits longer, the veggies may lose their crunch, so enjoy it within that time!

    Can I use frozen vegetables for this salad?
    While fresh ingredients are preferred for crunch, you can use thawed frozen broccoli and cauliflower. Just be sure to pat them dry to avoid excess moisture!

    What’s the best way to serve this salad?
    I love serving my Apple Broccoli Cauliflower Salad With Lemon in a colorful bowl, garnished with fresh herbs. It pairs beautifully with grilled meats or as a standalone dish for a light meal!

    Final Thoughts

    This Apple Broccoli Cauliflower Salad With Lemon is more than just a recipe; it’s a delightful experience packed with fresh flavors and textures. It reminds me of sunny days and cheerful gatherings, making any meal feel special. Whether you enjoy it as a vibrant side dish or a light lunch, each bite carries the essence of wholesome goodness. Plus, it’s a dish that can adapt to your cravings and what’s in your pantry. I hope this salad finds a regular place at your table, bringing joy and brightness to your everyday dining!


    Print

    clock clock iconcutlery cutlery iconflag flag iconfolder folder iconinstagram instagram iconpinterest pinterest iconfacebook facebook iconprint print iconsquares squares iconheart heart iconheart solid heart solid icon

    Description

    A refreshing and crunchy Apple Broccoli Cauliflower Salad with a zesty lemon dressing, perfect for a healthy meal!


    • 45 cups broccoli florets, chopped into bites size pieces (1012 ounce bag)
    • 2 ½3 cups cauliflower florets, chopped into bite size pieces (10-ounce bag)
    • 1 medium apple, diced (1 ½2 cups)
    • ½ small red onion, diced (½ cup)
    • 2 celery ribs, diced (½ cup)
    • 23 green onion, thinly sliced (1/3 cup)
    • ½ cup dried cranberries
    • ½ cup feta cheese, crumbled (omit for dairy-free or Whole30)
    • ½ cup lightly salted roasted almonds, roughly chopped (may substitute walnuts, pecans, or sunflower seed for nut free)
    • ¾ cup mayo (use egg-free mayo for vegan)
    • ¼ cup olive oil or avocado oil
    • 3 tablespoons lemon juice (1 lemon)
    • 2 teaspoons honey (use maple syrup for vegan)
    • 1 teaspoon garlic powder
    • ½ teaspoon fine salt
    • ¼ teaspoon black pepper

    1. Make the dressing: in a small bowl combine the mayo, oil, lemon juice, honey, garlic powder, salt, and pepper. Whisk until well combined, about 2-3 minutes. Set aside.
    2. In a large bowl, toss together all of the salad ingredients – broccoli, cauliflower, apple, red onion, celery, green onion, dried cranberries, feta cheese, and almonds or walnuts.
    3. Add the dressing to the large bowl and toss until well combined. Let salad sit in the fridge for 30 minutes to allow veggies to marinate in the dressing (optional step but recommended).
    4. Store leftovers in an airtight container in the fridge for up to 4 days.

    Notes

    • This salad can be customized with different nuts or dried fruits.
    • For a vegan option, ensure all ingredients, especially mayo and honey, are vegan-friendly.
    • Marinating the salad for a bit enhances the flavors but can be enjoyed immediately as well.
    • Prep Time: 15 minutes
    • Cook Time: 0 minutes
    • Category: Salad
    • Method: Mixing
    • Cuisine: American

    Nutrition

    • Serving Size: 1 cup
    • Calories: 200
    • Sugar: 6g
    • Sodium: 210mg
    • Fat: 14g
    • Saturated Fat: 2g
    • Unsaturated Fat: 10g
    • Trans Fat: 0g
    • Carbohydrates: 20g
    • Fiber: 4g
    • Protein: 5g
    • Cholesterol: 5mg

    Sharing is caring!

  • Salmon Pasta Creamy Garlic Sauce

    Salmon Pasta Creamy Garlic Sauce


    Introduction to Salmon Pasta Creamy Garlic Sauce

    As a busy mom, I often find myself juggling work, family, and the never-ending to-do lists. So, when I discover a dish like Salmon Pasta Creamy Garlic Sauce, it feels like a little slice of heaven. This recipe is an absolute crowd-pleaser, bursting with rich flavors while being quick and easy to prepare. Perfect for those family dinners when you want something special without spending hours in the kitchen. I promise, every spoonful will make you feel like a culinary superstar!

    Why You’ll Love This Salmon Pasta Creamy Garlic Sauce

    This Salmon Pasta Creamy Garlic Sauce is a delightful blend of convenience and flavor. In just 30 minutes, you can whip up a restaurant-quality meal that the whole family will devour. With creamy garlic sauce enveloping tender salmon and pasta, every bite feels indulgent yet comforting. It’s the kind of dish that transforms an ordinary night into something special, making it a go-to for busy moms like us!

    Ingredients for Salmon Pasta Creamy Garlic Sauce

    Gathering the right ingredients is half the fun of cooking! For this Salmon Pasta Creamy Garlic Sauce, you’ll need a combination of kitchen staples and fresh flavors that will elevate your meal.

    • Pasta: Any type will do, but spaghetti or linguine works beautifully with the creamy sauce.
    • Fresh Salmon: I prefer skinless salmon for a more refined taste, but you can leave the skin on if you prefer.
    • Onion Powder: This adds a subtle sweetness and depth to the dish without being overpowering.
    • Salt and Black Pepper: Essential for seasoning, these ingredients bring out the natural flavors of the salmon and pasta.
    • Olive Oil: A healthy option that gives a nice richness when cooking the salmon.
    • Butter: Adds a hint of decadence and makes the sauce velvety smooth.
    • All-Purpose Flour: This is essential for thickening your sauce, creating that creamy consistency we all crave.
    • Garlic: Freshly minced garlic infuses the dish with bold flavor—more is always better in my book!
    • White Wine or Chicken Broth: Using dry white wine gives a wonderful depth, but chicken broth is a great substitute for a non-alcoholic option.
    • Heavy Cream: The star of the show—this is what makes the sauce creamy and delightful!
    • Fresh Lemon Juice: A splash of lemon brightens the dish and balances the richness of the cream.
    • Parmesan Cheese: Grated freshly, it adds a salty nuttiness that elevates everything to another level.
    • Fresh Parsley: A sprinkle at the end adds an aromatic finish and a pop of color.

    For exact measurements, jump to the recipe section at the bottom of the article. Excited to start cooking? Let’s move on to the next steps!

    How to Make Salmon Pasta Creamy Garlic Sauce

    Now that you’ve gathered all your ingredients, it’s time to dive into making this delicious Salmon Pasta Creamy Garlic Sauce! These steps are straightforward and designed for busy people like us. Let’s get cooking!

    Step 1: Cook the Pasta

    Start by boiling a large pot of salted water. I always believe that adding salt to the water enhances the pasta’s flavor.

    Add in about 8 ounces of your favorite pasta and cook it until al dente, according to the package instructions. Once cooked, don’t forget to reserve some of that pasta water before draining the rest. This water is liquid gold when it comes to adjusting your sauce’s consistency!

    Step 2: Prepare the Salmon

    While the pasta is cooking, pat down your 227 grams of fresh salmon with a paper towel to remove any excess moisture.

    This is key to getting that beautiful golden color when searing. Season both sides of the salmon evenly with onion powder, salt, and black pepper. This simple seasoning brings out the salmon’s natural flavors.

    Step 3: Make the Roux

    In a skillet, heat 1 tablespoon of olive oil and 1 tablespoon of butter over medium-high heat. You’ll know it’s ready when the butter melts and begins to bubble gently.

    Add in 1 tablespoon of all-purpose flour and stir for about 30 seconds. This will create a roux, a base for our creamy sauce. It should look like a smooth paste—don’t let it brown!

    Step 4: Create the Sauce

    Next, whisk in 3 cloves of minced garlic, followed by 120 milliliters of dry white wine or chicken broth. Allow it to bubble for 20 seconds—this releases wonderful aromas!

    Now it’s time for the heavy cream! Pour in 180 milliliters to achieve that luxurious creaminess, along with 15 milliliters of freshly squeezed lemon juice. Whisk until it’s smooth and perfectly blended.

    Step 5: Combine Salmon and Sauce

    Gently place the cooked salmon back into the skillet. I like to break it into bite-sized pieces with a spoon, helping it mix seamlessly with the sauce.

    Let it all simmer together for about 3 to 5 minutes. This allows the salmon to cook through while thickening the sauce just enough to coat the pasta beautifully.

    Step 6: Toss in the Pasta

    Now comes the fun part! Add your drained pasta to the skillet, along with about 1 tablespoon of that reserved pasta water. Toss everything together until the pasta is well coated.

    If you feel the sauce needs thinning, add a little more pasta water until it reaches your desired consistency. A generous sprinkle of chopped fresh parsley at the end adds a lovely color and freshness!

    Tips for Success

    • Don’t overcook the pasta—aim for al dente for the best texture.
    • Use good-quality fresh salmon for a flavor boost.
    • For extra creaminess, whisk your sauce continuously to avoid lumps.
    • Adjust the garlic according to your taste preference; more garlic means more flavor!
    • Save a bit of pasta water; it helps in achieving the perfect sauce consistency.

    Equipment Needed

    • Large pot for boiling pasta
    • Skillet or frying pan for cooking the salmon and sauce
    • Whisk for combining ingredients and preventing lumps
    • Wooden spoon for stirring
    • Measuring cups and spoons for accuracy

    Variations for Salmon Pasta Creamy Garlic Sauce

    • Vegetable Add-Ins: Add spinach, cherry tomatoes, or asparagus for extra nutrition and flavor.
    • Spice It Up: For a kick, consider adding red pepper flakes or a dash of hot sauce.
    • Herb Alternatives: Swap fresh parsley for basil or dill for a different flavor profile.
    • Whole Wheat Pasta: Use whole wheat or gluten-free pasta for a healthier or dietary-friendly option.
    • Lighten Up: Substitute heavy cream with half-and-half or use a plant-based cream for a lighter version.
    • Lemon Zest: Grate some lemon zest into the sauce for an extra bright, citrusy flavor.

    Serving Suggestions for Salmon Pasta Creamy Garlic Sauce

    • Salad: Pair with a fresh greens salad, drizzled with a light vinaigrette to balance the richness.
    • Bread: Serve with warm garlic bread or a crusty baguette for dipping into that creamy sauce.
    • Wine: A chilled glass of white wine complements the dish beautifully—try Sauvignon Blanc!
    • Presentation: Garnish with extra parmesan and a sprig of parsley for a restaurant-worthy finish.

    FAQs about Salmon Pasta Creamy Garlic Sauce

    It’s no surprise that you might have some burning questions about this Salmon Pasta Creamy Garlic Sauce! I love sharing what I’ve learned, so here are a few frequently asked questions that might help you get started.

    Can I use frozen salmon for this recipe?

    Absolutely! Just make sure to thaw it completely before cooking. Frozen salmon is just as delicious and can be a time-saver when you’re short on fresh ingredients.

    What can I substitute for heavy cream?

    If you want a lighter option, half-and-half or even coconut cream can work in a pinch. Just remember that it may alter the flavor a little bit but still keep your sauce creamy!

    Is there a vegan alternative for this creamy sauce?

    Yes! Swap out the salmon for sautéed vegetables, use plant-based cream, and substitute olive oil for butter. It won’t have the same flavor, but it will still be tasty!

    What side dishes go well with Salmon Pasta Creamy Garlic Sauce?

    My go-to sides include a light salad or garlic bread. Both offer a lovely contrast to the rich, creamy pasta dish.

    Can I make this dish ahead of time?

    While it’s best enjoyed fresh, you can make the sauce ahead and reheat it when ready to serve. Just cook the pasta fresh to maintain that perfect texture!

    Final Thoughts

    Cooking and sharing a meal like Salmon Pasta Creamy Garlic Sauce is more than just feeding your family. It’s about creating memories, laughter, and those precious moments at the dinner table. As the creamy garlic sauce envelops the tender salmon and pasta, I can’t help but feel a sense of accomplishment. This dish transforms a busy weeknight into a delightful culinary adventure. I hope it brings you as much joy as it has brought to my family. Here’s to good food, good company, and a happy heart at the dinner table!


    Print

    clock clock iconcutlery cutlery iconflag flag iconfolder folder iconinstagram instagram iconpinterest pinterest iconfacebook facebook iconprint print iconsquares squares iconheart heart iconheart solid heart solid icon

    Description

    A delectable Salmon Pasta dish coated in a creamy garlic sauce, perfect for dinner.


    • 8 ounces uncooked spaghetti or other pasta
    • 227 grams (1/2 pound) fresh salmon, skinless if possible
    • 1/4 teaspoon onion powder
    • Salt to taste
    • Black pepper to taste
    • 1 tablespoon olive oil
    • 1 tablespoon butter
    • 1 tablespoon all-purpose flour
    • 3 cloves garlic, minced
    • 120 milliliters (1/2 cup) dry white wine or chicken broth
    • 180 milliliters (3/4 cup) heavy cream
    • 15 milliliters (1 tablespoon) freshly squeezed lemon juice
    • 50 grams (1/2 cup) freshly grated parmesan cheese
    • 1 tablespoon chopped fresh parsley

    1. Boil a large pot of salted water. Add pasta and cook until al dente according to package instructions. Reserve some cooking water, then drain.
    2. Pat salmon dry and season both sides evenly with onion powder, salt, and black pepper.
    3. Heat olive oil and butter in a skillet over medium-high heat. Once hot, add salmon and cook for 2 minutes per side until golden. Remove salmon to a plate and set aside.
    4. Reduce heat to medium. Add flour to the skillet and stir for 30 seconds to form a roux.
    5. Whisk in minced garlic and white wine. Allow the mixture to bubble for about 20 seconds. Add heavy cream and lemon juice, whisking until smooth.
    6. Gradually whisk in parmesan cheese until fully melted and sauce is creamy.
    7. Return salmon to skillet. Break into bite-size pieces using a spoon and gently combine with sauce. Cook 3–5 minutes until salmon is cooked through and sauce thickens.
    8. Add drained pasta to the skillet along with approximately 1 tablespoon reserved pasta water. Add chopped parsley and toss gently to combine. Add extra pasta water if sauce needs thinning.
    9. Divide among serving plates. Top with additional parmesan if desired and serve immediately.

    Notes

    • Use skinless salmon for a more refined dish.
    • Adjust the amount of garlic to suit your taste.
    • For a lighter version, substitute heavy cream with half-and-half.
    • Prep Time: 10 minutes
    • Cook Time: 20 minutes
    • Category: Main Course
    • Method: Stovetop
    • Cuisine: Italian

    Nutrition

    • Serving Size: 1 plate
    • Calories: 650
    • Sugar: 2g
    • Sodium: 800mg
    • Fat: 35g
    • Saturated Fat: 15g
    • Unsaturated Fat: 18g
    • Trans Fat: 0g
    • Carbohydrates: 62g
    • Fiber: 3g
    • Protein: 30g
    • Cholesterol: 90mg

    Sharing is caring!

  • Butterfinger Balls

    Butterfinger Balls


    Introduction to Butterfinger Balls

    As a busy mom, I know how precious those quick, effortless treats can be after a long day. That’s where these delightful Butterfinger Balls come in handy! They’re not only super easy to whip up but also deliver that delicious peanut butter and chocolate combo that everyone loves. Imagine treating your family or colleagues to these little bites of joy without spending hours in the kitchen. Whether you’re tackling bake sales or just looking for a sweet escape, these no-bake treats will impress your loved ones and satisfy your sweet tooth effortlessly.

    Why You’ll Love This Butterfinger Balls

    Butterfinger Balls are the perfect solution for those busy days when time is tight but you still want something sweet. These no-bake delights are not only quick to make, but they’re also kid-approved and practically foolproof! With that creamy peanut butter and crunchy, chocolatey goodness wrapped around every bite, you’ll find yourself reaching for seconds. Plus, they store well, making them a great treat for unexpected guests too!

    Ingredients for Butterfinger Balls

    Before we dive into making these scrumptious Butterfinger Balls, let’s gather our ingredients! Each component plays a vital role in crafting this easy no-bake treat. Here’s what you’ll need:

    • Creamy peanut butter: This is the star of our show! Smooth peanut butter lends richness and that luscious flavor we crave.
    • Salted butter: Softened butter brings moisture and a bit of indulgence. You can use unsalted if you prefer, but it helps to enhance the overall flavor.
    • Pure vanilla extract: A splash of real vanilla adds warmth, elevating the sweetness of the peanut butter and chocolate.
    • Powdered sugar: This gives our Butterfinger Balls their sweetness, ensuring they’re as delightful as they look.
    • Graham cracker crumbs: These provide a lovely texture and help to bind everything together. You can also use digestive biscuits for a twist.
    • Crushed Butterfinger candy: The highlight of this recipe! It adds that signature crunchy, chocolatey goodness. Feel free to toss in an extra bar or two if you want that Butterfinger flavor to shine!
    • Chocolate-flavored almond bark: This is what coats our treats in a glossy, chocolate shell. If you’re feeling adventurous, swap it for your favorite melted chocolate!

    You can find exact measurements and additional details at the bottom of this article for printing. Now that you know what goes into these delicious treats, let’s roll up our sleeves and get started!

    How to Make Butterfinger Balls

    Making Butterfinger Balls is a breeze! Follow these clear steps to create a sweet treat that you and your family will love. Trust me, you’ll be surprised at how simple it really is!

    Step 1: Combine Peanut Butter Mixture

    Start by grabbing a medium-sized mixing bowl. In it, you’ll combine one cup of creamy peanut butter, a quarter cup of softened salted butter, and a teaspoon of pure vanilla extract.

    I like to use a handheld mixer on medium-high speed for about one minute. This helps create a smooth and delightful base.

    The creamy blend will have your taste buds dancing with excitement before we even get to the fun part!

    Step 2: Mix in Dry Ingredients

    Next, lower the mixer speed to medium-low. Add in one cup of powdered sugar, three-quarters of a cup of graham cracker crumbs, and half a cup of crushed Butterfinger candy.

    Take your time here! Mix everything together for about 1½ to 2 minutes. You want to ensure the texture is uniform and that every bite will have that amazing blend of flavors.

    It’s the crunchy bits of Butterfinger that keep things exciting!

    Step 3: Form Balls

    Now onto the fun part! Line a baking sheet with parchment paper to catch all those sticky goodies.

    Using a 1-tablespoon cookie scoop, scoop the Butterfinger mixture and roll it into bite-sized balls in your hands.

    Place each ball on the lined baking sheet. They should be about the size of a golf ball! After that, pop them in the refrigerator to chill for at least 30 minutes. This helps them set nicely.

    Step 4: Melt Almond Bark

    While the balls are chilling, it’s time to melt the chocolate-flavored almond bark.

    In a microwave-safe bowl, add eight ounces of almond bark. Heat it in the microwave at full power for 45 seconds.

    Be sure to stir. Then, continue heating in 30-second intervals until it’s melted and smooth.

    Avoid overheating—nobody likes burnt chocolate!

    Step 5: Coat Butterfinger Balls

    Once your Butterfinger balls are firm, retrieve them from the fridge.

    Using a fork, carefully roll each ball in the melted almond bark, ensuring they’re fully coated in that glossy, mouth-watering chocolate.

    Place them back on the parchment-lined baking sheet. This coating makes every bite irresistible!

    Step 6: Final Touches

    Let’s make them look just as good as they taste! In a separate bowl, melt the remaining two ounces of almond bark.

    Drizzle this chocolate over the coated Butterfinger balls for a beautiful finishing touch.

    Feel free to sprinkle a little extra crushed Butterfinger candy on top for that added crunch.

    Finally, refrigerate them until you’re ready to serve. Your guests will be clamoring for more!

    Tips for Success

    • Always use creamy peanut butter for a smoother texture; chunkier versions can change the consistency.
    • Chill the balls thoroughly; this ensures they hold their shape when coating with chocolate.
    • Be patient while melting almond bark; stir often to avoid any scorching.
    • For easier rolling, lightly grease your hands to prevent the mixture from sticking.
    • Experiment with toppings like crushed nuts or sprinkles to personalize your Butterfinger Balls!

    Equipment Needed

    • Mixing Bowl: A medium-sized bowl works best; a large bowl can be used if you prefer more room for mixing.
    • Handheld Mixer: This makes combining ingredients a breeze; a whisk can be used if you enjoy a workout!
    • Cookie Scoop: A 1-tablespoon cookie scoop ensures even sizes; your hands can also work if needed.
    • Parchment Paper: It keeps the balls from sticking; wax paper is a good alternative if you have that on hand.

    Variations of Butterfinger Balls

    • Chocolate Swirl: Use a mix of milk and dark chocolate for coating. It adds a rich depth to your Butterfinger Balls.
    • Nutty Twist: Incorporate chopped nuts like almonds or peanuts into the mixture for an added crunch and flavor contrast.
    • Dairy-Free Option: Substitute creamy peanut butter with a nut or seed butter and use dairy-free chocolate alternatives for a vegan-friendly treat.
    • Flavor Infusion: Add a tablespoon of chocolate syrup or caramel sauce into the mixture for a flavor boost.
    • Gluten-Free Version: Ensure the graham cracker crumbs are certified gluten-free, or use crushed gluten-free cookies instead!

    Serving Suggestions for Butterfinger Balls

    • Coffee or Milk: Serve Butterfinger Balls alongside a steaming cup of coffee or a tall glass of cold milk for the perfect pairing.
    • Fruit Platter: Balance the sweetness with a colorful fruit platter, featuring strawberries, banana slices, and apple wedges.
    • Presentation: Arrange on a decorative plate and garnish with mint leaves for a fresh touch.
    • Party Treats: Use festive cupcake liners to make them pop for any gathering or celebration.

    FAQs about Butterfinger Balls

    As I’ve made these delightful Butterfinger Balls over the years, I’ve come across a few questions that tend to pop up. Here are some of the most common queries, along with my helpful insights!

    Can I make Butterfinger Balls ahead of time?

    Absolutely! These tasty treats store well in the refrigerator. You can make them a few days in advance. Just keep them in an airtight container to maintain their freshness.

    What can I use instead of almond bark?

    If almond bark isn’t easily available, don’t fret! You can substitute it with any type of melted chocolate. Just make sure to use chocolate with a good consistency for coating, like creamy milk chocolate or dark chocolate.

    Can I freeze Butterfinger Balls?

    Yes, you can freeze them! Place them in a single layer in a freezer-safe container. Just remember to let them thaw in the refrigerator before enjoying them. They taste just as delicious!

    How long do Butterfinger Balls last in the refrigerator?

    These scrumptious treats are best enjoyed within a week. However, they can still be tasty up to two weeks if stored properly in an airtight container.

    Can I add other mix-ins to the Butterfinger Balls?

    Definitely! Feel free to get creative. Mini chocolate chips, chopped nuts, or even a pinch of sea salt can enhance the flavor of your Butterfinger Balls. It’s all about making it your own!

    Final Thoughts

    Making Butterfinger Balls isn’t just about creating a delicious treat; it’s about sharing sweetness with those we love. The ease and joy of crafting these no-bake delights make them a perfect solution for busy days or special celebrations.

    The crunchy, chocolatey goodness will have everyone smiling with every bite, reminding us that little moments matter the most. So the next time you need a quick dessert, remember this simple recipe! Grab your loved ones, whip up a batch, and relish the laughter and warmth that follows. Trust me, these treats will leave a lasting impression!


    Print

    clock clock iconcutlery cutlery iconflag flag iconfolder folder iconinstagram instagram iconpinterest pinterest iconfacebook facebook iconprint print iconsquares squares iconheart heart iconheart solid heart solid icon

    Description

    Butterfinger Balls are an easy no-bake treat made with creamy peanut butter and crushed Butterfinger candy, coated in chocolate almond bark.


    • 1 cup creamy peanut butter
    • ¼ cup salted butter, softened
    • 1 teaspoon pure vanilla extract
    • 1 cup powdered sugar
    • ¾ cup graham cracker crumbs
    • ½ cup crushed Butterfinger candy (approximately 6 fun-size bars), plus 1-2 extra for garnish
    • 10 ounces chocolate flavored almond bark (divide into 8 ounces and 2 ounces)

    1. In a medium-sized mixing bowl, combine the creamy peanut butter, softened butter, and vanilla extract. Use a handheld mixer on medium-high speed to beat together until smooth, about 1 minute.
    2. Lower the mixer speed to medium-low, then add the powdered sugar, graham cracker crumbs, and crushed Butterfinger candy. Mix for 1½-2 minutes or until the mixture is well combined.
    3. Line a baking sheet with parchment paper.
    4. Use a 1-tablespoon cookie scoop to scoop the Butterfinger mixture and roll them into balls. Place on the lined baking sheet and chill in the refrigerator for at least 30 minutes.
    5. In a microwave-safe bowl, add 8 ounces of almond bark. Heat in the microwave at full power for 45 seconds, stir, and continue heating in 30-second intervals until melted and smooth.
    6. Remove the balls from the refrigerator and roll each one in the melted almond bark until fully coated, then place back on the lined baking sheet.
    7. In a separate bowl, melt the remaining 2 ounces of almond bark using the same method as before. Drizzle over the tops of the Butterfinger balls and sprinkle with extra crushed Butterfinger candy. Refrigerate until ready to serve.

    Notes

    • Make sure to use smooth peanut butter for the best texture.
    • You can substitute with other types of chocolate if preferred.
    • Store in an airtight container in the refrigerator for up to a week.
    • Prep Time: 15 minutes
    • Cook Time: 5 minutes
    • Category: Dessert
    • Method: No-Bake
    • Cuisine: American

    Nutrition

    • Serving Size: 1 ball
    • Calories: 150
    • Sugar: 10g
    • Sodium: 100mg
    • Fat: 8g
    • Saturated Fat: 3g
    • Unsaturated Fat: 5g
    • Trans Fat: 0g
    • Carbohydrates: 15g
    • Fiber: 0g
    • Protein: 3g
    • Cholesterol: 10mg

    Sharing is caring!

  • Jalapeno Popper Egg Rolls

    Jalapeno Popper Egg Rolls


    Introduction to Jalapeno Popper Egg Rolls

    As a busy mom, I know how precious time can seem, especially when it’s snack time! That’s why I adore these Jalapeno Popper Egg Rolls. They’re not just mouthwatering; they’re also a quick solution for those hectic afternoons. Imagine the crispy crunch mingled with melted cheese and savory bacon, a treat that’s sure to impress your loved ones. Whether you’re prepping for a party or just craving a tasty snack, these egg rolls will elevate your cooking game while keeping things fun and easy. So, let’s dive into this delicious adventure together!

    Why You’ll Love This Jalapeno Popper Egg Rolls

    These Jalapeno Popper Egg Rolls are a culinary trifecta: they’re quick, easy, and downright delicious! Perfect for busy moms like us, they whip up in no time, making snack time a breeze. Plus, the flavor is off the charts! The creamy filling and crispy exterior create a beautiful harmony that will make your taste buds dance. These delightful bites are sure to win over even the pickiest eaters!

    Ingredients for Jalapeno Popper Egg Rolls

    Gathering the right ingredients is the first step to creating these flavor-packed Jalapeno Popper Egg Rolls. Here’s what you’ll need:

    • Cream cheese: This creamy base pulls all the flavors together, making them rich and delicious.
    • Sharp cheddar cheese: Adds a tangy kick and melts beautifully to create a gooey center.
    • Bacon: Who doesn’t love bacon? Its savory crunch enhances the overall flavor and texture.
    • Jalapeno peppers: These fiery gems lend a spicy zing but can be adjusted based on your heat tolerance.
    • Garlic powder: Just a sprinkle of this enhances the flavor profile, making every bite more savory.
    • Egg roll wrappers: They’re the perfect vessel to cradle all that tasty filling and become crispy when fried.
    • Vegetable or canola oil: Essential for frying these rolls to golden perfection. You can use your preferred frying oil here.
    • Ranch dressing: Ideal for dipping, this cool contrast perfectly complements the spiciness of the egg rolls.

    Don’t forget, you can find the exact quantities for each ingredient at the end of the article, ready for you to print! With these ingredients in hand, you’re off to a great start on your culinary adventure!

    How to Make Jalapeno Popper Egg Rolls

    Prepare the Filling

    First things first! In a large bowl, add the softened cream cheese, shredded sharp cheddar, crumbled bacon, diced jalapenos, and garlic powder. Using a spatula or a big mixing spoon, blend everything together until well combined. The mixture should be smooth and cohesive, like a cozy blanket wrapping around each ingredient. This filling is the heart of your Jalapeno Popper Egg Rolls, so give it a good mix! Trust me; the aroma alone will make your mouth water!

    Assemble the Egg Rolls

    Now, let’s get to the fun part! Take one egg roll wrapper and lay it flat on a clean surface. Scoop about ⅓ cup of that beautiful filling and place it in the middle of the wrapper. Lightly wet the edges with a bit of water; this helps seal the rolls. Fold the bottom corner up to cover the filling, then fold the right and left corners toward the center. Roll it tightly until the filling is completely encased. Don’t rush this step; it’s crucial for avoiding leaks during frying!

    Fry the Egg Rolls

    It’s frying time, my friend! In a deep pot or fryer, heat about 2-3 inches of vegetable oil to around 350°F. Carefully drop in a few egg rolls, about 2-3 at a time, ensuring they don’t crowd each other. Fry them for about 2-3 minutes on each side until they’re golden brown and crispy! Always keep a close eye on the temperature; adjusting the heat as needed is vital to get that perfect fry. And remember, safety first! Use long tongs to avoid oil splashes.

    Drain and Serve

    Once they’re beautifully golden, carefully transfer the egg rolls to a paper towel-lined plate to drain any excess oil. Serve them hot with cool ranch dressing for dipping, and watch them disappear!

    Tips for Success

    • Always ensure your oil is hot enough before frying. A drop of water should sizzle!
    • Seal the edges of the egg rolls well to prevent leaks during frying.
    • Feel free to adjust the spice level by adding fewer jalapenos.
    • Experiment with different cheeses like pepper jack for an extra kick.
    • Make a double batch; these delicious snacks disappear fast!

    Equipment Needed

    • Deep pot or fryer: A deep pot works just as well if you don’t have a fryer.
    • Slotted spoon or tongs: Ideal for safely removing the egg rolls from the hot oil.
    • Mixing bowl: A large bowl helps combine the filling ingredients smoothly.
    • Paper towels: Perfect for draining excess oil and keeping things tidy.

    Variations of Jalapeno Popper Egg Rolls

    • Healthier Baked Option: Skip the frying and brush the assembled egg rolls with olive oil. Bake them in a preheated oven at 400°F until golden brown, about 15-20 minutes.
    • Vegetarian Delight: Swap out the bacon for sautéed mushrooms or black beans for a hearty, meat-free version. You can even add corn for a sweet twist!
    • Spicy Twist: For those who crave an extra kick, add diced serrano or habanero peppers to the filling. Just be cautious—these little guys pack a punch!
    • Cheesy Variety: Mix in other cheese varieties, like pepper jack or mozzarella, to add unique flavors and textures to your egg rolls.
    • Gluten-Free Option: Use gluten-free egg roll wrappers or rice paper to cater to dietary restrictions while still enjoying this deliciousness!

    Serving Suggestions

    • Fresh Veggies: Serve with a side of crunchy carrot and cucumber sticks for a refreshing contrast.
    • Flavorful Drinks: Pair with a chilled soda, iced tea, or a light beer to elevate your snack experience.
    • Fun Display: Arrange the egg rolls on a colorful platter, garnished with fresh herbs, for an eye-catching presentation.

    FAQs about Jalapeno Popper Egg Rolls

    Can I make Jalapeno Popper Egg Rolls ahead of time?

    Absolutely! You can prepare the filling and assemble the egg rolls a few hours in advance. Just cover them and keep them in the refrigerator until you’re ready to fry. This makes them a fantastic option for parties or gatherings!

    What can I do if I don’t have egg roll wrappers?

    No worries! You can use wonton wrappers or try rice paper instead. Just remember, the cooking time might vary, so keep an eye on them to achieve that crispy perfection!

    How spicy are these egg rolls?

    The spice level of these Jalapeno Popper Egg Rolls is entirely customizable! The more jalapenos you add, the spicier they become. If you’re cautious about heat, start with fewer or remove the seeds for a milder flavor!

    What’s the best way to store leftovers?

    If you have any leftovers (though, trust me, they’ll vanish quickly!), store them in an airtight container in the fridge for up to 2 days. Just reheat in the oven or air fryer for a few minutes to get that texture back!

    Can I bake instead of fry my egg rolls?

    Yes! For a healthier option, brush the assembled egg rolls with oil and bake them at 400°F until golden brown, around 15-20 minutes. They’ll still be delicious, though they won’t have the exact same crunch!

    Final Thoughts

    Making Jalapeno Popper Egg Rolls is like crafting little bundles of joy! The crispy exterior gives way to a creamy, cheesy filling that dances on your palate. It truly warms my heart to see my family devour these flavorful treats, especially after a long day. They’re not just snacks; they’re a gateway to fun, laughter, and connection around the dinner table. Whether it’s a casual night in or a festive gathering, these egg rolls bring a smile to everyone’s face. Trust me, once you try this recipe, it just might become a family favorite you’ll cherish!


    Print

    clock clock iconcutlery cutlery iconflag flag iconfolder folder iconinstagram instagram iconpinterest pinterest iconfacebook facebook iconprint print iconsquares squares iconheart heart iconheart solid heart solid icon

    Description

    Crispy and delicious jalapeno popper egg rolls filled with creamy cheese, bacon, and jalapenos, perfect as a snack or appetizer.


    • 8 ounces cream cheese, softened
    • 1 cup (113 g) sharp cheddar cheese, shredded
    • 8 strips thick-cut bacon, cooked and crumbled (about 1 cup)
    • 4 large jalapeno peppers, seeded and finely diced
    • 1 teaspoon garlic powder
    • 10 egg roll wrappers
    • vegetable or canola oil, for frying
    • ranch dressing, for dipping

    1. To a large bowl, add cream cheese, cheddar cheese, bacon, jalapenos, and garlic powder. Mix until well combined.
    2. Working with one wrapper at a time, place ⅓ cup of the jalapeno mixture onto the center of each wrapper.
    3. To roll, lightly wet the edges of the wrapper with water. Fold up the bottom corner of the wrapper to cover the filling. Then fold in the right and left corners to the center, pressing lightly to seal. Roll the wrapper tightly until the filling is completely enclosed and the edges are sealed.
    4. In a deep pot or fryer, heat 2-3 inches of vegetable oil to 350°F.
    5. Working 2-3 at a time, carefully place the egg rolls in the hot oil and fry until golden brown, about 2-3 minutes per side.
    6. Remove the egg rolls from the oil and place them on a paper towel-lined plate to drain excess oil. Before frying each batch, ensure the oil is heated to 350°F.
    7. Serve egg rolls hot, with ranch dressing for dipping.

    Notes

    • Ensure to properly seal the egg rolls to avoid leakage during frying.
    • Adjust the spiciness by controlling the amount of jalapenos used.
    • These egg rolls are best served fresh and hot for optimal texture.
    • Prep Time: 15 minutes
    • Cook Time: 10 minutes
    • Category: Appetizer
    • Method: Frying
    • Cuisine: American

    Nutrition

    • Serving Size: 1 egg roll
    • Calories: 200
    • Sugar: 1g
    • Sodium: 350mg
    • Fat: 12g
    • Saturated Fat: 6g
    • Unsaturated Fat: 4g
    • Trans Fat: 0g
    • Carbohydrates: 18g
    • Fiber: 1g
    • Protein: 6g
    • Cholesterol: 30mg

    Sharing is caring!

  • Raspberry Swirl Cupcakes

    Raspberry Swirl Cupcakes


    Introduction to Raspberry Swirl Cupcakes

    There’s something magical about the idea of Raspberry Swirl Cupcakes. They’re not just any dessert; they’re like a slice of happiness wrapped in a fluffy cupcake. Picture this: a busy afternoon, and you want to whip up something special for your loved ones or perhaps a treat for yourself. These vibrant cupcakes are the perfect answer! Filled with tangy raspberry goodness and topped with creamy frosting, they bring together ease and flavor in one delightful bite. Trust me, this recipe will quickly become your go-to for any occasion!

    Why You’ll Love This Raspberry Swirl Cupcakes

    You’re going to adore these Raspberry Swirl Cupcakes for so many reasons! First, they take just 40 minutes from start to finish, making them a brilliant choice for busy days. The sweet and tart raspberry swirl is a burst of flavor that dances on your taste buds. Plus, with no complicated techniques, even novice bakers can succeed! They’re perfect for brightening up any gathering or simply enjoying a moment of bliss at home.

    Ingredients for Raspberry Swirl Cupcakes

    Gathering your ingredients is half the fun! For these delectable Raspberry Swirl Cupcakes, you’ll need:

    • All-purpose flour: The foundation of your cupcakes, providing structure and tenderness.
    • Baking powder: This little magic maker gives rise, ensuring your cupcakes are light and fluffy.
    • Salt: A pinch enhances flavors, balancing the sweetness.
    • Unsalted butter: Softened butter adds creaminess and richness. Ensure it’s at room temperature for easy mixing.
    • Granulated sugar: Sweetness is key, helping to create that beautiful golden crust.
    • Large eggs: Eggs help bind the ingredients and provide moisture. They also contribute to a lovely texture.
    • Vanilla extract: A splash elevates the flavor, infusing warmth into each bite.
    • Whole milk: Adds moisture and richness, making your cupcakes super tender.
    • Fresh raspberries: The star of the show! They add vibrant color and a delicious tangy flavor.
    • Powdered sugar: Essential for the frosting, it adds sweetness and creates that creamy texture.
    • Raspberry puree: This gives your frosting that stunning swirl and enhances the overall raspberry experience.
    • Natural red food coloring: Optional, but it helps achieve that eye-catching red in the frosting.

    Don’t worry about exact quantities just yet; you’ll find them neatly listed at the bottom of the article for printing.

    How to Make Raspberry Swirl Cupcakes

    Step 1: Prepare Cupcake Batter

    Let’s start mixing up that cupcake batter! In a medium bowl, whisk together the all-purpose flour, baking powder, and salt. This little combo is key to fluffy cupcakes. In another large bowl, cream the softened unsalted butter and granulated sugar together until it’s light and fluffy. I like to use a handheld mixer for this—just a couple of minutes! Next, beat in the eggs one by one, along with the vanilla extract. The mixture will come together beautifully. Now, gradually add in the flour mix and whole milk, alternating between the two until everything is fully incorporated. Easy peasy!

    Step 2: Prepare Raspberry Swirl

    Now, let’s make that vibrant raspberry swirl! Toss your fresh raspberries and 2 tablespoons of granulated sugar into a blender. Blend them until you have a smooth puree. For that perfect texture, strain the mixture through a fine sieve to remove any pesky seeds. This step may take a bit of time, but it’s worth it for that silky finish!

    Step 3: Swirl Batter

    It’s time to get our cupcakes ready for their raspberry treatment! Line a muffin tin with cupcake liners. Fill each liner about halfway with the cupcake batter—don’t overdo it, or they’ll overflow! Now, drop a small spoonful of your raspberry puree onto each cupcake. Here comes the fun part: take a toothpick and gently swirl the puree into the batter. This creates that beautiful marbled effect. Trust me, it looks impressive!

    Step 4: Bake

    Preheat your oven to 350°F (175°C) and pop those beauties in for about 18 to 20 minutes. To check if they’re done, insert a toothpick in the center; it should come out clean. If there’s a little batter on it, give them a few extra minutes. Your kitchen will smell heavenly in no time!

    Step 5: Prepare Frosting

    Let’s move on to the frosting—the crowning glory of our Raspberry Swirl Cupcakes! In a large bowl, beat the softened butter until creamy. Gradually add in the powdered sugar, and mix until it’s light and fluffy. This is where the real magic happens. Divide the frosting in two. Mix 2 tablespoons of the raspberry puree into one portion and add a splash of vanilla extract. For that pop of color, you can use natural red food coloring if you like. Whip it all up until you reach the shade you desire!

    Step 6: Swirl Frosting

    It’s time to dress those cupcakes! Grab a piping bag and fit it with a large star tip. Fill the bag with both colors of frosting, placing them side by side. Gently squeeze the bag and pipe the frosting in a beautiful swirl on top of each cupcake. A little practice goes a long way, and your sweet creations will look like a bakery masterpiece!

    Tips for Success

    • Always use fresh raspberries for the best flavor.
    • Make sure your butter is softened to room temperature for easy mixing.
    • Let cupcakes cool completely before frosting to prevent melting.
    • For easy frosting, try using a large piping bag with a star tip.
    • Test for doneness early to avoid overbaking your cupcakes.

    Equipment Needed

    • Muffin tin: A standard muffin tin will do, or use silicone molds for easy removal.
    • Cupcake liners: Paper liners add a nice touch, but you can opt for reusable silicone ones.
    • Mixing bowls: A set of various sizes is ideal for preparing batter and frosting.
    • Handheld mixer: If you don’t have one, a whisk works fine, just requires a bit more muscle!
    • Piping bag: A disposable piping bag is convenient, but a resealable plastic bag also works in a pinch.

    Variations

    • Chocolate Raspberry Swirl: Add cocoa powder to the cupcake batter for a chocolaty twist paired with the raspberry swirl.
    • Gluten-Free Option: Substitute the all-purpose flour with a 1:1 gluten-free baking blend to make it suitable for gluten-sensitive friends.
    • Vegan Version: Replace the eggs with applesauce and use plant-based butter and non-dairy milk for a delightful vegan treat.
    • Raspberry Lemonade Swirl: Mix lemon zest and juice into the batter for a refreshing citrusy flavor to complement the raspberry.
    • Cheesecake Filling: Add a dollop of cream cheese filling in the center of each cupcake for a rich and tangy surprise!

    Serving Suggestions

    • Pair your Raspberry Swirl Cupcakes with a refreshing glass of iced tea or sparkling lemonade for a delightful afternoon treat.
    • Serve these cupcakes alongside fresh fruit, like sliced strawberries or blueberries, to enhance their fruity flavor.
    • For a lovely presentation, dust the cupcakes with a sprinkle of powdered sugar or garnish with a fresh raspberry on top.

    FAQs about Raspberry Swirl Cupcakes

    Can I use frozen raspberries instead of fresh?
    Yes, you can use frozen raspberries for this recipe. Just make sure to thaw them and drain any excess liquid before pureeing.

    How should I store the Raspberry Swirl Cupcakes?
    Store your cupcakes in an airtight container at room temperature for up to three days. If you want to keep them longer, refrigerate them, but they might lose a bit of their fluffiness.

    Can I make the cupcake batter ahead of time?
    Absolutely! You can prepare the batter in advance and store it in the fridge for up to 24 hours. Just give it a good stir before filling the cupcake liners.

    What’s the best way to frost the cupcakes?
    Using a piping bag with a star tip works wonders for swirling the frosting. You can also use a spatula for a more rustic look if you prefer!

    Can I substitute the butter in the frosting for something else?
    Yes, for a dairy-free option, you can use vegan butter or even coconut cream to create a deliciously creamy frosting.

    Final Thoughts

    Making Raspberry Swirl Cupcakes is more than just following a recipe; it’s about creating joyful moments in the kitchen and sharing sweet treats with the people you love. The vibrant colors and delightful flavors bring smiles and spark conversations at the table. Whether it’s a casual weekday or a special occasion, these cupcakes add that perfect touch of happiness. Each bite is a reminder of the beauty in simple pleasures, encouraging us all to slow down and savor life’s little joys. Trust me, once you try these, they’ll be your new favorite go-to for celebrations and everyday treats!


    Print

    clock clock iconcutlery cutlery iconflag flag iconfolder folder iconinstagram instagram iconpinterest pinterest iconfacebook facebook iconprint print iconsquares squares iconheart heart iconheart solid heart solid icon

    Description

    Indulge in delicious Raspberry Swirl Cupcakes with a creamy frosting and a fruity raspberry swirl.


    • 1 ¼ cups all-purpose flour
    • 1 ½ teaspoons baking powder
    • ½ teaspoon salt
    • ½ cup unsalted butter, softened
    • ¾ cup granulated sugar
    • 2 large eggs
    • 1 teaspoon vanilla extract
    • ¼ cup whole milk
    • ½ cup fresh raspberries
    • 2 tablespoons granulated sugar
    • ½ cup unsalted butter, softened
    • 2 cups powdered sugar
    • 2 tablespoons raspberry puree
    • 1 teaspoon vanilla extract
    • Natural red food coloring (optional)

    1. Prepare Cupcake Batter: In a bowl, whisk together flour, baking powder, and salt. In a separate bowl, cream together butter and sugar until light and fluffy. Beat in eggs, one at a time, and vanilla extract. Gradually add dry ingredients and milk, alternating between the two, beginning and ending with dry ingredients.
    2. Prepare Raspberry Swirl: In a blender, puree raspberries and sugar until smooth. Strain to remove seeds.
    3. Swirl Batter: Fill cupcake liners with batter until halfway full. Drop a small spoonful of raspberry puree onto each cupcake and use a toothpick to gently swirl it into the batter.
    4. Bake: Bake in a preheated oven at 350°F (175°C) for 18-20 minutes, or until a toothpick inserted into the center of a cupcake comes out clean.
    5. Prepare Frosting: In a bowl, beat the softened butter and vanilla extract until creamy. Gradually add powdered sugar, beating until smooth and fluffy. Divide the frosting into two portions. Mix 2 tablespoons of raspberry puree and vanilla extract into one portion of the frosting. Keep the other portion white. If desired, add natural red food coloring to the raspberry frosting until the desired shade of red is achieved.
    6. Swirl Frosting: Place both colors of frosting side by side in a piping bag fitted with a large star tip. Gently squeeze the bag to pipe the red and white frosting in a swirl onto each cupcake.

    Notes

    • Use fresh raspberries for the best flavor.
    • Ensure the butter is softened for easier mixing.
    • Let cupcakes cool completely before frosting.
    • Prep Time: 20 minutes
    • Cook Time: 20 minutes
    • Category: Dessert
    • Method: Baking
    • Cuisine: American

    Nutrition

    • Serving Size: 1 cupcake
    • Calories: 250
    • Sugar: 20g
    • Sodium: 200mg
    • Fat: 10g
    • Saturated Fat: 6g
    • Unsaturated Fat: 2g
    • Trans Fat: 0g
    • Carbohydrates: 35g
    • Fiber: 1g
    • Protein: 3g
    • Cholesterol: 40mg

    Sharing is caring!

  • Greek Potato Salad

    Greek Potato Salad


    Introduction to Greek Potato Salad

    Ah, the hustle and bustle of daily life! As a busy mom, I know all too well the never-ending lists of chores and the scramble to get dinner on the table. That’s why I’m so excited to share this delightful Greek Potato Salad with you! It’s not just a dish; it’s a refreshing escape packed with flavors that make you think of sunny Mediterranean shores.

    This Greek Potato Salad combines tender, fluffy potatoes with briny kalamata olives, vibrant sun-dried tomatoes, and a zesty dressing that has your taste buds dancing. It’s the perfect solution for those evenings when you don’t have hours to cook, yet still crave something nutritious and satisfying. Plus, it can easily be tailored to suit your family’s preferences—whether you want it warm, chilled, or somewhere in between. And let’s be honest, with kids and loved ones to please, this salad is a great way to sneak in some veggies without any complaints!

    Once you try this Greek Potato Salad, I have no doubt it will become a cherished recipe in your kitchen arsenal. So, let’s roll up our sleeves and dive into this culinary adventure together!

    Why You’ll Love This Greek Potato Salad

    This Greek Potato Salad is your go-to dish when time is tight, but flavor is a must! It comes together in just about 35 minutes, making it a real lifesaver for busy weeknights. With each bite, you’ll indulge in a delightfully fresh taste that transports you to sun-drenched shores.

    Plus, it serves beautifully, whether at a family dinner or a potluck, catering to picky eaters and adventurous palates alike. Everyone will love this colorful and nutritious feast!

    Ingredients for Greek Potato Salad

    Let’s gather our ingredients for this delicious Greek Potato Salad! Here’s what you’ll need:

    • Petite white or red potatoes: The stars of the dish, these small potatoes are creamy when cooked, making them perfect for salads.
    • Kalamata olives: These briny beauties add a salty kick, bringing an authentic Greek flavor to the mix.
    • Sun-dried tomatoes: Their intense sweetness and chewy texture are like little bursts of sunshine in every bite.
    • Capers: These tangy gems provide a wonderful contrast and a touch of sophistication.
    • Red onion: A sprinkle of this vibrant onion offers a nice crunch and a hint of sharpness.
    • Fresh dill: This herb brings a fresh, aromatic quality that pairs beautifully with the other ingredients.
    • Feta cheese: Crumbled feta adds creaminess and a tangy note that ties everything together.
    • Extra-virgin olive oil: A great source of healthy fats, enhancing flavor with its rich, fruity notes.
    • Red wine vinegar: This brightens the dish with its acidity, making it exceptionally refreshing.
    • Garlic: For a touch of warmth and depth, minced or pressed garlic is essential.
    • Dry mustard, thyme, oregano, kosher salt, and black pepper: These seasonings infuse the salad with flavor and complexity!

    For specific measurements, don’t forget to scroll to the bottom of the article where everything is listed for easy printing. Let’s get cooking!

    How to Make Greek Potato Salad

    Step 1: Prepare the Potatoes

    First, let’s tackle the potatoes. Grab a medium pot and fill it with enough water to cover the potatoes by about an inch.

    Once you add 1 to 2 teaspoons of kosher salt, bring the water to a rolling boil. Adding salt enhances the flavor of the potatoes, making them even more delicious!

    Now, let the potatoes cook for about 15 minutes, until they’re fork-tender but not mushy. When they’re ready, drain them and let them cool just enough to handle.

    Step 2: Make the Dressing

    While the potatoes are cooling, it’s time to whip up that zesty dressing! In a jar with a lid, pour in the extra-virgin olive oil and red wine vinegar.

    Add the minced garlic, dry mustard, oregano, thyme, kosher salt, and freshly ground black pepper. The combination of these ingredients creates a tangy and aromatic dressing that makes this Greek Potato Salad sing!

    Secure the lid tightly and shake like you mean it! This mixes everything beautifully, creating a harmonious dressing. Set it aside while we move forward.

    Step 3: Cut and Toss the Potatoes

    When the potatoes are cool enough to handle, cut them into bite-sized chunks. The warmth from the potatoes will help them soak up the flavors later!

    Next, drizzle the reserved caper brine over the potatoes. This adds a punch of flavor, making every bite memorable. Toss them gently until the brine is evenly distributed. You want all the potatoes coated without mashing them. They should look inviting and ready.

    Step 4: Combine Ingredients

    Now, it’s time for the fun part! In a large mixing bowl, combine the cooled potato chunks with the kalamata olives, thinly sliced red onion, capers, chopped sun-dried tomatoes, and fresh dill.

    Pour the prepared dressing over the mixture and gently toss to combine. The colors will pop, and you’ll find it hard to resist digging in. It’s a beautiful sight to see!

    Taste the salad and adjust the seasoning if necessary. A pinch more salt or a dash of pepper can elevate this salad even further.

    Step 5: Serve the Salad

    Ah, the moment we’ve all been waiting for! Top the salad with crumbled feta cheese. It should feel like a final touch of love, enhancing that Mediterranean vibe.

    This Greek Potato Salad can be enjoyed warm, at room temperature, or chilled. Letting it sit for at least an hour before serving will allow the flavors to mingle and deepen, making every bite a little burst of heaven.

    Feeling adventurous? Serve it alongside grilled chicken or fish for a complete meal. Trust me, it will be devoured faster than you can say “Opa!”

    Tips for Success

    • Use waxy potatoes like petite white or red for the best texture.
    • Always salt the water when boiling potatoes for enhanced flavor.
    • Let the salad chill for at least an hour before serving for maximum flavor.
    • Feel free to customize with seasonal veggies or proteins you love!
    • Taste and adjust the seasoning as you go to achieve perfect balance!

    Equipment Needed

    • Medium pot: Perfect for boiling the potatoes. A large saucepan works too.
    • Colander: Essential for draining the potatoes. If you don’t have one, use a large slotted spoon!
    • Jar with a lid: Ideal for shaking up the dressing. Any container with a tight seal will do.
    • Large mixing bowl: For combining all your ingredients. A salad bowl or even a plate can work in a pinch!
    • Sharp knife: Great for cutting the potatoes and veggies. Ensure it’s nice and sharp for easier chopping.

    Variations

    • Swap the potatoes: Try using sweet potatoes for a sweeter, healthier twist!
    • Add protein: Incorporate grilled chicken or chickpeas for a heartier meal that will satisfy everyone.
    • Herb it up: Experiment with fresh basil or parsley for a different flavor profile.
    • Spice it up: Toss in some red pepper flakes for a little kick if you like heat.
    • Vegan version: Leave out the feta or use a dairy-free alternative to make it suitable for vegan diets.

    Serving Suggestions

    • Pair with grilled meats: This salad complements grilled chicken, lamb, or fish beautifully.
    • Add a fresh loaf: Serve with warm pita or a crusty baguette for sopping up those flavorful juices.
    • Colorful presentation: Use a large, rustic bowl to showcase the vibrant colors of the salad.
    • Seasonal fruits: Consider a side of watermelon or fresh berries to balance out the meal.
    • Wine pairing: A crisp white wine like Sauvignon Blanc enhances the Mediterranean flavors perfectly.

    FAQs about Greek Potato Salad

    As a home cook, I’m often asked a variety of questions about my favorite recipes. This Greek Potato Salad is no exception! Here are some of the most common questions I receive, along with my insights. I hope they help you navigate your culinary journey.

    Can I make Greek Potato Salad ahead of time?
    Absolutely! In fact, this salad tastes even better after sitting in the fridge for a few hours or overnight. Just keep it covered, and you’ll have a flavorful dish ready for your busy days ahead. It’ll be your secret weapon for those crazy weeknights!

    Is Greek Potato Salad gluten-free?
    Yes! This delicious Greek Potato Salad is naturally gluten-free since it’s made with wholesome ingredients. Just double-check any seasoning packets or additives to confirm that they are gluten-free, ensuring this dish is safe for the whole family.

    Can I substitute other vegetables?
    Certainly! Feel free to get creative. Adding bell peppers or cucumbers can introduce new textures and flavors to the salad. If your family has favorites, use them! Just remember to keep the sizes consistent for even flavor distribution.

    What can I serve with Greek Potato Salad?
    This Mediterranean delight pairs beautifully with grilled meats, fresh pita bread, or even as a side to a hearty stew. It complements a wide variety of dishes, making it perfect for potlucks or family dinners. Think of it as your culinary chameleon!

    How long does Greek Potato Salad stay fresh?
    Stored properly in the refrigerator, this salad can last for about 3 to 4 days. Just give it a good stir before serving, as the dressing may settle over time. Keep an eye on the ingredients for freshness, especially the potatoes and feta cheese.

    Final Thoughts

    This Greek Potato Salad is more than just a dish; it’s a celebration of flavors and memories. Each bite transports you to sun-soaked terraces where laughter mingles with the aroma of crisp ingredients.

    I’ve shared it at potlucks and family dinners, always watching happy faces light up with each taste.

    So, the next time you need a quick yet satisfying meal, remember this recipe. It’s easy, colorful, and delicious—just like a day spent with loved ones! Enjoy every scoop, knowing you’ve created something special for your family.


    Print

    clock clock iconcutlery cutlery iconflag flag iconfolder folder iconinstagram instagram iconpinterest pinterest iconfacebook facebook iconprint print iconsquares squares iconheart heart iconheart solid heart solid icon

    Description

    A delicious and flavorful Greek Potato Salad that combines tender potatoes, olives, sun-dried tomatoes, and a zesty dressing.


    • 2 pounds petite white or red potatoes
    • 1 cup pitted kalamata olives
    • 7 ounces oil-packed sun dried tomatoes, drained and chopped
    • 4 ounces capers, drain and reserve brine
    • 1 cup red onion, thinly sliced
    • ½ cup fresh dill, roughly chopped
    • ½ cup feta cheese, crumbled
    • ½ cup extra-virgin olive oil
    • ½ cup red wine vinegar
    • 2 cloves garlic, pressed or minced
    • 2 teaspoons dry mustard
    • 2 teaspoons dried thyme
    • 2 teaspoons dried oregano
    • 1 teaspoon kosher salt
    • 1 teaspoon freshly ground black pepper

    1. Add the potatoes to a medium pot and fill with enough water to cover the potatoes by 1 inch, then bring to a boil. Add 1-2 teaspoons of kosher salt, reduce to a rolling simmer, and cook until tender, about 15 minutes.
    2. While the potatoes are cooking, make the dressing by adding the olive oil, red wine vinegar, garlic, dry mustard, oregano, thyme, kosher salt, and pepper to a jar fitted with a lid. Shake well and set aside.
    3. Once the potatoes are tender, drain them. When cool enough to handle, cut them into bite-sized chunks. While still warm, drizzle with the reserved caper brine and toss. Set aside to cool.
    4. Add the kalamata olives, red onion, capers, sun-dried tomatoes, and dill to the cooled potatoes. Gently toss with the dressing.
    5. Taste for seasoning and adjust with salt and pepper if necessary, then top with feta cheese. Serve warm, at room temperature, or chilled.
    6. For best flavor, let the salad sit for at least an hour after cooking so the potatoes absorb the dressing. Keeps in the refrigerator for 3-4 days.

    Notes

    • The salad can be served warm, at room temperature, or chilled.
    • It is best to allow the salad to sit for at least an hour before serving for maximum flavor absorption.
    • Can be stored in the refrigerator for up to 3-4 days.
    • Prep Time: 20 minutes
    • Cook Time: 15 minutes
    • Category: Salad
    • Method: Boiling, Mixing
    • Cuisine: Greek

    Nutrition

    • Serving Size: 1 cup
    • Calories: 250
    • Sugar: 2g
    • Sodium: 600mg
    • Fat: 20g
    • Saturated Fat: 3g
    • Unsaturated Fat: 15g
    • Trans Fat: 0g
    • Carbohydrates: 20g
    • Fiber: 4g
    • Protein: 5g
    • Cholesterol: 10mg

    Sharing is caring!

  • Healthy Tuna Garbanzo Bean Salad

    Healthy Tuna Garbanzo Bean Salad


    Introduction to Healthy Tuna Garbanzo Bean Salad

    Are you on the lookout for a quick and healthy meal that doesn’t skimp on flavor? Let me introduce you to my Healthy Tuna Garbanzo Bean Salad! As a busy mom myself, I understand the struggle of juggling work, family, and cooking. This salad is a lifesaver—it’s not only straightforward to whip up, but it also packs a protein punch. Imagine a vibrant dish that makes your taste buds dance, all while helping you stay nourished. With just a few simple ingredients, this recipe is perfect for those days when you need something delicious and nutritious in a flash.

    Why You’ll Love This Healthy Tuna Garbanzo Bean Salad

    This Healthy Tuna Garbanzo Bean Salad is the epitome of convenience and nutrition. It takes just 15 minutes to prepare, leaving you more time to bask in the moments that matter. Plus, it’s versatile! Serve it in a sandwich, over greens, or alongside your favorite crackers. The flavors blend beautifully, making it a meal that even picky eaters can enjoy. Healthy eating has never tasted this good, and you’ll feel great knowing it’s packed with protein and fiber!

    Ingredients for Healthy Tuna Garbanzo Bean Salad

    Gathering the ingredients for my Healthy Tuna Garbanzo Bean Salad is a breeze! Here’s what you’ll need:

    • Mayonnaise or Plain Greek Yogurt: This creamy base adds richness. If you prefer a healthier twist, Greek yogurt is a fantastic substitute, brimming with protein.
    • Extra-Virgin Olive Oil: A drizzle of this liquid gold brings healthy fats and a beautiful flavor. It’s a staple in Mediterranean diets, which focus on wholesome eating.
    • Fresh Lemon Juice: A splash of this zesty juice brightens the entire dish. Fresh is best, but bottled can work in a pinch!
    • Dijon Mustard: This tangy condiment adds depth. Most of us have a jar hanging out in the fridge—use it to kick things up a notch!
    • Kosher Salt and Black Pepper: A pinch of salt enhances flavor, while black pepper provides just the right amount of subtle heat.
    • Hot Sauce (Optional): For those who love spice, a few dashes can give your salad a delightful kick.
    • Canned Chickpeas: These are the star of the show! They’re packed with protein and fiber. Just drain and rinse before using.
    • Canned Tuna: Choose tuna packed in water for a leaner option. It’s the easy protein source that adds heartiness to your salad.
    • Celery: Finely chopped, this ingredient adds crunch and freshness. If you’re not a fan, you can skip it.
    • Red Onion: Minced for a bit of bite. Its sharpness balances the creamy dressing perfectly.
    • Fresh Dill: This herb brings a lovely, fragrant touch. If fresh isn’t available, dried works well too!
    • Capers, Green Olives, or Relish: Whichever you have on hand will give the salad an unforgettable flavor twist. Use your favorite or whatever strikes your fancy!

    For the exact measurements, check the bottom of the article—everything is there and ready for printing! Happy cooking!

    How to Make Healthy Tuna Garbanzo Bean Salad

    Making my Healthy Tuna Garbanzo Bean Salad is as easy as pie! Seriously, it’s almost too simple to be this delicious. Follow these steps, and you’ll have a nutritious meal ready in no time. Let’s get started!

    Step 1: Prepare the Dressing

    Begin by grabbing a small mixing bowl. In it, combine mayonnaise or Greek yogurt, olive oil, fresh lemon juice, and Dijon mustard.

    Stir in kosher salt and black pepper.

    If you’re feeling adventurous, add in a few splashes of hot sauce!

    Whisk all these elements together until they form a smooth dressing that looks oh-so-inviting.

    Step 2: Rinse and Prepare the Chickpeas

    Now, it’s time to give those chickpeas the attention they deserve. Drain and rinse them thoroughly under cold water. This helps to wash away excess sodium and preserves their lightness.

    Pat them dry with a clean kitchen towel. If you’re up for it, go ahead and peel off any loose skins for a creamier texture.

    For even better binding, you can mash a handful of the chickpeas—it’s totally optional!

    Step 3: Combine Ingredients

    In a medium bowl, combine the drained chickpeas with canned tuna, celery, and red onion.

    Now sprinkle in that beautifully fresh dill, along with your choice of capers, olives, or relish.

    Pour the dressing over this colorful medley and gently stir. Take care not to mash it all together.

    You want every ingredient to maintain its character in this healthy tuna garbanzo bean salad!

    Step 4: Serve and Enjoy!

    Now comes the fun part! You can serve this salad in a variety of delightful ways.

    Spoon it onto a bed of arugula, tuck it into a sandwich, or scoop it up with your favorite crackers.

    No matter how you enjoy it, trust me—you’re in for a treat.

    Bon appétit! Your meal is ready to impress and satisfy your cravings!

    Tips for Success

    • For extra creaminess, consider mixing half mayonnaise and half Greek yogurt.
    • Don’t skip the rinsing step for the chickpeas; it enhances their flavor and texture.
    • If you prefer a lighter salad, reduce the amount of dressing to suit your taste.
    • Letting the salad sit for 30 minutes enhances the flavors—perfect for meal prep!
    • Use fresh herbs whenever possible for the brightest flavor!

    Equipment Needed

    • Mixing Bowl: A medium-sized bowl works best. You can also use a large plate for mixing.
    • Whisk or Fork: Either will do to blend your dressing smoothly. A fork is a handy alternative.
    • Can Opener: You’ll need this for those chickpeas and tuna cans. A sturdy knife can work in a pinch.
    • Measuring Spoons: For precise ingredient amounts. You can even use your kitchen spoon for rough estimates.
    • Butter Knife: Great for chopping and mixing, especially for the veggies!

    Variations of Healthy Tuna Garbanzo Bean Salad

    • Add Avocado: For a creamy twist, mix in diced avocado. It adds richness and healthy fats.
    • Incorporate Quinoa: For extra texture and nutrition, fold in cooked quinoa. It’ll elevate the protein and fiber content.
    • Change the Beans: Swap chickpeas for black beans or kidney beans for a different flavor profile.
    • Include Bell Peppers: Diced red or yellow bell peppers introduce a colorful crunch and hint of sweetness.
    • Spice it Up: Experiment with spices like cumin or paprika for a unique flavor enhancement!
    • Go Dairy-Free: To make it vegan, skip the mayo and use a plant-based yogurt or tahini to bind everything.
    • Add Fruits: Toss in diced apples or grapes for a burst of sweetness and extra freshness.

    Serving Suggestions for Healthy Tuna Garbanzo Bean Salad

    • Pair with whole-grain pita chips for a crunchy complement.
    • Serve alongside a light, refreshing cucumber salad for extra veggies.
    • Enjoy with a glass of unsweetened iced tea or sparkling water for a thirst-quenching drink.
    • Garnish with extra dill for a beautiful presentation and added flavor.
    • Wrap it in lettuce leaves for a fun, low-carb option!

    FAQs about Healthy Tuna Garbanzo Bean Salad

    I’m glad you’re curious about my Healthy Tuna Garbanzo Bean Salad! Here are some common questions I often get, along with my answers:

    Can I make this salad ahead of time?

    Absolutely! This salad tastes even better the next day. Just store it in an airtight container in the refrigerator. It’ll be ready to grab for a quick lunch!

    What can I substitute for chickpeas?

    If you’re not a fan of chickpeas, you can easily swap them for black beans or edamame. Both options maintain the protein boost you’ll love!

    Is this salad suitable for meal prep?

    You bet! My Healthy Tuna Garbanzo Bean Salad is a meal prep dream. It stores well for a few days, making it perfect for your weekly cooking routine.

    How can I make it spicier?

    To add some heat, mix in diced jalapeños or a sprinkle of cayenne pepper. A few extra dashes of your favorite hot sauce would also do the trick!

    Can I use canned tuna in oil instead of water?

    Yes! If you prefer the richer flavor of tuna packed in oil, feel free to use it. Just keep in mind that it may add extra calories and fat!

    Final Thoughts

    Preparing my Healthy Tuna Garbanzo Bean Salad is not just about nourishing your body; it’s also about creating joyful moments around the table! There’s something so satisfying about tossing together wholesome ingredients, knowing they’ll delight every palate in your family. Whether you pack it for lunch or serve it as dinner, this dish is a beautiful reminder that healthy eating doesn’t have to be boring. It’s quick, delicious, and versatile—perfect for our busy lives. So, dig in, savor every bite, and relish the happiness this salad brings to you and your loved ones!


    Print

    clock clock iconcutlery cutlery iconflag flag iconfolder folder iconinstagram instagram iconpinterest pinterest iconfacebook facebook iconprint print iconsquares squares iconheart heart iconheart solid heart solid icon

    Description

    A healthy and delicious tuna garbanzo bean salad that combines protein-rich ingredients for a nutritious meal.


    • 2 tablespoons mayonnaise or plain Greek yogurt
    • 2 tablespoons extra-virgin olive oil
    • 1 tablespoon fresh lemon juice
    • 1 teaspoon Dijon mustard
    • 1/4 teaspoon kosher salt
    • 1/4 teaspoon black pepper
    • A few splashes of hot sauce (optional)
    • 1 can chickpeas (15 oz)
    • 1 can tuna packed in water, drained (5 oz)
    • 3 tablespoons finely chopped celery
    • 2 tablespoons minced red onion
    • 2 tablespoons finely chopped fresh dill
    • 1 tablespoon roughly chopped capers, green olives, or relish

    1. In a small bowl, combine mayonnaise, olive oil, lemon juice, Dijon mustard, salt, pepper, and hot sauce (if using). Whisk together until well combined.
    2. Drain and rinse the chickpeas thoroughly and pat them dry with a kitchen towel. Optionally, peel and discard any loose skins from the chickpeas. Transfer them to a medium bowl and optionally mash some of them for better binding.
    3. Add tuna, celery, onion, capers (or olives), and fresh dill to the chickpeas. Pour the prepared dressing over the ingredients and stir gently until everything is well mixed and coated.
    4. Serve the salad in a sandwich, atop arugula, or with crackers. Enjoy!

    Notes

    • This salad can be made a day in advance and stored in the refrigerator.
    • Feel free to customize with your favorite vegetables.
    • Adjust the amount of hot sauce to your spice preference.
    • Prep Time: 15 minutes
    • Cook Time: 0 minutes
    • Category: Salad
    • Method: Mixing
    • Cuisine: Mediterranean

    Nutrition

    • Serving Size: 1 serving
    • Calories: 250
    • Sugar: 2g
    • Sodium: 400mg
    • Fat: 12g
    • Saturated Fat: 2g
    • Unsaturated Fat: 8g
    • Trans Fat: 0g
    • Carbohydrates: 25g
    • Fiber: 6g
    • Protein: 18g
    • Cholesterol: 30mg

    Sharing is caring!

  • Raspberry Chocolate Lava Cupcakes

    Raspberry Chocolate Lava Cupcakes


    Introduction to Raspberry Chocolate Lava Cupcakes

    There’s something truly magical about the combination of chocolate and raspberries that just warms the heart. When I bake Raspberry Chocolate Lava Cupcakes, I feel like I’m wrapping my loved ones in a cozy blanket of sweetness. These delightful treats are not just desserts; they’re little acts of love, perfect for celebrations or simply to brighten a bustling day. Imagine indulging in a warm, gooey chocolate center oozing with raspberry goodness. These cupcakes invite you to take a moment for yourself, share joy with friends, or make any ordinary day a little sweeter.

    Why You’ll Love This Raspberry Chocolate Lava Cupcakes

    Let’s be honest—there’s nothing quite like the rich union of chocolate and raspberry. These Raspberry Chocolate Lava Cupcakes are a symphony of flavors that sing together beautifully. What makes them even better is how quick and easy they are to whip up. Whether you’re looking to impress dinner guests or treat yourself after a long day, these cupcakes are the perfect indulgence to lift your spirits and satisfy your sweet tooth.

    Ingredients for Raspberry Chocolate Lava Cupcakes

    To create these decadent Raspberry Chocolate Lava Cupcakes, you’ll need a few key ingredients. Start with all-purpose flour, which provides structure. The unsweetened cocoa powder brings that deep, chocolaty flavor we adore. Next, baking soda acts as a leavening agent for fluffy texture, while a pinch of salt elevates the sweetness.

    For richness, use unsalted butter, and don’t forget the sugar for that necessary sweetness. Eggs add moisture and richness, complemented by vanilla extract for warmth. The buttermilk keeps cupcakes tender, while boiling water helps create a smooth batter. Finally, raspberry preserves are the treasure hidden at the center, giving that delightful lava effect! If you’re out of buttermilk, try mixing milk with a squeeze of lemon juice as a substitute. Exact quantities can be found at the bottom of the article for easy reference.

    How to Make Raspberry Chocolate Lava Cupcakes

    Step 1: Preheat the Oven

    First things first, let’s get that oven warmed up! Preheat it to 350°F (175°C). This step is crucial because a preheated oven bakes your cupcakes evenly, helping them rise beautifully. So, while you’re mixing, the oven will do its magic, ready for those little chocolate lava wonders.

    Step 2: Mix Dry Ingredients

    In a medium bowl, grab your whisk and combine the all-purpose flour, unsweetened cocoa powder, baking soda, and salt. Whisk until blended well—about 30 seconds should do! Every little bit of dry goodness needs to mingle for even flavor distribution. This step is the foundation of your cupcakes, ensuring that every bite has that perfect chocolaty kick.

    Step 3: Cream Butter and Sugar

    Now, it’s time to whip up some magic! In a large bowl, combine the softened butter and sugar. With your vibrant energy, beat them together until it’s light and fluffy—like clouds in a summer sky! This will take about 3-5 minutes, depending on your mixer. Then, crack in those gorgeous eggs, one by one, beating well after each addition. Don’t forget the splash of vanilla extract. It adds warmth and fragrance that wraps the mixture like a warm hug. Your butter mixture should look creamy and inviting, and that’s exactly what we want!

    Step 4: Combine Ingredients

    It’s time to bring everything together. Alternately add the dry mixture and buttermilk to your creamy butter mix. Start with a third of the dry ingredients, mix, then add half the buttermilk, and continue alternating until everything is in the bowl. This technique helps maintain the batter’s fluffiness. Once all is combined, carefully stir in the boiling water until the batter is smooth. This step is vital; a smooth batter creates beautiful, moist cupcakes, so take your time!

    Step 5: Prepare Cupcakes

    Get those cupcake liners ready in your muffin tin! Fill each liner halfway with batter—this allows room for the raspberry preserves. Now, here comes the lava action: spoon a teaspoon of raspberry preserves right in the center. So divine! Top off each liner with more batter until they’re about 3/4 full. It’s like burying a treasure, waiting to reveal its delicious secret during baking!

    Step 6: Bake

    Slide those little cups of joy into the oven and close the door softly. Bake for 18-22 minutes, and remember, patience pays off! To check if they’re done, insert a toothpick into the edge of the cupcake; if it comes out clean, you’re golden! Let them cool completely in the pan before moving them to a wire rack, as cooling is just as important as baking.

    Step 7: Make Buttercream

    While the cupcakes cool, let’s whip up that luscious raspberry buttercream! In a clean bowl, beat the softened unsalted butter until creamy and smooth—an essential step for that light texture. Gradually add powdered sugar, mixing until combined. Then, mix in your raspberry puree, vanilla extract, and a pinch of salt. Keep beating until it’s fluffy and silky. You want that frosting to be spreadable, yet with enough stability to hold a delightful swirl!

    Step 8: Frost and Garnish

    Once your cupcakes are cool, it’s time to bring them to life! Generously frost each cupcake with your vibrant raspberry buttercream. Let your creativity shine—swirl on some frosting or use a piping bag for those fancy finishes. Finish with fresh raspberries and dark chocolate shavings on top for that extra special touch! They’ll look like little masterpieces that make your heart smile.

    Tips for Success

    • Always use softened butter for easy creaming and the best texture.
    • Store your Raspberry Chocolate Lava Cupcakes in an airtight container in the fridge to maintain freshness.
    • For a vibrant raspberry flavor, opt for high-quality raspberry preserves.
    • Allow the cupcakes to cool completely before frosting to prevent melting.
    • For a gooey center, avoid overbaking—check them a minute or two early.

    Equipment Needed

    • Muffin tin (or silicone cupcake molds for easy release)
    • Cupcake liners (paper or silicone)
    • Mixing bowls (preferably a large and medium size)
    • Whisk (or an electric mixer for easier mixing)
    • Measuring cups and spoons (accurate measurements are key)
    • Cooling rack (to let those cupcakes breathe)

    Variations

    • For a gluten-free option, substitute all-purpose flour with a gluten-free blend.
    • Experiment with different fruit preserves like strawberry or blueberry for a fun twist!
    • Try using dark chocolate or white chocolate for frosting to change up the flavor.
    • For a dairy-free version, use coconut oil and almond milk instead of butter and buttermilk.

    Serving Suggestions

    • Pair these delightful cupcakes with a freshly brewed cup of coffee or a soothing herbal tea for a perfect afternoon pick-me-up.
    • For an extra indulgence, serve with a scoop of vanilla ice cream or a dollop of whipped cream.
    • These cupcakes are ideal for birthday celebrations, dinner parties, or simply to share joy during family gatherings.

    FAQs about Raspberry Chocolate Lava Cupcakes

    Got questions? Don’t worry! I’m here with all the answers about your Raspberry Chocolate Lava Cupcakes.

    How should I store my cupcakes?
    These cupcakes are best stored in an airtight container in the refrigerator. They’ll stay fresh for up to three days, but I recommend enjoying them sooner for that warm, gooey center!

    How can I ensure a gooey center?
    To achieve the signature lava effect, it’s essential not to overbake them. Check for doneness a minute or two early by inserting a toothpick into the edge. It should come out clean, while the center remains delightfully soft.

    Can I use different fillings or toppings?
    Absolutely! Feel free to experiment with other fruit preserves like cherry or apricot for a unique twist. You can also top with chocolate chips or candy pieces to elevate the flavors. Raspberry Chocolate Lava Cupcakes are versatile, so let your creativity run wild!

    Can I make these cupcakes in advance?
    Yes! You can prepare the batter a day ahead and store it in the fridge. Just remember to let it come to room temperature before baking for the best results.

    What should I pair with these cupcakes?
    A dollop of whipped cream or a scoop of ice cream enhances their rich flavors. They also pair wonderfully with a cup of coffee or sweet tea, making them the perfect dessert for gatherings.

    Final Thoughts

    As you dive into the adventure of making Raspberry Chocolate Lava Cupcakes, remember, it’s not just about the baking; it’s about the love infused in each bite. These sweet marvels are more than dessert; they’re little bursts of happiness that brighten any day. Each cupcake, with its warm, gooey chocolate center and colorful raspberry goodness, serves as a reminder that joy can be found in the smallest moments. So whip up a batch, share them with loved ones, or savor one solo, and let their delightful flavors add a sprinkle of sweetness to your everyday life!


    Print

    clock clock iconcutlery cutlery iconflag flag iconfolder folder iconinstagram instagram iconpinterest pinterest iconfacebook facebook iconprint print iconsquares squares iconheart heart iconheart solid heart solid icon

    Description

    Indulge in the rich, chocolatey goodness of Raspberry Chocolate Lava Cupcakes, filled with raspberry preserves and topped with a creamy raspberry buttercream.


    • 1 cup all-purpose flour
    • 1/2 cup unsweetened cocoa powder
    • 3/4 teaspoon baking soda
    • 1/4 teaspoon salt
    • 1/2 cup unsalted butter, softened
    • 1 cup sugar
    • 2 large eggs
    • 1 teaspoon vanilla extract
    • 1/2 cup buttermilk
    • 1/2 cup boiling water
    • 1/2 cup raspberry preserves
    • Fresh raspberries for garnish
    • 1 cup unsalted butter, softened (for frosting)
    • 3 1/2 cups powdered sugar
    • 1/4 cup raspberry puree
    • 1 teaspoon vanilla extract (for frosting)
    • A pinch of salt (for frosting)
    • Dark chocolate shavings for garnish

    1. Preheat Oven: Preheat your oven to 350°F (175°C). Line a muffin tin with cupcake liners.
    2. Mix Dry Ingredients: In a medium bowl, whisk together the flour, cocoa powder, baking soda, and salt.
    3. Cream Butter and Sugar: In a large bowl, cream the softened butter and sugar until light and fluffy. Add the eggs one at a time, beating well after each addition. Mix in the vanilla extract.
    4. Combine Ingredients: Alternately add the dry ingredients and buttermilk to the butter mixture, beginning and ending with the dry ingredients. Stir in the boiling water until smooth.
    5. Prepare Cupcakes: Fill each cupcake liner halfway with batter. Spoon a teaspoon of raspberry preserves into the center of each, then cover with more batter until the liners are about 3/4 full.
    6. Bake: Bake for 18-22 minutes or until a toothpick inserted into the edge comes out clean. Cool completely.
    7. Make Buttercream: Beat the butter until creamy. Gradually add powdered sugar, then mix in raspberry puree, vanilla extract, and salt until smooth and fluffy.
    8. Frost and Garnish: Frost cooled cupcakes with raspberry buttercream. Garnish with fresh raspberries and dark chocolate shavings.

    Notes

    • Ensure the butter is softened for easier creaming.
    • For a more intense raspberry flavor, use fresh raspberries in the frosting.
    • Keep cupcakes stored in an airtight container in the fridge for up to 3 days.
    • Prep Time: 20 minutes
    • Cook Time: 22 minutes
    • Category: Dessert
    • Method: Baking
    • Cuisine: American

    Nutrition

    • Serving Size: 1 cupcake
    • Calories: 450
    • Sugar: 35g
    • Sodium: 200mg
    • Fat: 22g
    • Saturated Fat: 12g
    • Unsaturated Fat: 8g
    • Trans Fat: 0g
    • Carbohydrates: 58g
    • Fiber: 2g
    • Protein: 4g
    • Cholesterol: 70mg

    Sharing is caring!