Blog

  • Stuffed Taco Bell Beef Burrito

    Stuffed Taco Bell Beef Burrito


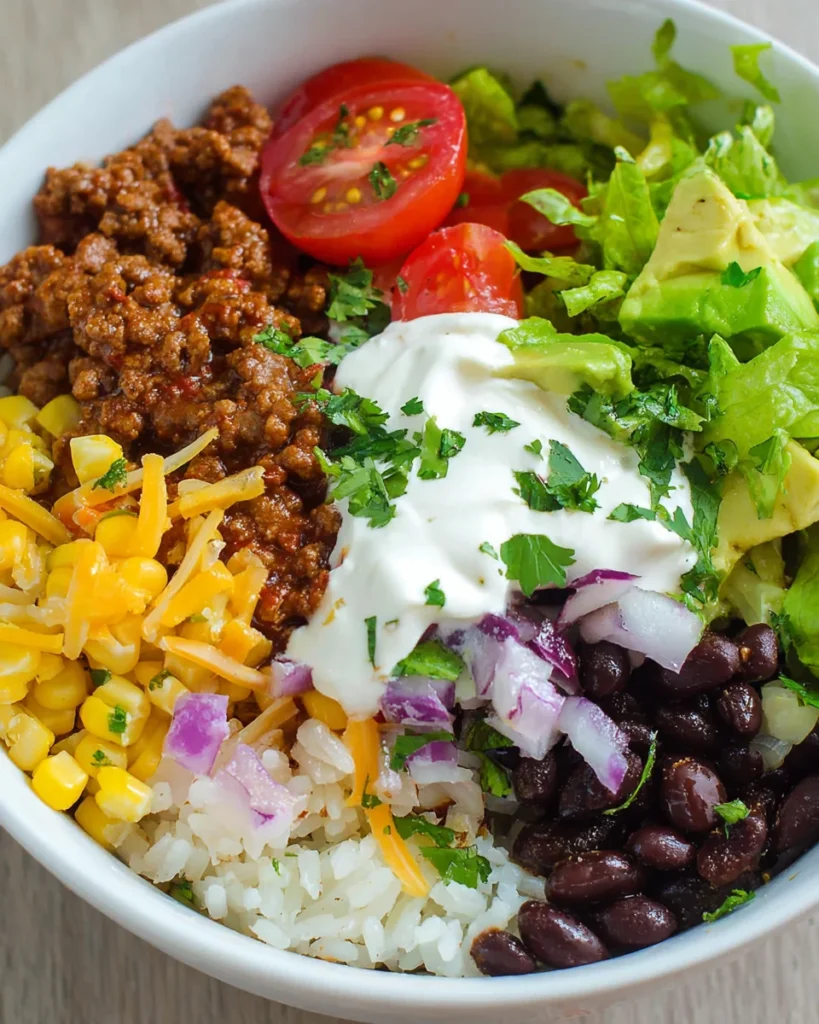
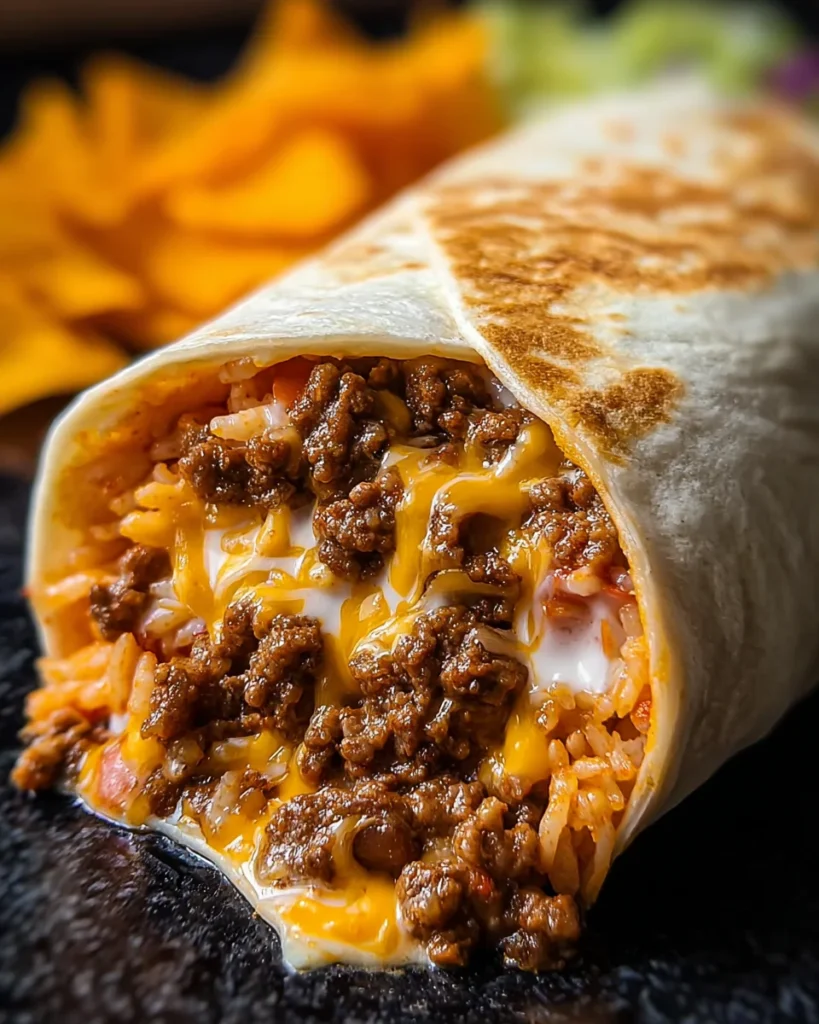
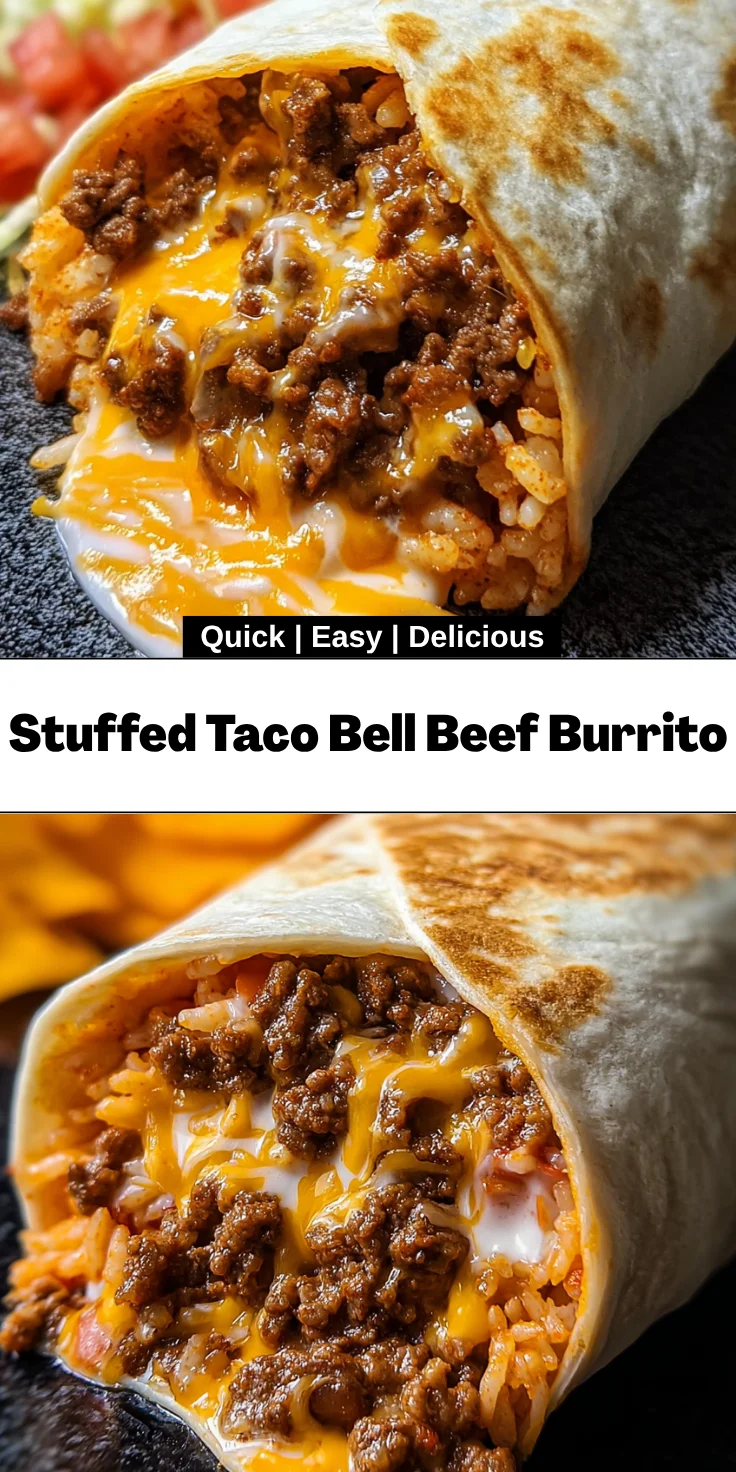
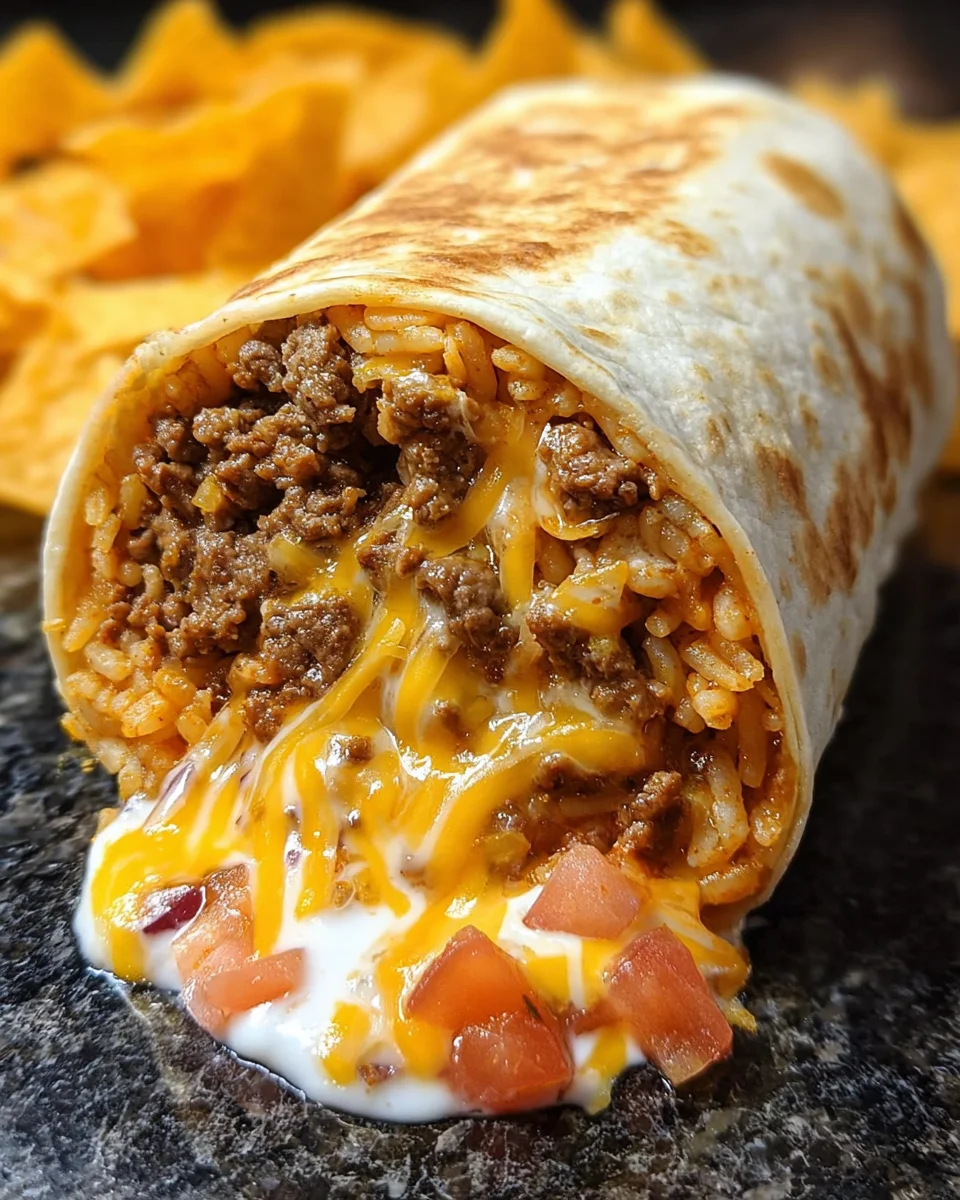
    Introduction to Stuffed Taco Bell Beef Burrito

    Hey there, fellow food lovers! If you’re like me, juggling a busy life and craving something hearty and satisfying, let me introduce you to my favorite comfort food: the Stuffed Taco Bell Beef Burrito. This delightful dish is not only packed with flavor but also comes together quickly, making it perfect for weeknight dinners or lazy weekends. Imagine sinking your teeth into a warm, cheesy burrito filled with seasoned beef, beans, and crunchy toppings. It’s like a fiesta in your mouth, making mealtime exciting again! Trust me, this recipe will quickly become a household favorite.

    Why You’ll Love This Stuffed Taco Bell Beef Burrito

    This Stuffed Taco Bell Beef Burrito is your go-to solution for quick, delicious meals. It’s unbelievably easy to whip up, using just a few ingredients that you probably already have in your pantry. Plus, the flavor explosion from the seasoned beef, creamy cheese dip, and crispy toppings will leave your entire family asking for seconds. Busy days just got better with this tasty treat, bringing smiles around the dinner table!

    Ingredients for Stuffed Taco Bell Beef Burrito

    Now, let’s dive into the ingredients that make this Stuffed Taco Bell Beef Burrito a delightful meal. Each element plays a crucial role in creating that irresistible flavor combination we all crave.

    • Lean ground beef: The star of the show, providing a juicy and savory base for our burrito.
    • Taco seasoning: This magical mix spices up your meat, giving it that authentic Mexican flavor. You can use store-bought or make your own!
    • Water or beef broth: A little liquid helps meld the flavors together, creating a moist filling.
    • Refried beans: Optional, but these creamy beans add depth and protein to your burrito. They can also give it that authentic Tex-Mex touch.
    • Mexican rice: Adding a hearty layer of rice helps balance all the flavors and textures. Use your favorite recipe or quick-cook options for convenience.
    • Burrito-sized flour tortillas: The wrap that holds everything together! Choose soft tortillas to make rolling easier.
    • Fritos or Doritos: Crunchy goodness! Adding chips gives a delightful texture contrast to your burrito.
    • Cheese dip: A warm, gooey layer is pure bliss. I love using Tostitos cheese dip, but feel free to explore other varieties.
    • Shredded Mexican cheese blend: This melty cheese brings everything together, enhancing the flavor and richness.
    • Sour cream: A cool, tangy topping that balances the spices and adds creaminess.
    • Salsa: Optional but highly recommended! A splash of salsa can brighten up your burrito.

    Don’t worry about memorizing these ingredients; if you’d like exact quantities, they’re available at the bottom of the article for easy printing!

    How to Make Stuffed Taco Bell Beef Burrito

    Now that we’ve gathered our ingredients, it’s time to bring the Stuffed Taco Bell Beef Burrito to life! This step-by-step guide will help you craft a meal that’s not only delicious but also satisfying. Let’s jump in!

    Step 1 – Cook the Beef

    Start by heating up a sauté pan over medium heat. Add the lean ground beef and begin to break it apart with a wooden spoon. This is crucial for even cooking. You don’t want any pink bits hiding away!

    Once the beef is brown and cooked through, sprinkle in the taco seasoning, followed by the water or beef broth. Stir well to combine everything and let it simmer for about a minute. You want those flavors to marry beautifully.

    If you choose to add refried beans, stir them in now. If you find the mixture a bit too thick, feel free to add a splash of water until you achieve a consistency that’s just right.

    Step 2 – Prepare Rice and Tortillas

    Next up, if you’re not using instant Mexican rice, cook your leftover rice according to your recipe. While that’s happening, pop your tortillas in the microwave. Heat them for about 30 seconds to make them soft and pliable — this will make rolling your burritos a breeze!

    Step 3 – Assemble the Burritos

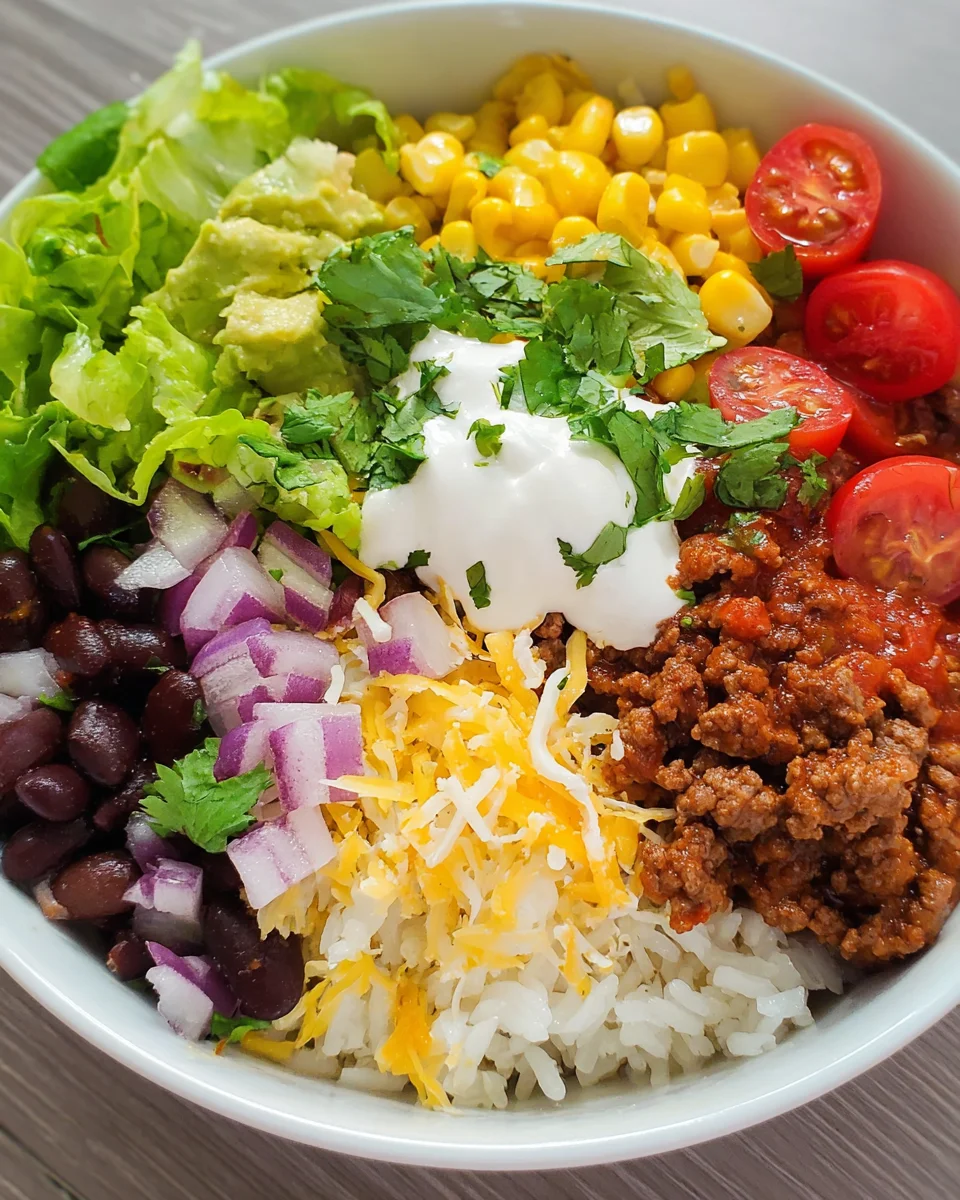
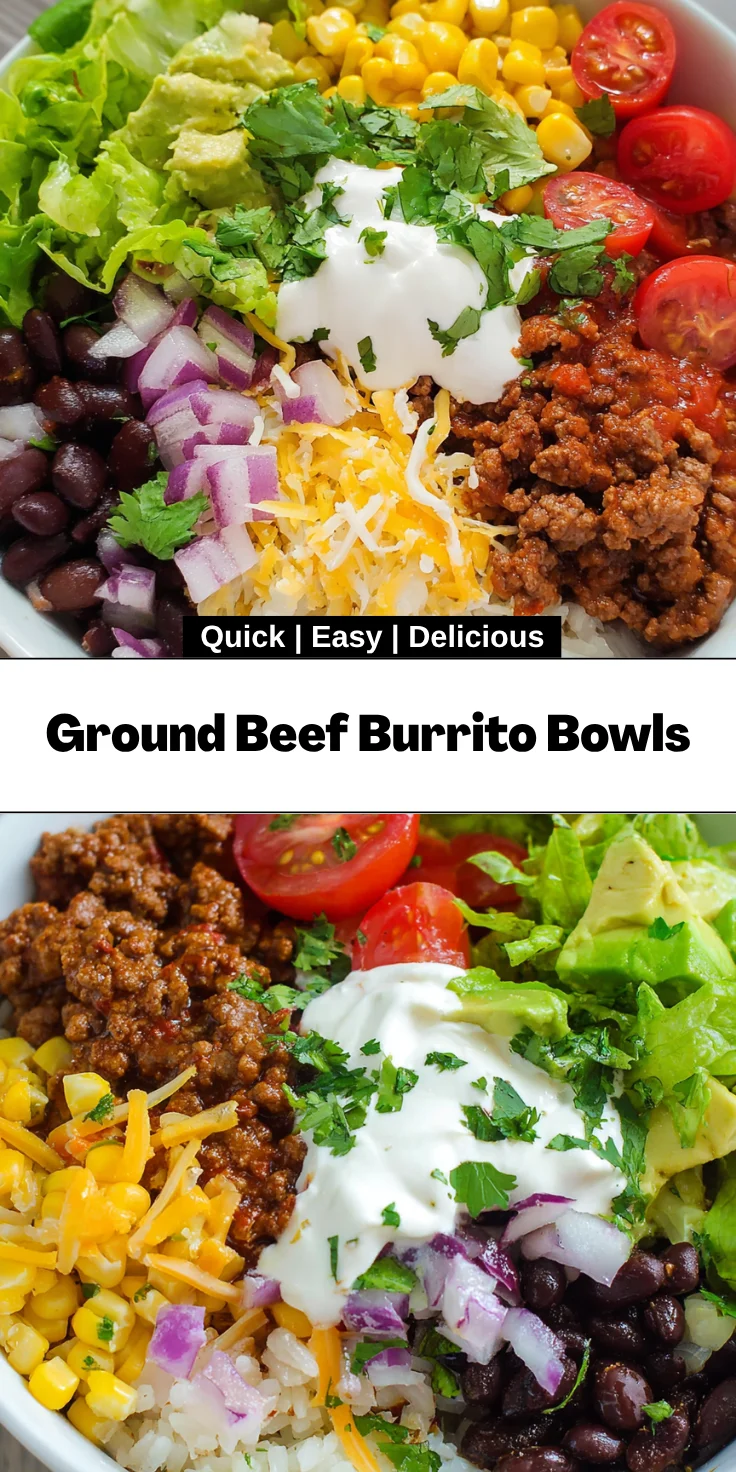
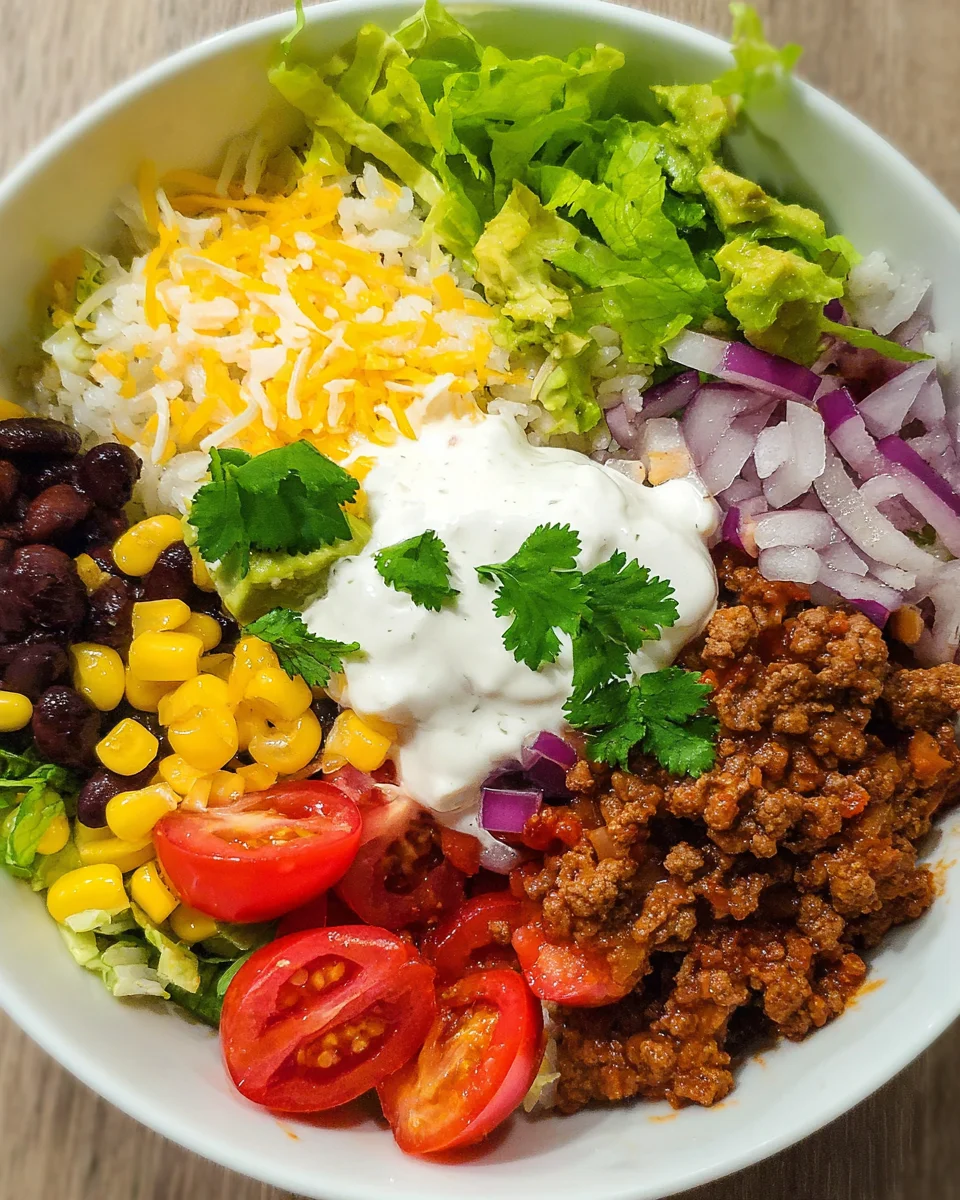
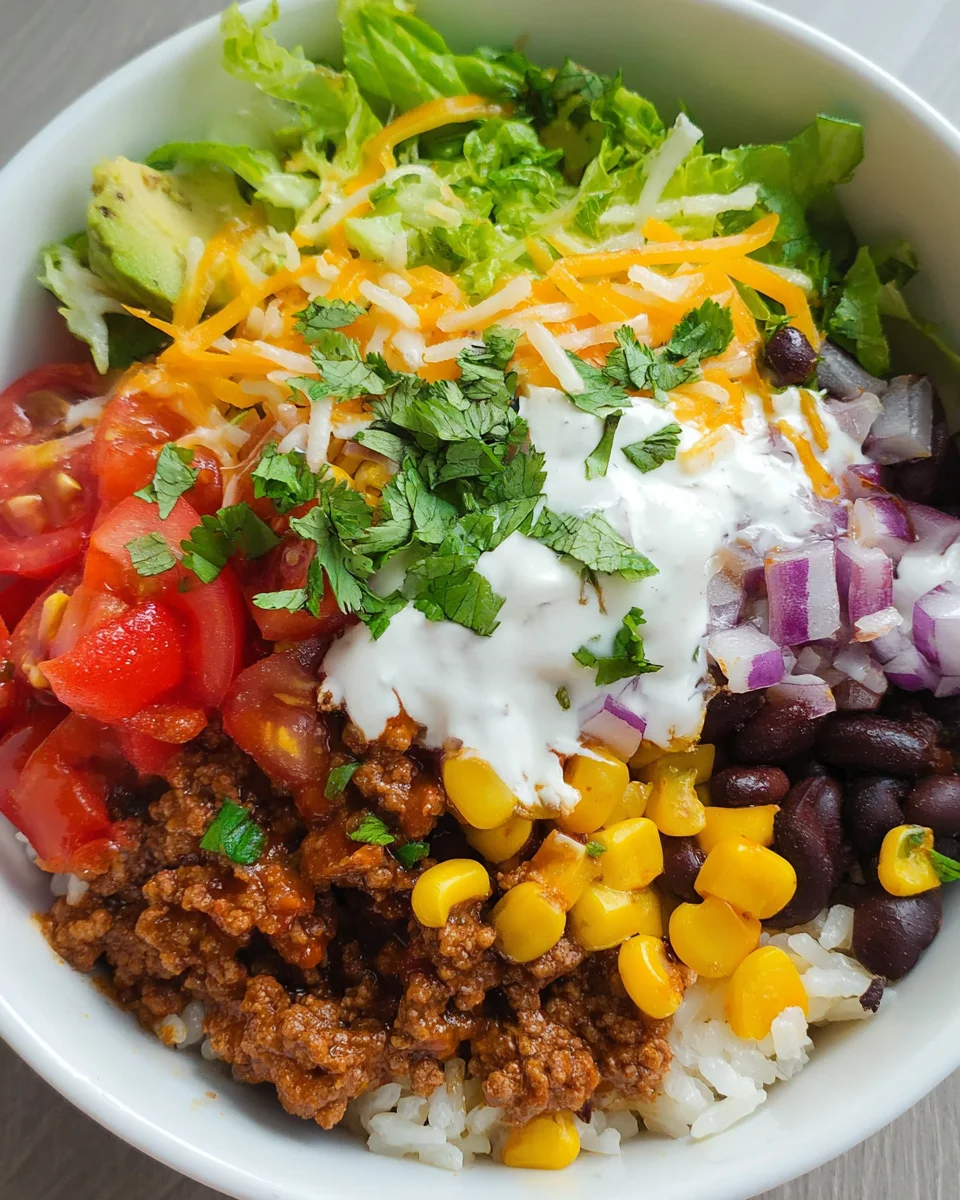
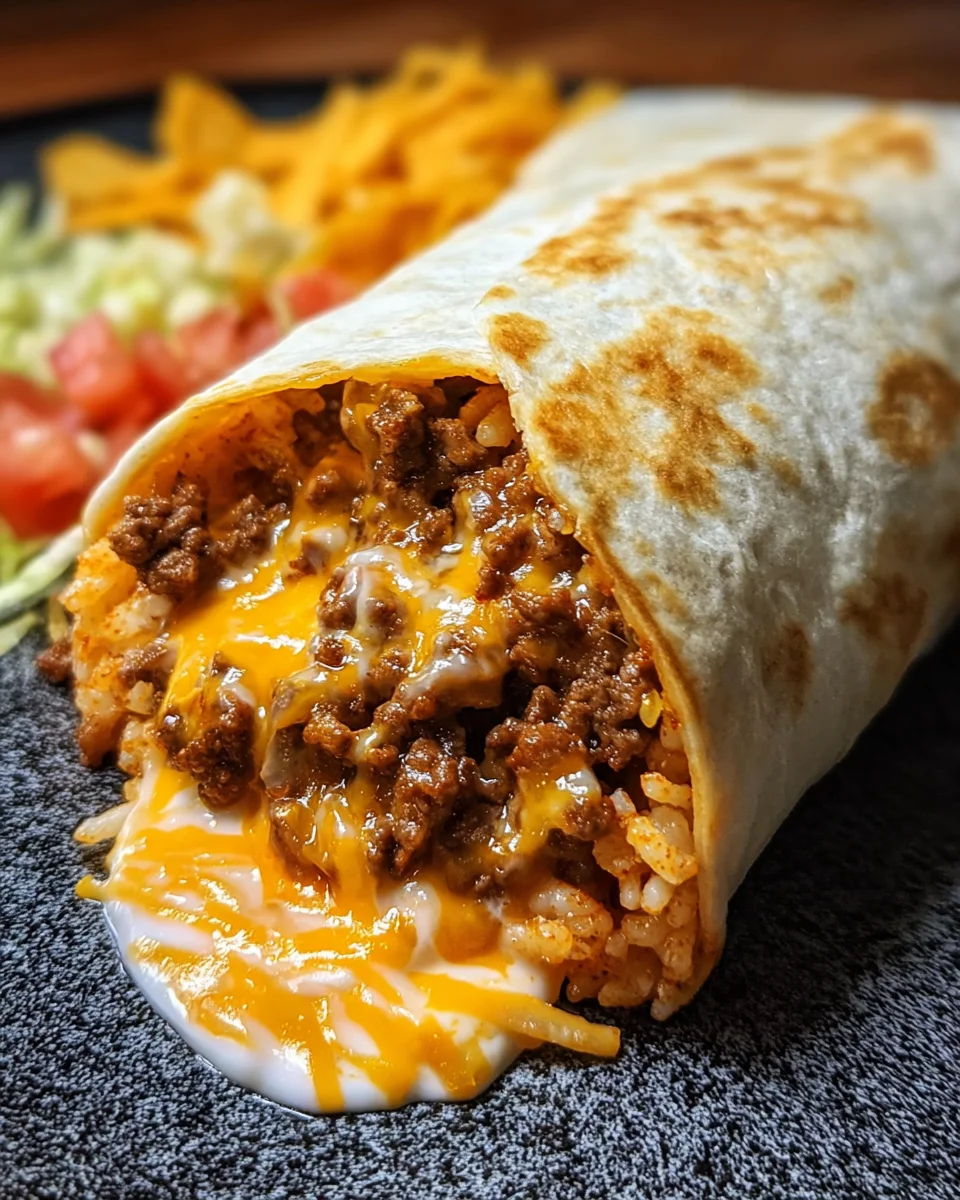
    Lay your warmed tortilla flat on a clean surface. Start by adding a generous couple of tablespoons of the savory beef and bean mixture right in the center.

    Next, spoon in a couple of tablespoons of that fluffy Mexican rice. Don’t forget to layer on some crunchy Fritos or Doritos. I love the extra crunch they add!

    Then, drizzle a large spoonful of warm cheese dip followed by a sprinkle of shredded Mexican cheese blend. Finally, finish it off with a dollop of sour cream.

    Now comes the fun part! Fold in the sides of the tortilla, then roll it from one end tightly to create your burrito. Repeat until you’ve filled all your tortillas. Don’t hesitate to get creative with your toppings!

    Step 4 – Serve Your Burritos

    These burritos can be enjoyed fresh off the assembly line, or you can take it up a notch. Heat a pan over medium heat and place the burritos seam-side down. This will give them a fabulous crispy texture.

    Serve them warm with a side of salsa for dipping. Trust me; your taste buds will thank you for that extra zip!

    Tips for Success

    • Make meal prep easier by cooking extra seasoned beef for future burritos.
    • Customize your burritos with your favorite toppings like jalapeños or guacamole for extra flair.
    • Don’t be afraid to experiment with different types of cheese for a rich flavor.
    • Use a damp paper towel to cover tortillas while microwaving to keep them warm and moist.
    • Wrap any leftovers tightly to keep them fresh for the next day!

    Equipment Needed

    • Sauté pan: A basic skillet works too, just ensure it has high sides to contain splatter.
    • Wooden spoon: Any sturdy utensil will do for breaking up the meat during cooking.
    • Microwave: Essential for warming tortillas; you can use a stovetop if preferred.
    • Measuring cups: Handy for portioning ingredients accurately.
    • Serving platter: To present those beautifully assembled burritos.

    Variations of the Stuffed Taco Bell Beef Burrito

    • Vegetarian option: Substitute the ground beef with lentils or black beans for a hearty meatless burrito.
    • Spicy twist: Use spicy taco seasoning or add jalapeños for a zesty kick.
    • Low-carb version: Swap tortillas for large lettuce leaves or low-carb tortillas for a lighter meal.
    • Breakfast burrito: Include scrambled eggs and crispy bacon or sausage for a delicious breakfast twist.
    • Cheesy indulgence: Layer in extra cheese or try different varieties like pepper jack for an extra kick.

    Serving Suggestions for Stuffed Taco Bell Beef Burrito

    • Pair your burritos with a refreshing side salad for a balanced meal.
    • Serve with tortilla chips and a generous bowl of salsa for extra crunch.
    • Consider a frosty margarita or iced tea for a fun drink option.
    • Garnish with fresh cilantro or sliced olives for a pop of color.
    • Displaying your burritos on a rustic wooden board can elevate the presentation!

    FAQs about Stuffed Taco Bell Beef Burrito

    Can I make the Stuffed Taco Bell Beef Burrito ahead of time?

    Absolutely! You can prepare the filling in advance and store it in the fridge. Just reheat before assembling the burritos. It’s a perfect time-saver for busy nights!

    How do I store leftovers?

    Wrap any leftover burritos tightly in plastic wrap or foil and store them in the refrigerator. They can last up to 3 days, and make for a great quick meal!

    Can I freeze the burritos?

    Yes, these burritos freeze beautifully! Wrap them individually in plastic wrap, then place them in a freezer bag. To reheat, just pop them in the microwave or oven until hot.

    What can I use instead of taco seasoning?

    If you’re out of taco seasoning, a homemade mix of chili powder, cumin, garlic powder, and onion powder works wonders! It’s an easy way to get that delicious flavor without the packet.

    Are there gluten-free options for the burrito?

    Definitely! Just use gluten-free tortillas. The other ingredients are naturally gluten-free, making this a great choice for those with dietary restrictions.

    Final Thoughts

    Creating this Stuffed Taco Bell Beef Burrito in your kitchen is more than just cooking; it’s about sharing joy with family and friends. Each vibrant layer of beef, beans, and cheese reflects the love and comfort that home-cooked meals provide. As you gather around the table, savoring those warm, cheesy burritos, you’ll feel the stress of the day fade away. It’s heartwarming to see smiles all around as everyone digs in. Trust me, each bite invites you to relive that festive Taco Bell flavor right at home, turning ordinary moments into treasured memories. Enjoy every delicious bite!


    Print

    clock clock iconcutlery cutlery iconflag flag iconfolder folder iconinstagram instagram iconpinterest pinterest iconfacebook facebook iconprint print iconsquares squares iconheart heart iconheart solid heart solid icon

    Description

    A delicious recipe for a Stuffed Taco Bell Beef Burrito, featuring seasoned beef, refried beans, Mexican rice, and oodles of toppings.


    • 1 1/2 pounds lean ground beef
    • 1 1/2 (1 oz) packets taco seasoning
    • 3/8 cup water or beef broth
    • 1 1/2 cups refried beans, optional
    • 3 cups cooked Mexican rice or instant Mexican rice
    • 6 burrito-sized flour tortillas
    • 3 cups Fritos or Doritos
    • 1 1/2 cups cheese dip, warmed (like Tostitos)
    • 1 1/2 cups shredded Mexican cheese blend
    • 3/4 cup sour cream
    • Salsa, if desired

    1. Cook the Beef: Cook the beef in a sauté pan, breaking apart the meat as it cooks, until no longer pink. Then add the taco seasoning and water and stir, cooking for another minute. Stir in the refried beans. (If the meat and bean mixture is a little too thick, add a little more water till desired consistency.)
    2. Prepare Rice and Tortillas: Cook your instant Mexican rice or warm leftover rice. Heat the tortillas in the microwave for 30 seconds.
    3. Assemble the Burritos: Lay a tortilla flat and add a couple of tablespoons of the meat mixture into the middle of the tortilla. Add a couple of tablespoons of rice over the meat. Layer with Fritos, a large spoonful of cheese dip, some shredded cheese, and a spoonful of sour cream. Fold the sides in, then start rolling from one end to roll into a burrito. Repeat with the remaining burritos.
    4. Serve: You can serve them as is, or heat them in a pan on the stove over medium heat to toast/crisp the outside. Serve immediately with salsa, if desired.

    Notes

    • You can customize the burritos with other toppings like jalapeños or guacamole.
    • For a spicier flavor, consider using spicy taco seasoning.
    • These burritos can also be wrapped and frozen for later use.
    • Prep Time: 15 minutes
    • Cook Time: 20 minutes
    • Category: Main Dish
    • Method: Stovetop
    • Cuisine: Mexican

    Nutrition

    • Serving Size: 1 burrito
    • Calories: 800
    • Sugar: 3g
    • Sodium: 1300mg
    • Fat: 45g
    • Saturated Fat: 20g
    • Unsaturated Fat: 15g
    • Trans Fat: 0g
    • Carbohydrates: 70g
    • Fiber: 8g
    • Protein: 35g
    • Cholesterol: 100mg

    Sharing is caring!

  • Spicy Shrimp and Avocado Rice Bowl

    Spicy Shrimp and Avocado Rice Bowl


    Introduction to Spicy Shrimp and Avocado Rice Bowl

    Hey there, busy friends! If you’re anything like me, juggling family, work, and the never-ending to-do list, you know how important quick and delicious meals can be. Enter the Spicy Shrimp and Avocado Rice Bowl—a dish that’s not only bursting with flavor but also easy to whip up in just 25 minutes. Picture juicy shrimp, zesty avocado, and fluffy rice all coming together in one bowl. Whether you’re impressing your loved ones or treating yourself after a long day, this bowl is a delightful escape that satisfies both your taste buds and your schedule!

    Why You’ll Love This Spicy Shrimp and Avocado Rice Bowl

    This Spicy Shrimp and Avocado Rice Bowl is a lifesaver for those hectic evenings. It’s incredibly simple to make, requiring just one skillet and minimal clean-up. With its vibrant flavors and fresh ingredients, it brings a sprinkle of gourmet flair to your dining table. Plus, it’s customizable! You can adjust spice levels to satisfy every palate, ensuring even the pickiest eaters come back for seconds!

    Ingredients for Spicy Shrimp and Avocado Rice Bowl

    Gathering the right ingredients is key to crafting this Spicy Shrimp and Avocado Rice Bowl that bursts with flavor! Here’s what you’ll need:

    • Rice: You can use either white or brown rice. Brown rice offers more fiber, while white rice cooks a bit faster.
    • Shrimp: I recommend using large shrimp, peeled and deveined for convenience. Fresh or frozen both work great; just thaw the frozen shrimp before cooking.
    • Olive oil: This heart-healthy fat adds smoothness and flavor to the dish, enhancing the overall taste.
    • Lime juice: Freshly squeezed lime juice imparts a zesty tang, balancing the spice of the shrimp beautifully.
    • Chili powder: A must-have spice to give the dish its kick! It lends a warm flavor without overwhelming heat.
    • Paprika: Adds depth to the flavor; go for smoked paprika for an extra layer of deliciousness.
    • Cayenne pepper: This is where you can adjust the spice level. Just a pinch adds the perfect punch!
    • Salt and pepper: Essential for seasoning; they elevate the other flavors in the bowl.
    • Avocado: A ripe avocado provides creaminess, contrasting the spiced shrimp and making every bite delightful.
    • Fresh cilantro: This herb brings freshness and a burst of color, perfect for a finishing touch.
    • Sesame seeds: Optional, but they add a delightful crunch and a nutty flavor that lifts the bowl.
    • Lime wedges: These are perfect for serving on the side, allowing everyone to squeeze a little extra zing on their bowls.

    For exact quantities, you’ll find them at the bottom of this article along with a printable version of the recipe!

    How to Make Spicy Shrimp and Avocado Rice Bowl

    Creating the perfect Spicy Shrimp and Avocado Rice Bowl is as easy as pie, especially when you follow these simple steps. Let’s dive into the delicious process!

    Step 1: Cook the Rice

    Start by cooking your rice according to the package instructions. For white rice, it usually takes about 15-20 minutes, while brown rice may take a bit longer. Whichever you choose, remember to give it some love—keep it warm until you’re ready to assemble the bowl. That fluffy, tender bed of rice will be the star!

    Step 2: Prepare the Marinade

    While the rice is cooking, it’s time to bring your flavors together. In a medium bowl, combine olive oil, lime juice, chili powder, paprika, cayenne pepper, salt, and pepper. Whisk it well. This marinade is like a flavor hug for your shrimp, promising a tasty and spicy kick when cooked!

    Step 3: Marinate the Shrimp

    Next, add the peeled and deveined shrimp to the bowl with your vibrant marinade. Toss them gently until each shrimp is coated in that zesty goodness. Let them marinate for about 10-15 minutes. This step is crucial; it allows the shrimp to soak up all those delicious flavors!

    Step 4: Cook the Shrimp

    Now, heat a large skillet over medium-high heat. When hot, add your marinated shrimp. Cook for about 2-3 minutes on each side. You’ll know they’re done when they’re pink and opaque. Perfectly cooked shrimp turn into little nuggets of joy that’ll make your taste buds dance!

    Step 5: Assemble the Bowl

    Finally, it’s assembly time! In two bowls, divide the warm rice as a base. Top it with the succulent shrimp, sliced avocado, and a sprinkle of fresh cilantro. For that extra touch, garnish with sesame seeds. Serve your Spicy Shrimp and Avocado Rice Bowl with lime wedges on the side for an optional squeeze of freshness!

    Tips for Success

    • Always taste as you go. Adjust spices to suit your preference!
    • For extra creamy avocado, look for one that gives slightly to pressure.
    • If you’re short on time, cook the rice ahead of time and store it in the fridge.
    • Toast the sesame seeds for an enhanced nutty flavor.
    • Don’t skip the lime wedges— they brighten up every bite!

    Equipment Needed

    • Medium Bowl: For mixing your marinade. A large zip-top bag can work, too!
    • Large Skillet: Essential for cooking shrimp. A non-stick skillet is a great option.
    • Measuring Cups and Spoons: Handy for precise ingredient measurements.
    • Cutting Board and Knife: Perfect for slicing avocado and chopping cilantro.

    Variations of Spicy Shrimp and Avocado Rice Bowl

    • Quinoa Swap: For a gluten-free option, use cooked quinoa instead of rice. It adds a nutty flavor!
    • Add Veggies: Toss in some sautéed bell peppers or snap peas for added color and crunch.
    • Spicy Tofu: For a vegetarian twist, replace shrimp with marinated and grilled tofu cubes for extra protein.
    • Dole It Down: If you’re watching your heat, skip the cayenne altogether or reduce the chili powder for a milder dish.
    • Coconut Rice: Cook your rice in coconut milk for a creamy, tropical touch that pairs beautifully with the shrimp.

    Serving Suggestions for Spicy Shrimp and Avocado Rice Bowl

    • Pair with a simple green salad dressed with lemon vinaigrette for a refreshing contrast.
    • Serve alongside tortilla chips and a homemade salsa for extra crunch and flavor.
    • A chilled glass of white wine complements the spiciness beautifully.
    • For a colorful touch, garnish bowls with additional cilantro and lime zest.

    FAQs about Spicy Shrimp and Avocado Rice Bowl

    Can I use frozen shrimp for this recipe? Absolutely! Frozen shrimp works great. Just make sure to thaw them beforehand to ensure even cooking.

    What if I don’t like spicy food? No problem! You can easily adjust the heat. Simply reduce the amount of cayenne pepper or chili powder to suit your taste preferences.

    Can I make the Spicy Shrimp and Avocado Rice Bowl ahead of time? While it’s best served fresh, you can prep the rice and marinade ahead of time. Just store them separately in the fridge and assemble when you’re ready to enjoy!

    What can I serve with the rice bowl? Pair it with a refreshing green salad or crispy tortilla chips. A light white wine can also enhance the dining experience!

    How can I store leftovers? Store any leftover shrimp and rice in an airtight container in the fridge for up to two days. Reheat gently to maintain the flavor.

    Final Thoughts

    Cooking should feel like a delightful adventure, and the Spicy Shrimp and Avocado Rice Bowl offers just that! With its vibrant colors and flavors, this dish transforms any ordinary meal into a festive occasion. It’s all about balance—the spiciness of the shrimp, the creaminess of the avocado, and the fluffiness of the rice come together in perfect harmony. Plus, it’s quick and simple, making it ideal for busy days. So, roll up your sleeves, embrace the joy of cooking, and savor each bite of this delicious creation. Your taste buds and your family will thank you!


    Print

    clock clock iconcutlery cutlery iconflag flag iconfolder folder iconinstagram instagram iconpinterest pinterest iconfacebook facebook iconprint print iconsquares squares iconheart heart iconheart solid heart solid icon

    Description

    A Flavorful Delight of spicy shrimp served over a bed of rice with fresh avocado.


    • 1 cup white or brown rice
    • 12 large shrimp, peeled and deveined
    • 2 tablespoons olive oil
    • 1 tablespoon lime juice
    • 1 teaspoon chili powder
    • 1/2 teaspoon paprika
    • 1/4 teaspoon cayenne pepper
    • Salt and pepper to taste
    • 1 ripe avocado, sliced
    • 1/4 cup fresh cilantro, chopped
    • 1 tablespoon sesame seeds
    • 1 lime, quartered, for serving

    1. Cook the rice according to the package instructions. Once cooked, set aside and keep warm.
    2. In a medium bowl, combine the olive oil, lime juice, chili powder, paprika, cayenne pepper, salt, and pepper. Whisk until well blended.
    3. Add the peeled and deveined shrimp to the bowl with the marinade. Toss the shrimp until they are fully coated in the mixture. Let marinate for 10-15 minutes.
    4. Heat a large skillet over medium-high heat. Add the marinated shrimp to the skillet and cook for 2-3 minutes on each side, or until they are pink and opaque. Remove from heat.
    5. To assemble the bowls, divide the rice between two bowls. Top with cooked shrimp, sliced avocado, and a sprinkle of fresh cilantro.
    6. Garnish with sesame seeds and serve with lime wedges on the side for squeezing over the top.
    7. Enjoy your delicious Spicy Shrimp and Avocado Rice Bowl!

    Notes

    • Feel free to adjust the spice levels by adding more or less cayenne pepper.
    • You can substitute the rice with quinoa for a healthier option.
    • Prep Time: 15 minutes
    • Cook Time: 10 minutes
    • Category: Main Course
    • Method: Skillet cooking
    • Cuisine: Mexican

    Nutrition

    • Serving Size: 1 bowl
    • Calories: 450
    • Sugar: 1g
    • Sodium: 600mg
    • Fat: 20g
    • Saturated Fat: 3g
    • Unsaturated Fat: 15g
    • Trans Fat: 0g
    • Carbohydrates: 45g
    • Fiber: 5g
    • Protein: 25g
    • Cholesterol: 180mg

    Sharing is caring!

  • No-Bake Oreo Cheesecake Bites

    No-Bake Oreo Cheesecake Bites


    Introduction to No-Bake Oreo Cheesecake Bites

    Hey there, fellow dessert lovers! If you’re anything like me, you appreciate the sweet symphony of flavors that come together effortlessly. That’s where these delightful No-Bake Oreo Cheesecake Bites waltz in! Perfect for busy days when time feels like a luxury, this recipe is not just simple; it’s downright satisfying.

    Imagine sinking your teeth into a creamy, chocolatey bite, savoring every mouthful. These little delights are not only quick to whip up but also promise to bring a smile to anyone you share them with. Let’s dive into this delicious adventure together!

    Why You’ll Love This No-Bake Oreo Cheesecake Bites

    Let’s be real: life can get hectic! That’s why I adore these No-Bake Oreo Cheesecake Bites. They’re not just easy to make; they’re a crowd-pleaser that never disappoints. With a prep time of just 15 minutes, you’ll have sweet treats ready without the fuss. Plus, the combination of creaminess and crunch is simply unbeatable, making them the perfect indulgence for any occasion!

    Ingredients for No-Bake Oreo Cheesecake Bites

    Gathering the right ingredients is half the fun of cooking! For these No-Bake Oreo Cheesecake Bites, you’ll need a mix of simple, delightful components. Here’s what you’ll be working with:

    • Oreo cookies: These chocolatey cookies form the base and give a rich, indulgent flavor.
    • Cream cheese: Softened cream cheese creates that luscious, creamy filling. Make sure it’s at room temperature for a smooth blend.
    • Powdered sugar: A touch of powdered sugar sweetens the filling and gives it a silky texture.
    • Vanilla extract: This aromatic addition boosts the flavor, making each bite heavenly.
    • Whipped cream: Folded in for lightness, it creates a fluffy texture that balances the richness of the cheesecake.

    Feel free to add your own twist! You can top these bites with a drizzle of melted chocolate for an extra treat.

    Remember, I’ve detailed the exact quantities at the bottom of the article for easy access and printing, so you can get right to baking these bites!

    How to Make No-Bake Oreo Cheesecake Bites

    Making these No-Bake Oreo Cheesecake Bites is as easy as pie—well, maybe even easier! Follow these simple steps, and soon you’ll be indulging in creamy, crunchy bliss.

    Step 1: Crush the Oreo Cookies

    First things first, let’s crush those Oreo cookies! You can put them in a ziplock bag and give them a good whack with a rolling pin. This method keeps the mess at bay. Alternatively, you can use a food processor; just pulse until you have fine crumbs. Aim for a texture that resembles sand, and you’ll be on your way to deliciousness!

    Step 2: Prepare the Cream Cheese Mixture

    Next, grab your softened cream cheese. Softening is key—this way, you avoid the dreaded lumps. In a mixing bowl, beat the cream cheese with powdered sugar and vanilla extract until it’s gloriously smooth. If you skip softening, your mixture might end up like a lumpy cloud instead of a creamy dream!

    Step 3: Fold in the Whipped Cream

    Now, it’s time to add a light and airy touch. Gently fold in the whipped cream with a spatula. The goal is to maintain that fluffy texture, so don’t mix too aggressively! Think of it like cradling a delicate soufflé—the fluffier, the better!

    Step 4: Combine with Crushed Cookies

    Here comes the fun part—mixing everything together! Add the crushed Oreo cookies to your cream cheese mixture. Stir gently until every crumb is coated, ensuring every bite is a perfect balance of creamy and crunchy goodness. Trust me, your taste buds will thank you!

    Step 5: Form the Bites

    With your mixture ready, it’s shaping time! Using a tablespoon, scoop out portions and roll them into small balls. Aim for about one inch in diameter—just the right size for a delightful treat. Don’t worry about making them perfect; the slight variations add to their charm!

    Step 6: Chill Before Serving

    Now, cover those beauties with plastic wrap and chill them in the fridge for at least 2 hours. Chilling is crucial; it allows the flavors to mingle and the cheesecake bites to firm up beautifully. Trust the process—a little patience yields amazing rewards!

    Tips for Success

    • Use room temperature cream cheese for a smoother mixture.
    • Don’t skip the chilling step; it’s vital for texture and flavor.
    • For a crunchy surprise, reserve a few crumbs to sprinkle on top.
    • Make them bite-sized for easy snacking and sharing.
    • Store leftovers in an airtight container to keep them fresh longer.

    Equipment Needed

    • Mixing bowl: A large bowl for combining ingredients. Any size will do!
    • Hand mixer or whisk: For beating the cream cheese. A whisk works well if you’re feeling adventurous!
    • Ziplock bag or food processor: To crush the Oreo cookies efficiently.
    • Measuring spoons: For precise ingredients, though you can eyeball it too!
    • Baking sheet: Line it with parchment paper for easy cleanup!

    Variations of No-Bake Oreo Cheesecake Bites

    • Peanut Butter Swirl: Mix in some creamy peanut butter for a nutty twist. It’ll add another layer of flavor that pairs perfectly with chocolate!
    • Mint Chocolate: Add a few drops of peppermint extract for a refreshing minty kick. Crush some Mint Oreo cookies instead for an extra flavor boost.
    • Gluten-Free: Use gluten-free Oreo cookies or other chocolate sandwich cookies to make these bites suitable for gluten-sensitive friends.
    • Fruit-Filled: Fold in some crushed berries or chopped nuts for added texture and a fruity swing. Strawberries or raspberries work wonders!
    • Coconut Bliss: Add shredded coconut to the cream cheese mixture and roll the bites in more coconut before chilling. It brings out tropical vibes!

    Serving Suggestions

    • Pair these No-Bake Oreo Cheesecake Bites with a fresh fruit salad for a balanced dessert experience.
    • Serve alongside a hot cup of coffee or a steaming cup of tea to enhance the flavors.
    • For parties, arrange them on a decorative platter and garnish with fresh mint leaves for an elegant touch.
    • Dust with cocoa powder or extra powdered sugar for a delightful presentation that looks as good as it tastes!

    FAQs about No-Bake Oreo Cheesecake Bites

    Can I make these No-Bake Oreo Cheesecake Bites ahead of time?

    Absolutely! These bites are perfect for making in advance. You can chill them in the fridge for up to three days before serving. Just store them in an airtight container to keep them fresh!

    What can I substitute for cream cheese?

    If you’re looking for a lighter option, try Greek yogurt! It won’t be as rich, but it still adds a creamy texture. Just make sure to use plain yogurt for the best results.

    How should I store leftovers?

    Store any leftovers in an airtight container in the refrigerator. They should last about 3 to 5 days, but I doubt they’ll last that long!

    Can I freeze No-Bake Oreo Cheesecake Bites?

    Sure thing! Just freeze them in a single layer on a baking sheet until firm, then transfer to a container. When you’re ready to enjoy them, let them thaw in the fridge for a few hours before serving.

    What if I don’t have whipped cream?

    No problem! If whipped cream isn’t on hand, you can use whipped topping instead, which works just as well. You can also try making your own by beating heavy cream with a bit of sugar until soft peaks form.

    Final Thoughts

    Creating these No-Bake Oreo Cheesecake Bites brings a joy that resonates beyond just satisfying a sweet craving. The thrill of whipping something so delightful, without the fuss of baking, is a true treat in itself. These little bites simplify dessert-making and elevate gatherings, reminding us that even in our busy lives, we can whip up magic in the kitchen.

    So grab your ingredients, unleash your inner pastry chef, and prepare to impress your loved ones. Enjoy every blissful bite—it’s not just a dessert; it’s a moment of shared happiness!


    Print

    clock clock iconcutlery cutlery iconflag flag iconfolder folder iconinstagram instagram iconpinterest pinterest iconfacebook facebook iconprint print iconsquares squares iconheart heart iconheart solid heart solid icon

    Description

    Delicious No-Bake Oreo Cheesecake Bites that are easy to make and perfect for any occasion.


    • 24 Oreo cookies
    • 8 oz cream cheese, softened
    • 1/2 cup powdered sugar
    • 1 tsp vanilla extract
    • 1/2 cup whipped cream

    1. Crush the Oreo cookies into fine crumbs.
    2. In a mixing bowl, combine the cream cheese, powdered sugar, and vanilla extract until smooth.
    3. Fold in the whipped cream gently.
    4. Add the crushed Oreo cookies to the mixture and stir until well combined.
    5. Form the mixture into small balls and place them on a baking sheet lined with parchment paper.
    6. Chill in the refrigerator for at least 2 hours before serving.

    Notes

    • For a chocolatey twist, you can drizzle melted chocolate over the bites before serving.
    • Store any leftovers in an airtight container in the refrigerator.
    • Prep Time: 15 minutes
    • Cook Time: N/A
    • Category: Dessert
    • Method: No-Bake
    • Cuisine: American

    Nutrition

    • Serving Size: 1 bite
    • Calories: 120
    • Sugar: 9g
    • Sodium: 90mg
    • Fat: 7g
    • Saturated Fat: 4g
    • Unsaturated Fat: 2g
    • Trans Fat: 0g
    • Carbohydrates: 14g
    • Fiber: 0g
    • Protein: 2g
    • Cholesterol: 20mg

    Sharing is caring!

  • Mini Biscoff Cheesecake: Indulge in a Sweet Delight!

    Mini Biscoff Cheesecake: Indulge in a Sweet Delight!


    Introduction to Mini Biscoff Cheesecake

    As a busy mom, I often find myself searching for desserts that satisfy my sweet tooth without eating up my entire day. That’s where this Mini Biscoff Cheesecake comes into play! With its creamy filling and that delightful crunch from the Biscoff cookie crust, it’s a sweet indulgence that feels special without being overly complicated.

    It’s the perfect treat for a last-minute gathering with friends or a cozy night in with my family, offering a delicious break in a hectic schedule. Trust me, once you try this heavenly dessert, your loved ones will be begging for seconds!

    Why You’ll Love This Mini Biscoff Cheesecake

    This Mini Biscoff Cheesecake is not just a dessert; it’s an act of love!

    It’s quick and easy to whip up, needing only 20 minutes of prep time.

    The taste? Absolutely divine!

    With creamy Biscoff spread blended into the filling and that irresistible cookie crust, it captures every sweet craving beautifully.

    And best of all, it can be made ahead of time—perfect for even the busiest of schedules!

    Ingredients for Mini Biscoff Cheesecake

    To create your delightful Mini Biscoff Cheesecake, you’ll need a few simple ingredients. Each one plays a vital role in building the layered magic of flavor. Here’s what you’ll gather:

    • Biscoff cookies: These are the star player! They form the crunchy base and add that signature caramelized flavor.
    • Unsalted butter: Used to bind the cookie crumbs together, it brings richness to the crust.
    • Cream cheese: The heart of any cheesecake! Softened cream cheese ensures a smooth and creamy filling.
    • Granulated sugar: This adds sweetness to the filling, balancing the rich cream cheese.
    • Brown sugar: A touch of molasses flavor enhances the caramel notes in the Biscoff, making it even more indulgent.
    • Vanilla extract: It brings warmth and depth to the flavor profile, complementing the Biscoff beautifully.
    • Heavy cream: Whipped to soft peaks, it lends a light texture to the filling, making it fluffy and irresistible.
    • Biscoff spread: This is the secret ingredient that truly elevates the cheesecake. It’s creamy, nutty, and downright delicious! Plus, it’s great for drizzling on top.
    • Eggs: They act as a binder, providing structure to the dessert while helping it set perfectly.
    • A pinch of salt: Just a touch! Salt enhances all the flavors, rounding out the sweetness.

    You’ll find exact measurements for each ingredient at the bottom of the article for easy printing. Feel free to get creative with additions—I’ve even swapped out half the Biscoff spread for a different cookie butter, and it was just as yummy!

    How to Make Mini Biscoff Cheesecake

    Making this Mini Biscoff Cheesecake is simpler than you might think! Just follow these clear steps, and you’ll have a delightful dessert ready in no time. With easy instructions and some patience, you’ll impress your family and friends with this creamy dream. Here’s how to do it:

    Step 1: Prepare the Crust

    Start by crushing your Biscoff cookies into fine crumbs. You can do this by placing them in a plastic bag and rolling a rolling pin over them. Alternatively, a food processor speeds things up!

    Once crumbled, mix the cookie crumbs with melted unsalted butter. You want to ensure all crumbs are coated.

    Then, press this mixture into the bottom of cupcake liners or a muffin tin to form your crust. Think of it as sculpting little cookie shells ready for a sweet filling!

    Step 2: Bake the Crust

    Preheat your oven to 325°F (160°C) and pop the crusts in to bake for about 5-7 minutes.

    This short baking time is crucial to set the crust nicely.

    Let them cool completely before moving on to the filling. Patience is key here; a warm crust can make your cheesecake filling a bit runny!

    Step 3: Make the Filling

    In a mixing bowl, beat the softened cream cheese until it’s smooth and creamy.

    Add the granulated and brown sugars along with vanilla extract, blending well.

    Next, whip the heavy cream until soft peaks form. Gently fold the whipped cream into the cream cheese mixture for that light, fluffy texture.

    Finally, mix in the creamy Biscoff spread and add the eggs one at a time. This method keeps your mixture smooth—no lumps allowed!

    Step 4: Combine and Fill

    Now, it’s time to combine!

    Spoon the creamy filling into the cooled crusts, filling them about three-quarters full.

    Leave some space for rising and settling while baking.

    If you’re feeling adventurous, you can swirl a little extra Biscoff spread into the filling for added flavor. Your mini cheesecakes are now ready to take on the heat!

    Step 5: Bake and Chill

    Return the filled crusts to the preheated oven and bake for 18-20 minutes.

    You’re looking for the edges to be set while the center has a little jiggle—it’s all about that perfect texture!

    Once baked, let them cool at room temperature for 30 minutes, then refrigerate for at least 2 hours to help them fully set.

    Step 6: Final Touches

    To add the ultimate finishing touches, drizzle melted Biscoff spread over the cheesecakes just before serving.

    Then, top each mini cheesecake with a whole Biscoff cookie for that wow factor.

    These tiny treats not only look stunning but also promise to be utterly delicious. Enjoy sharing—or keep them all to yourself!

    Tips for Success

    • Make sure your cream cheese is at room temperature for a smooth filling.
    • Don’t skip the cooling step! It helps firm up your cheesecakes.
    • If you’re short on time, you can use store-bought cookie crumbs!
    • For an extra flavor boost, try adding a pinch of cinnamon to the crust.
    • Remember, these cheesecakes can be made a day ahead—just keep them covered in the fridge.

    Equipment Needed

    • Mixing bowls: Use any size; just make sure they’re big enough for your ingredients.
    • Hand mixer or stand mixer: A whisk works too, but mixing will take longer.
    • Measuring cups and spoons: Essential for getting your ingredients just right.
    • Muffin tin or cupcake liners: These create the perfect shape for your mini cheesecakes.
    • Spatula: For folding in whipped cream and smoothing out your filling.

    Variations

    • Chocolate Twist: Swap out a portion of the Biscoff spread for chocolate hazelnut spread for a decadent chocolate variation.
    • Gluten-Free Option: Use gluten-free cookie crumbs to make the crust and ensure everyone can indulge.
    • Nutty Delight: Add chopped nuts, like pecans or almonds, into the crust for a delightful crunch.
    • Fruity Option: Top your cheesecakes with fresh berries for a burst of color and refreshing flavor.
    • Sugar-Free Version: Opt for sugar substitutes in place of granulated and brown sugars for a lighter treat.

    Serving Suggestions

    • Pair with Coffee: A rich cup of coffee complements the sweet flavors perfectly.
    • Fresh Berries: Serve with a side of mixed berries for a refreshing contrast.
    • Whipped Cream: Add a dollop of whipped cream for extra creaminess.
    • Presentation: Arrange the cheesecakes on a beautiful platter for a stunning display at parties.

    FAQs about Mini Biscoff Cheesecake

    You might have a few questions about this delightful Mini Biscoff Cheesecake. Let’s clear up some common queries to ensure your baking experience is as smooth as the cheesecake itself!

    Can I make Mini Biscoff Cheesecake ahead of time?

    Absolutely! These mini cheesecakes can be prepared a day in advance. Just make sure to store them in the refrigerator, covered, for the best flavor and texture. This makes them perfect for parties or those busy weeknights.

    How do I keep the cheesecakes from cracking?

    To prevent cracking, avoid over-beating the mixture. Make sure to bake them at a low temperature and allow them to cool gradually in the oven before transferring them to the fridge. A little patience goes a long way!

    Can I use other cookie types for the crust?

    Definitely! While Biscoff cookies are a fantastic choice, you can experiment with others. Golden Oreos, Graham crackers, or even chocolate cookies can add unique flavors and textures to your crust.

    What can I use instead of heavy cream?

    If you’re looking to lighten up the recipe, you can use half-and-half or evaporated milk. Although the texture will be slightly different, it can still yield a deliciously creamy Mini Biscoff Cheesecake!

    Can I freeze Mini Biscoff Cheesecake?

    You can freeze these mini cheesecakes! Just make sure they are well-wrapped in plastic wrap and keep them in an airtight container. Thaw in the fridge overnight before serving for the best results.

    Final Thoughts

    Preparing this Mini Biscoff Cheesecake has transformed my dessert game! The sheer joy of whipping up a creamy, dreamy treat that brings smiles to my family’s faces is simply unmatched.

    Every bite is a sweet escape, balancing that rich Biscoff flavor with the soothing creaminess of the cheesecake.

    I love how versatile and forgiving this recipe is, making it a reliable companion for my busy days.

    So, whether you’re hosting a gathering or just treating yourself, this cheesecake is sure to become a cherished tradition in your home. Dive into this creation and savor the joy!


    Print

    clock clock iconcutlery cutlery iconflag flag iconfolder folder iconinstagram instagram iconpinterest pinterest iconfacebook facebook iconprint print iconsquares squares iconheart heart iconheart solid heart solid icon

    Description

    Mini Biscoff Cheesecake is a sweet and indulgent dessert featuring a creamy filling made with cream cheese and Biscoff spread, set on a crunchy Biscoff cookie crust.


    • 20 Biscoff cookies (for crust and garnish)
    • 4 tablespoons unsalted butter (melted)
    • 8 oz cream cheese (softened)
    • 1/3 cup granulated sugar
    • 1/3 cup brown sugar
    • 1 teaspoon vanilla extract
    • 1/2 cup heavy cream
    • 1/2 cup Biscoff spread (plus extra for drizzling)
    • 2 large eggs
    • A pinch of salt

    1. Preheat your oven to 325°F (160°C). Crush the Biscoff cookies into fine crumbs.
    2. Combine the cookie crumbs with melted butter until well mixed. Press into cupcake liners to form the crust.
    3. Bake the crust for 5-7 minutes and let cool.
    4. Beat softened cream cheese until smooth, then add granulated sugar, brown sugar, and vanilla extract.
    5. Whip heavy cream until soft peaks form and fold into the cream cheese mixture.
    6. Mix in Biscoff spread and add eggs one at a time, mixing gently.
    7. Spoon the filling into the crusts, filling them about 3/4 full.
    8. Bake for 18-20 minutes until edges are set and center jiggles slightly. Cool at room temperature for 30 minutes.
    9. Refrigerate for at least 2 hours until fully set.
    10. Drizzle with melted Biscoff spread and garnish with a whole Biscoff cookie before serving.

    Notes

    • Ensure the cream cheese is softened for easier blending.
    • Let the cheesecakes cool completely before refrigerating for best results.
    • These cheesecakes can be made a day in advance and stored in the refrigerator.
    • Prep Time: 20 minutes
    • Cook Time: 30 minutes
    • Category: Dessert
    • Method: Baking
    • Cuisine: American

    Nutrition

    • Serving Size: 1 mini cheesecake
    • Calories: 280
    • Sugar: 15g
    • Sodium: 180mg
    • Fat: 20g
    • Saturated Fat: 10g
    • Unsaturated Fat: 5g
    • Trans Fat: 0g
    • Carbohydrates: 25g
    • Fiber: 1g
    • Protein: 3g
    • Cholesterol: 80mg

    Sharing is caring!

  • Blackberry Peach Arugula Salad with Honey Lime Dressing is a must-try!

    Blackberry Peach Arugula Salad with Honey Lime Dressing is a must-try!


    Introduction to Blackberry Peach Arugula Salad with Honey Lime Dressing

    As a busy mom, I know how challenging it can be to whip up something healthy yet delicious amidst the chaos of daily life. That’s why I absolutely love this Blackberry Peach Arugula Salad with Honey Lime Dressing. It’s not just quick and easy; it’s bursting with vibrant flavors and colors that will impress any family member or friend. Picture fresh arugula, juicy peaches, and sweet blackberries dancing together in a bowl, drizzled with honey lime goodness. This salad is my go-to for a light lunch or a refreshing side dish, effortlessly brightening any meal.

    Why You’ll Love This Blackberry Peach Arugula Salad with Honey Lime Dressing

    You’ll fall in love with this Blackberry Peach Arugula Salad with Honey Lime Dressing for so many reasons! First, it comes together in just 25 minutes—perfect for those hectic evenings. The combination of sweet fruits and zesty dressing creates a flavor explosion, celebrating summer’s best produce. Plus, it’s healthy and packed with nutrients, making it a guilt-free addition to your dining table. It’s the kind of salad that invites seconds, trust me!

    Ingredients for Blackberry Peach Arugula Salad with Honey Lime Dressing

    Gathering the right ingredients is vital to achieving that delightful burst of flavor in your Blackberry Peach Arugula Salad with Honey Lime Dressing. Let’s dive into the essentials!

    • Arugula: This peppery green forms the salad’s fresh base, giving a lovely contrast to the sweetness of the fruits.
    • Ripe Peaches: Sweet and juicy, they bring a summer vibe. Look for ones that yield slightly when pressed.
    • Blackberries: Their tartness perfectly complements the sugariness of the peaches while adding a colorful touch.
    • Avocado: Creamy and rich, it enhances texture and provides healthy fats, making the salad even more satisfying.
    • Farro: This hearty grain offers a nice chewiness, balancing the lightness of the other ingredients. You can substitute it with quinoa or couscous for variety.
    • Feta Cheese: Crumbled feta adds a salty punch; however, feel free to skip it for a dairy-free version.
    • Honey Lime Dressing: The star of the show! Made with olive oil, fresh lime juice, honey, and red wine vinegar. It ties everything together with its tangy sweetness. Adjust the honey based on your taste!

    Each ingredient plays a role in creating a salad that’s not just beautiful but also bursting with flavor. For exact measurements, you’ll find them at the bottom of the article, ready for printing when you need to dash to the store!

    How to Make Blackberry Peach Arugula Salad with Honey Lime Dressing

    Creating the Blackberry Peach Arugula Salad with Honey Lime Dressing is a delightful kitchen adventure. With just three simple steps, you’ll have a beautiful, vibrant salad that tastes as amazing as it looks. Let’s dive right in!

    Step 1: Combine the Base Ingredients

    Start by taking a large bowl and adding the fresh arugula as your foundation. Then, toss in the cooked farro for that perfect chewy texture. Slice the ripe peaches and scatter them on top, along with the juicy blackberries. Finally, sprinkle the crumbled feta cheese over everything. The bright green arugula, sunny peach slices, and deep purple-black blackberries create a beautiful rainbow of flavors. Everything looks so fresh, it’s like summer in a bowl!

    Step 2: Prepare the Honey Lime Dressing

    In a separate bowl or jar, it’s time to whip up the honey lime dressing. Start by whisking together olive oil, fresh lime juice, honey, and red wine vinegar. This tangy and sweet combination takes a little love to perfect. If you’re aiming for balance, add the honey gradually to achieve the right sweetness for you. This dressing ties together the salad like a warm embrace on a chilly day—comforting and uplifting!

    Step 3: Toss the Salad

    Now comes the fun part—gently toss the salad! Pour the honey lime dressing over your colorful creation, and with a light hand, mix everything together. It’s important not to over mix; you want the fruits to keep their shape and the arugula to maintain its crispness. Look at those colors melding beautifully! As the dressing coats everything, it enhances the freshness and brings every flavor to life. Serve immediately for the best experience!

    Tips for Success

    • Use ripe, fresh peaches and blackberries for maximum flavor and sweetness.
    • Consider chilling the salad before serving for an extra refreshing bite.
    • Experiment with different nuts, like walnuts or almonds, for added crunch.
    • If you have leftovers, store the dressing separately to keep the salad fresh.
    • Cut the avocado just before serving to prevent browning.

    Equipment Needed

    • Large Mixing Bowl: A salad bowl works perfectly, but any large bowl will do!
    • Whisk: Essential for mixing the dressing. A fork can also work in a pinch.
    • Cutting Board and Knife: For slicing the peaches and chopping the avocado.
    • Measuring Cups/Spoons: Helpful for accuracy but not necessary if you’re comfortable eyeballing.

    Variations for Blackberry Peach Arugula Salad with Honey Lime Dressing

    • Add Grilled Chicken: For a protein boost, grilled chicken strips transform this salad into a full meal.
    • Swap the Grain: Try quinoa, couscous, or even brown rice instead of farro for a different flavor profile.
    • Go Nut-Free: If allergies are a concern, simply omit nuts and enjoy the salad’s natural flavors.
    • Try Other Fruits: Substitute strawberries, mangoes, or even citrus segments for a twist on the classic recipe.
    • Make it Vegan: Leave out the feta cheese or use a dairy-free alternative to keep it plant-based.
    • Spicy Kick: Add slices of jalapeño or a sprinkle of red pepper flakes for a spicy contrast to sweetness.

    Serving Suggestions for Blackberry Peach Arugula Salad with Honey Lime Dressing

    • Pair with grilled lemon herb chicken for a delightful summer meal.
    • Serve alongside crusty whole grain bread to soak up the dressing.
    • Consider a chilled glass of rosé or sparkling water to complement the salad.
    • For a beautiful presentation, serve in individual bowls with a sprinkle of extra feta on top.

    FAQs about Blackberry Peach Arugula Salad with Honey Lime Dressing

    You might have some questions about this delightful Blackberry Peach Arugula Salad with Honey Lime Dressing. Here are a few common queries I often hear from fellow home cooks:

    Can I prepare the salad in advance?

    Absolutely! You can prepare the base ingredients ahead of time. Just store the salad components in an airtight container. However, I recommend adding the dressing just before serving to keep everything fresh and crisp.

    What can I substitute for feta cheese?

    If you’re not a fan of feta or want a dairy-free alternative, consider using goat cheese, or a vegan cheese option. Both will still provide a lovely flavor boost.

    How long will leftovers last?

    Leftover salad can be stored in the fridge for up to 2 days, but to maintain freshness, keep the dressing separate. This way, the arugula and fruits stay vibrant and crunchy!

    Can I use frozen fruit for this salad?

    While fresh is best for flavor and texture, you can use frozen fruit in a pinch. Just thaw and drain them before adding to the salad, as they may release extra moisture.

    Is this salad suitable for a meal prep?

    Absolutely! The Blackberry Peach Arugula Salad with Honey Lime Dressing is perfect for meal prepping. Just layer the ingredients effectively to keep them fresh, and drizzle the dressing over just before enjoying it!

    Final Thoughts on Blackberry Peach Arugula Salad with Honey Lime Dressing

    Creating this Blackberry Peach Arugula Salad with Honey Lime Dressing is truly a joyful experience. It’s not just about tossing ingredients in a bowl; it’s about celebrating the vibrant flavors of summer. Each bite combines sweetness, crunch, and zest, making me smile even on busy days. Plus, it’s a feast for the eyes! Whether I’m serving it to my family or bringing it to a gathering, this salad never fails to impress. The beauty of it lies in its versatility and ease, making it a staple in my kitchen. Trust me; it’ll become a favorite in yours too!


    Print

    clock clock iconcutlery cutlery iconflag flag iconfolder folder iconinstagram instagram iconpinterest pinterest iconfacebook facebook iconprint print iconsquares squares iconheart heart iconheart solid heart solid icon

    Description

    A refreshing and colorful salad featuring arugula, ripe peaches, blackberries, and a honey lime dressing.


    • 5 oz arugula
    • 3 medium ripe peaches (sliced)
    • 1 cup blackberries
    • 1 avocado (chopped)
    • 2 cups cooked farro
    • 1/2 cup feta cheese
    • Honey lime dressing (olive oil, lime juice, honey, red wine vinegar)

    1. In a large bowl, combine arugula, cooked farro, sliced peaches, blackberries, avocado, feta cheese, and chopped pecans.
    2. In a separate bowl or jar, whisk together olive oil, lime juice, honey, red wine vinegar, minced shallot, garlic, salt, and pepper to make the dressing.
    3. Pour the dressing over the salad mixture and gently toss until everything is well coated. Serve immediately.

    Notes

    • Feel free to add nuts for crunch, such as toasted pecans or walnuts.
    • Adjust the sweetness of the dressing according to your taste.
    • For a vegan option, omit the feta cheese.
    • Prep Time: 15 minutes
    • Cook Time: 10 minutes
    • Category: Salad
    • Method: Mixing
    • Cuisine: American

    Nutrition

    • Serving Size: 1 serving
    • Calories: 320
    • Sugar: 10g
    • Sodium: 250mg
    • Fat: 20g
    • Saturated Fat: 4g
    • Unsaturated Fat: 16g
    • Trans Fat: 0g
    • Carbohydrates: 30g
    • Fiber: 8g
    • Protein: 8g
    • Cholesterol: 15mg

    Sharing is caring!

  • Ground Beef Burrito Bowls

    Ground Beef Burrito Bowls


    Introduction to Ground Beef Burrito Bowls

    As a busy mom, I truly understand the hustle and bustle of meal times. That’s why I’m excited to share my recipe for Ground Beef Burrito Bowls! This dish is not only flavorful but also incredibly simple to whip up. With seasoned ground beef, fluffy rice, and vibrant toppings, these bowls are a hit with my family. They make dinner feel special without the fuss, letting us gather around the table and enjoy a fantastic meal together. Trust me, you’ll love how quick and delightful this recipe is for your weeknight dinners!

    Why You’ll Love This Ground Beef Burrito Bowls

    Who doesn’t love a meal that comes together in a flash? My Ground Beef Burrito Bowls are not only quick to make but also packed with flavor. In just 25 minutes, you can serve up a satisfying dinner the whole family will enjoy. Plus, the customizable toppings mean even picky eaters can craft their perfect bowl. It’s all about ease, speed, and taste—just the way we busy moms like it!

    Ingredients for Ground Beef Burrito Bowls

    For my Ground Beef Burrito Bowls, you’ll need some hearty ingredients that come together for a delightful meal. Start with ground beef, the star protein, which brings rich flavor. I love adding taco or burrito seasoning for just the right kick!

    Next up is salt, to enhance everything’s taste. Black beans provide fiber and depth. Fluffy white rice serves as a comforting base, while corn adds a sweet crunch. For freshness, chopped red onion, colorful cherry tomatoes, and lettuce are must-haves.

    Finally, don’t forget shredded cheese and a dollop of sour cream for creaminess. Top it all off with fresh cilantro. A dash of avocado never hurts either!

    How to Make Ground Beef Burrito Bowls

    Making Ground Beef Burrito Bowls is a delightful experience that brings the family together. I’ll walk you through each step to make this tasty meal. You’ll see how simple it is to prepare, and trust me, these bowls will become a quick dinner favorite! So, let’s dive in and get cooking!

    Step 1: Cook the Ground Beef

    Start with a skillet heated over medium-high heat. Add the ground beef, and sprinkle in the salt and taco seasoning. As it cooks, you’ll hear that satisfying sizzle! Stir occasionally, breaking it up with a spatula. You want it to brown evenly, transforming into a flavorful mix. This texture is key. Once browned and cooked through, drain excess fat. Just like that, you’ve got beautifully seasoned ground beef ready for the bowl!

    Step 2: Prepare the Rice

    Fluffy white rice is the perfect base for your burrito bowls. I typically use stovetop white rice, following the package instructions for the best results. Start by rinsing the rice under cold water—this step helps remove extra starch for a less sticky outcome. Combine the rinsed rice with water in a pot. Bring it to a boil, then cover and simmer until soft. If you want to switch it up, quinoa or cauliflower rice makes great alternatives. They add different textures while keeping it delicious!

    Step 3: Assemble the Bowls

    Now comes the fun part—assembling your burrito bowls! Begin with that beautiful scoop of rice at the base. It’s like a fluffy cloud, cradling all the tasty ingredients. Next, add the seasoned ground beef, letting it sit cozily on top of the rice. Layer on the black beans for fiber and a different flavor. Then, it’s time for corn, cherry tomatoes, and shredded cheese. It’s like painting a masterpiece, making each layer pop with color and flavor!

    Step 4: Add Toppings

    Finishing touches matter! Sprinkle some chopped red onion and crisp lettuce on top for crunch. Fresh cilantro adds a burst of lively flavor—a must-have, in my opinion! And don’t forget the sour cream; it ties everything together beautifully. If you want to channel your inner gourmet, toss in diced avocado for creaminess. Trust me; every bite will be a wonderful explosion of taste!

    Tips for Success

    • Prep your ingredients before cooking to save time and keep things organized.
    • Taste the ground beef while cooking to adjust seasoning to your liking.
    • Let cooked rice cool slightly before layering to prevent sogginess.
    • Experiment with additional toppings like jalapeños or salsa for an extra kick.
    • Store any leftovers in airtight containers to maintain freshness.

    Equipment Needed

    • Large skillet for cooking the beef. A non-stick pan works wonders!
    • Pot for cooking rice. A rice cooker can save time, too.
    • Spatula for stirring the beef. A wooden spoon is a great alternative.
    • Measuring cups for portion control. Your eyeball can work in a pinch!

    Variations

    • Swap ground beef for ground turkey or chicken for a lighter option that’s still packed with flavor.
    • For a vegetarian twist, use black beans or lentils instead of meat—delicious and nutrient-rich!
    • Tweak spice levels by using mild, medium, or spicy taco seasoning to suit your family’s taste buds.
    • Add grilled vegetables like zucchini and bell peppers for a fresh, colorful twist.
    • Try brown rice or quinoa for a hearty, whole-grain alternative.

    Serving Suggestions

    • Pair these Ground Beef Burrito Bowls with warm tortilla chips and salsa for a delightful crunch.
    • Offer a side of Mexican street corn for a sweet and savory twist.
    • Serve them with refreshing iced tea or a fruity margarita.
    • Garnish with lime wedges for an extra zesty burst!

    FAQs about Ground Beef Burrito Bowls

    Can I make Ground Beef Burrito Bowls ahead of time?
    Absolutely! You can prepare the seasoned ground beef, rice, and toppings in advance. Just store them separately in airtight containers in the fridge. When it’s time to eat, simply reheat the beef and rice, then assemble your bowls fresh!

    What can I use instead of ground beef?
    If you’re looking for a lighter option, ground turkey is a fantastic substitute. For a vegetarian choice, try using black beans or lentils. They’ll provide protein and flavor without sacrificing taste.

    How can I make these burrito bowls spicier?
    To add some heat, you can incorporate spicy taco seasoning or freshly chopped jalapeños into your ground beef. A drizzle of hot sauce right before serving can elevate the spice level too!

    Are Ground Beef Burrito Bowls healthy?
    Yes! With protein from the beef and fiber from the beans and veggies, they’re nutritious. Plus, you can control portion sizes and toppings to keep it balanced.

    Final Thoughts

    There’s something truly magical about gathering the family for a meal like Ground Beef Burrito Bowls. This recipe not only brings vibrant colors to the table but also the joy of customizing each bowl to individual tastes. It fits perfectly into our busy lives, allowing us to enjoy a delicious and wholesome dinner in just 25 minutes. The laughter, stories, and shared moments make it so much more than just food. These bowls remind us to savor our time together, making every bite a celebration of family and love. Dive in, and let the joyful memories unfold!


    Print

    clock clock iconcutlery cutlery iconflag flag iconfolder folder iconinstagram instagram iconpinterest pinterest iconfacebook facebook iconprint print iconsquares squares iconheart heart iconheart solid heart solid icon

    Description

    A delicious and easy-to-make dinner featuring seasoned ground beef, rice, and fresh toppings.


    • 1/2 pound ground beef
    • 1 packet taco or burrito seasoning
    • 1 teaspoon salt
    • 1 cup black beans
    • 1 1/2 cups cooked white rice
    • 1/4 cup corn kernels
    • 1/4 cup shredded cheese
    • 1/4 red onion chopped
    • Fresh cilantro chopped
    • 2 tablespoons sour cream
    • 1/4 cup cherry tomatoes halved
    • 1 cup lettuce chopped
    • Avocado diced (optional)

    1. Heat a skillet over medium-high, then add your ground beef along with a pinch of salt and your taco or burrito seasoning. Let it cook, stirring now and then, until the beef is browned and cooked through.
    2. To build your burrito bowls, start with a generous scoop of fluffy white rice. Pile on the seasoned beef, then layer up with black beans, corn, halved cherry tomatoes, shredded cheese, sliced red onion, and some crisp lettuce.
    3. Sprinkle over fresh cilantro and finish with a dollop of sour cream.
    4. If you’re feeling fancy, a few chunks of creamy avocado are always a good idea.

    Notes

    • Adjust the seasoning based on personal preference.
    • Feel free to substitute the ground beef with ground turkey or a plant-based alternative for a lighter option.
    • Leftover beef can be stored in the refrigerator for up to 3 days.
    • Prep Time: 10 minutes
    • Cook Time: 15 minutes
    • Category: Dinner
    • Method: Stovetop
    • Cuisine: Mexican

    Nutrition

    • Serving Size: 1 bowl
    • Calories: 550
    • Sugar: 3g
    • Sodium: 800mg
    • Fat: 25g
    • Saturated Fat: 10g
    • Unsaturated Fat: 12g
    • Trans Fat: 0g
    • Carbohydrates: 50g
    • Fiber: 8g
    • Protein: 30g
    • Cholesterol: 80mg

    Sharing is caring!

  • Chicken Bacon Ranch Zucchini Boats

    Chicken Bacon Ranch Zucchini Boats


    Introduction to Chicken Bacon Ranch Zucchini Boats

    As a busy mom, I completely understand how it feels to juggle work, family, and all those daily responsibilities. That’s why I’m excited to share with you my take on Chicken Bacon Ranch Zucchini Boats. These little delights are not just an impressive dish; they’re a nutritious, hearty meal that’s perfect for any weeknight dinner! Imagine biting into a tender zucchini filled with shredded chicken, crispy bacon, and creamy ranch. Trust me, this recipe will delight your taste buds and save you time in the kitchen. Let’s make dinner fun and flavorful together!

    Why You’ll Love This Chicken Bacon Ranch Zucchini Boats

    These Chicken Bacon Ranch Zucchini Boats are everything you crave: delicious, easy, and fast to prepare! With only a few ingredients, this dish comes together in no time, making it perfect for those hectic evenings. Plus, the combination of savory chicken, crispy bacon, and tangy ranch dressing is simply irresistible. You’ll find that your family will enjoy this delightful twist on dinner, making mealtime so much more fun!

    Ingredients for Chicken Bacon Ranch Zucchini Boats

    Gathering the right ingredients is key to creating these mouthwatering Chicken Bacon Ranch Zucchini Boats! Here’s what you need:

    • Chicken breast: The heart of this dish, it’s packed with protein and makes for a tender filling.
    • Zucchini: These vibrant green beauties serve as the perfect low-carb vessel for our savory filling.
    • Bacon: Crispy bits of bacon add a smoky flavor that elevates every bite to new heights!
    • Garlic: Just a clove of minced garlic brings a robust flavor that complements the ranch dressing.
    • Ranch dressing: This creamy dressing ties all the flavors together. Feel free to use store-bought or make your own for a personal touch.
    • Salt and pepper: Essential to bring out the flavors in your filling. Adjust to your taste!
    • Mexican blend cheese: A generous sprinkle of cheese on top gives that satisfying melty goodness we all love.

    Don’t hesitate to customize your ingredients based on what you have on hand. For example, tossing in some chopped onions or bell peppers can add a unique twist! If you’re feeling adventurous, swap the ranch for a different dressing—like Caesar or blue cheese—for a new flavor profile.

    Remember, the exact quantities are available at the bottom of the article for easy printing. Enjoy preparing your delicious components!

    How to Make Chicken Bacon Ranch Zucchini Boats

    Now that we’ve gathered our ingredients, it’s time for the fun part! Let’s dive into how to make these scrumptious Chicken Bacon Ranch Zucchini Boats step by step. Follow along, and soon you’ll be serving up a delightful dish that will impress your family and friends!

    Step 1: Preheat the Oven

    First things first, we need to preheat our oven to 400 degrees Fahrenheit. This temperature is crucial because it ensures the zucchini cooks evenly while the cheese gets bubbly and golden. The smell that fills your kitchen during baking? Absolutely heavenly!

    Step 2: Prepare the Chicken

    In a medium pot, bring water to a boil, then add your chicken breast. Cook it until the internal temperature reaches 165 degrees—this usually takes about 12-15 minutes. Once cooked, remove the chicken from the pot and let it cool. Use two forks to shred the chicken. It’s easier than it sounds! Just think of it like pulling apart a cozy sweater, and you’ll be shredding in no time!

    Step 3: Create the Filling

    In a medium mixing bowl, combine the shredded chicken, chopped bacon, minced garlic, ranch dressing, salt, and pepper. Give it a good stir until everything is nicely mixed. The ranch dressing plays a key role here—it makes the filling creamy and bursting with flavor. Taste it along the way to adjust the seasoning to your liking. You want this filling to sing!

    Step 4: Prepare the Zucchini

    Now, let’s get to those zucchini. Slice each one in half lengthwise, creating little boats ready to hold our delicious filling. Use a spoon to scoop out the seeds and make a nice well for stuffing. Don’t get too carried away—leave some flesh for a sturdy boat! Place the zucchini halves in a 13×9 baking pan, ready for their savory cargo.

    Step 5: Fill Zucchini and Add Cheese

    Time to fill those zucchini with the chicken mixture you created! Spoon it generously into each half. Don’t be shy; they can hold a lot! Once filled, sprinkle a handful of Mexican blend cheese over the tops. As you imagine that gooey, melted cheese, I can’t help but smile—you know it’s going to be delicious!

    Step 6: Bake to Perfection

    Cover the baking pan with aluminum foil and pop it in the oven for 20 minutes. After that, remove the foil and continue to bake for about 5 more minutes. This helps the cheese get that perfect golden brown color, making your dish irresistibly inviting. When it’s all done, you’ll know—it’s the aroma that fills the air and makes your mouth water!

    Tips for Success

    • Make sure to season the chicken as it cooks for added flavor.
    • Don’t rush the shredding—take your time for even pieces.
    • Use a larger spoon to fill the zucchini; it makes the job easier.
    • For a crispier cheese topping, broil the boats for a minute after baking.
    • Experiment with toppings, like green onions or diced tomatoes, for a fresh twist!

    Equipment Needed

    • Medium pot: For boiling chicken. A large saucepan works too!
    • Mixing bowl: To combine your ingredients. A large plate can suffice in a pinch.
    • Cutting board: To safely slice and scoop your zucchini.
    • Aluminum foil: Essential for baking. Parchment paper is a great alternative!
    • 13×9 baking pan: Perfect for holding those zucchini boats. Any oven-safe dish will do!

    Variations on Chicken Bacon Ranch Zucchini Boats

    • For a vegetarian option, substitute smoked tempeh or mushrooms for the chicken and bacon. You’ll still get that rich flavor!
    • Try using different dressings, like chipotle ranch or dressing based on yogurt, for a twist on the classic flavor.
    • Add fresh veggies like bell peppers, spinach, or diced tomatoes into the filling for extra nutrition and color.
    • If you’re dairy-free, use a plant-based cheese or simply skip the cheese entirely; it’ll still be flavorful!
    • For a spicy kick, toss in some diced jalapeños or sprinkle red pepper flakes into your filling before baking.

    Serving Suggestions for Chicken Bacon Ranch Zucchini Boats

    • Serve with a crisp side salad to balance the richness of the boats.
    • Pair with garlic bread for an indulgent twist on the classic meal.
    • Offer a refreshing drink, like sparkling water with lemon, to cleanse the palate.
    • Garnish with fresh herbs like parsley or chives for a pop of color!

    FAQs about Chicken Bacon Ranch Zucchini Boats

    Let’s tackle some of the questions you might have about these delightful Chicken Bacon Ranch Zucchini Boats. I know I had a few curious thoughts before I tried them out!

    Can I use leftover chicken for the filling? Absolutely! Leftover rotisserie chicken works wonderfully in this recipe. It adds even more flavor and saves you time—win-win!

    How can I make this dish spicier? If you enjoy a kick, consider mixing in diced jalapeños or adding hot sauce to the chicken filling. You could even sprinkle crushed red pepper flakes on top for that fiery touch!

    What should I do with extra zucchini scraps? Don’t toss those seeds and flesh! You can sauté them with some onions and garlic for a delicious side dish or toss them into soups for added nutrition and flavor.

    Can I freeze Chicken Bacon Ranch Zucchini Boats? Yes! Prepare them ahead of time, bake them partially, and then freeze. When you’re ready to enjoy, just thaw and finish baking. Perfect for those busy nights!

    What other toppings work well with this dish? Besides cheese, consider adding diced tomatoes, sliced olives, or even a drizzle of balsamic glaze after baking for a fresh twist!

    Final Thoughts on Chicken Bacon Ranch Zucchini Boats

    Embracing the joy of cooking is something I treasure, and these Chicken Bacon Ranch Zucchini Boats truly embody that spirit! They make dinner feel like a delightful occasion, filled with laughter and satisfaction. Picture your loved ones gathered around the table, excited to dig into these vibrant, flavorful boats. The best part? You’ve served up a healthy meal that’s quick and easy, leaving you with more time to enjoy those precious moments together. I can’t wait for you to experience the smiles and full bellies that come with this recipe. Happy cooking, friends!


    Print

    clock clock iconcutlery cutlery iconflag flag iconfolder folder iconinstagram instagram iconpinterest pinterest iconfacebook facebook iconprint print iconsquares squares iconheart heart iconheart solid heart solid icon

    Description

    Delicious and healthy Chicken Bacon Ranch Zucchini Boats filled with shredded chicken, bacon, and ranch dressing, topped with cheese.


    • 1 pound chicken breast raw
    • 4 medium zucchini
    • 3 strips bacon cooked and chopped
    • 1 clove garlic minced
    • 1/2 cup ranch dressing
    • salt and pepper to taste
    • 1/2 cup Mexican blend cheese

    1. Preheat oven to 400 degrees.
    2. In a medium pot boil your chicken until it reaches an internal temperature of 165 degrees. Remove your chicken from the pot and use two forks to shred the chicken.
    3. In a medium mixing bowl stir together the chicken, bacon, garlic, ranch, salt, and pepper.
    4. Cut your zucchini in half lengthwise. Using a spoon scoop the seeds out of the zucchini to create a well for your filling. Place the zucchini into a 13×9 baking pan.
    5. Fill the zucchini with your chicken mixture.
    6. Sprinkle the tops of the zucchini with cheese and cover the pan with aluminum foil.
    7. Bake for 20 minutes and remove the aluminum foil and continue to bake for another 5 minutes.

    Notes

    • Make sure the chicken is fully cooked before shredding.
    • Feel free to customize the filling with other ingredients like onions or bell peppers.
    • For added flavor, consider using homemade ranch dressing.
    • Prep Time: 15 minutes
    • Cook Time: 25 minutes
    • Category: Main Course
    • Method: Baking
    • Cuisine: American

    Nutrition

    • Serving Size: 1 boat
    • Calories: 300
    • Sugar: 2g
    • Sodium: 650mg
    • Fat: 15g
    • Saturated Fat: 5g
    • Unsaturated Fat: 8g
    • Trans Fat: 0g
    • Carbohydrates: 10g
    • Fiber: 2g
    • Protein: 25g
    • Cholesterol: 70mg

    Sharing is caring!

  • Zucchini Pasta Salad

    Zucchini Pasta Salad


    Introduction to Zucchini Pasta Salad

    As a busy mom, I know how important it is to have quick, delicious meals that everyone loves. That’s why I’m excited to share my Zucchini Pasta Salad recipe with you! This vibrant dish is the epitome of light and refreshing, perfect for warm days when you crave something that invigorates your taste buds. Not only is it easy to whip up, but it also makes for a fantastic side at family gatherings or an effortless meal prep option. Let’s dive in and uncover why this salad will become a staple in your kitchen!

    Why You’ll Love This Zucchini Pasta Salad

    This Zucchini Pasta Salad is a delightful explosion of freshness that brings joy to every bite! It’s simple to prepare, making it a perfect choice for those hectic days. With minimal effort, you can create a dish that’s full of vibrant flavors. Plus, it’s a wonderful recipe to have on hand during hot months, serving as a cool meal or a quick side dish that everyone will adore!

    Ingredients for Zucchini Pasta Salad

    Gathering your ingredients for this Zucchini Pasta Salad is part of the fun! You’ll need cooked rotini pasta, which adds a fun twist to every bite. Next, grab some fresh zucchinis—these green gems bring a lovely crunch and bright color. Cherry tomatoes provide a burst of juiciness, while diced red onion adds a touch of sharpness. Don’t forget the black olives for that salty kick! For the dressing, a classic Italian blend works wonders and is always a crowd-pleaser. Fresh parmesan cheese, grated on top, brings everything together nicely. You can easily mix and match veggies to your liking! Exact quantities are at the end of this article for quick reference.

    How to Make Zucchini Pasta Salad

    Making this Zucchini Pasta Salad is a breeze! With just a few simple steps, you’ll have a refreshing dish ready to impress. Let’s get started on this no-cook recipe that will brighten up your table in no time.

    Step 1: Combine Ingredients

    First things first, let’s gather all those colorful ingredients! In a large mixing bowl, combine your cooked rotini pasta, diced zucchinis, halved cherry tomatoes, diced red onion, and sliced black olives. You’ll want to give everything a gentle toss to ensure that the flavors mingle beautifully. The combination of textures and colors already gives a gorgeous look. I often like to use my hands for this step; it’s a tactile joy! Embrace the vibrant medley of ingredients and feel free to sneak a taste!

    Step 2: Toss with Dressing

    Now it’s time for the flavorful part! Drizzle your Italian dressing over the mixed ingredients and gently toss until everything is evenly coated. This dressing not only adds moisture but also infuses the salad with its zesty flavor. Don’t be shy—experiment with different dressings if you’d like! A sprinkle of grated parmesan cheese finishes off the dish, giving it a lovely creaminess. If you’re feeling adventurous, add a squeeze of lemon juice for an extra zing!

    Step 3: Chill and Serve

    One of the secrets to truly delectable Zucchini Pasta Salad is to let it chill! Pop your salad in the refrigerator for at least 30 minutes. This allows the flavors to meld together beautifully. It’s like a refreshing hug on a warm day! When you’re ready to serve, give it one last gentle toss. This salad is not only refreshing but also perfect for picnics, barbecues, or family gatherings. Enjoy every bite as the fresh flavors brighten up your day!

    Tips for Success

    For the best Zucchini Pasta Salad, remember to cut your zucchini into even, bite-sized pieces. This ensures they blend nicely with the pasta. To prep ahead, chop your veggies a day in advance and store them in an airtight container. This keeps them fresh and ready for quick assembly. Also, taste the salad before serving; if it needs more zing, add a splash of lemon juice or extra dressing!

    Equipment Needed

    To whip up this Zucchini Pasta Salad, you’ll need a few essential tools from your kitchen. A large mixing bowl is perfect for combining ingredients. Use a good knife and cutting board for chopping your veggies. If you’re short on time, a food processor makes quick work of chopping too!

    Variations on Zucchini Pasta Salad

    Feel free to get creative with your Zucchini Pasta Salad! Adding grilled chicken or crumbled feta cheese can bring a rich, savory depth to this dish. If you want to keep it gluten-free, swap the rotini for gluten-free pasta. Fresh herbs like basil or dill can also elevate the flavor exponentially!

    Serving Suggestions

    Your Zucchini Pasta Salad pairs beautifully with grilled meats like chicken or steak for a complete meal! A chilled glass of white wine can elevate the experience too. For a gorgeous presentation, serve the salad in a colorful bowl, topped with fresh herbs. It’s perfect for picnics or gatherings—everyone will love it!

    FAQs about Zucchini Pasta Salad

    Here are some common questions about Zucchini Pasta Salad that I often hear!

    Can I make this salad vegetarian? Absolutely! This recipe is already vegetarian-friendly, perfect for those looking for light meal options.

    How long can I store Zucchini Pasta Salad? You can keep it in the fridge for up to three days, but it’s freshest within the first couple of days.

    Can I adjust the serving size? Yes! Just scale the ingredient amounts based on the number of servings you need.

    What can I use instead of rotini? You can substitute any pasta shape or even zucchini noodles for a lighter version!

    Enjoy experimenting with this delightful salad!

    Final Thoughts

    Making Zucchini Pasta Salad can truly be a delightful addition to any meal. It brings family and friends together around the table, creating moments filled with laughter and joy. I encourage you to experiment with variations, whether it’s adding your favorite veggies or trying out different dressings. Each batch is a new adventure in flavor!

    There’s something special about home-cooked, healthy meals that nourish both body and soul. Embrace the freshness and let this vibrant salad be a staple in your kitchen, bringing light and joy amidst the busyness of life!


    Print

    clock clock iconcutlery cutlery iconflag flag iconfolder folder iconinstagram instagram iconpinterest pinterest iconfacebook facebook iconprint print iconsquares squares iconheart heart iconheart solid heart solid icon

    Description

    A refreshing zucchini pasta salad perfect for warm days or as a side dish.


    • 3 cups cooked rotini pasta
    • 2 medium zucchinis, diced
    • 1 cup cherry tomatoes, halved
    • 1/4 cup red onion, diced
    • 1/4 cup black olives, sliced
    • 1/4 cup Italian dressing
    • 1/4 cup grated parmesan cheese

    1. In a large bowl, combine cooked pasta, zucchini, cherry tomatoes, red onion, and olives.
    2. Toss with Italian dressing and sprinkle with parmesan.
    3. Chill for at least 30 minutes before serving.

    Notes

    • Feel free to add other vegetables like bell peppers or cucumbers for extra crunch.
    • This salad can be made a day ahead and stored in the refrigerator.
    • Adjust the amount of dressing according to your taste preference.
    • Prep Time: 10 minutes
    • Cook Time: 0 minutes
    • Category: Salad
    • Method: No-Cook
    • Cuisine: American

    Nutrition

    • Serving Size: 1 cup
    • Calories: 250
    • Sugar: 3g
    • Sodium: 400mg
    • Fat: 9g
    • Saturated Fat: 2g
    • Unsaturated Fat: 7g
    • Trans Fat: 0g
    • Carbohydrates: 35g
    • Fiber: 3g
    • Protein: 8g
    • Cholesterol: 8mg

    Sharing is caring!

  • Crunchy Cucumber, Carrot and Celery Salad

    Crunchy Cucumber, Carrot and Celery Salad


    Introduction to Crunchy Cucumber, Carrot and Celery Salad

    As a busy mom, I know how chaotic life can get. Between juggling work and family, it’s easy to lose sight of the importance of fresh, vibrant meals. That’s where my Crunchy Cucumber, Carrot and Celery Salad comes in! It’s a delightful burst of freshness, perfect for a quick lunch or as a side dish that will impress your loved ones. With its lively crunch and bright colors, this salad not only nourishes the body but also lifts the spirit. Plus, it comes together in just 15 minutes, making it a fantastic go-to when time is tight!

    Why You’ll Love This Crunchy Cucumber, Carrot and Celery Salad

    This Crunchy Cucumber, Carrot and Celery Salad is not just a dish; it’s a solution to weekday dinner dilemmas. It’s incredibly easy and quick to prepare, making it a lifesaver on busy nights. The refreshing taste of the vegetables is sure to brighten up your meal. Plus, it’s healthy and packed with nutrients, so you can feel good about what you’re serving your family. Who doesn’t love a salad that’s both delicious and simple?

    Ingredients for Crunchy Cucumber, Carrot and Celery Salad

    Gathering your ingredients is the first step towards creating this revitalizing salad! Here’s what you’ll need:

    • English cucumber: This variety is crisp and less watery, making it perfect for salads. Its smooth skin doesn’t require peeling.
    • Carrots: These vibrant orange gems add sweetness and a delightful crunch. You can shred them or cut them into sticks for a rustic touch.
    • Celery: The perfect crunchy component, celery lends its signature fresh flavor. Choose bright green stalks for the best taste.
    • Red onion: Just a bit adds zing to the salad. Its sharpness can be mellowed by soaking in water if preferred.
    • Fresh parsley: This herb brings brightness and a pop of color. Use it generously for added freshness.
    • Lemon juice: Freshly squeezed lemon juice balances flavors and enhances the overall zestiness of the dish.
    • Olive oil: A drizzle of quality olive oil helps to marry the ingredients and adds richness.
    • Dijon mustard: Just a teaspoon adds depth and tang, elevating the simple dressing.
    • Salt and pepper: Simple seasonings that round out all the flavors. Adjust to taste!
    • Maple syrup or honey (optional): A touch of sweetness can elevate the salad further if you’re feeling adventurous.

    Feel free to mix in other veggies like bell peppers or radishes for extra crunch. You can find the exact quantities listed at the bottom of the article for easy reference. Happy prepping!

    How to Make Crunchy Cucumber, Carrot and Celery Salad

    Step 1: Prepare the Vegetables

    Start by washing all your vegetables thoroughly under cold water. I swear by this step; it makes a world of difference! Slice the English cucumber into thin half-moons. Next, peel and julienne or shred the carrots into thin strips. For the celery, remove any strings that may be tough and then slice them thinly. The key here is uniformity, which ensures all ingredients mix well. This base will bring a symphony of crunch to your Crunchy Cucumber, Carrot and Celery Salad!

    Step 2: Make the Dressing

    In a small bowl, it’s time to create your dressing! Start by adding the freshly squeezed lemon juice, olive oil, and Dijon mustard. Whisk these together until they emulsify into a creamy blend. You’ll want a smooth consistency that doesn’t separate. If you’re adding maple syrup or honey, include it now to counterbalance the acidity with subtle sweetness. Tasting as you go is part of the fun—adjust salt and pepper to fit your flavor profile!

    Step 3: Toss it All Together

    Now comes the magic moment! In a large mixing bowl, toss together the prepared cucumber, carrot, celery, and red onion. Drizzle your dressing over the top, and gently toss everything together until each piece is beautifully coated. Take your time here; you want every crunch to delight your taste buds. This balancing act of textures is what makes your Crunchy Cucumber, Carrot and Celery Salad truly irresistible!

    Step 4: Add Fresh Herbs

    Once everything is mixed, it’s time for the green goodness! Sprinkle the finely chopped parsley over your salad. This simple step not only enhances the flavor but also adds a beautiful pop of color. If you’re feeling adventurous, consider adding other herbs, like dill or cilantro, depending on your taste. Fresh herbs make such a difference in lifting the entire dish. Your salad is already looking stunning!

    Step 5: Allow to Rest

    Before diving in, let your salad sit for about 5 to 10 minutes. This allows all those flavors to meld and develop a deeper taste. Serve it chilled or at room temperature for the best experience. Not only does this step enhance flavor, but it also helps the vegetables maintain their crispness! Enjoy your delicious, vibrant, and refreshing Crunchy Cucumber, Carrot and Celery Salad!

    Tips for Success

    • Chill your salad bowl before mixing for an extra refreshing crunch.
    • Use a sharp knife for clean cuts on vegetables; they hold their structure better.
    • Adjust the dressing ingredients according to your preferences—don’t be afraid to experiment!
    • Prepare veggies in advance and store them in the fridge for quick assembly.
    • Add nuts or seeds for an added crunch and nutrition boost!

    Equipment Needed

    • Cutting board: Essential for chopping vegetables. A sturdy wooden or plastic board works well.
    • Sharp knife: A chef’s knife is perfect for clean cuts and ease of use.
    • Mixing bowl: A large bowl for tossing ingredients. A salad spinner can double as an option!
    • Whisk: Use a small whisk or fork to blend dressing ingredients smoothly.
    • Measuring spoons: Handy for precise dressing ingredients—or just eyeball it for fun!

    Variations

    • Spicy Kick: Add thinly sliced jalapeños or a sprinkle of red pepper flakes for a spicy twist.
    • Protein Boost: Toss in cooked chickpeas or diced grilled chicken for added protein.
    • Cheesy Delight: Crumble feta or goat cheese on top for a creamy contrast to the crunch.
    • Fruit Infusion: Incorporate diced apples or pears for a hint of sweetness alongside the veggies.
    • Vegan Twist: Use agave nectar instead of honey for a fully plant-based salad.

    Serving Suggestions for Crunchy Cucumber, Carrot and Celery Salad

    • Pair with grilled chicken or fish for a complete meal.
    • Serve alongside quinoa or brown rice for additional fiber.
    • Enjoy with refreshing iced tea or lemonade for a thirst-quenching combo.
    • Dress up your salad with a sprinkle of sesame seeds for extra flair.
    • Use a colorful bowl to enhance the visual appeal on your table!

    FAQs about Crunchy Cucumber, Carrot and Celery Salad

    Can I make this salad ahead of time?
    Absolutely! You can prep the vegetables a day in advance, storing them in an airtight container. However, for the best crunch, I recommend adding the dressing just before serving.

    How long will the salad last in the fridge?
    You can enjoy your Crunchy Cucumber, Carrot and Celery Salad for up to two days in the fridge. Just keep it sealed to maintain freshness.

    What can I substitute for Dijon mustard?
    If Dijon isn’t your thing, feel free to use yellow mustard or even a bit of balsamic vinegar instead. It’ll still add that necessary tang to your salad.

    Can I add other vegetables to this salad?
    Definitely! Bell peppers, radishes, or even sugar snap peas can add exciting flavors. Mix and match according to your mood!

    Is this salad gluten-free?
    Yes! This salad is naturally gluten-free, making it a perfect option for those avoiding gluten. Enjoy the crunch without worry!

    Final Thoughts

    Making my Crunchy Cucumber, Carrot and Celery Salad is more than just a cooking task; it’s a joyful culinary adventure. Each crisp bite reminds me how vibrant flavors can lift spirits, even on hectic days. This salad offers a lovely balance of texture and taste, perfect for sharing around the dinner table. Plus, it’s so adaptable, allowing for creativity that matches your family’s preferences. I hope you find as much joy in creating and sharing this refreshing dish as I do. Here’s to delicious meals and cherished moments!


    Print

    clock clock iconcutlery cutlery iconflag flag iconfolder folder iconinstagram instagram iconpinterest pinterest iconfacebook facebook iconprint print iconsquares squares iconheart heart iconheart solid heart solid icon

    Description

    A refreshing and crunchy salad made with cucumber, carrots, and celery, perfect for a light meal or side dish.


    • 1 large English cucumber, sliced into thin half-moons
    • 2 medium carrots, peeled and julienned or shredded
    • 2 celery stalks, thinly sliced
    • 1/4 red onion, thinly sliced
    • 2 tablespoons fresh parsley, finely chopped
    • 2 tablespoons lemon juice (freshly squeezed)
    • 1 tablespoon olive oil
    • 1 teaspoon Dijon mustard
    • Salt and pepper, to taste
    • Optional: 1 teaspoon maple syrup or honey for subtle sweetness

    1. In a large mixing bowl, combine the cucumber, carrots, celery, and red onion.
    2. In a small bowl, whisk together the lemon juice, olive oil, Dijon mustard, salt, pepper, and optional sweetener until emulsified.
    3. Pour the dressing over the vegetables and toss gently until everything is evenly coated.
    4. Sprinkle the chopped parsley on top and mix gently again.
    5. Let the salad sit for 5–10 minutes before serving to allow the flavors to meld.
    6. Serve chilled or at room temperature.

    Notes

    • This salad is best served fresh but can be stored in an airtight container in the fridge for up to 2 days.
    • For a vegan option, ensure to omit the honey if used.
    • Prep Time: 15 minutes
    • Cook Time: 0 minutes
    • Category: Salad
    • Method: Mixing
    • Cuisine: Mediterranean

    Nutrition

    • Serving Size: 1 cup
    • Calories: 50
    • Sugar: 3g
    • Sodium: 150mg
    • Fat: 4g
    • Saturated Fat: 0.5g
    • Unsaturated Fat: 3.5g
    • Trans Fat: 0g
    • Carbohydrates: 7g
    • Fiber: 2g
    • Protein: 1g
    • Cholesterol: 0mg

    Sharing is caring!

  • Chocolate Oreo Cheesecake Brownie Trifle

    Chocolate Oreo Cheesecake Brownie Trifle


    Introduction to Chocolate Oreo Cheesecake Brownie Trifle

    There’s something magical about desserts that bring joy, isn’t there? My Chocolate Oreo Cheesecake Brownie Trifle is just that—a decadent delight that layers rich brownies, creamy cheesecake, and crunchy Oreos. Perfect for a busy day or a family gathering, this trifle is sure to impress your loved ones with minimal effort. As a mom, I know how priceless our time is, so creating something that looks fancy yet comes together quickly is a win-win. Let’s dive into this sweet adventure, where each spoonful is an explosion of flavor and happiness!

    Why You’ll Love This Chocolate Oreo Cheesecake Brownie Trifle

    This Chocolate Oreo Cheesecake Brownie Trifle is a showstopper that comes together in no time. It’s ridiculously easy to prepare, which is a blessing on chaotic days. Each bite is an enchanting blend of rich chocolate and creamy cheesecake, plus a satisfying crunch from the Oreos. Whether you’re entertaining friends or treating your family, this dessert guarantees smiles all around. It’s that sweet little escape we all deserve!

    Ingredients for Chocolate Oreo Cheesecake Brownie Trifle

    Creating this Chocolate Oreo Cheesecake Brownie Trifle requires a delightful array of ingredients, which you may already have in your kitchen. Each one plays a vital role in building the layers of flavor and texture.

    • Unsalted butter: This rich base ingredient adds moisture and richness to your brownies, making them deeply satisfying.
    • Granulated sugar: It sweetens the brownie batter while giving it a nice texture that complements the creaminess of the cheesecake.
    • Eggs: They provide structure and moisture, binding the ingredients together for that perfect brownie base.
    • Vanilla extract: Offers a fragrant warmth that enhances the overall flavor of the trifle. I always advocate using pure vanilla for the best taste!
    • All-purpose flour: This helps create the perfect brownie texture—fudgy yet structured.
    • Cocoa powder: Brings a deep chocolate flavor, setting the foundation for your decadent dessert.
    • Salt: Just a pinch balances the sweetness and elevates the chocolate flavor remarkably.
    • Baking powder: This leavening agent gives the brownies just the right amount of lift.
    • Chocolate chips: They melt beautifully in the brownies, adding pockets of gooey goodness in every bite.
    • Cream cheese: The star of the cheesecake layer, it provides that rich and creamy texture we all adore.
    • Powdered sugar: This is key for sweetening the cheesecake and giving it that silky smooth mouthfeel.
    • Heavy whipping cream: When whipped, it lightens the cheesecake, adding volume and a heavenly texture.
    • Crushed Oreos: They add delightful crunch to the cheesecake layer and in the trifle assembly, which I can’t resist.
    • Chocolate syrup: This drizzle on top adds a gorgeous presentation while enhancing that chocolatey goodness.
    • Whipped cream: A fluffy dollop on top is simply the icing on the cake—if you will—or the trifle, in this case!

    Remember, the exact measurements are at the bottom of this article, ready for printing when you’re prepared to create this luscious treat. Feel free to play with these ingredients. Maybe add a pinch of espresso powder for an extra kick, or swap in gluten-free flour for a diet-friendly option; the possibilities are endless!

    How to Make Chocolate Oreo Cheesecake Brownie Trifle

    Preheat & Prepare the Brownie Base

    Let’s kick things off by preheating your oven to 350°F (175°C). This step ensures your brownies start baking right away, achieving that rich, fudgy texture we all love. Meanwhile, grease a 9×13 inch baking pan to prevent sticking. Trust me, a non-stick surface is your best friend here! This will make the entire process smoother, making it easy to cut those delightful brownie squares later on.

    Make the Brownie Batter

    Now for the fun part—making the brownie batter! In a large saucepan, melt your unsalted butter over low heat. Once melted, stir in the granulated sugar, eggs, and vanilla extract until well blended. It’s key to mix thoroughly to incorporate air. Next, add the all-purpose flour, cocoa powder, salt, and baking powder, mixing gently until just combined. The batter should be thick and glossy, a fantastic promise of what’s to come! Finally, fold in those luscious chocolate chips, setting the stage for sweet pockets of joy.

    Bake the Brownies

    Pour the batter into your prepared pan and let it bake for 25-30 minutes. To check if your brownies are done, insert a toothpick into the center; if it comes out with a few moist crumbs, you’re golden! This gooeyness is key to the perfect brownie base. Once they’re baked, let them cool completely in the pan. This step is non-negotiable! If you skip this, your brownies might crumble apart when you assemble your trifle.

    Prepare the Cheesecake Layer

    While your brownies cool, let’s prepare the cheesecake layer. In a large mixing bowl, beat the softened cream cheese and powdered sugar until it’s smooth and creamy—no lumps allowed! This part is crucial for that decadent taste. Add a splash of vanilla extract next. In a separate bowl, whip the heavy cream until stiff peaks form—it should look like fluffy clouds. Gently fold the whipped cream into the cream cheese mixture, being careful not to deflate it. Finally, mix in those crushed Oreos, blending flawlessly into the rich cheesecake.

    Assemble the Trifle

    Now comes the fun part: assembling your trifle! Start with a layer of brownie pieces at the bottom of your serving dish, whether it’s a large trifle bowl or individual glasses. Spoon half of the cheesecake mixture over the brownies, creating an inviting layer. Next, sprinkle a layer of crushed Oreos on top for that satisfying crunch. Repeat this layering with the remaining brownies, cheesecake, and Oreos. For added flair, drizzle chocolate syrup in between layers and go wild with your presentation—this trifle should be as pretty as it is tasty!

    Chill Time

    Finally, cover your trifle with plastic wrap and place it in the refrigerator. Allow it to chill for a minimum of 3 hours—overnight is even better! This chilling time is essential for all the flavors to meld together, creating an unforgettable dessert experience that everyone will adore.

    Tips for Success

    • Always let your brownies cool completely to avoid a mushy assembly.
    • Use high-quality chocolate chips for a richer flavor.
    • Don’t rush the chilling time—it enhances the texture and flavor!
    • Experiment with flavors by adding a pinch of espresso powder or mint extract.
    • Consider using a clear trifle dish to showcase those beautiful layers!

    Equipment Needed

    • 9×13 inch baking pan – A glass dish works well if you don’t have a metal one.
    • Large saucepan – Any heavy-bottomed pan can work for melting the butter.
    • Mixing bowls – Use one for the brownie batter and another for the cheesecake layer.
    • Whisk – A hand whisk or electric mixer can speed up the mixing process.
    • Trifle dish or individual serving glasses – Clear options are fantastic for showing off those beautiful layers!

    Variations of Chocolate Oreo Cheesecake Brownie Trifle

    • Mint Chocolate Oreo Cheesecake Brownie Trifle: Add mint extract to the cheesecake layer for a refreshing twist, and use mint-infused Oreos to further enhance the flavor.
    • Peanut Butter Swirl: Incorporate creamy peanut butter into the cheesecake layer for a nutty flavor, drizzling some on top for decoration.
    • Gluten-Free Option: Swap regular flour for a gluten-free blend to make this delightful dessert accessible for those with dietary restrictions.
    • Fruits Addition: Add layers of fresh raspberries or strawberries between the brownie and cheesecake layers for a burst of freshness.
    • Vegan Variation: Use dairy-free cream cheese and coconut whipped cream to create a vegan-friendly version of the trifle, while still keeping it deliciously indulgent.

    Serving Suggestions

    • Pair your trifle with a scoop of vanilla ice cream for an extra indulgence.
    • Serve alongside freshly brewed coffee or a rich hot chocolate to complement the chocolatey flavors.
    • Garnish with chocolate shavings or fresh mint leaves for a pop of color.
    • For a festive touch, sprinkle crushed Oreos on top just before serving.
    • Present individual servings in clear glasses for an eye-catching display!

    FAQs about Chocolate Oreo Cheesecake Brownie Trifle

    Can I make this Chocolate Oreo Cheesecake Brownie Trifle ahead of time?

    Absolutely! In fact, making it a day ahead will intensify the flavors. Just make sure to store it covered in the refrigerator.

    What if I can’t find Oreo cookies?

    No worries! You can substitute with any chocolate sandwich cookies. Look for similar brands or even make your own if you’re feeling adventurous!

    How should I store leftover trifle?

    Store any leftovers in the refrigerator, covered with plastic wrap. It should last for about 3-4 days, though it’s so delicious you might not have any left!

    Can I use a different topping instead of whipped cream?

    Certainly! You could sprinkle some chocolate shavings, or even a dollop of marshmallow fluff for a fun twist. Get creative with your toppings!

    Is this dessert suitable for kids?

    Yes! The Chocolate Oreo Cheesecake Brownie Trifle is a hit with kids. Just be mindful of any dietary restrictions they may have.

    Final Thoughts on Chocolate Oreo Cheesecake Brownie Trifle

    Creating a Chocolate Oreo Cheesecake Brownie Trifle is more than just baking; it’s crafting memories over dessert. Each layer sings with rich, decadent flavors, bringing smiles to family gatherings or cozy evenings at home. I love how this recipe effortlessly combines indulgence and joy, making it a delightful treat any time. Don’t be surprised if it becomes your go-to dessert for every occasion! Sharing this trifle means sharing love, laughter, and a scoop of sweetness that warms the heart. Trust me, every bite is worth celebrating, and it’ll leave everyone asking for seconds!


    Print

    clock clock iconcutlery cutlery iconflag flag iconfolder folder iconinstagram instagram iconpinterest pinterest iconfacebook facebook iconprint print iconsquares squares iconheart heart iconheart solid heart solid icon

    Description

    Chocolate Oreo Cheesecake Brownie Trifle is a decadent dessert that layers rich brownie pieces, creamy cheesecake, and crunchy Oreo cookies, perfect for any occasion.


    • 1 cup unsalted butter
    • 2 cups granulated sugar
    • 4 large eggs
    • 1 teaspoon vanilla extract
    • 1 cup all-purpose flour
    • 1 cup cocoa powder
    • 1/2 teaspoon salt
    • 1/2 teaspoon baking powder
    • 1 cup chocolate chips
    • 16 oz cream cheese, softened
    • 1 cup powdered sugar
    • 1 teaspoon vanilla extract
    • 1 cup heavy whipping cream, chilled
    • 1/2 cup crushed Oreo cookies
    • 2 cups crushed Oreo cookies (for assembly)
    • 1/4 cup chocolate syrup (for drizzling)
    • Whipped cream (for topping)

    1. Preheat the oven to 350°F (175°C) and grease a 9×13 inch baking pan.
    2. In a large saucepan, melt the butter over low heat. Remove from heat and stir in sugar, eggs, and vanilla until well blended.
    3. Add flour, cocoa powder, salt, and baking powder; stir until just combined. Fold in chocolate chips.
    4. Pour the batter into the prepared pan and bake for 25-30 minutes, or until a toothpick inserted in the center comes out with a few moist crumbs. Allow to cool completely.
    5. In a large mixing bowl, beat the softened cream cheese and powdered sugar together until smooth and creamy.
    6. Add the vanilla extract and continue to beat until fully incorporated.
    7. In a separate bowl, whip the heavy cream until stiff peaks form. Gently fold the whipped cream into the cream cheese mixture until no streaks remain.
    8. Stir in the crushed Oreo cookies until evenly distributed.
    9. Cut the cooled brownies into bite-sized squares.
    10. In a large trifle dish or individual serving glasses, layer half of the brownie pieces at the bottom.
    11. Spoon half of the cheesecake layer over the brownies, followed by a layer of crushed Oreos.
    12. Repeat the layers with the remaining brownies, cheesecake mixture, and crushed Oreos.
    13. Drizzle chocolate syrup on top and finish with a dollop of whipped cream and some extra crushed Oreos.
    14. Cover the trifle with plastic wrap and refrigerate for at least 3 hours, or overnight, to allow the flavors to meld.

    Notes

    • Make sure to cool the brownies completely before assembling the trifle.
    • This dessert can be made a day ahead for better flavor blending.
    • Add more crushed Oreos or chocolate syrup as desired for extra flavor.
    • Prep Time: 30 minutes
    • Cook Time: 30 minutes
    • Category: Dessert
    • Method: Baking and Chilling
    • Cuisine: American

    Nutrition

    • Serving Size: 1 cup
    • Calories: 450
    • Sugar: 35g
    • Sodium: 150mg
    • Fat: 25g
    • Saturated Fat: 15g
    • Unsaturated Fat: 10g
    • Trans Fat: 0g
    • Carbohydrates: 50g
    • Fiber: 3g
    • Protein: 5g
    • Cholesterol: 80mg

    Sharing is caring!