Blog

  • Spinach Zucchini Chickpea Bake

    Spinach Zucchini Chickpea Bake


    Introduction to Spinach Zucchini Chickpea Bake

    As a busy mom, I understand how hectic life can get. Between work, errands, and family time, preparing a home-cooked meal often feels like a marathon! That’s why I’m excited to share my favorite recipe: the Spinach Zucchini Chickpea Bake. This dish is not just wholesome and delicious; it’s a quick solution that resonates with every family’s needs. Packed with veggies and protein, it’s perfect for those evenings when comfort food and nutrition go hand in hand. Let’s dive into this culinary adventure that your family will absolutely love!

    Why You’ll Love This Spinach Zucchini Chickpea Bake

    This Spinach Zucchini Chickpea Bake is truly a game-changer for busy schedules. It’s not only quick to prep but also bakes in under an hour! Imagine the aroma that fills your kitchen while it cooks; it’s enough to make anyone’s mouth water. Plus, this dish is a healthy option that sneaks in a variety of veggies, making it perfect for picky eaters. Trust me, your family will be coming back for seconds!

    Ingredients for Spinach Zucchini Chickpea Bake

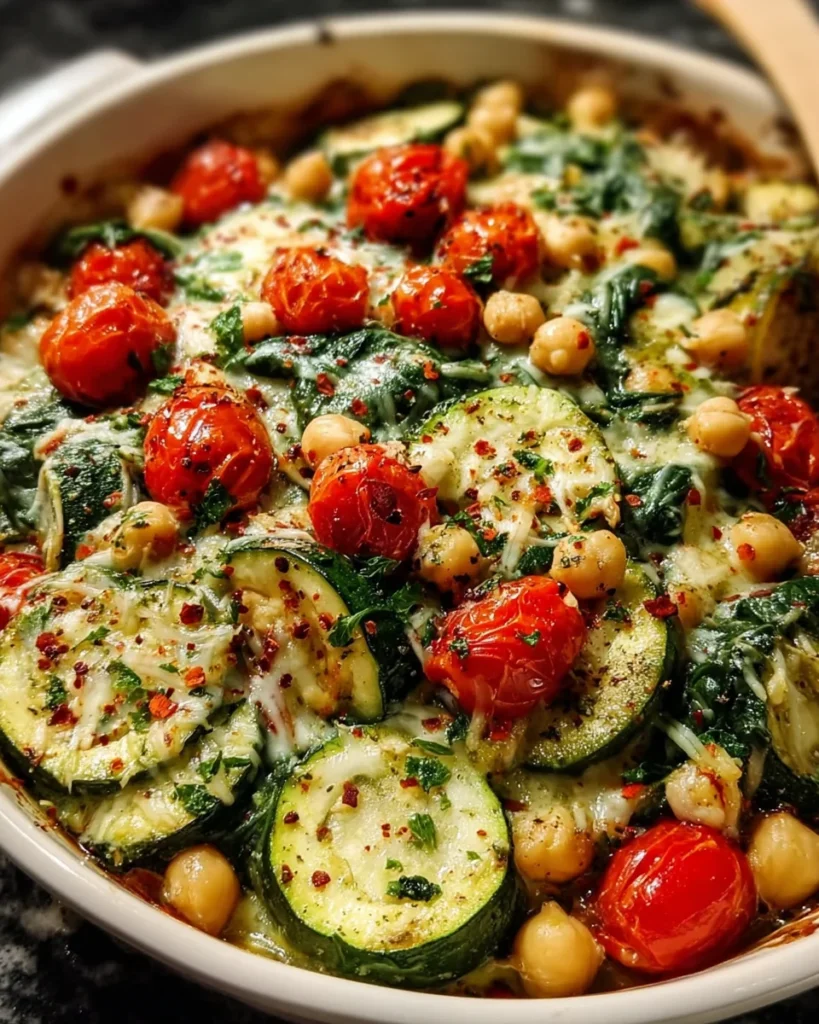
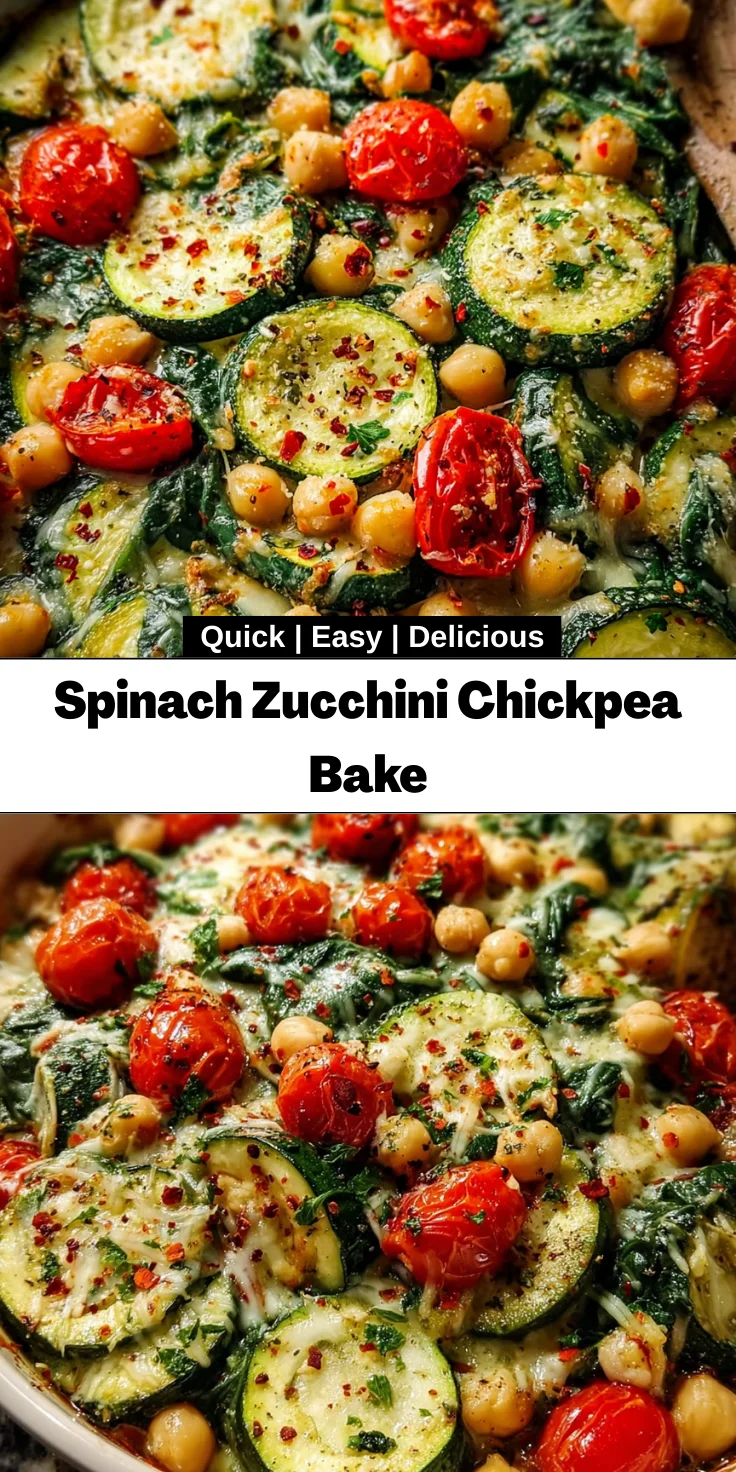
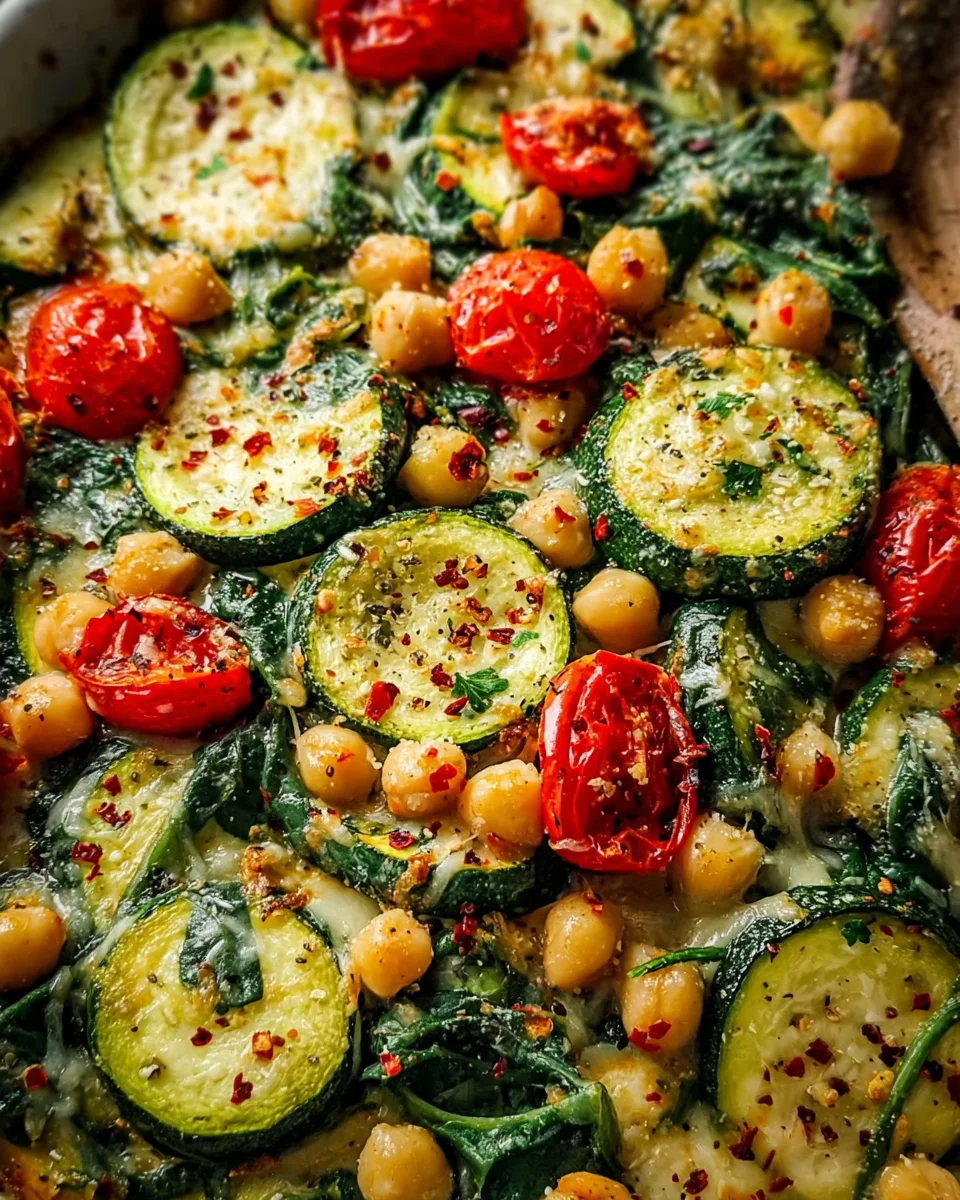
    Gather your ingredients to create this delightful Spinach Zucchini Chickpea Bake. You’ll need fresh zucchinis, which are the stars of this dish, lending a satisfying texture. Canned chickpeas bring a hearty protein punch, while vibrant baby spinach adds nutrition without overpowering flavors. Cherry tomatoes add a burst of sweetness, making every bite a little joy.

    Don’t forget olive oil for a healthy fat. Seasonings like garlic powder, oregano, red pepper flakes, salt, and black pepper elevate the dish. A combination of mozzarella and Parmesan cheese adds melty goodness.

    For those looking for a vegan twist, simply swap out the cheeses for your favorite dairy-free alternatives. Specific ingredient quantities are conveniently listed below for easy access when you’re ready to cook!

    How to Make Spinach Zucchini Chickpea Bake

    Step 1: Preheat the Oven

    First things first, let’s preheat that oven to 375°F (190°C). Preheating ensures even cooking, so your dish will bake perfectly. While it heats up, take some time to lightly grease a medium baking dish. I like to use a bit of olive oil for an extra flavor touch!

    Step 2: Prepare the Vegetable Mixture

    Now, grab a large bowl and add your sliced zucchinis, drained chickpeas, chopped spinach, and halved cherry tomatoes. Drizzle in the olive oil and sprinkle the garlic powder, oregano, red pepper flakes, salt, and black pepper. This mix is like a vibrant garden in your bowl! Give everything a good stir until the veggies are nicely coated with those seasonings.

    Step 3: Toss Everything Together

    When tossing your vegetable mixture, be gentle yet thorough. You want every piece to soak up the olive oil while mingling with the spices. I find it’s easier to use my hands – just make sure they’re clean! This way, you’ll get an even coating and every ingredient will shine in the final bake.

    Step 4: Transfer and Spread

    Carefully pour the mixture into your greased baking dish. Spread it out evenly with a spatula or the back of a spoon. Spreading ensures that all those yummy flavors meld together nicely while baking. You want every scoop to have a little of everything!

    Step 5: Add the Cheese

    Time for the cheesy magic! First, sprinkle a generous layer of shredded mozzarella over your veggie mixture. This will create that lovely melted texture. Next, add the grated Parmesan. The combo of these cheeses adds depth and a savory flavor that’s downright irresistible!

    Step 6: Bake Covered

    Now, cover the baking dish with foil. This step is crucial! Covering helps to trap moisture, preventing the veggies from drying out. It also lets the cheese start melting evenly. Place it in the preheated oven and let it bake for the first 20 minutes. Trust me, your kitchen will smell glorious!

    Step 7: Bake Uncovered

    Once the first stage is done, it’s time to uncover your dish and continue baking. Let it bake for another 10 to 15 minutes. This will give you the magical golden top. You want that cheese to bubble and slightly brown for the ultimate finish!

    Step 8: Garnish and Serve

    Finally, remove your Spinach Zucchini Chickpea Bake from the oven and let it cool for a few minutes. Garnish it with freshly chopped parsley for a pop of color and a burst of freshness. Serve it warm, and watch your family’s faces light up with joy!

    Tips for Success

    • Prep your ingredients in advance to save time during cooking.
    • Don’t skip rinsing the chickpeas; it helps reduce sodium and enhances flavor.
    • Feel free to mix and match vegetables based on what you have on hand.
    • For extra zest, add a squeeze of lemon before serving.
    • Store any leftovers in an airtight container for a quick lunch option!

    Equipment Needed for Spinach Zucchini Chickpea Bake

    • Medium baking dish (9×13 inch works well, but a round dish is fine too)
    • Large mixing bowl (a sturdy glass or plastic bowl is perfect)
    • Spatula for spreading and serving (you can also use a large spoon if needed)
    • Measuring cups and spoons to ensure accuracy
    • Foil to cover the dish (parchment paper can be an alternative)

    Variations on Spinach Zucchini Chickpea Bake

    • Add diced bell peppers or mushrooms for an extra flavor boost.
    • Swap out chickpeas for black beans for a different protein source.
    • Include a bit of crumbled feta cheese for a tangy twist.
    • Experiment with seasonal vegetables like butternut squash or carrots.
    • For a gluten-free option, ensure all ingredients are certified gluten-free.
    • Add a pinch of smoked paprika for a smoky depth of flavor.

    Serving Suggestions for Spinach Zucchini Chickpea Bake

    • Pair with a crisp green salad dressed in lemon vinaigrette for a refreshing balance.
    • Serve with warm crusty bread to soak up the delicious flavors.
    • A side of garlic roasted potatoes adds a hearty touch.
    • Enjoy with a glass of chilled white wine for a lovely dinner vibe.
    • Presentation is key! Use colorful plates and garnish with extra parsley for flair.

    FAQs about Spinach Zucchini Chickpea Bake

    Many readers often wonder about the best ways to enjoy this Spinach Zucchini Chickpea Bake. Here are some common questions and answers!

    Can I make this dish ahead of time? Yes! You can prepare the mixture the night before and store it in the fridge. Just bake it when you’re ready to serve.

    What can I substitute for chickpeas? If you’re not a fan, feel free to swap chickpeas with black beans or even lentils for a different texture and taste.

    Is it freeze-friendly? Absolutely! After baking, let it cool completely, then wrap portions tightly and freeze for up to three months.

    How can I make it spicier? You can add more red pepper flakes or even include a dash of hot sauce in the vegetable mix for a fiery kick!

    Final Thoughts on Spinach Zucchini Chickpea Bake

    Preparing this Spinach Zucchini Chickpea Bake is like wrapping your family in a warm, nutritious hug. Every bite is a blend of vibrant veggies and gooey cheese that satisfies the soul. I’ve seen picky eaters dive right in, and their smiles are priceless! It’s a dish that fosters togetherness and creates sweet memories around the dinner table. Whether it’s a busy weeknight or a leisurely weekend, this recipe makes meal times enjoyable and stress-free. Give it a try, and watch as it becomes a beloved staple in your home, just like it has in mine!


    Print

    clock clock iconcutlery cutlery iconflag flag iconfolder folder iconinstagram instagram iconpinterest pinterest iconfacebook facebook iconprint print iconsquares squares iconheart heart iconheart solid heart solid icon

    Description

    A delicious and healthy Spinach Zucchini Chickpea Bake that’s perfect for the whole family.


    • 2 medium zucchinis, sliced into 1/4″ rounds
    • 1 ½ cups canned chickpeas, drained and rinsed
    • 2 cups fresh baby spinach, roughly chopped
    • 1 cup cherry tomatoes, halved
    • 1 tablespoon olive oil
    • 1 teaspoon garlic powder
    • 1/2 teaspoon dried oregano
    • 1/2 teaspoon red pepper flakes (optional)
    • 1/2 teaspoon salt
    • 1/4 teaspoon black pepper
    • 1 cup shredded mozzarella cheese
    • 1/4 cup grated Parmesan cheese
    • 1/4 cup fresh parsley, chopped

    1. Preheat oven to 375°F (190°C) and lightly grease a medium baking dish.
    2. In a large bowl, combine zucchini, chickpeas, spinach, tomatoes, olive oil, garlic powder, oregano, red pepper flakes, salt, and black pepper.
    3. Toss the mixture well until everything is evenly coated.
    4. Transfer to the prepared baking dish and spread it out evenly.
    5. Sprinkle shredded mozzarella on top, followed by grated Parmesan.
    6. Cover with foil and bake for 20 minutes.
    7. Remove the foil and continue baking for 10–15 minutes, until cheese is golden and bubbly.
    8. Garnish with freshly chopped parsley and serve warm.

    Notes

    • For a vegan version, omit the cheese or use a dairy-free substitute.
    • Make sure to rinse the chickpeas thoroughly to remove excess sodium.
    • Add more veggies for variation, such as bell peppers or mushrooms, if desired.
    • Prep Time: 15 minutes
    • Cook Time: 35-40 minutes
    • Category: Main Course
    • Method: Baking
    • Cuisine: Mediterranean

    Nutrition

    • Serving Size: 1 serving
    • Calories: 320
    • Sugar: 3g
    • Sodium: 420mg
    • Fat: 16g
    • Saturated Fat: 7g
    • Unsaturated Fat: 8g
    • Trans Fat: 0g
    • Carbohydrates: 35g
    • Fiber: 8g
    • Protein: 12g
    • Cholesterol: 30mg

    Sharing is caring!

  • Cranberry Cream Cheese Muffins

    Cranberry Cream Cheese Muffins


    Introduction to Cranberry Cream Cheese Muffins

    Welcome to my kitchen, where I never shy away from a delicious adventure! Today, I’m sharing a recipe for Cranberry Cream Cheese Muffins that’s sure to brighten your day. These muffins strike the perfect balance between moist sweetness and creamy goodness, making them an ideal treat for busy mornings or cozy family gatherings. Whether you need a quick solution for breakfast or a delightful snack for the kids, this recipe hits the spot. Trust me, everyone will love them— and you might just end up with a new favorite in your baking repertoire!

    Why You’ll Love This Cranberry Cream Cheese Muffins

    Let me tell you, these Cranberry Cream Cheese Muffins are a game-changer. They’re incredibly easy to whip up, even on the busiest of days. Picture this: a fluffy muffin bursting with tart cranberries and a creamy surprise center. Each bite is a delightful balance of flavors that your loved ones will adore. Plus, they freeze beautifully, making them a fantastic option for meal prep. Who wouldn’t love that?

    Ingredients for Cranberry Cream Cheese Muffins

    Gathering the right ingredients is the first step to making these scrumptious Cranberry Cream Cheese Muffins. Here’s what you’ll need:

    • Unsalted butter: The foundation for a rich flavor, helping to create a moist texture.
    • Cream cheese: This adds that lovely, creamy filling that makes every muffin a delightful surprise.
    • Granulated sugar: The sweetener that balances the tanginess of the cranberries for a perfect harmony of flavors.
    • Large eggs: They help bind everything together, giving structure to your muffins.
    • Vanilla extract: A splash of this enhances the overall flavor and adds warmth to the batter.
    • All-purpose flour: The base of the muffin that provides the necessary gluten to hold it together. Consider whole wheat flour for extra fiber!
    • Baking powder: This leavening agent ensures your muffins rise and become fluffy while they bake.
    • Kosher salt: A touch of salt boosts the sweetness and balances the flavors beautifully.
    • Cranberries: Fresh or frozen, these little gems add a pop of tartness that pairs perfectly with the creaminess of the cheese.
    • Streusel ingredients: For a crunchy topping, you’ll need additional flour, light brown sugar, and melted butter. This adds texture and crunch!

    I’ve found that using fresh cranberries during their season takes these muffins to the next level. However, if you can’t find them, frozen ones work just fine. For exact measurements, scroll to the bottom of the article where I’ve got you covered with a handy, printable list!

    How to Make Cranberry Cream Cheese Muffins

    Now that you have everything you need, let’s dive into the delightful process of making these Cranberry Cream Cheese Muffins. I’ll walk you through each step, sharing a few tips along the way to ensure your muffins are nothing short of amazing. Let’s get started!

    Step 1: Preheat Oven and Prepare Muffin Tins

    First, preheat your oven to 350°F (175°C). Preheating is crucial because it helps the muffins rise evenly, creating that fluffy texture we all love. Line your muffin tins with liners. This makes for easier removal and cleanup. You’ll be ready to go when your oven is hot and those pans are lined up.

    Step 2: Cream Butter and Cream Cheese

    Next, grab your mixer and blend the softened unsalted butter and cream cheese together. Aim for a smooth consistency, which usually takes 2-3 minutes. This step is vital because it helps to create a light and fluffy batter, setting the foundation for the perfect muffin texture.

    Step 3: Combine Sugar and Eggs

    Now, gradually add in the granulated sugar and mix until the mixture becomes light and fluffy. It should take about another 3 minutes. One at a time, add in the large eggs, mixing well after each addition. This step incorporates air into the batter, making those muffins rise beautifully!

    Step 4: Mix in Vanilla Extract

    Don’t forget the magic touch! Add in the vanilla extract and mix it until fully combined. This simple yet powerful addition enhances the flavor, giving your muffins that warm, inviting aroma. Trust me; it makes a world of difference.

    Step 5: Prepare Dry Ingredients

    In a separate bowl, whisk together the all-purpose flour, baking powder, and kosher salt. Mixing your dry ingredients together before adding to the wet ingredients helps distribute the leavening agent evenly. This is key for a good rise, ensuring each muffin is fluffy from the first bite to the last!

    Step 6: Combine Wet and Dry Ingredients

    Now, it’s time to combine the wet and dry mixtures. Gradually fold the dry ingredients into the wet ingredients, mixing until just combined. Be gentle while folding in the chopped cranberries; we don’t want to break them apart. This preserves the delightful bursts of tartness in every muffin.

    Step 7: Make the Streusel Topping

    For the crunchy streusel topping, mix together some flour, light brown sugar, and a pinch of salt in a medium bowl. Then, add the melted butter and mix with a fork. You want a crumbly texture that creates a yummy layer of crunch on top of those moist muffins, adding another exciting element to your bites.

    Step 8: Fill Muffin Tins and Add Topping

    Fill each muffin tin all the way to the top with your delightful batter. Then, sprinkle about a tablespoon of that delicious streusel topping on each muffin. Filling the tins generously helps achieve that perfect bakery-style muffin dome we all crave!

    Step 9: Bake to Perfection

    Your oven is ready, your batter is prepped—it’s time to bake! Put the muffin tins in the preheated oven and bake for 24-26 minutes. To check for doneness, insert a toothpick into the center of a muffin. If it comes out clean or with just a few crumbs, they’re done!

    Step 10: Cooling the Muffins

    Once they’re done baking, remove the muffins from the oven and let them cool in the muffin tin for about 5-10 minutes. This makes them easier to handle. Then transfer them to a wire rack. Allowing them to cool prevents the bottoms from becoming soggy and helps maintain that delightful texture.

    Tips for Success

    • Make sure your butter and cream cheese are at room temperature for easier mixing.
    • Don’t overmix the batter; this keeps your muffins light and fluffy.
    • Use a cookie scoop to measure out the batter for even muffins.
    • Store leftover muffins in an airtight container to keep them fresh.
    • For added flair, sprinkle some cinnamon on top of the streusel!

    Equipment Needed for Cranberry Cream Cheese Muffins

    • Stand mixer: A must-have for creaming ingredients, but a hand mixer works too.
    • Measuring cups and spoons: Accurate measurements are key!
    • Muffin tins: Standard or silicone tins fit the bill for perfect muffins.
    • Mixing bowls: Have a few in varying sizes for mixing.
    • Cooling rack: Essential for cooling muffins evenly.

    Variations of Cranberry Cream Cheese Muffins

    • Nutty Delight: Add chopped walnuts or pecans for a crunchy texture and extra flavor.
    • Chocolate Chip Twist: Stir in a handful of chocolate chips for a sweet surprise in each bite.
    • Citrus Zest: Incorporate lemon or orange zest to brighten up the flavor profile.
    • Gluten-Free Option: Substitute the all-purpose flour with a gluten-free flour blend for a gluten-free version.
    • Vegan Version: Swap out eggs for flaxseed meal and use dairy-free cream cheese and butter alternatives.
    • Spiced Muffins: Add cinnamon or pumpkin spice for a warm, cozy flavor during the fall season.

    Serving Suggestions for Cranberry Cream Cheese Muffins

    • Pair with Coffee: These muffins are delightful alongside a warm cup of coffee or tea.
    • Add Fresh Fruit: Serve with a side of mixed berries for added freshness.
    • Top with Whipped Cream: For a special treat, a dollop of whipped cream can elevate these muffins.
    • Presentation: Serve them on a cute cake stand for a lovely display at brunch.

    FAQs about Cranberry Cream Cheese Muffins

    Got questions about these delightful Cranberry Cream Cheese Muffins? I’ve got you covered! Here are some common queries that I’ve come across, along with my answers to help you on your baking journey.

    Can I use frozen cranberries in the muffins?
    Absolutely! Frozen cranberries work wonderfully in this recipe. Just be sure to chop them a bit before adding to the batter. They’ll add that delicious tartness you love!

    How do I store leftover muffins?
    To keep your muffins fresh, store them in an airtight container at room temperature for up to three days. For longer storage, pop them in the freezer. They make a quick snack any time!

    What can I substitute for cream cheese?
    If you don’t have cream cheese on hand, you can try using ricotta or mascarpone. While the flavor might vary a little, they’ll still add a creamy texture to your muffins!

    Can I make these muffins ahead of time?
    Yes, definitely! These Cranberry Cream Cheese Muffins are perfect for meal prep. Make a batch on the weekend and enjoy them throughout the week for breakfast or snacks!

    How do I ensure my muffins are fluffy?
    Make sure your butter and cream cheese are at room temperature before mixing. Also, don’t overmix the batter once you add the flour. This keeps those lovely muffins light and airy!

    Final Thoughts

    Crafting these delightful Cranberry Cream Cheese Muffins is more than just baking; it’s about creating memories in your kitchen. The combination of tart cranberries and creamy cheese nestled in a fluffy muffin is simply irresistible. Whether you enjoy them fresh out of the oven or save a few for a busy morning, you’re sure to bring smiles to your family’s faces. These muffins are perfect for any occasion, from breakfast to a sweet afternoon treat. Embrace the joy of baking and the happiness these muffins can bring—your loved ones will thank you!


    Print

    clock clock iconcutlery cutlery iconflag flag iconfolder folder iconinstagram instagram iconpinterest pinterest iconfacebook facebook iconprint print iconsquares squares iconheart heart iconheart solid heart solid icon

    Description

    Deliciously moist cranberry muffins with a creamy cheesecake filling and a crunchy streusel topping.


    • 1 cup (2 sticks / 227 g) unsalted butter, softened
    • 1 package (8 ounces) cream cheese, softened
    • 1 ½ cups (300 g) granulated sugar
    • 4 large eggs, room temperature
    • 2 teaspoons vanilla extract
    • 2 cups (250 g) all-purpose flour
    • 2 teaspoons baking powder
    • ½ teaspoon kosher salt
    • 2 cups (200 g) fresh or frozen cranberries, roughly chopped
    • 1 cup (125 g) all-purpose flour (for streusel)
    • ½ cup (100 g) light brown sugar, packed (for streusel)
    • ½ teaspoon kosher salt (for streusel)
    • ½ cup (1 stick / 113 g) unsalted butter, melted (for streusel)

    1. Preheat oven to 350°F. Line muffin tins with muffin liners. (This recipe makes 18 muffins.)
    2. In the bowl of a stand mixer fitted with the paddle attachment, cream butter and cream cheese together.
    3. Gradually add sugar and beat until light and fluffy (about 3 minutes).
    4. Add eggs, one at a time, beating well after each addition, stopping to scrape down the sides of the bowl as needed.
    5. Add in the vanilla and mix to combine.
    6. In a separate medium bowl, whisk together flour, baking powder, and salt.
    7. Gradually add the flour mixture to the wet ingredients. Mix until just combined.
    8. Gently fold in cranberries.
    9. Fill each muffin tin to the top of the liner with the muffin batter.
    10. In a medium bowl, whisk together the flour, brown sugar, and salt for the streusel.
    11. Add the melted butter to the flour mixture. Mix with a fork until the mixture is combined.
    12. Add about a tablespoon of streusel topping to each muffin.
    13. Bake for 24-26 minutes, or until an inserted toothpick comes out clean.
    14. Remove the muffins from the oven. Let them cool for 5-10 minutes in the muffin tin before removing them and transferring to a wire rack.

    Notes

    • Ensure that the butter and cream cheese are at room temperature for easier mixing.
    • For best results, use fresh cranberries when in season.
    • Freeze leftover muffins for a quick snack anytime.
    • Prep Time: 20 minutes
    • Cook Time: 26 minutes
    • Category: Baked Goods
    • Method: Baking
    • Cuisine: American

    Nutrition

    • Serving Size: 1 muffin
    • Calories: 250
    • Sugar: 15g
    • Sodium: 180mg
    • Fat: 12g
    • Saturated Fat: 7g
    • Unsaturated Fat: 3g
    • Trans Fat: 0g
    • Carbohydrates: 32g
    • Fiber: 1g
    • Protein: 3g
    • Cholesterol: 60mg

    Sharing is caring!

  • Cranberry Walnut Bread

    Cranberry Walnut Bread


    Introduction to Cranberry Walnut Bread

    There’s something magical about the aroma of freshly baked bread wafting through your home, and today, I want to share my love for Cranberry Walnut Bread. This delightful loaf has become my go-to recipe on busy weekends or when I need a quick yet impressive snack for guests. Packed with tart cranberries and crunchy walnuts, it’s not just a treat; it’s a slice of comfort that bridges seasons and gatherings. Whether you’re a busy mom or a professional hustling through life, this easy recipe is sure to bring a sprinkle of joy into your kitchen!

    Why You’ll Love This Cranberry Walnut Bread

    This Cranberry Walnut Bread is not just easy to make; it’s a delightful blend of flavors that will have your taste buds dancing! With just a handful of simple ingredients, you can whip up a loaf in no time. The tartness of the cranberries beautifully complements the nutty crunch of walnuts, creating a perfect harmony. Whether served warm with butter or toasted for breakfast, it’s a crowd-pleaser that fits right into your busy life!

    Ingredients for Cranberry Walnut Bread

    To create this scrumptious Cranberry Walnut Bread, you’ll need some familiar staples and a couple of delightful additions that make all the difference. Below is a list of the essential ingredients that will come together to form this delicious loaf, as well as some optional ingredients to consider.

    • All-purpose flour: This is your base, providing the structure for the bread. Feel free to substitute with whole wheat flour for a heartier texture.
    • Fresh cranberries: The tartness of fresh cranberries brings a burst of flavor. You can also use frozen cranberries, just make sure they’re thawed and drained before adding.
    • Chopped walnuts: These add a lovely crunch and nutty flavor. If you’re allergic or prefer not to use nuts, you can skip them or swap in seeds like pumpkin or sunflower seeds.
    • Granulated sugar: This balances the tartness of the cranberries. Consider using coconut sugar or agave syrup if you’re looking for a healthier alternative.
    • Baking powder: This is essential for helping your bread rise and gives it that lovely fluffy texture.
    • Salt: While it might seem simple, a touch of salt enhances all the flavors in your bread.
    • Milk: It helps to bind the ingredients together, making the bread moist. You can use plant-based milk like almond or oat milk for a dairy-free option.
    • Large eggs: Eggs help with moisture and structure. If you’re looking for an egg-free option, replace each egg with a quarter cup of applesauce.
    • Melted butter: This adds richness and flavor. You can substitute with olive oil or coconut oil for a different twist.

    The specific measurements for each ingredient can be found at the bottom of the article, perfect for printing and keeping handy in your kitchen.

    How to Make Cranberry Walnut Bread

    Now that you’ve gathered your ingredients, it’s time to bring this Cranberry Walnut Bread to life. Follow these clear steps, and soon you’ll have a delightful loaf baking away, filling your home with heavenly aromas.

    Step 1: Preheat the Oven

    Preheat your oven to 350°F (175°C). This is the first crucial step for ensuring your bread bakes evenly. While the oven warms up, you’ll have a moment to enjoy that tantalizing anticipation!

    Step 2: Combine Dry Ingredients

    In a large mixing bowl, whisk together all-purpose flour, granulated sugar, baking powder, and salt. Make sure everything is combined well. This evenly distributes the leavening agent, ensuring your bread rises beautifully.

    Step 3: Mix Wet Ingredients

    In another bowl, mix the milk, eggs, and melted butter until well-blended. The warm melted butter helps dissolve the sugar, creating a luscious batter. It feels good knowing you’re making something that tastes homemade!

    Step 4: Combine Dry and Wet

    Now, gently pour the wet ingredients into your dry mixture. Stir lightly until just combined. Be cautious not to overmix; it’s okay if a few lumps remain. This is what keeps the bread tender!

    Step 5: Fold in Cranberries and Walnuts

    Next, fold in the fresh cranberries and chopped walnuts carefully. This adds texture and bursts of flavor with every bite. The colorful cranberries glisten like tiny jewels, making the batter simply irresistible!

    Step 6: Bake the Bread

    Pour the batter into a greased loaf pan or one lined with parchment paper. Smooth the top for a beautiful finish. Pop it in the preheated oven and bake for 60 to 70 minutes. To check if it’s done, insert a toothpick—if it comes out clean, your Cranberry Walnut Bread is ready! Remember, every oven is different, so keep an eye on your masterpiece as it bakes.

    After pulling it out, let it cool before slicing. It’s like waiting for a gift to be unwrapped; the anticipation adds to the joy!

    Tips for Success

    • Use fresh cranberries for the best flavor—frozen cranberries can work in a pinch but may alter the texture.
    • Don’t skip the resting time after baking; it helps the bread settle and makes slicing easier!
    • For a touch of sweetness, sprinkle some sugar on top before baking.
    • Store leftover bread wrapped tightly in plastic wrap to keep it moist.
    • Experiment with spices like cinnamon or nutmeg for added warmth and depth!

    Equipment Needed

    • Loaf pan: A standard 9×5-inch loaf pan works best, but you can use a smaller one for thicker slices.
    • Mixing bowls: Use one large bowl for the dry ingredients and another for the wet. Any bowls will do!
    • Whisk and spatula: A whisk for mixing and a spatula for folding in the goodies. Simple yet effective!
    • Toothpick: Essential for the classic doneness test. Alternatively, use a skewer or knife.

    Variations

    • Orange Zest: Add a tablespoon of freshly grated orange zest to the batter for a citrusy zing that pairs wonderfully with cranberries.
    • Dried Fruits: Swap out some of the cranberries for dried fruits like raisins or chopped apricots for a chewier texture.
    • Gluten-Free: Use a gluten-free all-purpose flour blend to make this recipe suitable for gluten-sensitive friends and family.
    • Vegan Option: Replace the eggs with flax eggs (1 tablespoon flaxseed meal + 2.5 tablespoons water per egg) and use plant-based milk and butter.
    • Spiced Version: Mix in a teaspoon of ground cinnamon, nutmeg, or ginger for a warm, aromatic spin on the classic flavor.

    Serving Suggestions

    • Spread it warm: Slather a slice with creamy butter or tangy cream cheese for a delightful start to your day.
    • Pair with tea or coffee: This bread complements your favorite morning beverage perfectly, making your breakfast feel special.
    • Toast it: A quick toast adds a crispy texture that contrasts beautifully with the soft interior.
    • Garnish simply: Top with a dusting of powdered sugar for an elegant touch when serving guests.

    FAQs about Cranberry Walnut Bread

    As I’ve baked this Cranberry Walnut Bread over the years, I’ve come across a few common questions that pop up often. Here are some answers to help you on your baking adventure!

    Can I use frozen cranberries?

    Yes, you can! Just be sure to thaw and drain them before adding to the batter. However, using fresh cranberries gives the best flavor and texture.

    How do I store leftover bread?

    Wrap the leftover bread tightly in plastic wrap or aluminum foil. It keeps the moisture in and helps maintain its freshness for up to a week!

    Can I add other nuts or seeds?

    Absolutely! Feel free to replace walnuts with pecans, almonds, or even sunflower seeds. It’s all about what you enjoy best!

    How can I make this bread more flavorful?

    Add a teaspoon of vanilla extract or ground spices like cinnamon for a cozy flavor boost. You can also mix in orange zest for a citrusy twist!

    Is this recipe suitable for a gluten-free diet?

    Yes! Just substitute the all-purpose flour with a gluten-free flour blend. It can work wonders while keeping the same delicious taste!

    Final Thoughts

    Baking Cranberry Walnut Bread is more than just a culinary task; it’s an opportunity to create moments filled with warmth and connection. As aromas drift through your kitchen, you’ll find joy in sharing slices with family and friends or indulging in a quiet moment with a cup of tea. This easy recipe not only nourishes the body but also warms the heart. So, roll up your sleeves, embrace the flour-dusted chaos, and enjoy the delightful process. Let this bread become your family’s go-to comfort food, making every gathering or quiet afternoon feel just a bit more special!


    Print

    clock clock iconcutlery cutlery iconflag flag iconfolder folder iconinstagram instagram iconpinterest pinterest iconfacebook facebook iconprint print iconsquares squares iconheart heart iconheart solid heart solid icon

    Description

    An easy and delicious bread recipe featuring fresh cranberries and chopped walnuts.


    • 2 cups all-purpose flour
    • 1 cup fresh cranberries (halved)
    • 1 cup chopped walnuts
    • 3/4 cup granulated sugar
    • 1/2 teaspoon baking powder
    • 1/2 teaspoon salt
    • 1/2 cup milk
    • 2 large eggs (room temperature)
    • 1/4 cup melted butter

    1. Preheat your oven to 350°F (175°C). Grease a loaf pan or line it with parchment paper.
    2. In a large bowl, whisk together flour, sugar, baking powder, and salt until combined.
    3. In another bowl, mix milk, eggs, and melted butter until well blended. Pour into the dry ingredients and stir gently.
    4. Fold in cranberries and walnuts until evenly distributed throughout the batter.
    5. Pour the batter into the prepared loaf pan and smooth the top.
    6. Bake for 60-70 minutes or until a toothpick inserted comes out clean. Allow cooling before slicing.

    Notes

    • Make sure cranberries are fresh for the best flavor.
    • Adjust the baking time if you are using a different size loaf pan.
    • Prep Time: 15 minutes
    • Cook Time: 60-70 minutes
    • Category: Bread
    • Method: Baking
    • Cuisine: American

    Nutrition

    • Serving Size: 1 slice
    • Calories: 210
    • Sugar: 12g
    • Sodium: 150mg
    • Fat: 8g
    • Saturated Fat: 4g
    • Unsaturated Fat: 2g
    • Trans Fat: 0g
    • Carbohydrates: 30g
    • Fiber: 2g
    • Protein: 4g
    • Cholesterol: 55mg

    Sharing is caring!

  • Vanilla Custard & Strawberry Tart

    Vanilla Custard & Strawberry Tart


    Introduction to Vanilla Custard & Strawberry Tart

    Is there anything more delightful than a slice of Vanilla Custard & Strawberry Tart? This classic dessert brings a smile to my face every time I make it. It’s the perfect way to end a long day, offering a burst of sweetness and comfort. As a busy mom, I know how precious time is. But this tart manages to impress your loved ones without being overly complicated. Whether it’s for a family gathering or just a little treat for yourself, this tart is a delightful solution for all occasions!

    Why You’ll Love This Vanilla Custard & Strawberry Tart

    This Vanilla Custard & Strawberry Tart is truly a gem in my dessert repertoire. It’s remarkably easy to whip up, even on the busiest of days. The luscious vanilla custard pairs perfectly with fresh strawberries, creating an explosion of flavor that dances on your tongue. Plus, this beautiful tart is a showstopper on any table, sure to delight your guests or brighten up your family meal with minimal effort!

    Ingredients for Vanilla Custard & Strawberry Tart

    To create this delectable Vanilla Custard & Strawberry Tart, you’ll need a few simple ingredients. While exact measurements can be found at the bottom of the article, here’s a quick rundown of what’s required:

    • All-purpose flour: This forms the base of the tart crust, providing essential structure.
    • Powdered sugar: Adds a hint of sweetness to the crust, making it melt-in-your-mouth delicious.
    • Salt: Just a pinch elevates the flavors and balances the sweetness.
    • Unsalted butter: Using cold, cubed butter ensures a flaky tart crust that everyone will rave about.
    • Egg yolk: This helps bind the crust together, making it rich and tender.
    • Ice water: Adding cold water helps bring the dough together without melting the butter.
    • Whole milk: Provides a creamy base for the custard, giving it a silky texture.
    • Heavy cream: Enhances the richness and creaminess of the custard for a luxurious mouthfeel.
    • Granulated sugar: Sweetens the custard, balancing it beautifully with the tart strawberries.
    • Vanilla bean or vanilla extract: A must-have for that classic vanilla flavor; the bean offers a more intense experience.
    • Egg yolks: They add richness and depth to the custard, creating a harmonious flavor profile.
    • Cornstarch: This helps thicken the custard, ensuring it sets perfectly without any lumps.
    • Fresh strawberries: The star of the show! Use the ripest, juiciest strawberries for the best flavor.
    • Apricot jam: Used for glazing, it gives a lovely sheen and adds a hint of fruity sweetness.
    • Fresh mint leaves (optional): These can be a lovely garnish, adding a pop of color and fresh flavor.

    By choosing high-quality ingredients, you’ll uplift the entire dessert. Trust me, it makes all the difference!

    How to Make Vanilla Custard & Strawberry Tart

    Making the Tart Crust

    Let’s start with the tart crust, which is the foundation of this lovely dessert. In a mixing bowl, combine the all-purpose flour, powdered sugar, and salt. Use a pastry cutter to cut in the cold, cubed unsalted butter. The mixture should resemble coarse crumbs, showing a little love from your hands.

    Once it’s crumbly, add the egg yolk and a sprinkle of ice water, mixing until the dough comes together. Wrap this lifesaver in plastic wrap, and let it chill in the refrigerator for at least 30 minutes. Chilling helps create a flakier crust, so don’t skip this step! After that, preheat your oven to 375°F (190°C). Roll out the dough on a floured surface, fit it into a tart pan, and prick the bottom with a fork. Bake your crust for 15-20 minutes, or until golden brown. Let it cool completely before adding the filling.

    Preparing the Vanilla Custard

    Now, onto the creamy goodness of the vanilla custard, a star that makes this tart shine! Start by combining the whole milk, heavy cream, and granulated sugar in a saucepan. If you’re using a vanilla bean, split it open, scrape the seeds, and toss them—along with the pod—into the mix. Bring everything to a gentle simmer over medium heat, stirring occasionally, and let the flavors marry for a few minutes.

    While that simmers, whisk together the egg yolks and cornstarch in a separate bowl. Slowly incorporate the hot milk mixture into the egg yolk blend, whisking constantly. This helps temper the eggs, avoiding any scary curdles. Once well combined, pour the mixture back into the saucepan and cook over medium heat. Keep whisking until the custard thickens—this will take about 5-7 minutes. Once thickened, remove it from the heat and stir in the unsalted butter until melted. Let the custard cool slightly before pouring it into your pre-baked tart crust.

    Assembling the Tart

    It’s time for the grand assembly! Carefully arrange the beautifully sliced fresh strawberries over the velvety custard. I love trying different patterns; try a spiral or a simple row for a classic touch. To finish, gently heat the apricot jam in a small saucepan until it melts and becomes glaze-like. Brush this delicious glaze over the strawberries for a beautiful shine. Pop your tart in the fridge for at least an hour before serving. This helps set everything perfectly, making for an even more delightful treat!

    Tips for Success

    • Always use cold butter for your crust. It’s the secret to a flaky texture!
    • Chill your dough before rolling it out. This helps maintain the structure during baking.
    • Don’t rush the custard-making process. Whisk constantly to ensure a smooth, creamy result.
    • Opt for ripe strawberries. They provide maximum flavor and sweetness to your tart.
    • Let the tart cool fully before glazing, ensuring a neat and beautiful finish!

    Equipment Needed

    • Tart pan: A fluted tart pan gives a beautiful shape, but a pie dish works too.
    • Mixing bowls: A couple of medium bowls are handy, but feel free to use whatever you have!
    • Whisk: Essential for making the custard smooth; a fork can work in a pinch.
    • Pastry cutter: Great for mixing butter into flour; a fork or your fingers will also do.
    • Saucepan: A medium-sized saucepan is perfect for cooking the custard and heating the jam.

    Variations

    • Use Different Fruits: While strawberries are the star, try blueberries, raspberries, or kiwi for a colorful twist. Each fruit brings its own unique flavor!
    • Make It Dairy-Free: Substitute almond milk or coconut milk for the whole milk and use a dairy-free cream for a lighter version of this Vanilla Custard & Strawberry Tart.
    • Add a Citrus Zing: For a refreshing kick, incorporate lemon or orange zest into the custard. It pairs beautifully with the sweetness of the strawberries!
    • Chocolate Lovers: Mix melted chocolate into the vanilla custard for a rich twist. Top with chocolate shavings or a drizzle for extra indulgence.
    • Gluten-Free Option: Replace all-purpose flour with a gluten-free flour blend to create a tart that everyone can enjoy!

    Serving Suggestions

    • Pair your Vanilla Custard & Strawberry Tart with a dollop of freshly whipped cream for extra decadence.
    • Enjoy with a cup of herbal tea or a crisp glass of sparkling water to cleanse the palate.
    • Dust with powdered sugar right before serving, adding an elegant touch to your dessert.
    • Add a few mint leaves on top for a pop of color and a refreshing scent.
    • Serve slices on elegant plates, and perhaps add a small fruit garnish for flair!

    FAQs about Vanilla Custard & Strawberry Tart

    Can I make the tart crust in advance?

    Absolutely! You can prepare the tart crust up to two days ahead. Just wrap it tightly in plastic wrap and store it in the refrigerator. When you’re ready to use it, roll it out and bake as directed.

    How do I store leftover Vanilla Custard & Strawberry Tart?

    Any leftovers can be stored in the refrigerator, covered lightly with plastic wrap. It will keep well for up to three days, although the crust may lose some crunch over time.

    Can I substitute the strawberries with other fruits?

    Yes! Feel free to get creative. Raspberries, blueberries, or peaches can add a delightful twist to this dessert. Just remember to use fresh seasonal fruits for the best taste!

    Is this Vanilla Custard & Strawberry Tart difficult to make?

    Not at all! With straightforward steps, this tart is beginner-friendly. Just take your time with each process, and you’ll be rewarded with a stunning dessert!

    Can I use store-bought custard instead of making my own?

    Yes, you can certainly use store-bought custard if you’re short on time. Just make sure to sweeten it slightly to suit your taste. It’s a great shortcut on busy days!

    Final Thoughts

    Every time I prepare this Vanilla Custard & Strawberry Tart, I’m reminded of the simple joys of baking. The rich, creamy custard and vibrant strawberries create a symphony of flavors that warm the heart. Whether serving it at a dinner party or enjoying a slice after a hectic day, this dessert brings a sense of accomplishment and happiness. It’s a beautiful way to gather loved ones around the table, turning an ordinary day into something extraordinary. Trust me, with each bite, you’ll experience a delightful moment of bliss that you’ll want to recreate time and again!


    Print

    clock clock iconcutlery cutlery iconflag flag iconfolder folder iconinstagram instagram iconpinterest pinterest iconfacebook facebook iconprint print iconsquares squares iconheart heart iconheart solid heart solid icon

    Description

    A classic dessert featuring a creamy vanilla custard filling topped with fresh strawberries, all encased in a buttery tart crust.


    • 1 1/4 cups all-purpose flour
    • 1/4 cup powdered sugar
    • 1/2 teaspoon salt
    • 1/2 cup unsalted butter, cold and cubed
    • 1 egg yolk
    • 23 tablespoons ice water
    • 1 1/4 cups whole milk
    • 1/2 cup heavy cream
    • 1/4 cup granulated sugar
    • 1 vanilla bean or 1 teaspoon vanilla extract
    • 4 egg yolks
    • 1 tablespoon cornstarch
    • 2 tablespoons unsalted butter
    • 1 pint fresh strawberries, hulled and sliced
    • 1 tablespoon apricot jam (for glazing)
    • Fresh mint leaves (optional)

    1. For the crust, combine the flour, powdered sugar, and salt in a bowl. Cut in the cold butter until the mixture resembles coarse crumbs.
    2. Add the egg yolk and ice water, mixing until the dough comes together. Wrap the dough in plastic wrap and chill in the refrigerator for at least 30 minutes.
    3. Preheat the oven to 375°F (190°C).
    4. Roll out the chilled dough on a floured surface and fit it into a tart pan. Prick the bottom with a fork and line it with parchment paper. Fill with pie weights or dried beans.
    5. Bake the crust for 15-20 minutes, or until golden brown. Let it cool completely.
    6. For the custard, in a saucepan, combine the milk, cream, and sugar. Split the vanilla bean (if using) and scrape out the seeds, adding both seeds and pod to the milk mixture. Bring to a simmer.
    7. In a separate bowl, whisk together the egg yolks and cornstarch. Gradually pour in the hot milk mixture, whisking constantly. Return the mixture to the saucepan and cook over medium heat, whisking constantly until thickened.
    8. Remove from heat and stir in the butter and vanilla extract (if using). Let the custard cool slightly before pouring it into the cooled tart crust.
    9. Arrange the sliced strawberries over the custard in a decorative pattern.
    10. Heat the apricot jam in a small saucepan until melted, then brush it over the strawberries to glaze them.
    11. Garnish with mint leaves if desired, and refrigerate the tart for at least 1 hour before serving.

    Notes

    • Ensure the butter is cold for a flaky crust.
    • Use fresh strawberries for the best flavor and texture.
    • Adjust sweetness of the custard according to taste.
    • Prep Time: 45 minutes
    • Cook Time: 30 minutes
    • Category: Dessert
    • Method: Baking
    • Cuisine: French

    Nutrition

    • Serving Size: 1 slice
    • Calories: 260
    • Sugar: 12g
    • Sodium: 150mg
    • Fat: 14g
    • Saturated Fat: 8g
    • Unsaturated Fat: 4g
    • Trans Fat: 0g
    • Carbohydrates: 32g
    • Fiber: 1g
    • Protein: 4g
    • Cholesterol: 120mg

    Sharing is caring!

  • Indian Meatballs in Curry Sauce

    Indian Meatballs in Curry Sauce


    Introduction to Indian Meatballs in Curry Sauce

    Let’s face it—some days, dinner feels like an uphill battle. That’s why I love whipping up these delightful Indian Meatballs in Curry Sauce. This recipe is a comforting embrace after a long day, offering rich flavors without stealing hours from your evening. Picture juicy meatballs simmering in a velvety curry sauce, warming your kitchen and your heart. Whether you’re impressing friends or just satisfying your family’s picky eaters, this dish effortlessly brings everyone to the table. It’s quick, it’s satisfying, and most importantly, it tastes divine. Ready to turn your dinner routine into a flavor adventure?

    Why You’ll Love This Indian Meatballs in Curry Sauce

    This recipe stands out because it’s a total lifesaver on busy weeknights. In just 40 minutes, you can create a rich and creamy dish that tastes like it simmered all day. Plus, who doesn’t love the combination of tender meatballs and aromatic spices? With minimal prep and cleanup, it’s perfect for those of us juggling work and family. Trust me, your taste buds will thank you!

    Ingredients for Indian Meatballs in Curry Sauce

    Let’s dive into the vibrant ingredients that bring these Indian Meatballs in Curry Sauce to life. Each element adds its unique touch, creating a delightful blend of flavors and textures.

    • Ground Beef or Lamb: The star of the show! You can use either, depending on your preference for rich flavor or leaner meat.
    • Cumin: This warm spice adds an earthy depth to the meatballs. It’s like a cozy hug for your palate.
    • Coriander: Slightly citrusy, it brightens the dish and complements the other spices beautifully.
    • Egg: This binds the meatball mixture, helping everything hold together while cooking. Think of it as the glue that unites friends at a dinner party!
    • Coconut Milk: The soul of the curry sauce! Rich and creamy, it creates a luscious base that soaks into the meatballs.
    • Curry Paste: This potent blend can elevate the dish from simple to extraordinary. Adjust it based on your spice tolerance!
    • Turmeric: This golden spice not only offers health benefits but also adds a beautiful color to your sauce.

    You can find all the precise measurements for these ingredients at the bottom of the article, ready for your next culinary adventure. So, gather your ingredients, and let’s start cooking!

    How to Make Indian Meatballs in Curry Sauce

    Are you ready to embark on a culinary adventure? Making these Indian Meatballs in Curry Sauce is like crafting a flavorful hug in a bowl. Follow these simple steps, and let your kitchen fill with mouthwatering aromas!

    Step 1: Prepare the Meatball Mixture

    Start by grabbing a bowl and combining the ground beef or lamb with cumin, coriander, and the egg. I like to use my hands for this—it’s the best way to ensure everything is mixed well. Picture it like giving your meat a flavorful massage!

    Once everything is combined, roll the mixture into bite-sized meatballs. Aim for about golf ball-sized portions. This size helps them cook evenly in the skillet. Lay them out on a plate, and get ready to bring some heat!

    Step 2: Brown the Meatballs

    Heat a little oil in a skillet over medium-high heat. When the oil shimmers, it’s time to add the meatballs. Don’t overcrowd the pan; you want to give each meatball space to sizzle!

    Cook for about 5-7 minutes, turning occasionally, until they’re nicely browned on all sides. They don’t need to be fully cooked yet; we’ll finish them off in the sauce. Just enjoy that glorious aroma filling your kitchen!

    Step 3: Make the Curry Sauce

    In that same skillet, reduce the heat and add the curry paste and turmeric. Toss them around, letting the spices bloom and fill your senses with fragrant beauty. Then, pour in the coconut milk and stir until everything is well mixed.

    Bring the sauce to a gentle simmer. You want it to thicken and become creamy, giving your meatballs a luxurious bath. This process takes about 5-7 minutes, and the colors will be nothing short of mesmerizing!

    Step 4: Combine Meatballs with Sauce

    Now, it’s time to reunite the meatballs with their luscious sauce. Gently add the browned meatballs back into the skillet, making sure they’re nestled in the sauce.

    Allow them to simmer together for about 15 minutes. This is where the magic happens, as the meatballs soak up the curry’s goodness. Make sure they’re cooked through and tender—your taste buds will soon be dancing!

    Step 5: Serve and Enjoy

    To serve, ladle the curry sauce and meatballs over fluffy rice or alongside warm naan. Don’t forget to sprinkle a bit of cilantro if you have it—it’s a nice touch that adds color and freshness.

    Dig in and enjoy the fruits of your labor! Feel free to savor it with your loved ones, as this dish is sure to make everyone smile. Bon appétit!

    Tips for Success

    • Use fresh spices for maximum flavor. A little goes a long way!
    • Don’t rush the browning step; it adds depth to your meatballs.
    • Feel free to adjust the curry paste according to your taste for spice.
    • Let the sauce simmer long enough for flavors to meld beautifully.
    • Serve immediately for the best texture, but leftovers reheat wonderfully!

    Equipment Needed

    • Skillet: A non-stick skillet works wonders, but any large pan will do.
    • Mixing Bowl: A large bowl for combining ingredients—don’t forget your hands!
    • Spatula: A sturdy spatula to flip those meatballs and stir the sauce.
    • Meat Thermometer: Optional, but great for checking meatball doneness.

    Variations on Indian Meatballs in Curry Sauce

    • Skip the Meat: Try using plant-based ground meat or chickpeas for a vegetarian twist. Your meatballs will still be packed with flavor!
    • Change the Meat: Swap ground beef or lamb for ground chicken or turkey for a lighter option while keeping it delicious.
    • Spice it Up: Add fresh chili peppers or a dash of cayenne to the meat mixture for an extra kick!
    • Herbaceous Note: Experiment by adding chopped spinach or parsley to the meatball mixture for added nutrition and flavor.
    • Different Sauces: Switch up the curry paste with a tikka masala or a coconut curry paste for a different flavor profile altogether!

    Serving Suggestions for Indian Meatballs in Curry Sauce

    • Accompany with Rice: Serve over fluffy basmati rice, soaking up that creamy curry sauce.
    • Naan or Roti: Pair with warm naan or roti for an authentic Indian experience.
    • Fresh Salad: Add a side of cucumber and tomato salad for a refreshing crunch.
    • Cool Drink: Enjoy with a cool mango lassi to balance the spices.

    FAQs about Indian Meatballs in Curry Sauce

    Can I make Indian Meatballs in Curry Sauce ahead of time?

    Absolutely! These meatballs can be prepared in advance. Just cook the meatballs and sauce, then store them in an airtight container in the refrigerator. When it’s time to eat, simply reheat on the stove over low heat until warmed through.

    What can I substitute for coconut milk?

    If you’re not a fan of coconut milk, almond milk or heavy cream can be used. While the flavor will differ, these alternatives still create a creamy base for the curry sauce.

    Is this dish suitable for gluten-free diets?

    Yes! This recipe for Indian Meatballs in Curry Sauce is naturally gluten-free, as it doesn’t contain any wheat-based ingredients. Just make sure to check the labels of curry paste and other store-bought ingredients.

    Can I freeze leftovers?

    Definitely! This dish freezes well. Just allow it to cool completely, then place it in a freezer-safe container. When you’re ready to enjoy it again, just thaw and reheat on the stovetop!

    What sides pair well with Indian Meatballs in Curry Sauce?

    Rice is a classic choice, but you can also serve it with warm naan, cilantro salad, or roasted vegetables. Each option enhances the flavors of the meatballs and sauce beautifully!

    Final Thoughts on Indian Meatballs in Curry Sauce

    Cooking these Indian Meatballs in Curry Sauce isn’t just about the food; it’s an experience that brings warmth and joy to your kitchen. The rich flavors and hearty textures make every bite a delight, inviting laughter and conversation around the dinner table. I find that this dish not only satisfies hunger but also creates cherished family memories. It’s a simple way to show love through cooking, turning an ordinary evening into an extraordinary culinary adventure. So gather your loved ones, share stories, and enjoy this beautiful dish together—it truly has the power to bring hearts closer!


    Print

    clock clock iconcutlery cutlery iconflag flag iconfolder folder iconinstagram instagram iconpinterest pinterest iconfacebook facebook iconprint print iconsquares squares iconheart heart iconheart solid heart solid icon

    Description

    A delicious recipe for Indian Meatballs in a rich and creamy curry sauce.


    • 1 lb ground beef or lamb
    • 1/2 tsp cumin
    • 1/2 tsp coriander
    • 1 egg
    • 2 cups coconut milk
    • 2 tbsp curry paste
    • 1 tsp turmeric

    1. Mix meat, cumin, coriander, and egg. Form into meatballs and brown in a skillet.
    2. Simmer curry paste, turmeric, and coconut milk until thick.
    3. Add meatballs and simmer for 15 minutes or until cooked through.
    4. Serve with rice.

    Notes

    • Use fresh spices for the best flavor.
    • Adjust curry paste to taste for spice level.
    • Serve with naan or roti for a complete meal.
    • Prep Time: 15 minutes
    • Cook Time: 25 minutes
    • Category: Main Course
    • Method: Skillet
    • Cuisine: Indian

    Nutrition

    • Serving Size: 1 meatball with sauce
    • Calories: 350
    • Sugar: 2g
    • Sodium: 600mg
    • Fat: 20g
    • Saturated Fat: 10g
    • Unsaturated Fat: 8g
    • Trans Fat: 0g
    • Carbohydrates: 10g
    • Fiber: 1g
    • Protein: 25g
    • Cholesterol: 70mg

    Sharing is caring!

  • Pretzel Bites

    Pretzel Bites


    Introduction to Pretzel Bites

    Hey there, fellow food lovers! If you’re searching for a game-changing snack, look no further than homemade pretzel bites. These little treasures are like warm hugs for your taste buds. Perfect for busy days, they can easily turn an ordinary afternoon into a delightful culinary adventure. Plus, they’re an absolute crowd-pleaser! Imagine serving fresh, golden-brown pretzel bites to your loved ones, and watch their faces light up with joy. Trust me, once you whip up a batch, you’ll find yourself making them again and again. Ready to dive in? Let’s get started on this delicious journey!

    Why You’ll Love This Pretzel Bites

    These pretzel bites are not just easy; they’re a breeze to make! In just over an hour, you’ll have warm, fluffy bites that’ll impress anyone. They pack a punch of flavor with minimal ingredients. Whether for a movie night, game day, or just because, they always hit the spot. Plus, the fun of shaping the dough is like playing with your food—what’s not to love?

    Ingredients for Pretzel Bites

    Let’s gather our ingredients, shall we? Making pretzel bites is straightforward, and you’ll love that most items are likely in your pantry already. Here’s what you’ll need:

    • All-purpose flour: This is the backbone of our bites, giving them that delightful chewy texture.
    • Sugar: Just a touch to balance the flavors and help with browning.
    • Instant yeast: This is our rising superhero, making the dough fluffy without the long wait.
    • Salt: It enhances flavor and helps the dough develop its structure.
    • Warm milk or water: This is essential for activating the yeast, so it comes to life and works its magic. Aim for a cozy 110°F.
    • Melted butter: Adds richness and flavor—it’s what makes your bites oh so good!
    • Water: For boiling the pretzel bites and giving them that signature chewy exterior.
    • Baking soda: This is the secret ingredient that helps achieve that classic pretzel taste and color when boiling.
    • Egg: It’s mixed with water to create an egg wash that gives the bites a beautiful, shiny finish.

    For added excitement, consider experimenting with toppings like garlic powder, cheddar cheese, or everything bagel seasoning. Remember, exact measurements are listed at the bottom of the article, ready for you to print and whip up your own batch of delicious pretzel bites!

    How to Make Pretzel Bites

    Now, let’s roll up our sleeves and dive into the world of soft, chewy pretzel bites! Making them is easier than you might think. I’m excited to guide you through each step. Just follow along, and you’ll have a delightful snack in no time!

    Step 1: Prepare the Dough

    First things first, let’s prepare the dough. In your stand mixer bowl, combine flour, sugar, yeast, warm milk, melted butter, and salt. Mix on medium speed with a dough hook for about 4-5 minutes. You want the dough to be smooth and elastic. If it’s overly sticky, sprinkle a bit more flour until it’s just right. The dough should feel like a soft cloud in your hands!

    Step 2: Let the Dough Rise

    After mixing, cover the bowl with a clean kitchen towel or plastic wrap. Let the dough rise in a warm spot for 30-60 minutes. You want it to double in size. This step is crucial for that fluffy texture we all crave. If you’re like me, you might take this time to sneak a bite of the chocolate stash hidden in the pantry. Just a little treat, right?

    Step 3: Preheat the Oven and Prepare for Boiling

    While the dough rises, it’s time to preheat your oven to a toasty 450°F. Line two baking sheets with parchment paper. Next, grab a large pot and bring 9 cups of water along with ½ cup of baking soda to a boil. This bubbling concoction gives pretzel bites their signature flavor and chewy exterior. Keep an eye on it; boiling water can be a little unpredictable, just like our kids during snack time!

    Step 4: Shape the Pretzel Bites

    Once the dough is ready, punch it down (let out that excitement!) and turn it onto a floured surface. Divide the dough into 12 equal pieces. Roll each piece into a ¾-inch rope, and then cut into 1-2 inch pieces. This is where the fun begins! You can even let the kids help out. It’s a perfect way to create lasting memories while making delicious snacks together.

    Step 5: Boil the Bites

    Now we get to that boiling step! Carefully drop a handful of pretzel bites into the boiling water for 30 seconds. This is the magic moment! Use a slotted spoon to transfer them onto the baking sheets, leaving a little space between each one. It’s like a dance party for pretzels, and they need room to groove!

    Step 6: Brush and Bake

    Finally, brush each pretzel bite with the egg wash (mix the egg with a tablespoon of water) for that shiny finish. Sprinkle a pinch of salt over them folks! Pop them in the preheated oven for 12-14 minutes, until they’re golden brown and fragrant. The aroma will fill your home, making it feel warm and inviting. And don’t forget, honey mustard is the perfect dip to accompany your delightful bites!

    Tips for Success

    • Measure your flour correctly—spoon it into the cup and level it off. Too much flour can make the dough dense!
    • Keep the water temperature at around 110°F to activate the yeast effectively.
    • If you’re short on time, let the dough rise in a warm oven (turned off) for a faster result.
    • Experiment with toppings! Adding spices or cheese can elevate your pretzel bites.

    Equipment Needed

    • Stand mixer: A must-have for mixing dough, but a sturdy mixing bowl and spoon work too.
    • Dough hook: Essential for kneading, or you can knead by hand if you prefer a workout!
    • Baking sheets: Parchment paper will prevent sticking, but greased sheets will work as well.
    • Pot: A large pot for boiling; any pot that can hold water will do.
    • Slotted spoon: Perfect for lifting pretzel bites from the boiling water, but tongs can work in a pinch.

    Variations

    • Garlic Parmesan Pretzel Bites: Before baking, sprinkle with garlic powder and grated Parmesan for a savory twist.
    • Cinnamon Sugar Pretzel Bites: After baking, toss in a mixture of cinnamon and sugar for a sweet treat.
    • Cheddar and Jalapeño Pretzel Bites: Fold in shredded cheddar cheese and diced jalapeños into the dough for a spicy kick.
    • Herb-Infused Pretzel Bites: Add dried herbs like rosemary or oregano to the dough for a fragrant bite.
    • Gluten-Free Pretzel Bites: Substitute all-purpose flour with a gluten-free flour blend for a gluten-free version.

    Serving Suggestions

    • Pair your pretzel bites with creamy honey mustard or tangy barbecue sauce for dipping.
    • Serve with a side of freshly cut veggies for a colorful platter.
    • They make a great addition to a game-day snack table, alongside wings and chips.
    • For drinks, grab some ice-cold beer or sparkling lemonade—perfect flavor companions!

    FAQs about Pretzel Bites

    Got questions about these scrumptious pretzel bites? You’re not alone! Here are some common queries I’ve encountered on this delicious journey, and I’m excited to share my insights with you.

    Can I make pretzel bites ahead of time?

    Absolutely! You can prepare the dough and let it rise ahead of time. Just store it in the fridge, and when you’re ready, bring it back to room temperature before shaping and boiling. It’s a great way to save time on busy days!

    What’s the best way to store leftover pretzel bites?

    To keep your pretzel bites fresh, store them in an airtight container at room temperature for up to two days. If you want to save them longer, pop them in the freezer. When ready to eat, reheat in the oven for that fresh-out-of-the-oven taste!

    Can I add different toppings to my pretzel bites?

    Of course! The beauty of homemade pretzel bites lies in their versatility. Think garlic, cheese, or even sesame seeds. You can customize their flavor to suit your cravings. Just sprinkle your favorites before baking, and watch the magic happen!

    What can I use if I don’t have a stand mixer?

    No worries! You can make the dough by hand. Just mix the ingredients in a bowl and knead by hand on a lightly floured surface for about 10 minutes. It may take a bit more elbow grease, but the result will be just as delicious!

    Are pretzel bites healthy?

    While pretzel bites are a delightful treat, it’s all about moderation. They contain carbohydrates and protein, making them a satisfying snack. Pair with veggies or a light dip for a more balanced option! Enjoy without guilt!

    Final Thoughts

    There’s something truly special about making homemade pretzel bites. They’re not just a snack; they’re an experience—a warm, doughy hug that brings family and friends together. I cherish the moments spent shaping the dough with my kids, laughing and creating memories that last a lifetime.

    As the aroma fills your home, you’ll find joy in sharing these perfectly baked bites with loved ones. Whether it’s for game nights, movie marathons, or just a cozy evening, these pretzel bites will soon become a beloved staple in your kitchen. Embrace the joy of cooking and savor every bite!


    Print

    clock clock iconcutlery cutlery iconflag flag iconfolder folder iconinstagram instagram iconpinterest pinterest iconfacebook facebook iconprint print iconsquares squares iconheart heart iconheart solid heart solid icon

    Description

    A simple and delicious recipe for homemade pretzel bites that are perfect for snacking.


    • 4 ½ cups all-purpose flour (spooned and leveled; plus more if needed)
    • 1 tablespoon sugar
    • 2 ¼ teaspoons instant yeast
    • 1 teaspoon salt
    • 1 ¾ cups warm milk (or water; around 110°F)
    • 2 tablespoons melted butter
    • 9 cups water
    • ½ cup baking soda
    • 1 large egg (mixed with 1 tablespoon of water)

    1. In a stand mixer bowl, combine the flour, sugar, yeast, milk, butter, and salt. Mix with a dough hook on medium speed for about 4-5 minutes until a smooth dough forms. If the dough is too sticky, add a little bit more flour.
    2. Cover the bowl and let the dough rise in a warm place for 30-60 minutes until doubled in size.
    3. Preheat your oven to 450°F. Line two baking sheets with parchment paper. Bring the water and baking soda to a boil in a large pot.
    4. Divide the dough into 12 pieces. Roll each into a ¾-inch rope and cut into 1-2 inch bites.
    5. Drop the bites into boiling water for 30 seconds, then transfer to the prepared baking sheets. Leave a little space between each one.
    6. Brush with egg wash and sprinkle with salt. Bake for 12-14 minutes until golden brown. Serve with honey mustard!

    Notes

    • Ensure the water temperature is around 110°F for the yeast to activate properly.
    • For added flavor, consider experimenting with different toppings like garlic or cheese.
    • Prep Time: 15 minutes
    • Cook Time: 14 minutes
    • Category: Snack
    • Method: Baking
    • Cuisine: American

    Nutrition

    • Serving Size: 1 serving (about 4 bites)
    • Calories: 200
    • Sugar: 1g
    • Sodium: 350mg
    • Fat: 4g
    • Saturated Fat: 2g
    • Unsaturated Fat: 2g
    • Trans Fat: 0g
    • Carbohydrates: 37g
    • Fiber: 1g
    • Protein: 6g
    • Cholesterol: 25mg

    Sharing is caring!

  • No-Bake Chia Pudding Bars with Zesty Coconut Lime Flavor

    No-Bake Chia Pudding Bars with Zesty Coconut Lime Flavor


    Introduction to No-Bake Chia Pudding Bars with Zesty Coconut Lime Flavor

    As a busy mom myself, I often find myself juggling tasks and racing against time. That’s why No-Bake Chia Pudding Bars with Zesty Coconut Lime Flavor have become my go-to treat! They’re not just refreshing; they’re an effortless way to indulge while keeping things healthy. Imagine a creamy, coconutty delight tantalizing your taste buds, all without turning on the oven. Whether you’re prepping a quick snack for the kids or planning a gathering, these bars are sure to impress. Plus, they bring a burst of zesty lime to brighten up any day!

    Why You’ll Love This No-Bake Chia Pudding Bars with Zesty Coconut Lime Flavor

    These No-Bake Chia Pudding Bars with Zesty Coconut Lime Flavor are a delightfully hassle-free dessert! They come together in just a few minutes, leaving you more time to relax or tackle that endless to-do list. Plus, the creamy texture and refreshing lime kick will make your taste buds dance with joy. It’s a healthy treat the whole family will love, and even picky eaters won’t resist!

    Ingredients for No-Bake Chia Pudding Bars with Zesty Coconut Lime Flavor

    Let’s get a little creative with our ingredients! The beauty of these No-Bake Chia Pudding Bars with Zesty Coconut Lime Flavor lies in their simplicity and flexibility.

    • Coconut Milk: This luscious ingredient gives the bars their creamy base. I prefer the full-fat version for that rich texture, but you can choose light coconut milk if you want something a tad lighter.
    • Chia Seeds: The secret to the pudding’s texture! They expand and soak up all that coconut milk, creating a delightful, gel-like consistency. Incorporating fiber and omega-3s, they also contribute to a healthier dessert option.
    • Maple Syrup or Agave Nectar: Our natural sweeteners! They add that touch of sweetness without any refined sugars. If you’re feeling adventurous, you could even use honey for a different flavor.
    • Lime Zest and Juice: This dynamic duo works wonders! The zest adds intense fragrance, while the juice imparts brightness. Perfect for that zingy flavor that elevates the whole bar.
    • Vanilla Extract: A splash of this adds warmth and depth. It’s like a cozy hug in your bite, balancing the tartness of the lime.
    • Pinch of Salt: Never underestimate salt! It elevates flavors and brings out the best in all your ingredients.
    • Optional Crust: For those wanting a little extra crunch, a crust made from nuts, shredded coconut, dates, and a hint of coconut oil can be simply delightful. It’s a no-bake winner that enhances texture and flavor.
    • Toppings: Think toasted coconut flakes and extra lime zest for a gorgeous finish. You can also add fresh berries or granola for an extra pop of color and crunch!

    For exact measurements, check the bottom of the article, where you can find them available for printing. Happy cooking!

    How to Make No-Bake Chia Pudding Bars with Zesty Coconut Lime Flavor

    Making No-Bake Chia Pudding Bars with Zesty Coconut Lime Flavor is an absolute breeze! I love how effortless this recipe is, and I know you will, too. Let’s dive in!

    Step 1: Prepare the Optional Crust

    If you’re craving a crunchy base, the optional crust is the way to go. Just toss the almonds or cashews, shredded coconut, Medjool dates, melted coconut oil, and a pinch of salt into a food processor. Pulse until everything is finely chopped and starts sticking together. This no-bake crust not only adds texture but also a delightful nuttiness to your bars!

    Once mixed, press this mixture firmly into an 8×8-inch square pan lined with parchment paper. Pop it in the refrigerator while you prepare the pudding. That way, it firms up beautifully and enhances the overall flavors.

    Step 2: Mix the Pudding Ingredients

    Now for the star of the show! In a medium bowl, whisk together the coconut milk, chia seeds, maple syrup or agave nectar, lime zest, lime juice, vanilla extract, and a pinch of salt. Make sure everything is well combined to avoid clumps of chia seeds later. Mixing thoroughly is key to achieving that creamy, uniform pudding consistency.

    Step 3: Chill the Mixture

    After mixing, let the pudding sit for about 5 minutes. This allows the chia seeds to start absorbing the liquid. Then, whisk it again to keep everything blended harmoniously. Cover the bowl and refrigerate the mixture for at least 3 hours, or even overnight if you’re planning ahead. It should thicken up nicely—don’t worry, that’s perfectly normal!

    Step 4: Assemble the Bars

    Next, it’s time for assembly. If you made the crust, retrieve it from the fridge. Carefully spoon the thickened pudding mixture over the crust. The bars can also be poured straight into the dish if you’re skipping the crust. Smooth the top with a spatula to create an even layer, which will make for great presentation later.

    Step 5: Final Chill

    Return the assembled bars to the refrigerator, letting them chill for at least another 2 hours to fully set. This final chill time is essential; it allows all the flavors to meld and the pudding to firm up. You’ll want to be patient—it’s worth the wait for that perfect texture!

    Step 6: Serve and Enjoy

    Once set, it’s showtime! Carefully slice the pudding into squares or bars. For a lovely touch, sprinkle on some toasted coconut flakes and extra lime zest before serving. You can also get creative with toppings like fresh fruit or granola. No matter how you present them, these bars are sure to be a hit!

    Tips for Success

    • Make sure to whisk the pudding mixture well to prevent clumping of chia seeds.
    • For extra creaminess, let the pudding chill overnight.
    • If using the crust, press it down firmly for stability.
    • Experiment with various toppings like berries or nuts for added flavor.
    • Store any leftovers in an airtight container for up to 5 days.

    Equipment Needed

    • Food Processor: Essential for making the optional crust; a blender works, too!
    • Medium Mixing Bowl: Use this for combining all pudding ingredients; any large bowl will suffice.
    • Parchment Paper: Helpful for lining your pan to avoid sticking; aluminum foil is a suitable alternative.
    • Whisk: Perfect for mixing; a fork can do the trick in a pinch.
    • 8×8-Inch Square Pan: Ideal for shaping your bars; use any similar-sized dish if you don’t have one.

    Variations of No-Bake Chia Pudding Bars with Zesty Coconut Lime Flavor

    • Berry Bliss: Swap out the lime zest and juice for fresh berries like strawberries or blueberries for a fruity twist.
    • Chocolate Delight: Add cocoa powder or melted dark chocolate to the pudding mixture for a rich, indulgent flavor.
    • Nut-Free Option: Replace almonds or cashews in the crust with sunflower seeds for a nut-free variant that’s equally delicious!
    • Minty Fresh: Mix in a touch of mint extract along with the lime for a refreshing mint-lime combo that’s perfect for summer.
    • Protein Boost: Sprinkle in some protein powder while mixing the pudding to make it an even more nutritious snack.

    Serving Suggestions for No-Bake Chia Pudding Bars with Zesty Coconut Lime Flavor

    • Pair these bars with a glass of refreshing coconut water for a tropical twist.
    • Serve alongside a scoop of dairy-free yogurt for a creamy contrast.
    • Add a handful of fresh berries for a burst of color and flavor.
    • Present with a sprig of mint to elevate the visual appeal.
    • Enjoy with a cup of herbal tea for a soothing after-dinner treat.

    FAQs about No-Bake Chia Pudding Bars with Zesty Coconut Lime Flavor

    Can I make the No-Bake Chia Pudding Bars ahead of time?

    Absolutely! In fact, these bars are perfect for meal prep. You can make them two to three days in advance and store them in the refrigerator. Just keep them covered, so they stay fresh and delicious.

    How do I know when the pudding has thickened enough?

    After chilling, the chia seeds will have absorbed the liquid, creating a gel-like consistency. If it’s thick enough to hold its shape when you spoon it, you’re all set! The pudding should also be creamy and smooth.

    Can I use different sweeteners instead of maple syrup?

    Of course! Feel free to swap in agave nectar, honey, or even coconut sugar if that’s your preference. Just remember that the sweetness level may vary, so adjust to taste.

    Are these bars suitable for vegan diets?

    Yes, these No-Bake Chia Pudding Bars with Zesty Coconut Lime Flavor are completely vegan! All the ingredients work together to provide a delicious and satisfying treat without any animal products.

    What other toppings can I use?

    The sky’s the limit! You can top your bars with fresh fruit like strawberries, kiwi, or mango. For an added crunch, consider granola or some chopped nuts. Get creative and make them your own!

    Final Thoughts

    As I wrap up my culinary adventure with these No-Bake Chia Pudding Bars with Zesty Coconut Lime Flavor, I can’t help but smile. They not only satisfy a sweet tooth but also deliver a healthy twist the whole family can enjoy. Each bite brings a delightful balance of creamy coconut and zesty lime, making them perfect for any occasion. Plus, the quick prep time means more moments spent with loved ones rather than in the kitchen. So, why not give these bars a try? They might just become your new favorite treat!


    Print

    clock clock iconcutlery cutlery iconflag flag iconfolder folder iconinstagram instagram iconpinterest pinterest iconfacebook facebook iconprint print iconsquares squares iconheart heart iconheart solid heart solid icon

    Description

    No-Bake Chia Pudding Bars with Zesty Coconut Lime Flavor are a refreshing treat that combines the creaminess of coconut with the zesty brightness of lime.


    • 1 can (13.5 oz / 400ml) full-fat coconut milk
    • 1/2 cup (80g) chia seeds
    • 1/4 cup (60ml) maple syrup or agave nectar
    • Zest of 1 large lime
    • Juice of 1/2 large lime (about 2 tbsp / 30ml)
    • 1 teaspoon (5ml) vanilla extract
    • Pinch of salt
    • For the optional crust:
    • 1 cup (140g) almonds or cashews
    • 1/2 cup (45g) shredded unsweetened coconut
    • 1/4 cup (45g) Medjool dates, pitted
    • 1 tablespoon (15ml) melted coconut oil
    • Pinch of salt
    • For the topping:
    • Toasted coconut flakes
    • Extra lime zest

    1. If you’re using the optional crust, place the almonds or cashews, shredded coconut, Medjool dates, melted coconut oil, and a pinch of salt in a food processor. Pulse until finely chopped and the mixture begins to stick together. Press into a lined 8×8-inch square pan and refrigerate.
    2. In a medium bowl, combine coconut milk, chia seeds, maple syrup or agave nectar, lime zest, lime juice, vanilla extract, and a pinch of salt. Whisk until well combined. Let sit for 5 minutes, then whisk again.
    3. Cover and refrigerate the pudding mixture for at least 3 hours or overnight until thickened.
    4. Once thickened, remove the crust (if made) from the fridge and spoon the pudding mixture over it. If no crust is made, just pour the pudding into a dish.
    5. Return to the refrigerator to chill for at least 2 more hours until set.
    6. Before serving, top with toasted coconut flakes and extra lime zest.
    7. Slice the pudding into squares or bars and serve chilled.

    Notes

    • For a nut-free version, use sunflower seeds instead of almonds or cashews.
    • Can be stored in the refrigerator for up to 5 days.
    • Experiment with different toppings such as fresh fruit or granola.
    • Prep Time: 15 minutes
    • Cook Time: 0 minutes
    • Category: Dessert
    • Method: No-Bake
    • Cuisine: Vegan, Healthy

    Nutrition

    • Serving Size: 1 bar
    • Calories: 150
    • Sugar: 5g
    • Sodium: 20mg
    • Fat: 10g
    • Saturated Fat: 8g
    • Unsaturated Fat: 2g
    • Trans Fat: 0g
    • Carbohydrates: 13g
    • Fiber: 5g
    • Protein: 3g
    • Cholesterol: 0mg

    Sharing is caring!

  • Chicken and Broccoli Alfredo Bake

    Chicken and Broccoli Alfredo Bake


    Introduction to Chicken and Broccoli Alfredo Bake

    As a busy mom, I know how precious time can be in the kitchen, especially after a long day. That’s why I’m excited to share my Chicken and Broccoli Alfredo Bake with you! This creamy delight beautifully combines tender chicken, fresh broccoli, and pasta all smothered in rich Alfredo sauce. It’s like a warm hug on a plate and an effortless solution for those hectic weeknights. Whether you’re trying to impress your loved ones or simply want a comforting meal, this dish hits all the right notes. Let’s dive into this delicious adventure together!

    Why You’ll Love This Chicken and Broccoli Alfredo Bake

    This Chicken and Broccoli Alfredo Bake is not only a flavor-packed dish, but it’s also a lifesaver for busy evenings. It comes together quickly, allowing you to savor the quality time with your family instead of spending hours in the kitchen. Plus, it’s a guaranteed crowd-pleaser! With its creamy goodness and hearty ingredients, everyone—from picky eaters to food lovers—will be asking for second helpings. It’s comfort food at its best!

    Ingredients for Chicken and Broccoli Alfredo Bake

    Let’s gather our ingredients for this mouthwatering Chicken and Broccoli Alfredo Bake! Each component plays a vital role in crafting this comforting dish. Here’s what you’ll need:

    • Boneless, skinless chicken breasts: Lean and tender, these provide a protein-packed base. You can also use rotisserie chicken for a quicker option.
    • Fresh broccoli florets: These add a vibrant pop of color and nutrients. Feel free to use frozen broccoli for convenience!
    • Penne or rotini pasta: Either shape holds onto the creamy Alfredo sauce beautifully, making every bite satisfying. Gluten-free pasta is a great alternative too.
    • Alfredo sauce: You can go for store-bought for speed or whip up a homemade version if you’re feeling adventurous.
    • Shredded Parmesan cheese: This cheesy topping enhances flavors and adds a lovely golden crust. Don’t hesitate to sprinkle more on top for extra cheesiness!
    • Garlic powder: A pinch of this elevates the overall flavor profile, giving it a warm, aromatic touch.
    • Salt and pepper: Essential seasonings to balance and bring out the best in each ingredient.

    For exact measurements, check the detailed list at the bottom of this article where you can print the recipe. Happy cooking!

    How to Make Chicken and Broccoli Alfredo Bake

    Now that we have our ingredients ready, let’s roll up our sleeves and make this delightful Chicken and Broccoli Alfredo Bake! Follow these straightforward steps, and I promise you’ll create a dish that leaves everyone raving. Ready? Let’s get started!

    Step 1: Preheat Your Oven

    First things first, preheat your oven to 375°F (190°C). This is a crucial step! Preheating helps your Chicken and Broccoli Alfredo Bake cook evenly, ensuring that every bite is just right. While your oven heats up, you can tick off some other tasks from your list!

    Step 2: Cook the Chicken

    Next, grab your skillet. Drizzle some olive oil over medium heat, and cook your seasoned chicken breasts. Aim for about 5-7 minutes on each side until they’re golden brown. This gives your chicken a delicious flavor and locks in moisture. Once cooked, take them off the heat and cut into bite-sized pieces. Trust me, the more tender the chicken, the better your bake will turn out!

    Step 3: Boil the Pasta

    While your chicken is cooking, let’s tackle the pasta. In a large pot, bring salted water to a rolling boil. Add in your penne or rotini pasta and cook according to package directions until al dente. Nobody wants mushy pasta, right? After draining, keep it aside. You’ll toss it into the mix shortly!

    Step 4: Combine Ingredients

    Now comes the fun part! In a large bowl, mix your cooked pasta, fresh broccoli florets, and those bite-sized pieces of chicken. Pour in the creamy Alfredo sauce, and add a sprinkle of garlic powder, salt, and pepper. Stir everything together gently until well combined. This is where the magic happens, creating that luxurious flavor fusion!

    Step 5: Prepare for Baking

    Time to get everything into a baking dish. Grease your dish lightly so nothing sticks. Pour the combined mixture in and spread it out evenly. Then, kick it up a notch by topping it with shredded Parmesan cheese. You can add more cheese if you’re feeling indulgent!

    Step 6: Bake and Enjoy

    Finally, pop your dish into the preheated oven and let it bake for 25-30 minutes. You’ll know it’s ready when it’s bubbly and gold on top. Check for doneness by giving it a little shake; if it jiggles a bit in the middle, it needs just a few more minutes. Once it’s out, let it cool for a few moments before serving. Each bite will be comfort food paradise!

    Tips for Success

    • Don’t rush the chicken cooking process; well-cooked chicken enhances flavor.
    • Use freshly grated Parmesan for a richer taste; it melts better than pre-shredded.
    • Cook pasta al dente for the best texture in the bake.
    • Let the dish rest for a few minutes before serving; it helps set the layers.
    • Feel free to customize this bake with your favorite veggies for added nutrition!

    Equipment Needed

    • Skillet: For cooking the chicken; a non-stick pan works wonders.
    • Large pot: Essential for boiling pasta; any sturdy pot will do.
    • Baking dish: A 9×13-inch dish is ideal for even baking; feel free to use glass or ceramic.
    • Mixing bowl: Use a large bowl to combine ingredients easily.

    Variations of Chicken and Broccoli Alfredo Bake

    • Swap the Chicken: Try using shrimp or even tofu for a vegetarian option that still packs a protein punch.
    • Add Different Veggies: Consider incorporating spinach, bell peppers, or carrots for a colorful twist and extra nutrients.
    • Switch Up the Cheese: Experiment with mozzarella or gouda for a different flavor profile; it adds a delightful creaminess.
    • Make It Spicy: Sprinkle in some red pepper flakes or diced jalapeños for a kick that adds an unexpected surprise!
    • Gluten-Free Option: Use gluten-free pasta to ensure this delightful bake meets the needs of those with dietary restrictions.

    Serving Suggestions for Chicken and Broccoli Alfredo Bake

    • Fresh Salad: A crisp Caesar or garden salad complements the creamy bake perfectly.
    • Crispy Garlic Bread: Serve with buttery garlic bread for a satisfying crunch.
    • Wine Pairing: A glass of Chardonnay enhances the rich flavors beautifully.
    • Garnish: Sprinkle fresh parsley or basil on top for a pop of color and freshness.

    FAQs about Chicken and Broccoli Alfredo Bake

    Can I make this Chicken and Broccoli Alfredo Bake ahead of time? Absolutely! You can assemble the entire dish, cover it, and refrigerate it until ready to bake. Just add a few extra minutes to the baking time if it’s coming straight from the fridge.

    What can I substitute for Alfredo sauce? If you prefer a lighter option, consider using a homemade béchamel or a creamy mushroom sauce. It will change the flavor profile but can be just as delicious!

    Can I freeze Chicken and Broccoli Alfredo Bake? Yes, you can freeze it! Just make sure to store it in an airtight container. To enjoy later, let it thaw overnight in the fridge before baking.

    How can I make the bake healthier? You can use whole grain or vegetable-based pasta, low-fat Alfredo sauce, and add more vegetables to boost the nutritional value without sacrificing taste.

    What are some common variations to try? Feel free to mix in spinach, bell peppers, or even swap out chicken for lean turkey. Experimenting keeps this dish exciting and caters to your family’s preferences!

    Final Thoughts

    This Chicken and Broccoli Alfredo Bake has a way of bringing warmth and joy to the dinner table. Each creamy layer tells a story, creating a moment for connection amid our busy lives. I love how simple yet satisfying this dish is; it truly feels like a warm embrace on a plate. Whether you’re making it for a family gathering or a cozy night in, it’s bound to be a hit. So go ahead, whip up this recipe, and let the smiles and compliments flow. After all, nothing beats the magic of a homemade meal!


    Print

    clock clock iconcutlery cutlery iconflag flag iconfolder folder iconinstagram instagram iconpinterest pinterest iconfacebook facebook iconprint print iconsquares squares iconheart heart iconheart solid heart solid icon

    Description

    A creamy and delicious Chicken and Broccoli Alfredo Bake that combines tender chicken, fresh broccoli, and pasta in a rich Alfredo sauce.


    • 34 boneless, skinless chicken breasts (about 1.5 lbs)
    • 2 cups fresh broccoli florets
    • 8 oz penne or rotini pasta
    • 2 cups Alfredo sauce (store-bought or homemade)
    • 1 cup shredded Parmesan cheese
    • 1 tsp garlic powder
    • Salt and pepper to taste

    1. Preheat the oven to 375°F (190°C).
    2. In a skillet over medium heat, drizzle olive oil and cook seasoned chicken breasts until golden brown (5-7 minutes per side). Remove from heat and cut into bite-sized pieces.
    3. Boil salted water in a large pot, cook pasta according to package directions until al dente, then drain.
    4. In a large bowl, mix cooked pasta, broccoli florets, cut chicken, and Alfredo sauce until well combined.
    5. Pour the mixture into a greased baking dish and top with Parmesan cheese.
    6. Bake for 25-30 minutes or until bubbly and golden brown.

    Notes

    • The bake can be assembled in advance and refrigerated until ready to bake.
    • You can add more cheese on top for a cheesier dish.
    • This recipe is versatile; feel free to add other vegetables such as spinach or bell peppers.
    • Prep Time: 20 minutes
    • Cook Time: 30 minutes
    • Category: Casserole
    • Method: Baking
    • Cuisine: Italian-American

    Nutrition

    • Serving Size: 1/6 of the dish
    • Calories: 450
    • Sugar: 3g
    • Sodium: 800mg
    • Fat: 19g
    • Saturated Fat: 10g
    • Unsaturated Fat: 7g
    • Trans Fat: 0g
    • Carbohydrates: 50g
    • Fiber: 2g
    • Protein: 30g
    • Cholesterol: 90mg

    Sharing is caring!

  • Steak & Queso Rice

    Steak & Queso Rice


    Introduction to Steak & Queso Rice

    Welcome to a delightful culinary adventure with my Steak & Queso Rice! If you’re like me, juggling a busy schedule, you crave a quick solution for wholesome meals that bring comfort to your family. This dish combines tender steak with creamy queso sauce over fluffy rice, perfectly blending flavors that satisfy even the pickiest eaters. Every bite is a hug from the inside out—exactly what we need after a hectic day. Whether you’re seeking a cozy dinner or something to impress your loved ones, I promise this recipe will hit the spot!

    Why You’ll Love This Steak & Queso Rice

    You’ll absolutely adore this Steak & Queso Rice for its delectable taste and simplicity. In just 50 minutes, you can whip up a dish that feels indulgent without the fuss. Plus, it’s adaptable! With ingredients you probably already have, it’s a lifesaver on a busy weeknight. The rich, creamy queso and tender steak create a symphony of flavors that will have your family asking for seconds. What’s not to love?

    Ingredients for Steak & Queso Rice

    Gathering your ingredients is part of the fun! Here’s what you’ll need to create this satisfying Steak & Queso Rice.

    • Steak: Use flank or sirloin steak for tenderness. These cuts will sear beautifully, giving you that mouthwatering taste.
    • Paprika: This spice adds a smoky depth and a pop of color. It’s a game-changer for seasoning!
    • Salt and Pepper: Essential for enhancing flavors. Season to your liking for a personal touch.
    • Ground Cumin: Earthy and warm, cumin gives a wonderful taste that pairs perfectly with the steak.
    • Olive Oil: A versatile oil for cooking; it helps sear the steak and adds richness to your rice.
    • Garlic Powder: Instant flavor booster that delivers that lovely garlic punch without the fuss of fresh garlic.
    • Whole Milk: This creamy base is vital for that luscious queso sauce. You can use low-fat if preferred.
    • Cheddar Cheese: Shredded for melting! It’s what makes the queso irresistibly cheesy and delicious.
    • Butter: Adds richness to the queso sauce, creating that silky smooth texture.
    • Chili Powder: This adds a hint of heat, brightening the flavor profile without overwhelming the dish.
    • Garlic Cloves: Fresh garlic enhances the aroma and taste with more depth than powder.
    • Monterey Jack Cheese: This cheese melts like a dream, contributing to the creamy allure of your queso sauce.
    • Rice: Long-grain white rice is perfect for soaking up all the delicious flavors.
    • Broth or Water: Use broth for added flavor, or stick to water for a lighter option.
    • Optional Garnishes: Fresh cilantro, lime wedges, avocado slices, and cut jalapeños add freshness and brightness to your dish.

    Don’t worry, you can find the exact quantities for all these ingredients at the bottom of the article, ready for printing!

    How to Make Steak & Queso Rice

    Making Steak & Queso Rice is easier than you might think! Let’s dive into these simple steps that will guide you to create this mouthwatering dish, just like I do in my kitchen.

    Step 1: Prepare the Ingredients

    First, gather everything you’ve put on the counter. Clean and chop your garlic, and get your cheeses ready for melting. They need to be within arm’s reach for that delicious queso sauce.

    Don’t forget to wash your rice under cold water; this removes excess starch. It’s an important step for fluffy rice, as nobody likes sticky grains!

    Step 2: Make the Queso Sauce

    Grab that skillet you used for the steak and melt some butter over medium heat. Toss in the minced garlic, and let it sizzle until it’s fragrant, about a minute.

    Next, stir in the whole milk, bringing it to a light simmer. Slowly add your shredded cheddar and Monterey Jack cheeses. Stir gently, letting each handful melt before adding the next.

    Keep your sauce smooth and creamy, seasoning with cumin, chili powder, salt, and pepper to taste. That cheesy goodness will captivate your senses!

    Step 3: Cook the Rice

    In a pot, heat a splash of olive oil and add the rinsed rice alongside some garlic powder. Stir it around for a few minutes to toast it lightly, waking up those flavors.

    Then, pour in your broth or water and bring it to a boil. Cover the pot and let it simmer on low for about 18-20 minutes, until the rice is tender and fluffy.

    Fluff it with a fork when it’s done. Your kitchen will smell divine!

    Step 4: Prepare the Steak

    While your rice is cooking, let’s focus on that steak! Pat it dry with paper towels and drizzle a bit of olive oil over it.

    Now sprinkle paprika, cumin, garlic powder, salt, and pepper on both sides, pressing the spices into the meat for maximum flavor.

    Heat up a large skillet over high heat and sear your seasoned steak for about 4-5 minutes on each side. Adjust the time based on how you prefer it cooked. Let it rest for 5-10 minutes before slicing—this keeps it juicy!

    Step 5: Combine & Serve

    Now the moment of truth! Serve your fluffy rice onto the plates, followed by those juicy steak strips, and give it a generous drizzle of that warm, creamy queso sauce.

    Top it off with fresh cilantro, jalapeños, avocado slices, and a squeeze of lime for a burst of flavor.

    Dig in immediately while it’s warm and melty, sharing those smiles with your family!

    Tips for Success

    • Let your steak rest before cutting to maintain juiciness.
    • For a spicier queso, add diced jalapeños right into the sauce.
    • Experiment with different cheeses for your queso—pepper jack adds a kick!
    • Serve the dish hot for that gooey cheese experience.
    • Feel free to prepare the queso and rice ahead of time; just reheat before serving.

    Equipment Needed

    • Skillet: A large, heavy skillet works best for searing. A non-stick one is a great alternative!
    • Pot: A medium-sized pot for cooking the rice—don’t fret if you don’t have a fancy one!
    • Cutting Board: Essential for slicing your steak. A plastic or wood board will do.
    • Knife: A sharp chef’s knife makes all the difference for prep work.
    • Measuring Cups and Spoons: Useful for precise ingredient measurements.

    Variations of Steak & Queso Rice

    • Protein Swap: Try using chicken or shrimp instead of steak for a lighter twist. Both are delicious in this creamy queso setting!
    • Vegetarian Option: Substitute the steak with grilled veggies, like bell peppers and zucchini, for a vibrant and fulfilling meal.
    • Spice It Up: For those who crave heat, mix in some diced jalapeños or a splash of hot sauce into the queso sauce.
    • Cheese Variety: Experiment with other cheese blends. Gouda or feta can add unique flavors to your queso!
    • Cauliflower Rice: For a low-carb option, use riced cauliflower instead of traditional rice. It soaks up the queso flavor beautifully!

    Serving Suggestions for Steak & Queso Rice

    • Fresh Salads: A crisp garden salad with a light vinaigrette pairs beautifully to balance the richness.
    • Drinks: Serve with a zesty limeade or a refreshing iced tea for a perfect meal.
    • Presentation: Use colorful plates to showcase the vibrant toppings—think avocado and cilantro splashes.
    • Stay Warm: Keep the queso sauce warm in a small saucepan for easy drizzling at the table!

    FAQs about Steak & Queso Rice

    What cut of steak is best for this recipe?
    Using flank or sirloin steak is ideal as both cuts are tender and can absorb the flavorful seasonings beautifully. Each provides a great sear, enhancing the overall taste.

    Can I make the queso sauce ahead of time?
    Absolutely! You can prepare the queso sauce in advance and store it in the fridge. Just reheat gently before serving to keep that creamy consistency.

    How can I adjust the recipe for picky eaters?
    You can tone down the spices or simply skip the jalapeños and serve them on the side. Most kids love the cheesy goodness, so keep the queso sauce as mild as you like!

    Is Steak & Queso Rice a gluten-free dish?
    Yes! This recipe is naturally gluten-free as long as the ingredients you use (like the broth) are gluten-free. It’s a comforting option for those avoiding gluten.

    Can I freeze leftovers of this dish?
    Yes, you can! Store the components separately in airtight containers. When you’re ready to enjoy again, thaw the steak and reheat the queso sauce for a quick meal!

    Final Thoughts on Steak & Queso Rice

    Creating this Steak & Queso Rice has been nothing short of a joyful culinary adventure for me. Each bite fills your heart with warmth and satisfaction, perfect for a family gathering or a cozy night in. I cherish the moments spent around the table, sharing stories and laughter while savoring this comforting dish. Plus, knowing I can whip it up in under an hour makes it a go-to for busy nights. So, roll up your sleeves and let your taste buds dance with delight. You’ll find this comforting plate brings everyone together in the most delicious way!


    Print

    clock clock iconcutlery cutlery iconflag flag iconfolder folder iconinstagram instagram iconpinterest pinterest iconfacebook facebook iconprint print iconsquares squares iconheart heart iconheart solid heart solid icon

    Description

    A delicious comfort dish featuring tender steak served with creamy queso sauce over rice.


    • For the Steak:
    • 450g (1 lb) flank or sirloin steak
    • 1 tsp paprika
    • A sprinkle of salt and pepper, to your taste
    • 2 tsp ground cumin
    • 1 tbsp olive oil
    • 1 tsp garlic powder
    • For the Queso Sauce:
    • 1½ cups whole milk
    • A pinch of salt and pepper, to your liking
    • ½ tsp ground cumin
    • 2 cups cheddar cheese, shredded
    • 2 tbsp butter
    • 1 tsp chili powder
    • 2 garlic cloves, chopped finely
    • 1 cup Monterey Jack cheese, shredded
    • For the Rice:
    • 2 cups broth (or water if you prefer)
    • A bit of salt, as needed
    • 1 tbsp olive oil
    • 1 cup long-grain white rice
    • 1 tsp garlic powder
    • Optional Garnishes:
    • Fresh cilantro, chopped
    • Wedges of lime
    • Slices of avocado
    • Cut jalapeños

    1. Grab the skillet you used for the steak and melt butter over medium heat. Toss in the minced garlic, letting it cook until fragrant, about a minute. Stir in the milk, bringing it to a light simmer.
    2. Wash the rice under cold water to rinse off the extra starch. Heat some olive oil in a pot, then stir in your rice and garlic powder to coat it well. Let the grains toast lightly for a couple of minutes before adding the broth or water. Bring it to a boil, cover the pot, and simmer on low for 18-20 minutes until soft.
    3. After cooking, put the steak on a board and let it sit for 5-10 minutes so the juices don’t run out when cutting. Slice it into thin strips across the grain to keep it tender.
    4. Dry off the steak with paper towels and rub it with a little olive oil. Sprinkle the paprika, cumin, garlic powder, salt, and pepper over both sides, pressing it into the meat.
    5. Slowly stir in the shredded cheeses, adding a handful at a time. Let it melt completely before adding the next. Keep stirring until smooth, then season with cumin, chili powder, salt, and pepper to taste.
    6. Heat a large skillet until very hot, then cook your seasoned steak for 4-5 minutes on each side, depending on how thick it is and your preferred doneness.
    7. Pile some rice onto each plate, add your steak strips, and drizzle warm, cheesy queso sauce over everything. Serve it up hot while the sauce is melty and the steak is warm.
    8. Toss on fresh cilantro, some jalapeños for heat, avocado slices for creaminess, and lime for a zesty pop.

    Notes

    • Make sure the steak rests after cooking to keep it juicy.
    • Feel free to adjust the spices based on your preference.
    • Use low-fat cheese if you’re looking for a lighter version.
    • Prep Time: 20 minutes
    • Cook Time: 30 minutes
    • Category: Main Course
    • Method: Skillet and stovetop
    • Cuisine: Mexican-American

    Nutrition

    • Serving Size: 1 plate
    • Calories: 700
    • Sugar: 6g
    • Sodium: 900mg
    • Fat: 45g
    • Saturated Fat: 25g
    • Unsaturated Fat: 15g
    • Trans Fat: 0g
    • Carbohydrates: 50g
    • Fiber: 2g
    • Protein: 40g
    • Cholesterol: 130mg

    Sharing is caring!

  • Burrata Cheese Appetizer

    Burrata Cheese Appetizer


    Introduction to Burrata Cheese Appetizer

    Oh, the creamy goodness of burrata cheese! It’s a culinary treasure that never fails to delight. As a busy mom, the last thing I want is to spend hours in the kitchen. That’s why this burrata cheese appetizer is such a gem. With just a few simple ingredients and minimal effort, you can achieve a gourmet taste that will impress your family and friends. Whether it’s a cozy weeknight dinner or a lively gathering, this dish is the perfect starter to showcase your home-cooking skills while keeping your stress levels in check.

    Why You’ll Love This Burrata Cheese Appetizer

    This burrata cheese appetizer is the perfect solution for busy lives. With just ten minutes of prep, you’ll create a stunning dish that looks as great as it tastes. The combination of creamy, luscious burrata and vibrant toppings makes for a flavor explosion that will wow your guests. It’s an effortless way to bring a touch of gourmet dining to your home, giving you more time to enjoy precious moments with family and friends.

    Ingredients for Burrata Cheese Appetizer

    Creating this delightful burrata cheese appetizer requires only a handful of ingredients. You’ll need creamy burrata cheese, rich olive oil, fresh garlic, and fragrant thyme. For exciting flavor, add Castelvetrano olives and capers, along with zesty lemon and toasted pine nuts for crunch. If you can’t find Castelvetrano, feel free to substitute with your favorite olives. I often source my ingredients from local farmers’ markets; they add a fresh touch! Don’t forget to have some sliced French baguette on hand. Exact quantities are shared at the bottom of the article for your convenience.

    How to Make Burrata Cheese Appetizer

    Making this delightful burrata cheese appetizer is a joy. It’s like creating a piece of art with scrumptious components. So, let’s dive into the process! You’ll be amazed at how easy and quick it is to bring this dish to life, sparing you extra time to chat with your guests or maybe even pour a glass of wine.

    Step 1: Preparing the Burrata

    Start by gently pulling apart the burrata cheese. I like to do this slowly, feeling that creamy center begin to ooze. The process itself is almost meditative! Once you’ve expertly separated it, place the lovely hunk of cheese on a beautiful serving platter. Don’t be shy; let it shine! This is the star of your appetizer, and it deserves to be showcased in style.

    Step 2: Infusing the Olive Oil

    Now, let’s take that olive oil to the next level. Grab a small saucepan and combine the olive oil, grated garlic, and fresh thyme. Warm this mixture over low heat. You’re aiming for a gentle infusion, so keep a close eye on it! Cook for about ten minutes, stirring gently. The goal is to allow the garlic to become fragrant, without letting it brown. Trust me; your kitchen will smell divine during this step!

    Step 3: Cooling the Olive Oil

    Once that aromatic oil is ready, remove it from the heat and let it cool for about five minutes. This cooling phase is essential. If you add hot oil directly onto the burrata, it will spoil the texture. You want that creamy goodness to remain perfectly soft and luscious. Waiting just a bit will ensure the flavors meld together beautifully, creating a harmonious presentation!

    Step 4: Assembling the Appetizer

    Now for the fun part! Pour the cooled garlic-infused olive oil generously over your burrata. The glistening oil will encourage curious fork-dipping! Next, sprinkle the sliced olives, drained capers, and bright lemon zest evenly over the cheese. For a touch of nuttiness, add your toasted pine nuts on top. Don’t forget a big pinch of kosher salt; it’s a game-changer! You’ll see each ingredient layer beautifully, transforming the burrata into a gourmet masterpiece.

    Step 5: Serving Suggestions

    Lastly, let’s get to the plate! Serve your gorgeous appetizer with sliced French baguette. This crunchy vehicle is perfect for scooping up that creamy burrata and all the tasty toppings. I love watching people dig in and savor those delightful flavors. There’s something so special about sharing food that’s not just delicious but also a feast for the eyes!

    Tips for Success

    • Make sure your burrata is at room temperature for the best texture.
    • Always keep an eye on the oil to avoid burning the garlic.
    • Let the olive oil cool before pouring it over the burrata to preserve creaminess.
    • Experiment with various toppings—don’t hesitate to make it your own!
    • Using fresh ingredients can elevate the flavors incredibly.

    Equipment Needed

    • Small saucepan
    • Wooden spoon or silicone spatula
    • Serving platter
    • Grater for garlic
    • Measuring cups and spoons
    • Knife for slicing baguette
    • Optional: Cutting board for easy assembly

    Variations

    • Add sun-dried tomatoes and fresh basil for a twist on classic Italian flavors.
    • For a Mediterranean flair, substitute feta cheese for burrata and add cherry tomatoes.
    • Try a vegan version using cashew cheese topped with olive oil and herbs.
    • Incorporate roasted red peppers and artichoke hearts for a vibrant, colorful dish.
    • Mix in some spicy red pepper flakes for an added kick!

    Serving Suggestions

    • A crisp white wine, like Sauvignon Blanc or a light Prosecco, complements the creamy burrata beautifully.
    • Serve with a fresh arugula salad tossed in lemon vinaigrette for a refreshing touch.
    • Pair with marinated artichokes or roasted vegetables for a hearty addition.
    • Offer a selection of olives alongside for an extra burst of flavor.

    FAQs about Burrata Cheese Appetizer

    Curious about making that amazing burrata cheese appetizer? Here are some common questions I’ve gathered, along with their answers to help you out!

    Is burrata cheese the same as mozzarella?
    Not quite! Burrata is actually a creamy version of mozzarella, filled with rich, luscious cream, giving it a unique texture.

    Can I prepare the appetizer in advance?
    Absolutely! You can prepare your toppings ahead of time, but I recommend adding the olive oil and assembling the dish just before serving to keep that creamy texture intact.

    What is the best way to store leftover burrata?
    If you have any leftovers, store the burrata in an airtight container in the fridge. Use it within a day or two for the best experience.

    Is this appetizer suitable for a vegetarian diet?
    Yes, this burrata cheese appetizer is a fabulous vegetarian delight, perfect for anyone looking to enjoy a creamy, Italian cheese dish!

    With these answers, you’re all set to impress your loved ones!

    Final Thoughts

    Making this burrata cheese appetizer has been such an enriching experience for me, truly embodying the joy of cooking. Each step is simple yet filled with the promise of delightful flavors. There’s something magical about gathering around a table, sharing good food and laughter. This dish isn’t just a showstopper; it’s a testament to the beauty of uncomplicated, gourmet cooking at home. I wholeheartedly encourage you to try this recipe for yourself. It’s more than just an appetizer; it’s an opportunity to create lasting memories with your loved ones over creamy, comforting goodness. Dive in and enjoy!


    Print

    clock clock iconcutlery cutlery iconflag flag iconfolder folder iconinstagram instagram iconpinterest pinterest iconfacebook facebook iconprint print iconsquares squares iconheart heart iconheart solid heart solid icon

    Description

    A delightful appetizer featuring creamy burrata cheese topped with a flavorful mixture of olive oil, garlic, olives, capers, lemon zest, and pine nuts, served with sliced French baguette.


    • 8 ounces burrata cheese
    • 1/4 cup olive oil
    • 1 clove garlic, grated
    • 1/2 teaspoon fresh thyme leaves
    • 1/3 cup sliced, pitted Castelvetrano olives
    • 2 tablespoons capers, drained
    • 2 teaspoons lemon zest
    • 2 tablespoons toasted pine nuts
    • Kosher salt
    • sliced French baguette for serving

    1. Gently pull the burrata apart and place it on a serving platter.
    2. Add olive oil, garlic, and thyme to a saucepan. Cook over low heat for 10 minutes until the garlic gets fragrant. Don’t let the oil simmer or let the garlic brown!
    3. Let the olive oil cool for about 5 minutes until it comes to room temperature.
    4. Pour garlic olive oil over the burrata.
    5. Sprinkle olives, capers, lemon zest, pine nuts, and a large pinch of salt in an even layer across the burrata.
    6. Serve with sliced French bread and enjoy!

    Notes

    • For a more intense flavor, allow the olive oil mixture to infuse longer.
    • Feel free to substitute the olives with your favorite type.
    • Ensure the burrata is at room temperature for optimal creaminess.
    • Prep Time: 10 minutes
    • Cook Time: 10 minutes
    • Category: Appetizer
    • Method: No Cook
    • Cuisine: Italian

    Nutrition

    • Serving Size: 1 serving
    • Calories: 320
    • Sugar: 1g
    • Sodium: 450mg
    • Fat: 30g
    • Saturated Fat: 9g
    • Unsaturated Fat: 20g
    • Trans Fat: 0g
    • Carbohydrates: 14g
    • Fiber: 1g
    • Protein: 8g
    • Cholesterol: 30mg

    Sharing is caring!