Blog

  • Creamy Honey Pepper Chicken Mac and Cheese

    Creamy Honey Pepper Chicken Mac and Cheese


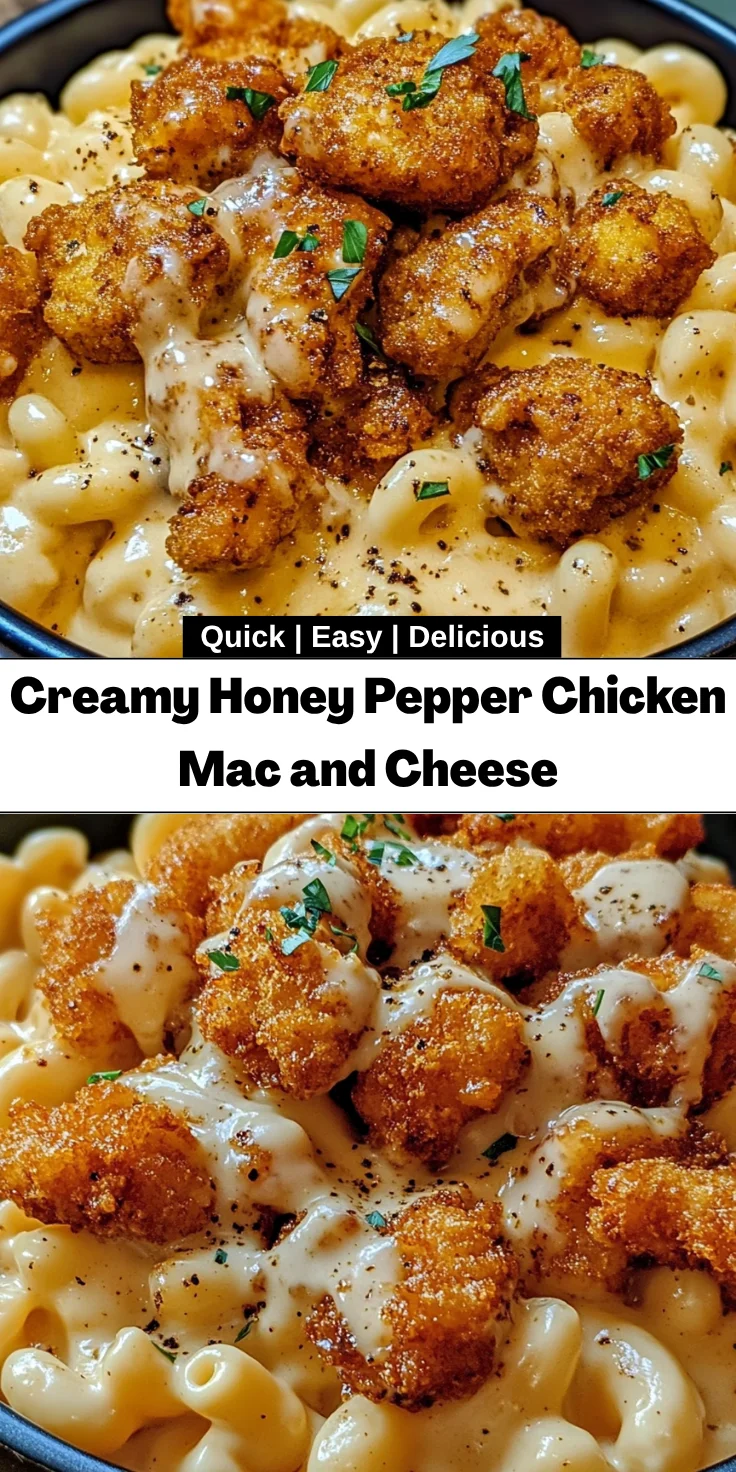
    Introduction to Creamy Honey Pepper Chicken Mac and Cheese

    As a busy mom myself, I know how challenging it can be to whip up a meal that satisfies everyone. Enter my Creamy Honey Pepper Chicken Mac and Cheese—the answer to your dinner dilemmas! This dish is like a warm hug on a plate, combining gooey cheese and crispy chicken in a way your family won’t be able to resist. It’s perfect for those frantic weeknights when you need something easy yet delicious. Plus, it’s impressive enough to delight guests during weekend gatherings. Trust me, you’ll love making this as much as they’ll love eating it!

    Why You’ll Love This Creamy Honey Pepper Chicken Mac and Cheese

    This dish is a culinary lifesaver! With its quick preparation and minimal cleanup, you can spend less time in the kitchen and more time with your loved ones. The creamy sauce envelops each elbow macaroni piece, while the crispy honey pepper chicken adds a delicious twist. It’s comforting, flavorful, and sure to please even the pickiest eaters at your table. Plus, who doesn’t love a little sweetness paired with savory goodness?

    Ingredients for Creamy Honey Pepper Chicken Mac and Cheese

    Gathering the right ingredients is the key to creating the perfect Creamy Honey Pepper Chicken Mac and Cheese. Here’s what you’ll need:

    • Elbow macaroni: Classic choice for mac and cheese. It holds the sauce beautifully!
    • Butter: Adds richness to the cheese sauce.
    • All-purpose flour: Used for thickening the sauce and for coating the chicken.
    • Whole milk: Essential for a creamy texture in the sauce.
    • Heavy cream: Makes the cheese sauce indulgently rich.
    • Shredded cheddar cheese: The star of the show! Offers that gooey goodness.
    • mozzarella cheese: Adds meltiness and stretches beautifully.
    • Garlic powder and onion powder: For an extra layer of flavor in the cheese sauce.
    • Salt and pepper: Essential seasonings to elevate the dish.
    • Chicken breasts: Boneless and skinless, perfectly suited for frying.
    • Buttermilk: Keeps the chicken moist and tender while providing a tangy flavor.
    • Paprika: Adds a hint of warmth to the chicken coating.
    • Vegetable oil: For frying the chicken until it’s golden and crispy.
    • Honey: Sweetens the glaze and complements the peppery notes beautifully.
    • Soy sauce: Provides umami and depth to the glaze.
    • Cracked black pepper: Enhances the flavor profile with a spicy kick.
    • Red pepper flakes: Optional for those who love an extra bit of heat!

    If you’re looking for substitutions, feel free to use a blend of cheeses or non-dairy alternatives for a lighter version. For exact measurements, check out the bottom of the article where details are available for printing!

    How to Make Creamy Honey Pepper Chicken Mac and Cheese

    Ready to dive into the deliciousness? Let’s get cooking my Creamy Honey Pepper Chicken Mac and Cheese. Follow these straightforward steps to create a meal that’s just as enjoyable to make as it is to eat!

    Step 1: Marinate the Chicken

    First things first, let’s marinate the chicken! Soak those bite-sized pieces in buttermilk for at least 20 minutes. This not only tenderizes the chicken but adds a delightful tang. It’s a little step that makes a big difference, trust me!

    Step 2: Prepare the Coating

    While your chicken is soaking, it’s time to whip up the coating. In a bowl, mix flour, paprika, salt, and black pepper. This blend adds flavor and forms that crispy crust we all crave. Make sure to combine it well for an even coating. The chicken will love this seasoning!

    Step 3: Fry the Chicken

    Now for the fun part! Heat vegetable oil in a pan over medium heat until shimmering. Dredge the marinated chicken in the flour mixture, shaking off the excess. Fry those pieces for about 4-5 minutes on each side until they turn golden brown and crispy. Chicken should reach an internal temperature of 165°F to be safely enjoyed. Transfer the chicken to a paper towel-lined plate to cool.

    Step 4: Prepare the Honey Pepper Glaze

    In a saucepan, combine honey, soy sauce, cracked black pepper, and optional red pepper flakes. Simmer over low heat for 2-3 minutes, stirring as you go. You want to achieve a slightly thickened consistency to coat that gorgeous chicken perfectly. This glaze is the sweet and spicy star of the dish!

    Step 5: Cook the Elbow Macaroni

    Next, bring a pot of salted water to a boil and cook the elbow macaroni according to package instructions. Don’t forget to taste for that al dente perfection! Drain and set aside, and be sure to give them a little rinse to stop the cooking process.

    Step 6: Make the Cheese Sauce

    In a separate saucepan, melt butter over medium heat, then whisk in flour to create a roux. Cook for about 1-2 minutes. Gradually add milk and heavy cream, whisking continuously to avoid lumps. Once it’s smooth, reduce the heat and stir in cheddar and mozzarella cheese until it’s all melted and creamy. This is where the magic happens!

    Step 7: Combine and Serve

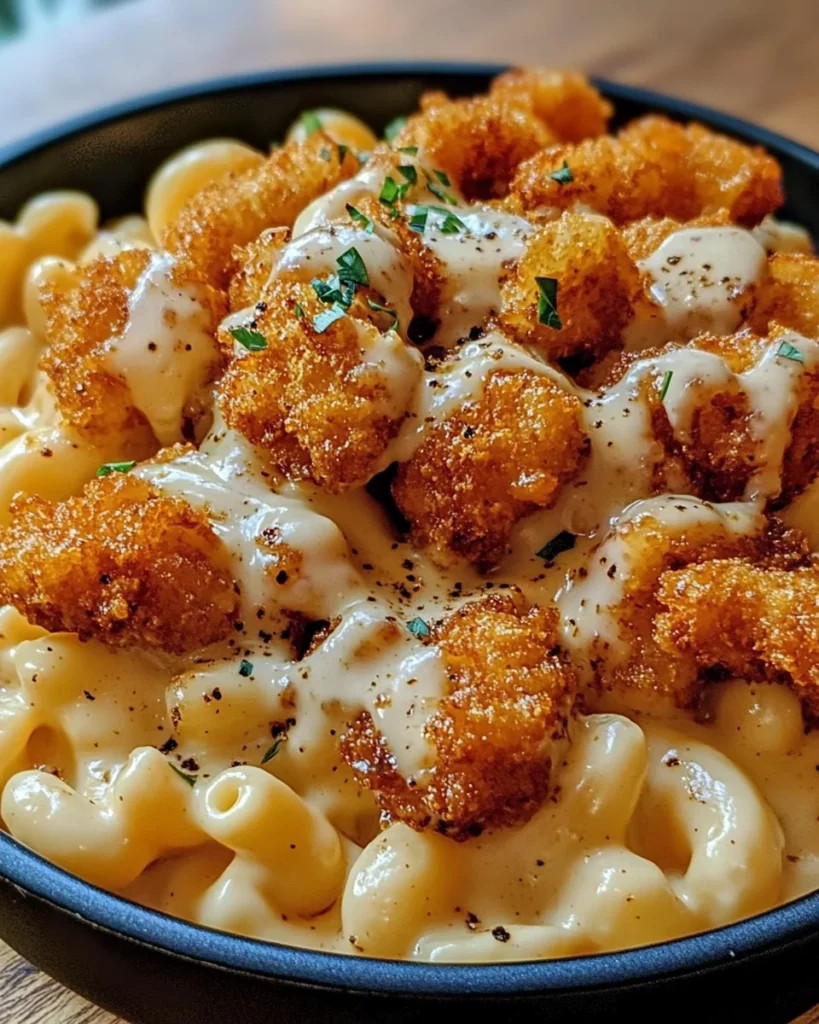
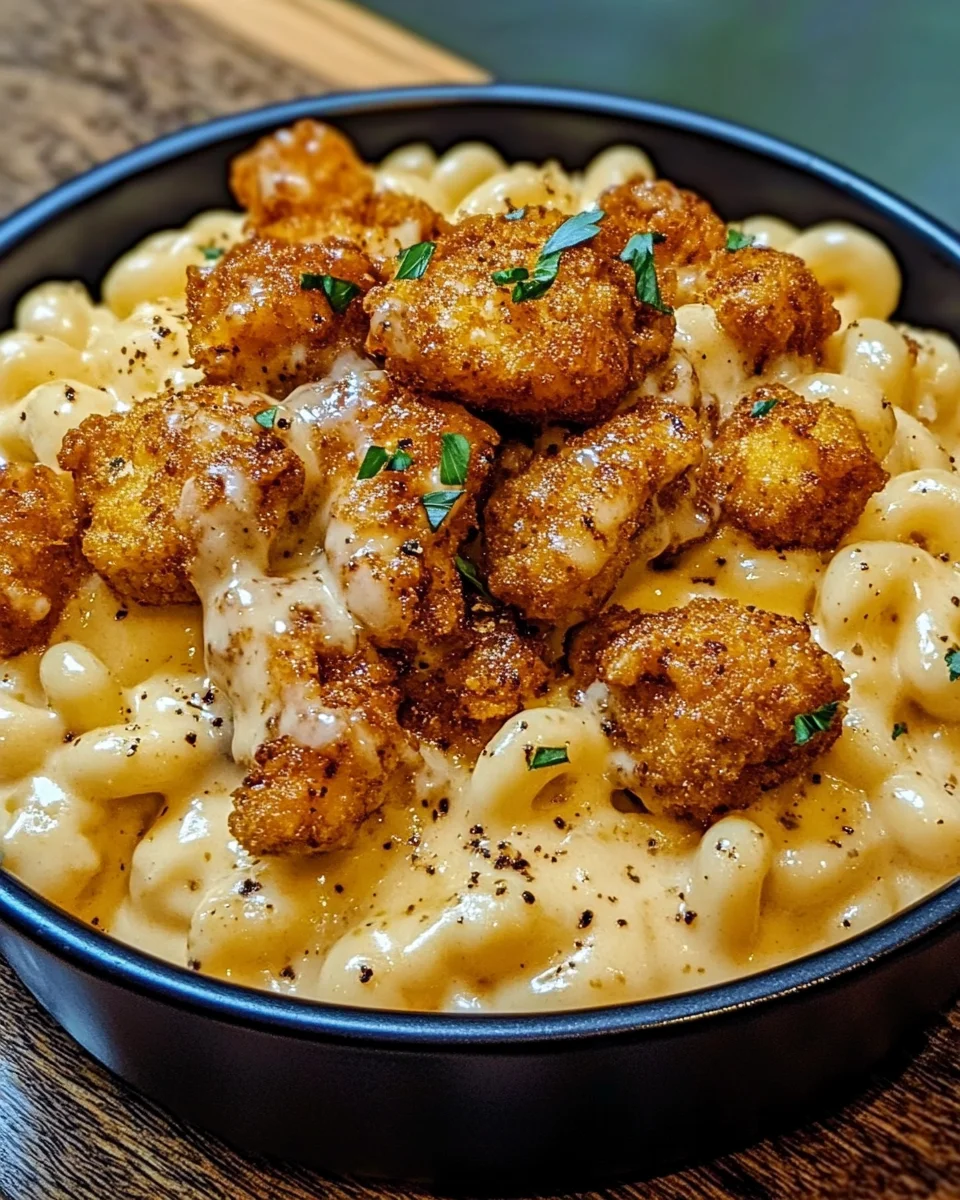
    Now, mix that cooked macaroni into the cheesy sauce. Make sure every elbow is coated in deliciousness! Spoon into serving bowls and generously top with your crispy honey pepper chicken. Garnish with fresh parsley or additional black pepper to make it look extra appetizing. Your Creamy Honey Pepper Chicken Mac and Cheese is ready to impress!

    Tips for Success

    • Soak the chicken long enough to ensure tenderness—20 minutes is ideal.
    • Use a thermometer to check the chicken’s internal temperature for perfect doneness.
    • Rinse macaroni after boiling to prevent it from sticking together.
    • For an extra creamy sauce, consider adding more heavy cream.
    • Make this dish ahead of time and reheat it for easy weeknight dinners!

    Equipment Needed

    • Large pot for boiling macaroni (a deep skillet works too).
    • Medium saucepan for making the cheese sauce.
    • Frying pan for cooking the chicken (a cast-iron skillet is perfect).
    • Mixing bowls for marinating and coating.
    • Whisk for blending sauces and roux.

    Variations

    • Spicy Kick: Add more red pepper flakes to the chicken glaze for an extra spicy version that will tantalize your taste buds!
    • Vegetarian Option: Replace chicken with crispy tofu or roasted veggies like zucchini and bell peppers for a meat-free twist.
    • Cheese Swap: Experiment with different cheeses! Pepper jack or gouda can add unique flavors to the cheese sauce.
    • Whole Wheat Pasta: For a healthier alternative, use whole wheat elbow macaroni to boost fiber content without sacrificing taste.
    • Herbed Variation: Add fresh herbs like thyme or basil into the cheese sauce for added freshness and flavor.

    Serving Suggestions for Creamy Honey Pepper Chicken Mac and Cheese

    • Pair with a crisp side salad for a refreshing contrast to the rich flavors.
    • Serve with garlic bread to soak up the cheesy goodness!
    • A glass of chilled sweet tea makes a delightful drink combo.
    • For a festive touch, garnish with fresh parsley or microgreens before serving.
    • Present in colorful bowls to make dinner feel special and inviting.

    FAQs about Creamy Honey Pepper Chicken Mac and Cheese

    As you get ready to create this delightful Creamy Honey Pepper Chicken Mac and Cheese, you might have a few questions. Here are some FAQs to help you out!

    Can I use different pasta shapes? Absolutely! While elbow macaroni is classic, you can use any pasta shape you love like shells or penne. Just adjust the cooking time as necessary.

    How can I store leftovers? Store any leftovers in an airtight container in the refrigerator for up to three days. Reheat in the microwave or bake in the oven until warmed through.

    Can I make this dish ahead of time? Yes! Prepare everything earlier in the day and assemble it right before baking. This way, you can simply pop it in the oven when you’re ready to enjoy!

    What if I don’t like spicy food? No problem! Just leave out the red pepper flakes in the glaze for a milder version that still packs flavor.

    Can I freeze Creamy Honey Pepper Chicken Mac and Cheese? You can! Just ensure it’s cooled completely before putting it in a freezer-safe container. Enjoy within two months for the best taste.

    Final Thoughts

    Cooking my Creamy Honey Pepper Chicken Mac and Cheese has become one of my favorite evening rituals. The joy on my family’s faces as they dig into this dish makes every effort worth it. It’s amazing how a simple meal can spark laughter and create memories around the dinner table. You’ll find that cooking brings a sense of warmth and comfort into your home, not just nourishment for the body. So don your apron, turn up your favorite tunes, and embrace the magic of home-cooked meals—this one will definitely become a cherished classic!


    Print

    clock clock iconcutlery cutlery iconflag flag iconfolder folder iconinstagram instagram iconpinterest pinterest iconfacebook facebook iconprint print iconsquares squares iconheart heart iconheart solid heart solid icon

    Description

    A delightful and creamy macaroni and cheese dish topped with crispy honey pepper chicken, perfect for a comforting meal.


    • 2 cups elbow macaroni
    • 2 tablespoons butter
    • 2 tablespoons all-purpose flour
    • 2 cups whole milk
    • 1 cup heavy cream
    • 2 cups shredded cheddar cheese
    • 1/2 cup mozzarella cheese
    • 1/2 teaspoon garlic powder
    • 1/2 teaspoon onion powder
    • Salt and pepper to taste
    • 2 boneless, skinless chicken breasts, cut into bite-sized pieces
    • 1 cup buttermilk
    • 1 cup all-purpose flour
    • 1 teaspoon paprika
    • 1/2 teaspoon salt
    • 1/2 teaspoon black pepper
    • Vegetable oil for frying
    • 1/3 cup honey
    • 1 tablespoon soy sauce
    • 1 teaspoon cracked black pepper
    • 1/2 teaspoon red pepper flakes (optional)

    1. Soak chicken pieces in buttermilk for at least 20 minutes.
    2. In a bowl, mix flour, paprika, salt, and black pepper.
    3. Heat oil in a pan over medium heat.
    4. Dredge chicken in the flour mixture and shake off excess.
    5. Fry until golden brown and crispy (about 4-5 minutes per side). Place on a paper towel-lined plate.
    6. In a saucepan, combine honey, soy sauce, cracked black pepper, and red pepper flakes.
    7. Simmer over low heat for 2-3 minutes, stirring frequently.
    8. Toss crispy chicken in the glaze to coat evenly.
    9. Cook elbow macaroni according to package instructions. Drain and set aside.
    10. In a saucepan, melt butter over medium heat. Add flour and whisk for 1-2 minutes.
    11. Slowly add milk and heavy cream, whisking continuously.
    12. Reduce heat and stir in cheddar and mozzarella cheese until melted.
    13. Season with garlic powder, onion powder, salt, and pepper.
    14. Mix cooked macaroni into the cheese sauce.
    15. Spoon mac and cheese into serving bowls.
    16. Top with honey pepper glazed chicken.
    17. Garnish with fresh parsley or extra black pepper (optional).

    Notes

    • For a spicier kick, increase the amount of red pepper flakes.
    • Use whole milk for a creamier texture in the cheese sauce.
    • Leftovers can be stored in an airtight container and reheated in the oven or microwave.
    • Prep Time: 30 minutes
    • Cook Time: 30 minutes
    • Category: Main Course
    • Method: Stovetop and Frying
    • Cuisine: American

    Nutrition

    • Serving Size: 1 serving
    • Calories: 750
    • Sugar: 10g
    • Sodium: 900mg
    • Fat: 40g
    • Saturated Fat: 20g
    • Unsaturated Fat: 10g
    • Trans Fat: 0g
    • Carbohydrates: 70g
    • Fiber: 3g
    • Protein: 40g
    • Cholesterol: 120mg

    Sharing is caring!

  • Sizzling Keto Philly Cheesesteak Casserole

    Sizzling Keto Philly Cheesesteak Casserole


    Introduction to Sizzling Keto Philly Cheesesteak Casserole

    Welcome to my kitchen! If you’re like me, juggling a hectic schedule while wanting to whip up something delicious, the Sizzling Keto Philly Cheesesteak Casserole is just what you need. This hearty dish beautifully marries the classic flavors of a Philly cheesesteak, while being perfect for those following a keto lifestyle. Imagine treating your family to a warm, cheesy feast, without the typical carb-heavy guilt. Whether it’s a busy weeknight or a weekend gathering, this casserole promises to impress your loved ones and satisfy those cravings!

    Why You’ll Love This Sizzling Keto Philly Cheesesteak Casserole

    This Sizzling Keto Philly Cheesesteak Casserole is a total game changer for dinner! It’s a one-dish wonder, saving you time on both cooking and cleaning. Plus, the creamy, cheesy goodness will tantalize your taste buds, delivering that comforting flavor we all crave. With just a few simple ingredients, it’s a quick solution for busy nights, making it perfect for families and busy professionals alike!

    Ingredients for Sizzling Keto Philly Cheesesteak Casserole

    Let’s dive into the ingredients that come together to create this mouthwatering Sizzling Keto Philly Cheesesteak Casserole! Each one is vital, adding its unique charm to the dish. Don’t worry, the precise measurements can be found at the bottom of the article for easy printing!

    • Ground beef or thinly sliced steak: This is the star of your casserole! Opt for lean ground beef or a tender cut like ribeye for that authentic Philly cheesesteak experience. If you want a meatless version, feel free to swap in some hearty mushrooms.
    • Bell pepper: A pop of vibrant color and sweetness! You can use green or red peppers based on your preference. Red adds a hint of sweetness, while green delivers a slightly more peppery flavor.
    • Onion: Diced onions add a wonderful aromatic base to the dish. Yellow onions are my go-to for their sweetness, but feel free to use white onions for a sharper punch.
    • Garlic: Freshly minced garlic enhances the overall flavor profile, infusing warmth and richness into the casserole. Use more if you’re a garlic lover!
    • Mushrooms: Sliced mushrooms bring an earthy depth to the dish. Button or cremini mushrooms work well, but you could also add portobellos for a meatier texture.
    • Heavy cream: The creamy sauce is what makes this casserole comfort food at its best. You can replace it with half-and-half or even coconut cream for a dairy-free option.
    • Provolone cheese (or mozzarella): A melty layer of provolone offers that authentic cheesesteak flavor. Mozzarella can be a great substitute if provolone isn’t available.
    • Cheddar cheese: Adding shredded cheddar gives an extra cheesy kick! It’s perfect for creating that golden, bubbly top layer.
    • Worcestershire sauce: This adds a hint of umami, balancing the richness of the cream and cheese. You can skip it or use a gluten-free version if needed.
    • Italian seasoning: A delightful blend of herbs ties the flavors together. If you prefer fresh herbs, feel free to use basil or oregano straight from your garden!
    • Salt and pepper: Always season to taste! These staples elevate the overall flavor.
    • Olive oil or butter: Used for sautéing, this fat adds richness. Butter will give a delightful taste, but olive oil is a healthier option and works perfectly too.
    • Fresh parsley (for garnish): A sprinkle of vibrant parsley adds freshness to the top. It’s all about that finishing touch!

    How to Make Sizzling Keto Philly Cheesesteak Casserole

    Step 1: Preheat and Prepare the Casserole Dish

    To kick things off, preheat your oven to 350°F (175°C). This gives the casserole that perfect bubbly finish. While that’s warming up, grab a 9×13 inch casserole dish and grease it with olive oil or non-stick spray. This little step helps to prevent your delicious creation from sticking. Nobody wants a stuck-on mess, right? Trust me, it makes serving and cleanup so much easier!

    Step 2: Cook the Beef or Steak

    Heat up a large skillet over medium-high heat. Add in a tablespoon of olive oil or butter, then toss in your ground beef or sliced steak. Let it cook for about 5-7 minutes until nicely browned. Don’t forget to season it with salt, pepper, and a splash of Worcestershire sauce. This adds a savory depth, making your flavors sing! Once done, remove the beef from the skillet and set it aside to keep warm. That browning adds so much flavor!

    Step 3: Sauté the Vegetables

    In the same skillet, you’ll want to add another tablespoon of oil if necessary. Sauté the diced onions and minced garlic for about 2 minutes, or until they become translucent and fragrant. Then, throw in your bell pepper and sliced mushrooms. Cook these colorful veggies for another 5-6 minutes until they’ve softened. The aroma will fill your home, making it feel cozy and warm! These veggies add so much character to your casserole.

    Step 4: Combine Ingredients

    In a large mixing bowl, take that gorgeous beef you set aside and combine it with the sautéed veggies. Pour in the heavy cream along with your Italian seasoning. Mix everything together well, ensuring that all flavors blend beautifully. You’ll want every bite to be just as tasty as the last! This creamy, savory blend is the heart of your Sizzling Keto Philly Cheesesteak Casserole.

    Step 5: Assemble the Casserole

    Now it’s time for the fun part! Transfer your flavorful mixture into the greased casserole dish. Spread it out evenly, creating a delicious base. Next, layer on the shredded provolone cheese and follow it up with a sprinkle of shredded cheddar cheese. This cheesy goodness is going to melt and form a fantastic crust on top! It’s practically begging to go in the oven.

    Step 6: Bake to Perfection

    Carefully place the casserole in your preheated oven and let it bake for about 25-30 minutes. Keep an eye on it—you’re looking for the cheese to get bubbly and golden brown. That’s how you know it’s ready to come out! The anticipation builds as you catch whiffs of that sizzling goodness. You’re going to love it!

    Step 7: Cool and Garnish

    When your casserole is done baking, remove it from the oven and let it cool for a few minutes. This helps the layers settle and makes it easier to slice. Before serving, give it a fresh touch by sprinkling some chopped parsley on top. It makes your dish pop and adds a lovely flavor boost!

    Tips for Success

    • Always let your casserole cool for a few minutes before slicing. This helps it hold its shape!
    • For extra flavor, try marinating your beef in the Worcestershire sauce for an hour before cooking.
    • Feel free to double the recipe and freeze half for later. Meal prep made easy!
    • Experiment with cheese combinations! Adding pepper jack can add a spicy kick!
    • If you’re low on time, pre-chop your veggies ahead of time.

    Equipment Needed

    • Large Skillet: A heavy-duty skillet is perfect for browning meat and sautéing veggies. If you don’t have one, a frying pan will work too!
    • Casserole Dish: A 9×13 inch dish is ideal, but any similar-sized oven-safe dish will do.
    • Mixing Bowl: Use a large bowl for combining ingredients; a sturdy plastic bowl works just as well.
    • Spatula: A classic spatula is great for mixing and transferring food; a wooden spoon works too!

    Variations

    • Vegetable Medley: Add more veggies like zucchini, spinach, or cherry tomatoes for a colorful twist. They also boost nutrition!
    • Spicy Option: Toss in some diced jalapeños or a sprinkle of red pepper flakes for a hint of heat. Your taste buds will thank you!
    • Different Cheeses: Experiment with different cheese blends! Try gouda for a smoky flavor or feta for a tangy punch.
    • Dairy-Free Version: Swap heavy cream for coconut cream and use dairy-free cheese alternatives to make it completely dairy-free!
    • Stuffed Peppers: Use this mixture to stuff halved bell peppers instead of making a casserole. Bake until the peppers are tender for a fun presentation!

    Serving Suggestions

    • Pair the Sizzling Keto Philly Cheesesteak Casserole with a fresh garden salad for a light, refreshing complement.
    • A side of roasted broccoli or asparagus adds a nice crunch and is low in carbs.
    • Serve with sparkling water or iced tea for a refreshing drink.
    • Garnish with extra parsley or sliced green onions for an appealing presentation.

    FAQs about Sizzling Keto Philly Cheesesteak Casserole

    Can I make this casserole ahead of time?
    Absolutely! The Sizzling Keto Philly Cheesesteak Casserole can be assembled ahead of time. Just store it in the refrigerator for up to 2 days before baking. This makes it perfect for meal prepping or when hosting guests!

    How can I store leftovers?
    Leftovers should be stored in an airtight container in the refrigerator. Enjoy them within 3 days for the best flavor. You can easily reheat individual portions in the microwave or oven!

    Is this casserole suitable for freezing?
    Yes, you can freeze the unbaked casserole! Cover it tightly with plastic wrap and foil. When you’re ready to enjoy it, simply bake it from frozen, increasing the baking time by about 10-15 minutes.

    Can I use ground turkey instead of beef?
    Definitely! Ground turkey or chicken can be great substitutes in this casserole for a lighter option. Just be sure to season it well, as those meats can be more bland.

    What can I serve with this casserole?
    Consider pairing it with a fresh garden salad or some roasted low-carb vegetables. They’ll add a nice crunch and balance the rich flavors of the casserole!

    Final Thoughts

    Creating this Sizzling Keto Philly Cheesesteak Casserole has been such a rewarding experience for me! The blend of creamy textures, savory beef, and melting cheese creates a dish that warms your soul and fills your belly with joy. Plus, knowing it fits perfectly into a keto lifestyle makes it all the more satisfying. Whether it’s a weeknight meal or a family gathering, this casserole has a way of bringing everyone together. I hope you enjoy every cheesy bite as much as I do, and find new moments of happiness shared around your table!


    Print

    clock clock iconcutlery cutlery iconflag flag iconfolder folder iconinstagram instagram iconpinterest pinterest iconfacebook facebook iconprint print iconsquares squares iconheart heart iconheart solid heart solid icon

    Description

    Welcome to my kitchen! If you’re like me, juggling a hectic schedule while wanting to whip up something delicious, the Sizzling Keto Philly Cheesesteak Casserole is just what you need. This hearty dish beautifully marries the classic flavors of a Philly cheesesteak, while being perfect for those following a keto lifestyle. Imagine treating your family to a warm, cheesy feast, without the typical carb-heavy guilt. Whether it’s a busy weeknight or a weekend gathering, this casserole promises to impress your loved ones and satisfy those cravings!


    • 1 lb ground beef (or thinly sliced steak)
    • 1 bell pepper (green or red), diced
    • 1 medium onion, diced
    • 2 cloves garlic, minced
    • 1 cup sliced mushrooms
    • 1 cup heavy cream
    • 1 ½ cups shredded provolone cheese (or mozzarella)
    • 1 cup shredded cheddar cheese
    • 1 tsp Worcestershire sauce
    • 1 tsp Italian seasoning
    • Salt and pepper to taste
    • 2 tbsp olive oil or butter
    • Fresh parsley, chopped (for garnish)

    1. Preheat your oven to 350°F (175°C) and grease a 9×13 inch casserole dish with olive oil or non-stick spray.
    2. In a large skillet over medium-high heat, add 1 tablespoon of olive oil or butter. Once hot, add the ground beef or sliced steak. Cook until browned, about 5-7 minutes. Season with salt, pepper, and Worcestershire sauce. Remove from the skillet and set aside.
    3. In the same skillet, add another tablespoon of oil if needed. Sauté the diced onion and garlic for around 2 minutes until translucent. Add the diced bell pepper and sliced mushrooms, cooking for an additional 5-6 minutes until softened.
    4. In a mixing bowl, combine the cooked beef, sautéed vegetables, heavy cream, and Italian seasoning. Mix well to ensure everything is evenly distributed.
    5. Transfer the mixture to the prepared casserole dish, spreading it out in an even layer. Top with shredded provolone cheese followed by shredded cheddar cheese.
    6. Place the casserole in the preheated oven and bake for about 25-30 minutes, or until the cheese is bubbly and golden brown.
    7. Remove from the oven and let it cool for a few minutes. Garnish with freshly chopped parsley before slicing and serving.

    Notes

    • This casserole can be made ahead of time and stored in the refrigerator for up to 2 days before baking.
    • Feel free to customize the vegetables according to your preference.
    • Leftovers can be stored in an airtight container in the refrigerator for up to 3 days.
    • Prep Time: 15 minutes
    • Cook Time: 30 minutes
    • Category: Main Dish
    • Method: Baking
    • Cuisine: American

    Nutrition

    • Serving Size: 1 serving
    • Calories: 450
    • Sugar: 2g
    • Sodium: 800mg
    • Fat: 35g
    • Saturated Fat: 18g
    • Unsaturated Fat: 10g
    • Trans Fat: 0g
    • Carbohydrates: 5g
    • Fiber: 1g
    • Protein: 32g
    • Cholesterol: 100mg

    Sharing is caring!

  • Healthy Oatmeal Apple Cake

    Healthy Oatmeal Apple Cake


    Introduction to Healthy Oatmeal Apple Cake

    As a passionate home cook, I know how chaotic life can be. Between school drop-offs, work commitments, and a thousand little tasks, finding time for a delicious dessert can feel impossible. That’s where my Healthy Oatmeal Apple Cake comes to the rescue! This delightful treat brings joy without any guilt, making it ideal for busy moms like me.

    Imagine biting into a moist, flavorful slice that not only satisfies your sweet tooth but also brings warmth and comfort to your busy day. Whether you’re entertaining guests or treating yourself, this healthy cake is a perfect solution!

    Why You’ll Love This Healthy Oatmeal Apple Cake

    You’re going to adore this Healthy Oatmeal Apple Cake for so many reasons! First off, it’s quick to whip up, taking just 40 minutes from start to finish. Plus, the delightful blend of oats and apples hits all the right notes of flavor and texture. With a recipe that’s healthy, yet irresistibly tasty, it’s a guilt-free treat your whole family will enjoy!

    Ingredients for Healthy Oatmeal Apple Cake

    Gather these simple ingredients to create your Healthy Oatmeal Apple Cake. Each one plays a crucial role in making the cake nutritious and delicious!

    • Rolled Oats: The star of the show! Oats add fiber and nuttiness, making this cake filling and hearty.
    • Ground Cinnamon: This spice adds warmth and a hint of sweetness, making every bite comforting.
    • Baking Soda and Baking Powder: These leavening agents help the cake rise, giving it that lovely fluffy texture.
    • Apples: Fresh and chopped, they lend natural sweetness and moisture. You can use any variety you love!
    • Honey: A natural sweetener that boosts flavor and keeps the cake moist. For a vegan option, feel free to swap it out for maple syrup!
    • Vanilla Extract: Adds a fragrant note, enhancing the overall flavor and making it feel special.
    • Plain Yogurt: This ingredient contributes to the cake’s moistness and adds a touch of creaminess.
    • Eggs: They bind the ingredients together and add structure, helping the cake hold its shape.
    • Unsalted Butter or Coconut Oil: Fat is essential for flavor and texture! Choose butter for a rich taste or coconut oil for a hint of tropical flavor.

    You can find exact measurements for each ingredient at the bottom of the article, which are available for printing. Happy baking!

    How to Make Healthy Oatmeal Apple Cake

    Making this Healthy Oatmeal Apple Cake is easy and enjoyable! Follow these simple steps to create a cake that will satisfy your cravings and impress your loved ones.

    Preheat the Oven

    First things first, preheat your oven to 350°F (180°C). This is a crucial step! A well-heated oven ensures your cake bakes evenly and rises beautifully. While the oven warms up, you can gather your ingredients and get ready to bake!

    Mix Ingredients

    In a large bowl or a blender, combine all the ingredients—except for 1/4 cup of oats. Start blending until you have a smooth mixture. When it’s all mixed, gently fold in the reserved oats. This adds a delicious texture to your cake, making each bite delightful!

    Prepare the Baking Pan

    Next up, it’s time to prepare your baking pan. I like to use parchment paper for easy removal. Line a small baking pan (about 8 inches) with the parchment, covering the bottom and sides. This way, the cake won’t stick, and it’ll be a breeze to lift out once it’s baked!

    Bake the Cake

    Now, pour the cake batter into the prepared pan. Smooth the top with a spatula to create an even layer. Pop it in the preheated oven and let it bake for 20 to 30 minutes. Keep an eye on it! You’ll know it’s ready when a toothpick inserted in the center comes out clean.

    Cool and Serve

    Once baked, take the cake out and let it cool completely in the pan. Then, use the parchment paper to lift it out. Slice into pieces and store them in an airtight container. I recommend chilling the cake for at least an hour in the refrigerator before serving. It enhances the flavors and makes for the perfect treat!

    Tips for Success

    • Ensure your ingredients are at room temperature for better mixing.
    • Use fresh, crisp apples for the best flavor and moisture.
    • Don’t skip cooling the cake in the fridge; it improves the texture!
    • For an extra flavor boost, add chopped nuts or raisins.
    • If you’re pressed for time, prepare the batter ahead and bake when ready!

    Equipment Needed

    • Mixing Bowl: A medium-sized bowl works well. Alternatively, use a blender for convenience.
    • Baking Pan: An 8-inch square or round pan is perfect. If you don’t have one, try a pie dish!
    • Parchment Paper: Use this for easy removal. If unavailable, grease the pan with oil or butter.
    • Spatula: Great for smoothing the batter. A wooden spoon can work in a pinch!

    Variations for Healthy Oatmeal Apple Cake

    • Nutty Delight: Stir in some chopped walnuts or pecans for a satisfying crunch and added healthy fats.
    • Fruit Fusion: Swap apples for other fruits like mashed bananas or grated carrots for a different flavor profile.
    • Spiced Up: Experiment with spices; nutmeg or pumpkin spice can add a seasonal twist to your cake.
    • Chocolate Chip Addition: Mix in dark chocolate chips for a decadent touch. Who doesn’t love a little chocolate?
    • Vegan Variation: Replace eggs with flaxseed meal mixed with water for a fantastic vegan alternative.
    • Gluten-Free Option: Use gluten-free oats to cater to dietary restrictions while keeping the flavor intact.

    Serving Suggestions for Healthy Oatmeal Apple Cake

    • Pair with Greek Yogurt: A dollop of yogurt adds creaminess and balances the cake’s sweetness.
    • Drizzle with Honey: Lightly drizzle honey on top for a touch of extra sweetness and shine.
    • Add Fresh Fruit: Serve with slices of fresh apple or berries for a colorful presentation.
    • Enjoy with Tea or Coffee: This cake pairs beautifully with a warm cup, enhancing your relaxation.
    • Garnish with Nuts: Sprinkle chopped nuts on top for added texture and flavor.

    FAQs about Healthy Oatmeal Apple Cake

    If you have questions about my Healthy Oatmeal Apple Cake, you’re not alone! Here are some common queries and their answers to help you along the way.

    Can I make this cake gluten-free?

    Absolutely! Just use gluten-free oats, and you’ll have a deliciously healthy cake that everyone can enjoy.

    How should I store leftover cake?

    Keep your cake in an airtight container in the refrigerator. It should stay fresh for up to a week, although I doubt it will last that long!

    Can I substitute the apples with other fruits?

    Yes! You can switch out the apples for mashed bananas, zucchini, or even grated carrots for a fun twist.

    How can I make this cake less sweet?

    Simply reduce the amount of honey or use ripe bananas for added sweetness without extra sugar.

    Is this cake good for breakfast?

    Definitely! This healthy cake is perfect for breakfast or a yummy snack. With wholesome ingredients, it’s a fantastic way to start your day.

    Final Thoughts

    As I take a moment to reflect on my journey with this Healthy Oatmeal Apple Cake, I’m filled with joy knowing I can satisfy my sweet tooth without guilt. The comforting aroma that fills my kitchen while it bakes is enough to brighten even the busiest day. It’s more than just a treat; it’s a way to share love and nourishment with my family. Whether enjoyed as a snack, a breakfast, or a dessert, this cake has a special place in my heart and on my table. I hope it brings you the same joy it brings me!


    Print

    clock clock iconcutlery cutlery iconflag flag iconfolder folder iconinstagram instagram iconpinterest pinterest iconfacebook facebook iconprint print iconsquares squares iconheart heart iconheart solid heart solid icon

    Description

    A delicious and healthy cake made with oats and apples, perfect for a guilt-free treat.


    • 1 cup rolled oats
    • 1 teaspoon ground cinnamon
    • 1/2 teaspoon baking soda
    • 1/2 teaspoon baking powder
    • 1 large apple, peeled and chopped
    • 3 tablespoons honey
    • 1 teaspoon vanilla extract
    • 3 tablespoons plain yogurt
    • 2 large eggs
    • 1 tablespoon unsalted butter or coconut oil

    1. Set the oven temperature to 350°F (180°C) and allow it to fully warm.
    2. Combine all ingredients except 1/4 cup of oats in a blender or bowl. Process until smooth, then fold in the reserved oats to maintain texture.
    3. Place parchment paper into a small baking pan, ensuring full coverage to prevent sticking.
    4. Pour the batter into the prepared pan. Bake for 20 to 30 minutes or until a toothpick inserted in the center comes out clean.
    5. Allow the cake to cool completely, then slice and store in an airtight container in the refrigerator for at least one hour before serving.

    Notes

    • Can substitute honey with maple syrup for a vegan option.
    • Adjust the sweetness according to your preference.
    • Best served chilled after storing in the refrigerator.
    • Prep Time: 10 minutes
    • Cook Time: 30 minutes
    • Category: Dessert
    • Method: Baking
    • Cuisine: American

    Nutrition

    • Serving Size: 1 slice
    • Calories: 150
    • Sugar: 10g
    • Sodium: 50mg
    • Fat: 5g
    • Saturated Fat: 2g
    • Unsaturated Fat: 3g
    • Trans Fat: 0g
    • Carbohydrates: 25g
    • Fiber: 3g
    • Protein: 4g
    • Cholesterol: 70mg

    Sharing is caring!

  • Espresso Chocolate Chip Muffins

    Espresso Chocolate Chip Muffins


    Introduction to Espresso Chocolate Chip Muffins

    Ah, the smell of freshly baked muffins! It fills the kitchen like a warm hug, doesn’t it? Today, I’m excited to share my recipe for Espresso Chocolate Chip Muffins. These little delights are perfect for busy mornings. With their rich coffee flavor mixed with gooey chocolate, they’re sure to win over even the pickiest eaters. Plus, they’re quick and easy to whip up, making them an ideal treat for moms trying to juggle a thousand things. Trust me; once you try these muffins, breakfast will never feel boring again!

    Why You’ll Love This Espresso Chocolate Chip Muffins

    These Espresso Chocolate Chip Muffins are a dream come true for busy cooks like us. They’re simple to make and take just 15 minutes of prep time! Not to mention, the delightful combination of espresso and chocolate makes for a flavor that dances on your palate. Whether it’s a quick breakfast or an afternoon snack, these muffins are sure to please everyone in the family while giving you a little caffeine boost, too!

    Ingredients for Espresso Chocolate Chip Muffins

    Before we dive into baking, let’s gather our ingredients! You’ll be happy to know that this recipe incorporates common pantry staples along with a few delightful add-ins that elevate the flavor. While the exact quantities are at the bottom of the article for easy printing, here’s an overview of what you’ll need to bring these Espresso Chocolate Chip Muffins to life.

    Main Ingredients

    Flour and Leavening Agents

    The backbone of any muffin is flour. It gives them structure and helps achieve that soft, fluffy texture we love. Baking powder acts like a magic wand, making the muffins rise beautifully. You can use all-purpose flour for a classic touch or even switch it up with whole wheat flour for a nuttier flavor.

    Wet Ingredients

    Eggs and Dairy

    Eggs are the secret superheroes, adding moisture and richness to your muffins. They also help bind everything together. As for dairy, a combination of milk and sour cream contributes to that moist, tender crumb we all crave. If you’re feeling adventurous, a dash of buttermilk can add an extra zing!

    Sweeteners

    Sugar Varieties

    Sweetness is essential in balancing the bitter notes of espresso. Granulated sugar provides a lovely sweetness, while brown sugar sneaks in some caramel undertones for depth. You can even swap in honey or maple syrup if you’re looking to experiment a bit!

    Chocolate Chips

    Miniature Chocolate Chips

    No muffin is complete without chocolate, right? Miniature chocolate chips are perfect! They melt perfectly, creating pockets of luscious chocolate throughout the muffins. Their smaller size helps them distribute evenly, giving each bite that delightful blend of espresso and chocolate.

    Streusel Topping

    Espresso Streusel Components

    This is the crowning glory of the muffins! The espresso streusel topping provides an irresistible crunch while enhancing the coffee flavor. With just a few ingredients like butter, flour, and sugar, this topping adds texture that elevates your muffins from good to gourmet.

    How to Make Espresso Chocolate Chip Muffins

    Now that we have our ingredients ready, let’s dive into the step-by-step process of making these delicious Espresso Chocolate Chip Muffins! Follow these simple instructions, and you’ll have a batch of muffins that’ll make your kitchen smell heavenly. Let’s get started!

    Prepare the Dry Ingredients

    Whisking the Flour Mixture

    First, grab a large bowl and combine the flour, baking powder, and salt. Whisk them together until everything is well mixed. This step is crucial to avoid lumps in your batter. You want that silky smooth muffin texture, don’t you?

    Mix the Wet Ingredients

    Blending for Smoothness

    In a separate medium bowl, mix together your eggs, sugar, melted butter, milk, sour cream, and vanilla. Make sure everything is well combined. However, be careful not to overmix! Overmixing can lead to tough muffins, and nobody wants that!

    Combine Wet and Dry Mixtures

    Folding in Chocolate Chips

    Now it’s time to merge the two mixtures. Gently fold the dry ingredients into the wet ones using a spatula. This technique helps keep your muffins light and fluffy. And don’t forget to add in those miniature chocolate chips. They’ll melt beautifully and create delicious pockets of chocolate.

    Making the Streusel Topping

    Achieving Crunch and Flavor

    For that delightful crunchy topping, mix melted butter with flour, sugar, brown sugar, salt, and espresso powder in a small bowl. Stir until you have a crumbly texture. This streusel will add that extra layer of flavor and crunch we all crave!

    Assembling the Muffins

    Filling the Muffin Tin

    Using an ice cream scoop or a ¼ measuring cup, fill your muffin tin with the batter. Don’t forget to grease the tin or use liners for easy clean-up! Make sure to distribute the batter evenly among the cups, leaving a little room for those muffins to rise.

    Baking Instructions

    Temperature Changes

    Preheat your oven to 425°F. Bake the muffins for 7 minutes at this temperature. Then, reduce the heat to 350°F and continue baking for an additional 10 minutes. This two-step baking process helps achieve those lovely domed tops and keeps your muffins moist inside.

    Tips for Success

    • Use room temperature ingredients for a smoother batter.
    • Don’t overmix the batter; gentle folding is key to fluffy muffins.
    • Sprinkle the streusel on top right before baking for maximum crunch.
    • Check for doneness by inserting a toothpick; it should come out clean.
    • Let the muffins cool in the pan for a few minutes before transferring them to a wire rack.

    Equipment Needed

    • Muffin tin: A standard 12-cup muffin tin works great, but you can use silicone muffin molds for easy removal.
    • Mixing bowls: A set of medium and large bowls will help you handle the wet and dry ingredients.
    • Whisk: Essential for blending dry ingredients; a fork can work in a pinch.
    • Spatula: A silicone spatula is perfect for folding in chocolate chips and mixing thoroughly.
    • Ice cream scoop or measuring cup: Choose either for easy, even muffin filling.

    Variations of Espresso Chocolate Chip Muffins

    • For a nutty twist, add chopped walnuts or pecans to the batter. They pair wonderfully with chocolate and coffee flavors.
    • Try substituting half the all-purpose flour with almond flour for a gluten-free option that adds a subtle nutty taste!
    • Make it a mocha muffin by adding a tablespoon of cocoa powder to the batter for an extra chocolatey kick.
    • For a hint of spice, sprinkle in some cinnamon or nutmeg to complement the espresso.
    • Want to cut some sugar? Use mashed ripe bananas instead of sugar for natural sweetness and added moisture.

    Serving Suggestions for Espresso Chocolate Chip Muffins

    Espresso Chocolate Chip Muffins

    • Pair your muffins with a hot cup of coffee or espresso for a delightful breakfast experience.
    • Add a side of fresh fruit, like berries or bananas, to balance the richness of the muffins.
    • For a special treat, dust with powdered sugar before serving for an elegant touch.
    • Elevate your muffin game by serving them warm with a pat of butter or a drizzle of honey.
    • Offer them as a tea-time snack alongside herbal tea for a cozy afternoon pick-me-up.

    FAQs about Espresso Chocolate Chip Muffins

    Can I use regular chocolate chips instead of miniature ones?

    Absolutely! If you prefer regular chocolate chips, go for it! Just be mindful that they may not melt as seamlessly throughout the muffin. But trust me, chocolate is chocolate!

    How can I store leftover muffins?

    To keep your Espresso Chocolate Chip Muffins fresh, store them in an airtight container. They’ll stay delicious for a few days at room temperature. If you want to keep them longer, freeze them for up to three months!

    Can I add more espresso powder for a stronger flavor?

    Yes! If you love coffee, feel free to add an extra teaspoon of espresso powder to intensify that rich flavor. Just remember that a little goes a long way!

    How do I know when my muffins are done baking?

    Check for doneness by inserting a toothpick into the center of a muffin. If it comes out clean or with a few moist crumbs, they’re ready to be enjoyed!

    Can I make these muffins ahead of time?

    Definitely! You can prepare the batter the night before and refrigerate it. Just scoop it into the muffin tin in the morning and bake. Freshly baked muffins in minutes—what could be better?

    Final Thoughts

    Creating these Espresso Chocolate Chip Muffins is like crafting tiny, edible pieces of joy. As the warm muffins emerge from the oven, the alluring aroma fills your home, wrapping you in comfort. Each bite offers a delightful blend of rich espresso and melted chocolate, making them perfect for any time of day. Whether they’re enjoyed fresh from the oven or later with a warm cup of coffee, these muffins create sweet moments for families. Trust me, baking these muffins will elevate your morning routine, transforming it into a cherished ritual filled with love and flavor!


    Print

    clock clock iconcutlery cutlery iconflag flag iconfolder folder iconinstagram instagram iconpinterest pinterest iconfacebook facebook iconprint print iconsquares squares iconheart heart iconheart solid heart solid icon

    Description

    Deliciously rich espresso chocolate chip muffins topped with a crunchy streusel.


    • 2 cups flour
    • 2 tsp baking powder
    • 1/4 tsp salt
    • 2 eggs
    • 1/2 cup granulated sugar
    • 1/2 cup butter
    • 1/4 cup milk
    • 1/2 cup sour cream
    • 1 tsp vanilla
    • 1/2 cup miniature chocolate chips
    • Espresso Streusel:
    • 2 tbsp butter (melted)
    • 4 tbsp flour
    • 2 tbsp sugar
    • 2 tbsp brown sugar
    • 1/2 tsp salt
    • 2 tsp espresso

    1. In a large bowl, add flour, baking powder, and salt. Whisk the dry mixture until all the ingredients are incorporated.
    2. In a medium size bowl, mix eggs, sugar, butter, milk, vanilla and sour cream together.
    3. Mix dry ingredients into the wet mixture. Then gently fold in chocolate chips.
    4. To make the streusel, combine butter, flour, brown sugar, salt and espresso powder.
    5. Using an ice cream scoop or 1/4 measuring cup, scoop batter into a prepared muffin tin (you can grease the pan or add liners). Add streusel to the top of each muffin.
    6. Bake on 425°F for 7 mins then on 350F for 10 more minutes.
    7. Remove the muffins from the oven and allow them to cool for 10 minutes.

    Notes

    • For a stronger coffee flavor, add more espresso powder.
    • These muffins are best served warm.
    • Store in an airtight container to keep them fresh.
    • Prep Time: 15 minutes
    • Cook Time: 17 minutes
    • Category: Breakfast
    • Method: Baking
    • Cuisine: American

    Nutrition

    • Serving Size: 1 muffin
    • Calories: 210
    • Sugar: 10g
    • Sodium: 150mg
    • Fat: 9g
    • Saturated Fat: 5g
    • Unsaturated Fat: 3g
    • Trans Fat: 0g
    • Carbohydrates: 30g
    • Fiber: 1g
    • Protein: 3g
    • Cholesterol: 45mg

    Sharing is caring!

  • Chopped Chicken Caesar Salad Wrap

    Chopped Chicken Caesar Salad Wrap


    Introduction to Chopped Chicken Caesar Salad Wrap

    Hey there, fellow food lovers! If you’re searching for a quick solution for a busy day, look no further than my Chopped Chicken Caesar Salad Wrap. It’s a delightful twist on the classic Caesar salad, wrapped up in a tortilla with grilled chicken and crispy bacon. Trust me, the vibrant flavors will have your loved ones cheering for seconds! This wrap is not only easy to whip up, but it also packs a punch in both taste and presentation. Let’s dive in and let your kitchen become a stage for this culinary adventure!

    Why You’ll Love This Chopped Chicken Caesar Salad Wrap

    This Chopped Chicken Caesar Salad Wrap is a lifesaver for busy moms and professionals! It’s quick, taking just 35 minutes from start to finish. The combination of tender chicken, crispy bacon, and crisp lettuce wrapped in a warm tortilla delivers satisfying flavors in every bite. Plus, you can customize it with your favorite veggies! It’s perfect for lunch, a picnic, or any time you need a delicious meal without the fuss.

    Ingredients for Chopped Chicken Caesar Salad Wrap

    To create your Chopped Chicken Caesar Salad Wrap, you’ll need a handful of ingredients that come together in a melody of flavors. Here’s what you’ll need:

    • Chicken Breast – The star of the dish, this protein adds substance. You can use grilled chicken strips for added convenience!
    • Kosher Salt and Cracked Black Pepper – Simple seasoning to enhance the chicken’s flavor. Adjust based on your taste preference.
    • Olive Oil – A touch of elegance in cooking, olive oil not only helps in cooking but infuses a rich flavor.
    • Burrito-size Tortilla – The wrap that holds all the goodness. Choose whole wheat or spinach tortillas for a nutritious twist!
    • Iceberg Lettuce – Crisp and refreshing, it provides the crunch we all crave. You can swap it for romaine if you prefer.
    • Bacon – Crispy strips add a savory twist to your wrap. If you’d like a healthier option, turkey bacon works beautifully!
    • Store-bought Caesar Dressing – A quick, easy way to add that classic Caesar flavor. If you’re feeling adventurous, make your own!
    • Freshly Grated Parmesan Cheese – A sprinkle of this creamy cheese elevates the dish. Consider a vegan alternative for a dairy-free option.

    Each ingredient plays a vital role in crafting this delectable wrap. Don’t forget, exact measurements are at the bottom of the article for your convenience. Happy cooking!

    How to Make Chopped Chicken Caesar Salad Wrap

    Now that we have our ingredients lined up, let’s dive into the step-by-step process! This Chopped Chicken Caesar Salad Wrap is a breeze to make, offering a delicious meal in just a few simple steps. Grab that apron; it’s time to get cooking!

    Step 1: Cook the Bacon

    Start by heating 1 tablespoon of vegetable oil in a skillet over medium-high heat. When it’s hot enough, add the bacon strips. Cook for 2-4 minutes on each side until they reach your desired crispiness. Once done, take the bacon out and let it cool slightly. Trust me, the aroma will have your taste buds dancing already!

    Step 2: Roast the Chicken

    Next, preheat your oven to 400°F (200°C). While the oven warms up, season both sides of the chicken breast with kosher salt and cracked black pepper. In an oven-safe skillet, add 1 tablespoon of olive oil and heat it until shimmering. Carefully, lay the seasoned chicken in the skillet. Sear each side for about 4 minutes until it’s golden brown. Then, transfer everything to the oven and roast for 9-12 minutes. The chicken is ready when it reaches an internal temperature of 165°F (75°C). Let it rest for 5 minutes before slicing it into thin, juicy strips.

    Step 3: Mix the Salad

    While the chicken rests, it’s time for the salad mix! Start by rinsing, drying, and chopping the iceberg lettuce into bite-sized pieces. On a large cutting board, mix the chopped lettuce with the sliced chicken, chopped bacon, Caesar dressing, and freshly grated Parmesan cheese. Use a large knife to chop everything together until it’s well-combined. The colors and textures will make your heart sing!

    Step 4: Prepare the Wrap

    Now for the fun part: assembling the wrap! Lay the burrito-size tortilla flat on a clean surface. Spoon the salad mixture down the center, ensuring you don’t overfill it—less is more here! Fold in the sides of the tortilla and tightly roll it up into a neat wrap. Feel free to get creative with the folding technique!

    Step 5: Toast the Wrap

    For that golden, crispy finish, heat a clean skillet over medium heat. Drizzle a small amount of olive oil or use a quick spray of cooking spray. Place the wrap seam-side down in the skillet. Cook for about 1-2 minutes on each side, gently pressing down with a spatula. You want the tortilla to become golden brown and crisp. The enticing smell will have everyone gathering around the kitchen!

    And there you have it—your Chopped Chicken Caesar Salad Wrap is ready to be devoured! Remember, it’s not just a meal; it’s an experience. Enjoy every bite!

    Tips for Success

    • Make sure to let the chicken rest for 5 minutes; this keeps it juicy!
    • Use a sharp knife for chopping the lettuce and chicken; it makes a big difference.
    • If possible, warm your tortillas slightly before wrapping; it makes rolling easier.
    • Don’t skip toasting the wrap; it adds a delightful crunch and flavor!
    • Experiment with different veggies; they add color and crunch!

    Equipment Needed

    • Skillet: A non-stick skillet is great for easy cooking. A cast-iron skillet works beautifully too!
    • Oven-safe Skillet: If you don’t have one, use a regular skillet and transfer the chicken to a baking dish.
    • Sharp Knife: Essential for chopping bacon and veggies. A pair of kitchen scissors also works.
    • Cutting Board: A sturdy surface to make your prep easy and neat.
    • Spatula: Perfect for flipping and pressing your wrap while it toasts.

    Variations

    • Vegetarian Option: Swap the chicken and bacon for grilled portobello mushrooms and avocados for a hearty vegetarian twist!
    • Gluten-Free Tortilla: Use gluten-free tortillas to make this wrap accessible to those with dietary restrictions.
    • Spicy Kick: Add sliced jalapeños or a dash of red pepper flakes to the salad mixture for some heat.
    • Extra Crunch: Toss in some cherry tomatoes, cucumbers, or bell peppers for added texture and flavor.
    • Herb Infusion: Mix fresh basil or cilantro into the salad for an aromatic twist that brightens the dish.

    Serving Suggestions

    • Side Salads: Pair the wrap with a simple arugula salad drizzled with lemon vinaigrette for a refreshing contrast.
    • Chips: Serve with crunchy tortilla chips or a light garden salad to make a fuller meal.
    • Drinks: Enjoy with iced tea or a sparkling lemonade for a delightful lunch.
    • Garnish: A sprinkle of extra Parmesan and fresh herbs elevates the presentation!

    FAQs about Chopped Chicken Caesar Salad Wrap

    Can I make the Chopped Chicken Caesar Salad Wrap ahead of time?

    Absolutely! You can prepare the salad mixture a few hours in advance. Just keep it covered in the fridge. However, I recommend waiting to assemble the wrap until right before serving for the best texture!

    What can I substitute for the bacon?

    If you’re looking for a healthier option, turkey bacon is a great substitute. You could also try crispy chickpeas for a plant-based alternative that still adds crunch!

    Is this recipe gluten-free?

    Yes, as long as you use gluten-free tortillas, this Chopped Chicken Caesar Salad Wrap can easily fit into a gluten-free diet. It’s delicious and satisfying!

    How do I store leftovers?

    Store any leftovers in an airtight container in the refrigerator. They can be enjoyed the next day, but I recommend consuming the wrap fresh for the best taste and texture.

    Can I customize the vegetables in my wrap?

    Definitely! Feel free to add veggies like cherry tomatoes, cucumbers, or bell peppers. Mixing in a variety of colors makes the wrap even more appealing!

    Final Thoughts

    The Chopped Chicken Caesar Salad Wrap is not just a meal; it’s a journey filled with comfort and joy. With its perfect blend of flavors and textures, it effortlessly transforms a simple lunch into a culinary delight. Every bite brings the crunch of lettuce, the savories of bacon, and the creaminess of Caesar dressing. I love how versatile it is, allowing you to customize it to your heart’s desire. Whether you’re rushing between errands or taking a moment to savor your lunch, this wrap is your tasty companion. Embrace the joy of cooking and enjoy this delightful dish!


    Print

    clock clock iconcutlery cutlery iconflag flag iconfolder folder iconinstagram instagram iconpinterest pinterest iconfacebook facebook iconprint print iconsquares squares iconheart heart iconheart solid heart solid icon

    Description

    A delicious and easy-to-make Chopped Chicken Caesar Salad Wrap that combines the classic flavors of Caesar salad with grilled chicken and crispy bacon, all wrapped in a tortilla.


    • 1 chicken breast
    • ½ teaspoon kosher salt
    • ¼ teaspoon cracked black pepper
    • 3 tablespoons olive oil
    • 1 large burrito-size tortilla
    • 1 head iceberg lettuce
    • 4 bacon strips
    • 4 tablespoons store-bought Caesar dressing
    • ¼ cup freshly grated Parmesan cheese

    1. Heat 1 tablespoon of vegetable oil in a skillet over medium-high heat until hot. Add the bacon strips and cook for 2-4 minutes on each side, depending on how crispy you like it. Remove the bacon, let it cool slightly, then chop into bite-sized pieces. Set aside.
    2. Preheat your oven to 400°F (200°C). Season both sides of the chicken breasts with salt and pepper. In an oven-safe skillet over medium-high heat, add 1 tablespoon olive oil. When shimmering, add the chicken breasts. Sear each side for 4 minutes until golden brown, then transfer the skillet to the oven. Roast for 9-12 minutes, or until the internal temperature reaches 165°F (75°C). Let the chicken rest for 5 minutes, then slice into thin strips.
    3. Rinse, dry, and chop the romaine lettuce into bite-sized pieces. On a large cutting board, add the lettuce, sliced chicken, chopped bacon, Caesar dressing, and freshly grated Parmesan. Use a large knife to chop and mix everything together until well-combined.
    4. Place the tortilla on a flat surface and add the salad mixture down the center. Fold in the sides and tightly roll up the tortilla into a wrap.
    5. To toast the wrap, heat a clean skillet over medium heat and add a small drizzle of olive oil or a quick spray of cooking spray. Place the wrap seam-side down in the skillet. Cook for 1-2 minutes on each side, pressing down gently with a spatula, until the tortilla is golden brown and crisp.

    Notes

    • You can substitute the chicken breast with grilled chicken strips for convenience.
    • Feel free to add other vegetables like cherry tomatoes or cucumbers for extra crunch.
    • This wrap is best enjoyed fresh but can be stored for a day in the refrigerator.
    • Prep Time: 15 minutes
    • Cook Time: 20 minutes
    • Category: Lunch
    • Method: Skillet and Oven
    • Cuisine: American

    Nutrition

    • Serving Size: 1 wrap
    • Calories: 540
    • Sugar: 2g
    • Sodium: 1200mg
    • Fat: 36g
    • Saturated Fat: 8g
    • Unsaturated Fat: 20g
    • Trans Fat: 0g
    • Carbohydrates: 34g
    • Fiber: 3g
    • Protein: 30g
    • Cholesterol: 85mg

    Sharing is caring!

  • Mozzarella Pepperoni Croissant Rolls

    Mozzarella Pepperoni Croissant Rolls


    Introduction to Mozzarella Pepperoni Croissant Rolls

    Welcome, fellow food lovers! If you’re like me, life gets busy, and finding time to whip up delightful snacks can feel impossible. That’s where these Mozzarella Pepperoni Croissant Rolls come into play. Imagine a quick solution for those chaotic afternoons or a dish that’ll have your loved ones swooning at the dinner table. These rolls effortlessly combine gooey mozzarella and savory pepperoni, all wrapped in flaky crescent dough. You won’t believe how easy they are to make! With simple ingredients and an even simpler method, let’s embark on this delicious culinary adventure together.

    Why You’ll Love This Mozzarella Pepperoni Croissant Rolls

    These Mozzarella Pepperoni Croissant Rolls are a game-changer for busy days. They come together in just about 30 minutes, making them perfect for a quick snack or a crowd-pleasing appetizer. The combination of crispy, flaky layers with warm, melty cheese and flavorful pepperoni is simply irresistible. Plus, the versatility allows for easy customization. Your family will beg for more, and you’ll feel like a kitchen superhero!

    Ingredients for Mozzarella Pepperoni Croissant Rolls

    Gathering the right ingredients is key to making these Mozzarella Pepperoni Croissant Rolls come to life. Here’s what you’ll need:

    • Crescent Roll Dough: This is the star of the show! A package of refrigerated crescent roll dough lends that amazing flaky texture.
    • Fresh Mozzarella Cheese: Cut into sticks, mozzarella brings that gooey melty goodness we all adore.
    • Pepperoni: Classic pepperoni slices give these rolls a savory flair. If your family loves a kick, opt for a spicy variety!
    • Parmesan Cheese: A sprinkle of grated Parmesan adds depth and richness to every bite.
    • Italian Seasoning: This aromatic blend enhances the flavors, turning an ordinary snack into an Italian delight.
    • Garlic Powder: A dash of garlic powder brings a hint of warmth and charm.
    • Egg (for egg wash): Beat an egg for a golden, shiny finish that makes your rolls look irresistible.
    • Marinara Sauce: Perfect for dipping and adding extra flavor. Homemade or store-bought works just as well!

    If you want to switch things up, feel free to add other ingredients, like sliced jalapeños for a spicy twist or different cheeses for a new flavor experience. Exact quantities are listed at the bottom of the article for your convenience, ready for printing!

    How to Make Mozzarella Pepperoni Croissant Rolls

    Step 1 – Preheat the Oven

    First things first, preheat your oven to 375°F (190°C). This magical step ensures that your Mozzarella Pepperoni Croissant Rolls bake evenly and reach that perfect golden color. While the oven warms up, line a baking sheet with parchment paper to prevent those delightful rolls from sticking. Trust me, your future self will thank you for this extra effort!

    Step 2 – Prepare the Crescent Rolls

    Now it’s time to handle the crescent roll dough! Open the package and gently unroll it on a clean surface. Take care to separate the dough into triangles along the perforated lines. This part is like unwrapping a present—exciting but requires a soft touch. You want to keep those triangles intact for all the yumminess that’s about to happen.

    Step 3 – Assemble the Filling

    Let’s dive into the fun part! At the wider end of each triangle, place a slice of pepperoni, followed by a stick of fresh mozzarella cheese. If your taste buds are dancing for more, feel free to add another slice of pepperoni on top for an extra kick of flavor. Once positioned, liven up the assembly with additional toppings like sliced jalapeños or onions, if you’d like. Each roll becomes a personal flavor adventure just waiting to unfold!

    Step 4 – Season the Filling

    Now, it’s time to bring out the flavors! Sprinkle a generous pinch of grated Parmesan cheese over the filling, adding just the right amount of sharpness. Follow this with a dash of Italian seasoning and garlic powder. Seasoning truly enhances every bite, ensuring your croissant rolls have that comforting Italian flair. Your kitchen will start to smell divine!

    Step 5 – Roll the Croissants

    With your filling ready, let’s roll! Start at the wide edge of each triangle and roll it tightly around the filling, ensuring everything is securely encased. This step is crucial; you want those delicious flavors to huddle together. Place each croissant roll seam-side down on your lined baking sheet to help them hold their shape.

    Step 6 – Apply the Egg Wash

    Before popping these beauties into the oven, brush each roll with the beaten egg. This lovely egg wash not only gives them a beautiful golden hue but also creates a shiny surface that’ll make them irresistible!

    Step 7 – Bake

    Once your oven is ready, slide the baking sheet inside and bake for 12-15 minutes. Keep an eye on those rolls! You’re looking for a beautiful golden brown color and that unmistakable flaky appearance. Your oven will start to fill with the scent of deliciousness—so it’ll be tough to wait!

    Step 8 – Serve

    After baking, let your Mozzarella Pepperoni Croissant Rolls cool slightly before devouring them. Serve warm alongside a bowl of marinara sauce for dipping. This classic combo elevates your snack experience—there’s nothing quite like it!

    Tips for Success

    • Prep your ingredients ahead of time to streamline the process.
    • Don’t rush the rolling—tight rolls help keep that cheesy goodness inside.
    • Experiment with your seasonings based on your family’s preferences.
    • For best results, use fresh mozzarella for the ultimate melting experience.
    • Keep an eye on the oven—every oven is a little different!

    Equipment Needed

    • Baking Sheet: A standard size works well. If you don’t have one, a large casserole dish is a good alternative.
    • Parchment Paper: Essential for preventing sticking. Foil can substitute if you don’t have parchment.
    • Mixing Bowl: For combining your egg wash. A small cup can do the trick, too!
    • Pastry Brush: Use this for the egg wash. Alternatively, your fingers work in a pinch!

    Variations

    • Spicy Twist: Add sliced jalapeños or crushed red pepper flakes for a kick that will surely awaken your taste buds.
    • Vegetarian Delight: Swap out pepperoni for roasted vegetables, like bell peppers or mushrooms, for a hearty, plant-based option.
    • Cheesy Bliss: Experiment with different cheeses, such as sharp cheddar or pepper jack, for a unique twist on flavor.
    • Herb Infusion: Mix fresh herbs like basil or oregano into the filling for an aromatic addition.

    Serving Suggestions for Mozzarella Pepperoni Croissant Rolls

    • Classic Marinara Sauce: Always a hit for dipping!
    • Side Salad: A fresh, crisp salad balances the richness of the rolls.
    • Fruit Platter: Serve with sliced apples or grapes for a sweet contrast.
    • Light Drinks: Pair with sparkling water or lemonade to refresh the palate.
    • Elegant Presentation: Arrange on a rustic wooden board for a charming touch.

    FAQs about Mozzarella Pepperoni Croissant Rolls

    Can I make Mozzarella Pepperoni Croissant Rolls ahead of time?
    Absolutely! You can assemble these rolls and refrigerate them before baking. Just cover them well to maintain freshness. When you’re ready, simply pop them in the oven and bake as instructed.

    What other cheeses can I use for these croissant rolls?
    While fresh mozzarella is a classic choice, you can experiment with various cheeses. Cheddar, provolone, or even a spicy pepper jack can add a fun twist to your Mozzarella Pepperoni Croissant Rolls.

    Can I freeze the unbaked rolls?
    Yes, you can! Prepare the rolls, place them on a baking sheet, and freeze until solid. Then transfer them to a freezer bag. Bake directly from frozen, adding a few extra minutes to the cooking time.

    What sides pair well with these rolls?
    These Mozzarella Pepperoni Croissant Rolls pair nicely with a fresh side salad, fruit platter, or even some roasted veggies to create a balanced meal.

    How do I store leftovers?
    Store any leftover rolls in an airtight container in the refrigerator for up to three days. Reheat them in the oven for the best texture!

    Final Thoughts

    In the whirlwind of our daily lives, Mozzarella Pepperoni Croissant Rolls stand out as a beacon of joy and simplicity in the kitchen. Each bite is a comforting embrace, blending savory goodness with that delightful flaky texture we crave. Whether it’s a bustling weeknight or a cozy weekend gathering, these rolls effortlessly elevate the moment. Not only do they bring smiles to your family’s faces, but they also inspire a sense of culinary adventure. So roll up your sleeves, and treat your loved ones to something special that’s both quick and memorable. Enjoy every cheesy, pepperoni-filled moment!


    Print

    clock clock iconcutlery cutlery iconflag flag iconfolder folder iconinstagram instagram iconpinterest pinterest iconfacebook facebook iconprint print iconsquares squares iconheart heart iconheart solid heart solid icon

    Description

    A delightful snack made with crescent roll dough, filled with mozzarella cheese and pepperoni, perfect for dipping in marinara sauce.


    • 1 package (8 oz) refrigerated crescent roll dough
    • 8 oz fresh mozzarella cheese, cut into sticks
    • 24 slices of pepperoni
    • 1/4 cup grated Parmesan cheese
    • 1 tsp Italian seasoning
    • 1/2 tsp garlic powder
    • 1 egg, beaten (for egg wash)
    • Marinara sauce (for dipping)

    1. Preheat the Oven: Preheat your oven to 375°F (190°C). Line a baking sheet with parchment paper.
    2. Prepare the Crescent Rolls: Open the package of crescent roll dough and carefully unroll the dough on a clean surface. Separate the dough into triangles based on the perforated lines.
    3. Assemble the Filling: Place a slice of pepperoni at the wider end of each triangle, followed by a stick of mozzarella cheese. You can place an additional slice of pepperoni on top of the cheese for extra flavor.
    4. Season the Filling: Sprinkle a pinch of grated Parmesan cheese and a sprinkle of Italian seasoning and garlic powder over the filling.
    5. Roll the Croissants: Starting from the wide edge of the triangle, roll the dough tightly around the filling, ensuring that the filling is well-encased. Place the croissant roll seam-side down on the lined baking sheet.
    6. Apply the Egg Wash: Using a brush, apply the beaten egg over each croissant roll to give them a beautiful golden finish as they bake.
    7. Bake: Place the baking sheet in the preheated oven and bake for about 12-15 minutes or until the croissant rolls are golden brown and flaky.
    8. Serve: Once done, remove the croissant rolls from the oven and allow them to cool slightly. Serve warm with marinara sauce for dipping. Enjoy your delicious Mozzarella Pepperoni Croissant Rolls!

    Notes

    • For a spicier version, add sliced jalapeños into the filling.
    • These croissant rolls can be made ahead of time and refrigerated before baking.
    • Experiment with different cheeses for variations in flavor.
    • Prep Time: 15 minutes
    • Cook Time: 15 minutes
    • Category: Snack
    • Method: Baking
    • Cuisine: Italian-American

    Nutrition

    • Serving Size: 1 croissant roll
    • Calories: 180
    • Sugar: 1g
    • Sodium: 350mg
    • Fat: 10g
    • Saturated Fat: 4g
    • Unsaturated Fat: 5g
    • Trans Fat: 0g
    • Carbohydrates: 16g
    • Fiber: 1g
    • Protein: 6g
    • Cholesterol: 50mg

    Sharing is caring!

  • Zesty Marinated Tomatoes: A Flavorful Delight Awaits!

    Zesty Marinated Tomatoes: A Flavorful Delight Awaits!


    Introduction to Zesty Marinated Tomatoes

    As a busy mom, I know how challenging it can be to whip up something delicious in a hurry. That’s why I’m excited to share my Zesty Marinated Tomatoes recipe with you! This vibrant dish bursts with flavors that can elevate any meal. Imagine the delight of your loved ones as they indulge in these juicy, marinated tomatoes. They make for a quick solution when you’re running short on time or a stunning appetizer that impresses guests. Plus, the best part? They practically make themselves while you tackle the rest of your to-do list!

    Why You’ll Love This Zesty Marinated Tomatoes

    You’re going to love how easy and quick this recipe is! In just about ten minutes, you can create a mouthwatering dish that delivers a punch of flavor. It’s perfect for busy schedules and picky eaters alike. The fresh ingredients mingle effortlessly, creating a burst of Mediterranean goodness. Plus, they’re versatile enough to pair seamlessly with various meals, making them a go-to dish in my kitchen!

    Ingredients for Zesty Marinated Tomatoes

    Gathering fresh ingredients is key to making flavorful Zesty Marinated Tomatoes. Here’s what you’ll need:

    • Fresh Tomatoes: Dive into a mix of juicy, ripe tomatoes. They form the foundation of this dish. Look for medium-sized varieties for a perfect bite size.
    • Extra Virgin Olive Oil: This rich oil enhances flavors and adds a silky texture, making every bite delightful. Pot for high-quality oil to elevate your dish.
    • Aged Balsamic Vinegar: This adds a sweet, tangy kick. Its complexity elevates the overall taste, so choose a good one for that authentic touch.
    • Fresh Basil Leaves: The aromatic herb brightens up the dish with its refreshing flavor. Use green, vibrant leaves for the best impact.
    • Garlic: Minced garlic brings depth and a savory tone, turning ordinary tomatoes into something extraordinary.
    • Sea Salt: Enhances and balances flavors. A key player in any marinade.
    • Freshly Cracked Black Pepper: Adds a hint of heat and flavor complexity. A little goes a long way here!

    Feeling adventurous? You can toss in some feta for a creamy contrast or sprinkle in red pepper flakes for a gentle kick. You’ll find precise measurements at the bottom of this article for easy printing!

    How to Make Zesty Marinated Tomatoes

    Prepare the Tomatoes

    First things first, let’s wash those fresh tomatoes. Rinse them under cool water to get rid of any dirt or residues. Then, it’s time to chop! I love cutting them into bite-sized pieces; it makes them easier to enjoy. Aim for uniform chunks, around an inch or so. This helps them soak up the marinade beautifully. If you have kids, let them join in the fun; chopping can be a great way to teach them kitchen skills!

    Make the Marinade

    Next up, let’s whip up our zesty marinade. In a medium bowl, whisk together extra virgin olive oil and aged balsamic vinegar. Its flavor will take your tomatoes to the next level! Add minced garlic to the mix for a punch of savory goodness. Then, sprinkle in sea salt and freshly cracked black pepper. Whisk everything together until it’s well combined. You’ll be amazed at how aromatic this marinade gets—it’s like a hug in a bowl!

    Combine Ingredients

    Now, it’s time for the fun part—combine the ingredients! Gently place your chopped tomatoes in a large mixing bowl. Sprinkle in those vibrant fresh basil leaves. Then, pour your beautifully whisked marinade over the tomatoes. Using a spatula or your hands, gently toss everything together. Make sure each tomato is coated in that divine marinade. This step is essential because it helps the flavors meld together, creating a symphony of taste!

    Marinate the Tomatoes

    Once your tomatoes are tossed and well coated, it’s time to marinate! Cover the bowl with plastic wrap or transfer the mixture to an airtight container. Pop it in the fridge for at least an hour. This is when the magic happens—the tomatoes soak in all that zesty goodness, becoming even more flavorful. If you can wait, letting them marinate a few hours will make them even tastier!

    Serve and Enjoy

    Finally, the moment of truth is here—time to serve! Transfer your marinated tomatoes to a pretty platter or individual bowls. Don’t forget to drizzle any remaining marinade on top for that extra flavor boost. They look stunning, bursting with colors and flavors! Serve them alongside grilled meats, on a fresh salad, or simply enjoy as an appetizer. Trust me, your family and friends will be asking for seconds!

    Tips for Success

    • Use ripe tomatoes for the best flavor; feel free to mix varieties!
    • Let them marinate longer for a deeper taste experience; three hours is ideal.
    • Adjust seasonings to match your personal preferences; add more salt or herbs if desired.
    • Don’t stress over perfection; rustic presentation adds to the charm!
    • This recipe is perfect for make-ahead meals; flavor only improves with time.

    Equipment Needed

    • Cutting Board: Any sturdy cutting surface will do; even a plate works in a pinch.
    • Sharp Knife: A good chef’s knife makes chopping tomatoes a breeze. Use whatever you have on hand.
    • Mixing Bowl: A medium-sized bowl for mixing. A large jar can work too!
    • Whisk: Use a whisk for best results; a fork will do if you’re in a hurry!
    • Plastic Wrap or Airtight Container: For marinating, either will keep the flavors locked in.

    Variations

    • Herbed Twist: Add oregano or thyme for an extra burst of flavor.
    • Spicy Kick: Toss in red pepper flakes or diced jalapeños for heat.
    • Vegan Option: Substitute nutritional yeast for a cheesy flavor without dairy.
    • Chunky Salsa: Mix in diced onions and cilantro for a delightful salsa twist.

    Serving Suggestions

    • Serve your Zesty Marinated Tomatoes alongside grilled meats like chicken or fish for a delightful contrast.
    • Pair with crusty bread for a simple yet elegant appetizer that guests will love.
    • A drizzle of balsamic glaze adds an extra touch when plating, making it visually appealing.
    • Enjoy with a refreshing white wine, such as Sauvignon Blanc, to enhance the flavors.

    FAQs about Zesty Marinated Tomatoes

    Can I use different types of tomatoes for this recipe?
    Absolutely! Feel free to mix varieties like cherry, heirloom, or beefsteak tomatoes. Each brings its own unique flavor, adding a personal touch to your Zesty Marinated Tomatoes. Just make sure they’re ripe for the best taste!

    How long can I store marinated tomatoes?
    If stored in an airtight container in the fridge, your marinated tomatoes can last up to three days. However, they’re best enjoyed fresh, as the flavors are most vibrant within the first day or two!

    Can I make Zesty Marinated Tomatoes ahead of time?
    Yes, indeed! In fact, preparing them a day in advance allows the flavors to meld beautifully. Just keep them covered in the fridge until you’re ready to serve. You’ll love how convenient this makes meal prep!

    What can I serve with Zesty Marinated Tomatoes?
    These tomatoes pair beautifully with grilled meats, fresh salads, or crusty bread. They also make a fantastic topping for bruschetta, transporting your meal straight to the Mediterranean!

    Are Zesty Marinated Tomatoes vegan?
    Yes! This recipe is completely vegan-friendly. The fresh ingredients create a deliciously wholesome dish that everyone can enjoy, regardless of dietary restrictions.

    Final Thoughts

    Cooking Zesty Marinated Tomatoes is more than just a recipe; it’s an experience filled with joy! Each step invites creativity, letting you infuse your personal touch in every bite. The vibrant colors and enticing aromas brighten your kitchen, making it a joy to serve. Whether enjoyed as an appetizer or alongside your favorite meal, these marinated tomatoes are sure to spark smiles and compliments all around. The ease of preparation means that even on the busiest days, you can still create something beautiful. I hope this dish becomes a cherished part of your family’s table!


    Print

    clock clock iconcutlery cutlery iconflag flag iconfolder folder iconinstagram instagram iconpinterest pinterest iconfacebook facebook iconprint print iconsquares squares iconheart heart iconheart solid heart solid icon

    Description

    A delicious and vibrant dish featuring marinated tomatoes that are bursting with flavor.


    • 4 cups fresh tomatoes, chopped (about 4 medium-sized)
    • 1/4 cup extra virgin olive oil
    • 2 tablespoons aged balsamic vinegar
    • 1/4 cup fresh basil leaves, chopped
    • 2 garlic cloves, minced
    • 1 teaspoon sea salt
    • 1/2 teaspoon freshly cracked black pepper

    1. Wash the tomatoes and cut them into bite-sized pieces.
    2. In a bowl, whisk together olive oil, balsamic vinegar, minced garlic, salt, and pepper until well combined.
    3. Add chopped basil to the sliced tomatoes and pour the marinade over them. Gently toss to coat.
    4. Cover with plastic wrap or transfer to an airtight container and refrigerate for at least one hour to allow the flavors to meld.
    5. Serve on a platter or in individual bowls, drizzling any remaining marinade on top.

    Notes

    • For best results, let the tomatoes marinate for a few hours before serving.
    • Adjust the seasoning according to your taste preference.
    • This dish pairs well with grilled meats or as a side in salads.
    • Prep Time: 10 minutes
    • Cook Time: 0 minutes
    • Category: Appetizer
    • Method: Marinating
    • Cuisine: Mediterranean

    Nutrition

    • Serving Size: 1/4 cup
    • Calories: 120
    • Sugar: 3g
    • Sodium: 120mg
    • Fat: 11g
    • Saturated Fat: 1.5g
    • Unsaturated Fat: 9g
    • Trans Fat: 0g
    • Carbohydrates: 6g
    • Fiber: 1g
    • Protein: 1g
    • Cholesterol: 0mg

    Sharing is caring!

  • Ground Turkey and Peppers Skillet

    Ground Turkey and Peppers Skillet


    Introduction to Ground Turkey and Peppers Skillet

    Welcome to a delicious culinary adventure! If you’re anything like me, life gets busy and dinner time often creeps up unexpectedly. That’s why my Ground Turkey and Peppers Skillet is a game-changer. This vibrant dish bursts with flavor, infusing your kitchen with mouthwatering aromas. It’s quick, healthy, and perfect for those hectic evenings when you want something nutritious yet delightful. Plus, it’s a fun dish to enjoy with family, allowing everyone to dig in. Let’s transform those ordinary weeknight dinners into something truly special!

    Why You’ll Love This Ground Turkey and Peppers Skillet

    This Ground Turkey and Peppers Skillet is a lifesaver. It’s not only a breeze to whip up, taking just 30 minutes from start to finish, but it’s bursting with vibrant flavors. The subtle warmth of spices combined with succulent turkey and fresh peppers makes it irresistible. Plus, it’s healthy! You can indulge guilt-free, knowing it’s low in calories and packed with protein. Your family will love it, and so will you!

    Ingredients for Ground Turkey and Peppers Skillet

    This colorful dish is built on simple, wholesome ingredients that come together beautifully. Here’s what you’ll need:

    • Ground Turkey: A lean protein that’s both flavorful and versatile, it serves as the main star of your skillet.
    • Bell Peppers: You can choose between red, yellow, or green. Each brings a slightly different sweetness and crunch to the dish.
    • Onion: Diced onion adds depth and a sweet aroma when sautéed. Use yellow or sweet onions for a milder flavor.
    • Garlic: Minced garlic is a must-have! It adds a fragrant, savory note that elevates every bite.
    • Smoked Paprika: This spice introduces a warm, smoky flavor that transforms the dish. It’s one of my secret weapons in the kitchen!
    • Cumin: Earthy and warming, cumin complements the other spices perfectly. It adds a hint of exotic flair to the skillet.
    • Tomato Paste: A small amount goes a long way, enriching the sauce and introducing a lovely acidity.
    • Soy Sauce: This enhances the umami flavor, making everything taste like it’s been simmering for hours.
    • Lime: Fresh lime juice at the end brightens the dish. It’s like a zesty hug for all those flavors!
    • Fresh Cilantro: Chopped cilantro adds freshness and a pop of color. If you’re not a fan, try parsley instead.
    • Salt and Black Pepper: Essential seasonings that elevate the overall taste. Adjust these to suit your family’s palate.
    • Olive Oil: A splash of olive oil for sautéing helps bring all the ingredients together beautifully.

    Feel free to swap in vegetables like zucchini or corn for added texture and taste. You’ll find the exact measurements listed at the bottom of the article, along with a handy option for printing!

    How to Make Ground Turkey and Peppers Skillet

    Now that you have all your ingredients lined up and ready, let’s dive into making this scrumptious Ground Turkey and Peppers Skillet. Trust me; it’ll be a breeze! I promise, each step is simple and rewarding.

    Step 1: Heat the Skillet

    Start by pouring a generous splash of olive oil into a large skillet. Turn the heat to medium. You want the oil hot enough to work its magic but not smoking. A quick test? Drop a small piece of onion in; if it sizzles, you’re good to go!

    Step 2: Sauté the Onions

    Next, toss in the diced onions. Sauté them for about 3 minutes until they become soft and translucent. This step is key for unlocking their sweetness and creating a beautiful aroma that fills your kitchen with warmth.

    Step 3: Cook the Garlic

    Once the onions are tender, stir in the minced garlic. Cook it for about 30 seconds, just until the garlic becomes fragrant. Keep an eye on it! Garlic can burn quickly, and we don’t want that bitter taste ruining our skillet.

    Step 4: Brown the Ground Turkey

    Now, it’s time to introduce the ground turkey to the party! Add it in and break it into small crumbles with a wooden spoon. Cook for 5–6 minutes until the turkey is fully browned and no longer pink. This is where the protein takes center stage in your Ground Turkey and Peppers Skillet.

    Step 5: Add Spices

    Sprinkle in the smoked paprika, cumin, and a pinch of salt and black pepper—feel free to add chili powder if you crave a little kick! Stir everything together to coat the turkey and onions in that aromatic blend of spices.

    Step 6: Incorporate Bell Peppers

    Next, toss in your sliced bell peppers. Stir and let them cook for about 3–4 minutes. You want them to soften slightly while still maintaining a little crunch. This adds lovely color and texture to your skillet.

    Step 7: Mix in Sauces

    Now, pour in the chicken broth, tomato paste, and soy sauce. Stir well to combine everything. Allow the mixture to simmer gently for 2–3 minutes. This gives the flavors time to mingle, creating a rich and savory sauce.

    Step 8: Final Touches

    Finally, turn off the heat and squeeze in the zesty lime juice. Give everything a good toss! Garnish with freshly chopped cilantro (or parsley if that’s your jam) before serving warm. This is the moment where your Ground Turkey and Peppers Skillet truly shines!

    Tips for Success

    • Always preheat your skillet for even cooking and a better sear.
    • Use a mix of bell pepper colors for a vibrant presentation.
    • Don’t hesitate to customize spices; adjust them to your taste.
    • For added nutrition, throw in some leafy greens like spinach or kale.
    • Leftovers? Reheat nicely for lunch the next day!

    Equipment Needed

    • Large Skillet: A non-stick or cast-iron skillet works wonders for even cooking.
    • Wooden Spoon: Perfect for breaking up the turkey and stirring the ingredients together.
    • Chef’s Knife: Essential for chopping veggies efficiently.
    • Cutting Board: A must for safe and easy prep.
    • Measuring Spoons: Handy for adding spices and sauces accurately.

    Variations for Ground Turkey and Peppers Skillet

    • For a spicy twist, add diced jalapeños or a pinch of crushed red pepper flakes.
    • Swap ground turkey for ground chicken or even lean beef for a different flavor profile.
    • Add more vegetables like zucchini, corn, or mushrooms for extra nutrition and flavor.
    • To make it low-carb, serve over cauliflower rice instead of regular rice or tortillas.
    • If you’re vegan, replace ground turkey with tempeh or a mixture of beans for protein.
    • For an Italian flair, stir in some Italian seasoning and diced tomatoes instead of the spices.

    Serving Suggestions for Ground Turkey and Peppers Skillet

    • Pair with fluffy white rice or quinoa to soak up the delicious sauce.
    • Serve with warm tortillas for a fun, wrap-it-yourself dinner experience.
    • Complement with a fresh side salad drizzled with vinaigrette for extra crunch.
    • A chilled glass of lemonade or iced tea makes a refreshing drink choice.
    • For presentation, garnish with extra cilantro and lime wedges for color.

    FAQs about Ground Turkey and Peppers Skillet

    Can I make this dish ahead of time? Absolutely! You can prepare the Ground Turkey and Peppers Skillet in advance and store it in the refrigerator for up to three days. Just reheat on the stove and enjoy!

    Is Ground Turkey and Peppers Skillet healthy? Yes! This dish is not only low in calories but also high in protein, making it a great choice for a healthy dinner. With colorful veggies and savory spices, it’s a wholesome option for busy nights.

    Can I freeze leftovers? Yes, you can freeze this skillet meal! Allow it to cool completely, then transfer it to an airtight container. It will last in the freezer for up to three months. Simply thaw and reheat when you’re ready to enjoy it again.

    What can I serve with Ground Turkey and Peppers Skillet? You can pair it with rice, quinoa, or warm tortillas. For a low-carb option, try serving it over cauliflower rice or a bed of greens. Each pairing elevates the meal wonderfully!

    How can I adjust the spice level? To increase the heat, add diced jalapeños or a pinch of crushed red pepper flakes. If you prefer it milder, simply reduce the spices or leave out the chili options altogether. Feel free to customize it according to your taste!

    Final Thoughts on Ground Turkey and Peppers Skillet

    There’s something magical about sharing a hearty meal like this Ground Turkey and Peppers Skillet with loved ones. The blend of spices and fresh ingredients creates an explosion of flavor that not only fills your stomach but warms your heart too. With its vibrant colors and inviting aroma, this dish turns an ordinary meal into a delightful experience. Plus, it’s so easy to prepare, making it a go-to recipe for my busy weeks. Every bite reminds me of the joy of cooking, and I hope it does the same for you and your family!


    Print

    clock clock iconcutlery cutlery iconflag flag iconfolder folder iconinstagram instagram iconpinterest pinterest iconfacebook facebook iconprint print iconsquares squares iconheart heart iconheart solid heart solid icon

    Description

    A delicious and colorful skillet dish featuring ground turkey and bell peppers, infused with warm spices and finished with fresh lime and cilantro.


    • 1 lb ground turkey
    • 2 bell peppers (red, yellow, or green)
    • 1 onion, diced
    • 2 cloves garlic, minced
    • 1 tsp smoked paprika
    • 1 tsp cumin
    • 1 tbsp tomato paste
    • 2 tbsp soy sauce
    • 1 lime, juiced
    • Fresh cilantro, chopped
    • Salt and black pepper to taste
    • Olive oil for sautéing

    1. Heat olive oil in a large skillet over medium heat.
    2. Add the diced onions and sauté for about 3 minutes, until they turn soft and translucent.
    3. Stir in the minced garlic and cook for another 30 seconds, just until fragrant.
    4. Add the ground turkey directly into the skillet and break it into small crumbles.
    5. Cook for 5–6 minutes, stirring occasionally, until it’s fully browned and no longer pink.
    6. Sprinkle in the smoked paprika, cumin, chili powder (if using), salt, and black pepper; stir well to coat.
    7. Add the sliced bell peppers and stir everything together; let cook for 3–4 minutes.
    8. Pour in the chicken broth, tomato paste, and soy sauce, stirring to combine.
    9. Let the mixture simmer gently for 2–3 minutes.
    10. Turn off the heat and squeeze in the lime juice; garnish with chopped fresh cilantro or parsley, then serve warm.

    Notes

    • Feel free to add more vegetables like zucchini or corn for variation.
    • This dish pairs well with rice, quinoa, or tortillas for serving.
    • For a spicier version, add chili flakes or fresh jalapeños.
    • Prep Time: 10 minutes
    • Cook Time: 20 minutes
    • Category: Dinner
    • Method: Skillet
    • Cuisine: American

    Nutrition

    • Serving Size: 1 cup
    • Calories: 300
    • Sugar: 3g
    • Sodium: 600mg
    • Fat: 10g
    • Saturated Fat: 2g
    • Unsaturated Fat: 8g
    • Trans Fat: 0g
    • Carbohydrates: 20g
    • Fiber: 4g
    • Protein: 30g
    • Cholesterol: 90mg

    Sharing is caring!

  • 2-Ingredient Pizza Chips

    2-Ingredient Pizza Chips


    Introduction to 2-Ingredient Pizza Chips

    How many times have you craved a crunchy snack but ended up settling for something bland? I feel you! Introducing my 2-Ingredient Pizza Chips, a simple yet delightful answer to your snacking dilemmas. With just two easy ingredients, these chips turn a hectic day into a moment of culinary joy. Whether it’s movie night with the family or just a quick bite during your busy work-from-home hours, these chips are sure to impress! They’re a flavorful way to satisfy those cravings without adding stress to your already full plate. Trust me, you’ll be reaching for these often!

    Why You’ll Love This 2-Ingredient Pizza Chips

    Let’s face it – we’re all busy, and finding time to whip up a snack can feel impossible. That’s why I adore these 2-Ingredient Pizza Chips. They’re incredibly easy to make, taking just 18 minutes from start to finish. Plus, the taste? Absolute perfection! Crunchy, cheesy, and bursting with flavor, they’re a satisfying guilt-free snack anytime. They’re perfect for busy moms like me who need quick solutions without sacrificing flavor!

    Ingredients for 2-Ingredient Pizza Chips

    To create these mouthwatering 2-Ingredient Pizza Chips, you’ll need just a handful of ingredients. Each one serves a purpose in making these chips a hit!

    • Low-moisture shredded mozzarella cheese: This melty delight is the star of the show! It creates that perfect cheesy texture we all crave in a snack.
    • Mini pepperoni: These bite-sized pieces add a burst of flavor and a bit of spice to each chip. You can opt for turkey pepperoni if you’re looking for a leaner version.
    • Italian seasoning: Not mandatory but highly recommended! Just a sprinkle enhances the flavors and transports you straight to the heart of Italy.

    Feel free to mix it up! If you’re feeling adventurous, you can substitute with your favorite toppings, like diced bell peppers or olives.

    Don’t worry about memorizing the exact amounts! Scroll down to the bottom of the article for precise measurements that you can easily print.

    How to Make 2-Ingredient Pizza Chips

    Ready to whip up a batch of these crunchy delights? Let’s dive into the quick steps for making your very own 2-Ingredient Pizza Chips. Trust me, they’re super simple!

    Step 1: Preheat Your Oven

    First things first, preheat your oven to 350°F (177°C). This is crucial for achieving that golden crunch we all love. While you wait, the anticipation will make your mouth water!

    Step 2: Prepare the Muffin Pan

    Next, grab a mini muffin pan and grease it well. I prefer using cooking spray or a little olive oil. This prevents the chips from sticking and helps with easy removal later on. A quick tip? Make sure to get in those corners!

    Step 3: Add Mozzarella Cheese

    Now it’s time for the cheese! Spoon about 2 teaspoons of shredded mozzarella into each greased mini muffin cup. Don’t worry if it looks a bit heaped; it will melt beautifully. Plus, more cheese means more goodness!

    Step 4: Top with Mini Pepperoni

    After that, take 3 slices of mini pepperoni and place them on top of the cheese in each cup. The bright red pepperoni peeking out adds a fun visual and packs a tasty punch. Make sure they are arranged neatly; you want everyone to see the delicious toppings!

    Step 5: Season and Bake

    Now it’s seasoning time! A light sprinkle of Italian seasoning across the cups will elevate the flavor. It’s a small step that makes a big difference! Place the muffin pan in the oven and bake for about 8 minutes. You’ll know they’re done when the edges of the cheese are dark golden brown.

    Step 6: Cool and Serve

    As the aroma fills your kitchen, resist the urge to dive in immediately! Let the chips cool slightly for better handling. Carefully remove them from the pan and serve warm. They’re perfect alone or dipped in marinara sauce for an extra burst of flavor!

    Tips for Success

    • Keep an eye on the baking time; ovens vary. Check for that golden edge!
    • Experiment with different cheese types. Cheddar or gouda can add unique flavors!
    • Don’t overload on toppings. Too much can make them harder to hold together.
    • Let them cool completely for the best crunch. Patience rewards you!
    • Store any leftovers in an airtight container to maintain crispness but enjoy them fresh!

    Equipment Needed

    • Mini muffin pan: Essential for shaping your chips; a silicone pan works wonderfully if you have one.
    • Cooking spray or olive oil: For greasing the pan. Butter can work in a pinch, but may stick more.
    • Teaspoon measure: Perfect for portioning cheese; a regular spoon can suffice if you’re in a hurry.

    Variations on 2-Ingredient Pizza Chips

    • Veggie Delight: Add finely diced bell peppers, mushrooms, or olives for a fresh twist that enhances flavor and nutrition.
    • Spicy Kick: Incorporate sliced jalapeños or a sprinkle of red pepper flakes for those who love a bit of heat.
    • Herb Infusion: Try using fresh herbs like basil or oregano for a burst of freshness. Just chop them finely and mix with the cheese!
    • Cheese Swap: Experiment with different cheeses, like pepper jack for spice or a blend of cheeses for a gourmet take.
    • Meat Lovers: Mix in cooked sausage crumbles or chopped bacon alongside the pepperoni for a heartier snack.

    Serving Suggestions for 2-Ingredient Pizza Chips

    • Dip it: Serve your chips warm with a side of marinara sauce or ranch dressing for an extra layer of flavor.
    • Pair with drinks: These chips are delightful alongside an icy beverage like sparkling water or your favorite soda.
    • Garnish idea: Sprinkle fresh chopped parsley or basil on top for a pop of color and freshness before serving.

    FAQs about 2-Ingredient Pizza Chips

    As a lover of 2-Ingredient Pizza Chips, I often find myself answering a few common questions. Let’s tackle them!

    Can I make these pizza chips ahead of time?

    Absolutely! You can prepare the chips and store them in an airtight container after they cool down. Just reheat them in the oven for a few minutes to crisp them back up!

    What other toppings can I use?

    Feel free to get creative! Any small toppings like olives, diced bell peppers, or cooked sausage work wonders. Just remember not to overload them!

    Are 2-Ingredient Pizza Chips kid-friendly?

    Without a doubt! My little ones adore these savory bites. They’re a fun snack, and you can let the kids help create their combinations!

    How do I store leftover pizza chips?

    To keep that crispy texture, store any leftovers in an airtight container. They last up to three days, but believe me, they’ll be gone in no time!

    Can I make these pizza chips dairy-free?

    Yes! Try using dairy-free cheese options. Just make sure to check the melting properties to ensure they hold together as chips!

    Final Thoughts

    These 2-Ingredient Pizza Chips have completely transformed my snacking game. They’re not just a quick fix; they’re a delightful experience brimming with flavor and warmth. Each chip is like a tiny piece of comfort, perfect for sharing with family or indulging in solo during a Netflix binge. Plus, the best part? They fit seamlessly into our busy lives without the hassle of long prep times. Whether you’re hosting friends or just need a simple treat for yourself, these chips are your answered prayer. Give them a try, and let the crispy joy unfold in your kitchen!


    Print

    clock clock iconcutlery cutlery iconflag flag iconfolder folder iconinstagram instagram iconpinterest pinterest iconfacebook facebook iconprint print iconsquares squares iconheart heart iconheart solid heart solid icon

    Description

    A simple and delicious snack made with just two ingredients: mozzarella cheese and mini pepperoni.


    • 2/3 cup (80g) low-moisture shredded mozzarella cheese
    • 48 slices (21g) mini pepperoni
    • Italian seasoning (to taste)

    1. Preheat the oven to 350°F (177°C). Grease 16 cups of a mini muffin pan.
    2. Spoon 2 teaspoons of mozzarella cheese into each greased muffin cup.
    3. Lightly press the cheese down into the cups, then top with 3 slices of mini pepperoni on each.
    4. Sprinkle a little Italian seasoning over each cup for added flavor.
    5. Place the muffin pan in the oven and bake for about 8 minutes, or until the edges of the cheese are dark golden brown.
    6. Let the chips cool slightly before removing them from the pan.
    7. Serve warm, perhaps with marinara sauce for dipping.

    Notes

    • Adjust the amount of Italian seasoning based on personal preference.
    • These chips are best served warm.
    • They can be enjoyed as a snack or appetizer.
    • Prep Time: 10 minutes
    • Cook Time: 8 minutes
    • Category: Snack
    • Method: Baking
    • Cuisine: Italian

    Nutrition

    • Serving Size: 2 chips
    • Calories: 130
    • Sugar: 0g
    • Sodium: 350mg
    • Fat: 10g
    • Saturated Fat: 4.5g
    • Unsaturated Fat: 2g
    • Trans Fat: 0g
    • Carbohydrates: 1g
    • Fiber: 0g
    • Protein: 9g
    • Cholesterol: 15mg

    Sharing is caring!

  • Summer Peach Watermelon Salad

    Summer Peach Watermelon Salad


    Introduction to Summer Peach Watermelon Salad

    As summer approaches, I find myself searching for vibrant, refreshing dishes that not only excite my palate but also fit into my busy life. Enter the Summer Peach Watermelon Salad! This delightful salad is a sweet escape from the heat, providing a burst of flavor with every bite. It’s perfect for quick lunches or to impress guests at backyard barbecues. In just 10 minutes, you can create a beautiful salad that brings joy to the table and everyone loves. Who doesn’t need a little more sunshine in their day?

    Why You’ll Love This Summer Peach Watermelon Salad

    This Summer Peach Watermelon Salad is a dream come true for busy moms and professionals alike. It requires no cooking, so you can whip it up in no time. The sweet peaches and juicy watermelon create a delightful balance of flavors. Plus, the addition of feta and mint gives it a gourmet touch. It’s an effortless way to wow your family or guests while keeping things light and refreshing!

    Ingredients for Summer Peach Watermelon Salad

    Creating this vibrant Summer Peach Watermelon Salad is as simple as it is delicious. Here’s what you’ll need to gather:

    • Fresh Peaches: Sweet, juicy peaches add a lovely burst of flavor and natural sweetness. Look for ones that are slightly soft to the touch—this signals ripeness!
    • Seedless Watermelon: Refreshing and hydrating, watermelon is the star of summer fruit salads. Choose one that feels heavy for its size, indicating it’s full of water.
    • Feta Cheese: Crumbled feta introduces a creamy, salty contrast to the sweetness of the fruits. If you prefer a dairy-free option, feel free to substitute with a vegan cheese.
    • Fresh Mint Leaves: Mint adds a delightful herbal note, enhancing the flavors while cooling the palate. Look for vibrant, intact leaves in the produce section.
    • Lime Juice: Bright and zesty, lime juice brings everything together, cutting through the sweetness with a touch of acidity. Fresh-squeezed is best, but bottled works in a pinch!
    • Honey (optional): If you crave additional sweetness, a drizzle of honey works wonders. You can easily skip it if your fruits are perfectly ripe.

    You can find the exact measurements for these ingredients at the bottom of the article for easy printing. Happy prepping!

    How to Make Summer Peach Watermelon Salad

    Step 1: Prepare the Fruits

    First, wash all your fruits thoroughly. I like to use a gentle scrub on the peaches to get rid of any dirt. Next, cut the watermelon into bite-sized cubes. A sharp knife does wonders here! Then, slice the peaches into wedges, being careful to avoid the pit. Remember, fresh peaches can be slippery, so be cautious while cutting. This vibrant mix sets the stage for your Summer Peach Watermelon Salad.

    Step 2: Mix the Base

    In a large mixing bowl, combine your watermelon cubes and peach slices gently. I recommend using a big bowl; it gives you more room to mix without making a mess. The watermelon will release some juice, which adds moisture and flavor to the salad. You want to create a beautiful blend of colors that instantly makes your dish more appetizing. Trust me; it’s a feast for the eyes!

    Step 3: Add Toppings

    Next, sprinkle the crumbled feta cheese over the fruit mixture. The creamy feta adds a lovely contrast to the sweet fruits. Then, toss in the chopped fresh mint leaves. Their aroma wafts up beautifully, inviting you to dig in. The combination of feta and mint elevates the Summer Peach Watermelon Salad to another level. This step is where the magic really begins!

    Step 4: Make the Dressing

    In a small bowl, whisk together the zesty lime juice and honey until well combined. This dressing is light, bright, and downright delicious. If you prefer a tangier kick, add a bit more lime juice. Taste it as you go to get the right balance for your palate. Drizzle this on top of your salad to enhance the overall flavor without overpowering the fresh fruits.

    Step 5: Combine Everything

    Now, gently toss your salad to combine all the ingredients evenly. Be careful not to mash the fruit; we want those chunks to stay intact! This toss is where all the flavors start dancing together. The feta, mint, and dressing should coat everything just right. That’s the secret to a perfect Summer Peach Watermelon Salad!

    Step 6: Chill and Serve

    For the best flavor, cover your salad and chill it in the refrigerator for about 30 minutes. This chilling time allows the flavors to meld together, making each bite even more refreshing. If you’re in a hurry, you can serve it right away. But trust me, that extra chill is worth the wait!

    Tips for Success

    • Choose ripe, juicy peaches and watermelon for the best flavor.
    • Use a sharp knife to make cutting easier and safer.
    • For extra flavor, consider adding a pinch of salt to enhance the sweetness.
    • Feel free to adjust the lime juice and honey to suit your taste.
    • Make this salad ahead of time for easy meal prep during busy weeks.

    Equipment Needed

    • Cutting Board: A sturdy board is essential; a plastic one works well for easy cleanup.
    • Knife: A sharp chef’s knife makes cutting the fruits smooth and safe.
    • Mixing Bowl: A large bowl allows for easy mixing without spills; a glass or plastic bowl is perfect.
    • Whisk: A simple whisk is all you need for mixing the dressing; a fork can work in a pinch.

    Variations for Summer Peach Watermelon Salad

    • Add Nuts: Toss in some toasted almonds or walnuts for an extra crunch and a boost of healthy fats.
    • Swap Cheese: Replace feta with goat cheese or blue cheese for a different flavor profile that still complements the sweet fruits.
    • Spicy Kick: Add slices of jalapeño or a sprinkle of chili flakes for a heat that contrasts beautifully with the sweetness.
    • Herb Alternatives: Try basil or cilantro instead of mint for a fresh twist that aligns with your taste preferences.
    • Fruit Variations: Mix in other summer fruits like berries or cherries for added sweetness and color.

    Serving Suggestions

    • Pairs Well With: Serve alongside grilled chicken or fish for a complete meal that shines in summer.
    • Perfect Drinks: Enjoy with iced tea or sparkling water for a refreshing combination.
    • Presentation Tips: Serve in a large glass bowl to showcase the vibrant colors, or portion into mason jars for an adorable, picnic-ready presentation!

    FAQs about Summer Peach Watermelon Salad

    1. Can I make the Summer Peach Watermelon Salad ahead of time?

    Yes, you can prepare this salad in advance! Just remember to keep the dressing separate until you’re ready to serve. This will help keep the fruits vibrant and prevent them from getting mushy. Chill until serving time for the best flavor.

    2. Can I use frozen fruits for this salad?

    While fresh fruits yield the best results, you can use thawed frozen fruits in a pinch. Just make sure to drain any excess liquid to avoid a watery salad. Freshness is key for the Summer Peach Watermelon Salad experience!

    3. What other ingredients can I add to this salad?

    You can easily customize your salad! Consider adding nuts, other fresh herbs, or even a dash of chili for a spicy twist. The Summer Peach Watermelon Salad is versatile, so make it your own!

    4. Is this salad suitable for special diets?

    Absolutely! This salad is naturally vegetarian and can be made vegan by swapping the feta cheese for a dairy-free alternative. It’s also low in calories, making it a healthy choice for most diets!

    5. How many servings does this recipe yield?

    The provided recipe yields about 4 servings, perfect for a small gathering or family meal. Feel free to double the recipe if you’re expecting company—it’s a crowd-pleaser!

    Final Thoughts on Summer Peach Watermelon Salad

    The Summer Peach Watermelon Salad is more than just a dish; it’s an experience that captures the essence of summer. Each bite transports you to sunlit afternoons, where laughter and lightness fill the air. The blend of sweet peaches and juicy watermelon is a refreshing remedy for the hustle and bustle of daily life. Plus, it’s a fantastic way to nourish your loved ones with wholesome ingredients. Whether you’re hosting a barbecue or enjoying a quiet night in, this salad makes every moment feel special. Let it be your go-to for summer gatherings!


    Print

    clock clock iconcutlery cutlery iconflag flag iconfolder folder iconinstagram instagram iconpinterest pinterest iconfacebook facebook iconprint print iconsquares squares iconheart heart iconheart solid heart solid icon

    Description

    A refreshing and vibrant salad featuring sweet peaches and juicy watermelon, topped with feta cheese and fresh mint for a delightful summer dish.


    • 2 cups fresh peaches, sliced
    • 3 cups seedless watermelon, cubed
    • 1/2 cup feta cheese, crumbled
    • 1/4 cup fresh mint leaves, chopped
    • Juice of 1 lime
    • 1 tablespoon honey (optional)

    1. Wash all fruits thoroughly. Cut watermelon into bite-sized cubes and slice peaches into wedges.
    2. In a large mixing bowl, gently combine the watermelon cubes and peach slices.
    3. Add crumbled feta cheese and chopped mint over the fruits.
    4. In a small bowl, whisk together lime juice and honey until well combined. Drizzle over the fruit mixture.
    5. Gently toss everything until evenly coated without mashing the fruit.
    6. Serve immediately or chill in the fridge for about 30 minutes before serving.

    Notes

    • For an extra kick, consider adding a pinch of salt to enhance the flavors.
    • This salad pairs well with grilled chicken or fish for a complete meal.
    • Feel free to substitute the feta with a vegan cheese for a dairy-free option.
    • Prep Time: 10 minutes
    • Cook Time: 0 minutes
    • Category: Salad
    • Method: No-Cook
    • Cuisine: American

    Nutrition

    • Serving Size: 1 cup
    • Calories: 150
    • Sugar: 12g
    • Sodium: 200mg
    • Fat: 7g
    • Saturated Fat: 4g
    • Unsaturated Fat: 3g
    • Trans Fat: 0g
    • Carbohydrates: 18g
    • Fiber: 2g
    • Protein: 5g
    • Cholesterol: 15mg

    Sharing is caring!