Category: Uncategorized

  • Easy Pepper Steak

    Easy Pepper Steak


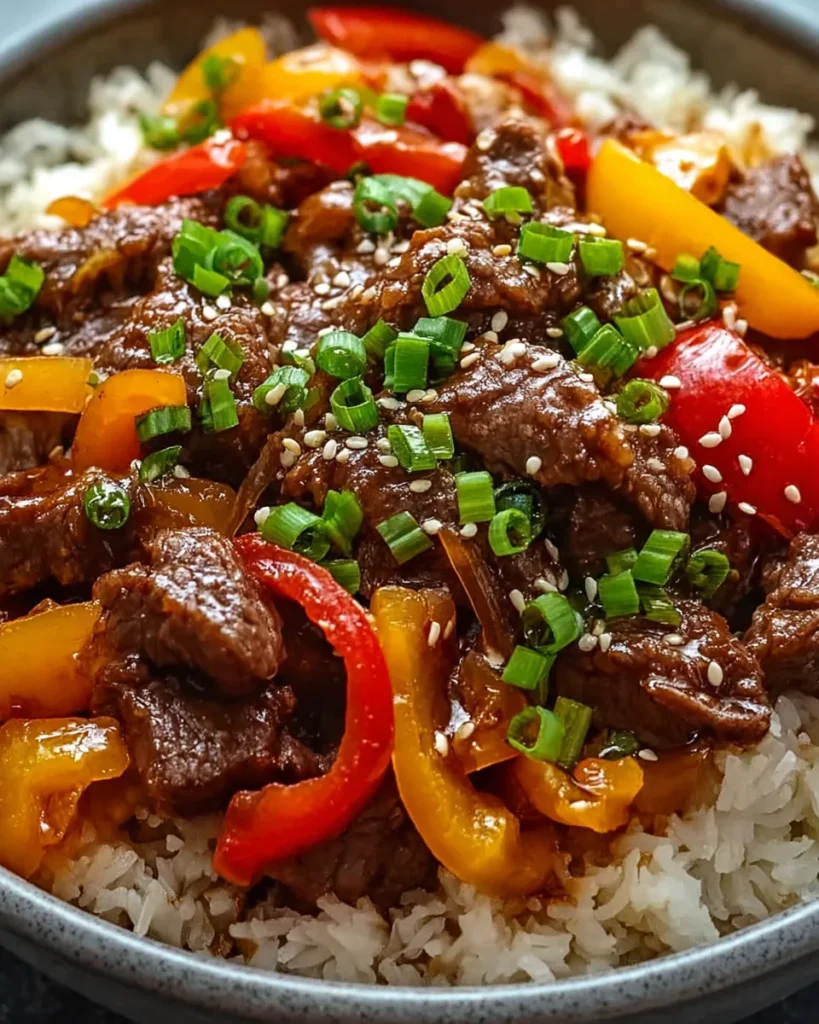
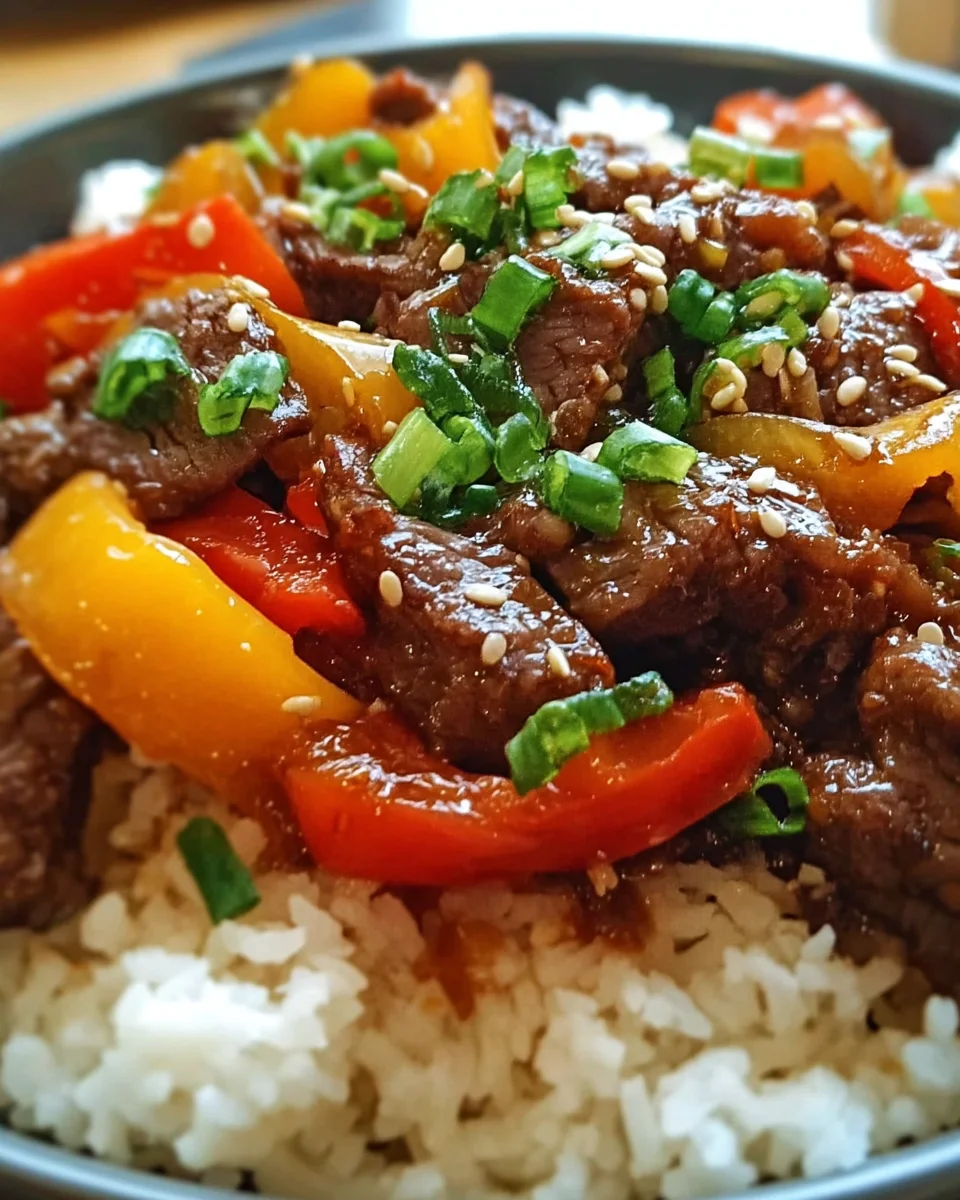
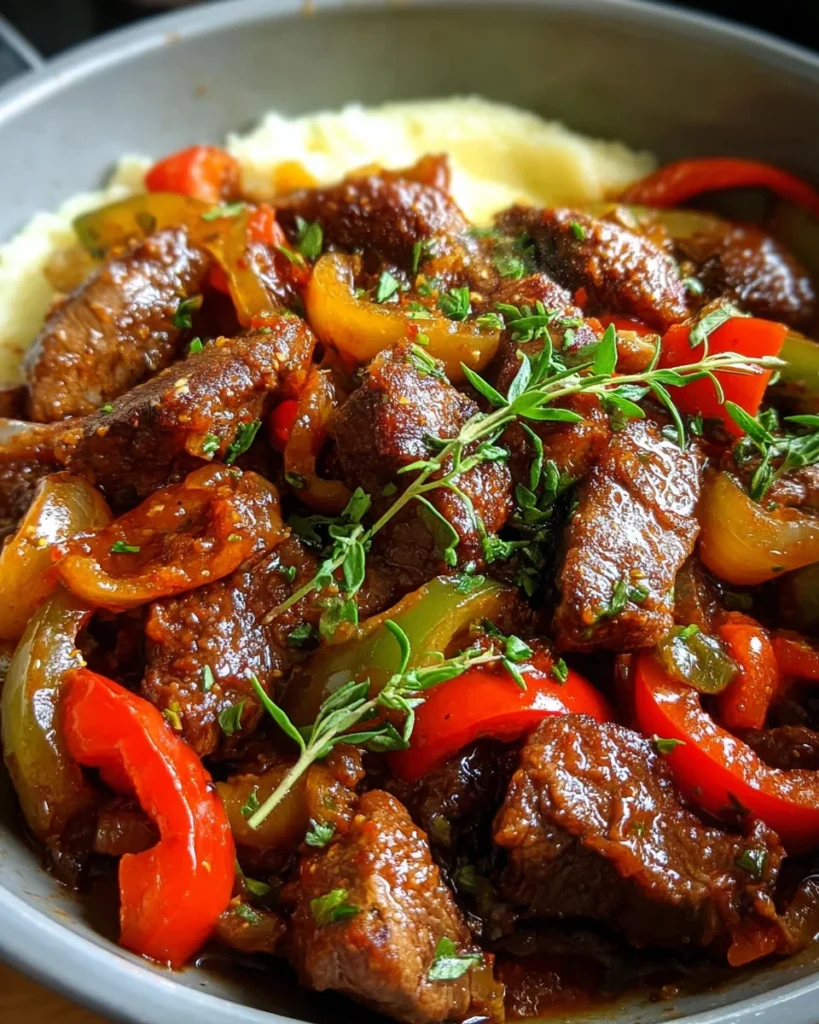
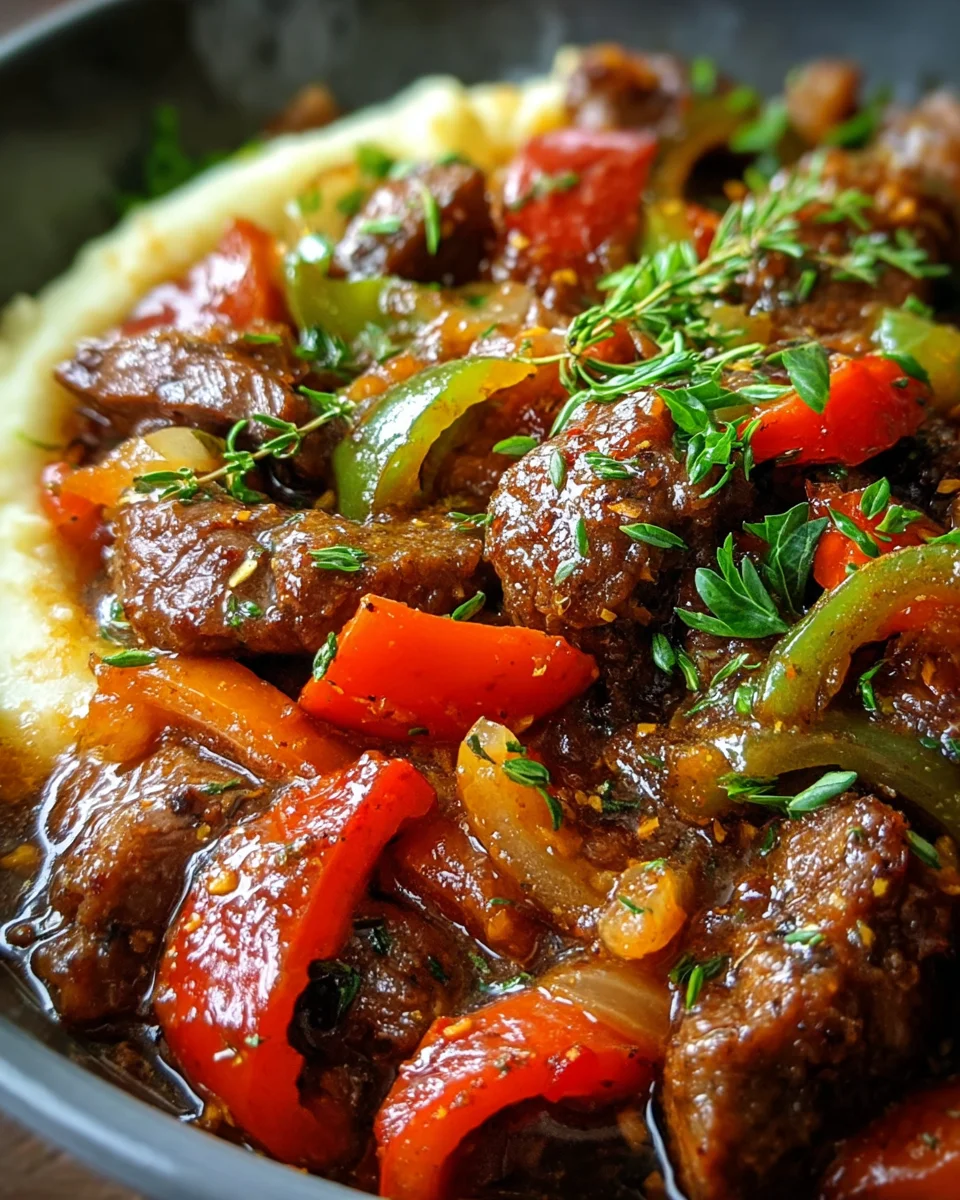
    Introduction to Easy Pepper Steak

    Welcome to the world of Easy Pepper Steak, where flavor meets simplicity! I know how hectic life can be—especially for busy moms and professionals trying to balance work and family. You’re often seeking meals that are quick yet satisfying, right? This dish is just that! In under an hour, you can whip up a tender, flavorful meal that’s bound to impress your loved ones. Picture juicy slices of beef partnered with vibrant bell peppers, all swimming in a savory sauce. It’s comfort food that requires minimal effort but delivers maximum delight!

    Why You’ll Love This Easy Pepper Steak

    This Easy Pepper Steak is a dream come true for anyone short on time! With its quick prep and cook times, you can create a meal the whole family will love in just about an hour. The combination of tender beef and colorful peppers bathed in a delicious sauce makes it not just easy but incredibly tasty. It’s the perfect dinner choice for busy nights—you’ll wonder how you lived without it!

    Ingredients for Easy Pepper Steak

    Gathering the right ingredients is the first step to creating a scrumptious Easy Pepper Steak! Here’s what you’ll need:

    • Beef Steak: Choose a tender cut, like sirloin or flank steak, sliced into strips. This adds juicy flavor.
    • All Purpose Seasoning: A blend of herbs and spices enhances taste. You can use your favorite brand or make your own.
    • Garlic Powder: This adds a warm, savory touch. Fresh garlic can substitute, but it may require more prep.
    • Onion Powder: A great flavor booster that complements the beef and peppers. It blends in well.
    • Salt & Black Pepper: These basic seasonings elevate the dish. A dash of each goes a long way!
    • Neutral Oil: For searing the steak, choose an oil with a high smoke point, like vegetable or canola oil.
    • Low Sodium Broth: Use chicken or beef broth for the base of the sauce. It keeps the dish savory without too much salt.
    • Low Sodium Soy Sauce: This adds depth to the marinade and sauce. You can opt for tamari if you’re gluten-free.
    • Worcestershire Sauce: A blend of flavors that kick up the umami factor. A few drops make all the difference!
    • Browning Seasoning: This burnt sugar sauce gives the dish a rich color and a hint of sweetness.
    • Bell Peppers: Either red or green, these vibrant veggies brighten the meal. They add crunch and sweetness.
    • Sliced Onion: Onions provide sweetness and a bit of crunch when cooked. Use yellow or white varieties.
    • Adobo Seasoning: A flavorful spice mix that adds warmth. It can be replaced with taco seasoning if desired.
    • Cornstarch: A key ingredient for thickening the sauce, giving it that perfect texture.
    • Cold Water: Helps mix the cornstarch to create a smooth slurry. This is essential for achieving the right consistency.

    For precise quantities, don’t hesitate to check the bottom of the article where you’ll find a handy printable recipe! Happy cooking!

    How to Make Easy Pepper Steak

    Are you ready to dive into the delicious world of Easy Pepper Steak? Let’s break it down into manageable steps. This is where the magic happens! Follow along, and soon you’ll be savoring a delightful meal that didn’t take all day to prepare.

    Prepare the Steak

    Start by prepping your beef steak! In a large bowl, toss the sliced steak strips with all-purpose seasoning, garlic powder, onion powder, salt, and black pepper. Don’t be shy—get those hands in there and mix well! This coats every piece of meat in flavor. If you have time, marinating overnight will elevate the taste even more.

    Sear the Steak

    Next, heat up a tablespoon of neutral oil in a big skillet over medium-high heat. Once the oil shimmers, it’s go time! Carefully add the seasoned steak strips to the skillet. Let them sizzle for 3 to 5 minutes. Remember, each flip helps achieve that perfect deep brown crust that brings out the flavor.

    Whisk the Sauce

    While the steak sears, let’s move on to the sauce! In a small bowl, whisk together your choice of low sodium chicken or beef broth, low sodium soy sauce, Worcestershire sauce, and browning seasoning. This flavor-packed mixture will boost the dish significantly. It’s all about depth and richness here!

    Combine Ingredients

    Once your steak is beautifully seared, pour that delightful sauce mixture right over it in the skillet. Toss in the sliced bell peppers and onions. Give everything a good stir! If things look a little dry, add a splash of water to make sure the steak is just covered. This will keep everything tender and juicy.

    Simmer to Perfection

    Now it’s time for the slow dance of flavors. Cover the skillet and let it simmer over low heat for 20 minutes. Peek in every so often to check the liquid level. If you see it getting low, don’t hesitate to add more water. We want all that steak submerged for maximum tenderness!

    Thicken the Sauce

    After the simmering time, stir in the adobo seasoning, additional garlic powder, onion powder, and season with salt and pepper to taste. No one likes a bland dish! Cover and let it cook for another 15 minutes. Time to thicken up the sauce!

    In a small bowl, mix cornstarch with cold water until it’s a smooth slurry. Pour it into the skillet while stirring continuously to combine. In just 10 to 15 minutes, the sauce should thicken beautifully, and your Easy Pepper Steak will be fork-tender and ready for devouring!

    Tips for Success

    • Marinate your steak overnight for intense flavor.
    • Slice steak against the grain for more tender bites.
    • Use fresh bell peppers for added crunch and color.
    • Adjust seasoning levels to suit your family’s taste buds.
    • Have all your ingredients prepped before starting to cook.

    Equipment Needed for Easy Pepper Steak

    • Large Skillet: A heavy-bottomed skillet works best for even searing. A non-stick pan is a great alternative.
    • Mixing Bowls: Use one for seasoning the steak and another for whisking the sauce.
    • Whisk: Essential for blending your sauce ingredients together.
    • Spatula or Tongs: Perfect for flipping and mixing the steak without causing a mess.

    Variations on Easy Pepper Steak

    • Vegetarian Option: Substitute beef with tempeh or tofu for a meatless version that’s equally satisfying.
    • Spicy Kick: Add sliced jalapeños or a dash of hot sauce for a spicy twist that’ll wake up your taste buds.
    • More Veggies: Toss in additional vegetables like broccoli, snap peas, or mushrooms for added nutrition and color.
    • Citrus Flair: Squeeze fresh lime or lemon juice over the finished dish for a bright, zesty flavor.
    • Gluten-Free Sauce: Ensure that all sauces used, especially soy sauce, are labeled gluten-free, or replace it with coconut aminos.

    Serving Suggestions for Easy Pepper Steak

    • Serve over fluffy white or brown rice for a satisfying meal.
    • Pair with steamed broccoli or sautéed green beans for a colorful plate.
    • A crisp garden salad with a light vinaigrette complements the savory steak.
    • Enjoy with a chilled glass of green tea or lime-infused water.
    • Garnish with fresh cilantro or green onions for a pop of color.

    FAQs about Easy Pepper Steak

    Can I use different cuts of beef for Easy Pepper Steak?

    Absolutely! While I love using sirloin or flank steak for their tenderness, you can also try ribeye or skirt steak. Each cut offers a unique flavor profile. Just ensure it’s sliced thinly for even cooking!

    Can I make Easy Pepper Steak in advance?

    You sure can! Prepare the dish ahead of time, and simply reheat it on the stove with a splash of broth. This allows the flavors to meld further, making it even more delicious the next day.

    How do I store leftovers of Easy Pepper Steak?

    Store any leftovers in an airtight container in the fridge for up to three days. When reheating, add a bit of water or broth to keep it juicy and tender.

    What can I serve with Easy Pepper Steak?

    Easy Pepper Steak pairs beautifully with rice, noodles, or even mashed potatoes. For a healthier option, consider serving it with a fresh salad or roasted vegetables!

    Can I freeze Easy Pepper Steak?

    Yes! This dish freezes well. Just let it cool completely, then transfer it to a freezer-safe container. When you’re ready to enjoy, thaw it overnight in the fridge before reheating.

    Final Thoughts

    There’s something truly special about sharing a meal prepared with love. Easy Pepper Steak not only brings flavors together but also creates moments around the dinner table that linger long after the plates are cleared.

    Whether it’s a busy weeknight or a weekend family gathering, this dish serves as a reminder that delicious food doesn’t have to be complicated.

    So, gather your loved ones, savor every bite, and embrace the joy that cooking at home brings! I promise, the smiles and satisfied bellies will be worth every moment spent in the kitchen.


    Print

    clock clock iconcutlery cutlery iconflag flag iconfolder folder iconinstagram instagram iconpinterest pinterest iconfacebook facebook iconprint print iconsquares squares iconheart heart iconheart solid heart solid icon

    Description

    Easy Pepper Steak is a flavorful and tender dish made with sliced beef steak, bell peppers, and a savory sauce.


    • 900 g beef steak, sliced into strips
    • 1 tablespoon all purpose seasoning
    • 1 teaspoon garlic powder
    • 1 teaspoon onion powder
    • 1 teaspoon salt
    • 1 teaspoon freshly ground black pepper
    • 1 tablespoon neutral oil
    • 480 ml low sodium chicken or beef broth
    • 60 ml low sodium soy sauce
    • 1 tablespoon Worcestershire sauce
    • 1 tablespoon browning seasoning (burnt sugar)
    • 1 cup sliced bell peppers (red or green)
    • 80 g sliced onion
    • Water as needed
    • 1 teaspoon adobo seasoning
    • 1 teaspoon garlic powder
    • 1 teaspoon onion powder
    • Salt and black pepper, to taste
    • 30 g cornstarch
    • 60 ml cold water

    1. In a large bowl, thoroughly coat steak strips with all-purpose seasoning, garlic powder, onion powder, salt, and freshly ground black pepper.
    2. Heat neutral oil in a large skillet over medium-high heat. Sear the seasoned steak strips for 3–5 minutes, turning to achieve a deep brown color.
    3. In a small bowl, whisk together chicken or beef broth, soy sauce, Worcestershire sauce, and browning seasoning until well blended.
    4. Pour the prepared liquid mixture into the skillet with steak. Stir in sliced bell peppers and onions. If necessary, add water to ensure the steak is just covered.
    5. Cover and simmer over low heat for 20 minutes, periodically checking liquid level and adding water if needed to keep steak submerged.
    6. Stir in adobo seasoning, garlic powder, onion powder, and additional salt and black pepper to taste. Cover and cook for an additional 15 minutes over low heat.
    7. In a small bowl, whisk together cornstarch and cold water to form a smooth slurry. Pour into the skillet, stirring constantly to combine and thicken the sauce.
    8. Simmer the covered skillet for 10–15 minutes or until the meat is fork-tender and the sauce has thickened to desired consistency. Total simmering time should be approximately 45 minutes.

    Notes

    • For extra flavor, you can marinate the steak overnight.
    • Adjust the seasoning according to your taste preferences.
    • This dish pairs well with rice or noodles.
    • Prep Time: 15 minutes
    • Cook Time: 45 minutes
    • Category: Main Course
    • Method: Stovetop
    • Cuisine: American

    Nutrition

    • Serving Size: 1 serving
    • Calories: 350
    • Sugar: 3 g
    • Sodium: 600 mg
    • Fat: 15 g
    • Saturated Fat: 5 g
    • Unsaturated Fat: 10 g
    • Trans Fat: 0 g
    • Carbohydrates: 20 g
    • Fiber: 2 g
    • Protein: 30 g
    • Cholesterol: 70 mg

    Sharing is caring!

  • Unbelievable Peanut Butter Pie

    Unbelievable Peanut Butter Pie


    Introduction to Unbelievable Peanut Butter Pie

    As a passionate home cook, I know life can get busy. Between work and family, finding time to whip up something special can feel like a challenge. That’s where this Unbelievable Peanut Butter Pie comes in! It’s an indulgent treat that simplifies dessert time while impressing your loved ones. With its creamy filling, luscious chocolate ganache, and a delightful Oreo crust, this pie is not just a dessert; it’s a celebration. Whether you’re gathering for a special occasion or just need a sweet escape, this pie will hit the spot!

    Why You’ll Love This Unbelievable Peanut Butter Pie

    This Unbelievable Peanut Butter Pie isn’t just delicious; it’s a time-saver for busy moms like us. Prep takes just 30 minutes, allowing you to focus on what truly matters—your loved ones. The combination of creamy peanut butter and rich chocolate makes every bite a delight. Plus, it’s perfect for any occasion, from family dinners to unexpected guests. You’ll have a showstopper that’s quick and easy to make!

    Ingredients for Unbelievable Peanut Butter Pie

    Creating this Unbelievable Peanut Butter Pie requires some simple yet essential ingredients. Here’s what you’ll need:

    • Oreo Cookies: These are the star of your crust! Their chocolatey goodness and cream filling bring a fantastic flavor that’s hard to resist.
    • Unsalted Butter: Melted butter is crucial for binding the crust together, giving it a rich and buttery taste.
    • Heavy Cream: This adds the perfect velvety texture to both the chocolate ganache and the peanut butter filling. Make sure it’s cold for whipping!
    • Semi-Sweet Chocolate: Finely chopped, this chocolate is essential for a smooth ganache that enhances the pie’s decadence.
    • Cream Cheese: Softened cream cheese contributes to the richness of the filling, giving it that lovely creamy consistency.
    • Creamy Peanut Butter: Go for processed peanut butter for a smooth and indulgent filling. It’s sweet and nutty, making it the hero of this pie.
    • Confectioner’s Sugar: This fine sugar sweetens the filling without leaving a gritty texture, allowing for a silky-smooth finish.
    • Vanilla Extract: A splash of pure vanilla adds depth to the flavors, making each bite more delightful.
    • Optional Toppings: Whipped cream, crushed Reese’s Pieces, and chopped peanuts for that extra flair! They’re perfect for garnishing and adding a fun crunch.

    All the ingredients come together for an unforgettable experience. You can find exact measurements at the bottom of the article, ready for printing when you’re set to bake!

    How to Make Unbelievable Peanut Butter Pie

    Making this Unbelievable Peanut Butter Pie is a simple process that brings together delicious ingredients to create a magical dessert. Follow these easy steps for a pie that will amaze your family and friends!

    Step 1: Prepare the Oreo Crust

    Start by preheating your oven to 350°F (177°C). Next, grab your food processor or blender, and pulse the Oreo cookies into fine crumbs. It’s fun to watch them transform into a dark, sandy mixture!

    Once blended, transfer the crumbs to a large bowl and pour in the melted butter. Mix it up until everything is fully combined, and the mixture resembles wet sand.

    Now, press this crumbly goodness firmly into the bottom and up the sides of a 9-inch pie dish. I like using medium pressure here, which helps make a sturdy crust. Bake it for 10 minutes, then let it cool completely.

    Step 2: Make the Chocolate Ganache

    While the crust cools, it’s time to create the velvety chocolate ganache. Place the finely chopped chocolate in a medium heat-proof bowl and set it aside.

    In a small saucepan, heat the heavy cream over medium heat. Watch carefully for it to just begin simmering, then remove it from the heat. Pour the hot cream over the chopped chocolate and let it sit for 2-3 minutes.

    During this time, the chocolate will soften beautifully. After waiting, gently stir the mixture until smooth. Set the ganache aside at room temperature to thicken slightly while you tackle the next step.

    Step 3: Prepare the Peanut Butter Filling

    Now, let’s whip up that creamy peanut butter filling! Start by using a hand mixer or stand mixer fitted with a whisk to beat the cold heavy cream on medium-high speed. Keep mixing until stiff peaks form—this will take about 3 minutes.

    Transfer the whipped cream to another bowl, and don’t worry about washing the mixer. In the same bowl, beat the softened cream cheese until smooth. Then, add the creamy peanut butter, confectioners’ sugar, and vanilla extract. Mix until fully combined and thick; this is where the magic happens!

    Finally, gently fold the whipped cream into the peanut butter mixture using a silicone spatula. Be careful here; you want to keep that lightness without deflating the whipped cream.

    Step 4: Assemble the Pie

    With your crust and fillings ready, it’s time to assemble! Spread the peanut butter filling evenly into your cooled Oreo crust. Grab a small offset spatula and smooth out the surface for an even layer.

    Next, drizzle the prepared chocolate ganache over the peanut butter layer. It’ll create a beautiful contrast and an irresistible topping!

    Step 5: Refrigerate

    To achieve the perfect texture, refrigerate the assembled pie for at least 6 hours or up to 48 hours. If you can wait overnight, I highly recommend that for optimal results. Just cover loosely with plastic wrap if you’re chilling for more than 24 hours.

    When you’re ready to serve, simply pipe whipped cream on top and sprinkle it with crushed Reese’s Pieces or chopped peanuts, if desired. Your Unbelievable Peanut Butter Pie is now ready to impress!

    Tips for Success

    • Chill the pie overnight for the best texture and flavor.
    • Use processed peanut butter for a smooth filling that spreads easily.
    • Don’t skip the cooling time for the crust; it makes a big difference!
    • Keep the heavy cream cold to achieve fluffy whipped cream.
    • For a quicker ganache, warm the cream gently and stir till melted.

    Equipment Needed for Unbelievable Peanut Butter Pie

    • Food Processor or Blender: Needed for crushing Oreo cookies; you can also use a zip-top bag and rolling pin.
    • Mixing Bowls: Essential for combining ingredients; any mixing bowl will do!
    • Hand Mixer or Stand Mixer: For whipping cream; a whisk can work in a pinch, but it takes longer.
    • 9-inch Pie Dish: To hold your beautiful pie; a tart pan works well too.
    • Spatula: For spreading filling and ganache; a silicone spatula is great for scraping.

    Variations on Unbelievable Peanut Butter Pie

    • Nut Butter Switch-Up: Try almond or cashew butter for a unique flavor twist.
    • Chocolate Lovers: Add a layer of chocolate mousse beneath the peanut butter filling for extra indulgence.
    • Healthier Option: Substitute Greek yogurt for part of the cream cheese to lighten up the filling.
    • Fruit Fusion: Swirl in some raspberry or strawberry puree for a fruity burst in every bite.
    • Gluten-Free Delight: Use gluten-free Oreos for a deliciously inclusive dessert option.

    Serving Suggestions for Unbelievable Peanut Butter Pie

    • Pair with Coffee: A rich cup of coffee complements the sweetness of the pie perfectly.
    • Fresh Fruit: Serve alongside sliced strawberries or bananas for a refreshing contrast.
    • Presentation: Garnish each slice with whipped cream and sprinkle some crushed peanuts for added flair.
    • Chilled Drinks: Iced tea or milkshakes make fantastic accompaniments to this indulgent treat.
    • Bring to Gatherings: This pie is sure to wow family and friends at potlucks or dinner parties!

    FAQs about Unbelievable Peanut Butter Pie

    Can I make this Unbelievable Peanut Butter Pie in advance?

    Absolutely! This pie actually tastes better when made ahead of time. I recommend chilling it overnight for the best texture and flavor. Just remember to cover it loosely, and you’ll be ready to impress your guests effortlessly!

    Is it possible to use natural peanut butter?

    While you can use natural peanut butter, I highly recommend sticking to processed versions for the best results. Processed peanut butter gives a creamier texture that’s more suitable for this filling.

    How do I store leftovers?

    Store any leftovers in the refrigerator, covered for up to 5 days. The pie holds up well, so you can enjoy it multiple times during the week without worry!

    What if I want a healthier version of this pie?

    For a healthier twist, consider using Greek yogurt in place of some cream cheese. You can also experiment with using less confectioners’ sugar or incorporating some crushed fruit into the filling for added flavor.

    Can I freeze the Unbelievable Peanut Butter Pie?

    Yes, you can freeze this pie! Just ensure it’s tightly wrapped in plastic wrap. When you’re ready to enjoy it, let it thaw in the fridge for a few hours before serving. It’s a fantastic make-ahead dessert!

    Final Thoughts on Unbelievable Peanut Butter Pie

    This Unbelievable Peanut Butter Pie captures the essence of comfort and indulgence in every slice. It’s more than just a dessert; it’s a shared experience, creating moments of joy with your loved ones. Each bite presents a symphony of flavors, from the smooth peanut butter to the rich chocolate ganache. Whether it’s a family gathering or a quiet night, this pie brings smiles to faces and warmth to hearts. I truly enjoy how easy it is to make, leaving more time for laughter and love around the table. So go ahead, treat yourself to this delightful creation!


    Print

    clock clock iconcutlery cutlery iconflag flag iconfolder folder iconinstagram instagram iconpinterest pinterest iconfacebook facebook iconprint print iconsquares squares iconheart heart iconheart solid heart solid icon

    Description

    Indulge in a creamy and rich peanut butter pie with a delicious Oreo crust and topped with chocolate ganache.


    • Oreo Crust
      250 grams Oreo cookies (22 whole, regular, with cream filling)
    • 71 grams unsalted butter, melted
    • Chocolate Ganache
      180 millilitres heavy cream
    • 170 grams semi-sweet chocolate, finely chopped
    • Peanut Butter Filling
      240 millilitres heavy cream, cold
    • 226 grams full-fat brick cream cheese, softened
    • 375 grams creamy peanut butter (processed, not natural)
    • 90 grams confectioners’ sugar
    • 1 teaspoon pure vanilla extract
    • Optional Toppings
      Whipped cream, for garnish
    • 50 grams Reese’s Pieces, crushed
    • 30 grams peanuts, chopped

    1. Preheat oven to 177°C. In a food processor or blender, pulse Oreo cookies into fine crumbs. Transfer to a large bowl and mix in melted butter until fully combined and mixture resembles wet sand. Press mixture evenly into the base and up the sides of an ungreased 23 cm pie dish, using medium pressure. Bake for 10 minutes, then allow crust to cool.
    2. Place chopped chocolate in a medium heat-proof bowl. Heat heavy cream in a small saucepan over medium heat until it just begins to simmer; remove from heat and pour over chocolate. Let stand for 2–3 minutes to melt, then gently stir until smooth. Set aside at room temperature to thicken slightly.
    3. Using a hand mixer or stand mixer fitted with a whisk, beat cold heavy cream on medium-high speed until stiff peaks form, about 3 minutes. Reserve in a separate bowl.
    4. In the same mixing bowl (no need to clean), beat softened cream cheese on medium-high speed until smooth. Add creamy peanut butter, confectioners’ sugar, and vanilla extract; mix until fully combined and thick.
    5. Gently fold the whipped cream into the peanut butter mixture using a silicone spatula until smooth and well incorporated, taking care not to deflate the mixture.
    6. Spread peanut butter filling evenly into the cooled Oreo crust, smoothing the surface with a small offset spatula.
    7. Spread prepared chocolate ganache evenly over the peanut butter layer.
    8. Refrigerate the assembled pie for a minimum of 6 hours and up to 48 hours for optimal texture. Cover loosely if chilling for longer than 24 hours.
    9. Pipe or dollop whipped cream over the chilled pie using a piping tip if desired. Sprinkle with crushed Reese’s Pieces and chopped peanuts, or add these toppings directly onto the ganache before chilling if omitting whipped cream.
    10. Cut pie into slices and serve cold. Store leftovers refrigerated and covered for up to 5 days.

    Notes

    • For best results, chill the pie overnight.
    • Use processed peanut butter for the best texture.
    • Store leftovers in the fridge for up to 5 days.
    • Prep Time: 30 minutes
    • Cook Time: 10 minutes
    • Category: Dessert
    • Method: Baking and Refrigerating
    • Cuisine: American

    Nutrition

    • Serving Size: 1 slice
    • Calories: 450
    • Sugar: 25g
    • Sodium: 250mg
    • Fat: 30g
    • Saturated Fat: 15g
    • Unsaturated Fat: 10g
    • Trans Fat: 0g
    • Carbohydrates: 40g
    • Fiber: 2g
    • Protein: 8g
    • Cholesterol: 60mg

    Sharing is caring!

  • Juicy Pineapple Heaven Cake

    Juicy Pineapple Heaven Cake


    Introduction to Juicy Pineapple Heaven Cake

    As a busy mom, I know how precious our time can be, and that’s why I adore this Juicy Pineapple Heaven Cake. It’s not just a dessert; it’s a slice of tropical paradise that brings joy to any kitchen! Imagine the delightful scent of pineapple wafting through your home as you bake this beauty. Whether you’re looking for a quick solution on a hectic day or wanting to impress your loved ones with something special, this cake has you covered. Trust me, it’s a recipe that makes everyone feel cherished amidst life’s chaos.

    Why You’ll Love This Juicy Pineapple Heaven Cake

    This Juicy Pineapple Heaven Cake is not only a treat for the taste buds, but it’s also a breeze to whip up! Busy moms and professionals will appreciate how quickly it comes together, allowing more time for family. The moist texture and sweet glaze make each slice feel like a celebration. Plus, it’s a delightful way to introduce a taste of the tropics to your everyday dessert routine. Who wouldn’t love that?

    Ingredients for Juicy Pineapple Heaven Cake

    To create this delightful Juicy Pineapple Heaven Cake, you’ll need a few fantastic ingredients that work together to create a moist, flavorful treat. Here’s a quick overview of what you’ll need:

    • All-purpose flour: The backbone of your cake, providing structure and stability.
    • Baking powder: Your leavening agent that makes the cake rise and get that lovely fluffy texture.
    • Salt: Just a pinch enhances the cake’s sweetness, creating a balanced flavor profile.
    • Unsalted butter: For that rich, buttery flavor that makes every bite melt in your mouth.
    • Granulated sugar: This adds sweetness and helps achieve that beautiful golden color.
    • Large eggs: Eggs contribute to the structure and moisture, helping to bind everything together.
    • Vanilla extract: A dash of this heavenly essence enhances all the flavors and adds warmth.
    • Sour cream: This secret ingredient gives the cake a tender crumb and adds a hint of tanginess.
    • Crushed pineapple: The star of the show! It infuses the cake with delicious tropical flavor, but remember to drain it well.
    • Powdered sugar: We’ll use this for the delightful glaze that finishes the cake off beautifully.
    • Pineapple juice: This will sweeten and glaze the cake, bringing out the fruity notes.

    For those who want to jazz it up a bit, consider adding some shredded coconut for added texture and flavor. Not to mention, you can find these ingredients at your local grocery store, making this recipe easy to tackle whenever the craving hits. Exact quantities for each ingredient can be found at the bottom of the article and are available for printing!

    How to Make Juicy Pineapple Heaven Cake

    Now, let’s dive into the delicious process of making this Juicy Pineapple Heaven Cake together! Each step is simple, and I promise, it will be worth the delightful flavors that await. Grab your apron, and let’s get baking!

    Preheat the Oven and Prepare Baking Pan

    Start by preheating your oven to 175°C (350°F).

    This is crucial for ensuring an even bake.

    While that’s warming up, take a standard loaf pan and grease it well with butter or cooking spray, then dust it with flour.

    This extra step helps prevent sticking, allowing your tropical cake to slide out effortlessly once baked!

    Mix Dry Ingredients

    In a medium bowl, whisk together your all-purpose flour, baking powder, and salt.

    Make sure these dry ingredients are well combined, as even distribution will make a big difference in the cake’s rise.

    A good tip? Use a fork to fluff up the flour before measuring—this ensures you get the right amount without any packed clumps!

    Cream Butter and Sugar

    Next, it’s time to cream the softened butter with granulated sugar in a large bowl.

    Using an electric mixer, beat them together on medium speed until the mixture is light and fluffy.

    This step is essential—it incorporates air, making your cake fluffy and textured.

    Trust me, it’s like magic watching it transform!

    Add Eggs and Vanilla

    Now, add in the eggs, one at a time, mixing well after each addition.

    This helps with binding and moisture.

    Then, pour in the vanilla extract, giving it a quick mix.

    The aroma will be heavenly—I could bottle it up!

    Combine Dry Ingredients and Sour Cream

    Gradually add the dry mixture and the sour cream to your creamed batter.

    I recommend doing this in three additions, alternating between flour and sour cream.

    This gentle integration will keep the batter light and fluffy!

    Mix until just combined, be careful not to overdo it. We want a tender cake, not a dense one!

    Fold in Pineapple

    Now comes the fun part—gently fold in the well-drained crushed pineapple.

    Using a spatula, be as delicate as a dance; you want to keep that air in your batter while ensuring the pineapple is spread evenly.

    This sweet, tropical delight is the star of the show!

    Bake the Cake

    Pour your luscious batter into the prepared loaf pan, smoothing the top to ensure an even bake.

    Pop it into your preheated oven and bake for 50–60 minutes.

    I recommend checking your cake around the 50-minute mark by inserting a toothpick into the center; it’s done when it comes out clean.

    Cool and Glaze

    Once baked, let the cake cool in the pan for about 10 minutes.

    This helps to firm it up for easier transfer.

    Then, gently turn it out onto a wire rack to cool completely.

    While it’s cooling, whisk together powdered sugar and pineapple juice to create a sweet glaze.

    Once cooled, drizzle that glaze over the beautiful loaf. Voilà! Your Juicy Pineapple Heaven Cake is ready to enjoy.

    Tips for Success

    • Make sure your butter is at room temperature for easy creaming.
    • Measure flour correctly by spooning it into the measuring cup and leveling it off.
    • For a richer flavor, consider using brown sugar in place of granulated sugar.
    • Don’t skip the cooling step; it ensures the glaze sets perfectly.
    • Feel free to experiment with adding nuts for extra crunch!

    Equipment Needed

    • Loaf pan: A standard loaf pan is best, but a round cake pan works too.
    • Mixing bowls: Use one large and one medium, or simply use a stand mixer bowl.
    • Electric mixer: An efficient choice, but a whisk and elbow grease will do fine.
    • Spatula: A flexible spatula is perfect for folding in the pineapple.
    • Wire rack: Essential for cooling; a plate works in a pinch!

    Variations

    • For a tropical twist, add shredded coconut to the batter for a delightful chewiness.
    • Swap out some or all of the all-purpose flour with whole wheat flour for a healthier option.
    • Make it gluten-free by using a gluten-free all-purpose blend instead of regular flour.
    • Add crushed macadamia nuts for a crunchy contrast and a hint of nuttiness.
    • For a vegan version, substitute eggs with unsweetened applesauce and use a plant-based butter replacement.

    Serving Suggestions

    • Pair with a dollop of freshly whipped cream for a light, airy touch.
    • Serve alongside a scoop of vanilla ice cream for a tempting contrast of temperatures.
    • Garnish with fresh pineapple slices or mint leaves for a beautiful presentation.
    • Enjoy with a refreshing iced tea or a tropical fruit smoothie.

    FAQs about Juicy Pineapple Heaven Cake

    Can I use fresh pineapple instead of canned?

    Absolutely! You can use fresh pineapple for this Juicy Pineapple Heaven Cake. Just make sure to chop and drain it well, so it doesn’t add extra moisture to the batter.

    How do I store leftovers of this cake?

    Store any leftover Juicy Pineapple Heaven Cake in an airtight container at room temperature for up to three days. It should stay moist and delicious!

    Can I freeze this cake?

    Yes! You can freeze the cake. Wrap it tightly in plastic wrap or aluminum foil and place it in an airtight container. It should be good for up to three months. Just thaw at room temperature before indulging!

    What if I don’t have sour cream?

    If you don’t have sour cream on hand, you can substitute it with plain yogurt or even buttermilk. Both alternatives work great and will add a nice tanginess to your cake.

    Can I make this cake ahead of time?

    Definitely! The Juicy Pineapple Heaven Cake can be made a day ahead. Just bake it, cool it completely, glaze it, and store it in an airtight container. Your friends and family will be none the wiser!

    Final Thoughts

    Baking this Juicy Pineapple Heaven Cake isn’t just about creating a delicious dessert; it’s about making memories in the kitchen and bringing smiles to those you love. Each rich, moist slice is a reminder of sunny days and warm gatherings, transporting you to a tropical oasis with every bite. Whether it’s a busy weekday or a special occasion, this cake shines through. It’s a versatile recipe that embraces creativity while delivering soul-soothing comfort. So, gather your ingredients, share this journey, and relish the joy that fills both your home and heart with sweetness!


    Print

    clock clock iconcutlery cutlery iconflag flag iconfolder folder iconinstagram instagram iconpinterest pinterest iconfacebook facebook iconprint print iconsquares squares iconheart heart iconheart solid heart solid icon

    Description

    A moist and flavorful cake infused with crushed pineapple and topped with a sweet pineapple glaze, perfect for tropical dessert lovers.


    • 190 grams all-purpose flour
    • 4 grams baking powder
    • 2 grams salt
    • 113 grams unsalted butter, softened
    • 200 grams granulated sugar
    • 2 large eggs
    • 5 millilitres vanilla extract
    • 120 grams sour cream
    • 165 grams crushed pineapple, well drained
    • 60 grams powdered sugar
    • 30 millilitres pineapple juice

    1. Set the oven to 175°C. Grease and flour a standard loaf pan to prevent sticking.
    2. In a medium bowl, whisk together all-purpose flour, baking powder, and salt until evenly distributed.
    3. In a large bowl, use an electric mixer to beat softened butter with granulated sugar on medium speed until light and fluffy.
    4. Add eggs one at a time to the creamed mixture, beating after each addition, then mix in vanilla extract.
    5. Add dry ingredients and sour cream to the batter in three additions, starting and ending with the flour mixture. Mix gently after each addition until just combined.
    6. Fold the well-drained crushed pineapple into the batter using a spatula, ensuring even distribution without overmixing.
    7. Pour the batter into the prepared loaf pan and smooth the surface. Bake for 50–60 minutes, or until a toothpick inserted into the centre comes out clean.
    8. Let the loaf cool in the pan for 10 minutes. Transfer to a wire rack to cool completely. Whisk powdered sugar with pineapple juice to create a smooth glaze, then drizzle over the cooled loaf.

    Notes

    • Ensure the crushed pineapple is well-drained to avoid excess moisture in the cake.
    • This cake can be stored in an airtight container at room temperature for up to three days.
    • For an extra touch, consider adding shredded coconut to the batter.
    • Prep Time: 20 minutes
    • Cook Time: 60 minutes
    • Category: Dessert
    • Method: Baking
    • Cuisine: Tropical

    Nutrition

    • Serving Size: 1 slice
    • Calories: 250
    • Sugar: 20 grams
    • Sodium: 150 milligrams
    • Fat: 10 grams
    • Saturated Fat: 5 grams
    • Unsaturated Fat: 3 grams
    • Trans Fat: 0 grams
    • Carbohydrates: 35 grams
    • Fiber: 1 gram
    • Protein: 2 grams
    • Cholesterol: 35 milligrams

    Sharing is caring!

  • Lazy Chicken Parmesan Grilled Cheese

    Lazy Chicken Parmesan Grilled Cheese


    Introduction to Lazy Chicken Parmesan Grilled Cheese

    As a busy mom and home cook, I know how crucial it is to have quick and delightful meals in our back pocket. That’s where my Lazy Chicken Parmesan Grilled Cheese comes into play! Picture this: a cheesy, crispy sandwich that combines the comforting flavors of chicken parmesan with the ease of a classic grilled cheese. It’s perfect for those hectic evenings when the kids are calling for dinner, or you simply want a cozy meal to relish after a long day. Trust me; this dish is a total crowd-pleaser that requires minimal effort!

    Why You’ll Love This Lazy Chicken Parmesan Grilled Cheese

    This Lazy Chicken Parmesan Grilled Cheese is truly a gem in the world of quick meals. Not only does it come together in just 30 minutes, but it also combines the rich flavors of chicken and cheese with the simplicity of a grilled cheese. For busy moms and professionals, it’s the perfect way to create a satisfying dish that everyone loves without spending hours in the kitchen. If you crave tasty comfort food, this sandwich ticks all the boxes!

    Ingredients for Lazy Chicken Parmesan Grilled Cheese

    Gathering your ingredients is half the fun! For this Lazy Chicken Parmesan Grilled Cheese, you’ll need a few simple items that I bet you can find right in your kitchen.

    • Frozen breaded chicken patties: These are the star of the dish. They add that crunchy texture and savory flavor without any fuss.
    • Italian bread: Choose thick slices for a hearty sandwich. The crust adds a delightful crunch, soaking up all the flavors without getting soggy.
    • Provolone cheese: This creamy cheese melts beautifully, giving the sandwich its gooey texture. If you prefer, mozzarella works just as well, too!
    • Shredded Parmesan cheese: A sprinkle of Parmesan elevates the flavors, giving that authentic Italian touch. Feel free to use any grated cheese you have on hand.
    • Marinara sauce: This delicious sauce brings a touch of sweetness and acidity. You can buy it pre-made or whip up a quick batch if time allows.
    • Dried basil: It adds a lovely herbaceous note, enhancing the overall flavor profile. If you have fresh basil, that would be simply divine!
    • Garlic salt: A pinch of this brings an irresistible aroma and taste. If you don’t have any, regular salt and a bit of minced garlic will do!
    • Garlic butter: This luscious spread gives the bread a rich flavor. You can easily make your own by mixing softened butter with minced garlic.

    Don’t worry about exact measurements just yet; you can find those at the bottom of the article for easy printing. Happy cooking!

    How to Make Lazy Chicken Parmesan Grilled Cheese

    Making this Lazy Chicken Parmesan Grilled Cheese is a breeze! Let’s walk through each step together so you can enjoy this savory delight in no time.

    Step 1: Preheat and Bake the Chicken Patties

    First things first, preheat your oven to a cozy 400°F (200°C). Once it’s nice and warm, place the frozen breaded chicken patties on a baking sheet. I love using a non-stick one to avoid any mess!

    Bake them in the oven for about 20 minutes until they’re golden brown and crispy. The aroma of chicken will fill your kitchen, making you even hungrier. After baking, let them cool for a minute, then slice each patty in half lengthwise. Trust me, this will help in later layers of deliciousness!

    Step 2: Prepare the Marinara Sauce Mixture

    While your patties bake, it’s time to whip up a quick marinara sauce mixture. In a bowl, combine your marinara sauce with the dried basil and a pinch of garlic salt.

    This combination isn’t just for flavor; it brings a touch of warmth and comfort!

    Microwave the mixture for about 30 to 60 seconds and stir. Be careful when taking it out—it’ll be hot! This sauce will elevate your sandwich to a whole new level.

    Step 3: Assemble the Sandwich

    Now comes the fun part—assembling your sandwich! Grab a sturdy skillet and lay it on your stovetop.

    Start by layering your ingredients like this: place a slice of Italian bread butter-side down in the skillet.

    On top, add two slices of provolone cheese, followed by 1 tablespoon of your warmed marinara sauce mixture.

    Now, add two halves of the chicken patties, then drizzle on another 2 tablespoons of sauce.

    Finally, top it off with one more slice of provolone cheese and finish with another slice of bread butter-side up. Your Lazy Chicken Parmesan Grilled Cheese is looking fantastic!

    Step 4: Cook the Sandwich

    Time to cook! Heat your skillet over medium heat. Cook the sandwich for about 2-3 minutes on each side. Flip carefully to avoid any stuffing spillage!

    You want it golden brown and for that cheese to melt into gooey goodness. If it’s browning too quickly, don’t hesitate to lower the heat. A little patience will lead to the perfect sandwich.

    Step 5: Serve with Extra Sauce

    Once your sandwiches are perfectly cooked, it’s time to serve! Warm up any leftover marinara sauce and stir in that shredded Parmesan cheese.

    This sauce makes an excellent dip for your sandwiches!

    Plate your Lazy Chicken Parmesan Grilled Cheese, and don’t forget to provide that extra sauce on the side. This meal is not just tasty; it’s a feast for the eyes, too! Enjoy every cheesy bite!

    Tips for Success

    • Always let the chicken patties cool slightly before slicing; this prevents them from falling apart.
    • Use a well-heated skillet to ensure a crispy crust on your sandwich.
    • Experiment with different cheeses; a mix of mozzarella and provolone can make it even creamier!
    • Add fresh herbs or spices to elevate the flavor of your marinara sauce.
    • Don’t overstuff your sandwich; a little goes a long way for melting perfection.

    Equipment Needed for Lazy Chicken Parmesan Grilled Cheese

    • Oven: Essential for baking those crispy chicken patties. A toaster oven works too!
    • Skillet: A non-stick skillet is ideal for cooking. If you don’t have one, any frying pan will do.
    • Baking sheet: You can use parchment paper for easy cleanup!
    • Microwave-safe bowl: Perfect for heating the marinara sauce mixture. A small pot can work too.

    Variations of Lazy Chicken Parmesan Grilled Cheese

    • Spicy Kick: Add sliced jalapeños or a sprinkle of red pepper flakes to the marinara sauce for a zesty twist that packs a punch.
    • Veggie Delight: Layer in some fresh spinach or sautéed mushrooms to sneak in extra veggies for a nutritious upgrade.
    • Gluten-Free Option: Use gluten-free bread and ensure the chicken patties are certified gluten-free for a tasty alternative.
    • Herb Infusion: Experiment with fresh basil or oregano layered in the sandwich for an aromatic freshness that’s simply divine.
    • Cheese Lovers: Mix in a combination of mozzarella, provolone, and Gouda for a cheesy explosion that’s unforgettable!

    Serving Suggestions for Lazy Chicken Parmesan Grilled Cheese

    • Classic Side Salad: A fresh garden salad with cucumbers and tomatoes pairs perfectly to balance the richness of the sandwich.
    • Crispy French Fries: Serve with golden, crispy fries for a comforting twist.
    • Sparkling Water: A bubbly drink refreshes the palate and complements the flavors.
    • Presentation Tip: Cut the sandwich diagonally and stick a toothpick in each half for a fun, café-style presentation!

    FAQs about Lazy Chicken Parmesan Grilled Cheese

    Can I use fresh chicken instead of frozen patties? Absolutely! If you have fresh grilled or cooked chicken on hand, feel free to slice it and layer it in your sandwich. It will add a lovely homemade touch!

    What if I don’t have marinara sauce? No marinara? No problem! You can substitute it with your favorite pizza sauce or even a homemade tomato sauce for a different flavor profile. Just be creative!

    How do I store leftovers? If you have any leftovers, simply wrap the sandwich tightly in foil or plastic wrap. Store it in the fridge for up to two days. Reheat it in a skillet for best results!

    Can this recipe be made in advance? While the Lazy Chicken Parmesan Grilled Cheese is best enjoyed fresh, you can prep the ingredients ahead of time. Bake the chicken patties and mix the sauce the day before!

    Is this dish kid-friendly? Definitely! Kids adore cheesy grilled sandwiches, and by adding chicken, you get a delicious meal that they will love. It’s a great way to sneak in protein, too!

    Final Thoughts

    There’s something incredibly satisfying about crafting a meal that brings joy and comfort, especially after a hectic day. My Lazy Chicken Parmesan Grilled Cheese does just that—with its melty cheese and crispy chicken, it’s the ultimate indulgence. This dish is not only quick to whip up, but it can stir up delightful memories of family dinners and stolen bites in the kitchen. Whether for those busy weeknights or a cozy weekend treat, I hope it brings as much happiness to your table as it does to mine. Enjoy each delicious bite and the smiles they bring!


    Print

    clock clock iconcutlery cutlery iconflag flag iconfolder folder iconinstagram instagram iconpinterest pinterest iconfacebook facebook iconprint print iconsquares squares iconheart heart iconheart solid heart solid icon

    Description

    A quick and delicious grilled cheese sandwich featuring lazy chicken parmesan style patties, perfect for a quick meal.


    • 2 frozen breaded chicken patties
    • 4 slices Italian bread
    • 6 thin slices provolone cheese
    • 2 tablespoons shredded Parmesan cheese
    • 1 cup marinara sauce
    • ½ teaspoon dried basil
    • 1 pinch garlic salt
    • 2 tablespoons garlic butter

    1. Preheat oven to 400°F (200°C). Bake frozen patties for 20 minutes until crispy. Cool slightly and slice each in half lengthwise.
    2. Spread garlic butter on one side of each bread slice. Mix marinara, basil, and garlic salt in a bowl; microwave for 30–60 seconds and stir.
    3. In a skillet (off heat), layer: Bread (butter-side down), 2 provolone slices, 1 tbsp sauce, 2 chicken halves, 2 more tbsp sauce, 1 provolone slice, top bread slice (butter-side up).
    4. Cook on medium heat for 2–3 minutes per side until golden and cheese melts. Press gently and adjust heat if needed.
    5. Repeat for the second sandwich. Warm leftover sauce, add Parmesan, and serve for dipping.

    Notes

    • For extra flavor, you can add more herbs to the sauce.
    • Feel free to substitute chicken patties with homemade or fresh grilled chicken.
    • Prep Time: 10 minutes
    • Cook Time: 20 minutes
    • Category: Main Course
    • Method: Grilling
    • Cuisine: Italian-American

    Nutrition

    • Serving Size: 1 sandwich
    • Calories: 500
    • Sugar: 5g
    • Sodium: 800mg
    • Fat: 25g
    • Saturated Fat: 10g
    • Unsaturated Fat: 10g
    • Trans Fat: 0g
    • Carbohydrates: 50g
    • Fiber: 2g
    • Protein: 28g
    • Cholesterol: 70mg

    Sharing is caring!

  • Cranberry Pecan Pumpkin Bread

    Cranberry Pecan Pumpkin Bread


    Introduction to Cranberry Pecan Pumpkin Bread

    As the leaves turn and the air gets crisp, there’s something incredibly comforting about baking a loaf of Cranberry Pecan Pumpkin Bread. This recipe is my go-to for busy days, bringing together the flavors of fall in a simple, delicious way. I find joy in sharing this bread with family and friends, making any moment special. Whether you’re looking to impress your loved ones or need a quick treat to enjoy during a hectic week, you can’t go wrong with this delightful combination. Let’s dive into this cozy kitchen adventure together!

    Why You’ll Love This Cranberry Pecan Pumpkin Bread

    This Cranberry Pecan Pumpkin Bread is not just easy to make; it’s downright enjoyable! With minimal prep time, you can whip up this delightful treat while juggling your busy day. The combination of tart cranberries and crunchy pecans creates a beautiful contrast against the moist, spiced pumpkin loaf. Each bite is like a warm hug, making it the perfect bread to share or savor snuggled up on the couch.

    Ingredients for Cranberry Pecan Pumpkin Bread

    Gathering the right ingredients is key to achieving that moist, flavorful Cranberry Pecan Pumpkin Bread. Here’s what you’ll need:

    • All-purpose flour: This forms the bread’s base and provides structure. You can substitute with whole wheat flour for added fiber.
    • Salt: Just a touch enhances all the flavors, balancing the sweetness of the bread.
    • Baking powder and baking soda: These leavening agents work together to make your bread rise, creating a fluffy texture.
    • Pumpkin pie spice: A delightful mix of spices that screams autumn—cinnamon, nutmeg, and cloves—all work together to warm your palette.
    • Canned pumpkin: Not the pie filling! We’re using pure pumpkin puree for its rich flavor and moisture content.
    • Brown sugar: This adds a lovely depth of flavor while keeping the bread moist. Light or dark brown sugar works here.
    • Granulated sugar: For just a touch of sweetness and to help that crispy crust form.
    • Applesauce or canola oil: Both keep the bread moist. Applesauce offers a healthier twist, while oil adds richness.
    • Eggs: These provide moisture and act as a binder, helping ingredients hold together.
    • Vanilla extract: A splash adds a lovely aroma and enhances the overall flavor profile.
    • Dried cranberries: Sweet-tart nuggets of goodness that add pops of flavor and gorgeous color.
    • Chopped pecans: These crunchy delights not only provide texture but also contribute a nutty flavor. Toasting them elevates their taste!

    Curious about measurements? You can find the exact quantities at the bottom of this article for printing!

    How to Make Cranberry Pecan Pumpkin Bread

    Now that you’ve gathered all your ingredients, it’s time to bring your Cranberry Pecan Pumpkin Bread to life! Follow these simple steps to create a loaf that will warm your heart and delight your taste buds.

    Preheat and Prepare

    Start by preheating your oven to 350°F. This ensures that your bread bakes evenly. While the oven warms up, take two 8×4 inch loaf pans and grease them gently. I also like to line the pans with parchment paper. It makes the bread easier to lift out and helps to keep the crust from getting too dark. Trust me, that little bit of prep work pays off!

    Mix Dry Ingredients

    In a large bowl, combine your all-purpose flour, salt, baking powder, baking soda, and pumpkin pie spice. Using a whisk, mix them together well, ensuring there are no lumps. This step is crucial because it helps evenly distribute the leavening agents, which makes for a perfect rise. As you whisk, think of the texture you’re creating—a fluffy, dreamy loaf that practically invites you in!

    Combine Wet Ingredients

    In another bowl, mix together the canned pumpkin, brown sugar, granulated sugar, and applesauce (or canola oil), followed by the eggs and vanilla extract. The order matters here! Adding the wet ingredients in this way helps them blend more smoothly, creating a rich, creamy mixture. You want this to be delightful and fragrant—like a cozy hug in liquid form.

    Combine Wet and Dry Mixtures

    Gently pour your wet ingredients into the bowl of dry ingredients. Using a spatula, fold them together until just combined. Look for streaks of flour; don’t worry about overmixing! Overmixing can lead to a denser loaf, while gentle folding keeps that airy texture we all love. Think of it like embracing flavors, not wrestling with them!

    Fold in Cranberries and Pecans

    Now comes the fun part. Carefully fold in your dried cranberries and chopped pecans into the batter. Make sure they’re evenly distributed, as each bite deserves a touch of tangy cranberry and a crunch from the pecans. Folding preserves the lightness and keeps your bread from becoming heavy.

    Bake the Bread

    Pour half of the batter into each prepared loaf pan. Bake for 50 to 55 minutes or until a toothpick inserted into the center comes out clean. If it comes out with moist crumbs, that’s a good sign, but if it’s wet, give it a few more minutes. The aroma of baking will fill your kitchen, making it hard to resist a little taste testing!

    Cool and Serve

    After baking, let the bread cool in the pan for about 10 minutes. This helps it firm up, making it easier to remove. Then transfer the loaves to a wire rack to cool completely. While it cools, consider how you’ll enjoy this luscious bread—perhaps with a smear of cream cheese or simply on its own with a warm cup of tea. It’s like a sweet slice of fall magic!

    Tips for Success

    • Use room temperature ingredients for a smoother batter.
    • Toast your pecans ahead of time to enhance their flavor.
    • Don’t overmix! Stop when there are just a few flour streaks visible.
    • Let the bread cool completely before slicing for cleaner cuts.
    • For added moisture, store leftover bread in an airtight container.

    Equipment Needed

    • Two 8×4 inch loaf pans (if you don’t have these, any similar-sized pans will do).
    • Mixing bowls (a large and a medium are perfect).
    • Whisk (or a fork works in a pinch).
    • Spatula (to gently fold in ingredients).
    • Parchment paper (makes for easy removal).

    Variations for Cranberry Pecan Pumpkin Bread

    • Gluten-Free: Substitute all-purpose flour with a 1:1 gluten-free flour blend for a deliciously inclusive option.
    • Add Chocolate: Toss in some chocolate chips for a rich contrast to the cranberries; it’s an indulgent twist!
    • Spice It Up: Experiment with adding more spices, like ginger or allspice, for an extra kick of flavor.
    • Fruit Medley: Swap out cranberries for other dried fruits like raisins or chopped dates, creating a unique taste and texture.
    • Nuts Galore: Try different nuts like walnuts or hazelnuts, each bringing its own special flavor to the bread.
    • Vegan Option: Use flax eggs (1 tbsp ground flaxseed + 2.5 tbsp water per egg) instead of regular eggs and swap applesauce for canola oil.

    Serving Suggestions

    • Pair slices of warm bread with a dollop of cream cheese or butter for extra indulgence.
    • Enjoy with a steaming cup of herbal tea or coffee to enhance the fall flavors.
    • Serve it alongside a fresh fruit salad to bring a refreshing contrast.
    • For a festive presentation, sprinkle with extra toasted pecans on top!

    FAQs about Cranberry Pecan Pumpkin Bread

    Can I use fresh cranberries instead of dried?
    Absolutely! Fresh cranberries can work well, but they’re a bit tart. Consider adding extra sugar to balance the flavors if you go this route.

    How do I store Cranberry Pecan Pumpkin Bread?
    Store your bread in an airtight container at room temperature for up to three days. If you want it to last longer, freeze individual slices for a quick treat later!

    Can I make this bread ahead of time?
    Definitely! This bread actually tastes better the next day. Make it the night before for a flavorful treat ready to go the next morning. It’s perfect for busy days.

    What can I substitute for eggs?
    If you’re going vegan or have an egg allergy, flax eggs are a great alternative. Mix 1 tablespoon of ground flaxseed with 2.5 tablespoons of water to replace one egg!

    Can I add any other nuts or spices?
    Yes! Feel free to get creative. Pecans and walnuts complement the bread beautifully. You can also experiment with additional spices like ginger or cardamom for a unique twist!

    Final Thoughts

    Baking Cranberry Pecan Pumpkin Bread is more than just a recipe; it’s an experience wrapped in the warm embrace of autumn flavors. Each slice invites you to slow down and savor the moment, whether you’re enjoying a quiet breakfast or sharing laughs with friends. The delightful aroma wafting through your kitchen creates a cozy atmosphere that reminds us of home. I hope you find as much joy in making this bread as I do. It’s a delicious way to celebrate the season and create memories with those you love—because nothing compares to a heartfelt loaf straight from your oven!


    Print

    clock clock iconcutlery cutlery iconflag flag iconfolder folder iconinstagram instagram iconpinterest pinterest iconfacebook facebook iconprint print iconsquares squares iconheart heart iconheart solid heart solid icon

    Description

    A delicious and moist fall bread featuring the flavors of pumpkin, tart cranberries, and crunchy pecans.


    • 3 cups all purpose flour
    • 1 tsp salt
    • 1 tsp baking powder
    • 1 tsp baking soda
    • 4 tsp pumpkin pie spice
    • 2 cups canned pumpkin (not pumpkin pie filling)
    • 2/3 cup brown sugar
    • 2/3 cup granulated sugar
    • 1 cup applesauce OR canola oil
    • 3 eggs, room temperature
    • 1 tbsp vanilla extract
    • 1 cup dried cranberries
    • 1 cup chopped pecans, toasted

    1. Preheat oven to 350F. Grease two 8×4 in loaf pans and line with parchment paper. Set aside.
    2. In a large bowl, whisk together flour, salt, baking powder, baking soda and pumpkin pie spice. Set aside.
    3. In a medium bowl, whisk together pumpkin, brown sugar, granulated sugar, applesauce OR oil, eggs, and vanilla extract.
    4. Stir wet ingredients into dry ingredients, mixing just until moistened and combined.
    5. Fold in cranberries and pecans, reserving a small amount of pecans for topping if desired.
    6. Pour half of the batter into each of the prepared loaf pans and bake for 50 to 55 minutes or until an inserted toothpick comes out clean.
    7. Cool for 10 minutes in the pan before removing to a wire rack to cool completely.

    Notes

    • For a richer flavor, use toasted pecans.
    • Store leftovers in an airtight container for up to three days or freeze for longer storage.
    • Prep Time: 15 minutes
    • Cook Time: 55 minutes
    • Category: Bread
    • Method: Baking
    • Cuisine: American

    Nutrition

    • Serving Size: 1 slice
    • Calories: 210
    • Sugar: 12g
    • Sodium: 210mg
    • Fat: 7g
    • Saturated Fat: 1g
    • Unsaturated Fat: 4g
    • Trans Fat: 0g
    • Carbohydrates: 34g
    • Fiber: 2g
    • Protein: 4g
    • Cholesterol: 30mg

    Sharing is caring!

  • Crustless Chicken Pot Pie

    Crustless Chicken Pot Pie


    Introduction to Crustless Chicken Pot Pie

    There’s something magical about a warm, hearty dish like Crustless Chicken Pot Pie that draws us in, isn’t there? As a busy mom myself, I often find solace in a meal that’s both comforting and quick to whip up after a long day. This recipe is a delightful twist on the classic, minus the stress of making pie crust. It’s perfect for those evenings when you want to impress your family with minimal effort. Trust me, once you serve this up, your loved ones will be raving and asking for seconds!

    Why You’ll Love This Crustless Chicken Pot Pie

    This Crustless Chicken Pot Pie is your ticket to a stress-free dinner! It’s incredibly easy to prepare, allowing you to spend more time with your family instead of in the kitchen. The creamy filling is bursting with flavor, and it’s packed with tender chicken and veggies that please even the pickiest eaters. Plus, it requires just one pot, making cleanup a breeze. Trust me, you’ll want this dish in your regular rotation!

    Ingredients for Crustless Chicken Pot Pie

    Gathering the right ingredients is crucial for making a delicious Crustless Chicken Pot Pie. Here’s what you’ll need:

    • Olive oil: This healthy oil adds flavor and helps cook the chicken. It’s a staple in my kitchen!
    • Chicken breasts: Fresh or thawed, cubed chicken is the star of the show, making it hearty and satisfying.
    • Onion: Diced onion adds aromatic depth, making the dish feel comforting from the first bite.
    • Garlic: Freshly minced garlic transforms the flavors, bringing a burst of zing that lifts the entire dish.
    • Carrots: Sliced carrots provide sweetness and a vibrant color, making every spoonful inviting.
    • Celery: Diced celery introduces a delightful crunch and enhances the overall texture of the pie.
    • Seasonings: Salt, black pepper, dried parsley, rosemary, thyme, and basil come together to create a symphony of flavor!
    • Whole wheat flour: This helps thicken the filling while giving a nutty flavor. You can easily switch to gluten-free options like tapioca flour if needed.
    • Chicken broth: Low-sodium broth adds moisture and richness. Homemade broth is a lovely touch if you have it!
    • Milk: Room temperature milk—regular or dairy-free—creates a creamy texture that makes it feel indulgent.
    • Peas and corn: These colorful veggies are not just tasty; they bring a pop of freshness and extra nutrition to the dish.

    For exact measurements, you can find all the details at the bottom of the article for easy printing!

    How to Make Crustless Chicken Pot Pie

    Now that you have everything ready, let’s dive into making this comforting Crustless Chicken Pot Pie! With just a few simple steps, you’ll create a dish that warms not only the belly but the heart too. Let’s get cooking!

    Step 1: Sauté the Chicken

    Start by heating a tablespoon of olive oil in a large pan over medium-high heat.

    Add the cubed chicken and cook it for about ten minutes.

    The goal is to let it brown lightly, allowing those savory flavors to develop. Don’t rush this step—let the chicken shine!

    Step 2: Add Vegetables

    Once your chicken is beautifully browned, it’s time to toss in the diced onion, minced garlic, carrots, and celery.

    Sauté these ingredients for another ten minutes.

    Watching those colors dance in the pan is like seeing a rainbow come together, and the aroma will be downright irresistible!

    Step 3: Incorporate Spices and Broth

    Now, sprinkle in the salt, pepper, dried parsley, rosemary, thyme, and basil.

    These spices are magical—they bring everything to life!

    Next, add the whole wheat flour, stirring it in well to coat the chicken and veggies.

    Pour in the low-sodium chicken broth, stirring constantly as it thickens.

    This is where the comfort food magic starts happening!

    Step 4: Thicken the Mixture

    Let the mixture simmer for about five minutes.

    Look for those bubbles to start forming, indicating that it’s thickening nicely.

    This is the base of your Crustless Chicken Pot Pie, so keep an eye on it to prevent burning!

    Step 5: Add Milk

    Next, slowly pour in the room temperature milk while stirring continuously.

    This step is crucial for achieving that creamy texture we love.

    Watching it transform from a thick soup into a velvety filling is nothing short of culinary poetry!

    Step 6: Mix in Peas and Corn

    Finally, fold in the peas and corn, letting them warm through.

    These vibrant additions not only add color but also a sweet crunch that contrasts beautifully with the creamy filling.

    Give it all a final stir, and prepare to serve the dish made with love!

    Tips for Success

    • Make sure your chicken is cubed evenly for uniform cooking.
    • Use room temperature milk to prevent curdling when added to the hot mixture.
    • Don’t skip the sautéing step; it deepens the flavor of your Crustless Chicken Pot Pie.
    • Customize with your favorite veggies to make it your own.
    • Consider using leftover chicken or rotisserie chicken for a speedy meal!

    Equipment Needed

    • Large pan: A non-stick skillet or sauté pan works perfectly for this dish.
    • Wooden spatula: Ideal for stirring and preventing scratches on your pan.
    • Measuring cups: Essential for getting your ingredients just right.
    • Cutting board: A sturdy surface for chopping your veggies and chicken.
    • Sharp knife: A good chef’s knife makes the prep swift and easy!

    Variations of Crustless Chicken Pot Pie

    • Vegetable Delight: Swap out the chicken for chickpeas or lentils for a hearty vegetarian version.
    • Cheesy Indulgence: Stir in some shredded cheese like cheddar or mozzarella for extra creaminess and flavor.
    • Herb Explosion: Experiment with fresh herbs, such as thyme or dill, for a burst of freshness.
    • Spicy Kick: Add a pinch of cayenne pepper or diced jalapeños for a zesty twist that packs a punch.
    • Seasonal Veggies: Incorporate seasonal vegetables like zucchini or bell peppers to keep things interesting and colorful.
    • Low-Carb Option: Substitute the whole wheat flour with almond flour or coconut flour for a low-carb variation.

    Serving Suggestions with Crustless Chicken Pot Pie

    • Side Salad: A fresh green salad with a tangy vinaigrette complements the richness of the pie.
    • Crusty Bread: Serve with warm, crusty bread for dipping into the creamy filling.
    • Sparkling Water: Pair with sparkling water or iced tea for a refreshing drink choice.
    • Herb Garnish: A sprinkle of fresh herbs on top elevates presentation and flavor.

    FAQs about Crustless Chicken Pot Pie

    Can I make Crustless Chicken Pot Pie ahead of time?
    Absolutely! You can prepare the filling in advance and store it in the refrigerator. Just reheat it on the stovetop before serving. This makes for a quick dinner solution on busy days!

    Is this dish freezer-friendly?
    Yes, the Crustless Chicken Pot Pie filling freezes well! Portion it into containers and freeze for up to three months. Thaw in the fridge overnight, then reheat and enjoy.

    What can I substitute for chicken in this recipe?
    If you prefer a vegetarian option, try using chickpeas or a mix of your favorite vegetables. Both create a tasty, satisfying dish even without chicken.

    Can I add more vegetables to my Crustless Chicken Pot Pie?
    Definitely! Feel free to incorporate any veggies you love, such as bell peppers, green beans, or mushrooms. Mixing it up will only enhance the flavor!

    What flavors does Crustless Chicken Pot Pie have?
    This dish boasts a comforting combination of savory chicken and mixed veggies in a creamy sauce, seasoned with herbs like thyme, rosemary, and basil. It’s pure comfort food heaven!

    Final Thoughts

    There’s something truly special about serving a warm bowl of Crustless Chicken Pot Pie to your family.

    The joy on their faces as they take the first bite is worth every minute spent in the kitchen.

    It’s a delicious reminder that comfort food doesn’t have to be complicated.

    With simple ingredients and a quick process, you get to enjoy quality time without sacrificing your love for great flavors.

    So next time you want to gather around the table, let this dish be your secret weapon for creating moments filled with laughter and warmth—it’s more than just a meal; it’s a memory in the making!


    Print

    clock clock iconcutlery cutlery iconflag flag iconfolder folder iconinstagram instagram iconpinterest pinterest iconfacebook facebook iconprint print iconsquares squares iconheart heart iconheart solid heart solid icon

    Description

    Crustless Chicken Pot Pie is a comforting and hearty dish that combines tender chicken and vegetables in a creamy sauce, perfect for any meal.


    • 1 tablespoon olive oil
    • 2 lbs chicken breasts, cubed in ½ inch squares
    • ½ cup diced onion
    • 1 tablespoon minced garlic (about 3 cloves)
    • 2 cups sliced carrots, cut in small circles
    • ¾ cup diced celery (about 3 stalks)
    • ½ teaspoon salt
    • ¼ teaspoon black pepper
    • 1 teaspoon dried parsley
    • 1 teaspoon dried rosemary
    • ½ teaspoon dried thyme
    • ½ teaspoon dried basil
    • 1/3 cup whole wheat flour (can substitute GF 1:1 or tapioca flour for gluten free)
    • 1 ½ cups low sodium chicken broth
    • 1 ½ cup room temperature milk (regular or nondairy)
    • 1 ½ cup peas
    • 1 ½ cup corn

    1. In a large pan, heat olive oil over medium high heat. Add cubed chicken to the pot and cook for 10 minutes until lightly browned.
    2. Once the chicken has cooked, add onion, garlic, carrots, and celery. Sauté for 10 minutes.
    3. Add dried spices, flour, and chicken broth to the pan. Stir well. Cook for 5 minutes or until the mixture starts to bubble and thicken.
    4. Once bubbling, slowly add in room temperature milk, stirring constantly as the mixture continues to thicken.
    5. Stir in peas and corn.
    6. Serve as is or over cooked rice.

    Notes

    • This dish can be made gluten-free by substituting the whole wheat flour with gluten-free flour or tapioca flour.
    • For a richer flavor, you can use homemade chicken broth.
    • Feel free to add your favorite vegetables or seasonings.
    • Prep Time: 15 minutes
    • Cook Time: 25 minutes
    • Category: Main Course
    • Method: Stovetop
    • Cuisine: American

    Nutrition

    • Serving Size: 1 cup
    • Calories: 350
    • Sugar: 5g
    • Sodium: 600mg
    • Fat: 10g
    • Saturated Fat: 2g
    • Unsaturated Fat: 6g
    • Trans Fat: 0g
    • Carbohydrates: 40g
    • Fiber: 5g
    • Protein: 30g
    • Cholesterol: 80mg

    Sharing is caring!

  • Beef Pepper Rice Bowl

    Beef Pepper Rice Bowl


    Introduction to Beef Pepper Rice Bowl

    As a busy mom juggling a million tasks, I know how challenging it can be to get a tasty meal on the table. That’s where my Beef Pepper Rice Bowl comes in—a one-pot wonder that marries hearty flavors with ease. This delightful dish is not just quick to whip up, but it also pleases a crowd, making it perfect for family dinners. With bright bell peppers, savory beef, and aromatic rice, it’s a meal that feels special without the fuss. Let’s dive into this flavorful journey that will soon become a staple in your kitchen!

    Why You’ll Love This Beef Pepper Rice Bowl

    This Beef Pepper Rice Bowl is not just a meal; it’s a solution for your busy life! With minimal prep and cook time, it fits right into those hectic evenings. Kids and adults alike love its hearty flavors and colorful ingredients. Plus, it’s versatile! You can easily tweak it to suit your family’s tastes. Say goodbye to mealtime stress and hello to a delightful dish that brings everyone to the table!

    Ingredients for Beef Pepper Rice Bowl

    This scrumptious Beef Pepper Rice Bowl comes together with a handful of simple, flavorful ingredients. Each one plays a role in creating that delightful balance of taste and texture. Here’s what you’ll need:

    • Ground Beef: The star of the dish, it brings protein and heartiness.
    • Olive Oil: A splash of this adds richness to sauté the veggies and beef.
    • Onion: Diced onions provide a base flavor, sweetening as they cook.
    • Bell Peppers: Feel free to use any color—red, yellow, or green—for sweetness and color.
    • Garlic: Freshly minced brings an aromatic warmth to the dish, elevating the flavors.
    • Jasmine Rice: This fragrant rice is tender and fluffy, soaking up all the savory goodness.
    • Beef Broth: Using broth instead of water infuses the rice with extra flavor.
    • Soy Sauce: A splash enhances umami, making every bite savory and satisfying.
    • Worcestershire Sauce: This adds depth and a tangy twist to the beef.
    • Ground Black Pepper: A pinch adds subtle spice that elevates the overall flavor.
    • Paprika: This gives a hint of sweetness and a touch of smoky flavor.
    • Salt: Don’t forget to season to taste, balancing all the flavors perfectly.
    • Chopped Green Onions: These are ideal for garnishing, adding color and freshness to your final dish.

    Feel free to experiment with your ingredients! You could add carrots, zucchini, or even mushrooms for a twist. All ingredient measurements can be found at the bottom of the article for printing. Let your creativity flow as you embark on this culinary adventure!

    How to Make Beef Pepper Rice Bowl

    Making this Beef Pepper Rice Bowl is a breeze, and I promise it will fill your kitchen with mouthwatering aromas! Follow my step-by-step guide to create this hearty dish that’s perfect for busy nights and will surely impress your family.

    Step 1: Cook the Jasmine Rice

    Start by cooking the jasmine rice. In a medium saucepan, combine 1 cup of uncooked jasmine rice with 2 cups of beef broth. This small switch from water to broth adds a tremendous depth of flavor!

    Bring the mixture to a boil over medium-high heat. Once boiling, reduce the heat to low, cover, and let it simmer for about 15 minutes. Don’t peek! Just trust the process.

    After 15 minutes, remove the pot from heat, but let it sit covered for another 5 minutes. This step is crucial as it ensures the rice steams, becoming fluffy and light. Fluff with a fork, and set it aside.

    Step 2: Sauté the Vegetables

    Next, grab a large skillet and heat 1 tablespoon of olive oil over medium heat. Add the diced onion and sauté for about 3-4 minutes until it’s translucent. The onions will sweeten as they cook, adding a wonderful base flavor.

    Make sure to stir occasionally; this step helps prevent them from sticking and burning. You want them soft and fragrant before moving on. Trust me; this is the foundation of your Beef Pepper Rice Bowl!

    Step 3: Brown the Beef

    Now it’s time to add the star of the show—ground beef! Crumble it into the skillet, breaking it apart with your spatula. Cook until browned, which should take about 5-7 minutes.

    As the beef cooks, keep an eye on the texture—aim for a fine crumble. Don’t forget to drain any excess fat when it’s done! Nobody wants a greasy dish, right? Now we’re building delicious flavors!

    Step 4: Add Peppers and Garlic

    Once the beef is browned, add the sliced bell peppers and minced garlic to the skillet. Stir and let them cook for about 5 minutes until the peppers soften and the garlic becomes aromatic.

    This timing is key! Adding the garlic too early can lead to bitterness, so wait until the beef is ready. The kaleidoscope of colors will brighten your day and whet your appetite!

    Step 5: Combine Ingredients

    Here comes the exciting part! Add the cooked jasmine rice straight into the skillet with the beef mixture. Pour in the soy sauce, Worcestershire sauce, ground black pepper, paprika, and salt to taste.

    Mix everything well, ensuring the rice absorbs all those tasty flavors. Heat it through for about 2-3 minutes while stirring occasionally. Now that’s what I call a flavor explosion in a bowl!

    Step 6: Garnish and Serve

    Finally, it’s time to plate! Spoon the enticing mixture into bowls and don’t forget the finishing touch—chopped green onions. These not only add a pop of color but also a fresh bite that brightens each mouthful.

    There you have it—your Beef Pepper Rice Bowl is ready to be enjoyed! Serve it up warm and watch as your family gathers, drawn in by the delightful aroma that fills your kitchen!

    Tips for Success

    • Always let the rice sit after cooking—it makes a world of difference in texture.
    • Customize your beef! You can use ground turkey or chicken for a lighter option.
    • Adjust the spices to your family’s taste. Add chili flakes for some heat!
    • Double the recipe for easy meal prep; leftovers reheat beautifully.
    • Top with sesame seeds or avocado slices for an extra touch of flavor.

    Equipment Needed

    • Medium saucepan: Perfect for cooking the rice; you can use a small pot instead.
    • Large skillet: Ideal for sautéing; a frying pan works too!
    • Spatula: A sturdy one for browning beef and mixing; a wooden spoon is great as well.
    • Measuring cups: For precise ingredient portions; use a kitchen scale if needed.

    Variations

    • Vegetarian Option: Substitute ground beef with lentils or a plant-based meat alternative for a satisfying veggie bowl.
    • Spicy Twist: Add diced jalapeños or a splash of Sriracha for a kick that warms you up!
    • Healthy Upgrade: Use quinoa instead of rice for added protein and fiber, or try brown rice for a nuttier flavor.
    • Extra Veggies: Load up with your favorite veggies like zucchini, corn, or broccoli for a colorful and nutritious boost.
    • Tropical Flair: Incorporate pineapple chunks for a sweet contrast to the savory ingredients; it’s a fun twist!

    Serving Suggestions for Beef Pepper Rice Bowl

    • Pair the bowl with a crisp side salad drizzled with a light vinaigrette for a refreshing contrast.
    • Serve with steamed broccoli or green beans to add a healthy crunch.
    • Offer chilled green tea or sparkling water with lemon for a zesty drink option.
    • For presentation, garnish with sesame seeds or extra green onions for a pop of color!

    FAQs about Beef Pepper Rice Bowl

    Can I make the Beef Pepper Rice Bowl ahead of time?

    Absolutely! This dish is perfect for meal prep. You can cook it in advance and store it in an airtight container for up to 3 days in the fridge. Just reheat it gently in the microwave or stovetop before serving!

    What can I substitute for ground beef?

    If you’re looking for alternatives, ground turkey or chicken works well for a lighter option. For a vegetarian twist, lentils or a plant-based meat substitute can be delicious replacements too!

    Can I freeze leftover Beef Pepper Rice Bowl?

    Yes, you can freeze this dish! Allow it to cool completely, then store it in freezer-safe containers. It will last up to 2 months in the freezer. Just thaw in the fridge overnight and reheat when you’re ready to enjoy it again!

    How can I adjust the spice level in the Beef Pepper Rice Bowl?

    If spicy food is your jam, feel free to add chili flakes or a swirl of hot sauce. For milder flavors, just skip those extras. Tailoring it to your family’s taste is part of the fun!

    What’s a good side dish to serve with the Beef Pepper Rice Bowl?

    A simple side salad or steamed vegetables pairs perfectly with this hearty bowl. The crispiness of greens provides a nice contrast to the warm, savory flavors, making it a balanced meal!

    Final Thoughts

    Embracing the joy of cooking can turn even the busiest days into delightful experiences. My Beef Pepper Rice Bowl not only serves up a satisfying meal but also bridges the gap between hectic schedules and meaningful family time. Each flavorful bite reminds me of the warmth shared around the dinner table. Whether it’s for a weeknight dinner or a special gathering, this recipe brings joy and comfort with its simplicity. So, roll up your sleeves, gather your loved ones, and share in the deliciousness. Your culinary adventure awaits, and trust me, it’s one you’ll cherish!


    Print

    clock clock iconcutlery cutlery iconflag flag iconfolder folder iconinstagram instagram iconpinterest pinterest iconfacebook facebook iconprint print iconsquares squares iconheart heart iconheart solid heart solid icon

    Description

    A flavorful and hearty Beef Pepper Rice Bowl that’s easy to make and will delight your taste buds.


    • 1 pound ground beef
    • 1 tablespoon olive oil
    • 1 medium onion, diced
    • 2 bell peppers (any color), sliced
    • 3 cloves garlic, minced
    • 1 cup uncooked jasmine rice
    • 2 cups beef broth
    • 2 tablespoons soy sauce
    • 1 tablespoon Worcestershire sauce
    • 1 teaspoon ground black pepper
    • 1 teaspoon paprika
    • Salt to taste
    • Chopped green onions for garnish

    1. Start by cooking the jasmine rice. In a medium saucepan, combine 1 cup of uncooked jasmine rice with 2 cups of beef broth. Bring the mixture to a boil over medium-high heat, then reduce the heat to low, cover, and let it simmer for about 15 minutes. Remove from heat and let it sit for another 5 minutes, then fluff with a fork and set aside.
    2. In a large skillet, heat 1 tablespoon of olive oil over medium heat. Add the diced onion and sauté for about 3-4 minutes until translucent. Then, add the ground beef and break it apart as it cooks. Cook until browned, about 5-7 minutes, and drain any excess fat.
    3. Add the sliced bell peppers and minced garlic to the skillet and stir. Cook for an additional 5 minutes until the peppers soften and infuse with garlic flavor.
    4. Add the cooked jasmine rice to the beef and vegetable mixture. Pour in the soy sauce, Worcestershire sauce, ground black pepper, paprika, and salt to taste. Mix well and heat through for about 2-3 minutes, stirring occasionally.
    5. Spoon the mixture into bowls and garnish with chopped green onions before serving. Enjoy your Beef Pepper Rice Bowl!

    Notes

    • Feel free to adjust the spice levels and add other vegetables as desired.
    • This dish pairs well with a side salad or steamed vegetables.
    • Store leftovers in an airtight container in the fridge for up to 3 days.
    • Prep Time: 10 minutes
    • Cook Time: 25 minutes
    • Category: Main Course
    • Method: Stovetop
    • Cuisine: Asian

    Nutrition

    • Serving Size: 1 bowl
    • Calories: 450
    • Sugar: 3g
    • Sodium: 650mg
    • Fat: 20g
    • Saturated Fat: 6g
    • Unsaturated Fat: 12g
    • Trans Fat: 0g
    • Carbohydrates: 45g
    • Fiber: 2g
    • Protein: 28g
    • Cholesterol: 70mg

    Sharing is caring!

  • Cranberry Pistachio Bread

    Cranberry Pistachio Bread


    Introduction to Cranberry Pistachio Bread

    Have you ever had one of those days where you just need a cozy little treat to brighten things up? That’s where my Cranberry Pistachio Bread comes in—a delightful sweet treat that’s as comforting as your favorite sweater! This recipe is perfect whether you’re a busy mom juggling work and family or just need a delicious pick-me-up. With moist bread filled with tart cranberries and crunchy pistachios, it’s a simple way to impress your loved ones at any gathering or to enjoy all by yourself. Let’s dive into this culinary adventure together!

    Why You’ll Love This Cranberry Pistachio Bread

    This Cranberry Pistachio Bread is not just a feast for the eyes; it’s a breeze to whip up! With minimal prep time and beginner-friendly steps, you can have this delightful dessert ready before you know it. Each slice offers a comforting blend of sweet and tart flavors that will make your taste buds dance. Plus, it’s the perfect addition to your holiday table or an afternoon coffee break, ensuring joy bites at any time!

    Ingredients for Cranberry Pistachio Bread

    Let’s gather our ingredients to make this scrumptious Cranberry Pistachio Bread! Each element not only adds flavor but brings its unique flair to the loaf. Here’s what you will need:

    • Unsalted butter: This provides richness and a moist texture. Softened to room temperature, it’s easier to cream with sugar.
    • Sugar: Adding sweetness balances the tartness of cranberries. We’ll use both regular sugar and a touch for the cranberries.
    • Eggs: They lend moisture and act as a binding agent to hold all the ingredients together.
    • Vanilla extract: A splash of vanilla infuses warmth and depth into the flavors.
    • Fresh whole cranberries: These beauties provide the tart kick that makes this bread special. Always opt for fresh for the best taste.
    • Milk: It adds moisture and creates a lovely crumb. You can use any milk or milk alternative of your choice.
    • All-purpose flour: This is the foundation of our bread, giving it structure and body.
    • Baking powder: Essential for leavening, it helps our bread rise to fluffy perfection.
    • Salt: Just a pinch enhances all the flavors and balances the sweetness.
    • Pistachio pudding mix: This delightful addition gives a unique flavor and keeps the bread wonderfully moist.
    • Chopped pistachios: For crunch! They not only taste amazing but also add vibrant color to the loaf.

    If you’re feeling adventurous, you can substitute the pistachios with walnuts for a different twist. A note on cranberries: be sure to choose fresh ones for the best flavor. You can find the exact quantities for each of these ingredients at the bottom of the article, ready for printing!

    How to Make Cranberry Pistachio Bread

    Now that we have everything ready, let’s move on to the fun part—making the Cranberry Pistachio Bread! I’ll guide you through each step so that you can create this delightful treat effortlessly. Just remember, cooking should be enjoyable, so let’s get started!

    Step 1: Prepare Your Oven and Loaf Pan

    First, we need to preheat our oven to 350°F. This is a crucial step because it ensures even baking. While the oven heats up, grease a 9×5 inch loaf pan with cooking spray. Greasing is essential to prevent our beautiful bread from sticking. Trust me, there’s nothing worse than an adorable loaf that won’t come out of its home!

    Step 2: Cream the Butter and Sugar

    In the bowl of a stand mixer, beat together softened butter and 1 cup of sugar until the mixture becomes light and fluffy. This creaming process is key to achieving a light texture in our bread. It incorporates air into the mixture, which helps it rise beautifully—a perfect start to our baking adventure!

    Step 3: Add in Eggs and Vanilla

    Next, let’s mix in the eggs and vanilla extract. Beat them well into the butter mixture until everything is combined. Eggs add moisture and act as a binding agent, holding our ingredients together. And that touch of vanilla? It infuses the most delightful aroma that fills your kitchen!

    Step 4: Prepare the Cranberries

    Now it’s time for the stars of our loaf—those lovely cranberries! In a food processor, combine the fresh cranberries with 1 tablespoon of sugar. Pulse to chop them roughly. Chopping enhances the berries’ flavor, creating delightful pockets of tartness in every slice. Yum!

    Step 5: Combine Dry Ingredients

    In a separate bowl, whisk together the flour, baking powder, salt, and pistachio pudding mix. Mixing these dry ingredients separately ensures even distribution. This prevents any surprises like big lumps of baking powder when you bite into a slice!

    Step 6: Mix the Batter

    With the mixer on low speed, gradually add half of the flour mixture to the wet ingredients. Then, pour in the milk, mixing just until combined. Follow this by adding the remaining flour mixture and the chopped pistachios. Here’s the trick: don’t overmix! Stir just until incorporated. We want a tender and moist bread, and overmixing can turn it dense.

    Step 7: Transfer Batter and Smooth Top

    Now, gently transfer the batter into your prepared loaf pan. Use a spatula to smooth out the top so that it bakes evenly. Remember, a smooth top leads to an even bake and beautiful slices!

    Step 8: Bake Until Golden

    Your bread is ready for the oven! Bake for about 55 to 65 minutes. The bread is done when a toothpick inserted in the center comes out clean. You should see a lovely golden color. The aroma wafting through your home will be absolutely delightful!

    Step 9: Cool and Serve

    Once baked, allow the bread to cool in the pan for a few minutes. After that, carefully transfer it to a cooling rack to cool completely. When it’s cool enough to handle, slice your bread with a sharp knife. You’ll find it easy to cut, thanks to the moist texture—perfect for enjoying with a cup of coffee or tea!

    Tips for Success

    • Always use fresh cranberries for the best flavor and texture.
    • Ensure your butter is softened to room temperature for easy creaming.
    • Don’t overmix the batter; it can make the bread dense.
    • Let the bread cool completely before slicing for clean cuts.
    • Store any leftovers in an airtight container to keep it moist.

    Equipment Needed

    • 9×5 inch loaf pan (a similar-sized baking dish works too)
    • Stand mixer (a hand mixer or whisk can do the job)
    • Food processor (you can chop cranberries by hand if needed)
    • Mixing bowls (any size will work)
    • Measuring cups and spoons (kitchen scale is an option for accuracy)

    Variations

    • Nut Alternatives: If pistachios aren’t your favorite, try walnuts or almonds for a different flavor and crunch.
    • Dried Fruits: Mix in dried cranberries or apricots for a chewy texture and added sweetness.
    • Spice it Up: Add a dash of cinnamon or nutmeg for a warm, cozy flavor that’s perfect for chilly days.
    • Gluten-Free Option: Substitute all-purpose flour with a gluten-free blend to make this recipe accessible for everyone.
    • Vegan Twist: Replace eggs with flaxseed meal and use a non-dairy milk to create a delicious vegan version.

    Serving Suggestions

    • Serve warm slices with a dollop of cream cheese for a luscious pairing.
    • Enjoy alongside a hot cup of tea or coffee for a delightful afternoon treat.
    • Pair with a fresh fruit salad to add a refreshing contrast.
    • For presentation, dust with powdered sugar to elevate its charm!

    FAQs about Cranberry Pistachio Bread

    Can I use frozen cranberries instead of fresh?

    Absolutely! Frozen cranberries work just fine. Just remember to thaw and drain them, as excess moisture can affect the texture of your bread.

    How do I store Cranberry Pistachio Bread?

    To keep your bread fresh, store it in an airtight container at room temperature for up to three days. You can also freeze it for up to three months. Just slice it before freezing for easy thawing!

    Can I make this bread ahead of time for the holidays?

    You bet! Cranberry Pistachio Bread actually tastes even better the next day. Bake it ahead of time, then wrap it well and store it. Just let it come to room temperature before serving!

    What’s a good way to dress up the bread for serving?

    A sprinkle of powdered sugar can brighten up the presentation! You can also serve slices with a side of cream cheese or butter for an extra indulgent touch.

    Is this Cranberry Pistachio Bread suitable for a brunch gathering?

    Definitely! Its vibrant colors and delightful flavors make it a perfect choice for brunch. Pair it with some fresh fruit and coffee, and you have a winning combination!

    Final Thoughts

    Making this Cranberry Pistachio Bread is more than just a culinary project; it’s a heartfelt journey. The thrill of creaming butter and sugar is a joyful anticipation, while the aroma filling your home warms your spirit. Each slice delivers a wave of sweet and tangy flavors that brightens any moment, whether shared with loved ones or savored solo. Plus, knowing you created this delightful treat from scratch adds to the satisfaction. So, grab your apron, embrace the process, and let this beautiful bread bring a sprinkle of joy to your day, one slice at a time!


    Print

    clock clock iconcutlery cutlery iconflag flag iconfolder folder iconinstagram instagram iconpinterest pinterest iconfacebook facebook iconprint print iconsquares squares iconheart heart iconheart solid heart solid icon

    Description

    Cranberry Pistachio Bread is a delightful sweet treat featuring a moist bread filled with fresh cranberries and crunchy pistachios, perfect for any occasion.


    • 1/2 cup unsalted butter, softened
    • 1 cup + 1 TBSP sugar
    • 2 eggs
    • 2 tsp vanilla extract
    • 1 1/4 cup fresh whole cranberries
    • 1/2 cup milk
    • 2 cups all-purpose flour
    • 1 1/2 tsp baking powder
    • 1/2 tsp salt
    • 3.4-oz box instant pistachio pudding mix
    • 1/4 cup chopped pistachios

    1. Preheat oven to 350F and grease a 9×5″ loaf pan with cooking spray.
    2. In the bowl of a stand mixer fitted with a paddle attachment, beat together butter and 1 cup sugar until light and fluffy.
    3. Add eggs and vanilla extract, beating well to combine.
    4. In a food processor, combine cranberries and 1 TBSP sugar. Pulse to process just until roughly chopped. Add these into the sugar and egg mixture, mixing on low speed just until combined.
    5. In a separate bowl, combine flour, baking powder, salt, and pistachio pudding mix. Whisk to combine, breaking apart any lumps of pudding mix.
    6. With the mixer on low speed, add half of the flour mixture to the wet ingredients.
    7. Add the milk, mixing to combine.
    8. Add remaining flour mixture and chopped pistachios, mixing just until combined.
    9. Transfer batter to prepared pan, smoothing out the top.
    10. Bake for 55-65 minutes, until a toothpick inserted in the center comes out clean.
    11. Allow to cool for a few minutes in the pan before transferring to a cooling rack to cool completely.

    Notes

    • Make sure to use fresh cranberries for the best flavor.
    • You can substitute the pistachios with walnuts if desired.
    • This bread can be served warm or at room temperature.
    • Prep Time: 15 minutes
    • Cook Time: 55-65 minutes
    • Category: Baking
    • Method: Baking
    • Cuisine: American

    Nutrition

    • Serving Size: 1 slice
    • Calories: 200
    • Sugar: 12g
    • Sodium: 150mg
    • Fat: 8g
    • Saturated Fat: 4g
    • Unsaturated Fat: 2g
    • Trans Fat: 0g
    • Carbohydrates: 30g
    • Fiber: 1g
    • Protein: 3g
    • Cholesterol: 45mg

    Sharing is caring!

  • Blueberry Peach Bread

    Blueberry Peach Bread


    Introduction to Blueberry Peach Bread

    As a passionate home cook, I know how hectic life can get, especially for busy moms and professionals. That’s why I’m excited to share my recipe for Blueberry Peach Bread. Imagine a warm slice of this delightful bread, bursting with juicy peaches and sweet blueberries, perfect for breakfast or an afternoon snack. It’s a quick solution for those days when you want to whip up something delicious without spending hours in the kitchen. Trust me, this comforting treat is sure to impress your loved ones and leave your home smelling heavenly!

    Why You’ll Love This Blueberry Peach Bread

    This Blueberry Peach Bread is not just a treat for your taste buds; it’s a lifesaver for your busy schedule! With simple ingredients and straightforward steps, you can whip it up in no time. The sweet aroma wafting through your kitchen will make your mouth water, while the delightful blend of fruits offers a burst of flavor in every bite. Plus, it’s a perfect way to sneak in some fruit into your family’s diet!

    Ingredients for Blueberry Peach Bread

    Gathering the right ingredients is key to making the best Blueberry Peach Bread. Here’s what you need:

    • Flour: The foundation of your bread. All-purpose flour works beautifully, giving it the perfect texture.
    • Diced Peaches: Fresh, ripe peaches add sweetness and moisture. You can substitute with canned peaches, but fresh is best!
    • Blueberries: Use fresh or frozen. Both bring a burst of color and flavor. Frozen blueberries can be a great time-saver!
    • Vanilla Extract: This heavenly flavor enhances the sweetness. It’s a must for baking bliss!
    • Eggs: They bind the ingredients and help the bread rise. Using large eggs gives the best results.
    • Sugar: Granulated sugar sweetens the bread. You could swap half the sugar for honey for a unique twist.
    • Butter: Unsalted and at room temperature for easy creaming. It imparts richness that balances the fruit’s tartness.
    • Salt: Just a pinch enhances all flavors. Don’t skip this, as it helps elevate the sweetness!
    • Baking Powder: This leavening agent makes your bread rise and become fluffy.
    • Sour Cream: Adds moisture and a slight tang. Greek yogurt can serve as a delicious alternative!

    For exact measurements, check out the bottom of this article where you can find a handy printable version of the recipe. Trust me, having these ingredients prepped will set you up for a successful baking adventure!

    How to Make Blueberry Peach Bread

    Making Blueberry Peach Bread is an enjoyable experience that fills your kitchen with a comforting aroma. Follow these steps to create a delightful loaf that will become a family favorite!

    Step 1: Preheat the Oven

    The first step is crucial: preheat your oven to 350°F (175°C). This ensures that your loaf bakes evenly. If you skip this step, your bread might not rise as beautifully as it should!

    Step 2: Cream Butter and Sugar

    In a large bowl, cream together the softened butter and sugar. To achieve the right texture, mix until it’s light and fluffy, with a pale color. This blending is where magic begins, allowing air to incorporate into the batter.

    Step 3: Add Eggs and Mix

    Next, add the eggs one at a time. Mixing well after each addition is essential. This step creates a nice, cohesive batter. Make sure your eggs are at room temperature for the best results!

    Step 4: Stir in Vanilla and Sour Cream

    Now, stir in the vanilla extract and sour cream. These ingredients enhance the flavor and moisture of the bread. The vanilla adds warmth, while the sour cream contributes a delightful tang!

    Step 5: Combine Dry Ingredients

    In another bowl, whisk together the flour, baking powder, and salt. Mixing these dry ingredients thoroughly ensures even distribution. It prevents any flour clumps from affecting the texture of your Blueberry Peach Bread.

    Step 6: Mix Wet and Dry Ingredients

    Gradually add the dry mixture to the wet ingredients. Remember not to overmix! Stir just until everything is combined. Overmixing can lead to a dense loaf, and we want a light, fluffy texture.

    Step 7: Fold in Peaches and Blueberries

    It’s time to fold in the diced peaches and blueberries gently. Use a spatula to incorporate them without breaking the fruit. This way, you’ll preserve those lovely pieces that burst with flavor in every bite!

    Step 8: Pour into Loaf Pan

    Before pouring your beautiful batter into a loaf pan, don’t forget to grease it well. Greasing prevents sticking and makes slicing easier when the bread is done baking. No one likes to wrestle with a loaf!

    Step 9: Bake and Check for Doneness

    Pop your loaf into the preheated oven. Bake for about 60-70 minutes. Check for doneness by inserting a toothpick into the center. If it comes out clean or with a few crumbs, your bread is ready!

    Step 10: Cool and Serve

    Finally, let the bread cool in the pan for about 10 minutes. After that, turn it out onto a wire rack to cool completely. Cooling is essential; slicing too soon can ruin the texture. Once cooled, slice and serve your delicious Blueberry Peach Bread!

    Tips for Success

    • Use ripe peaches for the best flavor; they should be slightly soft to the touch.
    • If using frozen blueberries, toss them in a bit of flour to prevent sinking.
    • Measure your flour correctly by spooning it into the cup and leveling it off.
    • Let the bread cool completely before slicing for perfect serving.
    • For extra flair, sprinkle some cinnamon sugar on top before baking!

    Equipment Needed

    • Loaf Pan: A standard 9×5 inch loaf pan works well, but any oven-safe dish can be a substitute.
    • Mixing Bowls: Use a large bowl for wet ingredients and a smaller one for dry.
    • Spatula: A rubber spatula is great for folding in fruits, but a wooden spoon will do just fine!
    • Whisk: Essential for combining dry ingredients, though a fork is an acceptable backup.
    • Toothpick: For checking doneness. You can also use a skewer if you don’t have one!

    Variations

    • Nutty Delight: Add a half cup of chopped walnuts or pecans for a crunchy texture.
    • Spiced Twist: Incorporate a teaspoon of cinnamon or nutmeg for a warm, spicy flavor.
    • Gluten-Free Option: Substitute all-purpose flour with a gluten-free flour blend for a gluten-free version.
    • Vegan Friendly: Replace eggs with flax eggs and use a dairy-free butter alternative for a vegan option.
    • Berry Mix: Swap blueberries for raspberries or blackberries for a fruity fusion.

    Serving Suggestions

    • Pair warm slices of Blueberry Peach Bread with a dollop of whipped cream for a delightful treat.
    • Serve it alongside a hot cup of coffee or tea for a cozy afternoon snack.
    • For a fancy touch, sprinkle powdered sugar on top before serving.
    • Top with fresh fruit or a scoop of vanilla ice cream for dessert.

    FAQs about Blueberry Peach Bread

    Can I use frozen blueberries in this recipe?

    Absolutely! Frozen blueberries work great in Blueberry Peach Bread. Just remember to toss them in a bit of flour before adding them to the batter. This will help prevent them from sinking to the bottom of the loaf.

    How do I store Blueberry Peach Bread?

    To keep your bread fresh, store it in an airtight container at room temperature. It will stay delicious for several days. You can also freeze individual slices for a quick snack later!

    Can I substitute the peaches with another fruit?

    Yes! The beauty of this recipe is its versatility. You can substitute peaches with nectarines, or even make a mixed fruit version by adding some strawberries or raspberries for a refreshing twist. Get creative!

    Is there a way to make the bread healthier?

    Definitely! You can reduce the sugar by using a natural sweetener like honey or maple syrup. Additionally, consider swapping half the all-purpose flour with whole wheat flour for added fiber.

    Can I make this recipe dairy-free?

    Yes, you can! Simply replace the butter with a dairy-free substitute, and use almond or soy yogurt instead of sour cream. It will still be just as delicious!

    Final Thoughts

    After making this Blueberry Peach Bread, you’ll find yourself enveloped in warmth and happiness. Each slice offers a burst of flavor, mixing sweet blues and juicy peaches in a delightful dance. I love how such a simple recipe can bring family and friends together, creating moments of joy with every bite. It’s not just about the bread; it’s about the memories created in your kitchen. So, whether for breakfast, snacking, or dessert, this recipe is sure to brighten your days. I can’t wait for you to experience the joy of baking this delicious loaf!


    Print

    clock clock iconcutlery cutlery iconflag flag iconfolder folder iconinstagram instagram iconpinterest pinterest iconfacebook facebook iconprint print iconsquares squares iconheart heart iconheart solid heart solid icon

    Description

    A delightful blend of blueberries and peaches in a moist, homemade bread.


    • 2 cups flour
    • 1 cup diced peaches, peeled (about 3 peaches)
    • 1 cup blueberries
    • 1 teaspoon vanilla extract
    • 2 eggs
    • 1 cup sugar
    • 1 stick butter, room temperature
    • 1/2 teaspoon salt
    • 1 teaspoon baking powder
    • 1/2 cup sour cream

    1. Preheat the oven to 350°F (175°C).
    2. In a large bowl, cream together the butter and sugar until light and fluffy.
    3. Add the eggs one at a time, mixing well after each addition.
    4. Stir in the vanilla extract and sour cream.
    5. In another bowl, whisk together the flour, baking powder, and salt.
    6. Gradually add the dry ingredients to the wet ingredients, mixing until just combined.
    7. Fold in the diced peaches and blueberries gently.
    8. Pour the batter into a greased loaf pan.
    9. Bake for 60-70 minutes or until a toothpick inserted into the center comes out clean.
    10. Let cool before slicing and serving.

    Notes

    • Ensure the peaches are ripe for the best flavor.
    • This bread can be stored in an airtight container for several days.
    • Prep Time: 20 minutes
    • Cook Time: 60-70 minutes
    • Category: Dessert
    • Method: Baking
    • Cuisine: American

    Nutrition

    • Serving Size: 1 slice
    • Calories: 250
    • Sugar: 15g
    • Sodium: 120mg
    • Fat: 10g
    • Saturated Fat: 6g
    • Unsaturated Fat: 4g
    • Trans Fat: 0g
    • Carbohydrates: 36g
    • Fiber: 1g
    • Protein: 4g
    • Cholesterol: 60mg

    Sharing is caring!

  • Pineapple Chicken and Rice

    Pineapple Chicken and Rice


    Introduction to Pineapple Chicken and Rice

    When life gets hectic, finding a recipe that is both simple and delicious can feel like striking gold. That’s where my go-to dish, Pineapple Chicken and Rice, comes into play. This delightful meal combines tender chicken with sweet pineapple, creating a flavor explosion that will impress your family and friends. Perfect for busy weeknights or when you want to whip up something special without spending all day in the kitchen, this recipe is bound to bring smiles to your table. Trust me, you’re going to love how easy it is to make this dish shine!

    Why You’ll Love This Pineapple Chicken and Rice

    This Pineapple Chicken and Rice recipe is a dream come true for busy moms and professionals alike. It’s quick to prepare, taking just about 40 minutes from start to finish. The combination of savory and sweet flavors is heavenly, creating a satisfying dish that everyone at the table will adore. Plus, it’s versatile enough to suit any occasion, whether it’s a family dinner or a laid-back weekend gathering.

    Ingredients for Pineapple Chicken and Rice

    Let’s gather everything we need for this scrumptious Pineapple Chicken and Rice. Below, you’ll find all the ingredients required to whip up this delightful dish.

    • Boneless, skinless chicken breasts or thighs: Tender and juicy, these will be the heart of your dish. Use thighs if you prefer extra flavor and moisture.
    • White or brown rice: White rice is quick to cook and fluffy, while brown rice adds a heartier texture and more fiber; pick what fits your lifestyle.
    • Canned pineapple chunks: The star of the show! Sweet and juicy, they lend a tropical flair and balance the savory chicken beautifully.
    • Olive oil: It’s perfect for sautéing the chicken, adding healthy fats and a subtle richness to the dish.
    • Garlic powder and onion powder: These spices bring depth and aroma without extra prep. They’re like a flavor hug for your chicken!
    • Ground ginger: This spice adds a warm, zesty note that enhances the overall balance between sweet and savory.
    • Red pepper flakes (optional): Looking for a bit of heat? Toss in some red pepper flakes for a kick that’ll tantalize your taste buds.
    • Salt and pepper: These staples are essential for bringing out all the flavors in your dish. Season to your liking!
    • Pineapple juice: Reserve it from the canned pineapple. It’s the secret ingredient to create a luscious sauce that ties everything together.
    • Soy sauce: This adds umami depth. If you’re avoiding gluten, opt for a gluten-free soy sauce.
    • Honey or brown sugar: Sweetness is key! Honey gives a floral touch, while brown sugar adds a hint of caramel flavor.
    • Rice vinegar or white vinegar: A splash of acidity balances the sweetness wonderfully. Rice vinegar is my favorite for its mild flavor.
    • Cornstarch: This is your thickening agent for that velvety sauce. It will transform your sauce from thin to luscious!

    Exact quantities for these ingredients are available at the bottom of the article for your convenience. Let’s dive into the fun part—cooking!

    How to Make Pineapple Chicken and Rice

    Ready to bring this delicious Pineapple Chicken and Rice to life? Let’s roll up our sleeves and dive into the cooking process. I promise it’s easier than a Sunday morning pancake flip. Follow these simple steps, and you’ll be enjoying a mouthwatering meal in no time!

    Prepare the Chicken

    Season and Cook

    Begin by seasoning the chicken breasts or thighs. Sprinkle garlic powder, onion powder, ground ginger, salt, and pepper over them. Feel free to mix and match spices according to your taste.

    Heat up a tablespoon of olive oil in a large skillet over medium heat. Wait for it to shimmer, then gently lay the seasoned chicken in the pan. Cook each piece for about 6-7 minutes per side until golden brown and cooked through. You can tell it’s done when the juices run clear—the perfect test for a tender piece of chicken. Once done, remove it from the skillet and set it aside on a plate.

    Cook the Rice

    Rice Cooker or Stovetop

    While the chicken is resting, let’s turn our attention to the rice. If you’re using a rice cooker, add your rice and the appropriate amount of water, and let it work its magic.

    If you prefer the stovetop method, combine the rice with water in a saucepan. Bring it to a boil first, then reduce the heat and let it simmer for about 20 minutes—just enough time for the grains to absorb that lovely water and fluff up perfectly! Once finished, fluff the rice with a fork and set it aside.

    Make the Pineapple Sauce

    Combine Ingredients and Thicken

    Now for the real flavor boost: the pineapple sauce. In a medium saucepan, combine the reserved pineapple juice, soy sauce, honey (or brown sugar), rice vinegar, garlic powder, and ground ginger.

    Bring this delightful mix to a gentle simmer. Here’s a little tip: while the sauce heats, create a cornstarch slurry by mixing cornstarch with a bit of cold water. Once the sauce is simmering, stir this slurry into the mixture to thicken it. Keep stirring for about 2-3 minutes until it’s nice and glossy.

    Combine the Chicken and Pineapple

    Simmer for Flavor

    Next, let’s bring the chicken back into the mix! Slice the cooked chicken into bite-sized pieces and return it to the skillet.

    Add those juicy pineapple chunks along with your luscious sauce. Stir everything together, making sure the chicken and pineapple are thoroughly coated. Allow it to simmer for about 5 minutes. The magical aroma will invade your kitchen and tempt everyone to wander in!

    Serve

    Garnish Options

    You did it! Now it’s time to serve this masterpiece. Scoop fluffy rice onto plates and lovingly layer the chicken and pineapple mixture on top. If you’re feeling fancy, consider garnishing with fresh cilantro and sliced green onions. Not only do they add color, but they also bring an extra burst of flavor!

    And there you have it—your beautiful Pineapple Chicken and Rice is ready to impress! It’s warm, colorful, and oh-so-satisfying. Enjoy every bite!

    Tips for Success

    • Prep all your ingredients before you start cooking. This makes the process smoother and faster.
    • Don’t skip the resting time for your chicken; it keeps the juices locked in.
    • For extra flavor, try marinating the chicken in a bit of soy sauce and ginger beforehand.
    • If you’re short on time, use pre-cooked rice to speed up meal prep.
    • Feel free to customize your sauce with chili flakes for more heat or additional vegetables for extra nutrition.

    Equipment Needed

    • Large Skillet: Essential for cooking the chicken and combining all flavors. A non-stick skillet works great!
    • Medium Saucepan: Needed to make that luscious pineapple sauce. A pot can do the job too!
    • Rice Cooker or Saucepan: Either will cook your rice perfectly. Choose based on what you have!
    • Measuring Cups and Spoons: Helpful for accuracy, especially when using ingredients like honey and soy sauce.

    Variations

    • Teriyaki Twist: Swap the soy sauce for teriyaki sauce for a sweet, tangy flavor.
    • Vegetarian Option: Replace chicken with tofu or chickpeas for a delightful plant-based meal.
    • Brown Rice Swap: Choose brown rice for more fiber and a nuttier taste that complements the dish beautifully.
    • Spicy Pineapple Chicken: Add more red pepper flakes or some diced jalapeños for a spicier kick that will excite your taste buds.
    • Extra Veggies: Toss in some colorful bell peppers, snap peas, or broccoli for added nutrition and crunch.

    Serving Suggestions

    • Fresh Side Salad: A crisp green salad with a tangy vinaigrette complements the sweetness of the dish.
    • Coconut Rice: For an island twist, serve with coconut-infused rice for added flavor.
    • Refreshing Beverage: Pair with iced tea or coconut water to balance out the richness.
    • Presentation: Garnish with lime wedges for a pop of color and extra zest!

    FAQs about Pineapple Chicken and Rice

    Can I make Pineapple Chicken and Rice ahead of time?

    Absolutely! You can cook the chicken and make the sauce in advance. Just store them separately in airtight containers in the fridge. When you’re ready to eat, heat them up and serve over freshly cooked rice.

    Is Pineapple Chicken and Rice gluten-free?

    Yes, this recipe can be made gluten-free by using gluten-free soy sauce. Always check the labels before you buy, just to be sure.

    Can I add vegetables to this dish?

    Sure! Bell peppers, snap peas, or even broccoli are all delicious additions. Just stir them in when combining the chicken and pineapple for extra color and crunch.

    How do I store leftovers?

    Store any leftovers in an airtight container in the fridge. They’ll last for about 3-4 days, and you can reheat in the microwave or on the stove.

    What can I serve with Pineapple Chicken and Rice?

    For a balanced meal, consider pairing it with a fresh side salad or coconut rice. The contrasting flavors enhance the pineapple chicken experience nicely!

    Final Thoughts

    As I reflect on this delightful Pineapple Chicken and Rice recipe, I’m reminded of the joy it has brought to my family dinner table. The balance of sweet and savory flavors transports me straight to a tropical paradise, even if just for a meal. It’s a dish that feels special, yet comes together in a snap, making it perfect for busy evenings. Watching my loved ones savor each bite fills my heart with joy. I hope this recipe brings as much happiness to your home as it has in mine. Happy cooking!


    Print

    clock clock iconcutlery cutlery iconflag flag iconfolder folder iconinstagram instagram iconpinterest pinterest iconfacebook facebook iconprint print iconsquares squares iconheart heart iconheart solid heart solid icon

    Description

    A deliciously simple recipe for Pineapple Chicken and Rice that combines tender chicken, sweet pineapple, and flavorful rice.


    • 4 boneless, skinless chicken breasts (or thighs, if preferred)
    • 1 cup white rice (or brown rice for a healthier option)
    • 1 can (20 oz) pineapple chunks, drained (reserve juice for sauce)
    • 1 tablespoon olive oil
    • 1/2 teaspoon garlic powder
    • 1/2 teaspoon onion powder
    • 1/2 teaspoon ground ginger
    • 1/2 teaspoon red pepper flakes (optional, for a kick)
    • Salt and pepper, to taste
    • For the Pineapple Sauce:
    • 1/2 cup pineapple juice (reserved from the canned pineapple)
    • 1/4 cup soy sauce
    • 2 tablespoons honey (or brown sugar)
    • 2 tablespoons rice vinegar (or white vinegar)
    • 2 tablespoons cornstarch (for thickening)
    • 1/2 teaspoon garlic powder
    • 1/2 teaspoon ground ginger

    1. Prepare the Chicken: Season the chicken breasts with garlic powder, onion powder, ground ginger, salt, and pepper. Heat olive oil in a large skillet over medium heat and cook the chicken for about 6-7 minutes per side, until cooked through. Remove and set aside.
    2. Cook the Rice: Prepare the rice in a rice cooker or in a saucepan according to the package instructions. Set aside once done.
    3. Make the Pineapple Sauce: Combine pineapple juice, soy sauce, honey, rice vinegar, garlic powder, and ground ginger in a medium saucepan. Bring to a simmer. Add a slurry made from cornstarch and water to thicken the sauce. Stir and cook for 2-3 minutes.
    4. Combine the Chicken and Pineapple: Slice the cooked chicken and return it to the skillet. Add pineapple chunks and pour the sauce over. Stir to coat evenly and simmer for 5 minutes.
    5. Serve: Serve the pineapple chicken over the rice, garnish with cilantro and sliced green onions if desired.

    Notes

    • You can use brown rice for a healthier option.
    • Adjust the spice level by adding or omitting the red pepper flakes.
    • Garnish with cilantro and green onions for extra flavor.
    • Prep Time: 15 minutes
    • Cook Time: 25 minutes
    • Category: Main Course
    • Method: Skillet & Sauce
    • Cuisine: Asian Fusion

    Nutrition

    • Serving Size: 1 plate
    • Calories: 450
    • Sugar: 14g
    • Sodium: 800mg
    • Fat: 10g
    • Saturated Fat: 1.5g
    • Unsaturated Fat: 6g
    • Trans Fat: 0g
    • Carbohydrates: 65g
    • Fiber: 2g
    • Protein: 32g
    • Cholesterol: 90mg

    Sharing is caring!