Category: Uncategorized

  • Apple Bubble Up Casserole

    Apple Bubble Up Casserole


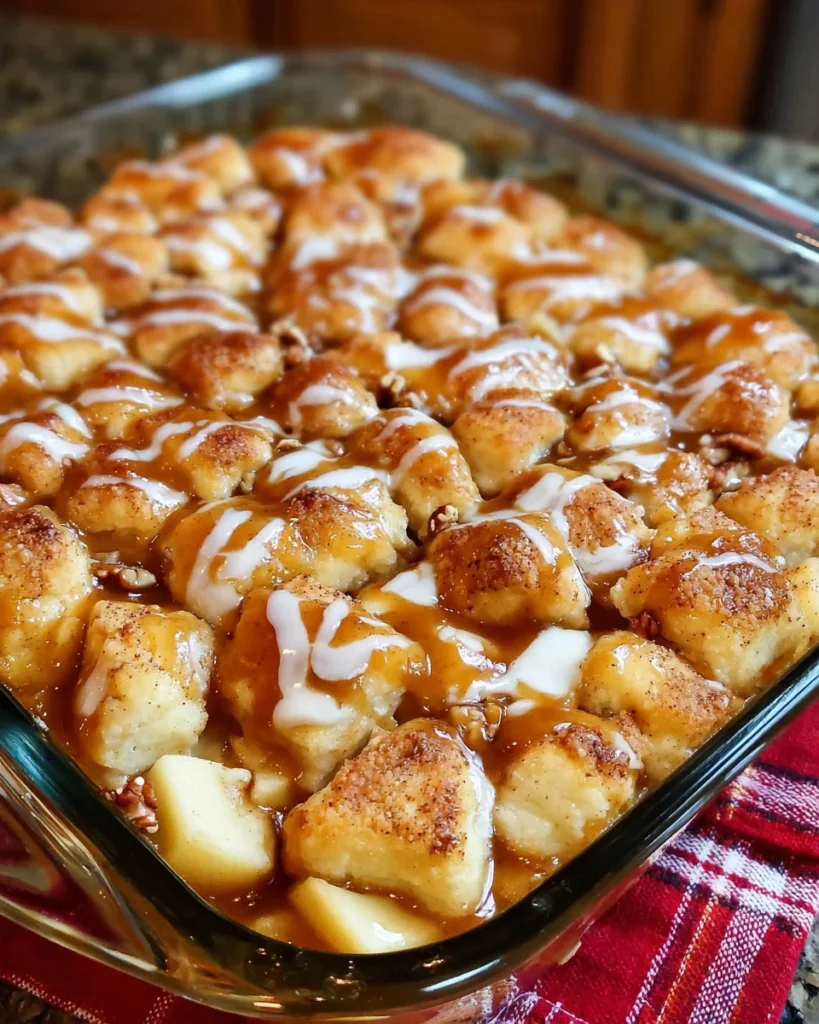
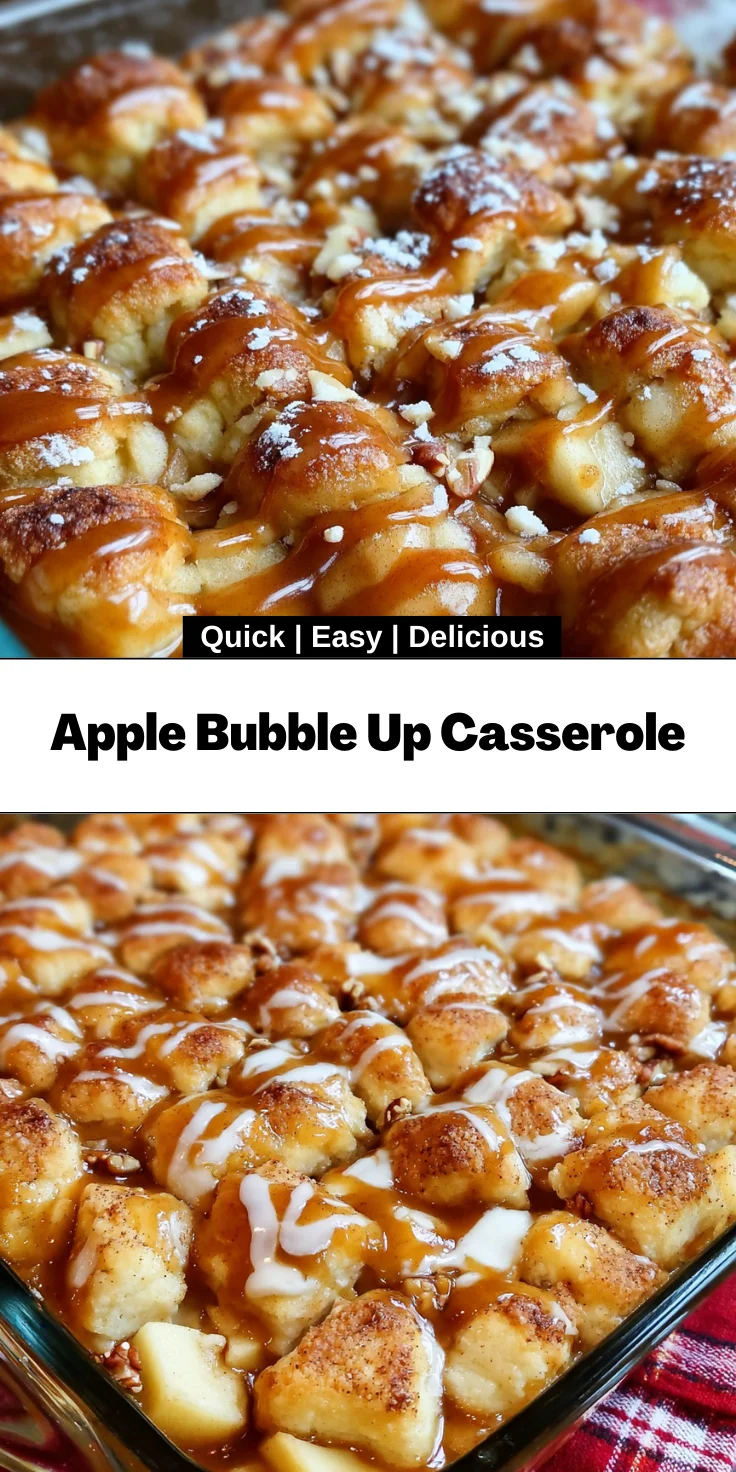
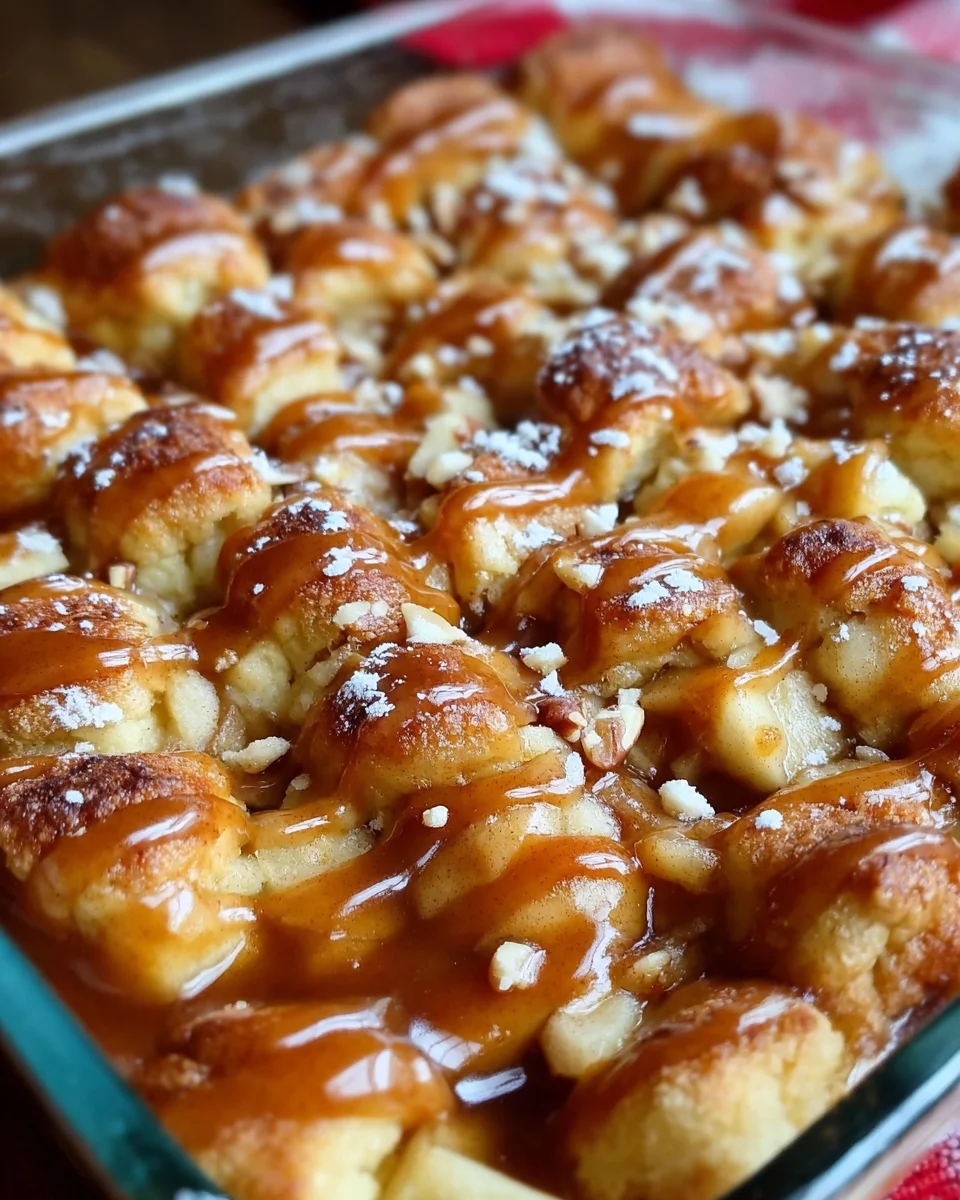
    Introduction to Apple Bubble Up Casserole

    As a busy mom myself, I understand how hectic life can get. That’s why I’m excited to share my recipe for Apple Bubble Up Casserole! This delightful dish isn’t just a quick solution for breakfast; it also doubles as a comforting dessert. Picture warm, gooey apples nestled among fluffy biscuit pieces, sprinkled with cinnamon – it feels like a warm hug on a plate! Whether you’re impressing guests or simply enjoying a family meal, this Apple Bubble Up Casserole will turn any ordinary day into something special.

    Why You’ll Love This Apple Bubble Up Casserole

    You’ll adore this Apple Bubble Up Casserole for so many reasons! First off, it’s incredibly easy to whip up, making it ideal for busy mornings or spontaneous gatherings. The taste? Oh, it’s simply divine! Delicate, sweet apples mingle with buttery biscuit goodness, creating a dessert that’s nothing short of magical. Plus, it only takes about 45 minutes from start to finish, leaving you with more time to enjoy the sweet moments of life!

    Ingredients for Apple Bubble Up Casserole

    Gather your ingredients for this delightful Apple Bubble Up Casserole, and let the aroma of apples and cinnamon fill your kitchen!

    • Diced apples: Choose Granny Smith or Fuji for that perfect sweet-tart balance.
    • Refrigerated biscuit dough: This is the magic that creates fluffy, chewy bits, saving you prep time!
    • Granulated sugar: A little sweetness brings out the apples’ natural flavors.
    • Ground cinnamon: This warm spice adds a comforting touch, reminiscent of fall festivities.
    • Unsalted butter: Melting this golden goodness enhances the richness of the dish.
    • Brown sugar: It adds a hint of caramel flavor, deepening the taste experience.
    • Vanilla extract: Just a splash makes everything taste more like home.
    • Chopped pecans (optional): For some delightful crunch, adding raw or roasted pecans is a great idea.

    Don’t worry; if you’re looking for specific measurements, you’ll find them at the end of the article, ready for you to print! Happy cooking!

    How to Make Apple Bubble Up Casserole

    Step 1: Preheat the Oven

    First things first, let’s get that oven hot! Preheat it to 350°F (175°C). This step is crucial for getting that lovely golden exterior and perfectly cooked dough. While it’s warming up, take a moment to enjoy the anticipation of deliciousness that’s about to unfold!

    Step 2: Prepare the Apple Mixture

    In a large bowl, it’s time to combine your diced apples with the refrigerated biscuit dough. The secret here is to cut the dough into small, bite-sized pieces, making sure every piece gets coated. Sprinkle in that granulated sugar and ground cinnamon, stirring gently until everything is well mixed. This is where the magic begins, and you’ll notice the sweet aroma wafting up—it’s like a sneak peek into dessert heaven! Take care to not overmix; we want those tender apple chunks to shine.

    Step 3: Assemble the Casserole

    Now that your mixture is ready, it’s time to transfer it to a greased 9×13-inch baking dish. Pour the apple and biscuit mixture evenly into the dish, spreading it out for even baking. Next, drizzle that luscious melted butter over the top like a warm blanket. Sprinkle the brown sugar generously, allowing it to create that sweet crust during baking. If you’re adding pecans, go ahead and sprinkle them on top for that extra crunch. This is not just assembling—it’s creating a comforting masterpiece that will come alive in the oven!

    Step 4: Baking Time

    Place your masterpiece in the preheated oven and bake for about 25–30 minutes. You’ll know it’s done when the biscuit pieces are golden brown and the apples are bubbling. Let it cool slightly before diving in. Trust me, the aroma will be irresistible, making it hard to wait!

    Tips for Success

    • Use firm apples like Granny Smith for best texture.
    • Don’t skip greasing the baking dish; it prevents sticking!
    • Let the casserole cool for a few minutes before serving; it allows flavors to settle.
    • Experiment with spices, adding nutmeg or allspice for a unique twist.
    • Serve warm to enjoy the gooey goodness at its best!

    Equipment Needed

    • 9×13-inch baking dish: A glass or ceramic dish works well, but any similar size will do.
    • Large mixing bowl: Perfect for combining all those delicious ingredients. A sturdy one ensures no spills!
    • Measuring cups and spoons: Essential for accuracy, though you can eyeball ingredients if you’re feeling adventurous!
    • Wooden spoon or spatula: Great for mixing and scraping down the sides of the bowl.

    Variations

    • Fruit Medley: Mix in other fruits like pears or berries for an exciting twist on this classic.
    • Gluten-Free Option: Use gluten-free biscuit dough to make this dish accessible for everyone.
    • Spiced Up: Add a pinch of nutmeg or ginger for a warming spice kick.
    • Nut-Free Version: Omit the pecans to make it safe for those with nut allergies.
    • Vegan Adaptation: Swap in dairy-free butter and use a plant-based biscuit dough for a vegan-friendly option.
    • Chocolate Drizzle: Drizzle a bit of melted chocolate over the finished casserole for a decadent dessert.

    Serving Suggestions for Apple Bubble Up Casserole

    • Vanilla Ice Cream: Serve warm slices with a scoop of vanilla ice cream for a delicious dessert.
    • Cinnamon Whipped Cream: Top with homemade or store-bought cinnamon whipped cream for extra flavor.
    • Morning Coffee: Pair it with a strong cup of coffee for a cozy breakfast treat.
    • Fresh Fruits: Offer a side of fresh berries or sliced oranges for a refreshing contrast.
    • Festive Presentation: Garnish with a sprinkle of powdered sugar and a few apple slices for eye-catching flair.

    FAQs about Apple Bubble Up Casserole

    Can I use frozen apples for this recipe? Absolutely! If you have frozen apples on hand, just ensure they’re thawed and drained before mixing them in. This makes it super convenient, especially when fresh apples aren’t in season.

    How do I store leftover Apple Bubble Up Casserole? If you have leftovers (which is rare, trust me!), store them in an airtight container in the fridge. They should last for about 3–4 days. Reheat in the microwave or oven before serving to bring back that comforting warmth!

    Can I make this casserole ahead of time? Yes! You can prep the apple mixture and assemble the casserole in advance. Cover it and refrigerate until you’re ready to bake. Just remember to add a few extra minutes to the baking time if it’s chilled.

    Is this Apple Bubble Up Casserole suitable for brunch? Definitely! It’s an excellent choice for brunch gatherings. Your guests will love the warm flavors and delightful aroma filling the room as it bakes.

    What can I substitute for the biscuit dough? If you’re in a pinch, you can use crescent roll dough or even homemade biscuits. Each will add its unique flair to the dish while still delivering that delicious bubble-up effect!

    Final Thoughts

    Cooking brings us together, doesn’t it? This Apple Bubble Up Casserole embodies the warmth of home and the comfort of family. Each bite is a reminder of cozy mornings and sweet celebrations. Whether you’re serving it for breakfast, brunch, or dessert, it’s bound to leave a smile on everyone’s faces. I love how easy it is to make, yet it feels special enough for gatherings. As you savor each delicious piece, know that you’re creating not just a meal, but memories too. So, gather your loved ones, dig in, and enjoy the sweet taste of connection!


    Print

    clock clock iconcutlery cutlery iconflag flag iconfolder folder iconinstagram instagram iconpinterest pinterest iconfacebook facebook iconprint print iconsquares squares iconheart heart iconheart solid heart solid icon

    Description

    A delightful and easy-to-make Apple Bubble Up Casserole perfect for breakfast or dessert.


    • 2 cups diced apples (preferably Granny Smith or Fuji)
    • 1 can (16.3 oz) refrigerated biscuit dough
    • 1/2 cup granulated sugar
    • 1 teaspoon ground cinnamon
    • 1/4 cup unsalted butter, melted
    • 1/2 cup brown sugar
    • 1 teaspoon vanilla extract
    • 1/2 cup chopped pecans (optional)

    1. Preheat your oven to 350°F (175°C). Grease a 9×13-inch baking dish and set aside.
    2. In a large bowl, combine the diced apples, biscuit dough pieces, sugar, and cinnamon. Stir until the dough pieces and apples are well coated.
    3. Pour the apple mixture into the prepared baking dish. Drizzle the melted butter over the top, then sprinkle with brown sugar and pecans.
    4. Bake in the preheated oven for 25-30 minutes, or until the dough is cooked through and golden brown. Let it cool slightly before serving.

    Notes

    • For a sweeter taste, add more sugar if desired.
    • Feel free to add raisins or cranberries for extra flavor.
    • Serve warm with vanilla ice cream for a delicious dessert.
    • Prep Time: 15 minutes
    • Cook Time: 30 minutes
    • Category: Dessert
    • Method: Baking
    • Cuisine: American

    Nutrition

    • Serving Size: 1/8 of casserole
    • Calories: 250
    • Sugar: 18g
    • Sodium: 300mg
    • Fat: 10g
    • Saturated Fat: 4g
    • Unsaturated Fat: 5g
    • Trans Fat: 0g
    • Carbohydrates: 36g
    • Fiber: 2g
    • Protein: 3g
    • Cholesterol: 20mg

    Sharing is caring!

  • Apple Crisp Pizza Dessert

    Apple Crisp Pizza Dessert


    Introduction to Apple Crisp Pizza Dessert

    As a busy mom, I totally get it—finding time to whip up something delightful can be a real challenge. Enter the Apple Crisp Pizza Dessert, the perfect blend of comfort and ease. It combines the warm, cozy flavors of apple pie with a crunchy topping, all laid out on a delightful pizza crust. This treat not only satisfies those sweet cravings but also impresses your loved ones. You can prepare it quickly, making it a great solution for hectic evenings or unexpected guests. Trust me, this dessert will become a favorite in your home!

    Why You’ll Love This Apple Crisp Pizza Dessert

    This Apple Crisp Pizza Dessert is not only delicious but also incredibly simple to make. With just a handful of ingredients and minimal prep time, it’s a speedy way to satisfy your sweet tooth. The mix of tender apples and crunchy crumb topping creates a mouthwatering experience. Plus, it’s so versatile—great as a family treat or dessert for gatherings. You’ll find yourself making this again and again!

    Ingredients for Apple Crisp Pizza Dessert

    This Apple Crisp Pizza Dessert utilizes simple yet essential ingredients that you’ll likely have on hand. Let’s break them down for you:

    • Single-crust pie dough: You can use homemade or store-bought dough. Pre-made saves time, but nothing beats the aroma of freshly rolled dough!
    • Granulated sugar: This adds sweetness to the apples, balancing their tartness beautifully.
    • All-purpose flour: This is used for both the apple mixture and the crumble topping, helping bind everything together.
    • Ground cinnamon: A classic warm spice that enhances the flavor of apple desserts. You can also try nutmeg for a twist!
    • Baking apples: Go for tart varieties like Granny Smith or Honeycrisp. They hold their shape well when cooked!
    • Brown sugar: This adds a rich, caramel-like flavor to the topping. Light or dark, use what you have!
    • Old-fashioned rolled oats: These lend a wonderful texture to the crumble. Quick oats work, too—just adjust baking time slightly.
    • Unsalted butter: Helps achieve that lovely crumbly texture in the topping. Make sure it’s softened for easy mixing.
    • Caramel topping or caramel apple dip: This can be drizzled on top once baked for a sweet finishing touch. Feel free to swap it out for chocolate syrup if you prefer!

    Exact measurements are available at the bottom of the article, ready for you to print out and take to your kitchen!

    How to Make Apple Crisp Pizza Dessert

    Preheat Your Oven

    First things first, preheat your oven to 375°F (190°C). This step is vital for ensuring your Apple Crisp Pizza Dessert bakes evenly. If you skip this, the pie crust may turn out soggy. While waiting for your oven, take a moment to gather your ingredients. You’ll be glad you did when everything is ready to go!

    Prepare the Pie Dough

    Next, roll out your single-crust pie dough onto a pizza pan or baking sheet. Aim for about a 1/4-inch thickness, making sure it’s even throughout. Use a bit of flour to prevent sticking. It’s like crafting a canvas; you want a sturdy base for your delicious toppings! If your dough is too thin, it may crack, so take your time and make it right.

    Toss the Apples

    Now, let’s focus on those apples. In a medium bowl, toss the peeled and sliced apples with granulated sugar, flour, and cinnamon. Coat the slices well, ensuring every piece is luscious and full of flavor. This sweet apple mixture is the heart of your dessert, creating a delightful balance with the crunchy topping. You’ll want to get your hands in there—it’s so satisfying!

    Assemble the Dessert

    With your apple mixture ready, it’s time to assemble. Evenly distribute the coated apple slices over your pie crust, creating a beautiful layer. Then, grab your crumble topping mix and sprinkle it generously over the apples. The combination of textures will make your Apple Crisp Pizza Dessert truly special. The crumble should cover every bit, leaving no apple unprotected!

    Bake and Serve

    Place your assembled dessert in the preheated oven. Bake for 35 to 40 minutes, or until the topping is golden brown and the apples are tender. When it’s done, the aroma will fill your kitchen like a cozy hug. Drizzle with caramel topping once cooled slightly. Slice it up, serve warm, and watch your loved ones swoon! Enjoy this moment—you’ve earned it!

    Tips for Success

    • Use a mix of apples for depth of flavor; combine tart and sweet varieties for a balanced taste.
    • Let the pie crust sit at room temperature for a few minutes; this makes it easier to roll out.
    • Don’t skip the caramel drizzle—it adds a delicious finishing touch!
    • Keep an eye on the baking time; ovens can vary!
    • Serve warm for the ultimate experience, and consider adding a scoop of ice cream on top.

    Equipment Needed

    • Pizza pan or baking sheet: A standard sheet works just fine if you don’t have a pizza pan.
    • Rolling pin: You can also use a wine bottle if you’re in a pinch!
    • Mixing bowls: Any size will do; just make sure they’re big enough for tossing ingredients.
    • Fork or pastry blender: Needed for cutting in butter for the crumble; a simple fork gets the job done!
    • Measuring cups and spoons: Essential for accurate ingredient measurements—especially those sweet flavors!

    Variations on Apple Crisp Pizza Dessert

    • Peach Crisp Pizza: Substitute half of the apples with sliced peaches for a juicy twist.
    • Gluten-Free Option: Use gluten-free pie crust and flour for a delicious alternative that everyone can enjoy.
    • Nutty Flavor: Add chopped walnuts or pecans to the crumble topping for an extra crunch.
    • Spice It Up: Experiment with adding a pinch of nutmeg or ginger to the apple mixture for a spiced kick.
    • Maple Drizzle: Swap caramel topping with maple syrup for a unique, rich flavor.

    Serving Suggestions

    • Pair your Apple Crisp Pizza Dessert with a scoop of vanilla ice cream for an indulgent treat.
    • Serve with whipped cream and a sprinkle of cinnamon on top for a festive touch.
    • For drinks, consider hot apple cider or a cold glass of sweet iced tea.
    • Presentation tip: Dust with powdered sugar just before serving for a lovely finish!

    FAQs about Apple Crisp Pizza Dessert

    As you dive into making this Apple Crisp Pizza Dessert, you might have a few questions. Here are some common inquiries and answers that may help you along the way:

    Can I make the pie crust ahead of time?

    Absolutely! You can prepare the pie crust a day in advance. Just wrap it tightly in plastic wrap and store it in the fridge. This will save you time when you’re ready to assemble your dessert!

    What types of apples are best for this recipe?

    For the best flavor and texture, use a mix of tart and sweet apples. Granny Smith and Honeycrisp are personal favorites. They hold their shape while baking and balance the sweetness perfectly!

    How do I store leftover Apple Crisp Pizza Dessert?

    Store any leftovers in an airtight container in the fridge for up to three days. Reheat in the oven at 350°F for a few minutes to regain that delicious crispiness!

    Can I freeze this dessert?

    Yes! You can freeze the assembled dessert before baking. Wrap it well and freeze for up to a month. When you’re ready to bake it, let it thaw overnight in the fridge and then bake as directed!

    What can I serve alongside Apple Crisp Pizza Dessert?

    This dessert pairs beautifully with vanilla ice cream or whipped cream, providing a creamy contrast to the warm, spiced apples. A drizzle of caramel or maple syrup on top enhances the flavors wonderfully!

    Final Thoughts

    As you gather around to enjoy this Apple Crisp Pizza Dessert, I hope you feel the warmth and joy that comes from sharing something special. This recipe encapsulates the flavors of home, nostalgia, and togetherness. It’s perfect for brightening any occasion, whether it’s a family dinner or a gathering with friends. The delightful combination of tender apples and crunchy topping will have everyone reaching for seconds. So, roll up your sleeves and dive into this sweet adventure; you and your loved ones deserve every bite of this delicious treat!


    Print

    clock clock iconcutlery cutlery iconflag flag iconfolder folder iconinstagram instagram iconpinterest pinterest iconfacebook facebook iconprint print iconsquares squares iconheart heart iconheart solid heart solid icon

    Description

    A delicious apple crisp pizza dessert combining the flavors of apple pie and a crispy oat topping for a delightful treat.


    • 1 single-crust pie dough
    • 2/3 cup granulated sugar
    • 3 tablespoons all-purpose flour
    • 1 teaspoon ground cinnamon
    • 4 medium baking apples, peeled and sliced into 1/2-inch wedges
    • 1/2 cup all-purpose flour (for topping)
    • 1/3 cup packed brown sugar
    • 1/3 cup old-fashioned rolled oats
    • 1 teaspoon ground cinnamon (for topping)
    • 1/4 cup unsalted butter, softened
    • 1/4 to 1/2 cup caramel topping or caramel apple dip

    1. Set oven temperature to 375°F (190°C) and allow to fully preheat.
    2. Gently roll out the pie dough onto a pizza pan or baking sheet, shaping a 1/4-inch thick crust.
    3. Combine granulated sugar, all-purpose flour, and ground cinnamon in a medium bowl.
    4. Toss apple slices with the prepared sugar mixture until apples are evenly coated.
    5. Distribute the coated apple slices evenly across the dough surface.
    6. In a separate bowl, mix all-purpose flour, brown sugar, rolled oats, and ground cinnamon for the topping.
    7. Cut in softened butter using a fork or pastry blender until mixture forms medium-sized crumbs.
    8. Sprinkle the crumble topping evenly over the layered apples.
    9. Place in preheated oven and bake for 35 to 40 minutes, until topping is golden and apples are tender.
    10. Remove from oven, drizzle with caramel topping, let cool slightly, then slice and serve.

    Notes

    • Serve warm for the best flavor.
    • Can be topped with ice cream for an extra treat.
    • Prep Time: 15 minutes
    • Cook Time: 40 minutes
    • Category: Dessert
    • Method: Baking
    • Cuisine: American

    Nutrition

    • Serving Size: 1 slice
    • Calories: 250
    • Sugar: 20g
    • Sodium: 150mg
    • Fat: 10g
    • Saturated Fat: 6g
    • Unsaturated Fat: 3g
    • Trans Fat: 0g
    • Carbohydrates: 40g
    • Fiber: 3g
    • Protein: 2g
    • Cholesterol: 25mg

    Sharing is caring!

  • Pizza Tortellini Skillet

    Pizza Tortellini Skillet


    Introduction to Pizza Tortellini Skillet

    Imagine coming home after a long day, tired and ready to kick off your shoes, but still facing the dreaded dinner dilemma. This is where the Pizza Tortellini Skillet swoops in like a culinary superhero! It’s a quick solution that combines cheesy goodness with all the pizza flavors we love. I crafted this dish to be a delightful one-pot meal that not only satisfies cravings but also makes life easier for busy moms and professionals alike. Trust me; it’s a crowd-pleaser that’ll impress your loved ones without the fuss!

    Why You’ll Love This Pizza Tortellini Skillet

    Let’s face it; we all crave a delicious meal without spending hours in the kitchen. This Pizza Tortellini Skillet checks all the boxes: it’s easy to prepare, takes just about 30 minutes, and requires minimal cleanup. The combination of savory ground beef, rich marinara, and melty cheese is pure comfort in a bowl. Plus, it’s customizable! Everyone gets their pizza favorites in one delightful dish. What’s not to love?

    Ingredients for Pizza Tortellini Skillet

    Gathering your ingredients is half the fun when making this Pizza Tortellini Skillet. Each element brings something unique to the party, making every bite worth savoring. Here’s what you’ll need:

    • Ground beef: This beefy base adds heartiness and protein to your dish. You can switch to turkey or chicken if you prefer a leaner option.
    • Frozen cheese tortellini: A key player, these little pasta pockets are filled with creamy cheese. Quick and easy, they dissolve in deliciousness. If you have fresh tortellini, that works too!
    • Marinara sauce: Use your favorite jar for a flavorful kick. Homemade, if you’re feeling adventurous, or a store-bought version saves time.
    • Cream cheese: This adds a luscious creaminess that binds the flavors together. I often use the reduced-fat variety for a little guilt-free indulgence.
    • Minced garlic: Nothing beats that aromatic essence! Fresh is best, but pre-minced garlic in a jar works just fine.
    • Mini pepperoni: The bite-sized goodness packs a punch of flavor. Feel free to swap it for turkey pepperoni or omit it entirely for a vegetarian twist.
    • Shredded mozzarella: For that bubbly, cheesy goodness. Combine it with provolone for a gourmet vibe!
    • Shredded cheddar: A sharp contrast that complements the mozzarella. You can experiment with other cheeses like Monterey Jack or Gouda.
    • Salt and black pepper: Essential for bringing out the flavors. Adjust these to suit your taste.
    • Onion powder: A delightful hint of sweetness that enriches the overall flavor. If you love fresh onions, chopped ones can also be sautéed.
    • Italian seasoning: A classic blend that evokes Italian cooking. If you don’t have it, a mix of oregano, basil, and rosemary works perfectly!

    You’ll find the specific quantities for each ingredient at the bottom of the article, ready for printing. Let’s dive into this cheesy adventure together!

    How to Make Pizza Tortellini Skillet

    Making this Pizza Tortellini Skillet is as fun as eating it! Follow these steps, and you’ll be enjoying a cheesy masterpiece in no time. Bring your culinary skills to life in a quick and satisfying process!

    Step 1: Brown the Ground Beef

    Start by heating a large oven-safe skillet over medium-high heat. Add the ground beef, breaking it up with a spatula as it cooks. Stir it every so often to ensure even browning, about 5-7 minutes. Season generously with salt, black pepper, onion powder, and Italian seasoning. This combination sets a flavorful foundation for your dish. Imagine the savory smell as it fills your kitchen! Once browned, you’re ready to add the next delightful ingredient.

    Step 2: Add Mini Pepperoni

    Next, toss in the mini pepperoni. Allow them to sizzle alongside the beef, cooking for about 2-3 minutes. You’ll want them crispy, providing that perfect snap with each bite. Be warned— the aroma will tempt even the pickiest eaters! When they turn a delightful shade, it’s time to move on to the garlic.

    Step 3: Incorporate Garlic

    Adding minced garlic is essential to elevate the flavor profile. Use about 30 seconds to cook the garlic until fragrant; watch closely, as burnt garlic can turn bitter. The moment the garlic scent wafts through your kitchen, you’ll want to dive right in! This step adds that extra layer of Italian flair.

    Step 4: Mix in Marinara and Cream Cheese

    Now it’s time for some serious flavor! Pour in the marinara sauce and add the cream cheese. Stir it all together, ensuring the cream cheese gets fully blended and creates a luscious, creamy sauce. This is where the magic happens! The marinara mingles with the savory beef and crispy pepperoni, enriching the dish’s character. Let it simmer for a moment, inviting those flavors to dance together.

    Step 5: Add Frozen Tortellini

    Carefully add the frozen cheese tortellini, stirring to coat them well in that delicious sauce. Cover the skillet and let it cook on medium-low for about 5 minutes. This will allow the tortellini to steam and heat through while absorbing all those scrumptious flavors. While you wait, it’s the perfect chance to set the table or grab some drinks!

    Step 6: Top and Broil

    Finally, let’s finish it off! Sprinkle the mozzarella and cheddar cheeses generously over the top, along with extra pepperoni, if desired. If you have a broiler in your oven, set it to broil and toast the cheese for about 2-3 minutes. Keep a close eye to ensure it melts just right without burning. You’ll want that irresistible bubbly, golden top to impress everyone around the dinner table!

    Tips for Success

    • Use a heavy-bottomed skillet to ensure even cooking and prevent sticking.
    • Keep an eye on the pepperoni; it can go from crispy to burnt quickly.
    • Don’t thaw the tortellini first; adding them frozen helps create a creamy sauce.
    • Feel free to adapt the cheese blend based on your favorites for extra flavors.
    • Make this a meal prep favorite by doubling the recipe for easy lunches!

    Equipment Needed

    • Large oven-safe skillet: A non-stick one makes cleanup easier. Any heavy-bottomed skillet works fine too.
    • Spatula: For browning the meat and mixing in ingredients. A wooden spoon is a great substitute.
    • Measuring cups and spoons: Handy for accurate ingredient portions; you can eyeball it if needed!

    Variations

    • Vegetarian option: Swap the ground beef and pepperoni for sautéed mushrooms, zucchini, and bell peppers. You’ll still get that cheesy goodness!
    • Low-carb twist: Replace the tortellini with zucchini noodles or cauliflower rice for a lighter version that’s still packed with flavor.
    • Spicy kick: Add sliced jalapeños or crushed red pepper flakes to amp up the heat. Spice lovers will appreciate this fiery addition!
    • Pesto infusion: Stir in a few tablespoons of pesto sauce along with the marinara for a burst of herby delight.
    • Cheesy overload: Mix in a variety of cheeses like fontina or Gouda for an extra-rich, decadent treat.

    Serving Suggestions

    • Garlic bread: The perfect companion! Serve warm, sliced, and ready to dip in that flavorful marinara.
    • Side salad: A crisp Caesar or mixed greens salad adds freshness to balance the richness of the skillet.
    • Refreshing drinks: Pair it with iced tea or a light red wine for a delightful meal experience.
    • Creative plating: Serve in bowls topped with fresh basil or parsley for a beautiful presentation.

    FAQs about Pizza Tortellini Skillet

    Can I use fresh tortellini instead of frozen?

    Absolutely! You can use fresh tortellini for this Pizza Tortellini Skillet. Just cut down the cooking time slightly since fresh tortellini cooks quicker than frozen varieties.

    How can I make this dish vegetarian?

    To turn this into a vegetarian one-pot meal, simply omit the ground beef and mini pepperoni. Substitute with mushrooms, zucchini, or spinach to maintain that comforting feel!

    Can I prepare this ahead of time?

    You can prep the ingredients and store them separately in the fridge. When you’re ready, just follow the cooking steps. Meal prep at its best!

    How do I store leftovers?

    Store any leftovers in an airtight container in the fridge for up to 3 days. Just reheat in the microwave or on the stove over low heat until warmed through.

    Is this dish gluten-free?

    Yes! If you choose gluten-free cheese tortellini, this Pizza Tortellini Skillet can easily be a gluten-free meal, making it suitable for those with dietary restrictions.

    Final Thoughts

    Cooking the Pizza Tortellini Skillet is more than just making dinner; it’s about creating moments to cherish. The joy of seeing my family gather around the table, laughter and happy faces filling the room, reminds me why I love to cook. This dish offers ease without sacrificing flavor! You can get creative with toppings, turning it into personalized plates of joy. Plus, the delicious aroma wafting from the kitchen makes everyone eager to dig in! So, when life’s busy days approach, remember this recipe as a comforting anchor amidst the chaos. Happy cooking!


    Print

    clock clock iconcutlery cutlery iconflag flag iconfolder folder iconinstagram instagram iconpinterest pinterest iconfacebook facebook iconprint print iconsquares squares iconheart heart iconheart solid heart solid icon

    Description

    A quick, cheesy skillet dish combining tortellini, ground beef, and pizza toppings for a delicious one-pot meal.


    • 1 lb ground beef
    • 19 oz frozen cheese tortellini
    • 24 oz jar marinara sauce
    • 4 oz cream cheese (½ block)
    • 1 tablespoon minced garlic
    • ⅓ cup mini pepperoni (plus extra for topping)
    • 1 cup shredded mozzarella cheese
    • ½ cup shredded cheddar cheese
    • ½ teaspoon salt
    • ½ teaspoon black pepper
    • 1 teaspoon onion powder
    • 1 teaspoon Italian seasoning

    1. In a large oven-safe skillet over medium-high heat, brown the ground beef, breaking it up as it cooks. Season with salt, pepper, onion powder, and Italian seasoning.
    2. Add about ⅓ cup of mini pepperoni to the skillet. Cook for 2-3 minutes until the pepperoni is crispy.
    3. Drain excess grease from the pan, then add minced garlic and cook for 30 seconds.
    4. Add marinara sauce and cream cheese. Stir well until the cream cheese is fully mixed in.
    5. Add frozen tortellini and stir to coat. Cover and cook on medium-low for about 5 minutes, until heated through.
    6. Top with mozzarella, cheddar, and extra pepperoni. Broil for 2-3 minutes or cover until cheese melts. Serve hot.

    Notes

    • Feel free to customize the toppings as per your preference.
    • Make sure to drain the grease thoroughly for a healthier dish.
    • Prep Time: 10 minutes
    • Cook Time: 20 minutes
    • Category: Main Dish
    • Method: Skillet
    • Cuisine: Italian-American

    Nutrition

    • Serving Size: 1 serving
    • Calories: 500
    • Sugar: 4g
    • Sodium: 800mg
    • Fat: 25g
    • Saturated Fat: 10g
    • Unsaturated Fat: 5g
    • Trans Fat: 0g
    • Carbohydrates: 45g
    • Fiber: 2g
    • Protein: 30g
    • Cholesterol: 80mg

    Sharing is caring!

  • Air Fryer Radish Chips

    Air Fryer Radish Chips


    Introduction to Air Fryer Radish Chips

    Hey there, fellow food lovers! If you’re like me, you’re always on the lookout for quick and healthy snacks. Enter Air Fryer Radish Chips—a delightful, crunchy treat that comes together in just 20 minutes! These chips are not only easy to whip up but also add a unique twist to your snacking routine. Perfect for impressing friends or indulging solo while binge-watching your favorite show! With just a handful of simple ingredients, you’ll find this recipe fits seamlessly into your busy life, helping to keep cravings in check without sacrificing flavor.

    Why You’ll Love This Air Fryer Radish Chips

    These Air Fryer Radish Chips are a game changer! They’re simple to make, requiring only 20 minutes from start to finish. The air fryer does the magic, giving you that satisfying crunch without the guilt of traditional snacks. Plus, they’re low in calories and high in flavor, making them a healthy choice for busy moms and professionals alike. Trust me, once you try them, they’ll become your go-to snack!

    Ingredients for Air Fryer Radish Chips

    Let’s gather our ingredients! You’ll need fresh radishes, which are the star of this show—crunchy, colorful, and packed with nutrients. Olive oil spray helps us get that delectable crisp without drowning the radishes in oil. Garlic powder and onion powder bring an aromatic flavor that elevates the chips. Sea salt is essential for taste, while black pepper adds a subtle kick.

    If you’re feeling adventurous, consider adding some spice! Maybe a dash of paprika or chili powder for a heat boost? Want to switch it up? Try different herbs, like rosemary or thyme, for a unique twist. And don’t forget, ingredient measurements are right at the bottom of the article for easy printing!

    How to Make Air Fryer Radish Chips

    Step 1: Preheat the Air Fryer

    Let’s kick things off by preheating our trusty air fryer to 350°F. This step is crucial for that perfect crunchy texture. When the air fryer is warmed up, it helps the radishes cook evenly, turning them into delicious chips!

    Step 2: Prepare the Radishes

    Next, it’s time to give our radishes some love! Start by trimming the stems and roots. Then, slice them into 1/8-inch thick rounds. A sharp knife or a mandoline works wonders here. This uniform thickness helps ensure that every chip gets just the right amount of crunch.

    Step 3: Season the Radish Slices

    Now for the fun part – seasoning! Place the radish slices on a baking sheet, and give them a light coat of olive oil spray. This helps those spices and flavors stick. Then sprinkle on the garlic powder, onion powder, sea salt, and black pepper. Toss the slices until they’re evenly coated in the seasoning mix. Trust me, your taste buds will thank you!

    Step 4: Arrange Radish Slices in the Air Fryer

    With your seasoned radishes ready, it’s time to load them into the air fryer basket. Arrange the slices in a single layer, avoiding any overlapping. This ensures all the chips get that perfect crispness. If you have to cook them in batches, it’s worth it for that crunch factor!

    Step 5: Cook and Enjoy

    Pop the basket into the air fryer and set the timer for 8–10 minutes. Halfway through, give the chips a little flip to ensure they’re browning evenly. Keep an eye on them as they approach the finish line; every air fryer is a bit different! Once they’re golden and crisp, transfer your radish chips to a cooling rack. Let them rest for a few minutes. Then, grab a handful and enjoy your fabulous, guilt-free snack!

    Tips for Success

    • Slice radishes evenly for consistent cooking.
    • Don’t overcrowd the air fryer basket; work in batches if needed.
    • Experiment with different seasonings for a unique taste.
    • Keep an eye on the chips in the last few minutes to prevent burning.
    • Store leftovers in an airtight container to maintain their crunch.

    Equipment Needed

    • Air fryer – your best friend for quick cooking.
    • Sharp knife or mandolin slicer – for even and precise cuts.
    • Baking sheet – useful for prepping radishes before air frying.
    • Mixing bowl – for tossing your radish slices with seasoning.
    • Cooling rack – to let chips rest and stay crisp.

    Variations of Air Fryer Radish Chips

    • Spicy Radish Chips: Add cayenne pepper or chili flakes for a fiery kick that’ll wake up your taste buds.
    • Herb-Infused Chips: Try mixing in dried herbs like dill, oregano, or thyme for a fragrant twist.
    • Cheesy Radish Chips: Sprinkle a light dusting of nutritional yeast or grated parmesan before air frying for a cheesy flavor.
    • Sweet Radish Chips: Toss with a sprinkle of cinnamon and a dash of maple syrup for a delightful sweet alternative.
    • Asian-Style Chips: Use sesame oil spray and sprinkle with sesame seeds and a hint of soy sauce for an umami punch.

    Serving Suggestions for Air Fryer Radish Chips

    • Serve alongside a zesty yogurt dip or hummus for a delightful contrast in flavors.
    • Pair with a refreshing herbal iced tea or sparkling water to elevate your snacking experience.
    • Use as a topping for salads or grain bowls for added crunch and flavor.
    • Create a colorful snack platter with sliced veggies and nuts for entertaining.
    • Garnish with fresh herbs or a squeeze of lemon just before serving for an extra zing!

    FAQs about Air Fryer Radish Chips

    Can I use different types of radishes?

    Absolutely! While I love using fresh red radishes, you can experiment with types like daikon or black radishes. Each brings a different flavor and texture, so have fun with it!

    Are Air Fryer Radish Chips gluten-free?

    Yes! These chips are naturally gluten-free. Just make sure to check your seasonings, as some can contain gluten. Keep snacking worry-free!

    How do I store leftover Air Fryer Radish Chips?

    To keep your chips crispy, store them in an airtight container. They’re best enjoyed fresh, but stored correctly, they’ll last a couple of days.

    Can I make Air Fryer Radish Chips in advance?

    While they taste best freshly made, you can prepare and season radish slices ahead of time. Air fry them right before serving for that delightful crunch!

    What other spices can I use for seasoning?

    The sky’s the limit! Try smoked paprika for a rich flavor or lemon pepper for a zesty twist. Get creative and make them yours!

    Final Thoughts

    Making Air Fryer Radish Chips is truly a joyful experience! It’s not just about the crunch; it’s about the satisfaction of creating a delicious, healthy snack in no time. I adore how this recipe transforms simple radishes into crispy delights, making them perfect for my family’s cravings. Whether you enjoy them solo or share with friends, each bite is a burst of flavor wrapped in a guilt-free package. So, embrace your inner chef, have fun experimenting with seasonings, and let these chips become a staple in your kitchen. Crunch on, and let the good times roll!


    Print

    clock clock iconcutlery cutlery iconflag flag iconfolder folder iconinstagram instagram iconpinterest pinterest iconfacebook facebook iconprint print iconsquares squares iconheart heart iconheart solid heart solid icon

    Description

    A delicious and healthy snack made from fresh radishes, cooked in an air fryer for a crunchy texture.


    • 1/2 pound fresh radishes, washed
    • Olive oil spray
    • 3/4 teaspoon garlic powder
    • 3/4 teaspoon onion powder
    • 1/2 teaspoon sea salt
    • 1/4 teaspoon black pepper

    1. Preheat the air fryer to 350°F.
    2. Trim stems and roots from the radishes, then slice into 1/8-inch thick rounds using a sharp knife or mandoline.
    3. Place radish slices on a baking sheet and coat lightly with olive oil spray. Sprinkle with garlic powder, onion powder, sea salt, and black pepper. Toss to coat evenly.
    4. Arrange radish slices in a single layer in the air fryer basket without overlapping. Cook for 8–10 minutes, flipping halfway through, until edges are browned and chips are crisp.
    5. Transfer chips to a cooling rack and let rest for 5 minutes before serving.

    Notes

    • Store leftover chips in an airtight container to maintain crispness.
    • Experiment with different seasonings for variety.
    • Prep Time: 10 minutes
    • Cook Time: 10 minutes
    • Category: Snack
    • Method: Air frying
    • Cuisine: American

    Nutrition

    • Serving Size: 1 serving (approximately 1/4 pound)
    • Calories: 50
    • Sugar: 1g
    • Sodium: 250mg
    • Fat: 3g
    • Saturated Fat: 0g
    • Unsaturated Fat: 2g
    • Trans Fat: 0g
    • Carbohydrates: 9g
    • Fiber: 5g
    • Protein: 1g
    • Cholesterol: 0mg

    Sharing is caring!

  • Mexican Cucumber Salad

    Mexican Cucumber Salad


    Introduction to Mexican Cucumber Salad

    Welcome to my kitchen! If you’re seeking a refreshing dish that brings a burst of flavor, then this Mexican Cucumber Salad is just what you need. Life gets hectic, but this vibrant salad serves as a quick solution for busy days, perfect for impressing loved ones or simply treating yourself. It’s light, easy to whip up, and offers a delicious escape from the ordinary. Plus, it’s the ideal accompaniment for barbecues or family dinners, providing a cool, crunchy contrast to any main dish. Let’s dive into this culinary adventure together!

    Why You’ll Love This Mexican Cucumber Salad

    You’re going to adore this Mexican Cucumber Salad for so many reasons! First off, it’s incredibly easy to make, fitting perfectly into your busy schedule. Just a few simple ingredients and a quick mix, and you’re done! The taste? Oh, it’s a delightful symphony of fresh, crunchy textures complemented by creamy dressing and zesty lime. This salad isn’t just pleasing to the palate; it’s a colorful addition that brightens up any table—effortlessly!

    Ingredients for Mexican Cucumber Salad

    Before we jump into the kitchen, let’s gather all the delicious ingredients that will come together to create this vibrant Mexican Cucumber Salad. Remember, you can find exact measurements at the bottom of the article for your convenience.

    • Cucumbers: Persian cucumbers are my go-to, but you can also use a large English cucumber. They provide a nice crunch and refreshing taste!
    • Corn Kernels: Fresh, canned, or frozen (just thaw it first) works great here. Corn adds a sweet pop that contrasts beautifully with the cucumbers.
    • Red Onion: A little finely diced red onion brings a sharp bite. If you find raw onion too strong, soaking it in water briefly can mellow the flavor.
    • Cilantro: Fresh cilantro lends a fragrant, herbaceous note. If you’re not a fan, feel free to swap with parsley!
    • Mayonnaise or Greek Yogurt: For the dressing, you can use either. Mayonnaise gives richness, while Greek yogurt offers a lighter option with a bit of tang.
    • Lime Juice: Zesty lime juice brightens the flavors and adds a refreshing twist!
    • Spices: Chili powder, ground cumin, and garlic powder give the salad a kick, creating depth and warmth. Adjust the spice levels to suit your taste!
    • Salt and Black Pepper: Essential for seasoning! A sprinkle elevates all the other flavors.

    With these ingredients on hand, you’re on the way to crafting something truly special. Each component plays an important role, ensuring every bite is filled with freshness and flavor.

    How to Make Mexican Cucumber Salad

    Now that we have our fresh ingredients ready, let’s bring this Mexican Cucumber Salad to life! I promise, the steps are simple and quick, perfect for busy afternoons or gatherings. Follow along, and let’s create something refreshing together!

    Step 1: Prepare the Vegetables

    Start by slicing the cucumbers into thin rounds, enhancing that delightful crunch. If you’re using corn on the cob, simply cut off the kernels. For canned or frozen corn, give it a quick rinse. Finely dice the red onion and chop the cilantro. The vibrant colors already begin to tell a delicious story of freshness!

    Step 2: Make the Dressing

    In a separate bowl, whisk together the mayonnaise (or Greek yogurt), lime juice, chili powder, ground cumin, and garlic powder. The mixture should become creamy and smooth. Don’t forget to sprinkle in a bit of salt and pepper to taste. This dressing is a key player, adding that zesty kick to our salad!

    Step 3: Combine Ingredients

    In the large bowl with your veggies, pour the dressing over the cucumber mixture. Gently toss to coat all the vegetables with that lovely creamy goodness. Ensure every piece gets its fair share of flavor—that’s where the magic happens!

    Step 4: Chill the Salad

    Now, here’s a little secret: let the salad chill in the refrigerator for about 15-20 minutes. This time allows the flavors to mingle and develop, transforming your salad into a refreshing masterpiece. Trust me; it’s worth the wait!

    Step 5: Final Touches

    Just before serving, garnish the salad with a sprinkle of Tajín or extra chili powder for a pop of color and spice. Consider serving it in a beautiful dish to showcase those vibrant colors. A visual feast awaits your guests!

    Tips for Success

    • Use cold cucumbers for extra crunch and freshness.
    • Feel free to adjust spice levels to fit your family’s taste.
    • Make the dressing a day in advance for easy prep.
    • Try adding diced avocado for a creamy twist!
    • To save time, use pre-cooked corn or canned corn.

    Equipment Needed

    • Large Bowl: Essential for mixing everything together. A small mixing bowl works too!
    • Whisk: Perfect for blending the dressing smoothly. You can also use a fork if you don’t have one.
    • Cutting Board: A stable surface needed for chopping your fresh ingredients.
    • Sharp Knife: To slice cucumbers and dice onions. A sturdy paring knife is also sufficient.

    Variations

    • Add Protein: Toss in some black beans, grilled chicken, or shrimp for a heartier salad that serves as a main dish.
    • Spice it Up: If you enjoy a kick, add diced jalapeños or a dash of hot sauce to elevate the heat level!
    • Vegan Option: Replace mayonnaise with a vegan mayo or avocado for a creamy dressing that’s plant-based.
    • Fruity Twist: Include diced mango or pineapple for a sweet and tropical flavor boost, perfect for summer.
    • Herb Variations: Swap cilantro for fresh dill or mint to give a different herbal note that complements the salad beautifully.

    Serving Suggestions

    • Pair the salad with grilled fish or chicken for a well-rounded meal.
    • Serve it alongside tortilla chips and salsa for a colorful appetizer.
    • Complement with a light citrusy drink, like lemonade or iced tea.
    • Garnish your serving dish with extra cilantro for visual appeal!

    FAQs about Mexican Cucumber Salad

    Can I make Mexican Cucumber Salad ahead of time? Absolutely! In fact, making it a few hours in advance allows the flavors to blend beautifully. Just remember to keep it chilled!

    What if I don’t like cilantro? No worries at all. You can easily substitute cilantro with fresh parsley or even omit it altogether. Your salad will still be delicious!

    How can I add protein to this salad? Great question! You can toss in black beans, grilled chicken, or shrimp for added nutrients and sustenance. It’ll transform this Mexican Cucumber Salad into a hearty meal!

    Is this salad gluten-free? Yes! This Mexican Cucumber Salad is naturally gluten-free, making it a safe choice for anyone with gluten sensitivities or celiac disease.

    What variations can I try for extra flavor? You can spice it up with diced jalapeños for heat or add diced fruits like mango or pineapple for a tropical twist. Don’t hesitate to get creative!

    Final Thoughts

    This Mexican Cucumber Salad is more than just a recipe; it’s a refreshing experience that can uplift any gathering or weeknight dinner. The combination of fresh textures, zesty flavors, and vibrant colors not only pleases the palate but also creates lasting memories around the table. Whether you’re serving it at a family barbecue or enjoying it on a quiet evening, this salad is sure to become a beloved staple in your kitchen. So roll up your sleeves, gather your ingredients, and embark on this delightful culinary adventure—your taste buds will thank you!


    Print

    clock clock iconcutlery cutlery iconflag flag iconfolder folder iconinstagram instagram iconpinterest pinterest iconfacebook facebook iconprint print iconsquares squares iconheart heart iconheart solid heart solid icon

    Description

    A refreshing and flavorful Mexican Cucumber Salad perfect for any occasion.


    • 3 Persian cucumbers (or 1 large English cucumber), sliced
    • 1 cup corn kernels (fresh, canned, or frozen and thawed)
    • 1/4 cup red onion, finely diced
    • 1/4 cup chopped fresh cilantro
    • 1/3 cup mayonnaise (or Greek yogurt for a lighter version)
    • 1 tbsp lime juice
    • 1/2 tsp chili powder
    • 1/4 tsp ground cumin
    • 1/4 tsp garlic powder
    • Salt and black pepper, to taste

    1. In a large bowl, mix sliced cucumbers, corn, red onion, and cilantro.
    2. In a separate bowl, whisk together mayonnaise, lime juice, chili powder, cumin, garlic powder, salt, and pepper until smooth.
    3. Pour the dressing over the cucumber mix and toss to combine evenly.
    4. Chill the salad for 15–20 minutes to let the flavors meld.
    5. Garnish with Tajín or extra chili powder just before serving.

    Notes

    • May use Greek yogurt for a lighter version of the dressing.
    • This salad can be made a few hours in advance for better flavor.
    • Prep Time: 10 minutes
    • Cook Time: 0 minutes
    • Category: Salad
    • Method: Mixing
    • Cuisine: Mexican

    Nutrition

    • Serving Size: 1 cup
    • Calories: 140
    • Sugar: 3g
    • Sodium: 200mg
    • Fat: 9g
    • Saturated Fat: 1g
    • Unsaturated Fat: 8g
    • Trans Fat: 0g
    • Carbohydrates: 16g
    • Fiber: 2g
    • Protein: 3g
    • Cholesterol: 5mg

    Sharing is caring!

  • BBQ Ranch Chickpea Quinoa Bowls

    BBQ Ranch Chickpea Quinoa Bowls


    Introduction to BBQ Ranch Chickpea Quinoa Bowls

    Life can get chaotic, right? That’s why I’m excited to share my BBQ Ranch Chickpea Quinoa Bowls with you! These bowls come together quickly, making them a perfect solution for busy weeknights or even a special weekend meal with loved ones. Packed with flavor, they’re a nutritious choice brimming with protein and texture. Plus, they’re visually appealing! Each bite offers a delightful medley of BBQ, chickpeas, and creamy ranch dressing that will leave your family craving more. Trust me, this is one recipe you’ll want to keep in your kitchen repertoire.

    Why You’ll Love This BBQ Ranch Chickpea Quinoa Bowls

    Let’s be honest: we all have those evenings when time escapes us, but we still crave something delicious. These BBQ Ranch Chickpea Quinoa Bowls are a simple solution! They take less than an hour to whip up, making meal prep a breeze. Plus, they’re refreshing and satiating, balancing flavors and nutrition all in one delightful bowl. Your taste buds will thank you, and your family will rave about the flavors!

    Ingredients for BBQ Ranch Chickpea Quinoa Bowls

    Let’s gather the star players for our BBQ Ranch Chickpea Quinoa Bowls! Each ingredient adds its own unique flair, ensuring a burst of flavor in every bite.

    • Pickled Red Onions: These provide a tangy crunch that contrasts beautifully with the creamy elements. You can prep them ahead and store them for up to three days.
    • Red Onion: When thinly sliced, this onion adds both flavor and crunch. Use a sharp knife for the best slices!
    • Apple Cider Vinegar: Its tanginess enhances the pickling process and brings brightness to your dish.
    • Sweetener of Choice: Whether it’s honey, maple syrup, or good old sugar, this sweetness helps balance the acidity of the vinegar.
    • Kosher Salt: This is crucial for amplifying flavors. Just a pinch goes a long way!
    • Quinoa: A nutritious base that’s high in protein. Its fluffy texture complements all the other ingredients.
    • Vegetable Broth: Using broth instead of water for cooking quinoa infuses flavor and depth into the dish.
    • Extra-Virgin Olive Oil: A drizzle adds richness and helps crisp the chickpeas for a satisfying bite.
    • Chickpeas: These little gems not only add plant-based protein but also a creamy texture once cooked.
    • Smoked Paprika: This spice brings a subtle smokiness that pairs perfectly with BBQ flavors.
    • Garlic Powder: It’s a versatile seasoning that enhances the savory notes of your chickpeas.
    • BBQ Sauce: Choose your favorite—whether homemade or store-bought—for that scrumptious glaze on the chickpeas.
    • Fire-Roasted Corn: It contributes a sweet, slightly charred essence. Plus, it adds color to your bowl.
    • Avocado: Creamy chunks of avocado are a must, adding healthy fats and a lovely texture.
    • Sharp White Cheddar Cheese: This cheese gives a nice bite of flavor that complements the other ingredients beautifully.
    • 2% Plain Greek Yogurt: It’s the main ingredient for our ranch dressing, offering creaminess and tanginess.
    • Mayonnaise: This offers additional creaminess to the dressing. A little goes a long way!
    • Fresh Lemon Juice: A splash of acidity brightens the ranch dressing and balances the flavors.
    • Fresh Chives: These add a hint of onion flavor and a dash of green that make everything look inviting.
    • Dried Dill: Dill’s herby flavor pairs wonderfully with the yogurt dressing, giving it that classic ranch taste.
    • Onion Powder: It deepens the flavor profile without overpowering the other ingredients.
    • Black Pepper: Season it to taste; a touch of warmth rounds out the flavors.

    For exact measurements, you’ll find everything listed neatly at the bottom of the article, ready for you to print out and take to the kitchen. Happy cooking!

    How to Make BBQ Ranch Chickpea Quinoa Bowls

    Now that we have our ingredients ready, let’s dive into making these fabulous BBQ Ranch Chickpea Quinoa Bowls! Each step is straightforward, and you’ll find that before you know it, a colorful and delicious meal will be staring back at you.

    Step 1: Pickle the Red Onions

    Start by making those pickled red onions. Trust me, they’ll elevate your dish! In a medium heat-proof bowl, add the thinly sliced onions. Next, grab a pot and combine apple cider vinegar, a splash of water, sweetener, and kosher salt. Bring this mixture to a boil. Once boiling, pour it over the onions. Allow them to sit at room temperature for at least 30 minutes. The longer they sit, the more flavor they’ll absorb, so feel free to keep them for up to two hours!

    Step 2: Cook the Quinoa

    While your onions are pickling, it’s time to cook the quinoa. In the same pot you used for the onions, combine the quinoa and vegetable broth. Add a pinch of salt. Bring it to a gentle boil. Once bubbling, lower the heat, cover it up, and let it simmer for about 15 to 18 minutes. The trick? Don’t peek! This helps the quinoa fluff up nicely. Remember, once the liquid has absorbed, keep the lid on for a few minutes to steam the grains.

    Step 3: Prepare the Yogurt Ranch Dressing

    While the quinoa is cooking, let’s whip up that creamy yogurt ranch dressing. In a medium bowl, mix together plain Greek yogurt, mayonnaise, lemon juice, chopped chives, dill, garlic powder, onion powder, salt, and pepper. This dressing brings a vibrant tanginess, enhancing the overall flavor of the bowl. Feel free to adjust the seasonings to your taste—it’s all about what makes your taste buds dance!

    Step 4: Sauté the Chickpeas

    Now for the chickpeas! Heat some extra-virgin olive oil in a skillet over medium heat. When it’s hot, toss in your rinsed and dried chickpeas. Sauté them for 4 to 5 minutes until they’re slightly crispy. Season them with smoked paprika, garlic powder, and a pinch of salt. Finally, drizzle in your BBQ sauce and cook for an additional minute or so, tossing to coat the chickpeas evenly. The rich flavors will make them irresistible!

    Step 5: Assemble the Bowls

    Time to bring everything together! Start by dividing the fluffy quinoa among three bowls. Layer the BBQ chickpeas on top, followed by the warm fire-roasted corn, pickled red onions, sharp cheddar cheese, and creamy avocado chunks. Drizzle generously with your yogurt ranch dressing, and if you’re feeling fancy, garnish with a sprinkle of fresh chives. Voila! Your BBQ Ranch Chickpea Quinoa Bowls are ready to impress!

    Tips for Success

    • Always rinse your quinoa before cooking to remove the bitter taste.
    • For extra flavor, let the pickled onions chill overnight; they’ll taste even better!
    • Mix and match ingredients according to your family’s preferences.
    • If you’re short on time, use canned corn instead of fire-roasted.
    • Keep leftover chickpeas on hand for salads or snacks throughout the week.

    Equipment Needed

    • Medium Pot: A good quality pot for cooking quinoa; a saucepan works too!
    • Heat-Proof Bowl: Essential for pickling onions; you can use any sturdy mixing bowl.
    • Skillet: A non-stick skillet is ideal for sautéing chickpeas and can be substituted with a frying pan.
    • Medium Bowl: Great for mixing up the yogurt ranch dressing; any bowl will suffice!
    • Sharp Knife: Important for slicing and dicing; a trusty chef’s knife will do the trick.

    Variations of BBQ Ranch Chickpea Quinoa Bowls

    • Add a protein boost: Tofu, grilled chicken, or shrimp can take this dish to the next level. Simply sauté them with some seasonings before adding.
    • Swap the grains: Experiment with farro, brown rice, or even barley for a different texture and flavor profile.
    • Make it spicy: Add jalapeños or a dash of hot sauce to your yogurt ranch dressing for those who love a kick!
    • Incorporate greens: Toss in fresh spinach, kale, or arugula for an extra crunch and nutritional benefits.
    • Vegan twist: Substitute Greek yogurt and mayonnaise with a vegan alternative to keep it plant-based!
    • Seasonal veggies: Use whatever vegetables are in season. Roasted bell peppers or zucchini would add a wonderful depth of flavor.

    Serving Suggestions for BBQ Ranch Chickpea Quinoa Bowls

    • Pair with a side salad: A refreshing green salad complements the richness of the bowls.
    • Serve with crusty bread: A warm baguette or garlic bread can soak up the delicious dressing.
    • Enjoy a fruit smoothie: A light smoothie balances the meal with a touch of sweetness.
    • Garnish with extra chives: A sprinkle of fresh herbs enhances visual appeal and flavor.
    • Plate beautifully: Layer ingredients in bowls to create color and texture contrast for an inviting presentation!

    FAQs about BBQ Ranch Chickpea Quinoa Bowls

    How can I store leftover BBQ Ranch Chickpea Quinoa Bowls?
    You can store any leftovers in airtight containers in the fridge for up to three days. Just keep the yogurt ranch dressing separate to maintain freshness, and mix it in when you’re ready to enjoy!

    Can I make BBQ Ranch Chickpea Quinoa Bowls vegan?
    Absolutely! Simply swap out the Greek yogurt and mayonnaise for vegan alternatives. There are plenty of delicious plant-based dressings available that mimic classic ranch flavors.

    What can I serve with BBQ Ranch Chickpea Quinoa Bowls?
    These bowls are incredibly versatile! Pair them with a fresh green salad, some roasted veggies, or a warm piece of crusty bread. They can easily be a stand-alone meal or part of a larger spread!

    Is there a way to make these bowls gluten-free?
    Yes! The recipe is already gluten-free as it contains quinoa, which is naturally gluten-free. Just double-check the labels on any sauces or dressings to ensure they don’t contain gluten.

    Can I customize the veggies in the bowls?
    Definitely! Feel free to get creative with the vegetables. Grilled bell peppers, roasted zucchini, or even some fresh spinach can add more flavor and nutrition. Adjust according to your family’s preferences!

    Final Thoughts

    Cooking is not just about feeding our bodies; it’s about nourishing our souls. These BBQ Ranch Chickpea Quinoa Bowls bring together flavors and textures that create a delightful dining experience. As you savor each bite, you’ll appreciate the harmony of ingredients, the ease of preparation, and the joy they bring to your family table. Whether it’s a bustling weeknight or a cozy Sunday gathering, this recipe is versatile and satisfying. I hope it brings as much happiness to you as it has to my family. Cheers to creating unforgettable meals and lasting memories!


    Print

    clock clock iconcutlery cutlery iconflag flag iconfolder folder iconinstagram instagram iconpinterest pinterest iconfacebook facebook iconprint print iconsquares squares iconheart heart iconheart solid heart solid icon

    Description

    BBQ Ranch Chickpea Quinoa Bowls are a delicious and nutritious meal featuring the flavors of BBQ, chickpeas, quinoa, and a creamy yogurt ranch dressing.


    • Pickled Red Onions
    • 1/2 red onion, very thinly sliced
    • 1/2 cup apple cider vinegar
    • 1 Tbsp. sweetener of choice (granulated sugar, honey, or maple syrup)
    • 1 tsp. kosher salt
    • Chickpea Quinoa Bowls
    • 3/4 cup dry (uncooked) quinoa
    • 1 1/2 cups vegetable broth
    • 1 Tbsp. extra-virgin olive oil
    • 1 (15-oz.) can chickpeas, rinsed, drained and patted dry
    • 1/2 tsp. smoked paprika
    • 1/4 tsp. garlic powder
    • 1/4 cup BBQ sauce
    • 3/4 cup frozen/thawed fire-roasted corn, warmed
    • 1 medium avocado, cut into chunks
    • 1/2 cup grated sharp white cheddar cheese
    • Yogurt Ranch Dressing
    • 1/3 cup 2% plain Greek yogurt
    • 2 Tbsp. mayonnaise
    • 1 1/2 tsp. fresh lemon juice
    • 1 Tbsp. finely chopped fresh chives
    • 1/2 tsp. dried dill (or 2 tsp. fresh)
    • 1/2 tsp. garlic powder
    • 1/4 tsp. onion powder
    • 1/4 tsp. each kosher salt and black pepper

    1. Pickle Red Onions: Place red onions in a medium heat-proof bowl. In a medium pot, combine vinegar, 1/2 cup water, sugar, and salt; bring to a boil. Turn off heat and pour vinegar mixture over red onions. Let sit for at least 30 minutes (or up to 2 hours) at room temperature.
    2. Cook Quinoa: Using the same pot, combine quinoa, vegetable broth, and a pinch of salt; bring to a boil. Reduce heat to low, cover, and cook until quinoa is fluffy and liquid is absorbed, about 15 to 18 minutes. Remove from heat, stir, and place lid back on to let grains steam until you’re ready to assemble the bowls.
    3. Prepare Yogurt Ranch: In a medium bowl, combine Greek yogurt, mayo, lemon juice, chives, dill, garlic powder, onion powder, salt, and pepper; mix to combine.
    4. Sauté Chickpeas: Heat oil in a medium skillet over medium heat. Once hot, add chickpeas and cook for 4 to 5 minutes, stirring only occasionally, until slightly crisp. Season with smoked paprika, garlic powder, and a pinch of salt. Add BBQ sauce and cook 1 to 2 more minutes.
    5. Assemble Bowls: Divide quinoa mixture evenly between 3 bowls. Top with BBQ chickpeas, fire-roasted corn, pickled red onion, sharp cheddar, and avocado. Drizzle yogurt ranch dressing overtop, and garnish with fresh chopped chives, if desired.

    Notes

    • You can prepare and refrigerate red onions up to 3 days in advance.
    • If you prefer saucier beans, add an extra 1 to 2 Tbsp. of BBQ sauce.
    • Prep Time: 30 minutes
    • Cook Time: 20 minutes
    • Category: Main Course
    • Method: Stovetop
    • Cuisine: American

    Nutrition

    • Serving Size: 1 bowl
    • Calories: 450
    • Sugar: 8g
    • Sodium: 500mg
    • Fat: 17g
    • Saturated Fat: 3g
    • Unsaturated Fat: 14g
    • Trans Fat: 0g
    • Carbohydrates: 60g
    • Fiber: 12g
    • Protein: 15g
    • Cholesterol: 10mg

    Sharing is caring!

  • Pretzel Bottom Caramel Brownies

    Pretzel Bottom Caramel Brownies


    Introduction to Pretzel Bottom Caramel Brownies

    Hey there, fellow dessert lovers! If you’re anything like me, you often find yourself juggling a million things at once. That’s why I can’t wait to share my Pretzel Bottom Caramel Brownies with you! These beauties are not only a delicious twist on traditional brownies, but they also save you time in the kitchen. Picture a crunchy pretzel crust topped with a rich brownie layer and a sweet caramel drizzle—pure bliss! Trust me, these brownies will impress your loved ones, making you the star of any gathering or the hero of your busy weeknights.

    Why You’ll Love This Pretzel Bottom Caramel Brownies

    What makes my Pretzel Bottom Caramel Brownies a must-try? First, they’re incredibly easy to whip up, even on your busiest days. You get to indulge in rich flavors and those delightful textures without spending hours in the kitchen. Plus, they make an excellent treat for gatherings or a sweet surprise for your family. Honestly, the combination of salty and sweet is guaranteed to satisfy your cravings!

    Ingredients for Pretzel Bottom Caramel Brownies

    Let’s gather the magic ingredients for these Pretzel Bottom Caramel Brownies! Each ingredient plays a crucial role in creating that irresistible flavor and texture I adore. Here’s what you’ll need:

    • Crushed Pretzels: These provide a crunchy, salty base that perfectly complements the sweet brownie.
    • Unsalted Butter: Essential for richness; melted for the crust and brownie batter.
    • Light Brown Sugar: Adds a subtle caramel flavor that enhances the overall sweetness.
    • All-Purpose Flour: It gives structure, helping the brownies hold together nicely.
    • Cocoa Powder: This enriches the chocolate flavor, making your brownies decadently chocolatey.
    • Large Eggs: Vital for binding ingredients and providing moisture.
    • Granulated Sugar: Sweetens the batter and balances the saltiness of the pretzel crust.
    • Quality Dark Chocolate: Melting it into the batter gives an intense chocolate richness.
    • Vanilla Extract: A splash of this magic ingredient elevates every dessert!
    • Pinch of Salt: Just a hint enhances all the flavors beautifully.
    • Chocolate Chunks (optional): For those extra gooey bites. Choose dark or milk chocolate for a sweeter twist.

    Now, let’s not forget the ingredients for that dreamy caramel drizzle:

    • Granulated Sugar (for caramel): This is what you’ll melt to create that lovely caramel sauce.
    • Unsalted Butter (for caramel): Gives the caramel a luscious, creamy texture.
    • Heavy Cream (for caramel): Makes your caramel rich and silky smooth.
    • Pinch of Salt (for caramel): Enhances sweetness and rounds out the flavor.

    You can find exact quantities for these ingredients at the bottom of the article, ready for you to print out for your next baking adventure!

    How to Make Pretzel Bottom Caramel Brownies

    Ready to embark on your brownie adventure? Let me guide you through this fun and rewarding process step by step. With just a bit of patience, you’ll create a dessert that’s bound to impress everyone. Let’s dive into the deliciousness!

    Prepare the Oven and Pan

    First things first, preheat your oven to 350°F (175°C). It’s like getting your dance floor ready before the party! While it warms up, take an 8×8-inch pan and line it with parchment paper. This makes for easy lifting later on. Trust me, your future self will thank you when it’s time to slice the brownies!

    Make the Pretzel Crust

    Now, for the fun part—making the pretzel crust! In a bowl, combine your crushed pretzels, melted butter, and brown sugar. Mix it well until it resembles wet sand. Press this mixture firmly into the bottom of your lined pan. Bake it for about 8 minutes, just until it’s lightly golden. This step perfectly sets the stage for the rich brownie layer!

    Prepare the Brownie Batter

    While your pretzel crust is cooling, let’s whip up that decadent brownie batter. In another bowl, whisk together your melted butter, granulated sugar, and brown sugar until it’s nice and smooth. Then, add the eggs, vanilla extract, and melted dark chocolate. Stir until everything is well combined. Gradually fold in the flour, cocoa powder, and a pinch of salt. If you’re using chocolate chunks, toss those in last for an extra chocolatey surprise!

    Bake the Brownies

    Spread the brownie batter evenly over your pretzel crust. Now, it’s time to bake these beauties! Slide them into your preheated oven and let them bake for 25 to 30 minutes. The center should be just set—think of it like a soft hug for your taste buds! A toothpick inserted should come out with a few moist crumbs. That’s perfection right there.

    Create the Caramel Sauce

    While the brownies are baking, let’s make that luscious caramel sauce. In a pan over medium heat, pour the granulated sugar and let it melt, stirring gently. When it turns a beautiful golden brown, whisk in the butter. Careful now! It’ll bubble up a bit. Slowly drizzle in the heavy cream while stirring until smooth. Finally, add a pinch of salt to elevate the flavor.

    Drizzle the Caramel Over Brownies

    Once your brownies are done and cooled slightly, it’s time for the grand finale! Drizzle the warm caramel sauce generously over the top of your brownies. Let it settle and cool down a bit more before slicing them into squares. And there you have it—your Pretzel Bottom Caramel Brownies are ready to make your taste buds dance!

    Tips for Success

    • Make sure to crush pretzels evenly for a consistent crust texture.
    • Use quality dark chocolate for the best flavor—don’t skip this step!
    • If your caramel gets too thick, gently reheat with a splash of cream.
    • Allow brownies to cool completely before slicing for clean edges.
    • For added flair, sprinkle sea salt on top of the caramel drizzle.

    Equipment Needed

    • 8×8-inch Baking Pan: Alternatively, use a similar sized dish, like a 9×9 inch pan.
    • Parchment Paper: If you don’t have this, greasing the pan works, but parchment helps with easy removal.
    • Mixing Bowls: Any size works; just ensure they’re big enough to mix your ingredients.
    • Whisk and Spatula: A whisk for combining and a spatula for scraping the batter.

    Variations

    • Nutty Delight: Add a half cup of chopped nuts like walnuts or pecans for a crunchy twist!
    • Peanut Butter Swirl: Swirl in a few tablespoons of peanut butter into the brownie batter before baking.
    • Gluten-Free Option: Substitute all-purpose flour with a gluten-free flour blend for a gluten-free treat.
    • Minty Fresh: Add a teaspoon of peppermint extract to the brownie batter for a refreshing flavor.
    • Spicy Kick: Mix in a pinch of cayenne pepper or chili powder for a surprising heat that contrasts with the sweetness.

    Serving Suggestions

    • Pair your brownies with a scoop of vanilla ice cream for a delightful contrast.
    • Serve with a dollop of whipped cream and a sprinkle of chocolate shavings.
    • Enjoy with a warm cup of coffee or a glass of cold milk to balance the sweetness.
    • For a festive touch, plate with fresh berries or a drizzle of chocolate sauce.

    FAQs about Pretzel Bottom Caramel Brownies

    Can I make these Pretzel Bottom Caramel Brownies ahead of time?

    Absolutely! You can prepare these brownies a day in advance. Just store them in an airtight container at room temperature to keep them fresh.

    What can I substitute for the pretzel crust?

    If you’re not a fan of pretzels, consider using crushed graham crackers or cookies for a sweet base. Each option will change the flavor profile a bit, but’ll still be delicious!

    How do I store leftover brownies?

    Store any leftovers in an airtight container to maintain their gooeyness. They’ll keep well for about three days. You can also refrigerate them for longer freshness!

    Can I freeze Pretzel Bottom Caramel Brownies?

    Yes, they freeze beautifully! Just make sure to wrap them tightly in foil or plastic wrap before placing them in a freezer-safe bag. They can last up to three months!

    What’s the best way to reheat brownies?

    To enjoy that warm, gooey goodness again, pop a brownie in the microwave for about 10-15 seconds. You’ll be rewarded with that just-baked texture!

    Final Thoughts

    There’s something truly magical about pulling these Pretzel Bottom Caramel Brownies from the oven. The delightful combination of sweet and salty brings a smile that even the busiest moms and professionals can appreciate. Every bite offers a touch of crunch from the pretzel crust, a rich chocolatey flavor, and that luscious caramel drizzle. Whether you’re surprising your family after a long day or impressing friends at a gathering, these brownies deliver joy! So, roll up your sleeves, gather your ingredients, and let this delightful recipe bring sweetness to your day. You deserve it!


    Print

    clock clock iconcutlery cutlery iconflag flag iconfolder folder iconinstagram instagram iconpinterest pinterest iconfacebook facebook iconprint print iconsquares squares iconheart heart iconheart solid heart solid icon

    Description

    Deliciously unique brownies with a crunchy pretzel crust, rich brownie layer, and a sweet caramel drizzle.


    • 1½ cups crushed pretzels
    • ½ cup unsalted butter, melted
    • 2 tbsp light brown sugar
    • ½ cup all-purpose flour
    • ½ cup cocoa powder
    • ½ cup unsalted butter
    • 2 large eggs (60g each)
    • ½ cup granulated sugar
    • ½ cup light brown sugar
    • 4 oz quality dark chocolate (60–75% cocoa), melted
    • 1 tsp vanilla extract
    • ¼ tsp salt
    • ½ cup dark or milk chocolate chunks (optional)
    • ½ cup granulated sugar (for caramel)
    • 2 tbsp unsalted butter (for caramel)
    • ¼ cup heavy cream (for caramel)
    • Pinch of salt (for caramel)

    1. Preheat oven to 350°F (175°C). Line an 8×8-inch pan with parchment.
    2. Make pretzel crust: Mix crushed pretzels, melted butter, and brown sugar. Press firmly into the pan. Bake for 8 minutes.
    3. In a bowl, whisk together butter and sugars. Add eggs, vanilla, and melted chocolate. Stir in flour, cocoa, and salt. Fold in chocolate chunks.
    4. Spread brownie mix over the pretzel crust. Bake for 25–30 mins or until the center is just set.
    5. For the caramel: Heat sugar over medium heat, stirring until melted and golden. Add butter, then cream (carefully). Stir until smooth. Add a pinch of salt.
    6. Drizzle caramel over warm brownies. Cool before slicing.

    Notes

    • Ensure to melt the chocolate properly for a smooth batter.
    • Serve brownies warm for an extra gooey experience.
    • Optional toppings could include whipped cream or ice cream.
    • Prep Time: 20 minutes
    • Cook Time: 40 minutes
    • Category: Dessert
    • Method: Baking
    • Cuisine: American

    Nutrition

    • Serving Size: 1 brownie
    • Calories: 290
    • Sugar: 16g
    • Sodium: 150mg
    • Fat: 15g
    • Saturated Fat: 8g
    • Unsaturated Fat: 5g
    • Trans Fat: 0g
    • Carbohydrates: 35g
    • Fiber: 2g
    • Protein: 4g
    • Cholesterol: 50mg

    Sharing is caring!

  • Vanilla Chai Cheesecake Bars

    Vanilla Chai Cheesecake Bars


    Introduction to Vanilla Chai Cheesecake Bars

    Hey there, fellow home cooks! If you’re anything like me, you often find yourself squeezed between a busy schedule and the desire to whip up something special for your loved ones. That’s why I am excited to share my beloved Vanilla Chai Cheesecake Bars recipe with you! These luscious treats combine creamy cheesecake and warm chai spices, all resting on a buttery crust. Perfect for a gathering or a cozy night in, they’ll wrap your family in a delicious hug. Let’s dive in together and bring a little sweetness into our lives!

    Why You’ll Love This Vanilla Chai Cheesecake Bars

    These Vanilla Chai Cheesecake Bars are the perfect blend of ease and flavor. They come together in no time, making them a fantastic choice for busy moms or professionals like us. The creamy filling combined with aromatic chai spices will enchant your taste buds and impress your family or guests. Plus, they’ll make your kitchen smell like a warm hug on a chilly day. What’s not to love?

    Ingredients for Vanilla Chai Cheesecake Bars

    Ready to gather a scrumptious lineup of ingredients for your Vanilla Chai Cheesecake Bars? Here’s what you’ll need:

    • Unsalted butter: The star of the buttery crust. It adds richness and flavor. If you’re out of unsalted butter, feel free to use salted butter, but be cautious with adding extra salt.
    • Brown sugar: This lends a delightful caramel touch to the crust. You can substitute it with granulated sugar if needed, but the flavor might be a tad less rich.
    • Vanilla extract: A must-have for enhancing sweetness and depth. Make sure to choose high-quality vanilla for the best flavor.
    • Salt: Just a pinch! It helps balance the sweetness and brings all the flavors together.
    • Ground cinnamon: This adds warmth to the crust, evoking the cozy sensation of the chai spices to come.
    • All-purpose flour: The backbone of your crust. You can use whole wheat flour for a nuttier flavor, though the texture may differ slightly.
    • Cream cheese: The heart of the cheesecake filling—make sure it’s at room temperature for a silky-smooth blend!
    • Granulated sugar: It sweetens up your filling beautifully. If you prefer a healthier version, consider using coconut sugar for a hint of extra flavor.
    • Sour cream or heavy cream: This contributes to the creaminess of the filling. Heavy cream gives a richer taste, while sour cream offers a slightly tangy profile.
    • Eggs: They provide structure and help set your cheesecake. Use large-sized eggs for best results.
    • Vanilla bean paste or more vanilla extract: This boosts that dreamy vanilla flavor. If you’ve got real vanilla beans lying around, feel free to scrape them in!
    • Chai seasoning or chai tea: This is where the magic happens! You can use chai spice blend or the contents of an unbrewed chai tea bag for that warm hug in every bite.

    If you’re curious about measurements, don’t worry! You can find the exact quantities at the bottom of the article for easy printing. Let’s get cooking!

    How to Make Vanilla Chai Cheesecake Bars

    Now that we’ve gathered our ingredients, it’s time to bring this delightful dessert to life! Follow these step-by-step instructions for your Vanilla Chai Cheesecake Bars. Let’s get started!

    Prepare Your Baking Pan

    First, take your baking pan, either a 9×9″ or an 8×8″ one will do. Line the bottom with parchment paper, allowing it to hang over the sides. This little trick will make it so much easier to lift out your cheesecake bars later. Give the parchment a light spray with cooking spray to prevent sticking.

    Make the Crust

    In a mixing bowl, stir together the melted butter, brown sugar, vanilla extract, salt, and ground cinnamon. You want to mix until it’s all combined. Then, gradually add in the all-purpose flour and mix until a soft dough forms. Once combined, press the mixture evenly into the bottom of your prepared pan using your fingers or the back of a measuring cup. Make sure it’s nice and compact!

    Bake the Crust

    Now it’s time to bake that crust! Preheat your oven to 300°F. Bake the crust for about 15 minutes until it’s golden and set. Once it’s done, take it out and let it cool for about 5-10 minutes while you adjust your oven temperature to 325°F.

    Prepare the Cheesecake Filling

    In the bowl of a stand mixer, or with a handheld mixer, beat the room-temperature cream cheese and granulated sugar together until it’s super smooth. I like to scrape the sides of the bowl to make sure everything is combined. Then, add in the sour cream (or heavy cream), eggs, vanilla bean paste, and chai seasoning. Mix until everything is well combined and velvety. It should look dreamy!

    Combine Filling and Crust

    Now for the fun part! Carefully pour the cheesecake filling over the cooled crust, smoothing it out with a spatula. Try to get an even layer. This will help with the overall texture, ensuring every bite is delicious!

    Bake the Cheesecake Bars

    Put your masterpiece in the oven and bake for 30-35 minutes. The filling should be set but a touch soft in the center. To make sure it’s just right, insert an instant-read thermometer about 1 inch from the edge. It should read around 180°F. If it’s not quite there, just bake for a few more minutes but keep an eye on it!

    Cool and Refrigerate

    Once baked, remove the bars from the oven and let them cool at room temperature for about 30 minutes. After that, cover them and pop them in the fridge. Let them chill for a few hours or overnight if you can resist them that long. This step is crucial for the flavors to develop and for the filling to perfectly set!

    Tips for Success

    • Ensure your cream cheese is at room temperature for a smooth filling.
    • Use a light touch when pressing down the crust; it shouldn’t be too compact.
    • If you prefer a less sweet bar, reduce the sugar slightly.
    • Check your bars a few minutes early for the perfect texture.
    • Let the bars cool completely before slicing for clean edges.

    Equipment Needed

    • Baking pan: A 9×9″ or 8×8″ pan works best. If you don’t have one, a round cake pan can also do the trick!
    • Parchment paper: Essential for easy removal. If you’re out, just grease the pan well with cooking spray.
    • Mixing bowls: Use two—one for the crust and one for the filling.
    • Electric mixer: A stand or handheld mixer will make whipping the filling a breeze.
    • Spatula: Great for smoothing the cheesecake filling and scraping down the sides of the bowl.

    Variations for Vanilla Chai Cheesecake Bars

    • Spiced Pumpkin Chai: Swap in pumpkin puree for half of the sour cream to create a spiced pumpkin version. Adjust the chai seasoning to enhance that fall flavor.
    • Chocolate Swirl: Melt some dark chocolate and swirl it into the cheesecake filling before baking for a decadent twist. Chocolate and chai are a match made in heaven!
    • Coconut Cream: Use coconut cream instead of heavy cream or sour cream for a dairy-free option. This adds a tropical flair to your bars.
    • Nutty Crust: Add crushed nuts, like almonds or pecans, to the crust mixture for an added crunch and flavor boost. Just be cautious about allergies.
    • Ginger Snap Crust: Substitute some or all of the all-purpose flour in the crust with crushed ginger snaps for an extra zing that pairs wonderfully with chai.

    Serving Suggestions for Vanilla Chai Cheesecake Bars

    • Serve with a dollop of lightly sweetened whipped cream for an elegant touch.
    • Pair with a hot chai latte or spiced tea to complement the flavors.
    • Dust with a sprinkle of cinnamon or nutmeg for a beautiful presentation.
    • Serve alongside fresh fruit, like berries, for a refreshing contrast.
    • Place the bars on a decorative platter for a visually appealing dessert display.

    FAQs about Vanilla Chai Cheesecake Bars

    As we embark on this delicious journey together, you may have a few questions about these Vanilla Chai Cheesecake Bars. Let’s dive into some common queries that might pop up:

    Can I make Vanilla Chai Cheesecake Bars ahead of time?

    Absolutely! These bars can be made up to three days in advance. Just keep them covered in the fridge until you’re ready to serve. They taste even better after chilling!

    What can I use instead of chai seasoning?

    If you’re in a pinch, you can use the contents of an unbrewed chai tea bag, or mix some ground ginger, cardamom, and cloves for a homemade blend. It’ll still give you that lovely chai flavor.

    How do I know when my cheesecake bars are done baking?

    You’ll want to check for a slight jiggle in the center, and it should read around 180°F when tested with a thermometer. Remember, they’ll firm up as they cool!

    Can I freeze these cheesecake bars?

    Yes, you can freeze them! Wrap the bars well in plastic wrap and then in foil to prevent freezer burn. They’ll last for up to two months. Thaw in the fridge before serving.

    What’s the best way to cut cheesecake bars for neat slices?

    Use a sharp knife dipped in hot water for clean cuts. Wipe the knife between slices for the best results. It’s all about presentation, right?

    Final Thoughts

    Creating these Vanilla Chai Cheesecake Bars is more than just baking; it’s about crafting moments of joy for our families. Each layer creates a delightful harmony of creamy cheesecake and warm chai spices that truly embrace you with every bite. Whether you’re serving them for a cozy family gathering or enjoying a quiet evening with a cup of tea, these bars add a sprinkle of happiness to your day. So, roll up your sleeves, and let’s relish the sweet, spicy journey together—because these delightful bars are bound to become a cherished favorite in your home!


    Print

    clock clock iconcutlery cutlery iconflag flag iconfolder folder iconinstagram instagram iconpinterest pinterest iconfacebook facebook iconprint print iconsquares squares iconheart heart iconheart solid heart solid icon

    Description

    Delicious Vanilla Chai Cheesecake Bars with a buttery crust and creamy filling featuring chai spices.


    • 1/2 cup unsalted butter, melted
    • 1/4 cup brown sugar
    • 1 tsp vanilla extract
    • 1/4 tsp salt
    • 1/2 tsp ground cinnamon
    • 1 cup all-purpose flour
    • 16 ounces cream cheese, room temperature
    • 1 cup granulated sugar
    • 1/4 cup sour cream or heavy cream
    • 3 large eggs
    • 2 1/2 tsp vanilla bean paste or vanilla extract
    • 11 1/2 tsp chai seasoning or contents of an unbrewed chai tea bag

    1. Line a 9×9″ or 8×8″ baking pan with parchment paper, spray lightly with cooking spray, and set aside. Preheat oven to 300°F.
    2. In a mixing bowl, stir together melted butter, brown sugar, vanilla, salt, and ground cinnamon. Add flour and stir until thoroughly combined. Press mixture into the prepared pan.
    3. Bake for 15 minutes, then set aside to cool for 5-10 minutes. Adjust oven temperature to 325°F.
    4. In the bowl of a stand mixer or using a handheld mixer, beat cream cheese and granulated sugar until smooth.
    5. Add sour cream (or heavy cream), eggs, vanilla, and chai seasoning. Beat until fully combined, scraping the sides and bottom of the bowl as needed.
    6. Pour the filling over the cooled crust and smooth into an even layer with a spatula.
    7. Bake the bars at 325°F for 30-35 minutes, or until the filling is set but slightly soft in the center. To check doneness, insert an instant-read thermometer into the filling about 1 inch from the edge; it should read approximately 180°F.
    8. Remove from the oven and cool at room temperature for 30 minutes. Cover and refrigerate until ready to serve.
    9. Before serving, optionally sprinkle the tops of the bars with a pinch of ground cinnamon.

    Notes

    • Store leftover bars in the refrigerator for up to 4 days.
    • For extra flavor, top with whipped cream or a drizzle of caramel.
    • Prep Time: 20 minutes
    • Cook Time: 45 minutes
    • Category: Dessert
    • Method: Baking
    • Cuisine: American

    Nutrition

    • Serving Size: 1 bar
    • Calories: 250
    • Sugar: 18g
    • Sodium: 150mg
    • Fat: 16g
    • Saturated Fat: 10g
    • Unsaturated Fat: 5g
    • Trans Fat: 0g
    • Carbohydrates: 22g
    • Fiber: 1g
    • Protein: 4g
    • Cholesterol: 70mg

    Sharing is caring!

  • Egg Salad Lettuce Wraps Light

    Egg Salad Lettuce Wraps Light


    Introduction to Egg Salad Lettuce Wraps Light

    As a busy mom, I understand the struggle of finding a quick, healthy snack that everyone will love. That’s why I adore these Egg Salad Lettuce Wraps Light. They’re not just refreshing; they’re packed with flavor and protein.

    Imagine a creamy egg salad nestled in crisp, vibrant lettuce leaves. It’s the perfect grab-and-go solution for those hectic days or a delightful lunch to impress your loved ones. Whether you’re rushing out the door or winding down after a long day, these wraps offer a wholesome bite that leaves you feeling satisfied without the guilt.

    Why You’ll Love This Egg Salad Lettuce Wraps Light

    You’ll fall head over heels for these Egg Salad Lettuce Wraps Light! They’re incredibly simple to whip up, taking just 10 minutes from start to finish.

    The taste? Oh, my, it’s creamy, crunchy, and oh-so-satisfying. Plus, they’re a guilt-free snack with low calories and high protein—perfect for fueling your busy day. What’s not to love about a dish that’s quick, wholesome, and utterly delicious?

    Ingredients for Egg Salad Lettuce Wraps Light

    Creating these Egg Salad Lettuce Wraps Light is easy with just a handful of ingredients. Here’s what you’ll need:

    • Hard-boiled eggs: The star of the show! They provide protein and a creamy texture.
    • Plain Greek yogurt: A healthier alternative to mayonnaise, it adds creaminess and tang without the extra calories.
    • Celery: This crunchy veggie adds a refreshing crunch and a touch of sweetness to the salad.
    • Chives: These mild onion-flavored herbs enhance the flavor of your egg salad, bringing a great color and a bit of zest.
    • Salt and black pepper: Essential for bringing all the flavors together; adjust to your taste!
    • Lettuce leaves: Large, crisp leaves, like romaine or butter lettuce, serve as the perfect edible wrap.

    For those who love experimenting in the kitchen, feel free to add optional ingredients like diced pickles, capers, or a drizzle of mustard for an extra kick.

    You can also swap the Greek yogurt with avocado for a creamy, dairy-free option.

    All the specific quantities are listed at the bottom of the article, ready for printing whenever you are!

    How to Make Egg Salad Lettuce Wraps Light

    Making these Egg Salad Lettuce Wraps Light is a breeze. Follow these simple steps for a deliciously satisfying snack that will brighten your day. They pair well with joy and laughter, so gather your family around and enjoy the cooking process together!

    Step 1: Prepare the Egg Salad Mixture

    Start by gathering your ingredients. In a mixing bowl, combine the chopped hard-boiled eggs with plain Greek yogurt. This gives the salad that creamy goodness we all crave! Next, toss in the finely diced celery and chives. Those little green bits add flavor and color – always a win!

    Season it with salt and black pepper to your liking, ensuring every bite bursts with taste. Mix everything gently until well combined. Voila! Your egg salad mixture is ready to shine!

    Step 2: Assemble the Lettuce Wraps

    Now comes the fun part: the assembly! Take those large, crisp lettuce leaves and lay them flat on a clean surface. Spoon the delightful egg salad mixture right into the center of each leaf. Don’t be shy – pack it in there!

    Once you’ve added the filling, gently fold up the sides of the lettuce, then roll it snugly. You want the deliciousness to stay tucked in! These wraps not only look good but are a true testament to simplicity and satisfaction.

    Step 3: Serve and Enjoy

    Serving these tasty wraps is super easy! For the best experience, chill them in the fridge for about 10 minutes before serving. This enhances the flavors and offers a fresh bite.

    You can garnish with extra chives or a sprinkle of paprika for a pop of color. And just like that, you’re ready to enjoy your wholesome, Egg Salad Lettuce Wraps Light. Perfect for a snack, lunch, or even a party platter!

    Tips for Success

    • Use fresh, crisp lettuce leaves for that satisfying crunch.
    • Chill the egg salad mixture for 10 minutes before filling the wraps.
    • Experiment with different herbs, like dill or parsley, for varied flavors.
    • Make a larger batch and store leftovers in the fridge for up to three days.
    • Consider pairing with carrot sticks or cucumber slices for a colorful plate!

    Equipment Needed

    • Mixing bowl: A medium-sized bowl works well; a large one can give you more room to mix.
    • Chopping board: Essential for chopping those eggs and vegetables safely; any sturdy surface will do.
    • Knife: A sharp knife helps with easy chopping; a butter knife can work for soft ingredients.
    • Spoon: Use a regular spoon or a scoop for transferring the egg salad into lettuce leaves.

    Variations

    • Add spice: For a kick, mix in a dash of hot sauce or some chopped jalapeños.
    • Herb-infused: Try adding fresh dill or parsley to elevate the flavor profile subtly.
    • Make it a meal: Serve the egg salad over a bed of quinoa or brown rice for a hearty lunch.
    • Different greens: Swap lettuce with collard greens or Swiss chard for a fun twist!
    • Vegan option: Replace the eggs with mashed chickpeas and use vegan yogurt for a plant-based version.

    Serving Suggestions

    • Pair with crunchy carrot sticks or cucumber slices for an extra crunch.
    • Serve alongside a refreshing fruit salad to complement the egg salad’s flavors.
    • Consider a glass of iced herbal tea or lemon water for a light, hydrating drink.
    • For a stunning presentation, arrange the wraps on a colorful platter with fresh herbs.

    FAQs about Egg Salad Lettuce Wraps Light

    Can I make the egg salad ahead of time?
    Absolutely! You can prepare the egg salad mixture a day in advance and store it in the fridge. Just assemble the wraps when you’re ready to enjoy them. This saves you time, especially on busy days!

    How long will leftovers last?
    Leftovers can be stored in an airtight container in the fridge for up to three days. Just keep the egg salad separate from the lettuce leaves to maintain their crispness.

    Can I use other types of salad greens?
    Certainly! If you’re in the mood for a change, try using spinach, kale, or even collard greens. They can add a delightful twist to your Egg Salad Lettuce Wraps Light.

    What can I pair these wraps with for a balanced meal?
    Add some fresh fruit, a side of veggie sticks, or a light soup to round out your meal. The wraps are satisfying on their own, but pairing them enhances the overall experience!

    How can I add more flavor to the egg salad?
    Consider mixing in diced pickles, a splash of mustard, or your favorite spices. These additions bring extra depth and zest to your Egg Salad Lettuce Wraps Light!

    Final Thoughts

    Making these Egg Salad Lettuce Wraps Light brings joy, flavor, and ease to my busy days. It’s amazing how simple ingredients can create such a delightful and wholesome snack. The burst of creamy goodness, paired with the crunch of fresh lettuce, offers a satisfying bite that feels both indulgent and guilt-free.

    Each time I prepare them, I’m reminded that easy meals can be delicious and nourishing. So whether you’re whipping these up for your family or simply treating yourself, I hope they bring a smile to your face and fuel your day with their vibrant taste!


    Print

    clock clock iconcutlery cutlery iconflag flag iconfolder folder iconinstagram instagram iconpinterest pinterest iconfacebook facebook iconprint print iconsquares squares iconheart heart iconheart solid heart solid icon

    Description

    A refreshing and healthy snack made with creamy egg salad wrapped in crisp lettuce leaves.


    • 4 hard-boiled eggs, chopped
    • 1/4 cup plain Greek yogurt
    • 1 celery stalk, finely diced
    • 1 tablespoon chives, chopped
    • Salt, to taste
    • Black pepper, to taste
    • 4 large lettuce leaves

    1. In a mixing bowl, blend chopped eggs, Greek yogurt, diced celery, chives, salt, and black pepper until evenly incorporated.
    2. Spoon the egg mixture evenly into the center of each lettuce leaf and fold or roll to enclose the filling.
    3. Serve chilled.

    Notes

    • This recipe is perfect for a light lunch or snack.
    • Prep Time: 10 minutes
    • Cook Time: 0 minutes
    • Category: Snack
    • Method: No-cook
    • Cuisine: American

    Nutrition

    • Serving Size: 1 wrap
    • Calories: 150
    • Sugar: 1g
    • Sodium: 200mg
    • Fat: 9g
    • Saturated Fat: 2g
    • Unsaturated Fat: 7g
    • Trans Fat: 0g
    • Carbohydrates: 3g
    • Fiber: 1g
    • Protein: 12g
    • Cholesterol: 370mg

    Sharing is caring!

  • Grilled Salsa Verde Chicken

    Grilled Salsa Verde Chicken


    Introduction to Grilled Salsa Verde Chicken

    Let’s face it—busy days can make meal prep feel like climbing a mountain. Enter my Grilled Salsa Verde Chicken, a dish that’s not only bursting with flavor but also easy enough to whip up, even on those hectic nights. Imagine juicy chicken dripping with zesty salsa verde and topped with melted pepper Jack cheese—now that’s a dinner worth coming home to! Whether you’re trying to impress your family or just need something tasty after a long day, this recipe is your go-to solution for quick and delightful meals.

    Why You’ll Love This Grilled Salsa Verde Chicken

    This Grilled Salsa Verde Chicken is a lifesaver for busy moms and professionals. It’s packed with flavor while being incredibly quick to prepare. In just 20 minutes, you’ll serve a dish that delights everyone at the table. The zingy salsa verde adds a vibrant kick, and who can resist the creamy, melted pepper Jack cheese? Trust me, this recipe makes dinner feel like a treat without all the fuss!

    Ingredients for Grilled Salsa Verde Chicken

    To create this mouthwatering Grilled Salsa Verde Chicken, you’ll need a handful of simple ingredients that pack a punch. Here’s what you’ll need:

    • Boneless chicken breasts: Tender and juicy, these are the star of the dish. Thin slices ensure they’re grilled to perfection.
    • Olive oil: A drizzle of this liquid gold keeps the chicken moist and helps the marinade cling beautifully.
    • Salsa verde: This zesty salsa adds vibrant flavor. You can use store-bought or whip up a homemade version if you’re feeling adventurous!
    • Black pepper: Freshly ground, it enhances the marinade with a subtle kick. Adjust the amount to suit your spice preference.
    • Pepper Jack cheese: Creamy and spicy, this cheese melts beautifully, taking the chicken to the next level of deliciousness.
    • Lime juice: Fresh lime juice brightens and balances the flavors. Roll the lime on the counter before cutting for more juice!
    • Cumin: This warm spice adds depth to the marinade. Just a touch goes a long way.
    • Salt: Essential for bringing out the flavors of the ingredients. Remember, you can always add more later!
    • Chopped fresh cilantro (optional): A sprinkle of this fresh herb brings a burst of color and flavor—perfect for garnish!
    • Lime wedges (optional): Serve alongside your grilled chicken for an extra squeeze of tangy goodness.

    For the exact amounts you’ll need, check out the bottom of this article where I’ve included printable measurements. Happy cooking!

    How to Make Grilled Salsa Verde Chicken

    Getting your grill on with this Grilled Salsa Verde Chicken is easier than you think! Let’s break down the steps so you can serve up a delicious meal everyone will love.

    Prepare the Marinade

    Start by grabbing a big mixing bowl. Combine salsa verde, olive oil, lime juice, cumin, salt, and freshly ground black pepper. Whisk everything together until it’s well blended. The aroma is already mouthwatering!

    Marinate the Chicken

    Now, it’s time to introduce the chicken to that flavorful marinade. Toss the sliced chicken breasts into the bowl, making sure each piece is completely coated. Cover the bowl with plastic wrap and let it sit in the fridge. I like to marinate for at least 30 minutes, but if you have time, letting it sit for up to 2 hours intensifies the flavors.

    Prepare the Grill

    While your chicken is soaking up all that flavor, heat your grill to medium-high. It should get nice and hot, almost like the summer sun. This temperature will ensure that your chicken grills quickly and achieves those beautiful grill marks!

    Grill the Chicken

    Once your grill is ready, it’s showtime! Remove the chicken from the marinade and discard any leftover liquid. Place the chicken on the grill and cook for about 4 to 5 minutes per side. You’ll want to aim for an internal temperature of 165°F—just enough to keep it juicy and safe to eat!

    Add the Cheese

    As your chicken nears the end of grilling, lay a slice of pepper Jack cheese on each piece. Close the grill lid for about a minute. This helps the cheese melt flawlessly, creating that gooey goodness we all crave!

    Garnish and Serve

    Once cooked, take the chicken off the grill and sprinkle some fresh chopped cilantro on top for a pop of color and flavor. Serve it up alongside lime wedges—trust me, the extra squeeze of lime lifts the dish to another level!

    This Grilled Salsa Verde Chicken is sure to be the hit of your next family dinner or BBQ gathering. Enjoy!

    Tips for Success

    • Letting the chicken marinate longer gives it rich flavor. Try overnight for maximum taste!
    • Always preheat your grill properly for even cooking and those attractive grill marks.
    • Use a meat thermometer to ensure perfectly cooked chicken every time.
    • Feel free to switch up the cheese—Monterey Jack or cheddar are great alternatives!
    • Top leftovers on salads or tacos for a quick lunch the next day.

    Equipment Needed

    • Grill: A traditional outdoor grill works wonders, but you can also use a grill pan on your stovetop if you’re short on space.
    • Mixing bowl: Any large bowl will do. Just make sure it’s big enough to toss the chicken around freely!
    • Meat thermometer: This handy tool ensures your chicken is perfectly cooked every time. If you don’t have one, just slice a piece to check for doneness.

    Variations

    • Salsa Verde Swap: Try using a mango or pineapple salsa for a sweet twist that pairs beautifully with the savory chicken.
    • Herb Infusion: Add fresh herbs like oregano or thyme to the marinade for a fragrant flavor boost!
    • Spice it Up: If you love heat, toss in some chopped jalapeños or a dash of cayenne pepper to the marinade.
    • Vegetarian Option: Substitute chicken with thick slices of portobello mushrooms or zucchini for a delicious veggie alternative.
    • Dairy-Free Delight: Skip the cheese or use a dairy-free cheddar alternative to keep it dairy-free while still tasty.

    Serving Suggestions

    • Fresh Salad: Pair the chicken with a crisp, refreshing garden salad topped with avocado and a light vinaigrette.
    • Grilled Veggies: Serve alongside colorful grilled vegetables for a beautiful and nutritious plate.
    • Cocktail Pairing: Enjoy with a chilled margarita or sparkling water with lime for a festive touch.
    • Presentation: Serve on a vibrant platter, garnished with cilantro and lime wedges for an eye-catching display!

    FAQs about Grilled Salsa Verde Chicken

    As you embark on your culinary adventure with Grilled Salsa Verde Chicken, you might have a few burning questions. Don’t worry—I’ve got you covered!

    Can I make the marinade ahead of time?

    Absolutely! You can mix the marinade a day in advance and store it in the fridge. Just add the chicken when you’re ready to grill. This pre-prepping really intensifies the flavors.

    What sides pair well with grilled chicken?

    Grilled corn on the cob, black bean salad, or even a zesty quinoa dish makes for great accompaniments. They add a refreshing touch, balancing the rich flavors of the chicken.

    Can I use chicken thighs instead of breasts?

    You bet! Chicken thighs bring extra moisture and flavor. Just keep an eye on their cooking time—they might need a bit longer on the grill.

    Is there a way to make this dish spicier?

    Oh, for sure! Add some chopped jalapeños to the marinade or opt for spicy salsa verde. You’ll get that fiery kick you crave!

    How do I store leftovers?

    Store leftovers in an airtight container in the fridge for up to three days. Reheat gently in the microwave, or enjoy cold on salads or in wraps for a quick lunch!

    Final Thoughts

    Making Grilled Salsa Verde Chicken is more than just a meal; it’s a culinary adventure with your loved ones. I find joy in serving this vibrant dish, where the bright flavors mingle together in perfect harmony. Whether it’s summer barbecues or cozy weeknight dinners, this recipe brings smiles and satisfied bellies. Plus, the simple process makes it approachable for even the busiest of cooks. So gather your family around the table, savor the deliciousness, and create cherished memories with this easy yet impressive dish. After all, great food is the heart of great moments!


    Print

    clock clock iconcutlery cutlery iconflag flag iconfolder folder iconinstagram instagram iconpinterest pinterest iconfacebook facebook iconprint print iconsquares squares iconheart heart iconheart solid heart solid icon

    Description

    A flavorful and juicy grilled chicken recipe infused with zesty salsa verde and topped with melted pepper Jack cheese.


    • 1.5 pounds boneless chicken breasts, sliced thin
    • 3 tablespoons olive oil
    • 12 ounces salsa verde
    • 1 teaspoon black pepper, freshly ground
    • 4 slices of pepper Jack cheese
    • 2 tablespoons lime juice
    • 1 teaspoon cumin
    • Salt, around 1 teaspoon or more if desired
    • Chopped fresh cilantro (for garnish, optional)
    • Lime wedges (optional)

    1. In a big bowl, mix together salsa verde, olive oil, lime juice, cumin, salt, and black pepper.
    2. Drop the chicken into the marinade and ensure all pieces are coated. Cover with plastic wrap and refrigerate for at least 30 minutes or up to 2 hours.
    3. Heat your grill to medium-high so it’s hot and ready for the chicken.
    4. Remove the chicken from the marinade and discard the leftover liquid. Grill the chicken, flipping once, about 4 to 5 minutes on each side until fully cooked (aim for an internal temperature of 165°F).
    5. With about a minute left on the grill, place a slice of pepper Jack cheese on each chicken piece. Close the grill lid to melt the cheese.
    6. Once done, remove the chicken from the grill, sprinkle with chopped cilantro, and serve with lime wedges if desired.

    Notes

    • Marinating the chicken for longer enhances the flavor.
    • Adjust the amount of salt to your taste.
    • Serve with a side salad or grilled vegetables for a complete meal.
    • Prep Time: 10 minutes
    • Cook Time: 10 minutes
    • Category: Main Dish
    • Method: Grilling
    • Cuisine: Mexican

    Nutrition

    • Serving Size: 1 piece
    • Calories: 300
    • Sugar: 2g
    • Sodium: 600mg
    • Fat: 15g
    • Saturated Fat: 6g
    • Unsaturated Fat: 8g
    • Trans Fat: 0g
    • Carbohydrates: 4g
    • Fiber: 1g
    • Protein: 35g
    • Cholesterol: 100mg

    Sharing is caring!