Category: Uncategorized

  • Spaghetti and Meatball Sliders

    Spaghetti and Meatball Sliders


    Introduction to Spaghetti and Meatball Sliders

    Are you looking for a fun and tasty way to shake up your dinner routine? Look no further than these delicious Spaghetti and Meatball Sliders! As a busy mom, I know just how hectic life can get, and sometimes, you need a quick solution that still feels special. These sliders are not only easy to prepare, but they also bring that comforting Italian flair to your table, pleasing even the pickiest of eaters. Imagine serving this delightful twist on dinner and watching your loved ones’ faces light up with joy. It’s pure magic!

    Why You’ll Love This Spaghetti and Meatball Sliders

    These Spaghetti and Meatball Sliders offer an ideal mix of convenience and flavor. They’re super quick to prepare, making them perfect for those busy weeknights. The combination of tender meatballs, gooey mozzarella, and savory marinara wrapped in soft rolls is pure bliss. Plus, they’re a surefire way to bring your family together. Trust me, every bite tastes like a warm hug at the end of a long day!

    Ingredients for Spaghetti and Meatball Sliders

    Gathering the right ingredients for my Spaghetti and Meatball Sliders is like putting together a culinary puzzle. Each piece plays a crucial role in creating this delicious masterpiece. Here’s what you’ll need:

    • Ground Beef: I prefer lean ground beef for a healthier option, but you can also substitute with ground turkey if you want a lighter slider.
    • Italian Bread Crumbs: These add texture and help bind the meatballs together. Homemade bread crumbs work too!
    • Grated Parmesan Cheese: It delivers a cheesy punch that everyone loves. Feel free to experiment with other hard cheeses if you don’t have parmesan on hand.
    • Large Egg: This helps to hold everything together, making for perfect meatballs.
    • Beefy Onion Soup Mix: It’s the secret weapon for flavor! You can also use homemade onion soup mix to keep it natural.
    • Garlic Powder: A must-have ingredient to boost the flavor. Fresh garlic works just as well if you’re feeling adventurous!
    • Dried Oregano: Gives that familiar Italian touch. If you’re out, thyme could make a good substitute.
    • Black Pepper: Just a pinch adds a subtle kick. Adjust according to your family’s taste preferences.
    • Cooked Spaghetti Noodles: Al dente is key, so don’t overcook! You can swap them for gluten-free pasta to suit any dietary restrictions.
    • Jarred Marinara Sauce: The easy way to get that rich, tomato flavor. Look for a brand without added sugars for a healthier option.
    • Additional Parmesan Cheese: For that final cheesy layer on top that makes all the difference!
    • Hawaiian Rolls: These sweet rolls complement the dish beautifully. You can try any soft rolls, like slider buns, for a different twist.
    • Shredded Mozzarella Cheese: Gooey, melty goodness! For a lighter option, use part-skim mozzarella.
    • Salted Butter: This adds flavor and richness to the top of the rolls, but unsalted butter works too.
    • Dried Italian Seasoning: A fantastic way to infuse more flavor without the hassle of collecting multiple spices.
    • Onion Powder: Enhances the savory notes. You can leave it out if you prefer a simpler flavor profile.

    For exact quantities, don’t forget to scroll down to the bottom of the article where they are listed and ready for printing!

    How to Make Spaghetti and Meatball Sliders

    Step 1: Preheat and Prepare

    First things first—preheat your oven to 375°F. This ensures that the sliders bake perfectly. Next, spray a 9×13 baking dish with cooking spray to prevent sticking. It’s an essential step, trust me! No one wants a slider that’s stuck to the pan. Meanwhile, line a sheet tray with parchment paper to prepare for the meatballs. Having everything ready will make your cooking experience smooth and stress-free!

    Step 2: Prepare the Meatballs

    In a large mixing bowl, combine the ground beef, Italian bread crumbs, grated parmesan, egg, onion soup mix, garlic powder, oregano, and black pepper. Stir gently until just combined, avoiding overmixing. The last thing you want is tough meatballs! Just ensure everything is well-distributed for that perfect bite, then set this delicious mixture aside while you get ready to roll.

    Step 3: Bake the Meatballs

    Divide the beef mixture into 12 equal portions and roll each into a ball, using your hands to create uniform shapes. Place them on the parchment-lined baking sheet, ensuring there’s space between each meatball for even cooking. Bake in the preheated oven for 10-15 minutes or until they reach an internal temperature of 165°F. A simple kitchen thermometer does wonders here, but any small gap in spacing while cooking helps make sure they brown evenly.

    Step 4: Cook the Spaghetti

    As your meatballs bake, it’s time to cook the spaghetti noodles! Boil them according to the package instructions until al dente. Timing is key, so don’t wander too far! You want them firm enough to hold up in the sliders.

    Step 5: Combine Spaghetti and Marinara

    Once your noodles are cooked perfectly, drain them and place them in a large bowl. Add the jarred marinara sauce and sprinkle in some parmesan cheese. Toss everything together until the spaghetti is well-coated in the sauce. Trust me, the flavor of marinara clinging to each noodle makes all the difference!

    Step 6: Assemble the Sliders

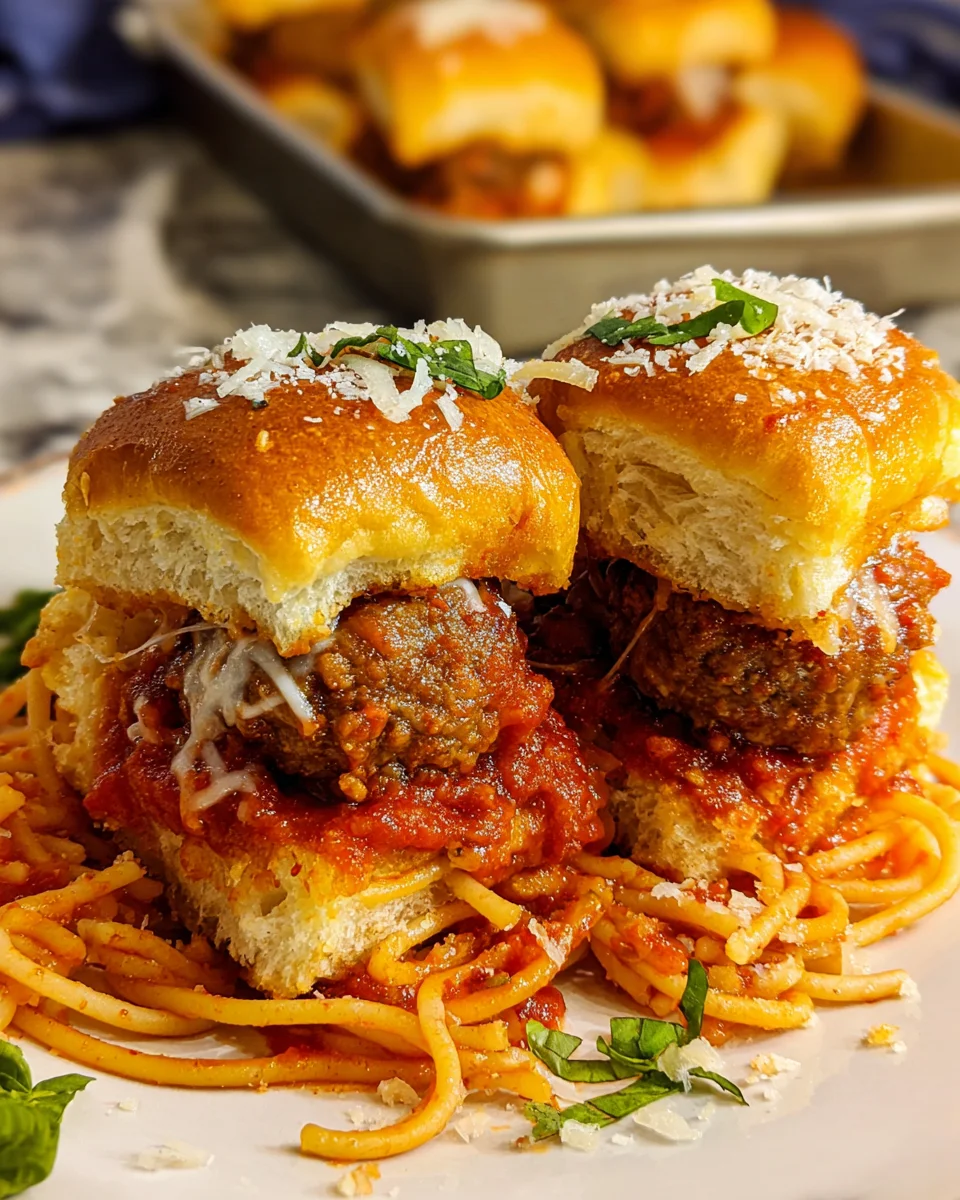
    Now comes the fun part—assembling the sliders! Slice the Hawaiian rolls in half lengthwise. Place the bottom halves cut-side up in your prepared baking dish. Scoop the saucy spaghetti onto the rolls, then place one luscious meatball on each slider. Top it all off with a generous sprinkle of shredded mozzarella cheese. The cheese is a critical part of this meal, giving it that gooey goodness we all love!

    Step 7: Butter the Rolls

    In a small bowl, combine the melted salted butter with Italian seasoning, garlic powder, and onion powder. Mix well! Use a brush to generously coat the tops of the rolls with this flavorful butter mixture. It provides a crispy, golden finish that no one can resist!

    Step 8: Bake the Sliders

    Cover your baking dish with nonstick foil to prevent the sliders from sticking. Bake in the oven for 20 minutes. After that, remove the foil and bake for an additional 4-5 minutes. This will give your rolls that beautiful golden-brown color on top while ensuring everything inside is nicely melted and heated through.

    Step 9: Cool and Serve

    Once they’re done baking, allow the sliders to cool for about 10 minutes. This little patience pays off! Slice them up and serve while they are warm and cheesy, and trust me, they will disappear in no time!

    Tips for Success

    • Make sure to properly space your meatballs on the tray for even cooking.
    • Eye the internal temperature of meatballs for perfect doneness—165°F is key!
    • Let the spaghetti cool slightly before mixing with marinara to prevent it from getting mushy.
    • Use nonstick foil to cover the sliders for a hassle-free baking experience.
    • Don’t skip the butter glaze; it adds a delicious flavor and crispiness!

    Equipment Needed

    • 9×13 baking dish: A standard size for this recipe. An oven-safe casserole dish works too!
    • Parchment paper: Keeps your meatballs from sticking. Foil can substitute in a pinch!
    • Mixing bowl: A large bowl for combining ingredients. Any size works, just make sure it’s spacious.
    • Baking sheet: For baking meatballs. A rimmed cookie sheet works perfectly!
    • Meat thermometer: To check meatball doneness. A simple kitchen thermometer is all you need!

    Variations on Spaghetti and Meatball Sliders

    • Make It Vegetarian: Swap the ground beef for plant-based meat alternatives, like lentils or chickpeas, mixed with Italian spices for added flavor.
    • Spicy Kick: Add a pinch of red pepper flakes to the meatball mixture or use spicy marinara sauce to give your sliders a fiery touch.
    • Cheesy Delight: Mix in some ricotta cheese into the meatball mixture or layer it beneath the meatballs for an extra cheesy surprise.
    • Gluten-Free Option: Use gluten-free bread crumbs and rolls, ensuring all your ingredients are labels gluten-free to keep it safe for gluten-sensitive diets.
    • Herb Infusion: Incorporate fresh herbs like basil or parsley into the meatball mixture to elevate the flavor profile with freshness.
    • Mini Sliders: Use cocktail-sized rolls for bite-sized sliders perfect for parties and snacks.

    Serving Suggestions for Spaghetti and Meatball Sliders

    • Pair with a fresh Caesar salad for a delightful crunch and balance.
    • Serve alongside crispy sweet potato fries for a fun twist on traditional sides.
    • Accompany with garlic bread to soak up the delicious marinara sauce.
    • Offer a side of marinara sauce for dipping to enhance those flavors.
    • For drinks, a light Italian red wine or sparkling water with lemon is perfect!

    FAQs about Spaghetti and Meatball Sliders

    Can I make Spaghetti and Meatball Sliders ahead of time?

    Absolutely! You can prepare the meatballs and cook the spaghetti in advance. Just assemble the sliders before serving, or even bake them ahead and reheat. They’ll still taste delicious!

    What can I substitute for the Hawaiian rolls?

    If you can’t find Hawaiian rolls, any soft rolls or slider buns will work just fine. You could also use whole grain or ciabatta rolls for a different twist!

    Can I freeze the sliders?

    Yes, freezing is an excellent option! Assemble the sliders and store them in an airtight container. Just thaw and bake when you’re ready for a quick meal. They make for a perfect last-minute dinner option!

    How do I store leftovers?

    Keeps your leftovers in the fridge for up to three days in an airtight container. Reheat them in the oven to maintain that melt-in-your-mouth goodness!

    Can I use other meats for the meatballs?

    Of course! Ground turkey or chicken can work wonderfully for a lighter variation. Get creative and customize your meatballs using ground sausage for a flavor boost!

    Final Thoughts

    Creating these Spaghetti and Meatball Sliders in my kitchen is like crafting a little piece of culinary magic. With each bite, you’ll savor not just the flavors but also the joy of bringing family and friends together. It’s a comforting reminder of home-cooked meals that warm the heart and fill the belly. The smiles around the table as everyone indulges in these sliders make all the prep worthwhile. So, why not dive into this delicious adventure? Grab your apron and let the fun begin! Trust me, dinner will never feel the same again!


    Print

    clock clock iconcutlery cutlery iconflag flag iconfolder folder iconinstagram instagram iconpinterest pinterest iconfacebook facebook iconprint print iconsquares squares iconheart heart iconheart solid heart solid icon

    Description

    A fun twist on dinner with delicious meatball sliders featuring spaghetti and marinara sauce.


    • 1/2 pound lean ground beef 80/20
    • 2 tablespoons Italian bread crumbs
    • 2 tablespoons grated parmesan cheese
    • 1 large egg
    • 1/2 envelope beefy onion soup mix
    • 1/2 teaspoon garlic powder
    • 1/2 teaspoon dried oregano
    • 1/4 teaspoon black pepper
    • 8 ounces spaghetti noodles cooked al dente and drained
    • 1 cup jarred marinara sauce
    • 1/4 cup grated parmesan cheese
    • 12 pack Hawaiian rolls
    • 2 cups shredded mozzarella cheese
    • 1/2 cup salted butter melted
    • 1/2 teaspoon dried Italian seasoning
    • 1/2 teaspoon garlic powder
    • 1/2 teaspoon onion powder

    1. Preheat the oven to 375°F. Spray a 9×13 baking dish with cooking spray and set aside. Line a sheet tray with parchment paper.
    2. In a large bowl, mix together the ground beef, bread crumbs, parmesan, egg, onion soup mix, garlic powder, oregano, and pepper until well combined, do not overmix.
    3. Divide the mixture into 12 portions and roll into balls. Place on the prepared sheet tray, allowing room between each meatball.
    4. Bake the meatballs for 10-15 minutes or until an internal temperature of the meatballs reaches 165°F.
    5. While the meatballs are baking, cook the spaghetti per the package directions.
    6. Place the cooked noodles into a large bowl with the marinara sauce and parmesan cheese, stir to combine.
    7. Slice the rolls in half lengthwise and place the bottom, cut side up into the prepared baking dish.
    8. Add the spaghetti on top of the rolls, then place one meatball onto each slider.
    9. Add the mozzarella on top of the meatballs.
    10. Top with the top of the rolls.
    11. In a small bowl, stir together the butter, Italian seasoning, garlic powder, and onion powder. Brush this all over the tops of the rolls.
    12. Cover with nonstick foil and bake for 20 minutes, then remove the foil and bake for an additional 4-5 minutes or until the tops of the rolls are browned.
    13. Allow to cool for 10 minutes, then slice and serve.

    Notes

    • Ensure the meatballs are spaced out properly on the sheet tray while baking.
    • Use nonstick foil to prevent sticking when covering the sliders.
    • Cooking times may vary based on individual ovens; adjust as needed.
    • Prep Time: 20 minutes
    • Cook Time: 30-35 minutes
    • Category: Main Dish
    • Method: Baking
    • Cuisine: Italian

    Nutrition

    • Serving Size: 1 slider
    • Calories: 350
    • Sugar: 4g
    • Sodium: 600mg
    • Fat: 15g
    • Saturated Fat: 8g
    • Unsaturated Fat: 5g
    • Trans Fat: 0g
    • Carbohydrates: 35g
    • Fiber: 2g
    • Protein: 15g
    • Cholesterol: 60mg

    Sharing is caring!

  • No-Bake Biscoff Cheesecake

    No-Bake Biscoff Cheesecake


    Introduction to No-Bake Biscoff Cheesecake

    Let’s be real, life gets hectic, and as a busy home cook, I completely understand the need for simple, delicious desserts. That’s where this No-Bake Biscoff Cheesecake comes in! It’s a creamy delight that practically makes itself while you handle your daily whirlwind. With layers of decadent Biscoff flavor and a cookie crust that’s to die for, this dessert is perfect for impressing your loved ones or settling in for a cozy night alone. Trust me, after one bite, you’ll be dreaming of ways to make this heavenly cheesecake a staple in your home!

    Why You’ll Love This No-Bake Biscoff Cheesecake

    This No-Bake Biscoff Cheesecake is an absolute dream for those of us who cherish time-saving recipes without sacrificing flavor. You’ll love how effortlessly it comes together, making it a breeze for busy weeknights or last-minute gatherings. Plus, the rich, luscious taste of Biscoff cookies and spread will have everyone coming back for seconds—trust me, this creamy dessert will steal the show!

    Ingredients for No-Bake Biscoff Cheesecake

    Let’s dive into the wonderful world of ingredients that make this No-Bake Biscoff Cheesecake truly irresistible! Below, I’ve laid out everything you need, along with some insights on each component:

    • Lotus/Biscoff biscuits: These are the star of your cheesecake crust. Their distinct caramel flavor and crunchy texture create a heavenly base.
    • Unsalted butter: This binds the biscuit crumbs together, allowing you to achieve the perfect crust. Plus, unsalted lets you control the overall flavor.
    • Full-fat cream cheese: The core of your cheesecake filling! It delivers creaminess and helps maintain the cheesecake’s structure.
    • Icing sugar: This adds just the right amount of sweetness, balancing the cream cheese’s tanginess.
    • Biscoff spread: Whether you choose smooth or crunchy, this spread elevates your dessert to new heights with its rich flavor.
    • Vanilla extract: A whisper of vanilla enhances the sweetness and rounds out the flavors beautifully.
    • Double cream (heavy cream): This is essential for that luscious texture. Whipping it up gives your cheesecake a light and airy quality.
    • Optional double cream: For decoration! A little whipped cream on top makes it extra indulgent.
    • Optional icing sugar: A sprinkle on the whipped cream adds sweetness and a lovely finish.
    • Melty Biscoff spread: Drizzling this on top not only looks gorgeous but adds another layer of flavor.
    • Biscoff biscuits for garnish: The perfect finishing touch, these little gems elevate your cheesecake presentation and give a nod to the star ingredient.

    You can find these ingredients at your local grocery store, but feel free to explore specialty shops for unique finds or alternative brands. Remember, the exact quantities are listed at the bottom of the article for easy printing!

    How to Make No-Bake Biscoff Cheesecake

    Getting this No-Bake Biscoff Cheesecake ready is a delightful experience! Just follow these simple steps, and soon you’ll have a dessert that impresses everyone. I promise you won’t break a sweat!

    Step 1: Prepare the Biscuit Base

    Start by taking those lovely Biscoff biscuits and tossing them into a food processor. Pulse until they resemble fine crumbs.

    Then, melt some unsalted butter and combine it with the cookie crumbs in a bowl.

    Here’s the vital part: press this mixture firmly into the bottom of an 8-inch springform pan. This ensures your base holds together, keeping every bite just as delicious as the last!

    Step 2: Make the Cream Cheese Filling

    Now for the creamy magic! In a mixing bowl, blend the full-fat cream cheese, Biscoff spread, vanilla extract, and icing sugar.

    Use an electric mixer for this part. Blend until it’s smooth and velvety.

    Trust me, if it’s not smooth, your cheesecake won’t shine with that rich texture we’re after!

    Step 3: Incorporate the Double Cream

    This step is where your cheesecake becomes dreamy! Take your double cream and whip it in a separate bowl until stiff peaks form.

    Gently fold this whipped cream into your cream cheese mixture.

    It’s essential to keep it light; we want to preserve that airy texture. Think of folding in the cream like cradling your dessert—gentle but effective!

    Step 4: Assemble and Refrigerate

    Once your filling is beautifully blended, spread it evenly over your crumb base.

    This is the time for patience—cover it and pop it into the fridge for at least 5-6 hours.

    If you want the absolute best texture and flavor, let it set overnight. Trust me, it’s worth the wait!

    Step 5: Decorate and Serve

    After chilling, it’s time for the big reveal! Carefully release the cheesecake from the springform pan and place it on a serving plate.

    Whip some additional cream with icing sugar for a decorative touch; then pipe it on top however you like.

    To finish, drizzle some melted Biscoff spread over the top and add a few whole biscuits for that Instagram-worthy flair!

    Tips for Success

    • Chill the cheesecake overnight for the best texture and flavor.
    • Use room temperature cream cheese for easier blending.
    • If using a springform pan, ensure it’s tightly sealed to prevent leaks.
    • Don’t rush the whipping of the cream; stiff peaks will hold the cheesecake beautifully.
    • Get creative! Add additional toppings like crushed cookies or a berry compote for excitement.

    Equipment Needed

    • Food processor: Essential for crushing those Biscoff biscuits, but a ziplock bag and rolling pin work too!
    • Springform pan: Perfect for easy removal; a regular pie dish can work in a pinch, but slicing could get messy.
    • Electric mixer: Ideal for achieving the silky cream cheese mixture; a whisk will do, but it takes longer!
    • Mixing bowls: You’ll need a couple of these—one for the filling and one for whipping cream.
    • Spatula: Use this for folding and spreading; a flexible one makes your life easier!

    Variations of No-Bake Biscoff Cheesecake

    • Chocolate Drizzle: Elevate your cheesecake by drizzling melted chocolate over the top for a rich contrast to the Biscoff flavors.
    • Nutty Twist: Add crushed nuts such as almonds or hazelnuts into the filling for an exciting crunch and texture that complements the creaminess.
    • Fruit Fusion: Top with fresh berries like raspberries or strawberries for a fruity kick that pairs wonderfully with the caramel notes.
    • Gluten-Free Option: Substitute the Biscoff biscuits with gluten-free cookies to create a delightful version for those avoiding gluten.
    • Lighter Version: Use low-fat cream cheese and whipped topping to lighten the dessert without compromising too much on flavor.

    Serving Suggestions for No-Bake Biscoff Cheesecake

    • Pair with Coffee: A steaming cup of coffee balances the sweetness and enhances the dessert experience.
    • Add Fresh Berries: Serve with a side of fresh strawberries or raspberries for a refreshing tart flavor.
    • Garnish with Mint: A sprig of mint brings a pop of color and freshness to the plate.
    • Use Decorative Plates: Presenting on colorful or patterned plates elevates the whole dessert experience.
    • Offer with Whipped Cream: A dollop of whipped cream on the side adds an extra touch of indulgence.

    FAQs about No-Bake Biscoff Cheesecake

    Can I make No-Bake Biscoff Cheesecake in advance?
    Absolutely! In fact, this cheesecake tastes even better when made a day ahead. Just cover it well and store it in the fridge.

    What can I use instead of double cream?
    If you can’t find double cream, heavy whipping cream is a perfect substitute. Just make sure to whip it to stiff peaks for that light texture!

    Can I freeze No-Bake Biscoff Cheesecake?
    Yes, this cheesecake freezes beautifully! Just ensure it’s well-wrapped to prevent freezer burn. It can last up to three months in the freezer.

    How do I get a smooth filling?
    To achieve that dreamy smooth filling, make sure your cream cheese is at room temperature before mixing. An electric mixer works wonders for blending!

    What can I serve with Biscoff cheesecake?
    Pair it with fresh berries, a sprinkle of chopped nuts, or a warm cup of coffee. These add-ons really elevate the dessert experience!

    Final Thoughts

    Creating this No-Bake Biscoff Cheesecake is more than just whipping up a dessert; it’s about crafting moments of joy. Whether you’re sharing it with friends, celebrating a special occasion, or treating yourself after a long day, the rich flavors and creamy texture have a way of making everything feel special. Plus, the ease of preparation means you can spend less time in the kitchen and more time with the ones you love. So, go ahead—bake (or should I say, no-bake) your way to happiness with this delightful cheesecake and relish every creamy, dreamy bite!


    Print

    clock clock iconcutlery cutlery iconflag flag iconfolder folder iconinstagram instagram iconpinterest pinterest iconfacebook facebook iconprint print iconsquares squares iconheart heart iconheart solid heart solid icon

    Description

    A creamy, no-bake cheesecake featuring the delicious flavors of Biscoff cookies and spread, perfect for dessert lovers.


    • 10.5 oz Lotus/Biscoff biscuits
    • 4.4 oz unsalted butter, melted
    • 17.6 oz full-fat cream cheese
    • 3.5 oz icing sugar
    • 8.8 oz Biscoff spread (smooth or crunchy)
    • 1 teaspoon vanilla extract
    • 10 fl oz double cream (heavy cream)
    • 5 fl oz double cream (optional, for decoration)
    • 2 tablespoons icing sugar (optional, for decoration)
    • 2.6 oz Biscoff spread, melted (optional, for decoration)
    • Biscoff biscuits for garnish

    1. Pulse the Lotus biscuits in a food processor until finely ground. Combine the crumbs with the melted butter and press firmly into the bottom of an 8-inch (20cm) deep springform pan.
    2. Using an electric mixer, blend the cream cheese, vanilla extract, icing sugar, and Biscoff spread until smooth and homogenous.
    3. Gradually add the double cream to the cream cheese mixture, whisking continuously until thickened and stable. For best results, whip the cream separately to stiff peaks before folding it in gently.
    4. Spread the filling evenly over the biscuit base. Refrigerate for a minimum of 5–6 hours, preferably overnight, to set completely.
    5. Remove the cheesecake from the springform pan. Whip the optional cream with icing sugar and pipe on top. Garnish each slice with a Biscoff biscuit and drizzle with melted Biscoff spread.

    Notes

    • Chilling overnight provides the best texture and flavor.
    • Use a piping bag for a decorative finish with the whipped cream.
    • This cheesecake can be frozen for later enjoyment, just make sure to cover it well.
    • Prep Time: 20 minutes
    • Cook Time: 0 minutes
    • Category: Dessert
    • Method: No-Bake
    • Cuisine: American

    Nutrition

    • Serving Size: 1 slice
    • Calories: 350
    • Sugar: 28g
    • Sodium: 150mg
    • Fat: 25g
    • Saturated Fat: 15g
    • Unsaturated Fat: 10g
    • Trans Fat: 0g
    • Carbohydrates: 30g
    • Fiber: 1g
    • Protein: 4g
    • Cholesterol: 70mg

    Sharing is caring!

  • Cream Cheese Pound Cake

    Cream Cheese Pound Cake


    Introduction to Cream Cheese Pound Cake

    There’s something magical about the aroma of freshly baked Cream Cheese Pound Cake wafting through your home. It fills the air with warmth and familiarity, a beacon for busy moms and professionals alike. I understand that life can get hectic, but this delightful cake is a quick solution for those days when you want comfort food without the fuss. Whether it’s a family gathering or a simple dessert to make your evening special, this cake will impress your loved ones and leave them asking for seconds!

    Why You’ll Love This Cream Cheese Pound Cake

    This Cream Cheese Pound Cake is a busy cook’s dream come true! It’s delightfully easy to whip up, requiring just a handful of simple ingredients. You’ll appreciate how quickly it comes together, saving you precious time on hectic days. Plus, the taste? Oh, it’s heavenly! Moist, dense, and packed with rich flavor, this cake transforms any moment into a celebration. Trust me, it’s the kind of cake that brings smiles.

    Ingredients for Cream Cheese Pound Cake

    Gathering the right ingredients is half the battle, and I promise it’s worth it for this Cream Cheese Pound Cake. Here’s what you’ll need:

    • Unsalted Butter: Softened, it provides a rich base. Opting for unsalted lets you control the saltiness of your cake.
    • Cream Cheese: This is the star! It adds that delightful creaminess and moistness that we all crave in a pound cake.
    • All-Purpose Flour: The backbone of this recipe, it gives structure. Feel free to use a gluten-free blend if needed.
    • Granulated Sugar: It sweetens and helps create that lovely golden crust. Brown sugar can be an exciting substitute for a richer flavor!
    • Large Eggs: They create moisture and help bind everything together. Room temperature eggs work best for a uniform batter.
    • Vanilla Extract: This classic flavor enhances the cake. You can use homemade or store-bought, whichever you prefer.
    • Almond Extract: A little dab will do! It adds a wonderful depth; if almond isn’t your thing, leave it out or replace it with more vanilla.
    • Salt: It balances flavors and enhances sweetness. Just a pinch boosts all the delicious notes in this cake!

    For exact measurements, scroll down to the end of the article where you can find everything laid out for easy printing. Happy baking!

    How to Make Cream Cheese Pound Cake

    Preheat the Oven and Prepare the Pan

    To kick things off, preheat your oven to 325°F (165°C). This temperature is crucial for baking the perfect Cream Cheese Pound Cake without any burnt edges. While the oven warms, grab your bundt pan. Grease it generously with butter, ensuring every nook and cranny is covered. Then, sprinkle some flour inside, shaking it around to coat the surface evenly. This simple step will help your cake slide right out after baking. Trust me, there’s nothing worse than having your gorgeous cake stick to the pan! With your pan prepped, it’s almost time to bring the magic to life.

    Cream Together Butter and Cream Cheese

    Now, let’s make the cake’s base creamy and luscious! In a stand mixer, combine the softened butter and cream cheese. Mix them together on medium speed for about 3–5 minutes. This is where the magic happens; you want the mixture to become light and fluffy, almost like a cloud! Don’t rush this step—it’s vital for the texture of your pound cake. Remember to stop and scrape down the sides of the bowl occasionally. This will ensure everything gets mixed well, and no lumps remain. Your arm will thank you later for this deliciously smooth batter!

    Add Eggs and Flavorings

    Next, it’s time to add richness with the eggs. Crack them in one at a time, mixing well after each addition. This method allows for a creamy batter as the eggs incorporate fully. Don’t forget to stop and scrape the sides again! After the last egg, it’s time to add your flavors. Swirl in the vanilla and almond extracts, which will elevate your Cream Cheese Pound Cake to heavenly heights. Give it another quick mix so all the delightful flavors are evenly distributed. You’re just a few steps away from cake greatness!

    Combine with Flour Mixture

    Now for the flour—this is where careful mixing comes into play. Gradually add in your all-purpose flour and salt. I suggest doing this in batches to keep the batter from flying everywhere! Mixing at low speed, blend until just combined. You want to avoid overmixing, as this can make the cake dense. Picture the batter becoming thick and smooth—this is what you’re aiming for. Once it reaches that perfect consistency, you’re ready to transfer it to your prepared bundt pan. Smooth the top gently before it hits the heat!

    Bake the Cake

    Baking time is here! Place your filled bundt pan on the center rack of the preheated oven. Set your timer for 60–70 minutes. You’ll know it’s done when a toothpick inserted into the thickest part comes out clean. Let anticipation build as the aroma fills your kitchen; it’s pure bliss! Once baked, let it cool in the pan for about 10 minutes. Then, flip it onto a wire rack to cool completely. This cooling process ensures the cake maintains its moisture. Well done! Your Cream Cheese Pound Cake is well on its way to making memories.

    Tips for Success

    • Always use room temperature ingredients for a smoother batter.
    • Mix the batter just until combined to keep it light and fluffy.
    • Don’t open the oven door too soon; it may cause the cake to sink!
    • Allow the cake to cool completely before slicing for the best texture.
    • Experiment with flavors by adding citrus zest or spices for a unique twist.

    Equipment Needed for Cream Cheese Pound Cake

    • Stand Mixer or Hand Mixer: A hand whisk can work, but it’ll take longer.
    • Bundt Pan: You can also use a 9×5 inch loaf pan if needed.
    • Measuring Cups and Spoons: Essential for precise ingredient amounts.
    • Rubber Spatula: Perfect for scraping down the bowl and folding ingredients.
    • Wire Rack: Useful for cooling the cake completely.

    Variations of Cream Cheese Pound Cake

    • Fruit-Infused: Add a cup of berries or diced peaches to the batter for a fruity twist. Blueberries are especially delightful!
    • Chocolate Chip: Fold in semi-sweet or dark chocolate chips for a decadent treat that chocolate lovers will adore.
    • Citrus Zest: Incorporate lemon or orange zest into the batter to brighten up the flavors; it adds a refreshing touch!
    • Nuts Galore: Throw in some chopped walnuts or pecans for added crunch; they pair beautifully with the creaminess of the cake.
    • Gluten-Free: Substitute all-purpose flour with a gluten-free blend to cater to dietary needs without sacrificing flavor.

    Serving Suggestions for Cream Cheese Pound Cake

    • Serve with a dollop of freshly whipped cream for an extra indulgent treat.
    • Add fresh berries on the side for a pop of color and sweetness.
    • Pair with a cup of coffee or tea for a cozy afternoon break.
    • Dust with powdered sugar for an elegant finish on special occasions.

    FAQs about Cream Cheese Pound Cake

    Can I make this Cream Cheese Pound Cake ahead of time?

    Absolutely! This cake actually tastes even better the next day. Once cooled, store it in an airtight container to maintain its moisture. You can enjoy it for several days!

    Why is my pound cake dense?

    A dense pound cake often results from overmixing the batter or not incorporating enough air. Make sure to mix just until combined and avoid beating it too vigorously.

    Can I freeze Cream Cheese Pound Cake?

    Yes! Freezing is a great option. Wrap slices or the whole cake tightly in plastic wrap and then in aluminum foil before placing it in the freezer. Thaw it in the refrigerator when you’re ready to enjoy.

    What can I substitute for cream cheese?

    If you need a substitute, try using Greek yogurt or sour cream for a similar texture. You could also use mascarpone for an upscale twist, though it will slightly alter the flavor.

    How can I enhance the flavor of my Cream Cheese Pound Cake?

    Consider adding citrus zest, spices like nutmeg or cinnamon, or even flavored extracts. A touch of fresh vanilla bean can take it to new heights. Enjoy experimenting!

    Final Thoughts

    As you enjoy your slice of Cream Cheese Pound Cake, take a moment to savor not just the flavors, but the memories created around it. Whether it’s a cozy family gathering or a quiet evening treat, this cake has a unique way of turning ordinary moments into cherished ones. It’s more than just a dessert; it’s a reminder that time spent in the kitchen can lead to delicious rewards and joyful connections. So, roll up your sleeves and embrace this delightful recipe. Every slice is a celebration, and trust me, you’ll be reaching for seconds!


    Print

    clock clock iconcutlery cutlery iconflag flag iconfolder folder iconinstagram instagram iconpinterest pinterest iconfacebook facebook iconprint print iconsquares squares iconheart heart iconheart solid heart solid icon

    Description

    A delightful and moist cream cheese pound cake that is perfect for any occasion.


    • 1 cup unsalted butter, softened
    • 8 ounces cream cheese, softened
    • 3 cups all-purpose flour
    • 3 cups granulated sugar
    • 6 large eggs
    • 1 teaspoon vanilla extract
    • 1 teaspoon almond extract
    • 1 teaspoon salt

    1. Preheat the oven to 325°F (165°C). Grease and flour a bundt pan thoroughly, ensuring even coverage.
    2. In a stand mixer fitted with a paddle attachment, beat the softened butter, cream cheese, and granulated sugar together on medium speed until the mixture is light and fluffy, about 3–5 minutes.
    3. Add eggs one at a time, mixing well after each addition. Scrape the bowl as needed. Blend in vanilla and almond extracts until evenly incorporated.
    4. Gradually add the all-purpose flour and salt to the wet mixture, mixing at low speed just until a smooth, thick batter forms. Avoid overmixing.
    5. Transfer the batter into the prepared bundt pan, smoothing the top. Bake for 60–70 minutes on the center rack, or until a toothpick inserted in the center emerges clean.
    6. Allow the cake to cool in the pan for 10 minutes. Carefully invert onto a wire rack and let cool completely before slicing.

    Notes

    • Ensure all ingredients are at room temperature for the best results.
    • Store cake in an airtight container to maintain moisture.
    • This cake can be served with a variety of toppings like fresh fruit or whipped cream.
    • Prep Time: 20 minutes
    • Cook Time: 70 minutes
    • Category: Dessert
    • Method: Baking
    • Cuisine: American

    Nutrition

    • Serving Size: 1 slice
    • Calories: 410
    • Sugar: 30g
    • Sodium: 210mg
    • Fat: 22g
    • Saturated Fat: 13g
    • Unsaturated Fat: 9g
    • Trans Fat: 0g
    • Carbohydrates: 46g
    • Fiber: 1g
    • Protein: 5g
    • Cholesterol: 90mg

    Sharing is caring!

  • Mediterranean Chicken Gyros with Creamy Feta Tzatziki

    Mediterranean Chicken Gyros with Creamy Feta Tzatziki


    Introduction to Mediterranean Chicken Gyros with Creamy Feta Tzatziki

    Imagine a cooking adventure that brings the vibrant flavors of the Mediterranean straight to your dinner table. These Mediterranean Chicken Gyros with Creamy Feta Tzatziki are not just a meal; they’re a delightful escape from the daily grind. Perfectly marinated chicken tucked into warm pita, topped with a rich, creamy tzatziki—what’s not to love?

    If you’re a busy mom or a professional juggling multiple responsibilities, this recipe is your saving grace. It’s quick, easy, and guaranteed to impress your loved ones. Who knew making a mouthwatering meal could be so simple?

    Why You’ll Love This Mediterranean Chicken Gyros with Creamy Feta Tzatziki

    This recipe for Mediterranean Chicken Gyros with Creamy Feta Tzatziki checks all the boxes for an enjoyable meal. It’s ridiculously easy to whip up, taking just about 40 minutes from start to finish. The juicy, seasoned chicken paired with that luscious tzatziki sauce bursts with flavor in every bite. Plus, it’s versatile! With just a few tweaks, you can cater to everyone’s taste buds and dietary needs.

    Ingredients for Mediterranean Chicken Gyros with Creamy Feta Tzatziki

    Gathering the right ingredients is the first step to creating those irresistible Mediterranean Chicken Gyros with Creamy Feta Tzatziki. Here’s what you’ll need:

    • Chicken breast: The star of the show! Boneless and skinless chicken breast works beautifully as it stays juicy when marinated.
    • Olive oil: This adds richness and helps the spices cling to the chicken. Choose extra virgin for the best flavor.
    • Dried oregano: The aromatic herb that gives your chicken a taste of Greece. It’s packed with earthy notes!
    • Garlic powder and onion powder: These spices boost the flavor without overpowering it, making for a well-rounded taste.
    • Salt and pepper: Essential seasonings to enhance all the flavors. Don’t skip these!
    • Pita breads: Soft and warm, they cradle the delicious fillings, adding a wonderful texture to each bite.
    • Cucumber: Grated for the tzatziki, it provides a refreshing crunch and balances the creaminess of the sauce.
    • Greek yogurt: The base of your creamy tzatziki! Use full-fat for an indulgent texture and flavor.
    • Feta cheese: Crumbled, this salty cheese adds a tangy punch that perfectly complements the chicken and yogurt.
    • Lemon juice: Freshly squeezed for that zesty brightness in the tzatziki, it elevates the entire dish.
    • Garlic: Minced fresh garlic in the tzatziki gives an aromatic kick, enhancing the overall flavor profile.
    • Fresh parsley: A splash of greenery that adds color and a hint of freshness as a garnish.

    Looking for swaps? You can substitute chicken with tofu for a vegetarian option, ensuring the flavors still shine. Let your creativity run wild! For exact measurements, check the details at the bottom of the article—they’re ready for you to print and keep handy.

    How to Make Mediterranean Chicken Gyros with Creamy Feta Tzatziki

    Step 1: Prepare the Marinade

    First things first, let’s kick off our Mediterranean Chicken Gyros with some flavor! In a bowl, combine olive oil, dried oregano, garlic powder, onion powder, salt, and pepper. Each ingredient plays a vital role in creating the juicy, flavorful chicken we all crave. Marinating is key. It allows the spices to seep in, transforming bland chicken into a savory delight. Aim for at least 30 minutes, or longer if you can. Trust me, it’s worth it!

    Step 2: Make the Creamy Feta Tzatziki

    Now, let’s craft that luscious creamy feta tzatziki sauce. In another bowl, mix grated cucumber, Greek yogurt, crumbled feta cheese, lemon juice, and minced garlic. The cucumber adds a refreshing crunch, while the feta provides a splendid tang. I recommend blending until smooth, but leave some texture for a rustic feel. This sauce is not just a topping; it’s the heart of the gyros and elevates them to new heights!

    Step 3: Grill the Chicken

    Time to get grilling! Heat up a grill or skillet over medium-high heat. Once it’s hot, add your marinated chicken, spreading it out evenly. Cook for about 5 to 7 minutes, turning occasionally. You’ll know it’s done when the chicken is golden brown and the juices run clear. Avoid overcooking as it can dry out the meat, leaving your gyros less than perfect.

    Step 4: Warm the Pita Breads

    Next up, warm those pita breads! Just a minute or so on the grill will do the trick. Warming is essential; it makes the pita soft and flexible. This way, they can hug all the ingredients without tearing. So, don’t skip this step; you want your gyros to be perfectly cozy!

    Step 5: Assemble Your Gyros

    Finally, it’s time for the grand assembly! Take a warm pita, add in the grilled chicken, and top it off with your creamy feta tzatziki. A sprinkle of fresh parsley adds that beautiful touch. Feel free to get creative—add extra toppings like sliced tomatoes, onions, or even olives to suit your taste buds. Each bite will be a burst of amazing Mediterranean flavors!

    Tips for Success

    • Marinate the chicken for at least an hour for maximum flavor.
    • Use a meat thermometer to ensure chicken reaches 165°F for perfect doneness.
    • Toast pita bread slightly for added texture and warmth.
    • Make tzatziki ahead of time; it tastes even better after sitting for an hour!
    • Experiment with additional toppings like roasted red peppers or olives for extra flavor.

    Equipment Needed

    • Grill or Skillet: A stovetop skillet works if you don’t have a grill.
    • Mixing Bowls: Any size will do; you just need room to stir.
    • Meat Thermometer: Optional, but helps ensure chicken is cooked perfectly.
    • Grater: For shredding cucumber; a food processor can save time.

    Variations

    • Vegetarian Option: Swap chicken for marinated tofu or grilled portobello mushrooms for a hearty meat-free alternative.
    • Spice it Up: Add a pinch of cayenne or red pepper flakes to the marinade for a kick of heat that complements the flavors beautifully.
    • Fresh Herbs: Experiment with fresh dill or mint in the tzatziki for a unique twist that brings extra freshness to the sauce.
    • Whole Wheat Pitas: Pot for whole wheat pitas for a healthier twist while still enjoying that classic gyro experience.
    • Grilled Veggies: Toss in some grilled zucchini, bell peppers, or eggplant for additional veggies that add vibrant colors and flavors.

    Serving Suggestions

    • Fresh Salad: Pair with a simple Greek salad for a refreshing crunch.
    • Chilled Beverages: Serve with sparkling water or a fruity iced tea for a delightful drink.
    • Presentation Tip: Serve gyros on a colorful platter, garnished with extra parsley and lemon wedges for a festive touch.

    FAQs about Mediterranean Chicken Gyros with Creamy Feta Tzatziki

    Can I make the tzatziki sauce ahead of time? Absolutely! In fact, making the creamy feta tzatziki a few hours ahead enhances the flavors. Just store it in the fridge, and it will be ready to go when you are.

    Can I use other meats for this recipe? Yes! This recipe is versatile. Feel free to substitute chicken with beef, lamb, or even shrimp for a different twist on Mediterranean flavors.

    What toppings can I add to the gyros? Get creative! You can add sliced tomatoes, onions, or even roasted red peppers. Each addition gives its own flair to your Mediterranean Chicken Gyros with Creamy Feta Tzatziki!

    Is this recipe suitable for meal prep? Definitely! The gyros can be assembled in advance. Just keep the assembled gyros in the fridge for up to a day. Reheat quickly in a skillet before serving!

    Are there any gluten-free options? Yes! Just swap the pita for gluten-free wraps, and you can enjoy this Mediterranean delight without worry. It’s all about accommodating your needs while enjoying a fabulous meal.

    Final Thoughts

    Creating these Mediterranean Chicken Gyros with Creamy Feta Tzatziki isn’t just about making dinner; it’s about savoring a moment of joy in the kitchen. The simplicity of marinating chicken and whipping up tzatziki feels like a culinary celebration, perfect for any night of the week. Each bite transports you to sun-kissed shores, wrapped in warmth and flavor. Whether enjoyed on a busy weeknight or at a cozy gathering, this meal promises to bring smiles, satisfaction, and perhaps even moments of laughter around the table. So gather your loved ones and dive into this delightful journey!


    Print

    clock clock iconcutlery cutlery iconflag flag iconfolder folder iconinstagram instagram iconpinterest pinterest iconfacebook facebook iconprint print iconsquares squares iconheart heart iconheart solid heart solid icon

    Description

    Delicious Mediterranean Chicken Gyros served with a creamy feta tzatziki sauce, perfect for a quick and tasty meal.


    • 1 lb chicken breast, sliced
    • 2 tbsp olive oil
    • 2 tsp dried oregano
    • 1 tsp garlic powder
    • 1 tsp onion powder
    • Salt and pepper to taste
    • 4 pita breads
    • 1 cup cucumber, grated
    • 1 cup Greek yogurt
    • 1/2 cup feta cheese, crumbled
    • 1 tbsp lemon juice
    • 1 clove garlic, minced
    • Fresh parsley for garnish

    1. In a bowl, combine olive oil, oregano, garlic powder, onion powder, salt, and pepper. Add chicken and marinate for at least 30 minutes.
    2. In another bowl, mix grated cucumber, Greek yogurt, feta cheese, lemon juice, and minced garlic to make the tzatziki sauce.
    3. Heat a grill or skillet over medium-high heat and cook the marinated chicken until fully cooked, about 5-7 minutes.
    4. Warm the pita breads on the grill for a minute on each side.
    5. Assemble the gyros by placing chicken in the pita, topping with tzatziki sauce, and garnishing with fresh parsley.
    6. Serve immediately and enjoy!

    Notes

    • Marinate chicken longer for a stronger flavor.
    • Can substitute chicken with tofu for a vegetarian option.
    • Feel free to add other toppings like tomatoes or onions.
    • Prep Time: 30 minutes
    • Cook Time: 10 minutes
    • Category: Main Dish
    • Method: Grilling/Skillet
    • Cuisine: Mediterranean

    Nutrition

    • Serving Size: 1 gyro
    • Calories: 450
    • Sugar: 3g
    • Sodium: 800mg
    • Fat: 22g
    • Saturated Fat: 6g
    • Unsaturated Fat: 10g
    • Trans Fat: 0g
    • Carbohydrates: 35g
    • Fiber: 3g
    • Protein: 30g
    • Cholesterol: 75mg

    Sharing is caring!

  • Smoked Cajun Burgers Cheese

    Smoked Cajun Burgers Cheese


    Introduction to Smoked Cajun Burgers Cheese

    Hey there, fellow food lovers! If you’re on the hunt for a dish that brings a spicy punch and comforting flavors, look no further than these Smoked Cajun Burgers Cheese. I can already hear the sizzle of those juicy patties on a smoker. Imagine serving these flavorful burgers to your family after a long day; trust me, they’ll be begging for seconds! This recipe is not just about flavor; it’s a quick and memorable way to elevate your mealtime, perfect for busy moms and professionals alike. Let’s dive into this mouthwatering adventure together!

    Why You’ll Love This Smoked Cajun Burgers Cheese

    These Smoked Cajun Burgers Cheese are a delightful solution for those busy weeknights. The rich, smoky flavor combined with the spicy kick of Cajun seasoning makes them impossible to resist! Plus, you can prep the burgers ahead of time and toss them in the smoker when you’re ready. In just an hour and a half, you’ll have a gourmet meal that’s sure to impress your loved ones while keeping your schedule intact!

    Ingredients Smoked Cajun Burgers Cheese

    When whipping up these Smoked Cajun Burgers Cheese, the ingredients play a starring role, adding layers of flavor and delight. Here’s what you’ll need:

    • Cajun Sauce: A creamy blend that packs a flavorful punch with mayo, Worcestershire sauce, and freshly squeezed lemon juice.
    • Worcestershire Sauce: This adds a savory depth to the burgers, enhancing the overall umami flavor.
    • Lemon: The zestiness of lemon brightens the sauce, cutting through the richness.
    • Black Pepper and Garlic Powder: These staple seasonings provide that essential kick and aroma in the burger mix.
    • Smoked Paprika: A must for that smoky flavor, which is key to these burgers being truly irresistible.
    • Cajun Seasoning: A perfect blend of spices that brings the southern flair right to your kitchen.
    • Burgers: For the meat, I recommend using ground chuck beef; it yields juicy, flavorful patties.
    • Pepper Jack Cheese: This cheese is diced and folded into the burger, lending a creamy texture that’s simply heavenly!
    • Caramelized Onions: Sweet, tender onions that bring a balanced richness, contrasting beautifully with the Cajun spices.
    • Buns: Toasted burger buns are essential for holding all that deliciousness together. Choose your favorite variety!

    Feel free to experiment with different cheeses or even make a zesty vegan version by using plant-based ground meat. Looking for a slightly milder option? Swap out pepper jack for a different cheese to suit your taste. For the exact quantities of each ingredient, check the bottom of the article where you can find them available for printing!

    How to Make Smoked Cajun Burgers Cheese

    Now, let’s roll up our sleeves and dive into crafting these flavorful Smoked Cajun Burgers Cheese! Each step is designed to maximize flavor while keeping the process simple and enjoyable. Whether you’re a seasoned pro or a kitchen newbie, this guide will help you achieve burger perfection.

    Prepare the Cajun Sauce

    First up is the Cajun sauce, which adds a creamy, zesty flair to our burgers. In a mixing bowl, combine mayonnaise, Worcestershire sauce, and fresh lemon juice. The lemon juice brightens the flavors and balances the richness of the mayo.

    Next, sprinkle in black pepper, garlic powder, smoked paprika, and the Cajun seasoning. Stir everything together until smooth. This sauce is a perfect blend of spicy and creamy! Chill it in the refrigerator while you work on the other components of the meal. Trust me; it’ll be worth the wait!

    Create the Cajun Burger Rub

    Once your sauce is prepped, it’s time to create the spice rub. In a small bowl, mix together garlic powder, onion powder, smoked paprika, black pepper, and Cajun seasoning. This blend is essential for injecting flavor directly into the burger patties.

    Feel free to adjust the seasoning according to your taste. A little more paprika will kick up that smoky flavor, while extra black pepper can bring in some heat. This rub will ensure that every bite is bursting with flavor!

    Form the Burgers

    Now, let’s get to the fun part—forming our burgers! In a large bowl, combine the ground chuck beef, the diced pepper jack cheese, and a splash of Tony’s Creole Style Burger Marinade. The cheese isn’t just a topping; it melts into the patties, creating a delightful flavor experience!

    Mix everything gently but thoroughly. Overmixing can lead to tough patties, so be careful here. Next, form the mixture into balls weighing about 1/3 to 1/2 pound. Flatten them into 1/2-inch thick patties. Lay them on parchment paper and freeze for about 20 minutes. Freezing helps hold their shape while smoking!

    Caramelize the Onions

    While the burgers are chilling, let’s caramelize those onions. In a skillet over medium heat, melt unsalted butter. Add the finely chopped sweet onions and a pinch of salt. Stir occasionally, allowing the onions to slowly cook down.

    Keep the heat moderate; you’re aiming for a golden, tender result. This process takes about 30-40 minutes, so be patient. The sweetness of the caramelized onions beautifully complements the spiciness of the burgers, creating a perfect harmony!

    Smoke the Patties

    Once your patties are frozen and the onions are caramelized, it’s time to smoke those flavorful morsels! Preheat your smoker to between 250-275°F and add some hickory wood chunks for that smoky goodness.

    Carefully place the patties on the smoker rack. Let them smoke for about 30-40 minutes. Keep an eye on the internal temperature; it should reach 165°F for perfectly cooked burgers. Add your slices of Colby Jack 3 Pepper Cheese when the patties are almost done. This will melt beautifully and enhance the flavor!

    Assemble the Burgers

    Finally, the moment we’ve all been waiting for—assembly! Start by toasting your buns until they’re golden. Spread that delicious Cajun sauce on the bottom bun for a burst of flavor. Place a smoked burger patty on top and pile on those caramelized onions.

    If you’re feeling indulgent, drizzle a little extra sauce on top before capping it with the other half of the bun. Each bite will take you on a delicious journey of smokiness, spice, and creaminess. Trust me; your taste buds will thank you!

    Tips for Success

    • Always use a meat thermometer for perfect burger doneness—aim for 165°F.
    • Let the patties rest for 6 minutes after smoking; this helps retain juices.
    • Adjust seasonings based on preference; don’t be afraid to get creative!
    • Prep the Cajun sauce and onions ahead of time to save on weeknight stress.
    • Consider using sliders for a fun party twist or smaller portions!

    Equipment Needed

    • Smoker: A traditional or electric smoker will do the trick.
    • Skillet: For caramelizing the onions; a cast-iron skillet works beautifully.
    • Mixing Bowls: Use these for mixing sauces and burger ingredients.
    • Parchment Paper: Perfect for freezing patties without sticking.
    • Meat Thermometer: Essential for ensuring burgers are cooked perfectly.

    Variations

    • For a milder flavor, substitute pepper jack cheese with mozzarella or provolone.
    • Make it spicy by adding diced jalapeños or cayenne pepper to the burger mixture.
    • For a lighter option, use ground turkey or chicken instead of beef.
    • Create a gluten-free version by using gluten-free buns or lettuce wraps.
    • Try adding a slice of avocado for creaminess and a fresh twist on the flavor!

    Serving Suggestions

    • Pair your burgers with crispy sweet potato fries for a delightful contrast.
    • Consider a fresh garden salad drizzled with a light vinaigrette for balance.
    • Enjoy with cold craft beer or a refreshing iced tea to complement the spice.
    • For presentation, serve on a rustic wooden board for a visual feast!

    FAQs about Smoked Cajun Burgers Cheese

    Can I use a different type of cheese in these burgers?

    Absolutely! While pepper jack cheese adds a nice kick, you can totally experiment. Try cheddar for a classic flavor or get adventurous with gouda for a smoky twist. The cheese melts into the patties beautifully, enhancing each bite.

    How can I make these burgers spicier?

    If you’re a fan of heat, consider adding crushed red pepper flakes or diced jalapeños right into the burger mix. You could also drizzle a bit of sriracha sauce on top for an extra zing when you’re assembling the burgers!

    Can I prepare the burgers in advance?

    Yes, meal prep is a fantastic option! You can form the patties and freeze them beforehand. Just remember to add the cheese before smoking them. When you’re ready for a quick dinner, pop them on the smoker, and you’re all set!

    What should I serve with my Smoked Cajun Burgers Cheese?

    I recommend pairing these burgers with crispy fries or a fresh salad to balance the richness. A light coleslaw adds a nice crunch, too! Wash it down with a chilled drink, and you’ve got a winning meal!

    Is this recipe gluten-free?

    Yes! The recipe is easily made gluten-free. Just substitute regular buns with gluten-free options or opt for lettuce wraps for a refreshing twist. Enjoy your flavorful burgers worry-free!

    Final Thoughts

    Embracing the smoky, spicy delight of Smoked Cajun Burgers Cheese brings joy not just at the dinner table, but throughout the cooking process itself. Each step transforms ordinary ingredients into a flavor-packed feast that delights the senses. Whether you’re cooking for family, friends, or simply treating yourself, these burgers will create a memorable experience. Plus, the easy prep and freezing tips make weeknight dinners feel less daunting. So, fire up that smoker and enjoy a little culinary adventure, one delicious bite at a time. These burgers are sure to become a beloved addition to your family’s mealtime favorites!


    Print

    clock clock iconcutlery cutlery iconflag flag iconfolder folder iconinstagram instagram iconpinterest pinterest iconfacebook facebook iconprint print iconsquares squares iconheart heart iconheart solid heart solid icon

    Description

    Deliciously smoky and spicy burgers infused with Cajun flavors and topped with creamy pepper jack cheese and caramelized onions.


    • Cajun Sauce
    • 1/2 lemon, squeezed
    • 1 tablespoon Worcestershire sauce
    • 1 teaspoon Tony’s Lite Creole Seasoning
    • 1 teaspoon smoked paprika
    • 1 teaspoon garlic powder
    • 1 teaspoon ground black pepper
    • 1/2 cup mayo
    • Cajun Burger Rub
    • 2 teaspoons black pepper
    • 1 tablespoon onion powder
    • 2 teaspoons smoked paprika
    • 1 tablespoon garlic powder
    • 2 teaspoons Tony’s Lite Creole Seasoning
    • Burgers
    • 10 ounces pepper jack cheese, diced into small cubes (around 1/4 inch)
    • 3 pounds of ground chuck beef
    • 1 bottle of Tony’s Creole Style Burger Marinade
    • Caramelized Onions
    • 2 tablespoons butter, unsalted
    • 2 sweet onions, finely chopped
    • 1 tablespoon table salt
    • For Assembly
    • Colby Jack 3 Pepper Cheese slices
    • Buns, toasted

    1. In a bowl, stir together mayo, Worcestershire sauce, fresh lemon juice, black pepper, garlic powder, smoked paprika, and Creole seasoning. Chill in the fridge until needed.
    2. In a small bowl, blend together garlic powder, onion powder, smoked paprika, black pepper, and Creole seasoning.
    3. In a big bowl, combine ground beef, diced pepper jack, and burger marinade. Form into balls weighing around 1/3 to 1/2 pound each. Flatten into 1/2-inch thick patties, lay them on parchment paper, and freeze for 20 minutes.
    4. In a skillet over medium heat, melt butter, then mix in the chopped onions with salt. Stir occasionally and cook for 30-40 minutes until caramelized.
    5. Set your smoker to 250-275°F and add hickory wood chunks. Lay the patties in and let them smoke for 30-40 minutes. Add cheese slices when patties are almost done. Once the internal temperature reaches 165°F, remove them and let them rest for 6 minutes.
    6. Toast the buns, spread Cajun sauce on the bottom bun, place a smoked patty on top, pile on caramelized onions, and add extra sauce if desired. Cap it with the top bun.

    Notes

    • Adjust seasoning according to personal taste.
    • Use a meat thermometer for the most accurate cooking results.
    • Experiment with different cheeses if desired.
    • Prep Time: 30 minutes
    • Cook Time: 1 hour
    • Category: Main Course
    • Method: Smoking
    • Cuisine: American

    Nutrition

    • Serving Size: 1 burger
    • Calories: 650
    • Sugar: 2g
    • Sodium: 850mg
    • Fat: 45g
    • Saturated Fat: 20g
    • Unsaturated Fat: 15g
    • Trans Fat: 0g
    • Carbohydrates: 30g
    • Fiber: 2g
    • Protein: 35g
    • Cholesterol: 100mg

    Sharing is caring!

  • Apple Pancakes

    Apple Pancakes


    Introduction to Apple Pancakes

    Ah, the delightful aroma of a freshly made breakfast wafting through the house! There’s something comforting about starting your day with a stack of apple pancakes. They’re not just another breakfast option; they’re a warm hug in food form.

    For those busy mornings, this recipe is a quick solution that even your pickiest eaters will adore. Imagine the joy on your family’s faces as they bite into fluffy, apple-infused pancakes drizzled with maple syrup. You’ll be the star of breakfast, effortlessly impressing your loved ones with this simple, yet delicious treat!

    Why You’ll Love This Apple Pancakes

    These apple pancakes are the perfect blend of speed and flavor. In just 20 minutes, you can whip up a breakfast that feels like a special occasion! They’re fluffy, sweet, and oh-so-delicious, making them an instant family favorite. Plus, with grated apples baked right in, you get to sneak in some fruit. This recipe offers satisfaction without hassle; it’s a win-win for busy mornings!

    Ingredients for Apple Pancakes

    Gather these simple ingredients to create your cozy stack of apple pancakes. Remember, the exact measurements are available at the bottom of the article for easy printing!

    • Fluffy Pancakes: You can use your favorite pancake mix or whip up a homemade batter. Homemade adds a touch of love, but a mix saves time!
    • Ground Cinnamon: This warms up the flavor. It balances the sweetness of the apples and makes the house smell divine.
    • Medium Apples: Grated apples bring moisture and sweetness. I love using tart apples like Granny Smith, but feel free to choose your favorite variety.
    • Powdered Sugar or Syrup: For the perfect finishing touch, dust them with powdered sugar or drizzle some maple syrup. Either way, it’s a sweet hug on your plate!

    How to Make Apple Pancakes

    Making apple pancakes is a breeze! Follow these simple steps to whip up a batch that’s fluffy and bursting with flavor. Let’s dive into this delicious adventure!

    Step 1: Preheat the Griddle

    Start by preheating your griddle to 350°F. A hot griddle is crucial for perfectly cooked pancakes. I like to spray it with nonstick cooking spray or melt some butter for added flavor. The griddle should sizzle gently when you’re ready to pour the batter. Trust me, that sound is music to your ears!

    Step 2: Prepare the Batter

    Mix your pancake batter according to the recipe or package instructions. This step is pretty fun—watch the transformation from dry mix to a silky batter. Now, here comes the star of the show! Stir in the grated apples along with the ground cinnamon. The apples add moisture, making these pancakes irresistibly fluffy. Feel free to sneak a taste of the batter; I won’t tell anyone!

    Step 3: Cook the Pancakes

    Now for the exciting part! Drop the batter onto your preheated griddle in your desired pancake size. I usually make medium-sized ones, but go big or small as you wish! Cook until the edges look set, and bubbles form on the surface. Flip them carefully when both sides are golden brown. The aroma will fill your kitchen, beckoning everyone to the table!

    Step 4: Serve and Enjoy

    Once your apple pancakes are nicely browned, it’s time to serve them hot! Stack them high on a plate for that Instagram-worthy look. Dust with powdered sugar or drizzle warm maple syrup on top. Each bite is a cloud of sweetness with a hint of cinnamon—pure breakfast bliss! Don’t forget to save some for yourself; you deserve it!

    Tips for Success

    • For extra fluffiness, let the batter rest for a few minutes before cooking.
    • Check the griddle temperature with a drop of water; it should sizzle and evaporate immediately.
    • Rotate pancakes gently so they cook evenly on both sides.
    • Don’t overcrowd the griddle; give each pancake room to puff up!
    • Experiment with different apple varieties to find your perfect flavor combination.

    Equipment Needed

    • Griddle or Nonstick Skillet: A good griddle is ideal, but any nonstick skillet works wonders too.
    • Mixing Bowl: A large bowl is perfect for combining your ingredients without a mess.
    • Whisk or Spoon: Use either to mix the batter smoothly; a whisk is faster!
    • Spatula: A sturdy spatula makes flipping pancakes easy and mess-free.

    Variations of Apple Pancakes

    • Spiced Apple Pancakes: Add a pinch of nutmeg or ginger for an extra flavor kick that pairs beautifully with apples.
    • Apple Oat Pancakes: Mix in some rolled oats to the batter for a heartier texture and a boost of fiber.
    • Whole Wheat Apple Pancakes: Swap regular flour for whole wheat flour for a healthier option that still tastes just as delicious.
    • Vegan Apple Pancakes: Use almond milk and flaxseed meal in place of eggs and regular milk to create a plant-based version.
    • Apple Cinnamon Maple Streusel Pancakes: Top with a crumbly streusel made from oats, brown sugar, and butter for a special treat.

    Serving Suggestions for Apple Pancakes

    • Fresh Fruit: Serve with berries, slices of banana, or citrus for a refreshing contrast.
    • Crispy Bacon or Sausage: A savory side perfectly balances the sweetness of the pancakes.
    • Yogurt: A dollop of Greek yogurt adds creaminess and pairs well with the fruit.
    • Coffee or Tea: Brew a cup to start your morning right!
    • Presentation: Stack pancakes high, drizzle syrup, and garnish with a sprinkle of cinnamon for an inviting look.

    FAQs about Apple Pancakes

    Apple pancakes are such a delightful treat that you might find yourself with a few burning questions. Here are some answers to common queries that can help clear things up!

    Can I make apple pancakes ahead of time?

    Absolutely! You can prepare the batter ahead and store it in the fridge for up to 24 hours. Just give it a good stir before cooking to reinvigorate those flavors.

    What type of apples are best for apple pancakes?

    I love using tart apples like Granny Smith for a balance of sweetness and tang. However, you can choose your favorite variety. Honeycrisps also add a lovely touch!

    How can I make my pancakes fluffier?

    For extra fluffiness, try letting the batter rest for about 5 minutes. This allows the baking powder to work its magic, giving you lighter pancakes.

    Can I freeze leftover apple pancakes?

    Yes, you can! Just let the pancakes cool completely before stacking them with parchment paper in between. Wrap them tightly and store in the freezer for up to 2 months. Reheat them in the toaster or microwave for a quick breakfast!

    What toppings go well with apple pancakes?

    Don’t hold back on toppings! Maple syrup, whipped cream, or a sprinkle of nuts and dried fruits elevate your apple pancakes to new heights. Enjoy experimenting!

    Final Thoughts

    There’s something magical about making apple pancakes, isn’t there? The way the batter transforms into fluffy stacks, infused with the sweetness of apples and a hint of cinnamon, warms my heart and fills my home with joy. These pancakes are not just a meal; they’re a cherished family experience, bringing everyone together around the breakfast table.

    So go ahead, make a batch of apple pancakes. Whether it’s a busy weekday morning or a leisurely weekend brunch, this simple recipe is sure to create smiles and fond memories. Embrace the joy of cooking, and let these pancakes be one of your family’s favorites!


    Print

    clock clock iconcutlery cutlery iconflag flag iconfolder folder iconinstagram instagram iconpinterest pinterest iconfacebook facebook iconprint print iconsquares squares iconheart heart iconheart solid heart solid icon

    Description

    These Apple Pancakes are irresistibly fluffy and delicious, perfect for a sweet breakfast treat.


    • 1 recipe Fluffy Pancakes or a mix, see note
    • ½ teaspoon ground cinnamon
    • 2 medium apples grated (use your favorite brand; leave the skin on when shredding)
    • Powdered sugar or syrup for topping

    1. Preheat griddle to 350°F. Spray with nonstick cooking spray or spread with melted butter.
    2. Mix pancake mix according to recipe or package instructions. Stir in grated apples.
    3. Drop batter in desired size onto prepared griddle and cook until both sides are browned.
    4. Serve warm with a dusting of powdered sugar and/or maple syrup.

    Notes

    • For the pancake mix, you can use a homemade recipe or a store-bought mix.
    • Prep Time: 10 minutes
    • Cook Time: 10 minutes
    • Category: Breakfast
    • Method: Griddling
    • Cuisine: American

    Nutrition

    • Serving Size: 2 pancakes
    • Calories: 250
    • Sugar: 10g
    • Sodium: 300mg
    • Fat: 8g
    • Saturated Fat: 3g
    • Unsaturated Fat: 2g
    • Trans Fat: 0g
    • Carbohydrates: 40g
    • Fiber: 2g
    • Protein: 4g
    • Cholesterol: 20mg

    Sharing is caring!

  • Teriyaki Chicken Casserole

    Teriyaki Chicken Casserole


    Introduction to Teriyaki Chicken Casserole

    As a busy mom, I often find myself tangled in the whirlwind of daily tasks. Between juggling work, homework, and family time, quick yet delicious meals can feel like a distant dream. Enter the Teriyaki Chicken Casserole—a lifesaver in my kitchen! This flavorful dish combines tender chicken, vibrant vegetables, and fluffy jasmine rice, all wrapped up in a savory teriyaki sauce. It’s not just an easy recipe; it’s a comforting dinner option that brings my family together, even on the busiest nights. Trust me, this casserole makes weeknight meals a joyous affair!

    Why You’ll Love This Teriyaki Chicken Casserole

    This Teriyaki Chicken Casserole is your new go-to dinner solution! Not only is it a breeze to make, but it’s also packed with flavor that will have your family singing praises. With just one dish to clean, you’ll save time in the kitchen. Plus, the combination of tender chicken, fresh veggies, and jasmine rice means everyone will be satisfied. It’s a delightful dinner option that fits right into your busy schedule!

    Ingredients for Teriyaki Chicken Casserole

    Gathering the right ingredients is like laying the foundation for a wonderful meal. For this Teriyaki Chicken Casserole, you’ll need:

    • Boneless skinless chicken breasts: The star of the casserole! They become tender and juicy after baking.
    • Low sodium soy sauce: This adds depth and saltiness without overwhelming flavors.
    • Water: Used for the sauce and to create a cornstarch slurry, helping thicken our delightful sauce.
    • Light brown sugar: Balances the savory elements with a touch of sweetness, giving the casserole its delicious flavor.
    • Seasoned rice wine vinegar: It enhances the sauce with a tart note that complements the sweetness.
    • Fresh garlic and ginger: These aromatics bring a burst of flavor. Use freshly grated for the best results!
    • Sesame oil: A splash of this fragrant oil adds a lovely nuttiness to the dish.
    • Cornstarch: This helps to thicken the teriyaki sauce, making it glossy and rich.
    • Frozen stir-fry vegetables: No hassle, just steam, add, and enjoy the crunch and color!
    • Jasmine rice: Soft, fluffy, and ready to soak up all that teriyaki goodness; it’s the perfect base.

    Feel free to get creative! You can mix and match vegetables based on your family’s favorites or even substitute chicken with tofu for a vegetarian version. For those who crave a little heat, consider adding red pepper flakes to the sauce. You can find the exact quantities for everything at the bottom of this article, ready for printing!

    How to Make Teriyaki Chicken Casserole

    Now that you have all the ingredients, let’s dive into the delightful process of making your Teriyaki Chicken Casserole. This is where the magic happens! Each step is simple, and I promise it won’t take too long. Ready? Let’s get started!

    Prepare the Baking Dish and Chicken

    First things first, preheat your oven to 350°F. While it warms up, grab a 9×13-inch baking dish and spray it with non-stick cooking spray. This little step ensures that your casserole doesn’t stick.’

    Now, take those boneless skinless chicken breasts and place them neatly in the dish. Make sure they’re laid out evenly. This allows for even cooking. It’s their time to shine, and trust me, the end result will be so worth it!

    Make the Teriyaki Sauce

    Let’s whip up that tasty teriyaki sauce! In a medium saucepan over medium-high heat, combine the low sodium soy sauce, ⅔ cup of water, and light brown sugar. Stir in the seasoned rice wine vinegar, grated garlic, grated ginger, and sesame oil. Bring it all to a gentle boil. Oh, the aroma in your kitchen will be heavenly!

    Cooking tip: If you want a richer flavor, let your sauce simmer for a few extra minutes. It deepens the taste and makes the dish even more unforgettable.

    Thicken the Sauce with Cornstarch

    While the sauce is heating up, grab a small bowl and whisk together the remaining 2 tablespoons of water with the cornstarch. This slurry is your secret weapon!

    Once your sauce has reached a boil, add the cornstarch slurry to the pan. Whisk constantly for about 30-45 seconds. You’ll notice the sauce becoming thick and glossy. This texture is key to coating that chicken beautifully!

    Bake the Chicken

    Now, pour a cup of your freshly made teriyaki sauce over the chicken breasts in the baking dish. Cover it tightly with aluminum foil and pop it in the preheated oven. Bake for 30-35 minutes, or until the chicken reaches an internal temperature of 165°F. This step is super important; juicy chicken is a happy chicken!

    To check for doneness, I always suggest using a meat thermometer. It’s the best way to ensure everything is perfectly cooked. No one wants dry chicken in their casserole!

    Shred the Chicken

    Once that timer rings, it’s time for some fun! Carefully take the baking dish out of the oven and remove the foil. It’s hot, so use oven mitts! Take two forks and shred the chicken directly in the dish. It’s quick, easy, and oh-so-satisfying.

    Just be careful, because the dish will be steamy. Don’t burn your fingers! This is a great moment to let kids help if they can. They’ll love pulling the chicken apart.

    Combine Ingredients and Bake Again

    Now, the exciting part! Add the steamed stir-fry vegetables, cooked jasmine rice, and any leftover teriyaki sauce to the chicken. Stir everything together with love. It’s all about getting those vibrant colors and flavors mixed!

    Once combined, spread the mixture evenly in the dish. Return it to the oven and bake uncovered for an additional 10-15 minutes. This step ensures everything is warmed through, and flavors meld beautifully!

    Feel free to drizzle any reserved teriyaki sauce on top before serving. The finish will be sheer perfection on your plate!

    Tips for Success

    • Prep your ingredients beforehand—it saves time and helps the cooking process run smoothly.
    • Adjust the sauce to your taste. If you prefer a sweeter or tangier flavor, tweak the brown sugar or vinegar.
    • Use a meat thermometer to check chicken doneness; it’s the best way to prevent dryness.
    • Experiment with vegetables; you can use what’s in your fridge!
    • Let the casserole sit for a couple of minutes before serving. It enhances the flavors!

    Equipment Needed

    • 9×13-inch baking dish: A must-have for this casserole. A smaller dish may work, but you’ll need to adjust cooking time.
    • Medium saucepan: Essential for making your tasty teriyaki sauce. Any pot will do!
    • Whisk: Helps combine your sauce ingredients smoothly. A fork can serve in a pinch.
    • Meat thermometer: Useful for checking chicken doneness; a knife can help if you don’t have one.
    • Forks: For shredding the chicken. Using two makes it easier and more efficient!

    Variations

    • Vegetarian Version: Swap the chicken for tofu or tempeh. This option absorbs all those delicious teriyaki flavors!
    • Spicy Kick: Add red pepper flakes or a dash of sriracha to the sauce for a flavorful heat that gives it edge.
    • Quinoa Substitute: Replace jasmine rice with quinoa for a protein-packed twist. It’s gluten-free and very nutritious!
    • Different Veggies: Experiment with bell peppers, snap peas, or mushrooms based on your family’s tastes. The more colorful, the better!
    • Low-Carb Option: Swap out the rice for cauliflower rice for a lighter take that’s still full of flavor.

    Serving Suggestions

    • Pair your Teriyaki Chicken Casserole with a crisp, fresh cucumber salad for a refreshing contrast.
    • A side of steamed edamame adds a healthy crunch and complements the Asian flavors.
    • For drinks, serve with iced green tea or a light white wine.
    • Garnish with sesame seeds and sliced green onions for an inviting presentation.

    FAQs about Teriyaki Chicken Casserole

    Can I use fresh vegetables instead of frozen?
    Absolutely! Fresh vegetables work beautifully in this casserole. Just ensure they’re cut into similar sizes for even cooking. Broccoli, bell peppers, and snap peas would make lovely additions!

    How do I store leftovers?
    To store leftovers, simply place the casserole in an airtight container. It will keep in the fridge for about 3-4 days. You can reheat in the oven for a warm meal anytime!

    Can I make this casserole in advance?
    Yes, you can prepare it a day ahead! Assemble everything, cover, and refrigerate. Just adjust the baking time if it’s cold from the fridge. A little extra time in the oven will do the trick!

    What can I use instead of jasmine rice?
    If you’re not a fan of jasmine rice, feel free to substitute it with brown rice, quinoa, or even cauliflower rice for a lower-carb option. Each brings its unique flavor and texture!

    Is the teriyaki sauce gluten-free?
    Yes! As long as you use gluten-free soy sauce, your Teriyaki Chicken Casserole will be gluten-free. There are plenty of tasty options available in stores nowadays!

    Final Thoughts

    Cooking this Teriyaki Chicken Casserole is more than just preparing a meal; it’s about creating warm memories around the dinner table. The rich flavors and vibrant ingredients come together in harmony, making every bite a delight. I love how it fills my home with a cozy aroma that invites everyone in. Plus, it’s an easy dish that brings smiles to busy faces after a long day. As you savor this casserole, I hope you feel the love and joy that stems from a good home-cooked meal. Enjoy every moment with your loved ones and this delightful dinner!


    Print

    clock clock iconcutlery cutlery iconflag flag iconfolder folder iconinstagram instagram iconpinterest pinterest iconfacebook facebook iconprint print iconsquares squares iconheart heart iconheart solid heart solid icon

    Description

    A flavorful and easy-to-make Teriyaki Chicken Casserole that combines tender chicken, steamed vegetables, and jasmine rice in a savory teriyaki sauce, perfect for a delicious dinner.


    • 1 pound boneless skinless chicken breasts (approximately 2 large breasts)
    • ⅔ cup low sodium soy sauce
    • ⅔ cup + 2 tablespoons water (⅔ cup for sauce, 2 tablespoons for cornstarch slurry)
    • ½ cup packed light brown sugar
    • 2 tablespoons seasoned rice wine vinegar
    • 2 teaspoons grated fresh garlic
    • 2 teaspoons grated fresh ginger
    • 1 teaspoon sesame oil
    • 2 tablespoons cornstarch
    • 28.8 ounces (2 14.4-ounce bags) frozen stir-fry vegetables (steamed according to package directions)
    • 3 cups cooked white jasmine rice (cooked according to package directions)

    1. Preheat oven to 350°F. Spray a 9×13-inch baking dish with non-stick cooking spray. Place boneless skinless chicken breasts into the prepared baking dish and set aside.
    2. In a medium saucepan over medium-high heat, combine low sodium soy sauce, ⅔ cup water, light brown sugar, seasoned rice wine vinegar, grated garlic, grated ginger, and sesame oil. Bring to a boil.
    3. While the sauce is heating, whisk the remaining 2 tablespoons of water and cornstarch in a small bowl to form a slurry.
    4. Add the cornstarch slurry to the boiling sauce and whisk constantly. Cook for 30-45 seconds until thick and glossy. Remove from heat.
    5. Pour 1 cup of the prepared teriyaki sauce over the chicken breasts in the baking dish. Cover the dish with aluminum foil and bake for 30-35 minutes, or until the chicken reaches an internal temperature of 165°F.
    6. Remove the baking dish from the oven and discard aluminum foil. Using two forks, shred the chicken directly in the dish. Be cautious as the dish will be hot.
    7. Add steamed stir-fry vegetables, cooked jasmine rice, and the remaining teriyaki sauce to the baking dish. Stir carefully to combine and spread mixture evenly.
    8. Return the dish to the oven and bake uncovered for an additional 10-15 minutes, or until warmed through. Optionally, drizzle reserved teriyaki sauce over the top before serving.

    Notes

    • For a spicier kick, add red pepper flakes to the sauce.
    • Feel free to mix and match the stir-fry vegetables based on your preference.
    • Let the casserole cool slightly before serving to allow flavors to meld.
    • Prep Time: 15 minutes
    • Cook Time: 50 minutes
    • Category: Dinner
    • Method: Baking
    • Cuisine: Asian

    Nutrition

    • Serving Size: 1/6 of the casserole
    • Calories: 380
    • Sugar: 8g
    • Sodium: 800mg
    • Fat: 8g
    • Saturated Fat: 2g
    • Unsaturated Fat: 6g
    • Trans Fat: 0g
    • Carbohydrates: 54g
    • Fiber: 2g
    • Protein: 24g
    • Cholesterol: 70mg

    Sharing is caring!

  • Grilled Peach Feta Salad Bowl

    Grilled Peach Feta Salad Bowl


    Introduction to Grilled Peach Feta Salad Bowl

    As summer rolls in, I find myself craving refreshing dishes that burst with flavor. That’s where the Grilled Peach Feta Salad Bowl comes into play! It’s a delightful combination of juicy, caramelized peaches, creamy feta, and crunchy nuts that brighten any table. Whether you’re hosting a garden party or just looking for a quick lunch, this salad is an easy way to elevate your dining experience. Plus, it’s unbelievably fast to whip up, making it the perfect solution for busy moms and professionals alike!

    Why You’ll Love This Grilled Peach Feta Salad Bowl

    This Grilled Peach Feta Salad Bowl is the perfect blend of ease and taste. In just 20 minutes, you can serve a dish that’s both gorgeous and delicious. The sweetness of grilled peaches combined with the saltiness of feta creates a flavor explosion! Plus, it’s healthy and satisfying—a wonderful guilt-free option for busy moms trying to please picky eaters. Who doesn’t love a salad that feels like a treat?

    Ingredients for Grilled Peach Feta Salad Bowl

    Creating a fantastic Grilled Peach Feta Salad Bowl is all about selecting the right ingredients. Here’s a quick rundown of what you’ll need to bring this delightful dish to life:

    • Peaches: Choose ripe, juicy peaches. Their sweetness shines when grilled, adding a smoky flavor to the salad.
    • Feta Cheese: Creamy and tangy, crumbled feta brings a wonderful contrast to the peaches. If you’re not a feta fan, goat cheese also works beautifully!
    • Arugula or Mixed Greens: This is your salad base! The peppery arugula enhances the flavor, but any leafy greens will do.
    • Walnuts: Toasted walnuts add a nice crunch and nutty flavor. Feel free to swap them for your favorite nuts or seeds like pecans or pumpkin seeds.
    • Balsamic Glaze: A drizzle of this sweet and tangy glaze elevates the salad’s flavors. You can also make your own if you’re feeling adventurous!
    • Olive Oil: Extra virgin olive oil is best for brushing the peaches. It not only enhances the flavor but also helps achieve that beautiful grill mark.
    • Salt and Pepper: Just the essentials! These spices bring out the natural flavors of the ingredients.

    For exact quantities, check out the bottom of the article where you’ll find a handy printable version. Enjoy selecting the freshest ingredients to create your delicious summer salad!

    How to Make Grilled Peach Feta Salad Bowl

    Now comes the fun part: making the Grilled Peach Feta Salad Bowl! This process is truly straightforward. With just a few simple steps, you’ll have a beautiful dish ready to impress your family or friends. Let’s dive into each step!

    Step 1: Preheat the Grill

    Start by preheating your grill to medium heat. This is essential for achieving those lovely grill marks on your peaches. A hot grill ensures they caramelize beautifully, enhancing their flavor. Trust me, you don’t want to skip this step!

    Step 2: Prepare the Peaches

    While the grill heats up, brush the peach halves with olive oil. This not only adds flavor but also prevents sticking. Sprinkle a pinch of salt and pepper on them. The seasoning will enhance their sweetness and create a delicious contrast with the feta later on!

    Step 3: Grill the Peaches

    Once your grill is hot, place the peaches cut-side down on the grates. Grill them for about 4–5 minutes. You’ll know they’re done when you see those gorgeous grill marks and the peaches become slightly softer. This step is crucial for unlocking their natural sweetness!

    Step 4: Combine the Ingredients

    Now that your grilled peaches are cool, it’s time to assemble the salad! In a large bowl, toss together the arugula, grilled peaches, crumbled feta, and toasted walnuts. Handle the peaches gently to keep them intact. A light tossing will help distribute the flavors so every bite is delightful!

    Step 5: Drizzle and Serve

    Finally, add a generous drizzle of balsamic glaze over your salad. This adds a lovely sweetness and tangy finish. Serve immediately for the freshest experience. This Grilled Peach Feta Salad Bowl will surely be the star of your summer meals!

    Tips for Success

    • Choose peaches that yield slightly when gently pressed—they’re perfect for grilling!
    • Let your grilled peaches cool a bit before mixing; this helps keep their shape.
    • For extra flavor, try adding fresh herbs such as basil or mint to your salad.
    • Store leftovers in an airtight container for a refreshing lunch the next day.
    • Experiment with different cheese types for unique flavor combinations!

    Equipment Needed

    • Grill: A standard outdoor grill works wonders, but a grill pan can do the job too.
    • Basting Brush: Perfect for brushing olive oil on the peaches; you could also use a clean cloth.
    • Mixing Bowl: Any large bowl will do for combining your salad ingredients.
    • Serving Plate: Use a beautiful plate for presentation; even a cutting board can add rustic charm.

    Variations on Grilled Peach Feta Salad Bowl

    • Grilled Chicken or Shrimp: For added protein, toss in grilled chicken slices or shrimp. It transforms the salad into a hearty meal!
    • Vegan Option: Substitute feta with avocado or vegan cheese. The creamy texture pairs wonderfully with the grilled peaches!
    • Herbs Galore: Add fresh basil, mint, or cilantro to enhance flavor. Each herb brings its own unique twist!
    • Spicy Kick: Sprinkle some red pepper flakes for a zesty kick. It balances the sweetness with a delightful heat.
    • Different Nuts: Swap walnuts for pecans or almonds for varying crunch and flavor. Toasting them adds an extra depth!

    Serving Suggestions for Grilled Peach Feta Salad Bowl

    • Pair with grilled chicken, fish, or tofu for a complete meal.
    • Serve alongside crusty bread or a light baguette to soak up the flavors.
    • A chilled glass of white wine or sparkling water complements the dish perfectly.
    • For presentation, use a colorful serving dish and garnish with fresh herbs.

    FAQs about Grilled Peach Feta Salad Bowl

    As you embark on your culinary adventure with the Grilled Peach Feta Salad Bowl, you might have a few questions swirling in your mind. Here are some common queries I’ve encountered along the way:

    Can I use frozen peaches for this salad?

    While fresh peaches are ideal, you can use frozen peaches in a pinch. Just remember to thaw and drain them well before grilling to avoid excess moisture!

    What can I substitute for feta cheese?

    If feta isn’t your thing, goat cheese or even crumbled blue cheese can add a punch of flavor. Consider avocado for a creamy, dairy-free option!

    How do I store leftovers?

    The best way to store any leftovers is in an airtight container in the fridge. Enjoy them within 2 days for optimal freshness!

    Can I prepare this salad in advance?

    While it’s best enjoyed fresh, you can grill the peaches and prepare the salad components ahead of time. Just assemble it right before serving to keep everything crisp.

    Can I make this salad vegan?

    Absolutely! Simply swap feta with your favorite vegan cheese or creamy avocado. It will still taste amazing while meeting plant-based needs!

    Final Thoughts

    Making the Grilled Peach Feta Salad Bowl is like inviting summer into your kitchen. Each bite delivers a harmonious blend of flavors and textures that thrill the palate and brighten your day. Whether you’re sharing it with loved ones or enjoying it solo, this salad is a celebration of the season—effortless, vibrant, and so satisfying! I hope this delightful offering eases your busy schedule while adding a touch of joy to your meals. Let the flavors transport you to sunny picnics and garden parties. Trust me, once you try it, you’ll want to make it your go-to summer dish!


    Print

    clock clock iconcutlery cutlery iconflag flag iconfolder folder iconinstagram instagram iconpinterest pinterest iconfacebook facebook iconprint print iconsquares squares iconheart heart iconheart solid heart solid icon

    Description

    A refreshing salad featuring grilled peaches, creamy feta, and crunchy walnuts, perfect for summer.


    • 4 ripe peaches, halved and pitted
    • 100 g feta cheese, crumbled
    • 100 g arugula or mixed greens
    • 50 g walnuts, toasted
    • 60 ml balsamic glaze
    • 2 tablespoons olive oil
    • Salt and pepper to taste

    1. Preheat the grill to medium heat.
    2. Brush the peach halves with olive oil and season with salt and pepper.
    3. Place the peaches cut-side down on the grill and cook for about 4-5 minutes, until grill marks appear and they soften slightly.
    4. Remove the peaches from the grill and let them cool slightly.
    5. In a large bowl, combine the arugula, grilled peaches, crumbled feta, and toasted walnuts.
    6. Drizzle with balsamic glaze and toss gently to combine. Serve immediately.

    Notes

    • Feel free to substitute the walnuts with your favorite nuts or seeds.
    • For added flavor, consider marinating the peaches in a bit of honey before grilling.
    • Prep Time: 10 minutes
    • Cook Time: 10 minutes
    • Category: Salad
    • Method: Grilling
    • Cuisine: American

    Nutrition

    • Serving Size: 1 bowl
    • Calories: 300
    • Sugar: 8g
    • Sodium: 450mg
    • Fat: 22g
    • Saturated Fat: 6g
    • Unsaturated Fat: 16g
    • Trans Fat: 0g
    • Carbohydrates: 23g
    • Fiber: 4g
    • Protein: 8g
    • Cholesterol: 25mg

    Sharing is caring!

  • Chicken Cheese Steak Sandwiches

    Chicken Cheese Steak Sandwiches


    Introduction to Chicken Cheese Steak Sandwiches

    There’s something undeniably comforting about a hearty sandwich, and that’s where Chicken Cheese Steak Sandwiches come in.
    Perfectly tender chicken, colorful veggies, and gooey cheese all nestled inside a soft roll create a flavor explosion.
    As a busy mom juggling countless tasks, this dish quickly became my go-to during hectic evenings.
    It’s fast to whip up yet impressive enough to make my family feel special.
    Just imagine the smiles you’ll get when serving these delightful sandwiches!
    Let’s dive into this culinary adventure together.

    Why You’ll Love This Chicken Cheese Steak Sandwiches

    You’ll adore these Chicken Cheese Steak Sandwiches for their incredible taste and speedy preparation.
    With just a handful of ingredients and minimal cooking time, they are perfect for those busy weeknights.
    Plus, the delightful combination of tender chicken, sautéed veggies, and melted cheese is a guaranteed crowd-pleaser.
    Whether you’re trying to impress guests or simply satisfy your family’s hunger, this recipe checks all the boxes!

    Ingredients for Chicken Cheese Steak Sandwiches

    Let’s gather all the goodies for our Chicken Cheese Steak Sandwiches! Each ingredient plays a role in creating that perfect bite. Here’s what you’ll need:

    • Chicken breast or thighs: Tender and juicy, thinly sliced for quick cooking.
    • Olive oil: This will help sauté the chicken and veggies, adding richness.
    • Onion: For a sweet, caramelized flavor that pairs beautifully with the chicken.
    • Bell pepper: Adds a pop of color and crunch; feel free to choose your favorite color.
    • Garlic: Fresh garlic brings aromatic depth; mincing it adds a lovely kick.
    • Seasonings (paprika, sea salt, black pepper, oregano, thyme): These create a flavor symphony, elevating your sandwich to another level.
    • Soy sauce (optional): Just a splash can add an umami punch to the filling.
    • Hoagie rolls or sub rolls: The base of our sandwich; fresh is best for toasting.
    • Cheese (provolone or American): Melty goodness on top; it’s the icing on the sandwich cake!
    • Optional toppings: Think sautéed mushrooms, pickled jalapeños, or extra grilled veggies for some added flair!

    Interested in precise measurements? You can find those at the bottom of this article, ready for you to print!

    How to Make Chicken Cheese Steak Sandwiches

    Step 1: Prepare the Chicken

    Start by slicing your chicken breast or thighs thinly; this ensures they cook quickly and evenly.
    Aim for strips about a quarter of an inch thick to keep it tender.
    In a large skillet, heat two tablespoons of olive oil over medium-high heat.
    The oil should shimmer but not smoke.
    You’re looking for that perfect sizzle when the chicken hits the pan—this helps lock in all the juicy flavors!

    Step 2: Cook the Chicken and Sauté Vegetables

    Once the oil is hot, add the sliced chicken in a single layer.
    Cook for 5 to 7 minutes, stirring frequently until the chicken is no longer pink.
    Next, toss in the sliced onion and bell pepper.
    Sauté these for about 5 minutes until they soften and meld with the chicken.
    Their sweetness adds such a nice depth to the Chicken Cheese Steak Sandwiches.
    Don’t be shy; keep stirring to blend all those flavors together!

    Step 3: Add Seasonings and Cheese

    Now’s the time to elevate your dish!
    Stir in the minced garlic, paprika, sea salt, black pepper, oregano, and thyme.
    This blend builds layers of flavor that dance on your palate.
    Allow it to cook for another 1 to 2 minutes until fragrant.
    If you crave a touch of soy sauce, drizzle a tablespoon in and mix well.
    When everything’s well combined, lay slices of your chosen cheese on top, ready for melting!

    Step 4: Toast and Assemble the Sandwiches

    While the filling is cooking, lightly toast your hoagie rolls in the oven or a toaster oven.
    Just until they’re lightly crisp helps them hold up against the filling.
    Grab each toasted roll and place a slice of cheese on the bottom half to create a delicious barrier.
    Spoon your chicken and veggie mixture generously on top.
    Don’t skimp—make them hearty and irresistible!
    The melted cheese should barely contain that vibrant explosion of flavors.

    Step 5: Broil to Perfection

    For the grand finale, place your assembled sandwiches under the broiler for about 1 to 2 minutes.
    This is where the magic happens!
    Keep a close eye on them as the cheese melts and bubbles, forming a glorious, gooey topping.
    You want that perfect golden-brown finish!
    Once they look irresistible, remove them from the broiler, and prepare for a flavor-packed feast that’ll make everyone swoon!

    Tips for Success

    • Slice the chicken thinly for even cooking and tenderness.
    • Don’t rush the sauté; let those veggies caramelize for extra flavor.
    • Experiment with your favorite cheeses for different flavor profiles.
    • Toast the rolls slightly more if you prefer a crunchier texture.
    • Customize the toppings based on what’s in your fridge for added creativity!

    Equipment Needed

    • Large skillet or sauté pan: A non-stick option makes cleanup a breeze.
    • Cutting board: Essential for safe slicing of chicken and veggies.
    • Sharp knife: Ensure precision when cutting, so the chicken cooks evenly.
    • Toaster oven or regular oven: For toasting rolls and broiling sandwiches.
    • Spatula: Perfect for stirring and flipping the ingredients comfortably.

    Variations of Chicken Cheese Steak Sandwiches

    • For a spicy twist, add sliced jalapeños to the chicken mixture or top the sandwich with pickled jalapeños.
    • Swap out traditional cheese for pepper jack or cheddar to introduce a different flavor profile.
    • Try using a whole grain or gluten-free roll to meet dietary needs.
    • For a lighter option, replace chicken with turkey or even tofu for a vegetarian alternative.
    • Add different vegetables like zucchini or spinach for extra nutrition and color.

    Serving Suggestions for Chicken Cheese Steak Sandwiches

    • Pair these sandwiches with crispy sweet potato fries for a delightful crunch.
    • A side salad with fresh greens and a tangy vinaigrette complements the hearty filling.
    • Try serving with a cold glass of iced tea or a refreshing lemonade.
    • For presentation, wrap sandwiches in parchment paper for a casual yet chic look.

    FAQs about Chicken Cheese Steak Sandwiches

    I get so many questions about these delicious Chicken Cheese Steak Sandwiches!
    Here are some common ones that might help you on your culinary journey.

    Can I use frozen chicken for this recipe?

    Absolutely! Just make sure to thaw it first.
    Cook it thoroughly to ensure even heating and incorporate those wonderful flavors.

    What kind of cheese works best for Chicken Cheese Steak Sandwiches?

    Provolone and American cheese are fan favorites, but feel free to explore other options.
    Mozzarella or even spicy pepper jack can elevate the taste and add a unique twist!

    Can I meal prep these sandwiches?

    Yes, you can prepare the chicken and vegetables ahead of time.
    Store them in an airtight container in the fridge for up to three days.
    Assemble them when you’re ready to enjoy a quick meal!

    How can I make these sandwiches gluten-free?

    Opt for gluten-free hoagie rolls or lettuce wraps as an alternative.
    The filling is naturally gluten-free, making it easy to swap out the bread!

    Can I use a slow cooker for this recipe?

    While I usually sauté for speed, you can use a slow cooker!
    Cook the chicken and veggies on low for about 4-6 hours, then assemble your sandwiches.
    Just remember to melt the cheese right before serving for that awesome gooey effect!

    Final Thoughts

    Every bite of these Chicken Cheese Steak Sandwiches brings a comforting warmth that feels like a hug.
    The joy of cooking this dish goes beyond just satisfying hunger; it’s about creating moments with loved ones.
    Whether it’s a casual dinner or a gathering with friends, I guarantee they’ll appreciate both the flavor and the love behind your creation.
    Plus, the ease of making these sandwiches fits beautifully into any hectic schedule.
    So, roll up your sleeves and dive into this delightful recipe.
    Trust me, your kitchen will soon be filled with happy chatter and satisfied smiles!


    Print

    clock clock iconcutlery cutlery iconflag flag iconfolder folder iconinstagram instagram iconpinterest pinterest iconfacebook facebook iconprint print iconsquares squares iconheart heart iconheart solid heart solid icon

    Description

    Delicious Chicken Cheese Steak Sandwiches filled with tender chicken and flavorful vegetables topped with melted cheese.


    • 450 g chicken breast or thighs, thinly sliced
    • 2 tablespoons olive oil
    • 1 medium onion, thinly sliced
    • 1 bell pepper, any color, thinly sliced
    • 2 cloves garlic, finely minced
    • 1 teaspoon paprika
    • 0.5 teaspoon sea salt
    • 0.5 teaspoon ground black pepper
    • 0.5 teaspoon dried oregano
    • 0.5 teaspoon dried thyme
    • 1 tablespoon soy sauce, optional
    • 4 hoagie rolls or sub rolls
    • 4 slices provolone cheese or American cheese
    • Optional: sautéed mushrooms, pickled jalapeños, or extra onions and bell peppers for topping

    1. Heat olive oil in a large skillet or sauté pan over medium-high heat. Add the sliced chicken and cook, stirring occasionally, until fully cooked and no longer pink, approximately 5–7 minutes.
    2. Add the sliced onion and bell pepper to the skillet with the chicken. Sauté for an additional 5 minutes until the vegetables are softened.
    3. Stir in the garlic, paprika, salt, black pepper, oregano, and thyme. Cook for 1–2 minutes until fragrant. If desired, add the soy sauce and incorporate thoroughly.
    4. While the filling cooks, lightly toast the hoagie rolls in an oven or toaster oven until just crisp.
    5. Lay a slice of provolone cheese on the bottom half of each toasted roll. Spoon the hot chicken and vegetable mixture on top of the cheese.
    6. Place the assembled sandwiches under a broiler or in a toaster oven for 1–2 minutes, until the cheese melts and becomes bubbly.
    7. Finish with preferred toppings such as sautéed mushrooms, pickled jalapeños, or extra vegetables as desired. Serve immediately.

    Notes

    • Feel free to customize with your favorite toppings.
    • For a spicier kick, add chopped jalapeños to the filling.
    • Make sure to slice the chicken thinly for even cooking.
    • Prep Time: 10 minutes
    • Cook Time: 15 minutes
    • Category: Main Course
    • Method: Sauté
    • Cuisine: American

    Nutrition

    • Serving Size: 1 sandwich
    • Calories: 450
    • Sugar: 2g
    • Sodium: 800mg
    • Fat: 20g
    • Saturated Fat: 8g
    • Unsaturated Fat: 10g
    • Trans Fat: 0g
    • Carbohydrates: 40g
    • Fiber: 2g
    • Protein: 30g
    • Cholesterol: 90mg

    Sharing is caring!

  • Crockpot Loaded Potatoes

    Crockpot Loaded Potatoes


    Introduction to Crockpot Loaded Potatoes

    Hey there, fellow food lovers! If you’re looking for a cozy dish that will wrap you in a warm embrace, then let me introduce you to my go-to recipe: Crockpot Loaded Potatoes. This hearty comfort food is perfect for busy days when you want something delicious waiting for you at dinner. The creamy texture and savory flavors make it a dish that not only fills your belly but also warms your soul. Picture this: a long day’s work followed by a simple, satisfying meal that the whole family loves. Sounds heavenly, right?

    Why You’ll Love This Crockpot Loaded Potatoes

    Let’s get real—time is precious, and we all want meals that come together easily. These Crockpot Loaded Potatoes check all the boxes! They’re incredibly easy to prepare, needing just a few minutes of your attention. Once set in the crockpot, they practically cook themselves, filling your home with a delightful aroma. Plus, the creamy, cheesy goodness is a crowd-pleaser. Trust me, your taste buds will thank you!

    Ingredients for Crockpot Loaded Potatoes

    Let’s dive into what you’ll need for these delectable Crockpot Loaded Potatoes. Gather these ingredients, and you’ll be on your way to creamy comfort in no time!

    • Russet Potatoes: The stars of this dish! They’re hearty and absorb all those lovely flavors. Cubing them helps them cook evenly.
    • Chicken Broth: A flavorful base that adds richness. You can use low-sodium if you’re watching your salt intake!
    • Butter: Softened butter adds creaminess and that essential, mouth-watering taste. It’s like a warm hug for your potatoes.
    • Sour Cream: This ingredient adds a tangy kick and enhances the creaminess. Greek yogurt is a great substitute if you prefer.
    • Cream Cheese: It makes everything even creamier! Just let it soften a bit before mixing it in for the best texture.
    • Garlic: Freshly minced, because who doesn’t love the aromatic flavor of garlic? It’s the secret ingredient that elevates this dish.
    • Shredded Cheddar Cheese: The crowning glory! It melts beautifully and adds that classic baked potato experience.
    • Turkey Bacon: Cooked, crispy, and crumbled over the top for that delightful crunch. Feel free to swap in regular bacon if you prefer.

    For those who crave a little extra flavor, consider tossing in chopped green onions. They sprinkle on top just before serving for a burst of freshness.

    Looking for exact quantities? Don’t worry! You can find a detailed list of measurements at the bottom of the article, perfect for printing.

    How to Make Crockpot Loaded Potatoes

    Now comes the fun part—making the Crockpot Loaded Potatoes! Follow these simple steps, and you’ll have a creamy side dish that everyone will rave about.

    Step 1: Prepare the Crockpot

    Let’s start by greasing the crockpot. Lightly coat the inside with some cooking spray or a bit of oil. This simple step ensures that the potatoes won’t stick. No one likes the sad sight of mashed-up potatoes at the end of the day!

    Step 2: Add the Potatoes

    Next, wash and cube those russet potatoes into bite-sized pieces. This is essential because even cooking means tender potatoes in every bite. Layer the cubed potatoes at the bottom of your greased crockpot. They’ll soak up all the delicious flavors that follow!

    Step 3: Make the Creamy Mixture

    In a mixing bowl, whisk together the chicken broth, softened butter, sour cream, cream cheese, and minced garlic. The aim is to create a smooth, creamy mixture that coats the potatoes perfectly. Don’t rush it—getting this right is key to achieving that rich flavor you’ll crave.

    Step 4: Combine Everything

    Now, pour that dreamy creamy mixture directly over the potatoes. Make sure they’re well-coated! Season with salt and pepper to taste; these classic flavors really boost the dish. Stir gently if you need to; just ensure everything is nestled together.

    Step 5: Cooking Time

    It’s time to let the magic happen! Cover your crockpot and cook on low for about 5-6 hours, or on high for 2.5-3 hours. Trust me; your kitchen will smell incredible! As cooking time approaches, grab a fork and check the potatoes for tenderness; you want them fork-tender, not mushy.

    Step 6: Final Touches

    Just before serving, sprinkle that glorious crumbled turkey bacon over the top. This adds a delightful crunch and salty flavor. If you’re feeling adventurous, toss in some chopped green onions for a pop of color and freshness. Now, you’re ready to dish up your Crockpot Loaded Potatoes!

    Tips for Success

    • Use a vegetable peeler for faster potato prep; it’s a game changer!
    • Don’t overfill your crockpot; leave some room for steam to circulate.
    • For a creamier texture, let all dairy ingredients come to room temperature before mixing.
    • Feel free to experiment with different cheeses—pepper jack adds a nice kick!
    • Leftovers? They reheat beautifully in the microwave; just add a splash of chicken broth.

    Equipment Needed

    • Crockpot: This is the star! Any size will do, just ensure it’s deep enough.
    • Mixing Bowl: A medium-sized bowl works perfectly for whisking your creamy mixture.
    • Cooking Spray: Can be swapped for olive oil or butter for greasing the crockpot.
    • Knife and Cutting Board: Essential for cubing those russet potatoes efficiently.
    • Measuring Cups: Handy for accurate ingredient portions, though eyeballing can work too!

    Variations on Crockpot Loaded Potatoes

    • Cheesy Ranch Delight: Add a packet of ranch dressing mix to the creamy mixture for extra zing!
    • Loaded Veggie Version: Toss in some steamed broccoli or spinach—great for sneaking in those greens!
    • Spicy Kick: Mix in diced jalapeños or a sprinkle of cayenne pepper for those who love a bit of heat.
    • Sweet Potato Swaps: Replace russet potatoes with sweet potatoes for a delicious twist that’s also packed with nutrients.
    • Gluten-Free Options: Rest assured, this recipe is naturally gluten-free, so you can enjoy it without worry!

    Serving Suggestions for Crockpot Loaded Potatoes

    • Perfect Pair: Serve alongside grilled chicken or steak for a hearty meal.
    • Fresh Salad: A crisp garden salad balances the richness of the potatoes nicely.
    • Presentation: Garnish with crispy green onions or extra cheese for eye-catching appeal.
    • Drinks: Pair with a chilled white wine or sparkling water for a refreshing touch.
    • Sharing is Caring: Serve family-style in a large bowl for friendly gatherings!

    FAQs about Crockpot Loaded Potatoes

    Got questions about these divine Crockpot Loaded Potatoes? Don’t worry, I’ve got you covered! Here are some common queries and tasty tips to keep in mind.

    Can I use different types of potatoes? Absolutely! While russet potatoes are a classic choice, you can experiment with Yukon gold or even baby potatoes for unique flavors and textures.

    Can I make this dish ahead of time? Yes, you can prep the potatoes and creamy mixture a day in advance. Just store them separately in the fridge. Then, when you’re ready, assemble and cook as directed!

    Can I freeze leftovers? Yes, these creamy potatoes freeze beautifully! Just let them cool completely, then store in an airtight container. Reheat gently in the microwave or on the stove with a splash of chicken broth.

    What can I use instead of turkey bacon? If you’re not a fan of turkey bacon, regular bacon works perfectly. Or try pancetta for a rich, savory flavor!

    How do I know when the potatoes are done? You’ll know they’re ready when they’re fork-tender. Just insert a fork; if it goes through easily, you’re good to go!

    Final Thoughts

    There’s something truly special about gathering around a table filled with comforting food like Crockpot Loaded Potatoes. The joy they bring is not just in each creamy bite, but in the shared moments they create with family and friends. Imagine the smiles as everyone digs into this hearty side dish, laughter filling the air. Whether it’s a busy weekday or a festive gathering, this recipe is a warm hug for your taste buds and a simple solution for any hungry crowd. Dive into this dish, and let the love and flavor flow—your family will thank you for it!


    Print

    clock clock iconcutlery cutlery iconflag flag iconfolder folder iconinstagram instagram iconpinterest pinterest iconfacebook facebook iconprint print iconsquares squares iconheart heart iconheart solid heart solid icon

    Description

    Crockpot Loaded Potatoes are an easy and creamy comfort food, perfect for a hearty side dish.


    • 4 russet potatoes (cubed)
    • 1/2 cup chicken broth
    • 1/4 cup butter (softened)
    • 1/2 cup sour cream
    • 1/2 cup cream cheese (softened)
    • 2 cloves garlic (minced)
    • 1 cup shredded cheddar cheese
    • 4 slices turkey bacon (cooked crisp and crumbled)

    1. Grease the crockpot and add cubed potatoes at the bottom.
    2. In a bowl, whisk together chicken broth, softened butter, sour cream, cream cheese, and minced garlic until smooth. Pour over the potatoes.
    3. Season with salt and pepper to taste.
    4. Sprinkle shredded cheddar cheese on top.
    5. Cover and cook on low for 5-6 hours or high for 2.5-3 hours until tender.
    6. Just before serving, add crumbled turkey bacon on top.

    Notes

    • Cooking times may vary based on the size of the potato cubes.
    • You can substitute regular bacon if preferred.
    • Add chopped green onions for extra flavor if desired.
    • Prep Time: 15 minutes
    • Cook Time: 5-6 hours on low or 2.5-3 hours on high
    • Category: Side Dish
    • Method: Crockpot
    • Cuisine: American

    Nutrition

    • Serving Size: 1 cup
    • Calories: 350
    • Sugar: 2g
    • Sodium: 800mg
    • Fat: 20g
    • Saturated Fat: 10g
    • Unsaturated Fat: 7g
    • Trans Fat: 0g
    • Carbohydrates: 35g
    • Fiber: 4g
    • Protein: 10g
    • Cholesterol: 50mg

    Sharing is caring!