Category: Uncategorized

  • Healthy Greek Ground Turkey Rice Bowl

    Healthy Greek Ground Turkey Rice Bowl


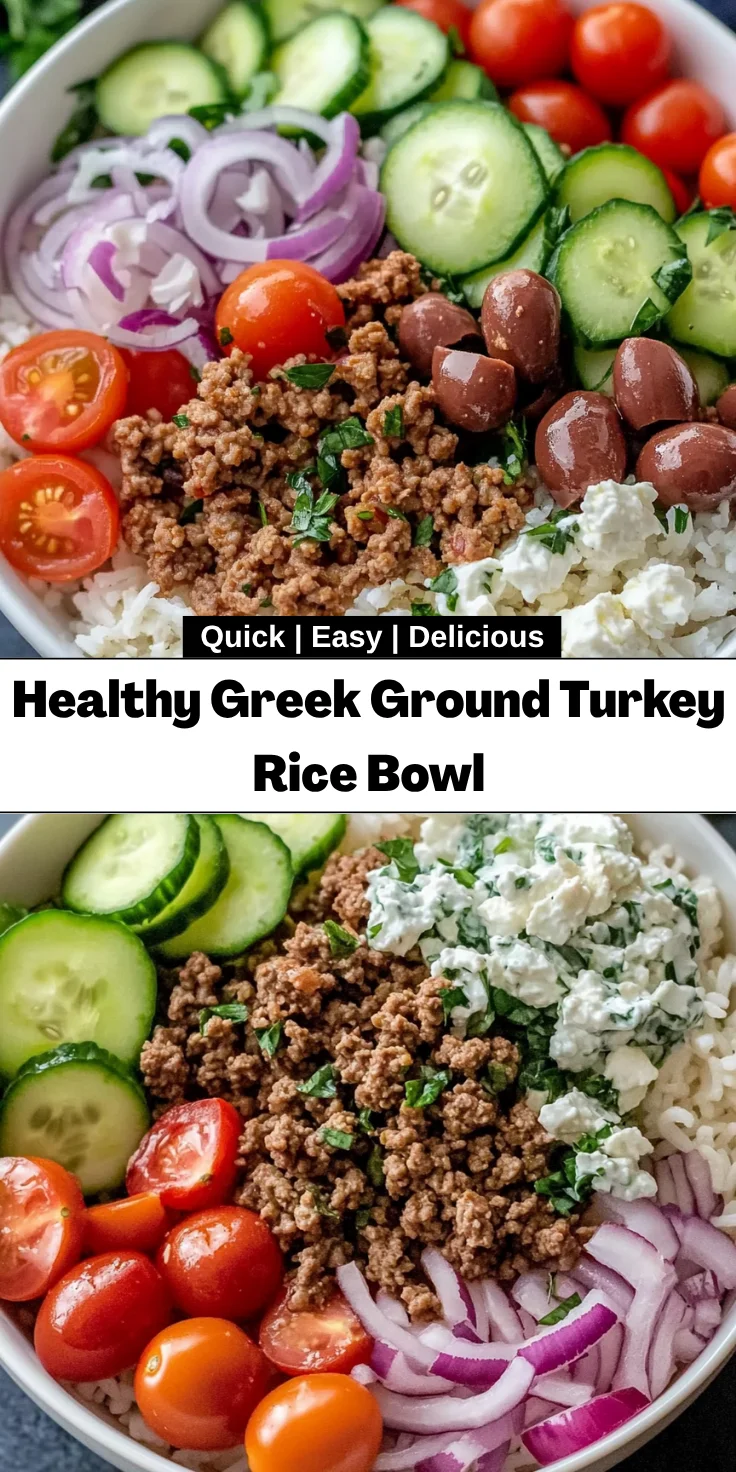
    Introduction to Healthy Greek Ground Turkey Rice Bowl

    Are you ever in need of a quick yet delicious meal? I know I am! That’s why I love my Healthy Greek Ground Turkey Rice Bowl. It’s the perfect solution for busy days when you crave something tasty and nutritious. Packed with seasoned ground turkey, fluffy rice, and vibrant toppings, this dish is a delightful fusion of flavors. Whether you’re feeding a family or just treating yourself, this bowl offers comfort without the guilt. Let’s dive into this culinary adventure that’s sure to impress your loved ones while keeping your kitchen running smoothly!

    Why You’ll Love This Healthy Greek Ground Turkey Rice Bowl

    This Healthy Greek Ground Turkey Rice Bowl checks all the boxes for a busy mom or professional. It’s quick to whip up—ready in just 30 minutes! Plus, the flavors are bright and satisfying, making dinner feel like a treat. The best part? You can customize it with your favorite veggies, ensuring picky eaters will still enjoy every bite. Trust me, this dish is one that will quickly become a weeknight staple!

    Ingredients for Healthy Greek Ground Turkey Rice Bowl

    Gathering the right ingredients is just part of the fun when making this Healthy Greek Ground Turkey Rice Bowl! Here’s what you’ll need:

    • Olive Oil: This is essential for sautéing and brings a wonderfully rich flavor.
    • Lean Ground Turkey: A healthier protein option that keeps the dish light yet filling. You can use 93% or 99% lean.
    • Garlic Cloves: Fresh garlic adds a punch of flavor—don’t skimp on this!
    • Onion: A small diced onion makes everything taste sweeter and more aromatic.
    • Dried Oregano: This herb is a classic in Greek cuisine, lending that familiar Mediterranean aroma.
    • Ground Cumin: Offers a warm, earthy flavor that complements the turkey beautifully.
    • Paprika: A sprinkle of this spice adds a lovely depth and a hint of color.
    • Salt and Black Pepper: Essential for seasoning, bringing out all the other flavors in the dish.
    • Fresh Lemon Juice: The acidity brightens the flavors and adds a refreshing zing.
    • Cooked Rice: You can use white or brown rice, or even cauliflower rice for a low-carb option.
    • Chopped Parsley: Fresh parsley not only adds color but also a hint of freshness.
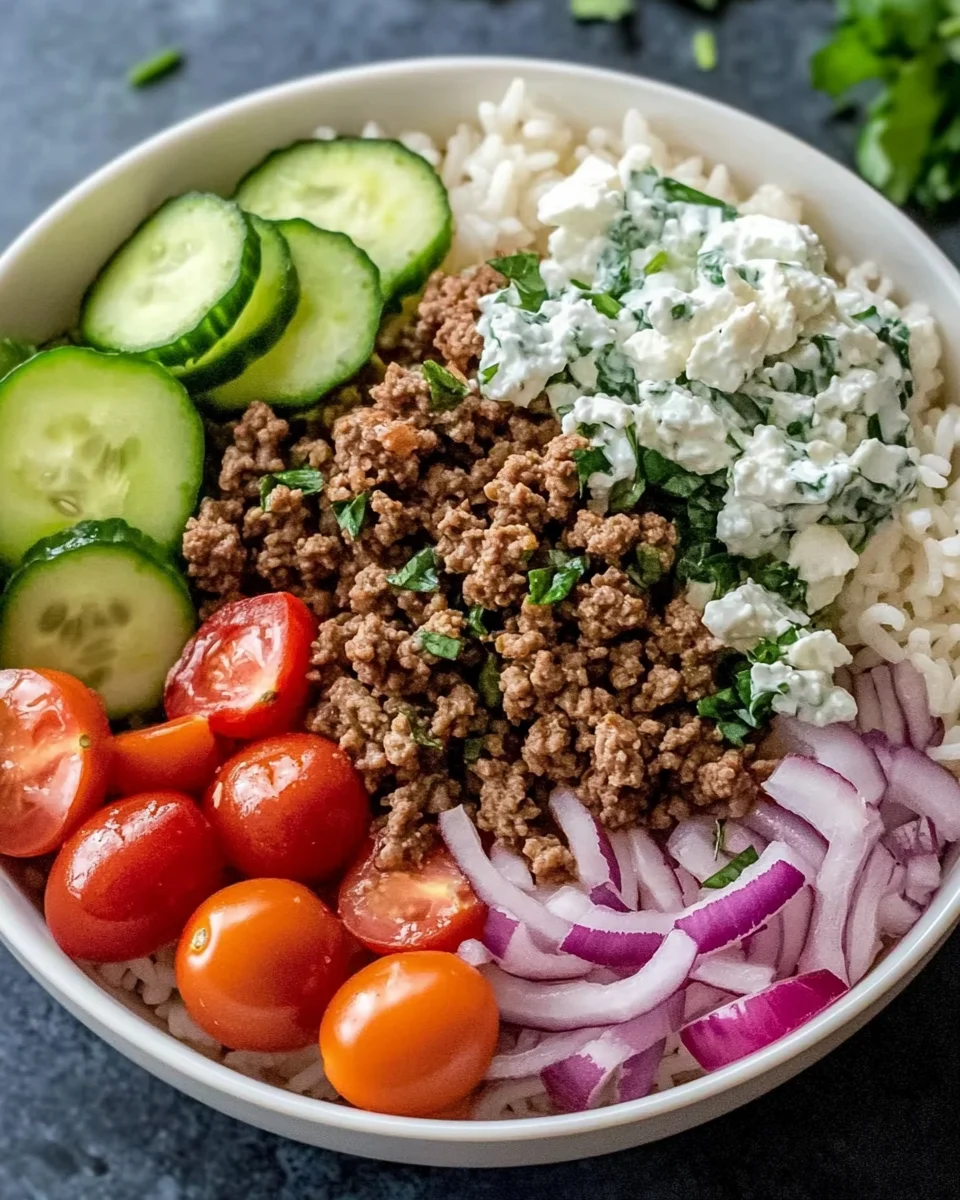
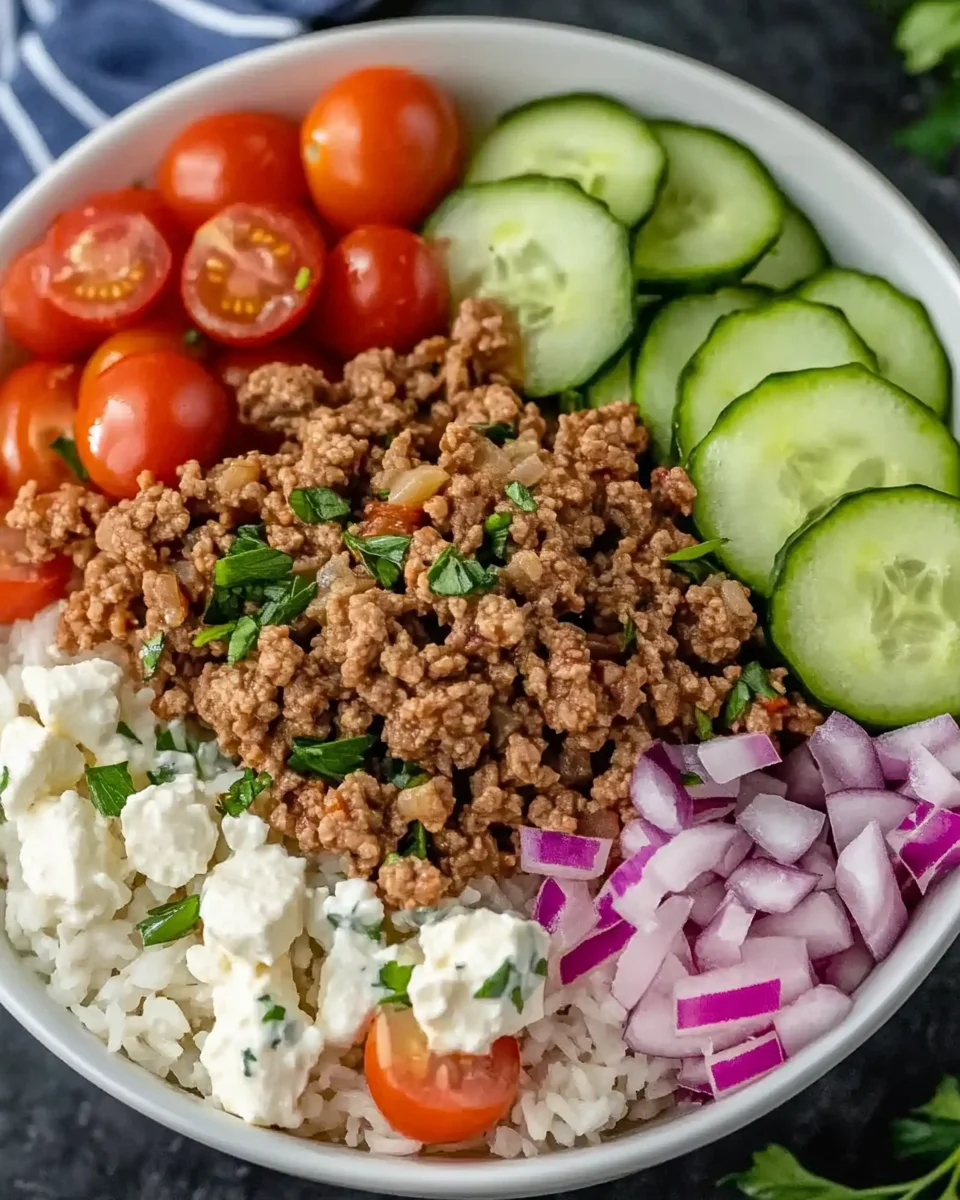
    • Cucumber: Diced cucumber adds a crunchy contrast and hydration.
    • Cherry Tomatoes: These sweet little gems provide a burst of juiciness.
    • Kalamata Olives: Sliced olives bring that classic Mediterranean brininess.
    • Red Onion: Thinly sliced for a hint of sharpness and color.
    • Feta Cheese: Crumbled on top, this tangy cheese is a must for authentic flavor.
    • Tzatziki Sauce: For the finishing touch, this creamy sauce adds a delightful zest.

    Feel free to customize your bowl with additional veggies or toppings based on what you have on hand. All exact quantities are listed at the bottom of the article and are available for printing, so you can easily refer to them while cooking!

    How to Make Healthy Greek Ground Turkey Rice Bowl

    Ready to get cooking? Let’s turn those fresh ingredients into a mouthwatering Healthy Greek Ground Turkey Rice Bowl! Follow these simple steps that will guide you right to flavor town.

    Step 1: Heat the Olive Oil

    Start by heating a tablespoon of olive oil in a large skillet over medium heat. This step is crucial because it creates the perfect base for your flavors to develop. The oil needs to shimmer before you add the garlic and onions, ensuring they sauté rather than just steam.

    Step 2: Sauté Garlic and Onion

    Add the minced garlic and diced onion to the hot oil. Sauté them for about two minutes, stirring continuously. You want to achieve that delightful golden-brown color! This process releases the aromatic properties of the garlic and onion, making your kitchen smell incredible. Trust me, it’s worth the wait!

    Step 3: Cook the Ground Turkey

    Next, add your lean ground turkey into the skillet. Using a wooden spoon, break apart the turkey as it cooks. Keep stirring, cooking it for about 6-8 minutes until it’s fully browned and no longer pink. This step ensures the turkey is well-cooked and ready to soak up those delicious seasonings!

    Step 4: Add Spices and Lemon Juice

    Now it’s time to build flavor! Sprinkle in the dried oregano, ground cumin, paprika, salt, and black pepper. Mix everything together, then add the fresh lemon juice to brighten it up. Stir and cook for another minute. Those spices will elevate the dish, giving it that authentic Greek flair!

    Step 5: Prepare Rice

    If your rice isn’t ready yet, now’s the time to cook it according to the package instructions. Once done, fluff it up with a fork for that light texture. For an extra flavor boost, mix in a drizzle of olive oil and the chopped parsley. It adds freshness you won’t want to skip!

    Step 6: Assemble the Rice Bowl

    Time to assemble your delicious bowls! Start by dividing the cooked rice among your serving bowls. Then, top each bowl with a generous portion of seasoned ground turkey. Finally, add your fresh toppings: diced cucumbers, halved cherry tomatoes, sliced olives, and red onion. Sprinkle crumbled feta on top, and finish it off with a drizzle of tzatziki sauce for a creamy, tangy touch!

    Tips for Success

    • Choose high-quality lean ground turkey for the best flavor.
    • Don’t rush the sautéing process; let garlic and onions develop their sweetness.
    • Feel free to swap veggies based on what’s in your fridge.
    • Prepare the rice ahead of time for a quicker meal.
    • Adjust spices to your taste; don’t be shy to experiment!

    Equipment Needed

    • Large skillet: Any frying pan will work if you don’t have a skillet.
    • Wooden spoon: A spatula can also help you break apart the turkey easily.
    • Fork: Use it to fluff the rice once it’s cooked.
    • Measuring spoons: Helpful for precise ingredients, but eyeballing works too!

    Variations of Healthy Greek Ground Turkey Rice Bowl

    • To make it vegetarian, substitute ground turkey with crumbled tempeh or lentils. Both options are hearty and protein-rich.
    • Add roasted vegetables like bell peppers or zucchini for a delightful sweetness and texture.
    • For a spicier kick, toss in some red pepper flakes or serve with hot sauce on the side.
    • For a low-carb option, switch to cauliflower rice or spiralized zucchini instead of traditional rice.
    • Try using different grains like quinoa or farro for varied texture and nutrition.
    • Add avocado slices for a creamy richness that pairs beautifully with the tzatziki sauce.

    Serving Suggestions

    • Pair your bowl with a light side salad for extra crunch and freshness.
    • A glass of crisp white wine complements the flavors beautifully.
    • For presentation, serve the bowl with vibrant garnishes and a wedge of lemon.
    • Fresh pita bread makes a great side, perfect for scooping.

    FAQs about Healthy Greek Ground Turkey Rice Bowl

    As with any beloved recipe, questions come up! Here are some common queries I receive about the Healthy Greek Ground Turkey Rice Bowl.

    Can I prepare this Healthy Greek Ground Turkey Rice Bowl ahead of time?
    Absolutely! You can cook the ground turkey and rice in advance and store them separately in the fridge. When you’re ready to eat, just warm them up and assemble your bowl with fresh toppings.

    Is this recipe suitable for meal prep?
    Definitely! This Healthy Greek Ground Turkey Rice Bowl is perfect for meal prep. Portion out servings into containers, and you have nutritious lunches or dinners ready for the week!

    Can I make a vegetarian version of this recipe?
    Yes! To make it vegetarian, simply replace the ground turkey with crumbled tempeh, lentils, or even chickpeas. They provide a great source of protein and bulk.

    How can I adjust the spice level of this dish?
    If you prefer a little heat, add red pepper flakes or diced jalapeños while cooking. You can also serve it with a spicy tzatziki sauce to kick things up a notch!

    What can I substitute for tzatziki sauce?
    If tzatziki isn’t your thing, you can use a dollop of plain Greek yogurt mixed with lemon juice and a pinch of salt. Or, try a simple dressing of olive oil and balsamic vinegar for a different flavor!

    Final Thoughts

    Cooking the Healthy Greek Ground Turkey Rice Bowl brings so much joy and satisfaction to my busy days. The delightful blend of flavors, brightened with fresh toppings, makes every bite a mini-celebration. Not only is it quick to prepare, but it also offers a healthy twist that fills you up without leaving you feeling heavy. Plus, I adore how adaptable this dish is—it caters to my family’s tastes and makes each dinner feel special. So gather your ingredients, and let’s create a wholesome dish that will put smiles on everyone’s faces!


    Print

    clock clock iconcutlery cutlery iconflag flag iconfolder folder iconinstagram instagram iconpinterest pinterest iconfacebook facebook iconprint print iconsquares squares iconheart heart iconheart solid heart solid icon

    Description

    Are you ever in need of a quick yet delicious meal? I know I am! That’s why I love my Healthy Greek Ground Turkey Rice Bowl. It’s the perfect solution for busy days when you crave something tasty and nutritious. Packed with seasoned ground turkey, fluffy rice, and vibrant toppings, this dish is a delightful fusion of flavors. Whether you’re feeding a family or just treating yourself, this bowl offers comfort without the guilt. Let’s dive into this culinary adventure that’s sure to impress your loved ones while keeping your kitchen running smoothly!


    • 1 tablespoon olive oil
    • 1 pound lean ground turkey 93% or 99%
    • 3 garlic cloves minced
    • 1 small onion diced
    • 1 teaspoon dried oregano
    • 1 teaspoon ground cumin
    • ½ teaspoon paprika
    • ½ teaspoon salt
    • ¼ teaspoon black pepper
    • 1 tablespoon fresh lemon juice
    • 2 cups cooked white or brown rice or cauliflower rice
    • 1 tablespoon olive oil
    • 2 tablespoons fresh parsley chopped
    • ½ cup cucumber diced
    • ½ cup cherry tomatoes halved
    • ¼ cup Kalamata olives sliced
    • ¼ cup red onion thinly sliced
    • ¼ cup feta cheese crumbled
    • ¼ cup tzatziki sauce

    1. Heat olive oil in a large skillet over medium heat.
    2. Add minced garlic and diced onion, sautéing for about 2 minutes until fragrant.
    3. Add the ground turkey and cook, breaking it apart with a spoon, until browned and fully cooked (about 6-8 minutes).
    4. Stir in the dried oregano, cumin, paprika, salt, and black pepper.
    5. Add fresh lemon juice and cook for another minute to blend the flavors.
    6. Remove from heat and set aside.
    7. Cook the rice according to package instructions if not already prepared.
    8. Fluff the rice with a fork and mix in olive oil and chopped parsley for added flavor.
    9. Divide the cooked rice into serving bowls.
    10. Top each bowl with a portion of the seasoned ground turkey.
    11. Add fresh toppings: cucumbers, cherry tomatoes, Kalamata olives, and red onion.
    12. Sprinkle with crumbled feta cheese.
    13. Drizzle with tzatziki sauce for a creamy, tangy finish.

    Notes

    • This recipe can be easily customized with your favorite vegetables.
    • You can use cauliflower rice for a low-carb option.
    • Make sure to adjust seasoning based on personal preference.
    • Prep Time: 10 minutes
    • Cook Time: 20 minutes
    • Category: Main Dish
    • Method: Skillet Cooking
    • Cuisine: Greek

    Nutrition

    • Serving Size: 1 bowl
    • Calories: 500
    • Sugar: 3g
    • Sodium: 700mg
    • Fat: 20g
    • Saturated Fat: 6g
    • Unsaturated Fat: 12g
    • Trans Fat: 0g
    • Carbohydrates: 50g
    • Fiber: 5g
    • Protein: 35g
    • Cholesterol: 80mg

    Sharing is caring!

  • Ground turkey with potatoes

    Ground turkey with potatoes


    Introduction to Ground Turkey with Potatoes

    As a busy mom, I know the struggle of getting dinner on the table amidst a flurry of daily chaos. That’s where my go-to recipe for ground turkey with potatoes shines! It’s a delightful one-pan meal that’s not only easy to whip up, but it’s also packed with flavor. Imagine tender potatoes mingling with seasoned turkey and aromatic herbs. This dish becomes a quick solution for those hectic days when you want to whip up something nourishing and delicious for your loved ones. Trust me, it’s a meal everyone will appreciate!

    Why You’ll Love This Ground Turkey with Potatoes

    This ground turkey with potatoes recipe is a true lifesaver for anyone juggling a busy schedule. It comes together in just one pan, making clean-up a breeze. With minimal prep time and deliciously satisfying flavors, you can have dinner ready in under an hour! Plus, the comforting combination of hearty potatoes and lean turkey ensures everyone at your table will leave happy and well-fed, making it a family favorite.

    Ingredients for Ground Turkey with Potatoes

    Gathering the right ingredients is half the battle in the kitchen. For this ground turkey with potatoes recipe, you’ll need a mix of fresh produce and pantry staples that will blend beautifully. Here’s what you’ll be using:

    • Ground turkey: A lean protein that cooks quickly and absorbs flavors beautifully, keeping your dish healthy.
    • Potatoes: They’re the hearty stars of this dish, providing texture and comfort. I love using regular potatoes, but feel free to swap in sweet potatoes for a nutritious twist.
    • Olive oil: A staple in my kitchen, it adds richness and helps achieve that lovely golden color on the potatoes.
    • Onion: A versatile aromatic that builds the base of flavor. Yellow or white onions work best for this recipe.
    • Garlic: It brings a fragrant kick that elevates your dish to another level of deliciousness.
    • Dried thyme: This herb adds earthy notes and has a depth that pairs perfectly with turkey and potatoes.
    • Paprika: A sprinkle of this spice not only adds color but also a gentle warmth to the dish.
    • Salt and black pepper: Essentials for seasoning, helping to enhance all the flavors in your meal.
    • Chicken broth: It infuses moisture and depth of flavor, making every bite irresistible.
    • Fresh parsley: A vibrant finishing touch that brightens up the dish with its color and fresh taste.

    And for those of you curious about optional add-ins, consider crushed red pepper flakes for a bit of heat or even adding some seasonal veggies if you have them on hand. If you’re wondering about the specific measurements for these ingredients, don’t worry! You can find precise quantities at the bottom of this article—they’ll be available for easy printing!

    How to Make Ground Turkey with Potatoes

    Step 1: Prepare Ingredients

    Start by gathering all your ingredients. Peel the potatoes and cut them into small cubes, about half an inch in size. This size helps them cook evenly. Next, chop the onion finely. Don’t forget to peel and mince the garlic cloves—they add such a delicious essence to the dish. Having everything ready simplifies your cooking process, allowing you to focus on creating amazing flavors!

    Step 2: Cook the Potatoes

    Heat a large skillet over medium heat and drizzle in a tablespoon of olive oil. Once the oil shimmers, toss in the diced potatoes. Sauté them for about 8 to 10 minutes. Stir occasionally until they turn golden brown and start softening. Keep an eye on them; you can poke a cube with a fork to test for tenderness. Once done, take them out and set them aside.

    Step 3: Sauté the Aromatics

    In the same skillet, it’s time to build flavor! Add the chopped onion and minced garlic to the hot pan. Sauté for around 3 to 4 minutes or until the onion becomes clear and fragrant. This step is essential; it develops the aromatic foundation of your ground turkey with potatoes dish. Don’t rush—let those aromas mingle together!

    Step 4: Brown the Ground Turkey

    Now, let’s add the star of the show—ground turkey. Sprinkle it into the skillet with the sautéed onion and garlic. Break it into smaller pieces as it cooks, stirring frequently for 6 to 8 minutes. Keep cooking until all the turkey is nice and brown, with no pink bits remaining. This step ensures every bite bursts with flavor!

    Step 5: Combine and Season

    It’s time to bring the potatoes back into the pan! Toss them in with the turkey mixture. Now, sprinkle in the dried thyme, paprika, salt, and black pepper for that perfect seasoning. Stir everything together until well mixed. It should smell absolutely delightful as all those flavors combine into one delicious medley.

    Step 6: Simmer and Serve

    Next, pour in the chicken broth, stirring to combine. Reduce the heat to low and cover the skillet. Let the mixture simmer for about 5 minutes. This allows the flavors to meld together beautifully, enhancing the overall taste. Just before serving, stir in the fresh parsley. It adds a fantastic pop of color and freshness. Now, your ground turkey with potatoes is ready to be enjoyed!

    Tips for Success

    • Always chop your ingredients uniformly for even cooking.
    • Don’t rush the sautéing process; let the flavors develop!
    • Season your turkey well; it makes a huge difference in flavor.
    • Feel free to add vegetables like bell peppers or carrots for extra nutrition.
    • Create a double batch and store leftovers for a quick lunch!

    Equipment Needed

    • Large skillet: Essential for this one-pan meal. A non-stick pan works wonders!
    • Sharp knife: For dicing potatoes and chopping veggies quickly.
    • Cutting board: Keep your workspace neat and safe while prepping ingredients.
    • Wooden spoon or spatula: Perfect for stirring and breaking up the turkey.

    Variations of Ground Turkey with Potatoes

    • Spicy Kick: Add crushed red pepper flakes or diced jalapeños for a heat that zings!
    • Veggie Boost: Toss in seasonal vegetables like bell peppers, zucchini, or spinach for a colorful, nutritious twist.
    • Herb Infusion: Experiment with fresh herbs like rosemary or oregano in place of dried thyme for a different flavor profile.
    • Savory Cheese: Sprinkle some grated cheese on top before serving to create a gooey, indulgent layer.
    • Low-Carb Option: Substitute potatoes with cauliflower for a lighter, keto-friendly version of this dish.

    Serving Suggestions for Ground Turkey with Potatoes

    • Pair the dish with a crisp green salad dressed with lemon vinaigrette for a refreshing contrast.
    • Serve alongside warm, crusty bread to soak up the delicious broth.
    • A chilled glass of sparkling water infused with lemon complements the meal perfectly.
    • For a colorful presentation, garnish with extra parsley or a sprinkle of paprika.

    FAQs about Ground Turkey with Potatoes

    Can I use ground turkey breast instead of regular ground turkey?

    Absolutely! Using ground turkey breast will give you a leaner dish. Just keep in mind that it can be less moist, so ensure you cook it with enough broth to retain that delicious juiciness.

    Can I make this ground turkey with potatoes in advance?

    Yes, this recipe is excellent for meal prep! You can cook it ahead of time, store it in the refrigerator for up to three days, and simply reheat it when you’re ready to eat.

    What other vegetables can I add to this dish?

    The beauty of this one-pan meal is its versatility! Consider adding bell peppers, carrots, or even green beans. You can sneak in some more veggies without losing that lovely flavor.

    Is this ground turkey with potatoes suitable for freezing?

    Definitely! Just let the dish cool completely before transferring it to a freezer-safe container. It will keep well for about three months. When it’s time to eat, thaw in the fridge overnight and reheat until heated through.

    Final Thoughts on Ground Turkey with Potatoes

    Cooking ground turkey with potatoes has become a cherished ritual in my home. It not only nourishes our bodies but also nurtures our souls. The unison of savory turkey and hearty potatoes creates a dish that feels like a warm hug after a long day. I hope this recipe brings you as much joy as it does to my family. It’s effortless and perfectly aligns with the busy lives we lead. So, roll up your sleeves, embrace the warmth of your kitchen, and enjoy this delightful dish—trust me, your loved ones will thank you!


    Print

    clock clock iconcutlery cutlery iconflag flag iconfolder folder iconinstagram instagram iconpinterest pinterest iconfacebook facebook iconprint print iconsquares squares iconheart heart iconheart solid heart solid icon

    Description

    As a busy mom, I know the struggle of getting dinner on the table amidst a flurry of daily chaos. That’s where my go-to recipe for ground turkey with potatoes shines! It’s a delightful one-pan meal that’s not only easy to whip up, but it’s also packed with flavor. Imagine tender potatoes mingling with seasoned turkey and aromatic herbs. This dish becomes a quick solution for those hectic days when you want to whip up something nourishing and delicious for your loved ones. Trust me, it’s a meal everyone will appreciate!


    • 1 pound ground turkey
    • 4 medium potatoes
    • 1 tablespoon olive oil
    • 1 medium onion
    • 2 cloves garlic
    • 1 teaspoon dried thyme
    • 1 teaspoon paprika
    • 1/2 teaspoon salt
    • 1/4 teaspoon black pepper
    • 1/2 cup chicken broth
    • 1/4 cup chopped fresh parsley

    1. Heat a large skillet over medium heat.
    2. Peel and dice the potatoes into small cubes, about 1/2 inch in size.
    3. Add the olive oil to the skillet and swirl to coat the bottom.
    4. Once the oil is hot, add the diced potatoes to the skillet.
    5. Cook the potatoes for about 8-10 minutes, stirring occasionally, until they begin to soften and turn golden brown.
    6. While the potatoes cook, peel and finely chop the onion.
    7. Peel and mince the garlic cloves.
    8. Once the potatoes are done, remove them from the skillet and set them aside.
    9. In the same skillet, add the chopped onion and garlic.
    10. Cook the onion and garlic for about 3-4 minutes, stirring occasionally, until the onion becomes translucent.
    11. Add the ground turkey to the skillet with the onion and garlic.
    12. Break up the turkey into smaller pieces as it cooks, stirring frequently for about 6-8 minutes, until the turkey is fully cooked and no longer pink.
    13. Add the dried thyme, paprika, salt, and black pepper to the skillet with the turkey.
    14. Stir the seasonings into the turkey mixture, ensuring an even distribution of flavor.
    15. Return the cooked potatoes to the skillet with the turkey and onions.
    16. Pour the chicken broth into the skillet and stir to combine.
    17. Reduce the heat to low and cover the skillet.
    18. Let the mixture simmer for about 5 minutes, allowing the flavors to meld together.
    19. Remove the skillet from the heat and stir in the chopped fresh parsley.
    20. Serve the ground turkey and potatoes hot, garnished with extra parsley if desired.

    Notes

    • For a spicier kick, consider adding crushed red pepper flakes.
    • You can substitute sweet potatoes for a healthier option.
    • This dish is excellent for meal prep and can be stored in the refrigerator for up to 3 days.
    • Prep Time: 15 minutes
    • Cook Time: 30 minutes
    • Category: Main Course
    • Method: Skillet
    • Cuisine: American

    Nutrition

    • Serving Size: 1 serving
    • Calories: 350
    • Sugar: 2g
    • Sodium: 400mg
    • Fat: 15g
    • Saturated Fat: 3g
    • Unsaturated Fat: 10g
    • Trans Fat: 0g
    • Carbohydrates: 35g
    • Fiber: 4g
    • Protein: 25g
    • Cholesterol: 70mg

    Sharing is caring!

  • Brown Sugar Pineapple Ham Bake

    Brown Sugar Pineapple Ham Bake


    Introduction to Brown Sugar Pineapple Ham Bake

    Hey there, fellow food lovers! If you’re searching for a dish that combines sweet and savory flavors while being easy to whip up on a busy weeknight, my Brown Sugar Pineapple Ham Bake is just what you need. This recipe is a delightful twist on traditional ham that’s sure to impress your loved ones, all without breaking a sweat in the kitchen. Imagine the comforting aroma wafting through your home as this dish bakes, inviting everyone to gather around the table. It’s not just a meal; it’s a reason to slow down and savor togetherness.

    Why You’ll Love This Brown Sugar Pineapple Ham Bake

    One of the best things about my Brown Sugar Pineapple Ham Bake is how simple it is to make, even on your busiest days. You can have a comforting, gourmet-style dish ready in just 45 minutes! The sweet tang of pineapple combined with rich ham creates an explosion of flavors that everyone at the table will adore. Plus, it’s versatile enough to pair with your favorite sides, making it perfect for any occasion!

    Ingredients for Brown Sugar Pineapple Ham Bake

    Let’s gather what we need to bring this scrumptious dish to life! Here’s a rundown of the ingredients you’ll require:

    • Cooked ham: Choose your favorite kind, either diced or cubed. It’s the star of the show!
    • Pineapple chunks: Canned works perfectly! Just be sure to drain them to avoid excess moisture.
    • Brown sugar: This adds sweetness and caramelization. Adjust the amount to suit your taste.
    • Dijon or yellow mustard: This gives the dish its tangy edge. Dijon offers a more refined flavor.
    • Soy sauce: A dash of umami, enhancing all the other flavors beautifully.
    • Pineapple juice: Don’t toss the juice! It’s key to making the glaze perfectly sweet.
    • Ground cloves (optional): This spice brings warmth to the dish. Use it for that extra depth of flavor.
    • Salt and freshly ground black pepper: Don’t forget these essentials! They balance out the sweetness perfectly.

    For exact measurements, check the bottom of the article, where they’re conveniently laid out for you. Feel free to experiment with the ingredients—cooking is all about finding your unique flavor! Enjoy the process as much as the meal itself!

    How to Make Brown Sugar Pineapple Ham Bake

    Now that we have our ingredients ready, let’s dive into making this delightful Brown Sugar Pineapple Ham Bake! Trust me, the process is as satisfying as the dish itself. Here’s a simple step-by-step guide to help you along the way.

    Preheat the Oven and Prepare the Baking Dish

    First things first! Preheating your oven to 190°C is essential for an even bake. While that’s warming up, grab a 33×23-centimeter baking dish and lightly grease it with nonstick spray or butter. This helps prevent sticking and ensures your delicious creation comes out easily.

    Make the Glaze

    In a medium bowl, whisk together the brown sugar, mustard, soy sauce, and reserved pineapple juice until smooth. Once you have that glossy glaze ready, take a moment to taste it. If you crave a bit more sweetness, feel free to add an extra sprinkle of brown sugar; this dish is all about your preference!

    Arrange Ham and Pineapple

    Next, it’s time to layer your ingredients in the baking dish. Start by evenly spreading the diced ham across the bottom. Then, add the drained pineapple chunks on top. Look at the colorful contrast—it’s pure joy on a plate! For a picture-perfect presentation, try to spread the pineapple out evenly, ensuring every bite has a bit of that sweet goodness.

    Combine and Bake

    Now, pour that luscious glaze over the ham and pineapple. Gently stir everything together to ensure each piece is coated with that sticky, sweet sauce. Place your dish in the preheated oven and bake for about 30 to 35 minutes. Keep an eye on it, though! You’ll want to spot that beautiful caramelization forming around the edges.

    Serve Your Dish

    Once your Brown Sugar Pineapple Ham Bake is golden and fragrant, it’s time to serve! This dish pairs wonderfully with steamed rice, roasted veggies, or even a crisp salad. So, gather your loved ones, and enjoy the sweet and savory experience together. Your kitchen becomes a hub of happiness as everyone digs in!

    Tips for Success

    • Make sure your ham is already cooked for the best flavors and efficiency.
    • Taste the glaze before pouring; adjust sweetness to fit your family’s preferences.
    • Let the dish sit for a few minutes after baking for easier serving.
    • Try adding crushed pineapple for an extra punch of sweetness.
    • Use leftovers to make sandwiches or toss into salads for a quick meal!

    Equipment Needed for Brown Sugar Pineapple Ham Bake

    • Baking Dish: A 33×23-centimeter dish will do best. Any oven-safe dish of similar size works.
    • Medium Bowl: For mixing your glaze; any large bowl you have on hand will suffice.
    • Whisk: Useful for blending ingredients. A fork will work too!
    • Cutting Board and Knife: Essential for dicing ham and prepping ingredients.

    Variations of Brown Sugar Pineapple Ham Bake

    • Sweet and Spicy: Add a teaspoon of crushed red pepper flakes to the glaze for a delightful kick that will surprise your taste buds!
    • Fruit Medley: Combine pineapple with other fruits like mango or peaches for a tropical twist that brings an explosion of flavors.
    • Gluten-Free Choice: Make sure your soy sauce is labeled gluten-free to cater to those with gluten sensitivities.
    • Lower Sugar Option: Substitute half the brown sugar with honey or maple syrup for a natural sweetness that’s also lower in refined sugar.
    • Veggie Boost: Toss in some diced bell peppers or red onion for added color and nutrients, enhancing flavors without much effort.

    Serving Suggestions for Brown Sugar Pineapple Ham Bake

    • Steamed Rice: Fluffy jasmine or basmati rice complements the dish beautifully.
    • Roasted Vegetables: A medley of seasonal veggies adds color and nutrition to your plate.
    • Crisp Salad: A refreshing green salad with a tangy vinaigrette balances the sweetness.
    • Pairing Drinks: Serve with iced tea or a light white wine to enhance the flavors.

    FAQs about Brown Sugar Pineapple Ham Bake

    Got questions about my beloved Brown Sugar Pineapple Ham Bake? You’re not alone! Here are some common queries that I often hear, along with helpful answers:

    Can I use fresh pineapple instead of canned?
    Absolutely! Fresh pineapple adds a vibrant flavor, enhancing your dish. Just make sure to dice it into similar-sized chunks for even cooking.

    What can I serve with this dish besides rice?
    Several options complement the sweet and savory flavor beautifully. Try roasted potatoes, quinoa, or even a hearty vegetable soup to round out your meal.

    Can I prepare this dish ahead of time?
    Yes, you can! Simply assemble the dish and cover it tightly with plastic wrap. Store it in the fridge for up to a day before baking. Just give it a little longer in the oven if it’s cold!

    How do I store leftovers?
    Place any leftovers in an airtight container and store them in the refrigerator for up to three days. They reheated perfectly—the flavors only get better!

    Is this dish suitable for special diets?
    This Brown Sugar Pineapple Ham Bake is gluten-free, as long as you choose gluten-free soy sauce. It’s perfect for gatherings where dietary needs vary!

    Final Thoughts

    Every time I prepare this Brown Sugar Pineapple Ham Bake, I’m reminded of the joy that comes from sharing a meal with loved ones. The blend of sweet and savory flavors never fails to bring smiles around the table. It’s a recipe that transforms an ordinary day into something extraordinary; it’s a celebration of togetherness. I hope it brings warmth and happiness to your home, too. No matter how busy life gets, remember that a delicious meal can turn any moment into a cherished memory. Happy cooking, and may your kitchen always be filled with love!


    Print

    clock clock iconcutlery cutlery iconflag flag iconfolder folder iconinstagram instagram iconpinterest pinterest iconfacebook facebook iconprint print iconsquares squares iconheart heart iconheart solid heart solid icon

    Description

    Brown Sugar Pineapple Ham Bake is a delicious dish combining sweet and savory flavors, perfect for any gathering.


    • 600 grams cooked ham, diced
    • 1 can (570 grams) pineapple chunks, drained, reserve 60 millilitres juice
    • 110 grams brown sugar
    • 2 tablespoons Dijon or yellow mustard
    • 1 tablespoon soy sauce
    • 60 millilitres reserved pineapple juice
    • 0.25 teaspoon ground cloves (optional)
    • Salt and freshly ground black pepper, to taste

    1. Set the oven to 190°C. Lightly grease a 33×23-centimetre baking dish with nonstick spray or butter.
    2. In a medium bowl, whisk together brown sugar, mustard, soy sauce, reserved pineapple juice, and ground cloves until the mixture is smooth and glossy.
    3. Arrange diced ham and drained pineapple chunks evenly in the prepared baking dish.
    4. Pour the prepared glaze over the ham and pineapple. Gently stir to ensure all ingredients are thoroughly coated.
    5. Place the dish uncovered in the oven and bake for 30 to 35 minutes, until the ham is heated through and the edges are caramelised and golden.
    6. Serve hot, accompanied by steamed rice, roasted vegetables, or a fresh salad as desired.

    Notes

    • Feel free to adjust the amount of brown sugar for your desired sweetness.
    • Leftovers can be stored in an airtight container in the refrigerator for up to 3 days.
    • This dish can be made ahead of time and reheated before serving.
    • Prep Time: 10 minutes
    • Cook Time: 35 minutes
    • Category: Main Course
    • Method: Baking
    • Cuisine: American

    Nutrition

    • Serving Size: 1 serving
    • Calories: 320
    • Sugar: 15g
    • Sodium: 700mg
    • Fat: 10g
    • Saturated Fat: 3.5g
    • Unsaturated Fat: 6.5g
    • Trans Fat: 0g
    • Carbohydrates: 45g
    • Fiber: 1g
    • Protein: 20g
    • Cholesterol: 55mg

    Sharing is caring!

  • High Protein Greek Yogurt Bagels

    High Protein Greek Yogurt Bagels


    Introduction to High Protein Greek Yogurt Bagels

    Are you tired of juggling a million things, only to be met with the same old breakfast options? Trust me, I’ve been there! That’s why I’m excited to share my recipe for High Protein Greek Yogurt Bagels. These delightful little rings of goodness are not only a quick solution for busy mornings, but they’re also packed with protein. Perfect for me or a tasty treat to impress your loved ones! Whether it’s a rushed breakfast before work or a satisfying snack, these bagels promise flavor and nourishment in every bite.

    Why You’ll Love This High Protein Greek Yogurt Bagels

    These High Protein Greek Yogurt Bagels are a game-changer! First off, they come together in just 35 minutes, perfect for busy moms and professionals. The taste? Oh, it’s heavenly—soft, chewy, and utterly satisfying. Plus, they’re versatile! You can top them with your favorite spreads or pair them with fresh fruit. Trust me, once you try them, they’ll become a staple in your kitchen routine!

    Ingredients for High Protein Greek Yogurt Bagels

    Gathering your ingredients for these High Protein Greek Yogurt Bagels is a breeze! Here’s what you’ll need:

    • Plain Greek Yogurt: This is the star of the show! It adds moisture, richness, and that lovely protein punch. Plus, it helps bind the dough together beautifully.
    • All-Purpose Flour: Used to give the bagels their structure. If you’re keeping an eye on carbs, swapping this with almond flour will work as a low-carb alternative.
    • Baking Soda: This helps the bagels rise and gives them a nice texture. It’s an essential ingredient that can’t be skipped!
    • Salt: Just a pinch for flavor. It enhances the overall taste of your bagels, making every bite more enjoyable.
    • Egg Wash (Optional): For that gorgeous golden-brown finish, you can brush the bagels with an egg wash before baking. It ups the presentation factor!

    All ingredients with exact measurements are listed at the bottom of the article for easy access and printing. Happy bagel-making!

    How to Make High Protein Greek Yogurt Bagels

    Getting to the heart of these High Protein Greek Yogurt Bagels is an adventure that’s quick yet rewarding. Let’s dive into the steps you need for that perfect bagel.

    Step 1: Preheat the Oven

    This step is essential! Preheating your oven to 375°F (190°C) gets it ready to bake those bagels to golden perfection. If the oven isn’t hot enough, your bagels might miss that lovely rise and chewy texture. So, don’t skip this crucial step!

    Step 2: Mix the Dough

    In a large mixing bowl, combine your plain Greek yogurt, all-purpose flour, and baking soda. Use a spatula or a spoon to mix until there are no dry patches—just a unified, slightly sticky dough. The yogurt not only makes it delicious but ensures your bagels boast high protein content too!

    Step 3: Knead the Dough

    Now, it’s kneading time! Turn your dough out onto a floured surface. With lightly floured hands, knead for about 5 minutes. You’re looking for a smooth, elastic texture here. Think of it as giving your dough a mini workout—it’s satisfying and helps develop that perfect bagel structure!

    Step 4: Shape the Bagels

    Divide your shiny dough into four equal pieces. Roll each piece into a long rope, then join the ends to form a ring. Make sure to pinch the sides together tightly. This little process not only looks fun but ensures that our High Protein Greek Yogurt Bagels retain their shape while baking.

    Step 5: Optional Egg Wash

    Feeling fancy? Brush your formed bagels with an egg wash made from beaten egg. This step gives your bagels a glorious, shiny glaze when baked. It’s all about that extra touch for both looks and flavor!

    Step 6: Bake the Bagels

    Now we get to the exciting part—baking! Place your shaped bagels on a parchment-lined baking sheet. Bake them in your preheated oven for 20-25 minutes until they turn golden brown. To check for doneness, give them a gentle tap. If they sound hollow, they’re ready to come out!

    And there you have it! A straightforward guide to making delicious High Protein Greek Yogurt Bagels that’re sure to impress. Enjoy every bite!

    Tips for Success

    • Make sure your Greek yogurt is at room temperature for easier mixing.
    • Don’t rush the kneading; it’s key for good texture!
    • Experiment with toppings like sesame seeds or everything bagel seasoning for extra flavor.
    • Store any leftovers in an airtight container for up to three days.
    • Feel free to freeze your bagels for quick snacks on busy mornings.

    Equipment Needed

    • Mixing Bowl: A medium-sized bowl will work perfectly. If you don’t have one, any large container will do!
    • Floured Surface: A clean countertop or cutting board is ideal for kneading. A baking mat works well too!
    • Baking Sheet: A sturdy baking sheet is essential—don’t forget the parchment paper!
    • Spatula or Spoon: These help in mixing the dough. Any sturdy utensil will do!

    Variations of High Protein Greek Yogurt Bagels

    • Herb and Cheese Bagels: Mix in your favorite herbs or grated cheese into the dough for a tasty twist. A touch of garlic powder also adds a delightful flavor!
    • Sweet Cinnamon Bagels: Add a teaspoon of cinnamon and a dash of vanilla extract to the dough for a sweet variation. Pair it with cream cheese for a delightful breakfast!
    • Everything Bagel Seasoning: Before baking, sprinkle on everything bagel seasoning to achieve that classic flavor. It’s an easy way to pack in flavor without extra effort!
    • Vegetable Bagels: Incorporate finely chopped spinach or sun-dried tomatoes into the dough. This adds color and extra nutrition!
    • Gluten-Free Option: Substitute all-purpose flour with a gluten-free blend to cater to gluten sensitivities while still enjoying those bagel vibes!

    Serving Suggestions for High Protein Greek Yogurt Bagels

    • Fresh Fruit: Serve your bagels with a side of mixed berries or sliced bananas for a refreshing contrast.
    • Cream Cheese Spread: Top with a dollop of cream cheese or Greek yogurt spread for added creaminess.
    • Herbal Tea or Coffee: Pair with your favorite herbal tea or a steaming cup of coffee to elevate your breakfast experience.
    • Presentation: Arrange bagels on a colorful plate and sprinkle some fresh herbs for an inviting look!

    FAQs about High Protein Greek Yogurt Bagels

    Have questions about these High Protein Greek Yogurt Bagels? You’re not alone! Here are some FAQs that can help clarify your concerns and inspire you in the kitchen.

    Can I use nonfat Greek yogurt for the bagels?
    Absolutely! Nonfat Greek yogurt works just as well, although it may alter the texture slightly. Don’t worry—it will still be delicious!

    How do I store leftovers?
    Once cooled, store your bagels in an airtight container. They’ll stay fresh for up to three days at room temperature. For longer storage, pop them in the freezer!

    Can I make these bagels ahead of time?
    Yes! You can prepare the dough the night before, shape the bagels, and place them in the fridge. Just let them come to room temperature before baking.

    What can I top my bagels with?
    The possibilities are endless! Cream cheese, avocado, or even peanut butter make great toppings. Add sliced tomatoes or cucumbers for a fresh touch.

    Are these bagels kid-friendly?
    Definitely! Kids love the chewy texture. Get them involved in the shaping process, and watch them enjoy these healthy bagels as a fun snack or breakfast!

    Final Thoughts

    There’s something immensely satisfying about creating High Protein Greek Yogurt Bagels at home. They’re not just a wholesome breakfast or snack; they’re a little hug for your taste buds! I adore how quick they come together, making them perfect even for the busiest of mornings. Plus, the joy of customizing them to your liking adds a personal touch that store-bought bagels just can’t compete with. Each bite captures that delightful blend of nutrition and flavor, leaving you energized and ready to tackle the day. Trust me, you’ll find yourself coming back to this recipe time and time again!


    Print

    clock clock iconcutlery cutlery iconflag flag iconfolder folder iconinstagram instagram iconpinterest pinterest iconfacebook facebook iconprint print iconsquares squares iconheart heart iconheart solid heart solid icon

    Description

    Are you tired of juggling a million things, only to be met with the same old breakfast options? Trust me, I’ve been there! That’s why I’m excited to share my recipe for High Protein Greek Yogurt Bagels. These delightful little rings of goodness are not only a quick solution for busy mornings, but they’re also packed with protein. Perfect for me or a tasty treat to impress your loved ones! Whether it’s a rushed breakfast before work or a satisfying snack, these bagels promise flavor and nourishment in every bite.


    • 1 cup plain Greek yogurt
    • 1 cup all-purpose flour
    • 1 teaspoon baking soda
    • 1/2 teaspoon salt
    • Egg wash (optional)

    1. Preheat the oven to 375°F (190°C).
    2. In a bowl, mix Greek yogurt, flour, and baking soda until no dry patches remain.
    3. Knead the dough on a floured surface for about 5 minutes until smooth and elastic.
    4. Divide the dough into four pieces and shape each into a bagel by forming a ring.
    5. Optionally, brush with egg wash before placing on a parchment-lined baking sheet.
    6. Bake for 20-25 minutes until golden brown.

    Notes

    • These bagels can be topped with seeds or seasonings of your choice before baking.
    • For a lower carb option, consider using almond flour instead of all-purpose flour.
    • Prep Time: 10 minutes
    • Cook Time: 25 minutes
    • Category: Breakfast
    • Method: Baking
    • Cuisine: American

    Nutrition

    • Serving Size: 1 bagel
    • Calories: 120
    • Sugar: 2g
    • Sodium: 250mg
    • Fat: 1g
    • Saturated Fat: 0g
    • Unsaturated Fat: 1g
    • Trans Fat: 0g
    • Carbohydrates: 22g
    • Fiber: 1g
    • Protein: 8g
    • Cholesterol: 0mg

    Sharing is caring!

  • Berry Spinach Salad with Pecans, Feta, and Balsamic Glaze

    Berry Spinach Salad with Pecans, Feta, and Balsamic Glaze


    Introduction to Berry Spinach Salad with Pecans, Feta, and Balsamic Glaze

    When life gets hectic, finding a quick and tasty meal can feel like a daunting task. That’s why I love this Berry Spinach Salad with Pecans, Feta, and Balsamic Glaze. This vibrant salad is not just a feast for the eyes, but also a quick solution for a busy day or a fantastic dish to impress your loved ones. With fresh berries and crunchy pecans, each bite is a delightful mix of textures and flavors. Plus, it’s healthy! I promise, this salad will become a go-to in your kitchen.

    Why You’ll Love This Berry Spinach Salad with Pecans, Feta, and Balsamic Glaze

    This Berry Spinach Salad with Pecans, Feta, and Balsamic Glaze is a delightful combination of flavors that will brighten your meal. It’s quick to whip up, taking just 25 minutes from start to finish. The sweetness of the berries pairs perfectly with the creamy feta and crunchy pecans, making for a salad that pleases every palate. Plus, it’s versatile, fitting seamlessly into any meal of the day!

    Ingredients for Berry Spinach Salad with Pecans, Feta, and Balsamic Glaze

    Gathering fresh ingredients is the first step in creating this delicious salad. Here’s what you’ll need:

    • Fresh spinach leaves: These are the vibrant base of our salad, packed with nutrients and flavor. Look for bright green leaves to ensure freshness.
    • Fresh strawberries: Sliced and sweet, strawberries add a burst of color and juicy sweetness. Feel free to swap in other berries if you prefer!
    • Fresh blueberries: These tiny gems bring a delightful tartness and an antioxidant boost. They pair beautifully with the strawberries.
    • Crumpled feta cheese: This creamy cheese adds a wonderful tang that contrasts perfectly with the sweet berries. It really elevates the entire dish.
    • Toasted pecans: Their crunchy texture enhances the salad while providing healthy fats. Toast them for a few minutes to deepen their flavor.
    • Red onion: Thinly sliced red onion offers a mild bite that rounds out the salad. Use them sparingly if you’re concerned about their strong flavor!
    • Balsamic vinegar: Essential for our glaze, balsamic brings sweetness and acidity that ties all the flavors together. Opt for a good-quality balsamic for the best taste.
    • Honey (optional): For those who like a little extra sweetness, honey is a great choice. Adjust to your taste or leave it out for a less sweet glaze.

    For exact measurements, check at the bottom of the article where a printable version awaits. Remember, freshness is key, so explore your local market for the best ingredients!

    How to Make Berry Spinach Salad with Pecans, Feta, and Balsamic Glaze

    Now that you have all your ingredients ready, let’s bring this delicious Berry Spinach Salad with Pecans, Feta, and Balsamic Glaze to life! Follow these simple steps, and you’ll have a gorgeous salad to serve in no time. Don’t worry; we’ll make it easy so you can impress everyone!

    Step 1: Combine the Base Ingredients

    Start by grabbing a large bowl. Toss in the fresh spinach leaves, sliced strawberries, blueberries, and red onion.

    Mix it gently—like a warm hug for your ingredients! This salad is all about layers of flavor.

    Feel free to sneak a taste. You might just find that your mix inspires a delightful crunch!

    Step 2: Add Feta Cheese

    Next, sprinkle the crumbled feta cheese over your beautiful blend. The creamy tang of the feta is the perfect complement to the sweet berries.

    Don’t rush this step! Crumbling larger chunks into smaller bits adds a touch of elegance. Just like that fancy restaurant salad!

    Step 3: Prepare the Balsamic Glaze

    Now it’s time for the magic touch—the balsamic glaze! In a small saucepan, pour in the balsamic vinegar.

    Heat it over medium flame and let it simmer until it reduces by half. This should take about 10 minutes—keep an eye on it!

    If you’d like to add honey for sweeter sauce, now’s the time. Stir it in, and let this delightful blend cool a bit before drizzling.

    Step 4: Drizzle and Serve

    Once everything is ready, drizzle that glorious balsamic glaze over the salad. Just before serving! It’s the cherry on top of your masterpiece.

    Toss everything gently again to coat all the ingredients in that luscious sauce. Serve it immediately so the spinach stays fresh and crisp!

    And voilà! You’ve created a stunning Berry Spinach Salad with Pecans, Feta, and Balsamic Glaze that’s as tasty as it is pretty. Enjoy each bite!

    Tips for Success

    • Always choose fresh ingredients for optimal flavor and nutrition.
    • Don’t rush to mix; letting the flavors sit enhances the taste.
    • Toast the pecans to unlock their nutty aroma and crunch.
    • Adjust the sweetness of the glaze by varying honey amounts.
    • Feel free to chill the salad slightly before serving for a refreshing touch.

    Equipment Needed

    • Large mixing bowl: Ideal for combining all your ingredients. A big salad bowl works just as well!
    • Small saucepan: Perfect for simmering the balsamic glaze. A non-stick pan can help if you’re short on time.
    • Measuring cups: Essential for accurate ingredient quantities. A simple kitchen scale can be a fun alternative!

    Variations

    • Add grilled chicken: For a heartier meal, toss in some sliced grilled chicken breast. It’s an easy way to turn your salad into a complete dinner.
    • Swap the cheese: If feta isn’t your favorite, try goat cheese or even blue cheese for a different flavor kick.
    • Vegan option: Omit the feta and replace it with avocado slices for creaminess without dairy.
    • Nut-free version: Substitute the pecans with sunflower seeds or pumpkin seeds for a nut-free alternative that still packs a crunch.
    • Seasonal twists: Use seasonal fruits like peaches or apples to keep the salad exciting and fresh all year!

    Serving Suggestions for Berry Spinach Salad with Pecans, Feta, and Balsamic Glaze

    • Complementary Sides: Pair this salad with grilled chicken or salmon for a nutritious dinner.
    • Perfect Drinks: A chilled glass of white wine or herbal iced tea elevates your meal beautifully.
    • Elegant Presentation: Serve in clear glass bowls to highlight the colorful ingredients.
    • Garnish with Fresh Herbs: Add sprigs of mint or basil for an aromatic touch.

    FAQs about Berry Spinach Salad with Pecans, Feta, and Balsamic Glaze

    As you explore the tasty world of this Berry Spinach Salad with Pecans, Feta, and Balsamic Glaze, you might have a few questions. Don’t worry; I’ve got you covered!

    Can I make this salad ahead of time?
    Absolutely! You can prepare the salad ingredients a few hours in advance. Just keep the dressing separate until you’re ready to serve. This way, your spinach stays fresh and crisp!

    What if I can’t find fresh berries?
    Frozen berries work well too! Simply thaw and drain them before adding. They might not be as crisp as fresh ones, but they’ll still taste delightful.

    Is it okay to use a different type of vinegar for the glaze?
    While balsamic vinegar is the star of this recipe, you could use a flavored vinegar, like apple cider or red wine vinegar. Just adjust the sweetness accordingly!

    How long does this salad last in the fridge?
    This delicious salad is best enjoyed fresh, but you can keep leftovers covered in the fridge for up to 2 days. The flavors will meld beautifully, but the spinach may wilt slightly.

    Can I substitute the pecans with something else?
    Definitely! If you have nut allergies, consider using sunflower seeds or crunchy chickpeas. They will add a nice crunch without the nuts!

    Final Thoughts

    Creating this Berry Spinach Salad with Pecans, Feta, and Balsamic Glaze is genuinely a joy in the kitchen. It’s not just about tossing ingredients together; it’s the satisfaction of combining sweet, tangy, and crunchy flavors that truly excites my taste buds. I can already imagine the smiles this salad will bring to my family’s faces. Each bite reflects a moment of care and creativity . Whether served at an elegant dinner or a casual lunch, it’s a dish loaded with love and flavor. I hope it inspires you to chase culinary happiness in your own kitchen!


    Print

    clock clock iconcutlery cutlery iconflag flag iconfolder folder iconinstagram instagram iconpinterest pinterest iconfacebook facebook iconprint print iconsquares squares iconheart heart iconheart solid heart solid icon

    Description

    A refreshing and delicious Berry Spinach Salad topped with crunchy pecans, creamy feta cheese, and a sweet balsamic glaze.


    • 6 cups fresh spinach leaves
    • 1 cup fresh strawberries (sliced)
    • 1 cup fresh blueberries
    • 1/2 cup crumbled feta cheese
    • 1/2 cup pecans (toasted)
    • 1/4 cup red onion (thinly sliced)
    • 1/2 cup balsamic for the glaze
    • 2 tbsp honey (optional)

    1. In a large bowl, combine the spinach, strawberries, blueberries, red onion, and toasted pecans.
    2. Sprinkle the crumbled feta cheese on top.
    3. For the balsamic glaze, heat balsamic in a small saucepan over medium heat. Simmer until the vinegar reduces by half and thickens. Stir in honey, if using, and let it cool.
    4. Drizzle the balsamic glaze over the salad just before serving.

    Notes

    • Toasting the pecans enhances their flavor.
    • Use fresh ingredients for the best taste.
    • Honey can be adjusted or omitted based on your sweetness preference.
    • Prep Time: 15 minutes
    • Cook Time: 10 minutes
    • Category: Salad
    • Method: Mixing and Simmering
    • Cuisine: American

    Nutrition

    • Serving Size: 1 serving
    • Calories: 250
    • Sugar: 6g
    • Sodium: 200mg
    • Fat: 15g
    • Saturated Fat: 4g
    • Unsaturated Fat: 10g
    • Trans Fat: 0g
    • Carbohydrates: 28g
    • Fiber: 5g
    • Protein: 6g
    • Cholesterol: 15mg

    Sharing is caring!

  • Two Ingredient Lemon Bars: Easy Recipe You’ll Love!

    Two Ingredient Lemon Bars: Easy Recipe You’ll Love!


    Introduction to Two Ingredient Lemon Bars

    As a passionate home cook, I know how life can get crazily busy. Suddenly, it’s 4 PM, you have no sweets in sight, and your family is asking for a treat. That’s where these delightful Two Ingredient Lemon Bars come to the rescue! With just two easy ingredients, you can whip up a batch in no time at all. Trust me, this recipe is your go-to solution for impressing loved ones or satisfying those sweet cravings without breaking a sweat. So, grab your mixing bowl, and let’s dive into this simple but oh-so-delicious treat!

    Why You’ll Love This Two Ingredient Lemon Bars

    These Two Ingredient Lemon Bars are a dream come true for busy moms or professionals. You’ll appreciate how quick and easy they are to make, with just a whisk and a baking dish standing between you and a sweet, tangy dessert. The burst of lemony goodness dances on your palate, making each bite a delightful treat. Plus, who can resist a dessert that practically makes itself?

    Ingredients for Two Ingredient Lemon Bars

    When it comes to making Two Ingredient Lemon Bars, simplicity is key! Here’s what you’ll need:

    • Angel Food or Yellow Cake Mix: This serves as the base of our bars, offering that delightful cake-like texture. If you want a lighter bar, go with angel food. For something richer, yellow cake mix is perfect!
    • Lemon Pie Filling: This lemony goodness not only provides the flavor but also acts as the binding agent in our recipe. Store-bought works beautifully, but if you’re feeling adventurous, homemade lemon pie filling can take your bars to the next level!

    For those who want to elevate their bars further, lemon zest can be mixed in for an extra zing, adding a pop of freshness. It’s like sunshine in your dessert, if you will!

    You’ll find the exact measurements at the bottom of the article, which you can print out for your convenience. Let’s keep it simple and delicious!

    How to Make Two Ingredient Lemon Bars

    Making these Two Ingredient Lemon Bars is a breeze! Follow these simple steps to create a treat that everyone will adore.

    Step 1: Combine the Ingredients

    Start by grabbing a large mixing bowl. Add the angel food or yellow cake mix and the lemon pie filling together. Stir until you have a smooth, well-blended batter. Don’t overmix; just ensure there are no dry spots. It should look like sunshine in a bowl!

    Step 2: Prepare the Baking Dish

    Now, let’s get our baking dish ready! Take a 33 x 23 cm baking dish and grease it with nonstick spray or a thin layer of oil. This step is crucial for easy removal later. Nobody wants a beautiful lemon bar stuck in the pan! Making sure it’s well-greased will allow the bars to pop out effortlessly.

    Step 3: Bake the Mixture

    Pour the batter into your prepared baking dish, spreading it evenly. Then, pop it into a preheated oven set at 175°C. Bake for 25 to 30 minutes. You’ll know they are done when the top turns golden and the center is set. While you wait, take a moment to sip some tea, because these treats are almost ready!

    Step 4: Cool and Serve

    Once your bars are baked to perfection, remove them from the oven and let them cool completely in the pan. Patience is key here! Once cooled, dust the top with powdered sugar if desired for that extra touch of sweetness. Slice them into squares, and voilà—your Two Ingredient Lemon Bars are ready to impress your family and friends!

    Tips for Success

    • Don’t skip greasing the baking dish—it’s the secret to perfectly lifted bars!
    • For a burst of freshness, add lemon zest to the batter. A little zest goes a long way!
    • Let your bars cool completely before slicing for clean cuts.
    • Feel free to experiment with different cake mixes like chocolate for a unique twist.
    • Store any leftovers in an airtight container in the fridge to keep them fresh!

    Equipment Needed

    • Large Mixing Bowl: A standard bowl will do. If it’s big enough to hold your ingredients, you’re set!
    • Whisk or Spoon: Use either for easy mixing. A whisk makes it fun, but a sturdy spoon works just as well.
    • 33 x 23 cm Baking Dish: Any similar-sized baking dish will do, even a glass one for all those golden moments!

    Variations

    • Gluten-Free Option: Use a gluten-free angel food cake mix to make these bars accessible for those with gluten sensitivities.
    • Lower Sugar Version: Choose a sugar-free lemon pie filling and a low-sugar cake mix for a guilt-free treat.
    • Fruit Infusion: Add fresh fruit like blueberries or raspberries into the batter for a fruity twist that pairs wonderfully with lemon.
    • Chocolate Drizzle: After baking, try drizzling melted dark chocolate or white chocolate over the cooled bars for an indulgent touch.
    • Herbal Twist: Incorporate a teaspoon of fresh herbs like mint or basil for an unexpected but delightful flavor combination.

    Serving Suggestions

    • Pair with Fresh Berries: Serve your Two Ingredient Lemon Bars with a side of fresh strawberries or raspberries for a colorful plate.
    • Top with Whipped Cream: A dollop of whipped cream can elevate your dessert experience.
    • Accompany with Iced Tea: Enjoy these bars with a glass of sweet iced tea for a refreshing treat.
    • Presentation: Dust with powdered sugar and add a lemon slice on top for a beautiful finish.

    FAQs about Two Ingredient Lemon Bars

    As you embark on your journey to make these delightful Two Ingredient Lemon Bars, you may have a few questions in mind. Here are some common queries I encounter, along with their answers!

    Can I use a different type of cake mix?

    Absolutely! You can experiment with other flavors like chocolate or spice cake mixes. Each variation adds a new twist to your easy lemon bars.

    How do I store leftovers?

    Keep your bars fresh by storing them in an airtight container in your fridge. They’ll last a few days, but I bet they’ll be gone long before that!

    What can I serve these lemon bars with?

    I love pairing my Two Ingredient Lemon Bars with fresh fruit or a dollop of whipped cream. It adds an extra layer of flavor and makes for a lovely presentation.

    Can I make these lemon bars in advance?

    Yes! These bars can be made a day ahead. Just cool them completely, cover them well, and refrigerate. You’ll have a sweet treat ready for your next gathering!

    Can I customize the sweetness level?

    For a less sweet option, consider using a sugar-free lemon pie filling and a low-sugar cake mix. It’s a great way to enjoy your dessert without too much sugar!

    Final Thoughts

    These Two Ingredient Lemon Bars have a special place in my heart as a quick and joyful treat. There’s something magical about how a simple mix can transform into a delightful dessert that brings smiles and sunshine to any gathering. Whether it’s a busy weekday evening or a weekend get-together, these bars deliver a refreshing burst of flavor with minimal effort. I hope you savor every bite and share them with your loved ones. Trust me, with this recipe, you’ll feel like a culinary rock star—making dessert easy, fun, and oh-so-delicious!


    Print

    clock clock iconcutlery cutlery iconflag flag iconfolder folder iconinstagram instagram iconpinterest pinterest iconfacebook facebook iconprint print iconsquares squares iconheart heart iconheart solid heart solid icon

    Description

    A simple and delicious recipe for lemon bars made with just two ingredients.


    • 1 box (approximately 430 g) angel food or yellow cake mix
    • 1 can (425 g) lemon pie filling

    1. In a large mixing bowl, thoroughly blend the angel food or yellow cake mix with the lemon pie filling until the mixture is smooth and evenly incorporated.
    2. Grease a 33 x 23 cm baking dish with nonstick spray or a thin layer of oil.
    3. Transfer the batter to the prepared baking dish and spread evenly. Bake in a preheated oven at 175°C for 25 to 30 minutes, or until the top is golden and bars are set at the center.
    4. Allow the bars to cool completely in the pan. Dust with powdered sugar if desired. Slice into squares before serving.

    Notes

    • For added flavor, consider adding lemon zest to the batter.
    • These bars can be refrigerated for a few days if stored in an airtight container.
    • Prep Time: 10 minutes
    • Cook Time: 30 minutes
    • Category: Dessert
    • Method: Baking
    • Cuisine: American

    Nutrition

    • Serving Size: 1 bar
    • Calories: 150
    • Sugar: 15 g
    • Sodium: 180 mg
    • Fat: 2 g
    • Saturated Fat: 0.5 g
    • Unsaturated Fat: 1.5 g
    • Trans Fat: 0 g
    • Carbohydrates: 29 g
    • Fiber: 0 g
    • Protein: 2 g
    • Cholesterol: 0 mg

    Sharing is caring!

  • Marry Me Chicken Soup

    Marry Me Chicken Soup


    Introduction to Marry Me Chicken Soup

    Have you ever wanted to impress your family with a meal that feels both luxurious and comforting? Let me introduce you to Marry Me Chicken Soup! This delightful concoction is like a cozy blanket on a chilly evening, offering warmth and flavor in every spoonful. Perfect for those hectic days, when you’re juggling groceries and kids’ homework, this creamy soup combines sun-dried tomatoes and Italian herbs for an experience that’s simply irresistible. It’s not just a meal; it’s a love letter to your taste buds and a blissful way to gather around the dinner table.

    Why You’ll Love This Marry Me Chicken Soup

    This Marry Me Chicken Soup is the answer to your weeknight dinner dilemmas. It’s quick to whip up, taking just 40 minutes from start to finish. The rich, creamy texture and burst of flavors will make you feel like a gourmet chef, all while using simple ingredients. Plus, it’s a fantastic way to sneak in some greens and protein, ensuring your family enjoys a wholesome, soul-soothing meal they won’t forget any time soon.

    Ingredients for Marry Me Chicken Soup

    When preparing Marry Me Chicken Soup, you’ll find a beautiful mix of flavors that come together effortlessly. Here’s what you’ll need:

    • Sun-dried tomatoes: These add a burst of tangy sweetness. Look for those packed in oil for extra flavor.
    • Oil from the sun-dried tomatoes jar: This infused oil serves as a perfect base to enrich your soup.
    • Chopped yellow onion: Onions are the backbone of most soups, providing essential sweetness and depth.
    • Garlic: Fresh minced garlic will elevate your soup’s aroma and taste, giving it that lovely Italian flair.
    • Tomato paste: A spoonful of tomato paste contributes a concentrated tomato flavor, intensifying the overall dish.
    • Chicken broth: Opt for low-sodium broth to control the salt levels. It serves as the soul of your soup.
    • Heavy whipping cream: This is where the creaminess comes from, making your soup rich and indulgent.
    • Fresh basil: Using fresh basil brings a vibrant herbaceous note. Dried basil is a decent substitute when fresh is unavailable.
    • Kosher salt: Just the right amount enhances all the wonderful flavors in your soup.
    • Dried Italian seasoning: A blend of herbs that infuses your soup with that classic Italian taste.
    • Garlic powder: This adds another layer of garlic goodness, perfect for those who love its flavor.
    • Crushed red pepper: For those who enjoy a little heat, adjust this according to your taste.
    • Medium shell pasta: These little shells hold the soup, making every bite a delightful experience.
    • Fresh baby spinach: Adding spinach not only boosts nutrition but also brings a fresh color to your soup.
    • Shredded rotisserie chicken: For convenience, rotisserie chicken saves time without sacrificing flavor.
    • Cream cheese: This creamy addition gives a luxurious texture to your soup.
    • Finely shredded Parmesan cheese: A sprinkle of this at the end adds a deliciously salty finish.

    For exact measurements, check the bottom of the article where you can find the full recipe available for printing!

    How to Make Marry Me Chicken Soup

    Step 1: Sauté Onions and Garlic

    Start by heating the oil from the sun-dried tomatoes in a large Dutch oven over medium heat. The oil will sizzle, inviting a wave of flavor. Add the chopped onions and minced garlic, cooking them for about 3-4 minutes. You want them softened and fragrant, creating a wonderful base for your Marry Me Chicken Soup. The aroma filling your kitchen is just the beginning of your culinary adventure!

    Step 2: Add Tomato Paste and Sun-Dried Tomatoes

    Next, it’s time to stir in the tomato paste and sun-dried tomatoes. Cook them for about 2 minutes, stirring constantly. This step is crucial as it deepens the flavors beautifully. Watch as the tomato paste darkens slightly, releasing a vibrant scent. The sun-dried tomatoes will plump up, and the colors in your pot will brighten, hinting at the deliciousness to come.

    Step 3: Combine Broth and Cream

    Now, pour in the chicken broth, followed by the heavy cream. Sprinkle in fresh basil, kosher salt, Italian seasoning, garlic powder, and crushed red pepper. Stir gently to combine everything. Bring the mixture to a gentle boil over medium heat while stirring occasionally. Allow it to simmer for about 12 minutes, allowing the flavors to meld and enrich your Marry Me Chicken Soup!

    Step 4: Incorporate Pasta

    Time to add the uncooked medium shell pasta! Drop those little shells into your bubbling pot and reduce the heat to medium-low. Keep an eye on them, stirring occasionally to prevent sticking. Let everything cook for about 12 minutes, or until the pasta is tender but not mushy. This is where the soup starts to become a hearty delight, filling your kitchen with enticing smells.

    Step 5: Mix in Spinach and Chicken

    Lower the heat to low, and it’s time to stir in the fresh baby spinach and shredded rotisserie chicken. Add the room temperature cream cheese and finely shredded Parmesan next. Stir often for about 5 minutes, ensuring the cheeses melt beautifully into the soup. Each spoonful will be creamy, comforting goodness combined with vibrant greens and tender chicken—a true hug in a bowl!

    Step 6: Serve and Enjoy

    Ladle your Marry Me Chicken Soup into bowls, inviting your family to join you at the table. Garnish each serving with extra Parmesan, a sprinkle of fresh basil, and a hint of red pepper flakes for those who like it spicy. Serve it with crusty bread or a fresh green salad on the side. Watching your loved ones indulge in this bowl of love will warm your heart, making every effort worthwhile!

    Tips for Success

    • Use high-quality sun-dried tomatoes for better flavor.
    • Don’t skip the cream cheese; it adds an irresistible creaminess.
    • Adjust the crushed red pepper for a heat level that works for your family.
    • Feel free to use leftover chicken for even quicker prep!
    • Garnish generously for that restaurant-worthy presentation.

    Equipment Needed

    • Large Dutch oven: A heavy pot is ideal, but any large pot works.
    • Wooden spoon: Perfect for stirring, or use a silicone spatula.
    • Measuring cups and spoons: Essential for accuracy in your ingredients.
    • Knife and chopping board: For prepping your vegetables.
    • Serving bowls: Any bowl can work, but larger ones are perfect for soup.

    Variations of Marry Me Chicken Soup

    • Vegetarian Version: Swap the chicken for cannellini beans or chickpeas to make it a hearty vegetarian soup. You can also replace chicken broth with vegetable broth.
    • Spicy Twist: Kick up the heat by adding more crushed red pepper or a dash of your favorite hot sauce. Jalapeños also make a delightful addition.
    • Pasta Options: If you crave something different, substitute medium shell pasta with orzo, rice, or gluten-free pasta for a unique texture.
    • Herb Variations: Experiment with using fresh thyme, oregano, or parsley in place of basil for a new flavor profile.
    • Low-Fat Version: Use light cream cheese and swap heavy cream for half-and-half or unsweetened almond milk to reduce calories but keep the creaminess.

    Serving Suggestions

    • Pair your Marry Me Chicken Soup with crusty garlic bread for a comforting combo.
    • Top with a fresh green salad to balance the richness of the soup.
    • Serve with a glass of crisp white wine or sparkling water for a refreshing touch.
    • Consider garnishing with a sprinkle of fresh herbs for an appealing presentation!

    FAQs about Marry Me Chicken Soup

    Can I make Marry Me Chicken Soup ahead of time?

    Absolutely! You can prepare it a day in advance. Just make sure to store it in an airtight container in the fridge. When you’re ready to serve, reheat it on the stovetop. Add a splash of chicken broth if it thickens too much!

    How do I store leftovers?

    Leftover Marry Me Chicken Soup can be stored in the fridge for up to 3 days. Just put it in an airtight container. You can also freeze it for up to a month. Just remember to leave some space in the container, as it may expand when frozen!

    Can I substitute ingredients?

    Definitely! If you’re out of cream cheese, try using Greek yogurt or additional heavy cream instead. Fresh spinach can be swapped for kale, and feel free to customize the pasta according to your preference. This recipe is quite forgiving!

    Is Marry Me Chicken Soup gluten-free?

    Yes, if you use gluten-free pasta. Make sure to check that your chicken broth and other packaged ingredients are also labeled gluten-free for a worry-free meal!

    What can I serve with Marry Me Chicken Soup?

    I recommend crusty bread, a fresh green salad, or even garlic bread for that perfect accompaniment. You could also serve it with a crisp white wine to elevate the meal experience!

    Final Thoughts

    Making Marry Me Chicken Soup is more than just cooking; it’s an experience filled with love and joy. As each ingredient comes together, I can almost hear the giggles around the dining table and feel the warmth that only a homemade meal can provide. This recipe brings comfort, nourishment, and a bit of romance to the chaos of everyday life as a busy mom or professional. I hope you enjoy every flavorful spoonful, as your loved ones savor the magic that’s been crafted in your kitchen. After all, when food tastes this good, it truly brings us together!


    Print

    clock clock iconcutlery cutlery iconflag flag iconfolder folder iconinstagram instagram iconpinterest pinterest iconfacebook facebook iconprint print iconsquares squares iconheart heart iconheart solid heart solid icon

    Description

    Have you ever wanted to impress your family with a meal that feels both luxurious and comforting? Let me introduce you to Marry Me Chicken Soup! This delightful concoction is like a cozy blanket on a chilly evening, offering warmth and flavor in every spoonful. Perfect for those hectic days, when you’re juggling groceries and kids’ homework, this creamy soup combines sun-dried tomatoes and Italian herbs for an experience that’s simply irresistible. It’s not just a meal; it’s a love letter to your taste buds and a blissful way to gather around the dinner table.


    • ½ cup sun-dried tomatoes (julienne-cut, packed in oil with herbs)
    • 1 tbsp oil from sun-dried tomato jar
    • 1 ½ cups chopped yellow onion
    • 4 cloves garlic, minced
    • 3 tbsp tomato paste
    • 32 oz or 2 packages chicken broth
    • 1 cup heavy whipping cream
    • 4 tsp fresh basil (plus more for garnish)
    • 2 tsp kosher salt
    • 1 ½ tsp dried Italian seasoning
    • 1 tsp garlic powder
    • ¼ tsp crushed red pepper (or more if you like heat)
    • 8 oz uncooked medium shell pasta
    • 3 cups fresh baby spinach, roughly chopped
    • 2 cups shredded rotisserie chicken
    • 8 oz cream cheese, cubed (room temperature)
    • 1 ½ oz Parmesan cheese, finely shredded (plus more for garnish)

    1. Heat 1 tablespoon of sun-dried tomato oil in a large Dutch oven over medium heat. Add onions and garlic, cooking for 3-4 minutes until softened and fragrant.
    2. Stir in tomato paste and sun-dried tomatoes. Cook for 2 minutes, stirring constantly, until the tomato paste deepens in color.
    3. Pour in the chicken broth, cream, basil, salt, Italian seasoning, garlic powder, and crushed red pepper. Bring to a gentle boil over medium heat, stirring occasionally. Let it simmer for 12 minutes.
    4. Add the pasta, reduce heat to medium-low, and cook for 12 minutes, stirring occasionally, until the pasta is tender.
    5. Lower the heat to low, then stir in spinach, shredded chicken, cream cheese, and Parmesan. Stir often for 5 minutes until the cheeses melt and the chicken is warmed through.
    6. Ladle into bowls, garnish with extra Parmesan, fresh basil, and a sprinkle of red pepper flakes. Serve immediately with crusty bread or a fresh green salad on the side.

    Notes

    • Add more crushed red pepper for spicier soup.
    • Can substitute fresh ingredients for dried ones if necessary.
    • Garnish with a sprinkle of fresh basil for added flavor.
    • Prep Time: 10 minutes
    • Cook Time: 30 minutes
    • Category: Soup
    • Method: Stovetop
    • Cuisine: Italian

    Nutrition

    • Serving Size: 1 bowl
    • Calories: 450
    • Sugar: 3g
    • Sodium: 900mg
    • Fat: 30g
    • Saturated Fat: 15g
    • Unsaturated Fat: 10g
    • Trans Fat: 0g
    • Carbohydrates: 30g
    • Fiber: 2g
    • Protein: 20g
    • Cholesterol: 80mg

    Sharing is caring!

  • Greek Garbanzo Bean Salad: A Refreshing Delight Awaits!

    Greek Garbanzo Bean Salad: A Refreshing Delight Awaits!


    Introduction to Greek Garbanzo Bean Salad

    Let me take you on a culinary adventure that’s as easy as a summer breeze—introducing my Greek Garbanzo Bean Salad. It’s vibrant, refreshing, and just the right dish when you need something quick yet delicious, especially on those bustling days. This salad blends nutritious garbanzo beans with crisp vegetables and tangy feta, leaving everyone smiling at the dinner table. It’s a fantastic way to impress loved ones without spending all day in the kitchen. Plus, it’s versatile enough to become a staple in your meal rotation. Trust me, you won’t regret making this delightful dish!

    Why You’ll Love This Greek Garbanzo Bean Salad

    This Greek Garbanzo Bean Salad is the epitome of convenience and taste. With minimal prep time, you’ll have a colorful and nutritious dish ready in just minutes! The juicy cherry tomatoes and crunchy cucumber create a delightful texture, while the creamy feta adds a burst of flavor. It’s not just easy to make; it’s also healthy, making it the perfect answer to busy weeknight dinners or last-minute gatherings!

    Ingredients in Greek Garbanzo Bean Salad

    Gather around, my friends! Here’s your chance to assemble the star cast of our Greek Garbanzo Bean Salad. Each ingredient plays a vital role in crafting this delicious experience:

    • Garbanzo Beans: These nutrient-packed powerhouses offer protein and fiber, making them a filling base.
    • Cherry Tomatoes: Their natural sweetness and juiciness bring a lovely pop of color and flavor.
    • Cucumber: Cool and crunchy, cucumbers add a refreshing element that balances the other ingredients.
    • Red Onion: This vibrant ingredient provides a sharpness that brightens the entire dish. Just go light on the onions if you’ve got picky eaters!
    • Kalamata Olives: With their rich, briny taste, these olives enhance the Mediterranean flair of the salad.
    • Feta Cheese: The creamy tang of crumbled feta is just the finishing touch we all need!
    • Parsley: This fresh herb not only looks pretty but brings a burst of herbal taste that rounds out the flavors.
    • Extra Virgin Olive Oil: A drizzle of this golden elixir adds healthy fats and richness to the dressing.
    • Lemon Juice: Enhancing the taste of every ingredient, lemon juice provides a zesty brightness that wakes up the dish.
    • Dried Oregano: This aromatic herb is a classic in Greek cuisine, giving a herbaceous note that ties everything together.
    • Salt and Pepper: Essential for elevating flavors, these basic seasonings should be adjusted to your preference.

    Feel free to mix it up! You can toss in other veggies like bell peppers for an extra crunch or radishes for a peppery twist. Don’t hesitate to get creative! For exact measurements, check the end of the article where you’ll find all the details available for printing.

    How to Make Greek Garbanzo Bean Salad

    Ready to whip up this delightful Greek Garbanzo Bean Salad? Let’s break it down step by step! Each part is simple, quick, and will leave your taste buds dancing with joy. Grab your apron, and let’s get started!

    Step 1: Combine the Ingredients

    In a large mixing bowl, gather all your colorful ingredients. Add the drained and rinsed garbanzo beans, halved cherry tomatoes, diced cucumber, finely chopped red onion, sliced Kalamata olives, and crumbled feta cheese. Just looking at it will make your heart sing! Make sure everything is evenly distributed. You want each bite to deliver a punch of Mediterranean goodness.

    Step 2: Make the Dressing

    Now, let’s create that amazing dressing that really ties the salad together. In a small bowl, whisk together the extra virgin olive oil, fresh lemon juice, dried oregano, and a sprinkle of salt and pepper. This golden elixir is a must for boosting flavor! If you enjoy a little zest, feel free to add more lemon juice. Taste it to see if it tickles your palate just right!

    Step 3: Toss the Salad

    Pour your freshly whisked dressing over the salad ingredients. With gentle hands, toss everything together with love. I like to think of this step as giving your salad a warm hug. Make sure every ingredient is coated with that tantalizing dressing; it’s the best part! If you come across a little onion slice that’s trying to escape, don’t let it—keep it close!

    Step 4: Chill and Serve

    Here comes the secret to enhancing those flavors. Cover the salad and pop it in the refrigerator for at least 30 minutes. Chilling allows the ingredients to mingle and develop their personality. When you’re ready to serve, simply give it a gentle toss again and enjoy the refreshing taste. Each bite will remind you of sun-kissed Mediterranean beaches!

    Tips for Success

    • Make sure to rinse the garbanzo beans well to remove excess sodium.
    • Let the salad chill longer for enhanced flavor; overnight is even better!
    • Use fresh, high-quality olive oil for the best taste in your dressing.
    • Adjust seasoning according to your preference; a pinch of cayenne can add a nice kick!
    • Try mixing in seasonal vegetables for added nutrition and variety.

    Equipment Needed

    • Large Mixing Bowl: A medium-sized bowl works too, especially for smaller servings.
    • Small Bowl: Any small dish will do for whisking the dressing.
    • Whisk or Fork: A fork is a handy alternative for mixing your dressing.
    • Measuring Cups: If you prefer specific quantities, a set of measuring cups is useful.
    • Cutting Board and Knife: Essential for chopping your veggies with ease.

    Variations on Greek Garbanzo Bean Salad

    • Add Protein: Toss in grilled chicken or shrimp for a heartier meal.
    • Go Vegan: Skip the feta cheese and replace it with avocado or a vegan cheese alternative.
    • Spice it Up: Include diced jalapeños or a dash of hot sauce for those who enjoy a little heat.
    • Different Beans: Substitute garbanzo beans with black beans or kidney beans for a twist.
    • Herb Mix: Experiment with fresh basil or mint for a change in flavor profile.

    Serving Suggestions for Greek Garbanzo Bean Salad

    • Pair the salad with warm pita bread for a delightful Mediterranean feast.
    • Serve alongside grilled chicken or fish for a well-rounded meal.
    • Consider a refreshing glass of iced tea or sparkling water to complement the salad.
    • Present the salad in a beautiful bowl; garnishing with extra parsley adds charm.
    • For a picnic vibe, pack servings into mason jars for easy transport!

    FAQs about Greek Garbanzo Bean Salad

    Can I make Greek Garbanzo Bean Salad ahead of time?
    Absolutely! In fact, making this salad a day ahead enhances the flavor as all the ingredients have time to mingle. Just cover and refrigerate until you’re ready to serve.

    How can I store leftovers?
    Store any leftover Greek Garbanzo Bean Salad in an airtight container in the refrigerator for up to three days. Just give it a little toss before serving again.

    Can I use dried garbanzo beans?
    Yes, you can! Just make sure to soak them overnight and cook them until tender before adding them to the salad. This option adds a lovely homemade touch.

    What if I don’t like feta cheese?
    No problem! You can skip the feta or opt for a dairy-free cheese alternative. Avocado is also a creamy and delicious substitute that works well in this salad.

    Is this salad gluten-free?
    Yes, this Greek Garbanzo Bean Salad is naturally gluten-free, making it a perfect choice for those with dietary restrictions. Enjoy without worries!

    Final Thoughts

    Making this Greek Garbanzo Bean Salad brings a sense of joy and satisfaction that’s hard to match. It’s not just about the delicious flavors dancing on your palate, but the nourishing ingredients that fuel your body and mind. Imagine gathering with family around the table, everyone raving about this delightful dish you created. Whether it’s for a busy weeknight dinner or a spring picnic, this salad consistently impresses and provides comfort. I hope you relish every bite and share the love! Seriously, it’s a refreshing reminder of how food can bring us together and create cherished memories.


    Print

    clock clock iconcutlery cutlery iconflag flag iconfolder folder iconinstagram instagram iconpinterest pinterest iconfacebook facebook iconprint print iconsquares squares iconheart heart iconheart solid heart solid icon

    Description

    A refreshing and nutritious salad featuring garbanzo beans and fresh vegetables, perfect for a light meal or side dish.


    • 1 can (15 oz) garbanzo beans, drained and rinsed
    • 1 cup cherry tomatoes, halved
    • 1 cucumber, diced
    • 1/2 red onion, finely chopped
    • 1/2 cup Kalamata olives, pitted and sliced
    • 1/2 cup feta cheese, crumbled
    • 1/4 cup fresh parsley, chopped
    • 2 tbsp extra virgin olive oil
    • 1 tbsp lemon juice
    • 1 tsp dried oregano
    • Salt and pepper to taste

    1. In a large bowl, combine the garbanzo beans, cherry tomatoes, cucumber, red onion, Kalamata olives, and feta cheese.
    2. In a small bowl, whisk together the olive oil, lemon juice, dried oregano, salt, and pepper.
    3. Pour the dressing over the salad and toss gently to combine.
    4. Sprinkle the chopped parsley on top and mix lightly.
    5. Cover the salad and refrigerate for at least 30 minutes to allow the flavors to meld.
    6. Serve chilled and enjoy.

    Notes

    • For added flavor, consider marinating the salad for longer before serving.
    • This salad can be kept in the refrigerator for up to 3 days.
    • Prep Time: 15 minutes
    • Cook Time: 0 minutes
    • Category: Salad
    • Method: No-Cook
    • Cuisine: Greek

    Nutrition

    • Serving Size: 1 serving
    • Calories: 220
    • Sugar: 3g
    • Sodium: 480mg
    • Fat: 12g
    • Saturated Fat: 3g
    • Unsaturated Fat: 8g
    • Trans Fat: 0g
    • Carbohydrates: 24g
    • Fiber: 6g
    • Protein: 8g
    • Cholesterol: 10mg

    Sharing is caring!

  • Oven-Baked Cabbage Burgers

    Oven-Baked Cabbage Burgers


    Introduction to Oven-Baked Cabbage Burgers

    Hey there, fellow food lovers! If you’re looking for a delicious, low-carb meal that won’t eat up your entire evening, Oven-Baked Cabbage Burgers are just the ticket. Picture this: juicy seasoned meat nestled between hearty cabbage slices, all baked to perfection. It’s not just quick to whip up but also incredibly satisfying. Trust me; it’s a dish that’ll impress your loved ones while making your kitchen smell divine. Whether it’s a busy weeknight or you’re just craving something different, these burgers are the perfect solution. Let’s dive in and bring some joy to our dining tables!

    Why You’ll Love This Oven-Baked Cabbage Burgers

    Oven-Baked Cabbage Burgers are a fantastic option for anyone short on time but big on flavor. They come together in a snap, great for busy weeknights or quick lunches. Plus, they’re healthier than typical burgers, leaving you feeling satisfied without the regret. The juicy beef (or turkey) paired with crispy cabbage is a match made in heaven. You’ll find yourself craving these nutritious delights again and again!

    Ingredients for Oven-Baked Cabbage Burgers

    Here’s what you’ll need to whip up these tasty Oven-Baked Cabbage Burgers:

    • Cabbage: A small head, cut into thick slices. This acts as a sturdy and crunchy “bun” delivering tons of nutrients.
    • Ground Beef or Turkey: 1 ½ lbs. Choose beef for a classic flavor, or turkey for a lighter twist.
    • Onion: A small one, finely chopped. It adds a sweet and savory touch to your meat mixture.
    • Garlic: Use 2 cloves, minced. Garlic boosts the flavor and gives that aromatic appeal we all love.
    • Salt & Pepper: 1 tsp of salt and ½ tsp of pepper. Simple, yet essential for bringing all the tastes together.
    • Smoked Paprika: 1 tsp. It brings a lovely smoky flavor that elevates the dish.
    • Worcestershire Sauce: 1 tsp. This adds depth and umami to your burger mix.
    • Shredded Cheese: ½ cup of your favorite kind, like cheddar or mozzarella. Melty cheese on top? Yes, please!
    • Olive Oil: 2 tbsp for brushing the cabbage. It helps achieve that beautiful golden-brown color.
    • Egg: 1, optional for binding. It adds a lovely richness to the meat mixture.

    Feel free to customize by adding your favorite herbs or spices! And don’t forget, you can find the exact measurements for each ingredient at the bottom of the article, ready for printing.

    How to Make Oven-Baked Cabbage Burgers

    Step 1: Preheat the Oven

    First things first, let’s get that oven fired up! Preheat it to 375°F (190°C) while you prepare your ingredients. This will ensure that your Oven-Baked Cabbage Burgers cook evenly and come out perfectly crispy.

    Step 2: Prepare the Cabbage

    Next, take that small head of cabbage and cut it into thick slices, about ½ inch each. Think of these slices as the perfect burger “buns”! Brush both sides with olive oil. This will not only help them brown nicely but also add a lovely flavor. Place those beautiful cabbage rounds onto a lined baking sheet. Make sure they are spaced out to let them breathe!

    Step 3: Make the Burger Mixture

    In a large bowl, it’s time to combine your ingredients. Mix together the ground beef or turkey with the finely chopped onion, minced garlic, salt, black pepper, smoked paprika, and Worcestershire sauce. If you’re feeling adventurous, toss in some herbs or spices you love. If you’re using an egg, now’s the time to add it for binding. Get in there and mix it well until everything is nicely combined. This is where all the flavor magic happens!

    Step 4: Assemble the Burgers

    Now comes the fun part—shaping your burgers! Take a handful of the meat mixture and press it onto each cabbage slice, forming it into a patty. Don’t fret about perfection; they’ll look rustic and delicious when they come out of the oven! Just make sure the meat is evenly distributed, covering the cabbage well.

    Step 5: Bake the Burgers

    Place your assembled cabbage burgers into the preheated oven and bake for about 25 minutes. This gives the beef time to cook through and allows those cabbage “buns” to soften while still holding their shape. Meanwhile, let your kitchen fill with that mouthwatering aroma. Seriously, it’s like an invitation to a feast!

    Step 6: Broil with Cheese

    Once the baking time is up, pull those burgers out of the oven. Here’s the treat—sprinkle your favorite shredded cheese generously on top of each burger. Now, put them back in and switch the oven to broil. Broil for just 3 to 5 minutes, or until the cheese is melted and lightly golden. If you find it hard to resist snacking while you wait, I won’t judge!

    Step 7: Serve and Enjoy

    Your Oven-Baked Cabbage Burgers are ready to shine! Garnish with a sprinkle of fresh parsley if you like. Serve them up with a side of sour cream, mustard, or your favorite dipping sauce. Trust me, every bite is a joy! You’ll find these low-carb delights are not just a meal but an experience. Get ready to impress your family!

    Tips for Success

    • For easier slicing, chill the cabbage in the fridge for about 30 minutes before cutting.
    • Ensure the meat mixture is well-combined for even flavor distribution.
    • Don’t skip the egg if you’re using ground turkey; it helps with binding.
    • Experiment with spices to match your taste preferences!
    • Keep an eye on the broiler; cheese can go from golden to burnt quickly.

    Equipment Needed

    • Baking Sheet: A standard sheet works perfectly, but a cast-iron skillet can add a nice touch.
    • Parchment Paper: Use for easy cleanup; foil is a suitable alternative.
    • Mixing Bowl: Any large bowl will do, like a glass or stainless steel one.
    • Sharp Knife: Needed for slicing cabbage; a chef’s knife makes it a breeze.
    • Brush: For olive oil. A silicone brush or even a spoon can substitute.

    Variations of Oven-Baked Cabbage Burgers

    • Vegetarian Option: Swap ground beef with a plant-based meat alternative for a delicious vegetarian version.
    • Spicy Kick: Add 1-2 teaspoons of chili powder or crushed red pepper flakes to the meat mixture for an extra zing.
    • Herb Infusion: Incorporate fresh herbs like parsley, cilantro, or basil into the meat mix for vibrant flavor.
    • Cheesy Goodness: Mix some shredded cheese directly into the meat mixture for a cheesy surprise inside!
    • Mediterranean Flair: Substitute garlic and onion with sun-dried tomatoes and feta cheese for a Mediterranean twist.

    Serving Suggestions

    • Crunchy Side Salad: Pair your burgers with a fresh salad, tossed with lemon vinaigrette for a zesty balance.
    • Fresh Veggies: Serve alongside steamed broccoli or roasted veggies for a colorful plate.
    • Beverage Pairing: A light iced tea or sparkling water complements the flavors beautifully.
    • Presentation: Arrange burgers on a wooden board with dipping sauces for an inviting display.

    FAQs about Oven-Baked Cabbage Burgers

    Can I use a different type of meat for these burgers?

    Absolutely! You can substitute ground beef with ground turkey, chicken, or even a meat alternative for a vegetarian option. Each choice will bring its own unique flavor!

    How do I store leftover cabbage burgers?

    After enjoying your Oven-Baked Cabbage Burgers, store any leftovers in an airtight container in the fridge. They’ll keep fresh for up to 3 days, making them perfect for quick meals later!

    Can I freeze these burgers?

    Yes, you can! Before baking, freeze the assembled burgers on a baking sheet. Once frozen, transfer them to a freezer bag. They’re great for a quick meal down the road!

    What can I serve with these low-carb burgers?

    Pair your Oven-Baked Cabbage Burgers with a side salad, roasted veggies, or a light dipping sauce like spicy mustard or yogurt. These additions will keep your meal tasty and balanced!

    How do I know when the burgers are fully cooked?

    To ensure they’re cooked through, check that the internal temperature reaches 160°F (71°C) for ground beef or turkey. A simple meat thermometer will help you avoid any guesswork!

    Final Thoughts

    Cooking should be a joyful experience, and these Oven-Baked Cabbage Burgers deliver just that. They’re not just a meal; they’re a flavorful journey that brings family and friends together. With each bite, you get a delightful crunch along with satisfying comfort from the seasoned meat. Plus, the ease of preparing them makes dinner less of a chore and more of a pleasure. Whether you’re counting carbs or simply seeking something new, these burgers promise to be a hit. Don’t just take my word for it; give them a try and watch your loved ones smile!


    Print

    clock clock iconcutlery cutlery iconflag flag iconfolder folder iconinstagram instagram iconpinterest pinterest iconfacebook facebook iconprint print iconsquares squares iconheart heart iconheart solid heart solid icon

    Description

    Oven-Baked Cabbage Burgers are a delicious low-carb alternative to traditional burgers, offering a flavorful and healthy meal option.


    • 1 small head of cabbage (cut into thick slices)
    • 1 ½ lbs ground beef (or ground turkey)
    • 1 small onion (finely chopped)
    • 2 cloves garlic (minced)
    • 1 tsp salt
    • ½ tsp black pepper
    • 1 tsp smoked paprika
    • 1 tsp Worcestershire sauce
    • ½ cup shredded cheese (cheddar, mozzarella, or your favorite)
    • 2 tbsp olive oil
    • 1 egg (optional, for binding)

    1. Preheat oven to 375°F (190°C). Line a baking sheet with parchment paper.
    2. Prepare the cabbage: Slice the cabbage into thick rounds (about ½-inch thick). Brush both sides with olive oil and place on the baking sheet.
    3. Make the burger mixture: In a bowl, combine ground beef, onion, garlic, salt, pepper, paprika, Worcestershire sauce, and egg (if using). Mix well.
    4. Assemble the burgers: Take a handful of the meat mixture and press it onto each cabbage slice, shaping it into a patty.
    5. Bake for 25 minutes, then remove from the oven and sprinkle cheese on top of each burger.
    6. Broil for 3-5 minutes until cheese is melted and slightly golden.
    7. Serve & enjoy: Garnish with fresh parsley or serve with a side of sour cream, mustard, or your favorite dipping sauce!

    Notes

    • For a vegetarian option, substitute ground beef with a plant-based meat alternative.
    • Feel free to add additional spices or herbs to the meat mixture for extra flavor.
    • Cabbage can be stored in an airtight container in the fridge for up to 3 days.
    • Prep Time: 15 minutes
    • Cook Time: 30 minutes
    • Category: Main Course
    • Method: Baking
    • Cuisine: American

    Nutrition

    • Serving Size: 1 burger
    • Calories: 250
    • Sugar: 2g
    • Sodium: 400mg
    • Fat: 15g
    • Saturated Fat: 6g
    • Unsaturated Fat: 8g
    • Trans Fat: 0g
    • Carbohydrates: 10g
    • Fiber: 3g
    • Protein: 20g
    • Cholesterol: 60mg

    Sharing is caring!

  • 7-Ingredient Essential Mediterranean Chicken Skillet

    7-Ingredient Essential Mediterranean Chicken Skillet


    Introduction to 7-Ingredient Essential Mediterranean Chicken Skillet

    As a passionate home cook, I know how hectic daily life can be. That’s why I’m thrilled to share my 7-Ingredient Essential Mediterranean Chicken Skillet recipe with you! This dish is not just quick to prepare; it brings a taste of the Mediterranean right to your table. With just a handful of easy ingredients, it’s the perfect meal for busy moms and professionals who still want to impress their loved ones. Trust me—your family will think you slaved over this meal for hours. Let’s dive into this delicious culinary adventure together!

    Why You’ll Love This 7-Ingredient Essential Mediterranean Chicken Skillet

    This 7-Ingredient Essential Mediterranean Chicken Skillet is a lifesaver on those busy weeknights! It’s not just about quick cooking; it’s about the delightful flavors that transport you to a sun-drenched villa in Greece. With minimal prep, you can whip up a healthy meal that satisfies everyone at the table. Plus, it’s gluten-free, making it suitable for various dietary needs. Who wouldn’t love that?

    Ingredients for 7-Ingredient Essential Mediterranean Chicken Skillet

    Gathering the right ingredients is key to creating a sensational dish. Here’s what you’ll need for this 7-Ingredient Essential Mediterranean Chicken Skillet:

    • Chicken Breast: Lean protein that cooks quickly when cut lengthwise. Use boneless, skinless pieces for convenience.
    • Gluten-Free Flour: Perfect for dredging the chicken to achieve a delightful crispiness. Regular flour can be used if gluten isn’t a concern.
    • Salt: A little seasoning goes a long way! It enhances the natural flavors of the chicken and vegetables.
    • Black Pepper: Adds a bit of warmth and depth to the dish. Freshly ground is always a nice touch.
    • Olive Oil: This Mediterranean staple is not only healthy but also provides a rich flavor to your chicken.
    • Roasted Artichoke Hearts: Tender and packed with flavor, they bring that authentic Mediterranean taste to the skillet.
    • Sun-Dried Tomatoes: These tiny bites are like sunshine captured in a jar! They add a sweet, tangy essence.
    • Capers: Briny and bold, capers give an exciting punch. They are wonderful for balancing flavors.
    • Lemon Juice: Freshly squeezed juice brightens the dish and complements the savory elements beautifully.
    • Almond Milk: A dairy-free option that keeps the sauce creamy. Feel free to use any milk you enjoy!
    • Parsley: Freshly chopped, this small garnish adds a pop of color and freshness to the finished dish.

    All ingredient measurements are conveniently outlined at the bottom of the article and are ready for you to print out!

    How to Make 7-Ingredient Essential Mediterranean Chicken Skillet

    Now comes the fun part! Making this 7-Ingredient Essential Mediterranean Chicken Skillet is a joyful experience that fills your kitchen with tantalizing aromas. Here’s how to bring everything together:

    Step 1: Prepare the Chicken

    Start by mixing 2 tablespoons of gluten-free flour with salt and pepper in a medium bowl. This is your seasoned flour!

    Take each piece of chicken breast and lightly dredge it in the mix. You want just enough flour to give it a bit of coating, helping it develop flavor while it cooks. Trust me, seasoning the chicken is key to elevated taste!

    Step 2: Sear the Chicken

    Heat 2 tablespoons of olive oil in a large skillet over medium heat. Once hot, gently add the chicken to the skillet. Searing is crucial; it creates a beautiful golden crust while locking in moisture.

    Cook the chicken for about 10–12 minutes on each side until golden brown and cooked through. If your pan is crowded, don’t hesitate to work in batches. Remove the chicken when done and keep it warm under a cover while you prepare the sauce.

    Step 3: Make the Sauce Base

    In a small bowl, whisk together 1 tablespoon of gluten-free flour and 1 cup of almond milk until the mixture is completely smooth. This will be the base of your sauce, thickening it beautifully.

    Next, pour this mixture into the skillet, adding the tangy juice of 2 tablespoons of freshly squeezed lemon juice. Combining these elements brings creaminess and a zesty burst that pairs perfectly with your chicken!

    Step 4: Add Vegetables and Simmer

    With the skillet still on medium heat, add the drained roasted artichoke hearts, sun-dried tomatoes, and capers. Sauté for about 2 minutes, allowing the flavors to meld together.

    These vegetables not only intensify the dish but also add vibrant colors and textures. The briny capers combined with the sweet, tangy sun-dried tomatoes are simply heavenly!

    Step 5: Combine Everything

    Now, it’s time to bring everything back together. Return the chicken to the skillet and let it simmer in the mixture for another 2–3 minutes. This allows the chicken to soak up the rich flavors and ensures everything is heated through.

    As the chicken mingles with the sauce, you’ll see a delightful transformation happening right in front of your eyes!

    Step 6: Garnish and Serve

    To make your dish pop, garnish with a sprinkle of freshly chopped parsley. It adds a lovely touch and a burst of freshness!

    Serve your beautiful 7-Ingredient Essential Mediterranean Chicken Skillet warm, perhaps with a side of fluffy rice or quinoa to soak up every drop of delicious sauce. Enjoy the smiles at your dinner table!

    Tips for Success

    • Don’t rush the searing—allow the chicken to develop a golden crust for the best flavor.
    • Consider marinating the chicken in lemon juice and herbs for extra zing!
    • Keep all ingredients prepped and measured before starting to make the cooking flow easier.
    • Serve with a side of Mediterranean quinoa salad for a complete meal.
    • Taste as you go to ensure the flavors are perfect before serving!

    Equipment Needed

    • Large Skillet: A heavy-bottomed skillet is best for even cooking. A non-stick option works well too.
    • Medium Bowl: For mixing the seasoned flour and almond milk.
    • Whisk: Essential for achieving a smooth sauce. A fork will do in a pinch!
    • Spatula: Handy for flipping the chicken and stirring the ingredients.

    Variations of 7-Ingredient Essential Mediterranean Chicken Skillet

    • Herb Variation: Add fresh herbs like thyme or oregano for an aromatic twist.
    • Veggie Boost: Toss in some fresh spinach or bell peppers to increase the vegetable content.
    • Protein Swap: Use shrimp or tofu for a delightful alternative to chicken while keeping it gluten-free.
    • Spicy Kick: Incorporate red pepper flakes for a little heat in every bite.
    • Creamy Twist: Stir in a dollop of Greek yogurt or dairy-free cream for an extra creamy sauce.
    • Zesty Flavor: Add a splash of white wine for a deeper flavor profile while cooking the sauce.

    Serving Suggestions for 7-Ingredient Essential Mediterranean Chicken Skillet

    • Pair with fluffy rice or quinoa to soak up the tasty sauce.
    • A crisp green salad with a lemon vinaigrette complements the dish wonderfully.
    • Serve with warm, crusty bread to scoop up every last bite.
    • A glass of chilled white wine enhances the flavors beautifully.
    • For a festive touch, garnish with lemon wedges and additional parsley before serving.

    FAQs about 7-Ingredient Essential Mediterranean Chicken Skillet

    Can I use another type of milk in the 7-Ingredient Essential Mediterranean Chicken Skillet?

    Absolutely! You can swap out almond milk for any milk of your choice, such as cow’s milk, cashew milk, or soy milk. Just keep in mind that this may slightly change the flavor.

    Is this recipe suitable for meal prep?

    Yes! This 7-Ingredient Essential Mediterranean Chicken Skillet is perfect for meal prep. You can make it ahead, store it in the fridge for 3–4 days, and reheat it when ready to enjoy!

    Can I freeze leftovers from the Mediterranean chicken skillet?

    Definitely! This dish freezes well. Just make sure to cool it completely before transferring it to an airtight container. It can last up to three months in the freezer.

    How can I make the chicken more flavorful?

    For added flavor, consider marinating the chicken in lemon juice, garlic, and herbs before cooking. It enhances the taste and gives you juicy chicken every time!

    What sides pair well with this dish?

    Serving this 7-Ingredient Essential Mediterranean Chicken Skillet with fluffy rice, quinoa, or a fresh salad will make for a complete meal that your family will love!

    Final Thoughts

    Cooking is not just about feeding the body; it’s about nourishing the soul. My 7-Ingredient Essential Mediterranean Chicken Skillet captures the essence of both. With its vibrant flavors and simple approach, it turns hectic evenings into delightful dinners. Sharing this dish with my family always brings smiles and a sense of togetherness. So, whether you’re a seasoned cook or just starting out, this recipe empowers you to bring a taste of the Mediterranean to your table. Enjoy every moment and savor the joy of creating something delicious and memorable for your loved ones!


    Print

    clock clock iconcutlery cutlery iconflag flag iconfolder folder iconinstagram instagram iconpinterest pinterest iconfacebook facebook iconprint print iconsquares squares iconheart heart iconheart solid heart solid icon

    Description

    As a passionate home cook, I know how hectic daily life can be. That’s why I’m thrilled to share my 7-Ingredient Essential Mediterranean Chicken Skillet recipe with you! This dish is not just quick to prepare; it brings a taste of the Mediterranean right to your table. With just a handful of easy ingredients, it’s the perfect meal for busy moms and professionals who still want to impress their loved ones. Trust me—your family will think you slaved over this meal for hours. Let’s dive into this delicious culinary adventure together!


    • 1.5 pounds chicken breast, cut lengthwise to cook faster
    • 2 tablespoons gluten-free flour (for dredging)
    • 1/2 teaspoon salt
    • 1/4 teaspoon ground black pepper
    • 2 tablespoons olive oil
    • 8 ounces canned roasted artichoke hearts, drained
    • 3 ounces sun-dried tomatoes
    • 3 tablespoons capers, drained
    • 2 tablespoons lemon juice, freshly squeezed
    • 1 tablespoon gluten-free flour (for the sauce)
    • 1 cup almond milk (or any milk of choice)
    • 1 tablespoon freshly chopped parsley, for garnish

    1. In a medium bowl, combine 2 tablespoons gluten-free flour with salt and pepper. Lightly dredge each piece of chicken breast in the seasoned flour.
    2. Heat olive oil in a large skillet over medium heat. Add chicken and sear for 10–12 minutes per side, or until golden and cooked through. Work in batches if needed. Remove chicken and set aside, covered.
    3. In a small bowl, whisk 1 tablespoon flour into the almond milk until smooth.
    4. In the same skillet, add artichoke hearts, sun-dried tomatoes, and capers. Sauté for 2 minutes, then pour in the almond milk mixture and lemon juice. Stir well and let it simmer until slightly thickened.
    5. Return the chicken to the skillet and simmer for another 2–3 minutes, allowing everything to heat through.
    6. Garnish with chopped parsley and serve warm.

    Notes

    • This dish is great served with rice or quinoa.
    • You can substitute the almond milk with any milk of choice.
    • For added flavor, consider marinating the chicken in lemon juice and herbs before cooking.
    • Prep Time: 15 minutes
    • Cook Time: 20 minutes
    • Category: Main Dish
    • Method: Skillet
    • Cuisine: Mediterranean

    Nutrition

    • Serving Size: 1 serving
    • Calories: 350
    • Sugar: 3g
    • Sodium: 600mg
    • Fat: 15g
    • Saturated Fat: 2g
    • Unsaturated Fat: 10g
    • Trans Fat: 0g
    • Carbohydrates: 25g
    • Fiber: 5g
    • Protein: 30g
    • Cholesterol: 80mg

    Sharing is caring!