Category: Uncategorized

  • Smoked Shotgun Shells Bacon: A Flavor Explosion Awaits!

    Smoked Shotgun Shells Bacon: A Flavor Explosion Awaits!


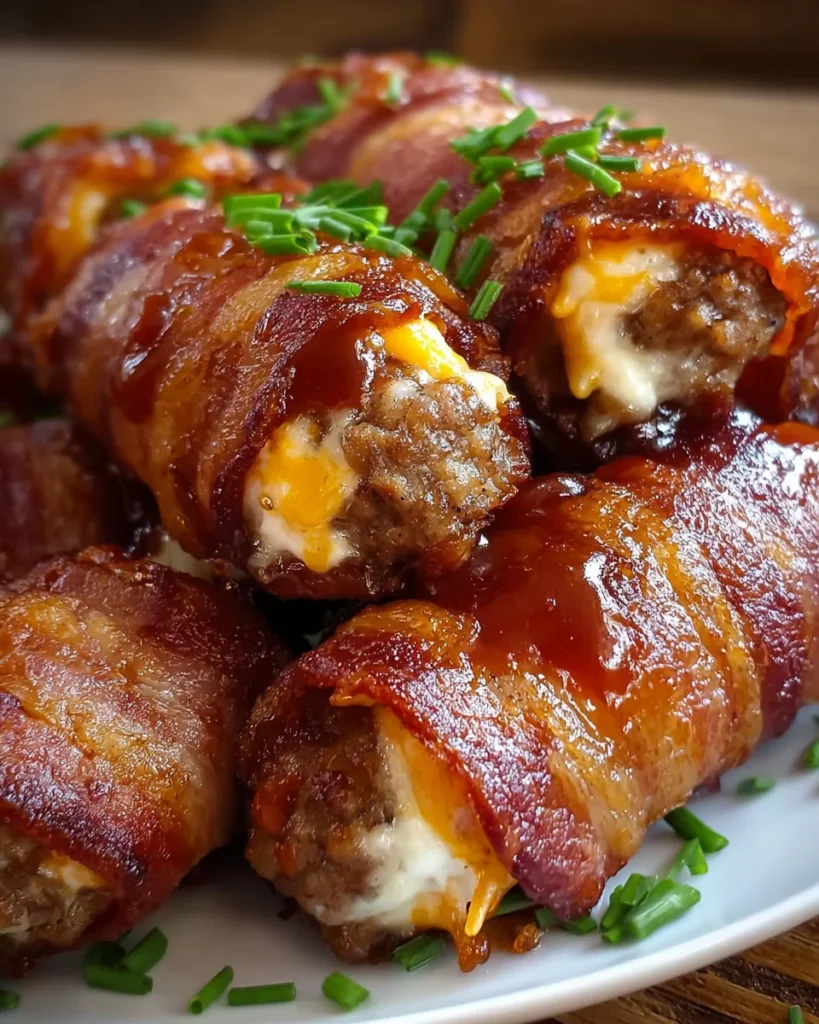
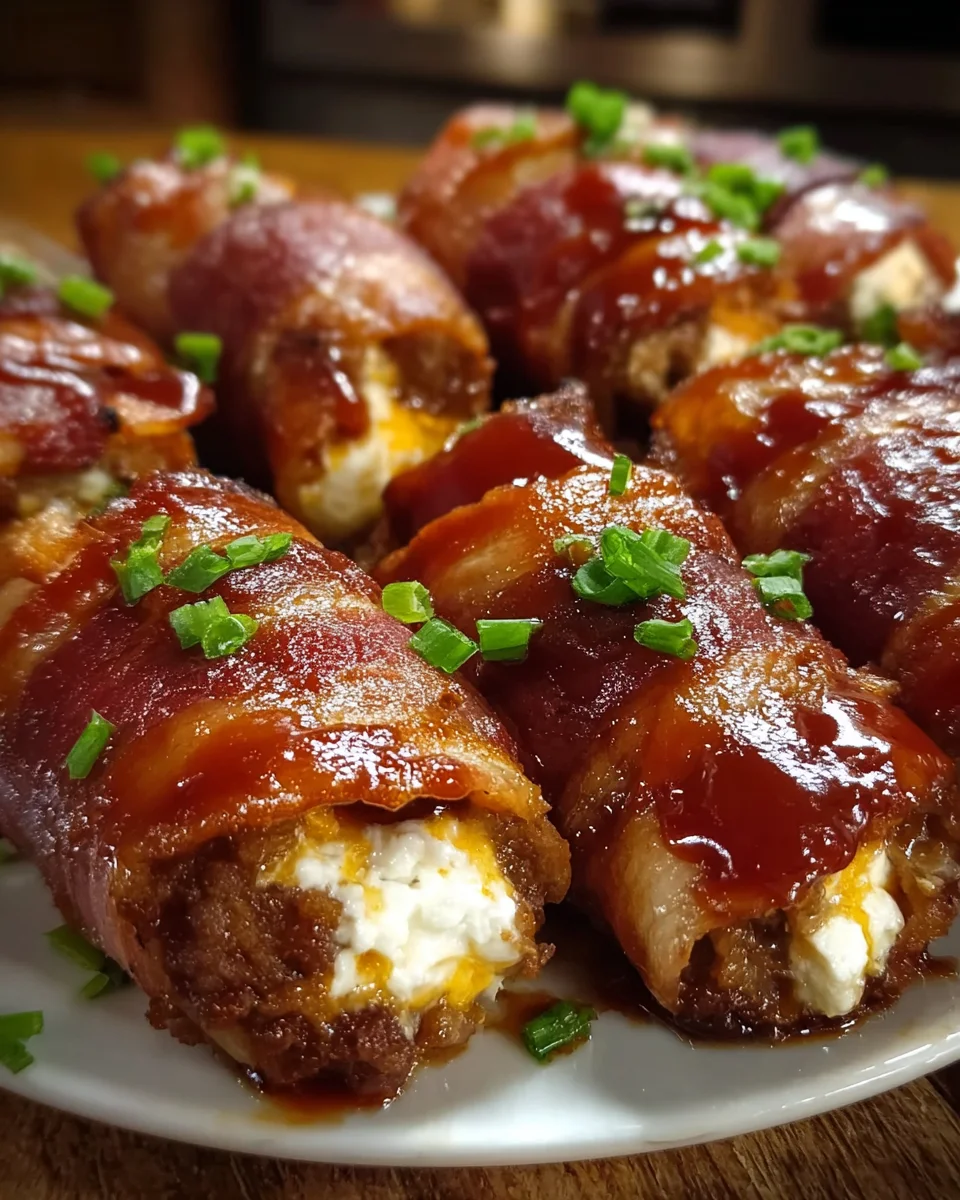
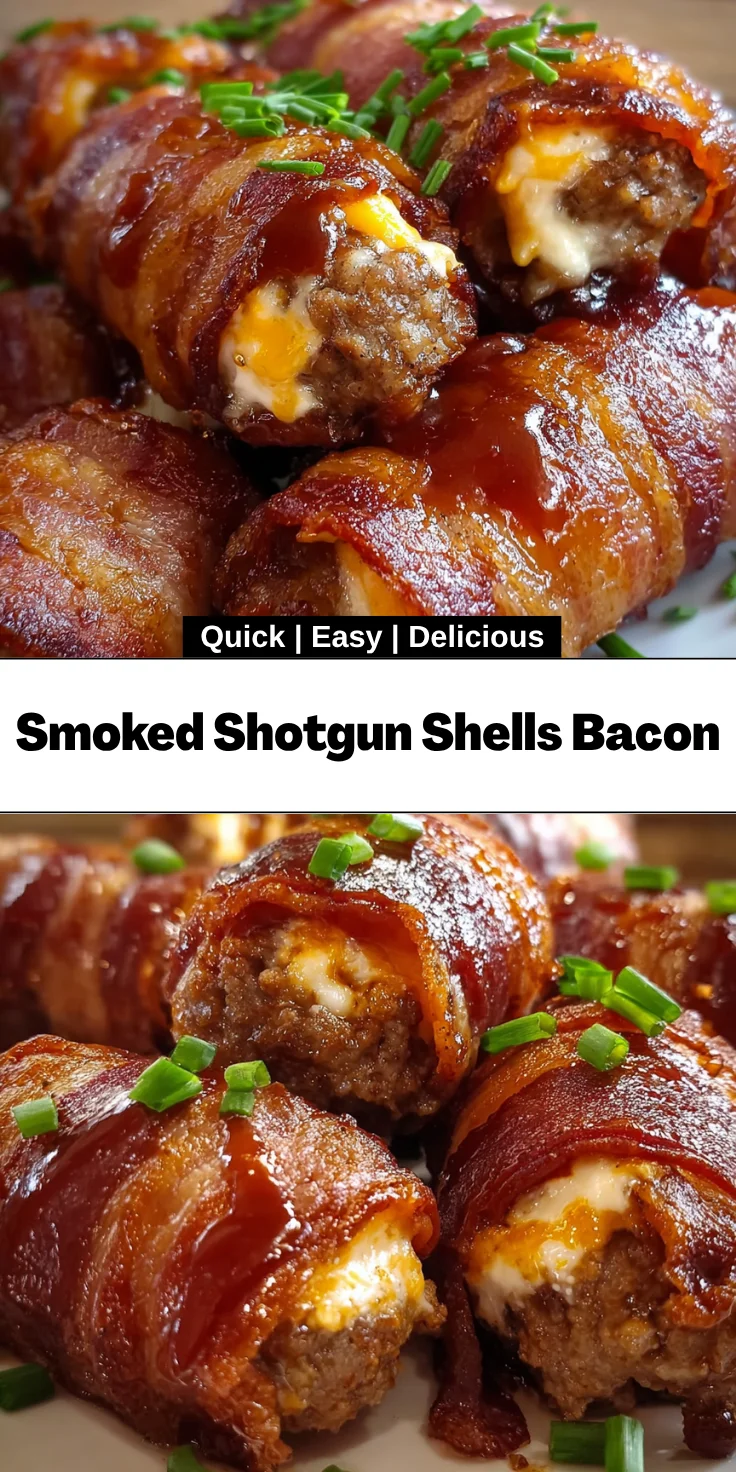
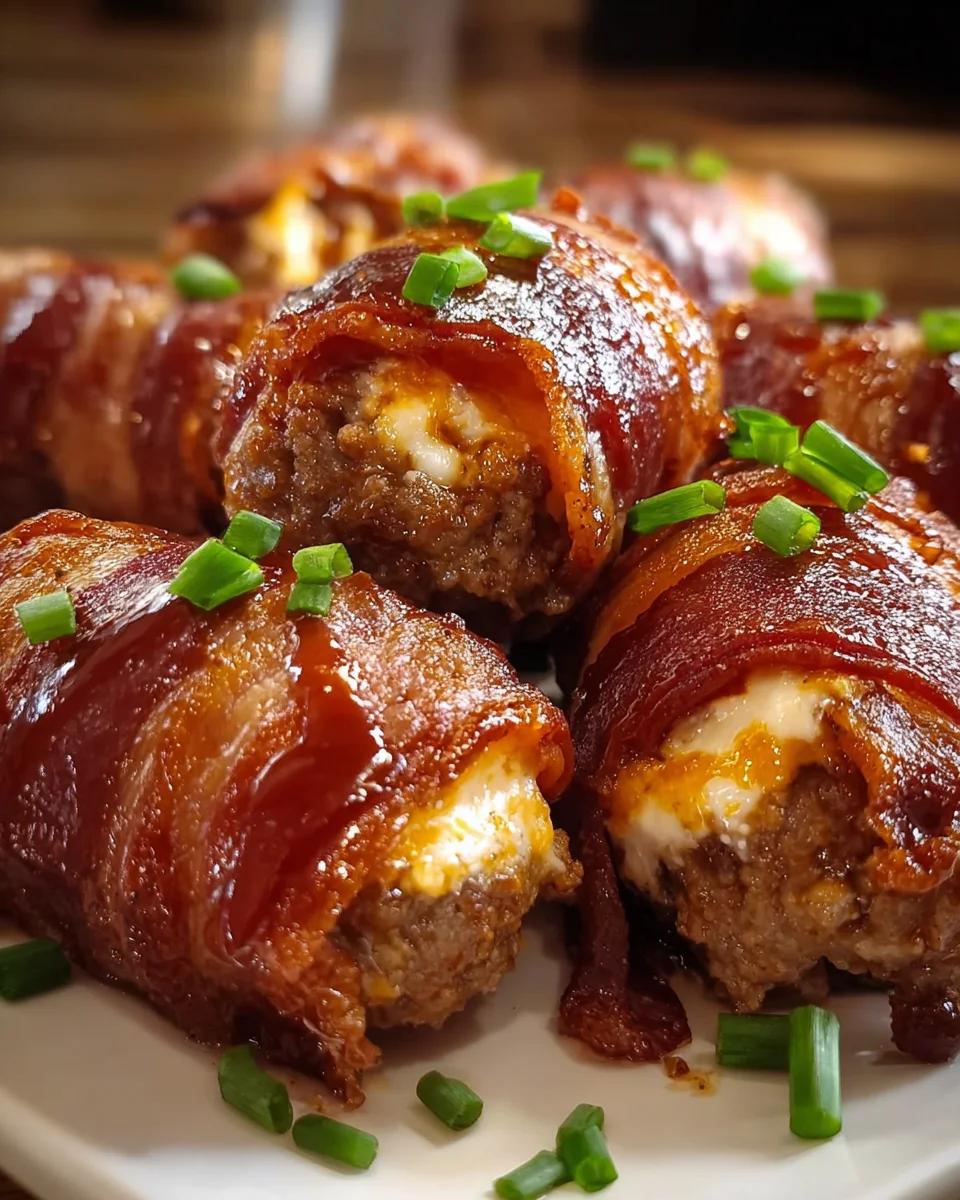
    Introduction to Smoked Shotgun Shells Bacon

    Welcome to a flavor adventure with Smoked Shotgun Shells Bacon! As a busy mom, I know how challenging it can be to whip up meals that are both delicious and quick. These smoked delights are perfect for those hectic days when you want something truly special yet simple. Imagine crispy bacon embracing cheesy, beefy goodness—all stuffed into tender manicotti shells. It’s the type of dish that will wow your family and friends or elevate your next backyard gathering. Trust me, once you try these smoky treats, they’ll be requested again and again!

    Why You’ll Love This Smoked Shotgun Shells Bacon

    Let’s be honest—finding meals that are both easy to prepare and drool-worthy can feel like searching for a unicorn. But these Smoked Shotgun Shells Bacon deliver! They come together quickly, allowing you to enjoy quality time with your loved ones while the smoker does its magic. The combination of flavors is simply irresistible, making every bite a celebration. Plus, they’re great for feeding a crowd, ensuring your gatherings shine!

    Ingredients for Smoked Shotgun Shells Bacon

    Let’s dive into the scrumptious world of ingredients that make these Smoked Shotgun Shells Bacon truly unforgettable. Each component adds its own flair to this culinary creation, making it irresistibly delicious.

    • Manicotti shells: These tubular pasta shells serve as the cozy home for our flavorful filling, providing a delightful bite.
    • Ground beef: Lean and juicy, this beef creates a savory base that’s hearty and satisfying. Feel free to substitute ground turkey or chicken for a lighter option.
    • Shredded cheddar cheese: Cheddar adds a rich, melty texture and a hint of sharpness, enhancing the overall flavor profile.
    • Cream cheese: Softened cream cheese lends creaminess to the mixture, making it smooth and decadent. You can swap this with ricotta cheese for a slightly different taste.
    • BBQ sauce: This gives a smoky-sweet flavor that ties everything together. Choose your favorite brand or make your own for a personal touch.
    • Garlic powder: A sprinkle of this adds an aromatic warmth that elevates the dish. Fresh minced garlic can work if preferred—just adjust the quantity.
    • Onion powder: This ingredient offers a mild but rich taste, enhancing the depth of flavor in your filling.
    • Smoked paprika: Like a kiss from the grill, smoked paprika provides that deep, smoky flavor that’s absolutely essential for our recipe.
    • Salt and black pepper: These pantry staples help balance and elevate the overall flavors of your filling.
    • Bacon: The star of the show! Crispy bacon wraps each manicotti shell in a savory embrace, flattering every bite.
    • Extra BBQ sauce for basting: This gives your shells a mouthwatering glaze while they’re smoking. Don’t hold back; it’s worth it!

    For the exact measurements, you can find them at the bottom of the article, perfect for printing your shopping list. Happy cooking!

    How to Make Smoked Shotgun Shells Bacon

    Now, let’s roll up our sleeves and get to the exciting part: making these Smoked Shotgun Shells Bacon! Follow these simple steps for a masterpiece that will tantalize taste buds and become the star of your kitchen.

    Preheat the Smoker

    Start by preheating your smoker to 250°F (120°C). This temperature is perfect for allowing the flavors to meld beautifully.

    Setting up the Right Temperature

    Make sure your smoker is well-calibrated. If it has a water pan, fill it to keep moisture levels up. I find that a touch of hickory or applewood enhances the smoky flavor, adding depth to the bacon. Just imagine the aroma wafting through your backyard!

    Prepare the Manicotti Shells

    While the smoker does its thing, it’s time to prepare those manicotti shells. Boil water in a large pot for cooking.

    Cooking Guidelines and Tips

    Cook the manicotti shells gently according to package instructions until they’re al dente. You want them firm enough to hold the filling but soft enough to bite into. Drain them and lay them out on a clean surface to cool.

    Mix the Filling

    Next comes the fun of mixing your filling! In a large bowl, combine ground beef, cheddar cheese, cream cheese, BBQ sauce, and all the seasoning.

    Tips for a Flavorful Mixture

    Mix it all with enthusiasm, breaking up any lumps. I usually use my hands for the best texture—don’t be shy! The flavors meld together and create a savory delight that fills every shell with warmth.

    Stuff the Shells

    Grab those manicotti shells and start the stuffing process. This part is key to ensuring each bite is packed with flavor!

    How to Properly Fill Each Shell

    Using a spoon or a piping bag, carefully fill each manicotti shell with the beef and cheese mixture. Don’t overstuff; just enough so they snugly hold the filling. The goal here is a perfect bite without excess spilling out!

    Wrap with Bacon

    Now, let’s get crispy! It’s time to wrap each filled manicotti shell with a slice of bacon.

    Ensuring a Tight Seal

    Make sure each shell is wrapped completely, overlapping the bacon for good coverage. Use toothpicks to secure the ends if needed. This step is crucial because we want every bite to be bursting with flavor and crunch.

    Smoke the Shells

    Finally, it’s time to let these beauties work their magic in the smoker.

    Optimal Smoking Techniques

    Place the bacon-wrapped shells on the smoker rack. Smoke them for 1.5 to 2 hours, basting every 30 minutes with BBQ sauce for added flavor. Keep an eye on the internal temperature—it should reach 165°F (74°C). The bacon should turn golden and crispy, creating an irresistible texture!

    Tips for Success

    • Always check the doneness of the bacon; it should be crispy but not burnt.
    • Use a meat thermometer to ensure your Smoked Shotgun Shells Bacon reaches 165°F.
    • Experiment with different fillings, such as pepper jack cheese or sausage, to switch it up.
    • For easier stuffing, consider using a piping bag.
    • Plan ahead—make extra for meal prep or freezing, because trust me, you’ll want leftovers!

    Equipment Needed for Smoked Shotgun Shells Bacon

    • Smoker: Essential for that perfect smoky flavor. A charcoal or electric smoker works great!
    • Large pot: For boiling the manicotti shells. Any deep pot will do.
    • Mixing bowl: A standard bowl for combining your filling. Use any large bowl you have.
    • Spoon or piping bag: For stuffing the shells. A spoon works fine, but a piping bag makes it easier.
    • Toothpicks: Handy for securing the bacon. Skewers can be a substitute.

    Variations of Smoked Shotgun Shells Bacon

    • Bacon Lovers Twist: Swap out regular bacon for thick-cut bacon or even try maple bacon for a sweet-savory combination.
    • Vegetarian Delight: Substitute the ground beef with a mixture of sautéed mushrooms, bell peppers, and spinach for a hearty veggie filling.
    • Spicy Kick: Add diced jalapeños or a splash of hot sauce to the cheese filling for those who crave a little heat.
    • Cheese Lovers Variation: Experiment with different cheese combinations, like pepper jack, gouda, or Italian-style cheese blends for a unique flavor profile.
    • Low-Carb Option: Use zucchini or eggplant slices instead of manicotti shells for a lighter, keto-friendly version.

    Serving Suggestions for Smoked Shotgun Shells Bacon

    • Fresh Salad: Pair with a crisp garden salad drizzled with a light vinaigrette for a refreshing contrast.
    • Cold Drinks: Serve with iced tea, lemonade, or a light beer to balance the smoky flavors.
    • Presentation: Arrange on a rustic wooden platter, garnished with fresh parsley for a pop of color.

    FAQs about Smoked Shotgun Shells Bacon

    Got questions about these flavor-packed Smoked Shotgun Shells Bacon? You’re not alone! Here are some common queries that home cooks like us often ponder.

    Can I use different types of meat in the filling?

    Absolutely! While ground beef is delicious, you can substitute it with ground turkey, chicken, or even sausage for a different twist. The key is to keep it flavorful!

    How do I store leftovers?

    Store any leftovers in an airtight container in the fridge for up to three days. You can also freeze them for later feasting—just reheat in the oven!

    What if I don’t have a smoker?

    No smoker? No problem! You can bake the wrapped shells in the oven at 400°F (200°C) for about 25-30 minutes. It won’t be quite the same, but they’ll still taste fantastic!

    How can I make these gluten-free?

    To make these Smoked Shotgun Shells Bacon gluten-free, simply swap the manicotti shells for gluten-free pasta alternatives. They work just as well!

    What’s the best way to know when they’re done cooking?

    Using a meat thermometer is your best friend here! Aim for an internal temperature of 165°F (74°C). The bacon should be crispy, and the filling should be hot and bubbly.

    Final Thoughts

    Creating Smoked Shotgun Shells Bacon isn’t just about preparing a meal; it’s about crafting an experience full of flavor and joy. The smoky aroma fills your home, mingling with laughter and love as you gather around the table. Each bite offers a delightful crunch wrapped around creamy, cheesy goodness that promises to make your taste buds dance. This dish is perfect for family nights, parties, or simply impressing your loved ones. I hope these delightful shells bring you as much happiness and satisfaction as they have brought to me. Happy cooking!


    Print

    clock clock iconcutlery cutlery iconflag flag iconfolder folder iconinstagram instagram iconpinterest pinterest iconfacebook facebook iconprint print iconsquares squares iconheart heart iconheart solid heart solid icon

    Description

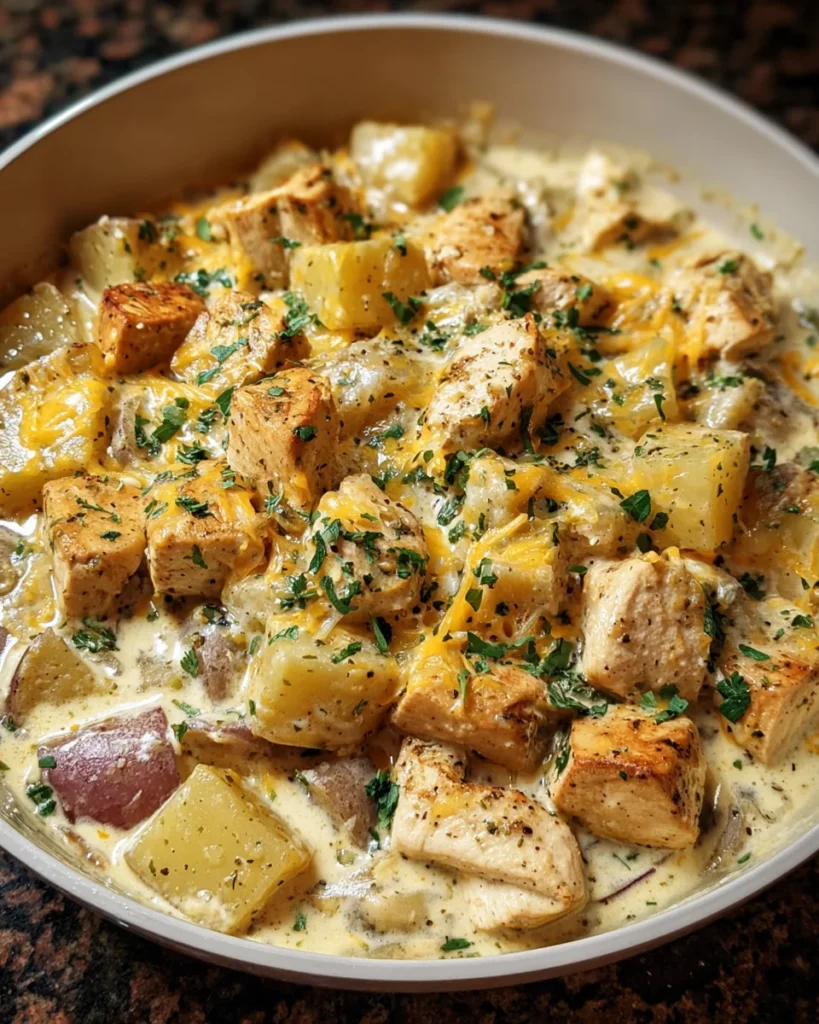
    Smoked Shotgun Shells Bacon are a mouthwatering dish featuring manicotti shells stuffed with a savory beef and cheese mixture, wrapped in crispy bacon and smoked to perfection.


    • 12 manicotti shells
    • 1 lb ground beef
    • 1 cup shredded cheddar cheese
    • 1/2 cup cream cheese, softened
    • 1/4 cup BBQ sauce
    • 1 tsp garlic powder
    • 1 tsp onion powder
    • 1 tsp smoked paprika
    • 1/2 tsp salt
    • 1/2 tsp black pepper
    • 12 slices bacon
    • 1 cup BBQ sauce (for basting)

    1. Preheat your smoker to 250°F (120°C).
    2. Cook the manicotti shells according to package instructions until al dente. Drain and set aside.
    3. In a large bowl, combine the ground beef, cheddar cheese, cream cheese, BBQ sauce, garlic powder, onion powder, smoked paprika, salt, and black pepper. Mix well.
    4. Stuff each manicotti shell with the beef and cheese mixture.
    5. Wrap each stuffed manicotti shell with a slice of bacon, securing the ends with toothpicks if necessary.
    6. Place the bacon-wrapped shells on the smoker rack.
    7. Smoke for 1.5 to 2 hours, basting with BBQ sauce every 30 minutes, until the bacon is crispy and the internal temperature reaches 165°F (74°C).
    8. Remove from the smoker and let cool for 5 minutes before serving.

    Notes

    • For added flavor, you can experiment with different types of cheese.
    • Ensure the bacon is fully wrapped to prevent any leakage of the filling.
    • Adjust the smoking time based on your smoker and desired doneness.
    • Prep Time: 30 minutes
    • Cook Time: 1.5 to 2 hours
    • Category: Appetizer
    • Method: Smoking
    • Cuisine: American

    Nutrition

    • Serving Size: 1 shell
    • Calories: 250
    • Sugar: 2g
    • Sodium: 600mg
    • Fat: 15g
    • Saturated Fat: 6g
    • Unsaturated Fat: 7g
    • Trans Fat: 0g
    • Carbohydrates: 20g
    • Fiber: 1g
    • Protein: 14g
    • Cholesterol: 50mg

    Sharing is caring!

  • Sausage and Zucchini Skillet

    Sausage and Zucchini Skillet


    Introduction to Sausage and Zucchini Skillet

    As a busy mom, I often find myself searching for quick and delicious meals that can please the whole family. That’s where my beloved Sausage and Zucchini Skillet comes in! This dish is not just easy to whip up, but it’s also packed with vibrant flavors and nutritious ingredients. Imagine the sizzle of Italian sausage mingling with fresh zucchini and colorful bell peppers—pure culinary bliss! Perfect for hectic weeknights, it’s a surefire way to impress your loved ones without spending hours in the kitchen.

    Why You’ll Love This Sausage and Zucchini Skillet

    This Sausage and Zucchini Skillet is the answer to your weeknight dinner prayers! It comes together in just 25 minutes—perfect for those busy days when time feels like a luxury. The combination of savory sausage and tender zucchini creates a mouthwatering meal that your family will rave about. Plus, it’s versatile! Feel free to customize it with your favorite veggies or serve it over rice for an even heartier dish.

    Ingredients for Sausage and Zucchini Skillet

    This Sausage and Zucchini Skillet is full of colorful and nutritious ingredients. Here’s what you’ll need:

    • Italian sausage: The star of the show! Its bold flavors will make your taste buds dance.
    • Zucchini: Tender and mildly sweet, zucchini adds a fantastic texture and helps balance out the richness of the sausage.
    • Bell peppers: These come in a rainbow of colors, bringing vibrant hues and a slight crunch to the dish.
    • Onion: A fragrant base that deepens the flavor of everything—use yellow, red, or even sweet Vidalia onions!
    • Garlic: You can never go wrong with garlic; it adds that cozy aroma and a punch of flavor.
    • Olive oil: Perfect for sautéing while adding healthy fats to this delightful meal.
    • Italian seasoning: A blend of herbs that takes this dish from simple to spectacular with just a sprinkle!

    Feel free to get creative! You can add mushrooms for earthiness or spinach for a pop of color and nutrition. Just think of your family’s favorites and toss them in.

    You’ll find the exact measurements for these ingredients at the bottom of this article, ready for easy printing. Let’s get cooking!

    How to Make Sausage and Zucchini Skillet

    Ready to cook? Let’s get started on your flavorful adventure with this Sausage and Zucchini Skillet. Here’s how you can whip it up in just a few easy steps!

    Step 1: Heat the Olive Oil

    First things first—grab your favorite skillet and place it over medium heat. Pour in a tablespoon of olive oil. As it heats up, watch for the shimmering effect. This means it’s ready for some cooking magic! Once it’s nice and warm, you’ll be prepped for the next step.

    Step 2: Sauté the Sausage

    Now it’s time to add the sliced Italian sausage. Toss it in the hot skillet and listen to that lovely sizzle! Sauté the sausage for about 5–7 minutes. You want it nicely browned and cooked through. This step not only enhances the flavor but also fills your kitchen with a mouthwatering aroma! Stir occasionally so everything cooks evenly.

    Step 3: Add Vegetables

    After the sausage gets its golden dance, it’s time to bring in the veggies! Add the sliced zucchini, chopped bell peppers, diced onion, and minced garlic. Stir everything together, making sure those veggies get some love in the heat. Cook for 8–10 minutes. You want the zucchini to be tender but not mushy, and those colorful peppers should remain slightly crisp. The combination will elevate the dish to new heights!

    Step 4: Season and Serve

    Once your vegetables are perfectly cooked, it’s seasoning time. Sprinkle half a teaspoon of Italian seasoning over the skillet. Stir well to distribute the flavors throughout. Taste a little bit and adjust if necessary. Finally, serve this delicious medley warm! Whether it’s over rice or simply on its own, this Sausage and Zucchini Skillet will shine on your dinner table.

    Tips for Success

    • Slice your vegetables evenly to ensure they cook at the same rate.
    • Don’t overcrowd the skillet; cook in batches if needed for even browning.
    • Use fresh herbs instead of dried for a brighter flavor!
    • If preferred, substitute turkey sausage for a leaner option without sacrificing taste.
    • Prep your ingredients beforehand to make cooking a breeze!

    Equipment Needed

    • Skillet: A large, non-stick skillet works best. A cast-iron skillet adds a nice touch too!
    • Cooking Spoon: Use a wooden spoon for stirring, or a silicone spatula to prevent scratching.
    • Cutting Board: Essential for chopping your veggies safely and efficiently.
    • Knife: A sharp chef’s knife makes slicing a breeze.

    Variations

    • Spicy Kick: If you love a little heat, add crushed red pepper flakes or diced jalapeños for an extra zing!
    • Herb-Infused: Mix in fresh basil, parsley, or oregano for a garden-fresh flavor that brightens up the dish.
    • Low-Carb Option: Replace the sausage with grilled chicken and serve this skillet over a bed of cauliflower rice.
    • Vegetarian Twist: Swap the sausage for chickpeas or lentils to create a filling plant-based version.
    • Cheesy Delight: Top with shredded mozzarella or Parmesan right before serving for a creamy finishing touch.

    Serving Suggestions

    • Serve the Sausage and Zucchini Skillet over fluffy rice or al dente pasta for a heartier meal.
    • A crisp green salad on the side brings a refreshing contrast to the dish.
    • Pair it with a chilled white wine like Pinot Grigio for an elegant touch.
    • For a family-style presentation, serve directly from the skillet at the table!

    FAQs about Sausage and Zucchini Skillet

    Can I use a different type of sausage?

    Absolutely! While Italian sausage is the star of this Sausage and Zucchini Skillet, you can easily swap it for chicken, turkey, or even vegan sausage. Just remember to adjust the cooking time as needed!

    How do I store leftovers?

    Leftovers can be stored in an airtight container in the fridge for up to 3 days. Just reheat in the skillet or microwave before enjoying again. You may find that the flavors meld even better overnight!

    Can I freeze this dish?

    Yes, you can freeze the Sausage and Zucchini Skillet for up to two months. Just cool it completely before transferring to a freezer-safe container. Thaw in the fridge overnight before reheating.

    What sides pair well with this skillet?

    This dish is versatile! Serve it alongside a light salad, garlic bread, or some roasted vegetables. Each adds a wonderful balance and keeps your meal colorful.

    Can I add more veggies?

    Definitely! Feel free to toss in your favorites like mushrooms, spinach, or even broccoli. The more, the merrier! Just adjust the cooking time to ensure everything is perfectly cooked.

    Final Thoughts

    Making this Sausage and Zucchini Skillet is more than just a cooking task; it’s a delightful experience of flavors and memories. Picture your family’s smiles as they gather around the table, eagerly anticipating a dish that not only nourishes but also brings them together. With every bite, you savor the richness of the Italian sausage and the freshness of the zucchini. This recipe is my secret weapon for busy nights and family love, proving that home-cooked meals can be simple, satisfying, and full of joy. I hope it becomes a beloved staple in your kitchen too!


    Print

    clock clock iconcutlery cutlery iconflag flag iconfolder folder iconinstagram instagram iconpinterest pinterest iconfacebook facebook iconprint print iconsquares squares iconheart heart iconheart solid heart solid icon

    Description

    A quick and delicious meal featuring Italian sausage and fresh zucchini sautéed with colorful bell peppers and onion, making it a perfect weeknight dinner.


    • 1 lb Italian sausage, sliced
    • 2 medium zucchinis, sliced
    • 1 cup chopped bell peppers
    • 1/2 cup diced onion
    • 2 garlic cloves, minced
    • 1 tbsp olive oil
    • 1/2 tsp Italian seasoning

    1. Heat olive oil in a skillet. Sauté sausage until browned.
    2. Add zucchini, bell peppers, onion, and garlic. Cook for 8–10 minutes.
    3. Sprinkle with Italian seasoning and serve warm.

    Notes

    • This dish can be served over rice or pasta for a heartier meal.
    • Prep Time: 10 minutes
    • Cook Time: 15 minutes
    • Category: Dinner
    • Method: Sautéing
    • Cuisine: Italian

    Nutrition

    • Serving Size: 1 serving
    • Calories: 350
    • Sugar: 3g
    • Sodium: 800mg
    • Fat: 25g
    • Saturated Fat: 8g
    • Unsaturated Fat: 15g
    • Trans Fat: 0g
    • Carbohydrates: 10g
    • Fiber: 2g
    • Protein: 20g
    • Cholesterol: 80mg

    Sharing is caring!

  • Deep-Fried Strawberry Cheesecake Wontons

    Deep-Fried Strawberry Cheesecake Wontons


    Introduction to Deep-Fried Strawberry Cheesecake Wontons

    Hey there, fellow food lovers! If you’re like me—juggling kids, work, and everything in between—you know how tough it can be to whip up something special. That’s where these Deep-Fried Strawberry Cheesecake Wontons come in! They’re the delightful answer to your dessert dreams. Imagine crispy, golden wontons bursting with a creamy, sweet strawberry cheesecake filling. Perfect for a special occasion or just a cozy night in, this treat is sure to impress your loved ones without taking too much of your precious time. Let’s dive into this deliciousness!

    Why You’ll Love This Deep-Fried Strawberry Cheesecake Wontons

    These Deep-Fried Strawberry Cheesecake Wontons are not just a dessert; they’re a lifesaver! Fast to make and easier than pie, they deliver big on flavor without demanding hours in the kitchen. The crunchy exterior gives way to a luscious, creamy filling that’s simply irresistible. Plus, they’re perfect for any gathering, impressing your guests while leaving you with extra moments to enjoy the celebration. Who could resist that?

    Ingredients for Deep-Fried Strawberry Cheesecake Wontons

    Let’s gather everything you need to create these heavenly treats! The magic begins with a handful of ingredients that come together effortlessly. Here’s what you’ll need:

    • Cream cheese: This smooth and rich base gives our filling that luxurious texture.
    • Powdered sugar: Provides the perfect touch of sweetness without any grittiness—just pure bliss.
    • Vanilla extract: A splash of vanilla adds a warm depth of flavor that complements everything beautifully.
    • Strawberry jam or preserves: This fruity addition brings a burst of strawberry goodness right into the filling.
    • Fresh strawberries: Optional but recommended! Diced strawberries bring freshness and a pop of color.
    • Wonton wrappers: The star of our show! These thin sheets become crispy pockets of deliciousness.
    • Water: Just a little dab will help seal the wontons so the filling stays put.
    • Vegetable oil: Essential for frying. This will give your wontons that golden, crispy exterior.
    • Whipped cream: For serving, it adds an extra creamy touch that pairs beautifully with strawberries.
    • Extra strawberry jam or sauce: A delightful dip that enhances the flavor of the wontons!
    • Sliced fresh strawberries: A gorgeous garnish that heightens visual appeal and freshness.

    Need the exact amounts? Check out the bottom of the article for printable details!

    How to Make Deep-Fried Strawberry Cheesecake Wontons

    Preparation of Filling

    Start by making that creamy cheesecake filling that makes these Deep-Fried Strawberry Cheesecake Wontons shine! In a medium bowl, combine softened cream cheese, powdered sugar, and vanilla extract. Beat them together until smooth and fluffy, like a cloud of deliciousness. The key is to ensure there are no lumps; a hand mixer works wonders here. Then, gently fold in your strawberry jam or preserves. If you’re using fresh strawberries, add them now for that pop of flavor. This filling should be rich and tasty, ready to take those wontons to the next level!

    Wrapping the Wontons

    Now comes the fun part—wrapping the wontons! Take a wonton wrapper and place it on a clean, flat surface. Add about a teaspoon of your delightful cheesecake filling right in the center. Moisten the edges with a tiny dab of water; this ensures they’ll seal properly. Fold the wrapper in half diagonally, creating a triangle, and press down to seal tightly. For an envelope shape, fold the corners into the center. To avoid leaks, make sure there’s no air trapped inside. Repeat this process until you’ve filled all your wrappers, and get ready for frying!

    Heating the Oil

    The oil’s temperature is critical for achieving that perfect golden-brown crust on your wontons. Pour vegetable oil into a deep skillet or pot, ensuring it’s about 1 to 2 inches deep. Heat the oil over medium heat until it reaches about 350°F. A good trick to test if the oil is ready: drop a small piece of wonton wrapper into the oil. If it sizzles immediately, you’re good to go! Don’t rush this step—properly heated oil prevents soggy wontons and ensures a crispy finish.

    Frying Process

    It’s time to fry those delicious parcels! Carefully place the wontons into the hot oil in small batches, avoiding overcrowding the pan, which can lead to uneven cooking. Fry them for about 1 to 2 minutes per side until they’re crisp and golden brown. Keep an eye on them; they’ll bubble excitedly and become beautifully golden. Use a slotted spoon to gently turn them. Once done, remove the wontons and place them on a paper towel-lined plate to drain excess oil. They’ll be hot and ready to make you swoon!

    Serving the Wontons

    Presentation is everything, isn’t it? Serve these golden delights warm for the best experience. You might want to arrange them on a fancy plate or even stack them in a little pyramid for a fun touch. Consider drizzling some warm strawberry sauce over the top, or a dollop of whipped cream alongside for dipping. Fresh strawberry slices make for a gorgeous garnish. Your guests will not only taste the love you put into these Deep-Fried Strawberry Cheesecake Wontons, but they’ll also appreciate the beautiful display!

    Tips for Success

    • Soften cream cheese properly for a smooth filling.
    • Ensure oil is at the right temperature to avoid sogginess.
    • Don’t overcrowd the pan when frying for even cooking.
    • Seal edges carefully to prevent leaks during frying.
    • Store un-fried wontons in the fridge for easy prep ahead of time.

    Equipment Needed

    • Mixing bowl: A medium bowl works well; a large one for bigger batches.
    • Hand mixer: Great for smooth filling; a fork can do the job too!
    • Deep skillet or pot: Essential for frying; a deep fryer is a fancy option.
    • Slotted spoon: Perfect for removing fried wontons; tongs can work too.
    • Paper towels: For draining excess oil and keeping things neat.

    Variations

    • Chocolate Hazelnut: Swap out the strawberry jam for chocolate hazelnut spread for a delicious twist.
    • Fresh Fruit Medley: Mix diced berries like blueberries or raspberries with the strawberry filling for a colorful surprise.
    • Nut-Free Option: Use sunflower seed cream cheese to make it nut-free for those with allergies.
    • Spiced Version: Add a sprinkle of cinnamon or nutmeg to the filling for a warm, spiced flavor.
    • Low-Calorie Version: Try using reduced-fat cream cheese and baked wontons for a lighter treat.

    Serving Suggestions

    • Pair with a refreshing fruit salad for a bright contrast.
    • Serve with a scoop of vanilla ice cream for an indulgent treat.
    • Offer hot chocolate or coffee for a cozy dessert experience.
    • Arrange on a platter with mint leaves for an elegant touch.
    • Drizzle with chocolate sauce alongside strawberry sauce for extra flair.

    FAQs about Deep-Fried Strawberry Cheesecake Wontons

    Can I bake these Deep-Fried Strawberry Cheesecake Wontons instead of frying them?

    Absolutely! For a lighter version, you can brush the wontons with a bit of oil and bake them in a preheated oven at 375°F until golden brown. While they won’t have the same crispy texture, they’ll still be delicious!

    How can I prevent the filling from leaking out while frying?

    To avoid leaks, make sure to seal the wontons tightly, removing any trapped air. Moisten the edges with water, and use a fork to crimp the edges if you like. This extra step helps keep your cream cheese filling inside!

    What can I do with leftover wonton wrappers?

    Leftover wonton wrappers can be quite versatile! Use them to make savory dumplings or simple baked chips. You can even fill them with cheese and bake for a quick snack. The possibilities are endless!

    How do I store any leftover Deep-Fried Strawberry Cheesecake Wontons?

    Store any leftovers in an airtight container in the refrigerator for up to two days. When you’re ready to enjoy them again, reheat in the oven for a few minutes to regain that crispy texture!

    Can these wontons be made in advance?

    Yes, you can prepare the wontons ahead of time! Fill and seal them, then place them in a single layer on a baking sheet and freeze. Once frozen, transfer them to a freezer bag. Just fry them straight from the freezer when you’re ready to enjoy!

    Final Thoughts

    Making Deep-Fried Strawberry Cheesecake Wontons is not just about satisfying a sweet tooth; it’s about crafting a little moment of joy. The crunch of golden wrappers, mingled with that creamy strawberry filling, creates a delightful harmony that dances on your taste buds. Whether you’re celebrating a special occasion or simply treating yourself after a long day, these wontons bring smiles and a sense of accomplishment. So roll up your sleeves, gather your loved ones, and share this delicious bite of happiness. Trust me, once you try them, you’ll be coming back for seconds—if not thirds!


    Print

    clock clock iconcutlery cutlery iconflag flag iconfolder folder iconinstagram instagram iconpinterest pinterest iconfacebook facebook iconprint print iconsquares squares iconheart heart iconheart solid heart solid icon

    Description

    A delicious dessert made with wonton wrappers filled with a creamy strawberry cheesecake mixture and deep-fried until golden brown.


    • 8 ounces cream cheese, softened
    • 1/4 cup powdered sugar
    • 1/2 teaspoon vanilla extract
    • 1/4 cup strawberry jam or preserves
    • 2 tablespoons fresh strawberries, diced (optional)
    • 20 to 24 wonton wrappers
    • Water for sealing edges
    • Vegetable oil for frying
    • Whipped cream (optional)
    • Strawberry jam or strawberry sauce (optional)
    • Fresh strawberries, sliced (optional)

    1. In a medium bowl, combine softened cream cheese, powdered sugar, and vanilla extract. Beat until smooth and creamy. Gently fold in strawberry jam or preserves, and mix in diced strawberries if using.
    2. Place a wonton wrapper on a clean, flat surface. Add about 1 teaspoon of cheesecake filling to the center. Moisten the wrapper’s edges lightly with water, fold the wrapper diagonally to form a triangle or envelope shape, and press to seal tightly, removing air pockets.
    3. Repeat filling and sealing process with remaining wonton wrappers and filling mixture.
    4. Pour vegetable oil into a deep skillet or heavy-bottomed saucepan to a depth of 1 to 2 inches. Heat oil to 350°F.
    5. Carefully fry wontons in batches for 1 to 2 minutes per side until golden brown and crisp. Avoid overcrowding the pan for even cooking.
    6. Remove fried wontons using a slotted spoon and transfer to a paper towel-lined plate to absorb excess oil.
    7. Serve warm with whipped cream, extra strawberry jam or sauce for dipping, and fresh strawberry slices as desired.

    Notes

    • For a lighter version, consider baking the wontons instead of frying.
    • Ensure the oil is hot enough before frying to prevent soggy wontons.
    • These wontons can be made in advance and stored in the refrigerator before frying.
    • Prep Time: 20 minutes
    • Cook Time: 10 minutes
    • Category: Dessert
    • Method: Frying
    • Cuisine: American

    Nutrition

    • Serving Size: 1 wonton
    • Calories: 100
    • Sugar: 3g
    • Sodium: 100mg
    • Fat: 5g
    • Saturated Fat: 1.5g
    • Unsaturated Fat: 3g
    • Trans Fat: 0g
    • Carbohydrates: 10g
    • Fiber: 0g
    • Protein: 2g
    • Cholesterol: 10mg

    Sharing is caring!

  • Amish Hamburger Steak Bake

    Amish Hamburger Steak Bake


    Introduction to Amish Hamburger Steak Bake

    Welcome to the world of comfort food! Today, I’m thrilled to share my recipe for Amish Hamburger Steak Bake. This dish is not just a meal; it’s a warm hug on a plate. Perfect for those hectic weeknights, it combines seasoned hamburger patties with a creamy mushroom sauce that will have your family asking for seconds. Whether you’re a busy mom racing against the clock or a professional juggling tasks, this recipe is your go-to solution for a quick, satisfying dinner that everyone will love. Let’s dive into this comforting delight!

    Why You’ll Love This Amish Hamburger Steak Bake

    This Amish Hamburger Steak Bake is the ultimate comfort dish that you’ll adore for many reasons. First, it’s incredibly easy to prepare, making it perfect for busy days. You can whip it up in just under an hour! The rich, savory flavors of seasoned beef paired with creamy mushroom sauce create a delightful experience for your taste buds. Plus, it’s a family-friendly meal that even picky eaters will enjoy!

    Ingredients in Amish Hamburger Steak Bake

    To create the heartwarming Amish Hamburger Steak Bake, you’ll need a few simple yet essential ingredients. Here’s a breakdown:

    • Ground beef: This forms the base of your patties, delivering delicious flavor and protein.
    • Dry breadcrumbs: These help bind the patties together and add texture. You can use homemade breadcrumbs or store-bought ones, depending on what you have on hand.
    • Egg: A classic binding agent, the egg keeps the patties moist and together while baking.
    • Garlic powder: This adds a subtle, savory depth to the beef, enhancing the overall taste.
    • Onion powder: Just like garlic, onion powder complements the beef with a mild flavor that your family will love.
    • Salt and black pepper: Essential seasonings that bring out the natural flavors of the meat and sauce.
    • Cream of mushroom soup: The star of the show! This creamy base transforms the dish into a comforting bake, melding all the flavors together.
    • Whole milk: Added for creaminess, milk balances the sauce without overpowering it. You can substitute with low-fat milk or a non-dairy alternative if needed.
    • Worcestershire sauce: A splash of this tangy sauce adds complexity and a hint of umami to the gravy.
    • Onions: Sliced thin, they become deliciously sweet as they bake, adding another layer of flavor.
    • Mushrooms (optional): Fresh or canned, these can be added for an earthy taste and extra texture. If family members aren’t fans of mushrooms, feel free to skip them.
    • Fresh parsley (optional): A sprinkle of chopped parsley at the end brightens the dish and gives a pop of color.

    All of these ingredients come together harmoniously, creating a dish that’s as comforting as it is delicious. You will find exact measurements at the end of this article, perfect for printing and easy preparation!

    How to Make Amish Hamburger Steak Bake

    Preheat the Oven

    First things first, let’s get that oven preheated to 350°F. This step is essential for getting a nice even bake. Next, lightly grease a 9×13-inch baking dish to ensure the patties don’t stick. You can use cooking spray or a bit of butter—whatever you have handy!

    Prepare the Hamburger Patties

    In a large mixing bowl, combine the ground beef, breadcrumbs, the egg, garlic powder, onion powder, salt, and black pepper. Mix gently until everything is just combined. Be careful not to overmix or your patties will be tough. Form the mixture into 4 to 6 oval-shaped patties, making sure they’re all about the same thickness to ensure even cooking.

    Sear the Patties

    Now for some deliciousness! Heat a large skillet over medium-high heat, and add your patties. Sear them for about 2–3 minutes per side until they’re browned. This creates a lovely crust while sealing in all the flavors. Don’t worry if they’re not fully cooked; they’ll finish baking in the oven!

    Make the Mushroom Gravy

    In a bowl, whisk together the cream of mushroom soup, milk, and Worcestershire sauce until smooth. This is the magical sauce that brings the dish all together! The goal is a creamy texture that will envelop those patties lovingly.

    Assemble the Dish

    Time to layer! Place the seared patties into your prepared baking dish, ensuring they’re evenly spaced out. Pour the mushroom gravy over the top, covering the patties thoroughly. If you’re using onions and mushrooms, sprinkle them on top for that extra deliciousness!

    Bake to Perfection

    Cover the baking dish with foil and pop it into your preheated oven. Bake for 30–35 minutes. After that, remove the foil and let it bake for another 10 minutes, allowing the sauce to bubble and the patties to cook through. You’ll know it’s done when the sauce is bubbling and the patties reach a safe internal temperature. Your kitchen will smell heavenly!

    Tips for Success

    • Use lean ground beef for a lighter option without sacrificing flavor.
    • Don’t skip the searing step; it adds a beautiful crust and rich flavor.
    • For more depth, consider adding sautéed garlic or herbs to the gravy.
    • Let your dish sit for a few minutes after baking; this helps the flavors meld.
    • Double the recipe for leftovers; this dish reheats wonderfully!

    Equipment Needed

    • 9×13-inch baking dish: A great size for this recipe. Any oven-safe dish will work!
    • Large mixing bowl: Essential for combining ingredients. You can also use a stand mixer if you prefer.
    • Skillet: A good non-stick skillet makes searing easy.
    • Whisk: Perfect for mixing the gravy smoothly. A fork will do in a pinch!
    • Meat thermometer: Helps ensure the patties are cooked to safety and perfection.

    Variations of Amish Hamburger Steak Bake

    • Mushroom Lovers: Increase the amount of mushrooms in the gravy for an extra earthy flavor throughout the dish.
    • Cheesy Twist: Add shredded cheese like cheddar or mozzarella on top of the patties during the last 10 minutes of baking for a melty, gooey finish.
    • Herb Infusion: Mix in fresh herbs like thyme or rosemary into the hamburger mixture for a fragrant touch.
    • Low-Carb Option: Substitute breadcrumbs with crushed pork rinds or almond flour for a keto-friendly twist.
    • Vegetarian Version: Replace the ground beef with plant-based meat or lentils, and use vegetable broth in place of the cream of mushroom for a hearty vegetarian alternative.

    Serving Suggestions for Amish Hamburger Steak Bake

    • Pair with creamy mashed potatoes for the ultimate comfort meal.
    • Serve alongside steamed green beans or buttered corn for a colorful plate.
    • A crisp garden salad with vinaigrette balances the richness of the dish.
    • For drinks, a chilled glass of iced tea or sparkling water complements the flavors.
    • Garnish with fresh parsley for an inviting presentation that adds color.

    FAQs about Amish Hamburger Steak Bake

    Can I prepare the Amish Hamburger Steak Bake in advance?

    Absolutely! You can mix the ingredients and shape the patties ahead of time. Just store them in the fridge until you’re ready to bake. This makes meal prep a breeze for busy days!

    What can I serve with Amish Hamburger Steak Bake?

    This comforting dish pairs wonderfully with creamy mashed potatoes, buttered corn, or a fresh garden salad. You could also serve it with egg noodles for a classic touch!

    Can I use ground turkey instead of ground beef?

    Yes, feel free to swap ground beef for ground turkey or chicken. Just note that the flavor will be lighter, so you may want to adjust the seasonings slightly.

    How do I store leftovers of the Amish Hamburger Steak Bake?

    Leftovers can be stored in an airtight container in the fridge for up to 3 days. Just reheat in the oven or microwave until warmed through. It’s perfect for a quick meal later in the week!

    Is Amish Hamburger Steak Bake a good freezer meal?

    You bet! This dish freezes well. Assemble it without baking, cover tightly, and freeze. When you’re ready to eat, thaw overnight in the fridge, then bake as directed for a cozy dinner.

    Final Thoughts

    Making Amish Hamburger Steak Bake isn’t just about food; it’s an experience wrapped in love and comfort. As you gather around the table, the aromas wafting through your home evoke memories of family dinners and smiles all around. This dish not only fills bellies but also warms hearts after a long, busy day. Whether it’s a weeknight meal or a weekend gathering, it brings everyone together. Try it out, and let this comforting delight create a joyful atmosphere in your home. I promise, your family will keep coming back for more!


    Print

    clock clock iconcutlery cutlery iconflag flag iconfolder folder iconinstagram instagram iconpinterest pinterest iconfacebook facebook iconprint print iconsquares squares iconheart heart iconheart solid heart solid icon

    Description

    Amish Hamburger Steak Bake is a comforting dish made with seasoned hamburger patties baked in a creamy mushroom sauce, perfect for family meals.


    • 1 1/2 pounds ground beef
    • 1/2 cup dry breadcrumbs
    • 1 large egg
    • 1 teaspoon garlic powder
    • 1 teaspoon onion powder
    • Salt, to taste
    • Black pepper, to taste
    • 1 can (10 ounces) cream of mushroom soup
    • 1/2 cup whole milk
    • 1 tablespoon Worcestershire sauce
    • 1 small onion, thinly sliced
    • 1 cup mushrooms, sliced (optional)
    • Fresh parsley, chopped (optional)

    1. Preheat oven to 350°F. Lightly grease a 9×13-inch baking dish and set aside.
    2. Combine ground beef, breadcrumbs, egg, garlic powder, onion powder, salt, and pepper in a mixing bowl. Mix until just incorporated.
    3. Form the mixture into 4 to 6 oval-shaped patties with uniform thickness.
    4. Sear patties in a large skillet over medium heat for 2–3 minutes per side until browned but not fully cooked. Transfer to the prepared baking dish.
    5. In a bowl, whisk together cream of mushroom soup, milk, and Worcestershire sauce until smooth.
    6. Pour gravy evenly over patties. Top with sliced onions and mushrooms if using.
    7. Cover the dish with foil and bake for 30–35 minutes.
    8. Remove foil and continue baking for an additional 10 minutes, until the sauce is bubbling and hamburger steaks are cooked through.
    9. Sprinkle with fresh parsley if desired and serve hot with mashed potatoes or egg noodles.

    Notes

    • For a richer flavor, you may add sautéed garlic or herbs to the gravy mixture.
    • This dish pairs nicely with a side of vegetables.
    • Consider using lean ground beef for a healthier option.
    • Prep Time: 15 minutes
    • Cook Time: 40-45 minutes
    • Category: Main Dish
    • Method: Baking
    • Cuisine: American

    Nutrition

    • Serving Size: 1 patty with gravy
    • Calories: 350
    • Sugar: 2g
    • Sodium: 800mg
    • Fat: 20g
    • Saturated Fat: 8g
    • Unsaturated Fat: 8g
    • Trans Fat: 0g
    • Carbohydrates: 18g
    • Fiber: 1g
    • Protein: 25g
    • Cholesterol: 90mg

    Sharing is caring!

  • Zucchini Cornbread Casserole

    Zucchini Cornbread Casserole


    Introduction to Zucchini Cornbread Casserole

    As a busy mom, I know how precious time can be in the kitchen. That’s why I absolutely adore this Zucchini Cornbread Casserole! It’s the perfect blend of cheesy goodness and fresh zucchini that can effortlessly turn a hectic weeknight into a heartwarming family dinner. Picture this: a delightful dish that not only fills up hungry bellies but also sneaks in those veggies that kids often shun. Plus, it’s easy to whip up, making it a fantastic go-to for when you need something quick yet truly special for your loved ones!

    Why You’ll Love This Zucchini Cornbread Casserole

    This Zucchini Cornbread Casserole is a winner in so many ways! Not only is it a breeze to make, but it also packs a punch of flavor with a wonderful cheesy, savory twist. It’s the kind of dish that comes together quickly, allowing you to spend less time in the kitchen and more time with your family. Plus, it’s a delightful way to sneak in those nutritious veggies without any fuss!

    Ingredients for Zucchini Cornbread Casserole

    Gathering the right ingredients for my Zucchini Cornbread Casserole is like assembling a colorful puzzle! Each component plays an important role in this scrumptious dish. Here’s what you’ll need:

    • Zucchini: Fresh and green, shredded zucchini adds moisture and a subtle flavor to the dish. It’s also a great way to use up those summer harvests!
    • White onion: Finely diced, this onion brings sweetness and depth. A small addition, but so impactful on the flavor!
    • Cheddar cheese: A must for gooey, cheesy goodness! I love using premium shredded cheddar, which melts perfectly to create that inviting, stretchy texture.
    • Corn: Frozen or fresh, corn provides a lovely burst of sweetness that balances the savory components. Just thaw it if you’re using frozen!
    • Jalapeño: For a little kick! Removing the seeds gives you more control over the spice level, making it adaptable for your family’s palate.
    • Eggs: Large and simple, eggs hold everything together and kick up the protein content, too!
    • Garlic powder: A sprinkle adds a hint of warmth and richness without overpowering the dish.
    • Cumin: This spice brings an earthy note, enhancing the overall flavor profile. You’ll be surprised at how different spices can transform a dish!
    • Salt and black pepper: Essential seasonings for elevating all the flavors! Adjust according to your taste preference.
    • Corn muffin mix: The secret shortcut that makes this casserole both comforting and easy! It gives structure while contributing to that delightful cornbread flavor.

    You can find the exact quantities for each ingredient at the bottom of the article, perfect for printing and keeping handy in your kitchen!

    How to Make Zucchini Cornbread Casserole

    Making your Zucchini Cornbread Casserole is like a delightful journey through flavors and textures! Follow the steps below, and I promise you’ll have a dish that’s not only scrumptious but also satisfying. Let’s get cooking!

    Step 1: Preheat the Oven

    The first thing you want to do is preheat your oven to 350°F. This ensures that your casserole cooks evenly. While the oven is warming up, prepare an 8×8-inch baking dish by giving it a light spray of nonstick cooking spray or a pat of butter. This will help your casserole slide out easily when it’s time to serve.

    Step 2: Combine Ingredients

    In a large mixing bowl, combine the shredded zucchini, diced onion, half of that gooey cheddar cheese, thawed corn, and diced jalapeño. Then, crack in the eggs. Don’t forget the garlic powder, cumin, salt, and black pepper! Mix everything together until it’s well combined; you want each bite to be full of flavor!

    Step 3: Add Corn Muffin Mix

    Now comes the star of the show – the corn muffin mix! Gradually add it into your vegetable mixture. I find that folding it in gently helps to avoid lumps while ensuring every morsel is deliciously bathed in that cornbread goodness. Mix just until combined; over-mixing can lead to a dense casserole.

    Step 4: Prepare for Baking

    Transfer the colorful mixture into your greased baking dish. It should look vibrant and enticing already! To finish it off, sprinkle the remaining cheddar cheese on top. This will create a wonderfully cheesy crust as it bakes, making it hard to resist!

    Step 5: Bake the Casserole

    Place your dish in the preheated oven and let it bake for 50 to 55 minutes. You’ll know it’s done when the center is set and the top is a lovely golden brown. A toothpick inserted into the center should come out clean. The aroma wafting through your kitchen will be simply irresistible!

    Step 6: Cool and Serve

    Once it’s done baking, carefully remove the casserole from the oven. Give it a few minutes to cool slightly – let it rest for about 10 minutes if you can. This helps the flavors to settle and makes it easier to slice. Serve it warm, perhaps with a side salad or some fresh fruit. You’re in for a treat!

    Tips for Success

    • Always drain the shredded zucchini well to avoid a soggy casserole.
    • Taste the mixture before baking to adjust seasonings to your preference.
    • For a twist, add chopped bell peppers or different cheese varieties.
    • Use freshly shredded cheese for the best melt and flavor.
    • Let the casserole cool slightly for easier cutting and serving.

    Equipment Needed

    • Mixing Bowl: A large bowl for combining ingredients; a plastic or glass bowl works well.
    • Baking Dish: An 8×8-inch dish is ideal; alternatively, use a 9×9-inch dish if needed.
    • Grater: For shredding zucchini; a food processor can save time, too.
    • Measuring Cups: Essential for accuracy, but you can estimate with a standard coffee cup.
    • Spatula: For mixing and transferring the batter – a rubber spatula is perfect!

    Variations of Zucchini Cornbread Casserole

    • Cheesy Italian Twist: Add Italian herbs like oregano and basil along with a mix of mozzarella and Parmesan cheese for a delightful Italian flavor.
    • Southwestern Style: Toss in black beans, chopped bell peppers, and some taco seasoning for a zesty southwestern flair!
    • Gluten-Free Option: Substitute the corn muffin mix with a gluten-free blend to make this dish suitable for those with dietary restrictions.
    • Meaty Delight: Incorporate cooked and crumbled sausage or bacon for a hearty, protein-packed version that will leave everyone satisfied.
    • Herbal Garden: Experiment with fresh herbs like parsley or cilantro to elevate the dish with a fresh, herby aroma and taste.

    Serving Suggestions for Zucchini Cornbread Casserole

    • Fresh Salad: Pair the casserole with a vibrant side salad dressed in vinaigrette for a refreshing crunch.
    • Fruit Medley: Serve with a side of seasonal fruits like berries or melon to balance the meal.
    • Cold Beverages: Complement with iced tea or lemonade to keep your meal refreshing.
    • Presentation Twist: Serve slices on colorful plates with a dollop of sour cream or Greek yogurt.

    FAQs about Zucchini Cornbread Casserole

    Can I make Zucchini Cornbread Casserole ahead of time?

    Absolutely! You can prep your casserole in advance and store it in the refrigerator overnight. Just pop it in the oven when you’re ready to bake! This is a great time-saver for busy evenings.

    How do I store leftovers?

    After enjoying your casserole, let any leftovers cool, then transfer them to an airtight container. It can be stored in the refrigerator for up to three days. Just reheat in the oven or microwave for quick meals later!

    Can I freeze Zucchini Cornbread Casserole?

    Yes, you can! Allow the casserole to cool completely, then wrap it tightly. It lasts up to three months in the freezer. When you’re ready to eat, thaw it in the fridge overnight before baking to reheat.

    How can I make this casserole spicier?

    If you’re looking for a heat boost, keep the jalapeño seeds in, or add a pinch of cayenne pepper for an extra kick. If your family enjoys heat, they’ll love these little adjustments!

    What can I serve with Zucchini Cornbread Casserole?

    This casserole pairs beautifully with a crisp green salad, fresh fruit, or even grilled meats. The balance of flavors will make your meal delightful, no matter what you choose!

    Final Thoughts

    Whipping up this Zucchini Cornbread Casserole is not just about putting dinner on the table; it’s about creating memories with loved ones. Each slice offers a delightful blend of flavors that warms the heart, much like the laughter shared around the dinner table. I cherish how this dish transforms simple ingredients into a comforting feast, making even hectic nights feel special. Whether you’re feeding a crowd or enjoying a quiet night in, this casserole is sure to become a cherished favorite in your home. Trust me, your taste buds will thank you!


    Print

    clock clock iconcutlery cutlery iconflag flag iconfolder folder iconinstagram instagram iconpinterest pinterest iconfacebook facebook iconprint print iconsquares squares iconheart heart iconheart solid heart solid icon

    Description

    A delicious and hearty Zucchini Cornbread Casserole that combines the flavors of cheesy goodness with the freshness of zucchini.


    • 3 1/2 cups of zucchini, shredded and thoroughly drained
    • 1 white onion, finely diced
    • 16 oz of premium cheddar cheese, shredded and divided
    • 1 cup of corn, thawed from its frozen state
    • 1 jalapeño, finely diced (seeds can be removed to reduce heat)
    • 2 large eggs
    • 1 tsp of garlic powder
    • 1 tsp of cumin
    • 1 tsp of salt
    • 1/2 tsp of black pepper
    • 1 package (8.5 oz) of corn muffin mix

    1. Preheat the oven to 350°F. Prepare an 8×8-inch baking dish by greasing it with nonstick spray or butter.
    2. In a bowl mix together the shredded zucchini, onion, half of the cheese, corn, jalapeño, eggs, garlic powder, cumin, salt and pepper until well combined.
    3. Gradually add the corn muffin mix to the vegetable mixture and stir until everything is evenly incorporated.
    4. Transfer the mixture into the greased dish. Sprinkle the remaining cheese on top.
    5. Place the dish in the oven. Bake for 50 to 55 minutes until the center is set and the top is golden brown.
    6. Once baked, remove from the oven. Allow it to cool slightly before serving warm, for the best flavor.

    Notes

    • This dish is great for using up excess zucchini in the summer.
    • For a spicier version, leave the jalapeño seeds in.
    • This casserole can be stored in the refrigerator for up to 3 days.
    • Reheats well in the oven or microwave.
    • Prep Time: 15 minutes
    • Cook Time: 55 minutes
    • Category: Casserole
    • Method: Baking
    • Cuisine: American

    Nutrition

    • Serving Size: 1 slice
    • Calories: 250
    • Sugar: 3g
    • Sodium: 450mg
    • Fat: 12g
    • Saturated Fat: 7g
    • Unsaturated Fat: 3g
    • Trans Fat: 0g
    • Carbohydrates: 30g
    • Fiber: 2g
    • Protein: 10g
    • Cholesterol: 80mg

    Sharing is caring!

  • Zucchini Carrot Bread

    Zucchini Carrot Bread


    Introduction to Zucchini Carrot Bread

    As a busy mom and passionate home cook, I know that finding the perfect quick solution for a busy day can sometimes feel overwhelming. That’s where my Zucchini Carrot Bread comes in! This moist, flavorful bread is not only delicious but also a delightful way to sneak in some nutritious veggies. Whether you’re whipping it up for breakfast or an afternoon snack, it’s sure to impress your loved ones. Best of all, it’s simple enough to prepare on even the most hectic days, making it an instant favorite in my house!

    Why You’ll Love This Zucchini Carrot Bread

    This Zucchini Carrot Bread is a game changer for anyone who craves flavor without spending hours in the kitchen. It’s as easy as mixing a few ingredients and waiting for the delightful aroma to fill your home. Plus, each slice is moist and tender, making it perfect for breakfast or a sweet snack. And the best part? You’ll feel good knowing you’re serving up something healthy and wholesome to your family!

    Ingredients for Zucchini Carrot Bread

    To create this delightful Zucchini Carrot Bread, you’ll need a lovely mix of ingredients. Here’s a brief rundown of what you’ll be gathering:

    • Egg: Gives the bread structure and moisture. You can use a flax egg for a vegan version!
    • Light brown sugar: Provides a subtle caramel flavor, enhancing the bread’s sweetness.
    • Coconut oil: This liquid oil keeps the bread moist and adds a hint of coconut flavor. Canola or vegetable oil works just as well if you prefer.
    • Granulated sugar: Adds sweetness and contributes to the perfect texture. Feel free to reduce the amount for less sweetness.
    • Sour cream: It keeps the bread rich and helps it remain moist. Greek yogurt is a fantastic substitute if you’re out of sour cream.
    • Vanilla extract: A must for rounding out the flavor. Use pure vanilla for a richer taste.
    • Cinnamon: Adds warmth and spice to the bread. You can experiment with nutmeg or pumpkin spice for a twist!
    • All-purpose flour: Forms the base of the bread. Whole wheat flour could be used for a heartier texture.
    • Baking powder and baking soda: These are essential for making the bread rise, creating that perfect, fluffy texture.
    • Salt: Just a pinch enhances the flavors. Optional, but it might make a difference!
    • Grated carrots: Brings natural sweetness and moisture. It’s a great way to add nutrients without the kids even noticing!
    • Grated zucchini: Similar to the carrots, it keeps the bread moist. You can use yellow squash as a substitute!
    • Optional mix-ins: Think walnuts, raisins, or chocolate chips for added texture and flavor. The choice is yours!

    You’ll find precise measurements for all these ingredients at the bottom of the article for easy printing! Happy baking!

    How to Make Zucchini Carrot Bread

    Creating this scrumptious Zucchini Carrot Bread is as easy as pie! Let’s dive into the steps to whip up this moist, vegetable-packed delight.

    Step 1: Prepare Your Oven and Pan

    First things first—preheat your oven to 350°F. This ensures that your bread bakes evenly. While the oven warms, grab a 9×5-inch loaf pan. Lightly coat it with floured cooking spray or grease and flour it well. This will prevent any sticky disasters when it’s time to slice!

    Step 2: Combine Wet Ingredients

    In a large mixing bowl, crack in the egg. Then add the brown sugar, coconut oil, granulated sugar, sour cream, vanilla extract, and cinnamon. Whisk everything together until it’s nice and smooth. You’re building a flavor base right here, so mix well but don’t go overboard!

    Step 3: Mix in Dry Ingredients

    Next, gently fold in the all-purpose flour, baking powder, baking soda, and optional salt. Mix just until combined. This is a key point! Overmixing can lead to a tough bread, and we want it light and fluffy.

    Step 4: Add Grated Veggies and Optional Mix-ins

    Now comes the fun part! Fold in the grated carrots and zucchini, being careful not to overmix. If you’re feeling adventurous, toss in some chopped walnuts or raisins for extra texture. Think of these mix-ins as little surprises in each bite—so delightful!

    Step 5: Bake the Bread

    Pour the batter into your prepared loaf pan, smoothing the top with a spatula. It’s time to pop it into the oven! Bake for about 52 to 58 minutes. You’ll know it’s done when the top is golden brown, the center feels set, and a toothpick comes out clean or with just a few moist crumbs. Ah, that delicious aroma will fill your kitchen!

    Step 6: Cool and Serve

    Once baked to perfection, let the bread cool in the pan for about 15 minutes. Then, remove it onto a wire rack to cool completely. This cooling process is crucial! Slicing too early can ruin the texture. Once it’s cool, cut a thick slice and serve. Enjoy each bite of this delicious Zucchini Carrot Bread!

    Tips for Success

    • Grate the zucchini and carrots just before use to keep them fresh and full of moisture.
    • Don’t skip greasing the pan—trust me, sticky bread is not fun!
    • Let the bread cool completely before slicing for the best texture.
    • Feel free to experiment with spices like nutmeg or cardamom for a unique twist.
    • Storing your bread in an airtight container keeps it moist and delicious for days!

    Equipment Needed for Zucchini Carrot Bread

    • 9×5-inch loaf pan: Essential for shaping your bread. A 8×4-inch pan works too, just adjust baking time.
    • Mixing bowls: You’ll need at least one large bowl. Glass or metal, it’s up to you!
    • Whisk: Perfect for blending wet ingredients. A fork can work in a pinch!
    • Spatula: For folding in ingredients. Silicone spatulas are my favorite—they’re super flexible!
    • Grater: To shred the carrots and zucchini. A box grater or food processor will save time.

    Variations on Zucchini Carrot Bread

    • Whole Wheat Flour: Swap out all-purpose flour for whole wheat flour for a nutty flavor and added fiber.
    • Gluten-Free Option: Use a gluten-free all-purpose flour blend to make this bread suitable for gluten-sensitive eaters.
    • Spices Add-On: Add a teaspoon of nutmeg or ginger for an autumn touch, perfect for cozy evenings.
    • Fruit Swaps: Replace half of the grated zucchini with mashed bananas for a delightful banana-zucchini twist!
    • Nut Alternatives: If walnuts aren’t your thing, try chopped pecans or almonds for a different crunch.
    • Chocolate Lovers: Fold in some mini chocolate chips for a decadent treat that kids will love!
    • Dairy-Free Version: Substitute sour cream with coconut yogurt for a creamy, dairy-free alternative.

    Serving Suggestions for Zucchini Carrot Bread

    • Pair with Cream Cheese: Spread a layer of cream cheese or a vegan alternative on toasted slices for added richness.
    • Enjoy with Coffee or Tea: This bread complements your morning coffee or afternoon tea beautifully.
    • Serve with Fresh Fruit: A side of sliced strawberries or bananas adds a refreshing touch.
    • Presentation Tip: Dust with powdered sugar or drizzle with a simple glaze for a lovely finish!

    FAQs about Zucchini Carrot Bread

    Curious about my Zucchini Carrot Bread? Here are some common questions I often hear:

    Can I freeze Zucchini Carrot Bread?

    Absolutely! This bread freezes beautifully. Just wrap it tightly in plastic wrap and then aluminum foil. When you’re ready, thaw it overnight in the fridge before enjoying. It’s like a little surprise waiting for you!

    How long does Zucchini Carrot Bread stay fresh?

    If stored in an airtight container, your bread should stay moist and delicious for about 3 to 4 days at room temperature. You can refrigerate it for up to a week if you prefer.

    Can I omit the sugar?

    You can reduce the sugar if you like, but keep in mind that it may change the texture and moisture level. Consider using natural sweeteners like mashed banana or applesauce as substitutes!

    Is Zucchini Carrot Bread healthy?

    Yes! This quick bread is loaded with veggies, providing fiber and nutrients. While it does contain sugar, it’s balanced with wholesome ingredients. Enjoy guilt-free!

    What’s the best way to serve Zucchini Carrot Bread?

    Serve it warm with a touch of butter or cream cheese. Or enjoy it plain alongside your favorite hot beverage. Either way, it’s a perfect treat!

    Final Thoughts on Zucchini Carrot Bread

    Baking my Zucchini Carrot Bread has become a cherished ritual in my home. The joy of creating something nutritious and delicious is unmatched. Each bite bursts with flavors that not only satisfy the taste buds but also warm the heart. This delightful bread has made breakfast and snacks feel special again, even on the busiest days. The smiles on my family’s faces as they savor every mouthful remind me why I love to cook. I hope this recipe brings the same joy to your kitchen and becomes a beloved favorite for your family, too!


    Print

    clock clock iconcutlery cutlery iconflag flag iconfolder folder iconinstagram instagram iconpinterest pinterest iconfacebook facebook iconprint print iconsquares squares iconheart heart iconheart solid heart solid icon

    Description

    Zucchini Carrot Bread is a deliciously moist delight packed with flavors from fresh zucchini and carrots, perfect for breakfast or a snack.


    • 1 large egg
    • ½ cup light brown sugar, packed
    • ⅓ cup liquid-state coconut oil (canola or vegetable may be substituted)
    • ¼ cup granulated sugar
    • ¼ cup sour cream (lite is okay; or Greek yogurt may be substituted)
    • 2 teaspoons vanilla extract
    • 2 teaspoons cinnamon
    • 1 cup all-purpose flour
    • ½ teaspoon baking powder
    • ½ teaspoon baking soda
    • pinch salt (optional and to taste)
    • 1 cup grated carrots (about 1 large/2 medium peeled and trimmed carrots, laid loosely in cup)
    • 1 cup grated zucchini (about 1 medium/large trimmed zucchini, laid loosely in cup)
    • ½ cup walnuts, raisins, etc. (optional)

    1. Preheat oven to 350F. Spray one 9×5-inch loaf pan with floured cooking spray, or grease and flour the pan; set aside.
    2. In a large bowl, add the egg, brown sugar, oil, sugar, sour cream, vanilla, and cinnamon, and whisk to combine.
    3. Add the flour, baking powder, baking soda, optional salt, and fold with a spatula or stir gently with a spoon until just combined; don’t overmix.
    4. Add the carrots, zucchini, and optional walnuts or raisins, and fold gently to combine.
    5. Turn the batter out into the prepared pan, smoothing the top lightly with a spatula.
    6. Bake for about 52 to 58 minutes or until the top is golden, the center is set, and a toothpick inserted in the center comes out clean, or with a few moist crumbs, but no batter.
    7. Allow bread to cool in the pan for about 15 minutes before turning out on a wire rack to cool completely before slicing and serving.

    Notes

    • Optionally, serve with or glaze with your favorite topping.
    • Prep Time: 15 minutes
    • Cook Time: 58 minutes
    • Category: Bread
    • Method: Baking
    • Cuisine: American

    Nutrition

    • Serving Size: 1 slice
    • Calories: 180
    • Sugar: 10g
    • Sodium: 150mg
    • Fat: 7g
    • Saturated Fat: 3g
    • Unsaturated Fat: 4g
    • Trans Fat: 0g
    • Carbohydrates: 24g
    • Fiber: 1g
    • Protein: 3g
    • Cholesterol: 30mg

    Sharing is caring!

  • High-Protein Creamy Garlic Cheesy Chicken & Potatoes

    High-Protein Creamy Garlic Cheesy Chicken & Potatoes


    Introduction to High-Protein Creamy Garlic Cheesy Chicken & Potatoes

    As a busy mom, I often find myself in the whirlwind of daily chaos, longing for a meal that’s both satisfying and easy to whip up. That’s where my High-Protein Creamy Garlic Cheesy Chicken & Potatoes steps in, ready to save the day! This dish is a true celebration of flavors, combining tender chicken with creamy potatoes, all wrapped in the warmth of garlic and cheesy goodness. It’s perfect for those hectic weeknights or even a cozy weekend dinner. Trust me, your loved ones will be asking for seconds, and you’ll feel like a kitchen superstar!

    Why You’ll Love This High-Protein Creamy Garlic Cheesy Chicken & Potatoes

    This dish is not just a meal; it’s a warm hug on a plate. Quick to prepare, it takes only 45 minutes from start to finish, making it perfect for busy nights. The flavors meld together beautifully, bringing comfort and indulgence in every bite. Plus, it’s packed with protein, keeping you and your family satisfied. You’ll find that the kids love it too, which is always a win!

    Ingredients for High-Protein Creamy Garlic Cheesy Chicken & Potatoes

    Gathering fresh ingredients is a crucial step for the delicious High-Protein Creamy Garlic Cheesy Chicken & Potatoes. Here’s what you’ll need:

    • Chicken Breasts: I prefer large, juicy chicken breasts for the best texture. You can also use boneless, skinless thighs for an extra rich flavor.
    • Russet Potatoes: These are starchy and fluffy, perfect for absorbing the creamy sauce. Don’t worry if you want to keep it low-carb—cauliflower works wonderfully as a substitute!
    • Olive Oil: A drizzle of this golden oil adds depth to the sautéed garlic and chicken, making everything taste divine.
    • Garlic: Freshly minced garlic is the heart of this dish, offering that irresistible aroma and rich flavor. Don’t skimp on it!
    • Chicken Broth: It enhances the overall flavor and adds moisture. Low-sodium options are available if you’re watching salt intake.
    • Heavy Cream: This is what transforms our dish into creamy comfort food. However, for lighter versions, you can consider half-and-half or a dairy-free alternative.
    • Cheddar Cheese: I love to use sharp cheddar for that rich, tangy flavor. Feel free to mix in other cheese varieties, like Monterey Jack, for a twist.
    • Parmesan Cheese: A little grated Parmesan adds a punch of umami. Plus, it creates a lovely crust during baking.
    • Dried Thyme and Rosemary: These herbs provide earthy notes that complement the chicken beautifully. Fresh herbs can also be used for enhanced flavor!
    • Salt and Pepper: Essential for elevating every flavor. Always adjust to suit your personal taste.
    • Fresh Parsley: This bright, chopped garnish adds color and freshness. It’s that final touch that makes your dish pop!

    For exact quantities, check the bottom of the article where you can find everything available for quick printing.

    How to Make High-Protein Creamy Garlic Cheesy Chicken & Potatoes

    Step 1: Preheat and Prepare

    First things first, let’s preheat your oven to 400°F (200°C). While that’s warming up, take a moment to prepare your ingredients.

    Peel and cube those russet potatoes, making them ready to soak up all those flavors.

    Having everything laid out makes cooking so much smoother, especially when you’re juggling a busy schedule!

    Step 2: Sauté the Garlic

    With the oven warming, heat up your large skillet over medium heat. Add the olive oil, and once it shimmers, toss in the minced garlic.

    Sauté for about a minute, and oh, the aroma that fills your kitchen is delightful! Garlic is truly the champion of flavor, and sautéing it first helps release all that tasty goodness.

    Step 3: Cook the Chicken

    Now, let’s get to the chicken. Add those diced chicken breasts into the skillet. Cook them for about 5-7 minutes, stirring occasionally.

    We want the chicken to start browning gently, which locks in moisture and flavors. Juicy chicken is key in our High-Protein Creamy Garlic Cheesy Chicken & Potatoes.

    Step 4: Create the Cheesy Sauce

    Once the chicken has that lovely golden hue, remove it from the skillet. In the same pan, pour in the chicken broth and heavy cream.

    Add the shredded cheddar and grated Parmesan cheese, stirring until it all melts together into a creamy hug.

    Remember, low heat is your friend here; it helps avoid curdling, ensuring a smooth and rich sauce.

    Step 5: Combine Ingredients

    It’s time to bring everything together! Add the cubed potatoes into the cheesy sauce, ensuring each piece is coated.

    Then, gently fold back in that delicious chicken. We want every bite to burst with all those yummy flavors!

    Step 6: Bake to Perfection

    Transfer the chicken and potato mixture into a baking dish, spreading it out evenly.

    Pop it into the preheated oven for 25-30 minutes. You’ll know it’s ready when the chicken is fully cooked, and the potatoes are tender.

    For added assurance, feel free to use a meat thermometer; chicken should reach an internal temperature of 165°F (75°C). Comfort food doesn’t get much better than this!

    Tips for Success

    • Prep your ingredients ahead of time to streamline the cooking process.
    • For an extra creamy sauce, whisk the heavy cream in slowly over low heat.
    • Adjust seasoning based on your family’s taste preferences; a pinch more of thyme is delightful!
    • Don’t rush the browning of the chicken; it adds depth to the flavor.
    • Leftovers make for fantastic next-day lunches; simply reheat and enjoy!

    Equipment Needed

    • Large Skillet: Essential for sautéing and creating the cheesy sauce. A non-stick pan works well too!
    • Baking Dish: A 9×13 inch pan is perfect for this recipe, but any oven-safe dish will do.
    • Meat Thermometer: Helpful for ensuring chicken is cooked to perfection.
    • Cutting Board and Knife: Useful for prepping your chicken and potatoes.

    Variations of High-Protein Creamy Garlic Cheesy Chicken & Potatoes

    • Vegetable Boost: Toss in some steamed broccoli or spinach for a nutrient boost and added color.
    • Spicy Kick: Add a pinch of red pepper flakes or some diced jalapeños for a zing that’ll wake up your taste buds!
    • Herb Infusion: Experiment with fresh herbs like basil or oregano to change the flavor profile for different seasons.
    • Protein Alternatives: Swap the chicken for turkey or use tofu for a vegetarian twist while keeping it high-protein.
    • Cheese Variety: Mix in gouda or feta cheese for a delightful twist on the classic cheesy flavor.

    Serving Suggestions for High-Protein Creamy Garlic Cheesy Chicken & Potatoes

    • Fresh Salad: Pair it with a crisp green salad, drizzled with a light vinaigrette for balance.
    • Steamed Veggies: Sides like green beans or asparagus add color and nutrition to your plate.
    • Refreshing Beverages: A glass of iced tea or a light white wine complements the richness beautifully.
    • Presentation Tip: Serve in individual ramekins for an elegant touch at a dinner party!

    FAQs about High-Protein Creamy Garlic Cheesy Chicken & Potatoes

    Can I make this dish ahead of time? Absolutely! You can prepare the chicken and cheesy sauce a day in advance. Just assemble everything before baking when you’re ready to eat.

    What if my family doesn’t like garlic? You can reduce the garlic or swap it for onion powder for a milder flavor. This dish will still shine without overpowering garlic notes.

    Can I use frozen chicken? Yes, you can! Just remember to thaw it completely before cooking. It may need a bit more cooking time, so check the chicken’s doneness with a thermometer.

    Is this dish gluten-free? Yes! This High-Protein Creamy Garlic Cheesy Chicken & Potatoes recipe is naturally gluten-free, making it a wonderful option for those on gluten-free diets.

    How can I store leftovers? Stored in an airtight container, leftovers will last in the fridge for about 3-4 days. When you’re ready to enjoy them, just reheat in the oven or microwave!

    Final Thoughts on High-Protein Creamy Garlic Cheesy Chicken & Potatoes

    There’s something truly magical about bringing together family and friends around a warm dish of High-Protein Creamy Garlic Cheesy Chicken & Potatoes. Not only does it fill your kitchen with a delightful aroma, but it also fills your hearts with joy. Sharing this meal is about more than just the food; it’s about connection. Each creamy bite has the power to turn an ordinary evening into a cherished memory. So, whether it’s a weeknight dinner or a special occasion, this dish is sure to impress and satisfy everyone at your table!


    Print

    clock clock iconcutlery cutlery iconflag flag iconfolder folder iconinstagram instagram iconpinterest pinterest iconfacebook facebook iconprint print iconsquares squares iconheart heart iconheart solid heart solid icon

    Description

    A delicious and indulgent dish featuring tender chicken and creamy potatoes, enhanced with garlic and cheeses, perfect for a hearty meal.


    • 3 large chicken breasts, diced
    • 4 medium-sized russet potatoes, peeled and cubed
    • 2 tablespoons olive oil
    • 6 cloves garlic, minced
    • 1 cup chicken broth
    • 1 cup heavy cream
    • 1 cup shredded cheddar cheese
    • 1/2 cup grated Parmesan cheese
    • 1 teaspoon dried thyme
    • 1 teaspoon dried rosemary
    • Salt and pepper, to taste
    • 1/4 cup fresh parsley, chopped (for garnish)

    1. Preheat your oven to 400°F (200°C).
    2. In a large skillet over medium heat, add the olive oil. Once heated, add the minced garlic and sauté until fragrant, about 1 minute.
    3. Add the diced chicken breasts to the skillet. Cook until they start to brown slightly, about 5-7 minutes.
    4. Remove the chicken from the skillet and set aside. In the same skillet, add the chicken broth, heavy cream, shredded cheddar, and grated Parmesan cheese. Stir until the cheese melts and the mixture is smooth.
    5. Season the sauce with dried thyme, dried rosemary, salt, and pepper. Bring to a simmer, ensuring it does not boil over.
    6. Incorporate the cubed potatoes into the sauce. Stir until they are well coated, then return the chicken to the skillet.
    7. Transfer the mixture to a baking dish, ensuring even distribution of the chicken and potatoes.
    8. Place the dish in the preheated oven and bake for 25-30 minutes, or until the chicken is fully cooked and the potatoes are tender.
    9. Once done, remove from the oven and let it cool for a few minutes.
    10. Garnish with fresh parsley before serving for an added burst of flavor and color.

    Notes

    • For a low-carb option, you can substitute potatoes with cauliflower.
    • Adjust seasonings according to personal taste preferences.
    • Prep Time: 15 minutes
    • Cook Time: 30 minutes
    • Category: Main Course
    • Method: Baking
    • Cuisine: American

    Nutrition

    • Serving Size: 1 serving
    • Calories: 620
    • Sugar: 3g
    • Sodium: 750mg
    • Fat: 38g
    • Saturated Fat: 18g
    • Unsaturated Fat: 12g
    • Trans Fat: 0g
    • Carbohydrates: 30g
    • Fiber: 3g
    • Protein: 40g
    • Cholesterol: 110mg

    Sharing is caring!

  • Thai Coconut Curry Meatballs

    Thai Coconut Curry Meatballs


    Introduction to Thai Coconut Curry Meatballs

    Have you ever found yourself scrambling for dinner ideas after a long day? I totally get it! That’s where my Thai Coconut Curry Meatballs shine. This delightful dish isn’t just about flavor – it’s about making life easier for fellow busy moms and professionals.

    Picture this: tender meatballs simmering in a warm, creamy coconut curry sauce that wraps around you like a hug. Perfect for family dinners or impressing guests, this recipe is quick and satisfying. So, roll up those sleeves and let’s dive into a culinary adventure that will become your go-to meal!

    Why You’ll Love This Thai Coconut Curry Meatballs

    This recipe is a lifesaver for our hectic lives, offering ease without skimping on taste. In just 35 minutes, you can serve a dish bursting with flavors that transport you to a Thai paradise. The combination of creamy coconut and zesty curry creates a harmonious balance, making it a family favorite. Plus, it’s versatile enough to cater to picky eaters and different diets, ensuring everyone leaves the table happy!

    Ingredients for Thai Coconut Curry Meatballs

    Let’s gather everything we need to bring these Thai Coconut Curry Meatballs to life. Each ingredient plays a special role in crafting that irresistible flavor profile.

    • Ground chicken: The heart of our meatballs, this lean protein complements the rich sauce beautifully. You can also use ground turkey or beef if you prefer!
    • Breadcrumbs: These little bits bind the mixture together and give the meatballs a delicate texture. Feel free to use gluten-free breadcrumbs for a gluten-free option.
    • Egg: A binding agent that helps the meatballs maintain their shape. You can swap it out for a flax egg for a vegan version.
    • Coconut milk: This provides a creamy base for our curry, adding richness without being overly heavy. Choose full-fat for a luxurious experience or light coconut milk for a healthier twist.
    • Red curry paste: The star of the show! This paste adds a delightful kick and depth of flavor. Adjust the amount to create your desired level of spiciness.
    • Fish sauce: A staple in Thai cooking, it enhances the umami flavor. If you’re vegetarian, you can omit it or use soy sauce as an alternative.

    For exact measurements, just scroll to the bottom of this article where you’ll find everything you need for a successful cooking session!

    How to Make Thai Coconut Curry Meatballs

    Step 1 – Prepare the Meatball Mixture

    Let’s start by putting the heart of our dish together! In a large mixing bowl, combine the ground chicken, breadcrumbs, and egg. I like to use my hands for this part because it’s the best way to feel that texture. Mix everything until it’s well blended but don’t overwork it; we want juicy meatballs, not tough ones! If you feel adventurous, add a pinch of salt or some fresh herbs to liven things up. Once it’s combined, set the bowl aside for a moment while we heat things up on the stovetop.

    Step 2 – Form and Brown the Meatballs

    Now comes the fun part! With your hands, grab a small handful of the mixture and roll it into balls about the size of golf balls. I find that wetting my hands with a little water helps prevent sticking. Heat a splash of oil in a pan over medium heat. Once it’s nice and hot, add the meatballs. Make sure not to crowd the pan; this is how you get that lovely brown crust! Let them sear on each side for several minutes until golden and crispy. This step adds such depth to the flavor, trust me!

    Step 3 – Make the Coconut Curry Sauce

    Alright, while those beautiful meatballs are browning, let’s whip up that divine sauce! In a separate pot, pour in the coconut milk, followed by the red curry paste and fish sauce. Turn the heat to medium and stir it all together. The vibrant colors and aromatic scents will already start to swirl around your kitchen! Allow the mixture to simmer gently for about 5 minutes. This is where all those wonderful flavors meld together to create the base of our Thai Coconut Curry. Just imagine the richness waiting for those meatballs to join the party!

    Step 4 – Combine and Simmer

    Once your meatballs are perfectly browned, it’s time for a warm reunion! Gently place them into the pot of simmering coconut curry sauce. Let them cook together for about 10 minutes, allowing the meatballs to absorb all that lovely flavor. Stir occasionally, but don’t get too vigorous, as we don’t want to break them apart. When they’re cooked through, the sauce will thicken just a bit, enveloping each meatball in creamy, spicy goodness. Perfection awaits, dear friends!

    Tips for Success

    • Use a meat thermometer to ensure meatballs are cooked through (165°F).
    • Prep ahead! Make the meatballs in advance and freeze them for busy weeknights.
    • Adjust the spice by adding more or less red curry paste according to your family’s taste.
    • Simmer the sauce longer for a richer flavor if you have the time.
    • Garnish with fresh cilantro or lime juice before serving for an extra pop!

    Equipment Needed

    • Mixing Bowl: Any large bowl will do; a glass bowl helps see the mixture.
    • Pan: A skillet or frying pan for browning meatballs; a non-stick option works best.
    • Pot: A saucepan for simmering the sauce; choose a medium-sized one.
    • Spoon or Spatula: Use a wooden spoon for stirring; it won’t scratch your cookware.
    • Meat Thermometer: Useful for checking meatball doneness; if you don’t have one, just cut one open to check!

    Variations of Thai Coconut Curry Meatballs

    • Vegetarian Option: Swap out the meat for cooked lentils or chickpeas. Add some finely chopped vegetables for extra texture.
    • Gluten-Free: Use gluten-free breadcrumbs or crushed rice crackers to keep it safe for gluten sensitivities.
    • Spicy Kick: Add sliced fresh chilies or a splash of sriracha to the sauce for an extra zing!
    • Herb Infusion: Mix in fresh herbs like basil or cilantro into the meatball mixture for a fresh twist.
    • Meal Prep Friendly: Make a double batch and freeze half. These meatballs thaw beautifully for quick meals later.

    Serving Suggestions

    • Serve Over Rice: Jasmine or basmati rice complements the curry perfectly, soaking up that delicious sauce.
    • Add Fresh Veggies: Pair with steamed broccoli or snap peas for a colorful and nutritious addition.
    • Drink Pairing: A cool coconut water or a light lager can refresh your palate.
    • Garnish: Top with cilantro or sliced lime for an extra burst of flavor!
    • Presentation: Serve in a deep bowl to showcase the vibrant curry and meatballs beautifully.

    FAQs about Thai Coconut Curry Meatballs

    Curious minds often have questions about making these delicious Thai Coconut Curry Meatballs. Here are some answers to help you on your culinary journey!

    Can I make these meatballs in advance?

    Absolutely! You can prepare the meatballs ahead of time and freeze them. Just cook them when you’re ready for a quick meal.

    What can I do if I don’t like spicy food?

    No worries! You can reduce the amount of red curry paste or choose a milder curry paste. Sweet Thai chili sauce can also add flavor without the heat.

    How do I store leftovers?

    Store any leftovers in an airtight container in the fridge for up to three days. Reheat gently on the stovetop with a splash of coconut milk for moisture.

    Can I substitute the chicken?

    Definitely! Ground turkey or beef works beautifully in this recipe. For a vegetarian twist, try using tofu or lentils!

    Is this recipe gluten-free?

    Yes! Just ensure you use gluten-free breadcrumbs and double-check your fish sauce for gluten-free labeling. Enjoy worry-free!

    Final Thoughts on Thai Coconut Curry Meatballs

    Cooking these Thai Coconut Curry Meatballs brings me a sense of joy that’s hard to describe. Each bite is a wonderful embrace of flavors that transports me to vibrant street markets in Thailand. The ease of preparation means I can create this delightful dish even amidst the chaos of a busy family life. Watching my loved ones savor every mouthful fills my heart with warmth. I hope you find the same happiness in this recipe, making it a beloved staple in your home, just like it has become in mine!


    Print

    clock clock iconcutlery cutlery iconflag flag iconfolder folder iconinstagram instagram iconpinterest pinterest iconfacebook facebook iconprint print iconsquares squares iconheart heart iconheart solid heart solid icon

    Description

    A flavorful dish of meatballs cooked in a rich and creamy Thai coconut curry sauce.


    • 1 lb ground chicken
    • 1/2 cup breadcrumbs
    • 1 egg
    • 1 can (14 oz) coconut milk
    • 2 tbsp red curry paste
    • 1 tsp fish sauce

    1. Mix ground chicken, breadcrumbs, and egg together in a bowl.
    2. Form the mixture into meatballs and brown them in a pan.
    3. In a separate pot, simmer the coconut milk, red curry paste, and fish sauce.
    4. Add the browned meatballs to the curry sauce and simmer for 10 minutes, or until the meatballs are cooked through.

    Notes

    • Serve over rice for a complete meal.
    • Adjust the amount of red curry paste for desired spiciness.
    • Can substitute ground chicken with turkey or beef.
    • Prep Time: 15 minutes
    • Cook Time: 20 minutes
    • Category: Main Course
    • Method: Stovetop
    • Cuisine: Thai

    Nutrition

    • Serving Size: 1 serving
    • Calories: 300
    • Sugar: 3g
    • Sodium: 700mg
    • Fat: 20g
    • Saturated Fat: 11g
    • Unsaturated Fat: 9g
    • Trans Fat: 0g
    • Carbohydrates: 15g
    • Fiber: 1g
    • Protein: 18g
    • Cholesterol: 90mg

    Sharing is caring!

  • Creamy Brussels Sprouts Bacon: Indulge in This Delight!

    Creamy Brussels Sprouts Bacon: Indulge in This Delight!


    Introduction to Creamy Brussels Sprouts Bacon

    Hey there, fellow home cooks! If you’re anything like me, you often find yourself in a whirlwind of busy schedules, and the thought of preparing a delicious dinner can feel overwhelming. That’s where this delightful recipe for Creamy Brussels Sprouts Bacon comes in! It effortlessly combines the rich flavors of creamy goodness with crispy bacon and tender Brussels sprouts, making it a quick solution for those hectic evenings. This dish is perfect for impressing your loved ones, or even just treating yourself after a long day. Trust me, every bite will be worth it!

    Why You’ll Love This Creamy Brussels Sprouts Bacon

    This Creamy Brussels Sprouts Bacon dish is a treasure for busy moms and professionals alike! It’s not only quick to whip up, but the combination of crispy bacon and creamy sauce creates a symphony of flavors that will leave your taste buds dancing. Plus, it’s an excellent way to sneak in some veggies without any fuss. Trust me, you’ll find yourself making this comfort food time and time again!

    Ingredients for Creamy Brussels Sprouts Bacon

    Gathering the right ingredients is step one in crafting this comforting dish. Here’s what you’ll need for the Creamy Brussels Sprouts Bacon:

    • Brussels sprouts: These little green gems bring a delightful crunch and earthy flavor. Look for fresh ones for the best taste.
    • Bacon: Thick-cut bacon is essential here. It offers perfect crispiness and an irresistible smoky plunge into flavor. Don’t skimp on quality!
    • Heavy cream or half and half: This adds that dreamy creaminess to the dish. Feel free to substitute with a lighter option if you prefer.
    • Parmesan cheese: A sprinkle of finely shredded parmesan brings nutty sharpness. It melts beautifully into the sauce.
    • Mozzarella cheese: Grated mozzarella adds creaminess and a stretchy texture that makes every bite heavenly.
    • Unsalted butter: Used for creating the delicious sauce base, it enriches the dish. Always try to use unsalted to control the salt content.
    • All-purpose flour: This is your thickening agent. It helps create that luscious sauce we all love!
    • Garlic: Minced garlic adds aromatic warmth. It’s definitely a must for that rich flavor.
    • Salt and black pepper: Essential seasoning to enhance every flavor. Always adjust according to your taste.

    For more precise measurements, check the end of the article where I’ve provided everything you need to get started!

    How to Make Creamy Brussels Sprouts Bacon

    Step 1: Prepare Your Oven and Ingredients

    Before we dive into cooking, let’s get organized. Preheat your oven to 200°C (about 400°F). It’s all about smoothing the cooking process, so gather all your ingredients on the counter. You’ll want to have your Brussels sprouts trimmed, bacon diced, and cheeses ready to go. Having everything within reach makes cooking feel like a breeze!

    Step 2: Cook the Bacon to Perfection

    Now, it’s time to bring that bacon to life! Grab a large cast iron skillet and toss in the diced bacon over medium heat. Sizzle it away until it’s beautifully crisp and golden, about 8–10 minutes. Use a slotted spoon to remove the bacon, placing it on a paper towel-lined plate to soak up that excess grease. Don’t toss the flavorful bacon fat—about 30–45 ml should be reserved in the pan. Trust me, it adds so much depth to our Brussels sprouts!

    Step 3: Sauté the Brussels Sprouts

    With the bacon crisped to perfection, it’s time for the Brussels sprouts to shine! Add them right into the skillet with the reserved bacon fat. Season with salt and black pepper to taste. Sauté those little green wonders over medium-high heat for about 6 minutes. You want them to be lightly charred with a hint of crunch. When they smell amazing—about a minute in—stir in minced garlic and let it cook for another minute, allowing that aroma to fill your kitchen.

    Step 4: Create the Creamy Sauce

    Remove the Brussels sprouts from the pan and set them aside on a plate. Now, let’s make that luscious sauce! In the same skillet, melt unsalted butter over medium heat. Whisk in the all-purpose flour until you have a smooth mixture. Gradually pour in the heavy cream while whisking continuously until it heats through and thickens. Stir in finely shredded parmesan cheese until it’s melted and smooth. This sauce is the heart of our Creamy Brussels Sprouts Bacon dish!

    Step 5: Combine Everything and Bake

    It’s time for the magic to happen! Return the sautéed Brussels sprouts and crispy bacon back to the skillet. Gently stir to coat them with that creamy sauce. If your skillet isn’t oven-safe, transfer everything to an ovenproof baking dish. Sprinkle grated mozzarella cheese evenly over the top. Give it a quick mix to distribute the cheese. Now, pop it in the preheated oven and bake for 15–20 minutes until the center is bubbling and the Brussels sprouts are tender. Get ready to enjoy the explosion of flavors!

    Tips for Success

    • Don’t rush the bacon! Cook it slowly for that perfect crispness.
    • Make sure your Brussels sprouts are similar in size for even cooking.
    • Keep the heat moderate while making the sauce to avoid scorching.
    • For added flavor, consider adding a pinch of red pepper flakes to the sauce.
    • Let it sit for a few minutes after baking; it makes serving easier.

    Equipment Needed

    • Cast iron skillet: Perfect for even cooking. A non-stick pan works too.
    • Measuring cups and spoons: Essential for precise ingredient amounts.
    • Whisk: Ideal for blending your sauce seamlessly. A fork can work in a pinch!
    • Ovenproof dish: Use if your skillet isn’t oven-safe.
    • Slotted spoon: Great for removing bacon without excess grease.

    Variations of Creamy Brussels Sprouts Bacon

    • Vegetarian Option: Replace bacon with sautéed mushrooms or smoked tempeh for a rich, savory flavor.
    • Cheesy Delight: Add crumbled goat cheese or feta for a tangy twist that complements the creaminess.
    • Nutty Addition: Toss in some toasted almonds or walnuts for added crunch and nutrition.
    • Spicy Kick: Incorporate a dash of cayenne pepper or red pepper flakes to the cream sauce for a delightfully fiery flavor.
    • Herb Infusion: Try adding fresh thyme or rosemary to the sautéed Brussels sprouts for an aromatic touch.

    Serving Suggestions for Creamy Brussels Sprouts Bacon

    • Pair this dish with a light green salad for a refreshing contrast.
    • Serve alongside roasted chicken or grilled steak for a hearty meal.
    • A glass of crisp white wine, like Sauvignon Blanc, complements the creaminess perfectly.
    • Garnish with fresh parsley or chives for a pop of color and freshness.
    • Present in individual ramekins for a charming touch at dinner parties.

    FAQs about Creamy Brussels Sprouts Bacon

    Can I make Creamy Brussels Sprouts Bacon ahead of time?

    Absolutely! You can prepare the dish up to the baking step, then cover and refrigerate it. When you’re ready, just pop it in the oven to heat through. It’s a fantastic time-saver!

    What can I substitute for heavy cream?

    If you want a lighter version, feel free to swap heavy cream with half and half or whole milk. The sauce might not be as thick, but it’ll still be delicious!

    How do I store leftovers?

    Store any leftovers in an airtight container in the fridge for up to 3 days. Reheat gently in the microwave or oven so it stays creamy and warm.

    Can I use frozen Brussels sprouts?

    Sure! Just make sure to thaw and drain excess moisture before sautéing. Fresh brings extra crunch, but frozen can work in a pinch.

    Is this dish suitable for meal prep?

    You bet! This Creamy Brussels Sprouts Bacon dish holds up well and makes for a fabulous meal prep option, providing healthy veggies wrapped in creamy goodness for your busy week!

    Final Thoughts

    Creating this Creamy Brussels Sprouts Bacon dish has been an absolute joy in my kitchen, and I hope it brings you the same delight! It’s incredible how a few simple ingredients can transform into a warm, comforting meal that feels like a big hug. The combination of creamy goodness and crispy bacon never fails to impress, making it perfect for any occasion. Whether it’s a busy weeknight or a cozy dinner with loved ones, this recipe is sure to brighten your day. Dive in and let the flavors sweep you off your feet!


    Print

    clock clock iconcutlery cutlery iconflag flag iconfolder folder iconinstagram instagram iconpinterest pinterest iconfacebook facebook iconprint print iconsquares squares iconheart heart iconheart solid heart solid icon

    Description

    A delightful dish combining creamy textures with crispy bacon and tender Brussels sprouts.


    • 900 g Brussels sprouts, trimmed and halved
    • 340 g thick-cut bacon, cut into small pieces
    • 360 ml heavy cream or half and half
    • 35 g parmesan cheese, finely shredded
    • 85 g mozzarella cheese, grated
    • 28 g unsalted butter
    • 2 tablespoons all-purpose flour
    • 2 teaspoons garlic, minced
    • Salt, to taste
    • Black pepper, to taste

    1. Set oven to 200°C.
    2. In a large cast iron skillet over medium heat, cook bacon pieces until thoroughly browned and crisp. Remove with a slotted spoon and place on a paper towel-lined plate. Reserve 30–45 ml bacon fat in the pan, discarding excess.
    3. Add Brussels sprouts to the reserved bacon fat. Season with salt and black pepper. Sauté over medium-high heat for approximately 6 minutes until lightly charred. Stir in garlic and cook for 1 minute until fragrant.
    4. Transfer Brussels sprouts to a plate or an ovenproof baking dish if skillet is not oven-safe. Melt butter in skillet over medium heat. Whisk in the flour until smooth. Gradually pour in the cream, whisking continually until heated through and thickened. Stir in parmesan cheese until melted and the sauce is smooth.
    5. Return Brussels sprouts and bacon to the skillet and gently stir to coat with the sauce. If using a baking dish, pour the sauce over and mix. Sprinkle grated mozzarella evenly and give a quick stir to distribute.
    6. Bake in the preheated oven for 15–20 minutes until the center is bubbling and Brussels sprouts are fully tender. Serve immediately while hot.

    Notes

    • For a lighter version, you can substitute heavy cream with a lower-fat alternative.
    • Ensure the Brussels sprouts are evenly charred for better flavor.
    • Can be served as a side dish or as a main meal.
    • Prep Time: 15 minutes
    • Cook Time: 30 minutes
    • Category: Main Course
    • Method: Baking
    • Cuisine: American

    Nutrition

    • Serving Size: 1 serving
    • Calories: 450
    • Sugar: 2 g
    • Sodium: 900 mg
    • Fat: 30 g
    • Saturated Fat: 15 g
    • Unsaturated Fat: 10 g
    • Trans Fat: 0 g
    • Carbohydrates: 18 g
    • Fiber: 5 g
    • Protein: 18 g
    • Cholesterol: 70 mg

    Sharing is caring!

  • Crab Stuffed Cheddar Bay Biscuits

    Crab Stuffed Cheddar Bay Biscuits


    Introduction to Crab Stuffed Cheddar Bay Biscuits

    Hey there, fellow home cooks! If you’re looking for a delightful treat that’s sure to wow family and friends, you’ve landed in the right spot. These Crab Stuffed Cheddar Bay Biscuits are more than just a recipe; they’re a warm hug in biscuit form! Perfect for busy evenings or gatherings, these little wonders are surprisingly easy to whip up. Picture buttery, flaky biscuits hiding a mouthwatering crab filling that makes any meal feel special. Trust me, this is a dish you’ll want to keep in your culinary toolkit. Let’s dive into the deliciousness together!

    Why You’ll Love This Crab Stuffed Cheddar Bay Biscuits

    These Crab Stuffed Cheddar Bay Biscuits are a busy mom’s dream come true! They’re quick to make, taking just about 35 minutes from start to finish. The taste? Imagine buttery biscuits bursting with savory crab—pure bliss. Plus, they’re perfect for impressing guests or enjoying as a cozy family treat. Your loved ones will rave about them, and you’ll appreciate how effortlessly they come together in your kitchen.

    Ingredients for Crab Stuffed Cheddar Bay Biscuits

    Let’s gather all the delicious components needed for our Crab Stuffed Cheddar Bay Biscuits. Each ingredient plays a vital role, ensuring these biscuits are as scrumptious as they sound. Don’t worry; I’ll also mention exact quantities at the bottom of the article for your convenience!

    • Cheddar Bay Biscuit Mix: The foundation of our biscuits, providing that signature cheesy flavor and fluffy texture.
    • Garlic Powder: A dash of garlic brings warmth and depth, elevating the overall taste.
    • Italian Seasoning: This blend adds a hint of herbaceous freshness that complements the crab beautifully.
    • Lump Crab Meat: The star of our show! This succulent, fully cooked crab meat is packed with flavor and protein.
    • Paprika: A sprinkle of this vibrant spice gives a subtle smokiness and lovely color to the filling.
    • Onion Powder: A touch of sweetness and savories that enhances the crab mixture.
    • Mayonnaise: This creamy ingredient helps bind everything together and adds moisture to our crab filling.
    • Prepared Mustard: A splash of tanginess that cuts through the richness, balancing all the flavors.
    • Crushed Ritz Crackers: Not just for snacking! They add a delightful crunch and a hint of buttery goodness.
    • Grated Parmesan Cheese: This cheesy goodness adds another layer of flavor, making our biscuits irresistible.
    • Unsalted Butter: A lovely brush of melted butter post-baking gives our biscuits a rich, golden sheen.
    • Fresh Lemon Juice: A splash of brightness that elevates the flavors, making the filling pop.

    With these simple yet flavorful ingredients, you’ll create an appetizer that will have everyone reaching for seconds! Now, let’s get cooking!

    How to Make Crab Stuffed Cheddar Bay Biscuits

    Now comes the fun part—making our Crab Stuffed Cheddar Bay Biscuits! Follow these steps, and don’t worry; I’ve got some tips along the way to make this as easy as pie. Let’s get started!

    Step 1: Prepare the Biscuit Dough

    First, grab your package of Cheddar Bay Biscuit Mix. Follow the instructions on the package to get that perfect, fluffy dough. As I prepare the dough, I like to stir in a teaspoon of garlic powder and Italian seasoning. It gives our biscuits extra flavor! Once mixed, set the dough aside for a moment.

    Step 2: Preheat the Oven

    While the dough is resting, it’s time to preheat the oven to 375°F (190°C). This ensures our biscuits will bake evenly and turn golden brown. It’s a small step, but oh-so-important for that perfect texture!

    Step 3: Make the Crab Filling

    Now, let’s make the delicious crab filling. In a mixing bowl, gently fold together lump crab meat, paprika, onion powder, mayonnaise, prepared mustard, crushed Ritz crackers, and grated parmesan cheese. If the mixture feels a bit dry, don’t hesitate to add a little more mayonnaise. Trust me, it makes a big difference!

    Step 4: Shape the Biscuits

    Get your hands a little dusty by lightly flouring them. Take a scoop of biscuit dough and shape it into a shallow cup in your palm. If you find that the dough is sticky, a little flour can save the day. It’ll help you create a nice little pocket for the crab filling!

    Step 5: Fill and Encase the Crab Mixture

    Here comes the magic! Place about a spoonful of the crab mixture right in the center of the dough cup. Carefully cover the filling with another piece of dough. Pinch the edges to seal in all that crabby goodness. This step is a bit like wrapping a tiny present—who wouldn’t love that?

    Step 6: Position in Muffin Tin

    Now, it’s time to place each filled biscuit into the slots of your greased muffin tin. This method not only gives them a lovely shape but also ensures they bake evenly. Make sure to give them a little space—they need room to rise!

    Step 7: Bake to Perfection

    Slide your muffin tin into the preheated oven and let these beauties bake for 12 to 15 minutes. You’ll know they’re ready when they are golden brown and firm to the touch. The aroma will fill your kitchen and make your mouth water!

    Step 8: Enhance with Butter and Lemon

    As soon as your biscuits are done baking, melt some unsalted butter and mix it with a squeeze of fresh lemon juice. Brush this delightful mixture over the tops of your biscuits while they’re still warm. It gives them an extra shine and that little touch of zing. Delicious!

    Tips for Success

    • Keep your hands floured when shaping the dough to avoid sticking.
    • Make sure your crab meat is as fresh as possible for the best flavor.
    • If you love spices, sprinkle a bit more paprika into your crab mixture.
    • Experiment with your favorite herbs in the biscuit dough for extra zest.
    • Serve warm for maximum enjoyment—trust me, they won’t last long!

    Equipment Needed

    • Muffin Tin: A standard muffin tin works well, but you can also use a mini muffin tin for bite-sized treats.
    • Mixing Bowls: Pot for medium to large bowls for easy mixing, or just grab whatever you’ve got on hand.
    • Measuring Cups and Spoons: Essential for accuracy, but you can eyeball if you’re feeling adventurous.
    • Spatula: A rubber spatula helps in folding and transferring mixtures easily.

    Variations on Crab Stuffed Cheddar Bay Biscuits

    • Cheesy Spinach Addition: Toss in some chopped, cooked spinach into the crab mixture for a nutritious twist and a pop of green.
    • Spicy Kick: Add diced jalapeños or a dash of hot sauce to the crab filling for a fiery flavor that adventurous palates will love.
    • Substitute Protein: For a different yet satisfying version, swap the crab for shrimp or even imitation crab for a budget-friendly option.
    • Herb Infusion: Incorporate finely chopped fresh herbs like dill or parsley to the crab mixture for a burst of freshness.
    • Gluten-Free Option: Use a gluten-free biscuit mix to make these Crab Stuffed Cheddar Bay Biscuits suitable for gluten-sensitive folks.

    Serving Suggestions for Crab Stuffed Cheddar Bay Biscuits

    • Pair with a light, crisp garden salad for a refreshing contrast.
    • Serve alongside a tangy dipping sauce, like a lemony aioli or a zesty remoulade.
    • A chilled glass of white wine complements the flavors beautifully.
    • For a fun twist, present them on a slate board with fresh herbs for garnish.

    FAQs about Crab Stuffed Cheddar Bay Biscuits

    Can I make these Crab Stuffed Cheddar Bay Biscuits ahead of time?

    Absolutely! You can prepare the crab filling and biscuit dough a day in advance. Just store them separately in the fridge. When you’re ready to bake, assemble and pop them in the oven. It’s a time-saver for busy days!

    What can I use instead of crab meat?

    If crab isn’t your thing, you can easily swap it out for cooked shrimp or even canned tuna. Both options provide an excellent flavor, transforming these biscuits while keeping the base recipe delightful!

    Are these Crab Stuffed Cheddar Bay Biscuits freezer-friendly?

    Yes, they freeze beautifully! After baking, let them cool completely. Then, place them in an airtight container or freezer bag. When you’re ready to enjoy, simply reheat in the oven for a few minutes.

    Can I include more cheese in the filling?

    Of course! If you’re a cheese lover, feel free to add extra grated cheese to your crab filling. It’s a delicious way to amp up the flavor and creaminess!

    How do I prevent the biscuits from sticking to the muffin tin?

    Coating your muffin tin with nonstick spray is key! You can also line each slot with cupcake liners for easy removal or ensure perfect shapes. Either way, happy baking!

    Final Thoughts on Crab Stuffed Cheddar Bay Biscuits

    Nothing brings people together quite like food, and these Crab Stuffed Cheddar Bay Biscuits are no exception. Whether you serve them at a family gathering or enjoy them on a cozy night in, each bite carries a wave of comfort and joy. The delightful flavors of the crab and the buttery biscuit create a warm moment that encourages laughter and conversation around the table. Plus, the ease of making them means more time to connect with those you love. So, grab your apron, and let’s create some delicious memories with these scrumptious bites!


    Print

    clock clock iconcutlery cutlery iconflag flag iconfolder folder iconinstagram instagram iconpinterest pinterest iconfacebook facebook iconprint print iconsquares squares iconheart heart iconheart solid heart solid icon

    Description

    A delightful twist on traditional cheddar bay biscuits, stuffed with a flavorful crab filling.


    • 1 package Cheddar Bay Biscuit Mix
    • 1 teaspoon garlic powder
    • 1 teaspoon Italian seasoning
    • 450 grams lump crab meat, fully cooked
    • 0.25 teaspoon paprika
    • 0.5 teaspoon onion powder
    • 125 millilitres mayonnaise, plus extra as needed
    • 1 tablespoon prepared mustard
    • 70 grams Ritz crackers, crushed (approximately half sleeve)
    • 100 grams grated parmesan cheese
    • 30 grams unsalted butter, melted
    • 1 teaspoon freshly squeezed lemon juice

    1. Combine the Cheddar Bay Biscuit Mix according to package directions. Stir in garlic powder and Italian seasoning until integrated. Set aside.
    2. Set oven to 190°C (375°F). Lightly coat two muffin tins with nonstick spray.
    3. In a mixing bowl, gently fold together lump crab meat, paprika, onion powder, mayonnaise, prepared mustard, crushed Ritz crackers, and grated parmesan until just combined. Add extra mayonnaise if the mixture seems dry.
    4. Dust hands lightly with flour. Scoop a portion of biscuit dough into your palm and shape into a shallow cup.
    5. Place a spoonful of the crab mixture into the centre of each dough cup.
    6. Cover each with an extra piece of dough to fully encase crab filling, pinching edges if needed.
    7. Position each filled biscuit into a slot in the prepared muffin tin.
    8. Transfer tins to the oven and bake for 12 to 15 minutes, until golden brown and firm.
    9. Once baked, immediately brush biscuit tops with a mixture of melted butter and lemon juice.

    Notes

    • Ensure the crab meat is fully cooked before using.
    • Add more mayonnaise for a creamier filling if desired.
    • Adjust seasoning to taste.
    • Prep Time: 20 minutes
    • Cook Time: 15 minutes
    • Category: Appetizer
    • Method: Baking
    • Cuisine: American

    Nutrition

    • Serving Size: 1 biscuit
    • Calories: 150
    • Sugar: 1g
    • Sodium: 400mg
    • Fat: 8g
    • Saturated Fat: 4g
    • Unsaturated Fat: 3g
    • Trans Fat: 0g
    • Carbohydrates: 14g
    • Fiber: 1g
    • Protein: 5g
    • Cholesterol: 30mg

    Sharing is caring!