Category: Uncategorized

  • Zesty Italian Pasta Salad

    Zesty Italian Pasta Salad


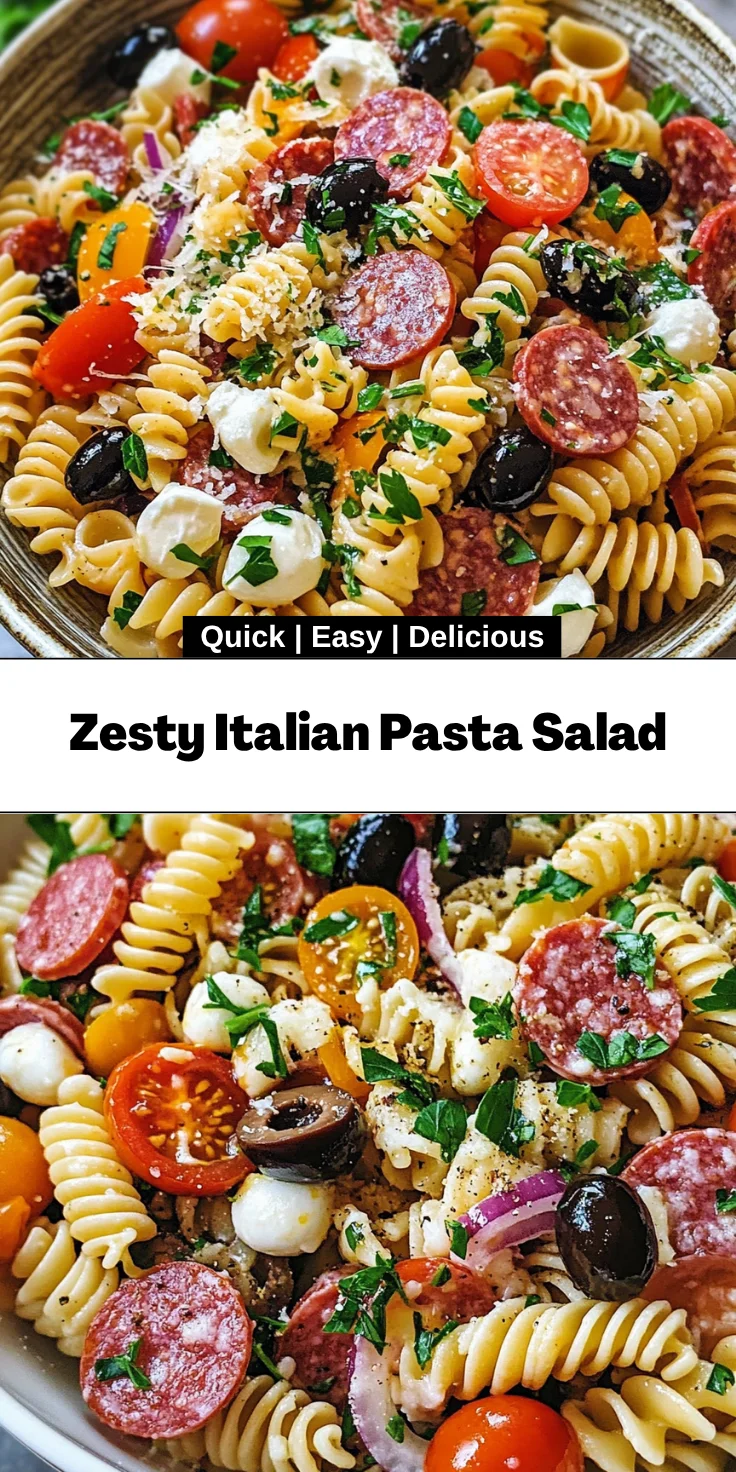
    Introduction to Zesty Italian Pasta Salad

    There’s something incredibly heartwarming about a big bowl of Zesty Italian Pasta Salad sitting on the table, isn’t there? This delightful dish is not just a feast for the eyes; it’s a perfect quick solution for a bustling day. Whether you’re juggling work, kids, or that endless to-do list, this salad brings together vibrant flavors with minimal effort. It’s also a fantastic way to impress your loved ones during casual get-togethers. Trust me, every bite bursts with Italian essence, making it a go-to recipe you’ll cherish. Let’s dive in and create something special!

    Why You’ll Love This Zesty Italian Pasta Salad

    If you’re like me, life can get hectic. This Zesty Italian Pasta Salad is a lifesaver—ready in just 25 minutes! The vibrant, tangy flavors transport you straight to Italy without the hassle of complex cooking. With each bite, you’ll enjoy a refreshing burst of taste that pleases the whole family. Plus, it’s make-ahead friendly, saving you time on busy weeknights. Who can resist a dish that’s both simple and delicious?

    Ingredients for Zesty Italian Pasta Salad

    Gathering the right ingredients makes all the difference in crafting a flavorful Zesty Italian Pasta Salad. Here’s what you’ll need to create this culinary delight:

    • Extra virgin olive oil: A rich, fruity essence that enhances the overall flavor.
    • Red wine vinegar: Adds a tangy brightness to the dressing, elevating the salad with its sharpness.
    • Lemon juice: A splash of fresh citrus to brighten up each bite and balance the flavors.
    • Grated Parmesan cheese: For a savory richness that pairs delightfully with the pasta.
    • Sugar: Just a pinch helps to balance the acidity in the dressing beautifully.
    • Dried parsley: Brings a mild herbal note and a pop of color to the dish.
    • Dried basil: Its sweet and aromatic flavor transports you straight to an Italian garden.
    • Dried oregano: A classic Italian herb that adds a rustic earthiness to the ensemble.
    • Garlic powder: For a subtle hint of garlic, this is a time-saver compared to fresh cloves.
    • Onion powder: Adds a mellow onion flavor without the crunch; easy peasy!
    • Paprika: A touch of smokiness that complements the other ingredients perfectly.
    • Salt and pepper: Essential for seasoning to taste, bringing all the flavors into harmony.

    Feel free to mix in some extra ingredients if you’re feeling adventurous! Think crunchy bell peppers, juicy cherry tomatoes, or even protein like salami and pepperoni. The options are endless. For those precise quantities, you can find the full list at the bottom of the article, ready for you to print out and whip up this delicious dish!

    How to Make Zesty Italian Pasta Salad

    Now that you have all your ingredients, let’s get cooking! Making this Zesty Italian Pasta Salad is straightforward and fun. Follow these simple steps, and you’ll have a colorful dish ready to impress.

    Step 1: Prepare the Dressing

    Start by whisking together the extra virgin olive oil, red wine vinegar, lemon juice, grated Parmesan, sugar, and seasonings in a bowl. If you prefer, simply combine these ingredients in a jar and shake it like you mean it! This method avoids splatters and is super easy to clean up.

    Once mixed, if you don’t plan to use it right away, store the dressing in the fridge. This allows the flavors to meld beautifully, but don’t worry if you can’t wait; it’s still delicious fresh!

    Step 2: Cook the Pasta

    Next, bring a large pot of salted water to a boil. Cooking the pasta in salted water is crucial, as it enhances the flavor and helps create a truly tasty base for our salad.

    Once the water is bubbling, add your pasta and cook according to the package instructions. Remember to keep it al dente. Trust me, you want that perfect bite! After cooking, don’t forget to drain it well and let it cool for a few minutes.

    Step 3: Toss with Half the Dressing

    While the pasta is warm, place it in a large serving bowl and pour half of the dressing over it. This is the secret to infusing flavor right from the start. Toss everything together until each piece of pasta is coated. The heat from the pasta really helps absorb those zesty flavors.

    Step 4: Add the Mix-ins

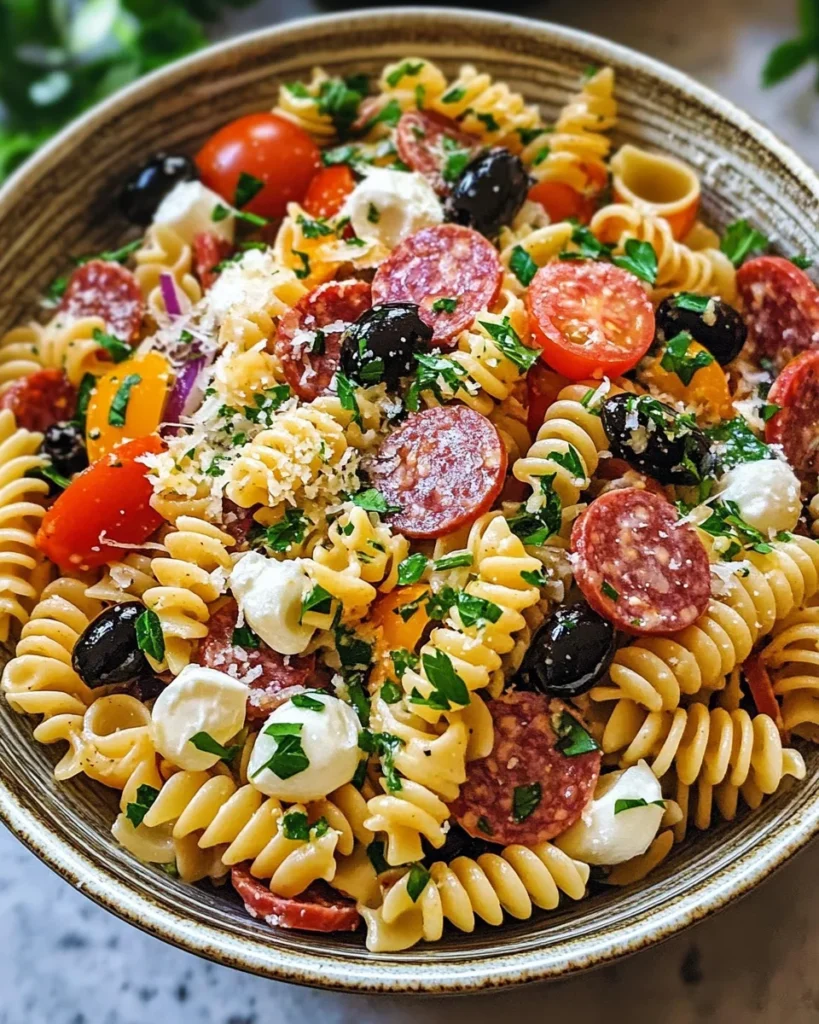
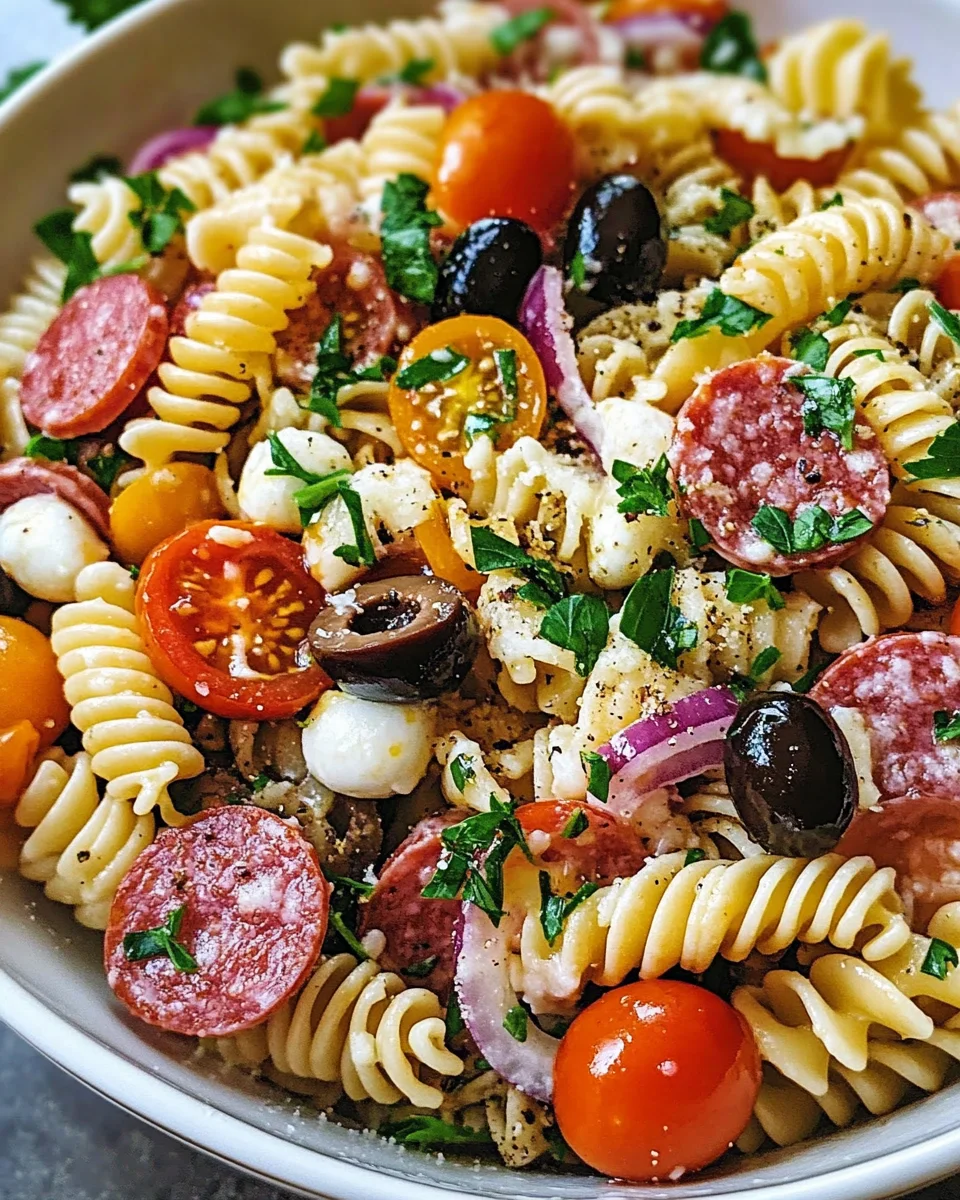
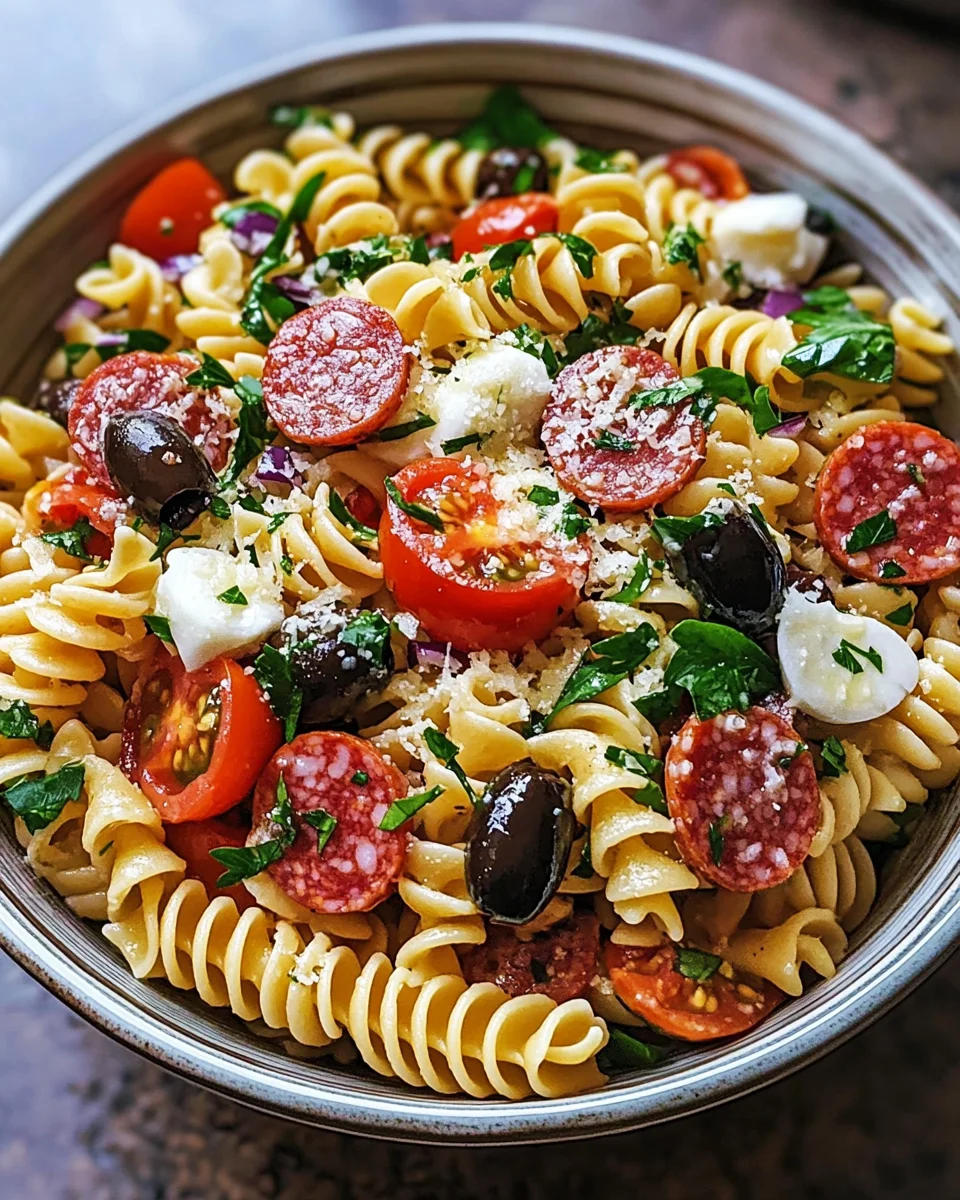
    Now, it’s time to add the fun stuff: the mix-ins! Toss in your pepperoni, salami, cherry tomatoes, black olives, bell peppers, red onion, pepperoncini, and mozzarella pearls. Each ingredient adds a unique flavor and crunchy texture, making this salad a feast for both your mouth and eyes.

    Step 5: Chill the Salad

    Cover your salad and pop it in the fridge for at least 30 minutes. Chilling is crucial because it allows the flavors to marry, creating a robust and delicious dish. You can even make it up to 24 hours ahead—just make sure to keep it covered so it stays fresh!

    Step 6: Final Toss and Garnish

    Before serving, give your salad a final toss with the remaining dressing to ensure every bite is bursting with flavor. Garnish with additional Parmesan and fresh parsley for a final touch that screams “I made this!” Your Zesty Italian Pasta Salad is now ready to shine at the table!

    Tips for Success

    • Always taste as you go! Adjust seasoning to your preference.
    • Don’t skip salting the pasta water—it makes a world of difference.
    • Let your salad chill longer for deeper flavors; overnight works wonders!
    • Prep veggies and proteins ahead to save time on busy days.
    • Got leftovers? Enjoy them cold as a quick lunch or toss them into a wrap!

    Equipment Needed

    • Mixing bowl: A large bowl for whisking the dressing and combining ingredients. A pot can work too!
    • Whisk or jar: Use a whisk for mixing or a jar for a quick shake.
    • Pot: A standard pot for boiling the pasta. Don’t forget a lid!
    • Colander: Essential for draining the pasta. A fine mesh strainer works as an alternative.
    • Serving spoon: Helpful for tossing and serving your delicious salad!

    Variations of Zesty Italian Pasta Salad

    • Veggie-packed version: Add in spinach, artichokes, or shredded carrots for extra color and nutrients.
    • Protein boost: Toss in grilled chicken, shrimp, or chickpeas for a heartier salad that keeps you full.
    • Gluten-free option: Swap regular pasta for gluten-free pasta, ensuring everyone can enjoy it!
    • Caprese twist: Incorporate fresh basil and replace black olives with sliced fresh mozzarella for a classic Caprese touch.
    • Spicy kick: Add diced jalapeños or crushed red pepper flakes to bring some heat to your Zesty Italian Pasta Salad.

    Serving Suggestions for Zesty Italian Pasta Salad

    • Pair with crusty bread or garlic breadsticks for a satisfying meal.
    • Serve alongside grilled chicken or fish for a delightful protein addition.
    • Complement with chilled white wine or sparkling water for a refreshing drink.
    • For presentation, garnish with fresh basil or parsley for a pop of color.

    FAQs about Zesty Italian Pasta Salad

    Can I make Zesty Italian Pasta Salad ahead of time?

    Absolutely! In fact, making it a day in advance allows the flavors to meld together beautifully. Just be sure to keep it covered in the fridge.

    What type of pasta works best for this salad?

    While any pasta can work, I prefer using rotini or penne. The shapes hold the dressing wonderfully and provide a delightful bite.

    Can I customize the ingredients in my pasta salad?

    Yes! Feel free to add your favorite veggies, proteins, or even switch up the dressing for a fun twist. The Zesty Italian Pasta Salad is very adaptable!

    How long does this pasta salad stay fresh?

    If stored properly in the fridge, it can last up to 3 days. Just give it a good toss before serving for a fresh taste!

    Is this pasta salad suitable for a vegetarian diet?

    Yes! This Zesty Italian Pasta Salad is naturally vegetarian, packed with veggies and flavors that everyone can enjoy.

    Final Thoughts

    Creating this Zesty Italian Pasta Salad isn’t just about whipping up a meal; it’s about bringing joy to your table. The colors, the flavors, and the excitement of sharing something homemade are what make cooking special. Every bite is an invitation to a moment of togetherness, laughter, and good vibes.

    Whether it’s a family gathering or a quick dinner on a busy weeknight, this salad makes life a little brighter. So, roll up your sleeves, dive into this recipe, and watch as smiles bloom around the dinner table. You’re not just cooking; you’re creating memories that linger long after the last bite!


    Print

    clock clock iconcutlery cutlery iconflag flag iconfolder folder iconinstagram instagram iconpinterest pinterest iconfacebook facebook iconprint print iconsquares squares iconheart heart iconheart solid heart solid icon

    Description

    A refreshing and flavorful pasta salad with Italian ingredients, perfect for any gathering.


    • ½ cup extra virgin olive oil
    • ¼ cup red wine vinegar
    • 1 tablespoon lemon juice
    • ¼ cup finely grated Parmesan cheese
    • 1 teaspoon sugar
    • 1 teaspoon dried parsley
    • 1 teaspoon dried basil
    • 1 teaspoon dried oregano
    • ½ teaspoon garlic powder
    • ½ teaspoon onion powder
    • ½ teaspoon paprika
    • Salt and pepper to taste

    1. Prepare the Italian dressing by whisking all dressing ingredients together in a bowl or shaking in a jar. Refrigerate until ready to use.
    2. Cook pasta in salted water according to the package instructions. Drain and place in a large serving bowl.
    3. Pour half of the dressing over the warm pasta and toss to combine.
    4. Add the pepperoni, salami, cherry tomatoes, black olives, bell peppers, red onion, pepperoncini, and mozzarella pearls. Toss to combine.
    5. Cover and chill for at least 30 minutes (or up to 24 hours) before serving.
    6. Before serving, toss with the remaining dressing and garnish with Parmesan and fresh parsley.

    Notes

    • This salad can be made a day ahead for enhanced flavor.
    • Prep Time: 15 minutes
    • Cook Time: 10 minutes
    • Category: Salad
    • Method: Mixing and Chilling
    • Cuisine: Italian

    Nutrition

    • Serving Size: 1 cup
    • Calories: 320
    • Sugar: 2g
    • Sodium: 750mg
    • Fat: 28g
    • Saturated Fat: 4g
    • Unsaturated Fat: 20g
    • Trans Fat: 0g
    • Carbohydrates: 18g
    • Fiber: 2g
    • Protein: 7g
    • Cholesterol: 10mg

    Sharing is caring!

  • Crack Breakfast Casserole

    Crack Breakfast Casserole


    Introduction to Crack Breakfast Casserole

    Hey there! If you’re anything like me, mornings can be a whirlwind of chaos. Between getting the kids ready and juggling the demands of daily life, a hearty breakfast can sometimes slip through the cracks. That’s where my Crack Breakfast Casserole comes in, and let me tell you, it’s pure magic! This dish is not just quick to whip up but also delivers a flavor explosion that will impress your family and friends. Imagine digging into a warm, cheesy slice brimming with sausage and bacon—a breakfast hero for busy days. Trust me, this recipe is perfect if you want something both delicious and crowd-pleasing!

    Why You’ll Love This Crack Breakfast Casserole

    Let’s face it: we all need a little help in the kitchen sometimes, especially during hectic mornings. This Crack Breakfast Casserole is truly a lifesaver! It’s not only super easy to prepare, taking just minutes to mix together, but it also bakes to golden perfection while you tackle your morning routine. Plus, with layers of savory sausage, crispy bacon, and creamy cheese, it’s a delight that will please even the pickiest eaters. Who could resist?

    Ingredients for Crack Breakfast Casserole

    This Crack Breakfast Casserole is a delightful blend of simple yet impactful ingredients. Let’s break down what you’ll need:

    • Pork sausage: A hearty base, offering flavor and protein. You can swap it for turkey sausage for a lighter option.
    • Bacon: Who doesn’t love crispy bacon? It adds that lovely crunch and smoky taste. You can use turkey bacon if you’re looking for a healthier twist.
    • Cream cheese: This magical ingredient gives the casserole a rich, creamy texture that’s hard to resist. Softened is best for easy mixing.
    • Sour cream: Adds a tangy note and enhances creaminess. Greek yogurt can be a healthier substitute.
    • Whole milk: It helps in creating that rich custard-like consistency. Feel free to use low-fat milk or almond milk for a dairy-free option.
    • Eggs: They’re the binder of this dish, giving it structure and protein. Large eggs work best for this recipe.
    • Shredded cheddar cheese: Essential for that gooey, cheesy goodness! You can mix in mozzarella or pepper jack for a flavor twist.
    • Frozen shredded hash browns: These make prepping a breeze! They create a delicious layer. You can substitute with diced fresh potatoes or sweet potatoes if preferred.
    • Dry ranch seasoning mix: This adds a full-bodied flavor that ties the dish together beautifully. Feel free to make your own version for a fresher kick.
    • Onion powder and garlic powder: These pantry staples enhance the savory notes. Fresh minced onion and garlic can also be used if you prefer.
    • Salt and freshly ground black pepper: Essential for seasoning to taste.

    The exact quantities are detailed at the bottom of this article for easy printing. Gather these ingredients, and you’ll be on your way to a delicious breakfast treat!

    How to Make Crack Breakfast Casserole

    Now that you have all your ingredients prepped, let’s dive into how to create this scrumptious Crack Breakfast Casserole. Trust me, following these simple steps will make you feel like a culinary rock star!

    Step 1: Cook the Meat

    Start by heating a large skillet over medium-high heat. Once it’s hot, toss in the pork sausage and chopped bacon. Cook them until they’re nicely browned and fully cooked, which should take about 8-10 minutes. Stir occasionally to keep things rolling. Once done, don’t forget to drain that excess fat before setting the meat aside. This step ensures a lighter casserole!

    Step 2: Prepare the Creamy Mixture

    In a spacious bowl, add the softened cream cheese and sour cream. Blend them together until smooth—this creamy base is the heart of your casserole. Now, crack in those large eggs and pour in the milk. Add the ranch seasoning, onion powder, garlic powder, salt, and pepper. Mix everything well until it’s fully combined and inviting. It should look rich and luscious!

    Step 3: Combine All Ingredients

    Time to bring it all together! Stir in the cooked meat, thawed hash browns, and 1 cup of shredded cheddar cheese into that creamy mixture. Make sure everything is evenly combined. You want every bite to burst with flavor! Also, don’t be afraid to sneak a taste—it’s that good!

    Step 4: Bake the Casserole

    Preheat your oven to 350°F (175°C). While it’s heating up, grab a 9×13-inch baking dish and give it a light grease. Pour in your combined mixture and spread it evenly. Top it off with the remaining cup of shredded cheddar cheese, sprinkling it generously across the top. Now, cover the dish with aluminum foil and pop it in the oven. Let it bake for about 50-60 minutes. This is where the magic happens!

    Step 5: Let It Rest and Serve

    After the baking time, remove the foil and give it an extra 8-10 minutes uncovered. This step helps create that bubbly, golden top that we all crave. Once it’s out, let the casserole rest for a few minutes. This is hard, I know, but it’ll help with slicing. Finally, serve warm, and watch your loved ones devour this delightful dish!

    Tips for Success

    • Prep the casserole the night before; just pop it in the oven in the morning.
    • Use room temperature ingredients for better mixing.
    • Feel free to customize with veggies like bell peppers or mushrooms.
    • Taste-test the meat mixture for seasoning before baking!
    • Let the casserole rest before serving for easier slicing.

    Equipment Needed

    • Large skillet: A non-stick skillet works wonders for easy meat cooking.
    • Mixing bowl: Use a large bowl to blend creamy ingredients. A stand mixer can save time too!
    • Baking dish: A 9×13-inch dish is ideal, but any oven-safe dish will do.
    • Aluminum foil: Essential for covering while baking—look for reusable options!
    • Spatula: A sturdy spatula is perfect for mixing and serving.

    Variations

    • Veggie Boost: Add diced bell peppers, spinach, or zucchini for a nutritious twist.
    • Spicy Kick: Mix in chopped jalapeños or a sprinkle of red pepper flakes to turn up the heat!
    • Herb-Infused: Stir in fresh herbs like chives, parsley, or dill for an aromatic experience.
    • Cheese Lovers: Experiment with different cheeses like feta, mozzarella, or gouda for a unique flavor.
    • Gluten-Free: Use gluten-free hash browns and check your ranch seasoning for gluten-free options.
    • Lower-Fat Option: Substitute turkey sausage and reduce cheese for a lighter casserole.

    Serving Suggestions

    • Pair your Crack Breakfast Casserole with a fresh fruit salad for a pop of color and flavor.
    • Serve with crispy hash browns or toast to complement the cheesy goodness.
    • A steaming cup of coffee or a fruity smoothie makes for a delightful drink pairing.
    • For an elegant touch, garnish with fresh herbs like parsley or chives before serving.

    FAQs about Crack Breakfast Casserole

    Can I make Crack Breakfast Casserole ahead of time?

    Absolutely! This Crack Breakfast Casserole is perfect for prepping the night before. Just assemble it, cover it, and pop it in the fridge. When you’re ready, bake it right in the morning!

    What can I add to my Crack Breakfast Casserole?

    The beauty of this casserole is its versatility. You can add diced veggies like bell peppers, spinach, or even mushrooms for nutrition. Feel free to experiment with different cheese varieties or spices!

    How do I store leftovers?

    Leftovers can easily be stored in an airtight container in the refrigerator for up to three days. Reheat them in the microwave or oven when you’re ready for another delicious slice!

    Can I freeze the Crack Breakfast Casserole?

    Yes, you can! Just let it cool completely after baking, then cover it tightly and freeze. When you’re ready to enjoy, thaw it in the fridge, then reheat in the oven until warmed through!

    How many servings does this recipe yield?

    This recipe yields about eight generous servings—perfect for a family breakfast or a delightful brunch with friends. You can easily halve or double the recipe to suit your needs!

    Final Thoughts

    Cooking this Crack Breakfast Casserole truly transforms the average morning into a warm and joyous occasion. It’s rewarding to see everyone gather around the table, sharing laughter and delicious bites. The flavors meld together beautifully, creating a dish that nurtures both the body and the soul. Whether it’s a busy weekday or a special weekend brunch, this casserole brings convenience and comfort in every mouthful. So, roll up your sleeves, give this recipe a try, and delight in the smiles it brings. Trust me, it’s a breakfast adventure you won’t forget!


    Print

    clock clock iconcutlery cutlery iconflag flag iconfolder folder iconinstagram instagram iconpinterest pinterest iconfacebook facebook iconprint print iconsquares squares iconheart heart iconheart solid heart solid icon

    Description

    A delicious and satisfying breakfast casserole loaded with sausage, bacon, cream cheese, and cheddar cheese, perfect for feeding a crowd.


    • 1 pound (450g) pork sausage
    • 1 pound (450g) bacon, chopped
    • 4 ounces (113g) cream cheese, softened
    • ½ cup (120g) sour cream
    • 1 cup (240ml) whole milk
    • 8 large eggs
    • 2 cups (200g) shredded cheddar cheese, divided
    • 1 (30-ounce/850g) bag frozen shredded hash browns, thawed and drained
    • 1 (1-ounce/28g) packet dry ranch seasoning mix
    • ½ teaspoon onion powder
    • ½ teaspoon garlic powder
    • ½ teaspoon salt
    • ½ teaspoon freshly ground black pepper

    1. In a large skillet over medium-high heat, cook the sausage and chopped bacon together until browned and fully cooked. Drain excess fat and set aside.
    2. In a large bowl, blend the softened cream cheese and sour cream until smooth. Add the milk, eggs, ranch seasoning, onion powder, garlic powder, salt, and pepper. Mix until well combined.
    3. Stir the cooked meats, thawed hash browns, and 1 cup of shredded cheddar cheese into the egg mixture until evenly incorporated.
    4. Preheat the oven to 350°F (175°C). Lightly grease a 9×13-inch (23x33cm) baking dish. Pour the mixture into the dish and spread evenly. Top with the remaining 1 cup shredded cheddar cheese.
    5. Cover the dish with aluminum foil and bake for 50–60 minutes. Remove the foil and bake for an additional 8–10 minutes, or until the cheese is bubbly and golden.
    6. Let the casserole rest for a few minutes before slicing. Serve warm.

    Notes

    • This casserole can be prepared the night before and stored in the refrigerator before baking.
    • Feel free to add vegetables like bell peppers or spinach for added nutrition.
    • Leftovers can be stored in the refrigerator and reheated in the microwave.
    • Prep Time: 15 minutes
    • Cook Time: 60 minutes
    • Category: Breakfast
    • Method: Baking
    • Cuisine: American

    Nutrition

    • Serving Size: 1 slice
    • Calories: 400
    • Sugar: 2g
    • Sodium: 900mg
    • Fat: 30g
    • Saturated Fat: 12g
    • Unsaturated Fat: 16g
    • Trans Fat: 0g
    • Carbohydrates: 16g
    • Fiber: 2g
    • Protein: 20g
    • Cholesterol: 200mg

    Sharing is caring!

  • One-Skillet Spicy Honey BBQ Sausage & Pasta

    One-Skillet Spicy Honey BBQ Sausage & Pasta


    Introduction to One-Skillet Spicy Honey BBQ Sausage & Pasta

    Life can be a whirlwind, right? Between juggling work, family, and everything in between, home-cooked meals sometimes feel like a distant dream. That’s where my beloved One-Skillet Spicy Honey BBQ Sausage & Pasta comes in! This dish is not just a delicious, zesty delight; it’s a comforting hug in a bowl, perfect for busy weeknights. With just one skillet and about thirty minutes, you’ll have a mouthwatering meal that’ll impress your loved ones and leave you smiling. Trust me, the combination of sweet honey and spicy sausage will turn even the pickiest eaters into fans!

    Why You’ll Love This One-Skillet Spicy Honey BBQ Sausage & Pasta

    This dish is a game changer for any busy mom or professional. First, it’s incredibly easy to throw together, requiring no complicated techniques. Second, it cooks all in one skillet, saving you the hassle of a messy kitchen. And can we talk about the taste? The sweet and spicy balance is truly irresistible. With just enough kick, it’s a meal that the whole family will love—and you’ll love how quickly it comes together!

    Ingredients for One-Skillet Spicy Honey BBQ Sausage & Pasta

    Gathering the right ingredients makes all the difference in cooking, and for my One-Skillet Spicy Honey BBQ Sausage & Pasta, you’ll need a mix of pantry staples and fresh flavors. Here’s what you’ll be working with:

    • Rotini Pasta: This spiral pasta holds onto the sauce beautifully, but feel free to swap it out for any pasta type you prefer.
    • Spicy Sausage: I love using Andouille or Italian sausage for that nice kick. You can also choose a milder sausage if you’re catering to sensitive taste buds.
    • Olive Oil: A drizzle adds richness to the dish. You could also try avocado oil for a different flavor profile.
    • Garlic: Minced for that punch of flavor! Fresh garlic elevates the dish; try using garlic powder in a pinch.
    • BBQ Sauce: This is where the magic happens! Opt for smoky or honey-based varieties for the best flavor. You can make your own for a personal touch.
    • Honey: This sweetener complements the barbecue sauce perfectly. It balances the spiciness, creating a harmonious blend.
    • Paprika: Adds a lovely warmth and color to your dish. Smoked paprika can bring an extra depth of flavor.
    • Chili Powder or Cayenne Pepper: For those who like heat, adjust to taste. You can skip this or add more if you’re feeling daring!
    • Salt & Pepper: Essential for enhancing flavors, don’t forget to season to your preference!
    • Fresh Parsley: For a pop of color and freshness! You can also use basil or cilantro if that’s more your style.

    Details on the exact quantities for each ingredient are at the bottom of the article and available for printing, making it super easy to follow along!

    How to Make One-Skillet Spicy Honey BBQ Sausage & Pasta

    Ready to dive into a culinary adventure? Follow these straightforward steps to create the delightful One-Skillet Spicy Honey BBQ Sausage & Pasta. With just a little bit of time, you’ll create a dish that’s sure to have everyone coming back for seconds!

    Step 1: Cook the Pasta

    Start by bringing a large pot of salted water to a boil. Add the rotini pasta and let it cook until al dente, following the package instructions. This typically takes about 8–10 minutes. Once cooked, drain the pasta and set it aside. A little tip: make sure to save a splash of that pasta water; it can come in handy later!

    Step 2: Cook the Sausage

    In a large skillet, heat a tablespoon of olive oil over medium-high heat. Add your sliced spicy sausage and cook it until it’s beautifully browned and caramelized. This should take about 5–7 minutes. The sizzling sound? That’s the sound of flavor building! Once browned, remove the sausage from the skillet and set it aside. Don’t clean the skillet just yet; we want to keep those tasty bits!

    Step 3: Sauté Garlic

    In the same skillet, add a bit more olive oil if needed. Toss in the minced garlic and sauté for about a minute. You want it fragrant and golden—not burnt! The aroma will instantly tell you it’s time to move on to the next delicious step.

    Step 4: Make the Sauce

    Now comes the fun part! Pour in the BBQ sauce, followed by the honey, paprika, chili powder, salt, and pepper. Stir everything together and let it simmer for about 2–3 minutes. This allows all those flavors to meld beautifully, making your sauce delightfully rich and tangy.

    Step 5: Combine and Toss

    It’s time to bring it all together! Return the cooked sausage to the skillet and add the drained pasta. Toss everything until the pasta and sausage are coated evenly with that glorious sauce. If it looks too thick, feel free to splash in some reserved pasta water to get the perfect consistency.

    Step 6: Garnish and Serve

    Finally, sprinkle chopped fresh parsley over the top for a splash of color. Serve hot and enjoy! This dish not only delights the taste buds but also brings everyone together around the table, creating moments that you and your family will cherish.

    Tips for Success

    • Don’t overcook the pasta! Remember to keep it al dente for the best texture.
    • For an even deeper flavor, allow the sauce to simmer a bit longer.
    • Experiment with different sausages; they can significantly change the taste!
    • Adjust the sweetness by modifying the honey based on your preference.
    • Always taste as you go! It helps in balancing the flavors just right!

    Equipment Needed

    • Large Pot: For boiling pasta. A Dutch oven can work great too.
    • Skillet: A non-stick or cast-iron skillet is ideal for this recipe.
    • Colander: For draining pasta. You can use a slotted spoon if needed.
    • Wooden Spoon: Perfect for stirring without scratching your skillet.
    • Measuring Cups: Handy for accurate sauce and ingredient portions.

    Variations of One-Skillet Spicy Honey BBQ Sausage & Pasta

    • Vegetarian Option: Substitute the sausage with grilled vegetables or plant-based sausage for a meatless delight.
    • Pasta Alternatives: Try using zucchini noodles or whole wheat pasta if you’re aiming for lighter options.
    • Sweet & Spicy Twist: Add diced jalapeños or fresh pineapple chunks to the sauce for exciting flavor contrasts.
    • Cheesy Goodness: Sprinkle in shredded cheese, like cheddar or mozzarella, during the last minute of cooking for a creamy finish.
    • Herb Infusion: Experiment with herbs like thyme or oregano to boost the flavor profile even further!

    Serving Suggestions for One-Skillet Spicy Honey BBQ Sausage & Pasta

    • Fresh Salad: Pair with a crisp garden salad for a refreshing contrast.
    • Garlic Bread: Serve alongside warm, buttery garlic bread to soak up the sauce.
    • Simple Drinks: I recommend sweet tea or lemonade to complement the dish’s flavors.
    • Presentation: Use colorful plates and garnish with extra parsley for a beautiful table display.

    FAQs about One-Skillet Spicy Honey BBQ Sausage & Pasta

    Can I make this dish ahead of time?
    Absolutely! You can prepare the One-Skillet Spicy Honey BBQ Sausage & Pasta ahead of time. Just store it in an airtight container in the fridge. When you’re ready to eat, simply reheat it on the stovetop or in the microwave.

    What can I substitute for spicy sausage?
    If spicy sausage isn’t your thing, you can easily swap it out for a milder sausage like turkey or chicken. You can also try plant-based sausage for a vegetarian option without sacrificing flavor.

    How do I adjust the spiciness level?
    You can control the spiciness by adjusting the amount of chili powder or cayenne pepper in the sauce. For a milder dish, reduce the heat or skip the chili powder altogether. Spice lovers can add extra for that kick!

    Can I freeze leftovers?
    Yes! The One-Skillet Spicy Honey BBQ Sausage & Pasta freezes well. Just cool it completely before transferring to a freezer-safe container. When you’re ready to enjoy, thaw it in the fridge overnight and reheat.

    What sides pair well with this dish?
    This hearty meal goes well with a simple green salad or some garlic bread on the side. The fresh salad adds a nice crunch while the bread is perfect for mopping up that tasty sauce!

    Final Thoughts on One-Skillet Spicy Honey BBQ Sausage & Pasta

    Every time I make my One-Skillet Spicy Honey BBQ Sausage & Pasta, it feels like a celebration. The vibrant flavors dance in harmony, creating a comforting meal that warms the heart and soul. This dish transforms busy evenings into special family moments, filled with laughter and delicious bites. It’s more than just food; it’s a way to connect and savor life’s little joys. Whether you’re sharing it with loved ones or enjoying a quiet night in, this recipe promises to deliver smiles all around. Give it a try, and let the love unfold!


    Print

    clock clock iconcutlery cutlery iconflag flag iconfolder folder iconinstagram instagram iconpinterest pinterest iconfacebook facebook iconprint print iconsquares squares iconheart heart iconheart solid heart solid icon

    Description

    A delicious one-skillet meal featuring spicy sausage and pasta coated in a sweet and tangy honey BBQ sauce.


    • 12 oz Rotini Pasta
    • 12 oz Spicy Sausage (Andouille or Italian), sliced
    • 1 tbsp Olive Oil
    • 3 cloves Garlic, minced
    • 1 cup BBQ Sauce (smoky or honey-based)
    • 2 tbsp Honey
    • 1 tsp Paprika
    • 1/2 tsp Chili Powder or Cayenne Pepper (adjust to taste)
    • Salt & Pepper, to taste
    • Fresh Parsley, chopped (for garnish)

    1. Cook the Pasta: Bring a large pot of salted water to a boil. Cook the rotini pasta according to package instructions until al dente. Drain and set aside.
    2. Cook the Sausage: Heat olive oil in a large skillet over medium-high heat. Add sliced sausage and cook until browned and caramelized, about 5–7 minutes. Remove sausage from skillet and set aside.
    3. Sauté Garlic: In the same skillet, add a bit more olive oil if needed. Add minced garlic and sauté for about 1 minute, until fragrant and golden.
    4. Make the Sauce: Add BBQ sauce, honey, paprika, chili powder, salt, and pepper to the skillet. Stir well and simmer for 2–3 minutes until slightly thickened.
    5. Combine and Toss: Return the cooked sausage to the skillet along with the drained pasta. Toss everything until the pasta and sausage are evenly coated.
    6. Garnish and Serve: Sprinkle fresh parsley over the top and serve hot. Enjoy!

    Notes

    • Adjust the level of spiciness by modifying the chili powder or cayenne pepper to suit your taste.
    • Feel free to substitute the pasta type with your favorite.
    • This dish can be made ahead of time and reheated for serving.
    • Prep Time: 10 minutes
    • Cook Time: 20 minutes
    • Category: Main Dish
    • Method: Skillet
    • Cuisine: American

    Nutrition

    • Serving Size: 1 serving
    • Calories: 500
    • Sugar: 12g
    • Sodium: 800mg
    • Fat: 20g
    • Saturated Fat: 6g
    • Unsaturated Fat: 10g
    • Trans Fat: 0g
    • Carbohydrates: 60g
    • Fiber: 4g
    • Protein: 20g
    • Cholesterol: 60mg

    Sharing is caring!

  • No Bake Energy Bites

    No Bake Energy Bites


    Introduction to No Bake Energy Bites

    Life can get hectic, can’t it? Between work, family, and those endless to-do lists, finding time for nourishing snacks feels nearly impossible. That’s where No Bake Energy Bites come to the rescue! These delightful little goodies are not only easy to whip up, but they also pack a punch of flavor and nutrition. Imagine biting into a chewy, chocolatey treat that fuels your day without any baking fuss. Perfect for busy moms and professionals alike, these energy bites make for a quick solution to keep you and your loved ones satisfied and energized.

    Why You’ll Love This No Bake Energy Bites

    These No Bake Energy Bites are the ultimate lifesaver for busy days! They’re quick to prepare, taking just ten minutes to mix everything together. Plus, there’s no need to crank up the oven, making them perfect for those sweltering summer afternoons. Each bite is a delicious combination of peanut butter and chocolate, satisfying those sweet cravings while giving you a wonderful energy boost. Who wouldn’t love that?

    Ingredients for No Bake Energy Bites

    Gathering the right ingredients is half the fun of making No Bake Energy Bites! Here’s what you’ll need:

    • Quick Cooking Oats: These form the hearty base of our bites, providing fiber and helping to keep you full.
    • Creamy Peanut Butter: This creamy goodness adds flavor and healthy fats. You can substitute with almond butter or sunflower seed butter for a nut-free option.
    • Honey: A natural sweetener that binds everything together while adding a hint of sweetness. Choose raw honey for an added health boost!
    • Mini Chocolate Chips: Because life is too short not to indulge a little! You can also use dark chocolate or carob chips for a different twist.
    • Vanilla Extract: This elevates the flavor profile. Pure vanilla extract is always best, but imitation works in a pinch.

    Feeling adventurous? You can toss in dried fruits like cranberries or raisins, or even some chopped nuts for extra texture and flavor.

    For exact quantities of each ingredient, scroll down to the bottom of the article where you’ll find them available for printing!

    How to Make No Bake Energy Bites

    Making No Bake Energy Bites is as easy as 1-2-3. Seriously, it feels like a culinary miracle! With just a few quick steps, you’ll have a delicious snack to fuel your busy day. Let’s dive right into how to make these delightful bites!

    Step 1: Mix Ingredients

    Start by grabbing a large mixing bowl. Add all your ingredients: quick cooking oats, creamy peanut butter, honey, mini chocolate chips, and vanilla extract.

    I find it helpful to pour the wet ingredients first, as it helps the dry ones blend more easily. Now, using a sturdy spatula or spoon, mix until everything is well combined. You want to see the chocolate chips distributed evenly, so keep stirring! Pro tip: If the mixture feels a bit sticky, don’t panic—this just means it’s packed with goodness!

    Step 2: Form into Balls

    Next up, it’s time for some hands-on fun. I like to use a cookie scoop for even-sized balls, but you can also roll them by hand if you prefer. Grab about a tablespoon of the mixture and roll it into a tight ball, about one inch in diameter.

    Don’t worry if they’re not perfect; as I always say, homemade is about love, not perfection! As you roll, place each ball on a parchment-lined baking sheet or plate. This step makes it easier to transfer them later.

    Step 3: Store Properly

    Now that your No Bake Energy Bites are rolled and ready to enjoy, it’s time to store them. Place the balls in an airtight container. They’ll last up to two weeks in the fridge—if they last that long!

    If you want to save some for later, consider freezing them. Pop them in the freezer for up to three months. Just be sure to separate them with parchment paper so they don’t stick together. When you’re ready to snack, pull one out and enjoy its deliciousness!

    Tips for Success

    • Use a non-stick spatula for easy mixing and cleanup.
    • If the mixture feels too dry, add a splash more honey or a little water
    • Experiment with add-ins, like chia seeds, to boost nutrition.
    • Chill the mixture briefly before rolling for easier handling.
    • Store energy bites in portioned bags for on-the-go snacks.

    Equipment Needed

    • Mixing Bowl: A large bowl for combining ingredients. A glass bowl works well.
    • Spatula or Spoon: Use a sturdy spatula for easy mixing. A big spoon does the trick too.
    • Cookie Scoop: For uniformity in sizing. Alternatively, your hands can shape the bites.
    • Parchment Paper: Useful for lining sheets or plates. Wax paper is a great substitute.
    • Airtight Container: For storage. Ziplock bags also work perfectly!

    Variations

    • Nut Butter Swap: Try almond butter or cashew butter instead of peanut butter for a different nutty flavor.
    • Chocolate Variety: Experiment with white chocolate chips or coconut flakes for a unique taste.
    • Fruit Additions: Dried fruits like apricots or apples can lend a chewy texture and extra sweetness.
    • Protein Boost: Incorporate protein powder for an extra energy kick, especially great for post-workout snacks.
    • Granola Version: Substitute part of the oats with your favorite granola for added crunch and flavor.

    Serving Suggestions

    • Pair No Bake Energy Bites with a tall glass of almond milk for a nutritious treat.
    • Serve them alongside fresh fruit, like apple slices or banana, for a balanced snack.
    • Present the bites in a colorful bowl for gatherings, or pack them in small bags for easy lunchbox additions.

    FAQs about No Bake Energy Bites

    Can I make No Bake Energy Bites vegan?

    Absolutely! To make them vegan, simply substitute honey with maple syrup or agave nectar. This way, you can still enjoy those delicious bites without any animal products!

    How do I store No Bake Energy Bites?

    Store your energy bites in an airtight container. They can be kept in the fridge for up to two weeks. You can also freeze them for three months. Just remember to separate them with parchment paper to prevent sticking.

    Can I add protein powder to my No Bake Energy Bites?

    Yes, you can! Adding protein powder is a fantastic way to boost the nutritional value of your bites. Just replace a little bit of the oats with protein powder, and they’ll be even more satisfying!

    What if my mixture is too sticky?

    If your mixture feels too sticky to form into balls, try adding a bit more quick cooking oats or a splash of water. Don’t be afraid to adjust until you reach the perfect consistency.

    Are No Bake Energy Bites suitable for kids?

    Definitely! These energy bites are kid-approved and make for a great after-school snack. With their delicious flavors and healthy ingredients, they’ll be a hit at home. Just keep an eye on portion sizes!

    Final Thoughts

    As a busy mom, I know how vital it is to have go-to snacks that are both delicious and nutritious. These No Bake Energy Bites not only fit the bill but also bring joy to the table. They’re perfect for anyone racing against time yet wanting something yummy. With every bite, you’re reminded that snacking can be simple and satisfying. So, gather your ingredients, roll up your sleeves, and indulge in a treat that fills your heart and soul with happiness. After all, who says healthy eating can’t be a delightful experience?


    Print

    clock clock iconcutlery cutlery iconflag flag iconfolder folder iconinstagram instagram iconpinterest pinterest iconfacebook facebook iconprint print iconsquares squares iconheart heart iconheart solid heart solid icon

    Description

    No Bake Energy Bites are an easy and delicious snack that combines quick oats, peanut butter, honey, chocolate chips, and vanilla for a tasty treat without the need for baking.


    • 2 1/2 cups quick cooking oats (222.5 grams)
    • 3/4 cup creamy peanut butter (202.5 grams)
    • 1/4 cup honey (84 grams)
    • 1/2 cup mini chocolate chips (88.5 grams)
    • 1 teaspoon vanilla extract

    1. Mix all the ingredients together in a large bowl until well combined.
    2. Form into one inch balls, using a cookie scoop for even sizes.
    3. Store in an airtight container for up to two weeks or in the freezer for three months.

    Notes

    • For a vegetarian option, ensure honey is ethically sourced.
    • Consider adding other ingredients like dried fruits or nuts for variation.
    • Prep Time: 10 minutes
    • Cook Time: 0 minutes
    • Category: Snacks
    • Method: No-Bake
    • Cuisine: American

    Nutrition

    • Serving Size: 1 bite
    • Calories: 100
    • Sugar: 5g
    • Sodium: 50mg
    • Fat: 5g
    • Saturated Fat: 1g
    • Unsaturated Fat: 4g
    • Trans Fat: 0g
    • Carbohydrates: 12g
    • Fiber: 1g
    • Protein: 3g
    • Cholesterol: 0mg

    Sharing is caring!

  • Crack Green Beans

    Crack Green Beans


    Introduction to Crack Green Beans

    Every busy mom knows the struggle of turning fresh ingredients into a meal that dazzles. I’ve been there, racing against the clock, trying to bring smiles to my family’s faces during dinner. Enter Crack Green Beans, the perfect solution for a speedy but delicious side dish. With fresh green beans and crispy bacon, this recipe not only bursts with flavor but is super simple to whip up. Trust me, these little green gems have the power to transform any meal into something special, making them a go-to for impressing loved ones. Let’s dive into this culinary adventure!

    Why You’ll Love This Crack Green Beans

    One of the highlights of this Crack Green Beans recipe is its simple preparation. In just 35 minutes, you can create a vibrant side dish that beats any soggy vegetable. Plus, the combination of crispy bacon, aromatic garlic, and sweet glaze is irresistible. It’s not just quick; it’s an explosion of flavor that’ll have your family asking for seconds. Perfect for busy nights or special gatherings!

    Ingredients for Crack Green Beans

    Let’s talk about the stars of this delicious dish! For my Crack Green Beans, you’ll need just a handful of fresh and flavorful ingredients. Here’s what you’ll be gathering:

    • Fresh Green Beans: Look for vibrant, crisp beans. They can be trimmed green beans or thawed frozen ones. Both work beautifully in this recipe!
    • Thick-Cut Bacon: The bacon is key for adding that irresistible smoky flavor. Feel free to explore alternatives like turkey bacon for a lighter option.
    • Unsalted Butter: A bit of butter helps create that silky glaze on the beans. You could substitute it with olive oil if you’re feeling adventurous!
    • Garlic: Fresh minced garlic adds a punch of flavor and aroma. You could use pre-minced garlic but nothing compares to the fresh stuff.
    • Brown Sugar: This ingredient gives a delightful sweetness that balances the savory elements. Adjust the sweetness to suit your taste—it’s all about personal preference!
    • Low-Sodium Soy Sauce: Soy sauce contributes umami and depth. Choose low-sodium to have more control over the saltiness of the dish.
    • Salt and Pepper: Simple seasonings that elevate the entire dish. Always taste as you go!
    • Red Pepper Flakes: An optional pinch adds a touch of heat for those who like a little kick. Spice it up as you please!

    All these ingredients come together beautifully in the kitchen! For specific quantities, check the bottom of the article where you’ll find everything laid out for easy printing.

    How to Make Crack Green Beans

    Now comes the fun part—creating those irresistible Crack Green Beans! Follow these simple and clear steps to transform fresh ingredients into a delightful side dish that steals the show. Let’s get started!

    Step 1: Prepare the Green Beans

    Start by washing the green beans under cool water. Trim the ends using kitchen scissors or a knife for a clean look. If you opted for frozen beans, be sure to thaw them first and pat them dry. Fresh or frozen, they’ll be perfect in this scrumptious dish!

    Step 2: Cook the Bacon

    In a large skillet, cook the chopped thick-cut bacon over medium heat. Let it sizzle until crispy, making sure to stir occasionally. This is where all the magic happens—the bacon fat left in the pan will add a fabulous depth of flavor to your Crack Green Beans. Once done, use a slotted spoon to transfer the bacon to a paper towel-lined plate to absorb excess grease.

    Step 3: Sauté the Garlic

    Now, let’s keep that delicious bacon flavor alive! In the same skillet, add minced garlic into the leftover bacon fat. Sauté for about 30–60 seconds, just until the garlic becomes fragrant. Be careful not to burn it; we want it golden, not bitter!

    Step 4: Add the Green Beans

    Time to toss in those green beans! Add them to the skillet with the sautéed garlic. Sauté everything together for about 6–8 minutes until the beans turn a vibrant green and become tender-crisp. You should see them glisten in that garlic-infused bacon goodness!

    Step 5: Create the Glaze

    In this step, we’ll make everything taste heavenly! Add unsalted butter, brown sugar, and low-sodium soy sauce to the sautéing beans. Stir everything gently until the butter melts, creating a beautiful glaze that coats the beans. The aroma will make your mouth water!

    Step 6: Combine Everything

    Now, it’s the grand finale! Return that crispy bacon back into the skillet. Carefully toss everything together for another 2 minutes to blend those flavors. You should see the beans glistening from the glaze, ready to be served!

    Step 7: Season and Serve

    Finally, don’t forget that finishing touch! Season with salt, pepper, and if you’re feeling adventurous, sprinkle in some red pepper flakes for a spicy twist. Serve warm and watch everyone rave about your incredible Crack Green Beans!

    Tips for Success

    • Use a larger skillet to give the green beans space to cook evenly.
    • Keep an eye on the garlic; it cooks quickly and can burn fast.
    • For a greater depth of flavor, consider adding a splash of balsamic vinegar.
    • Always taste as you go, adjusting salt and sugar to your preference!
    • To save time, prep the green beans and bacon ahead for quick assembly.

    Equipment Needed

    • Large Skillet: A must for even cooking. A non-stick pan can help prevent sticking.
    • Slotted Spoon: Perfect for removing the crispy bacon without the grease.
    • Knife and Cutting Board: Essential for trimming green beans and chopping bacon.
    • Measuring Utensils: Use measuring spoons for accurate ingredient quantities.

    Variations of Crack Green Beans

    • Garlic Parmesan: Add freshly grated Parmesan cheese during the last minute of cooking for a cheesy twist.
    • Mushroom Lovers: Toss in some sautéed mushrooms for an earthy flavor that pairs beautifully with green beans.
    • Lemon Zest: For a bright touch, add a sprinkle of lemon zest right before serving. It adds a refreshing zing!
    • Nuts for Crunch: Throw in slivered almonds or chopped pecans for added crunch and a nutty flavor.
    • Vegan Option: Substitute bacon with smoked tempeh or coconut bacon and use olive oil instead of butter.

    Serving Suggestions for Crack Green Beans

    • Pair with grilled chicken or salmon for a well-rounded meal.
    • Serve alongside fluffy rice or creamy mashed potatoes to soak up that glaze.
    • A chilled glass of white wine complements the flavors beautifully.
    • Garnish with chopped parsley for a pop of color!

    FAQs about Crack Green Beans

    Can I use frozen green beans for this recipe?
    Absolutely! Thawed frozen green beans work perfectly in Crack Green Beans. Just make sure to pat them dry before adding them to the skillet to avoid excess moisture.

    What’s the best way to store leftover Crack Green Beans?
    If you have leftovers, store them in an airtight container in the fridge. They’ll stay fresh for up to three days. Just reheat them in a skillet for a quick side dish the next night!

    Are there any vegetarian options for Crack Green Beans?
    Yes! You can make a delicious vegetarian version by replacing the bacon with smoked tempeh or using coconut bacon for that smoky flavor. Also, olive oil can replace the butter for a plant-based option.

    How can I adjust the sweetness of the glaze?
    You can easily tweak the sweetness by adding more or less brown sugar to suit your taste. If you want a less sweet version, start with a smaller amount and taste as you go.

    What main dishes go well with Crack Green Beans?
    Crack Green Beans are versatile and pair beautifully with many main dishes! They complement grilled chicken, roasted pork, or fish perfectly. Feel free to get creative!

    Final Thoughts

    Making Crack Green Beans is more than just cooking; it’s about creating memorable moments around the dinner table. This recipe is a perfect blend of simple ingredients that come together to craft something spectacular. I love how it elevates any meal from ordinary to extraordinary. Plus, it’s a family-friendly dish that even picky eaters can’t resist! Whether you’re whipping it up for a busy weeknight or a special occasion, these beans are sure to satisfy. I hope you enjoy sharing this recipe as much as I do—happy cooking!


    Print

    clock clock iconcutlery cutlery iconflag flag iconfolder folder iconinstagram instagram iconpinterest pinterest iconfacebook facebook iconprint print iconsquares squares iconheart heart iconheart solid heart solid icon

    Description

    Every busy mom knows the struggle of turning fresh ingredients into a meal that dazzles. I’ve been there, racing against the clock, trying to bring smiles to my family’s faces during dinner. Enter Crack Green Beans, the perfect solution for a speedy but delicious side dish. With fresh green beans and crispy bacon, this recipe not only bursts with flavor but is super simple to whip up. Trust me, these little green gems have the power to transform any meal into something special, making them a go-to for impressing loved ones. Let’s dive into this culinary adventure!


    • pounds fresh green beans, trimmed (or thawed frozen green beans)
    • 6 slices thick-cut bacon, chopped
    • 3 tablespoons unsalted butter
    • 4 cloves garlic, minced
    • ¼ cup brown sugar
    • 2 tablespoons low-sodium soy sauce
    • Salt and pepper to taste
    • Pinch of red pepper flakes (optional)

    1. Wash and trim green beans; pat dry if using frozen.
    2. In a large skillet over medium heat, cook chopped bacon until crispy. Remove bacon with a slotted spoon and set aside.
    3. Leave about 1–2 tablespoons of bacon fat in the pan. Add minced garlic and sauté for 30–60 seconds until fragrant.
    4. Toss in the green beans and sauté for 6–8 minutes until bright green and tender-crisp.
    5. Add butter, brown sugar, and soy sauce. Stir until everything melts into a glaze that coats the beans.
    6. Return bacon to the skillet, toss everything together, and cook for another 2 minutes.
    7. Season with salt, pepper, and optional red pepper flakes.
    8. Serve warm and enjoy!

    Notes

    • For a lighter version, you can reduce the amount of bacon or use turkey bacon.
    • This dish pairs well with grilled meats and fish.
    • Feel free to adjust the sweetness by adding more or less brown sugar.
    • Prep Time: 15 minutes
    • Cook Time: 20 minutes
    • Category: Side Dish
    • Method: Skillet
    • Cuisine: American

    Nutrition

    • Serving Size: 1 serving
    • Calories: 250
    • Sugar: 6g
    • Sodium: 500mg
    • Fat: 14g
    • Saturated Fat: 6g
    • Unsaturated Fat: 8g
    • Trans Fat: 0g
    • Carbohydrates: 24g
    • Fiber: 3g
    • Protein: 7g
    • Cholesterol: 25mg

    Sharing is caring!

  • Pickled Cucumbers and Onions

    Pickled Cucumbers and Onions


    Introduction to Pickled Cucumbers and Onions

    There’s something undeniably vibrant about the crunch of Pickled Cucumbers and Onions that brings life to any meal. Picture this: it’s a busy weeknight, and you’re juggling homework, dinner prep, and your own to-do list. This quick and tangy dish offers an easy side that you can whip up in minutes. All you need is a mixing bowl and a few simple ingredients, and, voilà, you have a refreshing companion for grilled meats, sandwiches, or salads. It’s a brilliant way to brighten up your family dinner while keeping it stress-free!

    Why You’ll Love This Pickled Cucumbers and Onions

    I can’t stress enough how easy it is to make Pickled Cucumbers and Onions. In just about 15 minutes, you’ll have a zesty side that will impress even the most discerning palates. With minimal ingredients and effort, you can elevate any meal. Plus, the taste? It’s a delightful dance of tanginess and crunch. You’ll find that it becomes a staple in your kitchen, perfect for any occasion!

    Ingredients for Pickled Cucumbers and Onions

    Let’s dive into the fresh, simple ingredients that make up Pickled Cucumbers and Onions. You’ll be amazed at how little you need for such a flavorful result! Here’s what to gather:

    • Cucumbers: Choose medium-sized cucumbers for the perfect crunch. Their mild flavor makes them the star of this dish.
    • Onion: A small onion adds a lovely bite. You can use white for a sharper taste or red for sweetness and color.
    • White Vinegar: This tangy ingredient is essential for the brine. It provides that bold pickling flavor everyone loves.
    • Water: Helps to balance the acidity of the vinegar, making the overall taste more rounded.
    • Sugar: Just a couple tablespoons will help balance the vinegar’s sourness, creating a harmonious flavor.
    • Salt: Sea salt or kosher salt will do the trick! It enhances flavor and aids in preservation.
    • Black Pepper: This brings warmth and depth. The freshly cracked variety packs a punch!
    • Garlic Powder: A sprinkle adds a savory kick without overpowering the mix.
    • Red Pepper Flakes (optional): Heat things up! Adjust based on your preference for spice.
    • Fresh Dill (optional for garnish): A sprinkle of dill lends a refreshing herbaceous note, perfect for an elegant finish.

    For exact quantities, don’t forget to check out the printable recipe at the bottom of the article. Happy gathering!

    How to Make Pickled Cucumbers and Onions

    Creating your own Pickled Cucumbers and Onions is a delightful adventure that doesn’t require a culinary degree! Follow these straightforward steps, and you’ll have a jar full of tangy goodness in no time. Let’s get cooking!

    Step 1: Prepare the Vegetables

    Start by thinly slicing your cucumbers and onion. Using a sharp knife or a mandoline can help achieve the perfect thinness, which is crucial for maximum flavor absorption. The thinner the slices, the better they soak in the brine. Place them in a large mixing bowl, allowing their fresh, crisp characteristics to shine.

    Step 2: Make the Brine

    Next, it’s time to make the brine. In a saucepan set over medium heat, combine white vinegar, water, sugar, salt, black pepper, garlic powder, and optional red pepper flakes. Stir regularly until the sugar dissolves completely. Don’t let it boil; we just want to warm the mixture. This step is vital, as it creates the tangy base that makes our pickles sing with flavor!

    Step 3: Combine the Vegetables and Brine

    Pour the warm brine over your sliced cucumbers and onions. Take a moment to stir gently, ensuring every piece is coated evenly. This combination is where all the magic happens! As they bathe in that luscious brine, the flavors meld beautifully, making each bite a burst of tangy goodness.

    Step 4: Cool and Refrigerate

    Allow the mixture to cool to room temperature for about 20 minutes. Then, transfer everything into jars or airtight containers. Make sure to cover them well! For optimal taste, refrigerate for at least 4 hours—overnight is best to let those flavors deepen and develop fully. These pickles can be kept in the fridge for up to two weeks!

    Step 5: Serve and Enjoy

    When you’re ready to serve, garnish with some freshly chopped dill if you’d like! This adds a lovely splash of color and flavor. Feel free to get creative—serve these pickles alongside grilled meats, atop your favorite sandwiches, or as a zesty addition to salads. Enjoy this tangy delight with family and friends!

    Tips for Success

    • Experiment with different types of cucumbers, like Persian or Kirby, for unique textures.
    • For added flavor, try incorporating a splash of lemon juice or vinegar variations like apple cider.
    • Slice your vegetables uniformly to ensure they pickle evenly.
    • Don’t skip the cooling step; it’s essential for preserving the crunchiness.
    • Make a larger batch; these delightful pickles are great for sharing!

    Equipment Needed

    • Large mixing bowl: A big glass or ceramic bowl works perfectly.
    • Sharp knife or mandoline: For those perfectly thin slices of cucumbers and onions.
    • saucepan: Any medium-sized pot will do for making the brine.
    • Jars or airtight containers: Glass jars are ideal, but plastic containers work, too!

    Variations of Pickled Cucumbers and Onions

    • Sweet Onions: Use sweet onions like Vidalia for a milder flavor that complements the cucumbers beautifully.
    • Herbs: Experiment with fresh herbs like thyme or tarragon for a herbaceous twist in your pickling brine.
    • Spices: Add mustard seeds or coriander seeds for an extra layer of flavor and complexity.
    • Fruits: Toss in thinly sliced strawberries or peaches for a refreshing touch of sweetness with a fruity kick.
    • Vinegar Variations: Swap out white vinegar for apple cider or rice vinegar to change the flavor profile entirely.
    • Heat Level: For more heat, increase the red pepper flakes or add slices of jalapeño or serrano peppers.

    Serving Suggestions

    • Pair your Pickled Cucumbers and Onions with grilled chicken or burgers for a refreshing contrast.
    • Serve them atop a crispy garden salad to add a zesty crunch.
    • Try them in tacos for an unexpected burst of flavor.
    • Enjoy with chilled white wine or iced tea for a lovely summer vibe.

    FAQs about Pickled Cucumbers and Onions

    Let’s tackle some common questions about Pickled Cucumbers and Onions that might pop into your mind as you prepare for this tasty journey!

    How long do pickled cucumbers and onions last in the fridge?

    If stored properly in the refrigerator, your pickled cucumbers and onions can last up to two weeks. Just make sure they’re always submerged in the brine!

    Can I adjust the sweetness in this recipe?

    Absolutely! You can easily tweak the sugar levels to suit your taste. Whether you prefer them less sweet or with a touch more sweetness, it’s all about your preference.

    What can I do with leftover brine?

    Don’t let that flavorful brine go to waste! You can use it as a marinade for chicken or fish, pour it over roasted vegetables, or even add it to salad dressings for an extra tang.

    Can I use different types of cucumbers?

    Yes, you can! Feel free to experiment with Persian or Kirby cucumbers for varied textures. Each type will offer a unique crunchy experience in your pickled cucumbers and onions.

    Are these pickles suitable for canning?

    This recipe is intended for refrigerator pickling. If you’re interested in canning, remember to adjust the recipes accordingly for proper preservation methods!

    Final Thoughts

    There’s a special joy in crafting Pickled Cucumbers and Onions that transcends the simple act of cooking. It’s about bringing a splash of vibrant flavor and crunch to our meals in moments of chaos. Each Bite becomes a celebration of freshness and tang, reminding us of garden picnics and summer barbecues. And let’s not forget the joy of sharing! Whether at dinner with family or as a tasty topping at a gathering, these pickles are a treasure trove of happiness. I hope you find as much joy in making and sharing them as I do!


    Print

    clock clock iconcutlery cutlery iconflag flag iconfolder folder iconinstagram instagram iconpinterest pinterest iconfacebook facebook iconprint print iconsquares squares iconheart heart iconheart solid heart solid icon

    Description

    A tangy and refreshing dish made with thinly sliced cucumbers and onions, perfect for a quick side or topping.


    • 4 medium cucumbers, thinly sliced
    • 1 small onion, thinly sliced
    • 1 cup white vinegar
    • 1/2 cup water
    • 2 tablespoons sugar
    • 1 teaspoon salt
    • 1/2 teaspoon black pepper
    • 1/2 teaspoon garlic powder
    • 1/4 teaspoon red pepper flakes (optional)
    • Fresh dill, chopped (optional for garnish)

    1. Thinly slice the cucumbers and onion and place them in a large mixing bowl.
    2. In a saucepan over medium heat, combine vinegar, water, sugar, salt, black pepper, garlic powder, and red pepper flakes. Stir until the sugar dissolves. Do not boil.
    3. Pour the warm brine over the sliced vegetables. Stir to coat evenly.
    4. Allow the mixture to cool to room temperature.
    5. Transfer to jars or containers, cover, and refrigerate for at least 4 hours (overnight is best).
    6. Garnish with chopped dill before serving, if desired.

    Notes

    • Adjust the level of sugar and spice according to your taste.
    • These pickles can be stored in the refrigerator for up to two weeks.
    • Prep Time: 15 minutes
    • Cook Time: 5 minutes
    • Category: Sides
    • Method: Refrigeration
    • Cuisine: American

    Nutrition

    • Serving Size: 1/2 cup
    • Calories: 40
    • Sugar: 3g
    • Sodium: 300mg
    • Fat: 0g
    • Saturated Fat: 0g
    • Unsaturated Fat: 0g
    • Trans Fat: 0g
    • Carbohydrates: 10g
    • Fiber: 1g
    • Protein: 1g
    • Cholesterol: 0mg

    Sharing is caring!

  • Crusty Italian bread

    Crusty Italian bread


    Introduction to Crusty Italian Bread

    Every time I smell freshly baked bread in my kitchen, it takes me back to my grandmother’s warm embrace and her beautiful kitchen filled with love. Crusty Italian bread is a gift that not only satisfies your hunger but also brings your family together. It’s a quick solution for a busy day or a delightful side to impress guests at dinner. With this simple recipe, you won’t just satisfy your craving, but you’ll also create an inviting atmosphere that fills your home with warmth. Let’s roll up our sleeves and dive into making this delicious treasure!

    Why You’ll Love This Crusty Italian Bread

    Making crusty Italian bread at home is incredibly rewarding and, believe me, it’s easier than you might think. It’s a speedy recipe that doesn’t require fancy equipment or hours in the kitchen. Plus, the aroma wafting through your home while it bakes is pure bliss! The satisfying crunch of the crust paired with that soft, airy interior? It’s simply irresistible. Your family will think you’ve become a pro baker!

    Ingredients for Crusty Italian Bread

    Let’s gather the essentials to create your masterpiece of crusty Italian bread. Here’s what you’ll need:

    • All-purpose flour: This is the backbone of our bread. It provides structure and a delightful chewiness.
    • Salt: A crucial ingredient that enhances flavor and strengthens the dough. It allows the bread to really sing!
    • Sugar: Added to fuel the yeast and enhance browning. A pinch goes a long way to create that golden crust.
    • Active dry yeast: This magical ingredient makes your dough rise. Make sure it’s fresh for optimal fluffiness.
    • Warm water: The perfect temperature helps the yeast activate. Think of it as a cozy bath for our yeast friends.
    • Cornmeal: Used for dusting the baking sheet. It gives the crust a lovely crunch and prevents sticking.

    Don’t forget, you can find the exact measurements at the bottom of the article, where they’re available for printing. With these simple ingredients, you’re already on your way to bakery-quality bread right in your kitchen!

    How to Make Crusty Italian Bread

    Step 1: Prepare the Yeast Mixture

    Start by pouring the warm water into a large mixing bowl. It should feel just warm to the touch, like a cozy hug! Sprinkle in the sugar and then add the active dry yeast. Give it a gentle stir and let it sit for 5-10 minutes. You’ll know it’s ready when it becomes frothy and bubbly. This little step is crucial; it ensures your bread will rise beautifully!

    Step 2: Mix the Dough

    Next, it’s time to join the party! Add the all-purpose flour and salt to your yeast mixture. Grab a sturdy wooden spoon or spatula, and stir until a rough dough forms. Don’t worry about perfection here; think of it as creating a rustic masterpiece!

    Step 3: Knead the Dough

    Lightly flour your kitchen counter and turn out that dough. Knead it with your hands for about 8-10 minutes. This is where the magic happens! Your dough should feel smooth and elastic. If it sticks to your fingers, add a tiny bit more flour. Think of it as giving your dough a workout!

    Step 4: First Rise

    Once kneaded, place the dough in a lightly greased bowl. Cover it with a damp cloth and let it rise in a warm spot, like near a sunny window. This resting period is essential; you’re allowing the dough to double in size, creating that light, airy texture we all love!

    Step 5: Shape the Dough

    After the first rise, it’s time for a little punch! Lightly punch down the dough to remove excess air. Shape it into a round or oval loaf, whatever your heart desires! Dust your baking sheet with cornmeal to prevent sticking, adding a crunchy bite to that crust later.

    Step 6: Second Rise

    Cover your shaped loaf with a cloth once again and let it rise for another 30-45 minutes. This second rise is just as important. It’s like giving your bread a beauty nap, ensuring it’s light and fluffy when it bakes.

    Step 7: Preheat and Prepare for Baking

    Now, preheat your oven to 450°F. To create that perfect crust, place a shallow pan of water on the bottom rack. This little trick helps generate steam during baking, making your crust nicely crusty!

    Step 8: Bake the Bread

    Make a few slashes on the top of your loaf using a sharp knife right before baking. This lets steam escape and adds that artisanal touch. Bake for 25-30 minutes, watching for that golden brown crust. When you tap the bottom and hear a hollow sound? That’s your cue—it’s done!

    Step 9: Cool Your Bread

    Remove the loaf from the oven and let it cool on a wire rack. Patience is key here! Allowing it to cool completely enhances the flavors and texture, so try not to slice it too soon. You’ll be rewarded with a beautiful bread that’s ready to serve.

    Tips for Success

    • Ensure your yeast is fresh by checking the expiration date. This guarantees a good rise.
    • Use a kitchen thermometer to maintain water temperature. Too hot can kill the yeast!
    • Experiment with kneading; you’ll get a feel for when the dough is just right.
    • Don’t rush the rising times; patience yields a more flavorful loaf.
    • Use an oven thermometer to ensure accurate baking temperature.

    Equipment Needed

    • Mixing bowl: A large bowl works best, but any bowl that can hold your ingredients will do.
    • Wooden spoon or spatula: Use any sturdy utensil to mix the dough; a whisk can work in a pinch.
    • Kitchen towel: Any clean cloth will cover your dough during rising.
    • Baking sheet: A regular baking tray is perfect; just dust it with cornmeal.
    • Wire rack: A cooling rack is great, but you can use any surface that allows airflow.

    Variations

    • Herb-Infused: Add chopped fresh herbs like rosemary or thyme to the dough for an aromatic twist.
    • Garlic Bread: Mix in minced garlic and a sprinkle of garlic powder for a flavorful addition. Brush with olive oil before baking!
    • Whole Wheat Option: Substitute half of the all-purpose flour with whole wheat flour for a nuttier flavor and added nutrition.
    • Cheesy Delight: Fold in grated Parmesan or mozzarella cheese into the dough for a savory spin.
    • Seed Topping: Top your loaf with sesame or poppy seeds before baking for extra texture and flavor.

    Serving Suggestions for Crusty Italian Bread

    • Pair with Olive Oil: Serve warm slices with a drizzle of quality olive oil and balsamic vinegar for dipping.
    • Soup Companion: Enjoy alongside a comforting bowl of tomato or minestrone soup.
    • Charcuterie Board: Include slices on a charcuterie board to elevate your appetizer spread.
    • Garlic Toast: Toast slices with garlic butter for an irresistible side for pasta dishes.
    • Salad Base: Use chunks of bread in salads or as croutons to add a delightful crunch.

    FAQs about Crusty Italian Bread

    What can I do if my crusty Italian bread doesn’t rise?
    If your dough doesn’t rise properly, it’s likely due to the yeast being old or the water temperature being too hot or cold. Always check your yeast’s expiration date and ensure the water is around 110°F for an optimal rise!

    Can I make crusty Italian bread ahead of time?
    Absolutely! You can prepare the dough and let it rise, then cover it tightly with plastic wrap and refrigerate for up to 24 hours. Just bring it back to room temperature before baking to ensure it rises again.

    Why does my crust turn out soft?
    A soft crust typically results from insufficient steam during baking. To achieve that perfect crust, add more water to your shallow pan or spray water into the oven during the first few minutes of baking.

    Can I use whole wheat flour instead of all-purpose flour?
    Yes! You can substitute up to half of the all-purpose flour with whole wheat flour. You’ll get a nuttier flavor and added nutrition, making your crusty Italian bread even more wholesome!

    How can I store the leftover crusty Italian bread?
    To keep your bread fresh, wrap it in parchment paper or a cloth and store it at room temperature. If you want to keep it longer, slice it and freeze it in a zip-top bag. Simply reheat slices in the oven to enjoy that fresh-baked taste!

    Final Thoughts

    Making crusty Italian bread at home is more than just a cooking project; it’s a heartfelt experience! The way your kitchen fills with that mouthwatering aroma, and the joy of sharing warm slices with family is truly priceless. This recipe brings everyone together, creating cherished memories over simple but delicious bread. Whether you’re enjoying it with olive oil, soups, or just on its own, each bite is a reminder that homemade food can nourish both body and soul. So, grab your apron, embrace the process, and savor the happiness that comes from your very own baking adventure!


    Print

    clock clock iconcutlery cutlery iconflag flag iconfolder folder iconinstagram instagram iconpinterest pinterest iconfacebook facebook iconprint print iconsquares squares iconheart heart iconheart solid heart solid icon

    Description

    A simple and delicious recipe for making crusty Italian bread at home.


    • 3 ½ cups all-purpose flour
    • 1 ½ teaspoons salt
    • 1 teaspoon sugar
    • 1 packet (2 ¼ teaspoons) active dry yeast
    • 1 ½ cups warm water (about 110°F)
    • Cornmeal for dusting

    1. In a large mixing bowl, combine the warm water, sugar, and yeast. Let it sit for about 5-10 minutes until it becomes frothy.
    2. Add the flour and salt to the yeast mixture. Stir until a rough dough forms.
    3. Turn the dough out onto a floured surface and knead for about 8-10 minutes until smooth and elastic.
    4. Place the dough in a lightly greased bowl, cover with a damp cloth, and let it rise in a warm place for about 1-2 hours, or until it has doubled in size.
    5. Once risen, punch down the dough and shape it into a round or oval loaf. Place it on a baking sheet dusted with cornmeal.
    6. Cover the shaped loaf with a cloth and let it rise again for about 30-45 minutes.
    7. Preheat your oven to 450°F. Place a shallow pan of water on the bottom rack to create steam.
    8. Just before baking, make a few slashes on the top of the loaf with a sharp knife.
    9. Bake the bread for 25-30 minutes or until the crust is golden brown and the loaf sounds hollow when tapped on the bottom.
    10. Remove from the oven and let it cool on a wire rack before slicing.

    Notes

    • For a crustier bread, you can increase the steam in the oven by adding more water to the shallow pan.
    • Allow the bread to cool completely before slicing for the best texture.
    • Prep Time: 15 minutes
    • Cook Time: 30 minutes
    • Category: Baking
    • Method: Baking
    • Cuisine: Italian

    Nutrition

    • Serving Size: 1 slice
    • Calories: 120
    • Sugar: 0g
    • Sodium: 150mg
    • Fat: 0.5g
    • Saturated Fat: 0g
    • Unsaturated Fat: 0.5g
    • Trans Fat: 0g
    • Carbohydrates: 25g
    • Fiber: 1g
    • Protein: 4g
    • Cholesterol: 0mg

    Sharing is caring!

  • Crock Pot Crack Potato Soup

    Crock Pot Crack Potato Soup


    Introduction to Crock Pot Crack Potato Soup

    Picture this: it’s a busy evening, and you’ve just realized the kids have soccer practice while dinner needs to be on the table in no time. Enter my Crock Pot Crack Potato Soup, the ultimate comfort food that saves the day! This creamy, dreamy soup is like a warm hug after a long day, providing nourishment and happiness with each spoonful. Not only does it taste divine, but it also cooks while you go about your busy schedule, ensuring you have a delicious meal ready and waiting, perfect for feeding your family during those hectic nights!

    Why You’ll Love This Crock Pot Crack Potato Soup

    This Crock Pot Crack Potato Soup is a true game-changer for any busy mom or professional. It’s quick, delicious, and satisfying—everything you need in a meal. With just a bit of prep work, you can set it and forget it, letting the crock pot do all the magic while you tackle your to-do list. The rich, cheesy flavors and creamy texture turn a simple potato soup into a family favorite.

    Ingredients for Crock Pot Crack Potato Soup

    Gathering the right ingredients is key to creating the rich and delightful Crock Pot Crack Potato Soup that your family will adore. Here’s what you’ll need:

    • Diced potatoes: The cornerstone of the soup, they provide that hearty texture and absorb all the wonderful flavors.
    • Shredded cheddar cheese: This adds a creamy, cheesy goodness that makes each bowl irresistible. Opt for sharp cheddar for a bolder flavor!
    • Cooked and crumbled bacon: For those who love a smoky crunch, bacon is an excellent choice. You can swap it out for turkey bacon or omit it entirely for a vegetarian alternative.
    • Ranch seasoning mix: This seasoning brings zest and depth, elevating the potato soup from ordinary to extraordinary.
    • Chicken or vegetable broth: The liquid base that ties everything together. Choose vegetable broth for a wholesome veggie version.
    • Heavy cream or half-and-half: This ingredient provides the luscious creaminess that makes the soup feel indulgent. You can use milk for a lighter option!
    • Salt and pepper: Essential seasonings to enhance all the flavors—don’t skip on these!
    • Optional garnishes: Think extra cheese, crispy bacon bits, or fresh chives. These little touches not only add flavor but also make your soup visually appealing.

    Exact measurements for these ingredients are available at the bottom of the article for easy printing. Happy cooking!

    How to Make Crock Pot Crack Potato Soup

    Let’s dive into the magic of making Crock Pot Crack Potato Soup. I promise it’s easier than a pie on a window sill. Just follow these simple steps, and you’ll be rewarded with a creamy dream of a dish!

    Step 1: Prep the Potatoes

    First things first, let’s show those potatoes some love! Peel and dice them into even-sized pieces. This helps them cook uniformly. You want pieces not too big and not too small, about an inch is great. This whole prep should take you about 10 minutes. You can do it while sipping a cup of coffee, maybe? Multitasking is key!

    Step 2: Layer the Ingredients

    Now it’s time to layer those diced potatoes right in your crock pot! Start with a nice, even base of potatoes. Then sprinkle that delightful ranch seasoning mix over the top. Oh, the aroma alone is worth it! Next, add your shredded cheddar and crumbled bacon, if using. The layers are like a warm hug for your taste buds, with flavor building at each level!

    Step 3: Add the Broth

    Pour the chicken or vegetable broth over your layered goodness, ensuring it’s enough to cover all the ingredients. The broth acts as a comforting blanket that infuses flavor while everything cooks. Be careful not to overflow your crock pot—nobody wants a messy kitchen!

    Step 4: Cook to Perfection

    Set your crock pot to low for 7-8 hours or high for 4 hours. While you go about your day, the magic happens. The longer cooking option allows those flavors to meld beautifully. Just keep your fingers crossed the aroma doesn’t lure you too close too soon; it smells divine!

    Step 5: Blend and Season

    Once the potatoes are tender, it’s time for the fun part. Stir in that rich heavy cream or half-and-half until combined. If you prefer a smoother consistency, grab your immersion blender or a regular blender. Just blend a portion of the soup until creamy, then return it to the pot. Season with salt and pepper to taste. Enjoy this little moment of culinary joy—it feels like magic!

    Step 6: Serve and Garnish

    Finally, it’s time to serve your masterpiece. Ladle the warm soup into bowls and add any optional garnishes you wish. Extra cheese, crispy bacon bits, or freshly chopped green onions are all fantastic options. Your Crock Pot Crack Potato Soup is now ready to impress your family or yourself! Enjoy the warm, cozy comfort in every bowl!

    Tips for Success

    • Use a mix of potatoes like Russets and Yukon Golds for extra flavor and creaminess.
    • Don’t skip on the ranch seasoning; it’s the secret to that “crack” in the Crock Pot Crack Potato Soup.
    • For even more flavor, sauté the bacon before adding it to the soup.
    • Store leftovers in an airtight container for up to three days.
    • Feel free to adjust seasoning at the end—taste as you go!

    Equipment Needed

    • Crock Pot: The star of the show! A slow cooker makes everything easy. No crock pot? A Dutch oven works too!
    • Knife and Cutting Board: Essential for prepping those potatoes. A sturdy kitchen knife makes all the difference.
    • Measuring Cups: For precise ingredients, especially liquids.
    • Immersion Blender: Perfect for blending the soup, but a regular blender works as well!

    Variations

    • Vegetarian Delight: Omit the bacon and use vegetable broth for a tasty veggie version. You’ll be amazed at how delicious it still is!
    • Spicy Kick: Add a teaspoon of cayenne pepper or a splash of hot sauce to bring some heat to the soup. Perfect for those who like a little spice in their life!
    • Loaded Baked Potato Style: Throw in some sour cream, chives, and extra crispy bacon bits before serving for that loaded baked potato experience.
    • Cheesy Variants: Swap out cheddar for Monterey Jack or Pepper Jack cheese for a unique twist!
    • Herbs and More: Add fresh herbs like thyme, rosemary, or parsley for an enticing aroma and flavor boost.

    Serving Suggestions

    • Crusty Bread: Serve with a side of warm, crusty bread for dipping. Sourdough or baguette adds a delightful texture.
    • Salad: A fresh garden salad pairs beautifully, adding a crisp bite alongside the creamy soup.
    • Drinks: Enjoy with a glass of white wine or a refreshing iced tea for a perfect meal.
    • Presentation: Garnish with a sprinkle of fresh chives or parsley for a pop of color!

    FAQs about Crock Pot Crack Potato Soup

    Can I make Crock Pot Crack Potato Soup ahead of time?

    Absolutely! You can prep the ingredients the night before. Just store everything in the fridge and toss it in the crock pot in the morning. Your family will love coming home to that comforting aroma!

    Is this soup gluten-free?

    Yes! The Crock Pot Crack Potato Soup is naturally gluten-free, especially when using gluten-free ranch seasoning and broth. Ensure all your ingredients are labeled gluten-free to be safe.

    How do I store leftovers?

    Leftovers can be stored in an airtight container in the refrigerator for up to three days. For longer storage, consider freezing in portions. Just reheat on the stove when you’re ready to enjoy again!

    Can I freeze this soup?

    You sure can! Just let it cool completely before transferring to freezer-safe bags or containers. When ready to eat, thaw overnight in the fridge and reheat on low. Creamy soups can sometimes separate, but a good stir will fix it!

    What can I serve with Crock Pot Crack Potato Soup?

    Pair it with a fresh salad or some crusty bread for a full meal. A dollop of sour cream on top adds an extra creamy comfort that’s simply delicious!

    Final Thoughts

    There’s something special about a bowl of Crock Pot Crack Potato Soup that brings people together. The creamy texture and rich flavors create warm memories around the dinner table, making dinner time a cherished moment for busy families. Every spoonful feels like a cozy hug, soothing your soul after a long day. Whether you’re feeding a crowd or just treating yourself, this soup is sure to delight. So dig in, savor each bite, and share the love! Cooking should be joyful, and this recipe is a delightful reminder that comfort can be as simple as a bowl of soup.


    Print

    clock clock iconcutlery cutlery iconflag flag iconfolder folder iconinstagram instagram iconpinterest pinterest iconfacebook facebook iconprint print iconsquares squares iconheart heart iconheart solid heart solid icon

    Description

    Picture this: it’s a busy evening, and you’ve just realized the kids have soccer practice while dinner needs to be on the table in no time. Enter my Crock Pot Crack Potato Soup, the ultimate comfort food that saves the day! This creamy, dreamy soup is like a warm hug after a long day, providing nourishment and happiness with each spoonful. Not only does it taste divine, but it also cooks while you go about your busy schedule, ensuring you have a delicious meal ready and waiting, perfect for feeding your family during those hectic nights!


    • 6 cups diced potatoes (peeled)
    • 1 cup shredded cheddar cheese
    • 1/2 cup cooked and crumbled bacon
    • 1 packet ranch seasoning mix
    • 4 cups chicken or vegetable broth
    • 1 cup heavy cream (or half-and-half)
    • Salt and pepper to taste
    • Optional garnishes: extra cheese, bacon bits, chopped green onions, or chives

    1. Peel and dice the potatoes into even-sized pieces.
    2. In the crock pot, layer the diced potatoes at the bottom. Sprinkle ranch seasoning over the potatoes. Add shredded cheese and crumbled bacon on top.
    3. Pour the broth over the layered ingredients, ensuring the liquid covers them.
    4. Cook on low for 7-8 hours or on high for 4 hours, until the potatoes are tender.
    5. Stir in heavy cream, season with salt and pepper. For a smoother soup, use an immersion blender.
    6. Serve with optional garnishes like extra cheese, bacon bits, or chopped green onions.

    Notes

    • For a vegetarian version, omit the bacon and use vegetable broth.
    • This soup can be thickened by using less broth or blending some of the potatoes.
    • Prep Time: 15 minutes
    • Cook Time: 4-8 hours
    • Category: Soup
    • Method: Crock Pot
    • Cuisine: American

    Nutrition

    • Serving Size: 1 cup
    • Calories: 350
    • Sugar: 2g
    • Sodium: 800mg
    • Fat: 25g
    • Saturated Fat: 10g
    • Unsaturated Fat: 3g
    • Trans Fat: 0g
    • Carbohydrates: 30g
    • Fiber: 3g
    • Protein: 8g
    • Cholesterol: 50mg

    Sharing is caring!

  • Strawberry Lasagna

    Strawberry Lasagna


    Introduction to Strawberry Lasagna

    Are you looking for a no-bake dessert that will wow your family and friends?
    This Strawberry Lasagna is just the ticket! With fresh strawberries, creamy layers,
    and a crunchy crust, it’s both a treat and a breeze to whip up. I absolutely love
    how this recipe serves as a quick solution for those busy days when time is short,
    but I still want to create something special. Plus, it’s a hit at gatherings.
    Who wouldn’t want to impress their loved ones with such a delightful dessert?

    Why You’ll Love This Strawberry Lasagna

    This Strawberry Lasagna is the ultimate easy dessert, perfect for bustling weekends or surprise guests. Whether you’re short on time or just craving a sweet delight, this no-bake treat delivers on all fronts. It’s creamy, fresh, and bursting with strawberry goodness. Plus, the layers make it visually stunning, so you can proudly serve it at brunch or family gatherings. Who doesn’t love a dessert that’s both gorgeous and effortlessly made?

    Ingredients for Strawberry Lasagna

    Making Strawberry Lasagna is not just simple; it’s about gathering the right ingredients for a perfect blend of flavors and textures. Here’s what you’ll need:

    • Golden Oreos or Graham Crackers: Both provide a deliciously crunchy base. I love using Golden Oreos for their subtle sweetness, but graham crackers are a classic alternative.
    • Unsalted Butter: This binds your crust together. Be sure to use unsalted to keep the dessert harmonious without that extra saltiness.
    • Cream Cheese: The star of the cream layer! Softened cream cheese creates a creamy, dreamy texture that pairs perfectly with strawberries.
    • Powdered Sugar: A sweet touch that adds just the right amount of sweetness to balance the tanginess of the cream cheese.
    • Vanilla Extract: Adds a warm, comforting depth of flavor that elevates every bite of this Strawberry Lasagna.
    • Heavy Cream: Essential for whipping – it transforms into a light, airy topping that makes the dessert indulgent and luscious.
    • Fresh Strawberries: The jewels of this dessert! Fresh, sweet strawberries provide a pop of color and flavor. Always choose ripe fruits for the best result.
    • Granulated Sugar: Just enough to enhance the strawberries’ natural sweetness, making them glisten and shine.
    • Lemon Juice (optional): A splash adds brightness to the strawberries if you’re aiming for a zesty kick. It’s not necessary but can take your flavor profile up a notch.
    • Additional Heavy Cream and Powdered Sugar: These are for whipping again, creating the heavenly top layer of your Strawberry Lasagna.

    All quantities for these ingredients are listed at the bottom of the article for your convenience. Happy cooking!

    How to Make Strawberry Lasagna

    Making Strawberry Lasagna is a delightful adventure that takes just a few simple steps!
    Whether you’re a novice or a seasoned cook, you’ll find this no-bake dessert surprisingly easy.
    Let’s dive into the sweet layers that make this dish so special!

    Step 1: Prepare the Crust

    Start by crushing the Golden Oreos or graham crackers in a large bowl.
    I often find smashing them in a zip-top bag quite satisfying!
    Once they’re fine crumbs, add melted unsalted butter and mix until they’re well-coated.
    Press this mixture firmly into the bottom of a 9×13-inch baking dish to build your crust.
    For the perfect crunch, make sure to chill it in the refrigerator while you prepare the other layers.

    Step 2: Make the Cream Cheese Layer

    In a large mixing bowl, beat together softened cream cheese, powdered sugar, and vanilla extract.
    The combination should be smooth and creamy.
    In a separate bowl, whip heavy cream until it forms stiff peaks.
    Fold this whipped cream gently into the cream cheese mixture—it’s like a soft cloud blending with a rich sunset!
    Spread this heavenly cream cheese layer evenly over your chilled crust.

    Step 3: Prepare the Strawberries

    Toss your fresh strawberries with granulated sugar and lemon juice (if using).
    Let them sit for about 10-15 minutes; this waiting period allows the juices to flow out.
    You’re creating a strawberry syrup that will be a delightful surprise in every bite!
    Afterward, place the berries in a single layer over the cream cheese layer.

    Step 4: Add the Whipped Cream

    Grab a clean mixing bowl and whip together the additional heavy cream, powdered sugar, and vanilla extract until stiff peaks form again.
    This layer should be light and fluffy, resembling fresh snow atop a mountain.
    Carefully spread this whipped cream over the strawberries, creating a cloud-like finish.

    Step 5: Layer the Strawberries

    Place the sweetened strawberries evenly on top of the whipped cream layer.
    This final layer adds both visual appeal and extra flavor.
    You can arrange them in whatever pattern you like; I enjoy a rustic, laid-back style.
    Just remember, it doesn’t have to be perfect!

    Step 6: Refrigerate and Serve

    Now comes the hardest part—waiting!
    Cover your Strawberry Lasagna and refrigerate it for at least four hours, preferably overnight.
    This allows all the layers to meld together beautifully.
    When you’re ready to serve, slice it into squares and enjoy the refreshing sweetness with your family and friends!

    Tips for Success

    • Chill the dessert overnight for the best flavor and texture!
    • Use ripe, fresh strawberries for maximum sweetness—you’re going for juicy perfection!
    • Don’t rush the chilling process; patience leads to that wonderful layered effect.
    • If you prefer a lighter option, opt for low-fat cream cheese and whipped cream.
    • Feel free to mix in other fruits like blueberries or bananas for a fun twist!

    Equipment Needed

    • 9×13-inch baking dish: Essential for assembling your Strawberry Lasagna. If you don’t have one, a similar-sized dish works too.
    • Mixing bowls: A few bowls for mixing layers; use any that fit comfortably in your kitchen.
    • Whisk or electric mixer: A handheld mixer speeds up whipping cream, but you can use a whisk for a workout!
    • Spatula: For spreading layers evenly; a silicone spatula is great for scraping every bit!

    Variations on Strawberry Lasagna

    • Berry Medley: Swap strawberries for a mix of berries, like raspberries and blueberries, for a colorful twist.
    • Chocolate Lovers: Add chocolate pudding between the layers for a decadent chocolate-strawberry combo that everyone will love.
    • Gluten-Free: Use gluten-free cookies instead of Golden Oreos or graham crackers for a tasty gluten-free version.
    • Reduced Sugar: Substitute sweeteners like Stevia or monk fruit for a lower sugar option without sacrificing taste.
    • Nutty Addition: Sprinkle crushed nuts, such as almonds or walnuts, between layers for an added crunch and a boost of flavor.

    Serving Suggestions for Strawberry Lasagna

    • Fresh Mint: Garnish each slice with a sprig of fresh mint for a pop of color and refreshing taste.
    • Coffee or Tea: Pair it with a steaming cup of coffee or a refreshing iced tea for a delightful contrast.
    • Berry Sauce: Drizzle raspberry or strawberry sauce over the top for an elegant presentation and extra flavor.
    • Ice Cream: A scoop of vanilla ice cream makes a creamy, dreamy addition to the fresh dessert.
    • Fruit Platter: Serve alongside a fresh fruit platter for a splash of color and healthy options.

    FAQs about Strawberry Lasagna

    I love the excitement around making Strawberry Lasagna, and I often get a few questions along the way. Here are some FAQs that you might find helpful!

    Can I make Strawberry Lasagna in advance?
    Absolutely! This no-bake dessert is perfect for making ahead. In fact, I recommend refrigerating it overnight for the flavors to meld beautifully. Just remember to cover it well!

    Can I use frozen strawberries instead of fresh?
    While fresh strawberries shine in this recipe, frozen ones can work in a pinch. Just make sure to defrost and drain them well before use to avoid excess moisture.

    What if I don’t have heavy cream?
    If heavy cream is elusive, you can substitute it with whipped topping like Cool Whip. It doesn’t create the same rich creaminess, but it works in a snap!

    Is there a way to make this recipe lighter?
    For a lighter version, consider using low-fat cream cheese and whipped cream. You can also reduce the sugar or switch it out for a sugar alternative to keep it guilt-free.

    Can I add other fruits to my Strawberry Lasagna?
    Yes! The beauty of this dessert lies in its versatility. Feel free to mix in other fruits like blueberries, peaches, or even bananas for extra flavor and a pop of color!

    Final Thoughts

    There’s something magical about a dessert like Strawberry Lasagna.
    Every layer tells a story of flavors coming together—creamy, crunchy, and oh-so-sweet.
    This delightful no-bake treat always brings smiles around the table.
    I love serving it on warm summer nights, where it feels like a celebration of all things bright and fresh.
    Each slice is not just a dessert; it’s a moment to share with family and friends.
    So, whip this up, gather your loved ones, and create beautiful memories with every delightful bite!


    Print

    clock clock iconcutlery cutlery iconflag flag iconfolder folder iconinstagram instagram iconpinterest pinterest iconfacebook facebook iconprint print iconsquares squares iconheart heart iconheart solid heart solid icon

    Description

    Are you looking for a no-bake dessert that will wow your family and friends?
    This Strawberry Lasagna is just the ticket! With fresh strawberries, creamy layers,
    and a crunchy crust, it’s both a treat and a breeze to whip up. I absolutely love
    how this recipe serves as a quick solution for those busy days when time is short,
    but I still want to create something special. Plus, it’s a hit at gatherings.
    Who wouldn’t want to impress their loved ones with such a delightful dessert?


    • 1 package (about 12 oz) of Golden Oreos or graham crackers, crushed
    • ½ cup unsalted butter, melted
    • 8 oz cream cheese, softened
    • 1 cup powdered sugar
    • 1 tsp vanilla extract
    • 1 ½ cups heavy cream
    • 4 cups fresh strawberries, hulled and sliced
    • 2 tbsp granulated sugar
    • 1 tbsp lemon juice (optional, for extra brightness)
    • 2 cups heavy cream
    • ¼ cup powdered sugar
    • 1 tsp vanilla extract

    1. In a medium bowl, mix the crushed Golden Oreos (or graham crackers) with the melted butter. Press this mixture into the bottom of a 9×13-inch baking dish to form a crust. Place the dish in the refrigerator to chill.
    2. In a large bowl, beat the softened cream cheese with the powdered sugar and vanilla extract until smooth and creamy. In a separate bowl, whip the heavy cream until stiff peaks form, then gently fold it into the cream cheese mixture. Spread this mixture evenly over the chilled crust.
    3. Toss the sliced strawberries with the granulated sugar and lemon juice (if using). Let them sit for 10-15 minutes to release some juices.
    4. In a large bowl, whip the heavy cream with powdered sugar and vanilla extract until stiff peaks form. Spread the whipped cream evenly over the cream cheese layer.
    5. Arrange the sweetened strawberries evenly on top of the whipped cream layer.
    6. Refrigerate for at least 4 hours, or preferably overnight, to allow the layers to set.
    7. Slice and serve chilled, enjoying the refreshing sweetness.

    Notes

    • For best results, chill overnight to allow flavors to meld.
    • Consider adding other fruits for variety.
    • This dessert serves well for gatherings and special occasions.
    • Prep Time: 30 minutes
    • Cook Time: 0 minutes
    • Category: Dessert
    • Method: No-bake
    • Cuisine: American

    Nutrition

    • Serving Size: 1 slice
    • Calories: 350
    • Sugar: 24g
    • Sodium: 150mg
    • Fat: 24g
    • Saturated Fat: 14g
    • Unsaturated Fat: 8g
    • Trans Fat: 0g
    • Carbohydrates: 36g
    • Fiber: 1g
    • Protein: 4g
    • Cholesterol: 75mg

    Sharing is caring!

  • Cheesy Beef Enchilada Tortellini

    Cheesy Beef Enchilada Tortellini


    Introduction to Cheesy Beef Enchilada Tortellini

    Life can be a whirlwind, can’t it? Between work and family, finding time to whip up a special meal often feels like a juggling act. That’s where my Cheesy Beef Enchilada Tortellini comes to the rescue! This easy, hearty dish is perfect for those busy nights when all you want is comfort food that’s quick to make. Imagine a cheesy, savory blend of beef and enchiladas enveloped around tender tortellini, tantalizing your taste buds. Trust me, this dish not only satisfies hungry bellies but also brings smiles to the dinner table!

    Why You’ll Love This Cheesy Beef Enchilada Tortellini

    Let’s be real—sometimes, I just need dinner to happen fast! That’s what makes this Cheesy Beef Enchilada Tortellini such a lifesaver. It’s made with simple ingredients and comes together in just over half an hour, perfect for busy evenings. The combination of rich flavors, creamy cheese, and hearty beef creates a dish that feels indulgent without the fuss. Your family will think you’ve spent hours in the kitchen!

    Ingredients for Cheesy Beef Enchilada Tortellini

    Gathering the right ingredients is like laying the foundation for a tasty meal. For this Cheesy Beef Enchilada Tortellini, you’ll need a handful of simple yet flavorful components:

    • Ground beef: This classic protein brings richness to the dish. You can use turkey or chicken for a lighter option.
    • Refrigerated cheese tortellini: Easy and convenient, these delicate pockets of pasta are burst with cheese goodness. Feel free to swap for another type of tortellini or even cheese ravioli!
    • Red enchilada sauce: This spicy-sweet sauce offers that robust Mexican flavor. If you prefer milder tastes, opt for a mild sauce or make your own!
    • Cream cheese: Adds a creamy texture and balances the flavors. For a lighter version, you can use reduced-fat cream cheese or a dairy alternative.
    • Shredded mozzarella cheese: Melts beautifully and gives that delicious gooeyness we all love. You can substitute with cheddar or Monterey Jack for a different twist!
    • Diced onion: This aromatic vegetable brings sweetness and depth. Shallots or green onions make great substitutes if you prefer something milder.
    • Minced garlic: A must-have for that savory punch, garlic amps up the flavor. You could use garlic powder in a pinch but fresh is always best!
    • Chili powder: This adds warmth and depth, enhancing the flavors of the beef. Adjust the amount based on your spice tolerance.
    • Ground cumin: A key spice in many Mexican dishes, it adds an earthy note. If you run out, coriander can be a good alternative!
    • Salt and pepper: Basic yet essential, they help round out the flavors. A dash of cayenne could also spice things up!
    • Fresh cilantro: Though optional, this fragrant herb garnishes the dish beautifully and adds freshness. If cilantro isn’t your friend, parsley works well too!

    Don’t worry about memorizing it all! You can find precise measurements for the ingredients at the bottom of the article, ready for printing.

    How to Make Cheesy Beef Enchilada Tortellini

    Sauté the Onions and Garlic

    Let’s start by heating a large skillet over medium heat. I like to add a drizzle of olive oil for flavor, but any cooking oil will do. Toss in the diced onion and let it cook for about 3 to 4 minutes. You want the onion to turn translucent, releasing its sweet aroma. This is the base of flavor for our Cheesy Beef Enchilada Tortellini. Once those onions are softened, add the minced garlic. Cook for just 30 seconds, stirring frequently to prevent burning. That garlic will sizzle and add a wonderful depth to your dish! Together, the onions and garlic create the perfect aromatic foundation.

    Brown the Ground Beef

    Now, it’s time for the star of the show—the ground beef! Add it to the skillet, breaking it apart with a spatula. Season generously with salt, pepper, chili powder, and ground cumin. These spices tie in beautifully with the enchilada sauce. Cook the beef on medium-high heat until it’s fully browned, stirring occasionally. This usually takes about 5 to 7 minutes. Once it’s nice and brown, it’s important to drain any excess fat. Nobody wants a greasy dish! This step ensures that our Cheesy Beef Enchilada Tortellini remains rich and satisfying, without being overly heavy.

    Simmer with Enchilada Sauce

    Now that our beef is golden and fragrant, it’s time to bring in the flavor! Pour in the red enchilada sauce, stirring it through the beef. Give the mixture a good stir to combine everything. Bring it to a gentle simmer, letting the savory fragrance fill your kitchen. This step allows the flavors to meld together beautifully. Just simmer for about 3 to 5 minutes. You want the mixture warm and bubbly, as this sets the stage for our creamy, cheesy goodness.

    Incorporate Cream Cheese

    Here comes the best part! Break the cream cheese into chunks and add it to the skillet. Stir it in, letting those lovely pieces melt into the sauce. This process will create a wonderfully creamy texture that enhances the overall flavor of the Cheesy Beef Enchilada Tortellini. It’s like a warm hug in each scoop! Keep stirring until the entire mixture is smooth and creamy. This should only take a couple of minutes, so don’t rush. You want it beautifully combined!

    Add Tortellini

    Time to add our star pasta! Gently fold in the refrigerated cheese tortellini, making sure to coat them well in your creamy enchilada mixture. Cook on medium-low heat for about 5 to 7 minutes, stirring occasionally. You want the tortellini to heat through and become tender. Watch them carefully; they cook quicker than you think! This step is where the dish truly comes together, merging those divine flavors of beef, cheese, and enchilada sauce into each delightful bite of tortellini.

    Melt the Mozzarella Cheese

    We’re almost there! Sprinkle shredded mozzarella cheese over the top of your glorious mixture. Cover your skillet and let it cook for about 2 to 3 minutes. The goal here is to let that mozzarella melt into a bubbly, slightly golden crust. If you prefer a crispy top, don’t hesitate to broil it for a minute or two. Just keep an eye on it, so it doesn’t burn! Your Cheesy Beef Enchilada Tortellini is now ready, and it looks absolutely divine!

    Tips for Success

    • Always taste as you go! Adjust spices to match your family’s preferences.
    • Keep an eye on your tortellini—they can cook quickly when added to the sauce.
    • If you’re short on time, use pre-cooked ground beef or rotisserie chicken.
    • For extra flavor, consider garnishing with avocado slices or a dollop of sour cream.
    • This dish freezes well! Make a double batch for a quick future meal.

    Equipment Needed

    • Large skillet: A non-stick or cast-iron skillet works best for even cooking.
    • Spatula: Essential for breaking up the beef and stirring the mixture.
    • Measuring cups and spoons: For precision in your ingredients.
    • Cutting board: Handy for chopping your onions and garlic.
    • Sharp knife: A good knife makes prep a breeze!

    Variations

    • Vegetarian Option: Replace ground beef with sautéed mushrooms or lentils for a meatless meal.
    • Spicy Twist: Add diced jalapeños or a splash of hot sauce for an extra kick of heat.
    • Beans Galore: Incorporate black beans or pinto beans for added protein and fiber.
    • Creamy Avocado: Top with avocado slices or guacamole for a creamy finish that complements the flavors.
    • Use Different Cheese: Swap mozzarella for pepper jack or a sharp cheddar for a unique flavor profile.

    Serving Suggestions

    • Pair with a fresh garden salad, loaded with your favorite veggies and a zesty vinaigrette.
    • Serve with warm tortilla chips and your favorite salsa for a delightful crunch.
    • A cold glass of sweet iced tea or a refreshing lemonade complements the dish beautifully.
    • Garnish with extra cilantro or a sprinkle of lime juice for added brightness.

    FAQs about Cheesy Beef Enchilada Tortellini

    Can I make Cheesy Beef Enchilada Tortellini ahead of time?
    Absolutely! You can prepare it ahead of time and store it in the refrigerator. Just add the mozzarella cheese before baking. This will save time on busy nights when you need a quick meal.

    Is this dish gluten-free?
    Yes, as long as you use gluten-free cheese tortellini, this Cheesy Beef Enchilada Tortellini can easily fit into a gluten-free diet. Just check the packaging to ensure it meets your dietary needs.

    Can I use other proteins in this recipe?
    Definitely! Ground turkey or shredded chicken work beautifully in place of beef. You can even go meatless by using legumes, like black beans, for a hearty option.

    How can I adjust the spiciness?
    To control the heat, use mild enchilada sauce or decrease the amount of chili powder. For an extra kick, consider adding diced jalapeños or a dash of hot sauce while cooking.

    Are there any good sides to serve with this dish?
    This Cheesy Beef Enchilada Tortellini pairs wonderfully with a fresh garden salad or some tortilla chips. You can also serve it with a side of refried beans for a complete meal!

    Final Thoughts

    Cooking should be a joyful experience, and my Cheesy Beef Enchilada Tortellini embodies that spirit perfectly. This dish turns busy evenings into culinary delights, and it’s sure to become a favorite in your household. With its creamy sauce and rich flavors, it’s like a big, warm hug on a plate. Plus, it’s easy to customize, meaning every family member can enjoy their own twist! Whipping up this delightful recipe isn’t just about filling bellies—it’s about creating moments, savoring flavors, and sharing smiles around the dinner table. Trust me, you’ll love every delicious bite!


    Print

    clock clock iconcutlery cutlery iconflag flag iconfolder folder iconinstagram instagram iconpinterest pinterest iconfacebook facebook iconprint print iconsquares squares iconheart heart iconheart solid heart solid icon

    Description

    A delicious and easy-to-make Cheesy Beef Enchilada Tortellini dish that’s perfect for a quick dinner.


    • 1 lb ground beef
    • 1 (9 oz) package refrigerated cheese tortellini
    • 1 (10 oz) can red enchilada sauce
    • ½ cup cream cheese
    • 1 cup shredded mozzarella cheese
    • ½ medium onion, diced
    • 2 cloves garlic, minced
    • 1 tsp chili powder
    • ½ tsp ground cumin
    • Salt and pepper to taste
    • Fresh cilantro (optional, for garnish)

    1. In a large skillet over medium heat, sauté the diced onion until translucent (3–4 minutes). Add the garlic and cook for another 30 seconds.
    2. Add ground beef, season with salt, pepper, chili powder, and cumin. Cook until browned, then drain excess fat.
    3. Pour in the enchilada sauce and bring to a simmer.
    4. Add cream cheese in chunks and stir until fully melted and combined.
    5. Fold in the cheese tortellini. Cook on medium-low heat for 5–7 minutes until tender and heated through.
    6. Sprinkle shredded mozzarella on top. Cover and cook for 2–3 minutes, or broil until cheese is bubbly and slightly golden.
    7. Garnish with fresh cilantro if desired. Serve hot!

    Notes

    • For a spicier kick, add more chili powder or some diced jalapeños.
    • This dish can be prepared ahead of time and baked just before serving.
    • Leftovers can be stored in the refrigerator for up to three days.
    • Prep Time: 10 minutes
    • Cook Time: 25 minutes
    • Category: Dinner
    • Method: Skillet
    • Cuisine: Mexican

    Nutrition

    • Serving Size: 1 serving
    • Calories: 550
    • Sugar: 3g
    • Sodium: 800mg
    • Fat: 30g
    • Saturated Fat: 15g
    • Unsaturated Fat: 10g
    • Trans Fat: 0g
    • Carbohydrates: 45g
    • Fiber: 2g
    • Protein: 30g
    • Cholesterol: 90mg

    Sharing is caring!