Author: IHAAL Team

  • Ground Beef Zucchini Sweet Potato Skillet

    Ground Beef Zucchini Sweet Potato Skillet


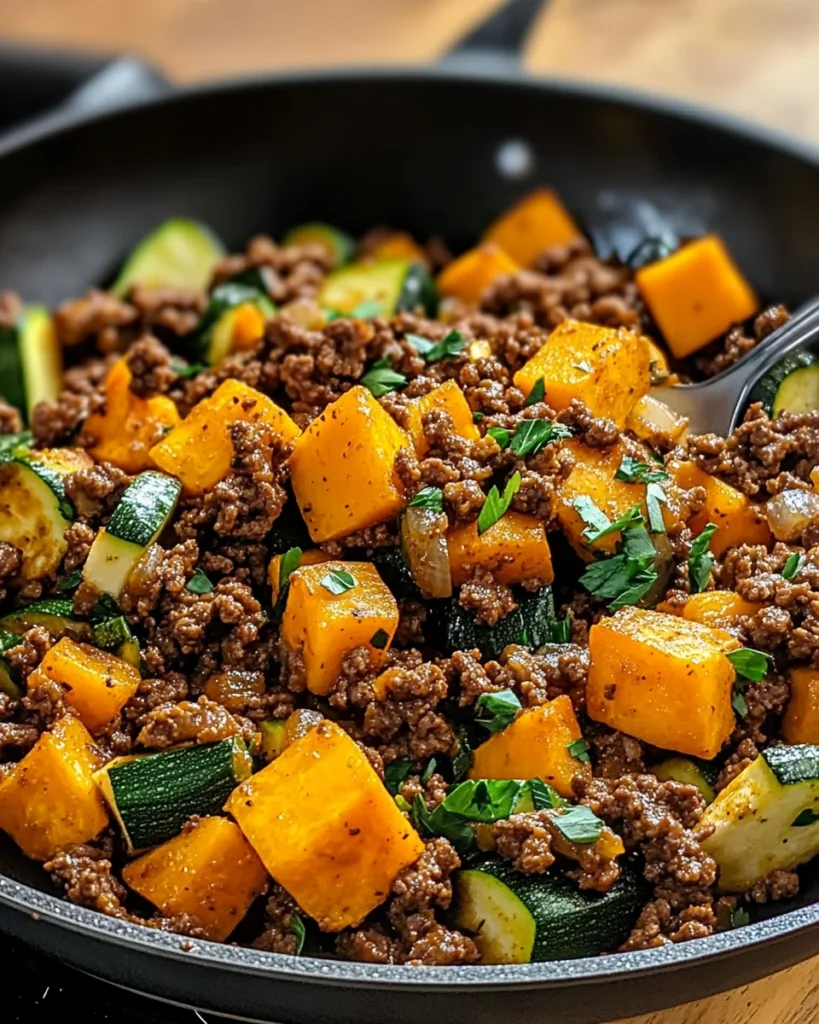
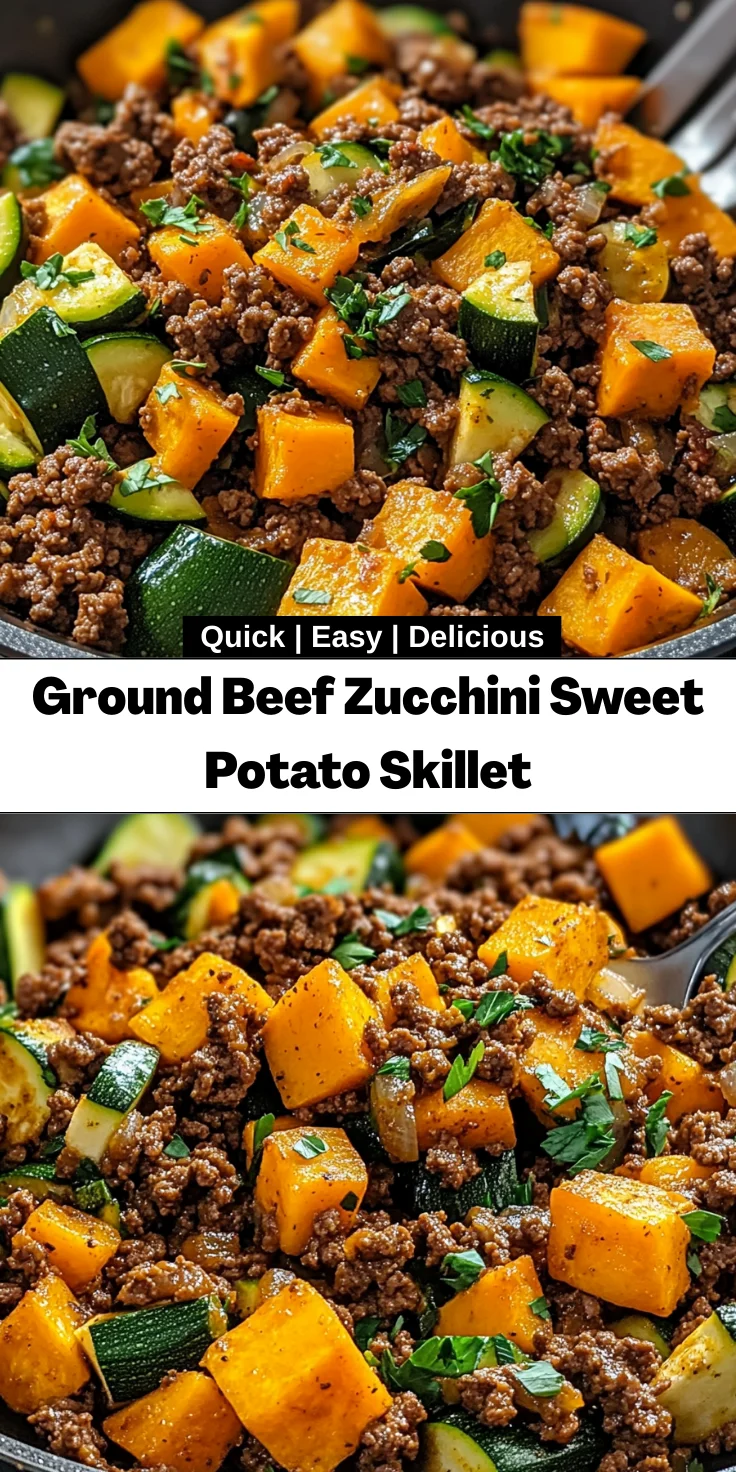
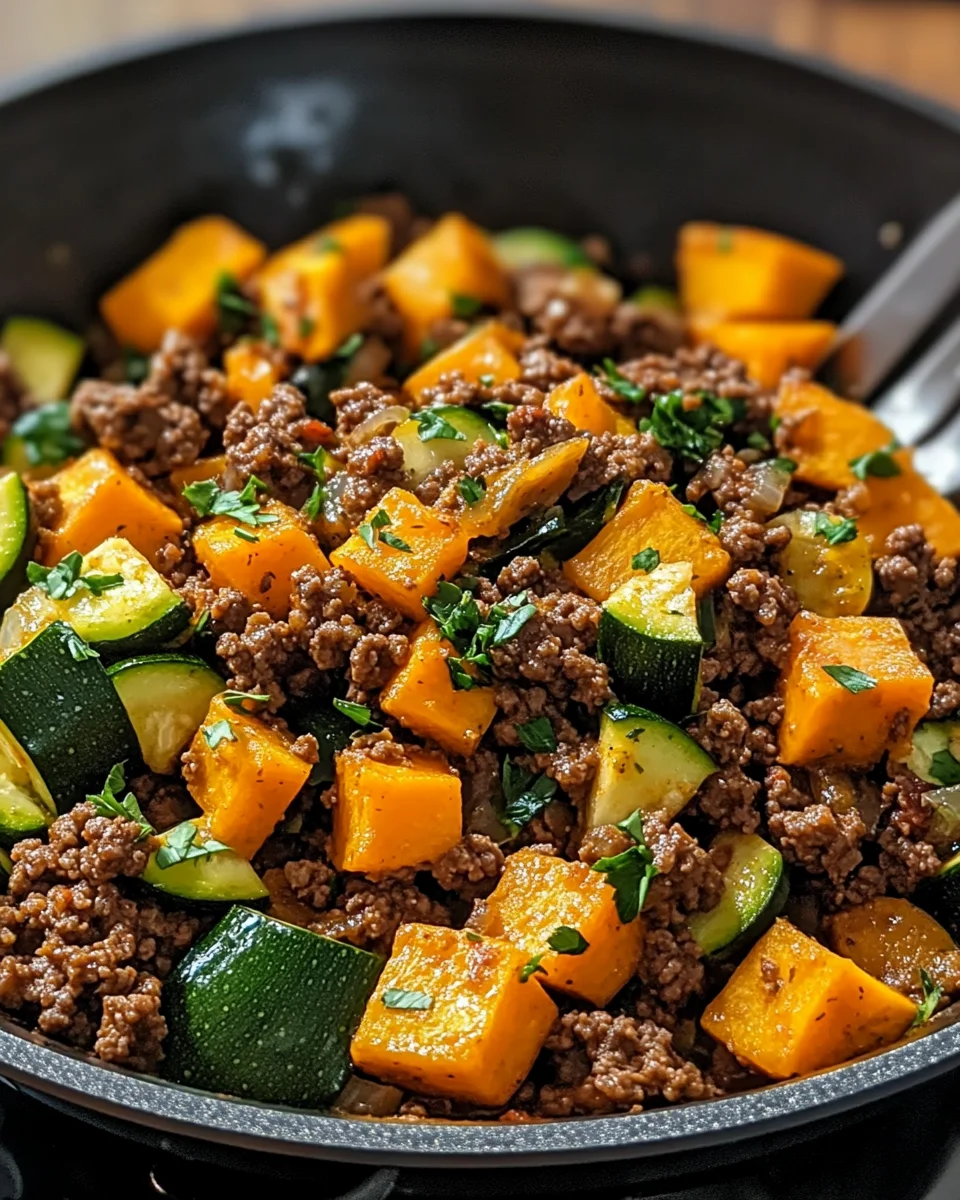
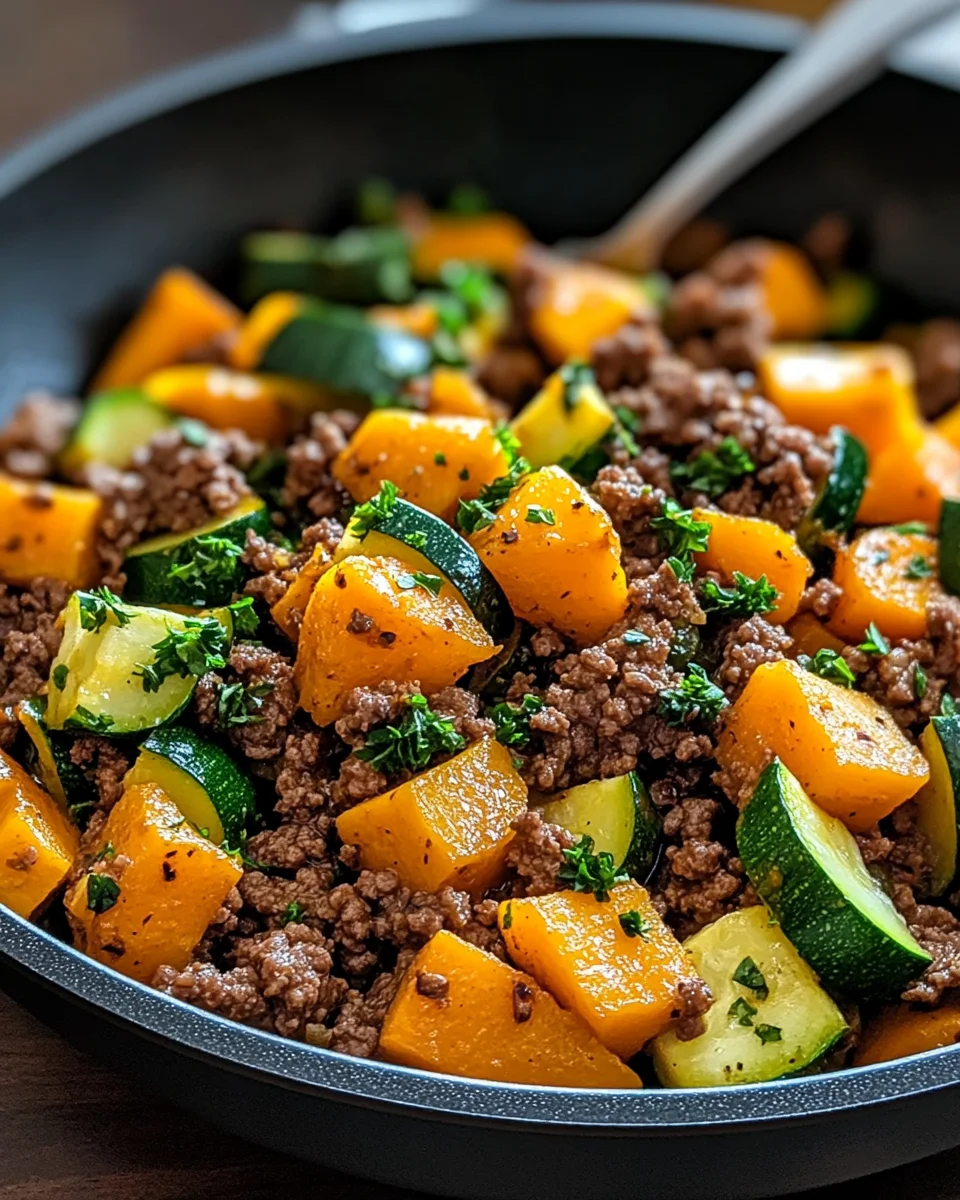
    Introduction to Ground Beef Zucchini Sweet Potato Skillet

    Welcome, fellow kitchen adventurers! If you’re like me—juggling work meetings, kids’ activities, and a never-ending to-do list—you know the value of a quick and delicious meal. That’s where my Ground Beef Zucchini Sweet Potato Skillet comes in! It’s a perfect solution for busy days when you need something tasty on the table without sacrificing quality. This dish is not just about ease; it’s about delighting your loved ones with flavors that meld beautifully while you tend to life’s chaos. Let’s turn your dinner into a joyful experience!

    Why You’ll Love This Ground Beef Zucchini Sweet Potato Skillet

    This Ground Beef Zucchini Sweet Potato Skillet truly shines for its simplicity and flavor. In just 35 minutes, you can whip up a hearty dish that even your picky eaters will adore. Packed with nutrients from sweet potatoes and zucchini, it’s a meal that leaves you feeling good. Plus, the one-pan cleanup means more time for what really matters—like savoring your delicious dinner and sharing stories with loved ones!

    Ingredients for Ground Beef Zucchini Sweet Potato Skillet

    Gathering the right ingredients is half the fun! For my Ground Beef Zucchini Sweet Potato Skillet, you’ll need:

    • Ground beef (or turkey): This is the protein powerhouse. Use lean ground turkey if you’re looking for a healthier option.
    • Small onion: Diced finely, it adds a sweet flavor when sautéed, enhancing the dish’s overall taste.
    • Garlic: Three cloves, minced—because who can resist that aromatic goodness? Garlic makes everything better!
    • Large sweet potato: Peeled and diced, it brings a natural sweetness and vibrant color to our skillet.
    • Medium zucchini: Chopped into bite-sized pieces, zucchini adds texture and a refreshing touch.
    • Olive oil: Two tablespoons help to sauté all the ingredients while imparting healthy fats.
    • Salt: Just a teaspoon to enhance the flavors—seasoning is key!
    • Black pepper: Half a teaspoon for a bit of heat and depth.
    • Smoked paprika: This spice adds a hint of smokiness that elevates the dish.
    • Dried oregano: Half a teaspoon for an earthy note; it’s a classic herb that blends well.
    • Tomato paste: A tablespoon gives richness and ties all the flavors together beautifully.
    • Fresh lemon juice: A tablespoon brightens everything up, adding that perfect zing!
    • Fresh parsley: Chopped, this is for garnish, bringing a pop of color and freshness to the finished dish.

    Feel free to mix things up with additional veggies, too! Bell peppers, spinach, or even carrots can provide an extra nutrition boost and vibrant colors.

    If you want the exact quantities, they’re listed at the bottom of the article and available for easy printing!

    How to Make Ground Beef Zucchini Sweet Potato Skillet

    Ready to dive into this scrumptious Ground Beef Zucchini Sweet Potato Skillet? Let’s walk through it step-by-step; it’s easier than you might think! And trust me, your taste buds are in for a treat!

    Step 1: Brown the Beef and Aromatics

    Start by heating 1 tablespoon of olive oil in a large skillet over medium heat.

    Once the oil shimmers, add the ground beef, breaking it up with a spatula as it cooks. I recommend a good non-stick skillet for easy cleanup!

    Add in your diced onion and minced garlic, letting their flavors mingle for about 5-7 minutes. You’re looking for the beef to be nicely browned while the onions turn translucent.

    Oh, and if there’s too much fat in the pan after browning, quickly drain it off—nobody wants a greasy skillet!

    Step 2: Add the Sweet Potatoes

    Next up, toss in those diced sweet potatoes along with smoked paprika, oregano, salt, and pepper.

    Stir it all well; you want every piece to get a touch of that vibrant spice!

    Cover your skillet and let it cook for about 8-10 minutes, stirring occasionally. This helps the sweet potatoes soften nicely while soaking up those lovely flavors.

    Step 3: Incorporate the Zucchini and Tomato Paste

    Once the sweet potatoes are getting tender, it’s time to put in the star of the show: zucchini!

    Stir in the chopped zucchini and a tablespoon of tomato paste.

    Mix everything well, ensuring the zucchini gets coated in the tomato goodness. Cook for another 5 minutes until the zucchini is tender but not soggy. Hooray for vibrancy!

    Step 4: Garnish and Serve

    Remove the skillet from heat and let the magic happen. Garnish with freshly chopped parsley to add that burst of color.

    Now, scoop a generous serving onto your plates. You’ve just created a delightful, nutritious meal that’s sure to impress!

    And just like that, dinner is served. What an accomplishment! Enjoy every scrumptious bite of your Ground Beef Zucchini Sweet Potato Skillet!

    Tips for Success

    • Chop vegetables evenly for consistent cooking.
    • Don’t rush the browning process; it adds depth of flavor.
    • Feel free to adjust seasonings to your taste—don’t hesitate to experiment!
    • Use leftovers creatively, like in wraps or salads.
    • For extra creaminess, add a splash of broth or a dollop of yogurt before serving.

    Equipment Needed for Ground Beef Zucchini Sweet Potato Skillet

    • Large skillet: A non-stick skillet works wonders for easy cleanup.
    • Spatula: Ideal for breaking up the beef and stirring ingredients.
    • Knife and cutting board: Necessary for chopping your fresh veggies.
    • Measuring spoons: Useful for precise seasoning.

    Variations of Ground Beef Zucchini Sweet Potato Skillet

    • Swap the Protein: Use ground turkey, chicken, or even plant-based alternatives for a different spin.
    • Go Veggie-Only: Omit the meat entirely and bump up zucchini, bell peppers, or mushrooms for a hearty vegetarian dish.
    • Add Beans: Incorporate black beans or chickpeas for added fiber and protein while keeping it filling.
    • Try Different Spices: Experiment with cumin, chili powder, or curry powder to switch up the flavor profile.
    • Make It Spicy: Toss in some diced jalapeños or a dash of crushed red pepper flakes to heat things up!

    Serving Suggestions for Ground Beef Zucchini Sweet Potato Skillet

    • Pair with a Salad: A crisp green salad with vinaigrette adds freshness.
    • Serve with Rice or Quinoa: For a heartier meal, spoon the skillet over cooked rice or quinoa.
    • Presentation Tip: Serve in colorful bowls for a delightful visual appeal!
    • Complement with Wine: A glass of Merlot or Chardonnay makes it feel special.

    FAQs about Ground Beef Zucchini Sweet Potato Skillet

    Let’s tackle some of the burning questions you might have about this scrumptious Ground Beef Zucchini Sweet Potato Skillet. I’ve been there too, searching for answers when trying new recipes. Here are the top queries I often hear:

    Can I use other vegetables in this skillet?

    Absolutely! Feel free to get creative. Bell peppers, carrots, or spinach make fabulous additions. Just adjust the cooking time so everything is tender.

    How can I make this meal gluten-free?

    This Ground Beef Zucchini Sweet Potato Skillet is naturally gluten-free. Just ensure any broth or seasonings used are certified gluten-free to stay safe.

    Can I freeze leftovers?

    You sure can! Store leftovers in an airtight container for up to three months. Just thaw and reheat for a quick meal later. I love having this on hand for busy days!

    What can I serve with the skillet for a complete meal?

    Pair it with a side salad or some warm, crusty bread. Quinoa or rice can also complement the dish wonderfully.

    Is it possible to make this vegetarian?

    Definitely! Simply omit the meat and add more veggies or beans instead. It’ll be just as filling and delicious!

    Final Thoughts

    Creating a Ground Beef Zucchini Sweet Potato Skillet is more than just cooking; it’s about bringing warmth to your family table. I love how this dish combines hearty flavors and vibrant colors, making dinner feel special—even on the busiest nights. Each bite delivers comfort and nutrition, proving that meals don’t have to be complicated to be delightful. So, gather your loved ones, and enjoy the happy moments shared over this delicious skillet meal. I promise, this wholesome dish will leave everyone satisfied and ready to conquer the next adventure together!


    Print

    clock clock iconcutlery cutlery iconflag flag iconfolder folder iconinstagram instagram iconpinterest pinterest iconfacebook facebook iconprint print iconsquares squares iconheart heart iconheart solid heart solid icon

    Description

    Welcome, fellow kitchen adventurers! If you’re like me—juggling work meetings, kids’ activities, and a never-ending to-do list—you know the value of a quick and delicious meal. That’s where my Ground Beef Zucchini Sweet Potato Skillet comes in! It’s a perfect solution for busy days when you need something tasty on the table without sacrificing quality. This dish is not just about ease; it’s about delighting your loved ones with flavors that meld beautifully while you tend to life’s chaos. Let’s turn your dinner into a joyful experience!


    • 1 lb ground beef (or ground turkey)
    • 1 small onion, diced
    • 3 cloves garlic, minced
    • 1 large sweet potato, peeled & diced
    • 1 medium zucchini, diced
    • 2 tbsp olive oil
    • 1 tsp salt
    • ½ tsp black pepper
    • ½ tsp smoked paprika
    • ½ tsp dried oregano
    • 1 tbsp tomato paste
    • 1 tbsp fresh lemon juice
    • 2 tbsp fresh parsley, chopped (for garnish)

    1. Heat 1 tbsp olive oil in a large skillet over medium heat. Add the ground beef, breaking it up as it cooks. Stir in the onion and garlic, cooking until the beef is browned (about 5-7 minutes). Drain excess fat if needed.
    2. Add the diced sweet potatoes, smoked paprika, oregano, salt, and pepper. Stir well, cover the skillet, and cook for 8-10 minutes until softened, stirring occasionally.
    3. Stir in zucchini and tomato paste, mixing well to coat everything in flavor. Cook for another 5 minutes, until zucchini is tender but not mushy.
    4. Remove from heat and garnish with fresh parsley before serving.

    Notes

    • This dish can be made with ground turkey for a leaner option.
    • Feel free to add other vegetables like bell peppers or spinach for extra nutrition.
    • Leftovers can be stored in the refrigerator and reheated for an easy meal.
    • Prep Time: 10 minutes
    • Cook Time: 25 minutes
    • Category: Dinner
    • Method: Skillet
    • Cuisine: American

    Nutrition

    • Serving Size: 1 serving
    • Calories: 350
    • Sugar: 4g
    • Sodium: 600mg
    • Fat: 20g
    • Saturated Fat: 7g
    • Unsaturated Fat: 10g
    • Trans Fat: 0g
    • Carbohydrates: 30g
    • Fiber: 5g
    • Protein: 20g
    • Cholesterol: 70mg

    Sharing is caring!

  • Old-Fashioned Swiss Steak

    Old-Fashioned Swiss Steak


    Introduction to Old-Fashioned Swiss Steak

    Welcome to the heartwarming world of cooking, where flavors translate into stories! Today, I’m excited to share my version of Old-Fashioned Swiss Steak, a dish that brings back fond memories of cozy family dinners. There’s something incredibly comforting about tender steak simmered in a savory tomato and vegetable sauce. This recipe is your perfect solution for a busy day or a chance to impress your loved ones with minimal effort. It’s hearty, flavorful, and forgiving—perfect for even the most chaotic weeknight. Let’s dive into this culinary adventure together!

    Why You’ll Love This Old-Fashioned Swiss Steak

    This Old-Fashioned Swiss Steak is a game changer for busy days. It’s a one-pot wonder that not only simplifies cleanup but also maximizes flavor. With simple ingredients and straightforward steps, even kitchen novices will shine. The combination of tender steak and savory sauce warms the soul. Plus, it’s a fantastic way to sneak in veggies, pleasing the pickiest of eaters around your table. Trust me; this dish will become a family favorite!

    Ingredients for Old-Fashioned Swiss Steak

    Gathering the right ingredients is the first step in crafting this delicious meal. Here’s what you’ll need to whip up your Old-Fashioned Swiss Steak:

    • All-purpose flour: This is used to coat the steak, creating a delightful crust that seals in the juices.
    • Salt and black pepper: Perfect for seasoning the steak and enhancing its natural flavors.
    • Garlic powder: Adds a savory depth to the dish, giving it that warm, welcoming aroma.
    • Cube steak or round steak: These cuts are affordable and ideal for slow cooking, becoming tender as they simmer.
    • Vegetable oil: Used for browning the steak, it adds a touch of richness.
    • Onion: Diced onions develop a sweet, caramelized flavor when sautéed, infusing your dish with goodness.
    • Celery: Adds a subtle crunch and earthy notes, elevating the overall texture of the dish.
    • Green bell pepper: Its slight bitterness harmonizes with tomato sauce, brightening the flavor palette.
    • Mushrooms: These lend a savory umami element, enriching the dish and providing a satisfying bite.
    • Garlic: Fresh minced garlic brings a punch of flavor, enhancing the dish’s aromatic profile.
    • Tomato paste: A concentrated flavor bomb, it thickens the sauce and imparts a rich tomato taste.
    • Diced tomatoes: Canned diced tomatoes add body and texture to the sauce, combining with the other ingredients wonderfully.
    • Beef broth: A key player for building a deep, savory base that simmers beautifully with the steak.
    • Worcestershire sauce: This iconic sauce introduces tangy notes that brighten the overall profile of the dish.
    • Dried thyme: A classic herb that adds warmth and earthiness to your sauce.
    • Sugar: Just a pinch balances out the acidity from the tomatoes, creating a harmonious flavor.
    • Celery seed (optional): Tiny but mighty, it can bring an extra layer of flavor if you choose to use it.
    • Cornstarch and water (for thickening): If you prefer a richer sauce, mixing these will achieve that velvety gravy consistency.

    For exact quantities, scroll down for the recipe at the bottom. You’ll also find it available for printing. Let’s get cooking and make some memories around the dinner table!

    How to Make Old-Fashioned Swiss Steak

    Creating a delicious Old-Fashioned Swiss Steak is a delightful journey that you’ll want to embark on. It’s straightforward and straightforward, letting you unleash your inner chef while keeping your kitchen relatively tidy. Let’s walk through the preparations step by step!

    Step 1: Preheat the Oven

    First things first—set your oven to 325°F (165°C). This temperature is perfect for a slow and gentle bake, allowing the flavors to meld beautifully as the steak becomes fork-tender. A preheated oven is key to achieving that ideal texture!

    Step 2: Prepare the Steak

    Now, let’s focus on the star of the show: the steak. In a shallow dish, combine the all-purpose flour, salt, pepper, and garlic powder. This mix not only seasons the meat but also helps achieve a lovely crust. Coat each piece of steak thoroughly in this mixture. Then, heat vegetable oil in a large oven-safe pot over medium heat. Brown the steaks for about 3-4 minutes on each side. This step locks in the juiciness and provides an irresistible flavor base.

    Step 3: Sauté the Vegetables

    Next up, let’s add those vibrant vegetables! In the same pot you used for the steaks (don’t wash it, just embrace the flavor!), sauté the diced onion, celery, green bell pepper, and mushrooms. Cook them for about 5-7 minutes until they’re soft and fragrant. Sautéing these vegetables helps release their natural sweetness and creates a foundation of flavor that enhances the entire dish.

    Step 4: Combine Ingredients

    Now it’s time for the magic to happen! Stir in the minced garlic and tomato paste, allowing them to cook for a minute or two. This step intensifies the flavors to a whole new level. Next, pour in the diced tomatoes and beef broth, adding Worcestershire sauce, thyme, sugar, and optional celery seed. Give it a good stir to combine the ingredients before placing the browned steak back into the pot. Each ingredient sings in unison, promising a symphony of flavors.

    Step 5: Bake the Dish

    Cover your pot with a lid and place it in the preheated oven. Bake for 1½ to 2 hours, allowing the steak to simmer luxuriously. The long cooking time is essential for achieving that tender texture we all crave in Old-Fashioned Swiss Steak. Just imagine the aroma filling your home—it’s comfort food at its finest!

    Step 6: Optional Gravy Thickening

    If you prefer a thicker gravy, here’s a handy tip! Mix two tablespoons of cornstarch with two tablespoons of water until smooth. Stir this into your pot and let it simmer for a few minutes until the sauce reaches your desired consistency. This optional step ensures every bite of your steak is enveloped in delicious gravy.

    Tips for Success

    • Marinate your steak overnight for deeper flavor—trust me, it’s worth it!
    • Don’t rush the browning process; letting the meat get a nice sear adds fabulous flavor.
    • Taste as you go! Adjust seasoning to suit your family’s preferences.
    • Feel free to add any leftover veggies you have on hand for added nutrition.
    • To save time, chop your veggies the night before.

    Equipment Needed

    • Large oven-safe pot: A Dutch oven works wonderfully, but any heavy pot with a lid will do.
    • Wooden spoon: Essential for stirring, but a spatula can also serve!
    • Shallow dish: For coating the steak; a plate works just fine.
    • Oven mitts: Safety first when handling hot pots!

    Variations

    • For a spicy kick, add diced jalapeños or red pepper flakes while sautéing the vegetables.
    • Swap in different proteins, like chicken or turkey, for a lighter twist on this classic dish.
    • Use a mix of different colored bell peppers for added sweetness and a vibrant presentation.
    • For a low-carb option, serve the steak over spiralized zucchini noodles or cauliflower rice instead of traditional sides.
    • Try using fresh herbs like rosemary or basil for a fragrant twist on the classic thyme.

    Serving Suggestions

    • Pair your Old-Fashioned Swiss Steak with creamy mashed potatoes to soak up that delicious sauce.
    • Serve it over buttered egg noodles for a comforting, hearty meal.
    • A side of steamed green beans or garlic sautéed spinach adds a lovely pop of color.
    • Complete the meal with a glass of robust red wine for a cozy evening.
    • Garnish with fresh parsley for a bright touch before serving!

    FAQs about Old-Fashioned Swiss Steak

    As you prepare to dive into making Old-Fashioned Swiss Steak, you might have a few questions. Here are some common queries that can help guide your culinary journey:

    Can I use a different cut of beef for Swiss Steak?

    Absolutely! While cube steak or round steak are traditional choices, you can use other cuts like chuck roast or flank steak for a richer flavor. Just remember that the longer the cooking time, the more tender your meat will become!

    How can I store leftovers of Old-Fashioned Swiss Steak?

    Leftovers can be stored in an airtight container in the fridge for up to 3 days. Just reheat gently on the stovetop or in the microwave, and you’ll have a delicious meal ready to go!

    Is Old-Fashioned Swiss Steak gluten-free?

    This recipe contains all-purpose flour, which is not gluten-free. However, you can substitute it with a gluten-free flour blend or a cornstarch coating to enjoy this comforting dish!

    What sides pair well with Old-Fashioned Swiss Steak?

    This hearty meal is great with classic sides like mashed potatoes or egg noodles. For a fresher option, consider steamed vegetables or a crisp garden salad to balance the rich flavors.

    Can I make Old-Fashioned Swiss Steak in a slow cooker?

    Yes, you can! Simply brown the steak and sauté the vegetables, then combine everything in a slow cooker. Cook on low for about 6-8 hours. It’ll be just as flavorful and tender with this method!

    Final Thoughts

    Cooking Old-Fashioned Swiss Steak is not just about creating a meal; it’s about weaving moments and memories around your table. The rich, savory aromas that fill your kitchen invite everyone to gather and indulge. Each bite offers a sense of comfort and warmth, perfect for lifting spirits after a long day. Whether it’s a weeknight dinner or a special occasion, this dish shines brightly in the spotlight. I hope you experience the joy and satisfaction that comes from preparing and sharing this classic recipe with your loved ones. Happy cooking!


    Print

    clock clock iconcutlery cutlery iconflag flag iconfolder folder iconinstagram instagram iconpinterest pinterest iconfacebook facebook iconprint print iconsquares squares iconheart heart iconheart solid heart solid icon

    Description

    Welcome to the heartwarming world of cooking, where flavors translate into stories! Today, I’m excited to share my version of Old-Fashioned Swiss Steak, a dish that brings back fond memories of cozy family dinners. There’s something incredibly comforting about tender steak simmered in a savory tomato and vegetable sauce. This recipe is your perfect solution for a busy day or a chance to impress your loved ones with minimal effort. It’s hearty, flavorful, and forgiving—perfect for even the most chaotic weeknight. Let’s dive into this culinary adventure together!


    • ¼ cup all-purpose flour
    • ½ tsp salt
    • ¼ tsp black pepper
    • 1 tsp garlic powder
    • 2 lbs cube steak or round steak sliced
    • ¼ cup vegetable oil
    • 1 onion diced
    • 12 stalks celery diced
    • 1 green bell pepper thinly sliced
    • 8 oz mushrooms sliced
    • 2 cloves garlic minced
    • 3 tbsp tomato paste
    • 1 15 oz can diced tomatoes
    • 2 cups beef broth
    • 1 tbsp Worcestershire sauce
    • ½ tsp dried thyme
    • 1 tsp sugar
    • Pinch of celery seed (optional)
    • 2 tbsp cornstarch + 2 tbsp water (optional, for thickening)

    1. Preheat oven to 325°F (165°C).
    2. Coat steaks in flour, salt, pepper, and garlic powder. Brown in oil in a large oven-safe pot. Remove and set aside.
    3. Sauté onion, celery, pepper, and mushrooms in the same pot. Add garlic and tomato paste; cook 1–2 minutes.
    4. Add tomatoes, broth, Worcestershire, thyme, sugar, and celery seed. Stir and return steak to pot.
    5. Cover and bake for 1½ to 2 hours, until steak is fork-tender.
    6. Optional: Thicken gravy by mixing cornstarch with water, stirring it into the pot, and simmering until thickened.
    7. Serve hot over mashed potatoes, egg noodles, or rice.

    Notes

    • For best results, allow the steak to marinate overnight for enhanced flavor.
    • This dish can be made ahead and reheated for convenience.
    • Feel free to add additional vegetables based on your preference.
    • Prep Time: 20 minutes
    • Cook Time: 2 hours
    • Category: Main Course
    • Method: Baking
    • Cuisine: American

    Nutrition

    • Serving Size: 1 serving
    • Calories: 350
    • Sugar: 4g
    • Sodium: 800mg
    • Fat: 15g
    • Saturated Fat: 3g
    • Unsaturated Fat: 10g
    • Trans Fat: 0g
    • Carbohydrates: 28g
    • Fiber: 3g
    • Protein: 30g
    • Cholesterol: 80mg

    Sharing is caring!

  • Guy Fieri’s Macaroni Salad

    Guy Fieri’s Macaroni Salad


    Introduction to Guy Fieri’s Macaroni Salad

    As summer rolls in, I find myself dreaming of backyard barbecues and family gatherings. One dish that never fails to steal the show is Guy Fieri’s Macaroni Salad. This vibrant, flavorful salad is not just a side; it’s a celebration of fresh ingredients and comfort. Perfect for busy moms like us, it’s quick to whip up and can be made ahead of time. Whether you’re hosting a picnic or just want to impress your loved ones at dinner, this macaroni salad is sure to bring smiles and satisfied bellies!

    Why You’ll Love This Guy Fieri’s Macaroni Salad

    This Guy Fieri’s Macaroni Salad is a game-changer for busy days. It’s incredibly easy to make, taking just 30 minutes of your time, plus chilling. The combination of creamy dressing and crunchy veggies creates a delightful texture that everyone will love. Plus, it’s versatile! You can customize it to suit your family’s tastes, making it a perfect dish for any summer gathering or casual weeknight dinner.

    Ingredients for Guy Fieri’s Macaroni Salad

    Gathering the right ingredients is the first step to creating Guy Fieri’s Macaroni Salad. Here’s what you’ll need:

    • Elbow macaroni or small pasta shells: The star of the dish! These pasta shapes hold the creamy dressing beautifully.
    • Carrots: Shredded or finely chopped, they add a sweet crunch and vibrant color.
    • Celery: Finely chopped for that satisfying crunch and a refreshing taste.
    • Red bell pepper: Diced for a pop of color and a hint of sweetness.
    • Red onion: Finely diced to bring a mild onion flavor that complements the other ingredients.
    • Sweet pickle relish: This adds a tangy sweetness that elevates the salad’s flavor profile.
    • Chopped parsley: Optional, but it adds a fresh touch and a burst of color for garnish.
    • Mayonnaise: The creamy base of the dressing, providing richness and flavor.
    • Sour cream: Adds a tangy creaminess that balances the mayonnaise.
    • Dijon mustard: For a subtle kick and depth of flavor.
    • Apple cider vinegar: This brings acidity, brightening up the salad.
    • Granulated sugar: Just a touch to balance the acidity and enhance the flavors.
    • Paprika: Adds a hint of smokiness and a beautiful color.
    • Garlic powder: For a savory depth that complements the other flavors.
    • Onion powder: Enhances the overall flavor without overpowering the dish.
    • Salt and freshly ground black pepper: Essential for seasoning, bringing all the flavors together.

    For exact measurements, check the bottom of the article where you can find everything listed for easy printing. Feel free to customize the ingredients based on what you have on hand or your family’s preferences!

    How to Make Guy Fieri’s Macaroni Salad

    Now that we have our ingredients ready, let’s dive into the fun part—making Guy Fieri’s Macaroni Salad! Follow these simple steps, and you’ll have a delicious dish that’s perfect for any summer gathering.

    Step 1: Cook the Pasta

    Start by bringing a large pot of salted water to a boil. Once it’s bubbling like a hot spring, add in the elbow macaroni or small pasta shells. Cook according to the package instructions until they’re al dente. This usually takes about 8 to 10 minutes. Remember, you want them firm enough to hold up in the salad!

    Step 2: Prepare the Vegetables

    While the pasta is cooking, it’s time to chop! Finely dice the celery, red bell pepper, and red onion. Shred or finely chop the carrots. The more colorful your veggies, the more inviting your salad will look! Once chopped, toss them into a large mixing bowl. The crunch from these fresh veggies will add a delightful texture to your salad.

    Step 3: Make the Dressing

    In a separate medium bowl, whisk together the mayonnaise, sour cream, Dijon mustard, and apple cider vinegar. Add in the granulated sugar, paprika, garlic powder, and onion powder. This creamy dressing is what makes Guy Fieri’s Macaroni Salad so irresistible! Taste it and adjust the seasoning with salt and pepper as needed. You want it to be just right!

    Step 4: Combine Ingredients

    Once the pasta is cooked and drained, rinse it under cold water to cool it down. This step is crucial to prevent clumping. Add the cooled pasta to the bowl with the chopped vegetables. Pour the dressing over everything and toss gently. Make sure every piece of pasta and veggie is coated in that creamy goodness!

    Step 5: Chill the Salad

    Cover the bowl with plastic wrap and pop it in the refrigerator. Let it chill for at least 1 to 2 hours. This waiting time allows the flavors to meld together beautifully. Trust me, it’s worth the wait! If you can make it a day ahead, even better!

    Step 6: Serve and Enjoy

    When you’re ready to serve, give the salad a final toss. Sprinkle some chopped parsley on top for a fresh touch. This Guy Fieri’s Macaroni Salad is best served chilled, making it a perfect side dish for barbecues, picnics, or family dinners. Enjoy every creamy, crunchy bite!

    Tips for Success

    • Always rinse the pasta after cooking to prevent it from sticking together.
    • For extra flavor, let the salad chill overnight; it enhances the taste!
    • Customize the veggies based on what’s in season or your family’s favorites.
    • Don’t skip the apple cider vinegar; it brightens the flavors beautifully.
    • Adjust the seasoning to your taste; every palate is different!

    Equipment Needed

    • Large pot: For boiling pasta. A deep saucepan works too.
    • Colander: To drain the pasta. A slotted spoon can be a quick alternative.
    • Mixing bowls: One large for the salad and a medium for the dressing. Any bowl will do!
    • Whisk: For mixing the dressing. A fork can work in a pinch.
    • Cutting board and knife: Essential for chopping veggies. A sturdy plate can substitute if needed.

    Variations of Guy Fieri’s Macaroni Salad

    • Spicy Twist: Add diced jalapeños or a splash of hot sauce to the dressing for a kick that’ll wake up your taste buds!
    • Protein Boost: Toss in some diced cooked chicken, ham, or even chickpeas for added protein and heartiness.
    • Herb Infusion: Experiment with fresh herbs like dill or basil for a fragrant twist that elevates the flavor profile.
    • Vegan Version: Substitute mayonnaise and sour cream with vegan alternatives, and use a plant-based pasta for a delicious vegan-friendly dish.
    • Fruit Addition: Mix in diced apples or grapes for a sweet contrast that pairs beautifully with the creamy dressing.

    Serving Suggestions for Guy Fieri’s Macaroni Salad

    • Pair it with grilled burgers or hot dogs for a classic summer meal.
    • Serve alongside barbecued ribs or chicken for a hearty feast.
    • Complement with a refreshing lemonade or iced tea to cool down.
    • Garnish with extra parsley or cherry tomatoes for a pop of color.
    • Use a vibrant serving bowl to make the dish visually appealing!

    FAQs about Guy Fieri’s Macaroni Salad

    Can I make Guy Fieri’s Macaroni Salad ahead of time?

    Absolutely! In fact, making it a day in advance allows the flavors to meld beautifully. Just cover it tightly and store it in the refrigerator until you’re ready to serve.

    What can I substitute for mayonnaise in this macaroni salad?

    If you’re looking for a lighter option, Greek yogurt works wonderfully as a substitute for mayonnaise. It adds creaminess while cutting down on calories!

    How long can I store leftovers of Guy Fieri’s Macaroni Salad?

    Leftovers can be stored in an airtight container in the fridge for up to 3 days. Just give it a good stir before serving again!

    Can I add protein to this macaroni salad?

    Definitely! Diced cooked chicken, ham, or even chickpeas can be added for a protein boost. It makes the salad more filling and satisfying.

    Is this macaroni salad suitable for a vegetarian diet?

    Yes! Guy Fieri’s Macaroni Salad is vegetarian-friendly, making it a great option for gatherings where you want to cater to different dietary preferences.

    Final Thoughts

    Guy Fieri’s Macaroni Salad is more than just a dish; it’s a celebration of summer flavors and cherished moments. Each creamy, crunchy bite brings back memories of laughter-filled gatherings and sunny afternoons. This recipe is a lifesaver for busy moms, offering a quick and delicious solution for any occasion. Whether you’re serving it at a barbecue or enjoying it as a light lunch, it’s sure to impress. So, gather your loved ones, whip up this delightful salad, and create new memories around the table. Trust me, it’s a dish that will keep everyone coming back for more!


    Print

    clock clock iconcutlery cutlery iconflag flag iconfolder folder iconinstagram instagram iconpinterest pinterest iconfacebook facebook iconprint print iconsquares squares iconheart heart iconheart solid heart solid icon

    Description

    As summer rolls in, I find myself dreaming of backyard barbecues and family gatherings. One dish that never fails to steal the show is Guy Fieri’s Macaroni Salad. This vibrant, flavorful salad is not just a side; it’s a celebration of fresh ingredients and comfort. Perfect for busy moms like us, it’s quick to whip up and can be made ahead of time. Whether you’re hosting a picnic or just want to impress your loved ones at dinner, this macaroni salad is sure to bring smiles and satisfied bellies!


    • 1 lb elbow macaroni or small pasta shells
    • 1 cup carrots, shredded or finely chopped
    • 1 cup celery, finely chopped
    • 1 small red bell pepper, finely diced
    • ½ cup red onion, finely diced
    • ½ cup sweet pickle relish
    • ¼ cup chopped parsley (optional, for garnish)
    • 1 cup mayonnaise
    • ¼ cup sour cream
    • 2 tbsp Dijon mustard
    • 2 tbsp apple cider vinegar
    • 1 tsp granulated sugar
    • ½ tsp paprika
    • ½ tsp garlic powder
    • ½ tsp onion powder
    • Salt and freshly ground black pepper, to taste

    1. Bring a large pot of salted water to a boil. Add the macaroni and cook according to the package instructions until al dente.
    2. Drain the pasta and rinse under cold water to cool it down and remove excess starch. This prevents clumping. Transfer the pasta to a large mixing bowl.
    3. Finely chop the celery, red bell pepper, and red onion. Shred the carrots or finely dice them. Add the chopped vegetables and sweet pickle relish to the bowl with the pasta.
    4. In a medium mixing bowl, whisk together mayonnaise, sour cream, Dijon mustard, apple cider vinegar, sugar, paprika, garlic powder, and onion powder. Taste the dressing and adjust with salt and pepper as needed.
    5. Pour the dressing over the pasta and vegetables. Toss gently to combine, ensuring everything is evenly coated.
    6. Cover the bowl with plastic wrap and refrigerate for at least 1–2 hours to let the flavors meld.
    7. Before serving, give the salad a final toss and sprinkle with chopped parsley for a fresh, vibrant touch. Serve chilled alongside barbecue favorites like burgers, ribs, or grilled chicken.

    Notes

    • For a spicier kick, consider adding diced jalapeños or a dash of hot sauce to the dressing.
    • This salad can be made a day in advance for even better flavor.
    • Feel free to customize the vegetables based on your preferences or what you have on hand.
    • Prep Time: 20 minutes
    • Cook Time: 10 minutes
    • Category: Salad
    • Method: Mixing and Refrigerating
    • Cuisine: American

    Nutrition

    • Serving Size: 1 cup
    • Calories: 350
    • Sugar: 4g
    • Sodium: 500mg
    • Fat: 25g
    • Saturated Fat: 4g
    • Unsaturated Fat: 20g
    • Trans Fat: 0g
    • Carbohydrates: 30g
    • Fiber: 2g
    • Protein: 6g
    • Cholesterol: 15mg

    Sharing is caring!

  • 3-Ingredient Peanut Butter Oreo Cookie Balls

    3-Ingredient Peanut Butter Oreo Cookie Balls


    Introduction to 3-Ingredient Peanut Butter Oreo Cookie Balls

    Hey there, fellow food lovers! If you’re anything like me, you know that life can get pretty hectic. Between juggling work, family, and everything in between, finding time to whip up a delicious treat can feel impossible. That’s where these 3-Ingredient Peanut Butter Oreo Cookie Balls come in! They’re not just easy to make; they’re a delightful way to impress your loved ones without spending hours in the kitchen. With just three simple ingredients, you’ll have a sweet, no-bake dessert that’s perfect for any occasion. Trust me, your taste buds will thank you!

    Why You’ll Love This 3-Ingredient Peanut Butter Oreo Cookie Balls

    These 3-Ingredient Peanut Butter Oreo Cookie Balls are a game-changer for busy moms and professionals alike. They come together in just 15 minutes, making them a quick solution for unexpected guests or a sweet treat after a long day. Plus, the combination of creamy peanut butter and rich chocolate is simply irresistible. You’ll love how easy they are to make and how quickly they disappear!

    Ingredients for 3-Ingredient Peanut Butter Oreo Cookie Balls

    Let’s dive into the deliciousness! Here’s what you’ll need to create these delightful 3-Ingredient Peanut Butter Oreo Cookie Balls. Each ingredient plays a vital role in making this treat a hit!

    • Oreo cookies: The star of the show! These chocolate sandwich cookies provide a rich, sweet base. You can also experiment with different flavors, like mint or peanut butter Oreos, for a fun twist.
    • Creamy peanut butter: This adds a luscious, nutty flavor and helps bind the cookie mixture together. If you prefer a healthier option, natural peanut butter works well too, just ensure it’s creamy for easy mixing.
    • Chocolate chips: Whether you choose milk, dark, or white chocolate, these chips create a decadent coating that takes these cookie balls to the next level. Feel free to use sugar-free chocolate chips if you’re looking for a lighter option.

    For exact measurements, check the bottom of the article where you can find everything listed for easy printing. Now, let’s get cooking!

    How to Make 3-Ingredient Peanut Butter Oreo Cookie Balls

    Now that we have our ingredients ready, let’s get to the fun part—making these 3-Ingredient Peanut Butter Oreo Cookie Balls! Follow these simple steps, and you’ll have a delightful treat in no time.

    Step 1: Crush the Oreos

    First things first, we need to turn those Oreos into crumbs. You can use a food processor for this task. Just toss the cookies in and pulse until they’re finely crushed. If you don’t have a food processor, no worries! Place the Oreos in a Ziploc bag and crush them with a rolling pin. It’s a great way to relieve some stress, too!

    Step 2: Mix with Peanut Butter

    Next, grab a large mixing bowl and combine the crushed Oreos with the creamy peanut butter. Stir it all together until you achieve a thick, dough-like consistency. It should be sticky but manageable. If it feels too dry, add a bit more peanut butter. This mixture is where the magic happens!

    Step 3: Shape the Balls

    Now comes the fun part—shaping the cookie balls! Roll the mixture into 1-inch balls using your hands. Don’t worry about making them perfect; a little imperfection adds character. Once shaped, arrange them on a parchment-lined baking sheet. This will make it easier to transfer them later.

    Step 4: Melt the Chocolate

    In a microwave-safe bowl, melt the chocolate chips. Heat them in 20-second intervals, stirring in between until smooth. Be careful not to overheat the chocolate, as it can seize up. If you prefer, you can also use a double boiler for this step. Just make sure it’s melted and ready for dipping!

    Step 5: Dip and Coat

    Time to coat those cookie balls! Dip each one into the melted chocolate, ensuring it’s fully covered. Tap off any excess chocolate before placing them back on the parchment-lined sheet. This step is where you can get creative—feel free to sprinkle some crushed nuts or colorful sprinkles on top before the chocolate sets!

    Step 6: Chill

    Once all the cookie balls are coated, it’s time to chill them. Pop the baking sheet in the refrigerator for about 30 minutes. If you’re in a hurry, you can also freeze them for a quicker set. This will help the chocolate harden and keep everything together.

    Step 7: Serve

    Finally, once the chocolate has hardened, it’s time to enjoy your delicious creations! Serve them at room temperature or straight from the fridge. Trust me, these 3-Ingredient Peanut Butter Oreo Cookie Balls will be a hit with everyone!

    Tips for Success

    • Use room temperature peanut butter for easier mixing.
    • For a smoother chocolate coating, add a teaspoon of vegetable oil to the melted chocolate.
    • Keep your hands slightly damp when rolling the balls to prevent sticking.
    • Experiment with different cookie flavors for unique variations.
    • Store any leftovers in an airtight container in the fridge for up to a week.

    Equipment Needed

    • Food processor: For quick crushing of Oreos. A rolling pin and Ziploc bag work too!
    • Mixing bowl: Any large bowl will do for combining ingredients.
    • Parchment paper: Essential for easy cleanup. Wax paper is a good alternative.
    • Microwave-safe bowl: For melting chocolate. A double boiler can be used as well.

    Variations of 3-Ingredient Peanut Butter Oreo Cookie Balls

    • Flavored Oreos: Switch things up by using different flavored sandwich cookies, like mint or birthday cake Oreos, for a unique twist.
    • Nut Butters: Try almond or cashew butter instead of peanut butter for a different nutty flavor.
    • Chocolate Coating: Experiment with white chocolate or dark chocolate for a change in taste and presentation.
    • Healthier Options: Use sugar-free Oreos and dark chocolate chips for a lighter version of these treats.
    • Mix-ins: Add mini chocolate chips, crushed nuts, or dried fruit to the mixture for added texture and flavor.

    Serving Suggestions for 3-Ingredient Peanut Butter Oreo Cookie Balls

    • Pair these cookie balls with a glass of cold milk for a classic treat.
    • Serve them on a decorative platter for a stunning presentation at parties.
    • For a fun twist, drizzle some melted chocolate or caramel over the top before serving.
    • These cookie balls also make a great addition to dessert tables at celebrations.

    FAQs about 3-Ingredient Peanut Butter Oreo Cookie Balls

    Got questions about these delightful 3-Ingredient Peanut Butter Oreo Cookie Balls? I’ve got you covered! Here are some common queries that might pop up as you whip up this sweet treat.

    Can I use gluten-free Oreos?

    Absolutely! Gluten-free Oreos are a fantastic option for those with dietary restrictions. They’ll work just as well in this recipe, ensuring everyone can enjoy these delicious cookie balls.

    How long do these cookie balls last?

    When stored in an airtight container in the fridge, these cookie balls can last up to a week. But trust me, they’ll likely be gone long before that!

    Can I freeze the cookie balls?

    Yes, you can freeze them! Just place the cookie balls in a single layer on a baking sheet until frozen, then transfer them to an airtight container. They’ll keep for about a month in the freezer.

    What can I use instead of chocolate chips?

    If you’re not a fan of chocolate, you can coat the cookie balls in melted white chocolate or even colorful candy melts for a fun twist. The flavor will still be delicious!

    Can I make these cookie balls ahead of time?

    Definitely! These 3-Ingredient Peanut Butter Oreo Cookie Balls are perfect for making ahead of time. Just prepare them and store them in the fridge until you’re ready to serve. They’ll be a hit at any gathering!

    Final Thoughts

    Making these 3-Ingredient Peanut Butter Oreo Cookie Balls is more than just a cooking experience; it’s a delightful journey filled with joy and creativity. Each bite is a sweet reminder of how simple ingredients can come together to create something truly special. Whether you’re sharing them with family or indulging in a quiet moment for yourself, these treats bring smiles all around. Plus, the ease of preparation means you can whip them up anytime you need a little sweetness in your life. So go ahead, treat yourself and your loved ones to this delicious adventure!


    Print

    clock clock iconcutlery cutlery iconflag flag iconfolder folder iconinstagram instagram iconpinterest pinterest iconfacebook facebook iconprint print iconsquares squares iconheart heart iconheart solid heart solid icon

    Description

    Hey there, fellow food lovers! If you’re anything like me, you know that life can get pretty hectic. Between juggling work, family, and everything in between, finding time to whip up a delicious treat can feel impossible. That’s where these 3-Ingredient Peanut Butter Oreo Cookie Balls come in! They’re not just easy to make; they’re a delightful way to impress your loved ones without spending hours in the kitchen. With just three simple ingredients, you’ll have a sweet, no-bake dessert that’s perfect for any occasion. Trust me, your taste buds will thank you!


    • 1 package (15.25 oz) Oreo cookies (or similar sandwich cookies)
    • 1 cup creamy peanut butter
    • 1 1/2 cups chocolate chips (milk, dark, or white chocolate)

    1. Crush the Oreos: Place the Oreos in a food processor and pulse until they’re finely crushed into crumbs. Alternatively, put them in a Ziploc bag and crush with a rolling pin.
    2. Mix with Peanut Butter: In a large mixing bowl, combine the crushed Oreos with the peanut butter. Stir until well mixed into a thick, dough-like consistency.
    3. Shape the Balls: Roll the mixture into 1-inch balls and arrange them on a parchment-lined baking sheet.
    4. Melt the Chocolate: In a microwave-safe bowl, melt the chocolate chips in 20-second intervals, stirring until smooth.
    5. Dip and Coat: Dip each ball into the melted chocolate, ensuring full coverage. Tap off the excess chocolate and place them back on the parchment-lined sheet.
    6. Chill: Refrigerate for 30 minutes or freeze for a quicker set.
    7. Serve: Once the chocolate hardens, serve and enjoy!

    Notes

    • For a fun twist, try using different flavored sandwich cookies.
    • Store leftovers in an airtight container in the refrigerator.
    • Prep Time: 15 minutes
    • Cook Time: 0 minutes
    • Category: Dessert
    • Method: No-Bake
    • Cuisine: American

    Nutrition

    • Serving Size: 1 cookie ball
    • Calories: 150
    • Sugar: 10g
    • Sodium: 50mg
    • Fat: 8g
    • Saturated Fat: 4g
    • Unsaturated Fat: 2g
    • Trans Fat: 0g
    • Carbohydrates: 18g
    • Fiber: 1g
    • Protein: 3g
    • Cholesterol: 0mg

    Sharing is caring!