Author: IHAAL Team

  • Philly Cheesesteak Stromboli

    Philly Cheesesteak Stromboli


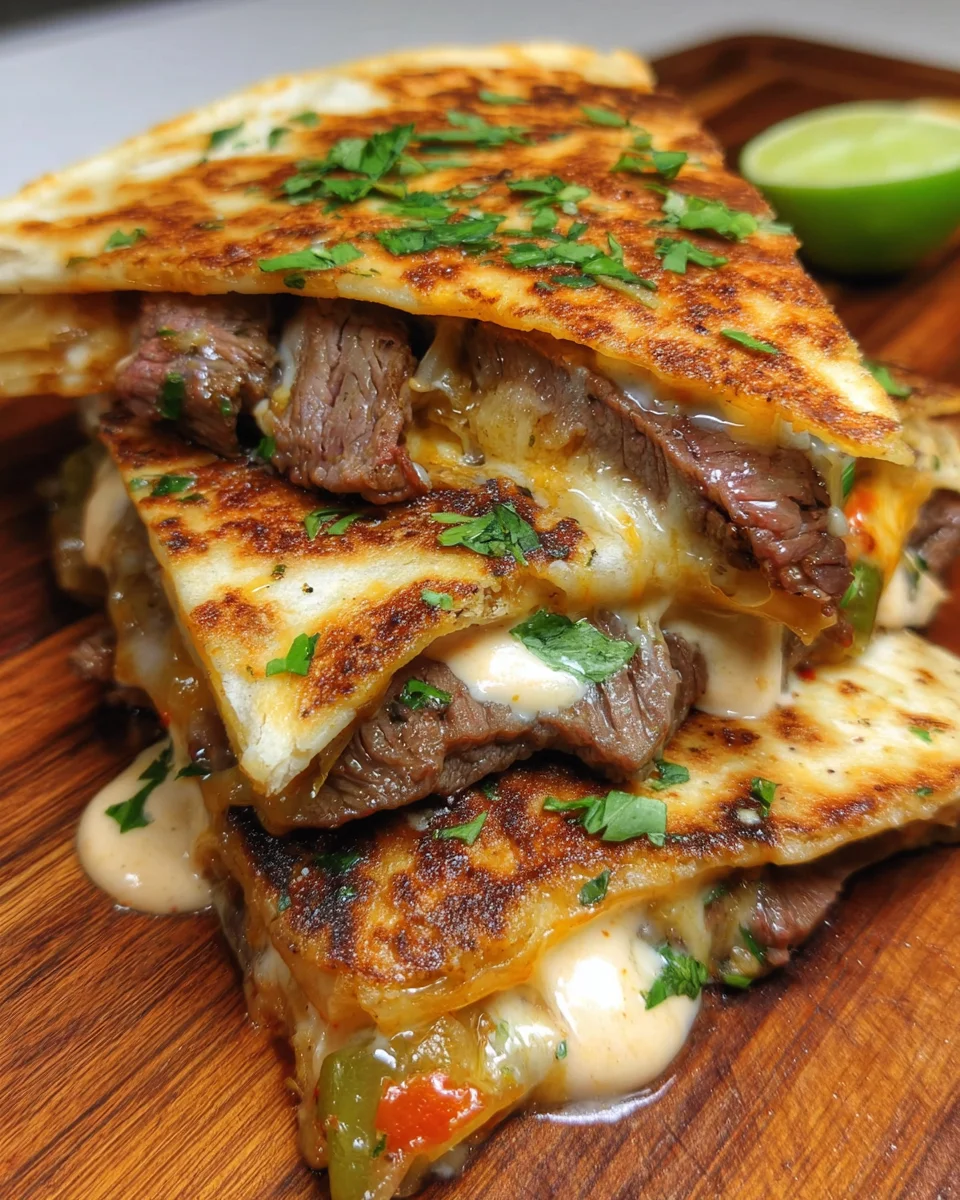
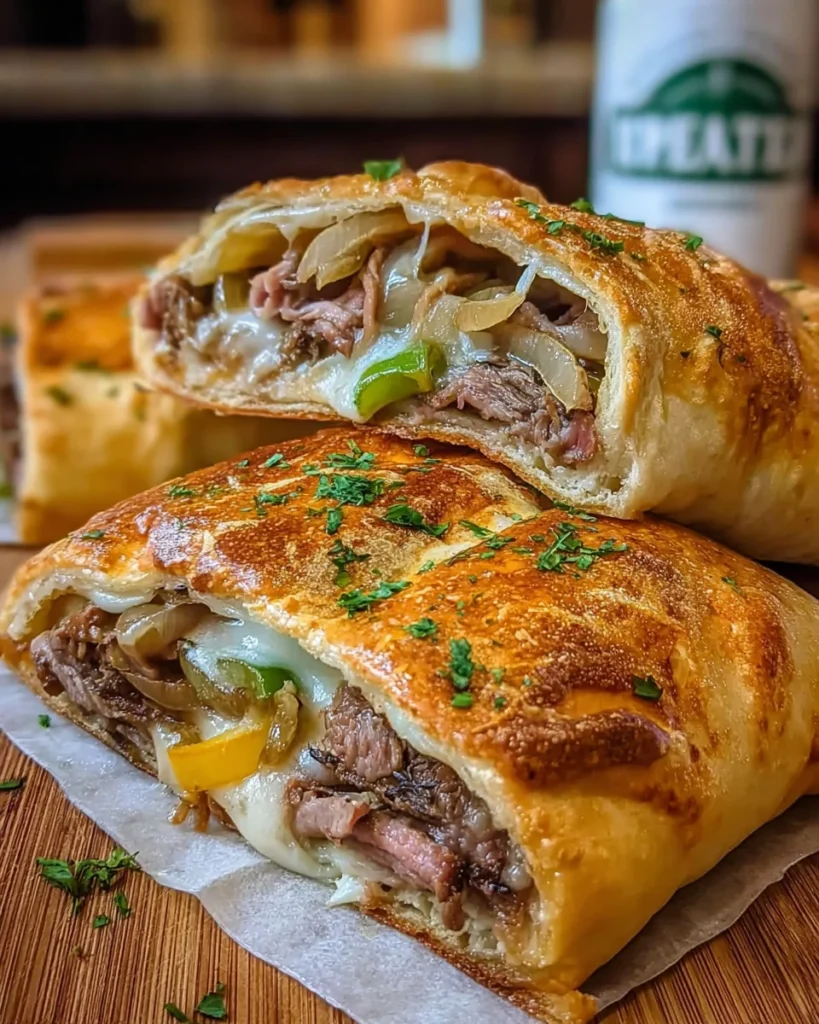
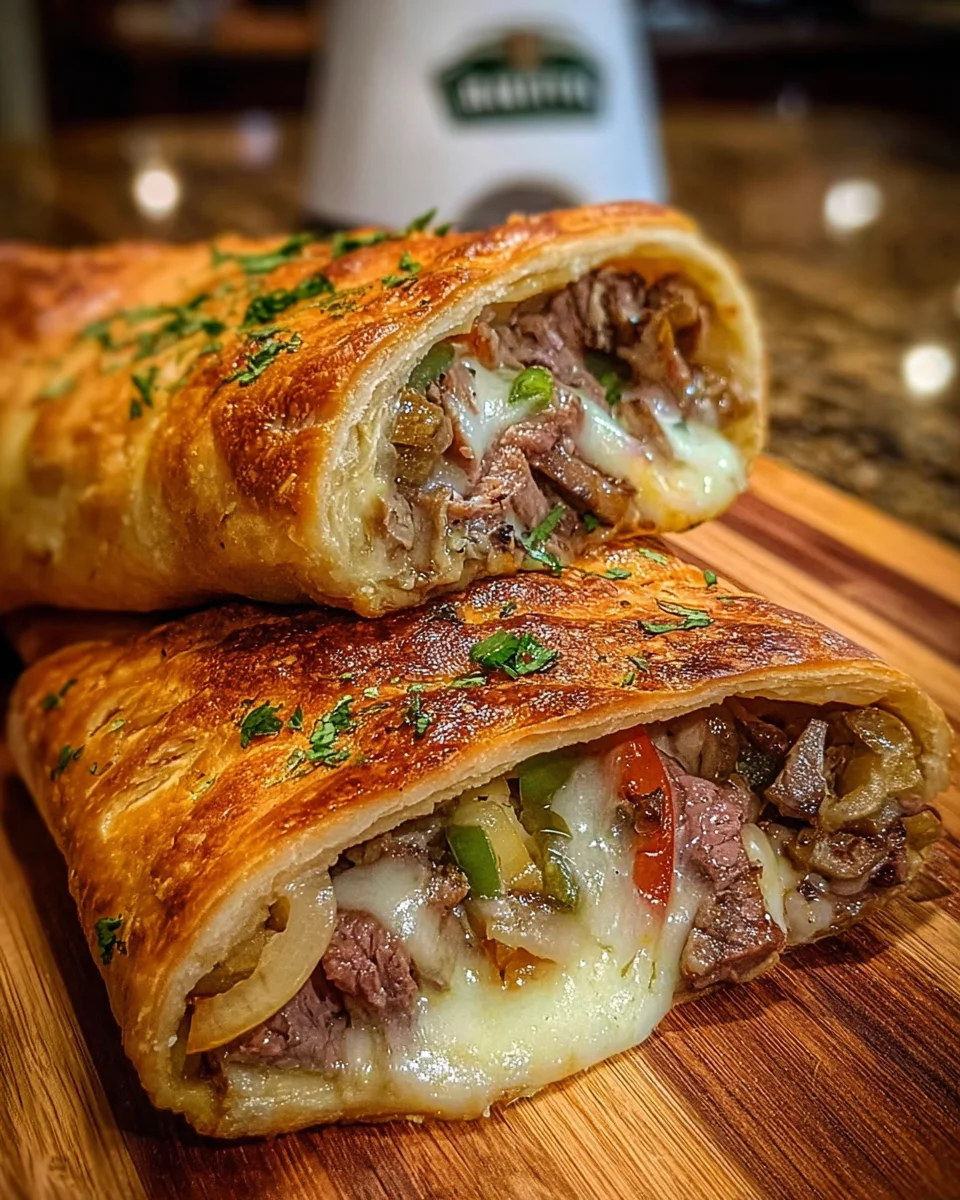
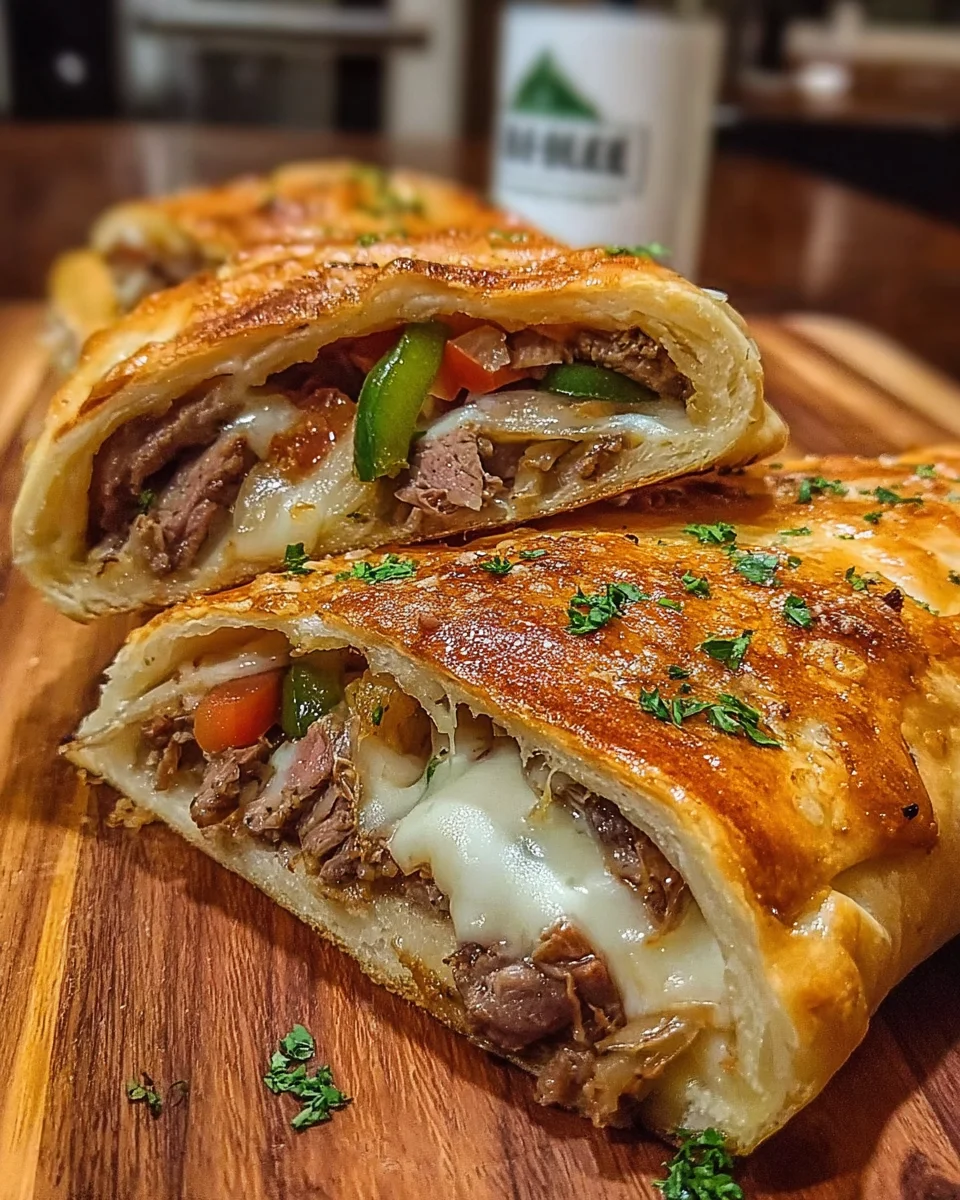
    Introduction to Philly Cheesesteak Stromboli

    As a home cook, there’s something special about the comfort of a Philly Cheesesteak Stromboli that just makes my heart sing. It’s the perfect blend of cheesy goodness and savory steak all wrapped up in warm pizza dough. If you’re anything like me, you’re no stranger to busy days filled with school pick-ups, meetings, and endless to-do lists. This recipe is a quick solution to share a delicious meal with your loved ones. It’s simple, satisfies cravings, and makes everyone feel like they’re indulging in a special treat, even on the busiest nights!

    Why You’ll Love This Philly Cheesesteak Stromboli

    This Philly Cheesesteak Stromboli is a true culinary gem you’ll adore. It’s not only quick to make but also incredibly satisfying. With just a handful of ingredients, you can whip up a meal that tastes like it’s straight from a restaurant. Picture this: golden, cheesy bliss wrapped in crispy dough, ready in under an hour. Perfect for bringing everyone together, whether it’s casual family dinners or game-day snacks!

    Ingredients for Philly Cheesesteak Stromboli

    Gathering the right ingredients is essential to make the most mouthwatering Philly Cheesesteak Stromboli. Here’s what you’ll need:

    • Pizza Dough: You can use store-bought dough for convenience or whip up a homemade version if you’re feeling adventurous!
    • Ribeye Steak: Thinly sliced ribeye adds tenderness and rich flavor. It’s a classic in Philly cheesesteaks and truly shines in this recipe.
    • Onion: Sliced onion caramelizes beautifully, adding sweetness and depth to the filling.
    • Bell Pepper: A pop of color and crunch, sliced bell pepper complements the savory steak and brings freshness.
    • Provolone Cheese: This melty cheese is a staple for its creamy texture and mild flavor. You could substitute with mozzarella for a different twist!
    • Garlic Powder: A sprinkle of garlic powder elevates the flavors and adds a comforting warmth.
    • Italian Seasoning: A dash of this blend infuses the dish with a nice herbaceous note, making each bite feel like a hug.
    • Egg: This will be mixed with water to create an egg wash, giving your Stromboli a golden-brown finish.

    For those wanting to play around with flavors, consider adding mushrooms for an earthier taste or hot peppers to spice things up!

    You can find the exact measurements for each ingredient at the bottom of the article, available for printing!

    How to Make Philly Cheesesteak Stromboli

    Preheat the Oven and Prepare Ingredients

    To begin your culinary adventure, preheat the oven to 400°F (200°C). This ensures your Stromboli bakes evenly. While the oven warms up, gather all your ingredients on the counter. Having everything ready not only speeds up the cooking process but also helps avoid any last-minute scrambling. Make sure to slice your vegetables and steak beforehand to make sautéing easier. Trust me, it makes all the difference!

    Sauté the Vegetables and Steak

    In a large skillet over medium heat, drizzle in a bit of olive oil for flavor. Toss in your sliced onions and bell peppers, sautéing them until they soften, about 5 minutes. The aroma will be heavenly! Next, add in the thinly sliced ribeye steak. Sprinkle garlic powder and Italian seasoning over the top for that classic Philly cheesesteak flavor. Stir everything together and cook until the steak is browned, roughly another 5-7 minutes. Be careful not to overcook the steak—tender bites are what you want. Feel free to taste-test along the way; it’s a fun part of cooking!

    Roll Out the Pizza Dough

    Once your filling is cooked, it’s time to work on the dough. Lightly flour your work surface and roll out the pizza dough into a rectangle, about 12×16 inches. Aim for a thickness of about ¼ inch to ensure a golden crust. If the dough shrinks back a little, let it rest for a few minutes. This will help you achieve the perfect shape! Plus, rolling it out gives a workout to your rolling pin—and your stress from the day!

    Assemble the Stromboli

    Now for the fun part! Carefully spoon your sautéed veggies and steak mixture onto the dough, spreading it evenly. Leave about a one-inch border around the edges for sealing. Next, sprinkle a generous layer of shredded provolone cheese on top. The cheese will melt into a delightful gooeyness—what’s not to love? Make sure every bite is packed with that cheesy goodness!

    Roll and Seal the Stromboli

    It’s time to roll! Starting from one long side, roll the dough tightly into a log shape. Imagine you’re wrapping a cozy burrito! Once you reach the opposite edge, gently press to seal it. Tuck in the ends to secure the filling. You don’t want anything escaping during baking. For extra assurance, you could pinch or crimp the edges. This step makes it feel like a special treat, perfect for family meals!

    Bake the Stromboli

    Before popping it into the oven, mix your egg with a tablespoon of water to create the egg wash. Brush this over the top of your Stromboli for that beautiful golden-brown color. Place your rolled masterpiece on a parchment-lined baking sheet. Bake it for 20-25 minutes or until golden brown and fragrant. The aroma wafting through your kitchen will draw everyone in; just try to resist until it’s cool enough to slice!

    Tips for Success

    • Use high-quality ribeye steak for unbeatable flavor.
    • Let the dough rest if it shrinks while rolling; it’ll roll out easier!
    • Don’t overload the filling; you want to roll it easily without any spills.
    • Experiment with different cheeses for unique flavors—cheddar or gouda can be delicious!
    • Brush the edges with egg wash for a beautiful seal and extra shine.

    Equipment Needed for Philly Cheesesteak Stromboli

    • Skillet: A large pan for sautéing. A non-stick skillet works wonders!
    • Rolling Pin: Essential for rolling out dough. A wine bottle can serve in a pinch.
    • Baking Sheet: Use a parchment-lined sheet for easy cleanup. A cast-iron skillet can also work.
    • Mixing Bowl: For the egg wash. A small bowl will do just fine!

    Variations of Philly Cheesesteak Stromboli

    • Vegetarian Option: Swap the ribeye steak for sautéed mushrooms, spinach, and your choice of peppers for a hearty, meatless version.
    • Spicy Ground Beef: Use ground beef instead of ribeye and spice it up with jalapeños for a kick.
    • Cheesy Three-Cheese Stromboli: Incorporate a mix of mozzarella, sharp cheddar, and provolone for an indulgent cheesy experience.
    • Gluten-Free Dough: Use gluten-free pizza dough available in stores if you’re accommodating dietary restrictions.
    • Buffalo Chicken Stromboli: Swap in shredded rotisserie chicken mixed with buffalo sauce for a tangy twist on the classic.

    Serving Suggestions for Philly Cheesesteak Stromboli

    • Pair with a crisp garden salad for a refreshing contrast to the richness of the Stromboli.
    • Serve with warm marinara sauce for dipping; it enhances the flavors beautifully!
    • A cold beverage, like beer or sparkling lemonade, complements the meal perfectly.
    • For a heartier option, serve alongside sweet potato fries or garlic bread.

    FAQs about Philly Cheesesteak Stromboli

    When it comes to making the perfect Philly Cheesesteak Stromboli, you might have a few questions. Here are some common queries I’ve encountered along with their answers:

    Can I use different types of cheese in my Stromboli?
    Absolutely! While provolone is a classic choice, you can experiment with mozzarella or even sharp cheddar. Each cheese brings a unique flavor profile to your dish.

    How do I store leftovers?
    Leftover Stromboli can be stored in an airtight container in the fridge for up to three days. Just reheat in the oven for a few minutes to restore its crispy goodness!

    Can I freeze Philly Cheesesteak Stromboli?
    Yes! To freeze, slice it first and place it in a freezer-safe container. When you’re ready to enjoy, thaw in the refrigerator overnight and then reheat in the oven.

    Is it possible to make this dish ahead of time?
    Certainly! You can prepare the filling a day in advance and assemble the Stromboli the next day. Just make sure to roll it just before baking for freshness.

    What sides pair well with Philly Cheesesteak Stromboli?
    Some great side options include a fresh garden salad, crispy fries, or warm garlic bread. They complement the rich flavors of the Stromboli beautifully!

    Final Thoughts

    Cooking a Philly Cheesesteak Stromboli brings pure joy to my kitchen. It’s not just a meal; it’s an experience that fills the house with warmth and inviting aromas. Sharing this delicious creation with family or friends feels like wrapping them in a cozy hug. Even on hectic nights, this recipe reminds me that good food doesn’t have to come from a restaurant. It can come from our very own ovens! I hope you bring this delightful dish to your table, creating memories that are as cheesy and satisfying as every perfect slice!


    Print

    clock clock iconcutlery cutlery iconflag flag iconfolder folder iconinstagram instagram iconpinterest pinterest iconfacebook facebook iconprint print iconsquares squares iconheart heart iconheart solid heart solid icon

    Description

    Philly Cheesesteak Stromboli is a delicious twist on the classic Philly cheesesteak, wrapped in pizza dough and baked to perfection.


    • 1 lb pizza dough (store-bought or homemade)
    • 8 oz thinly sliced ribeye steak
    • 1 medium onion, sliced
    • 1 medium bell pepper, sliced
    • 8 oz provolone cheese, shredded
    • 1 tsp garlic powder
    • 1 tsp Italian seasoning
    • 1 egg + 1 tbsp water (for egg wash)

    1. Preheat oven to 400°F (200°C).
    2. In a skillet over medium heat, sauté onions and bell peppers in olive oil until soft. Add ribeye steak seasoned with garlic powder and Italian seasoning, cooking until browned.
    3. Roll out pizza dough into a rectangle (12×16 inches).
    4. Layer sautéed veggies and steak evenly on the dough. Sprinkle provolone cheese generously.
    5. Roll the dough tightly into a log shape, sealing edges well.
    6. Brush the top with egg wash for a golden finish and place on a parchment-lined baking sheet.
    7. Bake for 20-25 minutes until golden brown.

    Notes

    • For extra flavor, consider adding mushrooms or hot peppers.
    • Serve with marinara sauce for dipping.
    • Leftovers can be reheated for a quick meal.
    • Prep Time: 15 minutes
    • Cook Time: 25 minutes
    • Category: Main Dish
    • Method: Baking
    • Cuisine: American

    Nutrition

    • Serving Size: 1 slice
    • Calories: 350
    • Sugar: 2g
    • Sodium: 800mg
    • Fat: 20g
    • Saturated Fat: 10g
    • Unsaturated Fat: 8g
    • Trans Fat: 0g
    • Carbohydrates: 30g
    • Fiber: 2g
    • Protein: 18g
    • Cholesterol: 60mg

    Sharing is caring!

  • Spicy Watermelon Salad

    Spicy Watermelon Salad


    Introduction to Spicy Watermelon Salad

    Let’s talk about a summer delight that packs a punch: Spicy Watermelon Salad!

    Picture this: the juicy sweetness of watermelon paired with a zesty kick from jalapeños. It’s like a party for your taste buds! I created this recipe as a quick solution for busy days when I need something fresh and exciting on the table. Like most moms, I know how chaotic life can get, and that’s why this salad is perfect. With just a few moments of prep, you can impress your family and friends with a vibrant dish that looks as good as it tastes!

    Why You’ll Love This Spicy Watermelon Salad

    This Spicy Watermelon Salad is a true lifesaver for busy nights. It’s quick to whip up, taking just 15 minutes from start to finish. Plus, it’s a feast for the senses! The combination of spicy jalapeños and sweet watermelon creates an unforgettable flavor explosion. And let’s not forget the refreshing crunch of cilantro and the creamy cotija cheese! It’s a guaranteed crowd-pleaser that everyone will adore.

    Ingredients for Spicy Watermelon Salad

    To make this Spicy Watermelon Salad, you’ll need some delicious ingredients. Here’s a rundown of what you’ll require:

    • Watermelon: The star of the dish! Use ripe, sweet watermelon cut into bite-sized cubes for the best flavor.
    • Jalapeño Peppers: These little green beauties add a delightful heat. Feel free to adjust the amount based on your spice preference or remove the seeds for less kick.
    • Cilantro: Fresh cilantro adds a burst of freshness. If you’re a cilantro hater, you could try mint or parsley as substitutes.
    • Cotija Cheese: This crumbly cheese brings a creamy, savory element. If you can’t find it, feta makes a great alternative!
    • Limes: Fresh lime juice gives a zesty tang that brightens the flavors. Squeeze it all on for that perfect citrus punch!
    • Chili Powder: A sprinkle of chili powder (Tajin works too!) brings a smoky warmth that balances the sweetness of the watermelon.
    • Salt: Just a pinch to enhance all those amazing flavors—you’ll be surprised how it elevates the dish!

    For exact measurements, check the printable recipe section at the bottom of the article.

    How to Make Spicy Watermelon Salad

    Now, let’s dive into making this refreshing Spicy Watermelon Salad! Trust me, the steps are easy and fun. Your kitchen will soon be filled with delightful scents. So, grab your ingredients, and let’s get started!

    Step 1: Prepare the Watermelon

    Begin by cutting your ripe watermelon into bite-sized cubes. Be sure to scoop out any seeds, as they can be a little pesky. Arrange the watermelon in a large mixing bowl, creating a vibrant foundation for our salad. The brighter the watermelon, the more inviting this salad will be!

    Step 2: Add the Jalapeños and Cilantro

    Next, it’s time for those jalapeños! Thinly slice them and toss them into the bowl. Adjust the quantity based on your spice tolerance. After that, add your chopped cilantro. Gently toss everything together. You want the flavors to mingle without squishing the watermelon cubes. This is where the salad starts to come alive!

    Step 3: Add Lime Juice and Chili Powder

    Now, grab your juicy limes! Squeeze their fresh juice over the watermelon mixture, making sure it coats everything. Then, sprinkle a teaspoon of chili powder on top. This will add that warm, smoky flavor we love! Don’t forget to sprinkle a pinch of salt to elevate those flavors even more. Give it another gentle toss. Ah, the aroma is simply heavenly!

    Step 4: Mix in Cotija Cheese

    At this point, it’s time for the cotija cheese. Crumble it on top of the salad for that creamy goodness. Be careful while mixing; a light toss is all you need to combine it evenly. Each bite will have a delightful burst thanks to this cheese. Trust me, it’s a game-changer!

    Step 5: Chill and Garnish

    To enhance the flavors even more, chill your salad for about 15-20 minutes in the refrigerator. While it’s chilling, feel free to get creative with garnishing! Consider adding a few extra cilantro leaves or some lime wedges on the side. It’s a lovely touch that’ll have your guests raving. Now, your Spicy Watermelon Salad is ready to impress!

    Tips for Success

    • Use perfectly ripe watermelon for the sweetest flavor.
    • Always taste before serving. Adjust salt or lime juice as needed!
    • For extra zest, try adding a pinch of cayenne pepper.
    • Chill your salad to let the flavors meld beautifully.
    • Toss gently after adding cotija cheese to maintain the salad’s texture.

    Equipment Needed

    • Large Mixing Bowl: Perfect for combining all ingredients. A salad bowl or even a pot will work.
    • Knife and Cutting Board: For chopping watermelon and slicing jalapeños with ease.
    • Citrus Juicer: Optional but handy for getting every drop of lime juice.
    • Serving Spoon: To toss and serve your delicious salad.

    Variations of Spicy Watermelon Salad

    • Fruit Additions: Toss in diced mango or pineapple for a tropical twist that complements the watermelon perfectly.
    • Spice It Up: For a bolder flavor, add diced habanero peppers or a splash of hot sauce. A bit of sriracha can also elevate the heat!
    • Nutty Crunch: Add toasted pecans or almonds for a delightful crunch that contrasts with the juicy watermelon.
    • Herb Options: Swap cilantro for fresh basil or mint for a new flavor profile. Each brings a unique fragrance and taste.
    • Protein Boost: Include grilled chicken or shrimp for a heartier salad, transforming it into a filling meal!

    Serving Suggestions for Spicy Watermelon Salad

    • Pair it with grilled chicken or fish for a refreshing summer meal.
    • Serve alongside tortilla chips for a fun crunch.
    • Try it with a glass of chilled white wine or a sparkling agua fresca.
    • Present in a clear bowl to showcase the vibrant colors.
    • Garnish with extra lime wedges for an inviting touch!

    FAQs about Spicy Watermelon Salad

    Can I make Spicy Watermelon Salad ahead of time?

    Absolutely! You can prepare your salad a few hours in advance. Just keep it chilled in the refrigerator. This will allow the flavors to meld beautifully!

    What can I substitute for cotija cheese?

    If you can’t find cotija cheese, feta is a fantastic alternative. It offers a similar salty creaminess that complements the salad well.

    How do I make this salad vegan?

    Going vegan? No problem! Just skip the cheese or swap it for a plant-based alternative. Your salad will still be delicious without it!

    What drinks pair well with Spicy Watermelon Salad?

    For a refreshing match, consider pairing this salad with a chilled white wine or a fruity ague fresca. The flavors will dance beautifully together!

    Can I adjust the spiciness of this salad?

    Absolutely! Adjust the jalapeño quantity according to your taste buds. Removing the seeds will also reduce the heat, making it perfect for all palates.

    Final Thoughts

    This Spicy Watermelon Salad has a way of transforming a simple gathering into a festive celebration. Each bite bursts with flavor, bringing together sweet, spicy, and creamy elements that create pure joy. From the first crunch of watermelon to the last sprinkle of cotija, it’s a delightful experience that showcases how fun cooking can be. This recipe not only saves time but also puts the wow factor back into meals. So grab those ingredients, let your creativity flourish, and enjoy the smiles around your table. Summer moments like these deserve to be celebrated, one refreshing bite at a time!


    Print

    clock clock iconcutlery cutlery iconflag flag iconfolder folder iconinstagram instagram iconpinterest pinterest iconfacebook facebook iconprint print iconsquares squares iconheart heart iconheart solid heart solid icon

    Description

    A refreshing and spicy watermelon salad that offers a flavor explosion in every bite.


    • 4 cups watermelon, cut into bite-sized cubes
    • 12 fresh jalapeño peppers, thinly sliced (remove seeds for less heat)
    • 1/4 cup fresh cilantro, chopped
    • 1/2 cup crumbled cotija cheese (or feta as a substitute)
    • 12 limes, juiced
    • 1 tsp chili powder (such as Tajín or regular chili powder)
    • Salt, to taste

    1. Start by placing the watermelon cubes in a large mixing bowl. This will be the base of your delicious salad!
    2. Next, add the thinly sliced jalapeños and chopped cilantro to the bowl with the watermelon. Gently toss everything together to ensure it’s evenly mixed.
    3. Squeeze fresh lime juice over the mixture and sprinkle the chili powder on top. Add a pinch of salt to taste! Toss everything gently again to ensure the watermelon is coated with all those tasty ingredients.
    4. Sprinkle the crumbled cotija cheese over the top of the salad and give it one last light toss, just to combine.
    5. Serve your spicy watermelon salad immediately for the best flavor and freshness. If you want to enhance the taste even more, chill it in the refrigerator for about 15-20 minutes before serving.
    6. If you’re feeling fancy, garnish with extra cilantro leaves or lime wedges. Enjoy this delightful, spicy, tangy salad as a refreshing treat!

    Notes

    • Adjust jalapeño quantity based on your heat preference.
    • For a vegan option, omit the cheese or use a plant-based alternative.
    • Chilling the salad enhances the flavors even more.
    • Prep Time: 15 minutes
    • Cook Time: 0 minutes
    • Category: Salad
    • Method: Mixing
    • Cuisine: Mexican

    Nutrition

    • Serving Size: 1 cup
    • Calories: 150
    • Sugar: 10g
    • Sodium: 170mg
    • Fat: 7g
    • Saturated Fat: 3g
    • Unsaturated Fat: 4g
    • Trans Fat: 0g
    • Carbohydrates: 18g
    • Fiber: 2g
    • Protein: 4g
    • Cholesterol: 10mg

    Sharing is caring!

  • Shrimp Enchiladas Cream Sauce

    Shrimp Enchiladas Cream Sauce


    Introduction to Shrimp Enchiladas Cream Sauce

    As a busy mom, I know how precious time can be, especially when it comes to preparing dinner. That’s why I’m thrilled to share my recipe for Shrimp Enchiladas Cream Sauce. This dish is not only a creamy delight but also a quick solution for a hectic weeknight. Imagine tender shrimp nestled in warm tortillas, smothered in a rich, flavorful cream sauce that will make your family swoon. Whether you’re trying to impress guests or just want something delicious after a long day, these enchiladas are sure to please everyone at the table.

    Why You’ll Love This Shrimp Enchiladas Cream Sauce

    This recipe is your secret weapon for creating a mouthwatering meal that doesn’t take hours to prepare. With minimal prep and cook time, Shrimp Enchiladas Cream Sauce offers a fantastic balance of flavor and simplicity. The creamy sauce envelops succulent shrimp, making each bite a taste sensation. Plus, it’s perfect for any occasion, whether it’s a cozy family dinner or a gathering with friends.

    Ingredients for Shrimp Enchiladas Cream Sauce

    Let’s dive into the delicious world of flavors with these Shrimp Enchiladas Cream Sauce. Here’s everything you’ll need to create this creamy masterpiece. Remember, exact quantities are available at the end of the article for easy printing.

    • Shrimp: 12 to 14 ounces of large shrimp, peeled and deveined. Fresh or frozen, shrimp packs a punch of protein and is incredibly quick to cook.
    • Vegetable Oil: 1 to 2 tablespoons to sauté those beautiful veggies. Light oils like canola or avocado oil work too!
    • Yellow Onion: One small onion, thinly sliced. It adds sweetness and depth to the dish, ensuring every bite is full of flavor.
    • Jalapeños: 2 large jalapeños, sliced. Adjust the heat according to your preference. You can leave the seeds in for spicier enchiladas or remove them for a milder kick.
    • Tomatoes: 2 medium tomatoes on the vine, diced. They bring a juicy freshness that complements the creaminess perfectly.
    • Garlic: 2 cloves, minced. Because nothing says delicious like the aroma of garlic wafting through your kitchen!
    • Heavy Whipping Cream: 1 ½ cups. This is the star of the show, creating that luscious, dreamy cream sauce that enchiladas deserve.
    • Sour Cream: ½ cup. A dollop of tanginess that adds richness to the enchiladas.
    • Cayenne Pepper: ¼ teaspoon. For those who enjoy a bit of zing; it can also be omitted for a milder flavor.
    • Chipotle Chili Powder: ½ teaspoon. This smokiness elevates the dish, lending a lovely complexity.
    • Ground Cumin: ½ teaspoon. This spice introduces warmth and earthiness that perfectly balances the cream and shrimp.
    • Salt: To taste. Don’t forget to season; it pulls all the flavors together beautifully.
    • Flour Tortillas: 4 soft taco size. They cradle all the delicious fillings, making each bite a delight.
    • Monterrey Jack Cheese: 8 ounces, grated. The melty cheese on top makes everything better; it’s impossible to resist!

    How to Make Shrimp Enchiladas Cream Sauce

    Creating these Shrimp Enchiladas Cream Sauce is a simple yet rewarding experience. I’ll walk you through each step, ensuring that your kitchen transforms into a haven filled with tantalizing aromas. Let’s get started!

    Preheat the Oven

    First things first, preheat your oven to 350°F. This will ensure that your enchiladas cook evenly and become bubbly and golden. While the oven heats up, lightly grease a 9 by 9 inch baking dish with vegetable oil or nonstick spray. This helps prevent sticking and makes cleanup a breeze.

    Sauté Vegetables

    Next, heat 1 to 2 tablespoons of vegetable oil in a large sauté pan over medium heat. When the oil is shimmering, add the thinly sliced yellow onion and jalapeños. Sauté them together until they’re tender and fragrant, about 4 to 5 minutes. This is where the magic begins, as the veggies start to soften, filling your kitchen with an inviting scent.

    Add Tomatoes and Garlic

    Now it’s time to elevate those flavors. Stir in the diced tomatoes and minced garlic into the pan. Cook for another 2 to 3 minutes. You’ll want the tomatoes to soften just enough so they release their juices, blending beautifully with the onions and garlic. The aroma will be irresistible!

    Prepare the Cream Sauce

    In a medium bowl, whisk together the heavy whipping cream, sour cream, cayenne pepper, chipotle chili powder, ground cumin, and salt. This creamy mixture is about to take your enchiladas to another level! Pour it into the pan with your sautéed vegetables, stirring to combine. Bring it all to a gentle simmer over medium-low heat. Watch as the fragrant sauce thickens slightly, inviting you to dive in!

    Cook the Shrimp

    Now it’s time for the star ingredient: the shrimp! Add the peeled and deveined shrimp into the simmering cream sauce. Cook for about 2 to 3 minutes per side, or just until they turn opaque. Be careful not to overcook them, as tenderness is key. Once cooked, remove the pan from heat, and take a deep breath—you’re getting closer!

    Assemble the Enchiladas

    Let’s put it all together! Carefully divide half of the shredded Monterrey Jack cheese among the four flour tortillas. Spoon the creamy shrimp and vegetable mixture evenly onto each tortilla, then roll them tightly. Place these lovely rolls seam side down in your prepared baking dish. Picture them all snug and cozy in there!

    Bake to Perfection

    Finally, pour any remaining cream sauce generously over the rolled enchiladas. Sprinkle the rest of the Monterrey Jack cheese on top. Now, bake them uncovered in your preheated oven for about 15 to 18 minutes. Wait for that melty cheese to bubble and turn golden. When you take them out, the smell will have everyone running to the table!

    Tips for Success

    • Prep all your ingredients before starting. This makes the cooking process smoother.
    • Don’t overcook the shrimp! They should just turn opaque for the best texture.
    • Feel free to experiment with spices or add some cheese into the filling for extra creaminess!
    • If you prefer a lighter dish, substitute half-and-half for the heavy cream.
    • Use fresh shrimp for the best flavor, but frozen works well too—just thaw fully first!

    Equipment Needed

    • 9 by 9 inch baking dish. A glass or ceramic dish works beautifully.
    • Large sauté pan. You can use a non-stick skillet if preferred.
    • Medium mixing bowl. Any bowl will do, just ensure it’s large enough for whisking.
    • Whisk. A fork can act as an alternative in a pinch!
    • Measuring spoons. Use regular spoons if you don’t have these handy.

    Variations for Shrimp Enchiladas Cream Sauce

    • Vegetable Delight: Swap shrimp for black beans or sautéed bell peppers and zucchini for a delicious vegetarian option.
    • Melted Cheese Lovers: Mix in some cream cheese or pepper jack cheese to the filling for an extra cheesy experience.
    • Spicy Kick: For a bold twist, add diced green chiles or a splash of hot sauce to the cream sauce.
    • Herbaceous Flavor: Incorporate fresh cilantro or oregano into the filling for a burst of freshness.
    • Low-Carb Style: Use low-carb tortillas or lettuce wraps instead of flour tortillas for a lighter dish.

    Serving Suggestions for Shrimp Enchiladas Cream Sauce

    • Pair your Shrimp Enchiladas Cream Sauce with a fresh green salad, tossed in a light vinaigrette.
    • Serve with warm, crusty French bread to soak up all that creamy goodness.
    • Don’t forget a zesty margarita or iced tea for a refreshing drink.
    • Top with fresh cilantro or avocado slices for a beautiful presentation.
    • Offer lime wedges on the side for a zesty finishing touch!

    FAQs about Shrimp Enchiladas Cream Sauce

    I often get asked questions about making Shrimp Enchiladas Cream Sauce, so I thought I’d share some insights to help you out. Here are the most common queries I hear, paired with friendly advice to make your cooking journey smoother.

    Can I use frozen shrimp for this recipe?
    Absolutely! If you’re short on time, frozen shrimp work just fine. Just remember to thaw them completely and pat them dry before cooking. This ensures they maintain the best flavor and texture.

    What can I substitute for heavy cream?
    If you’re looking for a lighter option, you can substitute half-and-half or even evaporated milk, though the texture will be a bit different. The **Shrimp Enchiladas Cream Sauce** might not be as luscious, but they’ll still taste delightful!

    Can I make these enchiladas ahead of time?
    Yes! You can assemble the enchiladas in advance and store them in the fridge for up to a day. When you’re ready, just pour the cream sauce on top and pop them in the oven. Perfect for busy nights!

    Are there any good side dishes to serve with shrimp enchiladas?
    Great question! A light salad, refried beans, or Mexican rice makes the perfect companion to your **Shrimp Enchiladas Cream Sauce**. They provide balance to the creaminess and round out the meal nicely.

    How do I store leftovers?
    Store any leftover enchiladas in an airtight container in the fridge for up to three days. When reheating, add a splash of cream or water to keep them from drying out. Enjoy that creamy goodness again!

    Final Thoughts

    Cooking should be an adventure, a celebration of flavors, and this Shrimp Enchiladas Cream Sauce recipe embodies that spirit. Each bite is a comforting hug, filled with creamy goodness and a dash of spice.

    I love how this dish brings my family together at the dinner table, laughter echoing as we share stories over a delicious meal.

    I hope you enjoy making these enchiladas as much as I do. So grab your apron, unleash your inner chef, and create those unforgettable moments that only home-cooked meals can bring!


    Print

    clock clock iconcutlery cutlery iconflag flag iconfolder folder iconinstagram instagram iconpinterest pinterest iconfacebook facebook iconprint print iconsquares squares iconheart heart iconheart solid heart solid icon

    Description

    A deliciously creamy shrimp enchiladas dish with a flavorful sauce.


    • 12 to 14 ounces large shrimp, peeled and deveined
    • 1 to 2 tablespoons vegetable oil
    • 1 small yellow onion, thinly sliced
    • 2 large jalapeños, seeded if desired, thinly sliced
    • 2 medium tomatoes on the vine, diced
    • 2 garlic cloves, minced
    • 1 1/2 cups heavy whipping cream
    • 1/2 cup sour cream
    • 1/4 teaspoon cayenne pepper
    • 1/2 teaspoon chipotle chili powder
    • 1/2 teaspoon ground cumin
    • Salt, to taste
    • 4 soft taco size flour tortillas
    • 8 ounces Monterrey Jack cheese, grated

    1. Preheat oven to 350 degrees Fahrenheit. Lightly grease a 9 by 9 inch baking dish with oil or nonstick spray.
    2. Heat vegetable oil in a large sauté pan over medium heat. Cook sliced onion and jalapeños until tender, about 4 to 5 minutes.
    3. Add diced tomatoes and minced garlic to the pan. Cook for 2 to 3 minutes, until tomatoes are softened and mixture is fragrant.
    4. In a medium bowl, whisk together heavy whipping cream, sour cream, cayenne pepper, chipotle chili powder, ground cumin, and salt. Pour cream mixture into the pan with sautéed vegetables and stir to combine. Bring to a gentle simmer over medium-low heat.
    5. Add shrimp to the simmering sauce and cook for 2 to 3 minutes per side, or until just opaque throughout. Remove pan from heat.
    6. Divide half of the shredded Monterrey Jack cheese among the flour tortillas. Spoon drained shrimp and vegetable mixture evenly onto each tortilla. Roll tortillas tightly and place seam side down in the prepared baking dish.
    7. Pour cream sauce evenly over the rolled enchiladas. Sprinkle with the remaining Monterrey Jack cheese.
    8. Bake uncovered for 15 to 18 minutes, or until cheese is melted and bubbly. Serve hot.

    Notes

    • For spicier enchiladas, leave seeds in the jalapeños.
    • Make sure to not overcook the shrimp to keep them tender.
    • Prep Time: 20 minutes
    • Cook Time: 30 minutes
    • Category: Dinner
    • Method: Baking
    • Cuisine: Mexican

    Nutrition

    • Serving Size: 1 enchilada
    • Calories: 550
    • Sugar: 3g
    • Sodium: 800mg
    • Fat: 36g
    • Saturated Fat: 18g
    • Unsaturated Fat: 15g
    • Trans Fat: 0g
    • Carbohydrates: 30g
    • Fiber: 1g
    • Protein: 30g
    • Cholesterol: 180mg

    Sharing is caring!

  • Creamy Pepper Jack Chicken Pasta

    Creamy Pepper Jack Chicken Pasta


    Introduction to Creamy Pepper Jack Chicken Pasta

    Are you looking for a scrumptious meal that’s both quick and satisfying? Let me introduce you to my Creamy Pepper Jack Chicken Pasta. This dish is a delightful combination of creamy, cheesy goodness and savory protein that’ll make your tastebuds dance with joy.

    As a busy mom, I get how overwhelming dinner can be. Thankfully, this recipe comes together in just 40 minutes, making it perfect for a hectic weeknight. Whether you’re cooking for family or trying to impress a special guest, this creamy pasta dish is sure to win hearts and fill bellies.

    Why You’ll Love This Creamy Pepper Jack Chicken Pasta

    If your schedule is tighter than a drum, you’ll appreciate how simple this dish is to whip up. With just a few ingredients and one skillet, you’ll have a rich, creamy dinner ready in no time. Plus, the pepper jack cheese adds a delightful kick of flavor, making this pasta anything but ordinary. Trust me, your family will be asking for seconds with this deliciously cheesy creation!

    Ingredients for Creamy Pepper Jack Chicken Pasta

    Gathering the right ingredients is essential for crafting a mouthwatering Creamy Pepper Jack Chicken Pasta. Here’s what you’ll need:

    • Turkey sausage: A leaner option that adds a savory flavor. You can substitute with chicken sausage for a lighter twist.
    • Boneless, skinless chicken breasts: These provide a hearty protein base. Feel free to use thighs if you prefer more juiciness.
    • Pasta: Rotini or penne works beautifully, but any pasta shape you enjoy will do. Try whole wheat or gluten-free options for a healthier choice.
    • Chicken broth: This adds depth to the sauce. You can use low-sodium broth for a healthier alternative.
    • Heavy cream: This creates the luscious creaminess of the dish. Swap it with half-and-half if you’re looking for a lighter touch.
    • Pepper Jack cheese: Adds the signature kick of spice. For a milder option, consider using Monterey Jack cheese.
    • Parmesan cheese: This sharp cheese enhances the sauce’s flavor. Grated or shredded works well—just make sure it’s fresh for the best taste!
    • Olive oil: For sautéing and adding flavor. If you’re out, butter can be a tasty substitute.
    • Onion: Diced onion gives a sweet and savory base. Shallots can be used for a more delicate flavor.
    • Garlic: Adds an aromatic depth that can’t be beaten. Fresh is best, but jarred garlic can save time.
    • Italian seasoning: A mix of dried herbs that bring it all together. You can eschew the pre-mixed version and use individual herbs instead, like oregano and basil.
    • Salt and black pepper: Essential for seasoning to taste; remember, seasoning makes all the difference!
    • Fresh parsley: This is optional but brings a lovely pop of color and freshness as a garnish. You could use basil or cilantro for a different twist.

    Exact measurements for each ingredient can be found at the bottom of the article for your convenience, so you can effortlessly print or save the recipe!

    How to Make Creamy Pepper Jack Chicken Pasta

    Now, let’s dive into the steps to create this mouthwatering Creamy Pepper Jack Chicken Pasta. Just follow these clear, simple instructions to whip up your new favorite dish in no time!

    Step 1: Sauté the Turkey Sausage

    Start by heating a tablespoon of olive oil in a large skillet over medium heat.

    Once the oil shimmers, add your sliced turkey sausage.

    Cook it for about 5 to 7 minutes, stirring occasionally, until it’s thoroughly browned.

    Then transfer the sausage to a plate and set it aside. This step gives your dish a lovely depth of flavor.

    Step 2: Cook the Chicken

    In the same skillet, add diced chicken breasts along with the diced onion and minced garlic.

    Don’t forget to sprinkle in a teaspoon of Italian seasoning, salt, and pepper to taste.

    Cook it all together for another 5 to 7 minutes. Stir occasionally until the chicken is fully cooked and the onions are wonderfully translucent.

    Step 3: Boil the Pasta

    While your chicken is cooking, bring a large pot of salted water to a boil.

    Once boiling, add in your pasta of choice, whether it’s rotini or penne.

    Cook according to package instructions until it reaches that perfect al dente texture.

    After draining the pasta, be sure to reserve a bit of pasta water for later, if needed!

    Step 4: Combine Ingredients

    It’s time to bring everything together!

    Return the browned turkey sausage to the skillet with the cooked chicken.

    Pour in the chicken broth and heavy cream. Stir everything well to combine.

    Let this delicious mixture reach a gentle simmer, allowing those flavors to meld beautifully.

    Step 5: Create the Creamy Sauce

    Lower the heat, and now it’s time to focus on that glorious creamy sauce!

    Stir in the shredded Pepper Jack and grated Parmesan cheese until it’s smooth and creamy.

    This is where the magic happens, and your kitchen will start to smell heavenly!

    Step 6: Toss Pasta with Sauce

    Once your sauce is perfect, add the drained pasta into the skillet.

    Toss everything gently until the pasta is fully coated with that luscious creamy sauce.

    If the sauce feels too thick, add a splash of the reserved pasta water to loosen it up.

    Step 7: Garnish and Serve

    Finally, scoop the Creamy Pepper Jack Chicken Pasta onto plates.

    Garnish generously with freshly chopped parsley for that touch of color and freshness.

    Serve hot and watch your loved ones enjoy every bite of this delightful meal.

    Tips for Success

    • Prep your ingredients before you start to streamline the cooking process.
    • Don’t rush the simmering step; it allows flavors to develop beautifully.
    • Always taste and adjust seasoning; a pinch can transform the dish!
    • If the sauce is too thick, a splash of pasta water will help.
    • Leftovers can be refrigerated and reheated easily—perfect for lunch!

    Equipment Needed

    • Large skillet: Ideal for sautéing and simmering. A wok can work in a pinch!
    • Pot: For boiling the pasta. Any large pot will do the job.
    • Colander: To drain the pasta. A slotted spoon can work if you don’t have one.
    • Cutting board and knife: Essential for chopping your ingredients.

    Variations for Creamy Pepper Jack Chicken Pasta

    • Vegetarian Option: Swap out the turkey sausage and chicken for your favorite veggies, like bell peppers, zucchini, and mushrooms. Sauté them until tender for a hearty, meat-free version.
    • Spicy Kick: For those who love heat, add diced jalapeños or a splash of hot sauce to the creamy sauce. It’ll elevate that pepper jack flavor!
    • Whole Grain Goodness: Use whole grain or gluten-free pasta for a healthier twist. The texture will still hold up beautifully in this dish.
    • Herbal Infusion: Mix in fresh herbs, like basil or cilantro, right before serving for an aromatic touch.
    • Cheesy Delight: Try adding different cheeses, such as Gouda or smoked cheddar, for a unique flavor profile that excites your palate.

    Serving Suggestions

    • Pair your Creamy Pepper Jack Chicken Pasta with a crisp green salad topped with a light vinaigrette.
    • Garlic bread is a wonderful accompaniment, perfect for dipping into that delicious creamy sauce.
    • For drinks, a chilled glass of white wine or sparkling water enhances the meal.
    • Presentation matters—serve in beautiful bowls, garnished with extra parsley for a pop of color.

    FAQs about Creamy Pepper Jack Chicken Pasta

    As you dive into making my Creamy Pepper Jack Chicken Pasta, you might have a few questions. Here are some common FAQs to help you on your culinary adventure!

    Can I use a different type of cheese?

    Absolutely! While Pepper Jack cheese gives this dish its signature flavor, you can substitute it with Monterey Jack for a milder taste or Cheddar for extra sharpness. Get creative!

    Is this dish suitable for meal prep?

    You bet! This recipe is great for meal prep. Store leftovers in an airtight container in the fridge. Just reheat gently in the microwave or on the stove with a splash of chicken broth to keep it creamy.

    Can I add vegetables to this dish?

    Yes! Adding vegetables like spinach, bell peppers, or zucchini not only boosts nutrition but also enhances the flavor. Sauté them along with the chicken for a colorful, hearty meal.

    What can I serve as a side dish?

    A refreshing green salad or garlic bread pairs elegantly with Creamy Pepper Jack Chicken Pasta. You might also enjoy topping it with some crusty bread to soak up the sauce!

    How can I adjust the spice level?

    If you prefer your food on the milder side, you can reduce the amount of Pepper Jack cheese and leave out any additional spicy ingredients. Your dish will still be rich and satisfying!

    Final Thoughts

    Making my Creamy Pepper Jack Chicken Pasta isn’t just about cooking; it’s an experience filled with joy and satisfaction. The creamy texture and zesty kick invite smiles and delightful chatter at the dinner table. It’s a dish that transforms hectic weeknights into culinary adventures, bringing families together. Whether you’re whipping it up for a cozy night in with the kids or serving guests, this pasta promises to be a hit. I love how you can easily tailor it to your family’s preferences, making it a meal that brings joy to every plate!


    Print

    clock clock iconcutlery cutlery iconflag flag iconfolder folder iconinstagram instagram iconpinterest pinterest iconfacebook facebook iconprint print iconsquares squares iconheart heart iconheart solid heart solid icon

    Description

    A delicious and creamy pasta dish featuring turkey sausage and chicken in a pepper jack cheese sauce.


    • 1 pound turkey sausage, sliced
    • 1 pound boneless, skinless chicken breasts, diced
    • 12 ounces rotini or penne pasta
    • 2 cups chicken broth
    • 1 cup heavy cream
    • 1½ cups shredded Pepper Jack cheese
    • ½ cup grated Parmesan cheese
    • 1 tablespoon olive oil
    • 1 small onion, diced
    • 3 cloves garlic, minced
    • 1 teaspoon Italian seasoning
    • Salt, to taste
    • Black pepper, to taste
    • Fresh parsley, chopped, for garnish

    1. Heat olive oil in a large skillet over medium heat. Add sliced turkey sausage and cook until thoroughly browned. Transfer sausage to a plate and set aside.
    2. In the same skillet, add diced chicken breast, diced onion, minced garlic, Italian seasoning, salt, and black pepper. Cook for 5 to 7 minutes, stirring occasionally, until chicken is fully cooked and onions are translucent.
    3. Bring a large pot of salted water to a boil. Add the pasta and cook according to package instructions until al dente. Drain thoroughly and reserve.
    4. Return the browned sausage to the skillet with the chicken. Pour in chicken broth and heavy cream, stirring well to combine. Allow the mixture to reach a gentle simmer.
    5. Reduce heat to low. Stir in the shredded Pepper Jack cheese and grated Parmesan cheese, mixing until the cheeses are fully melted and the sauce is smooth and creamy.
    6. Add the drained pasta to the skillet. Toss until the pasta is evenly coated with the creamy sauce.
    7. Serve hot, garnished with freshly chopped parsley.

    Notes

    • Use any type of pasta you prefer.
    • Adjust the seasoning according to your taste.
    • This dish can be made ahead and reheated.
    • Prep Time: 15 minutes
    • Cook Time: 25 minutes
    • Category: Main Course
    • Method: Skillet
    • Cuisine: American

    Nutrition

    • Serving Size: 1 serving
    • Calories: 600
    • Sugar: 2g
    • Sodium: 900mg
    • Fat: 35g
    • Saturated Fat: 20g
    • Unsaturated Fat: 10g
    • Trans Fat: 0g
    • Carbohydrates: 45g
    • Fiber: 2g
    • Protein: 40g
    • Cholesterol: 150mg

    Sharing is caring!

  • Rainbow Rice Krispie Treats

    Rainbow Rice Krispie Treats


    Introduction to Rainbow Rice Krispie Treats

    Welcome to my colorful world of Rainbow Rice Krispie Treats! As a busy mom and home cook, I know the struggle of finding quick, delightful treats that light up my family’s faces. These vibrant, gooey treats are not only super easy to whip up but also a total crowd-pleaser for kids and adults alike. Imagine gathering around the kitchen, laughter filling the air as you sink your hands into sweet, sticky goodness. With just a few simple ingredients, you can create something truly special that brings joy to every occasion!

    Why You’ll Love This Rainbow Rice Krispie Treats

    Let me tell you, these Rainbow Rice Krispie Treats are the epitome of simplicity and deliciousness! They’re quick to make, taking just around 15 minutes of hands-on time, perfect for busy days. Plus, the whimsical colors and sweet, crunchy texture deliver a delightful flavor explosion in every bite. Whether it’s a family gathering, a school treat, or just a fun snack, these treats bring smiles and colorful joy, making any moment brighter!

    Ingredients for Rainbow Rice Krispie Treats

    Get ready to dive into the magical world of flavors with these fun and vibrant treats! Here’s what you’ll need:

    • Salted butter: This brings richness and depth to the Rice Krispie mixture, making every bite feel indulgent.
    • Marshmallows: The star ingredient! They melt down to create that signature gooeyness we all adore. Fresh marshmallows work best, so pick up a bag from the store!
    • Salt: Even a pinch of kosher or sea salt enhances the sweetness, balancing the flavors beautifully.
    • Rice Krispies cereal: This classic cereal provides the crunch and texture that holds everything together, creating that satisfying bite.
    • Fruity Pebbles with marshmallows cereal: Adding a splash of colorful fun along with extra sweetness, this cereal is a playful twist. You can swap it for any other colorful cereal if you like!

    For those exploring flavor options, feel free to toss in chocolate chips or nuts for added crunch and richness. Remember, if you need exact measurements, check out the bottom of the article—they’re all set for printing, just for you!

    How to Make Rainbow Rice Krispie Treats

    Creating Rainbow Rice Krispie Treats is as simple as can be! Follow these steps to ensure your treats turn out perfectly every time. Let’s get started!

    Step 1: Prepare the Baking Dish

    First things first, grab a 9×9-inch baking dish. Line it with parchment paper, allowing the edges to hang over the sides. This little trick makes it easy to lift the treats out later without making a mess. A quick spray of cooking spray will ensure nothing sticks!

    Step 2: Melt the Butter

    Now, let’s get to the buttery goodness! In a large saucepan over medium-low heat, melt the butter, stirring gently. It should be just melted and not browned. This is crucial because browning can change the flavor. We want that creamy, rich taste to enhance our Rice Krispie Treats!

    Step 3: Mix in the Marshmallows

    Once the butter is melted, it’s time to add the marshmallows! Stir them into the butter until completely melted and smooth. Keep an eye out for any little lumps—they should vanish. That glossy, gooey mixture is exactly what we’re after; it will bond our cereals beautifully!

    Step 4: Combine with Cereals

    Now, it’s time for the fun part! Remove the saucepan from the heat and carefully mix in the Rice Krispies and Fruity Pebbles. Make sure everything gets coated with that marshmallow mixture. Do this gently but thoroughly. The right texture is essential, as we want a chewy but crunchy treat!

    Step 5: Press into the Dish

    Dump the yummy cereal mixture into your prepared baking dish. Use a silicone spatula or your hands (just be careful because it’s sticky!) to press it down into an even layer. Don’t rush this step! Press firmly but gently to ensure the treats hold together well and don’t crumble when cut.

    Step 6: Let it Cool

    Patience is key! Allow the treats to cool at room temperature for about an hour. This cooling time is not just a waiting game; it ensures they set up properly, holding their shape when you slice them into squares. You’ll be rewarded with perfectly chewy and colorful treats!

    Tips for Success

    • Always use fresh marshmallows for the best texture and flavor.
    • Pot for salted butter—it enhances the sweet and buttery taste wonderfully!
    • Don’t rush the mixing process; ensure all cereals are evenly coated for a perfect bite.
    • Use a lightly oiled spatula when pressing down the mixture to prevent sticking.
    • Store leftovers in an airtight container for maximum freshness and chewiness.

    Equipment Needed

    • 9×9-inch baking dish: This is essential for setting your treats. A similar-sized pan works too!
    • Large saucepan: You need this for melting butter and marshmallows. A medium pot can also do the trick.
    • Silicone spatula: Perfect for mixing and pressing down the mixture. A wooden spoon can be a good alternative.
    • Parchment paper: Crucial for easy removal. If you don’t have it, just use a light coating of cooking spray.
    • Measuring cups: Useful for precise ingredient portions; however, you can use a regular cup too if you’re feeling adventurous!

    Variations for Rainbow Rice Krispie Treats

    • Chocolate Drizzle: Drizzle melted chocolate over the top for a rich twist. White, dark, or milk chocolate all work beautifully!
    • Cereal Swap: Experiment with different colorful cereals like Trox or Lucky Charms for a unique flavor profile and even more vibrant colors.
    • Add-Ins: Toss in mini chocolate chips, dried fruit, or even nuts to add texture and additional flavors. It’s a great way to customize your treats!
    • Dietary Options: For a gluten-free version, ensure you use gluten-free Rice Krispies. Dairy-free butter and marshmallows are also available for an allergy-friendly treat.
    • Seasonal Themes: Incorporate seasonal sprinkles or themed cereals for holidays. Think pastel colors for Easter or red and green for Christmas fun!

    Serving Suggestions

    • Pair these colorful Rainbow Rice Krispie Treats with fresh fruit salad for a refreshing contrast.
    • Serve alongside a tall glass of creamy milk or a fun fruit punch to keep the playful theme alive.
    • For parties, cut them into fun shapes using cookie cutters for an exciting twist!
    • Display them on a colorful platter or in clear jars to show off their vibrant colors.

    FAQs about Rainbow Rice Krispie Treats

    As with any fun recipe, I’m sure you have some questions about these delightful Rainbow Rice Krispie Treats. Here are a few common queries that I often get, plus my tried-and-true answers!

    Can I make these treats in advance?

    Absolutely! In fact, they store wonderfully. You can make them a day ahead and keep them in an airtight container. Just be sure to let them cool completely before cutting.

    What can I do if my treats are too sticky?

    If your Rainbow Rice Krispie Treats are overly sticky, try pressing them down more firmly to help them hold their shape better. Using a lightly oiled spatula also helps with sticking!

    Can I use different types of cereal?

    Yes, yes, and yes! Feel free to swap out the fruity pebbles with any colorful cereal you like. This is a fun way to mix flavors and keep things exciting!

    How do I store leftover treats?

    To keep your treats fresh and chewy, store them in an airtight container at room temperature. They should stay delicious for about a week, if they last that long!

    Can I freeze Rice Krispie Treats?

    You sure can! Just wrap them tightly in plastic wrap and then place them in a freezer bag. They can be frozen for up to three months. Simply thaw at room temperature before enjoying!

    Final Thoughts

    As you dive into the world of Rainbow Rice Krispie Treats, you’ll discover a delightful experience wrapped in vibrant colors and sweet flavors. Making these treats not only brings joy to your loved ones but also creates cherished memories in the kitchen. I hope you find the same happiness I do when watching those colorful squares disappear in a matter of moments! Whether it’s a simple family snack or a festive treat for a party, they never fail to bring smiles and laughter. Enjoy the sweet moments they create, and happy cooking!


    Print

    clock clock iconcutlery cutlery iconflag flag iconfolder folder iconinstagram instagram iconpinterest pinterest iconfacebook facebook iconprint print iconsquares squares iconheart heart iconheart solid heart solid icon

    Description

    Delightful and easy to make Rainbow Rice Krispie Treats, perfect for kids and adults alike.


    • 4 tablespoons salted butter
    • 1 bag (12 ounces) marshmallows
    • ½ teaspoon salt (I use kosher salt or sea salt)
    • 4½ cups rice krispies cereal
    • 2½ cups fruity pebbles with marshmallows cereal

    1. Line a 9×9-inch square baking dish with parchment paper and spray it lightly with cooking spray. Set aside.
    2. In a large saucepan, over medium-low heat, melt the butter.
    3. Once the butter has melted, stir in the marshmallows and salt. Continue heating over medium-low heat, stirring continuously, until the marshmallows are completely melted and smooth.
    4. Remove the pan from the heat and gently stir in the rice krispies cereal and fruity pebbles with marshmallows cereal. Make sure to mix completely until all the cereal is mixed and combined well with the marshmallow mixture.
    5. Dump the mixture into the prepared pan and gently (but firmly) press it into an even layer with a silicone spatula or your hands.
    6. Allow the treats to cool and set at room temperature before cutting into squares. This takes about 1 hour.

    Notes

    • Make sure to use fresh marshmallows for best results.
    • You can substitute fruity pebbles with other colorful cereals as desired.
    • Store leftovers in an airtight container to keep them fresh.
    • Prep Time: 15 minutes
    • Cook Time: 10 minutes
    • Category: Dessert
    • Method: Stovetop
    • Cuisine: American

    Nutrition

    • Serving Size: 1 square
    • Calories: 150
    • Sugar: 10g
    • Sodium: 50mg
    • Fat: 5g
    • Saturated Fat: 3g
    • Unsaturated Fat: 2g
    • Trans Fat: 0g
    • Carbohydrates: 24g
    • Fiber: 0g
    • Protein: 1g
    • Cholesterol: 15mg

    Sharing is caring!

  • Crock Pot Beef Tips and Gravy

    Crock Pot Beef Tips and Gravy


    Introduction to Crock Pot Beef Tips and Gravy

    As a busy mom, I understand the importance of putting a delicious meal on the table with minimal effort. That’s why I love my Crock Pot Beef Tips and Gravy. It’s the ultimate comfort food that’s so easy to prepare! Just imagine coming home to the rich aroma of tender beef simmering in a savory gravy, waiting for you. This dish is not only a quick solution on hectic days, but it also satisfies the whole family. Trust me, when you serve this hearty meal, you’ll feel like a culinary hero!

    Why You’ll Love This Crock Pot Beef Tips and Gravy

    This dish is the perfect blend of ease and flavor. The slow cooker does all the heavy lifting, allowing you to focus on your day. Plus, the tender beef is drenched in a savory gravy that elevates any simple side. One bite, and you’ll find yourself smiling, as if wrapped in a warm blanket. It’s comfort food at its finest, bringing warmth to the table without keeping you rooted in the kitchen!

    Ingredients for Crock Pot Beef Tips and Gravy

    Gathering the right ingredients is simple. Here’s what you’ll need for your Crock Pot Beef Tips and Gravy.

    • Beef stew meat: This is the star of the dish. Cut into bite-sized pieces, it’s the foundation for your comforting meal.
    • Dry onion soup mix: Packed with flavor, this mix infuses the beef and gravy with a lovely savory depth.
    • Beef broth: It adds richness to the gravy and enhances the overall taste of the dish.
    • Ketchup: This ingredient might surprise you! It provides a touch of sweetness and balances the savory flavors wonderfully.
    • Worcestershire sauce: A little goes a long way here! It adds complexity to the dish with its tangy kick.
    • Cornstarch: Essential for thickening the gravy. Adjust the amount to achieve your desired consistency.
    • Minced garlic: This fragrant addition will awaken your taste buds and elevate the meal to delicious heights.
    • Dried thyme: A sprinkle of this herb adds a warm, earthy note that complements beef beautifully.
    • Salt and pepper: Always taste as you go! These seasonings enhance the flavor of your dish.

    For exact measurements, check the bottom of the article where you can find a printable version of the full recipe.

    How to Make Crock Pot Beef Tips and Gravy

    Making Crock Pot Beef Tips and Gravy is as straightforward as a Sunday afternoon stroll. Follow these simple steps to create a meal your family will adore. Ready? Let’s dive in!

    Prepare the Beef

    First things first, let’s give that beef some love. Pat the stew meat dry with paper towels. This step is key; it helps the meat brown better and soak up the flavor later. Place the beef in your 6-quart slow cooker, creating a cozy bed for it to simmer in.

    Mix the Seasonings

    Now, let’s whisk up some magic! In a bowl, combine beef broth, dry onion soup mix, minced garlic, ketchup, Worcestershire sauce, corn starch, and dried thyme. Each ingredient plays a part: the broth brings richness, while the onion soup mix packs a punch of flavor. The ketchup adds a touch of sweetness, and the Worcestershire sauce gives it that savory kick! Drizzle this luscious mixture over your beef. Don’t forget to sprinkle salt and pepper to taste, giving it that final touch of seasoning.

    Cook

    Cover your slow cooker and set it on low. Let the beef tips cuddle with the gravy for about 7-8 hours. You’ll know it’s done when the beef is tender and shreds easily. If only we could smell it through the screen, right? A delicious aroma will fill your kitchen as the hours go by!

    Serve

    When it’s time to serve, your heart will skip a beat. Ladle those beef tips and gravy over a bed of fluffy mashed potatoes, rice, or noodles. Each bite is like a warm hug on a cold day! Feel free to garnish with fresh herbs for a pop of color. Enjoy every single bite!

    Tips for Success

    • Make sure to pat the beef dry before cooking for better browning.
    • Adjust the cornstarch to control gravy thickness. Add more for a heartier sauce!
    • For maximum flavor, consider marinating the beef in the seasoning mix overnight.
    • If you’re short on time, preset your slow cooker to start while you’re out.
    • Taste and adjust salt and pepper just before serving to enhance the final flavor.

    Equipment Needed

    • 6-quart slow cooker: This is essential for cooking beef tips to perfection.
    • Mixing bowl: A medium-sized bowl will work well for combining your seasonings.
    • Whisk: Use this handy tool to ensure your ingredients blend seamlessly.
    • Meat thermometer: Optional, but helpful to check beef doneness.

    Variations

    • Use different cuts of beef, like chuck roast or flank steak, for varied textures and flavors.
    • For a healthier twist, swap beef broth with low-sodium broth and use leaner cuts of meat.
    • Make it a one-pot meal by adding vegetables like carrots, potatoes, or mushrooms halfway through cooking.
    • Try adding a splash of red wine to the seasoning mix for an extra depth of flavor.
    • Make it gluten-free by ensuring your onion soup mix and beef broth are certified gluten-free.

    Serving Suggestions for Crock Pot Beef Tips and Gravy

    • Pair with creamy mashed potatoes for the ultimate comfort food experience.
    • Serve over egg noodles for a heartier meal.
    • Add steamed green beans or roasted broccoli for a pop of color and nutrition.
    • A glass of red wine enhances the rich flavors beautifully.
    • Garnish with fresh parsley for a vibrant finish!

    FAQs about Crock Pot Beef Tips and Gravy

    If you’re like me, you probably have questions as you dive into the world of Crock Pot Beef Tips and Gravy. Here are some common queries and answers that can help you along the way!

    Can I use frozen beef stew meat?

    Absolutely! However, be sure to adjust your cooking time. Frozen meat may require up to an extra hour to become tender. It’s always best to check for doneness before serving.

    What can I serve with beef tips and gravy?

    The possibilities are endless! Traditional options include mashed potatoes, rice, or egg noodles. Don’t forget your favorite veggies to balance out the meal!

    Can I make this dish ahead of time?

    Yes, you can! This dish surprisingly re-heats beautifully. Just cook it as directed, let it cool, and store in the fridge for up to three days. Reheat it in your slow cooker or on the stove.

    How do I store leftovers?

    Store any leftovers in an airtight container in the fridge. They’ll last for about three to four days. You can also freeze the beef tips and gravy for up to three months for a convenient meal later!

    What if I want a thicker gravy?

    If you crave a heartier gravy, simply mix in more cornstarch! Dissolve a tablespoon in cold water and stir it into the slow cooker during the last hour of cooking. Watch your gravy thicken to perfection!

    Final Thoughts

    Making Crock Pot Beef Tips and Gravy is more than just preparing a meal; it’s about creating warmth and memories in your kitchen. The joy of coming home to a meal that has practically cooked itself is unparalleled! Watching my family gather around the table, their faces lighting up at the first bite, fills my heart with happiness. This recipe reminds us that even on our busiest days, we can nourish our loved ones with love and flavor. Embrace the comfort of this dish; after all, nothing says “home” quite like a steaming bowl of beef tips in gravy!


    Print

    clock clock iconcutlery cutlery iconflag flag iconfolder folder iconinstagram instagram iconpinterest pinterest iconfacebook facebook iconprint print iconsquares squares iconheart heart iconheart solid heart solid icon

    Description

    Crock Pot Beef Tips and Gravy is a comforting and easy dish featuring tender beef stew meat cooked in a flavorful gravy.


    • 2 lbs beef stew meat
    • 1 (1 oz) dry onion soup mix
    • 2 cups beef broth
    • 3 tbsp ketchup
    • 1 tbsp Worcestershire sauce
    • 3 tbsp cornstarch
    • 3 tbsp minced garlic
    • ½ tsp dried thyme
    • Salt and pepper to taste

    1. Prepare the Beef: Pat the stew meat dry and place it in a 6-quart slow cooker.
    2. Mix the Seasonings: In a bowl, whisk together beef broth, onion soup mix, thyme, garlic, ketchup, Worcestershire sauce, cornstarch, salt, and pepper. Pour over the beef tips.
    3. Cook: Cover and cook on low for 7-8 hours until the beef is tender.
    4. Serve: Serve hot over mashed potatoes, rice, or noodles.

    Notes

    • For added flavor, consider marinating the beef overnight.
    • Adjust the thickness of the gravy by altering the amount of cornstarch.
    • Prep Time: 10 minutes
    • Cook Time: 7-8 hours
    • Category: Main Dish
    • Method: Slow Cooking
    • Cuisine: American

    Nutrition

    • Serving Size: 1 cup
    • Calories: 350
    • Sugar: 2g
    • Sodium: 720mg
    • Fat: 12g
    • Saturated Fat: 4g
    • Unsaturated Fat: 8g
    • Trans Fat: 0g
    • Carbohydrates: 20g
    • Fiber: 1g
    • Protein: 35g
    • Cholesterol: 100mg

    Sharing is caring!

  • Steak Foil Packets

    Steak Foil Packets


    Introduction to Steak Foil Packets

    As a busy mom juggling work, school activities, and the never-ending list of chores, I know how challenging it can be to put together a satisfying dinner. That’s why I adore making Steak Foil Packets. These delightful little bundles make dinner practically effortless while delivering warm flavors that will impress even the pickiest eaters at the table. Imagine the aroma wafting through your kitchen as these packets bake in the oven, making everyone curious about what’s cooking. It’s a simple yet fabulous way to enjoy a homemade meal without the fuss!

    Why You’ll Love This Steak Foil Packets

    I can’t emphasize enough how easy these Steak Foil Packets are to whip up. They’re a time-saver on hectic nights and require minimal cleanup—just toss the foil and you’re done! Plus, the delightful combination of steak, rice, and fresh veggies creates a mouthwatering taste that beats takeout any day. This comforting meal guarantees smiles all around, perfect for those busy weeknights that still deserve a touch of love!

    Ingredients for Steak Foil Packets

    Let’s talk about the key players for our Steak Foil Packets. Each ingredient delivers its own charm, bringing you a delightful dinner in no time!

    • Cooked rice: This is the hearty base that soaks up all those delicious flavors. You can use white, brown, or even wild rice for added texture.
    • Onion soup mix: This adds a savory punch to the dish. You could even make your own with dried onion, garlic powder, and seasonings if you’re feeling adventurous.
    • Steak: Choose between tender cube steak or a juicy top round steak. Both options create that satisfying meaty goodness we crave.
    • Evaporated milk: This gives the packets a creamy richness. If you want to lighten things up, you can swap it for low-fat milk or skip it altogether.
    • Vegetables: Feel free to customize with your favorites! Carrots, zucchini, asparagus, bell peppers, and green beans are all great choices. Fresh or frozen, they add color and nutrition.

    Remember, every ingredient contributes to the special experience of making Steak Foil Packets. For exact measurements and more tips, check the bottom of the article, where you can find everything laid out for easy printing!

    How to Make Steak Foil Packets

    Preheat and Prepare

    Before you dive into assembling your Steak Foil Packets, it’s crucial to preheat your oven to 350 degrees F. This step is essential because it ensures even cooking throughout the meal. While the oven heats, tear off four large sheets of heavy-duty foil, each about 10-12 inches across. Having these ready will keep you organized and make assembly a breeze. Trust me, starting with a hot oven and good prep sets a positive vibe for your cooking adventure!

    Assemble Your Ingredients

    Now, let’s layer the magic together! Start by placing one cup of cooked rice in the center of each foil sheet. The warm rice will act like a cozy blanket for the other ingredients. Next, sprinkle about one to two teaspoons of onion soup mix over each mound, giving everything a savory kick. Slice the steak into thin strips, about an inch wide, and add three strips on top of each rice layer. Feel free to toss in your favorite veggies around the meat; think of bright carrots, vibrant bell peppers, or crunchy green beans for a splash of color and health. A sprinkle of salt and pepper will make these flavors pop like fireworks!

    Create the Foil Packets

    Now comes the fun part: creating those sturdy foil packets! Gently bring the short ends of the foil together, folding them down securely over the filling inside. Once it’s closed, fold in the corners to create a secure packet—this helps avoid any mess during cooking. Folding it snugly keeps all those delightful flavors locked in while they bake. You want to form little treasures that are both leak-proof and flavor-packed!

    Bake the Packets

    All set! Place the foil packets on a large baking sheet and pop them in your preheated oven. Bake for one hour, letting the aromas dance around your kitchen. When the time’s up, carefully open each packet, watching out for the hot steam that escapes like a mischievous ghost. Serve them hot, and prepare for a chorus of “wow!” from everyone at the table.

    Tips for Success

    • Use heavy-duty foil to prevent tearing during baking.
    • Experiment with different vegetables for varied textures and flavors.
    • Don’t overfill the packets; leave some space for steam to circulate.
    • Adjust cooking time if using larger cuts of steak for even cooking.
    • Let the packets rest for a few minutes before opening to avoid steam burns.

    Equipment Needed for Steak Foil Packets

    • Oven: A standard home oven works perfectly for baking.
    • Heavy-duty foil: Essential for sturdy packets; regular foil may suffice in a pinch.
    • Baking sheet: Helps catch any drips; a roasting pan can be a great alternative.
    • Sharp knife: For slicing the steak and veggies efficiently.
    • Measuring cups and spoons: Handy for accurate ingredient portions.

    Variations of Steak Foil Packets

    • Spicy Kick: Add jalapeños or a sprinkle of cayenne pepper for a zesty twist that will spice things up.
    • Mushroom Medley: Toss in some sliced mushrooms for an earthy flavor that pairs beautifully with steak.
    • Herb Infusion: Fresh herbs like rosemary or thyme can elevate the dish, adding a fragrant touch.
    • Low-Carb Delight: Swap rice for cauliflower rice to create a satisfying low-carb version that’s packed with veggies.
    • Flavorful Marinades: Marinate the steak in your favorite sauce ahead of time, such as teriyaki or barbecue, to introduce extra depth of flavor.

    Serving Suggestions for Steak Foil Packets

    • Pair with a Crisp Salad: A fresh green salad with a zesty vinaigrette complements the meal beautifully.
    • Serve with Crusty Bread: A warm loaf of bread is perfect for mopping up all those delicious juices.
    • Enjoy with Wine: A glass of red wine like Cabernet Sauvignon enhances the rich flavors of the steak.
    • Pretty Presentation: Serve the packets directly on plates, or open them up to reveal the colorful layers for a stunning table display.

    FAQs about Steak Foil Packets

    Can I use frozen steak for the packets?
    Yes, you can! Just make sure to thaw it completely before slicing and assembling the packets. This ensures even cooking and helps avoid any raw spots.

    How can I customize the veggies in the packets?
    Feel free to mix and match your favorite vegetables! Broccoli, mushrooms, or cherry tomatoes work wonderfully. Just keep in mind that different veggies have various cooking times, so cut them to a similar size.

    Can Steak Foil Packets be made on the grill?
    Absolutely! These packets are perfect for grilling. Just make sure to place them on a medium heat section of the grill and adjust the cooking time slightly, as grilling tends to be faster than baking.

    What should I do if I don’t have onion soup mix?
    You can easily create a substitute using dried onions, garlic powder, and mixed seasonings you have on hand. It won’t be exactly the same, but it’ll still pack a delicious flavor punch!

    How can I store leftovers of Steak Foil Packets?
    Store any leftover packets in airtight containers in the fridge for up to three days. Simply reheat in the oven or microwave when you’re ready for a quick meal.

    Final Thoughts on Steak Foil Packets

    There’s something incredibly satisfying about making Steak Foil Packets. You not only celebrate simple cooking, but you also gather your loved ones around the table for a cozy meal. The ease of preparation, combined with the mouthwatering aroma and vibrant flavors, creates a dining experience that feels like a warm hug after a long day. Each packet is like an adventure waiting to be unwrapped, and the smiles around the table are proof of its success. So, the next time you’re pressed for time, remember this delightful recipe. It promises joy and satisfaction, one tasty bite at a time!


    Print

    clock clock iconcutlery cutlery iconflag flag iconfolder folder iconinstagram instagram iconpinterest pinterest iconfacebook facebook iconprint print iconsquares squares iconheart heart iconheart solid heart solid icon

    Description

    A delicious and easy-to-make steak dinner packed in foil with rice and vegetables.


    • 4 cups cooked rice
    • 1 (1-oz) packet onion soup mix
    • 1 pound steak, cube steak or top round steak
    • 1/2 cup evaporated milk, divided
    • Carrots, zucchini, asparagus, bell peppers, green beans, etc. (optional)
    • Heavy duty foil

    1. Preheat the oven to 350 degrees F.
    2. Tear off 4 large sheets of heavy duty foil, about 10-12 inches across.
    3. Add 1 cup of cooked rice to the center of each sheet of foil.
    4. Top rice with about 1-2 teaspoons of onion soup mix.
    5. Slice the steak into 12 thin strips, about 1 inch wide.
    6. Place 3 strips of steak on top of each mound of rice.
    7. Add chopped vegetables around the edges if desired and season with salt and pepper.
    8. Pour 2 tablespoons of evaporated milk over each mound.
    9. Sprinkle the remaining onion soup mix evenly over the steak for each packet.
    10. Bring the short ends of the foil together and fold down securely over the food, then fold corners in to create a secure packet.
    11. Place the packets on a large baking sheet.
    12. Bake at 350 for 1 hour.
    13. Carefully open each packet after removing from the oven, avoiding steam burns.
    14. Serve hot!

    Notes

    • Can be made on a campfire or grill – see the notes for instructions.
    • Regular foil can be used, but heavy duty is recommended to avoid tearing.
    • Adjust cooking time for larger cuts of steak.
    • Prep Time: 15 minutes
    • Cook Time: 1 hour
    • Category: Dinner
    • Method: Baking
    • Cuisine: American

    Nutrition

    • Serving Size: 1 packet
    • Calories: 450
    • Sugar: 2g
    • Sodium: 800mg
    • Fat: 20g
    • Saturated Fat: 8g
    • Unsaturated Fat: 10g
    • Trans Fat: 0g
    • Carbohydrates: 45g
    • Fiber: 2g
    • Protein: 30g
    • Cholesterol: 80mg

    Sharing is caring!

  • Sweet Potato and Chickpea Salad with Feta and Herbs

    Sweet Potato and Chickpea Salad with Feta and Herbs


    Introduction to Sweet Potato and Chickpea Salad with Feta and Herbs

    Hey there, fellow food lovers! If you’re like me, life gets busy, and sometimes finding a nutritious meal feels like searching for a needle in a haystack. That’s where this Sweet Potato and Chickpea Salad with Feta and Herbs comes in. It’s vibrant, hearty, and quick to whip up—perfect for those hectic weeknights or when you want to impress your loved ones. With roasted sweet potatoes and chickpeas, rich in flavor and health benefits, this salad is sure to become a favorite. Trust me, your future self will thank you!

    Why You’ll Love This Sweet Potato and Chickpea Salad with Feta and Herbs

    This Sweet Potato and Chickpea Salad with Feta and Herbs is not just a dish; it’s a lifesaver for busy mornings and evenings. It’s incredibly simple to make, taking just about 45 minutes from start to finish. The combination of earthy sweet potatoes, protein-packed chickpeas, and bright herbs creates a delightful explosion of flavor. Plus, it’s healthy, filling, and perfect for meal prep, so you can enjoy it all week long!

    Ingredients for Sweet Potato and Chickpea Salad with Feta and Herbs

    Gathering the right ingredients can be half the battle when cooking. Fear not! Here’s a handy list for our Sweet Potato and Chickpea Salad with Feta and Herbs. These ingredients not only bring color and taste but also pack a nutritional punch.

    • Sweet Potatoes: These little beauties are sweet and nutritious. They add a creamy texture and a dose of vitamins.
    • Red Onion: For a mild yet zesty kick, sliced red onion is a must. It adds crunch and depth.
    • Chickpeas: These protein powerhouses help keep your tummy satisfied. Rinsed and drained, they mingle perfectly with other flavors.
    • Mixed Greens: A vibrant blend of greens gives this salad its fresh base and crunchy bite.
    • Fresh Parsley and Cilantro: These herbs brighten the dish. They add a burst of flavor and freshness.
    • Dried Cranberries: Optional, but they add a hint of sweetness. Perfect for balancing the savory ingredients!
    • Olive Oil: A key player in our dressing, it brings richness and healthy fats to the party.
    • Lemon Juice: A splash of citrus to brighten everything up. It enhances the taste and freshness.
    • Garlic: Minced garlic packs a flavor punch. It’s a must-have for an aromatic dressing.
    • Spices: Cumin, paprika, cinnamon, and cayenne create a warm depth. They transform the salad into something special!
    • Salt and Pepper: Simple, yet essential for bringing all the flavors together!

    For exact quantities, feel free to check the end of the article. I promise you will have everything you need ready for printing!

    How to Make Sweet Potato and Chickpea Salad with Feta and Herbs

    Now that we’ve gathered our ingredients, it’s time to bring this Sweet Potato and Chickpea Salad with Feta and Herbs to life! Follow these simple steps, and I promise you’ll have a delicious, colorful meal ready in no time.

    Step 1: Prepare the Vegetables and Preheat Oven

    First things first, let’s preheat that oven to 425°F (220°C). While it’s heating up, scrub the sweet potatoes under running water and chop them into cubes. Aim for bite-sized pieces; they cook faster that way!

    Next, rinse and drain the chickpeas. I gently pat them dry with a paper towel to ensure they roast well. Now, grab a large baking sheet. Arrange the sweet potatoes on one side and the chickpeas on the other. They’re about to get cozy in the oven!

    Step 2: Whisk the Dressing

    In a mixing bowl, combine the olive oil, lemon juice, minced garlic, and all those delightful spices: cumin, paprika, cinnamon, and cayenne. Don’t forget a pinch of salt and pepper to taste! Grab a whisk, and mix it all together until it’s combined and a bit frothy. This dressing is what gives the salad its zesty charm!

    Step 3: Roast the Ingredients

    Time to roast! Drizzle half of your dressing over the sweet potatoes and chickpeas, making sure they’re well coated but still separate. Move the chickpeas closer to the sweet potatoes, then toss in the sliced red onion on the same side. Spread everything out evenly on the baking sheet.

    Pop it into the oven for 30 minutes. Halfway through, give everything a good stir to ensure even roasting. You’re looking for tender sweet potatoes and slightly crispy chickpeas, so keep an eye on them sometimes!

    Step 4: Assemble the Salad

    After letting the roasted goodness cool for about 20 minutes, it’s time to assemble! In a large bowl, lay down the mixed greens as the foundation. Gradually pile on the roasted sweet potatoes, chickpeas, and onion.

    Now comes the fun part! Sprinkle the fresh parsley and cilantro over the top. Drizzle the remaining dressing on the salad and gently toss everything together. If you have those dried cranberries, sprinkle them on for a pop of color and a hint of sweetness. And voilà! Your salad is ready to shine!

    Tips for Success

    • Always cut sweet potatoes into even cubes for uniform cooking.
    • Let roasted items cool slightly before mixing; it prevents wilting the greens.
    • Make the salad ahead of time but store the dressing separately to keep it fresh.
    • Taste as you go! Adjust spices and salt to fit your preference.
    • Experiment with additional toppings like nuts for extra crunch!

    Equipment Needed

    • Baking sheet: A large half-sheet pan works great. A smaller pan will do too!
    • Mixing bowl: Any large bowl will suffice for combining ingredients.
    • Whisk: A fork can work as an alternative for whisking the dressing.
    • Knife and cutting board: Essential for chopping those veggies!
    • Measuring cups and spoons: Helpful for precise ingredient quantities.

    Variations of Sweet Potato and Chickpea Salad with Feta and Herbs

    • Grains Galore: Add cooked quinoa or farro for added texture and nutrition.
    • Protein Boost: Toss in some grilled chicken or feta cheese for an extra protein punch.
    • Vegetable Medley: Substitute roasted bell peppers or zucchini for a different flavor profile.
    • Spice it Up: Adjust the spiciness by adding more cayenne or fresh jalapeños.
    • Vegan Delight: Omit feta cheese and replace it with avocado for creaminess while keeping it plant-based.
    • Herb Swaps: Experiment with different herbs like dill or mint for a unique twist.

    Serving Suggestions for Sweet Potato and Chickpea Salad with Feta and Herbs

    • Pair this salad with grilled chicken or fish for a balanced meal.
    • Serve it alongside warm pita bread and hummus for a Mediterranean feast.
    • Complement with a chilled glass of white wine or sparkling water.
    • For a stunning presentation, serve in individual bowls topped with extra herbs.

    FAQs about Sweet Potato and Chickpea Salad with Feta and Herbs

    Can I make this salad ahead of time?
    Absolutely! This Sweet Potato and Chickpea Salad with Feta and Herbs stores well. Just keep the dressing separate until you’re ready to serve to maintain freshness and crunch.

    What can I substitute for chickpeas?
    If you’re not a fan of chickpeas, you can use black beans or white beans instead. They’ll still provide that satisfying protein boost!

    How do I store leftovers?
    Store any leftovers in an airtight container in the fridge. They should last about 3-4 days. However, the greens may get a bit wilty after a day.

    Can I use frozen sweet potatoes for this recipe?
    While fresh sweet potatoes offer the best flavor, you can use frozen sweet potatoes. Just make sure to adjust cooking times, as they may cook faster.

    Is this salad gluten-free?
    Yes! This Sweet Potato and Chickpea Salad with Feta and Herbs is naturally gluten-free, making it a great option for those avoiding gluten.

    Final Thoughts

    Creating this Sweet Potato and Chickpea Salad with Feta and Herbs has been a joyful journey filled with flavor and color. Each bite offers a delightful mix of textures and tastes, reminding me that healthy eating can be delicious too. Whether you’re sharing it with family or enjoying it solo, this salad is sure to brighten your day. Plus, the easy preparation lets you savor the moments in the kitchen without sacrificing precious time. So roll up your sleeves and dive into this fresh culinary adventure. Trust me, your tastebuds will be pleasantly surprised!


    Print

    clock clock iconcutlery cutlery iconflag flag iconfolder folder iconinstagram instagram iconpinterest pinterest iconfacebook facebook iconprint print iconsquares squares iconheart heart iconheart solid heart solid icon

    Description

    A vibrant and nutritious salad featuring roasted sweet potatoes and chickpeas, topped with fresh herbs and a zesty dressing.


    • 2 large sweet potatoes, scrubbed and cubed
    • ½ medium red onion, peeled and sliced
    • 1 can (15 oz) chickpeas, rinsed and drained
    • 3 oz (85 g) mixed greens
    • ¼ cup fresh parsley, chopped
    • ¼ cup fresh cilantro, chopped
    • Dried cranberries for garnish (optional)
    • ½ cup olive oil
    • ¼ cup lemon juice
    • 2 tbsp garlic, minced
    • 1 tsp ground cumin
    • 1 tsp paprika
    • ¼ tsp cinnamon
    • ¼ tsp cayenne pepper
    • Salt and pepper, to taste

    1. Preheat the oven to 425°F (220°C). On a large baking sheet, arrange the cubed sweet potatoes on one half and chickpeas on the other. In a bowl, whisk together olive oil, lemon juice, garlic, cumin, paprika, cinnamon, cayenne, salt, and pepper. Pour half the dressing over the sweet potatoes and chickpeas, ensuring they are well-coated but remain separate.
    2. Move the chickpeas closer to the sweet potatoes on the baking sheet and add the sliced onion. Spread everything evenly and bake for 30 minutes, stirring halfway through, until the sweet potatoes are tender. Let the roasted components cool for 20 minutes.
    3. In a large bowl, layer the mixed greens. Add the roasted sweet potatoes, chickpeas, and onions. Sprinkle with chopped parsley and cilantro. Drizzle the remaining dressing over the salad and toss gently to combine.
    4. Top the salad with dried cranberries (optional). Serve immediately and enjoy!

    Notes

    • This salad can be made ahead of time. Store the dressing separately until ready to serve.
    • Add your favorite nuts or seeds for extra crunch.
    • Feel free to substitute the herbs with those of your choice.
    • Prep Time: 15 minutes
    • Cook Time: 30 minutes
    • Category: Salad
    • Method: Roasting and Tossing
    • Cuisine: Mediterranean

    Nutrition

    • Serving Size: 1 serving
    • Calories: 350
    • Sugar: 6g
    • Sodium: 200mg
    • Fat: 18g
    • Saturated Fat: 2.5g
    • Unsaturated Fat: 15.5g
    • Trans Fat: 0g
    • Carbohydrates: 42g
    • Fiber: 10g
    • Protein: 9g
    • Cholesterol: 0mg

    Sharing is caring!

  • Garlic Chicken and Vegetables

    Garlic Chicken and Vegetables


    Introduction to Garlic Chicken and Vegetables

    Welcome to my kitchen! If you’re anything like me, finding a meal that’s quick, healthy, and crowd-pleasing can be quite the challenge. That’s where my Garlic Chicken and Vegetables recipe comes in! This dish isn’t just a feast for the taste buds; it’s also a lifesaver for busy days when time is tight. Picture tender chicken, vibrant veggies, and a punch of garlic, all dancing together in a single pan. Trust me, this recipe will become your go-to for nights when you want something impressive yet simple. Let’s dive into this savory delight!

    Why You’ll Love This Garlic Chicken and Vegetables

    This Garlic Chicken and Vegetables dish is a true game-changer. It takes minimal prep and cooks up in just 25 minutes! Perfect for those hectic weeknights when you need something delicious without the fuss. Plus, it’s packed with fresh ingredients, making it a healthier alternative to takeout. You’ll love the rich flavors of garlic and Parmesan, which will have everyone asking for seconds. It’s a win-win!

    Ingredients for Garlic Chicken and Vegetables

    Gathering the right ingredients is the key to success in making Garlic Chicken and Vegetables. Here’s what you’ll need to create this delightful dish:

    • Chicken Breast: Tender and protein-packed, this is the star of the show. Cut into cubes for even cooking.
    • Broccoli Florets: These little green trees add crunch and color. Broccoli is rich in vitamins and gives a nice depth to the dish.
    • Spinach Leaves: A great source of iron and nutrients, the spinach wilts down nicely, adding a lovely earthiness.
    • Olive Oil: This healthy fat helps cook the chicken while adding a smooth, rich flavor.
    • Chicken Broth: A splash of broth intensifies the flavor and keeps everything moist. You can use low-sodium options for less salt.
    • Parmesan Cheese: This cheese adds a nutty and savory kick that takes the dish to another level. Freshly grated is best!
    • Garlic: Minced garlic is crucial for that aromatic boost. It’s the essence of this dish!
    • Salt and Black Pepper: Simple seasonings that enhance all the flavors. Adjust to your preference.

    Feel free to mix and match your vegetables! Bell peppers, carrots, or zucchini would make fantastic substitutes. If you like a bit of heat, consider adding red pepper flakes as you cook. For the full ingredient measurements and a printable version, check out the end of the article.

    How to Make Garlic Chicken and Vegetables

    Now that we have our ingredients ready, let’s roll up our sleeves and dive into making this delightful dish! I promise, the steps are simple, and the flavors are worth every minute spent in the kitchen. Here we go!

    Step 1: Heat Olive Oil

    Start by grabbing a large pan and placing it over medium heat. Pour in that lovely olive oil and let it warm up. You’ll know it’s ready when it shimmers like a sunny day. This oil will not only cook our chicken but also infuse the dish with a rich, fruity flavor.

    Step 2: Cook the Chicken

    Next, toss in the cubed chicken breast. Sizzle it up! Cook it for about 5 to 7 minutes until it turns a beautiful golden brown. I recommend stirring occasionally to ensure even browning. The aroma of chicken sizzling in olive oil is simply irresistible! Cook it through until it’s no longer pink inside.

    Step 3: Add Garlic

    Once the chicken is perfectly browned, it’s time for the star of the show—garlic! Stir in the minced garlic and let it cook for about a minute. This step is crucial; watch carefully as garlic can burn quickly. When added, it fills your kitchen with a tantalizing fragrance that promises deliciousness to come!

    Step 4: Incorporate Broccoli

    Now, we’ll add the broccoli florets along with the chicken broth. Sprinkle them in, cover the pan, and let everything simmer together for about 5 minutes. This allows the broccoli to become tender while soaking up all the wonderful flavors. You’ll be amazed at the color transformation as the broccoli turns a vibrant green!

    Step 5: Add Spinach

    Time to fold in the spinach leaves. Add them gently to the mix, stirring until they wilt down nicely, which takes only a couple of minutes. You’ll notice how they shrink and blend harmoniously with the chicken and broccoli. A sprinkle of salt and pepper at this stage goes a long way in enhancing the taste.

    Step 6: Final Touches

    To wrap up this Garlic Chicken and Vegetables masterpiece, sprinkle the grated Parmesan cheese over everything. Give it a good stir, letting the cheese melt into that savory mix. This final touch not only adds flavor but also a lovely creaminess. Grab a taste and adjust the seasoning if needed. You’re ready to serve up this nutritious feast!

    Tips for Success

    • Prep everything in advance. Chop your veggies and cube the chicken to save time!
    • Don’t rush the browning of the chicken. This adds depth of flavor, so let it cook undisturbed for a bit.
    • Taste as you go. Adjust the seasoning to your liking.
    • Experiment with different veggies for variety. Add whatever’s in season!
    • Keep leftovers in an airtight container for a quick lunch option.

    Equipment Needed

    • Large Pan: A skillet or sauté pan works well. A cast-iron one adds extra flavor!
    • Spatula: A wooden or silicone spatula is perfect for stirring without scratching surfaces.
    • Measuring Cups: Essential for getting those olive oil and broth amounts just right.
    • Cutting Board: Use a sturdy board for chopping your chicken and veggies.
    • Knife: A sharp chef’s knife makes prep quick and easy.

    Variations for Garlic Chicken and Vegetables

    • Different Proteins: Swap the chicken for shrimp or tofu for a delightful twist. Both options cook quickly and absorb flavors beautifully.
    • Add Nuts: Toss in some sliced almonds or walnuts for an added crunch. They provide a nutritious boost and texture contrast!
    • Use Seasonal Veggies: Incorporate seasonal vegetables like asparagus, snap peas, or bell peppers for different flavors and colors throughout the year.
    • Herb Infusion: Add fresh herbs like basil or parsley right before serving to enhance freshness. Dried herbs like oregano or thyme work beautifully too.
    • Make it a Casserole: Combine the stir-fried mixture with cooked rice or pasta, top with cheese, and bake for a hearty casserole meal.

    Serving Suggestions

    • Serve with Rice: A fluffy bed of rice complements the dish perfectly, soaking up the flavorful sauce.
    • Pasta Pairing: Toss the chicken and veggies with your favorite pasta for a filling meal.
    • Fresh Salad: Pair it with a light salad for a refreshing contrast.
    • Wine Selection: A crisp white wine, like Sauvignon Blanc, pairs beautifully with this dish.
    • Garnish: Sprinkle extra Parmesan and fresh herbs on top before serving for a touch of elegance.

    FAQs about Garlic Chicken and Vegetables

    Can I use frozen chicken for this recipe?

    Yes, frozen chicken can be used, but it’s best to thaw it completely beforehand. This ensures even cooking and prevents excess water from affecting the flavor.

    How can I make this Garlic Chicken and Vegetables dish spicier?

    If you love a kick, consider adding red pepper flakes or a dash of hot sauce while sautéing the garlic. You can also substitute mild peppers with jalapeños for extra heat.

    Can I meal prep Garlic Chicken and Vegetables for the week?

    Absolutely! This dish is perfect for meal prepping. Just store each portion in an airtight container in the fridge. It reheats beautifully and makes for a quick, healthy lunch option.

    What can I serve with Garlic Chicken and Vegetables?

    This dish pairs wonderfully with rice or pasta, but you can also serve it with quinoa or a side salad for a lighter meal.

    Is Garlic Chicken and Vegetables gluten-free?

    Yes, as long as you stick to gluten-free pasta or rice, this dish is gluten-free! Always double-check your ingredients for any hidden gluten sources.

    Final Thoughts

    Preparing Garlic Chicken and Vegetables isn’t just about the food; it’s about bringing joy to your dining table. This vibrant dish is a celebration of flavors, combining the goodness of fresh veggies and tender chicken in one pan. It’s perfect for busy nights when you crave something healthy yet satisfying. Plus, the ease of making it means you can share those cherished kitchen moments with your loved ones, creating memories over a delicious meal. I hope this dish brings as much happiness to your home as it does to mine. Enjoy every flavorful bite!


    Print

    clock clock iconcutlery cutlery iconflag flag iconfolder folder iconinstagram instagram iconpinterest pinterest iconfacebook facebook iconprint print iconsquares squares iconheart heart iconheart solid heart solid icon

    Description

    A flavorful and healthy dinner option featuring chicken and fresh vegetables, all tossed in garlic and Parmesan.


    • 2 cups chicken breast, cubed
    • 1 cup broccoli florets
    • 1 cup spinach leaves
    • 1/4 cup olive oil
    • 1/2 cup chicken broth
    • 1/4 cup grated Parmesan cheese
    • 1 tablespoon garlic, minced
    • 1/4 teaspoon salt
    • 1/4 teaspoon black pepper

    1. Heat olive oil in a large pan over medium heat.
    2. Add cubed chicken breast and cook until browned.
    3. Stir in minced garlic and cook for 1 minute.
    4. Add broccoli florets and chicken broth. Cover and simmer for 5 minutes.
    5. Add spinach leaves and cook until wilted.
    6. Sprinkle with grated Parmesan cheese, salt, and black pepper. Stir well.

    Notes

    • Feel free to substitute the vegetables based on your preference.
    • For a spicier kick, add red pepper flakes when cooking.
    • This dish pairs well with rice or pasta.
    • Prep Time: 10 minutes
    • Cook Time: 15 minutes
    • Category: Dinner
    • Method: Stir Fry
    • Cuisine: American

    Nutrition

    • Serving Size: 1 serving
    • Calories: 350
    • Sugar: 2g
    • Sodium: 480mg
    • Fat: 22g
    • Saturated Fat: 4g
    • Unsaturated Fat: 16g
    • Trans Fat: 0g
    • Carbohydrates: 8g
    • Fiber: 3g
    • Protein: 30g
    • Cholesterol: 75mg

    Sharing is caring!

  • Cheese-crusted Steak Quesadillas

    Cheese-crusted Steak Quesadillas


    Introduction to Cheese-crusted Steak Quesadillas

    As a busy mom juggling countless tasks, I know how precious mealtime can be. That’s why I’m excited to share my favorite recipe: Cheese-crusted Steak Quesadillas. This dish is not just a meal—it’s a delightful experience! Picture perfectly seasoned skirt steak paired with sautéed veggies, all lovingly encased in a crispy tortilla. It’s a quick solution for a hectic weeknight or a gorgeous treat to impress friends at a gathering. Trust me, once you take that first bite, you’ll understand why these quesadillas have a special place in my heart and kitchen!

    Why You’ll Love This Cheese-crusted Steak Quesadillas

    These Cheese-crusted Steak Quesadillas are a lifesaver for busy evenings. They are quick to prepare, taking just 40 minutes from start to finish! The savory flavors of the seasoned steak combined with gooey melted cheese will have everyone asking for seconds. Plus, the crispy tortillas provide that satisfying crunch we all crave. It’s an easy, satisfying meal that brings the family together, making any night feel a bit special!

    Ingredients for Cheese-crusted Steak Quesadillas

    Gathering the right ingredients is the first step to culinary magic, and this recipe is no exception! Here’s what you’ll need for your Cheese-crusted Steak Quesadillas:

    • Skirt Steak: This cut is flavorful and tender when cooked right. It absorbs seasonings beautifully.
    • Sea Salt: Essential for enhancing the natural flavors of the steak.
    • Ground Cumin: This spice adds a warm, earthy taste, so don’t skip it!
    • Garlic Powder: A must for that extra layer of flavor—simple yet effective.
    • Paprika: This adds a smoky richness that complements the steak perfectly.
    • Cayenne Pepper: Just a pinch will boost the heat; adjust to your taste!
    • Oil (for Grilling): Use any neutral oil; it helps achieve that perfect sear on the steak.
    • Mayonnaise and Sour Cream: Both creamy ingredients add richness to the chipotle mayo.
    • Pickled Jalapeños: Blending them adds a subtle tang and just the right kick!
    • Lime Juice: Fresh lime juice brightens the mayo, giving it a zesty flair.
    • Chipotle Paste: This gives the mayo a smoky depth that’s simply irresistible.
    • Onion: Sliced onion caramelizes beautifully, adding sweetness to your quesadilla.
    • Green Bell Pepper: Color and crunch—this veggie accentuates the dish.
    • Avocado Oil: Excellent for sautéing vegetables; it has a mild flavor.
    • Monterey Jack Cheese: Its melty goodness is ideal for getting that perfect cheese stretch!
    • Cheddar Cheese: Adds sharpness to balance the creaminess of Monterey Jack.
    • Flour Tortillas: Burrito size works best for ample filling and folding without tearing.
    • Fresh Cilantro (optional): Chopped cilantro brightens up the dish with freshness.
    • Jalapeño (optional): For those who crave extra spice and kick.
    • Lime Wedges (optional): A squeeze of lime right before eating adds a refreshing zing.

    The quantities for these ingredients are available at the bottom of the article for easy printing!

    How to Make Cheese-crusted Steak Quesadillas

    Now that we have all our ingredients lined up, let’s dive into the fun part: making these delicious Cheese-crusted Steak Quesadillas! Follow these simple steps, and I promise you’ll be flipping those crispy golden delights in no time!

    Step 1: Prepare the Chipotle Lime Mayo

    First, let’s whip up that creamy Chipotle Lime Mayo that elevates our quesadilla to new heights. In a small bowl, combine the mayonnaise, sour cream, pickled jalapeños, lime juice, and chipotle paste. Stir until everything blends into a smooth, zesty sauce. It’s like a party in a bowl!

    Once everything is mixed, pop it in the fridge. This allows the flavors to meld together while you prepare the rest. Trust me, this mayo is worth the wait!

    Step 2: Season and Cook the Skirt Steak

    Next up, let’s get that skirt steak ready! In a small bowl, mix the sea salt, garlic powder, cumin, cayenne pepper, and paprika. This will be our dry rub.

    Generously season both sides of the steak with the rub, giving it a nice coat. Heat up a griddle or skillet over high heat, splashing in a tablespoon of oil for that perfect sear. When the pan is hot, lay the steak down. Cook it for about 3 minutes on each side until it reaches your desired doneness.

    Don’t forget to let the steak rest for around 5 minutes. This step locks in those juicy flavors, making each bite exquisite. After it’s cooled, slice it thinly, just like a pro!

    Step 3: Sauté the Vegetables

    Now, let’s bring some life to our quesadillas with sautéed vegetables! In the same skillet you just used for the steak, add a tablespoon of avocado oil. Toss in the sliced onions and green bell peppers.

    Sauté over medium-high heat for about 5 minutes, stirring until they’re slightly charred and tender. The colors alone will make your mouth water!

    Step 4: Cook the Quesadilla

    Things are heating up! Grab a clean griddle or skillet and heat it over medium heat. Sprinkle about ¼ cup of Monterey Jack cheese on the surface. When it starts to melt and caramelize, place one tortilla on top, pressing gently to stick the cheese to the tortilla. Flip it over so cheese-side up!

    Now, it’s assembly time! On one half of the tortilla, add ¼ cup of cheddar cheese, some of your juicy steak slices, and those sautéed veggies. Drizzle a bit of that luscious Chipotle Lime Mayo over everything. Let your taste buds whisper, “Yum!”

    After allowing that to cook for about 15 seconds, fold the tortilla in half. Cook both sides for 1 to 2 minutes until the cheese melts and the tortilla turns golden and crispy. You want that satisfying crunch!

    Step 5: Repeat and Serve

    Repeat these steps for the remaining tortillas until you’ve created a stack of cheesy goodness.

    Slice each quesadilla into triangles and serve them warm! You can garnish with fresh cilantro, chopped jalapeños, or lime wedges for a burst of color and flavor. Gather around the table and share these fantastic Cheese-crusted Steak Quesadillas with your loved ones!

    Tips for Success

    • Always let your steak rest before slicing; this keeps it juicy!
    • Use fresh veggies for a crunchier texture in your quesadillas.
    • Experiment with different cheeses to find your perfect blend!
    • Keep the heat at medium to achieve crispy tortillas without burning.
    • Make extra Chipotle Lime Mayo—it’s great as a dip for veggies!

    Equipment Needed

    • Griddle or Skillet: A large skillet works just as well if you don’t have a griddle.
    • Knife: A sharp knife makes slicing the steak easy and efficient.
    • Cutting Board: Essential for safe and clean food prep.
    • Mixing Bowls: Use any bowls you have for mixing ingredients.
    • Spatula: A sturdy spatula is key for flipping quesadillas without a fuss.

    Variations

    • Vegetarian Option: Swap the steak for grilled mushrooms, zucchini, or black beans for a delicious meat-free choice.
    • Spicy Twist: Add extra jalapeños or a splash of hot sauce to the filling for those who love more heat.
    • Cheesy Delight: Experiment with different cheese blends, like pepper jack or feta, for a unique flavor profile.
    • Low-Carb Version: Use cauliflower tortillas instead of flour tortillas to lower the carb count.
    • Loaded Quesadilla: Throw in sliced avocado, corn, or diced tomatoes to amp up the freshness and texture!

    Serving Suggestions

    • Pair these Cheese-crusted Steak Quesadillas with a refreshing side salad for a balanced meal.
    • Serve alongside classic Mexican rice or seasoned black beans for a comforting touch.
    • Accompany with chilled Mexican beer or a fruity margarita for the perfect drink pairing.
    • For presentation, arrange quesadilla slices on a platter with lime wedges and cilantro!

    FAQs about Cheese-crusted Steak Quesadillas

    As I dive deeper into the world of Cheese-crusted Steak Quesadillas, I often find myself answering some common questions. Here are the most frequently asked ones, sprinkled with a bit of my personal experience!

    Can I make Cheese-crusted Steak Quesadillas ahead of time?

    Absolutely! You can prepare the filling in advance and store it in the fridge. Just assemble and cook the quesadillas when you’re ready to serve. This makes them a fantastic choice for meal prep on a busy weeknight.

    What is the best way to store leftovers?

    If you have any leftovers (which is rare!), let them cool and place them in an airtight container. They’ll keep in the fridge for up to 3 days, though they might lose some crunch.

    Can I use a different cut of steak?

    Sure thing! While skirt steak is my favorite for its flavor and tenderness, flank steak or sirloin can work just as well. Just make sure to slice them thinly against the grain for the best texture.

    How can I make these quesadillas gluten-free?

    To make Cheese-crusted Steak Quesadillas gluten-free, swap the flour tortillas for your favorite gluten-free variety. They pack just as much flavor and crunch!

    What can I serve with Cheese-crusted Steak Quesadillas?

    For a delightful meal, consider serving these quesadillas with a fresh salad, a side of guacamole, or even some spicy salsa. A little extra flavor never hurt anyone!

    Final Thoughts

    Sharing these Cheese-crusted Steak Quesadillas with family brings me such joy. It’s a dish that transforms a simple night into a delightful feast. Each crispy bite bursts with flavor, igniting laughter and conversation around the table. Seeing my loved ones enjoy this meal makes all the effort worthwhile. Remember, it’s more than just food—it’s about creating memories. Don’t hesitate to make these quesadillas your own! With variations and options, they can fit every palate. I can’t wait for you to savor every cheesy, crunchy moment. Enjoy every last bite!


    Print

    clock clock iconcutlery cutlery iconflag flag iconfolder folder iconinstagram instagram iconpinterest pinterest iconfacebook facebook iconprint print iconsquares squares iconheart heart iconheart solid heart solid icon

    Description

    Cheese-crusted Steak Quesadillas are a delicious and savory dish featuring perfectly seasoned skirt steak, sautéed vegetables, and a blend of cheeses, all encased in a crispy flour tortilla served with a zesty chipotle lime mayo.


    • 1 pound skirt steak
    • 1 teaspoon sea salt
    • 1 teaspoon ground cumin
    • 1 teaspoon garlic powder
    • 1/2 teaspoon paprika
    • 1/4 teaspoon cayenne pepper
    • 1 tablespoon oil (for grilling)
    • 2 tablespoons mayonnaise
    • 2 tablespoons sour cream
    • 1 tablespoon pickled jalapeños with brine, blended
    • 2 teaspoons lime juice
    • 2 teaspoons chipotle paste
    • 1 medium onion, sliced
    • 1/2 green bell pepper, sliced
    • 1 tablespoon avocado oil (for cooking)
    • 1 cup shredded Monterey Jack cheese
    • 1 cup shredded cheddar cheese
    • 4 large flour tortillas (burrito size)
    • 1/4 cup fresh cilantro, chopped (optional)
    • 1 jalapeño, finely chopped (optional)
    • Lime wedges (optional)

    1. Mix the mayonnaise, pickled jalapeños, sour cream, lime juice, and chipotle paste in a small bowl. Refrigerate until ready for assembly.
    2. Combine the salt, garlic powder, cumin, cayenne, and paprika in a small bowl to create a dry rub. Season both sides of the skirt steak with the mixture. Heat a griddle or skillet over high heat with 1 tablespoon of oil. Cook the steak on each side for about 3 minutes or until the desired doneness level is reached. Let the steak rest for 5 minutes, then slice thinly.
    3. In the same skillet, sauté the sliced bell peppers and onions over medium-high heat with avocado oil for about 5 minutes or until slightly charred.
    4. Heat a clean griddle or skillet over medium heat. Sprinkle 1/4 cup of Monterey Jack cheese on the surface. Once the cheese starts to melt and caramelize, place a tortilla on top. Press gently to adhere the cheese to the tortilla. Flip the tortilla so the cheese side faces up.
    5. Sprinkle 1/4 cup of cheddar cheese on one half of the tortilla. Add 1/4 of the steak slices and sautéed vegetables. Drizzle Chipotle Lime Mayo over the fillings.
    6. Allow the tortilla to cook for 15 seconds, then fold the empty side over the filled side. Cook both sides for 1 to 2 minutes until the interior cheese melts and the exterior is crispy.
    7. Repeat the process for all tortillas. Slice each quesadilla into portions and serve with garnishes such as cilantro, chopped jalapeños, or lime wedges.

    Notes

    • For extra heat, include additional pickled jalapeños or spicy salsa as a side.
    • Serve immediately for the best texture and flavor.
    • Prep Time: 20 minutes
    • Cook Time: 20 minutes
    • Category: Main Dish
    • Method: Grilling and Sautéing
    • Cuisine: Mexican

    Nutrition

    • Serving Size: 1 quesadilla
    • Calories: 350
    • Sugar: 1g
    • Sodium: 700mg
    • Fat: 22g
    • Saturated Fat: 10g
    • Unsaturated Fat: 8g
    • Trans Fat: 0g
    • Carbohydrates: 30g
    • Fiber: 2g
    • Protein: 15g
    • Cholesterol: 60mg

    Sharing is caring!