Author: IHAAL Team

  • Gooey Raspberry Chocolate Chunk Cookies

    Gooey Raspberry Chocolate Chunk Cookies


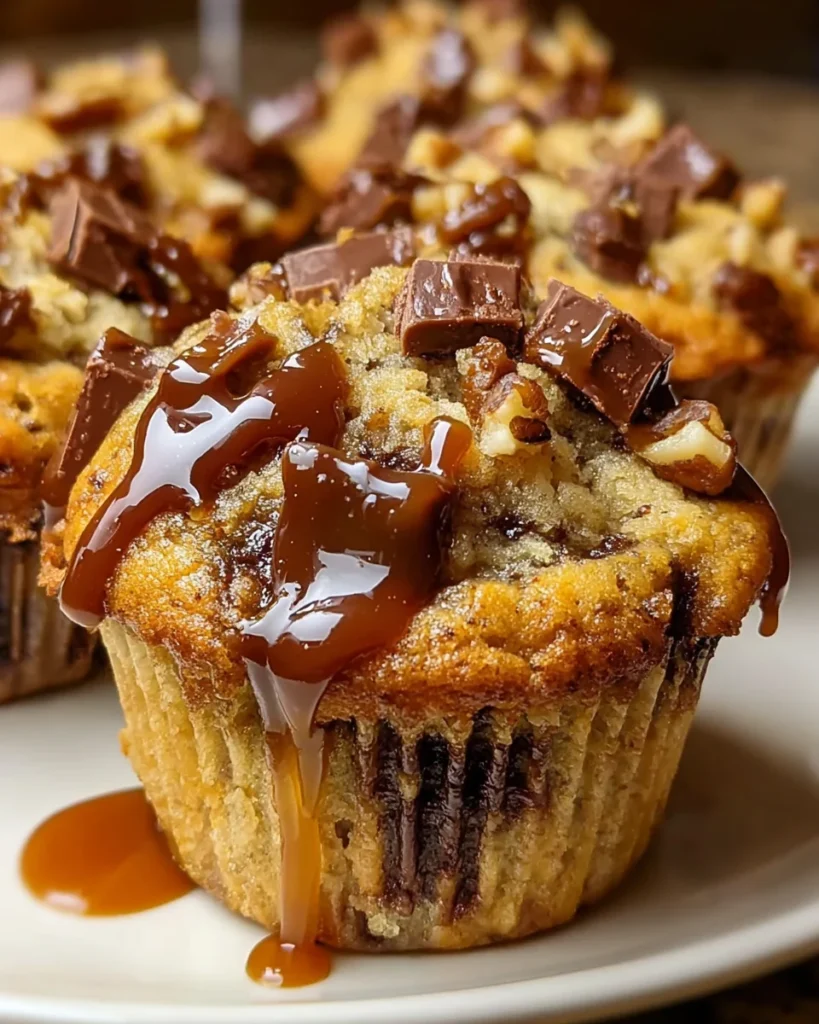
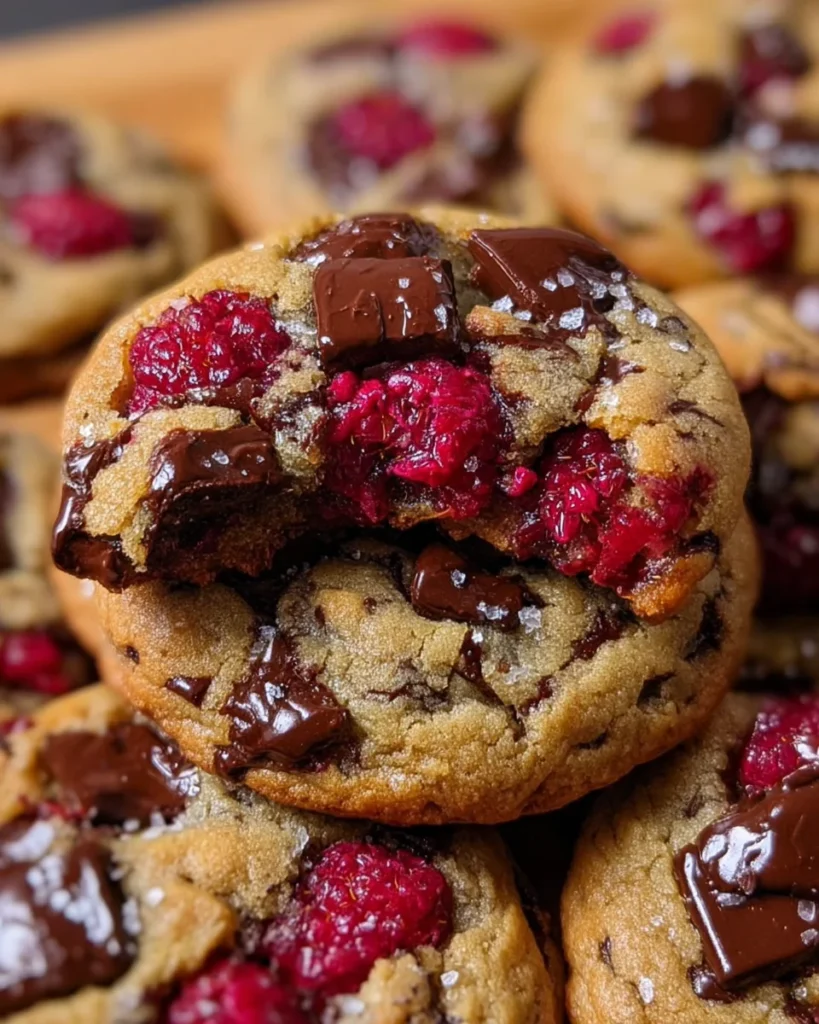
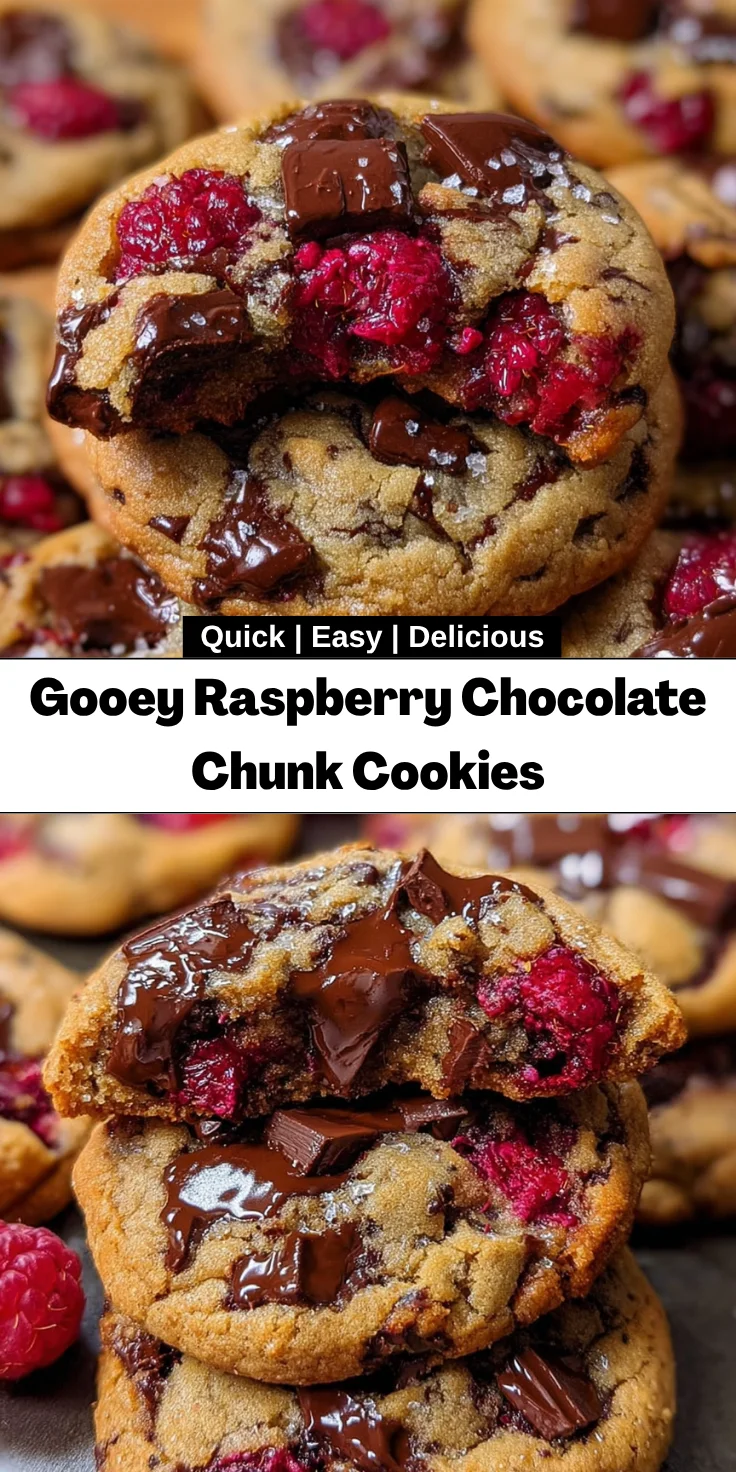
    Introduction to Gooey Raspberry Chocolate Chunk Cookies

    Hey there, fellow home chefs! Let me introduce you to the star of my dessert repertoire—Gooey Raspberry Chocolate Chunk Cookies. Picture this: a soft, chewy cookie bursting with juicy raspberries and rich chocolate, just waiting to be devoured. Sound good? These delightful treats are not just a quick solution for a busy day, they’re a sweet surprise that will bring smiles to your loved ones’ faces. Whether you’re tackling a hectic schedule or simply craving something special, this recipe is here to save the day. Let’s dive into this flavor-packed adventure together!

    Why You’ll Love This Gooey Raspberry Chocolate Chunk Cookies

    These Gooey Raspberry Chocolate Chunk Cookies are the perfect blend of convenience and indulgence. They come together in just a pinch, making them ideal for busy days. Plus, the combination of fresh raspberries and rich chocolate chunks creates a flavor explosion that’s hard to resist. With every bite, you’ll experience a delightful gooey texture that brings a little joy to your day. Trust me, these cookies will be a hit!

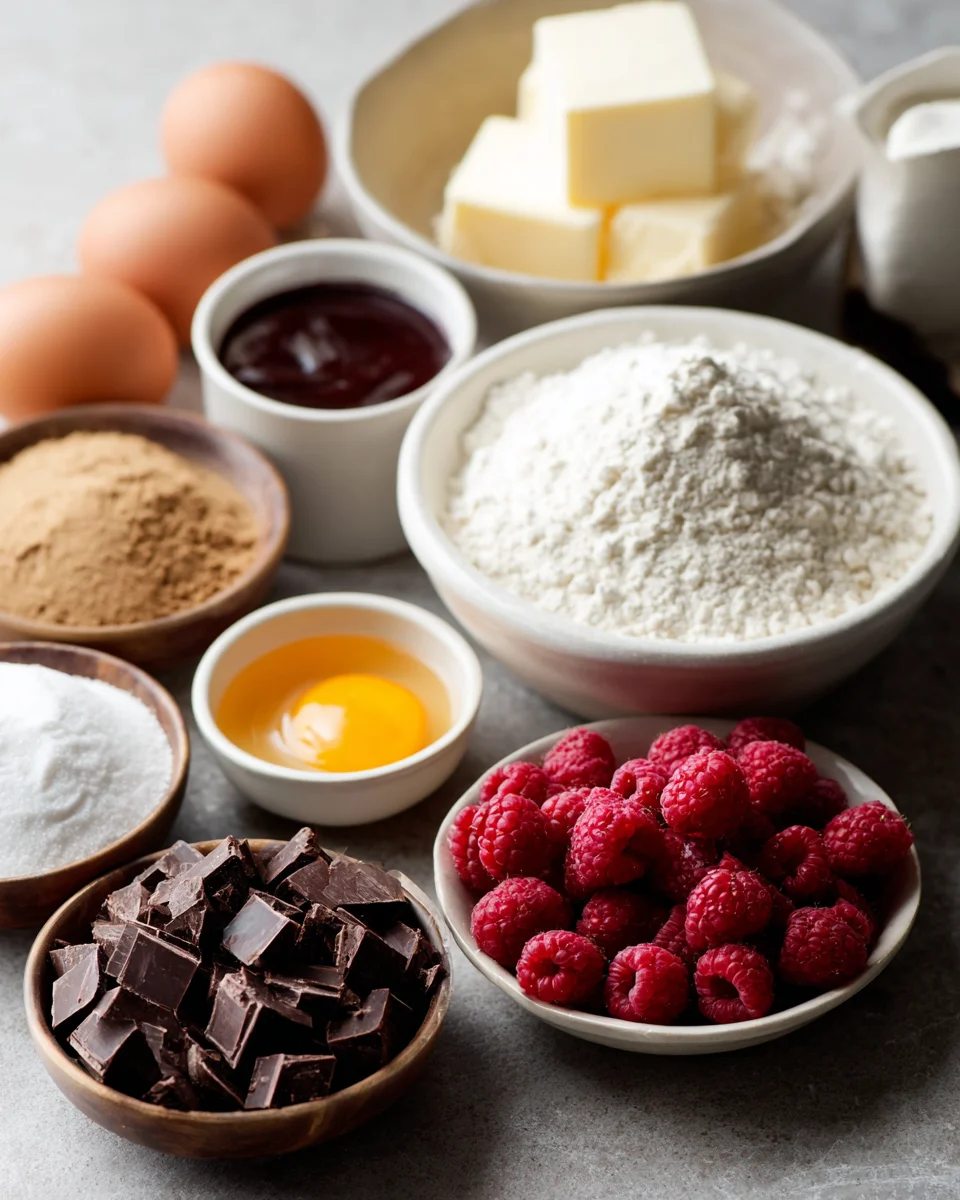
    Ingredients for Gooey Raspberry Chocolate Chunk Cookies

    Ready to whip up these delicious cookies? Here’s what you’ll need:

    • Unsalted butter: This is your base for that rich flavor and soft texture.
    • Granulated sugar: Adds sweetness and helps create a lovely crisp edge.
    • Brown sugar: Deepens the flavor and contributes to the gooeyness.
    • Eggs: Binds the ingredients and adds moisture for a tender cookie.
    • Vanilla extract: This adds a warm, aromatic note that enhances flavors.
    • All-purpose flour: The backbone of your cookie, providing structure and chewiness.
    • Baking soda: This leavening agent gives your cookies that nice lift and soft texture.
    • Salt: A pinch elevates all the flavors, balancing the sweetness.
    • Fresh raspberries: The star of this recipe, bringing bright flavor and juicy goodness.
    • Dark chocolate chunks: These are the decadent bites that take this cookie to the next level.

    If you’re feeling adventurous, consider adding a pinch of sea salt on top before baking for that extra flavor pop! You can find all ingredient measurements at the bottom of the article, where you can even print them out for easy access. Now, let’s get baking!

    How to Make Gooey Raspberry Chocolate Chunk Cookies

    Step 1: Preheat and Prepare

    First things first, let’s get that oven heating up! Preheat it to 375°F (190°C). While it’s warming, grab your baking sheets and line them with parchment paper. This little step is key because it prevents the cookies from sticking. It also makes cleanup a breeze! Trust me, a smooth process is what every busy mom dreams of. You’ll soon have the perfect foundation for your yummy cookies!

    Step 2: Creaming the Sugars and Butter

    Now onto the fun part—creaming the unsalted butter, granulated sugar, and brown sugar together. This step is crucial; it helps to create that light and fluffy texture we all love in cookies. Beat them together until it’s a creamy blend. This is where the magic starts, as the sugars dissolve and the butter gets soft. You want that perfect smoothness for your cookies, so take your time with this step!

    Step 3: Incorporating Eggs and Flavor

    Next, it’s time to add in the eggs. Crack them in one at a time, beating well after each addition. This ensures they get well incorporated into the mix. Now, stir in the vanilla extract; oh, that aroma will make you smile! To up the flavor ante, gently fold in the mashed raspberries. The juicy bursts of fruit bring a refreshing tang to each bite, making your Gooey Raspberry Chocolate Chunk Cookies truly special. You won’t regret adding that sweetness!

    Step 4: Mixing Dry Ingredients

    In a separate bowl, it’s time to whisk together your all-purpose flour, baking soda, and salt. This step may seem simple, but it’s essential for even baking. Whisking helps to distribute the baking soda and salt evenly throughout the flour. This way, they can work their magic and help your cookies rise just right. Plus, it prevents any clumps from sneaking into your dough. A smooth mix is always desirable!

    Step 5: Combining Wet and Dry Ingredients

    Now, let’s bring it all together! Gradually add your dry ingredients to the wet mixture, mixing just until combined. This step is crucial—not overmixing keeps your cookies tender and gooey. If you see a few floury streaks, that’s perfectly okay! You want to maintain a bit of that fluffiness which makes these cookies extra delightful. Patience is key here, and I promise it’ll be worth it!

    Step 6: Folding in Chocolate

    Once your dough comes together, it’s time to fold in those luscious dark chocolate chunks. Gently using a spatula, scoop the chocolate throughout the dough without overmixing. This folding technique ensures an even distribution, and allows the chocolate to shine in all its decadent glory. The richness of the chocolate will melt in your mouth, creating a delicious harmony with the tart raspberries. Oh, it’s divine!

    Step 7: Baking the Cookies

    Now, let’s bake those beauties! Use a tablespoon to drop rounded scoops of dough onto your prepared baking sheets, spacing them about two inches apart. This space gives the cookies room to spread while baking. Slide the sheets into the oven and let them bake for 10 to 12 minutes. You want the edges to turn golden while the centers remain soft and gooey. Wait patiently while they fill your kitchen with an irresistible aroma!

    Tips for Success

    • Always use room temperature butter for better creaming and texture.
    • Don’t overmix after adding the flour; your cookies will be better for it.
    • Use fresh raspberries for the best flavor—frozen can be too watery.
    • Let the cookies cool on the baking sheet for a few minutes before transferring them.
    • A cookie scoop makes portioning easy and keeps them uniform.

    Equipment Needed

    • Mixing bowls: Use any good-sized bowls you have, even a larger pot works!
    • Electric mixer: A hand mixer is great, but a whisk will do in a pinch.
    • Baking sheets: If you don’t have these, use any flat oven-safe tray.
    • Parchment paper: Aluminum foil works as an alternative.
    • Cookie scoop: A tablespoon can work just as well for portioning.

    Variations for Gooey Raspberry Chocolate Chunk Cookies

    • Add white chocolate chunks for a sweeter twist that pairs beautifully with raspberries.
    • Swap out the dark chocolate for milk chocolate if you prefer a creamier flavor.
    • For a nutty crunch, fold in chopped walnuts or pecans with the chocolate.
    • If you’re watching your sugar intake, try using sugar substitutes that can replace granulated and brown sugar.
    • For a gluten-free option, use gluten-free all-purpose flour in place of regular flour.
    • If you’re feeling adventurous, incorporate a splash of almond extract alongside the vanilla for an enticing flavor.

    Serving Suggestions for Gooey Raspberry Chocolate Chunk Cookies

    • Pair these cookies with a scoop of vanilla ice cream for an indulgent dessert.
    • Serve with a glass of cold milk—a classic combination that never fails!
    • For an elegant touch, dust with powdered sugar before serving.
    • Enjoy them alongside a warm cup of coffee or tea for a cozy afternoon treat.

    FAQs about Gooey Raspberry Chocolate Chunk Cookies

    Can I use frozen raspberries in this recipe?
    While fresh raspberries provide the best flavor, you can use frozen ones. Just make sure to thaw and drain them first to avoid excess moisture in your dough.

    How do I store the cookies after baking?
    To keep your cookies fresh, store them in an airtight container at room temperature. They should stay gooey and delicious for up to a week.

    Can I freeze the cookie dough for later use?
    Absolutely! You can freeze the cookie dough in portioned scoops. Just place them on a baking sheet to freeze first, then transfer the scoops to a zip-top bag. Bake them straight from the freezer, adding a minute or two to the baking time.

    What can I substitute for eggs in this recipe?
    If you need a vegan option, you can use 1/4 cup of unsweetened applesauce or a flaxseed meal. Mix 1 tablespoon of flaxseed with 2.5 tablespoons of water, let it sit for a few minutes, then add it to your mixture.

    How can I make these cookies chewier?
    For chewier cookies, try using a combination of brown sugar and a little bit of corn syrup. You can also chill the dough before baking, which adds to the texture!

    Final Thoughts

    Making Gooey Raspberry Chocolate Chunk Cookies is not just about baking; it’s about creating cherished memories in the kitchen. Each cookie is a moment of joy, bringing warmth to our hearts and smiles to our loved ones. When you take that first heavenly bite of gooey raspberry and rich chocolate, it’s like a tiny celebration in your mouth! I hope you find as much happiness in baking (and devouring) these cookies as I do. So, let’s embrace our inner bakers, gather our ingredients, and enjoy all the sweet moments that come with sharing these delightful treats!


    Print

    clock clock iconcutlery cutlery iconflag flag iconfolder folder iconinstagram instagram iconpinterest pinterest iconfacebook facebook iconprint print iconsquares squares iconheart heart iconheart solid heart solid icon

    Description

    Deliciously gooey cookies filled with fresh raspberries and rich dark chocolate chunks.


    • 1 cup unsalted butter, softened
    • 1 cup granulated sugar
    • 1 cup brown sugar, packed
    • 2 large eggs
    • 2 tsp vanilla extract
    • 3 cups all-purpose flour
    • 1 tsp baking soda
    • 1/2 tsp salt
    • 1 cup fresh raspberries, mashed
    • 1 1/2 cups dark chocolate chunks

    1. Preheat oven to 375°F (190°C) and line baking sheets with parchment paper.
    2. In a large bowl, cream together butter, granulated sugar, and brown sugar until light and fluffy.
    3. Beat in eggs one at a time, then stir in vanilla extract and mashed raspberries.
    4. In a separate bowl, whisk together flour, baking soda, and salt. Gradually add to the wet ingredients, mixing until just combined.
    5. Fold in chocolate chunks. Drop rounded tablespoons of dough onto prepared baking sheets, spacing 2 inches apart.
    6. Bake for 10-12 minutes until edges are golden but centers are still soft. Let cool on baking sheets for 5 minutes before transferring to wire racks.

    Notes

    • For an extra burst of flavor, you can add a pinch of sea salt on top before baking.
    • Ensure fresh raspberries are properly mashed to combine well with the dough.
    • Prep Time: 15 minutes
    • Cook Time: 12 minutes
    • Category: Dessert
    • Method: Baking
    • Cuisine: American

    Nutrition

    • Serving Size: 1 cookie
    • Calories: 200
    • Sugar: 15g
    • Sodium: 150mg
    • Fat: 10g
    • Saturated Fat: 5g
    • Unsaturated Fat: 3g
    • Trans Fat: 0g
    • Carbohydrates: 28g
    • Fiber: 1g
    • Protein: 2g
    • Cholesterol: 30mg

    Sharing is caring!

  • Creamy Chicken Bowls Feta

    Creamy Chicken Bowls Feta


    Introduction to Creamy Chicken Bowls Feta

    Have you ever found yourself longing for a warm home-cooked meal but simply have no time to spare for making it? This is where Creamy Chicken Bowls Feta steps into the picture; in such busy weekdays, I need flavors as well as health, this serves the purpose. Crispy-skinned juicy chicken with a creamy feta sauce that will blow your senses away. Imagine juicy little chicken squares, snuggled up to rice or quinoa, then topped with crisp fresh veggies and drizzled with that yummy feta magic. It’s not food, it’s a quickie for a seriously hectic day, or a delightful date for family and friends.

    Why You’ll Love This Creamy Chicken Bowls Feta

    This dish is a breeze to whip up, hitting the table in just 30 minutes! The combination of spices gives the chicken vibrant flavors that dance on your palate. Plus, the creamy feta sauce adds a luxurious touch without being heavy. It’s perfect for busy weeknights, yet impressive enough for a weekend dinner. Simply put, it’s a delicious and healthy option everyone in the family will adore!

    Ingredients for Creamy Chicken Bowls Feta

    Let’s dive into the star-studded cast of ingredients that makes the Creamy Chicken Bowls Feta an absolute delight. Most of these are pantry staples, which makes life easier. You’ll notice that I’m avoiding specific measurements here; you can find those at the bottom of the article for easy printing.

    • Boneless, skinless chicken breasts: Tender and protein-packed, these cubes are the main event of the dish.
    • Olive oil: This adds richness and helps with cooking, bringing out the best flavors in your spices.
    • Smoked paprika: This spice brings warmth and a smoky depth to the chicken—perfectly Mediterranean!
    • Ground cumin: A pinch of this adds earthiness, taking the flavor profile up a notch.
    • Garlic powder: Because garlic makes everything better! It adds a subtle, aromatic punch.
    • Onion powder: Another aromatic hero that enhances the overall taste without overpowering.
    • Salt and black pepper: Essential seasonings that balance and elevate the dish. Adjust these to your liking.
    • Feta cheese: Crumbled feta brings that creamy tanginess that defines this recipe. A must-have!
    • Greek yogurt: This adds extra creaminess while keeping the sauce light and wholesome.
    • Fresh lemon juice: A splash of brightness that complements the rich flavors beautifully.
    • Minced garlic: Fresh garlic really amps up the flavor in the feta sauce.
    • Cooked rice or quinoa: These serve as your base. Choose whichever you prefer for a delightful foundation.
    • Cherry tomatoes: Fresh and juicy, they add a burst of sweetness and color to your bowls.
    • Cucumber: Crisp and refreshing, cucumbers bring a lovely crunch that balances the creaminess.
    • Red onion: Thinly sliced, they provide a sharp flavor that contrasts nicely with the other ingredients.
    • Fresh parsley or dill: A sprinkle of herbs enhances both the flavor and the visual appeal of the dish.
    • Kalamata olives (optional): If you’re a fan, these add a briny bite that can elevate the whole meal!

    Feel free to mix it up! Like switching out quinoa for rice or adding your own favorite veggies to this scrumptious dish. Let your creativity shine in the kitchen! Now, let’s grab those exact measurements so you can get cooking!

    How to Make Creamy Chicken Bowls Feta

    Now that you have all your ingredients ready, let’s dive into the fun part: making the Creamy Chicken Bowls Feta! This step-by-step guide will help you navigate through the process effortlessly. Let’s get started!

    Step 1: Marinate the Chicken

    First, grab your bowl and toss in the cubed chicken. Add olive oil, smoked paprika, ground cumin, garlic powder, onion powder, salt, and black pepper.

    Mix it all up with your hands or a spoon until every piece of chicken is lovingly coated in spices. You can let it marinate for about 15 minutes if you have the time. This really lets those flavors soak in.

    Step 2: Cook the Chicken

    Next, heat a large skillet over medium-high heat. Once hot, add your seasoned chicken into the pan. Don’t overcrowd it—cook in batches if you need to.

    Sauté the chicken for about 6 to 8 minutes, stirring occasionally. You want it golden brown and fully cooked. The smell will tempt everyone around you! Once done, transfer the chicken to a plate and set aside.

    Step 3: Prepare the Feta Sauce

    Time to whip up that dreamy feta sauce! In a food processor or blender, combine the crumbled feta cheese, Greek yogurt, fresh lemon juice, minced garlic, and olive oil.

    Blend until smooth and creamy. If it’s too thick for your liking, add a tablespoon of water or a drizzle of olive oil. Season it to your taste with salt and black pepper. This sauce is where the magic truly happens!

    Step 4: Assembly

    Now comes the fun part! Start by distributing cooked rice or quinoa into your serving bowls. It forms the cozy base of our dish.

    Next, artfully pile on the cooked chicken, followed by a colorful array of cherry tomatoes, diced cucumber, and red onion. Don’t forget to sprinkle some fresh parsley or dill for that vibrant touch.

    Finally, drizzle a generous amount of that luscious feta sauce over each bowl. If you’re feeling fancy, toss in Kalamata olives for an extra pop of flavor. And voilà! Your Creamy Chicken Bowls Feta are ready to impress!

    Tips for Success

    • Prep your ingredients ahead of time to save time during cooking.
    • Don’t skip the marination step—let the chicken absorb the spices for more flavor.
    • For a creamier sauce, blend longer or add a splash more olive oil.
    • Experiment with different veggies to suit your family’s tastes.
    • Serve the dish immediately for the freshest flavors and textures!

    Equipment Needed

    • Large skillet: A non-stick option works wonders, but any skillet will do.
    • Cutting board: Essential for prepping your veggies and chicken.
    • Knife: A good sharp knife makes chopping a breeze.
    • Food processor or blender: For making that creamy feta sauce—don’t have one? Use a whisk and bowl!
    • Measuring cups and spoons: Helpful for accurate ingredient quantities.

    Variations

    • Add protein options: Swap chicken for shrimp, turkey, or tofu for a vegetarian twist.
    • Spice it up: Incorporate chili flakes or jalapeños for a kick of heat.
    • Herb infusion: Experiment with basil or cilantro instead of parsley or dill for a different flavor profile.
    • Whole grains: Replace rice or quinoa with farro or barley for added texture and nutrients.
    • Make it a salad: Serve the ingredients over a bed of mixed greens for a lighter option.

    Serving Suggestions for Creamy Chicken Bowls Feta

    • Pair with a light cucumber salad for a refreshing side.
    • A glass of chilled white wine beautifully complements the flavors.
    • Garnish with extra herbs or a lemon wedge for an eye-catching presentation.
    • Serve with crusty bread to soak up the creamy feta sauce.
    • Add a sprinkle of red pepper flakes for an extra pop of color.

    FAQs about Creamy Chicken Bowls Feta

    Can I make Creamy Chicken Bowls Feta ahead of time?

    Absolutely! You can prepare the chicken and feta sauce in advance. Just store them separately in the fridge. When you’re ready to enjoy, simply reheat the chicken and assemble the bowls with your fresh ingredients.

    Is this recipe suitable for meal prepping?

    Yes! This dish is perfect for meal prepping. Just portion out the servings in airtight containers, and you’ll have delicious meals ready to go for the week ahead. Just remember to keep the sauce separate until serving.

    Can I freeze the creamy feta sauce?

    While it’s best fresh, you can freeze the feta sauce for up to a month. Just thaw it in the fridge overnight before use, then give it a good stir.

    How can I make this dish dairy-free?

    For a dairy-free version, swap the feta cheese for a dairy-free alternative and use plant-based yogurt instead of Greek yogurt. You can still achieve a creamy texture without compromising on taste!

    What other toppings can I add to the bowls?

    The possibilities are endless! Consider adding avocado slices, roasted chickpeas, or a sprinkle of nuts for added texture. Get creative with toppings to suit your taste!

    Final Thoughts

    Cooking should be a joyous experience, and my Creamy Chicken Bowls Feta embodies that spirit. It’s more than just a meal; it’s a celebration of flavor, health, and togetherness. Each bowl is a canvas where colors and tastes unite, bringing smiles all around the table. I love knowing that it’s a recipe my family enjoys, and it’s quick enough for my busy evenings. Whether I’m impressing guests or winding down after a long day, this dish never fails to delight. I hope it brings as much happiness to your kitchen as it does to mine!


    Print

    clock clock iconcutlery cutlery iconflag flag iconfolder folder iconinstagram instagram iconpinterest pinterest iconfacebook facebook iconprint print iconsquares squares iconheart heart iconheart solid heart solid icon

    Description

    A delicious and healthy dish featuring tender chicken cubes tossed in spices, served over rice or quinoa, and topped with a creamy feta sauce.


    • 450 grams boneless, skinless chicken breasts, cut into cubes
    • 15 millilitres olive oil
    • 2 teaspoons smoked paprika
    • 1 teaspoon ground cumin
    • 1 teaspoon garlic powder
    • 1 teaspoon onion powder
    • Salt, to taste
    • Black pepper, to taste
    • 150 grams feta cheese, crumbled
    • 120 grams Greek yogurt
    • 30 millilitres fresh lemon juice
    • 1 garlic clove, minced
    • 3045 millilitres olive oil
    • Salt, to taste
    • Black pepper, to taste
    • 340 grams cooked rice or quinoa
    • 150 grams cherry tomatoes, halved
    • 130 grams cucumber, diced
    • 40 grams red onion, thinly sliced
    • 15 grams fresh parsley or dill, chopped
    • 40 grams Kalamata olives (optional)

    1. Combine cubed chicken with olive oil, smoked paprika, ground cumin, garlic powder, onion powder, salt, and pepper in a bowl. Toss thoroughly to ensure even coating.
    2. Heat a large skillet over medium-high heat. Add seasoned chicken and sauté for 6–8 minutes, stirring occasionally, until chicken is golden brown and fully cooked. Set aside.
    3. In a food processor or blender, combine crumbled feta cheese, Greek yogurt, lemon juice, minced garlic, and olive oil. Blend until the sauce is smooth and creamy. Adjust consistency with a tablespoon of water or additional olive oil if needed. Season with salt and pepper to taste.
    4. Distribute cooked rice or quinoa among serving bowls. Arrange the cooked chicken, cherry tomatoes, diced cucumber, red onion, parsley, and olives evenly over the grains.
    5. Generously drizzle bowls with feta sauce. Garnish with a sprinkle of fresh parsley or dill for brightness. Serve immediately.

    Notes

    • Feel free to replace quinoa with rice as per your preference.
    • Customize the dish by adding your favorite vegetables.
    • The feta sauce can be made in advance and stored in the refrigerator for a few days.
    • Prep Time: 15 minutes
    • Cook Time: 15 minutes
    • Category: Main Course
    • Method: Sauté and Blend
    • Cuisine: Mediterranean

    Nutrition

    • Serving Size: 1 bowl
    • Calories: 540
    • Sugar: 4g
    • Sodium: 700mg
    • Fat: 25g
    • Saturated Fat: 7g
    • Unsaturated Fat: 15g
    • Trans Fat: 0g
    • Carbohydrates: 45g
    • Fiber: 4g
    • Protein: 38g
    • Cholesterol: 90mg

    Sharing is caring!

  • Classic and Modern Cobb Salad

    Classic and Modern Cobb Salad


    Introduction to Classic and Modern Cobb Salad

    Hey there! I know if you are like me you like your food tasty but don’t like to spend much time making it. Well, here’s the Classic and Modern Cobb Salad that is just that! Imagine fresh greens with juicy proteins and a tangy dressing coming together in 25 minutes. It helps merit wanting something quick on busy nights or to really impress some loved ones for brunch. So flexible for combination, using whatever is available in the ingredients; trust me, this salad is not just a beautiful sight to look at.

    Why You’ll Love This Classic and Modern Cobb Salad

    This Classic and Modern Cobb Salad is a lifesaver for those busy days when time seems to slip through your fingers. It’s quick to whip up, so you can savor a nutritious meal without the fuss. Plus, the combination of fresh ingredients creates a symphony of flavors that will satisfy even the pickiest eaters. With endless variations, you can truly tailor this salad to fit every craving and occasion. What’s not to love?

    Ingredients for Classic and Modern Cobb Salad

    Gather these fresh and flavorful ingredients to create your very own Classic and Modern Cobb Salad. Each component plays a unique role, bringing together a delightful medley of tastes and textures!

    • Mixed greens: Choose from lettuce, spinach, or kale. These leafy wonders form a crisp and refreshing base for the salad.
    • Cooked chicken breast: Sliced and ready to go, this lean protein adds heartiness. You can also substitute with grilled turkey or tofu for a vegetarian option.
    • Cooked bacon: Chopped into bits, it brings a savory crunch. If you’re looking for alternatives, turkey bacon works wonderfully.
    • Hard-boiled egg: Sliced for elegance, it provides creaminess and additional protein. You can easily swap it out for a vegan alternative, like avocado.
    • Cherry tomatoes: Halved for sweetness, they burst with flavor and color. Feel free to use diced regular tomatoes if cherry ones are not available.
    • Avocado: Sliced to add richness, it’s a creamy delight. If avocados are hard to find, try using diced mango for a fruity twist.
    • Cucumber: Diced as an optional addition for that refreshing crunch. If cucumbers aren’t your thing, you can use bell peppers or radishes instead.
    • Crumble blue cheese: This tangy cheese enhances the flavor profile beautifully. If you’re not a fan, feta or goat cheese can serve as flavorful substitutes.
    • Red wine vinaigrette: A touch of acidity from this dressing pulls everything together. Store-bought vinaigrettes work fine, but homemade is always best!

    For exact quantities of these ingredients, check the end of the article for easy printing. Get ready to embark on a colorful and tasty salad adventure!

    How to Make Classic and Modern Cobb Salad

    Step 1: Prepare the Ingredients

    To start off, gather all your ingredients and wash them thoroughly. Rinse the mixed greens under cold water until clean, and then dry them in a salad spinner or with a towel. Slice the cooked chicken breast into bite-sized pieces, chop the bacon, and dice the cucumber if you’re including it. Slice the hard-boiled egg and halved cherry tomatoes. Finally, give the avocado a gentle slice and remove the pit. With everything prepped, you’re set for a smooth assembly!

    Step 2: Create the Base

    Now, let’s get to the fun part—building the base of your salad! Take a large serving bowl or plate and layer the mixed greens evenly at the bottom. Think of this as a vibrant canvas that will showcase all your colorful ingredients. As you pile on the greens, feel free to mix in some spinach or kale for a nutritional boost. The greens act as the foundation that holds all those delicious flavors together!

    Step 3: Assemble the Proteins

    Next, it’s time to make your protein shine. Arrange the slices of cooked chicken, followed by the crispy bacon bits, in neat rows over the greens, leaving some space between each. Add the sliced hard-boiled egg to create a beautiful contrast in color and taste. This arrangement not only elevates the salad’s look but also makes it easy for guests to pick their favorites. After all, who doesn’t love a little culinary artwork on their plate?

    Step 4: Add Fresh Veggies and Cheese

    Now that the proteins are in place, it’s time to add those fresh veggies! Artfully place the halved cherry tomatoes, avocado slices, and diced cucumber in separate sections, allowing each ingredient to stand out. Don’t forget to sprinkle the crumbled blue cheese over the top, as it adds a delightful tang. This step transforms your salad into a colorful masterpiece, making it as tasty as it is visually appealing!

    Step 5: Drizzle with Dressing

    Finally, it’s time to enhance those flavors with a luscious drizzle of red wine vinaigrette. Just before serving, pour the dressing over the salad, letting it glide over each layer. If you prefer, you can toss the salad gently to combine everything together, or allow your guests to mix it at the table. Either way, the final touch of dressing ties everything together beautifully, making every bite a little explosion of flavor!

    Tips for Success

    • Prep ingredients in advance for quick assembly during busy weeknights.
    • Use a variety of greens for added texture and color in your salad.
    • Opt for grilled or roasted chicken to add extra flavor!
    • Keep the dressing separate until serving to maintain freshness.
    • Experiment with different cheeses or nuts for a twist on flavor.

    Equipment Needed

    • Cutting board – any sturdy surface will do!
    • Sharp knife for easy slicing of ingredients.
    • Salad spinner or towel for drying greens.
    • Large serving bowl or plate to showcase your salad.
    • Measuring cups for accurate dressing portions.

    Variations to Classic and Modern Cobb Salad

    • For a vegetarian twist, skip the chicken and bacon, adding roasted chickpeas or lentils for protein instead.
    • Switch up the greens by using arugula or mixed baby greens for a peppery flavor.
    • Try different dressings like a honey mustard vinaigrette or a creamy ranch for a change in flavor profile.
    • Experiment with fruits, like diced apples or berries, for a refreshing sweetness.
    • Consider adding nuts or seeds for an extra crunch and healthy fats!

    Serving Suggestions for Classic and Modern Cobb Salad

    • Pair with crusty bread or garlic knots for a satisfying crunch.
    • Serve alongside a light, chilled white wine or sparkling water with lemon.
    • For an eye-catching presentation, use individual glass bowls for personal servings.
    • Add a sprinkle of fresh herbs, like parsley or chives, for a pop of color.
    • Perfect as a main dish for lunch or a delightful appetizer for dinner gatherings.

    FAQs about Classic and Modern Cobb Salad

    Can I make a Classic and Modern Cobb Salad ahead of time? Absolutely! You can prep the ingredients a day before and store them in the fridge. Just keep the dressing separate until you’re ready to serve for optimal freshness.

    What can I use instead of blue cheese? If blue cheese isn’t your favorite, don’t worry! Feta or goat cheese make great substitutes, adding their own delicious tang to the salad.

    Is this salad suitable for meal prep? Yes! This Classic and Modern Cobb Salad can be a part of your meal prep routine. Just ensure that ingredients like avocados and tomatoes are added fresh to maintain their texture.

    How can I make this salad gluten-free? Rest assured, this salad is naturally gluten-free! Just double-check store-bought dressings for any hidden gluten and you’re good to go!

    What are some good additions for a modern twist? You can elevate your Cobb Salad by adding quinoa or farro for extra texture. Diced fruits like apples or pomegranates add a lovely sweetness and make it even more vibrant!

    Final Thoughts

    Creating the Classic and Modern Cobb Salad is more than just whipping up a meal; it’s about bringing joy to your table. Each ingredient tells a story, combining freshness and flavor in every bite. Whether you’re serving it up for family or enjoying a quiet night in, this salad is a reminder of how simple ingredients can create something spectacular. Plus, with its versatility, it invites you to experiment and make it your own. So, roll up those sleeves, and let the colorful ingredients inspire your culinary creativity—dinner is about to get a lot more exciting!


    Print

    clock clock iconcutlery cutlery iconflag flag iconfolder folder iconinstagram instagram iconpinterest pinterest iconfacebook facebook iconprint print iconsquares squares iconheart heart iconheart solid heart solid icon

    Description

    A delicious blend of fresh greens, proteins, and a tangy dressing, perfect for any occasion.


    • 120 g mixed greens (lettuce, spinach, or kale), washed and dried
    • 85 g cooked chicken breast, sliced
    • 2 strips cooked bacon, chopped
    • 1 large egg, hard-boiled and sliced
    • 100 g cherry tomatoes, halved
    • 1/2 medium avocado, sliced
    • 40 g cucumber, diced (optional for variation)
    • 30 g crumbled blue cheese
    • 30 ml red wine vinaigrette

    1. Wash and thoroughly dry all greens and vegetables. Slice or chop the chicken, bacon, eggs, tomatoes, avocado, and cucumber as specified.
    2. Arrange the mixed greens evenly as the foundation on a large plate or shallow serving bowl.
    3. Neatly arrange rows of chicken breast, chopped bacon, hard-boiled egg slices, and crumbled blue cheese over the greens.
    4. Place tomatoes, avocado, and cucumber over the salad in segmented rows for a visually appealing presentation.
    5. Drizzle the salad with red wine vinaigrette just before serving. Toss gently if desired, or allow guests to combine at the table.

    Notes

    • Feel free to substitute proteins or vegetables based on personal preference.
    • The salad is best served fresh, but ingredients can be prepared ahead of time.
    • For a vegetarian version, omit bacon and chicken.
    • Prep Time: 15 minutes
    • Cook Time: 10 minutes
    • Category: Salad
    • Method: Mixing and assembling
    • Cuisine: American

    Nutrition

    • Serving Size: 1 serving
    • Calories: 400
    • Sugar: 3g
    • Sodium: 600mg
    • Fat: 28g
    • Saturated Fat: 9g
    • Unsaturated Fat: 15g
    • Trans Fat: 0g
    • Carbohydrates: 10g
    • Fiber: 5g
    • Protein: 30g
    • Cholesterol: 180mg

    Sharing is caring!

  • Stuffed butternut squash filled with feta spinach and bacon

    Stuffed butternut squash filled with feta spinach and bacon


    Introduction to Stuffed Butternut Squash Filled with Feta Spinach and Bacon

    I know how valuable time at the dinner table can be for a busy mom on the go! When a bacon and spinach feta stuffed butternut squash is on deck, it just feels like there’s a unicorn in my recipe box. This delicious dish is the perfect combination of easy prep and gourmet taste so it’s perfect to serve on those crazy nights.

    You could come in at the end of a long day to the warm smell of this cooking. Your family will be impressed, and you will be happy with how tasty and vegetable-laden it is. Seriously, you are going to want to make this recipe over and over again.

    Why You’ll Love This Stuffed Butternut Squash Filled with Feta Spinach and Bacon

    This stuffed butternut squash filled with feta spinach and bacon is not just a meal; it’s a lifesaver! You’ll adore how simple it is to whip up on a busy weeknight. Plus, the combination of savory bacon and creamy feta creates a flavor explosion that delights everyone at the table. It’s healthy, satisfying, and ready in under two hours. Trust me—your family will be asking for seconds!

    Ingredients for Stuffed Butternut Squash Filled with Feta Spinach and Bacon

    Let’s dive into the scrumptious components of this stuffed butternut squash filled with feta spinach and bacon! Each ingredient plays a vital role in creating a dish that’s both delicious and nutritious:

    • Butternut Squash: The star of the show! Its natural sweetness complements savory flavors beautifully.
    • Fresh Spinach: Packed with nutrients, it wilts down to add a lovely green color and health boost.
    • Feta Cheese: This crumbly, tangy cheese adds a creamy texture and extra flavor that you’ll love.
    • Diced Bacon: Provides a delightful crunch and smokiness. You can easily swap it for turkey bacon or even smoked tofu for a lighter option.
    • Minced Garlic: A must for that aromatic punch! It lights up the dish with its robust flavor.
    • Olive Oil: Helps in roasting the squash and enhances flavors, bringing everything together beautifully.
    • Salt and Pepper: Essential seasonings to enhance the natural flavors of the ingredients and tie them together.
    • Dried Oregano: An optional herb that adds a lovely earthy flavor reminiscent of Mediterranean cuisine.

    For exact measurements, you can find them at the bottom of the article, perfect for easy printing. Don’t hesitate to get creative with your ingredients—these can be adjusted to suit your taste or what’s available in your pantry!

    How to Make Stuffed Butternut Squash Filled with Feta Spinach and Bacon

    Preheat the Oven and Prepare the Squash

    The first step to create this heavenly stuffed butternut squash filled with feta spinach and bacon is to preheat the oven to 400°F (200°C). This ensures the squash cooks perfectly and evenly. While it’s heating up, grab your butternut squash and slice it in half lengthwise. Be careful; a good knife can make this easier!

    Scoop out the seeds with a spoon, just like we did with pumpkins as kids. This step is crucial. It allows the squash to soften while baking. Drizzle a bit of olive oil on the cut sides. Sprinkle them with salt and pepper for seasoning. This will enhance the flavors as the squash roasts, getting caramelized and delicious. Placing the squash cut-side down on a baking sheet for 40-50 minutes helps it caramelize beautifully!

    Cook the Bacon

    Next, let’s get that bacon sizzling! In a skillet, cook the diced bacon over medium heat for about 5-7 minutes until it’s crispy. You want to see it golden brown without burning it. The drippings left in the skillet will work wonders for the dish, adding a smoky flavor to the filling.

    Once the bacon is done, remove it and set it aside, but leave those drippings in the pan. They will be perfect for sautéing the spinach, which is our next step!

    Sauté the Spinach

    Now it’s time to sauté! In the same skillet with those bacon drippings, add the minced garlic and sauté it for about a minute until fragrant. Then toss in the fresh spinach. You’ll want to cook it until it wilts, about 3-4 minutes. This step is essential—not only does it remove excess moisture, but it also makes the spinach more flavorful and tender. Mixing it with the garlic also infuses lovely aromas into the filling!

    Fill the Squash

    Once the butternut squash is perfectly roasted and tender, it’s time for the fun part—filling it! Carefully turn the squash over so the cut side is facing up. Grab your spinach, bacon, and feta mixture. It’s time to combine them!

    Start by adding a generous scoop of the mixture into each half, pressing it down gently as you go. You want to pack it in, ensuring every bit of that wonderful filling gets to shine. If you have extra filling left over, don’t stress! You can set it aside to munch on or serve alongside.

    Now, with both halves filled and ready for action, pop the squash back into the oven. It’s going to bake for an additional 15-20 minutes, melting all those flavors together. Be sure to check it often—it should be hot and slightly bubbly when it’s ready!

    Bake Again

    For the final step, make sure to return the filled squash to the oven and bake until everything is heated through and the tops are golden. Keep an eye on it! You’ll know it’s ready when the edges of the squash start turning golden brown, and the filling is warmed through. Once that happens, remove it from the oven.

    Let it cool for a few minutes. This cooling time lets the flavors settle further. Trust me, your patience will pay off when you take that first bite!

    Tips for Success

    • Always use a sharp knife to slice the butternut squash; it makes the process much easier.
    • Don’t skip drizzling olive oil on the squash; it enhances roasting flavors.
    • Feel free to mix in other veggies like bell peppers or onions for added nutrition.
    • For a vegetarian option, substitute bacon with smoked tofu or mushrooms.
    • Let the stuffed squash cool slightly before serving to enhance the flavors!

    Equipment Needed

    • Sharp knife: Essential for halving the squash; a sturdy chef’s knife works well.
    • Cutting board: A must-have for safe and easy chopping.
    • Baking sheet: Any rimmed baking sheet will do; just make sure it’s big enough!
    • Skillet: A non-stick skillet makes cooking the bacon and sautéing easy.
    • Spoon: For scooping out seeds and filling the squash; a regular spoon will suffice!

    Variations

    • Vegetarian Delight: Swap out bacon for mushrooms or chickpeas for a protein boost without the meat.
    • Cheesy Twists: Add a mix of cheeses like mozzarella or goat cheese for a different taste profile.
    • Spicy Kick: Toss in some red pepper flakes or chopped jalapeños for a spicy version that packs a punch.
    • Sweeten the Deal: A drizzle of maple syrup or honey before baking can add a deliciously sweet contrast to the savory filling.
    • Grain Booster: Mix in cooked quinoa or brown rice to make it heartier and increase fiber content.

    Serving Suggestions for Stuffed Butternut Squash Filled with Feta Spinach and Bacon

    • Pair with a simple arugula salad drizzled with lemon vinaigrette for a fresh balance.
    • Serve with crusty bread to soak up any extra filling.
    • A glass of crisp white wine complements the dish beautifully.
    • Garnish with fresh herbs like parsley or dill for a pop of color.

    FAQs about Stuffed Butternut Squash Filled with Feta Spinach and Bacon

    Can I make stuffed butternut squash ahead of time? Absolutely! You can prepare the butternut squash and filling in advance. Just store the uncooked stuffed squash in the fridge for up to a day. When you’re ready to eat, bake it just before serving!

    Can I use frozen spinach instead of fresh? Yes, you can! If using frozen spinach, make sure to drain it well to prevent excess moisture. This will keep your filling from becoming soggy.

    How do I store leftovers of stuffed butternut squash filled with feta spinach and bacon? Store leftovers in an airtight container in the fridge for up to three days. Reheat in the oven or microwave for quick meals throughout the week.

    Can I customize the filling of the squash? Of course! Feel free to mix in other vegetables, herbs, or cheeses to this stuffed butternut squash filled with feta spinach and bacon. It’s a versatile dish that can adapt to your pantry items!

    Is this recipe gluten-free? Yes! This stuffed butternut squash is naturally gluten-free, making it a great option for those with gluten sensitivities or dietary restrictions.

    Final Thoughts

    There’s something magical about a dish that brings joy to the table, isn’t there? This stuffed butternut squash filled with feta spinach and bacon has the power to brighten even the busiest of days. The blend of flavors creates an experience that feels both indulgent and wholesome.

    Whether you’re cooking for your family or entertaining friends, I promise this recipe will be a hit. Plus, the aroma wafting through your kitchen is pure bliss. I hope you find as much joy in making it as I have. So, grab your apron and let’s create delicious memories together!


    Print

    clock clock iconcutlery cutlery iconflag flag iconfolder folder iconinstagram instagram iconpinterest pinterest iconfacebook facebook iconprint print iconsquares squares iconheart heart iconheart solid heart solid icon

    Description

    A delicious recipe for stuffed butternut squash filled with feta, spinach, and bacon that offers a delightful twist for your meals!


    • 1 medium butternut squash
    • 2 cups fresh spinach (well-drained if using frozen)
    • 1 cup crumbled feta cheese
    • 4 slices of bacon (diced; can substitute with turkey bacon or smoked tofu)
    • 1 clove garlic (minced)
    • Salt and pepper to taste
    • 1 tablespoon olive oil
    • 1/2 teaspoon dried oregano (optional)

    1. Preheat your oven to 400°F (200°C) and halve the butternut squash lengthwise, scooping out the seeds. Drizzle with olive oil and sprinkle with salt and pepper.
    2. Place the squash halves cut-side down on a baking sheet and bake for 40-50 minutes until tender.
    3. Cook diced bacon in a skillet over medium heat until crisp, around 5-7 minutes, then set aside, leaving drippings.
    4. In the same skillet, sauté minced garlic and spinach until the spinach wilts, about 3-4 minutes. Return bacon to the skillet, stir in feta and oregano.
    5. Once the squash is cooked, turn it over so the flesh faces up, and fill each half with the mixture, pressing down gently.
    6. Return to the oven and bake for an additional 15-20 minutes.
    7. Let cool for a few minutes before serving. Garnish with fresh herbs if desired.

    Notes

    • Can be made with turkey bacon or smoked tofu for a healthier option.
    • Feel free to add more vegetables to the filling, such as chopped bell peppers or onions.
    • Optional herbs can be added for extra flavor.
    • Prep Time: 15 minutes
    • Cook Time: 1 hour
    • Category: Main Dish
    • Method: Baking
    • Cuisine: Mediterranean

    Nutrition

    • Serving Size: 1 half of stuffed squash
    • Calories: 320
    • Sugar: 3g
    • Sodium: 600mg
    • Fat: 19g
    • Saturated Fat: 6g
    • Unsaturated Fat: 10g
    • Trans Fat: 0g
    • Carbohydrates: 25g
    • Fiber: 6g
    • Protein: 12g
    • Cholesterol: 25mg

    Sharing is caring!

  • Cajun Chicken Fettuccine Alfredo

    Cajun Chicken Fettuccine Alfredo


    Introduction to Cajun Chicken Fettuccine Alfredo

    Come into my kitchen: everything speaks about the story behind every dish! So, today I am very happy to present to you a food gift that merges comfort with a punch of thrill – Cajun Chicken Fettuccine Alfredo. If you are a busy mom, or a professional woman trying to dive through life’s chaos- this one is your secret. Fast, inexpensive and an indulgent meal your family will love! Imagine a soft Cajun-spiced chicken, covered in the fettuccine cream, prepared then served- that’s hearty bliss in a plate! Prepare to dazzle and delight those taste buds without spending that much time in the kitchen.

    Why You’ll Love This Cajun Chicken Fettuccine Alfredo

    This Cajun Chicken Fettuccine Alfredo is a delightful blend of ease and flavor, perfect for your busy schedule. It takes just 30 minutes from prep to plate, making it ideal for hectic weeknights. Plus, the creamy, spicy sauce is sure to please even the pickiest of eaters. With one skillet and minimal cleanup, you can enjoy a flavorful meal that feels like a restaurant treat right at home!

    Ingredients for Cajun Chicken Fettuccine Alfredo

    To create this enticing Cajun Chicken Fettuccine Alfredo, gather the following ingredients. I’ve highlighted a few substitutions and tips just for you!

    • Chicken breast: Tender and juicy, sliced into bite-sized pieces. You can swap in shrimp or tofu for a different protein option.
    • Cajun seasoning: This is the magic dust! A blend of spices that brings the heat and flavor. Adjust it to your spice tolerance.
    • Olive oil: Perfect for sautéing, infusing a subtle richness to the dish. Feel free to use avocado oil for a change!
    • Fettuccine: Classic pasta for a creamy experience. You can also use whole wheat or gluten-free varieties.
    • Butter: Adds richness to the sauce. I love using unsalted, but you can use salted butter if preferred.
    • Garlic: Minced for that punch of aromatics. Fresh garlic works best, but garlic powder is a quick alternative.
    • Heavy cream or half-and-half: Creamy elements that create that luxurious sauce! Choose heavy cream for a richer taste, or half-and-half for a lighter version.
    • Parmesan cheese: Grated for depth and creaminess. Freshly grated is preferable, but pre-grated works too!
    • Salt and black pepper: Essential for seasoning, can be adjusted to taste. Consider adding a dash of cayenne for extra kick!

    You’ll find the precise measurements at the bottom of this article, available for printing when you’re ready to dive into this delicious adventure!

    How to Make Cajun Chicken Fettuccine Alfredo

    Now that we’ve gathered all our ingredients, let’s get cooking! Follow these simple steps to whip up your Cajun Chicken Fettuccine Alfredo in no time. Trust me, this dish will have everyone asking for seconds!

    Step 1: Cook the Fettuccine

    Start by filling a large pot with water and adding a generous amount of salt. Bring it to a roaring boil. Once boiling, add your fettuccine. Cook it according to the package instructions until it reaches that perfect al dente texture. Don’t forget to reserve a cup of the pasta water before draining; it’s a magical ingredient for adjusting your sauce!

    Step 2: Season & Sauté the Chicken

    Meanwhile, take those sliced chicken breasts and toss them with Cajun seasoning. Go ahead, get your hands a bit messy—it’s part of the fun! Heat olive oil in a large skillet over medium-high heat. Once hot, place the seasoned chicken in the skillet and sauté until it’s golden brown and cooked through. This usually takes about 6–8 minutes. Just don’t overcrowd the pan; cook in batches if necessary to get that beautiful sear!

    Step 3: Prepare the Alfredo Sauce

    Using the same skillet (hello, flavor!), melt the butter over medium heat. Add the minced garlic and sauté until fragrant. This step is where the magic happens! Pour in the heavy cream, bringing it to a gentle simmer while whisking to combine. Toss in the grated Parmesan cheese and stir until it melts and the sauce is luxuriously smooth. If it thickens too much, feel free to splash in some of that reserved pasta water!

    Step 4: Combine Ingredients Together

    Now, time to bring it all together! Add the cooked fettuccine and sautéed chicken back into the skillet with your creamy sauce. Gently toss everything together, ensuring each noodle is coated in that delicious, spicy goodness. If your dish looks a bit thick, adjust it with some pasta water until it reaches your desired creaminess. Finally, season with extra salt and black pepper to taste, giving it that perfect finishing touch!

    Tips for Success

    • Don’t skip reserving pasta water; it helps perfect your sauce consistency.
    • Adjust Cajun seasoning based on your family’s spice preference.
    • For a lighter version, opt for half-and-half instead of heavy cream.
    • Warm your plates in advance; it keeps your meal hot longer!
    • Experiment with adding veggies like bell peppers or spinach for extra color and nutrition.

    Equipment Needed

    • Large Pot: For boiling fettuccine; a Dutch oven works too.
    • Skillet: A non-stick or cast-iron skillet is perfect for cooking chicken and sauce.
    • Measuring Cups/Spoons: Necessary for precise ingredient measurement.
    • Wooden Spoon: Ideal for stirring everything together.
    • Colander: For draining pasta; a slotted spoon can serve in a pinch.

    Variations of Cajun Chicken Fettuccine Alfredo

    • Seafood Twist: Substitute chicken with shrimp or crab for a delightful seafood flavor. Just adjust the cooking time to ensure they’re fully cooked.
    • Vegetarian Style: Replace chicken with sautéed mushrooms or zucchini. You can also add in some spinach for added nutrition and color.
    • Spicy Kick: Amp up the heat by adding a pinch of cayenne pepper or diced jalapeños to the Cajun seasoning. Your taste buds will thank you!
    • Gluten-Free Option: Use gluten-free fettuccine, which is available in most grocery stores, ensuring the dish fits your dietary needs.
    • Herb Infusion: Mix in fresh herbs like thyme or parsley at the end for an aromatic finish and a burst of color.

    Serving Suggestions for Cajun Chicken Fettuccine Alfredo

    • Garlic Bread: Serve warm, buttery garlic bread on the side for a perfect dip into the creamy sauce.
    • Caesar Salad: A crisp Caesar salad adds a refreshing crunch that complements the rich pasta.
    • White Wine: Pair your meal with a chilled glass of white wine like Sauvignon Blanc for a delightful touch.
    • Garnish: Sprinkle fresh parsley or extra Parmesan on top for a beautiful finish.

    FAQs about Cajun Chicken Fettuccine Alfredo

    Can I make Cajun Chicken Fettuccine Alfredo ahead of time?
    Absolutely! You can prepare the chicken and Alfredo sauce in advance and simply cook the fettuccine when you’re ready to serve. Just store the sauce in an airtight container in the fridge for up to two days.

    How can I make this dish healthier?
    To lighten it up, consider using half-and-half instead of heavy cream. Also, adding more vegetables like bell peppers or spinach can boost the nutritional value while keeping it delicious.

    What other proteins can I use besides chicken?
    You can easily swap out the chicken for shrimp or even diced tofu for a vegetarian option. Just remember to adjust the cooking times for different proteins!

    Can I freeze leftovers?
    Yes! This Cajun Chicken Fettuccine Alfredo freezes well. Just allow it to cool completely, then store it in an airtight container. Reheat it gently on the stovetop, adding a splash of cream or pasta water to revive the sauce.

    What’s the best way to store leftover Cajun Chicken Fettuccine Alfredo?
    Store your leftovers in a sealed container in the fridge. Make sure to consume them within 2-3 days for the best taste and quality!

    Final Thoughts

    Cooking Cajun Chicken Fettuccine Alfredo brings a sense of joy and accomplishment to my busy days. It’s more than just a meal; it’s a celebration of flavors that creates cherished moments around the dinner table. The creamy, zesty sauce dances harmoniously with the pasta and chicken, making it a family favorite. Plus, it’s quick and easy enough for even the busiest of nights! Each time I whip up this dish, I’m reminded that home-cooked meals can be both simple and extraordinary. So grab your skillet and give it a try; your taste buds will thank you!


    Print

    clock clock iconcutlery cutlery iconflag flag iconfolder folder iconinstagram instagram iconpinterest pinterest iconfacebook facebook iconprint print iconsquares squares iconheart heart iconheart solid heart solid icon

    Description

    A delicious and spicy take on classic fettuccine alfredo featuring Cajun spiced chicken.


    • 1 lb chicken breast, sliced
    • 2 tablespoons Cajun seasoning
    • 1 tablespoon olive oil
    • 8 ounces fettuccine
    • 2 tablespoons butter
    • 2 garlic cloves, minced
    • 1 cup heavy cream or half-and-half
    • 3/4 cup grated Parmesan cheese
    • Salt, to taste
    • Black pepper, to taste

    1. Prepare fettuccine in a pot of boiling salted water according to package instructions until al dente. Reserve a small amount of pasta cooking water before draining.
    2. Toss sliced chicken breast with Cajun seasoning. In a skillet over medium-high heat, warm olive oil and sauté chicken until fully cooked and slightly browned, then remove from the pan and set aside.
    3. In the same skillet, melt butter over medium heat. Add minced garlic and sauté until fragrant. Pour in heavy cream and bring to a gentle simmer. Stir in Parmesan cheese, mixing until completely melted and the sauce is smooth.
    4. Return cooked chicken and drained fettuccine to the skillet with the sauce. Gently toss to coat. If the sauce is too thick, add reserved pasta water, a little at a time, to adjust the consistency as desired. Season with salt and black pepper to taste.

    Notes

    • Adjust the level of Cajun seasoning according to your spice preference.
    • For a creamier sauce, use heavy cream instead of half-and-half.
    • Prep Time: 10 minutes
    • Cook Time: 20 minutes
    • Category: Main Course
    • Method: Skillet
    • Cuisine: Cajun

    Nutrition

    • Serving Size: 1 plate
    • Calories: 680
    • Sugar: 2g
    • Sodium: 800mg
    • Fat: 40g
    • Saturated Fat: 20g
    • Unsaturated Fat: 15g
    • Trans Fat: 0g
    • Carbohydrates: 45g
    • Fiber: 2g
    • Protein: 40g
    • Cholesterol: 110mg

    Sharing is caring!

  • Garlic Parmesan Chicken Bake

    Garlic Parmesan Chicken Bake


    Introduction to Garlic Parmesan Chicken Bake

    I know how hard it is, as a busy mom to create something quick but still filling. Enter my Garlic Parmesan Chicken Bake. A total crowd-pleaser that you can throw together on any old weeknight, yet special enough for company.

    Think of it with the heavenly smell of garlic filling your kitchen as it bakes. It’s a warm meal-that warms the heart and belly. Let’s get into this delicious recipe that has “Made in Heaven” flavors!

    Why You’ll Love This Garlic Parmesan Chicken Bake

    This Garlic Parmesan Chicken Bake is the epitome of simplicity and flavor. In just under an hour, you can have a creamy, delightful dish ready to please even the pickiest of eaters.

    The one-pan nature of this recipe means less fuss and quicker cleanup after a long day. Plus, it’s rich in taste without requiring hours in the kitchen, making it a go-to for my busy weeknights!

    Ingredients for Garlic Parmesan Chicken Bake

    Gathering the right ingredients is key to making a successful Garlic Parmesan Chicken Bake. Here’s what you’ll need:

    • Chicken Thighs or Breasts: Choose between flavorful thighs or tender breasts for your base protein. Both choices will soak up that creamy sauce beautifully.
    • Butter or Olive Oil: This is your cooking fat. Butter adds richness while olive oil offers a lighter option.
    • Garlic: Freshly minced garlic is the star of the show! It brings a delightful aroma and robust flavor to the dish.
    • Heavy Cream or Whole Milk: For the ultimate creaminess, heavy cream is the way to go. If you prefer a lighter version, whole milk works just fine.
    • Parmesan Cheese: Grated Parmesan adds a salty, nutty flavor that perfectly complements the garlic and cream.
    • Italian Seasoning: A blend of herbs like oregano and basil gives the dish depth. You can make your own mix or grab a store-bought option!
    • Salt and Pepper: Essential seasonings to taste. They enhance all the flavors and bring out the best in the dish!

    For precise measurements, scroll to the bottom of the article; you can also find a printable version there. Now, let’s get cooking!

    How to Make Garlic Parmesan Chicken Bake

    Step 1: Preheat Oven and Prepare Dish

    To kick things off, preheat your oven to 375°F (190°C). This ensures your Garlic Parmesan Chicken Bake cooks evenly. While the oven heats up, grab a baking dish and give it a light coating of non-stick spray or a dab of the butter you’re using. This step prevents that cheesy goodness from sticking. Trust me, no one wants to struggle with scraping off delicious remnants!

    Step 2: Sauté Garlic

    Next, let’s get aromatic! In a skillet set over medium heat, melt about two tablespoons of butter or warm up your olive oil. Once it’s glistening, toss in the finely minced garlic. Sauté for just a minute, stirring occasionally until that delightful aroma fills your kitchen. You want the garlic to become fragrant but not brown—burnt garlic can bring a bitter taste!

    Step 3: Make the Creamy Sauce

    Now for the magic—pour in the heavy cream or whole milk! Let it heat for a moment, then whisk in the grated Parmesan cheese and Italian seasoning. Stir and cook until the sauce is luscious and smooth, with the cheese perfectly melted. This creamy sauce will coat your chicken beautifully, adding a rich flavor that pairs perfectly with garlic!

    Step 4: Arrange Chicken

    With that creamy concoction ready, it’s time to prep the chicken! Place your thighs or breasts in the greased baking dish in a single layer. Make sure they don’t overlap! Season both sides generously with salt and pepper. Giving them a good rub ensures every bite is packed with flavor. Now you’re ready for the sauce!

    Step 5: Pour Sauce Over Chicken

    Take that delicious garlic Parmesan sauce you just created and drizzle it evenly over the chicken. Don’t be shy; make sure each piece is well-coated! The sauce will seep into the chicken as it bakes, keeping it juicy and full of flavor. It’s like a warm hug on a plate—a comfort meal at its finest!

    Step 6: Bake

    Finally, pop your dish into the preheated oven and bake, uncovered, for 35 to 45 minutes. You’ll know it’s ready when the chicken reaches an internal temperature of 165°F (74°C) and the sauce is bubbling around the edges. Keep an eye on it—those final moments of baking are pure anticipation, and the aroma will be utterly irresistible!

    Tips for Success

    • Always taste your creamy sauce before pouring it over the chicken; adjust salt and pepper as needed.
    • Let the dish rest for a few minutes after baking to allow juices to redistribute.
    • Use a meat thermometer for perfect doneness; no one likes dry chicken!
    • Don’t rush the sautéing stage; properly cooked garlic enhances the dish’s taste.
    • For a bit of crunch, sprinkle extra Parmesan on top before baking!

    Equipment Needed

    • Baking Dish: A 9×13 inch dish works perfectly; a cast-iron skillet is a great alternative.
    • Skillet: Use a non-stick skillet for sautéing; a regular pan will do, too.
    • Whisk: Essential for mixing the sauce; a fork can work in a pinch.
    • Meat Thermometer: Helps ensure your chicken is cooked perfectly; if you don’t have one, cut into the thickest part to check for doneness.

    Variations

    • Herb Variations: Try adding fresh herbs like rosemary or thyme for a fragrant twist to the classic flavor.
    • Cheese Alternatives: Swap Parmesan for other cheeses like mozzarella or Gruyère for a different flavor profile.
    • Low-Carb Option: Serve the chicken over a bed of zucchini noodles or cauliflower rice for a guilt-free meal.
    • Spicy Kick: Add red pepper flakes to the sauce for a hint of heat that complements the garlic.
    • Vegetable Add-Ins: Toss in vegetables like spinach, bell peppers, or mushrooms for added nutrition and flavor!

    Serving Suggestions

    • Fresh Salad: Pair your Garlic Parmesan Chicken Bake with a crunchy Caesar or mixed greens salad to balance the richness.
    • Crusty Bread: Serve with crusty garlic bread for dipping into that creamy sauce.
    • Wine: A crisp white wine, like Sauvignon Blanc, complements the dish beautifully.
    • Presentation: Garnish with fresh parsley or basil for a pop of color.
    • Steamed Veggies: Add steamed broccoli or green beans for a nutritious touch.

    FAQs about Garlic Parmesan Chicken Bake

    Can I use chicken breasts instead of thighs for this recipe?

    Absolutely! While chicken thighs tend to be juicier, chicken breasts will work just as well. Just be careful not to overcook them, as they can dry out more easily.

    Can I make this dish ahead of time?

    Yes! You can prepare the Garlic Parmesan Chicken Bake in advance and store it in the refrigerator. Just cover it with plastic wrap. When you’re ready to bake, uncover the dish and adjust the cooking time!

    What can I serve with Garlic Parmesan Chicken Bake?

    This creamy chicken bake pairs wonderfully with a fresh salad, garlic bread, or steamed vegetables. It’s versatile, making the side dish options plentiful!

    Can I freeze leftover Garlic Parmesan Chicken Bake?

    Definitely! Let it cool first, then transfer it to an airtight container. It can be frozen for up to three months. Just thaw overnight in the fridge before reheating!

    How can I make the dish healthier?

    For a lighter version, use whole milk instead of heavy cream and add extra vegetables like spinach or mushrooms to boost nutrition. You can also serve it with a side of steamed veggies!

    Final Thoughts

    Cooking is like wrapping your family in a warm, flavorful hug, and this Garlic Parmesan Chicken Bake is no exception. It brings joy and comfort, turning an ordinary dinner into a special moment together. With its simple preparation, rich creaminess, and delightful aroma, you’ll find it quickly becoming a family favorite.

    Whether you’re impressing guests or just trying to put a smile on your loved ones’ faces after a long day, this dish delivers. Trust me; no matter how busy life gets, sharing a meal that warms hearts is always worth it!


    Print

    clock clock iconcutlery cutlery iconflag flag iconfolder folder iconinstagram instagram iconpinterest pinterest iconfacebook facebook iconprint print iconsquares squares iconheart heart iconheart solid heart solid icon

    Description

    A creamy and flavorful Garlic Parmesan Chicken Bake that promises to be a delightful meal for any occasion.


    • 4 whole chicken thighs or breasts
    • 2 tablespoons unsalted butter or olive oil
    • 4 garlic cloves, finely minced
    • 1 1/2 cups heavy cream or whole milk
    • 3/4 cup grated Parmesan cheese
    • 1 teaspoon Italian seasoning blend
    • Salt and freshly ground black pepper, to taste

    1. Preheat oven to 375°F (190°C) and lightly grease a baking dish.
    2. In a skillet over medium heat, melt butter or warm olive oil. Add minced garlic and sauté until fragrant, about 1 minute.
    3. Pour in heavy cream, then whisk in grated Parmesan and Italian seasoning. Cook, stirring, until sauce is smooth and cheese has melted.
    4. Arrange chicken pieces in the greased baking dish in a single layer. Season both sides with salt and pepper.
    5. Pour the garlic Parmesan sauce evenly over the chicken.
    6. Bake uncovered for 35 to 45 minutes, or until internal temperature of chicken reaches 165°F (74°C) and sauce is bubbling.

    Notes

    • For a low-carb option, serve with steamed vegetables.
    • Leftovers can be stored in the refrigerator for up to 3 days.
    • Prep Time: 10 minutes
    • Cook Time: 35-45 minutes
    • Category: Main Dish
    • Method: Baking
    • Cuisine: Italian

    Nutrition

    • Serving Size: 1 piece
    • Calories: 520
    • Sugar: 2g
    • Sodium: 700mg
    • Fat: 40g
    • Saturated Fat: 23g
    • Unsaturated Fat: 15g
    • Trans Fat: 0g
    • Carbohydrates: 5g
    • Fiber: 0g
    • Protein: 36g
    • Cholesterol: 150mg

    Sharing is caring!

  • Seared Scallops Spicy Cajun Cream

    Seared Scallops Spicy Cajun Cream


    Introduction to Seared Scallops Spicy Cajun Cream

    Let’s face it, some days the last thing we want to do is cook. That’s where my Seared Scallops Spicy Cajun Cream recipe comes in! It’s a quick solution for busy moms like us who still want to impress our families with a homemade meal. Picture this: perfectly seared scallops, their golden crust glistening, all enveloped in a rich and zesty Cajun cream sauce. It’s the type of dish that elevates any weeknight dinner into a delightful celebration. So, grab your skillet, and let’s whip up something that feels special but takes mere minutes!

    Why You’ll Love This Seared Scallops Spicy Cajun Cream

    This dish is not just quick; it’s a flavor explosion! Within just 20 minutes, you can create a meal that tastes like it was prepared by a gourmet chef. The crispy scallops paired with the spicy, creamy sauce will have your family singing your praises. Plus, it’s versatile enough to suit various palates, making dinnertime a stress-free and delightful experience!

    Ingredients for Seared Scallops Spicy Cajun Cream

    Gathering the right ingredients is key to achieving that restaurant-quality taste! Here’s what you’ll need:

    • Large sea scallops – These plump gems are the star of the dish. Look for dry sea scallops if you can—they sear beautifully!
    • Salt – A little bit goes a long way in enhancing flavors. Always season your scallops well!
    • Ground black pepper – Adds a dash of spice and depth. Freshly ground is best for optimum flavor.
    • Unsalted butter or neutral oil – The choice is yours! Butter adds richness, while oil allows a higher searing temperature without burning.
    • Unsalted butter (for sauce) – It enriches the cream sauce, making it velvety and delicious.
    • Garlic – Freshly minced for a fragrant touch, garlic is essential in building layers of taste in your sauce.
    • Heavy cream – This is what gives the sauce its luxurious texture. You could substitute half-and-half, but it won’t be quite as creamy!
    • Cajun seasoning – This spice blend packs a punch! Adjust the amount to suit your heat preference.
    • Cayenne pepper (optional) – For those who like it hot! Use sparingly if you’re sensitive to spice.

    These ingredients will come together to create an unforgettable meal. For exact measurements, check the bottom of this article where you can find them for easy printing!

    How to Make Seared Scallops Spicy Cajun Cream

    Making Seared Scallops Spicy Cajun Cream is a breeze! Follow these simple steps to create a flavorful dish in no time. Trust me, with each step, your kitchen will start smelling heavenly.

    Step 1: Dry and Season the Scallops

    First things first, take your large sea scallops and pat them dry using paper towels. This step is crucial! Dry scallops will sear beautifully and develop that coveted golden crust.

    Once they’re dry, season both sides generously with salt and ground black pepper. This simple technique brings out their natural flavors, making each bite a delight!

    Step 2: Heat the Skillet

    Now, grab a large skillet and place it over medium-high heat. Add 2 tablespoons of butter or your favorite neutral oil.

    Wait until the butter melts and starts to shimmer. This means it’s hot enough for the scallops. You want to hear that sizzle when you first place them in the skillet. It’s music to my ears!

    Step 3: Sear the Scallops

    Carefully arrange the scallops in a single layer in the hot skillet. It’s tempting to move them around, but resist! Let them sear undisturbed for about 2 minutes.

    Watch for that golden crust to form on the bottom. Once you see it, it’s time to flip them over. Sear the other side for another 2 minutes until they’re just cooked through. They should be opaque in the center and spring back when gently pressed.

    Step 4: Prepare the Sauce

    Once the scallops are done, transfer them to a plate, covering them loosely to keep warm. In the same skillet, turn down the heat to medium and add 1 tablespoon of unsalted butter. Let it melt, and then toss in the minced garlic.

    Sauté the garlic for about a minute until it’s fragrant, but don’t let it brown! Burnt garlic can ruin the sauce’s flavor. Next, pour in the heavy cream and stir in your Cajun seasoning and a pinch of cayenne pepper if you’re feeling adventurous. Let it simmer for 2 to 3 minutes, stirring frequently, until it thickens slightly.

    Step 5: Combine and Serve

    Now, return those perfectly seared scallops to the skillet with the sauce. Gently turn the scallops to coat them evenly in that rich, spicy Cajun cream.

    Serve immediately, spooning extra sauce over the top. Your family is going to love this! Pair with a fresh side salad, and you’ve got a fantastic meal.

    Tips for Success

    • Always pat your scallops dry for a perfect sear.
    • Use a hot skillet to get that golden crust—don’t overcrowd the pan!
    • Feel free to adjust the spice levels based on your family’s preference.
    • Keep an eye on your garlic—burnt garlic can spoil the sauce!
    • Don’t be shy with the sauce; it adds the best flavor!

    Equipment Needed

    • Large skillet – A non-stick pan works well, but cast iron offers excellent heat retention.
    • Spatula – Use a fish spatula for easy flipping without breaking the scallops.
    • Paper towels – Essential for drying the scallops before cooking.
    • Measuring spoons – Helpful for accurate sauce ingredients.

    Variations on Seared Scallops Spicy Cajun Cream

    • Herb-Infused Sauce – Add fresh herbs like parsley or chives to the Cajun cream for a brightness that complements the dish.
    • Shrimp Option – Swap out scallops for shrimp! Cook them the same way, adjusting the searing time as shrimp cook faster than scallops.
    • Low-Calorie Twist – Use coconut milk or a light cream alternative for a lighter version without sacrificing too much creaminess.
    • Mushroom Addition – Sauté some sliced mushrooms along with the garlic for an earthy flavor that pairs well with the scallops.
    • Spice Variations – Experiment with different spice blends, like Old Bay or blackening seasoning, to give the dish a unique twist.

    Serving Suggestions for Seared Scallops Spicy Cajun Cream

    • Pair with a crisp green salad – A refreshing salad balances the richness of the dish.
    • Serve over creamy polenta – It adds an inviting texture and absorbs the delicious sauce.
    • Chill a glass of white wine – A Sauvignon Blanc elevates the meal.
    • Garnish with fresh herbs – Chopped parsley or chives add color and flavor!

    FAQs about Seared Scallops Spicy Cajun Cream

    Got questions about making Seared Scallops Spicy Cajun Cream? You’re not alone! Here are some common inquiries I’ve encountered, along with my answers to help you cook with confidence.

    Can I use frozen scallops for this recipe?

    Absolutely! Just make sure to thaw them completely and pat them dry before cooking. Frozen scallops can also be delicious when properly prepared.

    How do I know when scallops are cooked perfectly?

    Perfectly cooked scallops should be opaque and firm to the touch. They should spring back lightly when pressed. If they’re rubbery or overly firm, they may be overcooked.

    Can I make the sauce in advance?

    While it’s best freshly made, the sauce can be stored in the fridge for a day or two. Just reheat gently, but be cautious not to simmer too long!

    What can I serve with scallops besides salad?

    Scallops pair beautifully with various sides! Try serving them with garlic mashed potatoes, risotto, or sautéed vegetables for a complete meal.

    Is this recipe healthy?

    Yes! Scallops are a great source of lean protein. Paired with the creamy sauce, it’s nutritious and low in carbs, making it a satisfying option.

    Final Thoughts on Seared Scallops Spicy Cajun Cream

    There’s something genuinely magical about preparing Seared Scallops Spicy Cajun Cream at home. It elevates an ordinary weeknight into a culinary adventure, filled with rich flavors and warmth. Each velvety spoonful of sauce hugs the perfectly seared scallops, creating a symphony of taste that dances on your palate. I hope this dish brings your family as much joy as it has brought mine. Remember, cooking doesn’t have to be complicated; sometimes, it’s just about savoring the simple pleasures of good food. So, gather around the table, share smiles, and enjoy every delightful bite!


    Print

    clock clock iconcutlery cutlery iconflag flag iconfolder folder iconinstagram instagram iconpinterest pinterest iconfacebook facebook iconprint print iconsquares squares iconheart heart iconheart solid heart solid icon

    Description

    A quick and delightful dish featuring perfectly seared scallops in a rich and spicy Cajun cream sauce.


    • 1 pound large sea scallops, patted dry
    • Salt, to taste
    • Ground black pepper, to taste
    • 2 tablespoons unsalted butter or neutral oil
    • 1 tablespoon unsalted butter (for sauce)
    • 1 garlic clove, finely minced
    • 1/2 cup heavy cream
    • 1 teaspoon Cajun seasoning
    • Pinch ground cayenne pepper (optional)

    1. Pat the sea scallops thoroughly dry with paper towels. Season both sides with salt and ground black pepper.
    2. In a large skillet over medium-high heat, melt 2 tablespoons butter or heat oil until shimmering.
    3. Arrange scallops in a single layer and sear without moving for about 2 minutes, or until the underside develops a golden crust.
    4. Flip and sear for another 2 minutes until just cooked through. Transfer scallops to a plate and cover loosely to keep warm.
    5. In the same skillet over medium heat, add 1 tablespoon unsalted butter and minced garlic. Sauté for about 1 minute until fragrant, being careful not to brown the garlic.
    6. Pour in heavy cream, then stir in Cajun seasoning, cayenne pepper if desired, and salt. Simmer the sauce for 2 to 3 minutes, stirring often, until slightly thickened.
    7. Return the seared scallops to the pan with the sauce. Gently turn scallops to coat them evenly in the cream sauce.
    8. Serve immediately, spooning extra sauce over the top.

    Notes

    • For best results, use dry sea scallops.
    • Adjust the spiciness of the sauce by varying the amount of Cajun seasoning and cayenne pepper.
    • Prep Time: 10 minutes
    • Cook Time: 10 minutes
    • Category: Main Course
    • Method: Pan-searing
    • Cuisine: Southern

    Nutrition

    • Serving Size: 1 Serving
    • Calories: 400
    • Sugar: 1g
    • Sodium: 600mg
    • Fat: 30g
    • Saturated Fat: 15g
    • Unsaturated Fat: 10g
    • Trans Fat: 0g
    • Carbohydrates: 5g
    • Fiber: 0g
    • Protein: 35g
    • Cholesterol: 150mg

    Sharing is caring!

  • Salted Caramel Chocolate Chunk Muffins

    Salted Caramel Chocolate Chunk Muffins


    Introduction to Salted Caramel Chocolate Chunk Muffins

    There’s something magical about the aroma of freshly baked muffins wafting through the kitchen, don’t you think? These Salted Caramel Chocolate Chunk Muffins are not just a treat; they bring a sprinkle of happiness to your busy days. Whether you’re dashing off to work or planning a cozy weekend brunch, these muffins are the ideal quick solution. With their soft texture and gooey chunks of chocolate paired with a delightful caramel drizzle, they’re sure to impress the whole family. Trust me, these muffins will become a beloved staple in your home!

    Why You’ll Love This Salted Caramel Chocolate Chunk Muffins

    These Salted Caramel Chocolate Chunk Muffins are a dream for busy moms and professionals alike! They’re quick to whip up and bake in no time, making them perfect for those hectic mornings. The taste? Absolutely divine! With rich chocolate chunks melting in each bite and that sweet-salty caramel drizzle, each muffin feels like a decadent treat. Plus, they’re ideal for sharing or savoring all by yourself!

    Ingredients Used for Salted Caramel Chocolate Chunk Muffins

    Every great recipe begins with quality ingredients. For your Salted Caramel Chocolate Chunk Muffins, you’ll need the following:

    • All-purpose flour: This is the base, giving our muffins structure while keeping them tender.
    • Baking soda: A little leavening agent that helps the muffins rise and stay fluffy.
    • Salt: Just a pinch enhances all the flavors, balancing the sweetness beautifully.
    • Unsalted butter: Provides richness and moisture; I always recommend butter for the best flavor!
    • Brown sugar: Adds a deep, caramel-like sweetness that pairs perfectly with our other flavors.
    • Granulated sugar: This adds sweetness and helps achieve a lovely texture.
    • Egg: Vital for binding and adding moisture; it’s the glue that holds it all together.
    • Vanilla extract: A must for that warm, comforting taste; it elevates the entire muffin experience.
    • Buttermilk: Ensures a tender crumb; you can use regular milk with a splash of vinegar as a substitute!
    • Chopped chocolate chunks: The star of the show, bringing melty chocolate joy to each bite.
    • Caramel sauce: A delightful drizzle that ups the decadence factor; feel free to use store-bought or homemade!
    • Chopped walnuts (optional): These add a lovely crunch. If you’re nut-free, feel free to skip them!

    Excited to whip up these delightful muffins? Exact quantities are at the bottom of this article, waiting for you to print them out!

    How to Make Salted Caramel Chocolate Chunk Muffins

    Step 1: Preheat and Prepare

    Let’s get started by preheating your oven to 350°F (175°C). This is crucial for perfect muffins! While that’s heating up, grab a muffin tin and line it with paper liners. This not only makes for easy clean-up but also gives your muffins a beautiful presentation. Trust me, you’ll want to show them off!

    Step 2: Mix Dry Ingredients

    In a medium bowl, whisk together the all-purpose flour, baking soda, and salt. This step might seem simple, but it’s important! Mixing helps ensure everything is evenly distributed. Plus, it creates an airy mixture that contributes to fluffy muffins. Set this aside for later, as you’ll be mixing it with the wet ingredients soon!

    Step 3: Cream Butter and Sugars

    In a large bowl, beat the softened unsalted butter, brown sugar, and granulated sugar together. You want to mix these until the mixture is light and fluffy. This could take about 2-3 minutes. That airy texture is what makes your muffins soft and delicious. Use an electric mixer for the best results, but a good whisk will do in a pinch!

    Step 4: Incorporate Wet Ingredients

    Next, add in one large egg and a teaspoon of vanilla extract. Beat this mixture well until everything is combined smoothly. The egg acts as a binder, while the vanilla adds that comforting sweetness. You’ll want it to look creamy and inviting. This is where the magic starts to happen, so don’t rush!

    Step 5: Combine Mixtures

    Time to bring it all together! Slowly add in your dry flour mixture alternately with the buttermilk. Start by adding a third of the flour, followed by half the buttermilk, and repeat until everything is just combined. Be careful not to overmix; you want your muffins to remain tender and fluffy. Trust me, it’s worth it!

    Step 6: Fold in Chocolate

    Now, gently fold in your chopped chocolate chunks. Just use a spatula or wooden spoon to avoid breaking up those sweet morsels! You want to evenly distribute the chocolate throughout the batter. Picture those gooey rivers of chocolate melting in your mouth—heavenly, right? This step is crucial for distributing that delicious chocolate goodness!

    Step 7: Fill Muffin Tin

    Using a scoop or spoon, divide the batter evenly among the muffin cups. Aim to fill each one about two-thirds full. Now, here’s the fun part—drizzle a tablespoon of caramel sauce over each muffin before baking. If you’re feeling fancy, sprinkle some chopped walnuts on top for added crunch. These little additions make all the difference!

    Step 8: Bake Muffins

    Place your muffin tin in the preheated oven and bake for 18-20 minutes. Keep an eye on them! You’ll know they’re done when a toothpick inserted in the center comes out clean or with a few moist crumbs. Each minute can make a difference, so it’s worth it to check early. The smell will be incredible, drawing everyone to the kitchen!

    Step 9: Cool and Serve

    Once baked, remove the muffins from the oven and allow them to cool for about five minutes in the tin. Then, transfer them to a wire rack. Before serving, drizzle some extra caramel sauce on top for that final touch of deliciousness. These warm muffins are best enjoyed fresh, so gather your loved ones and dig in!

    Tips for Success

    • Use room temperature ingredients for the best mixing results.
    • Don’t overmix the batter; it can lead to tough muffins.
    • Experiment with different chocolate types, like dark or milk chocolate chunks.
    • For an extra caramel hit, warm your caramel sauce before drizzling.
    • Remember to cool your muffins before serving for the best texture.

    Equipment Needed

    • Muffin tin: Use a standard size for perfect muffins; mini muffin tins work too for bite-sized treats.
    • Paper liners: These help with easy removal; silicone liners are a great reusable alternative.
    • Mixing bowls: Pot for glass or stainless steel for durability and ease.
    • Electric mixer or whisk: A hand mixer speeds things up, but a good whisk works perfectly!

    Variations for Salted Caramel Chocolate Chunk Muffins

    • Gluten-free: Substitute all-purpose flour with a gluten-free flour blend for a delicious gluten-free option.
    • Vegan: Replace the egg with a flax egg (1 tablespoon ground flaxseed mixed with 2.5 tablespoons of water) and use coconut oil instead of butter.
    • Fruit additions: Add fresh berries like raspberries or chopped apples for a fruity twist on these muffins.
    • Different nuts: Swap walnuts for pecans, almonds, or even coconut flakes for different textures and flavors.
    • Cinnamon kick: Incorporate a teaspoon of cinnamon into the dry ingredients for a warm spice that complements the chocolate and caramel.

    Serving Suggestions for Salted Caramel Chocolate Chunk Muffins

    • Pair warm muffins with a dollop of whipped cream for a decadent dessert.
    • Serve alongside a scoop of vanilla ice cream for an indulgent treat.
    • Enjoy with a hot cup of coffee or milk for a cozy breakfast.
    • For a delightful brunch, arrange muffins on a pretty platter and garnish with fresh berries.

    FAQs about Salted Caramel Chocolate Chunk Muffins

    Can I make these muffins ahead of time?

    Absolutely! You can prepare the batter the night before and refrigerate it. Just remember to bring it to room temperature before baking. This can save you precious time in the morning, allowing you to enjoy warm muffins fresh out of the oven!

    Can I freeze Salted Caramel Chocolate Chunk Muffins?

    Yes, they freeze wonderfully! Just let the muffins cool completely, then wrap each one tightly in plastic wrap and place them in a freezer-safe container. They can last up to three months. When you’re ready to enjoy, just thaw them at room temperature or warm them in the oven.

    What can I substitute for buttermilk?

    If you don’t have buttermilk on hand, no worries! You can make a quick substitute by mixing one cup of milk with a tablespoon of vinegar or lemon juice. Let it sit for about five minutes, and you’ll have an excellent buttermilk replacement for your Salted Caramel Chocolate Chunk Muffins.

    Are these muffins suitable for a special diet?

    Yes! With a few adjustments, you can cater to different dietary needs. For gluten-free options, use a gluten-free flour mix. For a dairy-free version, swap the butter with coconut oil and replace buttermilk with a dairy-free alternative. They can still be delicious!

    How can I make these muffins even more decadent?

    If you’re craving an extra layer of flavor, consider adding a sprinkle of sea salt on top of the caramel drizzle. This simple addition enhances the sweetness and gives your Salted Caramel Chocolate Chunk Muffins that irresistible sweet-salty contrast.

    Final Thoughts on Salted Caramel Chocolate Chunk Muffins

    Every bite of these Salted Caramel Chocolate Chunk Muffins is a little celebration, isn’t it? They bring joy not just from their delightful flavors, but from the moments spent in the kitchen creating them. Whether you’re enjoying them with family or indulging in a quiet afternoon treat, these muffins offer warmth and comfort. I love how they evoke smiles and nostalgia, making any day feel special. So, roll up your sleeves, gather your loved ones, and bake up a batch of happiness. Trust me, once you try them, they’ll become your new favorite comfort food!


    Print

    clock clock iconcutlery cutlery iconflag flag iconfolder folder iconinstagram instagram iconpinterest pinterest iconfacebook facebook iconprint print iconsquares squares iconheart heart iconheart solid heart solid icon

    Description

    Delicious and decadent Salted Caramel Chocolate Chunk Muffins with a soft texture and rich flavors of chocolate and caramel.


    • 1 1/2 cups all-purpose flour
    • 1/2 teaspoon baking soda
    • 1/2 teaspoon salt
    • 1/2 cup unsalted butter, softened
    • 1/2 cup brown sugar
    • 1/4 cup granulated sugar
    • 1 large egg
    • 1 teaspoon vanilla extract
    • 1/2 cup buttermilk
    • 1 1/2 cups chopped chocolate chunks
    • 1/2 cup caramel sauce
    • 1/4 cup chopped walnuts (optional)

    1. Preheat your oven to 350°F (175°C). Line a muffin tin with paper liners.
    2. In a medium bowl, whisk together the flour, baking soda, and salt.
    3. In a large bowl, beat the butter, brown sugar, and granulated sugar until light and fluffy.
    4. Add the egg and vanilla extract, beating until well combined.
    5. Slowly add the flour mixture to the wet ingredients, alternating with the buttermilk, and mix until just combined.
    6. Fold in the chopped chocolate chunks.
    7. Divide the batter evenly among the muffin cups.
    8. Drizzle each muffin with a tablespoon of caramel sauce and sprinkle chopped walnuts on top (if using).
    9. Bake for 18-20 minutes, or until a toothpick inserted into the center comes out clean.
    10. Allow the muffins to cool for a few minutes before drizzling with extra caramel sauce and serving.

    Notes

    • For a richer flavor, use high-quality chocolate chunks.
    • These muffins can be stored in an airtight container for up to 3 days.
    • Feel free to customize with different nuts or add more caramel sauce for serving.
    • Prep Time: 15 minutes
    • Cook Time: 20 minutes
    • Category: Dessert
    • Method: Baking
    • Cuisine: American

    Nutrition

    • Serving Size: 1 muffin
    • Calories: 220
    • Sugar: 12g
    • Sodium: 150mg
    • Fat: 10g
    • Saturated Fat: 5g
    • Unsaturated Fat: 3g
    • Trans Fat: 0g
    • Carbohydrates: 30g
    • Fiber: 1g
    • Protein: 3g
    • Cholesterol: 30mg

    Sharing is caring!

  • Buffalo Chicken Egg Rolls

    Buffalo Chicken Egg Rolls


    Introduction to Buffalo Chicken Egg Rolls

    Hey, foodie friends! Here’s a quick, tasty, and refreshing way to level up your appetizer game: Buffalo Chicken Egg Rolls. These little gems are worth their weight in gold when you’re running around all week. Soaking up kids’ activities while working, or just working short and hard, it’s great to have these little crispy babies ready in a flash. Trust me: get ready to wow your family and friends. Believe me, once you make them for me once, they are going to end up being one of your favorite things as well.

    Why You’ll Love This Buffalo Chicken Egg Rolls

    Buffalo Chicken Egg Rolls are a game-changer for anyone short on time but big on flavor. They combine the spicy goodness of buffalo chicken with a crunchy exterior that’s simply irresistible. Plus, they can be made in under 35 minutes—now that’s what I call a win! Perfect as a quick snack or a party favorite, these egg rolls will have everyone asking for more!

    Ingredients for Buffalo Chicken Egg Rolls

    Let’s gather all the goodies needed to make these scrumptious Buffalo Chicken Egg Rolls! Here’s what you’ll need:

    • Rotisserie Chicken: This pre-cooked chicken saves you time. It adds a savory flavor that pairs perfectly with the buffalo sauce.
    • Sharp Cheddar Cheese: This cheese brings a tangy and bold flavor that enhances the egg rolls. It melts wonderfully, creating a gooey texture.
    • Mozzarella Cheese: Adding mozzarella to the mix creates a delightful creaminess which balances out the sharpness of the cheddar.
    • Cream Cheese: This ingredient adds smoothness and richness to the filling. It also helps bind everything together.
    • Buffalo Sauce: This is where the magic happens! It provides that signature spicy kick to the egg rolls. Feel free to adjust the quantity for your taste.
    • Ranch Seasoning Mix: A packet of ranch seasoning imparts a flavorful, savory depth to the filling. It complements the buffalo sauce beautifully.
    • Egg Roll Wrappers: These crispy carriers hold your flavorful filling. They’re easy to work with and give that satisfying crunch when cooked.
    • Water: A simple ingredient but essential for sealing the egg rolls to keep the filling secure during cooking.
    • Dipping Sauce: Dress these egg rolls up with ranch or blue cheese dressing for that final touch of flavor.

    You’ll find precise measurements and all the details for these ingredients at the bottom of the article for easy printing.

    How to Make Buffalo Chicken Egg Rolls

    Now comes the fun part! Making these Buffalo Chicken Egg Rolls is a rewarding adventure in the kitchen. Trust me, once you master this process, you’ll be whipping them up on repeat. Let’s dive right into the steps!

    Prepare the Filling

    First, grab a large mixing bowl. It’s time to combine all those delicious ingredients.

    Start with the finely diced rotisserie chicken. It’s flavorful and tender, perfect for our filling.

    Next, add the softened cream cheese. This adds richness and ties everything together. Use a spatula or a large spoon to help mix well.

    Pour in the buffalo sauce. Feel free to adjust based on how fiery you like it!

    Then, toss in the shredded sharp cheddar and mozzarella cheeses. They add a lovely gooey texture.

    Lastly, shake in the dry ranch seasoning. Don’t skip this—it’s what gives your egg rolls that extra bounce of flavor. Mix until everything is evenly combined. You should have a creamy, spicy filling that’s ready for action!

    Assemble the Egg Rolls

    Now that we have our delightful filling, let’s get wrapping!

    Take one egg roll wrapper and place it on a clean surface, with a corner pointing toward you. This is important for the folding!

    Position about 1/3 cup of your filling in the center of the wrapper. Don’t overstuff; we want these egg rolls to close properly.

    Lightly moisten the edges of the wrapper with water. This is your glue! It helps seal them tightly.

    Fold the bottom corner of the wrapper over the filling. Then, fold in the left and right corners. Finally, roll it up tightly from the bottom to the top, ensuring the filling is securely enclosed.

    Repeat this process for all the wrappers. You’ll soon have a beautiful platter of assembled egg rolls, just waiting to be cooked!

    Cooking Methods for Egg Rolls

    Now that our egg rolls are assembled, let’s get cooking! There are three fantastic methods you can choose from:

    Air Frying: Preheat your air fryer to 200°C (about 400°F). arrange the filled egg rolls in a single layer, making sure they’re not crowded. Spray the tops lightly with nonstick cooking spray. Cook for about 3–4 minutes, then turn them over and spray again. Cook for another 3–4 minutes until they’re golden and crispy.

    Frying: Heat up about 5–7 cm of vegetable oil in a deep pot to 185°C (365°F). Carefully fry 3–4 egg rolls at a time, turning occasionally, for about 3 minutes or until they turn golden brown and crispy. Don’t forget to drain them on paper towels afterward to remove excess oil!

    Baking: Preheat your oven to 200°C (about 400°F). Line a baking sheet with parchment paper. Arrange the egg rolls on the sheet, brush or spray the tops with oil, and bake for 15–20 minutes until they reach that perfect golden brown color.

    Whichever method you choose, you’re in for a treat. Enjoy the delightful crunch of these Buffalo Chicken Egg Rolls!

    Tips for Success

    • Ensure the oil is at the right temperature when frying to achieve that perfect crunch.
    • Don’t overcrowd the air fryer or pot; cook in batches for even cooking.
    • Can’t handle the heat? Simply reduce the amount of buffalo sauce for a milder flavor.
    • Try freezing uncooked egg rolls for a quick meal option later.
    • For a fun twist, add some veggies like finely chopped bell peppers or carrots to your filling!

    Equipment Needed

    • Mixing Bowl: A large bowl for combining your filling. A spoon or spatula works great here.
    • Egg Roll Wrappers: Find these in the refrigerated section or use spring roll wrappers as an alternative.
    • Cooking Method: Choose an air fryer, deep pot, or oven for cooking.
    • Measuring Cups: Handy for measuring your filling ingredients accurately.

    Variations of Buffalo Chicken Egg Rolls

    • Vegetable-Loaded: Add finely chopped bell peppers, zucchini, or spinach to the filling for an extra crunch and nutrition boost.
    • Cheddar and Blue Cheese: Incorporate crumbled blue cheese along with the cheddar for a tangy twist that complements the buffalo sauce beautifully.
    • Buffalo Cauliflower: Swap out the chicken for roasted cauliflower to create a vegetarian version that still packs a spicy punch.
    • Gluten-Free Option: Use gluten-free egg roll wrappers to make this dish suitable for gluten-sensitive eaters.
    • Sweet and Spicy: Mix in a touch of honey or maple syrup with the buffalo sauce for a sweet heat that’ll surprise your taste buds!

    Serving Suggestions

    • Pair your Buffalo Chicken Egg Rolls with a refreshing side salad for a light meal.
    • Serve with crispy celery sticks and carrot sticks for a classic combo.
    • Complement with your favorite dipping sauces—ranch or blue cheese dressing are perfect!
    • For drinks, try a zesty lemonade or a chilled beer to elevate the experience.
    • Present with a sprinkle of fresh herbs for a colorful, appetizing touch.

    FAQs about Buffalo Chicken Egg Rolls

    Can I use leftover chicken for this recipe?

    Absolutely! Leftover rotisserie chicken works perfectly for these Buffalo Chicken Egg Rolls. It saves time and adds great flavor. Just make sure to shred it finely for the best texture.

    How can I store leftover egg rolls?

    If you have any leftovers, store them in an airtight container in the fridge. They’ll last about 2–3 days. To reheat, pop them in the air fryer or oven until they’re hot and crispy again!

    Can I make these egg rolls ahead of time?

    Yes! You can assemble the egg rolls ahead of time and refrigerate them for a day. You can also freeze them before cooking. Just remember to adjust cooking time accordingly!

    What’s the best dipping sauce for these egg rolls?

    Ranch and blue cheese dressing are two fantastic options! They add a cool contrast to the spiciness of the buffalo sauce, creating a delicious balance.

    Are Buffalo Chicken Egg Rolls suitable for parties?

    Definitely! These crispy delights make for an impressive appetizer at any gathering. They’re easy to eat and utterly addictive, so your guests will love them!

    Final Thoughts

    Making Buffalo Chicken Egg Rolls is more than just cooking; it’s about creating moments. These crispy treats bring smiles around the table, igniting taste buds with every bite. I love how they transform busy weeknights into something special without stealing hours from my schedule. Whether it’s game day or a simple family dinner, these egg rolls deliver joy and satisfaction. So, grab your loved ones, whip up a batch, and enjoy the chatter and laughter that come when sharing good food. You’ll find this recipe not only saves time but opens the door to delightful flavor adventures!


    Print

    clock clock iconcutlery cutlery iconflag flag iconfolder folder iconinstagram instagram iconpinterest pinterest iconfacebook facebook iconprint print iconsquares squares iconheart heart iconheart solid heart solid icon

    Description

    Buffalo Chicken Egg Rolls are a crispy and flavorful appetizer that combines rotisserie chicken with creamy cheese and spicy buffalo sauce, all wrapped in a crunchy egg roll wrapper.


    • 280 g finely diced rotisserie chicken
    • 113 g sharp cheddar cheese, shredded
    • 113 g mozzarella cheese, shredded
    • 113 g cream cheese, softened
    • 60 ml buffalo sauce, plus extra for serving
    • 28 g dry ranch seasoning mix (1 packet or 2 tablespoons)
    • 8 egg roll wrappers
    • Water, for sealing
    • Ranch dressing or blue cheese dressing, for dipping

    1. In a large bowl, thoroughly combine rotisserie chicken, softened cream cheese, buffalo sauce, shredded cheddar, shredded mozzarella, and ranch seasoning until evenly mixed.
    2. Working with one wrapper at a time, place approximately 1/3 cup of filling onto the center of each egg roll wrapper. Lightly moisten the edges with water, fold the bottom corner over the filling, then fold in the right and left corners toward the center, and roll tightly to enclose.
    3. Preheat the air fryer to 200°C. Arrange filled egg rolls in the fryer basket in a single layer. Lightly spray the tops with nonstick cooking spray. Air fry for 3–4 minutes, turn each egg roll, spray again, and cook for an additional 3–4 minutes until golden brown and crisp.
    4. Present hot egg rolls with ranch or blue cheese dressing and extra buffalo sauce as desired.
    5. Heat 5–7 cm of vegetable oil in a deep pot to 185°C. Fry 3–4 egg rolls at a time, turning occasionally, for about 3 minutes until golden and crispy. Drain on paper towels; ensure oil temperature returns to 185°C between batches.
    6. Preheat the oven to 200°C and line a baking sheet with parchment paper. Arrange the egg rolls on the sheet, spray or brush the tops with oil, and bake for 15–20 minutes until golden brown and crisp.

    Notes

    • Ensure the oil is at the correct temperature for frying to avoid soggy egg rolls.
    • Feel free to adjust the amount of buffalo sauce for desired spiciness.
    • Egg rolls can be frozen before cooking for a later meal.
    • Prep Time: 20 minutes
    • Cook Time: 15 minutes
    • Category: Appetizer
    • Method: Frying, Baking, Air Frying
    • Cuisine: American

    Nutrition

    • Serving Size: 1 egg roll
    • Calories: 250
    • Sugar: 1 g
    • Sodium: 600 mg
    • Fat: 15 g
    • Saturated Fat: 7 g
    • Unsaturated Fat: 5 g
    • Trans Fat: 0 g
    • Carbohydrates: 20 g
    • Fiber: 1 g
    • Protein: 12 g
    • Cholesterol: 40 mg

    Sharing is caring!

  • Hawaiian Huli Huli Chicken Stack

    Hawaiian Huli Huli Chicken Stack


    Introduction to Hawaiian Huli Huli Chicken Stack

    Oh the beauty of a gorgeous Hawaiian Huli Huli Chicken Stack…I picture it…It’s a crazy weeknight and you’re trying to get something yummy together when your loved ones walk right into the kitchen. With this bright stack, you can spirit them on a virtual trip to Hawaii with no step taken out of your house. This dish isn’t just quick and convenient to make, it’s also pretty tasty, giving an impressive upgrade to plain chicken that was rather ordinary. It’s going to pull everyone in with the sweet and yummy smell, a great way to win over those special to you. Here we go!

    Why You’ll Love This Hawaiian Huli Huli Chicken Stack

    This Hawaiian Huli Huli Chicken Stack is a lifesaver for busy evenings. It’s simple to whip together, making it a go-to for any mom or professional. The marinade works its magic quickly, infusing the chicken with fantastic flavor. Plus, who can resist the delicious combination of char-grilled chicken and caramelized pineapple? With just a handful of ingredients, you’ll feel like a culinary hero without the stress. Yum!

    Ingredients for Hawaiian Huli Huli Chicken Stack

    Gathering your ingredients is the fun part! Each element in this Hawaiian Huli Huli Chicken Stack plays a crucial role in crafting that mouthwatering flavor.

    • Boneless, skinless chicken breasts or thighs: The star of your dish, these lean cuts soak up all that scrumptious marinade. Thighs bring juiciness, while breasts are a healthier option.
    • Low-sodium teriyaki sauce: This savory sauce is your first layer of flavor. It adds a fantastic umami taste without overwhelming saltiness.
    • Pure pineapple juice: Go for the no added sugar kind! It’s sweet and tangy, helping to elevate the flavors and tenderize the chicken.
    • Low-sodium or naturally brewed soy sauce: Just a splash will enhance the savory notes from the teriyaki sauce. It’s a great way to keep the salt levels in check.
    • Dark brown sugar: This sweetener gives caramelization an extra depth. You can adjust it based on your preferred level of sweetness.
    • Garlic: Minced garlic brings a warm, aromatic essence that complements the sweetness of the sauce.
    • Freshly grated ginger: Packed with a bit of zest, ginger adds a delightful bite and freshness to your marinade.
    • Toasted sesame oil: A drizzle of this oil adds a nutty flavor, rounding out the taste profile beautifully. You’ll love the touch it gives!
    • Fresh pineapple rings: Grilling these will unlock their natural sweetness! They’ll bring a tropical twist to your dish.
    • Cooked white rice: This serves as the perfect base. It’s mild and fluffy, soaking up the sauce and balancing the flavors.
    • Sliced green onions: A garnish that adds a pop of color and a gentle crunch. They’re great for finishing the dish.
    • Sesame seeds: These tiny seeds add a touch of elegance and additional flavor. They’re the final flourish!

    Ready to grab everything? For the exact quantities, scroll down to the recipe section at the bottom of this article. Happy cooking!

    How to Make Hawaiian Huli Huli Chicken Stack

    Now, let’s get our hands dirty and create this delightful Hawaiian Huli Huli Chicken Stack together. Each step is easy and straightforward! I promise you’ll savor every moment—both preparing it and devouring it!

    Step 1: Prepare the Marinade

    First, grab a medium bowl. In it, whisk together the teriyaki sauce, pineapple juice, soy sauce, and brown sugar. Add the minced garlic, freshly grated ginger, and sesame oil. Keep whisking until everything is well combined, and trust me, the aroma will whisk you away to Hawaii!

    Step 2: Marinate the Chicken

    Now, place the chicken in a large zip-top bag or a shallow dish. Pour that magically fragrant marinade over the chicken, ensuring it’s all coated nicely. Seal the bag tight or cover the dish, and pop it into the fridge. For the best flavor experience, marinate for at least two hours, or overnight if you’re organized!

    Step 3: Grill the Chicken

    It’s grilling time! Preheat your grill or grill pan to medium-high heat. Once hot, carefully remove the chicken from the marinade. It’s now ready for its charred makeover! Grill the chicken for about 6–7 minutes per side, until it’s fully cooked and has beautiful grill marks. That smokiness will be pure bliss!

    Step 4: Grill the Pineapple

    While the chicken is grilling, let’s show some love to our pineapple rings! Place them on the grill and cook for 2–3 minutes on each side. You’re aiming for those gorgeous caramelized edges that will add a delightful sweetness to the dish. Set them aside once they’re grilled to perfection!

    Step 5: Make the Marinade Glaze

    With the chicken and pineapple done, let’s create a glaze that will wow your taste buds. Transfer the reserved marinade (that hasn’t touched raw chicken!) to a small saucepan. Bring it to a boil over medium heat, then reduce it to a simmer. Cook it down for 5–6 minutes until it thickens into a glossy glaze, perfect for drizzling!

    Step 6: Assemble the Stack

    Let’s make our beautiful stack! Start by spooning cooked white rice onto serving plates. Lay the grilled chicken over the rice, then crown it with a caramelized pineapple ring. Drizzle that luscious marinade glaze generously over everything. For a pop of color, sprinkle sliced green onions and sesame seeds right on top. Voila! You’ve just created a stunning dish!

    Tips for Success

    • For the most flavorful chicken, let it marinate overnight if you can.
    • Keep an eye on the grill to avoid burning the chicken or pineapple.
    • Don’t rush the glaze—let it reduce until it’s thick and glossy for best results.
    • Feel free to use leftover chicken in salads or sandwiches for a quick meal.
    • Garnish with fresh herbs for extra flavor and a vibrant look!

    Equipment Needed

    • Grill or Grill Pan: A standard outdoor grill is perfect, but a grill pan on your stovetop works great too.
    • Medium Bowl: You’ll need one for mixing the marinade. Any mixing bowl will do!
    • Zip-top Bag or Shallow Dish: Use either for marinating your chicken—just ensure it’s sealable.
    • Small Saucepan: This is necessary for reducing the marinade into a glaze.
    • Whisk: A simple whisk or even a fork will help you mix those ingredients smoothly.

    Variations of Hawaiian Huli Huli Chicken Stack

    • Pineapple Teriyaki Tofu: Swap out chicken for firm tofu for a delicious vegetarian option. The marinade works wonders to infuse flavor!
    • Spicy Kick: Add some sriracha or red pepper flakes into the marinade for a fiery twist that will excite your taste buds.
    • Swap Rice: Try quinoa or cauliflower rice as a base for a gluten-free or lower-carb option. Both add a unique texture!

    • Herb Infusions: Incorporate fresh herbs like cilantro or basil into the glaze for a fresh pop of flavor and color.
    • Fruit Variations: Experiment with other fruits like mango or peaches! Grilling them brings out their natural sweetness.

    Serving Suggestions

    • Pair with a crisp green salad drizzled with a light vinaigrette for a refreshing balance.
    • Serve alongside coconut rice or jasmine rice for an aromatic explosion.
    • Consider a fruity mocktail, like pineapple lemonade, to complement the tropical flavors.
    • For a festive touch, serve in vibrant bowls that reflect the beauty of Hawaii!

    FAQs about Hawaiian Huli Huli Chicken Stack

    What is Huli Huli Chicken?
    Huli Huli Chicken is a popular Hawaiian dish that features grilled chicken marinated in a delightful mix of teriyaki sauce and pineapple juice. The name “Huli” means “to turn,” referencing the grill’s flipping action for perfect cooking.

    Can I make this recipe gluten-free?
    Absolutely! Simply use gluten-free teriyaki sauce and naturally brewed soy sauce for a gluten-free Hawaiian Huli Huli Chicken Stack that everyone can enjoy.

    How do I store leftovers?
    Store leftovers in an airtight container in the refrigerator for up to three days. Reheat gently in the microwave or on the stovetop to enjoy your meal again.

    Can I substitute the chicken with another protein?
    Yes, you can! Try using shrimp or pork instead of chicken for a delicious twist on the classic Hawaiian recipe. Just keep in mind that cooking times may vary.

    What sides pair well with Huli Huli Chicken?
    This dish complements a variety of sides! Consider serving it with a fresh salad, grilled veggies, or even coconut rice for that extra tropical flair.

    Final Thoughts on Hawaiian Huli Huli Chicken Stack

    Creating a Hawaiian Huli Huli Chicken Stack is like wrapping your family in a warm, flavorful hug. The burst of sweet and savory flavors dances on your palate, transporting you to a tropical paradise. I love how this dish not only pleases taste buds but also brings everyone together for a joyous meal. Whether it’s a weeknight dinner or a gathering with friends, this recipe shines brightly, leaving everyone wanting more. So, ready your grill and start this culinary adventure—you’re bound to create unforgettable memories around the table. Aloha to deliciousness!


    Print

    clock clock iconcutlery cutlery iconflag flag iconfolder folder iconinstagram instagram iconpinterest pinterest iconfacebook facebook iconprint print iconsquares squares iconheart heart iconheart solid heart solid icon

    Description

    A delicious and flavorful Hawaiian dish featuring grilled chicken marinated in teriyaki sauce and served with caramelized pineapple.


    • 680 g boneless, skinless chicken breasts or thighs
    • 120 ml low-sodium teriyaki sauce
    • 80 ml pure pineapple juice (no added sugar)
    • 60 ml low-sodium or naturally brewed soy sauce
    • 3 tablespoons dark brown sugar
    • 2 large garlic cloves, minced
    • 1 tablespoon freshly grated ginger
    • 1 teaspoon toasted sesame oil
    • 4 fresh pineapple rings
    • Cooked white rice, for stacking
    • 2 tablespoons sliced green onions, for garnish
    • 1 teaspoon sesame seeds, for garnish

    1. In a medium bowl, whisk together teriyaki sauce, pineapple juice, soy sauce, brown sugar, minced garlic, grated ginger, and toasted sesame oil until combined.
    2. Place chicken pieces in a large zip-top bag or shallow dish. Pour the marinade over, seal, and refrigerate for at least 2 hours, or overnight for enhanced flavor.
    3. Preheat a grill or grill pan to medium-high heat. Remove chicken from marinade, reserving the excess. Grill chicken for 6–7 minutes per side until fully cooked and lightly charred.
    4. Place pineapple rings on the grill and cook for 2–3 minutes on each side until caramelized with visible grill marks.
    5. Transfer reserved marinade to a small saucepan. Bring to a boil and simmer for 5–6 minutes until reduced to a thick, glossy glaze. Remove from heat.
    6. Spoon cooked white rice onto serving plates. Arrange slices of grilled chicken over rice, top with a caramelized pineapple ring, and drizzle with the marinade glaze. Garnish with sliced green onions and sesame seeds before serving.

    Notes

    • For the best flavor, marinate the chicken overnight.
    • Adjust the sweetness of the marinade by altering the amount of brown sugar.
    • Prep Time: 15 minutes
    • Cook Time: 20 minutes
    • Category: Main Course
    • Method: Grilling
    • Cuisine: Hawaiian

    Nutrition

    • Serving Size: 1 serving
    • Calories: 430
    • Sugar: 12 g
    • Sodium: 780 mg
    • Fat: 9 g
    • Saturated Fat: 2 g
    • Unsaturated Fat: 7 g
    • Trans Fat: 0 g
    • Carbohydrates: 58 g
    • Fiber: 2 g
    • Protein: 36 g
    • Cholesterol: 90 mg

    Sharing is caring!