Author: IHAAL Team

  • Cherry-Vibe Stuffed Portobello Mushrooms

    Cherry-Vibe Stuffed Portobello Mushrooms


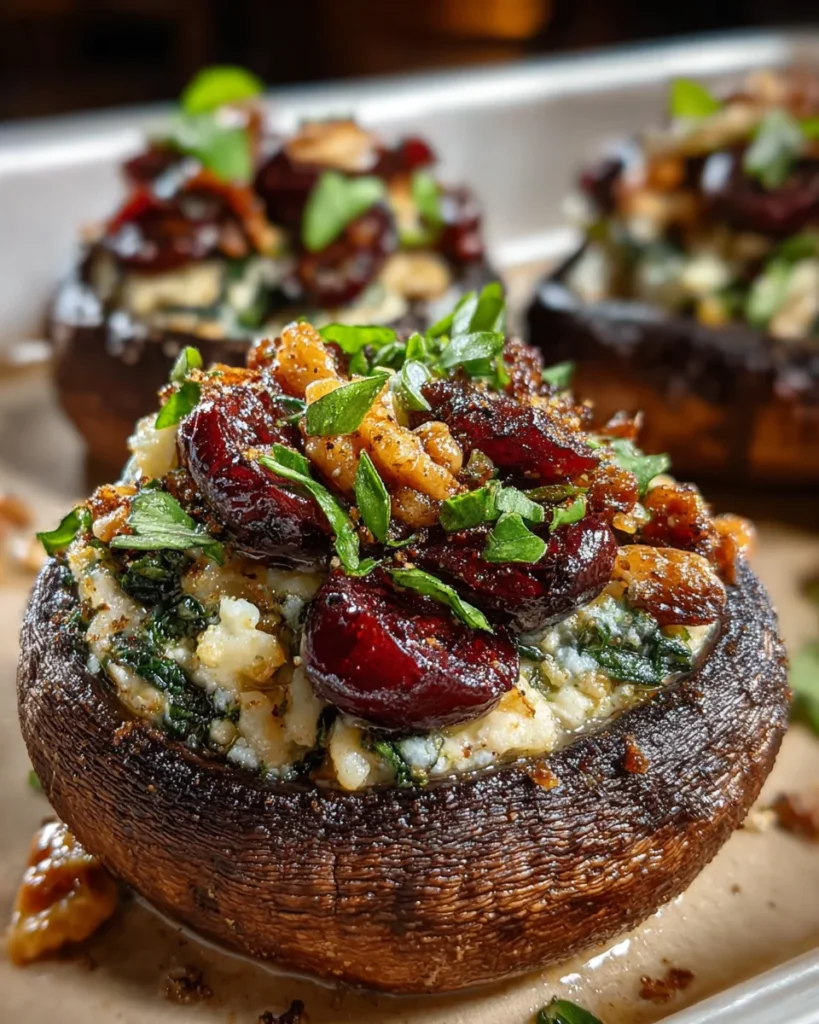
    Introduction to Cherry-Vibe Stuffed Portobello Mushrooms

    I’m a busy home cook but always running after those recipes, that feel like a warm hug – so comforting, so delightful. Look no further than my Cherry-Vibe Stuffed Portobello Mushrooms, Friends! These beauties don’t just carry great flavor but are a quick out for a hectic day and an ace dinner with which to win over your loved ones. Think biting into those meaty portobello caps that house a delicious sweet and savory cherry ‘stuffing’- it’s almost like culinary love letters that speak of simplicity versus sophistication for any occasion.

    Why You’ll Love This Cherry-Vibe Stuffed Portobello Mushrooms

    These Cherry-Vibe Stuffed Portobello Mushrooms are a fantastic choice for busy moms and professionals alike. They require just a handful of ingredients and minimal prep time, making weeknight dinners a breeze. Plus, the smoky, savory mushrooms paired with the vibrant cherry filling create a taste explosion that will make your taste buds dance! This dish is not just easy to prepare; it’s also a crowd-pleaser that brings family together around the table.

    Ingredients for Cherry-Vibe Stuffed Portobello Mushrooms

    Gathering the right ingredients is the first step to crafting these delicious Cherry-Vibe Stuffed Portobello Mushrooms. You may already have some of these in your pantry! Here’s what you’ll need:

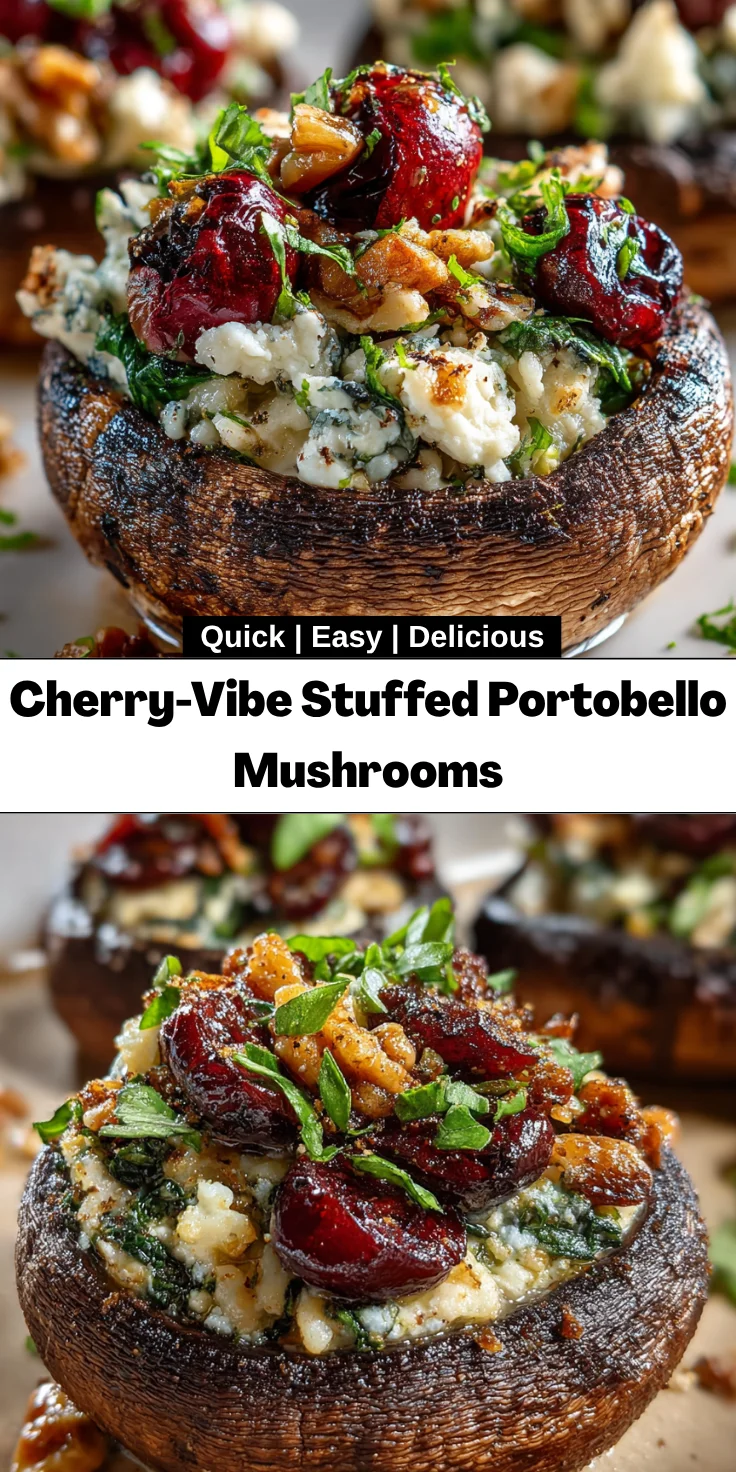
    • Portobello mushroom caps: Large and meaty, these mushrooms are the perfect vessel for our sweet and savory filling.
    • Olive oil: For brushing on the mushrooms, it adds a hint of richness and a lovely golden color when baked.
    • Salt and black pepper: Simple seasonings to enhance the natural flavors of our ingredients.
    • Fresh cherries: The stars of this recipe! Sweet, juicy cherries lend a delightful pop of flavor. Thawed and drained frozen cherries work too if fresh ones aren’t available.
    • Goat cheese: Creamy and tangy, it pairs beautifully with cherries. You could substitute it with a plant-based cheese for a vegan option.
    • Toasted walnuts: These crunchy bits add texture and a nutty aroma that complements the filling perfectly.
    • Fresh basil and parsley: Bright, fresh herbs bring a burst of flavor and color to the filling.
    • Shallot: A mild onion flavor that enriches our stuffing without overpowering it.
    • Lemon: Both the zest and juice add a zesty brightness, balancing the sweetness of the cherries.
    • Honey: An optional touch of sweetness that can intensify the cherry flavor.
    • Orzo pasta: This tiny pasta adds a delightful side that soaks up all the yummy flavors from the dish.
    • Vegetable broth: For cooking the orzo, it infuses additional savory notes into the dish.

    You can find exact measurements for these ingredients at the bottom of the article for easy printing. Don’t forget, feel free to mix and match according to your family’s dietary needs or preferences!

    How to Make Cherry-Vibe Stuffed Portobello Mushrooms

    Now that we have all our ingredients ready, it’s time to dive into the fun part—making our Cherry-Vibe Stuffed Portobello Mushrooms! I’ll walk you through each step, making it as easy as pie (or should I say mushrooms?). Let’s roll up our sleeves and get cooking!

    Step 1: Preheat and Prepare

    First, preheat your oven to 400°F (200°C). This ensures the mushrooms get perfectly tender and the filling melts beautifully. Next, line a baking sheet with parchment paper. This simple step will make cleaning up a breeze!

    Now, let’s clean our portobello mushrooms. Gently wipe the caps with a damp paper towel to remove any dirt. Be cautious not to soak them—they’ll absorb moisture and become soggy!

    Step 2: Brush and Season the Mushrooms

    Take a small bowl and drizzle some olive oil inside. Using a brush or a paper towel, coat each mushroom cap with the oil, ensuring both sides are covered. This little bit of fat helps enhance the flavor and keeps the mushrooms from drying out while baking.

    Next, season the shrooms with salt and freshly ground black pepper. Don’t be shy—this is your chance to really bring out their earthy flavor!

    Step 3: Make the Cherry Filling

    In a medium bowl, combine those luscious cherries, crumbled goat cheese, toasted walnuts, and fresh herbs. Add the finely diced shallot and lemon zest for that delightful zing.

    If you’re feeling sweet, drizzle in a bit of honey. It complements the tartness of the cherries beautifully. Mix everything until it’s just combined, being gentle to avoid crushing the cherries.

    Step 4: Stuff the Mushrooms

    Time to fill those mushrooms! Take a generous handful of the cherry mixture and spoon it into each mushroom cap. Press down gently to ensure it’s packed in snugly, but not so much that the filling spills over. They should look invitingly full, like a cherry-filled treasure!

    Step 5: Bake the Stuffed Mushrooms

    Now, pop those stuffed beauties in the oven! Bake for 20 to 25 minutes until the mushrooms are tender, and the filling turns a lovely golden color. You’ll know they’re ready when your kitchen starts smelling heavenly!

    Step 6: Cook the Orzo Pilaf

    While your mushrooms are baking, let’s whip up the orzo pilaf. In a saucepan over medium heat, warm a tablespoon of olive oil. Toss in minced garlic and sauté for about 1 minute until it’s fragrant—trust me, your taste buds will thank you!

    Next, add the orzo to the pan and stir constantly for 2 to 3 minutes until it’s lightly toasted. Then, pour in vegetable broth while seasoning with salt and pepper. Bring it to a boil, then reduce the heat to let it simmer for 8 to 10 minutes, stirring occasionally. The orzo should be tender and have absorbed most of the liquid.

    Step 7: Combine and Serve

    Once everything is cooked, stir in the lemon zest, lemon juice, and chopped parsley into the orzo for that fresh kick.

    Alright, it’s time to plate up! Spoon the orzo pilaf onto each plate, setting a stuffed portobello mushroom right on top. Garnish with extra herbs if you wish. Voilà! You now have a plate of Cherry-Vibe Stuffed Portobello Mushrooms that will impress anyone.

    Tips for Success

    • Use fresh cherries for the best flavor, but frozen work in a pinch.
    • To prevent soggy mushrooms, dry them well after cleaning.
    • Feel free to let your kids help with the stuffing; it’s a fun activity!
    • Experiment with different cheeses or nuts if you’re in the mood for a twist.
    • Make a double batch—you’ll thank yourself for leftovers!

    Equipment Needed

    • Baking sheet: A standard baking sheet works, but a cast iron skillet adds a nice touch.
    • Parchment paper: Use aluminum foil if you’re out of parchment—just grease it lightly.
    • Medium bowl: Any mixing bowl will do for combining your cherry filling.
    • Brush or paper towel: Use any soft cloth to apply olive oil.
    • Kitchen knife and cutting board: Essential for chopping ingredients safely.

    Variations for Cherry-Vibe Stuffed Portobello Mushrooms

    • Cheese Swaps: Try feta or cream cheese instead of goat cheese for a different flavor profile.
    • Nut Alternatives: Swap walnuts for pecans or even sunflower seeds for a nut-free version.
    • Herb Twists: Change up the herbs with dill or thyme for a fragrant twist.
    • Spicy Kick: Add a pinch of red pepper flakes to the filling for some heat!
    • Greens Boost: Mix in chopped spinach or kale for an extra healthy boost.
    • Grain Options: Replace orzo with quinoa or farro for a heartier side.

    Serving Suggestions for Cherry-Vibe Stuffed Portobello Mushrooms

    • Pair with a light arugula salad dressed in lemon vinaigrette for a refreshing contrast.
    • A glass of chilled white wine, like Sauvignon Blanc, enhances the flavors beautifully.
    • For an elegant presentation, garnish with extra fresh herbs or edible flowers.
    • Serve with crusty bread to soak up the delicious orzo pilaf!

    FAQs about Cherry-Vibe Stuffed Portobello Mushrooms

    Can I make Cherry-Vibe Stuffed Portobello Mushrooms ahead of time?

    Absolutely! You can prepare the stuffed mushrooms a few hours in advance. Just cover them tightly in the fridge until you’re ready to bake. This makes them a great option for gatherings.

    Can I use different types of mushrooms?

    While portobello mushrooms are large and ideal for stuffing, you can use cremini or button mushrooms for a bite-sized version. Just adjust the cooking time since smaller mushrooms will bake faster.

    What can I serve with these stuffed mushrooms?

    These stuffed portobello mushrooms pair beautifully with a green salad, steamed vegetables, or even a side of roasted potatoes. You have endless options to complement the dish!

    Are Cherry-Vibe Stuffed Portobello Mushrooms suitable for vegetarians?

    How do I store leftovers?

    You can store any leftovers in an airtight container in the fridge for up to three days. Just reheat in the oven or microwave when you’re ready to enjoy them again. They’ll still taste marvelous!

    Final Thoughts

    Creating these Cherry-Vibe Stuffed Portobello Mushrooms isn’t just about cooking; it’s about crafting a delightful experience. Every bite transports you to a place of comfort, joy, and culinary adventure. I can’t help but smile when I see my family gathered around the table, their plates filled with vibrant, flavorful goodness. This recipe offers a unique blend of sweet and savory that resonates with everyone, even the picky eaters! In the hustle and bustle of life, these mushrooms remind us of the simpler pleasures: good food, loving company, and heartfelt moments shared over a lovely meal.


    Print

    clock clock iconcutlery cutlery iconflag flag iconfolder folder iconinstagram instagram iconpinterest pinterest iconfacebook facebook iconprint print iconsquares squares iconheart heart iconheart solid heart solid icon

    Description

    Delicious Cherry-Vibe Stuffed Portobello Mushrooms filled with a sweet and savory mixture of cherries, goat cheese, and herbs, served atop a flavorful orzo pilaf.


    • 4 large portobello mushroom caps, stems and gills removed
    • 1 tablespoon olive oil (for mushrooms)
    • Salt, to taste
    • Freshly ground black pepper, to taste
    • 1 cup fresh cherries, pitted and quartered (or thawed and drained frozen cherries)
    • 3 ounces goat cheese, crumbled
    • 1/4 cup toasted walnuts, chopped
    • 2 tablespoons fresh basil, finely chopped
    • 2 tablespoons fresh parsley, finely chopped
    • 1 small shallot, finely diced
    • Zest of 1 lemon
    • 1/2 teaspoon honey (optional)
    • 1 cup orzo pasta
    • 1 tablespoon olive oil (for orzo)
    • 2 cloves garlic, minced
    • 2 cups low-sodium vegetable broth
    • 1/2 teaspoon salt (for orzo)
    • 1/4 teaspoon black pepper (for orzo)
    • Zest and juice of 1 lemon (for orzo)
    • 2 tablespoons fresh parsley, chopped (for orzo)

    1. Preheat oven to 400°F (200°C). Line a baking sheet with parchment paper.
    2. Brush the portobello mushroom caps with olive oil and season generously with salt and freshly ground black pepper. Arrange gill-side up on the prepared baking sheet.
    3. In a medium bowl, gently mix cherries, crumbled goat cheese, chopped toasted walnuts, basil, parsley, diced shallot, lemon zest, and honey if using until just combined.
    4. Distribute the cherry-goat cheese mixture evenly into each mushroom cap and press down gently to secure.
    5. Bake the stuffed mushrooms for 20 to 25 minutes, or until the mushrooms are tender and the filling is golden.
    6. In a saucepan set over medium heat, warm olive oil. Add minced garlic and sauté for 1 minute until fragrant.
    7. Add orzo and stir constantly for 2 to 3 minutes to lightly toast the pasta.
    8. Pour in the vegetable broth, season with salt and black pepper. Bring to a boil, reduce heat, and simmer uncovered for 8 to 10 minutes, stirring occasionally, until orzo is tender and liquid is absorbed.
    9. Stir in lemon zest, lemon juice, and chopped parsley. Taste and adjust seasoning if necessary.
    10. Spoon orzo pilaf onto each plate and set a stuffed portobello mushroom on top. Garnish with additional fresh herbs as desired.

    Notes

    • For a vegan version, substitute goat cheese with a plant-based cheese alternative.
    • Feel free to add other herbs or spices to suit your taste.
    • Leftover stuffing can be used for salads or as a dip.
    • Prep Time: 20 minutes
    • Cook Time: 40 minutes
    • Category: Appetizer
    • Method: Baking, Sautéing
    • Cuisine: American

    Nutrition

    • Serving Size: 1 stuffed mushroom with orzo
    • Calories: 320
    • Sugar: 5g
    • Sodium: 450mg
    • Fat: 18g
    • Saturated Fat: 4g
    • Unsaturated Fat: 10g
    • Trans Fat: 0g
    • Carbohydrates: 30g
    • Fiber: 3g
    • Protein: 8g
    • Cholesterol: 10mg

    Sharing is caring!

  • BBQ Chicken Sweet Potato Bowls

    BBQ Chicken Sweet Potato Bowls


    Introduction to BBQ Chicken Sweet Potato Bowls

    So, buckle in for some serious foodie fusion with BBQ Chicken Sweet Potato Bowls. I’m a busy mom, too, and get it – it’s all about needing something quick and tasty to put on the table. This is the superhero to your weeknight’s rescue: BBQ chicken plus roasted sweet potatoes and quick zesty coleslaw. That’s just half of it, however – it’s also full of flavors to make your family gush. So let’s get some bowls going to blow the minds of those around you and treat yourself to a great meal that’s a warm embrace in a bowl.

    Why You’ll Love This BBQ Chicken Sweet Potato Bowl

    Let’s face it, life can get chaotic—especially when you’re juggling work, kids, and everything in between. That’s why these BBQ Chicken Sweet Potato Bowls are a lifesaver! They’re quick to prepare, bursting with flavor, and best of all, they offer a warm, comforting meal that even picky eaters will enjoy. The blend of savory BBQ, sweet potatoes, and crunchy coleslaw is simply irresistible, making this dish a family favorite in no time!

    Ingredients Used in BBQ Chicken Sweet Potato Bowls

    Let’s dive into the star-studded lineup of ingredients that make up these BBQ Chicken Sweet Potato Bowls. They come together beautifully, creating an explosion of flavors and textures. Here’s what you’ll need:

    • BBQ Chicken: Juicy boneless, skinless chicken breasts steal the show here. They soak up the tangy BBQ sauce and Italian dressing, resulting in a moist, flavorful base for your bowls.
    • Sweet Potatoes: These orange gems not only add sweetness but also bring a hearty texture. Roasting them enhances their natural caramelization, making them irresistible.
    • Quick Dill Pickles: Fresh dill, crisp cucumber, and a touch of garlic come together for a zesty crunch, brightening the dish. They are easy to make and bring a delightful tang to each bite.
    • Coleslaw: A classic side, this creamy mixture adds a refreshing crunch. The cabbage blend soaked in a tangy sauce perfectly complements the sweet barbecue flavor.
    • Fresh Parsley: For garnish, this herb adds a pop of color and freshness. Plus, it sneaks in a tad of extra flavor!
    • BBQ Seasoning: Sprinkle this on top for added depth and complexity. A little goes a long way in enhancing the BBQ flavor.

    Feel free to customize! If you prefer turkey or veggie protein, both work wonders in this recipe. And for those sweet potatoes, russet potatoes can step in if you’re out. Need precise measurements? Check the end of the article, where you’ll find everything laid out nicely for printing!

    How to Make BBQ Chicken Sweet Potato Bowls

    Now, let’s roll up our sleeves and get cooking! This part is where the magic truly happens. Follow these straightforward steps to create your BBQ Chicken Sweet Potato Bowls. Trust me, these flavors will dance on your taste buds!

    Step 1: Roast the Sweet Potatoes

    First things first, preheat your oven to 220°C (about 425°F). Grab those cubed sweet potatoes and toss them in a mixing bowl. Sprinkle them with chili powder and a dash of cinnamon for warmth. Drizzle with avocado oil, and mix well until fully coated. Spread the sweet potatoes in a single layer on a baking sheet. Roast for approximately 20 minutes. Then stir them around and return to the oven for another 10–15 minutes. You want them golden brown on the edges but still tender inside. The aroma will fill your kitchen and guarantee some hungry faces!

    Step 2: Prepare the Quick Dill Pickles

    While the sweet potatoes are getting all lovely in the oven, turn your attention to the quick dill pickles. In a medium bowl, combine fresh dill, minced garlic, and thinly sliced cucumbers. Toss in the yellow mustard seeds, water, vinegar, and salt. Give it a good stir to mix everything. This simple pickling process takes just a few minutes and adds a refreshing tang to your bowls. Let these sit and soak up the flavors while we move on to the next step!

    Step 3: Cook the BBQ Chicken

    Next, let’s dive into the BBQ chicken. Grab your Instant Pot (my kitchen lifesaver!) and add the chicken breasts. Pour in the BBQ sauce and Italian dressing, then sprinkle with a little salt. Seal the lid and cook on High Pressure for 10 minutes. This step locks in all the juicy goodness! When the timer goes off, perform a quick release to let out the steam. Carefully shred the chicken using two forks or a hand mixer on low speed for an effortless method. Switch your Instant Pot to Sauté mode and stir the chicken for about 5 minutes until it’s all coated in that luscious BBQ sauce.

    Step 4: Make the Coleslaw

    Now, let’s whip up the coleslaw, which adds a nice crunch to our BBQ Chicken Sweet Potato Bowls. In a small bowl, whisk together mayonnaise, vinegar, coconut aminos, and a pinch of salt until smooth. In a medium bowl, place the shredded coleslaw mix and pour the dressing over it. Toss everything together until well mixed. This creamy addition balances out the dish with a cool, refreshing flavor that pairs wonderfully with the hot BBQ chicken.

    Step 5: Assemble the Bowls

    Finally, it’s the moment we’ve been waiting for. Take four bowls and start layering! First, divide the roasted sweet potatoes into each bowl. Next, add a generous portion of BBQ chicken, followed by a scoop of coleslaw. Top each bowl with several pickle slices for that desired crunch and brightness. For the finishing touch, sprinkle with fresh parsley and a dash of dry BBQ seasoning. Voilà! Your BBQ Chicken Sweet Potato Bowls are ready to delight your family and impress your friends!

    Tips for Success

    • Always preheat your oven for even roasting of sweet potatoes. It makes all the difference!
    • For extra flavor, marinate the chicken in BBQ sauce overnight if time permits.
    • Mix the coleslaw dressing a few hours ahead for enhanced flavor absorption.
    • Use a variety of sweet potato for added color and taste; purple or white sweet potatoes work well!
    • Make extra dill pickles—they’re great on sandwiches or as snacks!

    Equipment Needed for BBQ Chicken Sweet Potato Bowls

    • Instant Pot: Perfect for quick cooking of the BBQ chicken. A slow cooker can be used but will take longer.
    • Baking Sheet: A sturdy baking sheet is essential for roasting those sweet potatoes. A casserole dish will also do the trick.
    • Mixing Bowls: A couple of large mixing bowls are needed for assembling ingredients. You can use any size that fits your kitchen.
    • Whisk: Handy for mixing the coleslaw dressing. A fork can also work if necessary.

    Variations on BBQ Chicken Sweet Potato Bowls

    • Swap the Protein: Try grilled tofu or chickpeas for a vegetarian option that packs a protein punch.
    • Change the Sauce: Experiment with different BBQ sauces, such as garlic-infused or spicy chipotle, to switch up the flavor profile.
    • Try Different Vegetables: Add roasted Brussels sprouts, zucchini, or corn for a colorful twist and added nutrients.
    • Low-Carb Option: Replace sweet potatoes with cauliflower rice for a lighter version that still satisfies.
    • Seasonal Touch: Incorporate seasonal veggies like butternut squash in the fall or fresh corn in the summer for a farm-to-table feel.

    Serving Suggestions for BBQ Chicken Sweet Potato Bowls

    • Side Dish: Pair your bowls with a light garden salad or roasted asparagus for an extra veggie boost.
    • Drink Pairing: Complement your meal with a chilled sparkling lemonade or unsweetened iced tea for a refreshing touch.
    • Presentation: Serve in colorful bowls to create a vibrant table setting that’s sure to impress!

    FAQs about BBQ Chicken Sweet Potato Bowls

    Can I prep BBQ Chicken Sweet Potato Bowls in advance? Absolutely! You can roast the sweet potatoes and prepare the BBQ chicken a day ahead. Just store everything separately in the fridge. When you’re ready to serve, reheat and assemble the bowls.

    How can I make BBQ Chicken Sweet Potato Bowls spicier? If you prefer a little heat, add some diced jalapeños to your coleslaw or try a spicier BBQ sauce. A sprinkle of cayenne paprika on the sweet potatoes will also add a fiery kick!

    What can I substitute for sweet potatoes? No worries! You can use regular potatoes or even cauliflower if you’re looking for a low-carb alternative. Just adjust the cooking time as needed for different veggies.

    Are these BBQ Chicken Sweet Potato Bowls gluten-free? Yes! As long as your BBQ sauce is gluten-free, this dish is a perfect gluten-free option for those with dietary restrictions.

    Can children help make these BBQ Chicken Sweet Potato Bowls? Of course! Kids can help with washing the vegetables, stirring ingredients, or laying out the bowls. It’s a fabulous way to get them involved in the kitchen!

    Final Thoughts on BBQ Chicken Sweet Potato Bowls

    Whipping up BBQ Chicken Sweet Potato Bowls is like inviting a warm embrace into your kitchen. The combination of smoky BBQ, sweet potatoes, and creamy coleslaw creates a comforting dish that brings smiles to the dinner table. This recipe isn’t just about filling bellies; it’s about sharing moments and flavors that linger long after the last bite. With a blend of simplicity and deliciousness, these bowls are perfect for busy moms and professionals alike. So next time you need a meal that satisfies both your cravings and your family’s tastebuds, reach for these delightful bowls that promise to impress!


    Print

    clock clock iconcutlery cutlery iconflag flag iconfolder folder iconinstagram instagram iconpinterest pinterest iconfacebook facebook iconprint print iconsquares squares iconheart heart iconheart solid heart solid icon

    Description

    BBQ Chicken Sweet Potato Bowls that Delight Your Tastebuds! A delicious combination of BBQ chicken, roasted sweet potatoes, quick dill pickles, and coleslaw.


    • BBQ Chicken
      2 boneless, skinless chicken breasts (approximately 570 grams total)
      180 millilitres compliant BBQ sauce
      2 tablespoons Italian dressing
      Salt, to taste
    • Sweet Potatoes
      2 medium sweet potatoes, peeled and cubed
      2 teaspoons chili powder
      1 dash ground cinnamon
      1 tablespoon avocado oil or refined coconut oil
    • Quick Dill Pickles
      1 sprig fresh dill
      1 clove garlic, minced
      60 grams English cucumber, thinly sliced
      1 pinch yellow mustard seeds
      60 millilitres water
      60 millilitres white wine vinegar or white vinegar
      0.5 tablespoon salt
    • Coleslaw
      140 grams mayonnaise
      1.5 tablespoons apple cider vinegar or white wine vinegar
      3 tablespoons coconut aminos
      0.25 teaspoon kosher salt
      400 grams shredded coleslaw mix
    • To Garnish
      Fresh chopped parsley
      Dry BBQ seasoning

    1. Preheat oven to 220°C. On a baking sheet, toss cubed sweet potatoes with chili powder, cinnamon, and oil. Spread in a single layer and roast for 20 minutes. Stir and return to oven for 10–15 minutes until edges are browned but potatoes remain tender.
    2. While sweet potatoes are roasting, combine fresh dill, minced garlic, cucumber slices, yellow mustard seeds, water, vinegar, and salt in a bowl. Mix well and set aside to pickle.
    3. Place chicken breasts, BBQ sauce, Italian dressing, and salt in the Instant Pot. Seal and cook on High Pressure for 10 minutes. Perform a quick release, shred chicken with forks or a hand mixer on low speed. Switch to Sauté mode and cook for 5 minutes, stirring until chicken is fully coated with sauce.
    4. In a small bowl, whisk together mayonnaise, vinegar, coconut aminos, and salt. Place shredded coleslaw mix in a medium bowl, pour dressing over, and combine thoroughly.
    5. Divide roasted sweet potatoes, BBQ chicken, and coleslaw evenly among four bowls. Top each bowl with several pickle slices and garnish with fresh parsley and dry BBQ seasoning.

    Notes

    • Ensure to adjust the BBQ sauce for desired sweetness or spiciness.
    • Feel free to substitute chicken breasts with thighs for a richer flavor.
    • Store leftover pickles in the refrigerator for up to a week.
    • Prep Time: 15 minutes
    • Cook Time: 40 minutes
    • Category: Main Course
    • Method: Roasting, Instant Pot, Pickling
    • Cuisine: American

    Nutrition

    • Serving Size: 1 bowl
    • Calories: 750
    • Sugar: 10g
    • Sodium: 1200mg
    • Fat: 40g
    • Saturated Fat: 6g
    • Unsaturated Fat: 0g
    • Trans Fat: 0g
    • Carbohydrates: 70g
    • Fiber: 10g
    • Protein: 35g
    • Cholesterol: 100mg

    Sharing is caring!

  • Grilled Lamb Chops Flavor

    Grilled Lamb Chops Flavor


    Introduction to Grilled Lamb Chops Flavor

    Hey, home cooks, how’s it hanging?’ If you’re in the market for something tasty and wouldn’t mind it being easy, check out these grilled lamb chops. It’s that kind of flavorful marinade on the pleasantly grilled lamb chops that packs the 1-2- punch of a great grilled lamb chop flavor plain and simple. A perfect solution after a hectic day for mommies … … and executives. Imagine the sizzling flavored chops on the grill that would turn a routine dinner into an evening to remember … You will make your kin happy and, at the same time, relish the entire feeling of being a success!

    Why You’ll Love This Grilled Lamb Chops Flavor

    This grilled lamb chops flavor is a fabulous mix of taste and convenience. In just 42 minutes, you can whip up a delightful meal that feels like a gourmet feast. The marinade does all the work, infusing the meat with irresistible flavor. Plus, grilling adds a smoky essence unlike any other. Whether for a weeknight dinner or a weekend barbecue, this recipe simplifies your life without compromising on taste!

    Ingredients for Grilled Lamb Chops Flavor

    Let’s gather everything we need for these irresistible grilled lamb chops! Each ingredient plays a crucial role in crafting that unforgettable flavor. Here’s what you’ll need:

    • Lamb chops: Look for fresh, quality chops at your local butcher or grocery store. The meat’s tenderness is essential for that melt-in-your-mouth experience.
    • Olive oil: This is your base for the marinade, giving the lamb a rich, savory depth. Extra virgin olive oil adds that extra touch of quality.
    • Garlic powder: A must-have for flavor enhancement, it adds a subtle kick without the fuss of fresh garlic.
    • Onion powder: This seasoning rounds out the flavor profile, offering a sweet nuance that pairs beautifully with lamb.
    • Black pepper: Freshly ground black pepper elevates the dish with its aromatic charm. Feel free to adjust to your tolerance for spice.
    • Salt: Essential for balancing all the flavors. I recommend using sea salt for a delightful crunch.
    • Ground rosemary (optional): If you’re a fan of earthy flavors, this herb beautifully complements lamb. Just a pinch adds a lovely fragrance.
    • Paprika (optional): This brings a subtle smokiness and a beautiful color to the dish. Smoked paprika is especially delightful!

    For exact measurements, you can check the bottom of the article, where all the quantities are available for easy printing. So, gather these ingredients, and let’s move towards making some magic together!

    How to Make Grilled Lamb Chops Flavor

    Ready to bring those tasty grilled lamb chops to life? Follow these simple steps, and you’ll have a juicy dish that will make your taste buds sing. We’ll keep things clear and practical while making sure you get the most flavor from your lamb. Let’s dive in!

    Step 1: Preheat Your Grill

    First things first, preheating your grill or oven is crucial. This step ensures that the lamb chops cook evenly and develop a nice, charred crust. Aim for a medium-high heat, around 400°F. You want that grill sizzling when the meat hits it, creating that mouthwatering grilled lamb chops flavor right from the start. Trust me, it makes a world of difference!

    Step 2: Prepare the Marinade

    Now, grab a mixing bowl and let’s create that flavorful marinade. Start with a generous splash of olive oil, then sprinkle in garlic powder and onion powder. Feel free to add a good amount of black pepper and salt. If you’re feeling adventurous, toss in some ground rosemary and paprika for a flavor boom!

    Mix everything until well combined. You want those spices dancing together, creating a luscious coating for your lamb. This marinade isn’t just about taste; it helps tenderize the meat, making each bite a juicy delight. Trust me; it’s worth the effort!

    Step 3: Marinate the Lamb Chops

    Once you’ve prepared that marinade, it’s time to work your magic on the lamb chops. Coat each chop generously with the marinade, making sure every nook and cranny is covered. Now, here’s where the magic happens: let the lamb rest in the marinade for at least 30 minutes at room temperature. This waiting time allows the flavors to sink deep into the meat, resulting in a juicy and flavorful grilled lamb chop you’ll rave about.

    Step 4: Grill the Lamb Chops

    Finally, it’s grill time! Place the marinated lamb chops on your preheated grill. Cook them for about 4 to 6 minutes on each side. This varies depending on how well done you prefer your meat. For medium-rare, aim for an internal temperature of around 135°F. This will keep your chops tender and juicy!

    Don’t forget to avoid overcrowding the grill—this lets them breathe properly, ensuring a beautiful sear. While they cook, catch the delightful aroma wafting through your kitchen. That’s the grilled lamb chops flavor wrapping around you like a warm hug.

    Step 5: Rest Before Serving

    The last step is just as important as the first! After you’ve grilled your lamb chops to perfection, let them rest for a few minutes before serving. This resting time allows the juices to redistribute throughout the meat, making every bite a succulent experience. Slice into those beauties and savor the fruits of your labor. Your loved ones will be amazed!

    Tips for Success

    • Always use quality lamb chops for the best flavor and tenderness.
    • Let the chops marinate at room temperature for maximum flavor absorption.
    • Use a meat thermometer to ensure perfectly cooked lamb.
    • Experiment with spices and herbs to create your signature flavor.
    • Don’t rush the resting time; it’s key for juicy results!

    Equipment Needed for Grilled Lamb Chops Flavor

    • Grill or grill pan: A charcoal or gas grill works best for that authentic flavor.
    • Tongs: Ideal for flipping the chops without piercing and losing juice.
    • Mixing bowl: Essential for preparing your marinade.
    • Meat thermometer: Perfect for checking doneness and ensuring juicy results.

    Variations on Grilled Lamb Chops Flavor

    • Herb-Infused Marinade: Replace garlic and onion powder with fresh herbs like rosemary and thyme for a fragrant twist.
    • Spicy Kick: Add red pepper flakes or cayenne pepper to the marinade for those who love heat!
    • Citrusy Zing: Incorporate lemon zest or orange zest into the marinade to add a refreshing citrus note.
    • Vegan Option: Swap lamb chops for portobello mushrooms. Marinate and grill them the same way for a hearty, plant-based alternative.
    • Asian-Inspired: Use soy sauce and ginger in place of olive oil and traditional spices for a different flavor profile.

    Serving Suggestions with Grilled Lamb Chops Flavor

    • Classic Sides: Serve with roasted vegetables or a fresh garden salad to balance the richness of the lamb.
    • Wine Pairing: A bold red wine, like Merlot or Cabernet Sauvignon, complements the robust flavors beautifully.
    • Presentation: Garnish with fresh herbs and lemon wedges for a vibrant touch.
    • Dip Option: A mint yogurt sauce enhances the grilled lamb chops flavor.

    FAQs about Grilled Lamb Chops Flavor

    How long should I marinate the lamb chops for the best flavor?

    For maximum flavor, I recommend marinating the lamb chops for at least 30 minutes. If you have more time, up to 2 hours works wonders too! Just remember, the longer they soak, the richer the grilled lamb chops flavor.

    Can I use other cuts of meat for this marinade?

    Absolutely! While lamb chops are ideal, this marinade can also be used on chicken, pork, or beef. Each cut will showcase its own unique grilled flavor profile, making it versatile for all your cooking needs.

    What can I serve with grilled lamb chops?

    These grilled lamb chops pair beautifully with roasted vegetables, a fresh salad, or rice pilaf. If you’re feeling adventurous, try serving them with a mint yogurt sauce for a refreshing twist!

    How do I know when my lamb chops are done cooking?

    The best way to check doneness is by using a meat thermometer. For medium-rare, the internal temperature should be around 135°F, while medium will be closer to 145°F. This ensures you have tender, juicy lamb every time!

    Can I grill lamb chops indoors?

    Yes, if you don’t have access to an outdoor grill, a grill pan works great indoors. Just make sure your kitchen is well-ventilated, and you’ll still capture that delicious grilled lamb chops flavor!

    Final Thoughts

    Cooking these grilled lamb chops is not just about the delicious flavor; it’s an opportunity to create cherished memories with your loved ones. The joy of preparing a meal that fills the kitchen with mouthwatering aromas is unmatched. As the flavors mingle and transform, you enjoy a satisfying culinary adventure right from home. Whether it’s an everyday dinner or a special occasion, these lamb chops invite laughter, conversation, and smiles. With each bite, you’ll realize that this isn’t just a meal—it’s a celebration of flavor, togetherness, and the love that comes from sharing a home-cooked dish!


    Print

    clock clock iconcutlery cutlery iconflag flag iconfolder folder iconinstagram instagram iconpinterest pinterest iconfacebook facebook iconprint print iconsquares squares iconheart heart iconheart solid heart solid icon

    Description

    A delicious recipe for grilled lamb chops, marinated for maximum flavor and tenderness.


    • Lamb chops, as needed
    • Olive oil, sufficient for coating
    • Garlic powder, to taste
    • Onion powder, to taste
    • Black pepper, freshly ground, to taste
    • Salt, to taste
    • Ground rosemary, optional
    • Paprika, optional

    1. Preheat the grill or oven to medium-high heat.
    2. In a mixing bowl, combine olive oil with garlic powder, onion powder, black pepper, salt, and if desired, ground rosemary and paprika.
    3. Thoroughly coat the lamb chops in the prepared marinade and allow them to rest for at least 30 minutes at room temperature.
    4. Place the marinated lamb chops on the preheated grill and cook for 4 to 6 minutes per side until the preferred level of doneness is reached.
    5. Remove the lamb chops from heat and allow them to rest for a few minutes before serving to retain juices.

    Notes

    • Letting the lamb chops rest after cooking ensures they remain juicy.
    • The choice of optional spices can enhance flavor based on personal preference.
    • Prep Time: 30 minutes
    • Cook Time: 12 minutes
    • Category: Main Course
    • Method: Grilling
    • Cuisine: Mediterranean

    Nutrition

    • Serving Size: 1 lamb chop
    • Calories: 300
    • Sugar: 0g
    • Sodium: 500mg
    • Fat: 20g
    • Saturated Fat: 8g
    • Unsaturated Fat: 12g
    • Trans Fat: 0g
    • Carbohydrates: 0g
    • Fiber: 0g
    • Protein: 25g
    • Cholesterol: 80mg

    Sharing is caring!

  • Mexican Papas con Chorizo

    Mexican Papas con Chorizo


    Introduction to Mexican Papas con Chorizo

    Welcome to my kitchen; we’re going live with Mexican flavors! And I’m really excited to bring you one of my family’s absolute favorites: Mexican Papas con Chorizo. It’s just a comfort of tenderness with ‘log rolls’ of chorizo kick. Since I’m always in a hurry, this really works and is super-flavorful. You’re good to go with this recipe as your main course or a side, whatever the case is and that’s why it is so on

    Why You’ll Love This Mexican Papas con Chorizo

    What’s not to love about Mexican Papas con Chorizo? It’s a simple yet satisfying dish that comes together in no time—perfect for those hectic weeknights. The flavors meld beautifully, offering warmth and comfort with every bite. Plus, it’s adaptable! You can serve it as a main course or a delightful side. This recipe is truly a lifesaver that doesn’t skimp on taste, making it ideal for everyone at your dinner table.

    Ingredients for Mexican Papas con Chorizo

    Creating delicious Mexican Papas con Chorizo starts with the right ingredients. Here’s what you’ll need:

    • Potatoes: Choose starchy varieties like Russets for a fluffy texture that absorbs flavor beautifully.
    • Chorizo: This spicy sausage is the heart of the dish. Look for high-quality chorizo for a rich, bold taste.
    • Onion: A finely diced onion adds sweetness and depth. It pairs wonderfully with the savory chorizo.
    • Garlic: Freshly minced garlic gives a lovely aroma and an extra layer of flavor that will awaken your senses.
    • Ground cumin (optional): Adding this spice can boost the dish’s warmth, but feel free to leave it out if you prefer a lighter flavor.
    • Salt and pepper: These essentials enhance all the other ingredients—just season to your liking!
    • Fresh cilantro: Chopped cilantro adds a fresh, vibrant touch. It’s great for garnish and a burst of flavor.
    • Lime wedges: These are perfect for serving alongside the dish, giving an extra zing that brightens up each bite.

    Remember, you can adjust the ingredients to suit your taste or dietary needs. If you love heat, adding jalapeños or a splash of hot sauce works wonders! The ingredients’ exact proportions can be found at the bottom of the article, available for printing. Let’s get cooking!

    How to Make Mexican Papas con Chorizo

    Now that we have our ingredients prepped, let’s dive into making this delicious Mexican Papas con Chorizo! Follow these simple steps for a dish that’s sure to impress. Trust me, it’s easier than you think!

    Step 1: Prepare the Potatoes

    Boiling the Potatoes

    Start by peeling and dicing the potatoes into small cubes. This helps them cook evenly.

    Place the diced potatoes in a large pot and cover them with water. Bring it to a rolling boil over high heat.

    Once boiling, reduce heat to medium and cook for 10–15 minutes until fork-tender. You want them soft, but not mushy!

    After that, drain the potatoes well in a colander. Let them sit for a minute to remove excess moisture, then set aside.

    Step 2: Cook the Chorizo

    Sautéing for Flavor

    In a large skillet over medium heat, add the chorizo. Use a spatula to crumble it as it cooks. Brown the chorizo for about 5–7 minutes until it’s crispy and the fat is rendered.

    The sizzling sound is music to my ears! Make sure not to rush this step; browning adds fantastic flavor.

    Step 3: Add Aromatics

    Combining Ingredients

    Once your chorizo is perfectly browned, add the finely diced onion to the skillet. Sauté it for about 3–4 minutes until it turns translucent.

    Next, stir in the minced garlic and cumin (if you’re using it). Cook for just a minute until fragrant—your kitchen will smell amazing!

    Step 4: Mix in the Potatoes

    Folding and Coating

    Now it’s time to add the cooked potatoes to the skillet. Gently fold them into the chorizo mixture, coating them well in that delicious rendered fat.

    Be careful not to mash the potatoes! You want to keep them intact for that perfect texture.

    Step 5: Seasoning the Dish

    Final Touches

    After mixing, season with salt and freshly ground black pepper. Give everything a good stir and taste.

    This is your chance to adjust the seasoning to your liking! You might want more salt, or a pinch of pepper—it’s all about what you enjoy!

    Step 6: Garnishing and Serving

    Presentation Tips

    Transfer the Mexican Papas con Chorizo to a beautiful serving platter. Sprinkle freshly chopped cilantro over the top for that pop of color.

    Finally, serve with lime wedges on the side. A squeeze of lime brings out all the flavors!

    And there you have it—a delicious dish that’s not only tasty but also visually appealing. Your family will be asking for seconds, I promise!

    Tips for Success

    • Always use starchy potatoes for a fluffier texture.
    • Don’t skip browning the chorizo; it deepens the flavor.
    • Adjust seasoning gradually; it’s easier to add than to fix!
    • Experiment with spices; a dash of smoked paprika adds a unique twist.
    • For a faster meal, prep your ingredients ahead of time.

    Equipment Needed

    • Large pot: Essential for boiling the potatoes. A sturdy saucepan works too.
    • Colander: Perfect for draining the potatoes. Use a slotted spoon if you don’t have one.
    • Large skillet: Ideal for cooking the chorizo and combining ingredients. A non-stick pan does the trick!
    • Spatula: Great for crumbling the chorizo and mixing everything together. A wooden spoon is a good alternative.

    Variations

    • Vegan Option: Replace chorizo with plant-based chorizo or sautéed mushrooms for a hearty, meat-free version.
    • Spicy Kick: Stir in diced jalapeños or use hot chorizo for an extra burst of heat. Your taste buds will thank you!
    • Cheesy Delight: Add shredded cheese on top just before serving. A melty cheese blend will elevate the flavors even more.
    • Nutritious Spin: Incorporate vegetables like bell peppers or spinach. It’s a great way to boost nutrition and color!
    • One-Pan Wonder: Add cooked rice to the mixture for a complete meal, all in one skillet! Perfect for busy weeknights.

    Serving Suggestions

    • Tortillas: Serve warm corn or flour tortillas on the side for a classic touch.
    • Rice: Pair with fluffy Mexican rice for a hearty meal.
    • Fresh Salad: A crisp side salad adds a refreshing contrast to the dish.
    • Drinks: Enjoy with a light beer or a zesty margarita for a delightful combo.
    • Presentation: Serve in a colorful dish with lime wedges for that extra pop!

    FAQs about Mexican Papas con Chorizo

    What is Mexican Papas con Chorizo?

    Mexican Papas con Chorizo is a delicious dish made with diced potatoes, flavorful chorizo, onions, and garlic. It’s loved for its comforting taste and versatility, often served as both a main course and a side dish.

    Can I make Mexican Papas con Chorizo ahead of time?

    Absolutely! You can prepare the dish ahead by cooking and mixing the potatoes and chorizo. Then, just reheat when you’re ready to serve. It’s a fantastic meal prep option!

    Is there a gluten-free version of Mexican Papas con Chorizo?

    Yes! This recipe is naturally gluten-free, making it a perfect choice for those with dietary restrictions. Just make sure to use gluten-free chorizo.

    What sides pair well with Mexican Papas con Chorizo?

    Great options include warm tortillas, a side of rice, or a fresh salad. These combinations enhance the flavors and make for a complete meal.

    Can I customize this recipe?

    Definitely! You can add your favorite veggies, adjust the spice level, or even toss in some cheese. This recipe is flexible, allowing you to make it just the way you like!

    Final Thoughts

    Mexican Papas con Chorizo has become a cherished dish in my home, embodying warmth and togetherness. The vibrant layers of flavor create not just a meal, but an experience filled with joy and laughter. Each bite transports me to a family gathering, surrounded by smiles and stories. It’s wonderful to see my loved ones savoring a dish made with care. Whether you’re making it for a busy weeknight or a festive celebration, I hope you share the same delight and connection in your kitchen. Enjoy every moment of cooking and crafting delicious memories!


    Print

    clock clock iconcutlery cutlery iconflag flag iconfolder folder iconinstagram instagram iconpinterest pinterest iconfacebook facebook iconprint print iconsquares squares iconheart heart iconheart solid heart solid icon

    Description

    A flavorful Mexican dish made with potatoes and chorizo, perfect for serving as a main course or side dish.


    • 450g potatoes, peeled and diced
    • 225g chorizo, casings removed
    • 1 small onion, finely diced
    • 2 cloves garlic, minced
    • 1 teaspoon ground cumin (optional)
    • Salt, to taste
    • Freshly ground black pepper, to taste
    • Fresh cilantro, chopped (for garnish)
    • Lime wedges (for serving)

    1. Place diced potatoes in a pot, cover with water, and bring to a boil. Cook for 10–15 minutes until tender. Drain well and set aside.
    2. In a large skillet over medium heat, crumble and cook chorizo for 5–7 minutes until browned and fat is rendered. Add diced onion and sauté until translucent, about 3–4 minutes.
    3. Stir in minced garlic and cumin; cook for 1 minute until aromatic.
    4. Fold cooked potatoes into the chorizo mixture, gently mixing to coat the potatoes in the rendered oil.
    5. Season with salt and freshly ground black pepper. Continue cooking for 5–7 minutes, allowing edges to crisp lightly.
    6. Transfer to a platter. Garnish with chopped fresh cilantro and serve immediately with lime wedges.

    Notes

    • Feel free to adjust the seasoning according to your taste.
    • This dish pairs well with a side of tortillas or rice.
    • For extra spice, add chopped jalapeños or hot sauce.
    • Prep Time: 10 minutes
    • Cook Time: 25 minutes
    • Category: Main Course
    • Method: Stovetop
    • Cuisine: Mexican

    Nutrition

    • Serving Size: 1 serving
    • Calories: 350
    • Sugar: 2g
    • Sodium: 600mg
    • Fat: 25g
    • Saturated Fat: 10g
    • Unsaturated Fat: 12g
    • Trans Fat: 0g
    • Carbohydrates: 30g
    • Fiber: 4g
    • Protein: 10g
    • Cholesterol: 40mg

    Sharing is caring!

  • Slow Cooker Chicken Pot Pie

    Slow Cooker Chicken Pot Pie


    Introduction to Slow Cooker Chicken Pot Pie

    Isn’t there something magical about warm comfort food after a long day, there sure is there”? My heart is warm when I just think about it – a Classic Slow Cooker Chicken Pot Pie. The ultimate hugglefood, that’s so ideal for busy mommies and busy professionals. Imagine biting into tender chicken and hearty vegetables, all intermixed with yummy flaky biscuits. With minimal effort, enjoy this delectable yet convenient assembly that will attract everyone. We all are having hectic lives, but this recipe shall turn an ordinary evening period into the most warm cozy family gathering.

    Why You’ll Love This Slow Cooker Chicken Pot Pie

    This Slow Cooker Chicken Pot Pie is a game changer for your busy weeknights. It’s unbelievably easy, letting you toss everything in and forget about it while you tackle your to-do list. The flavors are mouthwatering, combining tender chicken, savory veggies, and creamy sauce. Plus, it wraps up beautifully in flaky biscuits that everyone loves. You’ll find yourself craving this comforting meal again and again, making weeknight dinners a breeze!

    Ingredients for Slow Cooker Chicken Pot Pie

    Gathering the right ingredients is the first step to creating a delightful Slow Cooker Chicken Pot Pie. Here’s what you need:

    • Boneless, Skinless Chicken Breasts: The star of the show! They cook up tender and juicy.
    • Dried Oregano: This herb adds a touch of earthy flavor that elevates the dish.
    • Garlic Powder: A sprinkle brings in that aromatic depth that warms the soul.
    • Salt: Essential for bringing out the flavors of all the ingredients.
    • Cracked Black Pepper: A bit of heat to balance the creaminess of the dish.
    • Smoked Paprika: This adds a subtle smokiness that makes the meal intriguing.
    • Yellow Onion: Diced onions contribute sweetness and depth – a classic flavor building block.
    • Frozen Mixed Vegetables: Convenient and colorful! You can use your favorites like peas, carrots, and corn.
    • Condensed Cream of Chicken Soup: A creamy base that thickens the whole pot pie and enriches the flavor.
    • Condensed Cream of Celery Soup: Adds a nice, subtle twist that enhances the creaminess.
    • Chicken Broth: To deepen the flavor of the sauce, making it rich and savory.
    • Heavy Cream: This gives a velvety finish to the sauce, making it indulgent.
    • Grands or Jumbo Biscuits: The crowning glory of the dish, these flaky biscuits are perfect for scooping!

    Feel free to get creative! You can substitute your favorite vegetables or even experiment with fresh herbs like thyme or rosemary for added flavor.

    If you’re curious about specific quantities, you can find them at the bottom of this article, ready for printing. Let’s dive into the cooking process next!

    How to Make Slow Cooker Chicken Pot Pie

    Step 1: Prepare the Chicken

    Start by placing the boneless, skinless chicken breasts at the bottom of your slow cooker. You can use a 5-quart or larger size for this recipe. Sprinkle the dried oregano, garlic powder, salt, pepper, and smoked paprika over the chicken. These seasonings will infuse each bite with flavor. You might find yourself craving this combination!

    Step 2: Add Vegetables

    Next, dice your large yellow onion and lay it evenly on top of the chicken. Then, grab your bag of frozen mixed vegetables and pour them over the onions. I love the convenience of frozen veggies; they save time, taste fantastic, and add vibrant color to the dish. You can even swap them for fresh ones if you prefer!

    Step 3: Mix the Sauce

    In a medium mixing bowl, combine the condensed cream of chicken soup, cream of celery soup, and chicken broth. Whisk them together until they’re smooth. This will create a luscious sauce that envelops everything in creamy goodness. Pour this mixture gently over the layers in the slow cooker, ensuring everything gets a nice coating.

    Step 4: Slow Cook

    Cover your slow cooker and set it to cook on high for 3-4 hours or low for 5-7 hours. I recommend using a meat thermometer to check that the chicken reaches 165 degrees F. The slow cooking method turns the chicken so tender, it practically melts in your mouth. No more dried-out meat here!

    Step 5: Shred the Chicken

    When the cooking time is up, carefully remove the chicken from the slow cooker. Using two forks or meat claws, shred the chicken into bite-sized pieces. It’s so tender that it should shred easily! Return the shredded chicken to the slow cooker, mixing it well with the other ingredients for flavor.

    Step 6: Add Cream and Serve

    Finally, pour in the heavy cream and stir it all together. This adds rich creaminess that makes the dish extra indulgent. Keep the slow cooker on warm while you bake the biscuits according to the package directions. Serve the chicken pot pie warm with those freshly baked biscuits on the side. It’s pure comfort food bliss!

    Tips for Success

    • Make sure to season the chicken well; it’s the foundation of flavor!
    • Use a meat thermometer for perfect chicken; stopping at 165 degrees F is key.
    • Let the slow cooker do the work—resist the urge to lift the lid while cooking!
    • Consider adding a splash of white wine for extra richness if desired.
    • Don’t hesitate to get creative with different vegetables or herbs!

    Equipment Needed

    • Slow Cooker: A 5-quart or larger model works best. An Instant Pot can also serve the purpose.
    • Mixing Bowl: Any medium-sized bowl for combining the sauces is fine.
    • Meat Thermometer: Essential for checking chicken doneness; a fork will do in a pinch!
    • Measuring Cups: Handy if you prefer precision in liquids!

    Variations of Slow Cooker Chicken Pot Pie

    • Vegetarian Version: Substitute the chicken with hearty vegetables like mushrooms and add a can of chickpeas for protein.
    • Gluten-Free Adaptation: Use gluten-free biscuits and check that your cream soups are certified gluten-free.
    • Herb-Infused Delight: Add fresh herbs such as rosemary, thyme, or parsley for an aromatic twist that brightens the flavor.
    • Spicy Kick: Toss in some diced jalapeños or a few dashes of hot sauce for a spicy version that will wake up your taste buds.
    • Cheesy Goodness: Mix in shredded cheese like cheddar or mozzarella towards the end for a gooey, cheesy pot pie.

    Serving Suggestions for Slow Cooker Chicken Pot Pie

    • Fresh Side Salad: A crisp green salad with a light vinaigrette pairs beautifully with the rich flavors.
    • Crusty French Bread: Serve with a slice of warm, crusty French bread for extra dipping joy!
    • Comforting Drink: Enjoy a glass of chilled white wine or hot apple cider to complement the meal.
    • Presentation: Serve the pot pie in individual bowls with biscuits nestled on top for a charming look.

    FAQs about Slow Cooker Chicken Pot Pie

    Can I use frozen chicken for this recipe?

    Yes, you can absolutely use frozen chicken! Just keep in mind that it might take a bit longer to cook. Ensure the chicken reaches an internal temperature of 165 degrees F for safety. The Slow Cooker Chicken Pot Pie will still turn out delicious!

    How do I store leftovers from the slow cooker?

    Leftovers can be stored in an airtight container in the refrigerator for up to three days. Simply reheat in the microwave or on the stovetop. This dish tastes even better the next day as the flavors meld together!

    Can I make this chicken pot pie in advance?

    Absolutely! You can prep everything a day ahead. Just assemble the slow cooker, cover, and refrigerate. In the morning, pop it into the slow cooker and let it do the magic while you’re busy. A warm, delicious Slow Cooker Chicken Pot Pie awaits you at dinner time!

    What’s the best way to make this a healthier dish?

    To make it lighter, consider using low-fat cream soups and reducing the heavy cream. You can also increase the vegetable content or swap out some chicken for beans. These simple tweaks make for a healthier version without losing those comforting flavors.

    Can I use fresh vegetables instead of frozen?

    Of course! Fresh vegetables can elevate the taste of your Slow Cooker Chicken Pot Pie. Just be sure to chop them into small pieces, so they cook evenly alongside the chicken. It’s a wonderful way to enjoy seasonal veggies!

    Final Thoughts

    Creating a Slow Cooker Chicken Pot Pie is more than just preparing a meal; it’s about crafting a cozy moment for your family to enjoy together. The aroma fills your home, inviting everyone to gather around the table. With its effortless preparation, this recipe transforms your busy days into joyful experiences. Whether you’re reminiscing about family traditions or introducing a new weeknight staple, every spoonful carries warmth and love. The flaky biscuits paired with creamy filling make each bite unforgettable. You’ll find this dish not just filling but also a trusty ally in the race against time during busy nights!


    Print

    clock clock iconcutlery cutlery iconflag flag iconfolder folder iconinstagram instagram iconpinterest pinterest iconfacebook facebook iconprint print iconsquares squares iconheart heart iconheart solid heart solid icon

    Description

    A comforting and easy slow cooker recipe for chicken pot pie with tender chicken and mixed vegetables, topped with flaky biscuits.


    • 4 boneless, skinless chicken breasts (about 2 ½ pounds)
    • 2 teaspoons dried oregano
    • 1 1/2 teaspoons garlic powder
    • 1 1/2 teaspoons salt
    • 1 teaspoon cracked black pepper
    • 1/2 teaspoon smoked paprika
    • 1 large yellow onion, diced
    • 3 cups frozen mixed vegetables
    • 1 (10.5 ounce) can of condensed cream of chicken soup
    • 1 (10.5 ounce) can of condensed cream of celery soup
    • 1/2 cup chicken broth
    • 1/2 cup heavy cream
    • 1 (16.3 ounce) can of Grands or jumbo biscuits (8 count)

    1. Place the chicken breast in the bottom of a 5-quart or larger slow cooker.
    2. Sprinkle the oregano, garlic powder, salt, pepper, and paprika over the chicken.
    3. Add the onion in an even layer, then top with the frozen vegetables.
    4. In a medium mixing bowl, whisk the cream of chicken soup, cream of celery soup, and chicken broth until combined.
    5. Pour the soup mixture over the ingredients in the slow cooker.
    6. Cover and cook on high for 3-4 hours or low for 5-7 hours or until the chicken reaches an internal temperature of 165 degrees F.
    7. Remove the chicken from the slow cooker and shred it using two forks or meat claws.
    8. Return the meat to the slow cooker and add the heavy cream. Stir to combine, and turn the temperature to warm while the biscuits bake.
    9. Bake the biscuits according to the package directions.
    10. Serve the chicken pot pie warm with freshly baked biscuits.

    Notes

    • Feel free to substitute your favorite vegetables for the mixed vegetables.
    • For a richer flavor, consider adding herbs like thyme or rosemary.
    • This recipe can easily be doubled for larger gatherings.
    • Prep Time: 15 minutes
    • Cook Time: 5-7 hours
    • Category: Main Course
    • Method: Slow Cooker
    • Cuisine: American

    Nutrition

    • Serving Size: 1 serving
    • Calories: 450
    • Sugar: 3g
    • Sodium: 920mg
    • Fat: 24g
    • Saturated Fat: 10g
    • Unsaturated Fat: 8g
    • Trans Fat: 0g
    • Carbohydrates: 35g
    • Fiber: 2g
    • Protein: 25g
    • Cholesterol: 80mg

    Sharing is caring!

  • Slow Cooker Street Corn Chicken

    Slow Cooker Street Corn Chicken


    Introduction to Slow Cooker Street Corn Chicken

    I’m super excited to share my Slow Cooker Street Corn Chicken recipe with you! As a busy mom, I know all too well about the battle to get something healthy on the table after a long day — so here’s the hip secret rescue for those weeks. Like who would not want to come home to chicken that cooks all day with corn in a “street corn” inspired creamy sauce? Yeah, it’s that special meal to get everyone feeling right at home and satisfied so good if you have special people to impress or even just to spoil yourself.

    Why You’ll Love This Slow Cooker Street Corn Chicken

    Let’s be honest: life can get pretty hectic, right? This Slow Cooker Street Corn Chicken takes dinner off your to-do list with its effortless preparation and incredible flavor. Just toss in the ingredients, and let your slow cooker work its magic! The rich, creamy sauce mixed with tender chicken and sweet corn makes for a mouthwatering meal that even the pickiest eaters will love. It’s truly a win-win for everyone!

    Ingredients for Slow Cooker Street Corn Chicken

    Getting ready for my Slow Cooker Street Corn Chicken is always a fun adventure! Here’s what you’ll need to set the stage for this delightful dish:

    • Boneless Chicken Breasts or Thighs: Choose chicken thighs for a juicier, richer flavor, or use breasts for a leaner option. Both work beautifully in the slow cooker.
    • Corn: Sweet corn, canned or frozen, adds that essential pop of flavor. If you have fresh corn, cut it off the cob for an extra touch of freshness!
    • Cream Cheese: This creamy ingredient forms the base of our sauce, lending a rich texture and tanginess that brilliantly complements the corn and chicken.
    • Cotija Cheese: A delightful Mexican cheese that adds a salty bite. If you can’t find it, you could swap it with feta or a dairy-free alternative!
    • Lime Juice: Freshly squeezed lime juice introduces brightness to the dish, balancing the creaminess with its zesty goodness. Squeeze in that citrus love!
    • Garlic: Minced garlic infuses a wonderful aroma and adds depth to the flavors. You can’t go wrong with a garlicky touch!
    • Chili Powder: This spice gives it a subtle kick. If you crave more heat, feel free to add some chipotle or cayenne pepper.
    • Smoked Paprika: A sprinkle of this adds a hint of smokiness, transforming the dish into something truly special.
    • Onion Powder: This pantry staple enhances the savory flavor without overpowering it.
    • Fresh Cilantro (optional): I recommend a handful of fresh cilantro to garnish your dish before serving! Its vibrant flavor elevates the meal.

    If you’re curious about specifics, like how much of each ingredient to use, check the bottom of this article for precise measurements available in a printable format!

    How to Make Slow Cooker Street Corn Chicken

    Now that you have all the ingredients ready, let’s dive into making the delightful Slow Cooker Street Corn Chicken. Follow these simple steps, and you’ll have a fantastic dish that’ll have everyone coming back for seconds!

    Prepare the Chicken Layer

    Start by arranging the boneless chicken breasts or thighs at the bottom of your slow cooker. This creates a perfect base for all those tasty flavors to meld together. I like to season the chicken with a little salt and pepper to give it an extra boost. Remember, the slow cooker will make it juicy!

    Add the Corn and Creamy Ingredients

    Next, layer in the corn right on top of the chicken. Frozen or canned works just fine! Then, add the cream cheese, cotija cheese, lime juice, minced garlic, and chili powder on top of the corn. It might look a bit chaotic, but trust me, don’t stir yet! Allow those ingredients to sit together; they’ll mingle beautifully while cooking.

    Slow Cook to Perfection

    Cover your slow cooker and set it on LOW for 4-5 hours or HIGH for 2-3 hours. You want the chicken to become tender and shred easily, like a dreamy culinary hug! The longer, the better for flavors to develop, so I usually opt for the low setting if I have the time.

    Shred the Chicken and Mix

    Once your cooking time is up, it’s time to shred the chicken. Use two forks to pull the meat apart right in the pot. This is where the magic happens, folks! Stir everything together to create a creamy combination, adjusting the consistency with broth or milk if needed. You’ll be amazed at how it all comes together!

    Garnish and Serve

    Finally, serve your delicious Slow Cooker Street Corn Chicken hot and bubbly, topped with fresh cilantro for a pop of color and flavor. I guarantee this dish will become a favorite in your household.

    Tips for Success

    • Always use boneless chicken thighs for a richer flavor and better moisture retention.
    • Consider adding black beans for extra protein and fiber!
    • If you’re short on time, you can cook on HIGH but opt for LOW if possible.
    • Stir in some fresh spinach just before serving for a nutritious boost!
    • Don’t skip the lime juice—it’s essential for brightening up the dish!

    Equipment Needed

    • Slow Cooker: Your trusty slow cooker is the star; any size will do, but a 6-quart fits the bill perfectly.
    • Cutting Board: A sturdy cutting board makes prep easy and safe.
    • Knife: A sharp knife is essential for chopping garlic and any other ingredients.
    • Mixing Spoon: Use a sturdy spoon for mixing everything together once cooked.

    Variations

    • Vegan Adaptation: Swap the chicken for jackfruit or chickpeas and use vegan cream cheese and a plant-based cotija to make this dish cruelty-free!
    • Spicy Twist: For a fiery kick, add diced jalapeños or switch out the chili powder for chipotle powder!
    • Herbaceous Flavor: Experiment with different herbs like smoked cumin or oregano for a unique taste to your dish!
    • One-Pot Meal: Add bell peppers or diced zucchini to the mix for a colorful and hearty dish in one pot.
    • Cheesy Goodness: For extra creaminess, stir in a handful of shredded cheese right before serving.

    Serving Suggestions

    • Serve with Rice: A fragrant cilantro lime rice pairs perfectly with the creamy chicken.
    • Drink Pairing: Enjoy a refreshing margarita or iced tea to complement the flavors.
    • Presentation Tip: Serve in bowls and sprinkle extra cotija and cilantro for a beautiful finish!
    • Side Salad: A simple garden salad can balance the richness of the dish.
    • Tortilla Chips: Provide tortilla chips for a crunchy side and scoop up the yummy goodness!

    FAQs about Slow Cooker Street Corn Chicken

    Can I use frozen chicken in this recipe?

    Absolutely! You can throw in frozen chicken breasts or thighs directly into the slow cooker. Just keep in mind that it might take a bit longer to cook. No need to thaw; the slow cooker does the work!

    What can I serve with Slow Cooker Street Corn Chicken?

    This dish pairs wonderfully with cilantro lime rice or a simple green salad. You can also serve it with warm tortillas, tortilla chips, or even atop a bed of lettuce for a fresh twist.

    How do I store and reheat leftovers?

    Store any leftovers in an airtight container in the fridge for up to three days. When ready to enjoy, gently reheat in the microwave or on the stovetop, adding a splash of broth or milk to keep it creamy.

    Can I make this dish spicier?

    If you crave heat, feel free to amp it up! Adding diced jalapeños or swapping out the chili powder for chipotle or cayenne pepper will certainly deliver a fiery kick!

    Is Slow Cooker Street Corn Chicken gluten-free?

    Yes, this recipe is naturally gluten-free! Just be sure to double-check any packaged ingredients, like your cream cheese, to ensure they are gluten-free as well.

    Final Thoughts

    Cooking should be a joyful experience, and my Slow Cooker Street Corn Chicken certainly delivers just that! The whole process, from tossing ingredients into the slow cooker to relishing the delightful aroma filling your kitchen, brings a sense of accomplishment. This dish isn’t just about nourishment; it fosters family bonding over a warm meal. The creamy texture, combined with vibrant flavors, will have everyone smiling around the table. Trust me, this recipe will not only make your busy days easier but will also create cherished moments. So, roll up your sleeves and dive into this culinary delight!


    Print

    clock clock iconcutlery cutlery iconflag flag iconfolder folder iconinstagram instagram iconpinterest pinterest iconfacebook facebook iconprint print iconsquares squares iconheart heart iconheart solid heart solid icon

    Description

    A delicious and easy slow cooker dish featuring chicken, corn, and creamy sauce inspired by street corn flavors.


    • 1 lb Boneless Chicken Breasts/Thighs
    • 2 cups Corn
    • 4 oz Cream Cheese
    • 1/3 cup Cotija Cheese
    • 1 lime Lime Juice
    • 2 cloves Garlic
    • 1/2 tsp Chili Powder
    • 1/2 tsp Smoked Paprika
    • 1/2 tsp Onion Powder
    • Fresh Cilantro (optional)

    1. Layer the boneless chicken breasts or thighs in the bottom of the slow cooker.
    2. Layer the corn, cream cheese, cotija cheese, lime juice, minced garlic, and chili powder on top without stirring.
    3. Cover the slow cooker and set it on LOW for 4-5 hours or HIGH for 2-3 hours until the chicken is juicy and shreds easily.
    4. Once cooked, shred the chicken in the pot with two forks and stir everything together. Adjust consistency with broth or milk if desired.
    5. Serve topped with fresh cilantro for extra flavor.

    Notes

    • Chicken thighs provide a richer flavor than chicken breasts.
    • Feel free to use vegan alternatives for cream cheese and cotija cheese.
    • Adjust spice levels by choosing chipotle or cayenne for more heat.
    • Prep Time: 10 minutes
    • Cook Time: 4-5 hours on LOW or 2-3 hours on HIGH
    • Category: Main Dish
    • Method: Slow Cooker
    • Cuisine: Mexican

    Nutrition

    • Serving Size: 1 serving
    • Calories: 300
    • Sugar: 3g
    • Sodium: 600mg
    • Fat: 15g
    • Saturated Fat: 8g
    • Unsaturated Fat: 6g
    • Trans Fat: 0g
    • Carbohydrates: 20g
    • Fiber: 3g
    • Protein: 25g
    • Cholesterol: 75mg

    Sharing is caring!

  • Nostalgic PB&J Thumbprint Cookies

    Nostalgic PB&J Thumbprint Cookies


    Introduction to Nostalgic PB&J Thumbprint Cookies

    As a busy mom of four, trying to find treats that merge simplicity and nostalgia is always at the top of my list. I’m so excited to share my sweet PB&J thumbprint cookie recipe! These little beauties are a marriage of creamy peanut butter and your favorite jelly – and totally take you back to childhood with each bite. Short of that – they’re fast to pull together, and oh-so-sweet for little sweet moments at home with the kids as well. Trust me, your loved ones will love them, and you will love the warm memories they bring.

    Why You’ll Love This Nostalgic PB&J Thumbprint Cookies

    These nostalgic PB&J thumbprint cookies are a dream for any busy kitchen! They’re quick to whip up, taking less than 30 minutes from start to finish. Plus, the combination of peanut butter and fruity preserves creates an explosion of flavor that satisfies cravings. Whether it’s a sweet treat for the kids or a delightful snack for yourself, these cookies deliver comfort and smiles with every bite. You’ll love how they bring warmth to any occasion!

    Ingredients for Nostalgic PB&J Thumbprint Cookies

    Creating these nostalgic PB&J thumbprint cookies is as straightforward as it gets! Here’s what you’ll need:

    • Unsalted Butter: Adds creaminess and richness to the cookies, helping to achieve that soft texture we all love.
    • Granulated Sugar: Sweetens the cookies, giving them a delightful crunch on the outside.
    • Brown Sugar: Brings a slight molasses flavor and moisture, keeping the cookies chewy.
    • Salt: Enhances the sweetness and balances all the flavors beautifully.
    • Creamy Peanut Butter: The star of the show! It provides that iconic flavor and delightful creaminess.
    • Egg: Acts as a binding agent, helping the cookies hold their shape and stay moist.
    • Vanilla Extract: A splash of vanilla adds depth and warmth to the overall taste.
    • All-Purpose Flour: Forms the structure of the cookies, giving them that soft and tender texture.
    • Baking Soda: The leavening agent that helps the cookies rise, creating a fluffy bite.
    • Jelly or Jam: Choose from grape jelly, strawberry jam, or raspberry jam for a fruity burst in the center!
    • Melted Peanut Butter: Use this for drizzling on top for an extra layer of delicious peanut butter flavor.

    If you’re curious about exact measurements, don’t worry! You can find them at the bottom of the article for easy printing. The beauty of these cookies is also in their flexibility. Feel free to experiment with various jams or jellies to create your own twist on this classic treat!

    How to Make Nostalgic PB&J Thumbprint Cookies

    Making these nostalgic PB&J thumbprint cookies is a fun journey, one that I love taking. With a few simple steps, you’ll find yourself with warm, gooey cookies that everyone will adore. Let’s dive into the process together!

    Preheat the Oven

    First things first: preheat your oven to 350 degrees F. It’s like a cozy blanket warming up, ready to embrace your cookies. While that’s happening, grab your baking sheets and line them with parchment paper. This little step prevents any cookie sticking drama later on!

    Cream the Wet Ingredients

    Now, in a large mixing bowl, let’s cream together the unsalted butter, granulated sugar, brown sugar, and salt. I usually use a handy electric mixer for this part because it adds a delightful airiness. Mix until everything blends into a smooth, creamy indulgence.

    Next, add in the egg, creamy peanut butter, and vanilla extract. Whisk it all together like you mean it! You should see a delightful mix that’s shiny and rich. Trust me; this combination is like a warm hug of flavor.

    Combine the Dry Ingredients

    In another bowl, combine the all-purpose flour and baking soda. I use a whisk to incorporate them well. This helps ensure that the baking soda is evenly distributed in your dry ingredients. Once mixed, gently fold this dry mix into your wet ingredients. Use a rubber spatula to make the process smooth, ensuring a thick dough forms with minimal lumps.

    Shape the Cookie Dough

    It’s time to scoop! Using a cookie scooper, take portions of dough and roll them into balls. I aim for about 2 inches apart on the baking sheet. This gives them room to spread and grow into fluffy cookies.

    Create Wells for Jelly

    Now here comes the fun part! Take the concave side of the scooper or your thumb and gently press into the center of each dough ball, creating a well. It’s like making little cookie bowls eager to be filled with fruity goodness. Remember, they’re waiting for that delicious jelly!

    Bake the Cookies

    Place the baking sheet in the preheated oven and let the cookies bake for 13 minutes. You want them to spread out and just become golden along the edges. Keep an eye on them as that magical scent wafts through your kitchen. Once they’re done, let them cool for about 5 minutes before transferring them to a cooling rack.

    Add the Finishing Touch

    The best part is yet to come! Melt a bit of peanut butter in the microwave until it’s smooth. Then, using a piping bag or a simple plastic bag with a cut corner, drizzle that warm peanut butter right into the center of each cookie. It’s the perfect crowning jewel on these nostalgic thumbprints!

    Tips for Success

    • Make sure your butter is at room temperature for easy creaming.
    • Don’t skip the chilling step if you want thicker cookies! Pop the dough in the fridge for 30 minutes.
    • Experiment with different nut butters for a unique flavor twist.
    • For a crunch, add chopped nuts or chocolate chips to the dough.
    • Get the kids involved! Let them fill the wells with jelly for extra fun.

    Equipment Needed

    • Baking Sheets: Any flat baking tray works, even a regular cookie sheet.
    • Parchment Paper: If you don’t have this, use a silicone baking mat instead.
    • Mixing Bowls: Large and medium bowls are handy; you can substitute with any deep bowls.
    • Cookie Scooper: A tablespoon can do the trick if you don’t have one.
    • Piping Bag: A ziplock bag with a corner cut is a great alternative!

    Variations

    • Nut Butter Swap: Try almond or cashew butter for a nutty twist that’s just as delightful!
    • Gluten-Free Option: Substitute all-purpose flour with a 1:1 gluten-free baking blend for a gluten-friendly treat.
    • Sweetener Alternatives: Use coconut sugar or honey in place of granulated sugar for a healthier touch.
    • Fruit Preserves: Experiment with other flavors like apricot, peach, or even lemon curd for a zesty twist.
    • Chunky Style: Add chopped peanuts or mini chocolate chips into the dough for extra texture and flavor.

    Serving Suggestions for Nostalgic PB&J Thumbprint Cookies

    • Pair these delightful cookies with a cold glass of milk for a classic treat.
    • Serve alongside a warm cup of tea or coffee for a cozy afternoon snack.
    • For added fun, plate them with fresh sliced fruit like apples or strawberries.
    • Present them on a colorful platter to brighten up your dessert table.

    FAQs about Nostalgic PB&J Thumbprint Cookies

    Can I use crunchy peanut butter instead of creamy?

    Absolutely! Using crunchy peanut butter will give these nostalgic PB&J thumbprint cookies a delightful texture. It’s a fun twist!

    What other jams can I use in these cookies?

    You can get creative! Raspberry jam, apricot preserves, or even chocolate spread can make each batch unique. The flavor possibilities are endless!

    How should I store these cookies after baking?

    To keep your cookies fresh, store them in an airtight container at room temperature. They’ll stay delicious for up to a week!

    Can I freeze the cookie dough for later use?

    Yes, you can! Portion the dough into balls, freeze them on a parchment-lined sheet, and then transfer to a freezer bag. Bake fresh cookies whenever the craving hits!

    What’s the secret to soft cookies?

    To keep your nostalgic PB&J thumbprint cookies soft, avoid overbaking. They should look slightly underdone when you take them out of the oven. Trust the cooling process to finish them off!

    Final Thoughts

    There’s something truly special about baking nostalgic PB&J thumbprint cookies. Each bite is a delightful trip down memory lane, mingling sweet flavors with comforting textures. They encapsulate the essence of childhood—and let’s be honest—the joy of sharing good food with family. Whether it’s a rainy day or a sunny afternoon, these cookies can bring smiles all around the table. So roll up your sleeves and get baking! The laughter and love you create in your kitchen will make every moment deliciously worthwhile. Trust me, your family will thank you for it!


    Print

    clock clock iconcutlery cutlery iconflag flag iconfolder folder iconinstagram instagram iconpinterest pinterest iconfacebook facebook iconprint print iconsquares squares iconheart heart iconheart solid heart solid icon

    Description

    Delicious and nostalgic thumbprint cookies filled with your choice of grape jelly, strawberry jam, or raspberry jam.


    • ½ cup unsalted butter (one stick)
    • ½ cup granulated sugar
    • ½ cup brown sugar
    • ¼ teaspoon salt
    • 1 cup creamy peanut butter
    • 1 egg
    • 1 teaspoon vanilla extract
    • 1 ½ cups all purpose flour
    • 1 teaspoon baking soda
    • ½ cup grape jelly, strawberry jam or raspberry jam
    • Melted peanut butter for drizzling

    1. Preheat oven to 350 degrees F. Line 1-2 baking sheets with parchment paper and set aside.
    2. In a large mixing bowl, cream together the butter, brown and white sugar and salt.
    3. Add the egg, peanut butter and vanilla next. Whisk together again rapidly until the mixture is combined, making sure the peanut butter is fully incorporated.
    4. Using a rubber spatula or wooden spoon, fold the dry ingredients (flour and baking soda) into the wet ingredients until a thick dough is formed.
    5. Using the scooper, scoop out balls of dough. Place the cookie dough balls on the prepared baking sheet about 2 inches apart.
    6. Use the concave side of the scooper to flatten the center of each cookie, creating a well for the jelly.
    7. Place a teaspoonful of preserves in the center of each unbaked peanut butter cookie.
    8. Bake in the oven for 13 minutes. The cookies will have spread and the edges become slightly browned. Let cool for 5 minutes then transfer to a cooling rack.
    9. Melt the extra peanut butter and place in a piping bag.
    10. To finish, create a swirl of melted peanut butter in the center of each cookie.

    Notes

    • Allow cookies to cool completely before storing.
    • Experiment with different types of fruit preserves for unique flavors.
    • Store in an airtight container for up to one week.
    • Prep Time: 15 minutes
    • Cook Time: 13 minutes
    • Category: Dessert
    • Method: Baking
    • Cuisine: American

    Nutrition

    • Serving Size: 1 cookie
    • Calories: 180
    • Sugar: 10g
    • Sodium: 100mg
    • Fat: 10g
    • Saturated Fat: 3g
    • Unsaturated Fat: 5g
    • Trans Fat: 0g
    • Carbohydrates: 20g
    • Fiber: 1g
    • Protein: 4g
    • Cholesterol: 15mg

    Sharing is caring!

  • Lemon Chicken Asparagus Stir-Fry

    Lemon Chicken Asparagus Stir-Fry


    Introduction to Lemon Chicken Asparagus Stir-Fry

    Hey, foodies! Life can be just as crazy for you as it is for me. You’ll love having this fast, fabulous Lemon Chicken Asparagus Stir-Fry at your fingertips—it’s vibrant enough to cheer up weeknight dinners. This isn’t just throwing ingredients together; this is a break from the daily routine in a good way. So stop stressing about what you’re going to serve your family – or show off to your date-turned-friend – and just make this.

    Why You’ll Love This Lemon Chicken Asparagus Stir-Fry

    This Lemon Chicken Asparagus Stir-Fry is a game changer for anyone juggling a busy schedule. It comes together in just 20 minutes, making it perfect for those unplanned evenings when you’re not sure what to cook. The vibrant flavors of lemon and garlic will have your family asking for seconds. Plus, it’s a healthy option that doesn’t compromise on taste, ensuring you feel great about what you’re serving!

    Ingredients for Lemon Chicken Asparagus Stir-Fry

    Gathering the right ingredients sets the stage for your delicious Lemon Chicken Asparagus Stir-Fry. Here’s what you’ll need:

    • Olive oil: This healthy fat helps cook the chicken to golden perfection while adding delightful flavor.
    • Boneless, skinless chicken breasts: A lean protein that cooks quickly and soaks up all those yummy flavors. You could also use chicken thighs for a richer taste.
    • Kosher salt and freshly ground black pepper: The essentials for enhancing the chicken’s natural flavors. Sprinkle generously for the best results.
    • Minced garlic: Adds a fragrant aroma and deep flavor. Always fresh minced garlic is a great choice, but dried will work in a pinch.
    • Asparagus: Tender, crunchy asparagus brings a pop of color and health benefits, too! Feel free to swap it with your favorite veggies like bell peppers or broccoli.
    • Lemon zest and juice: The stars of this dish! They brighten the stir-fry and add that citrusy zing we all love.
    • Soy sauce: This umami-rich sauce brings everything together, adding depth and seasoning. For a gluten-free option, use tamari.
    • Steamed rice: Perfect for serving alongside your stir-fry, it soaks up all those incredible juices and flavors.

    For exact measurements, don’t forget to check the bottom of the article; they’re also available for printing!

    How to Make Lemon Chicken Asparagus Stir-Fry

    Now that you have all your ingredients ready, let’s dive into making this delightful Lemon Chicken Asparagus Stir-Fry. It’s super easy and quick, which is just what we need on those busy nights. Follow along, and you’ll have a delicious, colorful dish everyone will love!

    Step 1: Prepare the Chicken

    To start, slice your boneless, skinless chicken breasts into even pieces. This helps them cook uniformly. Next, sprinkle kosher salt and freshly ground black pepper generously on the chicken. Don’t be shy! This simple seasoning elevates the flavor. Trust me, those little flecks of salt and pepper will bring your stir-fry to life. Allow the chicken to sit for a moment; it helps those seasonings soak in for a wonderfully tasty bite.

    Step 2: Heat the Oil

    Now, let’s get your pan sizzling! Heat a large pan over medium-high heat and drizzle in the olive oil. It should shimmer and give off a gentle wave when it’s ready. The right temperature is crucial! If it’s too hot, the oil will smoke; too cool, and your chicken will steam instead of sear. You want the oil hot enough to seal in those juices while creating a beautiful golden crust on your chicken.

    Step 3: Cook the Chicken

    Time to add the chicken! Carefully place the seasoned pieces into the pan, making sure not to overcrowd it. Stir-fry the chicken for about 4 minutes, or until it’s no longer pink on the outside. This ensures it’s entirely cooked through. Keep your spatula moving, so each piece gets a bit of love from the heat. Once the chicken looks perfectly golden, move to the next step.

    Step 4: Add Garlic

    Ah, garlic—the magic ingredient! After your chicken is just right, it’s garlic time. Toss in your minced garlic and stir it around for about 30 seconds. You’ll know it’s ready when the kitchen starts smelling like a cozy Italian restaurant. Be careful not to let it burn, though! Burnt garlic can turn bitter, and we’re aiming for that delightful flavor boost that rounds out our stir-fry.

    Step 5: Incorporate Asparagus

    Let’s bring in the veggies! Add your trimmed asparagus, along with the lemon zest and juice. Give everything a good toss to combine. Cook for about 2 minutes until the asparagus is just tender yet still bright green. You want that crunch! The lemon zest and juice will mingle with the garlic, creating a vibrant, fragrant dish that’ll have your taste buds dancing with joy.

    Step 6: Add Soy Sauce

    Finally, it’s time for the star player—soy sauce! Pour it over the chicken and asparagus, and give everything a good stir to coat all the ingredients evenly. Cook for an additional minute, allowing the soy sauce to caramelize slightly. This is the moment where all those fantastic flavors come together, making your Lemon Chicken Asparagus Stir-Fry a dish worth celebrating!

    Tips for Success

    • Prep all your ingredients beforehand to make cooking a breeze.
    • Use a large pan to avoid overcrowding; this ensures even cooking and better searing.
    • If you like spice, add red pepper flakes to the chicken as it cooks.
    • Don’t overcook the asparagus; you want a nice crunch!
    • Experiment with different vegetables based on what’s in season or what your family enjoys.

    Equipment Needed

    • Large frying pan or wok: Essential for stir-frying. A non-stick skillet works well, too!
    • Spatula: Use this to toss and turn ingredients for even cooking. A wooden or silicone spatula is perfect.
    • Knife and cutting board: For prepping chicken and vegetables. A sharp knife makes all the difference.
    • Measuring spoons: Handy for precise amounts of soy sauce and oil.

    Variations

    • Vegetable Swap: Try using broccoli, bell peppers, or snap peas instead of asparagus for a different flavor and texture.
    • Extra Protein: Add shrimp or tofu for a delicious twist. Both cook quickly and absorb the savory flavors beautifully.
    • Citrus Variety: Add orange or lime juice along with the lemon for a zestier taste that brightens the dish even more.
    • Gluten-Free: Use tamari instead of soy sauce to make this dish gluten-free while keeping all the deliciousness intact.
    • Spice it Up: For extra heat, include sliced jalapeños or a dash of sriracha in the stir-fry.

    Serving Suggestions

    • Pair your Lemon Chicken Asparagus Stir-Fry with fluffy steamed jasmine rice to soak up all those delightful flavors.
    • For a colorful twist, serve it over quinoa or cauliflower rice for a healthy option.
    • A light, crisp white wine or refreshing iced tea complements this dish beautifully.
    • Add a sprinkle of sesame seeds or fresh herbs for an elegant finishing touch!

    FAQs about Lemon Chicken Asparagus Stir-Fry

    Can I use different vegetables in this stir-fry? Absolutely! While asparagus is a star in this dish, feel free to swap it out for bell peppers, broccoli, or snap peas. The versatility of a stir-fry means you can use whatever veggies you have on hand.

    How can I make this Lemon Chicken Asparagus Stir-Fry spicier? If you like a bit of heat, consider adding red pepper flakes when cooking the chicken. Alternatively, toss in some sliced jalapeños or a splash of sriracha sauce to amp up the flavor!

    Can I meal prep this Lemon Chicken Asparagus Stir-Fry? Yes! This dish is perfect for meal prep. Simply cook it in advance, let it cool, and store in airtight containers in the fridge for up to 3 days. Reheat it in the microwave when you’re ready to enjoy!

    How do I store leftovers? Store any leftovers in an airtight container in the refrigerator. It’s best consumed within 3 days, as it keeps its flavors and texture nicely. Avoid freezing, as the veggies may become mushy.

    What can I serve with Lemon Chicken Asparagus Stir-Fry? Steamed rice is a classic pairing, but you can also serve it over quinoa or cauliflower rice for a healthier twist. A light side salad or fresh spring rolls make great additions, too!

    Final Thoughts

    Cooking can feel like a chore on busy nights, but my Lemon Chicken Asparagus Stir-Fry is here to change that. With its bright flavors and vibrant colors, this dish not only nourishes the body but also warms the heart. Each bite is a reminder that a homemade meal doesn’t have to take hours to prepare. I love how it brings my family together at the dinner table, sparking conversations and laughter. So grab your pan and give this recipe a try—you might just discover your new weeknight favorite that brings joy to your kitchen!


    Print

    clock clock iconcutlery cutlery iconflag flag iconfolder folder iconinstagram instagram iconpinterest pinterest iconfacebook facebook iconprint print iconsquares squares iconheart heart iconheart solid heart solid icon

    Description

    A quick and delicious Lemon Chicken Asparagus Stir-Fry that’s perfect for a weeknight dinner.


    • 7 mL olive oil
    • 2 boneless, skinless chicken breasts, sliced
    • 1 teaspoon kosher salt
    • 0.5 teaspoon freshly ground black pepper
    • 1 tablespoon minced garlic
    • 100 grams asparagus, trimmed
    • Zest of 0.5 lemon, plus extra for garnish
    • Juice of 0.5 lemon
    • 45 mL soy sauce
    • Steamed rice (to serve)

    1. Sprinkle sliced chicken breasts with kosher salt and freshly ground black pepper, ensuring even coverage.
    2. Heat olive oil in a large pan over medium-high heat. Add seasoned chicken and stir-fry until the surface is no longer pink, approximately 4 minutes.
    3. Incorporate minced garlic into the pan and continue stir-frying until chicken is fully cooked, about 4 minutes more.
    4. Add asparagus, lemon zest, and lemon juice to the pan. Toss to combine and cook until asparagus is just tender, approximately 2 minutes.
    5. Pour in soy sauce and stir well to coat all ingredients evenly.
    6. Serve chicken and asparagus stir-fry over steamed rice. Garnish with additional lemon zest to taste.

    Notes

    • For a spicier kick, add red pepper flakes when cooking the chicken.
    • Substitute asparagus with your choice of vegetables like bell peppers or broccoli.
    • Prep Time: 10 minutes
    • Cook Time: 10 minutes
    • Category: Dinner
    • Method: Stir-fry
    • Cuisine: Asian

    Nutrition

    • Serving Size: 1 serving
    • Calories: 300
    • Sugar: 2g
    • Sodium: 600mg
    • Fat: 12g
    • Saturated Fat: 2g
    • Unsaturated Fat: 8g
    • Trans Fat: 0g
    • Carbohydrates: 20g
    • Fiber: 3g
    • Protein: 30g
    • Cholesterol: 60mg

    Sharing is caring!

  • New York Chopped Cheese Sandwich

    New York Chopped Cheese Sandwich


    Introduction to New York Chopped Cheese Sandwich

    Imagination runs wild: work piles up on a frenetic pace during the busy afternoon of an ordinary weekday. Now, you need something yummy and quick to prepare that your family is going to love and ask for more- The New York Chopped Cheese Sandwich. Seasoned ground beef, gooey melted cheese, fresh toppings all ensconced in a crispy hoagie roll. The sandwich is perfect for those moments when you are busy and need comfort food fast and yet want to impress at the dinner table. Take my word on this; after one bite, it will quickly become a family favorite!

    Why You’ll Love This New York Chopped Cheese Sandwich

    If you’re like me, finding a quick and satisfying meal is a constant challenge. That’s where this New York Chopped Cheese Sandwich comes in. It’s not just easy and fast to make; it’s also bursting with flavor! The seasoned beef with melted cheese creates a symphony of tastes that make every bite unforgettable. Plus, you can personalize it with your favorite toppings. It’s the perfect weeknight hero!

    Ingredients for New York Chopped Cheese Sandwich

    Let’s talk about what you’ll need to whip up this mouthwatering New York Chopped Cheese Sandwich. Each ingredient plays a role in creating that perfect balance of flavors.

    • Ground Beef: I recommend using an 80/20 lean-to-fat ratio. The fat gives richness and flavor, keeping the beef juicy.
    • Yellow Onion: Diced onions add a sweetness and depth to the sandwich. Sautéing them first creates that lovely aromatic base.
    • American Cheese: You can’t go wrong with classic American cheese. It melts beautifully, giving that creamy texture we all love.
    • Hoagie Rolls: These rolls are critical—the perfect vessel for all that deliciousness. Freshness makes a difference in the final bite.
    • Seasoned Salt: This is your go-to seasoning. It enhances the beef and mingles perfectly with the other flavors.
    • Black Pepper: Just a dash is enough to give a little kick without overpowering the dish.
    • Garlic Powder: This little gem adds a touch of warmth and savory flavor, perfect for elevating the beef.
    • Mayonnaise and Ketchup: These creamy and tangy condiments bring all the elements together. Feel free to adjust based on your taste!
    • Tomato: Fresh slices add a burst of juiciness that complements the hearty beef.
    • Shredded Iceberg Lettuce: This crispy topping gives a refreshing crunch to your sandwich. It’s an essential for that textural contrast!
    • Unsalted Butter: Use this to toast your hoagie rolls; it imparts a delicious buttery flavor and golden crust.
    • Neutral Oil: Just a touch for sautéing the onions. Canola or vegetable oil works best, as it doesn’t interfere with the flavor.

    For exact measurements, you can refer to the bottom of the article where everything is listed for easy printing!

    How to Make New York Chopped Cheese Sandwich

    Ready to whip up your own New York Chopped Cheese Sandwich? Let’s dive into the steps together! Making this sandwich is straightforward, and I promise it’ll be worth every bite. Follow along, and soon you’ll be savoring a homemade masterpiece.

    Preparing the Onions and Beef

    First things first, we need to get our skillet hot.

    Heat a large skillet over medium-high heat.

    Add 1/2 teaspoon of neutral oil.

    Once it shimmers, toss in your diced yellow onion.

    Sauté those babies for about 5 minutes until they’re softened and fragrant.

    This is when the magic begins!

    Next, add the ground beef to the skillet.

    Use a spatula to break it apart.

    Let it cook for 6 to 8 minutes, stirring frequently.

    The goal here is to achieve that beautiful browned texture.

    Seasoning the Mixture

    Now it’s time to pack in the flavor!

    Sprinkle 1 teaspoon of seasoned salt, 1/2 teaspoon of black pepper, and 1/2 teaspoon of garlic powder evenly over the beef mixture.

    Make sure every morsel gets a tasty coating.

    Continue to cook for a couple of minutes until the beef is golden and crispy.

    This seasoning is what will elevate your chopped cheese sandwich and give it that iconic taste!

    Melting the Cheese

    Here comes the best part!

    Lay 8 slices of American cheese over the beef once it’s nicely browned.

    The cheese should cover as much surface as possible.

    Allow it to melt beautifully—this takes about a minute.

    Don’t forget to mix the melted cheese into the beef with your spatula.

    This creates that gooey, savory goodness we crave in a chopped cheese sandwich!

    Toasting the Rolls

    While that cheese is melting, let’s toast those hoagie rolls.

    Take 4 hoagie rolls and spread unsalted butter on the inside of each one.

    Place the rolls cut-side down in a clean skillet over medium heat.

    Toast until they’re golden brown and slightly crispy.

    This step adds a delightful crunch that complements the softness of the beef and cheese!

    Assembling the Sandwich

    We’re almost there!

    Start by spooning the chopped beef and cheese mixture into each toasted hoagie roll.

    Don’t be shy—make them generous!

    Now, it’s time for the toppings.

    Add slices of fresh tomato and a heap of shredded iceberg lettuce for that refreshing crunch.

    Finish it off with a drizzle of mayonnaise and ketchup, or any sauce you prefer.

    And just like that, your New York Chopped Cheese Sandwich is complete!

    Tips for Success

    • Always preheat your skillet to get that perfect sear on the beef.
    • Use a good quality ground beef for maximum flavor; 80/20 is ideal.
    • Feel free to experiment with toppings like avocado or jalapeños.
    • Serve immediately for that fresh, delicious experience.
    • Don’t rush the cheese melting process; it’s all about that creamy goodness!

    Equipment Needed

    • Large skillet: A non-stick option works great for easy cooking.
    • Spatula: Use a sturdy one for breaking up the beef.
    • Knife and cutting board: Essential for chopping onions and slicing tomatoes.
    • Serving plate: To showcase your delicious New York Chopped Cheese Sandwich.

    Variations

    • Spicy Twist: Add sliced jalapeños or a drizzle of hot sauce for a fiery kick that will warm your heart!
    • Veggie Option: Substitute the beef with sautéed mushrooms or a plant-based ground meat for a delicious vegetarian version.
    • Loaded Style: Top your sandwich with grilled peppers and onions for an extra layer of flavor and texture.
    • Cheese Lovers: Mix different cheeses like Pepper Jack or Cheddar for a unique cheesy experience.
    • Gluten-Free: Use gluten-free rolls or lettuce wraps to cater to gluten-sensitive friends.

    Serving Suggestions

    • Pair your New York Chopped Cheese Sandwich with crispy fries or sweet potato wedges for a classic touch.
    • A chilled cola or iced tea complements the sandwich perfectly.
    • For presentation, serve on a rustic wooden board with pickles on the side.

    FAQs about New York Chopped Cheese Sandwich

    What is a New York Chopped Cheese Sandwich?

    A New York Chopped Cheese Sandwich is a delicious sandwich made with seasoned ground beef, melted American cheese, and an assortment of fresh toppings, all served in a toasted hoagie roll. It’s a beloved street food in NYC!

    Can I make this sandwich ahead of time?

    While it’s best enjoyed fresh, you can prep the beef mixture in advance. Just reheat it when you’re ready to assemble your New York Chopped Cheese Sandwich.

    What can I substitute for ground beef?

    You can easily swap out ground beef for turkey, chicken, or plant-based meat if you’re looking for a lighter or vegetarian option. Just adjust the cooking time accordingly!

    How do I store leftovers?

    If you have any leftover mixture, store it in an airtight container in the fridge for up to three days. Reheat thoroughly before serving it again in a toasted roll.

    What are some great toppings for a Chopped Cheese Sandwich?

    The sky’s the limit! Tomato, shredded lettuce, jalapeños, or even avocado can elevate your sandwich. Feel free to get creative and make it your own!

    Final Thoughts

    The New York Chopped Cheese Sandwich is more than just a recipe; it’s an experience that brings joy and satisfaction to your kitchen. Each bite is a comforting reminder of home and warmth, making it perfect for busy nights or casual gatherings with friends. As you create this sandwich, you’ll feel a sense of accomplishment and delight, knowing you’ve crafted something so tasty with your own hands. Plus, the smiles on your loved ones’ faces when they take a bite? That’s the sweetest reward of all. So grab your ingredients and let the delicious adventure begin!


    Print

    clock clock iconcutlery cutlery iconflag flag iconfolder folder iconinstagram instagram iconpinterest pinterest iconfacebook facebook iconprint print iconsquares squares iconheart heart iconheart solid heart solid icon

    Description

    The New York Chopped Cheese Sandwich is a delicious combination of seasoned ground beef, melted American cheese, and fresh toppings served in a toasted hoagie roll.


    • 1 lb (450 g) ground beef, 80/20 lean-to-fat ratio
    • 1 small yellow onion, diced
    • 8 slices American cheese
    • 4 hoagie rolls, split
    • 1 teaspoon seasoned salt
    • 1/2 teaspoon black pepper
    • 1/2 teaspoon garlic powder
    • 4 tablespoons mayonnaise
    • 4 tablespoons ketchup
    • 1 medium tomato, sliced
    • 1 cup shredded iceberg lettuce
    • 2 tablespoons unsalted butter
    • 1/2 teaspoon neutral oil for sautéing

    1. Heat a large skillet over medium-high heat and add 1/2 teaspoon neutral oil. Sauté diced onion for 5 minutes until softened and fragrant.
    2. Add ground beef to the skillet with the onions. Break apart with a spatula and cook for 6 to 8 minutes, chopping and stirring frequently.
    3. Sprinkle seasoned salt, black pepper, and garlic powder evenly across the beef mixture. Continue to cook until beef develops a crispy, browned texture.
    4. Spread American cheese slices evenly atop the hot chopped beef. Allow cheese to melt, then use a spatula to mix the cheese thoroughly into the meat.
    5. Butter the interior of each hoagie roll with unsalted butter. Toast cut-side down in a clean skillet over medium heat until golden.
    6. Spoon chopped beef and cheese mixture into each toasted roll. Top with tomato slices, shredded lettuce, mayonnaise, and ketchup as desired.

    Notes

    • Feel free to customize the toppings based on your preferences.
    • For a spicier version, add jalapeños or hot sauce.
    • This sandwich is best enjoyed immediately while warm.
    • Prep Time: 10 minutes
    • Cook Time: 20 minutes
    • Category: Sandwich
    • Method: Stovetop
    • Cuisine: American

    Nutrition

    • Serving Size: 1 sandwich
    • Calories: 650
    • Sugar: 5g
    • Sodium: 1200mg
    • Fat: 40g
    • Saturated Fat: 15g
    • Unsaturated Fat: 20g
    • Trans Fat: 0g
    • Carbohydrates: 35g
    • Fiber: 2g
    • Protein: 35g
    • Cholesterol: 90mg

    Sharing is caring!

  • Strawberry Shortcake Ice Cream Cake

    Strawberry Shortcake Ice Cream Cake


    Introduction to Strawberry Shortcake Ice Cream Cake

    Life can whirl by when you are a busy mom or professional. That’s why I always look for yummy treats that don’t take hours to make. Enter the Strawberry Shortcake Ice Cream Cake. This multi-layered treat is not just visually appealing but also an almost instant solution to satiating those burgeoning sugar cravings. Oreo crust, vanilla and strawberry ice creams, and freeze-dried strawberries are just some of the ways your special someone will be delighted and giddy with laughter around the table. So, let’s get into the elation of making this frozen delight!

    Why You’ll Love This Strawberry Shortcake Ice Cream Cake

    This Strawberry Shortcake Ice Cream Cake is the ultimate dessert that combines ease with indulgence. It requires no baking, just blending and layering, making it perfect for busy days. Plus, it caters to those sweet tooth cravings without taking all afternoon. With its delightful flavors and impressive presentation, you can whip up something that feels fancy yet is incredibly simple. Trust me, it’ll make you the star of any gathering!

    Ingredients for Strawberry Shortcake Ice Cream Cake

    Let’s gather our ingredients! The beauty of this recipe is that it’s simple and straightforward, using everyday items that you might already have at home. Here’s what you’ll need:

    • Golden Sandwich Cookies: These cookies create a delightful, sweet crust. You can use any sandwich cookies if you prefer a twist.
    • Kosher Salt: Just a pinch helps enhance the flavors without making the dessert salty. It’s the secret ingredient that brings everything together.
    • Unsalted Butter: This adds richness to the crust. If you’re in a pinch, margarine can work too.
    • Vanilla Ice Cream: You’ll need a generous amount for that creamy texture. Choose your favorite brand, or even homemade if you’re feeling adventurous!
    • Strawberry Ice Cream: The star of this cake! It infuses each bite with fruity sweetness. Don’t hesitate to use a different flavor if you want to shake things up.
    • Freeze-Dried Strawberries: These little gems add a crunchy texture and concentrated strawberry flavor. Feel free to toss in fresh berries if you prefer.
    • Additional Vanilla Ice Cream: For topping and to complete the layered look. It’s the final touch that makes your cake sing!
    • More Sandwich Cookies: These will be crumbled for topping, adding an extra crunch.

    If you’re curious about exact quantities for each ingredient, don’t worry! They’re listed at the bottom of the article for your convenience, complete with an easy-to-print version. Now that our ingredients are ready, let’s move forward and create this mouthwatering dessert!

    How to Make Strawberry Shortcake Ice Cream Cake

    Creating this Strawberry Shortcake Ice Cream Cake is easier than you think! With a series of simple steps, you’ll be on your way to a treat that dazzles. Let’s jump right in!

    Step 1: Prepare the Pan

    Start by lining a 20 cm x 20 cm baking pan with parchment paper. Make sure to leave a nice overhang, about 5 cm, on each side. This makes it easy to lift out the cake later. Trust me, this little tip will save you from a messy disaster!

    Step 2: Make the Cookie Crust

    Next up, let’s whip up our crust. In a food processor, pulse the golden sandwich cookies and kosher salt until they turn into fine crumbs. It should resemble sand after a day at the beach! Add in the melted butter, and pulse until it’s all combined. Now, firmly press this mixture into the bottom of your prepared pan. Freeze it for about 15 minutes for that lovely firm base.

    Step 3: Add the Vanilla Ice Cream Layer

    Once your crust is firm, it’s time for the first layer of ice cream! In a large bowl, stir 4 cups of slightly softened vanilla ice cream until it’s smooth and spreadable. Spread this heavenly layer evenly over your chilled crust. Pop it back in the freezer for at least 30 minutes. You want it to set up nicely!

    Step 4: Add the Strawberry Ice Cream Layer

    Now, let’s bring in the flavor with the strawberry ice cream. In the same bowl (easy clean-up!), mix together 4 cups of slightly softened strawberry ice cream until smooth. Gently fold in 1/2 cup of freeze-dried strawberries for that extra crunch. Spread this luscious strawberry layer right over the frozen vanilla layer. Freeze again for another 30 minutes.

    Step 5: Create the Topping

    The fun continues! In that trusty food processor, pulse the remaining 10 golden sandwich cookies with 1 cup of freeze-dried strawberries until you have pea-sized crumbs. It’ll feel like you’re saving a little summer sunshine to sprinkle on top! In a bowl, gently stir 1 1/2 cups of vanilla ice cream until smooth for the final topping.

    Step 6: Final Assembly

    Spread the vanilla mixture evenly on the strawberry layer. Next, sprinkle that delightful crumb mixture over the top. Press it down lightly so it sticks. It’s like adding a crunchy crown on a cake fit for royalty!

    Step 7: Freeze and Serve

    Finally, let this masterpiece freeze for at least 4 hours or until fully firm. When you’re ready to feast, simply lift the cake out using the parchment overhang. Cut it into squares or rectangles, and serve immediately. Watch those smiles light up the room!

    Tips for Success

    • Let the ice cream soften just a bit before spreading. It’ll save you a struggle!
    • Use a sharp knife to cut the cake. It helps create clean slices.
    • Freeze the cake longer if it’s not firm enough. Better safe than sorry!
    • Experiment with your cookie crust! Different cookies can offer a fun twist.
    • Keep a batch in the freezer for surprise guests—it’s a lifesaver!

    Equipment Needed

    • Baking Pan: Use a 20 cm x 20 cm pan; an 8-inch square pan works too.
    • Parchment Paper: Essential for easy removal; aluminum foil can be a substitute.
    • Food Processor: Ideal for making crumbs; a rolling pin and a zip-top bag will work in a pinch.
    • Mixing Bowl: A large one is great; any bowl for mixing will suffice.
    • Sharp Knife: For cutting, a warm knife makes for smoother slices!

    Variations

    • Nutty Delight: Add crushed nuts, like almonds or walnuts, to the crumb topping for extra crunch and flavor.
    • Chocolate Lovers: Swap out the golden sandwich cookies for chocolate cookies and use chocolate ice cream for a decadent twist.
    • Fresh Fruit: Layer in some fresh strawberries or even blueberries in between the ice cream layers for a burst of freshness.
    • Dairy-Free Option: Use dairy-free ice creams and cookies for a lactose-free version that everyone can enjoy.
    • Low-Sugar Alternative: Look for sugar-free ice creams and cookies to create a guilt-free dessert option without sacrificing taste.

    Serving Suggestions

    • Whipped Cream: A dollop of freshly whipped cream on top elevates this dessert to a new level of indulgence.
    • Fresh Strawberries: Serve alongside whole strawberries for a pop of color and freshness.
    • Mint Leaves: Garnish with mint leaves for a refreshing touch.
    • Iced Tea: Pair with a glass of sweetened iced tea for a perfect summer treat.
    • Presentation: Serve on a decorative cake stand to showcase this stunning dessert beautifully.

    FAQs about Strawberry Shortcake Ice Cream Cake

    Got questions about making your beautiful Strawberry Shortcake Ice Cream Cake? You’re not alone! Here are some common queries that come up quite frequently as you embark on this delightful journey.

    Can I use fresh strawberries instead of freeze-dried strawberries?

    Absolutely! Fresh strawberries can be a great substitute. Just chop them finely and toss them in when mixing the strawberry ice cream layer. However, keep in mind that they can add extra moisture, so enjoy the flavorful twist!

    How long will the ice cream cake last in the freezer?

    Your Strawberry Shortcake Ice Cream Cake can last in the freezer for about 1 to 2 weeks. After that, it might lose some of its delightful texture. For the best experience, enjoy it within the first week!

    Can I make this dessert ahead of time?

    You can definitely make this cake a day or two in advance. Just ensure it’s well covered in the freezer to prevent freezer burn. This is perfect for parties or family gatherings—you can focus on enjoying time with your loved ones.

    Is this cake suitable for kids?

    Yes! Kids love the sweet flavors and fun textures of Strawberry Shortcake Ice Cream Cake. It’s a great treat for birthday parties or summer picnics. Just be cautious with the small bits from the freeze-dried strawberries for younger ones!

    Can I adjust the sweetness of the ice cream cake?

    Of course! You can use lower-sugar ice creams or even make your own. Just remember that the sweetness from the cookie crust and freeze-dried strawberries will still add some delicious flavor. Balance is key!

    Final Thoughts

    Creating this Strawberry Shortcake Ice Cream Cake reminds me of the joy that comes from sharing delicious moments with family and friends. Each layer tells a story—of busy afternoons transformed into sweet memories. It’s a dessert that not only satisfies cravings but also brings smiles and laughter to the table. Whether it’s a special occasion or just a Tuesday, this cake makes everything feel a little more festive. So, grab those ingredients, rally the family, and enjoy the fun of making something truly delightful together. Happy baking, and here’s to delicious moments!


    Print

    clock clock iconcutlery cutlery iconflag flag iconfolder folder iconinstagram instagram iconpinterest pinterest iconfacebook facebook iconprint print iconsquares squares iconheart heart iconheart solid heart solid icon

    Description

    Strawberry Shortcake Ice Cream Cake is a delightful layered dessert featuring a cookie crust, creamy vanilla and strawberry ice cream, and a crunchy topping.


    • 20 golden sandwich cookies
    • 1/4 teaspoon kosher salt
    • 3 tablespoons unsalted butter, melted
    • 4 cups vanilla ice cream, slightly softened
    • 4 cups strawberry ice cream, slightly softened
    • 1/2 cup freeze-dried strawberries
    • 1 1/2 cups vanilla ice cream, slightly softened (for topping)
    • 10 golden sandwich cookies (for topping)
    • 1 cup freeze-dried strawberries (for topping)

    1. Line the bottom and sides of a 20 cm x 20 cm baking pan with parchment paper, ensuring a 5 cm overhang on each side for easy removal.
    2. In a food processor, pulse 20 golden sandwich cookies and kosher salt to fine crumbs. Add melted butter, pulsing until the mixture resembles wet sand. Press the mixture evenly into the bottom of the prepared pan. Freeze for 15 minutes.
    3. In a large bowl, stir 4 cups of slightly softened vanilla ice cream until smooth and spreadable. Evenly spread the ice cream over the chilled crust. Freeze for at least 30 minutes.
    4. In the same bowl, mix together 4 cups strawberry ice cream until smooth. Fold in 1/2 cup freeze-dried strawberries. Spread this mixture evenly over the frozen vanilla layer. Freeze for an additional 30 minutes.
    5. Pulse the remaining 10 golden sandwich cookies with 1 cup freeze-dried strawberries in a food processor until pea-sized crumbs form.
    6. Gently stir 1 1/2 cups vanilla ice cream until smooth and spread evenly over the strawberry layer. Sprinkle the prepared crumb mixture over the top, pressing lightly so it adheres.
    7. Freeze for at least 4 hours or until fully firm. When ready to serve, use the parchment overhang to lift the cake from the pan. With a sharp knife, cut into 9 squares or 8 rectangles. Serve immediately.

    Notes

    • Ensure the ice cream is slightly softened for better spreading.
    • Freeze longer if the ice cream cake isn’t firm enough before serving.
    • Prep Time: 30 minutes
    • Cook Time: 0 minutes
    • Category: Dessert
    • Method: Freezing
    • Cuisine: American

    Nutrition

    • Serving Size: 1 square or rectangle
    • Calories: 250
    • Sugar: 23g
    • Sodium: 150mg
    • Fat: 11g
    • Saturated Fat: 6g
    • Unsaturated Fat: 4g
    • Trans Fat: 0g
    • Carbohydrates: 35g
    • Fiber: 1g
    • Protein: 3g
    • Cholesterol: 30mg

    Sharing is caring!