Author: IHAAL Team

  • Peppermint Mocha Bread

    Peppermint Mocha Bread


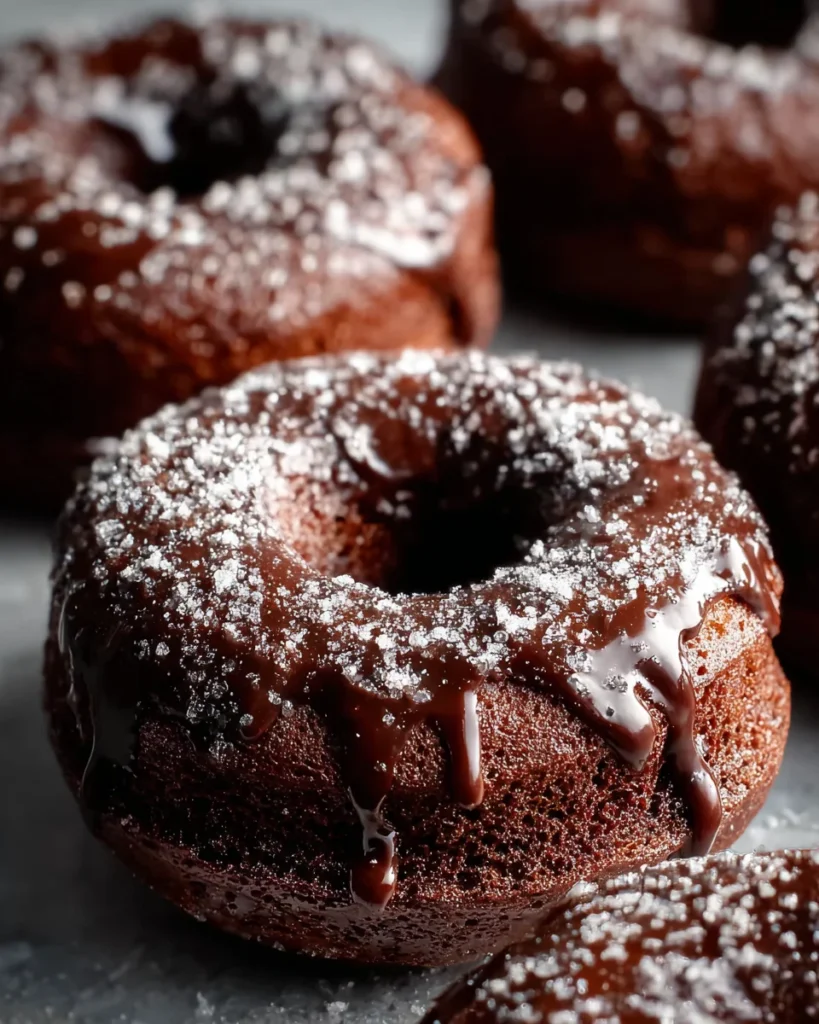
    Introduction to Peppermint Mocha Bread

    The smells of the season are starting to waft through the air, deliciously baked goods fill the kitchen and there is something magical about creating treats that warm the heart. This Peppermint Mocha Bread is pure magic rich chocolate and bright peppermint in every bite, embodying the season.

    You can already picture people crowding around the table for a piece of that aromatic holiday bread as it is served with stories blowing in the air. Every bite takes you back to the cheer at that toast; simple routines become special to welcome the creation of new traditions and memories.

    Why You’ll Love This Peppermint Mocha Bread

    This Peppermint Mocha Bread is a dream come true for busy cooks like us. It’s easy to whip up, requiring just a few steps and minimal fuss. Its delightful blend of chocolate and peppermint creates a flavor explosion that will have everyone asking for seconds. Perfect for holiday gatherings or cozy evenings at home, this bread adds a festive twist to any occasion without demanding hours in the kitchen.

    Ingredients for Peppermint Mocha Bread

    To create this delicious Peppermint Mocha Bread, you will need a mix of staple ingredients and festive additions.

    • All-purpose flour – The base for our bread, offering structure and texture.
    • Baking soda and salt – These enhance flavors and help the bread rise.
    • Granulated sugar – For sweetness and that lovely, moist crumb.
    • Baking cocoa – Provides rich chocolate notes.
    • Instant coffee granules – Intensifies the chocolate flavor and adds depth.
    • Sour cream – Ensures a tender and moist loaf.
    • Eggs – Bind the ingredients together and add richness.
    • Melted butter – Adds flavor and moisture.
    • White chocolate peppermint baking chips – The star of the show, offering a sweet peppermint twist.
    • Chocolate chips – For even more delicious chocolate goodness!
    • Crushed peppermint – A festive topping that brings everything together.

    If you’re looking for substitutions, feel free to swap all-purpose flour with a gluten-free blend or use almond milk instead of sour cream for a lighter option. Exact quantities are detailed in the printable version at the bottom of the article.

    How to Make Peppermint Mocha Bread

    Now that we have our ingredients ready, let’s dive into the joyful process of making this delightful Peppermint Mocha Bread. Each step is simple, but together they create something truly magical! Trust me, you won’t want to miss a moment of this delicious adventure.

    Step 1: Prepare the Loaf Pan

    Before we get our hands messy, let’s spray a 9 x 5 x 3-inch loaf pan with nonstick baking spray. This little step ensures your bread pops out effortlessly after baking. It also means less cleanup for you—who doesn’t love that?

    Step 2: Mix Dry Ingredients

    In a medium bowl, whisk together the all-purpose flour, baking soda, salt, sugar, and cocoa powder. Mixing the dry ingredients first helps distribute everything evenly. Plus, it’s a great arm workout—who needs the gym when you have baking?

    Step 3: Combine Wet Ingredients

    Now, let’s move to the wet ingredients. In the bowl of your stand mixer, add the sour cream, lightly beaten eggs, and melted butter. Mix on medium speed until everything is beautifully combined. This creamy mixture will make our bread moist and delicious.

    Step 4: Combine Wet and Dry Ingredients

    Here comes the fun part! Gradually add the dry ingredients to the wet mixture. Keep the mixer on medium speed until everything is just incorporated. Overmixing can lead to dense bread, and no one wants that. Aim for a smooth batter with a hint of summer joy!

    Step 5: Add Chips and Pour Batter

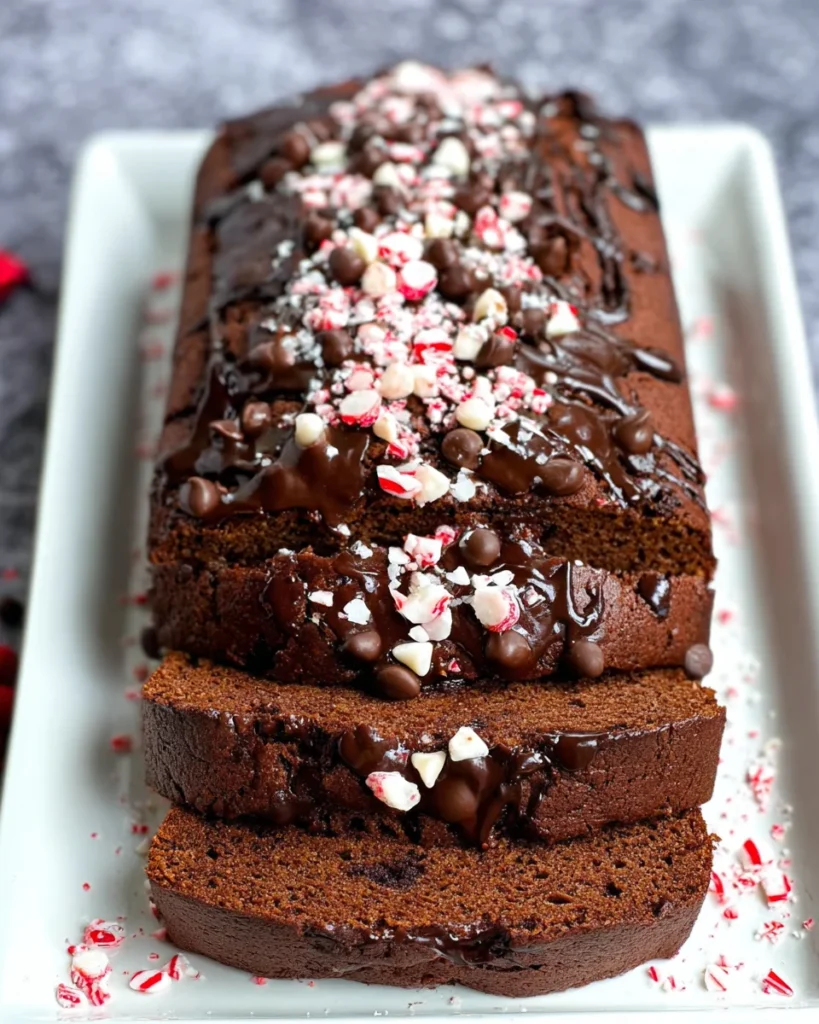
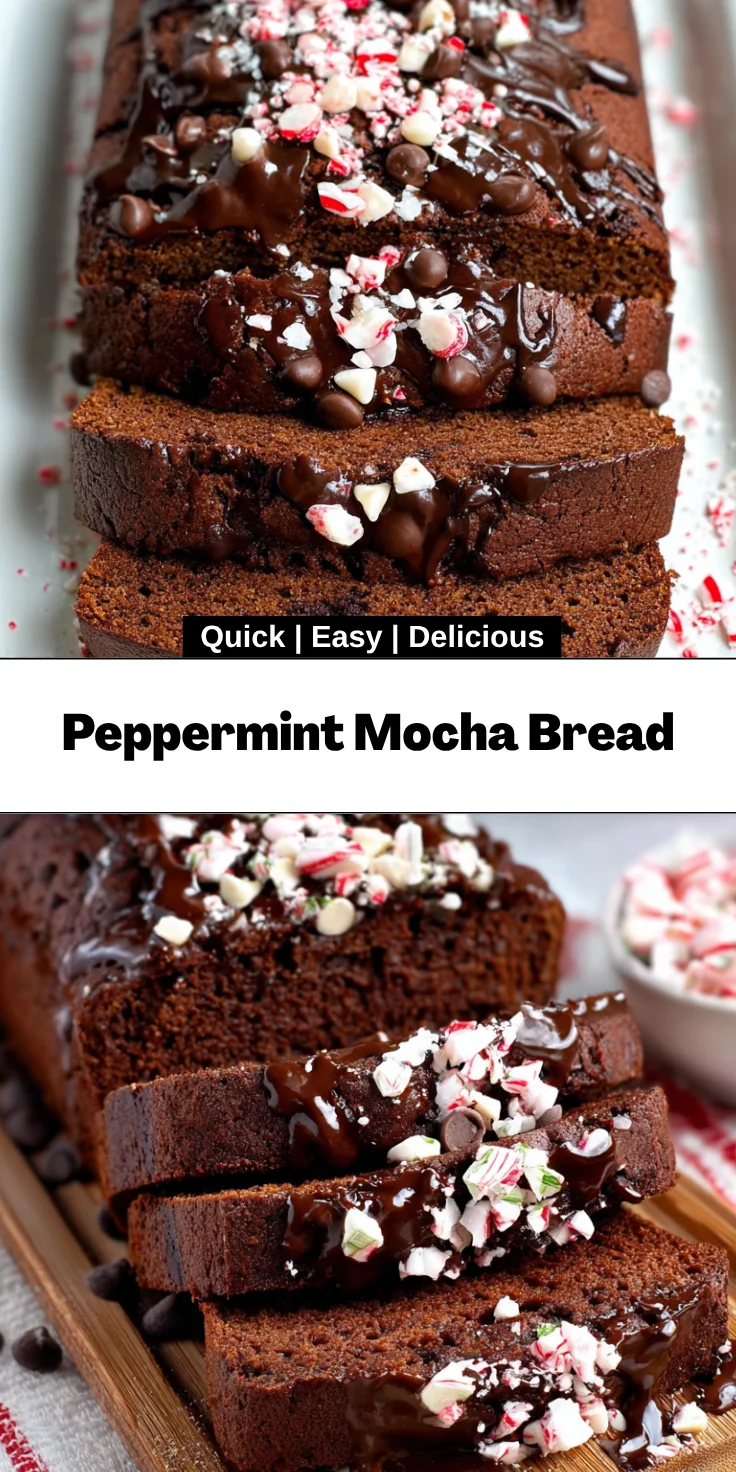
    Time to sweeten things up! Gently stir in the white chocolate peppermint baking chips and chocolate chips. The contrast between the white chocolate and dark cocoa will be a treat for your taste buds. Once combined, pour the batter into the prepared loaf pan. Spread it out evenly and sprinkle the top with crushed peppermint for that holiday magic.

    Step 6: Bake and Cool

    Preheat your oven to 350°F. Bake the bread for 50-55 minutes, or until a toothpick inserted in the center comes out clean. Your home will fill with the delightful aroma of chocolate and peppermint, making everyone wonder when they can sample this festive loaf. Once baked, let it cool in the loaf pan for about 10 minutes.

    Step 7: Final Touches

    Gently remove the bread from the pan and let it cool completely on a wire rack. For the grand finale, drizzle some fudge sauce over the top and add more crushed peppermint if you desire. This will make your Peppermint Mocha Bread not only taste festive but look stunning as well!

    And there you have it: a warm, delicious loaf that’s sure to capture hearts and taste buds. Enjoy every slice with your favorite coffee or hot cocoa, and let the holiday spirit soar.

    Tips for Success

    Ready to make the best Peppermint Mocha Bread? Here are some quick tips to ensure your baking adventure goes off without a hitch:

    • Use room temperature eggs for easier mixing and better incorporation.
    • Don’t skip the step of whisking dry ingredients separately; it avoids lumps.
    • Adjust the amount of peppermint if you prefer a subtler flavor.
    • Check your oven’s temperature with an oven thermometer for accuracy.
    • Store leftover bread in an airtight container to keep it moist.

    Equipment Needed

    Gathering your tools can make baking this Peppermint Mocha Bread a breeze! Here’s what you’ll need:

    • 9 x 5 x 3-inch loaf pan – a must-have for perfect bread shape.
    • Stand mixer or mixing bowl – for blending wet and dry ingredients.
    • Whisk – to combine the dry ingredients smoothly.
    • Spatula – for folding in the chocolate chips.
    • Wire rack – essential for cooling the loaf.

    Variations

    Get creative with your Peppermint Mocha Bread! Here are some flavorful variations and dietary adaptations to consider:

    • Gluten-Free: Substitute all-purpose flour with a gluten-free flour blend to cater to gluten sensitivities.
    • Dairy-Free: Use coconut yogurt or a dairy-free sour cream alternative to keep it creamy without dairy.
    • Vegan: Swap eggs for flax eggs (1 tablespoon of flaxseed meal mixed with 2.5 tablespoons of water per egg) and use a plant-based butter substitute.
    • Nutty Twist: Add chopped walnuts or pecans for an extra crunch and flavor depth.
    • Spicy Kick: Incorporate a sprinkle of cinnamon or nutmeg for a warm, spicy note that complements the chocolate.
    • Mint Chocolate Chip: Instead of peppermint chips, use mint chocolate chips for a minty chocolate explosion!

    Serving Suggestions

    Ready to present your Peppermint Mocha Bread in style? Here are some delightful serving ideas:

    • Pair a warm slice with a steaming cup of coffee or hot chocolate for a cozy treat.
    • Add a dollop of whipped cream on the side for extra creaminess.
    • Dust with powdered sugar for a festive touch.
    • Serve alongside a fruit salad for a fresh contrast.
    • Wrap slices in festive paper for a charming homemade gift.

    FAQs about Peppermint Mocha Bread

    Let’s address some common questions you might have as you embark on your festive baking journey with Peppermint Mocha Bread. Understanding these tips will ensure your delicious bread turns out just right, making this holiday treat even more enjoyable.

    How should I store leftover Peppermint Mocha Bread?
    Store your bread in an airtight container at room temperature for up to three days. For longer freshness, wrap it tightly in plastic wrap and freeze it. When ready to enjoy, simply thaw at room temperature.

    Can I substitute ingredients in this recipe?
    Absolutely! You can replace all-purpose flour with gluten-free flour for a gluten-free option. Unsweetened applesauce can replace butter if you’re looking for a lighter loaf without sacrificing moisture.

    What if I don’t have instant coffee granules?
    If you don’t have instant coffee on hand, try using brewed coffee instead. Reduce the sour cream slightly to maintain the bread’s moisture level. You can also skip coffee entirely for a more straightforward chocolate peppermint flavor.

    How can I make the bread less sweet?
    If sweetener isn’t your priority, reduce the amount of granulated sugar in the recipe. Alternatively, you can decrease the white chocolate peppermint baking chips for less sweetness.

    Can I prepare the batter ahead of time?
    It’s best to bake the batter immediately after mixing. However, if you need to prep ahead, you can mix the dry ingredients and store them separately from the wet ingredients. Combine them just before baking for best results.

    Is it possible to double the recipe?
    Yes! You can easily double the recipe. Bake the loaves in batches or use two loaf pans at the same time if you have space in your oven. Just watch the baking time as it may vary slightly.

    Final Thoughts

    Baking this Peppermint Mocha Bread is about more than just creating a delicious treat; it’s about crafting joyful moments with family and friends. The process fills your home with warmth and sweet aromas, creating an inviting atmosphere.

    Imagine serving slices at your holiday gatherings, each bite sparking laughter and conversations that linger long after the table is cleared. Sharing this festive bread becomes a cherished part of your family traditions, turning busy days into treasured memories. So roll up your sleeves, embrace the holiday spirit, and create unforgettable moments with every loaf you bake!


    Print

    clock clock iconcutlery cutlery iconflag flag iconfolder folder iconinstagram instagram iconpinterest pinterest iconfacebook facebook iconprint print iconsquares squares iconheart heart iconheart solid heart solid icon

    Description

    A delightful and festive bread that combines rich chocolate flavors with refreshing peppermint, perfect for holiday baking.


    • 2 cups all-purpose flour
    • 1/2 teaspoon baking soda
    • 1/4 teaspoon salt
    • 1 cup granulated sugar
    • 1/2 cup baking cocoa
    • 1/4 cup instant coffee granules
    • 1 1/4 cups sour cream
    • 2 eggs, room temperature, lightly beaten
    • 1/3 cup butter, melted
    • 1 cup white chocolate peppermint baking chips
    • 1/2 cup chocolate chips
    • Crushed peppermint for topping

    1. Spray your 9 x 5 x 3-inch loaf pan with a nonstick baking spray. Set aside.
    2. In a medium bowl, add the flour, salt, baking soda, sugar, and cocoa. Whisk to combine. Set aside.
    3. In the bowl of a stand mixer, add the sour cream, eggs, and butter. Mix on medium until combined.
    4. Add the dry ingredients to the wet ingredients and mix on medium until well combined.
    5. Gently stir in the white chocolate peppermint baking chips and chocolate chips.
    6. Pour batter into your prepared loaf pan. Top with crushed peppermint.
    7. Bake at 350 degrees F for 50-55 minutes.
    8. Remove from the oven and cool in a loaf pan for 10 minutes.
    9. Remove the bread from the loaf pan and let cool completely on a wire rack.
    10. Drizzle with fudge sauce and crushed peppermint.

    Notes

    • Make sure the eggs are at room temperature for better mixing.
    • For an extra festive touch, consider adding more crushed peppermint on top before serving.
    • Prep Time: 15 minutes
    • Cook Time: 55 minutes
    • Category: Baking
    • Method: Baking
    • Cuisine: American

    Nutrition

    • Serving Size: 1 slice
    • Calories: 250
    • Sugar: 20g
    • Sodium: 150mg
    • Fat: 10g
    • Saturated Fat: 5g
    • Unsaturated Fat: 3g
    • Trans Fat: 0g
    • Carbohydrates: 35g
    • Fiber: 2g
    • Protein: 4g
    • Cholesterol: 50mg

    Sharing is caring!

  • Cheesy Garlic Herb Stuffed Mushrooms

    Cheesy Garlic Herb Stuffed Mushrooms


    Introduction to Cheesy Garlic Herb Stuffed Mushrooms

    I know all too well how tough it is to find time for ‘elaborate’ meals as a mom and home cook. That’s why when it comes to entertaining, these Cheesy Garlic Herb Stuffed Mushrooms are my go-to appetizer. Super easy to whip up and always seem to impress my family and friends.

    Think of rich creaminess and cheese melting in your mouth with lovely fresh herbal scents – perfect if it’s a last-minute get-together or dinner party to really impress your guests. And who can turn down that much flavor in a stuffed mushroom?

    Why You’ll Love This Cheesy Garlic Herb Stuffed Mushrooms

    These Cheesy Garlic Herb Stuffed Mushrooms are a true lifesaver for busy days! With minimal prep and cooking time, you can create a delightful appetizer that tastes gourmet. The burst of flavors from the cheese and herbs is simply amazing, making them a hit at every gathering. Plus, they are vegetarian-friendly, so everyone can enjoy them. Say goodbye to boring snacks and hello to your new favorite dish!

    Ingredients for Cheesy Garlic Herb Stuffed Mushrooms

    To make these delightful Cheesy Garlic Herb Stuffed Mushrooms, you’ll need a handful of fresh ingredients that pack a flavorful punch:

    • Large cremini or button mushrooms: These form the base of your dish—choose ones that are firm and fresh.
    • Cream cheese: The creamy foundation that blends beautifully with the other cheeses, providing that luscious mouthfeel.
    • Shredded mozzarella: This cheese adds an amazing elasticity and gooeyness that just pulls everything together.
    • Grated Parmesan: A sprinkle of nutty goodness that brings depth to the cheesy filling.
    • Garlic: Freshly minced garlic elevates the flavor, adding a hint of zing that complements the mushrooms perfectly.
    • Fresh parsley: This vibrant herb adds freshness while enhancing the visual appeal—always a good touch!
    • Dried oregano and thyme: Add these herbs for an aromatic layer that screams Italian comfort food.
    • Red pepper flakes (optional): For those who like a kick, these flakes provide just the right amount of heat.
    • Salt and pepper: Essential seasonings to enhance all the flavors in this tasty dish.
    • Olive oil: A drizzle that adds richness and helps the breadcrumbs crisp beautifully on top.
    • Panko breadcrumbs: These create a lovely crunchy topping that contrasts with the creamy filling.

    If you’re ever in a pinch, feel free to experiment with whatever cheese or herbs you have on hand! Exact measurements for each of these ingredients are at the bottom of the article, just waiting for you to print and enjoy.

    How to Make Cheesy Garlic Herb Stuffed Mushrooms

    Preheat the Oven and Prepare the Mushrooms

    First things first, preheat your oven to 375°F (190°C). This ensures your Cheesy Garlic Herb Stuffed Mushrooms bake perfectly. While the oven warms up, gently clean the large mushrooms with a damp cloth to remove any dirt. Next, carefully twist and pull out the stems. Set the caps aside and finely chop the stems. This chopped goodness will add great flavor to your cheesy filling. Remember, the more flavor, the better!

    Make the Cheesy Filling

    In a large mixing bowl, combine the softened cream cheese, shredded mozzarella, grated Parmesan, and minced garlic. Next, add the finely chopped mushroom stems, fresh parsley, dried oregano, thyme, and red pepper flakes if you prefer a bit of heat. Then, season with salt and pepper. Mix everything until it’s wonderfully smooth and well combined. This smooth consistency is key to making the filling creamy and delicious. You’ll want every bite to burst with cheesy goodness!

    Stuff the Mushrooms

    Now comes the fun part! Gently fill each mushroom cap with your cheesy mixture. Don’t be shy here—pack the filling down a bit to ensure it doesn’t fall out. Use a spoon or even your fingers to get it just right. You want these caps to overflow with flavor! Once stuffed, place them back on the baking sheet. Trust me; the more filling, the better the bite!

    Prepare for Baking

    In a small bowl, drizzle the panko breadcrumbs with olive oil, tossing until they’re well coated. This step is vital for that beautiful golden crunch on top. Now, sprinkle the breadcrumb mixture evenly over the stuffed mushrooms. Arrange them neatly on a baking sheet lined with parchment paper to prevent sticking, making cleanup a breeze. There’s nothing quite like a well-organized workspace!

    Baking and Final Touches

    Place your stuffed mushrooms in the preheated oven and bake for about 20 to 25 minutes. Keep an eye on them! You’re looking for tender mushrooms and golden, crispy tops. Once they’re done, remove them carefully and let them cool for a few minutes before serving. These Cheesy Garlic Herb Stuffed Mushrooms are delightful warm or even at room temperature, making them a perfect appetizer for any occasion!

    Tips for Success

    • Choose mushrooms that are firm and free from blemishes for the best results.
    • Let your cream cheese soften at room temperature for easier mixing.
    • Dabble with different herbs to discover your unique flavor profile.
    • Make a double batch; these little bites vanish quickly!
    • Consider using leftover filling for stuffed chicken breasts—delicious!

    Equipment Needed

    • Baking sheet: A standard cookie sheet works just fine!
    • Parchment paper: Great for easy cleanup; foil can be a substitute.
    • Mixing bowl: Any size will do, but a medium bowl is ideal.
    • Spoon: Perfect for stuffing; a small ice cream scoop can work too!
    • Kitchen towel: Handy for cleaning mushrooms gently.

    Variations on Cheesy Garlic Herb Stuffed Mushrooms

    • Italian Sausage Stuffed: Add some cooked Italian sausage to the cheesy mixture for a meatier version that’s bursting with flavor.
    • Spinach and Feta: Mix in fresh spinach and crumbled feta cheese for a Mediterranean twist that brings a new layer of brightness.
    • Sun-Dried Tomato: Chop up some sun-dried tomatoes and add them to the filling for an extra touch of sweetness and tang.
    • Gluten-Free Options: Substitute regular breadcrumbs with gluten-free panko or almond flour for a gluten-free version while still keeping the crunch.
    • Low-Fat Version: Use low-fat cream cheese and reduced-fat mozzarella for a lighter take that still maintains great taste.
    • Herb Variations: Experiment with basil or dill in place of parsley and thyme for a fresher, herb-forward flavor.

    Serving Suggestions for Cheesy Garlic Herb Stuffed Mushrooms

    • Pair with a crisp green salad for a refreshing contrast to the cheesy richness.
    • Serve alongside a nice glass of white wine or sparkling water with lemon for a touch of elegance.
    • Garnish with extra fresh parsley for a pop of color on your serving platter.
    • Include toothpicks to make these bite-sized delights easier for guests to enjoy.
    • Consider offering a variety of dipping sauces, like marinara or garlic aioli, for an extra layer of flavor!

    FAQs about Cheesy Garlic Herb Stuffed Mushrooms

    Can I make Cheesy Garlic Herb Stuffed Mushrooms in advance?

    Absolutely! You can prepare the stuffed mushrooms a day ahead and keep them covered in the refrigerator. Just bake them before serving. This makes hosting so much easier, especially when you’re juggling a busy schedule!

    What other cheeses can I use in the filling?

    Feel free to get creative! You can substitute the mozzarella with gouda or cheddar for a different flavor. Just ensure you have cheese that melts well for that gooey texture we all love in stuffed mushrooms.

    How can I keep the mushrooms from getting soggy?

    To avoid sogginess, make sure to clean the mushrooms gently without soaking them in water. Also, baking them on parchment paper helps them crisp up beautifully while absorbing any excess moisture.

    Can I freeze Cheesy Garlic Herb Stuffed Mushrooms?

    Yes, you can! Freeze them before baking. Just place them in a single layer on a baking sheet until firm, then transfer them to a freezer bag. Bake from frozen; just add a few extra minutes to the cooking time.

    Are these stuffed mushrooms suitable for a vegetarian diet?

    Yes! These delicious cheesy bites are entirely vegetarian, making them perfect for gatherings where dietary preferences vary. Everyone will love the flavor-packed filling!

    Final Thoughts on Cheesy Garlic Herb Stuffed Mushrooms

    Creating these Cheesy Garlic Herb Stuffed Mushrooms is more than just a cooking task; it’s an adventure in the kitchen that brings joy to both the cook and the guests. The delightful aroma fills your home, crafting an atmosphere of comfort and warmth. Each bite is a testament to the love and care put into the meal, making gatherings feel more special. Whether you’re serving them for a festive occasion or a quiet evening at home, these mushrooms are sure to spark smiles and ignite conversations. Enjoy the journey of cooking and the happiness it brings!


    Print

    clock clock iconcutlery cutlery iconflag flag iconfolder folder iconinstagram instagram iconpinterest pinterest iconfacebook facebook iconprint print iconsquares squares iconheart heart iconheart solid heart solid icon

    Description

    Delicious and cheesy garlic herb stuffed mushrooms that make for an impressive appetizer.


    • 24 large cremini or button mushrooms
    • 1 cup cream cheese, softened
    • 1 cup shredded mozzarella cheese
    • 1/2 cup grated Parmesan cheese
    • 4 cloves garlic, minced
    • 1/4 cup fresh parsley, chopped
    • 1 teaspoon dried oregano
    • 1 teaspoon dried thyme
    • 1/4 teaspoon red pepper flakes (optional)
    • Salt and pepper to taste
    • 2 tablespoons olive oil
    • 1/4 cup panko breadcrumbs (for topping)

    1. Preheat your oven to 375°F (190°C).
    2. Gently clean the mushrooms with a damp cloth. Carefully remove the stems and set the caps aside. Finely chop the stems.
    3. In a large mixing bowl, combine the softened cream cheese, mozzarella cheese, Parmesan cheese, minced garlic, chopped mushroom stems, parsley, oregano, thyme, red pepper flakes, and season with salt and pepper. Mix until well combined.
    4. Generously fill each mushroom cap with the cheese mixture, pressing down slightly to ensure they are well-packed.
    5. In a small bowl, mix the panko breadcrumbs with olive oil until coated. Sprinkle the breadcrumbs evenly over the stuffed mushrooms.
    6. Place the stuffed mushrooms on a baking sheet lined with parchment paper. Bake in the preheated oven for about 20-25 minutes, or until the mushrooms are tender and the tops are golden brown.
    7. Remove from the oven and let them cool for a few minutes before serving. Enjoy these delicious stuffed mushrooms warm or at room temperature!

    Notes

    • For a spicier version, add more red pepper flakes.
    • These stuffed mushrooms can be made a day ahead and baked just before serving.
    • Experiment with different herbs for a unique flavor.
    • Prep Time: 15 minutes
    • Cook Time: 25 minutes
    • Category: Appetizer
    • Method: Baking
    • Cuisine: Italian

    Nutrition

    • Serving Size: 1 stuffed mushroom
    • Calories: 90
    • Sugar: 1g
    • Sodium: 200mg
    • Fat: 6g
    • Saturated Fat: 3g
    • Unsaturated Fat: 2g
    • Trans Fat: 0g
    • Carbohydrates: 6g
    • Fiber: 1g
    • Protein: 3g
    • Cholesterol: 15mg

    Sharing is caring!

  • Cheesy Taco Braid Beef

    Cheesy Taco Braid Beef


    Introduction to Cheesy Taco Braid Beef

    Hey home cooks, what’s up? So, if you’re as frenzied as I am and that to with work, the last thing you want to tackle is dinner. And that’s why my recipe for Cheesy Taco Braid is a braid-worthy one – dinner or should I say solution for the busy evening. Be prepared to make your family happy with a delicious, cheese-filled masterpiece that takes as much time to create as it does to consume. It’s braided pizza dough wraps up a rich beef mixture well enough for an ideal option to go for at dinnertime.

    Why You’ll Love This Cheesy Taco Braid Beef

    This Cheesy Taco Braid Beef is a real game-changer for busy moms and professionals alike. It’s quick to whip up, taking only about 40 minutes from start to finish. The combination of cheesy goodness and seasoned beef makes it a crowd-pleaser even for picky eaters. Plus, the braided style adds a fun twist that turns an ordinary dinner into an exciting event. Trust me, your family will be asking for seconds!

    Ingredients for Cheesy Taco Braid Beef

    Gathering the right ingredients is key to achieving deliciousness with your Cheesy Taco Braid Beef. Each component plays its part in bringing this dish to life. Here’s what you’ll need for a fantastic culinary adventure!

    Key Flavor Components

    Ground Beef

    Ground beef is the star of the show, bringing rich flavor and heartiness. I prefer using lean beef for a healthier twist, but go ahead and choose your favorite ground meat!

    Taco Seasoning

    This magical blend adds that signature taco flavor. I love using low-sodium versions to keep it healthier, but feel free to use homemade seasoning for a personal touch!

    Salsa

    Salsa brings moisture and a zesty tang that complements the meat perfectly. Whether store-bought or homemade, it’s a must-add for this beefy delight.

    Essential Structure

    Pre-made Pizza Dough

    This convenient ingredient forms the delicious crust of our taco braid. I often use store-bought dough, saving precious time, but homemade dough can elevate the experience!

    Toppings and Extras

    Cheddar Cheese

    Ah, cheese! Shredded cheddar adds a creamy, melty richness that everyone loves. You can mix it up using pepper jack for a spicy twist!

    Fresh Toppings

    Think about crisp lettuce, ripe avocado slices, or a dollop of sour cream. These toppings add layers of flavor and freshness—it’s like a fiesta in every bite!

    Optional Hot Ingredients

    If you like a bit of heat, consider adding jalapeños or hot sauce to the meat mixture. It’s a fun way to customize each bite!

    For precise measurements of all these ingredients, scroll to the bottom of the article for a printable recipe card.

    How to Make Cheesy Taco Braid Beef

    Now that you’ve gathered all your ingredients, let’s dive into the fun part: making the Cheesy Taco Braid Beef. Each step is simple, and I promise, it’ll be worth it when you see the smiles at the dinner table!

    Step 1: Prepare Your Oven and Baking Sheet

    First things first, preheat your oven to 350°F. This step is crucial for getting that golden, crispy crust. While your oven warms up, line a baking sheet with parchment paper. This keeps your braid from sticking and makes cleanup a breeze!

    Step 2: Cook the Ground Beef

    In a large skillet over medium heat, brown your ground beef until it’s nicely cooked through. As tempting as it might be, don’t rush this step! Drain any grease that accumulates—you want a flavorful filling, not a greasy one. Then, add the salsa, taco seasoning, and a splash of water. Give it a good stir and let it simmer until thickened, about 5 minutes. Your kitchen will smell amazing!

    Step 3: Shape the Pizza Dough

    Next up, take your pre-made pizza dough and spread it out onto your lined baking sheet. Aim for a rectangle shape; this will serve as the canvas for your delicious filling. If the dough is a bit sticky, sprinkle a tiny bit of flour on your hands or the countertop. Don’t worry about perfection; it’s all about the flavor!

    Step 4: Assemble the Cheesy Taco Filling

    Now, let’s build that glorious filling! Start by spreading 1 cup of your shredded cheddar cheese right down the center of the dough. Then, layer the beef mixture on top of the cheese, making sure to spread it evenly. Finally, sprinkle the remaining cheese over the beef. Yes, more cheese is always a good idea!

    Step 5: Create the Braided Look

    It’s time to make things pretty! Using a pizza cutter, cut about 12 strips on each side of the dough. These strips should be about an inch wide. Now, fold each strip over the filling, alternating sides to create a lovely braided look. It’s okay if it’s not flawless, the taste will shine through.

    Step 6: Brush with Egg Wash

    To give your braid a beautiful, shiny crust, whisk together 1 egg and a tablespoon of water in a small bowl. Using a pastry brush, gently paint this egg wash over the top of the braid. This will ensure it bakes up golden and irresistible!

    Step 7: Bake the Taco Braid

    Finally, pop your taco braid in the preheated oven! Bake it for about 22 to 25 minutes or until the top is golden and crisp. Keep an eye on it—there’s nothing better than the scent of a freshly baked cheesy taco braid wafting through your home. Once done, let it cool slightly before slicing into pieces.

    Tips for Success

    • Make sure to drain the ground beef well for a less greasy filling.
    • For a more flavorful broth, try using beef broth instead of water!
    • Don’t rush the braiding; take your time for an aesthetically pleasing result.
    • Experiment with different cheeses for unique flavors.
    • Serve your braid warm; it’s always best fresh from the oven!

    Equipment Needed for Cheesy Taco Braid Beef

    • Baking sheet – Any rimmed baking sheet will work, but a larger one gives more space.
    • Parchment paper – Use aluminum foil if you don’t have parchment on hand.
    • Large skillet – A non-stick pan makes cooking the beef easier.
    • Pizza cutter – You can also use a sharp knife to cut the dough strips.
    • Pastry brush – A silicone brush or even a paper towel can do the job for the egg wash.

    Variations on Cheesy Taco Braid Beef

    • Use ground turkey or chicken for a lighter twist on the protein.
    • Try a vegetarian option by substituting black beans or lentils in place of beef.
    • Incorporate different cheeses like mozzarella or pepper jack for a unique flavor profile.
    • Add grilled veggies, such as bell peppers or onions, to the beef mixture for extra nutrition.
    • For a gluten-free version, opt for a gluten-free pizza dough or a cauliflower crust.

    Serving Suggestions for Cheesy Taco Braid Beef

    • Pair your taco braid with a fresh side salad for a burst of color and crunch.
    • Serve with crispy tortilla chips and a side of guacamole for a fun appetizer.
    • A chilled can of your favorite soda or a refreshing iced tea complements the meal nicely.
    • For an added touch, garnish with fresh cilantro or lime wedges.

    FAQs about Cheesy Taco Braid Beef

    As I’ve gathered all the delicious details for you, I know you might have some questions about making this Cheesy Taco Braid Beef. Here are a few commonly asked ones that can help guide you through the process!

    Can I make Cheesy Taco Braid Beef ahead of time?
    Absolutely! You can prepare the braid in advance, store it in the fridge, and bake it when you’re ready to serve. Just be careful with the dough; it might not be as puffy if it sits too long before baking.

    What other toppings work well with this dish?
    The toppings are limitless! I like adding diced tomatoes, sliced olives, or even jalapeños for a spicy kick. Serve tacos with your family’s favorites; it’ll make every bite exciting.

    Can I freeze the leftovers?
    Yes! If you have any leftovers, let them cool completely, then wrap them tightly in plastic wrap and store them in the freezer for up to three months. Just reheat when you’re ready!

    How can I make this recipe healthier?
    To make it a bit lighter, you can use leaner ground meat or substitute it with beans for a vegetarian version. You can also load up on the fresh toppings to add nutrients without adding many calories.

    Is this recipe suitable for kids?
    Definitely! The cheesy flavor and fun braid style make it a hit with kids. You can also let them help with assembling the braid; they’ll love making it their way!

    Final Thoughts

    Making Cheesy Taco Braid Beef is more than just cooking; it’s about creating memories with loved ones over a delightful meal. This recipe brings smiles to the dinner table and transforms a simple evening into a fun family tradition. With its comforting flavors and playful presentation, it’s a surefire hit for even the pickiest eaters. Plus, the joy of pulling apart that cheesy braid is simply unbeatable! I truly believe that cooking brings us together, and this dish is the perfect vehicle for sharing love, laughter, and moments that matter.


    Print

    clock clock iconcutlery cutlery iconflag flag iconfolder folder iconinstagram instagram iconpinterest pinterest iconfacebook facebook iconprint print iconsquares squares iconheart heart iconheart solid heart solid icon

    Description

    Cheesy Taco Braid Beef is a flavorful and fun dish that combines a savory beef mixture with cheesy goodness, all wrapped up in a braided pizza dough crust, making it a perfect family dinner delight.


    • 1/4 cup water
    • 1/4 cup salsa
    • 1 ounce taco seasoning, low sodium
    • 1 pound of ground beef
    • 1 1/2 cups cheddar cheese, shredded
    • 13.8 ounces of pre-made pizza dough
    • 1 tablespoon of water
    • 1 egg
    • Lettuce
    • Avocado slices
    • Taco sauce
    • Sour cream

    1. Set the oven to 350°F and lay some parchment paper on a baking sheet.
    2. Brown the beef in a pan, then drain any grease. Add back to the stove with salsa, the seasoning packet, and water. Mix it up and simmer until thick.
    3. Spread the pizza dough onto the parchment-lined sheet and shape it into a rectangle.
    4. Add 1 cup of the shredded cheese right down the center of the dough. Spread the meat mixture on top, and sprinkle the rest of the cheese over it.
    5. Cut about 12 strips on each side of the dough with a pizza cutter. Fold one strip over the other from opposite sides until you have a braid.
    6. Whisk together the egg and water in a bowl, then paint it over the dough with a brush.
    7. Pop the taco braid in the oven for around 22-25 minutes, until the top is golden and crisp.
    8. Cut into pieces while warm and serve with extras like sour cream, taco sauce, lettuce, or avocado.

    Notes

    • Feel free to customize the toppings according to your preferences.
    • For a spicier kick, consider adding jalapeños to the meat mixture.
    • Leftovers can be stored in the refrigerator for up to 3 days.
    • Prep Time: 15 minutes
    • Cook Time: 25 minutes
    • Category: Main Dish
    • Method: Baking
    • Cuisine: Mexican

    Nutrition

    • Serving Size: 1 slice
    • Calories: 350
    • Sugar: 2g
    • Sodium: 680mg
    • Fat: 22g
    • Saturated Fat: 10g
    • Unsaturated Fat: 9g
    • Trans Fat: 0g
    • Carbohydrates: 29g
    • Fiber: 2g
    • Protein: 20g
    • Cholesterol: 100mg

    Sharing is caring!

  • Bacon Chicken Pasta

    Bacon Chicken Pasta


    Introduction to Bacon Chicken Pasta

    Hey everyone on the run, and foodies by heart! If you’re like me, some days get so overbooked with kids’ activities and everything work-related that there’s hardly enough time to create something yummy. So, without further ado, I present my new favorite: Bacon Chicken Pasta. A fabulous sensory indulgence that also presents a fast solution to blow your loved ones away. Flaunting savorous flavors and melted cheese, there’s just no reason why it can’t be a potential masterpiece for either crowded evening or adorable family get-together. So here’s how you make this soul-warming bowlful that everyone is sure to love!

    Why You’ll Love This Bacon Chicken Pasta

    Life is busy, and dinner should be a joy, not a chore. This Bacon Chicken Pasta offers a fantastic balance of flavor and convenience. In just under an hour, you can create a meal that’s creamy, savory, and oh-so-delicious. Plus, with the rich pairing of bacon and chicken, it’s a dish that even picky eaters will devour. It’s comfort food at its finest, ready to warm hearts and bellies alike!

    Ingredients for Bacon Chicken Pasta

    To take your taste buds on a delightful journey, we need some simple yet scrumptious ingredients. Here’s what you’ll need for this Bacon Chicken Pasta recipe:

    • Shredded cheddar cheese: This adds creaminess and a sharp depth of flavor. You can swap it with mozzarella or a cheese blend if you prefer.
    • Creamy alfredo sauce: The backbone of this dish, bringing a luscious texture. You might use homemade if you have a favorite recipe!
    • Minced garlic: Just a tablespoon! It gives a wonderful aromatic touch. You can use garlic powder in a pinch.
    • Yellow onion: Chopped finely for sweetness and depth. White or red onions work as well for different flavor profiles.
    • Paprika: It adds a smoky richness. If you want a kick, try smoked paprika or even cayenne pepper.
    • Garlic powder: Another layer of garlicky goodness. Feel free to increase the amount if you’re a true garlic lover!
    • Ranch seasoning mix: This gives an extra flavor boost. If you’re feeling adventurous, homemade ranch seasoning elevates things further.
    • Onion powder: A handy seasoning that complements the onions. You can leave it out, but why would you?
    • Rotini pasta: These corkscrew-shaped noodles hold onto the sauce beautifully, but any pasta shape works!
    • Boneless, skinless chicken breasts: Diced for easy cooking, it’s the protein that ties everything together. You could also use cooked rotisserie chicken for a quicker option!
    • Bacon: Cooked and crumbled, adding heartiness and crunch. Turkey bacon is a lighter option if that suits your palate better.

    For specific measurements of these ingredients, you can refer to the bottom of the article where they’re listed for easy printing. Happy cooking!

    How to Make Bacon Chicken Pasta

    Now, let’s get our hands dirty and dive into the step-by-step process of creating this mouthwatering Bacon Chicken Pasta! Each step is designed to make it easy and fun, even for the busiest of us.

    Step 1: Cook the Pasta

    Pasta Preparation Details

    Begin by boiling a large pot of water. Once it’s bubbling with excitement, toss in your rotini pasta. Cook it according to the package instructions, usually around 8-10 minutes. You want it al dente, so check a minute or two early. That way, your pasta will have a slight bite instead of being mushy. Remember to drain it well, but save a cup of the pasta water for later if you’d like to adjust the sauce consistency!

    Step 2: Fry the Bacon

    Achieving Perfect Crispiness

    In a large skillet over medium heat, add your bacon bits. Fry them until they’re crispy – usually about 5-7 minutes. You’ll know they’re ready when they turn a lovely golden brown and the kitchen fills with that irresistible aroma. This isn’t just about flavor; crispy bacon adds a satisfying crunch that elevates the entire dish. Once done, remove the bacon but leave about 1-2 tablespoons of grease in the pan. It will add fantastic flavor to the chicken and veggies!

    Step 3: Sauté the Onion and Chicken

    Seasoning Strategies

    Now, toss the chopped onion into the skillet with the bacon grease and stir it around for a couple of minutes until it’s softly golden. Then, add in the diced chicken breasts, followed by the ranch seasoning mix, paprika, garlic powder, and onion powder. These seasonings will create layers of flavor that are key to our delicious Bacon Chicken Pasta. Cook everything until the chicken is no longer pink, about 7-8 minutes, or until it hits 165°F internally. This seasoning ensures each bite is flavorful and mouthwatering!

    Step 4: Combine Ingredients

    Mixing for Flavors

    After the chicken is cooked perfectly, add the minced garlic and stir for 60 seconds to release that lovely aroma. Pour the creamy alfredo sauce over the sautéed mixture, stirring to combine. The goal here is a harmonious blend that coats everything beautifully. If the sauce appears too thick, add a splash of the reserved pasta water until it reaches your desired creaminess. Trust me, you want every noodle coated in this rich sauce!

    Step 5: Add the Cheese and Remaining Bacon

    Melting Techniques

    Finally, take half of the crispy bacon and toss it into the skillet with your pasta. Give everything a gentle stir to incorporate. Now, sprinkle the shredded cheddar cheese evenly over the top and cover the pan. Allow it to sit for a couple of minutes until the cheese melts into a gooey, dreamy layer. Once it’s nice and melted, it’s showtime! Dish it out and savor the creamy goodness of your Bacon Chicken Pasta.

    Tips for Success

    • Always taste as you go; adjusting the seasonings can elevate your dish.
    • Use high-quality bacon for that perfect crunch and flavor.
    • If you can, make the alfredo sauce from scratch; it’s simpler than you think!
    • Have fun experimenting with different cheeses like gouda or pepper jack.
    • Make a double batch; leftovers are perfect for lunch or a quick dinner!

    Equipment Needed for Bacon Chicken Pasta

    • Large pot: For cooking pasta; a Dutch oven works too!
    • Skillet: A non-stick or cast-iron skillet is ideal for frying bacon and sautéing.
    • Colander: Essential for draining pasta, but a slotted spoon does the trick too.
    • Spatula: Perfect for mixing everything together without scratching your cookware.

    Variations of Bacon Chicken Pasta

    • Switch the Protein: Try substituting chicken with shrimp or sautéed vegetables for a lighter, refreshing twist!
    • Add Vegetables: Enhance your dish with spinach, broccoli, or bell peppers for a nutrient boost and vibrant colors.
    • Make It Spicy: Toss in some crushed red pepper flakes or diced jalapeños for an extra kick that will wake up your taste buds!
    • Gluten-Free Option: Use gluten-free pasta to make this dish suitable for those with dietary restrictions.
    • Cheesy Delight: Experiment with different cheeses, such as gouda or pepper jack, for a unique flavor profile.

    Serving Suggestions for Bacon Chicken Pasta

    • Garlic Bread: Serve with warm, buttery garlic bread for a delightful pairing.
    • Side Salad: A crisp Caesar or garden salad adds a refreshing contrast to the creamy pasta.
    • Wine Pairing: A chilled Chardonnay complements the rich flavors beautifully.
    • Presentation: Garnish with fresh parsley or basil for a pop of color.

    FAQs about Bacon Chicken Pasta

    I know you might have some burning questions about this delightful Bacon Chicken Pasta recipe! Here are a few common queries that can help you on your culinary journey.

    Can I make this dish ahead of time?
    Absolutely! You can prepare the Bacon Chicken Pasta ahead. Just store it in the fridge, and when you’re ready, reheat it gently on the stovetop. You may need to add a splash of milk or more alfredo sauce to keep it creamy.

    How can I make Bacon Chicken Pasta healthier?
    You could use whole wheat pasta or zoodles (zucchini noodles) for a lighter option. Alternatively, substitute chicken with lean turkey or even plant-based proteins for a nutritious twist.

    Can I use other cheeses?
    Certainly! Feel free to experiment with cheeses like mozzarella, gouda, or pepper jack. Each will lend a different flavor and texture to your dish, keeping it exciting!

    What’s the best way to store leftovers?
    Store any leftovers in an airtight container in the fridge for up to 3 days. Just remember to reheat it gently over low heat to avoid drying it out.

    Is there a vegetarian version of this recipe?
    You bet! Simply omit the bacon and chicken, swap in your favorite veggies, and add some chickpeas or lentils for protein. You’ll still enjoy a creamy, savory dish without the meat!

    Final Thoughts

    Cooking this Bacon Chicken Pasta is more than just preparing a meal; it’s about bringing smiles to loved ones and creating memorable moments. The creamy sauce, crispy bacon, and tender chicken come together in a joyful celebration of flavors that warms the heart and soul. As you savor each bite, you’ll appreciate the love and effort infused into the dish. Whether it’s a weeknight dinner or a special gathering, this recipe has the power to sparkle in any setting. So grab your apron, share it with family, and let the deliciousness unfold on your dinner table!


    Print

    clock clock iconcutlery cutlery iconflag flag iconfolder folder iconinstagram instagram iconpinterest pinterest iconfacebook facebook iconprint print iconsquares squares iconheart heart iconheart solid heart solid icon

    Description

    A creamy and savory pasta dish featuring bacon, chicken, and cheddar cheese.


    • 1 cup shredded cheddar cheese
    • 15 ounces of creamy alfredo sauce
    • 1 tablespoon of minced garlic
    • ½ yellow onion, chopped into small pieces
    • 1 teaspoon of paprika
    • 1 teaspoon garlic powder
    • 1 tablespoon of ranch seasoning mix
    • 1 teaspoon onion powder
    • 12 ounces rotini pasta
    • 3 boneless, skinless chicken breasts, diced into chunks
    • 1 package of bacon, cooked and cut into bits

    1. Grab a big pot and cook the pasta as the package says. Drain it well once done.
    2. Heat a large skillet on medium heat and fry up the bacon bits. When they’re crispy, remove them and leave 1-2 tablespoons of grease behind.
    3. Toss the diced onion into the skillet and stir it around for a couple of minutes. Add the chicken pieces, sprinkle on the ranch seasoning, paprika, garlic powder, and onion powder. Stir and cook until there’s no pink left in the chicken, about 7-8 minutes, or until it hits 165°F inside.
    4. Throw in the minced garlic and stir for 60 seconds. Pour in the alfredo and mix it all up. Let it simmer gently.
    5. Take half the cooked bacon and toss it into the skillet with the drained noodles. Mix everything until coated in sauce.
    6. Scatter the shredded cheddar and the remaining bacon over the pasta. Cover the pan until the cheese is gooey and melted. Dish it out and enjoy eating!

    Notes

    • For a spicier version, add crushed red pepper flakes.
    • This dish can be made ahead of time and reheated.
    • Feel free to substitute the chicken with shrimp or vegetables for different variations.
    • Prep Time: 15 minutes
    • Cook Time: 30 minutes
    • Category: Dinner
    • Method: Stovetop
    • Cuisine: American

    Nutrition

    • Serving Size: 1 serving
    • Calories: 600
    • Sugar: 2g
    • Sodium: 800mg
    • Fat: 30g
    • Saturated Fat: 12g
    • Unsaturated Fat: 8g
    • Trans Fat: 0g
    • Carbohydrates: 55g
    • Fiber: 3g
    • Protein: 35g
    • Cholesterol: 100mg

    Sharing is caring!

  • Chicken Bacon Ranch Pasta Salad

    Chicken Bacon Ranch Pasta Salad


    Introduction to Chicken Bacon Ranch Pasta Salad

    Welcome to my kitchen: Where flavors dance, and stories unfold! So excited to bring you my most loved Chicken Bacon Ranch Pasta Salad; it’s more than a sum of its parts kind of salad. For all the time-crunched moms running to activities or workers running against the clock, homemade roasted chicken; crunchy bacon and fresh veggies in that creamy ranch dressing your ticket to a convenient win and wonderful way to help welcome the group or kick off a cozy family dinner. Seriously- do not let your taste buds miss out on this one!

    Why You’ll Love This Chicken Bacon Ranch Pasta Salad

    This Chicken Bacon Ranch Pasta Salad is a lifesaver for busy weeknights! It’s quick to whip up, taking just 40 minutes from start to finish. The combination of crispy bacon, savory chicken, and fresh veggies makes it a flavor powerhouse. Plus, the creamy ranch dressing brings everything together for a mouthwatering experience. It’s versatile enough that your family will want it again and again. Who wouldn’t love that?

    Ingredients for Chicken Bacon Ranch Pasta Salad

    Gathering the right ingredients is half the fun of cooking! For this Chicken Bacon Ranch Pasta Salad, you’ll need a delightful mix of fresh and flavorful ingredients:

    • Chicken Breast or Tenderloins: The heart of this salad, providing lean protein and a satisfying texture. Feel free to use shredded rotisserie chicken for a quick shortcut!
    • Romaine Lettuce: This adds a refreshing crunch and a vibrant green color. It’s perfect for a salad! You could also swap it for spinach for a different twist.
    • Bacon: Thick-cut bacon will elevate your dish with its crispy goodness. Can’t have bacon? Turkey bacon is a tasty alternative!
    • Rotini or Fusili Pasta: I like using high-protein or whole grain varieties for added nutrition. You can choose gluten-free pasta if that’s your preference.
    • Sharp Cheddar Cheese: This cheese adds a robust flavor that perfectly complements the creamy ranch dressing. If cheddar’s not your jam, feta or mozzarella also work beautifully.
    • Green Onions: A sprinkle of freshness! They’re subtle yet add just the right amount of zing. You can replace them with chives if you like.
    • Ranch Dressing: The star dressing that ties all the ingredients together. For a lighter touch, opt for a low-fat version.
    • Poultry or Italian Seasoning: This adds an aromatic layer. You might have a favorite herb blend to bring in even more flavor!
    • Salad Supreme Seasoning (optional): This seasoning boosts the flavor even further. It’s not necessary, but if you have it, why not add a dash?
    • Olive Oil: Used for searing the chicken, olive oil adds flavor and helps lock in moisture.
    • Bakery-Style Croutons: These can add a delightful crunch. You could make your own by toasting some bread if you’re feeling adventurous!

    For exact quantities, check at the bottom of the article, where you’ll find them ready for printing. Now, let’s dive into making this delicious salad!

    How to Make Chicken Bacon Ranch Pasta Salad

    Now, let’s roll up our sleeves and get to making this Chicken Bacon Ranch Pasta Salad! Each step is straightforward, and before you know it, you’ll have a meal that brings everyone to the table.

    Step 1 – Cook the Bacon

    Start by dicing the bacon into bite-sized pieces. Place it in a large pan over low heat. Cook it gently for about 10–12 minutes until it’s nice and crispy.

    Once done, remove the bacon from the pan and let it drain on paper towels. Don’t forget to reserve about 2 tablespoons of those delicious bacon drippings. Trust me, this adds flavor to the chicken!

    Step 2 – Prepare the Chicken

    Next up is the chicken! Rub it with a splash of olive oil for moisture and sprinkle with poultry or Italian seasoning.

    In the same pan with the reserved drippings, sear the chicken over medium-low heat. Cook it for about 3–4 minutes per side until it’s golden brown and fully cooked. Let it rest for a few minutes, then dice into pieces. The joy of cooking this chicken with bacon drippings—pure magic!

    Step 3 – Cook the Pasta

    Bring a large pot of salted water to a boil and add your rotini or fusili pasta. Cook according to the package directions, usually about 8 minutes until it’s al dente.

    Once done, drain and rinse the pasta under cold water to stop the cooking process. This helps maintain a firm texture for your pasta salad.

    Step 4 – Combine Ingredients

    In a large bowl, combine your drained pasta, diced chicken, crispy bacon, shredded cheddar, and sliced green onions. The aroma alone will make your mouth water!

    Pour in most of the ranch dressing, then gently toss everything together until well coated. Every morsel should glisten with that creamy goodness.

    Step 5 – Add Seasonings

    This is where the magic truly happens! Add the Salad Supreme seasoning, if you have it, and toss once more to blend. Taste your salad and adjust the seasoning as needed. A pinch more salt or a dash of pepper can go a long way!

    Step 6 – Final Touches

    Just before serving, fold in the shredded romaine lettuce and chopped croutons for that perfect crunch. Drizzle with the remaining ranch dressing and toss lightly to combine. You want to keep that crispness intact!

    And voila! Your Chicken Bacon Ranch Pasta Salad is ready to be served. Isn’t it satisfying to see a vibrant, delicious dish all come together?

    Tips for Success

    • Cook bacon low and slow for ultimate crispiness—trust me, it makes a difference!
    • Let the chicken rest after cooking. This keeps it juicy and flavorful.
    • Rinse pasta with cold water to prevent it from becoming mushy in the salad.
    • Mix in croutons just before serving to maintain their crunch!
    • Feel free to customize with your favorite veggies for extra freshness!

    Equipment Needed

    • Large Skillet: Perfect for cooking bacon and chicken. A non-stick pan works well too!
    • Pot: A big pot for boiling the pasta—make sure it’s deep enough to prevent splashes!
    • Mixing Bowl: A large bowl for combining everything. A serving platter works just as well.
    • Cutting Board & Knife: Ideal for dicing chicken and bacon. A good chef’s knife makes it smoother!

    Variations for Chicken Bacon Ranch Pasta Salad

    • Veggie Loaded: Toss in some diced bell peppers, cherry tomatoes, or cucumbers for added crunch and color.
    • Protein Swap: Substitute chicken with shrimp or even chickpeas for a vegetarian twist!
    • Low-Carb Option: Use zoodles (zucchini noodles) instead of pasta for a lighter, low-carb salad.
    • Spicy Kick: Add sliced jalapeños or a dash of hot sauce into the dressing for a zesty flair.
    • Herb Infusion: Incorporate fresh herbs like parsley or basil to elevate the flavors even more.

    Serving Suggestions

    • Pair it with: A crusty baguette or garlic bread for a hearty meal.
    • Perfect drinks: Serve it with a chilled glass of iced tea or lemonade for a refreshing contrast.
    • Presentation tips: Garnish with extra green onions or bacon bits for a colorful, inviting dish!
    • Make it a meal: Include a fruit salad on the side for a light and balanced dinner.

    FAQs about Chicken Bacon Ranch Pasta Salad

    Can I make this Chicken Bacon Ranch Pasta Salad ahead of time? Absolutely! You can prep the salad a day in advance. Just hold off on adding the romaine and croutons until you’re ready to serve. This keeps everything fresh and crunchy!

    What can I substitute for ranch dressing? If you’re not a big fan of ranch, you can certainly use your preferred dressing. A creamy Italian or even a light vinaigrette can add a different twist while keeping the salad flavorful.

    Is there a way to make this salad lower in calories? Yes! Try using reduced-fat ranch dressing and opting for turkey bacon instead of regular bacon. You can also pack in more veggies for extra volume without adding many calories.

    What sides pair well with Chicken Bacon Ranch Pasta Salad? This salad shines solo but is delicious with a side of garlic bread or fresh fruit. You could also serve it alongside grilled chicken or a light soup for a complete meal.

    Can I use different types of pasta? Absolutely! This recipe is flexible. While rotini or fusili works well, feel free to use penne, farfalle, or even whole-grain pasta. Just keep an eye on the cooking time for perfect texture!

    Final Thoughts

    This Chicken Bacon Ranch Pasta Salad is more than just a meal; it embodies the joy of cooking for loved ones. Every bite bursts with flavors, bringing a sense of comfort and satisfaction. Whether it’s a sunny picnic or a cozy dinner at home, this dish effortlessly brings everyone together. The blend of creamy ranch, crispy bacon, and tender chicken creates a delicious harmony that delights the senses.

    I hope this recipe adds a sprinkle of joy to your table, making your busy days a little brighter. Happy cooking, friends!


    Print

    clock clock iconcutlery cutlery iconflag flag iconfolder folder iconinstagram instagram iconpinterest pinterest iconfacebook facebook iconprint print iconsquares squares iconheart heart iconheart solid heart solid icon

    Description

    A flavorful chicken bacon ranch pasta salad that combines tender chicken, crispy bacon, and fresh vegetables dressed in a creamy ranch dressing.


    • 300 g chicken breast or tenderloins, diced
    • 120 g romaine lettuce, shredded
    • 120 g bacon, thick-cut, diced
    • 250 g rotini or fusili pasta, high-protein or whole grain
    • 100 g sharp cheddar cheese, shredded
    • 30 g green onions, sliced
    • 150 ml ranch dressing
    • 2 teaspoons poultry seasoning or Italian seasoning
    • 1 tablespoon Salad Supreme seasoning (optional)
    • 1 tablespoon olive oil
    • 50 g bakery-style croutons, chopped

    1. Dice bacon and gently cook in a large pan over low heat for 10–12 minutes until crisp. Remove and drain on paper towels, reserving 2 tablespoons of pan drippings.
    2. Rub chicken with olive oil and coat with poultry or Italian seasoning. Sear in the reserved bacon drippings over medium-low heat, 3–4 minutes per side until golden and fully cooked. Let rest, then dice.
    3. In a large pot of salted water, cook pasta according to package instructions until al dente, about 8 minutes. Rinse under cold water and drain thoroughly.
    4. In a large bowl, mix drained pasta, diced chicken, shredded cheddar, crisp bacon, and sliced green onions. Pour in most of the ranch dressing and toss until well coated.
    5. Add Salad Supreme seasoning and toss to combine. Taste and adjust seasoning if desired.
    6. Just before serving, gently fold in shredded romaine lettuce, chopped croutons, and reserved ranch. Toss lightly to maintain crunch.

    Notes

    • For a lighter version, consider using low-fat ranch dressing.
    • This salad can be made ahead of time, but add the romaine and croutons just before serving to keep them fresh.
    • Prep Time: 20 minutes
    • Cook Time: 20 minutes
    • Category: Salad
    • Method: Stovetop
    • Cuisine: American

    Nutrition

    • Serving Size: 1 bowl
    • Calories: 450
    • Sugar: 2 g
    • Sodium: 800 mg
    • Fat: 25 g
    • Saturated Fat: 8 g
    • Unsaturated Fat: 15 g
    • Trans Fat: 0 g
    • Carbohydrates: 35 g
    • Fiber: 3 g
    • Protein: 28 g
    • Cholesterol: 90 mg

    Sharing is caring!

  • Crockpot Chili Mac

    Crockpot Chili Mac


    Introduction to Crockpot Chili Mac

    More often than not, when I am in the kitchen, that chorus of ‘What’s for dinner?’ from my family can be heard. It’s at these times that I highly laud my trusty slow cooker as the stalwart savior. Step in Crockpot Chili Mac—the uber comfort food which marries that heartiness of chili with the warmth of macaroni. Job doing work? kids? or life itself? throwing unexpected curveballs? This is your quick answer for a busy day. It’s easy to throw together and quite hearty, which means it’s perfect for serving at a family get-together or enjoying on a cozy night in.

    Why You’ll Love This Crockpot Chili Mac

    This Crockpot Chili Mac is a lifesaver for busy nights. It’s not only super easy to prepare, but it also delivers comforting flavors that everyone will love. With just a few simple steps, you can turn fresh ingredients into a stew that beckons you home after a long day. Plus, the aroma wafting through the house as it cooks is enough to make any mouth water!

    Ingredients for Crockpot Chili Mac

    Gathering ingredients for Crockpot Chili Mac is half the fun! Each component contributes to the dish’s rich flavor and hearty texture. Here’s what you’ll need:

    • Ground Beef: The foundation of your chili, offering a savory richness that’s hard to beat. You can swap it out for ground turkey or chicken for a lighter take.
    • Onion: Diced onion adds sweetness and depth. If you’re short on time, shallots or onion powder make decent substitutes.
    • Kidney Beans: These beans pack protein and fiber while giving a creamy texture. Feel free to use pinto or white beans if you prefer.
    • Black Beans: Rich in flavor and nutrition, these beans also add a beautiful color contrast. Canned varieties work perfectly here!
    • Corn Kernels: Sweet, juicy corn lends a delightful crunch that balances the other ingredients. Frozen corn can be used in a pinch.
    • Diced Tomatoes: A must for that rich, stewy base; canned or fresh, your choice! You can go with fire-roasted for an extra kick.
    • Chili Seasoning Mix: This blend is what gives the dish its warm, zesty personality. You can make your own blend with chili powder, cumin, and other spices if you’re feeling adventurous.
    • Beef Broth: It adds moisture and flavor. If you’re watching your sodium, low-sodium broth or homemade stock works just as well.
    • Elbow Macaroni: The star of the show that brings the whole dish together. Gluten-free pasta can be substituted for those with dietary restrictions.
    • Shredded Cheddar Cheese: Melty cheese is the icing on the cake! Monterey Jack or pepper jack can add an interesting twist.
    • Garlic Powder: This ingredient boosts flavor without the prep time of fresh garlic. You can use fresh garlic cloves instead, if desired.
    • Paprika: A pinch of paprika enhances the dish’s warmth and color. Smoked paprika brings in a lovely smoky flavor.
    • Ground Black Pepper: A simple seasoning that injects subtle heat; feel free to adjust to your liking!
    • Fresh Cilantro: Optional but a refreshing garnish that ties everything together beautifully. You can use green onion or parsley as an alternative.

    For exact measurements, check the end of the article for easy printing!

    How to Make Crockpot Chili Mac

    Making Crockpot Chili Mac is like a delightful dance in your kitchen. The steps are simple, and the aroma that fills the air is a soothing reminder of home. Let’s dive into this cozy culinary adventure together!

    Step 1: Brown the Beef and Onions

    Start your journey by browning the ground beef in a skillet over medium heat.

    Add the diced onion and cook until both are nicely browned. This process releases fantastic flavors that set the stage.

    Don’t forget to drain any excess fat. This small step keeps your dish from becoming too greasy.

    Step 2: Combine Ingredients in the Slow Cooker

    Now, transfer your beef and onion mixture to the slow cooker. It’s time for the magic to happen!

    Add the kidney beans, black beans, corn, and diced tomatoes into the pot.

    Sprinkle in the chili seasoning mix, garlic powder, paprika, and ground black pepper. Don’t forget to pour in the beef broth! Stir everything until well-combined. This is where the flavors start to mingle beautifully.

    Step 3: Cook on LOW or HIGH

    Cover the slow cooker and set it to cook on LOW for 6 hours or HIGH for 3 to 4 hours.

    During this time, relax and let the delicious scents waft through your home. The slow cooking allows all those amazing flavors to meld perfectly together.

    Step 4: Add Macaroni

    When your cooking time is almost up, it’s time to add the uncooked elbow macaroni.

    Give it a good mix and cook on HIGH for another 25 to 30 minutes. Keep an eye on it! You want the pasta to become tender but not mushy.

    Step 5: Stir in Cheese and Serve

    Once the macaroni is cooked just right, stir in the shredded cheddar cheese.

    Watch as it melts and transforms your hearty dish into gooey perfection. If you’re feeling fancy, garnish with fresh cilantro before serving.

    Your Crockpot Chili Mac is ready to warm both hearts and bellies!

    Tips for Success

    • Prep your ingredients the night before. This saves time and stress on busy days.
    • Feel free to tweak the chili seasoning to suit your family’s taste. A little heat goes a long way!
    • Make a big batch! Crockpot Chili Mac freezes well, making future dinners a breeze.
    • If you like a thicker consistency, reduce the amount of beef broth.
    • Don’t skip the cheese! It adds a creamy texture that elevates the dish.

    Equipment Needed

    • Slow Cooker: The star of your kitchen for this dish. Any size will do, but a 6-quart is ideal.
    • Skillet: Essential for browning the beef. A non-stick pan makes clean-up easier.
    • Measuring Cups and Spoons: Useful for portioning everything accurately.
    • Wooden Spoon: Perfect for stirring and ensuring all ingredients are blended well.
    • Chopping Knife and Cutting Board: For dicing your onions and prepping other ingredients.

    Variations

    • Vegetarian Option: Replace ground beef with textured vegetable protein or lentils for a hearty plant-based twist.
    • Spicy Kick: Add jalapeños or a dash of hot sauce to the mix for those who crave extra heat.
    • Cheesy Delight: Try different cheeses like pepper jack or gouda to enhance the richness.
    • Quinoa Twist: Substitute elbow macaroni with cooked quinoa for a gluten-free and protein-packed meal.
    • Seasonal Veggies: Toss in diced bell peppers, zucchini, or spinach for added nutrition and color.

    Serving Suggestions

    • Side Salad: A crisp green salad with a light vinaigrette complements the flavorful Chili Mac perfectly.
    • Fresh Bread: Serve with warm, crusty bread or garlic bread to soak up every delicious bite.
    • Beverage Pairing: A chilled glass of iced tea or a light red wine works beautifully.
    • Presentation: Garnish each bowl with a sprinkle of shredded cheese and fresh cilantro for a vibrant touch.

    FAQs about Crockpot Chili Mac

    Can I make Crockpot Chili Mac ahead of time?

    Absolutely! You can prepare all the ingredients the night before. Just store everything in the fridge, and when you’re ready, dump it all in the slow cooker. This makes busy weeknight dinners a breeze.

    Can I freeze leftover Chili Mac?

    Yes! Once it cools, portion it into airtight containers and freeze. It stays delicious in the freezer for up to 3 months. Just thaw and reheat—easy peasy!

    What if I don’t have a slow cooker?

    No slow cooker? No problem! You can make this dish in a Dutch oven on the stove. Just simmer everything on low heat, stirring occasionally until it’s cooked through.

    Is this recipe gluten-free?

    Yes, as long as you use gluten-free elbow macaroni, it’s a great choice for those avoiding gluten. The rest of the ingredients are naturally gluten-free!

    How can I adjust the spice level?

    If you like it spicy, add diced jalapeños or a splash of hot sauce. For a milder flavor, stick with the chili seasoning mix and keep the heat to a minimum. Tweak it to make it your own!

    Final Thoughts

    Every time I make Crockpot Chili Mac, it feels like I’m wrapping my family in a warm hug. This dish not only satisfies hunger but creates moments that bring everyone together around the table. The ease of preparation frees up my time, letting me enjoy what matters most—real connections with my loved ones. That heavenly aroma filling the air is an invitation to unwind and share stories from our day. So, grab your ingredients and let this heartwarming meal brighten your evenings, making memories that last long after the last bite is gone.


    Print

    clock clock iconcutlery cutlery iconflag flag iconfolder folder iconinstagram instagram iconpinterest pinterest iconfacebook facebook iconprint print iconsquares squares iconheart heart iconheart solid heart solid icon

    Description

    A hearty and comforting dish combining chili and macaroni cooked slowly in a crockpot.


    • 900 grams ground beef
    • 1 medium onion, diced
    • 425 grams kidney beans, drained and rinsed
    • 425 grams black beans, drained and rinsed
    • 425 grams corn kernels, drained
    • 850 grams diced tomatoes, canned
    • 1 packet chili seasoning mix
    • 950 millilitres beef broth
    • 450 grams elbow macaroni, uncooked
    • 200 grams shredded cheddar cheese
    • 5 millilitres garlic powder
    • 5 millilitres paprika
    • 2.5 millilitres ground black pepper
    • Fresh cilantro, chopped (optional)

    1. Cook ground beef with diced onion over medium heat until meat is browned throughout. Drain excess fat before transferring to slow cooker.
    2. Add kidney beans, black beans, corn, diced tomatoes, chili seasoning, garlic powder, paprika, black pepper, and beef broth to the slow cooker with the beef and onion mixture. Stir until fully blended.
    3. Cover and cook on LOW for 6 hours or on HIGH for 3 to 4 hours, allowing flavours to meld.
    4. Add uncooked elbow macaroni and mix well. Cook on HIGH for 25 to 30 minutes or until pasta becomes tender.
    5. Stir in shredded cheddar cheese until melted and fully incorporated. Garnish with fresh cilantro before serving, if desired.

    Notes

    • Adjust seasoning to taste based on preference.
    • Optional toppings include sour cream or avocado.
    • Prep Time: 15 minutes
    • Cook Time: 6 hours on LOW or 4 hours on HIGH
    • Category: Main Course
    • Method: Slow Cooking
    • Cuisine: American

    Nutrition

    • Serving Size: 1 bowl
    • Calories: 500
    • Sugar: 5 grams
    • Sodium: 900 milligrams
    • Fat: 20 grams
    • Saturated Fat: 10 grams
    • Unsaturated Fat: 8 grams
    • Trans Fat: 0 grams
    • Carbohydrates: 55 grams
    • Fiber: 15 grams
    • Protein: 30 grams
    • Cholesterol: 80 milligrams

    Sharing is caring!

  • Raspberry Sweet Rolls

    Raspberry Sweet Rolls


    Introduction to Raspberry Sweet Rolls

    Nothing quite makes or breaks a morning quite as much as sweetness at the end of a Raspberry Sweet Roll baking fragrance filling up your house. These are, I think, perfect for when you want to surprise your family and of course to pamper yourself. Pretty tart filling makes it good as either breakfast or dessert.

    Let’s have at, then, with this sweet recipe!

    Why You’ll Love This Raspberry Sweet Rolls

    If you’re anything like me, you appreciate a recipe that balances flavor with simplicity. These Raspberry Sweet Rolls deliver just that! They’re quick to prep, easy to make, and perfect for any occasion. Not to mention, the sweet and tangy raspberry filling takes your taste buds on a delightful journey. Plus, your family will adore them, making this recipe an absolute crowd-pleaser—who can resist a warm, flaky roll fresh out of the oven?

    Ingredients for Raspberry Sweet Rolls

    Before we embark on our sweet roll journey, let’s gather the essentials. Here’s what you’ll need to make these scrumptious Raspberry Sweet Rolls:

    • All-Purpose Flour: The backbone of your rolls. It gives them that soft and tender texture we all love.
    • Granulated Sugar: A touch of sweetness that complements the raspberries, enhancing their flavor beautifully.
    • Active Dry Yeast: This little magic-maker helps your dough rise, creating those fluffy rolls. Be sure it’s fresh!
    • Warm Milk: Not too hot, not too cold! It activates the yeast and brings richness to the dough.
    • Unsalted Butter: For that delightful buttery flavor and a soft crumb. Melted and mixed in, it ensures richness in every bite.
    • Large Egg: This adds structure and helps bind everything together, contributing to that perfect texture.
    • Raspberry Jam or Preserves: The star of the show! Choose a quality brand for that burst of sweet-tart goodness.
    • Fresh Raspberries: Using these in addition to the jam enhances both flavor and visually elevates your rolls.
    • Powdered Sugar: A light dusting adds a touch of elegance and sweetness before serving.

    For ingredient measurements, you’ll find the exact quantities at the bottom of the article, perfect for printing. If fresh raspberries aren’t available, feel free to use frozen ones—they work beautifully too! Now that we have everything ready, let’s whip up some magic in the kitchen.

    How to Make Raspberry Sweet Rolls

    Now that we have our ingredients, it’s time to bring these Raspberry Sweet Rolls to life! Follow these simple steps, and don’t be shy about getting your hands a little doughy. I promise it’s worth it!

    Step 1: Prepare the Yeast Mixture

    Start by warming your milk until it’s comfortably warm but not scalding hot. Trust me, too hot, and you’ll kill the yeast—too cold, and it won’t activate.

    Sprinkle the active dry yeast over the warm milk, giving it a gentle stir. Let it sit for about five minutes until it becomes foamy and puffy. That means your yeast is ready to work its magic!

    Step 2: Mix the Base Ingredients

    Once your yeast mixture is bubbly, it’s time for the fun part. Add in your granulated sugar, melted butter, and that lovely egg.

    Whisk everything together until combined. The mixture should look like a silky, sweet concoction that’s just waiting for flour to join the party!

    Step 3: Form the Dough

    Now, gradually add your all-purpose flour, stirring gently. You want to mix it until the dough starts to come together into a soft ball.

    Don’t rush—allow the flour to blend with those yummy wet ingredients as if they’re old friends.

    Step 4: Knead the Dough

    Time to get physical! Turn your dough out onto a floured surface. Knead it for about 8-10 minutes.

    You’re looking for a smooth and elastic texture. If it’s sticky, sprinkle a little more flour, but try not to add too much. We want it soft and dreamy, not tough!

    Step 5: Allow the Dough to Rise

    Place your dough in a greased bowl, turning it to coat all sides. Cover the bowl with a clean kitchen towel and let it rise in a warm place.

    Wait about 60-90 minutes until it’s doubled in size. I like to think of this as dough taking a little beauty nap!

    Step 6: Roll Out the Dough

    Once doubled, it’s time to wake up your dough! Gently punch it down to release air.

    Now roll it out on a floured surface into a large rectangle, about 1/4 inch thick. This is where the magic of sweet rolls begins!

    Step 7: Add Raspberry Filling

    Spread raspberry jam evenly over your dough, ensuring to leave a 1-inch border around the edges.

    Scatter fresh raspberries on top for that burst of juicy flavor. Don’t be shy—go ahead, load it up!

    Step 8: Roll and Cut the Dough

    Starting from one long edge, tightly roll the dough into a log. It’s like wrapping a delicious present!

    Once rolled, use a sharp knife or dental floss to slice it into 12 equal pieces. Each piece is a little surprise waiting to be baked.

    Step 9: Second Rise

    Arrange your rolls in a greased 9×13 inch baking dish, leaving a little space between them.

    Cover them again and let them rise for another 30-45 minutes until they’re puffy and delightful.

    Step 10: Bake the Rolls

    Preheat your oven to 350°F (175°C). It’s the perfect time to prepare for the heavenly smell filling your home!

    Bake the rolls for 25-30 minutes or until golden brown on top. You’ll know they’re ready when they look like warm clouds of deliciousness.

    Step 11: Finish and Serve

    Once baked, remove from the oven and let them cool for about 10 minutes.

    Dust generously with powdered sugar for that extra sweetness before serving. When you bite into these rolls, you’re sure to smile!

    Tips for Success

    • Always check your yeast’s expiration date for the best results.
    • Use a kitchen thermometer to ensure your milk is the right temperature—about 110°F is perfect!
    • Don’t rush the rise! Giving the dough enough time will lead to fluffy rolls.
    • Try not to over-knead; a little tender loving care goes a long way.
    • If your kitchen is cool, consider turning on the oven for a few minutes, then turning it off. It creates a warm spot for rising.

    Equipment Needed

    • Mixing Bowl: A large bowl for combining ingredients. Any deep dish will work in a pinch.
    • Rolling Pin: To roll out the dough. A wine bottle can be a sneaky substitute!
    • Sharp Knife or Dental Floss: For cutting the roll. Floss is especially effective for a clean slice.
    • Baking Dish: A 9×13 inch pan for baking. A round dish also does the trick.
    • Kitchen Towel: To cover the dough while it rises. A clean cloth or plastic wrap works too!

    Variations on Raspberry Sweet Rolls

    • Chocolate Raspberry Rolls: Add mini chocolate chips to the raspberry filling for a decadent twist that chocolate lovers will adore.
    • Lemon Zest: Mix in some grated lemon zest with the raspberry jam for a refreshing citrus burst.
    • Whole Wheat Flour: Substitute half of the all-purpose flour with whole wheat flour for a healthier option that adds a nutty flavor.
    • Vegan Version: Replace butter with coconut oil, use almond milk, and swap the egg for a flax egg (1 tablespoon ground flaxseed mixed with 2.5 tablespoons water).
    • Cinnamon Roll Variation: Before spreading the raspberry jam, sprinkle cinnamon sugar over the dough for a warm, spiced flavor profile.

    Serving Suggestions for Raspberry Sweet Rolls

    • Pair your rolls with a hot cup of coffee or tea for a delightful morning treat.
    • Serve with a dollop of whipped cream or a scoop of vanilla ice cream for dessert.
    • Add fresh mint leaves for a pop of color and freshness on the plate.
    • Consider a fruit salad on the side to balance the sweetness.

    FAQs about Raspberry Sweet Rolls

    Can I use frozen raspberries in this recipe?
    Absolutely! Frozen raspberries work just as well as fresh ones. Just make sure to thaw and drain them properly to avoid excess moisture in your rolls.

    How should I store leftover Raspberry Sweet Rolls?
    Once they’ve cooled, store your rolls in an airtight container at room temperature for up to three days. If you want them to last longer, freeze them, and they’ll be good for a month.

    Can I make these rolls ahead of time?
    Yes! You can prepare the dough and shape the rolls the night before. Just keep them in the refrigerator overnight and bake them fresh in the morning for a delightful breakfast.

    What can I serve alongside Raspberry Sweet Rolls?
    These rolls go wonderfully with a hot beverage like coffee or tea. For a brunch spread, consider serving them with a light fruit salad or yogurt for balance.

    Can I experiment with other fruit fillings?
    Definitely! While raspberries are delicious, feel free to try other jams or preserves like strawberry, blueberry, or even mixed berry for a delightful twist!

    Final Thoughts

    Baking Raspberry Sweet Rolls is more than just following a recipe; it’s about creating moments of joy in your kitchen. The smiles from your loved ones when they take that first warm bite? Priceless. Each roll is a tiny celebration, reminding us to indulge in life’s simple pleasures.

    Whether enjoyed with morning coffee or as a delightful dessert, these sweet rolls are bound to bring happiness to your home. So, roll up your sleeves, savor the process, and watch as your kitchen transforms into a haven of sweet delight. You deserve it!


    Print

    clock clock iconcutlery cutlery iconflag flag iconfolder folder iconinstagram instagram iconpinterest pinterest iconfacebook facebook iconprint print iconsquares squares iconheart heart iconheart solid heart solid icon

    Description

    Delicious raspberry sweet rolls filled with jam and fresh raspberries, perfect for a delightful dessert or breakfast treat.


    • 3 cups all-purpose flour
    • 1/4 cup granulated sugar
    • 2 1/4 teaspoons active dry yeast
    • 3/4 cup warm milk
    • 1/4 cup unsalted butter, melted
    • 1 large egg
    • 1 cup raspberry jam or preserves
    • 1/2 cup fresh raspberries
    • Powdered sugar for dusting

    1. In a large mixing bowl, combine warm milk and yeast. Let stand for 5 minutes until foamy.
    2. Add sugar, melted butter, and egg, whisking until well combined.
    3. Gradually add flour, stirring until a soft dough forms.
    4. Knead on a floured surface for 8-10 minutes until smooth and elastic.
    5. Place dough in a greased bowl, cover with a clean kitchen towel, and let rise in a warm place for 60-90 minutes until doubled in size.
    6. Punch down the dough and roll it out on a floured surface into a large rectangle about 1/4 inch thick.
    7. Spread raspberry jam evenly over the dough, leaving a 1-inch border. Scatter fresh raspberries over the jam.
    8. Starting from one long edge, tightly roll the dough into a log.
    9. Using a sharp knife or dental floss, cut the log into 12 equal pieces.
    10. Arrange the rolls in a greased 9×13 inch baking dish, leaving small gaps between them.
    11. Cover and let rise for another 30-45 minutes until puffy.
    12. Preheat oven to 350°F (175°C). Bake the rolls for 25-30 minutes until golden brown on top.
    13. Remove from oven and let cool for 10 minutes before dusting generously with powdered sugar. Serve warm.

    Notes

    • Make sure the milk is warm but not hot to activate the yeast.
    • You can use frozen raspberries if fresh are not available.
    • These rolls can be stored in an airtight container for a few days.
    • Prep Time: 20 minutes
    • Cook Time: 30 minutes
    • Category: Dessert
    • Method: Baking
    • Cuisine: American

    Nutrition

    • Serving Size: 1 roll
    • Calories: 250
    • Sugar: 10g
    • Sodium: 150mg
    • Fat: 8g
    • Saturated Fat: 5g
    • Unsaturated Fat: 2g
    • Trans Fat: 0g
    • Carbohydrates: 38g
    • Fiber: 1g
    • Protein: 4g
    • Cholesterol: 30mg

    Sharing is caring!

  • Mac and Cheese Grilled Cheese

    Mac and Cheese Grilled Cheese


    Introduction to Mac and Cheese Grilled Cheese

    Ah, comfort food. There is something about it that is pure magic in comforting the soul and warming the heart. So, here’s my exciting twist on the classic fave: Mac and Cheese Grilled Cheese. Just picture creamy macaroni and cheese tucked between golden, crispy bread—oh yeah!

    If you’re anything like me and constantly juggling a bazillion things on your plate, then this dish is totally for you. Quick to get onto the table on a chaotic weeknight but special enough to have to impress the loved ones. So let’s get dipping into this cheesy loophole destined to be a household favorite!

    Why You’ll Love This Mac and Cheese Grilled Cheese

    This Mac and Cheese Grilled Cheese combines the best of both worlds: the comfort of creamy mac and cheese and the warmth of a classic grilled cheese. It’s incredibly easy to whip up, taking just 18 minutes from start to finish. Perfect for busy nights or sudden cravings, this dish offers a satisfying blend of flavors that’ll make you feel all warm and fuzzy inside. You’ll be hooked after just one bite!

    Ingredients for Mac and Cheese Grilled Cheese

    Gathering the right ingredients is key to crafting this magical Mac and Cheese Grilled Cheese. Here’s what you’ll need:

    • Sandwich Bread: You can use white, whole wheat, or even sourdough. The choice depends on your taste preference.
    • Leftover Mac and Cheese: A fabulous way to put that extra mac and cheese to work! Cold or at room temperature works great.
    • Shredded Extra Sharp Cheddar Cheese: This brings an extra layer of cheesy goodness, enhancing the flavor profile beautifully.
    • Unsalted Butter: Softened butter adds a golden crust when grilling and balances the rich flavors perfectly.

    Feel free to get creative! You can mix in different types of cheese for unique flavors, or add spices like garlic powder or paprika into your mac and cheese for a zing.

    For those evenings when time is tight, leftover mac and cheese can be a real lifesaver! And if you’re looking for a way to switch it up, using different types of bread can add a fresh twist to this comforting classic.

    You can find the exact quantities of each ingredient listed at the bottom of the article for easy printing!

    How to Make Mac and Cheese Grilled Cheese

    Now that you have your ingredients ready, let’s get started on making this delicious Mac and Cheese Grilled Cheese. Follow along with these easy steps, and soon you’ll be enjoying this cheesy delight!

    Prepare the Bread

    Start by arranging four slices of your chosen sandwich bread on a cutting board. Keep the bread slices laid out in pairs. This step is simple but sets the stage for the ultimate sandwich experience!

    Assemble the Mac and Cheese Filling

    Distribute about 3/4 cup of that scrumptious leftover mac and cheese onto two slices of bread. Spread it evenly, reaching all the way to the edges. Next, sprinkle 1/4 cup of shredded extra sharp cheddar cheese on top of the macaroni. This ensures a gooey, luscious bite with every forkful. Repeat this for the other sandwich, creating a cheesy masterpiece!

    Make the Sandwich

    Now, place the remaining slices of bread on top of each sandwich, creating a deliciously stuffed delight. But wait! Before we hit the grill, spread a thin layer of softened butter on the outer sides of each sandwich. This butter will create that golden, crispy crust we all adore.

    Grill the Sandwich

    It’s time to grill! Heat a nonstick skillet or a griddle over medium-low heat. Once it’s warm, place the sandwiches in the pan, buttered side down. Cook for about 3 to 4 minutes per side. Gently press down with a spatula to help everything meld together. You’re aiming for that glorious golden brown color and deliciously melted cheese inside.

    Serve and Enjoy

    When your sandwiches are beautifully golden, remove them from the pan. Allow them to rest for a minute—this helps the cheese set slightly. Then, slice each sandwich diagonally with a knife. Serve them warm, and watch as your family digs in, delighting in every cheesy bite!

    Tips for Success

    • Use day-old bread for better texture. It holds up well during grilling.
    • Experiment with different cheeses, like mozzarella or gouda, for unique flavors.
    • Don’t skip the butter; it’s essential for that irresistible crispy crust.
    • Adjust the heat as needed. Too high can burn the bread before the cheese melts.
    • Pair with your favorite tomato soup or a salad for a complete meal.

    Equipment Needed

    • Nonstick Skillet or Griddle: A good nonstick surface ensures easy flipping.
    • Spatula: For gentle pressing and flipping your sandwiches.
    • Cutting Board: A clean surface for assembling your delicious creation.
    • Knife: To slice your sandwiches and reveal that gooey filling.

    Variations

    • Spicy Twist: Add sliced jalapeños or crushed red pepper flakes to the mac and cheese for a kick of heat.
    • Vegetable Medley: Incorporate sautéed spinach, mushrooms, or roasted bell peppers into the mac and cheese for added nutrition and flavor.
    • Bacon Bliss: Crispy bacon bits mixed into the mac and cheese elevate this dish to new savory heights.
    • Gluten-Free Option: Substitute regular bread with gluten-free bread, ensuring everyone can enjoy it.
    • Plant-Based Delight: Use dairy-free cheese and butter for a vegan-friendly version while keeping it deliciously creamy.

    Serving Suggestions

    • Tomato Soup: Serve alongside a warm bowl of creamy tomato soup for a classic combo.
    • Salad: Pair with a crisp green salad for a refreshing balance to the richness.
    • Pickles: Offer tangy pickles or pickled vegetables on the side for a delightful crunch.
    • Presentation: Slice sandwiches and arrange them on a colorful plate, garnished with fresh herbs for an inviting look.

    FAQs about Mac and Cheese Grilled Cheese

    Can I use different types of cheese in my Mac and Cheese Grilled Cheese?

    Absolutely! In addition to sharp cheddar, you can experiment with mozzarella, gouda, or even a spicy pepper jack for a unique twist.

    What if I don’t have leftover mac and cheese?

    No worries! You can make a quick batch from scratch or use store-bought mac and cheese to whip up this delicious sandwich.

    Can this recipe be made gluten-free?

    Certainly! Simply substitute regular bread with gluten-free bread, and enjoy this comforting dish without the gluten.

    How do I reheat leftover Mac and Cheese Grilled Cheese?

    The best method is to use a skillet over low heat to preserve that crispy crust while letting the cheese melt thoroughly.

    Can I prepare these sandwiches in advance?

    While I recommend making them fresh for the best taste, you can assemble the sandwiches ahead of time and grill them when you’re ready to eat!

    Final Thoughts

    The joy of whipping up a Mac and Cheese Grilled Cheese is truly unmatched. This delightful sandwich merges classic comfort with the ease of a quick meal, perfect for busy nights. I love how each bite is a reminder of cozy family dinners and childhood nostalgia.

    Whether it’s a rainy day or a sudden craving, this dish embraces you like a warm hug. So gather your loved ones, savor every cheesy moment, and let this recipe become part of your home-cooked tradition. Trust me, it’s a delicious adventure you’ll want to embark on again and again!


    Print

    clock clock iconcutlery cutlery iconflag flag iconfolder folder iconinstagram instagram iconpinterest pinterest iconfacebook facebook iconprint print iconsquares squares iconheart heart iconheart solid heart solid icon

    Description

    A delicious twist on classic grilled cheese, featuring macaroni and cheese for a comforting, cheesy delight.


    • 4 slices sandwich bread (white, whole wheat, or sourdough)
    • 1 1/2 cups leftover mac and cheese, cold or at room temperature
    • 1/2 cup shredded extra sharp cheddar cheese
    • 2 tablespoons unsalted butter, softened

    1. Arrange the bread slices on a clean cutting board.
    2. Distribute about 3/4 cup of leftover mac and cheese over two slices of bread, spreading evenly to the edges.
    3. Top the mac and cheese on each sandwich with 1/4 cup shredded extra sharp cheddar cheese for added flavor and binding.
    4. Place the remaining bread slices on top to form closed sandwiches.
    5. Spread a thin, even layer of softened butter on the outer side of each sandwich.
    6. Heat a nonstick skillet or griddle over medium-low heat.
    7. Place sandwiches in the pan, buttered side down, and cook for 3 to 4 minutes per side, pressing gently, until golden brown and the cheese is melted.
    8. Remove sandwiches from the pan, let rest for 1 minute, cut diagonally with a knife, and serve hot.

    Notes

    • For added flavor, use different types of cheese in addition to cheddar.
    • Serve with a side of tomato soup for the ultimate comfort food experience.
    • Prep Time: 10 minutes
    • Cook Time: 8 minutes
    • Category: Comfort Food
    • Method: Grilling
    • Cuisine: American

    Nutrition

    • Serving Size: 1 sandwich
    • Calories: 540
    • Sugar: 3g
    • Sodium: 800mg
    • Fat: 30g
    • Saturated Fat: 15g
    • Unsaturated Fat: 10g
    • Trans Fat: 0g
    • Carbohydrates: 45g
    • Fiber: 2g
    • Protein: 20g
    • Cholesterol: 70mg

    Sharing is caring!

  • S’mores Rice Krispie Treats

    S’mores Rice Krispie Treats


    Introduction to S’mores Rice Krispie Treats

    I know, as a mom on the run that sometimes making a yummy treat everyone will enjoy can be daunting. Voilà, S’mores Rice Krispie Treats— a fun, new spin on an old favorite! These tasty munchies have combined the stickiest of marshmallows with the crunch of Rice Krispies and are dripping with warm, melted chocolate. Really time-efficient for sharing with the family or for taking along to get-togethers, and who doesn’t love s’mores? A few humble ingredients make a dessert that spreads happiness and sweet memories on your table!

    Why You’ll Love This S’mores Rice Krispie Treats

    Let’s be honest, life gets busy. But these S’mores Rice Krispie Treats are an absolute lifesaver! They come together in just 15 minutes of prep, plus some chill time. The mix of textures—crispy, chewy, and melty—creates an irresistible flavor explosion. You can easily make them with your kids, too. Who wouldn’t want to enjoy fun family moments while crafting a delicious dessert? Trust me; these treats will warm your heart!

    Ingredients for S’mores Rice Krispie Treats

    Gathering the right ingredients for your S’mores Rice Krispie Treats is the first step toward pure deliciousness! Here’s what you’ll need:

    • Rice Krispies cereal: This is the base of our treat, providing that signature crunch. You could substitute it with another crispy cereal if you like, but Rice Krispies hold the classic flavor.
    • Graham crackers: Roughly chopped, they add that iconic s’mores flavor. If you want, try chocolate graham crackers for an extra treat!
    • Salt: Just a pinch enhances all the flavors. It’s amazing how a little seasoning can make a big difference!
    • Salted butter: This brings richness to the mixture. You can use unsalted butter too, just add a tad more salt if you do.
    • Marshmallows: The heart of any Rice Krispie treat! They melt down to create that gooey texture we all love. Mini marshmallows can be a great alternative for quicker melting.
    • Marshmallow crème: This decadent layer takes the treats to a whole new level. It can be successfully swapped out for more melted marshmallows if you’re in a pinch.
    • Hershey’s chocolate bars: The chocolate layer pulls everything together beautifully. You can experiment with your favorite chocolate, or even try a nutty version for added depth.

    For precise amounts, check the bottom of the article for measurements, perfect for printing and keeping in your kitchen. Now let’s get cooking!

    How to Make S’mores Rice Krispie Treats

    Making S’mores Rice Krispie Treats is like crafting a tiny culinary adventure right in your kitchen! Follow these simple steps, and you’ll have a delicious treat ready in no time.

    Prepare the Pan

    Start by lining a 10×15-inch jelly roll pan with parchment paper. This way, your treats won’t stick, making cleanup a breeze. Give it a light spray with cooking spray too. This small step saves you from the post-treat battle of scraping gooey goodness off the pan!

    Mix Dry Ingredients

    In a large bowl, gently mix together the Rice Krispies, chopped graham crackers, and salt. This combination is where the magic begins! The salt brings out the sweetness while the crunch of the Rice Krispies and graham crackers sets the stage for a delightful texture.

    Melt Butter and Marshmallows

    Take a large saucepan and place the salted butter over low heat. Patience is key here! Once it begins to melt, add in the marshmallows. Stir continuously—this prevents them from burning. It should take about 5-8 minutes for them to transform into a gooey, heavenly mixture. Don’t rush it, or you might end up with candy-like blobs instead of smooth marshmallow goodness!

    Combine Mixtures

    Remove the saucepan from heat and gently fold in your Rice Krispies mixture. Ensure everything is evenly coated with that luscious marshmallow mix. I like to use a rubber spatula here; it helps to keep the mixture from getting too crushed. Every morsel deserves that sweet, sticky coating!

    Assemble the Layers

    Once your mixture is evenly combined, press it into the prepared pan. Make sure to spread it to the corners in an even layer. Let it cool for about 3-5 minutes until it’s just cool enough to touch. Then, spread the marshmallow crème over the layer, leaving about an inch border all around. This is where the extra s’mores magic happens!

    Broil to Melt Chocolate

    Now comes the best part: adding chocolate! Lay the Hershey’s chocolate bars side by side over the marshmallow layer. Pop the pan under the broiler for just 1 minute. Keep an eye on it—too long, and you’ll have a melted chocolate mess instead of a dreamy layer. Once it’s nice and melted, use a spatula to spread the chocolate evenly.

    Cool and Roll

    After spreading the chocolate, allow the treats to cool for about 5-7 minutes. This helps with rolling. Gently roll the treats starting from the edge with the most chocolate. Don’t worry if some chocolate oozes out—it’s all part of the fun! Place the rolled treats seam-side down and chill them for at least 4 hours to overnight. This will help them set perfectly.

    Tips for Success

    • Allow the treats to chill overnight for the best texture.
    • Keep the heat low while melting marshmallows to avoid burning.
    • Use a spatula sprayed with cooking spray when spreading the chocolate for easy application.
    • For neat slices, use a warm knife, wiping it clean between cuts.
    • Don’t hesitate to experiment with toppings or flavors—there are no wrong choices!

    Equipment Needed

    • Jelly roll pan: A 10×15-inch size works best. A cookie sheet with edges can also do the trick.
    • Parchment paper: Essential to prevent sticking. If you don’t have it, a silicone baking mat is a great substitute.
    • Large saucepan: For melting the butter and marshmallows. A deep skillet can work too.
    • Rubber spatula: Perfect for mixing and folding. A wooden spoon can serve as an alternative.
    • Mixing bowl: A large one to combine dry ingredients. Any large bowl will suffice!

    Variations

    • Nutty Delight: Add chopped nuts like walnuts or pecans for an extra crunch. They pair beautifully with the creamy chocolate!
    • Peanut Butter Twist: Drizzle some creamy or crunchy peanut butter over the marshmallow layer before adding chocolate for a rich addition.
    • Vegan Version: Use dairy-free chocolate and plant-based butter. Replace marshmallows with vegan marshmallow options available at specialty stores.
    • Fruit Fun: Incorporate dried fruits like cranberries or cherries for a tart contrast to the sweetness of the treats.
    • Flavored Marshmallows: Switch to flavored marshmallows, such as cinnamon or strawberry, to create a unique twist on the classic s’mores.

    Serving Suggestions

    • Pair your S’mores Rice Krispie Treats with a cold glass of milk for a nostalgic classic.
    • Serve alongside fresh fruit for a refreshing contrast to the sweetness.
    • For a fun presentation, cut them into colorful shapes using cookie cutters.
    • Consider wrapping them individually in wax paper for a perfect grab-and-go snack.
    • Garnish with mini marshmallows or a drizzle of chocolate for an extra special touch!

    FAQs about S’mores Rice Krispie Treats

    Got questions? Don’t worry! Here are some common queries about S’mores Rice Krispie Treats that you might find helpful.

    Can I make these S’mores Rice Krispie Treats ahead of time?
    Absolutely! These treats are best when they chill overnight. This allows all the flavors to meld together beautifully, and they cut more cleanly the next day.

    What’s the best way to store leftover treats?
    Store your treats in an airtight container at room temperature. They’ll stay fresh for up to a week. Just keep them away from direct sunlight!

    Can I substitute the Rice Krispies with another cereal?
    Yes! While Rice Krispies are traditional, you can use any crispy cereal you have on hand, like Cornflakes or even Puffed Rice. Just be sure to maintain that crunchy texture!

    How do I prevent the marshmallows from burning?
    To avoid burning, melt your marshmallows over low heat and stir consistently. Patience is key here—it takes just a little bit longer, but it’s worth avoiding that burnt flavor!

    What can I do if I can’t find marshmallow crème?
    If marshmallow crème isn’t available, simply use more melted marshmallows. They’ll provide a similar gooey texture, keeping that classic s’mores flavor intact!

    Final Thoughts

    Making S’mores Rice Krispie Treats is more than just baking; it’s about creating moments of joy and nostalgia. Each bite captures the essence of summer campfires and family gatherings, reminding us of simpler times. These treats are wonderfully versatile and quick to prepare, making them perfect for busy moms like me. Whether you’re sharing them at a potluck or savoring them at home with your kids, they’re bound to spark smiles and cheerful conversations. So grab your ingredients and let the magic happen! Here’s to sweet memories and crispy delights that bring happiness to our lives.


    Print

    clock clock iconcutlery cutlery iconflag flag iconfolder folder iconinstagram instagram iconpinterest pinterest iconfacebook facebook iconprint print iconsquares squares iconheart heart iconheart solid heart solid icon

    Description

    S’mores Rice Krispie Treats are a delightful twist on the classic dessert, combining the flavors of s’mores with the crunchy goodness of Rice Krispies.


    • 5 cups rice krispies cereal
    • 2 cups graham crackers, roughly chopped
    • ¼ teaspoon salt
    • ¼ cup (½ stick) salted butter
    • 10 ounce bag marshmallows
    • 7 ounce container marshmallow creme
    • 12.75 ounce (3 4.25-ounce) Hershey’s special dark XL chocolate bars

    1. Line a 10×15 inch jelly roll pan (or lipped quarter baking sheet pan) with enough parchment paper to cover the sides. Spray it lightly with cooking spray.
    2. In a large mixing bowl, gently mix together the rice krispies cereal, graham crackers and salt and then set the bowl to the side.
    3. Using a large saucepan, place the butter over low heat until it has started to melt.
    4. Add in the marshmallows and stir constantly until they are completely melted, about 5-8 minutes. Do not increase the heat.
    5. Remove the pan from the heat and gently fold in the rice krispies cereal mixture until everything is evenly coated.
    6. Press the mixture into the prepared pan until you have an even layer that goes to every corner and then allow it to cool for 3-5 minutes until it is cool to the touch.
    7. Spread the marshmallow creme over the middle of the rice krispie treats, leaving about 1 inch of a border all the way around.
    8. Set the chocolate bars on the marshmallow layer, side by side, leaving a little more of a gap on one short side than the other.
    9. Place the baking sheet in the oven and broil for 1 minute or until the chocolate has heated enough to spread slightly.
    10. Spread the chocolate with a spatula until it is evenly distributed over the marshmallow, but with a gap on one short side for it to spread as it rolls.
    11. Allow the treats to set and cool for about 5-7 minutes or until the treats are cool enough to touch.
    12. Gently roll the treats, from the side with the most chocolate, until it is completely rolled. Place it seam side down on the baking sheet. It may ooze chocolate so make sure the parchment paper is intact for easy clean up.
    13. Chill the treat for 4 hours to overnight, or until completely set. Be aware that the chocolate and marshmallow creme take the longest to set.
    14. Remove from the refrigerator and slice the log into individual rolls.
    15. Allow the treats to come to room temperature before serving.

    Notes

    • Allowing the treats to chill overnight gives the best results.
    • Be careful to avoid burning the marshmallows when melting.
    • Using a spatula sprayed with cooking spray can help with spreading the chocolate.
    • Prep Time: 15 minutes
    • Cook Time: 10 minutes
    • Category: Dessert
    • Method: No-Bake
    • Cuisine: American

    Nutrition

    • Serving Size: 1 roll
    • Calories: 250
    • Sugar: 22g
    • Sodium: 150mg
    • Fat: 8g
    • Saturated Fat: 4g
    • Unsaturated Fat: 3g
    • Trans Fat: 0g
    • Carbohydrates: 40g
    • Fiber: 1g
    • Protein: 2g
    • Cholesterol: 20mg

    Sharing is caring!

  • Homemade Chocolate Old-Fashioned Doughnuts

    Homemade Chocolate Old-Fashioned Doughnuts


    Introduction to Homemade Chocolate Old-Fashioned Doughnuts

    Warm, pillowy, and homemade – comfort food at its best is biting into a doughnut. This is my ‘secret weapon’ recipe, as a busy mom with how crazy life can get on days I really want to spoil my family but don’t have hours to spend in the kitchen. These doughnuts do take no time at all to prepare – – but they do take some loving time. So many times I’ve found that a good friend in need is just that good friend who brings over a batch of rich chocolatey goodness for everyone.

    Why You’ll Love This Homemade Chocolate Old-Fashioned Doughnuts

    These homemade chocolate old-fashioned doughnuts are a heavenly combination of rich flavor and minimal fuss. They come together quickly, fitting perfectly into even the busiest schedule. Each bite is like a warm hug, making them an instant favorite in our household. The delightful chocolate glaze elevates them, turning a simple treat into an impressive dessert. Trust me, they’ll have everyone asking for seconds—and maybe thirds!

    Ingredients for Homemade Chocolate Old-Fashioned Doughnuts

    Let’s gather the stars of our show—the ingredients that bring these homemade chocolate old-fashioned doughnuts to life! Here’s what you’ll need:

    • All-purpose flour: The backbone of any doughnut, offering structure and fluffiness.
    • Unsweetened cocoa powder: For that rich chocolate flavor that makes these doughnuts so irresistible.
    • Granulated sugar: Adds sweetness and helps in creating that delightful texture.
    • Baking powder: The magic leavening agent that gives the doughnuts their lift.
    • Baking soda: Works with the baking powder to create a light and airy bite.
    • Salt: A pinch goes a long way in bringing out the flavors.
    • Ground cinnamon: Just a hint adds warmth and depth to your doughnuts.
    • Large eggs: Essential for binding and providing moisture.
    • Buttermilk: Adds a rich tanginess; if you’re out, milk with a splash of vinegar works just as well!
    • Unsalted butter: This melting goodness gives a beautiful richness, enhancing flavor.
    • Vanilla extract: A splash of this elevates everything; it’s the secret weapon of bakers everywhere!
    • Vegetable oil: For frying; high smoke point is key here to achieve that golden-brown crust.
    • For the chocolate glaze: You’ll need powdered sugar and cocoa powder for sweetness and a silky finish, plus a little milk to achieve the perfect consistency, and more vanilla extract for extra flavor!

    Feel free to get creative! You can add a dash of espresso powder for that added coffee kick or replace some of the all-purpose flour with whole wheat flour for a heartier twist. If you’d like exact measures, don’t worry; they’re available at the end of the article for your convenience!

    How to Make Homemade Chocolate Old-Fashioned Doughnuts

    Now comes the fun part! Making these delicious homemade chocolate old-fashioned doughnuts is straightforward, and I promise, they will make your kitchen smell heavenly. Let’s dive right in!

    Step 1: Prepare the Dry Ingredients

    Start by grabbing a large mixing bowl. Whisk together the all-purpose flour, cocoa powder, granulated sugar, baking powder, baking soda, salt, and ground cinnamon. This step is important to ensure your doughnuts have an even distribution of flavors and rise beautifully. Make sure there are no lumps in your dry mixture.

    Step 2: Mix Wet Ingredients

    In a second bowl, whisk the large eggs. Then add the buttermilk, melted butter, and vanilla extract. Mix until everything is smooth and combined. Watching these ingredients come together is like turning the raw elements of your kitchen into a symphony of flavor!

    Step 3: Combine Wet and Dry Ingredients

    Gently pour the wet mixture into the dry ingredients. Now, here’s the secret: mix until just combined. A few small lumps are perfectly fine! Overmixing will create tough doughnuts, and who wants that? We’re aiming for tender and fluffy.

    Step 4: Chill the Dough

    Cover the dough with plastic wrap, and pop it in the refrigerator for about 30 minutes. This step firms up the dough, making it easier to roll out and shape later. During this wait, you might want to take a moment to envision that glorious doughnut with chocolate glaze!

    Step 5: Shape the Doughnuts

    Once the dough is chilled, lightly flour your countertop. Roll out the dough to about half an inch thick. Using a doughnut cutter or two round cookie cutters, cut out your doughnut shapes. Don’t forget to re-roll the scraps. No dough should go to waste!

    Step 6: Fry the Doughnuts

    In a deep frying pan or pot, heat about 2 inches of vegetable oil to 350°F (175°C). This temperature is crucial—it ensures that your homemade chocolate old-fashioned doughnuts fry evenly without absorbing too much oil. Carefully drop a few doughnuts at a time into the hot oil. Fry for about 1-2 minutes on each side, until they’re golden brown. It’s like cooking little puffs of happiness!

    Step 7: Prepare the Chocolate Glaze

    While your doughnuts cool, whisk together the powdered sugar, cocoa powder, milk, and vanilla extract in a medium bowl. Adjust the milk as needed until you reach a smooth, pourable consistency. This glaze! I could just drink it on its own!

    Step 8: Glaze the Doughnuts

    Once the doughnuts have cooled slightly, it’s time for the magic touch. Dip the tops into the chocolate glaze, allowing the excess to drip off. Place them on a wire rack to set. Check out those shiny tops; they’re practically begging to be devoured!

    Tips for Success

    • Always check your oil temperature. A candy or frying thermometer is a lifesaver!
    • Don’t overcrowd the frying pan; it can lower the oil temperature and lead to soggy doughnuts.
    • If your glaze seems too thick, add milk a teaspoon at a time until it’s just right.
    • For even more flavor, sprinkle some coarse sea salt on top of the glaze!
    • These doughnuts are best enjoyed fresh but can be stored in an airtight container for a few days.

    Equipment Needed

    • Mixing bowls: A large one for dry ingredients and a smaller one for wet; any bowl will do!
    • Whisk: Essential for mixing; a fork works in a pinch.
    • Doughnut cutter: You can use two round cookie cutters if you don’t have one.
    • Deep frying pan or pot: A large saucepan can also work for frying.
    • Slotted spoon: To remove doughnuts; tongs can substitute.

    Variations

    • Gluten-Free: Substitute all-purpose flour with a gluten-free flour blend to make this recipe suitable for gluten-sensitive eaters.
    • Flavored Glazes: Experiment with different glazes, like a classic vanilla or a zesty orange glaze, to switch things up!
    • Spiced Doughnuts: Add more warmth by mixing in 1/4 teaspoon of nutmeg or a dash of ginger for an extra layer of flavor.
    • Nutty Twist: Stir in finely chopped nuts, such as walnuts or pecans, into the dough for a delightful crunch.
    • Mini Doughnuts: Use a mini doughnut cutter for bite-sized treats that are perfect for little hands or party platters.

    Serving Suggestions

    • Fresh Fruit: Serve with a side of sliced strawberries or raspberries for a vibrant contrast.
    • Coffee or Tea: Pair these doughnuts with a hot cup of coffee or herbal tea for a delightful breakfast or afternoon treat.
    • Presentation: Arrange them on a vintage platter and sprinkle with colorful sprinkles for an added pop!

    FAQs about Homemade Chocolate Old-Fashioned Doughnuts

    Can I bake these doughnuts instead of frying them? Absolutely! If you’re looking to cut down on oil, you can bake them in a doughnut pan at 350°F (175°C) for about 12-15 minutes. They won’t be quite the same, but still delicious!

    How do I store leftover doughnuts? If you have any leftover homemade chocolate old-fashioned doughnuts, keep them in an airtight container at room temperature. They taste best within a few days, but they can last up to a week!

    Can I freeze these doughnuts? Yes, you can freeze your doughnuts! Just place them in an airtight container or freezer bag. When you’re ready to enjoy them, thaw them and reheat in the oven to get that freshly made taste back.

    What if I don’t have buttermilk? No worries! You can easily make a substitute by adding one tablespoon of vinegar to a measuring cup, then filling it with milk until you reach the 1/2 cup mark. Let it sit for a few minutes, and you’re all set!

    Can I make these doughnuts ahead of time? Sure! You can prepare the dough the night before, chill it, and then fry them fresh in the morning. This makes breakfast feel like a special treat without much added hassle!

    Final Thoughts

    These homemade chocolate old-fashioned doughnuts bring joy to any day, transforming ordinary moments into extraordinary ones. The delicious aroma fills your kitchen, welcoming everyone for a sweet treat. Each bite envelops you in rich chocolate goodness, making them hard to resist. Whether for a busy morning or a special family gathering, these doughnuts have a knack for bringing people together. Trust me, as a passionate home cook, there’s nothing more fulfilling than seeing loved ones smile over something you made. Let these doughnuts be your go-to recipe for spreading happiness, one chocolaty bite at a time!


    Print

    clock clock iconcutlery cutlery iconflag flag iconfolder folder iconinstagram instagram iconpinterest pinterest iconfacebook facebook iconprint print iconsquares squares iconheart heart iconheart solid heart solid icon

    Description

    Delicious homemade chocolate old-fashioned doughnuts with a rich chocolate glaze.


    • 2 cups all-purpose flour
    • 1/2 cup unsweetened cocoa powder
    • 1 cup granulated sugar
    • 1 tablespoon baking powder
    • 1/2 teaspoon baking soda
    • 1/2 teaspoon salt
    • 1/2 teaspoon ground cinnamon
    • 2 large eggs
    • 1/2 cup buttermilk (or milk with 1 tablespoon vinegar)
    • 1/4 cup unsalted butter (melted)
    • 1 teaspoon vanilla extract
    • Vegetable oil (for frying)
    • For the Chocolate Glaze:
    • 1 cup powdered sugar
    • 2 tablespoons unsweetened cocoa powder
    • 3 tablespoons milk (adjust for desired consistency)
    • 1/2 teaspoon vanilla extract

    1. In a large mixing bowl, whisk together the flour, cocoa powder, sugar, baking powder, baking soda, salt, and ground cinnamon until well combined.
    2. In another bowl, whisk the eggs, buttermilk, melted butter, and vanilla extract until smooth.
    3. Pour the wet ingredients into the dry ingredients and mix until just combined. Be careful not to overmix; a few lumps are okay.
    4. Cover the dough with plastic wrap and refrigerate for about 30 minutes to firm up.
    5. On a floured surface, roll out the chilled dough to about 1/2 inch thickness.
    6. Use a doughnut cutter or two round cookie cutters to cut out doughnut shapes, re-rolling scraps as necessary.
    7. In a deep frying pan or pot, heat about 2 inches of vegetable oil to 350°F (175°C).
    8. Carefully drop a few doughnuts into the hot oil and fry for about 1-2 minutes on each side, or until golden brown.
    9. Use a slotted spoon to transfer the fried doughnuts to a paper towel-lined plate to drain excess oil.
    10. In a medium bowl, whisk together the powdered sugar, cocoa powder, milk, and vanilla extract until smooth; adjust milk for desired consistency.
    11. Once the doughnuts have cooled slightly, dip the tops into the chocolate glaze, allowing excess to drip off.
    12. Place the glazed doughnuts on a wire rack to allow the glaze to set.

    Notes

    • Ensure the oil is heated to the correct temperature for best frying results.
    • Do not overcrowd the frying pan to maintain oil temperature.
    • You can store leftover doughnuts in an airtight container for a few days.
    • Prep Time: 30 minutes
    • Cook Time: 20 minutes
    • Category: Dessert
    • Method: Frying
    • Cuisine: American

    Nutrition

    • Serving Size: 1 doughnut
    • Calories: 240
    • Sugar: 12g
    • Sodium: 150mg
    • Fat: 10g
    • Saturated Fat: 5g
    • Unsaturated Fat: 3g
    • Trans Fat: 0g
    • Carbohydrates: 34g
    • Fiber: 2g
    • Protein: 3g
    • Cholesterol: 30mg

    Sharing is caring!