Author: IHAAL Team

  • No Bake Peanut Butter Balls

    No Bake Peanut Butter Balls


    Introduction to No Bake Peanut Butter Balls

    Hey guys, back in the kitchen with the rest of us! I know life gets crazy-ticking off kids at soccer, running to meetings, and trying to figure out dinner plans-so I am all for these No Bake Peanut Butter Balls. A sweet little solution for those times when you really need dessert but can’t deal with the drama that usually entails being made. With only a few ingredients and zero required baking, they’re perfect for that last-minute ‘Mom, can I have a treat?’ moment that children-and you-will have. Believe me, these yummy little bites could make them be your family’s new go-to snack!

    Why You’ll Love This No Bake Peanut Butter Balls

    If you’re short on time, these No Bake Peanut Butter Balls are your new best friend! They bring together creamy peanut butter and sweetness in a matter of minutes, making them perfect for quick desserts. Plus, they taste divine with that chocolate coating! Whether you’re a busy mom or a professional on the go, these easy treats feel indulgent without the hours of baking. You’ll appreciate the simplicity!

    Ingredients for No Bake Peanut Butter Balls

    Let’s gather everything we need to whip up these delightful No Bake Peanut Butter Balls. Below is a list of ingredients that create those irresistible bites. You’ll notice how simple they are, yet they pack a flavorful punch!

    • Peanut Butter: The star of the show! Creamy or crunchy, pick your preference.
    • Unsalted Butter: This adds richness. You could also use coconut oil for a dairy-free option.
    • Powdered Sugar: This sweetens and helps bind the mixture. No granulated sugar here, please!
    • Vanilla Extract: A splash of vanilla elevates the flavor to new heights.
    • Melted Chocolate: For dipping or drizzling. It adds that luscious layer we all adore!

    You can also customize with other ingredients! Consider adding chopped nuts for crunch or rolling the balls in graham cracker dust for texture. If you’re looking for a vegan twist, simply swap in dairy-free butter and chocolate.

    The exact measurements of each ingredient are listed at the bottom of this article, ready for printing when you decide to bring this easy treat into your kitchen!

    How to Make No Bake Peanut Butter Balls

    Ready to whip up some No Bake Peanut Butter Balls? Let’s roll! This process is as easy as pie, or in our case, balls! Each step builds on the previous one, so let’s dive right in!

    Step 1: Mix Peanut Butter and Butter

    First things first, grab a mixing bowl. Add your creamy peanut butter and softened unsalted butter. Using a hand mixer, mix them together until they are beautifully blended and creamy. Try not to snack too much here—it’s tempting, I know! This combination creates a luscious base full of flavor.

    Step 2: Add Vanilla Extract and Powdered Sugar

    Now it’s time to sweeten things up! Add the vanilla extract and powdered sugar into your bowl. Continue mixing until the mixture thickens to a cookie dough consistency. Don’t be afraid to get in there with a spatula and scrape the sides. You want every bit incorporated for maximum yumminess!

    Step 3: Shape the Dough into Balls

    Next up, let’s get hands-on! Line a plate or tray with parchment paper. Take about one tablespoon of the dough and roll it into a ball. Place each ball on the tray. It’s okay if they vary in size; that just adds character! I like to picture them as little globes of joy.

    Step 4: Chill in the Freezer

    Now, pop those peanut butter balls into the freezer for about 10 minutes. This quick chill helps them firm up nicely. While you wait, picture those delightful bites ready to burst with flavor. The anticipation makes everything more exciting, doesn’t it?

    Step 5: Melt Chocolate for Dipping

    While those treats are chilling, let’s prepare for the grand finale! Melt your chocolate using your preferred method—whether it’s in a microwave-safe bowl or a double boiler. Keep an eye on it to avoid burning. The chocolate should be smooth and glossy, ready to envelop our delicious balls!

    Step 6: Coat Peanut Butter Balls

    Once your peanut butter balls are good and firm, it’s time for the chocolate bath! Dip each ball in the melted chocolate, ensuring it’s fully coated. If you’re feeling fancy, drizzle some chocolate on top for a decorative touch. If chocolate isn’t your vibe, feel free to skip this step. They’re still fabulous on their own!

    Step 7: Store for Later Enjoyment

    Finally, return those heavenly creations to the freezer to let the chocolate harden. Once set, transfer them into a freezer-safe bag or container. You can store these treats for up to a month! But who are we kidding? They probably won’t last that long in your house!

    Tips for Success

    • For smoother mixing, make sure your butter is room temperature.
    • Use a cookie scoop to ensure uniform ball sizes for even chilling.
    • Don’t overmix the dough; it should be just combined.
    • Experiment with toppings like crushed nuts or sprinkles for a fun twist.
    • Keep the chocolate warm while you dip to make it easier.

    Equipment Needed

    • Mixing Bowl: Any large bowl will do; a glass bowl lets you see the mixture easily.
    • Hand Mixer: A whisk works too, but it requires more elbow grease!
    • Parchment Paper: Essential for easy cleanup; wax paper can be a substitute.
    • Microwave or Double Boiler: For melting chocolate; a small saucepan can also work.

    Variations

    • Nutty Delight: Swap in crunchy peanut butter for added texture and a bit of a bite.
    • Vegan Option: Use dairy-free butter and chocolate to make these treats suitable for a vegan diet.
    • Flavor Infusion: Add a tablespoon of maple syrup or honey for an extra layer of sweetness.
    • Coconut Twist: Roll the peanut butter balls in shredded coconut for a tropical flair.
    • Choco-Lovers: Mix mini chocolate chips into the dough before rolling them to amp up the chocolate flavor.

    Serving Suggestions for No Bake Peanut Butter Balls

    • Chocolate Drizzle: Drizzle a bit of melted chocolate on top for eye-catching appeal when serving.
    • Fruit Pairing: Serve alongside fresh strawberries or bananas to complement the rich flavors.
    • Coffee or Milk: Enjoy these treats with a cup of coffee or a glass of cold milk for a classic combo.
    • Party Platter: Arrange on a colorful plate with other snacks for a delightful dessert table.

    FAQs about No Bake Peanut Butter Balls

    Wondering about these No Bake Peanut Butter Balls? Here are some common questions I often hear. Hopefully, they help you on your delicious journey!

    Can I use natural peanut butter?

    Absolutely! Natural peanut butter can be used, but it might make the mixture slightly different in texture. Just make sure it’s well stirred and not too oily.

    How long do these treats last?

    When stored in a freezer-safe bag or container, these peanut butter balls can last for up to a month. But really, they’re so tasty you might not get to test that theory!

    Can I add other flavors?

    Definitely! Feel free to add a pinch of sea salt, cinnamon, or even some protein powder for a nutritious boost. The possibilities are endless!

    Are these healthy?

    In moderation, these peanut butter balls can be a satisfying treat with protein and healthy fats. Just keep an eye on your portion sizes!

    Can children help with this recipe?

    Yes! Kids will love rolling the balls and dipping them in chocolate. It’s a fun family activity, and you’ll cherish the memories made in the kitchen.

    Final Thoughts on No Bake Peanut Butter Balls

    Creating these No Bake Peanut Butter Balls is truly a joyful experience! They’re quick to make and provide a delightful treat that everyone loves. The combinations of flavors and textures will leave your taste buds dancing. Plus, the satisfaction of rolling these little bites by hand makes it all the more special. Whether you’re packing them in lunchboxes or serving them at a gathering, they’re bound to bring smiles. I hope this recipe becomes a part of your family traditions, just as it has in mine.


    Print

    clock clock iconcutlery cutlery iconflag flag iconfolder folder iconinstagram instagram iconpinterest pinterest iconfacebook facebook iconprint print iconsquares squares iconheart heart iconheart solid heart solid icon

    Description

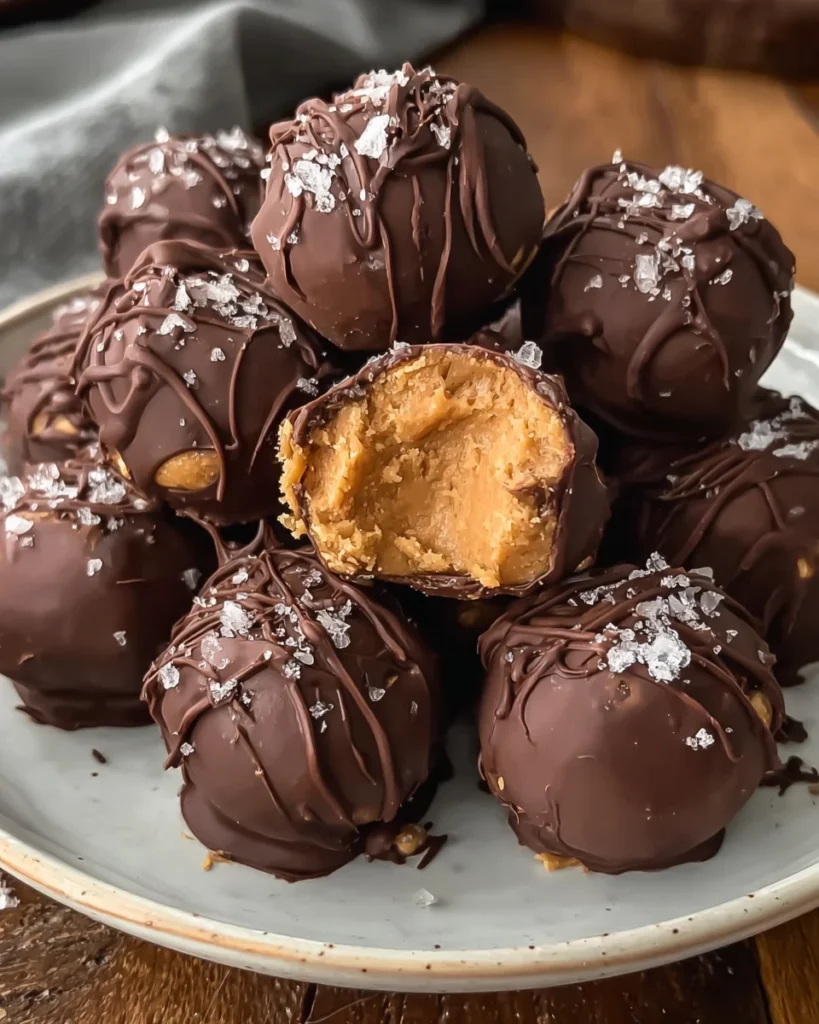
    No Bake Peanut Butter Balls are easy, delicious treats made with creamy peanut butter, butter, and powdered sugar, coated in melted chocolate.


    • 1 cup peanut butter
    • 5 tablespoons unsalted butter
    • 1 1/2 cups powdered sugar
    • 1/2 teaspoon vanilla extract
    • Melted chocolate for dipping and decoration

    1. In a bowl, add peanut butter and softened butter. Mix using a mixer until the mixture is well combined and creamy.
    2. Add powdered sugar and vanilla extract to the bowl. Mix until the mixture thickens to a cookie dough consistency.
    3. Line a plate or tray with parchment paper.
    4. Roll approximately one tablespoon of dough into a ball. Place it on the prepared tray and repeat with the remaining dough. Adjust ball size to preference if desired.
    5. Place the peanut butter balls in the freezer for about 10 minutes to set and harden.
    6. Melt the chocolate in a bowl using your preferred melting method.
    7. Remove the hardened peanut butter balls from the freezer. Dip or drizzle with melted chocolate as desired. Chocolate coating can also be skipped.
    8. Return the chocolate-coated peanut butter balls to the freezer to allow the chocolate to harden.
    9. Transfer frozen peanut butter balls into a freezer-safe bag or container. Store in the freezer for up to one month and enjoy as desired.

    Notes

    • For a nuttier flavor, consider adding chopped nuts or using crunchy peanut butter.
    • These can also be rolled in crushed graham crackers or coconut for added texture.
    • Make them vegan by using a dairy-free butter alternative and dairy-free chocolate.
    • Prep Time: 15 minutes
    • Cook Time: 0 minutes
    • Category: Dessert
    • Method: No-Bake
    • Cuisine: American

    Nutrition

    • Serving Size: 1 ball
    • Calories: 100
    • Sugar: 9g
    • Sodium: 50mg
    • Fat: 6g
    • Saturated Fat: 2g
    • Unsaturated Fat: 4g
    • Trans Fat: 0g
    • Carbohydrates: 10g
    • Fiber: 1g
    • Protein: 3g
    • Cholesterol: 5mg

    Sharing is caring!

  • Mac and Cheese Quesadillas

    Mac and Cheese Quesadillas


    Introduction to Mac and Cheese Quesadillas

    I personally know how overwhelming it could sometimes get for a mom to prepare meals that everyone on the table would like to eat. That’s where Mac and Cheese Quesadillas come to the rescue with my love. This yummy food marries the tasteful appeal of traditional mac’n cheese with the crunchy texture of a quesadilla. So it’s the fast answer for those busy nights when you’re trying your best to give work your all and also be there for the kids. Believe me, this recipe is a great spin to solve crime on dinner, Super Mom style!

    Why You’ll Love This Mac and Cheese Quesadillas

    This Mac and Cheese Quesadillas recipe is a game changer for busy families! Not only is it quick to prepare, but it’s also incredibly satisfying for both kids and adults. You’ll love how easily it combines creamy comfort with crispy texture. Plus, you can customize it to suit your family’s tastes. It’s the perfect meal to boost morale during those chaotic weeknights!

    Ingredients for Mac and Cheese Quesadillas

    Gathering the right ingredients is the first step to creating delicious Mac and Cheese Quesadillas. Here’s what you’ll need:

    • Elbow macaroni: This is the classic pasta choice, perfect for holding that cheesy goodness.
    • Unsalted butter: Used for both the cheese sauce and cooking the quesadillas, it adds rich flavor.
    • All-purpose flour: Essential for making a creamy cheese sauce by acting as a thickening agent.
    • Whole milk: It helps create a smooth, luscious sauce that coats the macaroni beautifully.
    • Sharp cheddar cheese: The star of the show! It brings a tangy flavor that complements the creaminess.
    • Shredded mozzarella cheese: This adds stretchiness to your quesadillas, making them ooey-gooey inside.
    • Mustard powder: Just a touch enhances the cheese flavor with a little zing.
    • Garlic powder: Adds warmth and depth to the cheese sauce.
    • Salt and black pepper: Basic seasonings that elevate the overall taste.
    • Flour tortillas: Soft and pliable, they provide the perfect vessel for the cheesy filling.
    • Optional ingredients: Feel free to get creative! Cooked bacon, sautéed veggies, or even spicy jalapeños make fabulous additions.

    You can find exact quantities for each ingredient at the bottom of this article, where you can also print the recipe. Happy cooking!

    How to Make Mac and Cheese Quesadillas

    Now that we have our ingredients ready, let’s dive into the delicious process of making Mac and Cheese Quesadillas! I promise, it’s simpler than it sounds, and the end result will leave your family wanting more.

    Step 1: Cook the Elbow Macaroni

    Start by boiling a pot of salted water. Once it’s bubbling away, toss in the elbow macaroni. Cook according to package directions until it’s al dente. This usually takes about 8-10 minutes. Drain it well and set it aside. It’s important not to overcook it, or your pasta could turn mushy when mixed with the cheese!

    Step 2: Make the Cheese Sauce

    In a medium saucepan, melt 2 tablespoons of unsalted butter over medium heat. Once it’s nice and bubbly, whisk in the all-purpose flour and cook for 1 minute. This creates a little roux, which is essential for thickening your cheese sauce. Gradually pour in the whole milk while whisking constantly. Keep stirring until the mixture is smooth and thickens, about 2-3 minutes.

    Step 3: Combine Pasta and Cheese Sauce

    Once your cheese sauce is thick, reduce the heat to low. Stir in the shredded sharp cheddar and mozzarella cheeses, mustard powder, garlic powder, salt, and black pepper. Mix until the cheese is fully melted and the sauce is creamy. Now, fold in the cooked macaroni gently. Make sure each elbow is coated in that cheesy goodness!

    Step 4: Assemble the Quesadillas

    Lay out four flour tortillas on your countertop or a clean cutting board. Spread about ½ cup of the mac and cheese mixture onto each tortilla, leaving a ½-inch border around the edges. This helps keep the cheesy filling from spilling out. Then, place another tortilla on top of each filled tortilla, creating a delicious sandwich of creamy mac and cheese!

    Step 5: Cook the Quesadillas

    Heat a large skillet or griddle over medium heat. Melt a small amount of unsalted butter in the skillet. Carefully add the assembled quesadillas to the hot skillet. Cook for 2-3 minutes per side. Press down gently with a spatula to ensure even cooking. You want them golden brown and crispy! Add more butter for subsequent batches if needed.

    Step 6: Serve and Enjoy

    Once your quesadillas are cooked to a perfect golden brown, remove them from the skillet. Allow them to rest for 1-2 minutes. This will make slicing easier. Cut into wedges, and serve immediately while hot! They are perfect on their own or paired with salsa or sour cream for dipping. Enjoy your culinary creation!

    Tips for Success

    • Cook the macaroni al dente to prevent it from becoming mushy in the quesadillas.
    • Don’t rush the cheese sauce; stir continuously to ensure a smooth consistency.
    • Experiment with different cheeses like pepper jack or gouda for extra flavor.
    • For added crunch, consider toasting the tortillas in the oven for a few minutes before assembling.
    • Let the quesadillas rest briefly before cutting to keep the filling intact.

    Equipment Needed

    • Medium saucepan: Essential for making the cheese sauce; a large saucepan can work too.
    • Large skillet or griddle: For cooking the quesadillas; a non-stick pan is perfect.
    • Cooking spatula: Needed to flip the quesadillas; a large one helps keep them intact.
    • Measuring cups: For precise ingredient measurement; you can also use a kitchen scale.
    • Colander: Ideal for draining the macaroni; a sieve can be a good substitute.

    Variations

    • Spicy Mac and Cheese Quesadillas: Add diced jalapeños or a sprinkle of red pepper flakes for a kick that will tantalize your taste buds.
    • Veggie-Loaded Quesadillas: Toss in some sautéed spinach, bell peppers, or mushrooms for extra nutrition and flavor—a great way to sneak in veggies!
    • Bacon Mac and Cheese Quesadillas: Crumbled cooked bacon adds a savory crunch. This hearty twist is sure to please even the pickiest eaters.
    • Gluten-Free Option: Swap the flour tortillas for gluten-free varieties to make this dish suitable for those with dietary restrictions.
    • Cheesy Herb Quesadillas: Mix in fresh herbs like chives or parsley into the cheese sauce for a burst of freshness.

    Serving Suggestions for Mac and Cheese Quesadillas

    • Pair with a crisp side salad for a refreshing contrast to the creamy quesadillas.
    • Serve with a side of homemade salsa or guacamole for extra flavor.
    • A dollop of sour cream adds a creamy tang that complements the dish perfectly.
    • For drinks, try iced tea or a light lemonade to balance the richness.
    • Cut quesadillas into fun shapes for a family-friendly presentation!

    FAQs about Mac and Cheese Quesadillas

    Can I make Mac and Cheese Quesadillas ahead of time? Absolutely! You can prepare the mac and cheese filling and store it in the fridge. When ready to eat, simply assemble and cook the quesadillas straight from the fridge for a quick meal.

    What cheese works best for Mac and Cheese Quesadillas? While sharp cheddar is my go-to, you can use a blend of cheeses. Pepper jack adds a spicy kick, while mozzarella keeps it stretchy and creamy!

    How can I make these quesadillas healthier? To lighten them up, consider using whole wheat tortillas, low-fat cheese, or add in sautéed vegetables like spinach or zucchini. These tweaks will boost nutrition without sacrificing flavor.

    Can I freeze Mac and Cheese Quesadillas? Yes, you can freeze them! After cooking, cool the quesadillas completely, then wrap them in foil or plastic wrap. They can last up to 2 months in the freezer!

    What dipping sauces pair well with Mac and Cheese Quesadillas? I love serving them with salsa, guacamole, or even a tangy ranch dressing. These sauces bring an additional layer of flavor that everyone will enjoy!

    Final Thoughts

    There’s something truly magical about Mac and Cheese Quesadillas. They blend the comfort of classic mac and cheese with the crispy joy of tortillas, delivering happiness in each bite. Whether you’re gathered around the table with family or creating a cozy dinner for one, this recipe brings flavor and warmth. The laughter, the shared smiles, and the satisfaction of hearing “Yum!” from your loved ones—that’s what cooking is all about. So, grab your ingredients, and let this delicious twist become a staple in your kitchen. You won’t regret it!


    Print

    clock clock iconcutlery cutlery iconflag flag iconfolder folder iconinstagram instagram iconpinterest pinterest iconfacebook facebook iconprint print iconsquares squares iconheart heart iconheart solid heart solid icon

    Description

    Mac and Cheese Quesadillas are a delicious twist on the classic comfort food, combining creamy mac and cheese with crispy tortillas for a satisfying meal.


    • 1 cup (90 g) elbow macaroni, uncooked
    • 2 tablespoons unsalted butter
    • 2 tablespoons all-purpose flour
    • 1 cup (240 ml) whole milk
    • 1 1/2 cups (150 g) shredded sharp cheddar cheese
    • 1/4 cup (25 g) shredded mozzarella cheese
    • 1/2 teaspoon mustard powder
    • 1/4 teaspoon garlic powder
    • 1/4 teaspoon salt
    • 1/4 teaspoon black pepper
    • 8 medium (20 cm) flour tortillas
    • 2 tablespoons unsalted butter, for cooking

    1. Boil a pot of salted water and cook the elbow macaroni according to package directions until al dente. Drain thoroughly and set aside.
    2. In a medium saucepan, melt 2 tablespoons of unsalted butter over medium heat. Whisk in the all-purpose flour and cook for 1 minute, stirring constantly.
    3. Gradually pour in the whole milk while whisking continuously until the mixture is smooth. Continue to cook for 2-3 minutes, stirring, until the sauce thickens.
    4. Reduce the heat to low. Stir in the shredded cheddar cheese, shredded mozzarella cheese, mustard powder, garlic powder, salt, and black pepper. Continue to stir until the cheese is fully melted and the sauce is smooth and creamy.
    5. Add the cooked and drained macaroni to the cheese sauce. Stir gently to ensure every piece of pasta is evenly coated. Remove the saucepan from the heat.
    6. Lay out four of the flour tortillas. Evenly spread approximately 1/2 cup of the mac and cheese mixture over each of these tortillas, leaving a roughly 1/2-inch border around the edges.
    7. Place a second flour tortilla on top of the mac and cheese filling on each of the prepared tortillas.
    8. Heat a large skillet or griddle over medium heat. Melt a small amount of unsalted butter. Carefully place the assembled quesadillas onto the hot skillet. Cook for 2-3 minutes per side, pressing down gently with a spatula, until each quesadilla is golden brown and crisp.
    9. Add more butter to the skillet as needed for subsequent batches. Continue to cook each quesadilla for another 2-3 minutes, until the other side is also golden brown and crisp.
    10. Remove the cooked quesadillas from the skillet. Allow them to rest for 1-2 minutes before cutting into wedges. Serve immediately while hot.

    Notes

    • Feel free to add other ingredients like cooked bacon or vegetables for extra flavor.
    • These quesadillas can be served with salsa or sour cream for dipping.
    • Prep Time: 10 minutes
    • Cook Time: 15 minutes
    • Category: Lunch/Dinner
    • Method: Stovetop
    • Cuisine: American

    Nutrition

    • Serving Size: 1 quesadilla
    • Calories: 400
    • Sugar: 2g
    • Sodium: 600mg
    • Fat: 22g
    • Saturated Fat: 12g
    • Unsaturated Fat: 8g
    • Trans Fat: 0g
    • Carbohydrates: 36g
    • Fiber: 2g
    • Protein: 16g
    • Cholesterol: 60mg

    Sharing is caring!

  • Avocado Chocolate Chip Muffins

    Avocado Chocolate Chip Muffins


    Introduction to Avocado Chocolate Chip Muffins

    Life can get so busy and finding that quick and yummy treat can be a bit of a challenge – enter these Avocado Chocolate Chip Muffins! Packed with healthy ingredients, they make a delicious snack or breakfast option perfect to help even the pickiest of eaters start their day.

    Think of biting into a warm muffin with chocolate running all through it and that’s good ‘n creamy ripe avocado. It’s a treat that’s not only delicious but deceptively good-for-you, kid you not! Your family will be begging for seconds!

    Why You’ll Love This Avocado Chocolate Chip Muffins

    These Avocado Chocolate Chip Muffins fuse flavor and nutrition effortlessly. They’re quick to whip up, making them perfect for my fellow busy moms and professionals out there. You can grab them on the go or savor them with your morning coffee. The combination of creamy avocado and sweet chocolate creates an indulgent treat that feels like a guilty pleasure—without the guilt! You’ll enjoy every bite.

    Ingredients for Avocado Chocolate Chip Muffins

    Gathering the right ingredients is the first step toward creating scrumptious Avocado Chocolate Chip Muffins. Here’s what you’ll need:

    • Ripe Avocado: The star of the show! It adds moisture and healthy fats.
    • Vegetable Oil or Melted Coconut Oil: Either oil helps achieve that perfect muffin crumb. Coconut oil adds a hint of tropical flavor.
    • Granulated Sugar: For just the right amount of sweetness. You could even swap it with coconut sugar for a more earthy taste.
    • Large Eggs: These bind the ingredients together and add a nice richness.
    • Pure Vanilla Extract: A splash of vanilla elevates the flavor, making every bite comforting.
    • Plain Greek Yogurt or Sour Cream: Both add moisture, but Greek yogurt gives a protein boost and a slight tang.
    • All-Purpose Flour: The base of your muffins, providing structure. You can try whole wheat flour for added fiber.
    • Baking Powder and Baking Soda: These leavening agents help your muffins rise perfectly. They’re essential for a fluffy texture.
    • Salt: Just a pinch enhances all the flavors!
    • Semi-Sweet Chocolate Chips: The delightful pockets of chocolate that make these muffins irresistible. Feel free to use dark or milk chocolate chips too!

    To find out the specific quantities needed for each ingredient, check out the end of this article. Everything’s neatly organized for you to print and use!

    How to Make Avocado Chocolate Chip Muffins

    Creating these Avocado Chocolate Chip Muffins is simple and rewarding. Follow these easy steps to achieve delicious results that will have your family clamoring for more. Let’s dive into the baking process!

    Step 1: Preheat the Oven

    Preheating your oven to 350°F (175°C) is crucial. This allows the muffins to bake evenly and rise perfectly. Without preheating, your muffins might turn out dense or uneven, and who wants that? Give it a good 10 minutes before you start mixing.

    Step 2: Prepare the Batter

    In a large mixing bowl, start by mashing your ripe avocado until it’s smooth and creamy. The texture should be like a silky puree. Next, add in the vegetable or melted coconut oil, granulated sugar, eggs, vanilla extract, and Greek yogurt. Whisk these ingredients together until they’re perfectly combined. You’ll feel the creaminess come through, and that’s exactly what we want!

    Step 3: Combine Dry Ingredients

    In a separate bowl, whisk together the all-purpose flour, baking powder, baking soda, and salt. Mixing these dry ingredients separately is essential. It ensures that the leavening agents are evenly distributed, which means your muffins will rise uniformly, creating that perfect, fluffy texture everyone loves.

    Step 4: Mix and Fold

    Now it’s time to bring everything together, but with a gentle touch. Carefully add the dry ingredients to the wet mixture. Stir just until combined—this is the key to keeping your muffins light and airy. Overmixing can make them tough, and nobody wants a chewy muffin! So, channel your inner gentle baker.

    Step 5: Distribute the Batter

    With a scoop or spoon, fill each muffin cup about three-quarters full with batter. This gives them plenty of room to rise while baking. If you like chocolate (and who doesn’t?), consider sprinkling some extra chocolate chips on top before baking. It makes for a pretty presentation and an extra chocolatey bite!

    Step 6: Bake to Perfection

    Place your muffin tin in the preheated oven and bake for 18 to 22 minutes. Keep an eye on them, but when a toothpick inserted into the center comes out clean, they’re done! This is the ultimate test of doneness. Set them aside to cool for a few minutes before transferring to a wire rack.

    Tips for Success

    • Use ripe avocados to ensure a creamy texture. The riper, the better!
    • Don’t overmix the batter. Mix until just combined for tender muffins.
    • Watch your baking time closely. Ovens can vary, so do the toothpick test.
    • Store leftover muffins in an airtight container for freshness.
    • Experiment with add-ins like nuts or dried fruit for extra flavor!

    Equipment Needed for Avocado Chocolate Chip Muffins

    • Muffin Tin: A standard 12-cup muffin tin works great. If you don’t have one, use a cupcake pan!
    • Mixing Bowls: Medium and large bowls are ideal. Any large bowl will do if you’re in a pinch.
    • Whisk: A simple whisk or a fork will do the trick for blending ingredients.
    • Scoop or Spoon: For easy batter distribution, a cookie scoop is perfect!
    • Measuring Cups and Spoons: Accurate measurements make all the difference; if missing, use approximate volume containers.

    Variations on Avocado Chocolate Chip Muffins

    • Whole Wheat Flour: Swap half the all-purpose flour for whole wheat flour to increase fiber and add a nutty flavor.
    • Nut Butter: Mix in a few tablespoons of almond or peanut butter for a nutty twist and added protein.
    • Other Mix-Ins: Add chopped nuts, dried fruit, or shredded coconut for extra texture and taste.
    • Spices: Sprinkle in some cinnamon or nutmeg for a warm, seasonal flavor boost.
    • Lower Sugar Option: Try reducing the sugar by half and using mashed bananas or applesauce to add natural sweetness.

    Serving Suggestions

    • Pair your Avocado Chocolate Chip Muffins with a cup of freshly brewed coffee or tea for a delightful morning treat.
    • Serve warm muffins with a spread of cream cheese or butter for added richness.
    • Enjoy them with a side of fresh fruit, like berries or sliced bananas, for a refreshing contrast.
    • Dress them up on a platter with a sprinkle of powdered sugar for an elegant presentation.
    • These muffins are also a fantastic addition to a brunch spread or picnic table.

    FAQs about Avocado Chocolate Chip Muffins

    Can I use frozen avocados for this recipe?

    While fresh ripe avocados provide the best texture and flavor, you can use frozen avocados if you thaw and mash them well. Just make sure they are adequately drained to avoid extra moisture in your muffins!

    How do I store leftover muffins?

    To keep your Avocado Chocolate Chip Muffins fresh, store them in an airtight container at room temperature for up to three days. You can also freeze them for up to three months—just thaw them in the fridge when you’re ready to enjoy!

    Can I replace the sugar with a sugar alternative?

    Absolutely! You can substitute granulated sugar with coconut sugar, honey, or agave syrup. Just remember that these alternatives may slightly alter the flavor and moisture content of the muffins.

    What if my muffins don’t rise properly?

    If your muffins don’t rise, it could be due to expired baking powder or baking soda. First, check the expiration dates on your leavening agents before using them. Also, ensure you’re not overmixing the batter, as that can lead to dense muffins.

    Are these muffins suitable for a gluten-free diet?

    You can make your Avocado Chocolate Chip Muffins gluten-free by using a gluten-free all-purpose flour blend. Just be sure to read the labels for any additional ingredients that may contain gluten!

    Final Thoughts on Avocado Chocolate Chip Muffins

    Making Avocado Chocolate Chip Muffins is more than just a baking task; it’s a joyful experience that brings comfort and satisfaction to busy days. The creamy avocado transforms these muffins into a moist and delicious treat that delights the senses.

    As you watch your family savor every bite and request seconds, you’ll feel that heartwarming sense of accomplishment. This recipe isn’t just a quick solution; it’s a delightful way to nourish your loved ones with healthy ingredients and unforgettable taste. So, embrace your inner baker, and let these muffins add a sprinkle of happiness to your day!


    Print

    clock clock iconcutlery cutlery iconflag flag iconfolder folder iconinstagram instagram iconpinterest pinterest iconfacebook facebook iconprint print iconsquares squares iconheart heart iconheart solid heart solid icon

    Description

    Delicious and moist muffins made with ripe avocado and chocolate chips for a tasty twist on a classic treat.


    • 1 ripe avocado, mashed (approximately 120 ml)
    • 1/3 cup vegetable oil or melted coconut oil (approximately 80 ml)
    • 2/3 cup granulated sugar
    • 2 large eggs
    • 1 teaspoon pure vanilla extract
    • 2/3 cup plain Greek yogurt or sour cream (approximately 160 ml)
    • 1 1/2 cups all-purpose flour
    • 1 teaspoon baking powder
    • 1/2 teaspoon baking soda
    • 1/4 teaspoon salt
    • 3/4 cup semisweet chocolate chips

    1. Preheat your oven to 350°F (175°C) and line a 12-cup muffin tin with paper liners or lightly grease it.
    2. In a large mixing bowl, mash the avocado until smooth, then whisk in the vegetable oil, granulated sugar, eggs, vanilla extract, and Greek yogurt until well combined.
    3. In a separate bowl, whisk together the all-purpose flour, baking powder, baking soda, and salt.
    4. Gently add the dry ingredients to the wet ingredients, stirring carefully until just combined.
    5. Fold in the semisweet chocolate chips, reserving some for topping if desired.
    6. Distribute the batter evenly among the muffin cups, filling each about three-quarters full. Top with reserved chocolate chips if using.
    7. Bake for 18 to 22 minutes, or until a toothpick inserted into the center comes out clean.
    8. Cool in the muffin tin for 5 minutes before transferring to a wire rack to cool completely.

    Notes

    • Ensure the avocado is ripe for optimal creaminess.
    • Can substitute Greek yogurt with sour cream if preferred.
    • Watch the baking time closely to avoid overbaking.
    • Prep Time: 15 minutes
    • Cook Time: 22 minutes
    • Category: Baking
    • Method: Baking
    • Cuisine: American

    Nutrition

    • Serving Size: 1 muffin
    • Calories: 180
    • Sugar: 8g
    • Sodium: 100mg
    • Fat: 9g
    • Saturated Fat: 1g
    • Unsaturated Fat: 7g
    • Trans Fat: 0g
    • Carbohydrates: 25g
    • Fiber: 2g
    • Protein: 3g
    • Cholesterol: 30mg

    Sharing is caring!

  • Cherry Chocolate Drizzle Wraps

    Cherry Chocolate Drizzle Wraps


    Introduction to Cherry Chocolate Drizzle Wraps

    There’s something utterly delightful about indulging in a dessert that feels like a warm hug. That’s why I absolutely adore Cherry Chocolate Drizzle Wraps. Imagine combining sweet, juicy cherries with the richness of creamy chocolate, all snugly wrapped in a warm tortilla. This recipe is perfect for busy evenings or a last-minute snack, effortlessly turning a simple treat into something extraordinary. Plus, it encourages those non-cookers in your life to join in the fun. So grab your loved ones and get ready to create a sweet memory in the kitchen together!

    Why You’ll Love This Cherry Chocolate Drizzle Wraps

    Let’s be honest: life gets busy, and finding time to whip up a delicious dessert can feel like searching for a needle in a haystack. That’s where these Cherry Chocolate Drizzle Wraps shine! They’re not only super quick to make, but each bite is a tantalizing mix of sweet and creamy. Perfect for satisfying that sweet tooth, they’re a treat your whole family will love, whether it’s after a long day or a weekend get-together.

    Ingredients for Cherry Chocolate Drizzle Wraps

    Gathering ingredients can sometimes feel like a chore, but trust me, these Cherry Chocolate Drizzle Wraps are worth it! Here’s what you’ll need:

    • Pitted sweet cherries: These juicy gems, fresh or thawed from your freezer, are the star of the show, bringing a burst of natural sweetness.
    • Granulated sugar: Just a sprinkle of this sweetener enhances the cherries’ natural sugars and balances their tartness.
    • Fresh lemon juice: A dash of acidity brightens the cherry flavor and keeps your taste buds dancing.
    • Cornstarch: This magical powder acts as a thickening agent, helping create that perfect cherry filling consistency.
    • Flour tortillas: Soft and warm, these wraps provide a delightful hug for all the scrumptious fillings inside.
    • Semi-sweet chocolate chips: These little morsels add a rich, creamy chocolate flavor that blends beautifully with the cherries.
    • Cream cheese: Its creamy texture creates a luxurious layer, marrying the sweet cherries and chocolate in a dreamy way.
    • Chocolate chips for drizzle: Melted and drizzled on top, they’re the cherry on the cake, taking your wraps to a whole new level.
    • Coconut oil or butter: This helps create a smooth, luscious drizzle that enhances the chocolatey goodness.
    • Sliced almonds or chopped pistachios: Optional, but these add a delightful crunch and nutty flavor for those looking to elevate their wraps.
    • Powdered sugar: A light dusting adds a touch of sweetness and charm, making your wraps look irresistible!

    For exact quantities, check the bottom of the article, where you can also print the recipe. Don’t forget, you can swap cherries for other fruits like blueberries or raspberries, giving this treat a fun twist!

    How to Make Cherry Chocolate Drizzle Wraps

    Creating Cherry Chocolate Drizzle Wraps is not just a recipe; it’s an adventure in flavor! Follow these simple steps, and you’ll surprise everyone with a deliciously sweet treat.

    Prepare Cherry Filling

    Start by grabbing a small saucepan. Toss in your halved pitted cherries, granulated sugar, fresh lemon juice, and cornstarch. Stir everything together, then set the saucepan over medium heat.

    As the mixture warms, you’ll want to stir continuously. Keep an eye on it, as it will bubble and thicken beautifully in about 3 to 5 minutes. Once it reaches that deliciously gooey consistency, take it off the heat and let it cool slightly. This filling will be the heart of your wraps!

    Assemble Wraps

    Now it’s time to build your wraps! Take a flour tortilla and spread about 2 tablespoons of softened cream cheese right in the center. Feel free to use the back of a spoon or a small spatula for this—it makes life easier!

    Next, spoon a generous amount of your cooled cherry filling over the cream cheese. But wait—don’t forget to sprinkle in about 2 tablespoons of semi-sweet chocolate chips on top. You want that chocolate to melt just enough to create heavenly bites with each mouthful!

    Form and Cook Wraps

    Let’s roll those tortillas up! Fold in the sides of each tortilla and then roll it tightly from the bottom up to enclose all the tasty goodness. This step is crucial; a tight roll means less mess later on.

    Heat a large nonstick skillet or griddle over medium heat. Place your wraps seam-side down in the skillet. Cook them for about 1 to 2 minutes on each side or until they turn golden brown and warm through. You’ll want to flip them carefully so they won’t burst open!

    Prepare Chocolate Drizzle

    While your wraps are getting all golden and crispy, it’s time for the chocolate drizzle! Grab a microwave-safe bowl and combine those chocolate chips meant for drizzling with coconut oil or butter.

    Microwave in 20-second bursts, stirring in between until the chocolate is perfectly melted and smooth. This drizzle adds an extra layer of decadent chocolate goodness that is simply irresistible!

    Garnish and Serve

    Now comes the fun part! Drizzle the melted chocolate generously over your warm wraps. Use a spoon or a squeeze bottle if you have one—whatever makes this easy and fun!

    If you’re feeling fancy, sprinkle some sliced almonds or chopped pistachios on top for a nutty crunch. Finally, dust them lightly with powdered sugar for that picture-perfect finish!

    Tips for Success

    • Use fresh cherries when possible for the best flavor.
    • Don’t overfill your tortillas; this will keep them from bursting.
    • Allow the cherry filling to cool slightly before assembling to avoid overly mushy wraps.
    • Experiment with different fruits to keep things exciting!
    • Keep an eye on your wraps while cooking to ensure even browning.

    Equipment Needed

    • Small saucepan: Any saucepan will work, but nonstick makes cleanup a breeze.
    • Spatula: A silicone spatula is perfect for stirring the cherry filling.
    • Large nonstick skillet or griddle: A regular skillet can also work, just be cautious about sticking.
    • Microwave-safe bowl: An oven-safe dish works for melting chocolate too.

    Variations

    • Fruit Swap: Try using raspberries or blueberries instead of cherries for a different flavor profile that still shines!
    • Nutty Twist: Add crushed hazelnuts or walnuts inside the wraps for an extra crunch and richness.
    • Spiced Delight: Sprinkle a pinch of cinnamon or nutmeg into the cherry filling for a warm, cozy flavor.
    • Dairy-Free Option: Substitute cream cheese with cashew cream or dairy-free cream cheese for a delicious vegan take.
    • Gluten-Free: Swap regular flour tortillas with gluten-free tortillas to make this treat accessible to everyone.

    Serving Suggestions

    • Pair your Cherry Chocolate Drizzle Wraps with a scoop of vanilla ice cream for a delightful contrast in temperature.
    • Serve with a side of fresh fruit salad to add a refreshing touch.
    • For a cozy vibe, enjoy with hot chocolate or a rich espresso.
    • Drizzle extra chocolate on a plate for an elegant presentation!

    FAQs about Cherry Chocolate Drizzle Wraps

    Can I use frozen cherries for these wraps?
    Absolutely! Frozen cherries will work just fine. Just make sure to thaw them and pat them dry before using, so you don’t end up with a watery filling.

    How do I store leftovers?
    If you have any wraps left over (which is rare!), store them in an airtight container in the refrigerator. They will be best enjoyed within a day or two. Just reheat in a skillet for that toasted goodness!

    Can I make these Cherry Chocolate Drizzle Wraps ahead of time?
    You sure can! Prepare your cherry filling and assemble the wraps in advance. Store everything in the fridge, and then simply cook them when you’re ready to serve!

    What can I substitute for the cream cheese?
    If you’d prefer a lighter option, consider using Greek yogurt. For a dairy-free alternative, cashew cream or dairy-free cream cheese works wonderfully!

    How can I make these wraps more filling?
    Feel free to add some sliced bananas or nut butter along with the cherry filling. This will give your wraps a heartier, even more satisfying twist!

    Final Thoughts

    Every time I whip up Cherry Chocolate Drizzle Wraps, I’m reminded of the simple joys found in cooking. The delightful blend of flavors and textures not only satisfies my sweet cravings but also brings smiles to my family’s faces. This recipe isn’t just about dessert; it’s about creating warm memories in the kitchen together. Whether it’s a cozy night in or a casual gathering, these wraps are sure to become a beloved favorite. So go ahead, gather your loved ones, and share the experience of making something truly sweet and special. You won’t regret it!


    Print

    clock clock iconcutlery cutlery iconflag flag iconfolder folder iconinstagram instagram iconpinterest pinterest iconfacebook facebook iconprint print iconsquares squares iconheart heart iconheart solid heart solid icon

    Description

    A delicious combination of sweet cherries and creamy chocolate wrapped in a warm tortilla, perfect for a dessert or snack.


    • 1 cup pitted sweet cherries, halved (fresh or thawed frozen)
    • 2 tablespoons granulated sugar
    • 1 tablespoon fresh lemon juice
    • 1 teaspoon cornstarch
    • 4 medium (8-inch) flour tortillas
    • 1/2 cup semi-sweet chocolate chips
    • 1/3 cup softened cream cheese
    • 1/4 cup semi-sweet chocolate chips (for drizzle)
    • 2 teaspoons coconut oil or butter
    • 2 tablespoons sliced almonds or chopped pistachios (optional garnish)
    • Powdered sugar (for dusting)

    1. Prepare Cherry Filling: In a small saucepan over medium heat, combine halved cherries, granulated sugar, fresh lemon juice, and cornstarch. Stir continuously and cook for 3–5 minutes, until the mixture achieves a bubbly and slightly thickened consistency. Remove from heat and allow to cool slightly.
    2. Assemble Wraps: Spread approximately 2 tablespoons of softened cream cheese in the center of each flour tortilla. Divide the cooled cherry mixture evenly among the tortillas, spooning it over the cream cheese. Sprinkle about 2 tablespoons of semi-sweet chocolate chips over the cherry filling in each wrap.
    3. Form and Cook Wraps: Fold in the sides of each tortilla, then roll up tightly to enclose the filling, forming wraps. Heat a large nonstick skillet or griddle over medium heat. Place the formed wraps seam-side down and cook for 1–2 minutes per side, until the tortillas are golden brown and warmed through.
    4. Prepare Chocolate Drizzle: In a microwave-safe bowl, combine the semi-sweet chocolate chips for the drizzle and the coconut oil or butter. Microwave in 20-second intervals, stirring between each interval, until the chocolate is completely melted and smooth.
    5. Garnish and Serve: Drizzle the melted chocolate generously over the warm wraps. If desired, sprinkle with sliced almonds or chopped pistachios and dust with powdered sugar. Serve immediately while warm.

    Notes

    • For a gluten-free version, use gluten-free tortillas.
    • Feel free to replace cherries with other fruits such as blueberries or raspberries.
    • Store any leftovers in an airtight container in the refrigerator.
    • Prep Time: 15 minutes
    • Cook Time: 10 minutes
    • Category: Dessert
    • Method: Stovetop
    • Cuisine: American

    Nutrition

    • Serving Size: 1 wrap
    • Calories: 350
    • Sugar: 25g
    • Sodium: 150mg
    • Fat: 15g
    • Saturated Fat: 8g
    • Unsaturated Fat: 5g
    • Trans Fat: 0g
    • Carbohydrates: 50g
    • Fiber: 3g
    • Protein: 5g
    • Cholesterol: 25mg

    Sharing is caring!

  • Cheddar Jalapeño Pretzel Bites

    Cheddar Jalapeño Pretzel Bites


    Introduction to Cheddar Jalapeño Pretzel Bites

    Welcome to the world of snack Purim-style. If you’re in the mood for a little something tasty and fun to brighten your day, here’s introducing my new favorite: Cheddar Jalapeño Pretzel Bites. These little gems are a great way to spice up snacking between meal times and are pretty share-worthy to bring to gatherings or on family movie nights. As a mom-on-the-go, juggling everything is no easy feat, and these bites are a quick fix that will blow your loved ones away. Your taste buds will thank you.

    Why You’ll Love This Cheddar Jalapeño Pretzel Bites

    These Cheddar Jalapeño Pretzel Bites are the ultimate marriage of flavor and convenience! Ready in just over an hour, they make perfect appetizers or snacks for your family’s movie night. Plus, their delightful combination of cheesy goodness with a kick of heat means you won’t hear any complaints at the table. Everyone will be reaching for seconds, and you’ll love knowing how simple it was to whip them up!

    Ingredients for Cheddar Jalapeño Pretzel Bites

    Gathering the right ingredients is the first step to enjoying these scrumptious Cheddar Jalapeño Pretzel Bites. Here’s what you’ll need:

    • All-purpose flour: The backbone of the dough, offering structure and chewiness.
    • Granulated sugar: Just a touch to feed the yeast and balance the flavors.
    • Kosher salt: Essential for flavor; it enhances the overall taste of your pretzel bites.
    • Instant yeast: Helps the dough rise quickly, making the prep time shorter.
    • Warm water: Activates the yeast and brings the dough together; aim for a comfortable temperature.
    • Olive oil: Adds moisture and richness while helping the dough hold together nicely.
    • Cheddar cheese: Opt for sharp cheddar for a bold flavor punch; cut into small cubes for easy stuffing.
    • Fresh jalapeño: Remove the seeds if you prefer milder bites; adds a delightful kick and a pop of color.
    • Baking soda: For the baking soda bath, which gives that classic pretzel crust and unique flavor.
    • Coarse salt: Perfect for sprinkling on top, elevating the taste and providing that favorite pretzel touch.

    Don’t forget, specific quantities for these ingredients can be found at the bottom of the article, ready to print when you’re set to get cooking!

    How to Make Cheddar Jalapeño Pretzel Bites

    Now that we’ve gathered our ingredients, let’s dive into the joy of making these Cheddar Jalapeño Pretzel Bites. I’ll guide you step-by-step, ensuring you can whip these up with ease!

    Prepare Dough

    Combine and Knead

    Start by combining all-purpose flour, granulated sugar, kosher salt, and instant yeast in a large mixing bowl. It’s crucial to mix these dry ingredients well, as this sets the foundation for the dough.

    Now, slowly add warm water and olive oil. Don’t rush. Let the liquids combine gently with the dry ingredients. Knead the dough until it becomes smooth and elastic—this can take about 5 to 7 minutes. Trust me, this step really pays off! Kneading helps develop the gluten, giving your pretzel bites that perfect chewy texture.

    Shape and Fill

    Create Bites

    Once your dough has risen and doubled in size, it’s time for some fun! Punch down the dough to release any air bubbles. Divide it into 24 equal pieces—this is where your bite-sized magic happens.

    Flatten each piece into a small circle and place one cheddar cheese cube and a pinch of diced jalapeño in the center. To seal your bites, simply pull the edges up and pinch them together tightly. Make sure the filling is well-enclosed, or you might end up with a cheesy mess!

    Baking Soda Bath

    Prepping for Baking

    Ah, the iconic baking soda bath! In a saucepan, bring 4 cups of water to a gentle boil and stir in 2 tablespoons of baking soda. This step is pivotal. The baking soda creates that distinct pretzel flavor and a beautiful brown crust.

    Using a slotted spoon, carefully lower each pretzel bite into the bath for 20 to 30 seconds. Don’t overcrowd the pot; work in batches to keep the water bubbling. Once they’re done, transfer them to a parchment-lined baking sheet for the next step.

    Bake Pretzel Bites

    Achieving Golden Perfection

    It’s time to bake these beauties! Preheat your oven to 425°F. Once the oven is hot, sprinkle each pretzel bite generously with coarse salt. Bake them for 10 to 12 minutes, or until they turn a gorgeous deep golden brown.

    As they bake, the delightful aroma will fill your kitchen, teasing your taste buds and getting everyone excited for snack time!

    Serve

    Enjoy Fresh

    Finally, the moment we’ve all been waiting for! It’s best to enjoy these Cheddar Jalapeño Pretzel Bites warm. Serve them fresh with a side of your favorite dipping sauce—think cheese sauce, mustard, or even a spicy ranch. Trust me, it adds an extra layer of yum!

    Tips for Success

    • Knead the dough until smooth for the best texture.
    • Adjust jalapeño levels based on your family’s spice tolerance.
    • When shaping, ensure there are no gaps in the dough to avoid leaking cheese.
    • Let the pretzel bites cool briefly before serving; they’ll be easier to handle.
    • These bites are best enjoyed fresh but can be reheated for later snacking!

    Equipment Needed

    • Mixing bowl: A large bowl works, or you can use a stand mixer for less effort.
    • Measuring cups and spoons: Essential for accuracy; can use a kitchen scale if you prefer.
    • Slotted spoon: Perfect for handling pretzel bites in the baking soda bath; a regular spoon works too.
    • Parchment paper: For lining your baking sheet; aluminum foil can be a good substitute.
    • Baking sheet: Use any flat baking tray available; you might need two for all the bites!

    Variations for Cheddar Jalapeño Pretzel Bites

    • Cheese Blend: Swap cheddar for a mix of mozzarella and pepper jack for a gooey and fiery bite.
    • Herbed Twist: Add fresh herbs like rosemary or thyme into the dough for a fragrant and flavorful twist.
    • Smoky Option: Incorporate smoked paprika into the dough for a hint of smoky flavor that complements the jalapeños.
    • Sweet Heat: Add a dash of honey or brown sugar in the dough for a sweet balance to the spicy jalapeños.
    • Gluten-Free Version: Use a gluten-free all-purpose flour blend with added xanthan gum for a delicious alternative.

    Serving Suggestions for Cheddar Jalapeño Pretzel Bites

    • Pair your Cheddar Jalapeño Pretzel Bites with a spicy mustard dip for an extra kick.
    • Consider serving them alongside a creamy cheese sauce for a classic combo.
    • A cold craft beer or sparkling lemonade makes a delightful drink pairing.
    • For presentation, arrange them on a rustic wooden board for a charming display.
    • Garnish the platter with fresh herbs for a pop of color and freshness.

    FAQs about Cheddar Jalapeño Pretzel Bites

    Can I make these Cheddar Jalapeño Pretzel Bites ahead of time?

    Yes, you can! Prepare the dough in advance and let it rise in the fridge. Just remember to bring it to room temperature before shaping and baking. This way, you can enjoy fresh pretzel bites whenever you want!

    What can I use instead of cheddar cheese?

    If cheddar isn’t your favorite or you’re looking for a variation, try using mozzarella for a gooier texture or pepper jack for an extra kick! The combination possibilities are endless!

    How do I store leftover Cheddar Jalapeño Pretzel Bites?

    Keep any leftovers in an airtight container at room temperature for a couple of days. To revive them, simply reheat in the oven or microwave for a few seconds—this will help the cheese get gooey again!

    Can I freeze these pretzel bites?

    Absolutely! After baking and cooling, flash freeze them. Then, store in a freezer-safe bag or container. When you’re ready to enjoy, just bake straight from the freezer, adding a few extra minutes to the cooking time.

    What dipping sauces pair well with Cheddar Jalapeño Pretzel Bites?

    The classic combo is a zesty mustard or a rich cheese sauce. For a unique twist, try pairing them with ranch dressing or a spicy salsa for a flavor explosion!

    Final Thoughts

    Making Cheddar Jalapeño Pretzel Bites is more than just about enjoying a delicious snack; it’s about creating moments that bring people together. Picture your family gathered around the kitchen, snacking on these warm bites and sharing laughter. Whether it’s a spontaneous munch between busy schedules or the star of your next gathering, they’ll never fail to impress. These bites are a delightful blend of comfort and joy, reminding us that simple pleasures often create the best memories. So grab those ingredients and let’s make some magic happen in your kitchen!


    Print

    clock clock iconcutlery cutlery iconflag flag iconfolder folder iconinstagram instagram iconpinterest pinterest iconfacebook facebook iconprint print iconsquares squares iconheart heart iconheart solid heart solid icon

    Description

    Delicious Cheddar Jalapeño Pretzel Bites that are perfect for snacking or sharing at parties.


    • 2 cups all-purpose flour
    • 1 teaspoon granulated sugar
    • 1 teaspoon kosher salt
    • 1 teaspoon instant yeast
    • 2/3 cup warm water
    • 1 tablespoon olive oil
    • 3.5 ounces cheddar cheese, cut into small cubes
    • 1 fresh jalapeño, finely diced, seeds removed
    • 4 cups water for baking soda bath
    • 2 tablespoons baking soda
    • Coarse salt, for sprinkling

    1. Prepare Dough: In a large mixing bowl, combine all-purpose flour, granulated sugar, kosher salt, and instant yeast. Add warm water and olive oil. Knead until the dough is smooth and elastic, about 5 to 7 minutes. Cover and let rise in a warm location for 45 minutes or until doubled in size.
    2. Shape and Fill: Punch down the risen dough and divide into 24 uniform pieces. Flatten each segment, place a cheddar cheese cube and a pinch of diced jalapeño in the center. Enclose the filling by pulling up the edges and pinching tightly to seal.
    3. Baking Soda Bath: In a saucepan, bring 4 cups of water and 2 tablespoons baking soda to a gentle boil. Working in batches, carefully lower pretzel bites into the bath for 20 to 30 seconds. Use a slotted spoon to transfer each bite onto a parchment-lined baking sheet.
    4. Bake Pretzel Bites: Sprinkle each bite with coarse salt. Bake in a preheated oven at 425°F for 10 to 12 minutes until the exterior is deep golden brown.
    5. Serve: Enjoy pretzel bites warm with the cheese filling melted inside.

    Notes

    • Ensure the dough is well-kneaded for the best texture.
    • Adjust the amount of jalapeño based on your heat preference.
    • These bites are best served fresh, but can be stored in an airtight container for a couple of days.
    • Prep Time: 15 minutes
    • Cook Time: 12 minutes
    • Category: Appetizer
    • Method: Baking
    • Cuisine: American

    Nutrition

    • Serving Size: 1 pretzel bite
    • Calories: 90
    • Sugar: 0.5g
    • Sodium: 200mg
    • Fat: 3g
    • Saturated Fat: 1g
    • Unsaturated Fat: 2g
    • Trans Fat: 0g
    • Carbohydrates: 13g
    • Fiber: 1g
    • Protein: 3g
    • Cholesterol: 5mg

    Sharing is caring!

  • Meatballs with Potatoes Cheese

    Meatballs with Potatoes Cheese


    Introduction to Meatballs with Potatoes Cheese

    Welcome to the sensational culinary trip, my friends, as we have prepared for you meatballs with potatoes cheese. This delicious dish includes fresh meatballs along with crispy roasted potatoes, drenched in cheddar cheese. So, this will certainly come in handy at deadlines when one has so much work but only a little time for cooking. And definitely, it will make your date happy with those heartwarming flavors. I myself am a mom so I never get enough time and peace while handling all my work and preparing meal for the family. And still, I face that problem daily – which is why this recipe makes me tingle with anticipation as well as hunger.

    Why You’ll Love This Meatballs with Potatoes Cheese

    This dish is a delightful blend of flavors that brings comfort and joy to your family dinner table. The ease of preparation makes it a go-to favorite for busy evenings. With just one pan, cleanup is a breeze, leaving you more time to enjoy those precious moments with loved ones. Plus, the combination of juicy meatballs and creamy cheese creates a taste sensation that’s simply irresistible. It’s like a warm hug in a dish!

    Ingredients for Meatballs with Potatoes Cheese

    Gathering the right ingredients is the first step in our delicious journey. Here’s what you’ll need for meatballs with potatoes cheese:

    • Ground beef: The star of the show! This provides the juicy meatiness we all love. You can also substitute with ground turkey or chicken for a lighter dish.
    • Plain breadcrumbs: They help bind the meatball mixture while adding a lovely texture. If you’re in a pinch, crushed crackers or oats can work too!
    • Whole milk: Adding moisture to the meatballs is key, ensuring a juicy bite. If you need a dairy-free option, try almond or oat milk.
    • Large egg: This acts as a binding agent, helping everything stick together. For a vegan approach, a flax egg is a great alternative.
    • Garlic powder: It infuses a lovely depth of flavor into the meatballs. If you’re feeling adventurous, fresh minced garlic can take it up a notch!
    • Onion powder: Another flavor booster! This ingredient adds a subtle sweetness. Fresh onions will do the trick if that’s what you have on hand.
    • Kosher salt: Essential for enhancing all the flavors in the dish. Don’t be shy—season to your taste preference!
    • Freshly ground black pepper: This adds a touch of spice. Feel free to adjust based on your family’s heat tolerance.
    • Ketchup (optional): A sweet touch that can elevate the meatballs. If you want extra tanginess, a bit of BBQ sauce works wonders.
    • Russet potatoes: Chopped into cubes, these become tender and flavorful as they meld with the meatballs. You could swap in sweet potatoes for a different twist!
    • Olive oil: A light drizzle to coat the potatoes, making them crisp and flavorful. Canola or vegetable oil are good substitutes.
    • Shredded cheddar cheese: The gooey blanket that ties everything together. Feel free to experiment with different cheeses like mozzarella or Monterey Jack.
    • Chopped fresh parsley (optional): This not only brightens the dish visually but adds a fresh flavor to the final presentation.

    For exact measurements, check the end of this article, where you’ll find everything you need for a hassle-free cooking experience!

    How to Make Meatballs with Potatoes Cheese

    Preheat and Prepare the Baking Dish

    First, let’s get our oven fired up! Preheat it to 375°F (190°C). While that’s heating, take a 9×13-inch baking dish and give it a gentle coat of nonstick cooking spray or unsalted butter. This step helps prevent any sticking, ensuring easy serving later. Trust me, those last-minute scrapes are no fun!

    Mix the Meatball Ingredients

    In a large mixing bowl, combine our starlit ground beef, breadcrumbs, whole milk, egg, garlic powder, onion powder, salt, black pepper, and ketchup if you’re feeling adventurous. Use your hands to mix everything thoroughly, but don’t overdo it! The secret to tender meatballs is all in the texture. You want it to be just combined, like a soft hug of flavors!

    Shape the Meatballs

    Now, it’s time to get a little hands-on! Take about two tablespoons of the meat mixture and gently roll them between your palms to form 1½-inch meatballs. Keep them uniform for even cooking, but don’t stress if they aren’t perfect. Imperfections also bring their own charm!

    Prepare the Potatoes

    While the meatballs are taking shape, let’s give some love to our potatoes! Toss the ½-inch potato cubes in a bowl with olive oil, salt, and black pepper. Seasoning is everything here, as these little nuggets will soak up flavor while baking. This contrast will highlight the meatballs beautifully, creating a delightful marriage on your plate!

    Layer the Dish

    Time to build our masterpiece! Spread the seasoned potatoes evenly at the bottom of your prepared baking dish. Now, gently place the meatballs on top of the potato layer in a single, cozy layer. This arrangement allows those savory juices to rain down on the potatoes while they bake. Yummy!

    Bake and Add Cheese

    Cover the dish tightly with foil to keep all that goodness locked in, and slide it into the oven. Bake for 40 minutes, allowing the flavors to mingle. After that, carefully remove the foil and sprinkle the shredded cheddar cheese over everything. Pop it back into the oven uncovered for another 10 to 15 minutes, until the cheese is melted and bubbling, like a savory sunrise!

    Serve and Enjoy

    Let your dish cool slightly before serving. For a colorful touch, sprinkle chopped parsley on top. Serve warm and watch as everyone gathers around the table, drawn in by that cheesy, delicious aroma. It’s a real showstopper!

    Tips for Success

    • Keep your hands slightly damp when shaping meatballs for a smoother texture.
    • Don’t skip the resting time after baking; it helps flavors settle and enhances the taste.
    • Try using a meat thermometer; meatballs are done when they reach 160°F (71°C).
    • For a fun twist, mix cheeses for a new flavor experience!
    • Make extra—these meatballs freeze beautifully for future meals.

    Equipment Needed

    • Baking dish: A 9×13-inch glass or ceramic dish is perfect. A similar-sized metal pan works, too!
    • Mixing bowls: You’ll need one large bowl for the meat mixture, and a smaller one for the potatoes.
    • Measuring cups: Useful for accurate ingredient portions if you’re a stickler for precision.
    • Cooking spray or butter: For greasing the baking dish, you can also use olive oil.

    Variations

    • Vegetarian Option: Swap out the ground beef for a plant-based substitute, like lentils or chickpeas, mixed with your favorite spices.
    • Cheese Choices: Experiment with different cheeses! Gouda, Swiss, or even feta can bring delightful new flavors.
    • Spicy Kick: Add crushed red pepper flakes or diced jalapeños to the meatball mixture for an extra layer of heat.
    • Herb Infusion: Mix in fresh herbs like basil, thyme, or rosemary to the potato layer for an aromatic touch.
    • Low-Carb Version: Replace potatoes with cauliflower florets or zucchini for a healthier, low-carb dinner option.

    Serving Suggestions for Meatballs with Potatoes Cheese

    • Pair your meatballs with a fresh green salad, drizzled with a light vinaigrette for a refreshing contrast.
    • A crusty garlic bread or warm dinner rolls are perfect for scooping up every bit of cheesy goodness.
    • Serve with steamed veggies like broccoli or green beans for added color and nutrition.
    • A glass of red wine can elevate your dining experience beautifully.

    FAQs about Meatballs with Potatoes Cheese

    Curious about meatballs with potatoes cheese? I’ve got you covered! Here are some common questions I hear from fellow home cooks:

    Can I make this dish ahead of time? Absolutely! You can prepare everything in advance and store it in the fridge. Just bake it when you’re ready for a delicious dinner!

    What can I use instead of ground beef? Ground turkey or chicken works well for a lighter option. You might also try a plant-based substitute for a vegetarian version!

    How do I know when the meatballs are cooked through? Use a meat thermometer to check for doneness. They should reach an internal temperature of 160°F (71°C).

    Can I freeze the leftovers? Yes! These meatballs freeze exceptionally well. Just let them cool completely before storing in an airtight container.

    What side dishes pair well with this meal? A fresh salad or steamed veggies complement the richness of the meatballs and make for a balanced meal. Enjoy!

    Final Thoughts

    Cooking is not just about filling bellies; it’s about creating moments. Meatballs with potatoes cheese doesn’t just satisfy hunger; it brings my family together, creating a cozy atmosphere filled with laughter and stories. Every bite is a reminder of love and comfort, a warm hug on a plate. As a busy mom, I cherish recipes like this one that blend simplicity with deliciousness. So, roll up your sleeves, gather your loved ones, and enjoy the magic of shared meals. This dish isn’t just dinner; it’s an invitation to savor every precious moment at the table!


    Print

    clock clock iconcutlery cutlery iconflag flag iconfolder folder iconinstagram instagram iconpinterest pinterest iconfacebook facebook iconprint print iconsquares squares iconheart heart iconheart solid heart solid icon

    Description

    A hearty dish featuring juicy meatballs baked with tender potatoes and topped with melted cheddar cheese.


    • 1 1/2 pounds ground beef
    • 1/2 cup plain breadcrumbs
    • 1/4 cup whole milk
    • 1 large egg
    • 1 teaspoon garlic powder
    • 1 teaspoon onion powder
    • 1 teaspoon kosher salt, or to taste
    • 1/2 teaspoon freshly ground black pepper, or to taste
    • 1 tablespoon ketchup (optional)
    • 4 medium russet potatoes, peeled and cut into 1/2-inch cubes
    • 2 tablespoons olive oil
    • 1/2 teaspoon kosher salt, or to taste
    • 1/4 teaspoon freshly ground black pepper
    • Nonstick cooking spray or unsalted butter, for greasing baking dish
    • 1 1/2 cups shredded cheddar cheese
    • 1/4 cup chopped fresh parsley (optional)

    1. Preheat oven to 375°F (190°C) and lightly coat a 9×13-inch baking dish with nonstick cooking spray or butter.
    2. In a large mixing bowl, combine ground beef, breadcrumbs, milk, egg, garlic powder, onion powder, salt, black pepper, and ketchup if using. Mix until just combined.
    3. Shape mixture into approximately twenty 1 1/2-inch meatballs and set aside on a plate.
    4. In a separate bowl, toss potato cubes with olive oil, salt, and black pepper until evenly coated.
    5. Evenly distribute the seasoned potato cubes in the bottom of the prepared baking dish. Place the meatballs on top of the potatoes in a single layer.
    6. Cover the baking dish tightly with foil and bake in the preheated oven for 40 minutes.
    7. Remove the foil. Evenly sprinkle the shredded cheddar cheese over the meatballs and potatoes. Return the dish to the oven and bake uncovered for 10–15 minutes until the cheese is melted and bubbly, and the meatballs are cooked through.
    8. Allow to cool slightly. Sprinkle chopped parsley over the top, if desired, and serve warm.

    Notes

    • You can use ground turkey or chicken instead of beef for a lighter option.
    • Add your favorite spices to the meatball mixture for a flavor boost.
    • This dish can be prepared ahead of time and baked when ready to serve.
    • Prep Time: 15 minutes
    • Cook Time: 55 minutes
    • Category: Dinner
    • Method: Baking
    • Cuisine: American

    Nutrition

    • Serving Size: 1 serving
    • Calories: 550
    • Sugar: 2g
    • Sodium: 800mg
    • Fat: 30g
    • Saturated Fat: 12g
    • Unsaturated Fat: 15g
    • Trans Fat: 0g
    • Carbohydrates: 30g
    • Fiber: 4g
    • Protein: 40g
    • Cholesterol: 150mg

    Sharing is caring!

  • Calico bean casserole bake

    Calico bean casserole bake


    Introduction to Calico Bean Casserole Bake

    Hey food people, what’s up? So, if you’re anything like me, most days feel pretty jammed up and being in the kitchen, doing any kind of cooking just adds to the endless list of to-dos. Well, I’m excited to spill the beans on my favorite fast-and-easy: calico bean casserole bake. It’s more than just a hot dish, you know? It’s like a huge warm hug for my family. And hey, not only does this casserole bake get dinner on the table on those crazy nights quickly, but it creates quite the scene and impresses my people too. Seriously, mark my words: your family is totally going to love this recipe!

    Why You’ll Love This Calico Bean Casserole Bake

    This calico bean casserole bake will quickly become your kitchen MVP. It’s not just easy to make—it’s a one-pan wonder that simplifies clean-up. In just an hour, you’ll have a delicious, crowd-pleasing meal that satisfies picky eaters and busy appetites alike. The rich flavors blend beautifully, making each bite feel like a warm hug. Plus, it’s a dish that leaves room for your own personal touches!

    Ingredients for Calico Bean Casserole Bake

    Gathering the right ingredients is key to whipping up a delightful calico bean casserole bake. Here’s what you’ll need:

    • Lean Ground Beef: This is the heart of your casserole, providing rich flavor and protein.
    • Bacon: A splash of savory goodness! It adds a crispy texture and smoky taste that pairs wonderfully with the beans.
    • Canned Baked Beans: A staple for any casserole. Their sweetness and tang will infuse every bite.
    • Canned Kidney Beans: These plump beans not only add color but also a hearty texture, making your dish more filling.
    • Canned Butter Beans: Soft and creamy, they help balance the other beans nicely, creating a delightful medley.
    • Medium Yellow Onion: Finely chopped for that aromatic base— onions caramelize beautifully, enhancing the entire flavor profile.
    • Ketchup: This tangy ingredient brings a familiar taste that children often love, making it a great option for families.
    • Brown Sugar: Just a hint of sweetness complements the savory elements beautifully, creating a well-rounded dish.
    • Distilled White Vinegar: Adds a necessary acidity to cut through the richness of the other ingredients, brightening the flavors.
    • Yellow Mustard: A subtle zesty punch that enhances the blend of tastes; it might surprise you!
    • Kosher Salt & Ground Black Pepper: Essential seasoning. They elevate the natural flavors and bring everything together.

    Feel free to get creative! Substitute your favorite beans or even add vegetables for a nutritious twist. If you want to prepare the dish ahead, all ingredient quantities can be found at the bottom of this article, ready for printing!

    How to Make Calico Bean Casserole Bake

    Now comes the best part—putting everything together to create your tasty calico bean casserole bake. Follow these simple steps, and I promise you’ll find the process as enjoyable as the meal itself!

    Step 1: Cook the Meat

    Start by heating a large skillet over medium heat. Add the chopped bacon and let it bubble away until it’s nicely crispy.

    Then, toss in the ground beef. Keep breaking it up with your spoon as it cooks, until it turns a beautiful brown color. Remember to drain any excess fat before moving to the next step to keep your dish light and flavorful!

    Step 2: Sauté the Onions

    With your meat mixture set aside, it’s time to sauté the onions. In that same skillet, just sprinkle in your finely chopped onions.

    Sauté them gently for about five minutes, or until they turn translucent. Don’t rush this step! The sweet aroma of the onions slowly cooking is part of what makes this dish such a delight.

    Step 3: Prepare the Bean Mixture

    In a large mixing bowl, combine the canned baked beans, kidney beans, and butter beans. Add the ketchup, brown sugar, vinegar, mustard, salt, and pepper.

    Stir everything together until well mixed. This mixture builds the flavor base and ensures every bite of your calico bean casserole bake is bursting with taste!

    Step 4: Combine All Ingredients

    Now it’s time for the star of the show! Pour your sautéed meat and onions into the bean mixture.

    Gently stir everything together, ensuring that the meat is evenly distributed among the beans. You want to achieve a gorgeous consistency for the ultimate family feast!

    Step 5: Bake the Casserole

    Preheat your oven to 350°F (175°C) while you transfer the mixture to a 2-quart baking dish.

    Spread it out evenly, as this helps it bake uniformly. Cover the dish with foil and bake in the oven for 45 minutes. Uncover it for the last 10 minutes to let that gooey goodness shine!

    Step 6: Rest Before Serving

    Once the casserole is out of the oven, resist the urge to dive right in! Let it rest for about 10 minutes before you serve.

    This resting period helps the flavors meld beautifully. Trust me, it’s worth the wait, and your family will be thanking you for that extra taste explosion!

    Tips for Success

    • Always drain excess fat from the meat to keep your casserole light and healthy.
    • For added flavor, consider using smoked bacon.
    • Experiment with different beans or add bell peppers for extra color and nutrition.
    • Make it a day ahead! It tastes even better after the flavors have melded overnight.
    • Serve it with a side of cornbread for a satisfying meal.

    Equipment Needed

    • Large Skillet: A non-stick pan works wonders for easy clean-up.
    • Baking Dish: A sturdy 2-quart dish is ideal; glass or ceramic both work well.
    • Mixing Bowl: Use a large bowl for combining all ingredients.
    • Spatula: A long spatula is great for mixing.
    • Measuring Cups: Essential for accuracy, but you can estimate if you’re confident!

    Variations of Calico Bean Casserole Bake

    • Vegetarian Option: Leave out the meat and replace it with extra beans or lentils for a hearty vegetarian version.
    • Spicy Kick: Add jalapeños or a dash of cayenne pepper to the bean mixture for a spicy twist that’ll awaken your taste buds.
    • Cheesy Delight: Sprinkle shredded cheese on top during the last 10 minutes of baking to create a bubbly, cheesy layer.
    • Southwestern Flair: Incorporate corn, bell peppers, and taco seasoning for a zesty southwestern vibe!
    • Gluten-Free: Ensure all canned ingredients are labeled gluten-free, and you’re good to go!

    Serving Suggestions for Calico Bean Casserole Bake

    • Serve with a crisp green salad dressed in a light vinaigrette for a refreshing contrast.
    • Pair with warm cornbread or buttery rolls to soak up all that delicious sauce.
    • A tall glass of iced tea or lemonade complements the rich flavors perfectly.
    • Garnish with fresh herbs like parsley or cilantro for a pop of color.

    FAQs about Calico Bean Casserole Bake

    Can I use different types of beans in my calico bean casserole bake?
    Absolutely! Feel free to swap out beans for your favorites. Pinto beans or black beans can add a wonderful twist to the traditional recipe.

    Can I make the casserole ahead of time?
    Yes! You can prepare your calico bean casserole bake and store it in the refrigerator. Just pop it in the oven when you’re ready to bake, but keep in mind, you might need to adjust the cooking time slightly.

    What sides pair well with calico bean casserole bake?
    This hearty casserole shines with a fresh green salad or crusty cornbread on the side. It’s perfect for soaking up those delicious juices!

    How long can leftovers be stored?
    If you have any leftovers, store them in an airtight container. They can last up to 3–5 days in the refrigerator, making for great lunch options!

    Can I freeze the calico bean casserole bake?
    Definitely! You can freeze the casserole before baking. Just make sure to cover it well. When you’re ready to serve, defrost it overnight in the fridge before baking.

    Final Thoughts

    I truly believe that the magic of a good recipe lies in the memories it creates around the table. This calico bean casserole bake is more than just a meal; it’s a way to bring my family together, sharing laughter and stories, even on the busiest of nights. The warmth of the flavors and the simplicity of the preparation make it a joy for me to whip up, knowing my loved ones will be satisfied and happy. I hope this dish brings the same comfort and joy to your family, turning ordinary dinners into cherished moments!


    Print

    clock clock iconcutlery cutlery iconflag flag iconfolder folder iconinstagram instagram iconpinterest pinterest iconfacebook facebook iconprint print iconsquares squares iconheart heart iconheart solid heart solid icon

    Description

    A hearty and delicious calico bean casserole bake that’s perfect for family dinners.


    • 225 grams (8 ounces) lean ground beef
    • 225 grams (8 ounces) bacon, chopped
    • 400 grams (14 ounces) canned baked beans
    • 400 grams (14 ounces) canned kidney beans, drained and rinsed
    • 400 grams (14 ounces) canned butter beans, drained and rinsed
    • 1 medium yellow onion, finely chopped
    • 80 grams (1/3 cup) ketchup
    • 50 grams (1/4 cup) brown sugar, packed
    • 30 milliliters (2 tablespoons) distilled white vinegar
    • 10 grams (2 teaspoons) yellow mustard
    • 2 grams (1/2 teaspoon) kosher salt
    • 1 gram (1/4 teaspoon) ground black pepper

    1. In a large skillet, cook chopped bacon over medium heat until crisp. Add ground beef and continue cooking, breaking up the meat, until browned. Drain excess fat.
    2. Add chopped onion to the skillet with the cooked meat and sauté until translucent, about 5 minutes.
    3. In a large mixing bowl, combine baked beans, kidney beans, butter beans, ketchup, brown sugar, vinegar, mustard, salt, and black pepper. Mix thoroughly.
    4. Stir the cooked meat and sautéed onions into the bean mixture until evenly distributed.
    5. Transfer the mixture to a 2-liter (2-quart) baking dish. Bake in a preheated oven at 175°C (350°F) for 45 minutes, uncovered, until bubbly and heated through.
    6. Allow casserole to rest for 10 minutes before serving to enhance flavor development.

    Notes

    • Feel free to customize with your favorite types of beans.
    • This dish pairs well with cornbread or a fresh salad.
    • Can be prepared ahead of time and stored in the refrigerator before baking.
    • Prep Time: 15 minutes
    • Cook Time: 45 minutes
    • Category: Main Course
    • Method: Baking
    • Cuisine: American

    Nutrition

    • Serving Size: 1 serving
    • Calories: 350
    • Sugar: 8g
    • Sodium: 680mg
    • Fat: 15g
    • Saturated Fat: 5g
    • Unsaturated Fat: 8g
    • Trans Fat: 0g
    • Carbohydrates: 40g
    • Fiber: 10g
    • Protein: 20g
    • Cholesterol: 60mg

    Sharing is caring!

  • Creamy Turkey Pumpkin Chili

    Creamy Turkey Pumpkin Chili


    Introduction to Creamy Turkey Pumpkin Chili

    With the arrival of fall, when warm food is desired and welcomed, flavors should bring happiness, and that’s exactly what I’m getting with my Creamy Turkey Pumpkin Chili. It’s a huge warm hug in the bowl and helps bring the family closer. For dinnertime tonight, there’s nothing like the taste of this chili to save the busy working mom, who’s also me, some time—45 minutes to be exact. So imagine dipping big hearty spoonfuls of creamy hot soup in bowls when it’s cold outside or at night when friends come over. Yeah, it’s not just about food; it’s about creating beautiful moments with loved ones!

    Why You’ll Love This Creamy Turkey Pumpkin Chili

    This Creamy Turkey Pumpkin Chili is the ultimate comfort food, combining ease and deliciousness. It’s a one-pot wonder that comes together in no time, making weeknight dinners a breeze. The creamy texture and savory spices create a flavor explosion that will leave your family asking for seconds. Plus, it’s a nutritious option loaded with protein, perfect for busy days when you still want to serve something wholesome and satisfying!

    Ingredients for Creamy Turkey Pumpkin Chili

    Gathering ingredients for my Creamy Turkey Pumpkin Chili is one of my favorite parts of cooking. It’s like collecting little treasures that will come together to create something beautiful. Here’s what you’ll need:

    • Ground turkey: This lean protein is the star of the show, adding a hearty base without excess fat.
    • Olive oil: A splash of this golden liquid keeps everything from sticking while adding a rich flavor.
    • Diced onion: Onions bring sweetness and depth, making your chili fragrant and flavorsome.
    • Minced garlic: No dish is complete without this aromatic gem; it adds a wonderful kick!
    • Diced red bell pepper: This colorful addition brings a touch of sweetness and vibrant color.
    • Diced carrots: Carrots not only add natural sweetness but also bring a lovely crunch.
    • White beans: These creamy wonders add substance and fiber—great for a hearty meal.
    • Pumpkin puree: The secret ingredient that gives the chili its creamy texture and autumnal flavor.
    • Chicken broth: This liquid gold adds moisture and enhances the flavor profile, making it rich and savory.
    • Chili powder: A must-have for that classic chili flavor—don’t be shy with this spice!
    • Cumin: Earthy and warm, cumin complements the chili beautifully and adds a hint of smokiness.
    • Smoked paprika: Just a pinch of this gives a subtle smokiness that tantalizes the taste buds.
    • Cinnamon: Optional, but if you dare, it adds an unexpected warmth—perfect for fall!
    • Salt and black pepper: Essential for seasoning and bringing all the flavors together.
    • Heavy cream or coconut milk: You can choose either for that luscious creaminess—ideal for a cozy touch.
    • Fresh parsley or cilantro: A sprinkle on top helps brighten the dish and adds a pop of freshness.

    Feel free to customize with additional spices or prote in, or switch the turkey for a meat-free option to suit your family’s taste. And remember, the exact quantities are at the bottom of the article and available for printing!

    How to Make Creamy Turkey Pumpkin Chili

    Cooking up my Creamy Turkey Pumpkin Chili is a delightful journey, filled with aromas that dance around the kitchen. Each step brings you closer to a bowl of warmth and comfort. Let’s dive into the steps to create this cozy dish!

    Step 1: Sauté the Ground Turkey

    Start by heating a splash of olive oil in a large pot over medium heat. I love using a sturdy Dutch oven—it holds heat well, making everything cook evenly. Then, add in 1 pound of ground turkey.
    Cook, stirring frequently, until it’s golden brown and cooked through. This should take about 5-7 minutes. Breaking it up into smaller pieces helps it brown nicely. Don’t rush; allowing it to get a nice sear adds flavor!

    Step 2: Cook the Vegetables

    Next, toss in diced onions, minced garlic, diced red bell pepper, and diced carrots into the mix. Sauté these vibrant veggies for about 5-6 minutes.
    You want to see them soften and become aromatic. The colors of the vegetables are like a little rainbow in your pot. It builds excitement for the flavor explosion to come!

    Step 3: Add Spices

    Now comes the fun part—spicing it up! Sprinkle in chili powder, cumin, smoked paprika, and optional cinnamon. It’s amazing how just a few spices can transform the dish.
    Toast them for about a minute in the pot. This step brings their flavors to life and fills your kitchen with an irresistible scent that draws everyone in!

    Step 4: Combine with Pumpkin and Beans

    Grab your can of pumpkin puree and white beans, and stir them right into the pot. Pour in chicken broth to tie everything together. I use about 2 cups to keep it nice and saucy.
    Bring this mixture to a boil, then reduce the heat to low. Let it simmer uncovered for 20-25 minutes. Stir occasionally; this helps the flavors meld beautifully. You’ll notice it thickening, making it creamy and comforting!

    Step 5: Simmer and Blend

    After simmering, it’s time to taste! Adjust the seasoning with salt and black pepper as needed. A little tweak can make a tremendous difference. Once satisfied, let it simmer for a further 2 minutes to incorporate all those delicious flavors fully.
    The smell is utterly divine, and by now, your mouth will be watering!

    Step 6: Finish with Cream

    The final touch is adding your choice of heavy cream or coconut milk. This is where the magic happens! It adds that luscious creaminess we all crave.
    Stir it in gently and, if desired, adjust seasoning one last time. Serve immediately, and don’t forget that sprinkle of fresh parsley or cilantro on top—it makes everything look and taste even better!

    Tips for Success

    • Prep your ingredients before cooking to save time.
    • Use a good-quality chicken broth for richer flavor.
    • Don’t skip the simmering; it melds the flavors perfectly.
    • Feel free to adjust spice levels based on your family’s preferences.
    • This chili tastes even better the next day—great for leftovers!

    Equipment Needed

    • Large pot or Dutch oven: If you don’t have a Dutch oven, any heavy-bottomed pot works well.
    • Wooden spoon or spatula: Essential for stirring without scratching your pot’s surface.
    • Measuring cups and spoons: Handy for getting the right amount of ingredients.
    • Cutting board and knife: For chopping veggies efficiently.

    Variations of Creamy Turkey Pumpkin Chili

    • Vegetarian Option: Substitute ground turkey with plant-based meat or mushrooms for a hearty, meat-free dish.
    • Spicy Kick: Add chopped jalapeños or a dash of cayenne pepper for an extra layer of heat!
    • Beans Galore: Mix in different beans like black beans or kidney beans for added texture and flavor.
    • Sweet Potato Twist: Replace the carrots with diced sweet potatoes for a sweet and nutritious boost.
    • Herb Infusion: Incorporate fresh herbs like thyme or rosemary during cooking for an aromatic experience.

    Serving Suggestions for Creamy Turkey Pumpkin Chili

    • Pair with warm, crusty bread or cornbread for a delightful dip.
    • Serve alongside a fresh garden salad to balance the richness.
    • A dollop of sour cream or Greek yogurt adds tangy creaminess.
    • Enjoy with your favorite fall-themed beverage, like spiced apple cider!

    FAQs about Creamy Turkey Pumpkin Chili

    Can I make this Creamy Turkey Pumpkin Chili ahead of time?
    Absolutely! It’s even better the next day. Just store it in an airtight container in the refrigerator. You can reheat on the stove or in the microwave.

    Is Creamy Turkey Pumpkin Chili freezer-friendly?
    Yes, you can freeze this chili! Just make sure it cools before transferring it to a freezer-safe container. It will keep well for up to three months.

    Can I substitute pumpkin puree with something else?
    If you’re not a fan of pumpkin, you can use squash puree or even blended cooked sweet potatoes for a similar creamy texture and taste.

    How can I make Creamy Turkey Pumpkin Chili spicier?
    To add heat, consider including diced jalapeños or a dash of hot sauce while cooking. You can also sprinkle in some cayenne pepper to your taste!

    Is this chili suitable for a low-carb diet?
    While it’s not strictly low-carb, you can reduce the beans or use fewer added sugars to make it more suitable for a low-carb lifestyle. Enjoy it as a satisfying treat!

    Final Thoughts

    Finding the perfect comfort food can feel like a treasure hunt, and my Creamy Turkey Pumpkin Chili is definitely a gem worth uncovering. It offers warmth, delightful flavors, and brings everyone together, like a cozy hug on a chilly evening. Each velvety spoonful reminds us that food is not just about sustenance but connection and love. Whether you’re savoring it after a busy day or serving it to friends, this chili creates not just meals, but memories. So go ahead—gather your loved ones and enjoy a bowl of joy that wraps you in fall’s comforting embrace!


    Print

    clock clock iconcutlery cutlery iconflag flag iconfolder folder iconinstagram instagram iconpinterest pinterest iconfacebook facebook iconprint print iconsquares squares iconheart heart iconheart solid heart solid icon

    Description

    A comforting and creamy chili made with ground turkey and pumpkin, perfect for the fall season.


    • 1 pound ground turkey
    • 1 tablespoon olive oil
    • 1 medium onion, diced
    • 3 garlic cloves, minced
    • 1 red bell pepper, diced
    • 2 carrots, diced
    • 2 cans (15 ounces each) white beans, drained
    • 1 can (15 ounces) pumpkin puree
    • 2 cups chicken broth
    • 1 teaspoon chili powder
    • 1 teaspoon cumin
    • 1/2 teaspoon smoked paprika
    • 1/2 teaspoon cinnamon, optional
    • 1/2 teaspoon salt
    • 1/4 teaspoon black pepper
    • 1/2 cup heavy cream or coconut milk
    • Fresh parsley or cilantro, for garnish

    1. Heat olive oil in a large pot over medium heat. Add ground turkey and cook, stirring frequently, until evenly browned and cooked through.
    2. Add diced onion, minced garlic, red bell pepper, and carrots to the pot. Sauté, stirring often, until vegetables soften and the mixture is fragrant.
    3. Sprinkle in chili powder, cumin, smoked paprika, and optional cinnamon. Stir well and toast spices for about one minute to develop their flavors.
    4. Stir in the pumpkin puree, drained white beans, and chicken broth. Bring the mixture to a boil, then reduce heat to low and simmer uncovered for 20 to 25 minutes until the flavors meld.
    5. Stir in heavy cream or coconut milk. Adjust with salt and black pepper as needed. Simmer for a further 2 minutes.
    6. Ladle chili into bowls and garnish with chopped fresh parsley or cilantro. Serve hot.

    Notes

    • For a vegan version, use plant-based ground meat and coconut milk.
    • This chili can be made ahead of time and stored in the refrigerator for up to 3 days.
    • Prep Time: 15 minutes
    • Cook Time: 30 minutes
    • Category: Main Dish
    • Method: Stovetop
    • Cuisine: American

    Nutrition

    • Serving Size: 1 cup
    • Calories: 350
    • Sugar: 3g
    • Sodium: 600mg
    • Fat: 18g
    • Saturated Fat: 8g
    • Unsaturated Fat: 7g
    • Trans Fat: 0g
    • Carbohydrates: 29g
    • Fiber: 8g
    • Protein: 25g
    • Cholesterol: 85mg

    Sharing is caring!

  • Pillsbury Crescent Roll Taco Bake

    Pillsbury Crescent Roll Taco Bake


    Introduction to Pillsbury Crescent Roll Taco Bake

    Hey, home cooks! This is such a crazy juggle in my day to nail mealtime on time and get yummy results, and here is where the Pillsbury Crescent Roll Taco Bake saves me! So, not just fast, and it’s a lovely flavor fusion your whole family is going to love, but what’s that warm cheesy taco work of art really quick to make on a busy weeknight? This is the kind of instant that has total family appeal. That much closer to your very own made-from-scratch tacos but without all the hassle. Seriously life-changing for those sorts of evenings, believe me!

    Why You’ll Love This Pillsbury Crescent Roll Taco Bake

    Why struggle with complicated recipes when you can whip up an irresistible Pillsbury Crescent Roll Taco Bake in no time? This dish is not only super easy to prepare but also packed with flavors that please even the pickiest eaters. With its comforting crescent crust, savory beef, and melty cheese, this meal ticks all the boxes for taste and convenience. You’ll savor every bite and relish the smiles around the table!

    Ingredients for Pillsbury Crescent Roll Taco Bake

    When it comes to the Pillsbury Crescent Roll Taco Bake, gathering your ingredients feels like unpacking treasures from a culinary adventure. Here’s what you’ll need:

    • Refrigerated crescent dinner rolls: These flaky rolls form the crust, providing a buttery base that perfectly cradles all the delicious fillings.
    • Lean ground beef: Opt for at least 80% lean meat for a savory flavor without too much grease. It’s the heart of this dish and adds protein.
    • Thick and chunky salsa: This adds zest and moisture. Choose your favorite brand or spice level to customize your bake.
    • Taco seasoning mix: Packed with spices, this mix elevates the ground beef, embedding each bite with bold flavors. You can get creative and make your own seasoning too!
    • Shredded Cheddar cheese: The gooier, the better! This cheesy topping melts beautifully, creating comfort in every bite.
    • Shredded lettuce: For a fresh crunch, this is optional but gives your taco bake a lovely, contrasting texture.
    • Diced tomatoes: These juicy gems add color and freshness. Feel free to substitute with canned tomatoes if fresh ones aren’t on hand.

    If you’re craving even more flavor or want to change it up, you can look for local markets or supermarkets that carry various toppings and fillings. Exact measurements are provided at the bottom of the article for your convenience!

    How to Make Pillsbury Crescent Roll Taco Bake

    Step 1: Prepare the Crescent Dough

    Let’s kick things off by preparing the crescent dough! Grab your can of refrigerated crescent rolls and unroll it carefully. It’s like peeling back a gift! Separate the dough into 8 triangles and press them into an ungreased 9-inch square pan or a 10-inch pie plate. Ensure the dough covers the bottom and climbs up the sides to create a nice crust. No need for perfection here; a little rustic charm adds character. Trust me, that flaky texture will be worth it!

    Step 2: Cook the Ground Beef

    Now, let’s bring in the beef. Heat a large skillet over medium heat until it’s nice and warm. Once heated, add in your lean ground beef and let it cook for about 8 to 10 minutes. Stir occasionally to get that beautiful browning. Don’t forget to drain any excess fat; we want all that flavor without the grease! Season the beef lightly with salt for a boost. This step is key to making the taco filling shine!

    Step 3: Mix in Salsa and Seasoning

    It’s time to jazz up that beef! Add the thick and chunky salsa along with the taco seasoning mix directly into the skillet. Stir everything together, letting those flavors mingle like old friends at a reunion. Give it about 5 minutes to simmer, allowing the spices to incorporate into the beef fully. You’ll notice a wonderful aroma wafting through your kitchen. It’s a sneak peek into the deliciousness ahead!

    Step 4: Assemble the Taco Bake

    Now for the fun part—assembly! Pour the seasoned beef mixture evenly over your prepared crescent dough. Use a spatula to spread it out for even coverage. Then, shower the top with shredded Cheddar cheese, like a warm, comforting blanket. You can never go wrong with cheese! Make sure it’s well-distributed, so every bite is filled with cheesy goodness.

    Step 5: Bake Until Perfectly Golden

    It’s time to let the magic happen! Pop the pan in your preheated oven set to 375°F and bake for 20 to 25 minutes. Keep an eye on it, as the goal is a deep golden-brown crust with melted cheese bubbling on top. You’ll know it’s good when it looks inviting!
    Remove it from the oven and take in that beautiful sight; you’re just moments away from enjoying your creation!

    Tips for Success

    • Always check the expiration date on your crescent rolls for freshness.
    • For an extra kick, try adding jalapeños or black olives to the beef mixture.
    • You can use ground turkey or chicken instead of beef for a lighter version.
    • Adjust the taco seasoning amount to match your family’s spice preference.
    • Let the taco bake cool for a few minutes before serving for easier slicing.

    Equipment Needed

    • 10-inch skillet: Any medium-sized skillet will work, whether it’s non-stick or cast iron.
    • 9-inch square pan or 10-inch pie plate: A round or square cake pan is just fine for baking.
    • Spatula: A rubber or plastic spatula helps in spreading the beef mixture evenly.
    • Measuring cups: Handy for keeping your portions right when adding cheese and salsa.

    Variations of Pillsbury Crescent Roll Taco Bake

    • Swap out the beef for ground turkey or lentils for a vegetarian twist.
    • Use a different cheese like pepper jack or Monterey Jack for a spicy flair.
    • Incorporate black beans or corn for extra texture and flavor.
    • Try different salsas, like mango or roasted tomato, to change up the taste.

    Serving Suggestions

    • Pair the Pillsbury Crescent Roll Taco Bake with a side of refried beans for a hearty meal.
    • A fresh green salad with avocado and lime dressing adds a refreshing touch.
    • Serve with crispy tortilla chips and guacamole for extra crunch.
    • For drinks, consider a chilled margarita or sparkling water with lime.

    FAQs about Pillsbury Crescent Roll Taco Bake

    Certainly, I know you might have some questions about this delightful Pillsbury Crescent Roll Taco Bake. Let’s clear things up!

    Can I prepare the taco bake ahead of time?

    Absolutely! You can assemble everything in advance, cover it, and refrigerate. Just remember to bake it the next day; it’s even easier when you’re short on time.

    Is this taco bake gluten-free?

    Yes, as long as you use gluten-free crescent rolls, this Pillsbury Crescent Roll Taco Bake can easily be made gluten-free. Check your local store for options!

    What’s the best way to store leftovers?

    Leftovers can be stored in an airtight container in the refrigerator for up to three days. Reheat in the oven for optimal taste. It’s great to enjoy later!

    Can I freeze this taco bake?

    You sure can! Freeze before baking for up to three months. Just thaw it in the fridge overnight before baking. This makes for quick meals down the road!

    What toppings can I add for extra flavor?

    Get creative! Add jalapeños, olives, or even avocado slices on top after baking for an exciting twist. The flavors are endless with this tasty bake!

    Final Thoughts

    The joy of making a Pillsbury Crescent Roll Taco Bake extends beyond just its deliciousness. It’s about gathering your loved ones around the table and creating memories over a hearty meal. I love how this recipe transforms a few simple ingredients into a warm, comforting dish everyone can enjoy. Whether it’s a busy weeknight or a cozy weekend, knowing you have a flavorful meal ready in no time is priceless. Plus, the smiles you’ll see around the dinner table are the ultimate reward. So, roll up those sleeves and dive into this culinary adventure—you won’t regret it!


    Print

    clock clock iconcutlery cutlery iconflag flag iconfolder folder iconinstagram instagram iconpinterest pinterest iconfacebook facebook iconprint print iconsquares squares iconheart heart iconheart solid heart solid icon

    Description

    A quick and delicious taco bake made with Pillsbury crescent rolls, ground beef, and topped with cheese and fresh veggies.


    • 1 can (8 ounces) refrigerated crescent dinner rolls
    • 1 pound lean ground beef (minimum 80% lean)
    • 3/4 cup thick and chunky salsa
    • 2 tablespoons taco seasoning mix
    • 1 cup shredded Cheddar cheese
    • Shredded lettuce, to taste
    • Diced tomato, to taste

    1. Preheat oven to 375°F. Unroll the crescent dough and separate into 8 triangles. Arrange in an ungreased 9-inch square pan or 10-inch pie plate, pressing over the bottom and up the sides to create a uniform crust.
    2. Heat a 10-inch skillet over medium heat. Cook ground beef for 8 to 10 minutes, stirring occasionally, until browned and fully cooked. Drain excess fat.
    3. Add salsa and taco seasoning to the cooked beef. Stir thoroughly and let simmer for 5 minutes to blend flavors.
    4. Distribute the seasoned beef mixture evenly over the crescent roll crust. Sprinkle shredded Cheddar cheese uniformly over the filling.
    5. Place pan in oven and bake for 20 to 25 minutes, or until the crust is deep golden brown and cheese is melted.
    6. Remove from oven and top with shredded lettuce and diced tomatoes as desired. Serve warm.

    Notes

    • For added flavor, consider using a spicier salsa.
    • Leftovers can be stored in the refrigerator for up to 3 days.
    • Prep Time: 15 minutes
    • Cook Time: 25 minutes
    • Category: Main Dish
    • Method: Baking
    • Cuisine: Mexican-American

    Nutrition

    • Serving Size: 1 slice
    • Calories: 350
    • Sugar: 2g
    • Sodium: 850mg
    • Fat: 20g
    • Saturated Fat: 10g
    • Unsaturated Fat: 8g
    • Trans Fat: 0g
    • Carbohydrates: 30g
    • Fiber: 2g
    • Protein: 18g
    • Cholesterol: 60mg

    Sharing is caring!

  • Pizza Lasagna Skillet Bake

    Pizza Lasagna Skillet Bake


    Introduction to Pizza Lasagna Skillet Bake

    I find myself wanting a meal that tastes hearty, comforting, and is easily made because generally, while working and taking care of the family, time isn’t on my side. So, that’s when this Pizza Lasagna Skillet Bake came into existence. Weaved within one pan together are all the great taste sensations your family craves-and how convenient is that for a quick midweek dinner solution. With layers of cheesy goodness, savory meats, and an explosion of Italian flavors, there’s no way you won’t win over every member sitting at the dinner table: mark my words, you won’t hear a single complaint when this bake makes its reappearance!

    Why You’ll Love This Pizza Lasagna Skillet Bake

    This Pizza Lasagna Skillet Bake is a game-changer for busy families! It melds the flavor of pizza with the comforting layers of lasagna, all in one dish. It’s quick to whip up—ready in just 30 minutes. The kids will devour it, leaving you with satisfied smiles all around. Plus, clean-up is a breeze with only one skillet to wash!

    Ingredients for Pizza Lasagna Skillet Bake

    Gathering the right ingredients is half the fun of cooking! For this Pizza Lasagna Skillet Bake, you’ll want a hearty selection that balances flavor and texture. Here’s what you’ll need:

    • Ground beef: A classic choice for protein that adds richness.
    • Italian sausage: This gives an extra kick, enhancing the overall flavor profile. Feel free to use sweet or spicy based on your taste.
    • Bacon: Crumbled bacon brings a smoky crunch. You could also opt for turkey bacon for a lighter version.
    • Yellow onion: Adds sweetness and depth. If you’re in a pinch, onion powder can work as a substitute.
    • Onion powder: This seasoning amplifies the onion flavor, giving a nice kick.
    • Garlic powder: Who doesn’t love the warm, comforting aroma of garlic? It blends beautifully with the meats.
    • Italian seasoning: A must-have for that quintessential Italian taste. You can mix your own if you prefer more control over flavors.
    • Pepperoni: Slices of pepperoni add a classic pizza touch. I love putting extra on top for that perfect finishing touch!
    • Marinara sauce: This ties it all together with its rich, tomatoey goodness. Look for a quality jar or make your own for an added personal touch.
    • Lasagna sheets: Broken into pieces to create layers. No need to pre-cook; just toss them in!
    • Mozzarella cheese: The star of the show for that gooey, melty goodness everyone craves.

    Don’t forget, if you prefer to tailor this dish, you can find exact quantities at the bottom of the article, where they’re available for printing. Happy cooking!

    How to Make Pizza Lasagna Skillet Bake

    Now that we’ve gathered our ingredients, it’s time to bring this Pizza Lasagna Skillet Bake to life! Follow these straightforward steps to create a meal that’s sure to please.

    Step 1 – Cook Lasagna Sheets

    Start by boiling a large pot of salted water. Add the broken lasagna sheets and cook them according to the package instructions. It’s usually about 8-10 minutes for al dente.

    Once they’re cooked, drain the sheets well and give them a little rinse under cold water. This prevents sticking. Set them aside to cool while you get to the exciting part!

    Step 2 – Brown the Meats

    In a large skillet, heat a drizzle of olive oil over medium-high heat. Add your ground beef and Italian sausage. With a wooden spoon, break the meat apart as it cooks until there’s no pink in sight. This usually takes about 5-7 minutes.

    Once it’s browned, drain the excess grease. You want the flavor, not the fat. Don’t rush this step; the browned bits at the bottom add depth!

    Step 3 – Add Flavorings

    Now, it’s time to amp up that flavor! Sprinkle in your onion powder, garlic powder, and Italian seasoning. Stir everything together until the spices coat the meat evenly.

    Next, toss in 20 pepperoni slices and half a cup of crumbled bacon. The sizzling sound as it hits the skillet will make your mouth water! Pour in the marinara sauce and stir to combine. You’re building a flavor bomb!

    Step 4 – Combine Ingredients

    Gently fold the cooked lasagna sheets into the skillet mixture. This part requires a little love; you want the sheets coated well with meat and sauce.

    Make sure everything is evenly distributed. You want every bite to be a delightful combination of flavors. Imagine the melding of cheese, sauce, and your favorite toppings!

    Step 5 – Top with Cheese and Pepperoni

    Spread the shredded mozzarella cheese generously over the top of your dish now. I usually pile it on, because who doesn’t love gooey cheese?

    For that classic pizza vibe, add the remaining 5 slices of pepperoni and any leftover crumbled bacon on top. Just wait until you see it bubble in the oven!

    Step 6 – Bake Perfection

    Preheat your oven to 350°F (175°C). Carefully transfer your skillet to the oven and let it bake for about 10-15 minutes.

    Keep an eye on it! You want the cheese to melt and become perfectly bubbly and golden. Once it looks irresistible, take it out and let it sit for a couple of minutes before serving. Enjoy your delicious Pizza Lasagna Skillet Bake!

    Tips for Success

    • Don’t rush the meat browning stage; those brown bits add incredible flavor!
    • Use a mix of cheeses, like cheddar or provolone, for extra taste.
    • Feel free to customize by adding vegetables like bell peppers or mushrooms.
    • To save time, prep your ingredients ahead of time to make cooking a breeze.
    • Let the dish sit for a few minutes after baking; this helps it set for easier serving!

    Equipment Needed for Pizza Lasagna Skillet Bake

    • Large pot: For boiling the lasagna sheets. A dutch oven works great, too!
    • Large skillet: Ideal for browning the meat and combining ingredients. A nonstick option makes clean-up easier.
    • Wooden spoon: Perfect for breaking up meat and mixing everything together.
    • Measuring cups: Helpful for measuring cheese and marinara. Not necessary if you’re comfortable eyeballing!

    Variations on Pizza Lasagna Skillet Bake

    • Vegetarian Option: Swap out all the meats for your favorite veggies. Think bell peppers, zucchini, or mushrooms for a burst of flavor!
    • Gluten-Free: Use gluten-free pasta or spiralized zucchini noodles for a lighter take without sacrificing taste.
    • Spicy Kick: Incorporate some diced jalapeños or crushed red pepper for an added zing. Your taste buds will thank you!
    • Cheese Lovers: Add layers of ricotta or cottage cheese for that classic lasagna richness and a curdly texture. Yum!
    • Herb Infusion: Fresh basil or parsley sprinkled on top before serving can brighten the dish and elevate its flavor profile.

    Serving Suggestions for Pizza Lasagna Skillet Bake

    • Pair with a fresh garden salad dressed in balsamic vinaigrette for a refreshing bite.
    • A crisp garlic bread on the side is always a crowd-pleaser.
    • Serve it with a glass of sparkling water or a fruity iced tea to complement the rich flavors.
    • For presentation, sprinkle some fresh parsley or basil on top just before serving!

    FAQs about Pizza Lasagna Skillet Bake

    Can I make this Pizza Lasagna Skillet Bake ahead of time?

    Absolutely! You can prepare the meat mixture a day in advance and store it in the fridge. Just reheat before adding the cooked lasagna sheets and baking. This way, you’ll save time on busy weeknights!

    What can I substitute for the marinara sauce?

    If you’re looking for a change, pizza sauce, alfredo sauce, or even a homemade tomato sauce will work wonderfully. Each option brings a unique twist to the Pizza Lasagna Skillet Bake.

    How do I store leftovers of the Pizza Lasagna Skillet Bake?

    Store any leftovers in an airtight container in the fridge for up to 3 days. Reheat in the microwave or oven until heated through before enjoying again!

    Can I use different types of cheese?

    Absolutely! Feel free to mix in different cheeses like cheddar or provolone for a unique flavor. Mixing cheeses can add extra creaminess and depth to your Pizza Lasagna Skillet Bake.

    Is this dish suitable for kids?

    Yes! Most kids love the combination of flavors, especially with familiar ingredients like pepperoni and cheese. If your little ones are picky eaters, consider letting them help add their favorite toppings!

    Final Thoughts on Pizza Lasagna Skillet Bake

    The Pizza Lasagna Skillet Bake isn’t just a meal; it’s a heartwarming experience that brings the family together. The delightful aroma wafting through your kitchen feels like a warm hug at the end of a long day. Watching my loved ones dive into this cheesy, savory dish always fills my heart with joy. Plus, knowing that I’ve managed to scrape together a dinner in 30 minutes makes evenings feel less chaotic. This dish is a true reminder that comfort food can be both delicious and simple, making it a beloved staple around my dinner table!


    Print

    clock clock iconcutlery cutlery iconflag flag iconfolder folder iconinstagram instagram iconpinterest pinterest iconfacebook facebook iconprint print iconsquares squares iconheart heart iconheart solid heart solid icon

    Description

    A hearty and delicious bake combining elements of pizza and lasagna, perfect for family dinners.


    • 1 pound ground beef
    • 1 pound Italian sausage
    • 1 cup bacon, crumbled
    • 1/2 yellow onion, diced
    • 1 teaspoon onion powder
    • 1 teaspoon garlic powder
    • 1/2 teaspoon Italian seasoning
    • 25 pepperoni slices
    • 24 ounces marinara sauce
    • 10 lasagna sheets, broken into small pieces
    • 1 cup mozzarella cheese, shredded

    1. Cook the broken lasagna sheets in a large pot of boiling salted water according to the package directions. Drain well and set aside.
    2. Brown the ground beef, Italian sausage, and diced yellow onion in a large skillet over medium-high heat, breaking up the meat until fully cooked and no pink remains. Drain off excess grease.
    3. Add onion powder, garlic powder, and Italian seasoning to the meat mixture. Stir in 20 pepperoni slices, 1/2 cup crumbled bacon, and the marinara sauce. Stir to combine thoroughly.
    4. Gently fold the drained lasagna sheets into the skillet mixture, ensuring even coating and distribution throughout.
    5. Sprinkle shredded mozzarella cheese evenly over the surface. Top with the remaining crumbled bacon and arrange the reserved 5 pepperoni slices on top.
    6. Transfer the skillet to an oven preheated to 350°F (175°C) and bake for 10 to 15 minutes, or until the cheese is fully melted and bubbly. Serve immediately.

    Notes

    • For a vegetarian version, substitute meat with vegetables or a meat alternative.
    • Feel free to add additional toppings like diced bell peppers or mushrooms for extra flavor.
    • Prep Time: 15 minutes
    • Cook Time: 15 minutes
    • Category: Main Course
    • Method: Baking
    • Cuisine: Italian-American

    Nutrition

    • Serving Size: 1 slice
    • Calories: 450
    • Sugar: 4g
    • Sodium: 800mg
    • Fat: 30g
    • Saturated Fat: 12g
    • Unsaturated Fat: 10g
    • Trans Fat: 0g
    • Carbohydrates: 30g
    • Fiber: 2g
    • Protein: 25g
    • Cholesterol: 80mg

    Sharing is caring!