Author: IHAAL Team

  • Cheese Bread

    Cheese Bread


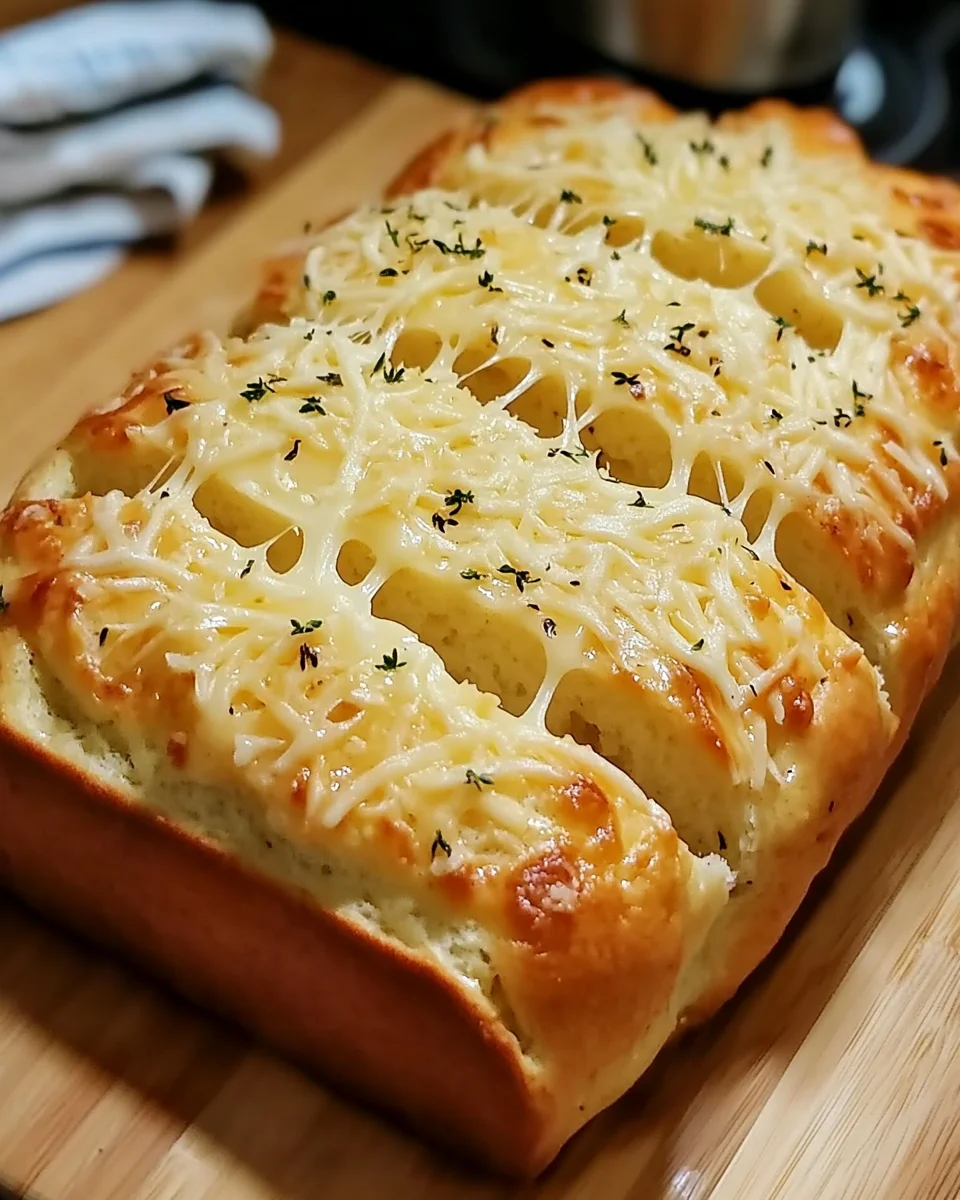
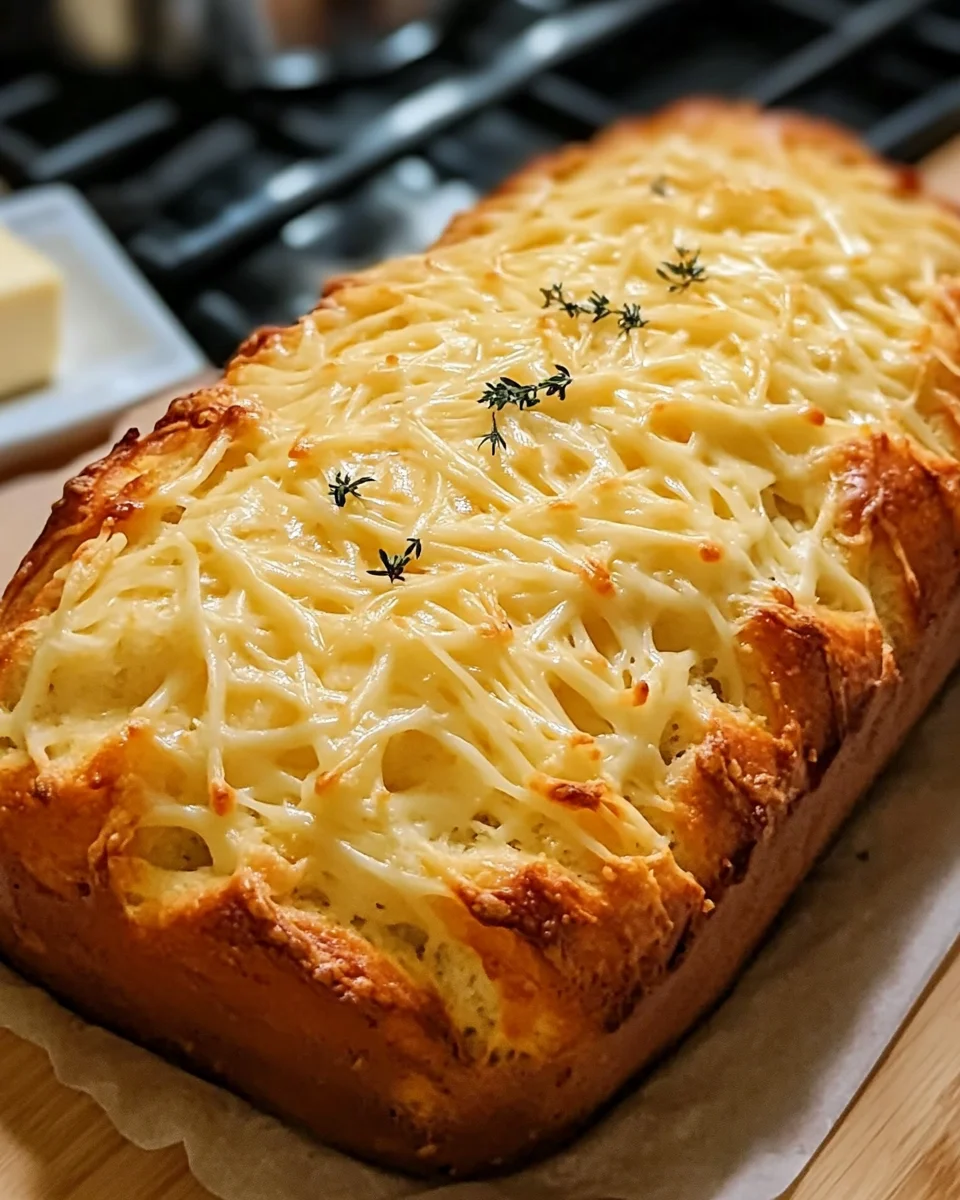
    Introduction to Cheese Bread

    There’s something magical about the aroma of cheese bread wafting through your home. It’s one of those cozy scents that hugs you like a favorite sweater. If you’re like me—a busy mom or a professional juggling countless responsibilities—you know how precious time is. That’s why this easy cheese bread recipe is my go-to! It’s quick to whip up and impressively delicious, making it perfect for family get-togethers or a simple weeknight dinner. Plus, who can resist warm, cheesy goodness? Let’s explore how to bring this delightful dish to life!

    Why You’ll Love This Cheese Bread

    This cheese bread is a game-changer for busy days! With minimal prep and just one bowl, you can have a warm loaf ready in no time. Its cheesy, buttery flavor dances on your taste buds, making it an instant hit with everyone. Plus, it’s perfect for teaming up with soups or salads. Trust me, you’ll be making this a staple in your home!

    Ingredients for Cheese Bread

    Creating this scrumptious cheese bread starts with gathering a few simple ingredients. Each one serves a purpose in building that beautiful, cheesy flavor and texture. You’ll need:

    • All-purpose flour: The foundation of our bread! It provides structure and a wonderful texture, making every slice a delight.
    • Sugar: Just a touch to balance the flavors and give our loaf a lovely golden crust.
    • Baking powder: This wonder spicing agent helps make the bread rise, giving it that fluffy quality we all love.
    • Salt: A little salt enhances everything, bringing out the flavors of the cheese, ensuring every bite is delicious.
    • Shredded cheese: This is the star! You can choose cheddar, mozzarella, or any cheese blend that tickles your fancy; it adds a glorious melty goodness.
    • Milk: Whole milk works best, enriching the dough and adding moisture; you can also use low-fat or a dairy-free alternative if needed.
    • Egg: This helps bind everything together and adds richness, making the bread irresistible.
    • Melted butter: Bringing in that delicious buttery flavor and moisture; it makes the bread soft and rich.
    • Optional extras: For a little zing, consider adding garlic powder or your favorite dried herbs like oregano or thyme.

    If you’re curious about exact measurements, hang tight! You’ll find those at the bottom of the article, ready for printing anytime you want to bake this cheesy delight.

    How to Make Cheese Bread

    Let’s dive into how to create this cheesy masterpiece! Baking cheese bread is a simple and fun activity, perfect for anyone, regardless of your kitchen experience. Just follow these easy-to-follow steps, and I promise you’ll have a delightful loaf in no time!

    Step 1: Preheat and Prepare

    First things first, preheat your oven to 375°F (190°C). This is crucial as it ensures even baking from the start.

    While that’s happening, grab your loaf pan and grease it with a bit of melted butter or line it with parchment paper. This will keep your bread from sticking and help it slide right out later!

    Step 2: Mix the Dry Ingredients

    Now, in a large mixing bowl, combine the all-purpose flour, sugar, baking powder, and salt. These ingredients form the base of your bread!

    If you’re using garlic powder or dried herbs, toss those in now. They’ll add wonderful extra flavor and elevate your cheese bread to the next level.

    Step 3: Add the Cheese

    Next up, it’s cheese time! Stir in your choice of shredded cheese until it’s evenly coated with the dry mixture. This little step ensures that cheesy goodness is distributed throughout your bread!

    Step 4: Combine Wet Ingredients

    In a separate bowl, whisk together the milk, egg, and melted butter. Make it smooth and creamy; think of this as creating a rich liquid gold that will bring your bread together.

    Step 5: Mix Dry and Wet Ingredients

    Pour your wet mixture into the bowl with the dry ingredients. Now, this is vital: stir gently and only until just combined. You don’t want to overmix; otherwise, your cheese bread could turn out tough instead of fluffy!

    Step 6: Bake the Cheese Bread

    Now comes the exciting part! Spoon the batter into your prepared loaf pan and smooth the top.

    Bake in your preheated oven for 30–35 minutes. Keep an eye on it! A toothpick inserted into the center should come out clean when it’s done. You’ll know it’s ready when the top turns a glorious golden brown.

    Step 7: Cool and Serve

    Once baked to perfection, let the bread cool in the pan for about 10 minutes. This helps it firm up a bit.

    Then, gently transfer it to a wire rack. Slice it up and serve warm, or let it cool to room temperature. Either way, you’ll want to enjoy every cheesy bit!

    Tips for Success

    • Measure your ingredients accurately to ensure the best results—too much flour can make the bread dense.
    • Let your cheese come to room temperature for even melting and mixing.
    • Add your favorite chopped veggies or spices for a unique twist.
    • For the best texture, allow the bread to cool completely before slicing.
    • Store leftovers in an airtight container for up to 3 days to maintain freshness.

    Equipment Needed for Cheese Bread

    • Loaf pan: A standard 8×4 inch pan works best, but any similar-sized oven-safe dish can be a substitute.
    • Mixing bowls: One large bowl for dry ingredients and a smaller one for wet ingredients will do.
    • Whisk: If you don’t have a whisk, a fork is a great alternative for mixing.
    • Measuring cups and spoons: Essential for getting your ingredients just right.
    • Spatula: Helpful for scraping down the sides of the bowl and smoothing the batter.

    Variations for Cheese Bread

    • Herb-Infused: Incorporate fresh herbs like rosemary or basil for a fragrant twist!
    • Spicy Kick: Add diced jalapeños or a dash of cayenne pepper for some heat.
    • Vegetable Boost: Toss in some finely chopped spinach, sun-dried tomatoes, or bell peppers for added nutrition and flavor.
    • Cheese Extravaganza: Experiment with different cheese combinations like pepper jack or feta for a unique taste.
    • Gluten-Free Option: Substitute all-purpose flour with a gluten-free blend for a delightful gluten-free cheese bread!
    • Cheesy Pesto Delight: Swirl in some pesto sauce to the batter for herby goodness and an irresistible flavor.

    Serving Suggestions for Cheese Bread

    • Pair with Soups: Serve warm cheese bread alongside your favorite soup, like tomato or minestrone, for a comforting meal.
    • Salad Companion: A fresh green salad pairs beautifully, providing a crisp contrast to the rich cheese.
    • Dip Delight: Slice and serve with marinara or garlic butter for a delightful dipping experience.
    • Charcuterie Board: Add to a cheese board alongside fruits, nuts, and cured meats for a fantastic spread.
    • Toast It: Enjoy a slice toasted with a smear of creamy butter or spreadable cheese!

    FAQs about Cheese Bread

    As I dive into more culinary adventures, I’ve noticed some common questions about cheese bread. Here are a few that might pop into your mind as you consider baking this delightful treat!

    Can I use different types of cheese?

    Absolutely! Cheese bread is versatile. You can pick from cheddar, mozzarella, or even a mix. Experiment and see which combination you love best!

    How do I store leftover cheese bread?

    To keep your cheese bread fresh, store it in an airtight container at room temperature. It stays tasty for up to three days—if it lasts that long!

    Can I freeze cheese bread?

    You sure can! Once cooled, wrap your cheese bread tightly in plastic wrap, then in aluminum foil. It can last up to three months in the freezer.

    What can I serve with cheese bread?

    Cheese bread pairs well with soups, salads, or just on its own! Consider adding a side of marinara for dipping, or serve with a fresh green salad to balance the richness.

    Can I make this bread in advance?

    Yes, you can! Just bake it a day ahead. Reheat in the oven before serving for a warm, cheesy treat that feels freshly baked.

    Final Thoughts

    Baking cheese bread is more than just following a recipe; it’s about creating moments of joy in our busy lives. The warm, cheesy aroma fills your kitchen and wraps around you like a comforting hug. Whether you’re enjoying a slice with your family or sharing it with friends, this bread has a way of bringing smiles all around. It’s an easy dish that transforms simple ingredients into a delightful experience. So grab your apron and bake this lovely treat! I promise it’ll become a cherished addition to your recipe collection.


    Print

    clock clock iconcutlery cutlery iconflag flag iconfolder folder iconinstagram instagram iconpinterest pinterest iconfacebook facebook iconprint print iconsquares squares iconheart heart iconheart solid heart solid icon

    Description

    There’s something magical about the aroma of cheese bread wafting through your home. It’s one of those cozy scents that hugs you like a favorite sweater. If you’re like me—a busy mom or a professional juggling countless responsibilities—you know how precious time is. That’s why this easy cheese bread recipe is my go-to! It’s quick to whip up and impressively delicious, making it perfect for family get-togethers or a simple weeknight dinner. Plus, who can resist warm, cheesy goodness? Let’s explore how to bring this delightful dish to life!


    • 2 cups all-purpose flour
    • 1 tablespoon sugar
    • 1 tablespoon baking powder
    • ½ teaspoon salt
    • 1 ½ cups shredded cheese (cheddar, mozzarella, or your favorite blend)
    • 1 cup milk (whole milk preferred)
    • 1 large egg
    • 3 tablespoons melted butter (plus more for greasing)
    • Optional: ½ teaspoon garlic powder or dried herbs (oregano, thyme) for extra flavor

    1. Preheat your oven to 375°F (190°C). Grease a loaf pan with butter or line it with parchment paper.
    2. In a large mixing bowl, combine flour, sugar, baking powder, and salt. Add garlic powder or herbs if using.
    3. Stir in the shredded cheese until evenly coated with the flour mixture.
    4. In a separate bowl, whisk together milk, egg, and melted butter.
    5. Pour the wet mixture into the dry ingredients. Stir gently until just combined—do not overmix.
    6. Spoon the batter evenly into the prepared pan and smooth the top.
    7. Bake for 30–35 minutes, or until the top is golden and a toothpick inserted into the center comes out clean.
    8. Let the bread cool in the pan for 10 minutes, then transfer to a wire rack. Slice and enjoy warm or at room temperature.

    Notes

    • This cheese bread can be customized with your favorite herbs and spices for added flavor.
    • Leftovers can be stored in an airtight container for up to 3 days.
    • Prep Time: 15 minutes
    • Cook Time: 35 minutes
    • Category: Bread
    • Method: Baking
    • Cuisine: American

    Nutrition

    • Serving Size: 1 slice
    • Calories: 200
    • Sugar: 1g
    • Sodium: 300mg
    • Fat: 10g
    • Saturated Fat: 5g
    • Unsaturated Fat: 3g
    • Trans Fat: 0g
    • Carbohydrates: 22g
    • Fiber: 1g
    • Protein: 7g
    • Cholesterol: 45mg

    Sharing is caring!

  • 1 Ingredient Cottage Cheese Chips

    1 Ingredient Cottage Cheese Chips


    Introduction to 1 Ingredient Cottage Cheese Chips

    Hey there, fellow food lovers! If you’re anything like me, you’re always on the lookout for quick and healthy snacks that don’t compromise on flavor. That’s where these 1 Ingredient Cottage Cheese Chips come in! With just one simple ingredient, you can whip up a crunchy delight that’s perfect for busy days or when you want to impress your loved ones. These chips are not only easy to make, but they also pack a protein punch, making them a guilt-free treat. Let’s dive into this deliciously simple recipe!

    Why You’ll Love This 1 Ingredient Cottage Cheese Chips

    These 1 Ingredient Cottage Cheese Chips are a game-changer for anyone juggling a busy lifestyle. They’re incredibly easy to make, taking just a few minutes of prep time. Plus, they bake up quickly, giving you a crunchy snack in no time. The best part? You can customize them with your favorite seasonings, making each batch uniquely delicious. Trust me, once you try them, you’ll be hooked!

    Ingredients for 1 Ingredient Cottage Cheese Chips

    Making these 1 Ingredient Cottage Cheese Chips is as simple as it gets! Here’s what you’ll need:

    • Cottage Cheese: The star of the show! Whole milk cottage cheese gives these chips their creamy texture and protein boost. Look for a brand with 4% milkfat for the best flavor.

    While the recipe is straightforward, you can also get creative with optional ingredients:

    • Seasonings: Feel free to sprinkle in some salt, pepper, or your favorite spices. Garlic powder, paprika, or even a dash of cayenne can elevate the flavor.
    • Cheese Variations: If you want to experiment, try using ricotta or a low-fat cheese for a different twist.

    For exact measurements, check the bottom of the article where you can find everything you need for printing. Happy snacking!

    How to Make 1 Ingredient Cottage Cheese Chips

    Ready to make your own 1 Ingredient Cottage Cheese Chips? Let’s get started! Follow these simple steps, and you’ll have a crunchy snack that’s sure to impress.

    Step 1: Preheat the Oven

    First things first, preheat your oven to 350°F. This step is crucial! Preheating ensures that your chips cook evenly and develop that perfect crispy texture. If you skip this, you might end up with soggy chips, and nobody wants that!

    Step 2: Prepare the Baking Sheet

    Next, line a cookie sheet with parchment paper. This little trick makes cleanup a breeze and helps your chips cook evenly. The parchment prevents sticking, so you can easily lift your chips off once they’re done. Trust me, your future self will thank you!

    Step 3: Scoop and Shape the Cottage Cheese

    Now, it’s time to scoop! Use a tablespoon to portion out the cottage cheese onto the prepared sheet, spacing them about two inches apart. Flatten each scoop to about 1/4 inch thick. This helps them cook evenly. If they’re too thick, they won’t crisp up properly, and we want crunchy chips, right?

    Step 4: Season to Taste

    Here’s where the magic happens! Before baking, sprinkle your favorite seasonings on top. Whether it’s a pinch of salt, a dash of pepper, or a sprinkle of garlic powder, this is your chance to get creative. The right seasoning can take these chips from good to absolutely delicious!

    Step 5: Bake the Chips

    Pop your baking sheet into the oven and let the chips bake for 40-50 minutes. Keep an eye on them, especially after 35 minutes. You’re looking for dark brown edges and a golden surface. This is the sweet spot for that perfect crunch!

    Step 6: Cool and Enjoy

    Once they’re done baking, remove the chips from the oven and let them cool completely for 20-30 minutes. This cooling time is essential! It allows the chips to firm up and become crispy. Patience is key here, but I promise it’s worth the wait!

    Tips for Success

    • Use a cookie scoop for even portions; it makes shaping easier!
    • Experiment with different seasonings to find your favorite flavor combo.
    • Check the chips regularly towards the end of baking to avoid burning.
    • Let them cool completely for maximum crunchiness.
    • Store any leftovers in an airtight container to keep them fresh.

    Equipment Needed

    • Baking Sheet: A standard cookie sheet works perfectly. If you don’t have one, a flat oven-safe dish will do.
    • Parchment Paper: This helps prevent sticking. If you’re out, a silicone baking mat is a great alternative.
    • Tablespoon: For scooping the cottage cheese. A regular spoon can work in a pinch!

    Variations

    • Herbed Cottage Cheese Chips: Add dried herbs like oregano, thyme, or rosemary for a Mediterranean twist.
    • Spicy Cottage Cheese Chips: Mix in some cayenne pepper or chili powder for a kick that’ll wake up your taste buds!
    • Cheesy Cottage Cheese Chips: Sprinkle grated Parmesan or cheddar on top before baking for an extra cheesy flavor.
    • Sweet Cottage Cheese Chips: For a unique treat, try adding a sprinkle of cinnamon and a touch of sugar for a sweet version.
    • Gluten-Free Option: These chips are naturally gluten-free, making them a perfect snack for those with dietary restrictions.

    Serving Suggestions

    • Pair your 1 Ingredient Cottage Cheese Chips with a refreshing salsa or guacamole for a delightful dip.
    • Serve them alongside a crisp salad for a satisfying crunch.
    • Enjoy with a glass of sparkling water or iced tea for a light snack.
    • For a fun presentation, stack them in a tall glass for a party platter!

    FAQs about 1 Ingredient Cottage Cheese Chips

    Can I use low-fat cottage cheese for this recipe?

    Absolutely! While I recommend whole milk cottage cheese for the best flavor and texture, low-fat options can work too. Just keep in mind that the chips may be slightly less creamy.

    How do I store leftover Cottage Cheese Chips?

    To keep your Cottage Cheese Chips fresh, store them in an airtight container at room temperature. They should stay crispy for a few days, but I doubt they’ll last that long!

    Can I make these chips in an air fryer?

    Yes, you can! Just scoop and shape the cottage cheese as directed, then air fry at 350°F for about 15-20 minutes. Keep an eye on them to ensure they don’t burn.

    What are some good dips for these chips?

    These chips pair wonderfully with guacamole, salsa, or even a creamy ranch dip. The crunchiness of the chips complements the smoothness of the dips perfectly!

    Can I freeze the chips?

    While I recommend enjoying them fresh, you can freeze the chips. Just make sure they’re completely cool before placing them in a freezer-safe bag. When you’re ready to eat, reheat them in the oven for that crispy texture!

    Final Thoughts

    Making 1 Ingredient Cottage Cheese Chips has been a delightful journey for me, and I hope it becomes one for you too! These chips are not just a snack; they’re a canvas for your creativity. Whether you enjoy them plain or jazzed up with spices, they bring a satisfying crunch that’s hard to resist. Plus, knowing you’ve whipped up something healthy in no time is a win in my book. So, gather your ingredients, get baking, and enjoy the joy of homemade snacks that are both delicious and nutritious. Happy snacking!


    Print

    clock clock iconcutlery cutlery iconflag flag iconfolder folder iconinstagram instagram iconpinterest pinterest iconfacebook facebook iconprint print iconsquares squares iconheart heart iconheart solid heart solid icon

    Description

    Hey there, fellow food lovers! If you’re anything like me, you’re always on the lookout for quick and healthy snacks that don’t compromise on flavor. That’s where these 1 Ingredient Cottage Cheese Chips come in! With just one simple ingredient, you can whip up a crunchy delight that’s perfect for busy days or when you want to impress your loved ones. These chips are not only easy to make, but they also pack a protein punch, making them a guilt-free treat. Let’s dive into this deliciously simple recipe!


    • 1 cup whole milk cottage cheese (4% milkfat, 256g)

    1. Heat oven to 350°F. Line a cookie sheet with parchment paper.
    2. Scoop 1 tablespoon portions of cottage cheese onto sheet, 2 inches apart. Flatten to 1/4 inch thick.
    3. Add any optional seasonings now.
    4. Cook 40-50 minutes until edges are dark brown and surface is golden. Check at 35 minutes.
    5. Let cool completely for 20-30 minutes until fully firm and crispy.

    Notes

    • Optional seasonings can include salt, pepper, or your favorite spices.
    • Store any leftovers in an airtight container.
    • Prep Time: 10 minutes
    • Cook Time: 40-50 minutes
    • Category: Snack
    • Method: Baking
    • Cuisine: American

    Nutrition

    • Serving Size: 1 chip
    • Calories: 25
    • Sugar: 1g
    • Sodium: 15mg
    • Fat: 1g
    • Saturated Fat: 0.5g
    • Unsaturated Fat: 0.5g
    • Trans Fat: 0g
    • Carbohydrates: 1g
    • Fiber: 0g
    • Protein: 3g
    • Cholesterol: 5mg

    Sharing is caring!

  • Peach Watermelon Salad

    Peach Watermelon Salad


    Introduction to Peach Watermelon Salad

    As summer rolls in, I find myself craving light, refreshing dishes that bring joy to my table. That’s where this delightful Peach Watermelon Salad comes in! It’s the perfect solution for those busy days when you want something quick yet impressive. With its vibrant colors and sweet flavors, this salad is sure to win over your family and friends. Plus, it takes just minutes to prepare, making it an ideal choice for a last-minute gathering or a simple weeknight dinner. Trust me, this salad will become your go-to summer favorite!

    Why You’ll Love This Peach Watermelon Salad

    This Peach Watermelon Salad is a true gem for busy moms and professionals alike. It’s incredibly easy to whip up, taking only about 10 minutes from start to finish. The combination of sweet peaches and juicy watermelon creates a flavor explosion that’s both refreshing and satisfying. Plus, it’s a guilt-free treat that’s perfect for hot summer days, making it a delightful addition to any meal or picnic!

    Ingredients for Peach Watermelon Salad

    Gathering the right ingredients is key to making this Peach Watermelon Salad shine. Here’s what you’ll need:

    • Watermelon: Sweet and juicy, watermelon is the star of this salad. It adds a refreshing crunch that’s perfect for summer.
    • Peaches: Ripe peaches bring a delightful sweetness and a hint of floral flavor. Look for ones that yield slightly to pressure for the best taste.
    • Fresh Mint Leaves: Chopped mint adds a burst of freshness. It’s like a cool breeze on a hot day, enhancing the overall flavor.
    • Lime Juice: A drizzle of lime juice brightens the salad and balances the sweetness. It’s the zesty kick that ties everything together.
    • Sea Salt: Just a pinch of sea salt elevates the flavors, making the fruits taste even sweeter.
    • Feta Cheese (Optional): Crumbled feta adds a creamy, salty contrast. If you’re feeling adventurous, it’s a great addition!
    • Red Onion (Optional): Thinly sliced red onion provides a sharp bite that complements the sweetness of the fruits.
    • Cucumber (Optional): Sliced cucumber adds a refreshing crunch and extra hydration, making the salad even more refreshing.

    Feel free to mix and match these ingredients based on your preferences. You can also add other fruits like berries or citrus for an extra flavor twist. For exact quantities, check the bottom of the article where you can find them available for printing!

    How to Make Peach Watermelon Salad

    Making this Peach Watermelon Salad is as easy as pie! Follow these simple steps, and you’ll have a refreshing dish ready in no time. Let’s dive in!

    Step 1: Combine the Fruits

    Start by grabbing a large bowl. Toss in the cubed watermelon and sliced peaches. The colors will pop, making your heart sing! Gently mix them together, ensuring the fruits are evenly distributed. This is where the magic begins!

    Step 2: Add Fresh Mint

    Next, sprinkle the chopped fresh mint leaves over the fruit mixture. The mint adds a refreshing twist that’s like a cool breeze on a hot summer day. Gently toss everything again, allowing the mint to mingle with the sweet fruits.

    Step 3: Drizzle with Lime Juice

    Now, it’s time for the lime juice! Drizzle it over the salad, letting the zesty flavor brighten up the dish. Lime juice not only enhances the taste but also helps keep the fruits fresh. It’s like sunshine in a bowl!

    Step 4: Season with Sea Salt

    Don’t forget the sea salt! Just a pinch will elevate the flavors, making the fruits taste even sweeter. Sprinkle it over the salad and give it a gentle toss. You’ll be amazed at how a little salt can make a big difference!

    Step 5: Incorporate Optional Ingredients

    If you’re feeling adventurous, now’s the time to add any optional ingredients. Crumbled feta cheese brings a creamy texture, while sliced red onion adds a sharp bite. If you choose to include cucumber, it’ll add extra crunch and hydration. Mix everything gently to combine.

    Step 6: Chill and Serve

    Finally, cover the salad and pop it in the refrigerator for about 10–15 minutes. Chilling allows the flavors to meld beautifully. When you’re ready to serve, scoop it into bowls and enjoy this delightful Peach Watermelon Salad with your loved ones!

    Tips for Success

    • Choose ripe peaches and watermelon for the best flavor. They should be sweet and juicy!
    • Chill the salad before serving to enhance the refreshing taste.
    • Experiment with different herbs like basil or cilantro for a unique twist.
    • For a more filling dish, serve it over a bed of greens.
    • Make it ahead of time, but add mint and lime juice just before serving to keep it fresh.

    Equipment Needed

    • Large Bowl: A mixing bowl is essential. If you don’t have one, any large dish will do.
    • Cutting Board: A sturdy cutting board makes slicing fruits easier. A plate can work in a pinch.
    • Knife: A sharp knife is key for cutting fruits. A butter knife can be used for softer fruits.
    • Measuring Spoons: Handy for lime juice and salt. You can use any small spoon if needed.

    Variations

    • Berry Bliss: Add a handful of fresh berries like strawberries or blueberries for a burst of color and flavor.
    • Citrus Twist: Incorporate segments of orange or grapefruit for a zesty kick that complements the sweetness.
    • Nutty Crunch: Toss in some toasted almonds or walnuts for added texture and a nutty flavor.
    • Spicy Kick: Add a pinch of cayenne pepper or sliced jalapeños for a surprising heat that contrasts with the sweetness.
    • Vegan Delight: Omit the feta cheese and replace it with avocado for a creamy, plant-based alternative.

    Serving Suggestions

    • Pair this Peach Watermelon Salad with grilled chicken or fish for a complete meal.
    • Serve it alongside crusty bread or pita chips for a delightful crunch.
    • For drinks, consider a refreshing iced tea or a light white wine.
    • Presentation tip: Serve in a clear bowl to showcase the vibrant colors!

    FAQs about Peach Watermelon Salad

    As I’ve shared my love for this Peach Watermelon Salad, I often get questions from fellow home cooks. Here are some of the most common inquiries I’ve encountered:

    Can I make this salad ahead of time?

    Absolutely! You can prepare the salad a few hours in advance. Just remember to add the mint and lime juice right before serving to keep everything fresh and vibrant.

    What other fruits can I add to this salad?

    The beauty of this summer salad is its versatility! Feel free to add berries, citrus segments, or even diced apples for a fun twist. The more, the merrier!

    Is this salad suitable for a vegan diet?

    Yes! Simply omit the feta cheese, and you’ll have a delicious vegan option. You can also add avocado for a creamy texture without dairy.

    How long will leftovers last in the fridge?

    Leftovers can be stored in an airtight container for up to two days. However, the salad is best enjoyed fresh, as the fruits may start to lose their texture.

    Can I use frozen fruit for this salad?

    While fresh fruit is ideal, you can use frozen fruit if necessary. Just be sure to thaw and drain any excess liquid before adding it to the salad to avoid a soggy mess!

    Final Thoughts

    Creating this Peach Watermelon Salad is more than just preparing a dish; it’s about bringing a slice of summer to your table. The vibrant colors and refreshing flavors can brighten even the busiest of days. I love how this salad not only satisfies my cravings but also sparks joy in my family. Whether it’s a picnic, a barbecue, or a simple weeknight dinner, this salad is a delightful companion. So, gather your ingredients, and let the magic of summer unfold in your kitchen. Trust me, you’ll be savoring every bite!


    Print

    clock clock iconcutlery cutlery iconflag flag iconfolder folder iconinstagram instagram iconpinterest pinterest iconfacebook facebook iconprint print iconsquares squares iconheart heart iconheart solid heart solid icon

    Description

    As summer rolls in, I find myself craving light, refreshing dishes that bring joy to my table. That’s where this delightful Peach Watermelon Salad comes in! It’s the perfect solution for those busy days when you want something quick yet impressive. With its vibrant colors and sweet flavors, this salad is sure to win over your family and friends. Plus, it takes just minutes to prepare, making it an ideal choice for a last-minute gathering or a simple weeknight dinner. Trust me, this salad will become your go-to summer favorite!


    • 3 cups watermelon, cubed
    • 2 ripe peaches, sliced
    • 1/4 cup fresh mint leaves, chopped
    • 1 tablespoon lime juice
    • 1/4 teaspoon sea salt
    • Optional: 1/4 cup crumbled feta cheese
    • Optional: 1/4 cup thinly sliced red onion
    • Optional: 1/2 cucumber, sliced

    1. In a large bowl, combine the cubed watermelon and sliced peaches.
    2. Add the chopped mint leaves and gently toss to mix.
    3. Drizzle the lime juice over the salad and sprinkle with sea salt.
    4. If using, add the crumbled feta cheese, sliced red onion, and cucumber.
    5. Toss everything gently to combine.
    6. Chill in the refrigerator for 10–15 minutes before serving for best flavor.

    Notes

    • For a vegan option, omit the feta cheese.
    • Feel free to add other fruits like berries or citrus for extra flavor.
    • Prep Time: 10 minutes
    • Cook Time: 0 minutes
    • Category: Salad
    • Method: No-cook
    • Cuisine: American

    Nutrition

    • Serving Size: 1 cup
    • Calories: 80
    • Sugar: 10g
    • Sodium: 150mg
    • Fat: 3g
    • Saturated Fat: 1g
    • Unsaturated Fat: 2g
    • Trans Fat: 0g
    • Carbohydrates: 15g
    • Fiber: 1g
    • Protein: 2g
    • Cholesterol: 5mg

    Sharing is caring!

  • Shrimp and Cucumber Salad

    Shrimp and Cucumber Salad


    Introduction to Shrimp and Cucumber Salad

    As a busy mom, I know how challenging it can be to whip up something delicious yet quick. That’s where my Shrimp and Cucumber Salad comes in! This refreshing dish is not only a breeze to prepare, but it also brings a burst of flavor that will impress your loved ones. Imagine crisp cucumbers mingling with succulent shrimp, all drizzled in a zesty dressing. It’s perfect for those hectic days when you need a light meal or a delightful appetizer. Trust me, this salad will become your go-to recipe for any occasion!

    Why You’ll Love This Shrimp and Cucumber Salad

    This Shrimp and Cucumber Salad is a lifesaver for busy days! It takes just 10 minutes to prepare, making it a fantastic option for those evenings when time is tight. The combination of fresh ingredients creates a vibrant taste that’s both light and satisfying. Plus, it’s low in calories, so you can enjoy it guilt-free. Whether as a quick lunch or a starter for dinner, this salad is sure to please!

    Ingredients for Shrimp and Cucumber Salad

    Gathering the right ingredients is key to making a delicious Shrimp and Cucumber Salad. Here’s what you’ll need:

    • Cooked shrimp: Look for peeled and deveined shrimp to save time. Fresh or frozen works well!
    • Cucumber: A large cucumber adds a refreshing crunch. English cucumbers are great for their thin skin.
    • Garlic: Minced garlic brings a punch of flavor. You can use fresh or jarred, depending on your preference.
    • Cilantro: This herb adds a burst of freshness. If you’re not a fan, parsley is a good substitute.
    • Soy sauce: A staple in Asian cuisine, it adds depth and umami. Low-sodium options are available for a healthier choice.
    • Rice vinegar: This tangy vinegar balances the flavors. You can swap it with apple cider vinegar if needed.
    • Sesame oil: A little goes a long way! It adds a nutty aroma. If you don’t have it, olive oil can work in a pinch.
    • Sugar: Just a touch to balance the dressing. You can use honey or a sugar substitute if you prefer.
    • Red pepper flakes: Adjust the spice level to your liking. For a milder version, leave it out!
    • Salt and pepper: Essential for seasoning. Always taste before adding more!

    For exact quantities, check the bottom of the article where you can find everything listed for easy printing. Happy cooking!

    How to Make Shrimp and Cucumber Salad

    Making this Shrimp and Cucumber Salad is as easy as pie! Follow these simple steps, and you’ll have a refreshing dish ready in no time. Let’s dive in!

    Step 1: Combine the Main Ingredients

    Start by grabbing a large bowl. Toss in the cooked shrimp, sliced cucumber, minced garlic, and chopped cilantro. The colors will pop, and the aroma will make your mouth water! Gently mix everything together, ensuring the shrimp and cucumber are well combined. This is where the magic begins!

    Step 2: Prepare the Dressing

    In a separate small bowl, whisk together the soy sauce, rice vinegar, sesame oil, sugar, and red pepper flakes. This dressing is the heart of the salad, bringing all the flavors together. Taste it as you go! If you like it spicier, add more red pepper flakes. If you prefer it sweeter, a pinch more sugar will do the trick.

    Step 3: Toss and Season

    Now, pour the dressing over the shrimp and cucumber mixture. Toss everything gently to coat. This is where the salad transforms into a flavor explosion! Don’t forget to season with salt and pepper to taste. A little sprinkle can elevate the dish to new heights!

    Step 4: Serve or Chill

    Your Shrimp and Cucumber Salad is almost ready! You can serve it immediately for a fresh crunch, or let it chill in the fridge for about 30 minutes. Chilling allows the flavors to meld beautifully. Either way, it’s a win-win!

    Tips for Success

    • Use fresh shrimp for the best flavor. If using frozen, thaw them completely before cooking.
    • Slice the cucumber just before serving to keep it crisp and crunchy.
    • Feel free to adjust the dressing ingredients to suit your taste. A little more vinegar can add zing!
    • For added texture, consider tossing in some chopped nuts or seeds.
    • Make it a meal by serving it over a bed of greens!

    Equipment Needed

    • Large bowl: Perfect for mixing. A salad bowl or any large mixing bowl will do.
    • Small bowl: For whisking the dressing. A ramekin works just as well!
    • Whisk or fork: To blend the dressing. A fork can be a handy alternative.
    • Knife and cutting board: Essential for slicing the cucumber and mincing garlic.

    Variations of Shrimp and Cucumber Salad

    • Avocado Addition: Add diced avocado for a creamy texture that pairs beautifully with the shrimp.
    • Spicy Twist: Incorporate diced jalapeños or a splash of sriracha for an extra kick!
    • Fruit Fusion: Toss in some diced mango or pineapple for a sweet and tropical flair.
    • Quinoa Base: Serve the salad over a bed of cooked quinoa for a heartier meal.
    • Vegan Option: Substitute shrimp with marinated tofu or chickpeas for a plant-based version.

    Serving Suggestions for Shrimp and Cucumber Salad

    • Pair with a light white wine, like Sauvignon Blanc, for a refreshing complement.
    • Serve alongside crispy spring rolls for a delightful appetizer duo.
    • Garnish with lime wedges and extra cilantro for a pop of color.
    • Enjoy with a side of jasmine rice for a complete meal.

    FAQs about Shrimp and Cucumber Salad

    Can I use frozen shrimp for this salad?

    Absolutely! Frozen shrimp work perfectly. Just make sure to thaw them completely before using. It saves time and still delivers great flavor!

    How long can I store the Shrimp and Cucumber Salad?

    You can store it in the fridge for up to two days. Just keep it in an airtight container. The flavors will continue to develop, making it even tastier!

    Can I make this salad ahead of time?

    Yes! This Shrimp and Cucumber Salad is ideal for meal prep. Just prepare it a few hours in advance and let it chill in the fridge. It’s a refreshing dish ready when you are!

    What can I substitute for cilantro?

    If cilantro isn’t your thing, parsley is a great alternative. You can also try fresh mint for a unique twist!

    Is this salad suitable for a low-calorie diet?

    Definitely! This salad is low in calories and packed with protein, making it a healthy choice for anyone watching their intake. Enjoy it guilt-free!

    Final Thoughts

    Creating this Shrimp and Cucumber Salad is more than just preparing a meal; it’s about bringing joy to your table. The vibrant colors and fresh flavors make it a feast for the eyes and the palate. Whether you’re enjoying it on a busy weeknight or serving it at a gathering, this salad is sure to impress. Plus, it’s a fantastic way to sneak in some healthy ingredients without sacrificing taste. I hope this recipe becomes a cherished part of your culinary adventures, just as it has in mine. Happy cooking, and enjoy every bite!


    Print

    clock clock iconcutlery cutlery iconflag flag iconfolder folder iconinstagram instagram iconpinterest pinterest iconfacebook facebook iconprint print iconsquares squares iconheart heart iconheart solid heart solid icon

    Description

    As a busy mom, I know how challenging it can be to whip up something delicious yet quick. That’s where my Shrimp and Cucumber Salad comes in! This refreshing dish is not only a breeze to prepare, but it also brings a burst of flavor that will impress your loved ones. Imagine crisp cucumbers mingling with succulent shrimp, all drizzled in a zesty dressing. It’s perfect for those hectic days when you need a light meal or a delightful appetizer. Trust me, this salad will become your go-to recipe for any occasion!


    • 1 pound cooked shrimp, peeled and deveined
    • 1 large cucumber, sliced
    • 2 cloves garlic, minced
    • 1/4 cup chopped cilantro
    • 2 tablespoons soy sauce
    • 1 tablespoon rice vinegar
    • 1 teaspoon sesame oil
    • 1/2 teaspoon sugar
    • 1/4 teaspoon red pepper flakes (adjust to your spice preference)
    • Salt and pepper to taste

    1. In a large bowl, combine the shrimp, cucumber, garlic, and cilantro.
    2. In a small bowl, whisk together the soy sauce, rice vinegar, sesame oil, sugar, and red pepper flakes.
    3. Pour the dressing over the shrimp and cucumber mixture, and toss to coat.
    4. Season with salt and pepper to taste.
    5. Serve immediately or chill for later.

    Notes

    • Adjust the amount of red pepper flakes based on your spice preference.
    • This salad can be made ahead of time and chilled for a refreshing dish later.
    • Prep Time: 10 minutes
    • Cook Time: 0 minutes
    • Category: Salad
    • Method: Mixing
    • Cuisine: Asian

    Nutrition

    • Serving Size: 1 serving
    • Calories: 150
    • Sugar: 1g
    • Sodium: 600mg
    • Fat: 5g
    • Saturated Fat: 1g
    • Unsaturated Fat: 4g
    • Trans Fat: 0g
    • Carbohydrates: 8g
    • Fiber: 1g
    • Protein: 20g
    • Cholesterol: 150mg

    Sharing is caring!

  • Peach Feta Salad

    Peach Feta Salad


    Introduction to Peach Feta Salad

    As summer rolls in, I find myself craving light, refreshing dishes that celebrate the season’s bounty. That’s where my beloved Peach Feta Salad comes in! This delightful salad is not just a feast for the eyes; it’s a quick solution for busy days when you want something delicious without spending hours in the kitchen. With juicy peaches and creamy feta, it’s a dish that impresses family and friends alike. Trust me, once you try this salad, it will become a staple in your summer repertoire!

    Why You’ll Love This Peach Feta Salad

    This Peach Feta Salad is a true gem for anyone juggling a busy lifestyle. It comes together in just 10 minutes, making it perfect for those hectic weeknights or impromptu gatherings. The combination of sweet peaches and tangy feta creates a flavor explosion that dances on your palate. Plus, it’s a healthy option that doesn’t skimp on taste, ensuring you can enjoy a guilt-free indulgence all summer long!

    Ingredients for Peach Feta Salad

    Gathering the right ingredients is key to making a delicious Peach Feta Salad. Here’s what you’ll need:

    • Ripe peaches: Sweet and juicy, they are the star of this salad. Look for peaches that yield slightly to pressure for the best flavor.
    • Crumble feta cheese: This creamy cheese adds a delightful tang. If you prefer a milder flavor, goat cheese is a great substitute.
    • Red onion: Thinly sliced, it brings a sharpness that balances the sweetness of the peaches. You can use green onions for a milder taste.
    • Fresh basil leaves: Their aromatic flavor elevates the salad. If basil isn’t available, try fresh mint for a refreshing twist.
    • Olive oil: A drizzle of good-quality olive oil enhances the flavors. You can also use avocado oil for a different profile.
    • Honey: This natural sweetener ties the dressing together. Maple syrup can be a lovely alternative for a vegan option.
    • Lemon juice: Freshly squeezed lemon juice adds brightness. Lime juice works well too if you’re looking for a zesty kick.
    • Salt and pepper: Essential for seasoning, they help to bring out the flavors of the other ingredients.

    For those who like a bit of crunch, consider adding nuts like walnuts or pecans. They not only add texture but also a nutty flavor that complements the salad beautifully.

    All the exact measurements for these ingredients can be found at the bottom of the article, ready for printing!

    How to Make Peach Feta Salad

    Step 1: Prepare the Ingredients

    First things first, let’s get our ingredients ready! Start by slicing the ripe peaches into wedges. I love the way they glisten in the light, almost like little jewels. Next, crumble the feta cheese into bite-sized pieces. This creamy goodness will melt in your mouth! Finally, chop the fresh basil leaves. The aroma is simply divine! Make sure to use a sharp knife to keep everything looking fresh and vibrant. With these ingredients prepped, you’re already halfway to a delicious Peach Feta Salad!

    Step 2: Combine the Salad Ingredients

    Now, let’s bring everything together! In a large bowl, gently mix the sliced peaches, crumbled feta, thinly sliced red onion, and chopped basil. I like to use a wooden spoon for this, as it feels more rustic. Be careful not to mash the peaches; we want them to keep their shape! The colors will start to pop, creating a beautiful medley. This combination of flavors is what makes the Peach Feta Salad so special. Trust me, your taste buds will thank you!

    Step 3: Make the Dressing

    Time to whip up a quick dressing! In a small bowl, whisk together the olive oil, honey, and freshly squeezed lemon juice. The honey adds a touch of sweetness, while the lemon juice brightens everything up. I usually use a fork for this, but a small whisk works wonders too! Season the dressing with a pinch of salt and pepper to taste. This simple dressing is the magic that ties the salad together, enhancing the flavors of the peaches and feta beautifully.

    Step 4: Toss and Serve

    Finally, it’s time to bring it all together! Drizzle the dressing over the salad mixture and toss gently to combine. I like to use my hands for this, as it feels more personal. Just be careful not to break the peaches! Once everything is coated in that luscious dressing, serve immediately. This Peach Feta Salad is best enjoyed fresh, so gather your loved ones and dig in. You’ll be amazed at how quickly it disappears!

    Tips for Success

    • Choose ripe peaches for the best flavor; they should feel slightly soft to the touch.
    • For a creamier texture, let the feta sit at room temperature for about 15 minutes before crumbling.
    • Mix the salad just before serving to keep the peaches fresh and vibrant.
    • Experiment with different herbs like mint or cilantro for a unique twist.
    • Store any leftovers in an airtight container in the fridge for up to a day.

    Equipment Needed

    • Large bowl: Perfect for mixing the salad. A mixing bowl works just as well.
    • Small bowl: Ideal for whisking the dressing. A mason jar can be a fun alternative!
    • Knife: A sharp knife is essential for slicing peaches and chopping herbs.
    • Wooden spoon: Great for gently combining ingredients. A spatula can also do the trick.

    Variations

    • Grilled Peaches: For a smoky flavor, grill the peach slices before adding them to the salad. This adds a delightful char that enhances the sweetness.
    • Nutty Crunch: Toss in some toasted walnuts or pecans for added texture and a nutty flavor that complements the salad beautifully.
    • Vegan Option: Substitute feta with a plant-based cheese or avocado for a creamy texture without the dairy.
    • Spicy Kick: Add a sprinkle of red pepper flakes or sliced jalapeños for a spicy twist that contrasts with the sweetness of the peaches.
    • Fruit Medley: Mix in other seasonal fruits like strawberries or blueberries for a colorful and fruity variation.

    Serving Suggestions

    • Pair this Peach Feta Salad with grilled chicken or shrimp for a complete meal.
    • Serve it alongside crusty bread or pita chips for a delightful crunch.
    • For drinks, a chilled white wine or sparkling water with lemon complements the salad beautifully.
    • Presentation tip: Serve in a large, colorful bowl to showcase the vibrant ingredients.

    FAQs about Peach Feta Salad

    Can I make Peach Feta Salad ahead of time?

    While this salad is best enjoyed fresh, you can prepare the ingredients ahead of time. Just keep the dressing separate until you’re ready to serve. This way, the peaches stay vibrant and juicy!

    What can I substitute for feta cheese?

    If feta isn’t your thing, goat cheese is a fantastic alternative. For a vegan option, try using a plant-based cheese or creamy avocado. Both will add a lovely texture to your Peach Feta Salad.

    How do I store leftovers?

    Store any leftover Peach Feta Salad in an airtight container in the fridge. It’s best consumed within a day to keep the flavors fresh and the peaches intact.

    Can I add protein to this salad?

    Absolutely! Grilled chicken, shrimp, or even chickpeas can turn this salad into a hearty meal. It’s a great way to make it more filling while still enjoying those fresh flavors.

    What other fruits can I add to the salad?

    Feel free to mix in other seasonal fruits like strawberries, blueberries, or even nectarines. They’ll add a burst of color and flavor, making your Peach Feta Salad even more delightful!

    Final Thoughts

    Creating this Peach Feta Salad is like capturing summer in a bowl. The vibrant colors and fresh flavors bring joy to any meal, making it a delightful addition to your table. Whether you’re enjoying it on a sunny afternoon or serving it at a family gathering, this salad is sure to impress. It’s quick, easy, and bursting with taste, reminding us that cooking can be a joyful experience, even on the busiest days. So, gather your loved ones, share a laugh, and savor every bite of this refreshing summer delight!


    Print

    clock clock iconcutlery cutlery iconflag flag iconfolder folder iconinstagram instagram iconpinterest pinterest iconfacebook facebook iconprint print iconsquares squares iconheart heart iconheart solid heart solid icon

    Description

    As summer rolls in, I find myself craving light, refreshing dishes that celebrate the season’s bounty. That’s where my beloved Peach Feta Salad comes in! This delightful salad is not just a feast for the eyes; it’s a quick solution for busy days when you want something delicious without spending hours in the kitchen. With juicy peaches and creamy feta, it’s a dish that impresses family and friends alike. Trust me, once you try this salad, it will become a staple in your summer repertoire!


    • 4 ripe peaches, sliced
    • ½ cup crumbled feta cheese
    • ¼ cup red onion, thinly sliced
    • ¼ cup fresh basil leaves, chopped
    • 2 tbsp olive oil
    • 1 tbsp honey
    • 1 tbsp lemon juice
    • Salt and pepper to taste

    1. In a large bowl, combine sliced peaches, crumbled feta, red onion, and basil leaves.
    2. In a small bowl, whisk together olive oil, honey, and lemon juice. Season with salt and pepper.
    3. Drizzle the dressing over the salad and toss gently to combine.
    4. Serve immediately and enjoy!

    Notes

    • For added crunch, consider adding nuts like walnuts or pecans.
    • This salad can be made ahead of time, but it’s best served fresh.
    • Prep Time: 10 minutes
    • Cook Time: 0 minutes
    • Category: Salad
    • Method: No-cook
    • Cuisine: American

    Nutrition

    • Serving Size: 1 serving
    • Calories: 180
    • Sugar: 10g
    • Sodium: 200mg
    • Fat: 12g
    • Saturated Fat: 4g
    • Unsaturated Fat: 8g
    • Trans Fat: 0g
    • Carbohydrates: 15g
    • Fiber: 2g
    • Protein: 5g
    • Cholesterol: 15mg

    Sharing is caring!

  • Alfredo Sausage Stuffed Peppers

    Alfredo Sausage Stuffed Peppers


    Introduction to Alfredo Sausage Stuffed Peppers

    Exquisite is the simplicity of being able to prepare a dish for a hectic weeknight meal from a few pantry staples. My Sausage Alfredo Stuffed Peppers have become quite the household hit with children and grown-ups alike. These cute little bell peppers each host a delicious filling of Italian sausage, creamy Alfredo sauce, and rice – so three-cheers yummy, and so easy to love for everyone! That’s the kind of meal that is perfect for those evenings when you have time to kill but do not wish to spend all your hours in the kitchen. Read on and find how you can make your evening meal routine a total breeze while wowing your loved ones!

    Why You’ll Love This Alfredo Sausage Stuffed Peppers

    Imagine a dish that combines delectable flavors with minimal effort. These Alfredo Sausage Stuffed Peppers deliver just that! They’re not only quick to prepare, but they also bake beautifully in one pan. The creamy, cheesy filling creates an irresistible taste that warms the heart. Plus, it’s a wonderfully adaptable recipe, perfect for those busy nights or family gatherings. Trust me; your dinner table will thank you!

    Ingredients for Alfredo Sausage Stuffed Peppers

    Gather around, my fellow cooking enthusiasts! Here’s what you’ll need for these tasty Alfredo Sausage Stuffed Peppers:

    • Bell Peppers: Choose four large, vibrant bell peppers in any color. They’re not just colorful; they’re delicious vessels for the hearty filling!
    • Italian Sausage: I prefer ground Italian sausage for that classic flavor—mild if you’ve got kids, or spicy for those adventurous taste buds!
    • Yellow Onion: A small finely chopped onion adds that essential savory base, enhancing flavor.
    • Garlic: Two cloves, minced to perfection, because who can resist the aroma garlic brings to a dish?
    • White Rice: Cooked rice binds everything together. It soaks up all those tasty juices, making each bite delightful.
    • Alfredo Sauce: Whether you whip up a homemade batch or grab a jar from the store, this creamy goodness is a star ingredient!
    • Grated Parmesan Cheese: A sprinkle of this adds a rich, nutty flavor that complements the creamy sauce.
    • Shredded Mozzarella Cheese: You’ll divide one cup to create that cheesy crust—always a crowd-pleaser!
    • Fresh Parsley: This bright herb not only adds color but a lovely freshness to your stuffing.
    • Dried Italian Herbs: A pinch of these herbs brings classic Italian flavors into your dish, making it irresistible.
    • Ground Black Pepper: Just a hint to elevate the flavor without overwhelming the palate.
    • Salt: For seasoning to taste; trust your instincts on this one!
    • Water or Chicken Broth: This liquid is poured into the baking dish to help steam the peppers, ensuring they come out perfectly cooked.

    If you’re feeling creative, consider adding spinach or mushrooms for extra nutrition. And if you’re in a pinch, swap out the sausage for ground turkey or chicken for a leaner filling. You can find exact measurements for each ingredient at the bottom of this article, ready for printing. Let’s get cooking!

    How to Make Alfredo Sausage Stuffed Peppers

    Preheat the Oven

    Let’s kick things off by preheating your oven to a cozy 375 degrees Fahrenheit. Preheating isn’t just a suggestion; it’s a must! This step ensures that your Alfredo Sausage Stuffed Peppers bake evenly, achieving that perfect golden color and delightful softness. So, let the oven warm up while you prep the other ingredients!

    Prepare the Bell Peppers

    Next, grab those beautiful bell peppers. Carefully slice off the tops and remove the seeds and inner membranes. Keeping the peppers upright in your baking dish is crucial; they hold all that sumptuous filling. Place them side by side, ready for a delicious makeover. Their vibrant colors will brighten up your meal!

    Cook the Sausage Mixture

    Now for the star of the show—the sausage! In a large skillet over medium heat, add your Italian sausage, breaking it apart with a spoon. Cook until it’s evenly browned and fully cooked, about 5 to 7 minutes. Drain excess fat if you see any. Once browned, toss in the chopped onions and minced garlic. Sauté everything for about 3 minutes, letting those scents mingle. You want the onion soft and translucent, enhancing that rich flavor we all love!

    Combine the Ingredients

    It’s time to blend those flavors! In your skillet with the sausage, stir in the cooked white rice, Alfredo sauce, grated Parmesan cheese, and half of the shredded mozzarella. Don’t forget the parsley, dried Italian herbs, black pepper, and a sprinkle of salt! Mix well until everything is combined and warmed through. This mixture should be fragrant and creamy; it’ll be the showstopper when stuffed into those peppers!

    Stuff the Peppers

    Now comes the fun part! Gently fill each prepared bell pepper with that delicious sausage mixture. Press it down slightly to ensure each pepper is packed tight with flavor. As you fill each one, let your inner artist shine! Don’t worry if some mixture spills over; that’s just extra goodness waiting to happen.

    Bake the Stuffed Peppers

    Lastly, pour a bit of water or chicken broth into the bottom of your baking dish. This helps steam the peppers while they bake, keeping them tender. Cover the dish loosely with aluminum foil and place it in the oven. Bake for 30 minutes. Once that time is up, remove the foil and sprinkle the remaining mozzarella cheese on top. Pop them back in for another 10 minutes. You want the cheese bubbling and golden, while the peppers are perfectly tender. Let them cool for a few minutes before serving and enjoy the aroma that fills your kitchen!

    Tips for Success

    • Always preheat your oven; it makes a big difference in cooking time and texture.
    • Use a variety of colored bell peppers for an eye-catching presentation.
    • Don’t rush the sausage browning—good flavor comes from a nice caramelization.
    • Pack your mixture firmly into the peppers for a satisfying bite.
    • Feel free to customize the filling with your favorite veggies!

    Equipment Needed

    • Baking Dish: A 9×13 inch dish works well; a cast iron skillet is a great alternative.
    • Large Skillet: This is essential for cooking the sausage; any heavy pan can do.
    • Cutting Board and Knife: Handy for prepping ingredients; a safe knife is a must!
    • Spoon or Spatula: Use it for stirring and stuffing; a sturdy spatula works wonders.
    • Aluminum Foil: Crucial for covering the baking dish; parchment paper is a suitable substitute.

    Variations on Alfredo Sausage Stuffed Peppers

    • Vegetarian Delight: Swap the Italian sausage for a mixture of quinoa, black beans, and chopped vegetables like spinach or mushrooms for a hearty vegetarian option.
    • Cheesy & Spicy: Use spicy Italian sausage along with pepper jack cheese to add a kick to your Alfredo Sausage Stuffed Peppers.
    • Low-Carb Version: Replace rice with cauliflower rice or zucchini noodles to create a low-carb alternative that still keeps the flavors rich.
    • Different Sauces: Experiment with different sauces like pesto or marinara instead of Alfredo for a completely new flavor profile.
    • Herb Infusion: Add fresh herbs like basil or oregano to the mixture for an extra layer of flavor and freshness in each bite.
    • Cheese Lovers: Use a combination of cheeses, like gouda and cheddar, instead of just mozzarella, for a luscious and gooey filling.

    Serving Suggestions for Alfredo Sausage Stuffed Peppers

    • Side Salads: A simple mixed green salad with a lemon vinaigrette pairs beautifully with these stuffed peppers.
    • Crusty Bread: Serve warm, crusty garlic bread to mop up that delicious Alfredo sauce.
    • Wine Pairing: A light Italian white wine like Pinot Grigio complements the dish splendidly.
    • Garnish: Finish with a sprinkle of freshly chopped parsley or grated Parmesan for a touch of elegance.

    FAQs about Alfredo Sausage Stuffed Peppers

    Can I make Alfredo Sausage Stuffed Peppers ahead of time?

    Absolutely! You can prepare the stuffed peppers in advance and store them in the fridge for up to 24 hours before baking. Just cover them tightly with plastic wrap or aluminum foil. When it’s time to eat, pop them in the oven directly from the fridge; you might need to add a few extra minutes to the cooking time.

    What can I substitute for Italian sausage?

    If you’re looking for alternatives, ground turkey or chicken works beautifully in these Alfredo Sausage Stuffed Peppers. You can also try using plant-based sausage for a vegetarian option. Just remember, the flavor profiles will change a bit, but the overall dish will still be delicious!

    Can I freeze leftover stuffed peppers?

    Yes, you can freeze them! Let the cooked peppers cool completely and then wrap each individually in plastic wrap and place them in a freezer-safe bag. They can be stored for up to three months. When you’re ready to enjoy them, thaw in the fridge overnight and reheat in the oven until warmed through.

    How do I know when the peppers are done baking?

    The Alfredo Sausage Stuffed Peppers are done when the cheese is golden and bubbly, and the peppers are tender but still hold their shape. A fork should easily pierce through the pepper skin without too much resistance. Trust your nose, too; the delightful aroma will fill your kitchen as they bake!

    What are some good side dishes to serve with stuffed peppers?

    These stuffed peppers are delicious on their own, but you can enhance the meal with a crisp side salad or some garlic bread. A light pasta dish or roasted vegetables also works wonderfully. Pairing with a light white wine like Pinot Grigio can elevate the dining experience!

    Final Thoughts

    Making Alfredo Sausage Stuffed Peppers is not just about enjoying a delicious meal; it’s about sharing warm moments with family and friends. The mouthwatering aroma fills your home, inviting everyone to gather around the table. Each bite brings a delightful explosion of flavors, making it a meal to remember. Plus, the ease of preparation means you can enjoy quality time without the stress. Whether it’s a weeknight dinner or a special occasion, these stuffed peppers will surely become a cherished recipe in your collection. Let’s embrace culinary adventures one stuffed pepper at a time!


    Print

    clock clock iconcutlery cutlery iconflag flag iconfolder folder iconinstagram instagram iconpinterest pinterest iconfacebook facebook iconprint print iconsquares squares iconheart heart iconheart solid heart solid icon

    Description

    A delicious recipe for bell peppers stuffed with Italian sausage, rice, and creamy Alfredo sauce, topped with cheese and baked to perfection.


    • 4 large bell peppers, any color, tops removed and seeds discarded
    • 1 pound Italian sausage, mild or spicy, casings removed
    • 1 small yellow onion, finely chopped
    • 2 cloves garlic, minced
    • 1 cup cooked white rice
    • 1 cup Alfredo sauce, homemade or store-bought
    • 1/2 cup grated Parmesan cheese
    • 1 cup shredded mozzarella cheese, divided
    • 1/4 cup chopped fresh parsley
    • 1/2 teaspoon dried Italian herbs
    • 1/4 teaspoon ground black pepper
    • Salt, to taste
    • 1/4 cup water or chicken broth

    1. Preheat oven to 375 degrees Fahrenheit.
    2. Slice tops off bell peppers and remove seeds and inner membranes. Arrange upright in a baking dish.
    3. In a large skillet over medium heat, cook the Italian sausage, breaking it up with a spoon, until evenly browned and fully cooked, about 5 to 7 minutes. Drain excess fat if necessary.
    4. Add chopped onion and minced garlic to the skillet. Sauté until the onion softens, about 3 minutes.
    5. Stir in cooked rice, Alfredo sauce, grated Parmesan, 1/2 cup of the shredded mozzarella, parsley, dried Italian herbs, black pepper, and salt. Mix until thoroughly combined and warmed through.
    6. Evenly fill each prepared bell pepper with the sausage mixture, gently pressing down to compact.
    7. Sprinkle the remaining 1/2 cup shredded mozzarella over the tops of the stuffed peppers.
    8. Pour water or chicken broth into the bottom of the baking dish. Cover the dish loosely with aluminum foil.
    9. Bake for 30 minutes. Remove foil and continue baking for 10 additional minutes, until peppers are tender and the cheese is golden and bubbling.
    10. Allow stuffed peppers to cool slightly. Garnish with extra parsley if desired and serve hot.

    Notes

    • For a spicier dish, use spicy Italian sausage.
    • Feel free to add vegetables like spinach or mushrooms to the filling.
    • Leftovers can be stored in the fridge for up to 3 days.
    • Prep Time: 20 minutes
    • Cook Time: 40 minutes
    • Category: Dinner
    • Method: Baking
    • Cuisine: Italian

    Nutrition

    • Serving Size: 1 stuffed pepper
    • Calories: 450
    • Sugar: 2g
    • Sodium: 850mg
    • Fat: 25g
    • Saturated Fat: 10g
    • Unsaturated Fat: 12g
    • Trans Fat: 0g
    • Carbohydrates: 30g
    • Fiber: 2g
    • Protein: 24g
    • Cholesterol: 75mg

    Sharing is caring!

  • Cherry Coded Sunrise Yogurt Bark

    Cherry Coded Sunrise Yogurt Bark


    Introduction to Cherry Coded Sunrise Yogurt Bark

    I know, things going on all over the place and organizing other routines and tasks is just asking for anything quick to eat to be either healthy but not tasty or yummy but unhealthy Not anymore with my Cherry Coded Sunrise Yogurt Bark! Here’s a brightly colored, fun, and tasty dessert I […] serve in the summer. This would […] also serve quickly as a […] yogurt-based cooking on the baking sheet broken into pieces. Layered yogurt together with fruit purees and crunchy toppings makes this dessert an absolute favorite at your home too, doesn’t it?

    Why You’ll Love This Cherry Coded Sunrise Yogurt Bark

    This Cherry Coded Sunrise Yogurt Bark is a game changer for busy families! It’s remarkably easy to prepare, requiring just 20 minutes of your time. The vibrant colors and delightful flavors make it a hit with both kids and adults, ensuring everyone leaves the table happy. Plus, it’s a healthy dessert option packed with protein and nutrients, so you can indulge without the guilt. Who doesn’t love that?

    Ingredients for Cherry Coded Sunrise Yogurt Bark

    Creating this fabulous Cherry Coded Sunrise Yogurt Bark is a breeze, thanks to its simple yet satisfying ingredients. Here’s what you’ll need:

    • Plain Greek yogurt: It’s the creamy foundation of this treat, offering a protein boost and rich flavor.
    • Honey: This natural sweetener adds just the right touch of sweetness without being overpowering.
    • Vanilla extract: A splash of vanilla brings warmth and enhances the overall flavor profile beautifully.
    • Mango puree: Fresh or store-bought, mango puree introduces a tropical sweetness that pairs perfectly with the tart cherries.
    • Orange juice: This adds a zesty kick to the mango, brightening the entire dessert with its citrusy note.
    • Fresh cherries: Make sure to use ripe cherries, as they provide bursts of flavor and a pop of color!
    • Cherry jam: Adds a layer of rich cherry flavor while also providing a glossy finish to the bark.
    • Crisp rice cereal: Essential for that satisfying crunch, this will make each bite a delightful texture experience.
    • Unsweetened cocoa powder: For a chocolatier twist, it balances the fruity flavors beautifully.
    • Melted coconut oil: This helps bind the cocoa topping while contributing a hint of tropical flair.
    • Maple syrup: Another natural sweetener, it deepens the flavor of the crunch topping.
    • Chopped pistachios: These offer a nutty crunch and vibrant green color that make the presentation pop.
    • Shredded coconut: Adds another layer of texture and a subtle sweetness that takes the bark to the next level.

    Feel free to get creative! You can swap in your favorite fruits for the puree or even use a plant-based yogurt for a vegan twist. The exact measurements for each ingredient can be found at the bottom of this article for printing convenience.

    How to Make Cherry Coded Sunrise Yogurt Bark

    Creating your own Cherry Coded Sunrise Yogurt Bark is easier than you might think! Just follow these simple steps for a delicious frozen treat your family will love. Let’s take this fruity adventure together!

    Prepare Baking Sheet

    First things first, line a 9×13 inch baking sheet with parchment paper. This crucial step makes removing your yogurt bark effortless and keeps it looking pretty when you serve it. Nobody likes a messy dessert, right?

    Combine Yogurt Base

    In a medium bowl, mix your Greek yogurt, honey, and vanilla extract. Whisk these ingredients together until smooth and creamy. This mixture forms the flavorful base for your yogurt bark. The combination of tangy yogurt and sweet honey is simply divine!

    Spread Yogurt

    Now, evenly spread the yogurt mixture onto your prepared baking sheet. Aim for about 1/2 inch in thickness. Use an offset spatula or the back of a spoon to achieve that beautiful even layer. This will help each piece of the bark freeze uniformly.

    Create Sunrise Swirl

    In a small bowl, combine the mango puree and orange juice. Dollop spoonfuls of this mixture over the yogurt base. Don’t be afraid to get a little artistic here! Use a knife to gently swirl it into the yogurt, creating that stunning sunrise effect. Picture a bright, colorful morning with each swirl!

    Add Cherry Layer

    Next, sprinkle the quartered fresh cherries evenly across the yogurt. Then, drizzle your cherry jam over the top. This layering technique not only enhances the flavor but also adds visual appeal with those pops of red. You’ll feel like a fancy chef!

    Prepare Cocoa Crisp Topping

    In a separate bowl, combine the crisp rice cereal, cocoa powder, melted coconut oil, and maple syrup. Mix until everything is well combined. This crispy topping adds a delightful crunch that complements the creamy yogurt. Trust me; your taste buds will thank you!

    Add Optional Toppings

    Now, let’s get creative! If you like, sprinkle chopped pistachios and shredded coconut over the top of your yogurt bark. These extras not only boost flavor but also offer different textures and colors. Go ahead, customize it to match your family’s favorite flavors!

    Freeze Until Solid

    Place your baking sheet in the freezer for at least 3 hours or until completely solid. Patience is key here! While waiting, you can daydream about how delicious your Cherry Coded Sunrise Yogurt Bark will be. Trust me, that refreshing treat will be worth the wait!

    Serve

    Once your bark is frozen solid, remove it from the freezer. Break it into pieces of your desired size. Serve these delightful treats to your family or guests on a colorful platter for a charming presentation. Feel free to garnish with a few extra cherries or nuts for that special touch!

    Tips for Success

    • Make sure your baking sheet is lined well; it makes removing the bark a breeze.
    • Use ripe, fresh cherries for the best flavor—aim for those deep red beauties!
    • Allow plenty of time for freezing; this ensures the bark has the right texture.
    • Feel free to swap the fruit puree according to what’s in season or in your fridge.
    • For an extra touch, serve with a dollop of yogurt or a sprinkle of cinnamon.

    Equipment Needed

    • Baking sheet: A 9×13 inch sheet is ideal, but any similar-sized tray will work.
    • Parchment paper: Use wax paper as a substitute if you’re in a pinch.
    • Mixing bowls: Any medium-sized bowl will do, even ones you have on hand.
    • Offset spatula: A regular spatula can also help spread the yogurt.
    • Knife: For swirling and cutting the bark into pieces later.

    Variations of Cherry Coded Sunrise Yogurt Bark

    • Try a different fruit puree, such as raspberry or blueberry, for a new flavor twist!
    • Substitute the Greek yogurt with a plant-based yogurt to make this bark vegan-friendly.
    • Add a layer of granola for an extra crunchy texture—perfect for adding energy!
    • Use any fresh seasonal fruits you like, such as strawberries or peaches, to customize the bark.
    • Swap out pistachios for walnuts or almonds to match your taste preferences.
    • Drizzle dark chocolate over the top for a gourmet touch that enhances richness.

    Serving Suggestions

    • Pair your Cherry Coded Sunrise Yogurt Bark with fresh fruit salad for a vibrant dessert table.
    • Serve it alongside a refreshing glass of iced herbal tea to elevate the flavors.
    • Garnish with a sprinkle of extra shredded coconut for a pretty effect.
    • Display on a colorful platter to impress your guests during summer gatherings.

    FAQs about Cherry Coded Sunrise Yogurt Bark

    Can I make Cherry Coded Sunrise Yogurt Bark ahead of time?
    Absolutely! This treat can be made a day or two in advance. Just store it in an airtight container in the freezer. It holds up beautifully for those spontaneous dessert cravings!

    What other fruits can I use in this recipe?
    While cherries are the star of this dish, you can use any fresh fruits you love. Berries, peaches, or even banana puree can create a delicious twist on the traditional Cherry Coded Sunrise Yogurt Bark.

    Is this recipe suitable for children?
    Definitely! Kids adore the colorful presentation and sweet flavors. It’s a fun, healthy treat that makes snacking enjoyable. Just ensure that your kids help with the swirling and topping for a delightful cooking experience!

    Can I make this bark vegan?
    Yes! Simply substitute Greek yogurt with your favorite plant-based yogurt. You can still enjoy the creamy and tasty profile of this delightful frozen dessert without any dairy.

    How should I store leftovers?
    Store any leftover Cherry Coded Sunrise Yogurt Bark in an airtight container in the freezer. It can stay fresh for up to two weeks, but I doubt it will last that long!

    Final Thoughts

    Creating your own Cherry Coded Sunrise Yogurt Bark is more than just whipping up a delicious recipe; it’s an experience filled with joy and creativity! The vibrant colors and delightful flavors bring a smile to both young and old, making it a treat everyone can enjoy. Whether you’re indulging on a hot summer day or serving it at a gathering, this refreshing dessert captures the essence of happiness in each bite. So, gather your loved ones, enjoy this deliciously easy treat together, and create delightful memories that will last long after the last piece is gone!


    Print

    clock clock iconcutlery cutlery iconflag flag iconfolder folder iconinstagram instagram iconpinterest pinterest iconfacebook facebook iconprint print iconsquares squares iconheart heart iconheart solid heart solid icon

    Description

    Cherry Coded Sunrise Yogurt Bark is a refreshing and colorful frozen treat made with layers of Greek yogurt, fruit purees, and crunchy toppings.


    • 2 cups plain Greek yogurt
    • 2 tablespoons honey
    • 1 teaspoon vanilla extract
    • 1/2 cup mango puree
    • 1 tablespoon orange juice
    • 3/4 cup fresh cherries, pitted and quartered
    • 2 tablespoons cherry jam
    • 1/2 cup crisp rice cereal
    • 2 tablespoons unsweetened cocoa powder
    • 1 tablespoon melted coconut oil
    • 1 tablespoon maple syrup
    • 2 tablespoons chopped pistachios
    • 1 tablespoon shredded coconut

    1. Prepare Baking Sheet: Line a 9×13 inch baking sheet with parchment paper.
    2. Combine Yogurt Base: In a medium bowl, thoroughly mix Greek yogurt, honey, and vanilla extract until smooth.
    3. Spread Yogurt: Evenly spread the yogurt mixture onto the prepared baking sheet, aiming for a thickness of about 1/2 inch.
    4. Create Sunrise Swirl: Combine mango puree and orange juice in a small bowl. Dollop spoonfuls of this mixture over the yogurt and gently swirl using a knife to create a visually appealing sunrise effect.
    5. Add Cherry Layer: Evenly scatter the quartered cherries across the yogurt bark. Drizzle with cherry jam.
    6. Prepare Cocoa Crisp Topping: In a separate bowl, combine crisp rice cereal, cocoa powder, melted coconut oil, and maple syrup. Mix until well combined, then sprinkle this mixture evenly over the yogurt.
    7. Add Optional Toppings: If desired, sprinkle chopped pistachios and shredded coconut over the bark.
    8. Freeze Until Solid: Place the baking sheet in the freezer and freeze for a minimum of 3 hours, or until completely solid.
    9. Serve: Once frozen solid, break the bark into pieces and serve immediately. Store any remaining portions in an airtight container in the freezer.

    Notes

    • For a vegan option, substitute Greek yogurt with a plant-based yogurt alternative.
    • Feel free to use other fruits for the swirl, such as berry puree.
    • This recipe is perfect for summer picnics and gatherings.
    • Prep Time: 20 minutes
    • Cook Time: 0 minutes
    • Category: Dessert
    • Method: Frozen
    • Cuisine: American

    Nutrition

    • Serving Size: 1 piece
    • Calories: 120
    • Sugar: 10g
    • Sodium: 40mg
    • Fat: 5g
    • Saturated Fat: 3g
    • Unsaturated Fat: 2g
    • Trans Fat: 0g
    • Carbohydrates: 15g
    • Fiber: 2g
    • Protein: 4g
    • Cholesterol: 10mg

    Sharing is caring!

  • Peanut Butter Caramel Bread

    Peanut Butter Caramel Bread


    Introduction to Peanut Butter Caramel Bread

    I get it. Life gets busy, and mothers are right in the middle of it with work, family, and everything else. They call it being pulled in too many directions – total chaos, feeling overwhelmed. All the more reason I am excited to share with you all something I like to call Peanut Butter Caramel Bread. This ‘something special’ dish will provide you with rich peanut butter and caramel flavors in a unique, pull-apart loaf that is simply to die for. Put it to good use serving a warm and welcoming family breakfast or as an aromatic, sweet self-indulgence during the day. Super quick to make so it’s no sweat to pull out for a little happy moment. Seriously.

    Why You’ll Love This Peanut Butter Caramel Bread

    This Peanut Butter Caramel Bread is a dream for busy families. It’s not just simple to prepare, but it also delivers a mouthwatering experience that keeps everyone coming back for more. The delightful combination of sweet caramel and creamy peanut butter makes it irresistible. Plus, it’s a warm hug in loaf form—perfect for those moments when you need a little pick-me-up or a sweet treat to share.

    Ingredients for Peanut Butter Caramel Bread

    Gathering your ingredients for this Peanut Butter Caramel Bread is a delightful part of the process. Here’s what you’ll need to create this scrumptious loaf:

    • All-purpose flour: The backbone of your bread, it gives structure and texture.
    • Granulated sugar: Adds sweetness and helps with browning as it bakes.
    • Active dry yeast: This little power player is essential for that perfect rise.
    • Salt: Just a pinch enhances the flavors and balances the sweetness.
    • Whole milk: Warmed milk not only adds moisture but activates the yeast. Just make sure it’s not too hot!
    • Unsalted butter: Melted for the dough, it brings richness and flavor.
    • Large eggs: These help bind everything together and give the bread a lightness.
    • Creamy peanut butter: The star of our show! Smooth peanut butter creates that dreamy texture and flavor we love.
    • Light brown sugar: Offers a deeper sweetness, blending so beautifully with the peanut butter.
    • Softened butter (for the peanut butter mixture): This ensures your peanut butter mixture is luscious and spreadable.
    • Granulated sugar (for caramel sauce): This is the main ingredient for creating that sweet, gooey caramel magic.
    • Water: Used for melting the sugar into a syrup—it’s all in the chemistry!
    • Heavy cream: Adds a rich creaminess to the caramel, making it silky smooth.
    • Unsalted butter (for caramel sauce): Enhances the flavor and adds extra richness to your caramel.
    • Salt (for caramel sauce): Just a pinch enhances the sweet flavors and adds depth.
    • Chopped roasted peanuts (optional): These crunchy toppings add texture and a nutty kick.

    For exact measurements, check out the bottom of the article where they’re available for printing. Let’s gather these ingredients and get ready for some baking magic!

    How to Make Peanut Butter Caramel Bread

    Prepare the Dough

    Let’s dive into creating the dough for our Peanut Butter Caramel Bread. In a large bowl, whisk together the all-purpose flour, granulated sugar, active dry yeast, and salt. This combo is what lays the foundation for our delicious bread.

    In another bowl, combine the warm whole milk, melted unsalted butter, and room-temperature eggs. Stir it until it’s nice and smooth. Now, pour those wet ingredients into the dry mixture.

    Using a wooden spoon, mix until a shaggy dough starts to form. It might seem a bit messy right now, but that’s perfectly okay! The magic is just beginning, and soon this mixture will transform into something incredible.

    Knead the Dough

    Once your dough is all shaggy, it’s time to knead it. You can do this by hand or with a stand mixer. If kneading by hand, turn the dough out onto a lightly floured surface. Use the heels of your hands to push the dough away from you, then fold it back over itself. Repeat this for about 6 to 8 minutes until the dough feels smooth and elastic.

    If you’re using a stand mixer, fit it with a dough hook and let it mix on a medium speed for about the same amount of time. No matter how you choose to knead, you’ll feel that lovely texture start to come together!

    Let the Dough Rise

    Now that we have our beautifully kneaded dough, it’s time for the first rise. Lightly coat a clean bowl with oil and place the dough inside, turning it to cover all sides. Cover the bowl with a clean kitchen towel or plastic wrap.

    Find a warm spot in your kitchen—like near a sunny window or a slightly warm oven. Let it rise for about one hour, or until it doubles in size. You’ll know it’s ready when you poke it gently, and it springs back slightly—a sure sign of its readiness!

    Make the Caramel Sauce

    While your dough is rising, let’s whip up that luscious caramel sauce. Start by combining the granulated sugar and water in a small saucepan. Place it over medium heat and let it cook. Keep an eye on it! You want the mixture to turn a beautiful amber color, which will take about 5 to 7 minutes.

    Once it reaches that perfect hue, carefully take it off the heat. Stir in the unsalted butter and the heavy cream slowly, being cautious as the mixture will bubble up. Finally, add that pinch of salt to enhance every sugary drop. Allow your caramel to cool to room temperature while we prepare the peanut butter mixture.

    Prepare the Peanut Butter Mixture

    Now, let’s make that peanut butter filling luscious and dreamy! In a small bowl, stir together the creamy peanut butter, light brown sugar, and softened unsalted butter. Use a spatula or wooden spoon to mix until completely smooth.

    This mixture should be spreadable and rich—a perfect pairing for our bread. Don’t forget to taste a little; it’s hard to resist! Set this beautiful concoction aside while we assemble the bread.

    Assemble the Bread

    It’s time to put everything together! Start by rolling out your risen dough onto a lightly floured surface, aiming for a rectangle that’s about 12 by 18 inches.

    Spread the peanut butter mixture evenly over the surface, getting every corner covered. Drizzle half of your prepared caramel sauce on top, letting it cascade down a bit—yum!

    Using a sharp knife or bench scraper, slice the dough into 6 strips. Stack these strips on top of each other and cut them into 6 even squares.

    Arrange these squares, cut-sides up, in a greased 9 by 5 inch loaf pan. It should look like a delightful tower! Cover it again and let it rise for about 30 minutes while you preheat the oven.

    Second Rise and Bake

    Now for the final stretch! Preheat your oven to 350°F (175°C) and let those dough squares puff up a bit during the last rise. After 30 minutes, your kitchen should smell heavenly!

    Once the oven is ready, pop the loaf pan in and bake your Peanut Butter Caramel Bread for 30 to 35 minutes. If your bread starts to brown too quickly, just cover it with foil during the last 10 minutes.

    When it’s done, the bread should be golden brown and sound hollow when tapped on the bottom. Let it cool for a few minutes before drizzling the remaining caramel sauce on top. Who would want to resist that warm, pull-apart goodness?

    Tips for Success

    • Make sure your milk is warm but not hot—this helps activate the yeast.
    • Use fresh roasted peanuts for an extra crunch and flavor boost.
    • Keep a close eye on the caramel sauce while cooking to prevent burning.
    • If the dough is too sticky, dust with a bit more flour while kneading.
    • Allow the bread to cool slightly before drizzling it with caramel for a better presentation.

    Equipment Needed

    • Mixing bowls: One large for the dough, a smaller one for the peanut butter mixture.
    • Whisk and spatula: For mixing ingredients smoothly.
    • Stand mixer (optional): A great alternative for kneading, saving some elbow grease.
    • Loaf pan: Essential for shaping and baking your bread.
    • Kitchen towel or plastic wrap: For covering the dough as it rises.

    Variations of Peanut Butter Caramel Bread

    • Nutty Additions: Swap out or mix in different nut butters, like almond or cashew, for an exciting twist.
    • Chocolate Swirl: Drizzle melted chocolate over the peanut butter mixture for a heavenly chocolate-peanut butter combo.
    • Whole Wheat Flour: Use half whole wheat flour to add a bit more fiber and a nuttier flavor to your bread.
    • Vegan Option: Replace eggs with flaxseed meal and use plant-based milk and butter to make it vegan-friendly.
    • Fruit Infusion: Add chopped bananas or apples to the dough for a fruity surprise in each bite!

    Serving Suggestions for Peanut Butter Caramel Bread

    • Fresh Fruit: Serve with slices of banana or strawberries for a refreshing contrast.
    • Hot Beverage: Pair with a warm cup of coffee or tea to complement the sweetness.
    • Presentation: Dust with powdered sugar and add a drizzle of caramel for an elegant touch.
    • Breakfast Treat: Enjoy slices toasted with butter for a delightful breakfast option.
    • Ice Cream: Top with a scoop of vanilla or chocolate ice cream for an indulgent dessert!

    FAQs about Peanut Butter Caramel Bread

    Can I make Peanut Butter Caramel Bread in advance?
    Absolutely! You can prepare the dough a day ahead and let it rise in the fridge overnight. Just bring it to room temperature before rolling out the peanut butter mixture.

    What can I substitute for all-purpose flour?
    If you’re looking for a healthier option, whole wheat flour can be used instead. Just keep in mind that the texture may be denser.

    Is it necessary to make the caramel sauce from scratch?
    While homemade caramel adds a special touch, store-bought caramel sauce works just fine! It’ll save you time without sacrificing flavor.

    What should I do if my dough doesn’t rise?
    If your dough isn’t rising, check if your yeast is fresh. Also, ensure the liquid was warm, not hot—too much heat can kill the yeast. Find a warm spot in your kitchen for the best results!

    Can I freeze Peanut Butter Caramel Bread?
    Yes! Wrap slices in plastic wrap and then foil before placing them in an airtight container. They can be frozen for up to 3 months. Just thaw and reheat to enjoy freshly baked goodness!

    Final Thoughts

    Baking my Peanut Butter Caramel Bread has been such a rewarding experience, and I hope it brings you as much joy as it has for me. The delightful aroma wafting through the kitchen while the bread bakes is truly special. Imagine gathering your loved ones, pulling apart warm, gooey pieces of this treat, and sharing hearty laughter.

    It’s not just a loaf of bread; it’s a way to create memories and sweet moments together. I genuinely believe this recipe will become a comforting staple in your home—one you’ll cherish and share for years to come!


    Print

    clock clock iconcutlery cutlery iconflag flag iconfolder folder iconinstagram instagram iconpinterest pinterest iconfacebook facebook iconprint print iconsquares squares iconheart heart iconheart solid heart solid icon

    Description

    A deliciously unique bread that combines the rich flavors of peanut butter and caramel in a soft, pull-apart loaf.


    • 3 cups all-purpose flour
    • 1/4 cup granulated sugar
    • 2 1/4 teaspoons active dry yeast
    • 1/2 teaspoon salt
    • 3/4 cup whole milk, warmed
    • 1/4 cup unsalted butter, melted
    • 2 large eggs, at room temperature
    • 1/2 cup creamy peanut butter
    • 1/3 cup light brown sugar
    • 2 tablespoons unsalted butter, softened
    • 1/2 cup granulated sugar (for caramel sauce)
    • 2 tablespoons water
    • 1/4 cup heavy cream, at room temperature
    • 2 tablespoons unsalted butter (for caramel sauce)
    • 1/4 teaspoon salt (for caramel sauce)
    • 1/4 cup chopped roasted peanuts (optional for topping)

    1. In a large bowl, whisk together the all-purpose flour, granulated sugar, active dry yeast, and salt until evenly combined.
    2. In a separate bowl, whisk warm whole milk, melted unsalted butter, and eggs until smooth. Pour the wet ingredients into the dry mixture and stir until a shaggy dough forms.
    3. Knead the dough by hand or with a stand mixer for 6 to 8 minutes until it is smooth and elastic.
    4. Transfer the dough to a greased bowl, cover it, and allow to rise in a warm location until doubled in size, about 1 hour.
    5. While the dough rises, combine granulated sugar and water in a small saucepan over medium heat. Cook until the mixture turns an amber hue. Remove from heat and carefully stir in the unsalted butter and heavy cream, then add salt. Let caramel sauce cool to room temperature.
    6. Stir together creamy peanut butter, light brown sugar, and softened unsalted butter in a small bowl until completely smooth.
    7. On a lightly floured surface, roll out the risen dough into a 12 by 18 inch rectangle.
    8. Evenly spread the peanut butter mixture across the surface of the rectangle. Drizzle half of the prepared caramel sauce over the top.
    9. Using a knife or bench scraper, cut the dough into 6 strips. Stack the strips and slice into 6 even squares.
    10. Arrange the stacked dough squares, cut-sides up, in a greased 9 by 5 inch loaf pan. Cover and let rise for 30 minutes.
    11. Preheat the oven to 350°F.
    12. Bake for 30 to 35 minutes, covering with foil during the final 10 minutes if the bread browns too rapidly.
    13. Let cool slightly, then drizzle the remaining caramel sauce over the top and sprinkle with chopped roasted peanuts if desired. Serve warm, allowing pieces to be pulled apart for enjoyment.

    Notes

    • Ensure the milk is warm but not hot to activate the yeast properly.
    • For even better flavor, use fresh roasted peanuts for the topping.
    • Keep an eye on the caramel sauce while cooking to prevent burning.
    • Prep Time: 1 hour
    • Cook Time: 35 minutes
    • Category: Dessert
    • Method: Baking
    • Cuisine: American

    Nutrition

    • Serving Size: 1 slice
    • Calories: 250
    • Sugar: 12g
    • Sodium: 200mg
    • Fat: 10g
    • Saturated Fat: 4g
    • Unsaturated Fat: 5g
    • Trans Fat: 0g
    • Carbohydrates: 35g
    • Fiber: 1g
    • Protein: 6g
    • Cholesterol: 40mg

    Sharing is caring!

  • Peanut Butter Brownie Cookies Drizzled

    Peanut Butter Brownie Cookies Drizzled


    Introduction to Peanut Butter Brownie Cookies Drizzled

    Let’s face it, life is busy and that especially rings true for many of us that are busy moms and professionals. Here’s the kicker – what if I was to tell you that you can make a batch of Peanut Butter Brownie Cookies Drizzled that will appease your sweet tooth but also impress your loved ones? All the goodness of the most tasty sweets combines the huge flavors of peanut butter as well as chocolate itself; obviously, that’s why these are a great way out in terms of a fast ending of a business day. Trust me on this one – these cookies are the cheer you need to lift your weeknight routine with a little bit of warmth and affection.

    Why You’ll Love This Peanut Butter Brownie Cookies Drizzled

    One bite of these Peanut Butter Brownie Cookies Drizzled and you’ll understand their magic! They’re super easy to make, taking just 15 minutes of prep and 12 minutes of baking. The gooey, chewy texture offers a blissful contrast to the drizzled white chocolate, creating ultimate comfort in every cookie. Plus, they’re perfect for kids of all ages, making them a delightful treat to share after a long day.

    Ingredients for Peanut Butter Brownie Cookies Drizzled

    Gathering the right ingredients is the first step toward creating your glorious Peanut Butter Brownie Cookies Drizzled. Here’s what you’ll need:

    • Unsalted butter: This gives the cookies a rich flavor and provides moisture.
    • Creamy peanut butter: The star of the show! It imparts a delicious nuttiness and chewy texture.
    • Granulated sugar: This sweetens the cookies while helping them to become soft and chewy.
    • Brown sugar: This adds moisture and a slight caramel flavor, elevating the cookie experience.
    • Large eggs: These act as binding agents to help hold everything together in perfect harmony.
    • Vanilla extract: Just a splash of this adds warmth and depth to the cookies’ overall flavor.
    • Unsweetened cocoa powder: It enriches the chocolate flavor and provides the brownie-like essence.
    • All-purpose flour: This is essential for structure, giving the cookies their shape.
    • Baking soda: It helps the cookies rise slightly, creating that fluffy texture.
    • Salt: Just a pinch enhances all the flavors, balancing sweetness.
    • White chocolate chips: Perfect for drizzling over the cookies for that beautiful finish. Substitute with dark chocolate for a richer taste!

    Don’t worry about measuring right now! You’ll find exact quantities at the bottom of the article, perfect for printing out and keeping in your kitchen.

    How to Make Peanut Butter Brownie Cookies Drizzled

    Making these Peanut Butter Brownie Cookies Drizzled is a breeze! I’ll walk you through each step to ensure you enjoy the process. Let’s dive into the magic of baking!

    Step 1: Combine Wet Ingredients

    Start by grabbing a large mixing bowl. Whisk together the melted butter and creamy peanut butter until smooth. This combo is the heart of your cookies, adding moisture and flavor. Next, add the granulated sugar and brown sugar. Mix until everything is well blended and glossy. Trust me, this glossy magic sets the stage for deliciousness!

    Step 2: Add Dry Ingredients

    Now comes the fun part. Sift in the cocoa powder, flour, baking soda, and salt. Gently fold the mixture with a spatula or wooden spoon until a thick, fudgy dough forms. It’s okay if you see some flour bits; overmixing can dull the cookie’s nice chewy texture. This dough should give off a brownie-like vibe—it’s pure bliss in a bowl!

    Step 3: Chill the Dough

    If you have a bit of time, let’s chill the dough for about 30 minutes. This step is optional but highly recommended. Chilling helps the cookies hold their shape, preventing them from spreading too much in the oven. Plus, it enhances that chewy texture we all adore!

    Step 4: Preheat and Prepare for Baking

    While the dough chills, it’s time to get your oven ready! Preheat it to 350°F (175°C). Then, line two baking sheets with parchment paper. This little trick keeps cookies from sticking and makes cleanup a breeze. Once the oven is hot, you’re all set!

    Step 5: Shape and Bake the Cookies

    Now, scoop the chilled dough into tablespoon-sized balls. Place them about 2 inches apart on the prepared baking sheets. Gently flatten each ball with the back of a spoon. This little nudging helps them bake evenly. Pop them in the oven and bake for 10-12 minutes. You want the edges set but remember, the centers should look slightly soft. They’ll continue to cook on the pan, creating chewy perfection!

    Step 6: Drizzle with White Chocolate

    Once the cookies are cooled, it’s time for the starry finish! Melt the white chocolate chips in a microwave-safe bowl, heating in 20-second intervals and stirring until smooth. Use a spoon or piping bag to elegantly drizzle the chocolate over each cookie. This adds the final touch of sweetness and a beautiful presentation. Wait a moment for the chocolate to set before diving in!

    Tips for Success

    • Use room-temperature ingredients for easier mixing and a smoother dough.
    • Don’t skip the chilling step—it’s key for chewy cookies!
    • Experiment with mix-ins like nuts or different chocolate types for fun variations.
    • Keep an eye on the baking time to ensure cookies stay soft inside.
    • Try adding a sprinkle of sea salt on top before baking for a flavor boost!

    Equipment Needed

    • Mixing bowl: A large bowl, or even a sturdy pot will do!
    • Whisk: Use a fork if you don’t have a whisk handy.
    • Spatula: A wooden spoon works great too for mixing your dough.
    • Baking sheets: Any sheet pan will suffice; just make sure to line them!
    • Parchment paper: Silicone baking mats are a fantastic alternative.

    Variations

    • Nutty Delight: Add chopped walnuts or pecans for an extra crunch and flavor boost.
    • Dark Chocolate Lovers: Swap white chocolate chips for dark chocolate chips to intensify that rich cocoa taste.
    • Gluten-Free Option: Substitute all-purpose flour with a 1:1 gluten-free baking blend for a gluten-free treat.
    • Vegan Twist: Use coconut oil instead of butter, and flax eggs in place of regular eggs for a vegan-friendly version.
    • Spice It Up: A dash of cinnamon or a pinch of cayenne can add a delightful kick and warmth.

    Serving Suggestions

    • Pair your Peanut Butter Brownie Cookies Drizzled with a tall glass of cold milk for the ultimate nostalgia.
    • Serve alongside a scoop of vanilla ice cream for a decadent dessert experience.
    • Dress up your cookie plate with fresh berries for a pop of color.
    • Wrap them in cute packaging for delightful homemade gifts.
    • Enjoy with a hot cup of coffee or tea for that cozy moment.

    FAQs about Peanut Butter Brownie Cookies Drizzled

    Have questions about making these fabulous Peanut Butter Brownie Cookies Drizzled? You’re not alone! Here are some common queries that pop up while baking these treats:

    Can I make the dough ahead of time?
    Absolutely! You can prepare the dough in advance and store it in the fridge for up to 3 days. Just remember to let it come to room temperature before scooping and baking.

    How can I store the cookies?
    Keep your cookies in an airtight container at room temperature for up to a week. If you want them to last longer, pop them in the freezer for a treat anytime!

    What if my cookies spread too much while baking?
    If this happens, it usually means the dough was too warm. Make sure to chill the dough for a bit before baking. A quick chill prevents excessive spreading!

    Can I use natural peanut butter?
    You can, but keep in mind that natural peanut butter can be a bit runnier and may change the texture of the cookies. Pot for the creamy, conventional kind for best results.

    How do I know when the cookies are done?
    Look for set edges and soft centers—they’ll finish cooking on the pan. Cookies that seem a bit underdone will firm up perfectly as they cool!

    Final Thoughts

    There’s something special about whipping up a batch of Peanut Butter Brownie Cookies Drizzled. The aroma fills your kitchen, creating a warm, inviting atmosphere that instantly lifts your spirits. These cookies are not just a treat; they’re a way to bring family together. Watching my kids enjoy these gooey delights reminds me that simple pleasures can create the most cherished memories. So whether you’re celebrating a special occasion or just a cozy night at home, these cookies will bring joy in every bite. Trust me, they’re worth every second spent in the kitchen!


    Print

    clock clock iconcutlery cutlery iconflag flag iconfolder folder iconinstagram instagram iconpinterest pinterest iconfacebook facebook iconprint print iconsquares squares iconheart heart iconheart solid heart solid icon

    Description

    Delicious peanut butter brownie cookies drizzled with white chocolate for a delightful treat.


    • 1/2 cup unsalted butter, melted
    • 1/2 cup creamy peanut butter
    • 1 cup granulated sugar
    • 1/2 cup brown sugar, packed
    • 2 large eggs
    • 1 teaspoon vanilla extract
    • 1/2 cup unsweetened cocoa powder
    • 1 cup all-purpose flour
    • 1/2 teaspoon baking soda
    • 1/4 teaspoon salt
    • 1/2 cup white chocolate chips (for drizzling)

    1. In a large mixing bowl, whisk together the melted butter, peanut butter, granulated sugar, and brown sugar until smooth. Add the eggs and vanilla extract, and stir until everything is well combined and glossy.
    2. Sift in the cocoa powder, flour, baking soda, and salt. Mix gently with a spatula or wooden spoon until the dough is thick and fudgy. It should resemble brownie batter but be thick enough to scoop.
    3. If you have time, chill the dough for 30 minutes. This helps the cookies hold their shape and enhances the chewy texture.
    4. Preheat the oven to 350°F (175°C). Line two baking sheets with parchment paper. Scoop the dough into tablespoon-sized balls and place them about 2 inches apart. Flatten slightly with the back of a spoon.
    5. Bake for 10–12 minutes, just until the edges are set but the centers still look slightly soft. They’ll continue to cook a bit on the pan.
    6. Let the cookies cool completely. Melt the white chocolate chips in a microwave-safe bowl in 20-second intervals, stirring until smooth. Use a spoon or piping bag to drizzle the white chocolate over the cookies in zig-zag lines.
    7. Let the chocolate set before storing—or eat them warm for maximum meltiness.

    Notes

    • Chilling the dough is optional but recommended for better texture.
    • For a richer flavor, use dark chocolate chips instead of white chocolate chips.
    • Store cookies in an airtight container for up to a week.
    • Prep Time: 15 minutes
    • Cook Time: 12 minutes
    • Category: Dessert
    • Method: Baking
    • Cuisine: American

    Nutrition

    • Serving Size: 1 cookie
    • Calories: 180
    • Sugar: 15g
    • Sodium: 90mg
    • Fat: 8g
    • Saturated Fat: 4g
    • Unsaturated Fat: 3g
    • Trans Fat: 0g
    • Carbohydrates: 23g
    • Fiber: 1g
    • Protein: 3g
    • Cholesterol: 25mg

    Sharing is caring!

  • Vegetarian Chili with Beans

    Vegetarian Chili with Beans


    Introduction to Vegetarian Chili with Beans

    I’m a mom constantly on the go so I get it, time is so precious, especially during those busy weekdays. That’s why I love love love this Vegetarian Chili with Beans so much. It’s not just dinner, it’s a warm embrace in a bowl! So much flavor and nutrition come from hearty beans and colorful veggies crammed into this chili. Quick to feed your family or impress your friends with the freshest of flavors, this is the answer. In less than an hour, you’re about to warm not only the heart but also the soul with what’s for dinner.

    Why You’ll Love This Vegetarian Chili with Beans

    This Vegetarian Chili with Beans is a lifesaver for busy nights. It’s easy to prepare, taking just about 50 minutes from prep to table. Plus, it’s a one-pan wonder, making cleanup a breeze! The diverse flavors and textures will satisfy even the pickiest eaters. You’ll love how it fills the house with mouthwatering aromas and leaves everyone asking for seconds. It’s the perfect cozy meal for any gathering!

    Ingredients in Vegetarian Chili with Beans

    Gathering the right ingredients is the first step to crafting a delightful Vegetarian Chili with Beans. Here’s what you’ll need:

    • Red onion: Adds sweetness and depth of flavor.
    • Garlic: A superstar for enhancing taste and aroma.
    • Red bell pepper: Brings a pop of color and crispness.
    • Carrot: Adds sweetness and a lovely texture.
    • Zucchini: A nutritious veggie that cooks down beautifully.
    • Kidney beans: These plump beans are rich in protein and fiber.
    • Black beans: Earthy and hearty, they create a lovely mix of flavors.
    • Diced tomatoes: Juicy and tangy, they form the base of the chili.
    • Tomato paste: Concentrated flavor that thickens and enriches the chili.
    • Vegetable stock: Adds liquid and depth; feel free to use homemade or store-bought.
    • Olive oil: For sautéing and a touch of healthy fat.
    • Chili seasoning blend: A mix of spices that infuses the dish with warmth and character.

    You can be creative, too! Consider adding jalapeños for a kick, or replace the zucchini with bell peppers for a change in flavor. If you have leftover veggies, toss them in! The beautiful thing about this recipe is its versatility.

    For exact measurements, scroll down to the recipe at the bottom, where you can find them handy for printing.

    How to Make Vegetarian Chili with Beans

    Now that you’ve gathered all your ingredients, it’s time to bring this Vegetarian Chili with Beans to life! Follow these simple steps, and you’ll have a pot of bubbling, flavorful chili ready to serve in no time.

    Step 1: Sauté Vegetables

    Start by heating three tablespoons of olive oil in a large sauté pan over medium-high heat. When the oil shimmers, toss in the finely chopped red onion and minced garlic. Sauté for a minute or two until fragrant. Next, add the diced red bell pepper, diced carrot, and chopped zucchini. Stir frequently for 8 to 10 minutes. You want the vegetables to soften, becoming tender yet still vibrant. This initial step sets the flavor foundation for your chili!

    Step 2: Add Beans and Seasoning

    Once your veggies are ready, it’s time for the star players: the beans! Add the drained kidney beans and black beans to the pan, along with your chili seasoning blend. Stir well to ensure every bean gets a generous coating of those spices. This is where your chili really starts to come alive! The warmth of the spices will tickle your senses, promising something delicious.

    Step 3: Mix in Tomatoes and Stock

    Now, let’s stir in those juicy diced tomatoes and the rich tomato paste. Mix thoroughly until everything is well combined. Pour in the vegetable stock and give it a good stir. Bringing all these flavors together creates a harmonious balance! Here’s a little tip: if you like a thicker chili, you can reduce the amount of stock you use.

    Step 4: Simmer to Perfection

    Bring your mixture to a gentle boil, then reduce the heat to a low simmer. Let it cook uncovered for 20 to 25 minutes, stirring occasionally. This allows the chili to thicken and all the flavors to meld beautifully. You might find that the aromas wafting from your stovetop draw the family to the kitchen like moths to a flame. Trust me, it’s worth the wait!

    Tips for Success

    • Prep your veggies ahead of time to save on cooking time.
    • Adjust the spice level by adding more or less chili seasoning, or even fresh herbs.
    • Don’t skip the simmering step; it’s crucial for flavor development!
    • Serve with toppings like avocado or cheese for added creaminess.
    • Double the recipe and freeze leftovers for a quick meal later.

    Equipment Needed

    • Large sauté pan: A deep skillet works well, too!
    • Wooden spoon: Great for stirring everything together; a spatula works just as well.
    • Measuring cups and spoons: Handy for precise ingredients; you can estimate if you’re comfortable!
    • Cutting board and knife: Essential for chopping veggies.

    Variations on Vegetarian Chili with Beans

    • Spicy Kick: Add diced jalapeños or serrano peppers for an extra kick of heat.
    • Quinoa Boost: Stir in cooked quinoa for added protein and texture.
    • Veggie Medley: Mix in other vegetables like corn, sweet potatoes, or spinach for a colorful twist.
    • Smoky Flavor: Add a teaspoon of smoked paprika or chipotle powder to infuse a smoky depth.
    • Vegan Option: Ensure all toppings are dairy-free, or use vegan cheese substitutions.
    • Herbaceous Twist: Incorporate fresh herbs like cilantro, parsley, or a squeeze of lime juice for brightness.

    Serving Suggestions for Vegetarian Chili with Beans

    • Serve with warm, crusty bread or cornbread for a comforting meal.
    • Add a dollop of sour cream or Greek yogurt for creaminess.
    • Pair with a fresh green salad to balance the meal.
    • Offer toppings like sliced avocado, shredded cheese, or chopped cilantro.
    • Enjoy with a glass of chilled iced tea or a light beer.

    FAQs about Vegetarian Chili with Beans

    Can I make this Vegetarian Chili with Beans ahead of time?

    Absolutely! This chili tastes even better the next day. You can make it in advance and store it in the refrigerator for up to four days. Just reheat it gently before serving.

    What can I add to enhance the flavor?

    For an extra burst of flavor, consider adding fresh herbs like cilantro or basil. A splash of lime juice before serving adds brightness, too.

    Is this chili gluten-free?

    Yes! As long as you choose a gluten-free chili seasoning blend, this Vegetarian Chili with Beans is a delicious option for those avoiding gluten.

    How do I make this chili spicier?

    If you love heat, add diced jalapeños or a pinch of cayenne pepper when mixing in the beans. You can always adjust to your taste preference!

    Can I freeze the leftovers?

    Certainly! This chili freezes beautifully. Just store it in an airtight container, and it can last up to three months. Thaw in the refrigerator before reheating. Enjoy your cozy meal anytime!

    Final Thoughts

    Creating this Vegetarian Chili with Beans has become a cherished ritual in my kitchen. It’s more than just a recipe; it’s an invitation to gather around the table and share a delightful, hearty meal. The joy of watching my family savor each spoonful is truly rewarding. Plus, knowing that I can whip up this dish in no time makes it a staple for busy nights. There’s something magical about a pot of chili bubbling away, filling the house with warmth and love. I hope this recipe brings as much joy to your home as it has to mine!


    Print

    clock clock iconcutlery cutlery iconflag flag iconfolder folder iconinstagram instagram iconpinterest pinterest iconfacebook facebook iconprint print iconsquares squares iconheart heart iconheart solid heart solid icon

    Description

    A hearty and flavorful vegetarian chili packed with beans and vegetables, perfect for a cozy meal.


    • 1 medium red onion, finely chopped
    • 2 cloves garlic, minced
    • 1 medium red bell pepper, diced
    • 1 large carrot, diced
    • 2 cups zucchini, chopped
    • 1 can (14 oz) kidney beans, drained and rinsed
    • 2 cans (14 oz each) black beans, drained and rinsed
    • 1 can (28 oz) diced tomatoes
    • 6 oz tomato paste
    • 1 1/2 cups vegetable stock
    • 3 tablespoons olive oil
    • 1 serving chili seasoning blend

    1. Heat olive oil in a large sauté pan over medium-high heat. Add chopped onion, minced garlic, diced red bell pepper, diced carrot, and chopped zucchini. Sauté for 8 to 10 minutes, stirring frequently, until the vegetables begin to soften.
    2. Add drained kidney beans, black beans, and chili seasoning blend to the pan. Stir well to evenly coat the beans with the seasoning.
    3. Stir in diced tomatoes, tomato paste, and vegetable stock. Mix thoroughly and bring the mixture to a gentle boil.
    4. Reduce heat to a low simmer and cook uncovered for 20 to 25 minutes, stirring occasionally, until the chili reaches desired thickness.

    Notes

    • Serve with your favorite toppings such as avocado, cilantro, or cheese.
    • For extra spice, add diced jalapeños or a pinch of cayenne pepper.
    • This chili can be made in advance and stored in the refrigerator for up to 4 days or frozen for later use.
    • Prep Time: 15 minutes
    • Cook Time: 35 minutes
    • Category: Main Course
    • Method: Stovetop
    • Cuisine: American

    Nutrition

    • Serving Size: 1 cup
    • Calories: 250
    • Sugar: 4g
    • Sodium: 360mg
    • Fat: 6g
    • Saturated Fat: 1g
    • Unsaturated Fat: 4g
    • Trans Fat: 0g
    • Carbohydrates: 40g
    • Fiber: 12g
    • Protein: 12g
    • Cholesterol: 0mg

    Sharing is caring!