Author: IHAAL Team

  • Southwest Cottage Cheese Bowl

    Southwest Cottage Cheese Bowl


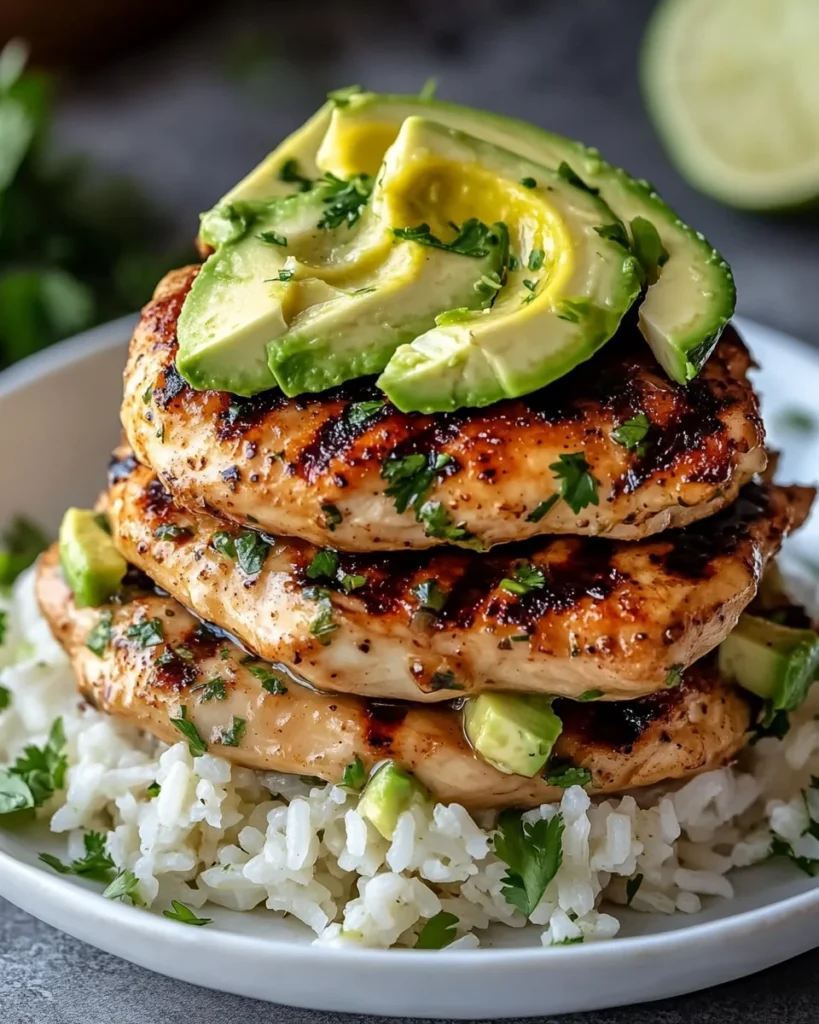
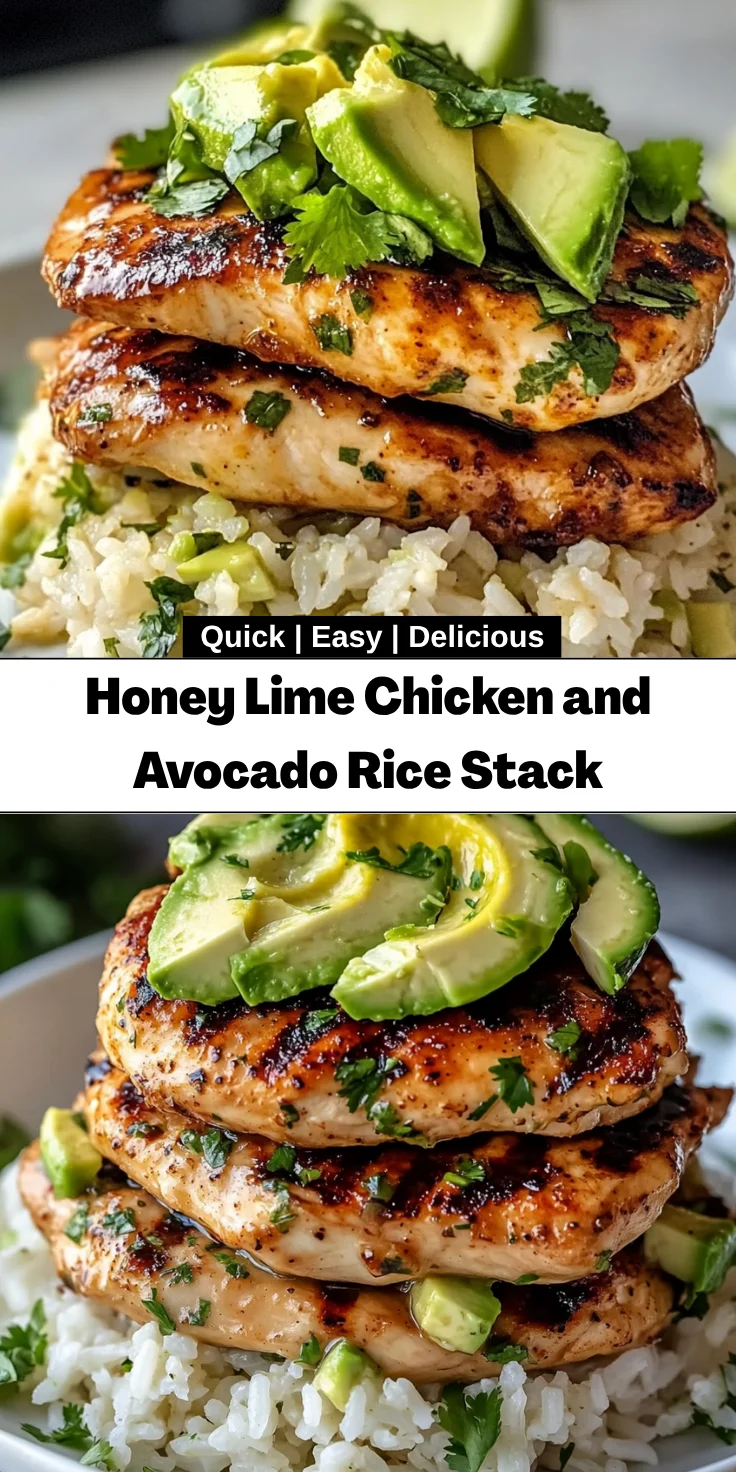
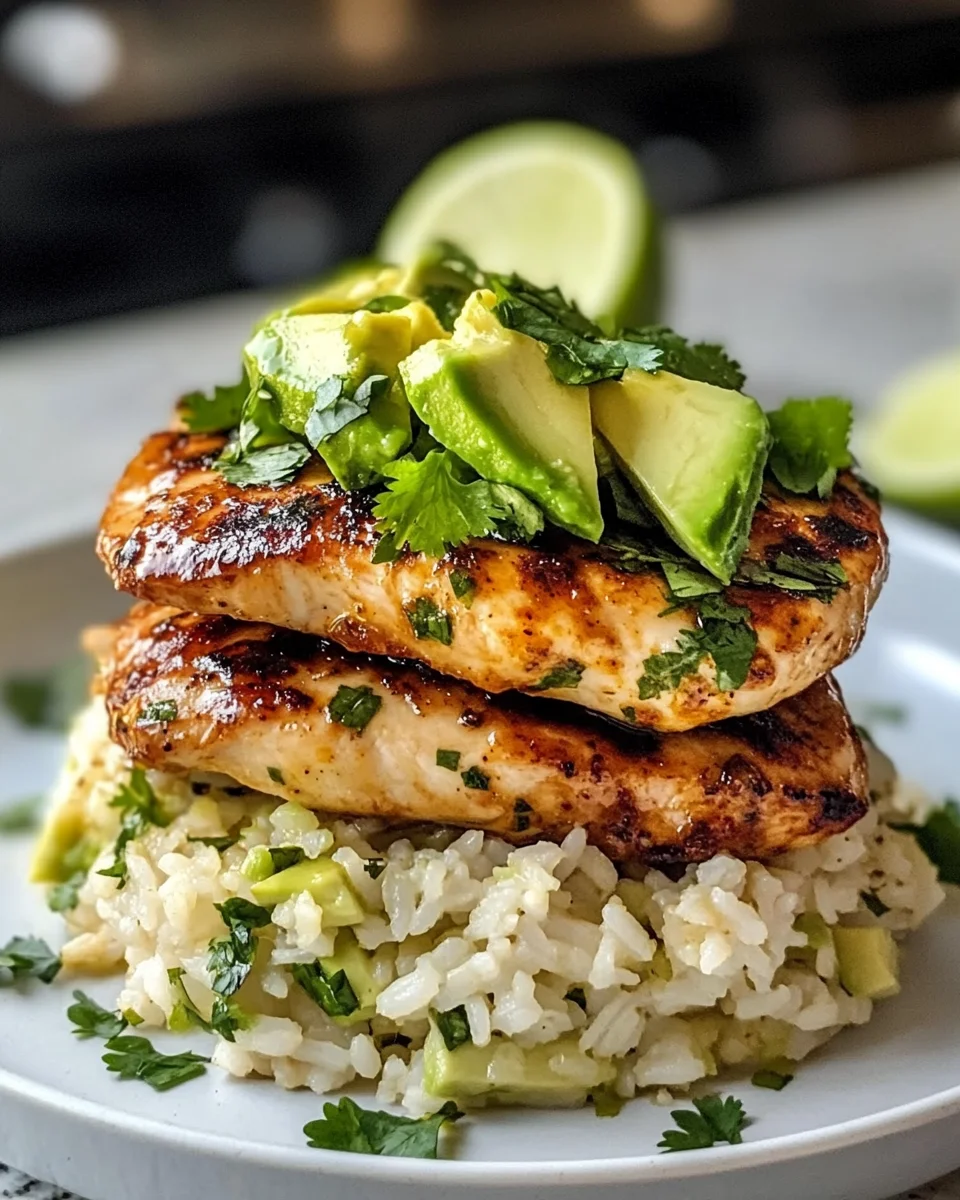
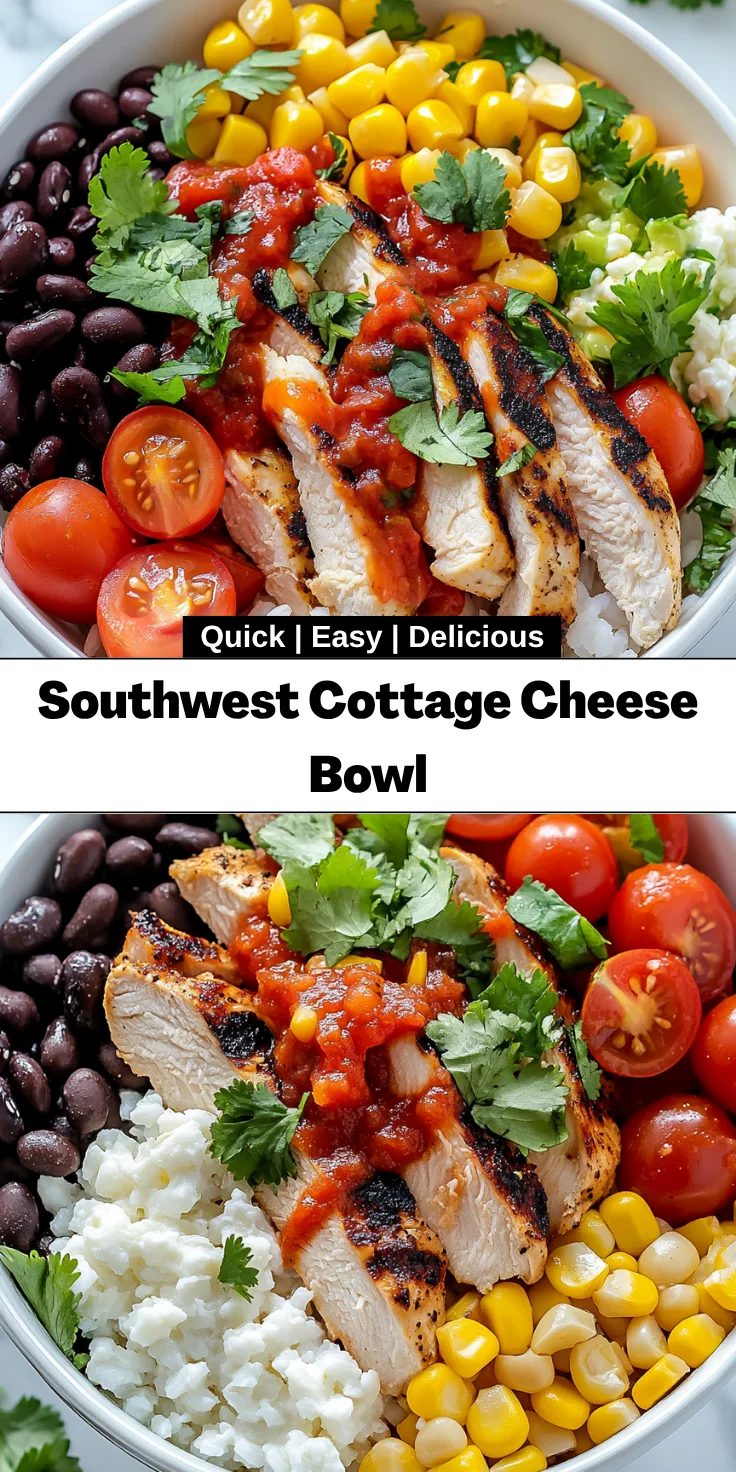
    Introduction to Southwest Cottage Cheese Bowl

    Welcome, my fellow kitchen adventurers! If you’re anything like me, the hustle and bustle of daily life can leave little time for cooking extravagant meals. But fear not! The Southwest Cottage Cheese Bowl is my secret weapon for busy days. It’s a tasty, nutritious option that comes together in just ten minutes. With a burst of Southwestern flavors, this bowl is the perfect solution to keep both your taste buds and your family happy without spending hours in the kitchen. Let’s get cooking and bring some joy to your table with this quick culinary delight!

    Why You’ll Love This Southwest Cottage Cheese Bowl

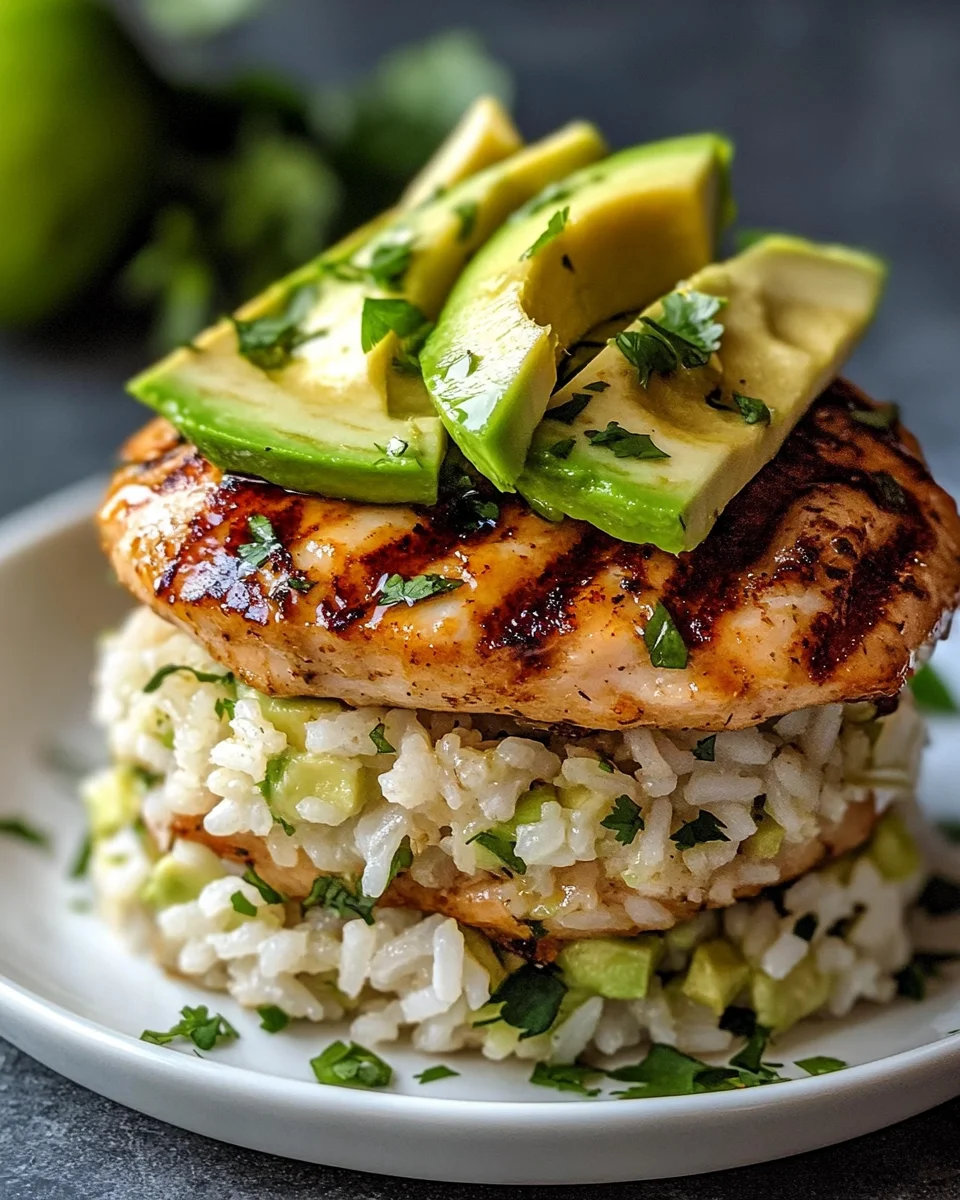
    This Southwest Cottage Cheese Bowl is a game-changer for busy nights. It’s loaded with protein, tastes amazing, and takes only ten minutes to whip up! You get the heartiness of grilled chicken, the creamy richness of cottage cheese, and the delightful crunch of fresh veggies. Plus, it’s customizable to fit your family’s tastes. It’s a quick, delightful dish that can easily please even the pickiest eaters!

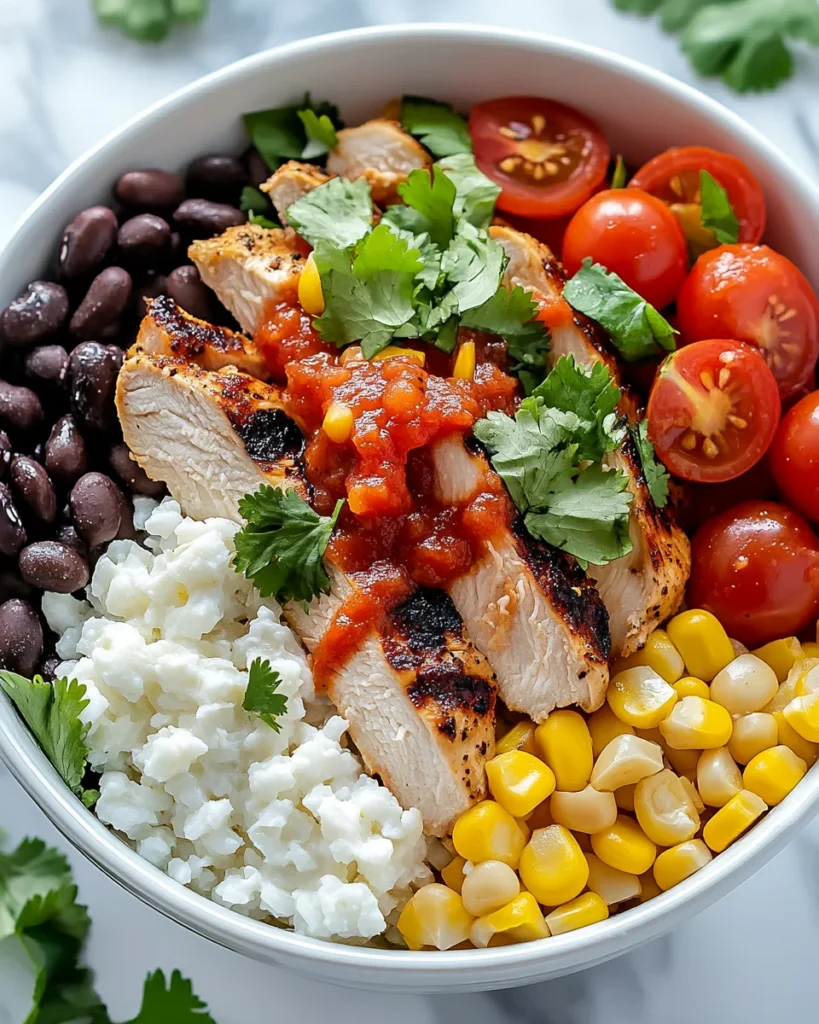
    Ingredients for Southwest Cottage Cheese Bowl

    Let’s gather our supplies for this zesty dish! Here’s what you’ll need:

    • Grilled chicken breast: Juicy and packed with protein, it’s the star of the show. You can easily swap it for grilled tofu for a vegetarian twist.
    • Cottage cheese: Creamy and rich, it adds a delightful texture and boosts the protein content. Opt for low-fat or full-fat, depending on your dietary goals.
    • Black beans: These little powerhouses are filled with fiber and protein. Rinse them to cut down excess sodium from the can.
    • Corn kernels: Sweet and crunchy, corn brightens up the bowl. Fresh, frozen, or canned—whatever you have on hand works well!
    • Diced tomatoes: Juicy and refreshing, they give the bowl a fresh burst of flavor. Feel free to use cherry tomatoes or any variety you fancy.
    • Chipotle dressing: Adds a smoky kick that perfectly brings all the ingredients together. If you like it spicy, don’t be shy with that drizzle!
    • Fresh cilantro: A flavorful garnish that elevates the dish. If cilantro isn’t your thing, parsley is a great substitute.

    Optional toppings like avocado or jalapeños can personalize your bowl, making it even more fun. The beauty of this Southwest Cottage Cheese Bowl is that its ingredients are flexible. Feel free to get creative with what you have available! If you’d like exact quantities, check out the bottom of the article where you can find everything available for printing.

    How to Make Southwest Cottage Cheese Bowl

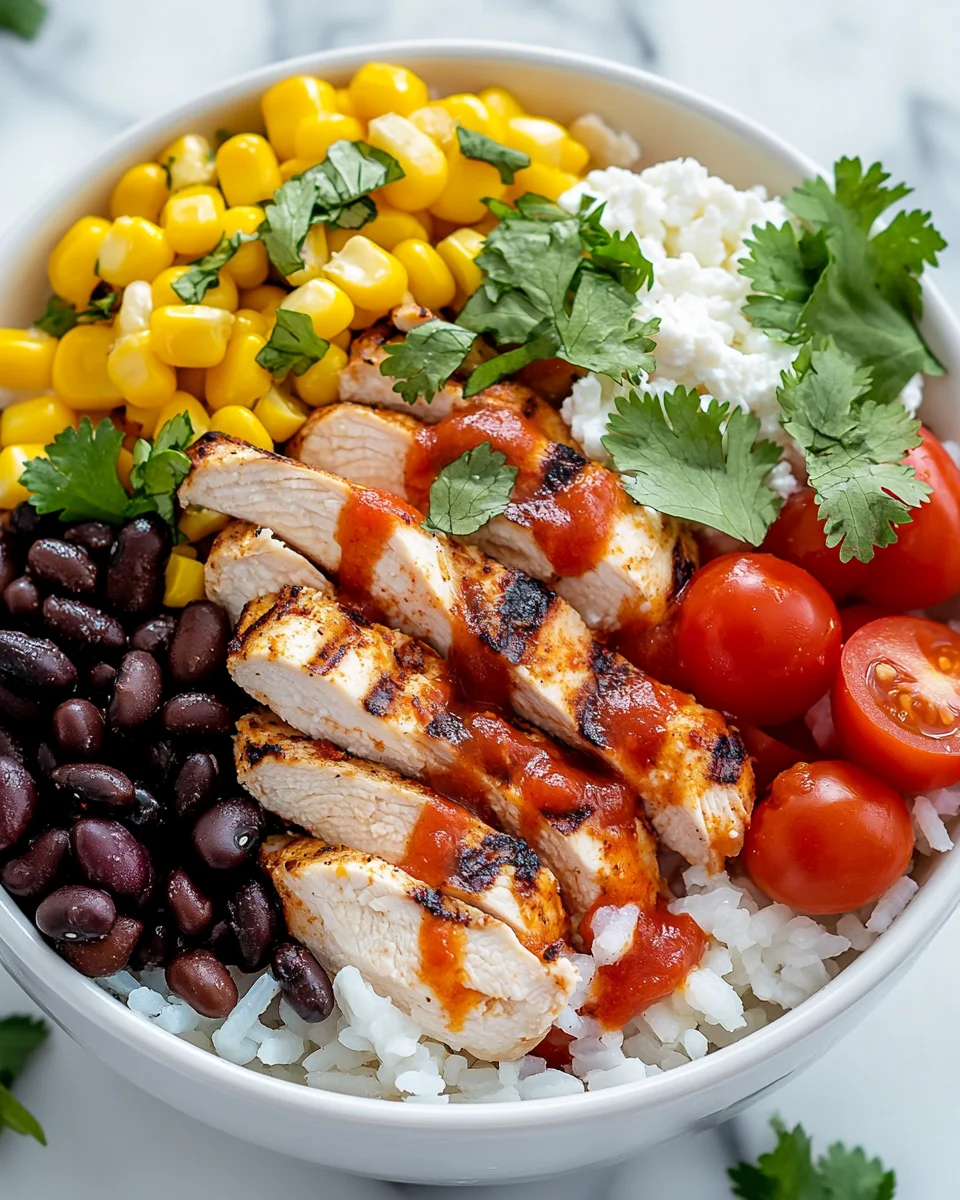
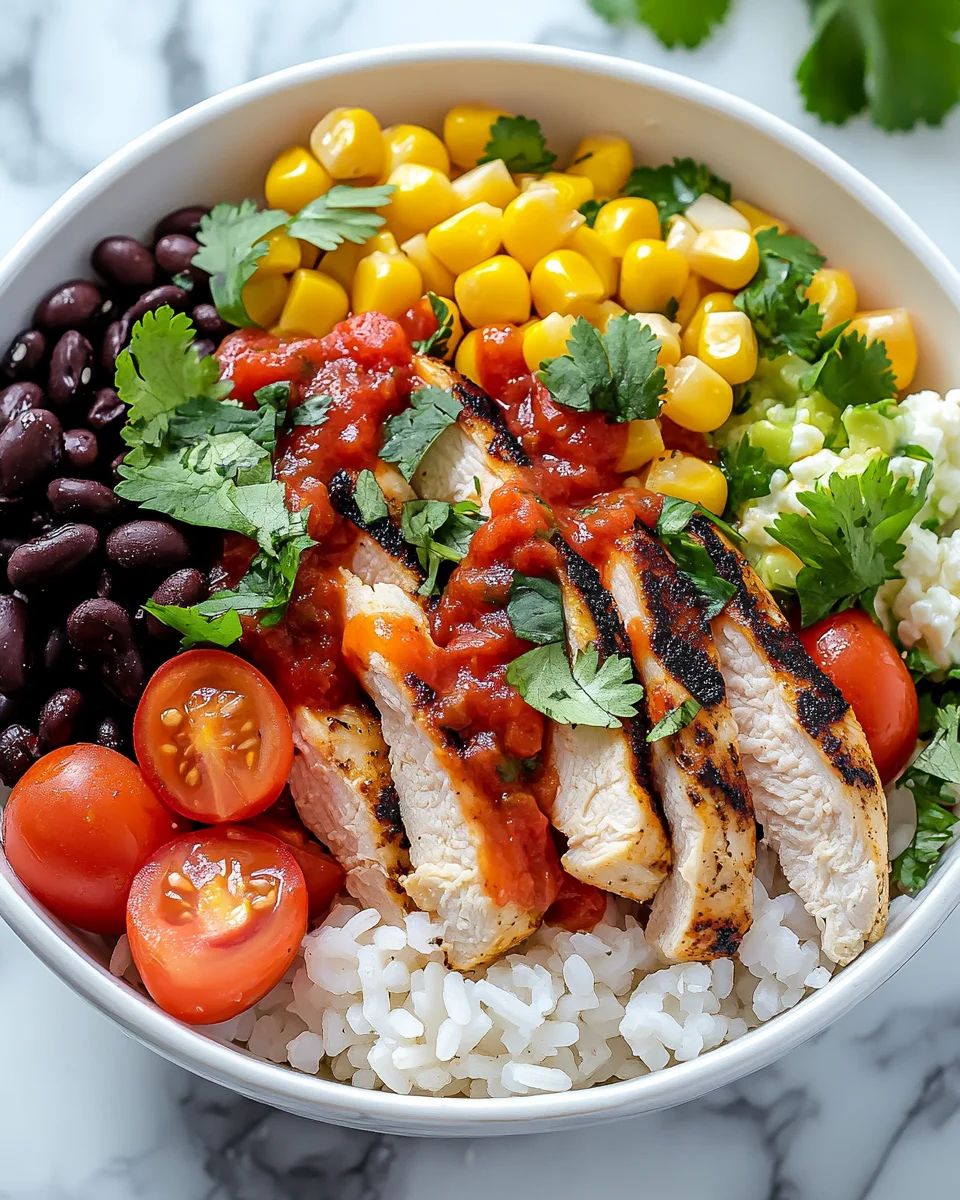
    Step 1: Prepare the Bowl Base

    Let’s kick things off by grabbing a nice bowl. I usually opt for a large, shallow one for easy layering. Start with one generous cup of cottage cheese as your base. This creamy goodness is where all the magic begins. It’s the heart of our Southwest Cottage Cheese Bowl!

    Step 2: Layer the Ingredients

    Now comes the fun part—layering! I like to add the grilled chicken breast slices next. They nestle in beautifully atop the cottage cheese, bringing protein to the forefront. Next, sprinkle in the black beans, followed by the sweet corn kernels. The vibrant reds from the diced tomatoes are up next, making your bowl visually appetizing. Each layer adds texture and flavor!

    Step 3: Add the Dressing

    Time to jazz it up! Take your chipotle dressing and drizzle it over the entire bowl. The smoky flavor infuses every layer, creating a burst of taste in each bite. Don’t hold back; a little extra dressing never hurt anyone, especially if you like a kick of heat!

    Step 4: Garnish and Serve

    Finally, it’s garnish time! Sprinkle fresh cilantro on top to add a pop of color and freshness. This is where you can get creative. If you’re feeling adventurous, toss in some sliced avocado or jalapeños. Now, your Southwest Cottage Cheese Bowl is ready to be devoured! Serve it up immediately and enjoy the symphony of flavors.

    Tips for Success

    • Make it a meal prep star! Prepare ingredients ahead of time to whip this bowl up in a flash.
    • Taste as you go! Adjust the seasoning and dressing to suit your family’s preferences.
    • Don’t overthink toppings. Get creative with what’s in your fridge, such as bell peppers or shredded carrots.
    • Keep it fresh! Enjoy your Southwest Cottage Cheese Bowl the same day for peak flavor.
    • Use leftovers! Transform any extra grilled chicken or beans into a new lunch idea.

    Equipment Needed

    • Mixing bowl: A large, shallow bowl works best for easy layering. Any bowl you have will do!
    • Cutting board: Essential for prepping fresh ingredients. A sturdy surface is key.
    • Knife: A simple chef’s knife will make slicing through chicken and veggies a breeze.
    • Spoon: Use a big spoon for mixing and serving your delicious creation!

    Variations

    • Vegetarian Delight: Swap grilled chicken for grilled tofu, chickpeas, or tempeh for a satisfying vegetarian option that’s just as hearty.
    • Spicy Kick: Add diced jalapeños or a sprinkle of chili flakes to elevate the heat for those who enjoy a fiery flavor.
    • Different Beans: Experiment with pinto beans or kidney beans. Each type adds a unique flavor and texture to your bowl.
    • Seasonal Veggies: Use whatever fresh produce you have on hand. Bell peppers, zucchini, or even roasted butternut squash can bring new flavors to life!
    • Dairy-Free Version: Substitute cottage cheese with vegan yogurt or your favorite dairy-free cheese alternative for a dairy-free bowl that still tastes fantastic.

    Serving Suggestions

    • Fresh Salad: Pair your Southwest Cottage Cheese Bowl with a light side salad. A simple mixed greens salad with a zesty vinaigrette complements the bowl beautifully.
    • Crispy Tortilla Chips: Serve with crunchy tortilla chips on the side for a satisfying crunch. They make a fun addition!
    • Refreshing Beverage: Enjoy with a cool glass of iced tea or lemonade. The refreshment balances the flavors perfectly.
    • Colorful Presentation: Use a colorful bowl to make your meal visually appealing. A vibrant dish is always inviting!

    FAQs about Southwest Cottage Cheese Bowl

    Can I make the Southwest Cottage Cheese Bowl ahead of time?

    Absolutely! This bowl is perfect for meal prep. Just store the ingredients in separate containers in the refrigerator. When you’re ready to eat, layer everything together and enjoy! It’s the ideal solution for busy moms needing a quick meal!

    Is this recipe suitable for a high-protein diet?

    Yes! The Southwest Cottage Cheese Bowl is packed with protein. With grilled chicken and cottage cheese as key ingredients, it offers a hearty dose of protein with every serving, making it perfect for anyone focusing on their fitness.

    What if I don’t have chipotle dressing?

    No worries! If you don’t have chipotle dressing, you can substitute it with any zesty dressing you enjoy, like ranch or a spicy vinaigrette. Or, create your own by mixing some yogurt with chipotle sauce for a quick alternative!

    Can I use frozen vegetables or canned beans?

    Definitely! Frozen vegetables can work just as well as fresh ones, and using canned beans is a great time-saver. Just rinse the canned beans beforehand to remove excess sodium—easy peasy!

    How can I make this dish vegan?

    To whip up a vegan version of the Southwest Cottage Cheese Bowl, simply replace the cottage cheese with a plant-based yogurt or a vegan cheese alternative. Swap chicken for grilled tofu or chickpeas, and you’re good to go!

    Final Thoughts

    Creating this Southwest Cottage Cheese Bowl is like finding a little culinary treasure amidst a busy week. In just ten minutes, I transform simple ingredients into a vibrant and satisfying meal that bursts with flavor. It’s incredibly rewarding to see my family’s smiles as they dive into a dish that’s as nutritious as it is delicious. Whether it becomes a quick lunch or a delightful dinner, this recipe allows me to connect and share joy through food. I hope it brings you the same happiness in your kitchen, making weekday meals a breeze!


    Print

    clock clock iconcutlery cutlery iconflag flag iconfolder folder iconinstagram instagram iconpinterest pinterest iconfacebook facebook iconprint print iconsquares squares iconheart heart iconheart solid heart solid icon

    Description

    A flavorful and nutritious Southwest Cottage Cheese Bowl perfect for a quick meal.


    • 1 cup grilled chicken breast, sliced
    • 1/2 cup cottage cheese
    • 1/4 cup black beans
    • 1/4 cup corn kernels
    • 1/4 cup diced tomatoes
    • 2 tablespoons chipotle dressing
    • Fresh cilantro for garnish

    1. In a bowl, layer cottage cheese, grilled chicken, black beans, corn, and diced tomatoes.
    2. Drizzle with chipotle dressing and garnish with fresh cilantro.
    3. Toss gently to combine and serve immediately.

    Notes

    • Feel free to customize with additional toppings like avocado or jalapeños.
    • This dish can be made ahead of time and stored in the refrigerator.
    • Substitute grilled tofu for a vegetarian option.
    • Prep Time: 10 minutes
    • Cook Time: 0 minutes
    • Category: Main Dish
    • Method: No-cook
    • Cuisine: Southwestern

    Nutrition

    • Serving Size: 1 bowl
    • Calories: 350
    • Sugar: 3g
    • Sodium: 600mg
    • Fat: 10g
    • Saturated Fat: 2g
    • Unsaturated Fat: 8g
    • Trans Fat: 0g
    • Carbohydrates: 30g
    • Fiber: 5g
    • Protein: 40g
    • Cholesterol: 70mg

    Sharing is caring!

  • Balsamic Strawberry Caprese

    Balsamic Strawberry Caprese


    Introduction to Balsamic Strawberry Caprese

    As a busy mom, I often find myself in the chaotic whirlwind of daily life, juggling work, kids, and everything in between. Amid this hustle, preparing a quick yet delightful dish is my hidden treasure. Enter the Balsamic Strawberry Caprese! This fresh salad combines strawberries, creamy mozzarella, and fragrant basil, drizzled with balsamic glaze for a delicious explosion of flavors. It’s a quick solution for those hectic evenings or an impressive dish to wow dinner guests. Trust me, you’ll feel like a gourmet chef with minimal effort—but that little secret stays just between us!

    Why You’ll Love This Balsamic Strawberry Caprese

    You’ll adore this Balsamic Strawberry Caprese because it’s the ultimate blend of fresh flavors, and it comes together in a snap! In just 10 minutes, you can whip up a charming salad that makes taste buds dance. It’s light, refreshing, and oh-so-pretty—perfect for impressing friends or enjoying a healthy treat after a busy day. Plus, it’s versatile enough to complement any meal, making it a go-to favorite!

    Ingredients for Balsamic Strawberry Caprese

    Let’s dive into the delightful ingredients that make the Balsamic Strawberry Caprese a refreshing hit. Each one plays a vital role in creating the colorful and tasty masterpiece we’re about to whip up!

    • Fresh mozzarella balls (bocconcini) – These soft and creamy bites provide a lovely contrast to the sweet strawberries. If you can’t find bocconcini, any fresh mozzarella works like a charm!
    • Ripe strawberries – They add that essential sweetness and juiciness. Opt for ripe, in-season berries for the best flavor. Frozen strawberries? Let’s stick to fresh for this recipe!
    • Fresh basil leaves – Their fragrant aroma elevates the salad, adding a burst of herbal goodness. If basil’s not your jam, mint could be a refreshing alternative.
    • Balsamic glaze – This velvety drizzle ties all the flavors together with its tangy sweetness. You can use store-bought or make your own by reducing balsamic vinegar over low heat.
    • Extra virgin olive oil – A drizzle of this golden elixir round out the dish. It adds a rich flavor and healthy fats. Feel free to switch to avocado oil for a lighter taste!
    • Salt and pepper – The dynamic duo enhances every single flavor in the salad. A sprinkle here and there does wonders!

    Remember, you can find exact measurements for these ingredients at the bottom of the article for your convenience. Happy cooking!


    How to Make Balsamic Strawberry Caprese

    Step 1: Prepare the Strawberries and Basil

    First things first, let’s get those strawberries ready! Start by rinsing them under cold water to remove any dirt. Then, slice the strawberries in half or quarters, depending on your preference for bite-sized pieces. Now, it’s time to freshen up the basil leaves. Rinse them gently and pat dry; try not to bruise those fragrant pals! You’ll love the burst of basil flavor in your salad.

    Step 2: Combine Strawberries and Mozzarella

    In a large mixing bowl, combine those vibrant strawberry pieces with the fresh mozzarella balls. Gently toss them together, allowing the sweet berries and creamy morsels to mingle. You want to keep the mozzarella intact for a delightful texture. This step brings our Balsamic Strawberry Caprese closer to that colorful masterpiece we’re aiming for!

    Step 3: Fold in the Basil

    Next, it’s time to bring in the star of our show—the basil! Carefully fold the fresh basil leaves into the strawberry and mozzarella mixture. Use a gentle hand here to keep that lovely presentation intact. Every leaf adds delightful aroma and flavor to the Balsamic Strawberry Caprese. You’ll be amazed at how fresh and vibrant it all looks!

    Step 4: Drizzle with Balsamic Glaze and Olive Oil

    Get ready for the fun part: the drizzling! Generously pour balsamic glaze over the salad—this is where the magic happens. Follow it up with a luscious drizzle of extra virgin olive oil. The rich flavors will intertwine beautifully, creating a delightful dressing that enhances each ingredient. Your taste buds are in for a treat, I promise!

    Step 5: Season to Taste

    Now, sprinkle a pinch of salt and freshly cracked black pepper over the salad. This dynamic duo is essential for taking the flavors up a notch! Adjust the seasoning to your preference; it rounds off the freshness beautifully. Just imagine that first bite—so heavenly!

    Step 6: Serve the Salad

    Finally, it’s showtime! Serve your stunning Balsamic Strawberry Caprese on beautiful plates or let it shine in the mixing bowl for a casual touch. Garnish it with a few extra basil leaves on top for presentation. Your loved ones will be amazed, and you’ll feel like a true culinary rockstar. Enjoy!

    Tips for Success

    • Choose the ripest strawberries you can find for maximum sweetness.
    • Don’t overmix the salad; gentle folding keeps the mozzarella intact.
    • Homemade balsamic glaze is easy—just simmer balsamic vinegar until it thickens!
    • Try chilling the salad for a bit before serving; it enhances the flavors.
    • For a colorful twist, add some sliced avocado or toasted nuts!

    Equipment Needed

    • Mixing bowl – A large bowl to mix your ingredients. A salad bowl works just as well!
    • Cutting board – Essential for slicing those strawberries. A sturdy surface is all you need!
    • Knife – A sharp knife makes slicing a breeze.
    • Serving utensils – These are handy for plating or serving the salad.

    Variations for Balsamic Strawberry Caprese

    • Berry Bonanza: Mix in other berries like blueberries or raspberries for an even fruitier twist!
    • Protein Boost: Add grilled chicken or shrimp for extra protein and heartiness. It transforms the salad into a meal!
    • Nuts for Crunch: Toss in some toasted walnuts or sliced almonds for a delightful crunch that elevates every bite.
    • Vegan Option: Substitute mozzarella with vegan cheese or avocado slices for a creamy, dairy-free delight.
    • Herb Variation: Experiment with other fresh herbs like mint or cilantro for a unique flavor profile!

    Serving Suggestions for Balsamic Strawberry Caprese

    • Pair with a crusty baguette or garlic bread for a delightful meal.
    • Serve alongside grilled chicken or fish for a balanced dinner.
    • Complement with a light white wine, like Sauvignon Blanc.
    • Garnish with extra basil leaves for an eye-catching presentation.
    • Great as a refreshing appetizer for summer gatherings!

    FAQs about Balsamic Strawberry Caprese

    You might have some burning questions about this delightful Balsamic Strawberry Caprese, and I’m here to provide the answers! Here’s a quick rundown of the most common queries I encounter.

    Can I make Balsamic Strawberry Caprese ahead of time?

    Yes, you can prepare the salad ahead of time! Just keep the balsamic glaze separate until you’re ready to serve. This prevents the ingredients from becoming too soggy, ensuring your salad stays fresh and vibrant.

    Can I use different types of cheese?

    Absolutely! While fresh mozzarella is classic, you can swap it for goat cheese or burrata. Each option brings a unique flavor and adds a delightful twist to your Balsamic Strawberry Caprese!

    What’s the best way to store leftovers?

    If you have leftovers, store the salad in an airtight container in the refrigerator. It’s best eaten within a day to enjoy the fresh flavors, but it can last up to two days with some flavor loss.

    Is this salad suitable for a gluten-free diet?

    Yes! The Balsamic Strawberry Caprese is naturally gluten-free, making it a great option for those who need to avoid gluten. It’s light, fresh, and perfect for a healthy lifestyle!

    Can I customize the herbs used in the salad?

    Definitely! While basil is the star, you can experiment with fresh mint or even arugula for a peppery kick. Customize the herbs to suit your taste preferences for a unique Balsamic Strawberry Caprese!

    Final Thoughts

    Creating the Balsamic Strawberry Caprese is more than just a cooking task—it’s an experience bursting with joy! With every colorful layer, I find myself savoring not only the fresh flavors but also the memories made around the table. The vibrant strawberries, creamy mozzarella, and fragrant basil come together like old friends, each bite bringing a sense of satisfaction. Whether it’s a quick weeknight dinner or a gathering with loved ones, this salad brings happiness to every occasion. I truly hope this delightful dish becomes a staple in your kitchen, bringing smiles and delicious moments your way!


    Print

    clock clock iconcutlery cutlery iconflag flag iconfolder folder iconinstagram instagram iconpinterest pinterest iconfacebook facebook iconprint print iconsquares squares iconheart heart iconheart solid heart solid icon

    Description

    A Fresh and delightful salad combining strawberries, mozzarella, and basil, drizzled with balsamic glaze.


    • 1 cup fresh mozzarella balls (bocconcini)
    • 2 cups ripe strawberries (halved)
    • ½ cup fresh basil leaves
    • ¼ cup balsamic glaze
    • 2 tbsp extra virgin olive oil
    • Salt and pepper to taste

    1. Wash and slice strawberries into halves or quarters. Rinse and pat dry basil leaves.
    2. In a large bowl, combine sliced strawberries and mozzarella balls. Gently toss to mix.
    3. Add fresh basil leaves to the mixture, folding them in lightly.
    4. Drizzle balsamic glaze generously over the salad followed by olive oil.
    5. Season with salt and freshly cracked black pepper to enhance flavors.
    6. Serve immediately on plates or in the mixing bowl for a casual feel.

    Notes

    • For a sweeter taste, use ripe strawberries.
    • Adjust the amount of balsamic glaze according to personal preference.
    • Prep Time: 10 minutes
    • Cook Time: 0 minutes
    • Category: Salad
    • Method: No-Cook
    • Cuisine: Italian

    Nutrition

    • Serving Size: 1 serving
    • Calories: 200
    • Sugar: 8g
    • Sodium: 150mg
    • Fat: 12g
    • Saturated Fat: 3g
    • Unsaturated Fat: 9g
    • Trans Fat: 0g
    • Carbohydrates: 18g
    • Fiber: 2g
    • Protein: 6g
    • Cholesterol: 15mg

    Sharing is caring!

  • Chocolate Peanut Butter Rice Krispies Roll

    Chocolate Peanut Butter Rice Krispies Roll


    Introduction to Chocolate Peanut Butter Rice Krispies Roll

    Are you a busy mom or professional looking for a delightful treat that brings a smile to your family’s faces? Let me introduce you to the Chocolate Peanut Butter Rice Krispies Roll! This no-bake dessert combines the nostalgic crunch of Rice Krispies with the rich flavors of chocolate and peanut butter. It’s incredibly easy to whip up, making it perfect for those hectic days. Trust me, when you serve this delightful roll, it’s bound to become a household favorite!

    Why You’ll Love This Chocolate Peanut Butter Rice Krispies Roll

    This Chocolate Peanut Butter Rice Krispies Roll is a winner for so many reasons. First, it comes together in a flash, making it perfect for busy schedules. The balance of crunchy Rice Krispies and creamy peanut butter, covered in silky chocolate, creates a flavor explosion that will have everyone coming back for more. Plus, there’s no baking involved! It truly is an effortless yet impressive treat the whole family will adore.

    Ingredients for Chocolate Peanut Butter Rice Krispies Roll

    Gathering the ingredients for this Chocolate Peanut Butter Rice Krispies Roll is half the fun! Here’s what you’ll need:

    • Rice Krispies cereal: The star ingredient, adding that delightful crunch.
    • Creamy peanut butter: Smooth and rich, it binds the mixture together and brings a delicious flavor.
    • Unsalted butter: This adds moisture and richness, balancing the sweetness perfectly.
    • Granulated sugar: For sweetness, giving that classic treat flavor everyone loves.
    • Light corn syrup or honey: This acts as a glue to hold everything together while adding a hint of sweetness.
    • Semi-sweet chocolate chips: Melted to create a luscious coating that envelopes the roll in chocolatey goodness.
    • Additional unsalted butter: Used for melting with the chocolate to ensure a smooth finish.

    Want to get adventurous? Consider adding a sprinkle of sea salt on top for a sweet-salty combo or even some chopped nuts for added crunch! All the ingredients with specific measurements can be found at the bottom of the article for easy reference and printing.

    How to Make Chocolate Peanut Butter Rice Krispies Roll

    Making this Chocolate Peanut Butter Rice Krispies Roll is like a little culinary adventure. Don’t worry—I’ll guide you through each step with clear instructions and helpful tips. Let’s dive in!

    Step 1: Prepare the Mixture

    Start by gathering all your fabulous ingredients. In a medium saucepan over medium heat, combine the creamy peanut butter, unsalted butter, granulated sugar, and light corn syrup (or honey). Stir continuously until everything melts into a smooth, delicious blend. It’s like a warm hug in a saucepan!

    Step 2: Form the Rice Krispies Base

    Once your mixture is smooth, remove it from the heat. Now, add the Rice Krispies cereal to the melting pot. Stir gently but thoroughly, ensuring each crispy piece gets coated. This is key for that delightful crunch in every bite!

    Next, lay a sheet of parchment or wax paper on your counter. Carefully transfer the Rice Krispies mixture onto it and press it into a rectangle about 12×8 inches. Use your hands or a rolling pin to smooth it out evenly. This is where the magic begins!

    Step 3: Melt the Chocolate

    Now, let’s talk chocolate! In a microwave-safe bowl, combine the semi-sweet chocolate chips and the additional unsalted butter. Heat them in 30-second intervals, stirring each time until smooth and glossy. The aroma of melting chocolate will make your kitchen feel like a bakery!

    Step 4: Assemble the Roll

    Time to give your Rice Krispies base some chocolate love. Spread the melted chocolate evenly over the rectangle, ensuring to cover every corner. Allow it to sit for about five minutes. We want it to cool slightly, but it needs to remain pliable for our rolling adventure ahead.

    Now, here comes the fun part! Starting from the shorter side of the rectangle, use the parchment paper to help you carefully roll it into a tight log. The parchment acts like your trusty sidekick, guiding the roll without making a mess. Once rolled, place the seam-side down to maintain its shape.

    Step 5: Chill and Slice

    Wrap your beautiful roll in the parchment paper to keep it fresh. Refrigerate it for at least an hour, or until firm. Waiting can be the hardest part, but let me assure you, this Chocolate Peanut Butter Rice Krispies Roll will be worth it!

    Once chilled, unwrap your masterpiece and slice it into ½-inch rounds. Each slice reveals an inviting combination of crunch and smooth chocolate. Enjoy these refreshing treats with a smile; they’re bound to be a hit!

    Tips for Success

    • Make sure the Rice Krispies are thoroughly coated for maximum flavor.
    • Use a sharp knife to slice the roll for cleaner, prettier pieces.
    • Let the chocolate cool slightly before rolling to avoid a sticky mess.
    • For an extra touch, sprinkle some sea salt on top of the melted chocolate.
    • Seal the roll tightly in parchment paper to keep it fresh longer.

    Equipment Needed

    • Medium saucepan: Use any pot you have handy; just make sure it has a sturdy base.
    • Mixing bowl: A large bowl works best for mixing the chocolate without splatter.
    • Parchment or wax paper: You can also use plastic wrap in a pinch!
    • Sharp knife: A bread knife can work wonders for slicing the roll.
    • Microwave-safe bowl: Any heatproof bowl will do for melting chocolate—just be cautious!

    Variations on Chocolate Peanut Butter Rice Krispies Roll

    • Nutty Delight: Toss in some chopped peanuts or almonds for added crunch, enhancing the texture.
    • Dark Chocolate Twist: Use dark chocolate chips instead of semi-sweet for a richer chocolate flavor.
    • Fruit Fusion: Add dried fruits like cranberries or raisins for a hint of sweetness and chewiness.
    • Flavorful Peanut Butter: Swap the creamy peanut butter for flavored varieties like honey-roasted or chocolate peanut butter.
    • Vegan Option: Substitute the butter with coconut oil and use dairy-free chocolate for a plant-based treat.
    • Spice It Up: Mix in a dash of cinnamon or a sprinkle of sea salt for a flavor boost that surprises the palate.

    Serving Suggestions

    • Refreshing Milk: Pair these delightful rolls with a glass of cold milk for a classic combo.
    • Fruit Slices: Serve alongside apple or banana slices to add a fresh touch.
    • Presentation: Arrange the slices on a colorful platter, drizzling some melted chocolate on top for flair.
    • Coffee Break: Enjoy these treats with your afternoon coffee for a sweet pick-me-up.

    FAQs about Chocolate Peanut Butter Rice Krispies Roll

    Can I make the Chocolate Peanut Butter Rice Krispies Roll ahead of time?
    Absolutely! This no-bake treat can be prepared a day in advance. Just keep it tightly wrapped in the refrigerator, and it will stay fresh and delicious.

    What other toppings can I use for the roll?
    If you’re feeling adventurous, consider adding crushed nuts, sprinkles, or even a drizzle of caramel on top. Each addition can elevate your dessert experience!

    Can I use different types of cereal in this recipe?
    Sure! While Rice Krispies are classic, feel free to experiment with other cereals—like Cornflakes or Cheerios. Each will bring its own unique texture to the roll.

    What if I have a peanut allergy?
    If peanuts aren’t your friends, you can substitute the peanut butter with sun butter or almond butter. These alternatives work perfectly while still keeping the flavor profile delicious!

    How do I store leftovers?
    To keep your Chocolate Peanut Butter Rice Krispies Roll fresh, wrap tightly in parchment paper or plastic wrap and store it in the refrigerator. It should last for about a week!

    Final Thoughts on Chocolate Peanut Butter Rice Krispies Roll

    There’s something truly special about creating this Chocolate Peanut Butter Rice Krispies Roll. Every bite offers a crunchy, chocolatey embrace that brings back childhood memories. It’s a recipe that not only satisfies your cravings but also invites family and friends to gather around. Whether you’re celebrating a special occasion or simply enjoying a quiet evening, this treat adds a spark of joy. I hope you create plenty of sweet moments with it, just like I do! So roll up your sleeves, get cooking, and let the smiles roll in!


    Print

    clock clock iconcutlery cutlery iconflag flag iconfolder folder iconinstagram instagram iconpinterest pinterest iconfacebook facebook iconprint print iconsquares squares iconheart heart iconheart solid heart solid icon

    Description

    A delicious and easy-to-make treat combining the flavors of chocolate and peanut butter in a crispy rice roll.


    • 3 cups (90 g) Rice Krispies cereal
    • 1/2 cup (120 g) creamy peanut butter
    • 1/4 cup (60 g) unsalted butter
    • 1/2 cup (100 g) granulated sugar
    • 1/4 cup (60 ml) light corn syrup or honey
    • 1 cup (175 g) semi-sweet chocolate chips
    • 2 tablespoons (30 g) unsalted butter

    1. In a medium saucepan over medium heat, combine the peanut butter, butter, sugar, and corn syrup (or honey). Stir until melted and smooth.
    2. Remove from heat and stir in the Rice Krispies until evenly coated.
    3. Place a sheet of parchment paper or wax paper on a flat surface. Press the Rice Krispies mixture evenly into a rectangle, approximately 12×8 inches. Use a rolling pin or your hands to smooth it out.
    4. In a microwave-safe bowl, melt the chocolate chips and butter in 30-second intervals, stirring until smooth and glossy.
    5. Spread the melted chocolate evenly over the Rice Krispies rectangle. Let it sit for 5 minutes to cool slightly but still remain pliable.
    6. Starting from the shorter side, carefully roll the rectangle into a tight log using the parchment paper to help lift and guide the roll. Place the roll seam-side down on the parchment.
    7. Wrap the roll in the parchment paper and refrigerate for at least 1 hour, or until firm. Once chilled, slice into 1/2-inch rounds and serve.

    Notes

    • Ensure the Rice Krispies are fully coated for even flavor.
    • Keep the roll tightly sealed in the refrigerator to maintain freshness.
    • Prep Time: 15 minutes
    • Cook Time: 10 minutes
    • Category: Dessert
    • Method: No-bake
    • Cuisine: American

    Nutrition

    • Serving Size: 1 slice
    • Calories: 150
    • Sugar: 8g
    • Sodium: 50mg
    • Fat: 8g
    • Saturated Fat: 4g
    • Unsaturated Fat: 3g
    • Trans Fat: 0g
    • Carbohydrates: 18g
    • Fiber: 1g
    • Protein: 2g
    • Cholesterol: 10mg

    Sharing is caring!

  • Honey Lime Chicken and Avocado Rice Stack

    Honey Lime Chicken and Avocado Rice Stack


    Introduction to Honey Lime Chicken and Avocado Rice Stack

    Hey there, fellow food lovers! If you’re anything like me, you crave delicious meals that don’t take hours to prepare. That’s where the Honey Lime Chicken and Avocado Rice Stack comes in! This vibrant dish is a perfect solution for those busy weeknights when you want to impress your loved ones without spending all night in the kitchen. Packed with flavor and nutrients, it’s not just a meal; it’s a delightful experience that brings a refreshing twist to your dinner table. Trust me, everyone will be asking for seconds!

    Why You’ll Love This Honey Lime Chicken and Avocado Rice Stack

    This Honey Lime Chicken and Avocado Rice Stack is a true lifesaver! It’s fast—ready in just an hour, so you’ll have more time for other important things. The flavors are simply incredible, with the sweetness of honey blending beautifully with zesty lime. Plus, it’s healthy and incredibly satisfying, making it perfect for those busy nights when you want a meal everyone will love.

    Ingredients for Honey Lime Chicken and Avocado Rice Stack

    Gather these wholesome ingredients to create your own Honey Lime Chicken and Avocado Rice Stack:

    • Boneless, skinless chicken breasts or thighs: The star of this dish! Chicken thighs can provide a juicier bite, while breasts are leaner.
    • Honey: This adds a perfect touch of sweetness that balances the zesty lime.
    • Fresh lime juice: You’ll need juice from a couple of limes for that refreshing tangy flavor.
    • Olive oil: A key player for marinating the chicken and adding richness to the rice.
    • Garlic powder: For that comforting aromatic flavor, a sprinkle goes a long way!
    • Chili powder: It adds a hint of warmth to contrast the sweetness of the honey.
    • Salt and black pepper: Fundamental seasonings that enhance all the other flavors.
    • Long-grain white rice: A perfect base; jasmine or basmati rice works beautifully.
    • Chicken broth: Cooking the rice in broth gives it extra flavor compared to just water.
    • Lime zest: This intensifies the lime flavor; don’t skip it!
    • Fresh cilantro: Adds a fresh and vibrant touch to the dish.
    • Avocado: Creamy, dreamy goodness! You can slice it or mash it for a spreadable layer.
    • Optional ingredients: Feel free to throw in extra cilantro or lime wedges for garnish.

    For exact measurements, check out the recipe at the bottom of the article—ready for printing!

    How to Make Honey Lime Chicken and Avocado Rice Stack

    Now, let’s dive into the heart of this delightful dish! Making the Honey Lime Chicken and Avocado Rice Stack is straightforward, yet every step fills your kitchen with mouthwatering aromas. Follow these simple steps to create a dish that’s not only stunning but also delicious!

    Prepare the Marinade

    Start by whisking together the honey, lime juice, olive oil, garlic powder, chili powder, salt, and black pepper in a small bowl. This marinade is where the magic happens! That zesty honey-lime concoction will infuse your chicken with a burst of flavor. Don’t rush this—it’s all about allowing those ingredients to mingle!

    Marinate the Chicken

    Once your marinade is ready, it’s time to get the chicken involved. Place the chicken breasts or thighs in a resealable bag or shallow dish. Pour that zesty marinade over the chicken, making sure it’s coated thoroughly. Seal the bag or cover the dish, then let it sit in the refrigerator for at least 30 minutes. For the best results, try marinating it for up to 4 hours. Your taste buds will thank you!

    Cook the Rice

    While the chicken is soaking up all that flavor, let’s move on to cooking the rice. Rinse the rice under cold water until the water runs clear. This step is crucial as it removes excess starch, keeping your rice fluffy instead of sticky. In a medium saucepan, bring your chicken broth (or water) to a boil. Once boiling, add the rinsed rice, reduce heat to low, cover, and let it simmer for about 12-15 minutes until tender. Fluff it with a fork and stir in lime zest, lime juice, olive oil, cilantro, and season with salt and pepper. Voila! Your rice is ready to shine!

    Grill the Chicken

    Now comes the exciting part—grilling the chicken! Heat your grill pan or skillet over medium-high heat. Remove the chicken from the marinade, discarding any excess marinade. Place the chicken on the hot grill and cook for about 6-7 minutes per side, or until the internal temperature reaches 165°F (74°C). Don’t forget to let it rest for about 5 minutes after grilling. This allows the juices to redistribute, making it even more tender.

    Assemble the Stack

    Let’s get creative and layer everything beautifully! Using a round mold (or a small bowl), layer the warm rice on a plate. Press down lightly to shape it. Next, add a generous layer of sliced or mashed avocado on top. Finally, crown it with slices of your perfectly grilled chicken. Carefully remove the mold to reveal your stunning stack! For a finishing touch, sprinkle some extra cilantro on top and add a lime wedge for that extra zing. Who knew creating art could be this delicious?

    Tips for Success

    • Allow the chicken to marinate longer for a deeper flavor.
    • When cooking rice, always use broth instead of water for added taste.
    • Check the chicken’s doneness with a meat thermometer to ensure it’s fully cooked.
    • For perfect avocado, choose one that’s ripe but not too soft; it should yield slightly to gentle pressure.
    • Feel free to customize seasonings in the marinade to suit your taste.

    Equipment Needed

    • Grill pan or skillet: You can also use an outdoor grill for that smoky flavor.
    • Medium saucepan: A basic pot works too; just ensure it’s good for simmering.
    • Whisk: A fork can do in a pinch, just be ready for a great arm workout!
    • Resealable bag or shallow dish: Any container that seals well will work, so don’t stress!
    • Round mold or small bowl: If you don’t have a mold, use a measuring cup to shape the rice.

    Variations

    • Spicy Kick: Add diced jalapeños or crushed red pepper flakes to the marinade for a spicy version that packs a punch.
    • Grilled Veggie Stack: Layer grilled vegetables like bell peppers, zucchini, or corn for a delightful vegetarian option.
    • Quinoa Substitute: Swap out the rice for quinoa for a protein-packed alternative that’s gluten-free and gives a nutty flavor.
    • Citrus Twist: Mix in some orange juice or zest with lime for a refreshing citrus burst!
    • Avocado Alternatives: Try using Greek yogurt or a dollop of sour cream instead of avocado for a creamy finish.

    Serving Suggestions

    • Pair with a crisp garden salad drizzled with a light vinaigrette for a refreshing contrast.
    • For drinks, a chilled glass of iced tea or a zesty limeade complements this dish perfectly.
    • Serve with grilled corn on the cob or roasted vegetables for a colorful and nutritious plate.
    • Consider a sprinkle of toasted sesame seeds on top for added crunch and visual appeal.

    FAQs about Honey Lime Chicken and Avocado Rice Stack

    Can I use frozen chicken for this recipe? Yes, you can use frozen chicken! Just make sure it’s completely thawed before marinating. Plan ahead to ensure safety and optimal flavor.

    What can I substitute for honey in the marinade? Try using agave syrup or maple syrup if you’re looking for a different sweetener. They will add a unique flavor while keeping it delicious!

    Can I prep the Honey Lime Chicken and Avocado Rice Stack in advance? Absolutely! You can marinate the chicken a day ahead. Just remember to cook the rice fresh so it retains its fluffiness.

    How can I store leftovers? Store any leftovers in an airtight container in the fridge. They should stay fresh for up to three days. Reheat gently to enjoy the flavors again!

    Is this recipe suitable for meal prep? Yes! The Honey Lime Chicken and Avocado Rice Stack is perfect for meal prep. Just stack everything in separate containers for easy grab-and-go lunches or dinners!

    Final Thoughts

    The Honey Lime Chicken and Avocado Rice Stack is more than just a meal; it’s a celebration of flavors and simplicity. Each layer represents love and care, perfect for busy days when you want to impress without the fuss. I adore how vibrant and appealing it looks, which always manages to brighten our dinner table. Plus, that balance of sweet, tangy, and creamy makes my taste buds dance with joy! Whether enjoyed with family or friends, this dish is guaranteed to create lasting memories and full bellies. Give it a try, and let the flavors work their magic!


    Print

    clock clock iconcutlery cutlery iconflag flag iconfolder folder iconinstagram instagram iconpinterest pinterest iconfacebook facebook iconprint print iconsquares squares iconheart heart iconheart solid heart solid icon

    Description

    A delicious stack of honey lime marinated chicken served with avocado and flavorful rice.


    • 1 lb boneless, skinless chicken breasts (or thighs)
    • 3 tbsp honey
    • 2 tbsp fresh lime juice (about 1 lime)
    • 1 tbsp olive oil
    • 1 tsp garlic powder
    • 1/2 tsp chili powder
    • 1/2 tsp salt
    • 1/4 tsp black pepper
    • 1 cup long-grain white rice (like jasmine or basmati)
    • 2 cups chicken broth (or water)
    • 1 tbsp lime zest (from 1 lime)
    • 1 tbsp fresh lime juice
    • 1 tbsp olive oil
    • 1/4 cup chopped fresh cilantro
    • Salt and pepper to taste
    • 1 large ripe avocado, sliced or mashed
    • Optional: extra cilantro, lime wedges for garnish

    1. In a small bowl, whisk together honey, lime juice, olive oil, garlic powder, chili powder, salt, and pepper.
    2. Place chicken in a resealable bag or shallow dish, pour marinade over it, and coat well. Marinate in the refrigerator for at least 30 minutes (up to 4 hours for more flavor).
    3. Rinse rice under cold water until water runs clear. In a medium saucepan, bring chicken broth to a boil.
    4. Add rice, reduce heat to low, cover, and simmer for 12-15 minutes until tender. Fluff with a fork, then stir in lime zest, lime juice, olive oil, cilantro, and season with salt and pepper. Set aside.
    5. Preheat a grill pan or skillet over medium-high heat. Remove chicken from marinade (discard excess) and cook for 6-7 minutes per side, or until internal temperature reaches 165°F (74°C). Let rest 5 minutes, then slice into strips.
    6. Using a round mold (or small bowl), layer warm rice on a plate, pressing lightly to shape. Add a layer of sliced or mashed avocado, then top with sliced chicken. Remove the mold carefully. Garnish with extra cilantro and a lime wedge if desired.

    Notes

    • For best results, marinate the chicken for longer.
    • Adjust seasonings according to your taste preference.
    • Rice can be made in advance and reheated.
    • Prep Time: 30 minutes (plus marinating time)
    • Cook Time: 30 minutes
    • Category: Dinner
    • Method: Grilling and Stovetop Cooking
    • Cuisine: Mexican

    Nutrition

    • Serving Size: 1 stack
    • Calories: 450
    • Sugar: 8g
    • Sodium: 400mg
    • Fat: 18g
    • Saturated Fat: 3g
    • Unsaturated Fat: 12g
    • Trans Fat: 0g
    • Carbohydrates: 45g
    • Fiber: 5g
    • Protein: 30g
    • Cholesterol: 75mg

    Sharing is caring!

  • Air Fryer Salmon Bites with Garlic Cream Sauce

    Air Fryer Salmon Bites with Garlic Cream Sauce


    Introduction to Air Fryer Salmon Bites with Garlic Cream Sauce

    Hey there, fellow foodie! If you’re searching for a meal that combines convenience with flavor, then Air Fryer Salmon Bites with Garlic Cream Sauce is just what you need. As a busy mom, I understand the struggle of preparing dinner after a long day. That’s why this recipe not only cooks up in a flash but also delivers a taste that’ll have your loved ones singing your praises! Imagine crispy salmon bites smothered in a rich, buttery garlic sauce. It’s a delicious crowd-pleaser that’s sure to brighten your table any night of the week.

    Why You’ll Love This Air Fryer Salmon Bites with Garlic Cream Sauce

    This recipe is a dream come true for busy days! You can whip up these Air Fryer Salmon Bites with Garlic Cream Sauce in just 20 minutes, making them perfect for those hectic evenings. Moreover, they’re packed with flavor and look impressive on any plate, turning your family dinner into a gourmet experience without much effort. Plus, who can resist that creamy garlic sauce? It’s simply irresistible!

    Ingredients for Air Fryer Salmon Bites with Garlic Cream Sauce

    Gathering the right ingredients is the first step to crafting these delightful Air Fryer Salmon Bites with Garlic Cream Sauce. Each one plays a special role in building flavor and texture. Here’s what you’ll need:

    • Fresh Salmon: Look for bright, firm fillets. Fresh salmon is crucial for that melt-in-your-mouth experience.
    • Olive Oil: A drizzle adds moisture and ensures a crispy exterior. Extra virgin olive oil works best for flavor.
    • Salt and Pepper: These simple seasonings highlight the natural flavor of the salmon. Adjust to your taste!
    • Paprika (optional): This spice brings a hint of smokiness and color, giving your bites an extra zing!
    • Unsalted Butter: The base for our creamy sauce, it adds richness and depth to the flavor profile.
    • Garlic: Freshly minced, garlic is the star of our sauce. Its aroma and flavor are simply irresistible!
    • Heavy Cream: This creates the luscious consistency of our garlic cream sauce. Feel free to substitute with half-and-half for a lighter version.
    • Lemon Juice: A splash of acidity balances the richness of the sauce while brightening the flavors of the dish.
    • Fresh Parsley: Chopped for garnish, it adds a pop of color and a fresh taste that complements the dish beautifully.

    Detailed measurements for each ingredient can be found at the end of the article, available for easy printing. With these components in hand, you’re ready to set off on a culinary adventure!

    How to Make Air Fryer Salmon Bites with Garlic Cream Sauce

    Now, let’s dive into the process of making your mouthwatering Air Fryer Salmon Bites with Garlic Cream Sauce. Follow these easy steps, and you’ll have a delectable dish on the table in no time!

    Step 1: Preheat the Air Fryer

    The first step is to preheat your air fryer. Set it to 400°F (200°C) and let it warm up for about 5 minutes. This ensures our salmon bites cook evenly. While it heats up, I like to give the basket a quick spray of cooking spray or brush it with a bit of olive oil for easier cleanup. Safety tip: always remember to handle the air fryer carefully, as it can get hot!

    Step 2: Season the Salmon

    Next, let’s season our salmon cubes. In a mixing bowl, toss the bite-sized pieces with olive oil, salt, and pepper. Don’t be shy with the seasoning! It enhances the salmon’s natural flavors. If you’re feeling adventurous, add paprika for a subtle smokiness. Make sure every morsel gets a flavorful coat—this is crucial for a delicious outcome!

    Step 3: Arrange and Cook the Salmon Bites

    Now, it’s time to arrange your salmon bites in the air fryer basket. Lay them out in a single layer, ensuring they’re not overcrowded. This helps them crisp up beautifully. Air fry for about 7-10 minutes. Don’t forget to flip them halfway through for even cooking! You’ll know they’re done when they’re golden brown and reach an internal temperature of 145°F (63°C). Your kitchen will smell heavenly!

    Step 4: Prepare the Garlic Cream Sauce

    While the salmon is cooking, let’s whip up that irresistible garlic cream sauce. In a small saucepan, melt the unsalted butter over medium heat. Add your minced garlic and sauté for 1-2 minutes until it’s fragrant. Then, stir in the heavy cream along with the lemon juice. Allow it to simmer for about 2-3 minutes until it thickens slightly. Make sure to stir occasionally for the perfect consistency. This creamy delight provides an amazing contrast to the salmon!

    Step 5: Serve and Garnish

    Once your salmon bites are done, it’s time to serve! Drizzle that luscious garlic cream sauce over the hot salmon bites. For a touch of freshness, sprinkle chopped parsley on top. Not only does it look beautiful, but it also adds a burst of flavor. Enjoy these delightful bites as an appetizer or pair them with your favorite sides for a complete meal. Bon appétit!

    Tips for Success

    • Use fresh salmon for the best flavor and texture. Frozen can work, but fresh is a treat!
    • Preheat your air fryer properly for even cooking—don’t skip this step!
    • Don’t overcrowd the basket. Space allows for crispy salmon bites on all sides.
    • Keep an eye on the cooking time; every air fryer is a bit different.
    • Experiment with different seasonings based on your family’s taste preferences!

    Equipment Needed

    • Air Fryer: Essential for crispy salmon bites. Any brand works well!
    • Mixing Bowl: For seasoning your salmon. A large bowl is handy.
    • Small Saucepan: Use this for making the garlic cream sauce. A non-stick option helps.
    • Meat Thermometer: Ensures the salmon is perfectly cooked every time.
    • Cooking Spray or Brush: Helps minimize sticking and make cleanup easier.

    Variations of Air Fryer Salmon Bites with Garlic Cream Sauce

    • Spicy Kick: Add a pinch of cayenne pepper or red pepper flakes to the seasoning blend for a delightful heat that contrasts with the creamy sauce.
    • Citrus Zing: Substitute lime juice for lemon juice in the garlic cream sauce for a zesty twist that pairs beautifully with salmon.
    • Herb Infusion: Experiment with different fresh herbs like dill or basil in your garlic cream sauce for a refreshing change.
    • Teriyaki Glaze: Brush the salmon bites with a teriyaki sauce before air frying for a sweet and savory flavor.
    • Mediterranean Twist: Add chopped sun-dried tomatoes and olives to the dish for a vibrant Mediterranean flavor profile.

    Serving Suggestions for Air Fryer Salmon Bites with Garlic Cream Sauce

    • Pair with Quinoa: Serve the salmon bites over fluffy quinoa for a nutritious grain option.
    • Fresh Salad: A crisp garden salad brings a refreshing crunch to your meal.
    • Citrus Sparkling Water: Complement the dish with a lightly flavored sparkling water.
    • Elegant Plating: Arrange the salmon bites on a platter, drizzling sauce artistically for a stunning presentation!

    FAQs about Air Fryer Salmon Bites with Garlic Cream Sauce

    Can I use frozen salmon for this recipe?

    Yes, you can use frozen salmon if needed! Just make sure to thaw it completely before seasoning and air frying. Fresh salmon, however, provides the best flavor and texture.

    What can I substitute for heavy cream?

    If you’re looking for a lighter option, you can substitute heavy cream with half-and-half or even coconut milk for a dairy-free alternative. Just keep in mind that consistency and flavor will slightly change.

    How do I know when the salmon is done cooking?

    The best way to ensure your salmon is perfectly cooked is to use a meat thermometer. It should read an internal temperature of 145°F (63°C). Also, the salmon should be opaque and flake easily with a fork.

    Can I make the garlic cream sauce in advance?

    Absolutely! You can prep the garlic cream sauce ahead of time and store it in the refrigerator for up to three days. Just reheat gently before serving over your salmon bites.

    What sides pair well with Air Fryer Salmon Bites?

    These salmon bites pair beautifully with a side of roasted vegetables, fluffy quinoa, or a refreshing salad. You can also serve them with rice for a more filling meal. Enjoy your culinary creations!

    Final Thoughts

    Cooking these Air Fryer Salmon Bites with Garlic Cream Sauce brings not just a dish to the table but also a burst of joy. Whether it’s a hectic weeknight or a gathering with loved ones, this recipe transforms ordinary moments into something special. The ease of making these bites allows you to spend more time with your family rather than in the kitchen. Plus, that creamy garlic sauce—oh, it’s the cherry on top! I can guarantee that every bite will evoke smiles and satisfaction. So, roll up your sleeves and get ready to impress!


    Print

    clock clock iconcutlery cutlery iconflag flag iconfolder folder iconinstagram instagram iconpinterest pinterest iconfacebook facebook iconprint print iconsquares squares iconheart heart iconheart solid heart solid icon

    Description

    Delicious air fryer salmon bites served with a rich garlic cream sauce.


    • 1 lb fresh salmon, cut into bite-sized cubes
    • 1 tablespoon olive oil
    • Salt and pepper, to taste
    • 1/2 teaspoon paprika (optional)
    • 1/4 cup unsalted butter
    • 3 cloves garlic, minced
    • 1/4 cup heavy cream
    • 1 tablespoon lemon juice
    • 1 tablespoon fresh parsley, chopped (for garnish)

    1. Preheat the air fryer to 400°F (200°C). Lightly spray the air fryer basket with cooking spray or brush with olive oil.
    2. Toss the salmon cubes with olive oil, salt, pepper, and paprika (if using). Arrange the salmon bites in a single layer in the air fryer basket.
    3. Air fry the salmon bites for 7-10 minutes, flipping halfway through, until golden brown and cooked through (internal temperature should reach 145°F/63°C).
    4. While the salmon is cooking, make the garlic cream sauce: In a small saucepan, melt the butter over medium heat. Add the minced garlic and sauté for 1-2 minutes until fragrant.
    5. Stir in the heavy cream and lemon juice, and simmer for another 2-3 minutes, until the sauce has thickened slightly.
    6. Season the sauce with salt and pepper to taste. Remove from heat.
    7. Once the salmon bites are done, drizzle the garlic cream sauce over them and garnish with fresh parsley.
    8. Serve immediately, either as an appetizer or with your favorite sides.

    Notes

    • Ensure salmon is fresh for the best flavor and texture.
    • Adjust seasonings to your liking.
    • Can be served with vegetables or rice as a complete meal.
    • Prep Time: 10 minutes
    • Cook Time: 10 minutes
    • Category: Appetizer
    • Method: Air Frying
    • Cuisine: American

    Nutrition

    • Serving Size: 4 oz
    • Calories: 350
    • Sugar: 1g
    • Sodium: 600mg
    • Fat: 26g
    • Saturated Fat: 15g
    • Unsaturated Fat: 8g
    • Trans Fat: 0g
    • Carbohydrates: 2g
    • Fiber: 0g
    • Protein: 27g
    • Cholesterol: 90mg

    Sharing is caring!

  • Mediterranean Ground Beef

    Mediterranean Ground Beef


    Introduction to Mediterranean Ground Beef

    As a busy mom, I know how challenging it can be to whip up a delicious meal that every family member will love. That’s why I’m excited to share my Mediterranean Ground Beef recipe with you! It’s packed with vibrant flavors, aromatic spices, and fresh ingredients that transport you straight to the sun-drenched shores of the Mediterranean. This dish is not only quick to prepare, but it also provides the comfort and satisfaction that busy days often crave. Let’s dive into this culinary adventure together—I promise, your taste buds will thank you!

    Why You’ll Love This Mediterranean Ground Beef

    This Mediterranean Ground Beef recipe is a lifesaver for those hectic days when dinner feels like a daunting task. It’s simple, taking only 30 minutes from start to finish, making it perfect for busy schedules. The rich blend of spices adds a delightful twist to the ordinary ground beef, ensuring that dinner is both satisfying and flavorful. Plus, it’s versatile—you can serve it in so many ways, keeping family meals exciting!

    Ingredients for Mediterranean Ground Beef

    Gather these flavorful ingredients to create your Mediterranean Ground Beef masterpiece! The beauty of this recipe lies in its simplicity and the aromatic flavors they bring to the table. Here’s what you’ll need:

    • Olive Oil: This healthy fat adds a richness and depth to the dish. It’s a staple in Mediterranean cooking.
    • Onion: Diced onion brings sweetness and a fragrant aroma when sautéed, forming the perfect base for the beef.
    • Garlic: Minced garlic adds a punch of flavor that enhances the overall dish. Who can resist that heavenly aroma?
    • Ground Beef: The star of the show! Choose lean ground beef for a healthier option without sacrificing taste.
    • Cumin: This warm, earthy spice gives a subtle smoky flavor that’s characteristic in Mediterranean cuisine.
    • Cinnamon: A surprising ingredient that adds warmth and complexity, taking the flavor profile to the next level.
    • Allspice: A pinch of this unique spice contributes warmth with hints of nutmeg and clove for that special touch.
    • Paprika: Adds both color and a mild, smoky flavor that will brighten your dish.
    • Dried Oregano: This herb brings a classic Mediterranean taste. Fresh oregano works, too, if you have it on hand!
    • Black Pepper: A dash of freshly ground black pepper adds subtle heat, enhancing the dish’s overall flavor.
    • Salt: Essential for balancing flavors; adjust to your preference as you cook.
    • Tomato Sauce: Provides moisture and acidity, tying all the flavors together beautifully.
    • Parsley: Freshly chopped parsley adds a burst of color and freshness. It’s a must for that finishing touch.
    • Mint: Like parsley, fresh mint elevates the dish with a refreshing note. Don’t skip this if you can help it!

    You can find the exact quantities for these ingredients at the bottom of the article, available for printing, so you’ll be all set to enjoy a delightful cooking experience!

    How to Make Mediterranean Ground Beef

    Making this Mediterranean Ground Beef is a delightful process that’s as easy as pie. Follow these simple steps, and you’ll have a fragrant, flavorful dish ready to enjoy in just 30 minutes!

    Step 1: Heat the Oil

    Start by heating a tablespoon of olive oil in a large skillet over medium heat. You want to feel that sizzle when the food hits the pan. Olive oil is not just for flavor; it’s a healthy choice, too!

    Step 2: Cook the Onion

    Add your diced onion to the skillet and cook it until it’s soft and golden. This will take about 3-5 minutes. The aroma of sautéing onions is like an invitation to the dinner table—so comforting!

    Step 3: Brown the Beef

    Now, it’s time to add the ground beef. Break it up with your spoon or spatula, stirring as it cooks. Aim for that beautiful brown color, which usually takes about 5-7 minutes. Ensure there’s no pink left—it’s key for a safe and tasty dish.

    Step 4: Season the Meat

    Sprinkle in the cumin, cinnamon, allspice, paprika, dried oregano, black pepper, and salt. These spices are what make this Mediterranean Ground Beef special! Mix everything together well, allowing the beef to soak up those vibrant flavors.

    Step 5: Add the Tomato Sauce

    Pour in the tomato sauce, nestling it amongst the spices and beef. Stir it all together, letting it simmer for about 3-5 minutes. This is where the magic happens—your kitchen will start to smell divine!

    Step 6: Final Touches

    Turn off the heat, and sprinkle in the chopped parsley and mint. These fresh herbs not only add color but also punch up the flavor. Give it one good stir to mix everything together.

    Step 7: Serve and Enjoy

    Now, it’s time to enjoy your hard work! Spoon the Mediterranean Ground Beef over warm rice, stuff it into pita bread, or serve alongside a fresh salad. No matter how you dish it, I promise it will be a hit!

    Tips for Success

    • For leaner meat, choose ground turkey or chicken instead of beef.
    • Pre-chop your herbs and veggies ahead of time to save precious minutes.
    • Feel free to double the recipe and enjoy leftovers for quick lunches.
    • To add more veggies, toss in diced bell peppers or zucchini when cooking the onions.
    • Serve with a drizzle of yogurt for a creamy finish to enhance the flavors.

    Equipment Needed

    • Large Skillet: A non-stick skillet is ideal, but any heavy-bottomed pan will work.
    • Spoon or Spatula: Use a wooden spoon for easy stirring and breaking up the beef.
    • Chopping Knife: A good sharp knife is essential for dicing your onions and herbs.
    • Cutting Board: A stable surface for chopping and prepping your ingredients.
    • Measuring Spoons: Helpful for adding accurate spice quantities; you can use regular spoons if needed.

    Variations of Mediterranean Ground Beef

    • Stuffed Peppers: Use the Mediterranean Ground Beef mixture to stuff halved bell peppers, top with cheese, and bake until bubbly.
    • Swap the Meat: For a lighter twist, replace ground beef with ground lamb or even lentils for a vegetarian option.
    • Adding Veggies: Incorporate chopped spinach or kale into the mix for added nutrition and color.
    • Spice It Up: For those who love heat, add red pepper flakes or chili powder to the spice blend.
    • Herb Variations: Experiment with different fresh herbs like cilantro or basil to give the dish a unique flair.

    Serving Suggestions for Mediterranean Ground Beef

    • Pair with fluffy couscous for a delightful contrast to the beef.
    • Serve alongside a crisp Greek salad topped with feta for a refreshing bite.
    • Complement the dish with a glass of chilled white wine, like Sauvignon Blanc.
    • Presentation tip: Garnish with lemon wedges for a zesty finish!
    • Add a dollop of tzatziki for a creamy, tangy element that enhances every bite.

    FAQs about Mediterranean Ground Beef

    Can I use other meats for this recipe?

    Absolutely! While this recipe features ground beef, you can also use ground turkey, chicken, or even lamb for a different flavor profile. Each option will bring a unique twist to your Mediterranean Ground Beef creation!

    How do I store leftovers of Mediterranean Ground Beef?

    Store any leftovers in an airtight container in the refrigerator for up to three days. You can easily reheat it in the microwave or on the stovetop. This makes it a great option for busy lunch prep, too!

    What should I serve with Mediterranean Ground Beef?

    This flavorful beef dish pairs excellently with rice, pita bread, or a fresh salad. The choices are endless! Serve with a side of hummus and veggies for a complete Mediterranean experience.

    Can I freeze Mediterranean Ground Beef?

    Yes, you can freeze it! Just let it cool completely, then transfer it to a freezer-safe container. This delicious dish can be frozen for up to three months. Perfect for those days when cooking feels like a marathon!

    Can I make this dish vegetarian?

    Definitely! You can replace the ground beef with lentils, quinoa, or a plant-based meat substitute. Just be sure to adjust the spices and cooking time as needed. Your vegetarian Mediterranean Ground Beef will still shine!

    Final Thoughts

    Cooking Mediterranean Ground Beef is more than just preparing a meal; it’s about creating lasting memories around the dinner table. The vibrant spices and fresh herbs combine to offer a delightful taste that transports you across the ocean. Whether you’re enjoying it with loved ones or savoring a quiet moment solo, this dish brings joy and comfort to your kitchen. I hope it becomes a go-to in your busy schedule—just like it has in mine. So, roll up your sleeves, embrace the flavors, and let the magic of Mediterranean cooking fill your home with warmth!


    Print

    clock clock iconcutlery cutlery iconflag flag iconfolder folder iconinstagram instagram iconpinterest pinterest iconfacebook facebook iconprint print iconsquares squares iconheart heart iconheart solid heart solid icon

    Description

    A flavorful Mediterranean dish featuring ground beef seasoned with aromatic spices and fresh herbs.


    • 1 tablespoon olive oil
    • 1 small onion, diced
    • 2 garlic cloves, minced
    • 1 pound ground beef
    • 1 teaspoon cumin
    • ½ teaspoon cinnamon
    • ½ teaspoon allspice
    • ½ teaspoon paprika
    • ½ teaspoon dried oregano
    • ¼ teaspoon ground black pepper
    • ¾ teaspoon salt
    • ¼ cup tomato sauce
    • 2 tablespoons chopped parsley
    • 2 tablespoons chopped mint

    1. Start by heating the olive oil in a large skillet over medium heat.
    2. Add your diced onion to the skillet and cook until it’s soft and golden.
    3. Add the ground beef to the skillet, breaking it up with your spoon or spatula and cook it until it’s no longer pink.
    4. Sprinkle in the cumin, cinnamon, allspice, paprika, oregano, black pepper, and salt.
    5. Pour in the tomato sauce and stir well, letting it simmer for a few minutes.
    6. Turn off the heat and sprinkle in the chopped parsley and mint.
    7. Spoon the beef over warm rice, stuff it into pita bread, or serve it alongside a fresh salad.

    Notes

    • This dish pairs well with rice or pita bread.
    • Feel free to adjust the spices according to your taste preferences.
    • Prep Time: 10 minutes
    • Cook Time: 20 minutes
    • Category: Main Dish
    • Method: Skillet
    • Cuisine: Mediterranean

    Nutrition

    • Serving Size: 1/4 of the recipe
    • Calories: 350
    • Sugar: 2g
    • Sodium: 800mg
    • Fat: 20g
    • Saturated Fat: 8g
    • Unsaturated Fat: 10g
    • Trans Fat: 0g
    • Carbohydrates: 10g
    • Fiber: 1g
    • Protein: 30g
    • Cholesterol: 70mg

    Sharing is caring!

  • Cheesy Garlic Chicken Wraps

    Cheesy Garlic Chicken Wraps


    Introduction to Cheesy Garlic Chicken Wraps

    Hey there, friends! If you’re like me, sometimes the day feels like a race against the clock. That’s where my delightful Cheesy Garlic Chicken Wraps come into play! This recipe is not just delicious; it’s also a fantastic solution for those busy evenings when you want something quick yet satisfying for dinner.

    Imagine wrapping mouthwatering sautéed chicken, vibrant veggies, and gooey cheese into a warm tortilla. It’s a dish that’ll impress your loved ones, but it won’t keep you in the kitchen for hours. Let’s dive into this culinary adventure and make mealtime a joyous moment again!

    Why You’ll Love This Cheesy Garlic Chicken Wraps

    These Cheesy Garlic Chicken Wraps are the ultimate weeknight lifesaver! They’re incredibly easy to prepare, making dinner a breeze even on the most hectic days. With just one pan and a handful of ingredients, you can whip up a tasty meal in no time.

    The combination of savory garlic, succulent chicken, and melted cheese wrapped in a tortilla is pure comfort food. Plus, this recipe is easily adaptable to suit your family’s tastes, ensuring everyone leaves the table happy!

    Ingredients for Cheesy Garlic Chicken Wraps

    Let’s gather the tasty ingredients that will bring our Cheesy Garlic Chicken Wraps to life! Each component adds its own touch, creating a symphony of flavors in each bite.

    • Boneless, skinless chicken breasts: The star of the show! Tender and juicy, they make for a hearty filling.
    • Fresh garlic: A true flavor booster! This aromatic adds a delightful punch to the wraps.
    • Large flour tortillas: The cozy blanket that holds everything together. You can swap them for whole wheat or corn tortillas for a healthier option.
    • Shredded mozzarella and cheddar cheese blend: Because cheese makes everything better! This melty duo creates that gooey goodness inside your wraps.
    • Extra virgin olive oil: A heart-healthy fat that helps sauté the chicken and veggies while adding flavor.
    • Diced bell peppers: They add a colorful crunch! Feel free to use any variety you enjoy – red, yellow, or even orange!
    • Fresh spinach or lettuce: A refreshing touch! Adding greens gives your wraps a nutritional boost.
    • Salt and pepper: Simple yet essential. These spices enhance the flavors and balance the dish.
    • Dried oregano or basil: An Italian herb that brings a hint of earthiness. You can use fresh herbs if you have them on hand.

    For your convenience, I’ve included exact measurements at the bottom of this article, so feel free to print the recipe out!

    How to Make Cheesy Garlic Chicken Wraps

    Now that we have our ingredients ready, let’s get cooking! Making these Cheesy Garlic Chicken Wraps is a breeze when you follow these clear steps. Each one builds on the last, creating a meal that’s bursting with flavor!

    Step 1: Prep the Chicken

    Start by dicing the boneless, skinless chicken breasts into bite-sized pieces. This ensures even cooking and makes for easy wrapping later. Heat about two tablespoons of extra virgin olive oil in a large skillet over medium heat. Once it’s shimmering, add in the chicken pieces. Sauté them for around 7 to 10 minutes, stirring occasionally, until they’re golden brown and fully cooked. You want a little bit of color on those delicious morsels!

    Step 2: Add Garlic and Herbs

    When the chicken is perfectly browned, it’s time to boost the flavor! Sprinkle in the minced garlic and your choice of dried oregano or basil. Stir the mixture, letting the garlic cook for just about two minutes. You’ll know it’s ready when your kitchen fills with that amazing aroma. Cooking the garlic lightly prevents it from burning, which can make it bitter. This step is crucial for depth in your Cheesy Garlic Chicken Wraps!

    Step 3: Incorporate Veggies

    Next, toss in the diced bell peppers. These vibrant veggies not only add color but also crucial crunch! Sauté for about 3 to 5 minutes, cooking until they are slightly softened but still maintain some bite. Season with salt and pepper to taste. This balance of flavors will make each bite of your wraps delightful. Remember to keep an eye on them; we want them tender but not mushy!

    Step 4: Assemble the Wraps

    Now, it’s time to bring it all together! Lay each tortilla flat on a clean surface. Spoon a generous amount of the chicken and veggie mixture into the center of each tortilla, followed by a handful of the shredded cheese blend. To wrap it up, fold the sides over securely, then roll from the bottom to the top, keeping it tight. This will help avoid any mess during cooking. You’ve just made a cozy little parcel of goodness!

    Step 5: Cook the Wraps

    To finish, heat the skillet to medium again. Place the wraps seam-side down in the pan, allowing them to cook for about 2 to 3 minutes until golden brown. Flip carefully and repeat on the other side. This step creates that perfect crispy exterior while the cheese inside melts into gooey perfection. Don’t rush this; the texture is what makes the wrap irresistible!

    Tips for Success

    • Choose chicken breasts that are uniform in size for even cooking.
    • Don’t skimp on the garlic; it’s the star flavor in these wraps!
    • For crispy tortillas, make sure the skillet is hot before cooking.
    • Experiment with your favorite veggies to customize the filling.
    • Always let the wraps rest for a minute before cutting; this helps keep the filling intact.

    Equipment Needed for Cheesy Garlic Chicken Wraps

    • Large skillet: A non-stick skillet works wonders to prevent sticking.
    • Cutting board: Essential for chopping your chicken and veggies safely.
    • Sharp knife: A good knife helps with those clean cuts.
    • Spatula: Perfect for flipping your wraps and mixing the ingredients.
    • Tortilla warmer or kitchen towel: Keeps your tortillas warm while you assemble.

    Variations of Cheesy Garlic Chicken Wraps

    • Vegetarian Delight: Replace chicken with black beans or grilled tofu for a hearty, meatless option.
    • Spicy Kick: Add jalapeños or cayenne pepper to the chicken mixture for some zest!
    • Buffalo Style: Toss the chicken in buffalo sauce before assembling for a tangy twist.
    • Cheesy Veggie Boost: Add sautéed mushrooms or zucchini for extra flavor and nutrition.
    • Low-Carb Version: Swap traditional tortillas for lettuce wraps to enjoy a lighter meal.

    Serving Suggestions for Cheesy Garlic Chicken Wraps

    • Serve with a side of fresh salsa or chunky guacamole for a tasty dip.
    • Add a crunchy green salad dressed with a zesty vinaigrette for balance.
    • Pair with a refreshing iced tea or sparkling water to complement the flavors.
    • For a lovely presentation, wrap the wraps in parchment paper with a twine bow.

    FAQs about Cheesy Garlic Chicken Wraps

    Can I make Cheesy Garlic Chicken Wraps in advance?
    Absolutely! You can prepare the filling ahead of time and store it in the fridge for up to two days. Just assemble and cook the wraps when you’re ready to serve!

    What can I substitute for chicken in this recipe?
    If you’re looking for a meatless option, try black beans, grilled tofu, or even tempeh. These alternatives hold flavor well and provide a hearty texture!

    How can I make the wraps spicier?
    To add some heat, sprinkle in crushed red pepper flakes or add diced jalapeños to the chicken mixture. You could also use spicy cheese blends or a drizzle of hot sauce before sealing the wraps!

    What sides pair well with Cheesy Garlic Chicken Wraps?
    These wraps go beautifully with a refreshing salad, fresh salsa, or a side of crispy tortilla chips. A zesty dip like guacamole elevates the whole meal!

    Can I freeze the Cheesy Garlic Chicken Wraps?
    Yes, you can! Just make sure they’re tightly wrapped in foil or freezer bags. When you’re ready, thaw in the fridge overnight and then reheat in a skillet for the best texture!

    Final Thoughts

    Creating Cheesy Garlic Chicken Wraps has been a joyful experience, connecting me to the kitchen and reminding me of the pleasures of home cooking. There’s something profoundly satisfying about wrapping up delicious flavors in a warm tortilla, especially after a long day. This recipe embodies comfort and convenience, making it perfect for busy nights or cozy family gatherings. I hope it brings the same joy to your table, filled with laughter and love. So grab those tortillas, gather your loved ones, and create delightful memories around mealtime—one cheesy garlic wrap at a time!


    Print

    clock clock iconcutlery cutlery iconflag flag iconfolder folder iconinstagram instagram iconpinterest pinterest iconfacebook facebook iconprint print iconsquares squares iconheart heart iconheart solid heart solid icon

    Description

    Cheesy Garlic Chicken Wraps are a delicious and satisfying meal, perfect for any dinner occasion.


    • 4 boneless, skinless chicken breasts (about 1 lb)
    • 4 cloves fresh garlic, minced
    • 4 large flour tortillas
    • 2 cups shredded mozzarella and cheddar cheese blend
    • 2 tbsp extra virgin olive oil
    • 1 cup diced bell peppers (mixed red and yellow)
    • 1 cup fresh spinach or lettuce
    • Salt and pepper to taste
    • 1 tsp dried oregano or basil

    1. Dice the chicken into bite-sized pieces. Heat olive oil in a pan over medium heat. Add chicken and sauté until golden brown and cooked through (about 7-10 minutes).
    2. Stir in minced garlic and Italian herbs; cook until fragrant (about 2 minutes).
    3. Add diced bell peppers; sauté until softened (3-5 minutes). Season with salt and pepper.
    4. Lay each tortilla flat, spoon the chicken mixture onto each, top with cheese, then wrap tightly.
    5. In a skillet over medium heat, cook each wrap seam-side down until golden brown (2-3 minutes per side).

    Notes

    • Serve with a side of fresh salsa or guacamole for dipping.
    • Can substitute chicken with a vegetarian protein for a meatless option.
    • Feel free to add your favorite vegetables for extra flavor.
    • Prep Time: 15 minutes
    • Cook Time: 20 minutes
    • Category: Dinner
    • Method: Sautéing and Grilling
    • Cuisine: American

    Nutrition

    • Serving Size: 1 wrap
    • Calories: 450
    • Sugar: 2g
    • Sodium: 600mg
    • Fat: 24g
    • Saturated Fat: 9g
    • Unsaturated Fat: 12g
    • Trans Fat: 0g
    • Carbohydrates: 36g
    • Fiber: 2g
    • Protein: 30g
    • Cholesterol: 90mg

    Sharing is caring!

  • Cheddar Cheese Biscuit Lobster Sandwich

    Cheddar Cheese Biscuit Lobster Sandwich


    Introduction to Cheddar Cheese Biscuit Lobster Sandwich

    As a busy mom, I know how the days can whirl by like a tornado. Between juggling work, family, and everything in between, finding time to whip up a gourmet meal feels like an uphill climb. That’s why I’m excited to share my Cheddar Cheese Biscuit Lobster Sandwich with you! This delightful dish combines flaky, buttery biscuits with a creamy lobster salad. It’s perfect for a quick lunch or an impressive dish for guests. With this sandwich, you’ll enjoy the taste of luxury while keeping things simple and satisfying!

    Why You’ll Love This Cheddar Cheese Biscuit Lobster Sandwich

    This Cheddar Cheese Biscuit Lobster Sandwich is a lifesaver for busy days! It comes together quickly, so you won’t miss a beat. Super tasty, it’s not just a meal; it’s an experience in every bite. The blend of rich cheddar and succulent lobster is undeniably delicious. Plus, it’s versatile enough to serve at a casual gathering or a cozy family meal. You’ll love how easy gourmet can be!

    Ingredients for Cheddar Cheese Biscuit Lobster Sandwich

    Gathering the perfect ingredients is key to crafting this scrumptious Cheddar Cheese Biscuit Lobster Sandwich. Let’s break down all you’ll need:

    • All-purpose flour: The backbone of your biscuit, providing structure and fluffy texture.
    • Baking powder: This leavening agent helps your biscuits rise, making them light and flaky.
    • Salt: A pinch enhances all the flavors. You won’t want to skip this!
    • Garlic powder: Adds a delightful aromatic touch to the biscuit’s flavor profile.
    • Sugar: A hint of sweetness balances the savory ingredients beautifully.
    • Cold butter: Essential for that flaky texture. Keep it chilled until you’re ready to use it!
    • Sharp cheddar cheese: It brings a rich, tangy flavor that pairs perfectly with lobster.
    • Buttermilk: This makes the dough tender and contributes to that classic biscuit taste.
    • Cooked lobster meat: The star of the show! Fresh lobster adds a luxurious touch.
    • Mayonnaise: It binds the lobster salad and adds creaminess.
    • Fresh lemon juice: A splash brightens the flavor, enhancing the lobster’s natural sweetness.
    • Dijon mustard: Offers a subtle zing that complements the other flavors.
    • Fresh parsley: Chopped for a pop of freshness and color.
    • Celery: Adds crunch and a nice contrast to the creamy salad.
    • Salt and pepper: For seasoning to your taste. Don’t hold back!
    • Fresh lettuce leaves: Optional, but they add a nice crunch and freshness.
    • Extra lemon wedges: Perfect for a zesty squeeze just before taking a bite.

    For exact quantities, check the bottom of the article where you can find a handy printable version!

    How to Make Cheddar Cheese Biscuit Lobster Sandwich

    Now that we’ve gathered everything, let’s dive into making this delightful Cheddar Cheese Biscuit Lobster Sandwich. Follow these straightforward steps to bring your gourmet lunch to life!

    Preheat the Oven

    First, let’s get our oven ready. Preheat it to 400°F (200°C). This step is crucial for achieving perfectly baked biscuits. While the oven heats, we can prepare the dough. It’s like setting the stage for our culinary masterpiece!

    Make the Biscuit Dough

    In a large mixing bowl, whisk together the all-purpose flour, baking powder, salt, garlic powder, and sugar. This combination is the foundation of your biscuits. Next, cut the cold butter into cubes. Add these chilly chunks to the dry mixture. Use your fingers or a pastry cutter to blend until it resembles coarse crumbs. Think of it as giving your dough a cozy, buttery blanket!

    Now, stir in the shredded sharp cheddar cheese. This is where the magic begins! It adds flavor and richness. Gradually pour in the buttermilk, mixing gently with a spoon until a dough forms. Avoid over-mixing; we want tender biscuits, not tough ones!

    Shape and Bake the Biscuits

    Lightly flour your workspace and turn the dough out onto it. Gently knead the dough a few times—just enough to bring it together. Pat it down to about 1-inch thick. Then, grab a biscuit cutter or a glass and cut out your biscuits. Place them on a baking sheet lined with parchment paper. As they bake, your kitchen will be filled with a buttery aroma!

    Bake the biscuits for 12-15 minutes or until they turn golden brown on top. Keep an eye on them; they’ll be just like little edible clouds, rising and fluffing up beautifully. Once done, take them out and let them cool slightly.

    Prepare the Lobster Salad

    If your lobster isn’t cooked yet, steam or boil the lobster tails according to package directions. Once cooked, let them cool a bit before removing the meat and chopping it into bite-sized pieces. This star of our sandwich deserves the spotlight!

    In a separate bowl, combine the chopped lobster with mayonnaise, fresh lemon juice, Dijon mustard, chopped parsley, and celery. Mix until everything is well-coated. Season with salt and pepper to taste. This delicious lobster salad will bring a decadent element to our sandwich!

    Assemble the Sandwich

    Now for the fun part—assembly! Slice each cooled cheddar cheese biscuit in half horizontally, creating a top and bottom. If you like, add a few fresh lettuce leaves on the bottom half for crunch. Next, pile on a generous scoop of the luscious lobster salad. Top it off with the biscuit lid, and voilà, your gourmet sandwich is ready!

    For that extra touch, serve with lemon wedges for a bright squeeze over the top. Enjoy every delicious bite of your homemade Cheddar Cheese Biscuit Lobster Sandwich!

    Tips for Success

    • Keep your butter cold for the flakiest biscuits.
    • Don’t overmix the biscuit dough; it should be tender, not tough.
    • For even baking, space the biscuits a bit apart on the baking sheet.
    • Use fresh lobster for the best flavor and texture.
    • Feel free to make the biscuits ahead; reheat them before filling.

    Equipment Needed

    • Mixing bowl: A large bowl for combining ingredients; any size works.
    • Pastry cutter or fingertips: Use either for mixing butter into the flour.
    • Baking sheet: A standard sheet works, but a rimmed one prevents spills.
    • Biscuit cutter or glass: Any round object can create the biscuit shapes.
    • Whisk: Essential for blending dry ingredients thoroughly.

    Variations

    • For a spicy kick, mix in diced jalapeños or a splash of hot sauce into your lobster salad.
    • Substitute crab or shrimp for a different seafood twist in your sandwich.
    • For a gluten-free option, replace all-purpose flour with a gluten-free baking mix.
    • Add chopped avocado for creamy richness or sliced tomatoes for a fresh crunch.
    • Try using gouda or pepper jack cheese for an exciting flavor variation in the biscuits.

    Serving Suggestions

    • Pair your Cheddar Cheese Biscuit Lobster Sandwich with a crisp salad for a refreshing bite.
    • Opt for a side of creamy coleslaw for that classic seafood experience.
    • Serve with chilled sparkling water or a crisp white wine to elevate your meal.
    • Garnish with fresh herbs for a beautiful presentation.

    FAQs about Cheddar Cheese Biscuit Lobster Sandwich

    Here are some common questions about the Cheddar Cheese Biscuit Lobster Sandwich, and I’m here to help clarify anything on your mind!

    Can I make the biscuit dough ahead of time?

    Absolutely! You can prepare the dough and freeze it. Just shape and bake them directly from frozen, adjusting the baking time as needed.

    What’s the best way to cook lobster for the salad?

    Steaming is my favorite method! It keeps the lobster tender and juicy. Boiling works too; just be cautious not to overcook.

    Is there a way to make this recipe healthier?

    Sure! You can use reduced-fat mayonnaise and substitute half of the butter in the biscuits with Greek yogurt for a lighter option.

    Can I use frozen lobster meat instead of fresh?

    Yes, frozen lobster is a convenient option! Just make sure to thaw it in the fridge overnight before using it in your sandwich.

    How long will the assembled sandwiches last in the fridge?

    Assembled sandwiches are best enjoyed right away, but you can store leftovers in an airtight container for up to 24 hours. Just keep the biscuits separate to retain their fluffiness!

    Final Thoughts

    Creating this Cheddar Cheese Biscuit Lobster Sandwich is more than just cooking; it’s about joy and connection. From the first bite of flaky, buttery biscuit to the rich and creamy lobster salad, every mouthful transports you to a seaside café. This recipe is my secret weapon for impressing guests or just treating my family to something extraordinary. Whether it’s a busy weekday lunch or a special occasion, this sandwich brings everyone together. I hope you enjoy making it as much as I do. Happy cooking, and here’s to delightful gourmet experiences at home!


    Print

    clock clock iconcutlery cutlery iconflag flag iconfolder folder iconinstagram instagram iconpinterest pinterest iconfacebook facebook iconprint print iconsquares squares iconheart heart iconheart solid heart solid icon

    Description

    A delightful sandwich featuring flaky cheddar cheese biscuits filled with a creamy lobster salad mix, perfect for a gourmet lunch or special occasion.


    • 2 cups all-purpose flour
    • 1 tablespoon baking powder
    • ½ teaspoon salt
    • ½ teaspoon garlic powder
    • 1 teaspoon sugar
    • ¾ cup cold butter, cubed
    • 1 cup shredded sharp cheddar cheese
    • ¾ cup buttermilk
    • 2 cups cooked lobster meat, chopped (about 23 lobster tails)
    • ¼ cup mayonnaise
    • 1 tablespoon fresh lemon juice
    • 1 teaspoon Dijon mustard
    • 1 tablespoon fresh parsley, chopped
    • 1 tablespoon celery, finely chopped
    • Salt and pepper, to taste
    • Fresh lettuce leaves (optional)
    • Extra lemon wedges (optional)

    1. Preheat your oven to 400°F (200°C) and line a baking sheet with parchment paper.
    2. In a large bowl, whisk together the flour, baking powder, salt, garlic powder, and sugar.
    3. Cut the cold butter into cubes and add it to the dry ingredients. Use a pastry cutter or your fingers to blend the butter into the flour mixture until it resembles coarse crumbs.
    4. Stir in the shredded cheddar cheese until evenly distributed.
    5. Gradually pour in the buttermilk, mixing gently with a spoon until a dough forms.
    6. Turn the dough onto a floured surface, gently knead it a few times, and then pat it into a 1-inch thick rectangle. Use a biscuit cutter or a glass to cut out biscuits. Place them on the prepared baking sheet and bake for 12-15 minutes or until golden brown on top. Set aside to cool slightly.
    7. If not using pre-cooked lobster, steam or boil the lobster tails. Once cooked, remove the meat and chop it into bite-sized pieces.
    8. In a bowl, combine the chopped lobster, mayonnaise, lemon juice, Dijon mustard, parsley, and celery. Stir until well combined. Season with salt and pepper to taste.
    9. Slice each cheddar cheese biscuit in half horizontally, creating a top and bottom for the sandwich.
    10. Place a few fresh lettuce leaves (optional) on the bottom half of the biscuit. Spoon a generous amount of lobster salad onto the lettuce, then top with the other half of the biscuit.
    11. Serve immediately, garnished with lemon wedges if desired, and enjoy!

    Notes

    • For a spicier lobster salad, consider adding diced jalapeños or a dash of hot sauce.
    • These biscuits can be made ahead of time and reheated before assembly.
    • Ensure lobster is fresh for the best flavor and texture.
    • Prep Time: 30 minutes
    • Cook Time: 15 minutes
    • Category: Sandwich
    • Method: Baking
    • Cuisine: American

    Nutrition

    • Serving Size: 1 sandwich
    • Calories: 450
    • Sugar: 2g
    • Sodium: 700mg
    • Fat: 30g
    • Saturated Fat: 15g
    • Unsaturated Fat: 12g
    • Trans Fat: 0g
    • Carbohydrates: 35g
    • Fiber: 2g
    • Protein: 18g
    • Cholesterol: 100mg

    Sharing is caring!

  • Chicken Coleslaw Salad with Ginger Sesame Dressing

    Chicken Coleslaw Salad with Ginger Sesame Dressing


    Introduction to Chicken Coleslaw Salad with Ginger Sesame Dressing

    As a busy mom who juggles work, family, and a million other tasks, I know how precious time can be in the kitchen. That’s why I adore this Chicken Coleslaw Salad with Ginger Sesame Dressing. It’s a refreshing burst of crunch and flavor that comes together in just 20 minutes!

    This recipe shines on those hectic days when you need something quick yet impressive. The zesty ginger and sesame dressing perfectly complements the vibrant veggies and tender chicken, making it a family favorite. Let’s dive into this delightful dish that feels gourmet but is oh-so-simple to whip up!

    Why You’ll Love This Chicken Coleslaw Salad with Ginger Sesame Dressing

    This Chicken Coleslaw Salad with Ginger Sesame Dressing is the perfect balance of flavors and textures—all in one bowl! It’s quick to prepare, taking only 20 minutes, which is a lifesaver for anyone on a tight schedule. The combination of crisp veggies, tender chicken, and a zingy dressing makes it a delightful meal that pleases even the pickiest eaters. You’ll find yourself returning to this recipe time and again!

    Ingredients for Chicken Coleslaw Salad with Ginger Sesame Dressing

    This vibrant Chicken Coleslaw Salad with Ginger Sesame Dressing features a medley of fresh ingredients that add both flavor and nutrition. You’ll need colorful bell peppers, bok choy, cucumbers, and carrots for crunch and freshness. Shredded cooked chicken brings heartiness to the dish.

    The spring mix and chopped romaine form a cozy base, while mandarin oranges add a hint of sweetness. For those irresistible toppings, fried wonton strips and toasted almonds offer delightful texture. Don’t forget the toasted sesame seeds and fresh cilantro for zest. You can find the exact quantities at the end of the article, ready for printing!

    How to Make Chicken Coleslaw Salad with Ginger Sesame Dressing

    Making Chicken Coleslaw Salad with Ginger Sesame Dressing is not just easy; it’s also a fun kitchen adventure! Follow these step-by-step instructions, and you’ll have a delicious, vibrant dish in no time. Let’s roll up our sleeves and get started!

    Step 1: Prepare Vegetables

    First, wash all your veggies under cold water. Grab your cutting board and julienne the yellow and red bell peppers. Slice the bok choy thinly and julienne those cucumbers. Lastly, shred the carrots for that fantastic crunch. Trust me, these fresh ingredients will make a world of difference!

    Step 2: Mix Greens

    In a large salad bowl, combine the chopped romaine and spring mix. This mix creates a cozy bed for all the toppings. I love using spring mix for its variety, while romaine adds that satisfying crunch. Remember, this is your salad, so feel free to tweak the greens as you like!

    Step 3: Layer Salad

    Now, it’s time to layer everything! Place the shredded chicken alongside your colorful vegetables on top of the mixed greens. You want every ingredient to be visible, showcasing that rainbow of colors! This not only makes it appealing but also allows everyone to enjoy each bite.

    Step 4: Make Dressing

    Grab a bowl to whisk together your ginger sesame dressing. Combine soy sauce, ginger, sesame oil, and a splash of rice vinegar. Whisk until it’s perfectly emulsified. You can adjust the dressing to your taste, adding more ginger for a kick or more oil for smoothness. It’s all about your preference!

    Step 5: Dress the Salad

    Pour about half of your delightful dressing over the layered salad. Gently toss everything together with your hands or salad tongs. This ensures the flavors mingle without crushing those crispy veggies. Remember, you can always add more dressing if needed, but you can’t take it away!

    Step 6: Top and Garnish

    As a final touch, add the mandarin oranges, fried wonton strips, toasted almonds, and sesame seeds. Toss in a few fresh cilantro sprigs for that pop of flavor. This Chicken Coleslaw Salad with Ginger Sesame Dressing is ready to shine at your dinner table. Serve it immediately for the best crunch!

    Tips for Success

    • Always wash your vegetables thoroughly to ensure freshness and remove any dirt.
    • For added crunch, consider making your own wonton strips at home!
    • Prep ingredients ahead of time for a quick assembly during busy days.
    • Taste the dressing before adding it all to the salad; adjust for the perfect flavor.
    • Store leftover salad in an airtight container but keep dressing separate to maintain freshness.

    Equipment Needed

    • Large salad bowl: A big, beautiful bowl helps combine all those vibrant ingredients.
    • Cutting board: Essential for safely prepping your veggies.
    • Sharp knife: A good knife makes quick work of chopping and slicing.
    • Whisk: Use it for mixing up that flavorful dressing.
    • Salad tongs: Perfect for gently tossing the salad without squishing it.

    Variations on Chicken Coleslaw Salad with Ginger Sesame Dressing

    • Add sliced avocado for creaminess and healthy fats.
    • Swap chicken for shrimp or tofu for a different protein option.
    • Include additional fruits like apple slices or berries for extra sweetness.
    • Use different greens like kale or spinach for variety.
    • Make it spicy with sliced jalapeños or a dash of sriracha in the dressing.

    Serving Suggestions

    • Pair with grilled chicken skewers or shrimp for a protein-packed meal.
    • Serve alongside crispy spring rolls for an Asian-inspired feast.
    • Offer a light iced tea or sparkling water with a splash of lemon to complement the flavors.
    • Present in clear bowls to showcase those vibrant colors.
    • Garnish with extra sesame seeds and cilantro for a restaurant-style finish.

    FAQs about Chicken Coleslaw Salad with Ginger Sesame Dressing

    Here are some common questions about this delicious Chicken Coleslaw Salad with Ginger Sesame Dressing that I encounter often:

    Can I make this salad ahead of time?

    Absolutely! You can prep the ingredients a few hours before serving. Just keep the dressing separate to maintain freshness and crunch.

    How do I store leftovers?

    Store leftover salad in an airtight container. Keep the dressing separately in the fridge to avoid soggy veggies. Enjoy within two days for the best taste.

    Can I customize the protein?

    Yes! Feel free to swap out chicken for cooked shrimp, tofu, or even crunchy chickpeas. Just ensure whatever protein you choose is cooked and chilled.

    Is this salad kid-friendly?

    Definitely! The colorful ingredients and sweet mandarin oranges make it appealing to kids. Plus, they can help assemble it!

    Can I make it vegan?

    Sure! Simply replace the chicken with tofu or chickpeas and use a plant-based soy sauce for a delicious vegan twist.

    Final Thoughts

    There’s something truly special about gathering around a bowl of Chicken Coleslaw Salad with Ginger Sesame Dressing. The vibrant colors, crunch of fresh veggies, and zingy dressing create moments of joy and connection at the table. Whether it’s a busy weeknight dinner or a lunchtime treat, this salad brings smiles with every bite. It’s effortless yet impressive, making it a go-to recipe for any home cook longing for ease and flavor. I hope you enjoy this culinary creation as much as my family does, turning everyday meals into delicious memories!


    Print

    clock clock iconcutlery cutlery iconflag flag iconfolder folder iconinstagram instagram iconpinterest pinterest iconfacebook facebook iconprint print iconsquares squares iconheart heart iconheart solid heart solid icon

    Description

    A refreshing and crunchy Chicken Coleslaw Salad paired with a flavorful Ginger Sesame Dressing.


    • 1 yellow bell pepper, julienned
    • 1 red bell pepper, julienned
    • 2 ribs bok choy, thinly sliced
    • 8 oz cucumbers, sliced or julienned
    • 8 oz shredded carrots
    • 12 oz cooked chicken, shredded
    • 5 oz spring mix
    • 12 oz chopped romaine
    • 15 oz can mandarin oranges, drained
    • 3 oz fried wonton strips
    • 3 oz toasted slivered almonds
    • 2 tsp toasted sesame seeds
    • 8 cilantro sprigs
    • Salt and pepper to taste

    1. Prepare Vegetables: Wash and julienne bell peppers, cucumbers, and carrots. Slice bok choy and chop romaine.
    2. Mix Greens: Combine romaine and spring mix in a large salad bowl.
    3. Layer Salad: Add prepared vegetables and chicken on top of greens.
    4. Make Dressing: Whisk all dressing ingredients in a bowl until emulsified. Store extra in the fridge.
    5. Dress the Salad: Pour about half the dressing over the salad and toss gently.
    6. Top and Garnish: Add mandarin oranges, wonton strips, almonds, sesame seeds, and cilantro. Serve immediately.

    Notes

    • Adjust the dressing to your taste preference.
    • This salad is best served fresh but can be made a few hours in advance.
    • Extra dressing can be used as a dip or stored for later use.
    • Prep Time: 20 minutes
    • Cook Time: 0 minutes
    • Category: Salad
    • Method: Mixing
    • Cuisine: Asian

    Nutrition

    • Serving Size: 1 serving
    • Calories: 350
    • Sugar: 10g
    • Sodium: 600mg
    • Fat: 22g
    • Saturated Fat: 3g
    • Unsaturated Fat: 16g
    • Trans Fat: 0g
    • Carbohydrates: 30g
    • Fiber: 5g
    • Protein: 12g
    • Cholesterol: 50mg

    Sharing is caring!

  • Soft Mozzarella Stuffed Pretzels with Fresh Rosemary

    Soft Mozzarella Stuffed Pretzels with Fresh Rosemary


    Introduction to Soft Mozzarella Stuffed Pretzels with Fresh Rosemary

    Ah, Soft Mozzarella Stuffed Pretzels with Fresh Rosemary—a dish that wraps warmth and comfort in every gooey bite! If you’re juggling the chaos of a busy day while also trying to make mealtime memorable, this recipe is a lifesaver. These pretzels are not just delicious; they’re also a fun family activity that brings everyone together. Imagine pulling apart the tender dough to reveal that melted mozzarella goodness inside. It’s a treat that’s sure to impress your loved ones, while also being simple enough for a busy weeknight!

    Why You’ll Love This Soft Mozzarella Stuffed Pretzels with Fresh Rosemary

    Let’s face it, life can get hectic, but these Soft Mozzarella Stuffed Pretzels with Fresh Rosemary offer a quick escape into deliciousness. They’re not only easy to whip up, but also bursting with flavor. The combination of warm, cheesy delights and fragrant rosemary makes for a perfect snack or appetizer. Best of all, they’re a hit with everyone—kids and adults alike will be reaching for seconds (or thirds!).

    Ingredients for Soft Mozzarella Stuffed Pretzels with Fresh Rosemary

    Gathering the right ingredients is the first step in your culinary adventure with Soft Mozzarella Stuffed Pretzels with Fresh Rosemary. Here’s what you’ll need:

    • Warm water: It activates the yeast, so make sure it’s just the right temperature, between 110–115°F.
    • Rapid Rise yeast: This fast-acting yeast will help your dough rise quickly, making it perfect for busy nights.
    • Sugar: It nourishes the yeast, promoting that delightful foamy goodness and a hint of sweetness.
    • Salt: Adds flavor and strength to your dough, ensuring each pretzel is savory and satisfying.
    • Fresh rosemary: This fragrant herb elevates the taste, giving your pretzels a unique, aromatic flair.
    • All-purpose flour: The backbone of your dough; it lends structure and chewiness to each pretzel.
    • Unsalted butter: Helps achieve a tender, rich dough and adds a touch of creaminess to the flavor.
    • Mozzarella cheese: The star of the show! Creamy and melty, it’s what makes these pretzels a real treat.
    • Parmesan cheese: This brings a sharp and salty flavor that beautifully complements the mozzarella.
    • Baking soda: Used in the boiling process to give pretzels their signature golden-brown color and glossy finish.
    • Egg wash: A mixture of beaten egg and water; it gives the pretzels that beautiful, shiny crust.
    • Melted butter: Brushed on after baking for added richness and flavor.
    • Garlic powder: A hint of this can add robustness to the flavor, giving your pretzels a little extra kick.
    • Black pepper: Just a sprinkle enhances the overall taste, adding depth without overpowering the rosemary.
    • Additional Parmesan: Optional but delicious—sprinkle it on top for even more cheesy goodness.

    You’ll find exact measurements at the bottom of the article, perfect for printing and keeping in your kitchen! Now that you’re all set, let’s dive into how to bring these delightful pretzels to life.

    How to Make Soft Mozzarella Stuffed Pretzels with Fresh Rosemary

    Prepare the Dough

    Start your adventure by pouring the warm water into a stand mixer bowl. Then, sprinkle in the Rapid Rise yeast, sugar, and salt. I let this sit for about 10 minutes until it froths up like a cozy marshmallow topping in hot chocolate! This foaming magic is essential; it indicates that your yeast is alive and ready to work its wonders. It’s the secret to that pillowy dough we all love. Once it’s foamy, you’re set to the next step, which will create the ideal foundation for your delicious Soft Mozzarella Stuffed Pretzels with Fresh Rosemary.

    Incorporate Rosemary and Flour

    Next, it’s time to bring some flavors into the mix. Add your chopped fresh rosemary, all-purpose flour, and softened butter to the yeast mixture. Using the dough hook on your mixer, knead this mixture for about 10–12 minutes. You want to achieve a smooth and elastic dough that feels a bit like a cloud. When it pulls away from the bowl easily, you know you’ve nailed it! Be sure to keep an eye on the texture; that’s your dough telling you it’s ready to rise to new heights—literally!

    Freeze the Cheese Filling

    Now, let’s talk about the gooey goodness that will fill your pretzels. In a bowl, combine your shredded mozzarella and grated Parmesan. Shape this cheesy mixture into small portions and pop them in the freezer for about 15–20 minutes. This little freeze is a game changer! It helps the cheese hold its shape during the cooking process, ensuring a delightful melty center rather than a puddle on your pretzel.

    Prepare the Boiling Station

    While your cheese is chilling, it’s time to prep the boiling station. Bring 10 cups of water to a boil in a large pot, then carefully mix in the baking soda. This step is what gives your pretzels their beautiful golden color and signature texture. As you heat up the water, preheat your oven to 425°F (220°C). It’s all about getting everything ready to maximize those fluffy pretzel vibes!

    Shape the Pretzels

    With your dough risen and your cheese prepped, it’s time for the fun part: shaping the pretzels! Punch down your rising dough and divide it into 8 equal pieces. Roll each piece into a long rope about 20 inches long. Go ahead, don’t worry if it takes a bit of practice—I promise each pretzel you shape will get better! Flatten each rope slightly, add a chilled cheese portion, pinch it closed, and twist it into a classic pretzel shape. Aim for that twisted look that screams “homemade pretzel magic!”

    Boil the Pretzels

    Now for the boiling magic! Carefully add each pretzel to your bubbling baking soda water. Allow them to boil for about 30 seconds, which enhances that chewy texture we all crave. Use a slotted spoon to lift them out, letting the excess water drip off. Place them on the prepared baking sheets like little treasures waiting to be baked!

    Bake to Perfection

    Finally, brush your pretzels with the egg wash for a gorgeous, shiny crust. Pop them into your preheated oven and bake for 16–18 minutes until they turn golden brown. You’ll know they’re ready when the heavenly aroma of baked pretzels fills your kitchen, and they look like a sunset on a plate. It’s hard to resist sneaking one as soon as they’re out!

    Tips for Success

    • Always measure your ingredients accurately for best results.
    • Keep the dough covered while rising to prevent it from drying out.
    • If you’re short on time, let the frozen cheese portions sit in the fridge.
    • Experiment with other herbs, like thyme or basil, for a fresh twist.
    • For a fun family activity, get the kids involved in shaping the pretzels!

    Equipment Needed for Soft Mozzarella Stuffed Pretzels with Fresh Rosemary

    • Stand mixer: A handheld mixer can work too, but the stand mixer is easier for dough.
    • Large pot: A stock pot is perfect for boiling the pretzels.
    • Baking sheets: Use parchment paper for non-stick baking, or grease them well.
    • Slotted spoon: This is essential for removing the pretzels from boiling water.
    • Measuring cups and spoons: Accurate measurements lead to perfect results every time.

    Variations on Soft Mozzarella Stuffed Pretzels with Fresh Rosemary

    • Cheese Medley: Swap out mozzarella and Parmesan for a blend of cheddar and pepper jack for a spicy kick.
    • Herb Infusion: Replace rosemary with other fresh herbs like basil or thyme to impart unique flavors.
    • Sweet Twist: Add a touch of cinnamon sugar to the dough for a sweet pretzel version that pairs beautifully with fruit toppings.
    • Gluten-Free Option: Use a gluten-free all-purpose flour blend to make these pretzels suitable for those with gluten sensitivities.
    • Additional Toppings: Experiment with toppings like everything bagel seasoning or sesame seeds for extra flavor before baking.

    Serving Suggestions for Soft Mozzarella Stuffed Pretzels with Fresh Rosemary

    • Pair with a tangy marinara or zesty mustard for dipping—perfect flavor companions!
    • Serve alongside a fresh garden salad for a balanced meal.
    • Enjoy with a chilled glass of white wine or a refreshing lemonade.
    • For a festive touch, sprinkle additional rosemary and Parmesan on top before serving.

    FAQs about Soft Mozzarella Stuffed Pretzels with Fresh Rosemary

    Can I make Soft Mozzarella Stuffed Pretzels with Fresh Rosemary ahead of time?

    Absolutely! You can prepare the dough a day in advance and let it rise in the refrigerator. The next day, just shape and boil before baking. It’s a great way to save time!

    What if my pretzels don’t rise?

    If your dough doesn’t rise, it could be due to inactive yeast. Always check the expiration date or proof it by mixing with warm water and sugar before adding to the dough. Your pretzels will love you for it!

    How do I store leftover pretzels?

    Store any leftover Soft Mozzarella Stuffed Pretzels in an airtight container at room temperature for up to two days. You can also freeze them for later—just reheat them in the oven to restore their softness!

    Can I use different cheeses for the filling?

    For sure! Feel free to mix it up with various cheeses like cheddar, gouda, or even blue cheese for a bolder flavor. The combinations are endless!

    What dips pair well with these pretzels?

    These pretzels are delightful with tangy marinara, zesty mustard, or even a creamy cheese sauce. They’ll elevate your soft pretzel experience to gourmet levels!

    Final Thoughts on Soft Mozzarella Stuffed Pretzels with Fresh Rosemary

    Creating Soft Mozzarella Stuffed Pretzels with Fresh Rosemary is more than just cooking; it’s an experience filled with joy and delicious aromas wafting through your kitchen. Each bite transports you to a cozy gathering where laughter and togetherness reign. The satisfaction of biting into a warm, cheesy pretzel is simply unbeatable. It’s a recipe that invites family and friends to share in the delight, making every moment together just a bit more special. So roll up your sleeves, embrace the messy fun, and enjoy making pretzels that will impress everyone around your table!


    Print

    clock clock iconcutlery cutlery iconflag flag iconfolder folder iconinstagram instagram iconpinterest pinterest iconfacebook facebook iconprint print iconsquares squares iconheart heart iconheart solid heart solid icon

    Description

    Soft Mozzarella Stuffed Pretzels with Fresh Rosemary are delicious pretzels filled with gooey mozzarella cheese and topped with fresh herbs and spices.


    • 1 ½ cups warm water (110–115°F)
    • 1 packet Rapid Rise yeast (2 ¼ tsp)
    • 1 ½ tbsp sugar
    • 1 ¾ tsp salt
    • 2 tbsp fresh rosemary, chopped
    • 4 ¼ cups all-purpose flour
    • 6 tbsp unsalted butter, softened
    • 1 cup mozzarella cheese, shredded
    • ¼ cup Parmesan cheese, grated
    • 10 cups water
    • ¾ cup baking soda
    • 1 egg, beaten with 1 tbsp water (egg wash)
    • 2 tbsp melted butter
    • ½ tbsp fresh rosemary
    • ½ tsp garlic powder
    • ½ tsp black pepper
    • Additional grated Parmesan (optional)

    1. In a stand mixer bowl, combine warm water, yeast, sugar, and salt. Let sit 10 minutes until foamy.
    2. Add rosemary, flour, and softened butter. Knead for 10–12 minutes until smooth and elastic. Transfer to a greased bowl, cover, and let rise for 1 hour until doubled.
    3. Mix mozzarella and Parmesan. Shape into 8 small portions and freeze for 15–20 minutes.
    4. In a large pot, bring 10 cups of water to a boil. Slowly add baking soda. Preheat oven to 425°F (220°C). Line baking sheets with parchment.
    5. Punch down dough and divide into 8 equal pieces. Roll each into a 20-inch rope. Flatten, add frozen cheese, pinch closed, and form into pretzel shapes.
    6. Boil each pretzel in baking soda water for 30 seconds. Remove with a slotted spoon and place on baking sheets.
    7. Brush with egg wash. Bake 16–18 minutes until golden brown.
    8. Brush hot pretzels with melted butter and sprinkle with rosemary, garlic powder, black pepper, and Parmesan.

    Notes

    • Make sure to keep the dough covered while it rises to prevent it from drying out.
    • Feel free to experiment with different cheese fillings.
    • Store leftover pretzels in an airtight container.
    • Prep Time: 25 minutes
    • Cook Time: 18 minutes
    • Category: Snack
    • Method: Baking
    • Cuisine: American

    Nutrition

    • Serving Size: 1 pretzel
    • Calories: 300
    • Sugar: 2g
    • Sodium: 400mg
    • Fat: 10g
    • Saturated Fat: 5g
    • Unsaturated Fat: 3g
    • Trans Fat: 0g
    • Carbohydrates: 40g
    • Fiber: 1g
    • Protein: 10g
    • Cholesterol: 30mg

    Sharing is caring!