Author: IHAAL Team

  • Tropical pineapple kiwi salad

    Tropical pineapple kiwi salad


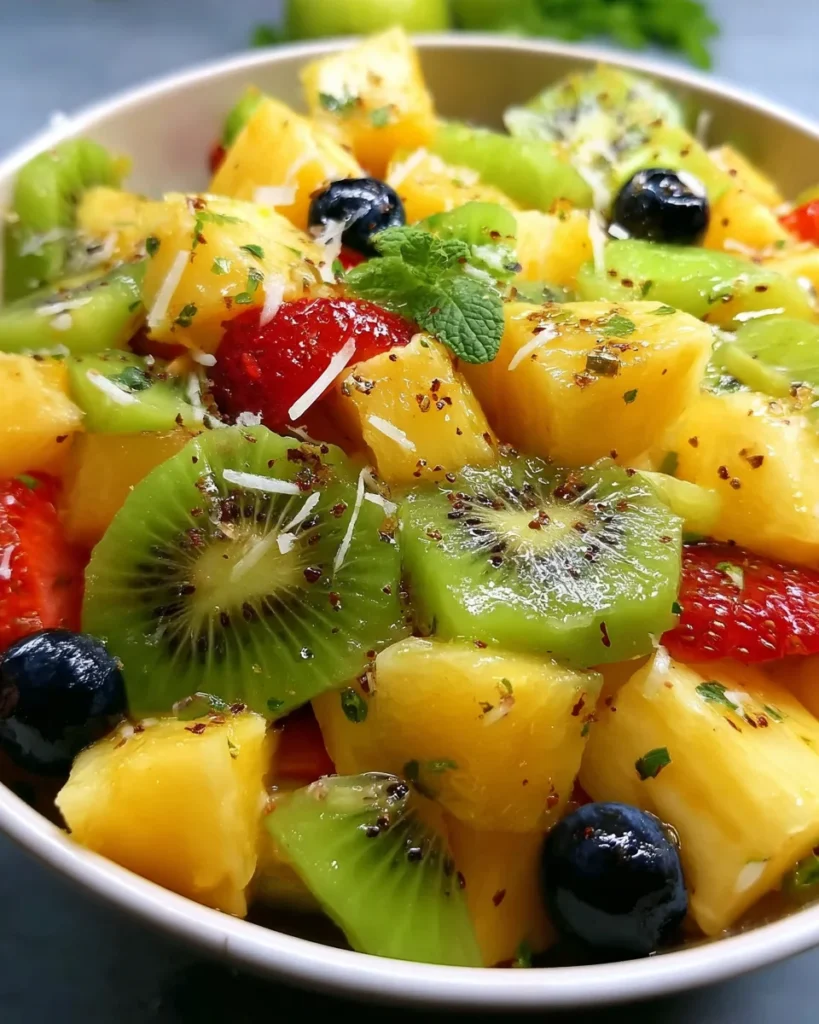
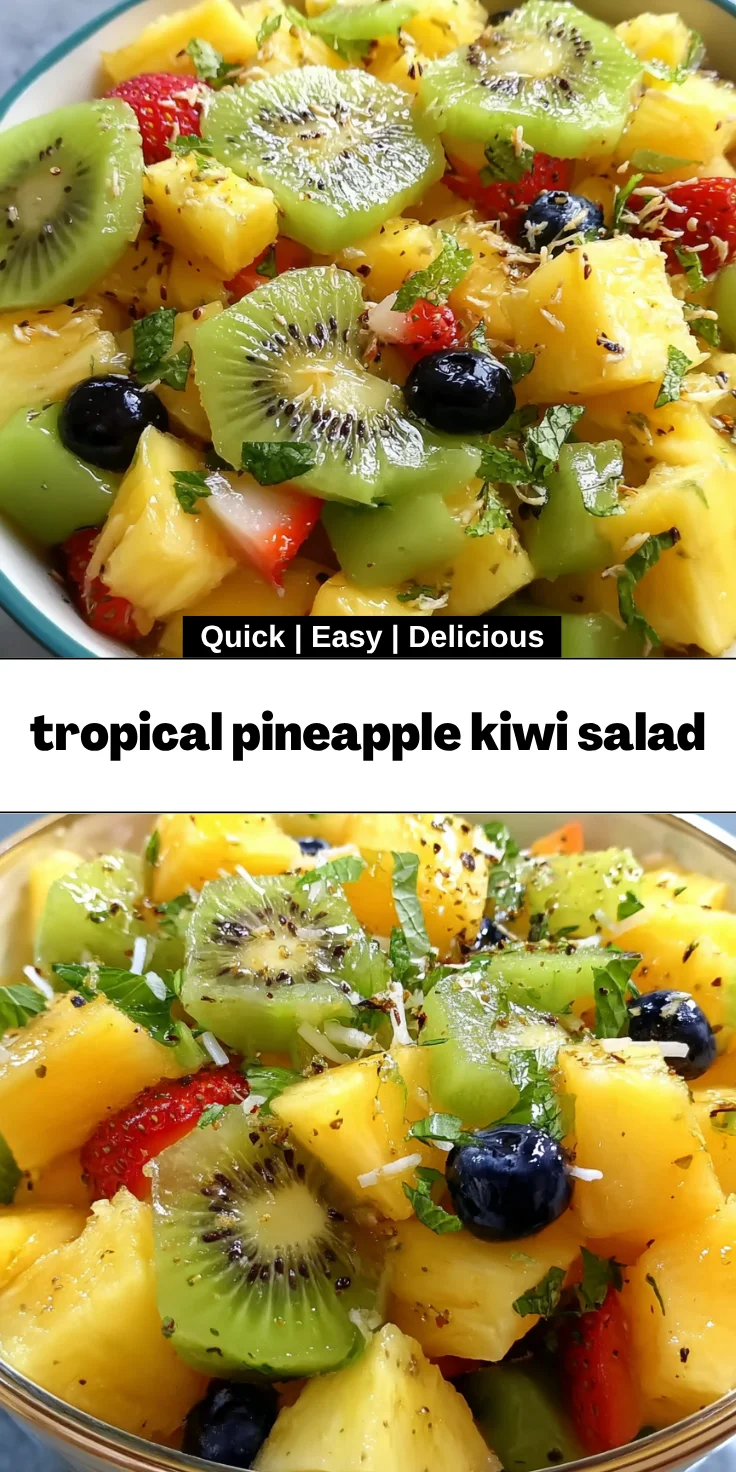
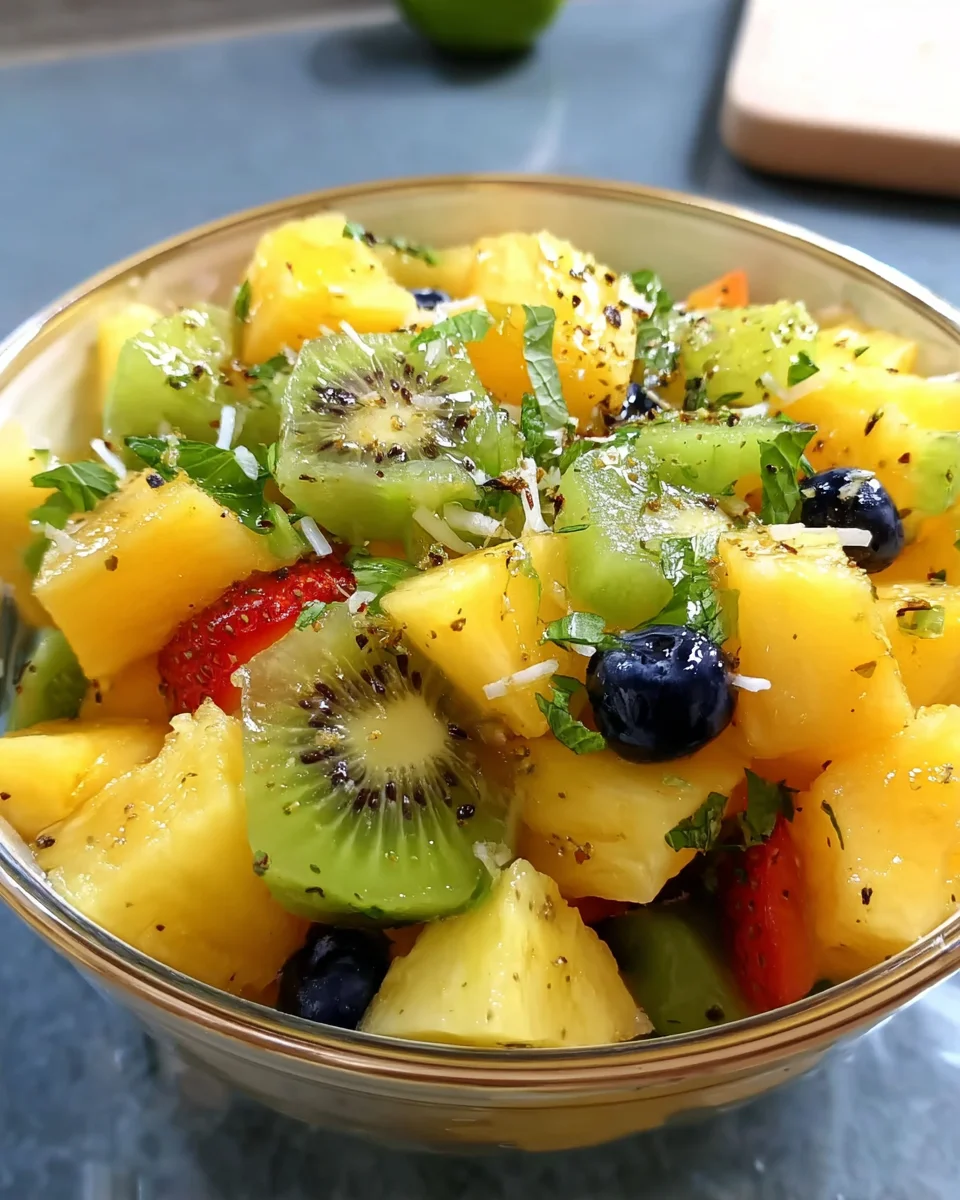
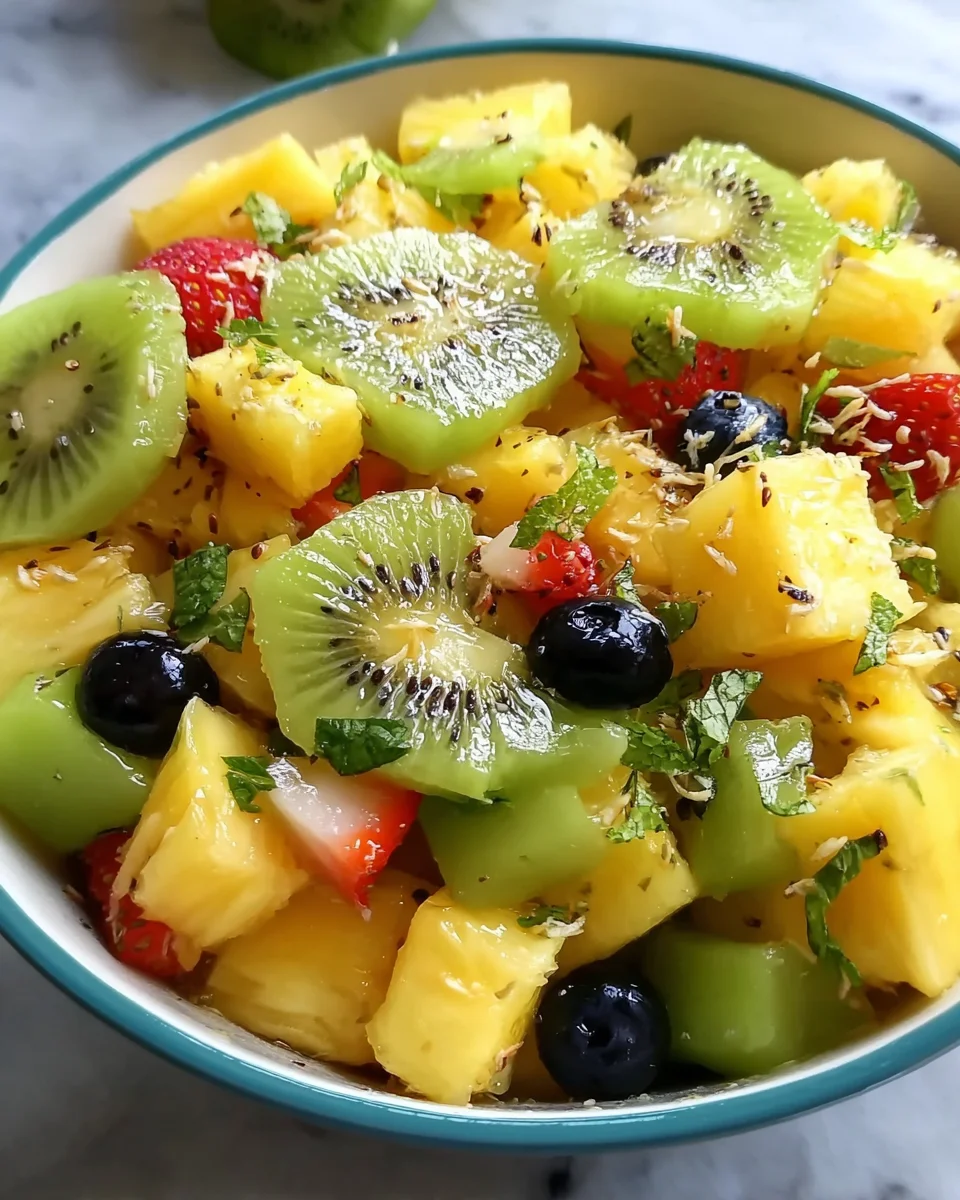
    Introduction to Tropical Pineapple Kiwi Salad

    As a busy mom, I treasure recipes that bring joy with minimal fuss. That’s why I’m excited to share my vibrant tropical pineapple kiwi salad! This fruity delight is not just a feast for the eyes; it’s a quick solution for those hectic days when you want something refreshing and healthy, without spending hours in the kitchen. The sweet zest of pineapple and the tangy kiwi create a tropical paradise, perfect for impressing your loved ones or brightening up your lunch. Let’s dive into this colorful world of flavor together!

    Why You’ll Love This Tropical Pineapple Kiwi Salad

    If you’re anything like me, ease and flavor are at the top of your cooking checklist. This tropical pineapple kiwi salad checks all the boxes! It comes together in just 15 minutes, making it a lifesaver on busy days. Plus, with vibrant flavors that dance on your palate, it’s a delightful treat for any occasion. Whether you’re hosting a gathering or just want a refreshing snack, this salad will brighten your day!

    Ingredients for Tropical Pineapple Kiwi Salad

    Gathering the right ingredients is the first step in crafting your tropical pineapple kiwi salad. Here’s what you’ll need:

    • Fresh pineapple: The star of this dish! Sweet, juicy, and bursting with tropical flavor, pineapple adds a refreshing base.
    • Kiwi: Its vibrant green color and tangy taste contrast beautifully with the sweetness of pineapple, giving the salad a delightful zing.
    • Strawberries: These juicy gems bring a burst of color and natural sweetness to the mix, complementing the other fruits perfectly.
    • Blueberries: Tiny but mighty, blueberries add a pop of color and are packed with antioxidants, making them a healthy choice.
    • Honey: This natural sweetener elevates the dressing, enhancing the fruits’ natural sweetness.
    • Fresh lime juice: A splash of lime juice brightens the flavors while adding a tangy twist that balances the sweetness.
    • Fresh mint (optional): For an aromatic boost, chopped mint can give your salad an extra layer of flavor and a touch of elegance.

    Feel free to mix things up! You might consider adding other tropical fruits like mango or papaya for an exciting twist. You can find all the exact measurements at the bottom of the article for easy printing. Now, let’s get ready to bring this fresh, vibrant dish to life!

    How to Make Tropical Pineapple Kiwi Salad

    Creating your tropical pineapple kiwi salad is as simple as pie! Follow along with me, and let’s dive into this colorful and refreshing dish step by step.

    Step 1: Prepare the Fruits

    Start by dicing that beautiful fresh pineapple into bite-sized cubes. I find that cutting off the skin first and then slicing it makes it easier.

    Next up, grab your kiwi! Peel the skin off gently using a knife or a vegetable peeler, then slice it into rounds. Those vibrant green circles are what make this salad pop.

    For the strawberries, hull them by gently removing the green tops. Then, quarter them to ensure they blend seamlessly with the other fruits.

    Finally, rinse those blueberries under cold water to keep them plump and juicy. Fresh fruits are key!

    Step 2: Mix the Fruits Together

    Now, let’s combine everything! In a large mixing bowl, throw in the diced pineapple, sliced kiwi, quartered strawberries, and rinsed blueberries. The colors will blend beautifully, inviting you to dig in!

    Step 3: Make the Honey-Lime Dressing

    In a small bowl, whisk together your honey and fresh lime juice. This tasty dressing ties everything together!

    Don’t worry if your honey is thick; a quick microwave zap for ten seconds works wonders. Aim for a smooth consistency that drizzles easily!

    Step 4: Combine Dressing with Fruit

    Drizzle that delightful honey-lime dressing over your fruit mixture. Using a large spoon, gently toss everything together. Be careful to avoid smashing the fruit; we want to maintain their beautiful shapes!

    Step 5: Chill and Serve

    Now here’s the secret magic! Chill the salad in the fridge for at least 30 minutes. This allows the flavors to mingle and truly shine! Trust me, your patience will be rewarded when you serve this refreshing treat.

    Tips for Success

    • Always choose ripe fruits for the best flavor—look for vibrant colors and a sweet aroma.
    • Use a sharp knife when cutting pineapple; it makes the process quicker and easier.
    • For extra freshness, prepare the salad just before serving if possible!
    • Don’t skip chilling time—it enhances the flavor and freshness, making every bite delightful.
    • If you’re short on time, pre-chop the fruits a day in advance for easy assembly!

    Equipment Needed

    • Large mixing bowl: Any bowl will work, just ensure it’s big enough to mix everything together.
    • Small bowl: Perfect for whisking the dressing; a measuring cup can substitute in a pinch.
    • Knife and cutting board: A good chef’s knife makes all the difference for easy chopping.
    • Whisk or fork: Either works well for mixing the honey-lime dressing!

    Variations of Tropical Pineapple Kiwi Salad

    • For a creamy twist, add a dollop of Greek yogurt or coconut cream for richness.
    • If you prefer a nutty crunch, sprinkle some toasted coconut flakes or chopped nuts on top.
    • Replace honey with agave syrup or maple syrup for a vegan-friendly option.
    • Try adding diced mango or papaya for an even more colorful and tropical flavor explosion.
    • Make it a tropical smoothie bowl by blending the salad ingredients with some coconut milk!

    Serving Suggestions for Tropical Pineapple Kiwi Salad

    • Serve it chilled in a large, colorful bowl for a vibrant centerpiece at your table.
    • Pair this salad with grilled chicken or fish for a light and refreshing meal.
    • Enjoy it with a glass of coconut water or iced green tea for a tropical beverage.
    • Top with additional mint leaves for a pop of color and aroma.
    • Package it in mason jars for a quick and healthy grab-and-go lunch option!

    FAQs about Tropical Pineapple Kiwi Salad

    As you gather the ingredients for your tropical pineapple kiwi salad, you might have a few questions. Let me answer the most common ones I’ve encountered!

    Can I make this salad ahead of time?

    Absolutely! You can prepare the fruits and toss them with the dressing up to a day in advance. Just remember to chill it in the fridge so those flavors meld, but it’s best enjoyed fresh for maximum crunch!

    What fruits can I substitute in this salad?

    If you’re not a fan of an ingredient, feel free to swap it out. Mango, papaya, or even cherries can enhance your tropical pineapple kiwi salad while keeping the fun flavors. Just keep the textures and sweetness in mind!

    Is this salad suitable for a vegan diet?

    Yes, this salad is vegan-friendly! The honey can be easily replaced with agave syrup or maple syrup, making it perfect for everyone.

    How do I store leftovers?

    While it tastes best fresh, you can store leftovers in an airtight container in the fridge for a few hours. Just know that the fruit might release some juice, which is still tasty!

    Can I use canned fruits instead of fresh ones?

    While fresh fruits are preferred for vibrant flavors and textures, you can use canned fruits in a pinch. Drain them well to avoid excess liquid and enjoy a simpler assembly!

    Final Thoughts

    Creating this tropical pineapple kiwi salad is truly a joyful adventure! Each bite transports you to sunny beaches, complete with fresh, vibrant flavors that dance on your palate. I love how simple this recipe is, yet it brings such delight and color to the table. Perfect for a quick snack, a dazzling side, or a light dessert, it’s a versatile dish that you can feel good about serving. Plus, the smiles that come from friends and family when they taste it? That’s the ultimate reward. So gather your fruits, and let’s celebrate the wonders of fresh flavors together!


    Print

    clock clock iconcutlery cutlery iconflag flag iconfolder folder iconinstagram instagram iconpinterest pinterest iconfacebook facebook iconprint print iconsquares squares iconheart heart iconheart solid heart solid icon

    Description

    A refreshing tropical fruit salad featuring pineapple, kiwi, strawberries, and blueberries with a honey-lime dressing.


    • 2 cups fresh pineapple, diced
    • 2 cups kiwi, peeled and sliced
    • 1 cup strawberries, hulled and quartered
    • 1 cup blueberries
    • 1 tablespoon honey
    • 1 tablespoon fresh lime juice
    • 1 tablespoon fresh mint, chopped (optional)

    1. In a large mixing bowl, combine the diced pineapple, sliced kiwi, quartered strawberries, and blueberries.
    2. In a small bowl, whisk together the honey and lime juice until well combined.
    3. Drizzle the honey-lime dressing over the fruit mixture and gently toss to coat all the fruit evenly.
    4. If using, sprinkle the chopped mint over the salad and toss lightly.
    5. Chill the salad in the refrigerator for at least 30 minutes before serving to allow the flavors to meld.

    Notes

    • For extra flavor, add other tropical fruits like mango or papaya.
    • This salad is best enjoyed fresh but can be stored in the refrigerator for a few hours.
    • Prep Time: 15 minutes
    • Cook Time: 0 minutes
    • Category: Salad
    • Method: Mixing
    • Cuisine: Tropical

    Nutrition

    • Serving Size: 1 cup
    • Calories: 150
    • Sugar: 25g
    • Sodium: 5mg
    • Fat: 0g
    • Saturated Fat: 0g
    • Unsaturated Fat: 0g
    • Trans Fat: 0g
    • Carbohydrates: 38g
    • Fiber: 5g
    • Protein: 2g
    • Cholesterol: 0mg

    Sharing is caring!

  • Barbecue Bacon Pizza Smoky

    Barbecue Bacon Pizza Smoky


    Introduction to Barbecue Bacon Pizza Smoky

    Picture this: a busy evening after a long day, and the last thing you want to do is slave away in the kitchen. Enter my Barbecue Bacon Pizza Smoky, your new go-to recipe! This pizza is a delicious solution that comes together in just 35 minutes, allowing you to enjoy quality time with your loved ones without the stress of complex cooking. The smoky flavor, combined with crispy bacon and gooey cheese, makes this pizza not just easy, but a real crowd-pleaser. Trust me, once you try it, it’ll become a staple in your home!

    Why You’ll Love This Barbecue Bacon Pizza Smoky

    This Barbecue Bacon Pizza Smoky is perfect for busy moms and professionals alike. It’s simple to whip up, combining quick prep with mouthwatering flavors. Plus, it’s a fantastic way to please even the pickiest eaters in your family. In just 35 minutes, you can create a gorgeous dish that’s as fun to make as it is to eat. Trust me, you’ll relish every cheesy, smoky bite!

    Ingredients for Barbecue Bacon Pizza Smoky

    Let’s dive into the delicious ingredients that make this Barbecue Bacon Pizza Smoky a winning dish! Below, you’ll find a list of what you need. Remember, the exact quantities can be found at the bottom of the article for your convenience.

    • Pizza Dough: You can use store-bought or make your own! Homemade dough is always a treat, but lifespan-saving options are just as good.
    • Barbecue Sauce: Opt for a smoky variety to elevate that rich flavor profile. You can also experiment with your favorite BBQ sauces—trust your taste buds!
    • Bacon: Cooked and chopped, this adds a crispy, savory element. If you want a healthier twist, turkey bacon is a wonderful substitute.
    • Mozzarella Cheese: This melty classic is essential for pizza. The gooey texture melts beautifully, creating that satisfying pull with every slice.
    • Cheddar Cheese: For those extra cheesy vibes! It brings a sharpness that balances well with the sweetness of the barbecue sauce.
    • Red Onion: Thinly sliced, it adds a lovely crunch and a bit of zing. For a milder option, try using sweet onions instead.
    • Fresh Cilantro or Parsley: Optional, but a sprinkle on top before serving can add a pop of freshness that brightens the dish.

    Feel free to get creative! You can add bell peppers, jalapeños, or even pineapple if you’re feeling adventurous. The beauty of this pizza is its versatility, so make it your own!

    How to Make Barbecue Bacon Pizza Smoky

    Let’s roll up our sleeves and get into the fun part—making this Barbecue Bacon Pizza Smoky! Follow along with these simple steps, and you’ll be savoring each delectable bite in no time.

    Step 1: Preheat the Oven

    First things first, preheat your oven to a sizzling 475°F (245°C). This heat is crucial for achieving that crispy crust we all love in a pizza. If you have a pizza stone, place it in the oven while it heats up. The stone will give your crust an extra crunch, like giving it a sun-kissed glow!

    Step 2: Prepare the Pizza Dough

    Next up, let’s prepare the dough! Roll out your pizza dough on a floured surface until it reaches your desired thickness. Think of this as your canvas; get creative! Once it’s ready, carefully transfer it onto a piece of parchment paper. This will make moving your masterpiece to the oven a breeze!

    Step 3: Pre-bake the Crust

    Now it’s time for a quick pre-bake! Slide the crust into your preheated oven for around 5-7 minutes. Keep an eye on it—you’re looking for a slightly golden hue. This step helps the crust hold up against the flavorful toppings we’re about to add!

    Step 4: Assemble the Pizza

    With a pre-baked crust in hand, it’s time to assemble. Spread an even layer of smoky barbecue sauce over the crust, leaving a small border around the edges. This acts like a flavorful moat around your pizza! Then, sprinkle the chopped bacon generously, followed by both mozzarella and cheddar cheese. Layer on those vibrant red onion slices, and try not to eat the toppings before baking!

    Step 5: Bake to Perfection

    Carefully transfer your pizza (with the parchment paper) to the hot pizza stone or a baking sheet. Bake for about 10-15 minutes, until the cheese is bubbling and golden. For an ideal clue that it’s done, look for that crispy, golden crust. Oh, that’s when the aroma fills the kitchen!

    Step 6: Garnish and Serve

    Once out of the oven, allow the pizza to cool for a few minutes. This is the moment to add a sprinkle of fresh cilantro or parsley for that burst of color. Then, slice it up and serve it to your hungry crew. Every bite is a delightful blend of smoky flavors and cheesy goodness—enjoy!

    Tips for Success

    • Make sure your oven is fully preheated to achieve that glorious crust.
    • For a crispier crust, use a pizza stone and don’t skip the pre-baking step!
    • Chop your bacon into small pieces to ensure it distributes evenly on the pizza.
    • Experiment with different barbecue sauces to find your family’s favorite flavor.
    • Don’t be afraid to mix in extra toppings—get creative and have fun!

    Equipment Needed

    • Oven: A conventional oven works best, but a convection oven can also help crisp the crust.
    • Pizza Stone or Baking Sheet: If you don’t have a pizza stone, a good baking sheet will do. Just ensure it’s preheated!
    • Parchment Paper: Helpful for easy transfer of the pizza and mess-free baking.
    • Rolling Pin: A simple tool to roll out the dough, but you could also use your hands!

    Variations of Barbecue Bacon Pizza Smoky

    • Meat Lover’s Delight: Add Italian sausage or pepperoni along with the bacon for a hearty twist.
    • Vegetarian Version: Skip the bacon and add colorful bell peppers, mushrooms, and spinach for a fresh take.
    • Spicy Kick: Sprinkle jalapeños or crushed red pepper flakes for those who love a little heat.
    • Gluten-Free Option: Use a gluten-free pizza dough to cater to dietary restrictions while still enjoying the smoky goodness!
    • BBQ Chicken Pizza: Swap bacon for shredded cooked chicken and a sweeter barbecue sauce for a tasty alternative.

    Serving Suggestions

    • Pair your Barbecue Bacon Pizza Smoky with a crisp garden salad for a refreshing contrast.
    • Serve alongside garlic breadsticks to complement the flavors beautifully.
    • Enjoy with a chilled glass of iced tea or your favorite craft beer.
    • For a festive touch, slice the pizza into smaller pieces for gatherings.

    FAQs about Barbecue Bacon Pizza Smoky

    Let’s tackle some common questions you might have about this mouthwatering Barbecue Bacon Pizza Smoky. Whether you’re curious about variations or cooking tips, I’ve got you covered!

    Can I use homemade pizza dough for this recipe?

    Absolutely! In fact, I love making my own dough—it adds a personal touch to the pizza. Just make sure to let it rise properly before rolling it out.

    What can I substitute for bacon?

    If you’re looking for an alternative, turkey bacon or even crispy tempeh work well! They both add a nice crunch without the heaviness of traditional bacon.

    Is there a vegetarian option for this pizza?

    Definitely! Just skip the bacon and load your pizza with colorful veggies like bell peppers, mushrooms, and spinach. The smoky barbecue sauce will still give you that delicious flavor.

    How can I make this pizza spicier?

    Add jalapeños or crushed red pepper flakes on top before baking. You can also sprinkle some hot sauce over it once it’s out of the oven for an extra kick!

    Can I prepare the toppings in advance?

    Yes! You can cook and chop the bacon, and even slice the onions ahead of time. This way, when you’re ready to assemble, it’s a quick and effortless process.

    Final Thoughts

    Cooking is all about creating memories and sharing joy with loved ones. My Barbecue Bacon Pizza Smoky does just that. It’s a dish that brings everyone together, whether it’s a busy weeknight or a fun weekend gathering. The smoky flavors, crispy bacon, and gooey cheeses create a delightful symphony of tastes that make every bite a celebration. Plus, the simplicity of this recipe means you can enjoy moments with family rather than stressing in the kitchen. So roll up your sleeves, enjoy the process, and cherish the smiles around the table as you serve this delicious pizza!


    Print

    clock clock iconcutlery cutlery iconflag flag iconfolder folder iconinstagram instagram iconpinterest pinterest iconfacebook facebook iconprint print iconsquares squares iconheart heart iconheart solid heart solid icon

    Description

    A delicious smoky barbecue bacon pizza that’s perfect for any gathering.


    • 1 pound pizza dough (store-bought or homemade)
    • 1 cup barbecue sauce (preferably smoky)
    • 8 ounces bacon, cooked and chopped
    • 2 cups shredded mozzarella cheese
    • 1 cup shredded cheddar cheese
    • ½ red onion, thinly sliced
    • Fresh cilantro or parsley, for garnish (optional)

    1. Preheat your oven to 475°F (245°C). If you have a pizza stone, place it in the oven to heat.
    2. Roll out the pizza dough on a floured surface to your desired thickness, then transfer to a piece of parchment paper.
    3. Pre-bake the crust for 5-7 minutes until it’s slightly golden.
    4. Spread the barbecue sauce evenly over the pre-baked crust, leaving a small border around the edges. Sprinkle the chopped bacon, then the mozzarella and cheddar cheeses, and finally, the red onion slices.
    5. Transfer the pizza (with the parchment paper) to the hot pizza stone or a baking sheet. Bake for about 10-15 minutes, or until the cheese is bubbly and the crust is golden brown.
    6. Remove from the oven, let cool for a few minutes, then sprinkle with fresh cilantro or parsley before slicing and serving.

    Notes

    • Feel free to add other toppings like bell peppers or jalapeños for an extra kick.
    • Using a pizza stone will yield a crispier crust.
    • Make sure to cook the bacon until crispy for the best texture.
    • Prep Time: 15 minutes
    • Cook Time: 20 minutes
    • Category: Main Dish
    • Method: Baking
    • Cuisine: American

    Nutrition

    • Serving Size: 1 slice
    • Calories: 320
    • Sugar: 5g
    • Sodium: 850mg
    • Fat: 20g
    • Saturated Fat: 8g
    • Unsaturated Fat: 8g
    • Trans Fat: 0g
    • Carbohydrates: 25g
    • Fiber: 1g
    • Protein: 12g
    • Cholesterol: 30mg

    Sharing is caring!

  • 4th of July Cake in a Jar Dessert

    4th of July Cake in a Jar Dessert


    Introduction to 4th of July Cake in a Jar Dessert

    As the 4th of July approaches, I can’t help but feel the excitement in the air! This year, I wanted to create something quick, festive, and fun to celebrate Independence Day with my family. That’s when I stumbled upon this delightful idea: a 4th of July Cake in a Jar Dessert! It’s colorful, delicious, and makes for an impressive centerpiece at any gathering. Plus, it’s perfect for busy moms like us who want to whip up something special without spending hours in the kitchen. Trust me; this dessert will steal the show!

    Why You’ll Love This 4th of July Cake in a Jar Dessert

    This 4th of July Cake in a Jar Dessert is a game-changer for busy moms and professionals. It’s quick and easy to make, taking just under an hour from start to finish. The layers of vibrant cake and creamy frosting create a taste sensation that delights every palate. Plus, it’s perfect for portion control, so you can serve just the right amount for everyone while keeping the festive spirit alive!

    Ingredients for 4th of July Cake in a Jar Dessert

    Gathering the right ingredients is like preparing for a culinary adventure. For this 4th of July Cake in a Jar Dessert, here’s what you’ll need:

    • Betty Crocker Super Moist Cake Mix White: This classic mix offers a light texture that perfectly complements the layers of this festive dessert.
    • Vegetable Oil: Adds moisture to the cake, ensuring each bite is soft and fluffy.
    • Eggs: They work as a binder, giving structure while making the cake rich and fluffy.
    • Water: A simple addition that helps activate the cake mix, bringing your batter to life.
    • Red and Blue Food Coloring: These vibrant colors are key to achieving the all-American look of this dessert. Feel free to adjust the shades to match your style!
    • Pillsbury Creamy Supreme Frosting Classic White: This frosting elevates your dessert into a showstopper with its creamy and sweet finishing touch.
    • Red, White, and Blue Sprinkles: The finishing touch! They add that burst of color and a festive flair, making each jar a visual treat.

    You’ll find exact measurements for each ingredient at the bottom of the article, so be sure to check there for printing. Happy baking!

    How to Make 4th of July Cake in a Jar Dessert

    Now that we have our ingredients ready, let’s dive into the fun part: making this festive 4th of July Cake in a Jar Dessert! Trust me, it’s easier than you might think, and the kids will love getting involved too. So, roll up your sleeves and let’s create something magical.

    Prepare the Cake Mixture

    First things first, let’s prepare that cake mixture! Grab a large mixing bowl and pour in the entire box of Betty Crocker Super Moist Cake Mix. Add in the vegetable oil, eggs, and water. Mix everything together until it’s a smooth batter—no lumps allowed! But wait, here’s the fun part: divide that batter into two separate bowls. We’re going to add some color!

    In one bowl, add your red food coloring. In the other, add the blue food coloring. Mix well until you achieve your preferred shade; vibrant colors equal a festive dessert! You might feel like a kid in art class, and it’s just a blast to see those colors come to life.

    Bake the Cupcakes

    Preheat your oven according to the instructions on the cake mix box—usually 350°F works wonders. Once the oven is hot, pour the red batter into cupcake liners. Fill them halfway to allow room for rising. Do the same with the blue batter. Bake them according to the package directions, usually around 18-20 minutes, or until a toothpick comes out clean. Your kitchen will smell amazing in no time!

    Crumble the Cupcakes

    Once your cupcakes are baked, let them cool completely. Patience is key, especially if you want those delightful layers! Once they’re cool, gently crumble the blue cupcakes into one bowl and tear the red ones into another. The texture should be like fluffy snowdrifts—light and airy. This is where we’re duplicating that rainbow effect in our jars!

    Assemble the Jars

    Now comes the creative part: assembling your masterpiece! Grab a mason jar and start with a layer of blue cake crumbles at the bottom. About an inch deep is perfect. Next, take your white frosting and pipe a thick line around the inside edge of the jar. This will create a lovely, creamy barrier between the cake layers. Then, add a layer of red cake crumbles, just like before, making it about an inch thick as well.

    Repeat the process: frosting edge, blue crumbles, frosting, red crumbles, and so on until you reach the top rim of the jar. Your layers will create a stunning visual, and your family won’t be able to resist peeking in!

    Top with Frosting and Sprinkles

    Finally, for the pièce de resistance: pipe a generous layer of white frosting on top of your layered creation. This adds sweetness and a beautiful finish. Don’t forget to decorate with red, white, and blue sprinkles, giving it that final patriotic touch. Trust me, these will make each jar look Instagram-worthy!

    And just like that, you have your colorful, festive 4th of July Cake in a Jar Dessert! It’s as simple as pie—or should I say, cake?

    Tips for Success

    • Make sure your cupcakes are completely cooled before crumbling them to avoid sticky messes.
    • For a fun twist, experiment with different cake flavors—chocolate or lemon can be a hit!
    • Use piping bags for easy frosting application—this makes layering a breeze.
    • Feel free to customize the sprinkles according to your theme; there’s no limit to creativity!
    • Prepare these jars a day in advance for easier entertaining on the big day.

    Equipment Needed

    • Mason Jars: Use any clear jars or cups for a chic look.
    • Mixing Bowls: A large bowl for mixing cake batter; smaller bowls for coloring.
    • Whisk or Electric Mixer: Whisk works well, but an electric mixer speeds things up!
    • Piping Bags or Baggies: Easily create beautifully frosted layers—no fancy tools needed!
    • Oven and Baking Tray: Required for cupcake baking; a regular tray does the job perfectly.

    Variations

    • Gluten-Free Option: Use a gluten-free cake mix to make this dessert suitable for those with gluten sensitivities.
    • Vegan Twist: Substitute eggs with flaxseed meal (1 tbsp flaxseed mixed with 3 tbsp water per egg). Change the frosting to a vegan brand for a delightful plant-based treat.
    • Flavor Fun: Swap the white cake mix for lemon or chocolate cake for a new flavor experience. The vibrant colors will still shine through!
    • Mini Jars: Make smaller portions in mini mason jars for a fun twist on serving sizes, perfect for kids or as party favors.
    • Fruit Layer: Add a layer of fresh berries or fruit puree between the cake crumbles for an added burst of flavor and freshness.

    Serving Suggestions

    • Ice Cream: Serve each jar with a scoop of vanilla or strawberry ice cream for an extra creamy treat.
    • Summer Drinks: Pair with lemonade, iced tea, or a refreshing berry-infused water for a seasonal touch.
    • Presentation: Display jars on a festive platter, garnished with fresh fruit or flowers for that extra pop.
    • Fireworks Viewing: Enjoy these jars while watching fireworks for a deliciously fun evening.
    • Share the Joy: Encourage friends to create their own customized jars for a fun bake-off party!

    FAQs about 4th of July Cake in a Jar Dessert

    Can I make the 4th of July Cake in a Jar Dessert ahead of time?
    Absolutely! This dessert can be prepared a day in advance. Just store the jars in the refrigerator until you’re ready to serve. This makes it a perfect, stress-free option for busy moms wanting to enjoy the holiday.

    How do I store leftovers of the 4th of July Cake in a Jar Dessert?
    If you have any leftovers, simply cover the jars with lids or plastic wrap and keep them in the refrigerator. They should last for about 3-4 days, but trust me, they won’t stick around for long!

    Can I use different types of frosting?
    Of course! Feel free to swap the Pillsbury Classic White frosting for chocolate, cream cheese, or even a fun flavored frosting. Each option will lend its own unique twist to this festive dessert.

    How can I achieve brighter colors for my cake layers?
    To make the colors pop, don’t be shy with the food coloring! Start with a few drops, then mix until you get your desired hue. You’ll want those red and blue layers to shine just as vibrantly as the holiday spirit!

    Is this dessert suitable for kids to help with?
    Definitely! Kids can get involved by helping with the crumbling of the cupcakes, layering the jars, and sprinkling the fun toppings. It’s a wonderful way to create lasting memories in the kitchen together!

    Final Thoughts

    As I reflect on this delightful 4th of July Cake in a Jar Dessert, I can’t help but smile at how it brings joy to our celebrations. The vibrant layers and creamy frosting transform into a colorful symbol of festivity, evoking laughter and togetherness. Whether you’re preparing it for a backyard barbecue or a cozy family gathering, each jar tells a story of love and creativity. So, gather your loved ones, embrace the mess, and let the simple act of baking create delicious memories together. Here’s to celebrating our freedom with sweet treats that unite us all!


    Print

    clock clock iconcutlery cutlery iconflag flag iconfolder folder iconinstagram instagram iconpinterest pinterest iconfacebook facebook iconprint print iconsquares squares iconheart heart iconheart solid heart solid icon

    Description

    A festive and fun dessert perfect for celebrating the 4th of July, featuring layers of colorful cake and creamy frosting in a mason jar.


    • 1 box Betty Crocker Super Moist Cake Mix White
    • 1/3 cup vegetable oil
    • 3 eggs
    • 1 cup water
    • red food coloring
    • blue food coloring
    • 16 oz Pillsbury Creamy Supreme Frosting Classic White
    • red, white and blue sprinkles assorted

    1. Divide the white cake mix batter equally into 2 bowls. Color half blue and half red to your liking. Bake 5 cupcakes of each color according to the package.
    2. Crumble up the blue cupcakes into a bowl. Crumble up the red cupcakes in a separate bowl.
    3. Put some of the white frosting into a small piping bag or a small plastic baggie with the corner cut off.
    4. Take a mason jar and put an inch layer of blue cake crumbles in the bottom.
    5. Take the frosting and pipe a thick line around the edges of the blue cake crumbles, pressing the frosting against the glass edge.
    6. Add a layer of the red cake crumbles next, about an inch thick.
    7. Pipe another thick line of frosting around the edges of the red cake.
    8. Add another layer of blue crumbles, then a frosting line, and another layer of red crumbles.
    9. Pipe a full layer of frosting over the top of the cake so it’s completely covered.
    10. Sprinkle the patriotic sprinkles over the top.
    11. Repeat steps for the remaining jars.

    Notes

    • Use additional food coloring for more vibrant colors, if desired.
    • Ensure the cake is completely cool before crumbling to maintain texture.
    • Store jars in the refrigerator if not serving immediately.
    • Prep Time: 30 minutes
    • Cook Time: 20 minutes
    • Category: Dessert
    • Method: Baking
    • Cuisine: American

    Nutrition

    • Serving Size: 1 jar
    • Calories: 350
    • Sugar: 25g
    • Sodium: 220mg
    • Fat: 15g
    • Saturated Fat: 2g
    • Unsaturated Fat: 0g
    • Trans Fat: 0g
    • Carbohydrates: 50g
    • Fiber: 1g
    • Protein: 4g
    • Cholesterol: 40mg

    Sharing is caring!

  • Cookies & Cream Red Velvet Brownies

    Cookies & Cream Red Velvet Brownies


    Introduction to Cookies & Cream Red Velvet Brownies

    Ah, the joy of baking—there’s nothing quite like it! Today, I want to share with you my delightful Cookies & Cream Red Velvet Brownies. These scrumptious squares are perfect for busy folks like us. Imagine a rich, velvety brownie infused with white chocolate and crunchy bits of Oreo. It’s like a little taste of decadence in every bite, ready to impress your loved ones or make a hectic afternoon feel special. Whether you’re a seasoned kitchen pro or just starting out, these brownies are an easy solution for a sweet pick-me-up!

    Why You’ll Love This Cookies & Cream Red Velvet Brownies

    You’re going to absolutely love these Cookies & Cream Red Velvet Brownies for so many reasons! Not only are they quick and simple to whip up, but they also bring a delightful burst of flavor that satisfies any sweet tooth. These brownies bake beautifully, producing a fudgy texture that melts in your mouth. Plus, they’re perfect for family gatherings or a cozy night in—an easy treat that never fails to impress!

    Ingredients for Cookies & Cream Red Velvet Brownies

    Here’s what you’ll need to create these delightful Cookies & Cream Red Velvet Brownies. Each ingredient plays a vital role in bringing this recipe to life, so let’s dive in!

    • Red velvet cake mix: This is the star ingredient, providing the rich color and soft texture that red velvet desserts are known for.
    • Unsalted butter: Melted for a gooey richness, it adds depth to the brownies. If you’re feeling adventurous, brown butter can really enhance the flavor!
    • Large eggs: Eggs contribute moisture and help bind everything together, creating a lovely, chewy consistency.
    • Vanilla extract: This simple addition amplifies the flavor, making every bite more aromatic and delicious.
    • White chocolate chips: These add a creamy sweetness, balancing out the rich cocoa flavor from the cake mix.
    • Crushed Oreo cookies: The crunchy bits lend a fun texture and a familiar taste that elevates these brownies to new heights.

    Don’t forget, all the exact measurements for these ingredients can be found at the bottom of this article, ready for you to print out! Happy baking!

    How to Make Cookies & Cream Red Velvet Brownies

    Now that you have all your ingredients ready, let’s delve into the exciting process of making these Cookies & Cream Red Velvet Brownies! Follow these simple steps, and you’ll soon have a tray of deliciously decadent treats perfect for any occasion.

    Step 1: Preheat Your Oven

    First things first, preheat your oven to 350°F (175°C). This step is crucial because it ensures that your brownies bake evenly. While the oven heats up, grease or line a 9×9-inch baking pan with parchment paper for easy removal later. Believe me, you’ll want to savor every crumb, so make sure nothing sticks!

    Step 2: Mix the Dry Ingredients with Wet Ingredients

    Next, it’s time to combine everything. In a large bowl, dump in your red velvet cake mix, melted butter, large eggs, and vanilla extract. Using a whisk or a big spoon, mix everything until it’s smooth and well combined. If you spot a few lumps, don’t worry—just keep stirring until you achieve a luscious batter. It should have that inviting red hue, resembling a cozy sunset.

    Step 3: Incorporate White Chocolate and Cookies

    Now comes the fun part! Gently fold in the white chocolate chips and crushed Oreo cookies. Use a spatula or a wooden spoon, being careful to avoid overmixing. You want those delightful cookie pieces evenly distributed throughout the batter, ensuring that every bite is indulgent. Imagine the crunch of those cookies mingling with the creamy sweetness of the white chocolate—a match made in dessert heaven!

    Step 4: Bake to Perfection

    Spread your beautiful red velvet batter evenly into the prepared baking pan. Slide it into your preheated oven, and bake for 25–30 minutes. Keep an eye on them! You’ll know they’re done when a toothpick inserted in the center comes out with a few moist crumbs—not wet batter. This ensures that your brownies will be deliciously fudgy. Trust your instincts; that warm, inviting aroma will guide you!

    Step 5: Cool and Serve

    Once baked to perfection, let the brownies cool completely in the pan on a wire rack. Patience is key here; cooling helps them set beautifully! When they’re cool, grab a sharp knife and cut them into squares. For an extra touch, dust the top with some powdered sugar or serve with a side of vanilla ice cream. Trust me, your family will be begging for seconds (and thirds)!

    Tips for Success

    • Measure your ingredients accurately for the best results.
    • Let your butter cool slightly before adding it to avoid scrambling the eggs.
    • Use a rubber spatula to improve folding without overmixing.
    • Check for doneness a few minutes before the timer goes off.
    • Let the brownies cool fully to enhance the fudgy texture.
    • Don’t hesitate to get creative with toppings like whipped cream or sprinkles!

    Equipment Needed

    • Baking pan: A 9×9-inch pan works best, but you can use an 8×8-inch pan if you prefer thicker brownies.
    • Mixing bowl: A large bowl is perfect, but a stand mixer can save you some elbow grease.
    • Whisk or spoon: Grab any sturdy stirring tool you have on hand!
    • Parchment paper: Use this for easy cleanup, or simply grease the pan generously.
    • Cooling rack: If you don’t have one, a plate will do just fine to help your brownies cool.

    Variations

    • Nutty Twist: Add some chopped pecans or walnuts for a delightful crunch that complements the creamy texture.
    • Chocolate Lovers: Swap half of the white chocolate chips with dark chocolate chips for a richer flavor.
    • Minty Fresh: Stir in a few drops of mint extract and top with chocolate mint drizzle for a refreshing take.
    • Gluten-Free Option: Use a gluten-free red velvet cake mix to make these brownies suitable for those with gluten sensitivities.
    • Vegan Treat: Replace eggs with flaxseed meal and use a dairy-free butter alternative along with vegan white chocolate chips.

    Serving Suggestions

    • Enjoy these brownies warm with a scoop of vanilla ice cream for a heavenly combination.
    • Pair with a rich coffee or a sweet latte to balance the flavors.
    • For a pretty presentation, dust with powdered sugar or drizzle with melted white chocolate.
    • Serve alongside fresh berries for a pop of color and added freshness.
    • Consider packing them in a cute box as a thoughtful gift for friends!

    FAQs about Cookies & Cream Red Velvet Brownies

    Can I use homemade red velvet cake mix for these brownies?

    Absolutely! If you love to make things from scratch, feel free to use your favorite homemade red velvet cake recipe. Just remember to adjust the other ingredients accordingly!

    What can I substitute for white chocolate chips?

    If white chocolate isn’t your thing, swap in semi-sweet or dark chocolate chips. They’ll create a wonderfully rich contrast with the red velvet base. Just keep in mind, it will change the overall flavor profile a bit!

    How should I store leftovers?

    To keep these delightful Cookies & Cream Red Velvet Brownies fresh, store them in an airtight container at room temperature for up to 3 days. You can also freeze them for up to a month—just make sure to separate layers with parchment paper!

    Can I double the recipe for a larger crowd?

    What toppings work well with these brownies?

    Oh, there are so many delicious options! Try whipped cream, crushed Oreos on top, or even a dollop of cream cheese frosting for an extra treat. Let your creativity shine!

    Final Thoughts

    These Cookies & Cream Red Velvet Brownies are more than just a dessert; they’re a heartfelt way to show you care. Whether you whip them up for a family gathering or share them with friends, these brownies have a way of bringing smiles. With their rich flavor and delightful textures, every bite is a little moment of joy. Plus, the simplicity of the recipe means you can enjoy these treats without spending hours in the kitchen. So, roll up your sleeves, embrace your inner baker, and let these brownies become a treasured part of your dessert repertoire!


    Print

    clock clock iconcutlery cutlery iconflag flag iconfolder folder iconinstagram instagram iconpinterest pinterest iconfacebook facebook iconprint print iconsquares squares iconheart heart iconheart solid heart solid icon

    Description

    Delicious red velvet brownies infused with white chocolate and crushed Oreo cookies, perfect for any dessert lover.


    • 1 box red velvet cake mix (15.25 ounces)
    • 1/2 cup unsalted butter, melted
    • 2 large eggs
    • 1 teaspoon vanilla extract
    • 1 cup white chocolate chips
    • 1 cup crushed Oreo cookies (about 1012 cookies)

    1. Preheat your oven to 350°F (175°C). Grease or line a 9×9-inch baking pan with parchment paper.
    2. In a large bowl, combine the red velvet cake mix, melted butter, eggs, and vanilla extract. Stir until the mixture is smooth and well combined.
    3. Gently fold in the white chocolate chips and crushed Oreo cookies until they are evenly distributed in the batter.
    4. Spread the batter evenly into the prepared baking pan. Bake in the preheated oven for 25-30 minutes, or until a toothpick inserted into the center comes out with a few moist crumbs.
    5. Allow the brownies to cool completely in the pan on a wire rack before cutting them into squares. Serve and enjoy!

    Notes

    • For a richer flavor, you can use brown butter instead of regular melted butter.
    • Store any leftovers in an airtight container at room temperature for up to 3 days.
    • These brownies can also be frozen for up to a month.
    • Prep Time: 15 minutes
    • Cook Time: 30 minutes
    • Category: Dessert
    • Method: Baking
    • Cuisine: American

    Nutrition

    • Serving Size: 1 brownie
    • Calories: 210
    • Sugar: 18g
    • Sodium: 150mg
    • Fat: 10g
    • Saturated Fat: 6g
    • Unsaturated Fat: 4g
    • Trans Fat: 0g
    • Carbohydrates: 28g
    • Fiber: 1g
    • Protein: 2g
    • Cholesterol: 35mg

    Sharing is caring!

  • Lemon and Raspberry Tart

    Lemon and Raspberry Tart


    Introduction to Lemon and Raspberry Tart

    As a passionate home cook, I often find myself yearning for that perfect dessert that can delight my family without consuming an entire afternoon in the kitchen. Enter the Lemon and Raspberry Tart—a mouthwatering treat that strikes the perfect balance between tangy lemon curd and sweet raspberry jam. It’s a quick solution for busy days or a dazzling dish to impress your loved ones at that weekend gathering. Imagine slicing into a beautifully baked tart, the zesty aroma filling the air, while you bask in the compliments from friends and family. Honestly, it just doesn’t get any better!

    Why You’ll Love This Lemon and Raspberry Tart

    This delightful Lemon and Raspberry Tart is not only easy to make, but it also dazzles with its vibrant flavors. In just under 30 minutes of prep, you’ll have a gorgeous dessert ready to impress. The buttery crust, luscious lemon curd, and sweet raspberry jam combine for a burst of sunshine in every bite. It’s the perfect ending to any meal, and it’s sure to make your loved ones smile!

    Ingredients for Lemon and Raspberry Tart

    The beauty of this Lemon and Raspberry Tart lies not only in its delightful flavors but also in the quality of its ingredients. Each component plays a vital role in creating that stunning dessert. Here’s what you’ll need:

    • All-purpose flour: This forms the base of your tart crust, providing that essential structure.
    • Powdered sugar: It adds sweetness and a touch of finesse to the crust, making it melt-in-your-mouth delicious.
    • Lemon zest: A fragrant burst of citrus flavor that brightens the dessert and enhances the lemon curd.
    • Salt: Just a pinch brings out the flavors, balancing the sweetness beautifully.
    • Unsalted butter: Cold and cubed, it creates a rich, flaky texture for your tart crust.
    • Egg yolk: This adds richness and helps bind the crust together perfectly.
    • Lemon juice: Freshly squeezed is best! It gives the lemon curd that vivid tang that we all crave.
    • Ice water: Optional, but can help bring the dough together if it feels too dry.
    • Raspberry jam: This sweet layer not only enhances the flavor but adds a beautiful color beneath the lemon curd.
    • Granulated sugar: Essential for sweetening the lemon curd, allowing the tartness to shine through.
    • Fresh lemons: You’ll need juice and zest, providing that signature lemony kick.
    • Large eggs and egg yolks: These are the backbone of the lemon curd, giving it a lovely custardy consistency.
    • More unsalted butter: This time, to finish the lemon curd with creaminess.
    • Optional garnishes: Fresh raspberries, lemon slices, whipped cream, fresh thyme, or edible flowers can elevate the presentation, making each slice Instagram-worthy.

    You can find the exact measurements for each ingredient listed at the bottom of this article, perfect for printing when you’re ready to embark on your culinary adventure!

    How to Make Lemon and Raspberry Tart

    Now, let’s unlock the secret to creating your very own Lemon and Raspberry Tart. It might seem like a culinary challenge, but trust me—follow these simple steps, and you’ll be a tart genius in no time!

    Prepare the Tart Crust

    First, we need to tackle that buttery crust. Grab a large bowl and combine the all-purpose flour, powdered sugar, lemon zest, and salt. Mix them together until they’re evenly blended. 

    Next, here comes the fun part—cutting in the unsalted butter! Using a pastry cutter or a fork, blend the cold butter cubes into the flour mixture until it resembles coarse sand. Think of it as creating sandy beach vibes in your kitchen!

    Then stir in the egg yolk and lemon juice. If the dough seems too crumbly, don’t fret! A tablespoon of ice water can help bring it all together. Gather the dough into a ball, wrap it tightly in plastic wrap, and let it rest in the fridge for about 15 minutes. This resting time is crucial for a flaky crust.

    Bake the Tart Crust

    With the crust chilling, it’s time to show it some heat! Preheat your oven to 375°F and lightly spray your tart pan with cooking spray. Roll the dough out on a floured surface. Aim for a 1/4-inch thickness to make it just right.

    Transfer your dough circle into the tart pan and gently press it into the edges, trimming off any excess. Don’t forget to prick the crust with a fork! This allows steam to escape and prevents a puffy crust. 

    Then, to ensure our crust is perfectly crisp, line it with parchment paper and fill it with pie weights (or dried beans will work in a pinch). Bake for 20 minutes, then remove the weights. Let it cool for 20 minutes. Your crust should start smelling heavenly by now!

    Make the Lemon Curd Filling

    Let’s unleash the zesty goodness of the lemon curd! In a saucepan, take your granulated sugar, fresh lemon juice, eggs, egg yolks, lemon zest, and salt. Cook over medium heat while whisking continuously. This helps prevent scrambled eggs, which is not the goal here!

    Keep whisking until the mixture thickens, and you can see the bottom of the pan as you stir. A great test? It should coat the back of a spoon perfectly. 

    Now, remove it from the heat and stir in your cubes of unsalted butter until they melt into a smooth, creamy filling. Finally, strain the curd through a fine-mesh sieve to catch any pesky bits of egg. Let it cool for about 15 minutes while you daydream about your accomplished baking skills!

    Assemble the Tart

    With everything prepared, it’s time for the grand assembly. Preheat your oven to 350°F again, and place the cooled tart shell on a baking sheet for easy handling.

    Spread that luscious raspberry jam evenly over the cooled crust, creating a sweet barrier beneath the tart lemon curd. Then pour the creamy lemon curd over the top, filling your tart shell to the brim.

    Bake the tart for just 10 minutes, then let it cool on a wire rack. After the tantalizing aroma fills your kitchen, pop it in the fridge for at least 2 hours before serving. The wait will be worth every moment!

    Tips for Success

    • Chill your butter and egg yolk for a flakier crust.
    • Use fresh lemons for zest and juice—it’s a game changer!
    • Don’t skip straining the lemon curd; it ensures a silky smooth texture.
    • Keep your oven calibrated to achieve the best baking results.
    • Allow your tart to set in the fridge to optimize flavor and consistency.

    Equipment Needed

    • Tart pan: A fluted or regular tart pan works, but a pie plate is a great alternative.
    • Pie weights: Dried beans or rice can serve as effective substitutes if you don’t have weights.
    • Whisk: A regular wire whisk does the job, but an electric mixer can save time.
    • Fine-mesh sieve: A regular strainer will work if you don’t have a sieve handy.

    Variations

    • Berry Bliss: Swap out the raspberry jam for other berry preserves like strawberry or blueberry for a unique twist.
    • Citrus Medley: Add more zest! Incorporate orange or grapefruit zest into the lemon curd for a burst of flavor.
    • Gluten-Free Option: Use a gluten-free all-purpose flour blend to create a delightful gluten-free crust.
    • Vegan Take: Substitute eggs with aquafaba (chickpea brine) and use a plant-based butter for a vegan version.
    • Herbal Infusion: Add a hint of rosemary or basil to the lemon curd for an unexpected but delicious herbal note.

    Serving Suggestions

    • Whipped Cream: Consider serving with a dollop of freshly whipped cream to add a creamy finish.
    • Mint Leaves: Garnish each slice with fresh mint leaves for a pop of color and freshness.
    • Coffee or Tea: Pair with a cup of coffee or herbal tea to balance the tartness.
    • Berries on the Side: Fresh berries make a lovely side that complements the tart’s flavors.
    • Presentation: Arrange slices on a cake stand and sprinkle edible flowers for a stunning display.

    FAQs about Lemon and Raspberry Tart

    As you embark on your journey to create the perfect Lemon and Raspberry Tart, you might have a few questions pop up. Don’t worry; I’ve been there! Here are some common inquiries I’ve gathered that can help guide your baking adventure.

    Can I make the tart crust in advance?

    Absolutely! You can prepare the tart crust a day ahead. Just wrap it tightly in plastic wrap and refrigerate. Then, when you’re ready, simply roll it out and bake as directed. It saves time on busy days!

    How do I store leftovers?

    If you have any tart left (which is rare in my house!), store it covered in the refrigerator. It stays delicious for up to three days. Just remember to bring it to room temperature before serving for the best flavor experience.

    What can I substitute for raspberry jam?

    Raspberry jam is delightful, but if you prefer something else, feel free to use any berry jam you fancy! Strawberry, blueberry, or even peach preserves can work wonders under the lemon curd, creating a new taste sensation.

    Can I freeze the lemon and raspberry tart?

    You sure can! After the tart has cooled completely, wrap it tightly with plastic wrap and then foil. It can stay in the freezer for up to two months. Just thaw it in the fridge overnight before serving.

    What other garnishes can I use?

    Don’t hesitate to get creative! Fresh raspberries and lemon slices are classics, but you can also try edible flowers, sprigs of thyme, or even a dusting of powdered sugar for that extra flair. The sky’s the limit!

    Final Thoughts

    Creating this Lemon and Raspberry Tart is truly a labor of love that brings joy to both the cook and the fortunate eaters. The vibrant flavors and stunning presentation never fail to impress, making it a dessert that’s perfect for any occasion—be it a family dinner or an elegant gathering. When I see my loved ones savoring each bite, it warms my heart. Remember, baking is about making memories and sharing happiness. So, roll up your sleeves, embrace the mess, and enjoy the sweet adventure of crafting this delightful tart!


    Print

    clock clock iconcutlery cutlery iconflag flag iconfolder folder iconinstagram instagram iconpinterest pinterest iconfacebook facebook iconprint print iconsquares squares iconheart heart iconheart solid heart solid icon

    Description

    A delightful dessert featuring a buttery tart crust filled with a luscious lemon curd and a layer of raspberry jam.


    • 1 ¼ cups all-purpose flour
    • ½ cup powdered sugar
    • 1 tablespoon lemon zest
    • ¼ teaspoon salt
    • 8 tablespoons unsalted butter, cold, cut into cubes
    • 1 egg yolk, room temperature
    • 1 teaspoon lemon juice
    • 2 tablespoons ice water (optional)
    • 5 tablespoons raspberry jam
    • 1 cup granulated sugar
    • 1 cup fresh lemon juice
    • 4 large eggs
    • 4 large egg yolks
    • 1 tablespoon lemon zest
    • ¼ teaspoon salt
    • ¾ cup unsalted butter, cut into tablespoons
    • Fresh raspberries, lemon slices, whipped cream, fresh thyme, and/or edible flowers (optional garnishes)

    1. In a large bowl, combine the flour, powdered sugar, lemon zest, and salt. Toss together until evenly combined.
    2. Using a pastry cutter or fork, blend the butter into the flour until it resembles coarse sand. Stir in the egg yolk and lemon juice. Gather the dough into a ball, adding ice water if needed.
    3. Wrap the dough in plastic wrap and refrigerate for 15 minutes.
    4. Preheat the oven to 375° and lightly spray a tart pan with cooking spray.
    5. Roll out the dough on a floured surface to a 1/4-inch thick circle and transfer it to the tart pan.
    6. Press the dough into the pan, trimming any excess. Prick the crust with a fork.
    7. Line the crust with parchment paper and fill with pie weights. Bake for 20 minutes.
    8. Remove the weights and parchment, and cool for 20 minutes.
    9. In a saucepan, combine sugar, lemon juice, eggs, egg yolks, zest, and salt. Cook over medium heat, whisking continually until thickened.
    10. Stir in butter until melted and smooth, then strain the curd and let cool for 15 minutes.
    11. Preheat the oven to 350° and place the tart shell on a baking sheet.
    12. Spread raspberry jam over the cooled crust, then pour the lemon curd on top.
    13. Bake for 10 minutes, then cool on a wire rack. Refrigerate for 2 hours before serving.

    Notes

    • The dough can be pressed directly into the tart pan instead of rolling it out.
    • Ensure the filling is thick enough to coat the back of a spoon for the best texture.
    • Additional garnishes enhance presentation and flavor.
    • Prep Time: 30 minutes
    • Cook Time: 30 minutes
    • Category: Dessert
    • Method: Baking
    • Cuisine: American

    Nutrition

    • Serving Size: 1 slice
    • Calories: 300
    • Sugar: 20g
    • Sodium: 150mg
    • Fat: 18g
    • Saturated Fat: 10g
    • Unsaturated Fat: 2g
    • Trans Fat: 0g
    • Carbohydrates: 30g
    • Fiber: 1g
    • Protein: 4g
    • Cholesterol: 90mg

    Sharing is caring!

  • Red Velvet Oreo Roll

    Red Velvet Oreo Roll


    Introduction to Red Velvet Oreo Roll

    Have you ever craved a dessert that brings a sprinkle of joy to your busy day? Well, let me introduce you to the Red Velvet Oreo Roll! This delightful dessert is a showstopper, combining the classic richness of red velvet cake with a creamy Oreo filling. Perfect for impressing guests or treating your family after a hectic week, it’s as simple to make as it is heavenly to eat. Trust me, once you serve this roll, you’ll be the culinary hero of your household. So, grab your apron, and let’s make some magic in the kitchen!

    Why You’ll Love This Red Velvet Oreo Roll

    This Red Velvet Oreo Roll is not just a dessert; it’s a hug on a plate. You’ll appreciate how quickly it comes together, making it ideal for those chaotic weeknights or spontaneous celebrations. The moist red velvet cake pairs beautifully with the creamy Oreo filling, creating a dessert that sings with flavor. Plus, it’s a great way to enjoy a classic twist, and your family will adore it!

    Ingredients for Red Velvet Oreo Roll

    Gathering the right ingredients is half the fun of creating this mouthwatering Red Velvet Oreo Roll. Here’s what you’ll need:

    • All-purpose flour: This is your foundation, giving the cake its lovely structure.
    • Unsweetened cocoa powder: Adds that deep chocolate flavor you crave without the excess sweetness.
    • Baking powder: This leavening agent helps the cake rise beautifully, keeping it light.
    • Salt: Just a pinch elevates all the flavors, enhancing the sweetness in contrast.
    • Large eggs: Room temperature eggs whip up to give you a fluffy, airy cake.
    • Granulated sugar: Sweetens the cake and balances the cocoa’s bitterness perfectly.
    • Vegetable oil: Keeps the cake moist and tender, contributing to its irresistible texture.
    • Vanilla extract: A dash of vanilla enriches the flavor profile, making each bite more delightful.
    • Red food coloring: This key ingredient adds that signature red hue, making the cake visually stunning.
    • Powdered sugar: For that lovely dusting on top, it gives a charming finish.
    • Cream cheese: The creamy base of your filling, lending richness and a hint of tanginess.
    • Whipped cream: Lightens the filling, giving it a fluffy consistency that makes it heavenly.
    • Crushed Oreo cookies: These sweet bits not only add crunch but infuse that beloved cookie flavor.
    • Semi-sweet chocolate chips: Creates a luscious, glossy ganache that coats your roll perfectly.
    • Heavy cream: This rich cream is key for a smooth ganache; it adds that melt-in-your-mouth texture.
    • Crushed Oreo cookies for topping: A delightful way to garnish your roll, adding a bit of flair.
    • Whipped cream (optional): For extra creaminess on the side—always a welcome addition!

    You can find exact measurements for these ingredients at the bottom of the article, along with a printer-friendly version. Let’s gather these goodies and get ready for some baking magic!

    How to Make Red Velvet Oreo Roll

    Now that we have our ingredients ready, let’s dive into the steps to create this beautiful Red Velvet Oreo Roll. Follow along, and don’t worry—I’ll share plenty of tips to ensure you nail it!

    Preparing the Cake

    First, let’s get our oven preheating to 350°F (175°C). This helps ensure the cake bakes evenly. While that’s heating up, line a jelly roll pan with parchment paper. This will make it much easier to roll your cake later.

    Next, grab a bowl and sift together the all-purpose flour, cocoa powder, baking powder, and salt. Sifting helps to eliminate lumps and ensures a light, fluffy cake. Trust me, it’s worth the extra step!

    Mixing the Batter

    Now onto the fun part! In a separate bowl, beat the room temperature eggs and granulated sugar using an electric mixer. Whisk until the mixture is thick and pale—this can take about 3 to 5 minutes.

    Add the vegetable oil, vanilla extract, and red food coloring to this golden mix. Stir until combined, then gently fold in the dry ingredients you’ve sifted earlier. Remember, be gentle to keep that lovely airiness!

    Baking the Cake

    Pour the batter into your prepared jelly roll pan and spread it evenly. Pop it into the oven for about 12-15 minutes. When done, the cake should spring back when touched lightly. The scent of chocolate will fill your kitchen like a warm hug!

    Once baked, remove it from the oven, and let it cool for a minute. Then, flip the cake onto a clean kitchen towel dusted with powdered sugar. Roll it up in the towel and let it cool completely. This helps the cake keep its shape when we add the filling!

    Preparing the Filling

    While the cake cools, let’s prepare the luscious filling. In a mixing bowl, beat the softened cream cheese until it’s smooth. Add the powdered sugar and vanilla extract, mixing until it’s combined.

    Carefully fold in the whipped cream for that fluffy texture, and then add in the crushed Oreo cookies. This filling is like a dreamy cookie cloud—you’ll want to dive right in!

    Assembling the Roll

    Once the cake has cooled completely, unroll it gently from the towel. Spread the creamy Oreo filling evenly over the cake. Now, it’s time to re-roll it! Start from one end, rolling tightly but carefully, like wrapping a gift with love.

    Wrap the rolled cake in plastic wrap and refrigerate it for at least an hour. This helps it firm up, making it easier to slice. Plus, the flavors meld beautifully!

    Making the Ganache

    Let’s whip up that rich chocolate ganache! In a small saucepan, simmer the heavy cream over low heat until it’s just about to boil. Then, take it off the heat and pour it over the semi-sweet chocolate chips in a bowl.

    Give it a good stir until the chocolate is completely melted and the mixture is smooth. This glossy ganache will make your Red Velvet Oreo Roll look even more irresistible!

    Final Touches

    After your cake has chilled, unwrap it and place it on a serving platter. Pour the luscious ganache over the roll, letting it cascade down the sides. Sprinkle crushed Oreo cookies on top for that extra crunch and visual appeal!

    If you’re feeling extra generous, add a dollop of whipped cream next to each slice when serving. It’s like the cherry on top of a fantastic dessert!

    Tips for Success

    • Always preheat your oven. It ensures an even bake for your Red Velvet Oreo Roll.
    • Use room temperature eggs; they whip better, giving you a fluffier cake.
    • Let the cake cool completely before unrolling to avoid cracks.
    • Don’t skip the sifting step! It creates a lighter and airier cake.
    • For a shinier ganache, let it sit for a few minutes before spreading.

    Equipment Needed

    • Jelly roll pan: A standard baking sheet works too, but a jelly roll pan helps create the right thickness.
    • Parchment paper: If you don’t have it, use a silicone baking mat to prevent sticking.
    • Mixing bowls: Any size will do; just grab what you have on hand!
    • Electric mixer: A whisk can work if you’re feeling strong and fearless!
    • Spatula: Ideal for folding in ingredients and spreading fillings smoothly.

    Variations for Red Velvet Oreo Roll

    • Gluten-Free Option: Substitute the all-purpose flour with a gluten-free baking blend. It’s easy to find and works beautifully!
    • Dairy-Free Delight: Use non-dairy cream cheese and coconut whipped cream for a dairy-free version of this delectable treat.
    • Red Velvet Swirl: Add a swirl of white chocolate or cream cheese frosting into the cake batter before baking for a fun twist!
    • Chocolate Lovers’ Upgrade: Fold in mini chocolate chips with the crushed Oreos for an extra chocolatey burst.
    • Seasonal Flavors: For a festive change, try adding peppermint extract during the holidays, or a hint of cinnamon for a cozy fall flavor.

    Serving Suggestions for Red Velvet Oreo Roll

    • Pair it with a scoop of vanilla ice cream for a delightful contrast in temperature and flavor.
    • Serve with fresh berries like strawberries or raspberries to add a pop of color and tartness.
    • A dollop of whipped cream enhances its creamy texture—always a favorite!
    • Enjoy with a warm cup of coffee or a rich hot chocolate for a cozy dessert experience.
    • Garnish with extra crushed Oreos for an eye-catching finish that guests will love!

    FAQs about Red Velvet Oreo Roll

    Can I make the Red Velvet Oreo Roll ahead of time?
    Absolutely! You can prepare the cake roll a day in advance. Just be sure to store it tightly wrapped in the fridge to keep it fresh. The flavors will deepen, making it even more delicious!

    What can I substitute for cream cheese?
    If you’re not a fan of cream cheese, mascarpone cheese or Greek yogurt can be great alternatives. They provide a similar creamy texture and flavor for the filling!

    Can I use store-bought whipped cream?
    Yes, you can! Pre-made whipped cream saves time, especially on busy days. Just fold it in gently to keep that airy texture intact.

    How should I store leftovers?
    Store any leftovers in an airtight container in the refrigerator. It should last for about 3-4 days—if it lasts that long!

    Is it possible to freeze the Red Velvet Oreo Roll?
    Yes! Freeze the roll before adding the ganache. Wrap it tightly in plastic wrap and foil. Just thaw it in the fridge overnight before serving, then add the ganache for a fresh look!

    Final Thoughts

    Creating your own Red Velvet Oreo Roll is not just about baking; it’s about crafting delightful moments. Imagine surprising your family with this luscious dessert after dinner, their smiles lighting up the room. The combination of rich red velvet, creamy filling, and decadent chocolate ganache makes each bite an experience to savor. This recipe is more than a treat; it’s a memory in the making. So, whether it’s a special occasion or a simple weekend, let this Red Velvet Oreo Roll bring joy, warmth, and sweetness to your kitchen. Happy baking!


    Print

    clock clock iconcutlery cutlery iconflag flag iconfolder folder iconinstagram instagram iconpinterest pinterest iconfacebook facebook iconprint print iconsquares squares iconheart heart iconheart solid heart solid icon

    Description

    A delightful dessert combining red velvet cake with a creamy Oreo filling, all topped with rich chocolate ganache.


    • ¾ cup all-purpose flour
    • ¼ cup unsweetened cocoa powder
    • 1 tsp baking powder
    • ½ tsp salt
    • 4 large eggs, room temperature
    • ¾ cup granulated sugar
    • 2 tbsp vegetable oil
    • 1 tsp vanilla extract
    • 1 tbsp red food coloring
    • Powdered sugar for dusting
    • 1 (8 oz) package cream cheese, softened
    • 1 cup powdered sugar
    • 1½ cups whipped cream
    • 1 tsp vanilla extract
    • 1215 crushed Oreo cookies
    • 1 cup semi-sweet chocolate chips
    • ½ cup heavy cream
    • Crushed Oreo cookies for topping
    • Whipped cream (optional)

    1. Preheat oven to 350°F (175°C) and line a jelly roll pan with parchment paper.
    2. Sift together flour, cocoa powder, baking powder and salt. In a separate bowl, whip eggs and sugar until thick. Stir in oil, vanilla and red food coloring. Then stir in dry ingredients.
    3. Transfer to pan and bake for 12-15 minutes. Turn out onto a powdered sugar-sprinkled towel and roll up. Cool completely.
    4. Beat cream cheese, then add powdered sugar and vanilla. Fold in whipped cream and crushed Oreo cookies.
    5. Unroll cooled cake, spread with filling, and re-roll. Refrigerate.
    6. Simmer heavy cream, pour over chocolate chips and mix until melted.
    7. Spread ganache over cake roll and sprinkle with crushed Oreos. Serve with optional whipped cream.

    Notes

    • Ensure the eggs are at room temperature for better volume when whipped.
    • Cool the cake completely before unrolling to prevent breaking.
    • For a richer flavor, let the ganache sit for a few minutes before spreading.
    • Prep Time: 30 minutes
    • Cook Time: 15 minutes
    • Category: Dessert
    • Method: Baking
    • Cuisine: American

    Nutrition

    • Serving Size: 1 slice
    • Calories: 350
    • Sugar: 25g
    • Sodium: 150mg
    • Fat: 20g
    • Saturated Fat: 10g
    • Unsaturated Fat: 5g
    • Trans Fat: 0g
    • Carbohydrates: 40g
    • Fiber: 2g
    • Protein: 5g
    • Cholesterol: 70mg

    Sharing is caring!

  • Red, White and Blue Mini Cheesecakes

    Red, White and Blue Mini Cheesecakes


    Introduction to Red, White and Blue Mini Cheesecakes

    Welcome to a delightful journey into the world of sweet treats! Today, I’m excited to share my recipe for Red, White and Blue Mini Cheesecakes. These little bites of perfection are not only visually stunning but also incredibly easy to whip up. They make for a great solution when you’re short on time but want to impress your guests. Perfect for summer barbecues or festive gatherings, these mini cheesecakes will add a splash of color and flavor to any occasion. Let’s dive in and discover how to make these extraordinary treats together!

    Why You’ll Love This Red, White and Blue Mini Cheesecakes

    These Red, White and Blue Mini Cheesecakes are a true game-changer! They’re simple to make, taking only about an hour from start to finish. The vibrant colors and delicious taste will capture hearts at any gathering. Plus, the individual portions mean less fuss and a stylish presentation. Trust me, these mini delights will be the star of your dessert table, leaving everyone wanting more!

    Ingredients for Red, White and Blue Mini Cheesecakes

    Gathering the right ingredients is key to creating these colorful, tasty mini cheesecakes. Most of them are pantry staples, making this recipe both accessible and rewarding. Let’s take a peek at what you’ll need:

    • Vanilla wafer cookie crumbs: These crunchy cookies form the delicious base. You can substitute with graham cracker crumbs if you prefer a different flavor.
    • Sugar: This sweetener brings balance to the creaminess of the cheese. You can use brown sugar for a hint of molasses flavor.
    • Butter: Melted butter binds the crust together. If you’re looking for a healthier choice, coconut oil can work, but it will slightly alter the taste.
    • Cream cheese: The star of the show! Make sure it’s at room temperature for a smooth filling. A Neufchâtel cheese can be used for a lighter version.
    • Sour cream: This adds a tangy richness. Greek yogurt can be a suitable substitute if you’re aiming for a healthier option.
    • Vanilla extract: Pure vanilla enhances the flavor complexity. For an alternative, you can use almond extract sparingly for a unique twist.
    • Eggs: These provide the necessary structure. If you’re avoiding animal products, you can experiment with flax eggs for a vegan version though the texture may vary.
    • Gel icing colors: Red and blue create the festive look. I recommend using gel rather than liquid colors for more vibrancy without watering down the batter.
    • Heavy whipping cream: This is essential for the whipped topping. Look for a cream labeled as “heavy” to achieve those luscious peaks.
    • Powdered sugar: Added to the whipped cream for sweetness and stability. If you’re in a pinch, you can blend granulated sugar until fine.
    • Sprinkles: Just for fun! They add that cheerful touch that makes these cheesecakes irresistible.

    Full ingredient measurements can be found at the bottom of the article and are available for printing. Now, let’s get ready to make these delightful mini cheesecakes!

    How to Make Red, White and Blue Mini Cheesecakes

    Ready to create a stunning dessert that turns heads? Let me guide you through the steps to make these delightful Red, White and Blue Mini Cheesecakes. We’ll keep it simple, so anyone can join in the fun. Let’s roll up our sleeves and get started!

    Step 1: Preheat and Prepare

    First things first, preheat your oven to 325°F (162°C). As it warms up, line your cupcake pan with liners. This makes it easy to remove the cheesecakes later. Saving clean-up time is a mom’s secret weapon!

    Step 2: Make the Crust

    Next, it’s crust-making time! In a mixing bowl, combine those delicious vanilla wafer cookie crumbs with sugar and melted butter. Mix until it resembles damp sand. Spoon about two tablespoons of this mixture into each cupcake liner and press it down firmly. This little base needs to hold all the cheesecake goodness!

    Step 3: Bake the Crust

    Pop the crusts in the oven and bake for just 5 minutes. You want them lightly golden and fragrant, not fully baked. Remove them from the oven and let them cool while you whip up the filling. They’ll set up as they cool, making a perfect base for the cheesecakes.

    Step 4: Prepare the Filling

    Now, let’s get to the creamy part! In a large bowl, combine the room-temperature cream cheese, sugar, and flour. Use a mixer on low speed until everything is well combined. Scrape down the bowl with a spatula to ensure no lumps remain. Trust me, a smooth filling equals delicious cheesecakes!

    Step 5: Incorporate Sour Cream and Vanilla

    Next up, add the sour cream and vanilla extract to your mixture. This will give your cheesecakes a lovely richness and aroma. Beat on low speed until fully combined. The anticipation is building, and it already smells wonderful!

    Step 6: Add Eggs

    Now, it’s time for the eggs! Add them one at a time, mixing slowly after each addition. This gentle approach helps create that smooth, velvety texture we all crave. Scrape the bowl again for good measure—every bit counts!

    Step 7: Color the Batter

    Divide your cheesecake filling evenly into three separate bowls. Keep one bowl plain (the white layer), then color one red and the other blue using gel icing colors. A couple of drops will do the trick. This is where the fun begins; you can actually see the holiday spirit come alive!

    Step 8: Layer the Cheesecakes

    Time to build our beautiful layers! Start with a tablespoon of the white batter in each cupcake liner. Follow this with a tablespoon of red batter, and then one of blue. Fill them up, but don’t overflow! Each layer adds to the stunning visual appeal and delicious flavor.

    Step 9: Bake the Cheesecakes

    Now, gently place your cupcake pan back in the oven. Bake the cheesecakes for 18-20 minutes until just set. You’ll notice they might puff up a bit—that’s normal! When they’re done, turn off the oven but leave them inside with the door closed for another 10 minutes. This slow cooling helps prevent cracks.

    Step 10: Cool Properly

    After 10 minutes, crack the oven door open to allow the cheesecakes to cool for about 15-20 minutes. This gentle cooling helps them set perfectly. Once cooled, move them to the fridge to chill completely. Patience, my friend—it’ll be worth it!

    Step 11: Make the Whipped Cream Topping

    Let’s add a fluffy, sweet finishing touch! In a large mixer bowl, combine the cold heavy whipping cream, powdered sugar, and a splash of vanilla extract. Whip on high speed until stiff peaks form. This is the cloud-like goodness that will crown your cheesecakes, making them even more irresistible!

    Step 12: Assemble and Serve

    Finally, it’s showtime! Pipe the beautiful whipped cream onto the tops of your cooled cheesecakes, and don’t forget the sprinkles. They add that extra festive flair! Store these mini delights in an airtight container in the fridge until you’re ready to impress your guests. Enjoy every delicious bite!

    Tips for Success

    • Use room-temperature cream cheese for a smoother filling.
    • Don’t overmix the batter to avoid cracks in your cheesecakes.
    • Let the cheesecakes cool slowly in the oven to prevent sinking.
    • Chill your whipped cream ingredients for better texture and stability.
    • For easy removal, ensure your crusts are cool before adding filling.

    Equipment Needed

    • Oven: Essential for baking your mini cheesecakes; a toaster oven can work in a pinch.
    • Cupcake pan: Use a standard or silicone cupcake pan for easy release.
    • Mixing bowls: Any size will do, but a large bowl is ideal for the filling.
    • Hand mixer: A stand mixer can also be used for convenience.
    • Piping bag: This is great for whipping cream; a ziplock bag can substitute in a hurry!

    Variations

    • Chocolate Drizzle: For a decadent twist, drizzle melted chocolate over the whipped cream topping.
    • Nutty Crust: Swap vanilla wafer crumbs with crushed almonds or pecans for a crunchy alternative.
    • Fruit Topping: Fresh berries, like strawberries or blueberries, can replace sprinkles for a refreshing finish.
    • Gluten-Free Option: Use gluten-free cookie crumbs to make the crust suitable for gluten-sensitive guests.
    • Vegan Version: Substitute cream cheese with a vegan alternative and replace eggs with flaxseed meal mixed with water.

    Serving Suggestions

    • Pair your mini cheesecakes with fresh fruit like strawberries or raspberries for a lovely contrast.
    • Serve alongside a dollop of whipped cream on the plate for an elegant presentation.
    • Consider a refreshing lemonade or iced tea as a perfect drink complement.
    • Use colorful serving platters to enhance the festive theme.
    • For gatherings, arrange on a tiered cake stand to showcase their beauty appealingly.

    FAQs about Red, White and Blue Mini Cheesecakes

    Can I make Red, White and Blue Mini Cheesecakes a day ahead?

    Absolutely! In fact, making them a day in advance can enhance their flavor. Just store them in the refrigerator in an airtight container until you’re ready to serve. They’ll be just as delightful the next day!

    What can I use instead of cream cheese for a lighter version?

    If you’re looking for a lighter alternative, consider using Neufchâtel cheese. It has the same creamy texture but with less fat. You can also opt for a dairy-free cream cheese for a vegan option!

    How can I adjust the sweetness of the cheesecake filling?

    Want to reduce sweetness? Simply cut back the sugar in the filling by a couple of tablespoons. You might even replace granulated sugar with a sugar substitute, but just keep in mind that the flavor could vary slightly.

    Are Red, White and Blue Mini Cheesecakes suitable for gluten-free diets?

    Yes! For a gluten-free version, just swap the vanilla wafer cookie crumbs for gluten-free cookie crumbs. This way, everyone can enjoy these festive mini cheesecakes at your gathering!

    How should I store the mini cheesecakes?

    Your cheesecakes should be kept in an airtight container in the fridge. They’ll stay fresh for about 2-3 days, making them a fantastic treat to enjoy over a few days!

    Final Thoughts

    Making these Red, White and Blue Mini Cheesecakes is like adding a splash of joy to your celebrations. Each colorful bite is a reminder of summer gatherings and festive moments with loved ones. Whether you’re sharing them at a BBQ or enjoying a quiet evening at home, these little treats bring smiles and happiness. I hope you feel inspired to create your own batch and watch as they steal the show. Trust me, the laughter and compliments will flow just as sweetly as the flavors. Happy baking, and may your kitchen be filled with love and delight!


    Print

    clock clock iconcutlery cutlery iconflag flag iconfolder folder iconinstagram instagram iconpinterest pinterest iconfacebook facebook iconprint print iconsquares squares iconheart heart iconheart solid heart solid icon

    Description

    Delicious Red, White and Blue Mini Cheesecakes perfect for impressing guests with a festive look.


    • 1 cup (134g) vanilla wafer cookie crumbs
    • 2 tbsp (26g) sugar
    • 4 tbsp (56g) butter, melted
    • 12 ounces (339g) cream cheese, room temperature
    • 1/2 cup (104g) sugar
    • 3 tbsp (24g) flour
    • 1/2 cup (115g) sour cream
    • 1 1/2 tsp vanilla extract
    • 2 eggs
    • Blue gel icing color
    • Red gel icing color
    • 1/2 cup (120ml) heavy whipping cream, cold
    • 5 tbsp (36g) powdered sugar
    • 1/2 tsp vanilla extract
    • Sprinkles

    1. Preheat oven to 325°F (162°C). Add cupcake liners to a cupcake pan.
    2. Combine the vanilla wafer cookies crumbs, sugar and melted butter. Divide the mixture between the cupcake liners (about 2 tablespoons per cup) and press into the bottoms.
    3. Bake the crusts for 5 minutes then remove from oven. Allow to cool while you make the filling.
    4. To make the filling, reduce oven to 300°F (148°C). In a large bowl, mix the cream cheese, sugar, and flour until combined (Use low speed to keep less air from getting into the batter, which can cause cracks). Scrape down the sides of the bowl.
    5. Add the sour cream and vanilla extract. Beat on low speed until well combined.
    6. Add the eggs one at a time, beating slowly and scraping the sides of the bowl after each addition.
    7. Divide the batter evenly into three bowls. Leave one as is and color one red and the other blue.
    8. Layer the colored batter into the crusts, starting with a tablespoon of white batter in each cup, then a tablespoon of red, then a tablespoon of blue. The cups should be mostly full.
    9. Bake the cheesecakes for 18-20 minutes, then turn off the oven and leave the door closed for another 10 minutes.
    10. Crack the oven door and allow cheesecakes to cool for 15-20 minutes, then put in the fridge to finish cooling.
    11. When cheesecakes are cooled, remove them from the pan.
    12. To make the whipped cream topping, add the heavy whipping cream, powdered sugar and vanilla extract to a large mixer bowl. Whip on high speed until stiff peaks form.
    13. Pipe the whipped cream onto the tops of the cheesecakes and add sprinkles.
    14. Refrigerate the cheesecakes in an airtight container until ready to serve. Cheesecakes are best for 2-3 days.

    Notes

    • Use cold ingredients for the whipped cream topping for better results.
    • These cheesecakes can be made a day in advance and stored in the refrigerator.
    • For a more vibrant color, use gel colors rather than liquid food coloring.
    • Prep Time: 30 minutes
    • Cook Time: 30 minutes
    • Category: Dessert
    • Method: Bake
    • Cuisine: American

    Nutrition

    • Serving Size: 1 mini cheesecake
    • Calories: 200
    • Sugar: 15g
    • Sodium: 150mg
    • Fat: 12g
    • Saturated Fat: 7g
    • Unsaturated Fat: 3g
    • Trans Fat: 0g
    • Carbohydrates: 22g
    • Fiber: 1g
    • Protein: 3g
    • Cholesterol: 50mg

    Sharing is caring!

  • Cheese Bread

    Cheese Bread


    Introduction to Cheese Bread

    There’s nothing quite like the aroma of freshly baked cheese bread wafting through your kitchen. It’s a warm embrace on a chilly evening or a delightful companion to your morning coffee. If you’re anything like me, you crave solutions that make life a little easier. This homemade cheese bread is just that—a quick, satisfying dish that brings joy to your family. Perfect for busy weekdays or special occasions, each slice bursts with cheesy goodness. Trust me, once you try making this at home, you’ll keep returning to this easy recipe time and time again.

    Why You’ll Love This Cheese Bread

    This cheese bread is a dream for anyone short on time. It’s so quick to make, you could whip it up between soccer practice and dinner. The flavor is simply heavenly; that melty cheese creates a symphony of taste in every bite. Plus, it’s versatile! You can enjoy it warm from the oven or toasted for a snack. Trust me, this recipe will quickly become a cherished staple in your kitchen.

    Ingredients for Cheese Bread

    Let me tell you, the magic of this cheese bread lies in its simple yet delightful ingredients. Here’s what you’ll need:

    • All-purpose flour: This is the backbone of your bread. It provides structure and gives that lovely rise.
    • Baking powder: The secret agent that helps the bread puff up beautifully, creating that soft interior.
    • Salt: A little pinch to enhance flavors and bring everything together. It’s a small but mighty ingredient!
    • Garlic powder (optional): If you’re a garlic lover like me, this adds an amazing flavor twist. Just be mindful; a little goes a long way!
    • Shredded cheddar cheese: The star of the show! This gooey delight melts in your mouth and delivers an irresistible taste.
    • Grated Parmesan cheese: Adds a rich, nutty flavor that complements the cheddar perfectly. Trust me, it’s worth it!
    • Large egg: This ingredient binds everything together and adds moisture, making each bite tender.
    • Milk: It keeps the batter moist and fluffy while enhancing the overall flavor.
    • Unsalted butter, melted: A touch of richness that helps brown the crust and adds a bit of decadence.

    Feel free to get creative! If you want to experiment, herbs like rosemary or thyme can elevate this bread to a whole new level. For the exact quantities needed, just scroll down to the end of the article where you’ll find a convenient printable version. Happy baking!

    How to Make Cheese Bread

    Let’s dive into the delightful adventure of making cheese bread! Follow these simple steps, and soon you’ll have a lovely loaf to enjoy.

    Step 1: Preheat and Prepare

    First things first, preheat your oven to 375°F (190°C). This is crucial for a perfectly baked loaf. While the oven warms up, grease a 9×5-inch loaf pan. I love using butter for this; it gives an extra hint of flavor to the crust!

    Step 2: Mix Dry Ingredients

    In a large bowl, whisk together the all-purpose flour, baking powder, salt, and garlic powder—if you’re feeling bold! Mixing these dry ingredients helps distribute everything evenly. After that, stir in the shredded cheddar and grated Parmesan cheese. The cheese will melt and create that heavenly gooey texture we all adore.

    Step 3: Combine Wet Ingredients

    In a separate bowl, whisk your egg, milk, and melted butter thoroughly. This mixture is what makes your cheese bread moist and rich. Don’t skip on whisking; combine until smooth. Each ingredient plays its part in creating a tender crumb.

    Step 4: Create the Batter

    Now, it’s time for the magic! Pour your wet ingredients into the dry ones and gently stir. Be careful not to overmix; this bread loves a light touch. Just combine until everything is moistened. That’s when you know you’re on the right track!

    Step 5: Transfer to the Pan

    Take your batter and spoon it into the greased loaf pan. Use a spatula to smooth out the top. This helps ensure even baking. That’s it! No need for fancy techniques here—just pure love and care.

    Step 6: Bake the Bread

    Pop the loaf pan in the preheated oven and bake for about 35 to 40 minutes. You’ll know it’s ready when the top turns golden brown and a toothpick inserted in the center comes out clean. The aroma alone will have everyone buzzing in anticipation!

    Step 7: Cool and Serve

    Once baked, let the cheese bread cool in the pan for 10 minutes. Then transfer it to a wire rack. This step is essential as it prevents the bottom from getting soggy. After it cools, slice into generous pieces and enjoy warm. Each bite is like a hug for your taste buds!

    Tips for Success

    • Measure your ingredients accurately for consistent results.
    • Let butter cool slightly before mixing to avoid cooking the egg.
    • If you prefer a crustier bread, add a shallow pan of water in the oven.
    • Feel free to experiment with cheese varieties like mozzarella or pepper jack!
    • For added moisture, cover your loaf with foil during baking.

    Equipment Needed

    • Loaf pan: A 9×5-inch pan works best, but any similar-sized pan will do.
    • Mixing bowls: Use one large bowl for dry and another for wet ingredients.
    • Whisk and spatula: Essential for mixing. A fork can work in a pinch!
    • Measuring cups and spoons: Precision is key for the best results.
    • Oven mitts: Safety first when handling hot pans!

    Variations of Cheese Bread

    • Herb-infused: Add a tablespoon of dried herbs like rosemary, thyme, or even oregano to elevate the flavor profile.
    • Spicy twist: Incorporate diced jalapeños or crushed red pepper flakes for a little heat and excitement.
    • Gluten-free: Substitute all-purpose flour with a gluten-free blend to accommodate those with gluten sensitivities.
    • Cheese medley: Experiment with different cheeses like mozzarella, pepper jack, or feta to create a unique flavor experience.
    • Sweet addition: For a sweeter version, add a tablespoon of sugar and some cinnamon for a comforting breakfast treat.

    Serving Suggestions for Cheese Bread

    • Pair it with a light salad for a balanced meal.
    • Enjoy it alongside a bowl of homemade soup for cozy evenings.
    • Serve warm with a spread of butter or garlic herb spread.
    • A glass of crisp white wine complements the cheese perfectly.
    • Presentation tip: Slice the bread and arrange it on a beautiful platter for gatherings.

    FAQs about Cheese Bread

    Can I make this cheese bread ahead of time?
    Absolutely! You can prepare the batter a day in advance, cover it, and store it in the fridge. Just bake it fresh when you’re ready. This is perfect for mornings when you want a warm surprise for your family.

    Can I freeze cheese bread?
    Yes! This bread freezes wonderfully. Slice it up, wrap the pieces tightly in plastic wrap, and store them in an airtight container. It can stay good for up to three months. Just toast slices directly from the freezer when you crave a cheesy treat.

    What is the best way to store leftovers?
    To keep excess cheese bread fresh, store it in an airtight container at room temperature for 3 days. If you want it to last longer, it’s best to refrigerate it. Just remember to toast it before serving for that delightful crunch!

    Can I use other types of cheese?
    Definitely! You can explore different cheese options like mozzarella or feta. For a spicy kick, pepper jack cheese is also a fantastic choice. The beauty of this cheese bread is its versatility; you can truly make it your own!

    How can I tell if the cheese bread is done?
    Good question! When your cheese bread is golden on top and a toothpick inserted in the middle comes out clean, it’s ready. Also, the sides will start to pull away from the pan slightly. Those are your cues for a delicious loaf!

    Final Thoughts

    Creating this cheese bread has been more than just baking—it’s a delightful culinary adventure that brings warmth into my home. The aroma drifting through my kitchen always makes my family gather around, eager to taste the deliciousness. Each slice radiates comfort and joy, perfect for any occasion. Whether it’s a cozy evening or a busy afternoon snack, this quick and easy recipe has earned its place in my heart. So, grab your ingredients, and let this lovely loaf of cheese bread become a centerpiece in your kitchen, reminding you that homemade is always better!


    Print

    clock clock iconcutlery cutlery iconflag flag iconfolder folder iconinstagram instagram iconpinterest pinterest iconfacebook facebook iconprint print iconsquares squares iconheart heart iconheart solid heart solid icon

    Description

    A delicious homemade cheese bread that’s easy to make and perfect for any occasion.


    • 2 cups all-purpose flour
    • 1 tbsp baking powder
    • ½ tsp salt
    • ¼ tsp garlic powder (optional)
    • ½ cup shredded cheddar cheese
    • ¼ cup grated Parmesan cheese
    • 1 large egg
    • 1 cup milk
    • ¼ cup unsalted butter, melted

    1. Preheat oven to 375°F (190°C). Grease a 9×5-inch loaf pan.
    2. Mix dry ingredients: Whisk together flour, baking powder, salt, and garlic powder. Stir in cheddar and Parmesan cheese.
    3. Combine wet ingredients: In a separate bowl, whisk egg, milk, and melted butter.
    4. Mix the batter: Pour wet ingredients into dry ingredients and stir until just combined. Avoid overmixing.
    5. Transfer to loaf pan: Spoon batter into the pan and smooth the top.
    6. Bake for 35-40 minutes until golden brown. Test with a toothpick.
    7. Cool and serve: Let the bread cool in the pan for 10 minutes, then transfer to a wire rack. Slice and enjoy!

    Notes

    • For added flavor, you can include herbs like rosemary or thyme.
    • Store leftovers in an airtight container for up to 3 days.
    • This bread is best enjoyed fresh but can be toasted for a warm snack.
    • Prep Time: 15 minutes
    • Cook Time: 40 minutes
    • Category: Baking
    • Method: Baking
    • Cuisine: American

    Nutrition

    • Serving Size: 1 slice
    • Calories: 150
    • Sugar: 1g
    • Sodium: 250mg
    • Fat: 7g
    • Saturated Fat: 4g
    • Unsaturated Fat: 2g
    • Trans Fat: 0g
    • Carbohydrates: 18g
    • Fiber: 0g
    • Protein: 5g
    • Cholesterol: 35mg

    Sharing is caring!

  • Crockpot Pineapple Chicken

    Crockpot Pineapple Chicken


    Introduction to Crockpot Pineapple Chicken

    Hey there, fellow home cooks! If you’re anything like me, juggling a busy life with family and work can feel like a circus at times. That’s why I’m so excited to share my Crockpot Pineapple Chicken recipe with you! It’s a delightful dish that combines sweet pineapple and savory chicken, making it a fantastic option for an easy dinner. Imagine tossing everything into the crockpot and coming home to a heavenly aroma and a satisfying meal. This recipe is a quick solution for those hectic days when you need a little extra joy at the dinner table!

    Why You’ll Love This Crockpot Pineapple Chicken

    This Crockpot Pineapple Chicken recipe is truly a game-changer for busy days. It’s a one-pot wonder that packs a punch of flavor without demanding too much of your precious time. Just toss everything in, set the timer, and relax while the crockpot does its magic. The sweet tang of pineapple elevates the tender chicken, making it a meal that’ll please even the pickiest eaters in your family. Talk about a win-win!

    Ingredients for Crockpot Pineapple Chicken

    Gathering your ingredients is an essential step for a successful Crockpot Pineapple Chicken, and I promise you, it’s worth the effort! Here’s what you need:

    • Boneless, skinless chicken breasts: The star of the dish! These cook up tender and juicy, absorbing all that delicious sauce.
    • Pineapple chunks: Canned for convenience. They add the perfect sweetness and a hint of tropical vibe to your meal.
    • Red and green bell peppers: They lend color and texture. Feel free to mix it up with yellow or orange peppers if you prefer!
    • Low-sodium soy sauce: This adds a savory depth to the dish. Who doesn’t love that umami flavor?
    • Honey: A natural sweetener that beautifully balances the savory elements. You could substitute with maple syrup or agave if you wish.
    • Garlic: Minced garlic gives an aromatic kick. You can never go wrong with garlic, right?
    • Fresh ginger: The grated ginger adds warmth and spice. Ground ginger can work in a pinch, but fresh is definitely better!
    • Cornstarch: This is used for thickening the sauce at the end. If you’re watching carbs, you might skip it, but it enhances texture.
    • Water: Just enough to mix with cornstarch and bring that silky sauce to life.
    • Optional garnishes: Sliced green onions and sesame seeds. They add a nice finish and crunch!

    The exact quantities of these ingredients can be found at the bottom of this article for your convenience or easy printing. Let’s get cooking!

    How to Make Crockpot Pineapple Chicken

    Making this scrumptious Crockpot Pineapple Chicken is a breeze! Just follow these simple steps, and you’ll be set for a delicious meal that’s perfect for busy nights. Let’s dive in!

    Step 1 – Prepare the Chicken

    Start by placing your boneless, skinless chicken breasts right at the bottom of the crockpot. This helps them soak up all those flavors as they cook. Each piece of chicken acts like a sponge, soaking up what’s to come.

    Step 2 – Mix the Marinade

    In a medium bowl, grab that luscious pineapple juice from the can. Add in the low-sodium soy sauce, honey, minced garlic, and grated ginger. Whisk it all together until it’s well combined. This marinade is a magical blend! The sweetness from the honey will dance with the tang from the pineapple, and your taste buds are in for a treat!

    Step 3 – Add Vegetables and Pineapple

    Now, pour the delightful marinade over the chicken in the crockpot. Next, toss in those vibrant chopped red and green bell peppers along with the canned pineapple chunks. The colors will brighten your day while adding crunch and sweetness. It’s like a party in your crockpot!

    Step 4 – Slow Cook the Dish

    Cover your crockpot and set it to cook. You can choose either low for 5-6 hours or high for 2-3 hours. Either way, you’ll walk away knowing dinner is taken care of. The chicken will transform into tender goodness, and the aromas will fill your home.

    Step 5 – Thicken the Sauce

    About 30 minutes before serving, take a small bowl and blend the cornstarch with water to create a slurry. Stir this into the crockpot. This step is key! It thickens the sauce, making every bite a luxurious experience.

    Step 6 – Serve and Garnish

    When it’s all done, it’s showtime! Serve the Crockpot Pineapple Chicken over steamed rice or noodles for a delightful meal. Don’t forget to sprinkle some sliced green onions and sesame seeds on top if you like. They add a pop of flavor and a beautiful finish!

    Tips for Success

    • Prep ahead! Chop the veggies the night before to save time.
    • Consider marinating the chicken overnight for deeper flavor.
    • Don’t skip the slurry! It’s crucial for that yummy thick sauce.
    • Experiment with different veggies, like snow peas or carrots, for variety.
    • Use a meat thermometer to ensure the chicken reaches 165°F.

    Equipment Needed for Crockpot Pineapple Chicken

    • Crockpot: The star of the show! If you don’t have one, a slow cooker works just as well.
    • Mixing bowl: For combining those tasty marinade ingredients. A large measuring cup can do the trick!
    • Whisk: A must for blending ingredients smoothly. A fork will work in a pinch!
    • Measuring cups: For accuracy in the recipe. Don’t have them? Use any cup as a guideline!

    Variations of Crockpot Pineapple Chicken

    • Spicy Kick: Add red pepper flakes or sriracha to the marinade for some heat. A little spice can elevate the flavor, making it extra exciting!
    • Vegetable Medley: Switch up the bell peppers with other veggies like snap peas, broccoli, or baby corn for added nutrition and crunch!
    • Low-Carb Option: Substitute chicken with cauliflower florets or tofu for a low-carb twist. Both options soak up the sauce beautifully while keeping it light.
    • Hawaiian Style: Toss in some diced ham or cooked bacon for a heartier dish. It introduces a savory depth that sings tropical vibes!
    • Quinoa or Brown Rice: Serve over quinoa or brown rice instead of white rice for a healthier grain option packed with fiber.

    Serving Suggestions for Crockpot Pineapple Chicken

    • Pair with fluffy steamed rice or noodles to soak up that delicious sauce.
    • Serve alongside a crisp green salad for a refreshing contrast.
    • A glass of chilled white wine, like Sauvignon Blanc, enhances the meal’s tropical notes.
    • Garnish with fresh cilantro or parsley for a burst of color and flavor.

    FAQs about Crockpot Pineapple Chicken

    As you dive into making this delightful Crockpot Pineapple Chicken, you might have a few questions. Here are some common ones that fellow home cooks often ask:

    Can I use frozen chicken for this recipe?

    Absolutely! I often use frozen chicken breasts. Just be sure to adjust the cooking time. On high, it might take an extra 30 minutes.

    Is this dish gluten-free?

    To make a gluten-free version, simply swap the low-sodium soy sauce for tamari or coconut aminos. Both alternatives work beautifully!

    What if I can’t find pineapple chunks?

    No worries! You can use diced pineapple or even crushed pineapple. Just be mindful of adjusting the cooking time to ensure the texture is still delightful.

    Can I make this dish in advance?

    Definitely! You can prep the ingredients a day ahead and just throw everything in the crockpot when you’re ready. It’s a perfect way to ease your weeknight dinner hustle!

    What sides pair well with Crockpot Pineapple Chicken?

    This dish excels with fluffy rice, but you can also serve it with steamed vegetables, quinoa, or even cauliflower rice for a low-carb option. The possibilities are endless!

    Final Thoughts on Crockpot Pineapple Chicken

    There’s something truly magical about the simplicity of Crockpot Pineapple Chicken. It’s a dish that brings the family together, filling your home with delightful aromas and taste that dances on your palate. As a busy mom, I cherish meals like this that require little effort but deliver big on flavor and satisfaction. Whether it’s a hectic weekday or a cozy weekend gathering, this recipe never fails to impress. The sweet and savory balance makes it a favorite among my loved ones. I hope it adds warmth and happiness to your dinner table, just as it has for mine!


    Print

    clock clock iconcutlery cutlery iconflag flag iconfolder folder iconinstagram instagram iconpinterest pinterest iconfacebook facebook iconprint print iconsquares squares iconheart heart iconheart solid heart solid icon

    Description

    A delicious and easy recipe for Crockpot Pineapple Chicken that combines sweet pineapple with savory chicken and peppers.


    • 4 boneless, skinless chicken breasts
    • 1 can (20 oz) pineapple chunks (with juice)
    • 1 red bell pepper, chopped
    • 1 green bell pepper, chopped
    • 1/2 cup low-sodium soy sauce
    • 1/3 cup honey
    • 2 cloves garlic, minced
    • 1 tablespoon fresh ginger, grated
    • 2 tablespoons cornstarch
    • 2 tablespoons water
    • Optional garnishes: sliced green onions, sesame seeds

    1. Place the chicken breasts at the bottom of the crockpot.
    2. In a medium bowl, mix pineapple juice (reserve chunks), soy sauce, honey, garlic, and ginger. Pour the mixture over the chicken.
    3. Add chopped bell peppers and pineapple chunks to the crockpot.
    4. Cover and cook: On low for 5-6 hours or on high for 2-3 hours (Cook until the chicken is tender and fully cooked).
    5. In the last 30 minutes of cooking, whisk together cornstarch and water to create a slurry. Stir it into the crockpot to thicken the sauce.
    6. Serve the chicken and vegetables over steamed rice or noodles. Garnish with green onions and sesame seeds, if desired.

    Notes

    • Ensure the chicken is cooked to an internal temperature of 165°F.
    • This dish pairs well with both rice and noodles.
    • Prep Time: 15 minutes
    • Cook Time: 5-6 hours on low or 2-3 hours on high
    • Category: Main Dish
    • Method: Crockpot
    • Cuisine: American

    Nutrition

    • Serving Size: 1 serving
    • Calories: 300
    • Sugar: 20g
    • Sodium: 800mg
    • Fat: 4g
    • Saturated Fat: 1g
    • Unsaturated Fat: 3g
    • Trans Fat: 0g
    • Carbohydrates: 40g
    • Fiber: 1g
    • Protein: 28g
    • Cholesterol: 70mg

    Sharing is caring!

  • Chicken Parm Cottage Cheese Bowl

    Chicken Parm Cottage Cheese Bowl


    Introduction to Chicken Parm Cottage Cheese Bowl

    Welcome to a culinary adventure that transforms the classic Chicken Parm into something wonderfully unique: the Chicken Parm Cottage Cheese Bowl! As a busy mom myself, I know how precious time can be, especially when it comes to putting dinner on the table. This recipe is a lifesaver on those hectic days when you want comfort food without the fuss. Imagine tender breaded chicken paired with creamy cottage cheese, slathered in marinara sauce. It’s like a warm hug on a plate, perfect for impressing your loved ones while keeping things quick and simple!

    Why You’ll Love This Chicken Parm Cottage Cheese Bowl

    This Chicken Parm Cottage Cheese Bowl is all about convenience and flavor. In just 25 minutes, you can whip up a dish that feels like a restaurant favorite but comes straight from your kitchen. The combination of crunchy chicken, creamy cottage cheese, and zesty marinara creates a scrumptious balance. Plus, it’s a low-fat option that doesn’t skimp on taste, making it a win-win for busy nights!

    Ingredients for Chicken Parm Cottage Cheese Bowl

    Let’s gather the stars of our show! Here’s what you’ll need for your Chicken Parm Cottage Cheese Bowl:

    • Breadcrumbed chicken breast: Think crispy, golden goodness! You can either use store-bought or make your own to suit your preference.
    • Cottage cheese: This creamy delight adds a lovely texture and is a great source of protein. I often go for low-fat varieties for a healthier take.
    • Marinara sauce: A rich, flavorful sauce that ties everything together. Don’t hesitate to try homemade or your favorite jarred version for convenience.
    • Shredded mozzarella cheese: Melty and stretchy, mozzarella takes this dish to the next level. Feel free to swap it for pizza cheese if that’s what you have!
    • Grated Parmesan cheese: The nutty tang of Parmesan adds depth to the flavors. You can opt for store-bought, or freshly grated for a touch of elegance!
    • Fresh basil leaves: They’re not just for garnish! Basil brings a burst of freshness that complements the dish beautifully. Don’t skip this if you can help it!

    For more options, consider additional toppings like olives, bell peppers, or even a sprinkle of Italian herbs. You can easily customize the recipe according to your family’s preferences or dietary needs. All the exact quantities for these ingredients are waiting for you at the end of the article, so you can print them out for easy reference!

    How to Make Chicken Parm Cottage Cheese Bowl

    Let’s dive into the heart of the Chicken Parm Cottage Cheese Bowl! This process is straightforward, making it perfect for busy evenings. Follow these steps, and you’ll serve a delicious meal in no time!

    Step 1: Prepare the Base

    Start by grabbing a bowl—any bowl will do as long as it’s large enough to fit your ingredients.

    Spoon in your creamy cottage cheese as the foundation of this delicious dish.

    It’s like laying down a soft blanket before adding the cozy layers of chicken and sauce.

    For a drier texture, you can drain excess liquid from the cottage cheese.

    But I love it creamy and soothing right out of the container!

    Step 2: Add the Chicken

    Now, it’s time to add the star of our show: the breaded chicken.

    Layer your cooked and sliced chicken breast evenly on top of the cottage cheese.

    This adds both heartiness and a satisfying crunch.

    Feel free to use leftover chicken if you have it—it’s a great way to save some time!

    Just make sure each piece is nestled perfectly among the cottage cheese.

    Step 3: Pour on the Marinara

    Next, let’s bring in the marinara sauce.

    Pour it generously over the chicken, allowing the saucy goodness to seep into all the crevices.

    That tangy flavor will melt right into the chicken.

    You can opt for homemade or store-bought—whatever fits your schedule!

    Just be careful not to drown the dish; a nice drizzle does the trick.

    Step 4: Cheese it Up

    Up next, it’s time to cheese it up!

    Sprinkle shredded mozzarella over the marinara layer, making sure every bite will be cheesy.

    Follow it up with a shower of grated Parmesan cheese, adding that nutty flavor we adore.

    Remember, there’s no such thing as too much cheese in my book!

    But if you want to lighten it up, a little goes a long way.

    Step 5: Garnish and Serve

    The final touch is to garnish with fresh basil leaves.

    Not only do they add a pop of color, but they also give your bowl a fresh lift!

    Serve this Chicken Parm Cottage Cheese Bowl immediately while it’s warm and cheesy.

    It’s a meal that’s comforting and inviting, just waiting to be devoured.

    I like to place it on the table and let everyone dig in—sharing is part of the joy!

    Tips for Success

    • Prep your ingredients ahead of time to save precious minutes during cooking.
    • Use a meat thermometer to ensure your chicken is cooked to perfection at 165°F.
    • Experiment with different marinara sauces for varied flavors—spicy, herby, or garlic-infused!
    • Layer the ingredients gently to maintain the texture and prevent sogginess.
    • Leftovers can be easily reheated in the microwave for a quick meal!

    Equipment Needed

    • Mixing Bowl: A large bowl works best; a deep casserole dish is a great alternative.
    • Measuring Cups: For precise ingredient volumes; a simple kitchen scale can also do the trick.
    • Spoon or Spatula: For layering your ingredients; a silicone spatula is perfect for cleanup.

    Variations of Chicken Parm Cottage Cheese Bowl

    • Spicy Kick: Add red pepper flakes or spicy Italian sausage for an extra kick in your bowl.
    • Vegetarian Delight: Swap the chicken for sautéed zucchini, eggplant, or mushrooms—just as flavorful!
    • Grilled Chicken: Use grilled chicken instead of breaded for a smoky flavor that pairs beautifully with marinara.
    • Dairy-Free Option: Substitute cottage cheese with a dairy-free alternative like cashew cheese or tofu for a vegan twist.
    • Pasta Base: Serve over cooked pasta for a more traditional Chicken Parmesan experience.
    • Herbed Variations: Mix in fresh herbs like oregano or thyme to the marinara for an herbaceous bounce.

    Serving Suggestions

    • Fresh Salad: Pair your Chicken Parm Cottage Cheese Bowl with a light garden salad drizzled in balsamic vinaigrette.
    • Garlic Bread: Crunchy garlic bread makes a wonderful side, perfect for dipping into that luscious marinara sauce.
    • Wine Pairing: A glass of Pinot Noir or a light Riesling complements the meal nicely.
    • Presentation: Serve in colorful bowls to brighten up the table—don’t forget the extra basil for garnish!

    FAQs about Chicken Parm Cottage Cheese Bowl

    Let’s tackle some of the burning questions you may have about this delightful Chicken Parm Cottage Cheese Bowl! I’ve gathered a few queries that often pop up, and I’m here to shed some light on them.

    Can I use leftover chicken in this recipe?

    Absolutely! Leftover chicken works wonders in this bowl. Just slice it thinly and layer it on your cottage cheese for a convenient and tasty option!

    What kind of marinara sauce should I use?

    You can use any marinara sauce you love! Homemade, store-bought, or even artisanal—it’s all about what fits your taste and time constraints. Just make sure it’s packed with flavor!

    Is this dish suitable for meal prep?

    Yes, indeed! You can prepare the ingredients ahead of time and assemble your Chicken Parm Cottage Cheese Bowl when you’re ready to enjoy it. Just keep the layers separate until it’s time to serve.

    Can I make this bowl dairy-free?

    Of course! Swap out the cottage cheese for a dairy-free alternative like cashew cheese or blended tofu. You’ll still get a creamy and delicious result!

    What can I do with leftovers?

    Leftovers can be easily reheated in the microwave for a quick meal. Just pop it in for a minute or two, and you’re back in business!

    Final Thoughts

    The Chicken Parm Cottage Cheese Bowl truly embodies the joy of home cooking. It brings comfort and satisfaction without the stress of complicated recipes.

    In just 25 minutes, you create a dish that feels like a warm embrace after a long day.

    Whether you’re feeding a family or treating yourself, this bowl celebrates simplicity and flavor.

    Plus, its versatility means you can customize it for every craving or dietary need.

    I hope this recipe becomes a cherished staple in your kitchen just as it has in mine. Enjoy every cheesy, delicious bite!


    Print

    clock clock iconcutlery cutlery iconflag flag iconfolder folder iconinstagram instagram iconpinterest pinterest iconfacebook facebook iconprint print iconsquares squares iconheart heart iconheart solid heart solid icon

    Description

    A delicious Chicken Parm Cottage Cheese Bowl, combining tender breaded chicken with marinara sauce and creamy cottage cheese.


    • 1 cup breaded chicken breast, cooked and sliced
    • 1/2 cup cottage cheese
    • 1/2 cup marinara sauce
    • 1/4 cup shredded mozzarella cheese
    • 2 tablespoons grated Parmesan cheese
    • Fresh basil leaves for garnish

    1. In a bowl, layer cottage cheese, breaded chicken, and marinara sauce.
    2. Sprinkle with mozzarella and Parmesan cheese.
    3. Garnish with fresh basil leaves and serve immediately.

    Notes

    • For a lighter version, use low-fat cottage cheese.
    • Can be customized with additional toppings like olives or peppers.
    • Prep Time: 10 minutes
    • Cook Time: 15 minutes
    • Category: Main Dish
    • Method: Baking
    • Cuisine: Italian

    Nutrition

    • Serving Size: 1 bowl
    • Calories: 400
    • Sugar: 3g
    • Sodium: 800mg
    • Fat: 12g
    • Saturated Fat: 5g
    • Unsaturated Fat: 6g
    • Trans Fat: 0g
    • Carbohydrates: 30g
    • Fiber: 2g
    • Protein: 40g
    • Cholesterol: 80mg

    Sharing is caring!