Author: IHAAL Team

  • Garbage Bread

    Garbage Bread


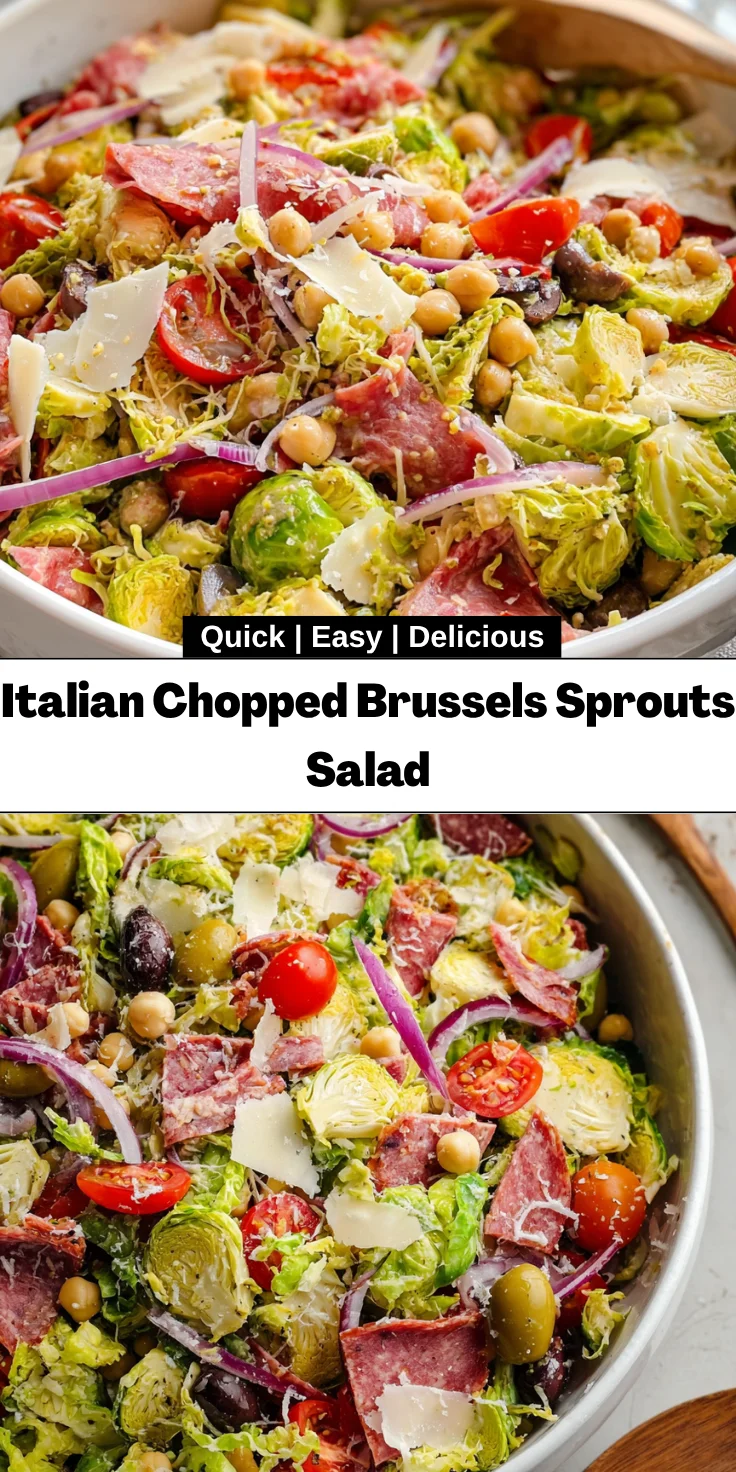
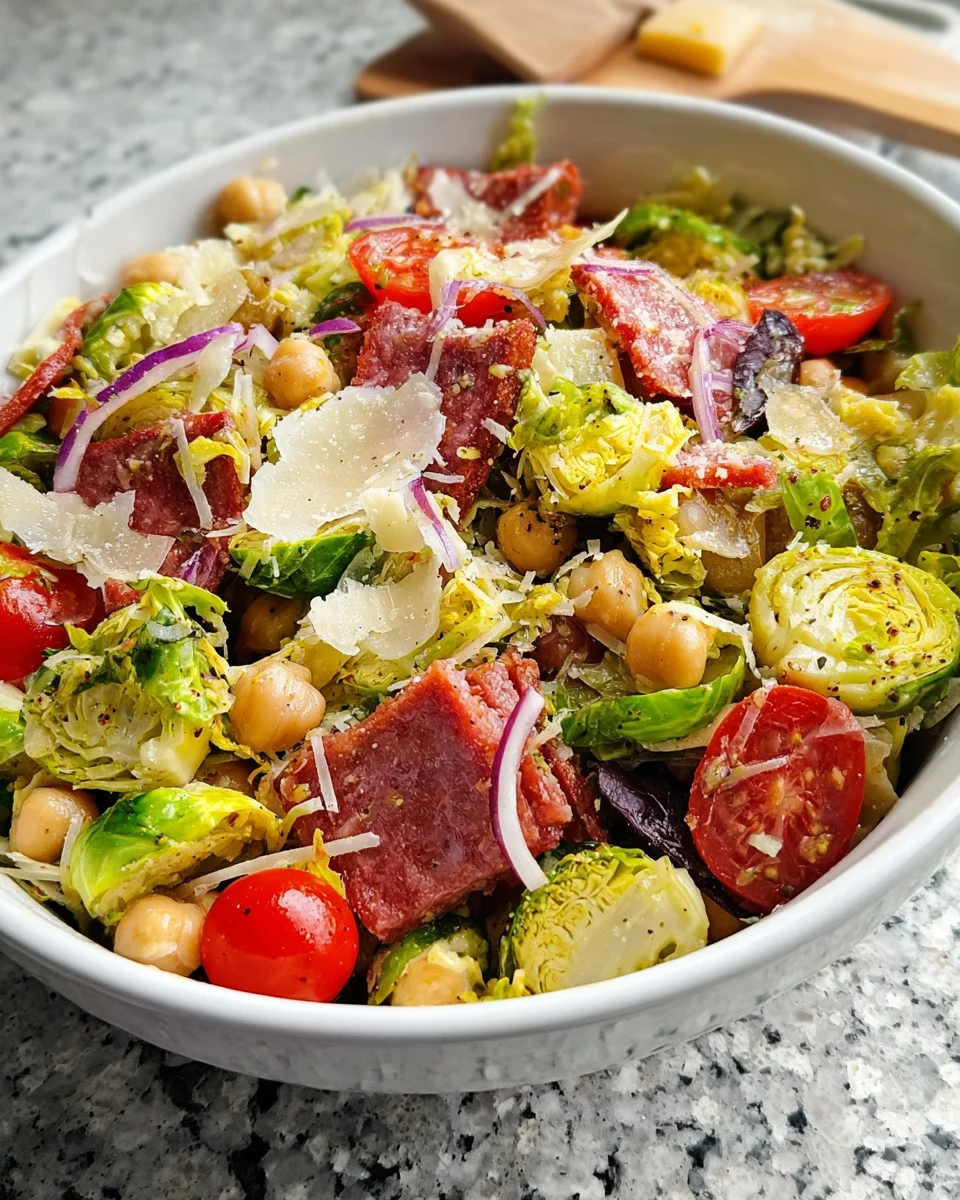
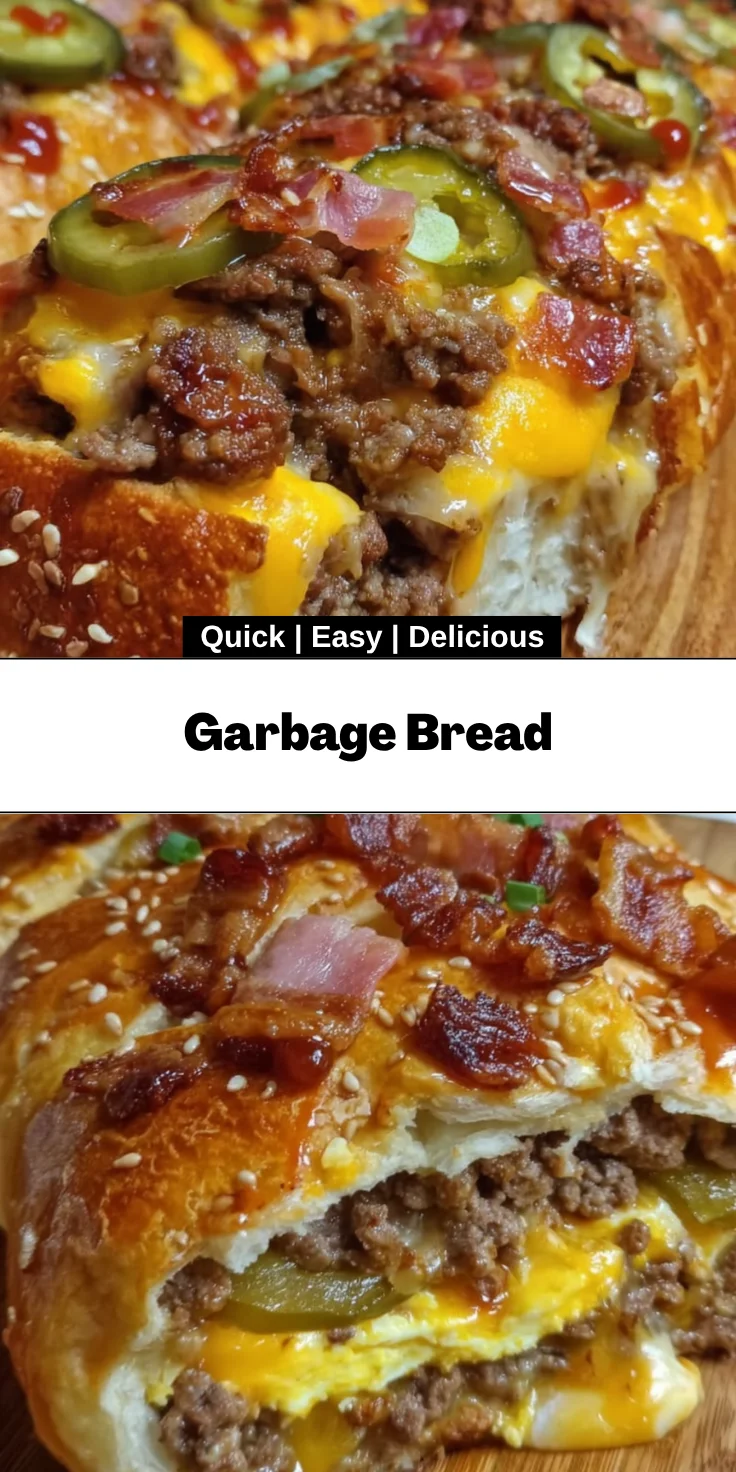
    Introduction to Garbage Bread

    Let me take you on a culinary adventure that blends simplicity with heartwarming flavor.
    Garbage Bread is the ultimate comfort food, perfect for busy moms and professionals like us!
    It’s quick to whip up and even easier to devour. Imagine coming home after a long day
    and having this warm, cheesy delight waiting for you. This recipe doesn’t just feed the belly,
    it wraps you in a cozy hug. It’s a delightful way to impress your loved ones while saving precious time!

    Why You’ll Love This Garbage Bread

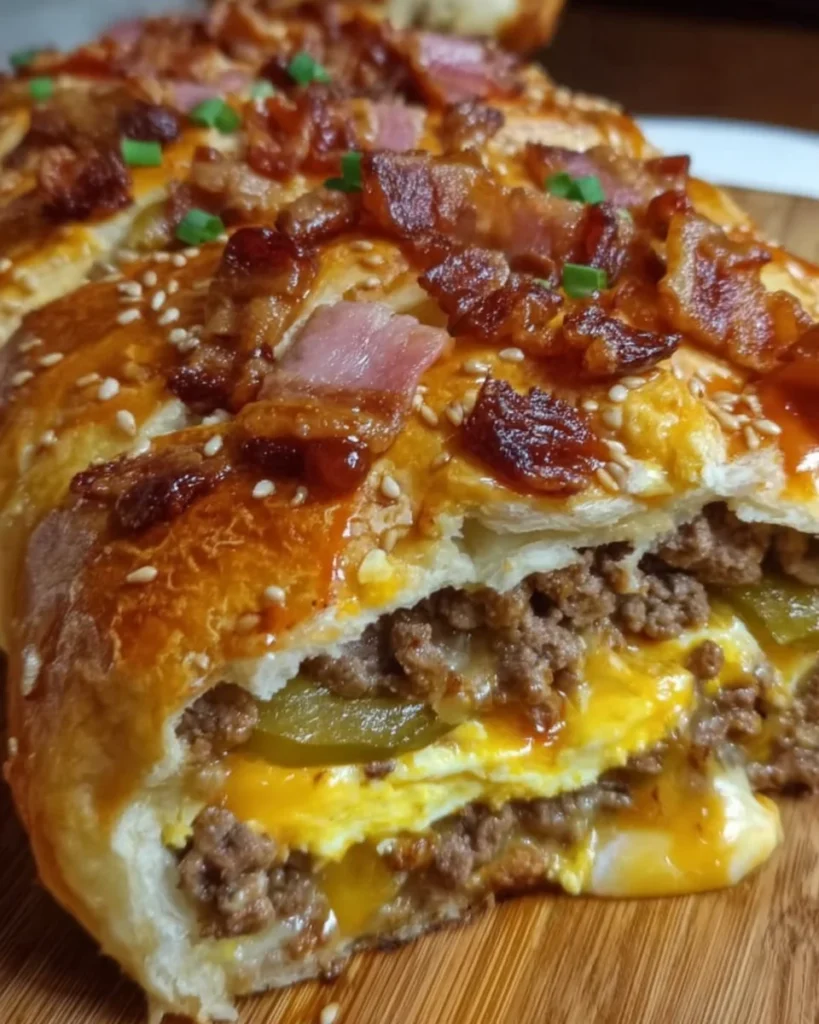
    Garbage Bread is a culinary lifesaver. It’s incredibly easy to make, which is perfect for our hectic schedules. In just about 40 minutes, you can create a delicious meal that your family will rave about! The comforting blend of beef, cheese, and zesty condiments wrapped in flaky bread offers a satisfying burst of flavor. Plus, it’s a fantastic way to use leftovers or customize according to your family’s tastes.

    Ingredients for Garbage Bread

    Let’s dive into the treasure trove of ingredients that make Garbage Bread a delightful experience!
    While I won’t spoil the fun with exact measurements just yet, here’s a peek into what you’ll need to create this scrumptious dish:

    • Ground beef: This is the star protein, bringing richness and satisfying flavors. Feel free to substitute with turkey or plant-based alternatives if you prefer.
    • Diced onion: Adding a sweet bite to the filling, dice your onion finely for a smooth mix. If onions aren’t your thing, shallots or green onions work well too!
    • Salt and black pepper: These staples enhance the flavors, ensuring that the filling sings with taste. Don’t skip these for that perfect seasoning balance.
    • Refrigerated French bread dough: This is what brings our Garbage Bread together! It’s easy to handle and bakes beautifully. You could use homemade dough, but nothing beats the convenience of store-bought.
    • Ketchup and yellow mustard: Classic condiments that add that tangy sweetness, evoking a sense of nostalgia. Feel free to switch them out for your favorite BBQ sauce or hot sauce for a kick!
    • Bacon: Crisply crumbled bacon adds a delightful crunch and smoky flavor. You can replace it with turkey bacon for a lighter option.
    • Dill pickle spears: For a zesty crunch that brightens up the filling. If you’re not a fan of pickles, try olives or skip it altogether!
    • American cheese: This melts beautifully, adding creaminess to each bite. Other cheeses like cheddar or provolone can bring unique flavors, too!
    • Beaten egg: This acts as a wash, giving our bread that golden, appetizing finish once baked. You can use milk or a dairy-free alternative if you prefer a vegan option.
    • Sesame seeds: For that extra crunch and nutty flavor on top. They’re optional, but they bring a lovely finish to the presentation!

    Just a reminder, all exact quantities are at the bottom of the article, ready for you to print out and take to the kitchen!

    How to Make Garbage Bread

    Now that we have our hearty ingredients ready, let’s roll up our sleeves and dive into making this delightful Garbage Bread!
    Don’t worry, the steps are simple and fun. And remember, it’s not about perfection; it’s all about enjoying the process!

    Step 1: Preheat Your Oven

    First things first, set your oven to 350°F (175°C).
    Preheating is crucial for that perfect golden crust!

    Step 2: Brown the Ground Beef

    Next, grab a skillet and heat it over medium flame.
    Toss in your ground beef and diced onion, cooking until the beef is browned and the onion looks translucent.
    Sprinkle in some salt and black pepper to taste, and drain any excess grease.
    Set this flavorful mix aside for a moment!

    Step 3: Prepare the Dough

    On a lightly floured surface, roll out the refrigerated French bread dough.
    Aim for a large rectangle, about 12×18 inches.
    Don’t fret if it’s not perfect! A little rustic charm is always welcome in the kitchen.

    Step 4: Add Condiments

    Now, it’s time to spread the love!
    Evenly layer ketchup and yellow mustard over the dough, leaving about a half-inch border at the edges.
    This juicy base will keep things moist and full of flavor as we assemble.

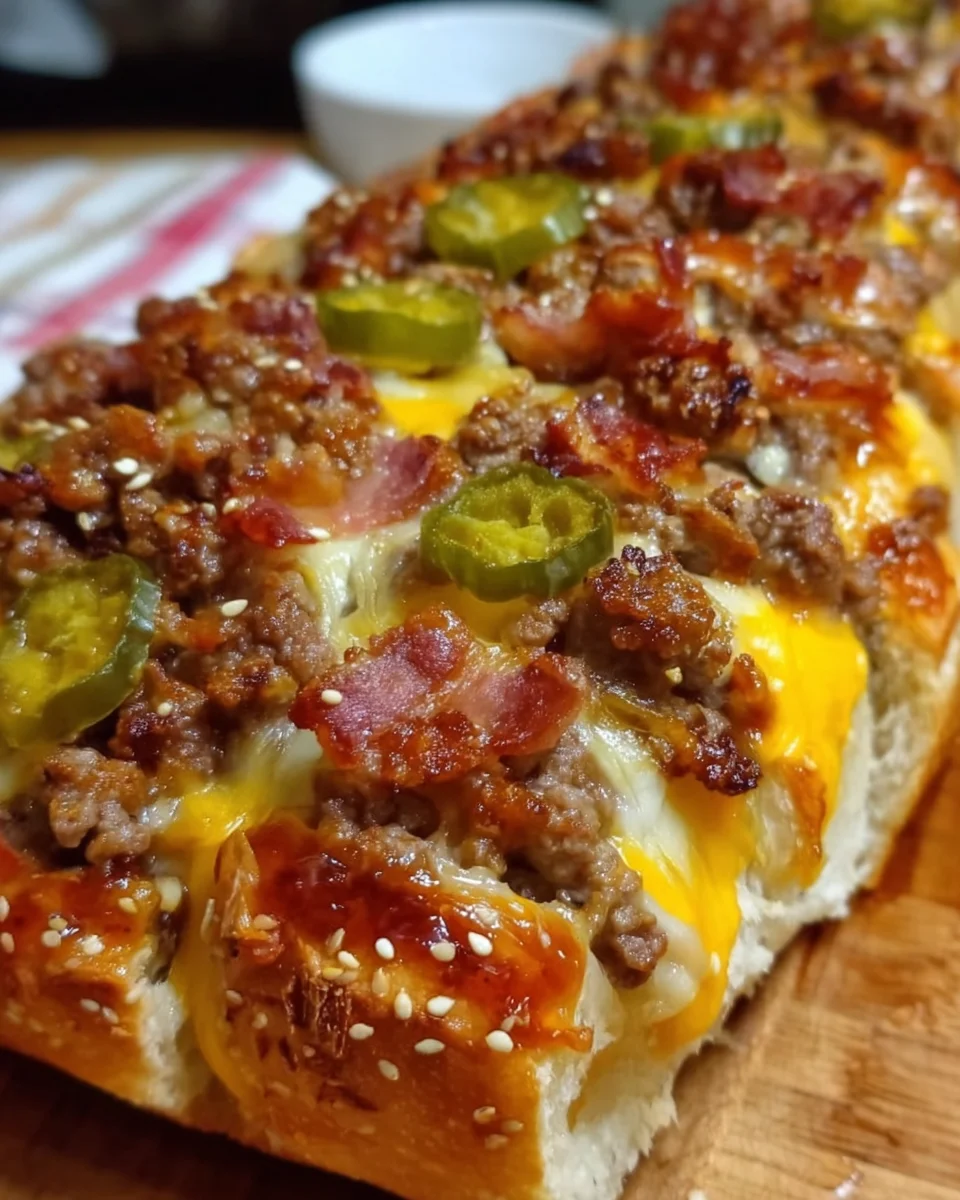
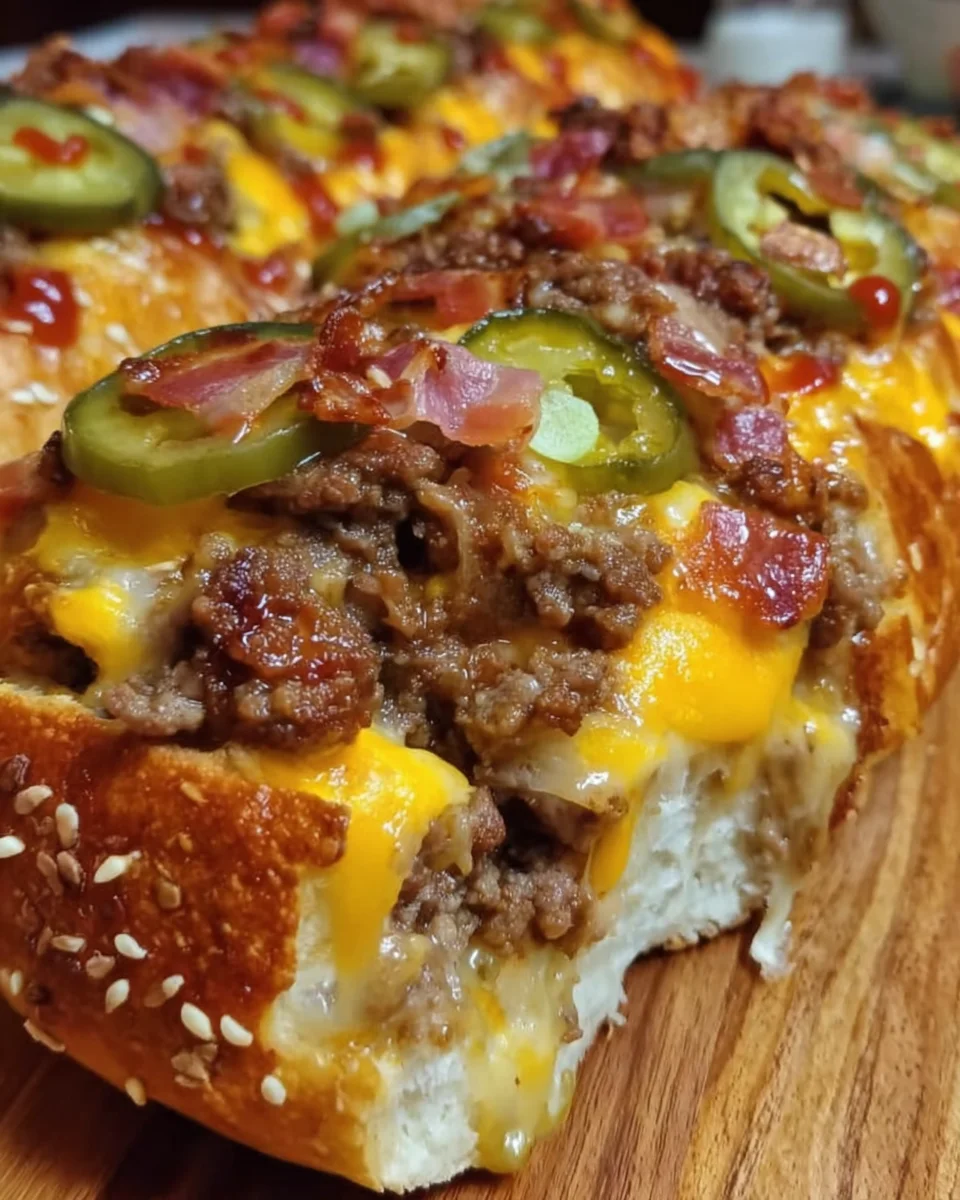
    Step 5: Layer the Filling

    Here’s where it gets exciting!
    Pour the cooked beef mixture over the condiments, spreading it evenly.
    Then, sprinkle crumbled bacon and chopped pickles atop the beef.
    Don’t forget to add those slices of American cheese — they’re going to melt into pure goodness!

    Step 6: Roll It Up

    Starting from one of the long edges, carefully roll the dough into a log.
    This is where it all comes together.
    Take your time to pinch the seams and ends tightly to seal in all that delicious filling.
    Place your roll seam-side down on a prepared baking sheet.

    Step 7: Brush and Bake

    Grab that beaten egg and brush it generously over the top of the roll.
    This gives the surface a beautiful shine and color as it bakes.
    Sprinkle sesame seeds on top for that extra crunch and nutty flavor, if you like.
    Slide the baking sheet into the oven and bake for 20 to 25 minutes.
    Just imagine that smell wafting through your kitchen!

    Step 8: Cool and Serve

    Once your kitchen is filled with enticing aromas and the bread is golden brown, it’s time to let it cool.
    Allow it to sit for about 5 minutes before slicing.
    Serve it warm, and if you desire, pair it with Thousand Island dressing for a fun twist!

    Tips for Success

    • Always preheat your oven! This ensures even cooking and that golden crust we all love.
    • Don’t rush the beef browning process. It develops those deep, rich flavors.
    • Feel free to customize the filling with your favorite ingredients — make it your own!
    • For a crispier outer layer, spray the top of the bread with cooking spray before baking.
    • Let the bread cool slightly before slicing to prevent it from falling apart.

    Equipment Needed

    • Skillet: Any frying pan works here—cast iron is great for heat retention.
    • Baking sheet: A simple sheet pan will do, or use a stone for an even crust.
    • Parchment paper: Optional, but helps with easy cleanup!
    • Rolling pin: A wine bottle can be a fun substitute in a pinch.

    Variations of Garbage Bread

    • Vegetarian Version: Swap the ground beef for sautéed mushrooms, bell peppers, and spinach for a delightful meat-free option.
    • Cheesy Spinach Garbage Bread: Add a layer of ricotta or cream cheese along with fresh spinach for an extra creamy and flavorful twist.
    • Spicy Garbage Bread: Mix in jalapeños or your favorite hot sauce for a kick that’ll spice things up!
    • BBQ Chicken Garbage Bread: Replace beef with shredded rotisserie chicken and use BBQ sauce instead of ketchup for a smoky flavor.
    • Gluten-Free Option: Pot for gluten-free dough if you’re avoiding gluten; many brands are available and taste great!

    Serving Suggestions

    • Pair Garbage Bread with a fresh side salad for a light and balanced meal.
    • Serve with crispy potato wedges or sweet potato fries for a comforting duo.
    • A dipping sauce like Thousand Island or ranch dressing enhances the flavor experience.
    • Accompany with a chilled glass of iced tea or lemonade for a refreshing drink.

    FAQs about Garbage Bread

    I know you might have a few questions swirling around in your mind about this delightful Garbage Bread!
    Let’s tackle some common queries to help make your cooking experience even better.

    Can I use other types of bread for Garbage Bread?

    Absolutely! While French bread provides a wonderful flaky texture, feel free to experiment with pizza dough or even puff pastry for a different twist. Each option brings its own unique flavor to the table!

    How can I make this Garbage Bread healthier?

    To lighten things up, try using lean ground turkey or even a plant-based meat alternative. You can also add more vegetables, like spinach or zucchini, to pack in extra nutrients without compromising on deliciousness!

    Can I freeze leftovers of Garbage Bread?

    Yes, you can! Wrap the leftovers tightly in plastic wrap or aluminum foil, then store them in an airtight container. They’ll keep in the freezer for up to three months. Reheat in the oven for best results, keeping that lovely crust intact!

    What can I serve with Garbage Bread for a complete meal?

    A light salad or coleslaw pairs beautifully, providing a refreshing contrast to the rich flavors of the bread. You could also throw in some roasted veggies to elevate your meal to the next level!

    How do I ensure the bread doesn’t get soggy?

    To prevent sogginess, make sure to drain any excess grease from the beef mixture. Also, avoid overloading the filling with moist ingredients. Keep your condiments balanced, and you’ll have a crispy, satisfying slice every time!

    Final Thoughts

    Cooking Garbage Bread is more than just a recipe; it’s a culinary hug that brings family and friends together. Every rich, cheesy bite is filled with nostalgia and warmth, reminding me of evenings spent laughing and savoring every morsel. The best part? You can easily customize it to fit your tastes, making it a go-to comfort food for any occasion. As you tuck in to this delightful creation, remember that it’s not just about feeding the stomach but also the heart. Enjoy the smiles and happy chatter around the table—it’s what cooking is all about!


    Print

    clock clock iconcutlery cutlery iconflag flag iconfolder folder iconinstagram instagram iconpinterest pinterest iconfacebook facebook iconprint print iconsquares squares iconheart heart iconheart solid heart solid icon

    Description

    Garbage Bread is the ultimate comfort food, featuring a delicious blend of ground beef, cheese, and tasty condiments, all wrapped in flaky French bread dough.


    • 1 pound ground beef
    • ½ cup diced onion
    • ¼ teaspoon salt
    • ¼ teaspoon black pepper
    • 1 (11-ounce) tube refrigerated French bread dough
    • ⅓ cup ketchup
    • 3 tablespoons yellow mustard
    • 6 slices cooked and crumbled bacon
    • 2 dill pickle spears, chopped
    • 8 slices American cheese
    • 1 large egg, beaten
    • 1 tablespoon sesame seeds

    1. Preheat your oven to 350°F (175°C). Line a baking sheet with parchment paper or lightly grease it.
    2. In a skillet over medium heat, cook the ground beef and diced onion until the beef is browned and the onion is translucent. Season with salt and black pepper. Drain any excess grease and set aside.
    3. On a lightly floured surface, roll out the French bread dough into a large rectangle, approximately 12×18 inches.
    4. Spread ketchup and mustard evenly over the dough, leaving a ½-inch border around the edges.
    5. Layer the cooked beef mixture over the condiments. Sprinkle crumbled bacon and chopped pickles on top. Place American cheese slices evenly over the filling.
    6. Starting from one long edge, carefully roll the dough into a log, enclosing the filling. Pinch the seams and ends to seal. Place the roll seam-side down on the prepared baking sheet.
    7. Brush the top of the roll with the beaten egg. Sprinkle sesame seeds over the top for added texture and flavor.
    8. Bake in the preheated oven for 20–25 minutes, or until the bread is golden brown and cooked through.
    9. Allow the bread to cool for at least 5 minutes before slicing. Serve warm, with Thousand Island dressing for dipping if desired.

    Notes

    • This recipe can be customized by adding your favorite toppings or ingredients.
    • Store leftovers in an airtight container in the refrigerator for up to 3 days.
    • Prep Time: 15 minutes
    • Cook Time: 25 minutes
    • Category: Appetizer
    • Method: Baking
    • Cuisine: American

    Nutrition

    • Serving Size: 1 slice
    • Calories: 300
    • Sugar: 3g
    • Sodium: 700mg
    • Fat: 18g
    • Saturated Fat: 7g
    • Unsaturated Fat: 9g
    • Trans Fat: 0g
    • Carbohydrates: 25g
    • Fiber: 1g
    • Protein: 12g
    • Cholesterol: 50mg

    Sharing is caring!

  • Bacon Burger Creamy Sauce

    Bacon Burger Creamy Sauce


    Introduction to Bacon Burger Creamy Sauce

    Hey there! If you’re a busy mom or professional like me, you know how hectic life can get. That’s why I’m thrilled to introduce my Bacon Burger Creamy Sauce. It’s not just about elevating a simple burger; it’s about making mealtime special. This creamy, dreamy sauce, packed with bacon flavor, will have your family clamoring for seconds.

    Perfect for those rushed weeknights or laid-back weekends, this sauce pairs beautifully with juicy beef burgers. It’s a delicious solution for your next dinner, guaranteed to impress your loved ones and satisfy even the pickiest eaters!

    Why You’ll Love This Bacon Burger Creamy Sauce

    This Bacon Burger Creamy Sauce is a game changer for your weeknight dinners. It’s super easy to whip up, taking just minutes to prepare. The rich, creamy blend of cream cheese and fresh chives complements the bacon and beef perfectly, making each bite a burst of flavor.

    Plus, it’s versatile! Use it not only for burgers but as a delightful dip for appetizers. Trust me, you’ll wonder how you ever lived without it!

    Ingredients for Bacon Burger Creamy Sauce

    Let’s gather all the deliciousness that we’ll be using to create our Bacon Burger Creamy Sauce! The ingredients blend perfectly to add flavor and texture to your meal.

    • Ground Beef: An 80/20 blend of ground beef gives your burgers the perfect balance of flavor and juiciness. Choose grass-fed for added health benefits!
    • Bacon: Thick-cut bacon brings a savory crunch that’s hard to resist. If you’re feeling adventurous, try maple bacon for a hint of sweetness!
    • Brioche Burger Buns: Soft and buttery, brioche adds a touch of luxury to your burger. If gluten is a concern, opt for gluten-free buns!
    • Cream Cheese: The star of our creamy sauce! Its smoothness creates a rich base. You can swap this with Greek yogurt for a lighter alternative.
    • Fresh Chives: These green beauties not only brighten your sauce but also add a mild onion flavor. Fresh herbs are always a great perk!
    • Butter Lettuce: Crispy and fresh, it’s perfect for adding some crunch beneath your burger layers. Romaine works just as well!
    • Garlic: Minced garlic infuses your sauce with a robust aroma. If you’re not a fan, feel free to omit it, or try garlic powder for a subtler touch.
    • Butter: Used for toasting the buns, butter adds that golden-brown perfection. You can also use olive oil as a healthier option.

    Remember, if you’re curious about measurements, they’re beautifully presented at the bottom of the article for you to print out or refer back to.

    How to Make Bacon Burger Creamy Sauce

    Now, let’s dive into the steps for creating this mouthwatering experience! I promise, it’s easier than you might think. Just follow along, and soon you’ll be savoring your very own Bacon Burger Creamy Sauce. Ready? Let’s go!

    Step 1: Cooking the Bacon

    Start by placing your thick-cut bacon strips in a large skillet over medium heat. As the bacon sizzles, you’ll be treated to that irresistible aroma wafting through your kitchen. Cook until the bacon is crispy and golden, about 8-10 minutes. Keep an eye on it! Once cooked, use tongs to transfer the bacon to a plate lined with paper towels. This will help absorb excess grease, leaving you with perfectly crispy strips.

    Step 2: Preparing the Creamy Sauce

    While the bacon cools a bit, let’s whip up that creamy sauce. In a bowl, combine the softened cream cheese, minced garlic, and freshly chopped chives. Using a spatula or a hand mixer, blend everything until it’s smooth and creamy. It should be a lovely, fragrant mix! Give it a taste, and don’t hesitate to add a pinch of salt and pepper if needed. This flavorful concoction is going to take your burgers to the next level!

    Step 3: Forming the Burger Patties

    Next up, let’s get our hands a little messy! Divide your ground beef into four equal portions. Gently shape each part into a patty, making sure they’re slightly larger than your buns. Don’t be shy! Make a small indentation in the center of each patty; this helps them cook evenly and prevents them from puffing up. Trust me, this little trick makes a difference!

    Step 4: Cooking the Burger Patties

    Now, let’s fire up that skillet again! Heat it over medium-high heat until it’s nice and hot. Carefully place the burger patties into the skillet and cook for about 4-5 minutes on each side. You want those nice sear marks! For medium doneness, aim for that sweet spot. Use a meat thermometer if you have one; you’re looking for an internal temperature of about 160°F. Mastering the cooking process means a juicy burger every time!

    Step 5: Toasting the Brioche Buns

    While your burgers cook, let’s toast those brioche buns to perfection! Slice each bun in half and brush the cut sides with melted butter. This will give them a golden crust that’s hard to resist! Place the buns cut-side down in a dry pan over medium heat. Toast for about 2-3 minutes, keeping a close eye until they’re beautifully crispy and golden. The toasted buns are a delightful addition to each bite!

    Step 6: Assembling the Burger

    It’s time for the grand assembly! Start by spreading a generous layer of your creamy sauce on both halves of the toasted buns. Add a large butter lettuce leaf to the bottom half—this is where we add our crunch! Next, carefully place the burger patty on top, pile on those crispy bacon strips (two per burger is ideal!), and finally, cap it off with the top bun. It’s a masterpiece waiting to be devoured!

    Tips for Success

    • Don’t overcrowd the skillet when cooking the burgers. Give them space to sear nicely!
    • Let the cooked burgers rest for a couple of minutes before assembling. This keeps them juicy!
    • Feel free to customize the creamy sauce by adding herbs or spices according to your taste.
    • Use a meat thermometer for perfect doneness; it takes guesswork out of cooking meat.
    • Always toast your buns. It adds an irresistible crunch that elevates your burger!

    Equipment Needed

    • Large skillet: A non-stick skillet works wonders, but any heavy-bottomed pan will do.
    • Spatula: For flipping those burger patties with ease. A fish spatula is a great alternative as well.
    • Meat thermometer: Optional but highly recommended for perfect doneness.
    • Mixing bowl: A medium-sized bowl for your creamy sauce.
    • Tongs: Perfect for transferring bacon and flipping burgers.

    Variations on Bacon Burger Creamy Sauce

    • Spicy Kick: Add diced jalapeños or a splash of hot sauce to the creamy sauce for a fiery twist.
    • Herb Infusion: Experiment with different herbs like rosemary or basil. They’ll add unique flavor notes to the sauce!
    • Cheesy Delight: Mix in some shredded cheddar or smoked gouda for a cheesy variation of your creamy sauce.
    • Veggie Lovers: Use sautéed mushrooms or caramelized onions in the burger build for added depth.
    • Low-Fat Option: Substitute cream cheese with low-fat Greek yogurt and reduce the bacon for a healthier sauce!
    • BBQ Flavor: Mix in some BBQ sauce with the creamy sauce for a tangy, smoky flavor profile.

    Serving Suggestions with Bacon Burger Creamy Sauce

    • Serve with crispy sweet potato fries for a delightful contrast of flavors.
    • Pair with a light, chilled cucumber salad to balance the richness of the burger.
    • A cold craft beer or sparkling lemonade complements the savory goodness deliciously.
    • For an elevated presentation, stack your burgers high and garnish with fresh chives!

    FAQs about Bacon Burger Creamy Sauce

    Can I make the creamy sauce ahead of time? Absolutely! You can prepare the Bacon Burger Creamy Sauce a day in advance. Just store it in an airtight container in the fridge. When you’re ready to use it, simply give it a good stir!

    What can I use this sauce for besides burgers? This creamy sauce is incredibly versatile. It makes a fantastic dip for fries, fresh veggies, or even chips! I often serve it as an appetizer during gatherings.

    Can I freeze the Bacon Burger Creamy Sauce? Yes, you can freeze the sauce! Just make sure to store it in a freezer-friendly container. When you’re ready to enjoy it again, just thaw it overnight in the fridge before serving.

    What if I don’t like chives? No worries! You can replace chives with any fresh herb you prefer, such as parsley or dill. Each will add a unique touch to the creamy sauce while still keeping it delicious!

    How can I make this sauce spicier? If you like a bit of heat, consider adding diced jalapeños or a few dashes of hot sauce to the creamy blend. Spice it to your heart’s content!

    Final Thoughts

    Creating the Bacon Burger Creamy Sauce is more than just a cooking project; it’s an adventure that will delight your taste buds! Each layer—from the crispy bacon to the creamy sauce—combines to create a meal that feels special, even on the busiest of nights. I hope this recipe inspires you to add a touch of joy to your weeknight dinners, inviting your loved ones to gather around the table. Just imagine their smiles as they take their first bite! Get ready to elevate your burger game and make memories one delicious meal at a time!


    Print

    clock clock iconcutlery cutlery iconflag flag iconfolder folder iconinstagram instagram iconpinterest pinterest iconfacebook facebook iconprint print iconsquares squares iconheart heart iconheart solid heart solid icon

    Description

    A delicious creamy sauce made with cream cheese and chives, paired with juicy bacon and beef burgers to elevate your burger experience.


    • 1.5 lbs ground beef (80/20 blend)
    • 8 strips thick-cut bacon
    • 4 brioche burger buns
    • 8 oz cream cheese, softened
    • 1/4 cup fresh chives, chopped
    • 4 large butter lettuce leaves
    • 2 cloves garlic, minced
    • 2 tablespoons butter

    1. Cook bacon strips in a large skillet over medium heat until crispy and golden, about 8-10 minutes. Transfer to paper towels and set aside.
    2. In a bowl, mix softened cream cheese with minced garlic and chopped chives until well combined. Season with salt and pepper to taste.
    3. Divide ground beef into 4 equal portions and gently form into patties slightly larger than your buns, creating a small indentation in the center.
    4. Heat the same skillet over medium-high heat. Cook patties for 4-5 minutes per side for medium doneness, or until desired temperature is reached.
    5. Slice brioche buns in half and brush cut sides with melted butter. Toast in a dry pan until golden brown and crispy, about 2-3 minutes.
    6. Spread herbed cream cheese generously on both halves of each toasted bun. Layer bottom bun with lettuce, burger patty, 2 strips of bacon, and top bun.

    Notes

    • Feel free to adjust the amount of garlic according to your preference.
    • For a spicier kick, add some jalapeños to the burger.
    • This sauce can also be used as a dip for fries or vegetables.
    • Prep Time: 15 minutes
    • Cook Time: 25 minutes
    • Category: Main Course
    • Method: Skillet
    • Cuisine: American

    Nutrition

    • Serving Size: 1 burger
    • Calories: 650
    • Sugar: 2g
    • Sodium: 950mg
    • Fat: 45g
    • Saturated Fat: 18g
    • Unsaturated Fat: 25g
    • Trans Fat: 0g
    • Carbohydrates: 35g
    • Fiber: 2g
    • Protein: 35g
    • Cholesterol: 120mg

    Sharing is caring!

  • Cottage Cheese Egg Salad

    Cottage Cheese Egg Salad


    Introduction to Cottage Cheese Egg Salad

    Hey there, fellow food lovers! If you’re like me, you sometimes need a quick yet delightful recipe that fits into a busy day. That’s where this Cottage Cheese Egg Salad comes in! It’s creamy, protein-packed, and bursting with flavor. This dish is not only super simple to whip up but also perfect for lunch boxes or a light dinner. Trust me, whether you need a tasty solution for a hectic evening or something to impress your loved ones, this salad has got you covered. Let’s dive into this culinary adventure together!

    Why You’ll Love This Cottage Cheese Egg Salad

    This Cottage Cheese Egg Salad is the ultimate lifesaver for busy days! It’s not just quick to make—taking only about 10 minutes—but the creamy texture and delightful taste will have your family asking for more. Plus, packed with protein, it’s a nutritious option that keeps everyone satisfied. Whether you’re preparing a meal to impress guests or a simple lunch for yourself, this salad will meet your needs with ease and flavor.

    Ingredients in Cottage Cheese Egg Salad

    Gathering the right ingredients makes the magic happen in this Cottage Cheese Egg Salad. Here’s what you’ll need:

    • Hard-boiled eggs: The stars of this dish! They’re packed with protein and rich in flavor. You’ll want to chop these into bite-sized pieces.
    • Cottage cheese: This creamy base adds texture and a punch of protein. Choose low-fat or full-fat based on your preference!
    • Mayonnaise (optional): A touch of mayo can lend a bit more creaminess, but it’s totally optional if you want to keep it light.
    • Dijon mustard: This zesty ingredient adds a sharp kick that elevates the salad to a whole new level.
    • Chives or green onions: Fresh herbs introduce a burst of vibrant flavor and a pop of color. They’re essential for that finishing touch!
    • Salt and black pepper: Simple seasonings that bring everything together. You’ll want to adjust these to your taste.
    • Optional seasonings: A pinch of paprika or everything bagel seasoning can add a flavorful twist. Experiment to find what you love!

    For those looking to customize this recipe, I have good news! Check out the end of this article for exact measurements and even more ingredient tips to suit your taste. Let’s get cooking!

    How to Make Cottage Cheese Egg Salad

    Making this Cottage Cheese Egg Salad is as easy as pie—or should I say salad? Follow these simple steps to whip up a creamy, protein-packed delight that everyone will love.

    Step 1: Prepare the Eggs

    First things first, let’s get those hard-boiled eggs ready! Carefully chop them into small pieces using a sharp knife. I like to mash them lightly with a fork afterward. This technique keeps some texture while making mixing easier. You want them to be chunky, not pureed! If you’re boiling your eggs at home, remember to cool them quickly in ice water after cooking. This makes peeling a breeze!

    Step 2: Combine Base Ingredients

    Next up, grab a mixing bowl and start adding your cottage cheese, mayonnaise (if you’re using it), and Dijon mustard. Toss the chopped eggs in there too. Give everything a gentle stir until it’s well mixed but a bit chunky. This creamy base is where the magic happens! The cottage cheese adds a unique creaminess that gives this salad its heartiness.

    Step 3: Add Flavor Enhancers

    Now it’s time to jazz it up! Gently mix in the chopped chives or green onions. These fresh ingredients bring a delightful crunch and flavor. Don’t forget to season with salt and black pepper to taste. Feeling daring? Toss in a pinch of paprika or everything bagel seasoning for an extra flair. Adjust everything according to your taste. After all, it’s your salad!

    Step 4: Serve and Enjoy!

    Finally, let the fun begin! Scoop your delicious Cottage Cheese Egg Salad onto toasted bread, stuff it into a sandwich, or pile it into crisp lettuce cups for a fresh twist. The choices are endless! Whatever you pick, just know a satisfying and flavorful meal awaits you. Enjoy every bite!

    Tips for Success

    • Use fresh eggs for the best flavor and texture in your Cottage Cheese Egg Salad.
    • Adjust seasonings gradually, tasting as you go to find the perfect balance.
    • Let the salad sit for a few minutes before serving; flavors meld beautifully as it rests.
    • For added crunch, consider mixing in diced celery or bell peppers.
    • Store leftovers in an airtight container for up to two days—if they last that long!

    Equipment Needed for Cottage Cheese Egg Salad

    • Mixing bowl: A medium-sized bowl works well, but any large bowl will do.
    • Fork: Essential for mashing the eggs; you could use a potato masher, too.
    • Sharp knife: Necessary for chopping the eggs smoothly.
    • Measuring cups and spoons: Handy if you’re following the ingredient amounts precisely.
    • Storage container: Perfect for keeping leftovers fresh in the fridge.

    Variations of Cottage Cheese Egg Salad

    • Avocado Twist: Replace some of the cottage cheese with mashed avocado for a creamy, healthy fat boost.
    • Spicy Kick: Add diced jalapeños or a splash of hot sauce to bring some heat to your salad.
    • Herbed Delight: Experiment with different fresh herbs like dill or parsley for a uniquely flavorful spin.
    • Mexican Flair: Mix in black beans, corn, and diced tomatoes, and serve with tortilla chips for a fun appetizer!
    • Curried Version: A dash of curry powder can add warmth and depth, creating an exotic flavor profile.

    Serving Suggestions for Cottage Cheese Egg Salad

    • Crunchy Lettuce Cups: Serve the salad in crisp lettuce leaves for a refreshing low-carb option.
    • Whole Grain Bread: Pair with slices of whole grain or sourdough bread for a hearty sandwich.
    • Fresh Veggies: Complement with carrot and cucumber sticks for extra crunch.
    • Iced Tea: Enjoy with a chilled glass of herbal iced tea for a lovely pairing.
    • Colorful Platter: Arrange on a colorful platter with fresh herbs for a beautiful presentation!

    FAQs about Cottage Cheese Egg Salad

    Got questions about making the perfect Cottage Cheese Egg Salad? Don’t worry; I’ve got you covered! Here are some frequently asked questions that might help you along the way.

    Can I make Cottage Cheese Egg Salad ahead of time?

    Absolutely! This salad keeps well in the fridge for up to 2 days, making it perfect for meal prep. Just store it in an airtight container.

    What can I use instead of mayonnaise?

    If you’re looking to lighten things up, you can skip mayonnaise altogether or substitute it with Greek yogurt for extra protein while keeping a creamy texture.

    How can I make this dish vegan?

    For a vegan version, substitute hard-boiled eggs with tofu or mashed chickpeas. You can still use cottage cheese if you find a vegan option, or use a plant-based yogurt for creaminess!

    What pairs well with Cottage Cheese Egg Salad?

    This salad is fantastic in sandwiches, on toast, or served in lettuce cups. Pair it with crunchy veggies or whole-grain crackers for a delightful meal!

    Can I customize the flavors?

    Absolutely! Feel free to add spices or herbs that you love. Whether it’s dill, curry powder, or even a squeeze of lemon, it’s all about making it your own!

    Final Thoughts

    Creating this Cottage Cheese Egg Salad is more than just preparing a meal; it’s about bringing joy to the table. Each bite bursts with creaminess and flavor, making it a delight for busy days or special gatherings alike. The ease of preparation means you can spend more time with loved ones instead of stuck in the kitchen. I hope you’ll savor the joy of cooking and sharing, just as I do. Remember, cooking at home can be a wonderfully fulfilling experience. Dive in, experiment, and enjoy every delicious moment this salad brings!


    Print

    clock clock iconcutlery cutlery iconflag flag iconfolder folder iconinstagram instagram iconpinterest pinterest iconfacebook facebook iconprint print iconsquares squares iconheart heart iconheart solid heart solid icon

    Description

    A creamy and protein-packed salad made with hard-boiled eggs and cottage cheese, perfect for sandwiches or lettuce cups.


    • 4 hard-boiled eggs, chopped
    • ½ cup cottage cheese
    • 1 tablespoon mayonnaise (optional, for extra creaminess)
    • 1 teaspoon Dijon mustard
    • 1 tablespoon chopped chives or green onions
    • Salt and black pepper, to taste
    • Optional: pinch of paprika or everything bagel seasoning

    1. In a mixing bowl, mash the hard-boiled eggs lightly with a fork. Add the cottage cheese, mayonnaise (if using), and Dijon mustard. Stir until combined but still a bit chunky.
    2. Stir in chives or green onions, and season with salt and pepper to taste. Add a pinch of paprika or everything bagel seasoning if you’re feeling fancy.
    3. Scoop onto toast, stuff into a sandwich, or serve in lettuce cups for a low-carb option. Refrigerate any leftovers for up to 2 days.

    Notes

    • For a vegan option, substitute eggs with tofu or chickpeas.
    • Adding diced celery can give extra crunch.
    • Perfect for meal prep as it keeps well in the fridge.
    • Prep Time: 10 minutes
    • Cook Time: 0 minutes
    • Category: Salad
    • Method: Mixing
    • Cuisine: American

    Nutrition

    • Serving Size: 1 serving
    • Calories: 210
    • Sugar: 2g
    • Sodium: 300mg
    • Fat: 10g
    • Saturated Fat: 2g
    • Unsaturated Fat: 8g
    • Trans Fat: 0g
    • Carbohydrates: 6g
    • Fiber: 1g
    • Protein: 16g
    • Cholesterol: 370mg

    Sharing is caring!

  • Candied Pistachios Cinnamon

    Candied Pistachios Cinnamon


    Introduction to Candied Pistachios Cinnamon

    Have you ever craved a quick, delightful snack that’s not just tasty but also easy to whip up? Enter my favorite treat: Candied Pistachios Cinnamon. This sweet and crunchy delight comes together effortlessly, making it perfect for those busy weeknights or unexpected guests. Whether you’re a super mom juggling too many tasks or a hardworking professional trying to squeeze in a little pleasure, these candied pistachios are a lifesaver. Plus, the aroma of vanilla and cinnamon wafting through your kitchen will feel like a warm hug, inviting everyone to indulge in a bite or two!

    Why You’ll Love This Candied Pistachios Cinnamon

    This recipe is a game-changer for busy days! It’s quick, taking only about 15 minutes to prep before you let the oven do the magic. The harmony of sweet pistachios and the warm spice of cinnamon creates a taste that feels like a cozy celebration. Plus, they’re healthier than many store-bought snacks, making them a guilt-free treat for the whole family. Enjoying something so scrumptious doesn’t get any easier!

    Ingredients for Candied Pistachios Cinnamon

    Let’s gather what we need for these delightful Candied Pistachios Cinnamon. Each ingredient plays a role in creating that perfect balance of sweetness and crunch!

    • Shelled Pistachios: The star of this snack! These nuts bring a unique flavor and are packed with nutrients.
    • Light Brown Sugar: This adds a lovely caramel-like sweetness and moisture to our candies, blending beautifully with the nuts.
    • Regular Sugar: A little extra sweetness enhances the flavor, giving the pistachios a delightful crunch.
    • Vanilla Extract: This is the magic ingredient! It adds depth and warmth, making the candied pistachios irresistible.
    • Egg White: This will help everything stick together while baking, creating that signature crispy texture.
    • Ground Cinnamon: If you love that cozy, spicy aroma, cinnamon is your go-to! It brings warmth and a subtly sweet kick.
    • Salt: Just a pinch of salt elevates the flavors, balancing the sweetness perfectly.

    Feel free to get creative! You can swap the pistachios for other nuts like almonds or walnuts. And if you want a little zing, adding a sprinkle of cayenne can elevate the flavor! For those with specific dietary restrictions, consider using vegan egg substitutes or experimenting with different sweeteners.

    For exact quantities, check the bottom of the article, where you can also find a printable version!

    How to Make Candied Pistachios Cinnamon

    Ready to dive into the sweet adventure of making your Candied Pistachios Cinnamon? Let’s get started! Each step is simple and rewarding, perfect for anyone—even on the busiest days.

    Step 1: Prepare Your Oven and Cookie Sheet

    First things first! Preheat your oven to a cozy 250°F. This low temperature allows the flavors to meld while making sure our pistachios crisp up beautifully.

    Line a cookie sheet with parchment paper. Trust me; this little trick will save you time later when it comes to clean-up. No one likes scrubbing burnt nuts off a pan!

    Step 2: Whip Egg Whites and Coat Pistachios

    Next, grab a big bowl and start whisking your egg white with the vanilla extract. Whip it gently until it becomes foamy and light. You’ll know it’s ready when soft peaks begin to form!

    Now toss in your shelled pistachios. Stir everything together until each nut is evenly coated with that delicious vanilla and egg mixture. It’s sticking time! You want those flavors to hug the pistachios tightly.

    Step 3: Mix and Coat with Sugars and Cinnamon

    In a small bowl, combine your light brown sugar, regular sugar, ground cinnamon, and salt. Mix these ingredients well. This blend is where the magic happens!

    Once mixed, scatter this sugary concoction over your pistachios. Give everything a gentle yet thorough stir so that every nut gets a delightful coating. Lay them out flat on the cookie sheet, ensuring they aren’t piled on top of each other. Space is key for even cooking!

    Step 4: Bake for a Crunchy Finish

    Time to let the oven work its wonders! Place your cookie sheet in the preheated oven and bake for about 60 to 90 minutes. Set a timer to stir the pistachios every 20 minutes. This helps them cook evenly and gets that crunch just right.

    When they’re golden and crispy, take them out and let them cool. The smell of cinnamon will linger, wrapping your kitchen in a cozy aroma. Once they’re cool, they’re ready to be devoured or stored!

    Tips for Success

    • Make sure your egg whites are at room temperature for better whipping.
    • Stir the pistachios every 20 minutes during baking for even crunchiness.
    • Keep an eye on the nuts—oven temperatures can vary, and you want them golden, not burnt!
    • Let them cool completely before storing to maintain that delightful crunch.
    • Try adding a pinch of nutmeg or cardamom for a unique twist!

    Equipment Needed

    • Baking Sheet: A standard-size sheet works great, but a larger one allows more space if you double the recipe.
    • Parchment Paper: If you don’t have parchment, greasing the sheet is a solid alternative.
    • Large Mixing Bowl: Any large bowl will do; a deep one makes mixing easier.
    • Whisk: A standard whisk is perfect, or use an electric mixer for quick whisking.

    Variations of Candied Pistachios Cinnamon

    • Chocolate Drizzle: After cooling, drizzle melted dark chocolate over the pistachios for an extra indulgence.
    • Spicy Kick: Add a dash of cayenne pepper or chili powder to the sugar mixture for a spicy-sweet contrast.
    • Maple Syrup Substitute: For a different flavor profile, replace sugars with maple syrup—just reduce the egg white slightly for proper coating.
    • Nut-Free Option: If nuts aren’t your jam, try this recipe with seeds like pumpkin or sunflower for a similar crunch.
    • Herb-Infused: Incorporate finely chopped fresh rosemary or thyme in the sugar mix for an aromatic twist that elevates taste!

    Serving Suggestions for Candied Pistachios Cinnamon

    • Pair with Cheese: Serve these candied treats alongside a cheese platter for a sweet and savory combo that impresses.
    • On Salads: Sprinkle over salads for a crunchy texture and a delightful burst of sweetness.
    • As a Snack: Enjoy them straight from the jar as a quick, energizing snack during busy days.
    • Gift Them: Package in a decorative jar and gift them to friends; they make for a thoughtful and tasty present!

    FAQs about Candied Pistachios Cinnamon

    Can I use salted pistachios for this recipe?

    Absolutely! Using salted pistachios will add an extra layer of flavor. Just reduce the amount of salt you add to the sugar mixture to balance things out.

    How do I store Candied Pistachios Cinnamon?

    Keep your candied pistachios in an airtight container at room temperature. This helps maintain their crunchiness. If stored properly, they can last for up to two weeks!

    Can I make these candied pistachios in advance?

    You can definitely make them ahead of time! They’re perfect for prepping a snack for the week or even for special occasions.

    What can I substitute for the egg white?

    If you’re vegan or allergic to eggs, you can use aquafaba, which is the liquid from canned chickpeas. It whips up just like egg whites and works wonderfully in this recipe!

    How spicy are these pistachios with cayenne?

    The spiciness level is entirely up to you! Start with a small pinch, then taste test. You can always add more for a kick, but remember, you can’t take it out once it’s in!

    Final Thoughts

    Making Candied Pistachios Cinnamon isn’t just about creating a delicious snack; it’s an experience that brings joy and warmth into your home. The simplicity of the recipe allows even the busiest of us to enjoy the pleasure of homemade treats. As you bake, the tantalizing scents of cinnamon and vanilla will wrap around you like a cozy blanket, inviting family and friends to gather. Each crunchy bite is a reminder that little moments spent in the kitchen can create lasting memories. So, go ahead and indulge; you deserve this sweet delight in your life!


    Print

    clock clock iconcutlery cutlery iconflag flag iconfolder folder iconinstagram instagram iconpinterest pinterest iconfacebook facebook iconprint print iconsquares squares iconheart heart iconheart solid heart solid icon

    Description

    A sweet and crunchy delight made with shelled pistachios, sweetened with sugars and flavored with vanilla and cinnamon.


    • 3 cups of shelled pistachios
    • 1/4 cup of light brown sugar
    • 1/4 cup of regular sugar
    • 1 teaspoon vanilla extract
    • 1 egg white
    • 1 teaspoon of cinnamon, ground
    • 1/4 teaspoon of salt

    1. Turn on your oven to 250°F. Line a cookie sheet with parchment for a quicker clean-up.
    2. Whip the egg white together with vanilla in a big bowl until it gets foamy. Toss in the pistachios and stir till everything’s coated. Spread evenly onto the lined cookie sheet.
    3. In a tiny bowl, mix cinnamon, the two sugars, and salt. Scatter this mix across the nuts while stirring to coat. Spread the pistachios again so they’re flat in one layer.
    4. Bake for 60 to 90 minutes, giving them a stir every 20 minutes, until they turn crisp. Pull them out, cool down, and enjoy!

    Notes

    • For a stronger cinnamon flavor, you can increase the amount of ground cinnamon.
    • Store the candied pistachios in an airtight container to maintain their crunch.
    • Prep Time: 15 minutes
    • Cook Time: 1 hour 30 minutes
    • Category: Snack
    • Method: Baking
    • Cuisine: American

    Nutrition

    • Serving Size: 1 ounce
    • Calories: 168
    • Sugar: 8g
    • Sodium: 66mg
    • Fat: 14g
    • Saturated Fat: 1g
    • Unsaturated Fat: 8g
    • Trans Fat: 0g
    • Carbohydrates: 9g
    • Fiber: 3g
    • Protein: 6g
    • Cholesterol: 0mg

    Sharing is caring!

  • Marinated Cheese Appetizer with Pepperoni & Pickles

    Marinated Cheese Appetizer with Pepperoni & Pickles


    Introduction to Marinated Cheese Appetizer with Pepperoni & Pickles

    As a passionate home cook, I’m always on the lookout for recipes that are both easy and impressive. The Marinated Cheese Appetizer with Pepperoni & Pickles is just that! It’s a delightful dish that comes together in no time, perfect for busy moms or professionals unwinding after a long day. The vibrant flavors meld beautifully, creating a savory treat that effortlessly wows guests. Whether you’re hosting a casual gathering or simply enjoying a cozy night in, this appetizer is sure to spark joy and delicious conversations around the table.

    Why You’ll Love This Marinated Cheese Appetizer with Pepperoni & Pickles

    This Marinated Cheese Appetizer with Pepperoni & Pickles is a game changer for any busy home cook. It’s quick to prepare, needing just 15 minutes of your time, yet it delivers bold, irresistible flavors that everyone adores. Imagine a vibrant blend of textures and tastes that wow your guests without keeping you in the kitchen all night. Plus, it’s a delightful addition to any gathering that leaves a lasting impression.

    Ingredients for Marinated Cheese Appetizer with Pepperoni & Pickles

    Gathering the right ingredients for this Marinated Cheese Appetizer with Pepperoni & Pickles is super simple and fun! Here’s what you’ll need:

    • Havarti Cheese: Creamy and buttery, this cheese adds richness. You can substitute it with mozzarella or cheddar for different flavors.
    • Sun-Dried Tomatoes: These little bursts of flavor bring a tangy sweetness. Fresh tomatoes work in a pinch, but they won’t have the same concentrated taste.
    • Diced Pepperoni: Salty and slightly spicy, pepperoni is a must for a hearty bite. For a healthier option, turkey pepperoni is a great alternative.
    • Cornichons: Petite and tangy, these pickles add crunch. If you can’t find cornichons, dill pickles do the trick too!
    • Castelvetrano Olives: These green beauties are mild and sweet. Black olives or kalamata olives can be used if that’s what you have.
    • Fresh Basil: Bright and fragrant, basil elevates the dish. If you’re out of basil, dried oregano can provide a different flavor profile.
    • Garlic or Italian-Style Vinaigrette: A zingy dressing ties it all together. You can opt for homemade or store-bought—whatever you prefer!

    With these ingredients, you’re set to create something delightful. Just a heads-up, detailed measurements are available at the bottom of this article for your convenience!

    How to Make Marinated Cheese Appetizer with Pepperoni & Pickles

    Creating this Marinated Cheese Appetizer with Pepperoni & Pickles is seamlessly easy and packed with flavors. Let’s walk through the steps together!

    Step 1: Combine the Ingredients

    Start by grabbing a medium-sized mixing bowl. Add the diced Havarti cheese, sun-dried tomatoes, and diced pepperoni. Toss in those crunchy cornichons and Castelvetrano olives, along with the chopped fresh basil. Gently mix everything until well combined. The colorful ingredients will make you feel like a culinary artist right in your own kitchen!

    Step 2: Add the Vinaigrette

    Next, it’s time to add that zesty touch. Pour in your favorite garlic or Italian-style vinaigrette. This step is key, as the dressing wonderfully coats every bit of cheese and meat, amplifying the flavors. Give it a good stir, ensuring every morsel is covered and ready to soak in all the umami goodness.

    Step 3: Let it Marinate

    Now comes the waiting game, but trust me, deliciousness is just around the corner! Transfer your mixture into a mason jar or a sealed bowl. Cover it tightly and pop it in the fridge. Let the flavors marinate for at least an hour. If you’re feeling extra indulgent, letting it marinate overnight makes it even better. The aroma will be intoxicating!

    Step 4: Serve and Enjoy

    Once your time is up, it’s showtime! Remove the jar from the fridge and grab some crusty bread or hearty crackers. Scoop out the marinated cheese, pepperoni, and pickle mixture, and arrange it on a serving platter. Your guests will be thrilled! This appetizer is perfect for snacking, mingling, or just winding down at home.

    Tips for Success

    • Prep ingredients the night before; it saves time and enhances flavor.
    • Adjust the vinaigrette to suit your taste; it’s your dish, after all!
    • Gently mix, don’t overdo it—keeping some chunks intact adds interest.
    • Let it marinate overnight for a richer experience; patience pays off.
    • Use fresh ingredients for the best flavors; they make all the difference.

    Equipment Needed

    • Mixing Bowl: A medium-sized bowl is perfect. If you don’t have one, any large container will do.
    • Mason Jar or Airtight Container: Essential for marinating. You can even use a resealable plastic bag!
    • Spoon: A sturdy spoon is needed for mixing. A spatula works well too if you have one!
    • Knife and Cutting Board: For chopping all those delicious ingredients with ease.

    Variations

    • Spicy Twist: Add sliced jalapeños or crushed red pepper flakes for some heat. This variation adds an exciting kick that spice lovers will appreciate!
    • Herb Infusion: Experiment with different herbs like thyme or dill instead of basil. Each herb brings its own personality to the dish!
    • Cheese Options: Swap Havarti for feta or gouda to create a different taste experience. Each cheese offers a unique flavor profile, making it fun to explore!
    • Vegetarian Delight: Leave out the pepperoni entirely and replace it with roasted red peppers or zucchini. This caters to vegetarian guests without sacrificing flavor.
    • Nuts for Crunch: Incorporate toasted pine nuts or chopped walnuts for added texture and nuttiness. They’ll give an unexpected crunch that’s delightful!

    Serving Suggestions

    • Pair with crusty baguettes or crispy crackers for delightful dipping.
    • Serve alongside a fresh garden salad for balancing flavors.
    • Complement the appetizer with a light white wine, such as Pinot Grigio.
    • Garnish with extra basil leaves for a pop of color and freshness.
    • Arrange on a charcuterie board with assorted cheeses and meats.

    FAQs about Marinated Cheese Appetizer with Pepperoni & Pickles

    Can I make the Marinated Cheese Appetizer in advance?

    Absolutely! This Marinated Cheese Appetizer with Pepperoni & Pickles actually tastes better when made a day in advance. The flavors have time to meld together, resulting in an even more delicious experience.

    How long can I store this appetizer in the fridge?

    You can keep it stored in the refrigerator for up to a week. Just be sure to keep it in an airtight container to maintain freshness!

    What can I substitute for pepperoni?

    If you’re looking for alternatives to pepperoni, try turkey pepperoni for a healthier option, or use salami for a different flavor. You can even leave it out entirely for a vegetarian twist!

    Is this appetizer gluten-free?

    Yes! The Marinated Cheese Appetizer with Pepperoni & Pickles is naturally gluten-free, making it a fantastic choice for gluten-sensitive guests. Just ensure your vinaigrette is also gluten-free.

    What should I serve with this appetizer?

    Pair it with crusty bread, crackers, or even fresh veggies for scooping. A refreshing salad or some light white wine complements this dish beautifully, too!

    Final Thoughts

    Creating the Marinated Cheese Appetizer with Pepperoni & Pickles is like inviting a burst of flavors into your kitchen. Each bite brings together creaminess, tanginess, and a touch of zest that embodies joy in cooking. This delightful dish not only brings elegance to gatherings but also fosters connection around the table. Plus, the ease of preparation makes it a perfect go-to for busy evenings or special occasions. When you serve this appetizer, you’re not just offering food; you’re sharing a memorable experience that your friends and family will savor and remember. Enjoy every moment of it!


    Print

    clock clock iconcutlery cutlery iconflag flag iconfolder folder iconinstagram instagram iconpinterest pinterest iconfacebook facebook iconprint print iconsquares squares iconheart heart iconheart solid heart solid icon

    Description

    A delightful marinated cheese appetizer featuring pepperoni and pickles, perfect for entertaining guests.


    • 6 oz Havarti cheese, diced into bite-sized cubes
    • 1/2 cup sun-dried tomatoes, roughly chopped
    • 1 cup diced pepperoni cubes
    • 1/2 cup cornichons (small pickles), halved or sliced
    • 1/2 cup Castelvetrano olives, pitted
    • 2 tablespoons fresh basil, roughly chopped
    • 1 cup of your favorite garlic or Italian-style vinaigrette

    1. In a medium-sized mixing bowl, add the diced cheese, sun-dried tomatoes, pepperoni cubes, cornichons, olives, and chopped basil. Gently mix until everything is well combined.
    2. Transfer the mixture to a mason jar or a bowl. Pour in the vinaigrette and give it a good stir to ensure all the ingredients are coated evenly.
    3. Cover with plastic wrap or seal in an airtight container. Refrigerate for at least an hour to allow the flavors to meld.
    4. Serve chilled with crusty bread or crackers for a savory and tangy appetizer.

    Notes

    • This dish can be prepared a day in advance for better flavor.
    • Keep it stored in the refrigerator for up to a week.
    • Feel free to customize the vinaigrette to your taste.
    • Prep Time: 15 minutes
    • Cook Time: 0 minutes
    • Category: Appetizer
    • Method: Marinating
    • Cuisine: Mediterranean

    Nutrition

    • Serving Size: 1 serving
    • Calories: 230
    • Sugar: 2g
    • Sodium: 400mg
    • Fat: 18g
    • Saturated Fat: 7g
    • Unsaturated Fat: 8g
    • Trans Fat: 0g
    • Carbohydrates: 5g
    • Fiber: 1g
    • Protein: 10g
    • Cholesterol: 30mg

    Sharing is caring!

  • Frozen Elote Cups: A Irresistible Summer Treat You’ve Got to Try!

    Frozen Elote Cups: A Irresistible Summer Treat You’ve Got to Try!


    Introduction to Frozen Elote Cups

    Summer means sunshine, warmth, and, of course, delightful treats! If you’re a busy mom or professional like me, finding a quick solution for a hot day can be a challenge. That’s where Frozen Elote Cups come in to save the day! These playful bites bring a burst of flavor with minimal effort, making them a go-to for those hectic afternoons. Imagine serving these delightful, creamy corn cups to friends and family at your next gathering. They’re not just easy to make; they’re sure to impress everyone. Let’s dive into this irresistible summer treat!

    Why You’ll Love This Frozen Elote Cups

    Frozen Elote Cups are not only a breeze to whip up, but they’re also incredibly delicious! With just a handful of ingredients, this recipe offers you a flavorful escape from the ordinary. Perfect for hot days, these creamy corn cups cool you down while tantalizing your taste buds. Plus, they’re a hit with both kids and adults, making them the ideal treat for any family gathering or get-together!

    Ingredients for Frozen Elote Cups

    To make these delightful Frozen Elote Cups, you’ll need a few simple yet flavorful ingredients.

    • Corn kernels – Fresh or frozen, corn is the star of this dish. It brings a sweet crunch that pairs perfectly with creamy flavors.
    • Mayonnaise – This creamy base adds richness. Feel free to use light mayo or a vegan alternative if you prefer.
    • Sour cream – It provides a tangy balance to the sweetness of the corn. Greek yogurt can be a great substitution for a lighter option.
    • Cotija cheese – This crumbly cheese adds a delightful salty bite and authentic Mexican flavor. You can swap it with feta if you can’t find cotija.
    • Lime juice – A splash of lime brings brightness to the mix. If you’re out of fresh limes, bottled juice works in a pinch.
    • Chili powder – It adds a lovely kick. Adjust the amount based on your family’s spice tolerance!
    • Salt – Just a pinch enhances all the flavors beautifully. Go easy and taste as you go!
    • Fresh cilantro – This aromatic herb makes for a beautiful garnish and adds freshness. If you’re not a fan of cilantro, consider using parsley instead.

    All ingredient measurements are available at the bottom of this article for your convenience!

    How to Make Frozen Elote Cups

    Making these Frozen Elote Cups is as fun and simple as dipping your toes in a refreshing pool on a hot day! With a step-by-step process, you’ll have these delicious treats ready in no time. Let’s get started!

    Step 1: Combine the Base

    Start by grabbing a large bowl. Toss in the corn kernels—fresh or frozen, whichever you have on hand. The corn is where the sweet crunch begins! Then, plop in the mayonnaise and sour cream. Trust me, this creamy base makes all the difference.

    Step 2: Mix the Ingredients

    Now it’s time to blend! Using a spatula or a sturdy spoon, gently mix all the ingredients together. You want everything to be evenly distributed. It should look creamy and inviting. Don’t hesitate to sneak in a taste. After all, quality control is key!

    Step 3: Portion them into Cups

    Once your ingredients are well mixed, it’s time to portion the deliciousness. Grab your favorite cups or small bowls. Scoop the mixture into each cup. Don’t be shy; fill them up generously! These cups are your delightful summer treat.

    Step 4: Freeze for Deliciousness

    Cover each filled cup with plastic wrap or a lid. Then it’s straight to the freezer they go! Allow them to freeze for at least two hours. This makes sure they’re perfectly solid and refreshing when you crave them. Trust me, the wait is worth it!

    Step 5: Let it Soften

    When you’re ready to serve, take the cups out of the freezer. Let them sit at room temperature for about 5 to 10 minutes. This will soften them slightly, making them easier to indulge in. You don’t want to chip a tooth on frozen treats!

    Step 6: Garnish and Serve

    Finally, it’s time for the best part—garnishing! Sprinkle some fresh cilantro on top for a pop of color and flavor. If feeling adventurous, add a lime wedge on the side. Serve them up and watch everyone’s eyes light up with excitement!

    Tips for Success

    • Use fresh corn in season for the best flavor and sweetness.
    • Don’t skip the lime juice; it brightens up the whole dish!
    • Adjust the amount of chili powder to suit your family’s taste—spicier is always exciting!
    • Make these cups a day ahead to save time on busy days.
    • Store any leftovers in airtight containers for freshness.

    Equipment Needed

    • Large mixing bowl – A sturdy bowl is essential for combining everything. Any bowl you have will do!
    • Spatula or sturdy spoon – You’ll need this to mix and scoop. A regular spoon works in a pinch!
    • Cups or small bowls – Use any reusable cups or even muffin tins for portioning.
    • Plastic wrap or lids – These keep your treats fresh while they freeze. Any food-safe cover will suffice!

    Variations

    • Add diced jalapeños for an extra kick. If your family loves heat, this is a game changer!
    • For a smoky flavor, sprinkle in some smoked paprika. It gives a delightful depth to the corn.
    • Try different herbs! Swap cilantro for fresh basil or green onions for a unique twist.
    • Make it dairy-free by using vegan mayo and coconut yogurt instead of sour cream.
    • Incorporate black beans for added protein and texture. They pair wonderfully with the corn!

    Serving Suggestions

    • Pair your Frozen Elote Cups with tortilla chips for a delightful crunch.
    • Serve alongside grilled meats or fish for a fresh, vibrant side dish.
    • Complement with a refreshing margarita or iced tea to elevate your summer experience.
    • Present them on a colorful platter with lime wedges for that festive touch!

    FAQs about Frozen Elote Cups

    Can I use canned corn instead of fresh or frozen for Frozen Elote Cups?

    Absolutely! Canned corn can work in a pinch. Just drain and rinse it well to remove excess salt before mixing it in. You’ll still get that sweet taste and crunchy texture that makes these cups delightful.

    How do I store any leftovers of Frozen Elote Cups?

    To keep your Frozen Elote Cups fresh, store them in airtight containers or wrap the cups tightly with plastic wrap. Ensure they’re sealed properly to prevent freezer burn. They’ll keep well for about a week!

    Can I make Frozen Elote Cups in advance for a party?

    Definitely! These cups are perfect for prepping ahead of time. Just make them a day or two before your gathering and store them in the freezer. This way, you can enjoy the festivities without any last-minute fuss!

    What’s the best way to serve Frozen Elote Cups?

    Serve them with a sprinkle of fresh cilantro on top and a lime wedge alongside for a refreshing touch. You can also pair them with chips or grilled items for a delicious appetizer spread!

    Can I customize the spice levels in Frozen Elote Cups?

    You can easily tailor the heat to your family’s preference. Add more chili powder for spice lovers or simply reduce it for a milder version. Feel free to experiment until you find that perfect balance!

    Final Thoughts

    Creating these Frozen Elote Cups has transformed my summer gatherings into a deliciously flavorful fiesta! Each bite reminds me of warm days spent with loved ones, sharing laughter and joy. The effort is minimal, yet the results are so satisfying. Whether you’re hosting a cookout or just looking for a quick, refreshing snack, these cups deliver a burst of taste that’s hard to resist. Plus, they’re a delightful way to get everyone involved in the kitchen. So, grab your ingredients and allow yourself the pleasure of indulging in this simple yet scrumptious treat!


    Print

    clock clock iconcutlery cutlery iconflag flag iconfolder folder iconinstagram instagram iconpinterest pinterest iconfacebook facebook iconprint print iconsquares squares iconheart heart iconheart solid heart solid icon

    Description

    Frozen Elote Cups are a refreshing and delicious summer treat featuring a creamy blend of corn, mayonnaise, sour cream, and spices.


    • 4 cups corn kernels (fresh or frozen)
    • 1/2 cup mayonnaise
    • 1/2 cup sour cream
    • 1/2 cup cotija cheese, crumbled
    • 1 tablespoon lime juice
    • 1 teaspoon chili powder
    • Salt to taste
    • Fresh cilantro, chopped (for garnish)

    1. In a large bowl, combine the corn kernels, mayonnaise, sour cream, cotija cheese, lime juice, chili powder, and salt.
    2. Mix well until all ingredients are evenly coated.
    3. Transfer the mixture into cups or small bowls.
    4. Cover and freeze for at least 2 hours or until solid.
    5. Before serving, let the cups sit at room temperature for a few minutes to soften slightly.
    6. Garnish with fresh cilantro before enjoying.

    Notes

    • For a spicy kick, consider adding more chili powder or jalapeños.
    • Serve with tortilla chips for added crunch.
    • Prep Time: 10 minutes
    • Cook Time: 0 minutes
    • Category: Dessert
    • Method: Freezing
    • Cuisine: Mexican

    Nutrition

    • Serving Size: 1 cup
    • Calories: 280
    • Sugar: 2g
    • Sodium: 250mg
    • Fat: 20g
    • Saturated Fat: 4g
    • Unsaturated Fat: 15g
    • Trans Fat: 0g
    • Carbohydrates: 23g
    • Fiber: 3g
    • Protein: 5g
    • Cholesterol: 15mg

    Sharing is caring!

  • Asparagus Chickpea Quinoa Salad is a Delightful Dish!

    Asparagus Chickpea Quinoa Salad is a Delightful Dish!


    Introduction to Asparagus Chickpea Quinoa Salad

    Let’s face it—life can be hectic, right? Between juggling work, family, and everything in between, finding time to prepare meals can feel like a challenge. That’s where my Asparagus Chickpea Quinoa Salad shines! This delightful dish brings together wholesome ingredients like protein-packed chickpeas and tender asparagus, all wrapped in a zesty lemon vinaigrette. It’s not just a breeze to whip up, but also a nourishing option that’ll leave you feeling satisfied and revitalized. Trust me, when you serve this vibrant salad, you’re not just feeding your family; you’re nurturing them!

    Why You’ll Love This Asparagus Chickpea Quinoa Salad

    This Asparagus Chickpea Quinoa Salad is not just easy to make, but it’s also bursting with flavors that even the pickiest eaters will adore. In just 35 minutes, you can have a wholesome meal that’s perfect for any busy day. The delightful combination of fresh ingredients makes it a satisfying dish that prioritizes both taste and nutrition—a true win-win for health-conscious families!

    Ingredients for Asparagus Chickpea Quinoa Salad

    To create this vibrant Asparagus Chickpea Quinoa Salad, you’ll need a collection of fresh and nutritious ingredients.

    • Lemon Juice: Freshly squeezed lemon juice adds a lovely tang and bright flavor that lifts the salad.
    • Extra Virgin Olive Oil: This gives richness and depth to the dressing, enhancing the overall taste.
    • Dijon Mustard: It adds a subtle zing and helps emulsify the dressing for a smoother texture.
    • Garlic: Minced garlic infuses the dressing with aromatic flavors, making it feel homemade.
    • Kosher Salt and Black Pepper: Seasoning adjusts the flavors beautifully—don’t skip this step!
    • Water: Essential for cooking the quinoa to fluffy perfection.
    • Quinoa: This gluten-free grain is packed with protein and fiber, serving as the salad’s hearty base.
    • Asparagus: Tender asparagus spears not only provide crunch but are also rich in vitamins.
    • Chickpeas: These nutritious legumes bring protein and texture, making the dish filling.
    • Green Onions: Sliced green onions offer a mild onion flavor that complements the salad.
    • Feta Cheese: Crumbled feta adds a creamy richness, balancing the salad’s brightness (optional for vegans).

    Feel free to explore other ingredients too, like cherry tomatoes for sweetness or nuts for crunch! You can find the detailed measurements at the bottom of the recipe for easy printing.

    How to Make Asparagus Chickpea Quinoa Salad

    Making the Asparagus Chickpea Quinoa Salad is simple and fun! Just follow these steps for a delightful dish that will impress everyone.

    Step 1: Prepare the Dressing

    Start by grabbing a small bowl or a medium jar, your choice!

    In it, combine the freshly squeezed lemon juice, extra virgin olive oil, Dijon mustard, and minced garlic.

    Whisk all the ingredients together until they’re nicely blended, or if you’re using a jar, simply put the lid on tightly and give it a good shake!

    Don’t forget to season with salt and pepper to taste—it makes a world of difference!

    Step 2: Cook the Quinoa

    Now, let’s cook the quinoa!

    In a medium saucepan, add 2 cups of water, 1 cup of rinsed quinoa, and half a teaspoon of salt.

    Bring this delightful mixture to a boil over medium heat. When it starts bubbling, reduce the heat to low and cover the pot.

    Let it simmer for about 15 minutes. This is where the magic happens!

    Once all the water is absorbed, remove it from heat and fluff the quinoa with a fork. It should be light and fluffy, perfect for our salad!

    Step 3: Cook the Asparagus

    While the quinoa is cooking, it’s time to sauté the asparagus.

    In a large skillet, heat up 2 teaspoons of olive oil over medium heat.

    Once hot, toss in the cut asparagus and pour that fresh lemon juice over them.

    Sauté for about 5 minutes until they’re tender but still have a crisp bite.

    The lemon juice gives the asparagus an extra zing, making it even more delicious!

    Step 4: Combine Ingredients

    Now for the fun part—mixing it all together!

    In a large bowl, combine the cooked quinoa, sautéed asparagus, chickpeas, sliced green onions, and crumbled feta cheese if you’re using it.

    Pour the zesty dressing over the top.

    Gently stir until everything is well-coated and combined.

    Taste a little and adjust the salt and pepper to your liking. This salad is now ready to shine on your table!

    Tips for Success

    • Make sure to rinse quinoa thoroughly before cooking to remove its natural coating, which can taste bitter.
    • For added flavor, try toasting the quinoa in the saucepan for a minute before adding water.
    • Fresh asparagus should be bright green and firm for the best texture.
    • Chill the salad in the fridge for 30 minutes to enhance flavors before serving.
    • Use a variety of colorful veggies for a more visually appealing salad!

    Equipment Needed

    To whip up this delightful Asparagus Chickpea Quinoa Salad, you’ll need a few essential tools:

    • A medium saucepan for cooking the quinoa.
    • A large skillet for sautéing the asparagus.
    • Mixing bowls for combining ingredients.
    • A whisk or a jar with a lid to prepare the dressing.
    • A fork to fluff the quinoa and stir the salad.

    Variations

    • Vegan Option: Simply omit the feta cheese or substitute it with a plant-based cheese alternative to keep the salad vegan-friendly.
    • Add Nuts: For a delightful crunch, toss in some toasted pine nuts, walnuts, or slivered almonds.
    • Seasonal Veggies: Feel free to mix in seasonal favorites like cherry tomatoes, bell peppers, or roasted zucchini for added color and flavor!
    • Legume Swap: Swap chickpeas for black beans or white beans if you’re looking for a different flavor profile or texture.
    • Herbs Galore: Add fresh herbs such as parsley, basil, or cilantro for a refreshing twist and an explosion of taste!

    Serving Suggestions

    • Pair the salad with grilled chicken or fish for a well-rounded meal.
    • Serve it alongside garlic bread for a delightful crunch.
    • Try a light white wine or sparkling water with lemon for a refreshing drink.
    • Garnish with fresh herbs for a pop of color and extra flavor!

    FAQs about Asparagus Chickpea Quinoa Salad

    Can I make Asparagus Chickpea Quinoa Salad ahead of time?
    Absolutely! This salad is perfect for meal prep. You can make it the day before and store it in the fridge. Just give it a gentle stir before serving, and it’ll taste even better as the flavors meld together.

    Can I use frozen asparagus in the salad?
    Yes, you can! Just make sure to thaw and drain any excess water before sautéing. Frozen asparagus can be a convenient option when fresh isn’t available.

    Is this salad suitable for meal prep?
    Definitely! This salad holds up well in the fridge for 3-4 days. Just keep the dressing separate until you’re ready to enjoy, so it won’t get soggy.

    Can I customize the protein in the salad?
    Of course! If you’re not a chickpea fan, you can swap them for grilled chicken, shrimp, or even a different legume like lentils. Make the salad your own!

    What can I pair this salad with for a complete meal?
    You can serve it with lean proteins like grilled fish or chicken. It also pairs perfectly with soups, or as a side to a hearty sandwich. The possibilities are endless!

    Final Thoughts

    There’s something genuinely joyful about making an Asparagus Chickpea Quinoa Salad.

    As you chop fresh ingredients and whip up that zesty dressing, you’ll be embracing the simplicity and flavor this dish offers.

    It’s not just a meal; it’s a vibrant celebration of wholesome ingredients that energize your body and uplift your spirit.

    Share it with your loved ones and watch their faces light up with delight.

    So, get cooking! Transform your kitchen into a haven of freshness and let this bright salad become a regular on your family table. You deserve it!


    Print

    clock clock iconcutlery cutlery iconflag flag iconfolder folder iconinstagram instagram iconpinterest pinterest iconfacebook facebook iconprint print iconsquares squares iconheart heart iconheart solid heart solid icon

    Description

    A refreshing and nutritious salad featuring quinoa, asparagus, chickpeas, and a zesty lemon vinaigrette.


    • 1/4 cup freshly squeezed lemon juice
    • 1/4 cup extra virgin olive oil
    • 2 teaspoons Dijon mustard
    • 1 clove garlic, minced
    • Kosher salt and black pepper, to taste
    • 2 cups water
    • 1 cup quinoa
    • 1/2 teaspoon salt
    • 2 teaspoons olive oil
    • 1 small bunch asparagus, about 15 spears, cut into 1-inch pieces
    • 1 tablespoon fresh lemon juice
    • 1 1/2 cups chickpeas, rinsed and drained (15 oz can)
    • 3 green onions, sliced
    • 1/3 cup crumbled feta cheese
    • Salt and freshly ground black pepper, to taste

    1. In a small bowl or medium jar, combine the lemon juice, olive oil, mustard, and garlic. Whisk to combine or shake with the jar lid on tight. Season with salt and pepper, to taste, and set aside.
    2. Add water, quinoa, and salt to a medium saucepan and bring to a boil over medium heat. Boil for 5 minutes. Turn the heat to low and simmer for about 15 minutes, or until the water is absorbed. Remove from heat and fluff with a fork.
    3. While the quinoa is cooking, cook the asparagus. In a large skillet, heat the olive oil over medium heat. Add the asparagus and fresh lemon juice. Cook until tender, about 5 minutes.
    4. In a large bowl, combine quinoa, asparagus, chickpeas, green onion, and feta cheese. Pour the dressing over the salad and stir until well coated. Season with salt and pepper, to taste. Serve.

    Notes

    • Feel free to adjust the quantity of lemon juice for more tanginess.
    • This salad is great served chilled or at room temperature.
    • For a vegan version, omit the feta cheese or use a plant-based alternative.
    • Prep Time: 15 minutes
    • Cook Time: 20 minutes
    • Category: Salad
    • Method: Mixing and Cooking
    • Cuisine: Mediterranean

    Nutrition

    • Serving Size: 1 serving
    • Calories: 320
    • Sugar: 2g
    • Sodium: 400mg
    • Fat: 18g
    • Saturated Fat: 3g
    • Unsaturated Fat: 15g
    • Trans Fat: 0g
    • Carbohydrates: 32g
    • Fiber: 9g
    • Protein: 10g
    • Cholesterol: 10mg

    Sharing is caring!

  • Spicy Shrimp Sushi Stacks: A Delicious Layered Delight!

    Spicy Shrimp Sushi Stacks: A Delicious Layered Delight!


    Introduction to Spicy Shrimp Sushi Stacks

    As a busy mom, finding time to prepare something special can feel overwhelming. That’s why I adore these Spicy Shrimp Sushi Stacks! They’re perfect for a quick dinner or a lively gathering. Imagine layers of succulent shrimp, creamy avocado, and perfectly seasoned sushi rice, all stacked into a beautiful tower. Not only are they visually stunning, but they’re also bursting with flavor. Plus, you can customize them to suit even the pickiest of eaters in your family. Let’s dive into this delightful and impressive dish that tells your family you love them—without taking hours in the kitchen!

    Why You’ll Love This Spicy Shrimp Sushi Stacks

    These Spicy Shrimp Sushi Stacks are not just a feast for the eyes; they’re quick and easy to prepare! In just 50 minutes, you can create a restaurant-quality dish right in your kitchen. The delightful combination of flavors and textures will make your taste buds dance. Plus, they’re customizable, so everyone can enjoy their perfect bite. Whether it’s a weeknight dinner or a fun lunch, these stacks will be a hit!

    Ingredients Spicy Shrimp Sushi Stacks

    When crafting these decadent Spicy Shrimp Sushi Stacks, you’ll need a delightful mix of ingredients. Here’s what you’ll gather:

    • Cooked shrimp: The star of the show! Use peeled and deveined shrimp to save time.
    • Mayonnaise: This adds creamy texture to our spicy mixture.
    • Sriracha sauce: A zesty kick! Adjust the amount for your family’s heat tolerance.
    • Lime juice: This brings brightness and freshness to the shrimp combo.
    • Sushi rice: The heart of this dish. It holds everything together beautifully.
    • Water: For cooking the rice, it’s essential for perfect texture.
    • Rice vinegar: This gives our sushi rice that authentic tangy flavor.
    • Sugar: To balance the acidity of the vinegar; a little goes a long way!
    • Salt: Just a pinch enhances all the flavors beautifully.
    • Avocado: Sliced avocados introduce creaminess and healthy fats.
    • Cucumber: Thinly sliced for a refreshing crunch that contrasts the other ingredients.
    • Chopped green onions: They add a pop of color and a mild onion flavor.
    • Nori sheets: Cut into strips; these are optional, but they’re fun for wrapping.
    • Sesame seeds: Use as a garnish for a nutty finishing touch; they’re optional, too!

    Don’t worry about exact measurements right now; they’re listed at the bottom for easy printing. With these tasty ingredients, you’re all set to make delicious Spicy Shrimp Sushi Stacks that will impress!

    How to Make Spicy Shrimp Sushi Stacks

    Step 1: Preparing the Sushi Rice

    To start, rinse your sushi rice under cold water. Keep rinsing until the water runs clear. This removes excess starch and prevents it from being gummy. Next, combine the rinsed rice with water in a saucepan. Bring everything to a boil! Then, reduce the heat to low, cover, and let it simmer for about 18-20 minutes until the water is absorbed. Let it rest, still covered, for another 10 minutes to steam and fluff up.

    Step 2: Seasoning the Rice

    While the rice cools, mix rice vinegar, sugar, and salt in a small bowl. Stir until everything dissolves completely. When the rice is ready, fluff it gently with a fork and fold in the vinegar mixture. This step is crucial, as it gives the rice that distinct sushi flavor. Allow it to cool to room temperature so it won’t warm the other ingredients.

    Step 3: Mixing the Spicy Shrimp

    In another bowl, take your cooked shrimp and mix it with mayonnaise, sriracha, and lime juice. Stir well until the shrimp is fully coated with this spicy mix. The creamy mayonnaise and zesty sriracha make for a delightful combination that livens up the shrimp. Taste to see if you want to kick the heat up a notch!

    Step 4: Assembling the Sushi Stacks

    Now comes the fun part! Grab your round mold or a small cup for shaping. Start by layering a spoonful of sushi rice at the bottom. Gently press it down to form a solid base. Next, add a layer of the spicy shrimp mixture, followed by slices of avocado and cucumber. Repeat these layers until you reach the top of the mold. Press down gently but firmly to keep the stacks stable. Carefully lift the mold to reveal your beautiful sushi tower.

    Step 5: Garnishing and Serving

    To finish, sprinkle chopped green onions on top for a burst of color. If you’re feeling fancy, add sesame seeds for a nutty touch. Serve your Spicy Shrimp Sushi Stacks immediately, alongside optional nori strips for those who want to take a flavorful wrap. Dig into those delightful layers!

    Tips for Success

    • Make sure to rinse the sushi rice thoroughly to achieve that perfect texture.
    • Customize your spice level by adjusting the sriracha to match your family’s taste buds.
    • Prep your ingredients ahead of time to streamline the assembly process.
    • Use a sharp knife for slicing the avocado and cucumber for clean and beautiful layers.
    • Don’t skip the resting time for the rice; it’s essential for fluffiness.

    Equipment Needed

    • Medium saucepan: A standard pot works well for cooking the rice.
    • Mixing bowls: Use two bowls, one for the shrimp and one for the rice.
    • Fork: Essential for fluffing the rice; a wooden spoon can work too.
    • Round mold or small cup: Any container can help shape your sushi stacks.
    • Sharp knife: A must for slicing your avocado and cucumber neatly.

    Variations

    • Crab Meat: Swap shrimp for lump crab meat for a luxurious twist on flavors.
    • Vegetarian Option: Substitute shrimp with grilled tofu or roasted vegetables like bell peppers and zucchini.
    • Spicy Tuna: For a change, try spicy tuna mix using diced raw tuna, mayo, and sriracha.
    • Quinoa Base: Use quinoa instead of sushi rice for a gluten-free and protein-packed version.
    • Additional Toppings: Add sliced radishes, pickled ginger, or mango for extra crunch and sweetness.
    • Low-Calorie Option: Reduce mayonnaise or use Greek yogurt for a lighter shrimp mixture.

    Serving Suggestions

    • Pair your Spicy Shrimp Sushi Stacks with a refreshing cucumber salad for added crunch.
    • Serve with tangy soy sauce or a sprinkle of wasabi for an authentic touch.
    • A crisp white wine or sparkling water complements the dish beautifully.
    • Present on a colorful platter for a vibrant, eye-catching display.
    • For a fun twist, set up a sushi-making station for family involvement.

    FAQs about Spicy Shrimp Sushi Stacks

    Can I make Spicy Shrimp Sushi Stacks ahead of time?

    Yes, you can prepare all the ingredients and assemble the stacks just before serving. However, for the best texture and flavor, I recommend serving them fresh. If you do pre-make them, store them in the refrigerator and assemble them up to a few hours before you plan to eat.

    What can I substitute for shrimp in this recipe?

    If shrimp isn’t your thing, you can swap it out for cooked crab, grilled tofu, or even a mix of colorful veggies. Each option will bring its unique flavor while keeping that layered delight intact.

    How spicy are these sushi stacks?

    The heat level in Spicy Shrimp Sushi Stacks can be adjusted easily! By modifying the amount of sriracha, you can make them mild or fiery. I personally suggest starting with a little and tasting as you go.

    Can I use regular rice instead of sushi rice?

    While sushi rice is optimal for this dish due to its sticky texture, you can substitute with a short-grain rice for similar results. Just remember, long-grain rice won’t provide the right consistency for a good stack.

    What’s the best way to serve leftover stacks?

    Store any leftovers in an airtight container in the refrigerator. When you’re ready to enjoy them, you can either serve them cold or reassemble with fresh ingredients. Just remember, the rice gets firmer as it cools, so a little microwave time can help.

    Final Thoughts

    There’s something truly magical about making Spicy Shrimp Sushi Stacks. It’s not just about the flavors; it’s about the experience of crafting a dish that brings your family together. Picture everyone gathering around the table, admiring your culinary masterpiece. You take pride in creating something that looks as good as it tastes. Each layer tells a story of love and creativity, and it’s sure to become a cherished recipe in your home. So, roll up your sleeves, embrace the fun, and delight in every delicious bite of your handmade sushi stacks!


    Print

    clock clock iconcutlery cutlery iconflag flag iconfolder folder iconinstagram instagram iconpinterest pinterest iconfacebook facebook iconprint print iconsquares squares iconheart heart iconheart solid heart solid icon

    Description

    Spicy Shrimp Sushi Stacks are a delicious layered delight featuring shrimp, avocado, and sushi rice, perfect for a unique sushi experience.


    • 1 pound cooked shrimp peeled and deveined
    • 1 tablespoon mayonnaise
    • 1 tablespoon sriracha sauce
    • 1 teaspoon lime juice
    • 1 cup sushi rice
    • 1 1/4 cups water
    • 2 tablespoons rice vinegar
    • 1 tablespoon sugar
    • 1/2 teaspoon salt
    • 1 avocado sliced
    • 1 cucumber thinly sliced
    • 1/4 cup chopped green onions
    • Nori sheets cut into strips (optional)
    • Sesame seeds for garnish (optional)

    1. Rinse the sushi rice under cold water until the water runs clear. In a medium saucepan, combine the rinsed rice and water. Bring to a boil, then reduce heat to low, cover, and simmer for 18-20 minutes or until the water is absorbed. Remove from heat and let it sit, covered, for 10 minutes.
    2. In a small bowl, mix together the rice vinegar, sugar, and salt until dissolved. Fluff the cooked rice with a fork and gently fold in the vinegar mixture. Allow the rice to cool to room temperature.
    3. In another bowl, combine the cooked shrimp, mayonnaise, sriracha, and lime juice. Mix well to coat the shrimp evenly.
    4. To assemble the sushi stacks, use a round mold or a small cup. Start by layering a spoonful of sushi rice at the bottom, followed by a layer of the spicy shrimp mixture, then add a few slices of avocado and cucumber. Repeat the layers until you reach the top of the mold.
    5. Carefully remove the mold to reveal the stacked sushi. Garnish with chopped green onions and sesame seeds, if desired.
    6. Serve immediately with nori strips on the side for wrapping, if using.

    Notes

    • Customize the level of spiciness by adjusting the amount of sriracha.
    • Feel free to add other ingredients such as crab or vegetables for variation.
    • These stacks are best served fresh on the day of preparation.
    • Prep Time: 30 minutes
    • Cook Time: 20 minutes
    • Category: Appetizer
    • Method: Layered
    • Cuisine: Japanese

    Nutrition

    • Serving Size: 1 stack
    • Calories: 350
    • Sugar: 1g
    • Sodium: 600mg
    • Fat: 10g
    • Saturated Fat: 1.5g
    • Unsaturated Fat: 8.5g
    • Trans Fat: 0g
    • Carbohydrates: 50g
    • Fiber: 3g
    • Protein: 20g
    • Cholesterol: 150mg

    Sharing is caring!

  • Mango Salad with Lime Dressing That Will Refresh You!

    Mango Salad with Lime Dressing That Will Refresh You!


    Introduction to Mango Salad with Lime Dressing

    When the heat rises, and your kitchen feels like a sauna, there’s nothing quite like a refreshing mango salad with lime dressing to lift your spirits! This vibrant dish isn’t just a feast for the eyes; it’s a quick solution when you’re juggling a busy day.

    I know how it feels to be a busy mom or professional, craving something delicious yet effortless. This salad is a breeze to whip up, making it perfect for a light meal or a side dish that will undoubtedly impress your loved ones. Let’s dive in and celebrate the flavors of summer!

    Why You’ll Love This Mango Salad with Lime Dressing

    This mango salad with lime dressing is your new best friend in the kitchen! It’s quick and easy, taking just 15 minutes to prepare, perfect for a weeknight meal. The combination of sweet mango and tangy lime creates a flavor explosion that dances on your tongue. Plus, it’s healthy and colorful, making it an eye-catching addition to any table. Trust me, you’ll want to make this salad again and again!

    Ingredients for Mango Salad with Lime Dressing

    This mango salad with lime dressing bursts with freshness and flavor. Here’s what you’ll need:

    • Mangoes: These juicy gems are the star of the show! Look for ripe ones that are slightly soft to the touch. They add natural sweetness that pairs perfectly with the tangy dressing.
    • Avocado: Creamy and rich, avocado balances the sweetness of the mango and adds healthy fats. Choose one that’s ripe, but not overly mushy.
    • Red Onion: A small amount of finely sliced red onion gives a lovely crunch and a mild bite. If you prefer a milder flavor, soak it in cold water for a few minutes.
    • Cucumber: Cucumber adds a refreshing crunch to the salad. Halving and slicing it keeps the texture intact, adding a lovely crispness.
    • Coriander (Cilantro): This herb adds a burst of freshness. If you’re not a fan, you can substitute it with fresh mint for a different twist.
    • Crushed Peanuts: They bring a delightful crunch and nuttiness to the dish. If you have nut allergies, sunflower seeds or pumpkin seeds make great substitutes!
    • Sweet Chilli Sauce: This offers a sweet and spicy kick! You can find it in most supermarkets or make your own if you’re feeling adventurous.
    • Lime Juice: Fresh lime juice brightens the salad and balances the other flavors. I highly recommend squeezing your own limes for the best taste.
    • Olive Oil: A drizzle of olive oil enhances the dressing’s richness. You can use avocado oil or any light oil if desired.
    • Honey or Maple Syrup: These natural sweeteners help to elevate the dressing. Adjust the amount to suit your taste!
    • Freshly Grated Ginger: This adds a zingy flavor that elevates the entire dish. You can skip it if you’re not a fan, but I love the warmth it gives!
    • Sea Salt Flakes: A sprinkle enhances all the flavors. Just a pinch will do—taste as you go!
    • Cracked Black Pepper: This adds a subtle heat that complements the sweetness of the mango. Freshly cracked is best for maximum flavor!

    You can find the exact quantities for each ingredient at the bottom of this post, ready for printing. Now, let’s dive into how to bring all these delicious ingredients together!

    How to Make Mango Salad with Lime Dressing

    Making this mango salad with lime dressing is as easy as pie! I promise, you’ll be amazed at how quickly everything comes together. Let’s get started on this refreshing journey!

    Step 1: Prepare the Lime Dressing

    First, grab a small bowl—this is where the magic begins. Whisk together the sweet chili sauce, lime juice, and olive oil.

    Don’t rush through it; the way these flavors meld is essential. Now, add in your honey or maple syrup along with the freshly grated ginger.

    I love ginger—it adds such a lively kick! Finally, season your dressing with sea salt flakes and cracked black pepper. Taste and adjust as needed. If you crave a little more sweetness, just add a touch more honey. Set it aside while you prep the salad.

    Step 2: Layer the Ingredients

    Now onto the fun part—layering your ingredients! In a shallow serving bowl, begin with the diced mangoes; they deserve to be the star of the show after all.

    Next, add the fresh cucumber slices, followed by creamy avocado cubes and the finely sliced red onion.

    Sprinkle the chopped coriander over the top. Each layer provides its own flavor and texture, creating a beautiful rainbow on your plate.

    You can customize this step, adding any extra veggies you love—bell peppers or cherry tomatoes would work wonderfully!

    Step 3: Combine and Serve

    It’s time to bring everything together! Just before serving, drizzle the lime dressing over your carefully layered salad and generously sprinkle with crushed peanuts.

    Gently toss everything to combine, but be careful not to mash the ingredients. You want to maintain that gorgeous presentation!

    Serve this mango salad with lime dressing immediately, so the flavors stay vibrant and fresh. Place it on the table and watch everyone dig in with a smile!

    Tips for Success

    • Always choose ripe mangoes for optimal sweetness and texture.
    • Prep the dressing ahead of time to allow flavors to meld beautifully.
    • For extra crunch, add some toasted coconut or sesame seeds.
    • Serve the salad fresh to maintain its vibrant crunch; store any leftovers in an airtight container.
    • Don’t be afraid to experiment with ingredients—this salad is versatile!

    Equipment Needed

    • Mixing Bowl: Any medium-sized bowl works, but a glass or stainless-steel bowl retains coolness.
    • Whisk: A standard whisk is great for mixing, but a fork will do if you’re in a pinch.
    • Cutting Board and Knife: A sharp knife makes cutting mangoes and avocados a breeze.
    • Measuring Cups: Helpful for accuracy; however, you can estimate if you prefer.

    Variations of Mango Salad with Lime Dressing

    • Spicy Kick: Add sliced jalapeños or a sprinkle of red pepper flakes for an extra spicy twist.
    • Fruit Medley: Mix in other fruits like diced pineapple or strawberries for a fruity explosion!
    • Grilled Vegetables: Toss in grilled zucchini or bell peppers for a smoky flavor that complements the salad.
    • Protein Boost: Add grilled chicken, shrimp, or chickpeas for a heartier meal option.
    • Nut-Free Option: Substitute crushed peanuts with crispy fried onions or pumpkin seeds for crunch without nuts.
    • Dressing Alternatives: Swap the lime dressing for a sesame or tahini dressing for a different flavor profile.

    Serving Suggestions for Mango Salad with Lime Dressing

    • Pair this salad with grilled fish or chicken for a complete meal.
    • Serve it alongside tacos or burritos for a delightful fusion.
    • For a refreshing drink, opt for iced tea or a tropical fruit smoothie.
    • Present it in a vibrant bowl to showcase its colorful layers!

    FAQs about Mango Salad with Lime Dressing

    Here are some common questions you might have about this refreshing mango salad with lime dressing:

    Can I make this salad ahead of time?

    While I recommend serving the mango salad fresh for the best crunch, you can prepare the dressing and chop the ingredients in advance. Just layer them and toss everything together right before serving to keep the flavors intact.

    What can I substitute for mangoes if they’re out of season?

    If mangoes aren’t available, consider using diced peaches or nectarines. They will offer a similar sweetness and brightness that complements the lime dressing beautifully.

    How can I make this salad spicier?

    For a spicy kick, add sliced jalapeños or even a dash of hot sauce to the lime dressing. Just be sure to adjust the sweetness to balance the heat!

    Is this salad suitable for meal prep?

    Yes! Just keep the dressing separate until you’re ready to eat. Storing the salad in an airtight container will help preserve its freshness for up to two days.

    Can I add more vegetables to this salad?

    Absolutely! Feel free to get creative—adding bell peppers, shredded carrots, or even green beans can provide an exciting texture and flavor boost!

    Final Thoughts

    Every time I make this mango salad with lime dressing, it feels like a mini celebration! The bright colors and flavors dance together in perfect harmony, transforming my kitchen into a tropical paradise. Whether I’m serving it at a family gathering or enjoying it as a light lunch, this salad consistently brings smiles to the table. It embodies the carefree joy of summer in every bite, reminding us to savor life’s simple pleasures. So, grab some ripe mangoes and let’s relish this refreshing dish together—your taste buds are in for a delightful treat!


    Print

    clock clock iconcutlery cutlery iconflag flag iconfolder folder iconinstagram instagram iconpinterest pinterest iconfacebook facebook iconprint print iconsquares squares iconheart heart iconheart solid heart solid icon

    Description

    A refreshing mango salad tossed with a zesty lime dressing, perfect for a light meal or side dish.


    • 2 ripe mangoes, peeled and diced
    • 1 avocado, peeled and diced
    • ½ small red onion, finely sliced
    • 1 small cucumber, halved lengthways and sliced
    • 1 cup fresh coriander (cilantro) leaves, roughly chopped
    • ¼ cup crushed peanuts
    • 3 tbsp sweet chilli sauce
    • Juice of 2 limes
    • 1 tbsp olive oil
    • 1 tsp honey or maple syrup
    • ½ tsp freshly grated ginger
    • Sea salt flakes, to taste
    • Cracked black pepper, to taste

    1. To make the dressing, whisk together the sweet chilli sauce, lime juice, olive oil, honey or maple syrup, and grated ginger in a small bowl. Season with sea salt and cracked black pepper to taste.
    2. In a shallow serving bowl, layer the diced mangoes, cucumber slices, avocado cubes, finely sliced red onion, and chopped coriander.
    3. Drizzle the prepared dressing over the salad layers and sprinkle with crushed peanuts.
    4. Toss gently just before serving to combine flavors while maintaining presentation.

    Notes

    • Feel free to add other vegetables or nuts to customize the salad.
    • This salad is best served fresh to retain the crunchiness of the ingredients.
    • Adjust the sweetness of the dressing by varying the amount of honey or maple syrup.
    • Prep Time: 15 minutes
    • Cook Time: 0 minutes
    • Category: Salad
    • Method: No-cook
    • Cuisine: Fusion

    Nutrition

    • Serving Size: 1 cup
    • Calories: 220
    • Sugar: 24g
    • Sodium: 30mg
    • Fat: 10g
    • Saturated Fat: 1.5g
    • Unsaturated Fat: 8g
    • Trans Fat: 0g
    • Carbohydrates: 31g
    • Fiber: 5g
    • Protein: 3g
    • Cholesterol: 0mg

    Sharing is caring!

  • Italian Chopped Brussels Sprouts Salad: A Healthy Delight!

    Italian Chopped Brussels Sprouts Salad: A Healthy Delight!


    Introduction to Italian Chopped Brussels Sprouts Salad

    As a busy mom, I’ve often found myself hunting for quick yet delicious meals that can satisfy my family’s cravings. Let me tell you, the Italian Chopped Brussels Sprouts Salad is one of my go-to recipes. It’s vibrant, nutritious, and packed with flavor, making it a delightful choice for a busy weeknight dinner or a gathering with friends. Plus, it’s a fantastic way to sneak in some greens and keep everyone happy. Seriously, if you want to impress your loved ones or whip up something satisfying in no time, this salad has got you covered!

    Why You’ll Love This Italian Chopped Brussels Sprouts Salad

    This Italian Chopped Brussels Sprouts Salad is a lifesaver! With minimal prep time, it’s perfect for those hectic evenings when you need something satisfying fast. The crunchy Brussels sprouts mixed with chickpeas and salami offer a taste explosion in every bite. Plus, the homemade Italian dressing elevates it to a whole new level. It’s not just a salad; it’s a vibrant feast that even picky eaters will love!

    Ingredients for Italian Chopped Brussels Sprouts Salad

    When it comes to the Italian Chopped Brussels Sprouts Salad, quality ingredients make all the difference. Let’s take a closer look at what you’ll need to create this flavorful dish!

    • Olive Oil: This serves as the base of our dressing, adding richness and healthy fats. Go for extra virgin for the best flavor.
    • Red Wine Vinegar: A splash of this adds a delightful tang to balance the salad’s heartiness.
    • Sugar or Honey: Just a hint of sweetness cuts through the acidity of the vinegar. You can adjust this to your liking.
    • Garlic: A must-have! It brings a punch of flavor and makes the dressing sing.
    • Dijon Mustard: This adds a nice zesty kick and helps emulsify the dressing.
    • Italian Seasoning: A blend of herbs that brings an aromatic essence, transporting you straight to Italy.
    • Salt and Pepper: Always essential for enhancing flavors. Use freshly ground pepper for the best results.
    • Brussels Sprouts: The star of the show! Trimmed and tender, they provide a unique crunch.
    • Chickpeas: These add protein and fiber, making the salad more filling and nutritious.
    • Genoa Salami: Adds a savory, meaty element, contributing to that irresistible Italian flair.
    • Cherry or Grape Tomatoes: Their sweetness and juiciness light up the dish and enhance the texture.
    • Kalamata or Black Olives: These lend a briny flavor that pairs beautifully with the other ingredients.
    • Pepperoncinis: For a touch of heat and tanginess—perfect for those who enjoy a bit of spice.
    • Red Onion: Its sharpness beautifully complements the flavors, adding both color and crunch.
    • Provolone Cheese: Mild and creamy, it melts in your mouth, balancing all the robust flavors.
    • Parmesan: A sprinkle of this aged cheese provides a final touch of umami and sophistication.

    Don’t forget that the ingredients with exact quantities are available at the bottom of the article for easy printing!

    How to Make Italian Chopped Brussels Sprouts Salad

    Let’s dive into making this delightful Italian Chopped Brussels Sprouts Salad! Follow these steps, and you’ll have a colorful, flavorful dish that’s bound to impress. Trust me, the process is as enjoyable as the outcome!

    Step 1: Prepare the Dressing

    In a medium bowl, whisk together the olive oil and red wine vinegar. This is where the magic begins! Add sugar or honey for a touch of sweetness, then stir in minced garlic, dijon mustard, and Italian seasoning. Sprinkle in salt and freshly ground black pepper to taste. You want a harmonious balance of flavors that dances on your palate.

    Step 2: Shred the Brussels Sprouts

    Time to turn those Brussels sprouts into the stars of the show! You can use a food processor with a slicing attachment for quick shredding, or a sharp knife if you prefer the old-school way. Slice them thinly. The thinner, the better—this allows them to soak up all that delicious dressing.

    Step 3: Marinate the Brussels Sprouts

    Place the shredded Brussels sprouts in a large bowl. Pour your freshly made dressing all over them. Get in there with some tongs and toss until they’re fully coated. Let them marinate for about 30 minutes. This step is crucial! It allows the flavors to meld beautifully while softening the Brussels sprouts just enough.

    Step 4: Prepare Other Ingredients

    While your Brussels are marinating, it’s time to prep the other goodness. Chop the chickpeas, salami, tomatoes, olives, and pepperoncinis into manageable pieces. Don’t forget to thinly slice the red onion and cube the provolone cheese. Each ingredient brings its own flair to this salad—so be generous!

    Step 5: Combine Ingredients

    Once the Brussels have marinated, add all those beautifully prepped ingredients into the bowl. Toss everything together gently. You want your salad to be inviting and well-mixed, ensuring every bite is a delightful surprise of flavors!

    Step 6: Serve and Enjoy

    Your Italian Chopped Brussels Sprouts Salad is ready to shine! Plate it up, and for a little extra kick, grind some fresh black pepper on top. Serve immediately and watch as your family and friends dig in. They won’t believe how healthy and tasty this salad is!

    Tips for Success

    • For a creamier dressing, you can add a dollop of Greek yogurt.
    • Make sure to trim the Brussels sprouts well—remove any wilted leaves.
    • Let the salad rest a bit to deepen the flavors, but don’t let it sit too long—fresh is best!
    • Want a crunch? Add some toasted nuts or seeds for extra texture.
    • Feel free to customize with your favorite veggies or proteins!

    Equipment Needed

    • Medium Bowl: Use this for mixing your dressing. A mixing bowl works too!
    • Food Processor: Great for shredding Brussels sprouts quickly. A sharp knife can work just as well.
    • Tongs: Perfect for tossing and mixing the salad. You can also use a spoon if you prefer.
    • Cutting Board: Essential for chopping your veggies and meats.
    • Measuring Cups: Handy for accurate ingredient measurements.

    Variations

    • Vegetarian Version: Omit the salami and replace it with roasted chickpeas for added crunch and protein.
    • Gluten-Free Option: This salad is naturally gluten-free, but always double-check your packaged ingredients!
    • Spicy Kick: Add some chopped jalapeños or a splash of hot sauce to the dressing for heat lovers.
    • Fruit Addition: Toss in some diced apples or pears for a sweet contrast to the savory ingredients.
    • Vegan Twist: Swap out provolone and parmesan for a vegan cheese or nutritional yeast for a cheesy flavor without dairy.

    Serving Suggestions

    • Pair with Grilled Chicken: This salad complements grilled chicken beautifully for a protein-packed meal.
    • Serve with Crusty Bread: A slice of warm, crusty Italian bread is perfect for mopping up the dressing.
    • Refresh with a Crisp White Wine: Enjoy a chilled Pinot Grigio or Sauvignon Blanc to elevate your dinner.
    • Presentation Tip: Serve in a large, colorful bowl to showcase the vibrant ingredients.
    • Add Fresh Herbs: Garnish with chopped basil or parsley for an aromatic touch.

    FAQs about Italian Chopped Brussels Sprouts Salad

    Can I make this salad ahead of time? Absolutely! The Italian Chopped Brussels Sprouts Salad can be made a few hours in advance. Just marinate the Brussels sprouts and add the rest of the ingredients right before serving to keep everything fresh and crunchy.

    Is this salad gluten-free? Yes, this salad is naturally gluten-free! Just be sure to check any packaged ingredients, like salami and dressings, to ensure they are gluten-free as well.

    Can I add other vegetables to this salad? Definitely! Feel free to get creative. Add your favorite veggies like bell peppers, cucumbers, or even radishes for an extra burst of flavor and color.

    What can I use instead of salami? If you’d like, you can replace salami with grilled chicken or turkey for a leaner protein option. For a vegetarian twist, roasted chickpeas work wonders too!

    How should I store leftovers? Keep any leftover salad in an airtight container in the fridge for up to 2 days. Just note that the Brussels may soften over time, but the flavors will still be delicious!

    Final Thoughts

    Creating the Italian Chopped Brussels Sprouts Salad is not just about whipping up a meal; it’s about the smiles and satisfied murmurs of delight from family and friends. Every crunchy bite is a reminder that healthy can be delicious. Whether I make it for a quick dinner or a festive gathering, this salad always impresses. Plus, its vibrant colors make it a feast for the eyes! So, grab those fresh ingredients, and let the culinary adventure begin. I promise this salad will soon become a beloved staple in your kitchen too!


    Print

    clock clock iconcutlery cutlery iconflag flag iconfolder folder iconinstagram instagram iconpinterest pinterest iconfacebook facebook iconprint print iconsquares squares iconheart heart iconheart solid heart solid icon

    Description

    A delightful and healthy Italian chopped salad featuring shredded Brussels sprouts, chickpeas, salami, and a delicious homemade Italian dressing.


    • ⅓ cup olive oil
    • 3 tablespoons red wine vinegar
    • 12 teaspoons sugar or honey
    • 1 clove garlic, finely minced
    • 1 teaspoon dijon mustard
    • 1 teaspoon italian seasoning
    • ½ teaspoon salt
    • Freshly ground black pepper to taste
    • 1 pound brussels sprouts, ends trimmed and outer leaves removed
    • 1 (15 ounce) can chickpeas, rinsed and drained
    • 46 oz thinly sliced Genoa salami, cut in half or julienned
    • 1 ½ cups cherry or grape tomatoes, halved
    • ½ cup pitted sliced kalamata or sliced black olives
    • ¼ cup sliced pepperoncinis
    • ½ small red onion, thinly sliced
    • ½ cup cubed provolone cheese
    • ¼ cup shaved or shredded parmesan

    1. Make the dressing: in a medium bowl, whisk together the olive oil, red wine vinegar, sugar/honey, garlic, dijon, italian seasoning, salt and pepper.
    2. Shred the brussels sprouts using a food processor with the slicing attachment or a sharp knife until thinly sliced.
    3. Add shredded brussels to a large bowl and pour the dressing all over. Use tongs to coat the brussels with the dressing and let it marinate for 30 minutes.
    4. While the brussels marinate, chop and prep the other ingredients.
    5. Add the chickpeas, salami, tomatoes, olives, pepperoncinis, red onion, provolone cheese cubes, and shaved parmesan to the brussels. Toss to combine.
    6. Serve immediately with extra black pepper. Serves 4 to 6.

    Notes

    • For a vegetarian version, omit the salami.
    • This salad can be made ahead, but it’s best served fresh.
    • Adjust the sweetness of the dressing to your taste preference.
    • Prep Time: 15 minutes
    • Cook Time: 0 minutes
    • Category: Salad
    • Method: Mixing
    • Cuisine: Italian

    Nutrition

    • Serving Size: 1 serving
    • Calories: 300
    • Sugar: 2g
    • Sodium: 500mg
    • Fat: 20g
    • Saturated Fat: 5g
    • Unsaturated Fat: 15g
    • Trans Fat: 0g
    • Carbohydrates: 25g
    • Fiber: 6g
    • Protein: 10g
    • Cholesterol: 15mg

    Sharing is caring!