Author: IHAAL Team

  • Shrimp and Creamed Corn

    Shrimp and Creamed Corn


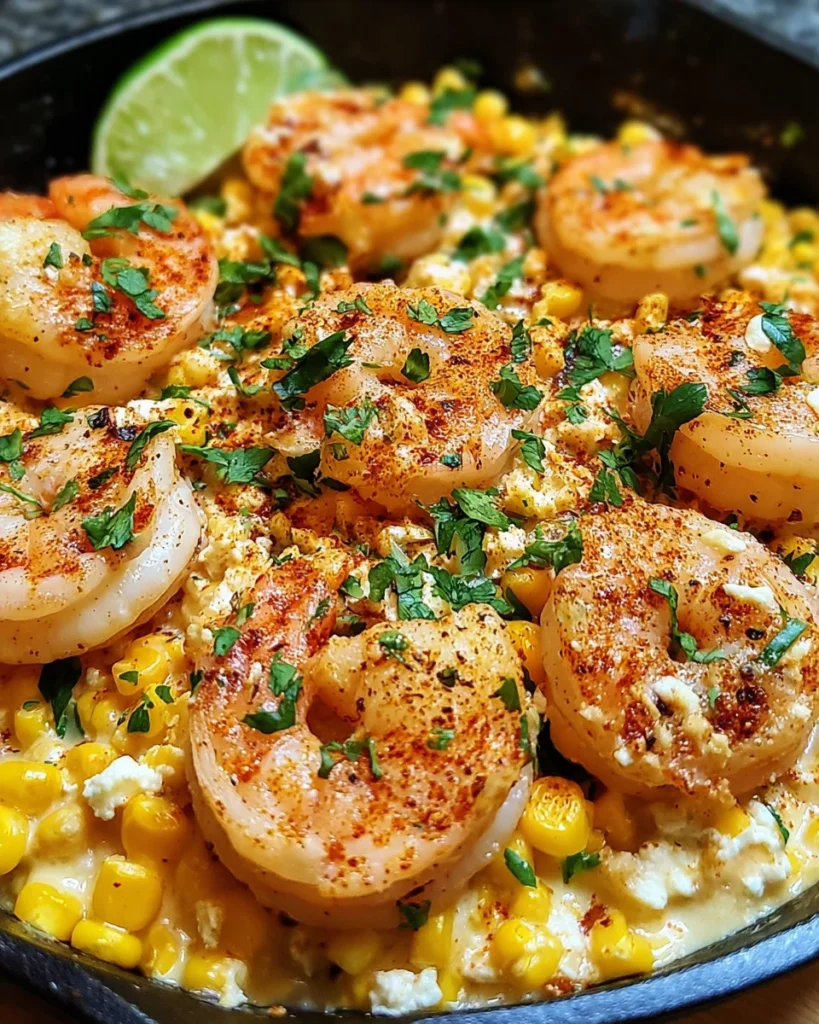
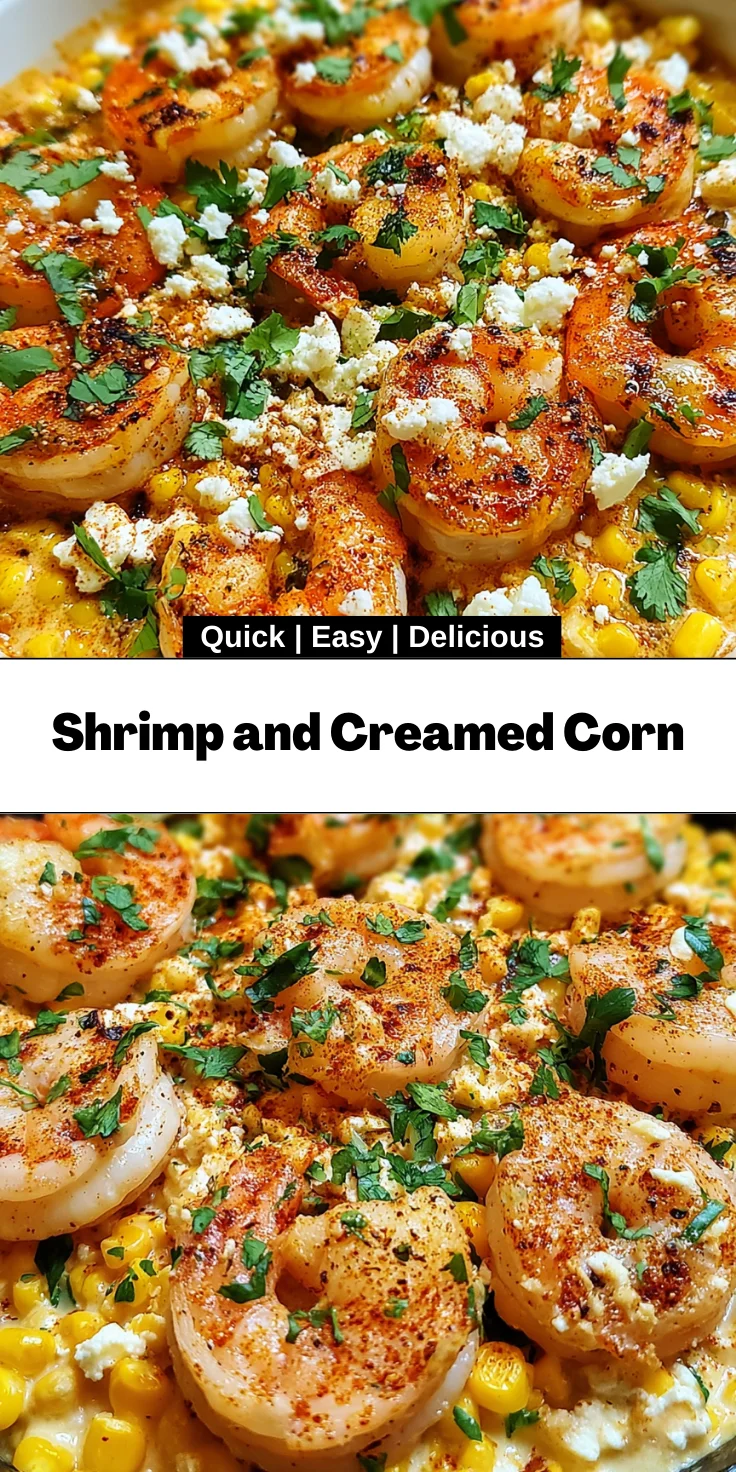
    Introduction to Shrimp and Creamed Corn

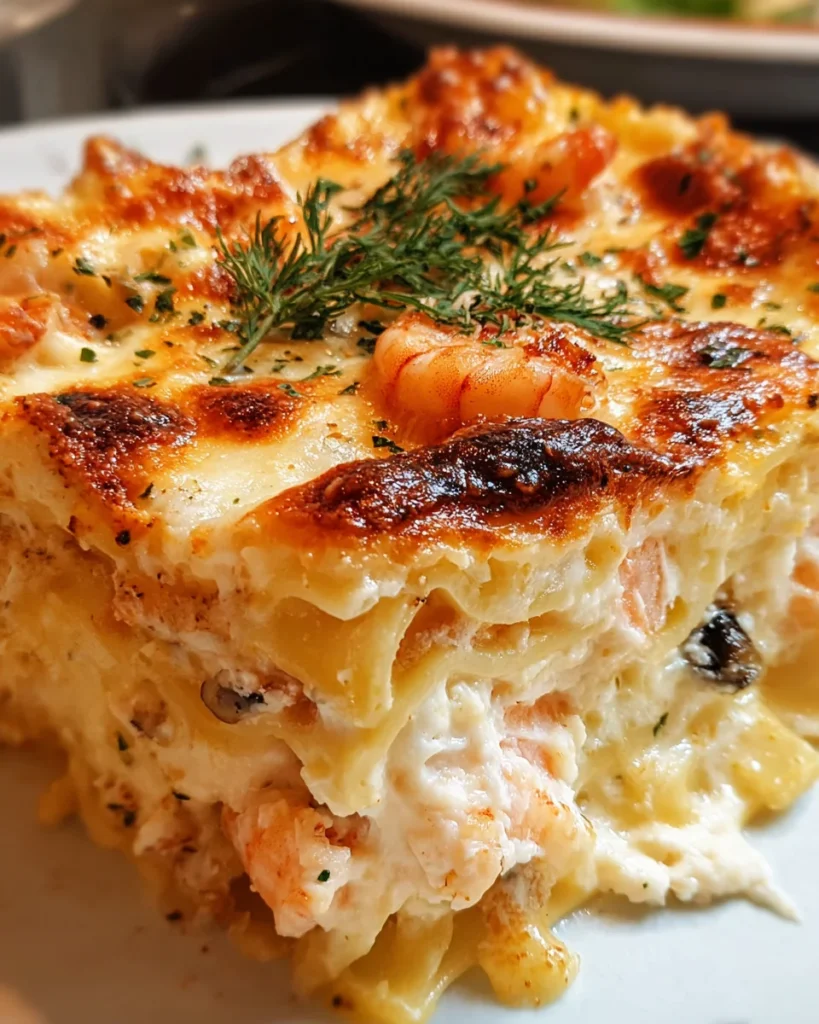
    Oh, let me tell you about Shrimp and Creamed Corn—it’s like a warm hug on a plate! This delicious dish combines tender shrimp with rich, creamed corn, all swimming in a luscious sauce that’s just irresistible. As a busy mom myself, I know how challenging it can be to whip up something tasty after a long day. That’s why this recipe is my go-to for a quick, comforting meal. Whether you’re trying to impress your loved ones or simply want something satisfying, this recipe promises to deliver on flavor and ease!

    Why You’ll Love This Shrimp and Creamed Corn

    This Shrimp and Creamed Corn recipe is not just quick; it’s a lifesaver on busy evenings! In just 30 minutes, you can serve up a meal that feels indulgent yet is incredibly simple to prepare. The delightful combination of flavors—from the sweetness of corn to the savory shrimp—creates a dish that’s both comforting and memorable. Best of all, it’s gluten-free, making it a worry-free choice for family dinners!

    Ingredients for Shrimp and Creamed Corn

    Gathering the right ingredients is key to creating that creamy, dreamy Shrimp and Creamed Corn. Here’s what you’ll need:

    • Raw shrimp: Fresh, peeled, and deveined shrimp are the star of this dish, bringing a delightful flavor. If you’re in a pinch, frozen shrimp works too—just make sure to thaw it properly!
    • Half-and-half: This creamy blend of milk and cream adds richness to your dish. You can substitute with whole milk or heavy cream if you prefer a lighter or richer base.
    • Cooked corn kernels: Sweet corn is what elevates this dish! You can use frozen or canned corn, but I always recommend fresh corn for that sweet crunch.
    • Olive oil: A splash of this golden elixir helps sauté the veggies and adds depth. It’s a healthier option, though you can swap it with butter if you’re feeling indulgent.
    • Salted butter: Buttery goodness is essential. It brings out the flavors and adds a velvety texture. If you’re watching sodium, feel free to use unsalted butter.
    • Chopped onion: A must for sautéing! It adds a savory sweetness. Yellow or white onions work wonderfully.
    • Garlic: I’m all about the garlic love! Fresh minced garlic enhances flavor and aroma; however, garlic powder is an option if you’re short on time.
    • Chili powder: Just a pinch of this spice adds a subtle kick. Adjust it based on your heat preference; my kids enjoy it mild!
    • Smoked paprika: This gives a beautifully smoky flavor that pairs perfectly with the shrimp. Regular paprika can work, but you’ll lose the smokiness.
    • Feta cheese: Tangy and creamy, feta crumbles enrich the dish. For a different twist, you could use goat cheese.
    • Garnish: Fresh cilantro and lime juice take your dish to the next level! They add brightness and a touch of freshness.

    For exact measurements, check the bottom of the article where all the ingredient details are listed for easy printing!

    How to Make Shrimp and Creamed Corn

    Now, let’s dive into the steps for creating this heavenly Shrimp and Creamed Corn! Each step is straightforward, so you’ll be in and out of the kitchen in no time. Just follow along, and you’ll have a plate of creamy goodness ready for dinner!

    Step 1: Prepare the Skillet

    First things first—grab a large skillet and set it over medium heat. Pour in the olive oil and add the salted butter. Let them melt together until they create a lovely, sizzling dance in the pan. This will be the flavorful base for your dish!

    Step 2: Sauté the Onions and Garlic

    Next up, toss in the chopped onion once the skillet is hot. Sauté the onions for about 3 to 4 minutes. You want them to become soft and translucent. Then, add in the minced garlic and cook for another minute. The aroma will be simply irresistible!

    Step 3: Cook the Shrimp

    Now, it’s time for the star of the show—add the peeled and deveined shrimp to the skillet. Sprinkle in the chili powder and some salt. Cook these beauties for about 3 to 4 minutes until they turn a vibrant pink, which means they’re perfectly cooked. You’ll love how the spices mingle with the shrimp.

    Step 4: Stir in the Corn and Spices

    Once the shrimp is just right, it’s time to stir in the cooked corn and the smoked paprika. This step infuses a delicious flavor into the mix. Keep stirring until everything is well combined and the corn is warmed. You’ll see the colors brighten up—it’s a feast for the eyes too!

    Step 5: Add Half-and-Half

    Pour in the half-and-half next, allowing it to gently simmer. This is where the magic happens! Let it bubble for about 3 to 5 minutes until the sauce thickens slightly. Stir occasionally to blend all those fantastic flavors together.

    Step 6: Mix in Feta Cheese

    Now, take half of the crumbled feta cheese and mix it into the creamy shrimp mixture. It melts beautifully, adding a rich tang. Once it’s well blended and smooth, you can taste the magic happening!

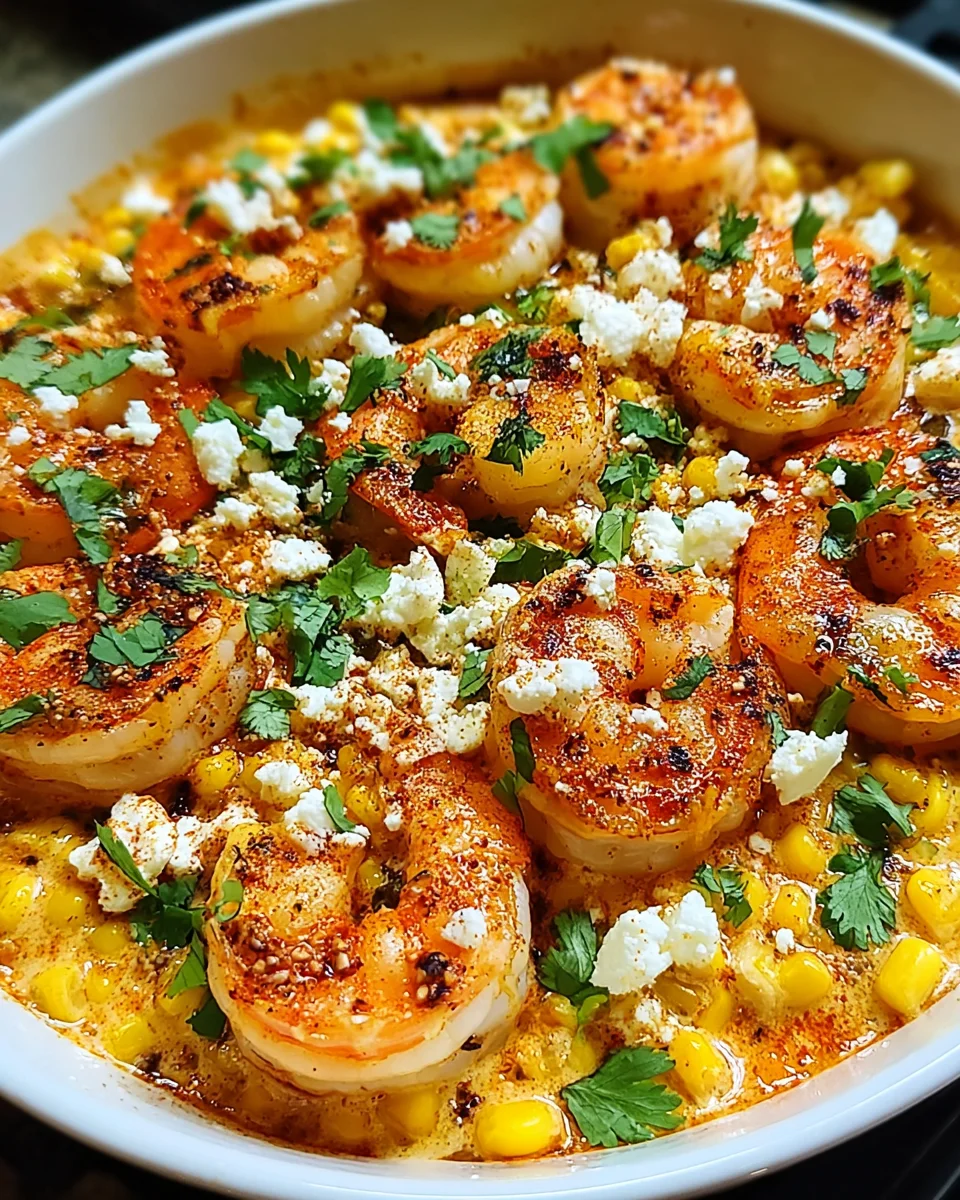
    Step 7: Garnish and Serve

    Finally, remove the skillet from the heat. Squeeze a fresh lime over the dish and sprinkle with the remaining feta and some chopped cilantro. Serve it warm, maybe alongside some crusty bread or over a bed of rice. Dig in and enjoy every creamy, comforting bite!

    Tips for Success

    • Always use fresh shrimp for the best flavor; it’s worth the effort!
    • Don’t skip the lime juice—it’s the secret to brightening up the dish!
    • Prep your ingredients ahead of time to make cooking quicker and smoother.
    • Feel free to adjust the spices based on your family’s taste preferences.
    • If you want a thicker sauce, let it simmer a bit longer before adding the cheese.

    Equipment Needed

    • Large skillet: A non-stick skillet works wonders, but any large pan will do.
    • Wooden spoon: Perfect for stirring without scratching your pan. A spatula is a good alternative!
    • Measuring cups: For accurate ingredient amounts. You can eyeball it if you prefer!
    • Cutting board: Ideal for prepping your veggies and shrimp.

    Variations of Shrimp and Creamed Corn

    • Add spice: For a kick, try adding diced jalapeños or a few dashes of hot sauce. This gives the dish an extra zing that heat lovers will adore!
    • Vegetarian option: Swap the shrimp with sautéed mushrooms or chickpeas for a hearty vegetarian dish. You’ll still enjoy the creamy goodness!
    • Coconut twist: Replace half-and-half with coconut milk for a tropical flair. It adds a delightful sweetness paired with the corn.
    • Herbal infusion: Experiment with different fresh herbs like basil or parsley instead of cilantro. Fresh flavors can change the game!
    • Cheesy upgrade: If you’re a cheese lover, try adding a blend of shredded cheeses like cheddar or Monterey Jack for an even creamier texture.

    Serving Suggestions for Shrimp and Creamed Corn

    • Crusty bread: Serve with warm, crusty baguette or garlic bread for dipping into the creamy sauce.
    • Rice: A bed of fluffy white or brown rice absorbs every delicious drop of the sauce.
    • Green salad: Pair with a light green salad to balance the richness of the dish.
    • White wine: Enjoy a chilled glass of Sauvignon Blanc or Pinot Grigio for an elegant touch!

    FAQs about Shrimp and Creamed Corn

    Can I use frozen shrimp in this recipe?

    Absolutely! Frozen shrimp can still deliver great flavor. Just be sure to thaw it thoroughly and pat it dry before cooking to avoid excess moisture.

    How can I make Shrimp and Creamed Corn spicier?

    For those who enjoy a little heat, add extra chili powder or even a pinch of cayenne pepper. You can also toss in diced jalapeños for a fresh burst of spice!

    What can I serve with Shrimp and Creamed Corn?

    This dish pairs wonderfully with crusty bread, fluffy rice, or a fresh green salad. All these options help soak up that creamy sauce!

    Is this dish suitable for meal prep?

    Yes! You can make Shrimp and Creamed Corn ahead of time and store it in the fridge. Just reheat gently, making sure not to overcook the shrimp on reheating.

    Can I substitute the feta cheese?

    Certainly! If you’re not a fan of feta, feel free to use goat cheese or even a blend of shredded cheeses for a different flavor profile. The creaminess will still shine through!

    Final Thoughts

    Preparing Shrimp and Creamed Corn is truly a delightful experience that warms both the heart and stomach. The spellbinding blend of succulent shrimp and the sweet, creamy corn never fails to impress friends and family alike. I love that it’s not just a meal; it’s a solution for my hectic days, reminding me that cooking can be simple yet spectacular. Each spoonful is a reminder of the joy of home-cooked comfort food, perfect for gatherings or a quiet dinner at home. Trust me, once you try this dish, it will quickly become a beloved recipe in your kitchen!


    Print

    clock clock iconcutlery cutlery iconflag flag iconfolder folder iconinstagram instagram iconpinterest pinterest iconfacebook facebook iconprint print iconsquares squares iconheart heart iconheart solid heart solid icon

    Description

    Shrimp and Creamed Corn is a deliciously creamy dish made with fresh shrimp, sweet corn, and a rich sauce, perfect for a comforting meal.


    • 1.5 lb raw shrimp (peeled and deveined)
    • 1 cup half-and-half
    • 1.5 cups cooked corn kernels
    • 2 tablespoons olive oil
    • 2 tablespoons salted butter
    • ½ cup chopped onion
    • 5 cloves garlic (minced)
    • 1 teaspoon chili powder
    • 1 teaspoon smoked paprika
    • 4 oz feta cheese (divided)
    • Fresh cilantro and lime for garnish

    1. Heat a large skillet over medium heat. Add olive oil and butter until melted.
    2. Sauté the onion until translucent (3–4 minutes), then add garlic and cook for another minute.
    3. Add shrimp, chili powder, and salt; cook until shrimp turn pink (3–4 minutes).
    4. Stir in corn and smoked paprika until combined.
    5. Pour in half-and-half; simmer for 3–5 minutes until slightly thickened.
    6. Mix in half of the crumbled feta; remove from heat.
    7. Garnish with lime juice, remaining feta, and fresh cilantro before serving.

    Notes

    • Make sure the shrimp are fresh for the best flavor.
    • This dish pairs well with crusty bread or over rice.
    • Adjust the amount of chili powder according to your heat preference.
    • Prep Time: 10 minutes
    • Cook Time: 20 minutes
    • Category: Main Course
    • Method: Skillet
    • Cuisine: American

    Nutrition

    • Serving Size: 1 serving
    • Calories: 400
    • Sugar: 3g
    • Sodium: 800mg
    • Fat: 20g
    • Saturated Fat: 10g
    • Unsaturated Fat: 8g
    • Trans Fat: 0g
    • Carbohydrates: 35g
    • Fiber: 3g
    • Protein: 25g
    • Cholesterol: 200mg

    Sharing is caring!

  • Zesty Lime & Turkey Salad Bowl

    Zesty Lime & Turkey Salad Bowl


    Introduction to Zesty Lime & Turkey Salad Bowl

    Hey there, fellow food lovers! As a busy mom and passionate home cook, I know just how challenging it can be to whip up something delicious yet nutritious amidst the whirlwind of daily life. That’s where my Zesty Lime & Turkey Salad Bowl comes in! Packed with vibrant flavors and wholesome ingredients, this salad is perfect for a quick lunch or a light dinner. You can enjoy it while still feeling refreshed and satisfied. So, grab your ingredients, and let’s dive into this delightful recipe that’ll brighten your mealtime and nourish your body!

    Why You’ll Love This Zesty Lime & Turkey Salad Bowl

    This Zesty Lime & Turkey Salad Bowl is the answer to your meal prep woes! It’s quick, taking just 25 minutes from start to finish, making it a lifesaver for busy evenings. The ground turkey brings protein and flavor, while the zesty lime dressing adds a refreshing kick. Plus, it’s customizable! You can easily swap in your favorite veggies or add spice to suit your family’s taste. Trust me, you’ll fall in love with this vibrant dish!

    Ingredients for Zesty Lime & Turkey Salad Bowl

    Let’s gather the colorful ingredients for this Zesty Lime & Turkey Salad Bowl that not only excite your taste buds but also provide essential nutrients. Here’s what you’ll need:

    • Ground turkey: Lean and packed with protein, it’s the main star here.
    • Olive oil: For sautéing the turkey, adding healthy fats.
    • Garlic powder: A quick way to infuse flavor without chopping garlic.
    • Onion powder: Enhances the savory taste of the turkey effortlessly.
    • Cumin: This earthy spice adds warmth and a touch of depth.
    • Salt and pepper: Essential seasonings to bring everything together.
    • Limes: Their juice offers a bright, zesty flavor that uplifts the salad.
    • Mixed salad greens: A colorful blend of spinach, arugula, and romaine provides crunch and nutrients.
    • Cherry tomatoes: Sweet and juicy, they add pops of color and flavor.
    • Avocado: Creamy texture and healthy fats make this salad even more hearty.
    • Black beans: They add protein and fiber, helping you feel full longer.
    • Corn: Sweet bites for a delightful crunch.
    • Red onion: A bit of sharpness that contrasts beautifully with the other ingredients.
    • Jalapeño: For those who like a little spice, this optional addition brings heat.
    • Fresh cilantro: A flavorful herb garnish that adds brightness.

    You can find these ingredients at your local grocery store, and remember, feel free to get creative! Customize with different veggies or even a different protein if turkey isn’t your thing. Exact quantities are available at the bottom of the article for easy printing!

    How to Make Zesty Lime & Turkey Salad Bowl

    Step 1: Prepare the Turkey

    To start your Zesty Lime & Turkey Salad Bowl, heat two tablespoons of olive oil in a large skillet over medium heat. Once the oil is shimmering, add one pound of ground turkey. Cook it for about 6-8 minutes, breaking it apart with a spatula. You’ll know it’s done when it’s nicely browned and no longer pink. Then, stir in one teaspoon each of garlic powder, onion powder, and cumin, along with salt and pepper to suit your taste. Let those spices meld with the turkey for another 2-3 minutes until everything is well-seasoned and aromatic. Trust me, the smell is irresistible! Once cooked, remove the skillet from heat and let the turkey cool slightly. This step is quick, and it sets a flavorful foundation for your salad bowl!

    Step 2: Whisk the Zesty Lime Dressing

    While your turkey is cooling, let’s make the zesty lime dressing that will bring this whole dish together. In a small bowl, squeeze the juice of two limes. Add a pinch of salt and a few cracks of freshly ground black pepper. Whisk them together until it’s well combined, and the aroma of the limes fills the air. This dressing is what adds that refreshing kick and brightens all the flavors in the salad! Taste it and adjust seasoning if needed; you want it to sing with bright zest!

    Step 3: Assemble the Salad Bowl

    Now comes the fun part! Grab a large salad bowl and add 4 cups of mixed salad greens—think spinach, arugula, and romaine, for a delightful crunch. Next, layer on that cooked turkey. Follow it up with a generous handful of halved cherry tomatoes. Then, add in the creamy diced avocado, rinsed black beans for extra protein, and sweet corn for texture. Don’t forget to sprinkle in some thinly sliced red onion. If you crave a little heat, toss in those jalapeño slices. Trust me, this colorful medley isn’t just a feast for your taste buds but also a visual delight!

    Step 4: Toss and Serve

    Finally, it’s time to drizzle your zesty lime dressing over your beautiful salad creation. Gently toss all the ingredients together, making sure each bite is coated in that incredible lime flavor. Garnish with a sprinkle of fresh cilantro on top, giving it that final touch! Serve this Zesty Lime & Turkey Salad Bowl immediately, while everything is fresh and vibrant. Each bite will be a balanced melody of flavors that’ll have you craving more!

    Tips for Success

    • Prep all ingredients before cooking to streamline the process.
    • Feel free to substitute ground turkey with chicken or tofu for variety.
    • Add a splash of hot sauce for an extra kick if you love spice!
    • Store any leftover turkey separately to maintain freshness.
    • Make the dressing ahead of time for even quicker meal prep!

    Equipment Needed

    • Large skillet: A non-stick or stainless-steel skillet works well.
    • Small bowl: For whisking the dressing; any mixing bowl will do.
    • Spatula: To break up and stir the turkey.
    • Salad bowl: A large bowl for combining all ingredients.
    • Whisk: If you don’t have one, a fork will work in a pinch!

    Variations for Zesty Lime & Turkey Salad Bowl

    • Protein Swap: Substitute ground turkey with shredded chicken, beef, or plant-based options like crumbled tempeh or chickpeas for a twist.
    • Veggie Boost: Add extra vegetables like bell peppers, cucumbers, or carrots for added crunch and color.
    • Grain Base: Serve it over cooked quinoa, brown rice, or couscous for added heartiness and fiber.
    • Vegan Option: Use vegetarian ground meat or quinoa instead of turkey, and opt for maple syrup in the dressing for sweetness.
    • Herb Infusion: Experiment with fresh herbs such as basil or mint for a unique flavor profile.
    • Cheese Lovers: Crumble feta or sprinkle cotija cheese on top for a salty pop!

    Serving Suggestions

    • Pair your Zesty Lime & Turkey Salad Bowl with whole-grain pita bread or warm tortillas for a satisfying meal.
    • A glass of chilled sparkling water with a slice of lime enhances the refreshing vibe.
    • For a pop of color, serve on a vibrant, large plate to showcase all those beautiful ingredients.

    FAQs about Zesty Lime & Turkey Salad Bowl

    Can I make the Zesty Lime & Turkey Salad Bowl ahead of time? Absolutely! You can prepare the turkey and dressing in advance. Just store them separately in airtight containers in the fridge. When you’re ready to eat, simply assemble the salad.

    Is this salad suitable for meal prep? Yes! This Zesty Lime & Turkey Salad Bowl is perfect for meal prep. Each ingredient holds up well in the fridge for a few days, making it easy to grab for lunch during the week.

    Can I customize the ingredients? Definitely! Feel free to swap in your favorite vegetables or proteins. Toss in some bell peppers, cucumbers, or even grilled shrimp for a new twist!

    How can I make this salad spicier? If you love a kick, add more jalapeños or even a pinch of cayenne pepper. You can also drizzle some hot sauce over your salad before serving for an extra zing.

    What can I serve with this salad? Consider pairing it with whole-grain pita chips or a light soup. A refreshing drink like iced tea or sparkling water can complement the meal beautifully!

    Final Thoughts

    The Zesty Lime & Turkey Salad Bowl is more than just a meal; it’s an experience that lifts your spirits and nourishes your body. Each bite is like a burst of sunshine, reminding you that healthy eating doesn’t have to be boring or time-consuming. I love how versatile it is, making it easy to mix and match ingredients based on what’s in the fridge. Whether it’s a quick lunch or a dinner standout, this salad truly makes mealtime joyful. Trust me, once you try it, you’ll want to bring a little zesty freshness back to your table every week!


    Print

    clock clock iconcutlery cutlery iconflag flag iconfolder folder iconinstagram instagram iconpinterest pinterest iconfacebook facebook iconprint print iconsquares squares iconheart heart iconheart solid heart solid icon

    Description

    A refreshing and nutritious salad bowl featuring ground turkey, mixed greens, and a zesty lime dressing.


    • 1 pound ground turkey
    • 2 tablespoons olive oil
    • 1 teaspoon garlic powder
    • 1 teaspoon onion powder
    • 1 teaspoon cumin
    • Salt and pepper to taste
    • Juice of 2 limes
    • 4 cups mixed salad greens (spinach, arugula, and romaine)
    • 1 cup cherry tomatoes, halved
    • 1 avocado, diced
    • 1/2 cup black beans, rinsed and drained
    • 1/2 cup corn (canned or frozen)
    • 1/4 cup red onion, thinly sliced
    • 1 jalapeño, sliced (optional for spice)
    • Fresh cilantro, for garnish

    1. In a large skillet, heat the olive oil over medium heat. Add the ground turkey and cook until browned, about 6-8 minutes. Stir in the garlic powder, onion powder, cumin, salt, and pepper. Cook for another 2-3 minutes until the turkey is well seasoned and fully cooked. Remove from heat and let it cool slightly.
    2. In a small bowl, whisk together the lime juice, a pinch of salt, and freshly ground black pepper. Adjust seasoning to taste.
    3. In a large salad bowl, add the mixed salad greens. Top with the cooked turkey, cherry tomatoes, avocado, black beans, corn, red onion, and jalapeño slices if using.
    4. Drizzle the lime dressing over the salad mixture. Gently toss everything together until well combined.
    5. Garnish with fresh cilantro and serve immediately. Enjoy your refreshing and nutritious Lime & Turkey Salad Bowl!

    Notes

    • This salad can be customized with your choice of vegetables.
    • Make it ahead of time by preparing the turkey and dressing separately.
    • Leftover turkey can be stored for up to 3 days in the refrigerator.
    • Prep Time: 15 minutes
    • Cook Time: 10 minutes
    • Category: Salad
    • Method: Stovetop
    • Cuisine: American

    Nutrition

    • Serving Size: 1 bowl
    • Calories: 400
    • Sugar: 2g
    • Sodium: 300mg
    • Fat: 18g
    • Saturated Fat: 3g
    • Unsaturated Fat: 12g
    • Trans Fat: 0g
    • Carbohydrates: 35g
    • Fiber: 9g
    • Protein: 30g
    • Cholesterol: 90mg

    Sharing is caring!

  • Chocolate Chip Butter Swim Biscuits

    Chocolate Chip Butter Swim Biscuits


    Introduction to Chocolate Chip Butter Swim Biscuits

    As a busy mom, I understand the challenge of finding quick meals that also satisfy the sweet tooth of my family. That’s where these Chocolate Chip Butter Swim Biscuits come to the rescue! Not only are they easy to whip up, but they also deliver a delightful burst of flavor. Imagine golden, buttery biscuits studded with chocolate chips, perfectly soft and rich. They are a treat that the whole family will love, and they make for a wonderful brunch or afternoon snack. Join me in this baking adventure, and let’s create some delicious memories together!

    Why You’ll Love This Chocolate Chip Butter Swim Biscuits

    These Chocolate Chip Butter Swim Biscuits are truly a lifesaver in the kitchen! They come together in just 40 minutes, making them a fantastic choice for busy weekdays or surprise guests. The buttery goodness combined with gooey chocolate makes every bite irresistibly tasty. Plus, you don’t need fancy skills to make them. It’s as simple as mix, bake, and enjoy—a delicious reward for minimal effort!

    Ingredients for Chocolate Chip Butter Swim Biscuits

    When it comes to Chocolate Chip Butter Swim Biscuits, simplicity is key! Here’s what you’ll need:

    • All-purpose flour: The foundation of your biscuits. It gives them structure and that delightful fluffy texture.
    • Semi-sweet chocolate chips: These little morsels add a touch of sweetness and satisfaction. You can use dark chocolate for a richer flavor!
    • Baking powder: This is your magic leavening agent! It helps your biscuits rise and gives them that light, airy quality.
    • Granulated sugar: Just a tablespoon is enough to enhance the overall sweetness without overwhelming the chocolate.
    • Kosher salt: A pinch of salt helps to balance and elevate the flavors in your biscuits.
    • Buttermilk: This ingredient is what makes the biscuits moist and tender. If you don’t have any, you can substitute with milk mixed with a splash of vinegar or lemon juice.
    • Unsalted butter: Melted butter adds richness and contributes to that irresistible buttery flavor. Make sure it’s unsalted, so you control the saltiness.

    For exact measurements, check the bottom of the article where you can find them ready for printing. Creating these scrumptious biscuits is a breeze with just a handful of straightforward ingredients!

    How to Make Chocolate Chip Butter Swim Biscuits

    Now that we have our ingredients ready, let’s dive into making these delightful Chocolate Chip Butter Swim Biscuits! I’ll walk you through each step to ensure your biscuits turn out perfectly fluffy and delicious.

    Step 1: Preheat the Oven

    First things first, let’s preheat that oven to a blazing 450°F. Preheating is crucial because it ensures your biscuits rise and bake evenly. That gorgeous golden color you’re dreaming of starts right here!

    Step 2: Mix the Dry Ingredients

    In a medium bowl, whisk together the all-purpose flour, baking powder, granulated sugar, and kosher salt. Make sure all the crumbs are evenly combined, as this will give us light, airy biscuits. You want to feel like a whisking wizard—as if your bowl is a cauldron bubbling with potential!

    Step 3: Add the Buttermilk

    Now, it’s time for the star of the show: the buttermilk. Pour it into the bowl with your dry ingredients. But be gentle! Stir until just combined. Overmixing can turn your biscuits into unwelcome hockey pucks. We want them fluffy and tender, not tough!

    Step 4: Prepare the Baking Dish

    Grab an 8×8-inch baking dish and pour in the melted unsalted butter. This layer of butter is magic; it will create a pool that makes each biscuit swim in flavor. Spread it evenly so every biscuit gets its buttery share.

    Step 5: Shape and Score the Dough

    Now for some fun! Using a spatula or your hands, spread the dough over the butter, making sure to reach the edges. It might get a little sticky, but don’t stress. Just go with the flow! Once nicely spread, score the dough into equal squares—think of a tic-tac-toe board! This helps them bake evenly and makes serving a breeze.

    Step 6: Top with Chocolate Chips

    Time to get creative! Sprinkle the remaining chocolate chips on top. Feel free to add more if you want to double down on that chocolatey goodness. This is your chance to express your love for chocolate—go wild!

    Step 7: Bake to Perfection

    Pop the baking dish into the oven and let those beauties bake for 28-30 minutes. You’ll know they’re done when they’re golden brown and your house smells heavenly. A gentle poke in the center should feel firm. If it’s still gooey, give them a few more minutes!

    Step 8: Allow to Absorb Butter and Serve

    Once out of the oven, resist the urge to dig in immediately! Let those biscuits sit and absorb the melted butter for a few moments. This step is crucial—it packs in that rich buttery flavor that pairs oh-so-well with the chocolate chips. Now, serve and watch those smiles light up the room!

    Tips for Success

    • Keep the dough mix gentle; overmixing will lead to dense biscuits.
    • Use fresh baking powder for the best rise and texture.
    • Let the butter swim a little longer for extra flavor absorption.
    • Experiment with different chocolate chip varieties for unique tastes.
    • Don’t skip the cooling step—it’s essential for that melt-in-your-mouth effect!

    Equipment Needed for Chocolate Chip Butter Swim Biscuits

    • Mixing bowl: A large bowl works best. If you don’t have one, a saucepan can do the trick.
    • Whisk: Essential for mixing dry ingredients. A fork can serve as a substitute in a pinch!
    • Baking dish: An 8×8-inch dish is perfect, but any similar-sized baking pan will do.
    • Spatula: For spreading the dough. A flexible rubber spatula is ideal, but a wooden spoon can work too.

    Variations of Chocolate Chip Butter Swim Biscuits

    • Nutty Addition: Toss in some chopped walnuts or pecans for an extra crunch and flavor.
    • Fruit Infusion: Mix in dried fruits like cranberries or blueberries for a tart twist alongside the chocolate.
    • Flavor Boost: Add a teaspoon of vanilla extract or almond extract to enhance the overall flavor profile.
    • Gluten-Free Option: Substitute all-purpose flour with a gluten-free blend; just ensure your baking powder is also gluten-free.
    • Vegan Version: Use plant-based butter and a non-dairy milk alternative to make it vegan-friendly.

    Serving Suggestions for Chocolate Chip Butter Swim Biscuits

    • Serve warm with a drizzle of honey or maple syrup for an added touch of sweetness.
    • Pair with a hot cup of coffee or a chilled glass of milk—perfect for dipping!
    • Present them on a pretty platter topped with fresh berries for a colorful touch.
    • Make them a brunch favorite by serving alongside scrambled eggs or bacon.
    • For dessert, scoop a dollop of whipped cream or vanilla ice cream on top!

    FAQs about Chocolate Chip Butter Swim Biscuits

    As a passionate home cook, I often get questions about these delightful Chocolate Chip Butter Swim Biscuits. Let’s take a moment to address some common queries to help you whip up a perfect batch!

    Can I use regular milk instead of buttermilk?

    Yes! You can easily substitute regular milk by adding a splash of vinegar or lemon juice to create a buttermilk-like acidity. This helps keep the biscuits moist.

    How should I store leftover biscuits?

    To keep your leftovers fresh, store them in an airtight container at room temperature. They’ll stay delicious for a day or two, but trust me, they probably won’t last that long!

    Can I freeze the biscuits?

    Absolutely! To freeze, allow the biscuits to cool completely. Then wrap them tightly in plastic wrap and place them in a freezer-safe bag. Reheat in the oven when you’re ready to enjoy!

    Why are my biscuits dense instead of fluffy?

    Density usually results from overmixing the dough. Be sure to stir until just combined for that light, airy texture we all crave!

    What can I substitute for chocolate chips?

    Get creative! You can use chunks of white chocolate, caramel bits, or even peanut butter chips for a different flavor twist. The options are endless!

    Final Thoughts

    There’s something truly magical about pulling a pan of Chocolate Chip Butter Swim Biscuits out of the oven. The delight in my family’s eyes as they take their first bite is a moment I cherish. These biscuits not only satisfy cravings but also create heartfelt memories. The simplicity of the recipe allows busy lives to enjoy wholesome treats. Whether it’s a cozy breakfast or an afternoon snack, they are sure to bring smiles all around. So, roll up your sleeves, gather your loved ones, and dive into this delicious baking adventure together!


    Print

    clock clock iconcutlery cutlery iconflag flag iconfolder folder iconinstagram instagram iconpinterest pinterest iconfacebook facebook iconprint print iconsquares squares iconheart heart iconheart solid heart solid icon

    Description

    Chocolate Chip Butter Swim Biscuits are delicious and indulgent biscuits that are easy to make and perfect for any occasion.


    • 2 ½ cups (312.5 g) all-purpose flour
    • 1 ¼ cups (227.5 g) semi-sweet chocolate chips, divided
    • 4 teaspoons baking powder
    • 1 tablespoon granulated sugar
    • ¼ teaspoon kosher salt
    • 2 cups (490 g) buttermilk
    • ½ cup (113 g) unsalted butter, melted

    1. Preheat oven to 450°F.
    2. In a medium bowl, whisk together the flour, 1 cup chocolate chips, baking powder, sugar, and salt.
    3. Pour in the buttermilk. Stir until mostly combined, being careful not to overwork the dough.
    4. Pour the melted butter into an 8×8-inch baking dish. Place the dough on top of the butter. Using a spatula (or your hands), evenly spread the dough out to the edges of the pan.
    5. Score the unbaked dough into 9 equal squares (3×3 pattern). Top with the remaining chocolate chips.
    6. Bake for 28-30 minutes, or until the biscuits are golden brown.
    7. After removing the biscuits from the oven, allow the butter mixture to be absorbed.
    8. Serve.

    Notes

    • Don’t overmix the dough to keep the biscuits fluffy.
    • Store leftovers in an airtight container at room temperature.
    • Prep Time: 10 minutes
    • Cook Time: 30 minutes
    • Category: Baking
    • Method: Baking
    • Cuisine: American

    Nutrition

    • Serving Size: 1 biscuit
    • Calories: 250
    • Sugar: 12 g
    • Sodium: 220 mg
    • Fat: 12 g
    • Saturated Fat: 7 g
    • Unsaturated Fat: 3 g
    • Trans Fat: 0 g
    • Carbohydrates: 34 g
    • Fiber: 1 g
    • Protein: 3 g
    • Cholesterol: 30 mg

    Sharing is caring!

  • Cajun Chicken with Bell Peppers

    Cajun Chicken with Bell Peppers


    Introduction to Cajun Chicken with Bell Peppers

    Life gets busy, doesn’t it? Between work, kids, and everything else, finding time to cook can feel like a race against the clock. That’s where my favorite recipe, Cajun Chicken with Bell Peppers, comes in. This dish is a vibrant explosion of flavors that’s quick to whip up, making it a perfect solution for a hectic day. With its zesty Cajun spices, tender chicken, and colorful veggies, this meal will not only satisfy your taste buds but also impress your loved ones. So, let’s dive into this delightful culinary adventure together!

    Why You’ll Love This Cajun Chicken with Bell Peppers

    This Cajun Chicken with Bell Peppers is all about convenience without compromising flavor. In just 35 minutes, you can have a mouthwatering meal that’s full of zest and color. Imagine the joy of serving a dish that’s not only quick but also healthy and low-calorie. Plus, the kids will love the sweet bell peppers, making it a fantastic choice for the whole family!

    Ingredients for Cajun Chicken with Bell Peppers

    Gathering the right ingredients is half the journey to creating this flavor-packed dish. Here’s what you’ll need:

    • Boneless, skinless chicken breasts: Tender and lean, perfect for soaking up the Cajun flavors.
    • Olive oil: A healthy fat that helps create a lovely sear on the chicken and sauté the veggies.
    • Cajun seasoning: The star of the show! You can grab a store-bought blend or make your own. This spice mix adds that bold, savory kick.
    • Garlic powder: Adds depth and richness to the dish. Use fresh if you have it for an extra flavor boost!
    • Onion powder: Another layer of savory goodness that complements the Cajun spices.
    • Paprika: It brings smokiness and a warm color to your dish, enhancing the visual appeal.
    • Dried thyme: This herb adds a delightful earthiness that’s aromatic and flavorful.
    • Salt and black pepper: Essential seasonings that enhance all the flavors. Adjust according to your taste.
    • Bell peppers: You can choose red, green, or yellow for sweetness and crunch. They add color and nutrition.
    • Onion: Sliced onions lend sweetness and flavor when sautéed.
    • Fresh garlic: Minced garlic brings a punch of flavor that can’t be beat.
    • Fresh parsley or cilantro: Optional garnish that adds a pop of freshness and color to the finished dish.

    For exact measurements, don’t forget to check the end of the article where I’ve got everything available for printing. Now, let’s get cooking!

    How to Make Cajun Chicken with Bell Peppers

    Cooking up a storm can feel daunting, but making Cajun Chicken with Bell Peppers is straightforward and fun. Let’s break it down into easy steps to navigate through your culinary creation smoothly. Grab your apron, and let’s get started!

    Step 1: Prepare the Cajun Spice Mix

    In a small bowl, mix together your Cajun seasoning, garlic powder, onion powder, paprika, thyme, salt, and pepper. This homemade spice blend packs a punch! Coat each chicken breast evenly in the mix, ensuring every inch is flavorful. You’ll be amazed at how these spices transform the chicken into something extraordinary.

    Step 2: Cook the Chicken

    Heat 2 tablespoons of olive oil in a large skillet over medium-high heat. Once it’s hot, add the seasoned chicken breasts. Cook them for about 6-7 minutes on each side, or until they’re golden brown and cooked through. Don’t rush this step; that beautiful sear adds flavor and texture, making each bite irresistible!

    Step 3: Sauté the Vegetables

    In the same skillet, pour in another tablespoon of olive oil, letting it heat up. Toss in the sliced bell peppers and onions, sautéing them for 5-6 minutes. You want them tender yet still vibrant. Add minced garlic and cook for another 1-2 minutes until aromatic. This combination of veggies is where the magic starts to happen!

    Step 4: Combine and Finish Cooking

    Once your peppers and onions are perfectly sautéed, slice the cooked chicken into thin strips. Return it to the skillet, tossing everything together to blend those yummy flavors. Let it cook together for 2-3 minutes to meld the spices, ensuring every bite is a delightful burst of Cajun goodness.

    Tips for Success

    • For extra flavor, marinate the chicken in the spice mix for 30 minutes before cooking.
    • If you love heat, add some cayenne pepper to the spice blend for an extra kick!
    • Make sure your skillet is hot before adding the chicken to achieve that perfect sear.
    • Don’t overcrowd the skillet; work in batches if needed for even cooking.
    • Serve promptly to enjoy the fresh flavors at their best!

    Equipment Needed

    • Large skillet: A non-stick or cast-iron skillet works well for even cooking.
    • Small mixing bowl: To easily combine your spice mix.
    • Cutting board: Essential for slicing chicken and vegetables safely.
    • Kitchen knife: A sharp knife will make prep quick and easy.
    • Spatula: Perfect for flipping and tossing the chicken and veggies around.

    Variations

    • Swap the protein: Try shrimp or tofu for a different twist on this dish. Both options absorb the Cajun flavors beautifully.
    • Add heat: For spicy lovers, toss in some sliced jalapeños or a dash of hot sauce during cooking.
    • Seasonal veggies: Use seasonal produce such as zucchini or asparagus for a fresh spin. Just sauté them alongside the bell peppers!
    • Low-carb option: Serve the chicken and veggies over cauliflower rice instead of traditional rice or pasta for a lighter meal.
    • Vegan version: Substitute chicken with hearty mushrooms or tempeh and use vegetable broth for sautéing.

    Serving Suggestions

    • Serve your Cajun Chicken with Bell Peppers over fluffy rice or pasta for a satisfying meal.
    • Pair with a crisp, green salad for a refreshing side that balances the spices.
    • For a cozy touch, present the dish in colorful bowls, garnished with fresh herbs.
    • A glass of chilled white wine complements the flavors beautifully.
    • Don’t forget some crusty bread to soak up those delicious juices!

    FAQs about Cajun Chicken with Bell Peppers

    As you whip up this delicious Cajun Chicken with Bell Peppers, you might find yourself with a few questions. Don’t worry—I’ve got you covered!

    Can I use chicken thighs instead of breasts?

    Absolutely! Chicken thighs add extra moisture and flavor. Just adjust the cooking time slightly, as they may take a bit longer to cook through.

    How spicy is Cajun chicken?

    The spice level can vary based on your Cajun seasoning. For a milder dish, use less seasoning or a milder blend. If you like heat, feel free to add some cayenne pepper!

    Can I customize the vegetables?

    You sure can! Feel free to mix in your favorite veggies, like zucchini or mushrooms. They’ll soak up all the lovely Cajun flavors!

    How do I store leftovers?

    Store any leftovers in an airtight container in the fridge for up to three days. They reheat beautifully and make for a fantastic next-day lunch.

    What should I serve with this dish?

    Cajun Chicken with Bell Peppers pairs wonderfully with rice, pasta, or a fresh salad. The juices are delicious, so don’t forget some crusty bread to soak them up!

    Final Thoughts

    Cajun Chicken with Bell Peppers isn’t just a recipe; it’s a culinary hug that warms the heart and satisfies the soul. I can’t tell you how many times this dish has saved me from the chaos of a busy week. With its blend of bold flavors and simple preparation, it makes every dinner feel special. Plus, the smiles from my family as they savor each bite are truly priceless. So, the next time you’re in a pinch for a meal, remember this delight. It’s a wonderful reminder that comforting, delicious food doesn’t have to be complicated!


    Print

    clock clock iconcutlery cutlery iconflag flag iconfolder folder iconinstagram instagram iconpinterest pinterest iconfacebook facebook iconprint print iconsquares squares iconheart heart iconheart solid heart solid icon

    Description

    A delicious Cajun Chicken dish served with sautéed bell peppers and onions, perfect for a flavorful meal.


    • 4 boneless, skinless chicken breasts
    • 2 tablespoons olive oil
    • 1 tablespoon Cajun seasoning (store-bought or homemade)
    • 1 teaspoon garlic powder
    • 1 teaspoon onion powder
    • 1 teaspoon paprika
    • ½ teaspoon dried thyme
    • ½ teaspoon salt
    • ½ teaspoon black pepper
    • 2 bell peppers (red, green, or yellow), sliced
    • 1 medium onion, sliced
    • 2 cloves garlic, minced
    • 1 tablespoon olive oil (for sautéing)
    • Fresh parsley or cilantro, chopped (optional)

    1. In a small bowl, mix together the Cajun seasoning, garlic powder, onion powder, paprika, thyme, salt, and pepper. Coat the chicken breasts evenly with the spice mix.
    2. Heat 2 tablespoons of olive oil in a large skillet over medium-high heat. Add the chicken breasts and cook for 6-7 minutes per side, or until the chicken is fully cooked through and has a nice golden-brown sear. Remove the chicken from the skillet and set aside.
    3. In the same skillet, add 1 tablespoon of olive oil. Add the sliced bell peppers and onions, and sauté over medium heat for about 5-6 minutes, or until they begin to soften. Add the minced garlic and cook for another 1-2 minutes until fragrant.
    4. Slice the cooked chicken breasts into thin strips and return them to the skillet with the peppers and onions. Toss everything together and cook for another 2-3 minutes to ensure the flavors meld.
    5. Garnish with fresh parsley or cilantro if desired, and serve the dish hot.

    Notes

    • This dish can be served over rice or pasta for a heartier meal.
    • Adjust the amount of Cajun seasoning based on your desired spice level.
    • Leftovers can be stored in an airtight container in the refrigerator for up to 3 days.
    • Prep Time: 10 minutes
    • Cook Time: 25 minutes
    • Category: Main Course
    • Method: Skillet
    • Cuisine: Cajun

    Nutrition

    • Serving Size: 1 serving
    • Calories: 350
    • Sugar: 3g
    • Sodium: 690mg
    • Fat: 15g
    • Saturated Fat: 2g
    • Unsaturated Fat: 10g
    • Trans Fat: 0g
    • Carbohydrates: 8g
    • Fiber: 2g
    • Protein: 45g
    • Cholesterol: 120mg

    Sharing is caring!

  • Ground Beef And Broccoli Fried Quinoa

    Ground Beef And Broccoli Fried Quinoa


    Introduction to Ground Beef And Broccoli Fried Quinoa

    Let’s be honest; life gets busy, and finding time to whip up a delicious meal can feel like climbing a mountain. That’s where my Ground Beef And Broccoli Fried Quinoa comes to the rescue! This dish is your go-to for those evenings when you crave something hearty yet healthy. With just a handful of ingredients and minimal prep, you can impress your family and delight your taste buds. Trust me, it’s not only satisfying but also a fantastic way to sneak in some nutrients!

    Why You’ll Love This Ground Beef And Broccoli Fried Quinoa

    This Ground Beef And Broccoli Fried Quinoa meal is a lifesaver on hectic nights! It’s quick to whip up, taking only about 25 minutes from start to finish. The vibrant flavors meld beautifully, creating a dish that’s not just filling but also nutritious. Plus, it’s a one-pan wonder, making cleanup a breeze. Busy moms, rejoice! With this recipe, you’ll serve up smiles around the dinner table in no time.

    Ingredients for Ground Beef And Broccoli Fried Quinoa

    Gathering the right ingredients for your Ground Beef And Broccoli Fried Quinoa is the first step to culinary success. Each element plays a vital role in building the flavors and wholesome goodness of this dish. Here’s what you’ll need:

    • Ground Beef: A flavorful protein base that brings richness to the dish. You can use lean or regular beef, depending on your preference.
    • Broccoli Florets: These little green trees are not just colorful but packed with vitamins. They add crunch and a lovely freshness.
    • Cooked Quinoa: This fluffy, gluten-free grain acts as the star of the show, providing a delightful texture and extra protein. Make sure it’s cooked before adding!
    • Garlic: Minced garlic seeds your dish with aromatic flavor. It’s that little kick that makes the meal pop.
    • Tamari Sauce: A gluten-free soy sauce that infuses a savory depth. It’s perfect for enhancing the overall flavor of your dish.
    • Spring Onions: Also known as green onions, they add a fresh, slightly sweet bite, balancing the richness of the beef.
    • Carrot: Diced carrots sweeten the dish and bring in a delightful color contrast. They’re also a fun way to add more nutrients!
    • Olive Oil: A healthy fat used to sauté your ingredients, ensuring everything cooks evenly and deliciously.

    You can always customize this recipe by adding or swapping out vegetables. For a spicier twist, consider tossing in some crushed red pepper flakes. Want to up the greens? Spinach or bok choy can also join the party. Remember, you can find all the exact measurements for these ingredients at the bottom of the article, ready for printing!

    How to Make Ground Beef And Broccoli Fried Quinoa

    Now that you’ve gathered the ingredients, let’s dive into the fun part: cooking! This Ground Beef And Broccoli Fried Quinoa recipe is straightforward and perfect for busy nights. I promise you’ll feel like a kitchen hero by the end. Here’s how to bring this dish to life:

    Step 1: Cook the Ground Beef

    Start by heating your non-stick pan over medium to medium-high heat.

    Once it’s warm, add the ground beef.

    Cook it for about 5 to 7 minutes until the meat is browned and almost cooked through.

    I like to break it apart with my spatula as it cooks for even browning.

    Step 2: Sauté Garlic and Red Pepper

    Next, let’s amp up the flavor!

    Stir in the minced garlic and, if you’re feeling adventurous, sprinkle in some crushed red pepper.

    The warmth of the pan will release those wonderful aromas.

    Sauté for just 30 seconds or until fragrant—don’t walk away, or you’ll risk burning it!

    Step 3: Add Broccoli and Carrots

    Now, toss in the chopped broccoli florets and carrots.

    Let them cook for about 2 to 3 minutes, stirring occasionally.

    The broccoli should remain bright green and still have a crunch to it.

    This quick cooking keeps all those nutrients intact!

    Step 4: Combine with Quinoa

    It’s time to bring everything together!

    Add your cooked quinoa to the mix along with the tamari sauce.

    Stir well, so everything is evenly coated.

    This is where the dish turns into a delicious fried quinoa extravaganza!

    Step 5: Taste and Adjust Seasoning

    Before we plate up, let’s taste the magic!

    Take a small bite and see if you need more tamari or a pinch of salt.

    This dish sings as all the flavors marry together.

    If it’s not quite right, don’t hesitate to adjust to your taste!

    Step 6: Incorporate Greens and Serve

    Finally, stir in any greens you’d like to add, such as fresh cilantro or spinach.

    These greens add an extra layer of nutrition and a pop of color.

    Once everything is mixed, turn off the heat.

    Serve your Ground Beef And Broccoli Fried Quinoa immediately, and watch your family dig in!

    Tips for Success

    • Prep your ingredients ahead of time to save precious moments during cooking.
    • Use a large non-stick pan for easier mixing and less sticking.
    • Feel free to experiment with the veggies based on what’s in your fridge.
    • Don’t rush the cooking process; let the flavors develop fully.
    • Leftovers make a great lunch the next day—just reheat and enjoy!

    Equipment Needed

    • Non-Stick Pan: Essential for even cooking and easy cleanup. A cast-iron skillet works too!
    • Spatula: A wooden or silicone spatula is perfect for stirring without scratching your pan.
    • Cutting Board: Use a sturdy cutting board for chopping your veggies safely.
    • Knife: A sharp chef’s knife makes prep a breeze.
    • Measuring Cups: Handy for measuring quinoa and other ingredients, though you can eyeball it if needed!

    Variations

    • Change the Protein: Substitute ground turkey, chicken, or even tofu for a meat-free option. Each will add a unique twist!
    • Switch Up the Vegetables: Consider adding bell peppers, snap peas, or zucchini for extra crunch and color.
    • Make it Spicy: For heat lovers, add extra crushed red pepper or a drizzle of sriracha just before serving.
    • Add Nuts: Toss in some chopped cashews or peanuts for a delightful crunch and a protein boost.
    • Vegan Option: Use a plant-based ground meat alternative and skip the tamari for a soy-free sauce.

    Serving Suggestions

    • Serve with Steamed Rice: Pair your Ground Beef And Broccoli Fried Quinoa with a side of fluffy jasmine or brown rice for an extra filling meal.
    • Garnish with Sesame Seeds: A sprinkle of toasted sesame seeds adds a nutty flavor and a touch of elegance.
    • Complement with a Fresh Salad: A light, crisp salad with a zesty vinaigrette balances the richness of the dish.
    • Drink Pairings: Serve with a chilled glass of sparkling water infused with lemon or a refreshing iced tea.

    FAQs about Ground Beef And Broccoli Fried Quinoa

    As I’ve shared my love for Ground Beef And Broccoli Fried Quinoa, you might have a few lingering questions. Let’s tackle some of the most common ones! I want to make sure you feel confident and excited to try this recipe.

    Can I use uncooked quinoa instead of cooked quinoa?

    No need to worry about pre-cooking the quinoa! If you prefer to use uncooked quinoa, simply rinse it, then cook it separately according to the package instructions. Once cooked, mix it into the dish as directed.

    How can I make this dish gluten-free?

    This recipe is already gluten-free thanks to the tamari sauce. However, always read the labels on any additional sauces or ingredients to ensure they meet your dietary needs!

    What can I do with leftovers?

    Leftover Ground Beef And Broccoli Fried Quinoa makes for a fab lunch. Just store it in an airtight container in the fridge. When you’re ready to eat, simply reheat in the microwave or on the stove until warmed through.

    Can I make this dish vegetarian?

    Absolutely! Switch out the ground beef for a plant-based option like lentils, tempeh, or your favorite meat alternative. It’ll still be tasty and satisfying!

    How can I add more veggies to this recipe?

    This dish is forgiving and versatile. Feel free to toss in more vegetables like bell peppers, zucchini, or snap peas. They’ll blend seamlessly into the mix and boost the nutrition factor. Enjoy experimenting!

    Final Thoughts

    Creating a dish like Ground Beef And Broccoli Fried Quinoa brings me such joy. It’s not just about the flavors; it’s about those moments shared over dinner, laughter echoing around the table. This recipe is a lifesaver on busy nights, turning chaotic evenings into delightful culinary experiences. You’ll find comfort in its simplicity, as well as satisfaction in knowing you’ve made something nutritious for your loved ones. So, roll up your sleeves, turn on your favorite playlist, and enjoy the process. Trust me, this is one meal that will keep everyone coming back for seconds!


    Print

    clock clock iconcutlery cutlery iconflag flag iconfolder folder iconinstagram instagram iconpinterest pinterest iconfacebook facebook iconprint print iconsquares squares iconheart heart iconheart solid heart solid icon

    Description

    A delicious and healthy meal featuring ground beef, broccoli, and fried quinoa, packed with flavor and nutrients.


    • 8 oz ground beef
    • 1 cup broccoli florets, chopped
    • 1 cup cooked quinoa
    • 3 garlic cloves, minced
    • 1 1/2 Tbsp tamari sauce
    • 2 spring onions, chopped
    • 1 carrot, chopped
    • 1 Tbsp olive oil

    1. In a large non-stick pan, cook the beef for a few minutes at medium to medium-high heat until almost done. Cover with a lid if needed.
    2. Add olive oil, garlic, and crushed red pepper (spicy and optional!) and sauté until fragrant.
    3. Stir in the broccoli and let cook for 2-3 minutes. Then add the tamari sauce and stir in the carrots, spring onions, and quinoa.
    4. Have a taste and adjust for salt if needed (you can add some more tamari sauce), cook while stirring for a few more minutes.
    5. Stir in the cilantro and spinach (if desired) and turn the heat off.
    6. Serve immediately!

    Notes

    • Feel free to adjust the vegetables based on your preference.
    • This dish can be made spicy by adding more crushed red pepper.
    • Optionally, you can add other greens like spinach for added nutrition.
    • Prep Time: 10 minutes
    • Cook Time: 15 minutes
    • Category: Main Course
    • Method: Stovetop
    • Cuisine: Asian

    Nutrition

    • Serving Size: 1 serving
    • Calories: 400
    • Sugar: 2g
    • Sodium: 800mg
    • Fat: 20g
    • Saturated Fat: 7g
    • Unsaturated Fat: 10g
    • Trans Fat: 0g
    • Carbohydrates: 34g
    • Fiber: 5g
    • Protein: 25g
    • Cholesterol: 70mg

    Sharing is caring!

  • Bang Bang Chicken Bowl

    Bang Bang Chicken Bowl


    Introduction to Bang Bang Chicken Bowl

    Welcome to a culinary adventure that’s as exciting as it is easy! The Bang Bang Chicken Bowl is here to rescue your weeknight dinners. I know how hectic life can get—between work, errands, and the never-ending list of chores, it’s tough to find time to whip up a meal that everyone in the family will love. But fear not! This bowl, bursting with crispy chicken, fluffy rice, and vibrant veggies, is not just quick; it’s a dish sure to impress your loved ones. Trust me, once you try this, it will quickly become a family favorite!

    Why You’ll Love This Bang Bang Chicken Bowl

    This Bang Bang Chicken Bowl is your new secret weapon for busy weeknights. It’s incredibly easy to make, taking just 30 minutes from start to finish. The flavors in this dish are out of this world! With crispy chicken and a delightful sauce, it’s a dish that pleases even the pickiest eaters. Plus, you can customize it with your favorite vegetables. Every bite is a taste of happiness!

    Ingredients for Bang Bang Chicken Bowl

    Let’s gather our delicious ingredients for the Bang Bang Chicken Bowl! Each item plays a crucial role in creating a flavor-packed experience.

    • Boneless, skinless chicken breasts: The star of our dish! Tender and juicy, they provide the perfect base for this bowl.
    • Panko breadcrumbs: These light, crispy breadcrumbs add a delightful crunch to the chicken. Feel free to swap with regular breadcrumbs if needed.
    • Mayonnaise: A creamy component that helps to bind our flavors together and keeps the chicken juicy.
    • Sweet chili sauce: This sticky, sweet sauce brings a tangy flavor that perfectly complements the spice of sriracha.
    • Sriracha: For those who like it hot! Adjust the amount based on your preferred spice level.
    • Cooked rice: I recommend jasmine rice for its fragrant aroma and fluffy texture. It serves as a hearty base for the bowl.
    • Mixed vegetables: Think cucumbers, carrots, and bell peppers! These add vibrant color and crunch. Feel free to use your favorites or whatever you have on hand.
    • Green onions: These little beauties add freshness and a mild onion flavor, but they’re optional if you prefer simplicity.
    • Fresh cilantro: A lovely garnish that brightens up the dish with its unique flavor. Only if you’re a fan, of course!

    Want to know how much of each ingredient you’ll need? Don’t worry! The exact measurements are at the bottom of the article and ready for printing!

    How to Make Bang Bang Chicken Bowl

    Now that we have all our ingredients laid out, let’s dive into making this delightful Bang Bang Chicken Bowl. Follow these simple steps to craft a meal that’s sure to please everyone at the table!

    Step 1: Prep the Chicken

    Start by cutting the boneless, skinless chicken breasts into bite-sized pieces.

    Season them with salt and pepper for a little flavor boost. This step sets the foundation for our crispy goodness!

    Step 2: Prepare the Breading

    In one bowl, place your panko breadcrumbs.

    These will give your chicken that satisfying crunch. Keep it simple; you won’t need extra seasonings here since our sauce will do the heavy lifting!

    Step 3: Make the Bang Bang Sauce

    In a separate bowl, whisk together the mayonnaise, sweet chili sauce, and sriracha.

    Oh, this sauce is magical! Save a spoonful for drizzling later, but otherwise, we’re ready to coat our chicken.

    Step 4: Bread the Chicken

    Now, dip each piece of chicken into your creamy sauce first, coating it well.

    Then, roll it in the breadcrumbs, ensuring every surface is covered. This layering will give your chicken that irresistible crunch!

    Step 5: Fry the Chicken

    Heat a generous amount of oil in a frying pan over medium heat.

    Once hot, add the breaded chicken pieces in batches. Fry them for about 3-4 minutes on each side until they’re golden brown.

    Make sure they cook through, and allow them to drain on paper towels afterward. Trust me; your kitchen will smell heavenly!

    Step 6: Assemble the Bang Bang Chicken Bowl

    It’s time to bring it all together! Scoop a generous amount of fluffy cooked rice into each bowl.

    Top it with those crispy chicken bites and colorful mixed vegetables. Finally, drizzle the reserved Bang Bang sauce on top.

    Toss on the green onions and fresh cilantro if you’re feeling fancy. Now, it’s ready to be devoured!

    Tips for Success

    • For extra crunch, use two coatings of panko.
    • Make sure your oil is hot enough before frying to achieve that golden color.
    • Experiment with different veggies like broccoli or snap peas for variety.
    • Let the fried chicken rest on paper towels to absorb excess oil.
    • Double the sauce for dipping; it’s a crowd pleaser!

    Equipment Needed

    • Cutting board: Essential for prepping your ingredients. A sturdy one is best!
    • Knife: A sharp chef’s knife makes cutting chicken a breeze.
    • Bowls: Use two bowls—one for breading and one for the sauce. Mixing bowls work well.
    • Frying pan: A good skillet is key for frying the chicken evenly. Alternatively, an air fryer can be used for a healthier option.
    • Whisk: Handy for mixing the sauce, but a fork does the trick, too!

    Variations

    • Baked Variation: Swap frying for baking! Coat the chicken and arrange it on a baking sheet. Bake at 400°F for 20-25 minutes until golden.
    • Gluten-Free Option: Use gluten-free panko breadcrumbs and ensure your sauces are certified gluten-free for this delightful dish.
    • Vegetarian Version: Substitute chicken with crispy tofu or tempeh, and follow the same preparation steps for a plant-based bowl.
    • Spicy Kick: Add a few slices of jalapeños in the mixed veggies for an extra layer of heat! Perfect for those who love a fiery touch.
    • Sweet Addition: Toss in some pineapple chunks or mango for a hint of tropical sweetness. It balances the savory flavors beautifully!

    Serving Suggestions

    • Side Salad: Pair your Bang Bang Chicken Bowl with a light cucumber salad for a refreshing crunch.
    • Rice Variations: Try coconut rice or seasoned brown rice to elevate the bowl’s flavor profile.
    • Drink Pairing: Serve with iced green tea or a citrus-infused sparkling water for a vibrant touch.
    • Presentation: Use colorful bowls and layer the ingredients for a visually appealing dish.

    FAQs about Bang Bang Chicken Bowl

    Let’s tackle some common questions about this scrumptious Bang Bang Chicken Bowl! I remember the first time I tried making this dish, and it was filled with curiosity. Here are a few questions that might pop up in your mind:

    Can I make Bang Bang Chicken Bowl in advance?

    Absolutely! You can prep the chicken and sauce ahead of time. Store them separately in the fridge. Just fry the chicken right before serving for that crispy goodness!

    Is this recipe kid-friendly?

    Yes, this Bang Bang Chicken Bowl is super kid-friendly! The mild sweetness of the sauce combined with crispy chicken tends to win over even the pickiest eaters. You can always adjust the sriracha to make it less spicy!

    What can I substitute for rice?

    If rice isn’t your thing, feel free to swap it with quinoa or cauliflower rice. Both options provide great flavor and texture while keeping it healthy!

    How can I make the sauce spicier?

    For an extra kick, you can increase the sriracha amount in the sauce. You can also add some red pepper flakes for added heat. Spice it to your heart’s content!

    Can I use frozen vegetables?

    You sure can! Frozen mixed veggies are a convenient option. Just ensure they’re heated through before serving, and they’ll be a colorful addition to your bowl!

    Final Thoughts

    Whipping up a Bang Bang Chicken Bowl is more than just preparing a meal; it’s creating a delightful experience for both you and your loved ones. The explosion of flavors, the satisfying crunch of the chicken, and the vibrant colors—each bite is a celebration.

    I love how this recipe turns a busy weeknight into a joyful culinary adventure. Plus, it’s versatile enough to cater to everyone’s tastes and dietary needs. So go ahead, gather your ingredients, and let the magic begin. Your family will be begging for this dish on repeat!


    Print

    clock clock iconcutlery cutlery iconflag flag iconfolder folder iconinstagram instagram iconpinterest pinterest iconfacebook facebook iconprint print iconsquares squares iconheart heart iconheart solid heart solid icon

    Description

    A delicious and easy recipe for a Bang Bang Chicken Bowl featuring crispy chicken, rice, and vibrant vegetables.


    • 1 lb boneless, skinless chicken breasts
    • 1 cup panko breadcrumbs
    • 1/2 cup mayonnaise
    • 1/4 cup sweet chili sauce
    • 2 tbsp sriracha (adjust to taste)
    • 2 cups cooked rice (jasmine preferred)
    • 1 cup mixed vegetables (cucumbers, carrots, bell peppers)
    • 23 green onions, chopped (optional)
    • Fresh cilantro for garnish (optional)

    1. Start by prepping your chicken. Cut the chicken breasts into bite-sized pieces and season with salt and pepper.
    2. In one bowl, place the panko breadcrumbs.
    3. In a separate bowl, whisk together mayonnaise, sweet chili sauce, and sriracha. Set aside a small amount of this sauce for drizzling later.
    4. Dip each piece of chicken into the sauce, then into the panko breadcrumbs, ensuring they’re well-coated.
    5. Heat a generous amount of oil in a frying pan over medium heat. Once hot, fry the chicken pieces in batches until they’re golden and cooked through, about 3-4 minutes per side. Drain on paper towels.
    6. To assemble your bowls, scoop a generous amount of rice into each bowl, top with crispy chicken, and add your mixed vegetables.
    7. Drizzle the reserved Bang Bang sauce on top and finish with green onions and cilantro if desired.

    Notes

    • Feel free to adjust the spice level by varying the sriracha amount.
    • For a healthier option, consider baking the chicken instead of frying.
    • Use your favorite vegetables to customize this bowl.
    • Prep Time: 15 minutes
    • Cook Time: 15 minutes
    • Category: Main Course
    • Method: Frying
    • Cuisine: Asian

    Nutrition

    • Serving Size: 1 bowl
    • Calories: 550
    • Sugar: 6g
    • Sodium: 800mg
    • Fat: 30g
    • Saturated Fat: 4g
    • Unsaturated Fat: 20g
    • Trans Fat: 0g
    • Carbohydrates: 45g
    • Fiber: 3g
    • Protein: 30g
    • Cholesterol: 75mg

    Sharing is caring!

  • Cucumber Strawberry Salad

    Cucumber Strawberry Salad


    Introduction to Cucumber Strawberry Salad

    If you’re anything like me, summer brings a delightful urge to whip up something fresh and vibrant. Enter my Cucumber Strawberry Salad – a perfect blend of sweet strawberries and crunchy cucumbers. It’s the kind of dish that feels like a hug on a hot day, light enough not to weigh you down yet bursting with flavor. Whether you’re juggling a busy schedule or just want a quick, healthy meal, this salad is a breeze to make. Trust me, once you try it, it’ll become a summer staple in your home!

    Why You’ll Love This Cucumber Strawberry Salad

    This Cucumber Strawberry Salad is a real lifesaver for busy moms and professionals like us. It’s incredibly easy to prepare, taking just 10 minutes from start to finish. The vibrant flavors of sweet strawberries and refreshing cucumbers dance together, creating a dish that’s as delicious as it is nutritious. Plus, it’s a fantastic way to sneak in those healthy greens without anyone noticing. What’s not to love?

    Ingredients for Cucumber Strawberry Salad

    Let’s gather up the fresh, vibrant ingredients for our Cucumber Strawberry Salad. You’ll find these items are not only easy to source but also bring an array of flavors and textures to the table.

    • Strawberries: Juicy, sweet, and packed with antioxidants, these little gems are the highlight of our salad. Choose ripe ones for the best flavor!
    • Cucumber: Crisp and refreshing, cucumbers add a cool crunch that complements the sweetness of strawberries beautifully.
    • Baby Spinach: Serving as the base, baby spinach is less bitter than regular spinach. It provides a wonderful, mild flavor and nutrients.
    • Feta Cheese: Crumbled feta brings a salty tang that ties the sweetness of the fruit together. It’s creamy goodness in every bite.
    • Olive Oil: A drizzle of good quality olive oil enhances the flavors without overpowering them. It’s rich in healthy fats, too!
    • Lemon Juice: Just a splash brightens up the salad, adding a fresh zing that balances the sweetness and richness of other ingredients.
    • Salt and Pepper: Simple seasonings that elevate the overall taste, ensuring every bite is flavorful.

    Feel free to get creative! If you have nuts or seeds handy, toss them in for a delightful crunch. No baby spinach? You can use arugula or mixed greens instead. And if you’re in the mood for something different, goat cheese works beautifully in place of feta.

    Don’t forget, exact quantities for each ingredient are listed at the bottom of this article for easy reference and printing!

    How to Make Cucumber Strawberry Salad

    Making this Cucumber Strawberry Salad is as easy as pie! With just a few simple steps, you will have a delicious dish ready to enjoy. Let’s dive into the step-by-step process that’ll turn fresh ingredients into a mouthwatering, colorful salad.

    Step 1: Wash and Slice Ingredients

    First things first, let’s wash our strawberries and cucumbers. Rinse them under cold water, keeping them clean and fresh.

    For the strawberries, remove the green tops and slice them in half or quarters depending on your preference.

    The cucumbers should be thinly sliced to ensure they blend well with the other flavors.

    Slicing the ingredients evenly keeps the texture throughout the salad light and pleasant.

    Step 2: Prepare the Base

    Now, it’s time to create a cozy home for our ingredients.

    Grab a large plate or a salad bowl and layer the baby spinach as the base.

    Spread it evenly, creating a vibrant green bed that’ll cradle our colorful toppings.

    Baby spinach is mild in flavor, and it pairs wonderfully with the sweetness of the fruit.

    Step 3: Add Layering Ingredients

    Here comes the fun part!

    Gently arrange the sliced cucumbers and strawberries over the spinach.

    Alternate the two for a beautiful presentation—think of it like creating a little rainbow on your plate!

    This layering not only looks impressive but ensures that every bite has a taste of each ingredient.

    Step 4: Sprinkle with Feta Cheese

    Next, sprinkle crumbled feta cheese on top of the layered ingredients.

    The salty and creamy feta adds a lovely contrast to the sweetness of the berries.

    This ingredient is like the cherry on top—bringing all the flavors together with its rich texture.

    Step 5: Dress the Salad

    It’s time to dress our gorgeous salad!

    Drizzle olive oil and fresh lemon juice over the entire dish.

    The olive oil enhances the overall flavor, while the lemon juice brightens everything up.

    Don’t be shy—this is where the magic happens!

    Step 6: Season and Serve

    Finally, season your salad with a pinch of salt and a dash of black pepper to taste.

    Toss gently to combine them all together, but be careful—you don’t want to mush anything!

    Serve immediately while everything is fresh.

    Your kids or guests will love this refreshing dish, and trust me, they won’t even realize how healthy it is!

    Tips for Success

    • Use ripe strawberries for the sweetest flavor and juiciest bites.
    • For an extra crunch, add toasted almonds or sunflower seeds.
    • Assemble the salad just before serving to keep ingredients crisp.
    • Feel free to swap feta with goat cheese or omit it for a vegan option.
    • Experiment with herbs like mint or basil for added freshness.

    Equipment Needed

    • Cutting board: A sturdy surface for chopping your fruits and vegetables.
    • Sharp knife: Essential for slicing strawberries and cucumbers easily.
    • Salad bowl or plate: A nice way to present your salad.
    • Measuring spoons: For precise amounts of olive oil and lemon juice.

    Variations

    • Berry Medley: Mix in other berries like blueberries or raspberries for a colorful twist.
    • Nutty Addition: Sprinkle with walnuts, slivered almonds, or pecans for extra crunch and nutrition.
    • Herb Influence: Add fresh herbs like mint, basil, or parsley for a refreshing burst of flavor.
    • Grilled Touch: Toss in grilled chicken or shrimp for a heartier meal option.
    • Vegan Delight: Omit feta cheese and use a plant-based dressing for a vegan-friendly version.

    Serving Suggestions

    • Perfect Pairing: This salad goes beautifully with grilled chicken or fish for a complete meal.
    • Refreshing Beverage: Serve with a glass of iced tea or sparkling lemonade to enhance the summer vibes.
    • Presentation: Garnish with extra strawberries or cucumber ribbons for a visually stunning dish.

    FAQs about Cucumber Strawberry Salad

    Have questions? You’re not alone! Here are some common queries I’ve seen about this delightful Cucumber Strawberry Salad and their answers. Let’s dive in!

    Can I make Cucumber Strawberry Salad ahead of time?

    Absolutely! You can prep the ingredients a few hours ahead. Just keep the dressing separate until you’re ready to serve. This keeps everything fresh and crunchy, ensuring a delicious bite every time!

    What are some good additions to this salad?

    Great question! You can mix in nuts, seeds, or even additional fruits for extra flavor. Chopped mint or basil can add a refreshing twist, too. Get creative and make it your own!

    Is this salad suitable for meal prep?

    While it’s best fresh, you can prep ingredients for quick assembly later. Just store each component separately to maintain that crispness. It’s a fantastic option for busy weekdays!

    How can I make this salad more filling?

    If you’re looking to turn this into a hearty meal, consider adding grilled chicken, chickpeas, or quinoa. These easy additions will pack in protein and keep you satisfied longer!

    Can I use vine-ripened tomatoes instead of cucumbers?

    While cucumbers provide a specific crunch and refreshing taste, vine-ripened tomatoes would offer a different flavor profile. If you’re a tomato fan, go ahead, but it will change the original intent of the Cucumber Strawberry Salad a bit!

    Final Thoughts

    Creating this Cucumber Strawberry Salad is like capturing a sunny day on a plate. Each vibrant bite brings a wave of freshness that’s both uplifting and satisfying. It’s an easy recipe that invites you to enjoy simple, wholesome ingredients while connecting with loved ones over a shared meal.

    Whether you’re hosting a summer get-together or simply indulging in a light lunch, this salad will surely brighten any table. So, gather your ingredients, let your culinary spirit shine, and enjoy this delightful dish that makes healthy eating a joy rather than a chore!


    Print

    clock clock iconcutlery cutlery iconflag flag iconfolder folder iconinstagram instagram iconpinterest pinterest iconfacebook facebook iconprint print iconsquares squares iconheart heart iconheart solid heart solid icon

    Description

    A refreshing salad featuring sweet strawberries and crisp cucumbers, perfect for a light meal or side dish.


    • 1 cup strawberries, halved or quartered
    • 1 cucumber, thinly sliced
    • 4 cups baby spinach
    • 1/3 cup feta cheese, crumbled
    • 2 tbsp olive oil
    • 1 tbsp lemon juice
    • 1/4 tsp salt
    • 1/4 tsp black pepper

    1. Wash and slice strawberries and cucumbers.
    2. Arrange baby spinach on a plate or in a salad bowl.
    3. Evenly layer strawberries and cucumber slices over the spinach.
    4. Crumble feta cheese on top.
    5. Drizzle with olive oil and lemon juice.
    6. Season with salt and black pepper before serving.

    Notes

    • Feel free to add nuts or seeds for added crunch.
    • This salad is best served fresh, but can be refrigerated if needed.
    • Prep Time: 10 minutes
    • Cook Time: 0 minutes
    • Category: Salad
    • Method: No-Cook
    • Cuisine: American

    Nutrition

    • Serving Size: 1 serving
    • Calories: 120
    • Sugar: 5g
    • Sodium: 150mg
    • Fat: 8g
    • Saturated Fat: 2g
    • Unsaturated Fat: 6g
    • Trans Fat: 0g
    • Carbohydrates: 10g
    • Fiber: 2g
    • Protein: 4g
    • Cholesterol: 10mg

    Sharing is caring!

  • Seafood Lasagna

    Seafood Lasagna


    Introduction to Seafood Lasagna

    Hey there, fellow culinary enthusiasts! If you’re like me, you know that time often slips through our fingers, especially as busy moms and professionals. That’s why I’m so excited to share my delightful Seafood Lasagna recipe with you. This dish is not only a gorgeous flavor adventure, but it’s also a quick solution for those hectic weeknights. Imagine diving into layers of creamy béchamel, tender seafood, and gooey cheese, all in one bite! Delicious! Trust me, this will impress your loved ones and have them asking for seconds. Let’s get cooking!

    Why You’ll Love This Seafood Lasagna

    What’s not to adore about a dish that brings together quick preparation and mouthwatering flavors? This Seafood Lasagna is a breeze to whip up, making it perfect for busy evenings. It combines fresh seafood with rich béchamel sauce, and every layer is a symphony of taste. Plus, it effortlessly caters to both your family’s cravings and your quest for something special when friends come over. It truly is the best of both worlds!

    Ingredients Seafood Lasagna

    To craft this exquisite Seafood Lasagna, you’ll need a medley of fresh ingredients that come together to create a symphony of flavors. Here’s a handy list to guide you:

    • Unsalted butter: Essential for making your silky béchamel sauce. It’s the base that enriches the dish.
    • All-purpose flour: This helps thicken your béchamel, giving it that creamy, luscious texture.
    • Milk: Full of essential nutrients, it transforms the béchamel into a rich companion for the seafood.
    • Salt and freshly ground pepper: These staples amplify the natural flavors. Adjust to your taste!
    • Onion and garlic: They add aromatic depth and warmth to your sautéed seafood. Use fresh for the best punch.
    • Boneless flounder fillets: Tender and mild, flounder lends a delicate flavor. You could swap with sole or tilapia if needed.
    • Shrimp: These sweet, succulent bites take the dish to a new level. Ensure they are peeled and deveined for convenience!
    • Scallops: A luxurious addition! They add a sweet ocean flavor. Fresh is always best, but frozen works too.
    • Dry white wine: This brings acidity, enhancing the seafood. If you prefer, use additional broth for a non-alcoholic version.
    • Mushrooms: They enrich the sauce with earthy flavors. Any variety works, but I love using cremini for that extra depth.
    • Canned crushed tomatoes: They introduce a hint of sweetness and acidity, balancing all the richness.
    • Heavy cream: For an ultra-creamy texture that’ll have everyone craving more!
    • Red pepper flakes: Just a pinch for a hint of heat! Adjust according to your taste preferences.
    • Fresh parsley, dried oregano, and basil: These herbs provide freshness and aroma. You can mix fresh and dried as per availability.
    • Lasagna noodles: The classic foundation of lasagna that holds all these layers together. Feel free to choose whole grain or gluten-free versions.
    • Swiss cheese: This adds meltiness and nutty flavor. You can replace it with mozzarella if you prefer.
    • Parmesan cheese: A sprinkle of this makes every layer sing! Use freshly grated for the best results.

    For exact quantities, scroll down to the bottom of the article, where you’ll find all the measurements organized for easy printing.

    How to Make Seafood Lasagna

    Now that we have the ingredients lined up, let’s dive right into the delightful process of creating this Seafood Lasagna. Don’t worry; I’ve broken it down into simple steps, ensuring you can follow along with ease. Let’s make some magic happen in the kitchen!

    Step 1: Prepare the Béchamel Sauce

    First up, the béchamel sauce. This creamy base is what takes our seafood lasagna to a whole new level of indulgence.

    In a medium saucepan, melt the butter over medium heat. Once it’s bubbly, whisk in the flour until it transforms into a smooth paste. Gradually pour in the milk while whisking away—this prevents lumps. Keep stirring until the mixture thickens. You want it to be creamy, almost like velvet! Add salt and pepper to taste, and set it aside for later.

    Step 2: Sauté the Seafood

    Next, it’s time to infuse our seafood with flavor. In the same pan, melt a tablespoon of butter over medium heat and throw in the finely chopped onions and minced garlic. The aroma will captivate you! Cook until they’re soft, about 2-3 minutes.

    Then, add the flounder, shrimp, and scallops to the pan. Cook until the shrimp turns pink, which indicates it’s done. Add the dry white wine to deglaze the pan, making sure to scrape any bits that are stuck. This adds depth to our dish. Once combined, use a slotted spoon to remove the seafood and set it aside.

    Step 3: Cook the Mushrooms and Combine

    Stay with me—this is where the magic unfolds! In the same pan, toss in the sliced mushrooms. Sauté them until they’re tender, soaking up all the delicious flavors left behind. Next, stir in the béchamel sauce, crushed tomatoes, and heavy cream. This is where we create that creamy symphony!

    Add in the red pepper flakes, oregano, and basil, allowing everything to simmer for a few minutes. The sauce will fuse flavors and bubble away, promising an explosion of taste once we layer it into the dish.

    Step 4: Assemble the Lasagna

    Now, let’s make it pretty! Start by spreading a thin layer of sauce on the bottom of your buttered 9×13 dish. This prevents the noodles from sticking.

    Layer the lasagna noodles on top, followed by a scoop of seafood, then more sauce, and a sprinkle of swiss and parmesan cheese. Repeat this process until you run out of ingredients, finishing with a final layer of sauce and cheese on top. It’s building that edible masterpiece!

    Step 5: Bake to Perfection

    Finally, it’s time to let the oven work its magic! Preheat your oven to 375°F (190°C). Bake your Seafood Lasagna for about 40-50 minutes. You’re looking for that beautiful golden top! If it starts browning too quickly, cover it loosely with foil.

    Once done, let it cool for a few minutes. This helps the layers set, and you won’t burn your mouth on the first bite!

    Tips for Success

    • Pre-cook the lasagna noodles al dente; they’ll soak up sauce while baking.
    • For extra creaminess, let your béchamel sauce cool slightly before layering.
    • Use fresh seafood for the best flavor; frozen can work in a pinch.
    • Don’t rush the sautéing step; it enhances the overall taste of the dish.
    • Allow the lasagna to rest before serving; it helps the layers hold together.

    Equipment Needed

    • Medium saucepan: A non-stick one helps prevent sticking and burning.
    • Whisk: Essential for smooth sauces; a fork can work in a pinch!
    • 9×13 baking dish: Perfect for layering; a larger casserole dish serves as a substitute.
    • Slotted spoon: Great for fishing out seafood; a regular spoon can also do the trick!
    • Spatula: Useful for spreading and layering; silicone ones are heat-resistant.

    Variations

    • Vegetarian Edition: Swap seafood for roasted veggies like zucchini, bell peppers, and spinach. It’s still rich and satisfying!
    • Cheesy Delight: Add ricotta cheese between layers for extra creaminess and flavor. This adds a delightful twist!
    • Spicy Kick: Incorporate chopped jalapeños or a splash of hot sauce for those who love a little heat.
    • Gluten-Free Option: Use gluten-free lasagna noodles or zucchini slices instead. They’ll still hold up beautifully!
    • Seafood Medley: Experiment with different seafoods like lobster, crab, or salmon to customize the taste!

    Serving Suggestions

    • Pair your Seafood Lasagna with a crisp green salad dressed in lemon vinaigrette for a refreshing contrast.
    • A chilled glass of pinot grigio or a light rosé complements the flavors beautifully.
    • For presentation, garnish with freshly chopped parsley or basil before serving.
    • Serve with crusty garlic bread to soak up any leftover sauce—delicious!

    FAQs about Seafood Lasagna

    As you embark on your culinary adventure with this Seafood Lasagna, you may have a few questions in mind. Don’t worry; I’m here to help! Here are some common queries and answers that might just make your cooking experience even smoother.

    Can I make Seafood Lasagna ahead of time?

    Absolutely! You can assemble the lasagna in advance and store it in the fridge for a day or two. Just remember to cover it tightly. When you’re ready to bake, add a few extra minutes to the cooking time to ensure everything is heated through.

    What type of seafood works best in this recipe?

    Using a mix of fresh seafood like shrimp, scallops, and flounder adds wonderful variety. However, feel free to get creative! Crab, lobster, or even a blend of your seafood favorites will work beautifully.

    Is this Seafood Lasagna kid-friendly?

    Absolutely! While seafood can be hit or miss with kids, the creamy béchamel and cheesy goodness usually win them over. You can even tone down the flavors by reducing the herbs or using milder cheeses.

    Can I freeze Seafood Lasagna?

    Yes, you can! Freeze it before baking for optimal freshness. Wrap it well in plastic wrap and then foil to prevent freezer burn. When you’re ready, bake from frozen, just allowing for more time in the oven!

    How can I customize the flavors in my Seafood Lasagna?

    The beauty of this dish lies in its flexibility! You can experiment with spices, try different herbs, or even add citrus zest for a bright twist. Play around until you find your favorite combination!

    Final Thoughts

    Cooking this Seafood Lasagna is like creating a warm hug in a casserole dish. Each layer tells a story of fresh ingredients and rich flavors that come together effortlessly. As you pull it out of the oven, watch the cheese bubble and turn golden, inviting your loved ones to the table. Whether it’s a cozy family dinner or a gathering with friends, this dish brings joy and applause. You’ll leave the kitchen with a heart full of pride and a belly full of satisfaction. So, grab your apron and dive into this flavor adventure—you won’t regret it!


    Print

    clock clock iconcutlery cutlery iconflag flag iconfolder folder iconinstagram instagram iconpinterest pinterest iconfacebook facebook iconprint print iconsquares squares iconheart heart iconheart solid heart solid icon

    Description

    Experience a delicious flavor adventure with this seafood lasagna, filled with fresh seafood and creamy béchamel sauce.


    • 4 tablespoons unsalted butter (for béchamel sauce)
    • 4 tablespoons all-purpose flour (for béchamel sauce)
    • 2 cups milk (for béchamel sauce)
    • Salt and freshly ground pepper (to taste)
    • 1 tablespoon unsalted butter (for sautéing)
    • 1 tablespoon finely chopped onion
    • 1 garlic clove, minced
    • 3/4 lb boneless flounder fillets, cut into bite-sized pieces
    • 1 pound raw shrimp, peeled and deveined
    • 1 pound scallops
    • ½ cup dry white wine
    • 2 cups thinly sliced mushrooms
    • 1 cup crushed canned tomatoes
    • 3/4 cup heavy cream
    • ¼ teaspoon red pepper flakes
    • 3 tablespoons finely chopped fresh parsley
    • ¼ teaspoon dried oregano
    • ¼ teaspoon dried basil
    • 9 lasagna noodles, cooked according to package directions
    • 1 cup grated swiss cheese
    • 1/2 cup shredded parmesan cheese

    1. Prepare the béchamel sauce by melting the butter in a medium saucepan and whisking in the flour until a smooth paste forms. Gradually add the milk while whisking until thickened.
    2. Sauté the seafood by cooking the onions and garlic in butter until fragrant, then adding the seafood and seasoning with salt and pepper. Once the shrimp turn pink, add the wine and remove the seafood with a slotted spoon.
    3. Cook the mushrooms in the same pan, then stir in the béchamel sauce, crushed tomatoes, heavy cream, herbs, and red pepper flakes. Let the mixture simmer gently.
    4. Spread a thin layer of sauce in a buttered 9×13 dish. Layer seafood, noodles, sauce, and cheese, repeating until ingredients are used.
    5. Bake at 375°F (190°C) for 40-50 minutes until golden and bubbly. Cover loosely with foil if browning too quickly.

    Notes

    • Serve hot for the best flavor experience.
    • Adjust the number of lasagna layers based on the depth of your dish.
    • Prep Time: 30 minutes
    • Cook Time: 50 minutes
    • Category: Main Dish
    • Method: Baking
    • Cuisine: Italian

    Nutrition

    • Serving Size: 1 slice
    • Calories: 425
    • Sugar: 3g
    • Sodium: 800mg
    • Fat: 20g
    • Saturated Fat: 10g
    • Unsaturated Fat: 8g
    • Trans Fat: 0g
    • Carbohydrates: 36g
    • Fiber: 2g
    • Protein: 28g
    • Cholesterol: 120mg

    Sharing is caring!

  • Roasted Brussels Sprouts Salad

    Roasted Brussels Sprouts Salad


    Introduction to Roasted Brussels Sprouts Salad

    As a busy home cook, I’m always on the lookout for meals that are both delicious and quick to prepare. That’s where my Roasted Brussels Sprouts Salad comes into play! This vibrant dish is like a hug on a plate, packed with nutritious ingredients that not only taste amazing but also make you feel great. It’s the perfect solution for a busy day when you want to whip up something healthy without spending hours in the kitchen. Trust me, your family will love it, and you might even want to impress your friends with this flavorful delight!

    Why You’ll Love This Roasted Brussels Sprouts Salad

    This Roasted Brussels Sprouts Salad isn’t just another salad; it’s a flavor explosion! Quick and easy, you can have it ready in under an hour, making it a great option for a weeknight meal. The crispy Brussels sprouts, hearty quinoa, and tangy dressing dance together in a delightful combination that’s both satisfying and nutritious. It’s perfect for those moments when you crave something healthy yet delicious to uplift your spirits!

    Ingredients for Roasted Brussels Sprouts Salad

    Gathering the right ingredients is a crucial step to creating the best Roasted Brussels Sprouts Salad. Each component adds its unique flavor and texture. Here’s what you’ll need:

    • Brussels sprouts: Fresh and vibrant, these little green gems are the star of the show. Opt for smaller ones for an even roast.
    • Olive oil: A good quality olive oil enhances the flavor and helps with roasting. It’s perfect for drizzling over veggies.
    • Kosher salt: A pinch helps to elevate the flavors. You can always add more to taste later.
    • Black pepper: Freshly ground, of course! It adds a nice kick that balances the sweetness of the Brussels sprouts.
    • Quinoa: This protein-packed grain gives the salad a hearty base. Feel free to experiment with a quinoa/rice blend for added texture.
    • Chickpeas: Canned and ready to use, chickpeas add a Middle Eastern flair and a healthy dose of fiber and protein.
    • Fresh spinach: Mild and tender, it adds a pop of green and nutrition to the salad.
    • Dried cranberries: These add a delightful sweetness that complements the roasted sprouts beautifully.
    • Goat cheese: Creamy and tangy, it brings richness to the dish. If you prefer, feta is a fabulous substitution.
    • Lemon juice: Freshly squeezed for a bright, zesty flavor that ties everything together nicely.
    • Apple cider vinegar: Adds acidity and depth. It’s a great way to perk up your salad.
    • Granulated sugar: A pinch can balance flavors. It’s optional, so feel free to skip it if you prefer.

    For exact measurements, you can find them towards the bottom of the article, along with a printable version of this scrumptious recipe!

    How to Make Roasted Brussels Sprouts Salad

    Creating this scrumptious Roasted Brussels Sprouts Salad is as easy as pie! Follow these simple steps to bring this wholesome dish to life, and I promise it will be a delightful addition to your table.

    Step 1: Preheat the Oven

    First things first—set your oven to 450°F (232°C). Preheating is essential for achieving that lovely roast. If you’re like me, you might enjoy lining your baking sheet with foil for easy cleanup. It’s a small step that makes a world of difference!

    Step 2: Prepare the Brussels Sprouts

    Now, let’s give some love to those Brussels sprouts. Start by trimming the ends and halving them. This ensures that each piece roasts evenly. Drizzle them with 2 tablespoons of olive oil, then sprinkle generously with kosher salt and freshly cracked black pepper. Make sure they’re well coated; it’s the secret to their deliciousness!

    Step 3: Roast the Brussels Sprouts

    Spread the seasoned Brussels sprouts on your prepared baking sheet, cut side down. This allows for that glorious char we all love. Roast for about 20 minutes until they’re tender and beautifully caramelized. You want that perfect golden-brown color—it’s when the magic happens!

    Step 4: Cook the Quinoa

    While the sprouts are roasting, it’s time to focus on the quinoa. Rinse ¾ cup of dry quinoa under cold water to remove its natural coating. Next, cook it according to the package directions. Adding a tablespoon of olive oil to the pot will help keep it fluffy and prevent sticking. In no time, you’ll have a perfect base for your salad!

    Step 5: Combine Ingredients

    Once the Brussels sprouts have roasted to perfection, transfer them to a large mixing bowl. Add in the cooked quinoa, a can of drained chickpeas, and a heaping cup of fresh spinach. Mix gently to combine, allowing the heat from the sprouts to wilt the spinach just a bit. It’s like a warm hug for the greens!

    Step 6: Add Final Seasoning

    Next, it’s time for the finishing touches! Add in those lovely dried cranberries, crumbled goat cheese, freshly squeezed lemon juice, and a splash of apple cider vinegar. Give everything a gentle stir. Taste your creation and adjust the seasoning with more salt or pepper if needed. If you want to balance the acidity, consider a pinch of sugar; it works wonders!

    Step 7: Serve the Salad

    Your Roasted Brussels Sprouts Salad is all set! Serve it warm, at room temperature, or even chilled—each way is delicious. You might want to pair it with a light vinaigrette or a sprinkle of extra goat cheese for that added flair. Enjoy every colorful bite!

    Tips for Success

    • Use smaller Brussels sprouts for even roasting and optimal tenderness.
    • Don’t forget to rinse the quinoa thoroughly; this removes bitterness.
    • Roast the sprouts until they’re nicely charred; it adds a fantastic flavor.
    • Feel free to customize the salad with your favorite veggies or nuts!
    • Make extra for meal prep; it keeps well in the fridge for a few days.

    Equipment Needed for Roasted Brussels Sprouts Salad

    • Baking sheet: A standard one works great, but a cast-iron skillet can give an even roast.
    • Mixing bowl: A large bowl is essential; a glass bowl allows you to see the beautiful colors.
    • Pot for quinoa: Any saucepan will do; a non-stick pot makes for easy cleanup.
    • Measuring spoons: These help you get the right quantities; or you can wing it for a pinch of love!

    Variations on Roasted Brussels Sprouts Salad

    • Nutty Addition: Toss in some toasted nuts, like walnuts or almonds, for extra crunch and healthy fats.
    • Herb Infusion: Add fresh herbs like rosemary or thyme for an aromatic twist that elevates the flavor profile.
    • Protein Boost: Include grilled chicken or shrimp to transform this salad into a hearty main dish.
    • Vegan Version: Swap out the goat cheese for avocado or a vegan cheese alternative to keep it plant-based.
    • Spicy Kick: Incorporate some red pepper flakes or diced jalapeños for those who enjoy a bit of heat.
    • Seasonal Variations: In autumn, add roasted butternut squash or in the summer, mix in fresh corn for seasonal flair.

    Serving Suggestions for Roasted Brussels Sprouts Salad

    • Pair this salad with a light grilled chicken breast for a satisfying meal.
    • Serve it alongside a glass of crisp Sauvignon Blanc to complement the flavors.
    • For a beautiful presentation, add edible flowers or a sprinkle of fresh herbs on top.
    • Try it as a side dish for holiday gatherings; it’s sure to impress!

    FAQs about Roasted Brussels Sprouts Salad

    Can I make Roasted Brussels Sprouts Salad ahead of time?

    Absolutely! This Roasted Brussels Sprouts Salad holds up wonderfully in the fridge. You can roast the sprouts and cook the quinoa earlier in the day. Just assemble everything right before serving for fresh flavors.

    What can I use instead of quinoa?

    If quinoa isn’t your thing, no worries! You can substitute it with brown rice, farro, or even couscous for a different twist. Each grain brings its unique taste and texture!

    How long can I store leftovers?

    Your salad can be stored in the fridge for up to three days. Just keep it in an airtight container to maintain freshness. Give it a little stir before serving to mix those flavors again!

    Is this salad gluten-free?

    Yes, this Roasted Brussels Sprouts Salad is gluten-free if you stick with quinoa or rice. Always check any substitutes to ensure they fit your dietary needs.

    Can I add protein to make it more filling?

    Definitely! Adding grilled chicken, chickpeas, or even sliced steak can boost its heartiness. It transforms this salad into a satisfying meal while keeping it healthy!

    Final Thoughts on Roasted Brussels Sprouts Salad

    The joy of preparing this Roasted Brussels Sprouts Salad lies in its vibrant colors and uplifting flavors. It’s not just a salad; it’s a celebration of wholesome ingredients that delight your taste buds and nourish your body. Whether you enjoy it warm, at room temperature, or chilled, it brings a refreshing twist to any meal. I love how it can be a simple weekday dish or a standout side for gatherings. Each bite is a reminder that healthy cooking can be both easy and delicious. Give it a try, and let this salad brighten your day!


    Print

    clock clock iconcutlery cutlery iconflag flag iconfolder folder iconinstagram instagram iconpinterest pinterest iconfacebook facebook iconprint print iconsquares squares iconheart heart iconheart solid heart solid icon

    Description

    A vibrant and nutritious salad featuring roasted Brussels sprouts, quinoa, chickpeas, and a tangy dressing, perfect for a healthy meal.


    • 1 pound Brussels sprouts, trimmed and halved
    • 4 tablespoons olive oil, divided or as necessary
    • 1 teaspoon Kosher salt, plus more if desired
    • 1 teaspoon freshly ground black pepper, plus more if desired
    • ¾ cup dry quinoa or a quinoa/rice blend
    • water
    • one 15-ounce can chickpeas, drained and rinsed
    • 1 heaping cup fresh spinach, loosely packed
    • ½ cup dried cranberries
    • ⅓ cup crumbled goat cheese, or as desired
    • 2 tablespoons lemon juice
    • 1 tablespoon apple cider vinegar
    • pinch granulated sugar, optional and to taste

    1. Preheat oven to 450F, lining a baking sheet with foil if desired. Add Brussels sprouts, drizzle with 2 tablespoons of olive oil, and season with salt and pepper.
    2. Roast the sprouts cut side down for about 20 minutes or until they begin to char.
    3. Cook quinoa or quinoa/rice blend according to package directions, adding a tablespoon of olive oil to prevent sticking.
    4. Once the sprouts and quinoa are done, transfer them to a large mixing bowl.
    5. Add the chickpeas and spinach, stirring to combine, letting the spinach gently wilt from the heat.
    6. Add dried cranberries, goat cheese, lemon juice, and apple cider vinegar; stir to combine.
    7. Taste and adjust seasoning with additional salt and pepper if needed; consider adding a pinch of sugar to balance flavors.
    8. Serve immediately or enjoy at room temperature or chilled.

    Notes

    • For best results, use smaller Brussels sprouts for even roasting.
    • This salad can be enjoyed warm or cold, making it versatile for meal prep.
    • Feel free to substitute goat cheese with feta or omit for a vegan version.
    • Prep Time: 15 minutes
    • Cook Time: 30 minutes
    • Category: Salad
    • Method: Roasting, Cooking
    • Cuisine: American

    Nutrition

    • Serving Size: 1 serving
    • Calories: 350
    • Sugar: 10g
    • Sodium: 400mg
    • Fat: 14g
    • Saturated Fat: 4g
    • Unsaturated Fat: 8g
    • Trans Fat: 0g
    • Carbohydrates: 47g
    • Fiber: 10g
    • Protein: 12g
    • Cholesterol: 15mg

    Sharing is caring!

  • Turkey Taco Stuffed Sweet Potatoes

    Turkey Taco Stuffed Sweet Potatoes


    Introduction to Turkey Taco Stuffed Sweet Potatoes

    Hey there, fellow home cooks! If you’re anything like me, juggling family, work, and life can often feel like a circus act. But fear not! Here’s a delightful recipe that hits all the right notes: Turkey Taco Stuffed Sweet Potatoes. Imagine tender, sweet potatoes cradling a savory turkey filling bursting with flavor. This dish is perfect for busy moms and professionals alike who crave a nutritious dinner without sacrificing time or taste. With just the right kick, these stuffed wonders will become a household favorite faster than you can say “taco night!”

    Why You’ll Love This Turkey Taco Stuffed Sweet Potatoes

    Let me tell you, these Turkey Taco Stuffed Sweet Potatoes are a game changer! They cook up in just 30 minutes, making them a lifesaver for busy weeknights. The combination of sweet and savory is nothing short of magic. Plus, they’re healthy, packing a punch of protein with lean turkey and fiber from sweet potatoes. Family-approved and incredibly satisfying, they’ll transform your dinnertime routine!

    Ingredients for Turkey Taco Stuffed Sweet Potatoes

    To whip up these flavorful Turkey Taco Stuffed Sweet Potatoes, gather these simple ingredients:

    • Sweet Potatoes: The star of the show! They’re rich in nutrients and naturally sweet.
    • Lean Ground Turkey: A healthier alternative to beef, it’s filled with protein to keep you satisfied.
    • Garlic: Fresh garlic adds a bold, aromatic touch. You can also use garlic powder if you’re in a pinch.
    • Chili Powder: This brings a dash of heat! You can adjust the amount depending on your family’s taste.
    • Pepper Jack Cheese: For a creamy, spicy finish that melts beautifully. Feel free to substitute with cheddar or your favorite cheese.
    • Olive Oil: A little drizzle helps keep everything moist and adds healthy fats.
    • Ground Cumin: This spice offers a warm, earthy flavor that complements the turkey perfectly. Use it generously!
    • Salt and Pepper: Essential for enhancing all the flavors. Don’t skip this step!
    • Dried Oregano: A sprinkle brings a slightly sweet, herbal note to the dish.
    • Paprika: Adds depth and a little smokiness. You can switch it for smoked paprika if you desire.
    • Canned Crushed Tomatoes: They’re juicy and packed with flavor, adding moisture to your filling.

    With each ingredient, you’re crafting a meal that not only nourishes the body but also tickles the taste buds! For exact measurements, check out the bottom of the article, where you can find everything neatly laid out for easy printing. Happy cooking!

    How to Make Turkey Taco Stuffed Sweet Potatoes

    Let’s dive into making these Turkey Taco Stuffed Sweet Potatoes! The process is simple, quick, and rewarding. Follow these steps to create a delicious meal that’s perfect after a long day.

    Step 1: Prepare the Sweet Potatoes

    First, grab those sweet potatoes. Pierce them a few times with a fork. This helps them steam evenly. Next, pop them into the microwave for about 8 to 10 minutes. You want them tender! Once they’re done, let them cool for a few minutes. Trust me, burned fingers from a hot potato are no fun!

    Step 2: Mix the Sweet Potato Filling

    Now, cut the cooled sweet potatoes in half and scoop out the flesh into a bowl. I use a fork for this, and it’s like digging into golden treasure! Add a drizzle of olive oil, half a teaspoon of ground cumin, and a sprinkle of salt and pepper. Mix it all together until it’s smooth and creamy. This will be the base of your stuffing, bringing both flavor and texture.

    Step 3: Cook the Turkey Taco Filling

    In a nonstick skillet, heat your pan over medium heat. Toss in your lean ground turkey and cook it thoroughly until it’s browned. After it’s cooked, add the minced garlic along with the chili powder, oregano, paprika, and the rest of the cumin. Those spices will create an aroma that makes your mouth water! Stir in the canned crushed tomatoes, letting everything simmer for about five minutes to combine those delicious flavors.

    Step 4: Assemble and Broil

    Time to bring this dish together! Place the sweet potato skins back onto a baking sheet. Spoon the savory turkey mixture generously into each sweet potato half. Sprinkle that grated pepper Jack cheese on top—don’t be shy! Now, broil them in the oven for about 30 seconds until the cheese melts and bubbly. Keep an eye on it; we want melted goodness, not burnt cheese!

    There you have it: Turkey Taco Stuffed Sweet Potatoes ready to be devoured. Quick, tasty, and oh-so satisfying!

    Tips for Success

    • Microwaving sweet potatoes? Ensure they’re evenly pierced for uniform cooking.
    • Feel free to swap out ingredients based on your family’s tastes! Ground chicken or beef also works well.
    • Want more flavor? Add a pinch of cayenne pepper for extra kick!
    • If you’re in a hurry, use pre-cooked turkey for a super fast assembly.
    • Garnish with fresh cilantro or avocado for a fresh twist!

    Equipment Needed

    • A microwave for quick cooking of sweet potatoes.
    • A sharp knife for cutting sweet potatoes and scooping out the flesh.
    • A mixing bowl to combine that creamy filling.
    • A nonstick skillet for browning the turkey.
    • A baking sheet for broiling your stuffed potatoes.

    Variations

    • For a vegetarian twist, swap ground turkey for black beans or lentils. They’ll bring protein and fiber!
    • Create a spicy kick by adding diced jalapeños into the turkey mixture. Heat lovers rejoice!
    • Try a Mexican cheese blend instead of pepper Jack for a different flavor profile.
    • For a lighter version, use spaghetti squash instead of sweet potatoes. It’s a tasty twist!
    • Add some diced bell peppers or corn to the turkey filling to sneak in extra veggies!

    Serving Suggestions

    • Pair these stuffed sweet potatoes with a refreshing side salad for a well-rounded meal.
    • Serve with homemade guacamole and tortilla chips for a delightful crunch.
    • A zesty margarita or sparkling water with lime is the perfect drink to complement the flavors.
    • Presentation tip: Garnish with chopped cilantro or a sprinkle of lime juice for an extra pop of color and freshness.

    FAQs about Turkey Taco Stuffed Sweet Potatoes

    Can I make Turkey Taco Stuffed Sweet Potatoes ahead of time?
    Absolutely! You can prepare the sweet potato filling and turkey mixture a day in advance. Just store them separately in the fridge. When you’re ready to eat, simply stuff the sweet potatoes and broil them until the cheese melts.

    What can I substitute for ground turkey?
    If turkey isn’t your thing, feel free to use ground chicken, beef, or even a plant-based meat alternative. Each option brings its own unique flavor to these Turkey Taco Stuffed Sweet Potatoes!

    Can I freeze leftover stuffed sweet potatoes?
    Of course! Just let them cool completely, then wrap them individually in plastic wrap and store in a freezer-safe bag. When you’re ready for a quick meal, pop them in the oven until heated through. It’s a lifesaver for busy nights!

    How can I make this recipe spicier?
    If you love heat, add more chili powder, or toss in some diced jalapeños during the turkey cooking step. There’s no such thing as too much flavor with Turkey Taco Stuffed Sweet Potatoes!

    What toppings go well with these stuffed sweet potatoes?
    Top them off with your favorites! Sliced avocado, fresh cilantro, or a dollop of sour cream add a delightful touch. You can even add some lime juice for a zesty kick!

    Final Thoughts

    Cooking should be a joyful experience, and these Turkey Taco Stuffed Sweet Potatoes embody that joy! Each bite is a celebration of flavors, offering comfort and satisfaction for both the cook and the family gathered around the table. The beauty of this dish lies in its versatility, allowing you to customize it to your family’s preferences. Plus, it effortlessly suits those busy weeknights. So, roll up your sleeves, gather your loved ones, and enjoy the pleasure that comes from creating this delicious and nutritious meal together. Trust me, it’ll become a cherished family favorite!


    Print

    clock clock iconcutlery cutlery iconflag flag iconfolder folder iconinstagram instagram iconpinterest pinterest iconfacebook facebook iconprint print iconsquares squares iconheart heart iconheart solid heart solid icon

    Description

    Delicious sweet potatoes stuffed with a savory turkey taco filling, topped with melted cheese.


    • 2 medium sweet potatoes
    • 3/4 pound lean ground turkey
    • 4 garlic cloves, minced
    • 1 teaspoon chili powder
    • 1/4 cup grated pepper Jack cheese
    • 1 teaspoon olive oil
    • 1 1/4 teaspoons ground cumin (divided)
    • 1/4 + 1/8 teaspoon salt
    • 1/4 + 1/8 teaspoon ground pepper
    • 1/2 teaspoon dried oregano
    • 1/2 teaspoon paprika
    • 1 1/4 cup canned crushed tomatoes

    1. Microwave the pierced sweet potatoes for 8-10 minutes until tender. Let cool.
    2. Cut in half and scoop out flesh into a bowl; mix with olive oil, cumin (½ tsp), salt (¼ tsp), and pepper (¼ tsp).
    3. In a nonstick skillet, cook the ground turkey until fully cooked; add garlic and spices, then stir in crushed tomatoes.
    4. Fill sweet potato skins with the turkey mixture, top with cheese, and broil for about 30 seconds until melted.

    Notes

    • Adjust the spice level by adding more chili powder if desired.
    • These stuffed sweet potatoes can be garnished with fresh cilantro or avocado for added flavor.
    • Prep Time: 10 minutes
    • Cook Time: 20 minutes
    • Category: Main Course
    • Method: Oven, Microwave
    • Cuisine: Mexican

    Nutrition

    • Serving Size: 1 stuffed sweet potato
    • Calories: 350
    • Sugar: 3g
    • Sodium: 600mg
    • Fat: 12g
    • Saturated Fat: 4g
    • Unsaturated Fat: 8g
    • Trans Fat: 0g
    • Carbohydrates: 40g
    • Fiber: 8g
    • Protein: 24g
    • Cholesterol: 70mg

    Sharing is caring!