Author: IHAAL Team

  • Gingerbread Rice Krispie Treats

    Gingerbread Rice Krispie Treats


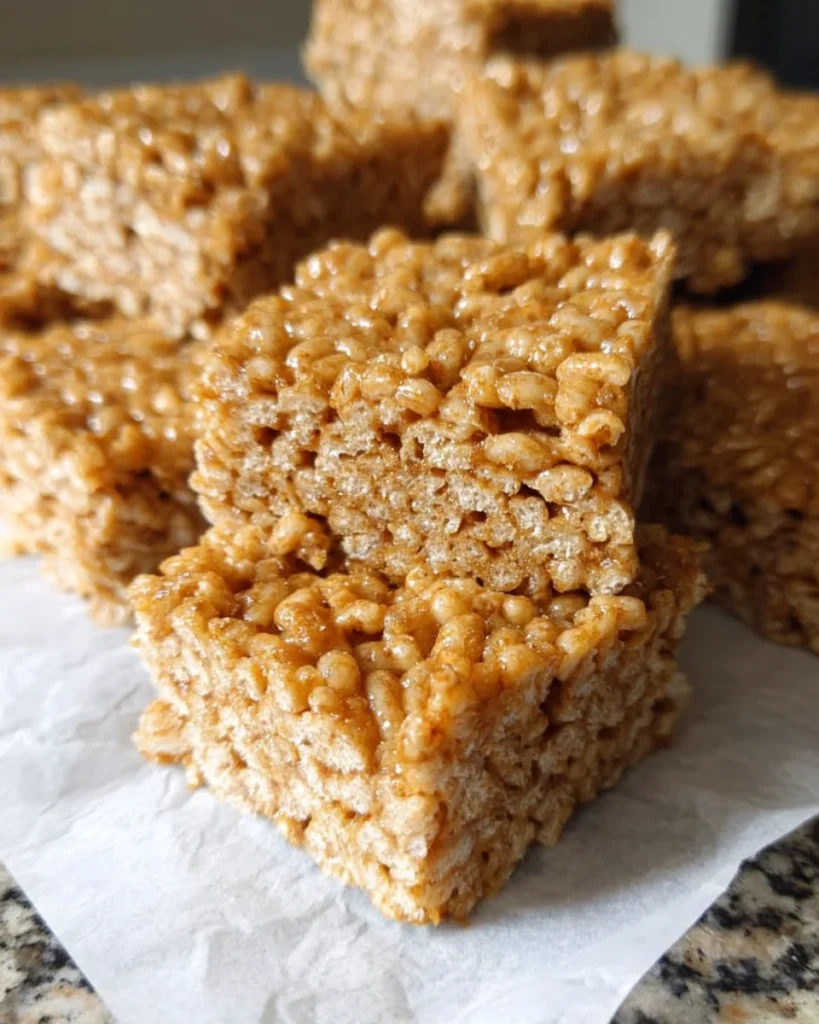
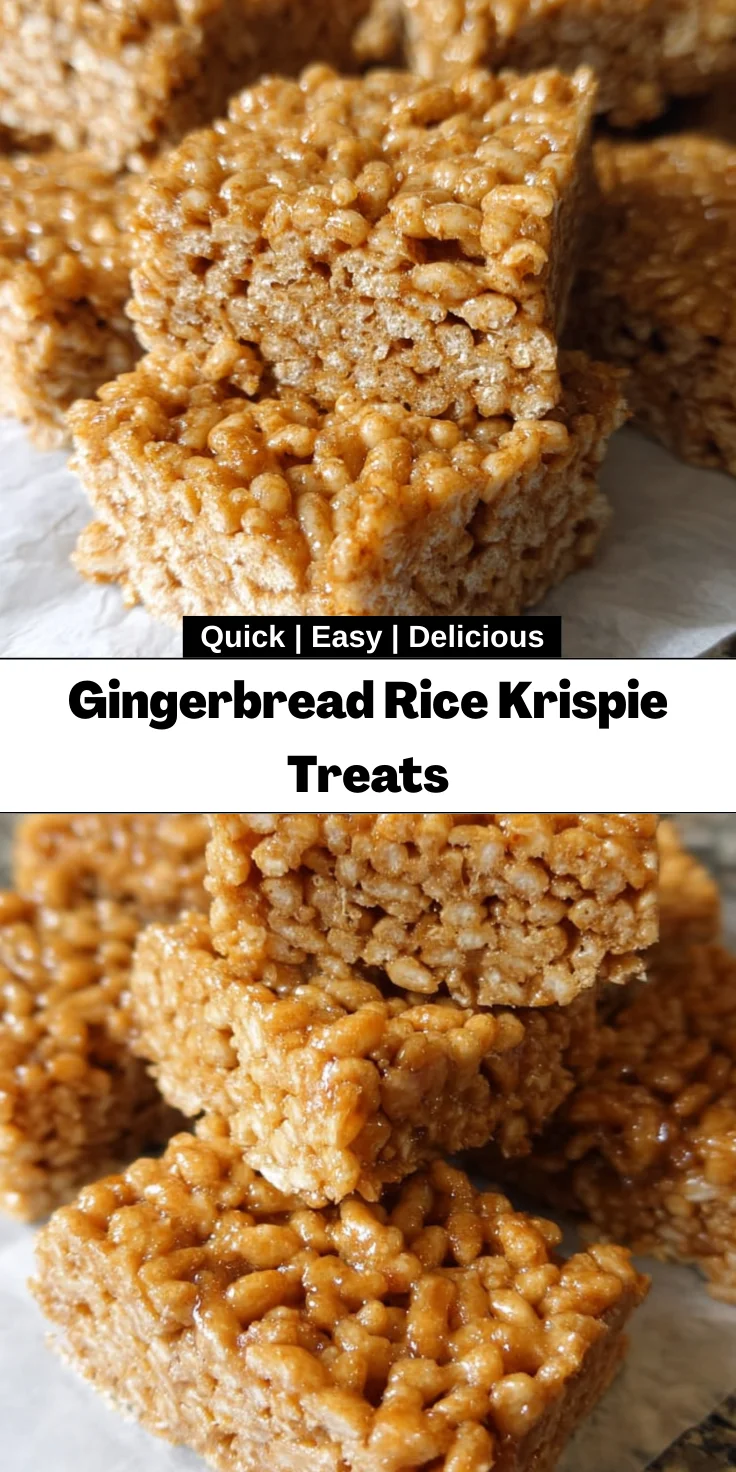
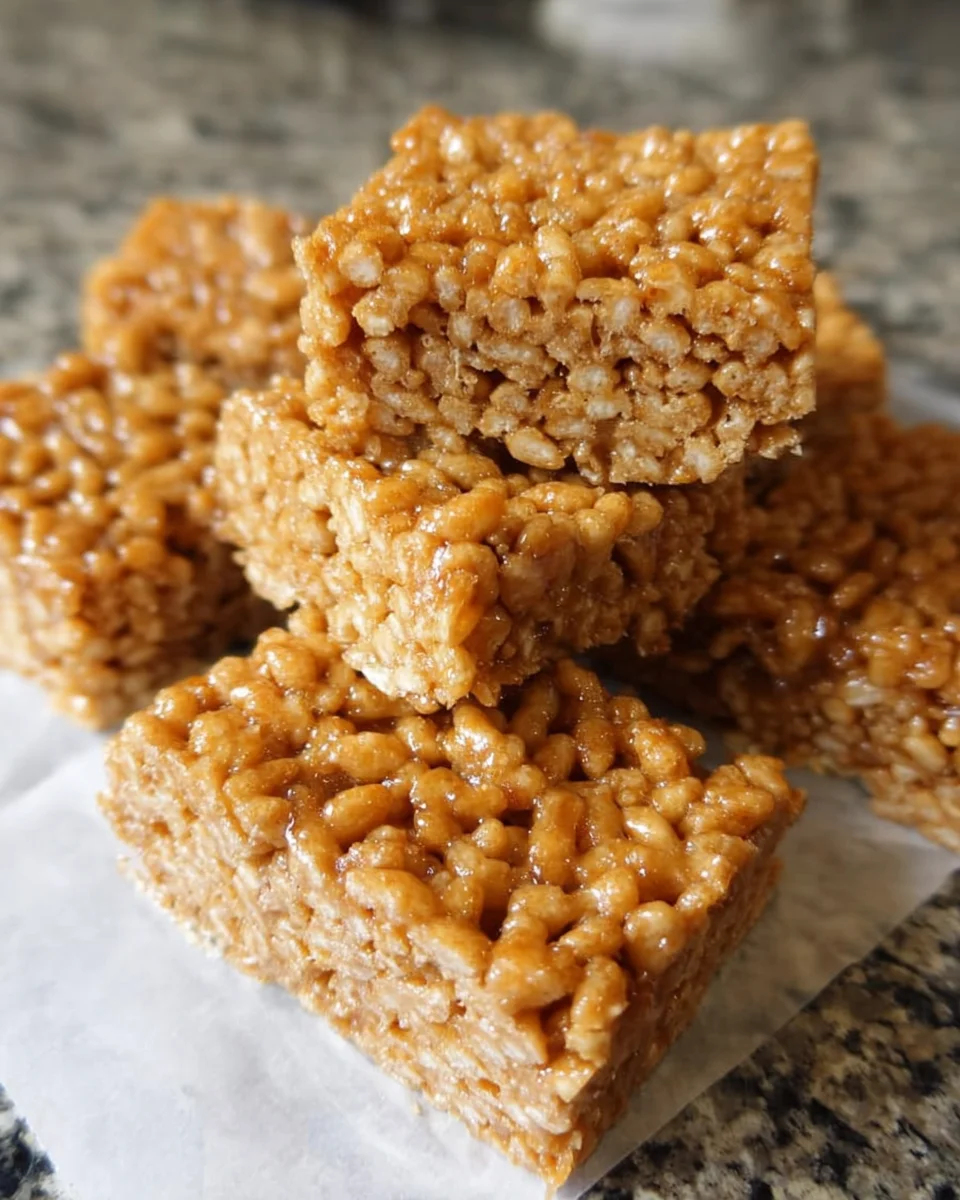
    Introduction to Gingerbread Rice Krispie Treats

    Imagine this: the holiday season is upon us, and you crave a sweet treat that embodies all the warmth and spice of gingerbread, but you’re short on time. Enter Gingerbread Rice Krispie Treats—your new go-to no-bake dessert! These delightful treats are not only quick and easy to whip up, but they also bring a festive cheer that will impress your loved ones. They’re perfect for busy moms and professionals like us, seeking a fun and simple solution for holiday gatherings or cozy evenings at home. You’ll love how these bars instantly elevate your dessert game!

    Why You’ll Love This Gingerbread Rice Krispie Treats

    These Gingerbread Rice Krispie Treats offer a delightful balance of flavor and convenience. They’re incredibly easy to prepare, making them perfect for those hectic holiday weeks. With just a handful of ingredients, you can create a festive treat that’s both crunchy and chewy. Plus, the warm spices you’ll blend in transform a classic recipe into something special, turning any moment into a cozy celebration. Your tastebuds will be dancing with joy!

    Ingredients for Gingerbread Rice Krispie Treats

    Let’s gather everything we need for our Gingerbread Rice Krispie Treats. This recipe is all about simple ingredients that pack a flavorful punch. Here’s what you’ll need:

    • Rice Krispie Cereal: A classic base that adds crunch. Opt for gluten-free if needed!
    • Cinnamon: This warm spice brings a comforting aroma, reminiscent of holiday baking.
    • Ginger: Fresh and zesty, it adds that signature gingerbread flavor we all adore.
    • Allspice: A hint of sweetness and spice to deepen the flavor profile.
    • Nutmeg: Enhances warmth; a little goes a long way for that cozy feel.
    • Cloves: These tiny buds pack a powerful punch, giving your treats a rich, festive essence.
    • Salt: Balances the sweetness, making each bite delightful.
    • Cashew Butter: This creamy nut butter is a great alternative to marshmallows. It’s rich and adds a hint of nuttiness.
    • Honey or Maple Syrup: The sweetener of your choice! Go with honey for a traditional touch, or maple syrup for a vegan option.
    • Molasses: Adds depth and that classic gingerbread taste. It’s sweet with a hint of bitterness.
    • Vanilla: A choir of flavor that ties everything together beautifully.

    Don’t forget that you can always experiment with ingredients! For example, try adding a pinch of cardamom for an extra flavor kick. You’ll find all the exact quantities listed at the bottom of this article for easy printing too.

    How to Make Gingerbread Rice Krispie Treats

    Ready to bring some holiday magic into your kitchen? Let’s dive into making these Gingerbread Rice Krispie Treats together. The process is so simple that even on your busiest days, you’ll find yourself whipping up a batch in no time. Follow these steps for a tasty treat that your family will love!

    Step 1: Prepare Your Pan

    First up, grab a 9×9 pan and line it with parchment paper. The edges should stick out a bit. This will help you lift the treats out later with ease. Trust me, nothing’s worse than trying to pry sticky rice treats from the pan!

    Step 2: Mix the Rice Krispie Cereal

    In a large mixing bowl, pour in your rice krispie cereal. This will create the base for our treats. Just picture the satisfying crunch! Make sure you use gluten-free cereal if you’re catering to some dietary restrictions.

    Step 3: Combine the Spices

    In a separate bowl, take all those warm spices we gathered earlier—cinnamon, ginger, allspice, nutmeg, cloves, and salt. Mix them together well. This blend is what will make your kitchen smell like a cozy bakery! I always get a little nostalgic when I smell those spices.

    Step 4: Prepare the Wet Ingredients

    In a small pot, combine cashew butter, honey, and molasses. Heat it on low until it’s warm and smoothly mixed. We want everything well combined, so stir until you see no streaks. Once it warms up and simmers gently, remove it from heat and stir in the vanilla and spice mixture. It’ll be like a sweet hug for our treats!

    Step 5: Combine Everything Together

    Carefully pour the warm mixture over the rice krispie cereal. Here’s where the fun begins! Stir everything together until every last morsel of cereal is coated in that spicy sweetness. Get in there with a spatula to make sure all the cereal gets a taste of those holiday flavors.

    Step 6: Spread and Chill

    Now it’s time to spread the mixture evenly in the prepared pan. Use your spatula to press firmly so they hold together nicely. If things are sticking, a little non-stick spray on the spatula helps. Once smoothed out, pop it into the fridge for at least an hour. This gives it time to firm up, making slicing much easier.

    Step 7: Cut and Serve

    After chilling, it’s time for the grand reveal! Lift your treats out of the pan using the parchment. Cut them into 12 bars, and voila—you’ve made Gingerbread Rice Krispie Treats! Serve them up to family and friends, watch their smiles, and maybe snag one for yourself. You deserve it!

    Tips for Success

    • Prep your ingredients in advance; it makes the process smoother and quicker.
    • For an extra festive touch, add decorative sprinkles or crushed nuts on top before chilling.
    • Allow the mixture to cool slightly before spreading—this helps it set better.
    • Using non-stick spray on your spatula can help with spreading the mixture evenly.
    • Keep the treats refrigerated for longer freshness!

    Equipment Needed

    • 9×9 pan: A standard baking dish works too, just ensure it’s deep enough.
    • Parchment paper: If you don’t have parchment, try greasing the pan with a bit of oil.
    • Mixing bowls: Any size will do; I often use one large and one small.
    • Spatula: A rubber spatula is great for mixing and spreading.
    • Small pot: A saucepan will work perfectly for your wet ingredients.

    Variations

    • Nut Butter Swap: Try almond or sunflower seed butter for a different nutty flavor.
    • Sweetness Levels: Adjust the sweetness by adding more or less honey. Maple syrup is also a great alternative for those avoiding bee products.
    • Spice it Up: Add a pinch of cayenne pepper for a surprising kick. It pairs surprisingly well with the otherwise sweet flavors!
    • Chocolate Drizzle: Drizzle with melted dark or white chocolate for an extra indulgent touch.
    • Dried Fruits: Toss in some chopped dried cranberries or apricots for a fruity contrast to the spices.
    • Protein Boost: Mix in a scoop of protein powder or some chia seeds to give your treats a nutritional boost.

    Serving Suggestions

    • Pair with a warm cup of spiced chai or hot cocoa to enhance the festive flavors.
    • Present the treats on a colorful platter, topped with festive holiday sprinkles.
    • For a fun twist, serve them alongside a scoop of vanilla ice cream.
    • Wrap individual bars in festive cellophane for a delightful gift!

    FAQs about Gingerbread Rice Krispie Treats

    Can I make these Gingerbread Rice Krispie Treats ahead of time?

    Absolutely! These treats can be made a day or two in advance. Just store them in an airtight container in the fridge to keep them fresh. This is a perfect strategy for busy holiday weeks!

    What can I substitute for cashew butter?

    If cashew butter isn’t your thing, feel free to use almond butter or peanut butter. Just remember that different nut butters may slightly alter the taste but will still be delicious!

    Can I use different spices?

    Of course! The beauty of these Gingerbread Rice Krispie Treats lies in their flexibility. Feel free to experiment with your favorite spices—like cardamom or even a bit of vanilla bean for extra flair!

    Are these treats gluten-free?

    Yes! Just make sure to use gluten-free Rice Krispie cereal. This makes them a wonderful treat option for those with dietary restrictions!

    How should I store leftover treats?

    Store any leftover Gingerbread Rice Krispie Treats in an airtight container at room temperature for a couple of days or in the fridge to keep them fresher longer. They’ll be just as yummy in a few days!

    Final Thoughts

    Making Gingerbread Rice Krispie Treats is more than just a fun cooking adventure; it’s about creating sweet memories in the kitchen. With their delightful crunch and warm, spiced flavor, these treats capture the essence of the holiday season perfectly. Every bite brings a smile—not just from the delicious taste, but from the love and joy shared with family and friends. So, whether you’re baking for a party or indulging on a quiet evening at home, these treats will surely warm your heart and brighten your day. Let’s make the holidays a little sweeter together!


    Print

    clock clock iconcutlery cutlery iconflag flag iconfolder folder iconinstagram instagram iconpinterest pinterest iconfacebook facebook iconprint print iconsquares squares iconheart heart iconheart solid heart solid icon

    Description

    Delicious and festive Gingerbread Rice Krispie Treats, perfect for the holiday season!


    • 4 cups rice krispie cereal (gluten-free)
    • 1 tsp cinnamon
    • 1 tsp ginger
    • 1/2 tsp allspice
    • 1/2 tsp nutmeg
    • 1/2 tsp cloves
    • 1/4 tsp salt
    • 1 cup cashew butter
    • 1/2 cup honey (or maple syrup if vegan)
    • 3 tbsp molasses
    • 1 tsp vanilla

    1. Line a 9×9 pan with parchment paper, ensuring the edges stick out for easy removal.
    2. In a large mixing bowl, pour in the rice krispie cereal.
    3. In a separate bowl, combine the spices (cinnamon, ginger, allspice, nutmeg, cloves, and salt) and mix well.
    4. In a small pot, combine cashew butter, honey, and molasses, and stir until well combined. Heat gently until it simmers, then remove from heat and mix in the vanilla and spice mixture.
    5. Pour the wet ingredients over the rice krispie cereal and stir until all cereal is well coated.
    6. Spread the mixture evenly in the prepared pan using a spatula, spraying with non-stick spray if necessary.
    7. Refrigerate for at least an hour to cool.
    8. Remove from fridge, lift out using parchment paper, and cut into 12 bars.
    9. Enjoy!

    Notes

    • For a vegan option, use maple syrup instead of honey.
    • Make sure to store the treats in an airtight container to maintain freshness.
    • Prep Time: 15 minutes
    • Cook Time: 5 minutes
    • Category: Dessert
    • Method: No-Bake
    • Cuisine: American

    Nutrition

    • Serving Size: 1 bar
    • Calories: 200
    • Sugar: 13g
    • Sodium: 50mg
    • Fat: 8g
    • Saturated Fat: 1g
    • Unsaturated Fat: 7g
    • Trans Fat: 0g
    • Carbohydrates: 30g
    • Fiber: 2g
    • Protein: 5g
    • Cholesterol: 0mg

    Sharing is caring!

  • Cucumber Salad With Feta And Chickpeas

    Cucumber Salad With Feta And Chickpeas


    Introduction to Cucumber Salad With Feta And Chickpeas

    Welcome, fellow food lovers! If you’re anything like me, you appreciate meals that are both quick and delightful. The Cucumber Salad With Feta And Chickpeas fits the bill perfectly. It’s not just a refreshing dish for those hot summer days; it’s also a vibrant option for busy moms and professionals looking for something nutritious. Imagine tossing together fresh produce, creamy feta, and hearty chickpeas. This salad not only brings joy to your table but also makes meal prep a breeze. Let’s dive into a celebration of flavors while keeping your kitchen time at a minimum!

    Why You’ll Love This Cucumber Salad With Feta And Chickpeas

    This Cucumber Salad With Feta And Chickpeas is a lifesaver. It takes just 15 minutes to prepare, which is perfect for busy days when time slips away. The combination of crunchy cucumbers and creamy feta treats your taste buds to a delightful experience. Plus, it’s versatile and nourishing, making it suitable for anyone looking for a healthy meal option. Trust me; once you try it, you’ll be hooked!

    Ingredients for Cucumber Salad With Feta And Chickpeas

    Gathering the right ingredients can set the stage for a fantastic dish! Here’s what you’ll need for this refreshing Cucumber Salad With Feta And Chickpeas:

    • English cucumbers: These are crisp and mild, perfect for salads. If you can’t find them, regular cucumbers will do just fine!
    • Chickpeas: A pantry staple that adds a protein punch. Don’t forget to rinse them well to remove any canned flavors.
    • Feta cheese: This creamy, tangy cheese elevates the salad. Choose either crumbled or diced, depending on your texture preference.
    • Red onion: Thinly sliced, it offers a slight bite and vibrant color. If you find red onion too strong, feel free to substitute with green onions or shallots.
    • Garlic: Freshly minced garlic packs a flavorful punch. You can adjust the amount based on your love for garlic!
    • Fresh herbs: Parsley, cilantro, or mint brighten up the dish and add freshness. Mix and match based on what you have at home!
    • Extra virgin olive oil: A drizzle of quality olive oil adds richness and depth. This is your dressing base.
    • Red wine vinegar: It gives a zesty kick to the salad. You can substitute it with lemon juice for a milder flavor.
    • Lemon juice: Fresh lemon juice brightens and elevates all the flavors. It’s essential for that refreshing taste!
    • Salt and black pepper: These elevate the dish. Season to taste and make it your own!

    If you’d like to know the exact measurements for these ingredients, head down to the bottom of the article. They’re conveniently listed there for printing, making your shopping a breeze!

    How to Make Cucumber Salad With Feta And Chickpeas

    Making this Cucumber Salad With Feta And Chickpeas is easier than pie! With just a few simple steps, you’ll have a vibrant salad ready to impress. Ready to roll up those sleeves? Let’s get cooking!

    Step 1: Prepare the Cucumbers

    Start by washing those refreshing cucumbers under cool water. Then, slice them into bite-sized pieces. If you love a bit of crunch, leave the skin on. It’s packed with nutrients and adds a nice color!

    Step 2: Combine Ingredients

    In a large mixing bowl, it’s time for the fun part. Toss in the diced cucumbers, chickpeas, thinly sliced red onion, crumbled feta cheese, minced garlic, and your choice of fresh herbs. The mix of textures is simply delightful!

    Step 3: Dress the Salad

    Now, let’s have a party with flavors! Drizzle extra virgin olive oil and red wine vinegar over your salad mix. Squeeze in the fresh lemon juice for that zing. As you do this, your kitchen will start to smell amazing!

    Step 4: Mix and Adjust Seasonings

    Gently stir everything together until well combined. Taste the salad, then season with salt and black pepper. This is your moment to make it perfect! If you prefer a lighter flavor, add more herbs or lemon juice.

    Step 5: Serve or Chill

    Finally, serve your salad immediately for the freshest taste, or let it chill in the refrigerator for at least 30 minutes. Chilling allows the flavors to marry beautifully. Either way, it’s sure to be a hit!

    Tips for Success

    • Use freshly squeezed lemon juice for a vibrant flavor boost.
    • Chill the salad before serving for enhanced taste and crispness.
    • Feel free to customize with seasonal veggies, like bell peppers or tomatoes.
    • Prep ingredients in advance to save time on busy days.
    • For extra protein, add grilled chicken or shrimp if desired.

    Equipment Needed

    • Cutting Board: A sturdy surface for chopping those cucumbers and onions. A simple plate will work in a pinch.
    • Sharp Knife: Essential for slicing ingredients easily. A butter knife could be your backup if needed.
    • Mixing Bowl: A large bowl for combining everything. Any large container will do!
    • Measuring Cups: Handy for precise quantities. You can always eyeball it if you prefer.

    Variations of Cucumber Salad With Feta And Chickpeas

    • Greek Twist: Add kalamata olives and diced bell peppers for an extra burst of flavor.
    • Spicy Addition: Incorporate diced jalapeños or a sprinkle of red pepper flakes for a spicy kick.
    • Nutty Crunch: Toss in some toasted almonds or walnuts for a delightful crunch and added healthy fats.
    • Herb Blend: Experiment with fresh dill or basil to switch up the flavor profile.
    • Low-FODMAP Version: Substitute chickpeas with quinoa for a low-FODMAP alternative while keeping protein levels high.

    Serving Suggestions

    • Pair this Cucumber Salad With Feta And Chickpeas with grilled chicken skewers for a hearty meal.
    • Serve alongside crusty bread to soak up the delicious flavors.
    • For drinks, enjoy with a chilled white wine or sparkling water with lemon.
    • Garnish with extra herbs for a pop of color and freshness.

    FAQs about Cucumber Salad With Feta And Chickpeas

    Can I make the Cucumber Salad With Feta And Chickpeas ahead of time?

    Absolutely! This salad tastes even better after sitting for a while. You can prepare it a day in advance. Just keep it covered in the refrigerator until you’re ready to serve.

    What substitutions can I make for chickpeas in this salad?

    If chickpeas aren’t your thing, you can swap them out for quinoa, white beans, or even diced avocado. They’ll add a different texture and nutrition while keeping the salad hearty.

    How long will leftovers last in the fridge?

    Your Cucumber Salad With Feta And Chickpeas can last about 2 days in the fridge. Just be mindful that the cucumbers may lose their crispness over time.

    Can I use different types of cheese?

    For sure! While feta brings a creamy tang, feel free to experiment with mozzarella, goat cheese, or even a vegan cheese for a twist in flavor.

    Is this salad suitable for meal prep?

    Yes, it’s perfect for meal prep! Just pack it into single serving containers for easy grab-and-go lunches. Add dressing just before you eat for the best taste.

    Final Thoughts

    Making this Cucumber Salad With Feta And Chickpeas not only fills your kitchen with delightful aromas but also nurtures your loved ones with a burst of freshness. It’s like a hug in a bowl, combining simple ingredients and big flavors. As you enjoy each bite, you’ll feel the joy of sharing good food that brings everyone together, even on the busiest days. Whether for a family gathering or a quick lunch, this salad shines through! Trust me, it’ll quickly become a favorite go-to recipe that you’ll cherish for years to come.


    Print

    clock clock iconcutlery cutlery iconflag flag iconfolder folder iconinstagram instagram iconpinterest pinterest iconfacebook facebook iconprint print iconsquares squares iconheart heart iconheart solid heart solid icon

    Description

    A refreshing cucumber salad with feta and chickpeas, perfect for summer gatherings or as a light meal.


    • 2 medium English cucumbers (or regular)
    • 1 can (15 oz) chickpeas, rinsed and drained
    • 1 cup feta cheese, diced or crumbled
    • 1/2 small red onion, thinly sliced
    • 12 cloves garlic, minced
    • 1/2 cup fresh herbs (parsley, cilantro, mint)
    • 1/4 cup extra virgin olive oil
    • 2 tablespoons red wine vinegar
    • Juice of 1/2 lemon
    • Salt and black pepper to taste

    1. Wash and dice the cucumbers into bite-sized pieces. Place them in a large mixing bowl.
    2. Add the chickpeas, red onion, feta cheese, garlic, and chopped herbs to the bowl.
    3. Drizzle olive oil and red wine vinegar over the salad. Squeeze in lemon juice and season with salt and black pepper.
    4. Gently mix everything until well combined. Taste and adjust seasoning if needed.
    5. Serve immediately or let chill in the refrigerator for at least 30 minutes before serving for enhanced flavor.

    Notes

    • This salad can be made a day in advance for convenience.
    • Feel free to substitute the herbs based on your preference.
    • Prep Time: 15 minutes
    • Cook Time: 0 minutes
    • Category: Salad
    • Method: Mixing
    • Cuisine: Mediterranean

    Nutrition

    • Serving Size: 1 serving
    • Calories: 220
    • Sugar: 2g
    • Sodium: 300mg
    • Fat: 12g
    • Saturated Fat: 3g
    • Unsaturated Fat: 8g
    • Trans Fat: 0g
    • Carbohydrates: 24g
    • Fiber: 7g
    • Protein: 10g
    • Cholesterol: 15mg

    Sharing is caring!

  • Pistachio & Raspberry Cheesecake Domes

    Pistachio & Raspberry Cheesecake Domes


    Introduction to Pistachio & Raspberry Cheesecake Domes

    Welcome, fellow home cooks! Imagine a little sweet escape that fits right into your busy life—enter the Pistachio & Raspberry Cheesecake Domes. These delightful treats combine creamy raspberry filling with a crunchy pistachio crust, making them a perfect dessert to impress loved ones or simply indulge yourself after a long day. Whether you’re navigating the chaos of family dinners or seeking a special treat for a friend, these domes are your answer. They’re not just delicious; they’re an experience that brings joy to your kitchen and smiles to your table!

    Why You’ll Love This Pistachio & Raspberry Cheesecake Domes

    If you’re like me, you’re juggling a million things at once. These Pistachio & Raspberry Cheesecake Domes make dessert easy and enjoyable! They require minimal prep, leaving you extra time to kick back and savor life with your family. Plus, the rich flavors and textures are a crowd-pleaser for everyone, from picky eaters to dessert aficionados. Delicious, simple, and elegant—the perfect trifecta!

    Ingredients for Pistachio & Raspberry Cheesecake Domes

    Gathering your ingredients is half the fun of this delicious adventure! Here’s what you’ll need for these delightful Pistachio & Raspberry Cheesecake Domes:

    • Cream cheese – This creamy, dreamy base helps achieve that silky texture we all love in cheesecake.
    • Granulated sugar – Sweetness is key! It balances the tartness of the raspberries and enhances flavors.
    • Sour cream – This adds richness and a tangy flavor that makes every bite heavenly.
    • Vanilla extract – A splash of this aromatic ingredient brings warmth to your cheesecake filling.
    • Eggs – These provide structure and creaminess, holding everything together beautifully.
    • Raspberries – Fresh or frozen, they’re the star of this dessert, adding a burst of fruity goodness.
    • Pistachio nuts – Finely ground, they form a crunchy crust that contrasts perfectly with the smooth filling.
    • Unsalted butter – This acts as the glue in your crust, adding richness and flavor.
    • Lemon juice – Just a hint brightens the raspberry sauce, amplifying its lovely taste.
    • Chopped pistachios – Perfect for garnishing, they add that extra crunch and a pop of color.
    • Fresh mint leaves – A charming touch to elevate your presentation and add a refreshing aroma.

    For those looking to adapt this recipe, consider using low-fat cream cheese or a dairy-free alternative for a lighter option. You can also swap the raspberries for strawberries or blueberries if you prefer.

    For the exact quantities, please check the section at the bottom of this article where they are all listed and available for printing!

    How to Make Pistachio & Raspberry Cheesecake Domes

    Step 1: Preheat the Oven and Prepare Your Molds

    First things first—preheat your oven to 350°F (175°C). This is crucial for that perfect bake! While the oven heats up, gather your individual molds. I love using silicone molds as they make it easy to pop the domes out. Next, grab a mixing bowl and combine the finely ground pistachios, a touch of sugar, and melted butter. The mixture should feel like moist sand. Once combined, it’s time to fill your molds with this enticing crust mixture, pressing it down firmly. This forms the base for our delightful cheesecakes!

    Step 2: Make the Pistachio Crust

    Now that your molds are prepared, it’s time to get baking. Place your filled molds in the preheated oven for about 10-12 minutes. This baking time allows the crust to firm up nicely—just the way we like it! The aroma of toasting pistachios will fill your kitchen, tempting your taste buds. After the time is up, keep those molds out of the oven and let them cool slightly while we move on to our creamy filling!

    Step 3: Prepare the Cheesecake Filling

    In a large mixing bowl, beat the softened cream cheese until it’s dreamy and smooth—trust me, no lumps, only love! Gradually add granulated sugar and sour cream, blending together beautifully. Next, pour in a splash of vanilla extract—it adds warmth to our filling. Now, crack in the eggs one at a time, making sure to mix thoroughly after each addition. Finally, gently fold in those luscious raspberries, creating a vibrant mixture. This step is where the magic happens!

    Step 4: Bake the Cheesecake Domes

    Once your filling is ready, it’s time to bring it all together. Carefully pour the cheesecake mix over the cooled pistachio crust in each mold. The batter should fill the molds almost to the top. Bake these innocent-looking domes for about 25-30 minutes. You’re looking for a slight jiggle in the center when they’re done—this indicates they’re set but still creamy. When finished, turn off the oven and let them cool inside for about 30 minutes. This gentle cooling prevents cracks on the surface.

    Step 5: Make Raspberry Sauce

    While the cheesecake domes cool, let’s whip up that tangy raspberry sauce! In a small saucepan, combine raspberries, sugar, and lemon juice over medium heat. Stir occasionally until the mixture thickens, which should take about 10 minutes. For a smoother sauce, you can strain it through a fine mesh sieve after cooking. This step is optional, but it elevates the presentation and taste. Once cooled, this vibrant sauce will be ready to pour over your cheesecakes!

    Step 6: Chill and Serve

    Patience is key here! After baking, it’s time to refrigerate these lovely cheesecakes for at least 4 hours or overnight if possible. This chilling time allows the flavors to meld beautifully. When you’re ready to serve, gently pop the domes out of the molds. Drizzle with your raspberry sauce and get creative with those chopped pistachios and fresh mint leaves for garnish. They’ll look fantastic on your dessert table, and your guests will marvel at your culinary skills!

    Tips for Success

    • Ensure your cream cheese is softened to make mixing a breeze.
    • Don’t skip the cooling step in the oven to prevent cracks in your cheesecake.
    • If using frozen raspberries, thaw and drain excess liquid for less moisture in the filling.
    • Make the raspberry sauce in advance to save time on serving day.
    • Chill the cheesecakes overnight for a firmer, more delicious result.

    Equipment Needed

    • Oven: Essential for baking the cheesecakes; toaster ovens can work too for smaller batches.
    • Mixing bowls: Use any deep bowl for mixing; one glass bowl is perfect for visibility.
    • Electric mixer: A hand mixer makes life easier, but a whisk works in a pinch!
    • Silicone molds: Great for easy release; traditional muffin tins can also be used.
    • Small saucepan: For the raspberry sauce; a regular pot does the job as well.

    Variations for Pistachio & Raspberry Cheesecake Domes

    • Nut-Free Option: Omit the pistachios and use a graham cracker or almond flour crust for a different texture.
    • Berry Medley: Swap raspberries for a mix of blueberries and strawberries for a colorful and fruity twist.
    • Chocolate Lovers: Add cocoa powder to the cream cheese filling or drizzle melted dark chocolate on top for added richness.
    • Gluten-Free Version: Use gluten-free cookies or almond flour in your crust to accommodate gluten sensitivities.
    • Vegan Option: Replace cream cheese with a plant-based alternative and use flax eggs in place of regular eggs for a delightful vegan treat.

    Serving Suggestions for Pistachio & Raspberry Cheesecake Domes

    • Pair with Coffee: A cup of rich brewed coffee offers a delightful contrast to the sweetness of the cheesecake.
    • Fresh Fruits: Serve alongside a medley of fresh berries for a colorful and refreshing touch.
    • Elegant Plating: Use a wide dessert plate and drizzle raspberry sauce artfully around the dome for an impressive presentation.
    • Whipped Cream: A dollop of lightly sweetened whipped cream adds an extra creamy texture.

    FAQs about Pistachio & Raspberry Cheesecake Domes

    Can I use other nuts for the crust? Absolutely! Feel free to experiment with almonds or walnuts if you’re not a fan of pistachios. Just remember to grind them finely for that perfect crunchy crust!

    How long can I store the cheesecake domes? These Pistachio & Raspberry Cheesecake Domes can be stored in the refrigerator for up to five days. Just make sure to keep them covered to maintain their freshness!

    Can I freeze the cheesecake domes? Yes! They freeze quite well. Just wrap them in plastic wrap and place them in an airtight container. To enjoy later, simply thaw them in the fridge overnight.

    What’s the best way to serve these cheesecakes? For a stunning presentation, drizzle warm raspberry sauce over your domes just before serving. Garnish with chopped pistachios and fresh mint leaves for that extra flair.

    Why is my cheesecake dome cracking? Cracks often happen due to too much heat or not enough cooling. Make sure your oven temperature is just right and remember to let them cool gradually in the oven!

    Final Thoughts

    Making Pistachio & Raspberry Cheesecake Domes is more than just a cooking task—it’s a delightful experience. Each step, from mixing to chilling, offers a chance to enjoy a moment of creativity in the kitchen. Watching your family’s eyes light up upon tasting these little wonders makes the effort worth every second. So, whether it’s for a special occasion or a casual family dinner, let these stunning cheesecakes be the highlight of your dessert table. They promise not just flavor, but also smiles and sweet memories that linger long after the last bite has vanished.


    Print

    clock clock iconcutlery cutlery iconflag flag iconfolder folder iconinstagram instagram iconpinterest pinterest iconfacebook facebook iconprint print iconsquares squares iconheart heart iconheart solid heart solid icon

    Description

    Delicious cheesecake domes featuring a creamy raspberry filling and a crunchy pistachio crust.


    • 12 oz cream cheese (softened)
    • 1 cup granulated sugar
    • 1 cup sour cream
    • 1 tsp vanilla extract
    • 3 large eggs (room temperature)
    • 1 cup raspberries (fresh or frozen)
    • 1 ½ cups pistachio nuts (finely ground)
    • ¼ cup granulated sugar
    • ½ cup unsalted butter (melted)
    • 1 cup raspberries
    • ¼ cup sugar
    • 1 tbsp lemon juice
    • Chopped pistachios (for garnish)
    • Fresh mint leaves (for garnish)

    1. Preheat oven to 350°F (175°C).
    2. Mix ground pistachios, sugar, and melted butter; press into molds. Bake for 10-12 minutes.
    3. Beat softened cream cheese until smooth. Add sugar, sour cream, and vanilla; mix well. Add eggs one at a time, then fold in raspberries.
    4. Pour filling over the cooled crust. Bake for 25-30 minutes until set but jiggly. Cool in the oven for 30 minutes.
    5. Cook raspberries, sugar, and lemon juice in a saucepan until thickened. Strain if desired and let cool.
    6. Refrigerate the cheesecake domes for at least 4 hours. Serve with raspberry sauce and garnishes.

    Notes

    • Ensure cream cheese is softened for easy mixing.
    • For a smoother raspberry sauce, strain it after cooking.
    • These cheesecakes can be made a day in advance for optimal chilling.
    • Prep Time: 25 minutes
    • Cook Time: 45 minutes
    • Category: Dessert
    • Method: Baking
    • Cuisine: American

    Nutrition

    • Serving Size: 1 dome
    • Calories: 320
    • Sugar: 15g
    • Sodium: 150mg
    • Fat: 22g
    • Saturated Fat: 10g
    • Unsaturated Fat: 10g
    • Trans Fat: 0g
    • Carbohydrates: 30g
    • Fiber: 2g
    • Protein: 5g
    • Cholesterol: 95mg

    Sharing is caring!

  • Halloween Popcorn

    Halloween Popcorn


    Introduction to Halloween Popcorn

    As the leaves turn crisp and the days get shorter, it’s time to embrace the seasonal fun with Halloween popcorn! This delightful treat is not just a feast for the eyes; it’s an easy and quick solution for busy moms and professionals alike. Whether you’re hosting a Halloween gathering or just need a sweet snack to please your family, this recipe will surely impress. Imagine the joy on your loved ones’ faces as they dig into a colorful mix of chocolate and candy-coated popcorn, making your spooky season even sweeter!

    Why You’ll Love This Halloween Popcorn

    This Halloween popcorn is not just a treat; it’s a time-saver! In just 20 minutes, you can whip up a spooky snack that delights kids and adults alike. Its combination of fluffy popcorn, creamy chocolate, and crunchy candies is pure bliss in every bite. Plus, you can involve your kids in the fun, creating lasting memories while crafting this festive dessert together. It’s the ideal treat for busy days!

    Ingredients for Halloween Popcorn

    Gathering the right ingredients is key to making this delightful Halloween popcorn! Here’s what you’ll need for this spooky treat:

    • Popped popcorn: Light and fluffy, the base of our treat. Use plain popcorn to let the flavors of the toppings shine through.
    • Miniature marshmallows: Sweet and soft, these little bites add a pillowy texture to the mix, making each handful extra delightful.
    • White chocolate melting wafers: This creamy coating is essential for that luscious chocolate layer. Melting wafers are easy to work with and prevent burning. You can substitute with dark or milk chocolate if that’s your preference!
    • Halloween sprinkles: These festive additions bring a pop of color and fun to your Halloween popcorn. Choose sprinkles that match your spooky theme!
    • Oreo cookies: Crushed Oreos introduce a rich chocolatey flavor. They’re a great way to add some crunch and a hint of creaminess. Feel free to use gluten-free Oreos for an alternative.
    • M&M’s: The fun doesn’t stop here! Including Cookies & Scream M&M’s gives a seasonal flair, but feel free to use any variety you have on hand for a different flavor profile.

    With these ingredients prepped, you’ll be all set to create your Halloween popcorn. For specific quantities, check the bottom of the article where the measurements are available for printing!

    How to Make Halloween Popcorn

    Now, let’s dive into the fun part—making your Halloween popcorn! Follow these simple steps to create a batch of spooky goodness. The best part? It’s so easy that your kids can join in on the process!

    Step 1: Divide the Popcorn and Marshmallows

    Start by dividing your popped popcorn and miniature marshmallows evenly into two large bowls. This makes it easier to coat each bowl separately later on. Mixing it in two bowls ensures that every piece gets just the right amount of chocolaty goodness!

    Step 2: Melt the White Chocolate

    Grab a microwave-safe bowl and place half of the white chocolate melting wafers inside. Heat at 50% power for about 45 seconds. Check and stir before zapping it again until it’s smooth and creamy. Be careful not to overheat the chocolate; burnt chocolate can ruin the fun!

    Step 3: Coat the First Bowl of Popcorn

    Once your chocolate is melted and smooth, pour it into the first bowl of popcorn and marshmallows. Stir gently to coat everything evenly, making sure the popcorn is deliciously covered. Sprinkle in those colorful Halloween sprinkles and give it another toss for that festive touch!

    Step 4: Prepare for the Tray

    Line a baking tray with parchment paper to make cleanup a breeze. Once your first popcorn bowl is coated, dump the mixture onto one side of that tray. While it’s still warm, add half of the M&M’s on top. This lovely layer of chocolates will make your Halloween popcorn irresistible!

    Step 5: Melt Remaining Chocolate and Coat

    Now, repeat the melting magic with the remaining chocolate wafers. Pour this delicious melted chocolate over the second bowl of popped popcorn and marshmallows. Watch it transform as you stir everything together. Ensure each piece has that chocolaty coat that’s so addictive!

    Step 6: Add Oreos and Finalize

    As you stir the second bowl, slowly add in the crushed Oreo cookies. This is where the spooky fun happens! Mix until every piece of popcorn is coated in the rich Oreo crumbs. Now, transfer this delicious mixture onto the other side of your baking tray. Top it off with the remaining M&M’s for an extra sweet touch!

    Step 7: Chill and Store

    Lastly, pop the tray into the refrigerator for about 5 minutes. This helps everything set nicely. Once cooled, break it apart into clusters. Store your delicious Halloween popcorn in a tightly sealed bag or container to keep it fresh and crunchy. Enjoy every spooky bite!

    Tips for Success

    • Use fresh popcorn for the best texture and flavor.
    • Keep an eye on the chocolate while melting; stop before it fully melts for easier stirring.
    • Involve your kids in mixing and decorating for creative fun!
    • Feel free to experiment with different candy toppings to switch things up!
    • Always store your Halloween popcorn in an airtight container to maintain crispness.

    Equipment Needed

    • Microwave-safe bowl: You can also use a double boiler for melting chocolate.
    • Large mixing bowls: Any size will do, as long as they can hold your popcorn.
    • Baking tray: A cookie sheet works just as well.
    • Parchment paper: If unavailable, greased foil works for easy cleanup.

    Variations for Halloween Popcorn

    • For a healthier twist, use air-popped popcorn and dark chocolate. It’s just as indulgent but with added antioxidants!
    • Add nuts like almonds or pecans for an extra crunch and some protein.
    • Incorporate dried fruits like cranberries or raisins for a chewy texture and tangy flavor.
    • Swap out the cookies for gluten-free varieties to make this treat suitable for gluten-sensitive guests.
    • Experiment with flavored popcorn, such as caramel or cheddar, to surprise your taste buds!

    Serving Suggestions

    • Serve your Halloween popcorn in festive treat bags or colorful bowls for a vibrant presentation at parties.
    • Pair it with warm apple cider or pumpkin spice lattes for a seasonal twist.
    • For movie nights, create a fun snack bar with your Halloween popcorn and assorted candies.
    • Add spooky touches like themed napkins or cups to enhance the festive atmosphere!

    FAQs about Halloween Popcorn

    As you whip up your Halloween popcorn, you might have some lingering questions. Here are a few common queries that can help guide you in your popcorn-making adventure!

    Can I make Halloween popcorn ahead of time?

    Absolutely! You can prepare it a day in advance. Just make sure to store it in an airtight container to keep it fresh and crunchy!

    What can I use instead of white chocolate?

    If white chocolate isn’t your thing, you can substitute it with milk or dark chocolate melting wafers. Both options will create a deliciously rich flavor for your Halloween popcorn.

    Is there a lower-sugar option for this treat?

    Yes, you can use dark chocolate and reduce the amount of candy. You can also replace M&M’s with dried fruit to keep things sweet yet healthier!

    How long does Halloween popcorn stay fresh?

    When stored in an airtight container, it can stay fresh for about a week. Just be sure to keep it in a cool, dry place!

    Can I make this treat gluten-free?

    Definitely! Simply swap regular Oreos with gluten-free versions and you’re good to go! Enjoy your gluten-free Halloween popcorn without worries.

    Final Thoughts

    Creating Halloween popcorn is more than just a recipe; it’s an opportunity to bond with your family and embrace the festive spirit together. The blend of flavors and textures, from gooey marshmallows to crunchy Oreos, brings joy and laughter to any gathering.

    With its bright colors and spooky charm, this sweet treat will undoubtedly be a hit at your Halloween festivities. Plus, it takes minimal time, making it an ideal choice for busy days. So gather your loved ones, roll up your sleeves, and get ready to enjoy the delicious magic of Halloween popcorn!


    Print

    clock clock iconcutlery cutlery iconflag flag iconfolder folder iconinstagram instagram iconpinterest pinterest iconfacebook facebook iconprint print iconsquares squares iconheart heart iconheart solid heart solid icon

    Description

    A festive and delicious treat perfect for Halloween, combining popcorn, chocolate, marshmallows, and candy.


    • 6 cups popped popcorn
    • 2 cups miniature marshmallows
    • 110 ounce bag white chocolate melting wafers
    • ¼ cup Halloween sprinkles
    • 10 Oreo cookies, crushed into fine crumbs
    • 1 bag M&M’s (Cookies & Scream M&M’s recommended)

    1. Divide the popcorn and marshmallows evenly in two bowls.
    2. Place half the melting wafers in a microwave safe bowl. Heat at 50% power for 45 seconds. Stir and repeat until melted and creamy.
    3. Pour into one bowl of popcorn. Stir until everything is coated. Add sprinkles and toss again.
    4. Dump the popcorn onto a tray lined with parchment. Add half the M&M’s.
    5. Melt the rest of the chocolate and pour into the other bowl of popcorn. Stir until everything is coated.
    6. Slowly add the Oreo crumbs as you continue to stir until everything has a crumb coating.
    7. Dump the popcorn onto the other end of the tray. Add the rest of the candies.
    8. Refrigerate for 5 minutes. Break apart and store in a tightly sealed bag.

    Notes

    • Ensure the chocolate is not overheated to prevent burning.
    • You can use any type of M&M’s for variety.
    • Store in an airtight container to keep it fresh.
    • Prep Time: 15 minutes
    • Cook Time: 5 minutes
    • Category: Dessert
    • Method: No-Bake
    • Cuisine: American

    Nutrition

    • Serving Size: 1 cup
    • Calories: 150
    • Sugar: 10g
    • Sodium: 90mg
    • Fat: 7g
    • Saturated Fat: 4g
    • Unsaturated Fat: 2g
    • Trans Fat: 0g
    • Carbohydrates: 20g
    • Fiber: 1g
    • Protein: 1g
    • Cholesterol: 5mg

    Sharing is caring!

  • Halloween Cookies

    Halloween Cookies


    Introduction to Halloween Cookies

    As the leaves start to turn and Halloween approaches, I find myself craving those delightful Halloween cookies. They bring a sprinkle of joy and a dash of nostalgia. This recipe is a quick solution for busy days, offering a festive way to celebrate the season. Trust me, these cookies are perfect to impress your loved ones, or even indulge in a moment of delightful self-care. With their chocolatey flavor and vibrant decorations, they’ll quickly become a favorite in your home. Let’s dive into this fun baking adventure together!

    Why You’ll Love This Halloween Cookies

    These Halloween cookies are not just delicious; they’re incredibly easy to make! In just about 30 minutes, you’ll have a batch of scrumptious treats that kids and adults alike will adore. The rich chocolatey flavor dances with festive colors, making them a hit at any gathering. Plus, they’re a fun way to involve the kids in the kitchen, creating cherished memories while whipping up these delightful festive bites. What’s not to love?

    Ingredients for Halloween Cookies

    To bring these delightful Halloween cookies to life, you’ll need a mix of simple ingredients that work together to create a truly festive treat. Here’s what you’ll need:

    • All-purpose flour: This is the foundation of your cookies, giving them the right structure and texture.
    • Black cocoa powder: This rich chocolatey powder adds depth and a delightful dark color. If you can’t find it, regular cocoa powder will work, but the color won’t be as striking.
    • Baking powder and baking soda: A little leavening goes a long way, helping your cookies rise and achieve that perfect chewy texture.
    • Salt: Just a pinch enhances the sweetness and balance of flavors in your cookies.
    • Unsalted butter: Softened butter is essential for creaming with sugars, creating a light and fluffy base for your cookies. Always opt for unsalted to control the saltiness.
    • Light brown sugar: This adds a lovely caramel flavor and moisture, keeping your cookies wonderfully chewy.
    • Granulated white sugar: This gives a bit of sparkle and sweetness. Together with brown sugar, it creates the perfect contrast in texture.
    • Egg yolks: Just the yolks help create a rich, tender cookie. Make sure they’re at room temperature for easier mixing.
    • Vanilla extract: A splash of this classic ingredient adds warmth and enhances the overall flavor of the cookies.
    • Halloween M&Ms: Not only do they add sweetness, but their festive colors bring a touch of fun to your cookies.
    • Halloween jimmies: These colorful sprinkles are perfect for that extra bit of pizzazz that makes every bite exciting!
    • Candy eyeballs: These whimsical decorations transform your cookies into mini-spooky delights, making them a hit with kids.
    • Extra Halloween M&Ms and jimmies: These are for decorating the tops of your cookies before baking. They’ll make your treats extra charming when they come out of the oven!

    Don’t worry; you can find the exact quantities for each ingredient at the bottom of this article, ready for printing when you’re set to bake.

    How to Make Halloween Cookies

    Step 1: Preheat and Prepare

    Begin by preheating your oven to 350 degrees Fahrenheit. While it warms up, line two baking sheets with parchment paper. This makes cleanup easy and helps your cookies bake evenly. Just imagine the delicious aroma wafting through your home in no time!

    Step 2: Mix Dry Ingredients

    Next, grab a medium bowl and whisk together the all-purpose flour, black cocoa powder, baking powder, baking soda, and salt. Mixing these dry ingredients thoroughly ensures even distribution. Don’t skip this step—it’s key for the best Halloween cookies!

    Step 3: Cream the Butter and Sugars

    Now for the fun part! In a large mixing bowl, combine softened unsalted butter, light brown sugar, and granulated sugar. Using an electric mixer, cream them together for about two minutes until light and fluffy. This airy texture is what gives your cookies that melt-in-your-mouth feel.

    Step 4: Incorporate Wet Ingredients

    Add the egg yolks and vanilla extract to your butter-sugar mixture. Mix on medium speed for another two minutes. Watch as it transforms into a pale and creamy mix. This stage is crucial; it adds richness and enhances the flavor of your delightful Halloween cookies!

    Step 5: Combine Wet and Dry Mixtures

    Now it’s time to bring the two worlds together! Gradually add the dry mixture to the wet ingredients. Stir on low speed, just until combined. Overmixing here can lead to tough cookies, and we want them soft and chewy!

    Step 6: Fold in M&Ms and Sprinkles

    Once combined, gently fold in the Halloween M&Ms and jimmies using a rubber spatula. Be careful not to crush the candies—those festive pops of color are what make your Halloween cookies so special and fun!

    Step 7: Shape the Cookies

    Time to scoop! Use a cookie scoop with a two-tablespoon capacity to scoop out dough balls. Place them about two inches apart on your prepared baking sheets. Remember, they’ll spread a little while baking, so plan accordingly!

    Step 8: Decorate Before Baking

    Give your cookies some personality! Add extra M&Ms, candy eyeballs, and sprinkles on top of the dough balls. This is where creativity shines through—let your Halloween spirit guide your designs!

    Step 9: Bake to Perfection

    Slide the baking sheets into the oven and bake for 10 to 11 minutes. Keep an eye on them as they bake; you want them to look just set but slightly soft in the center. That’s the hallmark of a perfectly baked cookie!

    Step 10: Cooling Tips

    Once done, let your cookies cool on the baking sheets for about 5 minutes. Then, carefully transfer them to a wire rack to cool completely. This step helps maintain their soft, chewy texture. Just be patient; the tasty treats will be ready to devour soon!

    Tips for Success

    • Always preheat your oven for even baking, so your cookies rise perfectly.
    • Make sure your butter is softened but not melting; this is crucial for the right texture.
    • Use a cookie scoop for uniform sizes—this helps them bake evenly.
    • Don’t overmix once you add the flour; treat your dough gently for softness.
    • Experiment with additional decorations for extra festive flair!

    Equipment Needed for Halloween Cookies

    • Mixing bowls: Use both medium and large bowls for mixing ingredients. A set of nested bowls is handy!
    • Electric mixer: A handheld mixer works wonders, but a sturdy whisk can also get the job done.
    • Cookie scoop: A 2-tablespoon scoop is perfect for shaping cookies. However, a spoon will do in a pinch!
    • Baking sheets: Standard baking sheets lined with parchment paper ensure easy cleanup.
    • Wire rack: Use this for cooling your cookies unless you have a large plate—freedom of airflow is key!

    Variations of Halloween Cookies

    • Gluten-free version: Substitute all-purpose flour with a gluten-free blend to keep everyone included in the fun.
    • Vegan option: Replace the butter with coconut oil and use flax eggs instead of regular egg yolks for a plant-based twist.
    • Add nuts: For a delightful crunch, fold in chopped walnuts or pecans with the M&Ms.
    • Spooky flavor: Add a dash of cinnamon or pumpkin spice for a hint of fall flavor that complements the chocolate.
    • Chocolate lovers: Use white chocolate M&Ms or chocolate chips in place of Halloween M&Ms for double the chocolate goodness!

    Serving Suggestions for Halloween Cookies

    • Milk: Pair your cookies with a tall glass of cold milk for the perfect classic treat.
    • Cider: Hot apple cider brings a cozy fall vibe that complements the chocolatey goodness.
    • Pumpkin spice lattes: These seasonal drinks enhance the festive atmosphere at any gathering.
    • Presentation: Arrange cookies on a spooky platter with some fake spiders for a fun Halloween touch!

    FAQs about Halloween Cookies

    Can I make the cookie dough in advance?

    Absolutely! You can prepare the dough, shape it into balls, and freeze them. Just let them thaw for about 10 minutes before baking. It’s a great time-saver if you’re busy during Halloween week!

    What can I substitute for black cocoa powder?

    If black cocoa powder is hard to find, regular cocoa powder is a good substitute. Your cookies will still taste delicious, but they won’t have that deep color. They’ll still be festive and delightful!

    How can I store leftover Halloween cookies?

    Keep your Halloween cookies in an airtight container at room temperature for about a week. For longer storage, you can freeze them. Just layer them with parchment paper to prevent sticking!

    Can I use different types of candies for decorating?

    Definitely! Feel free to get creative. Use any candies you like—chocolate chips, gummy worms, or even crushed candy corn for that extra Halloween flair!

    Why did my cookies spread too much during baking?

    Sometimes, cookies spread if the butter is too soft or melted. Ensure it’s just softened. If you have that issue, try chilling the dough for about 30 minutes before baking, and they’ll hold their shape better!

    Final Thoughts on Halloween Cookies

    Baking these Halloween cookies is more than just a recipe; it’s a delightful experience that fills your home with warmth and happiness. The joyful colors and chocolatey goodness bring smiles to faces young and old, creating magical moments together. Each bite whisks you away to a world of childhood memories, laughter, and celebration. Whether you’re making them for a festive gathering or a cozy night in, these cookies are sure to spread joy and create connections. So preheat that oven and let the fun begin—your taste buds and your loved ones will thank you!


    Print

    clock clock iconcutlery cutlery iconflag flag iconfolder folder iconinstagram instagram iconpinterest pinterest iconfacebook facebook iconprint print iconsquares squares iconheart heart iconheart solid heart solid icon

    Description

    Delightful cookies perfect for Halloween with a chocolatey flavor and festive decorations.


    • 1 1/4 cups (156 g) all-purpose flour, spooned and leveled
    • 5 tbsp (35 g) black cocoa powder
    • 1/2 tsp baking powder
    • 1/2 tsp baking soda
    • 1/2 tsp salt
    • 3/4 cup (168 g) unsalted butter, softened
    • 3/4 cup (165 g) light brown sugar, packed
    • 1/4 cup (50 g) granulated white sugar
    • 2 egg yolks, at room temperature
    • 1 tsp vanilla extract
    • 3/4 cup (170 g) Halloween M&M’s
    • 3 tbsp (36 g) Halloween jimmies
    • candy eyeballs for decoration
    • extra Halloween M&Ms and jimmies for decoration

    1. Preheat the oven to 350 degrees and line two baking sheets with parchment paper.
    2. In a medium bowl, whisk the flour, black cocoa powder, baking powder, baking soda and salt together.
    3. Add the softened, unsalted butter, light brown sugar, and granulated sugar to a large bowl. Cream the butter and sugars together with an electric mixer for two minutes, or until light and fluffy.
    4. Add in the egg yolks and vanilla and mix on medium speed for two minutes, or until the mixture is pale in color and fluffy.
    5. Add the dry ingredients to the wet ingredients and mix on low speed just until combined.
    6. Add in the M&Ms and Halloween sprinkles and gently fold them into the cookie dough with a rubber spatula.
    7. Scoop the dough into 17 balls using a 2-tablespoon capacity cookie scoop. Arrange the dough balls two inches apart on the prepared baking sheets lined with parchment paper.
    8. Add extra M&Ms, candy eyeballs, and sprinkles on the sides and center of the cookie dough balls.
    9. Bake the cookies for 10-11 minutes.
    10. Let the cookies cool on the baking sheet for 5 minutes, then transfer them to a wire rack to completely cool. (Some of the eyeballs may melt while baking.)
    11. When the cookies are straight out of the oven, scoot a large circular cookie cutter around them to give them a perfect circular shape.

    Notes

    • Ensure butter is softened for better mixing.
    • The cookies may spread slightly while baking, so space them adequately.
    • Prep Time: 30 minutes
    • Cook Time: 11 minutes
    • Category: Dessert
    • Method: Baking
    • Cuisine: American

    Nutrition

    • Serving Size: 1 cookie
    • Calories: 150
    • Sugar: 10g
    • Sodium: 100mg
    • Fat: 8g
    • Saturated Fat: 5g
    • Unsaturated Fat: 2g
    • Trans Fat: 0g
    • Carbohydrates: 18g
    • Fiber: 1g
    • Protein: 1g
    • Cholesterol: 25mg

    Sharing is caring!

  • Protein Peanut Butter Breakfast Burrito

    Protein Peanut Butter Breakfast Burrito


    Introduction to Protein Peanut Butter Breakfast Burrito

    Hey there, fellow food lovers! If you’re searching for a tasty way to kick-start your morning, let me introduce you to the delightful Protein Peanut Butter Breakfast Burrito. As a busy mom myself, I know how precious those morning minutes can be. This delicious dish is not only quick to whip up, but it also packs a powerful protein punch. It’s the perfect solution for a hectic day ahead or a special treat to impress your loved ones. Trust me, once you try it, you’ll wonder how you ever lived without this twist on breakfast!

    Why You’ll Love This Protein Peanut Butter Breakfast Burrito

    This Protein Peanut Butter Breakfast Burrito is a game-changer! It’s easy to make, taking just 20 minutes from start to finish. You can enjoy the rich, nutty flavor of peanut butter paired with savory veggies and fluffy eggs. Plus, it’s incredibly versatile. Whether you’re rushing off to work or making breakfast for your family, this burrito will satisfy everyone. Delicious and nutritious, what’s not to love?

    Ingredients for Protein Peanut Butter Breakfast Burrito

    Here’s what you’ll need to create this delightful Protein Peanut Butter Breakfast Burrito. Each ingredient brings something special to the table, making your breakfast not just delicious but also nourishing.

    • Large eggs: The protein base of your burrito, they add creaminess and flavor.
    • Milk: Whether dairy or plant-based, it helps the eggs become fluffy and light.
    • Unsalted butter: This creates a lovely richness when sautéing the veggies.
    • Fresh baby spinach: A superfood that adds a pop of color and vital nutrients.
    • Red bell pepper (optional): Adds a sweet crunch and a burst of vitamins.
    • Whole wheat tortillas: Healthier than white tortillas, they’re perfect for wrapping up your filling.
    • Natural peanut butter: The star of the show! It brings flavor, protein, and a hint of sweetness.
    • Honey (optional): Use it if you love a touch of sweetness to balance savory flavors.
    • Warm water: Helps to thin the peanut butter to a drizzle-friendly consistency.
    • Salt: A pinch enhances all the flavors, bringing everything together.
    • Black pepper: Just the right kick to elevate the dish.

    These ingredients work together beautifully to create a breakfast that’s satisfying and nutritious. For exact quantities, just scroll down to the end of the article, where you can find everything you need to print out your shopping list!

    How to Make Protein Peanut Butter Breakfast Burrito

    Now, let’s dive into the magic of creating your Protein Peanut Butter Breakfast Burrito. This process is not just a recipe; it’s a culinary adventure! With just a few steps, you’ll find yourself enjoying a scrumptious breakfast in no time.

    Step 1: Whisk the Eggs

    Start by cracking your large eggs into a small bowl. Add in the milk, salt, and black pepper. Use a whisk or a fork to mix everything together until it’s nice and frothy. This is where you set the stage for that fluffy egg experience. Trust me, it’s worth the effort!

    Step 2: Sauté the Vegetables

    Next, grab a non-stick skillet and heat it over medium. Toss in the unsalted butter and watch it melt into a golden pool of goodness. If you’re adding red bell pepper, toss it in first and let it sauté for about two minutes until it’s slightly softened. Then, add your fresh baby spinach. Stir it all together until the spinach wilts—this should only take a minute. Your kitchen will smell amazing!

    Step 3: Scramble the Eggs

    Now, it’s time for the eggs! Pour the whisked egg mixture into the skillet with the sautéed vegetables. Gently scramble the eggs with a spatula until theyJust set, yet still tender. You want them soft, not overcooked, like a cozy hug for your burrito. Once done, remove the skillet from heat.

    Step 4: Prepare the Peanut Butter Sauce

    While the eggs are cooking, grab a small bowl. Mix together the natural peanut butter, honey, and warm water. Stir until you have a smooth drizzle. This creamy sauce is going to take your burrito from good to glorious!

    Step 5: Warm the Tortillas

    To ensure your tortillas wrap up perfectly, warm them up! You can do this in a dry skillet for a few seconds or microwave them for 10-15 seconds. It makes them pliable and helps prevent tearing. Don’t skip this step—it makes all the difference!

    Step 6: Assemble the Burritos

    Now comes the fun part! Take your warmed tortillas, and divide the scrambled egg and spinach mixture evenly between them. Drizzle that luscious peanut butter sauce over the top. Then, roll each tortilla tightly, tucking in the sides to create a beautiful burrito. Slice each one in half, and voilà, your Protein Peanut Butter Breakfast Burrito is ready to be devoured!

    Tips for Success

    • Prep your ingredients ahead of time to save precious minutes in the morning.
    • Don’t rush the sautéing process; let those colors and flavors develop.
    • Experiment with the peanut butter sauce by adding spices like cinnamon or a dash of cayenne for heat.
    • Make extra burritos for quick breakfasts throughout the week—just grab and go!
    • Use a large skillet to ensure everything cooks evenly and easily.

    Equipment Needed

    • Non-stick skillet: A must for easy cooking. If you don’t have one, any skillet will do, just add a bit more oil.
    • Small bowl: For whisking eggs and mixing the peanut butter sauce. A cup works too!
    • Whisk or fork: Necessary for blending the egg mixture. A spoon can also get the job done.

    Variations

    • Swap out the spinach: Try using kale or arugula for a different flavor profile.
    • Add more protein: Include cooked chicken, turkey, or tofu for an extra boost.
    • Go vegan: Substitute eggs with tofu scramble and use plant-based milk and butter.
    • Change the spice level: Add jalapeños or a sprinkle of red pepper flakes for a spicy kick!
    • Customize the nut butter: Experiment with almond or cashew butter if you’re feeling adventurous.

    Serving Suggestions

    • Pair your burrito with a side of fresh fruit for a refreshing touch.
    • Consider a dollop of Greek yogurt or a sprinkle of crumbled feta on top.
    • Serve with a hot cup of coffee or a smoothie for a complete meal.
    • Garnish with chopped herbs for a pop of color and added flavor.

    FAQs about Protein Peanut Butter Breakfast Burrito

    Can I make this Protein Peanut Butter Breakfast Burrito ahead of time? Absolutely! You can prepare the filling and store it in the fridge for up to three days. Just warm it up and fill your tortillas when you’re ready to eat.

    Is this recipe suitable for meal prep? Yes! This Protein Peanut Butter Breakfast Burrito can easily be doubled or even tripled for meal prep. Just wrap each burrito tightly in foil or plastic wrap, and they’ll be ready for a quick breakfast any day of the week!

    How can I make this burrito more filling? To amp up the protein, consider adding cooked chicken, turkey, or even beans. You could also serve it with a side of Greek yogurt for a creamy touch.

    Can I customize the flavors in this burrito? Definitely! Add your favorite spices or herbs to the egg mixture, or swap the spinach for other greens like kale. Get creative!

    What if I’m allergic to peanuts? If peanuts are off the menu for you, feel free to substitute with almond or cashew butter. The creamy texture will still give you that satisfying sauce experience!

    Final Thoughts

    Making the Protein Peanut Butter Breakfast Burrito has transformed my mornings into a delightful ritual. The balance of flavors and textures creates a burst of joy with every bite. Not only does it nourish my body, but it also satisfies my taste buds like nothing else. Whether you’re dashing off to work or simply enjoying a quiet moment at home, this recipe brings comfort and energy to your day. I can’t wait for you to try it—I promise it’ll become a favorite in your kitchen too. Let the love for breakfast bloom in your home!


    Print

    clock clock iconcutlery cutlery iconflag flag iconfolder folder iconinstagram instagram iconpinterest pinterest iconfacebook facebook iconprint print iconsquares squares iconheart heart iconheart solid heart solid icon

    Description

    A delicious and nutritious breakfast option featuring eggs, spinach, and a savory peanut butter sauce wrapped in whole wheat tortillas.


    • 4 large eggs
    • 2 tablespoons milk (dairy or plant-based)
    • 1 tablespoon unsalted butter
    • 2 cups fresh baby spinach
    • 1 small red bell pepper, diced (optional)
    • 2 large whole wheat tortillas
    • 2 tablespoons natural peanut butter
    • 1 tablespoon honey (optional, for sweetness)
    • 1 tablespoon warm water (to thin peanut butter, if needed)
    • 1/4 teaspoon salt
    • 1/8 teaspoon black pepper

    1. In a small bowl, whisk together the eggs, milk, salt, and black pepper until well combined.
    2. Heat a non-stick skillet over medium heat. Add butter and allow to melt. Add the diced bell pepper (if using) and sauté for 2 minutes until slightly softened. Add spinach and cook, stirring, until wilted (about 1 minute).
    3. Pour in the egg mixture. Gently scramble until eggs are just set but still soft. Remove from heat.
    4. In a separate small bowl, mix peanut butter with honey and warm water until smooth and drizzle-able.
    5. Warm tortillas in a dry skillet or microwave for 10–15 seconds to make them pliable.
    6. Divide the scrambled egg and spinach mixture evenly between the tortillas. Drizzle each with the peanut butter sauce. Roll up each tortilla tightly, tucking in the sides to form a burrito. Slice in half and serve warm.

    Notes

    • Feel free to add other vegetables or protein sources according to your preference.
    • This recipe can be easily doubled for meal prep.
    • Adjust the honey sweetness based on your taste.
    • Prep Time: 10 minutes
    • Cook Time: 10 minutes
    • Category: Breakfast
    • Method: Skillet
    • Cuisine: American

    Nutrition

    • Serving Size: 1 burrito
    • Calories: 350
    • Sugar: 3g
    • Sodium: 320mg
    • Fat: 18g
    • Saturated Fat: 6g
    • Unsaturated Fat: 10g
    • Trans Fat: 0g
    • Carbohydrates: 34g
    • Fiber: 6g
    • Protein: 14g
    • Cholesterol: 300mg

    Sharing is caring!

  • Honey Feta Watermelon Salad

    Honey Feta Watermelon Salad


    Introduction to Honey Feta Watermelon Salad

    As a busy mom, I know how important it is to have quick, delicious recipes on hand. Enter the Honey Feta Watermelon Salad—your new summer sidekick! Imagine vibrant watermelon bursting with juiciness, tangy feta for that savory touch, and the crunch of sweet pomegranate seeds. This salad isn’t just fresh and colorful; it comes together in a snap! It’s perfect for those hectic weeknights or laid-back gatherings. I promise, every bite will whisk you away to a sun-soaked picnic, making it a delightful yet easy addition to your table!

    Why You’ll Love This Honey Feta Watermelon Salad

    This Honey Feta Watermelon Salad is a game-changer for busy lifestyles. It’s incredibly easy to whip up, taking only about 15 minutes from start to finish. The combination of refreshing watermelon and tangy feta creates a party in your mouth, while the sweet pomegranate seeds add delightful bursts of flavor. Whether you’re serving it at a BBQ or as a light lunch, this salad delivers quick satisfaction every single time!

    Ingredients for Honey Feta Watermelon Salad

    Gathering the right ingredients for your Honey Feta Watermelon Salad is a breeze! You’ll need seedless watermelon, sweet and juicy, which is the foundation of the salad. Pomegranate seeds bring a burst of sweetness and a lovely crunch, while crumbled feta adds a tangy bite that perfectly balances the flavors.

    Don’t forget fresh mint! Its bright notes will elevate your salad with a refreshing aroma. For the dressing, you’ll mix honey, fresh lime juice, and olive oil. This creates a delightful sweetness balanced with acidity. A pinch of salt and freshly ground black pepper enhances the overall flavor profile. If you’re feeling adventurous, adding some lime zest brings an extra zing!

    Please note, exact quantities are provided at the bottom for your convenience. Feel free to substitute with other fruits like berries or even add nuts for texture!

    How to Make Honey Feta Watermelon Salad

    Creating this Honey Feta Watermelon Salad is as easy as pie! Let’s break it down into simple steps to ensure you enjoy every second of making it.

    Step 1: Prepare the Ingredients

    Start by cubing the seedless watermelon into bite-sized pieces. This makes it easy to eat and allows all those flavors to mingle beautifully. Gather fresh mint leaves, checking for any brown spots, as you want only the freshest herbs for this dish!

    Step 2: Mix the Base Ingredients

    In a large mixing bowl, gently combine the watermelon cubes, pomegranate seeds, crumbled feta, and chopped mint leaves. Take your time here—gentle mixing keeps the watermelon intact and adds to the salad’s overall texture. Each ingredient brings something special, so be kind to those flavors!

    Step 3: Whisk the Dressing

    In a small bowl, whisk together the honey, fresh lime juice, and olive oil until it’s well blended. This isn’t just about combining liquids; you’re creating a sweet and tangy dressing that elevates the salad. Take a moment to appreciate those lovely aromas; it’s truly the heart of the dish!

    Step 4: Combine the Salad and Dressing

    Now it’s time to drizzle the dressing over the salad. Toss gently to coat everything evenly, ensuring each bite is flavorful. Serve it right away for that perfect fresh crunch; trust me, you’d want to enjoy it at its best!

    Step 5: Serve and Enjoy

    Transfer the salad to a beautiful serving platter. Garnish with lime zest and extra mint leaves for an added touch of elegance. This vibrant dish is not just a feast for the palate but also for the eyes!

    Tips for Success

    When making your Honey Feta Watermelon Salad, here are a few handy tips to ensure it shines:

    • Use ripe watermelon for the sweetest flavor and best texture.
    • Prepare the salad just before serving to keep the watermelon crisp.
    • Keep leftovers in an airtight container for up to a day, but avoid dressing until ready to eat.
    • This salad pairs beautifully with grilled meats or serves as a refreshing picnic side.

    Equipment Needed

    Here are the essential tools to whip up your Honey Feta Watermelon Salad:

    • Large mixing bowl for combining ingredients.
    • Small bowl for whisking the dressing.
    • Cutting board for preparing the watermelon.
    • Sharp knife for easy cutting.
    • Serving platter to showcase your salad.

    Variations of Honey Feta Watermelon Salad

    If you want to mix things up with your Honey Feta Watermelon Salad, here are some delightful variations to consider:

    • Swap feta for vegan cheese for a plant-based option.
    • Add diced cucumber for an extra crunch.
    • Incorporate berries like blueberries or strawberries for a colorful twist.
    • Mix in avocado for a creamy addition that harmonizes well.
    • Explore nuts like walnuts or almonds for extra texture and flavor.

    Serving Suggestions

    To elevate your Honey Feta Watermelon Salad experience, consider these delightful accompaniments:

    • Serve alongside grilled chicken or fish for a balanced meal.
    • Pair with a light, crisp white wine like Sauvignon Blanc.
    • Present in a beautiful bowl garnished with additional mint for an inviting look.
    • Include a side of crusty bread to scoop up any leftovers.

    FAQs about Honey Feta Watermelon Salad

    Here are some common questions I hear about the Honey Feta Watermelon Salad:

    How should I store any leftovers?
    Store the salad in an airtight container in the refrigerator for up to a day. Just remember, it’s best enjoyed fresh!

    Can I adjust the sweetness of the dressing?
    Absolutely! If you prefer a sweeter salad, add an extra drizzle of honey. Conversely, a splash of lime juice can balance out the sweetness.

    What can I use instead of feta cheese?
    If feta isn’t your thing, try crumbled goat cheese for a creamy twist or a dairy-free feta cheese for a vegan-friendly option.

    How do I keep the watermelon from getting soggy?
    To maintain that refreshing crunch, only dress the salad right before serving. This keeps everything fresh and vibrant!

    Can I add other fruits?
    Definitely! Feel free to experiment with berries or even citrus fruits for a colorful and flavorful addition!

    Final Thoughts

    The Honey Feta Watermelon Salad is more than just a dish; it’s a celebration of summer flavors! Each bite is a delightful blend of sweet, tangy, and fresh that I know you’ll cherish as much as I do. It’s incredibly easy to make, and it gives you a chance to impress family and friends with minimal effort. Don’t hesitate to bring this vibrant salad to your next gathering or simply whip it up for a light meal at home. I invite you to experience the joy this refreshing salad brings; it’s bound to become a beloved staple in your kitchen!


    Print

    clock clock iconcutlery cutlery iconflag flag iconfolder folder iconinstagram instagram iconpinterest pinterest iconfacebook facebook iconprint print iconsquares squares iconheart heart iconheart solid heart solid icon

    Description

    Honey Feta Watermelon Salad is a refreshing and colorful dish that combines juicy watermelon, tangy feta cheese, and sweet pomegranate seeds, topped with a light honey-lime dressing.


    • 4 cups seedless watermelon, cut into bite-sized cubes
    • 1/2 cup pomegranate seeds (arils)
    • 3/4 cup feta cheese, crumbled
    • 1/4 cup fresh mint leaves, chopped
    • 2 tablespoons honey
    • 1 tablespoon fresh lime juice
    • 1 tablespoon extra virgin olive oil
    • Pinch of salt
    • Freshly ground black pepper, to taste
    • Zest of 1 lime (optional)
    • Additional mint leaves for serving (optional)

    1. In a large mixing bowl, combine the watermelon cubes, pomegranate seeds, crumbled feta, and chopped mint leaves.
    2. In a small bowl, whisk together honey, fresh lime juice, olive oil, salt, and black pepper until well combined.
    3. Drizzle the dressing over the salad ingredients and gently toss to coat evenly.
    4. Transfer to a serving platter. Garnish with lime zest and extra mint leaves if desired.
    5. Serve immediately for best texture and flavor.

    Notes

    • Best served fresh to retain the texture of watermelon.
    • Can be made ahead, but dress just before serving to prevent the salad from getting soggy.
    • Feel free to add other fruits such as cantaloupe or berries for variation.
    • Prep Time: 15 minutes
    • Cook Time: 0 minutes
    • Category: Salad
    • Method: Mixing
    • Cuisine: American

    Nutrition

    • Serving Size: 1 cup
    • Calories: 160
    • Sugar: 15g
    • Sodium: 200mg
    • Fat: 9g
    • Saturated Fat: 4g
    • Unsaturated Fat: 4g
    • Trans Fat: 0g
    • Carbohydrates: 18g
    • Fiber: 2g
    • Protein: 5g
    • Cholesterol: 25mg

    Sharing is caring!

  • Fresh Cherry Chocolate Sourdough Bread

    Fresh Cherry Chocolate Sourdough Bread


    Introduction to Fresh Cherry Chocolate Sourdough Bread

    There’s magic in the kitchen when the aroma of freshly baked bread fills the air, and Fresh Cherry Chocolate Sourdough Bread is the enchanting highlight! Picture this: a cozy afternoon, the kids busy with their crafts, and you, basking in the delightful symphony of tangy cherries and rich chocolate harmonizing in your oven. It’s a warm hug in bread form!

    This recipe is perfect for busy days or special gatherings, as it combines simple ingredients and a bit of patience to yield a delightful treat. Trust me, it’s guaranteed to impress friends and family alike.

    Why You’ll Love This Fresh Cherry Chocolate Sourdough Bread

    This Fresh Cherry Chocolate Sourdough Bread is a true crowd-pleaser! Not only does it blend the tangy notes of sourdough with sweet cherries and luscious chocolate, but it’s also surprisingly simple to make. Its rustic charm will leave your family swooning. Plus, the joy of creating something homemade, especially with the little ones gathered around, is a heartwarming experience you won’t want to miss!

    Ingredients for Fresh Cherry Chocolate Sourdough Bread

    Gathering the right ingredients is the first step to creating this delightful bread. Here’s what you’ll need:

    • Sourdough starter: This living culture is the heart of your bread. It provides the lovely tangy flavor and helps the bread rise.
    • Bread flour: High in protein, it gives your bread structure and a chewy texture. You can use all-purpose flour if you’re in a pinch, but may miss some of that lovely chew.
    • Rye flour: Adds depth and flavor, giving the bread a unique twist. Feel free to experiment with whole wheat flour if rye isn’t available.
    • Water: Essential for hydration and activating the flour’s proteins. Use filtered water for the best results.
    • Cherries: Fresh, juicy, and sweet! They really shine in this recipe. Make sure they’re well-pitted and chopped for even distribution.
    • Semi-sweet chocolate chips: Because who can resist chocolate? They melt beautifully into the dough, adding richness to every bite.
    • Salt: Enhances flavors and controls fermentation. It’s a small yet crucial component in making your bread taste incredible.

    For those who like to play with flavors, feel free to substitute the cherries with other fruits like raspberries or blueberries. And if chocolate isn’t your thing, consider nuts or even dried fruits for a different spin. Remember, the exact measurements for each ingredient are listed at the bottom of the article, ready for printing!

    How to Make Fresh Cherry Chocolate Sourdough Bread

    Now that we have our ingredients ready, let’s dive into the magical world of making Fresh Cherry Chocolate Sourdough Bread. This process requires time and a bit of love, but I promise every step is worthwhile. Follow along for a delightful journey!

    Step 1: Make the Levain

    To begin, we’ll create the levain, the backbone of our sourdough. In a bowl, combine two tablespoons of your unfed sourdough starter with 50g of water, 40g of all-purpose flour, and 10g of rye flour. Mix it well until smooth and cover it with a towel. Let it sit for about 4 to 5 hours until it doubles in size. This bubbling mixture adds depth and flavor to our bread.

    Step 2: Autolyse the Dough

    Next up is autolyse! In a large bowl, combine all the flours (bread and rye) with 320g of water. Mix it gently until no dry flour remains. Cover it and let it rest for 30 minutes. This step is crucial, as it helps develop gluten and creates that chewy texture we love in sourdough.

    Step 3: Make the Dough

    Once your autolyse is complete, add the levain to the dough. Now, sprinkle in the salt and pour in the remaining water. Mix everything until it forms a smooth mixture. You want to feel the dough come together, just like a team working with synergy!

    Step 4: Stretch and Fold

    This technique is simple and builds strength in our dough. Every hour for two hours, stretch the dough by pulling one side up and folding it over to the opposite side. Rotate it a quarter turn and repeat. This process not only develops the gluten but also makes the bread airy and light.

    Step 5: Laminate the Dough

    Now for the fun part! This is where we add our stars: cherries and chocolate chips. Gently spread the dough into a thin sheet on a floured surface. Sprinkle the cherries and chocolate on top, then fold the dough like a letter. This step infuses the sweet flavors into our bread, making every bite a treat.

    Step 6: Coil Fold

    If you’re going for just one coil fold, do it two hours after lamination. For two coil folds, give it a one-hour interval in between. This method helps maintain the dough’s strength while allowing it to rise beautifully. Make sure to treat that dough gently, it’s your masterpiece!

    Step 7: Shaping the Dough

    This is the moment when your dough transforms into a lovely round boule. Transfer it to a floured workspace. Gently shape it by folding the edges toward the center and turn it seam-side down. Place it into a proofing basket, like tucking a baby in for a nap.

    Step 8: Cold Proof

    Now, we’re going to let the dough chill. Place it in the refrigerator overnight, or for up to 14 hours. This cold fermentation is key for developing flavor. Plus, it makes for a more manageable dough when it’s time to bake!

    Step 9: Score and Bake

    When you’re ready to bake, preheat your oven to a blazing 500°F (260°C). Gently score the top of your dough with a sharp blade, creating a beautiful pattern. Carefully transfer it to a Dutch oven and cover it with a lid. Bake for the first 15 minutes at 500°F, then lower to 450°F (232°C) for an additional 10 minutes. Remove the lid and turn your loaf for another 15 minutes until the crust is a gorgeous caramel color.

    Step 10: Cool

    Patience is key here! After pulling your loaf from the oven, let it cool completely on a wire rack. This step is vital as it helps set the crumb and prevents gummy slices. The anticipation builds, but trust me, it’s worth the wait!

    Tips for Success

    • Use fresh, high-quality ingredients for the best flavor.
    • Keep an eye on the temperature; a warm kitchen speeds up fermentation.
    • Patience is key—don’t rush the proofing process.
    • Be generous with flour when shaping the dough to prevent sticking.
    • Invest in a good razor for scoring your dough; it makes all the difference!

    Equipment Needed

    • Mixing bowls: A large bowl for your dough and a smaller one for levain. A glass bowl can work great!
    • Digital kitchen scale: For precise measurements, but measuring cups are fine if you don’t have one.
    • Bench scraper: Handy for cutting and shaping dough; a spatula works, too!
    • Proofing basket: A round basket is ideal, but any bowl lined with a kitchen towel will do.
    • Dutch oven: Essential for baking; feel free to use a heavy pot with a lid if necessary.

    Variations

    • Berry Delight: Replace cherries with blueberries or raspberries for a fruity twist that’s equally delightful.
    • Nutty Addition: Toss in walnuts or pecans for a crunchy texture and a boost of healthy fats.
    • Dark Chocolate Bliss: Pot for dark chocolate chips instead of semi-sweet for a richer flavor profile.
    • Spiced Up: Add a dash of cinnamon or nutmeg to the dough for a warm, aromatic touch that pairs beautifully with the sweetness.
    • Gluten-Free Version: Use a gluten-free flour blend in place of bread flour and adjust the water based on the flour’s absorbency.

    Serving Suggestions

    • Serve slices warm, spread with a pat of butter for a decadent treat.
    • Pair with a cup of tea or coffee for a perfect afternoon snack.
    • Top with cream cheese or mascarpone for an elegant breakfast option.
    • Garnish with a sprinkle of powdered sugar for a lovely presentation.
    • Enjoy alongside a fresh salad for a light and delicious lunch.

    FAQs about Fresh Cherry Chocolate Sourdough Bread

    Can I use frozen cherries for this recipe?

    Absolutely! Frozen cherries work just as well. Make sure to thaw and drain them before adding to your dough to avoid excess moisture. You’ll still get that delicious fruity burst in every bite of your Fresh Cherry Chocolate Sourdough Bread.

    How do I store leftover sourdough bread?

    To keep your bread fresh, place it in a paper bag at room temperature. This helps maintain that beautiful crust. Avoid plastic bags, as they can make the crust soft. If you have a lot of leftovers, consider slicing and freezing some for later!

    Why is my sourdough bread dense?

    The density can often be due to under-proofing or not enough fermentation time. Make sure you give your dough enough time to rise and develop that airy texture we all adore. The more patience you have, the lighter your cherry chocolate sourdough will be!

    Can I add nuts or seeds to the bread?

    Definitely! Adding nuts or seeds can add a crunchy texture and a flavor boost. Just be careful not to overload it, as it might affect the structure and rising of your Fresh Cherry Chocolate Sourdough Bread.

    How can I tell when my bread is done baking?

    Good question! Your bread will be ready when it has a deep golden-brown crust and sounds hollow when tapped on the bottom. Additionally, a digital thermometer should read around 200°F (93°C) when inserted into the center!

    Final Thoughts

    Making Fresh Cherry Chocolate Sourdough Bread is more than just baking; it’s a delightful experience that fills your home with warmth and love. The combination of tangy cherries and rich chocolate creates a symphony of flavors that will wow your loved ones.

    I cherish the moments spent crafting this beautiful loaf, from the first mix to the delightful aroma wafting through my kitchen. So roll up your sleeves, gather your ingredients, and let the magic unfold. Enjoy every chewy slice, and savor the smiles it brings around your table. Happy baking!


    Print

    clock clock iconcutlery cutlery iconflag flag iconfolder folder iconinstagram instagram iconpinterest pinterest iconfacebook facebook iconprint print iconsquares squares iconheart heart iconheart solid heart solid icon

    Description

    Fresh Cherry Chocolate Sourdough Bread is a delightful combination of sourdough’s tangy flavor, juicy cherries, and rich chocolate chips, making it a unique and tasty treat.


    • 19 g sourdough starter (100% hydration 50:50 all-purpose flour:whole wheat flour)
    • 40 g bread flour
    • 10 g rye flour
    • 50 g water (for levain)
    • 420 g bread flour (for dough)
    • 30 g rye flour (for dough)
    • 100 g leavain
    • 330 g water (for dough)
    • 130 g cherries, pitted and chopped
    • 75 g semi-sweet chocolate chips
    • 9 g salt

    1. Make the levain: Combine 2 tablespoons of unfed sourdough starter with 50g of water, 40 g of all-purpose flour, and 10g of rye flour. Mix, cover, and let sit for 4-5 hours until doubled in volume.
    2. Autolyse the dough: Mix all the flours with 320 g of water in a large bowl and knead for 1-2 minutes. Cover and rest for 30 minutes.
    3. Make the dough: Incorporate the levain into the autolyzed dough, then add salt and the rest of the water. Mix, cover, and set aside.
    4. Stretch and fold: Stretch and fold the dough every hour for 2 hours.
    5. Laminating the dough: Spread the dough into a thin sheet, sprinkle cherries and chocolate chips on top, and perform a letter fold.
    6. Coil fold: If doing 1 coil fold, do it 2 hours after lamination; for 2 coil folds, give a 1-hour interval.
    7. Shaping the dough: Transfer to a floured workspace, shape into a round boule, and place seam side up in a proofing basket.
    8. Cold proof: Let rise in the refrigerator overnight (up to 14 hours).
    9. Score and bake: Preheat oven to 500°F/260°C. Score the dough, transfer to a Dutch oven, and bake with the lid on for 15 minutes at 500°F, then 10 minutes at 450°F/232°C. Remove the lid and rotate; bake for another 15 minutes until crust is caramelized. Optionally, leave the oven door ajar after baking for a crackling crust.
    10. Cool: Once out of the oven, cool completely on a wire rack before slicing and enjoying with butter.

    Notes

    • Ensure the cherries are well-pitted and chopped for even distribution.
    • Control the baking times if you prefer a softer or crustier bread.
    • Store leftover bread in a paper bag to maintain crust integrity.
    • Prep Time: 4 hours
    • Cook Time: 40 minutes
    • Category: Bread
    • Method: Baking
    • Cuisine: American

    Nutrition

    • Serving Size: 1 slice
    • Calories: 250
    • Sugar: 10 g
    • Sodium: 200 mg
    • Fat: 7 g
    • Saturated Fat: 3 g
    • Unsaturated Fat: 4 g
    • Trans Fat: 0 g
    • Carbohydrates: 40 g
    • Fiber: 3 g
    • Protein: 6 g
    • Cholesterol: 0 mg

    Sharing is caring!

  • Summer Peach Blueberry Kale

    Summer Peach Blueberry Kale


    Introduction to Summer Peach Blueberry Kale

    Summer is a season ripe with flavor and joy, and there’s nothing quite like a refreshing salad to celebrate it. Summer Peach Blueberry Kale brings the sweetness of juicy peaches and plump blueberries together in a vibrant dish that’s as easy to whip up as it is delicious. Whether you’re juggling a busy schedule or looking to impress family with a dazzling meal, this salad is the perfect solution. With its bright colors and enticing tastes, it’s bound to become a favorite at your table, and trust me, your taste buds will thank you for it!

    Why You’ll Love This Summer Peach Blueberry Kale

    This salad is not just a feast for the eyes; it’s a breeze to make! With minimal prep and cooking time, you’ll be savoring flavors in no time. The combination of sweet peaches and tangy blueberries brings an explosion of taste, while the kale adds a crunchy texture. It’s a healthy option packed with nutrients, perfect for busy moms or anyone looking to enjoy summer’s bounty without breaking a sweat.

    Ingredients for Summer Peach Blueberry Kale

    Creating a delightful Summer Peach Blueberry Kale salad hinges on fresh, vibrant ingredients. Let’s explore what you’ll need to bring this dish to life.

    • Green Kale: The star of the show! This leafy green is loaded with nutrients and adds a satisfying crunch to your salad.
    • Fresh Peaches: Sweet and juicy, ripe peaches elevate the flavor profile. Look for peaches that give slightly when pressed for the best taste.
    • Blueberries: Bursting with antioxidants, these little gems provide sweetness and a pop of color. Opt for firm, plump berries for the freshest flavor.
    • Pepitas (Pumpkin Seeds): A great source of healthy fats and crunch. You can also use sunflower seeds or slivered almonds if that’s what you have on hand.
    • Lemon Juice: This brightens up the salad and complements the sweetness of the fruits. Freshly squeezed is always the best choice!
    • Olive Oil: A key player in both massaging kale and creating the vinaigrette, it offers healthy fats and a rich flavor.
    • Honey: To balance the tartness of the dressing, honey adds a hint of sweetness. Feel free to swap it with maple syrup for a vegan option.
    • Cracked Black Pepper: A simple touch that enhances the overall flavor. Adjust to your taste preference!

    Ready to get cooking? For precise measurements and a printable version of the recipe, check the bottom of the article!

    How to Make Summer Peach Blueberry Kale

    Making your Summer Peach Blueberry Kale salad is straightforward and fun! Let’s break it down step by step so you can create this delightful dish without stress.

    Toast the Pepitas

    Start by preheating your oven to 190°C. Line a baking tray with parchment paper. Next, spread the pepitas evenly on the tray. Pop them into the oven for about 5 to 6 minutes. Keep an eye on them, as they should turn golden and fragrant—just like sunshine in your kitchen! Once toasted, remove them from the oven and allow them to cool completely.

    Prepare the Vinaigrette

    While the pepitas cool, let’s whip up the vinaigrette. In a small bowl or jar, combine the juice of four lemons, honey, olive oil, and a sprinkle of cracked black pepper. Whisk it all together until everything is well mixed and emulsified. This dressing is the magic touch that brings the whole salad together! Refrigerate it until you’re ready to assemble.

    Massage the Kale

    Now, let’s give some love to our kale. Place the chopped kale leaves in a large mixing bowl. Drizzle a splash of olive oil and the juice of one lemon over the top. Now, it’s time to get hands-on! Massage the kale with your hands for about five minutes. You’ll notice the leaves soften and reduce in volume, making them much more enjoyable in your salad.

    Prepare the Fruits

    Rinse your peaches and blueberries gently. For the peaches, slice them in half, remove the pit, and dice into bite-sized pieces. Be sure to enjoy those juicy rewards as you work! Pat the blueberries dry with a paper towel; this keeps your salad from getting soggy and messy.

    Combine the Ingredients

    Once everything is prepped, it’s time for the best part! Add the diced peaches and blueberries to the massaged kale. Drizzle your vinaigrette over the salad, adjusting the amount to your taste. Toss everything gently to coat the fruits and greens evenly, ensuring every bite is bursting with flavor.

    Serve and Enjoy

    Now for the final touch! Distribute the salad into individual bowls and top each serving with those delicious, crunchy toasted pepitas. Serve immediately for the best experience, and watch your loved ones delight in this vibrant dish. Enjoy your refreshing Summer Peach Blueberry Kale, and don’t forget to share the joy!

    Tips for Success

    • Always choose ripe peaches for the best sweetness and flavor.
    • Massage the kale long enough to ensure it softens; this step is crucial.
    • Make the vinaigrette in advance to let flavors meld together.
    • Keep your pepitas separate until serving to maintain crunchiness.
    • Feel free to experiment with other fruits to mix up the flavors!

    Equipment Needed

    • Baking Tray: For toasting pepitas; a cookie sheet works well too.
    • Parchment Paper: Ensures easy cleanup; foil can be a substitute.
    • Mixing Bowl: Use a large bowl for massaging the kale; any deep bowl will do.
    • Whisk: To blend your vinaigrette; a fork is a handy alternative.
    • Knife and Cutting Board: Essential for prepping your fruits.

    Variations of Summer Peach Blueberry Kale

    • Add Protein: Toss in some grilled chicken, tofu, or chickpeas for a hearty meal.
    • Different Greens: Swap kale for spinach or arugula for a milder flavor.
    • Cheese Options: Crumbled feta or goat cheese adds a creamy contrast to the sweetness.
    • Dress it Up: Experiment with flavored oils, like cherry or walnut, for added depth.
    • Spices and Herbs: Fresh mint or basil can elevate the salad’s flavor profile.
    • Lemon Zest: Grate some lemon peel into the salad for an extra zing of citrus.

    Serving Suggestions for Summer Peach Blueberry Kale

    • Pair with Grilled Fish: This salad beautifully complements salmon or tilapia for a complete meal.
    • Delightful Drink: Serve with a chilled glass of iced green tea or a light white wine.
    • Presentation Tips: Use clear glass bowls to showcase the vibrant colors of your salad.
    • Perfect for Picnics: Pack it in a mason jar layered for easy transport and serving.
    • Add a Side: Accompany with crusty bread for a satisfying lunch option.

    FAQs about Summer Peach Blueberry Kale

    Can I make this salad ahead of time? Absolutely! You can prepare the kale and vinaigrette up to a day ahead. Just wait to add the pepitas until you’re ready to serve. This keeps them crunchy and fresh.

    What can I substitute for kale? If kale isn’t your favorite, no worries! You can easily swap it for baby spinach or arugula. Both options will provide a softer texture while still pairing wonderfully with the peaches and blueberries.

    Is this salad vegan? Yes, it is! The Summer Peach Blueberry Kale salad is naturally vegan due to its ingredients. Just make sure any substitutions, like honey, are vegan-friendly if that’s a concern.

    How do I store leftovers? To keep your salad fresh, store any leftovers in an airtight container in the fridge. However, I recommend eating it within a day or two for the best taste and texture before the fruits start to wilt.

    Can I add other fruits? Certainly! Feel free to mix in your favorite seasonal fruits like strawberries or cherries. The beauty of this salad is that it’s versatile and can adapt to whatever you have on hand!

    Final Thoughts

    Creating this Summer Peach Blueberry Kale salad has been a delightful journey for me, one that celebrates the beauty of summer’s bounty. There’s something magical about combining fresh ingredients that not only nourish our bodies but also warm our hearts. Every bite of sweet peaches, juicy blueberries, and hearty kale takes me back to sun-soaked afternoons spent outdoors. This salad is more than a meal; it’s a sharing of love and flavor with my family and friends. I hope you relish this experience too, savoring each moment spent crafting and enjoying this vibrant dish together!


    Print

    clock clock iconcutlery cutlery iconflag flag iconfolder folder iconinstagram instagram iconpinterest pinterest iconfacebook facebook iconprint print iconsquares squares iconheart heart iconheart solid heart solid icon

    Description

    A refreshing salad combining sweet peaches, blueberries, and kale, perfect for summer.


    • 2 bunches green kale, stems removed and leaves chopped into bite-sized pieces
    • 3 to 4 fresh peaches, pitted and diced
    • 250 grams blueberries
    • 60 millilitres pepitas (pumpkin seeds)
    • 1 lemon, juiced (for massaging kale)
    • Olive oil, for massaging kale
    • 4 lemons, juiced (for vinaigrette)
    • 40 millilitres honey
    • 60 millilitres olive oil (for vinaigrette)
    • Cracked black pepper, to taste

    1. Preheat the oven to 190°C and line a baking tray with parchment paper. Evenly spread pepitas on the tray and toast for 5–6 minutes until aromatic and lightly golden. Remove from oven and allow to cool completely.
    2. Combine lemon juice, honey, olive oil and cracked black pepper in a small bowl or jar. Whisk thoroughly until emulsified. Refrigerate until ready to use.
    3. Place chopped kale leaves into a large mixing bowl. Add a splash of olive oil and the juice of 1 lemon. Using your hands, massage the kale firmly for approximately 5 minutes until leaves soften and reduce in volume.
    4. Rinse peaches and blueberries. Dice the peaches into bite-sized pieces and pat the blueberries dry.
    5. Add diced peaches and blueberries to the massaged kale. Drizzle with desired amount of vinaigrette. Toss gently to ensure an even coating.
    6. Distribute salad into individual bowls and top each serving with toasted pepitas immediately before serving.

    Notes

    • Choose ripe peaches for the best flavor.
    • This salad can be made ahead of time, just add the pepitas right before serving to keep them crunchy.
    • Experiment with different nuts or seeds if desired.
    • Prep Time: 15 minutes
    • Cook Time: 6 minutes
    • Category: Salad
    • Method: Mixing, Toasting
    • Cuisine: American

    Nutrition

    • Serving Size: 1 bowl
    • Calories: 230
    • Sugar: 15g
    • Sodium: 5mg
    • Fat: 14g
    • Saturated Fat: 2g
    • Unsaturated Fat: 12g
    • Trans Fat: 0g
    • Carbohydrates: 25g
    • Fiber: 5g
    • Protein: 4g
    • Cholesterol: 0mg

    Sharing is caring!

  • Dragon Chili Cashew Chicken

    Dragon Chili Cashew Chicken


    Introduction to Dragon Chili Cashew Chicken

    Welcome, fellow food lovers! If you’re searching for a vibrant dish to spice up your weeknight dinners, let me introduce you to Dragon Chili Cashew Chicken. This fiery delight doesn’t just bring heat; it also wraps your taste buds in a symphony of flavors. Imagine crispy chicken thighs dancing in a tangy sauce, mingling with roasted cashews—pure magic! Perfect for busy moms or professionals, it’s quick to whip up yet impressive enough to wow your family and friends. Let’s dive into this culinary adventure together and make mealtime something to look forward to!

    Why You’ll Love This Dragon Chili Cashew Chicken

    This dish is incredibly easy to make, perfect for those hectic weeknights when time runs short. You’ll have a delicious meal on the table in under an hour! The flavorful combination of spices, crispy chicken, and crunchy cashews creates an explosion of taste with every bite. Not to mention, it’s gluten-free, catering to various dietary needs. Your family will love it, and you’ll revel in the compliments!

    Ingredients in Dragon Chili Cashew Chicken

    Now, let’s gather everything we need for this delightful dish! Here’s a glimpse of the star players that make up Dragon Chili Cashew Chicken:

    • Boneless Chicken Thighs: These are juicy, tender, and perfect for frying. Chicken thighs offer more flavor compared to breast meat.
    • Paprika: This spice adds a subtle smokiness and vibrant color to the dish, making it visually appealing.
    • Garlic Powder: For that aromatic punch, garlic powder enhances the savory elements without overpowering the dish.
    • Egg: This is crucial for marinating. It helps bind the coating to the chicken, leading to a beautifully crispy finish.
    • Onion Powder: Another flavor booster, it adds depth to the seasoning mix.
    • Cayenne Pepper: If you love heat, this will give your dish that fiery kick! Adjust it based on your spice tolerance.
    • Soy Sauce: Reduced sodium soy sauce keeps things on the lighter side while delivering umami goodness.
    • Ground Ginger: A lovely earthy taste that complements the other spices, ginger also adds warmth to the dish.
    • Chili Powder: To round out the seasoning, it boosts the heat and adds a beautiful red hue.
    • Flour and Cornstarch: This dynamic duo is essential for a crunchy coating that locks in moisture.
    • Oyster Sauce: Adds a touch of sweetness and complexity to the flavor profile—an Asian staple!
    • Chinkiang Vinegar: For a tangy twist, it’s perfect for balancing flavors. You can swap it with balsamic and rice vinegar if needed.
    • Asian Chili Sauce: This is where the magic happens with heat and flavor. Adjust according to taste.
    • Ketchup: You might be surprised, but it lends sweetness and balances the spices beautifully.
    • Toasted Sesame Oil: This oil adds a nutty flavor that elevates the overall dish.
    • Honey: A touch of sweetness helps to balance the heat, making every bite compelling.
    • Fresh Ginger: Grated fresh ginger packs a punch and adds a refreshing taste that can’t be beaten!
    • Red Bell Pepper: For a splash of color and a sweet crunch, red bell peppers offer a nice texture contrast.
    • Garlic Cloves: You can’t have too much garlic! Fresh garlic ramps up the flavor profile.
    • Unsalted Cashews: These nutty gems add crunch and richness—totally essential in this dish.
    • White Onion: Sliced thin for tenderness, it amplifies flavors in the sauté.
    • Green Onions: These are for garnishing, adding a fresh herbal touch to finish off the dish.
    • Toasted Sesame Seeds: A delightful final touch that adds crunch and visual appeal.

    You’ll find exact quantities for each ingredient at the bottom of the article, ready for your convenience when you’re ready to whip this up!

    How to Make Dragon Chili Cashew Chicken

    Step 1: Marinate the Chicken

    To begin your spicy journey, marinating the chicken is crucial. Not only does it infuse flavors deep into the meat, but it also tenderizes it. Start by cracking an egg into a mixing bowl, then add soy sauce, ginger, garlic powder, onion powder, paprika, and cayenne pepper. Whisk the mixture until everything is combined, and add the sliced chicken thighs. Make sure they are well-covered in the marinade. Let it sink in for 20 minutes while you prepare the other ingredients. Trust me, that time is essential for an explosion of flavor!

    Step 2: Prepare the Coating

    Now, let’s create that irresistible, crunchy coating! In a zip-top bag, combine flour, cornstarch, and chili powder. This trio is the secret to crispy chicken that locks in moisture while frying. Remove the marinated chicken and pat it dry with a paper towel—this step prevents the coating from becoming soggy. Add the chicken to the bag, seal it tightly, and shake until every piece is evenly coated. A good coating is key to that satisfying crunch we all love in Dragon Chili Cashew Chicken!

    Step 3: Fry the Chicken

    Time to work some frying magic! In a large nonstick frying pan, heat about 60 ml of oil over medium-high heat. Be sure the oil is hot enough; a drop of water should sizzle when added. Fry the chicken in batches, ensuring you don’t overcrowd the pan. Cook each piece for about 2 minutes on each side until golden brown and cooked through. Drain the fried chicken on paper towels. This not only rids it of excess oil but keeps each piece crisp and delicious. You’ll be yearning to dig in!

    Step 4: Toast the Cashews

    Next up, let’s toast the cashews for an extra flavor boost! In a dry cast iron pan over medium heat, add your raw cashews. Stir them frequently until they’re golden brown and you see lovely brown spots. It usually takes about 5-7 minutes. Toasting cashews enhances their flavor, making them aromatic and nutty. Once done, remove them from the heat and set aside. Your cashew crunch is about to join the party!

    Step 5: Sauté the Vegetables

    Since we want to keep all those lovely colors and textures, let’s sauté the veggies! Using the same skillet, drizzle in a bit of oil and add sliced onions and red bell peppers. Sauté them for just a couple of minutes until they’re looking tender. Then, toss in the grated ginger and minced garlic, cooking for another 30 seconds. This will infuse the skillet with fantastic aromas and ensure your vegetables are cooked to perfection—soft yet still vibrant!

    Step 6: Create the Sauce

    Now it’s time to unite all these fantastic elements with a delicious sauce! In a separate bowl, whisk together the oyster sauce, Chinkiang vinegar, reduced sodium soy sauce, Asian chili sauce, ketchup, honey, and sesame oil until smooth. This sauce will be the glue holding your Dragon Chili Cashew Chicken together. Once the veggies are sautéed, pour the sauce into the skillet and stir until it bubbles and thickens just a minute or so. The rich and tangy sauce is where all the flavor magic happens!

    Step 7: Combine Everything

    Finally, let’s bring this masterpiece to life! Add the crispy fried chicken and toasted cashews to the skillet, tossing everything together until each piece is generously coated in that luscious sauce. Remove it from the heat, allowing the flavors to mingle. For the finishing touch, serve this beauty immediately, garnished with sliced green onions and a sprinkle of toasted sesame seeds. Your Dragon Chili Cashew Chicken is not just a dish; it’s an experience! Enjoy every crunchy, spicy bite.

    Tips for Success

    • Always marinate the chicken for at least 20 minutes; it enhances flavor and tenderness.
    • Heat your oil properly to achieve that beautiful golden crust on the chicken.
    • Don’t overcrowd the frying pan; this allows the chicken to cook evenly.
    • Toast your cashews just before adding to the dish for maximum flavor.
    • Garnish with fresh green onions and sesame seeds for crunch and color!

    Equipment Needed

    • Large mixing bowl: A sturdy alternative is a deep plate.
    • Zip-top bag: You can also use a large bowl for coating the chicken.
    • Nonstick frying pan: A cast iron skillet works great too!
    • Cast iron pan: Any dry skillet can be used for toasting cashews.
    • Whisk: A fork can do the trick if you’re in a pinch!

    Variations of Dragon Chili Cashew Chicken

    • Vegetarian Option: Swap chicken for tofu or tempeh. Marinate and fry just like the chicken for a hearty, plant-based meal.
    • Gluten-Free Version: Ensure any sauces and coatings are certified gluten-free. Use cornstarch instead of traditional flour.
    • Extra Heat: Add chopped fresh chilies or increase the amount of cayenne and Asian chili sauce for those who crave fiery flavors.
    • Peanut Lovers: Use roasted peanuts in place of cashews for a different nutty taste and extra crunch.
    • Low-Carb Version: Substitute honey with a sugar-free alternative and serve over cauliflower rice instead of traditional rice.

    Serving Suggestions for Dragon Chili Cashew Chicken

    • Serve over steamed jasmine rice for a fluffy and fragrant pairing.
    • Pair with a crisp cucumber salad dressed in sesame oil for refreshing contrast.
    • A glass of chilled white wine complements the dish beautifully.
    • Top with sliced avocados for extra creaminess!
    • Present it on a colorful platter garnished with herbs for a stunning look.

    FAQs about Dragon Chili Cashew Chicken

    Cooking can sometimes raise questions, so here are some common ones I often hear about this delicious Dragon Chili Cashew Chicken:

    Can I use chicken breast instead of thighs?

    Absolutely! Chicken breasts can be used, but they may not be as juicy as thighs. Just be sure to adjust the cooking time, cooking them until they are no longer pink.

    How can I reduce the spiciness of the dish?

    If you’re not a fan of heat, consider reducing the amount of cayenne pepper and Asian chili sauce. You can also serve it with a side of creamy yogurt or sour cream, which helps tone down the spice.

    Can I prepare this dish in advance?

    Yes, you can prep the components ahead! Marinate the chicken the night before, and keep the sauce and veggies ready to go. Just fry the chicken and toss everything together when you’re ready to serve.

    Is Dragon Chili Cashew Chicken gluten-free?

    Indeed it is! Just make sure to use gluten-free soy sauce and check that your other sauces are gluten-free as well. Gluten-free options for flour and cornstarch ensure a smooth cooking experience.

    What should I serve with Dragon Chili Cashew Chicken?

    This dish pairs wonderfully with steamed jasmine rice, stir-fried veggies, or a refreshing cucumber salad. A chilled glass of white wine or sparkling water adds the perfect finishing touch!

    Final Thoughts on Dragon Chili Cashew Chicken

    Cooking Dragon Chili Cashew Chicken is not just about preparing a meal; it’s about embracing a delightful culinary experience. The blend of spices, the crunch of cashews, and the aroma filling your kitchen will make your heart sing. This dish is perfect for busy weeknights and festive family gatherings alike. Each bite is a reminder of how food brings us together and creates lasting memories. So, roll up your sleeves, gather your loved ones, and let this flavorful, spicy dish inspire joy and laughter around your table. You won’t regret it!


    Print

    clock clock iconcutlery cutlery iconflag flag iconfolder folder iconinstagram instagram iconpinterest pinterest iconfacebook facebook iconprint print iconsquares squares iconheart heart iconheart solid heart solid icon

    Description

    Dragon Chili Cashew Chicken is a spicy and flavorful dish featuring crispy chicken thighs, roasted cashews, and a tangy sauce, perfect for those who enjoy a kick in their meals.


    • 450 grams boneless chicken thighs, sliced about 1.25 cm thick
    • 2.5 millilitres paprika
    • 2.5 millilitres garlic powder
    • 1 egg
    • 2.5 millilitres onion powder
    • 2.5 millilitres cayenne pepper
    • 15 millilitres reduced sodium soy sauce
    • 2.5 millilitres ground ginger
    • 7 grams chili powder
    • Canola or vegetable oil, as needed for frying
    • 60 grams plain flour
    • 30 grams cornstarch
    • 30 millilitres oyster sauce
    • 15 millilitres Chinkiang (Chinese black) vinegar
    • 60 millilitres reduced sodium soy sauce
    • 7.5 millilitres cornstarch
    • 2230 millilitres Asian chili sauce
    • 60 millilitres ketchup
    • 15 millilitres toasted sesame oil
    • 45 millilitres honey
    • 15 millilitres fresh ginger, grated
    • 1 red bell pepper, thinly cut
    • 6 garlic cloves, minced
    • 130 grams unsalted cashews
    • 1/2 white onion, sliced thin
    • 15 millilitres vegetable oil or peanut oil
    • Green onions, sliced thin (for garnish)
    • Plenty of toasted sesame seeds (for garnish)

    1. Crack the egg into a large mixing bowl and add soy sauce, ginger powder, garlic powder, onion powder, paprika, and cayenne. Whisk together and add the chicken strips, mixing until coated. Let the chicken marinate.
    2. Combine flour, cornstarch, and chili powder in a zip-top bag. Dry the marinated chicken with a paper towel and toss in the bag until coated.
    3. Heat about 60 ml of oil in a large nonstick frying pan over medium-high heat. Fry the chicken in batches for about 2 minutes on each side until golden and cooked through. Drain on paper towels.
    4. Toast the cashews in a dry cast iron pan over medium heat until they have brown spots. Remove and set aside.
    5. In the same skillet, drizzle oil and sauté onion and bell pepper for a couple of minutes until soft. Add ginger and garlic, cooking for another 30 seconds.
    6. Whisk the sauce ingredients together in a bowl until smooth and pour it into the skillet with veggies. Stir until bubbly and thickened, about 1 minute.
    7. Return fried chicken and cashews to the skillet, tossing everything together until well coated with sauce. Remove from heat.
    8. Garnish with sesame seeds and sliced green onions. Serve immediately for a crunchy texture.

    Notes

    • You can substitute Chinkiang vinegar with half balsamic and half rice vinegar if needed.
    • For a milder dish, adjust the amount of chili sauce based on your taste preferences.
    • Prep Time: 30 minutes
    • Cook Time: 30 minutes
    • Category: Main Course
    • Method: Frying and Stir-frying
    • Cuisine: Asian

    Nutrition

    • Serving Size: 1 serving
    • Calories: 600
    • Sugar: 12 grams
    • Sodium: 800 milligrams
    • Fat: 30 grams
    • Saturated Fat: 5 grams
    • Unsaturated Fat: 20 grams
    • Trans Fat: 0 grams
    • Carbohydrates: 50 grams
    • Fiber: 3 grams
    • Protein: 40 grams
    • Cholesterol: 100 milligrams

    Sharing is caring!