Author: IHAAL Team

  • Sweet Chili Pineapple Shrimp

    Sweet Chili Pineapple Shrimp


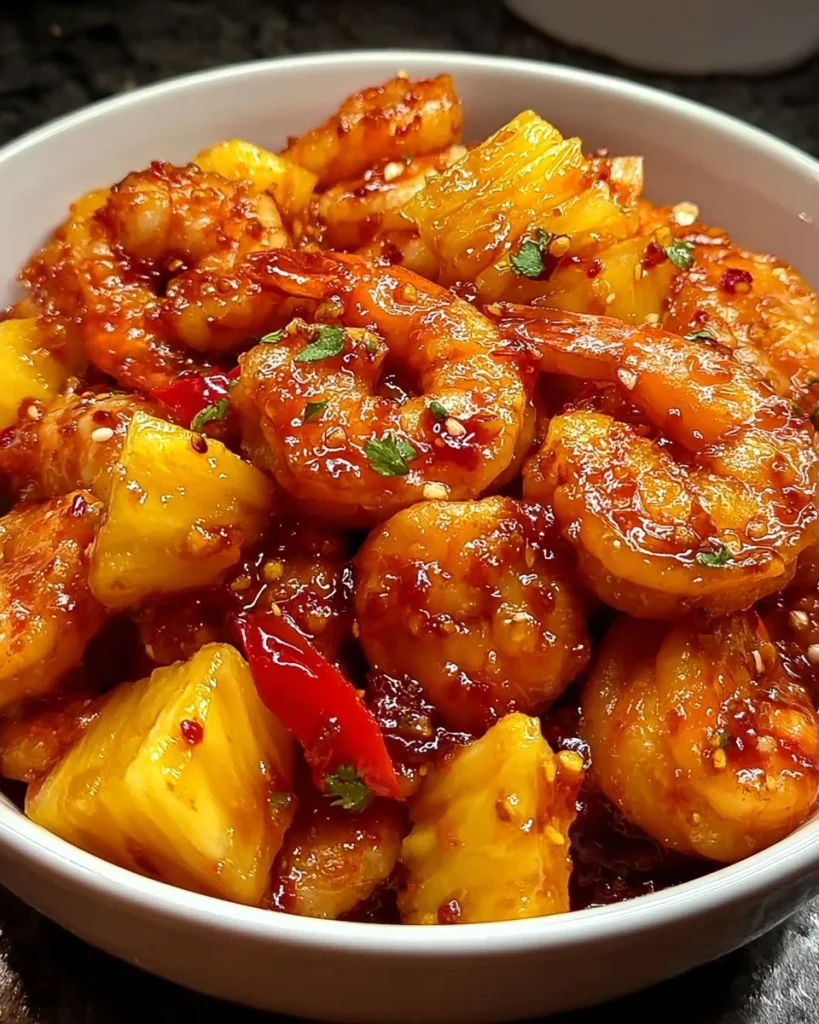
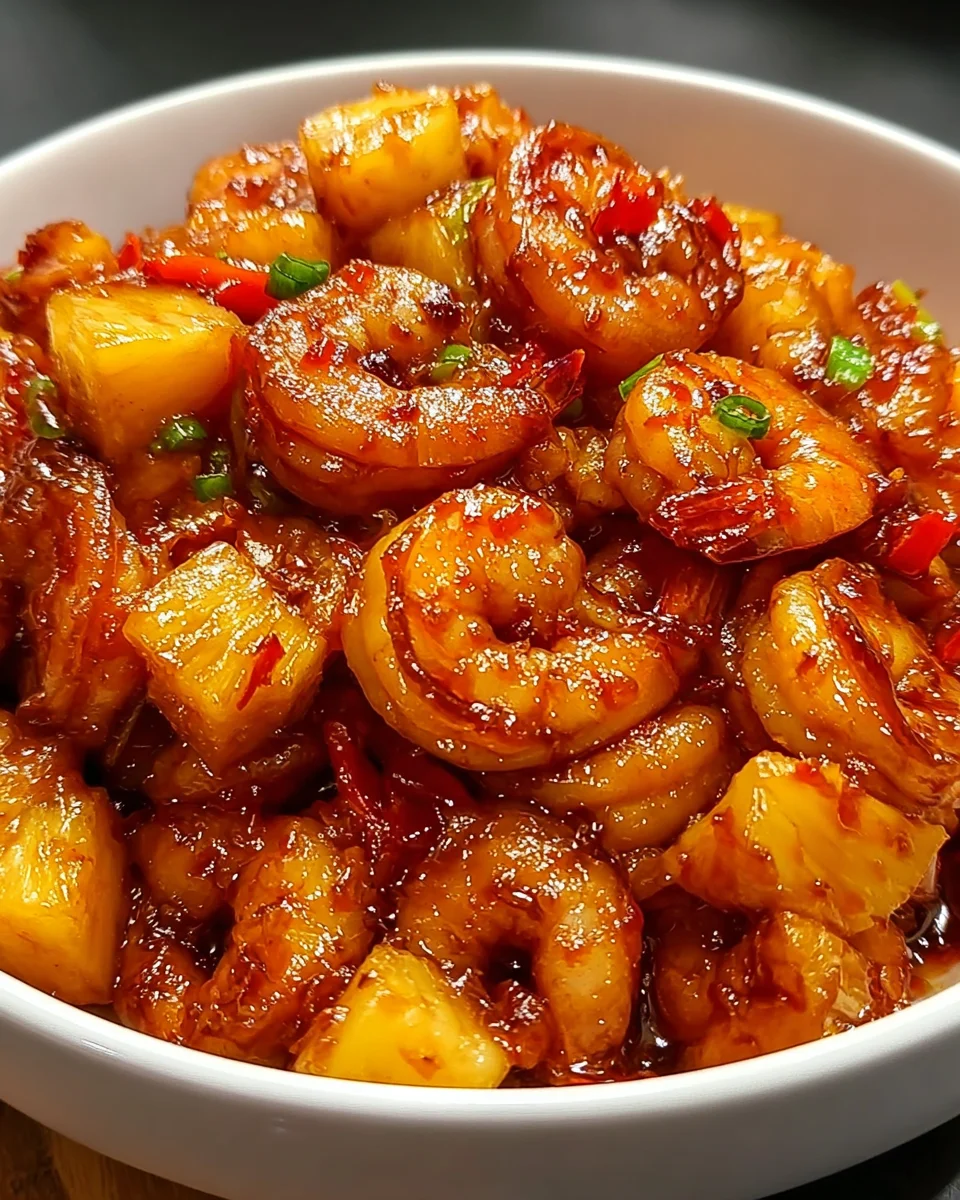
    Introduction to Sweet Chili Pineapple Shrimp

    As a busy mom, I know how important it is to have quick yet delicious meals on hand that the whole family will love. That’s where my Sweet Chili Pineapple Shrimp comes into play! This dish is a beautiful harmony of succulent shrimp and tangy pineapple bathed in a sweet and spicy sauce. It’s not just a meal; it’s a burst of flavor that transforms a hectic weeknight dinner into a delightful culinary experience. If you’re looking for a way to impress loved ones or simply make a weeknight special, this is the recipe for you!

    Why You’ll Love This Sweet Chili Pineapple Shrimp

    Let’s face it—life gets hectic, and cooking can sometimes feel like an uphill battle. That’s why I adore this Sweet Chili Pineapple Shrimp! It’s incredibly easy to whip together, taking barely 40 minutes from start to finish. Plus, the explosion of flavors will have everyone at the table forgetting the craziness of the day. With just a few ingredients, you’ll have a stunning meal that dazzles both the palate and the senses!

    Ingredients for Sweet Chili Pineapple Shrimp

    Gathering the right ingredients is the first step toward crafting this delightful dish. Here’s what you’ll need for my Sweet Chili Pineapple Shrimp:

    • Shrimp: Large, peeled, and deveined shrimp create the perfect base. They cook quickly and soak up flavors beautifully.
    • Pineapple: Fresh pineapple chunks add a juicy sweetness. Canned pineapple works in a pinch, too!
    • Sweet Chili Sauce: This key ingredient combines sweetness and spiciness. You can adjust the heat level based on your preference.
    • Soy Sauce: It adds umami and depth to the dish. Look for low-sodium options if you want to reduce sodium intake.
    • Olive Oil: A splash of olive oil helps cook the shrimp to a perfect flaky texture while providing a hint of richness.
    • Garlic: Minced garlic brings aromatic flavors that enhance the dish. Fresh is best, but jarred garlic works if you’re short on time.
    • Ginger: Grated ginger adds a zesty kick and complements the sweetness of the shrimp and pineapple.
    • Salt and Pepper: These simple seasonings fine-tune the flavors but can be adjusted based on your taste.

    Remember, exact ingredient quantities can be found at the bottom of the article, ready for you to print out. Feel free to get creative—substitutions and variations are always welcome in the kitchen!

    How to Make Sweet Chili Pineapple Shrimp

    Now that you have your ingredients ready, let’s dive into making my Sweet Chili Pineapple Shrimp. This simple process turns ordinary shrimp into something extraordinary, and I promise it’s easier than you think!

    Step 1: Marinate the Shrimp

    First off, in a large bowl, combine the shrimp with sweet chili sauce, soy sauce, minced garlic, and grated ginger. Make sure each shrimp is well-coated while you mix.

    Let them marinate for about 15 to 30 minutes. This isn’t just about flavor; it’s like giving the shrimp a little spa treatment, allowing them to soak in all that goodness!

    Step 2: Prepare the Pineapple

    Next up, let’s tackle the pineapple. If you’re using fresh pineapple, grab a sharp knife and cut it into bite-sized chunks. Fresh pineapple adds such a bright, juicy flavor that complements the shrimp beautifully.

    If canned pineapple is more your style, just drain it well and set it aside. Either way, you’re in for a treat!

    Step 3: Cook the Shrimp

    It’s time to heat things up! In a large skillet, drizzle a tablespoon of olive oil and place it over medium heat. Once the oil is hot and shimmering, add the marinated shrimp.

    Cook them for about 2-3 minutes on each side—watch as they turn a lovely pink color. This quick cooking method ensures the shrimp remain tender and juicy. It’s the moment your kitchen starts to smell amazing!

    Step 4: Combine Ingredients

    Finally, add the pineapple chunks to the cooked shrimp in the skillet. Stir everything together and let it cook for an additional 2-3 minutes. This will warm the pineapple and allow the flavors to meld beautifully.

    Soon enough, you’ll have a colorful dish that’s ready to impress anyone who sits at your table!

    Tips for Success

    • Always taste as you go! Adjust the sweet chili sauce to match your heat preference.
    • Don’t skimp on the marinade time; it makes a huge flavor difference!
    • Use fresh, high-quality shrimp for the best taste and texture.
    • If you’re short on time, prep your ingredients earlier in the day.
    • Serve promptly for the best taste; this dish is best enjoyed fresh.

    Equipment Needed

    • Large bowl: For marinating shrimp. A mixing bowl works just fine!
    • Sharp knife: Essential for chopping pineapple. A dull knife? No thanks!
    • Cutting board: Protects your countertops while you prep.
    • Skillet: A non-stick skillet is ideal for evenly cooking the shrimp.
    • Spatula: Perfect for flipping shrimp and mixing ingredients.

    Variations

    • Spicy Kick: Add a splash of sriracha or red pepper flakes to increase the heat for those who crave a bit more spice.
    • Veggie Boost: Toss in sliced bell peppers, snap peas, or broccoli for extra nutrition and color. These veggies bring freshness!
    • Coconut Twist: Substitute half of the sweet chili sauce with coconut milk for a creamy, tropical flavor that pairs well with shrimp.
    • Protein Swap: Try this recipe with chicken or tofu for an alternative protein option that caters to different dietary preferences.
    • Gluten-Free Friendly: Ensure your soy sauce is labeled gluten-free if you’re catering to gluten-sensitive guests.

    Serving Suggestions

    • Rice: Serve over fluffy jasmine or basmati rice to soak up the sauce and enhance the dish.
    • Noodles: Offer it with rice noodles for a delightful Asian twist!
    • Salad: Pair with a crisp garden salad for a refreshing balance.
    • Drinks: Lighten things up with a chilled white wine or sparkling water with lime.

    FAQs about Sweet Chili Pineapple Shrimp

    As I’ve shared my recipe for Sweet Chili Pineapple Shrimp, I often receive questions from readers. Let me address some common queries to help you on this flavorful journey!

    Can I use frozen shrimp for this recipe?

    Absolutely! Frozen shrimp is convenient and works just as well. Just make sure to thaw them in the fridge a few hours before cooking for the best texture and taste.

    What can I substitute for sweet chili sauce?

    If you’re low on sweet chili sauce, you can mix honey with a dash of hot sauce for a sweet and spicy alternative. It’s not quite the same but will give your shrimp a lovely glaze!

    Can I prepare this dish in advance?

    While I recommend enjoying this dish fresh, you can prep the shrimp and pineapple ahead of time. Just keep the marinated shrimp in the fridge for up to 1 hour before cooking. This way, you’re halfway ready!

    Is this dish suitable for a gluten-free diet?

    Yes, indeed! Just remember to look for gluten-free soy sauce. With that simple switch, everyone at your table can enjoy this delicious meal without worry!

    How can I store leftovers of Sweet Chili Pineapple Shrimp?

    Store leftovers in an airtight container in the refrigerator for up to 2 days. When reheating, do so gently—microwaves can overcook shrimp, leading to that rubbery texture. Enjoy!

    Final Thoughts

    Cooking Sweet Chili Pineapple Shrimp isn’t just about feeding the family—it’s a journey filled with joy, laughter, and flavor. From the vibrant colors to the mouthwatering aroma wafting through the kitchen, this dish brings everyone together. Each bite is a delightful reminder of why I love to cook. The sweet and spicy balance, paired with the fresh pineapple, truly elevates weeknight meals. So, whether you’re celebrating a special occasion or just trying to brighten a mundane day, this recipe is here to add a splash of joy to your table! Trust me, you and your loved ones will savor every moment!


    Print

    clock clock iconcutlery cutlery iconflag flag iconfolder folder iconinstagram instagram iconpinterest pinterest iconfacebook facebook iconprint print iconsquares squares iconheart heart iconheart solid heart solid icon

    Description

    A delicious and vibrant dish featuring shrimp marinated in sweet chili sauce and combined with fresh pineapple for a delightful flavor experience.


    • 1 pound of large shrimp, peeled and deveined
    • 1 cup of fresh pineapple, cut into bite-sized chunks
    • 1/2 cup of sweet chili sauce
    • 2 tablespoons of soy sauce
    • 1 tablespoon of olive oil
    • 2 cloves of garlic, minced
    • 1 teaspoon of ginger, grated
    • Salt and pepper to taste

    1. Marinate the Shrimp – In a bowl, combine shrimp, sweet chili sauce, soy sauce, garlic, and ginger. Marinate for 15-30 minutes.
    2. Prepare the Pineapple – Cut fresh pineapple into chunks or drain canned pineapple.
    3. Cook the Shrimp – Cook marinated shrimp in olive oil for 2-3 minutes per side.
    4. Combine Ingredients – Add pineapple to the skillet with shrimp and cook for 2-3 minutes.

    Notes

    • You can adjust the sweetness by adding more or less sweet chili sauce.
    • Serve over rice or with a side of vegetables for a complete meal.
    • Leftovers can be stored in the refrigerator for up to 2 days.
    • Prep Time: 10 minutes
    • Cook Time: 8-10 minutes
    • Category: Dinner
    • Method: Stovetop
    • Cuisine: Asian

    Nutrition

    • Serving Size: 1 serving
    • Calories: 200
    • Sugar: 10g
    • Sodium: 800mg
    • Fat: 8g
    • Saturated Fat: 1g
    • Unsaturated Fat: 6g
    • Trans Fat: 0g
    • Carbohydrates: 15g
    • Fiber: 1g
    • Protein: 20g
    • Cholesterol: 150mg

    Sharing is caring!

  • Shrimp & Rice Bowl with Pineapple Salsa

    Shrimp & Rice Bowl with Pineapple Salsa


    Introduction to Shrimp & Rice Bowl with Pineapple Salsa

    Hey there, fellow food lovers! If you’re looking for a quick, delicious solution for a busy day, let me introduce you to my favorite Shrimp & Rice Bowl with Pineapple Salsa. This vibrant dish is like a little party in a bowl, bursting with flavors that will brighten up your dinner table. It’s perfect for impressing family and friends without spending hours in the kitchen. With just a handful of fresh ingredients, you’ll create a meal that’s not only tasty but also wholesome. Who says weeknight dinners can’t be exciting?

    Why You’ll Love This Shrimp & Rice Bowl with Pineapple Salsa

    This Shrimp & Rice Bowl with Pineapple Salsa is a true lifesaver for busy days! It comes together in just 40 minutes, making it perfect for quick weeknight meals. The vibrant flavors of sweet pineapple, zesty lime, and tender shrimp dance on your palate, creating a delicious experience. Plus, the fresh ingredients are easy to find, so you can whip this up without a trip to the specialty store!

    Ingredients for Shrimp & Rice Bowl with Pineapple Salsa

    Let’s gather all the vibrant ingredients you’ll need to create this Shrimp & Rice Bowl with Pineapple Salsa. Each one brings its unique flavor to the dish, making this bowl truly special.

    • Shrimp: I recommend using large, peeled, and deveined shrimp for a delightful texture. They cook quickly and absorb flavors beautifully.
    • Onion powder: A staple in my pantry, it adds a sweet and savory depth to the shrimp without adding any chunks.
    • Garlic powder: For that aromatic touch—garlic is always a winner when it comes to seafood dishes.
    • Old Bay seasoning: A little sprinkle of this classic seasoning gives an irresistible coastal flavor to the shrimp, elevating the dish completely.
    • Salt & pepper: Simple but essential, these staples enhance the overall taste. Use them to your heart’s content!
    • Olive oil: I love using extra virgin for cooking. It adds richness and helps to sear the shrimp perfectly.
    • Jasmine rice: A fragrant choice, it pairs beautifully with the sweet and savory elements of the bowl.
    • Pineapple: Freshly diced pineapple brings a sweet, juicy burst. Plus, it works wonders in balancing the spices!
    • Red onion: Diced finely, it adds a sharp crunch that complements the sweetness of the pineapple.
    • Roma tomato: For a fresh, juicy addition, the Roma tomato adds color and moisture to the salsa.
    • Cilantro: This herb adds freshness and a herby zing—if you’re not a fan, feel free to omit it.
    • Lime juice: Freshly squeezed lime juice is essential for that tangy finish, brightening up every bite.
    • Red pepper flakes (optional): If you enjoy a bit of heat, feel free to add these for a spicy kick.
    • Avocado: For those who want extra creaminess, fresh avocado is blended to create the optional avocado crema.
    • Greek yogurt: This adds tanginess and creaminess to the avocado crema, making it a delightful topping.
    • Green onion stems: These can be tossed into the crema for a mild onion flavor or used as a garnish.
    • Water: Needed to adjust the consistency of the avocado crema, so have some on hand.

    Want to see exact quantities? You can find them at the bottom of the article, along with printing options for your convenience!

    How to Make Shrimp & Rice Bowl with Pineapple Salsa

    Step 1: Get the Rice Started

    First things first, let’s get that jasmine rice cooking! Rinse one cup of rice under cold water until it runs clear. This helps remove excess starch and prevents it from getting too sticky.

    Then, combine the rinsed rice with 1¾ cups of water in a medium saucepan. Bring it to a boil over high heat. Once it’s bubbling, reduce the heat to low, cover it, and let it simmer for 18-20 minutes. After that, remove it from the heat and let it rest for about 5 minutes. This allows the rice to fluff up perfectly!

    Step 2: Prep Your Shrimp

    Now, time to prepare the shrimp! Pat your peeled and deveined shrimp dry with paper towels. This step is crucial because dry shrimp sear better and develop a gorgeous golden color!

    Toss your shrimp with onion powder, garlic powder, Old Bay seasoning, salt, and pepper. I usually let them sit for a few minutes to absorb those fantastic flavors. Trust me, seasoning is key for a delectable bite!

    Step 3: Make the Pineapple Salsa

    While the shrimp is soaking up all the goodness, let’s whip up that bright pineapple salsa. Start by dicing your pineapple into small ¼-inch chunks. It’s like sunshine on your cutting board!

    In a mixing bowl, combine the diced pineapple with red onion and Roma tomato. Stir in chopped cilantro and freshly squeezed lime juice for that zesty kick. Don’t forget to season with salt, pepper, and, if you like it spicy, add some red pepper flakes. Set this delicious salsa aside and let those flavors meld together.

    Step 4: Make the Avocado Crema (Optional)

    If you’re feeling adventurous, let’s make the optional avocado crema! In a blender, add the ripe avocado, Greek yogurt, cilantro, green onion stems, and olive oil.

    Blend everything while gradually adding ⅓ cup of water until smooth. Adjust the water for your desired consistency. Season it with salt and pepper to taste. This crema is the secret ingredient that’ll take your bowl to the next level!

    Step 5: Cook the Shrimp

    Heat a drizzle of olive oil in a large skillet over medium-high heat. Once hot, add your shrimp in a single layer. It’s important not to overcrowd the pan! Cook them for about 2-3 minutes without moving them.

    When they’re golden on the first side, flip them over and continue cooking for another 2-3 minutes. They should be opaque and cooked through. It’s a beautiful thing to see!

    Step 6: Assemble Your Bowls

    Finally, let’s bring everything together! Divide that fluffy jasmine rice between 2-3 bowls. Top each bowl with the succulent shrimp and spoon over that vibrant pineapple salsa.

    If you made the avocado crema, drizzle it generously on top. Serve your Shrimp & Rice Bowl with Pineapple Salsa immediately, and watch everyone dig in with delight!

    Tips for Success

    • Make sure to rinse the rice well to avoid lumpiness.
    • Use fresh shrimp for the best flavor and texture.
    • Let the shrimp marinate in the spices for a few minutes for deeper flavors.
    • Feel free to adjust the lime juice in the salsa to your taste!
    • Serve immediately for maximum freshness and texture.

    Equipment Needed

    • Medium saucepan: Essential for cooking the rice; a pot works too!
    • Large skillet: Great for searing shrimp; a non-stick pan is a fantastic alternative.
    • Mixing bowls: Helpful for preparing salsa and crema; any bowl will do.
    • Blender: Useful for the avocado crema; a food processor is a good substitute.

    Variations for Shrimp & Rice Bowl with Pineapple Salsa

    • Switch up the protein: Feel free to substitute shrimp with grilled chicken or tofu for a vegetarian option.
    • Go tropical: Add diced mango or kiwi to the pineapple salsa for an even fruitier twist!
    • Spice it up: Incorporate diced jalapeños or chili powder for an extra punch of heat.
    • Use quinoa: Swap jasmine rice for quinoa to boost the protein content and add a nutty flavor.
    • Herb it up: Experiment with fresh herbs like mint or basil in the salsa for a unique flavor profile.

    Serving Suggestions for Shrimp & Rice Bowl with Pineapple Salsa

    • Sides: Pair with a light green salad or grilled veggies for a refreshing contrast.
    • Drinks: Enjoy with a chilled sparkling water or a fruity mocktail to complement the tropical flavors.
    • Presentation: Garnish with extra cilantro and lime wedges for a pop of color.
    • Bowls: Use colorful ceramic bowls to enhance the vibrant look of your dish.

    FAQs about Shrimp & Rice Bowl with Pineapple Salsa

    Can I make this Shrimp & Rice Bowl with Pineapple Salsa in advance?
    Absolutely! You can prepare the rice and the salsa ahead of time. Just cook the shrimp fresh right before serving for the best flavor and texture.

    Is this recipe suitable for meal prep?
    Definitely! This Shrimp & Rice Bowl with Pineapple Salsa holds up well in the fridge. Store the components separately and combine them when you’re ready to eat.

    Can I use frozen shrimp instead of fresh?
    Yes, frozen shrimp works perfectly! Just be sure to thaw them fully and pat them dry before seasoning for that golden sear.

    What other toppings can I add to this bowl?
    Feel free to get creative! Avocado slices, jalapeños, or even a sprinkle of feta cheese can add a delicious twist to your bowl.

    How can I make this dish spicier?
    If you love heat, add more red pepper flakes or include diced fresh jalapeños in the salsa for an extra kick!

    Final Thoughts

    Creating this Shrimp & Rice Bowl with Pineapple Salsa is more than just making dinner; it’s an experience that brings joy to the table. The colorful ingredients come together to form a dish that not only looks fantastic but also explodes with flavor. Each bite transports you to a sunny seaside, making it a mini getaway from your daily routine. It’s perfect for busy evenings, yet impressive enough to share at gatherings. So why not gather your loved ones and dive into this bowl of happiness? I promise it’ll be a memorable meal!


    Print

    clock clock iconcutlery cutlery iconflag flag iconfolder folder iconinstagram instagram iconpinterest pinterest iconfacebook facebook iconprint print iconsquares squares iconheart heart iconheart solid heart solid icon

    Description

    A flavorful and vibrant Shrimp & Rice Bowl topped with fresh Pineapple Salsa and optional creamy Avocado Crema that is perfect for a delightful meal.


    • ½ lb large shrimp, peeled and deveined
    • 1 tsp onion powder
    • 1 tsp garlic powder
    • ½ tsp Old Bay seasoning
    • Salt & pepper, to taste
    • Olive oil
    • 1 cup jasmine rice
    • 1¾ cups water
    • pineapple, diced (about 1 heaping cup)
    • ¼ red onion, diced
    • 1 Roma tomato, diced
    • ¼ cup cilantro, chopped
    • Juice of 1 lime
    • Red pepper flakes (optional, for heat)
    • ½ avocado (for Avocado Crema)
    • 2 tbsp Greek yogurt (for Avocado Crema)
    • 2 green onion stems (for Avocado Crema)
    • 2 tbsp olive oil (for Avocado Crema)
    • ⅓ cup water (for Avocado Crema, adjust for desired consistency)
    • Salt & pepper, to taste (for Avocado Crema)

    1. Get the rice started: Cook your jasmine rice according to package directions. Rinse 1 cup of rice until the water runs clear. Combine with 1¾ cups water in a medium saucepan. Bring to a boil, reduce heat to low, cover, and simmer for 18-20 minutes. Let it rest off the heat for 5 minutes before fluffing with a fork.
    2. Prep your shrimp: Pat your shrimp dry with paper towels. Toss the shrimp with onion powder, garlic powder, Old Bay seasoning, salt, and pepper. Let them sit while you make the salsa.
    3. Make the pineapple salsa: Dice pineapple into small chunks, about ¼-inch. Combine with diced red onion and Roma tomato, then stir in chopped cilantro and lime juice. Season with salt, pepper, and optional red pepper flakes. Set aside.
    4. Make the avocado crema (if using): In a blender, combine avocado, Greek yogurt, cilantro, green onion stems, lime juice, and olive oil. Blend with ⅓ cup water until smooth. Adjust water for desired consistency, season with salt and pepper to taste.
    5. Cook the shrimp: Heat olive oil in a large skillet over medium-high heat. Add seasoned shrimp in a single layer and cook for 2-3 minutes without moving them. Flip and cook another 2-3 minutes until golden and cooked through.
    6. Assemble your bowls: Divide cooked jasmine rice between 2-3 bowls. Top with shrimp, spoon over pineapple salsa, and drizzle with avocado crema if using. Serve immediately.

    Notes

    • Adjust the spice levels of the salsa by adding more or less red pepper flakes.
    • Make sure the shrimp are completely dry before searing for better results.
    • Avocado crema is optional but adds a delicious creaminess to the dish.
    • Prep Time: 15 minutes
    • Cook Time: 25 minutes
    • Category: Main Course
    • Method: Stovetop
    • Cuisine: American

    Nutrition

    • Serving Size: 1 bowl
    • Calories: 450
    • Sugar: 6g
    • Sodium: 600mg
    • Fat: 15g
    • Saturated Fat: 2g
    • Unsaturated Fat: 10g
    • Trans Fat: 0g
    • Carbohydrates: 55g
    • Fiber: 4g
    • Protein: 25g
    • Cholesterol: 150mg

    Sharing is caring!

  • Chicken Philly Cheesesteak

    Chicken Philly Cheesesteak


    Introduction to Chicken Philly Cheesesteak

    Welcome to the heartwarming world of the Chicken Philly Cheesesteak! This delightful twist on a classic dish is perfect for busy days when time feels short, but you still want to treat your loved ones. Picture tender, juicy chicken mingling with vibrant vegetables, all blanketed in gooey provolone cheese. It’s a hearty meal that’s quick to whip up and sure to impress! I find that this recipe not only satisfies my family’s cravings but also gives me a chance to get creative in the kitchen. Let’s dive into this delicious culinary adventure!

    Why You’ll Love This Chicken Philly Cheesesteak

    This Chicken Philly Cheesesteak is not just a meal; it’s a lifesaver! The ease of preparation makes it a fantastic choice for any hectic evening. With just a few simple ingredients and minimal clean-up, you’ll be savoring each cheesy bite in no time. Plus, the fresh veggies and tender chicken make for a delicious flavor explosion that’ll have everyone asking for seconds. Trust me, this recipe ticks all the right boxes!

    Ingredients for Chicken Philly Cheesesteak

    Let’s talk about the star players in this Chicken Philly Cheesesteak. Here’s what you’ll need:

    • Chicken Breasts: Thinly sliced against the grain for tenderness. It’s the heart of this dish, providing protein and moisture.
    • Green Bell Pepper: Adds a crunchy texture and a slight sweetness. Feel free to swap with other colors for a vibrant presentation.
    • Red Bell Pepper: Sweet and juicy, it complements the green bell pepper beautifully, both in flavor and color.
    • White Onion: Sautéed to perfection, it adds a savory depth that enhances the overall taste. You can use yellow or even red onion for a different flavor twist.
    • Italian Seasoning: A blend of herbs like basil and oregano, bringing an aromatic punch that lifts the chicken to another level.
    • Salt and Pepper: Essential for seasoning. Just a pinch can elevate the whole dish, balancing flavors effectively.
    • Provolone Cheese: Melt it right on top to create that gooey goodness everyone craves. You can substitute with mozzarella or cheddar if you prefer.
    • Hoagie Rolls: The perfect vessel for this filling. Choose soft, fresh rolls for the best texture. Gluten-free rolls can work well too!
    • Avocado Oil: For sautéing, it brings a light flavor without overwhelming the dish. Olive oil is a great substitute if that’s what you have on hand.
    • Butter: Adds richness and depth. You can also try using margarine or a dairy-free alternative for a healthier option.

    For precise measurements and to save this recipe for later, check the bottom of the article for a printable version!

    How to Make Chicken Philly Cheesesteak

    Getting down to business, let’s dive into how to make this Chicken Philly Cheesesteak. The steps are simple, and I promise you’ll love the process. Gather your ingredients, and let’s get cooking!

    Step 1: Preheat the Skillet

    First things first, grab a large skillet or griddle and preheat it over medium-high heat, around 400 degrees F. This is crucial for achieving a nice sear on your chicken. When the skillet is hot enough, it’s like throwing an invitation to the ingredients to come dance in the pan!

    Step 2: Sauté the Vegetables

    Once your skillet is ready, add one tablespoon of avocado oil and one tablespoon of butter right in the middle. Watch them melt together like they’re best friends! Toss in the sliced green and red bell peppers along with the white onion. Sauté them for about 3-5 minutes until they’re tender but still have a bit of crunch. The smell alone is pure happiness!

    Step 3: Cook the Chicken

    After the veggies are nice and aromatic, scoop them out and set them on a plate. Now, it’s chicken time! Add your thinly sliced chicken to the same skillet. Spread it out for an even cook. Season it with one teaspoon of Italian seasoning, half a teaspoon of salt, and half a teaspoon of pepper. Let the chicken sear for about 3-5 minutes until juicy and golden. Then, flip the chicken and chop it up into smaller pieces with a spatula. Cook it through for another 2-3 minutes until it’s no longer pink.

    Step 4: Combine and Melt the Cheese

    Now comes the magic moment! Add your sautéed vegetables back into the skillet with the chicken. Lay the eight slices of provolone cheese on top, covering all those delicious flavors. Cover the skillet with a lid but don’t forget to peek occasionally! Allow it a couple of minutes to melt into creamy bliss.

    Step 5: Toast the Hoagie Rolls

    While waiting for the cheese to melt, it’s time to prepare the hoagie rolls. You can toast them in a separate pan or in the oven until they’re warm and slightly crispy. This step elevates your Chicken Philly Cheesesteak from good to jaw-dropping!

    Step 6: Assemble and Serve

    Finally, the moment arrives! Using a spatula, scoop up the cheesy chicken and vegetable mix from the skillet. Place it generously onto each toasted hoagie roll. I recommend serving them warm, right away, so the cheese is all gooey and irresistible. Enjoy a perfect blend of flavors that will have your family raving!

    Tips for Success

    • Always slice chicken against the grain for maximum tenderness.
    • Feel free to mix up the veggies; mushrooms or spinach can add great flavors!
    • For the ultimate cheesiness, cover the skillet with a lid when melting the cheese.
    • Prepare ingredients ahead of time to streamline your cooking process.
    • Serve with a side of crispy fries or a fresh salad for a complete meal.

    Equipment Needed

    • Large Skillet or Griddle: Essential for even cooking. A non-stick option works wonders too.
    • Spatula: A sturdy spatula helps flip and serve the chicken and veggies with ease.
    • Lid: Needed to melt the cheese perfectly. If you don’t have one, just use aluminum foil!
    • Serving Plates: Don’t forget them for a delicious presentation!

    Variations

    • Add Spices: Spice it up by adding a pinch of red pepper flakes for a kick or a dash of smoked paprika for depth.
    • Vegetarian Option: Substitute chicken with sautéed portobello mushrooms or a mix of your favorite vegetables for a delightful meatless version.
    • Cheese Choices: Experiment with different cheeses like cheddar, gouda, or even spicy pepper jack for a flavor twist.
    • Bread Alternatives: Use whole grain hoagie rolls or lettuce wraps for a healthier, lower-carb option.
    • Flavor Boost: Try marinades! Marinate the chicken in lemon juice and garlic before cooking for extra zest.

    Serving Suggestions

    • Pair with Fries: Crispy French fries or sweet potato fries make a perfect side.
    • Fresh Salad: A side salad with mixed greens adds a refreshing crunch.
    • Cold Beverages: Serve with iced tea or lemonade for a delightful contrast.
    • Presentation: Garnish with fresh parsley or sliced jalapeños for a pop of color.

    FAQs about Chicken Philly Cheesesteak

    Can I use frozen chicken for this Chicken Philly Cheesesteak?
    Absolutely! Just be sure to thaw it completely beforehand. You’ll achieve the best texture and flavor if the chicken is cut fresh.

    What’s the best way to store leftovers?
    Store any leftovers in an airtight container in the fridge for up to three days. To reheat, pop the sandwich in the oven for a few minutes to maintain that melty cheese goodness!

    Can I make this Chicken Philly Cheesesteak ahead of time?
    Yes, you can sauté the chicken and veggies ahead of time. When you’re ready to eat, simply reheat, add cheese, and serve on toasted rolls!

    What other variations can I try with this recipe?
    Feel free to experiment! Swap in different proteins like turkey or add unique toppings such as jalapeños or mushrooms for added flavor.

    Is this Chicken Philly Cheesesteak gluten-free?
    Yes! Just use gluten-free hoagie rolls, and you’re all set for a delicious gluten-free meal!

    Final Thoughts

    Creating this Chicken Philly Cheesesteak has been a delightful experience that celebrates both flavor and simplicity. Each bite is filled with tender chicken, melted provolone, and crisp veggies, making it a dish the whole family can gather around. I cherish the joy it brings to my loved ones, transforming ordinary evenings into something special. Whether it’s a busy weeknight or a fun weekend treat, this recipe has a charming way of making busy days a little brighter. Give it a whirl, and let the cheesy goodness whisk you away on a culinary adventure!


    Print

    clock clock iconcutlery cutlery iconflag flag iconfolder folder iconinstagram instagram iconpinterest pinterest iconfacebook facebook iconprint print iconsquares squares iconheart heart iconheart solid heart solid icon

    Description

    A delightful twist on the classic Philly cheesesteak, featuring tender chicken and sautéed vegetables topped with melted provolone cheese.


    • 1 ½ pound Chicken Breasts thinly sliced against the grain
    • 1 Green Bell Pepper sliced
    • 1 Red Bell Pepper sliced
    • 1 White Onion sliced
    • 1 tsp Italian Seasoning
    • ½ tsp Salt
    • ½ tsp Pepper
    • 8 Slices Provolone Cheese
    • 4 Hoagie Rolls
    • 1 Tbsp Avocado Oil
    • 1 Tbsp Butter

    1. Preheat a large skillet or griddle over medium high heat (approximately 400 degrees F).
    2. Add the oil and butter to the middle of the griddle or skillet. Spread it around so that it can melt.
    3. Add the peppers and onions to the skillet or griddle. Toss them to coat them in the oil and butter. Sauté for 3-5 minutes until peppers are cooked to your preference.
    4. Remove them from the griddle or skillet to a separate plate.
    5. Add the chicken to the same griddle or skillet. Spread it out to a thin layer. Season with the Italian seasoning, salt and pepper. Let the chicken sear for 3-5 minutes until the juices start to flow. Flip and then use your spatula to chop into smaller pieces. Continue cooking the chicken until it is cooked through (2-3 more minutes).
    6. Then add the peppers and onions back into the same pan or on the griddle. Top the chicken and peppers with onions with the sliced cheese. Cover with a lid and allow the cheese to melt.
    7. Toast the hoagie rolls.
    8. Use a spatula to scoop and lift the cheesy chicken and veggie mixture onto each of the toasted hoagie rolls.
    9. Serve immediately while warm and enjoy!

    Notes

    • Feel free to customize the vegetables based on your preferences.
    • For added flavor, consider marinating the chicken before cooking.
    • Make sure to cover the skillet for the cheese to melt evenly.
    • Prep Time: 15 minutes
    • Cook Time: 15 minutes
    • Category: Main Course
    • Method: Skillet/Griddle
    • Cuisine: American

    Nutrition

    • Serving Size: 1 sandwich
    • Calories: 450
    • Sugar: 3g
    • Sodium: 800mg
    • Fat: 22g
    • Saturated Fat: 10g
    • Unsaturated Fat: 8g
    • Trans Fat: 0g
    • Carbohydrates: 38g
    • Fiber: 2g
    • Protein: 28g
    • Cholesterol: 85mg

    Sharing is caring!

  • 5-Minute Creamy Pumpkin Sage

    5-Minute Creamy Pumpkin Sage


    Introduction to 5-Minute Creamy Pumpkin Sage

    As a busy mom, I know how precious time can be, especially during dinner prep. That’s why I’m excited to share my 5-Minute Creamy Pumpkin Sage recipe with you! This dish feels like a warm hug on a chilly evening, combining cozy flavors and a creamy texture that the whole family will love.

    It’s the ultimate solution for those hectic nights when you want to whip up something delightful without spending hours in the kitchen. Trust me, this comfort food will impress your loved ones, giving you more time to savor the moments together.

    Why You’ll Love This 5-Minute Creamy Pumpkin Sage

    This 5-Minute Creamy Pumpkin Sage recipe is a dream come true for busy days. It’s not just the speed that wins hearts; it’s the comfort and depth of flavor too. With only a handful of ingredients, it magically transforms into a gourmet meal that even picky eaters will adore. Plus, you can enjoy it all in under 15 minutes, freeing up time for more cherished moments with your family.

    Ingredients for 5-Minute Creamy Pumpkin Sage

    Gathering the right ingredients is crucial for this scrumptious 5-Minute Creamy Pumpkin Sage dish. Here’s what you’ll need:

    • Rigatoni: This hearty pasta shape holds onto the creamy sauce, making every bite deliciously satisfying.
    • Canned pumpkin purée: A time-saver that brings a rich, earthy flavor. It’s packed with nutrients, too!
    • Heavy cream: This adds that velvety smoothness that makes the sauce irresistible.
    • Grated Parmesan cheese: A must for that salty, umami flavor. It also thickens the sauce beautifully.
    • Shallot: Softer and sweeter than onion, it enhances the depth of flavor without overpowering it.
    • Garlic: The aroma while cooking is simply heavenly! It adds warmth and zest.
    • Pasta cooking water: This starchy liquid helps bind the sauce, ensuring it clings well to the pasta.
    • Salt: A pinch elevates all the flavors. Feel free to adjust this according to taste.
    • Black pepper: Freshly ground brings a kick that perfectly balances the dish.
    • Ground nutmeg: Just a hint of this spice adds a wonderful warmth, making this dish feel cozy.
    • Diced pancetta: It’s like the cherry on top! This crispy element introduces a delicious richness.
    • Unsalted butter: Adds a luxurious touch and smoothness to the sauce.
    • Fresh sage leaves: Their aromatic flavor really shines and complements the pumpkin beautifully.
    • Extra grated Parmesan cheese: Always a good idea for serving—because who can resist more cheese?
    • Freshly ground black pepper: For the final touch, ensuring every bite is bursting with flavor.

    For those who like to experiment, consider adding toasted pumpkin seeds for a delightful crunch or swapping out the pancetta for turkey bacon to make it a bit lighter. You can find exact measurements for these ingredients at the bottom of the article for easy printing.

    How to Make 5-Minute Creamy Pumpkin Sage

    Step 1: Cook the Pasta

    First, bring a large pot of salted water to a rolling boil. Add your rigatoni, cooking it according to the package instructions until it’s al dente. Remember to reserve a bit of that precious pasta cooking water before draining to help thicken your sauce later.

    Step 2: Sauté the Pancetta

    While the pasta cooks, heat a large skillet over medium heat. Toss in the diced pancetta and cook until it’s golden and crispy, about 4 to 5 minutes. Use a slotted spoon to remove it from the skillet and set it aside, letting those delicious flavors linger.

    Step 3: Fry the Sage Leaves

    Next, in the same skillet, melt your unsalted butter. Once it’s hot, add the fresh sage leaves, frying them for about a minute until they’re crisp and fragrant. Transfer the sage leaves to a paper towel to drain and get ready for garnishing later.

    Step 4: Sauté Shallots and Garlic

    Now, add the finely chopped shallot to the skillet, sautéing it for about a minute until softened. Then, stir in the minced garlic, letting it cook for another 30 seconds. The aroma filling your kitchen is enough to make anyone eager for dinner.

    Step 5: Combine Ingredients

    It’s time to take the flavors up a notch! Stir in your canned pumpkin purée, heavy cream, salt, pepper, and ground nutmeg. Let it all simmer on medium-low heat for 2 to 3 minutes, stirring frequently to ensure everything blends together beautifully.

    Step 6: Mix Pasta with Sauce

    Add your drained rigatoni to the skillet, tossing it well to coat every piece with that creamy pumpkin sage sauce. Don’t forget to fold in the grated Parmesan cheese and half of that crispy pancetta. Adjust the seasoning with salt and pepper as needed for perfection.

    Step 7: Serve and Garnish

    Finally, divide the scrumptious pasta among serving plates. Top each dish with the rest of the pancetta, crispy sage leaves, a sprinkle of extra Parmesan cheese, and a dash of freshly ground black pepper. Serve immediately and watch your family devour every last bite!

    Tips for Success

    • Always taste as you go! Adjust seasonings to suit your family’s preferences.
    • To save time, chop your shallots and garlic ahead of time!
    • Don’t skip reserving the pasta water; it’s essential for sauce thickness.
    • Add leafy greens, like spinach or kale, for extra nutrition and color.
    • For a zing, a splash of lemon juice just before serving can elevate flavors!

    Equipment Needed

    • Large pot: Essential for boiling pasta. A Dutch oven works well, too.
    • Skillet: A non-stick skillet makes cooking and cleanup a breeze.
    • Slotted spoon: Perfect for removing the pancetta and sage without the oil.
    • Measuring cups: Handy for precise ingredient portions, especially if doubling.
    • Knife and cutting board: For chopping shallots and garlic.

    Variations to 5-Minute Creamy Pumpkin Sage

    • Vegetarian Delight: Skip the pancetta and use sautéed mushrooms for a rich, meaty texture without the meat.
    • Vegan Option: Substitute heavy cream with coconut cream and use nutritional yeast instead of Parmesan cheese for a dairy-free version.
    • Spicy Kick: For those who love heat, add a pinch of red pepper flakes to the sauce for an exciting twist.
    • Herb Twist: Experiment with other herbs like thyme or rosemary for a different flavor profile that complements the pumpkin.
    • Nutty Crunch: Top with toasted walnuts or pecans for added texture and a nutty flavor that pairs beautifully with the creamy sauce.

    Serving Suggestions

    • Fresh Salad: Pair with a light mixed greens salad dressed in balsamic vinaigrette for a refreshing contrast.
    • Warm Bread: Serve with crusty garlic bread or a warm baguette to soak up that delicious sauce.
    • Wine Pairing: A crisp white wine, like Chardonnay, complements the creamy pumpkin beautifully.
    • Cheese Platter: Create a small cheese platter with crackers and fruit as a delightful appetizer.

    FAQs about 5-Minute Creamy Pumpkin Sage

    Can I use fresh pumpkin instead of canned?

    Absolutely! If you’re feeling adventurous, you can roast fresh pumpkin and blend it into a puree. Just ensure it’s smooth for that creamy texture!

    Is this dish gluten-free?

    Yes! By using gluten-free pasta, you can easily make this 5-Minute Creamy Pumpkin Sage completely gluten-free and still enjoy all its deliciousness.

    Can I make this recipe vegan?

    Certainly! Swap the heavy cream with coconut cream and omit the pancetta. Nutritional yeast is a great alternative for a cheesy flavor without dairy.

    How can I store leftovers?

    If you have any leftovers, place them in an airtight container in the fridge for up to three days. Reheat gently on the stovetop while adding a splash of cream or water to revive the sauce.

    What can I add for extra protein?

    For a protein boost, consider adding cooked chicken or sautéed shrimp to your creamy pasta. They pair well with the flavors of pumpkin and sage!

    Final Thoughts

    The beauty of this 5-Minute Creamy Pumpkin Sage recipe is in its simplicity and warmth. This dish proves that delicious food doesn’t have to be complicated or time-consuming. It brings together flavors that feel like home, creating perfect moments to enjoy with family.

    Picture everyone gathered around the table, laughter filling the air as they savor each creamy bite. I cherish these easy recipes that effortlessly transform busy nights into cherished culinary experiences. So, why not give it a try? You’ll discover that quick and comforting meals can easily become your new family favorites!


    Print

    clock clock iconcutlery cutlery iconflag flag iconfolder folder iconinstagram instagram iconpinterest pinterest iconfacebook facebook iconprint print iconsquares squares iconheart heart iconheart solid heart solid icon

    Description

    A quick and creamy pasta dish featuring pumpkin and sage, perfect for a cozy meal in just 5 minutes.


    • 12 ounces rigatoni
    • 1 cup canned pumpkin purée
    • 3/4 cup heavy cream
    • 1/2 cup grated Parmesan cheese
    • 1 small shallot, finely chopped
    • 2 cloves garlic, minced
    • 1/4 cup reserved pasta cooking water
    • 1/2 teaspoon salt, plus more to taste
    • 1/4 teaspoon freshly ground black pepper
    • 1/8 teaspoon ground nutmeg
    • 4 ounces pancetta, diced
    • 2 tablespoons unsalted butter
    • 8 fresh sage leaves
    • Extra grated Parmesan cheese, for serving
    • Freshly ground black pepper, to taste

    1. Bring a large pot of salted water to a rolling boil. Add rigatoni and cook according to package instructions until al dente. Reserve 1/4 cup of pasta water, then drain.
    2. While the pasta cooks, heat a large skillet over medium heat. Add diced pancetta and cook for 4 to 5 minutes or until golden and crisp. Remove with a slotted spoon and set aside.
    3. In the same skillet, melt unsalted butter and add sage leaves. Fry for about 1 minute until sage is crisp. Transfer sage leaves to a paper towel and reserve for garnish.
    4. Add chopped shallot to the skillet and sauté for 1 minute. Stir in minced garlic and cook for an additional 30 seconds until fragrant.
    5. Stir in pumpkin purée, heavy cream, salt, pepper, and ground nutmeg. Simmer on medium-low heat for 2 to 3 minutes, stirring frequently to combine.
    6. Add drained rigatoni and reserved pasta water to the skillet. Toss until pasta is evenly coated with sauce. Fold in grated Parmesan cheese and half the crispy pancetta. Adjust seasoning to taste.
    7. Divide pasta among serving plates. Top with remaining pancetta, fried sage leaves, additional grated Parmesan cheese, and freshly ground black pepper. Serve immediately.

    Notes

    • For an extra touch, you can add toasted pumpkin seeds as a garnish.
    • This dish can be easily doubled for larger gatherings.
    • Prep Time: 5 minutes
    • Cook Time: 10 minutes
    • Category: Pasta
    • Method: Stovetop
    • Cuisine: Italian

    Nutrition

    • Serving Size: 1 serving
    • Calories: 560
    • Sugar: 3g
    • Sodium: 900mg
    • Fat: 40g
    • Saturated Fat: 20g
    • Unsaturated Fat: 12g
    • Trans Fat: 0g
    • Carbohydrates: 46g
    • Fiber: 3g
    • Protein: 18g
    • Cholesterol: 85mg

    Sharing is caring!

  • Cheesy Beef One-Pot

    Cheesy Beef One-Pot


    Introduction to Cheesy Beef One-Pot

    Boy, do I understand the rush of busy weekdays! When dinner time rolls around, a satisfying meal like Cheesy Beef One-Pot is just what you need to take the edge off. This easy, one-pot dish combines tender ground beef, macaroni noodles, and a rich, cheesy sauce into a deliciously comforting meal. Whether you’re feeding picky eaters or trying to impress your loved ones, this recipe is here to save the day. After all, who wouldn’t want a quick, flavorful meal ready in just thirty minutes?

    Why You’ll Love This Cheesy Beef One-Pot

    This Cheesy Beef One-Pot is the hero of my busy weeknight dinners! It’s simply effortless to whip up. Just one pot means fewer dishes to wash, and you’ll have a wholesome meal in no time. The buttery gooeyness of melted cheddar mingled with the savory flavors of ground beef creates a delightful taste sensation. Plus, it’s a crowd-pleaser! Your family will be asking for seconds—trust me on this!

    Ingredients for Cheesy Beef One-Pot

    Gathering fresh ingredients is like building the foundation of a cozy dinner, and for this Cheesy Beef One-Pot, here’s what you’ll need:

    • Crushed Tomatoes: This adds a tangy base and brings the dish together, lending a comforting warmth.
    • Ground Beef: Rich and hearty, it’s the star protein in this dish, making it filling and satisfying.
    • Onion Powder: It’s convenient and gives a deeper flavor that enhances the beef without the fuss of chopping.
    • Garlic Powder: You can never have enough garlic! It provides that savory depth that sings in every bite.
    • Salt: Essential for elevating all flavors. Remember, you can always add more, but it’s hard to take away.
    • Minced Garlic: Fresh garlic adds a lovely fragrance, creating mouthwatering aromas as you cook.
    • Macaroni Noodles: These lovely little tubes hold onto the cheesy goodness and make the dish undeniably comforting.
    • Pepper: A dash of pepper brings a subtle kick, balancing out the creaminess of the cheese.
    • Italian Herbs: A mix of dried herbs like oregano, basil, and thyme brings warmth and just the right hint of earthiness.
    • Beef Broth: This gives a luscious, savory base, ensuring the pasta cooks perfectly while soaking up flavor.
    • Shredded Cheddar Cheese: The ultimate cheesy finale! You could swap it for your favorite cheese if you wish, like Monterey Jack or mozzarella, for a fun twist.

    All these ingredients blend beautifully to create a meal that feels like a warm hug! Don’t forget, you can check the exact quantities at the bottom of the article for printing!

    How to Make Cheesy Beef One-Pot

    Now that we’ve gathered our ingredients, let’s dive into making this delightful Cheesy Beef One-Pot. Follow these clear steps, and you’ll have a mouthwatering meal ready in no time!

    Step 1: Cook the Ground Beef

    Start by heating a large pot over medium heat. Add the ground beef and break it up with your spatula as it cooks. You want it browned and crumbled, that way it’ll mix perfectly with the rest of the ingredients.

    When the beef is fully cooked and no longer pink, look for any excess grease. If you see some pooling at the bottom of the pot, carefully drain it out. Nobody wants a greasy meal!

    Step 2: Add Seasonings

    Now it’s time to bring some serious flavor into play! Toss in minced garlic, onion powder, and your Italian herbs. This is crucial; these little flavor bombs will enhance the beef, making every bite irresistible.

    Give everything a good stir, letting those spices release their delicious aromas. Trust me, your kitchen will start to smell heavenly!

    Step 3: Incorporate Tomatoes and Broth

    Once the seasonings are well-mixed, pour in your beef broth and the can of crushed tomatoes. This combination creates that velvety sauce we love!

    Stir everything together and bring it to a light boil. Keep an eye on it—once you see bubbles, it’s time to move on to the next step!

    Step 4: Cook Macaroni

    Here comes the fun part! Add the macaroni noodles to the pot and stir them in. Make sure they’re submerged in the liquid, as this will help them cook evenly.

    Let them cook for about 10-15 minutes. Stir occasionally to prevent sticking. And if you notice the mixture looking a bit dry, don’t be shy—add a splash more broth!

    Step 5: Stir in Cheese

    Once your elbows are cooked just right, it’s cheese time! Turn down the heat and sprinkle in the shredded cheddar cheese. Stir until it melts into that creamy goodness we all dream about.

    If it needs a little extra love, taste it and adjust the seasonings with salt or pepper as needed. The goal is to hit that perfect flavor balance!

    Step 6: Serve and Enjoy

    Now that your Cheesy Beef One-Pot is looking scrumptious, it’s time to plate it up!

    Dish it out into bowls, sprinkle a bit of extra cheese on top if you like, and enjoy it while it’s hot. This dish pairs wonderfully with a simple green salad or warm bread for dipping.

    And there you have it! A comforting meal in just one pot ensuring minimal mess and maximum taste!

    Tips for Success

    • Don’t skip draining the ground beef; it keeps your dish from being greasy.
    • Stir the macaroni occasionally while cooking to prevent it from clumping together.
    • For a creamy twist, try adding a splash of milk or cream with the cheese.
    • Use low-sodium broth to control the salt content if you’re watching your intake.
    • Feel free to add in veggies like spinach or bell peppers for extra nutrients.

    Equipment Needed

    • Large Pot: A sturdy pot is essential. If you don’t have one, a Dutch oven works great too.
    • Spatula: For stirring the beef and ingredients. A wooden or silicone spatula is perfect.
    • Measuring Cups: Handy for measuring broth and cheese—easy to find!
    • Bowl: To serve your delicious meal and impress your family!

    Variations for Cheesy Beef One-Pot

    • Vegetarian Option: Swap the ground beef for lentils or brown mushrooms for a hearty, plant-based meal.
    • Cheese Variety: Experiment with different cheeses like pepper jack for a spicy kick or Gouda for a smoky flavor!
    • Extra Veggies: Add chopped bell peppers, zucchini, or spinach to boost the nutrition and color of the dish.
    • Spicy Kick: Mix in jalapeños or a dash of hot sauce for those who crave some heat in their meals.
    • Gluten-Free Version: Use gluten-free macaroni and ensure your beef broth is gluten-free to keep it friendly for all diets.

    Serving Suggestions

    • Side Salad: A crisp green salad with a tangy vinaigrette complements the richness of the Cheesy Beef One-Pot.
    • Crusty Bread: Serve with warm, crusty bread for soaking up the cheesy sauce.
    • Fruity Drink: Pair with a refreshing iced tea or lemonade to balance the flavors.
    • Garnish: Sprinkle fresh parsley or extra cheese on top for a pop of color and flavor!

    FAQs about Cheesy Beef One-Pot

    Can I use a different type of meat for this recipe?

    Absolutely! You can swap the ground beef for ground turkey, chicken, or even plant-based alternatives like lentils or black beans. Each option will give you a distinct flavor while keeping the heartiness of the dish.

    Is this Cheesy Beef One-Pot a good recipe for meal prep?

    Yes, it’s perfect for meal prep! You can make a big batch and store it in individual containers. Just reheat it when you’re ready to enjoy a quick dinner on busy days.

    Can I make this dish ahead of time?

    You can make it a day ahead! Just let it cool before storing it in the fridge. When reheating, add a splash of beef broth to maintain that creamy texture.

    How can I customize the flavors?

    Feel free to add your favorite spices or sauces! A splash of Worcestershire sauce or some smoked paprika can elevate the flavors significantly. Don’t be shy—get creative!

    Is this recipe gluten-free?

    No problem! Just use gluten-free macaroni and ensure your beef broth is gluten-free. It’s an easy swap that still delivers all the flavor without the gluten!

    Final Thoughts

    Cooking should be joyful, and this Cheesy Beef One-Pot embodies all the warmth and comfort of home. It’s not just about throwing ingredients into a pot; it’s about creating a meal that brings family together. I love how this dish transforms a busy evening into a cozy gathering filled with laughter and contentment. You’ll find smiles around the table as everyone savors those cheesy bites. With just one pot to clean, it’s a win for you, too! Give it a try, and I promise it’ll become a beloved staple in your weeknight rotation!


    Print

    clock clock iconcutlery cutlery iconflag flag iconfolder folder iconinstagram instagram iconpinterest pinterest iconfacebook facebook iconprint print iconsquares squares iconheart heart iconheart solid heart solid icon

    Description

    Cheesy Beef One-Pot is a quick and flavorful meal that brings together ground beef, macaroni noodles, and a delicious cheesy sauce in one convenient pot.


    • 1 28 oz can of crushed tomatoes
    • 1 lb ground beef
    • 1 tablespoon onion powder
    • 1 tablespoon garlic powder
    • Salt as needed
    • 2 tablespoons minced garlic
    • 1 lb of macaroni noodles
    • Pepper as needed
    • 2 tablespoons Italian herbs
    • 3 cups of beef broth
    • 1.5 cups of shredded cheddar cheese

    1. Cook the ground beef in a big pot on medium heat, breaking it up as it cooks. Drain any excess grease if necessary.
    2. Add the minced garlic, salt, pepper, onion powder, garlic powder, and Italian herbs to the pot.
    3. Pour in the beef broth and the can of crushed tomatoes.
    4. Bring the mixture to a light boil, then add the macaroni noodles, stirring occasionally while they cook for about 10–15 minutes. Add extra broth if the noodles start to dry out.
    5. Once the macaroni is cooked, stir in the shredded cheddar cheese and adjust seasonings to taste.
    6. Serve hot in plates or bowls and enjoy!

    Notes

    • Feel free to swap the cheddar cheese with your favorite cheese.
    • This recipe can be easily adjusted to add more vegetables, such as bell peppers or spinach.
    • Prep Time: 10 minutes
    • Cook Time: 20 minutes
    • Category: Main Course
    • Method: One-Pot Cooking
    • Cuisine: American

    Nutrition

    • Serving Size: 1 serving
    • Calories: 600
    • Sugar: 5g
    • Sodium: 800mg
    • Fat: 30g
    • Saturated Fat: 15g
    • Unsaturated Fat: 10g
    • Trans Fat: 0g
    • Carbohydrates: 50g
    • Fiber: 3g
    • Protein: 40g
    • Cholesterol: 100mg

    Sharing is caring!

  • Honey Oat Sourdough Bread

    Honey Oat Sourdough Bread


    Introduction to Honey Oat Sourdough Bread

    Welcome to the comforting world of baking, where a loaf of Honey Oat Sourdough Bread can transform your day! As a busy mom balancing countless tasks, I often crave simple pleasures that bring joy to my family. This recipe is my little secret—it’s not just easy; it’s a wholesome way to elevate any meal. Whether it’s paired with soup or enjoyed with a spread of butter, this bread is sure to become a favorite in your home. Let’s dive into this delightful baking adventure together!

    Why You’ll Love This Honey Oat Sourdough Bread

    This Honey Oat Sourdough Bread is a game-changer for busy lives. It’s incredibly easy to make and the taste is downright heavenly! The sweet touch of honey paired with the nutty oats will make your kitchen smell like a warm hug. Plus, this wholesome loaf is packed with nutrients, making it a fantastic choice for your family’s health. You’ll love how simple it is to impress your loved ones with homemade goodness!

    Ingredients for Honey Oat Sourdough Bread

    Gathering the right ingredients is the first step in creating your Honey Oat Sourdough Bread. Here’s what you’ll need:

    • Bread flour: This forms the foundation of your dough, giving it structure and chewiness. You can use all-purpose flour in a pinch, but bread flour is best for that perfect rise.
    • Active sourdough starter: This fermented mixture of flour and water is your natural leavening agent. If you don’t have one, you can easily make your own or source it from a local bakery.
    • Salt: A vital ingredient that enhances all the flavors in your bread. It also helps strengthen the dough’s gluten, giving it a beautiful texture.
    • Water: Hydration is key! It activates the sourdough starter and helps the flour proteins develop. Use filtered or bottled water for the best results.
    • Honey: This sweet nectar adds a subtle sweetness and helps create a lovely golden crust. You can swap it for maple syrup or agave if needed.
    • Rolled oats: They add heartiness and nutrition to the bread. Plus, using extra oats to top your loaf creates a rustic feel. Feel free to substitute with other grains like flaxseed or sunflower seeds for a fun twist.

    For exact measurements, you’ll find them at the bottom of the article, ready for you to print out and take to the kitchen!

    How to Make Honey Oat Sourdough Bread

    Making Honey Oat Sourdough Bread is a journey full of simplicity and delight. Follow these easy steps and you’ll soon be the proud baker of a delicious loaf!

    Step 1: Combine Ingredients

    Start by mixing your sourdough starter, water, and flour in a large mixing bowl. I love using a wooden spoon for this; it feels more rustic and connects me to the process. Stir until the mixture forms a dense dough. You want everything combined without any dry bits hanging around. It’s like gathering friends to share a warm meal—everyone should feel welcomed!

    Step 2: Autolyse Stage

    Now, let your mixture sit for one hour. This is the autolyse stage, which helps the flour absorb the water and start forming gluten. Think of it as letting the dough take a little nap, which allows it to wake up full of potential. This will give your bread that lovely chewy texture we all adore!

    Step 3: Adding Salt, Honey, and Oats

    After the hour, it’s time to enhance our dough! Sprinkle in the salt, honey, and oats. The salt adds flavor, while honey introduces a sweet depth that makes this bread memorable. Oats contribute to the texture and health factor. Mix everything in until well integrated. It’s a team effort—just like parenting!

    Step 4: Stretch and Fold

    Let’s strengthen that dough! Use the stretch and fold method to build gluten structure. Grab the dough from one side, stretch it up, and fold it over to the other side. Repeat this for about 30 seconds. It’s a nice workout for your hands and helps create a gorgeous crumb. Fold with love!

    Step 5: Resting and Folding Process

    Rest your dough for 30 minutes, then repeat the stretch and fold process. Do this every half hour for about 2 to 3 hours. Each time you fold, you’ll feel the dough becoming stronger, like a supportive hug that builds confidence. This gives the dough time to rise and develop flavors.

    Step 6: Shaping the Dough

    Once your dough has doubled in size, it’s shaping time! Gently turn it out onto a floured surface. Shape it into a ball by tucking the edges towards the center. This is crucial for creating a nice round loaf. Now it’s ready for the fridge. You want that fancy proofing basket or bowl lined with a towel for later!

    Step 7: Proofing the Dough

    Cover your dough with plastic wrap and let it chill in the fridge for at least 12 hours, or up to 24. This overnight adventure is magical; the flavors develop even more. It’s like a fine wine—you just have to let it age a little before serving!

    Step 8: Preheating and Baking

    On baking day, preheat your oven to 425°F. Place your Dutch oven inside at the same time. This makes getting that crunchy crust easier! When you’re ready, flip the dough onto parchment paper, then spritz it with water and sprinkle oats on top. Create slashes or designs with a sharp knife to help it rise beautifully in the oven.

    Step 9: Cooling

    Once baked, I know it’s tempting, but resist the urge to slice it immediately! Let your loaf cool on a rack for at least an hour. This is crucial for letting the crumb set properly and enhances the final texture. Patience truly pays off when it comes to bread!

    Tips for Success

    • Use a kitchen scale for accurate measurements—precision makes a difference!
    • Keep your sourdough starter active for best results; feed it regularly.
    • Use wet hands when handling the dough; it helps prevent sticking.
    • Invest in a good Dutch oven; the heat retention is key for that perfect crust.
    • Be patient during the resting times; flavor develops beautifully over time.

    Equipment Needed

    • Large mixing bowl: Any deep bowl will do, but a wooden or stainless steel bowl is ideal.
    • Wooden spoon: Perfect for mixing; a spatula can also work in a pinch.
    • Kitchen scale: For precision in measuring ingredients; measuring cups can be used as an alternative.
    • Proofing basket or bowl: A simple bowl lined with a clean towel can serve just as well.
    • Dutch oven: Essential for achieving that crispy crust; you could use a regular baking tray covered with foil if needed.

    Variations

    • Herbed Honey Oat Sourdough: Add fresh herbs like rosemary or thyme to the dough for a savory twist.
    • Nutty Delight: Mix in chopped nuts or seeds, such as walnuts or sunflower seeds, for extra crunch and flavor.
    • Dried Fruit Addition: Fold in dried cranberries or raisins for a hint of sweetness that pairs beautifully with the honey.
    • Gluten-Free Option: Substitute bread flour with a gluten-free blend, ensuring you add a binding agent like xanthan gum.
    • Multigrain Twist: Replace some of the bread flour with whole wheat flour or spelt flour for a heartier loaf.

    Serving Suggestions

    • Serve warm slices with butter and a drizzle of honey for a delightful breakfast treat.
    • Pair with a hearty soup like creamy tomato or chicken noodle for a comforting meal.
    • Add fresh fruit preserves alongside for a touch of sweetness during brunch.
    • Create a beautiful sandwich with turkey, cheese, and arugula for lunch.
    • Enjoy with a cup of herbal tea or coffee to elevate your afternoon snack.

    FAQs about Honey Oat Sourdough Bread

    As you embark on the journey of making Honey Oat Sourdough Bread, you might have some questions. Let’s tackle a few common inquiries to help answer those burning questions!

    Can I use instant yeast instead of sourdough starter?

    Absolutely! If you’re short on time or don’t have a sourdough starter, you can substitute instant yeast. However, the flavor and texture will differ slightly. Just mix a teaspoon of yeast with your water before combining it with flour. This way, you can still enjoy a lovely loaf!

    What can I do if my dough isn’t rising?

    Don’t panic! Ensure your sourdough starter is active and bubbly. Also, consider the temperature. Dough rises best in a warm environment. Try placing it near a sunny window or in a warm oven (turned off) to encourage some action!

    Can I freeze Honey Oat Sourdough Bread?

    Yes, it freezes beautifully! Once your loaf is completely cool, wrap it tightly in plastic wrap and then in aluminum foil. It can stay in the freezer for up to 3 months. When you’re ready to enjoy it, simply thaw it at room temperature, then warm it in the oven for that fresh-baked taste!

    How do I know when my bread is done baking?

    Perfectly baked bread should have a deep golden-brown crust and sound hollow when tapped on the bottom. If you’re still unsure, use a thermometer; the internal temperature should be around 200°F when fully cooked. It’s the little tricks that make a big difference!

    Can I use different types of oats?

    Yes, feel free to play with different oat varieties! Quick oats or steel-cut oats can be substituted, but they could alter the texture slightly. Rolled oats give the best results for a balanced bread with that hearty feel. So, use what you enjoy!

    Final Thoughts

    There’s a special joy in creating your Honey Oat Sourdough Bread. It’s not just about the aroma wafting through the kitchen or the lovely crust that crackles when you slice into it. This bread represents connection—a way to bring your family together around the table, sharing stories and warmth. Whether you’re slathering it with butter or pairing it with a hearty soup, each bite is a celebration of your hard work. Baking this loaf will not only fill your home with love but also nourish your soul. So, roll up those sleeves and let’s bake some memories!


    Print

    clock clock iconcutlery cutlery iconflag flag iconfolder folder iconinstagram instagram iconpinterest pinterest iconfacebook facebook iconprint print iconsquares squares iconheart heart iconheart solid heart solid icon

    Description

    A delicious and wholesome Honey Oat Sourdough Bread, perfect for any meal.


    • 625 grams bread flour (about 4 cups)
    • 100 grams active sourdough starter (about 1 cup)
    • 10 grams salt (about 1 3/4 teaspoon)
    • 450 grams water (about 1 1/2 cups)
    • 30 grams honey
    • 50 grams rolled oats (extra for topping)

    1. Combine sourdough starter, water, and flour in a large mixing bowl and mix with a wooden spoon until dense.
    2. Let the mixture sit for one hour (autolyse stage).
    3. Add salt, honey, and oats and let sit for another 30 minutes.
    4. Perform the first stretch and fold or coil fold method on the dough.
    5. Rest the dough for another 30 minutes and repeat the folding process; repeat 3-4 more times at 30 minute intervals.
    6. Once the dough has doubled in size, shape it into a ball and prepare for the fridge.
    7. Line a bowl with a towel or use a proofing basket, flour the surface, and place the dough smooth side down inside.
    8. Cover with plastic wrap and let it sit in the fridge for at least 12 hours (up to 24 hours).
    9. Preheat the oven to 425 degrees Fahrenheit with a dutch oven inside.
    10. Gently flip the dough onto parchment paper, spray with water, and sprinkle oats on top.
    11. Cut slits or designs in the dough for rising and transfer it into the hot dutch oven.
    12. Add ice cubes outside the parchment for a bubbly crust if desired.
    13. Bake for 35 minutes, checking at 30 minutes; remove the lid to brown if necessary.
    14. Cool the bread completely on a rack before slicing.

    Notes

    • Using wet hands can make folding the dough easier.
    • Wheat flour can be used to flour the towel to prevent dough sticking.
    • For best results, use a preheated dutch oven for baking.
    • Prep Time: 1 hour
    • Cook Time: 35-55 minutes
    • Category: Bread
    • Method: Baking
    • Cuisine: Bread baking

    Nutrition

    • Serving Size: 1 slice
    • Calories: 150
    • Sugar: 1 g
    • Sodium: 200 mg
    • Fat: 1 g
    • Saturated Fat: 0 g
    • Unsaturated Fat: 0 g
    • Trans Fat: 0 g
    • Carbohydrates: 30 g
    • Fiber: 2 g
    • Protein: 5 g
    • Cholesterol: 0 mg

    Sharing is caring!

  • Creamy Crock Pot Ranch Chicken

    Creamy Crock Pot Ranch Chicken


    Introduction to Creamy Crock Pot Ranch Chicken

    Hey there, fellow kitchen adventurers! If you’re anything like me, finding a simple yet scrumptious dinner idea can feel like searching for a needle in a haystack. That’s where my Creamy Crock Pot Ranch Chicken comes to the rescue! This dish is a lifesaver on those busy weeknights when time is short and you crave comfort food. With minimal prep and a slow cooker doing all the heavy lifting, you can look forward to a warm, hearty dinner that the whole family will adore. Ready to dive in? Let’s get cooking!

    Why You’ll Love This Creamy Crock Pot Ranch Chicken

    This Creamy Crock Pot Ranch Chicken is the ultimate answer for busy nights! It combines ease and comfort while bursting with flavor. You can toss everything in your slow cooker and walk away, turning mealtime stress into pure bliss. With its rich, creamy sauce and tender chicken, it’s a dish that warms the heart and satisfies even the pickiest of eaters. What’s not to love about that?

    Ingredients for Creamy Crock Pot Ranch Chicken

    Gathering the right ingredients is like setting the stage for a culinary performance. Here’s what you’ll need for this delightful Creamy Crock Pot Ranch Chicken:

    • Boneless, skinless chicken breasts: The star of the show! Tender and juicy, they soak up the flavors beautifully.
    • Dry ranch seasoning mix: This savory mix brings that classic ranch taste to the dish. It’s like a flavor hug for the chicken!
    • Cream of chicken soup: A creamy base that adds richness. You could also use cream of mushroom for a twist.
    • Chicken broth: It enhances the sauce’s flavor and keeps the chicken moist. Homemade or store-bought works like a charm.
    • Sour cream: This ingredient is crucial for making the sauce creamy and tangy. It’s a little dollop of magic!
    • Garlic powder: A must for that aromatic punch. Fresh garlic can be used if you prefer!
    • Onion powder: It complements the garlic perfectly, providing a depth of flavor without overpowering the dish.
    • Black pepper: Just a pinch adds a subtle kick. Adjust to your taste if you like it spicier.
    • Olive oil: Optional but adds a beautiful sear to the chicken if you choose to sauté it first.
    • Shredded cheddar cheese: Because who doesn’t love a cheesy topping? Optional, but highly recommended for that extra comfort.
    • Fresh parsley: For garnish, this simple herb adds a pop of color and freshness to your dish.

    To get exact quantities for each of these ingredients, be sure to check the printable section at the bottom of the article. Happy cooking!

    How to Make Creamy Crock Pot Ranch Chicken

    Making Creamy Crock Pot Ranch Chicken is blissfully simple! Let’s break it down step by step so you can create this delightful meal without any fuss.

    Step 1: Sear the Chicken

    Searing the chicken is optional, but trust me, it’s worth considering. A quick sear in a skillet for just 2–3 minutes per side creates a stunning golden crust. This not only enhances the flavor but also seals in the juices, making every bite succulent.

    Step 2: Prepare the Sauce

    Now, let’s whip up that creamy sauce! In your slow cooker, combine the cream of chicken soup, dry ranch seasoning, chicken broth, garlic powder, onion powder, and black pepper. Whisk it all together until it’s smooth and creamy, ensuring the flavors meld perfectly.

    Step 3: Add the Chicken to the Sauce

    Time to get the chicken into the action! Place the seared (or unseared) chicken breasts into the sauce. Make sure to coat them well, turning them until each piece is submerged in that delicious goodness. This is where the magic starts to happen in your slow cooker.

    Step 4: Cook the Chicken

    Now, it’s time to let your slow cooker work its magic! Cook on LOW for 6–7 hours or set it to HIGH for 3–4 hours, depending on your schedule. Whichever way you choose, the chicken will turn out tender and juicy, with no need to stress about constant checking.

    Step 5: Shred the Chicken

    Once your chicken is cooked, take two forks and shred it right in the slow cooker. This step is key because it allows the chicken to soak up more of that creamy sauce, infusing every bite with flavor. Trust me, it’s like pulling apart fluffy clouds of deliciousness!

    Step 6: Stir in the Sour Cream

    Now for the pièce de resistance! Stir in the sour cream to that warm, flavorful mixture. This step is crucial as it transforms the sauce into a rich and creamy delight. It’s like adding frosting to a cake—you truly won’t want to skip it!

    Step 7: Serve and Enjoy

    Finally, it’s time to serve your Creamy Crock Pot Ranch Chicken. Ladle it over a bed of rice, fluffy noodles, or hearty potatoes. If you like, sprinkle some shredded cheddar cheese on top and add a sprinkle of fresh parsley for that gorgeous finishing touch. Enjoy the satisfied smiles around the dinner table!

    Tips for Success

    • Use a meat thermometer to ensure chicken reaches 165°F for perfect doneness.
    • Feel free to swap chicken breasts for thighs for a juicier option.
    • Add vegetables like carrots or broccoli for a complete meal in one pot.
    • Let leftovers cool before storing, and keep them in an airtight container.
    • Reheat gently in the microwave or on the stove for best results.

    Equipment Needed

    • Slow Cooker: The main hero of this recipe, ensuring your chicken cooks perfectly.
    • Skillet: Optional for searing the chicken, adding great flavor.
    • Whisk: Useful for mixing the sauce ingredients smoothly.
    • Meat Forks: Perfect for shredding that chicken effortlessly.

    Variations of Creamy Crock Pot Ranch Chicken

    • Swap the Protein: Try swapping chicken for turkey breast or even pork chops for a delightful twist on the classic.
    • Low-Fat Alternatives: Use low-fat cream of chicken soup and light sour cream to make a healthier version without sacrificing flavor.
    • Add Vegetables: Toss in some bell peppers, carrots, or zucchini to create a one-pot meal that’s colorful and nutritious.
    • Herb Twist: Add fresh herbs like thyme or rosemary for a fragrant touch that complements the ranch flavor.
    • Spicy Kick: Mix in some diced jalapeños or a splash of hot sauce for those who love a little heat in their dish.

    Serving Suggestions

    • Fluffy Rice: Serve over steamed white or brown rice for a comforting base.
    • Garlic Bread: Pair with warm garlic bread to scoop up all the creamy goodness.
    • Fresh Salad: A crisp green salad adds a refreshing contrast to the richness.
    • Wine Pairing: A chilled white wine complements the dish beautifully.
    • Presentation Tip: Use a colorful plate and garnish with fresh parsley for a pop of color.

    FAQs about Creamy Crock Pot Ranch Chicken

    Can I use frozen chicken breasts for this recipe?
    Yes, you can use frozen chicken breasts! Just make sure to cook them on HIGH for 4-5 hours instead of LOW. This will ensure they cook through thoroughly without losing moisture.

    Can I make this dish gluten-free?
    Absolutely! This Creamy Crock Pot Ranch Chicken is naturally gluten-free when you use gluten-free ranch seasoning and cream of chicken soup. Always check labels to confirm.

    What sides pair well with this dish?
    Serve it with fluffy rice, creamy mashed potatoes, or hearty pasta. Fresh vegetables like steamed broccoli or a colorful salad also complement the rich flavor of the chicken.

    How should I store leftovers?
    Allow leftovers to cool completely, then store them in an airtight container in the fridge for up to 3 days. Reheat on the stove or in the microwave until heated through.

    Can I prepare this dish ahead of time?
    Definitely! You can prepare the sauce and chicken the night before. Just combine them in the slow cooker insert and refrigerate. In the morning, pop it into the slow cooker and let it do its thing!

    Final Thoughts

    My Creamy Crock Pot Ranch Chicken isn’t just a meal; it’s a heartwarming experience for family dinners. With its appealing flavors and creamy texture, it has a way of making everyone feel right at home. This recipe streamlines meal prep, allowing busy moms and professionals like us to enjoy something delicious without the fuss. Whether it’s a weeknight dinner or a weekend gathering, this dish brings comfort and joy to the table. So gather your loved ones, serve it up, and relish the smiles that come with every bite. You truly deserve this culinary delight!


    Print

    clock clock iconcutlery cutlery iconflag flag iconfolder folder iconinstagram instagram iconpinterest pinterest iconfacebook facebook iconprint print iconsquares squares iconheart heart iconheart solid heart solid icon

    Description

    A delicious and easy creamy chicken dish made in a slow cooker, perfect for a family dinner.


    • 4 boneless, skinless chicken breasts
    • 1 packet dry ranch seasoning mix (1 oz)
    • 1 can cream of chicken soup (10.5 oz)
    • ½ cup chicken broth
    • ½ cup sour cream
    • ½ tsp garlic powder
    • ½ tsp onion powder
    • ¼ tsp black pepper
    • 1 tbsp olive oil (optional, for searing)
    • 1 cup shredded cheddar cheese (optional)
    • fresh parsley, for garnish

    1. (Optional) Heat olive oil in a skillet and sear chicken breasts for 2–3 minutes per side until golden.
    2. In the slow cooker, whisk together cream of chicken soup, ranch seasoning, chicken broth, garlic powder, onion powder, and pepper.
    3. Add chicken breasts to the sauce, turning to coat. Cover and cook on LOW for 6–7 hours or HIGH for 3–4 hours.
    4. Shred chicken with two forks directly in the slow cooker.
    5. Stir in sour cream until the sauce is smooth and creamy.
    6. Serve hot over rice, potatoes, or noodles. Garnish with cheddar cheese and parsley if desired.

    Notes

    • The olive oil is optional but adds a nice sear to the chicken.
    • Feel free to adjust the spices according to your taste.
    • This dish goes well with a variety of sides, such as rice, potatoes, or pasta.
    • Prep Time: 15 minutes
    • Cook Time: 6–7 hours on LOW or 3–4 hours on HIGH
    • Category: Dinner
    • Method: Slow Cooker
    • Cuisine: American

    Nutrition

    • Serving Size: 1 piece of chicken with sauce
    • Calories: 350
    • Sugar: 2g
    • Sodium: 800mg
    • Fat: 16g
    • Saturated Fat: 5g
    • Unsaturated Fat: 9g
    • Trans Fat: 0g
    • Carbohydrates: 10g
    • Fiber: 1g
    • Protein: 40g
    • Cholesterol: 100mg

    Sharing is caring!

  • Maximalist Grilled Cheese Casserole

    Maximalist Grilled Cheese Casserole


    Introduction to Maximalist Grilled Cheese Casserole

    Picture this: a bustling weeknight, you’re tired, and dinner feels like a daunting task. Enter the Maximalist Grilled Cheese Casserole—your new best friend in the kitchen! This recipe wraps comfort and decadence into one delicious dish that’s sure to impress everyone around the table. Perfect for busy moms or professionals craving a quick yet delightful meal, this casserole is like a warm hug on a plate. With layers of gooey cheese and hearty ingredients, it’s not just food; it’s a moment to savor and share with loved ones. Let’s get cooking!

    Why You’ll Love This Maximalist Grilled Cheese Casserole

    The Maximalist Grilled Cheese Casserole is not just incredibly tasty; it’s also a time-saver! In just 55 minutes, you can create a dish that’s perfect for busy weeknights or surprise guests. The combination of cheeses and fresh veggies makes each bite unforgettable. Plus, the leftovers (if there are any!) taste even better the next day, providing a deliciously cozy breakfast or lunch option. It’s comfort food at its finest!

    Ingredients for Maximalist Grilled Cheese Casserole

    Gathering the ingredients for your Maximalist Grilled Cheese Casserole is half the fun! Let’s dive into this cheesy adventure:

    • Sourdough Bread: Thick-cut with crusts on for that desired texture. It holds up beautifully against all that cheesy goodness.
    • Sharp Cheddar Cheese: Adds a delightful tang. Its melty nature makes this casserole a dream come true.
    • Gruyère Cheese: Known for its nutty flavor, it elevates this dish and brings everything together like a warm embrace.
    • Mozzarella Cheese: For the ultimate gooeyness! It melts perfectly, pulling the dish into a cheesy masterpiece.
    • Cream Cheese: Softened and spreadable, it adds rich creaminess to balance out the bold flavors.
    • Whole Milk: Adds moisture, ensuring your casserole remains wonderfully sumptuous and flavorful.
    • Eggs: The secret glue! They bind everything together while providing custardy bites between the layers.
    • Dijon Mustard: A little zing! It brightens the flavors and adds that extra layer of depth.
    • Unsalted Butter: Melted and drizzled over the top for a golden, crispy finish that will leave you craving more.
    • Heirloom Tomatoes: Fresh and juicy, they provide bursts of flavor and color, making this dish even more appealing.
    • Red Onion: Thinly sliced for a subtle sweetness that complements the sharpness of the cheeses.
    • Bacon (optional): For those who crave a smoky crunch! You can easily give this dish a meaty boost—or leave it out for a vegetarian option.
    • Baby Spinach: Adds a pop of color and nutrients, it eases the guilt of indulging in such a rich dish.
    • Chives or Green Onions: A finishing touch! They provide a burst of freshness that uplifts the casserole.
    • Garlic Powder: For a savory aroma that makes your kitchen smell divine as it bakes.
    • Smoked Paprika: This brings a lovely smokiness, adding depth and warmth to each mouthful.
    • Salt and Black Pepper: Essential seasonings that amplify all the flavors and tie the dish together.

    For the exact quantities needed to make this cheesy creation, scroll down to the bottom of the article, where you’ll find all the details ready for printing!

    How to Make Maximalist Grilled Cheese Casserole

    Now that we’ve got our ingredients ready, it’s time to dive into the fun part: making the Maximalist Grilled Cheese Casserole! Trust me; it’s as easy as pie—or should I say, casserole? Follow these simple steps, and you’ll be on your way to cheesy paradise in no time.

    Step 1: Preheat the Oven

    First things first—preheat your oven to 375°F. This ensures everything bakes evenly. While the oven warms up, grab your 9×13-inch casserole dish. Lightly grease it with butter or a nonstick spray. This will prevent the casserole from sticking and make cleanup a breeze.

    Step 2: Prepare the Egg Mixture

    In a large mixing bowl, it’s time for some whisking! Combine the eggs, whole milk, Dijon mustard, garlic powder, smoked paprika, salt, and black pepper. Whisk until everything is well mixed and creamy. This egg mixture will help hold your casserole together, so give it some love!

    Step 3: Build the Base Layer

    Now comes the fun part: layering! Start by arranging 6 slices of thick-cut sourdough bread at the bottom of the casserole dish. If needed, trim them to fit snugly. Then, evenly spread half of the softened cream cheese over the bread slices. Next, sprinkle half of the sharp cheddar, Gruyère, and mozzarella cheeses over this layer. Don’t forget to add half of the sliced tomatoes, red onion, spinach leaves, and bacon if you’re using it. Yum!

    Step 4: Add the Second Layer

    Let’s keep building! Repeat the layering with the remaining bread slices and any leftover ingredients. That means more cream cheese, cheese, tomatoes, onions, spinach, and bacon. This second layer adds a hearty, satisfying vibe to your casserole!

    Step 5: Add the Egg Mixture

    Once your layers are complete, it’s time to pour that glorious egg mixture over everything. Make sure it’s evenly distributed. Gently press down on the layers with a spatula. This helps the bread soak up the liquid, ensuring every bite is creamy and delicious.

    Step 6: Bake the Casserole

    Cover your casserole with aluminum foil. Pop it into the preheated oven and let it bake for about 25 minutes. After that, remove the foil to let the top crisp up. Bake for another 10 minutes, until everything is golden brown and bubbling. Your kitchen will smell divine!

    Step 7: Cool and Serve

    Once it’s finished baking, resist the urge to dig in immediately. Allow the casserole to rest for 5 to 10 minutes. This helps it set and makes slicing easier. When ready, cut into squares, serve warm, and enjoy the cheesy delight that is your Maximalist Grilled Cheese Casserole. Your family will be begging for more!

    Tips for Success

    • Use day-old sourdough for better texture; it absorbs the custard mixture beautifully.
    • For a crispier top, broil it for a minute or two after baking. Just keep an eye on it!
    • Feel free to mix up the cheeses based on what you have on hand—goat cheese, feta, or pepper jack can add a fun twist.
    • Prep the casserole a day ahead and refrigerate for an easy stress-free meal.
    • Always let it rest before slicing; it helps maintain structure and makes serving easier.

    Equipment Needed

    • 9×13-inch Casserole Dish: Essential for baking your masterpiece. A big baking dish works too!
    • Mixing Bowl: For whisking the egg mixture. Any large bowl will suffice.
    • Whisk: Helps you blend your ingredients smoothly. A fork can do the trick in a pinch.
    • Spatula: Great for pressing down layers and serving. A wooden spoon can double as an alternative.
    • Aluminum Foil: Necessary for covering the casserole while it cooks. Parchment paper can be a solution too!

    Variations of Maximalist Grilled Cheese Casserole

    • Vegetarian Delight: Omit the bacon and add extra vegetables, like bell peppers or zucchini, for a fresh twist.
    • Spicy Kick: Incorporate jalapeños or a sprinkle of red pepper flakes for heat that will tantalize your taste buds.
    • Herbed Up: Add fresh herbs such as basil or thyme to the egg mixture for a burst of herbal aroma and flavor.
    • Cheesy Swap: Experiment with different cheeses, like pepper jack for heat or blue cheese for boldness.
    • Low-Carb Option: Substitute the bread with cauliflower rice or zucchini slices for a lighter version.

    Serving Suggestions for Maximalist Grilled Cheese Casserole

    • Simple Salad: Pair with a fresh green salad dressed in a light vinaigrette for a nice balance.
    • Tomato Soup: Serve alongside a warm bowl of creamy tomato soup for that classic comfort combo.
    • Chilled Beverages: Iced tea or a crisp white wine complements the rich flavors wonderfully.
    • Garnish: Top with extra chives or fresh herbs before serving for a pop of color.

    FAQs about Maximalist Grilled Cheese Casserole

    Got questions about your Maximalist Grilled Cheese Casserole? Here are some common inquiries, along with answers to guide you through your cheesy journey.

    Can I prepare the casserole ahead of time?

    Absolutely! Prep the casserole the night before and store it in the refrigerator. Just remember to add a few extra minutes to the baking time if it’s cold from the fridge.

    What can I substitute for the sourdough bread?

    While sourdough bread offers a superb texture, you can use challah or ciabatta for a different flavor. Just make sure it’s thick-cut!

    Can I make this casserole dairy-free?

    Yes! Substitute the cheeses with dairy-free alternatives and use plant-based milk for a tasty, dairy-free version of the Maximalist Grilled Cheese Casserole.

    What do I do with leftovers?

    Leftovers can be stored in an airtight container in the fridge for up to three days. Reheat in the oven for the best taste!

    How can I make it spicier?

    For a spicy twist, add diced jalapeños or sprinkle some red pepper flakes during the layering process for an extra kick!

    Final Thoughts on Maximalist Grilled Cheese Casserole

    The Maximalist Grilled Cheese Casserole is more than just a meal; it’s a joyous experience wrapped in layers of cheesy goodness. Each bite hugs your taste buds like a warm blanket on a chilly night, offering comfort and nostalgia. It invites both creativity and simplicity to the table, allowing you to experiment or follow the recipe as is. Whether you’re feeding a family or enjoying a cozy night in, this casserole brings everyone together. With its decadent flavors and easy prep, it’s destined to become a beloved staple in your kitchen!


    Print

    clock clock iconcutlery cutlery iconflag flag iconfolder folder iconinstagram instagram iconpinterest pinterest iconfacebook facebook iconprint print iconsquares squares iconheart heart iconheart solid heart solid icon

    Description

    A decadent and cheesy casserole that combines multiple types of cheese and layers of sourdough bread, perfect for a comforting meal.


    • 12 slices thick-cut sourdough bread, crusts on
    • 1 1/2 cups shredded sharp cheddar cheese
    • 1 cup shredded Gruyère cheese
    • 1 cup shredded mozzarella cheese
    • 1/2 cup cream cheese, softened
    • 1 1/2 cups whole milk
    • 3 large eggs
    • 1 tablespoon Dijon mustard
    • 4 tablespoons unsalted butter, melted
    • 2 large heirloom tomatoes, sliced
    • 1 small red onion, thinly sliced
    • 6 strips cooked bacon, chopped (optional; omit for vegetarian)
    • 1/2 cup baby spinach leaves
    • 1/4 cup chives or green onions, thinly sliced
    • 1 teaspoon garlic powder
    • 1 teaspoon smoked paprika
    • 1/2 teaspoon salt
    • 1/2 teaspoon black pepper

    1. Preheat oven to 375°F. Lightly grease a 9×13-inch casserole dish with butter or nonstick spray.
    2. In a large mixing bowl, whisk eggs, whole milk, Dijon mustard, garlic powder, smoked paprika, salt, and black pepper until fully combined.
    3. Arrange 6 slices of sourdough bread in the base of the casserole dish, trimming to fit as needed. Evenly spread half the softened cream cheese over the bread slices.
    4. Distribute half of the sharp cheddar, Gruyère, and mozzarella cheeses evenly over the bread. Add half of the sliced tomatoes, red onion, spinach leaves, and chopped bacon if using.
    5. Repeat with remaining bread slices, cream cheese, shredded cheeses, tomatoes, red onion, spinach, and bacon to create a second layer.
    6. Pour the egg and milk mixture evenly over the entire casserole. Gently press down on the layers to help the bread absorb the liquid.
    7. Drizzle melted unsalted butter over the top layer. Sprinkle with chives or green onions.
    8. Cover casserole with foil and bake for 25 minutes.
    9. Remove foil and bake an additional 10 minutes, until golden brown and bubbling.
    10. Allow casserole to rest for 5 to 10 minutes before slicing into squares. Serve warm.

    Notes

    • For a vegetarian option, omit the bacon.
    • This casserole can be prepped ahead of time and stored in the refrigerator before baking.
    • Customize the cheeses and add-ins based on personal preference.
    • Prep Time: 20 minutes
    • Cook Time: 35 minutes
    • Category: Casserole
    • Method: Baking
    • Cuisine: American

    Nutrition

    • Serving Size: 1 square
    • Calories: 450
    • Sugar: 5g
    • Sodium: 800mg
    • Fat: 30g
    • Saturated Fat: 15g
    • Unsaturated Fat: 10g
    • Trans Fat: 0g
    • Carbohydrates: 35g
    • Fiber: 2g
    • Protein: 20g
    • Cholesterol: 150mg

    Sharing is caring!

  • Pumpkin Spice Rebel Float Milkshakes

    Pumpkin Spice Rebel Float Milkshakes


    Introduction to Pumpkin Spice Rebel Float Milkshakes

    Ah, fall! The season of cozy sweaters, golden leaves, and, of course, the beloved Pumpkin Spice Rebel Float Milkshakes! It’s that magical time when we crave warmth and nostalgia in each sip. This delightful treat not only satisfies your sweet tooth but also brings a fun twist to your dessert repertoire. Imagine a quick solution for a busy day—just blend, pour, and enjoy! Whether it’s a family gathering or a cozy night in front of the TV, these milkshakes are sure to impress everyone. Get ready to indulge in this creamy, dreamy concoction that’s perfect for fall!

    Why You’ll Love This Pumpkin Spice Rebel Float Milkshakes

    You’ll adore these milkshakes for their simple preparation. In just ten minutes, you can whip up a delightful treat that embodies the essence of fall! The combination of flavors is heavenly—creamy pumpkin mingles with sweet, fizzy cream soda. Plus, they’re a crowd-pleaser that even picky eaters will love. Trust me, this is a dessert that makes busy days feel just a little brighter!

    Ingredients for Pumpkin Spice Rebel Float Milkshakes

    Gathering the right ingredients is a breeze when it comes to these delightful milkshakes! Here’s what you’ll need to create your fall masterpiece:

    • Vanilla ice cream: The base of our shake brings creamy sweetness, a necessity for any milkshake.
    • Whole milk or plant-based milk: This adds creaminess; choose your favorite for extra flavor or dietary needs.
    • Canned pumpkin purée: A must-have for that rich, pumpkin flavor without the hassle of cooking.
    • Pumpkin pie spice: This quintessential blend of spices—think nutmeg, ginger, and cloves—will elevate your float.
    • Ground cinnamon: Adds warmth to the mix, making each sip feel like a cozy fall hug.
    • Maple syrup or honey: Use either sweetener to enhance the shake’s natural flavors; adjust to your taste!
    • Vanilla extract: Just a hint of this gives more depth to your milkshake, creating a harmonious blend.
    • Cold cream soda: This is the secret to that fizzy float experience; choose a quality brand for the best flavor.
    • Whipped cream (optional): A delightful finishing touch that adds a creamy, luxurious layer.
    • Ground nutmeg or cinnamon (optional): A sprinkle on top for presentation and extra flavor; because, why not?
    • Crushed graham crackers or ginger snaps (optional): Perfect for a crunchy garnish that brings a beautiful texture and taste contrast.

    Remember, the exact measurements of each ingredient are available at the bottom of the article for those who want to print this recipe and keep it handy!

    How to Make Pumpkin Spice Rebel Float Milkshakes

    Making Pumpkin Spice Rebel Float Milkshakes is as easy as pie—well, maybe easier! Let’s dive into these simple steps, ensuring a smooth blend of flavors that will warm your heart.

    Step 1: Blend the Base

    Combine all ingredients for the shake

    Start by grabbing your blender. Toss in the vanilla ice cream, whole or plant-based milk, and canned pumpkin purée.

    Next, add the pumpkin pie spice, ground cinnamon, maple syrup, and vanilla extract.

    Blend everything together until the mixture is smooth and creamy.

    You might want to taste it to see if you need to adjust the sweetness; a spoonful of extra syrup never hurt anyone!

    Step 2: Pour into Glasses

    Divide the mixture equally among the glasses

    Now that your base is ready, it’s time to pour it into tall glasses.

    Aim for about two-thirds full in each glass to leave room for that exciting cream soda float.

    You’ll want to see that beautiful creamy orange color against the glass—pure fall happiness!

    Step 3: Create the Float

    Add cold cream soda to complete the float experience

    Here comes the fun part!

    Grab your cold cream soda and slowly pour it over the milkshake mixture in each glass.

    Watch those bubbly fizzies rise up; it’s like a mini explosion of joy.

    Feel free to stir gently if you want to mix it in, but be careful not to lose that float effect!

    Step 4: Add the Finishing Touches

    Top with whipped cream and garnishes

    To finish, let’s dress up these beauties!

    Top each milkshake with a generous dollop of whipped cream—because why not?

    Sprinkle a pinch of ground nutmeg or cinnamon on top for that extra fall flair.

    If you’re feeling adventurous, add some crushed graham crackers or ginger snaps to give it that delightful crunch.

    Don’t forget to pop in a straw and a long spoon. Your Pumpkin Spice Rebel Float Milkshake is now ready to be enjoyed!

    Tips for Success

    • For a thicker milkshake, add extra ice cream or reduce the amount of milk.
    • Use chilled glasses for serving; it keeps your float colder longer!
    • Mix in a splash of vanilla for an extra depth of flavor.
    • Experiment with toppings like chocolate syrup or caramel for a twist!
    • Make a double batch and freeze leftovers in individual containers for a quick treat later.

    Equipment Needed

    • Blender: A high-speed blender works best, but any blender will do.
    • Tall glasses: Use any glass you have on hand; mason jars work great too!
    • Measuring cups and spoons: Helpful for accuracy, but eyeballing is just fine!
    • Spoon and straw: Essential for enjoying every last sip of your delicious float.

    Variations on Pumpkin Spice Rebel Float Milkshakes

    • Dairy-Free Option: Replace vanilla ice cream and whole milk with your favorite plant-based ice cream and almond or oat milk for a vegan delight.
    • Spiced Rum Float: For the adults, add a splash of spiced rum to each glass for a cozy twist on your milkshake.
    • Peanut Butter Swirl: Blend in a tablespoon of creamy peanut butter for added richness and a nutty flavor that pairs beautifully with pumpkin.
    • Chocolate Twist: Introduce chocolate ice cream instead of vanilla for a chocolate-meets-pumpkin experience that’s surprisingly delicious.
    • Chai Spice Variation: Use chai spice instead of pumpkin pie spice for a different spin that adds warmth and depth to your shake.
    • Frozen Banana Addition: Include a frozen banana for natural sweetness and a creamy texture that enhances the milkshake’s richness.

    Serving Suggestions for Pumpkin Spice Rebel Float Milkshakes

    • Serve with: Pair these milkshakes with warm pumpkin muffins for a cozy combo.
    • Drinks: Enjoy alongside spiced apple cider for extra fall vibes.
    • Presentation: Use festive straws and garnish the glasses with cinnamon sticks for a charming touch.
    • Dessert Tray: Create a fall dessert tray with cookies and mini pies for a delightful spread.

    FAQs about Pumpkin Spice Rebel Float Milkshakes

    Can I make Pumpkin Spice Rebel Float Milkshakes ahead of time?

    While it’s best enjoyed fresh, you can prepare the milkshake base ahead of time and store it in the fridge for a couple of hours. Just add the cream soda and toppings when you’re ready to serve.

    What if I don’t have pumpkin pie spice?

    No problem! You can easily make your own by mixing cinnamon, nutmeg, ginger, and cloves. Just a teaspoon of each blended together will do the trick.

    Can I use frozen pumpkin purée?

    Absolutely! Frozen pumpkin purée works well. Just make sure to thaw it before blending, so your milkshake turns out super creamy.

    How can I adjust the sweetness?

    You can customize the sweetness level by adding more maple syrup or honey, or even using a sugar substitute. Start with a little and taste-test as you blend.

    Is this recipe suitable for kids?

    Definitely! The Pumpkin Spice Rebel Float Milkshakes are a fun and tasty treat for kids. Just be mindful of any dietary restrictions or preferences they might have.

    Final Thoughts

    Indulging in a Pumpkin Spice Rebel Float Milkshake is like wrapping yourself in a cozy blanket of fall flavors. Each sip transports you to a whimsical world, where pumpkin meets cream soda in a delightful dance of sweetness. It’s a treat that’s quick to make, allowing you to spend more time enjoying moments with your loved ones. Whether you’re celebrating a special occasion or simply unwinding after a long day, these milkshakes bring joy to every gathering. So grab your ingredients, gather your family, and let this delightful recipe create some sweet memories together!


    Print

    clock clock iconcutlery cutlery iconflag flag iconfolder folder iconinstagram instagram iconpinterest pinterest iconfacebook facebook iconprint print iconsquares squares iconheart heart iconheart solid heart solid icon

    Description

    A delicious fall-inspired milkshake combining pumpkin, spices, and cream soda for a unique float experience.


    • 3 cups vanilla ice cream
    • 1 cup whole milk or plant-based milk
    • 1/2 cup canned pumpkin purée
    • 1 1/2 teaspoons pumpkin pie spice
    • 1/2 teaspoon ground cinnamon
    • 2 tablespoons maple syrup or honey
    • 1/2 teaspoon vanilla extract
    • 2 cups cold cream soda
    • Whipped cream (optional)
    • Ground nutmeg or cinnamon (optional)
    • Crushed graham crackers or ginger snaps (optional)

    1. Combine vanilla ice cream, whole milk, canned pumpkin purée, pumpkin pie spice, ground cinnamon, maple syrup, and vanilla extract in a blender. Blend until the mixture is smooth and creamy.
    2. Pour the blended mixture evenly into four tall glasses, filling each glass approximately two-thirds full.
    3. Slowly pour cold cream soda over the milkshake in each glass to create a float, allowing bubbles to form. Stir gently if desired.
    4. Top each serving with whipped cream, a sprinkle of ground nutmeg or cinnamon, and a handful of crushed graham crackers or ginger snaps, if desired.
    5. Present with a straw and long spoon for an optimal dessert experience.

    Notes

    • Adjust sweetness based on personal preference by adding more or less maple syrup or honey.
    • For a vegan version, use plant-based ice cream and plant-based milk.
    • Experiment with different toppings like chocolate shavings or caramel drizzle.
    • Prep Time: 10 minutes
    • Cook Time: 0 minutes
    • Category: Dessert
    • Method: Blending
    • Cuisine: American

    Nutrition

    • Serving Size: 1 milkshake
    • Calories: 520
    • Sugar: 60g
    • Sodium: 180mg
    • Fat: 20g
    • Saturated Fat: 12g
    • Unsaturated Fat: 8g
    • Trans Fat: 0g
    • Carbohydrates: 75g
    • Fiber: 2g
    • Protein: 7g
    • Cholesterol: 60mg

    Sharing is caring!

  • Beef and Herbed Biscuit Pot Pie

    Beef and Herbed Biscuit Pot Pie


    Introduction to Beef and Herbed Biscuit Pot Pie

    There’s something incredibly comforting about a warm, hearty meal that greets you at the end of a long day. My Beef and Herbed Biscuit Pot Pie is just that—a delightful embrace in the form of food! It’s lovingly crafted to not only satisfy hunger but to also bring a touch of joy into your kitchen. Perfect for busy evenings, this recipe allows you to whip up a cozy dinner without fuss. Imagine gathering your loved ones around the table, all smiles, as they dive into this delicious pot pie. It’s truly a dish made for togetherness!

    Why You’ll Love This Beef and Herbed Biscuit Pot Pie

    This Beef and Herbed Biscuit Pot Pie is a life-saver for busy weeks. It’s quick to prepare and bursting with flavors that make your taste buds dance! The dusty work is minimal, and let’s be honest, who doesn’t love a savory pie with fluffy biscuits topping it off? It not only pleases the palate but also warms the heart, making it the perfect centerpiece for family gatherings or a cozy night in.

    Ingredients for Beef and Herbed Biscuit Pot Pie

    Gathering the right ingredients is the first step to creating a memorable Beef and Herbed Biscuit Pot Pie. Here’s what you’ll need:

    • Butter: This creamy foundation adds richness to your filling and aids in sautéing vegetables.
    • Onion: Finely chopped onions introduce a savory sweetness and depth of flavor.
    • Celery: Thinly sliced celery gives a delightful crunch and freshness to the mix.
    • Carrots: Peeled and sliced carrots brighten the dish, both in flavor and color.
    • Garlic: Minced garlic brings an aromatic sweetness to the filling that’s irresistible.
    • All-purpose Flour: This thickens the sauce, ensuring it’s rich and satisfying.
    • Salt and Pepper: Essential seasonings that enhance all the flavors in the pie.
    • Beef Broth: A flavorful base that adds depth and moisture to your filling.
    • Heavy Cream: This makes the dish sumptuous and creamy, helping the flavors meld together beautifully.
    • Fresh Parsley: Chopped parsley lifts the flavor profile and adds a pop of vibrant green.
    • Frozen Sweet Peas: These little gems add a touch of sweetness and a delightful burst of color.
    • Cooked Beef: Shredded or diced, this is the star of your pot pie, providing hearty satisfaction.
    • Einkorn Flour: A nutritious choice for the biscuit dough that gives a unique flavor.
    • Baking Powder: This is crucial for creating a light and fluffy biscuit topping.
    • Baking Soda: Helps with leavening, giving the biscuits that nice rise.
    • Salt: Enhances the overall taste of the biscuit dough.
    • Freshly Ground Black Pepper: Adds a pleasant warmth without overwhelming the dish.
    • Dried Thyme, Rosemary, and Parsley: A delightful mix of herbs that brings earthiness to the biscuits, showcasing classic flavors.
    • Cold Butter: Sliced and integrated into the biscuit dough, this yields flakiness that’s downright delightful.
    • Buttermilk: This gives biscuits a tangy flavor and tender texture—feel free to adjust the quantity as needed!

    All ingredient measurements are provided at the bottom of this article for easy printing, so let’s get cooking! Your cozy paradise awaits with this Beef and Herbed Biscuit Pot Pie!

    How to Make Beef and Herbed Biscuit Pot Pie

    Step 1: Preheat and Sauté

    Let’s kick things off by preheating your oven to 375°F. Preheating is key; it ensures your pot pie bakes evenly and beautifully. In a large skillet, melt the butter over medium heat. Toss in the finely chopped onion, celery, and sliced carrots. Sauté these beauties until they become tender and start to soften, about 5-7 minutes. This process brings out their natural sweetness, enhancing the overall flavor of your Beef and Herbed Biscuit Pot Pie. Those fragrant aromas filling your kitchen will surely whet your appetite!

    Step 2: Create the Sauce

    Next, stir in the minced garlic and sprinkle the flour over your sautéed veggies. This helps create the base for your creamy sauce. Now, it’s time to whisk in the beef broth and heavy cream, letting it come to a gentle boil. That creamy allure is what brings your filling to life! Within minutes, the mixture thickens into a rich sauce, beautifully clinging to the savory veggies and beef that you’ll add later. Don’t be shy with those fridge doors; grab your favorite herbs for a flavor boost!

    Step 3: Add Vegetables and Beef

    With the sauce bubbling wonderfully, it’s time to incorporate the frozen sweet peas and the shredded or diced cooked beef. Gently fold them into your mixture, allowing all those flavors to mingle together. The peas add a burst of color and sweetness. Make sure every piece of beef is coated in that luscious sauce for maximum flavor in every bite. Once everything is well combined, pour this hearty filling into a 13×9-inch baking pan, inviting warmth and comfort to every serving.

    Step 4: Prepare Biscuit Dough

    Now it’s biscuit time! In a food processor, combine the all-purpose einkorn flour, baking powder, baking soda, and salt. Toss in the dried herbs too; they work wonders in the dough! Next, add the sliced cold butter. Pulse until the mixture resembles coarse crumbs. This step is vital for getting that desired flakiness in your biscuits. Slowly mix in the buttermilk until a soft dough forms. Remember, you can adjust the amount if needed, but be careful not to overwork it. Biscuit dough is all about being light and fluffy!

    Step 5: Shape the Biscuits

    Once your dough is ready, it’s time to roll it out! Lightly flour your work surface and use a rolling pin to create a rectangle about ½ inch thick. Now, cut this dough into squares or your favorite shapes, whatever strikes your fancy! Each piece should be roughly uniform for even baking. Lay these biscuit shapes on top of your bubbling beef filling. Their golden tops will rise beautifully while baking, giving you that rustic farmhouse feel!

    Step 6: Assemble and Bake

    Your masterpiece is nearly complete! Arrange those biscuit squares over the filling, ensuring they touch but don’t overlap too much. This helps with rising! Place the pan in your preheated oven and bake for about 25–30 minutes. Keep an eye on it, as you want the filling to be bubbly and the biscuits to achieve a lovely golden brown color. When you take it out, the fragrance will be absolutely heavenly! Get ready to serve and watch faces light up as they dig in.

    Tips for Success

    • Use leftover cooked beef for a quick meal solution.
    • For a healthier pot pie, consider substituting half of the heavy cream with low-fat milk.
    • Be generous with herbs; they elevate the flavor significantly!
    • Make sure your butter is cold when making the biscuit dough for perfect flakiness.
    • Allow the pot pie to cool slightly before serving to prevent burns and help it set.

    Equipment Needed

    • Large Skillet: Any non-stick pan works great for sautéing.
    • Baking Pan: A 13×9-inch dish is ideal, but any oven-safe pan will do.
    • Food Processor: This speeds up biscuit dough prep; a pastry cutter works too.
    • Measuring Cups and Spoons: Essential for accurate ingredient quantities.
    • Rolling Pin: If you don’t have one, a wine bottle can do the trick!

    Variations on Beef and Herbed Biscuit Pot Pie

    • Vegetarian Option: Swap the beef for hearty mushrooms or lentils for a satisfying meat-free version.
    • Spicy Twist: Add diced jalapeños or a dash of cayenne pepper for a kick of heat!
    • Herb-Infused Biscuits: Experiment with different herbs like basil or chives in your biscuit dough for a unique flavor.
    • Cheesy Delight: Incorporate shredded cheese into the biscuit dough for a rich, cheesy topping.
    • Seasonal Veggies: Feel free to use seasonal vegetables like zucchini or squash to elevate your filling.
    • Slow Cooker Version: Simmer the filling in a slow cooker, then top with biscuits before serving for a hands-off approach.

    Serving Suggestions for Beef and Herbed Biscuit Pot Pie

    • Side Salad: Pair with a crisp green salad dressed with a light vinaigrette for a refreshing contrast.
    • Garlic Bread: Serve with warm, buttery garlic bread for a comforting touch.
    • Wine Pairing: A chilled Chardonnay complements the richness of the pot pie beautifully.
    • Presentation: Garnish with fresh parsley for a pop of color and extra flavor.

    FAQs about Beef and Herbed Biscuit Pot Pie

    Can I use frozen beef in this recipe? Absolutely! Frozen cooked beef works perfectly. Just ensure it’s thawed before adding it to the filling for even cooking.

    How can I make this Beef and Herbed Biscuit Pot Pie ahead of time? You can prepare the filling a day in advance and store it in the fridge. Just make the biscuits fresh before baking for a fluffy topping!

    What sides pair well with this pot pie? A refreshing side salad or buttery garlic bread complements the richness of the Beef and Herbed Biscuit Pot Pie beautifully.

    Can I adjust the herbs in the biscuit topping? Certainly! Feel free to use your favorite dried herbs or fresh herbs to customize the flavors to your liking.

    Is it possible to make this dish gluten-free? Yes! You can use gluten-free flour instead of einkorn flour for the biscuit topping and all-purpose flour in the filling.

    Final Thoughts

    Making my Beef and Herbed Biscuit Pot Pie is more than just cooking; it’s sharing love through food. With each spoonful, you’re not only tasting comfort but also creating memories that linger long after the last bite. The blend of savory beef and fluffy biscuits warms hearts and bellies, making it an ideal dish for family gatherings or those cherished quiet evenings at home. Whether it’s a busy weeknight or a family feast, this pot pie is sure to become a beloved staple in your kitchen, reminding you that home-cooked love truly makes the world a better place.


    Print

    clock clock iconcutlery cutlery iconflag flag iconfolder folder iconinstagram instagram iconpinterest pinterest iconfacebook facebook iconprint print iconsquares squares iconheart heart iconheart solid heart solid icon

    Description

    A comforting and hearty Beef and Herbed Biscuit Pot Pie that combines savory beef filling with fluffy herbed biscuits, perfect for a cozy meal.


    • 3 Tbsp. Butter
    • 1/2 Medium Onion, Finely Chopped
    • 3 stalks Celery, Thinly Sliced
    • 3 Large Carrots, Peeled And Thinly Sliced
    • 3 cloves Garlic, Minced
    • 6 Tbsp. All-purpose Flour
    • Salt And Pepper, to taste
    • 3 cups Beef Broth
    • 3/4 cup Heavy Cream
    • 3 Tbsp. Chopped Fresh Parsley
    • 3 cups Frozen Sweet Peas
    • 4 cups Shredded Or Diced Cooked Beef
    • 3 cups All-purpose Einkorn Flour
    • 1 1/2 tsp. Baking Powder
    • 1/2 tsp. Baking Soda
    • 1 tsp. Salt
    • 1/4 tsp. Freshly Ground Black Pepper
    • 1/4 tsp. Dried Thyme
    • 1/4 tsp. Dried Rosemary
    • 1/2 tsp. Dried Parsley
    • 8 Tbsp. Cold Butter, Sliced
    • 3/4 cup Buttermilk Or More If Needed

    1. Preheat oven to 375°F. Sauté onion, celery, and carrots in butter until tender.
    2. Stir in garlic and flour, then whisk in broth and cream. Bring to a boil.
    3. Stir in parsley, peas, and beef. Pour the filling into a 13×9-inch pan.
    4. Make the biscuit dough by pulsing dry ingredients and herbs with cold butter in a food processor.
    5. Mix in buttermilk, then turn out the dough and fold it into thirds three times.
    6. Roll the dough into a rectangle, cut into squares, and place on top of the filling.
    7. Bake for 25–30 minutes until the filling is bubbly and the biscuits are golden.

    Notes

    • Feel free to use leftover cooked beef for ease.
    • For a healthier twist, you can substitute half of the cream with low-fat milk.
    • Adjust herbs according to your preference.
    • Prep Time: 30 minutes
    • Cook Time: 30 minutes
    • Category: Comfort Food
    • Method: Baking
    • Cuisine: American

    Nutrition

    • Serving Size: 1 serving
    • Calories: 540
    • Sugar: 4g
    • Sodium: 700mg
    • Fat: 32g
    • Saturated Fat: 18g
    • Unsaturated Fat: 7g
    • Trans Fat: 0g
    • Carbohydrates: 38g
    • Fiber: 3g
    • Protein: 25g
    • Cholesterol: 100mg

    Sharing is caring!