Author: IHAAL Team

  • Maple Walnut Sweet Potatoes

    Maple Walnut Sweet Potatoes


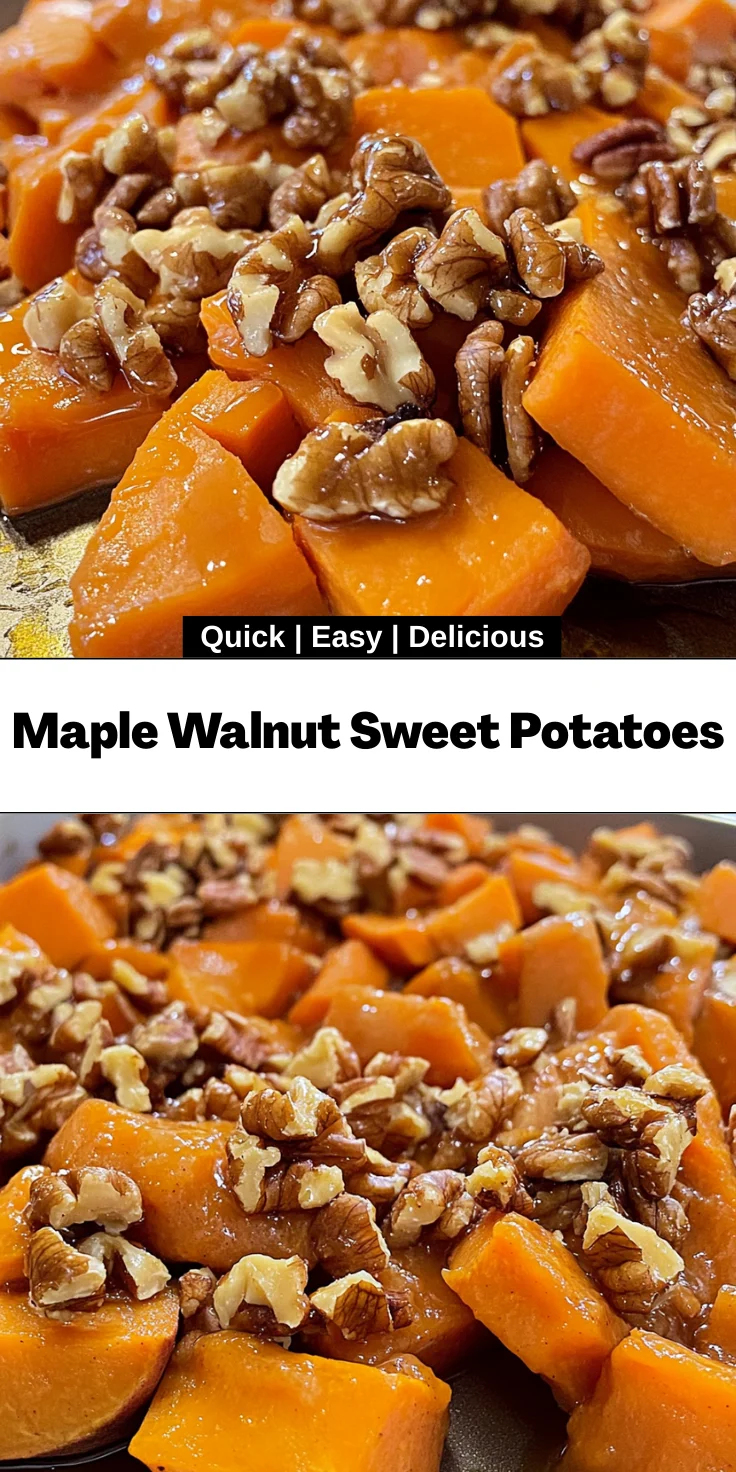
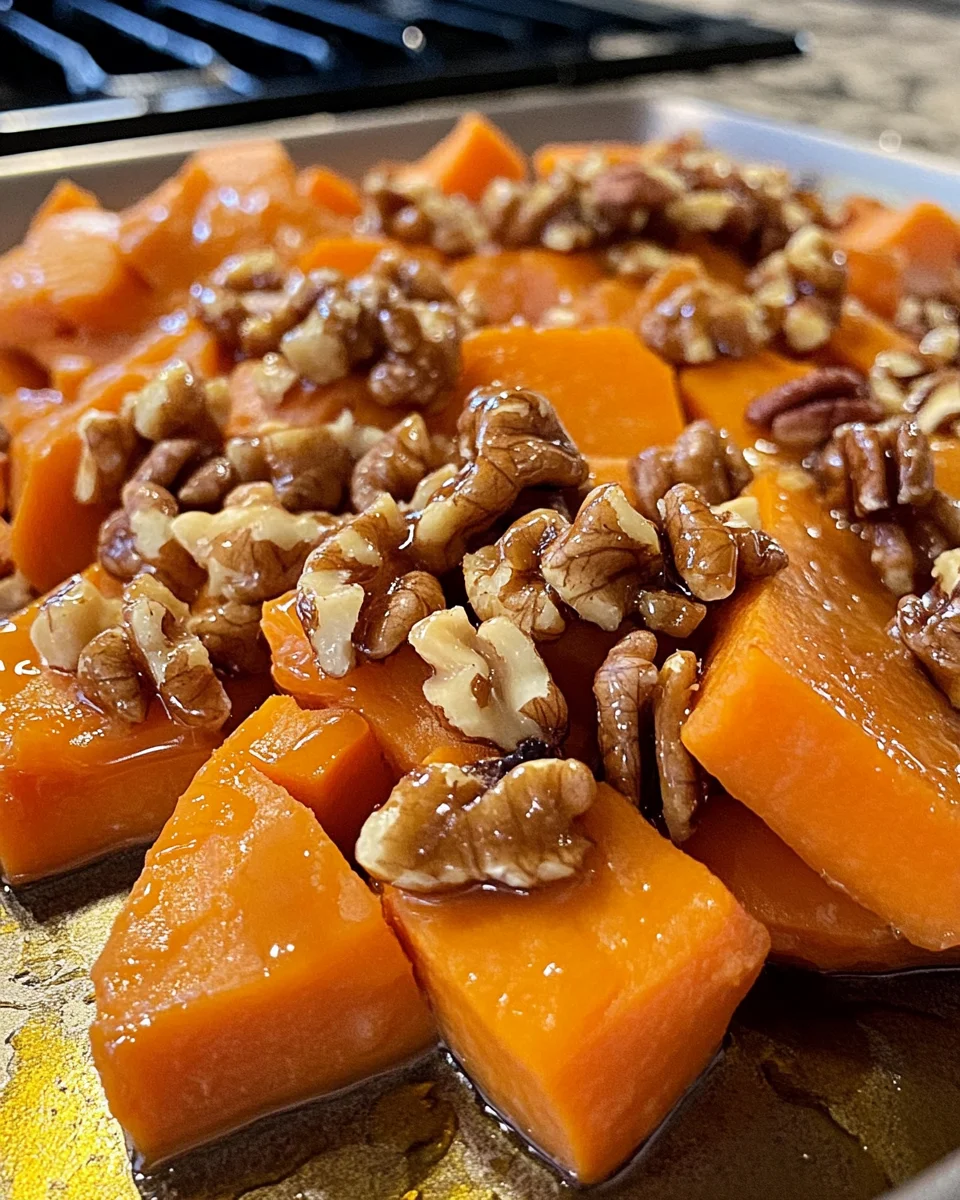
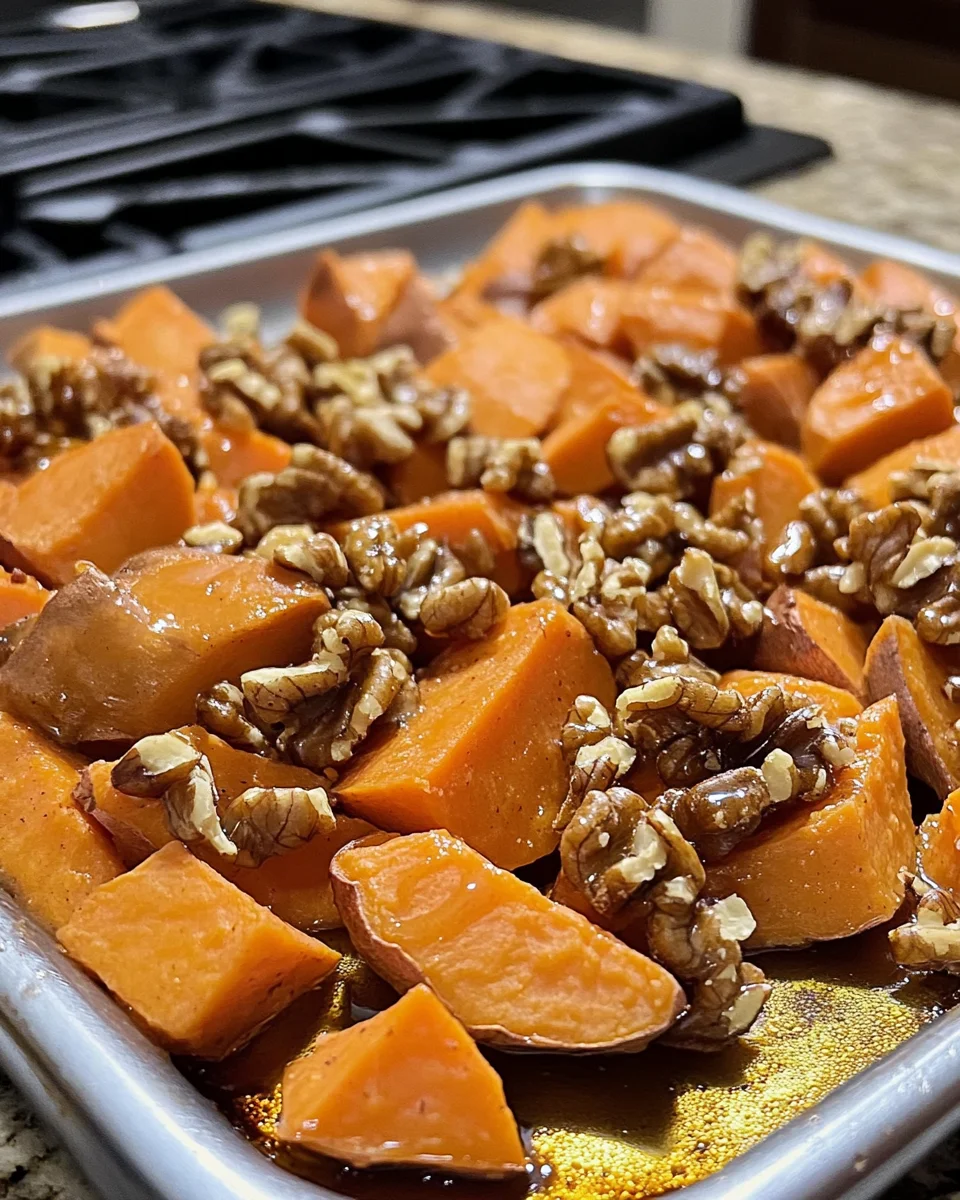
    Introduction to Maple Walnut Sweet Potatoes

    Welcome to the cozy world of Maple Walnut Sweet Potatoes, a dish that effortlessly combines warm, sweet flavors with a delightful crunch. As a busy mom, I understand the struggles of preparing meals that are both nutritious and enjoyable for the whole family. This recipe is your quick solution for a busy day, yet fancy enough to impress guests. With just a handful of ingredients, you’ll create a vibrant side dish that hugs your taste buds while filling your home with an irresistible aroma. Let’s dive in and discover a sweet treat that will become a family favorite!

    Why You’ll Love This Maple Walnut Sweet Potatoes

    There’s so much to love about Maple Walnut Sweet Potatoes! First and foremost, they’re super easy to whip up, making them perfect for those hectic weeknights. Just toss everything together, and let your oven do its magic. Plus, the sweet and nutty flavor explosion will have everyone asking for seconds. This dish truly captures the essence of comfort food, bringing warmth and joy to your dining table without a hefty time investment.

    Ingredients for Maple Walnut Sweet Potatoes

    Gather these simple yet delightful ingredients to create your Maple Walnut Sweet Potatoes. Each element plays a vital role in the melody of flavors you’ll soon enjoy.

    • Sweet Potatoes: The star of the show! Sweet potatoes add a natural sweetness and creaminess to the dish.
    • Pure Maple Syrup: This velvety sweetener enhances the earthy flavor of sweet potatoes. It’s a must for that rich glaze.
    • Walnuts: Chopped and toasted, these nuts introduce a satisfying crunch. They also add healthy fats and protein.
    • Ground Cinnamon: A sprinkle of this warm spice elevates the sweetness, making each bite comforting and aromatic.
    • Butter or Coconut Oil: A touch of fat is necessary for richness. Use butter for a savory taste or coconut oil for a vegan option.
    • Salt: Just a pinch enhances all the flavors, balancing the sweetness beautifully.

    For optional touches, feel free to include a dash of nutmeg or ginger for a spiced twist. And if you prefer a little more sweetness, adjust the maple syrup to your liking. Remember, the specific quantities are available at the bottom of this article for your convenience! Happy cooking!

    How to Make Maple Walnut Sweet Potatoes

    Ready to cook? Let’s dive into the fun part! Making Maple Walnut Sweet Potatoes is a straightforward process that will have your kitchen buzzing with delightful aromas. Just follow these simple steps, and you’ll whip up a tasty side dish that steals the show.

    Step 1: Preheat the Oven

    First things first—preheating your oven to 400°F (200°C) is essential. This temperature helps your sweet potatoes cook evenly and caramelize deliciously. You want that perfect blend of softness and golden edges, so don’t skip this step!

    Step 2: Prepare the Sweet Potatoes

    Next, let’s get those sweet potatoes ready. Peel the skins away and chop them into uniform cubes. I find that 1- to 1.5-inch pieces cook best. This helps them cook evenly and soak up that fantastic maple glaze. Plus, it ensures no pieces are left crunchy while others are mushy!

    Step 3: Mix the Ingredients

    In a large bowl, combine your sweet potato cubes with the melted butter (or coconut oil), pure maple syrup, ground cinnamon, and salt. Toss everything together until each piece is well-coated and happy. As you do this, imagine how the sweet and savory flavors will meld beautifully in the oven!

    Step 4: Add Walnuts

    Now for the best part—fold in those delicious walnuts. Gently mix them into the sweet potato mixture. This adds a lovely crunch that contrasts nicely with the creamy sweetness. Just be careful not to mush the potatoes with too much force; we want those textures to shine through!

    Step 5: Bake

    Spread the mixture evenly on a parchment-lined baking sheet. This helps with easy clean-up, too! Pop them in the oven and bake for 25 to 30 minutes, stirring halfway through. Keep an eye on them as they bake; you’re looking for that perfect caramelization that makes your taste buds dance!

    Step 6: Cool Before Serving

    Once they are beautifully tender and caramelized, let your Maple Walnut Sweet Potatoes cool for a few minutes before serving. This cooling time allows the flavors to settle and makes them easier to dish out. Plus, they taste even better when they’re slightly warm!

    Tips for Success

    • Make sure to cube the sweet potatoes evenly for consistent cooking.
    • Toast walnuts in a dry skillet until fragrant to enhance their flavor.
    • Adjust the maple syrup depending on your sweetness preference.
    • Experiment with spices like nutmeg or ginger for extra warmth.
    • Store leftovers in an airtight container in the fridge for up to 3 days.

    Equipment Needed

    • Large Bowl: For mixing ingredients. A sturdy mixing bowl works well.
    • Baking Sheet: A standard baking sheet to spread the mixture. A cast-iron skillet also works great!
    • Parchment Paper: For easy clean-up, but aluminum foil can be a handy substitute.
    • Sharp Knife: Essential for chopping sweet potatoes quickly and safely.

    Variations

    • Spicy Kick: Add a touch of cayenne pepper or chili powder for a spicy twist that will surprise your taste buds.
    • Maple Pecan Delight: Swap walnuts with pecans for a slightly different nutty flavor. Toasted pecans add a unique crunch!
    • Herb Infusion: Incorporate fresh herbs like rosemary or thyme for an earthy flavor that complements the sweetness.
    • Pineapple Addition: Toss in some diced pineapple for a caramelized fruity burst. It’s a fantastic flavor combo with sweet potatoes!
    • Nut-Free Option: Leave out the nuts altogether for a smoother texture. Add sunflower seeds instead for a delightful crunch.

    Serving Suggestions for Maple Walnut Sweet Potatoes

    • Perfect Pairing: Serve alongside roasted chicken or pork for a delicious meal.
    • Fresh Greens: Complement the dish with a simple arugula or spinach salad dressed in vinaigrette.
    • Drink Match: Enjoy with a glass of white wine or a refreshing sparkling water.
    • Presentation Tip: Garnish with extra toasted walnuts and a drizzle of maple syrup for a beautiful finish!

    FAQs about Maple Walnut Sweet Potatoes

    Can I make Maple Walnut Sweet Potatoes ahead of time?

    Absolutely! You can prep the sweet potatoes and mix them with the other ingredients a day in advance. Just store them in the fridge. When you’re ready to bake, pop them in the oven as directed. This tip is perfect for busy moms like us who love to simplify meal prep!

    What else can I add to this sweet potato recipe?

    The possibilities are endless! Consider adding cranberries for a tart flavor or even some tahini for a unique twist. You can also mix in different nuts, like pecans or almonds. Don’t be afraid to get creative and tailor the dish to your family’s taste!

    Can I use golden or purple sweet potatoes instead of orange ones?

    Yes, you can! Golden or purple sweet potatoes will bring a new twist to Maple Walnut Sweet Potatoes. Each type offers a unique flavor and nutritional profile, so feel free to experiment based on what you have on hand.

    How can I store leftovers?

    Store any leftovers in an airtight container in the fridge for up to three days. Reheat them in the microwave or oven until warmed through. This dish makes a fantastic addition to your meal prep lineup!

    Is this dish suitable for a vegan diet?

    Sure thing! Just replace the butter with coconut oil, and you’ll have a delicious vegan side dish. This little tweak doesn’t compromise the flavor; it keeps that delightful richness and sweetness intact while being respectful of dietary choices.

    Final Thoughts

    Every time I make Maple Walnut Sweet Potatoes, I’m reminded of how cooking can bring joy and warmth to our lives. This dish is not just about food; it’s about creating a shared experience around the table. The sweet and nutty flavors create lasting memories with family, and the ease of preparing it makes it a go-to recipe for busy nights. Whether it’s a weeknight dinner or a festive gathering, these sweet potatoes remind us to savor the little moments. I hope you find as much joy in this recipe as I do, bringing smiles to your loved ones’ faces!


    Print

    clock clock iconcutlery cutlery iconflag flag iconfolder folder iconinstagram instagram iconpinterest pinterest iconfacebook facebook iconprint print iconsquares squares iconheart heart iconheart solid heart solid icon

    Description

    Welcome to the cozy world of Maple Walnut Sweet Potatoes, a dish that effortlessly combines warm, sweet flavors with a delightful crunch. As a busy mom, I understand the struggles of preparing meals that are both nutritious and enjoyable for the whole family. This recipe is your quick solution for a busy day, yet fancy enough to impress guests. With just a handful of ingredients, you’ll create a vibrant side dish that hugs your taste buds while filling your home with an irresistible aroma. Let’s dive in and discover a sweet treat that will become a family favorite!


    • 2 lbs sweet potatoes, peeled and cubed
    • 1/4 cup pure maple syrup
    • 1/2 cup walnuts, chopped and toasted
    • 1 tsp ground cinnamon
    • 2 tbsp butter (or coconut oil)
    • 1/4 tsp salt

    1. Preheat your oven to 400°F (200°C).
    2. In a large bowl, combine the cubed sweet potatoes, melted butter, maple syrup, cinnamon, and salt. Toss until well coated.
    3. Gently fold in the toasted walnuts.
    4. Spread the mixture evenly on a parchment-lined baking sheet.
    5. Bake for 25-30 minutes or until tender and caramelized, stirring halfway through for even cooking.
    6. Let cool slightly before serving.

    Notes

    • Ensure the sweet potatoes are cut into similar sizes for even cooking.
    • Adjust the amount of maple syrup based on your sweetness preference.
    • This dish can be made vegan by using coconut oil instead of butter.
    • Prep Time: 15 minutes
    • Cook Time: 30 minutes
    • Category: Side Dish
    • Method: Baking
    • Cuisine: American

    Nutrition

    • Serving Size: 1 cup
    • Calories: 210
    • Sugar: 8g
    • Sodium: 150mg
    • Fat: 10g
    • Saturated Fat: 3g
    • Unsaturated Fat: 5g
    • Trans Fat: 0g
    • Carbohydrates: 30g
    • Fiber: 4g
    • Protein: 3g
    • Cholesterol: 10mg

    Sharing is caring!

  • Gooey Reese’s Cheesecake Cookies

    Gooey Reese’s Cheesecake Cookies


    Introduction to Gooey Reese’s Cheesecake Cookies

    As a busy home cook, I know the challenges of balancing work, family, and the desire to whip up something delicious. That’s why I absolutely adore my Gooey Reese’s Cheesecake Cookies. Imagine biting into a warm cookie, the creamy cheesecake filling melting into your mouth, paired with chocolatey goodness—it’s pure bliss! This recipe is not only quick but impressively simple, making it a favorite for gatherings, or just a sweet treat on a hectic day. Trust me, these cookies will become your new go-to dessert that everyone will rave about!

    Why You’ll Love This Gooey Reese’s Cheesecake Cookies

    What’s not to love about a dessert that marries the rich goodness of cheesecake with the charm of cookies? These Gooey Reese’s Cheesecake Cookies are easy to make, and they come together quickly, perfect for those busy afternoons. Each bite is a delightful mix of creamy and crunchy, creating a flavor explosion that will leave everyone asking for more. Plus, they’re ideal for sharing with family and friends or simply treating yourself!

    Ingredients for Gooey Reese’s Cheesecake Cookies

    Ready to dive into the sweet world of Gooey Reese’s Cheesecake Cookies? Here’s what you’ll need to create this mouth-watering treat. Don’t worry, the exact measurements are listed at the bottom of the article and are printable for your convenience!

    • Cream Cheese – This is the star of our cheesecake filling. Make sure it’s softened; nobody wants lumps in their filling!
    • Powdered Sugar – A perfect sweetener for our cream cheese, adding that melt-in-your-mouth texture. It blends effortlessly!
    • Vanilla Extract – A splash of this magical liquid enhances both the cream cheese and cookie dough flavors. It’s like a warm hug in baking!
    • Unsalted Butter – This gives our cookies that rich, buttery flavor. Using unsalted helps control the overall saltiness of the recipe.
    • Brown Sugar – Adding moisture and that caramel-like flavor, brown sugar is essential for achieving soft, chewy cookies.
    • Granulated Sugar – For a bit of crunch and sweetness, a balance of white sugar works wonders within the dough.
    • Large Egg – This binds everything together, providing moisture. Make sure it’s at room temperature for easy mixing.
    • All-Purpose Flour – The backbone of our cookie dough, helping to create the perfect chewy texture.
    • Baking Soda – This is our leavening agent, giving the cookies a nice lift while keeping them soft.
    • Salt – Just a pinch enhances all the flavors, making our cookies taste irresistible.
    • Chocolate Chips – Because what’s a cookie without chocolate? They add delightful melty pockets in every bite!
    • Reese’s Pieces – These colorful candies bring a fun crunch and that amazing peanut butter flavor we all love. Feel free to toss in any extra for an even more decadent treat!
    • Melted Chocolate (Optional) – Drizzling some melted chocolate on top is the cherry on top! It takes the presentation and taste to the next level.

    How to Make Gooey Reese’s Cheesecake Cookies

    Now that we’ve gathered our ingredients, let’s get into the fun part—making these delectable Gooey Reese’s Cheesecake Cookies! Don’t worry; I’ll walk you through every step of the process. With a bit of patience and love, you’ll have cookies that are sure to wow your family and friends.

    Step 1: Prepare the Cheesecake Filling

    Start with the cheesecake filling, which is the heart of our cookies. In a small bowl, combine the softened cream cheese, powdered sugar, and vanilla extract. Using a hand mixer or a whisk, blend until smooth. You want this mixture to be as creamy as a cloud!

    Once blended, scoop small dollops onto a parchment-lined baking sheet. Think of them as little treasures waiting to be wrapped in cookie dough! Pop the baking sheet in the freezer for at least one hour. This step is crucial; freezing helps maintain that gooey center when baked.

    Step 2: Create the Cookie Dough

    Next, let’s create the cookie dough that will wrap around our cheesecake-filled nuggets. In a large mixing bowl, beat together the softened unsalted butter, brown sugar, and granulated sugar. You’re aiming for a light and fluffy texture, which usually takes about 2-3 minutes.

    Once you achieve that fluffy consistency, crack in the large egg and add a splash more of vanilla extract. Mix until everything is combined yummy and smooth!

    Step 3: Combine Dry Ingredients

    Now, let’s prepare the dry ingredients! In another bowl, whisk together the all-purpose flour, baking soda, and salt. This step ensures even mixing of the ingredients.

    Gradually incorporate the dry mixture into the buttery wet mixture. Stir gently until it all comes together, showing no dry flour. This dough needs to be a bit thick, which is perfect for the chewy texture we’re after.

    Step 4: Assemble the Cookies

    It’s time for the exciting part! Take about two tablespoons of your cookie dough and flatten it in your palm. Place one frozen cheesecake filling piece right in the center. Envelop the filling with the dough by pinching the edges together. Make sure it’s sealed tight, or you could lose that gooey goodness while baking!

    Repeat this process until all your filling is wrapped up in delicious dough. Place the assembled cookie dough balls on a parchment-lined baking sheet, giving them some room—we want them to spread beautifully!

    Step 5: Bake the Cookies

    Let’s get baking! Preheat your oven to 350°F (175°C) and slide those delightful cookie balls in. Bake for about 12-14 minutes, or until the edges turn golden brown. Your house will smell heavenly—like a bakery! Remember, they will look a bit soft in the middle; that’s alright! They’ll firm up as they cool.

    Step 6: Final Touches

    After pulling the cookies from the oven, give them about 5 minutes to cool on the baking sheet. This allows for easy transfer without breaking. Then, move them to a wire rack to cool completely.

    If you’re feeling a bit extravagant, drizzle some melted chocolate on top for an extra touch of decadence. It’s the cherry on top of what already is a sweet masterpiece!

    Tips for Success

    • Ensure your cream cheese is fully softened for a smooth filling.
    • Don’t skip freezing the cheesecake filling; it keeps that gooey texture intact.
    • Experiment with chocolate chip varieties, like milk or dark, to customize flavor.
    • For added fun, mix in mini Reese’s cups for an extra crunch!
    • Store leftovers in an airtight container to keep cookies fresh and chewy.

    Equipment Needed

    • Mixing Bowls: Essential for combining ingredients; glass or stainless steel works best.
    • Hand Mixer or Whisk: A hand mixer speeds up blending; a whisk makes for a great workout!
    • Parchment Paper: Use this to line your baking sheet for easy cleanup; foil works too in a pinch.
    • Baking Sheet: A sturdy cookie sheet is key; half-sheet pans are perfect!
    • Spatula: Helps in transferring cookies; silicone is great for non-stick use.

    Variations of Gooey Reese’s Cheesecake Cookies

    • Chocolate Chip Swirl: Mix in a swirl of cream cheese and chocolate for that extra chocolatey goodness.
    • Nutty Delight: Add chopped walnuts or pecans for a crunch that pairs beautifully with the creamy filling.
    • Gluten-Free Option: Substitute all-purpose flour with a gluten-free blend to accommodate those with dietary restrictions.
    • Peanut Butter Bliss: Swirl in peanut butter into the cheesecake filling for an even richer flavor experience.
    • Festive Touch: During holidays, add colored sprinkles or use seasonal candies like candy corn or peppermint bits.

    Serving Suggestions for Gooey Reese’s Cheesecake Cookies

    • Coffee or Milk: Pair these cookies with a warm cup of coffee or a tall glass of milk for a classic combo.
    • Fresh Fruit: Serve alongside fresh strawberries or raspberries to balance the sweetness.
    • Cookie Platter: Create an inviting dessert platter with an assortment of cookies for gatherings.
    • Ice Cream: Top a warm cookie with a scoop of vanilla ice cream for an indulgent treat.
    • Decorative Plate: Present cookies on a colorful plate, garnished with mint leaves for a touch of elegance.

    FAQs about Gooey Reese’s Cheesecake Cookies

    Can I make these cookies ahead of time?

    Absolutely! You can prepare the cheesecake filling and freeze it up to a month in advance. Just make sure to assemble and bake the cookies the day you plan to serve them for the best results!

    What if I don’t have cream cheese?

    While cream cheese is essential for that rich cheesecake flavor, you can substitute it with mascarpone or Greek yogurt for a lighter alternative. Just remember it may slightly alter the texture and taste!

    Can I use other candies besides Reese’s Pieces?

    Definitely! Feel free to swap out with M&M’s, chocolate-covered pretzels, or mini marshmallows. Just think about what flavors would complement the cheesecake filling. The sky’s the limit!

    How should I store any leftover cookies?

    To keep these Gooey Reese’s Cheesecake Cookies fresh, store them in an airtight container at room temperature for up to a week. You can also refrigerate them for longer-lasting goodness, or freeze them if you want to keep them for a special occasion!

    What makes these cookies so gooey?

    It’s all about the frozen cheesecake filling! By freezing it before baking, you ensure that it remains soft and creamy, creating that irresistibly gooey texture in every bite. Trust me; it’s worth the wait!

    Final Thoughts

    Making Gooey Reese’s Cheesecake Cookies has been a delightful adventure in my kitchen! These cookies aren’t just a treat; they’re a joyful experience wrapped in gooey goodness and sweet memories. Every bite brings back the warmth of gathering around the table with family and friends, sharing laughter and stories. Whether you whip them up for a hectic weeknight or special celebrations, they’re sure to spark joy. Embrace the magic of baking, and indulge in the rich flavors and textures you create. Trust me, these cookies will leave you craving more and sharing your sweet success!


    Print

    clock clock iconcutlery cutlery iconflag flag iconfolder folder iconinstagram instagram iconpinterest pinterest iconfacebook facebook iconprint print iconsquares squares iconheart heart iconheart solid heart solid icon

    Description

    As a busy home cook, I know the challenges of balancing work, family, and the desire to whip up something delicious. That’s why I absolutely adore my Gooey Reese’s Cheesecake Cookies. Imagine biting into a warm cookie, the creamy cheesecake filling melting into your mouth, paired with chocolatey goodness—it’s pure bliss! This recipe is not only quick but impressively simple, making it a favorite for gatherings, or just a sweet treat on a hectic day. Trust me, these cookies will become your new go-to dessert that everyone will rave about!


    • 4 oz cream cheese, softened
    • 1/4 cup powdered sugar
    • 1 tsp vanilla extract
    • 1/2 cup unsalted butter, softened
    • 1/2 cup brown sugar
    • 1/4 cup granulated sugar
    • 1 large egg
    • 1 1/2 cups all-purpose flour
    • 1/2 tsp baking soda
    • 1/4 tsp salt
    • 1/2 cup chocolate chips
    • 1/2 cup Reese’s Pieces
    • Melted chocolate for drizzling (optional)

    1. In a small bowl, mix cream cheese, powdered sugar, and vanilla extract until smooth. Scoop small dollops onto a parchment-lined baking sheet and freeze for at least 1 hour.
    2. In a large bowl, beat butter, brown sugar, and granulated sugar until light and fluffy. Mix in the egg and vanilla extract.
    3. In another bowl, whisk together flour, baking soda, and salt. Gradually add dry ingredients to wet ingredients, stirring until combined. Fold in chocolate chips and Reese’s Pieces.
    4. Take 2 tablespoons of cookie dough, flatten it, and place a frozen cheesecake filling piece in the center. Cover with more dough and seal the edges.
    5. Place cookie dough balls on a parchment-lined baking sheet, spacing them apart. Bake at 350°F (175°C) for 12-14 minutes, until edges are golden.
    6. Let cookies cool on the baking sheet for 5 minutes before transferring to a wire rack. Drizzle with melted chocolate if desired. Serve warm!

    Notes

    • For best results, ensure the cream cheese is well softened.
    • Experiment with different kinds of chocolate chips for varied flavor.
    • Store leftover cookies in an airtight container.
    • Prep Time: 1 hour 15 minutes
    • Cook Time: 12-14 minutes
    • Category: Dessert
    • Method: Baking
    • Cuisine: American

    Nutrition

    • Serving Size: 1 cookie
    • Calories: 200
    • Sugar: 12g
    • Sodium: 150mg
    • Fat: 9g
    • Saturated Fat: 5g
    • Unsaturated Fat: 3g
    • Trans Fat: 0g
    • Carbohydrates: 30g
    • Fiber: 1g
    • Protein: 3g
    • Cholesterol: 25mg

    Sharing is caring!

  • Mediterranean Baked Fish

    Mediterranean Baked Fish


    Introduction to Mediterranean Baked Fish

    Life can feel like a whirlwind sometimes, especially for busy moms and professionals. That’s why I cherish dishes like Mediterranean Baked Fish. It’s not just a meal; it’s a flavorful escape for a moment! Fresh herbs, bright tomatoes, and olives come together in harmony, making it a delightful dish that pleases even the pickiest of eaters. Whether you’re looking for a quick solution after a hectic day or a recipe to impress loved ones, this one checks all the boxes. Let’s dive into the vibrant world of Mediterranean flavors that will leave your taste buds dancing!

    Why You’ll Love This Mediterranean Baked Fish

    This Mediterranean Baked Fish brings simplicity and incredible taste to your table. It’s perfect for those busy nights when time is scarce but nutrition is a must. With its quick prep and bake time, you’ll have a delicious meal ready in just 35 minutes. Each bite is packed with vibrant flavors, making it a delightful choice for family dinners or a special occasion. It’s a dish that showcases wholesome ingredients without the fuss!

    Ingredients for Mediterranean Baked Fish

    As I prepare this Mediterranean Baked Fish, I love gathering the vibrant, fresh ingredients that paint a picture of sunny coastlines. Here’s what you’ll need to create this beautiful dish:

    • Olive Oil: This golden elixir not only adds flavor but also helps keep the fish moist while baking.
    • Garlic: Sliced garlic infuses the dish with its aromatic essence, giving it a lovely depth that’s hard to resist.
    • Fresh Thyme: Earthy and fragrant, thyme adds a hint of robust flavor that pairs wonderfully with fish.
    • Baby Tomatoes: These burst with sweetness as they roast, creating a delectable contrast with the savory elements.
    • Haddock Fillets: A mild white fish that flakes beautifully, but feel free to substitute with cod or tilapia for a different taste experience.
    • Salt and Pepper: Essential to enhance the natural flavors, these simple seasonings make all the difference.
    • Chili Flakes (optional): For those who appreciate a gentle kick, add chili flakes to bring some heat!
    • Mezzetta Olives: These add a salty kick and rich flavor; I adore their briny nature with fish.
    • Mezzetta Sliced Jalapeños: Add a zesty crunch for an exciting twist, or leave them out for a milder dish.
    • Capers: With their tangy punch, capers offer a delightful burst that ties all the flavors together.

    If you’re curious about the specific quantities, you can find the exact measurements at the end of the article, ready for printing. Each ingredient plays a part in the symphony of flavors that make this Mediterranean Baked Fish unforgettable!

    How to Make Mediterranean Baked Fish

    Preheat and Prepare

    Before diving into the magic of Mediterranean Baked Fish, preheating the oven is key. Set it to a toasty 450°F to get things sizzling right away. Here’s a helpful tip: place your baking dish filled with olive oil inside the oven for about 6-8 minutes as it heats. This simple step creates a hot base, ensuring your fish cooks evenly and locks in moisture. Think of it as giving your dish a warm welcome! It’s a small prepare-and-patience moment that pays off in deliciousness. By the time you’re ready to assemble, your dish will be perfectly prepped to hold all those lovely ingredients together.

    Season the Fish

    Now, onto the seas of flavor! Start by seasoning your haddock fillets with salt, pepper, and optional chili flakes. Seasoning is essential—it’s like setting the stage! A pinch of salt brightens everything, while pepper brings warmth. If you’re feeling adventurous, the chili flakes add that zing. Make sure to rub the seasoning evenly, covering all sides of the fish for a burst of flavor with every bite. Trust me, this little step makes all the difference in turning a good dish into an unforgettable one!

    Assemble the Dish

    It’s assembly time, and this part is like painting a masterpiece! Carefully take your hot baking dish from the oven, and add in the sliced garlic. Sprinkle in half of the fresh thyme, and then layer the whole baby tomatoes around. Next, gently place your seasoned fish fillets in the center. Surround it with Mezzetta olives for a salty depth, a touch of sliced jalapeños for a crunch, and finish with capers to tie all those flavors together. Each component plays its role, and the balance is divine. The vivid colors and aromas will start to fill your kitchen, giving you a glimpse of the delicious Mediterranean magic unfolding!

    Bake the Fish

    Slide your masterpiece into the oven and lower the temperature to 375°F. Baking time is crucial here—let your fish bake for about 15-18 minutes. To check for doneness, simply look for that telltale flakiness and an opaque color. If you have a food thermometer handy, your fish should hit about 145°F internally. This gentle bake allows the flavors to mingle beautifully, ensuring your Mediterranean Baked Fish is flavorful and tender!

    Finish with Flair

    Here’s where we add a spritz of excitement! After baking, turn on the broiler and let your fish broil for 2 minutes. This golden touch creates a lovely char, boosting the dish’s appearance and flavor. Once it’s done, drizzle the fragrant olive oil from the pan generously over the fish for an extra burst of richness. Garnish with the remaining fresh thyme sprigs for a pop of color. Your dish is now ready! Plate it up with pride, and watch as everyone gathers around, drawn in by its vibrant beauty.

    Tips for Success

    • Always preheat the oven for even cooking.
    • Use fresh herbs for an aromatic boost; they make a big difference!
    • Feel free to experiment with different fish types to find your favorite.
    • Don’t skip the broiling step—it adds a lovely char to the fish.
    • Pair with a simple salad or couscous for a complete meal.

    Equipment Needed

    • Baking dish: A glass or ceramic dish works wonders; a sheet pan can be an alternative.
    • Olive oil dispenser: Measuring spoons will do if you don’t have one on hand.
    • Sharp knife: A good kitchen knife makes slicing garlic a breeze.
    • Cutting board: Any clean surface will suffice for safely prepping ingredients.
    • Food thermometer: Handy for checking the fish’s doneness; a simple fork can help too!

    Variations

    • Swap the haddock for salmon or tilapia to change up the flavor profile.
    • For a veggie twist, add sliced bell peppers or zucchini before baking.
    • Add feta cheese crumbles before serving for a tangy Mediterranean flair.
    • Use a gluten-free soy sauce in place of olives for a low-sodium option if desired.
    • Experiment with different herbs like oregano or parsley for a personal touch.

    Serving Suggestions for Mediterranean Baked Fish

    • Serve with a light couscous salad tossed in lemon and olive oil for freshness.
    • A chilled glass of Sauvignon Blanc pairs beautifully with the vibrant flavors.
    • Complement with steamed asparagus or roasted vegetables for added nutrition.
    • Garnish with additional thyme or a sprinkle of feta for an eye-catching presentation.

    FAQs about Mediterranean Baked Fish

    Can I use a different type of fish for this recipe?

    Absolutely! While haddock is delicious, you can easily substitute it with other white fish like cod or tilapia. Each variety has its flavor, so feel free to choose your favorite!

    Is Mediterranean Baked Fish healthy?

    Yes! This Mediterranean Baked Fish is not only flavorful but also packed with healthy ingredients. It’s rich in protein, healthy fats from olive oil, and loaded with antioxidants from the tomatoes and olives creating a nutritious meal.

    What can I serve with Mediterranean Baked Fish?

    This dish pairs wonderfully with a fresh salad or a side of couscous. You might also consider roasted vegetables or quinoa for an added nutritious boost!

    How do I know when the fish is finished cooking?

    Check for doneness by looking for flaky, opaque fish—it should easily flake with a fork. Ideally, use a food thermometer to check that it’s reached 145°F internally for perfectly cooked fish.

    Can I prepare this dish ahead of time?

    You can prep most of the ingredients ahead. Season your fish and chop the vegetables, then store them covered in the refrigerator. When you’re ready, just assemble and bake!

    Final Thoughts

    Cooking Mediterranean Baked Fish is more than just making dinner; it’s about creating a shared experience filled with warmth and flavor. Every time I whip up this dish, my kitchen transforms into a vibrant coastal escape, leaving my family smiling. The combination of fresh herbs and savory ingredients invites happiness to the table. I hope this recipe becomes a joyful part of your cooking journey, one that you can easily return to amidst the chaos of life. With each bite, you’re not just savoring a meal; you’re creating memories with loved ones that will last forever!


    Print

    clock clock iconcutlery cutlery iconflag flag iconfolder folder iconinstagram instagram iconpinterest pinterest iconfacebook facebook iconprint print iconsquares squares iconheart heart iconheart solid heart solid icon

    Description

    Life can feel like a whirlwind sometimes, especially for busy moms and professionals. That’s why I cherish dishes like Mediterranean Baked Fish. It’s not just a meal; it’s a flavorful escape for a moment! Fresh herbs, bright tomatoes, and olives come together in harmony, making it a delightful dish that pleases even the pickiest of eaters. Whether you’re looking for a quick solution after a hectic day or a recipe to impress loved ones, this one checks all the boxes. Let’s dive into the vibrant world of Mediterranean flavors that will leave your taste buds dancing!


    • 1/3 cup olive oil
    • 4 garlic cloves, sliced
    • 6 sprigs fresh thyme
    • 1 1/2 cup baby tomatoes, whole
    • 4 haddock fillets
    • 1/4 teaspoon salt and pepper
    • 1/2 teaspoon chili flakes (optional)
    • 1 cup Mezzetta olives
    • 1/4 cup Mezzetta sliced jalapeños
    • 2 teaspoons Mezzetta capers, drained

    1. Preheat your oven to 450°F. Place your baking dish with the olive oil in the oven to heat for 6-8 minutes.
    2. While the dish is preheating, season your fish fillets with salt, pepper, and chili flakes.
    3. Once the pan is preheated, carefully remove it from the oven and add in the garlic slices, half of the thyme sprigs, baby tomatoes, and fish fillets.
    4. Scatter the Mezzetta olives around the fish and top with sliced jalapeños and capers. Lower the oven temperature to 375°F and bake for 15-18 minutes.
    5. For a beautifully charred look, broil the fish for an additional 2 minutes after baking.
    6. Once done, drizzle the flavorful olive oil from the pan over the fish fillets and garnish with the remaining thyme sprigs. Serve immediately and enjoy!

    Notes

    • Feel free to substitute haddock with any white fish of your choice.
    • Adjust the amount of chili flakes based on your heat preference.
    • This dish pairs well with a side of couscous or a fresh salad.
    • Prep Time: 15 minutes
    • Cook Time: 20 minutes
    • Category: Main Dish
    • Method: Baking
    • Cuisine: Mediterranean

    Nutrition

    • Serving Size: 1 fillet
    • Calories: 350
    • Sugar: 3g
    • Sodium: 600mg
    • Fat: 20g
    • Saturated Fat: 3g
    • Unsaturated Fat: 15g
    • Trans Fat: 0g
    • Carbohydrates: 12g
    • Fiber: 2g
    • Protein: 30g
    • Cholesterol: 80mg

    Sharing is caring!

  • Slow Cooker Garlic Butter Beef Bites & Potatoes

    Slow Cooker Garlic Butter Beef Bites & Potatoes


    Introduction to Slow Cooker Garlic Butter Beef Bites & Potatoes

    When life gets hectic, nothing beats the ease of a delicious meal prepared in a slow cooker. That’s why I’m thrilled to share my recipe for Slow Cooker Garlic Butter Beef Bites & Potatoes. Picture this: after a long day of juggling work and family, you come home to a kitchen filled with the warm, robust aroma of beef and garlic, ready to impress your loved ones. This cozy dish combines tender beef and creamy potatoes, making it the perfect comfort meal for busy nights. Let’s dive in and make mealtime delightful without the stress!

    Why You’ll Love This Slow Cooker Garlic Butter Beef Bites & Potatoes

    This recipe is a game-changer for any busy mom or professional. First off, it’s incredibly easy to prepare. Just toss everything in the slow cooker, and let it work its magic! Plus, the combination of garlic and buttery beef creates a symphony of flavors that your family will adore. Not to mention, your home will smell divine while it simmers away, making dinner truly irresistible.

    Ingredients for Slow Cooker Garlic Butter Beef Bites & Potatoes

    Gathering the right ingredients is key to creating this delightful dish. Below is a list of everything you’ll need for the Slow Cooker Garlic Butter Beef Bites & Potatoes. Each ingredient plays a role in making this meal comforting and delicious:

    • Beef Chuck Roast or Stew Meat: This cut is ideal for slow cooking, as it becomes tender and flavorful with the right cooking time. You can swap it for other beef cuts suitable for slow cooking if preferred.
    • Baby Potatoes: These little gems are perfect for the dish because they’re naturally creamy. Halve or quarter them based on their size for even cooking.
    • Unsalted Butter: Melting this butter creates a creamy base for your garlic sauce. Choosing unsalted allows you to control the saltiness of the dish.
    • Garlic: Fresh, minced garlic lends a pungent aroma and bold taste, enhancing the overall flavor of the beef.
    • Olive Oil: Just a splash of this healthy fat helps to sear the beef, locking in that delicious juiciness.
    • Dried Thyme and Rosemary: These herbs add a fragrant earthiness, balancing out the richness of the butter and beef.
    • Smoked Paprika: This spice offers a rich, smoky flavor that adds depth, brightening up the entire dish.
    • Onion Powder: A simple yet effective way to infuse sweetness and a hint of onion flavor without the chopping hassle.
    • Salt and Pepper: The classic seasoning duo enhances and brings out the flavors of the dish.
    • Beef Broth: This liquid is essential for tenderizing the meat and adding moisture while it cooks.
    • Fresh Parsley: Used as a garnish, it adds a pop of color and a touch of freshness to finish off your lovely meal.

    For exact measurements, be sure to check the bottom of the article where you can find everything conveniently available for printing. Happy cooking!

    How to Make Slow Cooker Garlic Butter Beef Bites & Potatoes

    Making the Slow Cooker Garlic Butter Beef Bites & Potatoes is straightforward and enjoyable. Each step is designed to be simple and rewarding, helping to cater to your busy lifestyle while still impressing your loved ones. Let’s get started!

    Sear the Beef (Optional)

    Searing the beef bites is an optional step, but let me tell you, it works wonders in boosting the flavor.

    Start by heating olive oil in a skillet over medium-high heat. Once hot, add the beef pieces. Allow them to brown for about 2 to 3 minutes on each side. Don’t rush this step! The beautiful sear creates a rich crust, sealing in those lovely juices. Once done, transfer the beef to your slow cooker.

    Prepare the Garlic Butter Sauce

    Now it’s time to whip up that delicious garlic butter sauce. In a small bowl, combine melted butter with minced garlic.

    Next, sprinkle in dried thyme, rosemary, smoked paprika, onion powder, salt, and pepper. The mix of these ingredients is heavenly! Each one plays an important role, from the fragrant herbs to the smoky notes of paprika. Stir gently until everything is well blended. This sauce will elevate every bite.

    Layer the Ingredients in the Slow Cooker

    Grab your prepared slow cooker. Start by placing the halved baby potatoes at the bottom. These lovely little spuds will soak up all that garlic butter goodness!

    Drizzle half of your garlic butter sauce over the potatoes. This will infuse them with flavor as they cook. Make sure they’re evenly coated for the best results.

    Add the Beef Bites and Broth

    Next, it’s time to add those juicy beef bites on top of the potatoes. Make sure to distribute them evenly.

    Pour the remaining garlic butter sauce over the beef, ensuring everything is well covered. Now, it’s time to add the beef broth. This step is crucial, as it keeps everything moist and flavorful while cooking. Pour it evenly over the dish.

    Cook

    Now comes the best part—cooking! Cover your slow cooker and set it on low for 6 to 8 hours or high for 3 to 4 hours. Trust me, the longer you let it cook on low, the more tender and flavorful the beef will be.

    When it’s nearly done, you’ll know the dish is ready when the beef is fork-tender and the potatoes are cooked through. The aroma filling your kitchen will make your stomach rumble!

    Garnish and Serve

    Once your Slow Cooker Garlic Butter Beef Bites & Potatoes are done, gently stir everything together in the pot. This will coat both the beef and potatoes in that irresistible sauce.

    Before serving, sprinkle fresh parsley on top for that lovely pop of color. It’s the perfect way to finish off this comforting dish. Serve it warm and watch it vanish from the table!

    Tips for Success

    • Beef quality matters! Choose a cut with good marbling for better flavor.
    • Don’t skip the searing step—it adds a fantastic depth of flavor.
    • Adjust seasonings to your taste; everyone’s palate is different!
    • If you like thicker sauce, mix in cornstarch towards the end of cooking.
    • Enjoy leftovers! They taste even better the next day.

    Equipment Needed

    • Slow Cooker: Essential for this recipe—any size will do!
    • Skillet: Use any frying pan for searing the beef; a non-stick one is great.
    • Cutting Board: Perfect for chopping your veggies and meat.
    • Knife: A sharp chef’s knife makes cutting effortless.
    • Measuring Cups and Spoons: Handy for accurate ingredient measurement.

    Variations

    • Vegetable Add-Ins: Toss in some carrots or bell peppers for added color and nutrients.
    • Spicy Kick: Add a pinch of red pepper flakes for a spicy version that livens up the dish.
    • Herbed Garlic Butter: Experiment with fresh herbs like thyme or basil instead of dried for a flavor boost.
    • Beef Alternatives: Swap the beef for chicken or pork for a different protein experience.
    • Gluten-Free Adaptation: Ensure all ingredients, like broth, are labeled gluten-free for a safe meal.

    Serving Suggestions for Slow Cooker Garlic Butter Beef Bites & Potatoes

    • Side Salad: A fresh garden salad pairs perfectly to balance the richness of the beef.
    • Crusty Bread: Serve with crusty bread to soak up that delicious garlic butter sauce.
    • Red Wine: A glass of robust red wine complements the flavors beautifully.
    • Presentation: Garnish with extra parsley and serve in individual bowls for a cozy feel.

    FAQs about Slow Cooker Garlic Butter Beef Bites & Potatoes

    As you embark on your culinary adventure with Slow Cooker Garlic Butter Beef Bites & Potatoes, you might have some questions. Here are a few common ones that I often hear:

    Can I use frozen beef for this recipe?

    Absolutely! If you’re pressed for time, frozen beef works just fine. Just be sure to allow a bit more cooking time to ensure it becomes tender.

    How can I store leftovers?

    Store any leftovers in an airtight container in the fridge for up to 3 days. Reheat gently in the microwave or on the stove until warmed through.

    Can I double the recipe?

    For sure! Just make sure your slow cooker is large enough to accommodate everything. Doubling the ingredients is a fantastic way to have meals ready for busy days ahead.

    Is there a way to make this dish spicier?

    You bet! Add a pinch of red pepper flakes when you’re mixing in the garlic butter sauce, or serve with hot sauce on the side. Everyone loves a little kick!

    What can I serve with Slow Cooker Garlic Butter Beef Bites & Potatoes?

    Pair it with a refreshing salad or crusty bread to soak up the sauce. It complements the dish perfectly and makes for a hearty meal!

    Final Thoughts

    There’s something truly special about coming home to a warm bowl of Slow Cooker Garlic Butter Beef Bites & Potatoes after a long day. The aroma wraps around you like a comforting hug, inviting you to gather with family and friends. This recipe not only fills your stomach but also warms your heart, making every bite a cherished memory. Whether it’s a weekday dinner or a weekend feast, this dish is a reminder that delicious meals don’t have to be complicated. I hope it brings you as much joy as it has brought to my family! Happy cooking!


    Print

    clock clock iconcutlery cutlery iconflag flag iconfolder folder iconinstagram instagram iconpinterest pinterest iconfacebook facebook iconprint print iconsquares squares iconheart heart iconheart solid heart solid icon

    Description

    When life gets hectic, nothing beats the ease of a delicious meal prepared in a slow cooker. That’s why I’m thrilled to share my recipe for Slow Cooker Garlic Butter Beef Bites & Potatoes. Picture this: after a long day of juggling work and family, you come home to a kitchen filled with the warm, robust aroma of beef and garlic, ready to impress your loved ones. This cozy dish combines tender beef and creamy potatoes, making it the perfect comfort meal for busy nights. Let’s dive in and make mealtime delightful without the stress!


    • 1.5 lbs beef chuck roast or stew meat, cut into 1-inch pieces
    • 1 lb baby potatoes, halved (or quartered if large)
    • 4 tbsp unsalted butter, melted
    • 4 garlic cloves, minced
    • 1 tbsp olive oil
    • 1 tsp dried thyme
    • 1 tsp dried rosemary
    • 1 tsp smoked paprika
    • 1/2 tsp onion powder
    • Salt and pepper, to taste
    • 1/4 cup beef broth
    • 2 tbsp fresh parsley, chopped (for garnish)

    1. Sear the Beef (Optional): Heat olive oil in a skillet over medium-high heat. Sear the beef bites until browned on all sides, about 2–3 minutes per side. Transfer to the slow cooker.
    2. Prepare the Garlic Butter Sauce: In a small bowl, mix melted butter, minced garlic, thyme, rosemary, smoked paprika, onion powder, salt, and pepper.
    3. Layer the Ingredients in the Slow Cooker: Place the halved baby potatoes in the bottom of the slow cooker. Drizzle with half of the garlic butter sauce.
    4. Add the seared beef bites on top of the potatoes and drizzle with the remaining garlic butter sauce. Pour the beef broth over everything.
    5. Cook: Cover and cook on low for 6–8 hours or on high for 3–4 hours, until the beef is tender and the potatoes are cooked through.
    6. Garnish and Serve: Stir gently to coat the potatoes and beef in the sauce. Sprinkle with chopped fresh parsley before serving. Serve warm.

    Notes

    • Beef chuck roast can be substituted with other cuts of beef suitable for slow cooking.
    • For a thicker sauce, you can mix in a cornstarch slurry towards the end of the cooking time.
    • Prep Time: 15 minutes
    • Cook Time: 6–8 hours on low or 3–4 hours on high
    • Category: Dinner
    • Method: Slow Cooker
    • Cuisine: American

    Nutrition

    • Serving Size: 1 serving
    • Calories: 400
    • Sugar: 1g
    • Sodium: 600mg
    • Fat: 20g
    • Saturated Fat: 10g
    • Unsaturated Fat: 8g
    • Trans Fat: 0g
    • Carbohydrates: 30g
    • Fiber: 4g
    • Protein: 25g
    • Cholesterol: 80mg

    Sharing is caring!

  • Taco Soup

    Taco Soup


    Introduction to Taco Soup

    Hey there, fellow kitchen enthusiasts! If you’re anything like me, life can get pretty hectic. Balancing work, family, and everything in between often leaves little time for cooking. That’s where this delightful Taco Soup comes in! It’s a cozy, hearty dish that harmonizes lean ground beef with vibrant veggies and spices, making it perfect for a quick solution on busy weekdays. With just a few ingredients and minimal effort, you’ll have a comforting meal that’s sure to impress your loved ones. Let’s dive into a recipe that’s not just easy but also downright delicious!

    Why You’ll Love This Taco Soup

    This Taco Soup is a game changer for busy moms and professionals alike! It’s quick to prepare and packed with flavor, making dinner a breeze. The beauty of this dish lies in its versatility; you can easily adjust spices and toppings to please even the pickiest eaters. Plus, it’s a hearty meal that warms the soul without breaking the bank, proving that delicious can also be simple!

    Ingredients for Taco Soup

    Let’s gather the essentials for our tasty Taco Soup! Here’s what you’ll need:

    • Lean ground beef – The hearty foundation of our soup, offering protein for a satisfying meal. Feel free to swap it for turkey or plant-based protein if you prefer.
    • Small onion – Chopped to add a touch of sweetness and depth to the dish. Yellow onions work best, but white onions can do the trick too!
    • Garlic cloves – Minced to unleash a fragrant richness; garlic truly makes everything better. You can also use garlic powder in a pinch.
    • Beef or chicken broth – This acts as the flavorful liquid base. Homemade is great, but store-bought options are perfect for busy days.
    • Canned corn – Drained for a sweet crunch that complements the spices. If you have fresh corn, go for it; just remember to cook it first!
    • Black beans – Rinsed and drained to add heartiness and fiber. You can substitute them with pinto or kidney beans if you like.
    • Chili beans in chili sauce – These add bold flavor and a kick to your soup. If you’re not a fan of heat, you could skip these.
    • Crushed tomatoes – They’re the comforting base of our soup. Use diced tomatoes if you prefer some texture.
    • Chopped green chiles – These bring a little heat; use mild for less spice or spicy options for a fiery punch!
    • Chili powder – This is a must-have spice for that classic Mexican taste. Adjust the amount to suit your heat preference.
    • Cumin – A warm spice that adds depth and a slight earthiness. It’s the magic ingredient in many Mexican dishes!
    • Dried oregano – For an aromatic touch, enhancing the overall flavor profile. Just a pinch goes a long way.
    • Onion powder and garlic powder – Extra layers of flavor that are convenient and quick to use.
    • Salt, pepper, and cayenne pepper – Season to taste and spice it up if you’re feeling adventurous.

    For those interested in nutritional adaptations or personal preferences, feel free to mix and match! The exact quantities for each ingredient can be found at the bottom of the article for easy printing.

    How to Make Taco Soup

    Step 1: Browning the Meat

    Let’s start with the first step to delicious Taco Soup: browning the ground beef and onions. In a large Dutch oven or pot, heat a splash of oil over medium heat. Once hot, add the lean ground beef and diced onions. Stir occasionally, breaking up the meat with a wooden spoon. Brown the beef until it’s no longer pink and the onions become translucent, about 5-7 minutes. This step is important as it develops rich flavors that will infuse your soup.

    Don’t rush this part! The flavors deepen with that lovely caramelization. If you want to reduce some fat, you can drain excess grease before adding the next ingredients. Once you’ve achieved that beautiful browned goodness, it’s time to move on.

    Step 2: Adding Flavorful Ingredients

    Now that the meat and onions are perfectly cooked, let’s elevate those flavors. Add minced garlic and stir for about 2 minutes until aromatic. The smell of garlic can instantly transport you to a cozy taco joint, can’t it? Now, it’s time to introduce the star ingredients—canned corn, black beans, chili beans, crushed tomatoes, and chopped green chiles. Each component adds its unique flair.

    Don’t forget the spices! Toss in chili powder, cumin, dried oregano, onion powder, and garlic powder. These spices are essential for achieving that classic, bold Taco Soup flavor. Stir everything well to ensure the spices envelop the meat and veggies, and prepare your taste buds for a sensational meal!

    Step 3: Simmering Your Soup

    With the ingredients combined, it’s time for the magic to happen. Cover the pot and reduce the heat to low, allowing your Taco Soup to simmer for about 15 minutes. This gentle simmering blends all those fantastic flavors and creates a lovely consistency. If you enjoy a thicker soup, you can simmer longer, just make sure to stir occasionally. The smell wafting through your kitchen will make it hard to resist!

    As you wait, it’s a great moment to sneak a taste and adjust your spices. Don’t be shy—if you want more heat, add a pinch of cayenne or extra chili powder. Give it a good stir and watch your kitchen transform into a taco paradise.

    Step 4: Slow Cooking Method

    If you prefer a hands-free approach, the slow cooker is your best friend. Begin with raw ground beef in the bottom of the crockpot, breaking it into smaller chunks. Add all your other ingredients—yes, all of them! Stir well to combine everything. The beauty of this method is that you can set it and forget it.

    Cover the slow cooker with the lid and set it on high for 4-6 hours or low for 8-10 hours. During this time, flavor development continues, and you can focus on your day. When the cooking time is up, the soup will be warm, inviting, and ready to serve with your favorite toppings!

    Tips for Success

    • Prep your ingredients in advance to save time. Having everything ready makes cooking smoother.
    • Don’t hesitate to customize spices to match your family’s taste. A little extra chili powder can go a long way!
    • For extra depth, consider adding a splash of lime juice before serving. It brightens the flavors beautifully.
    • Feel free to double the recipe for leftovers; Taco Soup tastes even better the next day!

    Equipment Needed

    • Large Dutch oven or pot – A slow cooker works too if you choose that method.
    • Wooden spoon – Perfect for stirring and breaking up the meat; a spatula will do in a pinch.
    • Cutting board and knife – Essential for chopping your onion and garlic.
    • Can opener – Don’t forget this handy tool for opening those canned ingredients!

    Variations

    • For a vegetarian Taco Soup, swap the ground beef for lentils or textured vegetable protein. Both options will soak up the fabulous flavors while keeping it hearty!
    • Add more vegetables for a nutrient boost. Chopped bell peppers, zucchini, or even spinach can add color and flavor to your soup.
    • Experiment with different beans! Consider using chickpeas or pinto beans for a unique twist.
    • To make it spicier, include sliced jalapeños or add a dash of hot sauce during cooking. Your taste buds will thank you!
    • For a creamy version, stir in a splash of heavy cream or coconut milk just before serving. It creates a deliciously rich texture!

    Serving Suggestions

    • Serve your Taco Soup with warm, crusty bread or tortilla chips for the perfect dip.
    • A fresh garden salad adds a nice crunch and balances the flavors beautifully.
    • Top with shredded cheese, sliced avocado, or dollops of sour cream for extra indulgence.
    • Pair with a chilled glass of lemonade or iced tea to refresh your palate!

    FAQs about Taco Soup

    Can I make Taco Soup vegetarian?

    Absolutely! Making Taco Soup vegetarian is easy and just as delicious! Instead of using lean ground beef, try replacing it with lentils or textured vegetable protein. Both options soak up all the fantastic flavors of spices and vegetables, keeping the soup hearty. You can also add more beans, like kidney or cannellini, for added protein. Don’t forget to season with the same spices! The trick is to maintain that bold taco flavor that makes this soup so irresistible!

    What are the best toppings for Taco Soup?

    The right toppings can elevate your Taco Soup to another level! I love adding shredded cheese, like cheddar or Monterey Jack, for that rich, melty goodness. A dollop of sour cream or Greek yogurt adds a creamy balance to the spices. Chopped fresh cilantro and diced avocado give it a refreshing twist, while crushed tortilla chips provide that perfect crunch. For the adventurous, sliced jalapeños or a drizzle of hot sauce can add an exciting zing!

    How long can Taco Soup be stored?

    Leftover Taco Soup tastes even better the next day! You can store it in an airtight container in the refrigerator for up to 4-5 days. When you’re ready to enjoy it again, simply reheat on the stovetop or in the microwave. If you want to keep it longer, consider freezing it! Taco Soup freezes well for up to three months. Just let it cool completely before transferring it to freezer-safe containers, and remember to label them with the date!

    Final Thoughts

    Creating this Taco Soup has been a joyful culinary adventure! With each step, I felt the warmth and comfort this dish offers, perfect for busy days or cozy family nights. The delightful blend of flavors and textures not only satisfies the belly but also nourishes the soul. It’s a dish that invites personal touches, allowing everyone to make it their own. I hope you find as much joy in cooking this Taco Soup as I do, turning moments in the kitchen into cherished memories with your loved ones. Happy cooking, friends!


    Print

    clock clock iconcutlery cutlery iconflag flag iconfolder folder iconinstagram instagram iconpinterest pinterest iconfacebook facebook iconprint print iconsquares squares iconheart heart iconheart solid heart solid icon

    Description

    Hey there, fellow kitchen enthusiasts! If you’re anything like me, life can get pretty hectic. Balancing work, family, and everything in between often leaves little time for cooking. That’s where this delightful Taco Soup comes in! It’s a cozy, hearty dish that harmonizes lean ground beef with vibrant veggies and spices, making it perfect for a quick solution on busy weekdays. With just a few ingredients and minimal effort, you’ll have a comforting meal that’s sure to impress your loved ones. Let’s dive into a recipe that’s not just easy but also downright delicious!


    • 1 pound (500g) lean ground beef
    • 1 small onion, chopped
    • 45 cloves garlic, minced
    • 4 cups (946ml) beef or chicken broth or stock
    • 1 (15 oz) (432g) corn, drained
    • 1 (15 oz) (425g) black beans, drained and rinsed
    • 1 (15 oz) (425g) chili beans in chili sauce
    • 1 (28 oz) (793g) crushed tomatoes
    • 1 (4 oz) (113g) chopped green chiles
    • 1 tablespoon chili powder
    • 2 teaspoons cumin
    • 1 teaspoon dried oregano
    • 1 teaspoon onion powder
    • 1 teaspoon garlic powder
    • Salt, pepper, and cayenne pepper to taste

    1. STOVE TOP VERSION: In a large dutch oven or pot brown the ground beef and onions until meat is no longer pink. Add the garlic and cook for 2 minutes.
    2. Add remaining ingredients. Cover with lid and simmer for 15 minutes. Serve with toppings of choice. Can also be simmered longer if desired, just stir occasionally.
    3. SLOW COOKER VERSION: Place raw ground beef in the bottom of the crockpot and break up into small chunks (or if you prefer you can brown it). Add in all other ingredients except toppings and stir together.
    4. Cover with lid and cook on high for 4-6 hours or low for 8-10 hours. Serve with desired toppings.

    Notes

    • Feel free to adjust the spices according to your taste preference.
    • This soup can be topped with cheese, sour cream, or avocado.
    • For a vegetarian version, substitute ground beef with lentils or textured vegetable protein.
    • Prep Time: 15 minutes
    • Cook Time: 15-10 hours (depending on method)
    • Category: Soup
    • Method: Stove top or Slow cooker
    • Cuisine: Mexican

    Nutrition

    • Serving Size: 1 cup
    • Calories: 240
    • Sugar: 3g
    • Sodium: 800mg
    • Fat: 10g
    • Saturated Fat: 4g
    • Unsaturated Fat: 6g
    • Trans Fat: 0g
    • Carbohydrates: 30g
    • Fiber: 8g
    • Protein: 20g
    • Cholesterol: 60mg

    Sharing is caring!

  • Braised Strawberries Soup

    Braised Strawberries Soup


    Introduction to Braised Strawberries Soup

    As a passionate home cook, I’m always on the lookout for delightful recipes that surprise and please both my family and friends.

    Braised strawberries soup is a vibrant, unique dish that transforms fresh strawberries into something extraordinary.

    Whether you’re racing against the clock on a busy weekday or looking to impress at a weekend gathering, this soup is a quick solution that never disappoints.

    Rich in flavor and simplicity, it’s a sweet yet savory treat perfect for any occasion. Trust me, once you try it, you’ll be wondering why you never made it before!

    Why You’ll Love This Braised Strawberries Soup

    This braised strawberries soup is not just a dish; it’s a delightful experience wrapped in a bowl.

    It’s incredibly easy to prepare, taking just 30 minutes from start to finish, so you won’t feel overwhelmed.

    The unique blend of sweet strawberries and savory spices will captivate your taste buds, making it an instant favorite.

    Plus, it’s vegan, refreshing, and perfect for any time of year!

    Ingredients for Braised Strawberries Soup

    Let’s dive into the delightful ingredients that make this braised strawberries soup so special. Each component plays a crucial role in creating that perfect balance of flavor and texture. Here’s what you’ll need:

    • Fresh strawberries: The star of this dish! Look for luscious, sweet strawberries that are firm and fragrant. They’ll contribute the soup’s primary flavor.
    • Honey: This natural sweetener enhances the strawberries’ sweetness. You could swap it out for agave syrup or maple syrup for a vegan touch.
    • Vegetable broth: Adds a savory depth to the soup. If you’re low on time, store-bought broth works perfectly. Homemade broth takes it up a notch!
    • Balsamic vinegar: This unique ingredient provides a tangy twist, balancing the sweetness of strawberries beautifully. If you don’t have it, red wine vinegar can be a good substitute, though the flavor will differ slightly.
    • Ground cinnamon: A dash of cinnamon warms up the flavor profile. It’s aromatic and pairs perfectly with the strawberries. You can also experiment with nutmeg for a different spice kick!
    • Salt: Just a pinch to elevate the taste. It enhances all the flavors, so don’t skip it! Adjust according to your taste preferences.
    • Fresh mint leaves: For garnishing, mint adds a refreshing note. You can use basil too for a different flavor dimension!

    You’ll find the exact measurements for these ingredients at the bottom of the article, ready for you to print and take into your kitchen. This combination is going to knock your socks off with its simplicity and depth!

    How to Make Braised Strawberries Soup

    Now that we have our ingredients ready, let’s jump into how to make this delightful braised strawberries soup.

    I’ll walk you through each step, so you’ll feel like a pro in no time!

    Step 1: Prepare the Strawberries

    Start by washing your fresh strawberries under cool water.

    Remove the green tops and hull the strawberries, then slice them in halves or quarters.

    This makes them easier to cook down and blend later.

    I love watching those bright red berries glisten; it’s like nature’s candy right in my kitchen!

    Step 2: Combine Ingredients

    In a saucepan, combine the prepared strawberries, honey, vegetable broth, balsamic vinegar, ground cinnamon, and salt.

    Mix these ingredients together gently but thoroughly; we want all those flavors to get acquainted!

    Pro tip: Taste your mixture before simmering. You can always add a little more honey if you prefer it sweeter.

    Step 3: Simmer the Mixture

    Bring the mixture to a gentle simmer over medium heat.

    Once it’s bubbling, reduce the heat to low.

    Let it simmer away for 15-20 minutes until the strawberries soften and begin to break down.

    Your kitchen will smell absolutely heavenly during this step!

    Step 4: Blend Until Smooth

    Once the strawberries are tender, it’s time to blend!

    Use an immersion blender directly in the saucepan for a smooth texture.

    If you’re using a regular blender, be careful—blend in batches and allow the steam to escape!

    What you want is a luscious, silky soup that’s a feast for both the eyes and the taste buds.

    Step 5: Serve and Garnish

    To serve, pour your braised strawberries soup into bowls.

    Garnish with fresh mint leaves for a pop of color and that refreshing zing!

    You can enjoy this soup warm or chilled, depending on your mood.

    Whether it’s a cozy indoor lunch or a summer refreshment, you’re going to impress everyone with this vibrant dish!

    Tips for Success

    • Always choose ripe strawberries for the best flavor; they should smell sweet and look bright.
    • Adjust the sweetness of your braised strawberries soup by adding more honey before simmering.
    • Experiment with spices—don’t hesitate to try a pinch of nutmeg or a splash of citrus for a twist!
    • Serve the soup chilled on hot days for a refreshing treat.
    • Mix leftovers into yogurt or oatmeal for a delightful breakfast!

    Equipment Needed

    • saucepan: A medium-sized pot is ideal for simmering the soup. A Dutch oven can also work well.
    • Blender: An immersion blender is great for a smooth texture. A regular blender is fine, just blend in batches.
    • Cutting board and knife: For hulling and slicing strawberries with ease.
    • Measuring cups: To get your honey and broth quantities just right.

    Variations of Braised Strawberries Soup

    • Berry Medley: Mix in other berries like blueberries or raspberries for an exciting twist on the flavor profile.
    • Spicy Kick: Add a pinch of cayenne pepper or a slice of fresh ginger for an unexpected warmth that pairs wonderfully with strawberries.
    • Coconut Cream: Stir in a swirl of coconut cream before serving for a tropical flair and creamy texture.
    • Herbal Infusion: Try infusing the soup with basil or thyme while it simmers for a unique herbal undertone.
    • Nutty Essence: Serve with crushed pistachios or almonds on top for a delightful crunch and added nutrition.

    Serving Suggestions for Braised Strawberries Soup

    • Pair with Crusty Bread: A slice of warm, crusty baguette complements the soup beautifully.
    • Refreshing Beverage: Serve it with a glass of iced tea or sparkling water for a light touch.
    • Garnish with Edible Flowers: Fancy it up with edible flowers for a stunning presentation.
    • Accompany with Cheese: A side of creamy goat cheese will add richness that balances the soup’s sweetness.

    FAQs about Braised Strawberries Soup

    Curious minds often have questions when it comes to new recipes! Here are some frequently asked questions about braised strawberries soup that may help ease your culinary adventure.

    Can I make braised strawberries soup ahead of time?

    Absolutely! You can prepare the soup a day in advance.

    After cooking, let it cool and store it in an airtight container in the fridge.

    When you’re ready to serve, just reheat it gently on the stovetop.

    This makes it a perfect option for meal prep during busy weeks!

    How long does the soup last in the refrigerator?

    This soup stays good for about 3-4 days in the fridge.

    Just make sure to store it in a sealed container.

    If you want to enjoy it longer, you can freeze it for up to 3 months.

    Just remember to label your container!

    Can I use frozen strawberries instead?

    Yes, frozen strawberries can work in a pinch!

    Just defrost them and drain any excess liquid before using.

    The soup might be a tad less vibrant, but it will still be delicious.

    Perfect for those who want to whip up strawberry soup even when fresh fruit isn’t available!

    What can I serve alongside the braised strawberries soup?

    This soup pairs nicely with a simple salad or a slice of crusty bread.

    You can even serve it as a starter before a light main course.

    The combination of flavors will truly elevate any meal!

    Is this soup suitable for picky eaters?

    Yes! The bright color and sweet flavor of braised strawberries soup can appeal to various palates, making it great for kids and adults alike.

    Especially if you adjust the sweetness to their liking, they might just surprise you by asking for seconds!

    Enjoy creating some memorable family moments with this unique dish.

    Final Thoughts

    Making braised strawberries soup has been a delightful journey in my kitchen, and it’s a standout recipe I genuinely cherish.

    The blend of sweet strawberries with a hint of balsamic and spices is like a comforting hug in a bowl.

    Whether it’s a quick weeknight dinner or a fancier meal with friends, this soup brings joy and surprise to every table.

    I hope it brings a touch of magic to your culinary adventures too!

    Let your creativity shine as you experience the simple pleasure of working with fresh ingredients, and don’t forget to savor each delicious spoonful!


    Print

    clock clock iconcutlery cutlery iconflag flag iconfolder folder iconinstagram instagram iconpinterest pinterest iconfacebook facebook iconprint print iconsquares squares iconheart heart iconheart solid heart solid icon

    Description

    As a passionate home cook, I’m always on the lookout for delightful recipes that surprise and please both my family and friends.


    • 16 oz fresh strawberries
    • 1/4 cup honey
    • 1/2 cup vegetable broth
    • 1 tsp balsamic vinegar
    • 1/4 tsp ground cinnamon
    • 1/8 tsp salt
    • Fresh mint leaves for garnish

    1. Wash and hull the strawberries, then slice them in halves or quarters.
    2. In a saucepan, combine the strawberries, honey, vegetable broth, balsamic vinegar, cinnamon, and salt.
    3. Bring the mixture to a simmer over medium heat, then reduce heat and let it gently simmer for 15-20 minutes until the strawberries are softened.
    4. Using an immersion blender or regular blender, puree the soup until smooth.
    5. Serve hot or cold, garnished with fresh mint leaves.

    Notes

    • Adjust the sweetness by adding more honey if desired.
    • This soup can be served either warm or chilled for a refreshing treat.
    • Prep Time: 10 minutes
    • Cook Time: 20 minutes
    • Category: Soup
    • Method: Stovetop
    • Cuisine: American

    Nutrition

    • Serving Size: 1 cup
    • Calories: 120
    • Sugar: 22g
    • Sodium: 150mg
    • Fat: 0g
    • Saturated Fat: 0g
    • Unsaturated Fat: 0g
    • Trans Fat: 0g
    • Carbohydrates: 31g
    • Fiber: 2g
    • Protein: 1g
    • Cholesterol: 0mg

    Sharing is caring!

  • Crock Pot Creamy Chicken Parmesan Soup

    Crock Pot Creamy Chicken Parmesan Soup


    Introduction to Crock Pot Creamy Chicken Parmesan Soup

    As a home cook, I know all too well the whirlwind of a busy day. Between school pick-ups, work deadlines, and household demands, it can feel impossible to whip up a delicious dinner. That’s exactly why I fell in love with this Crock Pot Creamy Chicken Parmesan Soup. It’s comforting, creamy, and full of flavor, making it the perfect solution when time is tight. Just imagine coming home to a warm bowl of this hearty soup, ready to impress your family with minimal effort. Trust me, this recipe is a game-changer for busy moms and professionals alike!

    Why You’ll Love This Crock Pot Creamy Chicken Parmesan Soup

    This Crock Pot Creamy Chicken Parmesan Soup is your culinary superhero. It’s incredibly easy to throw together, allowing you to focus on your day’s chaos while it cooks away.

    The rich, savory flavors meld beautifully over time, creating a dish that’s not only delicious but also truly satisfying. Plus, it’s customizable! Say goodbye to mealtime stress, and hello to a comforting, flavorful bowl of joy!

    Ingredients for Crock Pot Creamy Chicken Parmesan Soup

    Gathering the right ingredients is half the battle when it comes to cooking. For this delightful Crock Pot Creamy Chicken Parmesan Soup, you’ll need the following:

    • Boneless, skinless chicken breasts: The backbone of the soup, providing lean protein and tenderness.
    • Chicken broth: A flavorful base that adds moisture and depth; feel free to use low-sodium for a healthier option.
    • Diced tomatoes: These add a pop of acidity and color; canned varieties work beautifully.
    • Onion: Brings a savory sweetness to the dish—onion lovers rejoice!
    • Garlic: Because garlic makes everything better; it adds aromatic goodness.
    • Dried basil: This herb infuses the soup with an Italian flair, making each spoonful feel special.
    • Dried oregano: Another classic Italian herb, perfect for balancing flavors.
    • Crushed red pepper flakes: A pinch gives it a delightful kick; adjust based on your heat preference.
    • Salt and pepper: Essential seasonings to round out the flavor; don’t forget to taste as you go.
    • Heavy cream: Adds that luxurious creaminess that makes you feel cozy inside.
    • Grated Parmesan cheese: A rich, cheesy finish that elevates the entire dish.
    • Pasta: I love using penne or rotini, but you can pick your favorite; it makes the soup heartier.
    • Fresh basil or parsley (optional): A sprinkle on top for a pop of color and freshness; it’s a great touch!

    If you’re interested in adjusting the recipe, feel free to add more veggies like spinach or carrots for extra nutrition. For a lighter version, consider substituting half-and-half for the heavy cream. The ingredient list with exact quantities is available at the bottom for easy printing!

    How to Make Crock Pot Creamy Chicken Parmesan Soup

    Step 1: Prepare the Base

    Let’s start this culinary adventure by placing our chicken breasts in the crock pot.

    Add in the chicken broth for moisture, and then pour in those diced tomatoes. Dice your small onion and toss it in along with minced garlic for a hearty base.

    Sprinkle in dried basil, oregano, and crushed red pepper flakes for that Italian touch. Finish with salt and pepper to season—your kitchen will be filled with amazing aromas!

    Step 2: Cook

    Now comes the best part! Cover your crock pot and set it to cook on low for 6 to 8 hours.

    If you’re short on time, the high setting for 3 to 4 hours works too.

    The goal here is to make sure the chicken is fully cooked and tender—this makes shredding it a breeze!

    Step 3: Shred the Chicken

    Once the chicken is cooked, carefully remove it from the crock pot.

    Using two forks, shred the chicken until it’s in bite-sized pieces.

    This step is satisfying and makes a delightful texture in our soup!

    Step 4: Add Cream and Pasta

    Return to your crock pot and stir in the heavy cream and grated Parmesan cheese.

    Add your choice of pasta right in there and cover again! Let it cook for an additional 15 to 20 minutes until the pasta is tender.

    The creaminess starts to bloom, making this soup even more irresistible!

    Step 5: Combine and Serve

    Finally, return the shredded chicken to the pot and stir everything together.

    Take a moment to taste and adjust salt and pepper if necessary.

    Before serving, garnish each bowl with fresh basil or parsley for that extra pop of color and flavor—it’s the cherry on top!

    Tips for Success

    • Prep your ingredients the night before to save time in the morning.
    • Always taste as you go to adjust flavors to your liking.
    • For less mess, use slow cooker liners for easy clean-up.
    • Add fresh greens like spinach during the last 30 minutes of cooking for a nutrient boost.
    • Store leftovers in airtight containers for up to 3 days—perfect for quick lunches!

    Equipment Needed

    • Crock Pot: A must-have for this recipe; any slow cooker will do.
    • Cutting Board: Essential for prepping veggies and chicken.
    • Sharp Knife: Helps with dicing and shredding easily.
    • Tongs: Great for shredding chicken without using your hands.
    • Measuring Cups: Useful for precise ingredient amounts if needed.

    Variations

    • Vegetable Additions: Toss in extra veggies like spinach, carrots, or zucchini for a nutrient boost and extra color.
    • Herb Swaps: Experiment with fresh herbs like thyme or rosemary for a unique twist on flavor.
    • Cheese Alternatives: Swap Parmesan for other cheeses like Asiago or Pecorino for different taste profiles.
    • Pasta Choices: Try whole wheat or gluten-free pasta to accommodate dietary preferences.
    • Spice Level: Increase the crushed red pepper flakes for a spicier version or omit them for a milder taste.

    Serving Suggestions

    • Crusty Bread: Serve with warmed garlic bread or a baguette for a delightful dipping option.
    • Salad: Pair with a fresh Caesar or mixed green salad to add some crunch.
    • Wine: A glass of white wine complements the creamy flavors perfectly.
    • Presentation: Serve in colorful bowls and garnish with basil for an inviting look!

    FAQs about Crock Pot Creamy Chicken Parmesan Soup

    Can I use frozen chicken for this recipe?

    Absolutely! Frozen chicken breasts are a great option. Just make sure to extend the cooking time by an hour or so to ensure they are fully cooked. This Crock Pot Creamy Chicken Parmesan Soup will still turn out delicious!

    Can I add more vegetables to the soup?

    Yes! I love adding veggies like spinach, carrots, or bell peppers. They not only add nutrition but also bring vibrant colors to your dish. Just toss them in during the last hour of cooking.

    How do I store leftovers?

    Store any leftover soup in an airtight container in the fridge for up to three days. It heats up beautifully in the microwave, making for a quick lunch.

    Can I make this soup gluten-free?

    Definitely! Just swap regular pasta for gluten-free pasta. Adjust the cooking time as needed, and your Crock Pot Creamy Chicken Parmesan Soup will be friendly for anyone with gluten sensitivities!

    What can I serve with this soup?

    This comforting soup pairs well with crusty bread, a light salad, or even some roasted veggies. It’s versatile enough to fit any meal situation!

    Final Thoughts

    Making this Crock Pot Creamy Chicken Parmesan Soup feels like wrapping yourself in a warm, cozy blanket after a long day. The delightful blend of flavors comes together effortlessly, transforming simple ingredients into a soul-soothing dish that warms the heart. I cherish the moments spent sharing this soup with my family, watching them savor each spoonful with smiles of delight. It’s moments like these that remind us of life’s simple joys. So, whether you’re racing against the clock or enjoying a peaceful evening, this soup is your culinary companion, ready to bring comfort and satisfaction to your table!


    Print

    clock clock iconcutlery cutlery iconflag flag iconfolder folder iconinstagram instagram iconpinterest pinterest iconfacebook facebook iconprint print iconsquares squares iconheart heart iconheart solid heart solid icon

    Description

    As a home cook, I know all too well the whirlwind of a busy day. Between school pick-ups, work deadlines, and household demands, it can feel impossible to whip up a delicious dinner. That’s exactly why I fell in love with this Crock Pot Creamy Chicken Parmesan Soup. It’s comforting, creamy, and full of flavor, making it the perfect solution when time is tight. Just imagine coming home to a warm bowl of this hearty soup, ready to impress your family with minimal effort. Trust me, this recipe is a game-changer for busy moms and professionals alike!


    • 1.5 lbs boneless, skinless chicken breasts
    • 4 cups chicken broth
    • 1 can (14.5 oz) diced tomatoes
    • 1 small onion, diced
    • 3 cloves garlic, minced
    • 1 teaspoon dried basil
    • 1 teaspoon dried oregano
    • 1/2 teaspoon crushed red pepper flakes
    • Salt and pepper to taste
    • 1 cup heavy cream
    • 1 cup grated Parmesan cheese
    • 8 oz pasta (penne, rotini, or your choice)
    • Fresh basil or parsley for garnish (optional)

    1. Place the chicken breasts, chicken broth, diced tomatoes, onion, garlic, dried basil, oregano, crushed red pepper flakes, salt, and pepper into your crock pot.
    2. Cover and cook on low for 6-8 hours or on high for 3-4 hours, until the chicken is fully cooked and tender.
    3. Remove the chicken from the crock pot and shred it using two forks.
    4. Stir in the heavy cream and Parmesan cheese. Add the pasta to the crock pot and let it cook for an additional 15-20 minutes, or until the pasta is tender.
    5. Return the shredded chicken to the crock pot, stir everything together, and season with additional salt and pepper if needed.
    6. Garnish with fresh basil or parsley before serving.

    Notes

    • This recipe can be adjusted by adding more vegetables such as spinach or carrots.
    • To make it lighter, you can substitute half-and-half for the heavy cream.
    • Ensure the pasta is cooked al dente to prevent it from becoming mushy.
    • Prep Time: 15 minutes
    • Cook Time: 6-8 hours
    • Category: Soup
    • Method: Crock Pot
    • Cuisine: Italian

    Nutrition

    • Serving Size: 1 bowl
    • Calories: 450
    • Sugar: 3g
    • Sodium: 850mg
    • Fat: 25g
    • Saturated Fat: 15g
    • Unsaturated Fat: 6g
    • Trans Fat: 0g
    • Carbohydrates: 39g
    • Fiber: 2g
    • Protein: 25g
    • Cholesterol: 120mg

    Sharing is caring!

  • Turkey Sweet Potato Skillet

    Turkey Sweet Potato Skillet


    Introduction to Turkey Sweet Potato Skillet

    As a busy mom, I know that finding time to whip up a delicious meal can feel like a juggling act. That’s where my Turkey Sweet Potato Skillet comes in! This dish is not just quick, but it’s also packed with flavor and nutrition. Imagine a weeknight dinner that makes everyone gather around the table, eager to taste each bite. It’s an easy solution for a chaotic day, and trust me, your loved ones will be singing your praises. Let’s dive into this simple and satisfying recipe that promises to brighten your weekday evenings!

    Why You’ll Love This Turkey Sweet Potato Skillet

    This Turkey Sweet Potato Skillet is a dream for anyone juggling family life and demanding schedules. It’s a one-pan wonder that comes together in just 35 minutes—perfect for those weeknights when time slips away! The blend of savory ground turkey and sweet, tender potatoes creates a delightful harmony of flavors that satisfy even picky eaters. Plus, it’s nutritious, making every bite a guilt-free delight.

    Ingredients for Turkey Sweet Potato Skillet

    The best part about my Turkey Sweet Potato Skillet is how simple the ingredients are. You’ll find that most, if not all, of them are probably already in your pantry or fridge. Here’s what you need to bring this dish to life:

    • Ground turkey: Lean and delicious, it’s low in fat and packed with protein. A fantastic alternative to beef!
    • Sweet potatoes: These vibrant tubers add a hint of sweetness and pairs perfectly with savory flavors. Plus, they’re full of vitamins!
    • Olive oil: A healthy fat that enhances the flavors and helps to sauté the vegetables beautifully.
    • Onion: This aromatic veggie adds a layer of sweetness and depth to the dish. It’s the base of many great meals!
    • Garlic: My secret weapon in the kitchen! It adds zing and brings everything together in a fragrant embrace.
    • Bell pepper: A pop of color and crunch! Choose any color for sweetness, from red to green.
    • Smoked paprika: This spice offers a warm, smoky flavor that elevates the dish. A little goes a long way!
    • Cumin: Earthy and aromatic, it adds a delightful twist that complements the sweet potatoes.
    • Salt and pepper: The essentials! Seasoning brings out the natural flavors of the ingredients.
    • Spinach: Fresh and nutrient-packed, it wilts beautifully, adding color and health benefits to your meal.
    • Fresh parsley: A final flourish for garnish, it brightens everything up and makes your dish look stunning!

    Feel free to customize any of these ingredients! For instance, if you have leftover vegetables, toss them in for added flavor and nutrition. You’ll find the exact measurements in the printable recipe at the bottom of the article.

    How to Make Turkey Sweet Potato Skillet

    Now, it’s time to bring the magic of the Turkey Sweet Potato Skillet to life! Each step is simple, making this a fantastic recipe for busy weeknights. Gather your ingredients and let’s get cooking!

    Step 1: Sauté Onions and Garlic

    Start by heating a tablespoon of olive oil in a large skillet over medium heat. Once the oil is shimmering, toss in the chopped onion and minced garlic. Sauté them for about 2-3 minutes. You want the onion to be translucent, offering a deliciously aromatic foundation for the rest of your dish. The magic begins here!

    Step 2: Cook Sweet Potatoes

    Next, add the diced sweet potatoes to the skillet. Stir them in and let them cook for around 10 minutes. This allows them to start softening and unleashes their natural sweetness. Keep an eye on them, giving them a stir occasionally. They’ll soon become tender and ready for the next flavor-packed layer!

    Step 3: Add Ground Turkey

    Now it’s time to introduce the star of the show—ground turkey! Crumble it into the skillet, breaking it apart as it cooks. This will take about 5-7 minutes. Cook until the turkey is no longer pink, and it should turn a lovely golden brown. The savory aroma will fill your kitchen, making everyone curious about dinner!

    Step 4: Season the Mixture

    With the turkey cooked, sprinkle in the smoked paprika, cumin, salt, and pepper. Stir everything really well to ensure the seasoning coats every piece. This step elevates the dish from ordinary to extraordinary. The spices complement the sweetness of the potatoes, creating a beautiful, rich flavor profile.

    Step 5: Incorporate Remaining Vegetables

    Finally, it’s time to add the vibrant bell pepper and spinach. Stir them in and let them cook for an additional 3-4 minutes. You’ll notice the spinach wilting down, adding a glorious splash of green to your skillet. Once the vegetables are tender, it’s all ready to be served. Optional: Garnish with fresh parsley for an extra pop of color!

    Tips for Success

    • Make sure to cut the sweet potatoes into evenly sized pieces for consistent cooking.
    • To save time, dice veggies while the turkey is cooking.
    • For extra flavor, try adding a splash of low-sodium chicken broth during cooking.
    • Feel free to swap ingredients based on your family’s preferences; creativity is key!
    • Don’t skip the garnish; it adds flavor and makes the dish look inviting!

    Equipment Needed

    • Large skillet: A non-stick or cast iron skillet works best for even cooking.
    • Cutting board: Essential for chopping vegetables safely and efficiently.
    • Sharp knife: A good knife makes quick work of dicing and slicing.
    • Wooden spoon: Perfect for stirring and ensuring nothing sticks.
    • Measuring spoons: Useful for precise seasoning.

    Variations on Turkey Sweet Potato Skillet

    • Protein Swap: Try using ground chicken, beef, or even tofu for a vegetarian twist. Each option adds a unique flavor!
    • Spice it Up: Add some crushed red pepper flakes or diced jalapeño for a spicy kick. It brings a whole new dimension to the dish.
    • Veggie Variety: Toss in other vegetables like zucchini, corn, or broccoli. They can add texture and enhance the nutritional profile.
    • Herb Infusion: Experiment with fresh herbs like thyme or cilantro instead of parsley to brighten the dish with fresh flavors.
    • Cheesy Delight: Stir in some shredded cheese towards the end of cooking. It adds creaminess and that irresistible cheesy goodness!

    Serving Suggestions for Turkey Sweet Potato Skillet

    • Side Salad: A fresh garden salad with a tangy vinaigrette balances the richness of the skillet.
    • Whole Grain Bread: Serve with crusty whole grain bread to soak up the flavorful juices.
    • Drink Pairing: A light white wine or sparkling water with lemon complements the dish beautifully.
    • Presentation: Serve in colorful bowls with a sprinkle of parsley for a vibrant touch!

    FAQs about Turkey Sweet Potato Skillet

    Can I make this Turkey Sweet Potato Skillet ahead of time?
    Absolutely! You can prep the vegetables and turkey in advance. Store them separately in the fridge for up to a day. When you’re ready to cook, simply toss everything into the skillet for a quick meal!

    How do I store leftovers?
    Leftover Turkey Sweet Potato Skillet can be stored in an airtight container in the refrigerator for about 3-4 days. It heats up wonderfully in the microwave, making it perfect for lunch the next day!

    Can I freeze this skillet dish?
    Yes! This dish freezes well. Just let it cool completely before transferring to an airtight container. It will keep in the freezer for up to 3 months. When you’re ready to eat, thaw overnight in the fridge before reheating.

    What can I serve with this skillet meal?
    A light side salad or some crusty whole grain bread pairs nicely with this Turkey Sweet Potato Skillet. They will elevate your meal without adding extra time to your prep!

    Is this skillet recipe healthy?
    Definitely! The Turkey Sweet Potato Skillet is packed with lean protein, fiber, and vitamins. With its wholesome ingredients, it’s a low-calorie meal that doesn’t sacrifice flavor!

    Final Thoughts

    The joy of cooking something as delightful as the Turkey Sweet Potato Skillet is a true pleasure. It’s not just about feeding your family; it’s about creating moments around the table where laughter and memories grow. This dish is a fantastic way to enjoy wholesome ingredients while simplifying your busy nights. I cherish those evenings when my family digs in, and we share stories, all thanks to this versatile skillet meal. So roll up your sleeves, embrace the flavors, and watch as this recipe becomes a cherished favorite in your household!


    Print

    clock clock iconcutlery cutlery iconflag flag iconfolder folder iconinstagram instagram iconpinterest pinterest iconfacebook facebook iconprint print iconsquares squares iconheart heart iconheart solid heart solid icon

    Description

    As a busy mom, I know that finding time to whip up a delicious meal can feel like a juggling act. That’s where my Turkey Sweet Potato Skillet comes in! This dish is not just quick, but it’s also packed with flavor and nutrition. Imagine a weeknight dinner that makes everyone gather around the table, eager to taste each bite. It’s an easy solution for a chaotic day, and trust me, your loved ones will be singing your praises. Let’s dive into this simple and satisfying recipe that promises to brighten your weekday evenings!


    • 1 pound ground turkey
    • 2 medium sweet potatoes, diced
    • 1 tablespoon olive oil
    • 1 onion, chopped
    • 2 cloves garlic, minced
    • 1 bell pepper, chopped
    • 1 teaspoon smoked paprika
    • 1 teaspoon cumin
    • Salt and pepper to taste
    • 2 cups spinach, chopped
    • Fresh parsley for garnish

    1. Heat olive oil in a skillet, then add chopped onion and minced garlic. Cook for 2-3 minutes until translucent.
    2. Add diced sweet potatoes to the skillet and cook for about 10 minutes until they start to soften.
    3. Add ground turkey to the skillet, breaking it apart as it cooks for 5-7 minutes until browned.
    4. Stir in smoked paprika, cumin, salt, and pepper.
    5. Add chopped bell pepper and spinach, and cook for an additional 3-4 minutes until the vegetables are tender. Garnish with fresh parsley before serving.

    Notes

    • This recipe can easily be customized by adding other vegetables or spices.
    • Leftovers can be stored in the refrigerator for 3-4 days.
    • Try using different types of ground meat if desired.
    • Prep Time: 10 minutes
    • Cook Time: 25 minutes
    • Category: Main Dish
    • Method: Skillet
    • Cuisine: American

    Nutrition

    • Serving Size: 1 serving
    • Calories: 350
    • Sugar: 5g
    • Sodium: 500mg
    • Fat: 15g
    • Saturated Fat: 3g
    • Unsaturated Fat: 10g
    • Trans Fat: 0g
    • Carbohydrates: 30g
    • Fiber: 6g
    • Protein: 25g
    • Cholesterol: 70mg

    Sharing is caring!

  • Street Corn Chicken Rice Bowl

    Street Corn Chicken Rice Bowl


    Introduction to Street Corn Chicken Rice Bowl

    As a busy mom, I know how challenging it can be to whip up a meal that’s both delicious and quick. That’s why I’m excited to share my Street Corn Chicken Rice Bowl recipe with you! This dish is a vibrant explosion of flavors, featuring grilled chicken, charred corn, and a zesty lime crema. It’s perfect for those hectic weeknights when you want to impress your family without spending hours in the kitchen. Trust me, this bowl will become a go-to favorite that everyone will love!

    Why You’ll Love This Street Corn Chicken Rice Bowl

    This Street Corn Chicken Rice Bowl is a lifesaver for busy days. It’s quick to prepare, taking just 25 minutes from start to finish. The combination of grilled chicken and charred corn creates a mouthwatering taste that will have your family asking for seconds. Plus, the zesty lime crema adds a refreshing twist that elevates the dish. It’s a simple yet satisfying meal that brings everyone together at the table!

    Ingredients for Street Corn Chicken Rice Bowl

    Gathering the right ingredients is key to making this Street Corn Chicken Rice Bowl a success. Here’s what you’ll need:

    • Cooked Rice: You can use white, brown, or even cilantro-lime rice for an extra flavor boost.
    • Chicken Breasts: Grilled and sliced, these provide a hearty protein base. Feel free to use rotisserie chicken for a quicker option!
    • Corn Kernels: Fresh, frozen, or canned corn works well. I love using fresh corn for that sweet crunch, but frozen is a great time-saver.
    • Black Beans: Drained and rinsed, they add fiber and protein. You can swap them for pinto beans if you prefer.
    • Diced Red Onion: This adds a nice crunch and a bit of sharpness. If red onion is too strong for your taste, try green onions instead.
    • Diced Tomatoes: Fresh tomatoes bring juiciness. Canned diced tomatoes can work in a pinch, just drain them well.
    • Cotija Cheese: This crumbly cheese adds a salty kick. Feta can be a good substitute if you can’t find cotija.
    • Fresh Cilantro: Chopped for garnish, it adds a burst of freshness. If you’re not a fan, parsley can be used instead.
    • Olive Oil: For sautéing the corn, it adds richness. You can use avocado oil if you prefer.
    • Spices: Chili powder, smoked paprika, cumin, salt, and black pepper create a flavorful seasoning blend. Adjust the spices to your taste!
    • Lime: The juice brightens the dish and is essential for the lime crema.
    • Sour Cream or Greek Yogurt: This is the base for the lime crema. Greek yogurt is a healthier option with a similar tang.
    • Garlic Powder: It adds depth to the crema. Fresh garlic can be used if you prefer a stronger flavor.

    For exact measurements, check the bottom of the article where you can find everything listed for easy printing!

    How to Make Street Corn Chicken Rice Bowl

    Now that you have all your ingredients ready, let’s dive into making this delicious Street Corn Chicken Rice Bowl! Follow these simple steps, and you’ll have a meal that’s sure to impress.

    Step 1: Sauté the Corn

    Start by heating a skillet over medium heat. Once it’s warm, add a tablespoon of olive oil. This will help the corn get that lovely char.

    Next, toss in your corn kernels. Sauté them for about 3-4 minutes until they’re lightly charred. The smell will be heavenly!

    While the corn cooks, sprinkle in chili powder, smoked paprika, cumin, salt, and black pepper. These spices will give the corn a flavorful kick. Stir everything together and set the corn aside once it’s done.

    Step 2: Prepare the Lime Crema

    In a small bowl, mix together ½ cup of sour cream (or Greek yogurt), the juice of one lime, garlic powder, and a pinch of salt. This zesty lime crema is what takes your bowl to the next level!

    Stir until everything is well combined. Taste it and adjust the lime juice if you want more zing. Set this aside for now; it’ll be the perfect finishing touch.

    Step 3: Assemble the Bowls

    Now it’s time to build your Street Corn Chicken Rice Bowl! Start with a generous base of cooked rice. You can use white, brown, or even cilantro-lime rice for extra flavor.

    Next, layer on the grilled chicken slices. Follow that with the sautéed corn, black beans, diced tomatoes, and red onion. Each layer adds a burst of color and flavor!

    Finally, sprinkle crumbled cotija cheese on top. It adds a delightful salty touch that complements the other ingredients beautifully.

    Step 4: Drizzle and Garnish

    Now for the fun part! Drizzle your homemade lime crema generously over the assembled bowl. Don’t be shy; it’s the star of the show!

    To finish, garnish with freshly chopped cilantro. This adds a pop of color and freshness that makes the dish even more appealing. Serve immediately and enjoy every bite!

    Tips for Success

    • Prep your ingredients ahead of time to save on cooking time.
    • Use a non-stick skillet for easy cleanup and to prevent sticking.
    • Don’t skip the lime crema; it’s what ties all the flavors together!
    • Feel free to customize toppings based on your family’s preferences.
    • For meal prep, store components separately to keep everything fresh.

    Equipment Needed

    • Skillet: A non-stick skillet works best, but any frying pan will do.
    • Mixing Bowl: Use a medium bowl for the lime crema; a mason jar can work too!
    • Spatula: A sturdy spatula helps with sautéing and serving.
    • Measuring Cups: Handy for precise ingredient measurements, but eyeballing works too!

    Variations

    • Vegetarian Option: Replace the grilled chicken with grilled zucchini or portobello mushrooms for a hearty, meat-free meal.
    • Spicy Kick: Add diced jalapeños or a splash of hot sauce to the corn for an extra layer of heat.
    • Quinoa Base: Swap out rice for quinoa for a protein-packed alternative that’s gluten-free.
    • Different Cheeses: Try using feta or goat cheese instead of cotija for a different flavor profile.
    • Seasonal Veggies: Incorporate seasonal vegetables like bell peppers or avocado for added nutrition and flavor.

    Serving Suggestions

    • Side Salad: Pair your bowl with a light mixed greens salad dressed in a simple vinaigrette.
    • Refreshing Drink: Serve with a chilled glass of iced tea or a fruity agua fresca for a delightful complement.
    • Presentation: Use colorful bowls to showcase the vibrant ingredients and make the meal visually appealing.

    FAQs about Street Corn Chicken Rice Bowl

    Can I make the Street Corn Chicken Rice Bowl ahead of time?

    Absolutely! You can prepare the components in advance. Just store the rice, chicken, and toppings separately in the fridge. When you’re ready to eat, simply assemble and drizzle with the lime crema.

    What can I substitute for cotija cheese?

    If you can’t find cotija cheese, feta is a great alternative. It offers a similar crumbly texture and salty flavor that complements the dish beautifully.

    Is this recipe gluten-free?

    Yes, this Street Corn Chicken Rice Bowl is naturally gluten-free! Just ensure that any packaged ingredients, like beans or spices, are labeled gluten-free.

    Can I use frozen corn instead of fresh?

    Definitely! Frozen corn is a convenient option and works just as well. Just sauté it until heated through and slightly charred for that delicious flavor.

    How can I make this dish spicier?

    If you love heat, add diced jalapeños to the corn while sautéing or drizzle some hot sauce over the finished bowl. It’ll give your Street Corn Chicken Rice Bowl an exciting kick!

    Final Thoughts

    Creating this Street Corn Chicken Rice Bowl is more than just cooking; it’s about bringing joy to your family’s table. The vibrant colors and bold flavors make every bite a celebration. I love how this dish transforms a busy weeknight into a delightful culinary adventure. Plus, it’s so easy to customize, ensuring everyone gets their favorite toppings. Whether you’re sharing it with loved ones or enjoying it solo, this bowl is sure to warm your heart. So, roll up your sleeves and dive into this delicious recipe—you won’t regret it!


    Print

    clock clock iconcutlery cutlery iconflag flag iconfolder folder iconinstagram instagram iconpinterest pinterest iconfacebook facebook iconprint print iconsquares squares iconheart heart iconheart solid heart solid icon

    Description

    As a busy mom, I know how challenging it can be to whip up a meal that’s both delicious and quick. That’s why I’m excited to share my Street Corn Chicken Rice Bowl recipe with you! This dish is a vibrant explosion of flavors, featuring grilled chicken, charred corn, and a zesty lime crema. It’s perfect for those hectic weeknights when you want to impress your family without spending hours in the kitchen. Trust me, this bowl will become a go-to favorite that everyone will love!


    • 2 cups cooked rice (white, brown, or cilantro-lime rice)
    • 2 chicken breasts (grilled and sliced)
    • 1 cup corn kernels (fresh, frozen, or canned)
    • 1/2 cup black beans (drained and rinsed)
    • 1/4 cup diced red onion
    • 1/4 cup diced tomatoes
    • 1/4 cup crumbled cotija cheese
    • 2 tablespoons chopped fresh cilantro (for garnish)
    • 1 tablespoon olive oil
    • 1 teaspoon chili powder
    • 1/2 teaspoon smoked paprika
    • 1/2 teaspoon cumin
    • 1/4 teaspoon salt
    • 1/4 teaspoon black pepper
    • 1/2 cup sour cream (or Greek yogurt)
    • Juice of 1 lime
    • 1/2 teaspoon garlic powder
    • 1/4 teaspoon salt (for lime crema)

    1. Heat a skillet over medium heat. Add the olive oil and sauté the corn kernels for 3-4 minutes until lightly charred. Season with chili powder, smoked paprika, cumin, salt, and pepper. Set aside.
    2. In a small bowl, mix together the sour cream, lime juice, garlic powder, and salt to make the lime crema. Adjust lime juice to taste.
    3. Assemble the bowls: Start with a base of cooked rice. Layer the grilled chicken slices, charred corn, black beans, diced tomatoes, red onion, and cotija cheese on top.
    4. Drizzle the lime crema over the bowl and garnish with fresh cilantro.
    5. Serve immediately and enjoy!

    Notes

    • Feel free to customize the toppings based on your preferences.
    • This dish can be made ahead of time; just store the components separately until ready to serve.
    • For a spicier kick, add jalapeños or hot sauce.
    • Prep Time: 15 minutes
    • Cook Time: 10 minutes
    • Category: Main Course
    • Method: Skillet
    • Cuisine: Mexican

    Nutrition

    • Serving Size: 1 bowl
    • Calories: 550
    • Sugar: 3g
    • Sodium: 600mg
    • Fat: 20g
    • Saturated Fat: 6g
    • Unsaturated Fat: 10g
    • Trans Fat: 0g
    • Carbohydrates: 65g
    • Fiber: 8g
    • Protein: 30g
    • Cholesterol: 80mg

    Sharing is caring!

  • Strawberry Banana Cake Frosting

    Strawberry Banana Cake Frosting


    Introduction to Strawberry Banana Cake Frosting

    I know how valuable quick yummy solutions can be for a busy parent looking to get through those crazy days. Enter my Strawberry Banana Cake Frosting recipe! Deliciously marrying ripe bananas and fresh strawberries into a sweet moist cake, rounded off with a creamy cream cheese frosting. Long story short, it’s super easy to whip up and adds that celebratory flair to just about any day of the week. Seriously, your clan will rave over this dessert long after the last slice is history!

    Why You’ll Love This Strawberry Banana Cake Frosting

    This Strawberry Banana Cake Frosting is a game-changer for busy days. It’s easy to make, requiring minimal prep while delivering impeccable taste. The moistness of the cake pairs beautifully with the creamy frosting, creating a heavenly dessert that’s perfect for any occasion. Plus, who can resist the delightful combination of strawberries and bananas? Your loved ones will appreciate the effort, and you’ll enjoy the joyful smiles at the table!

    Ingredients for Strawberry Banana Cake Frosting

    Gathering the right ingredients is key to making this Strawberry Banana Cake Frosting a showstopper. Here’s what you’ll need:

    • Ripe mashed bananas: Make sure they are overripe for the best flavor. They bring natural sweetness and moisture.
    • Ground cinnamon: A touch of spice that adds warmth and richness to the cake.
    • Lemon juice: Brightens up the flavors and balances the sweetness of the bananas.
    • Butter: Using softened butter creates a delectable, rich texture in both the cake and frosting.
    • Sugar: Regular and brown sugar add both sweetness and a lovely caramel tone.
    • Flour: This is your base, providing structure. You can use all-purpose or white whole wheat for a healthier twist.
    • Baking soda and baking powder: Both are crucial for leavening, ensuring your cake rises perfectly!
    • Salt: A little salt enhances all the flavors beautifully.
    • Eggs: They provide binding and moisture, contributing to the cake’s fluffiness.
    • Vanilla: A must-have for depth of flavor; it pairs wonderfully with bananas and strawberries.
    • Buttermilk: It keeps the cake super moist while adding a subtle tang.
    • Fresh diced strawberries: You’ll want lots of these for sweetness and juicy bites throughout the cake.
    • Chopped pecans: Optional, but they add a delightful crunch and nutty flavor.
    • Cream cheese: This is the star of the frosting, adding a tangy richness that complements the sweetness perfectly.
    • Powdered sugar: It sweetens the frosting while giving it that smooth, spreadable texture.

    For a full list of ingredients with exact measurements, make sure to check the bottom of the article, where you can easily print the recipe!

    How to Make Strawberry Banana Cake Frosting

    Ready to dive into this delicious Strawberry Banana Cake Frosting? Let’s break it down into simple steps that make this recipe a breeze. I’ll guide you through each stage, sharing little tips along the way. You’re going to get that delightful cake ready in no time!

    Step 1: Preheat Your Oven

    First things first, preheat your oven to 325°F. Preheating is critical! It ensures the cake bakes evenly and rises beautifully, giving you that fluffy texture we all crave.

    Step 2: Prepare the Baking Dish

    Grab a 9×13 baking dish and spray it with cooking spray. This little step is essential to keep the cake from sticking. A lined dish with parchment paper can also work wonders. I always opt for this method to make cleanup a breeze!

    Step 3: Make the Banana Mixture

    In a small bowl, combine your ripe mashed bananas, ground cinnamon, and lemon juice. Mixing them together not only helps the flavors meld but also releases that warm, inviting scent of cinnamon. Set this aside while we tackle other ingredients.

    Step 4: Cream the Butter and Sugars

    In a large mixing bowl, cream together the softened butter and both sugars—regular and brown. I love using an electric mixer for this part. Creaming them until light and fluffy gives your cake that dreamy texture. It’s the foundation for moisture and sweetness.

    Step 5: Combine Dry Ingredients

    Now, let’s incorporate the dry ingredients. In the same bowl, add the flour, baking soda, baking powder, and salt. Mix them well to combine. This step avoids any unpleasant clumps of baking powder in the cake, ensuring a smooth batter.

    Step 6: Add Wet Ingredients

    Add the eggs, vanilla extract, and buttermilk into the bowl. Mix until everything is well combined and smooth. The buttermilk adds a rich tanginess that compliments the bananas beautifully, trust me!

    Step 7: Fold in Strawberry and Banana Mixture

    Now, gently fold in the banana mixture and 1 1/2 cups of diced strawberries. Folding rather than stirring keeps your batter light and airy, which is essential for that perfect cake rise. Think of it as a hug—gently bringing the flavors together!

    Step 8: Transfer to Baking Dish

    Pour the batter into your prepared baking dish. Use a spatula to spread it evenly. This helps the cake cook uniformly. A smooth surface makes for a pretty cake once it’s frosted!

    Step 9: Bake to Perfection

    Pop the dish into the oven and set your timer for 60 minutes. Check for doneness by inserting a toothpick into the center. If it comes out clean, your cake is ready! Remember, if it’s slightly sticky, give it a bit more time.

    Step 10: Cool and Frost

    Once baked, allow your cake to cool completely in the dish. For the frosting, beat together the softened butter, cream cheese, and powdered sugar until smooth and creamy. Spread this heavenly frosting over the cooled cake. Top it off with the remaining pecans and diced strawberries for a stunning finish!

    Tips for Success

    • Use overripe bananas for maximum sweetness and moisture.
    • When baking, don’t open the oven door too soon—this can cause your cake to sink.
    • Let your cake cool completely before frosting for better results.
    • For easier mixing, remember to soften butter and cream cheese in advance.
    • Experiment with different nuts or even chocolate chips for added texture!

    Equipment Needed for Strawberry Banana Cake Frosting

    • A 9×13 baking dish (or any similar-sized pan will work)
    • Mixing bowls (both large and small)
    • Electric mixer or whisk (for creaming and blending)
    • Spatula (for spreading frosting and smoothing the batter)
    • Measuring cups and spoons (trust me, they’re essential!)

    Variations on Strawberry Banana Cake Frosting

    • Chocolate Twist: Add cocoa powder to the cake batter for a delightful chocolate-strawberry banana combo!
    • Nut-Free Option: Omit pecans and substitute with sunflower seeds for a nut-free version, perfect for school snacks!
    • Vegan Delight: Swap eggs with flaxseed meal and use coconut oil instead of butter for a plant-based treat.
    • Gluten-Free Alternative: Use a gluten-free flour blend to make this recipe suitable for gluten-sensitive guests.
    • Spiced Up: Incorporate nutmeg or ginger alongside the cinnamon for an exotic spice profile.

    Serving Suggestions for Strawberry Banana Cake Frosting

    • Serve with a scoop of vanilla ice cream for a delightful contrast in temperature and texture.
    • Pair with fresh whipped cream to enhance the creaminess of the frosting.
    • Enjoy with a cup of hot tea or coffee for a cozy afternoon treat.
    • Garnish with additional fresh strawberries for a vibrant presentation.
    • Slice and arrange on a beautiful platter for an inviting party centerpiece!

    FAQs about Strawberry Banana Cake Frosting

    Can I use frozen strawberries in this recipe?

    Absolutely! Just make sure to thaw and drain them well to avoid excess moisture in your batter. Fresh strawberries do add a vibrant flavor, but frozen can work in a pinch.

    How should I store leftover cake?

    Keep any leftover Strawberry Banana Cake in an airtight container in the fridge. The flavors actually deepen after a day, making it even more delicious!

    Is this cake suitable for kids?

    Definitely! With its natural fruit flavors and creamy frosting, kids will love it. Plus, it’s a great way to sneak in some fruit!

    Can I make this cake ahead of time?

    Yes! You can bake it a day in advance. Just frost it on the day you plan to serve it for the best texture and freshness.

    What’s the best way to cut this cake?

    Use a sharp knife and wipe it clean between slices to keep the frosting looking smooth and beautiful. Cut straight down for even pieces and serve with a smile!

    Final Thoughts

    This Strawberry Banana Cake Frosting is more than just a dessert; it’s a heartfelt creation that brings joy to both the baker and those who savor it. The vibrant flavors of ripe bananas and fresh strawberries come together in a lush cake topped with creamy frosting, wrapping a hug around your taste buds. Sharing this delightful treat at family gatherings or weekday celebrations makes for cherished memories. So, gather your loved ones, slice into this cake, and watch how it lights up faces with every bite. Trust me, the smiles will be worth all the effort!


    Print

    clock clock iconcutlery cutlery iconflag flag iconfolder folder iconinstagram instagram iconpinterest pinterest iconfacebook facebook iconprint print iconsquares squares iconheart heart iconheart solid heart solid icon

    Description

    A deliciously moist cake made with ripe bananas and fresh strawberries, topped with a creamy cream cheese buttercream frosting.


    • 1 1/2 cups ripe mashed bananas
    • 2 tsp ground cinnamon
    • 1 tbsp lemon juice
    • 3/4 cup butter, softened
    • 1 cup sugar
    • 1 cup brown sugar
    • 3 cups flour
    • 1 1/4 tsp baking soda
    • 1 tsp baking powder
    • 1/2 tsp salt
    • 3 eggs
    • 2 tsp vanilla
    • 1 1/2 cups buttermilk
    • 2 1/2 cups fresh diced strawberries, divided
    • 1 cup chopped pecans
    • 1/2 cup butter, softened (for frosting)
    • 8 oz cream cheese, softened
    • 4 cups powdered sugar

    1. Preheat oven to 325°F.
    2. Spray a 9×13 baking dish with cooking spray.
    3. In a small mixing bowl, combine mashed bananas, cinnamon, and lemon juice. Set aside.
    4. In a large mixing bowl, cream butter and sugars together.
    5. Add flour, baking soda, baking powder, and salt to the creamed mixture. Beat well, scraping down the sides as needed.
    6. Add eggs and vanilla. Beat until combined. Add buttermilk and beat again.
    7. Add banana mixture and 1 1/2 cups diced strawberries. Stir until fully incorporated.
    8. Add 3/4 cup chopped pecans and stir again.
    9. Transfer the batter to the prepared baking dish.
    10. Bake for 60 minutes or until a toothpick inserted into the center comes out clean.
    11. Allow cake to cool completely before frosting.
    12. In a large mixing bowl, beat butter, cream cheese, and powdered sugar until smooth and creamy.
    13. Spread frosting over the cooled cake.
    14. Top with the remaining pecans and diced strawberries.

    Notes

    • Ensure bananas are ripe for maximum flavor.
    • For a lighter cake, consider using white whole wheat flour.
    • Store leftovers in an airtight container in the refrigerator.
    • Prep Time: 20 minutes
    • Cook Time: 60 minutes
    • Category: Dessert
    • Method: Baking
    • Cuisine: American

    Nutrition

    • Serving Size: 1 slice
    • Calories: 320
    • Sugar: 30g
    • Sodium: 210mg
    • Fat: 15g
    • Saturated Fat: 8g
    • Unsaturated Fat: 4g
    • Trans Fat: 0g
    • Carbohydrates: 42g
    • Fiber: 2g
    • Protein: 4g
    • Cholesterol: 55mg

    Sharing is caring!