Author: IHAAL Team

  • Blackberry Balsamic Grilled Chicken Salad: A Must-Try!

    Blackberry Balsamic Grilled Chicken Salad: A Must-Try!


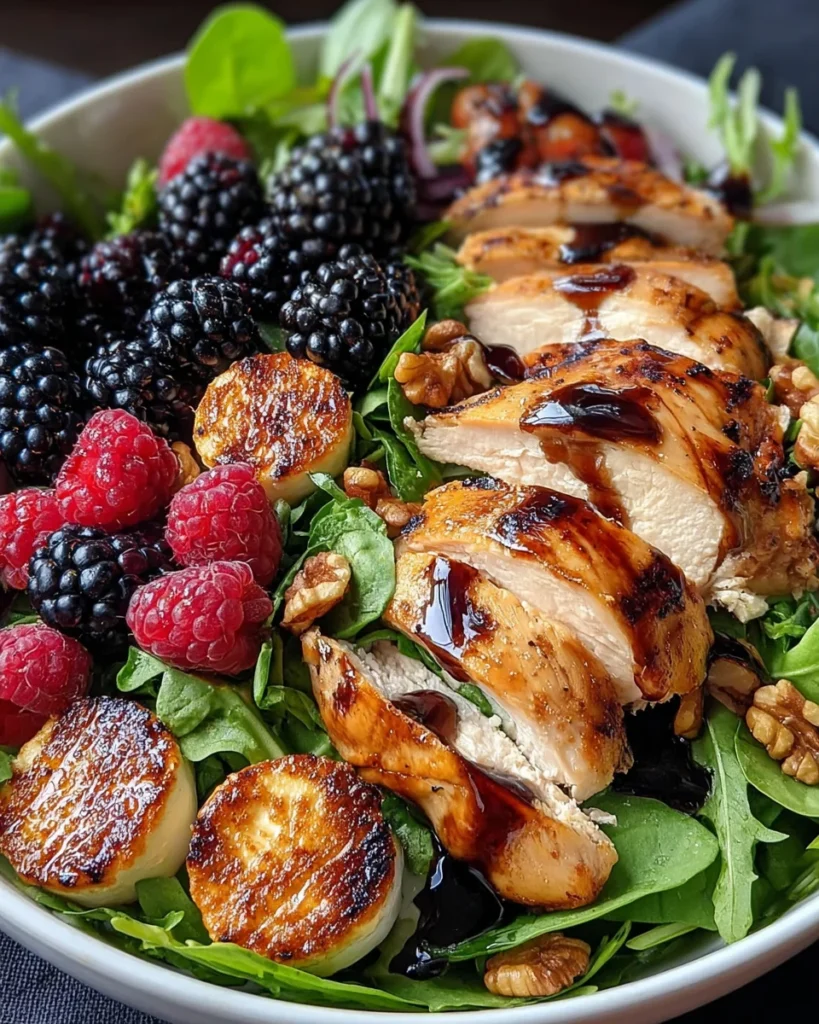
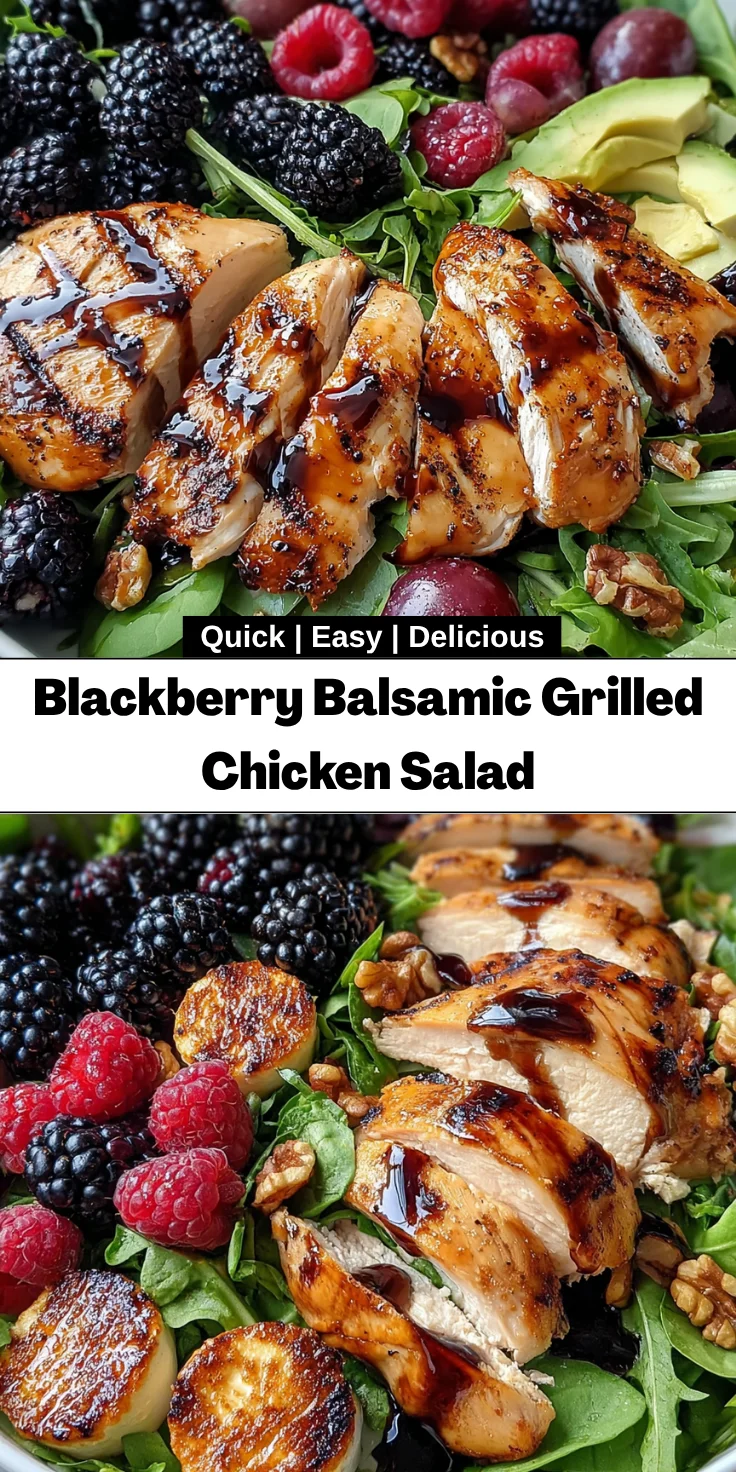
    Introduction to Blackberry Balsamic Grilled Chicken Salad

    As a busy mom, I know how hectic life can get. Sometimes, we crave a meal that’s not only quick but also bursting with flavor. That’s where this Blackberry Balsamic Grilled Chicken Salad comes in! It’s a vibrant dish that impresses both the eyes and the taste buds. With grilled chicken sitting atop a bed of lush greens, dotted with sweet blackberries and crispy goat cheese, it’s the perfect solution for a busy day. Plus, it takes just an hour to prepare – so you can enjoy a wholesome meal without stress!

    Why You’ll Love This Blackberry Balsamic Grilled Chicken Salad

    This Blackberry Balsamic Grilled Chicken Salad is a dream for busy lifestyles. It’s quick to prepare, even on those whirlwind days when time feels scarce. The combination of sweet blackberries and creamy goat cheese creates a delightful medley of flavors that your family will love. Plus, it’s a feast for the eyes, making it perfect for impressing guests. Trust me, this salad has a little something for everyone!

    Ingredients for Blackberry Balsamic Grilled Chicken Salad

    Gathering the right ingredients makes all the difference in preparing a delightful Blackberry Balsamic Grilled Chicken Salad. Here’s what you’ll need:

    • Boneless, skinless chicken breasts: These provide a lean protein source, perfect for grilling.
    • Salt and pepper: Essential for seasoning, they elevate the flavor profile of the chicken.
    • Balsamic vinegar: The star ingredient! It adds a tangy sweetness that pairs beautifully with the blackberries.
    • Olive oil: For marinating and dressing, it contributes healthy fats and a rich flavor.
    • Honey: This adds a touch of sweetness, balancing the acidity of the vinegar.
    • Minced garlic: A little garlic enhances the marinade, adding depth to the chicken.
    • Goat cheese: Creamy and tangy, it adds a luxurious touch to the dish when fried to crispy perfection.
    • All-purpose flour: For dredging the goat cheese, it ensures a great crust when frying.
    • Egg: This helps the breadcrumbs adhere to the goat cheese, creating a crispy coating.
    • Breadcrumbs: They give the goat cheese a crunchy texture – who doesn’t love a crispy bite?
    • Oil for frying: Choose a neutral oil for frying the goat cheese, like vegetable or canola oil, to ensure the flavors shine through.
    • Mixed greens: A colorful medley of greens like spinach, arugula, or spring mix adds freshness to the salad.
    • Blackberries: Juicy and sweet, they bring a delightful burst of flavor in every bite.
    • Raspberries: Their tartness complements the sweetness of the blackberries beautifully.
    • Avocado: Creamy and rich, it provides a luxurious texture and healthy fats.
    • Chopped walnuts: They introduce a crunchy element, plus a good dose of heart-healthy fats.
    • Red onion: Thinly sliced for a little kick, it adds color and boosts flavor.

    For an easy reference, all ingredients in specific quantities can be found at the bottom of the article, ready for you to print and take to the grocery store!

    How to Make Blackberry Balsamic Grilled Chicken Salad

    Making this Blackberry Balsamic Grilled Chicken Salad is an adventure in flavor! Let’s dive into the steps to create this culinary masterpiece. Follow along with me, and soon you’ll enjoy a meal that seems like it came from a fancy restaurant!

    Step 1: Prepare the Grill

    First things first, preheat your grill to medium-high heat. This ensures that the chicken gets those beautiful grill marks while cooking evenly. Always make sure your grill grates are clean and oiled to prevent sticking. Remember, safety is key; use long tongs to turn the chicken and a meat thermometer for checking doneness!

    Step 2: Marinate the Chicken

    Season the chicken breasts generously with salt and pepper. Now, let’s make that magical marinade! In a bowl, whisk together balsamic vinegar, olive oil, honey, and minced garlic. This combination not only enhances flavor but also tenderizes the chicken. Let the chicken marinate for at least 30 minutes. If you have more time, feel free to let it soak in the flavors for up to two hours. Trust me, the wait is worth it!

    Step 3: Prepare Goat Cheese

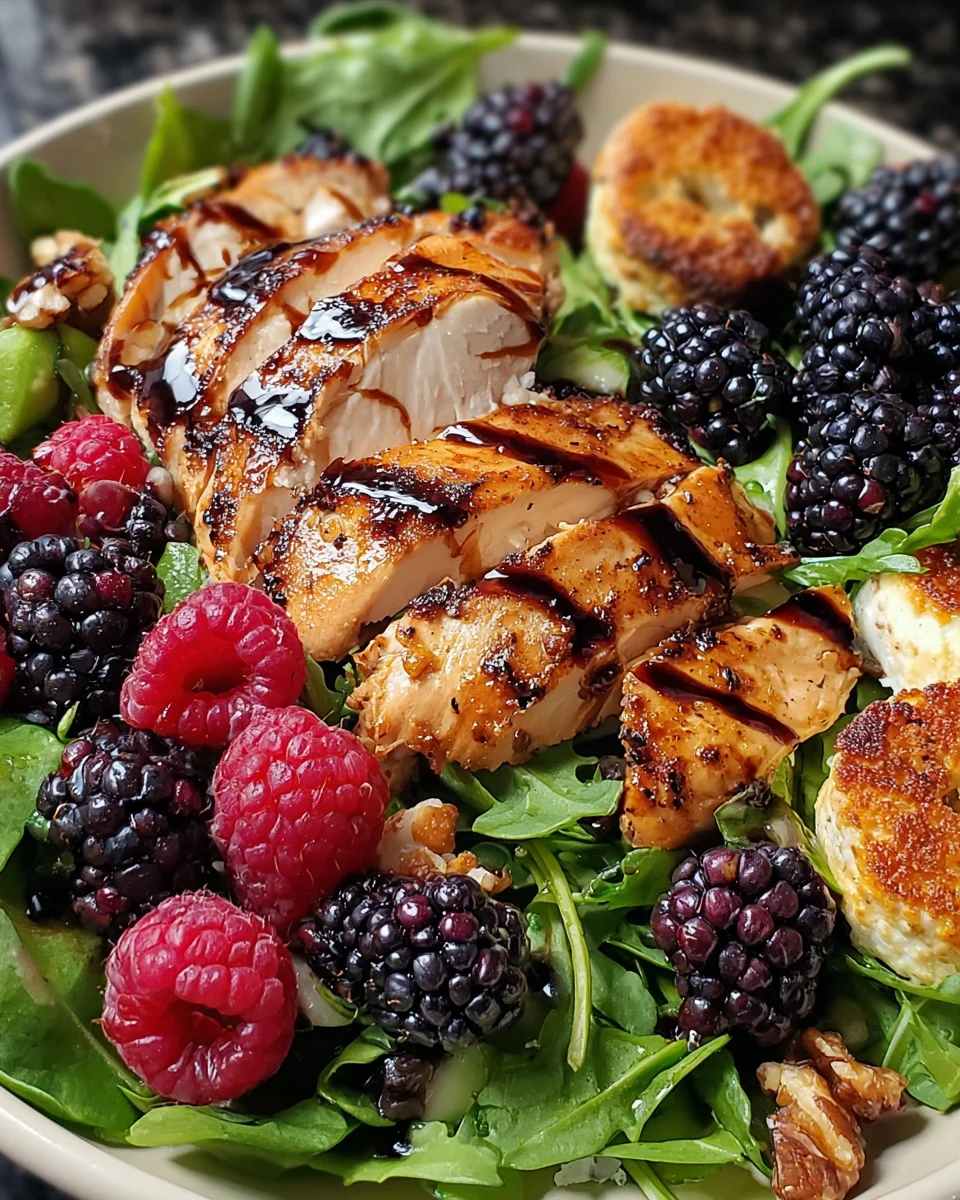
    While the chicken is marinating, let’s get that heavenly goat cheese ready. Set up three shallow bowls: one with flour, one with a beaten egg, and another with breadcrumbs. Dredge each slice of chilled goat cheese in flour, dip it into the egg, and then coat it with breadcrumbs. Fry the coated cheese slices in heated oil until they’re golden and crispy. The chill helps prevent the cheese from falling apart, so don’t rush this step!

    Step 4: Grill the Chicken

    Now, it’s time to grill! Place the marinated chicken breasts on the grill. Cook them for about 6-8 minutes on each side. To ensure they’re perfectly done, use an instant-read thermometer; the internal temperature should reach 165°F. Once cooked, remove the chicken and let it rest for a few minutes before slicing it thinly. Resting helps retain juices, making each bite tender and juicy!

    Step 5: Make Balsamic Vinaigrette

    Now, let’s whip up a delightful balsamic vinaigrette to punch up this salad. In a small bowl, whisk together balsamic vinegar, olive oil, honey, salt, and pepper. This dressing is crucial! A good vinaigrette ties all the flavors together and elevates the entire dish. So pour with confidence!

    Step 6: Assemble the Salad

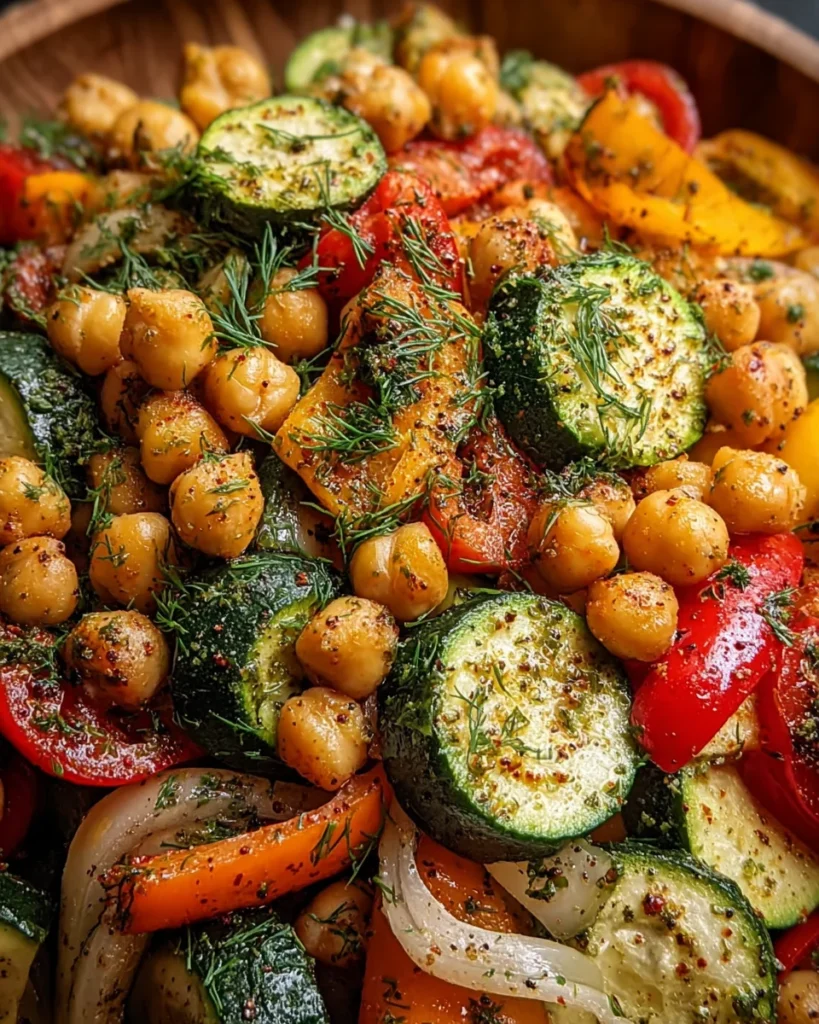
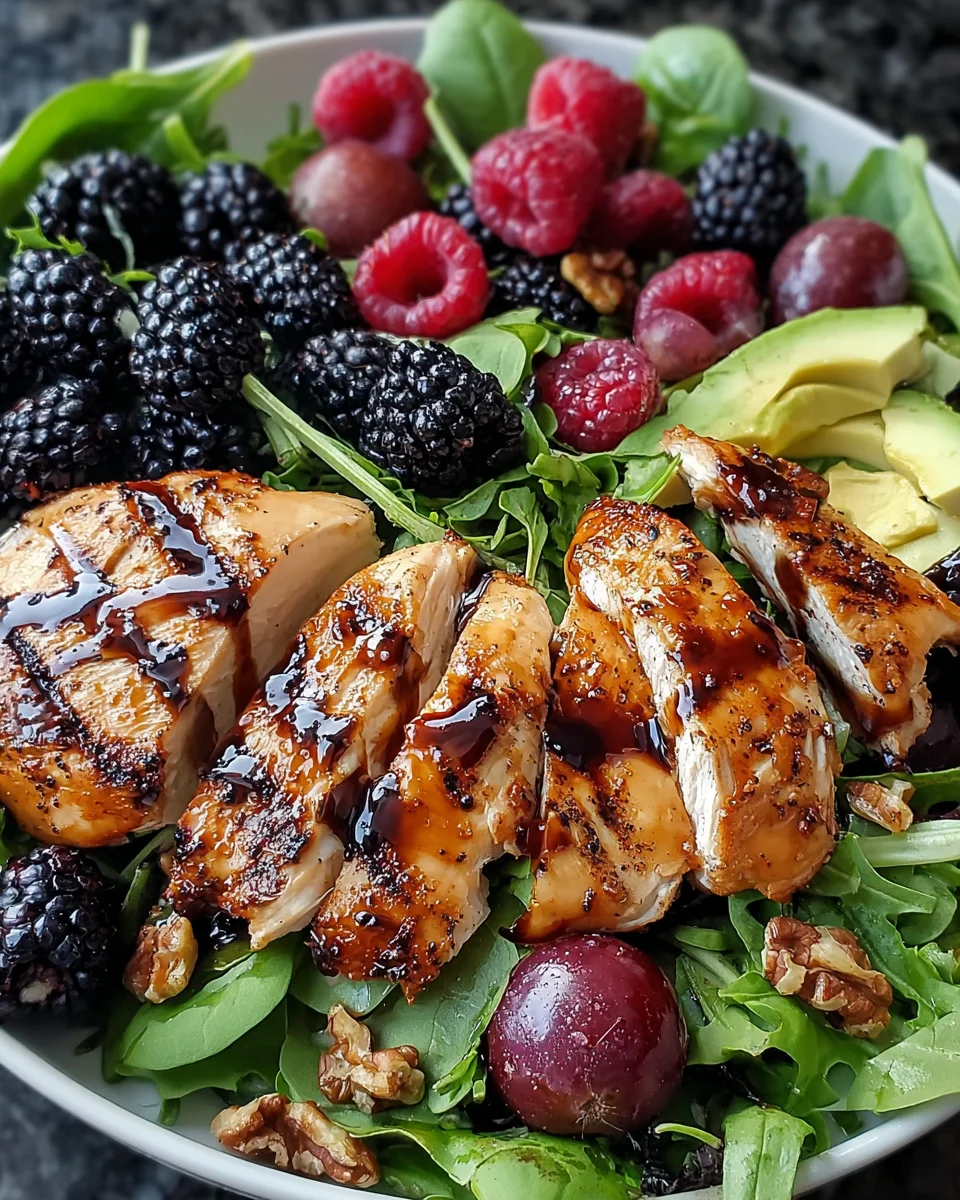
    In a large salad bowl, combine a colorful array of mixed greens, blackberries, raspberries, sliced avocado, chopped walnuts, and thinly sliced red onion. Layering is essential for presentation. Feel free to toss a bit before drizzling the vinaigrette. Just a gentle toss will ensure everything is well-coated and looks inviting!

    Step 7: Serve and Enjoy

    To serve, divide the salad onto plates, ensuring everyone gets a generous helping. Top each portion with sliced grilled chicken and garnish with those crispy fried goat cheese rounds. For a stunning finish, you might want to sprinkle a few extra blackberries on top. They add such a lovely pop of color!

    Tips for Success

    • Always marinate your chicken longer if time allows; it deepens the flavor.
    • Ensure your goat cheese is chilled before slicing—this prevents it from melting too quickly.
    • Use a meat thermometer for perfectly grilled chicken; 165°F is the magic number!
    • Feel free to customize the salad by adding your favorite fruits or nuts.
    • Whisk the vinaigrette just before serving for an extra fresh flavor.

    Equipment Needed for Blackberry Balsamic Grilled Chicken Salad

    • Grill: A gas or charcoal grill works perfectly, but an indoor grill pan can be a great alternative.
    • Skillet: Use a non-stick skillet for frying the goat cheese. You can also use a cast-iron skillet for even heating.
    • Meat thermometer: This ensures your chicken is cooked perfectly; if you don’t have one, a sharp knife can help check for doneness.
    • Mixing bowls: For preparing marinade and vinaigrette; any size will do!
    • Salad bowl: A large bowl for mixing your salad ingredients and showcasing your colorful creation.

    Variations of Blackberry Balsamic Grilled Chicken Salad

    • For a vegan version, substitute grilled tofu or chickpeas for chicken. Toss in some roasted sweet potatoes for added heartiness.
    • To make a keto-friendly variation, replace the honey with a low-carb sweetener and omit the fruits or use smaller amounts of berries.
    • If you prefer a Mediterranean twist, add grilled eggplant and a sprinkle of feta cheese, along with fresh herbs like basil or mint.
    • For a spicy kick, toss in some sliced jalapeños or drizzle with spicy ranch dressing instead of vinaigrette.
    • Try adding quinoa or farro to the salad base for an added dose of fiber and protein, making it even more filling.

    Serving Suggestions for Blackberry Balsamic Grilled Chicken Salad

    • Pair this salad with warm, crusty bread or a light baguette for a delightful contrast.
    • A chilled glass of white wine, like Sauvignon Blanc, complements the flavors beautifully.
    • For added color, serve the salad on a vibrant plate and sprinkle fresh herbs on top.
    • Consider including a side of crispy sweet potato fries for a satisfying crunch.
    • Don’t forget to garnish with extra blackberries for a stunning presentation!


    FAQs about Blackberry Balsamic Grilled Chicken Salad

    Here are some common questions readers often have about the Blackberry Balsamic Grilled Chicken Salad, along with my answers to help guide you in your cooking adventure.

    Can I make this salad ahead of time?

    Yes, you can! Prepare the chicken and vinaigrette in advance, but it’s best to add the greens and fruits right before serving. This keeps everything fresh and vibrant!

    What can I substitute for goat cheese?

    If goat cheese isn’t your favorite, try feta, blue cheese, or even a creamy avocado as a delicious alternative. Each option offers a unique taste that can still elevate your salad.

    How can I make this salad gluten-free?

    To keep the Blackberry Balsamic Grilled Chicken Salad gluten-free, use gluten-free breadcrumbs when coating the goat cheese. This small change ensures that everyone can enjoy it!

    Is this salad suitable for meal prep?

    Absolutely! It’s perfect for meal prep. Just keep the components separate until you’re ready to eat. That way, the greens stay crisp, and the chicken retains its juiciness.

    What dressing alternatives can I try?

    If you’re looking to mix things up, a honey mustard dressing or a citrus vinaigrette would be delightful options. Remember, a great dressing can truly enhance the flavors of your salad!

    Final Thoughts

    Creating this Blackberry Balsamic Grilled Chicken Salad is much more than just preparing a meal; it’s about crafting a moment to share with family and friends. The delightful combination of grilled chicken, vibrant berries, and crispy goat cheese creates an explosion of flavors that spark joy with every bite. As you gather around the table, you’ll appreciate how this dish transforms ordinary days into special occasions. I hope you find as much joy in making it as I do. Let this salad become a staple in your kitchen, bringing warmth and happiness to your dining experiences!


    Print

    clock clock iconcutlery cutlery iconflag flag iconfolder folder iconinstagram instagram iconpinterest pinterest iconfacebook facebook iconprint print iconsquares squares iconheart heart iconheart solid heart solid icon

    Description

    A delicious and fresh salad featuring grilled chicken, crisp greens, topped with blackberries, fried goat cheese, and drizzled with a homemade balsamic vinaigrette.


    • 2 boneless, skinless chicken breasts
    • Salt and pepper, to taste
    • 2 tablespoons balsamic vinegar
    • 2 tablespoons olive oil
    • 1 teaspoon honey
    • 1 teaspoon minced garlic
    • 4 oz goat cheese, chilled and sliced into rounds
    • 1/2 cup all-purpose flour
    • 1 egg, beaten
    • 1 cup breadcrumbs
    • Oil for frying
    • 6 cups mixed greens (such as spinach, arugula, and/or spring mix)
    • 1 cup blackberries
    • 1 cup raspberries
    • 1 ripe avocado, sliced
    • 1/2 cup chopped walnuts
    • 1/4 red onion, thinly sliced
    • 1/4 cup balsamic vinegar
    • 1/4 cup olive oil
    • 1 tablespoon honey
    • Salt and pepper, to taste

    1. Preheat your grill to medium-high heat.
    2. Season the chicken breasts with salt and pepper. In a small bowl, whisk together balsamic vinegar, olive oil, honey, and minced garlic. Pour the marinade over the chicken breasts and let them marinate for at least 30 minutes.
    3. Set up three shallow bowls: one with flour, one with beaten egg, and one with breadcrumbs. Dredge each slice of goat cheese in flour, then dip it in the beaten egg, and finally coat it with breadcrumbs. Heat oil in a skillet over medium heat and fry the coated goat cheese slices until golden brown and crispy on both sides. Remove from the skillet and set aside on paper towels to drain excess oil.
    4. Grill the marinated chicken breasts for 6-8 minutes on each side, or until they are cooked through and have grill marks. Remove from the grill and let them rest for a few minutes before slicing them thinly.
    5. Whisk together balsamic vinegar, olive oil, honey, salt, and pepper in a small bowl to make the vinaigrette.
    6. In a large salad bowl, combine mixed greens, blackberries, raspberries, sliced avocado, chopped walnuts, and thinly sliced red onion.
    7. Drizzle the balsamic vinaigrette over the salad and toss until everything is evenly coated.
    8. Divide the salad onto serving plates, top each portion with sliced grilled chicken, and garnish with crispy fried goat cheese rounds.

    Notes

    • Make sure the goat cheese is chilled before slicing to prevent it from falling apart.
    • To add more flavor, marinate the chicken for up to 2 hours.
    • You can use other berries or nuts based on your preference.
    • Prep Time: 40 minutes
    • Cook Time: 20 minutes
    • Category: Salad
    • Method: Grilling and frying
    • Cuisine: American

    Nutrition

    • Serving Size: 1 serving
    • Calories: 450
    • Sugar: 10g
    • Sodium: 600mg
    • Fat: 30g
    • Saturated Fat: 10g
    • Unsaturated Fat: 15g
    • Trans Fat: 0g
    • Carbohydrates: 30g
    • Fiber: 8g
    • Protein: 25g
    • Cholesterol: 85mg

    Sharing is caring!

  • One Pot Chicken Parmesan Mac: A Creamy Delight Awaits!

    One Pot Chicken Parmesan Mac: A Creamy Delight Awaits!


    Introduction to One Pot Chicken Parmesan Mac

    As a busy mom, finding time to whip up a delightful dinner can feel like a juggling act. That’s where my favorite dish, One Pot Chicken Parmesan Mac, comes to the rescue! This creamy pasta dish combines tender chicken and cheesy goodness all in one pot. It’s perfect for those evenings when you want something quick yet impressive enough for family or friends. Trust me, this dish will earn you a standing ovation at the dinner table while saving you precious time on cleanup!

    Why You’ll Love This One Pot Chicken Parmesan Mac

    Embrace the joy of a meal that marries convenience with comfort! One Pot Chicken Parmesan Mac is not just easy to prepare; it’s also a time-saver for those rushed evenings. The balance of creamy sauce, tender chicken, and rich cheeses brings a taste that delights the whole family. Plus, with just one pot to clean, you can savor quality time together without the hassle of kitchen chaos. What’s not to love?

    Ingredients for One Pot Chicken Parmesan Mac

    Gathering the right ingredients is key to making a scrumptious One Pot Chicken Parmesan Mac. Here’s what you’ll need:

    • Boneless, skinless chicken breasts: I prefer these for their tenderness and quicker cooking time. Diced into bite-sized pieces, they cook quickly and soak up all that delicious sauce.
    • Elbow macaroni: The classic choice! They hold the creamy sauce perfectly. You can also swap for whole-grain or gluten-free pasta if you prefer.
    • Olive oil: A staple in my kitchen for cooking the chicken. Its rich flavor adds a lovely depth to the dish.
    • Marinara sauce: Choose your favorite jarred brand or make your own if you have the time! It forms the base of the sauce that coats everything in flavor.
    • Chicken broth: This enhances the flavors and adds moisture. I use low-sodium chicken broth as it gives me more control over the salt levels.
    • Heavy cream: The key to the dish’s creaminess! If you’re looking for a lighter version, you can substitute it with half-and-half or a lower-fat alternative.
    • Shredded mozzarella cheese: Melty and gooey goodness! Feel free to mix in some provolone or fontina for a unique twist.
    • Grated Parmesan cheese: This adds that salty, nutty flavor that enhances the overall richness.
    • Garlic powder: A quick and easy way to infuse garlic flavor without the fuss. A must-have in my spice collection!
    • Italian seasoning: A blend of herbs that brings a taste of the Mediterranean, making every bite delightful.
    • Salt and black pepper: Essential seasonings to elevate the dish. Adjust them to your liking.

    All the exact quantities for these ingredients are available at the bottom of the article, perfect for printing and bringing into your kitchen. Enjoy the convenience and the glorious flavors that await you in this one-pot wonder!

    How to Make One Pot Chicken Parmesan Mac

    Making One Pot Chicken Parmesan Mac is easier than you think! With just a few steps, you’ll have a comforting meal that’s bursting with flavor. Let’s get cooking!

    Step 1: Cook the Chicken

    Start by heating olive oil in a large pot over medium heat.

    Once it’s hot, toss in the diced chicken breast.

    Season with salt, black pepper, and garlic powder.

    Cook, stirring occasionally, for about 5 to 7 minutes until the chicken turns golden brown and is fully cooked.

    Once done, remove the chicken from the pot and set it aside.

    This step is crucial because that little bit of browning adds incredible flavor to your dish!

    Step 2: Prepare the Sauce

    Now, in the same pot, it’s time to combine the star ingredients.

    Pour in the marinara sauce, chicken broth, and heavy cream.

    Stir well to incorporate and scrape up any browned bits resting at the bottom.

    Those bits are flavor gold!

    Bring it to a gentle simmer, and let the magic begin.

    Step 3: Cook the Pasta

    Next, add the elbow macaroni to the simmering sauce.

    Stir the pasta into the sauce and bring it back to a simmer.

    Cook uncovered for about 8 to 10 minutes.

    Stir occasionally until the pasta is tender, and the sauce thickens.

    You might find yourself tempted to sneak a taste — just do it!

    It’s too good to resist!

    Step 4: Melt the Cheese

    Once the pasta is beautifully tender, reduce the heat to medium-low.

    Stir in the shredded mozzarella and grated Parmesan cheese.

    Keep stirring until the cheese is melted and the sauce is wonderfully creamy.

    Finally, return the cooked chicken to the pot.

    Add the Italian seasoning and stir again until everything is blended perfectly.

    Step 5: Let it Rest

    Remove the pot from heat and let your One Pot Chicken Parmesan Mac rest for about 2 to 3 minutes.

    This will help it thicken up even more.

    Serve it warm, and if you’re feeling a bit fancy, garnish with additional Parmesan or fresh herbs.

    Trust me, this dish tastes even better when shared with loved ones!

    Tips for Success

    • Prep all your ingredients before starting to save time and streamline the cooking process.
    • Use a high-quality marinara sauce for the best flavor, or make your own if you’re feeling adventurous.
    • Don’t skip scraping the browned bits—those bits pack a punch of flavor!
    • Adjust seasoning gradually; it’s easier to add than to fix over-seasoned dishes.
    • For extra creaminess, consider mixing in some cream cheese at the end.

    Equipment Needed for One Pot Chicken Parmesan Mac

    • Large pot or Dutch oven: A sturdy pot is essential for even cooking. A deep skillet can also work if it has high sides.
    • Wooden spoon or spatula: Perfect for stirring and scraping the bottom without scratching your pot.
    • Measuring cups: For those precise ingredient quantities.
    • Knife and cutting board: Essential for dicing the chicken and prepping your ingredients.

    Variations on One Pot Chicken Parmesan Mac

    • Vegetarian Version: Swap out the chicken for diced zucchini or mushrooms. You can add more veggies like spinach or bell peppers for a colorful twist.
    • Spicy Kick: Add a pinch of red pepper flakes to the sauce for an extra kick. It’s a great way to jazz things up!
    • Different Cheeses: If mozzarella isn’t your favorite, try substituting with gouda or pepper jack cheese. Each brings its own unique flavor profile.
    • Whole Wheat or Gluten-Free Pasta: Substitute the elbow macaroni with whole wheat or gluten-free options. It keeps the comfort while accommodating dietary preferences.
    • Buffalo Chicken Option: Use shredded rotisserie chicken mixed with buffalo sauce instead of regular chicken for a tangy, spicy version everyone will love!

    Serving Suggestions for One Pot Chicken Parmesan Mac

    • Fresh Side Salad: Pair your dish with a crisp garden salad topped with a light vinaigrette for balance.
    • Garlic Bread: Serve warm garlic bread on the side for an irresistible carb combo.
    • Wine Pairing: A chilled white wine, like Pinot Grigio, complements the creaminess beautifully.
    • Garnish: Sprinkle extra Parmesan and fresh parsley for a pop of color and flavor.

    FAQs about One Pot Chicken Parmesan Mac

    Wondering how to make the most out of this One Pot Chicken Parmesan Mac? Well, let’s tackle some common questions to ensure your cooking experience is nothing short of fabulous!

    Can I prepare One Pot Chicken Parmesan Mac in advance?

    Absolutely! You can prepare it a day ahead. Just reheat it on the stovetop, adding a splash of chicken broth or cream to help loosen the sauce.

    What can I use instead of chicken broth?

    If you don’t have chicken broth, vegetable broth works just as well. You can even use water in a pinch, but it might lack some flavor.

    Is it okay to freeze leftovers?

    Yes! Freeze any leftovers in an airtight container. Just remember to thaw it overnight in the fridge before reheating. It’s a great way to enjoy a quick meal later!

    Can I make this dish vegetarian?

    Definitely! Substitute chicken with your favorite veggies, like zucchini or mushrooms, and use vegetable broth. Everyone can enjoy this creamy delight!

    How can I spice up One Pot Chicken Parmesan Mac?

    For a fun twist, add red pepper flakes for heat, or experiment with other spices like smoked paprika. This dish is versatile, and the options are endless!

    Final Thoughts

    One Pot Chicken Parmesan Mac isn’t just a meal; it’s a warm hug on a plate!

    The creamy texture and cheesy goodness bring comfort after a long day.

    I love how simple it is to make and how it brings my family together at the dinner table.

    The sounds of laughter and the delight on their faces make all the effort worth it.

    Plus, who can resist that incredible aroma wafting through the kitchen?

    This dish promises not only satisfaction but also wonderful memories.

    So, grab your pot and let the magic happen — deliciousness awaits!


    Print

    clock clock iconcutlery cutlery iconflag flag iconfolder folder iconinstagram instagram iconpinterest pinterest iconfacebook facebook iconprint print iconsquares squares iconheart heart iconheart solid heart solid icon

    Description

    One Pot Chicken Parmesan Mac is a creamy and comforting pasta dish that combines tender chicken, macaroni, and rich cheeses in a single pot for easy preparation and cleanup.


    • 2 boneless, skinless chicken breasts, diced
    • 225 grams elbow macaroni
    • 15 milliliters olive oil
    • 240 milliliters marinara sauce
    • 240 milliliters chicken broth
    • 240 milliliters heavy cream
    • 200 grams shredded mozzarella cheese
    • 50 grams grated Parmesan cheese
    • 2.5 milliliters garlic powder
    • 2.5 milliliters Italian seasoning
    • Salt, to taste
    • Black pepper, to taste

    1. Heat olive oil in a large pot over medium heat. Add diced chicken breast and season with salt, black pepper, and garlic powder. Cook, stirring occasionally, for 5 to 7 minutes until golden brown and fully cooked through. Remove from pot and set aside.
    2. In the same pot, pour in marinara sauce, chicken broth, and heavy cream. Stir thoroughly while scraping any browned bits from the base to enhance flavor.
    3. Add elbow macaroni and bring the mixture to a gentle simmer. Cook uncovered for 8 to 10 minutes, stirring occasionally, until pasta is tender and sauce has thickened.
    4. Reduce heat to medium-low. Stir in shredded mozzarella and grated Parmesan cheese until melted. Return cooked chicken and add Italian seasoning. Continue stirring until sauce is smooth and creamy.
    5. Remove the pot from heat. Allow the mac and cheese to rest for 2 to 3 minutes to thicken. Serve warm, garnished with additional Parmesan and fresh herbs if desired.

    Notes

    • This dish can be garnished with fresh herbs for added flavor.
    • Feel free to adjust the seasonings to suit your taste.
    • For a lighter version, substitute heavy cream with a lower-fat alternative.
    • Prep Time: 10 minutes
    • Cook Time: 25 minutes
    • Category: Main Course
    • Method: Stovetop
    • Cuisine: Italian

    Nutrition

    • Serving Size: 1 bowl
    • Calories: 650
    • Sugar: 4g
    • Sodium: 800mg
    • Fat: 35g
    • Saturated Fat: 15g
    • Unsaturated Fat: 10g
    • Trans Fat: 0g
    • Carbohydrates: 60g
    • Fiber: 2g
    • Protein: 30g
    • Cholesterol: 100mg

    Sharing is caring!

  • Shrimp, Corn, Potatoes, and Smoked Sausage Foil Pack

    Shrimp, Corn, Potatoes, and Smoked Sausage Foil Pack


    Introduction to Shrimp, Corn, Potatoes, and Smoked Sausage Foil Pack

    Let me tell you about a dish that has quickly become a favorite in my kitchen—the Shrimp, Corn, Potatoes, and Smoked Sausage Foil Pack. This meal is not just delicious; it’s a game-changer for busy families like ours! With the chaos of daily life, it can be tough to whip up a tasty dinner, but this one requires minimal prep and clean-up. Just toss everything together, seal in the flavors, and let the grill or oven do the work. It’s perfect for those days when you want to impress loved ones without spending hours in the kitchen!

    Why You’ll Love This Shrimp, Corn, Potatoes, and Smoked Sausage Foil Pack

    This Shrimp, Corn, Potatoes, and Smoked Sausage Foil Pack is a true lifesaver. Not only is it super easy to make, but it also packs a punch of flavors that will make your taste buds do a happy dance. Within just 30 minutes, you can serve a satisfying meal that requires minimal clean-up. It’s a delicious solution for busy weeknights and perfect for family gatherings!

    Ingredients for Shrimp, Corn, Potatoes, and Smoked Sausage Foil Pack

    Gathering the right ingredients is key to making this Shrimp, Corn, Potatoes, and Smoked Sausage Foil Pack a hit. Here’s what you’ll need:

    • Shrimp: Fresh, peeled, and deveined shrimp add a delightful sweetness. You can use frozen shrimp; just ensure they’re thawed before cooking.
    • Andouille Sausage: This smoked sausage brings a bold flavor. If you’re in the mood for something different, you could swap it for chicken sausage or even turkey kielbasa.
    • Corn: Fresh corn kernels add a burst of sweetness and crunch. If corn isn’t in season, frozen corn works wonders as a substitute.
    • Potatoes: Creamy, cubed potatoes make this dish hearty. I like using red or yellow potatoes for their waxy texture. Sweet potatoes are a great alternative if you’re craving a twist.
    • Red Bell Pepper: Sliced red bell pepper adds a pop of color and a slight sweetness. You can replace it with green bell pepper or even zucchini for a different flavor.
    • Olive Oil: This is essential for flavor and moisture. You could use other oils like avocado oil, but I love the richness of olive oil paired with the other ingredients.
    • Cajun Seasoning: This spice blend gives a nice kick! Feel free to adjust it to your heat preference or even make your own to tailor the flavors to your liking.
    • Black Pepper: Just a pinch enhances the overall taste. For those who enjoy some heat, you might add cayenne or crushed red pepper flakes.

    All these ingredients create a symphony of flavors that come together beautifully. For the exact measurements, don’t forget to check the bottom of the article, where you’ll find a printable recipe for your convenience!

    How to Make Shrimp, Corn, Potatoes, and Smoked Sausage Foil Pack

    Prepare the Vegetables

    Start by prepping your vegetables. Take fresh corn and cut the kernels off the cob. Next, peel and cube your potatoes into bite-sized pieces. Slice the red bell pepper into thin strips. Toss them together in a bowl with olive oil, Cajun seasoning, and black pepper for a flavorful base!

    Combine Shrimp and Sausage

    In a separate bowl, mix the fresh shrimp with the sliced andouille sausage. Ensure every piece is coated with the essence of that smoky, savory goodness. This is where the magic really begins!

    Assemble Foil Packs

    Now it’s time to make your foil packs! Lay two sheets of aluminum foil on your workspace. Divide the vegetable mixture evenly between the sheets. Then, top them with the shrimp and sausage blend. Don’t forget to fold the foil tightly to seal in all the flavors!

    Grill or Bake

    You can grill or bake these packs to perfection. If grilling, heat your grill to medium-high. Cook the foil packs for about 15-20 minutes, or until the shrimp turns pink and the potatoes are tender. If using an oven, preheat it to 400°F and follow the same cooking time.

    Serve and Enjoy

    Carefully open the foil packs, revealing a colorful medley of flavors. Serve them hot, and watch as everyone delights in the tantalizing aroma and burst of flavors. It’s a dish that truly excites the palate!

    Tips for Success

    • Use fresh shrimp for the best flavor; thaw frozen shrimp completely before cooking.
    • Don’t overcrowd the foil packs; they need space to steam properly.
    • Feel free to customize vegetables based on what you have on hand or your family’s preferences.
    • Check for doneness by ensuring shrimp are opaque and vegetables are tender.
    • Experiment with different spices to create your unique flavor combination!

    Equipment Needed

    • Aluminum Foil: Essential for creating the packs. Parchment paper can work, but foil is best for sealing in flavors.
    • Mixing Bowls: Use for preparing your ingredients. Any medium-sized bowl will do!
    • Grill or Oven: For cooking! You can use an outdoor grill or a conventional oven.
    • Spatula or Tongs: Handy for handling the foil packs after cooking.

    Variations of Shrimp, Corn, Potatoes, and Smoked Sausage Foil Pack

    • Spicy Cajun Variation: Add more Cajun seasoning for an extra kick, or toss in diced jalapeños to heat things up.
    • Vegetarian Twist: Replace shrimp and sausage with chickpeas or black beans. Add more veggies like zucchini and mushrooms for a hearty, meatless option.
    • Lemon Garlic Delight: Squeeze fresh lemon juice over the ingredients before sealing for a zesty flavor. Toss in minced garlic for additional aroma!
    • Tex-Mex Style: Incorporate black beans, corn, and diced tomatoes. Top with taco seasoning for a fun southwest flavor!
    • Herb Lovers’ Pack: Add fresh herbs like basil, dill, or parsley for a fresh twist. These herbs brighten up the flavors of the dish.

    Serving Suggestions for Shrimp, Corn, Potatoes, and Smoked Sausage Foil Pack

    • Pair with Garlic Bread: Serve warm, buttery garlic bread on the side for a delightful complement to the meal.
    • Fresh Salad: A crisp green salad with a light vinaigrette balances the hearty foil pack beautifully.
    • Chilled Drink: Refreshing lemonade or iced tea makes a perfect pairing with the flavors of the dish.
    • Presentation Tip: Serve the foil packs directly on plates for a rustic, fun dining experience!

    FAQs about Shrimp, Corn, Potatoes, and Smoked Sausage Foil Pack

    Can I use frozen shrimp for this recipe?
    Absolutely! Just make sure to thaw the shrimp completely before starting. Frozen shrimp works well and allows for a quick meal on busy nights.

    How do I know when the shrimp and sausage are cooked?
    The shrimp should turn pink and opaque, while the sausage should be hot throughout. Checking that the potatoes are tender will ensure everything is perfectly cooked.

    Can I make this dish ahead of time?
    Yes! You can prep the foil packs in advance and store them in the fridge for a few hours. Just pop them on the grill or in the oven when you’re ready to eat.

    What can I substitute for andouille sausage?
    You can easily swap the andouille sausage for chicken sausage or turkey kielbasa if you prefer a lighter option. Even vegetarian sausages can work if you want to change it up!

    Can I add other vegetables to the foil pack?
    Definitely! Feel free to add your favorite veggies, like zucchini, asparagus, or even cherry tomatoes. It’s a versatile dish that adapts to your personal taste!

    Final Thoughts

    Cooking the Shrimp, Corn, Potatoes, and Smoked Sausage Foil Pack has brought me so much joy in my kitchen. It’s more than just a meal; it’s a lively experience filled with vibrant flavors that make dining feel special. The best part? It’s incredibly simple—perfect for busy nights when you just want something satisfying. Plus, the cleanup is a breeze, leaving you more time to spend with your loved ones. So, gather your ingredients and dive into this delightful culinary adventure. Trust me, your taste buds will thank you, and so will your family!


    Print

    clock clock iconcutlery cutlery iconflag flag iconfolder folder iconinstagram instagram iconpinterest pinterest iconfacebook facebook iconprint print iconsquares squares iconheart heart iconheart solid heart solid icon

    Description

    A delicious and easy-to-make shrimp, corn, potatoes, and smoked sausage dish cooked in foil packs.


    • 1 pound shrimp, peeled and deveined
    • 1 pound andouille sausage, sliced
    • 1 ear of corn, cut into kernels
    • 2 potatoes, peeled and cubed
    • 1 red bell pepper, sliced
    • 1/4 cup olive oil
    • 1/2 teaspoon Cajun seasoning
    • 1/4 teaspoon black pepper

    1. Prepare vegetables: In a bowl, combine the corn, potatoes, red bell pepper, olive oil, Cajun seasoning, and black pepper. Toss to coat.
    2. Combine shrimp and sausage: In a separate bowl, combine the shrimp and sausage.
    3. Assemble foil packs: Divide the vegetables, shrimp, and sausage evenly between 2 sheets of aluminum foil.
    4. Grill or bake: Grill or bake the foil packs for 15-20 minutes, or until the shrimp and sausage are cooked through and the vegetables are tender.
    5. Serve: Serve immediately and enjoy!

    Notes

    • Ensure shrimp are fresh for best flavor.
    • You can adjust the seasoning to your taste.
    • This dish can be cooked on a grill or in an oven.
    • Prep Time: 10 minutes
    • Cook Time: 20 minutes
    • Category: Main Dish
    • Method: Grilling/Baking
    • Cuisine: American

    Nutrition

    • Serving Size: 1 pack
    • Calories: 450
    • Sugar: 2g
    • Sodium: 800mg
    • Fat: 25g
    • Saturated Fat: 7g
    • Unsaturated Fat: 15g
    • Trans Fat: 0g
    • Carbohydrates: 35g
    • Fiber: 5g
    • Protein: 25g
    • Cholesterol: 200mg

    Sharing is caring!

  • Ice Cream Sandwiches: The Ultimate Chill Treat Recipe!

    Ice Cream Sandwiches: The Ultimate Chill Treat Recipe!


    Introduction to Ice Cream Sandwiches

    There’s something undeniably special about Ice Cream Sandwiches, isn’t there? They remind me of sunny afternoons, laughter, and the satisfaction of a sweet bite. As a busy mom juggling work and family, I know the value of a quick, delightful treat. These sandwiches are perfect for a hot day, bringing joy without the fuss. With just two simple components, you can craft a nostalgic dessert that suits the whole family. So, whether you’re hosting a gathering or just pampering yourself, let’s dive into this fun and easy recipe!

    Why You’ll Love This Ice Cream Sandwiches

    You’re going to adore these Ice Cream Sandwiches for so many reasons! First off, they’re incredibly easy to whip up, perfect for those busy evenings when you want to indulge without spending hours in the kitchen. Plus, the flavor combinations are endless, keeping every bite exciting. It’s a treat that everyone enjoys—kids and adults alike. Trust me; you’ll be reaching for seconds!

    Ingredients for Ice Cream Sandwiches

    Gathering your ingredients for these delightful Ice Cream Sandwiches is a breeze! Here’s what you’ll need:

    • Cookies: A package of your favorite cookies serves as the base. Chocolate chip, oatmeal raisin, or even snickerdoodles work beautifully.
    • Ice Cream: You’ll want about two cups of ice cream in your chosen flavor. Vanilla and chocolate are classics, but feel free to get adventurous with mint chocolate chip or cookie dough!

    Don’t hesitate to mix and match flavors! I love combining a rich brownie cookie with vanilla ice cream for a decadent twist. Look for cookies that are slightly thicker if you crave that delightful crunch in every bite.

    If you’re dairy-free or have specific dietary needs, consider using dairy-free ice cream or gluten-free cookies. You can typically find great options at local grocery stores or specialty health food shops.

    For exact quantities, scroll to the bottom of the article, where I’ve made it easy for you to print the recipe!

    How to Make Ice Cream Sandwiches

    Making Ice Cream Sandwiches is a fun and straightforward process. You’ll be surprised at how quickly you can whip these up and delight your family. Just follow these easy steps, and you’ll be on your way to a delicious treat!

    Step 1: Prepare Your Cookies

    Start by grabbing that package of cookies you chose. Lay them out on a clean surface, making sure your selections have matching pairs. This step is like setting the table for a joyful feast, where every cookie gets to play its role. You can even take a moment to taste-test a cookie—quality control, right?

    Step 2: Scoop the Ice Cream

    Next, it’s time for the ice cream! Using a sturdy ice cream scoop, grab a generous scoop of your flavor of choice. Place the scoop right on top of one cookie. Don’t worry if it’s a little messy; that’s part of the charm! If you prefer a lighter treat, feel free to use a smaller scoop instead.

    Step 3: Assemble the Sandwiches

    Now comes the fun part! Take your second cookie and gently press it onto the ice cream. This is where magic happens as the cold ice cream hugs both cookies. If you want to add sprinkles or chocolate chips to the sides, now’s your chance! Just roll the edges in them before moving on to the next sandwich.

    Step 4: Freeze to Firm Up

    Finally, place all your assembled sandwiches onto a baking sheet. Pop them in the freezer for at least one hour. This step helps everything set and blend beautifully. Once they’re ready, you’ll have Ice Cream Sandwiches that are firm, cool, and oh-so-delicious!

    Tips for Success

    • Choose cookies that are slightly thick for a better texture.
    • Let ice cream sit out for a few minutes before scooping for easier handling.
    • Use a warm scoop to help glide through the ice cream smoothly.
    • Don’t overload the ice cream; too much can cause messy sandwiches!
    • Add a drizzle of chocolate or caramel for an extra special touch.

    Equipment Needed

    • Baking Sheet: A simple tray to freeze your sandwiches. If you’re short on space, use a plate instead.
    • Ice Cream Scoop: A solid scoop makes portioning easy. If you don’t have one, a regular spoon works too!
    • Spatula: Handy for lifting sandwiches. A large spoon can also do the trick.

    Variations for Ice Cream Sandwiches

    • Nutty Delight: Add crunchy peanut butter or almond butter to your ice cream for a nutty surprise.
    • Fruity Twist: Layer in fresh fruits like sliced strawberries or bananas before assembling for a refreshing burst.
    • Dairy-Free Options: Use coconut milk or almond milk ice cream paired with gluten-free cookies for a dairy-free treat.
    • Chocolate Lovers: Try chocolate cookies with mint chocolate chip ice cream for a decadent combo!
    • Festive Touch: Mix in seasonal ingredients like pumpkin spice ice cream with ginger cookies for fall festivities.

    Serving Suggestions for Ice Cream Sandwiches

    • Fresh Berries: Serve with a side of strawberries or raspberries for a fruity contrast.
    • Chocolate Sauce: Drizzle melted chocolate over the top for a decadent finish.
    • Iced Coffee: Pair with a refreshing iced coffee or cold brew for a balanced treat.
    • Fun Presentation: Stack the sandwiches on a colorful plate and sprinkle with powdered sugar for a cute look.

    FAQs about Ice Cream Sandwiches

    As I share my love for Ice Cream Sandwiches, I know you might have a few burning questions. Let’s address some common queries that pop up when making these delightful treats.

    Can I use homemade cookies for my Ice Cream Sandwiches?
    Absolutely! Homemade cookies bring a personal touch and can be customized to your taste. Just ensure they’re sturdy enough to hold the ice cream without getting too soggy.

    How long can I store Ice Cream Sandwiches?
    You can store your Ice Cream Sandwiches in the freezer for up to two weeks. Just make sure to wrap them individually in plastic wrap to keep them fresh and prevent freezer burn. Trust me; you’ll want to savor every bite!

    Can I make these sandwiches ahead of time?
    Yes! These sandwiches are perfect for meal prep. You can assemble them a day before your gathering and just pop them in the freezer. Easy-peasy!

    What’s the best ice cream flavor to pair with cookies?
    This is where your creativity can shine! Classic flavors like vanilla and chocolate are crowd-pleasers, but feel free to experiment! Strawberry, cookies and cream, or even coffee ice cream can breathe new life into your Ice Cream Sandwiches.

    Can I use non-dairy ice cream options?
    Absolutely! There are so many delicious non-dairy ice creams available now. Almond, coconut, or oat milk varieties work great, making these sandwiches suitable for those with dietary restrictions.

    Final Thoughts

    Creating Ice Cream Sandwiches is more than just a dessert; it’s a canvas for joy and creativity! Whether you’re bonding with your kids over a fun summer activity or enjoying a nostalgic treat as a reward for a long day, these sandwiches are a heartwarming addition to any occasion. The simple process and delicious results bring smiles all around. Plus, with endless flavor combinations, there’s always something new to try. So, gather your ingredients and relish the delightful moments you’ll create. Trust me, each bite is a sweet reminder that life is meant to be enjoyed!


    Print

    clock clock iconcutlery cutlery iconflag flag iconfolder folder iconinstagram instagram iconpinterest pinterest iconfacebook facebook iconprint print iconsquares squares iconheart heart iconheart solid heart solid icon

    Description

    Ice Cream Sandwiches are a delightful frozen treat made by sandwiching ice cream between two cookies. Perfect for a hot day!


    • 1 package of cookies (12 cookies)
    • 2 cups of ice cream (any flavor)

    1. Take one cookie and place a scoop of ice cream on top.
    2. Press another cookie on top of the ice cream.
    3. Repeat with remaining cookies and ice cream.
    4. Freeze for at least 1 hour.

    Notes

    • Feel free to mix and match cookie and ice cream flavors.
    • For a crunchier texture, use cookies that are thicker.
    • Prep Time: 10 minutes
    • Cook Time: 0 minutes
    • Category: Dessert
    • Method: No-Bake
    • Cuisine: American

    Nutrition

    • Serving Size: 1 sandwich
    • Calories: 250
    • Sugar: 20g
    • Sodium: 150mg
    • Fat: 10g
    • Saturated Fat: 5g
    • Unsaturated Fat: 3g
    • Trans Fat: 0g
    • Carbohydrates: 32g
    • Fiber: 1g
    • Protein: 3g
    • Cholesterol: 25mg

    Sharing is caring!

  • Zesty Roasted Lemon Dill Chickpeas & Veggies

    Zesty Roasted Lemon Dill Chickpeas & Veggies


    Introduction to Zesty Roasted Lemon Dill Chickpeas & Veggies

    As a busy mom, I often find myself scrambling for tasty yet healthy meal ideas. That’s why I absolutely adore this recipe for Zesty Roasted Lemon Dill Chickpeas & Veggies. It’s not only quick to whip up but bursting with flavors that even the pickiest eaters in my family can’t resist. Imagine the warmth of roasted veggies, drizzled in a zesty lemon-dill dressing—comfort food that feels good. This dish is perfect for any day of the week, making meal prep feel like a delightful culinary adventure!

    Why You’ll Love This Zesty Roasted Lemon Dill Chickpeas & Veggies

    This dish is a dream come true for busy cooks like us! It’s quick, taking just 45 minutes from start to finish, and it’s packed with vibrant flavors. The combination of roasted chickpeas and fresh veggies means you get a healthy meal that satisfies. Plus, the zesty lemon-dill dressing adds a delightful tang that uplifts even the dullest of weeknight dinners. Trust me, you’ll want to make this again and again!

    Ingredients for Zesty Roasted Lemon Dill Chickpeas & Veggies

    Gathering the right ingredients is key to creating this flavorful dish. Here’s what you’ll need for your Zesty Roasted Lemon Dill Chickpeas & Veggies:

    • Chickpeas: One can of chickpeas makes this dish substantial. They’re rich in protein and fiber, ensuring every bite feels hearty.
    • Zucchini: This versatile vegetable adds a delightful crunch. Look for ones that are firm and unblemished for the best texture.
    • Bell Pepper: Any color will do! They add sweetness and a pop of color to your dish. Feel free to mix them up for visual appeal.
    • Red Onion: This ingredient provides a mild yet zesty flavor. They caramelize beautifully while roasting, bringing out their natural sweetness.
    • Cherry Tomatoes: These burst with juicy goodness! Halving them allows their bright flavor to shine through the roasted mix.
    • Olive Oil: A good drizzle helps everything roast beautifully. It also enriches the dish with healthy fats.
    • Lemon Zest and Juice: Here’s where the zestiness comes from! The zest adds an aromatic kick, while the juice brightens the entire dish.
    • Dried Dill: This herb is the star of the dressing. Its slightly tangy flavor is perfect for complementing the lemon.
    • Garlic Powder: A sprinkle of garlic powder brings in that beloved depth of flavor without the fuss of chopping garlic.
    • Smoked Paprika: This adds a smoky undertone, balancing the freshness of the veggies. It enhances the overall flavor profile.
    • Salt and Pepper: Essential for seasoning! Adjust to your taste—these simple ingredients can elevate your dish.
    • Fresh Dill (optional): For garnish, it’s a lovely finishing touch. It adds a splash of color and fresh aroma!

    If you’re curious about exact quantities, check the bottom of the article. It includes everything you’ll need to whip up this delightful dish!

    How to Make Zesty Roasted Lemon Dill Chickpeas & Veggies

    Now comes the best part—making your Zesty Roasted Lemon Dill Chickpeas & Veggies. Trust me, it’s as simple as pie! Just follow these straightforward steps, and you’ll have a delightful dish ready in no time.

    Step 1: Preheat the Oven

    Your first task is to preheat that oven to a cozy 400°F (200°C). This ensures everything roasts evenly. While it heats up, you’ll have time to prep your veggies and chickpeas, maximizing efficiency!

    Step 2: Prepare the Vegetables and Chickpeas

    In a large bowl, combine your drained and rinsed chickpeas with the diced zucchini, bell pepper, red onion, and halved cherry tomatoes. Make sure to chop the veggies into uniform sizes. This way, they roast more evenly, and nobody likes a soft carrot nestled by a crunchy zucchini!

    Step 3: Make the Dressing

    In a separate small bowl, whisk together olive oil, lemon zest, lemon juice, dried dill, garlic powder, smoked paprika, salt, and pepper. Blend until well combined. The dressing should be zesty and aromatic, like a bathroom freshener on a hot summer day!

    Step 4: Toss the Mixture

    Pour that vibrant dressing over the chickpea and vegetable medley. Now, toss everything gently with a spatula to ensure every piece gets coated. Aim for a scrumptious hug with those flavors, but don’t mush it all together!

    Step 5: Roast in the Oven

    Transfer your colorful mixture to a baking sheet lined with parchment paper. Spread it out evenly; this ensures even roasting and crispiness. Pop the baking sheet into your preheated oven and roast for 25-30 minutes. Remember to stir halfway through—nobody likes mushy veggies!

    Step 6: Garnish and Serve

    Once roasted, take your dish out and let it cool for a few minutes. Feel free to sprinkle some fresh dill on top for a beautiful presentation. Serve warm, or toss it on a salad for a refreshing twist. Enjoy your culinary creation and the smiles it brings!

    Tips for Success

    • Make sure to drain and rinse your chickpeas well for better flavor and texture.
    • Chop veggies into similar sizes to ensure even roasting and cooking.
    • Adjust the seasoning based on your family’s taste preferences—don’t be shy to experiment!
    • For extra crunch, leave the chickpeas in the oven for a few additional minutes.
    • Store leftovers in an airtight container; they make a great quick lunch!

    Equipment Needed

    • Baking Sheet: A standard baking sheet works wonders. Alternatively, use a cast-iron skillet for a crispy finish.
    • Parchment Paper: This is optional but helps with easy cleanup. If unavailable, you can lightly grease the baking sheet.
    • Mixing Bowls: Have a large bowl for tossing and a smaller bowl for the dressing. Any mixing bowl will do!
    • Whisk: A simple whisk helps blend your dressing. A fork can work in a pinch!
    • Spatula: Use this for gentle tossing of ingredients to avoid squishing your veggies.

    Variations of Zesty Roasted Lemon Dill Chickpeas & Veggies

    • Spicy Kick: Add a pinch of red pepper flakes to the dressing for a zesty, spicy twist that adds warmth.
    • Herb Swap: Use fresh parsley or cilantro instead of dill for a different herbal note. Both bring freshness in their unique ways.
    • Seasonal Veggies: Feel free to substitute the zucchini with eggplant or squash. Use asparagus or green beans in the spring for a fresh touch.
    • Grain Bowl: Serve this mix over a bed of quinoa or brown rice. It adds heartiness while keeping the dish light and nutritious.
    • Cheesy Delight: For non-vegan options, sprinkle some feta cheese over the roasted veggies before serving. Its creamy flavor balances the zesty elements.

    Serving Suggestions for Zesty Roasted Lemon Dill Chickpeas & Veggies

    • Pair with Grains: Serve over fluffy quinoa or brown rice for a hearty meal.
    • Salad Topper: Add to mixed greens for a vibrant salad that pops with flavor.
    • Refreshing Drink: Complement with a glass of iced herbal tea or sparkling water with lemon.
    • Presentation: Serve in a large bowl and garnish with fresh dill for a beautiful touch.
    • Leftovers: Enjoy cold straight from the fridge as a convenient lunch option.

    FAQs about Zesty Roasted Lemon Dill Chickpeas & Veggies

    Can I make this dish ahead of time?
    Absolutely! You can prepare all the ingredients and the dressing ahead. Just combine them before roasting for a quick meal during your busy week. It stores well in the fridge, making it a fantastic dinner solution!

    How do I store leftovers?
    Store any leftovers in an airtight container in the refrigerator. They’ll be good for about 3-4 days. You can enjoy them cold or reheat in the oven to bring back that crispy texture we love!

    Can I use other beans instead of chickpeas?
    Yes, you can switch chickpeas for white beans or black beans—both will work wonderfully! Just keep in mind that different beans have unique flavors and textures, which can subtly change the dish.

    Is this recipe gluten-free?
    Yes, indeed! The Zesty Roasted Lemon Dill Chickpeas & Veggies recipe is naturally gluten-free, making it a great option for family members with dietary restrictions. Enjoy it without any worries!

    What variations can I try?
    Feel free to mix and match veggies based on what’s in season or what you have on hand. You can add roasted sweet potatoes or carrots for extra sweetness, or even leafy greens for a nutritious upgrade!

    Final Thoughts

    Making Zesty Roasted Lemon Dill Chickpeas & Veggies is more than just a cooking task; it’s a delightful experience that fills your kitchen with warmth and fragrant aromas. Each bite is a celebration of flavors, bringing the family together around the table. Whether enjoyed as a side dish or a heartier meal with grains, this recipe brightens up even the busiest of days. I find joy in watching my loved ones savor every mouthful. With simplicity and joy wrapped into this dish, you’ll discover a new family favorite—one that delivers smiles alongside nutrition. Happy cooking!


    Print

    clock clock iconcutlery cutlery iconflag flag iconfolder folder iconinstagram instagram iconpinterest pinterest iconfacebook facebook iconprint print iconsquares squares iconheart heart iconheart solid heart solid icon

    Description

    A flavorful and healthy dish featuring roasted chickpeas and colorful veggies tossed in a zesty lemon dill dressing.


    • 1 can (15 oz) chickpeas, drained and rinsed
    • 1 medium zucchini, diced
    • 1 bell pepper (any color), diced
    • 1 medium red onion, diced
    • 1 cup cherry tomatoes, halved
    • 3 tablespoons olive oil
    • Zest of 1 lemon
    • Juice of 1 lemon
    • 2 teaspoons dried dill
    • 1 teaspoon garlic powder
    • ½ teaspoon smoked paprika
    • Salt and pepper, to taste
    • Fresh dill, for garnish (optional)

    1. Preheat your oven to 400°F (200°C).
    2. In a large bowl, combine the drained and rinsed chickpeas, diced zucchini, bell pepper, red onion, and cherry tomatoes.
    3. In a separate small bowl, whisk together olive oil, lemon zest, lemon juice, dried dill, garlic powder, smoked paprika, salt, and pepper until well combined.
    4. Pour the dressing over the chickpea and vegetable mixture. Toss gently to ensure all ingredients are well coated with the dressing.
    5. Transfer the mixture to a baking sheet lined with parchment paper. Spread it out evenly to ensure even roasting.
    6. Place the baking sheet in the preheated oven and roast for 25-30 minutes, or until the veggies are tender and the chickpeas are slightly crispy, stirring halfway through for even cooking.
    7. Once roasted, remove from the oven and let cool for a few minutes. Garnish with fresh dill, if using, and serve warm as a side dish or on top of a salad.

    Notes

    • For a spicier version, consider adding red pepper flakes to the dressing.
    • This dish can be served warm or cold.
    • Feel free to swap vegetables based on seasonal availability.
    • Prep Time: 15 minutes
    • Cook Time: 30 minutes
    • Category: Side Dish
    • Method: Roasting
    • Cuisine: Mediterranean

    Nutrition

    • Serving Size: 1 serving
    • Calories: 180
    • Sugar: 3g
    • Sodium: 300mg
    • Fat: 7g
    • Saturated Fat: 1g
    • Unsaturated Fat: 5g
    • Trans Fat: 0g
    • Carbohydrates: 24g
    • Fiber: 6g
    • Protein: 6g
    • Cholesterol: 0mg

    Sharing is caring!

  • One-Pot Creamy Cajun Meatball Pasta

    One-Pot Creamy Cajun Meatball Pasta


    Introduction to One-Pot Creamy Cajun Meatball Pasta

    Can you relate to those busy evenings when dinner needs to be both quick and flavorful? I understand, and that’s why I want to share my secret weapon: One-Pot Creamy Cajun Meatball Pasta. This dish is not just a meal; it’s a cozy hug in a bowl, perfect for bringing the family together. Imagine creamy meatballs nestled among pasta, all simmered in one pot, leading to fewer dishes to wash! This recipe is a lifesaver for hectic nights, promising to impress your loved ones while keeping your stress levels low.

    Why You’ll Love This One-Pot Creamy Cajun Meatball Pasta

    This One-Pot Creamy Cajun Meatball Pasta is a culinary dream, especially for busy moms and professionals. It’s incredibly easy to whip up, taking just about 30 minutes from start to finish. The rich, spicy flavors are sure to satisfy, while the creamy sauce coats each bite perfectly. Plus, fewer dishes mean more time to relax after a long day. What’s not to love about a dish that brings joy and ease to dinner time?

    Ingredients for One-Pot Creamy Cajun Meatball Pasta

    Let’s dive into the heart of this delightful One-Pot Creamy Cajun Meatball Pasta. Gathering the right ingredients sets the stage for a satisfying meal. Here’s what you’ll need:

    • Meatballs: Whether homemade or store-bought, meatballs are the stars here! They add protein and flavor, making this dish hearty.
    • Pasta: I love using penne or rotini for this recipe. The curves of the pasta hold onto the sauce beautifully, but feel free to swap with any pasta you like.
    • Olive Oil: A drizzle of olive oil sets the base for sautéing. It adds richness and helps everything brown nicely.
    • Onion: Chopped small, onions provide sweetness and depth. Sauteing them adds a lovely aroma to the dish.
    • Garlic: Minced garlic brings a punch of flavor. I could legit eat it by the spoonful—it’s that good!
    • Heavy Cream: This is key to creating that dreamily creamy sauce that hugs the pasta. If you want something lighter, you can try half-and-half.
    • Chicken Broth: Enhances the flavor and cooks the pasta to perfection. Use low-sodium broth to keep things balanced.
    • Cajun Seasoning: Here’s where the magic happens! The Cajun spice mix gives that signature kick. Adjust it according to your spice tolerance.
    • Parmesan Cheese: Grated Parmesan adds a salty, savory element. It melts beautifully into the sauce, creating a rich finish.
    • Salt and Pepper: Always necessary to enhance flavor. Seasoning is personal, so taste as you go!

    For more details on exact measurements and cooking tips, scroll to the end of the article where you’ll find a printable recipe for your convenience!

    How to Make One-Pot Creamy Cajun Meatball Pasta

    Now, let’s roll up our sleeves and get cooking! This One-Pot Creamy Cajun Meatball Pasta is simple, fun, and rewarding. Follow these steps, and you’ll have a feast on the table in no time!

    Step 1 – Sear the Meatballs

    First things first, grab your large skillet and heat up that olive oil over medium heat.

    Once it’s nice and warm, add your meatballs. If you’re using frozen ones, make sure they are thawed first.

    Cook them until they are beautifully browned on all sides. It usually takes about 5-7 minutes.

    When they’re done, gently remove them from the skillet and set them aside. This step adds a layer of flavor, and trust me, it’s worth it!

    Step 2 – Sauté Onions and Garlic

    In the same skillet, toss in the chopped onion and minced garlic.

    The sound of sizzling garlic is like music to my ears! Sauté them for about 3 minutes, or until they soften and become fragrant.

    This mix will form a lovely bed of flavor for the pasta. Don’t rush it; let those aromas fill your kitchen!

    Step 3 – Add Broth and Pasta

    Next, it’s time for the chicken broth to make its entrance. Pour it into the skillet and bring everything to a gentle simmer.

    Once it’s bubbling, add your pasta. I typically use penne or rotini because they catch that creamy sauce so well.

    Cook the pasta according to the package instructions, usually around 8-10 minutes. Stir occasionally to keep it from sticking.

    Step 4 – Mix in Cream and Seasoning

    Now comes the decadent part—pour in the heavy cream and sprinkle in the Cajun seasoning!

    Stir it well and let it simmer for another 2-3 minutes. This allows the sauce to thicken slightly.

    If you want a spicier kick, don’t hesitate to add a bit more Cajun seasoning. Adjust according to your family’s taste preferences.

    Step 5 – Combine Meatballs and Cheese

    Finally, bring back those beautiful meatballs! Carefully add them back into the skillet.

    Now, it’s time to embrace the cheesy goodness by stirring in the grated Parmesan cheese.

    Mix everything until the cheese melts and creates a creamy embrace around the pasta. Season with salt and pepper to taste.

    And just like that, your One-Pot Creamy Cajun Meatball Pasta is ready to serve and share!

    Tips for Success

    • Keep an eye on your pasta. Stir often to prevent sticking and ensure even cooking.
    • Don’t skip the browning step for meatballs; it adds depth to the flavor.
    • Consider using fresh herbs like parsley or basil for a pop of color and flavor.
    • Taste as you go! Adjust salt, pepper, and Cajun seasoning to fit your family’s preference.
    • Leftovers make for a delightful lunch—just reheat gently!

    Equipment Needed

    • Large Skillet: A non-stick skillet works best, but any large pan will do.
    • Wooden Spoon: Great for stirring, but feel free to use any utensil you have on hand.
    • Measuring Cups: Essential for getting your ingredients just right.
    • Cutting Board: A must for chopping onions and garlic safely.

    Variations for One-Pot Creamy Cajun Meatball Pasta

    • Protein Swaps: Try using turkey or chicken meatballs for a lighter option. You can also substitute the meatballs entirely with grilled shrimp or sautéed chicken for a different flavor profile.
    • Vegetarian Option: Replace meatballs with hearty vegetable alternatives, like chickpeas or sautéed mushrooms. Add in eggplant or zucchini for extra texture!
    • Pasta Alternatives: Experiment with gluten-free pasta if needed. Zucchini noodles are a fun twist and keep it light!
    • Brighten It Up: Toss in fresh spinach or kale right before serving for an added nutritional boost and vibrant color.
    • Cheese Variations: Swap Parmesan for a sharp cheddar or pepper jack for a spicier kick that complements the Cajun flavors beautifully.

    Serving Suggestions for One-Pot Creamy Cajun Meatball Pasta

    • Fresh Salad: Serve alongside a crisp garden salad with a light vinaigrette to balance the richness of the pasta.
    • Garlic Bread: A slice of warm garlic bread is perfect for soaking up that delicious creamy sauce.
    • Wine Pairing: Enjoy with a chilled glass of white wine, like Sauvignon Blanc, to enhance the flavors.
    • Garnish: Top with chopped parsley or green onions for a pop of color and freshness.

    FAQs about One-Pot Creamy Cajun Meatball Pasta

    Curiosity often comes with cooking, and I’m here to clear up some questions you might have about this delightful dish!

    Can I use frozen meatballs for this recipe?

    Absolutely! Frozen meatballs are a great time-saver. Just thaw them before searing to ensure even cooking and better flavor.

    Is this dish spicy?

    The level of spice really depends on the amount of Cajun seasoning you use. If you prefer a milder dish, start with less seasoning and adjust to taste.

    How can I make this recipe lighter?

    Great question! You can use turkey meatballs, reduced-fat cheese, and swap heavy cream for half-and-half or evaporated milk to cut calories without sacrificing taste.

    Can I prepare this pasta ahead of time?

    While this dish is best enjoyed fresh, you can prepare the ingredients in advance. Just cook and combine everything right before serving!

    What can I substitute for chicken broth?

    If you’re out of chicken broth, feel free to use vegetable broth or even water in a pinch. Just remember, it may alter the flavor slightly!

    Final Thoughts on One-Pot Creamy Cajun Meatball Pasta

    Cooking can sometimes feel like a chore, but this One-Pot Creamy Cajun Meatball Pasta transforms that into a joyful experience. It’s a dish that not only satisfies your family’s hunger but also warms their hearts. The blend of creamy flavors and spicy Cajun seasoning creates a delightful harmony that leaves everyone asking for seconds. Imagine sitting around the table, sharing laughter and stories, all while enjoying a comforting meal. This recipe is more than just food; it’s a little moment of happiness on a busy weeknight, perfect for making cherished memories with your loved ones.


    Print

    clock clock iconcutlery cutlery iconflag flag iconfolder folder iconinstagram instagram iconpinterest pinterest iconfacebook facebook iconprint print iconsquares squares iconheart heart iconheart solid heart solid icon

    Description

    A delicious and flavorful one-pot pasta dish featuring creamy Cajun meatballs, perfect for a comforting dinner.


    • 1 lb meatballs (store-bought or homemade)
    • 8 oz pasta (penne or rotini)
    • 1 tbsp olive oil
    • 1 small onion (chopped)
    • 2 cloves garlic (minced)
    • 1 cup heavy cream
    • 1 1/2 cups chicken broth
    • 2 tbsp Cajun seasoning
    • 1/2 cup grated Parmesan cheese
    • Salt and pepper to taste

    1. Heat olive oil in a large skillet over medium heat. Add the meatballs and cook until browned on all sides. Once done, remove them from the skillet and set aside.
    2. In the same skillet, add the chopped onion and minced garlic. Sauté for about 3 minutes, or until softened and fragrant.
    3. Add the chicken broth to the skillet and bring it to a simmer. Once simmering, add the pasta and cook according to the package instructions, usually 8-10 minutes.
    4. Stir in the heavy cream and Cajun seasoning. Let it simmer for another 2-3 minutes, allowing the sauce to thicken slightly.
    5. Return the cooked meatballs to the skillet and mix them in with the pasta. Stir in the grated Parmesan cheese until well combined. Season with salt and pepper to taste.
    6. Serve the creamy Cajun meatball pasta hot and enjoy the rich, flavorful meal!

    Notes

    • This dish can be topped with fresh parsley for added flavor.
    • Feel free to adjust the Cajun seasoning to your spice preference.
    • Leftovers can be stored in the refrigerator for up to 3 days.
    • Prep Time: 10 minutes
    • Cook Time: 20 minutes
    • Category: Pasta
    • Method: Skillet
    • Cuisine: American

    Nutrition

    • Serving Size: 1 plate
    • Calories: 650
    • Sugar: 3g
    • Sodium: 800mg
    • Fat: 35g
    • Saturated Fat: 18g
    • Unsaturated Fat: 12g
    • Trans Fat: 0g
    • Carbohydrates: 55g
    • Fiber: 3g
    • Protein: 30g
    • Cholesterol: 120mg

    Sharing is caring!

  • Philly cheesesteak stuffed shells

    Philly cheesesteak stuffed shells


    Introduction to Philly Cheesesteak Stuffed Shells

    Ah, the magic of combining my two favorite things: cheesy pasta and savory steak. If you’re like me, busy juggling family and work, the Philly cheesesteak stuffed shells are your new secret weapon in the kitchen! This dish isn’t only delicious but also a breeze to whip up after a hectic day. Just picture your loved ones gathered around the table, their eyes lighting up at the sight of these cheesy, meaty treasures. It’s a win-win: a recipe that pleases the crowd and frees up your valuable time. Let’s dive into this culinary delight!

    Why You’ll Love This Philly Cheesesteak Stuffed Shells

    These Philly cheesesteak stuffed shells are pure comfort food bliss! They combine the rich flavors of a classic Philly cheesesteak with the convenience of pasta. Plus, they come together quickly, making them perfect for busy weeknights or when entertaining. The gooey cheese and savory steak create a taste sensation that your family will adore. And let’s face it, who can resist a dish that feels like a hug on a plate?

    Ingredients for Philly Cheesesteak Stuffed Shells

    Gathering the right ingredients is half the battle in creating these delightful Philly cheesesteak stuffed shells. Here’s what you’ll need to bring this dish to life:

    • Jumbo pasta shells: These serve as the perfectly shaped vessel for all the yumminess.
    • Thinly sliced steak sirloin or ribeye: Pot for these cuts for a tender and flavorful filling. You can also use leftover steak—just chop it into small pieces!
    • Olive oil: A staple in my kitchen, great for sautéing and adding depth to your flavors.
    • Onion: Thinly sliced onions bring sweetness and a lovely aroma as they cook. They’re the flavor base here!
    • Green bell pepper: This adds color and a delightful crunch. You could switch it for a red or yellow pepper if you prefer.
    • Mushrooms: Sliced mushrooms add earthy flavors and a soft texture. Feel free to experiment with different varieties!
    • Salt and pepper: Essential seasonings to taste; they enhance all the other ingredients beautifully.
    • Garlic powder and onion powder: These are my go-to flavor boosters. They add layers of taste without extra chopping!
    • Beef broth: This helps to cook the steak and veggies, making everything juicy and flavorful.
    • Cream cheese: Softened cream cheese creates a rich, creamy texture in the stuffing. Trust me, it’s a game-changer!
    • Shredded mozzarella cheese: A melty favorite that brings everything together—don’t skimp on this one!
    • Shredded provolone cheese: This distinct flavor is what makes a classic Philly cheesesteak. If you can’t find it, use your favorite mild cheese instead.
    • Grated Parmesan cheese: A sprinkle of Parmesan adds that final touch of flavor, elevating your dish.
    • Chopped fresh parsley: This brightens up the dish, offering freshness and a pop of color on top.
    • Cooking spray: Just a light coat on your baking dish prevents sticking, making clean-up a breeze!

    For detailed measurements, scroll to the bottom of the article where I’ve provided everything you’ll need for this recipe alongside printable options!

    How to Make Philly Cheesesteak Stuffed Shells

    Now, let me guide you through making these irresistible Philly cheesesteak stuffed shells. Each step is quite simple, and you’ll see how everything comes together beautifully!

    Step 1 – Preheat Your Oven

    First things first, preheat your oven to 375°F (190°C). Preheating is essential to getting those shells bubbly and golden. Trust me, it makes a world of difference in the final texture!

    Step 2 – Cook the Jumbo Pasta Shells

    Next, bring a large pot of salted water to a boil. Once boiling, add the jumbo pasta shells! Cook them according to the package instructions, but aim for al dente. They should be tender yet firm. Drain and set aside, letting them cool slightly.

    Step 3 – Sauté the Steak

    In a large skillet, heat a tablespoon of olive oil over medium-high heat. Once hot, add the thinly sliced steak. Sauté it until it’s no longer pink, which should take just a few minutes. Once done, remove it from the skillet and set it aside. This juicy steak is the star of our show!

    Step 4 – Sauté the Vegetables

    In the same skillet, pour in a little more olive oil if needed. Add the sliced onion, green bell pepper, and mushrooms. Sauté them until they’re tender; around 5-7 minutes should do. Season with salt, pepper, garlic powder, and onion powder. The aroma will lift your spirits!

    Step 5 – Combine Steak and Vegetables

    Now it’s time to bring the flavors together! Return the cooked steak to the skillet with the sautéed veggies. Pour in the beef broth and let it simmer for a few minutes, letting the flavors meld and most of the liquid evaporate. This step is flavor town!

    Step 6 – Prepare the Cheese Mixture

    Grab a mixing bowl and combine the softened cream cheese, 1 cup of shredded mozzarella, provolone, Parmesan, and chopped parsley. Mix until everything is well blended. This creamy goodness is going to elevate our shells to new heights!

    Step 7 – Stuff the Shells

    Take each cooked jumbo shell and stuff it generously with the cheese mixture, then top with a spoonful of the steak and vegetable mixture. Gently place them in a baking dish that you’ve coated with cooking spray. This is where they start turning into a masterpiece!

    Step 8 – Bake the Stuffed Shells

    Once all the shells are snugly arranged in the dish, sprinkle the remaining mozzarella cheese on top. Cover the baking dish with foil and pop it in the oven. Bake for 20-25 minutes until everything is melted and bubbly. For that perfect finish, uncover and bake for another 5-10 minutes to let the tops lightly brown. Your kitchen will smell heavenly!

    Tips for Success

    • Always taste your filling while cooking. Adjust the seasoning as needed!
    • Don’t overcook the pasta; it will continue cooking in the oven.
    • Feel free to mix in some spicy jalapeños for a kick!
    • Let the stuffed shells cool slightly before serving for easier handling.
    • Make extra! These hold up wonderfully for leftovers or meal prep.

    Equipment Needed

    • Large pot: For boiling pasta. A deep skillet works if you don’t have one.
    • Large skillet: For sautéing the steak and veggies. Any non-stick pan can do the trick.
    • Mixing bowl: To combine cheese mixtures. A regular bowl works just as well.
    • Baking dish: For cooking the stuffed shells. You can use a casserole dish instead.
    • Cooking spray: To prevent sticking. Olive oil can serve as a substitute.

    Variations

    • Chicken or Turkey: Swap out steak for ground chicken or turkey for a lighter twist.
    • Vegetarian Option: Replace meat with a hearty mix of diced zucchini, spinach, or additional mushrooms to create a veggie version.
    • Spicy Kick: Add diced jalapeños or crushed red pepper flakes to the filling for some heat!
    • Different Cheeses: Experiment with cheeses like gouda or cheddar for unique flavor profiles.
    • Dairy-Free: Use dairy-free cream cheese and plant-based cheeses to make this recipe suitable for a dairy-free diet.

    Serving Suggestions for Philly Cheesesteak Stuffed Shells

    • Pair with a fresh green salad drizzled with balsamic vinaigrette for a light side dish.
    • Serve with crusty garlic bread to soak up the cheesy goodness.
    • Offer a selection of beverages like iced tea or a light beer.
    • Garnish the shells with additional parsley for a vibrant presentation.

    FAQs about Philly Cheesesteak Stuffed Shells

    Can I make the Philly cheesesteak stuffed shells ahead of time? Absolutely! You can prepare the stuffed shells a day in advance. Just cover and refrigerate them before baking. When you’re ready, pop them in the oven, adjusting the baking time as needed.

    What kind of steak is best for this recipe? Thinly sliced steak sirloin or ribeye works wonders. However, feel free to use beef leftovers or even pre-cooked steak to save time.

    Can I freeze the stuffed shells? Yes, these Philly cheesesteak stuffed shells freeze beautifully! Just make sure to freeze them before baking, and when you’re ready, simply bake from frozen, adding a little extra time to ensure they’re heated through.

    What’s a good side dish to serve with this meal? A fresh green salad or some garlic bread pairs perfectly with the richness of the stuffed shells. It creates a wonderful balance on your plate!

    Can I use gluten-free pasta for this recipe? Absolutely! Just look for gluten-free jumbo pasta shells at your local grocery store. They work just as well in creating this delightful dish.

    Final Thoughts

    Creating these Philly cheesesteak stuffed shells feels like a delightful celebration in my kitchen! Each bite brings together comforting flavors that remind me of family gatherings and cozy evenings. The joy of watching my loved ones savor these cheesy, steak-filled wonders is absolutely priceless. Plus, knowing I can whip them up quickly on a busy weeknight? That’s just icing on the cake! Whether it’s a special occasion or a casual dinner, this dish truly brings happiness to the table. I can’t wait for you to experience this comforting delight!


    Print

    clock clock iconcutlery cutlery iconflag flag iconfolder folder iconinstagram instagram iconpinterest pinterest iconfacebook facebook iconprint print iconsquares squares iconheart heart iconheart solid heart solid icon

    Description

    Philly cheesesteak stuffed shells are a delicious fusion of classic cheesesteak flavors and pasta, making them a must-try delight!


    • 12 ounces jumbo pasta shells
    • 1 pound thinly sliced steak sirloin or ribeye, cut into small pieces
    • 2 Tablespoons olive oil
    • 1 onion thinly sliced
    • 1 green bell pepper thinly sliced
    • 8 ounces mushrooms sliced
    • salt and pepper to taste
    • 1 teaspoon garlic powder
    • 1 teaspoon onion powder
    • 1 cup beef broth
    • 8 ounces cream cheese softened
    • 2 cups shredded mozzarella cheese divided
    • 1 cup shredded provolone cheese
    • 1/2 cup grated Parmesan cheese
    • 1/4 cup chopped fresh parsley
    • Cooking spray

    1. Preheat your oven to 375°F (190°C).
    2. Cook the jumbo pasta shells according to the package instructions cooking to al dente. Drain and set aside.
    3. In a large skillet, heat olive oil over medium-high heat. Add the thinly sliced steak and cook until it’s no longer pink. Remove the steak from the skillet and set it aside.
    4. In the same skillet, add a bit more olive oil if needed. Sauté the sliced onion, green bell pepper, and mushrooms until they are tender. Season with salt, pepper, garlic powder, and onion powder.
    5. Return the cooked steak to the skillet with the sautéed vegetables. Stir in the beef broth and let it simmer for a few minutes until most of the liquid has evaporated. Remove from heat.
    6. In a mixing bowl, combine the cream cheese, 1 cup of mozzarella cheese, provolone cheese, Parmesan cheese, and chopped parsley. Mix until well combined.
    7. Take each cooked jumbo shell and stuff it with a generous spoonful of the cheese mixture, then top with the Philly cheese steak mixture. Place the stuffed shells in a baking dish coated with cooking spray.
    8. Once all the shells are stuffed and arranged in the baking dish, sprinkle with the remaining mozzarella cheese. Cover the dish with foil and bake in the preheated oven for 20-25 minutes or until the cheese is melted and bubbly.
    9. Remove the foil and bake for an additional 5-10 minutes, allowing the tops to lightly brown.
    10. Serve the Philly Cheese Steak Stuffed Shells hot, garnished with additional chopped parsley if desired.

    Notes

    • For extra flavor, consider adding some Worcestershire sauce to the steak mixture.
    • Feel free to use other types of cheese as a substitute for provolone.
    • Prep Time: 20 minutes
    • Cook Time: 40 minutes
    • Category: Main Course
    • Method: Baking
    • Cuisine: American

    Nutrition

    • Serving Size: 1 stuffed shell
    • Calories: 350
    • Sugar: 3g
    • Sodium: 800mg
    • Fat: 22g
    • Saturated Fat: 10g
    • Unsaturated Fat: 8g
    • Trans Fat: 0g
    • Carbohydrates: 30g
    • Fiber: 2g
    • Protein: 15g
    • Cholesterol: 70mg

    Sharing is caring!

  • Fried Strawberry Cheesecake

    Fried Strawberry Cheesecake


    Introduction to Fried Strawberry Cheesecake

    Have you ever craved a dessert so delicious that you can almost taste it just thinking about it? Well, let me introduce you to Fried Strawberry Cheesecake—a delightful treat that’s perfect for any occasion. This recipe marries the creamy goodness of cheesecake with the sweet-tartness of strawberries, all wrapped in a crispy coating. Whether you’re looking for a quick solution after a hectic day or a showstopper to impress friends and family, this dessert checks all the boxes. Trust me, it’s a sweet escape that you and your loved ones will adore!

    Why You’ll Love This Fried Strawberry Cheesecake

    This Fried Strawberry Cheesecake is more than just a dessert; it’s an experience! It’s easy to make, even on the busiest days. Plus, the taste is simply out of this world. The combination of warm, crispy coating with creamy cheesecake and juicy strawberries offers a flavor explosion with every bite. You’ll be amazed at how quickly this dessert disappears when you serve it at gatherings. Trust me, it’s a crowd-pleaser!

    Ingredients for Fried Strawberry Cheesecake

    Gathering the right ingredients is the first step to creating this mouthwatering Fried Strawberry Cheesecake. Each ingredient plays a unique role, contributing to the overall magical flavor. Here’s what you’ll need:

    • Cream Cheese: This is the star of the show—smooth and creamy—it forms the base of your cheesecake filling. Always opt for softened cream cheese for easy mixing.
    • Granulated Sugar: A sweet addition that balances the tartness of strawberries and enriches the creamy filling. It’s essential for that delicious cheesecake flavor.
    • Egg: This little wonder acts as a binder, helping the filling hold together beautifully. Just one large egg is all you need!
    • Vanilla Extract: A dash of this fragrant extract elevates the flavors, bringing warmth and depth to your cheesecake bite.
    • Pinch of Salt: Just a pinch enhances and balances the sweetness, ensuring the flavors shine through.
    • Fresh Strawberries: The juicy, sweet-tart heroes of this story! Make sure to choose ripe strawberries for the best flavor. They add a delightful freshness to each bite.
    • Lemon Juice: A little acidity from the lemon brightens the strawberry sauce, bringing out the fruit’s natural sweetness.
    • Water: Used to help create the perfect strawberry sauce texture.
    • All-Purpose Flour: This is for dredging—the first step to that crispy, crunchy coating.
    • Beaten Eggs: A second egg for dipping; this gives the panko breadcrumbs something to cling to, making those bites irresistibly crunchy!
    • Panko Breadcrumbs: These crisp-up beautifully and give our cheesecake bites that delightful crunch. You can use regular breadcrumbs, but panko offers a lighter texture.
    • Ground Cinnamon and Nutmeg: A sprinkle of these spices adds warmth and complexity, making each bite taste like a cozy dessert should.
    • Vegetable Oil: Essential for frying, look for an oil that can handle high heat without smoking. Think canola or peanut oil.
    • Graham Crackers: These provide the structure for your bites, acting as the sandwich that holds in all that creamy goodness.
    • Powdered Sugar: For that perfect finishing touch, dust it over your bites for sweetness and visual appeal.
    • Whipped Cream: To top off this indulgent delight, provide a fluffy cloud of whipped cream.
    • Chocolate Syrup: If you’re a chocolate lover like me, drizzle some chocolate syrup for an even richer dessert experience.

    For exact measurements, you’ll find all the details at the bottom of this article, ready for you to print out. Happy cooking!

    How to Make Fried Strawberry Cheesecake

    Ready to dive into the delightful world of Fried Strawberry Cheesecake? Follow these simple steps, and enjoy the fruits of your labor. With a little patience and love, you’ll create a dish that your family will cherish.

    Prepare the Strawberry Sauce

    First things first, let’s whip up that luscious strawberry sauce!

    In a medium saucepan, combine the sliced strawberries, granulated sugar, lemon juice, and water. Place the pan over medium heat and bring it to a gentle simmer, stirring occasionally. This simmering process is critical; it helps to bring out all the sweet flavors of the strawberries. Cook for about 10 to 15 minutes, or until the berries soften and the sauce thickens up nicely. Once it’s done, let it cool completely. If you’re in a hurry, pop it in the fridge for a bit to help speed things along.

    Make the Cheesecake Filling

    Next up is the cheesecake filling, and trust me, this step is a creamy dream!

    In a large mixing bowl, beat that softened cream cheese with an electric mixer until it’s smooth and creamy—this should take around 2 to 3 minutes. Gradually add the granulated sugar while mixing, letting it blend nicely. Don’t forget to scrape down the sides of the bowl to catch any sneaky bits. Once that’s mixed in, toss in the egg. Mix until just combined—overmixing can lead to a rubbery texture, and nobody wants that! Lastly, stir in the vanilla extract and a pinch of salt. This combination not only enhances the flavors but creates a beautiful harmony in your cheesecake filling.

    Assemble the Cheesecake Bites

    Now it’s time to put together our cheesecake bites!

    Start by laying out half of the graham cracker squares on a clean surface. Spoon or pipe a generous dollop of cheesecake filling onto each cracker. It should be dreamy enough to make you want to dive right in! Then, gently place another graham cracker square on top of the filling to create a sandwich. This is where the magic happens. Be sure to line up the bites on a baking sheet that’s lined with parchment paper. This keeps them from sticking, making your life much easier later on.

    Freeze

    Here comes the wait, but it’s worth it!

    Slide your baking sheet with the assembled cheesecake bites into the freezer. You’ll want to freeze them for at least 2 hours, or until they are firm and fully set. Can’t wait that long? You can freeze them overnight for perfect results. This step is crucial for effective frying later!

    Prepare the Breading Station

    While your bites are freezing, get your breading station ready. This part is super simple!

    Set three shallow dishes in a row. In the first dish, add all-purpose flour. In the second dish, whisk those beaten eggs until they’re nice and frothy. In the third dish, mix together the panko breadcrumbs, ground cinnamon, ground nutmeg, and a pinch of salt. Each one plays a unique role: the flour helps the egg stick, the egg binds everything together, and the panko gives that irresistible crunch.

    Bread the Frozen Cheesecake Bites

    Let’s get those bites all dressed up for frying!

    Take the frozen cheesecake bites out of the freezer. One at a time, dredge each bite in the flour, shaking off any excess. Then, dip it into the beaten eggs, allowing the extra to drip off. Finally, roll it in the panko breadcrumb mixture, using a gentle press to help it stick. This layering is what will give them their iconic crispy coating. Place the breaded bites back onto the parchment-lined baking sheet, ready for their second freeze!

    Freeze Again

    It’s time for one more quick chill!

    Return the breaded bites to the freezer for about 30 minutes. This step helps ensure they maintain their shape during frying. Plus, it sets the breading nicely!

    Fry the Cheesecake Bites

    Now, the moment we’ve all been waiting for: frying!

    Pour vegetable oil into a deep pot or Dutch oven—aim for about 2 to 3 inches deep. Heat the oil over medium heat until it reaches 350°F (175°C). This is the sweet spot for frying. Carefully add a few breaded cheesecake bites to the hot oil. Avoid overcrowding, or they won’t fry evenly. Fry for about 1 to 2 minutes on each side, or until they are golden brown and crispy. The sound of that frying oil is music to my ears!

    Drain

    We want to keep that crispy texture intact!

    Using a slotted spoon, gently remove the fried cheesecake bites from the oil. Place them on a wire rack lined with paper towels to let any excess oil drain off. This step is essential for maintaining their delicious crunch.

    Serve

    Finally, it’s time to dig in!

    Serve those warm, crispy cheesecake bites immediately. Drizzle them generously with the prepared strawberry sauce—trust me, it’s worth it! You can also dust them with powdered sugar and add a fluffy dollop of whipped cream. If you’re feeling fancy, toss on some fresh sliced strawberries or a drizzle of chocolate syrup for that extra treat! Enjoy every mouthful!

    Tips for Success

    • Don’t skip the freezing steps; they help the bites hold their shape while frying.
    • Use a thermometer to check the oil temperature for perfectly fried bites.
    • Feel free to get creative with toppings. Experiment with caramel sauce or nuts!
    • For a lighter option, air fry the bites instead of deep frying.
    • Always serve while warm for the best experience!

    Equipment Needed

    • Medium Saucepan: For making the strawberry sauce. A small pot works too.
    • Mixing Bowl: For the cheesecake filling. Any large bowl will do!
    • Baking Sheet: To freeze the bites. A dish like a casserole works if needed.
    • Shallow Dishes: For the breading station. You can use plates for easy access.
    • Deep Pot or Dutch Oven: For frying. A heavy skillet can work in a pinch.
    • Slotted Spoon: Ideal for removing bites from oil easily. A regular spoon can suffice.

    Variations on Fried Strawberry Cheesecake

    • Berry Medley: Swap out strawberries for a mix of your favorite berries like blueberries or raspberries. They add a delightful twist!
    • Chocolate Cheesecake: For all the chocolate lovers, mix in cocoa powder to the cheesecake filling for a rich chocolate flavor.
    • Gluten-Free Option: Use gluten-free graham crackers and panko breadcrumbs to make this dessert accessible for everyone.
    • Low-Sugar Version: Replace granulated sugar with a sugar substitute like stevia or erythritol to create a healthier version.
    • Stuffed Options: Try adding a layer of Nutella or caramel sauce inside the cheesecake bites for an extra flavor boost!

    Serving Suggestions for Fried Strawberry Cheesecake

    • Fresh Berries: Serve with a side of additional fresh strawberries or a berry medley for a colorful plate.
    • Ice Cream: Pair with a scoop of vanilla or strawberry ice cream for a delightful contrast of temperatures.
    • Elegant Plating: Arrange bites on a platter with a drizzle of chocolate syrup for visual appeal.
    • Coffee or Tea: A cup of rich coffee or a soothing herbal tea makes the perfect drink complement.
    • Whipped Topping: Top with freshly whipped cream for added indulgence and texture.

    FAQs about Fried Strawberry Cheesecake

    Curious about Fried Strawberry Cheesecake? You’re not alone! Here are some common questions that pop up, along with helpful answers.

    Can I make Fried Strawberry Cheesecake ahead of time?

    Absolutely! You can prepare the cheesecake bites, bread them, and freeze them until you’re ready to fry. This makes it easy for last-minute entertaining!

    What’s the best way to store leftover Fried Strawberry Cheesecake?

    If you have any leftovers (which is rare!), store them in an airtight container in the fridge for up to 2 days. Reheat in the oven to restore their crispy texture.

    Can I customize the filling for Fried Strawberry Cheesecake?

    Definitely! Feel free to mix in your favorite flavors, like chocolate chips, or even a splash of lemon zest for a refreshing twist!

    How do I know when the oil is hot enough for frying?

    A kitchen thermometer is your best friend. The oil should reach 350°F (175°C) before adding the cheesecake bites for perfect frying. If you don’t have one, drop a small piece of bread into the oil; if it sizzles, it’s ready!

    Can I air fry Fried Strawberry Cheesecake bites instead of deep frying?

    Yes! Cooking them in an air fryer is a healthier alternative. Just keep an eye on them to achieve that golden brown crunch!

    Final Thoughts

    Fried Strawberry Cheesecake is truly a celebration of flavors and textures that brings pure joy to any dessert table. With a crispy exterior and a luscious, creamy filling bursting with fresh strawberry goodness, this treat is bound to create happy memories. Whether you’re whipping them up for a cozy family night or a special gathering, the smiles you’ll see will make all the effort worthwhile. So, gather your loved ones, enjoy each bite, and create moments that’ll linger in your hearts long after the last crumb is gone. Trust me, this delightful recipe is a journey to sweetness!


    Print

    clock clock iconcutlery cutlery iconflag flag iconfolder folder iconinstagram instagram iconpinterest pinterest iconfacebook facebook iconprint print iconsquares squares iconheart heart iconheart solid heart solid icon

    Description

    Fried Strawberry Cheesecake is a delightful treat that combines the flavors of creamy cheesecake with the sweet tartness of strawberries, all encased in a crispy coating.


    • 8 ounces cream cheese, softened
    • 1/2 cup granulated sugar
    • 1 large egg
    • 1/2 teaspoon vanilla extract
    • Pinch of salt
    • 1 pound fresh strawberries, hulled and sliced
    • 1/4 cup granulated sugar
    • 1 tablespoon lemon juice
    • 1 tablespoon water
    • 1 cup all-purpose flour
    • 2 large eggs, beaten
    • 2 cups panko breadcrumbs
    • 1/2 teaspoon ground cinnamon
    • 1/4 teaspoon ground nutmeg
    • Pinch of salt
    • Vegetable oil, for frying (about 3-4 cups)
    • 1 package (14.3 ounces) graham crackers, broken into squares
    • Powdered sugar, for dusting
    • Whipped cream
    • Fresh strawberries, sliced
    • Chocolate syrup

    1. Prepare the Strawberry Sauce: In a medium saucepan, combine the sliced strawberries, granulated sugar, lemon juice, and water. Place over medium heat and bring to a simmer, stirring occasionally. Reduce heat to low and cook for 10-15 minutes, or until strawberries soften and the sauce thickens slightly. Stir frequently. Remove from heat and let cool completely (refrigerate to speed up).
    2. Make the Cheesecake Filling: In a large bowl, beat softened cream cheese with an electric mixer until smooth and creamy (2-3 minutes). Gradually add granulated sugar, beating until well combined. Scrape down the sides of the bowl as needed. Beat in the egg until just combined (do not overmix). Stir in vanilla extract and salt until well incorporated.
    3. Assemble the Cheesecake Bites: Lay out half of the graham cracker squares. Spoon or pipe a generous amount of cheesecake filling onto each square. Top with another graham cracker square to create a sandwich. Place assembled bites on a baking sheet lined with parchment paper.
    4. Freeze: Freeze the cheesecake bites for at least 2 hours, or until firm (can freeze overnight).
    5. Prepare the Breading Station: In a shallow dish, place the all-purpose flour. In a second shallow dish, whisk the eggs. In a third shallow dish, combine the panko breadcrumbs, ground cinnamon, ground nutmeg, and salt. Mix well.
    6. Bread the Frozen Cheesecake Bites: Remove frozen cheesecake bites from the freezer. One at a time, dredge each bite in the flour (shake off excess), then dip in the beaten eggs (let excess drip off), and finally dredge in the panko breadcrumb mixture (press gently to adhere). Place breaded bites back on the parchment-lined baking sheet.
    7. Freeze Again: Return the breaded cheesecake bites to the freezer for at least 30 minutes.
    8. Fry the Cheesecake Bites: Pour vegetable oil into a deep pot or Dutch oven until it is about 2-3 inches deep. Heat the oil over medium heat until it reaches a temperature of 350°F (175°C). Carefully place a few breaded cheesecake bites into the hot oil (do not overcrowd). Fry for about 1-2 minutes per side, or until golden brown and crispy.
    9. Drain: Remove fried cheesecake bites from the oil using a slotted spoon and place them on a wire rack lined with paper towels to drain any excess oil.
    10. Serve: Serve the fried cheesecake bites immediately while they are still warm and crispy. Drizzle generously with the prepared strawberry sauce. Optional: Dust with powdered sugar, top with whipped cream, add fresh sliced strawberries, or drizzle with chocolate syrup. Enjoy!

    Notes

    • Make sure to freeze the cheesecake bites thoroughly for the best frying results.
    • Use a thermometer to check the oil temperature for optimal frying.
    • Feel free to customize the toppings based on personal preferences.
    • Prep Time: 30 minutes
    • Cook Time: 15 minutes
    • Category: Dessert
    • Method: Frying
    • Cuisine: American

    Nutrition

    • Serving Size: 1 bite
    • Calories: 200
    • Sugar: 10g
    • Sodium: 150mg
    • Fat: 10g
    • Saturated Fat: 3g
    • Unsaturated Fat: 5g
    • Trans Fat: 0g
    • Carbohydrates: 25g
    • Fiber: 1g
    • Protein: 3g
    • Cholesterol: 40mg

    Sharing is caring!

  • Honey Garlic Butter Shrimp & Broccoli

    Honey Garlic Butter Shrimp & Broccoli


    Introduction to Honey Garlic Butter Shrimp & Broccoli

    Hey there, fellow food lovers! If you’re anything like me, your busy days often leave you craving a quick, flavorful meal that can wow your family. That’s where my Honey Garlic Butter Shrimp & Broccoli recipe comes in. It’s a delightful fusion of sweet and savory, making it a perfect weeknight dinner or a dish to impress on a special occasion. Plus, you can whip it up in no time, so you can savor moments with your loved ones instead of being stuck in the kitchen. Are you ready to dive into this culinary adventure?

    Why You’ll Love This Honey Garlic Butter Shrimp & Broccoli

    This Honey Garlic Butter Shrimp & Broccoli dish is an absolute game-changer for busy nights. It’s quick to prepare, taking only about 25 minutes from start to finish—perfect for those evenings when you’re juggling a million things.

    The balance of sweet honey and savory garlic creates a taste that your whole family will adore. Trust me, this recipe will turn any ordinary dinner into an exciting culinary experience!

    Ingredients for Honey Garlic Butter Shrimp & Broccoli

    Gathering the right ingredients for Honey Garlic Butter Shrimp & Broccoli is the first step to culinary bliss. Here’s what you’ll need:

    • Honey: This liquid gold adds natural sweetness, helping balance the savory elements of the dish.
    • Soy Sauce: Low sodium soy sauce is a must for a salty kick without overshadowing the other flavors.
    • Fresh Grated Ginger: A zingy addition that enhances the overall flavor profile, giving a warm and spicy note.
    • Minced Garlic: Garlic is the aromatic foundation of this dish, adding its signature depth and savory essence.
    • Red Pepper Flakes: For a hint of heat, but you can adjust the amount based on your spice tolerance; after all, no one wants a dish that’s too fiery!
    • Cornstarch: This thickening agent will ensure the sauce clings deliciously to the shrimp and broccoli.
    • Large Shrimp: The star of the show! Peeled and deveined shrimp cook up tender and perfectly absorbent.
    • Butter: Adds richness and flavor, creating that truly luscious sauce we crave.
    • Chopped Broccoli: This colorful veggie not only brings crunch but also packs a nutritional punch.
    • Olive Oil: Just a drizzle is needed for sautéing the broccoli, bringing a nice touch of healthy fat.
    • Salt & Pepper: Essential for seasoning to help each ingredient shine in this delightful dish.

    For exact measurements, check the bottom of the article where you can easily print this recipe.

    How to Make Honey Garlic Butter Shrimp & Broccoli

    Prepare the Sauce

    Let’s kick things off by whipping up our luscious sauce! In a small bowl, combine honey, low sodium soy sauce, fresh grated ginger, minced garlic, and red pepper flakes. Give it a good stir until everything is blended. The sweet honey will dance with the savory soy sauce, creating a balance that’s simply divine. Ginger and garlic add layers of flavor, making it aromatic and tempting. This sauce is truly the heart of the dish, coating each ingredient with a lovely glaze. Trust me; once you taste it, you’ll be back for seconds!

    Marinate the Shrimp

    Next, let’s get those shrimp flavorful! Place the peeled and deveined shrimp into a bowl and pour about a third of your prepared sauce over them. Give it a gentle toss to ensure they’re well-coated. Allowing the shrimp to marinate for a few minutes is key; it enhances their flavor and helps them soak up that sweet and tangy goodness. You’ll find that when they cook, they’ll carry that deliciousness into every bite!

    Cook the Broccoli

    Now, it’s time for the green star of our show! Heat a skillet or wok over high heat and drizzle with olive oil. Toss in your chopped broccoli, sprinkle with salt and pepper, and sauté for about 5-6 minutes. Keep an eye on it; you want the broccoli to be vibrant and slightly tender but still crisp. Overcooking can lead to mushy greens, and nobody wants that! The bright color and crunch will add a delightful contrast to our dish.

    Cook the Shrimp

    With the broccoli set aside, it’s time to cook the shrimp! In the same skillet, melt a couple of tablespoons of butter and add the marinated shrimp. Discard any leftover marinade to avoid extra liquid. Cook them for about 2 minutes on each side until they turn a beautiful pink color. This vibrant hue is an excellent sign that they’re done! The butter will add richness, making every bite extra special.

    Combine and Simmer

    Next comes the magic! Pour the reserved sauce into the skillet with the shrimp. Bring it to a gentle simmer and let it thicken up for about 2-3 minutes. This step creates a delicious coating that clings to the shrimp perfectly. The fragrant aroma coming from your pan will have your whole family wandering into the kitchen in no time! It’s all about getting that syrupy consistency that makes every bite satisfying.

    Final Touches

    Finally, it’s time for the crowning moment! Toss the sautéed broccoli back into the skillet with the shrimp and sauce. Give everything a quick toss so it warms through and combines beautifully. Serve your Honey Garlic Butter Shrimp & Broccoli over a fluffy bed of rice or your favorite pasta for an impressive plate. Don’t forget to drizzle any remaining sauce on top; it’s like icing on the cake! Your family will be begging for this dish again and again!

    Tips for Success

    • Prep all your ingredients before you start cooking to streamline the process.
    • Use fresh shrimp for the best flavor and texture; frozen shrimp works too, just ensure it’s fully thawed.
    • Taste the sauce before adding the shrimp; adjust sweetness or heat to your liking.
    • Don’t overcrowd the pan while cooking; it helps shrimp cook evenly.
    • Double the sauce if you love extra glaze over your rice or pasta!

    Equipment Needed

    • Skillet or Wok: A cast-iron skillet is ideal, but any large skillet will work well.
    • Mixing Bowl: For preparing your sauce and marinating the shrimp.
    • Whisk: Perfect for combining the sauce; a fork works too!
    • Spatula or Tongs: To help keep everything moving in the skillet.
    • Measuring Cups and Spoons: Necessary for accurate ingredient measurements.

    Variations for Honey Garlic Butter Shrimp & Broccoli

    • Chicken Swap: If shrimp isn’t your thing, replace it with diced chicken breast or thighs for a equally delicious protein-packed dish!
    • Tofu Delight: For a vegetarian twist, use firm tofu instead of shrimp. Just press the tofu to remove excess moisture before marinating.
    • Vegetable Medley: Add more veggies like snap peas, bell peppers, or carrots for added color and nutrition. Just adjust the sauté time accordingly.
    • Spicy Upgrade: Kick up the heat by adding sliced jalapeños or increasing the amount of red pepper flakes in the sauce.
    • Coconut Twist: Incorporate coconut milk with the sauce for extra creaminess and a tropical flavor boost!

    Serving Suggestions

    • Serve your Honey Garlic Butter Shrimp & Broccoli over fluffy jasmine rice or whole wheat noodles for an extra hearty meal.
    • Pair it with a light green salad drizzled with vinaigrette for a refreshing contrast.
    • A chilled glass of white wine, like Sauvignon Blanc, complements the dish beautifully.
    • Garnish with a sprinkle of sesame seeds or sliced green onions for an appealing presentation.

    FAQs about Honey Garlic Butter Shrimp & Broccoli

    Can I make this recipe ahead of time?
    Absolutely! You can prepare the sauce and marinate the shrimp a few hours beforehand. Just keep everything in the fridge and cook when you’re ready. This makes weeknight dinners even easier!

    Can I use frozen shrimp for this recipe?
    Yes, frozen shrimp works perfectly fine! Just make sure you fully thaw them before cooking. You want them to absorb all the delicious flavors of the Honey Garlic Butter sauce.

    What can I substitute for the soy sauce?
    If you’re looking for a gluten-free option, coconut aminos is an excellent alternative. It’s a great way to enjoy the same savory flavor without the gluten.

    Can I make this dish spicy?
    Definitely! You can increase the amount of red pepper flakes in the sauce, or even add some sliced fresh chili peppers to the mix for a fiery kick!

    How can I store leftovers?
    Store your Honey Garlic Butter Shrimp & Broccoli in an airtight container in the fridge for up to 2-3 days. Reheat gently in a skillet over low heat to keep the shrimp tender.

    Final Thoughts

    Creating this Honey Garlic Butter Shrimp & Broccoli dish is like inviting a burst of sunshine into your kitchen. Not only is it quick and easy, but the flavor will make your heart sing. Each mouthful delivers a dance of sweet and savory goodness that transforms any ordinary dinner into something special.

    Whether it’s a busy weeknight or a casual get-together, this recipe brings warmth and joy to your table. I hope you find as much happiness in preparing and sharing this dish as I do. Trust me, your loved ones will be asking for seconds!


    Print

    clock clock iconcutlery cutlery iconflag flag iconfolder folder iconinstagram instagram iconpinterest pinterest iconfacebook facebook iconprint print iconsquares squares iconheart heart iconheart solid heart solid icon

    Description

    A quick and tasty meal featuring shrimp and broccoli in a sweet and savory honey garlic butter sauce.


    • 1/2 cup honey
    • 1/4 cup low sodium soy sauce
    • 1 teaspoon fresh grated ginger
    • 2 tablespoons minced garlic
    • 1/4 teaspoon red pepper flakes
    • 1 teaspoon cornstarch
    • 1 pound large shrimp peeled, deveined and tails removed if desired
    • 2 tablespoons butter
    • 2 cups chopped broccoli
    • 1 teaspoon olive oil
    • Salt & pepper to taste

    1. In a small bowl add the honey, soy sauce, ginger, garlic, red pepper, and mix until combined.
    2. Place the peeled and deveined shrimp into a bowl and add 1/3 of the sauce.
    3. Whisk in the cornstarch to the reserved marinade and set aside.
    4. Heat a skillet (I use cast iron) or wok on high heat, add olive oil and broccoli, salt and pepper and cook 5-6 minutes just until soft. Remove from pan and set aside.
    5. Add the butter to the skillet and add shrimp discarding any marinade. Cook until the shrimp turns pink about 2 minutes on each side.
    6. Add in the reserved sauce and bring to a low-medium simmer until thickened about 2-3 minutes.
    7. Add in the broccoli and toss until heated through.
    8. Serve over rice or pasta.

    Notes

    • For a spicier kick, increase the amount of red pepper flakes.
    • You can substitute shrimp with chicken or tofu for different protein options.
    • This dish pairs well with steamed rice or noodles.
    • Prep Time: 10 minutes
    • Cook Time: 15 minutes
    • Category: Main Course
    • Method: Stovetop
    • Cuisine: Asian

    Nutrition

    • Serving Size: 1 cup
    • Calories: 350
    • Sugar: 15g
    • Sodium: 600mg
    • Fat: 10g
    • Saturated Fat: 5g
    • Unsaturated Fat: 3g
    • Trans Fat: 0g
    • Carbohydrates: 30g
    • Fiber: 3g
    • Protein: 25g
    • Cholesterol: 200mg

    Sharing is caring!

  • Cheesy Sausage and Egg Wraps

    Cheesy Sausage and Egg Wraps


    Introduction to Cheesy Sausage and Egg Wraps

    Life can be a whirlwind, can’t it? Mornings often rush in like a stampede, leaving little time for breakfast. That’s where my Cheesy Sausage and Egg Wraps come in! This delightful recipe is not just about convenience; it’s about creating a fulfilling start to your day. Picture cheesy scrambled eggs, savory sausage, all wrapped snugly in a warm tortilla—the perfect grab-and-go meal. You can whip these up in mere minutes, making them an ideal solution for busy moms and professionals alike. Trust me, there’s nothing quite like a breakfast that’s quick, tasty, and cheering!

    Why You’ll Love This Cheesy Sausage and Egg Wraps

    Let’s face it: mornings can be chaotic. But these Cheesy Sausage and Egg Wraps are a game changer! They’re not only quick to prepare, but they also pack a flavorful punch that your taste buds will adore. Plus, you can customize them with your favorite fillings. Whether you’re juggling kids or a hectic work schedule, these wraps make breakfast feel like a treat instead of a chore!

    Ingredients for Cheesy Sausage and Egg Wraps

    Gathering the right ingredients is the first step in creating these scrumptious Cheesy Sausage and Egg Wraps. Here’s what you’ll need:

    • Large eggs: The star of our dish. They provide protein and create a fluffy texture when scrambled.
    • Milk: Just a splash adds creaminess to the eggs, making them even more delightful.
    • Salt and black pepper: These basic seasonings enhance the flavor, giving the eggs that extra oomph!
    • Butter: This adds richness and helps prevent the eggs from sticking to the skillet.
    • Breakfast sausage: Whether links or ground, the savory goodness of sausage brings a hearty element to the wraps.
    • Large flour tortillas: The perfect wrappers to hold everything together. Opt for whole wheat for a healthier twist!
    • Shredded cheddar cheese: I’m partial to sharp cheddar, but feel free to use your favorite cheese for that melty goodness!

    Want to shake things up? You can add colorful veggies like bell peppers or onions for extra flavor and nutrition. If you’re short on time, pre-cooked sausage works well too!

    All ingredient measurements are at the end of this article, ready for easy printing. Let’s get cooking!

    How to Make Cheesy Sausage and Egg Wraps

    Creating Cheesy Sausage and Egg Wraps is as easy as pie! Follow these simple steps, and you’ll soon have a delicious breakfast ready to go.

    Step 1: Whisk the Eggs

    Start by cracking those large eggs into a bowl. Add in the milk, salt, and pepper. Whisk them together until well combined. The milk helps create a fluffier texture, while the salt and pepper enhance the eggs’ flavor. This mixture is the foundation of your cheesy delight!

    Step 2: Cook the Sausage

    Next, heat up a skillet over medium heat. Add the breakfast sausage links or crumbled ground sausage. Cook until browned and nice and crumbly. This step is crucial—the browning adds amazing depth of flavor. Once cooked, set the sausage aside. You’ll want that savory goodness ready to combine later!

    Step 3: Scramble the Eggs

    In the same skillet, melt a tablespoon of butter. Watch it sizzle as it coats the pan—this is where the magic happens! Pour in the egg mixture. Stroke the eggs gently as they cook, bringing the edges to the center. When they’re just set, remove them from the heat. That buttery richness makes all the difference!

    Step 4: Assemble the Wraps

    Now for the fun part! Lay out your warm flour tortillas. Divide the scrambled eggs and sausage evenly among them, then sprinkle on the cheese. Carefully roll each tortilla tightly, like a little present. This way, your wraps will be easy to handle, making breakfast on-the-go a breeze!

    Tips for Success

    • Use fresh ingredients for the best flavor and texture.
    • Don’t overcook the eggs; they should remain fluffy and creamy.
    • Warm the tortillas slightly before assembling to make them more pliable.
    • If prepping in advance, store wraps in an airtight container in the fridge.
    • Experiment with different cheeses or add-ins to keep things exciting!

    Equipment Needed

    • Mixing bowl: For whisking your egg mixture. A large measuring cup works too!
    • Skillet: A non-stick skillet is ideal for scrambling eggs. Any frying pan will do!
    • Spatula: Essential for gently scrambling the eggs and folding the wraps.
    • Tortilla warmer: Keeps your tortillas warm; a clean kitchen towel can work instead!

    Variations of Cheesy Sausage and Egg Wraps

    • Veggie Lovers: Add diced bell peppers, onions, or spinach for a healthier twist packed with nutrients!
    • Spicy Kick: Toss in some jalapeños or sriracha for a fiery flavor that’ll wake up your taste buds.
    • Cheese Fanatics: Experiment with different cheeses like pepper jack or feta for a flavor upgrade.
    • Whole Wheat Option: Use whole wheat tortillas instead of regular for added fiber and a nutty flavor.
    • Gluten-Free Version: Swap in gluten-free tortillas to make this recipe friendly for those with dietary restrictions.
    • Herbed Delight: Sprinkle in fresh herbs like chives or cilantro for a fresh burst of flavor.

    Serving Suggestions for Cheesy Sausage and Egg Wraps

    • Pair your wraps with a side of fresh fruit for a balanced breakfast.
    • Serve with a dollop of salsa or avocado for an extra zing!
    • A tall glass of orange juice or your favorite smoothie complements the meal perfectly.
    • Present wraps neatly on a platter for a delightful brunch experience.
    • Wrap them in parchment paper for a charming, on-the-go presentation!

    FAQs about Cheesy Sausage and Egg Wraps

    Curious about making Cheesy Sausage and Egg Wraps? Here are some frequently asked questions that might help you out!

    Can I make these Cheesy Sausage and Egg Wraps ahead of time?

    Absolutely! You can prepare the wraps in advance and store them in the fridge for up to three days. Just reheat them before serving to enjoy that fresh taste!

    Can I freeze Cheesy Sausage and Egg Wraps?

    Yes, these wraps freeze beautifully! Wrap each one tightly in foil or plastic wrap and then place them in a freezer-safe bag. They can be stored for up to three months. Just thaw and reheat when you’re ready!

    What can I use instead of sausage?

    If you prefer a different protein, feel free to swap sausage for cooked bacon, turkey sausage, or even tempeh for a vegetarian option. The possibilities are endless!

    Can kids help make these wraps?

    Definitely! Making Cheesy Sausage and Egg Wraps is a fun, hands-on activity for kids. They can help whisk the eggs or assemble the wraps, making breakfast a family affair.

    What’s a good dipping sauce for these wraps?

    Try a spicy salsa, creamy ranch, or even guacamole to elevate your wraps. They add a delightful twist that everyone will love!

    Final Thoughts

    There’s something incredibly satisfying about having a hot, delicious breakfast ready to go in just a short time. My Cheesy Sausage and Egg Wraps have brought me joy on those bustling mornings, ensuring I start my day with a smile. Not only are they customizable and easy to prepare, but they also make breakfast feel a little more special. Whether you enjoy them at home or on the run, these wraps are sure to become a favorite in your family. So roll up those tortillas and savor the delightful flavors; your mornings just got a flavorful upgrade!


    Print

    clock clock iconcutlery cutlery iconflag flag iconfolder folder iconinstagram instagram iconpinterest pinterest iconfacebook facebook iconprint print iconsquares squares iconheart heart iconheart solid heart solid icon

    Description

    A quick and delicious breakfast option featuring cheesy scrambled eggs and savory sausage wrapped in a flour tortilla.


    • 6 large eggs
    • 2 tablespoons milk
    • 1/4 teaspoon salt
    • 1/4 teaspoon black pepper
    • 1 tablespoon butter
    • 4 breakfast sausage links or 1/2 pound ground breakfast sausage
    • 4 large flour tortillas (8-inch size)
    • 1 cup shredded cheddar cheese (or your favorite cheese)

    1. In a bowl, whisk together eggs, milk, salt, and pepper.
    2. In a skillet, cook sausage until browned and crumbled. Remove from skillet and set aside.
    3. In the same skillet, melt butter and pour in the egg mixture. Cook and scramble until set.
    4. Divide sausage, scrambled eggs, and cheese among tortillas. Roll up tightly.

    Notes

    • Feel free to add vegetables such as bell peppers or onions for extra flavor.
    • This recipe can be easily doubled for larger servings.
    • These wraps are great for meal prep and can be stored in the refrigerator or freezer.
    • Prep Time: 10 minutes
    • Cook Time: 15 minutes
    • Category: Breakfast
    • Method: Skillet
    • Cuisine: American

    Nutrition

    • Serving Size: 1 wrap
    • Calories: 380
    • Sugar: 1g
    • Sodium: 800mg
    • Fat: 25g
    • Saturated Fat: 10g
    • Unsaturated Fat: 10g
    • Trans Fat: 0g
    • Carbohydrates: 25g
    • Fiber: 2g
    • Protein: 19g
    • Cholesterol: 300mg

    Sharing is caring!