Author: IHAAL Team

  • Brown Butter Mushroom Pasta

    Brown Butter Mushroom Pasta


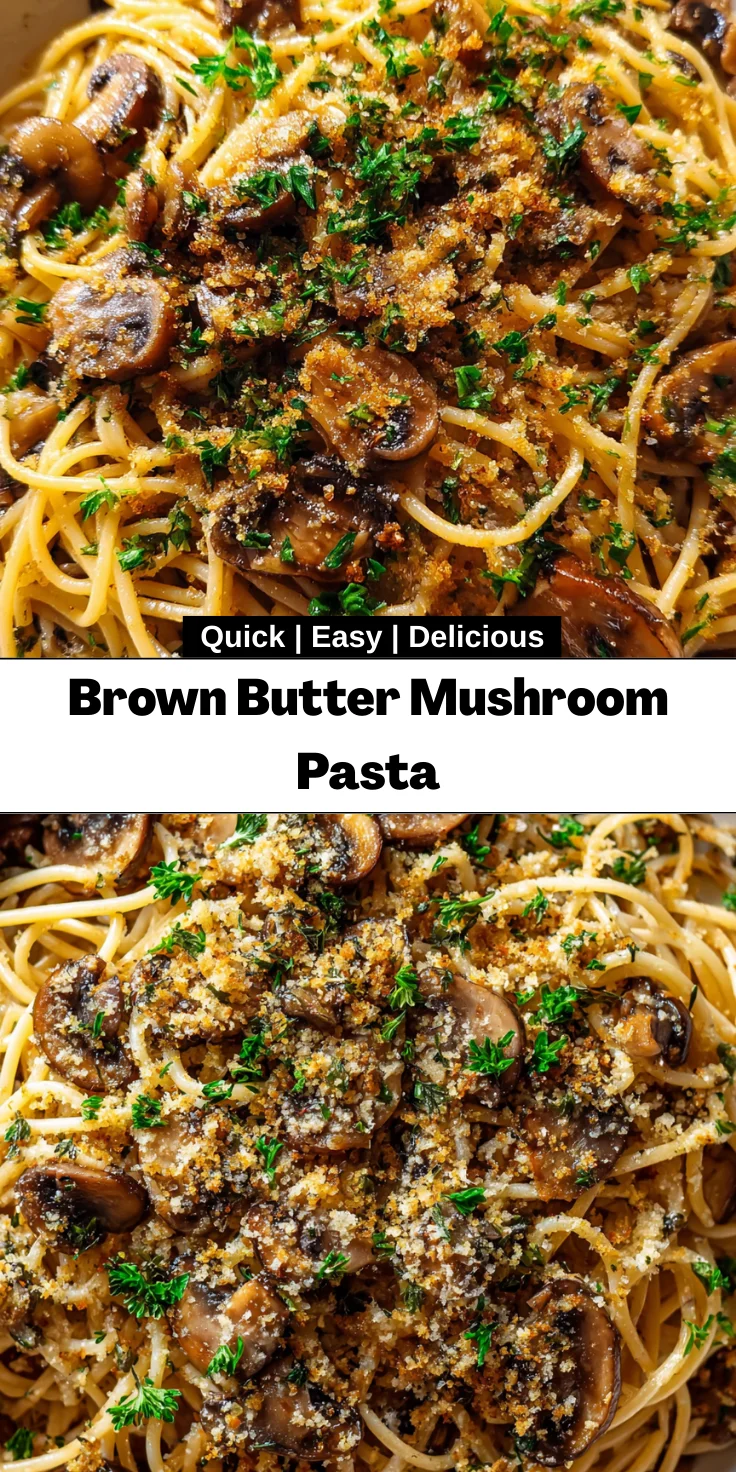
    Introduction to Brown Butter Mushroom Pasta

    As a home cook who truly loves experimenting in the kitchen, I often find myself searching for that perfect recipe that’s simple yet bursting with flavor. Enter the Brown Butter Mushroom Pasta: it’s become one of my go-to meals for those busy weeknights or when I want to impress guests without spending hours cooking. This dish brings together the nutty aroma of browned butter and the earthy richness of mushrooms. It’s comforting, quick to prepare, and perfect for making everyone feel special at the table. Trust me, your loved ones will be asking for seconds!

    Why You’ll Love This Brown Butter Mushroom Pasta

    This Brown Butter Mushroom Pasta is truly a lifesaver for busy moms and professionals. It takes just 30 minutes from start to finish, allowing you to savor each moment instead of rushing through dinner. The rich, nutty flavor of brown butter pairs perfectly with tender mushrooms, creating an irresistible dish that feels gourmet without the fuss. Plus, it’s vegetarian-friendly, making it a hit with everyone at the table!

    Ingredients for Brown Butter Mushroom Pasta

    Let’s talk about what you’ll need to create this delicious Brown Butter Mushroom Pasta. I find it helpful to have everything prepped and ready to go before cooking; it makes the process feel smooth and less chaotic. Below is a list of ingredients to gather:

    • Dried spaghetti: This classic pasta works perfectly, but feel free to use any shape you love.
    • Extra-virgin olive oil: A splash of this adds flavor while sautéing the breadcrumbs; it’s a pantry must-have.
    • Fresh French-style breadcrumbs: These add a delightful crunch on top. You can make your own or buy them at the store.
    • Kosher salt: Essential for seasoning, it enhances the dish without overpowering it. Use to taste.
    • Freshly ground black pepper: Adds a warm kick—always better than pre-ground!
    • Unsalted butter: The star of this dish; browning it brings out its nutty flavor that you’ll absolutely adore.
    • Garlic: Minced garlic infuses everything with a savory punch that elevates the dish.
    • Cremini mushrooms: These mushrooms offer a rich, earthy taste. You could swap them for shiitake or button mushrooms if needed.
    • Fresh thyme: Just a sprig or two gives a bright herbal note; substitutes like oregano work in a pinch!
    • Fresh parsley: Chopped for garnish, it brightens up the plate and adds color.

    For exact quantities, check out the bottom of the article where they’re available for printing. Happy cooking!

    How to Make Brown Butter Mushroom Pasta

    Now comes the best part—creating this delicious Brown Butter Mushroom Pasta. I promise, you don’t need to be a professional chef for this. Just follow these simple steps, and you’ll have a comforting meal that’s bursting with flavor. Let’s dive in!

    Step 1: Cook the Pasta

    Start by bringing a large pot of salted water to a boil. It’s like welcoming your pasta to a nice hot spa—it deserves it! Once boiling, add your dried spaghetti and cook according to the package instructions until it’s al dente. Make sure to taste a strand to check for doneness! Once it’s ready, drain the spaghetti thoroughly and set it aside. Keep the pasta water handy if you need to adjust the consistency later!

    Step 2: Prepare Toasted Breadcrumbs

    In a large skillet, heat a tablespoon of extra-virgin olive oil over medium heat. Add your fresh breadcrumbs and watch them sizzle. Stir often to prevent burning. You’re looking for a golden, crisp finish—this should take about 3 to 5 minutes. Season them with kosher salt and freshly ground black pepper to taste. Once they’re crispy and inviting, transfer them to a bowl and set aside. They’ll add the perfect crunch to your dish!

    Step 3: Create the Brown Butter

    In the same skillet, lower the heat a bit and add your unsalted butter. As the butter melts, watch for it to foam and turn a lovely golden-brown color—this should take about 3 to 4 minutes. Swirl the pan occasionally; it’s like giving your butter a little dance. The nutty aroma that fills your kitchen is truly something special, and that’s what will elevate your Brown Butter Mushroom Pasta.

    Step 4: Add Garlic and Mushrooms

    Once your butter is beautifully browned, toss in the minced garlic. Sauté for about a minute until it’s fragrant—this is when your kitchen smells like a cozy Italian restaurant! Next, add the sliced cremini mushrooms and fresh thyme sprigs. Crank the heat up to medium, stirring occasionally. Cook until the mushrooms are browned and tender, which should take about 3 to 5 minutes. Don’t forget to season with salt and pepper! When they’re golden, remove the thyme sprigs and discard.

    Step 5: Combine Pasta with Mushroom Mixture

    Now, it’s time to marry the pasta with all these incredible flavors. Add your drained spaghetti to the skillet, tossing it gently in that rich mushroom-butter mixture. Make sure every strand gets coated; this is where the magic happens! If your pasta seems a bit dry, don’t hesitate to add a splash of the reserved pasta water—it’ll bring everything together beautifully.

    Step 6: Serve the Dish

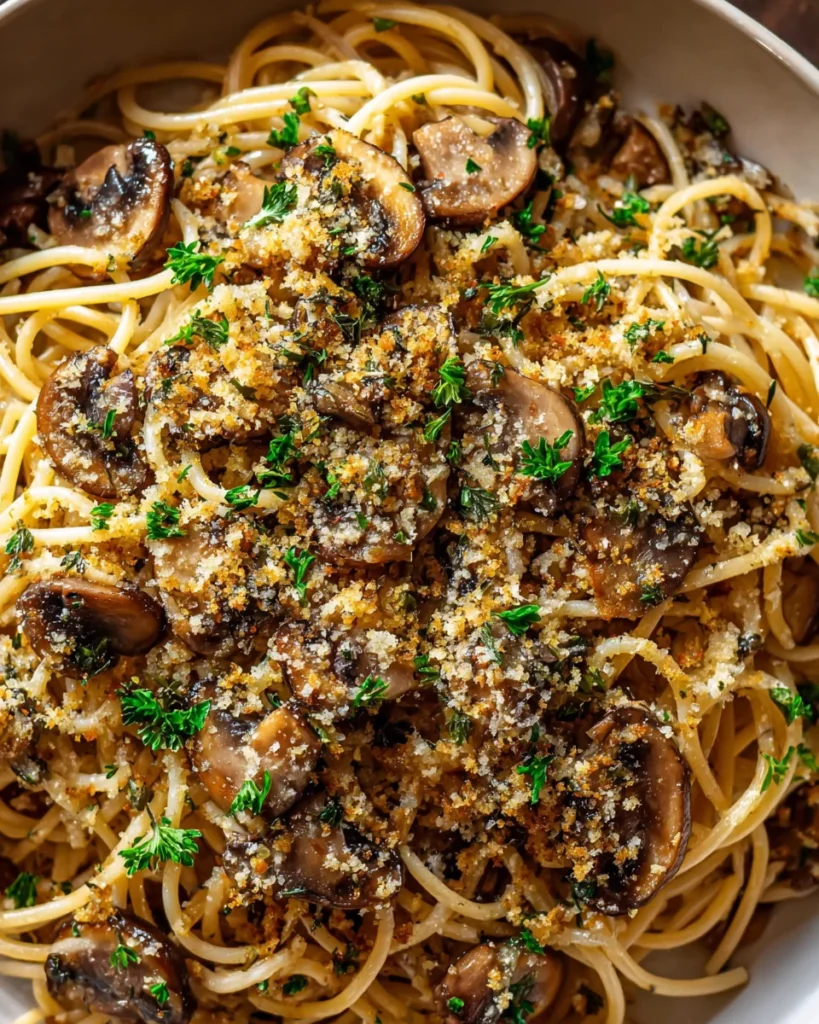
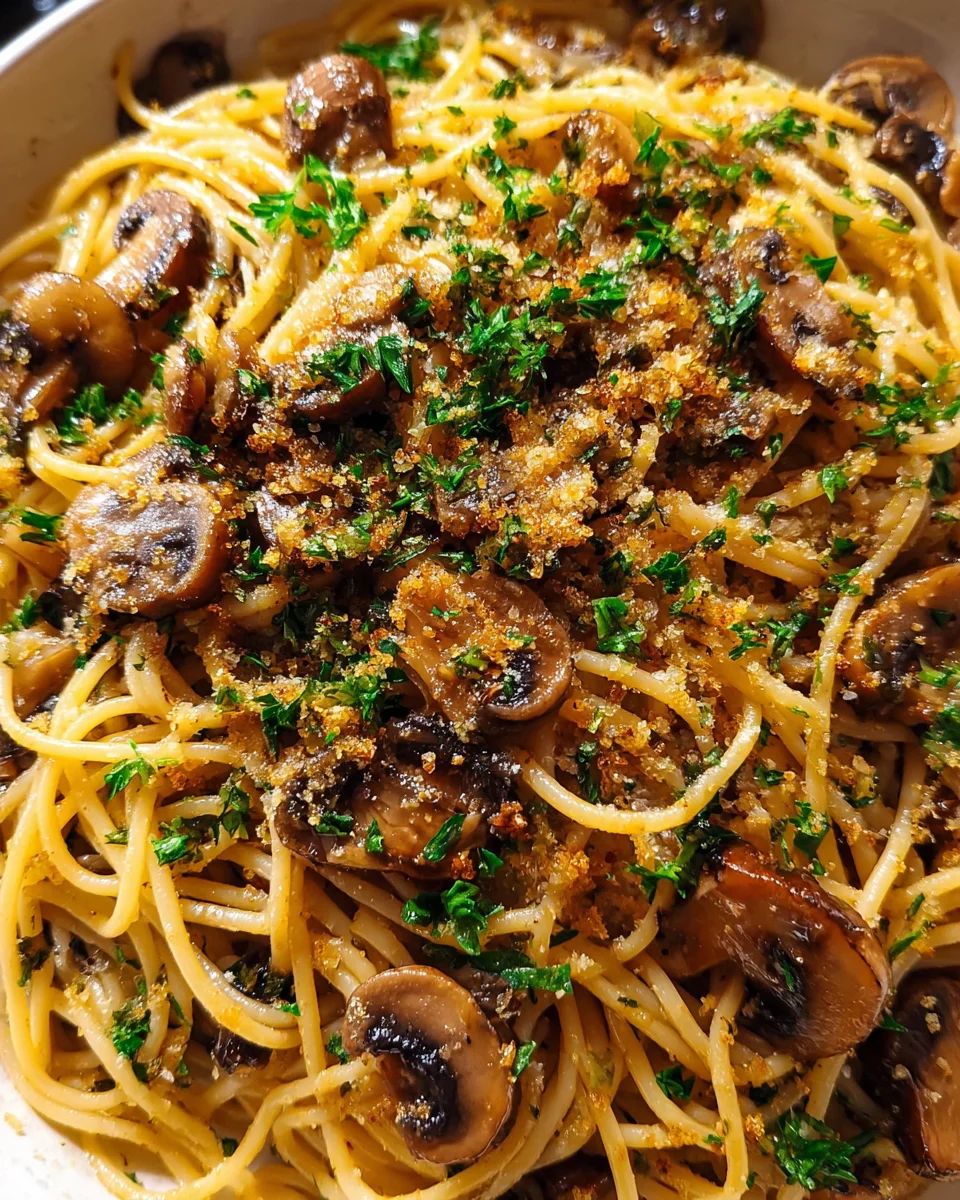
    It’s time to plate up your masterpiece! Divide the pasta among serving plates, ensuring everyone gets a fair share of those crispy breadcrumbs. Top each plate with your prepared toasted breadcrumbs and a sprinkle of chopped parsley for that vibrant color contrast. Serve immediately and watch smiles light up your table. You’ve just created a mouthwatering experience with your Brown Butter Mushroom Pasta!

    Tips for Success

    • Always taste your pasta before draining to get the perfect al dente texture.
    • Use freshly grated cheese for a richer flavor; it can make a big difference!
    • Add a splash of white wine to the mushroom mixture for extra depth.
    • Keep an eye on the butter; it can go from brown to burnt quickly.
    • Feel free to switch up the mushrooms—variety is the spice of life!

    Equipment Needed

    • Large Pot: Essential for cooking pasta; a big saucepan works as well.
    • Large Skillet: Needed for browning butter and sautéing; a frying pan can also do the job.
    • Slotted Spoon: Perfect for transferring pasta; a regular spoon can work in a pinch.
    • Measuring Cups and Spoons: For precision; guesswork is not recommended!
    • Serving Plates: Ideal for presenting your delicious creation.

    Variations

    • Mushroom Medley: Experiment with a mix of different mushrooms like shiitake, portobello, or oyster to enhance flavor and texture.
    • Protein Boost: Add cooked chicken or shrimp for a heartier meal that’s still incredibly satisfying.
    • Vegan Option: Substitute the unsalted butter with vegan butter or olive oil, and omit the cheese for a plant-based delight.
    • Spicy Kick: Sprinkle in some red pepper flakes to elevate the flavor with a bit of heat.
    • Seasonal Veggies: Toss in some sautéed spinach, asparagus, or zucchini for added nutrition and color.

    Serving Suggestions

    • Garlic Bread: Pair this Brown Butter Mushroom Pasta with warm garlic bread for a comforting touch.
    • Simple Salad: A fresh arugula or mixed green salad lightly dressed with lemon vinaigrette complements the dish beautifully.
    • Wine Pairing: Serve with a glass of Chardonnay or Pinot Grigio to enhance the flavors.
    • Presentation: Garnish with extra parsley and a sprinkle of parmesan for an inviting look.

    FAQs about Brown Butter Mushroom Pasta

    Can I use different types of pasta for this recipe?

    Absolutely! While spaghetti is a classic choice for Brown Butter Mushroom Pasta, you can swap it for any pasta shape you enjoy, such as fettuccine or penne. Just keep an eye on the cooking time, as it may vary.

    Is this recipe suitable for meal prep?

    Yes, this dish is perfect for meal prep! You can cook it ahead and store the portions in airtight containers in the fridge. Just reheat gently on the stove or in the microwave when ready to enjoy.

    What if I don’t like mushrooms?

    No problem! You can easily substitute mushrooms with other vegetables like zucchini, bell peppers, or even spinach. Keep in mind that adjusting the cooking time will help those veggies reach tender perfection.

    Can I make this dish gluten-free?

    Yes, simply use gluten-free pasta in place of traditional spaghetti. The flavors from the brown butter and other ingredients will still shine through, making it a delightful meal.

    How can I store leftovers from this pasta dish?

    Store any leftovers in an airtight container in the refrigerator for up to three days. Reheat on the stove with a splash of water to bring back the creamy texture for your next meal!

    Final Thoughts

    Cooking is more than just making meals; it’s about creating connections and memories. This Brown Butter Mushroom Pasta brings joy to my kitchen, transforming simple ingredients into a comforting dish that warms the heart. Whether it’s a weeknight family dinner or a special gathering with friends, this recipe is my secret weapon. With its rich flavors and enticing aroma, it’s bound to impress. I hope this becomes a cherished part of your culinary adventures. Let’s celebrate the joy of cooking together, one delicious bite at a time!


    Print

    clock clock iconcutlery cutlery iconflag flag iconfolder folder iconinstagram instagram iconpinterest pinterest iconfacebook facebook iconprint print iconsquares squares iconheart heart iconheart solid heart solid icon

    Description

    A simple and irresistible dish of pasta infused with the rich flavors of brown butter and sautéed mushrooms, making for a comforting meal.


    • 225 g dried spaghetti
    • 1 tablespoon extra-virgin olive oil
    • 30 g fresh French-style breadcrumbs
    • Kosher salt, to taste
    • Freshly ground black pepper, to taste
    • 113 g unsalted butter
    • 3 cloves garlic, minced
    • 225 g cremini mushrooms, thinly sliced
    • 4 sprigs fresh thyme
    • 2 tablespoons chopped fresh parsley leaves

    1. Bring a large pot of salted water to a boil. Cook the spaghetti according to package instructions until al dente. Drain thoroughly and set aside.
    2. Heat olive oil in a large skillet over medium heat. Add breadcrumbs and cook, stirring often, until golden and crisp, approximately 3 to 5 minutes. Season with kosher salt and black pepper to taste. Transfer toasted breadcrumbs to a bowl and set aside.
    3. Melt butter in the same skillet over low heat, adding one tablespoon at a time. Cook, swirling occasionally, until butter foams and develops a nutty aroma and golden-brown color, about 3 to 4 minutes.
    4. Add minced garlic to the browned butter and cook for 1 minute, stirring until fragrant.
    5. Stir in sliced cremini mushrooms and fresh thyme sprigs. Increase heat to medium and cook, stirring occasionally, until mushrooms are browned and tender, about 3 to 5 minutes. Season with salt and pepper. Remove thyme sprigs and discard.
    6. Add the drained spaghetti to the skillet with the mushroom-butter mixture. Toss thoroughly to evenly coat the pasta.
    7. Divide the pasta among serving plates. Top with toasted breadcrumbs and garnish with chopped parsley. Serve immediately.

    Notes

    • Adjust the seasoning according to your taste.
    • For an extra flavor boost, feel free to add grated parmesan cheese as a topping.
    • Prep Time: 10 minutes
    • Cook Time: 20 minutes
    • Category: Main Course
    • Method: Skillet
    • Cuisine: Italian

    Nutrition

    • Serving Size: 1 serving
    • Calories: 450
    • Sugar: 2 g
    • Sodium: 350 mg
    • Fat: 20 g
    • Saturated Fat: 10 g
    • Unsaturated Fat: 8 g
    • Trans Fat: 0 g
    • Carbohydrates: 55 g
    • Fiber: 3 g
    • Protein: 10 g
    • Cholesterol: 30 mg

    Sharing is caring!

  • Honey Glazed Salmon Rice Bowls

    Honey Glazed Salmon Rice Bowls


    Introduction to Honey Glazed Salmon Rice Bowls

    Are you searching for a meal that combines flavor, nutrition, and ease? Look no further than Honey Glazed Salmon Rice Bowls! As a busy mom myself, I know how important it is to whip up something delicious without spending hours in the kitchen. This recipe is perfect for those hectic weeknights when you want to impress your loved ones without the stress. Imagine tender salmon drizzled with a sweet honey glaze, served over a hearty bed of brown rice with a rainbow of fresh vegetables. It’s not just a meal; it’s an experience!

    Why You’ll Love This Honey Glazed Salmon Rice Bowls

    Honey Glazed Salmon Rice Bowls are a delightful solution to busy nights. This recipe takes only 30 minutes from start to finish, making it a speedy option for those hectic evenings. You’ll love the bold flavors mingling on your palate—sweet, tangy, and satisfying! Plus, it’s packed with nutrients, perfect for those trying to maintain a healthy lifestyle while keeping their family happy. Trust me, this dish will quickly become a weeknight favorite!

    Ingredients for Honey Glazed Salmon Rice Bowls

    Creating Honey Glazed Salmon Rice Bowls is easier than you might think. Here’s what you’ll need to bring this mouthwatering dish to life:

    • Salmon filets: Fresh, skinless salmon is ideal for a tender, flaky bite. If salmon is not your family’s favorite, feel free to substitute with another fish like trout or even chicken for variety.
    • Avocado oil: This oil has a high smoke point, perfect for cooking salmon. Olive oil can be used if you prefer a different flavor.
    • Honey: The star of our glaze! It adds sweetness that balances the flavors beautifully. If you’re looking for a lower glycemic option, consider using agave syrup instead.
    • Soy sauce (or tamari): This salty element introduces umami. Tamari is a great gluten-free alternative.
    • Sriracha: For those who crave a little spice, sriracha offers just the right kick. More can be added for heat enthusiasts!
    • Brown rice: The hearty base for this dish! You can substitute with quinoa or cauliflower rice if you want a lighter option.
    • Avocado: Creamy and rich, this adds a wonderful texture. Don’t have any? Try using diced mango for a tropical twist.
    • Cucumber: Crunchy and refreshing, it balances the warm salmon. Cherry tomatoes can serve as a bright alternative.
    • Olive oil: Used in our cucumber salad, it enhances the fresh flavors. You could also use avocado oil here.
    • Cilantro: This herb introduces a fragrant note, but if you’re not a fan, parsley works well, too.
    • Lime juice: Bright and zesty, it elevates the entire dish. Do you have lemon instead? That works perfectly!
    • Light mayo: The base for our paprika sauce, it brings creaminess. You can use Greek yogurt for a lighter version.
    • Paprika (smoked or regular): Adds flavor depth. Choose smoked for a more robust taste.
    • Cumin: This spice introduces a warm, earthy flavor that enhances the overall profile.

    For exact measurements, you can find them at the bottom of the article, along with a printable version!

    How to Make Honey Glazed Salmon Rice Bowls

    Crafting Honey Glazed Salmon Rice Bowls is a rewarding experience that brings a burst of flavor to your dining table. Follow these simple steps for a delicious and nutritious meal that’s quick to prepare!

    Step 1: Preheat the Oven

    To kick things off, preheat your oven to 425°F. This temperature is crucial for achieving perfectly cooked salmon that’s tender on the inside and slightly crisp on the outside. The right heat will help caramelize the honey glaze beautifully, enhancing the overall flavor of the dish.

    Step 2: Prepare the Salmon

    Now it’s time to marinate the salmon! Start by cutting your fresh salmon filets into bite-sized cubes. In a mixing bowl, combine freshly cut salmon with avocado oil, honey, soy sauce (or tamari), and a splash of sriracha. Make sure to coat each piece well for maximum flavor. 

    Let the salmon sit for about 10 minutes, allowing it to absorb those glorious flavors. If you’re a fan of citrus, try adding a splash of lime juice to the marinade for a zesty kick. This step elevates your Honey Glazed Salmon Rice Bowls, creating an irresistible taste that your entire family will love!

    Step 3: Roast the Salmon

    Next, spread the marinated salmon cubes out evenly on a baking sheet lined with parchment paper. Roast the salmon in the preheated oven for about 10 minutes. After that, switch your oven setting to broil for an additional 2-3 minutes. This final step gives the fish a lovely crispness on the outside, while keeping it tender and juicy inside. Be sure to keep an eye on it so it doesn’t overcook; just that slight golden touch is all you need!

    Step 4: Whisk the Sauce

    While the salmon is roasting, let’s whip up the simple yet delightful paprika mayo sauce. In a small bowl, combine light mayo with lime juice, paprika, cumin, and a drizzle of honey. Whisk the ingredients together until smooth and creamy. This sauce is the secret weapon for your Honey Glazed Salmon Rice Bowls. It adds a tangy and slightly spicy flavor that perfectly balances the sweetness of the salmon.

    Step 5: Make the Cucumber Salad

    Now, let’s prepare the cucumber salad to add a refreshing crunch to your dish! In another bowl, mix diced cucumber, avocados, chopped cilantro, olive oil, and a splash of lime juice. Toss everything together until well-coated. This salad not only adds flavor but also vibrant color to your meal. The crispy cucumbers will complement the warm salmon beautifully!

    Step 6: Assemble the Bowls

    It’s time for the grand assembly! Start with a generous scoop of your cooked brown rice at the bottom of each bowl. Then, add the roasted salmon cubes on top. Follow with a portion of the refreshing cucumber salad to add color and texture. Finally, drizzle your homemade paprika mayo on top for that flavorful finishing touch. As you dig in, enjoy the beautiful layers of taste and texture that make these Honey Glazed Salmon Rice Bowls a delight!

    Tips for Success

    • Use fresh, high-quality salmon for the best flavor and texture.
    • Don’t be shy with the marinade; a longer soak equals more flavor.
    • Keep an eye on the salmon while broiling to prevent burning.
    • Experiment with different veggies in the bowl to suit your family’s tastes.
    • Leftovers can be stored in the fridge and enjoyed the next day for lunch!

    Equipment Needed

    • Baking sheet: A simple pan works, but a parchment-lined sheet is ideal for easy cleanup.
    • Mixing bowls: Use any size you have on hand for marinating and mixing.
    • Whisk: A fork can also do the trick for mixing sauces and dressings.
    • Knife and cutting board: Essential for chopping ingredients safely and efficiently.

    Variations of Honey Glazed Salmon Rice Bowls

    • Tropical Twist: Substitute the cucumber with diced pineapple for a sweet, tropical flavor that pairs perfectly with the salmon.
    • Quinoa Base: Swap brown rice for quinoa to create a protein-packed bowl with a nutty flavor.
    • Paddy Veggie Boost: Add steamed broccoli, edamame, or shredded carrots for extra nutrients and vibrant color.
    • Spicy Kick: Increase the amount of sriracha in the marinade or top with sliced jalapeños for heat lovers!
    • Vegetarian Option: Use marinated tofu cubes instead of salmon for a plant-based alternative that’s just as tasty.

    Serving Suggestions for Honey Glazed Salmon Rice Bowls

    • Pair with a light, crisp white wine like Sauvignon Blanc to complement the dish.
    • Serve with a side of steamed asparagus or sautéed green beans for added nutrients.
    • Add a sprinkle of sesame seeds on top for an elegant finishing touch.
    • For a heartier meal, include a side salad with mixed greens and a light vinaigrette.
    • Present your bowls in colorful dishes to make the meal even more appealing!

    FAQs about Honey Glazed Salmon Rice Bowls

    As a passionate home cook, I often find myself fielding questions about this delightful dish. Here are some frequently asked questions about Honey Glazed Salmon Rice Bowls that can help you create the perfect meal!

    Can I make Honey Glazed Salmon Rice Bowls ahead of time?

    Absolutely! You can prep the salmon and cucumber salad earlier in the day. Just store them separately in the fridge. When you’re ready to eat, roast the salmon and assemble the bowls for a quick, delicious dinner.

    What can I serve with Honey Glazed Salmon Rice Bowls?

    These bowls are great on their own but pair wonderfully with simple sides like steamed veggies or a light salad. For drinks, a crisp white wine or sparkling water enhances the meal beautifully!

    Can I use other types of fish?

    Certainly! Feel free to experiment with other fish like trout or cod. You could also substitute chicken for a different protein. Just adjust the cooking time to ensure it’s cooked through.

    How do I store leftovers from the Honey Glazed Salmon Rice Bowls?

    Leftovers can be stored in an airtight container in the refrigerator for up to 2 days. Just reheat gently to keep the salmon tender! Don’t forget to keep the sauce and cucumber salad separate until you’re ready to enjoy.

    What if I don’t have sriracha?

    No worries! If sriracha isn’t in your pantry, you can use another hot sauce or even red pepper flakes to add that desired heat. Just adjust the amount to suit your taste.

    Final Thoughts

    Creating Honey Glazed Salmon Rice Bowls is more than just cooking; it’s about bringing joy to your family’s table and savoring every flavorful bite. Each bowl combines vibrant colors and taste, showcasing the love you put into your meals. As a busy mom, I’ve felt the satisfaction of serving a quick yet nutritious dish that everyone’s raving about. There’s something incredibly rewarding about preparing a meal that not only nourishes the body but also delights the soul. Give these bowls a try, and I promise they’ll become a cherished recipe in your household!


    Print

    clock clock iconcutlery cutlery iconflag flag iconfolder folder iconinstagram instagram iconpinterest pinterest iconfacebook facebook iconprint print iconsquares squares iconheart heart iconheart solid heart solid icon

    Description

    Honey Glazed Salmon Rice Bowls are a delicious and nutritious meal featuring tender salmon coated in a sweet honey glaze, served over a bed of brown rice with fresh vegetables and a zingy paprika mayo sauce.


    • 4 4-6 ounce skinless salmon filets (cut into cubes)
    • 2 Tablespoons avocado oil
    • 3 Tablespoons honey
    • 1 Tablespoon soy sauce (or tamari)
    • 1 Tablespoon sriracha
    • 2 cups cooked brown rice
    • 1 medium avocado (cubed)
    • 1 cup diced cucumber
    • 1 Tablespoon olive oil
    • 1/2 cup finely chopped cilantro
    • 1 Tablespoon fresh lime juice
    • 2 teaspoons honey
    • 1/3 cup light mayo
    • 1 Tablespoon lime juice
    • 1/2 teaspoon paprika (smoked or regular)
    • 1/4 teaspoon cumin
    • 1 teaspoon honey

    1. Preheat the oven to 425 Fahrenheit.
    2. Toss the cubed salmon with avocado oil, honey, soy sauce (or tamari), and sriracha.
    3. Add in a single layer to a baking sheet and roast for 10 minutes. Then switch the oven to broil and broil for just 2-3 minutes to crisp it up.
    4. Meanwhile, whisk together all ingredients for the sauce and set aside.
    5. Combine the avocado, cucumber, olive oil, cilantro, lime juice, and honey. Toss to combine.
    6. When the salmon is done, assemble your bowls with a base of rice, then layer on the salmon, cucumber salad and drizzle with the paprika mayo sauce. Enjoy!

    Notes

    • Feel free to add other vegetables like bell peppers or carrots to the bowl.
    • For a spicier kick, increase the amount of sriracha used.
    • This recipe can easily be made gluten-free by using tamari instead of soy sauce.
    • Prep Time: 15 minutes
    • Cook Time: 15 minutes
    • Category: Dinner
    • Method: Baking
    • Cuisine: American

    Nutrition

    • Serving Size: 1 bowl
    • Calories: 550
    • Sugar: 10g
    • Sodium: 600mg
    • Fat: 26g
    • Saturated Fat: 4g
    • Unsaturated Fat: 18g
    • Trans Fat: 0g
    • Carbohydrates: 55g
    • Fiber: 7g
    • Protein: 30g
    • Cholesterol: 70mg

    Sharing is caring!

  • Crockpot Marry Me Chicken

    Crockpot Marry Me Chicken


    Introduction to Crockpot Marry Me Chicken

    Let’s be honest—life gets busy! Between work, family duties, and everyday commitments, finding time to whip up a gourmet meal can feel impossible. But that’s where my Crockpot Marry Me Chicken comes to the rescue! This creamy, dreamy dish isn’t just a feast for the taste buds; it’s a big hug in a bowl. Imagine walking in after a long day, and all the hard work is done. Just sit back, relax, and enjoy a meal so delicious it’ll have everyone asking for seconds—and possibly proposing!

    Why You’ll Love This Crockpot Marry Me Chicken

    This Crockpot Marry Me Chicken is the answer to your dinner woes. It’s simple—just toss everything in your slow cooker and let it work its magic while you tackle other tasks. You’ll be amazed at how a handful of ingredients can create a dish bursting with flavor. Plus, it’s perfect for any occasion, whether it’s a busy weeknight or a cozy family gathering. Trust me, your taste buds will thank you!

    Ingredients for Crockpot Marry Me Chicken

    Before we dive into the cooking process, let’s gather our loveable ingredients that make Crockpot Marry Me Chicken oh-so-delicious. Each one plays a key role in building that creamy, dreamy sauce wrapped around tender, juicy chicken. Here’s what you’ll need:

    • Boneless skinless chicken breasts: They’re the star of this show. Lean and perfect for soaking up flavor!
    • Salt & black pepper: A pinch of salt and a dash of pepper boost everything. Seasoning is key!
    • Chicken broth: This adds depth to the sauce and keeps the chicken moist during cooking.
    • Heavy cream: The creamy base that wraps your chicken in lush goodness. It’s comfort food at its finest!
    • Grated Parmesan cheese: Adds a beautiful nutty flavor and enhances the creaminess. Do not skip this!
    • Garlic: Freshly minced garlic elevates the dish, filling your kitchen with a mouthwatering aroma.
    • Dried oregano & thyme: These herbs bring a hint of earthiness, reminiscent of Italian kitchens.
    • Red pepper flakes: A pinch will spice things up. Adjust to your taste if you’re feeling bold!
    • Sun-dried tomatoes: These tangy jewels add pops of flavor and color. They mesh so well with cream!
    • Butter: Pure magic! Stirred in at the end, it gives a silky finish.
    • Fresh basil or parsley: For that beautiful garnish! It brightens up the dish and adds a fresh bite.

    For specific quantities, check out the printable version at the end of this article. Remember, using fresh ingredients always yields the best results!

    How to Make Crockpot Marry Me Chicken

    Step 1: Prepare the Chicken

    Start by seasoning your boneless skinless chicken breasts generously with salt and black pepper. This basic step is essential, as it sets the flavor foundation for our Crockpot Marry Me Chicken. You want that seasoning to penetrate the chicken, enhancing its taste while it cooks. Once seasoned, place the chicken breasts aside and admire your work. You’re one step closer to a delicious meal!

    Step 2: Make the Creamy Sauce

    In a mixing bowl, whisk together the chicken broth, heavy cream, grated Parmesan cheese, and minced garlic until well combined. Then, sprinkle in the dried oregano, thyme, and red pepper flakes, stirring gently. The magic happens when these ingredients come together, creating a rich, creamy sauce that envelops the chicken like a warm blanket. Just imagine how good your kitchen will smell as this savory mixture comes to life!

    Step 3: Layer the Ingredients in the Crockpot

    Now, it’s time to layer the deliciousness in your crockpot! Start by placing the seasoned chicken breasts in a single layer at the bottom. Next, pour the creamy sauce evenly over the chicken, ensuring every piece is smothered. For an added burst of flavor, scatter the sun-dried tomatoes over the sauce. This vibrant layer enhances both color and taste, making your meal pop!

    Step 4: Cook the Chicken

    Cover your crockpot and select your cooking time. If you have the luxury of planning ahead, cook on LOW for 4 hours. If you’re in a rush, HIGH for 2 hours will work just fine. Keep the lid closed during cooking to retain moisture. The aroma wafting through your home is a promise of the cozy meal awaiting you!

    Step 5: Blend in the Butter

    About 30 minutes before the cooking time is up, add the butter to the pot. Stir it gently into the sauce until it’s melted and blended. This final touch adds richness and a velvety texture that elevates the dish to gourmet status. Your Crockpot Marry Me Chicken is almost ready to steal the show!

    Step 6: Garnish and Serve

    As your meal cooks to perfection, prepare to serve! When done, garnish with fresh basil or parsley for a pop of color and freshness. This simple step brightens the dish and makes it look appealing. Pair it with rice, pasta, or a crusty loaf of bread for a wholesome feast that’ll make everyone swoon!

    Tips for Success

    • Don’t skip seasoning the chicken—it’s vital for flavor.
    • Feel free to adjust the red pepper flakes based on your spice tolerance.
    • For creamier results, use freshly grated Parmesan cheese.
    • Store leftovers in an airtight container for up to 3 days.
    • For a meal prep option, double the recipe and freeze for later!

    Equipment Needed

    • Crockpot: A must-have for this recipe, but you can use any slow cooker.
    • Mixing bowl: For combining your sauce—any large bowl will do.
    • Whisk: Helps blend the sauce ingredients. A fork works just fine too!
    • Measuring cups: Handy for accuracy, but eyeballing is also an option!
    • Cutting board and knife: Essential for chopping sun-dried tomatoes and mincing garlic.

    Variations

    • Herb Infusion: Add fresh herbs like rosemary or thyme for a fragrant twist.
    • Protein Swap: Try using turkey or pork tenderloin instead of chicken for a different flavor profile.
    • Vegetarian Option: Substitute chicken with firm tofu or hearty vegetables like zucchini and mushrooms.
    • Spicy Kick: Incorporate diced jalapeños or a dash of hot sauce for extra heat.
    • Cheesy Delight: Mix in mozzarella or provolone cheese in the last 30 minutes for a gooey finish.

    Serving Suggestions

    • Rice: Fluffy white or wild rice absorbs the creamy sauce perfectly.
    • Pasta: Toss cooked pasta in the sauce for a hearty Italian-inspired dish.
    • Crusty Bread: Serve with a warm baguette to soak up every last drop.
    • Salad: A fresh green salad adds a light touch alongside this rich meal.
    • Wine: Pair with a glass of Chardonnay for a delightful dining experience.

    FAQs about Crockpot Marry Me Chicken

    Curious about some common questions regarding Crockpot Marry Me Chicken? You’re not alone! Here are a few queries I’ve encountered along my culinary journey, answered with love and experience.

    Can I use frozen chicken breasts?

    Absolutely! Just keep in mind that it might take a bit longer to cook. If you’re using frozen chicken, you may need to add an hour to the cooking time. Always ensure the chicken is cooked through before serving.

    What can I substitute for heavy cream?

    If you’re looking for a lighter option, you can use half-and-half or even coconut milk for a dairy-free alternative. Just note that the texture and flavor will vary slightly, but it should still be delicious!

    Can I make this dish ahead of time?

    Yes! You can assemble everything in the crockpot the night before and store it in the fridge. In the morning, pop it in the slow cooker and set it to cook while you go about your day.

    How do I store leftovers?

    Any leftover Crockpot Marry Me Chicken can be stored in an airtight container in the fridge for up to 3 days. Just reheat gently on the stovetop or in the microwave when you’re ready to enjoy it again!

    What side dishes pair well with this chicken?

    This creamy chicken dish goes wonderfully with various sides! Consider serving it with rice, pasta, or a light salad to balance the richness.

    Final Thoughts

    Creating this Crockpot Marry Me Chicken has been such a joyful experience! Each spoonful offers a comforting blend of creamy goodness and savory flavors, making it the perfect meal for any occasion. I love how this dish not only simplifies my busy evenings but also brings my family together around the dinner table, sharing smiles and laughter. Whether you’re cooking for loved ones or treating yourself, this dish is sure to impress. So grab your ingredients, put on your apron, and let this delightful chicken wrap you in a cozy embrace that elevates your dining experience!


    Print

    clock clock iconcutlery cutlery iconflag flag iconfolder folder iconinstagram instagram iconpinterest pinterest iconfacebook facebook iconprint print iconsquares squares iconheart heart iconheart solid heart solid icon

    Description

    A delicious and creamy crockpot chicken dish that you’ll fall in love with, featuring rich flavors and easy preparation.


    • 4 boneless skinless chicken breasts
    • Salt, to taste
    • Black pepper, to taste
    • 1 cup chicken broth
    • 1 cup heavy cream
    • 1/2 cup grated Parmesan cheese
    • 3 garlic cloves, minced
    • 1 teaspoon dried oregano
    • 1/2 teaspoon dried thyme
    • 1/4 teaspoon red pepper flakes
    • 1/2 cup sun-dried tomatoes in oil, drained and chopped
    • 2 tablespoons butter
    • Fresh basil or fresh parsley, for garnish

    1. Season both sides of the chicken breasts with salt and black pepper.
    2. In a mixing bowl, whisk together chicken broth, heavy cream, grated Parmesan, minced garlic, dried oregano, dried thyme, and red pepper flakes.
    3. Place the seasoned chicken breasts in the crockpot and pour the prepared sauce evenly over the chicken.
    4. Scatter chopped sun-dried tomatoes over the chicken and sauce.
    5. Cover and cook on LOW for 4 hours or HIGH for 2 hours, until the chicken is tender and cooked through.
    6. Add butter to the crockpot during the last 30 minutes of cooking and gently stir to combine.
    7. Garnish with fresh basil or parsley just before serving. Serve hot with rice, pasta, or crusty bread if desired.

    Notes

    • For best results, use fresh ingredients.
    • Adjust red pepper flakes to taste for desired spiciness.
    • This dish pairs well with a side salad.
    • Prep Time: 10 minutes
    • Cook Time: 4 hours on LOW or 2 hours on HIGH
    • Category: Main Course
    • Method: Slow Cooking
    • Cuisine: Italian-American

    Nutrition

    • Serving Size: 1 serving
    • Calories: 450
    • Sugar: 2g
    • Sodium: 600mg
    • Fat: 30g
    • Saturated Fat: 15g
    • Unsaturated Fat: 10g
    • Trans Fat: 0g
    • Carbohydrates: 8g
    • Fiber: 1g
    • Protein: 35g
    • Cholesterol: 120mg

    Sharing is caring!

  • Bourbon Chicken Crock Pot

    Bourbon Chicken Crock Pot


    Introduction to Bourbon Chicken Crock Pot

    Hey there, fellow home cooks! I know how hectic life can get, especially when you’re juggling work, kids, and everything in between. That’s why I’m excited to share my Bourbon Chicken Crock Pot recipe with you. It’s a warm hug on a plate! This dish is not only a quick solution for those busy weeknights, but it also impresses everyone at the dinner table. Just imagine rich, savory flavors mingling with tender chicken, all cooked to perfection while you tackle other tasks. Let’s dive into this culinary adventure that requires minimal effort yet delivers maximum taste!

    Why You’ll Love This Bourbon Chicken Crock Pot

    This Bourbon Chicken Crock Pot recipe is a true gem for anyone short on time but big on flavor. With just a bit of prep, you can kick back and relax while it slowly cooks away, filling your home with mouthwatering aromas. The sweet and savory glaze makes this dish a family favorite, sure to satisfy even the pickiest eaters. Plus, it’s an effortless way to elevate your weeknight dinners!

    Ingredients for Bourbon Chicken Crock Pot

    Let’s gather our ingredients for this dazzling Bourbon Chicken Crock Pot! This colorful mix of elements creates that stunning balance of flavors you’ll absolutely love. Don’t worry about memorizing every measurement just yet—you can find them all at the bottom of the article for printing!

    • Boneless, skinless chicken thighs: These juicy pieces are perfect for slow cooking, absorbing flavors while staying tender. You can substitute them with chicken breasts if you prefer a leaner option.
    • Light brown sugar: This adds a natural sweetness and beautiful caramelization to the sauce, creating that delightful glaze. It’s vital for the overall taste!
    • Soy sauce: A savory staple, soy sauce enhances the umami flavor profile in the dish, pulling everything together. You can use low-sodium soy sauce if you’re watching your sodium intake.
    • Bourbon whiskey: The star of the show! This richness pairs perfectly with the sugar and soy sauce, adding depth to the flavor. Don’t worry; it cooks off, leaving behind a lovely essence!
    • Apple cider vinegar: This tangy kicker balances the sweetness, preventing the dish from becoming overly sugary. It’s a must-have for flavor balance!
    • Ground ginger: A pinch of this spice adds warmth and a hint of spice, giving the dish a cozy undertone. Fresh ginger can be a great alternative if you have it on hand!
    • Honey: This brings an extra layer of sweetness and complexity to the sauce. You can swap it with maple syrup for a twist!
    • Red pepper flakes: For a bit of heat, toss in these fiery flakes! Feel free to adjust the amount based on your spice tolerance.
    • Garlic: Minced garlic enhances the aromatic base, deepening the flavors in this dish. You can use garlic powder in a pinch, but fresh is always better!
    • Cornstarch: This is your secret weapon for thickening the sauce towards the end. A slurry with water will help achieve that perfect texture!
    • Water: Mixed with cornstarch, it helps create that glossy sauce coating the chicken beautifully.
    • Chopped green onions: These provide a burst of fresh flavor and a pop of color as a garnish. A delightful finishing touch!

    How to Make Bourbon Chicken Crock Pot

    Ready to dive into this flavorful adventure? Making Bourbon Chicken Crock Pot is as easy as pie! Follow my step-by-step guide, and I promise you’ll have a delicious dinner without a fuss!

    Prepare the Chicken

    Start by placing the boneless, skinless chicken thighs at the bottom of your slow cooker.

    This layer is crucial as the chicken will soak up all those amazing flavors while cooking.

    Take a moment to trim any visible fat too; it makes for a cleaner bite later on!

    Mix the Bourbon Sauce

    Next, grab a bowl and whisk together the light brown sugar, soy sauce, bourbon whiskey, apple cider vinegar, ground ginger, honey, red pepper flakes, and minced garlic.

    This sauce is the heart of our dish, marrying sweet and savory notes.

    Feel free to adjust the red pepper flakes if you want it spicier; you’re in charge here!

    Combine Chicken and Sauce

    Now it’s time to pour that delicious sauce all over the chicken in the slow cooker.

    Make sure each piece of chicken is well-coated!

    This simple step sets the stage for maximum flavor absorption.

    Your taste buds will thank you later!

    Cook the Dish

    Cover the slow cooker and set it to cook on high for about four hours or low for six hours.

    This is where the magic happens!

    During this time, the chicken transforms into tender goodness, absorbing all those rich, bourbon-infused flavors.

    Take a moment to enjoy that aroma wafting through your kitchen—it’s heavenly!

    Thicken the Sauce

    Once the cooking time’s up, carefully remove the chicken from the slow cooker.

    You can chop or shred the chicken to your desired texture.

    Then, in a small bowl, mix the cornstarch with water to create a slurry.

    Stir this magic mixture back into the sauce in the slow cooker.

    Let it cook for an additional 5–10 minutes.

    Soon enough, you’ll see the sauce thicken beautifully, creating that glossy finish that’s oh-so-inviting!

    Garnish and Serve

    Finally, turn off the heat and sprinkle the chopped green onions over your Bourbon Chicken for that fresh pop of color and flavor.

    Serve this delicious dish over white rice, brown rice, or even cauliflower rice for a low-carb delight.

    Prepare to bask in the compliments when you serve this delectable creation to your family!

    Tips for Success

    • Always trim excess fat from chicken for a leaner bite.
    • Marinate the chicken overnight for even deeper flavors.
    • Use a slow cooker liner for easy cleanup.
    • Adjust the red pepper flakes based on your family’s taste preference.
    • Experiment with adding vegetables, like bell peppers or broccoli, for a complete meal.

    Equipment Needed

    • Slow cooker: The star of the show! If you don’t have one, a Dutch oven works too but will require more attention.
    • Mixing bowl: Perfect for whisking your sauce together; any medium-sized bowl will do.
    • Measuring cups and spoons: Essential for accuracy; you can always eyeball if you’re in a pinch!
    • Cutting board and knife: For trimming and chopping your chicken; a simple kitchen knife gets the job done!

    Variations

    • Spicy Bourbon Chicken: Add more red pepper flakes or diced jalapeños for a kick that’ll warm you up!
    • Vegetable-Loaded Delight: Toss in colorful bell peppers, carrots, and snap peas to create a hearty and nutrition-packed meal.
    • Gluten-Free Adaptation: Use tamari instead of soy sauce for a gluten-free bourbon chicken that everyone can enjoy.
    • Honey-Bourbon Glaze: Replace the brown sugar with honey for a distinct sweet twist on the traditional sauce.
    • Peach Bourbon Chicken: Add fresh or canned peaches to the mix for a fruity fusion that brightens your dish.

    Serving Suggestions for Bourbon Chicken Crock Pot

    • Rice Varieties: Serve over fluffy white rice, brown rice, or even a bed of cauliflower rice for a healthier twist.
    • Fresh Greens: Pair with steamed broccoli or sautéed green beans for vibrant color and added nutrition.
    • Chilled Drinks: A crisp iced tea or a light white wine can beautifully complement the rich flavors of the dish.
    • Presentation: Garnish with additional chopped green onions and sesame seeds for a restaurant-quality touch!

    FAQs about Bourbon Chicken Crock Pot

    Can I use chicken breasts instead of thighs for this Bourbon Chicken Crock Pot recipe?
    Absolutely! While I love the tenderness of chicken thighs, chicken breasts can work well too. Just keep an eye on the cooking time, as breasts may cook a bit faster.

    How do I store leftovers from my Bourbon Chicken Crock Pot?
    Leftovers can be stored in an airtight container in the fridge for up to 3 days. Just reheat in the microwave or on the stovetop when you’re ready to enjoy round two!

    Can I make this Bourbon Chicken Crock Pot recipe ahead of time?
    Yes! You can prepare the chicken and sauce in advance. Just store them separately in the fridge until you’re ready to cook. This can save you time on busy days!

    What if I don’t have bourbon whiskey on hand?
    No worries! You can substitute bourbon with apple juice or a splash of white wine. While it won’t taste exactly the same, it’ll still provide a delightful flavor.

    How spicy is this Bourbon Chicken Crock Pot recipe?
    The spice level can easily be adjusted by changing the amount of red pepper flakes. If you’re cooking for kids or those who prefer mild flavors, feel free to use less or skip it altogether!

    Final Thoughts

    Making Bourbon Chicken in your crock pot is nothing short of delightful! It’s a dish that wraps you in warmth, from the moment you smell the aromas wafting through your kitchen. I can’t help but smile when my family gathers around the table, sharing stories and savoring every bite of this tender chicken extravaganza. It’s not just a meal; it’s a memory in the making. With minimal fuss and maximum flavor, this Bourbon Chicken Crock Pot recipe is perfect for busy days. I hope it becomes a cherished favorite in your home, just like it is in mine!


    Print

    clock clock iconcutlery cutlery iconflag flag iconfolder folder iconinstagram instagram iconpinterest pinterest iconfacebook facebook iconprint print iconsquares squares iconheart heart iconheart solid heart solid icon

    Description

    Bourbon Chicken Crock Pot is a flavorful and tender chicken dish slow-cooked in a sweet and savory bourbon sauce.


    • 3 lbs boneless, skinless chicken thighs, trimmed
    • 1 cup light brown sugar
    • 1 cup soy sauce
    • ⅓ cup bourbon whiskey
    • 2 tablespoons apple cider vinegar
    • ½ teaspoon ground ginger
    • 1 tablespoon honey
    • ½ teaspoon red pepper flakes
    • 4 cloves garlic, minced
    • 3 tablespoons cornstarch
    • 2 tablespoons water
    • ¼ cup chopped green onions, for garnish

    1. Add the chicken thighs to the bottom of a slow cooker.
    2. In a separate bowl, whisk together the brown sugar, soy sauce, bourbon, apple cider vinegar, ground ginger, honey, red pepper flakes, and minced garlic.
    3. Pour the sauce mixture over the chicken in the slow cooker.
    4. Cover and cook on high for 4 hours or low for 6 hours, until the chicken is cooked through and tender.
    5. Remove the chicken from the slow cooker and chop or shred it to your preferred texture.
    6. In a small bowl, mix the cornstarch and water to make a slurry. Stir it into the sauce in the slow cooker.
    7. Return the chopped chicken to the slow cooker and stir everything together. Let cook for another 5–10 minutes until the sauce thickens.
    8. Turn off the heat and garnish with chopped green onions before serving. Serve over white rice, brown rice, or cauliflower rice for a low-carb option.

    Notes

    • For a spicier flavor, increase the amount of red pepper flakes.
    • Feel free to substitute chicken thighs with chicken breasts if desired.
    • If you prefer a thicker sauce, add more cornstarch slurry.
    • Prep Time: 15 minutes
    • Cook Time: 4 hours on high or 6 hours on low
    • Category: Main Dish
    • Method: Slow Cooking
    • Cuisine: American

    Nutrition

    • Serving Size: 1 serving
    • Calories: 320
    • Sugar: 16g
    • Sodium: 720mg
    • Fat: 10g
    • Saturated Fat: 3g
    • Unsaturated Fat: 5g
    • Trans Fat: 0g
    • Carbohydrates: 30g
    • Fiber: 1g
    • Protein: 24g
    • Cholesterol: 85mg

    Sharing is caring!

  • Chaos Cake Sheet Pan Brownies

    Chaos Cake Sheet Pan Brownies


    Introduction to Chaos Cake Sheet Pan Brownies

    Welcome to a scrumptious adventure that’s as colorful as it is delicious! Let me introduce you to my cherished recipe for Chaos Cake Sheet Pan Brownies. As a busy mom, I totally understand the struggle of balancing meal prep with family time. This recipe offers a delightful two-in-one treat, merging decadent brownies and birthday cake vibes effortlessly. Whether it’s for a festive gathering or a cozy dessert night at home, these brownies will bring smiles and nostalgia to the table. Trust me, they’re a slice of happiness that everyone can enjoy!

    Why You’ll Love This Chaos Cake Sheet Pan Brownies

    There’s something special about Chaos Cake Sheet Pan Brownies that makes them a go-to recipe in my kitchen. They come together quickly, so you won’t spend hours in the kitchen. Plus, the taste is a delicious explosion of chocolate goodness and colorful fun! With the perfect balance of rich flavors and playful textures, these brownies are a crowd-pleaser. Who wouldn’t love a chocolatey delight that’s as easy to make as it is to devour?

    Ingredients for Chaos Cake Sheet Pan Brownies

    To whip up these delightful Chaos Cake Sheet Pan Brownies, you’ll need a few simple ingredients that bring all the magic to life. Here’s what you’ll need:

    • Unsalted butter: You’ll want this melted for that creamy base. It adds richness and flavor.
    • Granulated sugar: The backbone of sweetness in your brownies, helping them rise and get that tender texture.
    • Light brown sugar: This adds a touch of caramel flavor and moisture for a chewy bite.
    • Large eggs: Essential for binding the ingredients and creating that luscious consistency.
    • Vanilla extract: Just a splash elevates the flavor profile, making everything taste even more divine.
    • All-purpose flour: Gives structure to the brownies while keeping them soft.
    • Unsweetened cocoa powder: It’s the star ingredient bringing that rich chocolate flavor we all crave.
    • Baking powder: Helps the brownies rise, giving them that perfect fluffy texture.
    • Salt: A pinch enhances all the flavors, making them pop.
    • Semi-sweet chocolate chunks: Because more chocolate is always a good idea! They provide melty pockets in every bite.
    • Rainbow sprinkles: These add a fun, festive touch, perfect for celebrations.
    • Birthday cake-flavored sandwich cookies: Chopped up, they add a nostalgic twist that’ll remind you of fun parties.
    • Softened unsalted butter: This is for the frosting, giving it that creamy texture.
    • Sifted powdered sugar: Creates a fluffy, sweet frosting that covers your brownies beautifully.
    • Milk: Just enough to bring your frosting to life and achieve that perfect spreadable consistency.
    • Additional rainbow sprinkles: For topping, because who can resist a little extra color?

    Don’t forget—you can customize the mix-ins based on your preferences! If you’re feeling adventurous, swap in nuts or your favorite candies. The ingredient list with exact quantities is available at the bottom of this article for your convenience. Happy baking!

    How to Make Chaos Cake Sheet Pan Brownies

    Making Chaos Cake Sheet Pan Brownies is a breeze, and I can’t wait to share the steps with you! From preheating the oven to that first delicious bite, the journey is as rewarding as the destination. Let’s dive right into it!

    Step 1: Preheat and Prepare

    Start by preheating your oven to 350°F. This ensures a perfectly baked brownie, right from the get-go.

    While that’s happening, line a 9×13-inch sheet pan with parchment paper. Make sure to leave an overhang on the sides for easy removal later. Trust me, this little trick saves you from a messy situation!

    Step 2: Mix Wet Ingredients

    In a large mixing bowl, whisk together your melted butter and both sugars until the mixture is smooth and glossy. It should feel like the silky surface of a calm lake!

    Next, crack in your eggs one at a time, whisking well after each addition. Add the vanilla extract, which will make your kitchen smell divine. The key here is to achieve a lovely, smooth consistency.

    Step 3: Combine Dry Ingredients

    Time to bring the dry ingredients into the mix! Sift together the all-purpose flour, cocoa powder, baking powder, and salt. Sifting aerates the flour, helping your brownies rise beautifully.

    Gently fold the dry mixture into the wet, taking care not to overmix. We want tender brownies, not tough ones, so a little folding is all we need!

    Step 4: Add Fun Mix-ins

    Now comes the fun part! Fold in those semi-sweet chocolate chunks, rainbow sprinkles, and chopped birthday cake-flavored cookies.

    These add a delightful texture and flavor burst with every bite! Don’t be shy; make sure everything is evenly distributed.

    Step 5: Bake the Brownies

    Spread the batter evenly in your prepared sheet pan and pop it into the oven.

    Bake for about 23 to 25 minutes. To check for doneness, insert a toothpick into the center—look for moist crumbs, not wet batter. Overbaking can lead to a dry brownie!

    Step 6: Cool before Frosting

    Once baked, let the brownies cool completely in the pan on a wire rack. This step is crucial for perfect frosting application. I know it’s tempting to frost them warm, but trust me, patience is a virtue here!

    Step 7: Make the Frosting

    Now, let’s whip up that creamy frosting! In a mixing bowl, beat the softened butter until it’s creamy. Gradually add the sifted powdered sugar, mixing until it’s fluffy and light.

    Include the milk, vanilla extract, and a pinch of salt to enhance the flavor. This frosting will be the cherry on top of your already delicious brownies!

    Step 8: Frost and Decorate

    Spread the frosting evenly over the cooled brownies. Don’t hold back—make it as thick as your heart desires!

    Finally, sprinkle on some extra rainbow sprinkles for that visual appeal. These colorful toppings will bring smiles and childhood memories back, making your Chaos Cake Sheet Pan Brownies even more special!

    Tips for Success

    • Always measure your ingredients accurately for the best results.
    • Use room temperature eggs for easier mixing and better texture.
    • Don’t skimp on the mixing time; this helps to fully incorporate the ingredients.
    • Experiment with different mix-ins for variety, like nuts or caramel!
    • For clean, square edges, use a sharp knife to cut the brownies.

    Equipment Needed

    • 9×13-inch sheet pan: A classic choice, but you can also use a glass or ceramic baking dish.
    • Parchment paper: Essential for easy cleanup; aluminum foil works in a pinch.
    • Mixing bowls: Use any size you have at home; a large bowl is ideal for whisking.
    • Electric mixer: Perfect for making frosting, but a whisk is fine for small batches.
    • Rubber spatula: Great for folding ingredients and scraping the bowl clean.

    Variations for Chaos Cake Sheet Pan Brownies

    • Nutty Delight: Add chopped walnuts or pecans for some crunch. They complement the chocolate beautifully.
    • Minty Fresh: Mix in mint chocolate chips instead of semi-sweet chunks for a refreshing twist.
    • Gluten-Free Option: Substitute all-purpose flour with a 1:1 gluten-free flour blend for gluten-sensitive friends.
    • Fruitful Fudge: Fold in dried cherries or apricots for a fruity contrast that pairs well with chocolate.
    • Vegan Version: Use plant-based butter and substitute eggs with flaxseed meal or applesauce for a vegan-friendly treat.
    • Spicy Choco: Add a pinch of cayenne or chili powder for a surprising kick! It’s a daring yet delicious variation.
    • Caramel Swirl: Drizzle caramel sauce on top of the brownie batter before baking for a gooey, indulgent treat.

    Serving Suggestions

    • Milk: A classic pairing—it balances the sweetness perfectly.
    • Ice cream: Serve warm brownies topped with vanilla or chocolate ice cream for an indulgent treat.
    • Fresh berries: A side of strawberries or raspberries adds a refreshing contrast to the rich brownies.
    • Coffee: Brew a strong cup to enhance the chocolate flavor.
    • Presentation: Consider cutting brownies into fun shapes with cookie cutters for parties!

    FAQs about Chaos Cake Sheet Pan Brownies

    Here are some common questions I often hear about Chaos Cake Sheet Pan Brownies. Let’s dive in and clear things up!

    Can I use different types of sugar?

    Absolutely! You can mix and match sugar types. Just remember that brown sugar adds moisture and a slight caramel flavor, while granulated sugar contributes to a lighter texture.

    How should I store leftovers?

    Keep your brownies in an airtight container at room temperature for up to three days. Trust me, they’ll stay delightful and chewy!

    Can I freeze these brownies?

    You sure can! Slice them into squares, wrap them tightly in plastic wrap, and then pop them in a freezer bag. They’ll last up to three months—perfect for when the craving hits!

    What if I don’t have unsweetened cocoa powder?

    If you’re in a pinch, you can use Dutch-processed cocoa. It may slightly alter the taste, but it will still give you delicious, chocolatey goodness!

    Are there any shortcuts for making the frosting?

    For a quicker version, you can use store-bought frosting. Just smooth it over the cooled brownies and sprinkle with rainbow sprinkles. It’s a time-saver without compromising taste!

    Final Thoughts

    Creating Chaos Cake Sheet Pan Brownies is more than just baking; it’s a heartwarming experience that fills your kitchen with laughter and joy. Each bite transports me back to carefree childhood celebrations brimming with sweetness. This recipe effortlessly brings together the rich flavor of chocolate and the whimsy of sprinkles, making it a favorite among my family and friends. I hope you find as much delight in making these brownies as I do. So, roll up your sleeves, gather your loved ones, and embark on this sweet adventure—you won’t regret it!


    Print

    clock clock iconcutlery cutlery iconflag flag iconfolder folder iconinstagram instagram iconpinterest pinterest iconfacebook facebook iconprint print iconsquares squares iconheart heart iconheart solid heart solid icon

    Description

    Chaos Cake Sheet Pan Brownies are a delightful and colorful treat combining brownies and cake with plenty of sweet add-ins and frosting.


    • 1 cup unsalted butter, melted
    • 1 1/2 cups granulated sugar
    • 1/2 cup packed light brown sugar
    • 3 large eggs
    • 2 teaspoons vanilla extract
    • 1 cup all-purpose flour
    • 1/2 cup unsweetened cocoa powder
    • 1 teaspoon baking powder
    • 1/2 teaspoon salt
    • 3/4 cup semi-sweet chocolate chunks
    • 1/2 cup rainbow sprinkles
    • 1 cup birthday cake-flavored sandwich cookies, roughly chopped
    • 1/2 cup unsalted butter, softened
    • 2 cups powdered sugar, sifted
    • 2 tablespoons milk
    • 1/2 teaspoon vanilla extract
    • Pinch of salt
    • Additional rainbow sprinkles for topping

    1. Preheat the oven to 350°F. Line a 9×13-inch sheet pan with parchment paper, leaving an overhang for easy removal.
    2. In a large mixing bowl, whisk together the melted butter, granulated sugar, and brown sugar until smooth and glossy.
    3. Add the eggs one at a time, whisking thoroughly after each addition. Stir in the vanilla extract.
    4. Sift in the all-purpose flour, cocoa powder, baking powder, and salt. Fold gently until just combined, taking care not to overmix.
    5. Fold in the semi-sweet chocolate chunks, rainbow sprinkles, and chopped birthday cake-flavored cookies until evenly distributed throughout the batter.
    6. Spread the batter evenly in the prepared sheet pan. Bake for 23 to 25 minutes, or until the center is just set and a toothpick inserted yields moist crumbs. Do not overbake.
    7. Allow brownies to cool completely in the pan placed on a wire rack.
    8. Beat the softened butter with an electric mixer until creamy. Gradually add sifted powdered sugar, milk, vanilla extract, and a pinch of salt, continuing to beat until the frosting is light and fluffy.
    9. Spread the prepared frosting evenly over the cooled brownies. Decorate generously with extra rainbow sprinkles.
    10. Cut into squares and serve.

    Notes

    • Ensure the brownies are completely cooled before frosting to avoid melting.
    • Store leftovers in an airtight container at room temperature for up to 3 days.
    • Feel free to customize add-ins based on your preferences.
    • Prep Time: 20 minutes
    • Cook Time: 25 minutes
    • Category: Dessert
    • Method: Baking
    • Cuisine: American

    Nutrition

    • Serving Size: 1 square
    • Calories: 250
    • Sugar: 20g
    • Sodium: 140mg
    • Fat: 10g
    • Saturated Fat: 6g
    • Unsaturated Fat: 4g
    • Trans Fat: 0g
    • Carbohydrates: 36g
    • Fiber: 2g
    • Protein: 3g
    • Cholesterol: 40mg

    Sharing is caring!

  • Chaos Cake Pancake Stack

    Chaos Cake Pancake Stack


    Introduction to Chaos Cake Pancake Stack

    Hey there, fellow busy moms and professionals! If you’re anything like me, mornings can often feel like a delightful whirl of chaos. That’s where my Chaos Cake Pancake Stack swoops in like a superhero breakfast! This recipe is not just about pancakes; it’s about combining the joy of cake with the convenience of pancakes. Perfect for those energetic little ones (or your inner child), these colorful stacks bring smiles all around. In just about 35 minutes, you can create a breakfast masterpiece that’ll please even the pickiest eaters. Let’s dive in and make some breakfast magic!

    Why You’ll Love This Chaos Cake Pancake Stack

    This Chaos Cake Pancake Stack is a game-changer for busy mornings! You’ll love how quickly it comes together, allowing you to serve up smiles in just 35 minutes. With its vibrant colors and fun toppings, breakfast transforms from a mundane routine into a delightful experience. Plus, these pancakes are wonderfully adaptable, so you can customize them to suit your family’s tastes. Who knew breakfast could be so joyful and easy?

    Ingredients for Chaos Cake Pancake Stack

    Gathering the ingredients for your Chaos Cake Pancake Stack is the first step to pancake paradise. Here’s what you’ll need:

    • All-purpose flour: The foundation of fluffy pancakes; it helps create that lovely texture.
    • Granulated sugar: Just a touch for sweetness. It harmonizes with all the delightful toppings.
    • Baking powder: This is your secret to fluffiness! It gives the pancakes that beautiful rise.
    • Baking soda: A little extra lift to complement the baking powder, ensuring your pancakes are light.
    • Salt: A pinch enhances all flavors, balancing the sweetness perfectly.
    • Large eggs: These bind the ingredients together and add richness.
    • Buttermilk: The magic ingredient that adds tang and moisture. Regular milk can substitute, but you’ll miss the flavor!
    • Unsalted butter: For that irresistible buttery flavor. Melted butter makes the batter rich and delicious.
    • Vanilla extract: A splash of vanilla adds warmth and depth to each pancake.
    • Rainbow sprinkles: Because life is too short for boring pancakes! They add fun and color.
    • Mini chocolate chips: Perfect for a sweet surprise in every bite. Chocolate makes everything better!
    • Whipped cream: A fluffy topping that adds both texture and richness, elevating your pancake stack.
    • Cream cheese frosting: For that cake-like flavor—yes, please! A delectable layer between pancakes.
    • Strawberry jam: A fruity drizzle adds a burst of flavor and a lovely, gooey texture.
    • Chopped nuts (optional): Toasted nuts can add a delightful crunch. Almonds or pecans are my favorites.
    • Maraschino cherries: The cherry on top, quite literally! They are a classic topping for a fun finish.
    • Mini marshmallows: Sweet and fluffy, they add whimsy and a bit of nostalgia for many of us.
    • Powdered sugar: A light dusting at the end for that café-style presentation.

    Exact quantities are available for printing at the bottom of this article, so you can whip up this colorful breakfast wonder easily. Feel free to raid your pantry for substitutions or get creative with whatever your family prefers—after all, that’s what chaos is all about!

    How to Make Chaos Cake Pancake Stack

    Preparing the Batter

    Creating the batter for your Chaos Cake Pancake Stack is an easy and enjoyable process. Start by grabbing a large mixing bowl, and whisk together the dry ingredients: all-purpose flour, granulated sugar, baking powder, baking soda, and salt. This step is crucial for evenly distributing the leavening power and ensuring fluffy pancakes.

    In a separate bowl, whisk the large eggs, buttermilk, melted unsalted butter, and vanilla extract until smooth and well combined. These wet components bring moisture and flavor that makes pancakes irresistible. Now, make a little well in the center of your dry mix, and gently pour in the wet ingredients. Stir with a spatula until just combined; it’s okay if a few lumps remain. Overmixing can lead to dense pancakes, and we want a light and airy result!

    Cooking the Pancakes

    Now that your batter is ready, it’s time to heat up your griddle! Preheat it over medium heat for a couple of minutes, and don’t forget to lightly grease it with a bit of butter or nonstick spray. This keeps pancakes from sticking and adds a delightful golden color.

    Pour 1/3 cup of batter onto the hot surface for each pancake. Here comes the fun part: sprinkle some rainbow sprinkles and mini chocolate chips on top before flipping! After 2-3 minutes, check for bubbles on the surface; this means it’s time to flip. You’re looking for a lovely golden brown color. Cook the other side for another couple of minutes, and repeat this process until all the batter is used. The sizzle and smell will leave you craving more!

    Stacking and Topping the Chaos Cake Pancake Stack

    Here’s where the magic truly happens! Once your pancakes are golden and beautiful, it’s time to build your Chaos Cake Pancake Stack. Start with a pancake as your base. Spread a thin layer of cream cheese frosting or whipped cream on top before layering the next pancake. This creates a delightful surprise as you dig in!

    As you stack, drizzle strawberry jam and scatter mini marshmallows, chopped nuts, and extra sprinkles for added flair. I like to finish the top pancake with a generous dollop of whipped cream, a sprinkle of powdered sugar, a few maraschino cherries, and a final flourish of sprinkles. Let your creativity shine! Serve your Chaos Cake Pancake Stack immediately, and watch as everyone rejoices in this delightful breakfast treat.

    Tips for Success

    • Use fresh ingredients for the best flavor and texture, especially the baking powder.
    • Don’t overmix the batter; a few lumps are perfectly fine!
    • Keep your griddle at medium heat for even cooking.
    • Let the pancakes rest on a plate while you cook the rest to keep them warm.
    • Customize the toppings based on seasonal fruits or what you have at home!

    Equipment Needed

    • Large mixing bowl: A regular mixing bowl works fine.
    • Whisk: A fork can do the trick if you don’t have one.
    • Nonstick skillet or griddle: A regular frying pan will work too.
    • Spatula: A large spoon can be handy for flipping.
    • Measuring cups: Estimating works, but accurate measurements yield the best results!

    Variations of Chaos Cake Pancake Stack

    • For a gluten-free option, substitute all-purpose flour with a 1:1 gluten-free flour blend. Keep that fluffy texture without the gluten!
    • Add a twist with fruit! Incorporate fresh blueberries or sliced bananas into the batter for extra flavor and nutrition.
    • Transition into fall with spiced Chaos Cake Pancakes by adding cinnamon and nutmeg to the batter. Your kitchen will smell divine!
    • Want a richer flavor? Try using buttermilk pancakes with chocolate-flavored cake mix instead of regular flour!
    • Vegan adaptation: Replace eggs with flax eggs and use almond or oat milk instead of buttermilk. Swap out butter with coconut oil for delightful vegan pancakes.
    • For a healthy twist, consider adding mashed sweet potatoes or ripe avocado to the batter for added nutrients without sacrificing taste.
    • Mix it up with your family’s favorite candies! Add crushed Oreos or peanut butter chips for a chaotic delight.

    Serving Suggestions

    • Pair your Chaos Cake Pancake Stack with a side of crispy bacon or sausage for a hearty breakfast.
    • Fresh fruit, like sliced strawberries or blueberries, adds a refreshing touch to balance the sweetness.
    • Serve with a tall glass of iced coffee or fresh orange juice for a perfect morning combo.
    • For an extra wow factor, arrange colorful plates and garnish with mint leaves for a vibrant presentation.

    FAQs about Chaos Cake Pancake Stack

    Can I make the pancakes ahead of time?
    Absolutely! You can cook the pancakes in advance and store them in the refrigerator. Just reheat them in the toaster or microwave before stacking and serving. They’ll still be fluffy and delicious!

    What can I substitute for buttermilk?
    If you don’t have buttermilk on hand, mixing milk with a tablespoon of vinegar or lemon juice will do the trick! Let it sit for a few minutes before using, and you’ll get a nice tang.

    Are these pancakes suitable for a special diet?
    Yes! They can be adapted to fit gluten-free or vegan diets. Just swap out the all-purpose flour for a gluten-free blend and use plant-based ingredients, like almond milk and flax eggs, to make them vegan.

    How should I store leftover Chaos Cake Pancakes?
    Store leftovers in an airtight container in the refrigerator for up to three days. You can freeze them for a more extended option. Just layer them between parchment paper and pop them in a freezer bag!

    Can I use different toppings for my pancakes?
    Absolutely! The beauty of the Chaos Cake Pancake Stack is its versatility. Use seasonal fruits, flavored syrups, or even yogurt to create your perfect stack. Get creative with what you have!

    Final Thoughts

    Creating a Chaos Cake Pancake Stack isn’t just about breakfast—it’s a joyful adventure that brings family and friends together. Whether it’s a special occasion or a simple Tuesday, every bite is a celebration of flavor and color. The laughter, the mess, and the smiles—those are the real icing on the cake! This recipe transforms a rushed morning into a moment of joy, allowing us to indulge our inner child. So grab your mixing bowl, make some memories, and let the chaos of cooking lead to delightful discoveries in your kitchen. Happy stacking!


    Print

    clock clock iconcutlery cutlery iconflag flag iconfolder folder iconinstagram instagram iconpinterest pinterest iconfacebook facebook iconprint print iconsquares squares iconheart heart iconheart solid heart solid icon

    Description

    Chaos Cake Pancake Stack is a fun and colorful pancake recipe that combines the joys of cake with the ease of pancakes, perfect for any breakfast or brunch.


    • 2 cups all-purpose flour
    • 2 tablespoons granulated sugar
    • 2 teaspoons baking powder
    • 1/2 teaspoon baking soda
    • 1/2 teaspoon salt
    • 2 large eggs
    • 1 1/2 cups buttermilk
    • 1/4 cup unsalted butter, melted
    • 1 teaspoon vanilla extract
    • 1/2 cup rainbow sprinkles
    • 1/2 cup mini chocolate chips
    • 1/2 cup whipped cream
    • 1/2 cup cream cheese frosting
    • 1/4 cup strawberry jam
    • 1/4 cup chopped nuts (optional)
    • 1/4 cup maraschino cherries, drained
    • 1/4 cup mini marshmallows
    • 2 tablespoons powdered sugar, for dusting

    1. In a large mixing bowl, whisk together the all-purpose flour, granulated sugar, baking powder, baking soda, and salt until well blended.
    2. In a separate bowl, whisk the eggs, buttermilk, melted unsalted butter, and vanilla extract until smooth.
    3. Pour the wet mixture into the dry ingredients and stir gently using a spatula until just combined. Do not overmix; a few lumps are fine.
    4. Heat a nonstick skillet or griddle over medium heat and lightly grease with butter or nonstick spray.
    5. Pour 1/3 cup batter per pancake onto the preheated surface. Sprinkle some rainbow sprinkles and mini chocolate chips over each pancake before flipping.
    6. Cook each pancake for 2–3 minutes per side, or until golden and cooked through. Repeat with remaining batter.
    7. Stack pancakes on a serving plate, spreading a thin layer of cream cheese frosting or whipped cream between each layer.
    8. Drizzle strawberry jam over the stack, scatter with mini marshmallows, chopped nuts if desired, and extra sprinkles as you build up.
    9. Finish with a generous layer of whipped cream, maraschino cherries, more sprinkles, and a light dusting of powdered sugar.
    10. Serve immediately for best texture and presentation.

    Notes

    • For a healthier option, you can substitute some of the all-purpose flour for whole wheat flour.
    • Feel free to customize the toppings based on your preferences or what you have on hand.
    • Prep Time: 15 minutes
    • Cook Time: 20 minutes
    • Category: Breakfast
    • Method: Cooking on Griddle
    • Cuisine: American

    Nutrition

    • Serving Size: 1 stack
    • Calories: 450
    • Sugar: 30g
    • Sodium: 350mg
    • Fat: 20g
    • Saturated Fat: 10g
    • Unsaturated Fat: 8g
    • Trans Fat: 0g
    • Carbohydrates: 60g
    • Fiber: 2g
    • Protein: 8g
    • Cholesterol: 70mg

    Sharing is caring!

  • Healthier Pumpkin Spice Latte

    Healthier Pumpkin Spice Latte


    Introduction to Healthier Pumpkin Spice Latte

    As the leaves turn golden and the air gets crisp, there’s nothing quite like cozying up with a seasonal beverage. Yet, I often find myself wanting to enjoy that classic pumpkin spice latte without all the guilt. That’s where this Healthier Pumpkin Spice Latte comes in. It’s a creamy cup of comfort made with wholesome ingredients, so I can savor every sip without a second thought. Perfect for busy days, it fits seamlessly into your health-conscious routine while still offering that warm, fall flavor we all crave.

    Why You’ll Love This Healthier Pumpkin Spice Latte

    This Healthier Pumpkin Spice Latte is a game-changer for busy moms and professionals like me who crave a delicious treat. It’s incredibly easy to whip up, taking just 10 minutes from start to finish. With its rich, satisfying flavor, it feels indulgent without the guilt. I love that I can enjoy a cozy cup while juggling my hectic schedule, making it the perfect companion for those busy fall mornings.

    Ingredients for Healthier Pumpkin Spice Latte

    Creating your own Healthier Pumpkin Spice Latte is all about using ingredients that nourish both your body and soul. Start with pumpkin purée, which not only provides that unmistakable flavor but is also loaded with vitamins A and C. It’s a nutritional powerhouse that adds creaminess without excess calories.

    Next, reach for unsweetened almond milk, a great dairy alternative that keeps the drink light while adding a subtle nutty taste. Ground cinnamon brings warmth and depth, boosting your metabolism and giving you that cozy vibe.

    Add a dash of maple syrup for a hint of sweetness that’s crafted straight from nature. Feel free to customize your creation! A dash of nutmeg or a little extra pumpkin purée can elevate the flavors. Exact quantities for these delightful ingredients await you at the end of this article, ready for easy printing!

    How to Make Healthier Pumpkin Spice Latte

    Now that you have all your ingredients ready, it’s time to dive into the delightful process of making this Healthier Pumpkin Spice Latte! Trust me, it’s as easy as pie and perfect for those busy mornings.

    Step 1: Combine the Base Ingredients

    Start by adding the pumpkin purée, unsweetened almond milk, ground cinnamon, and maple syrup into a small saucepan. You’ll want everything to blend nicely.

    The vibrant orange of the purée should mix beautifully with the creamy almond milk. Just imagine all those flavors coming together in one cozy pot!

    Step 2: Heat and Whisk

    Place your saucepan over medium heat. As it warms, make sure to whisk frequently. This keeps the mixture smooth and prevents it from sticking to the bottom.

    Heat until it’s hot, but avoid boiling! We want that comforting warmth, not an explosive mess. If you can dip your finger in without jumping back, you’re golden!

    Step 3: Froth the Mixture

    Once your base is heated, it’s time for some frothing fun! Remove the saucepan from heat, and take a whisk or milk frother to incorporate air into the mixture.

    Keep whisking until it becomes light and foamy. You want it to feel airy, just like a hug in a cup!

    Step 4: Combine with Coffee

    Pour this foamed wonder over your cup of strong brewed coffee or espresso. Watch as your drink transforms with beautiful layers.

    Gently stir to blend everything together, ensuring each sip is packed with that glorious pumpkin flavor.

    Step 5: Garnish and Enjoy

    Finally, finish off your creation with a dollop of dairy-free whipped cream and a light sprinkle of nutmeg if you’re feeling fancy.

    This garnish adds a special touch, making your Healthier Pumpkin Spice Latte not just a treat for your taste buds, but for your eyes too!

    Tips for Success

    • Store any leftover latte in the fridge for up to two days; just reheat gently.
    • Adjust sweetness by adding more or less maple syrup to your liking.
    • For optimal foam, froth the mixture while it’s still warm but off the heat.
    • If you prefer stronger flavors, feel free to increase the amount of cinnamon or pumpkin purée.
    • Use a good-quality coffee or espresso for the best flavor.

    Equipment Needed

    • Small saucepan for heating the ingredients.
    • Whisk or milk frother for achieving that perfect foam.
    • Cup for serving your delicious latte.
    • Measuring spoons for accuracy (or just wing it, I won’t judge!).
    • Good-quality coffee maker or espresso machine.

    Variations of Healthier Pumpkin Spice Latte

    • Swap unsweetened almond milk for oat milk or coconut milk for a creamier texture.
    • Create your own pumpkin spice blend using a mix of cinnamon, nutmeg, ginger, and cloves for a custom flavor.
    • Try different sweeteners like agave syrup or a sprinkle of stevia for a sugar-free option.
    • Add a dash of vanilla extract for an extra layer of warmth.
    • For a chocolate twist, mix in cocoa powder for a mocha flavor!

    Serving Suggestions

    • Pair your Healthier Pumpkin Spice Latte with warm scones for a delightful breakfast treat.
    • A flaky breakfast sandwich filled with eggs and cheese makes for a savory companion.
    • Serve with a slice of pumpkin bread to embrace the seasonal flavors fully.
    • Add a sprinkle of cinnamon on top for a beautiful presentation!

    FAQs about Healthier Pumpkin Spice Latte

    Can I make the Healthier Pumpkin Spice Latte ahead of time?

    Absolutely! You can prepare the latte mixture a day in advance. Just store it in the fridge, and reheat gently when you’re ready for a cozy cup.

    How can I adjust the flavor of my latte?

    Feel free to tweak the spices. If you love cinnamon, add a bit more. For a deeper flavor, consider including a splash of vanilla extract. Every sip can be just how you like it!

    What’s the best way to store leftovers?

    Keep any leftover Healthier Pumpkin Spice Latte in an airtight container in the fridge. It stays fresh for up to two days. Just remember to reheat it slowly!

    Can I use regular milk instead of almond milk?

    Of course! While I love the nutty flavor from almond milk, you can substitute it with any milk you prefer. Cow’s milk, soy milk, or oat milk work beautifully too!

    How do I create more foam in my latte?

    For maximum foam, froth your latte mixture while it’s still warm but not boiling. Whisking vigorously helps to incorporate air, giving you that café-style finish!

    Final Thoughts

    There’s something about a homemade Healthier Pumpkin Spice Latte that wraps you in a warm embrace, just like a cozy blanket on a chilly fall day. As the aroma fills your kitchen, you can’t help but smile, knowing you’re treating yourself to a guilt-free indulgence.

    This delightful drink not only brings joy but also fits perfectly into our bustling lives. With just a few minutes of prep, you can create a comforting ritual worth savoring. So, I encourage you to make this treat a regular part of your fall routine. You deserve it!


    Print

    clock clock iconcutlery cutlery iconflag flag iconfolder folder iconinstagram instagram iconpinterest pinterest iconfacebook facebook iconprint print iconsquares squares iconheart heart iconheart solid heart solid icon

    Description

    A guilt-free version of the classic pumpkin spice latte, made with pumpkin purée and almond milk, perfect for a cozy fall day.


    • 2 tablespoons pumpkin purée
    • 1 cup unsweetened almond milk
    • 1/2 cup strong brewed coffee or espresso
    • 1/2 teaspoon ground cinnamon
    • 1 tablespoon maple syrup

    1. Add pumpkin purée, unsweetened almond milk, ground cinnamon, and maple syrup to a small saucepan.
    2. Place saucepan over medium heat, whisking frequently, until the mixture is hot but not boiling, approximately 3–5 minutes.
    3. Remove from heat and use a whisk or milk frother to incorporate air into the mixture until foamy.
    4. Pour the foamed mixture over strong brewed coffee or espresso in a mug and gently stir to blend.
    5. Top with dairy-free whipped cream and a light sprinkle of nutmeg if desired.

    Notes

    • For a stronger flavor, add more cinnamon or pumpkin purée.
    • This recipe can be easily adjusted for sweetness according to personal preference.
    • Prep Time: 5 minutes
    • Cook Time: 5 minutes
    • Category: Beverage
    • Method: Stovetop
    • Cuisine: American

    Nutrition

    • Serving Size: 1 cup
    • Calories: 120
    • Sugar: 8g
    • Sodium: 150mg
    • Fat: 4g
    • Saturated Fat: 0.5g
    • Unsaturated Fat: 3g
    • Trans Fat: 0g
    • Carbohydrates: 18g
    • Fiber: 2g
    • Protein: 3g
    • Cholesterol: 0mg

    Sharing is caring!

  • Cheesesteak Tortellini in Creamy Provolone Sauce

    Cheesesteak Tortellini in Creamy Provolone Sauce


    Introduction to Cheesesteak Tortellini in Creamy Provolone Sauce

    As a busy mom, I often find myself juggling the day’s responsibilities while dreaming of a satisfying dinner. Enter my Cheesesteak Tortellini in Creamy Provolone Sauce, a dish that marries hearty flavors with convenience. This delightful recipe comes together in just 35 minutes, making it a fantastic option for those hectic weeknights when time is scarce. Plus, it combines the comforting richness of creamy provolone and tender steak, sure to impress everyone at the dinner table. Your loved ones will marvel at your culinary skills, and you’ll relish the minimal cleanup afterward!

    Why You’ll Love This Cheesesteak Tortellini in Creamy Provolone Sauce

    This Cheesesteak Tortellini in Creamy Provolone Sauce is not just another pasta dish; it’s a game-changer for busy nights. It’s quick and simple, yet bursting with flavor, making it a surefire hit with picky eaters and adventurous palates alike. You’ll love how effortlessly the rich, creamy sauce envelops each tortellini, creating comforting bites. Plus, the satisfaction of a homemade meal in under 40 minutes is hard to beat!

    Ingredients for Cheesesteak Tortellini in Creamy Provolone Sauce

    When crafting my Cheesesteak Tortellini in Creamy Provolone Sauce, I ensure to choose only the freshest ingredients for a mouthwatering experience. Here’s what you’ll need:

    • Cheese tortellini: The star of this dish! Pot for fresh or frozen, and either option works like a charm.
    • Olive oil: Adds a lovely depth while sautéing; you could also use butter, but olive oil is my go-to for healthier cooking.
    • Onion: A large, sliced onion brings sweetness and a hint of savories to the dish.
    • Cubed beef steak: Tender, juicy pieces of beef are essential for that comforting cheesesteak flavor.
    • Salt and pepper: These staples enhance the overall flavor of your dish. Don’t skip them!
    • Beef broth: Adds a savory foundation. Homemade or store-bought works well—just check the label for sodium content.
    • Worcestershire sauce: This secret ingredient infuses a unique umami flavor. A little goes a long way!
    • Shredded provolone cheese: The creamy, melting cheese creates that luscious sauce. Feel free to mix in mozzarella or cheddar for a twist.

    For any substitutions, you can swap the beef for chicken or even sautéed mushrooms for a vegetarian version. You’ll find all the exact measurements at the bottom of the article, ready for you to print and take to the kitchen!

    How to Make Cheesesteak Tortellini in Creamy Provolone Sauce

    Preparation

    To kick things off, grab your package of cheese tortellini. If it’s refrigerated, let it sit out for a few minutes. This helps to enhance its tenderness and speeds up cooking time. While you’re at it, gather all your ingredients. Prepping ahead keeps the chaos at bay, especially during those busy evenings.

    Sauté Aromatics

    Next, let’s heat up a large sauté pan. Add a tablespoon of olive oil and warm it over medium-high heat until it shimmers. Toss in the sliced onion. It should sizzle and begin to caramelize, filling your kitchen with a sweet aroma. Cook until the onion becomes nice and translucent, approximately 3-4 minutes. This step sets a flavorful base.

    Cook the Steak

    Now, introduce the cubed beef steak to the pan. Spread it out evenly for a good sear. Season it with salt and pepper, making sure every piece is seasoned. Leave them alone for about 2 minutes to form a lovely browned crust. Stir and continue cooking until the steak is perfectly tender but not overdone, around 5 minutes more.

    Build the Flavor Base

    Time to layer in some serious flavor! Pour in the cup of beef broth and the two tablespoons of Worcestershire sauce. Bring this mixture to a gentle simmer. Don’t forget to use a wooden spoon to scrape up any flavorful bits stuck to the bottom. That’s where the magic lies! This creates a rich foundation for our dish.

    Add the Tortellini

    Gentle now! Carefully add the cheese tortellini to the pan. Stir it all together, making sure the tortellini gets coated in that delicious beefy broth. Let it mingle with the steak and onions for about 3 minutes. This allows the tortellini to soak up all those wonderful flavors.

    Create the Sauce

    Lower the heat and sprinkle the shredded provolone cheese across the mixture. Stir slowly but steadily, watching that cheese melt into the luscious sauce you’re creating. The result should be a creamy consistency that hugs every tortellini. It’s pure comfort food bliss!

    Finish and Serve

    Once your sauce is wonderfully creamy, take the dish off the heat. It’s time to enjoy your creation! Serve immediately, maybe garnished with a sprinkle of freshly ground pepper or chopped parsley for a pop of color. Each bite of tender steak, cheesy tortellini, and that rich sauce is sure to be a hit!

    Tips for Success

    • Always have your ingredients prepped and ready to go. It streamlines the cooking process and minimizes chaos.
    • Ensure the pan is hot before adding ingredients. This helps achieve a nice sear on the steak.
    • Don’t rush the cheese melting process. Stir patiently for a silky sauce.
    • Feel free to adjust seasonings based on your taste. Every palate is unique!

    Equipment Needed

    • Large sauté pan: Essential for cooking the steak and tortellini. A deep skillet works fine too.
    • Wooden spoon: Perfect for mixing and scraping up flavor bits. A silicone spatula is a good alternative.
    • Measuring cups: Useful for liquid ingredients. You can use any cup you have on hand.

    Variations

    • Vegetarian Option: Swap out the beef steak for sautéed mushrooms or zucchini to create a tasty vegetarian version.
    • Spicy Kick: Add red pepper flakes or a splash of hot sauce to infuse some heat into your creamy sauce.
    • Cheese Lovers: Mix in additional cheeses like mozzarella or gouda for an even richer, cheesier flavor profile.
    • Veggie Boost: Toss in chopped bell peppers or baby spinach during the sautéing stage for a nutritious boost.
    • Gluten-Free Version: Use gluten-free tortellini to keep this dish suitable for gluten-sensitive diners.

    Serving Suggestions

    • Side Salad: A simple green salad with a light vinaigrette complements the richness of the dish.
    • Garlic Bread: Serve with warm, crusty garlic bread for a delightful dip into the creamy sauce.
    • Wine Pairing: Enjoy with a chilled white wine like Pinot Grigio for a refreshing contrast.
    • Presentation: Garnish with fresh parsley or basil to add a pop of color.

    FAQs about Cheesesteak Tortellini in Creamy Provolone Sauce

    Can I use a different type of cheese for the sauce? Absolutely! While provolone gives that creamy indulgence, you can experiment with mozzarella, gouda, or even cheddar for a unique twist.

    Is this dish suitable for meal prep? Yes! Cheesesteak Tortellini in Creamy Provolone Sauce keeps well in the refrigerator for 3 days. Just reheat gently on the stove, adding a splash of broth if needed.

    Can I make this dish in advance? You can prepare the components—sautéed steak and sauce—before cooking the tortellini. Just combine them right before serving to enjoy that fresh taste!

    What can I serve with it? This dish pairs beautifully with a crisp green salad, garlic bread, or even a refreshing glass of white wine. Each balances the richness perfectly!

    How can I make it gluten-free? Pot for gluten-free tortellini available in health food stores. This way, you can still enjoy this comforting dish without the gluten.

    Final Thoughts

    Creating Cheesesteak Tortellini in Creamy Provolone Sauce has transformed my weeknight dinners into delightful experiences. With every bite, I savor the comforting blend of flavors that brings my family together, even on the busiest days. This dish serves not just as a meal but as a reminder that cooking can be an enjoyable adventure, even with a hectic schedule. The smiles around the dinner table are worth every minute spent in the kitchen. So, whether I’m impressing guests or feeding my kids, this recipe never fails to deliver joy and satisfaction.


    Print

    clock clock iconcutlery cutlery iconflag flag iconfolder folder iconinstagram instagram iconpinterest pinterest iconfacebook facebook iconprint print iconsquares squares iconheart heart iconheart solid heart solid icon

    Description

    Cheesesteak Tortellini in Creamy Provolone Sauce is a delightful dish that combines cheese tortellini with tender steak and a rich provolone cheese sauce.


    • One package (12 oz) of cheese tortellini
    • One tablespoon of olive oil
    • One large onion, sliced
    • One pound of cubed beef steak
    • Half a teaspoon of salt
    • Quarter teaspoon of pepper
    • One cup of beef broth
    • Two tablespoons of Worcestershire sauce
    • One cup of shredded provolone cheese

    1. Preparation: Begin by ensuring your cheese tortellini is ready to go. If you’re using refrigerated tortellini, allow it to come to room temperature; this enhances its tenderness and reduces cooking time.
    2. Sauté Aromatics: In a large sauté pan, add 1 tablespoon of olive oil and heat over medium-high heat until shimmering. Add the sliced onion, frying until it becomes translucent and slightly caramelized, releasing its sweet aroma.
    3. Cook the Steak: Introduce the cubed beef steak into the pan, spreading it evenly. Season with salt and pepper. Allow the steak to sear undisturbed for about 2 minutes to create a beautifully browned exterior. Stir and continue cooking until the steak is cooked through yet tender.
    4. Build the Flavor Base: Pour in 1 cup of beef broth and add 2 tablespoons of Worcestershire sauce. Let the liquid come to a simmer, utilizing a wooden spoon to scrape any flavorful bits stuck to the bottom, which melds the tastes together.
    5. Add the Tortellini: Gently introduce the cheese tortellini to the pan. Stir carefully, ensuring even distribution under the rich, savory sauce. Allow it to mingle with the beef and onions for about 3 minutes, absorbing their flavors.
    6. Create the Sauce: Lower the heat and scatter the shredded provolone cheese over the mixture. Stir steadily until the cheese is thoroughly melted and the sauce acquires a creamy consistency, cloaking the tortellini luxuriously.
    7. Finish and Serve: Once the provolone sauce is smooth and creamy, remove the dish from heat. Serve immediately, garnished with freshly ground pepper or parsley, if desired. Enjoy each bite of tender steak, cheesy tortellini, and luscious sauce.

    Notes

    • For an extra touch, consider adding sautéed bell peppers or mushrooms to the mix.
    • This dish pairs well with a side salad or garlic bread.
    • Leftovers can be stored in an airtight container in the refrigerator for up to 3 days.
    • Prep Time: 15 minutes
    • Cook Time: 20 minutes
    • Category: Main Course
    • Method: Sautéing
    • Cuisine: American

    Nutrition

    • Serving Size: 1 serving
    • Calories: 550
    • Sugar: 3g
    • Sodium: 800mg
    • Fat: 24g
    • Saturated Fat: 10g
    • Unsaturated Fat: 11g
    • Trans Fat: 0g
    • Carbohydrates: 56g
    • Fiber: 2g
    • Protein: 30g
    • Cholesterol: 90mg

    Sharing is caring!

  • Pickle Fix Holiday Cheese Ball

    Pickle Fix Holiday Cheese Ball


    Introduction to Pickle Fix Holiday Cheese Ball

    As the holiday season approaches, we all feel the excitement in the air, don’t we? The Pickle Fix Holiday Cheese Ball is just the thing to impress your loved ones and spark joy at gatherings. It’s festive, flavorful, and easy to whip up, even on the busiest of days. Imagine a delicious cheese ball infused with dill pickles and coated in crunchy pecans—every bite is a delightful mix of creamy and crunchy. This recipe makes entertaining a breeze and will have your guests coming back for seconds (or thirds!). Let’s dive into this tasty treat!

    Why You’ll Love This Pickle Fix Holiday Cheese Ball

    This Pickle Fix Holiday Cheese Ball is not just a dish; it’s a lifesaver. It combines convenience and flavor, making it perfect for busy moms like me. In just 20 minutes, you can create a delightful appetizer that’s sure to please. Whether you’re hosting a festive gathering or just need a quick snack, this cheese ball delivers on taste without the fuss. Trust me, you’ll want it on your holiday table!

    Ingredients for Pickle Fix Holiday Cheese Ball

    Gathering the right ingredients is the first step to success in crafting the delicious Pickle Fix Holiday Cheese Ball. This flavorful concoction has a blend of textures and tastes that will appeal to everyone. Here’s what you’ll need:

    • Cream cheese: The silky base that brings richness to our cheese ball. Make sure it’s softened for easy mixing.
    • Sharp cheddar cheese: This adds depth and a delightful tang, making every bite memorable.
    • Sour cream: Offers a smooth, creamy texture and balances richness with a slight tartness.
    • Dill pickles: The star ingredient provides that signature dill flavor and crunch. Choose your favorite brand or even homemade!
    • Green onions: Finely sliced, these lend a mild onion flavor and a pop of color.
    • Fresh dill: For that unmistakable herby touch, fresh dill elevates the pickle flavor to new heights.
    • Worcestershire sauce: Just a dash adds a savory depth that rounds out the flavor profile beautifully.
    • Garlic powder: A pinch of this brings aromatic warmth without overpowering the other flavors.
    • Onion powder: Like garlic, it contributes a subtle flavor burst, enhancing the overall taste.
    • Black pepper: Freshly ground, it adds the perfect touch of heat and contrast.
    • Pecans: Chopped for coating, they offer a delightful crunch and nutty flavor that complements the creaminess.
    • Fresh parsley: Adds a burst of color and a hint of freshness to the outer layer.
    • Extra dill pickles: These are for coating the cheeese ball! They bring additional crunch and dill goodness.

    For exact quantities, scroll down to the end of the article where you’ll find a handy printable recipe. Ready to get started? Let’s move on to creating this festive delight!

    How to Make Pickle Fix Holiday Cheese Ball

    Now, let’s jump into the fun part—making your delicious Pickle Fix Holiday Cheese Ball! It’s a step-by-step journey packed with flavor and joy. Follow these simple instructions, and you’ll have a crowd-pleaser ready in no time!

    Combine the Cheeses

    Start by mixing the cream cheese, sharp cheddar, and sour cream. This is crucial because these three create a creamy base that will hold all the flavors together. If your cream cheese is soft, use a hand mixer or a sturdy spatula. Blend until smooth and there are no lumps. Trust me, this creamy base is the secret behind a delightful cheese ball!

    Fold in the Pickles and Seasonings

    Next, gently fold in the chopped dill pickles, green onions, fresh dill, Worcestershire sauce, garlic powder, onion powder, and black pepper. It’s like a flavor hug! Make sure each ingredient is evenly distributed throughout the mixture. This step guarantees that every bite packs a pop of flavor. Don’t rush; take your time to incorporate everything!

    Shape the Cheese Ball

    Once everything is mixed, it’s time to shape this tasty treat. On a large sheet of plastic wrap, spoon the cheese mixture into the center. Use the wrap to help mold it into a compact ball—like a big, cheesy snowball! This technique makes handling so much easier, and it looks amazing when served.

    Chill the Mixture

    Now comes the important part: chilling! Wrap the cheese ball tightly with the plastic wrap. Refrigerate it for at least one hour, or even up to 24 hours if you want to prep ahead. Chilling helps firm it up and allows the flavors to meld beautifully. I promise, patience is key here!

    Prepare the Coating

    While your ball is chilling, let’s prepare the coating. In a shallow dish, mix together the chopped pecans, fresh parsley, and additional dill pickles. This coating not only looks gorgeous but adds a crunchy texture to each bite. Your kitchen will smell divine at this point—get ready for the grand finale!

    Roll and Serve

    After chilling, unwrap your cheese ball and roll it in the coating mixture. Press gently to ensure it hugs every side evenly. It’s all about that beautiful presentation! When coated, transfer it to a serving platter. Serve it alongside crackers, pretzels, or fresh veggies for dipping. Your guests will be clamoring for more!

    Tips for Success

    • Keep your cream cheese at room temperature for smoother mixing.
    • Use a sturdy spatula to combine ingredients without overmixing.
    • Chill your cheese ball overnight for even better flavor melding.

    Simple Kitchen Hacks

    • Freeze the pecans for a few minutes before chopping; this prevents them from turning oily.
    • To soften cream cheese quickly, microwave it in 10-second intervals, checking frequently.
    • Use a cookie scoop for uniform cheese ball sizes when shaping.

    Equipment Needed

    • Mixing bowl: A large bowl works best; you can also use a stand mixer.
    • Hand mixer or sturdy spatula: Helpful for blending cheeses smoothly; a regular spoon will work in a pinch.
    • Plastic wrap: Essential for shaping the cheese ball; parchment paper can be an alternative.
    • Shallow dish: Useful for preparing the coating; any flat plate will do!
    • Serving platter: To present your finished cheese ball; a cutting board adds a rustic touch.

    Variations of Pickle Fix Holiday Cheese Ball

    Want to switch things up with the Pickle Fix Holiday Cheese Ball? Here are some variants that can add a twist to this festive favorite. Whether you’re looking to spice things up or accommodate dietary needs, I’ve got you covered!

    Spicy Flavor Additions

    • Add a pinch of cayenne pepper or crushed red pepper flakes to the cheese mixture for a spicy kick.
    • Incorporate chopped jalapeños for a zesty, fiery flavor that’ll wake up your taste buds.
    • Mix in some hot sauce with the Worcestershire sauce for an extra kick.

    Dietary Alternatives

    • For a gluten-free option, simply ensure that all your added ingredients are labeled gluten-free, especially the Worcestershire sauce.
    • To make it vegan, swap out the cream cheese for a plant-based cream cheese and use dairy-free cheese shreds.
    • Replace sour cream with coconut yogurt or a dairy-free alternative for a creamy texture.

    Serving Suggestions

    • Pair the cheese ball with a variety of crackers for delightful crunch and flavor contrast.
    • Add fresh pretzels for an enjoyable twist that complements the creaminess.
    • Serve with raw vegetables like celery, carrots, or bell peppers for a fresh, healthy option.
    • A sprinkle of extra fresh parsley on top makes for a lovely presentation touch.
    • Accompany it with your favorite holiday cocktail for a festive vibe!

    FAQs about Pickle Fix Holiday Cheese Ball

    Can I make the Pickle Fix Holiday Cheese Ball in advance?

    Absolutely! You can prepare the cheese ball a day ahead of your gathering. Just shape it and refrigerate; the flavors will meld beautifully.

    What can I serve with this cheese ball?

    This festive cheese ball pairs wonderfully with crackers, pretzels, and fresh vegetables. Feel free to get creative with your serving options!

    Can I substitute the dill pickles for something else?

    Sure! If you’re not a fan of dill pickles, you can use sweet pickles or even olives for a unique twist on this delicious appetizer.

    How long does the cheese ball last in the fridge?

    It will typically stay fresh for up to five days in the fridge. Just make sure it’s stored in an airtight container to maintain its flavor.

    Is the Pickle Fix Holiday Cheese Ball suitable for vegetarians?

    Yes, this cheese ball is 100% vegetarian! It includes no meat products, making it a delightful choice for your veggie-loving friends.

    Final Thoughts

    The joy of making the Pickle Fix Holiday Cheese Ball is truly something special. It’s more than just a recipe; it’s a chance to gather and create memories with loved ones. This creamy, crunchy delight is perfect for any occasion, adding a festive touch to your table. Every bite brings smiles, laughter, and stories shared over good food. And let’s be honest, there’s something magical about watching friends and family dig in with delight. So, as you prepare this cheese ball, remember: it’s not just about the flavors, but the connections it helps to nurture.


    Print

    clock clock iconcutlery cutlery iconflag flag iconfolder folder iconinstagram instagram iconpinterest pinterest iconfacebook facebook iconprint print iconsquares squares iconheart heart iconheart solid heart solid icon

    Description

    A festive and flavorful cheese ball infused with dill pickles and coated in crunchy pecans.


    • 16 oz cream cheese, softened
    • 2 cups sharp cheddar cheese, shredded
    • 1/2 cup sour cream
    • 3/4 cup dill pickles, finely chopped
    • 1/4 cup green onions, finely sliced
    • 2 tablespoons fresh dill, chopped
    • 1 tablespoon Worcestershire sauce
    • 1 teaspoon garlic powder
    • 1/2 teaspoon onion powder
    • 1/4 teaspoon freshly ground black pepper
    • 1/2 cup pecans, finely chopped
    • 1/4 cup fresh parsley, chopped
    • 2 tablespoons dill pickles, finely chopped for coating

    1. Combine the softened cream cheese, shredded sharp cheddar, and sour cream in a large mixing bowl. Beat until smooth and creamy using a hand mixer or sturdy spatula.
    2. Gently fold in the finely chopped dill pickles, green onions, fresh dill, Worcestershire sauce, garlic powder, onion powder, and black pepper. Ensure the mixture is evenly blended.
    3. Transfer the blended mixture onto a large sheet of plastic wrap. Use the wrap to shape the mixture into a compact ball.
    4. Refrigerate the wrapped cheese ball for a minimum of 1 hour, or up to 24 hours, to allow the mixture to firm up.
    5. In a shallow dish, mix together the chopped pecans, fresh parsley, and additional chopped dill pickles for the exterior coating.
    6. Remove the chilled cheese ball from the plastic wrap. Roll it in the prepared coating mixture, pressing gently to ensure an even layer on all sides.
    7. Transfer the finished cheese ball to a serving platter and present it with crackers, pretzels, or raw vegetables.

    Notes

    • For a spicier version, add a pinch of cayenne pepper to the cheese mixture.
    • This recipe can be prepared a day in advance for convenience.
    • Ensure all ingredients are at room temperature for easier mixing.
    • Prep Time: 20 minutes
    • Cook Time: 0 minutes
    • Category: Appetizer
    • Method: No-cook
    • Cuisine: American

    Nutrition

    • Serving Size: 1 oz
    • Calories: 120
    • Sugar: 1g
    • Sodium: 200mg
    • Fat: 10g
    • Saturated Fat: 4g
    • Unsaturated Fat: 5g
    • Trans Fat: 0g
    • Carbohydrates: 3g
    • Fiber: 0g
    • Protein: 4g
    • Cholesterol: 25mg

    Sharing is caring!

  • Loaded M&M’s Oreo Cookie Bars

    Loaded M&M’s Oreo Cookie Bars


    Introduction to Loaded M&M’s Oreo Cookie Bars

    Let’s face it: life can get pretty hectic! With school events, work commitments, and everything in between, finding time to whip up something special can feel like a luxury. That’s where these Loaded M&M’s Oreo Cookie Bars come in. They’re not just any dessert; they’re a delicious combination of chewy, candy-filled goodness that can put a smile on anyone’s face, including yours! Whether you’re prepping for a family get-together or simply want a tasty treat after a long day, these cookie bars are your ticket to a sweet escape!

    Why You’ll Love This Loaded M&M’s Oreo Cookie Bars

    These Loaded M&M’s Oreo Cookie Bars are a lifesaver for busy moms like me. They come together quickly, taking only about ten minutes of prep time. Plus, they bake up in just 22 minutes! The best part? Each bite bursts with the classic flavors of Oreos and M&M’s, satisfying any sweet tooth. You’ll love sharing these chewy treats with your family, and they’re sure to be a hit!

    Ingredients for Loaded M&M’s Oreo Cookie Bars

    Gathering the right ingredients can feel like an adventure. For these Loaded M&M’s Oreo Cookie Bars, here’s what you’ll need:

    • Unsalted butter: This adds richness and flavor. Make sure it’s melted for the best texture.
    • Large egg: It binds everything together while adding moisture. Remember to let it reach room temperature if possible.
    • Light brown sugar: This sweetener gives our bars a chewy texture and depth of flavor. It’s a must-have for that delicious sweetness!
    • Vanilla extract: A splash of vanilla enhances all the flavors. It truly elevates the taste of your cookie bars.
    • All-purpose flour: The backbone of our bar structure. It helps create that perfect chewy base.
    • Oreo Cookies: These classic cookies are the stars of the show. They add a delightful crunch and rich chocolate flavor.
    • M&M’s: Use your favorite type of M&M’s, whether the original, peanut, or even holiday-themed. They add a fun pop of color and sweetness!

    You can find the exact measurements for these ingredients at the bottom of the article, ready to be printed for your next baking adventure!

    How to Make Loaded M&M’s Oreo Cookie Bars

    Now, let’s get our hands a bit yummy and dive into the steps to create these Loaded M&M’s Oreo Cookie Bars. You’ll see how simple and enjoyable this process can be! I promise, you’ll be snacking on these bars in no time.

    Step 1: Prepare the Baking Pan

    First things first, preheat your oven to 350°F. This ensures that your Loaded M&M’s Oreo Cookie Bars bake evenly.

    Now, grab an 8-by-8-inch baking pan and line it with aluminum foil. Leave some overhang for easy lifting later.

    A light spray of cooking spray will make sure those bars release effortlessly after baking.

    Step 2: Melt the Butter

    In a large, microwave-safe bowl, melt your stick of unsalted butter. Place it in the microwave for about a minute on high.

    Be sure to watch closely to avoid spills! We want it melted but not burned.

    Let the bowl sit for a moment; we want it warm, not hot, when we add our egg.

    Step 3: Mix the Wet Ingredients

    Next, it’s time to whisk! Add the large egg, packed light brown sugar, and a tablespoon of vanilla extract to the melted butter.

    Mix everything together until you have a smooth, homogenous blend.

    If you can’t resist licking the whisk, I won’t blame you. The aroma is intoxicating!

    Step 4: Combine with Dry Ingredients

    Now, add one cup of all-purpose flour into your wet mixture.

    Here’s a quick tip: stir gently until just combined. Overmixing can lead to dense bars, and we want these chewy, not tough!

    This is where the magic begins to happen. Be patient and watch the batter come together!

    Step 5: Add Oreos

    Time to bring our star ingredient into the limelight! Carefully fold in the coarsely chopped Oreo cookies.

    I love how those dark chocolatey bits can be seen throughout the batter—it’s like a treasure hunt for every bite!

    Make sure they’re evenly distributed for that perfect Oreo flavor in every mouthful.

    Step 6: Transfer to Pan and Add M&M’s

    Now, pour the batter into the prepared pan, smoothing the top gently with a spatula.

    Don’t rush this; you want a nice, even surface.

    Sprinkle those colorful M&M’s over the top, pressing them down lightly with your fingers. This little step keeps them anchored while they bake!

    Step 7: Bake & Cool

    It’s finally time to bake! Place your pan in the preheated oven and set a timer for 20 to 22 minutes.

    You’ll know they’re ready when the top is set, and a toothpick inserted in the center comes out clean or with a few moist crumbs.

    Once done, take them out and let the bars cool in the pan for at least 30 minutes. Patience is key here, as cooled bars are easier to slice! Enjoy the heavenly smell wafting through your kitchen!

    Tips for Success

    • Let your butter cool slightly before adding the egg to avoid scrambling it.
    • Use a spatula to spread the batter evenly in the pan for uniform baking.
    • Cool the bars completely in the pan before slicing for clean cuts.
    • Experiment with various M&M’s flavors or add-ins like nuts for a twist.
    • Store any leftovers in an airtight container to keep them fresh!

    Equipment Needed

    • Baking pan (8-by-8-inch) – You can also use a similar-sized dish if that’s all you have.
    • Mixing bowls – Any size works, but I recommend one that’s microwave-safe for melting butter.
    • Whisk or spatula – If you don’t have a whisk, a fork can do the trick!
    • Measuring cups and spoons – Essential for accuracy, but eyeballing can work if you’re experienced.
    • Parchment paper or aluminum foil – For lining the pan, either will help with easy release.

    Variations of Loaded M&M’s Oreo Cookie Bars

    • Nutty Delight: Add chopped walnuts or pecans to the batter for that crunchy texture and nutty flavor!
    • Healthier Twist: Substitute half of the all-purpose flour with whole wheat flour for a bit more fiber.
    • Peanut Butter Bliss: Swirl in some creamy peanut butter into the batter. It adds a rich, nutty indulgence!
    • Gluten-Free Option: Use a gluten-free all-purpose flour blend to make these bars suitable for those with gluten sensitivities.
    • Seasonal Flavors: Get festive by swapping M&M’s with seasonal flavors, like pumpkin spice or peppermint during the holidays!

    Serving Suggestions for Loaded M&M’s Oreo Cookie Bars

    • Pair these scrumptious bars with a scoop of vanilla ice cream for that extra indulgence.
    • Serve alongside a warm cup of coffee or hot cocoa for a cozy treat.
    • Dust with powdered sugar for a pretty finish before cutting into squares.
    • Consider adding a dollop of whipped cream on the side for a delightful touch.
    • Present on a colorful platter for parties to make them visually appealing!

    FAQs about Loaded M&M’s Oreo Cookie Bars

    Can I use different types of M&M’s in this recipe?

    Absolutely! Feel free to get creative! Whether you prefer peanut butter, almond, or seasonal varieties, any type of M&M’s can add a unique flavor twist to your Loaded M&M’s Oreo Cookie Bars.

    How should I store these cookie bars?

    To keep your Loaded M&M’s Oreo Cookie Bars fresh, store them in an airtight container at room temperature. They can last up to a week, and if you want to extend their life, consider refrigerating them instead!

    Can I freeze these cookie bars?

    Yes, you can! Wrap the bars in plastic wrap and then place them in a freezer-safe container. They’ll retain their deliciousness for up to three months. Just thaw them overnight in the fridge before enjoying!

    What can I use instead of Oreos?

    If you’re looking to switch things up, you can use any chocolate sandwich cookie or even graham crackers for a different flavor profile. Just remember, the cookie needs to have a bit of crunch!

    Why did my cookie bars turn out hard?

    Densely packed bars are often the result of overmixing or baking for too long. To keep your Loaded M&M’s Oreo Cookie Bars chewy, mix until just combined and watch them carefully in the oven!

    Final Thoughts

    Making these Loaded M&M’s Oreo Cookie Bars is like crafting a little slice of joy! Every time I pull them from the oven, my heart leaps at the colorful, chewy goodness waiting to be shared.

    The smiles on my family’s faces as they indulge in these treats remind me that simple moments create the sweetest memories.

    Whether it’s a casual weeknight or a special occasion, these bars bring happiness to our busy lives. So, roll up your sleeves, and let the delightful aroma fill your kitchen. They are sure to become a cherished favorite in your home too!


    Print

    clock clock iconcutlery cutlery iconflag flag iconfolder folder iconinstagram instagram iconpinterest pinterest iconfacebook facebook iconprint print iconsquares squares iconheart heart iconheart solid heart solid icon

    Description

    Loaded M&M’s Oreo Cookie Bars are a delightful treat that combines the classic flavors of Oreos and M&M’s in a chewy cookie bar.


    • ½ cup unsalted butter, 1 stick, melted
    • 1 large egg
    • 1 cup light brown sugar, packed
    • 1 tablespoon vanilla extract
    • 1 cup all-purpose flour
    • 18 Oreo Cookies, coarsely chopped
    • about 1/2 cup M&M’s, plain or your favorite flavor

    1. Preheat oven to 350F. Line an 8-by-8-inch baking pan with aluminum foil, spray with cooking spray; set aside.
    2. In a large, microwave-safe bowl melt the butter, about 1 minute on high power.
    3. Wait momentarily before adding the egg so you don’t scramble it. Add the egg, brown sugar, vanilla, and whisk until smooth.
    4. Add the flour and stir until just combined, don’t overmix.
    5. Stir in the Oreos.
    6. Turn batter out into prepared pan, smoothing the top lightly with a spatula.
    7. Evenly sprinkle the M&M’s over the top, lightly pressing them down with your finger or a spatula.
    8. Bake for about 20 to 22 minutes, or until done based on add-ins used. Top should be set and edges slightly firm. A toothpick inserted in the center (if you can find a bare patch to test) should come out clean, or with a few moist crumbs, but no batter.
    9. Allow bars to cool in pan for at least 30 minutes before slicing and serving.

    Notes

    • Feel free to use different flavors of M&M’s or replace them with other chopped candies if desired.
    • Make sure to let the bars cool completely for easier slicing.
    • Prep Time: 10 minutes
    • Cook Time: 22 minutes
    • Category: Dessert
    • Method: Baking
    • Cuisine: American

    Nutrition

    • Serving Size: 1 bar
    • Calories: 200
    • Sugar: 15g
    • Sodium: 130mg
    • Fat: 9g
    • Saturated Fat: 5g
    • Unsaturated Fat: 3g
    • Trans Fat: 0g
    • Carbohydrates: 27g
    • Fiber: 1g
    • Protein: 2g
    • Cholesterol: 30mg

    Sharing is caring!