Author: IHAAL Team

  • Carrot Cake Protein Bites

    Carrot Cake Protein Bites


    Introduction to Carrot Cake Protein Bites

    As a busy mom, I know how challenging it can be to find nutritious snacks that the whole family will love. Enter my Carrot Cake Protein Bites! They’re a delightful blend of deliciousness and health—perfect for a quick pick-me-up during your hectic day. Whether you need an after-school treat for the kids or a mid-afternoon boost for yourself, these bites are just the ticket. Plus, they carry the cozy flavors of carrot cake that will make anyone feel like they’re indulging without the guilt. Let’s dive in and whip up this fabulous, no-bake snack!

    Why You’ll Love This Carrot Cake Protein Bites

    These Carrot Cake Protein Bites are a lifesaver for anyone juggling a busy schedule. They’re incredibly easy to whip up, needing only ten minutes of your time. Not to mention, they’re packed with wholesome ingredients that provide a satisfying sweetness without the sugar crash. Whether you’re fueling a workout or looking for a tasty snack to share with the kids, these bites deliver on flavor and nutrition. You’ll love how guilt-free they are!

    Ingredients for Carrot Cake Protein Bites

    Let’s talk about the stars of the show—those scrumptious Carrot Cake Protein Bites. Here’s what you’ll need to create these delightful morsels:

    • Rolled oats: These beauties form the base of our bites, adding fiber and texture to keep you full longer.
    • Shredded carrots: Packed with vitamins, these add natural sweetness and that signature carrot cake flavor.
    • Vanilla protein powder: A fantastic way to boost protein content, this ingredient helps keep your muscles fueled and satisfied.
    • Almond butter (or peanut butter): This creamy goodness adds healthy fats and richness, making each bite utterly indulgent.
    • Honey (or maple syrup): Perfect for providing a touch of sweetness, honey is an unrefined option while maple syrup works great for a vegan version.
    • Cinnamon: This warm spice enhances the flavor profile, giving a comforting vibe to your bites.
    • Chopped walnuts: A little crunch never hurt anyone! They also bring heart-healthy fats and a delightful texture.

    For variations, feel free to sprinkle in some raisins or coconut to elevate the flavor. Remember, the exact quantities are at the bottom of the article, easily available for printing when you’re ready to get cooking!

    How to Make Carrot Cake Protein Bites

    Now that we have our ingredients ready, let’s get into the fun part—making these fabulous Carrot Cake Protein Bites! Trust me; this process is as simple as it gets. You’ll become a pro in no time. Grab your mixing bowl, and let’s get started!

    Step 1: Combine Dry Ingredients

    First things first, we need to mix our dry ingredients. In a large bowl, combine the rolled oats, shredded carrots, vanilla protein powder, cinnamon, and chopped walnuts. Stir well until everything is combined. This blend gives our bites that delightful carrot cake flavor with a nice crunch from the nuts. You’ll notice the vibrant orange from the carrots enhance the overall look!

    Step 2: Add Wet Ingredients

    Next up, it’s time to add the star players—our wet ingredients! Pour in the almond butter and honey (or maple syrup if you’re going vegan). Mix vigorously until a sticky dough forms. Don’t be afraid to get your hands in there; it’s like playing with sweet, nutritious playdough! This step is crucial, as the sticky consistency helps hold the bites together.

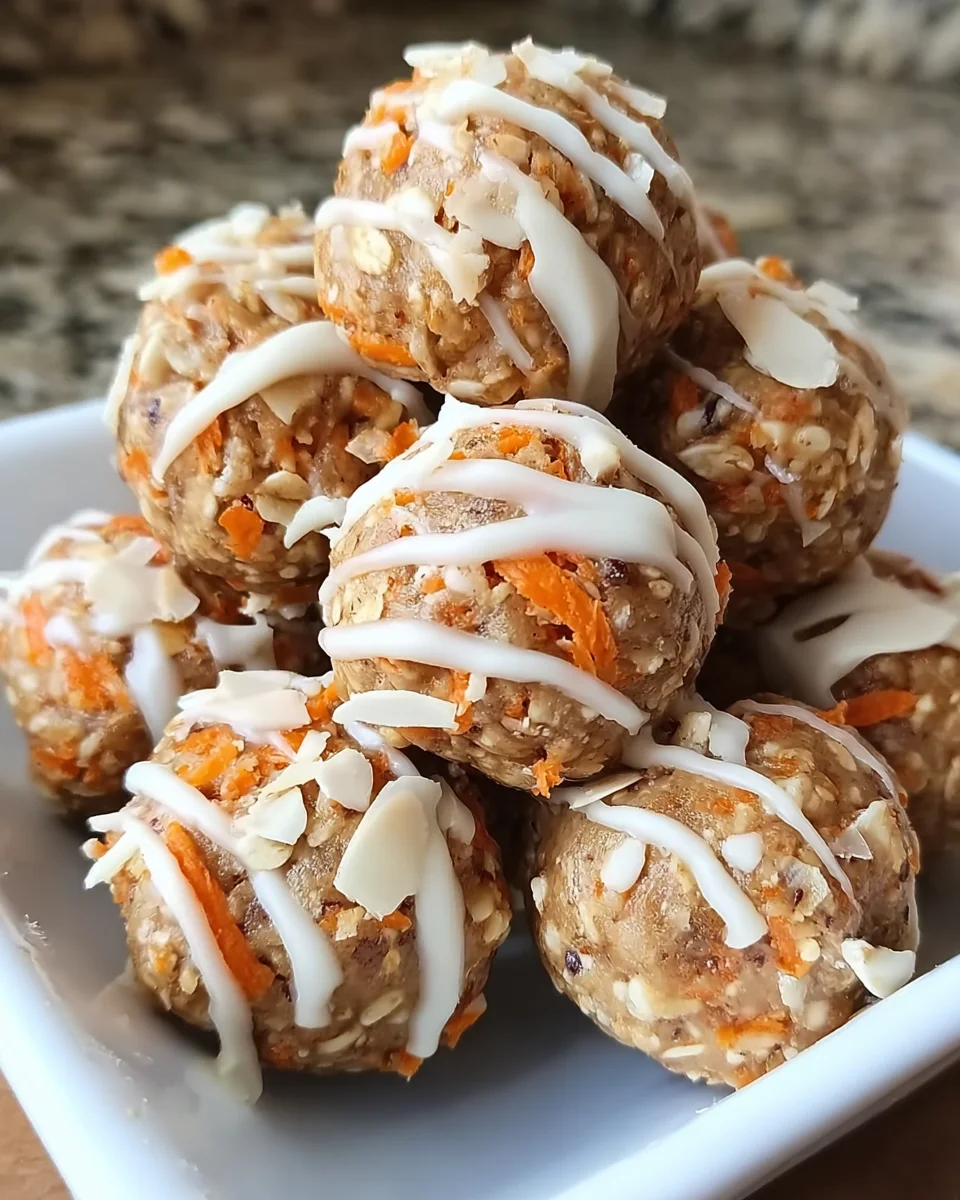
    Step 3: Shape the Bites

    With our mixture ready, it’s shaping time! Grab a small handful of the dough and roll it into balls, about 1-inch in diameter. Don’t stress if they aren’t perfectly uniform; each bite is unique, just like us! Place the rolled balls onto a plate or baking sheet lined with parchment paper. You can get your kids involved here—rolling balls can be a fun family activity!

    Step 4: Add a Drizzle

    If you’re feeling fancy, let’s add a drizzle of melted white chocolate or a swipe of cream cheese icing on top for that extra touch of indulgence. This step is optional, but it elevates the bites to a whole new level of yumminess. Just make sure to let it set for a minute before proceeding.

    Step 5: Chill and Serve

    Finally, pop those delightful bites in the fridge for about 10 minutes. This chilling time helps them firm up and develop a wonderfully chewy texture. Once the time is up, they’re ready to be enjoyed! I like to keep a stash handy for those snack attacks during my busy days.

    Tips for Success

    • Make sure your almond butter is stirred well for easy mixing.
    • Use finely shredded carrots for better texture and distribution.
    • Chill your hands with cold water before rolling the bites if the mixture gets sticky.
    • Experiment with spices; a pinch of nutmeg adds a nice depth!
    • These bites freeze well, so make extra for a quick snack anytime!

    Equipment Needed

    • Mixing Bowl: A large bowl to combine all ingredients. Any bowl will do, even a pot!
    • Measuring Cups: To ensure precise quantities. Use your kids’ cups for fun!
    • Spoon or Spatula: For mixing. A simple wooden spoon does the trick!
    • Parchment Paper: To line your baking sheet. Wax paper is a good substitute.
    • Fridge: For chilling the bites. A cooler works in a pinch!

    Variations on Carrot Cake Protein Bites

    • Nut-Free: Swap almond butter with sunflower seed butter or tahini for a nut-free version.
    • Coconut Bliss: Add unsweetened shredded coconut to the mixture for a tropical twist.
    • Fruit Fusion: Toss in some raisins or chopped dried apricots for added sweetness and chew.
    • Spiced Up: Mix in a pinch of nutmeg or ginger for an extra flavor kick.
    • Chocolate Lovers: Add dark chocolate chips for a decadent touch that pairs beautifully with carrot cake vibes.
    • Protein Boost: Incorporate collagen powder or additional protein powder for an extra nutritional punch.

    Serving Suggestions for Carrot Cake Protein Bites

    • Pair these bites with a refreshing cup of herbal tea for a cozy afternoon treat.
    • Serve with a side of fresh fruit for a balanced snack. Apples and oranges are great choices!
    • Presentation matters! Arrange them on a colorful platter to impress your guests.
    • Drizzle some extra honey on top just before serving for added sweetness and a beautiful finish!

    FAQs about Carrot Cake Protein Bites

    You may have a few questions swirling in your mind about these delicious Carrot Cake Protein Bites. I’m here to clarify those for you! Whether you need insight on storage, nutritional value, or modifications, I’ve got you covered.

    1. How do I store Carrot Cake Protein Bites?

    These bites can be stored in the fridge for up to one week. Just place them in an airtight container to keep them fresh. They also freeze well, so feel free to stash some for later!

    2. Can I make these Carrot Cake Protein Bites vegan?

    Absolutely! Simply replace honey with maple syrup as your sweetener. The rest of the recipe remains the same, ensuring you enjoy all the wonderful flavors while keeping it plant-based.

    3. What’s the nutritional information for each bite?

    Each Carrot Cake Protein Bite contains approximately 120 calories, 4g of protein, and 2g of fiber. It’s a guilt-free snack packed with wholesome goodness, making it perfect for a busy lifestyle!

    4. Can I add other ingredients to my Carrot Cake Protein Bites?

    Of course! You can mix in raisins, coconut, or even chocolate chips. Personalizing your bites keeps them exciting and allows you to cater to your family’s taste preferences.

    5. How long does it take to make these bites?

    You’ll be delighted to know that making these Carrot Cake Protein Bites takes just 10 minutes! Add in some chill time, and you’ll have a nutritious snack ready in no time!

    Final Thoughts

    Making Carrot Cake Protein Bites has been a delightful experience in my kitchen. The joy of blending nutritious ingredients with the comforting flavors of carrot cake warms my heart. These bites are not only easy to whip up but also a fantastic way to sneak in healthy goodness for the family. I love how they can satisfy a sweet craving without the guilt! Whether you’re sharing them with loved ones or enjoying them during a busy day, these little treats bring smiles and nourishment. Trust me, once you make them, you’ll be wondering why you hadn’t tried them sooner!


    Print

    clock clock iconcutlery cutlery iconflag flag iconfolder folder iconinstagram instagram iconpinterest pinterest iconfacebook facebook iconprint print iconsquares squares iconheart heart iconheart solid heart solid icon

    Description

    Carrot Cake Protein Bites are a delicious and healthy snack option packed with flavor and nutrition.


    • 1 cup rolled oats
    • ½ cup shredded carrots
    • ¼ cup vanilla protein powder
    • ¼ cup almond butter (or peanut butter)
    • 3 tbsp honey (or maple syrup)
    • ½ tsp cinnamon
    • ¼ cup chopped walnuts

    1. In a bowl, mix oats, shredded carrots, protein powder, cinnamon, and walnuts.
    2. Add almond butter and honey, stirring until a sticky dough forms.
    3. Roll the mixture into small balls, about 1-inch in diameter.
    4. Drizzle with melted white chocolate or cream cheese icing.
    5. Chill in the fridge for 10 minutes before serving.

    Notes

    • For a vegan option, substitute honey with maple syrup.
    • Can be stored in the fridge for up to one week.
    • Feel free to add raisins or coconut for extra flavor.
    • Prep Time: 10 minutes
    • Cook Time: 0 minutes
    • Category: Snack
    • Method: No-Bake
    • Cuisine: American

    Nutrition

    • Serving Size: 1 bite
    • Calories: 120
    • Sugar: 4g
    • Sodium: 50mg
    • Fat: 7g
    • Saturated Fat: 1g
    • Unsaturated Fat: 6g
    • Trans Fat: 0g
    • Carbohydrates: 11g
    • Fiber: 2g
    • Protein: 4g
    • Cholesterol: 0mg

    Sharing is caring!

  • Cheesecake Stuffed Strawberries

    Cheesecake Stuffed Strawberries


    Introduction to Cheesecake Stuffed Strawberries

    As a busy mom and home cook, I know how imperative it is to have quick, stunning treats that can make any day feel special. That’s why I absolutely adore these Cheesecake Stuffed Strawberries! They are the perfect blend of juicy, fresh strawberries and rich, creamy cheesecake filling.

    Imagine bringing these delightful bites to a gathering, and watching the smiles appear! They’re incredibly simple to prepare, yet they look like something straight from a gourmet kitchen. Ready to dive into this sweet adventure? Let’s whisk our culinary creativity away!

    Why You’ll Love This Cheesecake Stuffed Strawberries

    You’re going to fall head over heels for these Cheesecake Stuffed Strawberries! They not only deliver a burst of luscious flavor, but they’re also incredibly easy to whip up. In just 45 minutes, you can have a crowd-pleasing dessert ready to impress. Plus, they’re guilt-free, thanks to fresh strawberries. These delightful treats will satisfy your sweet tooth without derailing your healthy eating goals. What’s not to love?

    Ingredients for Cheesecake Stuffed Strawberries

    To create these divine Cheesecake Stuffed Strawberries, you’ll need a handful of fresh ingredients. Here’s what you’ll gather for this delightful treat:

    • Large strawberries: Look for plump and ripe strawberries, as they provide the perfect sweetness and juiciness.
    • Cream cheese: This is the star of the show! Make sure it’s softened to room temperature; it makes mixing so much easier.
    • Powdered sugar: This adds a touch of sweetness to the cheesecake filling without being overly gritty—perfect for desserts.
    • Vanilla extract: A splash of this magical extract brings warmth and depth to the cheesecake flavor.
    • Heavy whipping cream: Adding this not only makes the filling fluffy but gives it that creamy texture we all love.
    • Lemon juice: A dash of lemon adds brightness, cutting through the richness of the cream cheese and balancing flavors beautifully.
    • Crushed graham crackers: These act as the cherry on top! They mimic the traditional cheesecake crust, providing that crunch.
    • Chocolate shavings or drizzle: This is optional, but who can resist chocolate? It’s like a little extra surprise for your taste buds.

    You can find exact quantities of these ingredients at the bottom of the article, available for easy printing. Keep your pantry stocked with these staples, and you’ll always be ready to whip up this exquisite dessert whenever the cravings strike!

    How to Make Cheesecake Stuffed Strawberries

    Step 1: Prepare the Strawberries

    Start by giving those luscious strawberries a good rinse under cool water. Next, gently pat them dry with a paper towel. Now, here comes the fun part: take a small knife and cut a little cone-shaped piece from the top of each strawberry. This creates a hollow space perfect for our cheesecake filling. Don’t worry if you lose a bit of strawberry in the process; just think of it as a chef’s snack!

    Step 2: Make the Cheesecake Filling

    In a mixing bowl, beat the softened cream cheese using an electric mixer until it’s ultra-smooth and creamy. This step is crucial! If your cream cheese is chilly, you’ll end up with a lumpy filling, which is not what we want. Gradually add in the powdered sugar, vanilla extract, lemon juice, and heavy whipping cream. Keep mixing until everything is well combined and light as a cloud. I love how the ingredients blend into a smooth delight!

    Step 3: Fill the Strawberries

    Once your filling is ready, transfer it into a piping bag or a plastic sandwich bag. If you’re using a sandwich bag, just snip off one corner, and you’re all set! Now, gently pipe that cheesecake filling into each hollowed strawberry. Fill them generously, making sure to give them a nice swirl on top for a touch of elegance. A little messy filling can add character, so don’t stress if it’s not perfect!

    Step 4: Garnish and Chill

    After all your strawberries are stuffed, it’s time to sprinkle those crushed graham crackers on top. This adds that delightful crunch we love in cheesecake. If you’re feeling fancy, drizzle some melted chocolate over the topped strawberries or sprinkle chocolate shavings. Now, place them on a serving platter and pop them into the fridge for at least 30 minutes. This chilling time lets the filling firm up and the flavors meld together perfectly!

    Tips for Success

    • Always use room temperature cream cheese for the smoothest filling.
    • Choose strawberries that are similar in size for even stuffing.
    • Make the filling a few hours ahead for easier assembly when you’re ready.
    • Don’t overfill the strawberries; a little bit of cheesecake filling goes a long way.
    • Keep the stuffed strawberries chilled until serving to maintain freshness.

    Equipment Needed

    • Mixing bowl: Any medium-sized bowl will do, or use a stand mixer for convenience.
    • Electric mixer: A hand mixer is sufficient, but a stand mixer can save time.
    • Piping bag: If you don’t have one, a plastic sandwich bag with a snipped corner works perfectly!
    • Knife: A small paring knife is ideal for hulling strawberries.
    • Serving platter: Any dish will work to display your beautiful creation.

    Variations for Cheesecake Stuffed Strawberries

    • Chocolate Cheesecake Filling: Swap some of the cream cheese for chocolate cream cheese to create a rich chocolate version!
    • Berry Medley: Instead of just strawberries, try combining raspberries or blueberries for a burst of color and flavor.
    • Healthier Option: Use Greek yogurt instead of cream cheese for a lighter filling that’s still creamy and packed with protein.
    • Nutty Twist: Add a tablespoon of finely chopped nuts like pecans or almonds to the filling for added crunch and nuttiness.
    • Flavor Enhancements: Experiment with flavored extracts such as almond or coconut to give your filling an exciting twist.

    Serving Suggestions

    • Pair your Cheesecake Stuffed Strawberries with a dollop of whipped cream for added indulgence.
    • Serve alongside a refreshing glass of iced tea or sparkling lemonade to balance the sweetness.
    • For a beautiful presentation, arrange strawberries on a decorative platter, garnished with fresh mint leaves.

    FAQs about Cheesecake Stuffed Strawberries

    I know you might have some burning questions about these delightful Cheesecake Stuffed Strawberries. So, let’s dive into a few common queries to help you get the most out of this sweet treat!

    Can I make Cheesecake Stuffed Strawberries in advance?
    Absolutely! You can prepare them a few hours ahead of time. Just keep them chilled in the refrigerator until you’re ready to serve. This actually enhances the flavors, making them even more delicious!

    What can I use instead of cream cheese?
    If you’re looking for a lighter option or have dietary restrictions, Greek yogurt is an excellent substitute. It adds creaminess and a bit of tang without the heaviness of cream cheese, making a wonderful filling!

    How do I keep the strawberries fresh?
    To maintain freshness, keep the stuffed strawberries in an airtight container in the fridge. They should stay lovely for a day or two—but trust me, they won’t last that long once you share them!

    Can I add different toppings?
    Absolutely! While crushed graham crackers give that beloved cheesecake crunch, feel free to get creative. Fresh fruit slices, coconut flakes, or even a drizzle of caramel can lift these strawberries to new flavor heights!

    What’s the best way to store leftovers?
    If you somehow have leftovers (or more likely, if there are any!), simply place them in a chilled, covered container. Enjoy them within a day or two for the best taste and texture experience!

    Final Thoughts

    Creating these Cheesecake Stuffed Strawberries is like capturing sunshine in a bite.

    The moment you take a juicy fruit filled with that sweet, creamy goodness, the world feels a little brighter.

    Whether it’s a cozy family gathering or a spontaneous treat for yourself, these strawberries bring joy and deliciousness to the table.

    You’ll bask in compliments, and your loved ones will eagerly ask for more.

    So grab those berries and dive into this simple, yet sensational, recipe.

    Let each luscious bite be a reminder that even in our busy lives, sweetness can always find a way to bloom!


    Print

    clock clock iconcutlery cutlery iconflag flag iconfolder folder iconinstagram instagram iconpinterest pinterest iconfacebook facebook iconprint print iconsquares squares iconheart heart iconheart solid heart solid icon

    Description

    Cheesecake Stuffed Strawberries are a delicious and eye-catching treat, combining the freshness of strawberries with the creamy sweetness of cheesecake filling.


    • 1 pound large strawberries, hulled
    • 8 ounces cream cheese, softened
    • 1/2 cup powdered sugar
    • 1 teaspoon vanilla extract
    • 1/4 cup heavy whipping cream
    • 2 tablespoons lemon juice
    • 1/4 cup crushed graham crackers (for topping)
    • Chocolate shavings or drizzle (optional, for garnish)

    1. Begin by washing the strawberries thoroughly and then gently pat them dry with a paper towel. Cut a small cone-shaped piece off the top of each strawberry to create a hollowing effect for stuffing.
    2. In a mixing bowl, beat the softened cream cheese with an electric mixer until smooth and creamy.
    3. Gradually add in the powdered sugar, vanilla extract, lemon juice, and heavy whipping cream. Continue to mix until everything is well combined and the mixture is light and fluffy.
    4. Transfer the cheesecake filling into a piping bag or a plastic sandwich bag with one corner snipped off for easier filling.
    5. Carefully pipe the cheesecake mixture into each hollowed strawberry, filling them generously.
    6. Once all strawberries are filled, sprinkle the tops with crushed graham crackers for that authentic cheesecake crust flavor.
    7. For an extra touch, drizzle some melted chocolate over the filled strawberries or sprinkle chocolate shavings on top.
    8. Arrange the stuffed strawberries on a serving platter and refrigerate for at least 30 minutes before serving to ensure they are chilled.
    9. Serve as a delightful and romantic treat!

    Notes

    • Make sure the cream cheese is softened for easier mixing.
    • These can be prepared a few hours in advance and kept chilled until serving.
    • Use fresh, ripe strawberries for the best flavor.
    • Prep Time: 15 minutes
    • Cook Time: 0 minutes
    • Category: Dessert
    • Method: No Bake
    • Cuisine: American

    Nutrition

    • Serving Size: 1 stuffed strawberry
    • Calories: 80
    • Sugar: 7g
    • Sodium: 30mg
    • Fat: 4g
    • Saturated Fat: 2.5g
    • Unsaturated Fat: 1.5g
    • Trans Fat: 0g
    • Carbohydrates: 9g
    • Fiber: 1g
    • Protein: 2g
    • Cholesterol: 15mg

    Sharing is caring!

  • Blueberry Cheesecake Protein Bites

    Blueberry Cheesecake Protein Bites


    Introduction to Blueberry Cheesecake Protein Bites

    As a busy mom, I often find myself hunting for that perfect snack to satisfy my cravings without sacrificing nutrition. That’s where Blueberry Cheesecake Protein Bites come in! These little gems are packed with protein, making them a fantastic energy booster for those hectic afternoons. Not only are they deliciously delightful, but they also require no baking at all! They’re the ideal solution for busy days when you need a quick pick-me-up or want to impress your family with a healthy treat. Trust me, once you try these bites, you’ll be hooked!

    Why You’ll Love This Blueberry Cheesecake Protein Bites

    What’s not to love about Blueberry Cheesecake Protein Bites? They are a breeze to whip up and taste absolutely divine! Each bite is bursting with the vibrant flavor of blueberries, reminding you of a delicious cheesecake. Plus, they fit perfectly into your busy schedule as a quick and energizing snack. Whether you need a mid-day boost or a post-workout treat, these bites have you covered with wholesome goodness!

    Ingredients for Blueberry Cheesecake Protein Bites

    Gathering the right ingredients is the first step in creating your mouthwatering Blueberry Cheesecake Protein Bites. Each ingredient plays an essential role, contributing both flavor and nutrition. Here’s a quick rundown:

    • Rolled oats: Acts as the base, providing heartiness and fiber. Opt for old-fashioned or quick-cooking oats for convenience.
    • Vanilla protein powder: This adds a protein boost, helping keep you full and energized. Choose either whey, casein, or a plant-based option, depending on your preference.
    • Freeze-dried blueberries: Ground into powder, these give an intense blueberry flavor. They’re lighter and more concentrated than fresh blueberries, making them perfect for these bites.
    • Applesauce (or mashed banana): A natural sweetener and moisture provider, applesauce keeps the bites soft and adds a touch of fruitiness. You can swap this for mashed banana if you like that flavor better.
    • Cream cheese: This brings that cheesecake vibe! You can use regular or choose a vegan alternative if you’re looking for a dairy-free option.
    • Honey or maple syrup: Sweeten your bites! Adjust based on your taste preference, leaning towards honey for a quicker sweetness or maple syrup for that unique flavor.
    • Chia seeds or flax seeds (optional): These tiny powerhouses add extra nutrients and a bit of crunch. Feel free to skip them if you prefer a smoother texture.
    • Frozen blueberries: Make sure to thaw and drain these before folding them in. They provide fresh bursts of flavor in each bite!
    • Milk: Whether dairy or non-dairy, use this for adjusting the mixture’s consistency. Add a little at a time until it’s just right for rolling!
    • Glaze ingredients: For a little flair, you’ll need cream cheese, milk, vanilla extract, and optional powdered sugar for sweetness.
    • Fresh blueberries: To top your bites, these make it look gorgeous and add an extra pop of flavor!

    For specific quantities, check out the bottom of the article where you’ll find a handy printable version!

    How to Make Blueberry Cheesecake Protein Bites

    Making Blueberry Cheesecake Protein Bites is as simple as pie—actually, even simpler! Follow these easy steps, and you’ll have an energizing snack ready in no time.

    Prepare Freeze-Dried Blueberries

    First things first, grab your freeze-dried blueberries. Toss them into a blender or food processor and grind them into a fine powder. This will give your protein bites that incredible blueberry flavor without the moisture of fresh berries.

    Mix Dry Ingredients

    In a large bowl, combine your rolled oats, vanilla protein powder, and the blueberry powder you just made. If you’re adding chia or flax seeds, mix them in now. This step is crucial for even distribution of flavors!

    Mix Wet Ingredients

    In another bowl, whisk together the applesauce or mashed banana, softened cream cheese, and your choice of honey or maple syrup. The combination should be smooth—this will bind everything together beautifully.

    Combine & Mix

    Now, pour the wet mixture into the dry ingredients. Stir it well until everything is nicely combined. You want a thick, sticky dough that holds its shape.

    Fold in Blueberries

    Next, gently fold in the thawed and drained frozen blueberries. This is where those juicy bursts of flavor come from! Just be careful not to squish the berries too much.

    Adjust Consistency

    If your mixture feels too dry or crumbly, add milk one tablespoon at a time until it reaches a rollable consistency. The goal is to make it sticky but not too wet—they should hold together nicely when you roll them!

    Roll Into Bites

    With your mixture ready, it’s time to roll! Take small portions of the mixture and form them into bite-sized balls—think two bites worth! Place these on a parchment-lined plate for easy cleanup.

    Prepare the Glaze

    Now, let’s add a lovely touch with the glaze! In a small bowl, whisk together cream cheese, milk, vanilla extract, and powdered sugar (if using). The glaze should be smooth and pourable without being too runny.

    Chill the Bites

    Once your bites are rolled, refrigerate them for at least 30 minutes to firm up. This makes them easier to handle and enhances their flavor!

    Drizzle & Decorate

    After chilling, drizzle your bites with the cream cheese glaze and add fresh blueberries on top for that gorgeous finishing touch. You can really make them stand out this way!

    Chill Again (Optional)

    If you’re feeling fancy, pop them back into the fridge for another 10 minutes after glazing. This allows the glaze to set perfectly and makes for a show-stopping presentation.

    Serve & Enjoy

    These delightful Blueberry Cheesecake Protein Bites are best chilled, so keep them in the refrigerator until you’re ready to serve! Enjoy them as a quick snack or share with friends—they’re bound to impress!

    Tips for Success

    • Make sure your cream cheese is softened for easy mixing—no one wants lumpy bites!
    • Don’t skip chilling the bites; this step is vital for the perfect texture.
    • Adjust the sweetness to your preference, especially if sharing with kids.
    • Experiment with different freeze-dried fruit powders for unique flavors!
    • Store the bites in an airtight container for maximum freshness throughout the week.

    Equipment Needed

    • Blender or Food Processor: For grinding freeze-dried blueberries. A coffee grinder can work in a pinch!
    • Mixing Bowls: You’ll need two. Anything you have on hand works fine.
    • Parchment Paper: For lining your plate. You could also use a silicone baking mat.
    • Measuring Cups and Spoons: Essential for accurate ingredient amounts.
    • Whisk: A whisk for mixing is best, but a fork will do the trick too!

    Variations of Blueberry Cheesecake Protein Bites

    • Nut Butter Swirl: Add a tablespoon of your favorite nut butter, like almond or peanut, to the wet ingredients for an extra creamy texture and flavor boost.
    • Coconut Delight: Mix in unsweetened shredded coconut for a tropical twist that complements the blueberry flavor beautifully.
    • Chocolate Chip Treat: Stir in mini dark chocolate chips for a bit of decadence—because who doesn’t love chocolate and blueberries together?
    • Vegan Version: Substitute cream cheese with a vegan cream cheese alternative and use maple syrup instead of honey to keep it dairy-free.
    • Spicy Kick: Sprinkle in a pinch of cinnamon or nutmeg for a warm, cozy flavor that pairs nicely with the blueberries.
    • Protein Power: Use a flavored protein powder, like blueberry or vanilla, to enhance the overall taste without sacrificing nutrition.

    Serving Suggestions for Blueberry Cheesecake Protein Bites

    • Pair with a cold glass of almond milk or iced tea for a refreshing afternoon snack.
    • Serve on a rustic wooden platter to showcase those vibrant colors—it’s all about the presentation!
    • Enjoy with fresh fruit, like sliced strawberries or a handful of raspberries, for a delightful fruit medley.
    • Sprinkle some granola on top for added crunch and texture—perfect for the breakfast-on-the-go!
    • Include a small bowl of yogurt on the side for a creamy dip or topping!

    FAQs about Blueberry Cheesecake Protein Bites

    How long do Blueberry Cheesecake Protein Bites last?
    These bites can be stored in the refrigerator for up to a week, making them a perfect snack for busy days!

    Can I use fresh blueberries instead of frozen?
    Certainly! You can use fresh blueberries, but make sure to fold them in gently. Just keep in mind they have more moisture, which may alter the texture slightly.

    Can I freeze these protein bites for later?
    Yes! These Blueberry Cheesecake Protein Bites freeze beautifully. Place them in an airtight container, and they’ll last for about a month in the freezer. Just thaw them when you’re ready to enjoy!

    Are there any substitutes for the cream cheese?
    Absolutely! You can swap cream cheese for a vegan alternative or even Greek yogurt for a lighter option. Both will work well in maintaining that luscious texture!

    Can I adjust the sweetness?
    Definitely! Feel free to alter the amount of honey or maple syrup to suit your taste buds. You might even try adding a splash of vanilla extract for an added flavor kick!

    Final Thoughts

    Creating these Blueberry Cheesecake Protein Bites has been such a joy for me, and I hope you feel the same magic in your kitchen! They’re not just delicious; they’re a wonderful way to treat yourself and your family with something nutritious. Each bite filled with fruity goodness reminds us that healthy eating doesn’t have to be a chore. Plus, the satisfaction of hearing happy murmurs when loved ones enjoy these bites is utterly rewarding. So go ahead, whip up a batch, and let these delightful treats provide you with the energy boost you need for your busy days!


    Print

    clock clock iconcutlery cutlery iconflag flag iconfolder folder iconinstagram instagram iconpinterest pinterest iconfacebook facebook iconprint print iconsquares squares iconheart heart iconheart solid heart solid icon

    Description

    A delicious and energizing snack made with protein-rich ingredients and bursting with blueberry flavor.


    • 1 cup rolled oats (old-fashioned or quick-cooking, gluten-free if needed)
    • 1/2 cup vanilla protein powder (whey, casein, or plant-based)
    • 1/4 cup freeze-dried blueberries, finely ground
    • 1/4 cup unsweetened applesauce (or mashed banana)
    • 1/4 cup cream cheese, softened (or vegan alternative)
    • 2 tablespoons honey or maple syrup (adjust to taste)
    • 1 tablespoon chia seeds or flax seeds (optional)
    • 1/4 cup frozen blueberries (thawed and drained)
    • 12 tablespoons milk (dairy or non-dairy) as needed
    • 2 tablespoons cream cheese (for the glaze)
    • 12 tablespoons milk (for the glaze)
    • 1/2 teaspoon vanilla extract (for the glaze)
    • 12 teaspoons powdered sugar (optional, for the glaze)
    • Fresh blueberries (for topping)

    1. Prepare Freeze-Dried Blueberries – Grind freeze-dried blueberries into a fine powder using a blender or food processor.
    2. Mix Dry Ingredients – In a bowl, combine oats, protein powder, freeze-dried blueberry powder, and chia or flax seeds.
    3. Mix Wet Ingredients – In another bowl, whisk applesauce (or mashed banana), cream cheese, and honey or maple syrup.
    4. Combine & Mix – Add the wet ingredients to the dry ingredients and mix well.
    5. Fold in Blueberries – Gently fold in the thawed and drained frozen blueberries.
    6. Adjust Consistency – If the mixture is too dry, add milk 1 tablespoon at a time until rollable.
    7. Roll Into Bites – Form into bite-sized balls and place on a parchment-lined plate.
    8. Prepare the Glaze – Whisk softened cream cheese, milk, vanilla extract, and powdered sugar until smooth.
    9. Chill the Bites – Refrigerate for at least 30 minutes to firm up.
    10. Drizzle & Decorate – Drizzle with glaze and top with fresh blueberries.
    11. Chill Again (Optional) – Refrigerate for 10 more minutes for the glaze to set.
    12. Serve & Enjoy – Keep them chilled and enjoy as a healthy snack!

    Notes

    • Adjust sweetness by varying the amount of honey or maple syrup.
    • Store in the refrigerator for up to a week.
    • Make sure to drain the frozen blueberries well to avoid excess moisture.
    • Prep Time: 15 minutes
    • Cook Time: 0 minutes
    • Category: Snack
    • Method: No-Bake
    • Cuisine: American

    Nutrition

    • Serving Size: 1 bite
    • Calories: 80
    • Sugar: 3g
    • Sodium: 40mg
    • Fat: 3g
    • Saturated Fat: 1g
    • Unsaturated Fat: 2g
    • Trans Fat: 0g
    • Carbohydrates: 10g
    • Fiber: 1g
    • Protein: 4g
    • Cholesterol: 10mg

    Sharing is caring!

  • Philly Cheesesteak Bowls

    Philly Cheesesteak Bowls


    Introduction to Philly Cheesesteak Bowls

    Ah, the beauty of Philly Cheesesteak Bowls! Picture this: a bustling weekday, and the clock is ticking. You want something delicious yet uncomplicated to whip up. That’s where these delightful bowls come in, offering a savory blend of thinly sliced steak, vibrant veggies, and gooey cheese, all piled high over a comforting base. Perfect for busy moms or professionals looking to enjoy a quick meal without sacrificing flavor. Whether you’re impressing the family or savoring a cozy dinner solo, these bowls bring hearty satisfaction to your table in no time.

    Why You’ll Love This Philly Cheesesteak Bowls

    These Philly Cheesesteak Bowls are truly a dream come true for busy nights. In just 25 minutes, you can serve a scrumptious meal that satisfies everyone’s cravings. You’ll love the mouthwatering combination of savory steak and melty cheese, which feels like a big hug in a bowl. Plus, the customizable toppings let you cater to picky eaters and preferences. Trust me, this dish will become a staple in no time!

    Ingredients for Philly Cheesesteak Bowls

    Before diving into the cooking, let’s gather all we need for these incredible Philly Cheesesteak Bowls. It’s important to have quality ingredients on hand, as they play a big role in making this dish truly scrumptious. Here’s what you’ll need:

    • Ribeye or sirloin steak: Tender, thinly sliced steak provides fantastic flavor. Ribeye is richer and more marbled, while sirloin is leaner yet still delicious.
    • Onion: Thinly sliced onion adds sweetness and depth. You can use yellow, white, or even red for a pop of color.
    • Green and red bell peppers: These vibrant veggies bring color and a crunch. They sweeten nicely when sautéed, making every bite delightful.
    • Garlic: Minced garlic delivers a fragrant punch. It elevates the flavor, making your kitchen smell heavenly!
    • Olive oil: A touch of oil is a must for sautéing. It helps cook the veggies and meat to perfection.
      Feel free to swap with avocado oil if you prefer.
    • Worcestershire sauce: This magic elixir adds a nice umami flavor. A little goes a long way in rounding out the taste of the steak.
    • Salt and black pepper: Basic seasonings that enhance the flavors. Adjust to your taste, and don’t be shy!
    • Shredded cheese: Provolone or mozzarella offers that beloved melty factor. Use a blend for extra flavor—maybe throw in some cheddar?
    • Parsley: Chopped parsley is perfect for garnishing. It adds a fresh finish that’s visually appealing!
    • Base (optional): Choose your favorite! Cauliflower rice is great for a low-carb option, while mashed potatoes or white rice offer a classic comfort.

    For exact quantities, scroll to the bottom of the article where you can find them for printing. Gathering these ingredients will set you up for success in creating your delicious Philadelphia Cheesesteak Bowls!

    How to Make Philly Cheesesteak Bowls

    Creating these Philly Cheesesteak Bowls is easier than a Sunday morning! Follow these uncomplicated steps to bring this delightful dish to your table.

    Step 1: Sear the Steak

    Heat a splash of olive oil in your skillet over medium-high heat. When the pan is hot, add in your thinly sliced steak. It’s the star of the show, after all! Sear the steak for about 3 to 4 minutes, letting it brown beautifully. Remember to sprinkle in the Worcestershire sauce, salt, and pepper during this step. This will add depth to the meat’s flavor. Once it’s nice and browned, remove the steak from the pan and set it aside. You want it juicy, not overcooked!

    Step 2: Sauté the Vegetables

    In that same pan, toss in your sliced onions, bell peppers, and minced garlic. The remnants of the steak will add a pop of flavor to the veggies! Cook for about 4 to 5 minutes until they’re soft and fragrant. Trust me, your kitchen will smell divine! You can stir frequently to ensure even cooking. When they’re done, it’s time to assemble your bowls!

    Step 3: Assemble the Bowls

    Now for my favorite part—assembly! Grab your favorite bowl, and choose your base. It could be a fluffy serving of cauliflower rice for a low-carb spin or classic mashed potatoes. You can even use white rice for comfort. Spoon a generous portion in, then layer on the cooked steak and the sautéed veggies. This colorful mix is already looking utterly tempting!

    Step 4: Melt the Cheese

    Here’s where the magic truly happens. Sprinkle your choice of shredded cheese—provolone or mozzarella—over the warm steak and veggies. If you’re feeling adventurous, toss in a handful of cheddar too! Allow the cheese to melt naturally over the warm filling. For an extra crispy touch, switch your oven to broil and pop it under for 1 to 2 minutes. Watch carefully so you don’t burn it—that melted gooey goodness is the highlight!

    Step 5: Garnish and Serve

    Finally, it’s time to sprinkle some chopped parsley on top for an added burst of freshness. This step isn’t just for looks; it adds a lovely flavor contrast, too. Now, dig in! Serve your Philly Cheesesteak Bowls warm and feel free to customize with your favorite toppings like hot sauce or additional veggies. Enjoy the hearty satisfaction that comes from this easy dinner recipe!

    Tips for Success

    • Use a sharp knife to slice your steak thinly, ensuring faster cooking and tenderness.
    • Don’t overcrowd the pan. Cooking in batches helps achieve that lovely sear on the steak.
    • Feel free to mix up the veggies! Mushrooms, zucchini, or jalapeños can add a fun twist.
    • Make it even quicker by prepping ingredients in advance for easy weeknight meals.
    • Don’t skip the Worcestershire sauce—it truly enhances the flavor of the steak!

    Equipment Needed

    • Skillet: A large non-stick skillet works best, but any frying pan will do.
    • Sharp knife: Essential for slicing the steak and veggies easily.
    • Cutting board: A sturdy cutting board is needed for safe chopping.
    • Spatula: Use a spatula for flipping and serving.
    • Bowl: Any bowl works to create your delicious Philly Cheesesteak Bowls!

    Variations

    • Spicy Kick: Add sliced jalapeños or a drizzle of sriracha to spice things up!
    • Mushroom Bliss: Incorporate sautéed mushrooms for an earthy twist that complements the richness of the steak.
    • Cheesy Delight: Experiment with different cheese blends, such as cheddar or pepper jack, for extra flavor.
    • Veggie-Loaded: Load up on additional vegetables like zucchini, spinach, or broccoli for a healthier option!
    • Low-Carb Alternative: Replace the rice with zucchini noodles or spaghetti squash for a delightful low-carb meal.

    Serving Suggestions

    • Pair your Philly Cheesesteak Bowls with a crisp garden salad to lighten the meal.
    • Serve with a refreshing iced tea or sparkling water for a nice beverage choice.
    • Garnish bowls with extra parsley or sliced green onions for a pop of color.
    • Offer hot sauce on the side for those who love a bit of heat.

    FAQs about Philly Cheesesteak Bowls

    Can I use other types of meat for Philly Cheesesteak Bowls?

    Absolutely! While ribeye or sirloin are traditional choices, feel free to use chicken, turkey, or even tofu for a vegetarian version. Each option will bring its own delightful spin on this quick meal.

    How can I store leftovers from Philly Cheesesteak Bowls?

    Store any leftovers in an airtight container in the fridge for up to three days. When reheating, add a splash of water or broth to keep the dish moist. It’s also a great meal-prep option for busy days ahead!

    What can I serve on the side with Philly Cheesesteak Bowls?

    Consider serving a side of crispy sweet potato fries, a zesty coleslaw, or a hearty bread. Each will complement the cheesesteak bowls nicely, making for a filling meal!

    What’s the best way to customize my Philly Cheesesteak Bowls?

    Customization is key! You can change up the veggies, add different cheeses, or even drizzle your favorite sauces. Hot sauce, ranch, or even barbecue sauce can add a tasty kick!

    Are Philly Cheesesteak Bowls kid-friendly?

    Definitely! This dish is perfect for picky eaters. The colorful ingredients and gooey cheese can entice even the fussiest of diners. You can let kids build their own bowls for fun, too!

    Final Thoughts

    Making Philly Cheesesteak Bowls is not just about the food; it’s about creating a delightful experience around the dinner table. As you savor each bite, you’ll appreciate the overwhelming joy of a quick, flavorful meal that brings everyone together. Whether you’re navigating a busy weeknight or enjoying a cozy dinner at home, this recipe wraps you in warmth and comfort. Plus, with its versatile toppings and customizable ingredients, this tasty bowl can cater to everyone’s preferences. I hope it becomes a cherished part of your culinary adventures—one delicious bite at a time!


    Print

    clock clock iconcutlery cutlery iconflag flag iconfolder folder iconinstagram instagram iconpinterest pinterest iconfacebook facebook iconprint print iconsquares squares iconheart heart iconheart solid heart solid icon

    Description

    A quick and delicious meal featuring thinly sliced steak, sautéed vegetables, and melted cheese, served over a bed of your choice.


    • 1 lb ribeye or sirloin steak, thinly sliced
    • 1 small onion, sliced
    • 1 green bell pepper, sliced
    • 1 red bell pepper, sliced
    • 2 cloves garlic, minced
    • 1 tbsp olive oil
    • 1 tsp Worcestershire sauce
    • 1 tsp salt (to taste)
    • 1 tsp black pepper (to taste)
    • 1 cup shredded provolone or mozzarella cheese
    • Chopped parsley (for garnish)
    • Cauliflower rice, mashed potatoes, or white rice (for serving)

    1. Heat olive oil in a skillet over medium-high heat. Add sliced steak, Worcestershire sauce, salt, and pepper. Sear for 3-4 minutes until browned. Remove and set aside.
    2. In the same pan, add onions, bell peppers, and garlic. Cook for 4-5 minutes until soft.
    3. Divide your choice of cauliflower rice, mashed potatoes, or white rice into bowls. Add the cooked steak and sautéed veggies on top.
    4. Sprinkle shredded cheese over the warm ingredients and allow it to melt naturally. For extra crispiness, broil for 1-2 minutes.
    5. Top with fresh parsley and enjoy!

    Notes

    • Feel free to customize your toppings with additional veggies or hot sauce.
    • This dish can be made in under 30 minutes for a quick dinner option.
    • Prep Time: 10 minutes
    • Cook Time: 15 minutes
    • Category: Main Course
    • Method: Skillet
    • Cuisine: American

    Nutrition

    • Serving Size: 1 bowl
    • Calories: 500
    • Sugar: 3g
    • Sodium: 800mg
    • Fat: 30g
    • Saturated Fat: 12g
    • Unsaturated Fat: 5g
    • Trans Fat: 0g
    • Carbohydrates: 20g
    • Fiber: 3g
    • Protein: 40g
    • Cholesterol: 90mg

    Sharing is caring!

  • Cowboy Butter Steak Bites

    Cowboy Butter Steak Bites


    Introduction to Cowboy Butter Steak Bites

    As a busy mom who loves to whip up something delicious, I know how important it is to have quick, flavorful meals at your fingertips. That’s why I’m excited to share my Cowboy Butter Steak Bites recipe! These little gems are not only irresistibly flavorful, but they also come together in just 20 minutes, perfect for a weeknight dinner or a special gathering. Trust me, with the rich buttery sauce enveloping tender steak bites, you’ll earn the title of “kitchen hero” in your household. Let’s dive into this simple dish that your family will adore!

    Why You’ll Love This Cowboy Butter Steak Bites

    If you’re on the hunt for a quick, mouthwatering appetizer, look no further! Cowboy Butter Steak Bites deliver phenomenal flavor in less than half an hour. They’re perfect for busy nights when you want something indulgent yet simple. Plus, these bites are incredibly versatile, making them suitable for any occasion. Your family and friends will be begging for seconds, and you’ll love how easy they are to prepare!

    Ingredients for Cowboy Butter Steak Bites

    Before we get cooking, let’s chat about what you’ll need for these flavor-packed Cowboy Butter Steak Bites. Gather your ingredients to set the stage for a delectable experience!

    • Extra virgin olive oil: This oil is a fantastic choice for searing the steak. It adds a rich flavor and helps achieve that beautiful golden crust. If you’re out, you can use canola or avocado oil as substitutes.
    • Steak: I recommend top sirloin or ribeye for their tenderness. Both cuts sear beautifully and soak up the cowboy butter perfectly. If you’re feeling adventurous, you could also opt for filet mignon for a softer bite.
    • Cowboy butter: This is the star of the show! A blend of melted butter and spices that adds irresistible flavor to your steak bites. I’ll share the full cowboy butter recipe later, so don’t fret if you’re not sure what it entails.

    Remember, the exact quantities for each ingredient can be found at the bottom of the article, ready for printing. Now, let’s roll up our sleeves and get cooking! Your kitchen adventure is about to begin!

    How to Make Cowboy Butter Steak Bites

    Now, let’s turn up the heat and bring this recipe to life! Making Cowboy Butter Steak Bites is straightforward and rewarding. Follow these simple steps, and you’ll have a dish that’s deliciously ready in no time!

    Step 1: Prepare the Skillet

    First things first, let’s get our skillet ready. Grab a medium skillet and place it on the stove over medium-high heat. Add a tablespoon of extra virgin olive oil and let it heat up. You want the oil hot and shimmering, but be careful not to let it smoke. This preheating allows your steak bites to sear perfectly. A good sear locks in flavor and gives that gorgeous crust we all crave.

    Step 2: Sear the Steak Bites

    Once your oil is ready, it’s time to introduce the stars of the show – those tender steak bites! Carefully add them to the skillet in a single layer. A trick I always follow is to avoid crowding the pan; this helps the meat sear rather than steam. Let them cook without moving for about 1½ to 2 minutes. When you flip them over, aim for that perfect golden-brown color. Cook for another 1 to 2 minutes, until they reach your desired doneness. Don’t worry; you can adjust the cook time based on the thickness of the steak.

    Step 3: Add Cowboy Butter

    With the steak bites done, it’s time to elevate the flavor! Reduce the heat to medium and toss half of your freshly made cowboy butter into the skillet. As the butter melts, it’ll create a luscious glaze that coats each piece of steak. Give the skillet a good shake to evenly coat the bites. Cook for just another minute, and your kitchen will start smelling like a little slice of heaven!

    Step 4: Serve and Enjoy

    Finally, let’s plate these beauties! Melt the remaining cowboy butter in the microwave and serve it on the side for dipping or drizzling. When your family or friends take that first bite, you may just hear a chorus of ‘Oh wow!’ Trust me; each mouthful is truly irresistible. Enjoy these Cowboy Butter Steak Bites hot, and prepare to bask in all the compliments that will surely follow!

    Tips for Success

    • Don’t overcrowd the skillet; this ensures your steak bites sear instead of steam.
    • Let the steak come to room temperature before cooking for a more even cook.
    • Use an instant-read thermometer to check for doneness—130°F for medium-rare!
    • Adjust the amount of cowboy butter based on your flavor preference.
    • For better texture, let the cooked steak rest for a few minutes before serving.

    Equipment Needed

    • Medium skillet: A non-stick or cast iron will do the trick for a perfect sear.
    • Spatula: A flexible spatula helps flip your steak bites without breaking them apart.
    • Microwave-safe bowl: Essential for melting the remaining cowboy butter.
    • Instant-read thermometer: This handy tool ensures your steak is cooked to perfection.

    Variations

    • Spicy Cowboy Butter: Add a pinch of cayenne pepper or a drizzle of hot sauce to your cowboy butter for a kick of heat.
    • Herb-Infused Butter: Mix in some chopped fresh herbs like parsley, chives, or cilantro for added freshness and flavor.
    • Meat Alternatives: Try using shrimp or chicken bites instead of steak for a lighter option that still packs a punch.
    • Low-carb Twist: Serve the steak bites on a bed of sautéed zucchini noodles for a delicious, low-carb meal.
    • Vegetarian Version: Substitute the steak with hearty mushrooms or cauliflower for a tasty plant-based alternative.

    Serving Suggestions

    • Pair your Cowboy Butter Steak Bites with crispy roasted potatoes or a fresh garden salad for a balanced meal.
    • A chilled glass of red wine, like Cabernet Sauvignon, complements the rich flavors beautifully.
    • For a lovely presentation, garnish with fresh parsley or chives to add a pop of color.
    • Consider serving with dipping options like a creamy garlic sauce or a tangy barbecue sauce for variety.

    FAQs about Cowboy Butter Steak Bites

    Can I make Cowboy Butter in advance?

    Absolutely! You can prepare the cowboy butter ahead of time. Just store it in an airtight container in the refrigerator. When you’re ready to use it, simply reheat it gently in the microwave before tossing it with your steak bites.

    What is the best steak cut for Cowboy Butter Steak Bites?

    I recommend using tender cuts like top sirloin or ribeye. These cuts sear beautifully and absorb the flavors of the cowboy butter perfectly, making each bite a delightful experience.

    Can I use the cowboy butter for other dishes?

    Definitely! This cowboy butter is versatile and pairs well with grilled vegetables, chicken, or even as a dipping sauce for crusty bread. It’s truly a flavor enhancer for many meals.

    How do I know when my steak bites are done?

    The best way to check your steak bites is by using an instant-read thermometer. For medium-rare, cook until they reach 130°F. Remember, they’ll continue to cook a bit after you take them off the heat.

    Are Cowboy Butter Steak Bites gluten-free?

    Yes, they are! All the ingredients I used in this recipe, including the steak and cowboy butter, are gluten-free. Just double-check any extra seasonings you may add to ensure they’re gluten-free as well.

    Final Thoughts

    Creating Cowboy Butter Steak Bites is more than just cooking; it’s about bringing joy and rich flavors to your table. This recipe not only satisfies your taste buds but also serves as a quick culinary adventure that fits seamlessly into your busy life. Whether it’s a weeknight dinner or a gathering with friends, these steak bites will undoubtedly impress. Picture the smiles as everyone savors each buttery, delicious bite. I guarantee this dish will become a cherished go-to in your recipe repertoire, making your cooking life a little more special and a lot more flavorful!


    Print

    clock clock iconcutlery cutlery iconflag flag iconfolder folder iconinstagram instagram iconpinterest pinterest iconfacebook facebook iconprint print iconsquares squares iconheart heart iconheart solid heart solid icon

    Description

    Cowboy Butter Steak Bites are tender pieces of steak cooked in a delicious cowboy butter sauce, offering an irresistible flavor.


    • 1 tablespoon extra virgin olive oil
    • 1 pound steak, cut into 1-inch pieces (top sirloin or ribeye recommended)
    • 1 recipe cowboy butter, divided

    1. In a medium skillet over medium-high heat, add olive oil. Once hot and shimmering, add steak bites in a single layer, searing for 1 ½ to 2 minutes without moving.
    2. Flip the steak bites and cook for another 1 to 2 minutes, or until they reach your desired doneness.
    3. Reduce heat to medium. Add half of the cowboy butter to the pan and toss the steak bites to coat. Cook for an additional minute, until the butter melts and the steak is glazed.
    4. Melt the remaining cowboy butter in the microwave and serve on the side for dipping or drizzling.

    Notes

    • For a perfect sear, do not overcrowd the skillet.
    • Adjust cook time based on the thickness and type of steak used.
    • Prep Time: 10 minutes
    • Cook Time: 10 minutes
    • Category: Appetizer
    • Method: Skillet
    • Cuisine: American

    Nutrition

    • Serving Size: 4 ounces
    • Calories: 300
    • Sugar: 0g
    • Sodium: 600mg
    • Fat: 20g
    • Saturated Fat: 5g
    • Unsaturated Fat: 15g
    • Trans Fat: 0g
    • Carbohydrates: 0g
    • Fiber: 0g
    • Protein: 30g
    • Cholesterol: 80mg

    Sharing is caring!

  • Slow Cooker Mediterranean Chicken

    Slow Cooker Mediterranean Chicken


    Introduction to Slow Cooker Mediterranean Chicken

    Ah, the wonder of a slow cooker! There’s nothing quite like coming home to a delightful aroma filling your kitchen after a long day. My favorite in this culinary dreamland is Slow Cooker Mediterranean Chicken. It’s a dish that brings a burst of flavor without the fuss, perfect for busy moms and professionals alike. Just imagine tender chicken breasts simmering with olives and tomatoes, like a warm hug on a plate. This recipe is not only easy but also a true crowd-pleaser, ideal for light dinners or impressing your loved ones. Sounds amazing, right?

    Why You’ll Love This Slow Cooker Mediterranean Chicken

    This Slow Cooker Mediterranean Chicken is your ticket to stress-free evenings. Just toss your ingredients in and let the slow cooker do its magic while you tackle your to-do list or enjoy some quality time with family. The flavors are vibrant, making every bite feel like a little Mediterranean getaway. Plus, it’s a nutritious option packed with protein, ensuring your family eats well without any hassle.

    Ingredients for Slow Cooker Mediterranean Chicken

    To create this mouthwatering Slow Cooker Mediterranean Chicken, you’ll need a delightful combination of ingredients. Each item plays a unique role in crafting this flavorful dish.

    • Boneless, skinless chicken breasts: The heart of this recipe, ensuring each bite is tender and juicy.
    • Diced tomatoes: These add moisture and a tangy sweetness, creating a lovely base for the sauce.
    • Kalamata olives: Their rich brininess elevates the dish, offering that authentic Mediterranean flair.
    • Red onion: Adding depth and a slight sweetness, it enhances the overall flavor profile.
    • Garlic: Because who doesn’t love garlic? Its aromatic nature brings everything together in a harmonious blend.
    • Dried oregano and basil: Essential herbs that impart a warm, earthy note, capturing the essence of Mediterranean cuisine.
    • Red pepper flakes (optional): For those who enjoy a little kick, these add a delightful heat, balancing the flavors.
    • Salt and pepper: Simple yet crucial to enhance the vibrancy of each ingredient.
    • Fresh parsley: This beautiful garnish brightens the dish and adds a fresh touch right before serving.
    • Couscous or quinoa: Serve your chicken on a bed of either grain for a satisfying meal. Swap them based on your family’s preference!

    All these ingredients come together beautifully in the end. For exact measurements, check the bottom of the article, where you can find everything needed for printing!

    How to Make Slow Cooker Mediterranean Chicken

    Now, let’s dive into the delightful process of making Slow Cooker Mediterranean Chicken. With just a handful of simple steps, you’ll discover how easy it is to cook an impressive meal at home. Get your slow cooker ready, and let’s get cooking!

    Step 1: Prepare the Chicken

    Start by placing your boneless, skinless chicken breasts into the slow cooker. This juicy base is essential for the dish. If you like a bit of a head start, you can even thaw them the night before.

    Step 2: Season the Chicken

    Now, let’s bring some flavor to our chicken! Season the breasts generously with salt, pepper, dried oregano, and basil. If you love a little heat, sprinkle in some red pepper flakes. Remember, a well-seasoned chicken is the foundation of a delicious meal.

    Step 3: Add the Mediterranean Ingredients

    Next, it’s time for the magic! Pour the can of diced tomatoes over the seasoned chicken. Then sprinkle those Kalamata olives, red onion slices, and minced garlic on top. The aromas will start to dance in your kitchen! This medley of Mediterranean ingredients will create a mouthwatering sauce.

    Step 4: Slow Cook

    Cover your slow cooker and set it to low for about 6 to 7 hours or high for 3 to 4 hours. The longer, the better, as slow cooking allows the flavors to meld beautifully. You might want to check on it halfway through, just to tease your senses with that delightful smell wafting through your home!

    Step 5: Serve with a Side

    Once the cooking time is up, it’s time to serve! Carefully plate the chicken and pour some of that luscious sauce over it. Pair it with cooked couscous or quinoa, and garnish with fresh parsley. This final touch adds a pop of color and freshness to your meal!

    Enjoy the beautiful harmony of flavors in each bite. Your family will be begging for seconds!

    Tips for Success

    • Always start with fresh ingredients for the best flavor.
    • Don’t overcrowd your slow cooker; it needs space to cook evenly.
    • For added flavor, marinate the chicken in spices overnight.
    • Feel free to adjust the seasoning to suit your family’s taste preferences.
    • Leftovers are great for wraps or salads the next day!

    Equipment Needed

    • Slow Cooker: Your best friend for this recipe. Alternatively, use a pressure cooker if time is tight.
    • Measuring Cups and Spoons: For accurate ingredient measurements. You can also eyeball it if you’re a seasoned cook!
    • Knife and Cutting Board: Essential for prepping your vegetables and herbs. A sturdy board makes this task a breeze.
    • Serving Platter: To showcase your beautiful meal. A colorful plate can make a world of difference!

    Variations of Slow Cooker Mediterranean Chicken

    • Herb Swap: Experiment with fresh herbs like rosemary or thyme to give the dish a new twist!
    • Add Vegetables: Incorporate bell peppers, zucchini, or spinach for extra nutrients and color.
    • Go Vegan: Substitute chicken with chickpeas or tofu and adjust cooking time accordingly for a plant-based version.
    • Spice It Up: Try adding some smoked paprika or cayenne pepper for an exciting flavor kick.
    • Different Olives: Use green olives or a mix of olives for varied taste and texture.
    • Creamy Touch: Stir in a dollop of Greek yogurt or a splash of coconut milk before serving for a creamy finish.

    Serving Suggestions for Slow Cooker Mediterranean Chicken

    • Couscous or Quinoa: Serve the chicken over fluffy couscous or quinoa to soak up that delicious sauce.
    • Fresh Salad: A crisp Mediterranean salad with cucumbers and feta complements the dish beautifully.
    • Wine Pairing: Enjoy a glass of chilled white wine, like Sauvignon Blanc, for a refreshing accompaniment.
    • Presentation: Garnish with lemon wedges and sprinkle additional parsley for a vibrant look.

    FAQs about Slow Cooker Mediterranean Chicken

    As you embark on your delicious journey with Slow Cooker Mediterranean Chicken, you might have a few questions. Here are some common ones I’ve encountered, along with my helpful insights!

    Can I use frozen chicken breasts for this recipe?

    Yes, you can! Just be mindful that frozen chicken may need an extra hour of cooking time. Always check to ensure it’s thoroughly cooked before serving.

    How can I store leftovers of Slow Cooker Mediterranean Chicken?

    Leftovers can be stored in an airtight container in the refrigerator for up to three days. They’re perfect for meal prep or quick lunches throughout the week!

    What can I serve with Slow Cooker Mediterranean Chicken to make it a complete meal?

    Pair it with couscous or quinoa as a base. You could also enjoy it alongside a fresh Greek salad or roasted vegetables for a balanced meal.

    Is this dish suitable for meal prepping?

    Absolutely! This Slow Cooker Mediterranean Chicken not only holds up well in the fridge but also reheats beautifully, making it a fantastic option for meal prep.

    Can I make this recipe in advance?

    Yes! You can prepare everything the night before and store it in the fridge. Just pop it in the slow cooker in the morning, and you’ll come home to a comforting meal waiting for you!

    Final Thoughts

    Creating this Slow Cooker Mediterranean Chicken is more than just a recipe; it’s a culinary adventure that brings warmth and joy into your home. The vibrant flavors and delightful aromas transform an ordinary dinner into a memorable experience. Whether it’s a hectic weeknight or a special family gathering, this dish effortlessly fits the bill. Plus, knowing it’s nutritious and loved by all makes it a true winner. I hope you enjoy every bite, and may your kitchen be filled with laughter and the delightful sounds of satisfied munching. Enjoy your flavorful journey!


    Print

    clock clock iconcutlery cutlery iconflag flag iconfolder folder iconinstagram instagram iconpinterest pinterest iconfacebook facebook iconprint print iconsquares squares iconheart heart iconheart solid heart solid icon

    Description

    A flavorful dish made with chicken breasts cooked slowly with Mediterranean ingredients like olives, tomatoes, and spices.


    • 4 boneless, skinless chicken breasts
    • 1 can (14 oz) diced tomatoes, undrained
    • 1 cup Kalamata olives, pitted and halved
    • 1/2 cup red onion, sliced
    • 4 cloves garlic, minced
    • 1 tsp dried oregano
    • 1 tsp dried basil
    • 1/2 tsp red pepper flakes (optional)
    • Salt and pepper, to taste
    • Fresh parsley, for garnish
    • Cooked couscous or quinoa, for serving

    1. Place the chicken breasts in the slow cooker. Season with salt, pepper, oregano, basil, and red pepper flakes.
    2. Add the diced tomatoes, olives, red onion, and garlic on top of the chicken.
    3. Cover and cook on low for 6-7 hours or high for 3-4 hours, until the chicken is cooked through and tender.
    4. Serve the chicken with the sauce over cooked couscous or quinoa, garnished with fresh parsley.

    Notes

    • Adjust seasoning to taste.
    • Feel free to substitute quinoa with couscous based on preference.
    • Leftovers can be stored in the refrigerator for up to 3 days.
    • Prep Time: 15 minutes
    • Cook Time: 6-7 hours on low or 3-4 hours on high
    • Category: Dinner
    • Method: Slow Cooker
    • Cuisine: Mediterranean

    Nutrition

    • Serving Size: 1 serving
    • Calories: 350
    • Sugar: 4g
    • Sodium: 620mg
    • Fat: 12g
    • Saturated Fat: 2g
    • Unsaturated Fat: 8g
    • Trans Fat: 0g
    • Carbohydrates: 20g
    • Fiber: 3g
    • Protein: 40g
    • Cholesterol: 100mg

    Sharing is caring!

  • Melon and Pineapple Salad

    Melon and Pineapple Salad


    Introduction to Melon and Pineapple Salad

    As the sun beams down, there’s something incredibly refreshing about a Melon and Pineapple Salad. It’s like a sweet hug on a hot summer day! I often find myself seeking quick solutions for those busy afternoons, and this salad is my go-to. Packed with juicy fruits and a zesty kick, it’s perfect for impressing your loved ones or easily satisfying a crowd at BBQs. Plus, it takes no time at all to whip up! So, let’s dive into this delightful dish that celebrates summer and brings a splash of color to any table.

    Why You’ll Love This Melon and Pineapple Salad

    This Melon and Pineapple Salad is a shining example of ease and flavor coming together beautifully. It requires barely any time yet offers a burst of taste that sings summer!

    Whether you’re a busy mom looking for a quick side or simply wanting to impress at your next cookout, this salad checks all the boxes. Its vibrant colors and refreshing taste will make it a favorite for everyone!

    Ingredients for Melon and Pineapple Salad

    Creating this vibrant Melon and Pineapple Salad is as simple as gathering a few fresh ingredients. Here’s what you’ll need:

    • Fresh pineapple: This tropical fruit is the star of the show, bringing sweetness and juiciness to every bite.
    • Cantaloupe or honeydew melon: Both options add a beautiful color and subtle sweetness. Feel free to use whichever you have on hand!
    • Watermelon (optional): Adding watermelon enhances the freshness and offers a delightful crunch. It’s perfect for summer!
    • Lime juice: A splash of lime juice perks up the flavor, adding a tangy kick that brightens the dish.
    • Lime zest: This aromatic zest deepens the lime flavor and adds a lovely fragrance that enhances your salad.
    • Fresh mint or basil (optional): Adding fresh herbs can elevate the flavor. Mint gives it a refreshing note, while basil offers a unique twist!
    • Pinch of salt: Just a touch of salt helps bring out the sweetness of the fruits without overpowering them.
    • Optional toppings: For added flair, try chili powder or Tajín for spice, crumbled feta or goat cheese for creaminess, or toasted coconut flakes for a crunchy finish!

    Remember, the exact quantities for each ingredient are listed at the bottom of this article, ready for easy printing. So grab your shopping list and get ready to enjoy this refreshing summer treat!

    How to Make Melon and Pineapple Salad

    Making this Melon and Pineapple Salad is a breeze! Follow these simple steps, and you’ll be ready to enjoy a refreshing treat in no time. Let’s get started!

    Step 1: Prep the Fruit

    First, wash all your fruits under cool running water. Depending on the type of melon you’re using, peel the skin away carefully. With a sharp knife, cube or scoop the pineapple, cantaloupe or honeydew, and if you’re using it, the watermelon into bite-sized pieces. Aim for uniform sizes so every bite is equally delightful and easy to munch on!

    Step 2: Combine Ingredients

    In a large mixing bowl, gently toss together your cubed and scooped fruits. Squeeze in the lime juice, and sprinkle the lime zest for an extra zing. If you’ve decided to add herbs, throw those in too! Be gentle when mixing to keep the fruits intact. This way, each piece stays fresh and adds to the visual appeal!

    Step 3: Chill the Salad

    Now comes the hard part—patience! Cover your mixing bowl and pop it into the refrigerator for 15–30 minutes. Chilling the salad allows the flavors to meld beautifully. Trust me, the wait will pay off when you take that first refreshing bite. It’s like summer in a bowl!

    Step 4: Add Toppings

    Just before serving, add your desired toppings. A pinch of salt draws out the sweetness wonderfully. If you opt for chili powder or Tajín, sprinkle it for some kick. Cheese lovers might enjoy crumbled feta or goat cheese, while toasted coconut flakes bring an extra crunch. Serve immediately to keep those toppings fresh and enjoyable!

    Tips for Success

    • Always choose ripe fruits for the sweetest salad experience.
    • Try using a melon baller for a fun presentation and uniform pieces.
    • Don’t skimp on chilling time; it really enhances the flavors.
    • Feel free to mix in other seasonal fruits for variety.
    • Store leftovers in an airtight container in the fridge for up to two days.

    Equipment Needed

    • Mixing bowl: A large bowl is ideal, but any bowl will do for combining the ingredients.
    • Sharp knife: A good knife makes cutting the fruit easier and safer.
    • Cutting board: A stable surface for chopping is essential.
    • Measuring spoons: Handy for accurate amounts of lime juice and zest.

    Variations of Melon and Pineapple Salad

    • Spicy Mint Melon Salad: Add diced jalapeño for a spicy kick, and toss in more fresh mint for an invigorating twist!
    • Coconut Tropical Delight: Use fresh coconut meat along with the fruits for that island vibe. It adds sweetness and texture!
    • Honey-Lime Drizzle: Mix a tablespoon of honey with lime juice for an extra touch of sweetness. It truly elevates the flavor!
    • Nutty Flavor Boost: Sprinkle chopped almonds or walnuts over the salad for added crunch and healthy fats.
    • Berry Fusion: Add strawberries or blueberries to the mix for a splash of color and additional sweetness.

    Serving Suggestions for Melon and Pineapple Salad

    • Pair this salad with grilled chicken or shrimp for a complete meal.
    • Serve alongside light wraps or sandwiches for a refreshing lunch option.
    • Enjoy a glass of iced tea or lemonade to complement the salad’s vibrant flavors.
    • Garnish your salad with extra mint leaves for a visually appealing touch!

    FAQs about Melon and Pineapple Salad

    Can I make this Melon and Pineapple Salad in advance?

    Absolutely! This salad can be prepped a few hours ahead of time. Just remember to add the toppings right before serving to keep everything fresh and vibrant.

    What other fruits can I add to the salad?

    Feel free to get creative! Berries like strawberries or blueberries work wonderfully. You can also include grapes, peaches, or any other seasonal fruits you enjoy!

    Is this salad suitable for a vegan diet?

    Yes, this Melon and Pineapple Salad is entirely vegan. Its delicious mix of fruits and optional toppings means everyone can enjoy it without worry.

    How do I store leftovers?

    Leftover salad can be stored in an airtight container in the refrigerator for up to two days. Just keep in mind, the fruits may become a bit softer as they sit.

    Can I serve this salad at a party?

    Definitely! This salad is perfect for gatherings. Its bright colors and refreshing taste make it an impressive dish that your guests will love.

    Final Thoughts

    Creating this Melon and Pineapple Salad not only brings joy to your taste buds but also brightens your table with vibrant colors and refreshing flavors. It’s a delightful escape on those hot summer days, reminding us of sunshine and carefree moments. Whether it’s for a family gathering or just a weekday treat, this salad offers versatility and ease. I’ve loved hearing my family’s laughter around the table as they dig in, each bite bursting with sweetness. So, gather your ingredients, share this recipe, and let the joy of summer salads fill your home!


    Print

    clock clock iconcutlery cutlery iconflag flag iconfolder folder iconinstagram instagram iconpinterest pinterest iconfacebook facebook iconprint print iconsquares squares iconheart heart iconheart solid heart solid icon

    Description

    A refreshing summer salad featuring a mix of sweet melons and juicy pineapple, perfect for hot days.


    • 2 cups fresh pineapple, cubed
    • 2 cups ripe cantaloupe or honeydew melon, cubed or balled
    • 12 cups juicy watermelon, cubed or scooped (optional)
    • 1 tbsp lime juice
    • 1 tsp lime zest
    • A handful of fresh mint or basil, chopped (optional)
    • Pinch of salt
    • Optional Toppings: Chili powder or Tajín, Crumbled feta or goat cheese, Toasted coconut flakes

    1. Prep the fruit: Wash and peel as needed. Cube or ball the pineapple, melon, and watermelon into bite-sized pieces.
    2. Combine ingredients: In a large mixing bowl, add the fruit, lime juice, zest, and herbs (if using). Gently toss until evenly coated.
    3. Chill: Refrigerate for 15–30 minutes to let the flavors meld and cool before serving.
    4. Add toppings: Just before serving, sprinkle with a pinch of salt and any optional toppings like Tajín, cheese, or coconut.

    Notes

    • This salad can be prepared a few hours in advance.
    • Adjust the lime juice according to your taste preference.
    • Prep Time: 15 minutes
    • Cook Time: 0 minutes
    • Category: Salad
    • Method: Mixing
    • Cuisine: American

    Nutrition

    • Serving Size: 1 cup
    • Calories: 90
    • Sugar: 13g
    • Sodium: 5mg
    • Fat: 0.5g
    • Saturated Fat: 0g
    • Unsaturated Fat: 0g
    • Trans Fat: 0g
    • Carbohydrates: 22g
    • Fiber: 2g
    • Protein: 1g
    • Cholesterol: 0mg

    Sharing is caring!

  • Pistachio Rice Krispie Treats with Dark Chocolate

    Pistachio Rice Krispie Treats with Dark Chocolate


    Introduction to Pistachio Rice Krispie Treats with Dark Chocolate

    Welcome to my kitchen, where every recipe tells a story! Today, I’m excited to share my delightful Pistachio Rice Krispie Treats with Dark Chocolate. These treats are not just your average dessert; they’re the answer to your busy afternoons or that last-minute craving for something sweet yet satisfying. Imagine a cozy evening, a cup of tea in hand, and indulging in these luscious bars that melt in your mouth. Whether you’re entertaining friends, rewarding yourself after a long day, or just need a simple pick-me-up, this recipe is your new best friend!

    Why You’ll Love This Pistachio Rice Krispie Treats with Dark Chocolate

    What’s not to love about these Pistachio Rice Krispie Treats with Dark Chocolate? They’re incredibly easy to whip up, making them perfect for busy moms like us. The combination of creamy pistachio and rich dark chocolate creates a flavor explosion that will earn you rave reviews from your loved ones. Plus, they require minimal clean-up since it’s a no-bake treat. Your new favorite snack is just a few steps away!

    Ingredients for Pistachio Rice Krispie Treats with Dark Chocolate

    Gathering the right ingredients is the first step on this delicious journey! For my Pistachio Rice Krispie Treats with Dark Chocolate, you’ll need the following:

    • Salted Butter: This adds richness and flavor, giving your treats a delightful base. Unsalted butter can be used if you prefer to monitor salt levels.
    • Mini Marshmallows: These little pillows of sweetness are crucial for that gooey texture we all love. The pockets of melted marshmallow are what bind the treat together.
    • Instant Pistachio Pudding Mix: This is the secret to infusing a vibrant pistachio flavor without the fuss. If you can’t find pistachio pudding, vanilla works as a tasty substitute!
    • Pure Vanilla Extract: Just a teaspoon of this aromatic extract elevates the overall flavor, bringing all the elements together beautifully.
    • Rice Krispies Cereal: The backbone of the treat! Feel free to experiment with other cereals for different textures—just make sure they’re crispy!
    • Dark Chocolate: Melted to drizzle on top, dark chocolate adds a sophisticated contrast to the sweetness of the treats. A higher quality dark chocolate will deliver a richer flavor.

    Don’t forget! Exact quantities of these ingredients are listed at the bottom of the article for your convenience and for printing purposes.

    How to Make Pistachio Rice Krispie Treats with Dark Chocolate

    Creating these delightful Pistachio Rice Krispie Treats with Dark Chocolate is easier than you might think! Follow my simple steps and enjoy the process. Let’s dive in!

    Step 1: Melt the Butter

    Start by grabbing a large pot. Set your heat to medium and add in the salted butter. As it melts, it’ll start to bubble like a gentle cauldron. Stir it occasionally with a spatula until it’s completely melted and smooth. Now, toss in all but one cup of those mini marshmallows. Keep stirring until everything comes together effortlessly. You want it to be silky, almost like a marshmallow soup!

    Step 2: Mix in the Pudding and Cereal

    Once your marshmallow mixture is smooth, it’s time to add flavor. Sprinkle in the dry pistachio pudding mix and pour in that fragrant vanilla extract. Carefully fold it together with the spatula, combining the ingredients until it’s well mixed. Now, add the Rice Krispies cereal and the remaining marshmallows. Gently mix everything again. This is where the magic happens—each Rice Krispie should be coated with that dreamy marshmallow goodness!

    Step 3: Pour and Cool

    Grab your prepared baking dish lined with parchment paper and pour the mixture inside. Use your spatula to spread it evenly into the dish. Don’t compress it too much; just level it out. Now comes the hardest part—waiting! Let the treats cool and set for at least one hour. This gives them that perfect chewy texture, making every bite a delight.

    Step 4: Add the Dark Chocolate

    Once your treats are set and firm, it’s time to take them to the next level! Melt the dark chocolate in a microwave-safe bowl, stirring every 30 seconds until it’s smooth and glossy. Drizzle the melted chocolate generously over the cooled treats. Allow it to set for about 15 minutes. If you’re impatient like me, popping it in the fridge can speed up the process. Don’t forget to admire your masterpiece before you dive in!

    Tips for Success

    • Make sure to measure your ingredients carefully for the best results.
    • Use a non-stick spatula to help with mixing; it’ll make everything easier!
    • Don’t skip the cooling time; it’s crucial for the treats to hold their shape.
    • For clean cutting, use a sharp knife coated with a bit of butter.
    • Store your treats in an airtight container to keep them fresh and chewy.

    Equipment Needed

    • Large Pot: A sturdy pot will help you melt the butter and marshmallows evenly. A non-stick saucepan works well too.
    • Spatula: Use a silicone or wooden spatula for mixing; it won’t scratch your pot.
    • Baking Dish: A 9-inch square dish is perfect; an 8-inch dish can work if you prefer thicker bars.
    • Parchment Paper: This makes for easy removal; wax paper is a suitable alternative.
    • Microwave-Safe Bowl: Ideal for melting the dark chocolate smoothly; any microwave-safe dish works.

    Variations for Pistachio Rice Krispie Treats with Dark Chocolate

    • Nutty Twist: Add chopped nuts like almonds or walnuts for extra crunch and flavor.
    • Fruity Flavor: Mix in dried cranberries or chopped dried apricots for a sweet and tangy twist.
    • Adaptive Diet: Substitute gluten-free Rice Krispies or use a grain-free cereal for a gluten-free option.
    • Sweetened Coconut: Fold in sweetened flaked coconut to add a tropical taste to your treats.
    • Milk Chocolate Delight: Swap dark chocolate for milk chocolate if you prefer a sweeter topping.

    Serving Suggestions for Pistachio Rice Krispie Treats with Dark Chocolate

    • Pair with Coffee: Enjoy these treats alongside a rich cup of coffee for a delightful afternoon pick-me-up.
    • Garnish: Sprinkle crushed pistachios over the chocolate drizzle for an eye-catching presentation.
    • Serve with Ice Cream: Offer a scoop of vanilla or pistachio ice cream alongside for a dessert duo.
    • Wrap as Gifts: Wrap individual squares in cellophane for a sweet, homemade gift.
    • Festive Platter: Create a colorful dessert platter with fresh fruits to complement the treats.

    FAQs about Pistachio Rice Krispie Treats with Dark Chocolate

    Can I use a different flavor of pudding mix?

    Absolutely! While I adore the pistachio flavor, you can experiment with other pudding mixes like chocolate or vanilla to change things up. Just keep in mind that flavors may alter the final taste slightly.

    How do I store my Pistachio Rice Krispie Treats with Dark Chocolate?

    To keep them fresh, store your treats in an airtight container at room temperature. They can also be refrigerated for a firmer texture, especially under that delightful dark chocolate drizzle.

    Can I make these treats ahead of time?

    Yes, you can! These treats store well, which makes them perfect for meal prep. Make them a day or two in advance for a hassle-free dessert option.

    What can I substitute for dark chocolate?

    If dark chocolate isn’t your thing, you can swap it for milk chocolate or even white chocolate for a different flair. Just melt the chocolate of your choice as directed for a sweet finish.

    Are there any nut-free variations?

    Certainly! These Pistachio Rice Krispie Treats with Dark Chocolate can be made nut-free by simply skipping the pistachio bits and using regular marshmallows. Your family won’t miss a thing!

    Final Thoughts

    Creating these Pistachio Rice Krispie Treats with Dark Chocolate is not just about enjoying a tasty dessert; it’s about the joy of sharing something special with those you love. Each square is a reminder that even in the busiest of days, there’s always time for a little indulgence. Gathering around these treats can spark laughter, fellowship, and delightful conversations. So, whether you serve them at a gathering or enjoy them solo with a book, they bring comfort and a sprinkle of happiness to every moment. Dive into this delightful experience, and let the sweet memories unfold!


    Print

    clock clock iconcutlery cutlery iconflag flag iconfolder folder iconinstagram instagram iconpinterest pinterest iconfacebook facebook iconprint print iconsquares squares iconheart heart iconheart solid heart solid icon

    Description

    Delicious Pistachio Rice Krispie Treats topped with melted dark chocolate.


    • 6 Tablespoons salted butter
    • 16 ounce bag mini marshmallows, divided
    • 3.5 ounce box instant pistachio pudding mix
    • 1 teaspoon pure vanilla extract
    • 6 cups rice krispies cereal
    • ½ cup dark chocolate melted

    1. In a large pot, melt butter over medium heat. Add all but 1 cup of the mini marshmallows and continue stirring until completely smooth. Remove from heat.
    2. Add dry pistachio pudding mix and vanilla extract. Fold in with spatula. Add in cereal and remaining 1 cup of mini marshmallows. Mix completely.
    3. Pour into a parchment paper lined 9-inch square baking dish. Allow treats to cool and set at least one hour. Remove from dish, remove parchment paper. Cut into 16 squares.
    4. Drizzle with melted dark chocolate, allow to set, about 15 minutes. Enjoy (these are great in the fridge)!

    Notes

    • Store leftovers in an airtight container.
    • For a richer flavor, use higher quality dark chocolate.
    • Prep Time: 15 minutes
    • Cook Time: 10 minutes
    • Category: Dessert
    • Method: No-bake
    • Cuisine: American

    Nutrition

    • Serving Size: 1 square
    • Calories: 150
    • Sugar: 11g
    • Sodium: 80mg
    • Fat: 6g
    • Saturated Fat: 4g
    • Unsaturated Fat: 2g
    • Trans Fat: 0g
    • Carbohydrates: 22g
    • Fiber: 1g
    • Protein: 1g
    • Cholesterol: 15mg

    Sharing is caring!

  • Melt-in-Your-Mouth Sweet Potato Rum Tres Leches Cake

    Melt-in-Your-Mouth Sweet Potato Rum Tres Leches Cake


    Introduction to Melt-in-Your-Mouth Sweet Potato Rum Tres Leches Cake

    Ah, the joy of baking! When I’m navigating the whirlwind of daily life, nothing brings me more comfort than a slice of my Melt-in-Your-Mouth Sweet Potato Rum Tres Leches Cake. This cake is a harmonious blend of flavors that takes you on a delightful journey with each bite. It’s perfectly moist, thanks to the sweet potatoes, and bursting with rich flavors. Whether you’re preparing for a family gathering or just treating yourself after a long day, this cake is here to save the day. Trust me, it’s the kind of dessert that’ll make your heart sing!

    Why You’ll Love This Melt-in-Your-Mouth Sweet Potato Rum Tres Leches Cake

    This cake is not just a delight for your taste buds; it’s a real lifesaver for your busy schedule! It’s incredibly easy to make, so even on your craziest days, you can whip it up in under an hour. Plus, the combination of sweet potatoes and tres leches makes it irresistibly moist and flavorful. Everyone will rave about it, and you’ll feel like a superstar in the kitchen!

    Ingredients for Melt-in-Your-Mouth Sweet Potato Rum Tres Leches Cake

    This scrumptious cake comes together with a delightful selection of ingredients that bring out the best flavors. Below, I’ve outlined what you’ll need to create this sweet masterpiece. You can find the exact measurements at the bottom of the article, available for printing!

    • Mashed Sweet Potatoes: About one medium sweet potato helps create that moist texture that melts in your mouth.
    • All-Purpose Flour: This forms the base of your cake. A gluten-free blend is a reliable substitute if needed.
    • Baking Powder & Baking Soda: These leavening agents work together to create a light and airy cake.
    • Salt: Just a pinch brings all the sweet flavors together and enhances the overall taste.
    • Sugar: A half-cup adds sweetness, balancing the subtle earthiness of the sweet potatoes.
    • Vegetable Oil: This keeps the cake moist. You can even use melted coconut oil for a tropical twist!
    • Large Eggs: They provide structure and stability. Make sure they’re at room temperature for best results.
    • Vanilla Extract: A teaspoon adds warmth and richness that makes the cake oh-so-satisfying.
    • Milk, Sweetened Condensed Milk, & Evaporated Milk: These three milks are where the magic happens, soaking into the cake to create layers of flavor.
    • Dark Rum (optional): For those who want a touch of sophistication, this adds a lovely depth. You can skip it or use extra vanilla extract instead.
    • Whipped Cream: The perfect topping for a light and airy finish, adding a delightful creaminess.
    • Ground Cinnamon: For garnish, it lends a classic touch and a warm, inviting aroma.

    How to Make Melt-in-Your-Mouth Sweet Potato Rum Tres Leches Cake

    Creating this fabulous cake is a delightful adventure you’ll want to share. Let’s dive into the steps of making this Melt-in-Your-Mouth Sweet Potato Rum Tres Leches Cake, and trust me, it’s easier than it sounds!

    Step 1: Preheat and Prepare the Pan

    First things first, preheat your oven to 350°F (175°C). While that’s heating up, grab a 9×13 inch baking dish and give it a generous coating of grease. This ensures your cake will pop out easily when it’s time to serve. I always have a little fun pretending I’m a pastry chef at this stage!

    Step 2: Combine Dry Ingredients

    In a medium bowl, whisk together the all-purpose flour, baking powder, baking soda, and salt until they’re thoroughly blended. This step is crucial because evenly mixed dry ingredients help your cake rise beautifully. Just imagine: a cake so soft it feels like you’re biting into a cloud!

    Step 3: Cream Sugar and Oil

    Now it’s time for the magic. In a large bowl, beat together the sugar and vegetable oil until the mixture becomes light and fluffy. This usually takes about 2-3 minutes. The air you’re whipping in now is what will give your cake that lovely texture that makes people go “wow.”

    Step 4: Add Sweet Potatoes and Vanilla

    Once your sugar and oil are creamy, stir in the mashed sweet potatoes and the vanilla extract. Mix gently until everything is fully incorporated. The vibrant color and flavor of sweet potatoes not only lend moisture but also create a stunning hue that’s just as appetizing as it is tasty.

    Step 5: Mix Dry with Wet Ingredients

    Now for the fun part—combine your dry ingredients with the wet ones! Alternate adding the flour mixture and the milk into the sweet potato blend. This is key: mix until just combined. If you can see a few lumps, that’s okay. Remember, overmixing is the enemy of a fluffy cake!

    Step 6: Bake the Cake

    Pour your batter into the greased baking dish and pop it into the oven. Bake for 25-30 minutes. You’ll know it’s ready when a toothpick inserted into the center comes out clean. The anticipation is usually the hardest part; the aroma will be irresistible!

    Step 7: Prepare the Tres Leches Mixture

    While your cake is baking, let’s work on the tres leches mixture. In a separate bowl, whisk together the sweetened condensed milk, evaporated milk, and dark rum (if using). This trio is what makes the cake so incredibly moist—you’ll want every drop!

    Step 8: Poke Holes and Soak

    Once the cake is out of the oven and cooled for about 10 minutes, it’s time for some love! Take a fork and poke holes all over the top of the cake. This way, the milk mixture can seep in, creating that unforgettable melt-in-your-mouth experience. Pour it evenly over the cake and allow it to soak in.

    Step 9: Chill and Top

    Let the cake cool completely, preferably in the refrigerator, for at least an hour. This chilling time allows the flavors to deepen. Once it’s cool, top with a generous layer of whipped cream and sprinkle with ground cinnamon. Voila! You’re all set to impress friends and family!

    Tips for Success

    • Measure your sweet potatoes after mashing for accuracy in moisture content.
    • For a richer flavor, let the tres leches mixture soak in for a few hours.
    • Use a knife to gently spread whipped cream for a beautiful finish.
    • Don’t skip the chilling time; it enhances texture and flavor.
    • Feel free to experiment with spices like nutmeg for a unique twist.

    Equipment Needed

    • 9×13 inch Baking Dish: A standard size; you can also use an 8×8 inch dish for thicker layers.
    • Mixing Bowls: Grab both medium and large bowls for mixing the batter and liquids.
    • Whisk: Essential for combining dry ingredients; a fork works too in a pinch!
    • Electric Mixer: Ideal for beating sugar and oil, but a handheld whisk will work as well.
    • Fork: Important for poking holes in the cake, ensuring it absorbs the milks.

    Variations

    • Gluten-Free: Swap all-purpose flour with a gluten-free blend for a cake everyone can enjoy.
    • Dairy-Free: Use coconut milk, almond milk, or a dairy-free condensed milk alternative.
    • Spice it Up: Add a teaspoon of pumpkin pie spice or nutmeg for a warm seasonal touch.
    • Nutty Twist: Fold in half a cup of chopped nuts like walnuts or pecans into the batter for added crunch.
    • Fruit Infusion: Layer in fresh fruits like bananas or berries between the cake and whipped cream for a fruity surprise.

    Serving Suggestions

    • Serve with a side of fresh berries for a pop of color and added tartness.
    • Pair with a cup of spiced chai or coffee for a comforting warm drink.
    • Garnish with mint leaves for a refreshing touch that elevates presentation.
    • Drizzle caramel sauce on top for a sweet finishing touch.
    • Arrange slices on a beautiful platter, topped with additional whipped cream and a sprinkle of cinnamon.

    FAQs about Melt-in-Your-Mouth Sweet Potato Rum Tres Leches Cake

    Can I make this cake ahead of time?
    Absolutely! In fact, making it a day ahead allows flavors to meld beautifully. Just remember to store it in the refrigerator, covered, until you’re ready to serve.

    What if I don’t have dark rum?
    No problem at all! You can simply substitute it with extra vanilla extract or even a splash of coffee liqueur for a different flavor profile.

    How should I store leftovers?
    To keep your cake fresh, tightly cover it with plastic wrap or place it in an airtight container. Refrigerate it, and it should stay delicious for up to 3-4 days.

    Can I freeze the cake?
    Yes, you can! Just make sure to freeze it without the whipped cream topping. Wrap it well in plastic wrap and aluminum foil, and it will last for up to three months.

    What’s the best way to serve this cake?
    For the ultimate presentation, slice a piece, top it with whipped cream, and sprinkle cinnamon on top. Pairing it with a refreshing drink, like sweet tea or coffee, makes it even more delightful!

    Final Thoughts

    Every slice of this Melt-in-Your-Mouth Sweet Potato Rum Tres Leches Cake tells a story. It’s a wonderful reminder that we can create magic in our kitchens, even on our busiest days. This cake not only fills your home with delightful aromas but also warms your heart and soul. Whether it’s a family gathering or a moment of self-care, serving this cake brings smiles all around. I truly believe that food has the power to connect us, and this recipe is a delicious invitation to create lasting memories. So, roll up your sleeves and enjoy the joy of baking!


    Print

    clock clock iconcutlery cutlery iconflag flag iconfolder folder iconinstagram instagram iconpinterest pinterest iconfacebook facebook iconprint print iconsquares squares iconheart heart iconheart solid heart solid icon

    Description

    A delectable and moist Sweet Potato Rum Tres Leches Cake that melts in your mouth.


    • 1 cup mashed sweet potatoes (about 1 medium sweet potato)
    • 1 cup all-purpose flour (or gluten-free blend)
    • 1 teaspoon baking powder
    • 0.5 teaspoon baking soda
    • 0.25 teaspoon salt
    • 0.5 cup sugar
    • 0.5 cup vegetable oil
    • 3 large eggs
    • 1 teaspoon vanilla extract
    • 0.5 cup milk
    • 0.5 cup sweetened condensed milk
    • 0.5 cup evaporated milk
    • 0.25 cup dark rum (optional)
    • whipped cream (for topping)
    • ground cinnamon (for garnish)

    1. Preheat your oven to 350°F (175°C). Grease a 9×13 inch baking dish.
    2. Whisk together the flour, baking powder, baking soda, and salt in a medium bowl. Set aside.
    3. In a large bowl, beat together the sugar, oil, and eggs until the mixture is light and fluffy.
    4. Stir in the vanilla extract and mashed sweet potatoes.
    5. Gradually add the dry ingredients to the wet ingredients, alternating with the milk, until everything is just combined. Don’t overmix!
    6. Pour the batter into your prepared baking dish and bake for 25-30 minutes, or until a toothpick inserted into the center comes out clean.
    7. While the cake is baking, whisk together the sweetened condensed milk, evaporated milk, and rum (if using) in a separate bowl.
    8. Let the cake cool for about 10 minutes in the pan. Then, using a fork, poke holes all over the top of the cake.
    9. Pour the milk mixture evenly over the warm cake. Let it cool completely, preferably in the refrigerator.
    10. Once completely cool, top with whipped cream and a sprinkle of ground cinnamon. Serve and enjoy!

    Notes

    • You can substitute the dark rum with extra vanilla extract or coffee liqueur if preferred.
    • Using a sweeter variety of sweet potato like Jewel enhances the cake’s flavor.
    • For a gluten-free version, use a gluten-free flour blend.
    • Letting the cake chill in the refrigerator enhances its flavor.
    • Prep Time: 20 minutes
    • Cook Time: 30 minutes
    • Category: Dessert
    • Method: Baking
    • Cuisine: Latin American

    Nutrition

    • Serving Size: 1 slice
    • Calories: 350
    • Sugar: 23g
    • Sodium: 150mg
    • Fat: 15g
    • Saturated Fat: 2g
    • Unsaturated Fat: 10g
    • Trans Fat: 0g
    • Carbohydrates: 50g
    • Fiber: 2g
    • Protein: 5g
    • Cholesterol: 80mg

    Sharing is caring!

  • Burrata Bruschetta

    Burrata Bruschetta


    Introduction to Burrata Bruschetta

    As a busy mom, I totally understand the hustle of daily life. Between juggling work and family, it’s nice to have a delicious recipe like Burrata Bruschetta up my sleeve. This delightful appetizer not only impresses my loved ones but also comes together in just 20 minutes. Isn’t that a dream? The creamy burrata paired with fresh tomatoes and fragrant basil brings a taste of Italy right to your kitchen. Whether you’re hosting a weekend gathering or simply treating yourself to something special, this dish is sure to bring a smile to your face!

    Why You’ll Love This Burrata Bruschetta

    This Burrata Bruschetta is not just a recipe; it’s a lifesaver for busy lives. In just 20 minutes, you’ll create a gourmet appetizer that tastes like a restaurant dish without the fuss. Plus, the combination of creamy burrata and vibrant tomatoes is a flavor explosion! It’s fresh, satisfying, and impressively simple, making it perfect for busy moms like us or an elegant surprise for unexpected guests.

    Ingredients for Burrata Bruschetta

    This recipe for Burrata Bruschetta calls for simple and fresh ingredients that come together beautifully. Here’s what you’ll need:

    • Baguette: A French or Italian baguette adds that perfect crisp texture. Look for fresh bread for the best results.
    • Olive Oil: You’ll brush the baguette slices with olive oil. It not only adds flavor but helps with toasting.
    • Cherry Tomatoes: Halved cherry tomatoes bring a burst of sweetness. They’re juicy and vibrant, making every bite delightful.
    • Burrata Cheese: This creamy cheese is the star of the show! Its rich, soft texture elevates the bruschetta to the next level.
    • Fresh Basil: Torn basil leaves add a fragrant, herbal note. This fresh herb is key for that classic Italian taste.
    • Balsamic Glaze (optional): A drizzle of balsamic glaze adds a touch of sweetness and tang. Feel free to skip it if you prefer a lighter taste.
    • Salt and Pepper: Simple seasonings to enhance the flavors. Freshly cracked pepper makes a world of difference!

    If you need exact quantities for each ingredient, they can be found at the bottom of the article for easy printing. Enjoy shopping for these fresh ingredients! Creating Burrata Bruschetta is not just about the flavors; it’s about choosing the best quality ingredients to make it truly special.

    How to Make Burrata Bruschetta

    Creating the perfect Burrata Bruschetta is easier than you might think! Follow these simple steps, combining fresh ingredients with a sprinkle of love and care. Let’s dive right in!

    Step 1: Preheat Your Oven

    Start by preheating your oven to 375°F (190°C). This temperature is crucial for toasting the baguette slices just right. The warmth will create a lovely golden-brown crust, perfect for holding the toppings. Just imagine that satisfying crunch when you take a bite!

    Step 2: Prepare the Baguette Slices

    Next, take your fresh baguette and slice it into 1-inch rounds. Lay them out on a baking sheet like little canvases, ready for a beautiful topping. Brush both sides generously with olive oil. This step infuses flavor and helps achieve that crispy texture we all love.

    Step 3: Toast the Baguette

    Now, place the baking sheet in your preheated oven and toast the baguette slices for about 8-10 minutes. Keep an eye on them! You’ll know they’re ready when they’re golden brown and crispy. No one wants soggy bruschetta, right?

    Step 4: Mix the Tomato and Basil Topping

    While the bread is toasting, grab a mixing bowl. Combine the halved cherry tomatoes and torn basil leaves. Sprinkle in a pinch of salt and a dash of pepper. Toss gently to mix. This mixture is where the magic begins! The vibrant colors and aromas will have your mouth watering.

    Step 5: Add Toppings Post-Toasting

    Once your baguette slices are perfectly toasted, remove them from the oven and let them cool just a bit. It’s time for assembly! Top each slice with a generous spoonful of the tomato and basil mixture. Then, add your torn burrata cheese pieces on top, allowing the creamy goodness to melt into the tomatoes. It’s like a beautiful masterpiece on toast!

    Step 6: Serve and Enjoy

    Finally, if you’re using balsamic glaze, drizzle it over the top for an extra pop of flavor. Serve your Burrata Bruschetta immediately to enjoy that delightful combination of crispy bread and creamy cheese. Trust me, this dish is best enjoyed fresh!

    Tips for Success

    • Use the freshest ingredients for the best taste—especially the burrata and tomatoes.
    • Don’t over-toast the baguette. Aim for a golden brown color for optimal crunch.
    • Experiment with different toppings like pesto or olives for a unique twist.
    • Serve the bruschetta right away to maintain its crunch and creaminess.
    • Make extra batches because these will disappear fast!

    Equipment Needed

    • Baking sheet: A standard baking sheet works perfectly. You can also use a pizza stone for a crispier finish!
    • Mixing bowl: Any bowl will do! A large glass bowl is my favorite for mixing and showing off colors.
    • Brush: A pastry brush helps apply olive oil evenly. A clean paper towel also works in a pinch!
    • Knife: A good bread knife is essential for slicing the baguette effortlessly.

    Variations of Burrata Bruschetta

    • Caprese Style: Add slices of ripe avocado and drizzles of extra virgin olive oil for a creamy twist.
    • Spicy Kick: Top with thinly sliced jalapeños or red pepper flakes to add a kick of heat!
    • Olive Medley: Mix in chopped kalamata olives or green olives for a briny touch that complements the cheese.
    • Vegan Option: Substitute burrata with a dairy-free cheese alternative made from cashews or tofu for a vegan-friendly dish.
    • Herb Infusion: Experiment with other fresh herbs like parsley or cilantro for a different flavor profile.
    • Roasted Peppers: Add roasted red or yellow pepper strips for a sweet, smoky element to the bruschetta.

    Serving Suggestions

    • Pair with a chilled white wine, like a crisp Pinot Grigio, for a delightful contrast.
    • Serve alongside a fresh arugula salad drizzled with lemon vinaigrette for extra greens.
    • Consider adding a bowl of marinated olives on the side for a Mediterranean touch.
    • Arrange on a wooden board for a beautiful presentation that invites sharing.
    • Garnish with extra basil leaves or drizzle more balsamic glaze for an elegant finish.

    FAQs about Burrata Bruschetta

    As you prepare to make your own Burrata Bruschetta, you might have some questions. Here are some common queries I’ve come across, along with helpful answers to guide you:

    Can I make Burrata Bruschetta ahead of time?
    While it’s best served fresh, you can prepare the tomato and basil mixture ahead. Just store it in the fridge and assemble shortly before serving to keep everything crisp and fresh!

    What can I substitute for burrata cheese?
    If burrata isn’t available, fresh mozzarella or a creamy goat cheese can provide tasty alternatives. Their textures will add a unique twist to your bruschetta.

    Is Burrata Bruschetta gluten-free?
    No, since baguette is made from wheat. However, you can substitute it with gluten-free bread for a delicious, gluten-free version of this classic appetizer.

    How can I store leftovers?
    If you have any leftovers, store the tomato mixture and bread separately. The bread will become soggy if stored topped with the toppings. Enjoy the bread toasted anew the next day!

    What drinks pair well with Burrata Bruschetta?
    A chilled glass of white wine, like Sauvignon Blanc or Pinot Grigio, pairs wonderfully. For a non-alcoholic option, a sparkling lemon soda can refresh your palate beautifully.

    Final Thoughts

    Making Burrata Bruschetta has become one of my go-to kitchen adventures. There’s something special about creating a dish that is as delicious as it is beautiful. The combination of fresh ingredients brings joy to the table, whether it’s a cozy family dinner or a fun gathering with friends.

    Each bite delivers that perfect balance of creamy and crunchy, all while being a visual treat. This recipe not only makes you shine as a host but also reminds me how easy it is to bring a taste of Italy home. Enjoy every moment of this delightful culinary journey!


    Print

    clock clock iconcutlery cutlery iconflag flag iconfolder folder iconinstagram instagram iconpinterest pinterest iconfacebook facebook iconprint print iconsquares squares iconheart heart iconheart solid heart solid icon

    Description

    A simple and delicious recipe for Burrata Bruschetta, perfect as an appetizer or a light meal.


    • 1 baguette, sliced into 1-inch rounds
    • 2 tablespoons olive oil (for brushing)
    • 1 pint cherry tomatoes, halved
    • 8 oz burrata cheese, torn into pieces
    • 1/4 cup fresh basil, torn
    • 1 tablespoon balsamic glaze (optional)
    • Salt and pepper to taste

    1. Preheat your oven to 375°F (190°C).
    2. Arrange the baguette slices on a baking sheet and brush both sides with olive oil.
    3. Toast the baguette slices in the oven for 8-10 minutes, or until golden brown and crispy.
    4. While the bread is toasting, prepare the topping: In a bowl, combine the halved cherry tomatoes, torn basil leaves, salt, and pepper. Gently toss to combine.
    5. Once the crostini are toasted, remove them from the oven and let them cool slightly.
    6. Top each toasted baguette slice with a generous spoonful of the tomato and basil mixture.
    7. Add a piece of burrata cheese on top of each bruschetta, gently tearing it into smaller pieces.
    8. Drizzle with balsamic glaze, if using, and serve immediately.

    Notes

    • For best flavor, use fresh, high-quality burrata cheese.
    • Feel free to add other toppings like olives or roasted peppers for variety.
    • Serve immediately to enjoy the bread’s crispness and burrata’s creaminess.
    • Prep Time: 10 minutes
    • Cook Time: 10 minutes
    • Category: Appetizer
    • Method: Baking
    • Cuisine: Italian

    Nutrition

    • Serving Size: 1 bruschetta
    • Calories: 150
    • Sugar: 2g
    • Sodium: 250mg
    • Fat: 9g
    • Saturated Fat: 5g
    • Unsaturated Fat: 3g
    • Trans Fat: 0g
    • Carbohydrates: 14g
    • Fiber: 1g
    • Protein: 5g
    • Cholesterol: 20mg

    Sharing is caring!