Author: IHAAL Team

  • Chocolate Salted Caramel Pretzel Cookies Delight You!

    Chocolate Salted Caramel Pretzel Cookies Delight You!


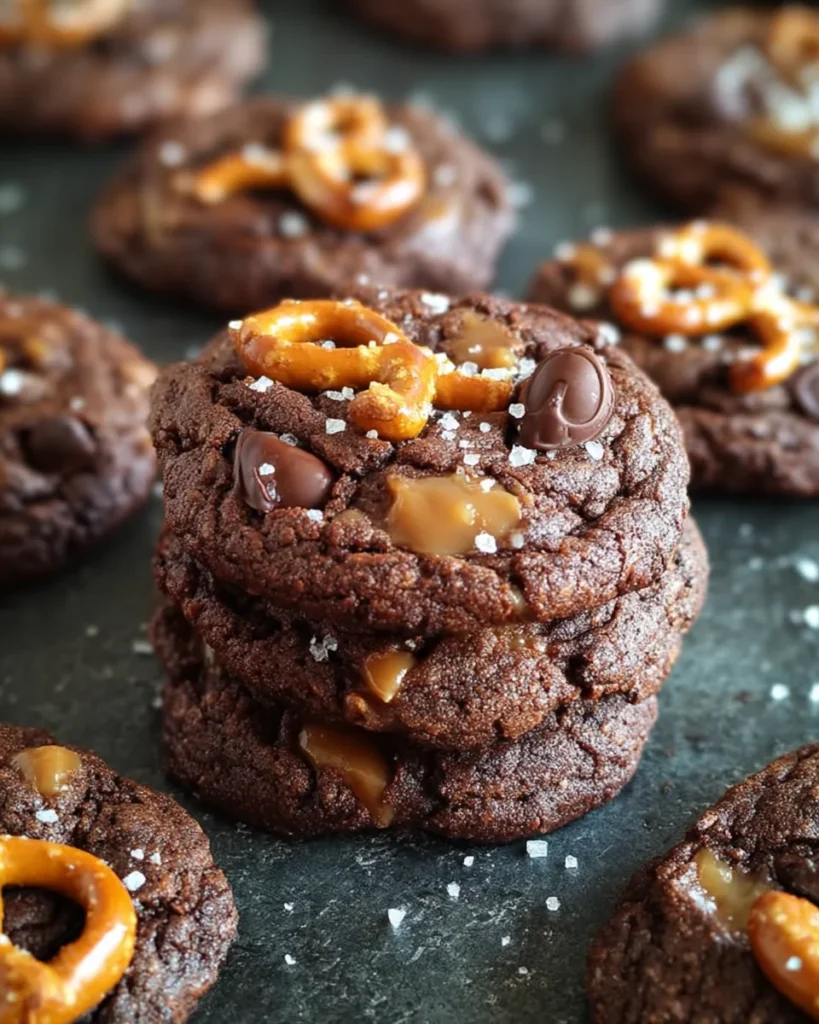
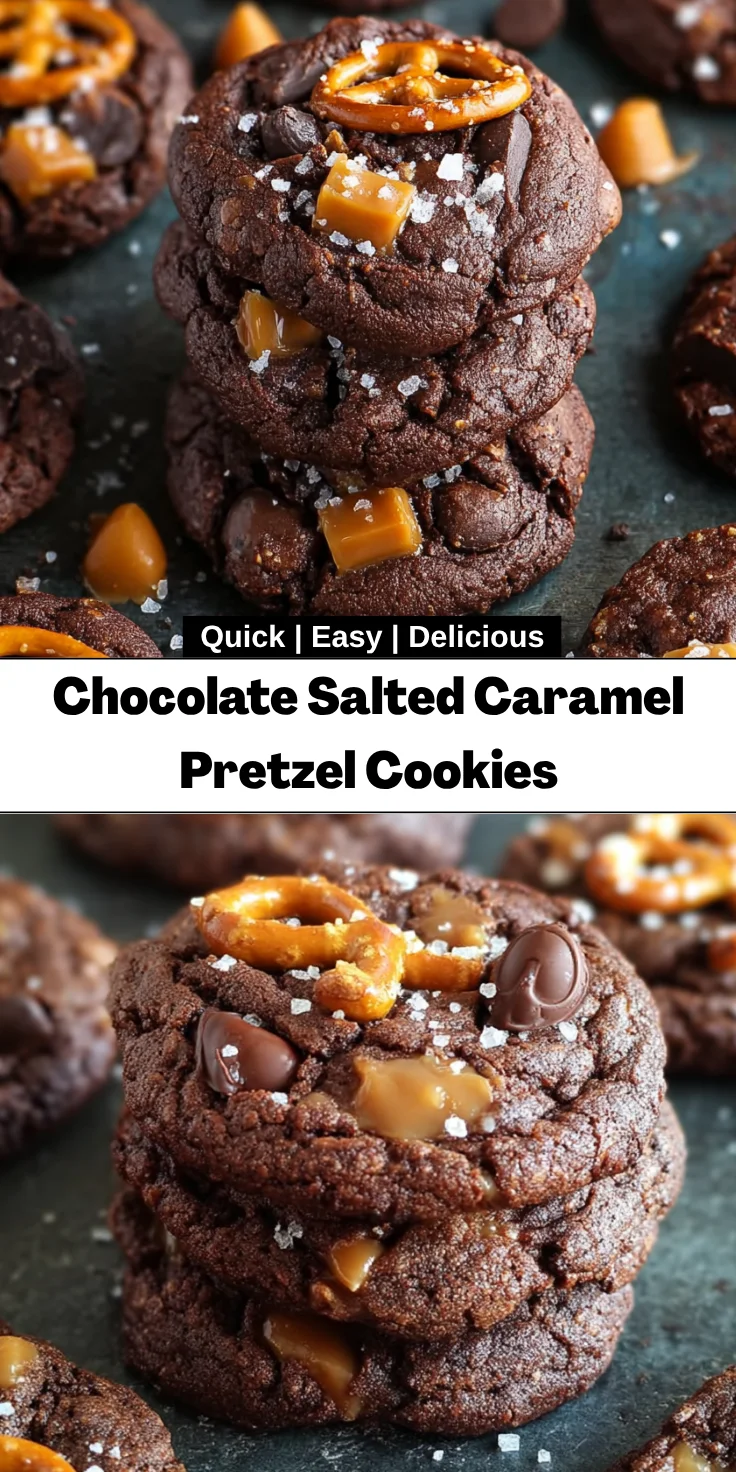
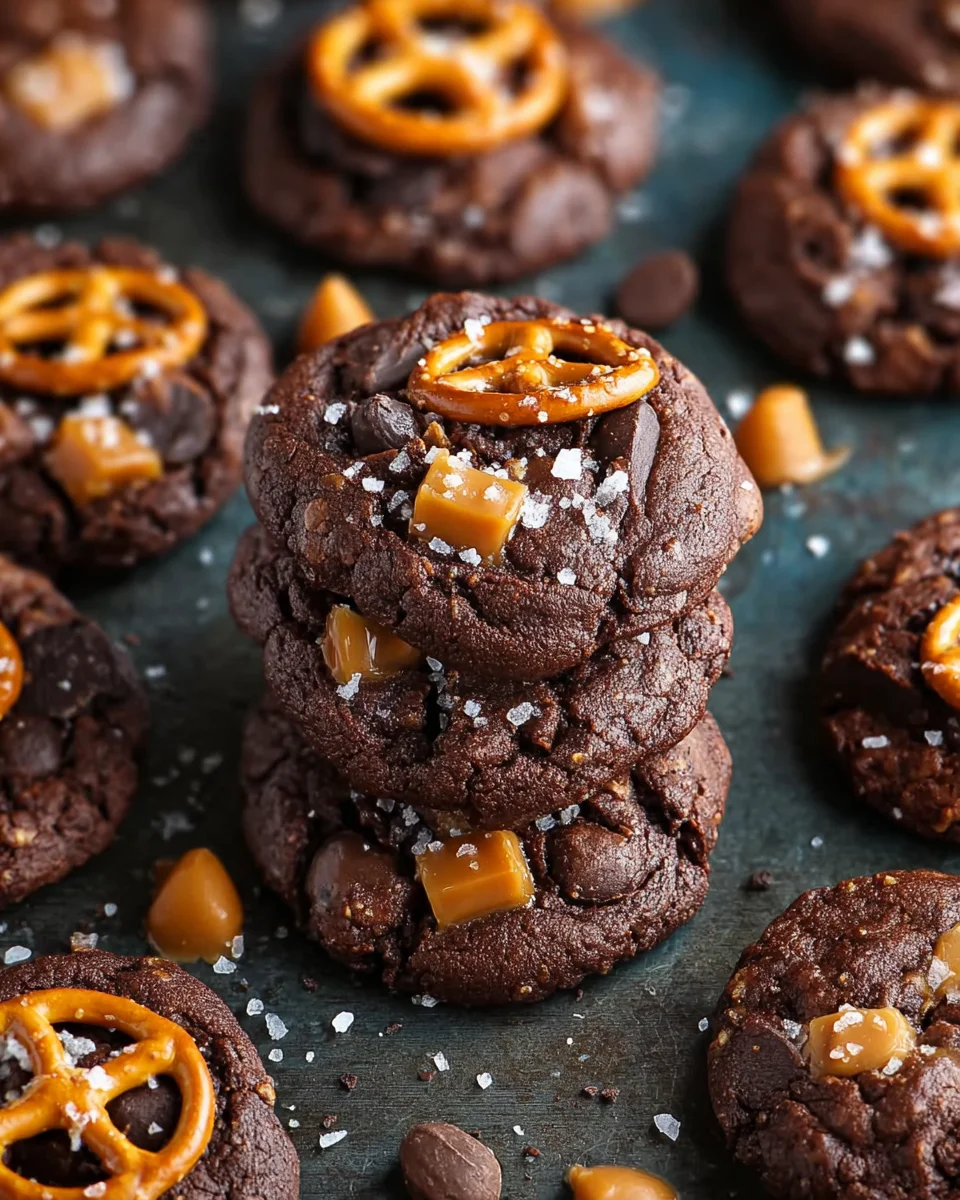
    Introduction to Chocolate Salted Caramel Pretzel Cookies

    Welcome to a delightful journey into the sweet and savory world of Chocolate Salted Caramel Pretzel Cookies! If you’re like me, balancing a busy schedule can sometimes leave you with little time for baking. But trust me, these cookies are your new best friend in the kitchen. They’re simple, quick to whip up, and combine the richness of chocolate with the buttery crunch of pretzels, all wrapped around gooey caramel. Perfect for a family treat or when you want to impress friends, these cookies truly elevate any occasion!

    Why You’ll Love This Chocolate Salted Caramel Pretzel Cookies

    You’re going to fall head over heels for these Chocolate Salted Caramel Pretzel Cookies! They’re not just easy to make; they’re a delicious marriage of flavors and textures that your loved ones will adore. With quick prep time, you’ll have warm, gooey cookies ready in just 30 minutes. Plus, the salty-sweet harmony is a flavor explosion that’ll leave you craving more. Seriously, what’s not to love?

    Ingredients for Chocolate Salted Caramel Pretzel Cookies

    Gathering the right ingredients is key to making these irresistible Chocolate Salted Caramel Pretzel Cookies. Here’s what you’ll need:

    • All-purpose flour: The base of your cookie, giving it structure. It’s versatile and keeps the cookies chewy.
    • Dutch process cocoa: Adds a rich, deep chocolate flavor. You can use regular cocoa, but Dutch gives a smoother taste.
    • Baking soda: Helps the cookies rise and become delightful soft pillows of goodness.
    • Sea salt: Enhances the flavors of chocolate and caramel. A must for that perfect sweet-salty balance!
    • Unsalted butter: Adds a creamy texture and flavor. Choose high-quality butter for the best results.
    • Granulated sugar: Sweetens the cookies and helps them spread nicely while baking.
    • Brown sugar: For moisture and a hint of caramel flavor. The duo of sugars creates a lovely depth.
    • Large eggs: Act as a binder, helping the cookies hold their shape. Always use room temperature eggs for better mixing.
    • Vanilla extract: A simple touch that enhances the overall flavor profile of the cookies.
    • Chopped pretzels: The crunchy element that complements the smooth chocolate and gooey caramel. Use your favorite buttery pretzels for added flavor.
    • Semi-sweet chocolate chips: Melting into the cookie dough, they offer pockets of melted chocolate joy.
    • Caramel candy squares: A gooey surprise in each cookie. I recommend Kraft caramels for their softness.
    • Sea salt for sprinkling: Use sparingly on top for that extra touch of salinity.

    If you want to get creative, consider swapping out chocolate chips for white chocolate or adding nuts for extra crunch. Don’t fret! Exact measurements are at the bottom of the article for easy printing.

    How to Make Chocolate Salted Caramel Pretzel Cookies

    Creating these delightful Chocolate Salted Caramel Pretzel Cookies is a breeze. Follow these simple steps, and you’ll soon have warm, mouthwatering cookies fresh from your oven. Let’s get started!

    Step 1: Preheat and Prepare

    First things first—let’s preheat your oven to 350 degrees F.

    While the oven warms up, line a baking sheet with parchment paper or a Silpat baking mat. This little step helps prevent sticking and makes clean-up a snap.

    Step 2: Mix Dry Ingredients

    In a medium bowl, whisk together the all-purpose flour, Dutch process cocoa, baking soda, and sea salt. This whisking ensures every bite is evenly flavored.

    Plus, it’s an excellent arm workout too! Who knew baking could double as exercise?

    Step 3: Cream the Butter and Sugars

    Time to grab your mixer! In another bowl, beat together the unsalted butter, granulated sugar, and brown sugar until it’s wonderfully smooth.

    Add in the large eggs, one at a time, then pour in the vanilla extract. Mix until just combined. This step creates that lovely creamy base we all adore.

    Step 4: Combine Mixtures

    Now, gradually add your dry mixture to the wet ingredients. Mix until everything is just combined, being careful not to overmix. Overdoing it can result in tough cookies—no thanks!

    Then, gently fold in the chopped pretzels and semi-sweet chocolate chips. This is where your cookies come alive with flavor and crunch!

    Step 5: Form Cookies

    Using about 2 tablespoons of dough, shape it into a ball in your palm.

    Now, here comes the fun part: Place a caramel piece in the center, then cover it fully with cookie dough. This step keeps the gooey caramel hidden until you bite into your cookie!

    Step 6: Bake the Cookies

    Place the cookie dough balls on your prepared baking sheet about two inches apart for even baking.

    Before popping them in the oven, sprinkle a dash of sea salt on top. This adds a delightful burst of flavor.

    Bake these beauties for about 10 minutes. When they’re done, remove them from the oven and let them cool on the baking sheet for 2-3 minutes, then transfer them to a wire rack. Trust me, the wait is worth it!

    Tips for Success

    • Measure your flour accurately to avoid dry cookies. Spoon it into the measuring cup and level it off.
    • Let your butter reach room temperature for easier mixing and a creamier texture.
    • Don’t overmix once you add the dry ingredients. This keeps your cookies soft and chewy.
    • Use a cookie scoop for uniform cookie sizes, ensuring even baking.
    • Experiment with the type and amount of sea salt for the ideal sweet-salty balance.

    Equipment Needed

    • Mixing bowls: A sturdy set works best, but feel free to use any large bowls you have on hand.
    • Electric mixer: A stand mixer is perfect, but hand mixers do the job just as well.
    • Baking sheets: Use regular sheets or line with parchment paper for easy cleanup.
    • Measuring cups and spoons: Essential for accurate ingredient measurements.
    • Wire cooling rack: If you don’t have one, a plate will work in a pinch.

    Variations of Chocolate Salted Caramel Pretzel Cookies

    • Nutty Twist: Add chopped nuts like pecans or walnuts for an extra crunch. They provide a delightful contrast to the chewy texture.
    • White Chocolate Delight: Swap semi-sweet chocolate chips for white chocolate chips to create a sweeter cookie. The combination with salted caramel is divine!
    • Peanut Butter Surprise: Incorporate peanut butter chips alongside chocolate chips for a rich, nutty flavor. Perfect for peanut butter fans!
    • Gluten-Free Version: Substitute all-purpose flour with a gluten-free flour blend to enjoy these treats without gluten.
    • Spiced Up: Add a pinch of cinnamon or espresso powder to the dry ingredients for a warming flavor profile that enhances the chocolate.

    Serving Suggestions for Chocolate Salted Caramel Pretzel Cookies

    • Milk: A classic pairing! Enjoy these cookies with a cold glass of milk for the ultimate comfort food experience.
    • Hot Cocoa: Serve alongside a warm mug of rich hot cocoa for a cozy treat.
    • Iced Coffee: The cookie’s sweetness beautifully complements the bitterness of iced coffee.
    • Presentation: Arrange cookies on a decorative plate and sprinkle with extra sea salt for a fancy touch.

    FAQs about Chocolate Salted Caramel Pretzel Cookies

    Can I make these cookies ahead of time?
    Absolutely! You can make the cookie dough in advance and store it in the fridge for up to three days. Just ensure to wrap it tightly. When you’re ready to bake, let it sit at room temperature for about 10 minutes before shaping.

    What if I can’t find caramel squares?
    No worries! You can substitute with caramel sauce—just drizzle a spoonful into the center of the cookie before sealing. However, keep an eye on your oven, as baking time may vary.

    Can I freeze the cookies?
    Yes, you can freeze baked cookies! Just let them cool completely before wrapping them in airtight containers. They’ll keep well for up to three months. When you’re ready to enjoy, thaw at room temperature.

    Are there any substitutions for the flour?
    Certainly! If you’re looking for a gluten-free option, you can use a gluten-free all-purpose flour blend. The texture may differ slightly but still delicious!

    How do I store leftover cookies?
    Store your Chocolate Salted Caramel Pretzel Cookies in an airtight container at room temperature for up to a week. If they last that long, I’m impressed!

    Final Thoughts

    Baking Chocolate Salted Caramel Pretzel Cookies is not just about satisfying a sweet tooth; it’s about crafting joyful moments. Each time I pull a batch from the oven, my heart fills with excitement. The delightful combination of rich chocolate, velvety caramel, and crunchy pretzels creates happiness with every bite. Whether sharing with family, surprising a friend, or indulging solo, these cookies add a touch of warmth to any day. I hope you find as much joy in baking and sharing them as I do. Grab your apron and let’s get cookie making!


    Print

    clock clock iconcutlery cutlery iconflag flag iconfolder folder iconinstagram instagram iconpinterest pinterest iconfacebook facebook iconprint print iconsquares squares iconheart heart iconheart solid heart solid icon

    Description

    Delicious cookies combining the flavors of chocolate, salted caramel, and crunchy pretzels.


    • 2 1/2 cups all-purpose flour
    • 3/4 cup Dutch process cocoa
    • 1 teaspoon baking soda
    • 1/2 teaspoon sea salt
    • 1 cup unsalted butter at room temperature
    • 1 cup granulated sugar
    • 1 cup packed brown sugar
    • 2 large eggs
    • 1 1/2 teaspoons vanilla extract
    • 1 cup chopped pretzels
    • 1 cup semi-sweet chocolate chips
    • About 20 caramel candy squares cut in half (I use Kraft caramels)
    • Sea salt for sprinkling on cookies

    1. Preheat oven to 350 degrees F. Line a baking sheet with parchment paper or Silpat baking mat. Set aside.
    2. In a medium bowl, whisk together flour, cocoa, baking soda, and sea salt.
    3. With a mixer, cream butter and sugars together until smooth. Add in eggs, one at a time. Next, add in vanilla extract and mix until combined.
    4. Gradually add flour mixture and beat until just combined. Stir in the pretzel pieces and chocolate chips.
    5. Form the cookie dough into balls, about 2 tablespoons of dough. Place a caramel piece in the center and cover with cookie dough.
    6. Place on prepared baking sheet, about 2 inches apart. Sprinkle with sea salt.
    7. Bake cookies for 10 minutes. Remove from oven and let cool on the baking sheet for 2-3 minutes. Transfer to a wire cooling rack to cool completely.

    Notes

    • Ensure caramel is fully enclosed in the cookie dough to prevent leakage.
    • Adjust the amount of sea salt on top according to preference.
    • These cookies can be stored in an airtight container for a week.
    • Prep Time: 20 minutes
    • Cook Time: 10 minutes
    • Category: Dessert
    • Method: Baking
    • Cuisine: American

    Nutrition

    • Serving Size: 1 cookie
    • Calories: 200
    • Sugar: 15g
    • Sodium: 150mg
    • Fat: 10g
    • Saturated Fat: 6g
    • Unsaturated Fat: 4g
    • Trans Fat: 0g
    • Carbohydrates: 25g
    • Fiber: 1g
    • Protein: 2g
    • Cholesterol: 30mg

    Sharing is caring!

  • Grilled California Avocado Chicken

    Grilled California Avocado Chicken


    Introduction to Grilled California Avocado Chicken

    Hey there, busy moms and professionals! If you’re looking for a delightful meal that feels both festive and uncomplicated, let me introduce you to Grilled California Avocado Chicken. This dish is not just about food; it’s about sharing flavorful moments with loved ones after a long day. With juicy grilled chicken topped with creamy avocados and succulent cherry tomatoes, it’s a dish that checks all the boxes. Perfect for quick weeknight dinners or even special gatherings, this recipe will have you saving time while still impressing everyone at the table!

    Why You’ll Love This Grilled California Avocado Chicken

    This Grilled California Avocado Chicken is a game-changer in my kitchen. Not only is it quick to whip up, but it’s also incredibly satisfying for the taste buds. With a short marinating time and minimal prep, you can juggle this recipe effortlessly alongside your busy schedule. The combination of creamy avocado and juicy chicken creates a delightful medley of flavors that’ll leave everyone asking for seconds. Trust me—this dish makes meal prep feel like a breeze!

    Ingredients for Grilled California Avocado Chicken

    To create the magic of Grilled California Avocado Chicken, you’ll need a few fresh and hearty ingredients. Here’s what you’ll gather:

    • Boneless skinless chicken breasts or thighs: These provide the meaty foundation for our dish—tender and packed with protein.
    • Olive oil: This luscious oil not only adds flavor but also helps keep the chicken moist during grilling.
    • Fresh lime juice: A splash of zing—this brightens up the flavors and enhances the marinade.
    • Garlic: Minced garlic adds a warm, aromatic depth that makes any meal special.
    • Paprika: This spice lends a subtle smokiness and a beautiful color to your chicken.
    • Ground cumin: A dash of cumin brings an earthy note, elevating the flavor profile.
    • Salt and black pepper: Essential seasonings that really bring out all those flavors.
    • California avocados: The star of the show! Creamy and nutritious, they add a rich texture and healthy fats.
    • Cherry tomatoes: These little gems provide a burst of sweetness and vibrant color.
    • Shredded mozzarella or Monterey Jack cheese: This melty goodness crowns your dish and adds a rich flavor.
    • Optional toppings: Feel free to customize with chopped cilantro for freshness, balsamic glaze for a tangy finish, or diced red onion for an extra crunch.

    For exact measurements, check the bottom of the article where I’ve included everything you need for printing. Enjoy gathering these fresh ingredients as they promise deliciousness in every bite!

    How to Make Grilled California Avocado Chicken

    Prepare the Marinade

    Start by whisking together the olive oil, fresh lime juice, minced garlic, paprika, ground cumin, salt, and black pepper in a bowl or zip-top bag. This delightful mixture is your marinade, infusing the chicken with vibrant flavor. For the best results, let the chicken soak in this mixture for at least 30 minutes, but up to 4 hours will really deepen those flavors. Trust me, your taste buds will thank you!

    Marinate the Chicken

    Next, add your chicken breasts or thighs into the marinade, ensuring they’re well coated. I like to massage the marinade into the meat for an extra flavor kick. Cover the container or seal the bag, then pop it into the refrigerator. This allows the chicken to absorb all those delightful flavors, making it juicy and tender.

    Heat the Grill

    While the chicken is soaking up those flavors, it’s time to fire up the grill! Preheat your grill or grill pan to medium-high heat. To prevent sticking, lightly oil the grates with a paper towel dipped in oil, making grilling smooth and easy.

    Grill the Chicken

    Take the chicken out of the marinade and let any excess drip off. Place it on the grill and cook for about 6–7 minutes on each side. To ensure the chicken reaches a safe internal temperature, aim for 165°F. Remember, patience is key! Let each side get a nice sear for added flavor and that beautiful grill mark.

    Add Toppings

    Once your chicken is perfectly grilled, it’s time for the fun part! Top each piece with slices of creamy California avocados, halved cherry tomatoes, and a generous handful of shredded mozzarella or Monterey Jack cheese. Close the grill lid for just 1–2 minutes to let the cheese melt deliciously, enhancing this dish’s vibrant flavors.

    Serve and Enjoy

    Your Grilled California Avocado Chicken is ready to shine! Serve it on a lovely platter, garnished with fresh cilantro or a drizzle of balsamic glaze for extra flair. Pair it with your favorite sides for a wholesome meal that everyone will remember.

    Tips for Success

    • Make sure to let the chicken marinate for at least 30 minutes, but longer is better for flavor!
    • Use a meat thermometer to ensure your chicken reaches 165°F for perfect doneness.
    • Let the chicken rest for a few minutes after grilling to enhance juiciness.
    • Experiment with different toppings for a unique flavor twist every time.
    • Keep your grill clean and well-oiled to minimize sticking and ensure even cooking.

    Equipment Needed

    • Grill or Grill Pan: A standard grill works best, but a grill pan on the stovetop is a great alternative.
    • Mixing Bowl or Zip-Top Bag: Use either for marinating the chicken.
    • Meat Thermometer: This is key for checking the chicken’s doneness. If you don’t have one, cut into the thickest part to check for clear juices.
    • Cooking Brush: Handy for oiling the grill grates.
    • Serving Platter: A nice dish to present your masterpiece.

    Variations of Grilled California Avocado Chicken

    • Spicy Kick: Add a teaspoon of cayenne pepper or chopped jalapeños to the marinade for a fiery twist that will spice things up!
    • Herb-Infused: Incorporate fresh herbs like cilantro, basil, or oregano into the marinade for an aromatic flavor boost.
    • Low-Carb Version: Swap the cherry tomatoes for grilled bell peppers or zucchini to keep it fresh and low in carbs.
    • Cheese Alternatives: Try crumbled feta or goat cheese instead of mozzarella for a tangy flavor profile that pairs beautifully with avocados.
    • Grilled Veggies: Add grilled corn, asparagus, or mushrooms as toppings or on the side for extra nutrition and texture.

    Serving Suggestions for Grilled California Avocado Chicken

    • Side Salads: Pair with a fresh green salad or a quinoa salad for a nutritious boost.
    • Grilled Veggies: Serve alongside grilled vegetables like zucchini or asparagus for added color and flavor.
    • Beverage Pairing: A crisp white wine or refreshing sparkling water enhances the meal perfectly.
    • Presentation: Garnish with lime wedges and additional cilantro for a vibrant table display.

    FAQs about Grilled California Avocado Chicken

    Can I use skin-on chicken for this recipe?
    Absolutely! Skin-on chicken can add a delightful crispiness. Just remember to adjust your cooking time slightly to ensure it cooks through.

    What can I substitute for California avocados if I can’t find them?
    If you can’t find California avocados, try using Hass avocados or any other variety that’s creamy and ripe. They add that delicious richness you’re looking for in this dish.

    How do I store leftovers?
    Store leftovers in an airtight container in the refrigerator for up to three days. Reheat in the microwave or on the grill for best results, keeping the chicken juicy.

    Can I make this recipe ahead of time?
    Definitely! You can marinate the chicken and prep the toppings a day in advance. Just grill when you’re ready for that fresh, flavorful meal!

    What sides go best with Grilled California Avocado Chicken?
    This dish pairs wonderfully with a side salad, rice, or grilled veggies. You can even serve it in tacos for a fun twist. Enjoy exploring different combinations!

    Final Thoughts on Grilled California Avocado Chicken

    Making Grilled California Avocado Chicken is more than just cooking; it’s about creating joyful moments in your kitchen. With its vibrant flavors and delightful texture, this dish embodies the essence of family meals, whether on a busy weeknight or a weekend gathering. I love how this recipe can easily become a family favorite, sparking smiles and satisfied taste buds at the dinner table. So, gather your ingredients, fire up the grill, and let the warm, comforting aromas fill your home. I promise, every bite will bring a bit of sunshine into your day!


    Print

    clock clock iconcutlery cutlery iconflag flag iconfolder folder iconinstagram instagram iconpinterest pinterest iconfacebook facebook iconprint print iconsquares squares iconheart heart iconheart solid heart solid icon

    Description

    A delicious and flavorful grilled chicken recipe topped with fresh California avocados, cherry tomatoes, and melted cheese.


    • 4 boneless skinless chicken breasts (or thighs)
    • 3 tablespoons olive oil
    • 2 tablespoons fresh lime juice
    • 2 cloves garlic, minced
    • 1 teaspoon paprika
    • 1 teaspoon ground cumin
    • ½ teaspoon salt
    • ½ teaspoon black pepper
    • 2 California avocados, sliced
    • 1 cup cherry tomatoes, halved
    • 1 cup shredded mozzarella or Monterey Jack cheese
    • Optional: chopped cilantro, balsamic glaze, diced red onion

    1. In a bowl or zip-top bag, whisk together olive oil, lime juice, garlic, paprika, cumin, salt, and pepper.
    2. Add the chicken and coat well. Cover and refrigerate for at least 30 minutes, or up to 4 hours.
    3. Heat your grill (or grill pan) to medium-high and lightly oil the grates to prevent sticking.
    4. Remove the chicken from the marinade and shake off excess. Grill for 6–7 minutes per side, or until internal temperature reaches 165°F. Do not flip frequently—let each side get a nice sear.
    5. Once the chicken is cooked, top with sliced avocado, halved cherry tomatoes, and shredded cheese. Close the grill lid for 1–2 minutes to allow the cheese to melt slightly.
    6. Transfer to plates, garnish with fresh cilantro or a drizzle of balsamic glaze if desired. Serve immediately with your favorite sides.

    Notes

    • For a bolder flavor, marinate the chicken for the full 4 hours.
    • Grilling times may vary based on the thickness of the chicken.
    • Feel free to customize toppings based on your preference.
    • Prep Time: 30 minutes (plus marinating time)
    • Cook Time: 15 minutes
    • Category: Main Dish
    • Method: Grilling
    • Cuisine: American

    Nutrition

    • Serving Size: 1 chicken breast with toppings
    • Calories: 500
    • Sugar: 2g
    • Sodium: 600mg
    • Fat: 30g
    • Saturated Fat: 7g
    • Unsaturated Fat: 16g
    • Trans Fat: 0g
    • Carbohydrates: 8g
    • Fiber: 4g
    • Protein: 40g
    • Cholesterol: 120mg

    Sharing is caring!

  • Honey Butter Cornbread Poppers

    Honey Butter Cornbread Poppers


    Introduction to Honey Butter Cornbread Poppers

    Every now and then, life throws those busy days at us when we just need something quick yet delightful. That’s where my Honey Butter Cornbread Poppers come in! These mini cornbread muffins are a sweet treat waiting to add a sprinkle of joy to your day. Imagine the aroma of freshly baked cornbread filling your kitchen, making everyone gather around, eager for a bite. Perfect for family gatherings or a simple afternoon snack, these poppers are a sweet way to bring warmth to any occasion. Let’s dive into a recipe that feels like a hug in every bite!

    Why You’ll Love This Honey Butter Cornbread Poppers

    These Honey Butter Cornbread Poppers are like little bundles of happiness that come together in a snap! In just 25 minutes, you can bake these tasty morsels, with minimal mess and fuss. Not only are they easy to whip up, but their sweetness makes them irresistible. Each popper has a delightful texture, making them perfect for both kids and adults. Whether it’s a busy weekday or a weekend treat, they’ll become a new favorite!

    Ingredients for Honey Butter Cornbread Poppers

    Let’s gather our ingredients and prepare for a cornbread adventure! Here’s what you’ll need for these delightful Honey Butter Cornbread Poppers:

    • Yellow Cornmeal: The star of the show! This ingredient gives the poppers their classic cornbread flavor and a slightly gritty texture.
    • All-Purpose Flour: It balances the cornmeal and helps the poppers rise perfectly. You can substitute it with whole wheat flour for a heartier bite.
    • Granulated Sugar: A touch of sweetness is essential! You can swap this for brown sugar for an added depth of flavor.
    • Baking Powder: This is your leavening agent that allows the poppers to puff up beautifully. Make sure your baking powder is fresh for best results!
    • Salt: Just a pinch to enhance the flavors. It’s that secret ingredient that ties everything together.
    • Milk: This brings moisture to the batter. For a richer taste, feel free to use buttermilk instead.
    • Melted Butter: Oh, the buttery goodness! It adds richness and keeps the poppers moist.
    • Honey: Our sweetener of choice! Honey not only sweetens but adds a lovely floral note. You can experiment with different types of honey for unique flavors.
    • Large Egg: This binds everything together, ensuring a uniform texture.
    • Corn Kernels: A delightful addition that adds bursts of sweetness and texture. Fresh or frozen corn works well here!
    • Melted Butter for Glaze: This glossy finish adds a mouth-watering shine, making the poppers even more appealing.
    • Honey for Glaze: A second drizzle of honey, because why not? This will make them extra special.

    For exact quantities, you’ll find them at the bottom of the article, ready for you to print out. Now, gather these ingredients and let’s create something delicious!

    How to Make Honey Butter Cornbread Poppers

    Preheat the Oven and Prepare the Muffin Tin

    Let’s kick off our baking adventure by preheating the oven to 375°F. This step is crucial, as a hot oven ensures even cooking! While the oven warms up, grab your mini muffin tin and give it a good grease. A light coating of butter or cooking spray will prevent those delightful poppers from sticking. Trust me, you want them to pop right out without a fuss!

    Mix the Dry Ingredients

    In a large bowl, combine yellow cornmeal, all-purpose flour, granulated sugar, baking powder, and salt. Whisk these dry ingredients together until they’re well-blended. The beauty of mixing dry items first ensures that the baking powder, our secret weapon for rising, gets evenly distributed. A solid foundation leads to perfect consistency in every bite!

    Combine Wet Ingredients

    Now it’s time for the wet ingredients! In a separate bowl, whisk together milk, melted butter, honey, and the large egg until they form a smooth mixture. This blend is the heart of our Honey Butter Cornbread Poppers, adding moisture and that irresistible sweetness. Make sure the melted butter isn’t too hot; we don’t want to scramble the egg!

    Combine Wet and Dry Mixtures

    Gradually pour the wet mixture into the bowl of dry ingredients. Gently stir until just combined, careful not to overmix. A few lumps are perfectly fine! This keeps your poppers light and fluffy. Next, fold in those corn kernels. Each slice of sweet corn contributes to the overall deliciousness, making every popper a mini flavor party!

    Fill the Muffin Tin

    Using a spoon or a scoop, portion the batter into the prepped muffin tin, filling each cup about ¾ full. This allows space for the poppers to rise without overflowing. For an even bake, try to make sure each one is filled uniformly. Trust me, it makes for a pretty presentation and even texture!

    Bake and Glaze

    Pop the muffin tin into the oven and bake for 12-15 minutes, or until a toothpick inserted into the center comes out clean. Once they’re done, remove the poppers from the oven and immediately brush them with a mixture of melted butter and honey for that delectable glaze. This adds a heavenly shine and extra sweetness. Let these little beauties cool slightly before serving—if you can resist the temptation!

    Tips for Success

    • Use fresh ingredients for the best flavor; check expiration dates!
    • For an extra kick, add a pinch of cayenne pepper for a sweet and spicy twist.
    • Don’t overmix the batter to ensure light and fluffy poppers.
    • Experiment with different types of honey to vary the sweetness.
    • For a fun presentation, sprinkle with chopped herbs or a sprinkle of sea salt before serving.

    Equipment Needed

    • Mini Muffin Tin: This is essential for creating those adorable poppers. If you don’t have one, a regular muffin tin works, but you may need to adjust baking time.
    • Mixing Bowls: A couple of medium-sized bowls are perfect for mixing your wet and dry ingredients.
    • Whisk: Ideal for blending ingredients smoothly; you can also use a fork if that’s handy.
    • Spoon or Scoop: For easy filling of the muffin tin.

    Variations of Honey Butter Cornbread Poppers

    • Herbed Poppers: Add fresh herbs like chives or rosemary for an aromatic twist.
    • Cheesy Delight: Fold in shredded cheese, like cheddar or pepper jack, for a savory popper with a cheesy surprise.
    • Spicy Kick: Incorporate jalapeños or diced green chiles for a sweet and spicy flavor combo.
    • Fruit-Infused: Mix in chopped fruits such as blueberries or diced peaches for a fruity sweetness.
    • Gluten-Free Option: Substitute all-purpose flour with a gluten-free blend to accommodate dietary needs.
    • Dairy-Free Version: Use almond milk or coconut milk instead of regular milk, and substitute melted butter with coconut oil.

    Serving Suggestions

    • Enjoy these poppers warm, paired with a pat of additional honey butter for an indulgent treat.
    • Serve alongside a fresh green salad for a balanced meal that delights the senses.
    • Pair with a glass of sweet iced tea or lemonade for a refreshing experience.
    • For parties, arrange them on a vibrant platter, garnished with fresh herbs for a pop of color.

    FAQs about Honey Butter Cornbread Poppers

    Can I use frozen corn in my Honey Butter Cornbread Poppers?

    Absolutely! Frozen corn works perfectly in this recipe. Just make sure to thaw and drain it before adding it to the batter. Fresh or frozen, each popper will still burst with that delightful corn flavor!

    How do I store leftover Honey Butter Cornbread Poppers?

    To keep these little gems fresh, store them in an airtight container at room temperature for up to 2 days. If you want to keep them longer, refrigerate them for up to a week, or freeze for up to three months!

    Can I adjust the sweetness of the poppers?

    Of course! Feel free to tweak the amount of honey in the batter or glaze depending on your taste preference. If you prefer a more subtle sweetness, simply reduce the honey a little bit.

    How can I make my Honey Butter Cornbread Poppers vegan?

    To make these poppers vegan, substitute the egg with flaxseed meal mixed with water or a commercial egg replacer. Use plant-based milk and coconut oil in place of butter for a delightful dairy-free version!

    What occasions are perfect for serving Honey Butter Cornbread Poppers?

    These lovely poppers are versatile! They’re perfect for family gatherings, holiday dinners, potlucks, or even just as a sweet snack any day of the week. They’re bound to be a crowd-pleaser!

    Final Thoughts

    Baking these Honey Butter Cornbread Poppers brings more than just sweet satisfaction; it creates moments of joy and togetherness in the kitchen. The aroma fills the air, drawing everyone in, transforming a simple snack into a cherished memory. There’s something special about sharing these poppers with loved ones, whether at a family table or during a cozy gathering. Their delightful sweetness and golden color make them irresistible bites of joy. I hope you enjoy creating, sharing, and devouring each mini masterpiece as much as I do. Happy baking!


    Print

    clock clock iconcutlery cutlery iconflag flag iconfolder folder iconinstagram instagram iconpinterest pinterest iconfacebook facebook iconprint print iconsquares squares iconheart heart iconheart solid heart solid icon

    Description

    Honey Butter Cornbread Poppers are delightful mini cornbread muffins with a sweet and buttery glaze, perfect for any occasion.


    • 1 cup yellow cornmeal
    • ½ cup all-purpose flour
    • ¼ cup granulated sugar
    • 2 teaspoons baking powder
    • ½ teaspoon salt
    • ½ cup milk
    • ¼ cup melted butter
    • 2 tablespoons honey
    • 1 large egg
    • ½ cup corn kernels
    • ¼ cup melted butter for glaze
    • 2 tablespoons honey for glaze

    1. Heat oven to 375°F and grease mini muffin tin.
    2. Combine cornmeal, flour, sugar, baking powder, and salt.
    3. Whisk milk, melted butter, honey, and egg until smooth.
    4. Mix wet into dry ingredients, then fold in corn kernels.
    5. Spoon batter into muffin tin cups, filling ¾ full.
    6. Cook for 12-15 minutes until toothpick comes out clean.
    7. Mix melted butter and honey, brush over warm poppers.

    Notes

    • For a richer flavor, use buttermilk instead of regular milk.
    • Adjust the amount of honey to your desired level of sweetness.
    • Serve warm for the best taste.
    • Prep Time: 10 minutes
    • Cook Time: 15 minutes
    • Category: Baked Goods
    • Method: Baking
    • Cuisine: American

    Nutrition

    • Serving Size: 1 popper
    • Calories: 120
    • Sugar: 8g
    • Sodium: 100mg
    • Fat: 5g
    • Saturated Fat: 3g
    • Unsaturated Fat: 2g
    • Trans Fat: 0g
    • Carbohydrates: 16g
    • Fiber: 1g
    • Protein: 2g
    • Cholesterol: 30mg

    Sharing is caring!

  • Tremendous Cheesy Pepperoni Stromboli

    Tremendous Cheesy Pepperoni Stromboli


    Introduction to Tremendous Cheesy Pepperoni Stromboli

    Welcome to my kitchen, where simple ingredients come together to create joy! Today, I’m excited to share my recipe for Tremendous Cheesy Pepperoni Stromboli. This dish is your ultimate solution for busy evenings or when you’re craving something comforting and flavorful. Picture this: a golden, crispy crust enveloping oozy melted cheese and tangy pepperoni. It’s perfect for family gatherings or just when you want to treat yourself. You won’t need to spend hours in the kitchen to whip up this delight, making it ideal for the amazing moms and professionals out there!

    Why You’ll Love This Tremendous Cheesy Pepperoni Stromboli

    This Tremendous Cheesy Pepperoni Stromboli is a lifesaver for busy nights. It’s easy to make, requiring just a handful of ingredients and minimal prep time. The melted cheese and zesty pepperoni create a flavor explosion that will please everyone at your dinner table. Plus, it’s versatile—perfect for parties or a cozy night in. Trust me, this dish will become a staple in your home, bringing smiles to my family and yours!

    Ingredients for Tremendous Cheesy Pepperoni Stromboli

    Gathering the right ingredients is the first step to making your Tremendous Cheesy Pepperoni Stromboli a success. Here’s what you’ll need:

    • Prepared pizza dough: This is your canvas! Use store-bought for convenience or make your own for that extra homemade touch.
    • Mozzarella cheese: The star of the show! Shredded mozzarella ensures gooey, melty goodness throughout your stromboli.
    • Pepperoni: These slices add that classic flavor. Feel free to experiment with other meats or even veggies if you want to mix things up.
    • Parmesan cheese: A sprinkle of this finely grated cheese adds depth and a rich, nutty flavor.
    • Italian seasoning blend: This aromatic mix brings everything together, making each bite a little taste of Italy.
    • Large egg: Beaten and brushed over the dough to give your stromboli a beautiful, glossy exterior.
    • Marinara sauce: Perfect for dipping! It not only adds moisture but elevates the overall flavor of your cheesy delight!

    If you’re feeling adventurous, you could add chopped bell peppers or onion to boost the flavor and nutrition. For those who prefer a lighter version, consider using a whole wheat dough or a cheese alternative. Don’t sweat it if you need to substitute; the essence lies in making it your own.

    For exact measurements and printing convenience, check the bottom of the article, where all the details await!

    How to Make Tremendous Cheesy Pepperoni Stromboli

    Now that we have our ingredients ready, let’s dive into the fun part: making this Tremendous Cheesy Pepperoni Stromboli! Follow my step-by-step guide to bake this delicious dish with ease. You’ll be amazed at how simple it is!

    Step 1: Preheat Your Oven

    Start by preheating your oven to 190°C (375°F). This ensures your stromboli bakes evenly, giving you that perfect golden crust. While it’s heating up, you can get everything else ready.

    Step 2: Roll Out the Pizza Dough

    On a lightly floured surface, roll your prepared pizza dough into a rectangle approximately 30×40 cm. Keep it as even as possible, creating a nice foundation for your cheesy masterpiece. A well-rolled dough minimizes tearing, making for a better wrap.

    Step 3: Add the Cheese and Pepperoni

    Now, sprinkle the shredded mozzarella cheese evenly across the surface of your dough. Remember to leave a 2.5 cm border! Next, layer on the pepperoni slices. Feel free to pile them on for that satisfying bite!

    Step 4: Season It Up

    It’s time to add the flavor! Sprinkle the grated Parmesan cheese and Italian seasoning blend over the pepperoni layer. This step is crucial because it transforms your stromboli with a delightful taste of Italy in every bite!

    Step 5: Roll It Up

    Starting from the long side, tightly roll up the dough. As you go, tuck in the ends to keep all that cheesy goodness inside. Ensuring the seam is on the underside helps to keep everything intact while baking.

    Step 6: Prepare for Baking

    Place the rolled stromboli seam-side down on a greased baking tray. Brush the surface with the beaten egg. This creates a beautiful, glossy finish that makes the crust shine! Don’t forget to cut small diagonal slits along the top. They allow steam to escape and prevent sogginess.

    Step 7: Bake to Perfection

    Now, it’s showtime! Bake your stromboli in the preheated oven for about 25–30 minutes. You’re looking for a golden-brown crust and bubbling filling. Your kitchen will smell heavenly during this time!

    Step 8: Serve and Enjoy

    Once it’s baked to perfection, take it out of the oven and let it cool for a few minutes. This makes slicing easier. Cut into generous portions and serve warm with marinara sauce for dipping. Watch as everyone digs in—it’s a delightful showstopper!

    Tips for Success

    • Ensure your pizza dough is at room temperature for easy rolling.
    • Don’t overstuff your stromboli to prevent spilling during baking.
    • Experiment with different cheeses for added flavor, like provolone or cheddar.
    • For a spicy kick, add jalapeños or crushed red pepper flakes.
    • Let the stromboli rest for 5 minutes before slicing for clean cuts.

    Equipment Needed

    • Baking tray: A standard baking sheet works perfectly, but you can also use a pizza stone for even heat distribution.
    • Rolling pin: Any smooth surface will do if you don’t have one—just use a wine bottle!
    • Pastry brush: A simple spoon can work for brushing the egg wash.
    • Knife: Use a sharp chef’s knife or kitchen scissors for clean slices.

    Variations for Tremendous Cheesy Pepperoni Stromboli

    • Veggie Delight: Add chopped bell peppers, onions, or spinach for a nutritious twist.
    • Spicy Style: Include some spicy Italian sausage or jalapeños to turn up the heat!
    • Cheese Lover’s Dream: Double the cheese with mozzarella and add provolone for extra creaminess.
    • Meat Lovers: Mix in sliced ham or cooked bacon along with the pepperoni for a heartier filling.
    • Gluten-Free Option: Swap regular pizza dough for a gluten-free version for those with dietary restrictions.
    • Herb-infused Dough: Try adding fresh herbs like basil or rosemary to the dough for an aromatic touch.

    Serving Suggestions for Tremendous Cheesy Pepperoni Stromboli

    • Fresh Salad: Pair it with a crisp Caesar or garden salad for a refreshing contrast.
    • Garlic Bread: Serve with garlic breadsticks for that classic Italian dining experience.
    • Wine Pairing: A chilled soda or a light red wine like Pinot Noir complements it beautifully.
    • Presentation: Slice your stromboli and serve it on a wooden board with marinara sauce in a decorative bowl for an appetizing display.

    FAQs about Tremendous Cheesy Pepperoni Stromboli

    Can I make the stromboli ahead of time?
    Absolutely! You can prepare your Tremendous Cheesy Pepperoni Stromboli and freeze it before baking. Just wrap it tightly in plastic wrap and store in an airtight container. When you’re ready, simply bake it from frozen, adding a few extra minutes to the baking time.

    What if my pizza dough tears while rolling?
    No worries! If your dough tears, simply pat it back together. You can also use some extra flour to help smooth things out. Remember, the filling will hide any small imperfections!

    How can I customize the filling?
    The beauty of stromboli is its versatility! Try adding sautéed vegetables, such as bell peppers and mushrooms, or switch the meats for your favorites. Just remember to keep a balance so it rolls up easily.

    What do I serve with the stromboli?
    A side salad, garlic bread, or even some crispy veggies make great companions. And don’t forget that marinara sauce for dipping—it’s the cherry on top!

    Can I use a different type of cheese?
    Definitely! While mozzarella is traditional for its meltiness, feel free to experiment. Provolone, cheddar, or even a sprinkle of feta can add unique flavors to your Tremendous Cheesy Pepperoni Stromboli!

    Final Thoughts

    Cooking is more than just a task; it’s a chance to create moments that linger in our hearts and kitchens. My Tremendous Cheesy Pepperoni Stromboli is not just a dish; it’s a hug wrapped in dough. Each bite bursts with cheesy goodness, and the aroma alone draws family and friends to the table. With its ease and delightful flavors, this recipe brings joy to busy days and special occasions. I hope you feel inspired to infuse your own love into it, making it your family’s new favorite. Happy baking, and may your kitchen always be filled with warmth!


    Print

    clock clock iconcutlery cutlery iconflag flag iconfolder folder iconinstagram instagram iconpinterest pinterest iconfacebook facebook iconprint print iconsquares squares iconheart heart iconheart solid heart solid icon

    Description

    A delicious and cheesy pepperoni stromboli, baked to perfection and served with marinara sauce.


    • 1 prepared pizza dough, rolled into a 30×40 cm rectangle
    • 130 grams mozzarella cheese, shredded
    • 60 grams pepperoni, sliced
    • 25 grams Parmesan cheese, finely grated
    • 1 teaspoon Italian seasoning blend
    • 1 large egg, beaten
    • 120 millilitres marinara sauce, for dipping

    1. Set oven to 190°C to ensure even baking temperature.
    2. Roll pizza dough into a 30×40 cm rectangle on a lightly floured surface, maintaining even thickness.
    3. Distribute shredded mozzarella cheese evenly across the dough, leaving a 2.5 cm border. Arrange sliced pepperoni over the mozzarella.
    4. Sprinkle grated Parmesan and Italian seasoning evenly over the pepperoni layer.
    5. Tightly roll the dough from the long side, tucking in the ends as you go. Ensure seam is on the underside.
    6. Place rolled dough seam-side down on a greased baking tray. Brush surface with beaten egg for a glossy, golden finish.
    7. Cut small diagonal slits along the top to allow steam to escape during baking.
    8. Bake in preheated oven for 25–30 minutes until crust is golden brown and filling is bubbling.
    9. Cool for several minutes before slicing into portions. Serve warm with marinara sauce for dipping.

    Notes

    • For extra flavor, consider adding bell peppers or onions to the filling.
    • This stromboli can be made ahead of time and frozen before baking.
    • Prep Time: 15 minutes
    • Cook Time: 30 minutes
    • Category: Main Dish
    • Method: Baking
    • Cuisine: Italian

    Nutrition

    • Serving Size: 1 slice
    • Calories: 320
    • Sugar: 1g
    • Sodium: 800mg
    • Fat: 18g
    • Saturated Fat: 8g
    • Unsaturated Fat: 8g
    • Trans Fat: 0g
    • Carbohydrates: 34g
    • Fiber: 2g
    • Protein: 12g
    • Cholesterol: 60mg

    Sharing is caring!

  • Jalapeno Popper Pinwheels

    Jalapeno Popper Pinwheels


    Introduction to Jalapeno Popper Pinwheels

    Gather around, friends! If you’re searching for a quick, mouthwatering snack, look no further than these irresistible Jalapeno Popper Pinwheels. Life can be a whirlwind, especially for busy moms or professionals, and having a simple yet delicious recipe in your back pocket is a game-changer. These delightful pinwheels capture the creamy, spicy essence of jalapeno poppers in a fun, roll-up format that’s perfect for gatherings or afternoon cravings. With just a handful of ingredients, you’ll impress your loved ones without breaking a sweat!

    Why You’ll Love This Jalapeno Popper Pinwheels

    Let’s face it—life’s busy, and we could all use a little help in the kitchen. These Jalapeno Popper Pinwheels check all the right boxes: they’re super easy to whip up, deliciously cheesy, and packed with that perfect kick of flavor. In just about 50 minutes, you’ll have a snack that’s not only a crowd-pleaser but also an exciting twist on classic flavors. What’s not to love?

    Ingredients for Jalapeno Popper Pinwheels

    Getting the right ingredients is key to making these delightful Jalapeno Popper Pinwheels shine. Let’s break down what you’ll need to create these cheesy, spicy treasures:

    • Cream Cheese: This is the creamy base that brings everything together, adding richness and a wonderful texture.
    • Shredded Cheddar Cheese: For that classic cheesy flavor, cheddar complements the creaminess beautifully.
    • Mayonnaise: This adds moisture and a touch of tanginess, enhancing the richness of the filling.
    • Chopped Pickled Jalapeños: These provide the signature heat and a salty, briny note; adjust the amount to suit your spice preference.
    • Fresh Cilantro: While optional, this herb adds freshness and brightens up the flavors.
    • Garlic Powder: A must-have for depth, this seasoning brings a lovely savory flavor to the mix.
    • Onion Powder: This ingredient adds sweetness and a mild onion flavor without the crunch.
    • Black Pepper: A sprinkle of black pepper adds just the right amount of warmth and helps elevate other flavors.
    • Refrigerated Pizza Dough: This is your canvas, making rolling up these pinwheels quick and easy.
    • Beaten Egg: Used for brushing on top, the egg gives the pinwheels a beautiful golden color when baked.
    • Everything Bagel Seasoning (optional): Sprinkle this on top for an extra crunch and flavor that will wow your guests.

    You’ll find exact measurements at the end of this article, where I’ve made it easy for you to print the recipe!

    How to Make Jalapeno Popper Pinwheels

    Prepare the Jalapeño Popper Filling

    Let’s kick things off with the filling! Start by grabbing a medium bowl. In it, you’ll combine the softened cream cheese with shredded cheddar and a swirl of mayo. This concoction creates a rich, creamy base that’s simply irresistible. Next, toss in chopped pickled jalapeños, cilantro, garlic powder, onion powder, and black pepper. As you mix, the flavors meld together like an orchestra harmonizing. You want it all to be smooth and creamy, so take your time. Give it a taste, and if you want more heat, add just a few more jalapeños. Yum!

    Assemble the Pinwheels

    Now comes the fun part—assembly! Lightly flour a clean workspace to prevent any sticky situations. Unroll your pizza dough into a lovely rectangle, about 12 by 16 inches. Spread that delicious jalapeño popper filling over the dough, leaving a ½-inch border on one long edge. This is where things get exciting: starting from the opposite long edge, roll the dough tightly into a log. When you reach the edge with the border, pinch it to seal. This simple step sets you up for pinwheel perfection. Wrap your log in plastic wrap and pop it in the fridge for at least 30 minutes if you can, making slicing easier.

    Bake the Pinwheels

    Time to bake those beauties! Preheat your oven to 375°F (190°C)—we want it nice and hot. Meanwhile, line a baking sheet with parchment paper to keep cleanup a breeze. Slice your chilled log into 1-inch thick pinwheels, and place them on the prepared baking sheet with a bit of space between each. This allows them to bake evenly, creating that perfect golden-brown crust. Brush the tops with the beaten egg for that lovely glossy finish, and, if you’re feeling adventurous, sprinkle everything bagel seasoning on top. Bake for about 15 to 20 minutes, until they’re golden and bubbly. Your kitchen will be filled with that heavenly aroma!

    Tips for Success

    • Let the cream cheese soften fully to mix easily and create a smooth filling.
    • Don’t skip chilling the log; it helps with clean, even slicing.
    • Experiment with your spice level by adjusting the jalapeños to suit your tastes.
    • Use a sharp knife to slice the pinwheels cleanly without squishing them.
    • For a crispier bottom, place the pinwheels directly on the baking sheet without parchment.

    Equipment Needed for Jalapeno Popper Pinwheels

    • Mixing Bowl: A medium-sized bowl to combine your filling. Any bowl will do, but one with a wide base makes mixing easier.
    • Baking Sheet: A standard baking sheet for cooking the pinwheels. If you don’t have one, any flat, oven-safe dish can work.
    • Plastic Wrap: To chill the log before slicing. Alternatively, you can use a clean kitchen towel.
    • Sharp Knife: For cutting the pinwheels neatly. A pizza cutter can also be used for quick slices.
    • Parchment Paper: To line your baking sheet for easier cleanup. Wax paper can be an alternative but not for baking!

    Variations of Jalapeno Popper Pinwheels

    • Spicy Bacon Add-In: Crumble cooked bacon into the filling for a smoky, crispy addition that takes the flavor up a notch.
    • Cheesy Chicken Twist: Add shredded cooked chicken to the filling for a protein-packed version that’s perfect for a hearty snack.
    • Veggie Delight: Replace jalapeños with finely chopped bell peppers and spinach for a milder, veggie-friendly option.
    • Gluten-Free Option: Use gluten-free pizza dough or a tortilla for a gluten-free twist on these delicious pinwheels.
    • Taco Flavor: Mix in taco seasoning and black beans for a unique spin that embraces a Mexican flair.

    Serving Suggestions for Jalapeno Popper Pinwheels

    • Pair with creamy ranch dressing or cool sour cream for a delightful dip.
    • Serve alongside fresh veggie sticks for a colorful, crunchy contrast.
    • Present on a vibrant platter with fresh cilantro sprigs for a touch of elegance.
    • For drinks, try chilled lemonade or a crisp soda to complement the spice.
    • These pinwheels also make a fun addition to a game day spread!

    FAQs about Jalapeno Popper Pinwheels

    Can I make Jalapeno Popper Pinwheels ahead of time?

    Absolutely! You can prepare the pinwheels ahead of time and refrigerate or freeze them before baking. Just slice and bake when you’re ready for a snack. It’s a fantastic time-saver!

    How spicy are these pinwheels?

    The spiciness depends on the amount of chopped pickled jalapeños you use. If you’re cautious, start with a smaller quantity and adjust according to your heat preference. Remember, you can always add more later!

    Can I customize the filling?

    Definitely! The beauty of these Jalapeno Popper Pinwheels is their versatility. Feel free to add cooked bacon, shredded chicken, or even swap out jalapeños for milder veggies. Your taste buds are your guide!

    What’s the best way to store leftovers?

    Store any leftover pinwheels in an airtight container in the fridge for up to three days. Just reheat them in the oven for a few minutes to bring back that crispy goodness!

    Are Jalapeno Popper Pinwheels vegetarian?

    Yes! These delightful snacks are vegetarian-friendly, so they’re perfect for a crowd. However, remember to check for any non-vegetarian seasonings or toppings!

    Final Thoughts

    Making Jalapeno Popper Pinwheels is more than just whipping up a snack; it’s about creating a moment of joy for yourself and your loved ones. Each pinwheel brings a burst of flavor, evoking the warmth of shared laughter and tasty bites. Whether you’re hosting a party or enjoying a quiet afternoon, these treats are there to lift your spirits. Plus, the simplicity of preparing them means you won’t feel overwhelmed. So go ahead, roll up your sleeves, and indulge in the scrumptious delight of these pinwheels. Your taste buds will thank you!


    Print

    clock clock iconcutlery cutlery iconflag flag iconfolder folder iconinstagram instagram iconpinterest pinterest iconfacebook facebook iconprint print iconsquares squares iconheart heart iconheart solid heart solid icon

    Description

    Jalapeno Popper Pinwheels are a delicious and easy-to-make snack that combines the classic flavors of jalapeno poppers in a convenient pinwheel form.


    • 1 package (8 ounces) cream cheese, softened
    • 1 cup shredded cheddar cheese
    • 1/2 cup mayonnaise
    • 1/4 cup chopped pickled jalapeños, drained (more or less to taste)
    • 1 tablespoon chopped fresh cilantro
    • 1 teaspoon garlic powder
    • 1/2 teaspoon onion powder
    • 1/4 teaspoon black pepper
    • 1 package (14.1 ounces) refrigerated pizza dough
    • 1 egg, beaten
    • Everything bagel seasoning, for topping (optional)

    1. Prepare the Jalapeño Popper Filling: In a medium bowl, combine softened cream cheese, cheddar cheese, and mayonnaise.
    2. Add chopped pickled jalapeños, cilantro, garlic powder, onion powder, and black pepper.
    3. Mix well until smooth and creamy. Taste and adjust seasonings as needed.
    4. Assemble the Pinwheels: Lightly flour a clean work surface. Unroll pizza dough into a 12×16 inch rectangle.
    5. Spread the jalapeño popper filling evenly over the dough, leaving a 1/2-inch border on one long edge.
    6. Starting at the opposite long edge, tightly roll up the dough into a log.
    7. Pinch the seam to seal.
    8. Wrap the log in plastic wrap and refrigerate for at least 30 minutes for easier slicing (optional).
    9. Preheat oven to 375°F (190°C). Line a baking sheet with parchment paper.
    10. Slice the log into 1-inch thick pinwheels.
    11. Arrange pinwheels on the prepared baking sheet, leaving space between each one.
    12. Brush the tops with beaten egg.
    13. Sprinkle with everything bagel seasoning (optional).
    14. Bake: Bake for 15-20 minutes, or until golden brown and the filling is bubbly.
    15. Cool: Let cool on the baking sheet for a few minutes before transferring to a wire rack to cool completely.
    16. Serve: Serve warm or at room temperature with ranch dressing or sour cream for dipping (optional).

    Notes

    • Adjust the spiciness by varying the amount of jalapeños.
    • These pinwheels can also be made ahead and frozen before baking.
    • For a different flavor, try adding cooked bacon or shredded chicken to the filling.
    • Prep Time: 30 minutes
    • Cook Time: 20 minutes
    • Category: Appetizer
    • Method: Baking
    • Cuisine: American

    Nutrition

    • Serving Size: 1 pinwheel
    • Calories: 150
    • Sugar: 1g
    • Sodium: 250mg
    • Fat: 10g
    • Saturated Fat: 5g
    • Unsaturated Fat: 4g
    • Trans Fat: 0g
    • Carbohydrates: 10g
    • Fiber: 1g
    • Protein: 4g
    • Cholesterol: 30mg

    Sharing is caring!

  • Creamy Avocado Grilled Cheese

    Creamy Avocado Grilled Cheese


    Introduction to Creamy Avocado Grilled Cheese

    As a busy mom, I know how chaotic life can get. Between juggling work, the kids, and a laundry list of responsibilities, the last thing I want is to spend hours in the kitchen. That’s where my beloved Creamy Avocado Grilled Cheese comes in! This delightful sandwich is not only quick to whip up but also transforms the humble grilled cheese into something special. With creamy avocado and gooey cheese, it’s a dish that delights both the palate and the spirit. Perfect for a cozy lunch or a comforting dinner, it’s sure to impress your loved ones.

    Why You’ll Love This Creamy Avocado Grilled Cheese

    Let’s face it, life can be busy and unpredictable. This Creamy Avocado Grilled Cheese is a lifesaver! It’s easy to make, and in under 20 minutes, you’ll have a delicious meal ready to go. The combination of creamy avocado and melted cheese creates a flavor explosion that will satisfy even the fussiest eaters. It’s a simple pleasure, and who doesn’t need more of those in their day?

    Ingredients for Creamy Avocado Grilled Cheese

    Gathering the right ingredients is key to making your Creamy Avocado Grilled Cheese sing with flavor. Here’s what you’ll need:

    • Bread: Choose your favorite type—white, whole grain, or sourdough work beautifully.
    • Ripe Avocado: The star of the show! It adds creaminess and healthy fats, making your sandwich satisfying.
    • Mozzarella Cheese: This cheese melts beautifully, providing that wonderful gooeyness we all love.
    • Cheddar Cheese: For a sharp, tangy contrast to the mozzarella, making each bite exciting.
    • Butter: Softened and spread on the bread, it helps achieve that golden, crispy exterior.
    • Mayonnaise: A thin layer on the bread adds richness and helps with browning when grilled.
    • Garlic Powder: Just a sprinkle adds depth and flavor, elevating your grilled cheese to gourmet status.
    • Onion Powder: This pairs beautifully with garlic powder for an extra savory kick.
    • Salt and Pepper: Essential for seasoning the avocado and enhancing all the flavors.
    • Fresh Basil Leaves (optional): A burst of freshness that complements the creaminess of the avocado.

    Feel free to mix and match other ingredients; maybe some sliced tomatoes or a dash of hot sauce for extra kick! The measurements for everything are waiting for you at the bottom of the article for easy reference and printing.

    How to Make Creamy Avocado Grilled Cheese

    Ready to dive into the deliciousness of my Creamy Avocado Grilled Cheese? Let me guide you through each step. It’s as easy as pie, and I promise the results will leave you smiling. Grab your apron, and let’s get cooking!

    Step 1: Preheat the Skillet

    First, preheat a skillet over medium heat. You want it hot enough to create a golden, crispy crust on the bread without burning it. If you have a non-stick skillet, that’s perfect for this job, but any skillet will do.

    Step 2: Prepare the Avocado

    Now, take your ripe avocado and cut it in half. Remove the pit carefully, and in a small bowl, mash the avocado with a fork until it’s creamy. Season it with salt and pepper to your liking. This avocado is the secret to the creaminess of your sandwich!

    Step 3: Mix the Cheeses

    In another bowl, mix together the shredded mozzarella and cheddar cheese. I find that combining these two varieties creates the perfect cheesy blend—mozzarella for its melting magic and cheddar for its tangy flavor. It’s a match made in cheesy heaven!

    Step 4: Assemble the Sandwich

    Grab your slices of bread. Spread butter on one side of each slice. On the unbuttered side of two slices, smear a thin layer of mayonnaise. This will help with the browning and flavor. Place these mayo-smeared sides down in your preheated skillet. Now, spread the mashed avocado evenly over the bread and sprinkle garlic powder and onion powder on top. Then, layer your cheese mix over the avocado, making sure to cover it generously!

    Step 5: Cook the Sandwich

    Now it’s time to get grilling! Place the remaining slices of bread on top, buttered side up. Cook the sandwiches for about 3-4 minutes, or until the bread is golden brown and the cheese starts to melt. Flip the sandwiches carefully, pressing down slightly for that perfect crisp. If your skillet gets too hot, don’t hesitate to lower the heat. We want the cheese melted evenly!

    Step 6: Serve and Enjoy

    Once both sides are beautifully browned, remove the sandwiches from the skillet. Let them cool slightly before slicing into them. Trust me; those cheesy layers will ooze out temptingly! Serve warm and enjoy the delightful flavors of your Creamy Avocado Grilled Cheese! You deserve it!

    Tips for Success

    • Use a quality, non-stick skillet for easy flipping and perfect browning.
    • When choosing avocados, look for ones that yield slightly to pressure—this means they’re ripe and ready!
    • For an extra crispy sandwich, consider using a heavier pan or pressing down gently while cooking.
    • Don’t rush the cooking process; keep the heat at medium to allow the cheese to melt perfectly.
    • Experiment with different cheeses or add-ins to create your own culinary twist!

    Equipment Needed

    • Skillet: A non-stick skillet is ideal, but a regular one works just fine!
    • Mixing Bowls: You’ll need at least two for prepping your avocado and cheese.
    • Fork: Perfect for mashing the avocado to that creamy consistency.
    • Spreader: A simple butter knife works wonders for spreading butter and mayonnaise.
    • Spatula: Crucial for flipping your sandwiches without losing any cheesy goodness!

    Variations for Creamy Avocado Grilled Cheese

    • Spicy Kick: Add sliced jalapeños or a drizzle of hot sauce for a zesty flavor boost.
    • Garden Fresh: Incorporate fresh spinach or arugula for added nutrients and a crispy texture.
    • Meaty Delight: Include crispy bacon or sliced turkey for a heartier sandwich that meat lovers will adore.
    • Flavorful Fusion: Swap the mozzarella and cheddar for pepper jack and gouda for a smoky twist.
    • Vegan Option: Use plant-based cheeses and vegan butter for a delicious dairy-free version.

    Serving Suggestions

    • Fresh Salad: Pair your sandwich with a simple mixed greens salad tossed with lemon vinaigrette for a refreshing contrast.
    • Tomato Soup: A classic side! Dip your grilled cheese into a warm bowl of tomato soup for pure comfort.
    • Iced Tea: Enjoy a glass of sweetened iced tea or lemonade to complement the flavors.
    • Presentation: Serve on a cute wooden board and garnish with fresh basil for a lovely touch.

    FAQs about Creamy Avocado Grilled Cheese

    Many of you may have some burning questions about my beloved Creamy Avocado Grilled Cheese. I’ve compiled some of the most frequently asked questions to help you enjoy this delicious dish even more!

    Can I make this sandwich gluten-free?

    Absolutely! Simply substitute regular bread with your favorite gluten-free variety. It’s a great way to enjoy this creamy delight without worrying about gluten.

    What can I use instead of mayonnaise?

    If mayonnaise isn’t your thing, consider using cream cheese or Greek yogurt. Both of these create a creamy texture and rich flavor, while still being a delightful accompaniment to the avocado.

    How can I store leftovers?

    If you have leftovers (which might be a rarity!), store them in an airtight container in the fridge for up to two days. To reheat, a skillet is best to maintain that crispy exterior!

    Can I prepare this ahead of time?

    While this Creamy Avocado Grilled Cheese is best eaten fresh, you can mash the avocado and mix the cheeses in advance. Just assemble and grill when you’re ready!

    What’s a good dip for this sandwich?

    Each bite of this sandwich is a treat on its own, but adding a spicy chipotle aioli or a rich tomato basil dip takes it to the next level! Enjoy pairing it up!

    Final Thoughts

    Creating the Creamy Avocado Grilled Cheese isn’t just a cooking task; it’s a little moment of joy in a busy day. Every bite brings back memories of cozy family gatherings and the laughter shared over simple meals. The creamy avocado mixed with gooey cheese transforms this comfort food into something extraordinary, perfect for satisfying cravings or impressing guests. So, whether you’re indulging solo or sharing it with loved ones, this sandwich is a celebration of flavors that nourishes the soul. Allow it to become a staple in your kitchen, because everyone deserves a tasty hug on a plate!


    Print

    clock clock iconcutlery cutlery iconflag flag iconfolder folder iconinstagram instagram iconpinterest pinterest iconfacebook facebook iconprint print iconsquares squares iconheart heart iconheart solid heart solid icon

    Description

    A delicious and creamy grilled cheese sandwich with avocado and melted cheese.


    • 4 slices of bread
    • 1 ripe avocado
    • 1 cup shredded mozzarella cheese
    • 1 cup shredded cheddar cheese
    • 2 tablespoons butter, softened
    • 1 tablespoon mayonnaise
    • 1/2 teaspoon garlic powder
    • 1/2 teaspoon onion powder
    • Salt and pepper to taste
    • 1/4 cup fresh basil leaves (optional)

    1. Preheat a skillet over medium heat, ensuring it is hot enough to achieve a golden brown crust on the bread.
    2. In a small bowl, mash the ripe avocado with a fork until smooth. Season the mashed avocado with salt and pepper to taste, adjusting based on your preference.
    3. In another bowl, combine the shredded mozzarella cheese and shredded cheddar cheese, mixing them well for an even distribution.
    4. Spread butter on one side of each slice of bread. On the unbuttered side of two slices, spread a thin layer of mayonnaise.
    5. Place the two slices of bread with mayonnaise side down in the skillet. Evenly spread the mashed avocado over the bread in the skillet. Sprinkle the garlic powder and onion powder over the avocado.
    6. Layer the cheese mixture over the avocado. If using, top with the fresh basil leaves.
    7. Top with the remaining two slices of bread, ensuring the buttered side is facing up.
    8. Grill the sandwiches in the skillet until the bread is golden brown and the cheese is melted, about 3-4 minutes per side. Adjust the heat as necessary to prevent burning.
    9. Remove the sandwiches from the skillet and let them cool slightly before slicing. Serve warm and enjoy.

    Notes

    • Feel free to add more spices based on your taste.
    • For a crunchier bread, try using sourdough or whole grain.
    • Adjust the amount of cheese for a cheesier sandwich.
    • Prep Time: 10 minutes
    • Cook Time: 8 minutes
    • Category: Sandwich
    • Method: Grilling
    • Cuisine: American

    Nutrition

    • Serving Size: 1 sandwich
    • Calories: 450
    • Sugar: 2g
    • Sodium: 650mg
    • Fat: 30g
    • Saturated Fat: 15g
    • Unsaturated Fat: 10g
    • Trans Fat: 0g
    • Carbohydrates: 35g
    • Fiber: 5g
    • Protein: 15g
    • Cholesterol: 40mg

    Sharing is caring!

  • Velvety Garlic Butter Chicken

    Velvety Garlic Butter Chicken


    Introduction to Velvety Garlic Butter Chicken

    As a busy mom, I know the struggle of finding time to prepare a delicious dinner without losing my sanity. That’s where my Velvety Garlic Butter Chicken comes into play—a creamy, flavorful dish that’s sure to please everyone at the table. The moment that buttery garlic aroma fills my kitchen, it’s like a warm hug on a hectic day. It’s easy to whip up in just 30 minutes, making it the perfect weeknight meal. Plus, who can resist tender chicken and rotini coated in a luscious sauce? Let’s dive into this culinary adventure together!

    Why You’ll Love This Velvety Garlic Butter Chicken

    This Velvety Garlic Butter Chicken is a lifesaver for busy weeknights. It’s quick to prepare, taking just 30 minutes from start to finish. The creamy sauce, mixed with garlic and butter, delivers an explosion of flavor that dances on your palate. Not only is it delicious, but the recipe is also flexible, allowing for easy adjustments based on pantry staples. This dish transforms any ordinary dinner into a comforting, satisfying experience!

    Ingredients for Velvety Garlic Butter Chicken

    Gathering the right ingredients can make all the difference in creating a fantastic Velvety Garlic Butter Chicken. Here’s what you’ll need:

    • Boneless Chicken Breasts: Tender and juicy, they serve as the star of the dish. Cut them into small bite-sized pieces for quicker cooking and easier eating.
    • Rotini Noodles: Their spiral shape grasps the sauce beautifully, ensuring every bite is filled with creamy goodness. You can swap them for any pasta you like, such as penne or fettuccine.
    • Butter: This adds that rich, velvety flavor we love. You can substitute with olive oil for a lighter take, but I recommend sticking with butter for maximum creaminess.
    • Olive Oil: Used to sauté the chicken; it enhances flavor and keeps things from sticking. You could also use canola or avocado oil if that’s what you have on hand.
    • Heavy Cream: This is the heart of our creamy sauce. It creates a luscious texture. For a healthier option, you could use half-and-half, but the cream truly makes this dish special.
    • Low Sodium Chicken Broth: It injects flavor without overwhelming saltiness. You can opt for homemade or store-bought, just make sure it’s low sodium to maintain control over the salt levels.
    • Garlic: Fresh garlic cloves are a must! They add an aromatic punch. Feel free to adjust how much you use depending on how garlicky you’d like it.
    • Parmesan Cheese: Grated addition for richness and depth. You can swap with Pecorino Romano if you prefer a sharper flavor.
    • Onion Powder and Garlic Powder: These bring a depth of taste without the moisture of fresh onion and garlic. They’re great for a stronger flavor without any fuss.
    • Salt and Black Pepper: Essential for seasoning, enhancing the overall taste of the dish. Make sure to adjust to your liking.
    • Fresh Parsley: A lovely garnish that not only brightens the dish visually but also adds a hint of freshness.

    For exact quantities, scroll down to the recipe card at the end of the article, where you’ll find everything neatly laid out for printing or easy reference!

    How to Make Velvety Garlic Butter Chicken

    Now, let’s unravel the magic of this Velvety Garlic Butter Chicken together! Follow these steps, and you’ll create a dish that’s not only delicious but will also make your kitchen smell heavenly. Let’s get cooking!

    Step 1: Boil the Rotini Noodles

    Start by bringing a pot of salted water to a boil. Once boiling, toss in the rotini noodles and cook them according to the package instructions. This usually takes about 8–10 minutes. Keep an eye on them—they should be al dente, firm but tender. Remember, these noodles are going to soak up all that creamy sauce, so cooking them just right is essential. When done, drain them well and set them aside.

    Step 2: Sauté the Chicken

    While the noodles are cooking, it’s time to work on the chicken. In a large skillet, heat the olive oil over medium heat. Season your chopped chicken with salt, black pepper, garlic powder, and onion powder. This seasoning will give your chicken a flavorful punch. Once your oil is hot, add the chicken to the skillet. Cook it for about 6–8 minutes, stirring occasionally. You’re aiming for a gorgeous golden color and fully cooked pieces. When it’s done, move the chicken to a plate and let it rest for a moment. Your kitchen should be smelling delightful already!

    Step 3: Create the Creamy Sauce

    In the same skillet, don’t wash it just yet! Reduce the heat if needed, then add in the butter. Let it melt and swirl the pan to coat the bottom. The magic happens when you stir in the minced garlic; cooking it until fragrant is key! After about a minute, pour in the chicken broth and heavy cream, mixing them thoroughly. Allow this to bubble softly for a few minutes, letting it thicken into a creamy delight. This sauce is what makes your chicken shine!

    Step 4: Combine Everything Together

    Now for the grand finale! Toss the cooked chicken and drained rotini noodles back into the skillet with the sauce. Stir everything together gently, ensuring the noodles and chicken are fully coated in that luscious, garlic butter sauce. Then, sprinkle the grated Parmesan cheese over the top. Stir until it melts into the sauce, making it even creamier. If you want to elevate it, add some fresh parsley at the end for that pop of color and flavor.

    Tips for Success

    • Prep your ingredients first. It saves time during cooking and keeps everything organized.
    • Adjust the seasoning to your taste. Don’t be shy to experiment with more garlic or herbs!
    • For extra creaminess, keep the heat low while mixing in the cheese.
    • Use tongs to toss the noodles with the chicken and sauce, ensuring even coverage.
    • Always taste before serving; each ingredient contributes to the final flavor!

    Equipment Needed

    • Large Pot: For boiling the rotini noodles; a deep saucepan can work too.
    • Skillet: A non-stick or cast-iron skillet is perfect for sautéing the chicken and making the sauce.
    • Colander: Essential for draining your pasta; a slotted spoon can be used in a pinch.
    • Measuring Cups: For accurate measuring of liquid ingredients; you can use a glass or plastic one.
    • Wooden Spoon or Tongs: For stirring and mixing the noodles and chicken; both tools are handy!

    Variations for Velvety Garlic Butter Chicken

    • Add Vegetables: Toss in some spinach, cherry tomatoes, or zucchini for a colorful twist. They enhance nutrition and flavor.
    • Swap the Protein: Try using shrimp or tofu for a different protein option. Both will absorb the sauce beautifully!
    • Herb Infusion: Experiment with fresh herbs like basil or thyme for a fragrant touch that brightens up the dish.
    • Spicy Kick: Add a pinch of red pepper flakes or a drizzle of hot sauce to spice things up a notch.
    • Gluten-Free Options: Pot for gluten-free pasta for an entirely gluten-free experience without sacrificing flavor.

    Serving Suggestions for Velvety Garlic Butter Chicken

    • Fresh Salad: A crisp green salad drizzled with vinaigrette pairs wonderfully, balancing the creamy richness.
    • Garlic Bread: Serve with warm, buttery garlic bread to mop up any delicious sauce left on your plate.
    • Wine Pairing: A chilled Sauvignon Blanc or Pinot Grigio complements the flavors beautifully.
    • Presentation: Serve in a large bowl, garnishing with fresh parsley and extra Parmesan for an inviting touch.

    FAQs about Velvety Garlic Butter Chicken

    Can I make Velvety Garlic Butter Chicken in advance?
    Absolutely! You can prepare the chicken and sauce ahead of time, then just reheat everything when you’re ready to serve. Just add a splash of broth or cream to loosen the sauce.

    How can I make this dish healthier?
    You can lighten it up by using less butter and replacing heavy cream with half-and-half or evaporated milk. Adding more vegetables is another great way to boost the nutritional value!

    What do I serve with Velvety Garlic Butter Chicken?
    This creamy chicken pairs beautifully with a fresh salad, garlic bread, or even steamed vegetables. It’s a versatile dish that complements various sides.

    Can I freeze leftovers?
    Yes! You can freeze the leftovers in an airtight container. Just be aware that the sauce may separate upon thawing, so stir well when reheating.

    Is this recipe kid-friendly?
    Absolutely! The creamy sauce and tender noodles make it a hit with kids. You could even toss in some veggies if you’re looking to sneak in extra nutrition!

    Final Thoughts

    There’s something truly magical about gathering around the table for a meal like Velvety Garlic Butter Chicken. It’s an experience that warms not just your heart but your home as well. The rich, creamy sauce feels like a cozy embrace after a busy day. With each bite, I get to share not only delicious food but also precious moments with my loved ones. Cooking this dish feels like a comforting ritual, transforming ordinary evenings into cherished memories. So grab your apron and let your culinary adventure begin—this delightful recipe is sure to become your family’s new favorite!


    Print

    clock clock iconcutlery cutlery iconflag flag iconfolder folder iconinstagram instagram iconpinterest pinterest iconfacebook facebook iconprint print iconsquares squares iconheart heart iconheart solid heart solid icon

    Description

    A creamy and flavorful chicken dish infused with garlic and butter, served with rotini noodles.


    • 680 g boneless chicken breasts, chopped into small bites
    • 340 g rotini noodles
    • 4 tablespoons butter
    • 2 tablespoons olive oil
    • 240 ml heavy cream
    • 120 ml low sodium chicken broth
    • 5 garlic cloves, smashed and minced
    • 60 g Parmesan, grated fine
    • 1 teaspoon onion powder
    • 1 teaspoon garlic powder
    • Salt, to taste
    • Black pepper, to taste
    • Fresh parsley, chopped (for garnish)

    1. Boil rotini noodles in salt water according to package instructions. Drain well and set aside.
    2. In a skillet, heat olive oil on medium heat. Season chopped chicken with salt, black pepper, garlic powder, and onion powder before placing it in the pan.
    3. Cook the chicken for 6–8 minutes until golden and cooked through. Remove the chicken and set it on a plate.
    4. In the same pan, reduce heat if necessary, add butter and let it melt. Then stir in the minced garlic until fragrant.
    5. Pour in the chicken broth and heavy cream, mixing well and allowing it to bubble softly for a few minutes until it thickens.
    6. Toss the cooked chicken and rotini noodles back into the skillet, ensuring everything is coated in the creamy sauce.
    7. Stir in the grated Parmesan until melted and the sauce becomes creamy.
    8. Garnish with chopped parsley if desired, and serve immediately.

    Notes

    • For a richer flavor, you can add additional herbs like thyme or rosemary.
    • Adjust the garlic amount to your preference for more or less garlicky taste.
    • Serve with a side salad for a complete meal.
    • Prep Time: 10 minutes
    • Cook Time: 20 minutes
    • Category: Main Course
    • Method: Stovetop
    • Cuisine: Italian

    Nutrition

    • Serving Size: 1 serving
    • Calories: 550
    • Sugar: 2 g
    • Sodium: 800 mg
    • Fat: 36 g
    • Saturated Fat: 20 g
    • Unsaturated Fat: 10 g
    • Trans Fat: 0 g
    • Carbohydrates: 35 g
    • Fiber: 3 g
    • Protein: 35 g
    • Cholesterol: 120 mg

    Sharing is caring!

  • Cream Puff Cake

    Cream Puff Cake


    Introduction to Cream Puff Cake

    Hey there! If you’re in the mood for a dessert that’s both stunning and scrumptious, let me introduce you to the delightful world of Cream Puff Cake. You won’t believe how easy it is to whip up this showstopper! As a busy mom, I know how precious time can be, and this recipe saves the day. It’s perfect for impressing family and friends, yet simple enough to make on a hectic afternoon. Just imagine creamy custard layered on a light, fluffy cake topped with rich chocolate glaze—a slice of happiness ready to be savored!

    Why You’ll Love This Cream Puff Cake

    This Cream Puff Cake is a delightful combination of flavors and textures that will leave everyone craving more! The best part? It comes together without a fuss. You’ll appreciate how quickly you can go from ingredients to a beautiful dessert, perfect for potlucks or family gatherings. With its creamy custard and luscious chocolate glaze, it feels indulgent, yet is surprisingly simple to create. It’s truly a win-win!

    Ingredients for Cream Puff Cake

    To create this delightful Cream Puff Cake, you’ll need some simple yet essential ingredients. Here’s what to gather:

    • Water: Essential for creating the base of the dough, giving it the needed moisture.
    • Unsalted Butter: This adds richness and flavor. Unsalted is preferred, so you can better control the saltiness.
    • All-Purpose Flour: This provides structure to our cake, helping it rise beautifully in the oven.
    • Large Eggs: They are crucial for binding everything together and contributing to the delightful texture.
    • Vanilla Extract: Who can resist a touch of vanilla? It adds warmth and depth to both the cake and custard.
    • Instant Vanilla Pudding Mix: This is the secret to our creamy filling. It makes it smoothly luscious.
    • Cold Milk: Important for preparing the pudding mix, ensuring a rich and smooth custard.
    • Heavy Cream: Used in both the pudding and for the delightful chocolate glaze, adding that dreamy creaminess.
    • Semi-Sweet Chocolate Chips: These turn into a dreamy glaze, delivering a rich chocolatey finish.

    For those looking to experiment, consider adding some fruit puree for a fruity twist or swapping in almond extract for a different flavor profile! Ingredients with exact quantities are at the bottom of this article, ready for printing.

    How to Make Cream Puff Cake

    Step 1: Preheat the Oven and Prepare the Pan

    First things first, let’s get that oven ready! Preheating it to 400°F (200°C) ensures our Cream Puff Cake bakes evenly. While it’s heating up, grab a 9×13-inch baking pan and grease it well. This prevents the cake from sticking, making it easier to remove later. Trust me; you want that gorgeous cake to come out intact!

    Step 2: Create the Dough

    In a medium saucepan, pour 1 cup of water and add ½ cup of butter. Bring this mixture to a rolling boil over medium-high heat. It’s like waiting for a pot to boil, but it’ll be worth it! Once it’s boiling, quickly stir in 1 cup of all-purpose flour. Keep stirring until the dough forms a ball, which usually takes about 2-3 minutes. The dough should look smooth and come away from the sides of the pan; this means you’ve nailed it!

    Step 3: Add Eggs and Vanilla

    Now, you’ll want to let that dough cool for about 5 minutes. It’s too hot to add eggs just yet! Once it’s cooled slightly, you can begin incorporating 4 large eggs. Add them one at a time, mixing well after each addition for a silky texture. Finally, stir in 1 teaspoon of vanilla extract to give that lovely aroma. Your arm might feel like it’s been at the gym, but trust me; it’s worth it!

    Step 4: Bake the Cake Base

    Spread the dough evenly into the prepared pan, smoothing the top with a spatula. Pop the pan in the oven and bake for 30-35 minutes. Keep an eye on it! You’ll know it’s done when the top is golden brown and puffy. You want it to feel light to the touch. Once it’s baked, let the cake cool completely in the pan.

    Step 5: Make the Custard Filling

    While your cake base is cooling, it’s time to whip up that dreamy custard filling. In a medium bowl, whisk together 1 package of instant vanilla pudding mix and 2 cups cold milk. Blend until smooth. In another bowl, whip 1 cup of heavy cream with 1 teaspoon of vanilla extract until soft peaks form. Gently fold this fluffy cream into the pudding mixture. It’s all about that light, airy texture!

    Step 6: Assemble the Cream Puff Cake

    When your cake base has cooled completely, spread the custard filling evenly over the top. Use a spatula to ensure every bite will be filled with that luscious custard goodness. It’s like icing on a cake—but a whole lot better!

    Step 7: Prepare the Chocolate Glaze

    Now, let’s make that rich chocolate glaze! In a small saucepan, heat ¼ cup of heavy cream over medium heat until it starts to simmer. Remove it from heat and stir in 1 cup of semi-sweet chocolate chips. Keep stirring until the chocolate melts into a glossy, smooth glaze. Drizzle this chocolaty goodness over the custard layer. Spread it gently using a spatula for that professional touch!

    Step 8: Chill and Serve

    Last but not least, let this fabulous creation chill in the refrigerator for at least 2 hours. This step is crucial; it allows the layers to set and become one delicious dessert. Once chilled, slice and serve this Cream Puff Cake. Get ready for the delighted smiles when you share it!

    Tips for Success

    • Always preheat your oven for even baking.
    • Cool the dough properly before adding eggs to avoid cooking them.
    • For extra flavor, try using almond extract instead of vanilla.
    • Let the cake chill longer if you have the time for perfect texture.
    • Don’t skip the chocolate glaze; it’s the icing on the cake!

    Equipment Needed

    • 9×13-inch baking pan: A regular baking dish works too, but this size is ideal.
    • Medium saucepan: Use a standard pot for boiling ingredients; just ensure it has a sturdy handle.
    • Mixing bowls: Any size will do, but having a large one makes mixing easier.
    • Whisk: A hand whisk is great; you could even use a fork in a pinch.
    • Spatula: A silicone spatula is perfect for spreading the custard and glaze.

    Variations on Cream Puff Cake

    • Fruit-Infused Twist: Add layers of fresh berries or sliced bananas between the custard and cake for a burst of fruity freshness!
    • Chocolate Lovers: Swap the vanilla pudding for chocolate pudding mix to create a richer, chocolatey filling.
    • Nutty Delight: Incorporate finely chopped nuts like pecans or almonds into the custard for added texture and flavor.
    • Gluten-Free Option: Replace all-purpose flour with a gluten-free flour blend to accommodate dietary needs.
    • Sugar-Free Version: Use sugar-free pudding mix and sugar substitute to enjoy a lighter dessert without the sweetness overload.

    Serving Suggestions

    • Pair Cream Puff Cake with a dollop of whipped cream for extra indulgence.
    • Serve it alongside fresh fruit like strawberries or raspberries for a vibrant contrast.
    • A warm cup of coffee or tea makes for a delightful drink pairing.
    • Garnish with chocolate shavings or mint leaves for an elegant presentation!
    • For a fun twist, serve with a scoop of vanilla ice cream on the side.

    FAQs about Cream Puff Cake

    Can I make Cream Puff Cake ahead of time?

    Absolutely! This dessert actually benefits from sitting in the fridge for a few hours or even overnight. The longer it chills, the more the flavors meld together, and the custard sets perfectly. Just be sure to cover it well to keep it fresh!

    What can I use instead of heavy cream?

    If you’re looking for a lighter option, you can substitute heavy cream with half-and-half or even whole milk. However, this may alter the richness of the chocolate glaze slightly. For a whipped cream alternative, try using coconut cream for a dairy-free version!

    How should I store leftovers?

    Keep any leftovers covered and refrigerated for up to 3 days. The texture may change slightly as it sits, but it’s still delicious! Just be prepared for some swooning when you uncover that creamy goodness again.

    Can I freeze Cream Puff Cake?

    Freezing this cake isn’t ideal due to the creamy layers. However, if you must, consider freezing just the cake base. Make sure it’s well-wrapped and enjoy the custard and glaze fresh!

    What’s a good way to garnish my Cream Puff Cake?

    There are so many lovely options! Fresh berries, chocolate shavings, or even a sprinkle of powdered sugar make a beautiful presentation. Feel free to get creative—your guests will love the extra touch!

    Final Thoughts

    Creating this Cream Puff Cake is more than just baking; it’s about sharing moments of joy with loved ones. The laughter around the table, the delighted expressions as the first slice is served—these are the memories that make us cherish our time spent in the kitchen. With its perfect blend of creamy custard and rich chocolate glaze, this dessert truly uplifts any occasion. I hope you find as much happiness in making and sharing this cake as I do. So roll up your sleeves, gather your family, and enjoy every blissful bite together!


    Print

    clock clock iconcutlery cutlery iconflag flag iconfolder folder iconinstagram instagram iconpinterest pinterest iconfacebook facebook iconprint print iconsquares squares iconheart heart iconheart solid heart solid icon

    Description

    A delightful dessert featuring a light cake topped with creamy custard and rich chocolate glaze.


    • 1 cup water
    • ½ cup unsalted butter
    • 1 cup all-purpose flour
    • 4 large eggs
    • 1 teaspoon vanilla extract
    • 1 package (3.4 oz) instant vanilla pudding mix
    • 2 cups cold milk
    • 1 cup heavy cream
    • 1 teaspoon vanilla extract
    • 1 cup semi-sweet chocolate chips
    • ¼ cup heavy cream

    1. Preheat the oven to 400°F (200°C). Grease a 9×13-inch baking pan and set aside.
    2. In a medium saucepan, bring 1 cup of water and ½ cup butter to a boil over medium-high heat. Stir in the flour and cook, stirring constantly, until the mixture forms a ball, about 2-3 minutes.
    3. Remove from heat and let cool for 5 minutes. Once cooled slightly, add the eggs one at a time, mixing well after each addition. Stir in the vanilla extract.
    4. Spread the dough into the prepared pan and smooth the top. Bake for 30-35 minutes, or until the dough is golden brown and puffy. Remove from the oven and allow to cool completely in the pan.
    5. In a medium bowl, whisk together the instant pudding mix and cold milk until smooth. Set aside.
    6. In another bowl, whip the heavy cream and vanilla extract until soft peaks form. Gently fold the whipped cream into the pudding mixture until combined and smooth.
    7. Once the cake base has completely cooled, spread the custard filling evenly over the top.
    8. In a small saucepan, heat the heavy cream over medium heat until it begins to simmer. Remove from heat and stir in the chocolate chips until smooth and glossy.
    9. Drizzle the chocolate glaze over the custard layer, spreading it gently with a spatula to cover the surface evenly.
    10. Refrigerate the cake for at least 2 hours before serving to allow the layers to set.
    11. Slice and enjoy this creamy, indulgent dessert!

    Notes

    • For best results, chill the cake for a longer time if possible.
    • Feel free to garnish with chocolate shavings or fresh berries before serving.
    • Prep Time: 30 minutes
    • Cook Time: 35 minutes
    • Category: Dessert
    • Method: Baking
    • Cuisine: American

    Nutrition

    • Serving Size: 1 slice
    • Calories: 350
    • Sugar: 22g
    • Sodium: 150mg
    • Fat: 20g
    • Saturated Fat: 10g
    • Unsaturated Fat: 5g
    • Trans Fat: 0g
    • Carbohydrates: 35g
    • Fiber: 1g
    • Protein: 5g
    • Cholesterol: 70mg

    Sharing is caring!

  • Roasted Winter Vegetable Nourish Bowl

    Roasted Winter Vegetable Nourish Bowl


    Introduction to Roasted Winter Vegetable Nourish Bowl

    As the winter chill settles in, I find comfort in warm, hearty meals that are both nourishing and delicious. That’s where this Roasted Winter Vegetable Nourish Bowl comes in. It’s a wonderful dish that’s quick enough for a busy day but impressive enough to wow your loved ones. With vibrant seasonal vegetables and protein-packed quinoa, it’s a one-bowl wonder that fuels your body and soul. If you’re juggling family, work, and everything in between, this recipe is your ticket to a satisfying meal that won’t leave you stressed. Let’s dive in!

    Why You’ll Love This Roasted Winter Vegetable Nourish Bowl

    This Roasted Winter Vegetable Nourish Bowl is as straightforward as it gets! In just 45 minutes, you can create a meal that bursts with flavor and nutrition. The oven does most of the work, allowing you to tackle other tasks or spend time with your family. Plus, the vibrant colors and delightful textures make it appealing to even the pickiest eaters. It’s a comfort food that genuinely makes you feel good inside!

    Ingredients for Roasted Winter Vegetable Nourish Bowl

    Let’s talk about the star players in this Roasted Winter Vegetable Nourish Bowl. These ingredients are not just tasty; they’re nutrition-packed friends that help you through those busy weeks. You’ll find the details on exact measurements at the bottom of the article, so check there for printing!

    • Brussels sprouts: These little gems are a burst of flavor and loaded with vitamins. Halving them helps achieve that perfect roast.
    • Carrots: Their natural sweetness adds a delightful balance. Just slice them up to let their vibrant color shine.
    • Sweet potato: This starchy superstar brings a creamy texture and is rich in fiber. Cubing it ensures even cooking.
    • Red onion: A touch of sharpness enhances the sweetness of the other veggies. Slicing them creates lovely caramelization during roasting.
    • Olive oil: This isn’t just for flavor. Olive oil helps everything crisp up beautifully while providing healthy fats.
    • Salt and pepper: Simple seasonings that elevate flavors to new heights. A touch here can make all the difference!
    • Cooked quinoa: This protein-packed grain is the foundation of your bowl. It’s nutty, filling, and gluten-free!
    • Chopped parsley: This bright herb is a finishing touch that adds freshness and a pop of color.

    Feel free to experiment and toss in other seasonal vegetables you love. Think about adding butternut squash, kale, or even some beets for an extra flavor kick!

    How to Make Roasted Winter Vegetable Nourish Bowl

    Creating your Roasted Winter Vegetable Nourish Bowl is easier than you might think! With just a few simple steps, you can whip up a nourishing meal that comforts your soul. Let’s break it down step by step.

    Step 1: Preheat the Oven

    First things first: preheat that oven to 400°F (200°C). Preheating is crucial because it helps vegetables roast evenly and achieve that golden-brown perfection you desire. A well-heated oven means less waiting time, so don’t skip this essential step!

    Step 2: Prepare the Vegetables

    Now it’s time to roll up your sleeves! Start by washing your Brussels sprouts, carrots, sweet potato, and red onion. Fresh, seasonal veggies are the stars here, so choose the best quality for optimal flavor.

    For the Brussels sprouts, just slice them in half. Slice the carrots and cube the sweet potato for even cooking. I recommend using a sharp knife for easier cutting, and if you want to make it even simpler, grab a vegetable peeler for those carrots!

    Step 3: Toss and Season

    In a big bowl, combine all the chopped veggies. Drizzle olive oil over them, then sprinkle salt and pepper to taste. Now, this is where the fun begins! Toss everything together until each piece is well-coated. A thorough toss ensures the flavors meld beautifully during roasting.

    If you want an extra flavor boost, consider adding a dash of garlic powder or your favorite herbs at this point!

    Step 4: Roast the Vegetables

    Spread the seasoned vegetables evenly on a baking sheet. Pop them into your preheated oven and roast for 25 to 30 minutes. Halfway through, give them a stir for even browning. You’ll know they’re ready when they’re golden brown and tender, with a delightful aroma that fills your kitchen!

    Personal tip: If you’d like an extra crunch, leave them in a few more minutes. Just keep an eye on them to prevent burning!

    Step 5: Assemble the Nourish Bowl

    Once cooked, it’s time for the grand assembly! Start by placing a generous scoop of cooked quinoa at the bottom of your bowl. Heap those golden veggies on top, adding a pop of color. Finally, sprinkle with fresh parsley for a touch of brightness.

    Presentation matters, so don’t be shy! Arrange the veggies in a way that showcases their vibrant hues. You’ll feel the joy of creating every time you dig in!

    Tips for Success

    • Always preheat your oven to ensure even roasting.
    • Use a large bowl for tossing veggies to avoid a mess.
    • Don’t overcrowd the baking sheet; a single layer helps veggies crisp up.
    • Experiment with different seasonal vegetables for variety.
    • Garnish with nuts or seeds for added crunch and nutrition.

    Equipment Needed

    • Baking sheet: A sturdy one is ideal; you can use a glass dish if that’s what you have.
    • Sharp knife: Essential for chopping veggies; any kitchen knife will do if it feels comfortable.
    • Mixing bowl: A large bowl makes tossing easier; any bowl you have will work.
    • Spatula: Perfect for stirring veggies on the sheet; a wooden spoon is a great alternative!

    Variations for Roasted Winter Vegetable Nourish Bowl

    • Add Protein: For a heartier meal, toss in some chickpeas or cooked lentils while roasting. They pair wonderfully with the veggies!
    • Add Nuts or Seeds: Incorporate almonds, walnuts, or pumpkin seeds for a delightful crunch and added nutrition.
    • Spice It Up: Experiment with spices like cumin, paprika, or chili powder. A bit of heat can elevate the flavor profile!
    • Vegan Cheese: Crumble some vegan feta or sprinkle nutritional yeast for a cheesy twist without the dairy.
    • Green Leafy Additions: Toss in some kale or spinach during the last few minutes of roasting for an extra dose of greens.

    Serving Suggestions for Roasted Winter Vegetable Nourish Bowl

    • Pair with a light vinaigrette dressing for extra flavor.
    • Serve alongside crusty whole-grain bread for a comforting meal.
    • Enjoy with a glass of sparkling water or herbal tea.
    • Garnish with avocado slices or feta cheese for richness.
    • For a festive touch, add a sprinkle of pomegranate seeds!

    FAQs about Roasted Winter Vegetable Nourish Bowl

    Here are some common questions I get about the Roasted Winter Vegetable Nourish Bowl. I hope these help clear up any confusion and inspire you to get cooking!

    Can I use frozen vegetables?

    Absolutely! Just remember that frozen veggies might require a slightly different roasting time. They can still make a tasty bowl, especially when you’re short on time.

    What other grains can I use instead of quinoa?

    You can easily swap quinoa for brown rice, farro, or even barley. Each has its own unique flavor and texture, so feel free to experiment!

    Can I meal prep this nourish bowl ahead of time?

    Yes! The roasted veggies can be stored in the fridge for up to 4 days. Just reheat before serving over fresh quinoa for a quick meal!

    How do I make it a bit spicier?

    Add a pinch of red pepper flakes or your favorite hot sauce during the seasoning step. A little kick can elevate the flavor beautifully!

    Is this dish kid-friendly?

    Definitely! The colorful veggies and hearty quinoa can delight kids and adults alike. Serve it with a side of their favorite dipping sauce for extra fun!

    Final Thoughts

    This Roasted Winter Vegetable Nourish Bowl is more than just a meal; it’s a warm hug on a plate. The vibrant colors and delicious flavors remind me of cozy winter nights spent with loved ones, sharing stories and laughter. It delights the palate and fills the heart, making it feel like home cooking at its best. Plus, it’s effortless enough for our busy lives. I hope this recipe becomes a frequent visitor in your kitchen, bringing joy and nourishment to your family meals. So gather those veggies and enjoy every colorful bite!


    Print

    clock clock iconcutlery cutlery iconflag flag iconfolder folder iconinstagram instagram iconpinterest pinterest iconfacebook facebook iconprint print iconsquares squares iconheart heart iconheart solid heart solid icon

    Description

    A nutritious and delicious roasted winter vegetable nourish bowl featuring a variety of seasonal vegetables served over quinoa.


    • 2 cups Brussels sprouts, halved
    • 2 carrots, sliced
    • 1 sweet potato, cubed
    • 1 red onion, sliced
    • 2 tbsp olive oil
    • Salt and pepper to taste
    • 1 cup cooked quinoa
    • Chopped parsley for garnish

    1. Preheat the oven to 400°F (200°C).
    2. Toss the Brussels sprouts, carrots, sweet potato, and red onion in olive oil, salt, and pepper. Spread on a baking sheet.
    3. Roast for 25-30 minutes until golden brown.
    4. Serve the roasted veggies over quinoa and garnish with chopped parsley.

    Notes

    • Feel free to add any other seasonal vegetables you prefer.
    • This bowl can be served warm or at room temperature.
    • Prep Time: 15 minutes
    • Cook Time: 30 minutes
    • Category: Main Course
    • Method: Roasting
    • Cuisine: American

    Nutrition

    • Serving Size: 1 bowl
    • Calories: 320
    • Sugar: 5g
    • Sodium: 300mg
    • Fat: 14g
    • Saturated Fat: 2g
    • Unsaturated Fat: 10g
    • Trans Fat: 0g
    • Carbohydrates: 42g
    • Fiber: 8g
    • Protein: 8g
    • Cholesterol: 0mg

    Sharing is caring!

  • 4th of July Sprinkle Cookies

    4th of July Sprinkle Cookies


    Introduction to 4th of July Sprinkle Cookies

    As the sun shines bright and fireworks fill the sky, there’s nothing quite like celebrating the 4th of July with festive treats. My absolute favorite? Those delightful 4th of July sprinkle cookies! They’re not just delicious; they’re an easy way to bring a sparkle to any gathering. Whether you’re a busy mom or a professional with little time, this recipe is your secret weapon. Imagine your loved ones grinning from ear to ear, all thanks to these colorful little delights. Let’s dive into this simple yet impressive recipe that’ll make your holiday extra special!

    Why You’ll Love This 4th of July Sprinkle Cookies

    These 4th of July sprinkle cookies are truly a game-changer for any celebration. They come together in a flash, making them a perfect choice for busy days. With each bite, you’ll taste a buttery goodness, combined with playful sprinkles that bring pure joy to both kids and adults. Plus, they’re adaptable, so you can let your creativity shine while keeping the process simple and stress-free!

    Ingredients for 4th of July Sprinkle Cookies

    Before we embark on this baking adventure, let’s gather all the fun and colorful ingredients that will make our 4th of July sprinkle cookies shine. Here’s what you’ll need:

    • Unsalted butter: This is our rich base, providing that lovely, melt-in-your-mouth texture.
    • Granulated sugar: Sweetness is key! It helps the cookies spread and gives them a delightful sweetness.
    • Egg and egg yolk: The egg adds structure, while the yolk keeps our cookies soft and chewy.
    • Vanilla extract: This fragrant addition gives depth and warmth, making every bite heavenly!
    • Baking soda: Needed for leavening, it helps our cookies rise to perfection.
    • Cream of tartar: Don’t worry if you’ve never used it! It stabilizes the dough and adds a touch of tang.
    • Salt: A sprinkle of salt enhances all those delicious flavors, balancing the sweetness.
    • All-purpose flour: The foundation of our cookie dough, giving it structure and heartiness.
    • Sprinkles: The fun part! Use any color for any holiday, or go with classic rainbow sprinkles for festive cheer.

    You’ll find the exact measurements of each ingredient at the bottom of the article for easy printing. Now, let’s get ready to whip up these delightful cookie creations that will light up your 4th of July celebrations!

    How to Make 4th of July Sprinkle Cookies

    Now that we’ve gathered our colorful ingredients, let’s jump into the fun part: making those irresistible 4th of July sprinkle cookies! Follow these simple, step-by-step instructions for a delicious result that’ll have everyone reaching for seconds!

    Step 1: Preheat and Prepare

    First things first, preheat your oven to 350°F. While it warms up, line two cookie sheets with parchment paper or silpat mats. This keeps our cookies from sticking and makes cleanup a breeze.

    Step 2: Cream Butter and Sugar

    In a large mixing bowl, combine the softened butter and granulated sugar. Using a stand mixer or a hand mixer, beat them together until fluffy and light. The airiness is crucial! Once you’ve achieved that lovely texture, mix in the egg, egg yolk, and a splash of vanilla extract until everything is smooth and well blended.

    Step 3: Mix Dry Ingredients

    In a separate bowl, whisk together the baking soda, cream of tartar, and salt. Slowly add this dry mix to your creamed butter and sugar. This is where the magic happens, as the dry ingredients help create a beautiful structure for our cookies.

    Step 4: Incorporate Flour

    Now, it’s time to gently fold in the all-purpose flour. Do this slowly until just combined. Overmixing can lead to tough cookies, and we want them soft and chewy! Once the flour is mixed in, toss in those fun sprinkles. They add a festive touch and make our cookies pop with color!

    Step 5: Scoop and Shape

    Using a tablespoon (or a cookie scoop if you have one), scoop out the dough and shape it into balls. Space them about two inches apart on your prepared cookie sheets. This allows them to spread without sticking together while baking.

    Step 6: Bake

    Place the cookie sheets in the oven and bake for 9 to 11 minutes. Keep an eye on them! I find that taking them out when the bottoms just begin to turn golden ensures a delightful taste. Trust me, these 4th of July sprinkle cookies taste better if you err on the side of underbaking!

    Step 7: Cool and Store

    After baking, let those little beauties cool on the cookie sheet for about 5 minutes. This helps them set perfectly. Once cooled, transfer them to a wire rack or simply store them in an airtight container. Enjoy your colorful, festive cookies for up to three days, or freeze them for later enjoyment!

    Tips for Success

    • Ensure butter is softened for easy creaming; it should feel like a warm hug when you touch it.
    • Don’t overmix the dough after adding flour; we want those cookies to be soft and chewy!
    • Experiment with sprinkles—mix different colors for a unique look that dazzles!
    • Check your cookies a minute or two early to avoid overbaking; the perfect cookie is just lightly golden!
    • If freezing, lay cookies flat in a sealed bag to keep them fresh for your next celebration!

    Equipment Needed for 4th of July Sprinkle Cookies

    • Mixing bowl: Any large bowl works; a glass or metal one is perfect for easy mixing.
    • Electric mixer: A stand mixer is great, but a hand mixer does the job just fine!
    • Cookie sheets: Baking sheets are essential; using parchment paper helps with cleanup.
    • Measuring cups and spoons: Essential for getting those ingredients just right!
    • Cookie scoop: A tablespoon works too if you don’t have a scoop on hand!

    Variations on 4th of July Sprinkle Cookies

    • Chocolate Chip Addition: Swap out some flour for mini chocolate chips. It adds a sweet surprise in each bite!
    • Nutty Twist: Mix in chopped walnuts or pecans for a lovely crunch and nutty flavor that pairs beautifully.
    • Email-Free Version: Use a flaxseed mixture (1 tbsp flaxseed meal + 2.5 tbsp water) to replace each egg for a vegan option.
    • Gluten-Free Delight: Substitute all-purpose flour with a gluten-free baking blend for those with dietary restrictions while still enjoying the fun!
    • Holiday-Themed Sprinkles: For other holidays, switch to themed sprinkles like hearts for Valentine’s Day or pastel colors for Easter!

    Serving Suggestions for 4th of July Sprinkle Cookies

    • Pair your cookies with a big glass of cold milk for a classic treat that never goes out of style.
    • Serve them alongside fresh fruit, like strawberries or blueberries, for a refreshing finish.
    • For a festive touch, stack cookies on a colorful cake stand for an eye-catching dessert display.
    • Consider drizzling melted chocolate over the cookies for an indulgent twist.
    • Bring them to your next barbecue or picnic—everyone will love these delightful treats!

    FAQs about 4th of July Sprinkle Cookies

    Can I use different types of sprinkles?

    Absolutely! You can use any type of sprinkles you like. Whether it’s red, white, and blue for the 4th of July or a mix of rainbow colors, the choice is yours! The key is to have fun and let your creativity shine.

    How long can I store leftover cookies?

    Your 4th of July sprinkle cookies can be stored in an airtight container for up to three days. If you want to keep them longer, consider freezing them for up to a month!

    Can I freeze the cookie dough?

    Yes! You can freeze the cookie dough before baking. Just scoop the dough into balls, place them on a baking sheet, and freeze until solid. Then transfer them to a bag. When you’re ready, pop them straight into the oven—no need to thaw!

    Are these sprinkle cookies suitable for kids with allergies?

    This recipe is quite adaptable! You can swap common allergens, like using gluten-free flour for those with gluten sensitivities or a flaxseed mixture in place of eggs for a vegan treat. Always check your sprinkles for additional allergens!

    What can I serve with these cookies?

    These 4th of July sprinkle cookies pair wonderfully with a tall glass of milk. You can also serve them alongside fresh fruit or a scoop of ice cream for a delightful dessert experience everyone will love!

    Final Thoughts

    As we gather to celebrate the 4th of July, these sprinkle cookies not only fill our bellies but also our hearts with joy. Baking brings a sense of togetherness, especially when you’re sharing colorful treats that spark smiles and laughter. Each cookie is a canvas of fun, inviting your family and friends to join in on the celebration. So, whether it’s a backyard barbecue or a cozy get-together, these 4th of July sprinkle cookies are bound to create sweet memories. Enjoy the journey of baking and the delicious outcome that will make this holiday unforgettable!


    Print

    clock clock iconcutlery cutlery iconflag flag iconfolder folder iconinstagram instagram iconpinterest pinterest iconfacebook facebook iconprint print iconsquares squares iconheart heart iconheart solid heart solid icon

    Description

    Delicious and festive 4th of July sprinkle cookies perfect for celebrating the holiday!


    • ¾ cup (170g) unsalted butter softened
    • ¾ cup (150g) granulated sugar
    • 1 large egg
    • 1 large egg yolk
    • 1 teaspoon vanilla extract
    • ½ teaspoon baking soda
    • ½ teaspoon cream of tartar
    • ½ teaspoon salt
    • 2 cups (248g) all purpose flour
    • 1 ½ cups sprinkles any color for any holiday or use rainbow

    1. Preheat oven to 350°F. Line two cookie sheets with parchment paper or silpat baking mats.
    2. Cream butter and sugar with a stand mixer fitted with the paddle attachment (or you may use a hand mixer). Once the mixture is creamed and fluffy, mix in the egg, egg yolk and vanilla until smooth, then mix in the baking soda, cream of tartar, and salt.
    3. Slowly mix in flour until the mixture is just combined, then stir in the sprinkles.
    4. Scoop balls of cookie dough 2 tablespoons each, and place them 2 inches apart on the prepared cookie sheets.
    5. Bake for 9-11 minutes, or until the bottoms just start to turn golden brown. (These taste better if you err on the side of under rather than over done).
    6. Cool at least 5 minutes on cookie sheet before removing.
    7. Store in an airtight container for up to 3 days or freeze for up to 1 month.

    Notes

    • For best flavor, do not overbake the cookies.
    • The cookies can be frozen for up to 1 month.
    • Prep Time: 15 minutes
    • Cook Time: 11 minutes
    • Category: Dessert
    • Method: Baking
    • Cuisine: American

    Nutrition

    • Serving Size: 1 cookie
    • Calories: 120
    • Sugar: 6g
    • Sodium: 80mg
    • Fat: 5g
    • Saturated Fat: 3g
    • Unsaturated Fat: 1g
    • Trans Fat: 0g
    • Carbohydrates: 18g
    • Fiber: 0g
    • Protein: 1g
    • Cholesterol: 30mg

    Sharing is caring!