Author: IHAAL Team

  • Grilled Cheese Eggs: Discover a Delicious Twist Today!

    Grilled Cheese Eggs: Discover a Delicious Twist Today!


    Introduction to Grilled Cheese Eggs

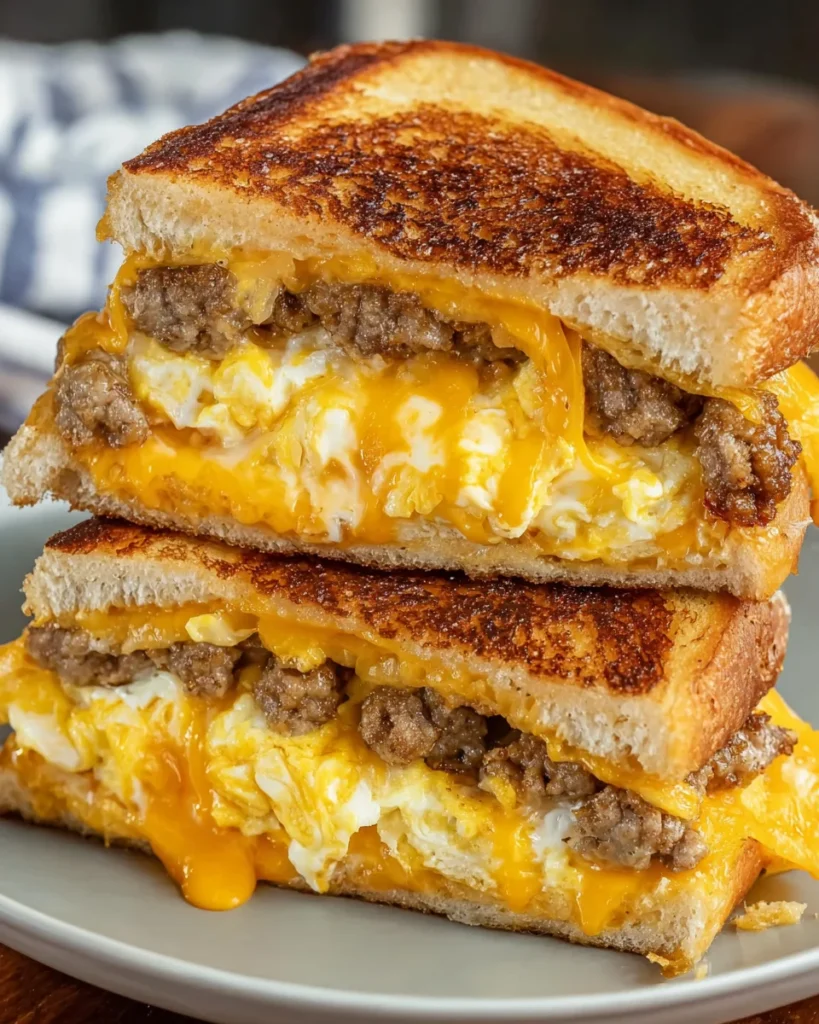
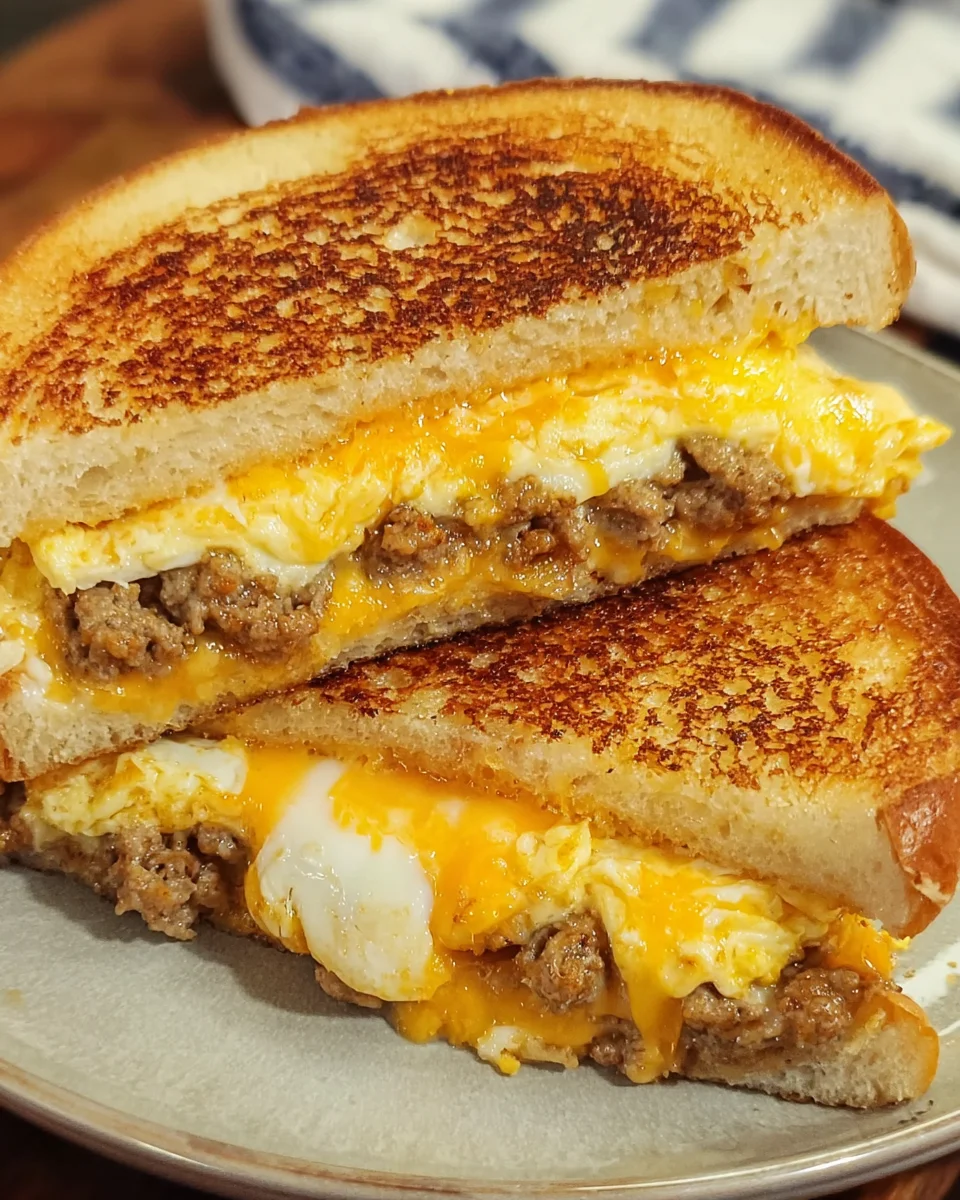
    As a home cook, I know that time can sometimes slip away from us, especially during busy mornings. That’s why I’m excited to share my delicious twist on breakfast with you: Grilled Cheese Eggs! Think of it as your go-to solution for a hearty meal that comes together in no time. Combining creamy scrambled eggs with savory sausage and melty cheese, this dish is sure to impress your family and satisfy those morning cravings. It’s perfect for busy moms and professionals alike, giving you the comfort of traditional grilled cheese with a delightful upgrade.

    Why You’ll Love This Grilled Cheese Eggs

    Imagine whipping up a hearty breakfast that not only tastes fantastic but also takes minimal time. That’s exactly why I adore these Grilled Cheese Eggs! They bring together comforting flavors in an easy-to-make dish that pleases both picky eaters and gourmet palates alike. Plus, they’re perfect for those hectic mornings when you need something nourishing and delightful. With just a skillet, you’re on your way to breakfast bliss!

    Ingredients for Grilled Cheese Eggs

    Gathering the right ingredients makes all the difference in creating delightful Grilled Cheese Eggs. Here’s what you’ll need for this savory twist:

    • Sourdough Bread: The star of your sandwich! Sourdough offers a tangy flavor and a sturdy structure for holding everything together.
    • Breakfast Sausage: Ground sausage adds a richness and savory depth, perfectly complementing the eggs. Feel free to choose turkey or plant-based sausage for a lighter or vegetarian option!
    • Eggs: Six big eggs will create the creamy, fluffy filling we all love. Eggs are packed with protein and are the heart of your breakfast dish.
    • Butter: Softened butter gives a golden crust and rich flavor. It’s also essential for toasting the bread to perfection.
    • Colby-Jack Cheese: This cheese adds melty goodness with a mild flavor that pairs beautifully with the other ingredients. You can easily swap in cheddar or mozzarella if you prefer.

    All the ingredients come together to create a satisfying meal that’s not only meant for breakfast but can also shine at brunch or quick dinners!

    Remember, exact quantities of these delightful ingredients can be found at the bottom of the article where you can easily print the recipe.

    How to Make Grilled Cheese Eggs

    Let’s roll up our sleeves and dive into making these delicious Grilled Cheese Eggs! Follow these steps closely, and soon enough, you’ll have a plate of mouthwatering sandwiches ready to savor.

    Step 1: Cook the Sausage

    Start by heating up a large non-stick skillet over medium-high heat. Add the ground sausage and cook it until there’s no pink left. Break it up as it cooks to ensure even browning. Using a slotted spoon, transfer the cooked sausage to a bowl lined with a paper towel to absorb excess grease. Set it aside while we prep the eggs.

    Step 2: Scramble the Eggs

    Now, let’s turn our attention to the eggs. In the same skillet, add two tablespoons of softened butter and melt it down. Once it’s bubbly, pour in the whisked eggs. Stir gently as they begin to set. Keep cooking until there’s barely any liquid left – fluffy scrambled eggs are what we’re aiming for! Don’t overcook them; you want softness that pairs perfectly with the sausage and cheese.

    Step 3: Combine and Prepare

    Once your scrambled eggs are ready, remove the skillet from the heat. Go back to the bowl with the sausage, and take away the paper towel. Add your scrambled eggs to that bowl and give them a light stir to mix everything together. Wiping down the skillet again, warm it up over medium heat to toast the sandwiches next.

    Step 4: Assemble the Sandwich

    Grab your slices of sourdough bread! Spread butter on one side of each slice, because that’s going to give us that golden crunch. Place one slice, buttered side down, in the now-hot skillet. On top of it, layer a slice of Colby-Jack cheese, followed by about half a cup of the delicious sausage-egg mix. Add another cheese slice before topping with another slice of bread, buttered side up.

    Step 5: Toast and Serve

    Time to get toasting! Let the bottom piece cook for about 3-4 minutes or until it turns golden. Carefully flip the sandwich and cook the other side until it matches the glorious color of the first side. Once golden brown, transfer it to a cutting board. Slice it in half if you’d like to share—though I wouldn’t blame you for keeping it all to yourself! Repeat the process for the remaining ingredients. Serve these beauties hot, right away!

    Tips for Success

    • Use fresh eggs for the best flavor and fluffiness.
    • Don’t rush the cooking; let each side toast nicely for that golden touch.
    • Experiment with different cheeses to find your family’s favorite!
    • Keep an eye on the heat; too high can burn the bread before the insides heat through.
    • For an added dimension, sneak in some veggies like spinach or bell peppers.

    Equipment Needed

    • Large Non-Stick Skillet: Perfect for cooking without sticking. You can use a regular skillet but may need to add more butter.
    • Slotted Spoon: Ideal for transferring cooked sausage. A regular spoon works too but leaves more grease behind.
    • Whisk: For whisking those eggs. A fork will do in a pinch!
    • Cutting Board: Essential for slicing your sandwich. A plate doubles if you’re in a hurry.

    Variations for Grilled Cheese Eggs

    • Spicy Kick: Add chopped jalapeños or a dash of hot sauce to the egg mixture for an extra zing!
    • Veggie Delight: Toss in diced bell peppers, onions, or spinach for a nutritious twist that adds color and crunch.
    • Cheese Lover’s Dream: Try mixing different cheeses like sharp cheddar, pepper jack, or gouda for unique flavors.
    • Herby Goodness: Fresh herbs like chives, parsley, or basil can elevate the flavor and make it more aromatic.
    • Whole Wheat or Gluten-Free: Substitute sourdough with whole wheat or gluten-free bread to cater to dietary needs.

    Serving Suggestions

    • Fresh Fruit: Serve with a side of mixed berries or sliced apples for a refreshing contrast.
    • Crispy Hash Browns: Pair with golden, crispy hash browns for a hearty breakfast plate.
    • Hot Sauce or Salsa: Offer hot sauce or salsa on the side for an extra flavor boost.
    • Refreshing Drink: Enjoy with a glass of freshly squeezed orange juice or a warm cup of coffee.

    FAQs about Grilled Cheese Eggs

    Can I make Grilled Cheese Eggs ahead of time?

    Absolutely! You can prepare the sausage and scrambled eggs in advance. Store them in the fridge for up to two days. When you’re ready, just pop everything between the bread and toast. Quick and easy!

    What can I substitute for sourdough bread?

    If sourdough isn’t your thing, you can easily swap it out for whole wheat, rye, or even a gluten-free variety. Each option offers its unique flavor and texture!

    Can children enjoy these Grilled Cheese Eggs?

    Definitely! Kids usually love the melty cheese and fluffy eggs. You can make them more appealing by cutting the sandwiches into fun shapes or fingers for easy handling.

    How can I make these Grilled Cheese Eggs healthier?

    Use lean turkey sausage and whole-grain bread for a lighter option. You can also add veggies to boost the nutritional value. Think diced spinach or tomatoes mixed in!

    What’s the best way to store leftover Grilled Cheese Eggs?

    If you have leftovers, simply store them in an airtight container in the fridge. They’ll last for about three days. Reheat in a skillet to keep them crispy!

    Final Thoughts

    Each bite of Grilled Cheese Eggs is like a warm hug, inviting and satisfying, perfect for any time of day. I cherish the memories made around the table while enjoying these delicious sandwiches with family and friends. This simple but hearty recipe allows us to savor comforting flavors without spending hours in the kitchen. Whether you’re whipping them up for a busy breakfast or a leisurely brunch, these mouthwatering creations bring joy and nourishment. I hope you find as much delight in making these Grilled Cheese Eggs as I do—because great meals should always come with great memories!


    Print

    clock clock iconcutlery cutlery iconflag flag iconfolder folder iconinstagram instagram iconpinterest pinterest iconfacebook facebook iconprint print iconsquares squares iconheart heart iconheart solid heart solid icon

    Description

    A delightful twist on traditional grilled cheese, combining scrambled eggs and sausage for a hearty meal.


    • 8 slices of sourdough bread
    • ½ pound of breakfast sausage, ground
    • 6 big eggs, whisked
    • 4 tablespoons of softened butter (split in half)
    • 8 slices of Colby-Jack cheese

    1. Heat up a large non-stick skillet and cook the ground sausage until it’s no longer pink. Break it up as it cooks. Move the sausage to a medium bowl lined with a paper towel, then set it aside. Use a paper towel to clean the skillet.
    2. Add 2 tablespoons of butter to the same skillet and melt over medium-high heat. Pour in the whisked eggs. Once the eggs start to firm up, gently stir them to make scrambled eggs. Keep going until there’s barely any liquid left. Take the pan off the heat.
    3. Remove the paper towel from under the sausage, leaving it in the bowl. Add the scrambled eggs to the bowl and lightly stir them together. Wipe out the skillet again and warm it over medium heat.
    4. Spread butter on one side of each bread slice. Put one slice, buttered side down, in the hot skillet. Add one slice of Colby-Jack cheese on top, followed by about ½ cup of the sausage-egg mix. Place another cheese slice on top of that, then finish with another bread slice, buttered side up.
    5. Toast the bottom bread slice until it turns golden, about 3-4 minutes. Flip the sandwich carefully and brown the other side until golden, too.
    6. Put the sandwich on a cutting board and slice it in half if you’d like. Do the same with the rest of the bread, cheese, and sausage-egg mix. Serve right away.

    Notes

    • For a spicier version, consider adding some hot sauce or jalapeños to the egg mixture.
    • This sandwich can be customized with different types of cheese or bread.
    • Prep Time: 10 minutes
    • Cook Time: 15 minutes
    • Category: Breakfast
    • Method: Skillet
    • Cuisine: American

    Nutrition

    • Serving Size: 1 sandwich
    • Calories: 450
    • Sugar: 2g
    • Sodium: 850mg
    • Fat: 30g
    • Saturated Fat: 15g
    • Unsaturated Fat: 10g
    • Trans Fat: 0g
    • Carbohydrates: 30g
    • Fiber: 2g
    • Protein: 20g
    • Cholesterol: 300mg

    Sharing is caring!

  • Keto Philly Cheesesteak Stuffed Peppers

    Keto Philly Cheesesteak Stuffed Peppers


    Introduction to Keto Philly Cheesesteak Stuffed Peppers

    Life can be a whirlwind, can’t it? Between juggling work, kids, and everything in between, finding time to whip up something delicious often feels like a luxury. That’s where my Keto Philly Cheesesteak Stuffed Peppers come in! Bursting with flavor and easy to prepare, they’re the perfect weeknight dinner that even picky eaters will fall in love with. Imagine sinking your teeth into a savory cheesesteak filling, all tucked snugly inside a colorful bell pepper—a dish that’s quick enough for busy nights yet impressive enough for gatherings. Let’s dive into this delight together!

    Why You’ll Love This Keto Philly Cheesesteak Stuffed Peppers

    This Keto Philly Cheesesteak Stuffed Peppers recipe is a game-changer for busy moms and professionals alike. It’s incredibly quick to make, taking just about an hour from start to finish. Plus, the tantalizing taste—filled with savory beef, mushrooms, and melty provolone—will have your family asking for seconds. With low carbs and loads of flavor, it checks all the boxes for a comforting weeknight meal that everyone will love!

    Ingredients for Keto Philly Cheesesteak Stuffed Peppers

    Gathering the right ingredients is half the fun, isn’t it? Here’s what you’ll need to create these keto-friendly delights. Feel free to customize based on what you have in your pantry or your family’s taste preferences.

    • Large bell peppers: These are the colorful vessels of your cheesesteak filling. Choose any color you love—red, green, or yellow works beautifully!
    • Ground beef: This classic protein is the star of the show! You can use lean ground beef for a healthier option or even substitute with ground turkey or chicken if you prefer.
    • Sliced mushrooms: They add a wonderful earthiness to the mix. If you’re not a fan of mushrooms, try using zucchini or spinach for a different twist.
    • Small onion: Diced onions bring a nice depth of flavor. If you’re in a pinch, onion powder is a good alternative, but fresh is always best!
    • Garlic: Minced garlic brings a punch! Feel free to adjust the amount to suit your taste. Garlic powder can also work if you want a quicker option.
    • Provolone cheese: The gooey topping that melts beautifully. If you’re looking for a stronger flavor, mozzarella, cheddar, or even pepper jack are fantastic choices!
    • Olive oil: This helps sauté the veggies and adds richness. You can swap it for avocado oil or butter if that’s what you have on hand.
    • Salt and pepper: Essential seasonings that bring all the flavors together. Feel free to add your favorite spices or herbs for an extra kick!

    For exact quantities, just scroll down to the printable section at the bottom. Happy cooking!

    How to Make Keto Philly Cheesesteak Stuffed Peppers

    Preheat the Oven

    Before diving into the deliciousness, preheating the oven is essential. Setting it to 375°F (190°C) ensures that your stuffed peppers bake evenly and come out perfectly soft. An adequately preheated oven is like a warm hug for your meal—it helps everything cook just right!

    Prepare the Bell Peppers

    Start by cutting the tops off each bell pepper. Be careful not to slice too far down! Remove the seeds inside gently—isn’t it satisfying to see that vibrant color? Rinse them under cold water to remove any residue. These colorful beauties will house our cheesesteak filling. They’re not just pretty; they bring flavor and nutrition too!

    Sauté the Aromatics

    Next up, let’s heat some olive oil in a skillet over medium heat. Add the diced onion and minced garlic, stirring frequently. Cook until the onions become translucent and fragrant, about 3-5 minutes. This step forms a flavor base that’s simply irresistible and sets the stage for your savory filling!

    Cook the Ground Beef

    Now it’s time for our ground beef to shine! Add it to the skillet, breaking it apart as it cooks. Browning the beef not only adds flavor but also gives it a lovely color. Continue cooking until it’s evenly browned and no longer pink, around 5-7 minutes. Don’t forget a sprinkle of salt and pepper—those seasoning buddies enhance all the flavors beautifully!

    Add Mushrooms and Season

    Once the beef is cooked, toss in the sliced mushrooms. Cook them down until softened, about 3-4 minutes. Seasoning here is key! A touch of salt and pepper brings everything together, turning a simple mix into a mouthwatering filling for your Keto Philly Cheesesteak Stuffed Peppers. Your kitchen will smell heavenly!

    Stuff the Peppers

    It’s the fun part! Carefully spoon the cooked beef and mushroom mixture into each bell pepper. Pack them generously but don’t overstuff. Leave room at the top for a glorious layer of cheese. Trust me, that cheesy goodness is something to look forward to as it melts!

    Bake the Stuffed Peppers

    Place the stuffed peppers upright in a baking dish. Cover them with foil to keep moisture in and help the flavors meld together. Bake for 25-30 minutes. Then, remove the foil and generously sprinkle shredded provolone cheese on top. Bake for another 10 minutes, so the cheese becomes bubbly and golden. The moment the oven timer goes off, get ready for the cheesy, savory delight of these Keto Philly Cheesesteak Stuffed Peppers!

    Tips for Success

    • Always taste as you go! Adjust seasonings to fit your family’s preferences.
    • For extra texture, consider adding diced bell peppers or spinach to the filling mixture.
    • If the cheese isn’t melting fast enough, broil for a minute at the end. Watch closely!
    • Prep your peppers ahead of time to save on weeknight cooking.
    • Pair with a simple side salad for a complete meal!

    Equipment Needed

    • Baking dish: A 9×13 inch dish works great. You can also use a cast-iron skillet for a rustic look!
    • Skillet: A large frying pan for sautéing your aromatics and beef. Any nonstick skillet will do.
    • Knife: A sharp knife helps for safe and easy cutting of the peppers.
    • Cutting board: Use a sturdy board to protect your counters while chopping.
    • Spoon: A large spoon is perfect for stuffing the peppers easily!

    Variations

    • Spicy Kick: Add some diced jalapeños or a splash of hot sauce to the beef mixture for a spicy twist!
    • Vegetarian Option: Replace the ground beef with a mix of black beans and quinoa for a hearty meatless version.
    • Cheesy Surprise: Try adding cream cheese to the beef mixture for an extra creamy texture and flavor!
    • Herb Infusion: Mix in fresh herbs like parsley or basil into the filling for a refreshing burst of flavor.
    • Italian Flair: Substitute mozzarella cheese and add Italian seasoning for a unique twist on the classic cheesesteak.

    Serving Suggestions

    • Side Salad: A light, crisp green salad with vinaigrette pairs perfectly to balance the richness of the stuffed peppers.
    • Low-Carb Vegetables: Roasted asparagus or Brussels sprouts make for excellent sides that keep with the keto theme.
    • Refreshing Drink: Serve with unsweetened iced tea or sparkling water with lemon for a refreshing touch.
    • Presentation: Garnish with freshly chopped parsley or serve on a colorful platter for a beautiful spread!

    FAQs about Keto Philly Cheesesteak Stuffed Peppers

    When venturing into the world of Keto Philly Cheesesteak Stuffed Peppers, questions tend to pop up. Here are some of the most common inquiries I’ve encountered, along with helpful answers to guide you through this delicious endeavor!

    Can I make these stuffed peppers ahead of time?
    Absolutely! You can prepare the filling and stuff the peppers a day in advance. Just store them in the fridge, then bake when you’re ready. It’s a real time-saver on busy nights!

    Can I freeze Keto Philly Cheesesteak Stuffed Peppers?
    Yes, you can freeze them before baking! Just wrap them tightly in plastic wrap and foil. When you’re ready to enjoy, thaw in the fridge overnight and bake as usual. Easy and convenient!

    What can I use instead of ground beef?
    If ground beef isn’t your thing, try ground turkey or chicken for a lighter option. For a meaty twist with fewer carbs, crumbled sausage or shredded beef can also work wonderfully!

    How can I make this dish vegetarian?
    For a tasty vegetarian version, replace the meat with a hearty mix of black beans, lentils, or a quinoa blend. You can add some chopped veggies for extra texture and flavor!

    What sides go well with these stuffed peppers?
    Stuffed peppers pair beautifully with light salads, roasted veggies, or cauliflower rice. Each option complements the richness of the cheese and beef, enhancing your meal without piling on carbs!

    Final Thoughts on Keto Philly Cheesesteak Stuffed Peppers

    There’s something truly special about the aroma of Keto Philly Cheesesteak Stuffed Peppers wafting through your kitchen. It signals comfort, family time, and delicious memories waiting to happen. This recipe not only satisfies cravings but also makes weeknight dinners feel like a feast. Whether you’re preparing it for your family or entertaining friends, these stuffed peppers have a way of bringing everyone together. So grab those bell peppers and dive into this savory delight; I promise they will become a favorite in your household, just like they’ve become in mine!


    Print

    clock clock iconcutlery cutlery iconflag flag iconfolder folder iconinstagram instagram iconpinterest pinterest iconfacebook facebook iconprint print iconsquares squares iconheart heart iconheart solid heart solid icon

    Description

    Delicious Keto-friendly stuffed peppers filled with a savory cheesesteak mixture.


    • 4 large bell peppers
    • 1 lb ground beef
    • 1 cup sliced mushrooms
    • 1 medium onion, diced
    • 2 cloves garlic, minced
    • 1 cup provolone cheese, shredded
    • 1 tablespoon olive oil
    • Salt and pepper to taste

    1. Preheat the oven to 375°F (190°C).
    2. Cut the tops off the bell peppers and remove the seeds.
    3. In a skillet, heat olive oil over medium heat and sauté onions and garlic until translucent.
    4. Add ground beef and cook until browned.
    5. Stir in mushrooms and cook until softened.
    6. Season with salt and pepper.
    7. Fill each bell pepper with the beef mixture and top with provolone cheese.
    8. Place stuffed peppers in a baking dish and cover with foil.
    9. Bake for 25-30 minutes, then remove foil and bake for an additional 10 minutes until cheese is bubbly.

    Notes

    • Feel free to add additional vegetables to the stuffing if desired.
    • You can substitute other types of cheese if preferred.
    • Leftovers can be stored in an airtight container in the fridge for up to three days.
    • Prep Time: 15 minutes
    • Cook Time: 40 minutes
    • Category: Main Dish
    • Method: Baking
    • Cuisine: American

    Nutrition

    • Serving Size: 1 stuffed pepper
    • Calories: 350
    • Sugar: 2g
    • Sodium: 600mg
    • Fat: 25g
    • Saturated Fat: 10g
    • Unsaturated Fat: 15g
    • Trans Fat: 0g
    • Carbohydrates: 10g
    • Fiber: 3g
    • Protein: 25g
    • Cholesterol: 85mg

    Sharing is caring!

  • Smoked Watermelon “Tuna” Poke Bowl

    Smoked Watermelon “Tuna” Poke Bowl


    Introduction to Smoked Watermelon “Tuna” Poke Bowl

    Let me just say, if you’re looking for a bold and exciting dish, the Smoked Watermelon “Tuna” Poke Bowl is a game-changer! I know how busy life can get, especially for us moms and professionals juggling countless responsibilities. This poke bowl is not only quick to whip up but also a fantastic way to impress your loved ones with a fresh, exciting twist on traditional poke. Imagine biting into smoky, flavorful watermelon that mimics tuna, paired with creamy avocado and fragrant sushi rice. Trust me, this dish will become a meal prep favorite in your kitchen!

    Why You’ll Love This Smoked Watermelon “Tuna” Poke Bowl

    This Smoked Watermelon “Tuna” Poke Bowl is the perfect recipe for those hectic weekdays

    It’s simple, quick, and oh-so-delicious! With minimal prep and a refreshing taste, you’ll delight in every bite. The smoky essence of the watermelon beautifully replaces traditional fish, making it a guilt-free treat. Plus, it’s packed with nutrients from the fresh ingredients! This vegan poke bowl is not just a meal; it’s a vibrant celebration of flavors!

    Ingredients for Smoked Watermelon “Tuna” Poke Bowl

    To create this stunning Smoked Watermelon “Tuna” Poke Bowl, you’ll need a handful of vibrant ingredients, each adding a unique touch to the flavor profile.

    • Watermelon: The star of the show! Choose a small watermelon for easy handling and sweet, juicy cubes.
    • Soy sauce: This provides a savory depth and umami flavor to the marinade, enhancing the watermelon’s taste.
    • Liquid smoke: A little goes a long way! This ingredient adds that irresistible smoky essence, mimicking traditional poke.
    • Avocado: Creamy and nutritious, it balances the flavors and adds richness to the bowl.
    • Sushi rice: This short-grain rice is sticky and tender, serving as the perfect base for our poke bowl.
    • Edamame: These shelled young soybeans contribute a lovely pop of texture and protein, making the dish heartier.
    • Pickled ginger: A zesty addition that provides a refreshing contrast against the smoky watermelon.
    • Seaweed salad: Light and flavorful, this salad brings ocean vibes that complement the overall theme.
    • Sesame seeds: These tiny seeds add a delightful crunch and a touch of nuttiness when garnishing.
    • Chopped green onions: Fresh and bright, they really elevate the flavors and add a beautiful green finish.

    For those looking to experiment, feel free to swap out the avocado for sliced cucumbers or add some crunchy radishes for a fresh twist. You can find the exact measurements for these ingredients at the end of the article, ready for printing!

    How to Make Smoked Watermelon “Tuna” Poke Bowl

    Now that you’re ready to dive into this delightful Smoked Watermelon “Tuna” Poke Bowl, let’s get cooking! Follow these simple steps for a culinary adventure that’ll have your family begging for seconds.

    Step 1: Prepare the Watermelon

    First things first, grab your small watermelon! Cut it into halves, and then into quarters. Carefully remove the rind from each quarter.

    Next, chop the juicy flesh into bite-sized cubes. Try to make them uniform for even marinating. This is key to achieving that flavor-packed punch!

    Step 2: Marinate the Watermelon

    In a mixing bowl, whisk together the soy sauce and liquid smoke until blended.

    Toss your watermelon cubes into the marinade, ensuring every piece gets a lovely coat of smoky goodness. Cover the bowl and let the magic happen for at least 30 minutes.

    The longer you let them marinate, the more depth of flavor you’ll experience. If you’re not in a rush, a few hours can work wonders!

    Step 3: Cook the Sushi Rice

    While the watermelon is soaking in those flavors, let’s prepare the sushi rice!

    Follow the package instructions for cooking; typically, you’ll boil it with water until tender. Remember to let it cool slightly after cooking.

    If you’re short on time, using a rice cooker can speed things up considerably. Just set it and forget it!

    Step 4: Assemble the Poke Bowl

    Once everything is prepped, it’s assembly time! Grab a bowl and place a generous scoop of sushi rice at the bottom.

    Now, artfully layer the marinated watermelon cubes on one side, followed by the creamy avocado slices. Add a handful of edamame, some zesty pickled ginger, and a scoop of ocean-fresh seaweed salad.

    Make it visually stunning by arranging everything neatly. It’s like presenting art on a plate!

    Step 5: Garnish and Serve

    To finish, sprinkle sesame seeds over the top and add a flourish of chopped green onions. These garnishes not only add flavor but also a pop of color!

    Serve your Smoky Watermelon “Tuna” Poke Bowl immediately. Enjoy the compliments while diving into this fresh, nutritious dish!

    Tips for Success

    • Choose a ripe watermelon for the best flavor—look for a uniform shape and a creamy spot.
    • Let the watermelon marinate longer if time allows; it intensifies the smoky flavor.
    • Rinse your sushi rice until the water runs clear for perfect texture.
    • For a vibrant touch, add sliced radishes or colorful veggies.
    • Experiment with different garnishes, like cilantro or spicy mayo, for unique twists!

    Equipment Needed

    • Sharp knife: Essential for cutting the watermelon and ingredients—ensure it’s sharp for clean slices.
    • Cutting board: A stable surface makes your prep safe and easy.
    • Mixing bowl: Needed for marinating the watermelon; any bowl will do!
    • Rice cooker or pot: For cooking perfect sushi rice.
    • Bowl for serving: Make it visually appealing when presenting your poke bowl!

    Variations of Smoked Watermelon “Tuna” Poke Bowl

    • Spicy Option: Add a drizzle of sriracha or sprinkle in some chili flakes for a fiery kick.
    • Asian-Inspired: Incorporate sliced radishes, cucumbers, or a handful of avocado for a refreshing crunch.
    • Quinoa Base: Swap out sushi rice for cooked quinoa to bump up the protein and add a nutty flavor.
    • Nutty Twist: Mix in some toasted cashews or almonds for extra texture and flavor.
    • Herb-Infused: Experiment with fresh herbs like cilantro or mint to brighten the overall taste.

    Serving Suggestions for Smoked Watermelon “Tuna” Poke Bowl

    • Serve alongside a refreshing cucumber salad for extra crunch and flavor.
    • A tall glass of iced green tea pairs beautifully, enhancing the meal.
    • If you want to impress, present the poke bowl in unique, colorful dishes.
    • Add some soy sauce or wasabi on the side for dipping!

    FAQs about Smoked Watermelon “Tuna” Poke Bowl

    Can I make this poke bowl ahead of time? Absolutely! You can marinate the watermelon and prepare the sushi rice in advance. Just assemble the bowl fresh before serving for the best flavor and texture.

    What other ingredients can I add to the poke bowl? Feel free to get creative! Adding ingredients like edamame, sliced radishes, or pickled vegetables can enhance both flavor and texture. The sky’s the limit!

    Is this Smoked Watermelon “Tuna” Poke Bowl gluten-free? It depends on the soy sauce you use. Opt for a gluten-free soy sauce or tamari if you want to keep the dish gluten-free!

    How do I store leftovers if I have any? Store any leftovers in an airtight container in the fridge. Enjoy them within 1–2 days for the best taste!

    Can I customize the level of smokiness? Yes! Adjust the amount of liquid smoke in the marinade to suit your taste. A little goes a long way.

    Final Thoughts

    The journey of creating this Smoked Watermelon “Tuna” Poke Bowl is a delightful experience that brings joy to your kitchen. From the moment you slice that vibrant watermelon to the satisfying assembly of fresh ingredients, each step is a celebration of flavors. The smoky watermelon truly shines like a star, transforming a simple dish into a culinary masterpiece. I hope you not only savor every bite but also enjoy sharing it with your family and friends. Let this poke bowl inspire you to embrace creativity and love in your cooking; happiness truly is homemade!


    Print

    clock clock iconcutlery cutlery iconflag flag iconfolder folder iconinstagram instagram iconpinterest pinterest iconfacebook facebook iconprint print iconsquares squares iconheart heart iconheart solid heart solid icon

    Description

    A delicious vegan poke bowl featuring smoked watermelon as a tuna substitute.


    • 1 small watermelon
    • 2 tablespoons soy sauce
    • 1 tablespoon liquid smoke
    • 1 avocado, sliced
    • 1 cup cooked sushi rice
    • 1/2 cup edamame, shelled
    • 1/4 cup pickled ginger
    • 1/4 cup seaweed salad
    • Sesame seeds for garnish
    • Chopped green onions for garnish

    1. Cut the watermelon into cubes and remove the rind.
    2. In a bowl, mix soy sauce and liquid smoke, then marinate the watermelon cubes for at least 30 minutes.
    3. Prepare the sushi rice according to package instructions.
    4. Assemble the poke bowl by placing a scoop of sushi rice at the bottom.
    5. Top the rice with marinated watermelon, avocado slices, edamame, pickled ginger, and seaweed salad.
    6. Garnish with sesame seeds and chopped green onions.
    7. Serve immediately and enjoy your vegan poke bowl!

    Notes

    • For best flavor, marinate the watermelon for a few hours if time permits.
    • This recipe is great for meal prep; just assemble fresh before serving.
    • Prep Time: 10 minutes
    • Cook Time: 30 minutes
    • Category: Main Dish
    • Method: No-Cook
    • Cuisine: Japanese

    Nutrition

    • Serving Size: 1 bowl
    • Calories: 350
    • Sugar: 6g
    • Sodium: 600mg
    • Fat: 15g
    • Saturated Fat: 2g
    • Unsaturated Fat: 12g
    • Trans Fat: 0g
    • Carbohydrates: 45g
    • Fiber: 10g
    • Protein: 9g
    • Cholesterol: 0mg

    Sharing is caring!

  • Sheet pan sausage and sweet potatoes with honey garlic sauce

    Sheet pan sausage and sweet potatoes with honey garlic sauce


    Introduction to Sheet Pan Sausage and Sweet Potatoes with Honey Garlic Sauce

    Let’s face it—some nights, the kitchen can feel like a whirlwind of chaos. Between work, kids, and life in general, who has time to slave over a stove? That’s where this sheet pan sausage and sweet potatoes with honey garlic sauce comes to the rescue! It’s quick, cozy, and brings the family together around a delicious meal that simply roasts itself in the oven. Plus, the sweet, savory aroma wafting through the house is pure comfort. Trust me, this easy recipe will be a favorite in your busy weeknight dinner rotation!

    Why You’ll Love This Sheet Pan Sausage and Sweet Potatoes with Honey Garlic Sauce

    This sheet pan sausage and sweet potatoes with honey garlic sauce delivers unbeatable ease and flavor. In just about 40 minutes, you can have a wholesome meal on the table. The best part? There’s minimal cleanup involved—just one pan! As a busy mom myself, I cherish any recipe that has my back on hectic evenings while still providing a nourishing dinner the family will rave about.

    Ingredients for Sheet Pan Sausage and Sweet Potatoes with Honey Garlic Sauce

    The beauty of this sheet pan sausage and sweet potatoes with honey garlic sauce lies not only in its flavor but also in its simplicity. Here’s a rundown of what you’ll need:

    • Chicken or turkey sausage: I prefer using chicken sausage for lighter meals. Turkey sausage works equally well, providing a delicious, savory twist.
    • Sweet potatoes: These vibrant orange beauties add a touch of sweetness and a good dose of nutrients. Their natural sugars caramelize perfectly when roasted.
    • Broccoli: This green gem adds a delightful crunch and a pop of color, enhancing both the nutrition and visual appeal of the dish.
    • Unsalted butter: For sautéing the garlic, butter brings a rich creaminess to the sauce without overwhelming the other flavors.
    • Garlic: I can’t stress enough how garlic elevates this recipe. It adds warmth and depth, making everything more scrumptious.
    • Honey: This sweet golden nectar is the star of the show. It balances the savory sausage and enhances the whole meal with its sticky goodness.
    • Low-sodium soy sauce: A splash of this adds umami, enhancing the overall taste without too much salt.
    • Apple cider vinegar: A little acidity from the vinegar brightens up the sauce, making flavors pop.
    • Salt and pepper: Simple yet essential, these seasonings help bring out the best in every ingredient.
    • Fresh parsley: The final sprinkle adds a refreshing touch and beautiful color contrast before serving.

    Feel free to swap in your favorite veggies—zucchini, cauliflower, or bell peppers could work well, too! Just remember to cut everything into similar sizes for even cooking. You can find the exact quantities for each ingredient at the bottom of the article, perfect for printing out whenever you need it.

    How to Make Sheet Pan Sausage and Sweet Potatoes with Honey Garlic Sauce

    Ready to dive into this delightful sheet pan sausage and sweet potatoes with honey garlic sauce? Let’s roll up our sleeves and get started!

    Step 1: Preheat the Oven

    First things first—preheating your oven is essential. Set it to 400°F (200°C). This temperature allows for perfectly roasted sweet potatoes and sausage. When the oven is preheated, your ingredients will cook evenly, locking in all that flavor!

    Step 2: Prepare the Ingredients

    Now it’s time to prep the star players! Start by cutting the chicken or turkey sausage into 1/2-inch slices. Then, chop your sweet potatoes into cubes, also about 1/2-inch. Don’t forget the broccoli—cut it into similar-sized florets to ensure everything roasts evenly. This makes for a lovely presentation and ensures your meal has a consistent texture throughout.

    Step 3: Make the Honey Garlic Sauce

    Next up, let’s whip up that irresistible honey garlic sauce! Start by melting the unsalted butter in a small saucepan over medium heat. Once melted, toss in the minced garlic and sauté for just about one minute until it’s fragrant. Then, pour in the honey, low-sodium soy sauce, and apple cider vinegar. A sprinkle of salt and pepper will really tie this sauce together. Give everything a good stir and let it simmer for 2-3 minutes. You want those flavors to mingle like old friends!

    Step 4: Assemble on the Sheet Pan

    Grab a baking sheet and arrange the sausage slices, sweet potatoes, and broccoli in an even layer. It’s like art on a pan! Now, drizzle the honey garlic sauce over everything. Make sure to toss the ingredients gently but thoroughly, so every piece is coated in that sweet and savory goodness.

    Step 5: Roast in the Oven

    Now for the magic! Slide the sheet pan into the oven and roast for 25-30 minutes. Make sure to stir everything halfway through to ensure even cooking. You want those sweet potatoes tender and the sausage slightly crisp on the edges—heavenly!

    Step 6: Garnish and Serve

    Once out of the oven, it’s time for the final touch. Sprinkle some fresh parsley over your roasted meal before serving. The vibrant green not only adds a pop of color but also a bit of freshness to balance all those delicious flavors. And voila! Dinner is served!

    Tips for Success

    • Cut all ingredients uniformly to ensure even cooking.
    • Try marinating the sausage in the honey garlic sauce for extra flavor.
    • Swap out broccoli for other seasonal veggies like Brussels sprouts or asparagus.
    • Don’t overcrowd the pan; this helps achieve a nice, crisp roast.
    • Make it ahead! This meal tastes even better as leftovers the next day.

    Equipment Needed

    • Sheet pan: A large baking sheet works best, but any oven-safe baking dish can substitute.
    • Cutting board: Essential for chopping veggies and sausage.
    • Chef’s knife: Choose a good knife for precise cutting—your best friend in the kitchen!
    • Small saucepan: Needed for making the honey garlic sauce; a frying pan can work too.
    • Spatula or tongs: Use these for easy stirring and serving.

    Variations on Sheet Pan Sausage and Sweet Potatoes with Honey Garlic Sauce

    • Spicy kick: Add crushed red pepper flakes or diced jalapeños to the honey garlic sauce for a zesty twist.
    • Vegetarian version: Substitute the sausage with chickpeas or marinated tofu for a meatless option that still packs a punch!
    • Sweeter profile: Use maple syrup instead of honey for a unique flavor, perfect for those with a sweet tooth.
    • Herb-infused: Toss in fresh rosemary or thyme along with the parsley for an aromatic experience that elevates the entire dish.
    • Root vegetable medley: Mix in carrots or parsnips with the sweet potatoes for a delightful variety of flavors and textures.

    Serving Suggestions for Sheet Pan Sausage and Sweet Potatoes with Honey Garlic Sauce

    • Side salad: Serve with a crisp green salad to add a refreshing crunch.
    • Grains: Pair with quinoa or brown rice for a filling meal.
    • Beverages: A light white wine or sparkling water complements the dish beautifully.
    • Presentation: Serve directly from the pan for a rustic touch and get everyone sharing!

    FAQs about Sheet Pan Sausage and Sweet Potatoes with Honey Garlic Sauce

    Can I make this recipe ahead of time? Absolutely! You can chop the ingredients and prepare the honey garlic sauce a day in advance. Store them separately in the fridge. When you’re ready to cook, simply toss everything together and roast!

    What other vegetables can I use in this sheet pan dish? The beauty of this recipe is its versatility! Feel free to substitute with zucchini, bell peppers, or even brussels sprouts. Just keep their sizes similar to the sweet potatoes for even cooking.

    Can I use other types of sausage? Yes! This sheet pan sausage and sweet potatoes with honey garlic sauce works great with any smoked sausage, kielbasa, or even a spicy Italian sausage if you’re craving a bit of heat.

    How do I store leftovers? Store any leftovers in an airtight container in the refrigerator for up to 3 days. Reheat in the oven or microwave until warmed through for a quick lunch or dinner.

    Can I freeze this dish? While I recommend enjoying it fresh, you can freeze the assembled raw ingredients (sans sauce) for up to 2 months. Just thaw overnight in the fridge and then follow the cooking instructions when you’re ready to enjoy!

    Final Thoughts

    Cooking should be a joyous experience, not a stressful chore. With this sheet pan sausage and sweet potatoes with honey garlic sauce, you’ll feel the warmth of home-cooked goodness without breaking a sweat. The simplicity of this dish allows you to savor every bite while spending quality time with family. Imagine the delicious aromas filling your kitchen, creating cozy memories that linger long after the dishes are done. I hope this recipe brings you as much joy and ease as it has to my bustling kitchen—happy cooking, friends!


    Print

    clock clock iconcutlery cutlery iconflag flag iconfolder folder iconinstagram instagram iconpinterest pinterest iconfacebook facebook iconprint print iconsquares squares iconheart heart iconheart solid heart solid icon

    Description

    A quick and cozy dinner recipe featuring chicken or turkey sausage, sweet potatoes, and broccoli, all roasted on a sheet pan with a delicious honey garlic sauce.


    • 14 oz chicken or turkey sausage, cut into 1/2-inch slices
    • 2 medium sweet potatoes, cut into 1/2-inch cubes
    • 2 cups broccoli, cut into 1/2-inch florets
    • 1 tablespoon unsalted butter
    • 4 medium cloves garlic, minced
    • 1/4 cup honey
    • 1/4 cup low-sodium soy sauce
    • 1 tablespoon apple cider vinegar
    • Salt and pepper to taste
    • 2 tablespoons minced fresh parsley

    1. Preheat the oven to 400°F (200°C).
    2. Arrange the sausage slices, sweet potatoes, and broccoli on a sheet pan.
    3. In a small saucepan, melt butter over medium heat. Add minced garlic and sauté for about 1 minute, or until fragrant.
    4. Add honey, soy sauce, apple cider vinegar, salt, and pepper to the saucepan. Stir to combine and bring to a simmer for 2-3 minutes.
    5. Pour the sauce over the sausage, sweet potatoes, and broccoli. Toss everything to coat evenly.
    6. Roast in the oven for 25-30 minutes, stirring halfway through, until the sweet potatoes are tender and the sausage is cooked through.
    7. Remove from the oven and sprinkle with fresh parsley before serving.

    Notes

    • Feel free to substitute with your favorite vegetables.
    • Make sure to cut all vegetables to similar sizes for even cooking.
    • Prep Time: 10 minutes
    • Cook Time: 30 minutes
    • Category: Dinner
    • Method: Oven roasting
    • Cuisine: American

    Nutrition

    • Serving Size: 1/4 of the recipe
    • Calories: 400
    • Sugar: 10g
    • Sodium: 600mg
    • Fat: 18g
    • Saturated Fat: 6g
    • Unsaturated Fat: 10g
    • Trans Fat: 0g
    • Carbohydrates: 45g
    • Fiber: 5g
    • Protein: 20g
    • Cholesterol: 60mg

    Sharing is caring!

  • Grilled Chicken Bites with Creamy Garlic Sauce

    Grilled Chicken Bites with Creamy Garlic Sauce


    Introduction to Grilled Chicken Bites with Creamy Garlic Sauce

    Welcome to my kitchen! Today, I’m excited to share a recipe that has become a favorite in our home: Grilled Chicken Bites with Creamy Garlic Sauce. Life can get so busy that finding time to cook feels like an Olympic event. But this dish? It’s your golden ticket! Not only is it quick and easy to whip up, but the flavors will surely impress your loved ones. Picture tender, juicy chicken bites kissed by the grill, all drizzled with a dreamy, creamy garlic sauce. Who wouldn’t love that?

    Why You’ll Love This Grilled Chicken Bites with Creamy Garlic Sauce

    This recipe is a lifesaver for busy moms and professionals! It’s quick—ready in just 30 minutes—yet feels special enough for a family gathering. The succulent chicken combined with a rich, creamy garlic sauce packs a flavor punch that everyone will adore. You can easily customize it to suit your family’s taste, making it as versatile as it is delicious. Trust me, this dish will become a go-to in your weeknight repertoire!

    Ingredients for Grilled Chicken Bites with Creamy Garlic Sauce

    Let’s gather our ingredients and prepare for a flavor adventure! Here’s what you’ll need for these irresistible Grilled Chicken Bites with Creamy Garlic Sauce. Don’t worry about the measurements just yet; they’re available at the bottom for printing.

    • Boneless, skinless chicken thighs or breasts: These are perfect for tender, juicy bites. Thighs offer more flavor, while breasts are leaner.
    • Olive oil: This adds richness and helps to keep the chicken moist during grilling.
    • Soy sauce: A dash of this brings umami and enhances the flavor profile. You can swap it out with coconut aminos for a gluten-free option.
    • Lemon juice: Freshly squeezed is best! It brightens the dish and balances the richness of the sauce.
    • Smoked paprika: This gives a delightful smoky flavor and beautiful color to the chicken. If you don’t have it, regular paprika works too!
    • Garlic powder and onion powder: These add depth and aroma to the marinade, giving each bite a delightful kick.
    • Salt and black pepper: Essential for seasoning, enhancing all the other flavors. Always adjust to taste!
    • Butter: This creates a lovely base for the creamy sauce, making it rich and buttery.
    • Garlic cloves: Freshly minced garlic makes the sauce sing! You can increase or decrease the amount based on your preference.
    • Heavy cream: The star of the sauce! It creates that luxurious creaminess we all crave.
    • Grated Parmesan cheese: This adds a sharp, nutty note that complements the garlic beautifully.
    • Dijon mustard (optional): Just a teaspoon adds a subtle tang. Feel free to skip it if you’re not a mustard fan.
    • Fresh parsley: Not just a garnish! It adds a pop of color and fresh flavor.

    Now that we’ve got everything gathered, let’s dive into the cooking! The exact ingredient quantities are just a scroll away at the end of this post!

    How to Make Grilled Chicken Bites with Creamy Garlic Sauce

    Let’s dive into how to make these mouthwatering Grilled Chicken Bites with Creamy Garlic Sauce. I promise you, it’s easier than it sounds! Follow these steps, and you’ll be treating yourself to a delightful dinner in no time.

    Step 1: Marinate the Chicken

    Start by combining olive oil, soy sauce, lemon juice, smoked paprika, garlic powder, onion powder, salt, and black pepper in a mixing bowl. I love using a whisk for this; it makes blending everything together a breeze.

    Add your chicken pieces to the mixture and give it a solid stir. Make sure each chunk is coated generously. Marinating is a key step! Let it sit for at least 30 minutes. But if you have time, go ahead and let it marinate in the fridge overnight. Trust me, this makes the flavors shine!

    Step 2: Prepare the Creamy Garlic Sauce

    While the chicken is soaking up all that flavor, let’s whip up the creamy garlic sauce. Grab a saucepan and melt your butter over medium heat. As it starts to melt, toss in the minced garlic. The aroma will be heavenly!

    Cook the garlic for about 1–2 minutes, just until it’s fragrant—be careful not to let it burn. Slowly stir in the heavy cream and bring it to a gentle simmer. Stirring is vital here to get that creamy consistency. Then, sprinkle in the grated Parmesan cheese and optional Dijon mustard. Mix until everything is silky smooth and warmed through. Season with salt and pepper to your liking, and keep it on low heat while you grill the chicken.

    Step 3: Grill the Chicken

    Time to fire up the grill! Preheat your grill or grill pan over medium-high heat. Give a light oiling to the surface to prevent sticking. Once hot, place your marinated chicken pieces on the grill.

    Grill them for about 3–4 minutes per side. You want those beautiful grill marks and the chicken cooked through. Keep an eye on them, as cooking times can vary. You’ll know they’re done when they reach a juicy golden brown and no longer show pink!

    Step 4: Serve and Enjoy

    Once your chicken bites are perfectly grilled, transfer them to a serving dish. Now, here’s the fun part: drizzle that dreamy creamy garlic sauce generously over the top. Garnish with fresh chopped parsley for a vibrant touch.

    Then, serve immediately while it’s still warm. Everyone will love this crowd-pleasing dish that brings together so much flavor with minimal effort. Enjoy every bite!

    Tips for Success

    • Marinate overnight for even richer flavors!
    • Don’t skip the oiling step to prevent chicken from sticking.
    • Use an instant-read thermometer to ensure the chicken reaches 165°F for perfect doneness.
    • Adjust the amount of garlic in the sauce to suit your taste.
    • For added flavor, try adding herbs like thyme or rosemary to the marinade.

    Equipment Needed

    • Grill or Grill Pan: Use either for delicious grilling. A non-stick skillet can work in a pinch.
    • Mixing Bowl: For marinating the chicken, a large bowl is ideal. A zip-top bag is great for easy clean-up!
    • Whisk: Perfect for mixing marinade. A fork also does the trick!
    • Saucepan: Needed for the creamy garlic sauce. Any medium pot will work.
    • Instant-Read Thermometer: To check chicken doneness. If you don’t have one, just cut into the thickest part to ensure it’s no longer pink.

    Variations

    • Spicy Kick: Add some cayenne pepper or chili flakes to the marinade for a fiery twist.
    • Herb Infusion: Mix in fresh herbs like basil or oregano for a fragrant touch.
    • Low-Fat Option: Use skinless chicken breast and swap heavy cream for a lighter milk alternative like half-and-half or even Greek yogurt.
    • Lemon Garlic Sauce: Replace the creamy sauce with a lemon garlic vinaigrette for a tangy, lighter option.
    • Vegetarian Delight: Substitute chicken with bite-sized pieces of firm tofu or portobello mushrooms marinated the same way.

    Serving Suggestions

    • Grilled Vegetables: Serve alongside asparagus, zucchini, or bell peppers for a colorful plate.
    • Fresh Salad: A crisp garden salad with a light vinaigrette complements the rich sauce beautifully.
    • Sides: Pair with fluffy rice or quinoa to soak up the creamy goodness.
    • Drink Pairing: A chilled white wine or sparkling lemonade pairs perfectly.
    • Presentation: Serve on a beautiful platter and garnish with lemon wedges for a pop of color!

    FAQs about Grilled Chicken Bites with Creamy Garlic Sauce

    I’m here to help answer any burning questions you might have about these Grilled Chicken Bites with Creamy Garlic Sauce. Let’s dive in!

    Can I use a different type of chicken?

    Absolutely! While I love using thighs for their flavor, boneless skinless chicken breasts work just as well. Feel free to experiment!

    How can I make the sauce thicker?

    If you desire a thicker sauce, let it simmer longer, allowing it to reduce. You can also mix a bit of cornstarch with water and add it to the sauce for an instant thickening boost.

    Can I make this dish ahead of time?

    You can marinate the chicken the night before, and it will save you time during dinner prep. The sauce can also be made in advance; just reheat it gently before serving.

    What can I serve with the chicken bites?

    These chicken bites pair well with a variety of sides! Consider serving them with grilled vegetables, rice, or a fresh salad for a complete meal.

    Is this recipe gluten-free?

    Yes, it is! Just be sure to use gluten-free soy sauce or tamari, and you’re all set for a delicious gluten-free meal!

    Final Thoughts

    Creating these Grilled Chicken Bites with Creamy Garlic Sauce is not just about satisfying hunger; it’s about making memories around the table. The aroma wafting through your kitchen, the smiles on your loved ones’ faces, and those first delightful bites are what cooking is all about. Whether you’ve had a long day or are simply looking to make the ordinary feel special, this dish has your back. With minimal fuss and maximum flavor, it’s that weeknight hero we all need. So, don your apron and get ready to enjoy a delicious culinary experience that’s sure to bring joy!


    Print

    clock clock iconcutlery cutlery iconflag flag iconfolder folder iconinstagram instagram iconpinterest pinterest iconfacebook facebook iconprint print iconsquares squares iconheart heart iconheart solid heart solid icon

    Description

    Delicious grilled chicken bites served with a creamy garlic sauce for an irresistible flavor.


    • 1.5 lbs boneless, skinless chicken thighs or breasts, cut into bite-sized chunks
    • 2 tbsp olive oil
    • 1 tbsp soy sauce
    • 1 tbsp lemon juice
    • 2 tsp smoked paprika
    • 1 tsp garlic powder
    • 1 tsp onion powder
    • 1/2 tsp salt
    • 1/2 tsp black pepper
    • 3 tbsp butter
    • 4 garlic cloves, minced
    • 1 cup heavy cream
    • 1/2 cup grated Parmesan cheese
    • 1 tsp Dijon mustard (optional)
    • Salt and pepper to taste
    • Fresh chopped parsley for garnish

    1. In a bowl, combine olive oil, soy sauce, lemon juice, smoked paprika, garlic powder, onion powder, salt, and pepper. Add chicken and mix well. Marinate for 30 minutes or up to 12 hours.
    2. To make the sauce, melt butter in a saucepan over medium heat. Add garlic and cook for 1–2 minutes until fragrant. Stir in heavy cream and bring to a low simmer.
    3. Add Parmesan and Dijon mustard to the cream. Stir until smooth and slightly thickened. Season with salt and pepper. Keep warm.
    4. Heat a grill or grill pan over medium-high heat. Lightly oil the surface.
    5. Grill chicken pieces for 3–4 minutes per side until nicely charred and cooked through.
    6. Transfer chicken to a serving dish. Drizzle with warm garlic cream sauce.
    7. Garnish with parsley and serve immediately.

    Notes

    • Marinating the chicken for longer enhances the flavors.
    • Adjust garlic in the sauce according to taste.
    • Serve with a side of vegetables for a complete meal.
    • Prep Time: 10 minutes
    • Cook Time: 20 minutes
    • Category: Main Course
    • Method: Grilling
    • Cuisine: American

    Nutrition

    • Serving Size: 1 serving
    • Calories: 450
    • Sugar: 2g
    • Sodium: 600mg
    • Fat: 30g
    • Saturated Fat: 15g
    • Unsaturated Fat: 10g
    • Trans Fat: 0g
    • Carbohydrates: 5g
    • Fiber: 0g
    • Protein: 38g
    • Cholesterol: 150mg

    Sharing is caring!

  • Beet and Orange Salad with Creamy Feta Awaits You!

    Beet and Orange Salad with Creamy Feta Awaits You!


    Introduction to Beet and Orange Salad with Creamy Feta and Crunchy Pistachios

    Welcome, fellow kitchen adventurers! If you’re anything like me—an eager home cook who juggles family dinners and work commitments—you’ll love this Beet and Orange Salad with Creamy Feta and Crunchy Pistachios. It’s a delightful way to brighten up any table, especially on those rushed days when time is tight. This salad isn’t just simple; it’s a flavorful burst of color and nutrition. With its mix of vibrant beets, juicy oranges, and tangy feta, it’s sure to impress your loved ones. Plus, it’s a quick solution for a busy day!

    Why You’ll Love This Beet and Orange Salad with Creamy Feta and Crunchy Pistachios

    This Beet and Orange Salad with Creamy Feta and Crunchy Pistachios is the epitome of effortless elegance. With minimal prep time, you can create a stunning dish that elevates any meal. The sweet and earthy flavors dance on your palate, while the feta and pistachios offer that delightful creamy crunch. It’s a nourishing option that even fickle eaters can enjoy, making it your go-to recipe for busy weeknights or special gatherings!

    Ingredients for Beet and Orange Salad with Creamy Feta and Crunchy Pistachios

    Let’s talk about what makes this Beet and Orange Salad with Creamy Feta and Crunchy Pistachios sing. Gather these vibrant ingredients to create a feast for both the eyes and your taste buds:

    • Beets: Roasted, peeled, and sliced into wedges. These earthy beauties are rich in vitamins and give the salad its stunning color.
    • Oranges: Peeled and segmented. Juicy, sweet oranges add a refreshing zing that balances the flavors beautifully.
    • Feta Cheese: Crumbled. Creamy and tangy, feta takes this dish to another level, giving it that rich flavor we crave.
    • Pistachios: Shelled and chopped. The crunchy nuts provide a delightful contrast to the creamy feta and soft beets.
    • Fresh Mint Leaves: A few sprigs for garnish. Mint brings a lovely aromatic note. It’s like a fresh breeze on your salad.
    • Olive Oil: Extra virgin quality is recommended for its rich flavor. This is the base for our tangy dressing.
    • Balsamic Vinegar: Adds depth and sweetness. It’s important for a well-rounded dressing that brings everything together.
    • Honey: A drizzle to balance out the acidity of the vinegar and enhance the sweetness of the oranges.
    • Dijon Mustard: Just a hint to add a bit of zing to the dressing. It gives it a sophisticated edge.
    • Salt and Pepper: To taste. Don’t skip these; they enhance the flavors of all the other elements.

    If you like to mix things up, feel free to substitute other nuts or cheeses that you enjoy! For the exact quantities of these ingredients, just scroll down to the bottom of the article, where you’ll find them ready for printing.

    How to Make Beet and Orange Salad with Creamy Feta and Crunchy Pistachios

    Now, let’s dive into creating this refreshing Beet and Orange Salad with Creamy Feta and Crunchy Pistachios. The process is simple yet rewarding. Trust me, anyone can master it!

    Prepare the Dressing

    First, grab a small bowl. Whisk together 2 tablespoons of extra virgin olive oil, 1 tablespoon of balsamic vinegar, 1 teaspoon of honey, and 1/2 teaspoon of Dijon mustard.

    Add a pinch of salt and freshly ground black pepper to taste. This dressing will be the magical drizzle that brings everything together!

    Arrange the Ingredients

    Next, take a large serving platter and start arranging the roasted beet wedges and orange segments beautifully. Think of it as creating a work of art on a plate.

    The vibrant colors are already inviting, and it’s only going to get better from here!

    Add the Feta and Pistachios

    Once the beets and oranges are elegantly displayed, sprinkle the crumbled feta cheese over the top. Don’t hold back; let that creamy goodness shine!

    Then, scatter the shelled pistachios across the salad. Their crunch will add a delightful texture contrast with the smooth feta and tender beets.

    Drizzle and Garnish

    Here comes the fun part! Drizzle your prepared dressing evenly over the entire salad.

    Garnish with a few fresh mint leaves for pops of green and a burst of aroma, making it look even more appealing.

    Serve and Enjoy

    Your Beet and Orange Salad with Creamy Feta and Crunchy Pistachios is ready to be enjoyed!

    Before serving, taste it all. Adjust the seasoning with a little more salt and pepper if you like. This salad is best served fresh, so dig in and enjoy the delightful blend of flavors!

    Tips for Success

    • Always roast your beets ahead of time. This way, you save precious minutes during prep.
    • Use a sharp knife to cut the oranges. This will help retain their juicy segments and keep it neat.
    • Don’t skip the mint garnish! It adds a refreshing burst that elevates the dish.
    • Feel free to toast the pistachios for an extra crunch and nutty flavor.
    • Taste and adjust the dressing to suit your palate—everyone’s taste buds are different!

    Equipment Needed

    • A small mixing bowl for whisking the dressing.
    • A large serving platter to display your colorful salad.
    • A sharp knife for slicing the beets and oranges.
    • A cutting board to protect your countertops.
    • Measuring spoons to ensure your dressing is spot on.

    Variations on Beet and Orange Salad with Creamy Feta and Crunchy Pistachios

    • For a vegan twist, substitute the feta with creamy avocado or a vegan cheese alternative to keep that luscious texture.
    • Try adding quinoa or farro for a heartier salad that’s packed with protein and fiber.
    • Swap out pistachios for walnuts or almonds for a different nutty flavor and crunch.
    • Incorporate goat cheese instead of feta for a tangier flavor that pairs beautifully with beets and oranges.
    • Add sliced red onion or shallots for a hint of sharpness that beautifully complements the sweetness of the oranges.
    • Mix in some arugula or baby spinach for a fresh green touch and extra nutrients.

    Serving Suggestions for Beet and Orange Salad with Creamy Feta and Crunchy Pistachios

    • Pair this salad with grilled chicken or fish for a balanced meal full of flavor.
    • Serve it alongside crusty bread to soak up the delicious dressing.
    • Consider a light white wine or sparkling water infused with citrus for refreshing drink options.
    • For a festive touch, serve on colorful dinnerware to highlight the salad’s vibrant hues.
    • Try adding edible flowers for a stunning presentation that’s sure to impress!

    FAQs about Beet and Orange Salad with Creamy Feta and Crunchy Pistachios

    Can I prepare the Beet and Orange Salad with Creamy Feta and Crunchy Pistachios in advance?

    Yes, you can prep the beets and oranges ahead of time. Just keep the components separate until you’re ready to serve. Mixing them too early may make everything soggy.

    What can I substitute for feta cheese in the salad?

    If feta isn’t your thing, try goat cheese or even creamy avocado for a delightful twist. Both options will add a unique flavor.

    Is this salad gluten-free and suitable for a vegetarian diet?

    Absolutely! This Beet and Orange Salad with Creamy Feta and Crunchy Pistachios is naturally gluten-free and perfect for vegetarians, making it inclusive for various diets.

    Can I make this salad without pistachios?

    Certainly! You can leave out the pistachios if you have a nut allergy or just want a simpler version. Try sunflower seeds or even toasted pumpkin seeds for added crunch!

    What’s the best way to store leftovers of this salad?

    If you have leftovers, store them in an airtight container in the fridge. It’s best to consume within a day for optimal freshness. The flavors will meld and may taste even better!

    Final Thoughts

    Creating this Beet and Orange Salad with Creamy Feta and Crunchy Pistachios is more than just a culinary task—it’s a joyful experience! Each vibrant layer invites you to explore unique flavors that dance on your palate. The earthy sweetness of the beets, the bright zing of oranges, and the creamy feta come together like a harmonious symphony. This salad not only brightens up your table but also brings smiles to those you serve it to. I hope it becomes a cherished recipe in your home, offering delightful moments and conversations with family and friends. Enjoy every bite!


    Print

    clock clock iconcutlery cutlery iconflag flag iconfolder folder iconinstagram instagram iconpinterest pinterest iconfacebook facebook iconprint print iconsquares squares iconheart heart iconheart solid heart solid icon

    Description

    A refreshing salad featuring roasted beets, juicy oranges, creamy feta cheese, and crunchy pistachios, finished with a tangy dressing.


    • 3 medium beets, roasted, peeled, and sliced into wedges
    • 3 oranges, peeled and segmented
    • 1/2 cup crumbled feta cheese
    • 1/4 cup shelled pistachios
    • Fresh mint leaves, for garnish
    • Salt and freshly ground black pepper, to taste
    • 2 tablespoons extra virgin olive oil
    • 1 tablespoon balsamic vinegar
    • 1 teaspoon honey
    • 1/2 teaspoon Dijon mustard
    • Salt and freshly ground black pepper, to taste

    1. In a small bowl, whisk together olive oil, balsamic vinegar, honey, Dijon mustard, salt, and pepper. Set aside.
    2. Arrange beet wedges and orange segments on a large serving platter.
    3. Sprinkle crumbled feta cheese over the beets and oranges.
    4. Scatter pistachios across the salad.
    5. Drizzle the prepared dressing evenly over the salad.
    6. Garnish with fresh mint leaves.
    7. Season with additional salt and pepper if needed. Serve immediately.

    Notes

    • Best served fresh.
    • Feel free to customize with other nuts or cheese if desired.
    • Prep Time: 15 minutes
    • Cook Time: 30 minutes
    • Category: Salad
    • Method: Mixing
    • Cuisine: Mediterranean

    Nutrition

    • Serving Size: 1 serving
    • Calories: 220
    • Sugar: 6g
    • Sodium: 250mg
    • Fat: 14g
    • Saturated Fat: 5g
    • Unsaturated Fat: 9g
    • Trans Fat: 0g
    • Carbohydrates: 22g
    • Fiber: 5g
    • Protein: 6g
    • Cholesterol: 20mg

    Sharing is caring!

  • Salmon Burrito Bowl: A Deliciously Healthy Delight!

    Salmon Burrito Bowl: A Deliciously Healthy Delight!


    Introduction to Salmon Burrito Bowl

    As a busy mom, I’ve learned that a delicious meal can also be quick and healthy! Enter the Salmon Burrito Bowl, my go-to recipe for those whirlwind weeknights when time is short, but tastes need to shine. Imagine perfectly seasoned salmon paired with fluffy rice, black beans, and vibrant toppings all bundled in one bowl. This dish not only satisfies my family’s cravings but also makes for a beautiful presentation that impresses even the most discerning eaters. Whether it’s a casual dinner or a family gathering, this Salmon Burrito Bowl makes every meal feel extra special!

    Why You’ll Love This Salmon Burrito Bowl

    This Salmon Burrito Bowl is a game-changer for busy lives. It brings together the wholesome goodness of salmon and the convenience of a one-bowl meal that everyone will love. It’s quick to prepare, taking just 30 minutes from start to finish! Plus, the vibrant colors and fresh flavors make it a feast for the eyes and the taste buds. Trust me, this dish will become a family favorite in no time!

    Ingredients for Salmon Burrito Bowl

    Gathering the right ingredients is half the fun! This Salmon Burrito Bowl celebrates fresh flavors and nutritious elements that will make your taste buds dance. Here’s what you need:

    • Salmon fillets: Fresh salmon is always best, but you can use frozen if needed. It’s packed with omega-3s!
    • Olive oil: This helps create a crispy exterior and adds healthy fats to the dish.
    • Garlic powder: A must-have to bring depth and flavor, making the salmon irresistibly tasty.
    • Chili powder: For a subtle kick! Adjust this based on your family’s heat tolerance.
    • Paprika: This adds beautiful color and a hint of smokiness to the dish.
    • Salt and pepper: Essential for enhancing all the flavors and allowing them to shine through.
    • Cooked brown rice: A healthy base option, but feel free to switch it up with quinoa or cauliflower rice for a lighter touch!
    • Black beans: These are nutritious and add protein. Rinse them to remove excess sodium.
    • Corn kernels: Fresh, frozen, or canned—whatever you have on hand! Sweet corn brings a wonderful crunch.
    • Avocado: Creamy and delicious, it adds richness and healthy fats.
    • Cherry tomatoes: Their sweetness brightens the bowl and adds vibrant color.
    • Red onion: Thinly sliced for a bit of bite and beautiful contrast in texture.
    • Cilantro: Optional but very much recommended for a fresh flavor boost.
    • Lime wedges: Squeeze some over the bowl for that zesty finish!
    • For the Dressing:
    • Greek yogurt: A creamy base for the dressing that cuts down on calories compared to sour cream.
    • Lime juice: Adds an acidic note, bringing everything together.
    • Honey or agave: If you like a touch of sweetness, this is an optional addition!
    • More garlic powder, salt, and pepper: To season the dressing as well.

    Feel free to get creative with toppings! Ingredients with exact quantities are listed at the bottom of the article for your convenience and easy printing.


    How to Make Salmon Burrito Bowl

    Making a Salmon Burrito Bowl is as simple as pie. Follow these clear steps, and soon you’ll have a beautiful, nutritious dish ready to savor. Jumping into culinary action can be a joy, especially when you know what to do!

    Step 1 – Prepare the Oven or Grill

    First things first, let’s preheat that oven! Set it to 400°F (200°C). This way, you’ll ensure the salmon cooks evenly and perfectly. If you prefer grilling, heat your grill pan over medium heat. Whichever method you choose, getting this right sets the stage for a flavorful main course!

    Step 2 – Season the Salmon

    Next, grab those salmon fillets and rub them with olive oil. This step not only helps the salmon cook beautifully but also adds a touch of richness. Sprinkle garlic powder, chili powder, paprika, salt, and pepper evenly on both sides. Let those spices mingle with the fish for an explosion of flavor that’s simply irresistible!

    Step 3 – Cook the Salmon

    Now, it’s time to cook. If you’re baking, place the seasoned salmon on a lined baking sheet and slide it into the oven for 12-15 minutes. This technique brings out the moistness of the fish. If grilling, cook the fillets for 4-5 minutes per side. You’ll know it’s done when the flesh flakes apart easily with a fork. Ah, the aroma filling your kitchen is heavenly!

    Step 4 – Prepare the Base

    While your salmon is cooking, let’s turn our attention to the base. Prepare your choice of rice, quinoa, or cauliflower rice according to the package instructions. Fluffy grains will serve as a hearty foundation for all the other delicious toppings. Don’t forget, a good base is like a strong foundation for a house!

    Step 5 – Prepare the Toppings

    Now for the fun part—prepping those colorful toppings! Rinse and drain the black beans to remove any excess sodium. Heat the corn briefly in a pan or microwave if you’re using frozen or canned options. If fresh corn is your pick, sauté it to pop the flavor. Next, slice up your avocado, halve the cherry tomatoes, and thinly slice the red onion. Keep them all ready for the assembly!

    Step 6 – Mix the Dressing

    In a small bowl, combine Greek yogurt, lime juice, honey (if you’re using it), garlic powder, and a splash of salt and pepper. Whisk this all together until it’s smooth. This dressing will tie all the elements together beautifully, adding that creamy tanginess to your bowl.

    Step 7 – Assemble the Bowl

    Finally, it’s time to build your masterpiece! Start by layering your cooked rice or chosen grain at the bottom of the bowl. Flake the cooked salmon into large chunks and place it on top. Add the black beans, corn, sliced avocado, cherry tomatoes, and red onion, arranging them for a vibrant look. Drizzle that delightful dressing over it all and top with fresh cilantro, if you fancy it. Serve with lime wedges on the side for that refreshing zest!

    Tips for Success

    • Prep ingredients in advance for a smooth cooking experience.
    • Use a meat thermometer to ensure salmon reaches 145°F for perfect doneness.
    • Customize toppings based on your family’s preferences—it’s a fun way to involve everyone!
    • Double the recipe for meal prep; these bowls store well in the fridge!
    • Don’t skip the lime juice; it brightens up all the flavors!

    Equipment Needed

    • Baking sheet or grill pan: Either works great for cooking the salmon.
    • Medium bowl: For mixing the dressing; a salad bowl can do the job!
    • Knife and cutting board: Essential for slicing up those delicious toppings.
    • Measuring spoons: Handy for measuring dressings and spices.
    • Rice cooker or pot: Cook your rice perfectly every time!

    Variations of Salmon Burrito Bowl

    • **Spicy Twist**: Add chopped jalapeños or a drizzle of spicy salsa for an extra kick.
    • **Tropical Delight**: Swap avocado for mango for a fruity sweetness that brightens up the entire bowl.
    • **Protein Boost**: Include grilled shrimp or chicken along with the salmon to elevate the protein content.
    • **Vegetarian Version**: Replace salmon with grilled tofu or roasted vegetables for a tasty meatless option.
    • **Cauliflower Rice Base**: For a low-carb option, use cauliflower rice instead of traditional grains, keeping it light and refreshing.
    • **Herbed Yoghurt Sauce**: Mix in fresh herbs like dill or parsley with the dressing for a fresh twist on flavors.

    Serving Suggestions for Salmon Burrito Bowl

    • Pair with a refreshing side salad topped with citrus vinaigrette for vibrant flavor.
    • Serve with tortilla chips or crispy plantain chips for a delightful crunch.
    • Enjoy with a chilled glass of sparkling water or a fruity iced tea.
    • Garnish with extra lime wedges and colorful edible flowers for a beautiful presentation.

    FAQs about Salmon Burrito Bowl

    Curious about this delicious Salmon Burrito Bowl? I’ve got answers to your burning questions! Let’s dive into some common queries and uncover the magic behind this quick meal.

    Can I use a different type of fish?
    Absolutely! While salmon is a standout choice, you can substitute it with trout, tilapia, or even canned tuna for a different flavor profile. Just remember to adjust cooking times accordingly!

    Is this recipe suitable for meal prep?
    Yes! This Salmon Burrito Bowl is perfect for meal prep. Prepare all the components ahead of time and store them separately in the fridge. When you’re ready to eat, just assemble and enjoy!

    Can I make this bowl vegetarian?
    Definitely! For a vegetarian version, replace the salmon with grilled tofu, tempeh, or roasted chickpeas. These options will still give you a hearty, satisfying meal.

    What can I substitute for the rice?
    If you prefer, you can use quinoa, couscous, or even cauliflower rice. Each option offers a unique texture while keeping the meal healthy and delicious.

    How spicy is this dish, and can I adjust the heat?
    The heat level is pretty mild but can easily be adjusted! If your family loves spice, consider adding jalapeños or more chili powder. You are in control of the spice, so feel free to customize it to your liking!

    Final Thoughts on Salmon Burrito Bowl

    Preparing a Salmon Burrito Bowl transcends mere cooking; it’s an experience filled with joy and flavor. The vibrant colors and fresh tastes bring a sense of celebration to the dinner table, making every meal feel special. This recipe is a reminder that healthy food can be delicious and satisfying, bringing families together. The best part? It’s quick enough to whip up on busy evenings, yet impressive enough for guests. I hope you find as much love and happiness in this dish as I have. Trust me, your taste buds will thank you!


    Print

    clock clock iconcutlery cutlery iconflag flag iconfolder folder iconinstagram instagram iconpinterest pinterest iconfacebook facebook iconprint print iconsquares squares iconheart heart iconheart solid heart solid icon

    Description

    A Salmon Burrito Bowl is a delicious and healthy meal that combines seasoned salmon with rice, black beans, corn, and fresh toppings.


    • 2 salmon fillets (about 6 oz each)
    • 1 tbsp olive oil
    • 1 tsp garlic powder
    • 1 tsp chili powder
    • 1 tsp paprika
    • Salt and pepper, to taste
    • 1 cup cooked brown rice (or white rice, quinoa, or cauliflower rice)
    • 1/2 cup black beans, rinsed and drained
    • 1/2 cup corn kernels (fresh, frozen, or canned)
    • 1/2 avocado, sliced
    • 1/4 cup cherry tomatoes, halved
    • 1/4 cup red onion, thinly sliced
    • 1/4 cup cilantro, chopped (optional)
    • Lime wedges, for serving
    • For the Dressing:
    • 2 tbsp Greek yogurt (or sour cream)
    • 1 tbsp lime juice
    • 1 tsp honey or agave (optional, for sweetness)
    • 1/2 tsp garlic powder
    • Salt and pepper, to taste

    1. Preheat your oven to 400°F (200°C) or heat a grill pan over medium heat.
    2. Rub the salmon fillets with olive oil and season with garlic powder, chili powder, paprika, salt, and pepper on both sides.
    3. If baking, place the salmon on a lined baking sheet and bake for 12-15 minutes, or until the salmon is cooked through and flakes easily with a fork. If grilling, cook the fillets for about 4-5 minutes per side, depending on thickness.
    4. While the salmon cooks, prepare the brown rice (or your choice of rice/quinoa). Follow the package instructions and set aside.
    5. Rinse and drain the black beans.
    6. Heat the corn in a pan or microwave if using frozen or canned corn. If using fresh corn, you can briefly sauté it or grill it for added flavor.
    7. Slice the avocado, cherry tomatoes, and red onion. Set them aside for assembling.
    8. In a small bowl, combine the Greek yogurt, lime juice, honey (optional), garlic powder, salt, and pepper. Stir until smooth and well combined.
    9. In each bowl, start with a base of cooked rice (or your choice of grain).
    10. Flake the cooked salmon into large chunks and add it to the bowl.
    11. Arrange the black beans, corn, sliced avocado, cherry tomatoes, and red onion around the salmon.
    12. Drizzle with the dressing and top with fresh cilantro for added flavor.
    13. Serve with lime wedges on the side to squeeze over the bowl before eating for extra freshness.

    Notes

    • Feel free to customize your bowl with other toppings like jalapeños or your favorite salsa.
    • This recipe can be made ahead of time for meal prep and stored in the refrigerator for a few days.
    • Prep Time: 15 minutes
    • Cook Time: 15 minutes
    • Category: Main Course
    • Method: Baking or Grilling
    • Cuisine: Mexican

    Nutrition

    • Serving Size: 1 bowl
    • Calories: 550
    • Sugar: 3g
    • Sodium: 400mg
    • Fat: 25g
    • Saturated Fat: 4g
    • Unsaturated Fat: 18g
    • Trans Fat: 0g
    • Carbohydrates: 50g
    • Fiber: 10g
    • Protein: 30g
    • Cholesterol: 70mg

    Sharing is caring!

  • Falafel Cottage Cheese Bowl: A Delightful Healthy Dish!

    Falafel Cottage Cheese Bowl: A Delightful Healthy Dish!


    Introduction to Falafel Cottage Cheese Bowl

    As a busy mom, I know how precious time can be in the kitchen. That’s why I absolutely adore my Falafel Cottage Cheese Bowl. It’s a quick solution for those hectic days when you want something nourishing yet delightful. Packed with flavors and colorful ingredients, this bowl not only pleases your taste buds but also impresses your loved ones. With the satisfying crunch of fresh veggies and the creaminess of cottage cheese, it feels like a mini celebration in each bite. Trust me—your family will savor every mouthful!

    Why You’ll Love This Falafel Cottage Cheese Bowl

    This Falafel Cottage Cheese Bowl is all about ease and flavor. In just 20 minutes, you can whip up a meal that’s not only tasty but also packed with nutrients. The zing of fresh ingredients combined with the soothing creaminess of cottage cheese creates a delightful dance on your palate. Plus, it’s versatile! Whether you serve it warm or cold, this bowl is perfect for both busy weeknights and special occasions.

    Ingredients for Falafel Cottage Cheese Bowl

    Gathering the right ingredients makes the world of difference in your cooking adventure! For this Falafel Cottage Cheese Bowl, here’s what you’ll need:

    • Falafel balls: These little flavor-packed wonders provide a crispy, savory base. You can make your own or buy pre-cooked ones to save time!
    • Cottage cheese: Creamy and high in protein, it brings a delightful richness to the bowl. Choose low-fat or full-fat, depending on your preference.
    • Cucumber: Fresh and crunchy, diced cucumber adds a refreshing pop. Opt for English cucumbers for fewer seeds!
    • Cherry tomatoes: Sweet and juicy, halved cherry tomatoes introduce vibrant color and juicy bursts of flavor.
    • Red onion: Thinly sliced, it gives a nice crunch and sharpness that complements the mellow flavors of the bowl.
    • Tzatziki sauce: A creamy and tangy Greek yogurt sauce that elevates the dish! You can easily make your own or grab a store-bought version.
    • Mixed greens: This leafy mix adds a healthy and colorful foundation—a perfect way to incorporate more greens into your diet.

    Feel free to customize this bowl with additional ingredients like bell peppers, carrots, or even avocado slices for added creaminess.

    The detailed measurements for each ingredient are available at the bottom of the article for your convenience, perfect for printing when you’re ready to get cooking!

    How to Make Falafel Cottage Cheese Bowl

    Step 1 – Prepare the Ingredients

    First things first, let’s get organized! Start by gathering all your ingredients and tools. If you haven’t already, cook the falafel balls according to the package instructions or from your own recipe. While they cool, dice the cucumber, halve the cherry tomatoes, and thinly slice the red onion. I love to use a colorful cutting board for prepping—it adds a little joy to the process!

    Once everything is prepped, lay out your mixed greens onto a large plate or bowl. This will be the base for our scrumptious creation!

    Step 2 – Layer the Bowl

    Now that your ingredients are prepped, it’s time for the fun part! Layering your Falafel Cottage Cheese Bowl is where you can get creative. Start with a generous handful of mixed greens at the bottom. Next, add the creamy cottage cheese right in the center.

    Then, place the falafel balls around the cottage cheese for an inviting look. Follow with the diced cucumber, halved cherry tomatoes, and thin slices of red onion scattered on top. I like to keep it colorful and eye-catching, mimicking a vibrant garden. It makes digging in so much more enjoyable!

    Step 3 – Add Toppings

    Your layers are looking fantastic! Now it’s time to add a touch of magic. Take your tzatziki sauce and dollop it generously atop the cottage cheese. Drizzle it around to really elevate the presentation.

    Adding a sprinkle of fresh herbs like parsley or dill could bring even more flavor! If you’re feeling adventurous, a squeeze of lemon juice enhances the freshness beautifully. Remember, the key is to make each layer stand out without overwhelming the dish.

    Step 4 – Toss and Serve

    Finally, it’s time to dig in! Gently toss all the ingredients together for a harmonious blend of flavors and textures. I find that using a large fork or salad tongs makes this process smooth and easy.

    Once everything is nicely mixed, serve immediately for the freshest taste. You can dish it out into individual bowls or keep it in the original for a family-style meal. Either way, your Falafel Cottage Cheese Bowl is now ready to be enjoyed; every bite is a vibrant explosion of deliciousness!

    Tips for Success

    • Prep your ingredients in advance to save time during busy days.
    • Experiment with different toppings like olives or feta cheese for variety.
    • Use sturdy bowls to prevent spills when tossing.
    • Balance flavors by adjusting tzatziki according to taste—add more or less as desired!
    • Make this bowl your own by mixing in your favorite seasonal veggies!

    Equipment Needed

    • Cutting board: A colorful one makes prep fun; any sturdy board will do!
    • Knife: A sharp chef’s knife speeds up cutting veggies.
    • Bowl: A large mixing bowl or plate works for assembling and serving.
    • Salad tongs: Perfect for tossing ingredients; a large fork also does the trick!

    Variations of the Falafel Cottage Cheese Bowl

    • Hummus Upgrade: Swap the tzatziki for a generous scoop of your favorite hummus for a creamier texture and added flavor.
    • Grain Base: Serve over quinoa, farro, or brown rice instead of mixed greens for a hearty and filling option.
    • Spice it Up: Sprinkle your bowl with some chili flakes or a drizzle of sriracha for a kick of heat!
    • Protein Boost: Add in grilled chicken or shrimp for an extra protein punch that will keep you energized.
    • Vegan Twist: Use a plant-based yogurt in place of cottage cheese to make it completely dairy-free.
    • Seasonal Veggies: Incorporate roasted vegetables like sweet potatoes or bell peppers for a delightful change with each season.

    Serving Suggestions for Falafel Cottage Cheese Bowl

    • Pair it with warm pita bread or crispy flatbreads to soak up every tasty bit.
    • A side of tabbouleh adds a refreshing grainy crunch—perfect for a Mediterranean flair!
    • Serve alongside a glass of chilled lemonade or herbal iced tea to enhance the meal.
    • Present in colorful bowls for a vibrant table setting that’ll impress family or guests!

    FAQs about Falafel Cottage Cheese Bowl

    Can I prepare the Falafel Cottage Cheese Bowl in advance?

    Yes! You can prep all the ingredients ahead of time. Just assemble your Falafel Cottage Cheese Bowl when you’re ready to eat. This makes it an excellent option for meal prep!

    Is the Falafel Cottage Cheese Bowl suitable for kids?

    Absolutely! Kids often love the fun layers and vibrant colors. You can even let them customize their own bowls by choosing their favorite toppings!

    Can I make this bowl gluten-free?

    Of course! Just make sure to choose gluten-free falafel and be cautious with the tzatziki sauce to ensure all ingredients fit the bill. Your Falafel Cottage Cheese Bowl will still be delicious!

    How do I store leftovers of the Falafel Cottage Cheese Bowl?

    Store any leftovers in an airtight container in the fridge. It’s best enjoyed fresh, but it can last for up to two days. Just note that the veggies may get a bit soft.

    Can I switch out the cottage cheese for another ingredient?

    Definitely! If cottage cheese isn’t your thing, consider swapping it with Greek yogurt for a similar creamy consistency. It will add a delightful twist to your Falafel Cottage Cheese Bowl!

    Final Thoughts

    Creating a Falafel Cottage Cheese Bowl is like gifting yourself a little moment of joy amid the chaos of life. Each bite bursts with fresh flavors, transforming simple ingredients into a delightful culinary experience. This bowl embodies the essence of quick, nourishing meals that not only satisfy hunger but also nurture the soul. Whether you share it with family during a busy weeknight or savor it solo on your lunch break, this dish is truly a celebration of wholesome goodness. I’m excited for you to enjoy this recipe that brings color and comfort to every table!


    Print

    clock clock iconcutlery cutlery iconflag flag iconfolder folder iconinstagram instagram iconpinterest pinterest iconfacebook facebook iconprint print iconsquares squares iconheart heart iconheart solid heart solid icon

    Description

    A delightful and healthy Falafel Cottage Cheese Bowl that is refreshing and packed with flavors.


    • 4 falafel balls, cooked
    • 1/2 cup cottage cheese
    • 1/2 cucumber, diced
    • 1/2 cup cherry tomatoes, halved
    • 1/4 red onion, thinly sliced
    • 2 tablespoons tzatziki sauce
    • 1 cup mixed greens

    1. In a bowl, layer mixed greens, cottage cheese, falafel, cucumber, cherry tomatoes, and red onion.
    2. Top with a dollop of tzatziki sauce.
    3. Toss gently to combine and serve immediately.

    Notes

    • Can be served warm or cold.
    • Feel free to add additional vegetables or toppings to customize.
    • Great for meal prep – just assemble when ready to eat.
    • Prep Time: 10 minutes
    • Cook Time: 10 minutes
    • Category: Lunch
    • Method: Mixing/Layering
    • Cuisine: Mediterranean

    Nutrition

    • Serving Size: 1 bowl
    • Calories: 300
    • Sugar: 5g
    • Sodium: 450mg
    • Fat: 12g
    • Saturated Fat: 3g
    • Unsaturated Fat: 8g
    • Trans Fat: 0g
    • Carbohydrates: 32g
    • Fiber: 6g
    • Protein: 16g
    • Cholesterol: 10mg

    Sharing is caring!

  • Chocolate Coffee Toffee Crunch Muffins are irresistible!

    Chocolate Coffee Toffee Crunch Muffins are irresistible!


    Introduction to Chocolate Coffee Toffee Crunch Muffins

    There’s something incredibly comforting about the simple joy of a warm muffin, especially when it’s a Chocolate Coffee Toffee Crunch Muffin!

    These little delights blend the rich flavors of chocolate and coffee, creating a tempting treat to satisfy your sweet tooth.

    Perfect for those busy mornings or as an indulgent afternoon snack, these muffins are a quick solution for any hectic day.

    Whether you’re trying to impress friends or just fancy a cozy moment with yourself and a cup of tea, these muffins are sure to sprinkle a bit of happiness into your day.

    Why You’ll Love This Chocolate Coffee Toffee Crunch Muffins

    These Chocolate Coffee Toffee Crunch Muffins are not just a treat; they’re a lifesaver!

    With a fuss-free recipe, you can whip up a batch in under an hour.

    Each bite delivers a perfect harmony of rich chocolate, bold coffee, and deliciously crunchy toffee.

    Whether you need something quick for breakfast or a sweet snack in the afternoon, these muffins will delight your taste buds and fill your kitchen with irresistible aromas!

    Ingredients for Chocolate Coffee Toffee Crunch Muffins

    Let’s gather some key ingredients that will turn your kitchen into a charming bake shop.

    You’ll need all-purpose flour, the backbone of these muffins, providing that perfect texture and structure.

    Unsweetened cocoa powder adds a deep chocolate flavor without unnecessary sweetness—just what we want!

    Instant coffee granules give a delightful kick, enhancing the rich flavors and waking up your taste buds.

    Baking soda acts like magic, helping your muffins rise beautifully.

    Add a pinch of salt to balance the flavors for an unforgettable treat.

    Next up, we have unsalted butter, which, once creamed with sugar, adds a rich creaminess.

    Granulated sugar is essential for sweetness, while brown sugar gives a hint of caramel notes, enhancing depth.

    We can’t forget about eggs, which help bind everything together and add moisture.

    A touch of vanilla extract elevates the overall flavor, sprinkling in a hint of warmth.

    Buttermilk, or its substitute (regular milk with vinegar), brings in some tanginess, which keeps our muffins tender.

    Toffee bits are the star of the show, bringing that delightful crunch we all love.

    Last but not least, semisweet chocolate chips are a must for a melty, indulgent touch.

    You can find the exact quantities at the bottom of the article for easy printing.

    Now that we’ve stocked our pantry, let’s get to baking these irresistible Chocolate Coffee Toffee Crunch Muffins!

    How to Make Chocolate Coffee Toffee Crunch Muffins

    Step 1: Preheat and Prepare

    First things first, let’s get your oven ready! Preheat it to 350°F (175°C).

    While that’s warming up, grab a muffin tin and line it with your favorite muffin liners.

    This helps keep cleanup easy and makes your muffins look lovely!

    Step 2: Mix Dry Ingredients

    In a large bowl, combine all the dry ingredients.

    This means the flour, cocoa powder, instant coffee, baking soda, and salt.

    Give it a good whisk so everything is well mixed and ready to meet the wet ingredients later.

    Step 3: Cream Butter and Sugar

    In another mixing bowl, add the softened butter and granulated sugar.

    Cream them together using a hand mixer or a sturdy wooden spoon.

    You want a mixture that’s light and fluffy—this is the secret to tender muffins!

    Step 4: Add Eggs and Vanilla

    Now it’s time for the eggs! Crack them in one at a time, beating well after each addition.

    This ensures they’re evenly incorporated.

    Add in the vanilla extract, which will make your kitchen smell heavenly.

    Step 5: Combine Wet and Dry Ingredients

    It’s time to mingle! Gradually add the dry mixture to your creamed sugars and eggs.

    Pour in the buttermilk, alternating with the flour mix until just combined.

    Be gentle—overmixing will lead to tough muffins, and we want them soft and delightful.

    Step 6: Fold in Chocolate Chips

    Here comes the best part! Gently fold in the semisweet chocolate chips.

    This technique is key: use a spatula and lift the batter from the bottom to the top.

    You want to keep that airiness intact for fluffy muffins!

    Step 7: Prepare the Toffee Crunch

    In a small bowl, mix together the brown sugar, cocoa powder, cinnamon, and remaining toffee bits.

    This will create a crunchy topping that takes these muffins to another level of deliciousness!

    Step 8: Spoon Batter into Muffin Cups

    Using a spoon or an ice cream scoop, portion the muffin batter into your lined muffin cups.

    Fill each one about three-quarters full.

    This leaves room for them to rise beautifully without overflowing.

    Step 9: Add Topping and Bake

    Now sprinkle that delightful toffee crunch mixture over the tops of each muffin.

    Pop the muffin tin in the oven, and set a timer for 25 minutes.

    The aroma that fills your kitchen will be nothing short of magical!

    Step 10: Cooling Time

    Once baked, let the muffins cool in the tin for about 5 minutes.

    This helps them set and makes transferring easier.

    After that, move them to a wire rack. Allow them to cool completely before diving in—if you can wait!

    Tips for Success

    • Make sure your ingredients are at room temperature for better mixing.
    • Don’t skip lining your muffin tin—it’s a game changer for easy cleanup!
    • Use a toothpick to test for doneness; it should come out clean.
    • For extra flavor, try adding chopped nuts or dried fruit to the batter.
    • Let your muffins cool completely to enhance their flavor.

    Equipment Needed

    • Muffin tin: A standard muffin tin works perfectly, but you can use a silicone mold for easy release.
    • Mixing bowls: Use both large and medium-sized bowls for mixing ingredients.
    • Measuring cups: For accurate measurements of your ingredients.
    • Whisk: A regular whisk will do, but an electric mixer can speed up creaming butter and sugar.
    • Spatula: A silicone spatula is great for folding ingredients gently.

    Variations

    • For a nutty twist, add chopped walnuts or pecans into the batter for an extra crunch.
    • Swap out toffee bits for caramel bits for a gooey, sweet alternative.
    • Try using dark chocolate chips instead of semisweet for a richer chocolate experience.
    • For a gluten-free option, substitute all-purpose flour with a 1:1 gluten-free baking blend.
    • Make it vegan by replacing eggs with flaxseed meal and using a plant-based milk alternative.

    Serving Suggestions for Chocolate Coffee Toffee Crunch Muffins

    • Serve warm with a dollop of whipped cream or a scoop of vanilla ice cream.
    • Pair with a steaming cup of coffee or a rich hot chocolate for the ultimate treat.
    • For a brunch spread, offer alongside fresh fruit or yogurt.
    • Dust with powdered sugar for a beautiful presentation.

    FAQs about Chocolate Coffee Toffee Crunch Muffins

    Can I use regular coffee instead of instant coffee granules?

    Absolutely! If you prefer regular coffee, brew a strong cup and use a few tablespoons in place of the instant granules. Your muffins will still have that delightful coffee flavor, perfect for coffee lovers!

    How should I store the muffins for freshness?

    Store your Chocolate Coffee Toffee Crunch Muffins in an airtight container at room temperature. This keeps them soft and fresh for up to three days. If you want to keep them longer, you can freeze them!

    Can I make the batter ahead of time?

    You can prepare the batter and store it in the fridge for up to 24 hours. Just give it a good stir before filling the muffin cups. But remember, fresh is best for that amazing, fluffiness!

    Why are my muffins dense instead of fluffy?

    Ah, the age-old question! Dense muffins often result from overmixing or too much flour. Make sure you combine the ingredients just until they’re mixed—no more. Gentle folding is the key to keeping that fluffiness!

    Can I add other mix-ins to the muffins?

    Yes! Feel free to get creative! Throw in some chopped nuts, dried fruits, or even a swirl of peanut butter. Just keep in mind that too many extras can affect the texture, so balance is key!

    Final Thoughts

    Making Chocolate Coffee Toffee Crunch Muffins is more than just baking; it’s creating little moments of joy.

    As the sweet aroma fills your kitchen, it wraps around you like a warm hug.

    Each bite bursts with rich flavors that dance together in perfect harmony.

    These muffins are your secret weapon against a busy day, a delightful treat to share, or a comforting indulgence just for you.

    So, grab your apron and mix up a batch!

    Trust me, this recipe will become a beloved favorite in your home, bringing smiles to your family and friends alike.


    Print

    clock clock iconcutlery cutlery iconflag flag iconfolder folder iconinstagram instagram iconpinterest pinterest iconfacebook facebook iconprint print iconsquares squares iconheart heart iconheart solid heart solid icon

    Description

    Irresistible Chocolate Coffee Toffee Crunch Muffins with a delightful blend of chocolate, coffee, and crunchy toffee.


    • 2 cups all-purpose flour
    • 1/2 cup unsweetened cocoa powder
    • 1 tablespoon instant coffee granules
    • 1 teaspoon baking soda
    • 1/2 teaspoon salt
    • 1/2 cup unsalted butter, softened
    • 1 cup granulated sugar
    • 2 large eggs
    • 1 teaspoon vanilla extract
    • 1 cup buttermilk
    • 1/4 cup brown sugar
    • 1/2 cup toffee bits
    • 1/2 cup semisweet chocolate chips
    • 1/3 cup brown sugar, packed
    • 1 tablespoon unsweetened cocoa powder
    • 1/4 teaspoon cinnamon
    • 1/4 cup toffee bits

    1. Preheat your oven to 350°F (175°C) and prepare a muffin tin with liners.
    2. In a bowl, combine flour, cocoa powder, instant coffee, baking soda, and salt.
    3. In another bowl, cream together butter and sugar until light and fluffy.
    4. Beat in the eggs one at a time and then add the vanilla extract.
    5. Gradually add the dry ingredients to the wet ingredients, alternating with buttermilk, and mix until just combined.
    6. Gently fold in the chocolate chips.
    7. Combine brown sugar, cocoa powder, cinnamon, and toffee bits in a small bowl and set aside.
    8. Spoon the muffin batter into the prepared muffin cups, filling each about three-quarters full.
    9. Sprinkle the prepared toffee crunch mixture on top of each muffin.
    10. Bake the muffins for about 25 minutes or until a toothpick inserted into the center comes out clean.
    11. Let the muffins cool in the tin for 5 minutes before transferring them to a wire rack to cool completely.

    Notes

    • For an extra coffee kick, add more instant coffee granules to the batter.
    • Store muffins in an airtight container to keep them fresh.
    • You can substitute buttermilk with regular milk mixed with a tablespoon of vinegar for a similar effect.
    • Prep Time: 20 minutes
    • Cook Time: 25 minutes
    • Category: Dessert
    • Method: Baking
    • Cuisine: American

    Nutrition

    • Serving Size: 1 muffin
    • Calories: 280
    • Sugar: 20g
    • Sodium: 150mg
    • Fat: 12g
    • Saturated Fat: 7g
    • Unsaturated Fat: 3g
    • Trans Fat: 0g
    • Carbohydrates: 39g
    • Fiber: 2g
    • Protein: 4g
    • Cholesterol: 50mg

    Sharing is caring!

  • Halloween trifle: Create a Spooktacular Dessert Today!

    Halloween trifle: Create a Spooktacular Dessert Today!


    Introduction to Halloween Trifle

    As a busy mom, I know how quickly time can slip away, especially during the Halloween season bustling with costumes and candy preparations. That’s why I can’t wait to share my delightful Halloween trifle! This fun and festive dessert combines layers of decadent chocolate cake and creamy vanilla pudding, all topped with whipped goodness. It’s a perfect treat that will impress your family and friends, without taking up your entire day. You’ll find that this Halloween trifle becomes a showstopper at any gathering, bringing smiles and sweet anticipation to all who indulge!

    Why You’ll Love This Halloween Trifle

    This Halloween trifle is the ultimate solution for busy moms looking to create a delicious dessert with minimal effort. It’s quick to prepare, taking just 35 minutes from start to finish! Plus, the blend of flavors—from rich chocolate to smooth vanilla—will leave everyone asking for more. And let’s be honest, who doesn’t love a dessert that looks as good as it tastes? This trifle will be the highlight of your Halloween feast!

    Ingredients for Halloween Trifle

    Let’s dive into the fun part: the ingredients! This Halloween trifle effortlessly combines delightful flavors and festive fun. Here’s what you’ll need:

    • Chocolate cake mix: The base of our trifle, rich and delicious. You can use your favorite brand.
    • Water: Just a simple liquid to help bring the cake mix together.
    • Vegetable oil: This adds moisture to the cake, keeping it soft and tasty.
    • Large eggs: Vital for binding the cake and giving it a light texture. I always use room temperature eggs for best results.
    • Instant vanilla pudding: This is where the magic happens! Creamy and sweet, it adds a satisfying layer to the trifle.
    • Milk: Helps mix with the pudding for that silky-smooth consistency we crave.
    • Orange food coloring: Totally optional, but adds a fun spooky twist to the pudding!
    • Cool Whip: Light and fluffy, this topping is perfect for a trifle. You can also use homemade whipped cream if you prefer.
    • Sprinkles: Tiny bursts of color to make your trifle extra festive!
    • Chocolate balls wrapped like eyes: These are fantastic for that creepy, Halloween touch—perfect for little ones!
    • Gummy body parts: Think brains and fingers! These fun candies make it all the more festive.
    • Any decorations you like: Feel free to unleash your creativity; it’s your masterpiece!

    For precise measurements, check the bottom of the article where they’re available for printing. Remember, the joy of cooking comes from making it your own! So let your imagination run wild with these ingredients!

    How to Make Halloween Trifle

    Ready to bring this spooky creation to life? With just a few steps, you’ll have a stunning Halloween trifle that’s sure to wow your guests. Let’s get started!

    Step 1: Prepare the Cake

    First, let’s whip up that chocolate cake!

    Begin by preheating your oven to 350 degrees F. It’s like warming up an old friend—trust me, this will make a difference!

    Grab a small rimmed baking sheet and lightly spray it with cooking spray. This ensures our cake won’t stick. In a large mixing bowl, combine the chocolate cake mix, water, vegetable oil, and eggs. Beat everything together until the mixture is smooth—around two minutes will do the trick.

    Next, pour the batter into the prepared baking sheet, spreading it evenly. Bake for about 12 to 15 minutes, or until a toothpick poked in the center comes out clean.

    Once baked, allow the cake to cool on a wire rack. Cooling is essential—no one wants a soggy trifle! Let it chill out completely while you work on the next layer.

    Step 2: Make the Vanilla Pudding

    Now, time for the creamy layer that will tie everything together!

    In a medium bowl, whisk together the instant vanilla pudding mix and milk. Keep whisking until it becomes smooth—about two minutes should suffice.

    If you’re feeling festive, this is the moment to add a few drops of orange food coloring. It’s an optional step, but it brings a Halloween vibe that everyone loves!

    Cover the bowl and place it in the refrigerator for about 10 to 15 minutes. This chilling allows the pudding to set perfectly. Just imagine that velvety goodness ready to be layered in your trifle!

    Step 3: Assemble the Trifle

    Let’s bring it all together—layers of deliciousness await!

    Grab your trifle dish and take out the cooled chocolate cake. Using a sharp knife, carefully cut circles from the cake that will fit inside the bottom of the dish.

    Start with a layer of the chocolate cake at the bottom. It’s the foundation of our spooky delight!

    Next, pipe or spoon the prepared vanilla pudding over the cake layer. The smoothness is just irresistible!

    Then, add a generous layer of Cool Whip. I usually like to pipe it too, just for that extra special touch.

    Now, the fun part—decorating! Sprinkle some colorful sprinkles and arrange those spooky gummy body parts and chocolate eyes to create a festive scene. Repeat the layers until your dish is full, finishing with whipped topping.

    Cover your trifle with plastic wrap and refrigerate it until you’re ready to serve. If you can wait, I promise it only gets better as the flavors meld together!

    Tips for Success

    • Make the chocolate cake a day ahead for easier assembly.
    • Use room temperature ingredients for the cake and pudding, ensuring fluffy texture.
    • Feel free to swap in your favorite cake mix or pudding flavors.
    • If you don’t have a trifle dish, any large glass bowl will work beautifully.
    • Get the kids involved! Let them add decorations for added fun.

    Equipment Needed for Halloween Trifle

    • Mixing bowls: A large bowl for the cake and a medium one for the pudding. Any bowl will do!
    • Baking sheet: A small rimmed baking sheet works best, but a casserole dish can be a great alternative.
    • Trifle dish: Use a clear glass bowl to showcase the layers, but any large bowl will suffice.
    • Whisk: A simple whisk for mixing. A fork can work too in a pinch!
    • Pastry bags: Ideal for piping, but zip-top bags cut at the corner work perfectly!

    Variations of Halloween Trifle

    • Funfetti Version: Swap out chocolate cake mix for a funfetti mix and use white frosting instead of Cool Whip for a colorful twist.
    • Red Velvet Delight: Use red velvet cake instead of chocolate for a striking contrast with the vanilla pudding.
    • Gluten-Free Option: Use a gluten-free chocolate cake mix to make this dessert accessible for everyone.
    • Vegan Trifle: Replace the eggs and milk with vegan alternatives, like flaxseed for eggs and almond milk for a dairy-free treat.
    • Fruit Layer: Add layers of fresh berries between the cake and pudding for a refreshing burst of flavor and extra nutrition.

    Serving Suggestions for Halloween Trifle

    • Pair with warm apple cider for a festive fall drink that complements the dessert.
    • Serve with spooky-themed cookies for an extra sweet touch at your gathering.
    • Display the trifle on a colorful Halloween tablecloth to make it shine.
    • Top each serving with a few extra gummy candies for a fun surprise!

    FAQs about Halloween Trifle

    Let’s address some of the most common questions I hear about making this charming Halloween trifle. I want you to feel confident and excited about creating this dessert!

    Can I make Halloween trifle ahead of time?
    Absolutely! In fact, I recommend it. Making your trifle a day in advance allows the flavors to meld together beautifully. Just be sure to cover it well before refrigerating so it stays fresh!

    What can I use instead of Cool Whip?
    If you’re not a fan of Cool Whip, feel free to whip up some homemade whipped cream. Just beat heavy cream with sugar until you reach soft peaks. It adds a lovely touch to your trifle!

    Can I customize the decorations?
    Of course! The beauty of this Halloween trifle is how versatile it is! Use whatever spooky treats you like—candy corn, chocolate-covered pretzels, or even edible glitter. Get creative!

    Is it possible to make this trifle gluten-free?
    Certainly! Opt for a gluten-free chocolate cake mix to make this trifle inclusive for everyone. Just check the pudding mix as well; there are gluten-free options available.

    What if my kids won’t eat the decorations?
    No worries! You can always set aside a portion of the trifle without the spooky treats for those picky eaters. They can enjoy the delicious layers without any frights!

    Final Thoughts

    As I wrap up my Halloween trifle adventure, I can’t help but smile thinking about the joy it brings to my family. This easy, layered dessert captures the spirit of Halloween while offering a delicious treat that everyone can enjoy. It’s a memory-maker, a conversation starter, and a lovely addition to any gathering. Whether you choose to decorate it with spooky candies or leave it simple, the delightful blend of chocolate, vanilla, and whipped cream is sure to enchant young and old alike. So, gather your loved ones and bring home the fun with this charming Halloween trifle!


    Print

    clock clock iconcutlery cutlery iconflag flag iconfolder folder iconinstagram instagram iconpinterest pinterest iconfacebook facebook iconprint print iconsquares squares iconheart heart iconheart solid heart solid icon

    Description

    A fun and festive Halloween trifle that layers chocolate cake, creamy vanilla pudding, and whipped topping, decorated with spooky treats.


    • 1 box chocolate cake mix
    • 1 cup water
    • ½ cup vegetable oil
    • 3 large eggs (room temperature)
    • 1 small box instant vanilla pudding
    • 2 cups milk
    • Orange food coloring (optional)
    • 8 oz container Cool Whip
    • Sprinkles
    • Chocolate balls wrapped like eyes
    • Gummy body parts like brains, teeth, fingers, etc.
    • Any decorations you like

    1. Move the oven rack to the middle position and preheat the oven to 350 degrees F.
    2. Spray a small rimmed baking sheet with cooking spray.
    3. In a large bowl, beat together cake mix, water, oil, and eggs until smooth.
    4. Spread the batter evenly into the baking sheet.
    5. Bake for 12-15 minutes or until a toothpick inserted in the center comes out clean.
    6. Remove the cake from the oven and cool on a cooling rack until completely cooled.
    7. Meanwhile, in a medium bowl, whisk together pudding mix and milk until smooth.
    8. Add several drops of orange food coloring and whisk until well combined.
    9. Place pudding in the refrigerator for 10-15 minutes or until completely set.
    10. Remove pudding and whipped topping from the refrigerator.
    11. Fit two pastry bags with large round tips.
    12. Add pudding in one bag, and in the other, add whipping topping.
    13. Using the rim of your trifle dish as a pattern, lightly press it into the cake.
    14. Remove and then use a sharp knife to cut out the circle. You may need to cut it a little smaller so it fits into the trifle dish easily.
    15. Add cake to the trifle dish.
    16. Then pipe in the pudding.
    17. Next, add Cool Whip on top of the pudding.
    18. Decorate with sprinkles and candy, if desired.
    19. Serve immediately or store in the refrigerator up to 1 day before serving.

    Notes

    • This dessert can be made a day in advance for convenience.
    • Feel free to customize decorations to fit your Halloween theme.
    • Ensure that all ingredients are at room temperature for best results.
    • Prep Time: 20 minutes
    • Cook Time: 15 minutes
    • Category: Dessert
    • Method: Baking and Assembling
    • Cuisine: American

    Nutrition

    • Serving Size: 1 piece
    • Calories: 250
    • Sugar: 15g
    • Sodium: 200mg
    • Fat: 10g
    • Saturated Fat: 3g
    • Unsaturated Fat: 7g
    • Trans Fat: 0g
    • Carbohydrates: 36g
    • Fiber: 1g
    • Protein: 3g
    • Cholesterol: 50mg

    Sharing is caring!