Author: IHAAL Team

  • Buffalo Chicken Lasagna with a Ranch Twist

    Buffalo Chicken Lasagna with a Ranch Twist


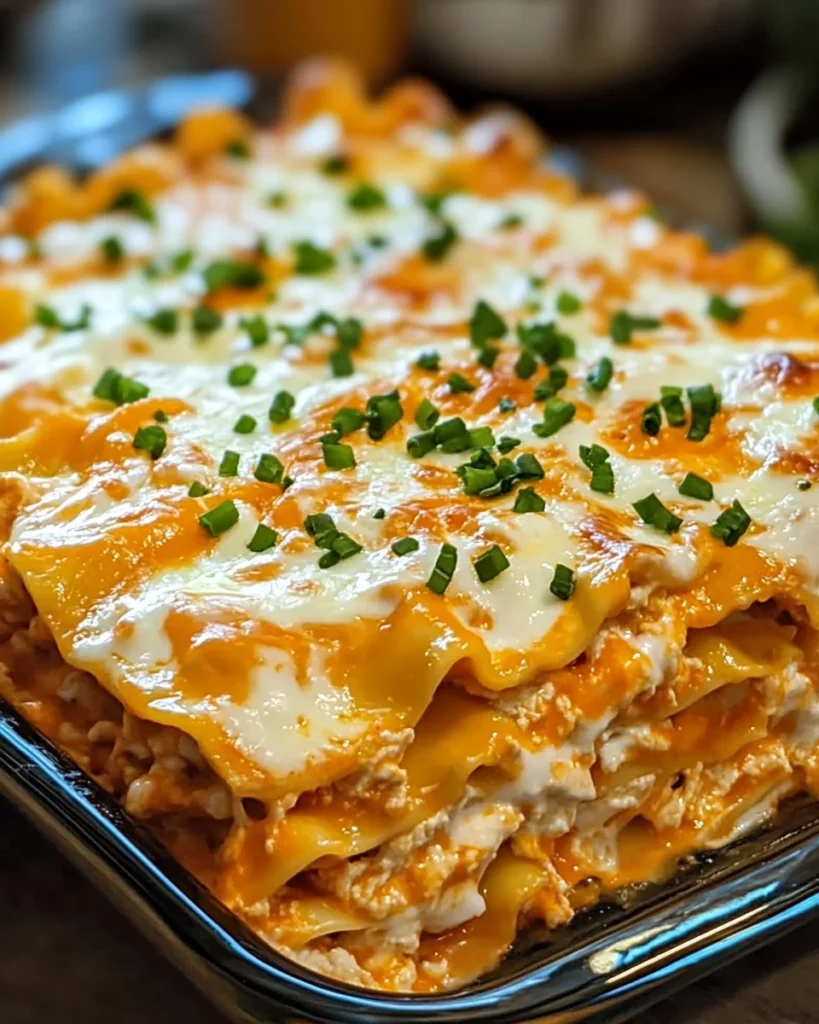
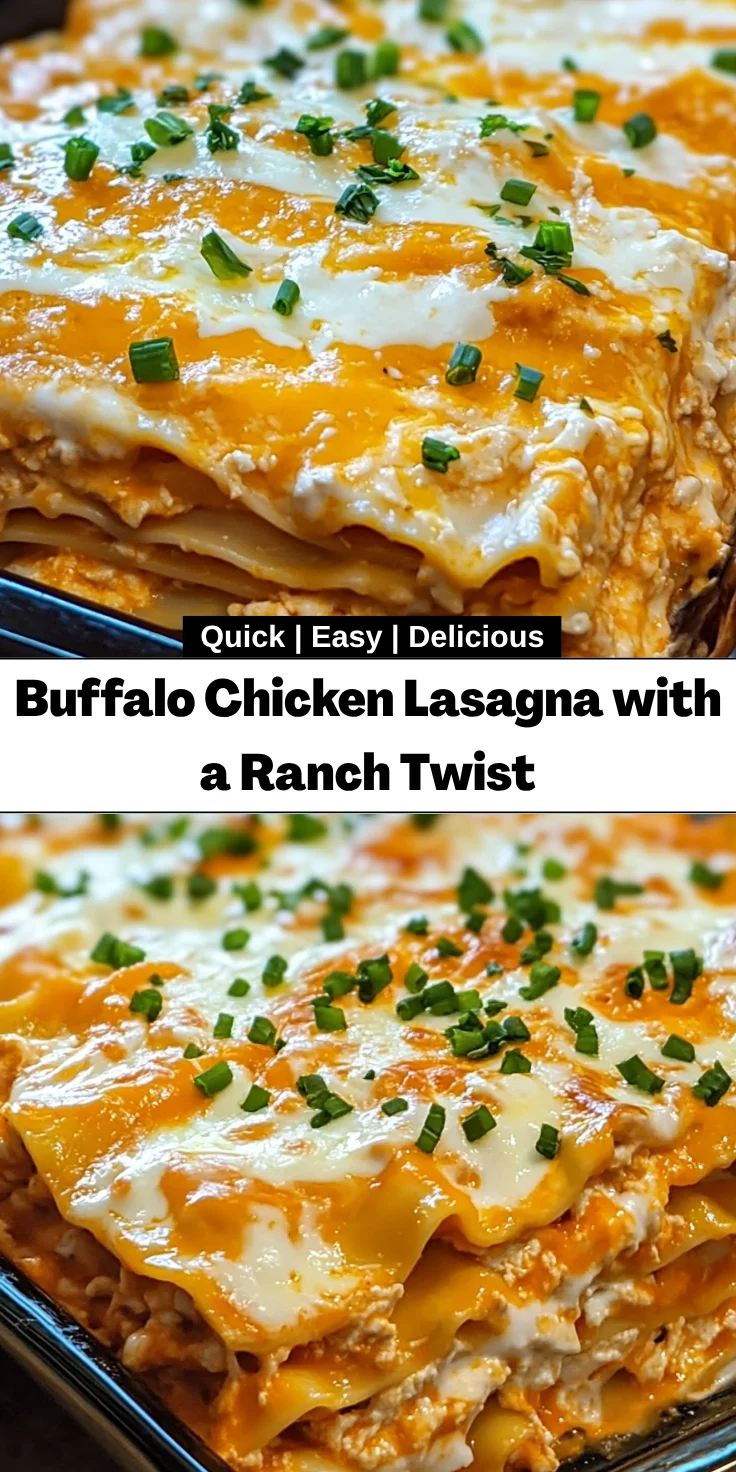
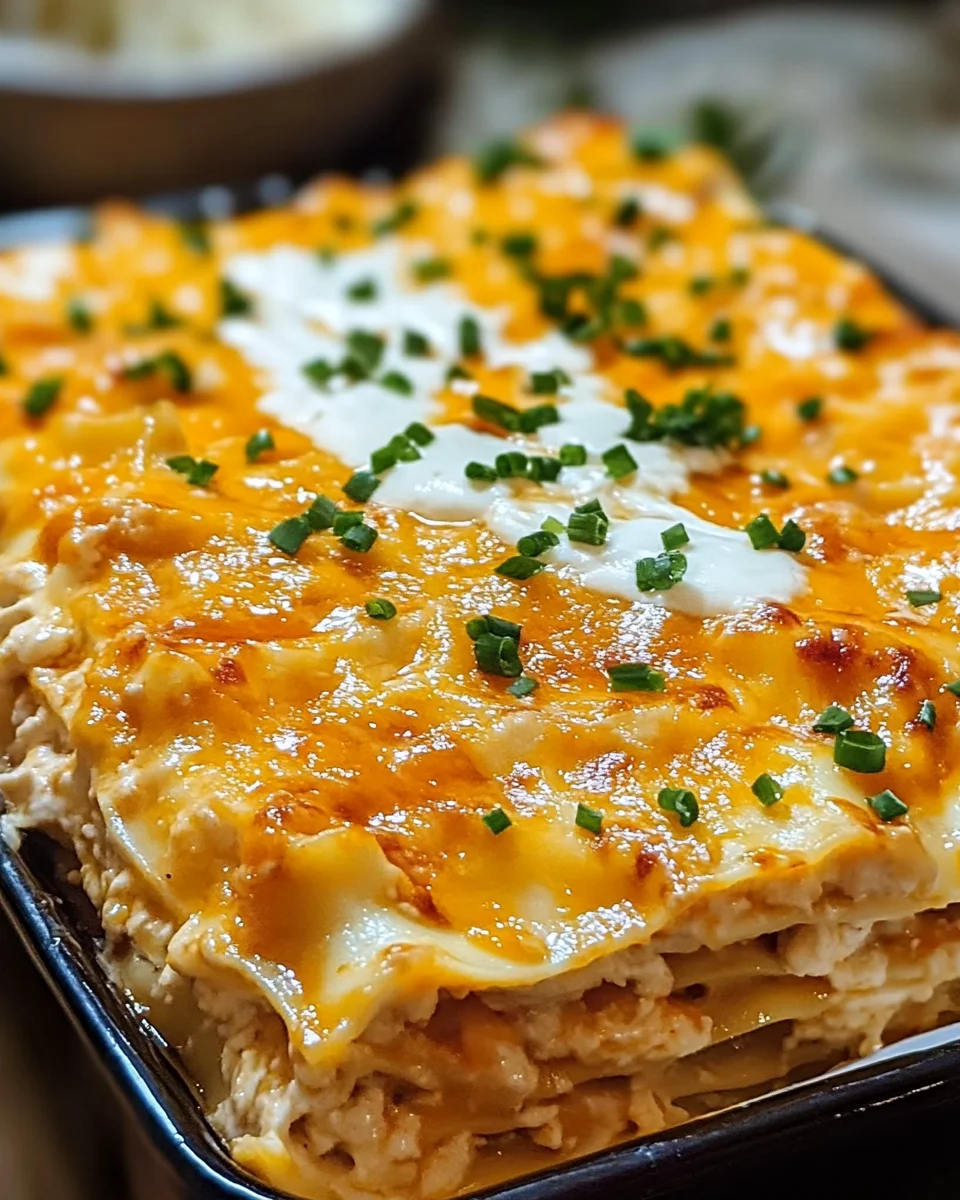
    Introduction to Buffalo Chicken Lasagna with a Ranch Twist

    Let’s be honest, finding the perfect dinner solution can often feel like a hectic juggling act. As a busy mom myself, I know there are days when the clock is ticking, and you just need something quick yet delicious. That’s where my Buffalo Chicken Lasagna with a Ranch Twist comes in! This dish isn’t just a time-saver; it’s a unique fusion of spicy Buffalo chicken, creamy cheeses, and a tangy ranch drizzle that will have your family begging for seconds. It’s the kind of meal that makes weeknight cooking enjoyable, uncomplicated, and oh-so-satisfying!

    Why You’ll Love This Buffalo Chicken Lasagna with a Ranch Twist

    If you’re like me and often face the daily dinner dilemma, this Buffalo Chicken Lasagna with a Ranch Twist is your new best friend. It’s a breeze to prepare, coming together in just about an hour. The combination of spicy and creamy flavors creates an explosion of taste that even picky eaters will love. Plus, it’s a fantastic way to use leftover chicken, making it both economical and delicious!

    Ingredients for Buffalo Chicken Lasagna with a Ranch Twist

    To create this flavorful Buffalo Chicken Lasagna with a Ranch Twist, you’ll need a blend of essential ingredients that marry together beautifully. Here’s a handy list to get you started!

    • Lasagna noodles: These will form the layers of your delicious dish. Choose regular or no-boil noodles to save time.
    • Shredded cooked chicken: The star of the show! You can use leftover rotisserie chicken for convenience or cook your own.
    • Buffalo wing sauce: This offers that signature spicy kick everyone loves. Adjust the quantity based on your heat preference!
    • Ricotta cheese: Creamy and smooth, it adds a luscious layer to the lasagna that balances the spice perfectly.
    • Shredded mozzarella cheese: A crowd favorite! It melts beautifully and creates that gooey texture we crave.
    • Shredded cheddar cheese: This adds a wonderful sharpness to the dish, enhancing every bite.
    • Grated Parmesan cheese: A sprinkle of this elevates your dish with a nutty flavor. Trust me; it’s worth it!
    • Large eggs: These help bind the ricotta mixture, ensuring your layers hold together nicely.
    • Alfredo sauce: This creamy base lends a dreamy texture and balances the flavors beautifully.
    • Ranch dressing: A perfect finishing touch! Drizzle a bit over the top for that tangy contrast.
    • Milk: Optional, but useful if you like your ranch drizzle a little thinner.
    • Green onions: Fresh and vibrant, these are great for garnish. They add a pop of color and flavor.
    • Extra Buffalo sauce: If you like your lasagna extra spicy, keep this on hand for drizzling before you serve.

    You can find the exact measurements for these ingredients at the bottom of the article, where they are available for printing. Happy cooking!

    How to Make Buffalo Chicken Lasagna with a Ranch Twist

    Step 1: Preheat and Prepare

    First, preheat your oven to 375°F (190°C). This step heats things up as your meal comes together!

    While the oven warms up, grab a 9×13-inch baking dish and lightly grease it with cooking spray or olive oil.

    This little detail helps your lasagna slide right out when it’s time to serve. Believe me, nobody wants a sticky mess on their hands!

    Step 2: Mix the Buffalo Chicken

    Now, let’s take that shredded cooked chicken and toss it into a medium bowl.

    Pour in the Buffalo wing sauce, ensuring every piece gets coated with that spicy goodness.

    Feel free to adjust the amount of sauce based on how fiery you like your dish!

    The more sauce, the more kick—incredible for those who love a little extra heat!

    Step 3: Prepare the Ricotta Mixture

    In another bowl, combine the ricotta cheese, eggs, grated Parmesan cheese, and a cup of shredded mozzarella.

    Mix them together until smooth and creamy.

    This mixture is your secret weapon for binding layers and adding a rich texture.

    It’ll help balance that spicy chicken with creamy goodness.

    Step 4: Start Layering

    Let’s assemble! Start by spreading a thin layer of Alfredo sauce on the bottom of your greased baking dish.

    Lay down three pasta noodles over the sauce, making sure they’re evenly spaced.

    Now spread a third of your creamy ricotta mixture over the noodles, followed by a third of the Buffalo chicken mix.

    Sprinkle in some mozzarella and cheddar cheese, then drizzle more Alfredo sauce on top.

    Repeat these layers twice more, finishing with a final layer of noodles topped with Alfredo and the remaining mozzarella and cheddar.

    This towering creation is going to be glorious!

    Step 5: Bake to Perfection

    Cover your layered masterpiece with foil, ensuring it’s snug but not touching the cheese.

    Bake for 25 minutes to let those flavors mingle happily.

    After that, remove the foil and bake for an additional 15 minutes.

    You’ll know it’s ready when it’s bubbly and golden on top, which hints at all that cheesy goodness waiting inside!

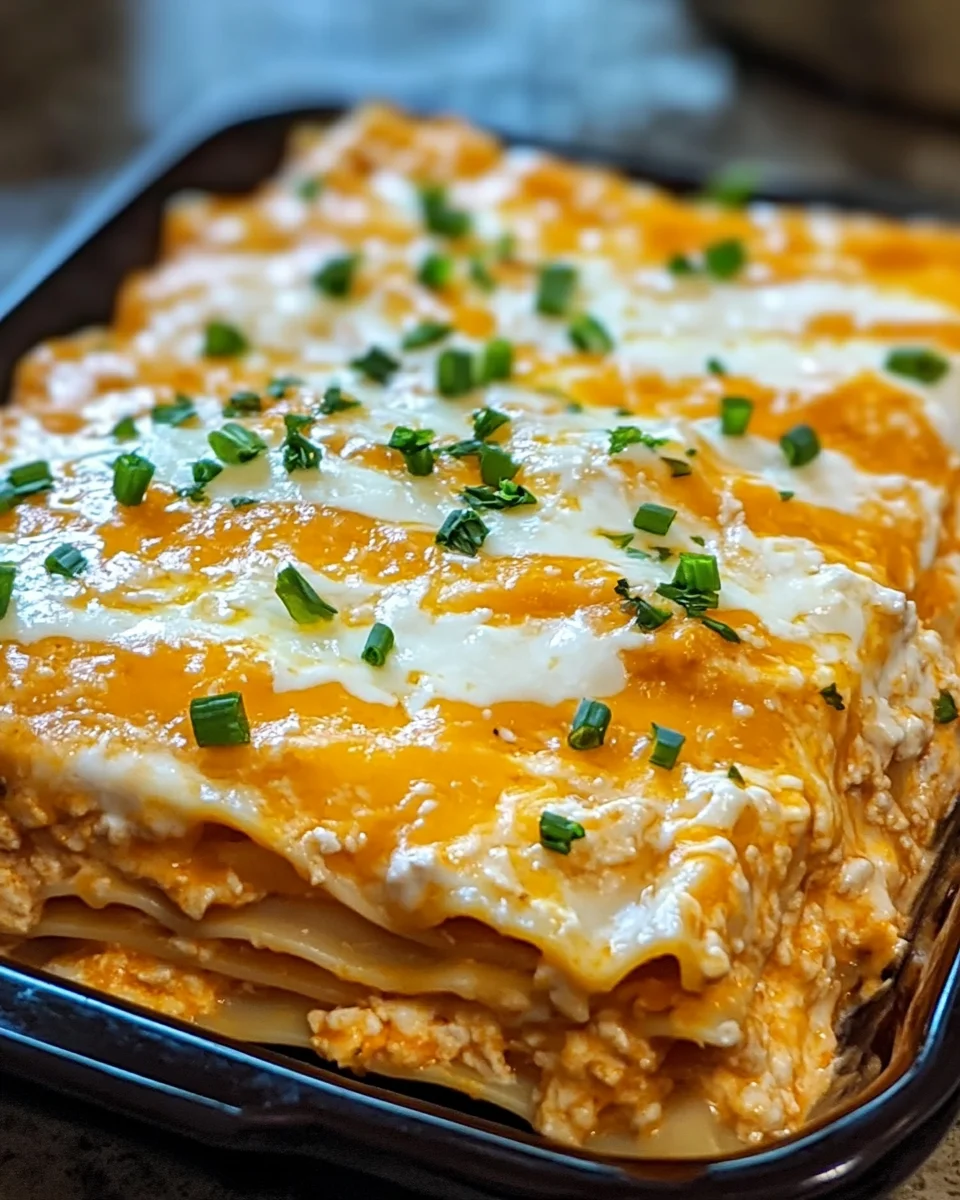
    Step 6: Garnish and Serve

    Once out of the oven, allow it to cool for about 5-10 minutes.

    This waiting time helps it set for easier slicing.

    Drizzle ranch dressing over the top, adding a bit of milk if you want a thinner drizzle.

    Finally, sprinkle some chopped green onions for that fresh pop.

    Serve it hot with a crisp side salad or some garlic bread for dipping. Enjoy!

    Tips for Success

    • Use pre-cooked chicken to save time—rotisserie works perfectly!
    • Don’t rush the cooling time after baking; it helps with slicing.
    • Feel free to adjust cheese types to your family’s taste.
    • Cover leftovers tightly and refrigerate for quick lunches.
    • To spice it up, add jalapeños between layers for an extra kick!

    Equipment Needed

    • Baking dish: A 9×13-inch dish is ideal, but you can use any similar-sized dish.
    • Mixing bowls: Have a couple on hand for combining those delicious layers.
    • Whisk or fork: For blending your ricotta mixture smoothly.
    • Measuring cups: Helpful for gauging ingredients accurately.
    • Aluminum foil: Essential for baking and keeping the cheese from browning too quickly.

    Variations for Buffalo Chicken Lasagna with a Ranch Twist

    • Vegetarian Option: Swap the shredded chicken for a plant-based protein like lentils or mushrooms for a hearty, meat-free alternative.
    • Gluten-Free Lasagna: Use gluten-free lasagna noodles to easily make this dish suitable for gluten-sensitive family members.
    • Cheesy Spinach: Add a layer of sautéed spinach or kale for some extra nutrition and a pop of color.
    • Different Sauces: Experiment with different sauces; try a white sauce, like Alfredo, in place of ranch for a creamy twist.
    • Fire Roasted Veggies: Toss in some fire-roasted bell peppers or zucchini for added flavor and texture!

    Serving Suggestions

    • Pair your lasagna with a crisp green salad drizzled with a light vinaigrette to balance the richness.
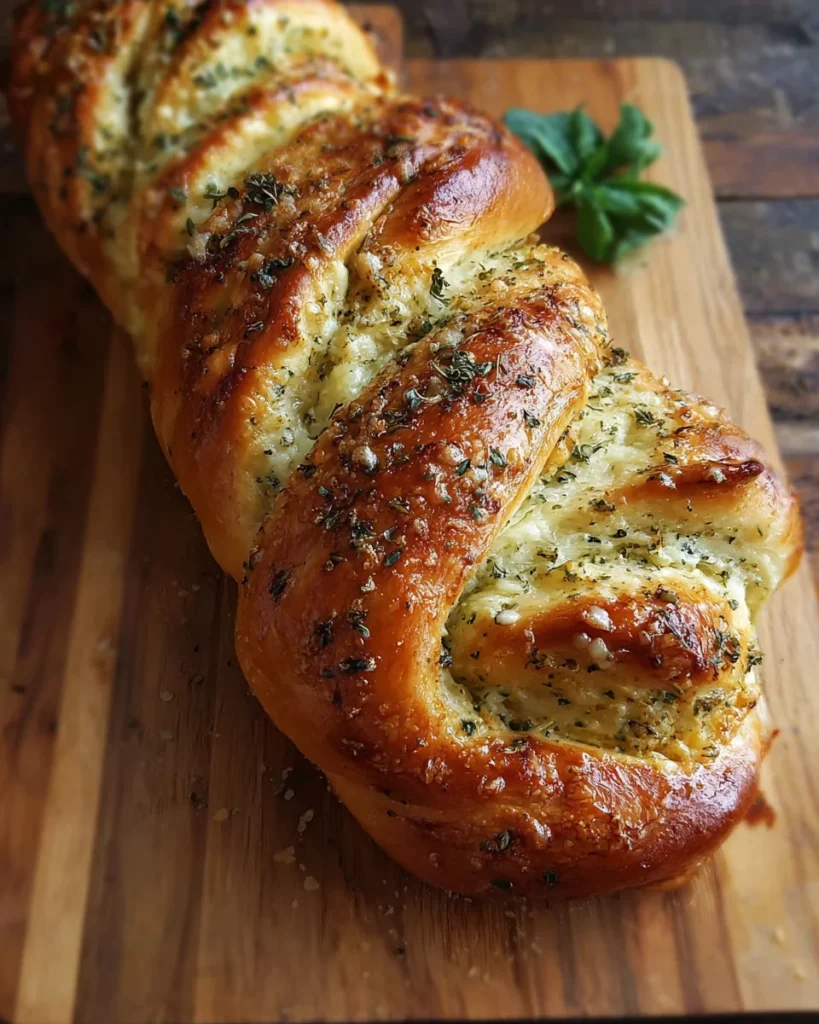
    • Serve with warm garlic bread or cheesy breadsticks for that comforting touch.
    • For drinks, cool iced tea or a light lager enhances the flavors perfectly.
    • Garnish your dish with fresh cilantro for a pop of color and flavor.

    FAQs about Buffalo Chicken Lasagna with a Ranch Twist

    I know you might have some questions about my Buffalo Chicken Lasagna with a Ranch Twist, so let’s clear things up! Here are some common inquiries I’ve encountered.

    Can I make this lasagna ahead of time? Absolutely! You can prepare the layers and assemble the lasagna in advance, then refrigerate it before baking. Just add about 10 minutes to the baking time if it’s cold from the fridge.

    How do I reheat leftovers? Simply slice the lasagna and place it in a microwave-safe dish. A few minutes in the microwave or about 20 minutes in a 350°F (175°C) oven should do the trick. Cover it with foil to keep it moist!

    Can I omit the ranch dressing? Yes! If ranch isn’t your thing, you can leave it out or substitute it with a drizzle of buffalo sauce for an extra kick. It’s all about what flavors make you happy!

    Is this Buffalo Chicken Lasagna kid-friendly? Definitely! The creamy cheeses combined with the tangy and spicy chicken is a hit with most kids. Adjust the Buffalo sauce if you’re concerned about spice levels for little ones.

    What can I serve with this dish? This lasagna pairs wonderfully with a crisp salad or some warm garlic bread. Feel free to get creative with sides that make it your own!

    Final Thoughts

    Cooking is much more than simply putting food on the table; it’s a way to bring loved ones together. My Buffalo Chicken Lasagna with a Ranch Twist embodies this spirit by marrying bold flavors with familiar comfort. Each layer offers a delightful surprise, while the tangy ranch and spicy chicken create an adventure on the palate.

    Whether it’s a busy weeknight or a special gathering, this dish promises to please. It’s not just about the meal; it’s about creating memories. So gather your family around, serve up some hearty slices, and let the deliciousness unfold!


    Print

    clock clock iconcutlery cutlery iconflag flag iconfolder folder iconinstagram instagram iconpinterest pinterest iconfacebook facebook iconprint print iconsquares squares iconheart heart iconheart solid heart solid icon

    Description

    Buffalo Chicken Lasagna with a Ranch Twist is a delicious and unique fusion of flavors, combining spicy Buffalo chicken with creamy cheeses and a tangy ranch drizzle.


    • 12 lasagna noodles, cooked according to package instructions
    • 3 cups shredded cooked chicken
    • 1 cup Buffalo wing sauce (adjust for spice level)
    • 1 (15 oz) container ricotta cheese
    • 2 cups shredded mozzarella cheese
    • 1 cup shredded cheddar cheese
    • 1/4 cup grated Parmesan cheese
    • 2 large eggs
    • 2 cups Alfredo sauce
    • 1/2 cup ranch dressing
    • 1 tbsp milk (optional, to thin)
    • Green onions, chopped (for garnish)
    • Extra Buffalo sauce (optional)

    1. Preheat your oven to 375°F (190°C). Lightly grease a 9×13-inch baking dish.
    2. In a medium bowl, toss the shredded chicken with Buffalo wing sauce until evenly coated. Set aside.
    3. In another bowl, combine ricotta cheese, eggs, Parmesan, and 1 cup of mozzarella. Mix until smooth.
    4. Spread a thin layer of Alfredo sauce on the bottom of the prepared baking dish.
    5. Place 3 lasagna noodles over the sauce.
    6. Spread a third of the ricotta mixture over the noodles, followed by a third of the Buffalo chicken mixture, and a sprinkle of mozzarella and cheddar cheese. Drizzle with more Alfredo sauce.
    7. Repeat these layers two more times, ending with a top layer of noodles, Alfredo sauce, and the remaining mozzarella and cheddar cheese.
    8. Cover with foil and bake for 25 minutes. Remove the foil and bake for another 15 minutes, or until the lasagna is bubbly and golden.
    9. Allow the lasagna to cool for 5-10 minutes. Drizzle ranch dressing over the top (add milk to thin if necessary) and garnish with chopped green onions. For extra heat, drizzle with additional Buffalo sauce.
    10. Slice and serve the lasagna hot with a crisp salad or garlic bread on the side.

    Notes

    • Feel free to adjust the amount of Buffalo wing sauce according to your spice preference.
    • For a vegetarian version, substitute shredded chicken with a plant-based protein.
    • Prep Time: 20 minutes
    • Cook Time: 40 minutes
    • Category: Main Dish
    • Method: Baking
    • Cuisine: American

    Nutrition

    • Serving Size: 1 slice
    • Calories: 450
    • Sugar: 2g
    • Sodium: 700mg
    • Fat: 25g
    • Saturated Fat: 12g
    • Unsaturated Fat: 10g
    • Trans Fat: 0g
    • Carbohydrates: 36g
    • Fiber: 2g
    • Protein: 30g
    • Cholesterol: 100mg

    Sharing is caring!

  • Sizzling Ground Beef Enchilada Soup

    Sizzling Ground Beef Enchilada Soup


    Introduction to Sizzling Ground Beef Enchilada Soup

    As someone who juggles a busy life, I know how important it is to have quick, delicious meals ready to go. Let me introduce you to my Sizzling Ground Beef Enchilada Soup. This hearty, flavorful dish is a lifesaver on hectic days. With a warm blend of beef, spices, and creamy goodness, it’s sure to impress your loved ones. Plus, it comes together in just 30 minutes! Whether you’re feeding a crowd or making a cozy dinner for your family, this recipe checks all the boxes for a satisfying and delightful meal.

    Why You’ll Love This Sizzling Ground Beef Enchilada Soup

    This soup is not just a meal; it’s a comforting hug in a bowl. First off, it’s incredibly easy to whip up, making it perfect for weekday dinners. With minimal prep and only 30 minutes of cooking, you’re left with a dish that satisfies even the pickiest eaters. The rich flavors dance on your palate, while the creamy texture invites you back for seconds. It’s truly a joy to share with family and friends!

    Ingredients for Sizzling Ground Beef Enchilada Soup

    To create this delicious Sizzling Ground Beef Enchilada Soup, you’ll need a mix of hearty and flavorful ingredients. Below, I’ve outlined everything you’ll need, but remember that the exact quantities are at the bottom of the article for easy printing.

    • Ground Beef: The star of the show, offering protein and a savory base. I prefer lean ground beef to keep it light.
    • Olive Oil: Used for browning the beef. It adds a nice richness and healthy fats to the soup.
    • Beef Broth: This creates a flavorful liquid base, bringing depth to each spoonful. Feel free to use low-sodium broth for a healthier option.
    • Enchilada Sauce: This gives your soup that signature Mexican flair and zest. A can of your favorite brand works perfectly!
    • Cream Cheese: Adds creaminess and richness, balancing the bold flavors beautifully. For a lighter version, consider using reduced-fat cream cheese.
    • Diced Tomatoes and Green Chilies: These provide a hint of sweetness and a little heat. A must for that vibrant color and texture!
    • Garlic: Freshly minced for its aromatic qualities, it brightens the entire dish. If you’re in a pinch, garlic powder will do.
    • Yellow Onion: Sweet and caramelized when sautéed, it adds a lovely flavor backbone to the soup.
    • Bell Pepper: I love using a red or green bell pepper. It brings sweetness and crunch to every bite.
    • Frozen Corn: A pop of sweetness that complements the other ingredients perfectly. Plus, it’s convenient!
    • Taco Seasoning: This will be your secret weapon for flavor! Feel free to use store-bought or make your own blend.
    • Toppings: Get creative with broken tortilla chips or strips, sour cream, shredded cheese, lime, and chopped cilantro. They elevate the soup, adding textures and bursts of flavor!

    Each ingredient plays a vital role in crafting a vibrant, comforting soup that not only satisfies but brings joy to your table. Now let’s dive into the cooking process and bring this dish to life!

    How to Make Sizzling Ground Beef Enchilada Soup

    Now that you have your ingredients ready, let’s dive into making the Sizzling Ground Beef Enchilada Soup step by step. Each step builds upon the last, filled with tips to ensure your soup turns out perfect every time.

    Step 1: Brown the Beef

    In a large Dutch oven, warm a tablespoon of olive oil over medium-high heat. I find that a Dutch oven retains heat well, making for beautiful browning. Add the ground beef, breaking it into large chunks. Spread it evenly across the bottom of the pan.

    Let the beef brown undisturbed for about 3 minutes. This allows those tasty crusty bits to form. Then, stir the beef, continuing to brown until it’s mostly cooked through, which should take another 3 minutes.

    Step 2: Sauté the Vegetables

    Next, toss in your chopped yellow onion and bell pepper. Sauté them until they soften, about 3 to 4 minutes. The aroma is simply delightful! You’ll see the onions become translucent, releasing their sweet fragrance.

    Step 3: Add Seasonings

    Now it’s time to amp up the flavors! Stir in the minced garlic and taco seasoning. I love using homemade seasoning, but store-bought is great too. Cook this mixture for about 30 seconds or until fragrant. The spices should create an irresistible aroma that fills your kitchen!

    Step 4: Create the Soup Base

    Pour in the beef broth next, scraping up any delicious browned bits from the bottom of the pot. This is where the magic happens! Add the can of diced tomatoes and green chilies along with the enchilada sauce and frozen corn.

    Heat the soup until it begins to bubble, allowing all those fabulous flavors to meld together. This step really brings everything to life!

    Step 5: Melt in the Cream Cheese

    Remove the pot from heat and stir in the cream cheese. Make sure the cream cheese is cubed to help it melt quickly. Mix until it’s fully combined and creamy. This is the secret to achieving that lovely rich texture!

    Step 6: Serve and Garnish

    Your soup is ready to be served! Dish it up in bowls and top it with broken tortilla chips or strips. Don’t forget the sour cream and shredded cheese to create a decadent topping. Sprinkle fresh cilantro on top for that extra pop of flavor and a squeeze of lime if you like an added zing!

    Enjoy your Sizzling Ground Beef Enchilada Soup, perfect for family dinners or cozy nights in!

    Tips for Success

    • For extra flavor, use grass-fed ground beef—it makes a difference!
    • Don’t rush the browning step; it builds a rich foundation for the soup.
    • Experiment with toppings—add avocado or jalapeños for a kick!
    • Make it ahead of time; the flavors deepen wonderfully overnight.
    • Freeze leftovers in individual portions for a quick meal later.

    Equipment Needed

    • Large Dutch Oven: Perfect for browning and simmering. A heavy-bottomed pot or deep skillet will also work.
    • Wooden Spoon: An essential tool for stirring. A silicone spatula can be a great alternative.
    • Sharp Knife: For chopping vegetables. A chef’s knife is versatile for all your cutting needs.
    • Measuring Cups: Helpful for accuracy. If you prefer, eyeballing the ingredients can be fun!

    Variations of Sizzling Ground Beef Enchilada Soup

    • Turkey or Chicken: Swap out the ground beef for ground turkey or chicken for a leaner option. It’s just as tasty!
    • Vegetarian Delight: For a meatless version, replace the beef with black beans, lentils, or extra vegetables like zucchini and mushrooms.
    • Spicy Kick: Add fresh jalapeños or a dash of hot sauce if you prefer your soup with a hearty kick of heat!
    • Low-Carb Option: Omit corn and serve the soup over cauliflower rice for a low-carb alternative.
    • Southwestern Twist: Incorporate diced sweet potatoes or butternut squash for a sweet contrast to the savory flavors.

    Serving Suggestions

    • Complement with a Fresh Salad: A crisp garden salad topped with a zesty vinaigrette pairs beautifully.
    • Make It a Meal: Serve with warm, crusty bread or soft tortillas for a satisfying feast.
    • Perfect Drink Pairing: Accompany the soup with a refreshing iced tea or a light beer.
    • Garnish with Style: Consider serving in colorful bowls and add lime wedges alongside for a vibrant presentation.

    FAQs about Sizzling Ground Beef Enchilada Soup

    Can I make Sizzling Ground Beef Enchilada Soup ahead of time?
    Absolutely! This soup actually tastes better the next day as the flavors meld together. Just store it in the fridge, and reheat when you’re ready to enjoy.

    What can I substitute for ground beef in this recipe?
    You can easily swap the ground beef for ground turkey, chicken, or black beans for a vegetarian version. Each option offers a unique flavor!

    How can I thicken my Sizzling Ground Beef Enchilada Soup?
    If you prefer a thicker soup, consider adding a tablespoon of cornstarch dissolved in water during the cooking process. Let it simmer to thicken nicely.

    Can I freeze leftovers?
    Yes! This soup freezes well. Just make sure to place it in an airtight container and leave some room for expansion. It will last for about 3 months in the freezer.

    What are some good toppings for this soup?
    Toppings really elevate this dish! Try shredded cheese, sour cream, fresh cilantro, diced avocado, or broken tortilla chips for crunch. The options are endless!

    Final Thoughts

    Cooking the Sizzling Ground Beef Enchilada Soup is more than just preparing a meal; it’s about creating moments that bring warmth to our busy lives. The savory aroma wafting through the kitchen can instantly bring everyone together, sparking joy and connection. As we ladle it into bowls, we share not only food but laughter and love. This soup is my go-to for a quick dinner or a cozy gathering with friends. By the end of the meal, you’ll find smiles all around, proving that sometimes, all it takes is a hearty bowl of soup to create lasting memories.


    Print

    clock clock iconcutlery cutlery iconflag flag iconfolder folder iconinstagram instagram iconpinterest pinterest iconfacebook facebook iconprint print iconsquares squares iconheart heart iconheart solid heart solid icon

    Description

    As someone who juggles a busy life, I know how important it is to have quick, delicious meals ready to go. Let me introduce you to my Sizzling Ground Beef Enchilada Soup. This hearty, flavorful dish is a lifesaver on hectic days. With a warm blend of beef, spices, and creamy goodness, it’s sure to impress your loved ones.


    • 1 lb ground beef
    • 1 tablespoon olive oil
    • 2 cups beef broth
    • 1 10 oz can enchilada sauce
    • 4 oz cream cheese, cubed
    • 1 10 oz can diced tomatoes and green chilies
    • 1 teaspoon minced garlic
    • 1 yellow onion, chopped
    • 1 bell pepper, chopped
    • 1 cup frozen corn
    • 2 tablespoons taco seasoning
    • Toppings:
    • Broken tortilla chips or strips
    • Sour cream
    • Shredded cheese, Mexican blend or cheddar
    • Lime, optional
    • Cilantro, chopped

    1. In a large Dutch oven, warm the oil over medium-high heat. Add the ground beef, breaking it into large chunks and spreading it evenly across the bottom of the pan.
    2. Let it brown undisturbed for about 3 minutes until the bottom develops some color. Stir the beef and continue to brown until it’s mostly cooked through, about 3 more minutes.
    3. Add the onion and bell pepper, sautéing them until they soften, which should take another 3-4 minutes.
    4. Stir in the garlic and taco seasoning, cooking for about 30 seconds until the mixture becomes fragrant.
    5. Pour in the broth, scraping up any browned bits from the bottom of the pot, then add the diced tomatoes, enchilada sauce, and corn. Heat the soup until it begins to bubble.
    6. Stir in the cream cheese, continuing to mix until it’s melted and fully combined. Remove the pot from heat.
    7. Serve the soup with shredded cheese, sour cream, tortilla strips, cilantro, and lime for garnish.

    Notes

    • Adjust the spice level by adding more or less taco seasoning.
    • For a creamier texture, use full-fat cream cheese.
    • This soup can be made ahead of time and stored in the refrigerator.
    • Prep Time: 10 minutes
    • Cook Time: 20 minutes
    • Category: Soup
    • Method: Stovetop
    • Cuisine: Mexican

    Nutrition

    • Serving Size: 1 cup
    • Calories: 350
    • Sugar: 3g
    • Sodium: 850mg
    • Fat: 20g
    • Saturated Fat: 8g
    • Unsaturated Fat: 10g
    • Trans Fat: 0g
    • Carbohydrates: 15g
    • Fiber: 3g
    • Protein: 25g
    • Cholesterol: 70mg

    Sharing is caring!

  • Blueberry Corn Feta Salad

    Blueberry Corn Feta Salad


    Introduction to Blueberry Corn Feta Salad

    As the sun shines brighter and summer beckons, nothing beats a refreshing dish that celebrates the season’s bounty. That’s where my Blueberry Corn Feta Salad comes into play! It’s not just a salad; it’s a vibrant blend of sweet blueberries, crisp corn, and creamy feta, sure to impress your loved ones. You know those busy days when you need something easy but delightful? This salad is your go-to solution! It’s quick to whip up, making it perfect for gatherings or simply enjoying on a relaxing afternoon. Trust me, your taste buds will thank you!

    Why You’ll Love This Blueberry Corn Feta Salad

    This Blueberry Corn Feta Salad is a delightful fusion of flavors that’s as easy as pie! It comes together in just 15 minutes, which is a blessing on those busy days when time isn’t on your side. The sweet bursts of blueberries paired with crisp corn and creamy feta create a taste explosion that everyone will love. Plus, it’s a great way to sneak in some freshness during those hot summer months!

    Ingredients for Blueberry Corn Feta Salad

    To create this vibrant Blueberry Corn Feta Salad, you’ll need a handful of fresh and delicious ingredients. Each one plays a crucial role in crafting the perfect bite.

    • Fresh or Frozen Corn: Sweet kernels that add a delightful crunch. If you’re feeling adventurous, try grilling fresh corn for a smoky flavor!
    • Fresh Blueberries: These juicy gems bring a natural sweetness that pairs wonderfully with the other ingredients. Look for plump, ripe ones for the best results.
    • Sliced Green Onions: Adding a mild pungent kick, these onions give a subtle depth to the salad. They also add a pop of color.
    • Jalapeño: For those who like a bit of heat, a seeded and minced jalapeño brightens up the dish. If you prefer it milder, feel free to skip it!
    • Crumble Feta Cheese: This creamy cheese provides a saltiness that balances the sweetness of the blueberries beautifully. You can use goat cheese for a tangy twist.
    • Chopped Fresh Basil: Fresh basil leaves add a fragrant element. They enhance the summer vibes, making each bite feel like a garden party.
    • Fresh Lime Juice: A splash of lime brings brightness to the dish, cutting through the richness of the feta. It’s the zesty finishing touch!
    • Olive Oil: Just a drizzle of quality olive oil ties all the flavors together. You can opt for a flavored oil for an extra kick.
    • Honey: A hint of sweetness from honey balances the salad, complementing the berries nicely.
    • Chili Powder: This adds a touch of smokiness, elevating the overall flavor profile. Just a pinch goes a long way!
    • Kosher Salt and Fresh Ground Black Pepper: Essential for enhancing the natural flavors of the ingredients. Use them to taste.

    For exact measurements, check the bottom of the article where you can also find a printable version. Happy cooking!

    How to Make Blueberry Corn Feta Salad

    Step 1 – Prepare the Ingredients

    Preparation is key for the perfect Blueberry Corn Feta Salad. Start with the corn; if you’re using fresh corn, husk the ears and remove the kernels with a sharp knife. For frozen corn, simply let it thaw at room temperature. Now, onto the blueberries! Rinse them gently in cold water and let them dry on a clean towel. This will prevent a watery salad. Next, chop the green onions, making sure to use both the white and green parts for flavor and color. If you’re adding jalapeño, cut it lengthwise, remove the seeds, and mince it finely. Finally, crumble the feta cheese into delightful morsels. Each ingredient plays a unique role, enhancing both flavor and texture.

    Step 2 – Mixing the Salad

    In a large serving bowl, it’s time to combine all of these vibrant ingredients! Start by adding the prepared corn followed by the fresh blueberries, sliced green onions, and minced jalapeño. Crumble the feta cheese on top and sprinkle the chopped basil for a heavenly aroma. When it comes to mixing, I suggest using a gentle hand. Fold the ingredients together carefully to keep the blueberries intact; they should burst with flavor, not be completely squished! This step is where the magic happens, as the colors and textures meld together, setting the stage for a stunning salad.

    Step 3 – Whisking the Dressing

    Let’s whisk up a zesty dressing that brings everything together! In a small bowl, combine the fresh lime juice and honey. This mixture creates a tangy-sweet flavor that beautifully balances the salad’s savoriness. Add the olive oil, chili powder, and a sprinkle of kosher salt and freshly cracked black pepper. When whisking, be sure to incorporate the ingredients thoroughly to create an emulsion; this helps the oil and lime juice play nice. You’ll want a dressing that coats the salad perfectly without overpowering it. Remember to taste as you go—adjusting the seasoning ensures each bite is a delightful experience!

    Step 4 – Combining Salad and Dressing

    Now it’s time to bring the salad and dressing together! Pour the zesty dressing over the mixed salad ingredients. Use a large spoon or spatula to gently combine everything, making sure every morsel is beautifully coated. Taste and adjust if necessary; a pinch of salt or a dash more lime can make all the difference. Don’t rush this step; the right mix is crucial for a perfect flavor balance!

    Step 5 – Serving Suggestions

    Your Blueberry Corn Feta Salad is almost ready to shine! Serve it immediately for the freshest experience. If you need to prep ahead, refrigerate the salad in an airtight container up to three days, but fresh is ideal! For presentation, consider a colorful bowl or layering the salad in a mason jar for an attractive display. This dish pairs wonderfully with grilled chicken or as a light side at barbeques. Enjoy your summer gatherings with this delightful salad!

    Tips for Success

    • When using fresh corn, grilling adds a delicious smoky flavor.
    • Choose ripe blueberries; they should be firm and sweet.
    • To avoid a soggy salad, serve immediately after mixing.
    • Adjust the amount of jalapeño based on your spice preference.
    • Make the salad a day ahead for flavors to meld, but add dressing just before serving.

    Equipment Needed

    • Large mixing bowl: Any big bowl will work, but a clear glass bowl shows off the colorful layers.
    • Small bowl for dressing: A simple whisking bowl or even a mason jar can do the trick.
    • Sharp knife: Essential for chopping ingredients evenly.
    • Cutting board: A sturdy one for easy ingredient prep.

    Variations on Blueberry Corn Feta Salad

    • Add Protein: Toss in grilled chicken, shrimp, or chickpeas for a heartier dish that satisfies your hunger.
    • Switch the Cheese: Try goat cheese or ricotta for a different flavor profile, complementing the sweetness of the blueberries.
    • Go Nutty: Add walnuts or pecans for a delightful crunch and a boost of healthy fats.
    • Change the Greens: Incorporate fresh spinach or arugula for an exciting twist and added nutrients.
    • Fruit Variations: Replace blueberries with strawberries or peaches, lending a seasonal touch that’s just as refreshing.
    • Herb Alternatives: Substitute basil with mint or cilantro for a different aromatic lift and flavor combination.

    Serving Suggestions for Blueberry Corn Feta Salad

    • Pair the salad with grilled chicken or fish for a complete meal.
    • Serve with crusty bread or pita for a delightful crunch.
    • Complement the flavors with a chilled white wine, such as Sauvignon Blanc.
    • Garnish with extra basil leaves for a pop of color.
    • Consider a colorful bowl for an eye-catching presentation.

    FAQs about Blueberry Corn Feta Salad

    Can I use frozen blueberries in this salad?
    Absolutely! Frozen blueberries work perfectly in a pinch. Just be sure to let them thaw completely and pat them dry to avoid excess moisture.

    How long does Blueberry Corn Feta Salad last in the fridge?
    This colorful salad is best enjoyed the day it’s made, but it can be stored in an airtight container for up to three days. Just remember that the colors and textures might change slightly over time.

    What can I serve with Blueberry Corn Feta Salad?
    This salad pairs beautifully with grilled chicken or fish, making it a perfect side dish for summer barbecues. You can also serve it alongside crusty bread or pita chips for a delightful crunch!

    Is Blueberry Corn Feta Salad suitable for meal prep?
    Yes! It’s great for meal prep. Just mix all the ingredients ahead of time, but add the dressing right before serving to keep it fresh and vibrant.

    Can I make this salad vegan?
    Definitely! You can omit the feta cheese or replace it with a plant-based cheese option. The sweetness of the blueberries and the zing from lime juice will still create a delightful experience!

    Final Thoughts

    Creating the Blueberry Corn Feta Salad is more than just preparing a meal; it’s about bringing joy to the table. Each vibrant ingredient dances together, creating a symphony of flavors that encapsulates summer’s spirit. I love how it transcends being just a side dish, turning ordinary gatherings into something special with its colorful allure. So, whether you’re enjoying it with loved ones or savoring leftovers, every bite is a reminder of the beauty of fresh ingredients. This salad has a way of evoking those delicious moments of connection and celebration that we all cherish.


    Print

    clock clock iconcutlery cutlery iconflag flag iconfolder folder iconinstagram instagram iconpinterest pinterest iconfacebook facebook iconprint print iconsquares squares iconheart heart iconheart solid heart solid icon

    Description

    As the sun shines brighter and summer beckons, nothing beats a refreshing dish that celebrates the season’s bounty. That’s where my Blueberry Corn Feta Salad comes into play! It’s not just a salad; it’s a vibrant blend of sweet blueberries, crisp corn, and creamy feta, sure to impress your loved ones. You know those busy days when you need something easy but delightful? This salad is your go-to solution! It’s quick to whip up, making it perfect for gatherings or simply enjoying on a relaxing afternoon. Trust me, your taste buds will thank you!


    • 1 1/2 cups fresh or frozen defrosted corn
    • 1 1/2 cups fresh blueberries
    • 1/4 cup sliced green onions
    • 1 jalapeño, seeded and minced
    • 1/3 cup crumbled feta cheese
    • 2 tablespoons chopped fresh basil
    • 3 tablespoons fresh lime juice
    • 1 1/2 tablespoons olive oil
    • 1 tablespoon honey
    • 1/2 teaspoon chili powder
    • Kosher salt and fresh ground black pepper to taste

    1. In a large serving bowl, combine the corn, blueberries, green onion, jalapeño, feta, and basil.
    2. In a small bowl, whisk together the lime juice, honey, olive oil, chili powder, salt, and pepper.
    3. Pour the dressing over the salad and stir together until combined. Taste for seasoning.
    4. Serve immediately or cover and refrigerate until ready to serve.
    5. The salad will last up to 3 days in the refrigerator, but is best the day it’s made.

    Notes

    • This salad can be made with either fresh or frozen corn.
    • Grilling fresh corn adds extra flavor.
    • Prep Time: 15 minutes
    • Cook Time: 0 minutes
    • Category: Salad
    • Method: No-cook
    • Cuisine: American

    Nutrition

    • Serving Size: 1 cup
    • Calories: 180
    • Sugar: 9g
    • Sodium: 200mg
    • Fat: 8g
    • Saturated Fat: 2g
    • Unsaturated Fat: 5g
    • Trans Fat: 0g
    • Carbohydrates: 22g
    • Fiber: 3g
    • Protein: 6g
    • Cholesterol: 10mg

    Sharing is caring!

  • Crispy Zucchini Chips

    Crispy Zucchini Chips


    Introduction to Crispy Zucchini Chips

    As a busy mom, I know how challenging it can be to find healthy snacks that everyone in the family will love. That’s where these Crispy Zucchini Chips come in! They’re not just a quick solution for a busy day; they’re a delightful way to sneak in some veggies without anyone noticing. Imagine the satisfying crunch as you munch on these golden, baked delights. Plus, they’re low in calories, making them a guilt-free treat. Trust me, once you try these, they’ll become a staple in your kitchen!

    Why You’ll Love This Crispy Zucchini Chips

    These Crispy Zucchini Chips are a game-changer for busy families! They’re incredibly easy to make, requiring just a handful of ingredients and minimal prep time. In about two hours, you’ll have a delicious, crunchy snack that’s perfect for movie nights or after-school munchies. Plus, they’re a fantastic way to satisfy those salty cravings without the guilt. Who knew healthy could taste this good?

    Ingredients for Crispy Zucchini Chips

    Gathering the right ingredients is key to making the perfect Crispy Zucchini Chips. Here’s what you’ll need:

    • Zucchinis: Choose medium-sized zucchinis for the best texture. They should be firm and free of blemishes.
    • Olive Oil: This adds a lovely richness. You can also use avocado oil for a healthier twist.
    • Sea Salt: A must for enhancing flavor. It helps draw out moisture, making your chips crispier.
    • Garlic Powder: This adds a savory kick. It’s a simple way to elevate the taste without extra effort.
    • Smoked Paprika: Optional, but it brings a delightful smokiness. Perfect for those who love a bit of flair!
    • Black Pepper: Just a pinch adds a subtle heat that balances the flavors beautifully.
    • Grated Parmesan: Another optional ingredient, but it gives an extra layer of flavor and crunch. Who can resist cheese?

    For exact measurements, check the bottom of the article where you can find everything listed for easy printing. Feel free to experiment with different seasonings to make these chips your own!

    How to Make Crispy Zucchini Chips

    Making Crispy Zucchini Chips is a straightforward process that yields delicious results. Follow these simple steps, and you’ll be snacking on crunchy goodness in no time!

    Step 1: Preheat the Oven

    Start by preheating your oven to 250°F (120°C). This low temperature is crucial for achieving that perfect crispiness. If the oven is too hot, your chips may burn before they dry out. Patience is key here!

    Step 2: Prepare the Zucchini

    Next, wash your zucchinis thoroughly under cool water. Dry them well with a clean towel. Slice them into thin rounds, about 1/8-inch thick. The thinner the slices, the crispier they’ll be. A mandoline slicer can be a handy tool for this, ensuring even cuts.

    Step 3: Draw Out Moisture

    Now, lay the zucchini slices on a paper towel and sprinkle them lightly with sea salt. Let them sit for about 10 minutes. This step is essential as it draws out excess moisture, which helps your chips become crispy. You’ll be amazed at how much water comes out!

    Step 4: Pat Dry and Season

    After the zucchini has sat, gently pat the slices with another paper towel to soak up the moisture. This step is vital for crispiness! If you’re feeling adventurous, sprinkle some garlic powder or grated parmesan on top for added flavor.

    Step 5: Arrange on Baking Sheet

    Line a baking sheet with parchment paper. Arrange the zucchini slices in a single layer, making sure they don’t overlap. This spacing allows for even cooking and ensures that every chip gets that delightful crunch.

    Step 6: Bake to Perfection

    Place the baking sheet in the oven and bake for about 1.5 to 2 hours. Flip the slices halfway through to ensure they crisp evenly. Start checking for doneness around the 90-minute mark. They should be golden brown and crispy. Let them cool for about 5 minutes before diving in!

    Tips for Success

    • Ensure your zucchini slices are uniform in thickness for even cooking.
    • Don’t rush the drying process; it’s key to achieving that perfect crunch.
    • Experiment with different seasonings to find your favorite flavor combination.
    • Store leftover chips in an airtight container to keep them crispy.
    • Keep an eye on them towards the end of baking to prevent burning.

    Equipment Needed

    • Baking Sheet: A standard baking sheet works well. You can also use a cooling rack for better air circulation.
    • Parchment Paper: This prevents sticking. If you don’t have it, a silicone baking mat is a great alternative.
    • Mandoline Slicer: For even slices, but a sharp knife will do just fine!

    Variations

    • Spicy Zucchini Chips: Add a pinch of cayenne pepper or chili powder for a kick of heat.
    • Herb-Infused Chips: Sprinkle dried herbs like oregano, thyme, or rosemary for a fragrant twist.
    • Cheesy Zucchini Chips: Use nutritional yeast instead of parmesan for a vegan-friendly cheesy flavor.
    • Sweet Zucchini Chips: Drizzle with a bit of honey or sprinkle with cinnamon for a sweet treat.
    • Asian-Inspired Chips: Toss with sesame oil and a sprinkle of sesame seeds for an umami flavor.

    Serving Suggestions

    • Pair your Crispy Zucchini Chips with a refreshing dip like hummus or tzatziki for a delightful contrast.
    • Serve them alongside a crisp salad for a light lunch or dinner.
    • Enjoy with a chilled glass of sparkling water or iced tea for a perfect snack.
    • For a fun presentation, stack them in a mason jar for a charming display.

    FAQs about Crispy Zucchini Chips

    As I’ve shared my love for Crispy Zucchini Chips, I often get questions from fellow home cooks. Here are some of the most common queries I’ve encountered:

    Can I use other vegetables for chips?

    Absolutely! While zucchini is a favorite, you can experiment with other veggies like sweet potatoes, carrots, or even kale. Just adjust the cooking time as needed.

    How do I store leftover chips?

    To keep your healthy snack crispy, store any leftovers in an airtight container. They’ll stay fresh for a few days, but trust me, they might not last that long!

    Can I make these chips in an air fryer?

    Yes! An air fryer is a fantastic option for making low-calorie chips. Just set it to a lower temperature and keep an eye on them to avoid burning.

    What can I dip these chips in?

    These chips pair wonderfully with dips like hummus, guacamole, or even a tangy yogurt sauce. The options are endless!

    Are these chips suitable for meal prep?

    Definitely! You can make a big batch ahead of time. Just store them properly, and you’ll have a crunchy snack ready whenever you need it.

    Final Thoughts

    Making Crispy Zucchini Chips has been a delightful journey for me, and I hope it becomes one for you too! There’s something incredibly satisfying about creating a healthy snack that everyone enjoys. The joy of watching my family crunch away on these chips, all while knowing they’re eating something nutritious, warms my heart. Plus, the versatility of this recipe means you can customize it to fit your family’s tastes. So, roll up your sleeves, embrace the kitchen adventure, and enjoy the delicious crunch of these guilt-free treats. Happy snacking!


    Print

    clock clock iconcutlery cutlery iconflag flag iconfolder folder iconinstagram instagram iconpinterest pinterest iconfacebook facebook iconprint print iconsquares squares iconheart heart iconheart solid heart solid icon

    Description

    As a busy mom, I know how challenging it can be to find healthy snacks that everyone in the family will love. That’s where these Crispy Zucchini Chips come in! They’re not just a quick solution for a busy day; they’re a delightful way to sneak in some veggies without anyone noticing. Imagine the satisfying crunch as you munch on these golden, baked delights. Plus, they’re low in calories, making them a guilt-free treat. Trust me, once you try these, they’ll become a staple in your kitchen!


    • 2 medium zucchinis
    • 12 tablespoons of olive oil (or avocado oil for a healthier option)
    • ½ teaspoon of sea salt
    • ½ teaspoon of garlic powder
    • ½ teaspoon of smoked paprika (optional for a little extra flavor)
    • ¼ teaspoon of black pepper
    • Grated parmesan (optional for added flavor and crunch)

    1. Preheat your oven to 250°F (120°C).
    2. Wash and dry your zucchinis thoroughly, then slice them into thin rounds about 1/8-inch thick.
    3. Lay the zucchini slices on a paper towel, sprinkle lightly with salt, and let sit for about 10 minutes to draw out moisture.
    4. Gently pat the slices with another paper towel to soak up the moisture. Optionally, sprinkle grated parmesan for extra flavor.
    5. Line a baking sheet with parchment paper and arrange the zucchini slices in a single layer without overlapping.
    6. Bake for about 1.5 to 2 hours, flipping the slices halfway through for even crisping.
    7. Check for crispiness around the 90-minute mark; they should be golden brown and crispy. Let cool for 5 minutes before serving.

    Notes

    • Ensure zucchini slices are evenly cut for consistent cooking.
    • Experiment with different seasonings to customize flavors.
    • Store any leftovers in an airtight container to maintain crispiness.
    • Prep Time: 15 minutes
    • Cook Time: 2 hours
    • Category: Snack
    • Method: Baking
    • Cuisine: American

    Nutrition

    • Serving Size: 1 serving (about 1 ounce)
    • Calories: 100
    • Sugar: 2g
    • Sodium: 200mg
    • Fat: 7g
    • Saturated Fat: 1g
    • Unsaturated Fat: 6g
    • Trans Fat: 0g
    • Carbohydrates: 8g
    • Fiber: 2g
    • Protein: 3g
    • Cholesterol: 0mg

    Sharing is caring!

  • Chicken Taco Mac Cheese

    Chicken Taco Mac Cheese


    Introduction to Chicken Taco Mac Cheese

    Hey there, fellow busy moms and professionals! If you’re searching for a quick yet satisfying meal, let me introduce you to my all-time favorite: Chicken Taco Mac Cheese. This dish is a delightful fusion of creamy comfort and spicy taco goodness, bringing joy to your dinner table without the fuss. Imagine melting cheesy goodness, tender chicken, and zesty flavors all in one bowl—it’s like a warm hug on a plate! Perfect for those hectic weeknights, this recipe will impress your loved ones and make mealtime feel like a fiesta!

    Why You’ll Love This Chicken Taco Mac Cheese

    This Chicken Taco Mac Cheese is a game-changer for your dinner routine! It’s quick to whip up, taking just about 35 minutes from start to finish. The blend of flavors is a treat for your taste buds, combining classic macaroni and cheese with taco-inspired spices. Plus, it’s a one-pan dish, which means less cleanup—definitely a winning combo for busy days!

    Ingredients for Chicken Taco Mac Cheese

    Gathering your ingredients is half the fun! For this Chicken Taco Mac Cheese, you’ll need a fantastic array of items that contribute to the delightful flavors.

    • Chicken Breast: Cutting this into cubes provides a savory protein boost and keeps it juicy.
    • Vegetable Oil: A tablespoon helps to sauté the chicken and onion, ensuring they cook evenly without sticking.
    • Onion: Chopped onion adds sweetness and depth of flavor that pairs beautifully with the spices.
    • Elbow Macaroni: The classic pasta shape that holds the creamy sauce wonderfully—feel free to swap with gluten-free pasta if needed!
    • Chicken Broth: This adds moisture and reinforces the rich, savory flavor throughout the dish.
    • Rotel Tomatoes: A can of these zesty tomatoes brings extra flavor and a touch of heat without overwhelming the dish.
    • Tomato Sauce: Perfect for creating a thick, comforting sauce that envelops the pasta.
    • Minced Garlic: Adding it at the right moment enhances the dish’s fragrance and depth, making everything taste more complex.
    • Colby Jack Cheese: This melty cheese offers a creamy texture and a delightful combination of flavors—who can resist that?
    • Whole Milk: It helps create that extra creamy sauce when stirred in with the cheese for a rich finish.
    • Salt and Pepper: A pinch of each brightens and enhances all the flavors in the dish.
    • Chili Powder: The key spice that gives it that taco flair—adjust the quantity to suit your heat tolerance!
    • Ground Cumin: A warm, earthy spice that complements the taco theme beautifully.
    • Dried Cilantro: For a hint of herby brightness; if you prefer, fresh cilantro can be used as a garnish instead.
    • Fresh Cilantro for Garnish: Sprinkle it on top for a fresh finish that adds color and flavor.

    For optional ingredients, consider adding sliced jalapeños for some extra kick. Remember, the exact measurements can be found at the bottom of the article for easy printing!

    How to Make Chicken Taco Mac Cheese

    Now, let’s dive into the heart of the recipe! Making Chicken Taco Mac Cheese is not just about gathering ingredients; it’s about transforming them into a beautiful, comforting dish. Follow these simple, tasty steps to create a masterpiece that everyone will love!

    Step 1: Prepare Your Ingredients

    Preparation is key when it comes to efficiency in the kitchen. Start by gathering all your ingredients together. Measure out your spices, chop the onion and garlic, and cube the chicken. Having everything ready means you’re less likely to miss an ingredient, and it speeds up the cooking process. Trust me, when you’re trying to juggle everything, it’ll save you time and stress!

    Step 2: Cook the Chicken and Onion

    In a large skillet, heat the vegetable oil over medium heat. Add the cubed chicken and chopped onion together. Season them with salt, black pepper, chili powder, cumin, and dried cilantro. Stir frequently for 6-8 minutes until the chicken is lightly browned and almost cooked through. This step is crucial; it develops flavors that linger throughout the dish. Keep your spatula moving to prevent any sticking or burning!

    Step 3: Add Garlic and Combine Ingredients

    Once your chicken and onion are cooked, it’s time for the garlic. Stir in the minced garlic and let it cook for about a minute. This brings out its fragrant goodness. Now, add the elbow macaroni, chicken broth, undrained Rotel tomatoes, and tomato sauce. Mix everything together thoroughly, ensuring the pasta is submerged in the liquids. This combination sets up a wonderful flavor base for your creamy sauce!

    Step 4: Boil and Simmer

    Increase the heat slightly until you reach a rolling boil. Stir occasionally to get rid of any sticking. When you see those bubbling, steady bubbles, reduce the heat to medium-low, and cover it with a lid. Let it simmer for about 12 minutes. Stir at least once to check the pasta’s texture. You want it tender but still holding its shape. That perfect bite is what we’re aiming for!

    Step 5: Create the Creamy Cheese Sauce

    Remove the skillet from heat, and stir in your shredded Colby Jack cheese along with the milk. This is where the magic happens! Let it sit for 2-3 minutes and then stir until the cheese completely melts into a luscious, creamy sauce. If it feels too thick, add a splash more milk. The creaminess is the heart of your Chicken Taco Mac Cheese!

    Step 6: Serve and Garnish

    It’s time to enjoy your creation! Serve the Chicken Taco Mac Cheese immediately while it’s hot. For a burst of freshness, garnish with fresh chopped cilantro on top. You can also add a dollop of sour cream or sliced jalapeños for extra flavor if you like. Don’t forget to dish out generous portions because this dish is bound to disappear quickly!

    Tips for Success

    • Prep your ingredients before cooking to streamline the process.
    • Use a large skillet to avoid overcrowding, ensuring even cooking.
    • Stir the pasta occasionally to prevent it from sticking to the bottom.
    • For extra creaminess, don’t hesitate to add more cheese or milk!
    • Feel free to customize spices based on your family’s taste preferences.

    Equipment Needed

    • Large Skillet: A non-stick skillet works great for easy cooking and cleanup.
    • Measuring Cups and Spoons: Essential for consistency in flavor and texture.
    • Wooden Spoon or Spatula: Perfect for stirring and mixing everything together.
    • Cutting Board and Knife: For chopping the onion, garlic, and chicken.

    Variations

    • Try using ground turkey or beef instead of chicken for a different meat choice.
    • For a vegetarian version, use black beans or chickpeas as your protein source.
    • Swap out the Colby Jack cheese for pepper jack for an extra kick!
    • Add bell peppers or corn for added color and crunch.
    • For a lower-carb option, substitute macaroni with zucchini noodles.

    Serving Suggestions

    • Pair your Chicken Taco Mac Cheese with a fresh garden salad for a refreshing crunch.
    • Serve with tortilla chips on the side for an added crunch and dipping fun!
    • A glass of iced tea or margarita complements the meal beautifully.
    • Present in a colorful bowl for a cheerful table setting that enhances the dish’s vibrant flavors!

    FAQs about Chicken Taco Mac Cheese

    If you have questions about my beloved Chicken Taco Mac Cheese, you’re not alone! Many of us want to know the details before diving in. Here are some frequently asked questions that might help you feel more confident in trying this recipe.

    Can I use frozen chicken in this recipe? Absolutely! Just ensure the chicken is fully thawed before cooking to ensure even cooking.

    How do I store leftovers? This delicious dish can be stored in an airtight container in the refrigerator for up to three days. If it thickens, add a splash of milk when reheating for extra creaminess.

    Can I make this Chicken Taco Mac Cheese ahead of time? Yes! Prepare it a day in advance and store it in the fridge. Just reheat it gently on the stovetop or microwave.

    Can I customize the spiciness level? Definitely! Adjust the chili powder or add more jalapeños to increase the heat. Tailor it to suit your family’s taste buds.

    Is this dish kid-friendly? Without a doubt! The cheesy goodness and taco flavors usually entice even picky eaters. Plus, they can help with toppings like cilantro and sour cream!

    Final Thoughts

    Creating Chicken Taco Mac Cheese has been a joyous experience, and I know it will be for you, too! This dish brings warmth, comfort, and an explosion of flavor that’s sure to brighten any hectic day. It’s the kind of meal that fosters togetherness, inviting family and friends to gather around your table. Watching loved ones savor each bite is truly rewarding. Remember, cooking is not just about feeding hungry bellies—it’s about sharing moments and making memories. So, roll up your sleeves, embrace the process, and enjoy every cheesy, delicious moment!


    Print

    clock clock iconcutlery cutlery iconflag flag iconfolder folder iconinstagram instagram iconpinterest pinterest iconfacebook facebook iconprint print iconsquares squares iconheart heart iconheart solid heart solid icon

    Description

    Chicken Taco Mac Cheese is a delicious blend of creamy mac and cheese with taco-inspired flavors, providing a comforting and flavorful twist to a classic dish.


    • 1 lb chicken breast, cut into cubes
    • 1 tablespoon vegetable oil
    • 1 medium onion, chopped
    • 2½ cups elbow macaroni
    • 1½ cups chicken broth
    • 10 oz can Rotel tomatoes (undrained)
    • 8 oz can tomato sauce
    • 1 tablespoon minced garlic
    • 2 cups shredded Colby Jack cheese
    • ½ cup whole milk
    • ½ teaspoon salt
    • ½ teaspoon black pepper
    • 2 teaspoons chili powder
    • 1 teaspoon ground cumin
    • 1 teaspoon dried cilantro
    • Fresh cilantro for garnish

    1. Heat oil in a large skillet over medium heat. Add the cubed chicken and chopped onion to the pan. Season with salt, pepper, chili powder, cumin, and dried cilantro. Cook for 6-8 minutes, stirring frequently, until chicken is nearly cooked through.
    2. Stir in the minced garlic, then add the elbow macaroni, chicken broth, undrained Rotel tomatoes, and tomato sauce. Mix everything together well to combine all ingredients evenly.
    3. Increase heat slightly and bring the mixture to a rolling boil, stirring occasionally to prevent sticking. Once you see steady bubbles throughout, you’re ready for the next step.
    4. Reduce heat to medium-low and cover with a lid. Let it simmer for about 12 minutes, or until the pasta is tender. Stir at least once halfway through to keep the macaroni from sticking to the bottom of the pan.
    5. Remove from heat and stir in the shredded Colby Jack cheese and milk. Let it sit for 2-3 minutes, stirring occasionally, until the cheese melts completely and creates a creamy sauce.
    6. Serve immediately while hot, topped with fresh chopped cilantro. Let it rest for a few minutes if you prefer a thicker consistency, as it will continue to thicken as it cools slightly.

    Notes

    • For extra spice, consider adding jalapeños or hot sauce to the mixture.
    • This dish is great for meal prep and can be stored in the refrigerator for up to 3 days.
    • Leftovers can be reheated on the stovetop or in the microwave, adding a splash of milk if it gets too thick.
    • Prep Time: 10 minutes
    • Cook Time: 25 minutes
    • Category: Main Course
    • Method: Stovetop
    • Cuisine: Mexican-American

    Nutrition

    • Serving Size: 1 bowl
    • Calories: 550
    • Sugar: 4g
    • Sodium: 800mg
    • Fat: 27g
    • Saturated Fat: 12g
    • Unsaturated Fat: 6g
    • Trans Fat: 0g
    • Carbohydrates: 50g
    • Fiber: 3g
    • Protein: 36g
    • Cholesterol: 85mg

    Sharing is caring!

  • Swirled Garlic Herb and Cheese Bread

    Swirled Garlic Herb and Cheese Bread


    Introduction to Swirled Garlic Herb and Cheese Bread

    There’s something undeniably magical about the smell of freshly baked bread wafting through the house. It wraps around you like a warm hug, doesn’t it? Today, I’m excited to share my recipe for Swirled Garlic Herb and Cheese Bread—a delightful treat that transforms even the busiest of days into something special. It’s the kind of bread that impresses your loved ones while being surprisingly easy to make. Whether you’re preparing a cozy family dinner or savoring a quiet evening at home, this bread brings comfort and joy to every bite.

    Why You’ll Love This Swirled Garlic Herb and Cheese Bread

    This Swirled Garlic Herb and Cheese Bread is not just another loaf, it’s a game changer for hectic days. With its blend of mouth-watering garlic, fresh herbs, and gooey cheese, it’s impossible not to love. Plus, it’s simple and quick to prepare, making it a perfect choice for us busy moms and professionals who need flavor without the fuss. Trust me, your family will be begging for more!

    Ingredients for Swirled Garlic Herb and Cheese Bread

    Gathering the right ingredients is key for creating a delectable Swirled Garlic Herb and Cheese Bread. Here’s what you’ll need:

    • Buttermilk: At room temperature for tenderness and a subtle tang.
    • Instant yeast: Helps the dough rise quickly—no waiting around!
    • Granulated sugar: Just a touch to balance flavors and fuel the yeast.
    • Large eggs: Use them at room temperature to enrich the dough and give it structure.
    • Bread flour: Higher protein content ensures a chewy, dreamy texture.
    • Salt: Vital for flavor; it also controls the yeast growth.
    • Garlic: Freshly chopped to infuse that irresistible aroma.
    • Salted butter: Adds richness and keeps the bread moist; more for brushing brings it all together.
    • Parmesan cheese: For a sharp, nutty kick that complements the flavors perfectly.
    • Cheddar cheese: Grated to give that gooey, creamy texture we all love.
    • Fresh basil, thyme, and oregano: These herbs are essential for that garden-fresh taste. Don’t hesitate to adjust these based on your preferences!
    • Topping: A mixture of melted salted butter and garlic powder for that final touch of flavor.

    For exact measurements, you can find them at the bottom of this article, where you can also print the recipe for easy access. Let’s gather these ingredients and embark on a flavorful journey together!

    How to Make Swirled Garlic Herb and Cheese Bread

    Step 1: Prepare the Dough

    Let’s kick things off by making the dough, shall we? In the bowl of a stand mixer, mix buttermilk, instant yeast, granulated sugar, and eggs. Next, add in the bread flour and salt. Using the dough hook, it’s essential to mix until everything is well combined. Keep an eye on the consistency; it should be smooth and elastic. If it feels too sticky, don’t hesitate to add a little more flour, a quarter cup at a time, until you get that perfect texture.

    Step 2: Let the Dough Rise

    Now comes the fun part—letting the dough rise! Cover the bowl tightly with plastic wrap and find a warm spot in your kitchen. This warmth allows the yeast to do its thing, causing the dough to double in size. This step is essential for that light and airy texture we all crave in bread.

    Step 3: Create the Garlic Herb Butter

    While the dough is rising, let’s spice things up with some garlic herb butter. In a small bowl, combine softened butter with finely chopped garlic, parmesan cheese, and all those fragrant herbs—basil, thyme, and oregano. The aroma alone will make your mouth water! This butter blend is crucial for making those swirls incredibly flavorful.

    Step 4: Roll and Shape the Dough

    Once the dough has risen, punch it down and roll it out on a floured surface into a large rectangle, about 12 x 18 inches. Spread a generous amount of your garlic herb butter over the dough, followed by a generous sprinkling of shredded cheddar cheese. It’s a sight to behold! Now, starting from the long edge closest to you, roll the dough into a tight log. Pinch the edges to seal it all in.

    Step 5: Twist the Dough

    This is where the fun really begins! Using a sharp knife, carefully slice the log in half lengthwise, making sure to leave a small section intact at one end. Turn those halves to reveal the beautiful filling. Then, cross the strands over each other, twisting them to create that delightful swirled effect. Trust me, it looks more complicated than it is!

    Step 6: Second Rise

    Transfer your twisted dough to a parchment-lined baking sheet and cover it with plastic wrap again. Allow it to rise in a warm spot for about 45 minutes. This second rise is crucial for achieving that perfect texture—fluffy on the inside and crusty on the outside.

    Step 7: Bake the Bread

    Finally, we can bake this masterpiece! Preheat your oven to 350 degrees F. Before popping it in, brush the top with that melted butter and sprinkle some garlic powder for an extra kick. Bake for 30-35 minutes until the top is golden brown and sounds hollow when tapped. And there you have it—your very own Swirled Garlic Herb and Cheese Bread!

    Tips for Success

    • Always use room temperature ingredients for a smoother dough.
    • Keep a close eye on the rising dough; warmth is key.
    • Don’t rush the second rise; it’s essential for that fluffy texture.
    • Experiment with different cheeses—add mozzarella for extra gooeyness!
    • For a delightful finish, brush with garlic butter right before serving.

    Equipment Needed

    • Stand mixer: A great tool for kneading, but you can knead by hand if you prefer.
    • Dough hook: Perfect for mixing and kneading, but a wooden spoon works too.
    • Rolling pin: Ideal for rolling out dough; you can use a wine bottle in a pinch.
    • Baking sheet: Essential for baking bread, but a cast iron skillet adds a nice touch.
    • Plastic wrap: To cover dough; a clean kitchen towel works well too.

    Variations of Swirled Garlic Herb and Cheese Bread

    • Cheese Variations: Swap out cheddar for gouda or mozzarella for a creamier texture.
    • Herb Swaps: Experiment with fresh dill or cilantro for a unique twist.
    • Spicy Kick: Add red pepper flakes or diced jalapeños to the garlic herb butter for a zesty surprise.
    • Whole Wheat Option: Substitute half of the bread flour with whole wheat flour for a heartier loaf.
    • Vegan Alternative: Use plant-based butter and cheese for a vegan-friendly version of this bread.

    Serving Suggestions for Swirled Garlic Herb and Cheese Bread

    • Pair it with soups: This bread complements creamy tomato or vegetable soup beautifully.
    • Salads: Serve alongside a fresh green salad with a light vinaigrette for contrast.
    • Wine: A glass of white wine elevates the experience when enjoying this bread.
    • Presentation: Slice it elegantly and serve warm on a rustic wooden board.
    • Herb garnishes: Add sprigs of fresh herbs on the side for a touch of color.

    FAQs about Swirled Garlic Herb and Cheese Bread

    Can I use regular yeast instead of instant yeast?

    Absolutely! Just remember to activate regular yeast in warm buttermilk with sugar before mixing it into your dough. It’s a simple step that ensures those little bubbles of goodness.

    How should I store the leftover Swirled Garlic Herb and Cheese Bread?

    To keep it fresh, store the bread in an airtight container at room temperature for up to 2 days. You can freeze it for longer storage, simply wrap it tightly in plastic wrap.

    What can I serve with this bread?

    This bread pairs wonderfully with soups, salads, or a nice glass of wine. It’s the perfect companion to elevate any meal!

    Can I make this bread ahead of time?

    Yes, you can prepare the dough and let it rise, then shape it and place it in the fridge overnight. Let it come to room temperature before baking for that fresh, warm goodness.

    Why is the second rise so important?

    The second rise gives your Swirled Garlic Herb and Cheese Bread that fluffy, light texture. Skipping it might result in a denser loaf, which we definitely want to avoid!

    Final Thoughts

    As I reflect on my journey with Swirled Garlic Herb and Cheese Bread, I can’t help but smile. The delightful aroma that fills my kitchen while it bakes is simply irresistible. Each bite brings a burst of flavor and warmth, making gatherings at home feel extra special. It’s more than just a recipe; it’s an experience that invites family and friends to come together. Whether you’re savouring it solo or sharing with loved ones, this bread becomes a delicious memory, reminding us of the joy found in home-cooked delights. Give it a try, and let the smiles unfold!


    Print

    clock clock iconcutlery cutlery iconflag flag iconfolder folder iconinstagram instagram iconpinterest pinterest iconfacebook facebook iconprint print iconsquares squares iconheart heart iconheart solid heart solid icon

    Description

    A delightful bread infused with garlic, herbs, and cheese, swirled and baked to perfection.


    • ¾ cups buttermilk at room temperature
    • 2 ½ tsp instant yeast
    • 2 tbsp granulated sugar
    • 3 large eggs, at room temperature
    • 3 ½4 cups bread flour
    • 1 ¼ tsp salt
    • 4 cloves garlic, finely chopped
    • 6 tbsp salted butter, at room temperature + more for brushing and serving
    • ¼ cup grated parmesan cheese
    • 2 cups grated cheddar cheese
    • ½ cup fresh chopped basil
    • 2 tbsp fresh chopped thyme
    • 1 tbsp fresh chopped oregano
    • Topping: 2 tbsp salted butter, melted
    • ¼ tsp garlic powder

    1. In the bowl of a stand mixer combine the room temperature buttermilk, instant yeast, granulated sugar, eggs, 3 ½ cups bread flour, and salt. Using the dough hook, mix until the flour is completely incorporated, about 4-5 minutes. Add 2 tablespoons of the room temp butter and mix until combined, an additional 2-3 minutes. If the dough is still sticky, add ¼ cup of flour at a time, adding more as needed until the dough is smooth and elastic to the touch.
    2. Cover the bowl tightly with plastic wrap and place in a warm spot. Allow the dough to rise for 2 hours, or until doubled in size. While the dough is rising, combine the remaining 4 tablespoons of butter, chopped garlic, parmesan, basil, thyme, and oregano in a small bowl.
    3. Once the dough has risen, punch the dough down and roll out onto a lightly floured surface, creating a large rectangle about 12 x 18 inches. Spread the garlic and herb butter evenly over the dough and the shredded cheddar cheese. Starting with the long edge closest to you, roll the dough into a log, keeping it fairly tight as you go. When you reach the edge, pinch along the edge to seal.
    4. Using a sharp knife, cut the log of dough in half lengthwise, leaving a small portion at one end intact. Turn the halves to expose the filling. Cross the dough ropes over each other, repeating the twisting until you have a long, twisted dough.
    5. Carefully transfer to a parchment-lined baking sheet and cover with plastic wrap and allow to rise in a warm spot for an additional 45 minutes.
    6. After the second rise, uncover and brush the top of the dough with the remaining 2 tablespoons of salted butter and garlic powder.
    7. Preheat the oven to 350 degrees F. Carefully transfer the bread to the oven and bake 30-35 minutes, or until the top is golden brown and the bread is cooked through.

    Notes

    • Adjust the herbs to your preference.
    • Store leftovers in an airtight container or freeze for later use.
    • Prep Time: 15 minutes
    • Cook Time: 35 minutes
    • Category: Bread
    • Method: Baking
    • Cuisine: American

    Nutrition

    • Serving Size: 1 slice
    • Calories: 250
    • Sugar: 2g
    • Sodium: 350mg
    • Fat: 12g
    • Saturated Fat: 7g
    • Unsaturated Fat: 4g
    • Trans Fat: 0g
    • Carbohydrates: 30g
    • Fiber: 1g
    • Protein: 8g
    • Cholesterol: 75mg

    Sharing is caring!

  • Chickpea Edamame Salad with Ginger Sesame Vinaigrette

    Chickpea Edamame Salad with Ginger Sesame Vinaigrette


    Introduction to Chickpea Edamame Salad with Ginger Sesame Vinaigrette

    As a busy mom, I know how hectic life can get. You’re juggling work, family, and endless responsibilities. Sneaking in healthy meals can feel overwhelming. That’s where this Chickpea Edamame Salad with Ginger Sesame Vinaigrette comes into play! It’s a refreshing and vibrant dish that’s as easy to whip up as it is exciting for your taste buds. Packed with protein and bursting with colorful veggies, this salad is perfect for lunch, dinner, or a quick snack. Trust me, you’ll savor every bite while feeling great about nourishing yourself and your loved ones!

    Why You’ll Love This Chickpea Edamame Salad with Ginger Sesame Vinaigrette

    This Chickpea Edamame Salad with Ginger Sesame Vinaigrette is not just a feast for the eyes; it’s a quick and nutritious meal! With just ten minutes of prep time, you’ll have a delicious, vibrant dish ready to serve. The balance of protein-packed chickpeas and crisp vegetables makes it satisfying without being heavy. Plus, the ginger sesame vinaigrette adds an irresistible zing that will keep you coming back for more!

    Ingredients for Chickpea Edamame Salad with Ginger Sesame Vinaigrette

    Gathering fresh ingredients is the first step to creating a delightful Chickpea Edamame Salad with Ginger Sesame Vinaigrette. Here’s what you need:

    • Chickpeas: These creamy legumes are packed with protein and fiber, making them a star player in this salad.
    • Edamame: Young soybeans furnish a tasty crunch and are rich in nutrients. You can use fresh or frozen, depending on what you have on hand.
    • Red bell pepper: This sweet pepper adds beautiful color and a satisfying crunch. It also provides vitamin C!
    • Carrot: Shredded carrot brings natural sweetness and a pop of vibrant orange that contrasts nicely with the other ingredients.
    • Green onions: These mild onions contribute fresh flavor, enhancing the salad’s overall taste profile.
    • Sesame oil: This oil infuses a nutty richness into the vinaigrette. Be mindful of the quantity, as it’s potent!
    • Rice vinegar: It offers a bright acidity that balances the salad perfectly. If you don’t have it, try apple cider vinegar as a substitute.
    • Soy sauce (or tamari): Adds umami depth. Tamari is a great gluten-free option.
    • Fresh ginger: Grated ginger provides warm, zesty notes. It’s a fabulous way to spice things up!
    • Honey (or maple syrup): This natural sweetener balances the zingy vinaigrette. Pot for maple syrup for a vegan version.
    • Garlic: A hint of garlic lends its aromatic magic, making the dressing irresistible.
    • Sesame seeds: These tiny seeds are for garnish. They add a delightful crunch and look pretty, too!

    For more precise measurements, check the bottom of the article where you can find the ingredients available for printing!

    How to Make Chickpea Edamame Salad with Ginger Sesame Vinaigrette

    Step 1: Prepare the Vegetables

    First things first—let’s get those veggies ready!

    Start by rinsing the chickpeas under cool water to remove any excess sodium from the can. Drain them well! Then, if you’re using frozen edamame, follow the package instructions to thaw them. While that’s happening, wash your bell pepper and carrot.

    Next, chop the red bell pepper into small, bite-sized pieces. Shred the carrot using a grater for that perfect crunchy texture. Slice the green onions thinly, keeping both the white and green parts. Fresh ingredients really make a difference!

    Step 2: Mix the Salad Base

    Now that your veggies are prepped, it’s time to combine them.

    In a large mixing bowl, toss together the chickpeas, edamame, diced red bell pepper, shredded carrot, and sliced green onions. This colorful mix is not just a feast for the eyes; it’s packed with nutrients too!

    Step 3: Make the Ginger Sesame Vinaigrette

    This vinaigrette is where the magic happens! Grab a small bowl and whisk together the sesame oil, rice vinegar, soy sauce, grated ginger, honey or maple syrup, and minced garlic.

    Whisking is key here for a smooth consistency. You want the flavors to meld beautifully. Give it a quick taste—if it’s deliciously tangy and sweet, you’re on the right track!

    Step 4: Combine and Toss

    Time to bring it all together!

    Pour the ginger sesame vinaigrette over your salad mixture. With a gentle hand, toss everything together until the veggies are evenly coated in that flavorful dressing. Don’t rush this part; let the salad shine!

    Step 5: Garnish and Serve

    Your Chickpea Edamame Salad with Ginger Sesame Vinaigrette is almost ready!

    To finish, sprinkle sesame seeds on top for that extra crunch and visual appeal. Serve it right away or let it chill in the fridge for about 30 minutes. Trust me, the flavors will develop beautifully as it sits!

    Tips for Success

    • Always rinse canned chickpeas to reduce sodium. Freshness matters!
    • If using frozen edamame, ensure it’s thoroughly thawed for the best texture.
    • Taste the ginger sesame vinaigrette before combining. Adjust sweetness and acidity as needed!
    • For extra crunch, add chopped cucumbers or cherry tomatoes.
    • Let the salad chill for at least half an hour to enhance the flavors.

    Equipment Needed for Chickpea Edamame Salad with Ginger Sesame Vinaigrette

    • Large mixing bowl: Essential for combining all the ingredients. A smaller bowl works too, if that’s what you have!
    • Small bowl: Perfect for whisking the vinaigrette. Any bowl will do!
    • Whisk or fork: Use to mix the dressing. A spoon will also work if you’re in a pinch!
    • Grater: Needed for shredding the carrot and grating ginger. A box grater or a simple hand grater is great.

    Variations of Chickpea Edamame Salad with Ginger Sesame Vinaigrette

    • Add proteins: For extra heartiness, toss in some grilled chicken, shrimp, or tofu cubes.
    • Spice it up: If you enjoy a kick, sprinkle in some red pepper flakes or sriracha to the vinaigrette.
    • Greens galore: Mix in a handful of spinach or kale to boost vitamins and add a leafy texture.
    • Fruit fusion: Try adding diced mango or sliced avocado for a sweet and creamy contrast.
    • Nuts and seeds: Throw in some chopped almonds or sunflower seeds for additional crunch and healthy fats.

    Serving Suggestions for Chickpea Edamame Salad with Ginger Sesame Vinaigrette

    • Pair with grilled chicken or fish for a satisfying meal.
    • Serve alongside whole grain pita or baguette slices for a hearty lunch.
    • Enjoy with a refreshing iced green tea or sparkling water for a delightful drink combination.
    • Present in a large salad bowl, garnished with extra sesame seeds for an appealing touch.

    FAQs about Chickpea Edamame Salad with Ginger Sesame Vinaigrette

    Can I make this Chickpea Edamame Salad ahead of time?
    Absolutely! This salad can be made a few hours in advance. In fact, allowing it to chill in the fridge for a bit enhances the flavors. Just remember to add the sesame seeds right before serving for extra crunch!

    Is this salad suitable for meal prep?
    Yes! The Chickpea Edamame Salad is perfect for meal prepping. You can store it in individual containers for a quick grab-and-go lunch or snack. Just be sure to keep the vinaigrette separate until you’re ready to eat.

    Can I customize the ingredients?
    Definitely! Feel free to customize the Chickpea Edamame Salad with any veggies you love. Cucumber, cherry tomatoes, or even jalapeños can add new flavors and textures!

    Is this salad gluten-free?
    Yes, as long as you choose tamari instead of soy sauce, this salad is entirely gluten-free. It’s a great option for those with gluten sensitivities!

    How long can I store the leftover salad?
    You can keep the leftover Chickpea Edamame Salad in an airtight container in the fridge for 3-4 days. Just be aware that the veggies may become a bit softer over time, but it will still be delicious!

    Final Thoughts on Chickpea Edamame Salad with Ginger Sesame Vinaigrette

    Creating this Chickpea Edamame Salad with Ginger Sesame Vinaigrette has been such a joyful experience. The vibrant colors and fresh flavors bring life to any meal, making healthy eating enjoyable and accessible. Plus, it’s a breeze to prepare, fitting perfectly into my busy lifestyle. I love knowing that with each bite, I’m nourishing my body and setting a great example for my family. Whether served at a picnic, family dinner, or as meal prep, this salad is a delightful reminder that healthy meals can be quick, easy, and absolutely delicious!


    Print

    clock clock iconcutlery cutlery iconflag flag iconfolder folder iconinstagram instagram iconpinterest pinterest iconfacebook facebook iconprint print iconsquares squares iconheart heart iconheart solid heart solid icon

    Description

    A refreshing and healthy salad made with chickpeas and edamame, dressed in a flavorful ginger sesame vinaigrette.


    • 400g (1.75 cups) chickpeas, canned, drained and rinsed
    • 200g (1 cup) edamame, shelled, fresh or frozen
    • 1 medium red bell pepper, diced
    • 1 medium carrot, shredded
    • 23 green onions, thinly sliced
    • For the vinaigrette:
    • 2 tablespoons sesame oil
    • 3 tablespoons rice vinegar
    • 2 tablespoons soy sauce (or tamari)
    • 1 tablespoon fresh ginger, grated
    • 1 tablespoon honey (or maple syrup)
    • 1 clove garlic, minced
    • 1 tablespoon sesame seeds, for garnish

    1. In a large mixing bowl, combine the chickpeas, edamame, red bell pepper, carrot, and green onion.
    2. In a small bowl, whisk together the sesame oil, rice vinegar, soy sauce or tamari, grated ginger, honey or maple syrup, and minced garlic.
    3. Pour the vinaigrette over the chickpea and edamame mixture. Toss gently to combine.
    4. Garnish with sesame seeds. Serve immediately or chill for later.

    Notes

    • This salad can be served immediately or refrigerated for later use.
    • For a vegan version, use maple syrup instead of honey.
    • Feel free to add other vegetables like cucumber or cherry tomatoes for extra flavor and color.
    • Prep Time: 10 minutes
    • Cook Time: 0 minutes
    • Category: Salad
    • Method: No-cook
    • Cuisine: Fusion

    Nutrition

    • Serving Size: 1 serving
    • Calories: 250
    • Sugar: 5g
    • Sodium: 400mg
    • Fat: 9g
    • Saturated Fat: 1g
    • Unsaturated Fat: 8g
    • Trans Fat: 0g
    • Carbohydrates: 36g
    • Fiber: 10g
    • Protein: 11g
    • Cholesterol: 0mg

    Sharing is caring!

  • Turkey Bacon Ranch Sliders

    Turkey Bacon Ranch Sliders


    Introduction to Turkey Bacon Ranch Sliders

    Hey there, fellow food enthusiasts! If you’re hunting for a game day delight that pleases a crowd, look no further than Turkey Bacon Ranch Sliders. Picture this: tender turkey, crispy bacon, and a tangy ranch dressing all sandwiched between pillowy Hawaiian rolls. It’s like a warm hug for your taste buds! These sliders are not just delicious; they’re a lifesaver for busy days when you want to impress your family or friends. So, grab your apron and let’s whip up these quick and tasty treats that are guaranteed to steal the show!

    Why You’ll Love This Turkey Bacon Ranch Sliders

    These Turkey Bacon Ranch Sliders are a true game changer in the kitchen! They come together in just 35 minutes, making them perfect for busy moms like us. The flavors blend seamlessly, and every bite bursts with ranch goodness. Plus, they’re easy to customize, so you can adapt them to your family’s tastes effortlessly. Dreamy, cheesy, and oh-so-satisfying, these sliders will quickly become a go-to for any gathering!

    Ingredients for Turkey Bacon Ranch Sliders

    When it comes to crafting the perfect Turkey Bacon Ranch Sliders, the ingredients make all the difference. Here’s what you’ll need:

    • King’s Hawaiian rolls: These sweet, soft rolls are the ideal base, bringing a delightful texture.
    • Ranch dressing: A creamy, tangy dressing that ties all the flavors together beautifully.
    • Deli sliced turkey: Lean and versatile, it adds protein while keeping the sliders light.
    • Cheddar cheese: This classic cheese melts perfectly, creating a gooey layer of goodness.
    • Bacon: Crispy bits of bacon bring an irresistible crunch and smoky flavor.
    • Chives: Fresh and mild, they provide a burst of color and a hint of onion-like flavor.
    • Butter: Brushing melted butter on top adds richness and promotes that golden-brown finish.
    • Onion powder: This seasoning lends a sweet, savory depth to the sliders.
    • Garlic powder: A little sprinkle heightens overall flavor with aromatic hints.
    • Dill weed: Fresh or dried, it adds a lovely herbal note that complements the ranch perfectly.

    Feel free to get creative! You can swap in other cheeses like pepper jack for a little heat, or add spinach and tomatoes for extra nutrition. Don’t worry; the ingredient specifics are listed at the bottom of this article, available for easy printing. Happy cooking!

    How to Make Turkey Bacon Ranch Sliders

    Now that you’ve gathered your ingredients, let’s dive into the delicious process of making these Turkey Bacon Ranch Sliders! I promise you’ll have them ready in no time with these easy steps.

    Step 1: Preheat the Oven

    First things first, let’s get that oven preheating to 375°F. This is crucial for achieving that perfect, melty cheese and golden-brown bread. A hot oven helps create the ideal environment for baking, ensuring your sliders come out beautifully.

    Step 2: Prepare the Rolls

    Next, take your King’s Hawaiian rolls and slice them in half horizontally. It’s super important to keep the tops and bottoms together for easy assembly later. Make sure to cut through the entire batch at once for efficiency. This way, you’ll save time and effort, giving you more time to enjoy your creations!

    Step 3: Assemble the Bottom

    Now, place the bottom half of the rolls on a baking sheet and spread a generous layer of ranch dressing on them. This creamy goodness is what ties all the flavors together! After that, sprinkle the chopped deli turkey over the ranch-covered buns. The turkey adds that essential protein, making these sliders satisfying and delicious.

    Step 4: Cheese and Toppings

    It’s time for cheese! Lay the cheddar cheese slices evenly over the turkey layer. The moment it melts in the oven, it’ll create a gooey, comforting layer that everyone loves! Then, sprinkle the crispy bacon bits and chopped chives right on top. The bacon not only adds crunch but brings in that savory punch, while the chives offer a nice pop of color.

    Step 5: Final Touches

    Before popping those sliders in the oven, let’s not forget the finishing touch! In a small bowl, mix the melted butter with onion powder, garlic powder, and dill weed. Brush this flavorful mixture generously over the top buns. This step not only adds incredible flavor but also gives your sliders that gorgeous golden hue as they bake.

    Step 6: Bake to Perfection

    Cover the tray with aluminum foil and bake those sliders in the preheated oven for 17-20 minutes. The foil helps keep moisture in, giving you soft buns while the cheese melts beautifully. When the timer goes off, check to ensure they’re golden brown and bubbly. If they look tempting, go ahead and serve them up!

    Tips for Success

    • Always preheat the oven for even cooking.
    • Use a sharp knife when slicing the rolls for clean edges.
    • Don’t skimp on the ranch dressing; it enhances flavor!
    • Experiment with different toppings or cheeses for a twist.
    • Cool sliders slightly before serving to avoid burnt tongues!

    Equipment Needed

    • Baking sheet: A sturdy tray for your sliders. A rimmed cookie sheet works too!
    • Sharp knife: Essential for slicing the Hawaiian rolls. A bread knife is ideal!
    • Measuring cups: For precise ingredient amounts, especially ranch dressing.
    • Mixing bowl: For combining the butter and seasonings.

    Variations

    • Try using turkey sausage instead of deli turkey for a spicy twist.
    • If you’re looking for a vegetarian option, substitute turkey with roasted bell peppers or mushrooms.
    • For those who love heat, add slices of jalapeños or use pepper jack cheese.
    • Switch out ranch dressing for a zesty chipotle mayo for a smoky flavor.
    • Make it gluten-free by using gluten-free rolls instead of King’s Hawaiian.

    Serving Suggestions

    • Pair your sliders with crispy sweet potato fries for a satisfying crunch.
    • Serve with vegetable sticks and ranch dip for a colorful appetizer platter.
    • For drinks, consider iced tea or a refreshing lemonade to complement the flavors.
    • Garnish with fresh herbs for a pop of color and freshness!

    FAQs about Turkey Bacon Ranch Sliders

    If you’re anything like me, you probably have a few questions bubbling up as you dive into the delicious world of Turkey Bacon Ranch Sliders. Let’s tackle some of the most frequently asked questions to ensure you’re feeling confident and ready to whip up these tasty treats!

    Can I make these sliders ahead of time?

    Absolutely! You can prepare these sliders up to a day in advance. Just assemble all the layers and cover them tightly with plastic wrap. When you’re ready to bake, remove the wrap, brush on that seasoned butter, and pop them in the oven. Perfect for busy days!

    How can I store leftovers?

    Leftovers can be stored in an airtight container in the refrigerator for up to three days. Simply reheat in the oven at 350°F to revive that melt-in-your-mouth goodness. Microwave works too, but the oven gives you the best texture!

    Are Turkey Bacon Ranch Sliders kid-friendly?

    Definitely! Kids adore sliders because they’re easy to hold and eat. The combination of turkey, cheese, and bacon appeals to even the pickiest eaters. Plus, they can help assemble their own, making it a fun family activity!

    Can I use a different type of bread?

    Sure thing! While King’s Hawaiian rolls offer a unique sweetness, you can use slider buns, ciabatta, or even whole-grain options if you prefer something heartier. Just keep in mind that the flavor profile might change slightly!

    What other toppings can I add?

    The sky’s the limit! Consider adding fresh spinach, sliced tomatoes, or even jalapeños for a spicy kick. You can also experiment with different cheese varieties like mozzarella or gouda to create your dream sliders!

    Final Thoughts

    Making Turkey Bacon Ranch Sliders isn’t just about whipping up a tasty dish; it’s about creating joyful experiences with family and friends. The blend of flavors and textures takes center stage, making each bite a celebration. As you gather around the table, the warmth of these sliders sparks smiles and laughter. Trust me, you’ll appreciate the simplicity and comfort they bring, especially on busy days or during game nights. So, roll up your sleeves and dive into this delightful recipe. It’s more than a meal; it’s a memory waiting to happen!


    Print

    clock clock iconcutlery cutlery iconflag flag iconfolder folder iconinstagram instagram iconpinterest pinterest iconfacebook facebook iconprint print iconsquares squares iconheart heart iconheart solid heart solid icon

    Description

    Delicious turkey bacon ranch sliders perfect for game day.


    • 12 King’s Hawaiian rolls
    • ⅓ cup ranch dressing
    • 5 oz deli sliced turkey, chopped
    • 6 slices cheddar cheese
    • 6 slices bacon, cooked and chopped
    • 1 tablespoon chopped chives
    • 1 tablespoon butter, melted
    • ¼ teaspoon onion powder
    • ¼ teaspoon garlic powder
    • ¼ teaspoon dill weed

    1. Preheat oven to 375F.
    2. Slice the Hawaiian rolls in half horizontally.
    3. Place the bottom buns on a baking sheet and spread with ranch dressing.
    4. Sprinkle the chopped turkey over the buns.
    5. Place the cheddar cheese slices over the turkey.
    6. Sprinkle the chopped bacon and chives on top of the cheese.
    7. Place the top buns on the sandwiches.
    8. Add the onion powder, garlic powder, and dill weed to the bowl with the melted butter and stir well.
    9. Brush the seasoned butter mixture on top of the buns.
    10. Cover the sliders with aluminum foil and place the pan in the oven.
    11. Bake the sliders until the cheese is melted and the buns are nicely browned, about 17-20 minutes.
    12. Serve and enjoy!

    Notes

    • These sliders are great for parties and can be easily doubled for larger gatherings.
    • Feel free to experiment with different cheeses or add veggies for extra flavor.
    • Prep Time: 15 minutes
    • Cook Time: 20 minutes
    • Category: Appetizer
    • Method: Baking
    • Cuisine: American

    Nutrition

    • Serving Size: 1 slider
    • Calories: 220
    • Sugar: 2g
    • Sodium: 500mg
    • Fat: 12g
    • Saturated Fat: 5g
    • Unsaturated Fat: 5g
    • Trans Fat: 0g
    • Carbohydrates: 22g
    • Fiber: 1g
    • Protein: 10g
    • Cholesterol: 35mg

    Sharing is caring!

  • Crock Pot Green Enchilada Chicken

    Crock Pot Green Enchilada Chicken


    Introduction to Crock Pot Green Enchilada Chicken

    As a busy mom, I know how chaotic life can get. Between work and family activities, it’s easy to lose track of time. That’s why I’m excited to share my Crock Pot Green Enchilada Chicken recipe! This dish is a sheer delight, combining the creamy richness of cheese and chicken with the zesty punch of green enchilada sauce.

    It’s the perfect solution for those long days when you need a comforting meal waiting for you at home. I promise, each bite will make your taste buds dance and your loved ones will ask for seconds!

    Why You’ll Love This Crock Pot Green Enchilada Chicken

    This Crock Pot Green Enchilada Chicken is a lifesaver, transforming your busy afternoons into easy evenings. With minimal prep time, you simply toss ingredients in the slow cooker and let it work its magic. The rich flavors meld together beautifully, offering a satisfying meal that everyone will love. Plus, it’s versatile—serve it as a soup, a filling for tacos, or even over rice. Who wouldn’t adore that?

    Ingredients for Crock Pot Green Enchilada Chicken

    When it comes to crafting my lovely Crock Pot Green Enchilada Chicken, I like to keep things simple yet flavorful. Here’s what you’ll need:

    • Boneless, skinless chicken breasts or thighs: The star of the show! Chicken starts off tender and takes on all the flavors from the sauce.
    • Green enchilada sauce: This tangy sauce adds a burst of flavor, transforming your chicken into a delightful Mexican treat.
    • Chicken broth: A great way to keep things moist and juicy, adding richness to the overall dish.
    • Half and half or Greek yogurt: For creaminess, half and half offers indulgence, while Greek yogurt provides a lighter option without sacrificing flavor.
    • Monterey Jack cheese: This ooey-gooey cheese melts beautifully, adding richness and a comforting texture.
    • Cream cheese: Cubes of cream cheese make the dish extra creamy, providing that luscious mouthfeel you crave.
    • Green salsa (salsa verde): A hint of zest to amp up the flavors. It complements the other ingredients perfectly!
    • Salt and black pepper: Simple seasonings to adjust the flavor to your liking—sometimes, less is more!

    Feel free to personalize this dish based on what you have at hand or your family’s taste preferences! Can’t find green enchilada sauce? Aim for a red enchilada sauce instead; it’ll add a different twist. For spices, a sprinkle of cumin or chili powder can ramp up the heat. Specific measurements can be found below for your convenience, so you can easily print them out!

    How to Make Crock Pot Green Enchilada Chicken

    Making my Crock Pot Green Enchilada Chicken is a breeze! Follow these simple steps, and you’ll have a creamy, delicious dish ready in no time. Let’s get started!

    Prepare the Chicken

    First, gather your chicken. I like using boneless, skinless chicken breasts for this recipe, but thighs work great too. They hold moisture well and are often more forgiving if you accidentally overcook them. Just rinse the chicken under cold water, pat it dry, and place it in your slow cooker. Trust me, you want juicy chicken!

    Combine with Sauce

    Next, pour in the green enchilada sauce and chicken broth over the chicken. Use a spatula to gently stir and make sure the chicken is fully submerged in that savory goodness. This helps the chicken soak up all those amazing flavors during cooking. What a delightful combo!

    Cook Until Tender

    Cover your slow cooker and set it on low heat. Cooking for 6 to 8 hours allows the chicken to simmer to perfection. The low and slow method makes the meat tender and pulls the flavors together beautifully. Bonus tip: resist the urge to lift the lid! It lets out heat and slows the cooking process.

    Shred the Chicken

    Once that heavenly aroma fills your kitchen, it’s time for the fun part! Carefully remove the chicken from the slow cooker using tongs or a slotted spoon. Place it on a cutting board and use two forks to shred it into bite-sized pieces. The chicken should fall apart easily—this means it’s cooked to perfection!

    Add Creaminess to the Mix

    Now, it’s time to unleash the creaminess! Return the shredded chicken to the crock pot and add the cubes of cream cheese, Monterey Jack cheese, and either half and half or Greek yogurt. Don’t forget the green salsa! Stir everything well to combine. This will help create that dreamy, comforting texture. Cook for another 30 minutes on low, and stir occasionally. You’ll see it get wonderfully creamy.

    Serve and Garnish

    Finally, it’s serving time! Ladle the luscious green enchilada chicken into bowls. I love to top mine with fresh avocado, a sprinkle of cilantro, or a dollop of sour cream. Get creative! You can even add a squeeze of lime for an extra zing. Enjoy the smiles around the table as everyone digs in!

    Tips for Success

    • Keep the lid closed during cooking to maintain heat and moisture.
    • Don’t skip the cream cheese; it adds essential creaminess!
    • For a quicker prep, shred the chicken the night before.
    • Adjust the spice level with extra green salsa or canned peppers.
    • Garnish with your family’s favorite toppings for a personal touch.

    Equipment Needed

    • Slow cooker: The star player for this dish; a 6-quart size works perfectly.
    • Cutting board: Essential for shredding that delicious chicken.
    • Meat forks: Handy for shredding the chicken, but regular forks can work in a pinch.
    • Measuring cups: For those precise liquids, especially if you’re using half and half or broth.
    • Spatula: Great for mixing and ensuring the ingredients are well combined.

    Variations

    • Spicy Twist: Add sliced jalapeños or a dash of cayenne pepper for an extra kick.
    • Vegetarian Option: Substitute chicken with canned chickpeas or firm tofu for a delicious meatless version.
    • Flavorful Add-Ins: Mix in black beans or corn for added texture and flavor.
    • Low-Carb Alternative: Serve over cauliflower rice instead of traditional rice for a healthier option.
    • Cheese Lovers: Experiment with different cheese like Pepper Jack or even Queso Fresco for a unique flavor.

    Serving Suggestions

    • Side Salads: A light, crisp salad with avocado and lime can balance the richness.
    • Beverages: Pair with a refreshing lemonade or a light Mexican beer.
    • Presentation: Serve in colorful bowls and add a sprinkle of fresh cilantro for a vibrant touch.
    • Tortilla Chips: Crispy chips are perfect for scooping up the creamy goodness!

    FAQs about Crock Pot Green Enchilada Chicken

    Can I use frozen chicken for this recipe?
    Absolutely! You can toss frozen chicken directly into your slow cooker. Just increase the cooking time by an hour or so to ensure it’s fully cooked.

    How do I store leftovers?
    Store any leftover Crock Pot Green Enchilada Chicken in an airtight container in the fridge for up to 4 days. It also freezes well for up to 3 months!

    Can I make this dish ahead of time?
    Yes! You can prepare everything the night before. Just combine the chicken, sauces, and broth in your slow cooker, then refrigerate overnight and cook in the morning.

    What can I serve this dish with?
    This dish pairs beautifully with rice, tortillas, or even on top of a crisp salad. You could also serve it with avocado and lime for extra flavor.

    Is it suitable for gluten-free diets?
    Yes! This Crock Pot Green Enchilada Chicken is naturally gluten-free. Just make sure your enchilada sauce and broth are gluten-free as well.

    Final Thoughts

    Making my Crock Pot Green Enchilada Chicken is like wrapping up in a cozy blanket after a long day. The flavors dance together, creating a warm embrace that feels like home. It’s not just a meal, but a gathering point for laughter and shared moments. Whether it’s a busy weeknight or a weekend feast, this dish brings joy to the table. Each bowl filled with creamy goodness invites memories, smiles, and satisfaction. So grab your slow cooker, and let’s make some magic happen—your family will thank you for it!


    Print

    clock clock iconcutlery cutlery iconflag flag iconfolder folder iconinstagram instagram iconpinterest pinterest iconfacebook facebook iconprint print iconsquares squares iconheart heart iconheart solid heart solid icon

    Description

    A creamy and flavorful crock pot dish featuring shredded chicken simmered in green enchilada sauce, perfect for a comforting meal.


    • 1.1 kg boneless, skinless chicken breasts or thighs
    • 800 ml green enchilada sauce
    • 710 ml chicken broth
    • 240 ml half and half or Greek yogurt
    • 200 g Monterey Jack cheese, shredded
    • 115 g cream cheese, cubed
    • 115 g green salsa (salsa verde)
    • Salt, to taste
    • Black pepper, to taste

    1. Place the chicken, green enchilada sauce, and chicken broth into the slow cooker and ensure the poultry is fully submerged.
    2. Cover and cook on low heat for 6 to 8 hours until the chicken is tender and fully cooked.
    3. Remove the chicken from the cooker, shred using two forks, and return the meat to the broth.
    4. Incorporate the Monterey Jack cheese, cream cheese, half and half or Greek yogurt, and green salsa. Stir to blend thoroughly.
    5. Continue to cook on low setting for an additional 30 minutes, stirring occasionally until the soup is creamy and smooth.
    6. Taste and adjust salt and black pepper as needed before serving.
    7. Ladle the soup into bowls and top with preferred garnishes such as avocado, cilantro, green onion, and sour cream.

    Notes

    • For a lower-calorie option, substitute Greek yogurt for half and half.
    • Garnishes can be customized based on personal preference.
    • Prep Time: 15 minutes
    • Cook Time: 6 to 8 hours
    • Category: Main Dish
    • Method: Slow Cooker
    • Cuisine: Mexican

    Nutrition

    • Serving Size: 1 cup
    • Calories: 400
    • Sugar: 3g
    • Sodium: 800mg
    • Fat: 22g
    • Saturated Fat: 10g
    • Unsaturated Fat: 8g
    • Trans Fat: 0g
    • Carbohydrates: 12g
    • Fiber: 1g
    • Protein: 40g
    • Cholesterol: 120mg

    Sharing is caring!

  • Cheesecake Egg Rolls Cinnamon Twist

    Cheesecake Egg Rolls Cinnamon Twist


    Introduction to Cheesecake Egg Rolls Cinnamon Twist

    Hey there, fellow kitchen enthusiasts! If you’re anything like me, you know that life can get a bit hectic, especially when you’re juggling work, family, and a pinch of me-time. That’s where these delightful Cheesecake Egg Rolls Cinnamon Twist come into play, providing a sweet escape from the ordinary. Imagine creamy cheesecake wrapped in a crispy shell, dusted with cinnamon sugar—pure bliss! This recipe is not only a breeze to whip up, but it’s also a surefire hit with family and friends, making it the perfect treat to brighten any busy day.

    Why You’ll Love This Cheesecake Egg Rolls Cinnamon Twist

    This recipe brings the joy of homemade desserts without the fuss. In just 30 minutes, you can treat your family to something special that tastes like it’s from a gourmet restaurant. The crunchy outer layer contrasts beautifully with the creamy filling, creating a delightful experience. Plus, who doesn’t love a dessert that can be polished off in mere moments? It’s irresistible, delicious, and oh-so-easy!

    Ingredients for Cheesecake Egg Rolls Cinnamon Twist

    Let’s gather the tasty essentials for these scrumptious Cheesecake Egg Rolls Cinnamon Twist. Here’s a rundown of what you’ll need:

    • Cream Cheese: The star of the show! This brings a rich, creamy texture that makes every bite feel luxurious.
    • Granulated Sugar: Sweetens the filling just enough, balancing the tanginess of the cream cheese. It’s essential for that delightful flavor.
    • Fresh Lemon Juice: A splash of brightness that brightens up the cheesecake filling. It cuts through richness, making each bite a refreshing delight.
    • Pure Vanilla Extract: Adds that warm, comforting aroma. This simple ingredient elevates the flavor profile, creating nostalgic vibes.
    • Kosher Salt: Just a pinch to enhance all the other flavors and prevent the dish from being overly sweet.
    • Egg Roll Wrappers: These crisp outer shells hold everything together perfectly. They crisp up beautifully when fried.
    • Water: A little for sealing those egg rolls, ensuring none of that delicious filling escapes during frying.
    • Cinnamon Sugar: A blend of sugar and cinnamon, this magical topping is what gives our dessert that irresistible sweet twist.
    • Neutral Oil: Essential for frying—choose something light like vegetable or canola oil, as it won’t interfere with flavors.
    • Optional Serving Suggestions: Consider whipped cream, caramel sauce, or chocolate sauce as delightful dips. Fresh strawberries can add a fruity, vibrant touch!
    • Tablespoon of powdered sugar: A light dusting before serving makes everything look more tempting and elegant.

    Ready to whisk up a batch? Specific quantities for these ingredients are at the bottom of the article for your convenience, perfect for printing and having handy in your kitchen!

    How to Make Cheesecake Egg Rolls Cinnamon Twist

    Alright, let’s dive into creating these mouthwatering Cheesecake Egg Rolls Cinnamon Twist. Follow these straightforward steps, and you’ll be enjoying a delicious dessert in no time!

    Step 1: Preheat the Oil

    First things first, grab a large stockpot and pour in about 2 inches of your neutral oil. Set your heat to medium and let it warm up. You want the oil to reach around 375°F for that perfect crispy texture. It’s best to use a deep-fry thermometer if you have one. This keeps things safe and ensures delicious results!

    Step 2: Prepare the Cheesecake Filling

    While your oil is heating, pull out your stand mixer and the ingredients for the creamy filling. Start by adding your cream cheese, granulated sugar, lemon juice, vanilla extract, and kosher salt. Beat this mixture on high speed for 1 to 2 minutes, until it’s smooth and creamy. Don’t forget to scrape down the sides of the bowl to get every bit creamy and delightful!

    Step 3: Assemble the Egg Rolls

    Now for the fun part! Take an egg roll wrapper and place it in a diamond shape on your countertop. Spoon about 2 tablespoons of that luscious cream cheese filling in the center. Fold the bottom corner over the filling, then bring in the two side corners. Brush a little water on the top corner to help seal things up. Roll it tightly, like a snug little burrito, and place it aside. Repeat this process with the remaining wrappers and filling.

    Step 4: Create the Cinnamon Sugar Coating

    In a small bowl, whisk together your granulated sugar and ground cinnamon until it’s well mixed. This is the magical dust that will add that sweet, warm touch to your egg rolls. Set this aside for coating once they come out of the oil.

    Step 5: Fry the Egg Rolls

    With your oil at the right temperature, carefully drop in 4 egg rolls at a time to avoid overcrowding. Fry those little delights for about 2 minutes, or until they’re golden brown and crispy. Use a slotted spoon to remove them and let them drain on a paper towel-lined plate. Don’t rush this step; patience is key to achieving that golden exterior!

    Step 6: Coat and Serve

    Once your egg rolls are cool enough to handle, roll each one in the cinnamon sugar mixture while they’re still warm. This gives them that irresistible sweet coating we all love! Serve them up warm and enjoy with caramel sauce, chocolate sauce, or fresh strawberries on the side. A light dusting of powdered sugar on top adds the perfect finishing touch!

    Tips for Success

    • Make sure the oil is hot enough before frying. This prevents soggy egg rolls.
    • Don’t overfill the wrappers; a little filling goes a long way!
    • Keep the cooked egg rolls warm in an oven set to low while frying the rest.
    • Try different flavorings in the cheesecake filling, like chocolate or fruit.
    • Use a thermometer to check the oil temperature for crispy perfection.

    Equipment Needed

    • Large Stockpot: Essential for frying. You can also use a deep fryer for more control.
    • Stand Mixer: Great for mixing the filling. A hand mixer works too!
    • Slotted Spoon: Perfect for removing egg rolls from the oil. A regular spoon can work in a pinch.
    • Deep-Fry Thermometer: Ensures the oil is at the right temperature. An instant-read thermometer can serve as a good alternative.
    • Paper Towels: Handy for draining excess oil from the fried egg rolls.

    Variations

    • Fruity Twist: Add mashed bananas or diced strawberries to the cheesecake filling for a fresh burst of flavor.
    • Chocolate Lovers: Mix in cocoa powder or melted chocolate to the filling for a rich chocolate cheesecake experience.
    • Nutty Delight: Incorporate crushed nuts like pecans or walnuts into the filling for added texture and flavor.
    • Dairy-Free Option: Substitute the cream cheese with a dairy-free alternative, such as cashew cream or coconut cream, to suit dietary needs.
    • Spice It Up: Add a sprinkle of nutmeg or pumpkin spice to the cream cheese filling for a warm, seasonal twist.

    Serving Suggestions

    • Pair with a scoop of vanilla ice cream for a delightful contrast.
    • Serve alongside fresh berries for added color and freshness.
    • Drizzle with caramel or chocolate sauce for a sweet extravaganza.
    • Garnish with mint leaves for an elegant touch.
    • Present on a rustic wooden board for that homemade charm.

    FAQs about Cheesecake Egg Rolls Cinnamon Twist

    Can I make Cheesecake Egg Rolls Cinnamon Twist ahead of time?
    Absolutely! You can prepare the filling and fill the wrappers a day in advance. Just store them in the refrigerator, covered tightly to avoid drying out. Fry them fresh when you’re ready!

    How do I store leftover egg rolls?
    Leftovers can be stored in an airtight container in the refrigerator for up to 2 days. Just remember, they’re best enjoyed fresh for that crispy crunch!

    Can I bake these instead of frying?
    Yes, you can! Preheat your oven to 400°F and place the assembled egg rolls on a parchment-lined baking sheet. Lightly brush them with oil and bake for about 15-20 minutes, flipping halfway through until golden brown.

    What can I serve with these egg rolls?
    Consider serving them with a side of caramel or chocolate sauce for dipping. Fresh berries, a dollop of whipped cream, or even a scoop of ice cream can enhance your dessert experience!

    Are there any gluten-free options for the wrappers?
    Yes! Look for gluten-free egg roll wrappers or use rice paper as a substitute. Just follow the same assembly method with your gluten-free option.

    Final Thoughts

    Creating these Cheesecake Egg Rolls Cinnamon Twist is more than just making a dessert; it’s about embracing the joy of cooking and sharing delightful moments with loved ones. Each crispy bite reveals creamy goodness, making it an instant favorite! Whether it’s a special occasion or a quiet night at home, these treats bring smiles and warmth to the table. Plus, the admiration in your family’s eyes? Priceless! So go ahead, roll up your sleeves and give this recipe a shot—the delicious satisfaction is just a fry away!


    Print

    clock clock iconcutlery cutlery iconflag flag iconfolder folder iconinstagram instagram iconpinterest pinterest iconfacebook facebook iconprint print iconsquares squares iconheart heart iconheart solid heart solid icon

    Description

    Cheesecake Egg Rolls Cinnamon Twist is a delightful dessert featuring a creamy cheesecake filling encased in crispy egg roll wrappers and rolled in cinnamon sugar.


    • 8 ounces cream cheese
    • 3 and 1/2 tablespoons granulated sugar
    • 1/2 teaspoon fresh lemon juice
    • 1/2 teaspoon pure vanilla extract
    • 1/4 teaspoon kosher salt
    • Egg roll wrappers
    • Water for brushing
    • 1 cup granulated sugar (for coating)
    • 2 tablespoons ground cinnamon (for coating)
    • Neutral oil for frying
    • Caramel sauce (for serving)
    • Chocolate sauce (for serving)
    • Chopped strawberries (for serving)
    • Powdered sugar (for serving)

    1. Preheat approximately 2 inches of oil in a large stockpot over medium heat until oil reaches 375°F.
    2. Using a stand mixer fitted with the paddle attachment, combine cream cheese, sugar, lemon juice, vanilla extract, and salt. Beat on high speed for 1 to 2 minutes, scraping down the bowl as needed, until smooth and creamy.
    3. Arrange an egg roll wrapper in a diamond shape on your work surface. Place 2 tablespoons of cream cheese filling in the center. Fold the bottom corner over the filling, then fold in the two side corners. Brush the top corner with water, roll tightly to seal, and set aside. Repeat with remaining wrappers and filling.
    4. In a small bowl, whisk together sugar and cinnamon until evenly combined. Set aside for coating.
    5. Working in batches, fry 4 egg rolls at a time in the hot oil for approximately 2 minutes, or until golden brown and crisp. Remove with a slotted spoon and transfer to a paper towel-lined plate. Repeat with remaining egg rolls.
    6. While still warm, roll each fried egg roll in the cinnamon sugar mixture to evenly coat.
    7. Serve warm with caramel sauce, chocolate sauce, chopped strawberries, or a dusting of powdered sugar as desired.

    Notes

    • Ensure the oil is hot enough before frying to achieve a crispy texture.
    • Leftover egg rolls can be stored in the refrigerator for up to 2 days.
    • For a fruity twist, add mashed bananas to the cream cheese filling.
    • Prep Time: 20 minutes
    • Cook Time: 10 minutes
    • Category: Dessert
    • Method: Frying
    • Cuisine: American

    Nutrition

    • Serving Size: 1 egg roll
    • Calories: 250
    • Sugar: 15g
    • Sodium: 180mg
    • Fat: 12g
    • Saturated Fat: 3g
    • Unsaturated Fat: 7g
    • Trans Fat: 0g
    • Carbohydrates: 30g
    • Fiber: 1g
    • Protein: 3g
    • Cholesterol: 20mg

    Sharing is caring!