Author: IHAAL Team

  • Cajun Chicken with Creamy Parmesan Linguine Pasta

    Cajun Chicken with Creamy Parmesan Linguine Pasta


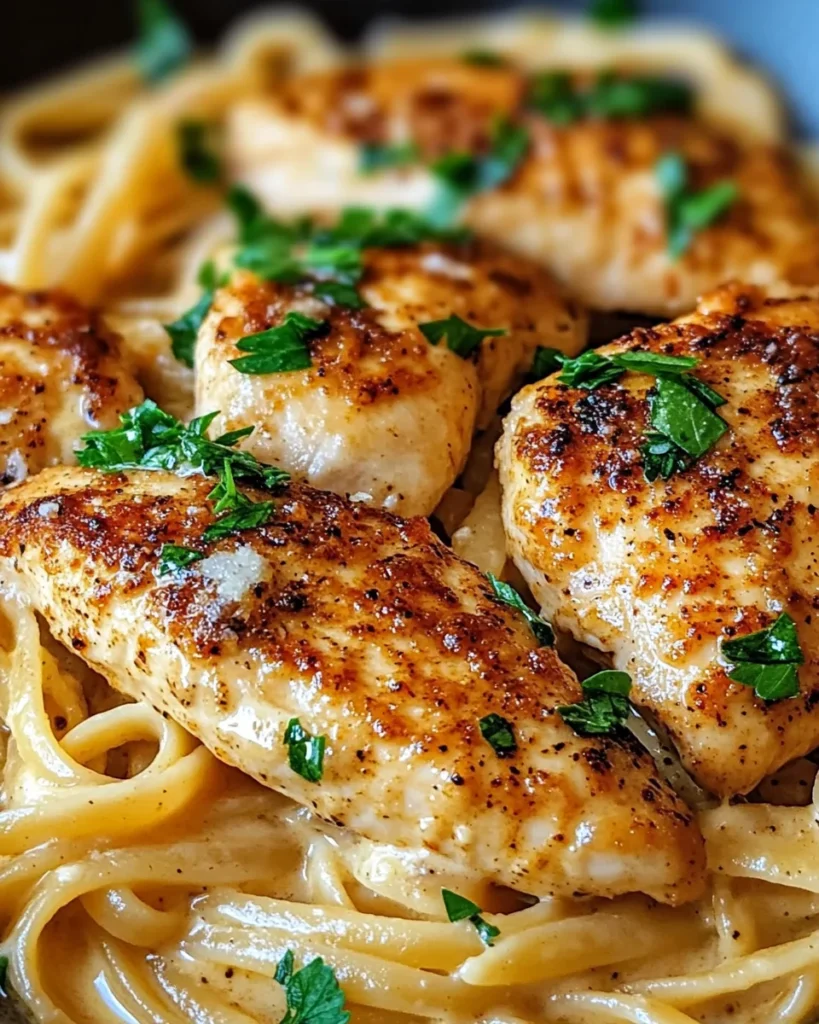
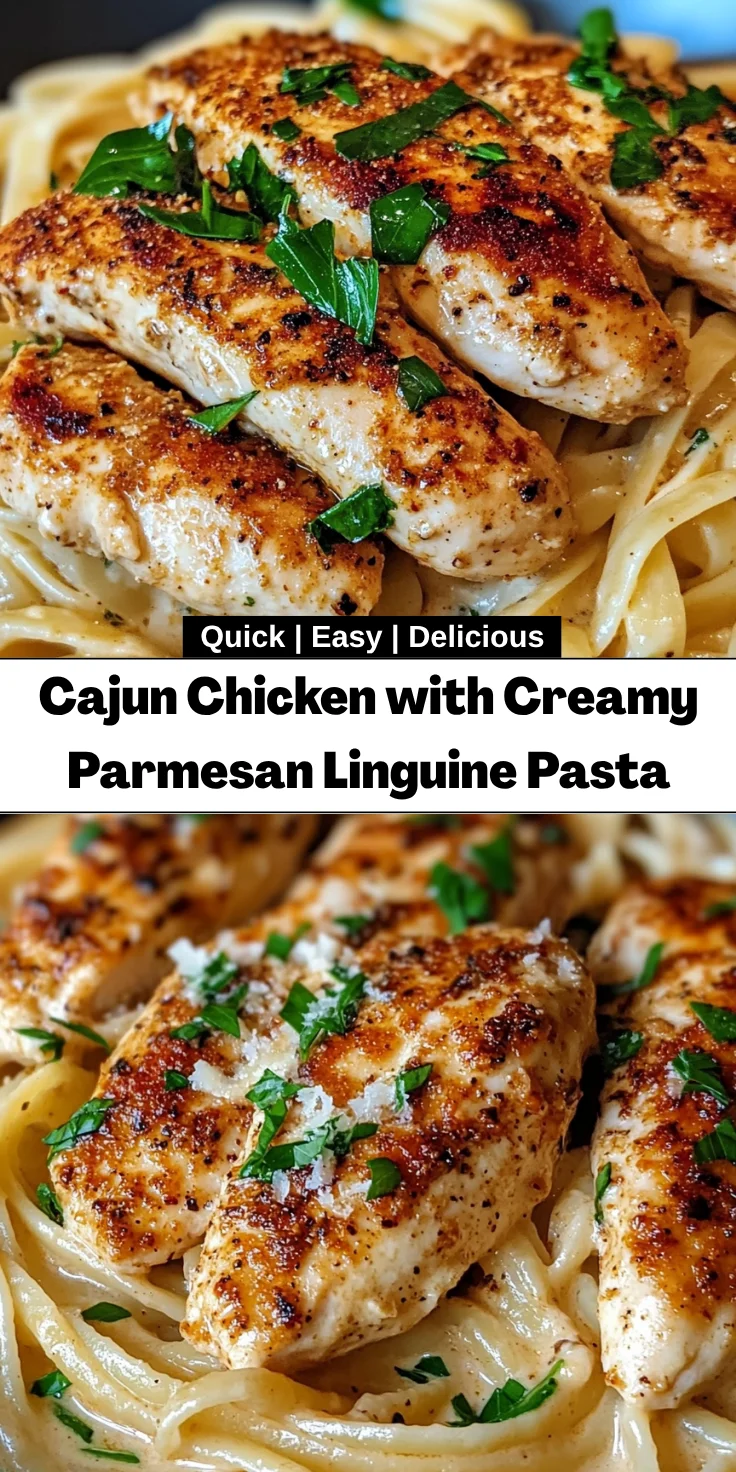
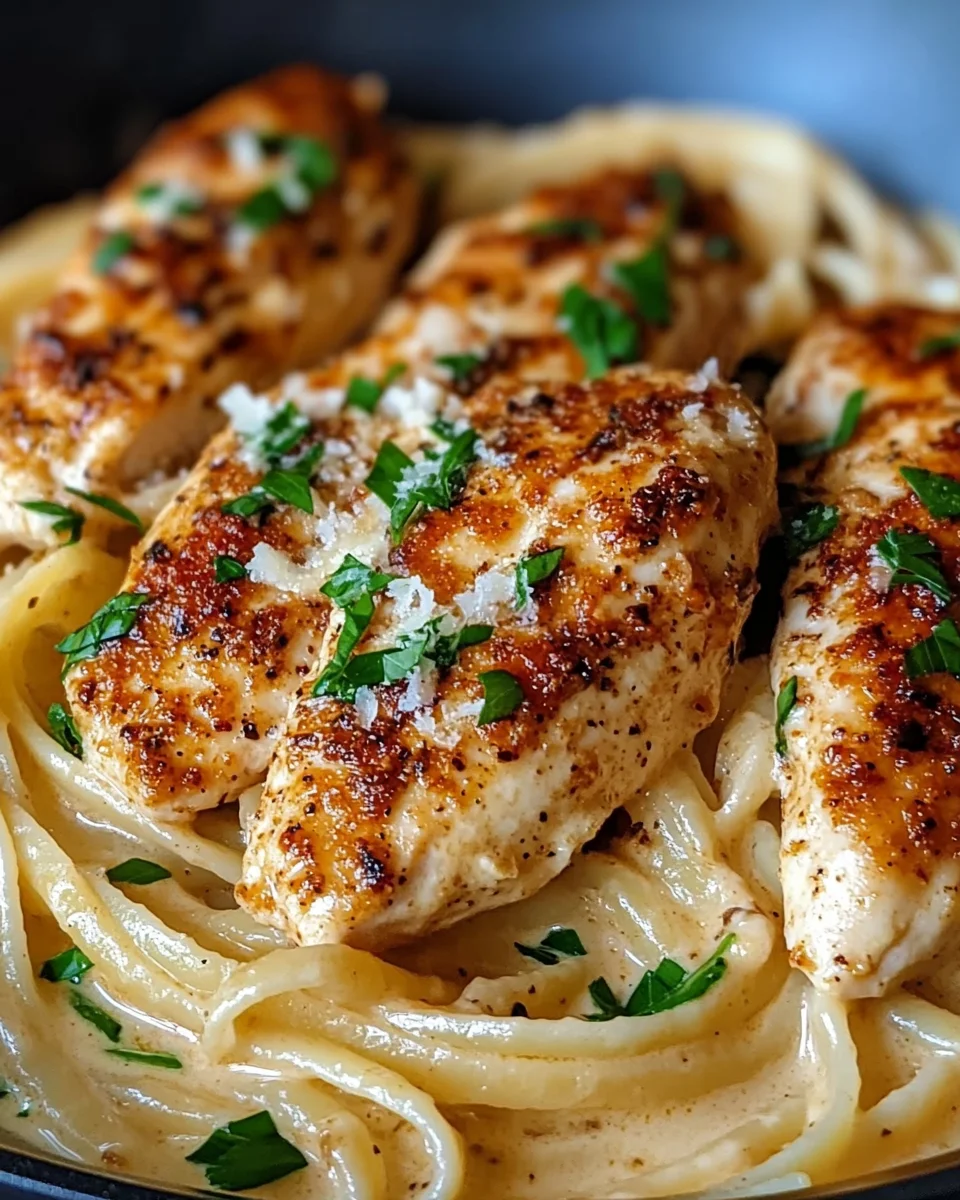
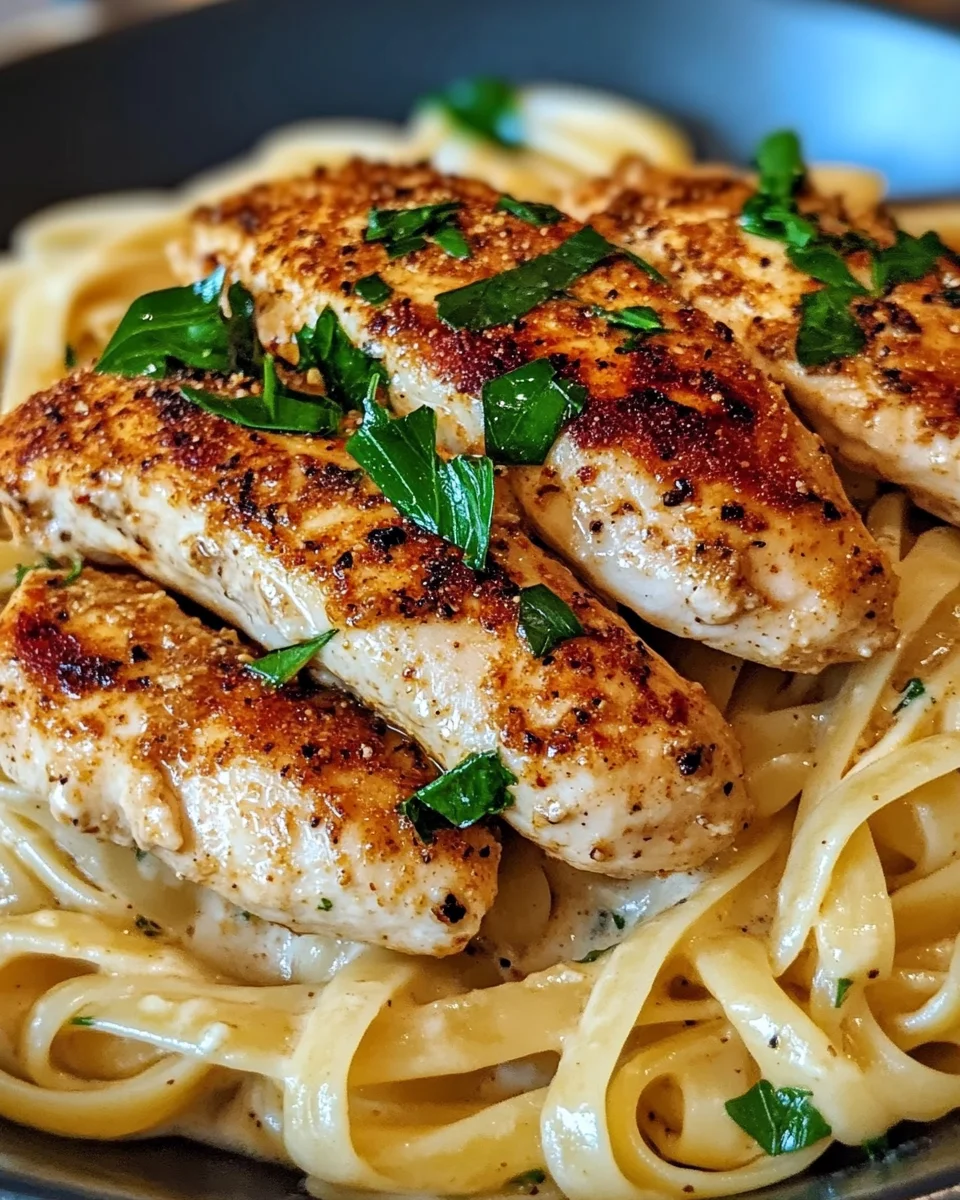
    Introduction to Cajun Chicken with Creamy Parmesan Linguine Pasta

    Have you ever craved a meal that feels like a comforting hug? Cajun Chicken with Creamy Parmesan Linguine Pasta is just the ticket! This dish combines spicy chicken with rich, creamy pasta, creating a delightful symphony of flavors. It’s perfect for busy weeknights when you want something quick yet impressive. In just 30 minutes, you can whip up a dinner that will make your family feel like they’re dining at a restaurant! Trust me, it’s a fantastic way to break the routine and turn a regular meal into a memorable experience.

    Why You’ll Love This Cajun Chicken with Creamy Parmesan Linguine Pasta

    This delightful dish is not only incredibly tasty but also remarkably quick and easy to prepare. In just 30 minutes, you can serve up a meal that’s bursting with flavor and elegance. The combination of tender Cajun chicken and creamy parmesan linguine makes it a satisfying dinner that appeals to everyone at the table, even the pickiest of eaters. It’s a stress-free solution that will undoubtedly brighten your busy evenings!

    Ingredients for Cajun Chicken with Creamy Parmesan Linguine Pasta

    Gathering the right ingredients is key to creating this flavorful dish. Here’s what you’ll need to make Cajun Chicken with Creamy Parmesan Linguine Pasta:

    • Chicken Breasts: Boneless and skinless, they provide the perfect canvas for Cajun flavors.
    • Cajun Seasoning: This spice blend is what packs a punch and gives that southern flair. Don’t be shy—season generously!
    • Linguine Pasta: I love linguine for its ability to hold onto the creamy sauce. It’s a dream come true when cooked al dente.
    • Heavy Cream: The creamy base that transforms the dish into a comforting delight. Alternate options like half-and-half can work too.
    • Parmesan Cheese: Grated for seamless melting, it adds richness and depth to the sauce. Pecorino Romano is a great substitute if you seek something sharper.
    • Garlic: Minced for that aromatic kick, garlic completes the sauce with its irresistible flavor.
    • Olive Oil: This is essential for sautéing your chicken beautifully. You can swap it for avocado oil if desired.
    • Fresh Spinach: Leafy greens lend a pop of color and nutrition, wilting perfectly into the sauce. Kale or arugula are excellent alternatives!
    • Salt and Black Pepper: Essential for seasoning throughout the cooking process, ensuring everything tastes just right.
    • Fresh Parsley: Use for garnish, giving your dish a bright and inviting finish, and a sprinkle of freshness.

    Keep in mind, detailed measurements for each ingredient can be found at the bottom of the article, a handy reference when you’re ready to cook!

    How to Make Cajun Chicken with Creamy Parmesan Linguine Pasta

    Now that you’ve gathered your ingredients, let’s dive into the magic of cooking! Follow these steps for a delicious, satisfying meal that will impress your family and friends without turning your kitchen into a battlefield.

    Step 1 – Season the Chicken

    Begin by seasoning your chicken breasts generously with Cajun seasoning, salt, and pepper. This step is crucial—seasoning infuses the meat with flavor that carries through every bite. Let the chicken sit for about 10 minutes. This resting time allows the spices to sink in, ensuring each piece of chicken is deliciously seasoned.

    Step 2 – Cook the Pasta

    Next, bring a large pot of salted water to a boil. Add in your linguine, stirring occasionally. Aim for that perfect al dente texture, usually around 8-10 minutes. Don’t forget to reserve about ½ cup of the starchy pasta water before draining! This magic water will help thicken your creamy sauce later, making everything stick beautifully.

    Step 3 – Sauté the Chicken

    In a skillet, heat the olive oil over medium-high heat. Add your seasoned chicken breasts and sauté until they’re a lovely golden brown—about 4-5 minutes a side. To ensure the chicken is done, check that it reaches an internal temperature of 165°F. After cooking, let the chicken rest on a cutting board. This little pause allows the juices to redistribute, keeping your chicken tender and juicy.

    Step 4 – Create the Creamy Sauce

    In the same skillet, add the minced garlic and sauté for about a minute until fragrant. Pour in the heavy cream and bring it to a gentle simmer. Stir in the grated Parmesan cheese, letting it melt and mix seamlessly into the cream. The garlic adds a beautiful depth, while the cheese thickens the sauce to dreamy perfection!

    Step 5 – Combine Everything

    Now it’s time to bring it all together! Slice your rested chicken into strips and add it back into the skillet along with the drained linguine. Toss everything gently to coat in the creamy sauce. Finally, fold in the fresh spinach, allowing it to wilt into the mix. Watch the colors blend and flavors meld, creating a visually stunning meal.

    Step 6 – Serve and Garnish

    Your Cajun Chicken with Creamy Parmesan Linguine Pasta is almost ready to shine! Plate your dish and garnish with a sprinkle of fresh parsley for that vibrant touch. It’s best to serve this dish immediately while it’s warm and creamy. Trust me, your family will be gathered around the table in no time, eager to dig in!

    Tips for Success

    • Always let your seasoned chicken rest before cooking for better flavor absorption.
    • Reserve that pasta water! It’s a game-changer for creamy sauces.
    • Adjust the spice level by using more or less Cajun seasoning based on your taste.
    • Don’t rush the sauce—allow it to simmer gently for a richer flavor.
    • Experiment with different greens like collard greens for a new twist!

    Equipment Needed

    • Large Pot – A sturdy pot for boiling pasta, essential for even cooking.
    • Skillet – A non-stick skillet works wonders for sautéing chicken and making the sauce.
    • Cutting Board – For slicing the chicken safely and efficiently.
    • Measuring Cups – Handy for accurate measuring of heavy cream and cheese.
    • Chef’s Knife – A good knife makes chopping garlic and slicing chicken a breeze.

    Variations

    • For a kick of heat, add diced jalapeños or red pepper flakes to the creamy sauce.
    • Switch the linguine for whole wheat or gluten-free pasta to accommodate dietary preferences.
    • Try swapping the chicken for shrimp or even tofu for a delicious pescatarian or vegan option.
    • Incorporate other veggies like bell peppers or mushrooms for extra nutrients and flavor.
    • To lighten the dish, use a lower-fat milk or yogurt in place of heavy cream.

    Serving Suggestions

    • Pair your dish with a refreshing side salad, like a simple mixed greens salad with vinaigrette.
    • Serve with warm, crusty garlic bread for a delightful touch.
    • Consider a glass of chilled white wine, like Sauvignon Blanc, to enhance the flavors.
    • Garnish plates with lemon wedges for a zesty finish.
    • For a pop of color, sprinkle extra parsley on top before serving.

    FAQs about Cajun Chicken with Creamy Parmesan Linguine Pasta

    Can I make this dish ahead of time?

    Yes! You can prepare the Cajun chicken and creamy sauce ahead of time. Just store them separately in airtight containers. When you’re ready to serve, simply reheat and combine with freshly cooked pasta for the best flavor and texture.

    What can I substitute for heavy cream?

    If you’re looking for a lighter option, you can substitute heavy cream with half-and-half or even evaporated milk. Just remember that the sauce may be slightly less rich and creamy, but still delicious!

    Can I use other types of protein?

    Absolutely! This recipe works beautifully with shrimp, scallops, or even grilled tofu for a vegetarian twist. Just adjust the cooking time according to the protein you choose.

    Is this Cajun Chicken with Creamy Parmesan Linguine Pasta spicy?

    The level of spiciness depends on your Cajun seasoning. If you’re sensitive to heat, start with a smaller amount and adjust according to your taste. You can always add more but can’t take it away!

    How can I make leftovers last longer?

    To keep your leftovers fresh, store them in an airtight container in the refrigerator for up to 3 days. Reheat gently on the stovetop or in the microwave. Adding a splash of milk or reserved pasta water can help revive the creamy texture.

    Final Thoughts

    Cooking Cajun Chicken with Creamy Parmesan Linguine Pasta is more than just a meal; it’s an experience that nourishes both body and spirit. Every bite is a delightful blend of spices and creaminess that transports you to a cozy kitchen filled with laughter. It’s a dish that brings families together, turning a busy weeknight into a joyful occasion. Plus, with its speed and simplicity, it’s perfect for the busy mom or professional trying to maintain that balance. So gather your loved ones, serve up this hearty dish, and make lasting memories around the dinner table!


    Print

    clock clock iconcutlery cutlery iconflag flag iconfolder folder iconinstagram instagram iconpinterest pinterest iconfacebook facebook iconprint print iconsquares squares iconheart heart iconheart solid heart solid icon

    Description

    Cajun Chicken with Creamy Parmesan Linguine Pasta is a flavorful dish that combines spicy Cajun chicken with creamy, rich pasta for a delightful meal.


    • 2 large Chicken Breasts (boneless and skinless)
    • 2 tablespoons Cajun Seasoning
    • 8 ounces Linguine Pasta
    • 1 cup Heavy Cream
    • ¾ cup Parmesan Cheese (grated)
    • 3 cloves Garlic (minced)
    • 2 tablespoons Olive Oil
    • 2 cups Fresh Spinach
    • Salt and Black Pepper (to taste)
    • Fresh Parsley (for garnish)

    1. Season the Chicken: Start by seasoning your chicken breasts generously with Cajun seasoning, salt, and pepper. Let it sit for about 10 minutes to absorb the spices.
    2. Cook the Pasta: Bring a large pot of salted water to a boil. Add the linguine and cook until al dente. Reserve about ½ cup of pasta water and drain the rest.
    3. Sauté the Chicken: In a skillet, heat the olive oil over medium-high heat. Add the seasoned chicken breasts and cook for about 4-5 minutes on each side until browned and cooked through. Remove the chicken and let it rest.
    4. Create the Creamy Sauce: In the same skillet, add minced garlic and sauté for about 1 minute. Pour in the heavy cream and bring to a gentle simmer. Stir in the grated Parmesan cheese until melted.
    5. Combine Everything: Slice the cooked chicken and add back to the skillet along with the cooked linguine. Toss to coat the pasta and chicken in the sauce. Fold in the fresh spinach until it wilts slightly.
    6. Serve and Garnish: Plate your dish and garnish with fresh parsley. Serve immediately.

    Notes

    • Substitute Pecorino Romano for a sharper cheese taste.
    • Avocado oil can replace olive oil for cooking.
    • Kale or arugula can be used instead of spinach.
    • Prep Time: 10 minutes
    • Cook Time: 20 minutes
    • Category: Main Course
    • Method: Skillet cooking
    • Cuisine: Cajun

    Nutrition

    • Serving Size: 1 plate
    • Calories: 600
    • Sugar: 3g
    • Sodium: 800mg
    • Fat: 30g
    • Saturated Fat: 15g
    • Unsaturated Fat: 10g
    • Trans Fat: 0g
    • Carbohydrates: 60g
    • Fiber: 3g
    • Protein: 32g
    • Cholesterol: 120mg

    Sharing is caring!

  • Sweet and Spicy Garlic Steak Pasta

    Sweet and Spicy Garlic Steak Pasta


    Introduction to Sweet and Spicy Garlic Steak Pasta

    As a busy mom, I know how precious time can be in the kitchen. That’s why I cherish recipes like Sweet and Spicy Garlic Steak Pasta. It’s the perfect balance of flavors that makes dinner feel special, even on hectic days. Picture tender steak paired with perfectly cooked spaghetti, all tossed in a sauce that’s both sweet and spicy. This dish is not only quick to prepare but also impressive enough to wow your loved ones. Trust me; it’s a delightful culinary escape that brings everyone back to the table with smiles!

    Why You’ll Love This Sweet and Spicy Garlic Steak Pasta

    This Sweet and Spicy Garlic Steak Pasta is a busy cook’s dream! It comes together in under 35 minutes, making it a splendid choice for those chaotic weeknights. The combination of savory steak and a rich, flavor-packed sauce will tickle your taste buds and leave everyone asking for seconds. Plus, with its perfect blend of sweetness and heat, every bite feels like a special occasion. You’ll find yourself falling in love with this dish time and again!

    Ingredients for Sweet and Spicy Garlic Steak Pasta

    Getting the ingredients ready for this Sweet and Spicy Garlic Steak Pasta is half the fun! Here’s everything you’ll need:

    • Sirloin Steak: Tender and flavorful, this choice of meat forms the backbone of your dish.
    • Salt and Black Pepper: Essential for seasoning and bringing out the best flavors in your steak.
    • Soy Sauce: Do you want a savory depth? This condiment does the trick beautifully.
    • Olive Oil: Perfect for searing the steak, adding a rich touch while preventing stickiness.
    • Cornstarch (optional): A little sprinkle helps to create a lovely glaze on the steak.
    • Garlic: Minced and aromatic, garlic is your ticket to infuse scrumptious flavor into the sauce.
    • Honey: This natural sweetener adds delightful sweetness, balancing the dish’s spicy notes.
    • Brown Sugar: Works hand-in-hand with honey for an irresistible caramel-like complexity.
    • Sriracha: Love a kick? This hot sauce elevates your dish with spice and zest.
    • Rice Vinegar: A splash for tang, enhancing the depth of flavors in the sauce.
    • Sesame Oil: Adds a nutty richness that rounds out the sauce beautifully.
    • Crushed Red Pepper Flakes: Just a bit more heat for those who like it spicy!
    • Water: Helps to create your sauce’s perfect consistency.
    • Spaghetti: The perfect pasta to soak up that delicious sauce! You can also try gluten-free varieties.
    • Butter: Tossed with the pasta, it gives richness and prevents sticking.
    • Sesame Seeds: Toasted and used for garnish, they add an inviting crunch.
    • Fresh Parsley or Green Onions: A splash of color and freshness to brighten the dish!
    • Extra Red Pepper Flakes: Use this as a tasty garnish for those who crave more heat.

    You’ll find the exact quantities for each ingredient at the end of this article, ready for easy printing. Happy cooking!

    How to Make Sweet and Spicy Garlic Steak Pasta

    Step 1: Cook the Spaghetti

    Let’s get things cooking! Start by bringing a big pot of salted water to a rolling boil. Once you see those bubbles dancing, add in the spaghetti and cook it until it’s al dente. This should take around 8-10 minutes.

    Don’t forget to reserve half a cup of that starchy pasta water before draining! After draining, toss the spaghetti with a good pat of butter. This little trick keeps the pasta from sticking together and adds a luscious richness. Trust me, your taste buds will thank you!

    Step 2: Prepare the Steak

    Next up, let’s give some love to our sirloin steak. Pat it dry with paper towels; this step is key! A dry surface helps achieve that golden-brown sear.

    Now, sprinkle your steak generously with salt and black pepper. If you’re feeling adventurous, add a dash of soy sauce along with a touch of cornstarch. The cornstarch is optional, but it can create a wonderful glaze once you sear it!

    Step 3: Sear the Steak

    Time to fire things up! Heat a tablespoon of olive oil in a large skillet over medium-high heat. Once the oil is shimmering, gently place your seasoned steak cubes into the pan.

    Don’t crowd the pan. Give each piece a bit of space! Sear them until they’re perfectly browned and cooked to your liking—this should take around 3-5 minutes. Once done, remove them from the pan and set aside. The sizzling sound? It’s pure music to your ears!

    Step 4: Make the Sauce

    In the same pan, let’s continue the flavor party! Add minced garlic to the leftover oil and sauté it until it’s fragrant. You’ll know it’s ready when your kitchen starts to smell heavenly!

    Now, it’s sauce time! Pour in soy sauce, honey, brown sugar, sriracha, rice vinegar, sesame oil, and crushed red pepper flakes. Stir it all together and simmer for a few minutes until it thickens. This sauce is the heart of your Sweet and Spicy Garlic Steak Pasta!

    Step 5: Combine Pasta and Steak

    Now we’ll bring everything together! Toss the cooked spaghetti into the sauce. If things seem a bit dry, add a splash of the reserved pasta water until you reach the desired consistency. Then, fold in your delicious steak pieces.

    Make sure every strand of spaghetti is coated in that glorious sauce. It’s all about getting that sweet and spicy flavor throughout!

    Step 6: Serve It Up

    Finally, let’s make this dish shine! Serve your Sweet and Spicy Garlic Steak Pasta in vibrant bowls. Garnish generously with toasted sesame seeds and a sprinkle of fresh parsley or green onions. If you like extra heat, toss on some red pepper flakes for good measure!

    As you plate this delightful dish, feel the excitement in the air. Dinner is about to be a hit!

    Tips for Success

    • Always cook your pasta al dente for the best texture.
    • Pat the steak dry to ensure a nice sear; moisture can lead to steaming.
    • Use high heat for searing steak—this locks in flavor.
    • Adjust the spice level by varying sriracha and red pepper flakes.
    • Don’t rush the sauce; let it simmer for maximum flavor.

    Equipment Needed

    • Large Pot: For boiling spaghetti. A deep skillet can also work.
    • Skillet or Frying Pan: Ideal for searing steak and making the sauce.
    • Measuring Cups and Spoons: For precise ingredient measurements.
    • Wooden Spoon: To stir the sauce and pasta.
    • Colander: For draining the spaghetti.

    Variations on Sweet and Spicy Garlic Steak Pasta

    • Vegetarian Delight: Swap out steak for grilled vegetables like bell peppers, zucchini, and eggplant for a vibrant vegetarian option.
    • Pasta Alternatives: Use zucchini noodles or whole wheat pasta for a healthier twist. They soak up the sauce beautifully!
    • Seafood Sensation: Substitute steak with shrimp or scallops for a fresh seafood take on this recipe.
    • Sweet and Spicy Chicken: Replace the steak with cubed chicken breast—just adjust the cooking time accordingly!
    • Kid-Friendly Version: Reduce the sriracha for a milder dish for picky eaters, and toss in some peas or carrots for added nutrition.

    Serving Suggestions

    • Pair your Sweet and Spicy Garlic Steak Pasta with a crisp green salad drizzled with vinaigrette.
    • A chilled glass of Sauvignon Blanc complements the dish beautifully.
    • For a cozy touch, serve with garlic bread for sopping up the sauce.
    • Garnish plates with a sprinkle of chili flakes and fresh herbs for that restaurant-style presentation.

    FAQs about Sweet and Spicy Garlic Steak Pasta

    Can I use a different type of pasta for this recipe?

    Absolutely! While spaghetti works wonders, feel free to swap it for any pasta shape you love. Penne, fusilli, or even zucchini noodles are fantastic options!

    How can I make this Sweet and Spicy Garlic Steak Pasta gluten-free?

    Not a problem! Just substitute regular soy sauce with tamari or coconut aminos. These alternatives will keep your dish delicious and gluten-free.

    What can I do with leftovers?

    Leftovers can be refrigerated in an airtight container. Reheat gently on the stovetop, adding a splash of water if the sauce needs loosening up. Your Sweet and Spicy Garlic Steak Pasta will taste great even the next day!

    Can I adjust the spice level in the recipe?

    Definitely! Tailor the spice to your liking by reducing sriracha and crushed red pepper flakes. You can even leave them out entirely for a milder flavor.

    Is this dish suitable for meal prep?

    Yes! This dish is perfect for meal prep. Just pack it in individual containers after cooking and refrigerate. You’ll have delicious ready-to-go meals for your busy week!

    Final Thoughts

    There’s something truly magical about gathering around the table for a home-cooked meal. Sweet and Spicy Garlic Steak Pasta not only satisfies your hunger but also warms hearts and creates lasting memories. The joy of sharing this dish with loved ones while savoring the flavors is unbeatable. It’s the perfect blend of sweet, spicy, and comforting that brings excitement to dinner time. Even on the busiest of days, this flavorful recipe can add a sparkle to your evening. I hope it becomes a cherished part of your family’s meal rotation, just as it has in mine!


    Print

    clock clock iconcutlery cutlery iconflag flag iconfolder folder iconinstagram instagram iconpinterest pinterest iconfacebook facebook iconprint print iconsquares squares iconheart heart iconheart solid heart solid icon

    Description

    A flavorful dish combining tender steak and spaghetti in a sweet and spicy garlic sauce.


    • 1 lb sirloin steak, cubed
    • Salt and black pepper, to taste
    • 1 tablespoon soy sauce
    • 1 tablespoon olive oil
    • 1 teaspoon cornstarch (optional)
    • 4 cloves garlic, minced
    • 3 tablespoons soy sauce
    • 2 tablespoons honey
    • 1 tablespoon brown sugar
    • 2 tablespoons sriracha
    • 1 tablespoon rice vinegar
    • 1 teaspoon sesame oil
    • 1 teaspoon crushed red pepper flakes
    • 2 tablespoons water
    • 8 oz spaghetti
    • Salt for boiling water
    • 2 tablespoons butter
    • Sesame seeds, toasted (for garnish)
    • Fresh parsley or green onions, chopped (for garnish)
    • Extra red pepper flakes, optional (for garnish)

    1. Bring salted water to a boil and cook spaghetti until al dente. Reserve ½ cup pasta water, drain pasta, and toss with butter.
    2. Pat steak dry, season with salt, pepper, and soy sauce (plus cornstarch if using).
    3. Heat olive oil in a large pan and sear steak cubes over high heat until browned and cooked to desired doneness. Remove from pan.
    4. In the same pan, sauté garlic until fragrant. Add soy sauce, honey, brown sugar, sriracha, vinegar, sesame oil, crushed red pepper, and water. Simmer to thicken.
    5. Toss pasta into the sauce, loosening with reserved pasta water as needed. Add the steak back to the pan and stir to coat.
    6. Sprinkle with sesame seeds, parsley or green onions, and additional red pepper if desired.
    7. Plate and enjoy your sweet, spicy, and savory masterpiece!

    Notes

    • Adjust the level of spiciness by modifying the amount of sriracha and crushed red pepper flakes.
    • If gluten-free, substitute soy sauce with tamari or coconut aminos.
    • This dish is best enjoyed immediately after preparation.
    • Prep Time: 15 minutes
    • Cook Time: 20 minutes
    • Category: Main Dish
    • Method: Pan-fry
    • Cuisine: Fusion

    Nutrition

    • Serving Size: 1 plate
    • Calories: 600
    • Sugar: 8g
    • Sodium: 1000mg
    • Fat: 25g
    • Saturated Fat: 5g
    • Unsaturated Fat: 15g
    • Trans Fat: 0g
    • Carbohydrates: 70g
    • Fiber: 3g
    • Protein: 30g
    • Cholesterol: 70mg

    Sharing is caring!

  • Zesty Pesto Zucchini Noodle Salad

    Zesty Pesto Zucchini Noodle Salad


    Introduction to Zesty Pesto Zucchini Noodle Salad

    Welcome to the bright and fresh world of my Zesty Pesto Zucchini Noodle Salad! Life gets busy, doesn’t it? When juggling work, family, and everything in between, I often crave a dish that’s quick yet impressive. This vibrant salad serves that purpose perfectly. It’s not just delicious; it’s a delightful way to sneak in healthy veggies without any fuss. Imagine twirling those zucchini noodles around your fork, all while bursting with the flavor of homemade pesto! It’s an effortless solution worthy of any dinner table and will leave your loved ones asking for seconds.

    Why You’ll Love This Zesty Pesto Zucchini Noodle Salad

    This Zesty Pesto Zucchini Noodle Salad is a game changer in my kitchen! First off, it takes only 15 minutes to whip together. Yes, you read that right! It’s a burst of fresh flavors that keeps everyone satisfied, yet it’s light enough to indulge guilt-free. Plus, with every bite, you’re getting a colorful array of nutrients. Whether you’re hosting friends or just need a meal for yourself, this salad fits the bill perfectly.

    Ingredients for Zesty Pesto Zucchini Noodle Salad

    Before diving into this delicious salad, let’s gather our star ingredients! Each element plays a vital role, bringing its own unique flavor and nutrition to the table. Here’s what you’ll need:

    • Zucchinis: These green beauties become our noodles! They’re low in calories and high in water content, perfect for a refreshing salad. Spiralizing them is easier than you think!
    • Cherry Tomatoes: Sweet and juicy, they add bursts of color and flavor. Halving them makes it easier to enjoy, plus they look adorable in the salad.
    • Fresh Mozzarella Balls: Also known as bocconcini, these cheesy delights add creaminess to the dish. Their mild flavor balances the pesto beautifully.
    • Fresh Basil Leaves: An absolute must for our homemade pesto! Fragrant and flavorful, basil is the heart of this dish, giving it a fresh Italian vibe.
    • Toasted Pine Nuts: These little nuggets bring richness and a nice crunch. If you’re looking for a nut-free version, sunflower seeds are a great alternative.
    • Extra Virgin Olive Oil: A staple in Mediterranean cooking, this oil enhances the pesto’s flavor and adds healthy fats to the salad.
    • Garlic: Just a couple of cloves will amplify the flavor. It’s pungent and aromatic, adding depth to our delicious pesto.
    • Grated Parmesan Cheese: This salty cheese gives our pesto a savory kick. It also brings a touch of richness that’s simply irresistible.
    • Salt and Pepper: These essential seasonings tie everything together. Use them to your taste, adjusting the levels as you go.
    • Lemon Juice (optional): If you want an extra zing, adding a splash of lemon juice brightens the flavors even more!

    Don’t worry about the exact measurements just yet; you can find those at the bottom of the article for your convenience. Gather these ingredients and get ready for a flavor explosion!

    How to Make Zesty Pesto Zucchini Noodle Salad

    Ready to create your Zesty Pesto Zucchini Noodle Salad? Let’s roll up our sleeves and dive in! Follow these simple steps, and before you know it, you’ll have a colorful bowl of refreshing goodness.

    Step 1: Make the Pesto

    First, we’ll whip up the star of our dish: the pesto. In a food processor, add the fresh basil, toasted pine nuts, minced garlic, and grated Parmesan cheese. Pulse it until everything is finely chopped. Then, while the processor is running, slowly drizzle in the extra virgin olive oil until you have a smooth, creamy mixture. Don’t forget to season with salt and pepper! This homemade pesto is what truly makes the salad sing.

    Step 2: Prepare the Zucchini Noodles

    Now for the zucchini! Grab your spiralizer (or julienne peeler, if that’s your trusty tool). Spiralize the zucchinis into fun noodles. They should resemble spaghetti but can be even more fabulous! I love how they soak up the pesto flavors, offering that satisfying crunch with each bite. If you’re short on time, pre-spiralized zucchini from the store works just as well!

    Step 3: Combine the Salad

    In a large mixing bowl, combine the fresh zucchini noodles, halved cherry tomatoes, and mozzarella balls. Take a moment to admire the gorgeous colors! It’s a feast for the eyes that matches the fantastic flavor. Gently toss these ingredients together; you want them mixed but not broken apart. This salad is all about those fresh textures coming together.

    Step 4: Add the Pesto

    Here comes the magic! Drizzle your delightful homemade pesto over the zucchini noodle mixture. Use a spatula to gently toss everything together, ensuring those lovely noodles are well-coated. l prefer to keep it light, but feel free to add a bit more pesto if you like! The goal is to let every bite be bursting with flavor.

    Step 5: Taste and Adjust

    Ah, the best part! Taste the salad, and adjust the seasoning as needed. Maybe you’d like a little more salt, or perhaps a sprinkle of pepper to kick things up? If you went for that lemon juice option, now’s the time to mix it in for a bright finish. Tasting is essential, as it allows you to tailor the dish to your preferences.

    Step 6: Serve

    Transfer your beautiful salad to a serving dish or plates. For that extra flair, sprinkle a handful of additional pine nuts and fresh basil leaves on top. Not only does it look stunning, but your family will also be eager to dig in!

    Step 7: Enjoy Immediately

    This Zesty Pesto Zucchini Noodle Salad is best enjoyed fresh. However, you can store any leftovers in the fridge for up to 24 hours. Just a little tip: if you let it sit too long, the zucchini might get a touch soggy, so savor it while it’s crisp and vibrant!

    Tips for Success

    • Use firm, fresh zucchinis for the best noodle texture.
    • Toast your pine nuts over low heat to avoid burning and intensify their flavor.
    • Make the pesto ahead of time and store it in the fridge for up to a week.
    • If you’re prepping for a party, keep the noodles and pesto separate until serving to maintain freshness.
    • Add a pinch of red pepper flakes for a delightful kick!

    Equipment Needed

    • Food Processor: Essential for making that silky pesto. A high-quality blender can work in a pinch.
    • Spiralizer: This tool makes beautiful zucchini noodles! If you don’t have one, a julienne peeler or a box grater can do the trick.
    • Mixing Bowl: A large bowl is perfect for tossing all those yummy ingredients together.
    • Measuring Cups and Spoons: Helpful for precision with your ingredients, if that’s your style.

    Variations

    • Add Protein: Toss in grilled chicken, shrimp, or chickpeas for a heartier meal.
    • Switch Up the Veggies: Incorporate bell peppers, shredded carrots, or zucchini flowers for extra crunch and color.
    • Herb Substitutions: Experiment with fresh parsley, dill, or cilantro instead of basil for a unique twist on flavor.
    • Cheese Alternatives: Try feta or goat cheese for a tangy flavor that complements the salad beautifully.
    • Gluten-Free Option: This salad is naturally gluten-free, making it perfect for those with dietary restrictions.

    Serving Suggestions

    • Pair your Zesty Pesto Zucchini Noodle Salad with grilled chicken or fish for a complete meal.
    • Serve alongside crusty garlic bread to soak up any leftover pesto goodness.
    • A chilled glass of white wine or sparkling water enhances the fresh flavors.
    • For presentation, use a colorful serving bowl and garnish with extra basil and pine nuts.

    FAQs about Zesty Pesto Zucchini Noodle Salad

    As a passionate home cook, I often get asked questions about my Zesty Pesto Zucchini Noodle Salad. Here are some of the most common queries I encounter, along with helpful answers!

    Can I make the pesto in advance?

    Absolutely! In fact, making the pesto ahead of time enhances the flavors. Store it in an airtight container in the fridge for up to a week. Just give it a good stir before using!

    Can I use other vegetables instead of zucchini?

    Yes! While zucchini noodles are a fantastic base, you can easily substitute them with spiralized carrots or cucumber for a crunchy twist. Just keep in mind that cooking times and textures will vary.

    What can I serve with the salad?

    This salad pairs wonderfully with grilled chicken or fish. It’s also tasty alongside some crusty garlic bread to soak up the pesto. Enjoy it as a refreshing side dish or a main course!

    Is this salad good for meal prep?

    Yes, but if you’re planning to prepare it in advance, keep the zucchini noodles and pesto separate until you’re ready to serve. This keeps everything crisp and fresh, avoiding soggy noodles!

    How long does this salad last in the fridge?

    You can keep leftovers for up to 24 hours. Just know that the zucchini may lose its crunch and get a bit soggy over time, so it’s best enjoyed fresh!

    Final Thoughts

    Creating this Zesty Pesto Zucchini Noodle Salad is like a mini celebration in my kitchen! It’s a joy to whip up something so vibrant and fresh, especially when I know my family will adore it. The flavors dance together beautifully, and nourishing my loved ones feels wonderful. This salad inspires creativity, whether you’re sticking to the classic recipe or adding your spin. So, next time you need a quick yet impressive dish, remember this salad. It’s not just a meal; it’s an experience that brightens any table and warms hearts with every colorful bite!


    Print

    clock clock iconcutlery cutlery iconflag flag iconfolder folder iconinstagram instagram iconpinterest pinterest iconfacebook facebook iconprint print iconsquares squares iconheart heart iconheart solid heart solid icon

    Description

    A refreshing and vibrant salad featuring spiralized zucchini noodles tossed with a homemade pesto, cherry tomatoes, and mozzarella balls.


    • 4 medium zucchinis, spiralized into noodles
    • 1 cup cherry tomatoes, halved
    • 1 cup fresh mozzarella balls (bocconcini), halved
    • 1 cup fresh basil leaves, loosely packed
    • 1/4 cup pine nuts, toasted
    • 1/2 cup extra virgin olive oil
    • 2 cloves garlic, minced
    • 1/2 cup grated Parmesan cheese
    • Salt and pepper, to taste
    • 1 tablespoon lemon juice (optional, for extra brightness)

    1. Make the Pesto: In a food processor, combine the basil leaves, toasted pine nuts, minced garlic, and grated Parmesan cheese. Pulse until finely chopped. Gradually drizzle in the olive oil while the processor is running until the mixture is smooth. Season with salt and pepper to taste.
    2. Prepare the Zucchini Noodles: Using a spiralizer, create zucchini noodles from the zucchinis. If you don’t have a spiralizer, you can use a julienne peeler for a similar effect.
    3. Combine the Salad: In a large bowl, combine the zucchini noodles, halved cherry tomatoes, and mozzarella balls.
    4. Add the Pesto: Drizzle the homemade pesto over the zucchini noodle mixture and toss gently to coat all ingredients evenly. If desired, add the lemon juice for an extra zing.
    5. Taste and Adjust: Taste the salad and adjust the seasoning with more salt and pepper as needed.
    6. Serve: Transfer the salad to a serving dish or plates. Sprinkle with additional pine nuts and fresh basil for garnish, if desired.
    7. Enjoy Immediately: This salad is best enjoyed fresh but can be stored in the fridge for up to 24 hours.

    Notes

    • For a nut-free version, omit the pine nuts or substitute with sunflower seeds.
    • This salad can be customized with additional vegetables or proteins as desired.
    • Prep Time: 15 minutes
    • Cook Time: 0 minutes
    • Category: Salad
    • Method: No-Cook
    • Cuisine: Italian

    Nutrition

    • Serving Size: 1 serving
    • Calories: 350
    • Sugar: 3g
    • Sodium: 350mg
    • Fat: 28g
    • Saturated Fat: 5g
    • Unsaturated Fat: 23g
    • Trans Fat: 0g
    • Carbohydrates: 10g
    • Fiber: 3g
    • Protein: 10g
    • Cholesterol: 15mg

    Sharing is caring!

  • Salted Caramel Rice Krispie Treats

    Salted Caramel Rice Krispie Treats


    Introduction to Salted Caramel Rice Krispie Treats

    Hey there, fellow dessert lovers! If you’re anything like me, you appreciate a sweet treat that’s both easy to whip up and undeniably delicious. That’s where my Salted Caramel Rice Krispie Treats come in! These aren’t your average rice crispy treats; the rich salted caramel adds a twist that elevates them to a whole new level.

    This comforting recipe is perfect for busy days when you want to create something special without spending hours in the kitchen. Trust me, you’re going to love how quickly these come together—let’s dive in!

    Why You’ll Love This Salted Caramel Rice Krispie Treats

    First off, these treats are remarkably simple to make. With just a few ingredients, you’ll be serving a delightful dessert in no time.

    The satisfaction of that gooey caramel intertwining with crispy cereal is simply divine. Plus, they’re perfect for any occasion, from a quick snack to a party centerpiece.

    Honestly, who can resist a sweet and salty treat? I know I can’t!

    Ingredients for Salted Caramel Rice Krispie Treats

    Gathering the ingredients for these delightful Salted Caramel Rice Krispie Treats is half the fun! Here’s what you need:

    • Rice Krispies cereal: The classic base that gives these treats their signature crunch.
    • Unsalted butter: This adds richness. Using unsalted helps control the overall saltiness.
    • Mini marshmallows: These melt beautifully and give those gooey, sticky layers we all love.
    • Salted caramel sauce: The star of the show! This adds a sweet, savory twist to the traditional recipe. You can use store-bought or homemade to suit your taste.
    • Sea salt: Just a hint enhances the caramel flavor. A little extra for topping takes it over the top!
    • Vanilla extract: This brings warmth and depth to the flavor. Trust me, it makes a difference!

    For those who want to mix things up, consider adding your favorite candies or nuts for an exciting texture.

    If you’re looking for lower sugar options, there are sugar-free caramel sauces available too.

    Don’t worry; I’ve included exact quantities at the bottom of this article, plus a printable version for your convenience!

    How to Make Salted Caramel Rice Krispie Treats

    Making these Salted Caramel Rice Krispie Treats is as delightful as eating them! Let’s break it down step by step, ensuring you get that perfect combination of gooey deliciousness and crunchy texture.

    Step 1: Melt the Butter

    Start by gathering a large saucepan and placing it over medium heat. Add in the unsalted butter and let it melt slowly. Keep an eye on it! You don’t want it browned.

    Step 2: Add the Marshmallows

    Once the butter is melted, lower the heat and toss in the mini marshmallows. Stir continuously until they become melted and smooth, resembling a creamy cloud. The aroma at this stage is absolutely heavenly!

    Step 3: Combine with Caramel and Vanilla

    Time for the star of the show! Remove the saucepan from the heat and pour in your salted caramel sauce and vanilla extract. Stir it all together until it’s completely combined. This is where the magic happens!

    Step 4: Mix with Rice Krispies

    Grab a large mixing bowl and pour in the Rice Krispies cereal. Now, pour the marshmallow-caramel mixture over the cereal. Gently mix everything until the cereal is coated evenly. This may take some patience, but trust me, it’s worth it!

    Step 5: Prepare the Baking Pan

    Next, line a 9×13-inch baking pan with parchment paper for easy removal later. This little trick helps keep things neat. Take your greased spatula or even your hands—your choice!—and press the crispy mixture evenly into the pan.

    Step 6: Drizzle and Sprinkle

    Now for a little indulgence! Drizzle some extra salted caramel on top of your pressed treat mixture. Then, sprinkle a dash of sea salt for that sweet and savory balance that’ll make your taste buds dance with joy.

    Step 7: Cool and Cut

    Let the pan cool at room temperature for about 30 minutes. Once they are set, it’s time to cut them into squares. I recommend using a sharp knife for clean edges, but hey, if they’re a little rustic, that just adds character!

    Tips for Success

    • Use fresh marshmallows for the best texture. Stale ones can be a bit stubborn and won’t melt as well.
    • To prevent sticking, lightly grease your spatula or hands when pressing the mixture into the pan.
    • Feel free to experiment! Add in some chopped nuts or your kids’ favorite candies to customize your treats.
    • For a firmer treat, let them cool in the refrigerator for about an hour before cutting!

    Equipment Needed

    • Large saucepan: You can use a Dutch oven if you have one on hand.
    • Spatula: A rubber spatula works great; a wooden spoon is a solid alternative.
    • Mixing bowl: Any large bowl will do; just ensure it’s big enough for the cereal.
    • Baking pan: A 9×13-inch pan is ideal, but a similar-sized dish works, too.
    • Parchment paper: If you’re out, greasing the pan will work just fine.

    Variations for Salted Caramel Rice Krispie Treats

    • Chocolate Drizzle: Add a decadent touch by drizzling melted chocolate over the cooled treats for a sweet layer of richness.
    • Nuts and Seeds: Mix in chopped nuts like pecans or walnuts, or even add sunflower seeds for some extra crunch and healthy fats.
    • Peanut Butter Swirl: Swirl in some creamy peanut butter into the marshmallow mixture for a nutty flavor twist that complements the caramel.
    • Gluten-Free Option: Use gluten-free Rice Krispies to cater to those with dietary restrictions without sacrificing taste.
    • Puffed Cereal Blend: Try combining Rice Krispies with other puffed cereals like puffed wheat or Corn Pops for a fun texture and flavor variety.

    Serving Suggestions for Salted Caramel Rice Krispie Treats

    • Pair your treats with a scoop of vanilla ice cream for a delightful dessert combo.
    • Serve alongside a steaming cup of coffee or tea for a cozy afternoon snack.
    • Presentation tip: Arrange them on a colorful platter with fresh fruit for a pop of color.
    • Offer them at parties as a playful yet elegant treat that everyone will love.

    FAQs about Salted Caramel Rice Krispie Treats

    Can I make these treats ahead of time?

    Absolutely! You can prepare your Salted Caramel Rice Krispie Treats a day in advance. Just store them in an airtight container at room temperature to keep them fresh and chewy.

    How do I store leftover treats?

    Store any leftovers in an airtight container for up to three days. If they last that long! Just remember, they might get a little firmer as time goes on.

    Can I use store-bought caramel sauce?

    Sure thing! Using store-bought caramel sauce is not only convenient but also a great way to save time. Just make sure it’s salted for that perfect flavor balance.

    How can I make my treats softer or firmer?

    For softer treats, melt the ingredients a tad longer. If you prefer firmer ones, let them cool in the refrigerator for about an hour before cutting. Play around to find your perfect texture!

    What can I add to enhance the flavor?

    You can experiment by mixing in chocolate chips, dried fruit, or nuts! Adding spices like cinnamon or a splash of almond extract can give them a unique twist too.

    Final Thoughts

    There’s just something truly special about these Salted Caramel Rice Krispie Treats. They whisk you away to a comforting childhood memory while introducing a touch of gourmet flair.

    Every chewy bite brings a delightful crunch and rich caramel flavor that’s hard to resist.

    Whether you’re sharing them with family after dinner or surprising a friend with a sweet gift, they radiate warmth and happiness.

    So roll up your sleeves, gather those ingredients, and let the simple joy of creating these treats fill your home with love and laughter. Trust me, you won’t regret it!


    Print

    clock clock iconcutlery cutlery iconflag flag iconfolder folder iconinstagram instagram iconpinterest pinterest iconfacebook facebook iconprint print iconsquares squares iconheart heart iconheart solid heart solid icon

    Description

    A delicious twist on the classic Rice Krispie Treats, featuring a rich salted caramel flavor.


    • 6 cups Rice Krispies cereal
    • 1 cup (2 sticks) unsalted butter
    • 1 package (10 oz) mini marshmallows
    • 1/2 cup salted caramel sauce (store-bought or homemade)
    • 1/2 tsp sea salt (plus extra for topping)
    • 1 tsp vanilla extract

    1. In a large saucepan over medium heat, melt the butter.
    2. Lower the heat and stir in the mini marshmallows. Stir continuously until melted and smooth.
    3. Remove from heat and add the salted caramel sauce and vanilla extract. Stir until fully combined.
    4. Place the Rice Krispies cereal in a large bowl and pour the marshmallow-caramel mixture over it. Stir until all cereal is coated.
    5. Line a 9×13-inch baking pan with parchment paper. Press the mixture evenly into the pan using a greased spatula or your hands.
    6. Drizzle extra salted caramel on top and sprinkle with sea salt.
    7. Let cool at room temperature for about 30 minutes before cutting into squares.

    Notes

    • Store leftovers in an airtight container for up to 3 days.
    • For a more intense caramel flavor, you can add more salted caramel sauce.
    • Feel free to mix in your favorite candies or nuts for added texture.
    • Prep Time: 15 minutes
    • Cook Time: 10 minutes
    • Category: Dessert
    • Method: Stovetop
    • Cuisine: American

    Nutrition

    • Serving Size: 1 square
    • Calories: 180
    • Sugar: 10g
    • Sodium: 90mg
    • Fat: 8g
    • Saturated Fat: 5g
    • Unsaturated Fat: 3g
    • Trans Fat: 0g
    • Carbohydrates: 25g
    • Fiber: 0g
    • Protein: 1g
    • Cholesterol: 15mg

    Sharing is caring!

  • Ground Turkey Teriyaki Stir Fry

    Ground Turkey Teriyaki Stir Fry


    Introduction to Ground Turkey Teriyaki Stir Fry

    As a busy mom and passionate home cook, I understand the constant juggling act of daily life. That’s why I adore my Ground Turkey Teriyaki Stir Fry. It’s a quick solution for those rushed weeknights when everyone is famished and your brain feels like mush. With tender ground turkey, vibrant vegetables, and a savory teriyaki sauce, this dish offers not just flavor, but also a burst of nutrition. Whether it’s a casual family dinner or a meal to impress your loved ones, this stir fry will leave you feeling accomplished and satisfied. Trust me, it’s a delight you won’t want to miss!

    Why You’ll Love This Ground Turkey Teriyaki Stir Fry

    This Ground Turkey Teriyaki Stir Fry is a lifesaver! It’s quick, tasty, and packed with nutrition, making it perfect for busy evenings. You’ll have dinner on the table in just 30 minutes, which is a dream come true when you’re wrangling hungry kids or after a long workday. Plus, the vibrant colors will brighten your dinner table, and the savory flavors will keep everyone coming back for seconds!

    Ingredients for Ground Turkey Teriyaki Stir Fry

    Gathering fresh ingredients is the heart of any great recipe. Here’s what you’ll need for your Ground Turkey Teriyaki Stir Fry:

    • Ground Turkey: Lean and versatile, it forms the base of this dish. Look for packages labeled 93% lean for the best flavor without too much grease.
    • Vegetable Oil: Perfect for high-heat cooking, but feel free to swap with olive oil or avocado oil if you prefer those flavors.
    • Broccoli Florets: These add a delightful crunch and are packed with nutrients. You could substitute with snow peas or green beans if you like.
    • Bell Pepper: Any color will do! Sweet, colorful bell peppers provide a touch of sweetness and vibrant colors to your dish.
    • Carrot: Julienned carrots add nice texture and natural sweetness. Don’t worry if you don’t have fresh; you can use frozen carrots as an alternative.
    • Green Onions: These lend a fresh, mild flavor. Feel free to use regular onions if you don’t have green ones on hand.
    • Garlic: Minced garlic brings a robust flavor that’s hard to resist. Fresh is best, but jarred garlic can work in a pinch.
    • Fresh Ginger: Minced ginger adds a warm earthiness. Ground ginger can substitute in a hurry, but the flavor differs a bit.
    • Soy Sauce: A key component for that umami kick! Low-sodium options are great for lowering the salt content.
    • Honey or Maple Syrup: These naturally sweeten the sauce. If you’re vegan, opt for maple syrup!
    • Rice Vinegar: It adds a subtle tang. Apple cider vinegar can be a good stand-in if you’re out.
    • Cornstarch: Mixed with water, it helps thicken your sauce for a luscious finish.
    • Sesame Seeds: A sprinkle of these on top gives a delightful crunch and charm.
    • Cooked Rice or Noodles: To serve with your stir fry. Brown rice or whole grain noodles can elevate nutritional value.

    Exact measurements and tips for printing are at the bottom of this article. Enjoy gathering these ingredients, and let the cooking begin!

    How to Make Ground Turkey Teriyaki Stir Fry

    Step 1: Cook the Ground Turkey

    Start your delicious Ground Turkey Teriyaki Stir Fry by heating vegetable oil in a large skillet or wok over medium-high heat. Once the oil shimmers, add the ground turkey. As it cooks, use a spatula to break it apart, ensuring even browning. This step is crucial; it develops flavor and keeps your meat tender. Cook for about 5-7 minutes until it’s no longer pink, and the turkey is brown. Oh, the sizzle in the pan is music to my ears!

    Step 2: Add Aromatics and Vegetables

    Next, it’s time to boost the flavor by adding the minced garlic and ginger to the cooked turkey. Sauté them for 1-2 minutes until fragrant—this really elevates the dish. Then, toss in the broccoli, bell pepper, and julienned carrots. Sauté these colorful veggies just right, about 5 minutes, until they remain slightly crisp. This timing preserves their vibrant flavors and nutrients. You want crunch, not mush!

    Step 3: Prepare the Teriyaki Sauce

    In a small bowl, whisk together your soy sauce, honey (or maple syrup), and rice vinegar until smooth. This mixture is the heart of your stir fry, balancing sweet and salty perfectly. When you pour this sauce over the turkey and vegetables, it’s like a flavor explosion! Ensure every bit of turkey and veggies gets a nice coat. That luscious sauce is what makes this dish truly unforgettable.

    Step 4: Thicken the Sauce

    Now, let’s make that sauce gloriously thick! Grab your cornstarch slurry—simply mix cornstarch with water—and stir it into the skillet. As the mixture simmers, you’ll see the sauce begin to thicken. This step is key for that glossy finish we all love. Allow it to cook for an additional 2-3 minutes, so all those intense flavors meld beautifully. Believe me, you’ll want every last drop on your rice or noodles!

    Step 5: Final Touches

    Remove your skillet from the heat and toss in the chopped green onions, stirring them through quickly. They’re fresh and vibrant, perfect for brightening up the dish. To serve, spoon the stir fry over cooked rice or noodles, and don’t forget to sprinkle sesame seeds on top! This final touch adds a delightful crunch, making for an eye-catching presentation. Enjoy every bite of your amazing creation!

    Tips for Success

    • Prep all ingredients before cooking to streamline your process and enjoy stress-free cooking.
    • Adjust the sauce sweetness by playing with honey or maple syrup based on your family’s taste.
    • Experiment with different veggies like snap peas or mushrooms for added flavor and variety.
    • Don’t rush the browning of the turkey; it enhances the overall flavor of the dish.
    • Always taste and adjust seasoning before serving to ensure it’s just right!

    Equipment Needed

    • Large Skillet or Wok: Essential for even cooking; a deep frying pan can work too.
    • Spatula: For breaking apart the turkey and stirring; a wooden spoon is a great alternative.
    • Measuring Cups and Spoons: For accuracy; if you’re short on tools, eyeballing can work in a pinch.
    • Mixing Bowl: To whisk the sauce; any bowl will do if you’re in a bind.

    Variations of Ground Turkey Teriyaki Stir Fry

    • Vegetable Boost: Add a variety of vegetables like zucchini, bell peppers, or snap peas for more color and nutrition.
    • Spicy Kick: Incorporate red pepper flakes or Sriracha to elevate the heat factor in your Ground Turkey Teriyaki Stir Fry.
    • Low-Carb Option: Serve it over cauliflower rice instead of traditional rice or noodles for a healthier twist.
    • Gluten-Free: Simply use gluten-free soy sauce or tamari for your sauce to make this dish friendly for those with dietary restrictions.
    • Nutty Flavor: Sprinkle toasted cashews or peanuts on top to add a crunchy texture and rich taste!

    Serving Suggestions

    • Pair your Ground Turkey Teriyaki Stir Fry with fluffy steamed jasmine rice for an authentic touch.
    • Whole grain noodles provide an earthy flavor that complements the teriyaki sauce beautifully.
    • Serve with a crisp cucumber salad or edamame on the side for added freshness.
    • A light sparkling water with a slice of lime makes a refreshing drink option.
    • For an appealing presentation, use a colorful plate and garnish with extra sesame seeds!

    FAQs about Ground Turkey Teriyaki Stir Fry

    Can I use chicken or beef instead of ground turkey?
    Absolutely! While this recipe features ground turkey for its lean profile, you can easily substitute it with ground chicken, beef, or even tofu for a vegetarian option. Just adjust the cooking times accordingly to ensure everything is cooked through.

    How can I store leftovers from my ground turkey teriyaki stir fry?
    Store any leftovers in an airtight container in the refrigerator for up to three days. When ready to eat, reheat them in a skillet over low heat, or pop them in the microwave until warmed through. Just remember, the veggies might lose a bit of their crunch, but it will still be delicious!

    Is this stir fry healthy?
    Yes! This Ground Turkey Teriyaki Stir Fry is packed with fresh vegetables, lean protein, and flavorful toppings. Plus, you control the amount of sauce, making it a customizable and nutritious dinner option.

    Can I make this dish gluten-free?
    Definitely! Just use gluten-free soy sauce or tamari in your teriyaki sauce mixture. Your stir fry will still be just as tasty, without sacrificing flavor or quality!

    What side dishes pair well with this stir fry?
    Serve your Ground Turkey Teriyaki Stir Fry alongside steamed rice, quinoa, or whole grain noodles for added heartiness. A side salad or some steamed dumplings can also make a delightful addition to your meal!

    Final Thoughts

    Making this Ground Turkey Teriyaki Stir Fry has become a cherished routine in my kitchen. It’s not just a recipe; it’s a way to bring family together, sharing laughter over a colorful plate of deliciousness. I love watching everyone dig in, their faces lighting up with each bite. It’s a quick meal that doesn’t skimp on flavor or nutrition. And on those long, hectic evenings, knowing I can whip up something delightful in just 30 minutes? That’s the kind of kitchen magic I truly treasure. Give it a try; it might just become your new favorite too!


    Print

    clock clock iconcutlery cutlery iconflag flag iconfolder folder iconinstagram instagram iconpinterest pinterest iconfacebook facebook iconprint print iconsquares squares iconheart heart iconheart solid heart solid icon

    Description

    A quick and delightful stir fry featuring ground turkey, fresh vegetables, and a savory teriyaki sauce.


    • 1 lb ground turkey
    • 2 tablespoons vegetable oil
    • 1 cup broccoli florets
    • 1 bell pepper, thinly sliced (any color)
    • 1 carrot, julienned
    • 4 green onions, chopped
    • 2 cloves garlic, minced
    • 1 tablespoon fresh ginger, minced
    • 1/4 cup soy sauce (low-sodium recommended)
    • 2 tablespoons honey or maple syrup
    • 1 tablespoon rice vinegar
    • 1 tablespoon cornstarch mixed with 2 tablespoons water
    • Sesame seeds, for garnish
    • Cooked rice or noodles, for serving

    1. In a large skillet or wok, heat the vegetable oil over medium-high heat. Add the ground turkey and cook until browned, breaking it apart with a spatula, about 5-7 minutes.
    2. Stir in the minced garlic and ginger, cooking for an additional 1-2 minutes until fragrant. Next, add the broccoli, bell pepper, and carrot. Sauté for about 5 minutes, until the vegetables are tender but still slightly crisp.
    3. In a small bowl, whisk together the soy sauce, honey (or maple syrup), and rice vinegar until well combined. Pour the sauce into the skillet with the turkey and vegetables.
    4. Bring the mixture to a gentle simmer and stir in the cornstarch slurry (cornstarch mixed with water). Allow the sauce to thicken, cooking for an additional 2-3 minutes. Adjust seasoning if necessary.
    5. Stir in the chopped green onions and cook for 1 more minute. Remove from heat and serve the stir fry over cooked rice or noodles. Garnish with sesame seeds for an extra crunch.

    Notes

    • For a spicier version, add red pepper flakes to the stir fry.
    • This dish can be made gluten-free by using gluten-free soy sauce.
    • Store leftovers in an airtight container in the refrigerator for up to 3 days.
    • Prep Time: 10 minutes
    • Cook Time: 20 minutes
    • Category: Dinner
    • Method: Stir Fry
    • Cuisine: Asian

    Nutrition

    • Serving Size: 1 serving
    • Calories: 350
    • Sugar: 8g
    • Sodium: 600mg
    • Fat: 15g
    • Saturated Fat: 2g
    • Unsaturated Fat: 10g
    • Trans Fat: 0g
    • Carbohydrates: 30g
    • Fiber: 3g
    • Protein: 25g
    • Cholesterol: 70mg

    Sharing is caring!

  • Cajun-Style Stuffed Bell Peppers

    Cajun-Style Stuffed Bell Peppers


    Introduction to Cajun-Style Stuffed Bell Peppers

    If you’re anything like me, finding a quick yet delicious meal that pleases the whole family can feel like a delightful challenge. That’s where Cajun-Style Stuffed Bell Peppers come into play. These vibrant gems are brimming with a heavenly blend of flavors—think succulent shrimp, spicy andouille sausage, and comforting rice. They offer a nutritious and satisfying dinner choice that’s perfect for busy weeknights or impressing guests. Not to mention, they are as fun to make as they are to eat! So, let’s dive into this culinary adventure together!

    Why You’ll Love This Cajun-Style Stuffed Bell Peppers

    Cajun-Style Stuffed Bell Peppers are not just a meal; they are a celebration of flavors. They come together quickly, making them perfect for those hectic evenings when you’re juggling work and family. Each bite bursts with zest from the Cajun spices that liven up the ordinary. Plus, they’re a great way to sneak in veggies, making these stuffed peppers a true hero for the health-conscious family.

    Ingredients for Cajun-Style Stuffed Bell Peppers

    Let’s talk about the wonderful ingredients that go into these Cajun-Style Stuffed Bell Peppers. These vibrant peppers serve as the perfect vessel for your flavorful filling. Dive into the list:

    • Bell Peppers: Choose any color you like—red, yellow, or green. They provide a crisp texture and a slightly sweet flavor.
    • Olive Oil: This buttery oil adds richness and helps sauté the filling, enhancing all those bold flavors.
    • Andouille Sausage: A must for that smokey, spicy kick! You can substitute it with turkey or chicken sausage if needed.
    • Raw Shrimp: Fresh, peeled, and deveined shrimp take this dish to the next level. Frozen shrimp will work too; just thaw them beforehand!
    • Onion and Celery: These aromatic veggies create a flavorful base for the filling, adding sweetness and crunch.
    • Red Bell Pepper: Dice this for additional sweetness in the filling. Plus, it looks gorgeous in the mix.
    • Garlic: Because who can resist that savory aroma? It elevates the taste and adds depth.
    • Fire-Roasted Diced Tomatoes: These canned beauties bring a smoky richness to the pepper filling. Don’t skip them!
    • Cooked Rice: You can use white or brown rice, depending on your preference. It helps to fill the peppers and brings everything together.
    • Cajun Seasoning: This spice blend is the star of the show, offering that signature punch of flavor synonymous with Cajun cooking.
    • Paprika and Hot Sauce: Optional, but they provide a lovely warmth and extra zing that enhances the overall deliciousness.
    • Shredded Cheese: Whether you go for cheddar or pepper jack, cheese adds a melty, comforting finish.
    • Fresh Parsley or Green Onions: A sprinkle of these on top adds color and a burst of freshness, making every bite sing!

    Exact quantities for all these ingredients are at the bottom of the article, making it easy for you to print and reference as you cook!

    How to Make Cajun-Style Stuffed Bell Peppers

    Now that we’ve gathered all our ingredients, it’s time to bring these Cajun-Style Stuffed Bell Peppers to life! Follow along for a step-by-step guide that’s as easy as pie—or should I say, as easy as stuffed peppers!

    Preparing the Peppers

    Preheat and Roast

    First things first, preheat your oven to 375°F (190°C). While it warms up, take those beautiful bell peppers and slice them in half, removing the seeds.

    Brush both sides with olive oil and sprinkle a dash of salt and pepper. Place them cut-side up in a baking dish. Pop them in the oven and roast for about 15 minutes. This will soften them a bit and get that flavor going!

    Cooking the Filling

    Brown the Sausage and Shrimp

    While the peppers roast, let’s get that scrumptious filling ready. Heat 1 tablespoon of olive oil in a large skillet over medium heat. Toss in the diced andouille sausage, cooking until it’s nicely browned—about 5 minutes.

    Next, add the chopped raw shrimp. Sauté them until they just turn pink. Once done, remove both the sausage and shrimp from the skillet and set aside. We want them to keep their lovely flavors before mixing everything.

    Sauté the Vegetables

    In the same skillet, add your finely diced onion, celery, and red bell pepper. Cook these for about 5 to 7 minutes until they’ve softened and released their fragrant aroma.

    Stir in the minced garlic, fire-roasted diced tomatoes, Cajun seasoning, paprika, and optional hot sauce. Mix everything well and let it simmer for a few minutes so those spices can dance together!

    Combining and Stuffing

    Mixing Ingredients Together

    Now, it’s time to bring it all together! Return the sausage and shrimp to the skillet and add the cooked rice. Toss everything until it’s well combined, and adjust the seasoning to your taste. Remember, this is where your personal touch shines!

    Filling the Peppers

    Grab those roasted pepper halves and fill them generously with your flavorful mixture. Don’t be shy; pile it high! Then, sprinkle shredded cheese on top to get that melty goodness going!

    Baking

    Melting the Cheese

    Finally, place the stuffed peppers back in the oven. Bake them uncovered for an additional 10 to 15 minutes until that cheese is melted and bubbly, radiating deliciousness throughout your kitchen.

    Once done, take a moment to admire your masterpiece. Garnish with fresh parsley or green onions, and if you’re feeling extra fancy, serve them with a side of cornbread or creamy grits!

    Tips for Success

    • Prep your ingredients ahead of time to streamline the cooking process.
    • Don’t overstuff the peppers; leave a little space for the cheese to melt beautifully.
    • Adjust the level of Cajun seasoning to suit your family’s spice tolerance.
    • Try using leftover cooked chicken or turkey in place of shrimp for a different twist.
    • For an extra crunch, top with breadcrumbs before baking!

    Equipment Needed

    • Large baking dish: A glass dish works well, but any oven-safe dish will do.
    • Skillet: A non-stick skillet makes cleanup easy.
    • Spatula: Perfect for mixing and transferring your filling.
    • Knife and cutting board: Essential for prepping your veggies.
    • Measuring spoons: Handy for precise seasoning!

    Variations

    • For a vegetarian twist, substitute the sausage and shrimp with black beans and corn for a hearty option.
    • Add quinoa instead of rice for an extra protein punch—it’s packed with nutrients!
    • Use different spices like taco seasoning for a Tex-Mex flair instead of Cajun seasoning.
    • Try adding chopped spinach or kale to your filling for more greens and a pop of color.
    • For a cheesy delight, use a mix of cheeses like feta and mozzarella to enhance creaminess.

    Serving Suggestions

    • Serve with a side of cornbread for that perfect Southern comfort.
    • A refreshing green salad adds a crisp contrast to your meal.
    • Pair with a glass of chilled white wine, like Sauvignon Blanc, to complement the spices.
    • For a fun twist, present on a colorful platter, garnished with extra parsley.

    FAQs about Cajun-Style Stuffed Bell Peppers

    I know you might have a few questions swirling in your mind about these delectable Cajun-Style Stuffed Bell Peppers. Let’s tackle some common queries to make your cooking experience even more enjoyable!

    Can I make these Cajun-Style Stuffed Bell Peppers ahead of time?

    Absolutely! You can prepare the filling and stuff the peppers ahead. Just store them in the fridge for up to a day. When you’re ready to serve, bake them straight from the refrigerator. They might need a couple of extra minutes in the oven.

    What’s the best way to store leftovers?

    If you have any leftovers, place them in an airtight container in the refrigerator. They’ll stay fresh for up to 3 days. Just reheat in the oven or microwave until warmed through.

    What type of rice works best for the filling?

    You can use either white or brown rice based on your dietary preference. Brown rice provides more fiber, while white rice will give a softer texture. Either way, your Cajun-Style Stuffed Bell Peppers will be delightful!

    Can I freeze Cajun-Style Stuffed Bell Peppers?

    Yes, you can! These little treasures freeze beautifully. Just prepare them fully, and then wrap each stuffed pepper tightly in plastic wrap and foil. They’ll keep for about 3 months in the freezer. When you’re ready, thaw them overnight in the fridge and bake as directed!

    Is there a gluten-free alternative for the filling?

    Great question! This recipe is naturally gluten-free as long as you ensure all ingredients, particularly your sausage and any seasonings, are gluten-free. Feel free to customize with grains like quinoa or rice for a safe and scrumptious meal!

    Final Thoughts

    Cooking is more than just a necessity; it’s a joyful expression of love and creativity. These Cajun-Style Stuffed Bell Peppers have a way of bringing us together around the table, filling our homes with warmth and laughter. The blend of savory and spicy flavors creates an experience that’s sure to delight everyone, turning an ordinary meal into a memorable occasion. Whether you’re enjoying them on a busy weeknight or serving them at a gathering, these stuffed peppers remind us that food can be both comforting and adventurous. Dive in, and savor every delicious bite!


    Print

    clock clock iconcutlery cutlery iconflag flag iconfolder folder iconinstagram instagram iconpinterest pinterest iconfacebook facebook iconprint print iconsquares squares iconheart heart iconheart solid heart solid icon

    Description

    If you’re anything like me, finding a quick yet delicious meal that pleases the whole family can feel like a delightful challenge. That’s where Cajun-Style Stuffed Bell Peppers come into play. These vibrant gems are brimming with a heavenly blend of flavors—think succulent shrimp, spicy andouille sausage, and comforting rice. They offer a nutritious and satisfying dinner choice that’s perfect for busy weeknights or impressing guests. Not to mention, they are as fun to make as they are to eat! So, let’s dive into this culinary adventure together!


    • 4 large bell peppers (any color), halved and seeds removed
    • Olive oil
    • Salt & pepper
    • 1 tbsp olive oil (for filling)
    • ½ lb andouille sausage, diced
    • ½ lb raw shrimp, peeled, deveined, and chopped
    • ½ yellow onion, finely diced
    • ½ cup celery, finely diced
    • ½ cup red bell pepper, diced
    • 2 cloves garlic, minced
    • 1 can fire-roasted diced tomatoes, drained
    • 1 ½ cups cooked rice (white or brown)
    • 1 tbsp Cajun seasoning
    • ½ tsp paprika
    • Dash hot sauce (optional)
    • Salt & black pepper to taste
    • ½ cup shredded cheese (cheddar, pepper jack, or mozzarella)
    • Fresh parsley or green onions for garnish

    1. Preheat oven to 375°F (190°C). Brush pepper halves with olive oil, season with salt and pepper, and place in a baking dish. Roast for 15 minutes while you make the filling.
    2. In a large skillet, heat olive oil over medium. Cook andouille sausage until browned, then add shrimp and sauté until just pink. Remove both and set aside.
    3. In the same skillet, add onions, celery, and diced bell pepper. Cook 5–7 minutes until softened. Stir in garlic, tomatoes, Cajun seasoning, paprika, hot sauce, salt, and pepper.
    4. Return sausage and shrimp to the pan, add cooked rice, and stir until combined. Adjust seasoning to taste.
    5. Spoon filling into roasted pepper halves. Top with shredded cheese. Bake uncovered for 10–15 more minutes, until cheese is melted and bubbly.
    6. Top with chopped parsley or green onions. Serve hot with cornbread, salad, or a side of creamy grits.

    Notes

    • You can substitute the andouille sausage with other types of sausage if desired.
    • Feel free to add other vegetables to the filling as per your preference.
    • This recipe can be easily doubled for larger gatherings.
    • Store leftovers in the refrigerator for up to 3 days.
    • Prep Time: 15 minutes
    • Cook Time: 35 minutes
    • Category: Main Course
    • Method: Baked
    • Cuisine: Cajun

    Nutrition

    • Serving Size: 1 stuffed pepper
    • Calories: 350
    • Sugar: 3g
    • Sodium: 900mg
    • Fat: 18g
    • Saturated Fat: 7g
    • Unsaturated Fat: 5g
    • Trans Fat: 0g
    • Carbohydrates: 30g
    • Fiber: 2g
    • Protein: 20g
    • Cholesterol: 75mg

    Sharing is caring!

  • Mozzarella & Sun-Dried Tomato Sourdough Bread

    Mozzarella & Sun-Dried Tomato Sourdough Bread


    Introduction to Mozzarella & Sun-Dried Tomato Sourdough Bread

    There’s something magical about the aroma of freshly baked bread wafting through the house. It warms not just the kitchen, but also the heart. I discovered this Mozzarella & Sun-Dried Tomato Sourdough Bread recipe during a hectic week when I craved a comforting dish. Perfect for busy moms, this bread packs a punch of flavor and impresses family and friends alike. Imagine crispy crust, soft cheesy inside, and bursts of tangy sun-dried tomatoes. It’s an adventure that requires patience, but oh, is it worth it for those cozy, delightful moments!

    Why You’ll Love This Mozzarella & Sun-Dried Tomato Sourdough Bread

    This Mozzarella & Sun-Dried Tomato Sourdough Bread is a culinary dream come true! Not only is it simple to make, but the flavors are simply divine. With just a little prep, you’ll have a warm loaf that elevates any meal. Impress your loved ones with every slice. Plus, you can easily customize it, making it a playful addition to your baking adventures—perfect for both beginners and seasoned bakers!

    Ingredients for Mozzarella & Sun-Dried Tomato Sourdough Bread

    Gathering the right ingredients is like assembling a team for a thrilling culinary adventure. For this Mozzarella & Sun-Dried Tomato Sourdough Bread, you’ll need:

    • Sourdough Starter: This bubbly base brings life to your bread, lending it that beloved tang and airy texture.
    • Bread Flour: A high-protein flour essential for developing gluten. It ensures a delightful chew with every bite.
    • Water: This magical liquid hydrates the flour, kicking off the fermentation process and bringing all the ingredients together.
    • Salt: A flavor enhancer that not only boosts taste but also strengthens the dough’s structure.
    • Italian Seasoning: A blend of aromatic herbs that adds an earthy depth to your loaf, making it sing with Mediterranean flair.
    • Mozzarella Cheese: Oh, the gooey goodness! Whether shredded or cubed, this melty delight creates pockets of indulgence.
    • Sun-Dried Tomatoes: These little gems pack a punch of flavor and introduce a tangy sweetness that pairs perfectly with the cheese.

    For precise measurements and a handy printable version of these ingredients, scroll to the bottom of the article. Let’s get ready to bake!

    How to Make Mozzarella & Sun-Dried Tomato Sourdough Bread

    Now that we have our ingredients ready, it’s time to jump into the delightful task of making this Mozzarella & Sun-Dried Tomato Sourdough Bread. Trust me, the process is as rewarding as the outcomes! Let’s go through this step-by-step so you can create a loaf filled with flavor and warmth.

    Step 1: Create the Dough

    Begin by mixing your active sourdough starter, water, and bread flour in a large bowl.

    Stir until you form a shaggy dough that’s somewhat sticky. This lively mixture starts your bread journey, so embrace the mess!

    Step 2: Stretch and Fold Technique

    After 30 minutes of resting, it’s time to work that dough! Dampen your hands to prevent sticking.

    Perform a series of stretch and folds: pull up one side of the dough and fold it over the center. Repeat this for all four sides.

    This technique helps develop gluten. You can add one or two more sets of stretch and folds every 30 minutes for extra lift!

    Step 3: Add Cheesy Goodness

    On your second round of stretch and fold, add in the mozzarella cheese and sun-dried tomatoes.

    Gently fold them into the dough, allowing those luscious flavors to blend in every bite. It’s like gifting your bread a surprise!

    Step 4: Shape the Dough

    Once the dough has risen about 75% and looks beautifully bubbly, it’s shaping time!

    Dump it onto an unfloured surface and gently shape it like an envelope. Pathway to perfection, right?

    Step 5: Refrigeration Time

    Place the elegant dough upside down in a banneton or flour-dusted bowl, then cover it with a tea towel.

    Now, this is the magical part! Let it chill in the refrigerator for 8 hours or even up to 2 days. The longer, the better the flavor develops.

    Step 6: Preheat and Prepare for Baking

    When you’re ready to bake, let’s fire up that oven!

    Preheat the dutch oven to 450℉. This will create a perfect environment for your bread to rise and form a crust that everyone will rave about.

    Step 7: Scoring the Dough

    Carefully flip your dough onto a piece of parchment paper.

    Use a bread lame or sharp knife to score the top. This allows the bread to expand and vent while baking—a stylish touch that makes a difference!

    Step 8: Baking and Cooling

    Now it’s showtime: place the dough inside the preheated dutch oven with the lid on. Bake for 30 minutes.

    Afterward, remove the lid and let it bake for another 12 to 15 minutes until it achieves your desired crust darkness. Let the aroma fill your kitchen!

    Finally, transfer the loaf to a cooling rack and resist the urge to cut it immediately. Cooling for at least 2 hours ensures the best texture.

    But if you can’t wait, go ahead, slice it warm, and relish every cheesy, tangy bite! Enjoy your homemade Mozzarella & Sun-Dried Tomato Sourdough Bread!

    Tips for Success

    • Make sure your sourdough starter is active and bubbly for the best rise.
    • A damp hand during stretching helps prevent sticking.
    • Performing extra stretch & folds can improve the dough’s texture and rise.
    • Keep the dough covered while it rests to retain moisture.
    • Don’t rush cooling—this brings out the best texture and flavor!

    Equipment Needed

    • Large Mixing Bowl: A sturdy bowl to combine your ingredients. A ceramic or glass bowl works great!
    • Banneton Basket: Helps shape your dough. No banneton? A well-floured bowl will do!
    • Dutch Oven: Perfect for baking. No dutch oven? Use a heavy pot with a lid instead!
    • Sharp Knife or Bread Lame: For scoring your dough before baking.
    • Cooling Rack: To let your bread breathe after baking. A simple plate can suffice in a pinch!

    Variations

    • Herb-Infused Bread: Add fresh herbs like basil or rosemary to enhance the Mediterranean flair.
    • Spicy Kick: Mix in crushed red pepper flakes for a spicy twist that adds some heat to your loaf.
    • Gluten-Free Option: Substitute with a gluten-free flour blend to create a gluten-free version of this delightful bread.
    • Other Cheeses: Try swapping mozzarella with feta, cheddar, or goat cheese for diverse flavor profiles.
    • Vegetable Boost: Incorporate chopped olives or roasted peppers for added texture and taste.

    Serving Suggestions for Mozzarella & Sun-Dried Tomato Sourdough Bread

    • Pair with Soup: Serve with a steaming bowl of tomato basil soup for a classic combination.
    • Cheese Platter: Create a delightful cheese board with olives, fruits, and cured meats.
    • Bruschetta Toasts: Slice and toast the bread for bruschetta topped with fresh diced tomatoes and basil.
    • Wine Pairing: Accompany with a light red or a crisp white wine for a lovely evening treat.
    • Presentation: Serve warm on a rustic wooden board for an inviting display.

    FAQs about Mozzarella & Sun-Dried Tomato Sourdough Bread

    Can I use pre-made pizza dough instead of sourdough for this recipe?

    While pre-made pizza dough is tempting, it lacks the unique sour flavor of sourdough. This Mozzarella & Sun-Dried Tomato Sourdough Bread shines because of the starter. So, for the best results, stick to sourdough!

    How can I store my Mozzarella & Sun-Dried Tomato Sourdough Bread?

    To keep your bread fresh, wrap it in a clean kitchen towel and store it at room temperature. Avoid plastic, as it can make the crust soggy. If you want to enjoy it later, freeze slices and toast them when ready!

    What if my dough isn’t rising?

    No worries! Check that your sourdough starter is active and bubbly. Sometimes, a warmer environment can help. Place the dough in a cozy spot, like near the oven, to encourage it to rise.

    Can I make this bread without sun-dried tomatoes?

    Absolutely! Feel free to skip the sun-dried tomatoes or substitute them with ingredients like olives or roasted peppers. The Mozzarella & Sun-Dried Tomato Sourdough Bread is versatile and can adapt to your taste preferences.

    How do I know when my bread is done baking?

    The best way to tell is by the crust color and a hollow sound when tapping the bottom. A golden-brown crust usually indicates perfection! Your Mozzarella & Sun-Dried Tomato Sourdough Bread should invite you in with a delightful aroma too.

    Final Thoughts

    There’s something undeniably joyful about pulling a freshly baked Mozzarella & Sun-Dried Tomato Sourdough Bread from the oven. The anticipation, the scent, and those beautiful golden crusts make every moment worthwhile.

    With each warm slice, you’re gifting your loved ones a piece of your heart and a slice of comfort.

    Whether enjoyed with a hearty soup or simply slathered with butter, this bread invites togetherness around the table.

    So, roll up those sleeves and embark on this baking journey! Trust me, the rewards are flavors that linger in memory and warmth that fills the soul.


    Print

    clock clock iconcutlery cutlery iconflag flag iconfolder folder iconinstagram instagram iconpinterest pinterest iconfacebook facebook iconprint print iconsquares squares iconheart heart iconheart solid heart solid icon

    Description

    This recipe for Mozzarella & Sun-Dried Tomato Sourdough Bread is a delicious and easy way to make flavorful bread at home with a beautiful crust.


    • 50 grams sourdough starter, doubled in size and bubbly
    • 500 grams bread flour
    • 350 grams water
    • 10 grams salt
    • 5 grams Italian Seasoning
    • 125 grams mozzarella cheese, shredded or cubed
    • 90 grams sun-dried julienne-cut tomatoes, chopped

    1. Mix together active starter, water, flour, Italian seasoning and salt until a shaggy dough is formed.
    2. After 30 minutes, get your hand damp and then perform a set of stretch and folds. Cover and let rest. You can either add in 1 or 2 more sets of stretch & folds every 30 minutes or let the dough sit on the counter.
    3. On the second stretch and fold, add in the mozzarella cheese and chopped sun-dried tomatoes.
    4. Once the dough has risen 75% and is domed on top with bubbles on the sides, dump the dough onto an unfloured surface and shape it like an envelope.
    5. Place the shaped dough upside down in a banneton basket or a floured bowl with a tea towel and cover to keep moisture in.
    6. Refrigerate the dough for about 8+ hours or up to 2 days.
    7. Preheat the dutch oven in the oven at 450℉.
    8. Flip dough onto parchment paper and score it with a bread lame or sharp knife.
    9. Bake bread for 30 minutes with the lid on, then remove the lid and bake for another 12-15 minutes until desired crust darkness is achieved.
    10. Let the bread cool on a cooling rack for at least 2 hours before cutting, or slice while warm to enjoy.

    Notes

    • Performing additional stretch & folds will help the loaf rise more in the oven.
    • Baking time can be adjusted based on your preference for crust darkness.
    • Prep Time: 30 minutes
    • Cook Time: 45 minutes
    • Category: Breads
    • Method: Baking
    • Cuisine: Italian

    Nutrition

    • Serving Size: 1 slice
    • Calories: 210
    • Sugar: 1g
    • Sodium: 300mg
    • Fat: 5g
    • Saturated Fat: 2g
    • Unsaturated Fat: 2g
    • Trans Fat: 0g
    • Carbohydrates: 38g
    • Fiber: 2g
    • Protein: 7g
    • Cholesterol: 15mg

    Sharing is caring!

  • Frozen Greek Yogurt Peanut Butter Bites

    Frozen Greek Yogurt Peanut Butter Bites


    Introduction to Frozen Greek Yogurt Peanut Butter Bites

    As a busy mom, I know how challenging it can be to find a quick and satisfying snack. That’s where these Frozen Greek Yogurt Peanut Butter Bites come to the rescue! Packed with protein and flavor, they’re perfect for those moments when your sweet tooth strikes, yet you want something healthy. Just a few simple ingredients come together to create a delightful treat that even your pickiest eaters will love. So whether you need a snack on the go or a quick pick-me-up, these bites are here to brighten your day!

    Why You’ll Love This Frozen Greek Yogurt Peanut Butter Bites

    These Frozen Greek Yogurt Peanut Butter Bites are the ultimate snack solution for busy lives. They’re quick to whip up in just 10 minutes, yet they bring a delightful blend of flavors that will keep you coming back for more. Plus, they are customizable! Whether you prefer creamy or crunchy peanut butter, or add-ins like nuts or chocolate, you can cater to your family’s tastes easily. Enjoy guilt-free snacking!

    Ingredients for Frozen Greek Yogurt Peanut Butter Bites

    Gathering the right ingredients for these Frozen Greek Yogurt Peanut Butter Bites is half the fun! Here’s what you’ll need:

    • Greek yogurt: Choose plain or vanilla for a creamy base packed with protein.
    • Peanut butter: Use creamy for a smooth texture or crunchy for added fun! Make sure it’s at room temperature.
    • Honey or maple syrup: Sweeten to your taste. Honey adds a lovely floral note, while maple syrup brings a unique flavor.
    • Vanilla extract: Just a dash enhances all the delicious flavors.
    • Mini chocolate chips: These tiny morsels make each bite a little indulgent—perfect for your sweet cravings.
    • Cinnamon (optional): A pinch adds warmth and a comforting spice.
    • Chia seeds or ground flaxseed (optional): Added nutrients and a boost in fiber to power through your day.
    • Chopped nuts (optional): Almonds, walnuts, or pecans add crunch and extra protein!

    For precise ingredient measurements, don’t forget to check the printable recipe at the bottom of this article.

    How to Make Frozen Greek Yogurt Peanut Butter Bites

    Step 1: Mix Base Ingredients

    Start by grabbing a mixing bowl. Add your Greek yogurt and peanut butter to it. A big scoop of honey or maple syrup comes next, followed by a splash of vanilla extract. Using a spatula or a whisk, mix everything until it’s smooth and creamy. It should feel like a warm hug for your taste buds—rich, velvety, and oh so inviting!

    Step 2: Add Optional Ingredients

    Once your base is well mixed, it’s time for some fun! Fold in the mini chocolate chips gently. If you’re feeling adventurous, sprinkle in cinnamon, chia seeds, or chopped nuts at this stage. Each addition brings a unique twist to your Frozen Greek Yogurt Peanut Butter Bites. Let your creativity flow; you can mix it up every time!

    Step 3: Prepare Baking Sheet

    Next, line a baking sheet with parchment paper. This step prevents sticking, making your clean-up effortless. Plus, it’s crucial for the freezing process. Just imagine the frustration of scraping frozen remnants off metal! Parchment paper is a lifesaver in those moments.

    Step 4: Drop Mixture onto Baking Sheet

    Using a spoon or a cookie scoop, drop dollops of your creamy mixture onto the prepared baking sheet. Space them apart a bit since they’ll expand slightly as they freeze. Don’t worry about making them perfect—it’s the taste that counts! With each scoop, you’re one step closer to enjoying these delightful bites.

    Step 5: Freeze Until Solid

    Now comes the hard part: waiting! Place your baking sheet in the freezer for at least two hours. This is when the magic happens. The bites will transform into a frosty treat, ready to satisfy those cravings. Just think about the refreshing taste you’ll enjoy later; it makes the time fly by!

    Step 6: Store for Enjoyment

    Once frozen solid, transfer those delightful bites into an airtight container. This keeps them fresh and prevents freezer burn, allowing you to snack on them anytime. Store them in the freezer, and you’ll always have a quick and healthy treat within reach. Trust me; they won’t last long!

    Tips for Success

    • Make sure your peanut butter is at room temperature to blend smoothly.
    • For extra sweetness, taste the mixture before freezing and adjust honey or maple syrup as needed.
    • Use a cookie scoop for evenly-sized bites; it makes for beautiful treats!
    • Consider freezing in small batches, so you can enjoy a variety of flavors.
    • Label your container with the date for freshness tracking.

    Equipment Needed

    • Mixing bowl: A medium bowl works best, but any bowl will do!
    • Spatula or whisk: Use a spatula for mixing; a whisk can add air for a fluffier texture.
    • Baking sheet: Any flat surface will work, but a rimmed baking sheet prevents spills.
    • Parchment paper: You can also use silicone baking mats for easy cleanup!
    • Spoon or cookie scoop: Either will help you drop the mixture with ease.

    Variations for Frozen Greek Yogurt Peanut Butter Bites

    • Nut Butters: Switch peanut butter for almond, cashew, or sunflower seed butter for different flavors!
    • Fruit Add-Ins: Add chopped strawberries, bananas, or blueberries for a fruity twist and added nutrition.
    • Chocolate Variations: Experiment with different types of chocolate—try white chocolate chips or dark chocolate chunks.
    • Protein Boost: Mix in protein powder to up the nutrition factor and keep you feeling fuller longer.
    • Dairy-Free Option: Substitute Greek yogurt with coconut yogurt or any plant-based yogurt to make it dairy-free.

    Serving Suggestions for Frozen Greek Yogurt Peanut Butter Bites

    • Serve with a drizzle of honey or melted chocolate for a rich touch.
    • Pair with fresh fruit like sliced bananas or strawberries for a colorful plate.
    • Enjoy alongside a glass of cold almond milk or a refreshing smoothie.
    • Present in fun cupcake liners for a delightful party snack.
    • Add a sprinkle of crushed nuts on top for extra crunch and flair!

    FAQs about Frozen Greek Yogurt Peanut Butter Bites

    Can I use flavored Greek yogurt for these bites?

    Absolutely! Flavored Greek yogurt can add a fun twist to your Frozen Greek Yogurt Peanut Butter Bites. Just remember, it might increase the sugar content, so adjust the honey or maple syrup accordingly.

    How long do these bites last in the freezer?

    When stored correctly in an airtight container, these bites can last up to two months in the freezer. But honestly, they’ll probably be gone long before then!

    Can I make these bites without peanut butter?

    Of course! Feel free to swap peanut butter for any nut or seed butter you prefer. Almond, cashew, or even sunflower seed butter would work beautifully in these Frozen Greek Yogurt Peanut Butter Bites.

    Are these bites suitable for kids?

    Definitely! They’re a great, healthy snack option for kids. They’ll enjoy the sweet taste while benefiting from the protein and nutrients in Greek yogurt and peanut butter.

    Can I change the sweetener in this recipe?

    Yes, you can! If honey or maple syrup isn’t your thing, other sweeteners like agave syrup or even stevia can be used. Just adjust to taste to keep your Frozen Greek Yogurt Peanut Butter Bites delightful!

    Final Thoughts

    Making Frozen Greek Yogurt Peanut Butter Bites has become one of my favorite kitchen adventures. The joy of seeing my family’s faces light up when they take their first bite is priceless. These little gems are not only a tasty treat but also a nourishing choice that fits perfectly into our hectic lives. Plus, they offer endless opportunities for customization, ensuring no two batches are ever the same! With just a few ingredients and minimal effort, I’ve found a simple way to put smiles on faces—one sweet, creamy bite at a time. Enjoy every moment of this delicious snacking experience!


    Print

    clock clock iconcutlery cutlery iconflag flag iconfolder folder iconinstagram instagram iconpinterest pinterest iconfacebook facebook iconprint print iconsquares squares iconheart heart iconheart solid heart solid icon

    Description

    A quick and delicious snack made with Greek yogurt and peanut butter, perfect for satisfying your sweet tooth.


    • 1 cup Greek yogurt (plain or vanilla)
    • 1/3 cup peanut butter (creamy or crunchy, at room temperature)
    • 2 tablespoons honey or maple syrup (adjust to taste)
    • 1/2 teaspoon vanilla extract
    • 1/3 cup mini chocolate chips (or chopped dark chocolate)
    • 1/4 teaspoon cinnamon (optional)
    • 1 tablespoon chia seeds or ground flaxseed (optional)
    • 2 tablespoons chopped nuts (almonds, walnuts, or pecans, optional)

    1. In a mixing bowl, combine Greek yogurt, peanut butter, honey or maple syrup, and vanilla extract. Mix until smooth.
    2. Fold in mini chocolate chips and any optional add-ins like cinnamon, chia seeds, or chopped nuts.
    3. Line a baking sheet with parchment paper.
    4. Using a spoon or cookie scoop, drop dollops of the mixture onto the prepared baking sheet.
    5. Freeze for at least 2 hours or until solid.
    6. Once frozen, transfer the bites to an airtight container and store in the freezer.

    Notes

    • Adjust the sweetness by adding more or less honey/maple syrup.
    • Feel free to customize with your favorite nuts or seeds.
    • These bites can be stored in the freezer for a quick snack anytime.
    • Prep Time: 10 minutes
    • Cook Time: 0 minutes
    • Category: Snack
    • Method: Freezing
    • Cuisine: American

    Nutrition

    • Serving Size: 1 bite
    • Calories: 80
    • Sugar: 4g
    • Sodium: 50mg
    • Fat: 4g
    • Saturated Fat: 1g
    • Unsaturated Fat: 3g
    • Trans Fat: 0g
    • Carbohydrates: 10g
    • Fiber: 1g
    • Protein: 3g
    • Cholesterol: 5mg

    Sharing is caring!

  • Buttery Raspberry Crumble Cookies

    Buttery Raspberry Crumble Cookies


    Introduction to Buttery Raspberry Crumble Cookies

    There’s something magical about baking that transforms a regular day into a cozy occasion. The aroma of freshly baked goodies fills the air, wrapping you in a comforting embrace.
    Buttery Raspberry Crumble Cookies, with their delightful raspberry jam and crumbly topping, are the perfect treat for creating sweet moments with family and friends.
    As a busy mom myself, I find these cookies are a breeze to whip up, perfect for those hectic days when you want to elevate your snack game.
    Trust me, these cookies are not just delicious; they’re a little slice of joy in your day!

    Why You’ll Love This Buttery Raspberry Crumble Cookies

    These Buttery Raspberry Crumble Cookies are a dream come true for anyone needing a quick yet impressive treat.

    With just a handful of ingredients, they come together effortlessly.

    The sweet and tart raspberry jam pairs beautifully with the buttery, crumbly topping, making each bite a little adventure.

    Ideal for family gatherings or a delightful afternoon snack, you’ll find them disappearing faster than you can say “yum!”

    Ingredients for Buttery Raspberry Crumble Cookies

    When it comes to baking these buttery delights, each ingredient plays a star role.

    You’ll need unsalted butter, which brings that rich, creamy goodness we all adore.

    Granulated sugar helps to sweeten while powdered sugar adds a lovely melt-in-your-mouth element.

    Vanilla and almond extracts boost the flavor, giving your cookies that irresistible aroma.

    All-purpose flour forms the dough’s backbone, while a sprinkle of kosher salt enhances every bite.

    For that fruity love, use seedless raspberry jam, but feel free to swap it for your favorite fruit varieties!

    For detailed measurements, just scroll down to the end of the article.

    How to Make Buttery Raspberry Crumble Cookies

    Making Buttery Raspberry Crumble Cookies is like embarking on a delightful adventure in your kitchen. With each step, you’ll find joy and satisfaction as you create these irresistible treats. Let’s dive into the process, where I’ll guide you through the steps, ensuring your cookies turn out beautifully every time.

    Step 1: Preheat the Oven and Prepare the Tin

    First things first, preheat your oven to 350°F (175°C). This step is crucial for even baking, ensuring those cookies rise just right. While the oven warms, grease a jumbo muffin tin with butter and flour. If you’re in a rush, non-stick cooking spray comes to the rescue. A well-prepared tin prevents any cookie mishaps later, so don’t skip this step!

    Step 2: Mix the Buttery Base

    Now, grab a large mixing bowl and get ready to cream your butter. I love using softened unsalted butter for its rich flavor. Beat it together with granulated sugar and powdered sugar for about 1-2 minutes until it’s light and fluffy. This fluffy texture is crucial; it allows air to expand, making your cookies soft and tender. Trust me, you want this step to be just right!

    Step 3: Flavor the Dough

    Next, it’s time to enhance our buttery base. Mix in the vanilla and almond extracts. They add an aromatic touch that makes your cookies fragrant and unforgettable. I mean, who doesn’t love a kitchen that smells divine? Both extracts work harmoniously together, enhancing the overall flavor profile of our cookies with each delicious bite.

    Step 4: Combine Dry Ingredients

    Now, grab your flour and kosher salt. Gradually add them to the mixture while mixing gently. Here’s where your dough starts to come alive! But remember—don’t overmix. The goal is to have a crumbly but cohesive dough that holds together when pressed. Overmixing can lead to tough cookies, so mix until just combined, then stop.

    Step 5: Shape the Cookies in the Tin

    It’s shaping time! Scoop about 1/4 cup of dough into each muffin tin well. Using your fingers, gently press the dough down and up the sides slightly. You’re creating a cozy little well for that luscious raspberry jam, so make it spacious. This step is like giving your cookies a comfy home before baking!

    Step 6: Add Raspberry Jam

    Now comes the fun part—adding the raspberry jam! Spoon in about 1/2 to 1 tablespoon into each well. I love using seedless raspberry jam as it gives a smoother texture that spreads beautifully without any pesky seeds. This is where the flavor explosion happens—sweet, tangy, and oh-so-delicious.

    Step 7: Top with Crumble

    To finish these cookies, sprinkle a heaping tablespoon of the remaining dough over the raspberry jam. This crumble topping is the crowning glory, offering that delightful contrast in texture we crave. It’s like the cozy blanket of crumbles that hugs the jam underneath.

    Step 8: Baking to Perfection

    Slide the muffin tin into your preheated oven and bake for 18-22 minutes. You’ll know they’re done when the edges turn lightly golden and the tops look set. Keep an eye on them during the last few minutes; you don’t want to overbake!

    Step 9: Cooling and Removing

    Once baked to perfection, let the cookies cool completely in the tin. This is hard, but trust me, it’s key for avoiding breakage. After they’ve cooled, run a knife around the edges of each cookie to help release them. Carefully wiggle them out without breaking. Voila! You have a platter of beautiful Buttery Raspberry Crumble Cookies ready to be enjoyed!

    Tips for Success

    Baking Buttery Raspberry Crumble Cookies can be a delightful experience! Here are some quick tips to help ensure your success:

    • Store cookies in an airtight container for up to a week to keep them fresh.
    • For a sweeter treat, add more raspberry jam according to your taste.
    • Substitute other fruit jams like apricot or strawberry for variety.
    • Feel free to add nuts for extra crunch and flavor!

    Equipment Needed

    Before diving into those delicious cookies, make sure you have the right tools handy. Here’s a quick list of must-have equipment for making Buttery Raspberry Crumble Cookies:

    • Mixing bowls (different sizes are helpful)
    • Jumbo muffin tin or regular muffin tin
    • Measuring cups and spoons
    • Spatula for mixing
    • Cooling rack

    Variations on Buttery Raspberry Crumble Cookies

    One of the best parts about baking Buttery Raspberry Crumble Cookies is how easily you can mix things up! Here are some delicious variations that will make your cookie adventures even more exciting:

    • Use different fruit jams like blueberry, peach, or apricot for a fruity twist.
    • Add chopped nuts such as walnuts or pecans for extra crunch in each bite.
    • Incorporate a sprinkle of cinnamon or nutmeg into the dough for a warm spice hint.
    • Try using chocolate chip pieces mixed into the dough for a decadent chocolatey touch.
    • Drizzle melted chocolate over cooled cookies for an elegant finish.

    Serving Suggestions

    These Buttery Raspberry Crumble Cookies are perfect for any occasion, and here are some delightful ways to serve them:

    • Pair them with a cup of hot tea or coffee for a cozy afternoon treat.
    • Serve with a scoop of vanilla ice cream for a scrumptious dessert.
    • Present them on a decorative platter at gatherings for an elegant touch.
    • Dust with powdered sugar before serving for an added flair!

    FAQs about Buttery Raspberry Crumble Cookies

    I often get questions about baking these delightful Buttery Raspberry Crumble Cookies. Here are some common queries and my insights to help you out!

    Can I use frozen raspberries instead of jam?
    While fresh or seedless raspberry jam gives the best flavor and texture, you can use thawed frozen raspberries. Just be careful with the extra moisture; you may need to reduce the amount of jam to keep the cookies from becoming too soggy.

    How can I make these cookies gluten-free?
    To make Buttery Raspberry Crumble Cookies gluten-free, simply substitute all-purpose flour with a 1:1 gluten-free baking blend. Ensure that your other ingredients are also gluten-free.

    What can I use if I don’t have almond extract?
    If almond extract isn’t on hand, don’t worry! You can use additional vanilla extract or even a splash of coconut extract for a unique flavor. The aroma in your kitchen will still be inviting!

    How should I store leftover cookies?
    To keep your cookies fresh, store them in an airtight container at room temperature for up to a week. If you want them to last longer, you can refrigerate or freeze them. Just be sure to separate layers with parchment paper to avoid sticking!

    Can I make the dough ahead of time?
    Absolutely! You can prepare the dough in advance and refrigerate it for up to two days. When ready to bake, just let it sit at room temperature for a few minutes before scooping into the muffin tin.

    Final Thoughts

    Baking Buttery Raspberry Crumble Cookies is more than just a kitchen task; it’s a delightful way to create lasting memories.

    With their simple preparation and irresistible flavor, these cookies invite warmth into your home, perfect for family gatherings or cozy evenings.

    Each bite is a reminder of the joy that comes from sharing moments with loved ones around the table.

    So gather your ingredients, unleash your creativity, and enjoy the process!

    I encourage you to share your baking experiences, whether they are triumphs or delightful disasters. Happy baking!


    Print

    clock clock iconcutlery cutlery iconflag flag iconfolder folder iconinstagram instagram iconpinterest pinterest iconfacebook facebook iconprint print iconsquares squares iconheart heart iconheart solid heart solid icon

    Description

    Delicious buttery cookies filled with raspberry jam and topped with a crumbly mixture.


    • 1 cup unsalted butter, softened
    • 1/4 cup granulated sugar
    • 1/3 cup powdered sugar
    • 1 teaspoon vanilla extract
    • 1 teaspoon almond extract
    • 2 1/4 cups all-purpose flour
    • 1/4 teaspoon kosher salt
    • 1/2 cup seedless raspberry jam

    1. Preheat your oven to 350°F (175°C). Grease a jumbo muffin tin with butter and flour, or use non-stick cooking spray to prevent sticking.
    2. In a large mixing bowl, beat the butter, granulated sugar, and powdered sugar together until light and fluffy (about 1-2 minutes).
    3. Mix in the vanilla extract and almond extract until evenly distributed.
    4. Gradually add the flour and salt, mixing just until combined. The dough should be crumbly but hold together when pressed. Avoid overmixing to prevent dense cookies.
    5. Scoop about 1/4 cup of dough into each well of the muffin tin. Gently press the dough evenly into the bottom and slightly up the sides to create a shallow well in the center.
    6. Spoon 1/2 to 1 tablespoon of raspberry jam into the well of each cookie.
    7. Sprinkle a heaping tablespoon of the remaining dough over the jam for a crumbly topping.
    8. Bake for 18-22 minutes, or until the edges are lightly golden and the tops are set.
    9. Let the cookies cool completely in the pan before attempting to remove them.
    10. Once cooled, run a knife around the edges of each cookie to help release them from the muffin tin. Serve as they are, or dust with powdered sugar for an elegant touch.

    Notes

    • For a sweeter option, increase the amount of raspberry jam used.
    • These cookies can be stored in an airtight container for up to a week.
    • Feel free to substitute other fruit jams if desired.
    • Prep Time: 20 minutes
    • Cook Time: 22 minutes
    • Category: Dessert
    • Method: Baking
    • Cuisine: American

    Nutrition

    • Serving Size: 1 cookie
    • Calories: 180
    • Sugar: 8g
    • Sodium: 90mg
    • Fat: 8g
    • Saturated Fat: 5g
    • Unsaturated Fat: 2g
    • Trans Fat: 0g
    • Carbohydrates: 24g
    • Fiber: 1g
    • Protein: 2g
    • Cholesterol: 35mg

    Sharing is caring!

  • No-Bake Oreo Cheesecake Cups

    No-Bake Oreo Cheesecake Cups


    Introduction to No-Bake Oreo Cheesecake Cups

    If you’re anything like me, life can sometimes feel like a whirlwind. Between work, family, and just trying to keep up with everything, who has time to bake? That’s where these No-Bake Oreo Cheesecake Cups come in! They’re the perfect quick solution for busy days, packing a delightful punch of flavor without the fuss of an oven. Whether you’re hosting a last-minute gathering or craving something sweet after a long day, these creamy, dreamy cups are sure to impress your loved ones. Let’s dive into making this simple dessert that’s guaranteed to bring smiles all around!

    Why You’ll Love This No-Bake Oreo Cheesecake Cups

    These No-Bake Oreo Cheesecake Cups are a lifesaver for busy moms and professionals alike! They come together in just 20 minutes, making them a quick and easy dessert option. You don’t need fancy baking skills to create a stunning treat. Plus, the rich, creamy cheesecake paired with crunchy Oreo crumbs delivers a taste sensation that feels indulgent without the effort.

    Ingredients for No-Bake Oreo Cheesecake Cups

    Let’s gather up some simple yet delightful ingredients for these No-Bake Oreo Cheesecake Cups. You’ll only need a few essentials, most of which you probably have in your kitchen already. Here’s what to whip out:

    • Cream cheese: This is the star ingredient. Make sure it’s softened so it blends easily into a smooth filling.
    • Whipped topping: You can use Cool Whip or any store-bought whipped topping. It adds fluffiness to the cheesecake that’s irresistible.
    • Powdered sugar: This sweet magic ingredient gives the cheesecake that familiar sweetness without the graininess of granulated sugar.
    • Vanilla extract: A splash of vanilla elevates the flavors, creating that decadent taste everyone loves. It’s like a warm hug in each bite!
    • Oreo cookies: The backbone of this dessert! Crush some for the base and keep a few aside for a crunchy topping—because who can resist more Oreos?
    • Optional ingredients: Feel free to try different cookie varieties! Chocolate or peanut butter alternatives can completely change the game in a delicious way.

    For exact quantities and a printable version of the recipe, check the bottom of the article. With these ingredients, you’re just a few steps away from pure bliss!

    How to Make No-Bake Oreo Cheesecake Cups

    Now that we have our ingredients lined up, it’s time to get our hands a little messy and create these No-Bake Oreo Cheesecake Cups. Just follow these simple steps, and I promise you’ll be enjoying your delicious treat in no time!

    Step 1: Crushing the Oreos

    Grab a sealed plastic bag and toss in the Oreo cookies—about 24 to 26 should do the trick. Then, take a rolling pin or a sturdy wooden spoon and start crushing. You want fine crumbs for the best texture. Just imagine smashing away your stresses from the day; it’s quite therapeutic!

    Step 2: Preparing the Oreo Base

    Now, take those delightful crushed Oreos and spoon around 1 ½ to 2 tablespoons into the bottom of each dessert cup. Choose cups that hold between ¾ and 1 cup—perfect for just the right portion! Pat them down gently to create a base that’s ready for that creamy cheesecake filling.

    Step 3: Making the Cheesecake Filling

    In a mixing bowl, combine the softened cream cheese and powdered sugar. I find that using an electric mixer works wonders here, making everything smooth and creamy. Add in the vanilla extract and mix until it’s well blended. This filling is already smelling delightful!

    Step 4: Combining Ingredients

    Gently fold the whipped topping into the cream cheese mixture. Take your time with this step, as you want to retain that light, airy texture. Once the whipped topping is fully folded in, drop in the remaining crushed Oreos and fold them in too. Deliciousness is just around the corner!

    Step 5: Assembling the Cups

    Now comes the fun part! Evenly divide your cheesecake filling among the prepared cups. Press it gently onto the Oreo base to ensure it holds together beautifully. Aim for a nice layer that sits proudly above those crumbled cookies.

    Step 6: Chilling to Set

    Finally, pop those cups into the refrigerator! Let them chill for at least an hour so they can set perfectly. This wait will feel like the longest hour of your life, but trust me—it will be worth it. Once they’re ready, finish off with a dollop of whipped cream and a sprinkle of crushed Oreos before serving!

    Tips for Success

    • Ensure your cream cheese is at room temperature for a silky-smooth filling.
    • Don’t rush the mixing! Take your time folding in the whipped topping to maintain fluffiness.
    • For extra flavor, try adding a dash of almond extract along with the vanilla.
    • Use a piping bag to make filling the cups easier and more fun!
    • Chill overnight for best results if making ahead of time.

    Equipment Needed

    • Mixing bowl: A large bowl works best, but any bowl can do the trick.
    • Electric mixer: Use a hand mixer for ease, or whisk by hand if preferred.
    • Sealed plastic bag: A zip-top bag is perfect for crushing Oreos; alternatively, use a food processor.
    • Dessert cups: Small cups or mason jars add a fun touch to your serving!
    • Spoon: A sturdy spoon is essential for measuring and mixing.

    Variations

    • Chocolate Lover: Use chocolate wafer cookies instead of Oreos for a rich chocolate flavor that pairs beautifully with the cheesecake.
    • Peanut Butter Bliss: Swirl in some peanut butter to the cheesecake filling for a nutty twist that adds depth and richness.
    • Fruit Infusion: Incorporate fresh berries like strawberries, raspberries, or blueberries into the filling or as a topping for a fresh burst of flavor.
    • Healthier Option: Substitute the whipped topping with Greek yogurt for a lighter version that still packs a creamy punch.
    • Gluten-Free Delight: Switch to gluten-free Oreo cookies to make this dessert suitable for those with gluten sensitivities.

    Serving Suggestions

    • Pair these No-Bake Oreo Cheesecake Cups with a hot cup of coffee or a glass of cold milk for a delightful combo.
    • Add fresh fruit, like strawberries or raspberries, for a burst of color and flavor on top!
    • Consider garnishing with chocolate shavings or a drizzle of chocolate sauce for extra elegance.
    • Serve in cute mason jars for a rustic touch that makes them even more inviting.

    FAQs about No-Bake Oreo Cheesecake Cups

    You might have a few questions about these delightful No-Bake Oreo Cheesecake Cups. Let’s tackle some common queries to make your dessert-making experience even smoother!

    Can I make No-Bake Oreo Cheesecake Cups in advance?

    Absolutely! These cups are perfect for prepping a day ahead. Just chill them overnight, and they’ll be ready to impress when you are!

    What can I use instead of whipped topping?

    If you’re looking for a healthier alternative, Greek yogurt works wonders! It still creates that creamy texture while cutting down on calories.

    How do I store leftovers?

    Store any leftover No-Bake Oreo Cheesecake Cups in the refrigerator. They’ll stay fresh for about 2 to 3 days, though I doubt they’ll last that long!

    Can I freeze these cheesecake cups?

    Freezing is an option! Just be aware that the whipped topping may change texture slightly once thawed. It’s best to enjoy them fresh!

    What else can I add to customize my cheesecake cups?

    Get creative! You can mix in some chopped nuts, chocolate chips, or even a splash of your favorite liqueur to elevate the flavor even more. The possibilities are endless!

    Final Thoughts

    Making No-Bake Oreo Cheesecake Cups reminds me that simplicity can lead to remarkable joy. This no-fuss recipe invites even the busiest of us to step into the kitchen and whip up something that tastes as good as it looks. Each bite is a creamy explosion of flavor, topped off with that classic Oreo crunch that brings smiles to faces young and old. Whether you’re celebrating a special occasion or treating yourself after a hectic day, these cups offer a delightful burst of happiness. Try them out, and let the sweet magic unfold in your home!


    Print

    clock clock iconcutlery cutlery iconflag flag iconfolder folder iconinstagram instagram iconpinterest pinterest iconfacebook facebook iconprint print iconsquares squares iconheart heart iconheart solid heart solid icon

    Description

    A delicious and easy-to-make No-Bake Oreo Cheesecake Cups that are perfect for any occasion.


    • 8 ounces cream cheese, softened
    • 8 ounces whipped topping (such as Cool Whip)
    • 2/3 cup powdered sugar
    • 1 teaspoon vanilla extract
    • 24 to 26 Oreo cookies, plus more for topping

    1. Place Oreo cookies in a sealed plastic bag and use a rolling pin or sturdy wooden spoon to crush them into fine crumbs.
    2. Spoon 1 1/2 to 2 tablespoons of crushed Oreos into the bottom of each of 6 small dessert dishes (cup capacity between 3/4 and 1 cup). Set aside.
    3. In a mixing bowl, combine softened cream cheese and powdered sugar. Beat with a hand or stand mixer until smooth. Add vanilla extract and blend to fully incorporate.
    4. Gently fold whipped topping into the cream cheese mixture until well combined.
    5. Fold the remaining crushed Oreos into the cheesecake filling to distribute evenly.
    6. Evenly divide the cheesecake mixture among the prepared dishes, pressing it gently onto the Oreo base. Refrigerate for at least 1 hour or until set.
    7. Before serving, top each cup with additional whipped cream and a sprinkle of crushed Oreos.

    Notes

    • This recipe can be made a day in advance for convenience.
    • Try using different types of cookies for a unique flavor.
    • Prep Time: 20 minutes
    • Cook Time: 0 minutes
    • Category: Dessert
    • Method: No-Bake
    • Cuisine: American

    Nutrition

    • Serving Size: 1 cup
    • Calories: 310
    • Sugar: 22g
    • Sodium: 200mg
    • Fat: 20g
    • Saturated Fat: 10g
    • Unsaturated Fat: 9g
    • Trans Fat: 0g
    • Carbohydrates: 30g
    • Fiber: 1g
    • Protein: 3g
    • Cholesterol: 30mg

    Sharing is caring!