Author: IHAAL Team

  • Creamy Buffalo Chicken Stuffed Shells

    Creamy Buffalo Chicken Stuffed Shells


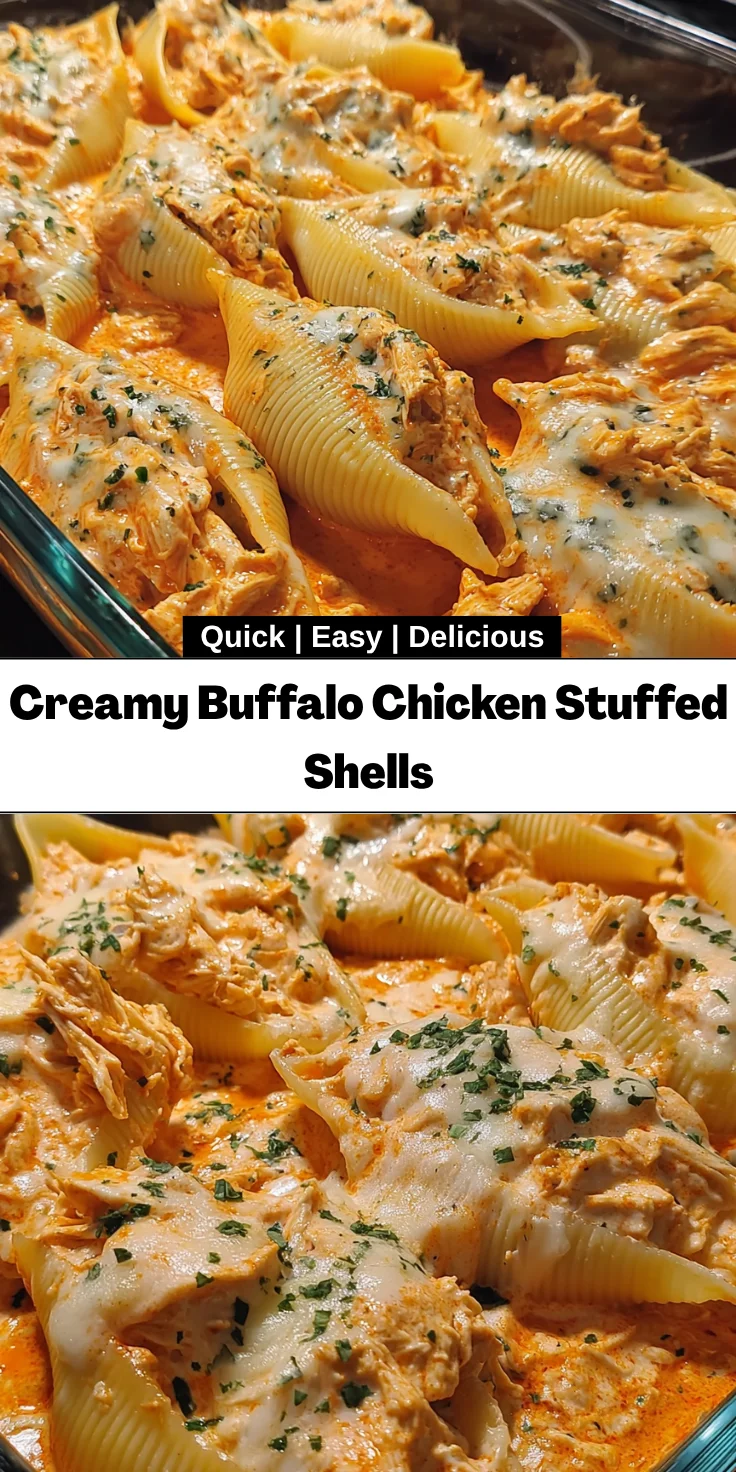
    Introduction to Creamy Buffalo Chicken Stuffed Shells

    Every busy mom knows that the kitchen can become a battleground of time and picky eaters. But fear not! Creamy Buffalo Chicken Stuffed Shells are here to save the day. This dish captures the indulgent flavors of buffalo chicken, wrapped in tender pasta shells smothered in creaminess that’s simply irresistible. Whether it’s a weeknight dinner or a gathering with friends, these stuffed shells promise to impress without keeping you chained to the stove. Plus, they’re quick to whip up, making them the perfect game-changer for your family’s dinner routine.

    Why You’ll Love This Creamy Buffalo Chicken Stuffed Shells

    When life gets hectic, there’s nothing better than a meal that’s quick, easy, and full of flavor. Creamy Buffalo Chicken Stuffed Shells tick all the boxes! The heavenly combination of spicy buffalo and creamy cheese ensures each bite is a delight. Plus, these shells are a total crowd-pleaser, making them perfect for family dinners or gatherings. With minimal prep and a bubbly cheese topping, they bring comfort to your table without fuss.

    Ingredients for Creamy Buffalo Chicken Stuffed Shells

    Gathering the right ingredients for Creamy Buffalo Chicken Stuffed Shells sets the stage for a beautifully comforting meal. Here’s what you’ll need:

    • Jumbo Pasta Shells: These large shells are perfect for holding the delicious filling and add a fun twist to your meal.
    • Cooked Chicken: Shredded chicken is the heart of this dish. Leftover rotisserie chicken works wonders if you’re short on time.
    • Buffalo Sauce: Adds that signature spicy kick. Feel free to adjust the amount to fit your family’s heat tolerance.
    • Ricotta Cheese: This creamy cheese provides a luscious texture that balances the spiciness beautifully.
    • Mozzarella Cheese: Shredded mozzarella adds gooeyness. Who doesn’t love that bubbly cheese layer on top?
    • Cream Cheese: Softened cream cheese enhances the creaminess of the filling, making it extra decadent.
    • Garlic Powder: A dash of garlic powder elevates the flavors. It’s a shortcut for that savory goodness.
    • Ranch Dressing: This classic dressing tempers the heat of the buffalo sauce and adds a hint of herby flavor.
    • Green Onions: Chopped green onions bring a fresh crunch and a pop of color to your dish.

    Ready to dive into this deliciousness? You’ll find the exact measurements at the bottom of the article, along with an option to print the recipe for your convenience!

    How to Make Creamy Buffalo Chicken Stuffed Shells

    Making Creamy Buffalo Chicken Stuffed Shells is a breeze! I swear, it’s like a culinary hug in a pasta shell. Follow these uncomplicated steps, and you’ll have a comforting dish ready in no time.

    Step 1: Prepare Your Filling

    Start by combining your shredded chicken and buffalo sauce in a large mixing bowl. The chicken should be tender and flavorful, soaking up all that spiciness. Add the ricotta cheese, mozzarella cheese, and softened cream cheese. You want to get that creamy goodness flowing!

    Now, sprinkle in the garlic powder and fold in the ranch dressing. It balances out that zing with a cool creaminess. Stir everything together until it’s beautifully combined—trust me, this filling is going to be the star of the show!

    Step 2: Cook the Pasta

    While you’re busy with the filling, bring a large pot of salted water to a boil. Cook the jumbo pasta shells according to the package instructions. Remember, not to overcook them! You want them al dente, so they hold up when stuffed. After draining, let them cool for a few minutes, making them easier to handle.

    Step 3: Stuff the Shells

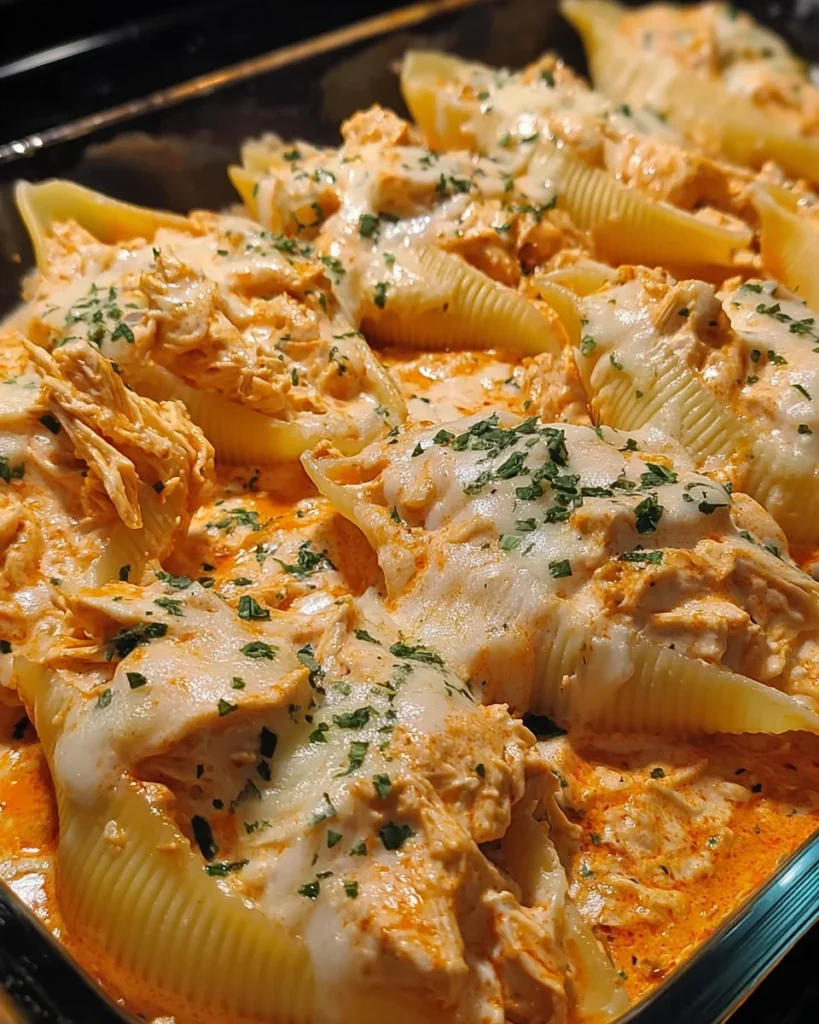
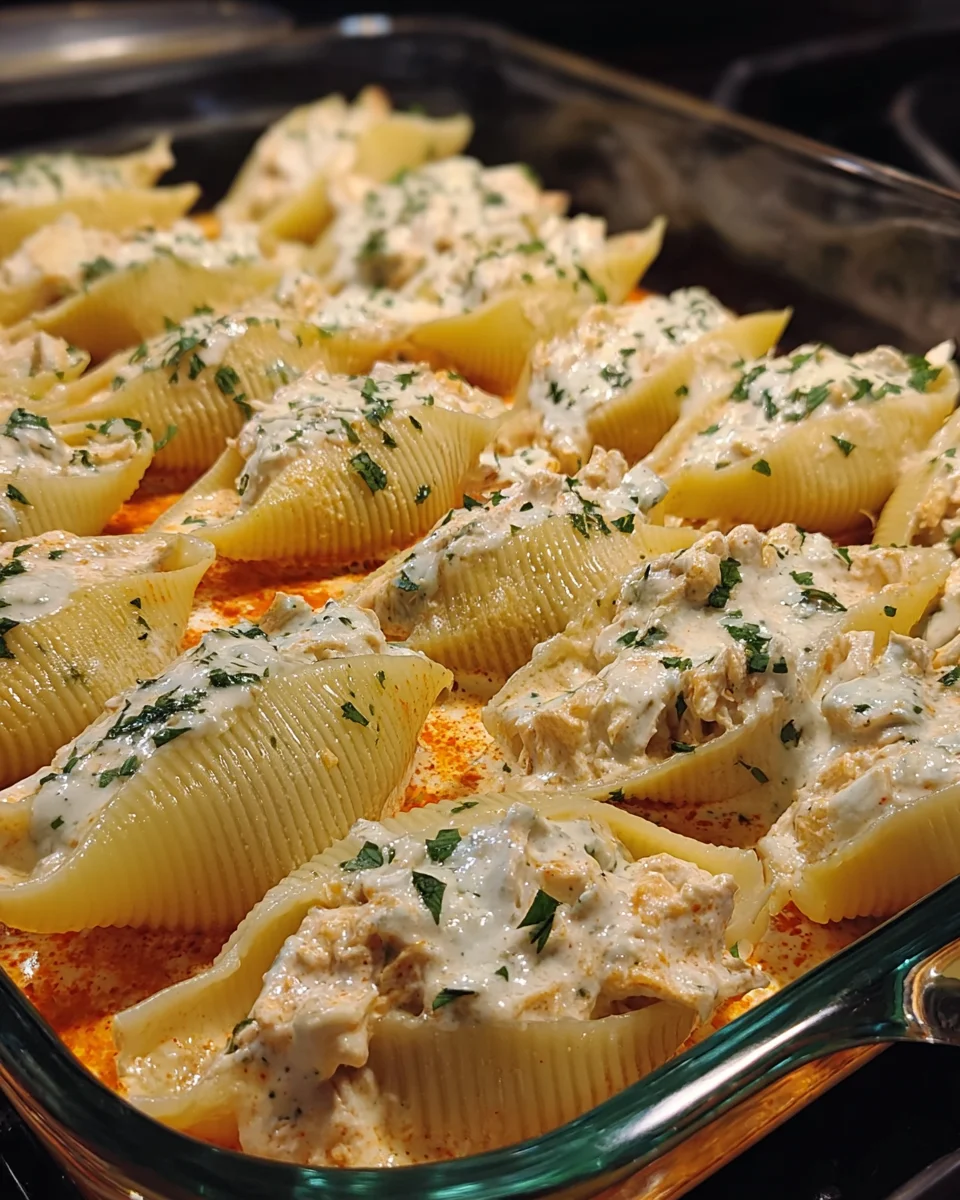
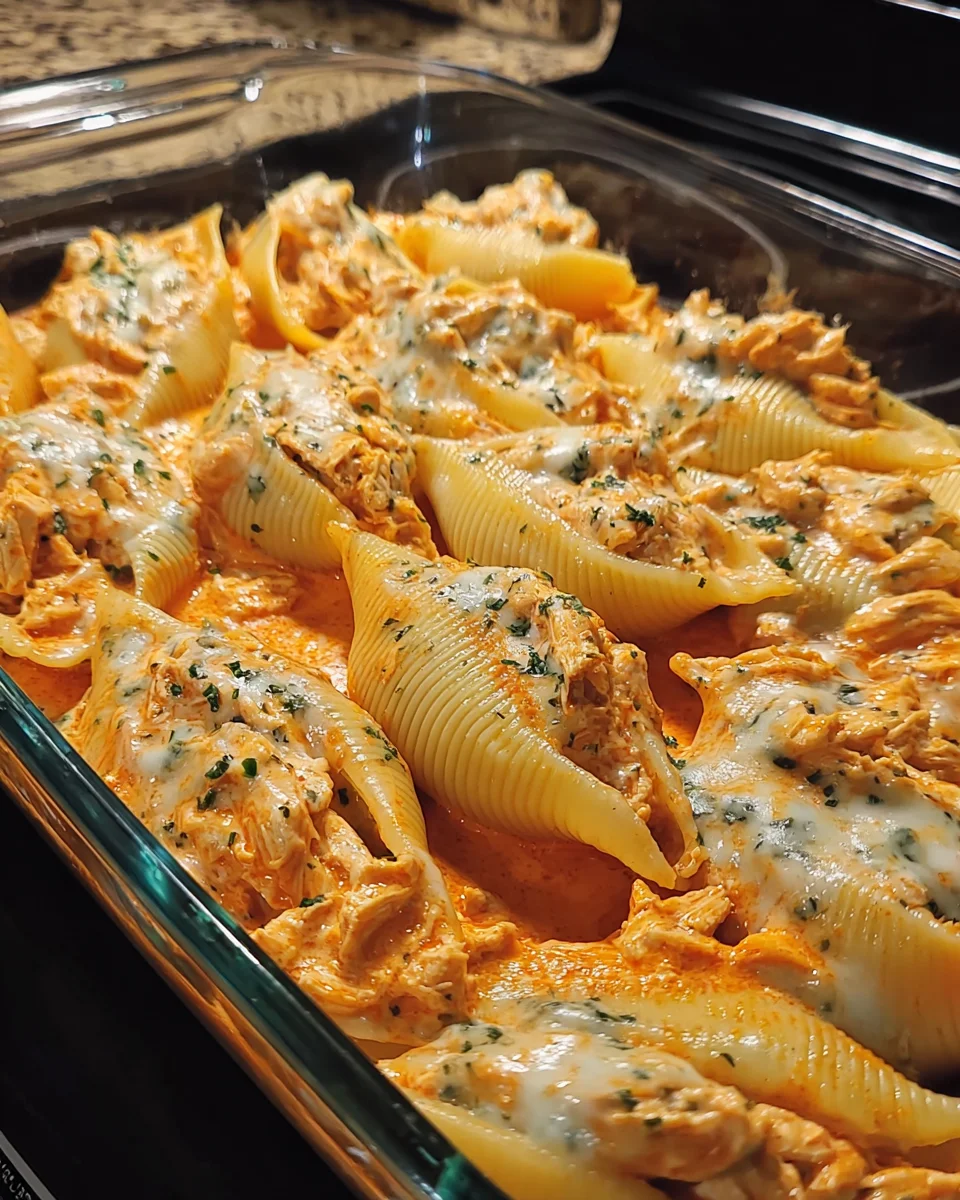
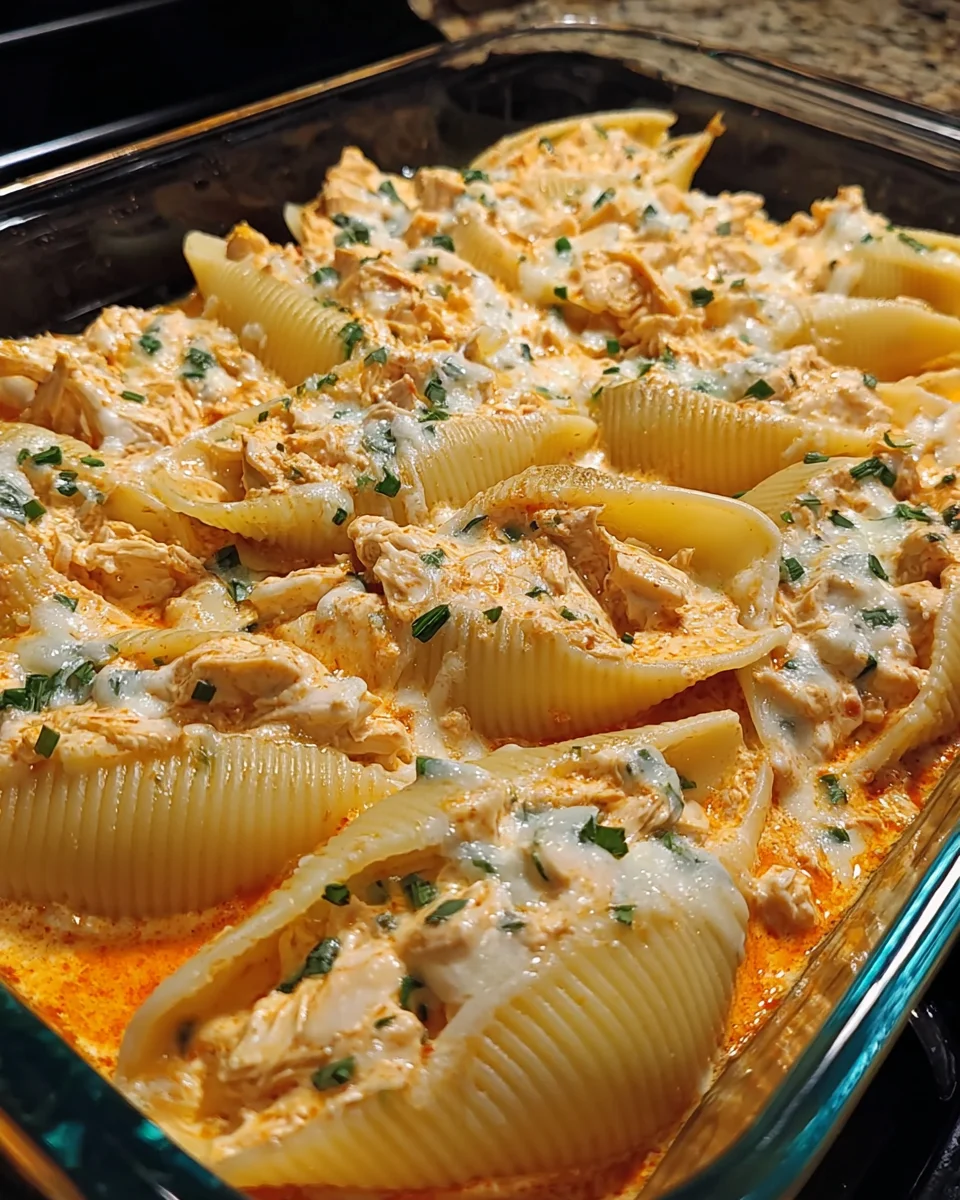
    Grab a spoon or even a piping bag—whatever feels right. Carefully fill each cooked shell with your buffalo chicken mixture. Don’t be shy; pack it in! Arrange the stuffed shells snugly in a greased baking dish. Seeing those vibrant colors peeking out is more satisfying than one of those cozy blanket forts.

    Step 4: Bake to Perfection

    Now it’s time to bring everything together. Preheat your oven to 375°F (190°C). Cover the baking dish with foil—this traps all that cheesy goodness inside. Bake for about 25 minutes. You’ll know they’re done when the cheese is gloriously melted and bubbly. Get ready! The aroma wafting through your kitchen will have everyone rushing to the table.

    Tips for Success

    • Make sure your pasta is al dente; it holds better when stuffed.
    • Consider using a cookie scoop for filling the shells; it’s a game changer!
    • Don’t skip the foil covering while baking, it keeps the moisture locked in.
    • Add a sprinkle of extra cheese on top before the final baking for a delicious crust.
    • Feel free to adjust spices to suit your family’s taste.

    Equipment Needed

    • Large Pot: For boiling pasta; a deep skillet can work in a pinch.
    • Mixing Bowl: Use a large bowl for the filling; a sturdy dish will also do.
    • Spoon or Piping Bag: For stuffing shells; a spatula is a handy alternative.
    • Greased Baking Dish: A casserole dish is ideal; any oven-safe dish can substitute.

    Variations

    • Spicy Veggie Version: Substitute cooked chicken with black beans or lentils for a vegetarian take. Add chopped bell peppers and spinach for color and nutrients.
    • Cheesy Blue Buffalo: Mix in crumbled blue cheese along with the cheeses for an extra tangy flavor that pairs perfectly with buffalo sauce.
    • Whole Wheat or Gluten-Free Option: Use whole wheat jumbo shells for a healthier twist or gluten-free shells to accommodate dietary restrictions.
    • Herb-Infused: Stir in fresh herbs like parsley or cilantro for a burst of freshness that complements the rich flavors.
    • Buffalo Cauliflower: Replace chicken with roasted cauliflower for a lighter, yet still flavorful, dish that’s perfect for meatless Mondays.

    Serving Suggestions for Creamy Buffalo Chicken Stuffed Shells

    • Side Salad: Pair your stuffed shells with a crisp side salad. A simple Caesar or mixed greens works wonders.
    • Garlic Bread: Serve with warm garlic bread for an extra comforting touch.
    • Refreshing Beverages: Complement the spice with a cool drink like lemonade or a light beer.
    • Garnish: Top with fresh chopped parsley or extra green onions for a pop of color and flavor.

    FAQs about Creamy Buffalo Chicken Stuffed Shells

    Can I make Creamy Buffalo Chicken Stuffed Shells ahead of time?

    Absolutely! You can prepare the dish up to the baking stage, cover it tightly, and refrigerate it. When you’re ready to bake, just pop it in the oven for about 30 minutes, adding extra time if it’s cold from the fridge.

    What can I substitute for buffalo sauce?

    If you have little ones or a family that prefers milder flavors, switch out buffalo sauce for barbecue sauce or even a honey mustard dressing for a sweeter, tangy taste that everyone will enjoy.

    How spicy are these pasta shells?

    The spice level is adjustable! Start with a smaller amount of buffalo sauce and taste test your filling. You can always add more for those who like it hot, but this way, it’s suitable for everyone at the table.

    Can I freeze leftovers?

    Yes! Freeze any leftovers in an airtight container. When you’re ready to eat, thaw them overnight in the fridge and reheat in the oven until warm and bubbly again.

    Are there gluten-free options available?

    Absolutely! Many brands offer gluten-free jumbo pasta shells, making this dish suitable for those with gluten sensitivities. Just be sure to check the packaging!

    Final Thoughts on Creamy Buffalo Chicken Stuffed Shells

    There’s something undeniably joyful about bringing Creamy Buffalo Chicken Stuffed Shells to the table. They’re not just a meal; they’re a celebration of flavors and textures that spark happiness in every bite. Whether you’re gathering around with family or sharing them with friends, these stuffed shells create the kind of warmth that makes a house feel like a home. Plus, with their easy preparation, they transform stressful weeknights into culinary adventures. Embrace the comfort, get messy with the filling, and relish the smiles as each shell disappears. I promise you; this dish will have a special place in your heart!


    Print

    clock clock iconcutlery cutlery iconflag flag iconfolder folder iconinstagram instagram iconpinterest pinterest iconfacebook facebook iconprint print iconsquares squares iconheart heart iconheart solid heart solid icon

    Description

    Deliciously creamy and spicy buffalo chicken filled jumbo pasta shells, perfect for a comforting meal.


    • 12 Jumbo Pasta Shells
    • 2 cups Cooked Chicken, shredded
    • 1/2 cup Buffalo Sauce
    • 1 cup Ricotta Cheese
    • 1 cup Mozzarella Cheese, shredded
    • 4 oz Cream Cheese, softened
    • 1 tsp Garlic Powder
    • 1/4 cup Ranch Dressing
    • 1/4 cup Green Onions, chopped

    1. Combine shredded chicken, buffalo sauce, ricotta cheese, mozzarella cheese, softened cream cheese, and garlic powder in a large bowl. Stir until well-incorporated and creamy.
    2. Fold in the ranch dressing to balance the heat of the buffalo sauce.
    3. Cook the jumbo pasta shells according to package instructions. Be careful not to overcook them.
    4. Once cooked, cool slightly and use a spoon to fill each shell with the buffalo chicken mixture.
    5. Preheat the oven to 375°F (190°C). Arrange the stuffed shells in a greased baking dish.
    6. Cover the dish with foil and bake for 25 minutes, or until heated through and cheese is melted and bubbly.
    7. Garnish with extra shredded cheese or chopped green onions before serving.

    Notes

    • Adjust the amount of buffalo sauce to your desired spice level.
    • Can be prepared ahead of time and baked just before serving.
    • Leftovers can be stored in the refrigerator for up to 3 days.
    • Prep Time: 15 minutes
    • Cook Time: 25 minutes
    • Category: Main Dish
    • Method: Baking
    • Cuisine: American

    Nutrition

    • Serving Size: 1 serving
    • Calories: 400
    • Sugar: 2g
    • Sodium: 800mg
    • Fat: 20g
    • Saturated Fat: 10g
    • Unsaturated Fat: 5g
    • Trans Fat: 0g
    • Carbohydrates: 36g
    • Fiber: 2g
    • Protein: 25g
    • Cholesterol: 80mg

    Sharing is caring!

  • Chocolate Chip Rice Krispies

    Chocolate Chip Rice Krispies


    Introduction to Chocolate Chip Rice Krispies

    There’s something magical about a treat that combines crispy textures and gooey chocolate. That’s where my indulgent Chocolate Chip Rice Krispies come in! As a busy mom, I know how important it is to whip up something delicious without spending hours in the kitchen. This delightful recipe is perfect for those hectic days when you still want to impress your loved ones without any fuss. Not only are these treats quick to make, but they also make your heart smile with each bite. Trust me; your family will eagerly ask for more!

    Why You’ll Love This Chocolate Chip Rice Krispies

    What’s not to love about Chocolate Chip Rice Krispies? They come together in under 15 minutes, making them a perfect afternoon pick-me-up or a last-minute dessert for unexpected guests. The mix of crunchy Rice Krispies and luscious chocolate chips creates a flavor sensation that’s hard to resist. Plus, their no-bake nature means less mess and more time for what really matters—enjoying a sweet treat with your loved ones!

    Ingredients for Chocolate Chip Rice Krispies

    Gathering the right ingredients is half the fun of making Chocolate Chip Rice Krispies. Below is a list of everything you’ll need to create these delightful treats. For exact measurements, you’ll find them at the bottom of this article for easy printing.

    • Unsalted butter: This creamy staple adds richness and helps bind the other ingredients together. Just the right amount makes all the difference!
    • Marshmallows: You can use a package of regular marshmallows or opt for mini ones. They’ll melt to create that gooey goodness we all love.
    • Rice Krispies cereal: This is the star of the show, providing a wonderful crunch that perfectly balances the sweet, sticky marshmallow mixture.
    • Semi-sweet chocolate chips: Adding these little gems brings a decadent touch to your treats. They melt beautifully but still maintain their shape if you’re gentle.
    • Pinch of salt (optional): A dash of salt enhances sweetness and balances flavors, so don’t skip it if you enjoy a delightful contrast!

    Feel free to get creative! You can swap in ingredients your family loves. For instance, try adding nuts for extra crunch or dried fruit for a chewy texture. The options are endless!

    How to Make Chocolate Chip Rice Krispies

    Making Chocolate Chip Rice Krispies is a breeze! Follow these simple steps, and you’ll have a delicious treat ready to enjoy in no time. Let’s dive into the joy of cooking!

    Melt Butter and Marshmallows

    Start by grabbing a large saucepan. Melt the butter over low heat first. Be patient; we don’t want burnt butter ruining our indulgence!

    Once the butter is melted, add in your marshmallows. Stir continuously until they’re completely gooey. Oh, the sweet aroma is heavenly! Remove the pan from heat once it’s all melted.

    Tip: If you notice some marshmallows aren’t melting fully, don’t stress. Just give them a little more time under the warm butter’s embrace.

    Mix in Cereal

    Now, it’s time to introduce the star of our show—Rice Krispies cereal! Gradually add them into the marshmallow mixture. Stir gently to coat every crunchy morsel.

    Let the combined mixture cool for a few minutes. This helps the flavors meld together beautifully. Plus, it means less risk of burning your fingers—always a plus!

    Add Chocolate Chips

    Next, gently fold in those delightful semi-sweet chocolate chips. Make sure to distribute them evenly throughout the mixture. By being gentle, you keep those lovely chips intact!

    Tip: If you’re worried about melting, be quick but steady when folding them in. We want some chocolate pockets in our final treat!

    Shape and Cool

    Get a buttered spatula or use your wet hands to press the mixture into a well-greased 13×9 inch pan. Feel free to channel your inner artist and create an even layer!

    Once you’ve pressed it down firmly, let it cool and set for about 30 minutes. This cooling period is crucial. It allows the treats to firm up and makes cutting easier.

    Additional cooling tip: If you’re in a hurry, pop the pan in the refrigerator for a bit. Just don’t forget about it!

    Cut and Serve

    After everything has cooled down, it’s time for the fun part! Use a sharp, buttered knife to cut your treats into squares. The butter will help prevent sticking.

    These beauties can be served right away or stored in an airtight container for later indulgence. Just remember, they won’t last long once your family gets a taste!

    Tips for Success

    • Use fresh marshmallows for the best gooey consistency.
    • Be careful not to overheat the mixture—low and slow is key!
    • Experiment with mix-ins like nuts or candy for a fun twist.
    • Store leftovers in an airtight container to maintain freshness.
    • For easier slicing, chill the pan in the refrigerator briefly before cutting.

    Equipment Needed

    • Large saucepan: A medium-sized pot works too, just ensure it’s deep enough for melting.
    • Spatula: A buttered spatula is best, but a wooden spoon will suffice.
    • 13×9 inch pan: An alternative is a similar sized baking dish or tin.
    • Sharp knife: Any sharp knife will do for cutting the squares.

    Variations of Chocolate Chip Rice Krispies

    • Nutty Delight: Add a cup of chopped nuts—like almonds or walnuts—for a satisfying crunch.
    • Dried Fruit Twist: Stir in a half-cup of dried cranberries or raisins for a chewy, fruity addition.
    • Peanut Butter Swirl: For a rich, nutty flavor, mix in a few tablespoons of creamy peanut butter with the melted marshmallows.
    • Gluten-Free Option: Use gluten-free Rice Krispies to create a delicious treat for those with dietary restrictions.
    • Fun Colorful Sprinkles: Add vibrant sprinkles to the mixture before shaping for a festive touch perfect for kids’ parties.
    • Minty Fresh: Incorporate a few drops of peppermint extract for a refreshing twist and enhance the holiday spirit.

    Serving Suggestions

    • Serve these Chocolate Chip Rice Krispies alongside a scoop of vanilla ice cream for a decadent dessert.
    • Pair them with a glass of cold milk or a warm cup of cocoa for a comforting experience.
    • For an extra touch, plate the squares on a colorful platter, garnished with fresh berries.

    FAQs about Chocolate Chip Rice Krispies

    I’ve received quite a few questions about making these delightful Chocolate Chip Rice Krispies. Here are some common queries that can help you along the way!

    Can I use other cereals instead of Rice Krispies?

    Absolutely! While Rice Krispies are classic, you can experiment with other cereals like Cheerios or Fruity Pebbles for a fun twist. Just keep in mind that the texture and flavor will change.

    What can I do if my mixture is too sticky?

    If your mixture feels overly sticky, try adding a bit more Rice Krispies. This can help absorb some of the gooeyness. You could also chill the mixture before pressing it into the pan.

    How long will my Chocolate Chip Rice Krispies last?

    These treats can last about one week if stored properly in an airtight container. However, I doubt they’ll last that long at your house!

    Can I make these Chocolate Chip Rice Krispies ahead of time?

    Definitely! You can make them a day or two in advance. Just keep them stored in an airtight container to maintain their freshness.

    What should I serve with my Chocolate Chip Rice Krispies?

    They pair wonderfully with a scoop of ice cream or a cup of hot cocoa. You can also enjoy them as a stand-alone treat for a quick, sweet snack!

    Final Thoughts

    Embracing the joy of cooking is one of life’s little pleasures, especially when it comes to making Chocolate Chip Rice Krispies. This recipe not only delivers a sweet escape but also brings people together, creating memories around the kitchen table. The sounds of crunching cereal mixed with laughter make every batch feel special. Each square encapsulates warmth and love, reminding us that the simplest treats can have the biggest impact. So, roll up those sleeves, and let’s create some delicious moments that your family will cherish, one crispy, chocolatey bite at a time!


    Print

    clock clock iconcutlery cutlery iconflag flag iconfolder folder iconinstagram instagram iconpinterest pinterest iconfacebook facebook iconprint print iconsquares squares iconheart heart iconheart solid heart solid icon

    Description

    A delightful treat combining the crispy texture of Rice Krispies with delicious chocolate chips.


    • 3 tablespoons unsalted butter
    • 1 package (10 oz) marshmallows or 4 cups mini marshmallows
    • 6 cups Rice Krispies cereal
    • 1 cup semi-sweet chocolate chips
    • Pinch of salt (optional)

    1. Melt Butter and Marshmallows: In a large saucepan, melt the butter over low heat. Add marshmallows and stir until completely melted. Remove from heat.
    2. Mix in Cereal: Gradually add Rice Krispies cereal to the marshmallow mixture, stirring until well coated. Allow the mixture to cool for a few minutes.
    3. Add Chocolate Chips: Gently fold in the chocolate chips, trying to distribute them evenly without melting them entirely.
    4. Shape and Cool: Using a buttered spatula or wet hands, press the mixture into a 13×9 inch pan coated with cooking spray. Let it cool and set for about 30 minutes.
    5. Cut and Serve: Cut into squares with a sharp, buttered knife for serving.

    Notes

    • Ensure the pan is well greased to make it easier to remove the treats.
    • You can customize by adding nuts or dried fruit if desired.
    • Prep Time: 10 minutes
    • Cook Time: 5 minutes
    • Category: Dessert
    • Method: Stovetop
    • Cuisine: American

    Nutrition

    • Serving Size: 1 square
    • Calories: 150
    • Sugar: 10g
    • Sodium: 70mg
    • Fat: 5g
    • Saturated Fat: 2.5g
    • Unsaturated Fat: 2.5g
    • Trans Fat: 0g
    • Carbohydrates: 24g
    • Fiber: 0g
    • Protein: 1g
    • Cholesterol: 15mg

    Sharing is caring!

  • Pizza Supreme Sliders

    Pizza Supreme Sliders


    Introduction to Pizza Supreme Sliders

    As a busy mom, I totally understand the joy of a quick and delicious meal. Pizza Supreme Sliders have become my go-to dish for gatherings or cozy family nights. These sliders are not just your average appetizer; they are bursting with gooey cheese, savory toppings, and that perfect kick of flavor that is sure to impress everyone around the table.

    When I whip these up, I know I’m offering something special without spending all day in the kitchen. They’re a huge hit with my kids and their friends, making them the perfect solution for any occasion.

    Why You’ll Love This Pizza Supreme Sliders

    Honestly, who doesn’t love a dish that’s easy to make, quick to bake, and utterly delicious? These Pizza Supreme Sliders are everything you need when time is short but flavor is a must. With just a simple assembly and a short bake, you’ll have a warm, cheesy feast that feels fancy yet remains completely approachable. Plus, they’re customizable, so every bite can be exactly what you crave!

    Ingredients Pizza Supreme Sliders

    Gathering the right ingredients is key to creating these fantastic Pizza Supreme Sliders. Here’s what you’ll need:

    • Grated Parmesan cheese: This adds a deliciously sharp flavor that complements the richness of the mozzarella.
    • Extra-virgin olive oil: A drizzle enhances the overall taste and helps create that golden crust.
    • Apple cider vinegar: Just a splash amplifies the flavors of the toppings and helps balance the richness.
    • Unsalted butter: Melted, it brings a rich buttery essence that seeps into the rolls.
    • Garlic: Minced, it provides that wonderful aroma and flavor that everyone loves.
    • Dried oregano: This herb is a must for all things pizza, adding an earthy note to the sliders.
    • Cracked red pepper flakes: A sprinkle for those who enjoy a little heat—feel free to adjust to your taste!
    • Sweet Hawaiian rolls: These soft, slightly sweet rolls provide the perfect base for the sliders.
    • Marinara sauce: The heart of the sliders, it’s the delicious tomato flavor that ties everything together.
    • Shredded mozzarella cheese: The gooey goodness that melts beautifully, making each bite a cheesy delight.
    • Marinated artichoke hearts: They offer a tangy burst of flavor and a unique twist to the classic pizza toppings.
    • Green bell pepper: Diced small, it adds a fresh crunch and a pop of color.
    • Sliced pepperoni: A beloved classic that adds savory bites of flavor—an essential for any true pizza lover.
    • Sliced black olives: They provide a briny contrast to the other flavors, bringing depth to the mixture.

    If you’re looking to customize your sliders, the ingredients with exact measurements are listed at the bottom of the article for easy printing. Feel free to mix it up with your favorite toppings!

    How to Make Pizza Supreme Sliders

    Prepare Your Oven and Baking Dish

    First things first! Preheat your oven to 350 degrees F. This is essential for getting that perfect bake. While the oven warms up, grab a 9×13-inch baking dish and spray it generously with nonstick cooking spray. This will make sure your sliders come out easily and don’t stick, keeping all that gooey goodness intact!

    Whisk the Flavorful Mixture

    In a small bowl, it’s time to create a flavorful topping. Whisk together the grated Parmesan, olive oil, apple cider vinegar, melted butter, minced garlic, dried oregano, and cracked red pepper flakes. This combination of ingredients will be a burst of flavor when poured over the sliders. Trust me; your kitchen is going to smell heavenly just from this step alone!

    Slice the Rolls for Stuffing

    Don’t pull the rolls apart just yet! Instead, take a large serrated knife and carefully slice the sweet Hawaiian rolls in half, just like you would a bagel. This creates top and bottom “slabs” that are perfect for stuffing to hold all those delicious ingredients. Be gentle, so you don’t tear the rolls apart—nobody wants a mess!

    Layer the Bottom Half

    Now, it’s time to build that delicious foundation! Place the bottom layer of rolls into your prepared baking dish, cut side up. Spread half of the marinara sauce over these rolls, ensuring every inch is covered. Next, sprinkle on 1 cup of shredded mozzarella cheese, followed by chopped artichokes, diced bell pepper, pepperoni slices, and black olives. Finish it all off with the remaining mozzarella cheese to create a hearty base for these sliders.

    Add the Top Half and Pour the Mixture

    Grab that top slab of rolls and spread the rest of the marinara sauce on the cut side. Gently place it on top of your beautifully layered fillings. To enhance the flavor, slowly pour the oil and butter mixture evenly over the top of the rolls. Give it about 5 minutes to soak in and just let the flavors mingle. This step is key to creating a mouthwatering treat!

    Bake to Perfection

    Cover your baking dish with foil and pop it into the preheated oven. Bake for 18 to 20 minutes, allowing the flavors to meld and the cheese to get melty. After the initial bake, remove the foil and bake uncovered for another 5 minutes. This step is crucial for achieving a golden, crispy crust on top while keeping the inside gooey and delicious. Your kitchen will be an irresistible aroma zone!

    Slice and Serve

    Once you’ve pulled those sliders out of the oven, let them rest for about 5 minutes. This allows them to firm up and makes slicing easier. Next, cut the sliders into individual sandwiches and serve them warm. Your guests will be diving into these tasty gems in no time, and you’ll be the star of the show!

    Tips for Success

    • For an extra kick, don’t be shy with the red pepper flakes—spice it up to your liking!
    • Ensure you let the sliders sit for a few minutes after baking for easier slicing.
    • Try mixing in different toppings like sausage, veggies, or even a drizzle of pesto for a fun twist.
    • If you’re short on time, prep the layers ahead of time and bake when you’re ready!
    • Use a serrated knife to slice dense rolls easily without squishing them.

    Equipment Needed

    • 9×13-inch baking dish: A glass or metal dish works best for even baking.
    • Serrated knife: This is great for slicing rolls without squishing them. A bread knife is a solid alternative.
    • Mixing bowl: Any medium-sized bowl will do for whisking the ingredients together.
    • Whisk: If you don’t have one, a fork or spoon can also get the job done.

    Variations

    • Meat Lover’s Sliders: Add cooked Italian sausage, bacon, or extra slices of pepperoni for a heartier option. This is perfect for those big appetites!
    • Vegetarian Delight: Skip the meat and double up on fresh veggies like mushrooms, zucchini, or spinach. A sprinkle of feta cheese can also enhance the flavor.
    • Spicy Sliders: Incorporate jalapeños or banana peppers into the filling. This will kick up the heat and provide a delicious tang.
    • Cheesy Garlic Bread Version: Use garlic bread instead of sweet Hawaiian rolls for a flavor-packed twist that’s sure to please garlic lovers.
    • Gluten-Free Option: Substitute the rolls with gluten-free slider rolls or even create a pizza-style base using a cauliflower crust for a lower-carb alternative.

    Serving Suggestions

    • Pair the sliders with a crisp garden salad for a refreshing contrast.
    • Serve with a side of extra marinara sauce for dipping—it’s a crowd favorite!
    • For drinks, try a light white wine or sparkling lemonade to complement the flavors.
    • Present the sliders on a wooden platter for an eye-catching display.
    • Add some colorful fresh herbs on top for that extra touch of elegance.

    FAQs about Pizza Supreme Sliders

    Can I make Pizza Supreme Sliders ahead of time?

    Absolutely! You can prep the sliders the night before by layering the ingredients in the baking dish and covering them with plastic wrap. Just store them in the refrigerator. When you’re ready to bake, remove the cover and let them sit at room temperature for about 20 minutes before popping them in the oven.

    What toppings can I use for my sliders?

    The beauty of Pizza Supreme Sliders is in their versatility! You can use any of your favorite pizza toppings. Consider adding sautéed mushrooms, diced ham, or even fresh basil for a delightful twist. Get creative and make them your own!

    How do I store leftovers?

    Leftover sliders can be stored in an airtight container in the refrigerator for up to 3 days. When reheating, I suggest covering them with foil in the oven to keep them moist and crispy—no one likes a soggy slider!

    Can I freeze Pizza Supreme Sliders?

    Absolutely! Assemble the sliders but don’t bake them. Instead, cover the dish tightly with plastic wrap and then foil before freezing. When you’re ready to enjoy them, let them thaw in the fridge overnight and then bake as normal. You’ll have a scrumptious meal ready to go in no time!

    Are Pizza Supreme Sliders kid-friendly?

    For sure! Kids adore these sliders because they’re fun, cheesy, and packed with flavor. You can even let them pick their own toppings for a personalized touch. Trust me, these will be a hit at your next family gathering!

    Final Thoughts

    Pizza Supreme Sliders are more than just a recipe; they are a celebration of togetherness. Whenever I make these sliders, I’m reminded of the laughter and joy shared around the table. They’re easy enough for a busy weekday dinner yet impressive enough for special occasions. It fills me with warmth to see family and friends delighting in something I created with love. So, whether you’re hosting a party or enjoying a cozy night in, these sliders will surely bring smiles and a burst of flavor to your home. Ready to dig in?


    Print

    clock clock iconcutlery cutlery iconflag flag iconfolder folder iconinstagram instagram iconpinterest pinterest iconfacebook facebook iconprint print iconsquares squares iconheart heart iconheart solid heart solid icon

    Description

    Pizza Supreme Sliders are a delicious and easy-to-make appetizer filled with gooey cheese, savory toppings, and a flavorful sauce, perfect for parties or family gatherings.


    • 1/2 cup grated Parmesan cheese
    • 3 tablespoons extra-virgin olive oil
    • 2 teaspoons apple cider vinegar
    • 2 tablespoons unsalted butter, melted
    • 1 clove garlic, minced
    • 1 teaspoon dried oregano
    • 1/4 teaspoon cracked red pepper flakes
    • 1 package (12 count) sweet Hawaiian rolls
    • 1 cup marinara sauce, divided
    • 2 cups shredded mozzarella cheese, divided
    • 14 ounce jar marinated artichoke hearts, drained and chopped
    • 1 small green bell pepper, seeded and diced very small
    • 4 ounces sliced pepperoni
    • 2.25 ounce can sliced black olives, drained

    1. Preheat the oven to 350 degrees F. Spray a 9×13-inch baking dish with nonstick cooking spray.
    2. In a small bowl, whisk together the grated Parmesan, olive oil, vinegar, butter, garlic, oregano, and red pepper flakes.
    3. Do not pull the rolls apart. Instead, using a large serrated knife, slice the rolls in half (like you would a bagel) so you have a top and bottom ‘slab.’
    4. Place the bottom layer into the prepared baking pan, cut side up, then spread with half of the marinara sauce.
    5. Top with 1 cup of the mozzarella cheese, artichoke hearts, bell pepper, pepperoni, olives, and finish with the remaining 1 cup shredded cheese.
    6. Spread the remaining marinara sauce on the cut side of the top slab of rolls and place onto the sandwiches.
    7. Slowly and evenly pour the oil/butter mixture over the rolls. Let stand for 5 minutes.
    8. Cover the pan with foil. Bake for 18-20 minutes.
    9. Remove the foil from the baking pan, return the sliders to the oven and bake uncovered for an additional 5 minutes until rolls are golden.
    10. Let rest for 5 or so minutes, then cut into individual sandwiches and serve immediately.

    Notes

    • For added spice, increase the amount of red pepper flakes.
    • These sliders can be customized with your favorite pizza toppings.
    • Prep Time: 15 minutes
    • Cook Time: 25 minutes
    • Category: Appetizer
    • Method: Baking
    • Cuisine: American

    Nutrition

    • Serving Size: 1 slider
    • Calories: 250
    • Sugar: 3g
    • Sodium: 500mg
    • Fat: 12g
    • Saturated Fat: 6g
    • Unsaturated Fat: 2g
    • Trans Fat: 0g
    • Carbohydrates: 30g
    • Fiber: 1g
    • Protein: 10g
    • Cholesterol: 30mg

    Sharing is caring!

  • Cauliflower Broccoli Salad

    Cauliflower Broccoli Salad


    Introduction to Cauliflower Broccoli Salad

    Is there anything more delightful than a fresh, crunchy salad on a busy day? I find that a good Cauliflower Broccoli Salad is just the ticket to lighten up my meals, especially when I’m on the go. This salad is not only quick to whip up, but it also impresses everyone at the table. Whether you need a side dish for a family gathering or want to treat yourself to something nutritious, this salad fits the bill perfectly. With its creamy dressing and vibrant flavors, you’ll fall in love with it just as I have!

    Why You’ll Love This Cauliflower Broccoli Salad

    This Cauliflower Broccoli Salad is a real gem for busy lives! It’s incredibly easy to prepare, allowing you to toss it together in just 15 minutes. The crunch of fresh veggies combined with the creamy dressing is a taste sensation that, I promise, everyone will rave about. Plus, it’s a versatile dish; you can enjoy it at home or pack it for a picnic. Who doesn’t love that?

    Ingredients for Cauliflower Broccoli Salad

    Gathering the right ingredients for a scrumptious Cauliflower Broccoli Salad is half the fun! Each component plays a crucial role in delivering flavor and texture. Below, I’ve listed the basic and optional ingredients you’ll need, along with some helpful explanations.

    • Cauliflower Florets: Fresh and crunchy, they’re the star of this salad, giving it a satisfying bite.
    • Broccoli Florets: These vibrant green pieces not only add color but also a rich nutritional punch.
    • Red Onion: Finely chopped to give a mild yet zesty flavor that brightens every mouthful.
    • Raisins (or Cranberries): For a touch of sweetness that beautifully balances the savory elements.
    • Cooked Bacon (optional): Crumbled bacon adds a smoky flavor and crispy texture; a great choice for meat lovers!
    • Sunflower Seeds (optional): These crunchy gems bring an extra crunch and nutty flavor to the mix.
    • Mayonnaise: The base of the creamy dressing, making the salad rich and smooth.
    • Apple Cider Vinegar (or White Vinegar): Adds a tangy kick that brightens all the flavors.
    • Honey or Maple Syrup: Either sweetener can work wonders in the dressing, introducing that delicious hint of sweetness.
    • Salt and Pepper: Essential seasonings to enhance all the flavors, making everything pop!

    For exact measurements, you’ll find them at the bottom of the article, ready for you to print out and take to the kitchen!

    How to Make Cauliflower Broccoli Salad

    Now that you have all your ingredients ready, let’s dive into the fun part—making the Cauliflower Broccoli Salad! Follow these simple steps, and you’ll be amazed at how quickly it comes together.

    Step 1: Prepare the Vegetables

    Start by washing your cauliflower and broccoli florets thoroughly. I like to shake them a bit to eliminate excess water.

    Next, chop your cauliflower and broccoli into bite-sized florets. Think of them as little crunchy clouds, just waiting to be dressed!

    Step 2: Mix in the Bowl

    Grab a large mixing bowl and place all the chopped veggies inside. You want ample space to mix without causing a veggie avalanche!

    This bowl is where the magic begins, so make sure it’s large enough to hold all the colorful goodness.

    Step 3: Add Flavorful Ingredients

    Now it’s time to jazz things up! Finely chop your red onion and toss it in with the cauliflower and broccoli. The zingy flavor elevates the entire dish.

    Add the raisins or cranberries for that delightful touch of sweetness. If you’re using bacon, sprinkle in the crumbled pieces now. Don’t forget about those optional sunflower seeds; they add crunch and flavor!

    Step 4: Whisk the Dressing

    In a smaller bowl, combine the mayonnaise, apple cider vinegar, and honey or maple syrup. I usually start with two tablespoons of each and adjust to taste.

    Add salt and pepper to the mix. Whisk until it’s smooth and creamy. This dressing is like a velvet coat for your salad—rich, inviting, and oh-so-delicious!

    Step 5: Combine and Toss

    Now, pour that creamy dressing over your vegetable mixture. Use a spatula or spoon to toss everything together gently. You want every piece to be coated, bringing all those delicious flavors together.

    After mixing, taste the salad and adjust the seasoning if needed—maybe a pinch more salt or a dash of pepper!

    Step 6: Chill Before Serving

    Cover the salad with plastic wrap or a lid and pop it in the refrigerator for at least 30 minutes. This chilling time lets all the flavors meld beautifully.

    Like a fine wine, the longer it sits, the better it gets! Plus, it’s a refreshing side dish you can enjoy cold.

    Tips for Success

    • Always wash your vegetables thoroughly to remove any grit or pesticides.
    • Chop your veggies evenly for consistent bite sizes and even flavor distribution.
    • Adjust the sweetness of the dressing according to your taste preference.
    • Let the salad chill longer for even better flavor melding.
    • Swap in your favorite crunchy nuts if you don’t have sunflower seeds.

    Equipment Needed

    • Large Mixing Bowl: Perfect for combining your veggies. A salad bowl or even a pasta bowl will work in a pinch.
    • Small Bowl: Ideal for whisking the dressing together. A coffee mug can serve as a clever alternative!
    • Whisk or Fork: For blending the dressing smoothly. A fork can do the job just as well!
    • Chopping Knife: Essential for cutting your veggies. A good pair of kitchen shears can help, too.

    Variations on Cauliflower Broccoli Salad

    • Add Fresh Herbs: Toss in chopped parsley, dill, or cilantro for an herby twist.
    • Make it Vegan: Swap mayonnaise for a plant-based alternative like cashew cream or avocado.
    • Spice it Up: Add a pinch of cayenne pepper or chopped jalapeños for some heat.
    • Cheesy Delight: Fold in shredded cheddar or crumbled feta for a richer flavor.
    • Fruit Option: Include diced apples or pears for a fruity note that balances the veggies nicely.

    Serving Suggestions for Cauliflower Broccoli Salad

    • Pair with grilled chicken or fish for a complete meal.
    • Serve alongside a light soup for a comforting lunch.
    • Try it as a filling in a wrap with your favorite protein.
    • Garnish with extra sunflower seeds for added crunch.
    • Complement with a chilled lemonade or iced tea.

    FAQs about Cauliflower Broccoli Salad

    Can I prepare the Cauliflower Broccoli Salad in advance?

    Absolutely! This Cauliflower Broccoli Salad tastes even better when the flavors have time to meld. You can prepare it a day in advance, just keep it covered in the refrigerator.

    What can I substitute for mayonnaise in the dressing?

    If you’re looking for a healthier option or have dietary restrictions, try using Greek yogurt or a vegan mayonnaise alternative. Your salad will still be rich and creamy!

    Can I use frozen vegetables instead of fresh?

    While fresh vegetables give the best crunch, you can use frozen cauliflower and broccoli. Just make sure to thaw and drain them properly before mixing.

    How long will the salad stay fresh in the fridge?

    The Cauliflower Broccoli Salad should stay fresh for about 3 to 4 days when stored in an airtight container. Just give it a good toss before serving again!

    What other ingredients can I add for more flavor?

    Feel free to experiment! You can add chopped bell peppers, shredded carrots, or even nuts like almonds or walnuts for extra texture and flavor in your salad.

    Final Thoughts

    Making this Cauliflower Broccoli Salad has truly been a joyful experience for me. It’s more than just a recipe; it’s a refreshing medley of flavors that brings family and friends together. The crunch of the vegetables paired with the creamy dressing creates a delightful balance that’s hard to resist.

    Whenever I serve this salad, it sparks smiles and satisfied nods, proving that healthy can be delicious! I hope this vibrant dish brightens your tables just as it has for mine. Enjoy the process, relish the flavors, and watch it become a beloved favorite in your home!


    Print

    clock clock iconcutlery cutlery iconflag flag iconfolder folder iconinstagram instagram iconpinterest pinterest iconfacebook facebook iconprint print iconsquares squares iconheart heart iconheart solid heart solid icon

    Description

    A refreshing and crunchy salad made with cauliflower and broccoli, dressed in a creamy mixture that adds a delightful twist.


    • 2 cups cauliflower florets (about 1 small head)
    • 2 cups broccoli florets (about 1 small head)
    • 1/2 cup red onion, finely chopped
    • 1/4 cup raisins (or cranberries)
    • 1/2 cup cooked bacon, crumbled (optional)
    • 1/4 cup sunflower seeds (optional)
    • 1/2 cup mayonnaise
    • 2 tbsp apple cider vinegar (or white vinegar)
    • 2 tbsp honey or maple syrup
    • Salt and pepper, to taste

    1. Wash and chop the cauliflower and broccoli into bite-sized florets. Remove any tough stems from both.
    2. Place the florets in a large mixing bowl.
    3. Finely chop the red onion and add it to the bowl.
    4. Add the raisins (or cranberries) and crumbled bacon (if using) to the bowl. If you want a bit of extra crunch, sprinkle in some sunflower seeds.
    5. In a small bowl, whisk together the mayonnaise, apple cider vinegar, honey (or maple syrup), and salt and pepper to taste. The dressing should be smooth and creamy.
    6. Pour the dressing over the cauliflower and broccoli mixture. Toss everything together until evenly coated. Taste and adjust the seasoning with more salt or pepper if needed.
    7. Cover the salad and refrigerate it for at least 30 minutes to allow the flavors to meld together.
    8. Serve the salad cold, garnished with extra bacon or sunflower seeds if desired.

    Notes

    • Feel free to substitute the raisins with cranberries for a different flavor profile.
    • Sunflower seeds add a nice crunch but can be omitted if you prefer.
    • This salad can be made a day in advance; just keep it covered in the fridge.
    • Prep Time: 15 minutes
    • Cook Time: 0 minutes
    • Category: Salad
    • Method: Mixing
    • Cuisine: American

    Nutrition

    • Serving Size: 1 cup
    • Calories: 200
    • Sugar: 6g
    • Sodium: 300mg
    • Fat: 15g
    • Saturated Fat: 2g
    • Unsaturated Fat: 10g
    • Trans Fat: 0g
    • Carbohydrates: 16g
    • Fiber: 3g
    • Protein: 4g
    • Cholesterol: 15mg

    Sharing is caring!

  • Black Pepper Chicken

    Black Pepper Chicken


    Introduction to Black Pepper Chicken

    As a busy mom juggling work and family life, I understand how vital it is to whip up something delicious without spending hours in the kitchen. That’s where Black Pepper Chicken comes in! This zesty dish brings together tender chicken and vibrant vegetables, all enveloped in a savory sauce that’s sure to tantalize your taste buds. It’s quick, simple, and bursting with flavor, making it a perfect weeknight dinner. With just a handful of ingredients, you can create a meal that’s not only hearty but also a crowd-pleaser. Trust me, this recipe will soon become a family favorite!

    Why You’ll Love This Black Pepper Chicken

    What’s not to love about quick and delicious meals? This Black Pepper Chicken comes together in a snap! You’ll appreciate how it transforms simple ingredients into an irresistible dish that the whole family will devour. Plus, with just a bit of chopping and a few minutes on the stovetop, you’ll have dinner ready before you know it. It’s an easy way to add a burst of flavor to your busy week!

    Ingredients for Black Pepper Chicken

    Gathering your ingredients for Black Pepper Chicken is as simple as a brisk stroll through your kitchen! Here’s what you’ll need:

    • Skinless chicken breast: Tender and lean, the chicken breast is the star of this dish. It cooks quickly and absorbs all the flavors beautifully.
    • Peanut oil: This oil adds a subtle richness that enhances the dish. You can swap it for vegetable or canola oil if you prefer.
    • Salt: Just a sprinkle to season the chicken, enhancing its natural flavor.
    • Onions: Cut into bite-sized cubes, they add sweetness and depth to the dish.
    • Green bell pepper: This veggie adds crunch and a pop of color. Feel free to use red or yellow peppers for a sweeter taste.
    • Minced garlic and ginger: These aromatics bring warmth and depth to the sauce. Fresh is best, but jarred works in a pinch!
    • Chili: A fresh chili brings a gentle heat. Adjust it according to your spice tolerance or use chili flakes for an extra kick.
    • Cornstarch: It’s essential for coating the chicken, giving it that perfect golden crispiness.
    • Freshly ground black pepper: This is where the dish gets its name! Use it generously for that signature peppery flavor.
    • Soy sauce: Both light and dark varieties are used in the sauce, balancing saltiness with sweetness.
    • Rice vinegar: Its tangy notes brighten the dish and cut through the richness.
    • Brown sugar: Just a hint adds a touch of sweetness that complements the savory elements.
    • Toasted sesame oil: It gives a nutty richness, rounding out the flavors beautifully.
    • Water or chicken broth: This helps adjust the sauce’s consistency, making it smooth and delicious.

    All measurements can be found at the bottom of the article and are available for printing. Now that your ingredients are lined up like a well-rehearsed choir, let’s get cooking!

    How to Make Black Pepper Chicken

    Prepare Your Ingredients

    Before I dive into cooking, I always love to prep my ingredients. Start by washing and cutting the chicken into bite-sized cubes. This makes everything cook evenly. Next, chop your onions and bell pepper into 1-inch cubes. Don’t forget to mince the garlic and ginger too; these little guys add a ton of flavor! Having all your ingredients ready to go makes the cooking process smooth and fun. Trust me, it beats scrambling around the kitchen looking for things mid-recipe!

    Mix the Sauce

    Now, let’s get to the heart of what makes this Black Pepper Chicken so flavorful—the sauce! In a bowl, whisk together the freshly ground black pepper, rice vinegar, light soy sauce, dark soy sauce, brown sugar, toasted sesame oil, cornstarch, and a bit of water. This is where the magic happens! The balance of sweet, salty, and tangy flavors is essential, so take a moment to taste it. Is it sharp enough? Adjust to suit your palate! Remember, this sauce is what will bring everything to life, coating our chicken in deliciousness.

    Cook the Chicken

    Next up is cooking the chicken. Heat a large frying pan over medium heat and add one tablespoon of peanut oil. Let it heat up, then add the coated chicken pieces in a single layer. This way, they get that beautiful golden color and crispiness. Cook for about five minutes, flipping them halfway for even browning. Once they’re almost done, transfer your chicken to a plate and repeat if necessary. Don’t worry if you have to do this in batches, it ensures your chicken doesn’t steam. Tender, juicy chicken is the aim here!

    Stir-Fry the Vegetables

    With your chicken cooked, it’s time to stir-fry those colorful veggies! In the same pan, add another tablespoon of peanut oil, heating it up over medium-high heat. Toss in minced garlic, ginger, and chopped chili, letting them sizzle for 30 seconds. Then, add the onion and bell pepper cubes. Stir-fry them quickly for about 3-4 minutes, just until they are crunchy yet tender. You want vibrant colors and textures that pop! Let them retain their freshness while soaking in those aromatic flavors. This step is crucial for creating a dish that’s as pleasing to the eye as it is to the taste buds!

    Combine Everything

    Now for the big finish! Lower the heat and give that delicious sauce a quick re-whisk before pouring it into the pan with the veggies. Let it bubble for about 30 seconds, then add in your beautiful chicken. Toss everything together until the chicken is well-coated in that glossy sauce. Your kitchen will start to smell heavenly at this point! Let it heat through, then sprinkle it with a bit of extra freshly ground black pepper for that final kick. Serve hot, and get ready to enjoy a meal that’s sure to impress!

    Tips for Success

    • Prep everything before you start cooking to streamline the process.
    • Use fresh spices; they enhance flavor and aroma significantly.
    • For extra crispiness, let the chicken rest after coating in cornstarch.
    • Don’t overcrowd the pan; this helps achieve that golden sear.
    • Feel free to adjust the chili to suit your family’s spice tolerance.

    Equipment Needed

    • Large frying pan: A non-stick one works wonders for easier cooking.
    • Whisk: Essential for mixing the sauce smoothly; a fork can do in a pinch.
    • Cutting board: Use it to prep your veggies and chicken safely.
    • Sharp knife: A good knife makes chopping a breeze.

    Variations

    • For a vegetarian twist, substitute the chicken with tofu or tempeh, marinating it in the sauce for extra flavor.
    • Add more vegetables like broccoli, snap peas, or carrots for extra color and crunch!
    • Incorporate cashews or peanuts to add a delightful nutty texture and flavor to the dish.
    • If you’re feeling adventurous, kick it up a notch with a splash of sherry or rice wine for a unique depth of flavor.
    • For a low-carb option, serve the dish over cauliflower rice instead of traditional rice or noodles.

    Serving Suggestions

    • Serve your Black Pepper Chicken over a bed of fluffy steamed rice or noodles for a filling meal.
    • Pair it with a refreshing cucumber salad to balance the spices.
    • A chilled glass of iced green tea complements the flavors beautifully.
    • For a pop of color, garnish with sliced green onions or sesame seeds.

    FAQs about Black Pepper Chicken

    Can I use other meats for this recipe?
    Absolutely! While this recipe highlights chicken, you can easily swap it for beef, shrimp, or even tofu for a vegetarian option. Just adjust the cooking times as needed to ensure everything is cooked perfectly.

    How do I store leftovers?
    Store your Black Pepper Chicken in an airtight container in the refrigerator. It should last up to three days. If you’re like me, leftovers can often taste even better the next day as the flavors meld together!

    Can I make this dish in advance?
    You can prep your ingredients and mix your sauce ahead of time. Just store everything separately in the fridge. When you’re ready for dinner, it’ll come together in minutes!

    What should I serve with Black Pepper Chicken?
    This dish pairs wonderfully with steamed rice, noodles, or even a fresh salad. Think of it as the main event on your dinner table, surrounded by all the tasty sides!

    How can I adjust the heat level?
    If you prefer a milder dish, reduce the amount of chili or omit it altogether. For those who love spice, feel free to add more chili or even sprinkle some chili flakes over the finished dish. Make it your own!

    Final Thoughts

    Cooking Black Pepper Chicken is more than just making a meal; it’s about creating a joyful experience in your kitchen. The vibrant colors, delightful aromas, and wonderfully balanced flavors come together to not only satisfy but also to spark connection among family and friends. This dish is a reminder that quick, delicious meals can bring everyone to the table, sharing stories and laughter. Each bite carries the warmth of home-cooked love, filling your heart and stomach. So, invite your loved ones in, serve this delightful dish, and relish the delightful moments you create together!


    Print

    clock clock iconcutlery cutlery iconflag flag iconfolder folder iconinstagram instagram iconpinterest pinterest iconfacebook facebook iconprint print iconsquares squares iconheart heart iconheart solid heart solid icon

    Description

    Black Pepper Chicken is a flavorful dish featuring tender chicken cooked with vibrant vegetables and a savory sauce, highlighted by the spiciness of freshly ground black pepper.


    • 500 grams or 1.1 lbs skinless chicken breast, cut into bite-sized cubes
    • 2 tablespoons peanut oil
    • Salt, as required
    • 2 medium-sized onions, cut into 1-inch cubes
    • 1 large green bell pepper, cut into 1-inch cubes
    • ½ teaspoon minced garlic
    • ½ teaspoon minced ginger
    • 1 fresh red or green chili, chopped
    • 2 tablespoons cornstarch
    • ¼ teaspoon freshly ground black pepper
    • ¾ teaspoon freshly ground black pepper (for sauce)
    • 3 tablespoons light soy sauce
    • 1 tablespoon dark soy sauce
    • 1 tablespoon rice vinegar
    • ½ teaspoon brown sugar
    • 1 teaspoon toasted sesame oil
    • 1 teaspoon cornstarch (for sauce)
    • 2 tablespoons water or chicken broth

    1. Whisk together the freshly ground black pepper, rice vinegar, light soy sauce, dark soy sauce, brown sugar, toasted sesame oil, cornstarch, and water in a bowl until smooth.
    2. Coat the chicken pieces with 1 tablespoon of the prepared sauce, 2 tablespoons of cornstarch, and salt. Set aside while you prepare the vegetables and aromatics.
    3. Heat a large frying pan over medium heat. Add 1 tablespoon of peanut oil and tilt the pan to distribute the oil evenly. Arrange the chicken pieces in a single layer and cook until golden on the bottom. Flip the chicken cubes and cook until browned and almost cooked through. Transfer to a plate and repeat in batches if necessary to avoid overcrowding the pan.
    4. In the same pan, heat 1 tablespoon of peanut oil. Add minced garlic, ginger, and chopped chili. Stir-fry for 30 seconds, then add the onion and bell pepper cubes. Stir-fry over high heat until the vegetables are crisp but tender.
    5. Reduce the heat to low. Re-whisk the prepared sauce and pour it into the pan. Simmer for 30 seconds, then add the cooked chicken and toss until warmed through and coated with the sauce.
    6. Turn off the heat and sprinkle with additional freshly ground black pepper. Stir to combine and serve hot.

    Notes

    • For an extra kick, use more chili or add chili flakes.
    • Serve with steamed rice or noodles for a complete meal.
    • Leftovers can be stored in an airtight container in the refrigerator for up to 3 days.
    • Prep Time: 15 minutes
    • Cook Time: 20 minutes
    • Category: Main Dish
    • Method: Stir-fry
    • Cuisine: Asian

    Nutrition

    • Serving Size: 1 serving
    • Calories: 320
    • Sugar: 2g
    • Sodium: 800mg
    • Fat: 16g
    • Saturated Fat: 2g
    • Unsaturated Fat: 14g
    • Trans Fat: 0g
    • Carbohydrates: 14g
    • Fiber: 2g
    • Protein: 30g
    • Cholesterol: 70mg

    Sharing is caring!

  • Strawberry Arugula Salad

    Strawberry Arugula Salad


    Introduction to Strawberry Arugula Salad

    Hey there! If you’ve been on the hunt for a vibrant, delicious dish, let me introduce you to my go-to Strawberry Arugula Salad. This salad is not just a feast for the eyes, but a burst of fresh flavors that will brighten any meal. With its peppery arugula, sweet strawberries, and creamy feta, it’s a perfect blend that’s quick to whip up after a long day. Whether you’re soothing a crowd or just treating yourself, this salad is a delightful solution that feels effortless yet wholly satisfying. Trust me, you’ll want this on your table!

    Why You’ll Love This Strawberry Arugula Salad

    This Strawberry Arugula Salad is a lifesaver! It’s incredibly easy to make, taking only about 15 minutes from start to finish. Perfect when you need a quick meal that doesn’t skimp on taste. The combination of peppery arugula and sweet, juicy strawberries is like a dance party for your taste buds. Plus, it’s versatile enough to pair with virtually any main dish. Enjoy the fresh, vibrant flavors that simply scream spring!

    Ingredients in Strawberry Arugula Salad

    Let’s take a quick look at the star players of our delightful Strawberry Arugula Salad. Each ingredient brings something unique to the table, ensuring a flavorful explosion with every bite.

    • Arugula or Baby Spinach: The base of our salad. Arugula has a peppery kick, while baby spinach is milder. Use whichever you prefer or have on hand!
    • Pine Nuts: These little gems add a lovely crunch and a rich, buttery flavor. Toasting them brings out their natural sweetness. If you’re allergic to nuts, sunflower seeds work just as well.
    • Strawberries: Sweet and juicy, they provide a refreshing contrast to the pepperiness of arugula. Feel free to swap strawberries for other berries like blueberries or raspberries if you’re feeling adventurous!
    • Feta Cheese: Creamy and tangy, feta cheese elevates our salad. For a twist, try goat cheese or skip it altogether for a vegan option.
    • Lemon Wedges: A squeeze of fresh lemon juice brightens the salad, enhancing all the flavors. Don’t skip this part—it’s the cherry on top!

    The dressing includes lemon juice, olive oil, maple syrup or honey, and balsamic vinegar, adding a delightful balance of sweetness and acidity. For exact quantities and proportions, check the bottom of the article for a handy printable version!

    How to Make Strawberry Arugula Salad

    Creating this Strawberry Arugula Salad is as easy as pie! With simple steps, you’ll find it’s a breeze, perfect for busy mornings or a quick dinner fix. I promise, each step leads you closer to a delightful dish that will impress your family and friends!

    Step 1: Prepare the Arugula

    Start by rinsing your arugula under cold water. This ensures all the dirt is washed away. After rinsing, use a salad spinner or gently pat the leaves dry with a kitchen towel. Nobody wants a soggy salad! Once dry, set the arugula aside. It’s the heart of your dish!

    Step 2: Toast the Pine Nuts

    Next, grab a dry skillet and heat it over medium heat. Toss in the pine nuts and keep an eye on them! Stir them often until they’re golden brown and fragrant—about 3 to 5 minutes. This will intensify their nutty flavor. Remember, it can go from perfect to burnt in a blink, so stay close!

    Step 3: Make the Dressing

    In a small bowl, combine your dressing ingredients: lemon juice, olive oil, maple syrup (or honey), and balsamic vinegar. Whisk them together until well blended. Taste it! You might want to adjust the sweetness or acidity. This is your moment to make it perfect!

    Step 4: Assemble the Salad

    Now comes the fun part! In a large serving bowl, combine your dried arugula with the sliced strawberries and toasted pine nuts. Gently toss these together. If you prefer a more unified salad, you can mix all the ingredients and then top with crumbled feta! You can never go wrong!

    Step 5: Drizzle with Lemon Juice

    Just before serving, squeeze fresh lemon juice all over the salad. This little action adds a zesty brightness that elevates every forkful. Serve immediately, and watch your loved ones dive in for seconds!

    Tips for Success

    • Choose fresh, vibrant arugula for the best flavor and texture.
    • Keep an eye on the pine nuts while toasting to prevent burning.
    • For a more colorful salad, mix in other berries or nuts.
    • Adjust the dressing to your taste by adding more lemon or sweetness.
    • Let the salad sit for a few minutes to allow flavors to meld.

    Equipment Needed

    • Salad Spinner: Great for washing and drying your arugula. If you don’t have one, a kitchen towel works just fine.
    • Skillet: A non-stick skillet is perfect for toasting pine nuts. Any pan will do if it doesn’t stick.
    • Mixing Bowl: Essential for combining your ingredients. A large plate can also work for serving.
    • Whisk: For mixing the dressing. A fork works just as well in a pinch!

    Variations of Strawberry Arugula Salad

    • Add Protein: Boost your salad’s heartiness by adding grilled chicken, shrimp, or chickpeas for a satisfying meal.
    • Switch Up the Cheese: Try goat cheese or tangy blue cheese instead of feta for a different flavor profile.
    • Colorful Berries: Mix in blackberries, blueberries, or raspberries for a vibrant twist and exciting flavors!
    • Dress Up the Nuts: Swap out pine nuts for walnuts or pecans for a delightful crunch and unique taste.
    • Change the Greens: Experiment with kale or mixed greens instead of arugula for a different texture and flavor.

    Serving Suggestions for Strawberry Arugula Salad

    • Pair with Protein: Serve alongside grilled chicken, salmon, or shrimp for a complete meal.
    • Complementary Sides: A side of crusty bread or a light quinoa dish enhances the salad beautifully.
    • Refreshing Drinks: Enjoy with a chilled white wine or lemonade for a delightful combo.
    • Presentation: Use a large, colorful bowl for a stunning display that invites everyone to dig in!

    FAQs about Strawberry Arugula Salad

    Have some questions about this delicious Strawberry Arugula Salad? No worries! Let’s dive into some common queries, ensuring you have all you need to whip up this vibrant dish.

    Can I make this salad ahead of time? Absolutely! You can prepare the arugula, strawberries, and dressing in advance. Just combine everything a few minutes before serving to keep the arugula fresh and crisp.

    What should I do if my strawberries aren’t sweet enough? If you find your strawberries lack sweetness, drizzle a bit of honey or maple syrup over them before adding them to the salad. It works wonders!

    Can I substitute the feta cheese for a non-dairy option? Yes! For a vegan twist, try using nutritional yeast or a crumbled tofu-based feta. Both will provide flavor while keeping it dairy-free!

    How can I store leftovers? If you have any salad left, keep it in an airtight container in the fridge. However, the arugula may wilt slightly. Enjoy leftovers within 24 hours for the best flavor!

    Is this Strawberry Arugula Salad suitable for meal prep? Definitely! Pack the ingredients in separate containers. Just mix them together with dressing right before you eat to maintain freshness.

    Final Thoughts on Strawberry Arugula Salad

    As you take that first bite of your Strawberry Arugula Salad, a wave of flavors dances across your palate. The sweet strawberries playfully contrast the peppery arugula, while the toasted pine nuts add just the right crunch. This salad is more than a meal; it’s a celebration of fresh ingredients and effortless cooking. Whether you’re a busy mom or a professional, this dish easily fits into your life, bringing joy and nourishment to your table. So grab those ingredients and whip up this delightful salad—your taste buds will thank you, and your loved ones will cheer!


    Print

    clock clock iconcutlery cutlery iconflag flag iconfolder folder iconinstagram instagram iconpinterest pinterest iconfacebook facebook iconprint print iconsquares squares iconheart heart iconheart solid heart solid icon

    Description

    A refreshing salad combining peppery arugula and sweet strawberries, enhanced with toasted pine nuts and crumbled feta cheese, drizzled with a light dressing.


    • 45 cups arugula or baby spinach leaves, rinsed and dried
    • ¼ cup pine nuts
    • 1 + ½ cup strawberries, sliced or quartered
    • 23 ounces feta cheese, crumbled
    • lemon wedges for serving
    • 1 teaspoon lemon juice
    • 1 tablespoon olive oil
    • 1 teaspoon maple syrup or honey
    • 1 teaspoon balsamic vinegar

    1. Start with fresh arugula. Wash it thoroughly to remove dirt and dry it well—either with a salad spinner or by gently patting it dry to prevent a watery salad. Set it aside.
    2. Toast the pine nuts in a dry skillet over medium heat until they become fragrant and turn a lovely golden brown.
    3. Combine the dressing ingredients in a bowl, then toss them with the arugula leaves.
    4. To assemble the salad, transfer the dressed arugula to a serving plate. Top it with strawberries, crumbled feta, and the toasted pine nuts. Alternatively, gently toss all the ingredients together and then add the feta cheese.
    5. Finish by drizzling fresh lemon juice over the salad just before serving for a delightful burst of freshness!

    Notes

    • This salad can be served as a side dish or a light main course.
    • Feel free to substitute feta with goat cheese or leave it out for a vegan version.
    • Prep Time: 10 minutes
    • Cook Time: 5 minutes
    • Category: Salad
    • Method: Tossing
    • Cuisine: American

    Nutrition

    • Serving Size: 1 serving
    • Calories: 200
    • Sugar: 5g
    • Sodium: 300mg
    • Fat: 14g
    • Saturated Fat: 4g
    • Unsaturated Fat: 10g
    • Trans Fat: 0g
    • Carbohydrates: 15g
    • Fiber: 2g
    • Protein: 6g
    • Cholesterol: 15mg

    Sharing is caring!

  • Cheesy Taco Breadsticks

    Cheesy Taco Breadsticks


    Introduction to Cheesy Taco Breadsticks

    Creating quick and delicious snacks is like finding hidden treasures in the kitchen, isn’t it? I still remember the first time I whipped up a batch of Cheesy Taco Breadsticks. The smiles on my family’s faces were priceless! These delightful sticks have that amazing combination of flavors that everyone loves—perfect for busy moms trying to please picky eaters or professionals looking for a fun treat after a long day. They’re simple, quick to make, and everyone from toddlers to teenagers devours them. Seriously, who can resist cheesy goodness wrapped in soft dough?

    Why You’ll Love This Cheesy Taco Breadsticks

    These Cheesy Taco Breadsticks are a game-changer! They’re incredibly easy to make, so you can whip them up even on the busiest weeknights. In just 27 minutes, you have a warm, cheesy snack that the whole family will adore. The fusion of bold taco flavors and gooey cheese wrapped in soft dough creates a comforting treat. Trust me, once you try them, you’ll be making them on repeat!

    Ingredients for Cheesy Taco Breadsticks

    Gathering the right ingredients for Cheesy Taco Breadsticks makes the cooking process a breeze. You’ll need seasoned ground beef to provide that savory, taco flavor. Taco seasoning mix brings all the spices together, though you can easily swap it for homemade if you prefer.

    Don’t forget the pizza dough—it’s the magic blanket that wraps all this yumminess! For that ooey-gooey cheesy delight, colby jack and cheddar cheese sticks are perfect. A touch of butter, garlic powder, and dried parsley adds a beautiful golden hue and flavor. Feel free to get creative with ingredients and adjust based on what your family loves! Detailed measurements are provided later in this article for your convenience.

    How to Make Cheesy Taco Breadsticks

    Creating these Cheesy Taco Breadsticks is a delightful journey that everyone can enjoy! Follow these simple steps, and soon you’ll have a snack that’s perfect for gatherings, after-school treats, or last-minute cravings. Trust me; they’ll vanish in an instant!

    Step 1: Preheat and Prepare

    First things first! Preheat your oven to 425 degrees F. This step ensures that your breadsticks bake to golden perfection. While the oven warms up, lightly coat a large baking sheet with non-stick spray. This will help keep your creations from sticking, making cleanup a breeze!

    Step 2: Cook the Beef

    In a skillet over medium heat, cook the ground beef until it’s fully browned, breaking it up with a wooden spoon as it cooks. Don’t forget to drain any excess fat! Then, sprinkle in the taco seasoning mix—no water needed! Stir until the beef is coated with that zesty spice, bringing the fiesta flavors alive. Let it cool to room temperature so it doesn’t make the dough soggy.

    Step 3: Prepare the Dough

    Once your beef is ready, it’s time to work with the pizza dough. Spread it flat on a clean surface, and cut it in half lengthwise. Then, make four vertical cuts, creating 10 small rectangles. This is where all the fun happens! Feel free to get creative at this stage with extra fillings like veggies or beans tailored to your family’s taste.

    Step 4: Assemble the Breadsticks

    Now, let’s put these tasty morsels together! Place about a tablespoon of the taco meat in the center of each rectangle. Top it off with a halved cheese stick, giving it that melty goodness we crave. Carefully roll up the dough, making sure to pinch the seams tightly closed to lock in all the delicious filling. Don’t skimp on sealing: this will prevent any of that tasty mixture from escaping during baking!

    Step 5: Add Butter Mixture

    In a small bowl, combine your melted butter, garlic powder, and parsley. Use a pastry brush to spread this savory mix generously over the tops of your rolled breadsticks. This step is super important for flavor, creating that irresistible buttery crust that adds just the right touch!

    Step 6: Bake

    Finally, pop the breadsticks in your preheated oven and bake for 10-12 minutes, or until they turn a beautiful golden brown. You’ll want to serve them hot for that melty cheese experience! Trust me; this is when your home will start smelling like a taco party!

    Tips for Success

    To ensure your Cheesy Taco Breadsticks turn out perfectly every time, here are a few handy tips:

    • Keep your ingredients organized to streamline the cooking process.
    • Use parchment paper on your baking sheet for easy cleanup—no one loves scrubbing the pans!
    • Make the taco filling ahead of time to save those precious minutes when you need a quick snack.
    • Encourage your kids to help assemble; it’s a fun way to get everyone involved!

    Equipment Needed

    • Large skillet for cooking the beef.
    • Wooden spoon to break up the meat.
    • Baking sheet (or a stone for even cooking).
    • Parchment paper for mess-free baking (optional).
    • Pastry brush for applying the butter mixture.
    • Knife or pizza cutter for slicing the dough.

    Variations

    • Add sliced jalapeños to the filling for a spicy kick that’ll wake up your taste buds!
    • Try using mozzarella or pepper jack cheese for a different cheesy experience.
    • For a veggie version, substitute the beef with black beans and corn—just as tasty!
    • You can use gluten-free pizza dough to make these Cheesy Taco Breadsticks gluten-free and just as delightful.
    • Experiment with different herbs or spices in the butter mixture to shake things up!

    Serving Suggestions

    • Serve with fresh salsa for that perfect zesty dip that everyone will love.
    • Add a dollop of sour cream to balance the spices and create creamy goodness.
    • A side salad can add a refreshing crunch to your meal.
    • Pair with a crisp soda or a soothing iced tea for a delightful combo!

    FAQs about Cheesy Taco Breadsticks

    You’ve got questions, and I’ve got answers about these irresistible Cheesy Taco Breadsticks! Let’s dive in:

    How do I store leftovers?
    Simply place any uneaten breadsticks in an airtight container and refrigerate them. They’ll be good for 3-4 days! To enjoy them again, reheating in the oven will bring back that delicious crispy texture.

    Can I make them ahead of time?
    Absolutely! You can prepare the filling and roll the breadsticks earlier in the day. Keep them covered in the fridge until you’re ready to bake. This makes for a quick meal or snack when you’re short on time!

    What’s the nutrition info?
    Each breadstick contains about 200 calories, with 10g of protein, making them a filling snack. Perfect for those busy evenings when you want something hearty without the guilt!

    Final Thoughts

    Crafting Cheesy Taco Breadsticks is more than just whipping up a scrumptious snack; it’s about sharing love and joy within your family! Each bite embodies warmth, laughter, and those special moments spent together around the table. I cherish how these delightful treats create a sense of tradition in my home, with everyone eagerly awaiting their turn to taste the cheesy goodness. So whether you’re serving them at a gathering, a game night, or just on a busy weekday, these breadsticks have a way of bringing everyone together, sparking joy and creating cherished memories. Enjoy every delicious moment!


    Print

    clock clock iconcutlery cutlery iconflag flag iconfolder folder iconinstagram instagram iconpinterest pinterest iconfacebook facebook iconprint print iconsquares squares iconheart heart iconheart solid heart solid icon

    Description

    Cheesy Taco Breadsticks are a delicious snack made with seasoned ground beef and cheese rolled in pizza dough, baked until golden brown.


    • 1 lb ground beef
    • 1 packet taco seasoning mix or homemade taco seasoning
    • 1 tube Pillsbury Pizza Dough
    • 5 colby jack and cheddar cheese sticks, halved
    • 4 tbsp butter, melted
    • 1 tsp garlic powder
    • 1 tsp dried parsley

    1. Preheat oven to 425 degrees F and lightly coat a large baking sheet with non-stick spray. Set aside.
    2. Cook ground beef in a skillet, breaking it up with a wooden spoon until fully browned and crumbled. Drain any fat, return the skillet to the stove top, mix in the taco seasoning (no water), stir until coated, and let cool to room temperature.
    3. Spread the pizza dough flat, cut it in half lengthwise, and then make 4 vertical cuts to create 10 small rectangles.
    4. Place about a tablespoon of taco meat in the center of each rectangle, top with a halved cheese stick, and carefully roll up the dough, pinching all seams closed.
    5. Combine melted butter, garlic powder, and parsley in a small bowl. Brush this mixture over the tops of the taco sticks.
    6. Bake the sticks for 10-12 minutes or until golden brown. Serve hot with your favorite taco toppings.

    Notes

    • For a spicier version, add jalapeños or hot sauce to the filling.
    • These breadsticks can be served with salsa or sour cream for dipping.
    • Leftovers can be stored in the refrigerator and reheated in the oven.
    • Prep Time: 15 minutes
    • Cook Time: 12 minutes
    • Category: Snack
    • Method: Baking
    • Cuisine: Mexican

    Nutrition

    • Serving Size: 1 breadstick
    • Calories: 200
    • Sugar: 1g
    • Sodium: 450mg
    • Fat: 12g
    • Saturated Fat: 6g
    • Unsaturated Fat: 4g
    • Trans Fat: 0g
    • Carbohydrates: 16g
    • Fiber: 1g
    • Protein: 10g
    • Cholesterol: 30mg

    Sharing is caring!

  • Strawberry Pecan Chicken Salad with poppyseeds

    Strawberry Pecan Chicken Salad with poppyseeds


    Introduction to Strawberry Pecan Chicken Salad with Poppyseeds

    Hey there, fellow cooking enthusiasts! Let me tell you about my latest culinary delight: Strawberry Pecan Chicken Salad with poppyseeds. This dish is like a hug in a bowl, perfect for those hectic days when you need something light, fresh, and utterly delicious.

    Whether you’re looking to impress your loved ones or just want a quick, nutritious meal, this salad does it all. With juicy strawberries, crunchy pecans, and a creamy dressing, it’s a burst of flavor that’s sure to become a family favorite. Trust me, your taste buds will thank you!

    Why You’ll Love This Strawberry Pecan Chicken Salad with Poppyseeds

    This Strawberry Pecan Chicken Salad with poppyseeds is not just easy to whip together; it’s a time-saver for busy moms and professionals. In just 15 minutes, you can have a refreshing meal that dazzles on your table. Plus, the crispy pecans and sweet strawberries create a symphony of flavors. It’s a delightful blend that keeps both your palate and your schedule satisfied!

    Ingredients for Strawberry Pecan Chicken Salad with Poppyseeds

    Let’s dive into the vibrant lineup of ingredients that make this Strawberry Pecan Chicken Salad with poppyseeds truly shine. Here’s what you’ll need:

    • Shredded Chicken: This is the heart of the salad. Use rotisserie chicken for convenience or leftover grilled chicken to save time.
    • Celery: Chopped into small pieces, it adds a refreshing crunch that lightens up the dish.
    • Green Onion: Thinly chopped, this brings a mild onion flavor to the mix, balancing the sweetness of the strawberries.
    • Strawberries: The star of the show! Sweet and juicy, they provide a delightful burst of flavor.
    • Pecans: Chopped for that irresistible nutty crunch. You can also swap them for walnuts or sunflower seeds if you prefer.
    • Mayonnaise: This creamy base brings all the flavors together. Light mayo works too for fewer calories!
    • Greek Yogurt: Adding a tangy twist, it lightens the creaminess while boosting protein content.
    • Dijon Mustard: Just a teaspoon adds a hint of zest that lifts the overall flavor profile.
    • Lemon Juice: A splash for brightness and to balance the sweetness of the strawberries.
    • Poppy Seeds: These tiny seeds bring visual appeal and a subtle crunch to the dressing.
    • Pepper: A dash for seasoning, leaving room for salt to your liking.
    • Salt: Essential for enhancing all the other flavors.

    Feeling adventurous? You can mix in some grapes or swap regular yogurt for flavored varieties to change things up! For the exact quantities, check at the bottom of the article where you’ll find them available for printing. Happy cooking!

    How to Make Strawberry Pecan Chicken Salad with Poppyseeds

    Step 1: Prepare the Ingredients

    Start by gathering all your fresh ingredients. Chop the celery and green onion into small pieces to ensure they mix well. Don’t forget to dice the strawberries too! Aim for bites that are similar in size—this adds harmony to each delicious mouthful. Trust me, it makes a difference!

    Step 2: Mix the Base Ingredients

    In a large mixing bowl, combine the shredded chicken, celery, green onion, pecans, mayonnaise, Greek yogurt, Dijon mustard, lemon juice, poppy seeds, and a pinch of pepper. Stir everything together until well-coated and blended. If you find it too thick, feel free to adjust with extra mayo or yogurt. Balance is key!

    Step 3: Fold in the Strawberries

    Now, gently fold in the diced strawberries. You can add them right away for a vibrant look or wait until just before serving to keep them fresher. This way, they won’t lose their juicy texture and sweetness. It’s all about that burst of flavor in every bite!

    Step 4: Serve or Chill

    You can enjoy your salad right away, or if you have a bit of time, chill it for about 10-20 minutes. Chilling enhances the flavors and gives the whole salad a refreshing experience. Perfect for a warm day or as a light lunch!

    Tips for Success

    • Use pre-cooked rotisserie chicken for convenience.
    • Chill your mixing bowl for extra coolness while preparing the salad.
    • Experiment with fresh herbs like basil or mint for added flavor.
    • For a brighter taste, use fresh lemon zest in the dressing.
    • Store any leftovers in an airtight container for up to two days.

    Equipment Needed

    • Mixing Bowl: A large bowl is key. If you don’t have one, use any deep dish.
    • Knife and Cutting Board: Essential for chopping ingredients. A sturdy one will do!
    • Spoon or Spatula: Perfect for mixing everything together.
    • Measuring Cups: Handy for precise amounts, but you can eyeball it if you’re adventurous!

    Variations

    • Add grapes or apples for extra sweetness and crunch.
    • Swap chicken for tofu to make this salad plant-based.
    • Use vegetable mayo to lighten it up or make it vegan-friendly.
    • Incorporate feta cheese for a creamy, tangy twist.
    • Try adding spinach or mixed greens for an extra layer of freshness.

    Serving Suggestions for Strawberry Pecan Chicken Salad with Poppyseeds

    • Serve it over a bed of fresh mixed greens for an elegant presentation.
    • Pair with whole grain bread or pita pockets for a satisfying meal.
    • Complement with a chilled white wine or refreshing lemonade.
    • Add a sprinkle of fresh herbs like basil or mint for an aromatic touch.

    FAQs about Strawberry Pecan Chicken Salad with Poppyseeds

    Can I make Strawberry Pecan Chicken Salad with poppyseeds ahead of time?

    Absolutely! You can prepare it a few hours in advance. Just keep it in the fridge until you’re ready to serve. This salad is actually tastier when chilled!

    What can I substitute for chicken in this salad?

    If you’re looking for alternatives, shredded tofu or chickpeas work beautifully as a vegetarian option. They still provide that hearty texture!

    How long does this salad last in the fridge?

    This Strawberry Pecan Chicken Salad can last up to two days in an airtight container. Just be sure to keep those strawberries fresh either by adding them just before serving or enjoying them early on!

    What can I pair with this salad for a complete meal?

    Pair it with whole grain bread or pita for a satisfying dish. A light soup or a side of fruit would also make a lovely accompaniment.

    Is this salad gluten-free?

    Yes! The Strawberry Pecan Chicken Salad with poppyseeds is inherently gluten-free, making it a perfect choice for those with dietary restrictions.

    Final Thoughts

    There’s something truly special about sharing a dish like Strawberry Pecan Chicken Salad with poppyseeds. It’s more than just a recipe; it’s a way to bring joy to your table, whether for a casual lunch or a gathering with friends. Each bite bursts with flavor, reminding us of sunny days and laughter-filled moments. Plus, it’s so simple to make! I hope this salad finds its way into your kitchen, brightening your busy days and impressing your loved ones. Here’s to creating warm memories, one delightful salad at a time!


    Print

    clock clock iconcutlery cutlery iconflag flag iconfolder folder iconinstagram instagram iconpinterest pinterest iconfacebook facebook iconprint print iconsquares squares iconheart heart iconheart solid heart solid icon

    Description

    A refreshing and delicious strawberry pecan chicken salad with a creamy poppyseed dressing.


    • 2 c shredded chicken
    • 2 celery stalks, chopped into 1/4 in. pieces
    • 1 green onion, chopped thin
    • 56 large strawberries, diced
    • c chopped pecans
    • ¼ c mayonnaise
    • 2 T Greek yogurt, plain
    • 1 tsp dijon mustard
    • 1 tsp lemon juice
    • 1 T poppy seeds
    • ½ tsp pepper
    • salt to taste

    1. Cut and chop ingredients accordingly.
    2. In a mixing bowl, add all the ingredients except the strawberries. Stir to combine and evenly coat. Add more mayo or yogurt to adjust to desired consistency.
    3. Fold in strawberries–or you can wait until just before serving to add the strawberries if serving at a later time.
    4. You can serve this salad immediately or chill for about 10-20 minutes before serving.

    Notes

    • Adjust mayo or yogurt for desired creaminess.
    • For best flavor, serve chilled or just after mixing.
    • Prep Time: 15 minutes
    • Cook Time: 0 minutes
    • Category: Salad
    • Method: Mixing
    • Cuisine: American

    Nutrition

    • Serving Size: 1 cup
    • Calories: 300
    • Sugar: 5g
    • Sodium: 220mg
    • Fat: 18g
    • Saturated Fat: 3g
    • Unsaturated Fat: 15g
    • Trans Fat: 0g
    • Carbohydrates: 12g
    • Fiber: 2g
    • Protein: 25g
    • Cholesterol: 60mg

    Sharing is caring!

  • Rustic No-Knead Rosemary Garlic Bread

    Rustic No-Knead Rosemary Garlic Bread


    Introduction to Rustic No-Knead Rosemary Garlic Bread

    There’s something magical about the smell of freshly baked bread wafting through your home, isn’t there? When it comes to making my Rustic No-Knead Rosemary Garlic Bread, I feel like I’ve created a little piece of heaven. This recipe is not just delicious; it’s quick and stress-free, perfect for those busy days when time is of the essence. Imagine gathering your loved ones around the table, sharing slices of warm, fragrant bread that make even the simplest meal feel special. Trust me, this bread will be a showstopper at any occasion!

    Why You’ll Love This Rustic No-Knead Rosemary Garlic Bread

    This Rustic No-Knead Rosemary Garlic Bread is your new best friend in the kitchen! It’s astonishingly simple yet offers such rich flavors. The beauty of this recipe lies in its minimal effort; mix, wait, and bake! No kneading is required, making it perfect for busy days. Plus, the fragrant rosemary and garlic elevate ordinary meals into something extraordinary, tempting even the pickiest eaters at your table.

    Ingredients for Rustic No-Knead Rosemary Garlic Bread

    Gathering the right ingredients is a journey in itself, and it’s one of my favorite parts of baking! For this Rustic No-Knead Rosemary Garlic Bread, you’ll need:

    • All-purpose flour: The foundation of your bread, providing structure and chewiness. You can swap in whole wheat flour for added nutrition.
    • Salt: Essential for flavor, salt enhances the bread’s taste. Don’t skip it; it makes a world of difference!
    • Instant yeast: This magical ingredient helps your bread rise quickly. You can also use active dry yeast, but you’ll need to proof it first.
    • Warm water: Activates the yeast and hydrates the flour. Aim for about 110°F to avoid killing the yeast.
    • Fresh rosemary: The star of the show! Its aromatic qualities bring a wonderful flavor. If you can’t find fresh, dried rosemary works well.
    • Garlic: Minced cloves add a savory punch. Who doesn’t love the scent of garlic mingling with bread? Feel free to adjust based on your garlic love!
    • Olive oil: Adds moisture and richness, making each bite delightful. If you’re looking for a twist, try flavored oils.
    • Black pepper (optional): A sprinkle of this can give your bread a nice kick. It’s entirely up to your taste buds!
    • Extra flour for dusting: Keep your surface and hands floured to prevent sticking. It’s a simple but important step!

    For exact quantities of each ingredient, check the bottom of the article where they’re conveniently listed for you to print out. Happy baking!

    How to Make Rustic No-Knead Rosemary Garlic Bread

    Now that we’ve gathered our ingredients, it’s time to dive into the process. Making this Rustic No-Knead Rosemary Garlic Bread is as simple as one, two, three. I promise it’s not complicated at all. Just follow these steps, and you’ll be rewarded with a beautiful loaf that fills your home with a mouthwatering aroma!

    Step 1: Mix the Ingredients

    Start by grabbing a large mixing bowl. Combine your all-purpose flour, salt, and instant yeast. Don’t forget the chopped rosemary and minced garlic! Stir everything together until the dry ingredients are well mixed. Then, pour in the warm water and olive oil. This is where the magic begins! Use a wooden spoon to mix until a sticky dough forms. It might feel a bit messy — trust the process!

    Step 2: Allow the Dough to Rise

    Once your dough looks like a shaggy mess, cover the bowl with plastic wrap. It’s time to let it rest and rise. Leave it at room temperature for 12 to 18 hours. Yes, this is what gives the bread its unique texture! You’ll know it’s ready when the dough has doubled in size and is bubbly on top. Patience pays off here, so take a deep breath, and enjoy the wait!

    Step 3: Shape the Dough

    Okay, your dough has risen beautifully! Now, lightly flour a clean surface. Turn the dough out onto the floured area and gently shape it into a round loaf. Keep it simple — don’t over-handle it, or you might deflate all that lovely air. Just a few gentle folds to create a nice shape will do. It’s like tucking a little blanket around your bread!

    Step 4: Preheat the Oven

    This is where the excitement builds! While your dough rests, preheat your oven to 450°F (230°C). Place your Dutch oven inside the oven to heat up as well. This step is crucial for achieving that perfect crust. Allow the Dutch oven to warm for about 30 minutes. Trust me, this little detail makes a world of difference!

    Step 5: Bake the Bread

    Finally, the moment of truth! Carefully transfer the shaped dough onto a piece of parchment paper. Lower it into the hot Dutch oven, and cover it with the lid. Bake for 30 minutes. The bread steams beautifully in this environment, creating an unreal taste. After that, remove the lid and bake for an additional 10 to 15 minutes until the crust turns a glorious golden brown. Just try not to eat it before it cools!

    Once done, let the bread cool on a wire rack for at least 15 minutes before slicing. Patience is key. You want those warm, inviting, fluffy slices – trust me!

    Tips for Success

    • Always measure your flour accurately. Too much can lead to dry bread.
    • Let the dough rise in a warm spot, like near a sunny window.
    • Use a kitchen scale for precise measurements if possible.
    • Experiment with different herbs for unique flavors.
    • For extra flavor, brush the crust with olive oil before baking.

    Equipment Needed

    • Large mixing bowl: A basic bowl will work, but a large, sturdy one makes mixing easier.
    • Wooden spoon: Ideal for mixing, but any spoon will do.
    • Plastic wrap: Use a clean kitchen towel if you don’t have plastic wrap.
    • Dutch oven: A heavy pot with a lid is perfect; a regular oven-safe pot can work too.
    • Parchment paper: If unavailable, you can lightly grease your Dutch oven instead.

    Variations

    • Herb Medley: Mix in other fresh herbs like thyme or basil for diverse flavor profiles.
    • Cheesy Delight: Add shredded cheese like cheddar or mozzarella to the dough for a savory twist.
    • Sundried Tomato: Incorporate chopped sundried tomatoes for an Italian flair.
    • Olive Boost: Toss in chopped olives for a briny, rich addition to your bread.
    • Gluten-Free Option: Experiment with gluten-free flour blends that work for your dietary needs.

    Serving Suggestions

    • Pair your Rustic No-Knead Rosemary Garlic Bread with a fresh garden salad for a light meal.
    • Serve it alongside a warm bowl of soup, like tomato basil or minestrone.
    • Try it with a spread of herbed butter or olive tapenade for added flavor.
    • Enjoy with a glass of dry red wine to elevate your dining experience.

    FAQs about Rustic No-Knead Rosemary Garlic Bread

    As I’ve shared my love for this Rustic No-Knead Rosemary Garlic Bread, I often get the same questions. Here are the answers to help you feel more confident in your baking adventure!

    Can I use different herbs in this bread?

    Absolutely! This recipe is quite versatile. Feel free to swap rosemary for thyme, dill, or even oregano. Each herb will add its own unique flavor. Get creative!

    What if I don’t have a Dutch oven?

    No worries! If you don’t own a Dutch oven, you can use a heavy oven-safe pot with a lid. Alternatively, a baking sheet can work, but the crust won’t turn out quite the same. Just keep an eye on it!

    How do I know when the bread is fully baked?

    The bread should be golden brown on top and sound hollow when tapped on the bottom. Use a food thermometer if you’re unsure. It should reach around 200°F (93°C) internally.

    Can I freeze the bread?

    Yes! After cooling, wrap the bread tightly in plastic wrap and then in aluminum foil. It will keep well in the freezer for up to three months. Just thaw it at room temperature when you’re ready to enjoy!

    How long does the bread last?

    This delightful bread is best enjoyed fresh. However, it can last for about 3-4 days at room temperature when stored in a paper bag. For extended freshness, see the freezing option above!

    Final Thoughts

    Making Rustic No-Knead Rosemary Garlic Bread is more than just following a recipe; it’s about creating an experience filled with warmth and comfort. Each loaf tells a story, filled with the scents of rosemary and garlic that wrap around you like a cozy blanket. Whether you share it with family, friends, or just enjoy it alone, this bread turns ordinary moments into cherished memories. Plus, the ease of preparation means you can savor these delightful experiences even on your busiest days. I hope you feel inspired to create your own loaf and taste the joy it brings!


    Print

    clock clock iconcutlery cutlery iconflag flag iconfolder folder iconinstagram instagram iconpinterest pinterest iconfacebook facebook iconprint print iconsquares squares iconheart heart iconheart solid heart solid icon

    Description

    A delicious and easy Rustic No-Knead Rosemary Garlic Bread recipe perfect for any occasion.


    • 3 ½ cups all-purpose flour
    • 1 ½ teaspoons salt
    • ½ teaspoon instant yeast
    • 1 ¾ cups warm water (about 110°F)
    • 2 tablespoons fresh rosemary, chopped (or 1 tablespoon dried)
    • 3 cloves garlic, minced
    • 2 tablespoons olive oil
    • ½ teaspoon black pepper (optional)
    • Extra flour for dusting

    1. In a large mixing bowl, combine flour, salt, yeast, rosemary, garlic, and black pepper. Add warm water and olive oil, stirring until a sticky dough forms.
    2. Cover with plastic wrap and let sit at room temperature for 12-18 hours, until doubled in size and bubbly.
    3. Lightly flour a surface, turn out the dough, and gently shape it into a round loaf. Avoid over-handling.
    4. Place on floured parchment paper, cover, and let rest for 30-45 minutes while the oven preheats.
    5. Heat oven to 450°F (230°C), placing a Dutch oven inside for 30 minutes.
    6. Carefully transfer the dough (on parchment paper) into the hot Dutch oven. Cover and bake for 30 minutes.
    7. Remove the lid and bake for 10-15 more minutes until golden brown.
    8. Let the bread cool on a wire rack for at least 15 minutes before slicing.

    Notes

    • This bread works well with other herbs or spices for different flavor variations.
    • Ensure the water temperature is warm but not hot to activate the yeast properly.
    • For a crunchier crust, place a dish of water in the oven while baking.
    • Prep Time: 15 minutes
    • Cook Time: 45 minutes
    • Category: Bread
    • Method: No-Knead
    • Cuisine: American

    Nutrition

    • Serving Size: 1 slice
    • Calories: 150
    • Sugar: 0g
    • Sodium: 300mg
    • Fat: 3g
    • Saturated Fat: 0.5g
    • Unsaturated Fat: 2.5g
    • Trans Fat: 0g
    • Carbohydrates: 28g
    • Fiber: 1g
    • Protein: 4g
    • Cholesterol: 0mg

    Sharing is caring!

  • Sweet Potato Muffins with Cinnamon Pecan Streusel

    Sweet Potato Muffins with Cinnamon Pecan Streusel


    Introduction to Sweet Potato Muffins with Cinnamon Pecan Streusel

    Hey there, fellow food lovers! If you’re anything like me, satisfying your sweet tooth while juggling a busy schedule can feel like a high-wire act. That’s where these Sweet Potato Muffins with Cinnamon Pecan Streusel come in. They’re a delightful solution for hectic mornings or a cozy afternoon snack. Imagine biting into a warm muffin, filled with the comforting flavors of sweet potatoes and topped with a crunchy, cinnamon-spiced pecan streusel. Trust me, these muffins are sure to impress your friends and family while making your life a little sweeter!

    Why You’ll Love This Sweet Potato Muffins with Cinnamon Pecan Streusel

    These Sweet Potato Muffins with Cinnamon Pecan Streusel are not only quick to whip up but bursting with flavor! They combine the natural sweetness of sweet potatoes and the warm spice of cinnamon, creating a wholesome treat that everyone will enjoy. Whether you’re a busy mom rushing out the door or a professional needing a midday pick-me-up, these muffins are simple, satisfying, and oh-so-delicious!

    Ingredients for Sweet Potato Muffins with Cinnamon Pecan Streusel

    Let’s dive into the flavorful world of these Sweet Potato Muffins with Cinnamon Pecan Streusel. Gathering the right ingredients is key to creating a muffin masterpiece. Here’s what you’ll need:

    • All-Purpose Flour: This forms the base of our muffins, giving them structure and fluffiness. It’s pantry staple, easy to find, and versatile for a variety of baked goodies.
    • Granulated Sugar & Brown Sugar: Both sugars add sweetness, but brown sugar lends a lovely caramel flavor. You could substitute with coconut sugar if you prefer a healthier option.
    • Baking Powder & Baking Soda: These leavening agents help the muffins rise, keeping them light and airy. Make sure they’re fresh for the best results.
    • Ground Cinnamon & Nutmeg: These warm spices create a cozy flavor that’s perfect for fall. Freshly ground spices can elevate your muffins, but pre-ground works just fine.
    • Salt: A pinch brings all these flavors together, enhancing sweetness and depth.
    • Mashed Roasted Sweet Potatoes: The star of the show! Not only do they add sweetness and moisture, but they’re also packed with nutrients. You can roast them ahead of time for convenience!
    • Unsalted Butter: Melting this adds richness and flavor. If you’re looking for a dairy-free version, coconut oil can work as a wonderful substitute.
    • Eggs: They bind the ingredients and add moisture. For a vegan alternative, you can use flax eggs.
    • Buttermilk (or whole milk): Buttermilk enhances flavor and tenderness. If you don’t have any, just mix regular milk with a splash of vinegar or lemon juice as a quick substitute.
    • Vanilla Extract: A splash of this liquid gold brings warmth and aroma. Always opt for pure vanilla for the best flavor!
    • Chopped Pecans: These not only add crunch but also a buttery flavor. Feel free to swap them for walnuts or omit them if you’re nut-free.
    • Streusel Ingredients: This delicious topping includes flour, brown sugar, ground cinnamon, and cold butter. It gives a sweet, nutty crunch that takes these muffins to the next level!

    You can find exact measurements for all these ingredients at the bottom of the article, ready for printing. Happy baking!

    How to Make Sweet Potato Muffins with Cinnamon Pecan Streusel

    Ready to whip up those delightful Sweet Potato Muffins with Cinnamon Pecan Streusel? Let’s break it down into simple steps. Follow along, and you’ll have these delicious treats in no time!

    Preheat Your Oven and Prepare the Muffin Tin

    First things first, preheat your oven to 375°F (190°C). This step is crucial for achieving the perfect muffin rise. While the oven warms up, line your muffin tin with paper liners or give it a light coating of cooking spray. This little preparation will save you from a sticky mess later. Make sure the tin is well-greased for easy muffin removal!

    Make the Cinnamon Pecan Streusel Topping

    Next, let’s create that irresistible cinnamon pecan streusel topping. In a small bowl, combine chopped pecans, flour, brown sugar, and cinnamon. Give it a gentle stir to distribute the dry ingredients evenly. Now, cut cold butter into small cubes, then work it into the mixture using a fork or pastry cutter. You’re aiming for a crumbly texture, with tiny pea-sized chunks of butter still visible. This will give the streusel that perfect crunchy bite!

    Mix the Dry Ingredients

    Now, grab a large mixing bowl for the dry ingredients. Combine all-purpose flour, granulated sugar, brown sugar, baking powder, baking soda, ground cinnamon, nutmeg, and salt. Whisk them together until they’re well blended. This step is key because it ensures even distribution of the leavening agents, which will help your muffins rise nicely. When dry ingredients are mixed correctly, your muffins will be light and fluffy!

    Combine and Mix Wet Ingredients

    In a separate bowl, let’s mix the wet ingredients. Combine the mashed roasted sweet potatoes, melted butter, eggs, buttermilk, and vanilla extract. Whisk them until smooth and creamy. It’s okay if the sweet potatoes are a bit lumpy; they will add great texture to the muffins. This sweet potato mixture acts as a natural sweetener while keeping your muffins moist.

    Combine Wet and Dry Ingredients

    Now, it’s time to bring the wet and dry ingredients together. Pour the wet mixture into the dry ingredients. Gently fold them together using a spatula. Be careful not to over-mix; a few lumps are just fine. Over-mixing can result in dense muffins, and we definitely want to keep them light and airy. So let the batter come together gently, like a soft hug between friends!

    Fill the Muffin Tin and Add Topping

    Time to fill those muffin cups! Using a spoon or a scoop, pour the batter into the muffin tin, filling each cup about 3/4 full. This gives the muffins room to rise without overflowing. Once filled, sprinkle the cinnamon-pecan streusel topping evenly over the muffin batter. Don’t be shy here—more streusel means more crunch and flavor!

    Bake the Muffins

    Slide your muffin tin into the preheated oven and set a timer for 18-22 minutes. To check for doneness, insert a toothpick into the center of a muffin. If it comes out clean, they’re ready! If there’s wet batter, give them a few more minutes. Once baked, let the muffins cool in the tin for about 5 minutes. Then, transfer them to a wire rack to cool completely. Serving them warm will unleash all the delightful aromas and flavors!

    Tips for Success

    • Always use room temperature ingredients for better mixing and texture.
    • Keep an eye on your muffins while baking, as ovens can vary in temperature.
    • Feel free to add dried fruits like raisins or cranberries for an extra flavor boost.
    • Store any leftovers in an airtight container to maintain freshness.
    • For extra crunch, mix in some oats into the streusel topping!

    Equipment Needed

    • Muffin tin: A standard 12-cup muffin pan works best, but you can use mini or jumbo sizes if desired.
    • Mixing bowls: Use one large and one small bowl for mixing ingredients; glass or stainless steel are ideal.
    • Whisk: A good whisk helps combine wet and dry ingredients smoothly.
    • Spatula: A rubber or silicone spatula is perfect for folding the batter gently.
    • Measuring cups and spoons: Reliable tools for accurate ingredient measurements.

    Variations on Sweet Potato Muffins with Cinnamon Pecan Streusel

    • Gluten-Free Option: Substitute all-purpose flour with a gluten-free flour blend for a gluten-free version that everyone can enjoy!
    • Vegan Twist: Use flax eggs instead of regular eggs and replace buttermilk with almond milk mixed with a splash of vinegar for a plant-based muffin.
    • Add Fruits: Fold in some chopped apples or pears for added sweetness and moisture. Dried cranberries or raisins can also enhance flavor!
    • Spice It Up: For a kick, incorporate a teaspoon of ginger or a pinch of cayenne pepper into the batter. It adds a delightful depth!
    • Salted Caramel Twist: Drizzle a bit of salted caramel sauce over the warm muffins before serving for a luxurious touch!

    Serving Suggestions

    • Enjoy your Sweet Potato Muffins with Cinnamon Pecan Streusel with a warm cup of chai or coffee for a delightful morning.
    • They make a perfect afternoon snack alongside a refreshing herbal tea.
    • Serve them on a charming platter with a drizzle of honey for an elegant presentation.
    • Pair with yogurt or cottage cheese for a satisfying breakfast!

    FAQs about Sweet Potato Muffins with Cinnamon Pecan Streusel

    As with any delicious recipe, you might have a few questions about these Sweet Potato Muffins with Cinnamon Pecan Streusel. Let’s tackle some common inquiries to ensure your baking experience is smooth and successful!

    Can I use canned sweet potatoes instead of roasted ones?

    Absolutely! Canned sweet potatoes can save time, especially on busy days. Just be sure to drain and mash them well to achieve the right consistency for your muffins.

    How do I store leftover muffins?

    Store your muffins in an airtight container at room temperature for up to 3 days. For longer storage, you can freeze them for up to 3 months. Just make sure to wrap them tightly!

    Can I make these muffins dairy-free?

    What other nuts can I use for the topping?

    If pecans aren’t your thing, walnuts or sliced almonds are great alternatives. Each will add its own unique flavor and crunch to the streusel topping!

    How can I make my muffins fluffier?

    For fluffier muffins, ensure that you don’t over-mix when combining the wet and dry ingredients. A few lumps in the batter are totally fine. Also, make sure your leavening agents are fresh!

    Final Thoughts

    These Sweet Potato Muffins with Cinnamon Pecan Streusel are more than just a recipe; they’re a warm hug in muffin form! I love how easy they are to make, yet they bring such joy to the table. Whether you’re enjoying them solo with a cup of coffee or sharing them with friends and family, these muffins create a comforting atmosphere that invites conversation and laughter. The blend of sweet potatoes and buttery pecans is a delightful way to celebrate the flavors of the season. Trust me, your taste buds will thank you for this sweet treat!


    Print

    clock clock iconcutlery cutlery iconflag flag iconfolder folder iconinstagram instagram iconpinterest pinterest iconfacebook facebook iconprint print iconsquares squares iconheart heart iconheart solid heart solid icon

    Description

    Sweet Potato Muffins with Cinnamon Pecan Streusel delight your taste buds!


    • 1 1/2 cups All-Purpose Flour
    • 1/2 cup Granulated Sugar
    • 1/2 cup Brown Sugar (packed)
    • 1 1/2 tsp Baking Powder
    • 1/2 tsp Baking Soda
    • 1 tsp Ground Cinnamon
    • 1/2 tsp Ground Nutmeg
    • 1/4 tsp Salt
    • 1 cup Mashed Roasted Sweet Potatoes (about 1 medium sweet potato)
    • 1/4 cup Unsalted Butter (melted)
    • 2 Large Eggs
    • 1/2 cup Buttermilk (or whole milk)
    • 1 tsp Vanilla Extract
    • 1/2 cup Chopped Pecans
    • 1/4 cup All-Purpose Flour (for streusel)
    • 1/4 cup Brown Sugar (packed, for streusel)
    • 1 tsp Ground Cinnamon (for streusel)
    • 2 tbsp Unsalted Butter (cold and cubed, for streusel)

    1. Preheat your oven to 375°F (190°C).
    2. Line a muffin tin with paper liners or lightly grease it with cooking spray.
    3. In a small bowl, combine the chopped pecans, flour, brown sugar, and cinnamon for the streusel topping.
    4. Cut the cold butter into small cubes and work it into the dry ingredients with a fork or pastry cutter until the mixture becomes crumbly. Set aside.
    5. In a large bowl, whisk together the flour, granulated sugar, brown sugar, baking powder, baking soda, cinnamon, nutmeg, and salt.
    6. In a separate bowl, combine the mashed sweet potatoes, melted butter, eggs, buttermilk, and vanilla extract. Mix until smooth.
    7. Pour the wet ingredients into the dry ingredients and stir gently until just combined.
    8. Spoon the batter into the muffin tin, filling each cup about 3/4 full.
    9. Sprinkle the cinnamon-pecan streusel topping evenly over the muffin batter.
    10. Bake for 18-22 minutes, or until a toothpick inserted into the center of a muffin comes out clean.
    11. Allow the muffins to cool in the tin for 5 minutes before transferring them to a wire rack to cool completely.
    12. Serve warm or at room temperature.

    Notes

    • These muffins are perfect for breakfast, an afternoon snack, or as a treat with a cup of tea.
    • Prep Time: 15 minutes
    • Cook Time: 22 minutes
    • Category: Baked Goods
    • Method: Baking
    • Cuisine: American

    Nutrition

    • Serving Size: 1 muffin
    • Calories: 200
    • Sugar: 10g
    • Sodium: 180mg
    • Fat: 8g
    • Saturated Fat: 3g
    • Unsaturated Fat: 5g
    • Trans Fat: 0g
    • Carbohydrates: 30g
    • Fiber: 2g
    • Protein: 3g
    • Cholesterol: 35mg

    Sharing is caring!