Author: IHAAL Team

  • Turtle Rice Krispie Treats

    Turtle Rice Krispie Treats


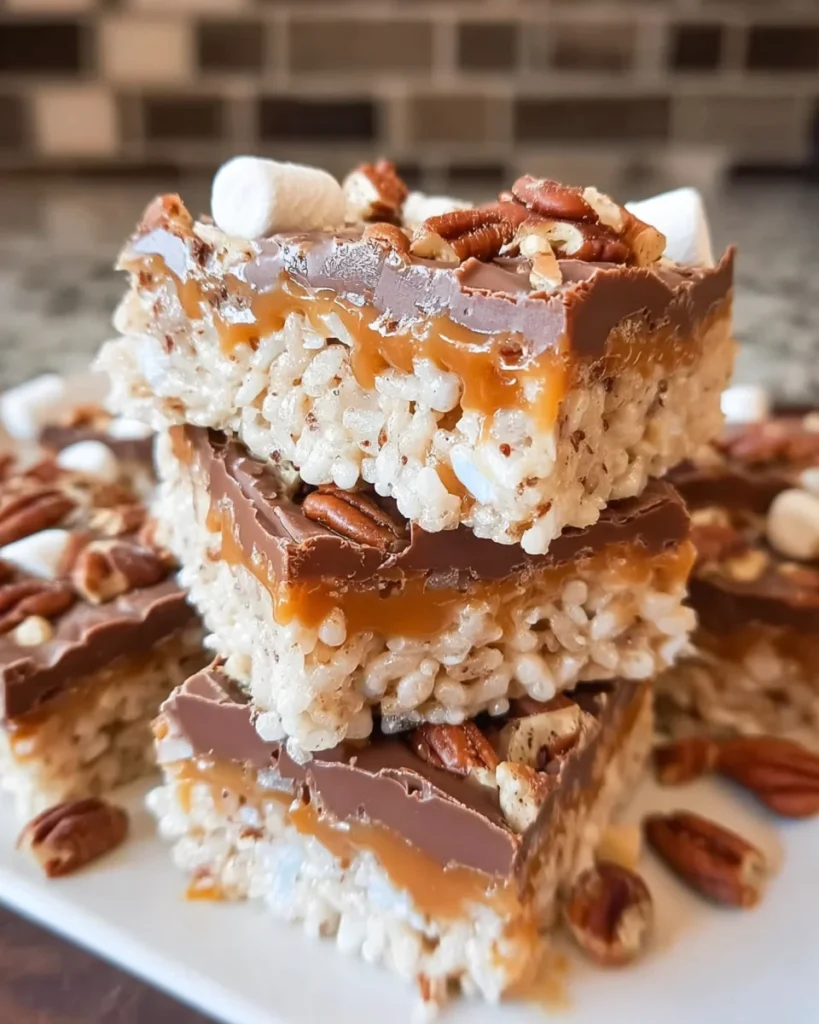
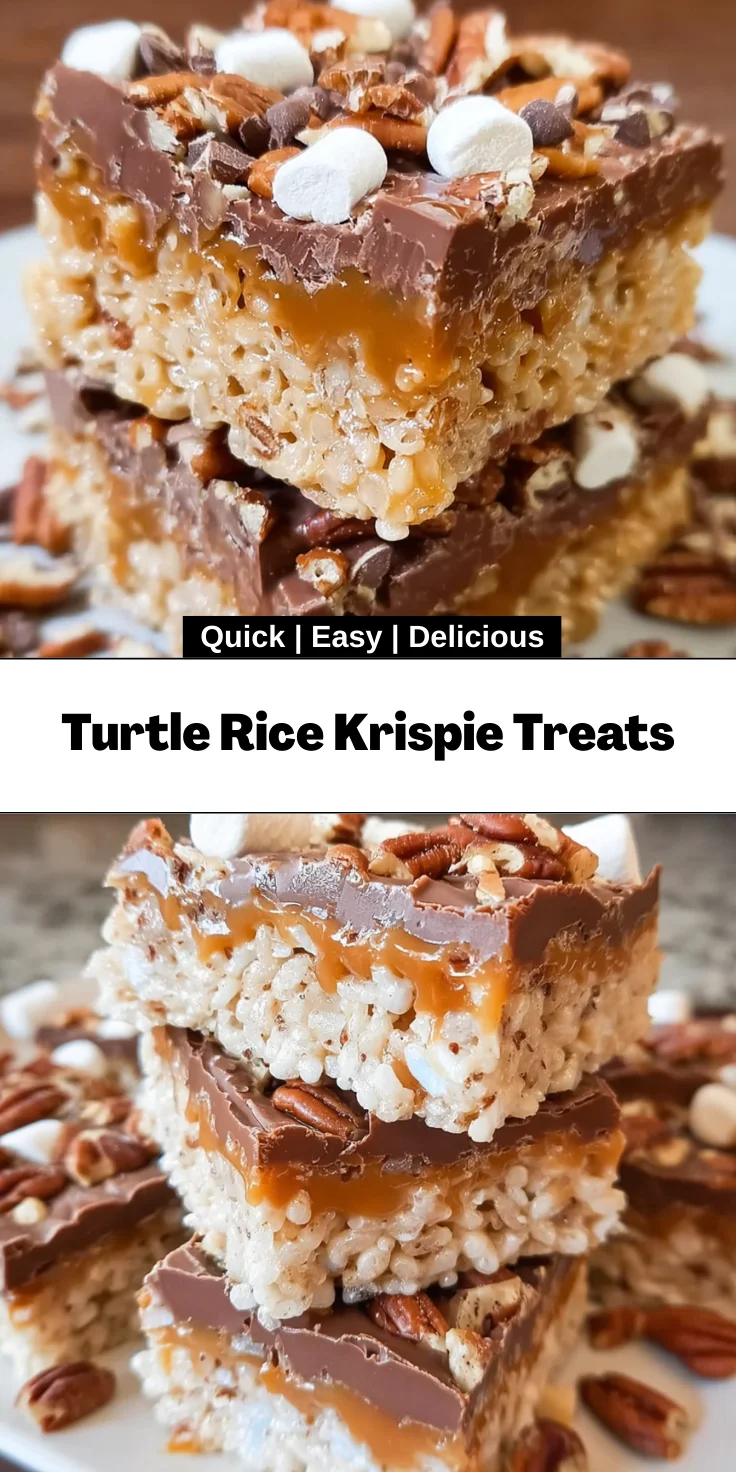
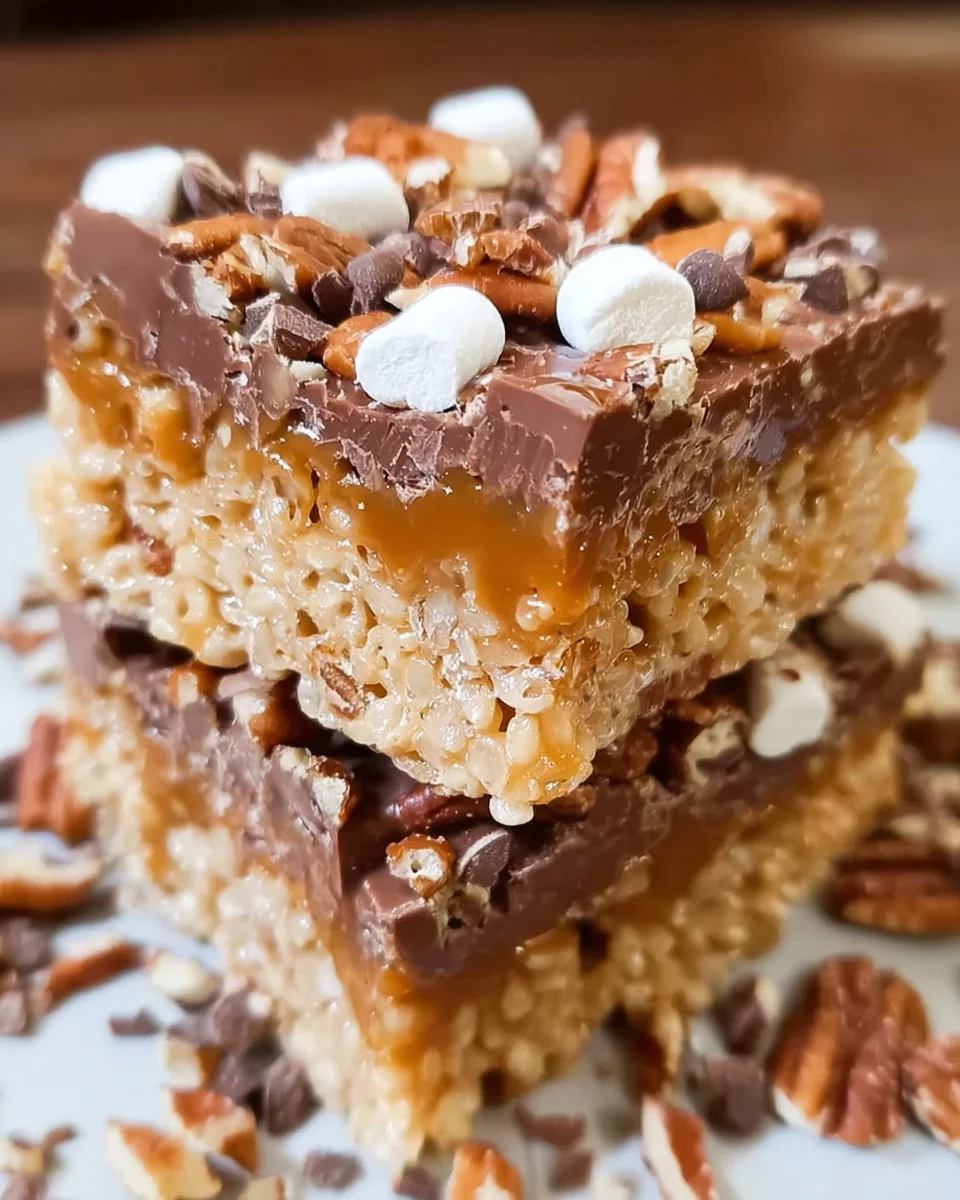
    Introduction to Turtle Rice Krispie Treats

    Welcome to a world of delightful flavors and nostalgia! Turtle Rice Krispie Treats inspire smiles and warm memories, bringing a touch of sweetness to any gathering. As a busy mom myself, I know how essential it is to whip up something quick yet utterly delicious. These layered, gooey bars combine crispy cereal, luscious caramel, and rich chocolate, all topped with crunchy pecans. It’s a dessert that will not only satisfy your sweet tooth but also enchant your family and friends. Let’s make magic happen in the kitchen together!

    Why You’ll Love This Turtle Rice Krispie Treats

    These Turtle Rice Krispie Treats are truly a game-changer for busy parents. They’re super easy to whip up, taking just 30 minutes from start to finish. The combination of crispy, gooey, and crunchy flavors will have your taste buds dancing with joy. Plus, they require no baking, making them the perfect hassle-free dessert to share at gatherings or enjoy at home. Trust me, you’ll keep coming back for more!

    Ingredients for Turtle Rice Krispie Treats

    Gathering quality ingredients is the key to making your Turtle Rice Krispie Treats a sweet success. Here’s what you’ll need:

    • Butter: This adds a rich flavor and helps bind everything together. Unsalted is best, but use what you have on hand.
    • Mini Marshmallows: Soft and fluffy, these create the gooey texture that’s essential in any Rice Krispie treat. You can use regular marshmallows, but mini ones melt better!
    • Rice Krispie Cereal: The star of the show! This crispy cereal gives that satisfying crunch. Feel free to experiment with other cereals if you’re on a quest for a new texture!
    • Soft Caramels: These bring a delightful, chewy sweetness. Look for name-brand caramels, as they melt more uniformly. If you’re feeling adventurous, salt caramel varieties can add an exciting twist!
    • Heavy Cream: This helps create a smooth caramel sauce. If you’re in a pinch, half-and-half can work, but the richness will be different.
    • Chocolate Chips: Rich chocolate drizzle on top makes everything even better. Dark, milk, or even white chocolate can be substituted here, depending on your sweet cravings!
    • Chopped Pecans: The final touch, giving a pleasant crunch and nutty flavor. If you have nut allergies at home, feel free to leave them out or substitute with sunflower seeds for a similar texture.

    Exact ingredient quantities can be found at the bottom of this article, available for easy printing. Happy cooking!

    How to Make Turtle Rice Krispie Treats

    Once you have all your ingredients ready, it’s time to create your Turtle Rice Krispie Treats! Follow these easy steps to craft this heavenly dessert. Let’s dive in!

    Step 1: Melt the Butter

    Start by placing ¼ cup of butter into a large saucepan. Set your stove to medium-low heat, letting the butter melt slowly. You don’t want it to brown—just melt. As the butter turns into a lovely golden liquid, you’ll smell that deliciousness wafting through your kitchen. I always say, “Butter is the aroma of happiness!”

    Step 2: Add Marshmallows

    Once your butter is melted, toss in 5 cups of mini marshmallows. Stir them constantly until they completely melt into a smooth, gooey mixture. This part can be a bit sticky, but trust me, the outcome is worth it! Just think about the sweet, gooey goodness you’re creating.

    Step 3: Combine with Cereal

    Now, it’s time to incorporate the star ingredient—5½ cups of Rice Krispie cereal! Pour the cereal into the warm marshmallow mix and stir gently. Make sure every piece is coated with that gooey mixture. It’s like a warm hug for the cereal! You’ll see the magic transforming before your eyes.

    Step 4: Press into the Pan

    Take your Rice Krispie mixture and pour it into a greased 9×13-inch baking pan. This part is crucial! Use a spatula or your hands (lightly greased) to press the mixture down evenly. Don’t squish too much; we want that delightful texture! Imagine you’re making a firm, yet gentle bed for all the toppings.

    Step 5: Prepare the Caramel

    In another medium saucepan, add 16 oz of soft caramels along with 3 tablespoons of heavy cream. Heat them over medium heat, stirring until the caramels are completely melted and smooth. Be patient! The creamy goodness will be worth the wait. This is where the flavor starts to build!

    Step 6: Layer the Caramel

    Carefully pour the melted caramel over your Rice Krispie base. Spread it evenly with a spatula so every bite will be a marvelous mix of flavors. The caramel takes these treats to a whole new level of deliciousness!

    Step 7: Melt the Chocolate

    Grab 2 cups of chocolate chips and place them in a microwave-safe bowl. Heat the chocolate in 30-second increments, stirring well after each one, until you achieve a silky smooth consistency. This usually takes about 90 seconds. Keep a close eye—we want melted chocolate, not a chocolate volcano!

    Step 8: Top with Chocolate

    Once the chocolate is melted, pour it over the caramel layer. Use a spatula to spread it out evenly, letting it create a glossy finish. The combination of rich chocolate and gooey caramel is like a heavenly layer of joy!

    Step 9: Sprinkle Pecans

    Finally, sprinkle ½ cup of chopped pecans over the chocolate layer. This adds a wonderful crunch! Plus, it’s all about that texture explosion when you sink your teeth into this treat.

    Step 10: Let Set

    Now comes the hardest part: waiting! Allow the chocolate to set completely at room temperature or pop it in the fridge for quicker results. Once it’s firm, you can cut your Turtle Rice Krispie Treats into squares and serve. It’s like waiting for a beautiful sunrise, but trust me, it will be worth it!

    Tips for Success

    • Use fresh ingredients for the best flavor. Stale marshmallows aren’t as gooey!
    • Don’t rush melting the butter and marshmallows; low heat creates a perfect blend.
    • Grease your hands or spatula when pressing the Rice Krispie mixture into the pan to prevent sticking.
    • Store any leftovers in an airtight container to maintain freshness and flavor.
    • For an extra touch, drizzle more melted chocolate on top before serving!

    Equipment Needed

    • Large Saucepans: Ideal for melting butter and mixing. A non-stick one is easiest for cleanup!
    • 9×13-Inch Baking Pan: Essential for shaping your treats. An 8×8 pan can work for thicker bars.
    • Spatula: Perfect for mixing and spreading. A silicone spatula is my favorite for scraping the sides!
    • Microwave-Safe Bowl: Necessary for melting chocolate. Any heat-resistant bowl will do in a pinch.

    Variations

    • Nut-Free Option: Leave out the pecans or substitute with crunchy sunflower seeds for a similar texture without nuts.
    • Flavor Infusions: Add a pinch of sea salt or a sprinkle of cinnamon for an extra flavor kick that complements the chocolate and caramel.
    • Dark Chocolate Delight: Use dark chocolate chips instead of milk chocolate for a richer, more sophisticated taste.
    • Peanut Butter Twist: Swirl in creamy or crunchy peanut butter when mixing the marshmallows for a delicious peanut butter twist.
    • Fruit Additions: Mix in dried fruits like cranberries or raisins for a touch of chewiness and a pop of color!

    Serving Suggestions for Turtle Rice Krispie Treats

    • Pair these delightful treats with a scoop of vanilla ice cream for an indulgent dessert combo.
    • Serve alongside a warm cup of coffee or a chilled glass of milk for the perfect afternoon snack.
    • For a festive touch, arrange them on a colorful platter and drizzle extra caramel over the top.
    • Add a sprinkle of sea salt or a dusting of cocoa powder before serving to enhance the flavors.

    FAQs about Turtle Rice Krispie Treats

    Can I make Turtle Rice Krispie Treats ahead of time?

    Absolutely! You can prepare these treats a day in advance. Just store them in an airtight container to maintain their freshness and deliciousness. They’ll remain gooey and tasty!

    What’s the best way to cut the treats?

    For clean cuts, use a sharp knife. If you lightly grease the knife, it prevents sticking. I often pop them in the fridge for about 30 minutes before cutting—this helps set the chocolate, making slicing easier!

    Can I use different types of chocolate for these treats?

    Yes, you can! Dark chocolate, milk chocolate, or even white chocolate work wonderfully. Each brings a different flavor profile that can complement the caramel beautifully. Feel free to experiment!

    What do I do if my Rice Krispie mixture is too sticky?

    If you find the mixture too sticky to handle, try greasing your hands or using a damp spatula when pressing it into the pan. This will help create that perfectly textured layer without too much fuss!

    How long can I store the leftover Turtle Rice Krispie Treats?

    You can store them in an airtight container for up to a week at room temperature. Just ensure they’re sealed well to keep all that gooey goodness fresh!

    Final Thoughts on Turtle Rice Krispie Treats

    There’s something magical about Turtle Rice Krispie Treats that brings joy to every moment. Whether it’s a family gathering or a quiet evening at home, these delightful bars become a sweet centerpiece. As you watch your loved ones savor every bite, you’ll feel a sense of pride and warmth. The combination of textures and flavors creates a satisfying treat that’s hard to resist. Plus, the simplicity of making them together makes for cherished memories in the kitchen. So grab those ingredients, roll up your sleeves, and enjoy the delight of baking something that everyone will love!


    Print

    clock clock iconcutlery cutlery iconflag flag iconfolder folder iconinstagram instagram iconpinterest pinterest iconfacebook facebook iconprint print iconsquares squares iconheart heart iconheart solid heart solid icon

    Description

    Turtle Rice Krispie Treats are a delightful dessert combining crispy cereal, gooey caramel, and rich chocolate, topped with crunchy pecans.


    • ¼ cup butter
    • 5 cups mini marshmallows
    • 5½ cups rice krispie cereal
    • 16 oz soft caramels (1½ 11oz bags, unwrapped)
    • 3 TBS heavy cream
    • 2 cups chocolate chips
    • ½ cup chopped pecans

    1. Melt your butter over medium low heat in a large sauce pan.
    2. Add in marshmallows, and stir together till marshmallows are completely melted.
    3. Pour in your rice krispie cereal and stir together till cereal is completely coated.
    4. Pour cereal into a 9×13 in pan and press down evenly. (Don’t squish too much!)
    5. In a medium sized sauce pan combine caramels and heavy cream over medium heat.
    6. Stir until caramel is melted and smooth.
    7. Pour and spread caramel evenly over the top of rice krispie treats.
    8. Melt chocolate chips in the microwave in 30 second increments (for about 90 seconds total), stirring after each until smooth.
    9. Pour chocolate over the caramel layer and spread evenly.
    10. Sprinkle chopped pecans over the top of the chocolate evenly.
    11. Let chocolate set completely and cut and serve.

    Notes

    • Make sure to use fresh ingredients for the best taste.
    • Store leftovers in an airtight container to maintain freshness.
    • Prep Time: 15 minutes
    • Cook Time: 15 minutes
    • Category: Dessert
    • Method: No-bake
    • Cuisine: American

    Nutrition

    • Serving Size: 1 piece
    • Calories: 220
    • Sugar: 23g
    • Sodium: 65mg
    • Fat: 9g
    • Saturated Fat: 5g
    • Unsaturated Fat: 3g
    • Trans Fat: 0g
    • Carbohydrates: 32g
    • Fiber: 1g
    • Protein: 2g
    • Cholesterol: 10mg

    Sharing is caring!

  • Pesto Chicken Flatbread

    Pesto Chicken Flatbread


    Introduction to Pesto Chicken Flatbread

    Let me share with you a delightful gem from my kitchen: Pesto Chicken Flatbread. If you’re like me, juggling a busy schedule, this recipe is a lifesaver. Imagine coming home after a long day and whipping up a satisfying meal in just over half an hour!

    With tender chicken, vibrant pesto, and melty cheese on a crispy flatbread, it’s a dish that pleases everyone at the dinner table. Whether you’re looking for a quick solution for a family dinner or something to impress your friends, this recipe fits the bill perfectly!

    Why You’ll Love This Pesto Chicken Flatbread

    There’s something truly special about Pesto Chicken Flatbread. It’s not just a meal; it’s an experience! This recipe combines speed and flavor, making it ideal for our busy lifestyles.

    In under 35 minutes, you can serve a dish that feels gourmet without all the fuss. Plus, it’s totally customizable, so you can cater to even the pickiest eaters in your family.

    Ingredients for Pesto Chicken Flatbread

    Let’s gather our star players for this delightful Pesto Chicken Flatbread. Each ingredient brings its charm to the dish, making it mouthwatering and loaded with flavor.

    • Boneless, skinless chicken breasts: Tender and mild, they’re the perfect base for our toppings.
    • Fresh basil pesto: This vibrant green sauce is a superstar, adding a punch of flavor. You can opt for store-bought for convenience or whip up a homemade batch for that fresh touch.
    • Flatbread: Crispy and versatile, it serves as our delicious canvas. You can choose store-bought for quickness or try your hand at making it from scratch.
    • Shredded mozzarella cheese: Creamy and melty, it’s the gooey goodness we all love on a pizza-inspired dish.
    • Cherry tomatoes: Sweet and juicy, these pop with flavor and add a burst of color.
    • Grated Parmesan cheese: A sprinkle of this salty cheese elevates the taste, adding an extra layer of yum.
    • Olive oil: This liquid gold is perfect for cooking and adds a rich flavor to the chicken.
    • Salt and pepper: Simple seasonings that are crucial for bringing out the natural flavors of our ingredients.
    • Fresh basil leaves (optional): For garnish, they add a lovely touch and another layer of fresh aroma!

    The exact quantities for each ingredient can be found at the bottom of the article, ready for you to print out. Let’s dive into the preparation next!

    How to Make Pesto Chicken Flatbread

    Step 1: Preheat and Prepare

    To kick things off, preheating your oven to 400°F (200°C) is essential for achieving that perfect crispy flatbread. While your oven is warming up, pat the chicken breasts dry. This simple step ensures they sear beautifully. Season both sides generously with salt and pepper; feel free to add garlic powder or Italian seasoning if you’re feeling adventurous. Preparing your chicken properly is key to locking in flavor, and this sets the stage for our delicious Pesto Chicken Flatbread.

    Step 2: Cook the Chicken

    In a skillet, heat up some olive oil over medium-high heat. Once shimmering, carefully place your seasoned chicken breasts in the pan. Cook them for 6-7 minutes on each side. Look for a golden-brown crust that shows they’re caramelizing just right. Remember, it’s important to ensure the internal temperature reaches 165°F (75°C) before removing them from the skillet. After cooking, let the chicken rest for about 5 minutes before slicing. This juicy, tender chicken will be the star of your flatbread, so let it shine!

    Step 3: Assemble the Flatbreads

    Now it’s time for the fun part—assembling your Pesto Chicken Flatbread. Lay the flatbreads out on a baking sheet, ready for a flavor upgrade. Spread a generous layer of that vibrant basil pesto over each piece, making sure to cover it thoroughly. Next, distribute your sliced chicken evenly on top, and don’t be shy with the shredded mozzarella cheese. Finish off by placing halved cherry tomatoes for sweetness and a sprinkle of grated Parmesan for that extra umami. This colorful arrangement is not just beautiful but also delicious!

    Step 4: Bake to Perfection

    Slide your beautifully assembled flatbreads into the preheated oven. Bake them for about 10-12 minutes until you see that cheese melting into ooey-gooey perfection. Keep an eye on them, especially during the last few minutes. If you want that crispy top, switch to broil for 1-2 minutes, but don’t wander off—you’ll want to watch closely to prevent any burning. Once they’re done, take the flatbreads out and let them cool for a minute. You’re just a slice away from enjoying your creation!

    Tips for Success

    • Prep ingredients ahead of time to save on cooking chaos.
    • For a vibrant flavor boost, try adding garlic or sun-dried tomatoes to your toppings.
    • Consider grilling the chicken for a smoky flavor boost.
    • Don’t overcrowd the baking sheet; it helps with even cooking.
    • Experiment with different flatbreads like naan or pita for variety!

    Equipment Needed

    • Skillet: A non-stick or cast-iron skillet works wonders for cooking chicken.
    • Baking sheet: A standard baking sheet will do; line it with parchment for easy cleanup.
    • Oven: Any conventional oven will serve well for that perfect bake.
    • Chef’s knife: A good knife is essential for slicing chicken and toppings.
    • Spatula: A spatula helps transfer flatbreads from the baking sheet to your plate.

    Variations of Pesto Chicken Flatbread

    • Veggie Delight: Add a medley of your favorite vegetables such as bell peppers, zucchini, or spinach for an extra crunch and boost of nutrients.
    • Pesto Shrimp Flatbread: Swap out chicken for shrimp marinated in lemon juice and garlic for a seafood twist that’s equally delicious.
    • Caprese Style: Instead of chicken, top with fresh mozzarella slices, tomatoes, and a drizzle of balsamic glaze for a classic Italian favorite.
    • Spicy Kick: Add sliced jalapeños or a sprinkle of red pepper flakes to the pesto for a deliciously spicy version!
    • Dairy-Free Option: Substitute dairy cheese with nut-based cheese or nutritional yeast to enjoy this dish while keeping it dairy-free.

    Serving Suggestions for Pesto Chicken Flatbread

    • Pair with a fresh green salad tossed in lemon vinaigrette for a light and refreshing side.
    • Serve with garlic bread or a side of crispy roasted vegetables for a wholesome meal.
    • Complement with a chilled white wine, like Pinot Grigio, for a delightful evening.
    • Arrange the flatbreads on a wooden board for a beautiful presentation.
    • Don’t forget your favorite dipping sauces, like ranch or a light pesto drizzle!

    FAQs about Pesto Chicken Flatbread

    You might have some questions swirling around in your mind as you dive into the world of Pesto Chicken Flatbread. Here are some common queries I often hear, along with the answers that keep meal prep anxiety at bay!

    Can I use different proteins for the flatbread? Absolutely! While chicken is a favorite, you can easily substitute it with turkey, beef, or even tofu for a vegetarian option. Just ensure to adjust the cooking times accordingly.

    How should I store leftovers? If you have any leftovers, they can be stored in an airtight container in the fridge for up to 2-3 days. Just reheat in the oven for a crispy finish.

    Can I make this Pesto Chicken Flatbread ahead of time? Yes! You can prep everything in advance but hold off on baking it until you’re ready to enjoy. Just store the assembled flatbreads in the fridge.

    What are some great side dishes to serve with it? I recommend tossing together a simple arugula salad with lemon dressing or pairing it with roasted veggies. Both work wonderfully to complement the flatbread’s flavors!

    Is this dish gluten-free? Yes, as long as you use gluten-free flatbreads, this Pesto Chicken Flatbread can easily fit into a gluten-free diet. Just check the packaging to be sure!

    Final Thoughts

    Cooking should be a joyful experience, and Pesto Chicken Flatbread truly embodies that spirit. It’s more than just a meal; it’s a chance to gather around the table with loved ones and create warm memories.

    With its delightful flavors, vibrant colors, and simplicity, this dish takes the stress out of weeknight dinners. Each bite is a reminder that cooking can be effortless and enjoyable, even on our busiest days. I hope this recipe brightens your kitchen, just as it has brightened mine!


    Print

    clock clock iconcutlery cutlery iconflag flag iconfolder folder iconinstagram instagram iconpinterest pinterest iconfacebook facebook iconprint print iconsquares squares iconheart heart iconheart solid heart solid icon

    Description

    A deliciously simple recipe for Pesto Chicken Flatbread, combining tender chicken, fresh pesto, and melty cheese on a crispy flatbread.


    • 2 large boneless, skinless chicken breasts
    • 1 cup fresh basil pesto (store-bought or homemade)
    • 4 pieces of flatbread (store-bought or homemade)
    • 1 cup shredded mozzarella cheese
    • 1/2 cup cherry tomatoes, halved
    • 1/4 cup grated Parmesan cheese
    • 2 tablespoons olive oil
    • Salt and pepper, to taste
    • Fresh basil leaves, for garnish (optional)

    1. Preheat your oven to 400°F (200°C).
    2. Pat the chicken breasts dry and season both sides with salt and pepper (add garlic powder or Italian seasoning if desired).
    3. Heat olive oil in a skillet over medium-high heat. Cook the chicken for 6-7 minutes on each side until golden brown and cooked through (internal temperature should reach 165°F or 75°C).
    4. Remove the chicken from the skillet and let it rest for 5 minutes before slicing into thin strips.
    5. Lay out the flatbreads on a baking sheet. Spread a generous layer of basil pesto over each piece.
    6. Distribute the sliced chicken evenly over the pesto-covered flatbreads.
    7. Sprinkle shredded mozzarella cheese over the chicken, followed by halved cherry tomatoes.
    8. Top with grated Parmesan cheese.
    9. Bake in the preheated oven for 10-12 minutes until the cheese is melted and bubbly, and the edges are golden brown.
    10. Optionally, switch to broil for the last 1-2 minutes for a crispy top, watching closely to prevent burning.
    11. Carefully take the flatbreads out of the oven and let them cool for a minute.
    12. Slice into quarters or halves and garnish with fresh basil leaves if desired.
    13. Serve warm with a side salad or your favorite dipping sauce.

    Notes

    • Feel free to customize with your favorite vegetables or additional toppings.
    • Store-bought pesto can save time, but homemade pesto adds freshness.
    • Prep Time: 15 minutes
    • Cook Time: 20 minutes
    • Category: Main Dish
    • Method: Baking
    • Cuisine: Italian

    Nutrition

    • Serving Size: 1 flatbread
    • Calories: 450
    • Sugar: 3g
    • Sodium: 650mg
    • Fat: 20g
    • Saturated Fat: 8g
    • Unsaturated Fat: 6g
    • Trans Fat: 0g
    • Carbohydrates: 42g
    • Fiber: 2g
    • Protein: 30g
    • Cholesterol: 70mg

    Sharing is caring!

  • Halloween Rice Krispie Treats

    Halloween Rice Krispie Treats


    Introduction to Halloween Rice Krispie Treats

    Ah, Halloween! The crisp fall air and the vibrant colors get me every time. One of my favorite ways to celebrate this spooky season is with delightful Halloween Rice Krispie Treats. Honestly, they’re a lifesaver for busy moms like us!

    You can whip these adorable, festive goodies up in just 25 minutes, making them perfect for impromptu celebrations or school treats. With a melt-in-your-mouth texture, they’ll not only impress your kids but also charm anyone who lays eyes on them. Trust me, they’re as fun to make as they are to eat!

    Why You’ll Love This Halloween Rice Krispie Treats

    You’re going to adore these Halloween Rice Krispie Treats for so many reasons! First off, they’re incredibly easy to whip up, even on our busiest days. Plus, the delightful combination of creamy marshmallows and crunch from the cereal is a winning recipe for smiles. And let’s not forget the festive M&Ms and sprinkles that add a pop of color and joy. They’re simply irresistible!

    Ingredients for Halloween Rice Krispie Treats

    Before diving into the world of Halloween Rice Krispie Treats, let’s gather our essentials. Here’s what you’ll need:

    • Butter: Unsalted butter serves as the base, making the treats rich and creamy.
    • Marshmallows: These sweet fluffy delights create that signature gooey texture we all crave.
    • Vanilla Extract: This adds a lovely depth of flavor, enhancing the sweetness.
    • Rice Krispies Cereal: The backbone of this treat, they provide that delightful crunch!
    • Halloween M&Ms: These colorful candies not only taste great but also give a festive flair.
    • Halloween Sprinkles: A sprinkle of these will turn your treats into fun, spooky bites.
    • Candy Corn: This traditional Halloween candy adds both color and sweetness to the mix.

    Feel free to get creative! You could swap the candy corn for chocolate chips or trade the M&Ms for seasonal peanut butter candies. The beauty of this recipe is that you can personalize it based on family favorites.

    For exact measurements, you can find them at the bottom of the article, ready for printing. Now that we have our ingredients ready, let’s jump into the fun part—making these treats!

    How to Make Halloween Rice Krispie Treats

    Now that we have our ingredients ready, let’s dive into making these delightful Halloween Rice Krispie Treats! Follow these easy steps to create your festive masterpiece. Trust me, the whole family will love them!

    Prepare the Baking Pan

    First things first, let’s prep our baking pan. Take a 9×13-inch baking dish and line it with foil, making sure it covers the bottom and sides. This makes cleanup a breeze!

    Now, spray the foil with a bit of cooking spray. This prevents your treats from sticking. Trust me, no one enjoys a sticky situation!

    Melt the Butter and Marshmallows

    Next, it’s time to melt our butter and marshmallows together. Grab a medium saucepan and place it over medium-low heat.

    Add in the 8 tablespoons of unsalted butter and the 15 ounces of marshmallows. Stir frequently until they melt into a smooth, gooey mixture. It will start to smell heavenly!

    Once melted, remove the saucepan from the heat. Stir in 2 teaspoons of vanilla extract, giving the mixture an extra boost of flavor.

    Mix in the Cereal and Candies

    Now comes the fun part—mixing everything together! Quickly add 9 cups of Rice Krispies cereal into the melting marshmallow mixture.

    Stir vigorously until the cereal is well-coated. Then, toss in 1 cup of Halloween M&Ms and 1/2 cup of Halloween sprinkles. They bring vibrant colors and a festive spirit. Mix until everything is combined! Make it a family affair; kids love getting involved here!

    Transfer and Press the Mixture

    Time to transfer our sticky goodness to the prepared baking pan! Pour the marshmallow-cereal mixture into the lined pan. It might be tempting to eat it right off the spoon, but hold that thought!

    Using a spatula or your hands (sprayed with a little cooking spray to avoid sticking), press the mixture down. You want it nice and compact, so the treats hold together. Be gentle but firm!

    Cool and Cut the Treats

    Patience is key now! Let your treats cool completely in the pan, which will take about 30 minutes. Waiting can feel like torture, but it’ll be worth it!

    Once they’re cool, you can cut them into squares. Use a sharp knife for clean edges, and try not to eat too many while doing so. Trust me, these Halloween Rice Krispie Treats will vanish quick!

    Tips for Success

    • Be sure to keep the heat low while melting. This prevents burning the marshmallows!
    • Use a spatula coated with cooking spray for easy mixing and pressing.
    • For added creativity, try different candies like Reese’s Pieces or colorful chocolates!
    • To aid cooling, place the pan in a cool spot, but avoid the fridge to keep from condensation.
    • Cut these treats with a warm, wet knife for clean edges!

    Equipment Needed

    • 9×13-inch baking pan: Any similar-sized dish will work.
    • Medium saucepan: A larger pot is fine if you double the recipe.
    • Spatula: A wooden spoon also gets the job done.
    • Parchment paper or foil: Use wax paper in a pinch!
    • Cooking spray: Butter works too if you don’t have spray.

    Variations of Halloween Rice Krispie Treats

    • Chocolate Drizzle: Melt some dark or white chocolate and drizzle it over the cooled treats for an elegant touch.
    • Peanut Butter Twist: Stir in 1/2 cup of creamy peanut butter with the melted marshmallows for a nutty flavor that everyone will love!
    • Festive Colors: Use colored candies or sprinkles according to your theme, such as red and green for Christmas or pastels for Easter.
    • Gluten-Free Option: Switch to gluten-free Rice Krispies to make a treat everyone can enjoy!
    • Vegan Version: Substitute butter with coconut oil and use vegan marshmallows for a plant-based adaptation.
    • Fruit Infusion: Add in dried fruit like cranberries or apricots for a chewy contrast and a bit of natural sweetness.

    Serving Suggestions for Halloween Rice Krispie Treats

    • Pair with warm apple cider for a cozy autumn vibe.
    • Serve alongside spooky-themed cupcakes or cookies for a festive treat table.
    • For a fun twist, cut them into ghost shapes using cookie cutters.
    • Wrap individually in clear cellophane for party favors.
    • Add a small decorative plate and festive napkin for an eye-catching presentation.

    FAQs about Halloween Rice Krispie Treats

    Can I make Halloween Rice Krispie Treats ahead of time?

    Absolutely! You can make these treats a day or two in advance. Just store them in an airtight container to keep them fresh. They’ll hold up well, and you can even decorate them right before serving!

    What’s the best way to store leftovers?

    Keep any leftover Halloween Rice Krispie Treats in an airtight container at room temperature. They’ll stay fresh for about a week. If they last that long!

    Can I use different types of cereal?

    You sure can! Feel free to substitute with other cereals, like Fruity Pebbles or Cocoa Krispies. Each type will give its own unique twist to the Halloween Rice Krispie Treats.

    How can I make these treats a little healthier?

    Consider using brown rice cereal or reducing the amount of M&Ms and candy corn. You can also add in some nuts or seeds for extra nutrition without sacrificing sweetness.

    What’s the best way to cut them into squares?

    For clean cuts, use a sharp knife that’s been dipped in warm water. This prevents the sticky marshmallow bits from clinging to the blade. Everyone loves perfect squares!

    Final Thoughts

    Making Halloween Rice Krispie Treats is not just about creating a dessert; it’s about crafting memories with your family. The smiles on their faces when they bite into those gooey, colorful squares make all the effort worthwhile. I love how this quick recipe allows us to gather in the kitchen, laugh, and enjoy quality time together.

    Whether you’re hosting a Halloween party or just looking to brighten a weekday afternoon, these treats are sure to add a sprinkle of joy to your celebrations. Once you try them, you’ll find them in your recipe rotation every October!


    Print

    clock clock iconcutlery cutlery iconflag flag iconfolder folder iconinstagram instagram iconpinterest pinterest iconfacebook facebook iconprint print iconsquares squares iconheart heart iconheart solid heart solid icon

    Description

    Delicious Halloween-themed Rice Krispie Treats, perfect for festive celebrations.


    • 8 tablespoons unsalted butter
    • 15 ounces marshmallows (about 1 1/2 (10 ounce) bags)
    • 2 teaspoons vanilla extract
    • 9 cups Rice Krispies Cereal
    • 1 cup Halloween M&Ms
    • 1/2 cup Halloween Sprinkles
    • 1 cup candy corn

    1. Line a 9×13-inch baking pan with foil and spray with cooking spray. Set aside.
    2. Melt the butter and the marshmallows in a medium sized saucepan over medium-low heat. Once the marshmallows are melted, remove from heat and stir in the vanilla.
    3. Quickly stir in the cereal. Stir in the candy and sprinkles.
    4. Pour the marshmallow-cereal mixture into the prepared baking dish. Press to flatten. (It is recommended to spray your hands with cooking spray to press the treats into the pan.)
    5. Cool completely before cutting into squares.

    Notes

    • Be careful while pressing the mixture into the pan to avoid burns.
    • Store leftovers in an airtight container.
    • Prep Time: 15 minutes
    • Cook Time: 10 minutes
    • Category: Dessert
    • Method: Stovetop
    • Cuisine: American

    Nutrition

    • Serving Size: 1 square
    • Calories: 140
    • Sugar: 9g
    • Sodium: 90mg
    • Fat: 6g
    • Saturated Fat: 4g
    • Unsaturated Fat: 0g
    • Trans Fat: 0g
    • Carbohydrates: 20g
    • Fiber: 0g
    • Protein: 1g
    • Cholesterol: 10mg

    Sharing is caring!

  • One Pot Chicken Orzo

    One Pot Chicken Orzo


    Introduction to One Pot Chicken Orzo

    Let’s be real: some days, dinner can feel like a juggling act. That’s where my One Pot Chicken Orzo comes to the rescue—bringing together tender chicken, colorful veggies, and creamy orzo in just one pot! It’s a quick solution for busy days when you’re racing against the clock. With minimal cleanup and maximum flavor, this dish is sure to delight your family and impress your friends. Picture the cozy aroma filling your kitchen as you create a meal that warms the heart. Trust me; you won’t want to miss adding this gem to your weekly rotation!

    Why You’ll Love This One Pot Chicken Orzo

    This One Pot Chicken Orzo is not just a meal; it’s a lifesaver! Imagine whipping up a flavorful dish that requires minimal prep and even less cleanup. It delivers hearty comfort without compromising on taste. Trust me, after a long day, who wouldn’t love a quick, satisfying dinner that you can make with ingredients you likely already have? This recipe truly meets your needs, making it a perfect fit for your busy lifestyle.

    Ingredients for One Pot Chicken Orzo

    Gathering the right ingredients is half the fun of cooking! For this One Pot Chicken Orzo, you’ll need a mix of wholesome items that work beautifully together. You’ll want boneless, skinless chicken breasts or tenders, cut into bite-sized pieces. Their juicy tenderness forms the heart of the dish.

    Now, let’s amp up the flavor! Garlic powder, salt, black pepper, and red pepper flakes will season the chicken perfectly, giving it that extra oomph. Don’t forget the olive oil—it’s your trusty companion for sautéing.

    For the vegetables, I love adding fresh asparagus, but feel free to swap in peas or broccoli if that’s what you have on hand. A diced yellow onion brings a sweet base, while minced garlic adds a delightful kick.

    Next, the star of our dish: dry orzo pasta. It’s small, cute, and cooks up creamy when combined with broth. You’ll need low-sodium chicken broth, which creates a rich backdrop for all these flavors to mingle. Fresh thyme is a great herb to bring freshness, but dried thyme can step in when needed!

    For that creamy texture, half and half (or milk) works wonders, along with freshly grated Parmesan cheese for a touch of decadence. Finally, don’t forget the fresh spinach—it’s vibrant and adds a nourishing green element. A sprinkle of fresh parsley and extra Parmesan as a garnish brings your dish full circle.

    Curious about exact measurements? You can find them at the bottom of the article, available for printing!

    How to Make One Pot Chicken Orzo

    Step 1: Prepare the Chicken

    Let’s kick things off by seasoning our chicken! In a small bowl, combine cubed chicken pieces with garlic powder, salt, black pepper, and red pepper flakes. This mix will give the chicken a wonderful aroma and flavor. Toss everything together until each piece is well coated. Trust me, this step is vital for making sure your chicken is bursting with deliciousness!

    Step 2: Brown the Chicken

    Next, it’s time to add some color to that chicken! Heat 1 tablespoon of olive oil in a large pan over medium-high heat. As the oil shimmers, add your seasoned chicken. Cook it for about 10 to 12 minutes, turning occasionally until it’s golden brown all over. This browning step isn’t just for looks; it brings out deep flavors you’ll love. Once done, remove the chicken and set it aside in a bowl.

    Step 3: Sauté the Vegetables

    Keep the flavor train rolling by sautéing the asparagus! In the same pan, add another tablespoon of oil and then toss in your fresh asparagus. Sauté for about 2 minutes, just until the asparagus is tender yet still crisp. You want that bright green color to pop! Once ready, remove them from the pan and set them aside with your chicken.

    Step 4: Toast the Orzo

    Now, let’s add some depth to our dish by toasting the orzo. In the same pan, add the diced onion and cook until it’s soft, about 3 minutes. Then, pour in the dry orzo and minced garlic, stirring well. Cook for another 3 minutes, allowing the orzo to slightly brown. Toasting is key here; it enhances the flavors beautifully, making your dish taste amazing!

    Step 5: Add Broth and Simmer

    It’s time to create that luscious base! Pour in the low-sodium chicken broth and bring it all to a simmer. Give it a good stir, ensuring you scrape up any browned bits from the pan—those little treasures pack flavor! Cover the pan with a lid and let it cook for about 7 minutes. You’ll know it’s ready when most of the liquid is absorbed. Make sure to stir halfway through to keep it from sticking!

    Step 6: Combine All Ingredients

    For the grand finale, it’s time to bring it all together! Stir in the previously cooked chicken, sautéed asparagus, half and half, Parmesan cheese, fresh spinach, and thyme. Allow everything to heat together for an extra minute or two until the spinach is wilted and everything blends perfectly. This step is where magic happens, making a beautifully creamy and hearty dish!

    Tips for Success

    • Prep your ingredients ahead of time to save moments during cooking.
    • Don’t skip toasting the orzo; it intensifies the flavor!
    • Feel free to experiment with different seasonal vegetables for variety.
    • For added creaminess, use more half and half or milk as desired.
    • Let the dish rest for a few minutes before serving; it settles the flavors.

    Equipment Needed

    • Large high-sided pan or Dutch oven – a skillet works in a pinch!
    • Wooden spoon or spatula for stirring – metal tools can scratch your pan.
    • Small bowl for seasoning chicken – any mixing bowl will do.
    • Measuring cups for accuracy – eyeballing works for experienced cooks!

    Variations

    • Swap out asparagus for peas, broccoli, or even zucchini for a fresh twist.
    • Add in diced bell peppers or cherry tomatoes for a pop of color and flavor.
    • To make it lighter, use grilled chicken instead of sautéed chicken.
    • For a vegetarian option, replace chicken with chickpeas or tofu and use vegetable broth.
    • Experiment with different herbs like basil or oregano to change up the flavor profile!

    Serving Suggestions for One Pot Chicken Orzo

    • Pair with a crisp green salad dressed in lemon vinaigrette for a refreshing contrast.
    • A glass of chilled white wine, like Pinot Grigio, complements the dish beautifully.
    • Serve with crusty bread to soak up any leftover creamy sauce.
    • Top with extra Parmesan and a sprinkle of fresh parsley for a lovely presentation.
    • For extra flavor, add a squeeze of fresh lemon juice just before serving!

    FAQs about One Pot Chicken Orzo

    Can I make this One Pot Chicken Orzo ahead of time?
    Absolutely! You can prep the ingredients in advance. Just store them separately in the fridge until you’re ready to cook. However, I recommend enjoying this dish fresh for the best texture and flavor.

    Is One Pot Chicken Orzo gluten-free?
    While orzo is typically made from wheat, you can find gluten-free orzo in many stores. Just check the package for that gluten-free label to keep the meal suitable for anyone with dietary restrictions.

    How do I store leftovers?
    Store any leftover One Pot Chicken Orzo in an airtight container in the refrigerator. It should stay fresh for about three days. Just reheat on the stovetop or in the microwave, adding a splash of broth or milk if it needs a little moisture.

    Can I add more protein to the dish?
    Definitely! Feel free to toss in some cooked shrimp or even diced sausage to elevate the protein content. Just adjust the cooking times! You want everything to be perfectly cooked and flavorful.

    What can I substitute for chicken broth?
    If you’d like to change it up, vegetable broth works great! It’ll still give your One Pot Chicken Orzo an amazing depth of flavor while keeping it vegetarian-friendly. Just remember that the broth adds a rich foundation, so pick one you love!

    Final Thoughts

    Cooking should feel like a joyous adventure, and my One Pot Chicken Orzo perfectly embodies that spirit. This dish brings together family and friends around the table, offering warmth and nourishment in every bite. The ease of preparation and delightful flavors make it a staple for my busy evenings, and I know it will become one of your favorites too. So next time you find yourself in a dinner rut, give this recipe a try! You’ll savor the joy of simple ingredients coming together to create something truly special. Happy cooking!


    Print

    clock clock iconcutlery cutlery iconflag flag iconfolder folder iconinstagram instagram iconpinterest pinterest iconfacebook facebook iconprint print iconsquares squares iconheart heart iconheart solid heart solid icon

    Description

    One Pot Chicken Orzo is a quick and delicious meal idea that combines tender chicken, fresh vegetables, and creamy orzo pasta all cooked in one pot for easy cleanup.


    • 1 ½ pounds boneless, skinless chicken breasts or tenders, cubed into 1” pieces
    • 1 teaspoon garlic powder
    • ¼ teaspoon salt
    • ½ teaspoon black pepper
    • ½ teaspoon red pepper flakes
    • 2 tablespoons olive oil, divided
    • ½ cup diced yellow onion (about 1/2 a medium onion)
    • 2 cups chopped fresh asparagus spears, cut into 1 inch pieces
    • 1 tablespoon minced garlic (about 3 garlic cloves)
    • 8 ounces dry orzo
    • 2 ½ cups low sodium chicken broth
    • 2 sprigs fresh thyme (can substitute with 1/4 teaspoon dried thyme)
    • ⅓ cup half and half (can substitute with milk)
    • ⅓ cup freshly grated parmesan
    • 2 cups fresh spinach
    • Chopped fresh parsley and extra Parmesan for garnish

    1. In a small bowl, combine chicken chunks, garlic powder, salt, pepper, and red pepper flakes; toss to coat.
    2. In a large high-sided pan over medium-high heat, heat 1 tablespoon of olive oil and add the chicken. Cook for 10-12 minutes, until brown on all sides. Remove from the pan and set aside in a bowl.
    3. In the same pan (no need to clean it!), add the remaining tablespoon of oil. Add the asparagus and sauté for 2 minutes, until tender but still crisp. Remove from the pan and set aside on the plate with the cooked chicken.
    4. Add the onion to the pan and sauté until softened, about 3 minutes. Add the orzo and garlic and cook until the orzo starts to toast slightly, another 3 minutes.
    5. Add in the broth and bring to a simmer, stirring occasionally and scraping the bottom of the pan. (Tip: You can microwave your broth before adding to the pan to speed up cook time.) Cover the pan with a lid and cook for 7 minutes, or until most of the liquid has been absorbed, stirring halfway.
    6. Stir in the cooked chicken, asparagus, half and half, parmesan, spinach, and thyme. Heat for one to two minutes more until heated through and spinach is wilted.
    7. Serve immediately garnished with chopped parsley and extra grated parmesan.

    Notes

    • You can substitute the asparagus with other vegetables like peas or broccoli.
    • This dish is best served fresh but can be stored in the refrigerator for up to 3 days.
    • Adjust the level of red pepper flakes according to your heat preference.
    • Prep Time: 15 minutes
    • Cook Time: 30 minutes
    • Category: Main Course
    • Method: Stovetop
    • Cuisine: Italian

    Nutrition

    • Serving Size: 1 serving
    • Calories: 450
    • Sugar: 2g
    • Sodium: 400mg
    • Fat: 14g
    • Saturated Fat: 4g
    • Unsaturated Fat: 7g
    • Trans Fat: 0g
    • Carbohydrates: 45g
    • Fiber: 3g
    • Protein: 32g
    • Cholesterol: 90mg

    Sharing is caring!

  • Peach Pecan Bread

    Peach Pecan Bread


    Introduction to Peach Pecan Bread

    There’s something truly magical about baking with ripe peaches, isn’t there? The sweet aroma wafts through the house, warming my heart like a cozy hug. This Peach Pecan Bread brings together juicy, sun-kissed peaches and crunchy pecans, making it a delightful treat for busy mornings or a relaxing afternoon snack. Whether you’re juggling kids, work, or both, this easy recipe is a game changer. Plus, it fills your home with the fragrance of summer, reminding us to savor every moment. Let’s dive into this delicious adventure together!

    Why You’ll Love This Peach Pecan Bread

    This Peach Pecan Bread is not only scrumptious, but it’s also a breeze to whip up! With a prep time of just 20 minutes, it fits perfectly into even the busiest of schedules. Imagine starting your day with a slice packed with flavor—sweet peaches and nutty pecans dancing together in every bite. It’s a heartwarming recipe that invites everyone to gather around the table, eager for seconds!

    Ingredients for Peach Pecan Bread

    Gathering your ingredients is like setting the stage for a delightful culinary performance. For this Peach Pecan Bread, you’ll need a blend of simple yet flavorful components:

    • Pecans: Crunchy and nutty, they add texture and richness. Coarsely chop them for an even distribution throughout the bread.
    • Peaches: Sweet, ripe peaches are the star of the show! Choose juicy ones for maximum flavor. Don’t skip the peeling and pitting; it enhances the bread’s consistency and taste.
    • Granulated Sugar: This sweet ingredient balances the natural tartness of the peaches, making every bite delightful.
    • Milk: Adds moisture and creates a tender crumb. Feel free to substitute with almond or oat milk if you prefer a dairy-free option.
    • Canola Oil: This oil keeps your bread moist and adds a subtle flavor without overpowering the stars—in this case, the peaches and pecans.
    • Eggs: They act as a binder, providing structure while also contributing to the bread’s beautiful rise.
    • All-Purpose Flour: The foundation of the bread, it provides the necessary structure. If you’re looking for a gluten-free twist, almond or coconut flour can be fun alternatives, just adjust the amount accordingly.
    • Salt: A pinch enhances all the flavors, allowing the sweetness of the peaches to shine more brightly.
    • Baking Powder: This leavening agent helps the bread rise, creating that fluffy texture we crave.
    • Glaze: A simple mixture of powdered sugar and milk adds a finishing touch. It transforms the perfectly baked loaf into a sweet masterpiece!

    For the exact measurements, check the bottom of this article—they’re just waiting to be printed for your convenience!

    How to Make Peach Pecan Bread

    Prepare the Ingredients

    To start this delightful journey, selecting ripe peaches is crucial. The sweeter they are, the more flavor they’ll bring to your Peach Pecan Bread. Peel, pit, and chop those juicy beauties into chunks—this step releases their delicious juices during baking.

    Next, coarsely chop your pecans. This step adds a lovely crunch that complements the softness of the peaches. Together, these ingredients create a satisfying texture that you’ll adore. Trust me; fresh fruit and nut combinations make every bite an adventure!

    Mix the Batter

    In a large bowl, combine your wet ingredients: sugar, milk, canola oil, and eggs. Whisk them together until they blend harmoniously. This mix becomes the sweet base of your Peach Pecan Bread.

    Now, let’s add the dry ingredients. Gradually sift in the flour, salt, and baking powder. Stir gently just until combined. Here’s a helpful tip: resist the urge to over-mix! A few lumps are perfectly fine. Over-mixing can lead to a dense loaf, and we want that delightful softness! Remember, you’re creating a balance between wet and dry for a dreamy bread.

    Fold in the Fruits and Nuts

    Now it’s time for the fun part! Carefully fold in your vibrant peach chunks and crunchy pecans. Use a spatula, gently lifting and turning the batter to incorporate them evenly. This technique preserves their lovely shapes. You want those sweet, juicy pieces to weave throughout the bread, providing bursts of flavor in every slice.

    Baking Time

    Pour that luscious batter into a greased 9×5-inch loaf pan or two smaller pans if you prefer. Pop it into the oven at 350°F. Now, the magic begins! Bake for 50-60 minutes, but here’s a pro tip: check for doneness by inserting a knife into the center. If it comes out clean, your bread is ready. If not, give it a few more minutes. It’s worth the wait!

    Prepare the Glaze

    While your bread cools, let’s whip up a quick glaze! In a small bowl, whisk together powdered sugar and milk until it’s smooth and drizzle-worthy. This glaze adds a lovely finish and enhances the sweetness of your Peach Pecan Bread. Drizzle it over the cooled loaves just before serving for a beautiful presentation. Your loved ones will be impressed!

    Tips for Success

    • Use ripe peaches for maximum sweetness and flavor.
    • Don’t skip the glaze; it adds that sweet finishing touch.
    • Wait until the bread is completely cool before slicing to keep it from crumbling.
    • Store leftovers in an airtight container to maintain freshness.
    • Feel free to freeze slices for a quick snack later on!

    Equipment Needed

    • Loaf Pan: A standard 9×5-inch loaf pan is ideal. You can use two smaller pans for mini loaves.
    • Mixing Bowls: A large mixing bowl is essential. Use a whisk for blending and a spatula for folding.
    • Measuring Cups: Essential for precise ingredient measurements. Alternatively, use a kitchen scale.
    • Whisk: Perfect for mixing wet ingredients. A fork can work in a pinch!

    Variations

    • Spiced Up: Add a teaspoon of cinnamon or nutmeg for a warm, spicy twist that complements the peaches beautifully.
    • Chocolate Lover: Toss in some chocolate chips for a decadent touch. The chocolate pairs wonderfully with the sweetness of the peaches.
    • Nut-Free Option: Leave out the pecans entirely or substitute with sunflower seeds for those with nut allergies.
    • Whole Grain: Swap out half the all-purpose flour for whole wheat flour if you’re looking for a heartier bread packed with fiber.
    • Zesty Surprise: Consider adding a tablespoon of lemon zest to brighten the flavors and add a delightful citrus note.

    Serving Suggestions

    • Pair your Peach Pecan Bread with a dollop of whipped cream or a scoop of vanilla ice cream for a delightful dessert.
    • Enjoy it alongside a cup of your favorite coffee or tea to elevate your morning or afternoon snack.
    • Slice and serve on a beautiful platter, drizzled with glaze, to impress your family and friends.

    FAQs about Peach Pecan Bread

    Can I use frozen peaches for this recipe?

    Absolutely! If fresh peaches aren’t available, frozen ones work too. Just be sure to thaw and drain them well to avoid excess moisture in your Peach Pecan Bread batter.

    How should I store the Peach Pecan Bread?

    To keep your bread fresh, store it in an airtight container at room temperature for up to 3 days. You can also freeze slices for up to three months. Just wrap each slice in plastic wrap before placing them in a freezer bag.

    Can I make Peach Pecan Bread gluten-free?

    Yes! Substitute all-purpose flour with a gluten-free blend or almond flour. Just ensure your other ingredients are gluten-free as well, and adjust the baking time as needed.

    What can I serve with Peach Pecan Bread?

    This bread pairs beautifully with whipped cream, yogurt, or even a scoop of vanilla ice cream. Add some fresh fruit on the side for a delightful breakfast or dessert.

    Can I add other fruits to this bread?

    Definitely! Feel free to mix in other fruits like blueberries or cherries along with the peaches. Just be mindful of moisture content to keep your Peach Pecan Bread perfectly fluffy!

    Final Thoughts

    As I reflect on the simple joy of baking this Peach Pecan Bread, I’m reminded of the delightful moments spent in the kitchen. It’s more than just a recipe—it’s a chance to create memories with loved ones, sharing laughter over warm slices fresh from the oven. With each bite, you savor not just flavors but the essence of summer and family connection. So, whether you’re starting your day or winding down, let this bread be a comforting companion that brings happiness to your table. Happy baking, friends!


    Print

    clock clock iconcutlery cutlery iconflag flag iconfolder folder iconinstagram instagram iconpinterest pinterest iconfacebook facebook iconprint print iconsquares squares iconheart heart iconheart solid heart solid icon

    Description

    A delightful and sweet Peach Pecan Bread recipe that combines the flavors of ripe peaches and crunchy pecans, perfect for a tasty breakfast or snack.


    • 1 cup pecans, coarsely chopped
    • 2 large peaches, peeled, pitted, and cut into chunks
    • 2/3 cup granulated sugar
    • 1/4 cup milk
    • 1/4 cup canola oil
    • 2 large eggs
    • 2 cups all purpose flour
    • 1 teaspoon salt
    • 2 teaspoons baking powder
    • Glaze: 1/2 cup powdered sugar
    • Glaze: 2 tablespoons milk

    1. Peel and cut up the peaches. Set aside and chop the pecans.
    2. In a large bowl, stir together the sugar, milk, oil, and eggs. Now mix in the flour, salt, and baking powder.
    3. Note: The batter will be a bit dry.
    4. Fold in the peaches and pecans until thoroughly blended.
    5. Spoon the batter into a standard 9×5″ loaf pan or two smaller size half pans.
    6. Bake at 350°F for 50-60 minutes, or until a knife inserted into the loaf comes out clean. Allow it to cool for 20 minutes.
    7. In a small bowl, whisk together the milk and powdered sugar. Drizzle over the cooled bread just before serving.

    Notes

    • Ensure the peaches are ripe for the best flavor.
    • For additional texture, consider adding a sprinkle of cinnamon in the batter.
    • Prep Time: 20 minutes
    • Cook Time: 60 minutes
    • Category: Bread
    • Method: Baking
    • Cuisine: American

    Nutrition

    • Serving Size: 1 slice
    • Calories: 230
    • Sugar: 14g
    • Sodium: 150mg
    • Fat: 10g
    • Saturated Fat: 1g
    • Unsaturated Fat: 8g
    • Trans Fat: 0g
    • Carbohydrates: 34g
    • Fiber: 1g
    • Protein: 3g
    • Cholesterol: 35mg

    Sharing is caring!

  • Zucchini & Sweet Potato Fritters

    Zucchini & Sweet Potato Fritters


    Introduction to Zucchini & Sweet Potato Fritters

    Ah, the blissful crunch of Zucchini & Sweet Potato Fritters! As a home cook, I can tell you that they’re more than just a delightful snack; they represent a harmony of flavors that can truly brighten your day. In our busy lives, finding quick meals that wow our families can feel daunting. These fritters are not only easy to whip up but are also a crowd-pleaser! Whether you’re serving a light lunch or entertaining guests, these fritters will impress. Trust me, this recipe is a lovely little gem that you’ll want to keep on repeat!

    Why You’ll Love This Zucchini & Sweet Potato Fritters

    These Zucchini & Sweet Potato Fritters are a lifesaver for any busy mom or professional! They come together in a flash, needing only 30 minutes from start to finish. Plus, the blend of zucchini and sweet potato brings a delicious sweetness and nutrition that even picky eaters will adore. Say goodbye to meal prep fatigue, and hello to tasty, crispy bites that can brighten your day! They’re as satisfying as they are scrumptious!

    Ingredients for Zucchini & Sweet Potato Fritters

    Getting the right ingredients makes all the difference in your Zucchini & Sweet Potato Fritters. Let’s break down what you’ll need to create these tasty treats:

    • Zucchini: Shredded and squeezed to rid it of excess moisture. It’s refreshing and adds a light texture.
    • Sweet Potato: Shredded as well, this gives a sweet flavor and vibrant color.
    • Eggs: Lightly beaten, they act as a binder, holding everything together.
    • All-purpose Flour: This helps achieve the perfect fritter consistency. You can switch to gluten-free flour if needed.
    • Parmesan Cheese (optional): For a delightful umami kick, but feel free to skip it for a dairy-free version.
    • Green Onions: Finely chopped to add a fresh, oniony flavor.
    • Garlic: Minced for that memorable aroma and taste that will have everyone coming back for more.
    • Ground Cumin: This spice adds warmth and depth to your fritters.
    • Smoked Paprika (optional): A hint of smokiness makes the flavors really pop, but it’s not necessary if you don’t have any.
    • Salt and Black Pepper: Simple staples that enhance all the flavors.
    • Vegetable Oil: Needed for frying, ensuring your fritters get perfectly crispy.

    For exact quantities, just scroll to the bottom of the article for the printable recipe. Happy cooking!

    How to Make Zucchini & Sweet Potato Fritters

    Now that you have your ingredients ready, it’s time to dive into the fun part: making those fantastic Zucchini & Sweet Potato Fritters! Follow these easy steps, and I promise you’ll find the whole process both rewarding and delicious.

    Step 1: Prepare the Vegetables

    Start by shredding the zucchini and sweet potato. I use a box grater, but a food processor works well, too. After shredding, the most critical part is moisture removal—especially from the zucchini. Place your shredded zucchini in a clean kitchen towel or cheesecloth. Twist and squeeze until there’s no more liquid pooling. This keeps the fritters from becoming soggy during cooking!

    Step 2: Mix the Ingredients

    In a spacious bowl, combine the squeezed zucchini and sweet potato. Add in your lightly beaten eggs, flour, cheese (if you’re using it), green onions, minced garlic, cumin, and seasoning. This mix marries the flavors beautifully! Stir until everything is evenly coated, ensuring each fritter is packed with sweetness and spice.

    Step 3: Heat the Oil

    Next, it’s time to heat the oil. Grab a large skillet and add about three tablespoons of vegetable oil. Turn the heat to medium. Now here’s a tip: before adding the fritters, test if the oil is hot enough by dropping in a tiny bit of the mixture. If it sizzles, you’re good to go! This ensures a perfect crispy exterior.

    Step 4: Form the Fritters

    Once the oil is ready, it’s time to scoop! Using about two tablespoons of the mix, form it into a small patty. Flatten it slightly between your hands. This not only helps with cooking but also increases surface area for that lovely crunch! Repeat until all the mixture is shaped into fritters.

    Step 5: Fry the Fritters

    Carefully place the fritters in the hot skillet, ensuring not to overcrowd the pan. You want to give them room to fry evenly. Cook for 3–4 minutes on each side. You’ll know they are ready when they turn golden brown and crispy. If you’re unsure, a gentle press in the center should feel firm yet springy. It’s all about that texture!

    Step 6: Serve Warm

    Finally, transfer your fritters to a plate lined with paper towels to drain any excess oil. Serve them warm with a dollop of sour cream, Greek yogurt, or your favorite dip. They’re fantastic as a snack, appetizer, or even a light meal! Trust me, these fritters will disappear quickly!

    Tips for Success

    • Remove as much moisture as possible from your zucchini to prevent soggy fritters.
    • Don’t rush the frying! Let them cook until golden brown for that crispy bite.
    • Use a non-stick skillet or cast iron for even cooking.
    • Keen on flavor? Experiment with different herbs or spices!
    • For extra crunch, chop some nuts or seeds and fold them into the mixture.

    Equipment Needed

    • Box Grater or Food Processor: For shredding zucchini and sweet potato.
    • Large Bowl: To mix your ingredients. A mixing bowl works great, too!
    • Skillet: A non-stick or cast iron skillet is perfect for frying.
    • Spatula: To flip those fritters with ease!
    • Paper Towels: Essential for draining excess oil.

    Variations of Zucchini & Sweet Potato Fritters

    • Herb-Infused: Add fresh herbs like basil or cilantro to brighten the flavor.
    • Spice it Up: Incorporate red pepper flakes or cayenne for a spicy kick.
    • Cheesy Goodness: Swap in feta or goat cheese for a tangy twist.
    • Other Vegetables: Mix in grated carrots or bell peppers for added color and nutrition.
    • Sweet Twist: Add a touch of cinnamon for a hint of sweetness.
    • Protein Boost: Fold in cooked quinoa or even shredded chicken for an extra protein hit.

    Serving Suggestions for Zucchini & Sweet Potato Fritters

    • Pair with a light salad for a refreshing meal.
    • Serve alongside a zesty dipping sauce, like tzatziki or spicy aioli.
    • Enjoy with a cool glass of lemonade or iced tea.
    • Presentation tip: Garnish with fresh herbs for a pop of color!

    FAQs about Zucchini & Sweet Potato Fritters

    Can I make Zucchini & Sweet Potato Fritters ahead of time?

    Absolutely! You can prepare the fritters in advance and store them in the refrigerator. Just reheat them in a skillet for that delightful crunch!

    How do I ensure my fritters are crispy?

    To achieve that perfect crispy texture, remove excess moisture from your zucchini, use medium heat for frying, and don’t overcrowd the pan. Give them space to get golden brown!

    Can I freeze leftover fritters?

    Yes, you can freeze these delicious bites! Just let them cool completely, then place them in an airtight container or freezer bag. When you’re ready, pop them in the oven to warm up!

    Are these fritters gluten-free?

    You can easily make Zucchini & Sweet Potato Fritters gluten-free by swapping the all-purpose flour with a gluten-free variety. They’ll still turn out delicious!

    What dips pair well with these fritters?

    Great question! I love serving my fritters with sour cream, Greek yogurt, ranch dressing, or even a spicy aioli. The options are endless for a tasty bite!

    Final Thoughts

    Cooking Zucchini & Sweet Potato Fritters isn’t just about food; it’s an experience that brings joy to your kitchen. Watching these delightful fritters transform from a simple mixture into a golden brown treat feels like magic. They’re crispy, flavorful, and versatile, making them perfect for any occasion. Best of all, every crunchy bite resonates with family happiness, laughter, and a sense of togetherness. So, as you whip up a batch, remember, it’s not just a recipe; it’s creating memories to savor. Enjoy the smiles—as every fritter brings a little more love to your table!


    Print

    clock clock iconcutlery cutlery iconflag flag iconfolder folder iconinstagram instagram iconpinterest pinterest iconfacebook facebook iconprint print iconsquares squares iconheart heart iconheart solid heart solid icon

    Description

    A delicious and crispy fritter made from shredded zucchini and sweet potato, perfect for any meal.


    • 2 cups shredded zucchini, squeezed to remove excess moisture
    • 2 cups shredded sweet potato
    • 2 large eggs, lightly beaten
    • 1/2 cup all-purpose flour or gluten-free flour
    • 1/4 cup grated Parmesan cheese, optional
    • 2 green onions, finely chopped
    • 1 clove garlic, minced
    • 1/2 teaspoon ground cumin
    • 1/4 teaspoon smoked paprika, optional
    • Salt and black pepper, to taste
    • 3 tablespoons vegetable oil for frying

    1. In a large bowl, combine the shredded zucchini and sweet potato. Use a clean kitchen towel or cheesecloth to squeeze out as much moisture as possible, especially from the zucchini.
    2. Add the eggs, flour, Parmesan (if using), green onions, garlic, cumin, smoked paprika, salt, and black pepper to the bowl with the vegetables. Stir until the mixture is evenly combined.
    3. Heat the vegetable oil in a large skillet over medium heat.
    4. Scoop about 2 tablespoons of the mixture for each fritter and flatten it slightly with your hands.
    5. Place the fritters in the skillet, being careful not to overcrowd the pan. Cook for 3-4 minutes on each side, or until golden brown and crisp. Transfer to a plate lined with paper towels to drain excess oil.
    6. Serve warm with a dollop of sour cream, Greek yogurt, or your favorite dipping sauce.

    Notes

    • You can substitute the all-purpose flour with gluten-free flour to make it gluten-free.
    • Feel free to add your favorite herbs or spices for extra flavor.
    • Prep Time: 15 minutes
    • Cook Time: 15 minutes
    • Category: Appetizer
    • Method: Frying
    • Cuisine: American

    Nutrition

    • Serving Size: 1 fritter
    • Calories: 150
    • Sugar: 3g
    • Sodium: 150mg
    • Fat: 7g
    • Saturated Fat: 1g
    • Unsaturated Fat: 6g
    • Trans Fat: 0g
    • Carbohydrates: 17g
    • Fiber: 2g
    • Protein: 4g
    • Cholesterol: 70mg

    Sharing is caring!

  • Mexican pasta salad

    Mexican pasta salad


    Introduction to Mexican Pasta Salad

    Finding time to whip up a meal can feel like searching for a needle in a haystack, especially when life gets hectic. That’s where my vibrant Mexican pasta salad comes to the rescue! This dish is not just a treat for the taste buds; it’s a colorful explosion of flavors and textures that even the pickiest eaters will love. Whether you’re prepping for a family gathering or looking for a light, satisfying meal, this recipe is your new go-to. Join me in creating a dish that’s as quick to make as it is delightful to enjoy!

    Why You’ll Love This Mexican Pasta Salad

    This Mexican pasta salad is the answer to your mealtime prayers! It’s super easy to make, taking just 25 minutes from start to finish. Plus, it’s bursting with fresh ingredients, making each bite a festival of flavor. Whether you’re a busy mom juggling schedules or a professional winding down after a long day, this dish can be your go-to for a quick, delicious meal the whole family will devour!

    Ingredients for Mexican Pasta Salad

    Gathering fresh ingredients is part of the fun in making my Mexican pasta salad! Here’s what you’ll need to create this colorful delight:

    • Rotini pasta: The spirals hold onto the dressing really well. Plus, they add a fun twist!
    • Black beans: Rinsed and drained, these protein-packed beans give the salad an earthy flavor.
    • Jack cheese: Creamy and mild, this cheese is perfect for melting into the blend of ingredients.
    • Cilantro: Fresh cilantro brings a burst of brightness and a hint of that signature Mexican flavor.
    • Corn on the cob: Sweet, juicy kernels add a delightful crunch. You can also use frozen corn in a pinch!
    • Yellow and red bell peppers: Diced for a colorful crunch. They’re like little flavor-packed jewels!
    • Red onion: Adds a sharp tang that balances the richness of the cheese and avocado.
    • Green onions: Sliced for a mild onion flavor, they brighten up the salad.
    • Cotija cheese: Crumbled over the top, it adds a salty tang that’s irresistible.
    • Avocados: These beautiful green gems add creaminess and healthy fats. Just remember to add them right before serving to keep them fresh!

    For the vinaigrette, you’ll need:

    • Lime juice: Freshly squeezed for that zesty punch—it brightens everything up!
    • Sunflower oil: A light oil that complements the flavors without overpowering them.
    • Salt and pepper: Just a pinch of each brings out all the delicious flavors of the ingredients.

    Make sure to check the bottom of the article for exact quantities of these ingredients, as well as handy printable versions!

    How to Make Mexican Pasta Salad

    Step 1: Cook the Pasta

    To kick things off, bring a large pot of salted water to a boil. Toss in the rotini pasta and cook it until it’s al dente—perfectly firm yet tender. This usually takes about 8–10 minutes, but check the package instructions. Once it’s done, drain the pasta and run it under cold water to cool it quickly. Cooling is key, as it prevents the pasta from becoming mushy in our delightful salad!

    Step 2: Prepare the Corn

    Next up is the corn! Start by shucking the corn on the cob, removing all those silky strands. Then, boil it in salted water for about 2–3 minutes until it’s tender. This short cooking time really helps to enhance the sweetness of the corn. Once it’s cooled, carefully cut the kernels off the cob. Make sure to collect those juicy gems, as they’ll add a delightful crunch to our Mexican pasta salad!

    Step 3: Make the Vinaigrette

    Now, let’s whip up that zesty vinaigrette! In a mason jar, combine the freshly squeezed lime juice, sunflower oil, and a pinch of salt and pepper. Seal the jar tightly and shake it like you’re at a dance party! You want it to become a lovely, homogenous mix—smooth and bright with a citrusy aroma that promises a punch of flavor over your salad.

    Step 4: Combine All Ingredients

    In a large mixing bowl, combine the cooled pasta with the black beans, Jack cheese, chopped cilantro, corn, diced yellow and red bell peppers, red onion, and sliced green onions. Gently fold everything together, being careful not to mash the avocados if you’ve included them at this stage. To keep those beautiful green cubes intact, add them just before the final toss!

    Step 5: Toss with Vinaigrette

    It’s time for the grand finale! Pour the vinaigrette over your vibrant salad and give it a good toss. Make sure every ingredient gets coated in the tangy goodness. You can serve the salad right away or chill it in the fridge for a bit to let the flavors mingle. Either way, this Mexican pasta salad is ready to impress!

    Tips for Success

    • Cook the pasta al dente; it’ll absorb the dressing without turning mushy.
    • Rinse the black beans well to remove excess sodium and enhance flavor.
    • Use ripe avocados for creaminess, but add them just before serving to prevent browning.
    • Feel free to mix in leftover veggies or proteins for a personalized touch!
    • Taste and adjust the vinaigrette—add more lime juice for a zippier flavor!

    Equipment Needed

    • Large pot: For boiling the pasta; a deep skillet can work too.
    • Colander: To drain the pasta; a mesh strainer is a great alternative.
    • Mason jar: Ideal for mixing the vinaigrette; a small bowl and whisk will do.
    • Large mixing bowl: To combine everything; any large bowl will suffice.
    • Sharp knife: For chopping veggies; a multi-purpose knife is perfect!

    Variations

    • Add Protein: Toss in some grilled chicken or shrimp for a hearty meal. Blackened salmon could also bring a smoky flavor!
    • Swap the Cheese: If you’re not a fan of Jack cheese, try crumbled feta or pepper jack for an extra kick.
    • Go Vegan: Replace cheese with nutritional yeast and use olive oil instead of sunflower oil for a plant-based twist!
    • Explore Veggies: Add diced cucumbers, cherry tomatoes, or even some roasted zucchini for extra flavor and nutrients.
    • Spicy Kick: Include jalapeños or a splash of hot sauce in the vinaigrette to turn up the heat!

    Serving Suggestions

    • Pair it with warm tortilla chips for a delightful crunch.
    • Serve alongside grilled chicken or fish for a complete meal.
    • A light margarita complements the flavors perfectly!
    • For presentation, garnish with extra cilantro and lime wedges.
    • Use a colorful serving bowl to showcase the vibrant hues of the salad!

    FAQs about Mexican Pasta Salad

    Can I make this Mexican pasta salad in advance?
    Absolutely! This salad can be prepped a day ahead. Just remember to add the avocados right before serving to keep them from browning. It’s a great time-saver for busy days!

    What can I substitute if I don’t have certain ingredients?
    Feel free to get creative! If you’re missing black beans, chickpeas make a fantastic substitute. No Jack cheese? Try feta or even a dairy-free option like vegan cheese.

    Is this salad gluten-free?
    It can be made gluten-free by swapping the rotini pasta for a gluten-free variety. There are lots of tasty options available these days!

    How long will leftovers stay fresh?
    In the fridge, leftovers will last about 2–3 days. Just give it a gentle toss before serving to refresh those flavors!

    Can I make this salad spicy?
    Definitely! Add sliced jalapeños or a splash of hot sauce to the vinaigrette for a zesty kick. It’s sure to delight those who enjoy a little heat!

    Final Thoughts

    As the last bites of my Mexican pasta salad vanish, I can’t help but smile. This recipe isn’t just about nourishment; it’s about joy, celebration, and shared moments. Whether it’s a family gathering or a quiet dinner at home, each vibrant forkful invites laughter and connection. Trust me, you’ll want to see your loved ones’ eyes light up with each colorful bite! Best of all, this dish embodies the beauty of quick, healthy meals that fit into our busy lives. So, let’s make mealtime an adventure with this delightful, easy-to-make salad!


    Print

    clock clock iconcutlery cutlery iconflag flag iconfolder folder iconinstagram instagram iconpinterest pinterest iconfacebook facebook iconprint print iconsquares squares iconheart heart iconheart solid heart solid icon

    Description

    A vibrant and flavorful Mexican pasta salad filled with fresh ingredients and dressed with a zesty vinaigrette, perfect for gatherings or a light meal.


    • 12 oz rotini pasta
    • 15 oz can black beans, rinsed and drained
    • 8 oz Jack cheese, cubed
    • ½ c cilantro, packed loose and chopped
    • 2 corn on the cob
    • 1 yellow bell pepper, diced
    • 1 red bell pepper, diced
    • ½ red onion, diced
    • 3 green onions, sliced
    • ¼ c cotija cheese
    • 2 avocados, cubed
    • VINAIGRETTE:
    • 2 limes, juiced
    • 2 oz sunflower oil
    • Pinch of salt
    • Pinch of pepper

    1. Cook the pasta per package instruction until al dente or your desired level. Drain and let cool.
    2. Shuck the corn on the cob and boil it for 2-3 minutes. Once cooled, carefully cut off the corn kernels.
    3. Use a mason jar to shake up the vinaigrette. Add in the lime juice, oil, salt and pepper and shake it up until it looks homogenous.
    4. In a very large bowl combine the pasta, black beans, jack cheese, cilantro, corn, bell peppers, red onion, green onion, cotija cheese and avocados.
    5. Toss everything together with the vinaigrette. Serve.

    Notes

    • This salad can be made a day in advance, but add the avocados just before serving to prevent browning.
    • Customize with your favorite veggies or proteins.
    • Prep Time: 15 minutes
    • Cook Time: 10 minutes
    • Category: Salad
    • Method: Boiling, Mixing
    • Cuisine: Mexican

    Nutrition

    • Serving Size: 1 cup
    • Calories: 320
    • Sugar: 3g
    • Sodium: 420mg
    • Fat: 18g
    • Saturated Fat: 5g
    • Unsaturated Fat: 10g
    • Trans Fat: 0g
    • Carbohydrates: 34g
    • Fiber: 6g
    • Protein: 12g
    • Cholesterol: 25mg

    Sharing is caring!

  • Cheddar-Stuffed BBQ Bacon Bombs: A Flavor Explosion!

    Cheddar-Stuffed BBQ Bacon Bombs: A Flavor Explosion!


    Introduction to Cheddar-Stuffed BBQ Bacon Bombs

    There are days when you need a little something to shake things up in the kitchen, right? Enter my Cheddar-Stuffed BBQ Bacon Bombs, a dish that’s not only delicious but also a quick solution for busy nights. Packed with savory ground beef and bursting with sharp cheddar, these little bites are wrapped in crispy bacon and coated in BBQ sauce. Imagine the excitement when your loved ones take a bite! Not only do they taste fantastic, but they also make for an impressive appetizer. Let’s dive into this flavor explosion together!

    Why You’ll Love This Cheddar-Stuffed BBQ Bacon Bombs

    Life gets hectic, and cooking can sometimes feel overwhelming. That’s what makes these Cheddar-Stuffed BBQ Bacon Bombs so special. They come together quickly, allowing you to whip up something mouthwatering without fuss. Plus, they hit all the right notes—savory, cheesy, and smoky—all in one bite. You’ll love how easy they are to make and how they bring joy to your family gatherings or game-day get-togethers!

    Ingredients for Cheddar-Stuffed BBQ Bacon Bombs

    Let’s talk about what makes these Cheddar-Stuffed BBQ Bacon Bombs incredibly delightful! Here’s what you’ll need:

    • Ground beef: This is the hearty base that brings everything together. Feel free to use lean or regular, depending on your taste.
    • Garlic powder: A must-have for that aromatic kick, elevating the entire dish to flavor heaven.
    • Onion powder: It adds depth without the fuss of chopping onions, perfect for a time-saving home cook like you!
    • Smoked paprika: For that lovely smoky flavor, it’s like a warm hug for your taste buds, adding a hint of BBQ goodness.
    • Salt and black pepper: Simple staples that highlight every savory note, bringing balance and brightness to the mix.
    • Sharp cheddar cheese: The star of the show! When that gooey goodness oozes out, it’s pure bliss.
    • Bacon: Who can resist crispy bacon? It wraps around each bomb to make these bites irresistible!
    • BBQ sauce: This glaze brings everything together with a tangy sweetness, the cherry on top of your flavor explosion.
    • Toothpicks: Handy little helpers to keep that bacon snug, ensuring no delicious bacon unravels on you.

    For more precise measurements, head to the bottom of the article where you’ll find the full list ready for printing. Whether you deviate a bit or stick closely to these ingredients, these Cheddar-Stuffed BBQ Bacon Bombs are sure to impress!

    How to Make Cheddar-Stuffed BBQ Bacon Bombs

    Step 1: Preheat and Prepare

    Let’s get that oven fired up! Preheat it to 375°F (190°C). While the oven is warming up, grab a baking sheet and line it with parchment paper. This will help with cleanup, and trust me, you’ll appreciate it later. It’s a small step that makes a big difference in your kitchen journey!

    Step 2: Prepare the Beef Mixture

    Now it’s time for the fun part! In a large bowl, combine the ground beef with garlic powder, onion powder, smoked paprika, salt, and black pepper. Use your hands and mix everything until it’s well blended. Feel free to channel your inner chef—this mix is the heart of your Cheddar-Stuffed BBQ Bacon Bombs. The fragrance from the spices is heavenly. You’ll see your family flocking to the kitchen in anticipation!

    Step 3: Form the Bombs

    Now, we get to shape these tasty bites! Take the beef mixture and divide it into 12 equal portions. Flatten each portion into a patty, like a mini burger. Place a cube of sharp cheddar cheese right in the center. Gently wrap the beef around the cheese, forming a ball. Be sure to seal it well to lock that gooey cheese inside. Wrap each beef ball with a slice of delicious bacon, securing it all with a toothpick. This will keep everything intact while baking and give the bacon a chance to crisp up nicely!

    Step 4: Bake the Bombs

    It’s showtime! Place the bacon-wrapped bombs on your prepared baking sheet, spaced evenly apart. Brush each bomb generously with your BBQ sauce. This adds a sweet, tangy glaze that caramelizes beautifully in the oven. Bake for 25-30 minutes, or until the bacon is crispy and the beef is cooked through. You’ll know they’re ready when your kitchen smells like a BBQ paradise, drawing in everyone within a few blocks!

    Step 5: Serve and Enjoy

    Once they’re baked to perfection, remove the bombs from the oven and let them cool for a few minutes. This helps the cheese settle a bit. Serve your Cheddar-Stuffed BBQ Bacon Bombs while they’re warm. Perhaps with a side of extra BBQ sauce for dipping? They’re perfect as appetizers during a party or a fun family dinner! Get ready for the oohs and aahs as everyone digs in!

    Tips for Success

    • Use high-quality bacon for the best crispy texture and flavor.
    • Don’t oversize your meatballs; they should be easy to eat in one bite.
    • Experiment with spices—try adding a dash of cayenne for heat!
    • Make ahead and store in the fridge until you’re ready to bake.
    • Always check the internal temperature; it should reach 160°F (71°C).

    Equipment Needed

    • Baking sheet: A standard sheet works, but a rimmed one helps catch any drips.
    • Parchment paper: This aids in cleanup; aluminum foil is a good alternative.
    • Mixing bowl: Any large bowl will do for blending the beef and spices.
    • Toothpicks: Essential for securing the bacon; you can also use kitchen twine if needed.

    Variations on Cheddar-Stuffed BBQ Bacon Bombs

    • Cheesy Jalapeño Bombs: Add diced jalapeños to the beef mixture for a spicy kick and use pepper jack cheese instead of cheddar for an extra layer of flavor.
    • BBQ Chicken Version: Substitute ground beef with shredded cooked chicken and barbecue sauce in the mixture for a lighter twist.
    • Vegetarian Option: Use lentils or black beans as a base, mixing them with your favorite spices and stuffing them with cheddar cheese, wrapped in a plant-based bacon alternative.
    • Sweet and Spicy: Incorporate a teaspoon of brown sugar into the BBQ sauce for a hint of sweetness that balances the savory flavors.
    • Herb Infusion: Add fresh herbs like chopped parsley or cilantro into the beef mixture for a burst of freshness and flavor.

    Serving Suggestions for Cheddar-Stuffed BBQ Bacon Bombs

    • Serve with fresh veggies: A colorful platter of carrot sticks, cucumber slices, and bell pepper strips adds crunch and balance.
    • Pair with dipping sauces: Offer extra BBQ sauce, ranch, or a spicy aioli to elevate the flavor experience.
    • Garnish with herbs: Finely chop fresh parsley or cilantro and sprinkle over the bombs for a vibrant touch.
    • Complement with drinks: Serve with ice-cold lemonade, sweet tea, or your favorite beer for a refreshing balance.

    FAQs about Cheddar-Stuffed BBQ Bacon Bombs

    Can I use ground turkey instead of beef? Absolutely! Ground turkey can be an excellent substitute. It delivers a lighter flavor while still being satisfying. Just ensure not to overcook it since turkey can dry out quicker than beef.

    How can I make these bombs ahead of time? Prepping in advance is a lifesaver! You can assemble the bombs and place them in the refrigerator until you’re ready to bake. Just remember to extend the baking time slightly if they’re cold from the fridge.

    What’s the best way to store leftovers? After enjoying your Cheddar-Stuffed BBQ Bacon Bombs, store any leftovers in an airtight container in the refrigerator for up to three days. You can reheat them in the oven for that delightful crispiness!

    Can I freeze them? Yes, you can freeze these bombs! Freeze them before cooking for easy meal prep. Just make sure to wrap them tightly. When ready to enjoy, bake directly from the freezer for about 30-35 minutes, adding time if needed.

    What dipping sauces pair well with these BBQ Bacon Bombs? While I love serving them with BBQ sauce, ranch dressing, or spicy mayo can add a nice zing. Try whatever fits your flavor profile; I bet you’ll discover a new favorite!

    Final Thoughts

    There’s something truly special about crafting Cheddar-Stuffed BBQ Bacon Bombs. The joy that fills the room as they bake is almost as delightful as the first bite. Whether it’s a cozy family dinner or a lively gathering with friends, these flavor-packed bites will surely be a hit. I love how versatile and easy they are, making them a go-to recipe in my kitchen. Plus, there’s nothing quite like the satisfaction of watching your loved ones savor every gooey, cheesy morsel. I can’t wait for you to experience the joy they bring, too!


    Print

    clock clock iconcutlery cutlery iconflag flag iconfolder folder iconinstagram instagram iconpinterest pinterest iconfacebook facebook iconprint print iconsquares squares iconheart heart iconheart solid heart solid icon

    Description

    Cheddar-Stuffed BBQ Bacon Bombs are savory meatballs filled with sharp cheddar cheese, wrapped in crispy bacon, and glazed with BBQ sauce for a flavor explosion.


    • 1 lb ground beef
    • 1 tsp garlic powder
    • 1 tsp onion powder
    • 1 tsp smoked paprika
    • 1/2 tsp salt
    • 1/2 tsp black pepper
    • 4 oz sharp cheddar cheese, cut into 1/2-inch cubes
    • 12 slices bacon
    • 1/2 cup BBQ sauce
    • Toothpicks (for securing bacon)

    1. Preheat the oven to 375°F (190°C) and line a baking sheet with parchment paper.
    2. In a large bowl, mix the ground beef, garlic powder, onion powder, smoked paprika, salt, and black pepper until well combined.
    3. Divide the beef mixture into 12 equal portions. Flatten each portion into a patty, place a cube of cheddar in the center, and wrap the beef around the cheese to form a ball.
    4. Wrap each beef ball with a slice of bacon, securing it with a toothpick.
    5. Place the bacon-wrapped bombs on the prepared baking sheet, spacing them evenly.
    6. Brush each bomb generously with BBQ sauce.
    7. Bake for 25-30 minutes, or until the bacon is crispy and the beef is cooked through.
    8. Remove from the oven and let cool slightly before serving.

    Notes

    • For extra flavor, add your favorite spices to the ground beef mixture.
    • Make sure to secure the bacon with toothpicks to prevent it from unraveling during baking.
    • These can be served as appetizers or a main dish.
    • Prep Time: 15 minutes
    • Cook Time: 25-30 minutes
    • Category: Appetizer
    • Method: Baking
    • Cuisine: American

    Nutrition

    • Serving Size: 1 bomb
    • Calories: 250
    • Sugar: 2g
    • Sodium: 600mg
    • Fat: 20g
    • Saturated Fat: 8g
    • Unsaturated Fat: 10g
    • Trans Fat: 0g
    • Carbohydrates: 2g
    • Fiber: 0g
    • Protein: 15g
    • Cholesterol: 50mg

    Sharing is caring!

  • Grilled Steak Bowl with Creamy Sauce & Grilled Zucchini

    Grilled Steak Bowl with Creamy Sauce & Grilled Zucchini


    Introduction to Grilled Steak Bowl with Creamy Sauce & Grilled Zucchini

    As a busy mom, finding time to create a delicious and nutritious dinner can feel daunting. That’s why I love this Grilled Steak Bowl with Creamy Sauce & Grilled Zucchini! Not only is it quick to prepare, but it also offers a burst of flavor that everyone at the table will enjoy. Imagine perfectly grilled steak paired with tender zucchini, all drizzled with a creamy sauce. It’s a meal that feels indulgent, yet wholesome—perfect for those hectic weeknights when you want to sit down as a family and relish good food together.

    Why You’ll Love This Grilled Steak Bowl with Creamy Sauce & Grilled Zucchini

    This Grilled Steak Bowl with Creamy Sauce & Grilled Zucchini is a true lifesaver for busy nights. It’s quick to whip up and packed with flavor, making dinner feel like a treat rather than a chore. The vibrant colors and textures create a show-stopping meal on your dinner table. Plus, it’s healthy! Your family will love the delicious taste, and you’ll appreciate the ease of preparing it.

    Ingredients for Grilled Steak Bowl with Creamy Sauce & Grilled Zucchini

    Let’s talk ingredients! For this Grilled Steak Bowl with Creamy Sauce & Grilled Zucchini, you’ll need the following:

    • Sirloin or Ribeye Steak: Choose a good-quality cut for that melt-in-your-mouth experience. Sirloin is leaner, while ribeye is more marbled and rich.
    • Zucchini: Fresh, medium zucchinis add a delightful crunch and a hint of sweetness when grilled. Feel free to substitute with yellow squash if you prefer.
    • Grains: I often use quinoa, but you can switch it up with rice, farro, or whatever grain you love. Each adds its unique texture!
    • Olive Oil: This is your magic elixir for cooking! It not only adds flavor but also helps in grilling the steak and zucchini to golden perfection.
    • Salt and Black Pepper: Simple seasonings that elevate the taste of your ingredients. Don’t skimp on these; they’re essential!
    • Garlic Powder: Adds an aromatic kick without the hassle of peeling and chopping fresh garlic. Perfect for quick meals!
    • Smoked Paprika: A dash of smoky flavor that brings the steak to life. If you love heat, try adding a pinch of cayenne!
    • Sour Cream or Greek Yogurt: Creamy goodness that’s the base for your sauce. Greek yogurt is a healthy alternative too!
    • Dijon Mustard: This adds a tangy depth to your sauce, creating a lovely balance with the creaminess.
    • Chopped Parsley or Chives: Fresh herbs add a pop of color and brightness. Use whatever you have on hand!
    • Lemon Juice: Optional, but a splash adds a refreshing zing to the sauce. Perfect for brightening flavors!

    Don’t worry! Exact measurements for these ingredients are at the bottom of the article and are printable for your convenience. Happy cooking!

    How to Make Grilled Steak Bowl with Creamy Sauce & Grilled Zucchini

    Step 1: Prepare the Steak

    First, bring your steak to room temperature. This helps it cook evenly. Pat it dry and rub it with olive oil, salt, pepper, garlic powder, and smoked paprika. Just imagine that seasoning mingling for a delicious flavor infusion!

    Step 2: Preheat the Grill

    While you season the steak, preheat your grill or grill pan over high heat. This step is crucial! A hot grill ensures those lovely char marks and locks in the steak’s juicy flavor.

    Step 3: Season and Prepare the Zucchini

    Toss your sliced zucchinis in a bowl with olive oil and a sprinkle of salt. This simple step amps up their flavor and ensures they grill perfectly. You want them coated but not drenched.

    Step 4: Grill the Zucchini

    Now, place the zucchini slices on the grill. Cook them for about 2–3 minutes per side. You’re looking for tender veggies with those beautiful grill marks. After that, set them aside; they’ll be a lovely addition to your bowl!

    Step 5: Grill the Steak

    Time for the steak! Grill it for about 4–5 minutes on each side for medium-rare. After grilling, let it rest for 5–10 minutes. This resting time lets the juices redistribute, creating a juicy steak in your bowl.

    Step 6: Cook the Grains

    While your steak rests, cook the quinoa or your chosen grain according to the package instructions. I like to prepare my grains in advance on busy days. It’s a lifesaver!

    Step 7: Make the Creamy Sauce

    In a bowl, mix together your sour cream or Greek yogurt, Dijon mustard, remaining garlic powder, smoked paprika, and a pinch of salt. If you want a zesty lift, add a splash of lemon juice. This creamy sauce is what brings everything together.

    Step 8: Assemble Your Bowl

    Finally, it’s time to assemble! Start with a base of grains, then layer the grilled zucchini and sliced steak. Drizzle the creamy sauce over the top and garnish with chopped parsley or chives. Voilà! You have a stunning Grilled Steak Bowl with Creamy Sauce & Grilled Zucchini ready to impress!

    Tips for Success

    • Always let your steak rest after grilling for maximum juiciness.
    • Use a meat thermometer to ensure your steak reaches the perfect doneness.
    • Prep your grains and creamy sauce in advance during busier weeks.
    • Experiment with different veggies like bell peppers or asparagus for variety.
    • Keep the sauce in the fridge; it tastes even better the next day!

    Equipment Needed

    • Grill or Grill Pan: A barbecue grill gives the best flavor, but a grill pan works wonders indoors.
    • Tongs: A must-have for flipping steak and zucchini without losing those precious juices.
    • Cutting Board: Essential for slicing the steak and zucchini for serving.
    • Mixing Bowl: Perfect for combining your creamy sauce ingredients.
    • Pot for Grains: Any good pot will do; just ensure it has a tight lid for steaming.

    Variations of Grilled Steak Bowl with Creamy Sauce & Grilled Zucchini

    • Swap the Protein: Try chicken or shrimp instead of steak for a lighter option. Both grill beautifully!
    • Go Vegetarian: Replace the steak with grilled portobello mushrooms or marinated tofu for a filling vegetarian meal.
    • Change Up the Grains: Swap quinoa for brown rice, cauliflower rice, or even a chickpea base for a protein-packed twist!
    • Herby Variations: Experiment with different herbs in the sauce like dill, cilantro, or basil for a fresh flavor boost.
    • Spicy Upgrade: Add jalapeños or a dash of hot sauce to the sauce for an exciting kick to elevate your bowl!

    Serving Suggestions for Grilled Steak Bowl with Creamy Sauce & Grilled Zucchini

    • Pair with a refreshing green salad drizzled with a light vinaigrette.
    • Serve alongside crusty bread for a delightful crunch.
    • Try a chilled glass of sparkling water with lemon for a zesty drink.
    • Garnish with extra herbs for a pop of color and freshness!
    • Consider using vibrant bowls to make the meal visually appealing.

    FAQs about Grilled Steak Bowl with Creamy Sauce & Grilled Zucchini

    Can I prepare the creamy sauce in advance?

    Absolutely! The creamy sauce can be made in advance and stored in the fridge. In fact, it often tastes even better the next day as the flavors meld together.

    What can I substitute for steak in this recipe?

    If you’re looking to swap out the steak, grilled chicken or shrimp are excellent options. You could also try going vegetarian with grilled portobello mushrooms or marinated tofu.

    How do I know when the steak is properly cooked?

    Using a meat thermometer is the best way to check! Aim for 130°F for medium-rare. If you prefer it well-done, you’ll want to cook it to around 160°F.

    Can I use other vegetables besides zucchini?

    Definitely! Bell peppers, asparagus, or even corn on the cob would all work wonderfully in this Grilled Steak Bowl. Get creative with your veggie choices!

    Is this Grilled Steak Bowl suitable for meal prep?

    Yes! This dish holds up well in the fridge, making it perfect for meal prep. Just store everything separately and assemble when you’re ready to enjoy!

    Final Thoughts

    Cooking this Grilled Steak Bowl with Creamy Sauce & Grilled Zucchini brings joy and satisfaction to my busy evenings. Each bite bursts with warmth, and it feels like a hug on a plate. Not only does it display vibrant colors, but it also rewards you with a symphony of flavors that’s hard to resist. Plus, it’s a wonderful way to engage the family at dinner. It transforms a standard weeknight into a memorable meal. I hope this recipe inspires you to gather around the table and savor every delicious moment together!


    Print

    clock clock iconcutlery cutlery iconflag flag iconfolder folder iconinstagram instagram iconpinterest pinterest iconfacebook facebook iconprint print iconsquares squares iconheart heart iconheart solid heart solid icon

    Description

    A delicious Grilled Steak Bowl topped with a creamy sauce and grilled zucchini.


    • 1 lb sirloin or ribeye steak
    • 2 medium zucchinis, sliced
    • 1 cup uncooked quinoa (or rice/farro)
    • 2 tbsp olive oil
    • Salt and black pepper to taste
    • 1 tsp garlic powder
    • 1/2 tsp smoked paprika
    • 1/2 cup sour cream or Greek yogurt
    • 1 tbsp Dijon mustard
    • 1 tbsp chopped parsley or chives
    • Optional: splash of lemon juice for sauce

    1. Bring the steak to room temperature. Pat dry and rub with 1 tbsp olive oil, salt, pepper, garlic powder, and smoked paprika.
    2. Preheat grill or grill pan over high heat.
    3. Toss zucchini slices with 1 tbsp olive oil and a pinch of salt.
    4. Grill zucchini for 2–3 minutes per side until tender and charred. Set aside.
    5. Grill steak 4–5 minutes per side for medium-rare, depending on thickness. Let rest 5–10 minutes.
    6. Cook quinoa (or chosen grain) according to package instructions.
    7. In a bowl, mix sour cream or yogurt with Dijon mustard, garlic powder, smoked paprika, salt, and chopped herbs. Add lemon juice if desired.
    8. Slice steak against the grain.
    9. Assemble bowls: layer grains, top with zucchini and steak, and drizzle with creamy sauce.

    Notes

    • For a spicier sauce, consider adding a pinch of cayenne pepper.
    • Ensure steak is of good quality for the best flavor.
    • Feel free to substitute quinoa with any grain of choice.
    • Prep Time: 15 minutes
    • Cook Time: 20 minutes
    • Category: Dinner
    • Method: Grilling
    • Cuisine: American

    Nutrition

    • Serving Size: 1 bowl
    • Calories: 550
    • Sugar: 3g
    • Sodium: 600mg
    • Fat: 30g
    • Saturated Fat: 10g
    • Unsaturated Fat: 15g
    • Trans Fat: 0g
    • Carbohydrates: 40g
    • Fiber: 5g
    • Protein: 35g
    • Cholesterol: 100mg

    Sharing is caring!

  • Mediterranean Chicken Zucchini Bake

    Mediterranean Chicken Zucchini Bake


    Introduction to Mediterranean Chicken Zucchini Bake

    Hey there, busy moms and professionals! If you’re anything like me, finding the time to whip up a delicious dinner can feel like a juggling act. That’s where this Mediterranean Chicken Zucchini Bake comes in. It’s not just easy to prepare; it’s bursting with flavors! Perfect for a family meal or impressing friends, this dish will have everyone at the table raving. Plus, it’s healthy, which is a win-win. So, let’s dive into this culinary delight that’ll save you time and please the crowd. Get ready to savor every bite!

    Why You’ll Love This Mediterranean Chicken Zucchini Bake

    This Mediterranean Chicken Zucchini Bake is your secret weapon for a satisfying dinner without the hassle. It’s quick to prepare, taking just 15 minutes of hands-on time, leaving you free to tend to other responsibilities. The combination of juicy chicken, fresh vegetables, and zesty flavors creates a taste sensation that feels like a gourmet meal. Plus, it’s low in calories, making it a wonderful option for health-conscious families!

    Ingredients for Mediterranean Chicken Zucchini Bake

    Gathering your ingredients is half the fun! Here’s what you’ll need to create this Mediterranean Chicken Zucchini Bake:

    • Boneless, skinless chicken breasts: The star of the show! Lean protein that cooks up juicy and tender.
    • Zucchinis: These green wonders add a delightful crunch. They soak up all the luscious flavors while baking.
    • Cherry tomatoes: Bursting with sweetness, they add both color and a pop of flavor that lights up the dish.
    • Black olives: For that Mediterranean flair! Their briny goodness pairs perfectly with the other ingredients.
    • Sun-dried tomatoes: Packed with concentrated flavor, these will elevate your bake to new heights.
    • Feta cheese: Crumbled feta brings a creamy, tangy element that ties all the flavors together beautifully.
    • Olive oil: A drizzle of this liquid gold adds moisture and helps the spices stick to the chicken.
    • Dried oregano: This herb complements the Mediterranean vibes, imparting a warm, aromatic taste.
    • Dried basil: A hint of sweetness that enhances the overall flavor profile of the dish.
    • Garlic powder: Just a pinch adds depth and a savory punch to your chicken.
    • Salt & pepper: Simple seasoning that enhances all the flavors, leaving your taste buds dancing!

    Feel free to customize your bake with seasonal veggies or herbs from your garden! The specific amounts needed for each ingredient can be found at the bottom of this article, making it easy to print out the recipe and get cooking.

    How to Make Mediterranean Chicken Zucchini Bake

    Let’s roll up our sleeves and get cooking! This Mediterranean Chicken Zucchini Bake is not only straightforward but also a delightful way to fill your kitchen with mouth-watering aromas. Follow these easy steps to create a truly irresistible meal.

    Step 1: Preheat the Oven

    First thing’s first, preheat your oven to 375°F (190°C). Preheating is crucial! It ensures the chicken cooks evenly and locks in all that juicy goodness. Just imagine the aroma wafting through your house as it starts to heat up.

    Step 2: Prepare the Chicken

    Next, let’s season our chicken. Drizzle a little olive oil over the chicken breasts. This not only adds flavor but helps the spices cling. Sprinkle on your dried oregano, basil, garlic powder, salt, and pepper. Feel free to massage those spices into the chicken. Trust me, that’s how you pack in the flavor!

    Step 3: Arrange in the Baking Dish

    Now, grab a greased baking dish and lay the seasoned chicken at the center. Surround it with those vibrant zucchini slices, followed by the halved cherry tomatoes and the black olives. This colorful arrangement not only looks appealing but also allows the flavors to meld beautifully in every bite. It’s like a work of art!

    Step 4: Bake

    Pop your dish into the oven for about 30–35 minutes. While it’s baking, you can take a moment to relax or prep a side salad. To check if the chicken is cooked, insert a meat thermometer into the thickest part. It should read 165°F (74°C). Nothing like the feeling of serving perfectly cooked chicken!

    Step 5: Add Feta and Serve

    In those last few minutes of baking, sprinkle the crumbled feta cheese on top. It melts slightly and creates a creamy layer that perfectly offsets the zesty flavors. Once it’s done, take it out and garnish with fresh parsley. It adds a touch of color and freshness. Your Mediterranean Chicken Zucchini Bake is now ready to be enjoyed!

    Tips for Success

    • Always preheat the oven to ensure even cooking.
    • Use a meat thermometer to check chicken doneness accurately.
    • Spread the veggies evenly for balanced flavors and cooking.
    • Let the dish rest for a few minutes before serving; it helps the juices settle.
    • Feel free to customize with your favorite herbs or veggies for a personal touch!

    Equipment Needed

    • Baking dish: A 9×13 inch dish works perfectly, but any oven-safe vessel will do.
    • Meat thermometer: Essential for ensuring your chicken is cooked just right; an instant-read thermometer is handy.
    • Knife and cutting board: To chop and slice your veggies with ease.
    • Measuring spoons: While eyeballing spices is fun, precise measurements can enhance flavor!

    Variations on Mediterranean Chicken Zucchini Bake

    • Add more veggies: Consider adding bell peppers, eggplant, or spinach for a colorful twist and extra nutrients!
    • Swap the protein: If you’re looking for variety, try using turkey or even tofu for a plant-based option.
    • Change the cheese: For a different flavor profile, switch the feta with goat cheese or mozzarella, both of which melt beautifully.
    • Spice it up: Add crushed red pepper flakes for some heat, or experiment with Italian seasoning for a different herbal flavor.
    • Make it gluten-free: This dish is naturally gluten-free but always check your ingredient labels to be sure!

    Serving Suggestions for Mediterranean Chicken Zucchini Bake

    • Fresh Salad: Pair with a light, crunchy Greek salad for a refreshing contrast.
    • Grain Base: Serve over quinoa or brown rice for added texture and nutrition.
    • Herbed Bread: Complement the dish with crusty bread or pita for a delightful dip.
    • Wine Pairing: Enjoy with a chilled white wine, like Sauvignon Blanc, for a beautiful meal.

    FAQs about Mediterranean Chicken Zucchini Bake

    As a passionate home cook, I often get asked a few common questions about making this delightful Mediterranean Chicken Zucchini Bake. Let’s dive into some of these queries to make your cooking experience even smoother!

    Can I prepare the Mediterranean Chicken Zucchini Bake ahead of time?
    Absolutely! You can season the chicken and chop the vegetables a day in advance. Just store them in the refrigerator. When you’re ready to bake, everything is ready to go!

    What can I serve with this dish?
    This Mediterranean Chicken Zucchini Bake pairs beautifully with a fresh Greek salad, crusty bread, or even over a bed of quinoa. You could also enjoy it with a side of roasted potatoes for a heartier meal!

    Can I use frozen chicken breasts?
    Sure! Just make sure to defrost them completely before cooking. It’s best to avoid cooking chicken from frozen, as it may not cook evenly.

    Can I make this dish in a slow cooker?
    While this recipe is designed for baking, you can adapt it for a slow cooker. Simply layer the ingredients as described and cook on low for about 4–6 hours. Just make sure to check that the chicken reaches 165°F (74°C)!

    Is this Mediterranean Chicken Zucchini Bake gluten-free?
    Yes! This dish is naturally gluten-free, making it a perfect choice for those with dietary restrictions. Just be sure to check all ingredient labels to confirm.

    Final Thoughts

    Every time I make this Mediterranean Chicken Zucchini Bake, I’m reminded of the joy it brings to my family around the dinner table. The vibrant colors, fresh flavors, and enticing aromas create a delightful experience that everyone loves. Plus, it’s a meal that feels special, yet remains easy to prepare, even on those super busy evenings. When I see their smiles after the first bite, it’s a beautiful reminder that cooking is an act of love. Give this recipe a try, and you just might discover your new go-to dish for family gatherings and weeknight dinners!


    Print

    clock clock iconcutlery cutlery iconflag flag iconfolder folder iconinstagram instagram iconpinterest pinterest iconfacebook facebook iconprint print iconsquares squares iconheart heart iconheart solid heart solid icon

    Description

    A delicious and healthy Mediterranean Chicken Zucchini Bake that is packed with flavors and easy to prepare.


    • 4 boneless, skinless chicken breasts
    • 2 large zucchinis, sliced
    • 1 cup cherry tomatoes, halved
    • ½ cup black olives, sliced
    • ½ cup sun-dried tomatoes, chopped
    • ½ cup crumbled feta cheese
    • 1 tbsp olive oil
    • 1 tsp dried oregano
    • 1 tsp dried basil
    • ½ tsp garlic powder
    • Salt & pepper, to taste

    1. Preheat oven to 375°F (190°C).
    2. Season chicken breasts with olive oil and spices.
    3. In a greased baking dish, arrange seasoned chicken at the center; surround with zucchini slices and add tomatoes and olives.
    4. Bake uncovered for 30–35 minutes until the chicken reaches an internal temperature of 165°F (74°C). Top with feta during the last few minutes if desired.
    5. Serve hot, garnished with fresh parsley.

    Notes

    • Ensure the chicken is fully cooked by checking the internal temperature.
    • Feel free to add other vegetables for a more colorful dish.
    • This dish can be stored in the refrigerator for up to 3 days.
    • Prep Time: 15 minutes
    • Cook Time: 30-35 minutes
    • Category: Main Course
    • Method: Baking
    • Cuisine: Mediterranean

    Nutrition

    • Serving Size: 1 serving
    • Calories: 300
    • Sugar: 3g
    • Sodium: 600mg
    • Fat: 10g
    • Saturated Fat: 3g
    • Unsaturated Fat: 6g
    • Trans Fat: 0g
    • Carbohydrates: 20g
    • Fiber: 3g
    • Protein: 30g
    • Cholesterol: 70mg

    Sharing is caring!