Author: IHAAL Team

  • Lentil Sweet Potato Salad: A Delicious, Healthy Delight!

    Lentil Sweet Potato Salad: A Delicious, Healthy Delight!


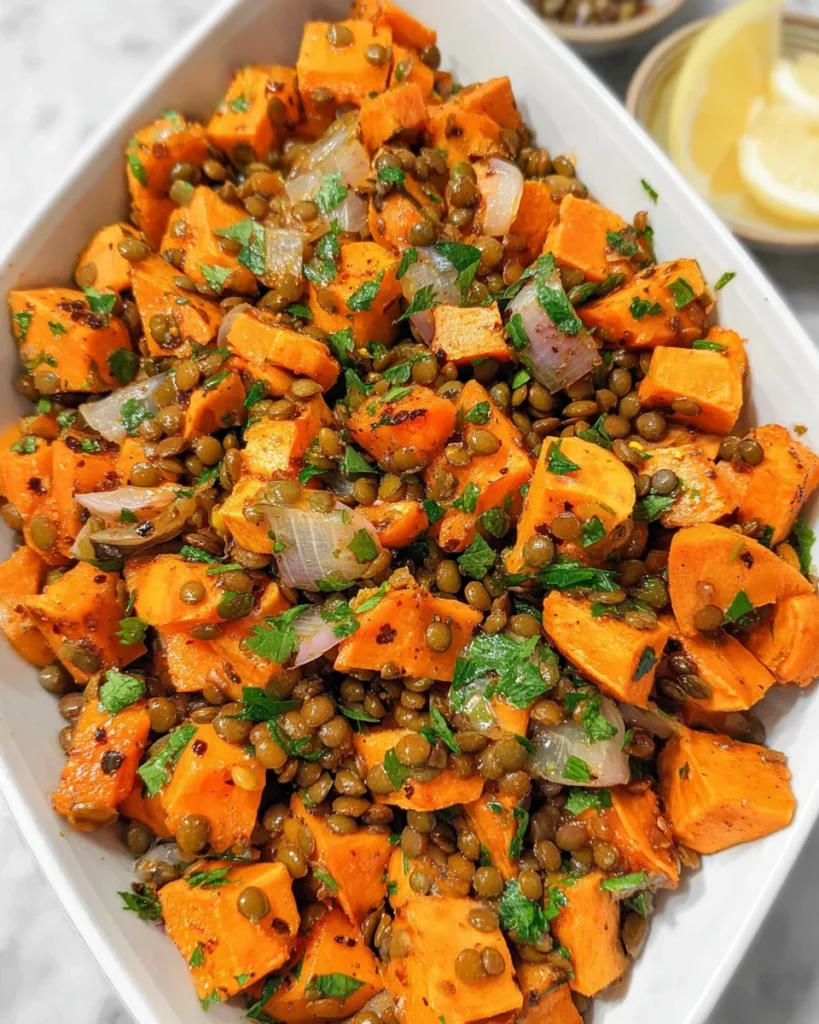
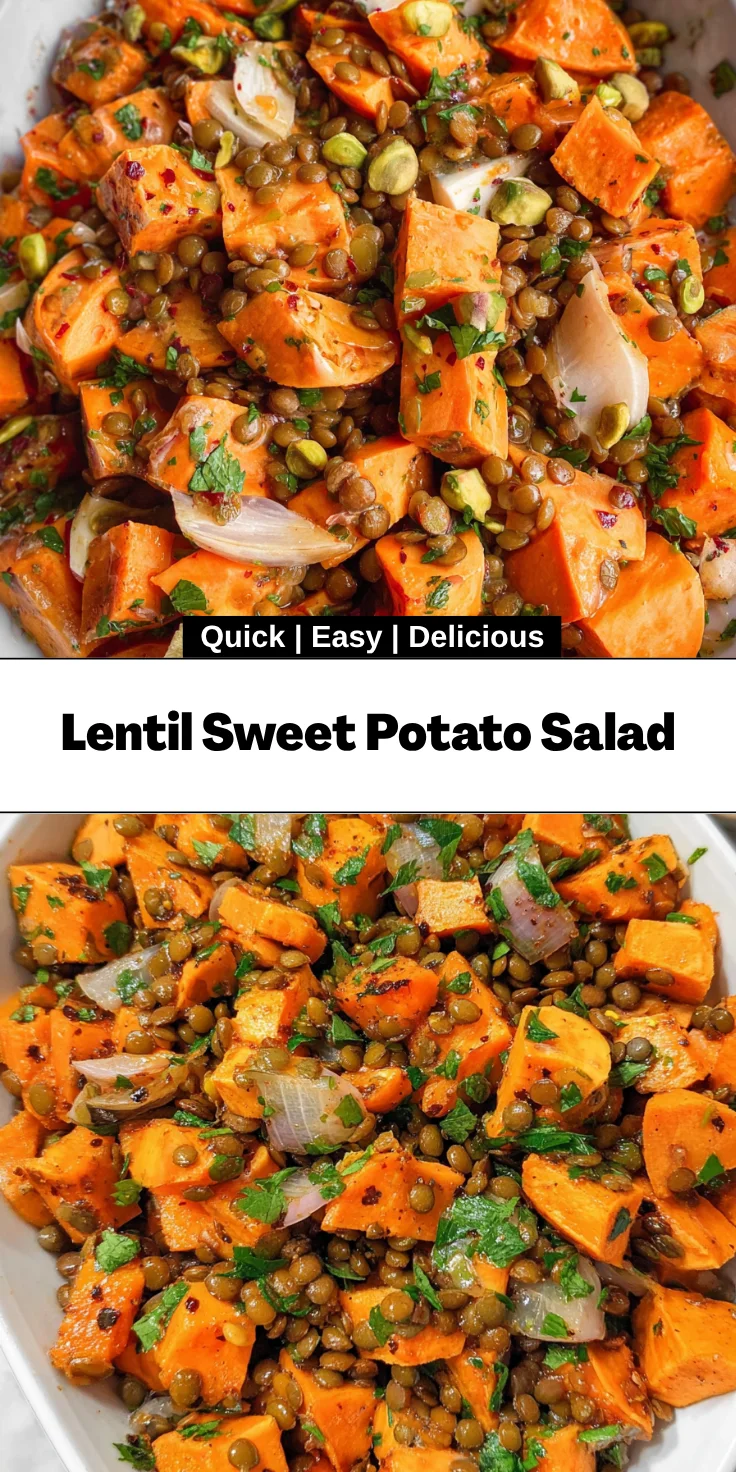
    Introduction to Lentil Sweet Potato Salad

    As a busy mom, I understand the daily dance of meal prep, picky eaters, and time constraints. That’s why I’m excited to share my Lentil Sweet Potato Salad! This delightful dish brings together roasted sweet potatoes and hearty lentils, creating a wonderfully satisfying salad that’s perfect for lunch or dinner. It’s bright, colorful, and bursting with flavor, making it a quick solution for a hectic day. Trust me, whether you’re feeding your family or impressing friends, this salad will win their hearts and bellies!

    Why You’ll Love This Lentil Sweet Potato Salad

    This Lentil Sweet Potato Salad checks all the boxes for a busy lifestyle! It’s easy to whip up, taking just 45 minutes from start to finish. The vibrant combination of flavors and textures—sweet, creamy, and nutty—will satisfy your taste buds while nourishing your body. Plus, it’s a fantastic make-ahead dish that keeps well in the fridge, ensuring you always have a healthy, delicious option on hand!

    Ingredients for Lentil Sweet Potato Salad

    Gathering the right ingredients is key to crafting a delightful Lentil Sweet Potato Salad. Here’s what you’ll need:

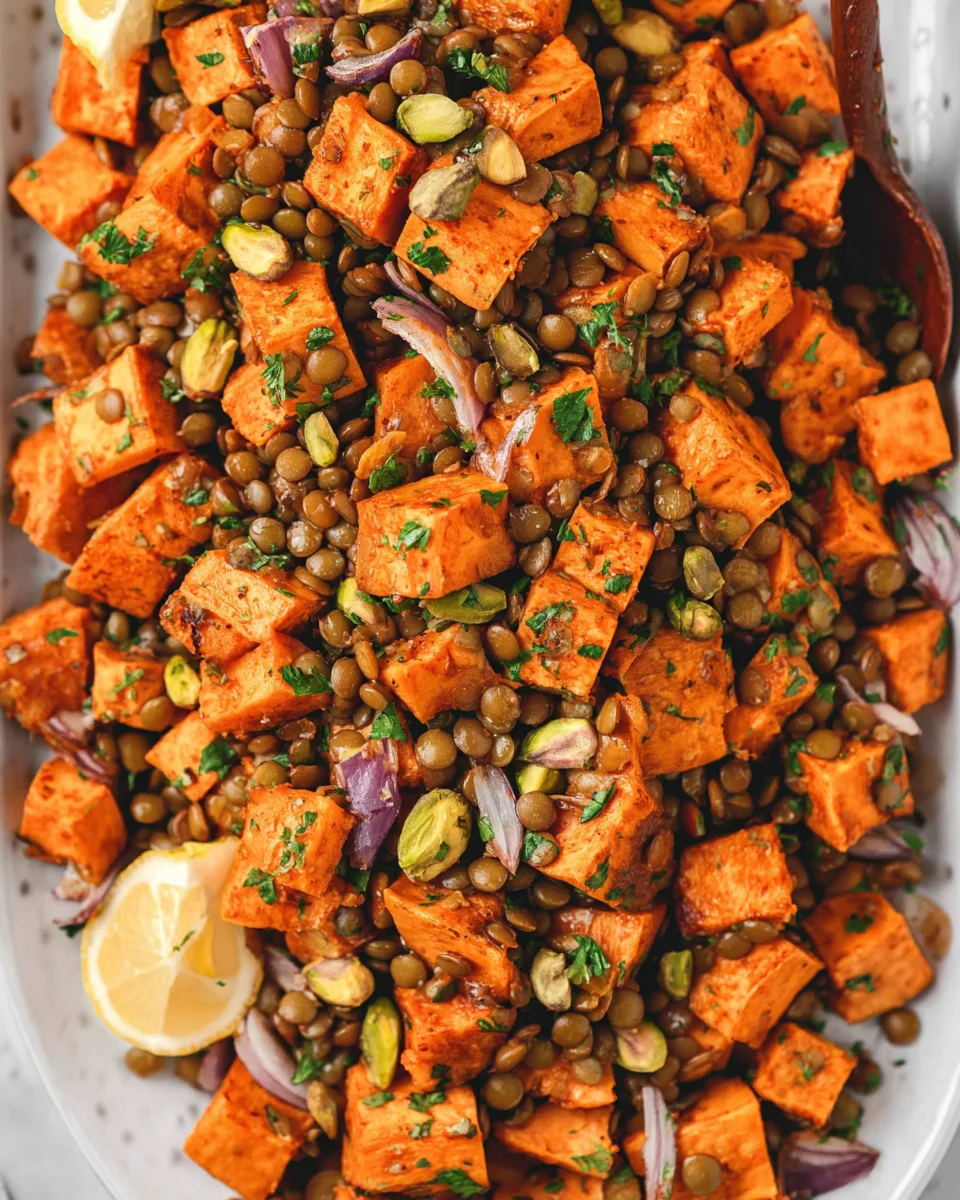
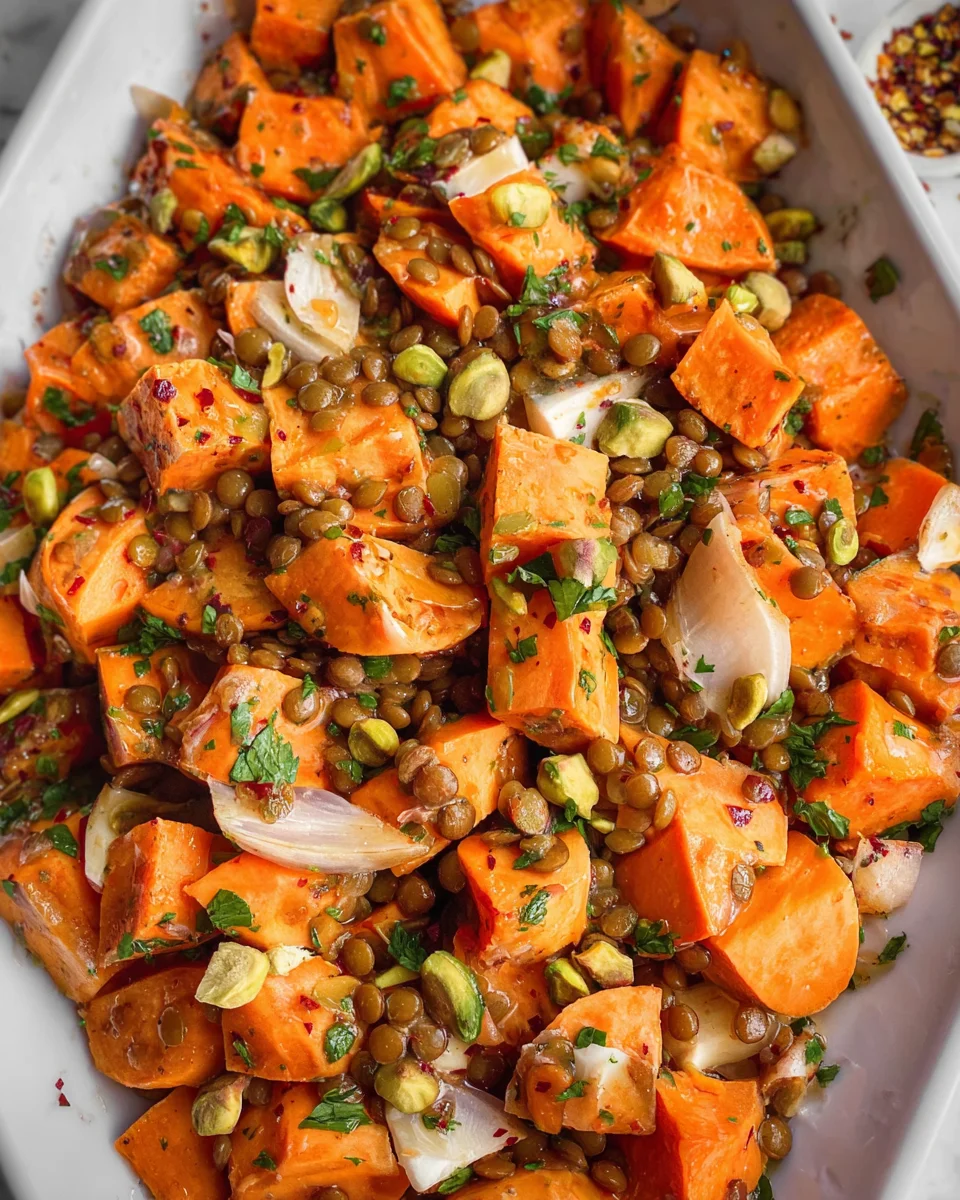
    • Sweet Potatoes: These vibrant gems lend a natural sweetness and creamy texture to the salad. Peeled and cubed, they become beautifully roasted treasures.
    • Lentils: Packed with protein and fiber, lentils are the backbone of this dish. You can use canned lentils for convenience or cook dry lentils for a fresher taste.
    • Parsley: Fresh parsley adds a bright, herby note that elevates the overall flavor. Feel free to chop in other herbs for a personalized touch!
    • Pistachio Nuts: Optional but recommended, these crunchy nuts bring a delightful contrast and an earthy flavor. They also make the salad visually appealing.
    • Feta Cheese: This creamy cheese adds a decadent, salty kick. If you’re going dairy-free, non-dairy feta or simply omitting it works perfectly too.
    • Extra Virgin Olive Oil: A high-quality olive oil enriches the dressing, blending all the flavors beautifully.
    • Fresh Lemon Juice: A splash of lemon juice brightens up the dressing and adds a refreshing zing.
    • Mustard: Whether American or Dijon, mustard adds a lovely depth and tang to the dressing. Don’t skip this vital ingredient!
    • Garlic: Fresh garlic is a powerhouse of flavor in the dressing. Grating it keeps it pungent without overpowering the other ingredients.
    • Cumin and Paprika: These spices bring warmth and depth to the dish, enhancing the character of the salad.
    • Salt and Pepper: Essential for seasoning, they help balance the flavors and bring everything together.

    You can find all these ingredients with exact measurements at the bottom of the article, where they’re available for printing. Get ready to create a bowl of goodness that’s not only nutritious but also a feast for the eyes!

    How to Make Lentil Sweet Potato Salad

    Creating your own Lentil Sweet Potato Salad is a breeze! Let’s take it step by step, so you can enjoy this tasty, healthy delight in no time.

    Preheat and Prepare Sweet Potatoes

    First things first, preheat your oven to 400°F (200°C). This ensures that your sweet potatoes roast perfectly.

    While the oven warms, peel your sweet potatoes and chop them into 1-inch (2.5 cm) cubes. This size helps them cook evenly and absorb all those lovely flavors. Toss the cubes in a bowl with a drizzle of olive oil, salt, and a sprinkle of black pepper. Get your hands in there and mix it up! The more even the coating, the tastier your sweet potatoes will be.

    Bake the Sweet Potatoes

    Now, transfer your seasoned sweet potatoes onto a baking tray lined with parchment paper for easy cleanup. Spread them out in a single layer, so they roast rather than steam.

    Bake for about 20 to 30 minutes. You’ll know they’re ready when they’re fork-tender and have caramelized edges that show off their golden brown color. Don’t be afraid to peek in and give them a little toss halfway through to ensure even roasting!

    Prepare the Lentils

    Next up are the lentils! If you’re using canned lentils, simply drain and rinse them under cold water. This helps remove some sodium and keeps them fresh.

    If you’re starting with dry lentils, bring a pot of lightly salted water to a boil. Add in one cup of lentils, and let them simmer for about 15 to 30 minutes until tender. You don’t want mushy lentils, so keep an eye on them!

    Whisk Together the Dressing

    While your sweet potatoes are baking, it’s time to prepare the dressing. In a small bowl, combine extra virgin olive oil, fresh lemon juice, mustard, grated garlic, cumin, paprika, salt, and pepper.

    Whisk everything together until well combined and creamy. The flavors meld beautifully, and this dressing is what brings everything to life!

    Combine Ingredients

    Once the sweet potatoes are out of the oven and slightly cooled, it’s time to combine! In a large bowl, add the roasted sweet potatoes, lentils, and dressing.

    Next, toss in the chopped parsley. Mix everything gently until every ingredient is coated in that delicious dressing. Don’t forget to taste and adjust the seasoning as needed!

    Optional Toppings

    Here comes the fun part—toppings! For added crunch, sprinkle pistachio nuts over the top. Their earthy flavor pairs so well with the sweetness of the potatoes.

    If you enjoy a creamy texture, crumble some feta cheese on top. It adds a delightful salty contrast, making the salad even more irresistible. Just like that, your Lentil Sweet Potato Salad is ready to shine!

    Tips for Success

    • Make sure to cut sweet potatoes into uniform cubes for even cooking.
    • Always taste your dressing before adding it to the salad; this way, you can adjust flavors to your liking.
    • If you’re short on time, use canned lentils—they’re a lifesaver!
    • Let the roasted sweet potatoes cool slightly before combining with lentils to prevent wilting.
    • Prepare extra dressing on the side for a flavor boost when serving!

    Equipment Needed

    • Baking Tray: A standard baking sheet works well; you can line it with parchment paper for easy cleanup.
    • Mixing Bowls: Have one large bowl for combining ingredients and a smaller one for the dressing.
    • Whisk: A simple whisk or fork will do a great job for mixing the dressing.
    • Knife and Cutting Board: Essential for prepping your sweet potatoes and herbs.

    Variations

    • Quinoa Replacement: For a gluten-free twist, replace lentils with quinoa for a different texture and flavor.
    • Veggie Boost: Toss in additional vegetables like spinach, bell peppers, or cherry tomatoes for extra color and nutrition.
    • Herb Swaps: Experiment with different herbs—basil, cilantro, or dill can create exciting flavor profiles.
    • Spicy Kick: Add a touch of cayenne pepper or red pepper flakes to the dressing for a spicy kick that will wake up your taste buds!
    • Nuts Galore: Try walnuts or almonds in place of pistachios for an alternative crunchy topping; each brings its unique taste.
    • Fruit Addition: Incorporate dried cranberries or pomegranate seeds for a sweet contrast to the savory elements of this salad.

    Serving Suggestions

    • Pair the salad with warm pita bread for a satisfying meal that’s perfect for dunking.
    • For a refreshing contrast, serve alongside a light cucumber and tomato salad.
    • A glass of sparkling water with lemon enhances the salad’s vibrant flavors.
    • Present the salad on a colorful platter to make it visually stunning.

    FAQs about Lentil Sweet Potato Salad

    Can I make Lentil Sweet Potato Salad ahead of time?

    Absolutely! This Lentil Sweet Potato Salad is perfect for meal prep. You can roast the sweet potatoes and cook the lentils in advance. Just mix them together with the dressing on the day you plan to serve it. The flavors even get better as they meld in the fridge!

    Is this salad vegan?

    Yes! To make this dish vegan, simply omit the feta cheese. It’s packed with flavor and nutrients on its own, so you won’t miss the dairy at all!

    How can I store leftovers?

    Leftover Lentil Sweet Potato Salad can be stored in an airtight container in the refrigerator for up to three days. Just give it a quick stir before serving, and it’s ready to enjoy again!

    Can I substitute the lentils with something else?

    Absolutely! If you prefer a different protein, try using quinoa or chickpeas. Both options offer great texture and nutrition while keeping the salad vibrant and filling.

    What can I serve with this salad?

    This salad pairs beautifully with warm pita bread, a dollop of yogurt tahini sauce, or a refreshing tzatziki. It also makes a great side dish to grilled meats or roasted vegetables!

    Final Thoughts

    Making this Lentil Sweet Potato Salad is more than just preparing a meal; it’s about creating a moment of joy and nourishment. With each bite, you savor the warmth of roasted sweet potatoes and the satisfying protein of lentils, balancing flavors that dance together in perfect harmony. Whether it’s a busy weeknight or a sunny weekend gathering, this dish brings a touch of culinary magic to your table. Share it with loved ones, and watch their faces light up. Cooking like this is not just about food; it’s about love, connection, and flavorful memories that last a lifetime!


    Print

    clock clock iconcutlery cutlery iconflag flag iconfolder folder iconinstagram instagram iconpinterest pinterest iconfacebook facebook iconprint print iconsquares squares iconheart heart iconheart solid heart solid icon

    Description

    A delicious and healthy salad combining roasted sweet potatoes and lentils, topped with a flavorful dressing.


    • pound sweet potatoes, peeled and cut into 1-inch or 2.5 cm cubes
    • 1 can (15 ounces) lentils or 1 ⅓ cups cooked or ⅔ cup dry lentils
    • 3 tablespoons parsley, chopped
    • 2 tablespoons pistachio nuts, optional
    • 2 ounces feta cheese or non-dairy feta, optional
    • FOR THE DRESSING:
    • 3 tablespoons extra virgin olive oil
    • 2 tablespoons fresh lemon juice
    • 1½ tablespoons mustard (American or Dijon)
    • 1 small garlic clove, grated
    • 1 teaspoon cumin, ground
    • 1 teaspoon paprika
    • ½ teaspoon salt
    • ⅛ teaspoon black pepper

    1. Preheat oven to 400°F or 200°C. Peel and chop sweet potatoes into 1-inch (2.5 cm) cubes and add them to a baking tray.
    2. Toss with a drizzle of olive oil, 2 pinches of salt, and a pinch of black pepper and bake for 20 to 30 minutes or until fork tender.
    3. Drain and rinse the lentils, or cook dry lentils in lightly salted boiling water for 15 to 30 minutes or until tender.
    4. In a small bowl, whisk together all dressing ingredients until well combined.
    5. In a large bowl, add roasted sweet potatoes, lentils, dressing, and parsley, and toss until combined.
    6. Taste and adjust for salt before serving.
    7. Optionally, add pistachio nuts and feta cheese on top.
    8. Serve on lettuce or watercress leaves with yogurt tahini sauce or tzatziki, and warm pita bread or couscous on the side.

    Notes

    • For a vegan option, omit the feta cheese.
    • Leftover salad can be stored in the refrigerator for a few days.
    • This salad makes a great meal prep option.
    • Prep Time: 15 minutes
    • Cook Time: 30 minutes
    • Category: Salad
    • Method: Baking, Mixing
    • Cuisine: Mediterranean

    Nutrition

    • Serving Size: 1 cup
    • Calories: 350
    • Sugar: 4g
    • Sodium: 250mg
    • Fat: 15g
    • Saturated Fat: 2g
    • Unsaturated Fat: 10g
    • Trans Fat: 0g
    • Carbohydrates: 45g
    • Fiber: 12g
    • Protein: 12g
    • Cholesterol: 5mg

    Sharing is caring!

  • Ground Beef Zucchini Casserole

    Ground Beef Zucchini Casserole


    Introduction to Ground Beef Zucchini Casserole

    Hey there, fellow home cooks! If you’re juggling the demands of a busy life like I am, you’ll appreciate this Ground Beef Zucchini Casserole. It’s one of those comforting dishes that wraps you in warmth with every bite. Packed with flavor and easy to whip up, it’s a delightful way to sneak in some veggies for picky eaters in the family. This recipe makes me feel like a culinary superhero on hectic days. Whether it’s a family dinner or meal prep for the week, this casserole is your new best friend!

    Why You’ll Love This Ground Beef Zucchini Casserole

    This Ground Beef Zucchini Casserole is a game changer for busy nights. It’s not only quick to prepare, but also comforting and satisfying. With just a few ingredients and a little love, you can create a dish that’s full of flavor and nutrition. Plus, it beautifully combines the heartiness of beef and the freshness of zucchini, making it a family favorite. Trust me, you’ll be craving it again and again!

    Ingredients for Ground Beef Zucchini Casserole

    Let’s dive into the goodness that makes this Ground Beef Zucchini Casserole a hit in my kitchen! Here’s what you’ll need:

    • Ground beef: The star of the show! It adds richness and protein.
    • Zucchinis: Fresh, tender zucchinis give the dish a lovely texture and sneak in some veggies.
    • Onion: Finely chopped, it brings sweetness and depth of flavor.
    • Garlic: A couple of cloves, minced, add that aromatic kick.
    • Marinara or tomato sauce: Use your favorite brand for convenience; it’s the flavorful base of this dish.
    • Shredded mozzarella cheese: Melts beautifully for that creamy topping.
    • Parmesan cheese: Grated, it adds a salty, nutty finish that elevates the flavors.
    • Ricotta cheese (optional): Creamy texture and a little indulgence if you choose to incorporate it.
    • Olive oil: A drizzle for sautéing the aromatics, giving everything a lovely gloss.
    • Italian seasoning or oregano: Dried herbs that pack a flavor punch and enhance the Italian flair.
    • Salt and pepper: Essential for seasoning. Adjust to personal taste.
    • Fresh basil leaves (for garnish, optional): Adds a pop of color and fresh flavor on top.
    • Red pepper flakes (optional): A pinch can spice things up if you like a little heat.

    For specific quantities, check out the bottom of the article where you can find the printable version of this delicious recipe!

    How to Make Ground Beef Zucchini Casserole

    Now for the fun part—let’s bring this Ground Beef Zucchini Casserole to life! With straightforward steps, you’ll soon have a warm, bubbly dish that your family will love. Let’s get started!

    Preheat the Oven

    First things first, preheat your oven to 375°F (190°C). This gets your oven nice and toasty, ensuring your casserole bakes perfectly.

    Cook the Aromatics

    In a skillet, pour in a tablespoon of olive oil. Over medium heat, add the finely chopped onion and minced garlic. Sauté for about 2-3 minutes, until the onion turns translucent. That heavenly aroma will fill your kitchen!

    Brown the Ground Beef

    Now it’s time for the ground beef. Toss it in the skillet and break it up with a wooden spoon. Season with salt, pepper, and your favorite Italian seasoning. Cook until the beef is browned, which should take about 5-7 minutes. Drain any excess fat, if necessary—we want the casserole rich but not greasy!

    Add the Sauce

    Stir in your marinara or tomato sauce. Let it simmer for 3-5 minutes, allowing those flavors to meld together. Trust me, your taste buds are already getting excited!

    Layer the Ingredients

    In a baking dish, start layering! Place half of the sliced zucchini as your base. Then, spread half of the beef mixture on top. This gives a hearty foundation for your casserole.

    Add Cheese

    If you’re feeling indulgent, dollop some ricotta cheese on top. Next, sprinkle a generous amount of shredded mozzarella and grated Parmesan over the meat. Those cheesy layers will create a wonderful, gooey texture as it bakes.

    Finish Layering

    Repeat the process with another layer of zucchini and the remaining beef mixture. Top everything off with the leftover mozzarella and Parmesan. You want that golden brown finish, right?

    Bake It

    Pop the dish in your preheated oven and let it bake uncovered for about 25-30 minutes. Keep an eye on it! When the cheese is bubbly and golden, you know it’s time to pull it out.

    Cool and Garnish

    Once done, let it sit for a few minutes. This helps everything set perfectly. After that, sprinkle some fresh basil leaves and red pepper flakes on top if you like a little kick.

    Serve and Enjoy

    Slice your Ground Beef Zucchini Casserole into hearty pieces and serve it warm. You’ll be savoring each delicious bite, and your kitchen will smell like an Italian bistro!

    Tips for Success

    • Use a large skillet for browning the beef; it helps prevent overcrowding.
    • Don’t skip the resting time after baking; it allows the layers to set.
    • Feel free to swap out zucchinis for other veggies like bell peppers or eggplant.
    • Using homemade marinara sauce can boost flavor; it’s worth the effort!
    • If you want more cheese, go ahead and add extra layers!

    Equipment Needed

    • Large skillet: Perfect for browning the beef. A sauté pan works, too.
    • Baking dish: A 9×13 inch dish is ideal. A similar-sized casserole dish can suffice.
    • Wooden spoon: Great for mixing and breaking up the beef. A spatula will do.
    • Knife and cutting board: Essential for slicing zucchini and chopping onions.

    Variations of Ground Beef Zucchini Casserole

    • Cheesy Mexican Twist: Add taco seasoning to the beef and incorporate black beans and corn. Top with Mexican cheese blend for a flavorful kick.
    • Low-Carb Delight: Skip the pasta and add more zucchini. You can also use ground turkey or chicken for a lighter option!
    • Vegetarian Style: Replace ground beef with lentils or crumbled tempeh. Layer in bell peppers and spinach for a hearty veggie dish.
    • Italian Sausage Version: Swap ground beef with mild or spicy Italian sausage for a flavorful twist. The seasoning in the sausage adds a delicious dimension.
    • Herbed & Garlic Tofu: For a vegetarian option, substitute tofu. Marinate it in garlic and herbs before crumbling into the casserole.

    Serving Suggestions

    • Pair with a crisp green salad dressed in vinaigrette for a fresh contrast.
    • Serve with crusty garlic bread to soak up the delicious sauce.
    • A glass of red wine or sparkling water complements the flavors beautifully.
    • Garnish plates with extra basil for a pop of color and freshness.

    FAQs about Ground Beef Zucchini Casserole

    Got some questions about this delicious Ground Beef Zucchini Casserole? You’re in the right spot! Here are a few common queries that might help you whip this up even better.

    Can I make Ground Beef Zucchini Casserole ahead of time?

    Absolutely! This casserole is perfect for prepping ahead. Just assemble it, cover tightly, and refrigerate. When you’re ready to eat, bake it straight from the fridge; it might need a few extra minutes in the oven.

    What can I substitute for ground beef?

    If you’re looking for alternatives to ground beef, try ground turkey, chicken, or even plant-based meat. These substitutes work beautifully, making it a versatile dish for different diets.

    Can I freeze the leftovers?

    You bet! This casserole freezes well. Just cool it completely, portion it out in freezer-safe containers, and store for up to three months. Reheat it straight from the freezer—simple and scrumptious!

    How do I make it more flavor-packed?

    For an extra punch of flavor, consider adding some sautéed mushrooms or roasted peppers. You can also sprinkle fresh herbs like thyme or oregano before serving. Your taste buds will thank you!

    Is this casserole gluten-free?

    Yes! As long as you stick to gluten-free sauces and ingredients, this Ground Beef Zucchini Casserole is a tasty option for those avoiding gluten. Just double-check labels to be sure.

    Final Thoughts

    This Ground Beef Zucchini Casserole is more than just a dish; it’s a delightful hug on a plate. The blend of savory beef, tender zucchini, and gooey cheese creates a comforting experience that warms the belly and the heart. I love how it effortlessly brings families together around the dinner table, sparking conversations and laughter. Plus, it’s easy to customize, making it a go-to recipe for any season. So, whether you’re busy juggling work and kids or simply seeking a hearty meal, this casserole is here to make your life a little simpler and much tastier!


    Print

    clock clock iconcutlery cutlery iconflag flag iconfolder folder iconinstagram instagram iconpinterest pinterest iconfacebook facebook iconprint print iconsquares squares iconheart heart iconheart solid heart solid icon

    Description

    A delicious and comforting Ground Beef Zucchini Casserole that’s easy to prepare and packed with flavor.


    • 1 lb (450 g) ground beef
    • 3 medium zucchinis, sliced into rounds
    • 1 small onion, finely chopped
    • 23 cloves garlic, minced
    • 1 cup marinara or tomato sauce
    • 1 cup shredded mozzarella cheese
    • 1/4 cup grated Parmesan cheese
    • 1/2 cup ricotta cheese (optional)
    • 1 tablespoon olive oil
    • 1 teaspoon dried Italian seasoning or oregano
    • Salt and pepper, to taste
    • Fresh basil leaves, for garnish (optional)
    • Red pepper flakes (optional, for a little heat)

    1. Preheat the Oven: Start by preheating your oven to 375°F (190°C).
    2. Cook the Aromatics: In a skillet over medium heat, heat the olive oil, add the onion and garlic, and sauté until translucent.
    3. Brown the Ground Beef: Add ground beef, season, and cook until browned, draining excess fat if necessary.
    4. Add the Sauce: Stir in marinara sauce and simmer for 3-5 minutes.
    5. Layer the Ingredients: In a baking dish, layer sliced zucchinis, then half of the beef mixture.
    6. Add Cheese: Dollop ricotta (if using), then sprinkle mozzarella and Parmesan cheeses.
    7. Finish Layering: Add another layer of zucchinis and the remaining beef mixture, topping with remaining cheeses.
    8. Bake It: Bake uncovered for about 25-30 minutes until cheese is melted and golden brown.
    9. Cool and Garnish: Allow to cool for a few minutes, then garnish with fresh basil and red pepper flakes, if desired.
    10. Serve and Enjoy: Slice and serve warm.

    Notes

    • This casserole can be made ahead and refrigerated.
    • Feel free to add other vegetables for extra nutrition.
    • Prep Time: 15 minutes
    • Cook Time: 30 minutes
    • Category: Main Course
    • Method: Baking
    • Cuisine: Italian

    Nutrition

    • Serving Size: 1 serving
    • Calories: 350
    • Sugar: 4g
    • Sodium: 600mg
    • Fat: 20g
    • Saturated Fat: 8g
    • Unsaturated Fat: 10g
    • Trans Fat: 0g
    • Carbohydrates: 12g
    • Fiber: 2g
    • Protein: 28g
    • Cholesterol: 75mg

    Sharing is caring!

  • Classic Dill Pickle Pasta Salad

    Classic Dill Pickle Pasta Salad


    Introduction to Classic Dill Pickle Pasta Salad

    If you’re anything like me, busy days can sometimes feel like a whirlwind. That’s why I love whipping up a dish that not only tastes delicious but also brings a sense of nostalgia. This Classic Dill Pickle Pasta Salad is my go-to for summer gatherings or a quick weeknight meal. With its refreshing and tangy flavors, it’s a dish that your family will adore, whether it’s a casual picnic or a last-minute barbecue invite. Plus, it’s easy to make, perfect for those hectic days when you want something special without spending all your time in the kitchen.

    Why You’ll Love This Classic Dill Pickle Pasta Salad

    This Classic Dill Pickle Pasta Salad shines in its simplicity and delightful flavor. With minimal prep and cook time, you’ll have a fantastic dish ready in just 40 minutes—perfect for busy moms and professionals alike. The crunchy pickles paired with creamy dressing provide a taste that’s hard to resist. It’s not just a salad; it’s a joyful burst of summer on your plate, bringing smiles with every bite!

    Ingredients for Classic Dill Pickle Pasta Salad

    Gather these fresh and flavorful ingredients to create your Classic Dill Pickle Pasta Salad. Each one adds a special touch, inviting flavor, and texture that promises to delight your taste buds!

    • Rotini pasta: This twisted shape hugs the dressing perfectly, making every bite flavorful and satisfying.
    • Dill pickles: The star of the salad! Their crunchy texture and tangy taste elevate the dish.
    • Red onion: For a sweet crunch, you want a bit of color and zing that complements the pickles.
    • Fresh dill: A fragrant herb that enhances the dill pickle flavor, providing brightness and an aromatic touch.
    • Mayonnaise: This creamy base brings everything together, adding richness and smoothness to the pasta salad.
    • Greek yogurt: A tangy alternative to regular yogurt, it adds creaminess while boosting nutrition.
    • Mustard: Just a hint brings depth and a slight zing, harmonizing beautifully with the other flavors.
    • Sugar: A pinch balances out the tanginess of the pickles and dressing, creating harmony in flavors.
    • Salt and pepper: Essential for seasoning, they bring the flavors to life, enhancing every ingredient.

    If you’re feeling adventurous, consider adding cooked chicken or hard-boiled eggs for extra protein. For those seeking a lighter version, you can substitute the mayo with additional Greek yogurt. All quantities for these ingredients are detailed at the bottom of the article for easy printing!

    How to Make Classic Dill Pickle Pasta Salad

    Creating this Classic Dill Pickle Pasta Salad is as simple as a summer breeze! Just follow these easy steps to whip up a dish that will impress your family and friends. Trust me, it’s an adventure in flavor and freshness!

    Step 1: Cook the Pasta

    Start by bringing a large pot of salted water to a boil. Once bubbling, add 8 oz of rotini pasta and cook until al dente, which will take about 8-10 minutes. Stir occasionally to keep the pasta from sticking. When it’s done, drain the pasta and rinse it under cold water. This will stop the cooking process and keep it from getting mushy!

    Step 2: Prepare the Vegetables

    While the pasta cools, it’s time to chop up those veggies. Grab 1 cup of diced dill pickles and 1/2 cup of finely chopped red onion. The pickles provide that signature crunch, while the onions add a sweet kick. Place everything in a bowl, and let their vibrant colors set the mood for what’s to come!

    Step 3: Mix the Dressing

    In a separate mixing bowl, it’s time to make the creamy dressing. Whisk together 1/2 cup mayonnaise, 1/2 cup Greek yogurt, 1 tablespoon mustard, 1 tablespoon sugar, and a sprinkle of salt and pepper to taste. You’re aiming for a smooth blend, so give it a good whisk. This dressing is the glue that holds all those delicious flavors together!

    Step 4: Combine All Ingredients

    Now the fun part! In a large bowl, combine the cooled pasta with your dressing, chopped pickles, red onion, and 1/4 cup of fresh dill. Gently fold everything together until the pasta is well-coated. Keep it easy on the mixing—overdoing it can break up the pasta and make it mushy. You want to maintain that delightful texture!

    Step 5: Chill and Serve

    Cover your salad and let it chill in the refrigerator for at least 30 minutes. This chilling time is crucial! It allows the flavors to meld beautifully, creating a symphony of taste in every bite. When you’re ready to serve, pull it out, and prepare to be showered with compliments!

    Tips for Success

    • Use fresh dill for a more vibrant flavor—it’s worth it!
    • Let your salad chill longer than 30 minutes if possible; overnight is best!
    • Adjust the dressing ingredients based on your taste. Like it tangier? Add more mustard!
    • Substitute the rotini pasta with your favorite shape if you have a preference.
    • For a crunchier texture, add celery or bell peppers to the mix.

    Equipment Needed

    • Large pot: A sturdy one for cooking pasta; a stockpot works great too.
    • Colander: For draining the pasta; a slotted spoon in a pinch.
    • Mixing bowls: A medium bowl for the dressing and a large one for mixing.
    • Whisk: To blend the dressing; a fork will do if you’re in a hurry.
    • Knife and cutting board: For chopping veggies—always handy in the kitchen!

    Variations of Classic Dill Pickle Pasta Salad

    • For a protein punch, mix in diced cooked chicken or chunks of hard-boiled eggs.
    • Swap out rotini pasta for whole wheat or gluten-free options for a healthier choice.
    • Add cherry tomatoes for a burst of sweetness and vibrant color.
    • Incorporate crumbled feta or shredded cheddar for a cheesy twist.
    • If you’re a spice lover, toss in some chopped jalapeños or a dash of hot sauce for heat.
    • For a herbaceous flavor, try adding chopped green onions or parsley alongside the dill.

    Serving Suggestions for Classic Dill Pickle Pasta Salad

    • Pair with grilled chicken or shrimp for a complete meal that’s full of flavor.
    • Serve alongside fresh garden salads or crunchy vegetable platters for extra color and texture.
    • For drinks, a chilled lemonade or iced tea complements the tanginess perfectly.
    • Presentation matters—use a colorful serving bowl and garnish with extra dill for a lovely touch.

    FAQs about Classic Dill Pickle Pasta Salad

    As I’ve enjoyed making this Classic Dill Pickle Pasta Salad over the years, I’ve come across a few common questions. Let’s dive into them together, shall we?

    Can I prepare Classic Dill Pickle Pasta Salad in advance?

    Absolutely! In fact, making it a day ahead enhances the flavors. Just store it in an airtight container in the fridge, and you’ll have a delicious salad ready to impress!

    What can I serve with this pasta salad?

    This pasta salad pairs beautifully with grilled proteins like chicken or fish. It’s also great alongside fresh veggies or as a side for sandwiches. Think of it as a delightful sidekick to your main dish!

    Can I customize the ingredients?

    Definitely! Feel free to mix in your favorite ingredients. Adding extra veggies or proteins can take your Classic Dill Pickle Pasta Salad to new heights and cater to your family’s taste preferences.

    Is this salad suitable for a potluck?

    Can I make this salad gluten-free?

    Yes! Simply swap the rotini pasta for a gluten-free pasta variety. You’ll maintain the essence and enjoy the same tasty experience without the gluten!

    Final Thoughts

    There’s something incredibly satisfying about digging into a bowl of Classic Dill Pickle Pasta Salad. It’s like a hug in a bowl, bringing together flavors that spark joy and memories of summer gatherings. This dish not only fills hungry tummies but also warms the heart with its nostalgia. Whether you’re preparing it for a family picnic or a quick meal after a long day, it effortlessly combines convenience and taste. Plus, as you experiment with variations, you’ll find your family favorites. So, roll up your sleeves, and let this vibrant salad take center stage at your next meal!


    Print

    clock clock iconcutlery cutlery iconflag flag iconfolder folder iconinstagram instagram iconpinterest pinterest iconfacebook facebook iconprint print iconsquares squares iconheart heart iconheart solid heart solid icon

    Description

    A refreshing and tangy pasta salad featuring dill pickles, perfect for summer gatherings or as a side dish.


    • 8 oz rotini pasta
    • 1 cup diced dill pickles
    • 1/2 cup finely chopped red onion
    • 1/4 cup fresh dill, chopped
    • 1/2 cup mayonnaise
    • 1/2 cup Greek yogurt
    • 1 tbsp mustard
    • 1 tbsp sugar
    • Salt and pepper to taste

    1. Cook rotini pasta in a large pot of salted boiling water until al dente, about 8-10 minutes. Drain and rinse under cold water.
    2. While pasta cools, chop dill pickles and red onion.
    3. In a mixing bowl, whisk together mayonnaise, Greek yogurt, mustard, sugar, salt, and pepper until smooth.
    4. Combine cooled pasta with dressing, chopped pickles, red onion, and fresh dill. Fold gently until coated.
    5. Chill for at least 30 minutes before serving for flavors to meld. Serve cold.

    Notes

    • Adjust seasoning to taste.
    • Can add cooked chicken or hard-boiled eggs for extra protein.
    • This salad can be made a day in advance for better flavor.
    • Prep Time: 10 minutes
    • Cook Time: 10 minutes
    • Category: Salad
    • Method: Mixing
    • Cuisine: American

    Nutrition

    • Serving Size: 1 serving
    • Calories: 300
    • Sugar: 3g
    • Sodium: 400mg
    • Fat: 18g
    • Saturated Fat: 3g
    • Unsaturated Fat: 15g
    • Trans Fat: 0g
    • Carbohydrates: 30g
    • Fiber: 2g
    • Protein: 8g
    • Cholesterol: 15mg

    Sharing is caring!

  • Steak and Mushroom Foil Packs

    Steak and Mushroom Foil Packs


    Introduction to Steak and Mushroom Foil Packs

    Hey there, busy moms and professionals! If you’re juggling work, kids, and everything in between, I totally get it. That’s why I’m excited to share my go-to recipe for Steak and Mushroom Foil Packs. This dish is not only delicious but also a quick solution for those hectic nights when you want a hearty meal without the fuss. Imagine tender, juicy steak mingling with savory mushrooms, all wrapped up in a neat little foil packet. It’s a meal that will impress your loved ones while giving you more time to spend with them!

    Why You’ll Love This Steak and Mushroom Foil Packs

    Steak and Mushroom Foil Packs are the answer to your weeknight dinner dilemmas. They cook quickly on the grill, making your life easier when you’re pressed for time. Plus, the flavors meld beautifully, creating a taste sensation that will make you feel like a gourmet chef! The best part? Cleanup is a breeze. Just toss the foil when you’re done, leaving you more time to relax with your family!

    Ingredients for Steak and Mushroom Foil Packs

    Let’s dive into the star-studded lineup of ingredients you’ll need for these delightful Steak and Mushroom Foil Packs. Each element plays a crucial role in creating that flavorful harmony, so you won’t want to skip any!

    • Top sirloin steak: This cut is tender and flavorful, making it the perfect base. Feel free to swap it with ribeye for a richer taste.
    • Avocado oil: A healthy choice that enhances the flavors without overpowering. Olive oil would be a great substitute if you don’t have it on hand.
    • Soy sauce: This brings a savory depth to the dish. For a gluten-free option, try tamari or coconut aminos.
    • Worcestershire sauce: Adding a tangy richness, it complements the steak beautifully. You might also use a homemade version if you’re feeling adventurous!
    • Garlic cloves: Freshly minced garlic adds that aromatic kick. Trust me, you can never have too much garlic!
    • Mushrooms: Their earthiness balances the meat’s richness. Cremini or portobello work wonders—just remember to cut them in half if they’re large.
    • Steak seasoning: This adds the perfect blend of spices. You can certainly make your own mix or use whatever you prefer, like Montreal seasoning.
    • Fresh thyme: Optional, but this herb brightens the dish and adds a burst of freshness. If you can’t find it, parsley will do just fine!

    For exact measures, you’ll find everything detailed at the bottom of the article, ready for printing. Now let’s get cooking!

    How to Make Steak and Mushroom Foil Packs

    Step 1: Marinate the Steak

    To kick things off, grab a large bowl and toss in those succulent chunks of top sirloin steak. Add the avocado oil, soy sauce, Worcestershire sauce, and minced garlic. Mix everything well, making sure that each piece is coated in the flavorful marinade. Cover the bowl and let it sit in the fridge for at least 8 hours, or overnight if you can. This step is essential for infusing that tender meat with all the delicious flavors. Trust me, the longer you marinate, the better it gets!

    Step 2: Prepare the Grill and Foil

    When you’re ready to cook, fire up your grill to medium-high heat, around 400 degrees F. While it’s heating up, take four large sheets of aluminum foil and lay them out on your counter or work surface. This will make assembly a breeze! The foil will keep all the juice in, and you won’t have to worry about cleaning the grill afterwards. Just imagine those flavors steaming inside the packets—it’ll be mouthwatering!

    Step 3: Combine Ingredients

    After your steak has had its time to soak in those tasty marinades, it’s time to assemble. Uncover the bowl and add the halved mushrooms, gently tossing them with the steak to ensure they’re coated too. Now, divide this mixture evenly between the four sheets of aluminum foil. Don’t forget to reserve some marinade that’s left in the bowl—this helps keep everything juicy! Your aroma is going to be amazing—it’s all coming together!

    Step 4: Seasoning and Folding

    Next up, it’s time to add a finishing touch. Spoon 1 tablespoon of the reserved marinade over each foil packet, bringing even more depth to the dish. Now, sprinkle about ½ teaspoon of steak seasoning on top of each. This is where the magic happens! Once seasoned, fold the foil packets tightly by bringing two sides together and crimping the edges to seal them closed. Make sure they’re well sealed so the flavorful steam doesn’t escape!

    Step 5: Grill to Perfection

    It’s showtime! Place the foil packs on your preheated grill. Let them cook for about 15 to 20 minutes, depending on your preferred doneness. For medium-rare steak, I find that 18 minutes is just right. To check if they’re done, carefully open a packet (watch out for the steam!) and check the steak’s color. Once cooked to your liking, remove the packets from the grill and let them rest for 5 minutes. This resting time allows the juices to redistribute—your taste buds will thank you!

    Tips for Success

    • For an extra flavor boost, marinate the steak overnight if you can.
    • Use heavy-duty aluminum foil to prevent ripping and leaking during grilling.
    • Don’t skip the resting time! It ensures juicy, tender steak.
    • Experiment with different mushrooms like shiitake or oyster for a unique taste.
    • Feel free to double the recipe for gatherings—who wouldn’t love these tender packs?

    Equipment Needed

    • Grill: A gas or charcoal grill works perfectly. If you’re short on time, an indoor grill or grill pan will do the trick.
    • Aluminum foil: Heavy-duty foil is best for sealing, but regular foil can work in a pinch. Just be gentle!
    • Large bowl: Any mixing bowl will suffice, as long as it’s big enough to hold the marinade and steak.
    • Tongs: Handy for flipping the packets and keeping your hands safe from the heat.

    Variations

    • Spice it up: Add sliced jalapeños or chili flakes for a kick of heat. Your taste buds will thank you!
    • Vegetarian option: Swap the steak for firm tofu or tempeh, and use the same marinade for a delectable meat-free meal.
    • Kabob style: Instead of foil packs, thread the marinated steak and mushrooms onto skewers for a fun grilling experience.
    • Herb variations: Experiment with different herbs like rosemary or oregano for a flavor twist. Each herb brings something unique!
    • Add vegetables: Bell peppers, zucchini, and onions can make excellent additions to your foil packs, boosting nutrition and flavor.

    Serving Suggestions

    • Serve with a fresh green salad tossed in a light vinaigrette to balance the richness of the steak.
    • A side of garlic bread pairs perfectly, absorbing all those delicious juices.
    • Consider a chilled glass of red wine for a delightful dining experience.
    • For presentation, garnish the foil packs with additional thyme or a sprinkle of fresh parsley.

    FAQs about Steak and Mushroom Foil Packs

    Can I prepare Steak and Mushroom Foil Packs in the oven instead of on the grill?
    Absolutely! If grilling isn’t an option, you can bake these foil packs in a preheated oven at 400 degrees F for about 20-25 minutes. Just ensure they are sealed well to trap the steam.

    What’s the best steak cut for these foil packs?
    While top sirloin is perfect, ribeye or flank steak can also work beautifully. Choose a cut you love; it’ll still deliver that fabulous flavor!

    Can I make these packs ahead of time?
    Yes! You can marinate the steak several hours or even a day in advance. Just store everything in the fridge. Assemble the foil packs right before grilling for the best results.

    How do I store leftovers?
    If you have any leftovers, simply transfer the contents to an airtight container and store them in the fridge for up to 3 days. You can easily reheat them in the oven or on the stovetop.

    Are there any vegetarian alternatives to this recipe?
    Definitely! Replace the steak with hearty vegetables like eggplant or firm tofu. The marinade will infuse them with all those delightful flavors. You’ll have a scrumptious vegetarian option!

    Final Thoughts on Steak and Mushroom Foil Packs

    Cooking doesn’t have to be a time-consuming chore, especially when it can result in mouthwatering meals like Steak and Mushroom Foil Packs. I love how this recipe brings family and friends together around the grill, filling the air with enticing aromas and creating treasured memories. The simplicity of this dish makes it a lifesaver for busy days, while its flavors will make your taste buds dance with joy. So, grab those ingredients and fire up the grill! You’ll soon find that this culinary delight is not just a meal but an experience worth savoring!


    Print

    clock clock iconcutlery cutlery iconflag flag iconfolder folder iconinstagram instagram iconpinterest pinterest iconfacebook facebook iconprint print iconsquares squares iconheart heart iconheart solid heart solid icon

    Description

    Steak and Mushroom Foil Packs are a quick and flavorful meal, perfect for grilling enthusiasts looking to enjoy a delicious combination of tender steak and savory mushrooms.


    • 2 lbs top sirloin steak cut into 2-inch pieces
    • ½ cup avocado oil
    • ⅓ cup soy sauce
    • ¼ cup Worcestershire sauce
    • 8 garlic cloves minced
    • 16 oz mushrooms (halved if large)
    • 2 tsp steak seasoning
    • Fresh thyme optional for garnish

    1. In a large bowl, combine the steak pieces, oil, soy sauce, Worcestershire sauce, and minced garlic. Cover and marinate for at least 8 hours.
    2. Heat the grill to medium-high heat, approximately 400 degrees F. Lay out 4 large pieces of aluminum foil on your counter or work surface.
    3. Uncover the marinaded steak and add the mushrooms, tossing to coat in the liquid.
    4. Divide the mixture evenly between the 4 pieces of aluminum foil, reserving the liquid at the bottom of the bowl.
    5. Add 1 tbsp of the reserved marinade to each foil packet, and sprinkle each foil packet with ½ tsp steak seasoning.
    6. Fold the foil packets by bringing 2 sides together and folding them over, then closing the ends.
    7. Grill the packets for 15-20 minutes, until the steak is cooked per your preference. For my grill, it took 18 minutes for the steak to reach medium-rare consistency. Remove the packets from the grill, and allow them to rest for at least 5 minutes.
    8. Open the packets, garnish with fresh thyme, and serve!

    Notes

    • For best flavor, marinate the steak overnight.
    • Adjust cooking time based on the thickness of the steak pieces.
    • Prep Time: 8 hours (plus resting time)
    • Cook Time: 20 minutes
    • Category: Main Course
    • Method: Grilling
    • Cuisine: American

    Nutrition

    • Serving Size: 1 pack
    • Calories: 450
    • Sugar: 2g
    • Sodium: 800mg
    • Fat: 30g
    • Saturated Fat: 8g
    • Unsaturated Fat: 18g
    • Trans Fat: 0g
    • Carbohydrates: 5g
    • Fiber: 1g
    • Protein: 40g
    • Cholesterol: 90mg

    Sharing is caring!

  • Marinated Cheese

    Marinated Cheese


    Introduction to Marinated Cheese

    Welcome to the delicious world of marinated cheese! As a busy mom myself, I know how hectic life can get, and sometimes, you’re craving a little something special but don’t have hours to spend in the kitchen. This marinated cheese is my go-to solution for effortless snacking. It’s quick, simple, and oh-so-flavorful! Imagine enjoying creamy, tangy cheese infused with aromatic herbs and zesty spices, all ready to serve with minimal effort. Whether it’s a casual get-together or a family movie night, this recipe will make you look and feel like a culinary hero!

    Why You’ll Love This Marinated Cheese

    You’re going to adore this marinated cheese because it’s so easy to whip up! In just 15 minutes of prep time, you’ll create a crowd-pleasing snack that tastes gourmet. Plus, it’s perfect for busy days. Just throw your favorite cheese in the marinade, let it chill, and it’s ready whenever you are. Say goodbye to complicated recipes! This delightful treat brings effortless elegance to your snacking game.

    Ingredients for Marinated Cheese

    Let’s gather our ingredients and get ready to create some flavor magic! For this marinated cheese, you’ll need a few simple components that pack a punch. Grab your favorite types of semi-hard or hard cheese. Think mozzarella, cheddar, or gouda—these cheeses melt nicely into the marinade.

    Next, we’ll need olive oil. This is the base of our marinade, lending richness and depth. Red wine vinegar adds a lovely tang, balancing the flavors beautifully.

    Fresh herbs like parsley and oregano bring a pop of color and freshness. You can even swap them out for your favorite herbs, like basil or thyme, to customize the flavor!

    Don’t forget garlic—lots of it! Thin-sliced, it infuses the marinade with a warm, aromatic punch. Finally, crushed red pepper is your secret spice to add warmth and a little kick. If you prefer it milder, feel free to skip this ingredient.

    Feeling adventurous? You can also consider using different cheese varieties or try adding olives, roasted peppers, or even sun-dried tomatoes to the mix. Make it your own!

    Keep in mind, the exact quantities for these ingredients can be found at the bottom of the article, ready for printing!

    How to Make Marinated Cheese

    Step 1: Prepare the Cheese

    Begin by slicing your favorite cheese into bite-sized cubes or wedges. The size is entirely up to you, but I find that smaller pieces absorb the marinade better. Plus, they’re easier to grab when you’re snacking. Choose a mix of textures for extra excitement!

    Step 2: Make the Marinade

    In a mixing bowl, combine olive oil, red wine vinegar, chopped herbs, sliced garlic, and crushed red pepper. Whisk everything together until the ingredients meld into a fragrant marinade. This is where the magic happens! The aroma will have you dreaming of Mediterranean delights.

    Step 3: Combine and Chill

    Pour your luscious marinade over the cheese, ensuring each piece is well-coated. It’s crucial to let it chill in the fridge for at least two hours—overnight is even better! This wait allows the flavors to deepen, turning ordinary cheese into a gourmet experience.

    Step 4: Serve Your Marinated Cheese

    When it’s time to serve, pull your marinated cheese from the fridge and let it come to room temperature for the best flavor. Arrange it on a lovely platter, perhaps with some crusty bread or fresh veggies for dipping. It’s not just food; it’s a visual feast!

    Tips for Success

    • Marinate your cheese overnight for the best flavor infusion.
    • Use a variety of cheeses for a more exciting flavor profile!
    • Let the cheese sit at room temperature before serving; it enhances the taste greatly.
    • Don’t hesitate to experiment with different herbs and spices based on your preference.
    • Store leftovers in the marinade for up to a week—if they last that long!

    Equipment Needed

    • Cutting board – A solid surface for slicing your cheese.
    • Sharp knife – Essential for cutting the cheese into cubes or wedges.
    • Mixing bowl – Use any bowl you have on hand for making the marinade.
    • Whisk or fork – To combine marinade ingredients thoroughly.
    • Container with a lid – Ideal for storing the marinated cheese in the fridge.

    Variations on Marinated Cheese

    • Add roasted red peppers for a sweet twist with Mediterranean flair.
    • Mix in olives or artichoke hearts for a savory medley.
    • Looking for a kick? Include fresh jalapeños or even a splash of hot sauce.
    • Try swapping olive oil for a flavored oil, like garlic or herb olive oil, to enhance the taste.
    • For a vegan option, replace cheese with marinated tofu or a nut-based cheese alternative.

    Serving Suggestions for Marinated Cheese

    • Pair with crusty artisan bread or crackers for a delightful crunch.
    • Serve alongside fresh veggies like carrots, cucumber, or bell peppers for a colorful platter.
    • Complement with a glass of crisp white wine to enhance the flavors.
    • Arrange on a cheese board with nuts and dried fruits for a stunning presentation.

    FAQs about Marinated Cheese

    Can I use any type of cheese for marinating?

    Absolutely! While semi-hard or hard cheeses work best, feel free to experiment with different varieties. Soft cheeses, like feta or goat cheese, can also be delicious but may require a gentler hand during marinating!

    How long can I store the marinated cheese?

    Your marinated cheese will hold up well stored in the fridge for up to a week. Just be sure to keep it submerged in the marinade for maximum flavor!

    Is marinated cheese suitable for guests with dietary restrictions?

    This recipe is vegetarian, and by choosing dairy alternatives, it can be made vegan too! Just ensure you communicate any specific dietary concerns with your guests.

    Can I add more spices to the marinade?

    Definitely! Spice it up with additional ingredients like black pepper, lemon zest, or even cumin for a touch of warmth. The marinade is your playground—don’t hesitate to get creative!

    What’s the best way to serve marinated cheese at a party?

    To impress your guests, arrange the marinated cheese on a beautiful platter. Add some fresh herbs and a drizzle of marinade on top for that wow factor. Pair it with assorted bread and veggies for a lovely spread!

    Final Thoughts on Marinated Cheese

    This marinated cheese recipe is more than just a snack; it’s a celebration of flavors and creativity. Each bite transports you to a sunny Mediterranean terrace, even if you’re enjoying it on a busy weeknight at home. It’s a simple way to elevate your snacking game, bringing joy not only to your palate but also to your gatherings. Whether it finds its way to your family dinner table or a festive gathering, this marinated cheese will surely spark happy conversations. So, gather your loved ones and let this delightful treat be the star of the show!


    Print

    clock clock iconcutlery cutlery iconflag flag iconfolder folder iconinstagram instagram iconpinterest pinterest iconfacebook facebook iconprint print iconsquares squares iconheart heart iconheart solid heart solid icon

    Description

    A simple and flavorful marinated cheese recipe perfect for snacking anytime.


    • Your favorite semi-hard or hard cheese (like mozzarella, cheddar, or gouda)
    • 1/2 cup olive oil
    • 2 tablespoons red wine vinegar
    • 2 tablespoons chopped fresh parsley
    • 1 tablespoon chopped fresh oregano
    • 2 cloves thin-sliced garlic
    • 1 teaspoon crushed red pepper

    1. Slice your favorite cheese into cubes or wedges.
    2. In a bowl, mix the olive oil, vinegar, herbs, garlic, and red pepper. Whisk to combine.
    3. Pour the marinade over the cheese and let it chill in the fridge for at least two hours, preferably overnight.
    4. Serve at room temperature.

    Notes

    • For best results, marinate the cheese overnight.
    • Feel free to experiment with different herbs and spices based on your preference.
    • Prep Time: 15 minutes
    • Cook Time: 0 minutes
    • Category: Appetizer
    • Method: No-Cook
    • Cuisine: Mediterranean

    Nutrition

    • Serving Size: 100g
    • Calories: 350
    • Sugar: 0g
    • Sodium: 600mg
    • Fat: 30g
    • Saturated Fat: 9g
    • Unsaturated Fat: 20g
    • Trans Fat: 0g
    • Carbohydrates: 2g
    • Fiber: 0g
    • Protein: 20g
    • Cholesterol: 50mg

    Sharing is caring!

  • One pot marry me shrimp and orzo pasta

    One pot marry me shrimp and orzo pasta


    Introduction to One Pot Marry Me Shrimp and Orzo Pasta

    Let’s be honest, life moves pretty fast, and I often find myself juggling between work, family, and a million other responsibilities. This is where my one pot marry me shrimp and orzo pasta shines as my go-to dish! It’s not just easy; it’s a delightful triumph in flavor that brings smiles around the dinner table. Think of it as a comforting hug in a bowl, perfect for a busy weeknight or to impress your loved ones during weekend gatherings. With every creamy bite, it’s hard not to fall in love—seriously, it’s that good!

    Why You’ll Love This One Pot Marry Me Shrimp and Orzo Pasta

    This recipe is the perfect blend of easy preparation and extraordinary taste. With just one pot, you cut down on cleanup, which is a huge win for busy moms like me! The star ingredient, succulent shrimp, pairs beautifully with creamy orzo, creating a dish that feels indulgent without requiring hours of cooking. Trust me, once you try it, it will quickly become a family favorite!

    Ingredients for One Pot Marry Me Shrimp and Orzo Pasta

    Gathering the right ingredients is half the battle, and for my one pot marry me shrimp and orzo pasta, you’ll want to have these on hand:

    • Shrimp: Look for fresh or frozen shrimp that are thawed, well-drained, and patted dry. They provide that juicy, tender bite that steals the show.
    • Sun-dried tomato oil: This flavorful oil adds a gourmet touch. Feel free to substitute with olive oil if you’re in a pinch, but trust me, the sun-dried tomato oil works wonders.
    • Kosher salt and black pepper: Essential for seasoning the shrimp and bringing out the joyful flavors in this dish.
    • Smoked paprika: This spice adds depth and a hint of smokiness, making your pasta sing!
    • Butter: The creamy richness of butter enhances the overall flavor and creates a luscious base.
    • Garlic: Freshly minced garlic infuses the dish with an irresistible aroma that’ll have your family rushing to the table.
    • Crushed red pepper flakes: A little heat to kick things up! Adjust to your taste if you prefer it milder or spicier.
    • Low-sodium chicken broth: A vital component, it provides moisture and depth, making the orzo so tender and flavorful.
    • Heavy cream: This ingredient gives the dish its creamy goodness, balancing out the flavors beautifully.
    • Orzo pasta: Tiny pasta shapes like orzo are perfect for soaking up all the delicious goodness. It’s a comforting alternative to traditional pasta!
    • Italian seasoning blend: A blend of herbs brings that Mediterranean flair right to your kitchen.
    • Sun-dried tomatoes: These little jewels add a pop of color and tangy flavor that elevates the dish.
    • Parmesan cheese: Grated and mixed in, this cheese melts effortlessly, bringing richness and umami to the party!
    • Fresh baby spinach: Tossing in spinach adds freshness, color, and a nutritional boost. You can swap it with kale if that’s your preference.
    • Parsley or basil for garnish: A sprinkle of fresh herbs adds a finishing touch that makes the dish look stunning.

    For exact measurements, please check further down in the article—it’s simple to find, and you can even print it out! Happy cooking!

    How to Make One Pot Marry Me Shrimp and Orzo Pasta

    Step 1: Prepare the Shrimp

    Start by taking your thawed shrimp and coating them with sun-dried tomato oil. This oil is like liquid gold, giving the shrimp amazing flavor. Sprinkle in about half a teaspoon of kosher salt, a quarter teaspoon of freshly ground black pepper, and the smoked paprika.

    Heat a large skillet over medium heat and add the shrimp. Cook them for just a few minutes, flipping them once, until they turn pink; that’s when they’re perfectly cooked. The shrimp should be tender, juicy, and radiant. Trust me, the aroma will be inviting!

    After they’re done, scoop them out and set them aside. If there’s any liquid left in the skillet, take care to drain it. A clean pan is key for building your luscious sauce later. You’re already on your way to a fantastic dish!

    Step 2: Create the Base

    In the same skillet, add two tablespoons of butter and let it melt over medium heat. As it melts, the kitchen will smell heavenly! Once bubbly, toss in the freshly minced garlic and crushed red pepper flakes. Sauté them together for about two minutes. This simple step is where the magic begins, filling your home with warmth and comfort.

    Now, grab your low-sodium chicken broth and heavy cream and pour them into the skillet along with the sun-dried tomatoes, uncooked orzo, and a teaspoon of Italian seasoning. Stir everything together with a wooden spoon. It’s important that it all gets mixed well, allowing the orzo to soak up those delicious flavors.

    Bring the mixture to a gentle simmer. Cover the pan and let it cook for about 10 minutes, stirring occasionally. Keep an eye on it—you want the orzo to be tender and creamy. The anticipation will build, and soon you’ll be ready for the grand finale!

    Step 3: Combine Ingredients

    Once the orzo is cooked to perfection, it’s showtime! Gently fold in the grated Parmesan cheese and fresh baby spinach. As the cheese melts, the mixture becomes creamy and irresistible. The spinach will wilt beautifully, adding a splash of color.

    Next, return the properly cooked shrimp to the pan. Give everything a good stir to combine, allowing the flavors to meld together. When you’re ready to serve, sprinkle fresh parsley or basil on top for that pop of brightness. Now, you’ve created a dish that looks as divine as it tastes!

    Tips for Success

    • Always pat your shrimp dry before cooking for that perfect sear.
    • Don’t rush the simmering step; let the orzo absorb all the goodness.
    • Adjust seasoning gradually; you can always add more but can’t take it away!
    • Experiment with fresh herbs based on what you have; they all add brightness!
    • For meal prep, double the recipe and enjoy leftovers for lunch!

    Equipment Needed

    • Large Skillet: A non-stick skillet works best, but any large pan will do.
    • Wooden Spoon: Ideal for stirring, but a silicone spatula will also work.
    • Measuring Cups and Spoons: Essential for accurate ingredient amounts; use kitchen scales if preferred.
    • Knife and Cutting Board: For chopping garlic, spinach, and sun-dried tomatoes easily.

    Variations for One Pot Marry Me Shrimp and Orzo Pasta

    • Swap Proteins: Try using cooked chicken, scallops, or even a plant-based protein for a delightful twist.
    • Dairy-Free Option: Substitute the heavy cream with full-fat coconut milk and skip the Parmesan for a lighter, dairy-free dish.
    • Vegetable Boost: Add some diced bell peppers, zucchini, or mushrooms for extra flavor and nutrition!
    • Spice it Up: For an extra kick, add a splash of hot sauce or toss in some jalapeños when cooking.
    • Herb Variations: Experiment with different fresh herbs like dill or cilantro to change the flavor profile of your dish.

    Serving Suggestions for One Pot Marry Me Shrimp and Orzo Pasta

    • Serve with a crisp green salad tossed with vinaigrette for a refreshing contrast.
    • Pair with a chilled glass of white wine, like Sauvignon Blanc, to enhance the flavors.
    • For added elegance, sprinkle some extra Parmesan and fresh herbs on top before serving.
    • For a hearty meal, include garlic bread or toasted ciabatta on the side.

    FAQs about One Pot Marry Me Shrimp and Orzo Pasta

    Can I make this dish ahead of time?
    Absolutely! You can prepare it ahead and store it in the fridge. Just make sure to reheat gently to avoid overcooking the shrimp.

    What can I substitute for orzo pasta?
    If orzo isn’t your thing, feel free to use any small pasta shape, like ditalini or even quinoa for a gluten-free option!

    How can I add more veggies to this recipe?
    You can easily toss in additional vegetables like zucchini or bell peppers while the base simmers. They’ll add color and nutrients without crowding the dish.

    Is this One Pot Marry Me Shrimp and Orzo Pasta spicy?
    Not unless you want it to be! You control the heat level by adjusting the crushed red pepper flakes to suit your taste.

    Can I use frozen shrimp for this recipe?
    Definitely! Just thaw them out completely before cooking. That way, you’ll still enjoy succulent shrimp in your meal.

    Final Thoughts

    Cooking isn’t just about feeding the family; it’s about creating moments that linger long after the plates are cleared. My one pot marry me shrimp and orzo pasta does just that, transforming a hectic evening into a delightful culinary adventure. With ease and flavor wrapped in one pot, this dish makes me feel like a superstar in the kitchen without the hassle. It’s the shared laughter around the table, the happy sighs with each creamy bite, and the satisfaction of a meal made with love that truly makes this recipe shine. Embrace the joy it brings!


    Print

    clock clock iconcutlery cutlery iconflag flag iconfolder folder iconinstagram instagram iconpinterest pinterest iconfacebook facebook iconprint print iconsquares squares iconheart heart iconheart solid heart solid icon

    Description

    One pot marry me shrimp and orzo pasta is a delicious and easy-to-make dish that combines succulent shrimp with creamy orzo pasta.


    • 1 pound of shrimp thawed, well-drained, and patted dry
    • 2 tablespoons of oil from a jar of sun-dried tomatoes
    • Kosher salt to taste
    • Freshly ground black pepper to taste
    • 1 teaspoon of smoked paprika
    • 2 tablespoons of butter
    • 4 cloves of garlic finely minced
    • 1/4 teaspoon of crushed red pepper flakes
    • 3 cups of low-sodium chicken broth
    • 1/4 cup of heavy cream
    • 8 ounces of orzo pasta about 2 cups, uncooked
    • 1 teaspoon of Italian seasoning blend
    • 1/2 cup of sun-dried tomatoes drained and cut into thin strips
    • 1/2 cup of grated Parmesan cheese
    • 2 cups of fresh baby spinach
    • Fresh minced parsley or thinly sliced basil leaves for garnish

    1. Coat the shrimp with the sun-dried tomato oil, 1/2 teaspoon of kosher salt, 1/4 teaspoon of freshly ground black pepper, and the smoked paprika. Cook the shrimp in a skillet over medium heat just until they turn pink and are fully cooked through. Remove the shrimp from the pan and set aside to be added later. If there’s any liquid left in the pan from the shrimp, drain it and quickly wipe the pan clean.
    2. Add the butter to the same pan and let it melt. Once melted, add the minced garlic and crushed red pepper flakes, cooking over medium heat for about two minutes until fragrant. Stir in the chicken broth, heavy cream, sun-dried tomatoes, orzo, Italian seasoning, 1/4 teaspoon of kosher salt, and 1/4 teaspoon of black pepper. Bring the mixture to a gentle simmer. Lower the heat, cover the pan, and cook for about 10 minutes, or until the orzo is fully cooked and tender.
    3. When the orzo is done, mix in the grated Parmesan and baby spinach, stirring until the spinach wilts and the cheese melts. Taste and adjust seasoning if needed. Return the shrimp to the pan, give everything a final stir, and garnish with freshly chopped parsley or basil before serving.

    Notes

    • For a spicier version, add more crushed red pepper flakes.
    • Feel free to use fresh herbs for garnish for enhanced flavor.
    • This dish can also be made with other types of pasta if you prefer.
    • Be cautious not to overcook the shrimp; they should be just pink and opaque.
    • Prep Time: 10 minutes
    • Cook Time: 15 minutes
    • Category: Dinner
    • Method: Stovetop
    • Cuisine: Mediterranean

    Nutrition

    • Serving Size: 1 serving
    • Calories: 450
    • Sugar: 2g
    • Sodium: 650mg
    • Fat: 20g
    • Saturated Fat: 10g
    • Unsaturated Fat: 7g
    • Trans Fat: 0g
    • Carbohydrates: 45g
    • Fiber: 2g
    • Protein: 25g
    • Cholesterol: 180mg

    Sharing is caring!

  • Spicy Brazilian Coconut Chicken

    Spicy Brazilian Coconut Chicken


    Introduction to Spicy Brazilian Coconut Chicken

    Welcome to my kitchen, where I’m so excited to share a recipe that will whisk you away to a tropical paradise—Spicy Brazilian Coconut Chicken! This flavorful dish isn’t just another dinner option; it’s a delicious escape, perfect for busy weeknights or when you want to impress loved ones without spending hours in the kitchen. Imagine tender chicken thighs swirled in a rich coconut sauce, tangy lime, and a hint of heat. Trust me; this dish will become a cherished favorite in your recipe box!

    Why You’ll Love This Spicy Brazilian Coconut Chicken

    This Spicy Brazilian Coconut Chicken is here to save your busy evenings! With easy prep and a quick cooking time, you’ll have a beautiful meal on the table in just one hour. The combination of creamy coconut milk and zesty lime creates a flavor explosion that’s hard to resist. Plus, it’s a gluten-free dish that your family will ask for again and again. It’s comfort food at its finest!

    Ingredients for Spicy Brazilian Coconut Chicken

    Ready to get started on this culinary adventure with Spicy Brazilian Coconut Chicken? Here’s what you’ll need to conjure up this tropical delight. Feel free to explore substitutes based on what you have in your kitchen!

    • Boneless, skinless chicken thighs: The stars of the dish! They’re juicy, tender, and soak up flavors beautifully.
    • Olive oil: A healthy fat for cooking that adds depth to the flavor. Feel free to swap this out for coconut oil for an extra burst of coconut goodness.
    • Onion: This aromatic veggie builds the flavor base and adds sweetness when sautéed.
    • Garlic: A must-have for any savory dish. It enhances every bite with its savory punch.
    • Red and green bell peppers: They bring both color and crunch to the dish. You can also use yellow or orange peppers for sweetness!
    • Ginger: Fresh ginger adds a warm, peppery kick. If you don’t have fresh, ground ginger can work in a pinch.
    • Red chili peppers: A spice lover’s delight! Adjust the number based on your heat tolerance; you can always add more later. Jalapeños are great substitutes for a milder flavor.
    • Coconut milk: This creamy ingredient is what makes the sauce luxurious. Go for full-fat for richness or light coconut milk for a lighter version.
    • Tomato paste: This packs a flavor punch and gives the sauce body and richness.
    • Lime juice: Freshly squeezed lime juice adds a zingy brightness that really lifts the dish. Bottled can work, but fresh is always better!
    • Brown sugar: Just a touch of sweetness balances the spice and acidity. You can swap in honey or maple syrup for a different sweetness profile.
    • Cumin and paprika: These spices bring a warm, earthy flavor that complements the coconut beautifully.
    • Salt and pepper: Essential for seasoning and bringing all the flavors together.
    • Fresh cilantro: For garnishing, this herb adds freshness and a pop of color. If cilantro isn’t your favorite, you can use parsley.
    • Lime wedges: Serve on the side for an extra squeeze of zing at the table!

    For exact quantities, check the bottom of the article—they’re all printed out for your convenience!

    How to Make Spicy Brazilian Coconut Chicken

    Ready to dive into the cooking process? Let’s turn those beautiful ingredients into a stunning dish! Follow these steps, and you’ll achieve a plate of Spicy Brazilian Coconut Chicken that will make you feel like a culinary rock star.

    Prepare the Marinade

    Start by whisking together coconut milk, lime juice, brown sugar, cumin, smoked paprika, salt, and pepper in a cozy bowl. The combination of coconut and lime is pure magic, creating a savory embrace.

    Remember, marinating is your secret weapon! Pop those chicken thighs into the bowl and ensure they’re fully submerged in the marinade.

    Let them marinate for at least 30 minutes—though overnight is best. The longer the soak, the deeper the flavors.

    Cook the Chicken

    Heat olive oil in a large skillet over medium heat. When the oil sparkles like sunshine, it’s time to shine.

    Take those marinated chicken thighs out (don’t toss that marinade!) and place them in the skillet.

    Sear each side for about 3-4 minutes until they’re golden brown and mouthwatering. This step locks in the moisture and flavor.

    Once they’re beautifully browned, set the chicken aside. You won’t need to cook it fully just yet!

    Sauté the Vegetables

    Now, in the same skillet, the magic continues! Add your finely chopped onion and let it sizzle for 2-3 minutes until it becomes translucent.

    Then, toss in the garlic, ginger, and chopped chili peppers.

    The aroma will be heavenly! Cook everything for about a minute, then add the diced red and green bell peppers.

    Sauté for about 5 minutes until the peppers start to soften, hitting that sweet spot of texture!

    Build the Sauce

    Next, pour the reserved marinade and tomato paste into the skillet, mixing well with the sautéed veggies.

    Stir until everything melds beautifully. This is where your sauce begins to blossom—imagine how delicious it will taste!

    Bring the mixture to a gentle simmer, letting it bubble softly as the flavors dance together.

    Combine and Simmer

    Time to bring the chicken back to the party! Return the seared chicken thighs to the skillet, ensuring each piece is coated in that luscious sauce.

    Cover the skillet and let it simmer on low heat for about 20-25 minutes.

    Keep an eye on it; you’re looking for the chicken to reach an internal temperature of 165°F, ensuring it is cooked through and tender. Your kitchen will smell heavenly!

    Serve

    Once cooked, remove your skillet from the heat. Allow the chicken to rest for a few minutes, soaking in all that flavor.

    Garnish generously with fresh chopped cilantro and serve with lime wedges on the side.

    Pair this vibrant dish with steaming rice or fluffy quinoa, perfect for soaking up that scrumptious sauce. Enjoy every bite of your Spicy Brazilian Coconut Chicken!

    Tips for Success

    • Marinating is key! Give your chicken at least 30 minutes, but overnight is even better.
    • Don’t skip the searing step—this locks in flavors and gives a lovely color.
    • Taste the sauce before serving to adjust seasoning; add more salt or spices if needed.
    • For meal prep, make extra sauce to pair with other proteins later.
    • Use fresh, quality ingredients for the best flavor impact!

    Equipment Needed

    • Large Skillet: A non-stick or cast iron skillet works great. Both will help in searing the chicken beautifully.
    • Mixing Bowl: Any medium-sized bowl will do for marinating. Just make sure it can hold the chicken comfortably!
    • Whisk or Fork: For mixing the marinade ingredients effectively.
    • Meat Thermometer: Useful for checking the chicken’s doneness; a simple one will suffice!

    Variations

    • Vegetarian Option: Substitute chicken with firm tofu or tempeh for a delightful plant-based version. Make sure to marinate them just like the chicken!
    • Spicy Twist: For those who crave heat, add a teaspoon of chili flakes to the marinade or serve with sriracha on the side.
    • Healthy Version: Use skinless chicken breast for a leaner meat choice. You can also replace coconut milk with a lighter broth—though you’ll miss that creamy richness!
    • Fruit Addition: Add diced pineapple or mango to the sauce for a sweet, tropical twist. It complements the coconut beautifully!
    • Nutty Flavor: Stir in some crushed peanuts or cashews just before serving for a crunchy texture and nutty flavor enhancement.
    • Low-Carb Version: Instead of rice, serve your dish over cauliflower rice to keep it low-carb while still enjoying all those vibrant flavors.

    Serving Suggestions

    • Serve your Spicy Brazilian Coconut Chicken over fluffy jasmine rice or quinoa for a delightful soak-up of all that creamy sauce.
    • Pair with a light, refreshing cucumber salad to balance the spice.
    • A chilled white wine, like Sauvignon Blanc, enhances the tropical flavors beautifully.
    • Garnish with extra lime wedges for a zesty finish!

    FAQs about Spicy Brazilian Coconut Chicken

    Can I use chicken breasts instead of thighs? Absolutely! Chicken breasts can be used, but they might dry out a bit more. Be mindful of cooking time, as they typically cook faster than thighs.

    How spicy is this dish? The spice level can be adjusted to your taste! If you prefer milder flavors, use fewer chili peppers or opt for jalapeños instead.

    Can I make this dish ahead of time? Yes! You can prepare the marinade and let the chicken soak overnight for deeper flavors. This dish also reheats beautifully, making it perfect for meal prep!

    What should I serve with Spicy Brazilian Coconut Chicken? This dish pairs wonderfully with rice or quinoa. You can also enjoy it with a refreshing salad or sautéed veggies to balance the flavors.

    Is it suitable for gluten-free diets? Yes, this Spicy Brazilian Coconut Chicken is gluten-free, making it a delightful option for those with gluten sensitivities. Just double-check all your spices and ingredients!

    Final Thoughts

    Creating Spicy Brazilian Coconut Chicken in your kitchen is more than just cooking; it’s an adventure filled with vibrant flavors and tropical vibes. Each bite transports you to sun-kissed shores, making every meal feel special. The harmony of creamy coconut and zesty lime, combined with the warmth of spices, truly delights the senses. I hope this dish brings joy to your dinner table, making busy nights a little brighter and family gatherings even more memorable. So, roll up your sleeves, embrace the cooking journey, and let this recipe ignite your passion for home cooking!


    Print

    clock clock iconcutlery cutlery iconflag flag iconfolder folder iconinstagram instagram iconpinterest pinterest iconfacebook facebook iconprint print iconsquares squares iconheart heart iconheart solid heart solid icon

    Description

    Welcome to my kitchen, where I’m so excited to share a recipe that will whisk you away to a tropical paradise—Spicy Brazilian Coconut Chicken! This flavorful dish isn’t just another dinner option; it’s a delicious escape, perfect for busy weeknights or when you want to impress loved ones without spending hours in the kitchen. Imagine tender chicken thighs swirled in a rich coconut sauce, tangy lime, and a hint of heat. Trust me; this dish will become a cherished favorite in your recipe box!


    • 4 boneless, skinless chicken thighs
    • 1 tablespoon olive oil
    • 1 medium onion, finely chopped
    • 3 cloves garlic, minced
    • 1 red bell pepper, diced
    • 1 green bell pepper, diced
    • 1 tablespoon ginger, grated
    • 12 red chili peppers, chopped (adjust for spice level)
    • 1 can (13.5 oz) coconut milk
    • 2 tablespoons tomato paste
    • 2 tablespoons lime juice
    • 1 tablespoon brown sugar
    • 1 teaspoon cumin
    • 1 teaspoon paprika
    • Salt and pepper to taste
    • Fresh cilantro, chopped (for garnish)
    • Lime wedges (for serving)

    1. Prepare the Marinade: In a bowl, combine the coconut milk, lime juice, brown sugar, cumin, smoked paprika, salt, and pepper. Add the chicken thighs, ensuring they are fully submerged in the marinade. Let it marinate for at least 30 minutes (or up to overnight in the fridge for more flavor).
    2. Cook the Chicken: In a large skillet over medium heat, heat the olive oil. Remove the chicken from the marinade (reserve the marinade) and add it to the skillet. Sear for about 3-4 minutes on each side or until golden brown. Remove the chicken and set aside.
    3. Sauté the Vegetables: In the same skillet, add the onion and sauté for about 2-3 minutes until translucent. Add the garlic, ginger, and chili peppers, cooking for an additional minute until fragrant. Then stir in the red and green bell peppers and cook for about 5 minutes until they begin to soften.
    4. Build the Sauce: Pour the reserved marinade and tomato paste into the skillet, mixing well with the sautéed vegetables. Bring the mixture to a gentle simmer.
    5. Combine and Simmer: Return the chicken to the skillet, ensuring it is coated in the sauce. Cover and let it simmer on low heat for about 20-25 minutes, or until the chicken is cooked thoroughly and tender (internal temperature should reach 165°F).
    6. Serve: Once cooked, remove from heat and let it rest for a few minutes. Garnish with fresh chopped cilantro and serve with lime wedges on the side. This dish pairs wonderfully with rice or quinoa to soak up the delicious sauce.

    Notes

    • Adjust the number of chili peppers based on your desired spice level.
    • For best flavor, marinate the chicken overnight.
    • Serve with rice or quinoa to complement the dish.
    • Prep Time: 30 minutes
    • Cook Time: 30 minutes
    • Category: Main Course
    • Method: Stovetop
    • Cuisine: Brazilian

    Nutrition

    • Serving Size: 1 serving
    • Calories: 400
    • Sugar: 5g
    • Sodium: 600mg
    • Fat: 25g
    • Saturated Fat: 10g
    • Unsaturated Fat: 10g
    • Trans Fat: 0g
    • Carbohydrates: 20g
    • Fiber: 3g
    • Protein: 30g
    • Cholesterol: 100mg

    Sharing is caring!

  • Creamy Roasted Garlic Tomato Soup

    Creamy Roasted Garlic Tomato Soup


    Introduction to Creamy Roasted Garlic Tomato Soup

    There’s something magical about a bowl of soup, especially on those chilly evenings when you just want to feel cozy at home. This Creamy Roasted Garlic Tomato Soup is not only delicious but also a quick solution for those busy nights when time is tight. Imagine your kitchen filled with the tempting aroma of roasted garlic mingling with sweet, ripe tomatoes—heavenly, isn’t it? I created this recipe to share a warm hug in a bowl, perfect for impressing your loved ones or just enjoying a moment of tranquility at the end of a long day.

    Why You’ll Love This Creamy Roasted Garlic Tomato Soup

    This Creamy Roasted Garlic Tomato Soup is a game-changer in the kitchen. It’s incredibly easy to whip up, making it perfect for busy moms and professionals like us. In just under an hour, you can create a rich and flavorful dish that tastes like you’ve slaved over it for hours. Plus, the blend of roasted garlic and fresh tomatoes creates a taste explosion that will leave everyone asking for seconds!

    Ingredients for Creamy Roasted Garlic Tomato Soup

    Let’s dive into the scrumptious details of what you need for this Creamy Roasted Garlic Tomato Soup. I love how each ingredient plays a crucial role in creating that rich, comforting flavor.

    • Fresh Tomatoes: Choose Roma or vine-ripened tomatoes for their sweetness. They’re the star of this soup, creating a vibrant base.
    • Whole Head of Garlic: Roasting garlic transforms its sharpness into a mellow, sweet delight. Trust me, it’s like magic.
    • Chopped Onion: A small amount of onion adds depth and sweetness to the soup, perfectly balancing the acidity of the tomatoes.
    • Olive Oil: A couple tablespoons for roasting and sautéing. It brings everything together and adds a smooth richness.
    • Vegetable or Chicken Broth: This is the liquid gold! Use vegetable broth for a vegetarian version or chicken broth for an extra layer of flavor.
    • Heavy Cream: It gives the soup a luxurious, silky finish. For a lighter option, coconut milk works wonders too!
    • Fresh Basil Leaves: Add these beauties at the end for a burst of freshness and color.
    • Salt and Black Pepper: Essential seasonings that elevate the soup’s flavor. Adjust to your taste!
    • Red Pepper Flakes: A dash of heat adds a lovely kick, but feel free to skip it if you prefer mild flavors.

    Don’t worry about memorizing all this. Exact quantities are detailed at the bottom of the article, ready for printing. Let’s get cooking!

    How to Make Creamy Roasted Garlic Tomato Soup

    Step 1: Preheat and Prepare

    First things first, let’s get that oven fired up! Preheat it to 400°F (200°C). As the oven warms up, grab a baking sheet and line it with parchment paper. This little trick keeps things tidy and helps with cleanup. You’ll be arranging the halved tomatoes on this sheet shortly. Drizzle them with olive oil and sprinkle some salt and pepper over the top. I usually like to get my kids involved at this point; they love drizzling and seasoning. Plus, it’s a great way to teach them about cooking!

    Step 2: Roast the Tomatoes and Garlic

    Once the oven’s hot, it’s time to roast! Place those beautiful halved tomatoes cut-side up on the baking sheet. Now, take the head of garlic, slice the top off, drizzle with olive oil, and wrap it in foil. This step is key, as it transforms the garlicky bite into a sweet, mellow flavor. Pop the wrapped garlic next to the tomatoes on the baking sheet, and roast everything for about 30 to 35 minutes. You want the tomatoes to caramelize and the garlic to get soft and heavenly. Your kitchen will smell amazing during this process!

    Step 3: Sauté the Onions

    Next up, let’s get those onions nice and soft. In a large pot, heat a tablespoon of olive oil over medium heat. Toss in your chopped onion and sauté it for about 5 minutes or until it becomes translucent and fragrant. This is where the magic begins! Just before the onions are done, squeeze the roasted garlic cloves out of their skins and into the pot. The mixture of onion and garlic will create a delicious aroma that you won’t be able to resist.

    Step 4: Blend the Ingredients

    Now it’s blending time! Add the roasted tomatoes and broth to the pot with the sautéed onions and garlic. Using an immersion blender is my go-to, as it makes the process super easy. If you don’t have one, a regular blender will do just fine—just be sure to blend in batches to avoid spills. Blend until everything is smooth and creamy. This is when you’ll see that beautiful, rich orange color come together!

    Step 5: Final Cooking Steps

    After blending, return the smooth mixture back to the pot. Next, stir in the heavy cream, letting it simmer for about 5 to 10 minutes. This is when all the flavors meld together beautifully. Don’t forget to taste and adjust your seasonings with salt, pepper, or even those red pepper flakes for a little kick. Your Creamy Roasted Garlic Tomato Soup will be ready to warm your heart!

    Tips for Success

    • Always taste as you go! Adjust seasonings based on your preferences.
    • For a smoother texture, blend longer—creamy goodness awaits!
    • Let the soup cool slightly before blending to avoid splattering.
    • Use fresh, ripe tomatoes for the best flavor; overripe ones work too!
    • Feel free to freeze leftovers in portions for quick meals later.

    Equipment Needed

    • Baking Sheet: A trusty sheet for roasting your tomatoes and garlic.
    • Parchment Paper: Helps with easy cleanup. Aluminum foil works too!
    • Large Pot: For sautéing and combining ingredients.
    • Immersion Blender: Great for easy blending. A regular blender is a good alternative.
    • Measuring Cups and Spoons: To accurately portion your ingredients.

    Variations of Creamy Roasted Garlic Tomato Soup

    • Spicy Twist: Add a teaspoon of chipotle powder or extra red pepper flakes for a fiery kick that brings depth to the flavor.
    • Herb Blend: Experiment with different herbs like thyme or oregano alongside basil for a unique aromatic experience.
    • Cheesy Delight: Stir in grated Parmesan or a cube of cream cheese for an indulgent creaminess and umami boost.
    • Roasted Veggies: Toss in chopped roasted bell peppers or zucchini for added nutrition and texture, creating a more substantial dish.
    • Dairy-Free Version: Opt for coconut milk instead of heavy cream for a rich, dairy-free alternative that adds a hint of sweetness.
    • Added Protein: Stir in cooked lentils or white beans to make it a heartier meal while boosting the protein content.

    Serving Suggestions for Creamy Roasted Garlic Tomato Soup

    • Grilled Cheese Sandwich: A classic pairing! The gooey cheese complements the soup’s richness beautifully.
    • Crusty Bread: Serve with a warm, crusty baguette for dipping and scooping.
    • Salad: A fresh green salad can balance the meal, adding a light and crisp contrast.
    • Presentation: Garnish each bowl with fresh basil and a swirl of cream for an inviting look.

    FAQs about Creamy Roasted Garlic Tomato Soup

    Can I use canned tomatoes instead of fresh for this Creamy Roasted Garlic Tomato Soup?

    Absolutely! If you’re short on fresh tomatoes, canned tomatoes are a convenient alternative. Look for whole or diced tomatoes packed in juice or puree for the best flavor. Just skip the roasting step!

    How can I store leftovers of this soup?

    Leftover Creamy Roasted Garlic Tomato Soup can be stored in an airtight container in the fridge for up to 4 days. For longer storage, consider freezing it in portion sizes. Just thaw and reheat when you’re ready to enjoy!

    Is this soup freeze-friendly?

    Yes, this soup freezes wonderfully! Allow it to cool completely, then transfer it to freezer-safe containers. It can be frozen for up to 3 months. To reheat, simply thaw in the fridge overnight and warm it on the stove.

    Can I make this soup vegan?

    Definitely! To make it vegan, substitute the heavy cream with coconut milk or any plant-based cream. This will keep the creamy texture without any dairy products.

    What variations can I try with this soup?

    You can get creative with this Creamy Roasted Garlic Tomato Soup! Add different herbs, spices, or vegetables as mentioned in the variations section. Feel free to mix in some cooked beans or even cheese for extra heartiness or flavor!

    Final Thoughts

    Making this Creamy Roasted Garlic Tomato Soup is not just about food; it’s an experience that warms the soul. Each spoonful invites you to savor the rich flavors while wrapping you in comfort like a favorite sweater. Whether you’re hosting a family dinner, enjoying a quiet evening, or needing a quick meal, this soup has you covered. As I ladle it into bowls, I feel joy knowing I’m sharing something special. So gather your loved ones around the table, serve this lovely soup, and create lasting memories over every hearty bite!


    Print

    clock clock iconcutlery cutlery iconflag flag iconfolder folder iconinstagram instagram iconpinterest pinterest iconfacebook facebook iconprint print iconsquares squares iconheart heart iconheart solid heart solid icon

    Description

    There’s something magical about a bowl of soup, especially on those chilly evenings when you just want to feel cozy at home. This Creamy Roasted Garlic Tomato Soup is not only delicious but also a quick solution for those busy nights when time is tight. Imagine your kitchen filled with the tempting aroma of roasted garlic mingling with sweet, ripe tomatoes—heavenly, isn’t it? I created this recipe to share a warm hug in a bowl, perfect for impressing your loved ones or just enjoying a moment of tranquility at the end of a long day.


    • 2 lbs fresh tomatoes (Roma or vine-ripened), halved
    • 1 whole head of garlic
    • 1 small onion, chopped
    • 2 tbsp olive oil
    • 2 cups vegetable or chicken broth
    • ½ cup heavy cream (or coconut milk for dairy-free option)
    • ¼ cup fresh basil leaves
    • Salt and black pepper to taste
    • ½ tsp red pepper flakes (optional, for heat)

    1. Preheat the oven to 400°F (200°C). Line a baking sheet with parchment paper.
    2. Arrange the halved tomatoes on the baking sheet. Drizzle with 1 tbsp olive oil, season with salt and pepper.
    3. Cut the top off the head of garlic, drizzle with 1 tbsp olive oil, and wrap in foil. Place on the baking sheet with the tomatoes.
    4. Roast for 30-35 minutes, until the tomatoes are caramelized and the garlic is soft. Let cool slightly.
    5. In a large pot, heat 1 tbsp olive oil over medium heat. Add the chopped onion and sauté for 5 minutes until soft.
    6. Squeeze the roasted garlic cloves from their skins into the pot. Add the roasted tomatoes, broth, and basil.
    7. Blend using an immersion blender until smooth (or transfer to a blender in batches).
    8. Return to the pot, stir in the heavy cream, and let simmer for 5-10 minutes to blend flavors. Adjust seasoning if needed.
    9. Serve warm, garnished with fresh basil, a drizzle of cream, or crispy roasted cherry tomatoes.

    Notes

    • For a dairy-free version, substitute heavy cream with coconut milk.
    • Can add croutons for extra texture.
    • This soup pairs well with grilled cheese sandwiches.
    • Prep Time: 15 minutes
    • Cook Time: 40 minutes
    • Category: Soup
    • Method: Roasting and blending
    • Cuisine: Italian

    Nutrition

    • Serving Size: 1 bowl
    • Calories: 320
    • Sugar: 6g
    • Sodium: 600mg
    • Fat: 24g
    • Saturated Fat: 10g
    • Unsaturated Fat: 14g
    • Trans Fat: 0g
    • Carbohydrates: 25g
    • Fiber: 4g
    • Protein: 4g
    • Cholesterol: 30mg

    Sharing is caring!

  • Crispy Cajun Shrimp with Creamy Sauce

    Crispy Cajun Shrimp with Creamy Sauce


    Introduction to Crispy Cajun Shrimp with Creamy Sauce

    When life gets hectic, we all crave meals that bring joy and excitement to the table. That’s where my Crispy Cajun Shrimp with Creamy Sauce comes into play! This dish is a delightful combination of crispy, flavorful shrimp paired with a rich, creamy sauce. It transforms an ordinary dinner into something spectacular, all in under twenty-five minutes! Whether you’re feeding hungry kids or trying to impress friends, this recipe covers all bases. Let’s dive into a culinary adventure that’ll make your taste buds dance and keep your family coming back for more.

    Why You’ll Love This Crispy Cajun Shrimp with Creamy Sauce

    This Crispy Cajun Shrimp with Creamy Sauce isn’t just about amazing flavors; it’s about quick, stress-free cooking!

    With just a handful of ingredients and under 30 minutes from start to finish, it’s perfect for busy weeknights.

    Plus, the rich, creamy sauce adds a gourmet touch that impresses everyone.

    Get ready for smiles all around as you serve this delicious dish on your dinner table!

    Ingredients for Crispy Cajun Shrimp with Creamy Sauce

    Gathering the right ingredients is the first step to creating the magic of Crispy Cajun Shrimp with Creamy Sauce. Here’s what you’ll need:

    • Shrimp: Large, peeled, and deveined shrimp are ideal. They soak up flavors wonderfully and cook quickly.
    • Olive Oil: Adds richness and helps the shrimp crisp up beautifully. Feel free to substitute with canola or vegetable oil.
    • Cajun Seasoning: This seasoning blend gives the shrimp that aromatic, zesty kick. Look for a mix that suits your taste, or make your own!
    • Garlic Powder: It enhances the overall flavor, making everything just a bit more savory.
    • Smoked Paprika: Adds depth and a subtle smokiness, elevating the dish from ordinary to extraordinary.
    • Salt and Pepper: The essentials for seasoning! Adjust these to your personal preference.
    • Chopped Parsley: This vibrant herb isn’t just for garnish; it freshens up every bite.
    • Mayonnaise: The creamy base of your sauce, providing a luscious texture.
    • Sour Cream: Adds tanginess and balances the richness of the mayo in the sauce.
    • Dijon Mustard: A hint of condiment magic! It brings a zesty kick that complements the Cajun flavors.
    • Lemon Juice: This brightens the sauce, cutting through the richness. Fresh is best, but bottled will work in a pinch.
    • Paprika: A pinch of this just enhances the color and flavor of your creamy sauce.
    • Hot Sauce: Optional but recommended for those who enjoy a kick! Use according to your spice tolerance.
    • Fresh parsley: A beautiful garnish that adds color and freshness right at the end.

    For exact measurements, check the bottom of the article where you’ll find a printable format. Happy cooking!

    How to Make Crispy Cajun Shrimp with Creamy Sauce

    Making Crispy Cajun Shrimp with Creamy Sauce is a breeze, even if you’re juggling a busy schedule. With these clear steps, you’ll have a delicious dinner in no time!

    Step 1: Prepare the Shrimp

    Start by patting the shrimp dry with paper towels. This helps them get that perfect crispness.

    In a mixing bowl, toss the shrimp with olive oil, Cajun seasoning, garlic powder, smoked paprika, salt, and pepper. Give them a good mix until every shrimp is nicely coated. Let them rest for 5 to 10 minutes. This resting time allows the flavors to blend beautifully!

    Step 2: Mix the Creamy Sauce

    While the shrimp are marinating, it’s time to whip up that creamy sauce!

    In a separate bowl, whisk together mayonnaise, sour cream, Dijon mustard, lemon juice, Cajun seasoning, and a pinch of paprika. The key here is to blend adequately until smooth and well-combined.

    Remember to taste it! You can adjust the seasoning or add hot sauce based on your spice preference. You want that perfect balance of creamy and zesty.

    Step 3: Sear the Shrimp

    Now, heat a skillet over medium-high heat. You want it hot enough to get that beautiful sear on the shrimp!

    Add the shrimp to the skillet in a single layer. If you have a lot, work in batches. You don’t want to overcrowd the pan. Sear the shrimp for about 2 minutes on each side or until they’re cooked through and have a golden, crispy exterior.

    Step 4: Serve and Garnish

    Once your shrimp are beautifully cooked, transfer them to a plate or bowl. Drizzle generously with your creamy sauce.

    To finish, sprinkle with chopped parsley for a pop of color and freshness. Serve hot and enjoy the delightful flavors!

    Tips for Success

    • Always pat the shrimp dry before seasoning for maximum crispiness.
    • Let the shrimp marinate for at least 10 minutes to enhance the flavor.
    • Use a hot skillet to achieve that perfect golden sear.
    • Feel free to play with Cajun seasoning—add more for extra spice!
    • Pairing the dish with rice or a fresh salad balances the richness beautifully.

    Equipment Needed

    • Skillet: A non-stick or cast iron skillet works best for a nice sear.
    • Mixing Bowls: You’ll need a couple for marinating the shrimp and mixing the sauce.
    • Whisk: Perfect for blending the sauce ingredients smoothly. A fork will do in a pinch.
    • Paper Towels: Handy for drying the shrimp before cooking.

    Variations of Crispy Cajun Shrimp with Creamy Sauce

    • Spicy Cajun Shrimp: Add more Cajun seasoning or additional hot sauce for a fiery kick that will set your taste buds on fire!
    • Coconut Curry Twist: Swap out the creamy sauce for a coconut curry sauce by using coconut milk and curry powder for a tropical twist.
    • Garlic Butter Cajun Shrimp: Replace the creamy sauce with a garlic butter sauce. Simply melt butter, add minced garlic, and toss with the cooked shrimp.
    • Vegetarian Version: Substitute shrimp with crispy tofu or chickpeas for a plant-based take on this delightful dish.
    • Make it a Salad: Serve the crispy Cajun shrimp over mixed greens for a lighter, fresh salad option with your creamy sauce as dressing.

    Serving Suggestions for Crispy Cajun Shrimp with Creamy Sauce

    • Serve it over rice: Fluffy white or brown rice makes a great base, soaking up that creamy sauce.
    • Add a side salad: A fresh garden salad balances the richness of the shrimp beautifully.
    • Pair with chilled white wine: A crisp Sauvignon Blanc enhances the flavors perfectly.
    • For an eye-catching presentation: Serve the shrimp on a colorful platter, garnished with lemon wedges and parsley.

    FAQs about Crispy Cajun Shrimp with Creamy Sauce

    Can I use frozen shrimp for this recipe?

    Absolutely! Just make sure to thaw the shrimp completely and pat them dry before seasoning. This step is crucial for achieving that crispy texture.

    How can I make the sauce spicier?

    If you love heat, feel free to add more hot sauce or extra Cajun seasoning. You can also mix in some crushed red pepper flakes for an added kick!

    What can I substitute for mayonnaise in the creamy sauce?

    If you’re looking for alternatives, try Greek yogurt or a dairy-free mayo. Both create a deliciously creamy texture while adding their own unique flavors.

    Can I make this dish ahead of time?

    While it’s best enjoyed fresh, you can prep the shrimp and sauce ahead of time. Just store them separately in the refrigerator and cook the shrimp right before serving.

    Is this recipe gluten-free?

    Yes! The Crispy Cajun Shrimp with Creamy Sauce is naturally gluten-free, making it a great option for those with dietary restrictions. Enjoy without worry!

    Final Thoughts

    There’s something truly special about sharing a plate of Crispy Cajun Shrimp with Creamy Sauce with family and friends. This dish embodies the joy of home cooking, bringing smiles to faces while leaving your kitchen smelling heavenly.

    With its quick prep and bold flavors, it’s a lifesaver on those busy nights when you want to impress without the stress.

    So why not create this simple yet glamorous recipe tonight? It’s moments like these that help us savor life’s tasty little adventures, one delightful bite at a time.


    Print

    clock clock iconcutlery cutlery iconflag flag iconfolder folder iconinstagram instagram iconpinterest pinterest iconfacebook facebook iconprint print iconsquares squares iconheart heart iconheart solid heart solid icon

    Description

    When life gets hectic, we all crave meals that bring joy and excitement to the table. That’s where my Crispy Cajun Shrimp with Creamy Sauce comes into play! This dish is a delightful combination of crispy, flavorful shrimp paired with a rich, creamy sauce. It transforms an ordinary dinner into something spectacular, all in under twenty-five minutes! Whether you’re feeding hungry kids or trying to impress friends, this recipe covers all bases. Let’s dive into a culinary adventure that’ll make your taste buds dance and keep your family coming back for more.


    • 1 lb large shrimp, peeled and deveined
    • 2 tbsp olive oil
    • 1 tbsp Cajun seasoning
    • ½ tsp garlic powder
    • ¼ tsp smoked paprika
    • Salt and pepper, to taste
    • Chopped parsley, for garnish
    • ¼ cup mayonnaise
    • 1 tbsp sour cream
    • 1 tsp Dijon mustard
    • 1 tsp lemon juice
    • ½ tsp Cajun seasoning
    • Pinch of paprika
    • Optional: a few dashes of hot sauce
    • Fresh parsley, for garnish

    1. Pat the shrimp dry with paper towels. In a bowl, toss them with olive oil, Cajun seasoning, garlic powder, paprika, salt, and pepper. Let rest for 5–10 minutes.
    2. In a separate bowl, whisk together mayonnaise, sour cream, Dijon mustard, lemon juice, Cajun seasoning, paprika, and hot sauce. Taste and adjust seasoning.
    3. Heat a skillet over medium-high heat. Add shrimp in a single layer and sear for 2 minutes per side, or until cooked through and crispy. Work in batches if needed.
    4. Transfer shrimp to a plate or bowl, drizzle with creamy sauce, and sprinkle with chopped parsley. Serve hot.

    Notes

    • Allow shrimp to marinate for better flavor.
    • Adjust the amount of hot sauce based on your spice preference.
    • Serve with rice or salad for a complete meal.
    • Prep Time: 15 minutes
    • Cook Time: 6 minutes
    • Category: Seafood
    • Method: Searing
    • Cuisine: Cajun

    Nutrition

    • Serving Size: 1 serving
    • Calories: 300
    • Sugar: 1g
    • Sodium: 500mg
    • Fat: 20g
    • Saturated Fat: 3g
    • Unsaturated Fat: 15g
    • Trans Fat: 0g
    • Carbohydrates: 10g
    • Fiber: 0g
    • Protein: 22g
    • Cholesterol: 150mg

    Sharing is caring!

  • Mediterranean Salmon Bowl

    Mediterranean Salmon Bowl


    Introduction to Mediterranean Salmon Bowl

    As a mom juggling everything from work to family, I know how challenging it can be to whip up something delicious and nutritious. That’s why I adore this Mediterranean Salmon Bowl! It’s a flavor-packed delight that can be on your table in about 30 minutes—perfect for those hectic weeknights. Picture fresh salmon, colorful veggies, and creamy Tzatziki sauce all in one bowl. It’s not just a meal; it’s a joyful rendezvous with the Mediterranean! Trust me, your loved ones will be impressed, and you won’t feel rushed. Let’s dive into this delightful recipe!

    Why You’ll Love This Mediterranean Salmon Bowl

    This Mediterranean Salmon Bowl is genuinely a dream come true for busy parents and professionals. It comes together quickly, making it an excellent choice for a weeknight dinner. The combination of fresh flavors and textures will leave your taste buds dancing! Plus, it’s packed with protein and nutrients, so you can feel good about what you’re serving. You’ll have a delicious meal that even the pickiest eaters will enjoy!

    Ingredients for Mediterranean Salmon Bowl

    Let’s gather all the vibrant ingredients for this Mediterranean Salmon Bowl! Each element plays a role in creating the perfect dish, so here’s what you’ll need:

    • Marinade: Olive oil brings richness, while lemon juice adds zesty brightness. Fresh oregano and dill create aromatic layers, and garlic gives a lovely, savory kick. Honey or maple syrup adds a hint of sweetness, balancing the dish perfectly. Don’t forget salt and pepper to season!
    • Bowl: You’ll need fresh salmon fillets—think flaky, tender, and oh-so-delicious! Quinoa serves as a lovely base, delivering protein and fiber. For that crunch, grab romaine or mixed greens, along with sliced English cucumber and halved cherry tomatoes. The red onion adds a sharp bite, while garbanzo beans boost heartiness. Kalamata olives provide a salty punch, and feta brings a creamy tang. Finally, an avocado adds healthy fats and a buttery texture!
    • Tzatziki Sauce: This creamy element is essential! Use grated cucumber for freshness mixed with creamy Greek yogurt. Lemon juice and dill bring vibrancy, while garlic adds depth. Season with salt and pepper for the perfect finishing touch.
    • For Garnish: Fresh parsley enhances the dish’s flavor and adds a splash of color.

    For precise measurements, you can find the details at the bottom of the article, ready for printing!

    How to Make Mediterranean Salmon Bowl

    Preheat the Oven and Prepare Marinade

    To start, preheat your oven to 425°F (220°C). This step ensures your salmon cooks evenly and quickly. While the oven warms up, let’s whip up the marinade. In a small bowl, whisk together extra virgin olive oil, lemon juice, oregano, dill, garlic, honey or maple syrup, salt, and pepper. This marinade is a flavor powerhouse!

    Marinating the salmon for just 15 minutes allows those lovely flavors to soak in, transforming your fish from good to outstanding. Place the salmon fillets in a shallow dish and pour half the marinade over them. Get every piece coated! Once marinated, set aside the reserved marinade for the salad mixture.

    Bake the Salmon Fillets

    Now it’s time to bake! Transfer your marinated salmon fillets skin-side down onto a parchment-lined baking sheet. Baking this way keeps the skin crispy while the flesh becomes tender. Cook your salmon for 9 to 12 minutes, then make sure to check for doneness. The salmon should flake easily with a fork and have that lovely orange-pink hue. Let it rest for about 5 minutes after baking; resting allows the juices to redistribute, making it more succulent.

    Prepare the Salad Mixture

    While the salmon bakes, let’s create a vibrant salad. In a medium bowl, combine sliced cucumber, halved cherry tomatoes, sliced red onion, and garbanzo beans. Don’t forget to toss in the reserved marinade! This will give your vegetables a flavorful kick that complements the salmon beautifully. Using fresh ingredients makes a world of difference in taste and texture, so go for the crispest veggies you can find.

    Make the Tzatziki Sauce

    Next, we’ll prepare the Tzatziki sauce that elevates the bowl to a new level! In a separate small bowl, mix grated English cucumber (make sure to squeeze out the extra water) with Greek yogurt, lemon juice, dill, garlic, salt, and pepper. Whisk it all together until creamy and smooth. This refreshing sauce perfectly balances the richness of the salmon and enhances your entire Mediterranean Salmon Bowl.

    Assemble the Mediterranean Salmon Bowls

    Finally, let’s bring it all together! In each serving bowl, start with a handful of greens, creating a colorful base. Next, add a generous scoop of cooked quinoa. Then, layer on the salad mixture we’ve created. Top each bowl with one glorious salmon fillet—don’t forget to remove the skin if you prefer!

    Add a dollop of your homemade Tzatziki sauce and sprinkle crumbled feta cheese over the top. Finish with halved kalamata olives and diced avocado for a creamy twist. The combination of colors and flavors in these bowls is not only eye-catching but packed with nutrients. It’s a complete meal that bursts with the goodness of the Mediterranean!

    Tips for Success

    • Use fresh herbs for the best flavor—dried can work, but fresh is truly magical!
    • Don’t skip the marination time; even 15 minutes makes a noticeable difference.
    • Check the salmon a minute early; better to undercook than overcook!
    • Experiment with veggies—zucchini or bell peppers make great additions.
    • Make extra Tzatziki sauce; it’s delicious on sandwiches or as a dip!

    Equipment Needed

    • Baking sheet: A lined cookie sheet works too!
    • Mixing bowls: Use any size, just make sure they’re durable.
    • Whisk: A fork can do the trick in a pinch!
    • Measuring cups and spoons: Don’t have them? Use standard cups and spoons!
    • Grater: A box grater or even a food processor is great for Tzatziki.

    Variations on Mediterranean Salmon Bowl

    • Swap salmon for grilled chicken or tofu for a different protein option.
    • For a lighter option, use lettuce wraps instead of quinoa and greens.
    • Add roasted vegetables like bell peppers or zucchini for an extra flavor boost.
    • Try using a flavored quinoa, like garlic or lemon-infused, for more depth.
    • For a vegan take, replace salmon with chickpeas or tempeh and use cashew yogurt in the Tzatziki.
    • Incorporate a different cheese, like goat cheese or nutritional yeast, for a unique twist.
    • Add fruits like diced mango or pomegranate seeds for a sweet contrast to the savory elements.

    Serving Suggestions for Mediterranean Salmon Bowl

    • Pair the bowls with crusty whole-grain bread for a hearty side.
    • Serve with a light, citrusy white wine for a refreshing complement.
    • Add a handful of toasted pine nuts for extra crunch and flavor.
    • Garnish with lemon wedges for a zesty finishing touch.
    • Present the bowls on colorful plates for an eye-catching display.

    FAQs about Mediterranean Salmon Bowl

    Can I prepare the Mediterranean Salmon Bowl in advance? Absolutely! You can marinate the salmon ahead of time and store it in the refrigerator. The salad ingredients and Tzatziki sauce can also be prepped in advance to save time during busy evenings.

    What can I substitute for quinoa in the bowl? If you’re not a fan of quinoa, try using brown rice, couscous, or even farro! Each alternative offers a different texture, but will still make for a heart-healthy base.

    Is the Tzatziki sauce necessary for this recipe? While it adds a refreshing element, you can totally skip the Tzatziki if you prefer. You might consider a drizzle of tahini or a simple olive oil dressing instead!

    Can I use frozen salmon fillets? Yes, frozen salmon works well! Just ensure to thaw it completely before marinating and baking for the best flavor and texture.

    How long will the Mediterranean Salmon Bowl last in the fridge? Leftovers are good for up to 2 days when stored in an airtight container. Just keep in mind that the salad might get a bit soggy over time, so try to add that fresh before serving!

    Final Thoughts on Mediterranean Salmon Bowl

    The Mediterranean Salmon Bowl is not just a meal; it’s an experience brimming with joy, color, and flavor! Every bite transports you to sunlit shores, where freshness reigns supreme. This recipe is perfect for busy evenings, allowing you to enjoy a nutritious and delicious feast without spending hours in the kitchen. The assembly becomes an exciting activity, where you can unleash your creativity with colorful ingredients. Best of all, you’re creating happy memories around the dinner table, savoring laughter and love with every forkful. I genuinely hope this bowl becomes a family favorite!


    Print

    clock clock iconcutlery cutlery iconflag flag iconfolder folder iconinstagram instagram iconpinterest pinterest iconfacebook facebook iconprint print iconsquares squares iconheart heart iconheart solid heart solid icon

    Description

    A Mediterranean Salmon Bowl that brings together delicious flavors with fresh ingredients for a nutritious meal.


    • Marinade:
    • ½ cup extra virgin olive oil
    • Juice of 1 lemon (about 34 tablespoons)
    • 2 tablespoons fresh oregano leaves (or 2 teaspoons dried)
    • 1 tablespoon fresh dill, chopped (or 2 teaspoons dried)
    • 2 cloves garlic, minced
    • 1 teaspoon honey or maple syrup
    • ½ teaspoon sea salt
    • ¼ teaspoon black pepper
    • Bowl:
    • 4 salmon fillets (1 to lbs total)
    • 1½ cups cooked quinoa
    • 4 cups romaine or mixed greens
    • 1 cup sliced English cucumber
    • 1 cup halved cherry tomatoes
    • ½ cup sliced red onion
    • 1 (15 oz) can garbanzo beans, drained and rinsed
    • ⅓ cup pitted kalamata olives, halved
    • ½ cup feta cheese, crumbled
    • 1 avocado, sliced or diced
    • Tzatziki Sauce:
    • ½ cup grated English cucumber (water squeezed out)
    • ½ cup plain Greek yogurt
    • 1½ tablespoons lemon juice
    • 1 tablespoon extra virgin olive oil
    • 1 tablespoon fresh dill (or 1 teaspoon dried)
    • 2 cloves garlic, minced
    • ¼ teaspoon sea salt
    • ¼ teaspoon black pepper
    • For Garnish:
    • 2 tablespoons fresh parsley, finely chopped

    1. Preheat your oven to 425°F (220°C).
    2. In a small bowl, whisk together all marinade ingredients. Place your salmon fillets in a shallow dish and pour half of the marinade over them. Allow them to marinate for about 15 minutes while you prepare other ingredients. Reserve the remaining marinade.
    3. Transfer the marinated salmon (skin-side down) onto a parchment-lined baking sheet. Bake for 9–12 minutes until the salmon flakes easily with a fork. Let it rest for about 5 minutes after baking.
    4. In another medium bowl, combine sliced cucumber, cherry tomatoes, red onion, and garbanzo beans. Toss this mixture with the reserved marinade. Set aside.
    5. In a small bowl, mix together all Tzatziki sauce ingredients until well combined and creamy.
    6. In each serving bowl, add a handful of greens followed by an even distribution of quinoa and salad mixture. Top each bowl with one salmon fillet (skin removed if desired), a dollop of Tzatziki sauce, crumbled feta cheese, olives, and diced avocado.
    7. Serve immediately or store in the refrigerator for an easy make-ahead meal!

    Notes

    • Feel free to add any other vegetables or toppings you prefer in the bowls.
    • Leftovers can be stored in the refrigerator for up to 2 days.
    • For a spicier option, add diced jalapeños or a sprinkle of red pepper flakes.
    • Prep Time: 20 minutes
    • Cook Time: 12 minutes
    • Category: Main Dish
    • Method: Baking
    • Cuisine: Mediterranean

    Nutrition

    • Serving Size: 1 bowl
    • Calories: 500
    • Sugar: 4g
    • Sodium: 900mg
    • Fat: 36g
    • Saturated Fat: 6g
    • Unsaturated Fat: 20g
    • Trans Fat: 0g
    • Carbohydrates: 30g
    • Fiber: 8g
    • Protein: 30g
    • Cholesterol: 70mg

    Sharing is caring!