Author: IHAAL Team

  • Chocolate Chocolate Chip Cookie Bars

    Chocolate Chocolate Chip Cookie Bars


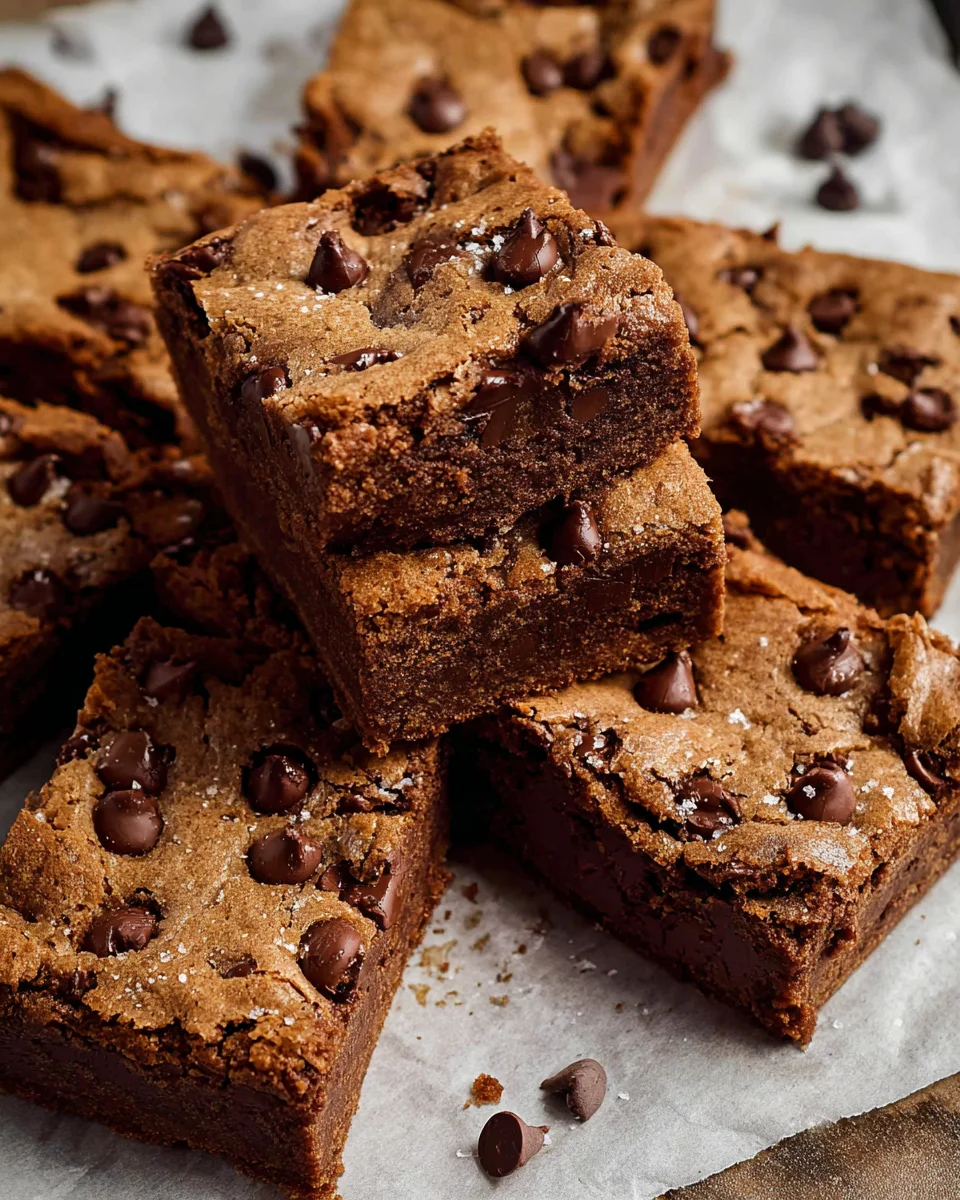
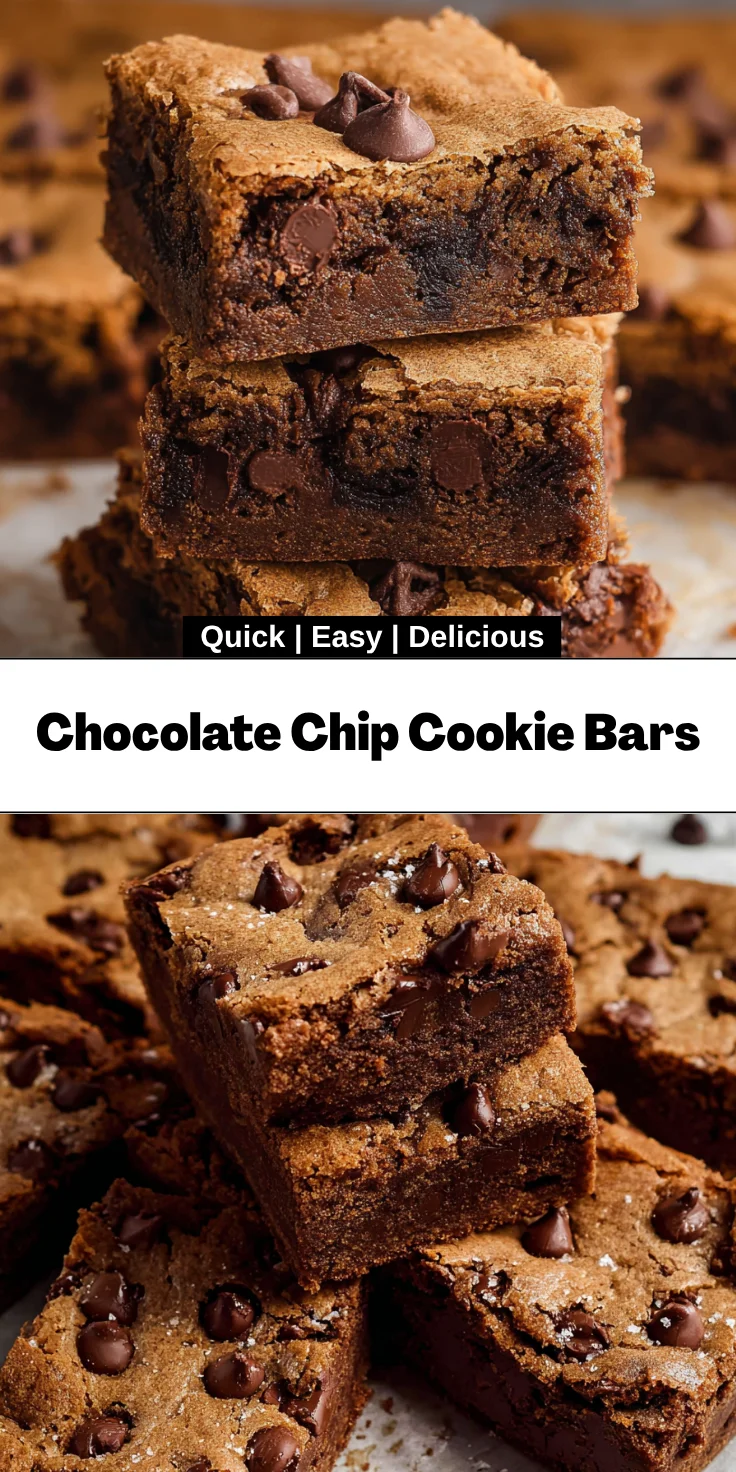
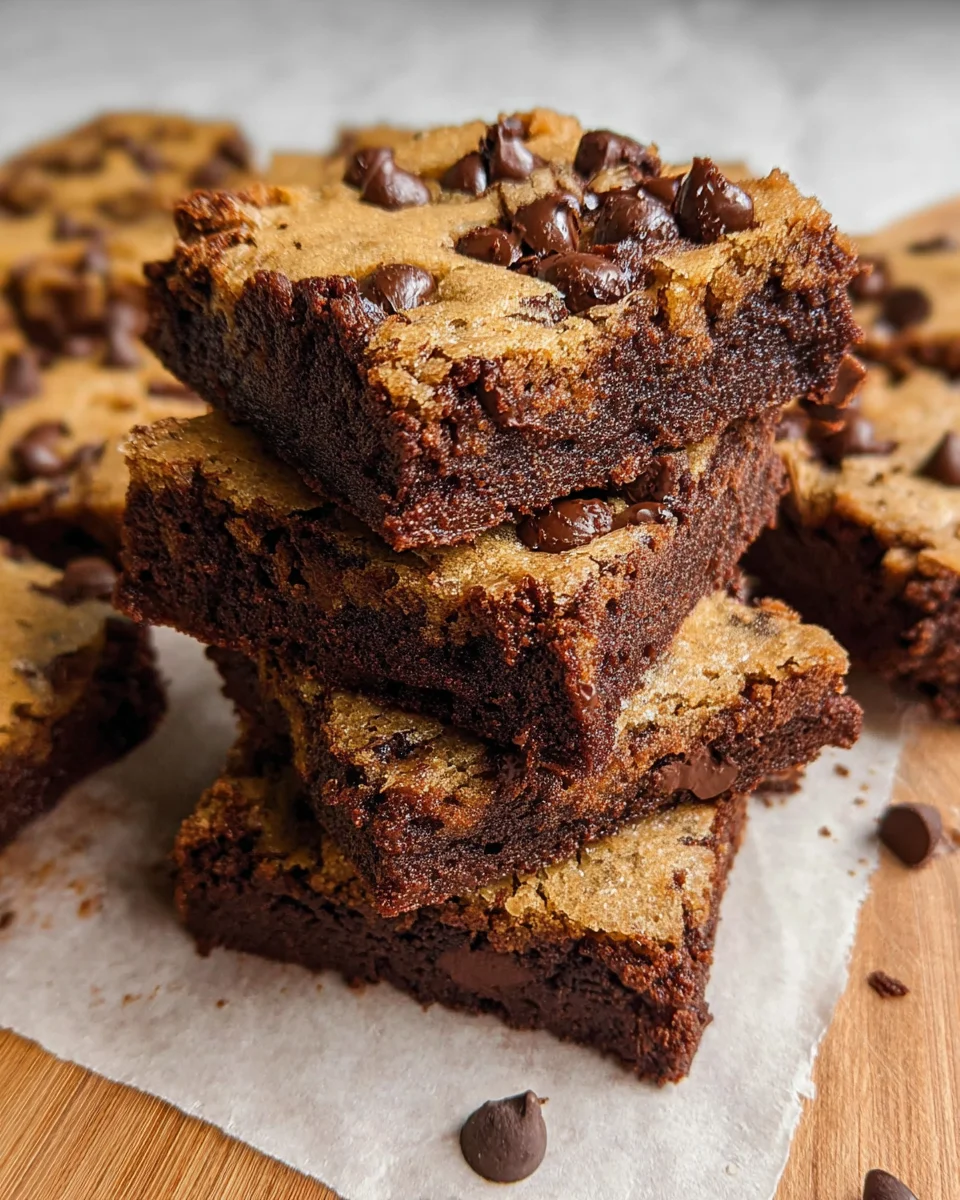
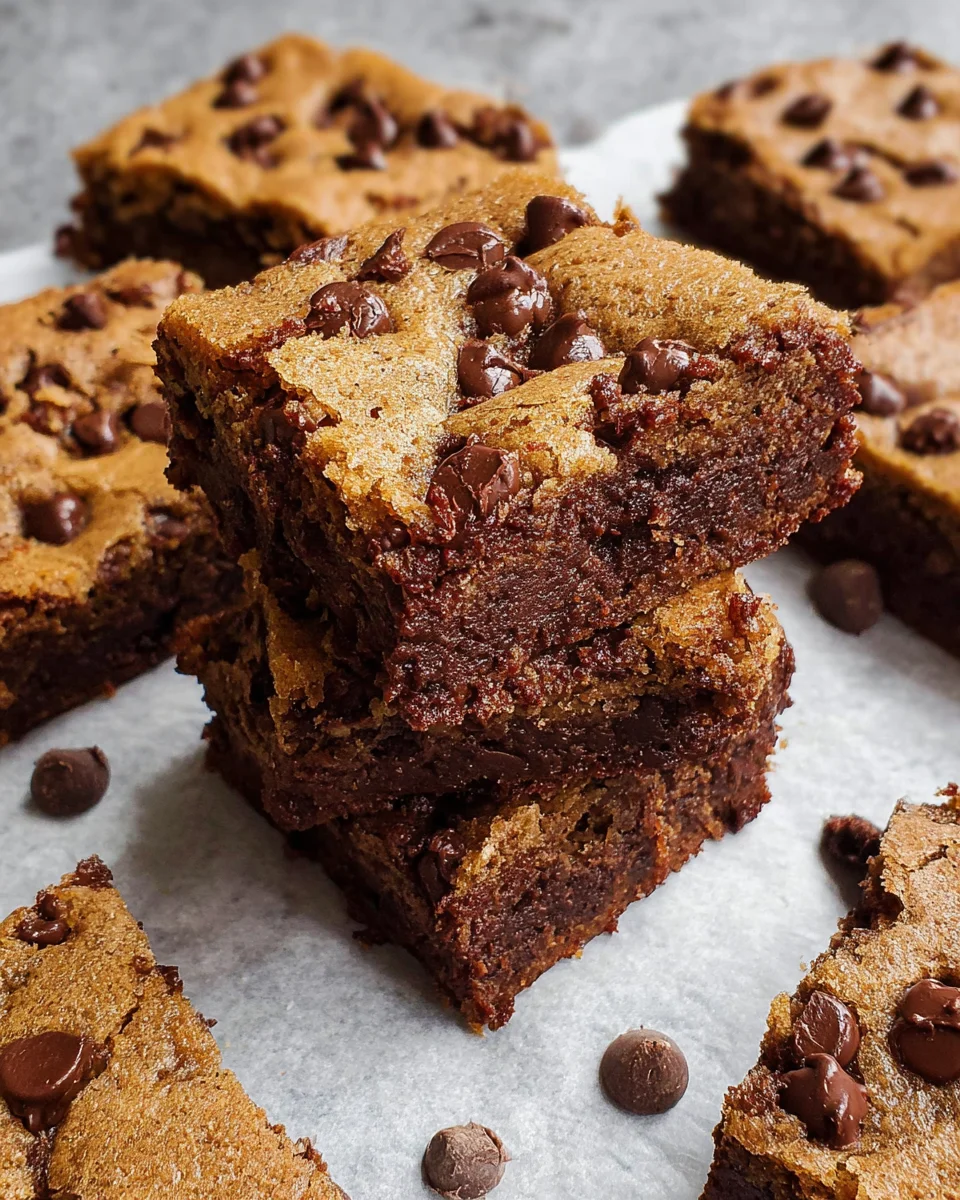
    Introduction to Chocolate Chocolate Chip Cookie Bars

    Welcome to the delightful world of Chocolate Chocolate Chip Cookie Bars! If you’re like me, juggling family, work, and everything in between, you crave recipes that are quick yet indulgent. These bars hit the sweet spot, mixing rich chocolate with gooey chocolate chips—a treat that can brighten even the busiest of days.

    Whether you need a last-minute dessert for a gathering or a comforting snack after a long day, this recipe fits the bill perfectly. Let’s dive into making these delightful cookie bars that will win hearts and satisfy sweet cravings!

    Why You’ll Love This Chocolate Chocolate Chip Cookie Bars

    These Chocolate Chocolate Chip Cookie Bars are truly a mom’s best friend! They come together in just 15 minutes of prep time, making them perfect for busy schedules. The combination of rich chocolate and melty chocolate chips creates an irresistible flavor that everyone will love. Plus, they make perfect goodies for school bake sales or casual family nights. Trust me, they’ll disappear before you know it!

    Ingredients for Chocolate Chocolate Chip Cookie Bars

    Gathering the right ingredients is the first step towards creating delicious Chocolate Chocolate Chip Cookie Bars. Here’s what you’ll need:

    • Unsalted Butter: Softened to room temperature, it ensures the bars stay tender and rich.
    • Light Brown Sugar: This adds moisture and a delightful caramel note to our bars.
    • Granulated Sugar: For sweetness and to help achieve that irresistible crust.
    • Large Eggs: They provide structure and binding, creating a chewy texture.
    • Vanilla Extract: A must for enhancing the flavors and making every bite heavenly.
    • All-Purpose Flour: The base of our bars; it provides stability and balance.
    • Unsweetened Cocoa Powder: This is the star ingredient that brings rich chocolate flavor without adding extra sweetness.
    • Baking Soda: A leavening agent to help the bars rise slightly during baking.
    • Salt: It elevates the sweetness and enhances the overall flavor profile.
    • Semi-Sweet Chocolate Chips: The more, the merrier! These will melt beautifully and create pockets of chocolate joy.

    For optimal results, using room-temperature ingredients is key. If you’re in a pinch, you can substitute half of the butter with applesauce for a slightly healthier alternative. Remember, the specific quantities for each ingredient are listed at the bottom of the article and are available for printing.

    How to Make Chocolate Chocolate Chip Cookie Bars

    Step 1: Preheat the Oven and Prepare the Pan

    First things first, preheat your oven to 350°F. It’s essential to have the right temperature to achieve those perfectly baked Chocolate Chocolate Chip Cookie Bars. Take a moment to line a 9 x 13 pan with parchment paper, leaving some overhang on the sides. This makes for a simple removal later—no sticky mess, I promise!

    Step 2: Cream the Butter and Sugars

    Now, in the bowl of your stand mixer, cream the room-temperature unsalted butter with both sugars until it’s light and fluffy—about 3 minutes should do it. This step is crucial because it introduces air into the mix, giving your cookie bars a delightful texture. You want them to be chewy, not dense!

    Step 3: Add Eggs and Vanilla

    Next up, crack in those large eggs and pour in the vanilla extract. Mix well until everything is smoothly combined. This step amplifies the flavor, elevating your chocolate experience to new heights. A thorough mix ensures that every bar bursts with that comforting taste.

    Step 4: Combine Dry Ingredients

    In a medium bowl, whisk together the all-purpose flour, unsweetened cocoa powder, baking soda, and salt. This blending of dry ingredients helps to disperse the baking soda evenly, prepping them to work their magic during baking. Trust me; this step is often overlooked but equally important!

    Step 5: Mix Dry and Wet Ingredients

    With your mixer set on low, carefully add the dry mixture into the wet ingredients in batches. It’s vital to mix just until everything is incorporated. Overmixing can lead to tough bars, and no one wants that! Remember, we’re going for deliciously soft and chewy here.

    Step 6: Fold in Chocolate Chips

    Now comes the best part! Gently fold in 2 cups of semi-sweet chocolate chips. Save the remaining cup for later! This folding technique is key to keeping the cookie bars soft and tender while adding those luscious melted chocolate pockets. They’re well worth the wait!

    Step 7: Press Dough into Pan

    Using your hands or a sheet of parchment paper to avoid stickiness, press the dough evenly into the prepared pan. Make sure it fills the corners but don’t compress it too much. A gentle touch will keep your bars from becoming too dense. We want them soft and dreamy!

    Step 8: Sprinkle Remaining Chocolate Chips

    Next up, sprinkle those last chocolate chips on top. Let your creativity shine here! This little step not only enhances the presentation but also gives you more of that gooey chocolate experience. Trust me; your guests will appreciate the extra touch!

    Step 9: Baking Time

    Time to pop the pan into the oven! Bake for 22-26 minutes, watching closely as the edges set while the center looks just about set—it shouldn’t be jiggly. Remember, your Chocolate Chocolate Chip Cookie Bars will continue to cook a bit more outside of the oven thanks to residual heat!

    Step 10: Cooling and Slicing

    Allow your bars to cool completely in the pan. This step is vital to achieving perfect slices. Once cooled, use the parchment overhang to lift them out. Slicing them into squares is easier now, and you won’t end up with a crumbly mess. Enjoy your masterpiece!

    Tips for Success

    • Always use room-temperature butter for a smoother batter and better texture.
    • Don’t overmix the dough; a gentle hand preserves that sought-after softness.
    • Experiment with chocolate chip varieties—milk chocolate, dark, or even white chocolate!
    • For extra indulgence, drizzle melted chocolate on top after baking.
    • Store in an airtight container to keep them fresh for several days.

    Equipment Needed

    • Stand Mixer: A hand mixer works too if you don’t have a stand mixer.
    • 9 x 13 Baking Pan: Any similarly sized pan will suffice in a pinch.
    • Parchment Paper: Aluminum foil can be used, but parchment ensures easier removal.
    • Mixing Bowls: A couple of different sizes will make mixing effortless.
    • Whisk and Spatula: Essential for mixing dry ingredients and folding chocolate chips.

    Variations

    • Nutty Delight: Add 1 cup of chopped nuts, like walnuts or pecans, for an extra crunch.
    • Peanut Butter Swirl: Incorporate ½ cup of creamy peanut butter into the batter for a sweet and salty twist.
    • Gluten-Free Option: Substitute the all-purpose flour with a 1:1 gluten-free baking blend.
    • Mint Chocolate: Mix in ½ teaspoon of peppermint extract for a refreshing flavor boost.
    • Chocolate Chip Cookie Dough: Layer cookie dough on the bottom and bake for an indulgent treat.

    Serving Suggestions for Chocolate Chocolate Chip Cookie Bars

    • Pair these bars with a chilled glass of milk for the ultimate comfort food experience.
    • Serve with a scoop of vanilla ice cream on top for a delightful dessert sundae.
    • Dust with powdered sugar or drizzle with chocolate sauce for a touch of elegance.
    • Bring to picnics or potlucks—your friends will love sharing them!
    • Cut into fun shapes using cookie cutters for a festive presentation at parties.

    FAQs about Chocolate Chocolate Chip Cookie Bars

    Here are some common questions that might pop into your mind while making or enjoying these delightful Chocolate Chocolate Chip Cookie Bars:

    Can I freeze these cookie bars?

    Absolutely! Allow the bars to cool completely, then cut them into squares and store in an airtight container or freezer bag. They can be frozen for up to 3 months. Just thaw them overnight in the refrigerator when you’re ready to enjoy.

    What’s the best way to store them?

    Keep your Chocolate Chocolate Chip Cookie Bars in an airtight container at room temperature for up to a week. For longer freshness, try refrigerating them, but I recommend letting them come to room temperature before serving for the best taste.

    Can I substitute ingredients if I’m out of something?

    For sure! If you’re out of unsalted butter, you can use margarine, but the taste may vary slightly. Also, feel free to experiment with alternative sugars or flours to fit dietary needs. Just be mindful of how those substitutions might affect texture!

    How do I know when they’re done baking?

    The edges of the bars should look set while the center should look slightly underbaked. A toothpick inserted into the center should come out with a few moist crumbs clinging to it. Trust your senses—if they smell incredible, it’s a good sign!

    What can I do if the bars turn out too dry?

    If you find your cookie bars are on the dry side, it may be a sign of overbaking or too much flour. In the future, be sure to spoon your flour into the measuring cup and level it off without packing it down. You can also enjoy the bars warm with ice cream to counteract dryness!

    Final Thoughts on Chocolate Chocolate Chip Cookie Bars

    There you have it! These Chocolate Chocolate Chip Cookie Bars are not just a dessert; they’re a celebration of simple joys and cherished moments. Each bite is a little piece of happiness, perfect for family gatherings or a quiet night in. I love how easy they are to make, turning ordinary days into something special. Plus, watching loved ones savor the rich chocolate goodness is a delight that warms my heart. So gather your ingredients and make these bars—your loved ones will thank you, and you might just create a new family favorite!


    Print

    clock clock iconcutlery cutlery iconflag flag iconfolder folder iconinstagram instagram iconpinterest pinterest iconfacebook facebook iconprint print iconsquares squares iconheart heart iconheart solid heart solid icon

    Description

    Delicious and rich chocolate cookie bars loaded with chocolate chips.


    • 1 cup unsalted butter, room temperature
    • 1 cup light brown sugar
    • ½ cup granulated sugar
    • 2 large eggs
    • 1 teaspoon vanilla extract
    • 2 ¾ cups all-purpose flour
    • ¾ cup unsweetened cocoa powder
    • 1 teaspoon baking soda
    • 1 teaspoon salt
    • 2 ½ cups semi-sweet chocolate chips, divided

    1. Preheat the oven to 350°F. Line a 9 x 13 pan with parchment paper, allowing it to overhang on the sides.
    2. In the bowl of a stand mixer fitted with the paddle attachment, cream the butter, brown sugar, and granulated sugar until light and fluffy, about 3 minutes.
    3. Mix in the eggs and vanilla until combined. Scrape down the sides of the bowl as needed to ensure even mixing. Set aside.
    4. In a medium bowl, whisk to combine the flour, cocoa powder, baking soda, and salt.
    5. With the mixer on low, add the flour mixture a little at a time, scraping down the sides and bottom of the bowl as needed. Mix until just combined – do not overmix.
    6. Fold in 2 cups of chocolate chips.
    7. Press the dough into the prepared pan in an even layer. Tip: Use a sheet of parchment paper or lightly coat your hands with nonstick cooking spray to make pressing the sticky dough into the pan easier.
    8. Sprinkle the remaining cup of chocolate chips over the dough.
    9. Bake for 22-26 minutes, or until the edges are set and the center of the dough is barely set.
    10. Allow the bars to cool completely in the pan before removing, slicing, and serving.

    Notes

    • Make sure to not overmix the dough to keep the bars tender.
    • Using room-temperature butter is crucial for the right texture.
    • Letting the bars cool completely ensures easier slicing.
    • Prep Time: 15 minutes
    • Cook Time: 26 minutes
    • Category: Dessert
    • Method: Baking
    • Cuisine: American

    Nutrition

    • Serving Size: 1 bar
    • Calories: 290
    • Sugar: 20g
    • Sodium: 150mg
    • Fat: 15g
    • Saturated Fat: 9g
    • Unsaturated Fat: 4g
    • Trans Fat: 0g
    • Carbohydrates: 36g
    • Fiber: 2g
    • Protein: 4g
    • Cholesterol: 50mg

    Sharing is caring!

  • Greek yogurt potato salad

    Greek yogurt potato salad


    Introduction to Greek Yogurt Potato Salad

    Summer picnics, family reunions, or just a Tuesday night dinner—this Greek yogurt potato salad fits every occasion beautifully. As a busy mom, I know how some days can feel like a whirlwind. This creamy, healthy twist on the classic potato salad brings both flavor and nutrition without the hassle.

    It’s rich, but not heavy, making it a delightful addition to your table. With its zingy freshness, it’s sure to impress your loved ones and make meal prep a breeze. Just imagine devouring this vibrant dish while soaking up the sun!

    Why You’ll Love This Greek Yogurt Potato Salad

    This Greek yogurt potato salad is the perfect blend of ease and flavor. In just over an hour, you can whip up a dish that delights everyone at the table. It’s healthier than traditional versions, making it a guilt-free indulgence. Plus, the lively notes of lemon and fresh dill transform simple ingredients into a vibrant meal. With minimal effort, you’ll bring joy and goodness to your family gatherings.

    Ingredients for Greek Yogurt Potato Salad

    Gathering the right ingredients is the first step to making this delightful Greek yogurt potato salad. Each component plays a vital role in achieving that creamy, refreshing taste, all while being nutritious. Here’s what you’ll need:

    • Yukon Gold potatoes: These beauties are buttery and creamy. Their waxy texture holds up beautifully after boiling.
    • Plain Greek yogurt: This is the star of our salad! Creamy and tangy, it replaces heavy mayonnaise, adding protein and flavor.
    • Fresh dill: The herb of summer! It’s bright and aromatic, giving the salad a lovely, refreshing kick. But if dill isn’t your jam, fresh parsley works wonders too.
    • Lemon juice: A dash of zing! The acidity brightens up the dish, balancing the creaminess of the yogurt.
    • Red onion: For a sweet and slightly sharp bite. It adds color and crunch. You can swap this with green onions if you prefer a milder flavor.
    • Celery: This adds a nice crunch and earthy flavor. You could even add bell peppers for a pop of color!
    • Salt & pepper: Essential for enhancing all the flavors, don’t skip these basic seasonings!

    For those looking to jazz it up, sprinkle in some garlic powder or a dab of mustard for an extra punch. If you’re prepping for a crowd, feel free to adjust the quantities according to your needs. Full measurements are available at the bottom for your convenience!

    How to Make Greek Yogurt Potato Salad

    Now that we have our ingredients, let’s get cooking! This process is straightforward, allowing you to create a wholesome Greek yogurt potato salad that fills bellies and warms hearts. Each step is designed to keep the cooking experience enjoyable and manageable, especially for those busy days when you just want something delicious and quick.

    Step 1: Prepare the Potatoes

    Start by rinsing those lovely Yukon Gold potatoes under cool water. This removes any dirt. Next, chop them into uniform chunks about 1-2 inches in size. Keeping the pieces even helps them cook thoroughly and evenly. Trust me, there’s nothing worse than biting into an undercooked potato! Plus, these perfect little morsels absorb the delicious yogurt dressing beautifully.

    Step 2: Boil the Potatoes

    In a large pot, bring salted water to a rolling boil. Add your chopped potatoes and cook for about 15 to 20 minutes. You want them fork-tender but not mushy; nobody enjoys a soggy salad, right? Once tender, drain them in a colander and set aside to cool completely. Letting them cool prevents the dressing from becoming overly warm, which would dilute all that flavor.

    Step 3: Make the Yogurt Dressing

    In a medium bowl, combine the creamy Greek yogurt, fresh lemon juice, chopped dill, and a sprinkle of salt and pepper. Mix until smooth and well-blended. This combination creates a rich, tangy dressing that’s simply divine. The lemon adds brightness, while the dill gives it that classic potato salad flavor. Together, they elevate our dish from ordinary to extraordinary!

    Step 4: Combine Ingredients

    Next, take your cooled potatoes and place them in a large mixing bowl. Gently fold in the diced red onion and chopped celery. Now, pour the luscious yogurt dressing over the potato mixture. Using a spatula, carefully mix until all the ingredients are well coated. A gentle hand is crucial here—overmixing could lead to a mushy salad, and we definitely want those potatoes to hold their shape!

    Step 5: Chill and Serve

    Here’s the best part: refrigeration! Cover the salad and chill it in the fridge for at least an hour before serving. This step is vital; it allows the flavors to meld and deepen, creating a colorful symphony of taste. You’ll be amazed at how delicious it becomes after some time in the cool embrace of your refrigerator. Once chilled, it’s ready to wow your family and friends!

    Tips for Success

    • Always use fresh ingredients for the best flavor and texture.
    • Make sure to let the potatoes cool completely to avoid a runny dressing.
    • Feel free to adjust the seasoning to suit your taste—don’t be shy!
    • For a creamier texture, add more yogurt if you like.
    • Cooking times may vary, so check potatoes for doneness regularly.

    Equipment Needed

    • Large pot for boiling potatoes—any sturdy pot will do.
    • Colander for draining—if you don’t have one, a slotted spoon works too.
    • Mixing bowl—use your favorite large bowl; it doesn’t have to be fancy!
    • Spatula for folding ingredients—any kitchen spoon can do in a pinch.

    Variations of Greek Yogurt Potato Salad

    • Herbed Potato Salad: Feel free to mix in other herbs like chives or basil for a different flavor profile.
    • Spicy Kick: Add a pinch of cayenne pepper or a dash of hot sauce for some heat!
    • Protein Boost: Toss in some cooked chicken or chickpeas to turn it into a satisfying meal.
    • Veggie Delight: Incorporate chopped bell peppers, peas, or even grated carrots for added crunch and nutrition.
    • Vegan Version: Replace Greek yogurt with a plant-based yogurt alternative for a creamy, vegan-friendly option.

    Serving Suggestions for Greek Yogurt Potato Salad

    • Pair it with grilled chicken or fish for a complete meal.
    • Serve alongside fresh garden greens to balance richness.
    • Add a sprinkle of paprika or extra dill on top for visual appeal.
    • Try it with crusty bread or pita on the side for dipping.
    • For drinks, consider a refreshing lemonade or iced tea.

    FAQs about Greek Yogurt Potato Salad

    As I’ve whipped up this Greek yogurt potato salad, I often get asked a few common questions. Let’s dive into them and set your mind at ease!

    Can I make this potato salad ahead of time?

    Absolutely! In fact, making it a day in advance allows the flavors to develop, creating an even tastier dish. Just be sure to keep it tightly covered in the fridge!

    How long does Greek yogurt potato salad last in the fridge?

    This salad can typically be stored for up to 3 to 5 days in the refrigerator. Just keep it in an airtight container to maintain freshness.

    Can I customize the flavors?

    For sure! You can add spices or different herbs to reflect your taste preferences. Experiment with things like garlic powder, mustard, or even a splash of vinegar for extra zing!

    Is this potato salad suitable for a healthy diet?

    This Greek yogurt potato salad is a fantastic healthy option! It’s lower in calories and fat than traditional versions, thanks to the yogurt. Plus, with added vegetables, it offers nutrition and flavor!

    Can I use other types of potatoes?

    Yes! While Yukon Gold potatoes are my favorite, you can use red potatoes or even fingerling potatoes for a different texture and taste. Just keep in mind that cooking times may vary slightly.

    Final Thoughts

    Making this Greek yogurt potato salad brings me joy like few other recipes can. It’s all about simpler, healthier choices that still delight the taste buds. I love serving it at family gatherings, where its creamy freshness steals the spotlight. Each bite offers a burst of flavor and nostalgia, reminding me of summer days spent with loved ones. Plus, it’s so adaptable, catering to various tastes and dietary needs. Whether it’s an ordinary weeknight or a special occasion, this salad gives me the comfort of home-cooked goodness in a vibrant, healthful twist. Enjoy every creamy forkful!


    Print

    clock clock iconcutlery cutlery iconflag flag iconfolder folder iconinstagram instagram iconpinterest pinterest iconfacebook facebook iconprint print iconsquares squares iconheart heart iconheart solid heart solid icon

    Description

    A creamy, healthy twist on classic potato salad using Greek yogurt.


    • 2 lbs Yukon Gold potatoes
    • 1 cup plain Greek yogurt
    • 1/4 cup fresh dill, chopped
    • Juice of 1 lemon
    • 1/2 cup red onion, diced
    • 1/2 cup celery, chopped
    • Salt & pepper to taste

    1. Rinse and chop the Yukon Gold potatoes into uniform chunks.
    2. Boil potatoes in salted water until fork-tender (15-20 minutes). Drain and cool completely.
    3. In a bowl, mix Greek yogurt, lemon juice, dill, salt, and pepper until smooth.
    4. Gently fold cooled potatoes, red onion, and celery into the yogurt mixture.
    5. Chill in the fridge for at least an hour before serving.

    Notes

    • Ensure potatoes are cooled completely for better texture.
    • Can substitute dill with parsley if desired.
    • Feel free to add other vegetables like bell peppers or carrots for extra crunch.
    • Prep Time: 15 minutes
    • Cook Time: 20 minutes
    • Category: Salad
    • Method: Boiling and Mixing
    • Cuisine: Mediterranean

    Nutrition

    • Serving Size: 1 cup
    • Calories: 180
    • Sugar: 2g
    • Sodium: 300mg
    • Fat: 4g
    • Saturated Fat: 1g
    • Unsaturated Fat: 2g
    • Trans Fat: 0g
    • Carbohydrates: 32g
    • Fiber: 3g
    • Protein: 6g
    • Cholesterol: 5mg

    Sharing is caring!

  • Chocolate Chip Cookie Dough Brownie Bombs

    Chocolate Chip Cookie Dough Brownie Bombs


    Introduction to Chocolate Chip Cookie Dough Brownie Bombs

    Hi there, sweet friends! If you’re like me, there’s nothing quite like the combo of rich brownies and the soft, gooey goodness of cookie dough. That’s why I’m thrilled to share my Chocolate Chip Cookie Dough Brownie Bombs recipe! These bite-sized treats are like little nuggets of joy. Perfect for when the kids come rushing home or when you just need a little pick-me-up after a long day. Trust me, these will become your secret weapon for satisfying those sweet cravings without spending all day in the kitchen!

    Why You’ll Love This Chocolate Chip Cookie Dough Brownie Bombs

    You’re going to adore these Chocolate Chip Cookie Dough Brownie Bombs for so many reasons! First, they’re incredibly easy to whip up, making them perfect for a busy mom like you. Second, they combine two beloved treats in one delightful bite, so it’s like a celebration with every chew. Plus, they are excellent for gatherings or just as a special surprise for your family. Who can resist that?

    Ingredients for Chocolate Chip Cookie Dough Brownie Bombs

    Let’s dive into what makes these Chocolate Chip Cookie Dough Brownie Bombs so special! Here’s what you’ll need:

    • Brownie Mix: Start with your favorite box mix; it saves time and effort. Feel free to experiment with different flavors!
    • Butter: Softened butter is key for that creamy texture in both the brownie and cookie dough layers.
    • Brown Sugar: This adds a deeper, caramel-like flavor that enhances the sweetness.
    • Granulated Sugar: A must for sweetness! It perfectly balances the brown sugar.
    • Milk: Whole milk works best! It provides moisture and a nice rich flavor.
    • Vanilla Extract: The magic ingredient that brings everything together with its warm, inviting aroma.
    • All-Purpose Flour: Essential for the cookie dough. If you’re in a pinch, whole wheat flour can work too.
    • Salt: Just a pinch enhances the sweetness and balances the flavors.
    • Mini Chocolate Chips: These nuggets of joy add bursts of flavor in the cookie dough. Use dark chocolate for an extra kick!
    • Chocolate Chips for Coating: Melted chocolate to encase those yummy bombs. Choose semi-sweet or milk chocolate, whichever you fancy!
    • Vegetable Oil: Adding a little oil helps the chocolate coating stay smooth and glossy.

    Don’t worry; the exact quantities for each ingredient are at the bottom of this article and available for printing. This way, you’ll have it handy the next time a sweet craving strikes!

    How to Make Chocolate Chip Cookie Dough Brownie Bombs

    Ready to embark on a delicious adventure? Here’s how to make your Chocolate Chip Cookie Dough Brownie Bombs step by step. It’s easier than you might think, and the rewards? Absolutely worth it!

    Step 1: Prepare the Brownies

    First off, grab that box of brownie mix! Follow the package directions to whip up a batch. Pour the batter into a 9×13 inch pan and bake until a toothpick comes out clean. Let them cool completely. I usually place my brownie pan on a wire rack. This speeds things up and guarantees perfect brownies!

    Step 2: Make the Cookie Dough

    While the brownies are cooling, let’s make the cookie dough. In a mixing bowl, cream together softened butter, brown sugar, and granulated sugar until it’s light and fluffy. I use my electric mixer for this; it’s a time-saver! Add in the milk and vanilla, mixing until nicely combined. Gradually add flour and salt, mixing gently. Don’t overmix! Now, fold in those mini chocolate chips. You want pockets of chocolate joy!

    Step 3: Freeze the Cookie Dough

    Next, scoop the cookie dough into 1-inch balls. Line them up on a parchment-lined baking sheet. Pop them in the freezer for about 30 minutes. This chilling step is crucial; it helps your cookie dough hold its shape later when wrapping it in brownie!

    Step 4: Assemble the Bombs

    Now, let’s put it all together! Crumble your cooled brownies into a large bowl. Grab a piece of brownie, flatten it out a bit, and place one cookie dough ball in the center. Wrap the brownie around the cookie dough, making sure it’s completely enclosed. Seal it well, so no cookie dough peeks out. Repeat this process until all brownie and dough are used up.

    Step 5: Melt the Chocolate

    Time to melt the chocolate for coating! In a microwave-safe bowl, combine your chocolate chips and vegetable oil. Microwave in 30-second intervals, stirring each time until smooth. Be careful – you don’t want burnt chocolate! The oil helps give the coating that glossy finish we all love.

    Step 6: Coat and Chill

    Now, dip each brownie bomb into the melted chocolate. Let the excess chocolate drip off, then place them on a parchment-lined baking sheet. Once you’ve coated them all, refrigerate until the chocolate sets – about 30 minutes should do the trick. And there you have it! Your Chocolate Chip Cookie Dough Brownie Bombs are ready to impress!

    Tips for Success

    • Make sure your brownies are completely cooled before enclosing the cookie dough; this prevents melting!
    • Use an electric mixer for the cookie dough; it saves time and adds air for a fluffier texture.
    • Keep the cookie dough balls in the freezer for failing to hold shape while wrapping.
    • Test one brownie bomb first by dipping it in chocolate to ensure a perfect coating.
    • Consider using flavored chocolate for a twist on the classic!

    Equipment Needed

    • Mixing Bowl: A large bowl for combining ingredients. Any sturdy bowl will do!
    • Electric Mixer: A hand mixer speeds up creaming. You can use a whisk if you’re feeling strong!
    • 9×13 Inch Pan: Essential for baking brownies. A metal or glass dish is perfect!
    • Parchment Paper: Helps with cleanup and prevents sticking. Foil works too!
    • Microwave-Safe Bowl: For melting chocolate. A regular bowl can work, but watch it closely!

    Variations

    • Nutty Delight: Add chopped nuts like walnuts or pecans to the brownie mix for a delicious crunch!
    • Gluten-Free Option: Substitute all-purpose flour with a gluten-free blend to create a gluten-friendly treat.
    • Peanut Butter Swirl: Mix in some creamy peanut butter into the brownie batter for an extra layer of flavor.
    • Dark Chocolate Version: Use dark chocolate chips for both the brownies and coating for a more intense chocolate experience.
    • Healthy Swap: Replace half the butter with applesauce for a lighter version without sacrificing flavor.

    Serving Suggestions

    • With Milk: Serve these Chocolate Chip Cookie Dough Brownie Bombs with a glass of cold milk for the ultimate combo.
    • On a Platter: Arrange them on a decorative platter for parties; they’ll be the star of the dessert table!
    • With Ice Cream: Pair with a scoop of vanilla ice cream for a decadent treat.
    • Drizzle with Sauce: Drizzle chocolate or caramel sauce on top for an extra touch of indulgence.

    FAQs about Chocolate Chip Cookie Dough Brownie Bombs

    Can I use homemade brownie batter instead of a box mix?

    Absolutely! If you have a cherished brownie recipe, feel free to use it! Just ensure the texture is compatible with encasing the cookie dough.

    How long can I store the Chocolate Chip Cookie Dough Brownie Bombs?

    These delightful treats can last in the fridge for up to a week. Just keep them in an airtight container to retain their freshness.

    Can I freeze the brownie bombs?

    Yes, you can! Freeze them in a single layer on a baking sheet first, then transfer them to a freezer bag. They’ll be perfect for a sweet craving anytime!

    What’s the best way to melt the chocolate for coating?

    Melt the chocolate in a microwave, using short intervals to avoid burning. Stir in some vegetable oil for a silky, smooth coating.

    Are there any eggless options for the cookie dough?

    Of course! Just follow a no-egg cookie dough recipe or use alternatives like flaxseed meal mixed with water to create a similar binding effect.

    Final Thoughts

    Making Chocolate Chip Cookie Dough Brownie Bombs is not just about satisfying a sweet tooth; it’s a delightful journey into comfort and joy in the kitchen. Each bite is a sweet reminder of the magical moments created with loved ones, whether it’s baking together or indulging after a long day. Plus, they’re a perfect treat for any occasion, bringing smiles to faces young and old. So, gather your family and friends, share these delightful bombs, and savor every moment of sweetness together. Trust me, these will quickly become a favorite in your home!


    Print

    clock clock iconcutlery cutlery iconflag flag iconfolder folder iconinstagram instagram iconpinterest pinterest iconfacebook facebook iconprint print iconsquares squares iconheart heart iconheart solid heart solid icon

    Description

    Chocolate Chip Cookie Dough Brownie Bombs are a delightful treat combining the rich flavor of brownies and the sweetness of cookie dough, all coated in chocolate.


    • 1 box brownie mix plus ingredients as directed on the box
    • 1 cup butter, softened
    • 1 cup packed brown sugar
    • 0.5 cup granulated sugar
    • 0.25 cup milk
    • 1 teaspoon vanilla extract
    • 2 cups all-purpose flour
    • 0.5 teaspoon salt
    • 1 cup mini chocolate chips
    • 2 cups chocolate chips for coating
    • 2 tablespoons vegetable oil

    1. Prepare brownie mix as directed on the package; bake in a 9×13 inch pan. Cool completely. I usually let mine cool on a wire rack for faster cooling.
    2. Cream together butter, brown sugar, and granulated sugar until light and fluffy. Use an electric mixer for best results – it makes the process so much faster!
    3. Add milk and vanilla; mix until combined.
    4. Gradually add flour and salt; mix until just combined. Stir in mini chocolate chips. Don’t overmix the dough!
    5. Scoop cookie dough into 1-inch balls; place on a parchment-lined baking sheet. Freeze for 30 minutes. This helps them hold their shape during dipping.
    6. Crumble cooled brownies. Flatten a brownie piece, enclose a cookie dough ball, and seal. Repeat. Make sure the brownie completely covers the cookie dough.
    7. Melt chocolate chips and oil in a microwave-safe bowl until smooth. Microwave in 30-second intervals, stirring in between, to prevent burning.
    8. Dip each brownie bomb in melted chocolate; let excess drip off. Place on a parchment-lined baking sheet. Refrigerate until chocolate sets. This takes about 30 minutes.

    Notes

    • Ensure the brownie crust is completely cooled before enclosing the cookie dough.
    • For quicker cooling, place the brownie pan on a wire rack.
    • Test the chocolate coating by dipping one bomb first, adjusting the melting time if necessary.
    • Prep Time: 50 minutes
    • Cook Time: 30 minutes
    • Category: Dessert
    • Method: Baking
    • Cuisine: American

    Nutrition

    • Serving Size: 1 brownie bomb
    • Calories: 210
    • Sugar: 18g
    • Sodium: 150mg
    • Fat: 10g
    • Saturated Fat: 5g
    • Unsaturated Fat: 3g
    • Trans Fat: 0g
    • Carbohydrates: 29g
    • Fiber: 1g
    • Protein: 2g
    • Cholesterol: 30mg

    Sharing is caring!

  • Sweet Potato and Chickpea Curry

    Sweet Potato and Chickpea Curry


    Introduction to Sweet Potato and Chickpea Curry

    As a busy mom, I often find myself juggling a million things while trying to whip up something delicious for dinner. That’s where this Sweet Potato and Chickpea Curry comes in—a true lifesaver in my kitchen! It’s hearty, wholesome, and bursting with flavors that impress even the pickiest of eaters. Perfect for those nights when you need a quick meal that doesn’t skimp on nutrition or taste. Trust me, this comforting dish brings warmth to the table and makes for delightful leftovers. Plus, it’s vegan, so everyone can enjoy it without a worry!

    Why You’ll Love This Sweet Potato and Chickpea Curry

    This Sweet Potato and Chickpea Curry is more than just a meal; it’s a game changer! With effortless preparation and only one pot needed, it saves you time on those busy weekdays. The flavors meld beautifully, creating an aromatic dish that’s both comforting and satisfying. Plus, it’s naturally vegan—perfect for everyone gathered around your dinner table, whether they’re health-conscious or simply hungry for something delectable!

    Ingredients for Sweet Potato and Chickpea Curry

    Gathering the right ingredients is key for crafting a delicious Sweet Potato and Chickpea Curry. Here’s what you’ll need:

    • Sweet Potatoes: These vibrant orange gems are loaded with vitamins A and C and add a natural sweetness to the dish.
    • Chickpeas: Canned for convenience, chickpeas bring protein and fiber to the table, making this curry hearty and satisfying.
    • Onion: A must-have aromatic, it forms the flavorful base of the curry, adding depth and sweetness when sautéed.
    • Garlic: Freshly minced gives a lovely kick of flavor, enhancing the overall taste of the dish.
    • Fresh Ginger: Grated, it pairs beautifully with garlic, delivering warmth and zest that brightens the curry.
    • Coconut Milk: This creamy element establishes a rich, luscious texture while keeping the dish vegan-friendly.
    • Curry Powder: A blend of spices that provides the distinctive curry flavor; feel free to use your favorite blend!
    • Turmeric: Not just for color, it offers anti-inflammatory benefits and a warm earthiness that enhances the dish.
    • Cumin: These seeds add a lovely, nutty flavor that complements the other spices beautifully.
    • Salt and Pepper: Simple yet essential, they elevate all the flavors in your curry.
    • Vegetable Oil: For sautéing—you can also use olive oil or coconut oil for a different flavor.
    • Fresh Cilantro: A garnish that brightens the dish with a burst of freshness at the end.

    Don’t forget that if you’re looking for exact measurements, they’re conveniently located at the bottom of the article for easy printing!

    How to Make Sweet Potato and Chickpea Curry

    Making this Sweet Potato and Chickpea Curry is easier than you might think! Follow these simple steps, and you’ll have a delicious meal ready in no time. Let’s dive in!

    Step 1: Sauté the Onion

    Start by heating vegetable oil in a large pot over medium heat. Once the oil shimmers, add the chopped onion. Sauté for about 5 minutes until it turns translucent. To prevent burning, stir regularly and lower the heat if necessary. Aromatic sensations will fill your kitchen!

    Step 2: Add Garlic and Ginger

    Next, toss in the minced garlic and grated ginger. Stir them into the onions, cooking for about a minute. The key here is to keep an eye on them to avoid overcooking, which can lead to bitterness. You want that fragrant aroma wafting through your space!

    Step 3: Toast the Spices

    Now, it’s time to add the curry powder, turmeric, and cumin. Sprinkle them into the pot and toast the spices for about 30 seconds. This quick step enhances their flavors, making your curry rich and aromatic. Just keep stirring to avoid sticking!

    Step 4: Add Sweet Potatoes and Chickpeas

    Time to introduce the star players! Add the cubed sweet potatoes and chickpeas to your spiced base. Gently stir to coat everything evenly. This ensures that every bite is packed with flavor and warmth. Let those delicious ingredients mingle!

    Step 5: Pour in Coconut Milk

    Pour in the rich coconut milk, adding enough water to cover the vegetables just a tad. Bring the mixture to a rolling boil, then reduce the heat and let it simmer. Cook for 15-20 minutes until the sweet potatoes are fork-tender. The magic is happening!

    Step 6: Season and Garnish

    Finally, season your curry with salt and pepper to taste. Don’t forget to sprinkle a generous handful of fresh cilantro on top before serving! This vibrant garnish not only looks beautiful but adds a fresh burst of flavor that elevates your dish.

    Tips for Success

    • Prep your ingredients beforehand to streamline the cooking process.
    • Feel free to adjust the spice levels to suit your family’s taste preferences.
    • Use fresh, high-quality spices for the best flavor impact.
    • If you’re short on time, consider using pre-chopped veggies or canned sweet potatoes.
    • Let the curry sit for a few minutes before serving to enhance the flavors.

    Equipment Needed

    • Large Pot: A sturdy pot is essential for all those beautiful flavors to combine. You can also use a Dutch oven for even heat distribution.
    • Wooden Spoon: Perfect for stirring your curry without scratching your pot. A silicone spatula works just as well!
    • Knife and Cutting Board: Necessary for chopping your ingredients efficiently.
    • Measuring Cups and Spoons: Handy for precise ingredient measurements, especially if you love consistency.

    Variations

    • Spicy Kick: Add diced jalapeños or a splash of hot sauce for some heat if you’re feeling adventurous!
    • Protein Boost: Mix in cooked chicken or tofu for extra protein to keep everyone fuller longer.
    • Vegetable Medley: Toss in extra veggies like spinach, bell peppers, or carrots to enhance nutrition and color.
    • Different Grains: Serve the curry with quinoa or farro instead of rice for a delicious and nutritious twist.
    • Slow Cooker Option: Don’t have time to stand over the stove? Throw all the ingredients into a slow cooker. Cook on low for 6-8 hours for a fuss-free meal!

    Serving Suggestions

    • Serve with Rice: A fluffy bed of basmati or jasmine rice makes the perfect companion for soaking up all that delicious curry sauce.
    • Flatbreads: Warm naan or pita bread adds a delightful touch, perfect for scooping up the curry.
    • Fresh Salad: A crunchy cucumber and tomato salad provides a refreshing contrast to the warmth of the curry.
    • Complementary Drinks: Enjoy your meal with a refreshing glass of mango lassi or chilled herbal tea.
    • Presentation: Serve in vibrant bowls topped with extra cilantro for a pop of color that will impress your guests!

    FAQs about Sweet Potato and Chickpea Curry

    Curious about this Sweet Potato and Chickpea Curry? Here are some common questions I often hear, along with my answers to help you out!

    Can I use frozen sweet potatoes? Sure! Frozen sweet potatoes can be a real time-saver. Just be sure to add them at the same point in the recipe, but they may need a little extra cooking time to become tender.

    How can I make this curry spicier? If you enjoy a bit of heat, consider adding red pepper flakes, chopped green chilies, or a dash of cayenne pepper. Start with a small amount and adjust to your taste!

    Can I double the recipe? Absolutely! This recipe is perfect for doubling, especially for meal prepping or feeding a larger crowd. Just ensure your pot is large enough to accommodate all the ingredients.

    Is this curry gluten-free? Yes! All the ingredients in this Sweet Potato and Chickpea Curry are naturally gluten-free. Just make sure to check any spice blends you use to confirm they meet gluten-free standards.

    Can I make this curry in advance? Indeed! This curry keeps well in the fridge for up to three days. The flavors often deepen overnight, making it even tastier. Just reheat gently on the stovetop!

    Final Thoughts

    Cooking this Sweet Potato and Chickpea Curry has truly been one of my favorite culinary adventures. The joy of gathering fresh ingredients and transforming them into a fragrant, wholesome meal is unmatched. Each bite is a celebration of flavors that warms my heart and nourishes the soul. Whether you whip it up for a family dinner or enjoy it as leftovers for yourself, this curry brings a comforting embrace to any table. Plus, it’s a fantastic way to explore vibrant spices and healthy ingredients, making every spoonful a delicious journey worth savoring!


    Print

    clock clock iconcutlery cutlery iconflag flag iconfolder folder iconinstagram instagram iconpinterest pinterest iconfacebook facebook iconprint print iconsquares squares iconheart heart iconheart solid heart solid icon

    Description

    As a busy mom, I often find myself juggling a million things while trying to whip up something delicious for dinner. That’s where this Sweet Potato and Chickpea Curry comes in—a true lifesaver in my kitchen! It’s hearty, wholesome, and bursting with flavors that impress even the pickiest of eaters. Perfect for those nights when you need a quick meal that doesn’t skimp on nutrition or taste. Trust me, this comforting dish brings warmth to the table and makes for delightful leftovers. Plus, it’s vegan, so everyone can enjoy it without a worry!


    • 2 large sweet potatoes peeled and cubed
    • 1 can 15 oz of chickpeas, drained and rinsed
    • 1 onion finely chopped
    • 3 cloves of garlic minced
    • 1 tbsp fresh ginger grated
    • 1 can 14 oz of coconut milk
    • 2 tbsp curry powder
    • 1 tsp turmeric
    • 1 tsp cumin
    • Salt and pepper to taste
    • 2 tbsp vegetable oil
    • Fresh cilantro for garnish

    1. Heat the oil in a large pot over medium heat. Add the onion and sauté until translucent, about 5 minutes.
    2. Add the minced garlic and grated ginger, cooking for another minute until fragrant.
    3. Stir in the curry powder, turmeric, and cumin. Toast the spices for about 30 seconds to release their flavors.
    4. Add the cubed sweet potatoes and chickpeas to the pot, stirring to coat them with the spices.
    5. Pour in the coconut milk and add enough water to just cover the vegetables. Bring to a boil, then reduce heat and simmer for 15-20 minutes, or until the sweet potatoes are tender.
    6. Season with salt and pepper to taste.
    7. Garnish with fresh cilantro before serving.

    Notes

    • This curry can be served with rice or bread for a complete meal.
    • Leftovers can be stored in an airtight container in the refrigerator for up to 3 days.
    • Prep Time: 15 minutes
    • Cook Time: 25 minutes
    • Category: Main Course
    • Method: Stovetop
    • Cuisine: Indian

    Nutrition

    • Serving Size: 1 cup
    • Calories: 350
    • Sugar: 6 g
    • Sodium: 400 mg
    • Fat: 18 g
    • Saturated Fat: 9 g
    • Unsaturated Fat: 8 g
    • Trans Fat: 0 g
    • Carbohydrates: 42 g
    • Fiber: 10 g
    • Protein: 10 g
    • Cholesterol: 0 mg

    Sharing is caring!

  • Sourdough Discard Pancakes

    Sourdough Discard Pancakes


    Introduction to Sourdough Discard Pancakes

    As a busy mom, I often find myself juggling various tasks while trying to whip up something delicious. That’s when I discovered Sourdough Discard Pancakes. Not only are they a fantastic way to use up leftover sourdough starter, but they also bring joy to mornings that might otherwise feel rushed. Imagine fluffy pancakes on a Saturday morning, served with maple syrup and fresh berries! With just a few easy steps, you can impress your loved ones while enjoying a quick solution to breakfast dilemmas. Let’s dive into this delightful recipe!

    Why You’ll Love This Sourdough Discard Pancakes

    You’re going to adore how quick and easy these pancakes come together. In just a few simple steps, you’ll have a breakfast that’s both delicious and satisfying. The tangy flavor from the sourdough discard elevates a classic dish, making it a unique treat. Plus, these pancakes are perfect for busy mornings or lazy weekends, satisfying everyone at the table with fluffy goodness that keeps them asking for seconds!

    Ingredients for Sourdough Discard Pancakes

    Let’s gather our ingredients before we embark on this pancake adventure! Here’s what you’ll need for these delightful Sourdough Discard Pancakes:

    • All-purpose flour – This forms the base of our pancakes, giving them structure and fluffiness. You can also use whole wheat flour for a heartier option.
    • Sugar – A touch of sweetness to enhance the flavor. Feel free to substitute with honey or maple syrup if you prefer a natural sweetener.
    • Sea salt – Just a pinch to balance the sweetness and bring out the flavors.
    • Baking powder – This key ingredient provides the lift needed to keep our pancakes light and airy.
    • Baking soda – A little boost alongside the baking powder to give your pancakes extra fluff.
    • Sourdough discard or active sourdough starter – The star of the show! Using leftover sourdough not only reduces waste but also adds a unique tang to the flavor.
    • Large eggs – Eggs provide moisture and help bind the batter together. They also contribute to the lovely texture.
    • Whole milk – This keeps the batter creamy and adds richness. You can swap it out for your favorite non-dairy milk if desired.
    • Vanilla extract – Just a splash for that warm, comforting aroma. It takes your pancakes to the next level!
    • Avocado oil or melted coconut oil – These fats keep your pancakes moist and prevent sticking. Use whatever you have on hand.

    For exact measurements, check the bottom of the article. You’ll also find tips for easy printing if you want to keep this recipe handy!

    How to Make Sourdough Discard Pancakes

    Now, let’s get into the fun part: making our delicious Sourdough Discard Pancakes! Just follow these simple steps, and you’ll have a breakfast that’s sure to impress.

    Step 1: Combine Wet and Dry Ingredients

    Start by whisking together the wet and dry ingredients in a large bowl. This means mixing the sourdough discard, eggs, whole milk, vanilla extract, and avocado oil. In another bowl, combine the all-purpose flour, sugar, sea salt, and then just hold off on the baking powder and baking soda for now. Cover this mixture and chill it in the fridge overnight. This is crucial for achieving that lovely taste and texture!

    Step 2: Sift in the Baking Powders

    The next morning, it’s time to wake up those dry ingredients! Sift in the baking powder and baking soda directly into your batter. This helps eliminate any lumps and ensures every pancake is fluffy and light. Give it a good whisk to combine everything thoroughly, ensuring no dry spots remain.

    Step 3: Adjust the Batter Texture

    Now, let’s make sure the texture is just right! It should be thick and bubbly. If it seems a bit too thick for your preference, just add more milk, one tablespoon at a time. Remember, achieving that bubble-filled texture is key to the fluffiness you want in these pancakes!

    Step 4: Let Batter Rest

    Patience is a virtue, especially in pancake-making! Allow the batter to rest for at least 5 minutes. This resting period lets those bubbles form, which will translate to perfectly fluffy pancakes. So let your batter sit while you sip your morning coffee.

    Step 5: Preheat the Skillet

    With the batter ready, it’s time to prepare the skillet. Heat a large stainless steel skillet over low heat. Once warmed, add about a tablespoon of avocado oil to coat the bottom of the pan. This helps in achieving that lovely golden color and prevents the pancakes from sticking.

    Step 6: Cook the Pancakes

    Finally, the moment we’ve all been waiting for! Pour about ⅓ cup of batter into the skillet, using an ice cream scoop for perfect portions. Keep the heat at low to avoid burning.
    Watch as the edges puff up and bubbles form on the surface. That’s your sign it’s time to flip! Cook until golden brown on both sides.
    Serve these beauties hot, topped with fresh berries or a drizzle of maple syrup!

    Tips for Success

    • Make the batter the night before for an easy morning!
    • Use a non-stick skillet if you prefer less oil.
    • Test your skillet’s heat by sprinkling water on it; if it sizzles, it’s ready.
    • Experiment with different toppings like yogurt, nuts, or chocolate chips.
    • Keep cooked pancakes warm in the oven while you finish the batch.

    Equipment Needed

    • Mixing bowls – You’ll need a large bowl for combining ingredients. A glass or metal bowl works great!
    • Whisk – A good whisk will help blend your batter smoothly. A fork can also do the trick!
    • Skillet – A stainless steel or non-stick skillet is important for cooking the pancakes evenly.
    • Ice cream scoop – This helps portion your batter perfectly. A measuring cup can be a handy alternative!
    • Spatula – A sturdy spatula is essential for flipping those golden pancakes.

    Variations

    • Chocolate Chip Pancakes – Add semi-sweet or dark chocolate chips directly into the batter for a sweet twist that kids love!
    • Banana Pancakes – Mash a ripe banana and stir it into the batter for a naturally sweet flavor that’s perfect for breakfast.
    • Blueberry Pancakes – Fold in fresh or frozen blueberries for a fruity burst of flavor in every bite.
    • Gluten-Free Option – Substitute all-purpose flour with a gluten-free blend to cater to dietary needs without sacrificing taste.
    • Nutty Pancakes – Stir in a handful of chopped walnuts or pecans for added crunch and flavor.

    Serving Suggestions

    • Serve with a dollop of whipped cream for extra indulgence.
    • Add a side of crispy bacon or sausage for a savory contrast.
    • Top with fresh strawberries, blueberries, or a drizzle of honey.
    • Pair with a hot cup of coffee or fresh orange juice.
    • For a fancy touch, sprinkle powdered sugar and serve on a colorful plate!

    FAQs about Sourdough Discard Pancakes

    I often hear questions about these delightful Sourdough Discard Pancakes. Here are some common queries, answered just for you!

    Can I use active sourdough starter instead of discard?

    Absolutely! Using active sourdough starter will give your pancakes a slightly more pronounced tangy flavor, enhancing their deliciousness!

    How do I store leftover pancakes?

    Store any leftover pancakes in an airtight container in the refrigerator for up to three days. You can also freeze them for a longer shelf life. Just pop them in the toaster for a quick breakfast!

    What if my batter is too thick?

    If your batter feels too thick, simply stir in a tablespoon of milk at a time until you reach your desired consistency. You want it thick, but easy to pour!

    Can I make these pancakes vegan?

    Yes! You can replace eggs with flaxseed meal or applesauce, and use almond milk or soy milk for a tasty vegan option. They will still be delicious!

    What toppings pair well with sourdough pancakes?

    Get creative! Fresh fruits like bananas and berries are wonderful. Try maple syrup, honey, or even a sprinkle of nutty granola for extra crunch.

    Final Thoughts

    Making Sourdough Discard Pancakes has transformed my breakfast routine. There’s something so joyful about taking leftover starter and turning it into a fluffy stack of deliciousness. These pancakes not only use ingredients I already have, but they also fill my home with warmth and comfort on busy mornings. Whether enjoyed solo with a cup of coffee or shared with family, these pancakes spark happiness and connection. I encourage you to try this recipe. Your mornings might just become a little brighter and a lot more flavorful. Happy cooking!


    Print

    clock clock iconcutlery cutlery iconflag flag iconfolder folder iconinstagram instagram iconpinterest pinterest iconfacebook facebook iconprint print iconsquares squares iconheart heart iconheart solid heart solid icon

    Description

    Delicious pancakes made with sourdough discard, perfect for using up leftover starter.


    • 1 ½ cups all-purpose flour
    • 3 tablespoons sugar
    • 1 teaspoon sea salt
    • 3 teaspoons baking powder
    • ½ teaspoon baking soda
    • 1 cup sourdough discard or active sourdough starter
    • 2 large eggs
    • 1 cup whole milk, plus more if needed
    • 1 teaspoon vanilla extract
    • 3 tablespoons avocado oil, plus more to coat the skillet, or use melted coconut oil

    1. Combine the wet and dry ingredients EXCEPT for the baking powder and baking soda. Whisk well, cover and chill overnight in the fridge.
    2. The next day, sift the powders directly into the bowl and give it a good whisk to combine everything together.
    3. The texture should be thick and bubbly. Add extra milk, 1 tablespoon at a time, to thin out the texture if needed.
    4. Let the batter sit for at least 5 minutes; it should be nice and bubbly before using. The batter can be used cold.
    5. In a large bowl, whisk the dry ingredients together. Add the wet ingredients. Whisk gently until a smooth batter forms, let rest for 5-10 min.
    6. In a large (stainless steel) skillet, add 1 tablespoon of oil over low heat. Swirl the pan around to coat.
    7. Pour ⅓ cup of batter into the pan using an ice cream scoop. Cook until golden color on both sides, cooking on low heat. When the edges begin to puff up and bubbles appear on the surface, flip it over. Serve with fresh berries, maple syrup or strawberry sugar puree.

    Notes

    • Pancake batter can be made the night before for a quick breakfast.
    • Use gluten-free flour for a gluten-free option.
    • Adjust the thickness of the batter by adding more milk if necessary.
    • These pancakes can be stored in the refrigerator for up to 3 days.
    • Prep Time: 10 minutes
    • Cook Time: 20 minutes
    • Category: Breakfast
    • Method: Stovetop
    • Cuisine: American

    Nutrition

    • Serving Size: 1 pancake
    • Calories: 220
    • Sugar: 4g
    • Sodium: 300mg
    • Fat: 9g
    • Saturated Fat: 1g
    • Unsaturated Fat: 8g
    • Trans Fat: 0g
    • Carbohydrates: 32g
    • Fiber: 1g
    • Protein: 6g
    • Cholesterol: 70mg

    Sharing is caring!

  • Bang Bang Salmon

    Bang Bang Salmon


    Introduction to Bang Bang Salmon

    Welcome to my kitchen, where I’m excited to share my love for Bang Bang Salmon! This dish has quickly become a family favorite. With its quick preparation and bold flavors, it’s the perfect solution for busy days. Whether you’re juggling work, kids, or personal projects, this recipe offers a delightful meal that’s ready in no time. It’s not just delicious; it’s a surefire way to impress your loved ones, making even the simplest dinner feel special. Trust me, once you try it, you’ll find yourself craving this salmon again and again!

    Why You’ll Love This Bang Bang Salmon

    Bang Bang Salmon isn’t just another recipe; it’s a lifesaver for busy evenings. In just 25 minutes, you can serve a restaurant-quality dish right at home. The creamy, spicy Bang Bang sauce elevates the rich flavors of the salmon, delighting your taste buds. You’ll appreciate the ease of preparation—no complicated techniques—making it perfect for anyone, even if you’re new to cooking. It’s a dish the whole family will love!

    Ingredients for Bang Bang Salmon

    Creating the perfect Bang Bang Salmon starts with gathering fresh, quality ingredients. Here’s what you’ll need:

    • Salmon fillets: The star of the dish! Look for fresh salmon fillets to ensure a rich and buttery texture.
    • Olive oil: A drizzle to help the salmon crisp up beautifully while baking, adding a delightful flavor.
    • Garlic powder: A must for that aromatic kick, enhancing the overall flavor profile.
    • Onion powder: Balances the dish with its savory essence, complementing the other spices perfectly.
    • Smoked paprika: Adds a warm, smoky depth that pairs wonderfully with salmon and the sauce.
    • Salt & black pepper: Basic seasonings, but essential for bringing out the natural flavors of the salmon.
    • Cayenne pepper: Optional for those who like an extra heat boost; it will definitely wake up your taste buds!
    • Mayonnaise: The creamy base of your Bang Bang sauce; it creates that luscious texture we all love.
    • Thai sweet chili sauce: Imparts sweet and zesty notes that balance the spice of the sriracha.
    • Sriracha sauce: A staple for spice enthusiasts. Adjust according to your tolerance for heat!
    • Honey: Adds a touch of sweetness that mellows the sauces while enhancing the overall flavor.
    • Lime juice: Freshly squeezed juice brings a zesty brightness, cutting through the richness.

    For exact quantities, refer to the bottom of the article. You’ll find everything neatly laid out and ready for you to print!

    How to Make Bang Bang Salmon

    Making Bang Bang Salmon is a breeze, and I promise it’s as fun as it is delicious! Follow these simple steps, and you’ll have a meal that impresses everyone at the table. Let’s dive in!

    Preparing the Salmon

    First things first, let’s choose the right salmon. I always opt for wild-caught salmon if possible; it has a richer flavor. Once you have your salmon fillets, rinse them under cold water and pat them dry with a paper towel.

    Next, cut the salmon into bite-sized pieces. This not only helps it cook evenly but also makes it perfect for soaking up that amazing Bang Bang sauce later. Finally, season these pieces with a pinch of salt and black pepper. This helps to bring out the salmon’s natural flavors. Trust me; this step is quick but oh-so-worth it!

    Creating the Sauce

    Now, onto the star of the show: the Bang Bang sauce! In a mixing bowl, combine the mayonnaise, Thai sweet chili sauce, sriracha, honey, and lime juice. Whisk them together vigorously until you see that beautiful, creamy texture forming. The mixture should be smooth and slightly thick.

    One of my favorite parts? The vibrant colors of the sauce. The creamy white mayonnaise, combined with the red hue from the sriracha, creates a visually appealing dish. Taste it as you go; adjust the spice and sweetness to your liking. Add more sriracha if you’re feeling adventurous!

    Cooking the Salmon

    Next, it’s showtime! Preheat your oven to 400°F (200°C). While it heats up, line a baking sheet with parchment paper. This makes cleanup a snap later on!

    Arrange the salmon pieces on the sheet, skin-side down, ensuring they’re not too crowded. Bake them for 12-15 minutes until they’re opaque and flakes easily with a fork. Keep an eye on them, though! Overcooked salmon can be dry, and we want it juicy and tender. A little tip: if it’s hard to flake, it probably needs a couple more minutes. Don’t stress, just adjust as needed!

    Applying the Sauce

    Right after pulling the salmon from the oven, it’s time to slather on the Bang Bang sauce! Drizzle it generously over the top of the salmon pieces while they’re still hot. This way, the heat will help the sauce meld into the fish, enhancing every bite.

    If you want to kick it up a notch, add some sauce to the side for dipping. It’s an easy way to make the dish interactive and fun. Plus, who doesn’t love a good dip?

    Serving

    Once your Bang Bang Salmon is sauced up, it’s time to serve it! I love garnishing with chopped green onions or a sprinkle of sesame seeds for that extra crunch and flavor pop.

    For the best experience, plate your salmon immediately. Serve it alongside steamed rice or a fresh salad for a complete meal. The flavors are at their peak right out of the oven, so dig in while it’s hot!

    Tips for Success

    • Use fresh salmon for the best flavor and texture.
    • Don’t skip seasoning; it truly enhances the dish.
    • Keep an eye on baking time; overcooked salmon is dry salmon!
    • Experiment with the sauce; adjust spice levels to suit your palate.
    • For a fun twist, consider adding your favorite veggies to the baking sheet.

    Equipment Needed

    • Baking sheet: A lined tray works well, but any oven-safe dish will do!
    • Parchment paper: Optional, but makes cleanup a breeze.
    • Mixing bowl: A medium bowl for whipping up that creamy sauce.
    • Whisk: Perfect for blending ingredients. A fork can work too in a pinch!
    • Knife and cutting board: Essential for prepping the salmon pieces.

    Variations of Bang Bang Salmon

    • Bang Bang Shrimp: Swap the salmon for shrimp for a fun twist that’s just as flavorful!
    • Spicy Tuna: Use spicy tuna chunks instead of salmon, tapping into that rich, creamy sauce.
    • Teriyaki Style: Integrate teriyaki sauce into the Bang Bang sauce for a sweet and savory blend.
    • Vegetarian Option: Try the sauce on crispy tofu or seared cauliflower for a satisfying plant-based dish.
    • Lemon Herb Variation: Replace lime juice with lemon juice and add fresh herbs for a zesty profile.

    Serving Suggestions for Bang Bang Salmon

    • Pair the salmon with fluffy steamed rice to soak up that delicious sauce.
    • A fresh, crisp salad with mixed greens adds a delightful crunch.
    • Serve with a chilled glass of Sauvignon Blanc for a refreshing drink.
    • Lastly, adding citrus wedges as garnish brightens the presentation!

    FAQs about Bang Bang Salmon

    When it comes to cooking Bang Bang Salmon, I know you might have a few questions floating around in your mind. Let’s tackle some of the most common queries to ensure your cooking adventure is a breeze!

    Can I prepare Bang Bang Salmon in advance?

    Absolutely! You can marinate the salmon pieces and whip up the sauce ahead of time. Just store them separately in the refrigerator. Bake them fresh when you’re ready to eat for the best taste.

    What can I use if I don’t have Thai sweet chili sauce?

    You can substitute with a mix of honey and hot sauce for a quick alternative. The sweetness coupled with a hint of spice works well to mimic the flavor.

    Is Bang Bang Salmon healthy?

    Yes! Salmon is rich in omega-3 fatty acids and protein. Plus, you can control the ingredients in the Bang Bang sauce, making it as healthy as you like. Just keep an eye on the quantity of mayonnaise for a lighter version!

    Can I make this a one-pan meal?

    Of course! Throw some veggies like bell peppers or broccoli on the baking sheet alongside the salmon. They will roast beautifully and soak up all those fantastic flavors, simplifying your meal prep.

    How do I store leftovers?

    Store any leftover Bang Bang Salmon in an airtight container in the fridge for up to 2 days. Reheat gently in the oven or microwave, but be careful not to overcook it!

    Final Thoughts

    Bang Bang Salmon is more than just a meal; it’s a delightful culinary adventure waiting to be explored in your kitchen. Every bite is bursting with flavor, and the vibrant colors will have your family reaching for seconds. Cooking this dish brings joy not only from the delicious results but also from the ease of preparation, making it perfect for those busy days. I hope you’ll try it out, share it with your loved ones, and discover how simple ingredients can create an unforgettable dining experience. Trust me, you’ll find yourself coming back to this recipe again and again!


    Print

    clock clock iconcutlery cutlery iconflag flag iconfolder folder iconinstagram instagram iconpinterest pinterest iconfacebook facebook iconprint print iconsquares squares iconheart heart iconheart solid heart solid icon

    Description

    Bang Bang Salmon is a quick and flavorful dish that features bite-sized pieces of salmon coated in a creamy and spicy Bang Bang sauce, perfect for a delicious meal.


    • 1 ½ pounds salmon fillets (remove skin and cut into bite-sized pieces)
    • 1 tablespoon olive oil
    • 1 teaspoon garlic powder
    • 1 teaspoon onion powder
    • 1 teaspoon smoked paprika
    • ½ teaspoon salt
    • ½ teaspoon black pepper
    • ¼ teaspoon cayenne pepper (optional for extra heat)
    • ½ cup mayonnaise
    • ¼ cup Thai sweet chili sauce
    • 1 tablespoon sriracha sauce (adjust according to your taste)
    • 1 tablespoon honey
    • 1 tablespoon lime juice

    1. Preparing the Salmon: Choose fresh, quality salmon and pat dry for crispy skin. Lightly season with salt and pepper to enhance its natural flavors.
    2. Creating the Sauce: Mix mayonnaise, sweet chili sauce, and sriracha. Ensure a creamy, vibrant texture.
    3. Cooking the Salmon: Preheat oven to 400°F (200°C), bake salmon skin-side down on a lined sheet for 12-15 minutes, until flesh is opaque.
    4. Applying the Sauce: Drizzle Bang Bang sauce evenly post-baking for flavor in every bite.
    5. Serving: Garnish with green onions or sesame seeds; serve immediately for the best taste.

    Notes

    • Adjust the amount of sriracha according to your spice preference.
    • For an extra crunch, consider broiling the salmon for the last 2 minutes of cooking.
    • This dish pairs well with steamed rice or a fresh salad.
    • Prep Time: 10 minutes
    • Cook Time: 15 minutes
    • Category: Main Course
    • Method: Baking
    • Cuisine: Thai

    Nutrition

    • Serving Size: 1 serving
    • Calories: 350
    • Sugar: 6g
    • Sodium: 600mg
    • Fat: 24g
    • Saturated Fat: 4g
    • Unsaturated Fat: 18g
    • Trans Fat: 0g
    • Carbohydrates: 10g
    • Fiber: 0g
    • Protein: 25g
    • Cholesterol: 80mg

    Sharing is caring!

  • Monterey Sausage Pie Layers

    Monterey Sausage Pie Layers


    Introduction to Monterey Sausage Pie Layers

    Welcome to the comforting world of Monterey Sausage Pie Layers! As a busy mom, I understand the maze of juggling work and home life. That’s why I love sharing recipes that bring joy without consuming my entire day. This savory pie, bursting with layers of pork sausage, rich custard, and two delightful cheeses, is a game-changer for busy weeknights. It’s not only easy to prepare but also a family favorite that’ll keep everyone coming back for seconds. Let’s uncover the secrets behind this irresistible dish together!

    Why You’ll Love This Monterey Sausage Pie Layers

    This Monterey Sausage Pie Layers recipe is a lifesaver for those hectic evenings when time is scarce. It’s an all-in-one meal that combines protein, veggies, and creamy cheese, making it both hearty and satisfying. Plus, it’s incredibly easy to throw together. In just under an hour, you can have a warm, comforting dinner ready that the whole family will adore. Trust me; leftovers (if there are any!) are just as delightful!

    Ingredients for Monterey Sausage Pie Layers

    Bringing the delightful flavors of Monterey Sausage Pie Layers to your table starts with gathering some simple ingredients. Here’s what you’ll need:

    • Bulk pork sausage: The star of the show! It adds depth and richness, filling every bite with flavor.
    • Onion: A medium onion, chopped, adds that lovely aroma and sweetness when sautéed.
    • Green bell pepper: Optional, but it introduces a bit of crunch and a pop of color to the dish.
    • Green onions or chives: These make for a fresh garnish, bringing brightness to the savory layers.
    • Shredded Monterey Jack cheese: This cheese melts beautifully, lending creaminess and a mild flavor.
    • Shredded sharp cheddar cheese: Adds a robust, tangy kick that complements the Monterey Jack perfectly.
    • Large eggs: Essential for creating that rich custard texture that binds everything together.
    • Half-and-half: This rich cream makes the custard indulgent and velvety, elevating the entire dish.
    • All-purpose flour: Just a bit helps stabilize the custard, giving it the right consistency.
    • Baking powder: A tiny amount aids in achieving a fluffy texture as it bakes.
    • Kosher salt: A crucial seasoning to enhance the flavors within the pie.
    • Freshly ground black pepper: A dash adds a nice warmth and depth to the overall taste.

    Feel free to customize the ingredients based on what’s in your pantry! Whether you want to switch up the vegetables or vary the cheeses, there’s room for creativity.

    For precise measurements, check the end of the article where they’re laid out for your convenience. Now, let’s get cooking!

    How to Make Monterey Sausage Pie Layers

    Step 1: Cook the Sausage

    To kick things off, heat a large skillet over medium heat. Toss in the bulk pork sausage, breaking it apart with a spatula. Stir occasionally for about 7 to 8 minutes. You want it to be perfectly browned and crumbly. Once done, transfer the sausage to some paper towels to drain the excess fat. It leaves just the right amount of drippings for the next step, making every bite flavorful.

    Step 2: Sauté the Vegetables

    In the same skillet, add your chopped onion and optional green bell pepper, stirring frequently. Cook them over medium heat for about 5 minutes. You’re looking for that lovely translucence in the onions and a slight softness in the peppers. This process releases their natural sweetness, enhancing the flavors in the pie. Once done, remove the skillet from heat and set aside. Your kitchen will smell incredible!

    Step 3: Prepare the Pie Dish

    Preheat your oven to 350°F. Next, grab a 9-inch pie dish and grease it thoroughly with butter or cooking spray. Make sure to cover the sides well. This little step is important for easy serving later, preventing any sticking mishaps that can happen during baking.

    Step 4: Layer the Ingredients

    Now, it’s time to assemble! Start by spreading the drained sausage evenly over the bottom of your prepared pie dish. Follow it up with the sautéed onion and bell pepper mixture. The final touch is sprinkling the shredded Monterey Jack and sharp cheddar cheeses all over the vegetables. This layering is key to achieving that rich, comforting bite in every slice.

    Step 5: Make the Custard

    In a large bowl, beat those eggs vigorously. Whisk in the half-and-half until it’s all well combined. Then, add the flour, baking powder, salt, and pepper. Keep whisking until the mixture is smooth with no lumps. You want a custard that pours easily over your layered ingredients. This custard is what binds all the deliciousness together as it bakes.

    Step 6: Bake the Pie

    Pour that lovely custard over the layered ingredients in your pie dish. Remember to gently tap the dish on the counter a few times to release any pesky air bubbles. Place the pie dish on a baking sheet to catch any overflow while baking. Now, slide it into your preheated oven and bake for 35 to 40 minutes. You’re aiming for a golden top, and a knife inserted in the center should come out clean. Trust me, the wait will be worth it!

    Tips for Success

    • Use high-quality sausage for the best flavor – it makes a difference!
    • Experiment with veggies like mushrooms or spinach for added nutrients.
    • Let the pie cool briefly before slicing – this helps the custard set.
    • Store leftovers in an airtight container in the fridge for up to 3 days.
    • Reheat in the oven for optimal texture – the microwave can make it soggy!

    Equipment Needed

    • Large skillet: A non-stick or cast-iron skillet works best for cooking the sausage.
    • 9-inch pie dish: If you don’t have one, a similar-sized baking dish will do.
    • Mixing bowl: Essential for combining the custard ingredients.
    • Whisk: This helps create a smooth custard; a fork can serve as a backup.
    • Spatula: Ideal for stirring and spreading ingredients evenly.

    Variations

    • Add cooked spinach or kale for a boost of nutrition and color.
    • Swap the pork sausage for turkey sausage or chicken sausage for a lighter option.
    • Replace the cheese with your favorites, such as Gouda or pepper jack, for a fun twist.
    • Try using a gluten-free flour blend instead of all-purpose flour to cater to dietary needs.
    • Incorporate spices like cumin or smoked paprika for a touch of warmth and depth.

    Serving Suggestions

    • Pair it with a fresh green salad for a light and refreshing contrast.
    • A side of roasted vegetables complements the flavors beautifully.
    • Serve with a slice of crusty bread to soak up every bit of custard.
    • Consider a glass of chilled white wine for a delightful dinner ensemble.
    • Garnish with extra chives for a pop of color and flavor.

    FAQs about Monterey Sausage Pie Layers

    Can I make Monterey Sausage Pie Layers ahead of time?
    Absolutely! You can prepare it a day in advance. Just assemble the pie, cover it tightly, and refrigerate. When you’re ready to bake, allow it to sit at room temperature for about 30 minutes before cooking.

    What can I substitute for half-and-half?
    If you’re out of half-and-half, mix equal parts of whole milk and heavy cream. It replicates the richness perfectly, giving your custard that velvety texture.

    How do I store leftover Monterey Sausage Pie Layers?
    Store any leftovers in an airtight container in the fridge for up to three days. Reheat slices in the oven for the best texture. This pie is still delicious the second time around!

    Can I freeze Monterey Sausage Pie Layers?
    Yes, you can freeze it! Just make sure it’s completely cooled before wrapping it tightly. It can be stored for up to three months. Thaw it in the fridge overnight before baking.

    What side dishes pair well with this pie?
    Monterey Sausage Pie Layers pairs beautifully with a simple green salad or some roasted veggies. A light vinaigrette on the salad complements the richness of the pie perfectly!

    Final Thoughts

    Each bite of Monterey Sausage Pie Layers is like a warm hug on a chilly evening. It’s more than just a meal; it becomes a shared experience that brings families together at the dinner table. I cherish how this dish transforms hectic weekdays into moments of connection and joy. With simple ingredients and effortless preparation, it’s a comforting reminder that meals can be both satisfying and uncomplicated. So why not try this recipe and gift yourself the pleasure of sharing delicious, home-cooked goodness? Trust me, your family will savor every single slice!


    Print

    clock clock iconcutlery cutlery iconflag flag iconfolder folder iconinstagram instagram iconpinterest pinterest iconfacebook facebook iconprint print iconsquares squares iconheart heart iconheart solid heart solid icon

    Description

    Monterey Sausage Pie Layers is a delicious, savory pie filled with layers of pork sausage, vegetables, and a rich custard topped with two types of cheese.


    • 1 pound bulk pork sausage
    • 1 medium onion, chopped (about 1 cup)
    • 1 green bell pepper, chopped (optional)
    • 2 tablespoons chopped green onions or chives (optional, for garnish)
    • 1 cup shredded Monterey Jack cheese
    • 1 cup shredded sharp cheddar cheese
    • 4 large eggs
    • 1 cup half-and-half
    • 1/4 cup all-purpose flour
    • 1 teaspoon baking powder
    • 1/2 teaspoon kosher salt
    • 1/4 teaspoon freshly ground black pepper

    1. Heat a large skillet over medium heat. Add the bulk pork sausage, breaking it apart, and cook, stirring occasionally, for 7 to 8 minutes until fully browned and crumbly. Transfer sausage to paper towels to drain excess fat, leaving about 1 tablespoon of drippings in the pan.
    2. Add chopped onion and green bell pepper (if using) to the skillet. Cook over medium heat for about 5 minutes, stirring frequently, until onions are translucent and vegetables soften. Remove from heat and set aside.
    3. Preheat oven to 350°F. Grease a 9-inch pie dish thoroughly with butter or cooking spray, especially the sides to ensure easy serving.
    4. Spread the drained sausage evenly over the bottom of the prepared pie dish. Top with the sautéed onions and bell pepper mixture. Sprinkle the shredded Monterey Jack and sharp cheddar cheeses evenly over the vegetables.
    5. In a large bowl, beat the eggs vigorously. Whisk in the half-and-half until combined. Add flour, baking powder, salt, and pepper. Continue whisking until the mixture is smooth with no lumps and pours easily.
    6. Pour the custard evenly over the layered ingredients in the pie dish. Gently tap the dish on the counter a few times to release air bubbles. Place the pie dish on a baking sheet to catch any overflow.
    7. Bake in the preheated oven for 35 to 40 minutes, until the top is golden and a knife inserted in the center comes out clean. The pie will puff up during baking and settle as it cools.
    8. Allow the pie to rest at room temperature for at least 5 minutes to set the custard. Garnish with chopped green onions or chives if desired. Slice and serve warm alongside a salad or preferred side.

    Notes

    • Feel free to customize the vegetables based on your preferences.
    • This dish is best served warm, but can also be enjoyed at room temperature.
    • For extra flavor, consider adding spices such as garlic powder or paprika to the sausage mixture.
    • Prep Time: 15 minutes
    • Cook Time: 40 minutes
    • Category: Main Dish
    • Method: Baking
    • Cuisine: American

    Nutrition

    • Serving Size: 1 slice
    • Calories: 300
    • Sugar: 2g
    • Sodium: 700mg
    • Fat: 20g
    • Saturated Fat: 8g
    • Unsaturated Fat: 12g
    • Trans Fat: 0g
    • Carbohydrates: 10g
    • Fiber: 1g
    • Protein: 18g
    • Cholesterol: 150mg

    Sharing is caring!

  • Chicken & Sweet Potato Rice Bowl

    Chicken & Sweet Potato Rice Bowl


    Introduction to Chicken & Sweet Potato Rice Bowl

    Life gets busy, doesn’t it? Some days, it’s a whirlwind of work, school runs, and extracurriculars. That’s where my Chicken & Sweet Potato Rice Bowl shines! It’s more than just a meal; it’s a hearty hug in a bowl that can delight your taste buds without consuming your precious time. This dish is perfect for those chaotic evenings when you want something nourishing and delicious. Plus, it’s easy enough to whip up on a moment’s notice, making it a go-to for impressing loved ones or simply treating yourself after a long day.

    Why You’ll Love This Chicken & Sweet Potato Rice Bowl

    This Chicken & Sweet Potato Rice Bowl is a showstopper in the kitchen. It’s quick to prepare, taking just 40 minutes from start to finish. With its vibrant colors and delicious flavors, it’s sure to entice even the pickiest eaters. Plus, it’s packed with nutrients, offering a balance of protein and fiber. You’ll love that it’s versatile enough to customize based on what you have on hand!

    Ingredients for Chicken & Sweet Potato Rice Bowl

    This Chicken & Sweet Potato Rice Bowl is built on simple yet delightful ingredients that come together to create a satisfying meal. Here’s what you’ll need:

    • Chicken breast: The protein powerhouse in this dish. You want it diced and seasoned for maximum flavor, making it juicy and tender.
    • Sweet potatoes: Sweet, creamy, and a nutritional heavyweight. Their natural sweetness complements the savory chicken beautifully.
    • Brown rice: A hearty base that adds texture and fiber. Its nutty flavor is a perfect match for the other ingredients.
    • Olive oil: This liquid gold enhances the roasting process, giving the sweet potatoes that delightful crispiness while adding healthy fats.
    • Paprika: A flavor booster! It lends a smoky warmth that elevates the dish and adds vibrant color.
    • Salt and pepper: Essential seasonings that enhance the natural flavors of your ingredients. Adjust to your taste!
    • Tahini: A creamy sesame paste that adds richness and depth. It’s a wonderful source of healthy fats and protein.
    • Lemon juice: A splash of brightness that balances the dish. It cuts through the richness and adds a refreshing zing.
    • Water: If you need to adjust the tahini’s consistency, a splash more or less will help you achieve your desired drizzle.

    Feel free to get creative! You can toss in additional veggies like bell peppers or broccoli, or swap the protein for tofu or chickpeas for a plant-based version. For the exact quantities of these ingredients, check the bottom of the article where you’ll find everything available for printing.

    How to Make Chicken & Sweet Potato Rice Bowl

    Making this Chicken & Sweet Potato Rice Bowl is a breeze! With a few simple steps, you’ll have a delicious meal ready to serve. Let’s dive into the process!

    Step 1: Prepare the Sweet Potatoes

    Start by preheating your oven to 400°F (200°C). While that warms up, grab those sweet potatoes and dice them into bite-sized pieces. This not only helps with even cooking but also makes it easy to scoop into your bowl later.

    Now, toss the sweet potatoes in a bowl with olive oil, paprika, salt, and pepper. Make sure each piece is nicely coated. Spread them on a baking sheet lined with parchment paper, creating a single layer. Roast them in the oven for 20 minutes, just until they’re tender and slightly caramelized. You’ll want to flip them halfway through for an even roast!

    Step 2: Cook the Chicken

    While the sweet potatoes are roasting, it’s time to focus on the chicken. Heat a skillet over medium-high heat and add a splash of olive oil. Once it’s hot, add your seasoned chicken breast pieces. Listen to that sizzle!

    Cook the chicken for about 6-8 minutes, stirring occasionally, until it’s nicely browned and cooked through. Check the internal temperature; it should reach 165°F (75°C) for safety. The savory aroma will make your kitchen smell divine!

    Step 3: Whisk the Tahini Sauce

    Next up is the creamy tahini sauce. In a small bowl, combine tahini, lemon juice, and water. Whisk it together until it’s smooth and pourable. If it feels too thick, add a splash more water until it reaches your desired consistency. This drizzle adds a gloriously nutty flavor to your meal!

    Step 4: Assemble Your Rice Bowl

    Now, the fun part! Grab your serving bowls and layer them up. Start with a portion of brown rice as the base, then add the beautifully roasted sweet potatoes and your perfectly cooked chicken on top.

    Finally, don’t forget that luscious tahini sauce! Drizzle it generously over your bowl for that extra richness. Serve it up warm and watch everyone dig in with delight.

    Enjoy every bite of your Chicken & Sweet Potato Rice Bowl – a wholesome dish that truly satisfies!

    Tips for Success

    • Make sure the sweet potatoes are cut into uniform pieces for even cooking.
    • Season your chicken generously for full flavor – don’t hold back!
    • Feel free to prep your ingredients ahead of time for a stress-free meal.
    • If you’re short on time, use pre-cooked brown rice for a quicker assembly.
    • Taste and adjust the tahini sauce; it should be creamy but light.

    Equipment Needed

    • Oven: Essential for roasting sweet potatoes. A toaster oven can work too!
    • Skillet: A non-stick skillet is best for cooking chicken. You can use a regular skillet with a bit more oil.
    • Baking Sheet: Needed for roasting. If you don’t have one, a cast-iron pan can do the trick!
    • Mixing Bowls: Great for combining ingredients. You can use any bowl you have handy.
    • Whisk or Fork: Perfect for blending the tahini sauce, but a spoon can work too!

    Variations

    • Vegetable Medley: Add in diced bell peppers, broccoli, or carrots for a colorful veggie boost.
    • Spice it Up: Swap paprika for cayenne pepper for a spicy kick. Adjust according to your taste!
    • Herbed Chicken: Season the chicken with garlic powder or Italian herbs for added flavor.
    • Grain Alternatives: Substitute brown rice with quinoa or cauliflower rice for a lighter option.
    • Nutty Twist: Drizzle with sesame oil for a richer flavor and a touch of Asian flair.

    Serving Suggestions

    • Fresh Salad: Pair your rice bowl with a light cucumber or mixed greens salad for a refreshing contrast.
    • Bright Beverage: A sparkling lemon water or iced herbal tea complements the dish perfectly.
    • Garnish: Add fresh herbs like cilantro or parsley on top for an extra burst of flavor and color.
    • Nuts: Sprinkle some toasted almonds or sesame seeds for added crunch!

    FAQs about Chicken & Sweet Potato Rice Bowl

    Can I prepare the Chicken & Sweet Potato Rice Bowl in advance?

    Absolutely! Prep the chicken and sweet potatoes ahead of time and store them in the fridge. Assemble the bowl right before serving for maximum freshness.

    What can I use instead of tahini?

    If tahini isn’t your thing, almond butter or even plain yogurt can work as a delightful substitute, adding creaminess to your bowl.

    Is this recipe gluten-free?

    Yes, this Chicken & Sweet Potato Rice Bowl is naturally gluten-free! Just ensure your brown rice is certified gluten-free if you’re serving someone with allergies.

    Can I freeze leftovers?

    You can freeze the components separately! Store them in airtight containers. Reheat thoroughly before enjoying again.

    What other vegetables can I add for variation?

    Feel free to include vegetables like zucchini, asparagus, or even spinach. They’ll all complement the flavors beautifully!

    Final Thoughts

    Creating this Chicken & Sweet Potato Rice Bowl is truly a delightful experience. Each bite bursts with flavor, making even the busiest weeks feel a bit brighter. I love how it transforms simple ingredients into a dish that feels special, perfect for family dinners or just a cozy night in. This bowl nourishes both the body and soul, reminding us that cooking can be fun, fulfilling, and stress-relieving. When I see my loved ones enjoying it, I know I’ve made something truly satisfying. Give it a try and savor the joy it brings to your table!


    Print

    clock clock iconcutlery cutlery iconflag flag iconfolder folder iconinstagram instagram iconpinterest pinterest iconfacebook facebook iconprint print iconsquares squares iconheart heart iconheart solid heart solid icon

    Description

    A hearty and nutritious Chicken & Sweet Potato Rice Bowl, perfect for satisfying your cravings with a delicious combination of flavors.


    • 1 lb chicken breast, diced and seasoned with salt and pepper
    • 2 cups sweet potatoes, diced
    • 2 cups cooked brown rice
    • 1 tbsp olive oil
    • 1 tsp paprika
    • Salt and pepper, to taste
    • 2 tbsp tahini
    • 1 tbsp lemon juice
    • 1 tbsp water

    1. Toss sweet potatoes with olive oil, paprika, salt, and pepper. Roast at 400°F (200°C) for 20 minutes.
    2. Cook chicken in a skillet until browned and cooked through.
    3. Whisk tahini, lemon juice, and water for the drizzle.
    4. Layer rice, chicken, and sweet potatoes in bowls. Drizzle with tahini sauce before serving.

    Notes

    • Feel free to add more vegetables or use different spices to customize the flavor.
    • This dish can be stored in the fridge for up to 3 days.
    • Adjust the consistency of the tahini drizzle by adding more water if needed.
    • Prep Time: 10 minutes
    • Cook Time: 30 minutes
    • Category: Main Course
    • Method: Roasting and Skillet Cooking
    • Cuisine: American

    Nutrition

    • Serving Size: 1 bowl
    • Calories: 420
    • Sugar: 5g
    • Sodium: 600mg
    • Fat: 10g
    • Saturated Fat: 1.5g
    • Unsaturated Fat: 8g
    • Trans Fat: 0g
    • Carbohydrates: 54g
    • Fiber: 8g
    • Protein: 30g
    • Cholesterol: 70mg

    Sharing is caring!

  • Honey Garlic Salmon Bites

    Honey Garlic Salmon Bites


    Introduction to Honey Garlic Salmon Bites

    Hey there, fellow cooking enthusiast! If you’re anything like me, your days are a whirl of activity, and finding time to whip up a delicious meal can feel impossible. That’s where my recipe for Honey Garlic Salmon Bites comes in. They’re not just a quick solution for busy days; they also pack a flavorful punch that’s sure to impress your loved ones. Plus, with just a handful of fresh ingredients, you can have a delectable dish on the table in 30 minutes or less. Let’s dive into this tasty adventure!

    Why You’ll Love This Honey Garlic Salmon Bites

    You’re going to adore these Honey Garlic Salmon Bites because they combine simplicity with incredible flavor. Not only are they easy to make, but they also come together in no time, making them perfect for your bustling schedule. Imagine crispy, golden bites of salmon coated in a sweet garlic glaze that’ll have everyone reaching for seconds. It’s a meal that’s quick, satisfying, and utterly delicious—exactly what a busy mom or professional needs!

    Ingredients for Honey Garlic Salmon Bites

    Let’s gather the goodies for our Honey Garlic Salmon Bites! Here’s what you’ll need:

    • Salmon: Fresh salmon fillet, skin removed and cut into 1-inch cubes. It’s rich in omega-3 fatty acids and gives this dish a fantastic texture.
    • Paprika: This adds a subtle smokiness and beautiful color to the salmon. Any type works well, but smoked paprika brings an extra layer of flavor.
    • Garlic powder: This handy spice gives a delicious garlic taste without the peeling and chopping. Perfect for my busy nights!
    • Onion powder: Another time-saver that enhances the flavor profile of the salmon with a gentle sweetness.
    • Salt and black pepper: These basic seasonings bring out the salmon’s flavor. Adjust them to your taste!
    • Olive oil: Use this for cooking the salmon and adding richness. It’s healthy and enhances that crispy exterior.
    • Garlic and ginger: Fresh minced garlic and grated ginger elevate the sauce. They create a fragrance that’ll have your family swooning in the kitchen.
    • Soy sauce: This salty goodness adds umami, balancing the sweetness of honey perfectly.
    • Rice vinegar: A touch of acidity, enhancing the overall flavor and brightness of the dish.
    • Honey: The star of the show! Its sweetness caramelizes beautifully, creating that signature glaze.
    • Sesame seeds: For those finishing touches, they add a nice crunch and a mild nutty flavor.
    • Chives: Fresh herbs add color and a mild oniony flavor, brightening up the dish.

    For exact measurements, be sure to check the bottom of the article where they’re available for printing. Now, let’s get cooking and make these scrumptious bites come to life!

    How to Make Honey Garlic Salmon Bites

    Now that we have all our ingredients, let’s walk through the process of making these delightful Honey Garlic Salmon Bites step by step. With a little practice, you’ll have this tasty dish mastered in no time!

    Step 1: Prep the Salmon

    First, pat the salmon cubes dry with a paper towel. This simple step is crucial for achieving a crispy texture! By removing excess moisture, the seasoning sticks better, and we get that beautiful crust when cooking. Next, combine paprika, garlic powder, onion powder, salt, and pepper in a bowl and season those salmon bites generously. Don’t be shy; this adds a depth of flavor that makes a difference!

    Step 2: Cook the Salmon

    Heat a heavy skillet over medium-high heat and add a tablespoon of olive oil. Once hot, add the salmon cubes in a single layer. This ensures even cooking and that coveted golden crust. Here’s a quick tip: Flip the salmon after about 4-5 minutes to achieve a crispy finish on all sides. Cook until the salmon is beautifully golden and crispy, and then transfer those bites to a plate. If you’re making a larger batch, don’t overcrowd the pan—cook in batches if necessary!

    Step 3: Make the Sauce

    In the same skillet, pour in the remaining oil and toss in the minced garlic and grated ginger. Sauté them for about a minute until fragrant; your kitchen will start to smell heavenly! Then, stir in soy sauce, rice vinegar, and honey, creating a luscious sauce. Let it simmer for 3-5 minutes, allowing it to thicken slightly. This sweet-savory sauce is what makes these bites irresistible!

    Step 4: Combine and Serve

    Return the crispy salmon bites to the skillet and toss them in the sauce until well coated. Make sure every bite is drenched in that glorious mixture! Before serving, taste and adjust the seasonings, adding a pinch more salt or honey if needed. Serve these yummy bites over rice or veggies for a complete meal. Enjoy every delicious bite!

    Tips for Success

    • Pat the salmon dry! This helps achieve that perfect crispy texture.
    • Cook in batches if necessary. Overcrowding can lead to steaming instead of searing.
    • Don’t skip the saucing step! It enhances flavor and keeps the salmon moist.
    • Garnish with extra chives or sesame seeds for a lovely presentation.
    • Serve immediately for the best texture and flavor—trust me on this!

    Equipment Needed

    • Heavy skillet: A cast iron skillet is perfect for even heat, but a non-stick pan also works well.
    • Spatula: A fish spatula makes flipping the salmon easy, but any spatula will do.
    • Measuring cups and spoons: Essential for accurate ingredient measurements.
    • Paper towels: Handy for patting the salmon dry.

    Variations for Honey Garlic Salmon Bites

    • Different Fish: Swap out salmon for other firm fish like cod, trout, or even shrimp for a fun twist.
    • Spicy Kick: Add red pepper flakes or sriracha to the sauce for those who love a bit of heat!
    • Sweet Substitutes: Try using maple syrup instead of honey for a unique flavor that pairs well with the fish.
    • Vegetarian Option: Substitute salmon with tofu or tempeh; just follow the same prep and cooking methods.
    • Herb Variations: Experiment with fresh herbs like cilantro or parsley instead of chives for a different flavor profile.

    Serving Suggestions

    • Serve over steamed jasmine rice or quinoa for a nutritious pairing.
    • Add a side of sautéed seasonal vegetables like broccoli or snap peas for color and crunch.
    • A light salad with sesame dressing complements the dish beautifully.
    • For drinks, try pairing with a crisp white wine or sparkling water with lemon.

    FAQs about Honey Garlic Salmon Bites

    Can I use frozen salmon for this recipe?

    Yes, you can! Just ensure to thaw it completely and pat it dry before seasoning. This will help achieve that crispy texture we all love.

    How do I store leftover Honey Garlic Salmon Bites?

    Store any leftovers in an airtight container in the refrigerator. They’ll stay fresh for up to 2 days. To reheat, use the skillet, so they regain their crispiness!

    Can I make the sauce ahead of time?

    Absolutely! You can prepare the sauce and store it in the fridge. Just warm it up and toss the salmon bites in it when ready to serve.

    What should I serve with Honey Garlic Salmon Bites?

    These bites pair wonderfully with steamed rice, quinoa, or vibrant sautéed greens. The sweetness of the salmon complements a light salad too!

    Are Honey Garlic Salmon Bites healthy?

    Yes! Salmon is high in protein and omega-3 fatty acids, making this dish both nutritious and satisfying without compromising on flavor.

    Final Thoughts

    Making Honey Garlic Salmon Bites is not just about cooking; it’s about creating memorable moments around the dinner table. Each bite bursts with flavor, making it easy to forget the day’s chaos. It’s a dish that transforms busy evenings into delightful events, where your loved ones can savor the sweet and savory harmony of garlic and honey. Plus, knowing you can whip this up in under 30 minutes feels like a small victory! I hope this recipe brings as much joy to your kitchen as it has to mine. Happy cooking and savor every delicious moment!


    Print

    clock clock iconcutlery cutlery iconflag flag iconfolder folder iconinstagram instagram iconpinterest pinterest iconfacebook facebook iconprint print iconsquares squares iconheart heart iconheart solid heart solid icon

    Description

    A mouthwatering recipe for honey garlic salmon bites that are crispy on the outside and bursting with flavor.


    • 1 ½ lb salmon, skin removed and cut into 1-inch cubes
    • 1 teaspoon paprika
    • 1 teaspoon garlic powder
    • 1 teaspoon onion powder
    • ¾ teaspoon salt
    • 1 teaspoon ground black pepper
    • 3 tablespoons olive oil, divided
    • 2 teaspoons garlic, minced
    • 1 teaspoon ginger, grated
    • 3 tablespoons soy sauce
    • 2 tablespoons rice vinegar
    • ¼ cup honey
    • 2 teaspoons sesame seeds
    • 2 teaspoons chopped chives

    1. Pat dry the salmon cubes with a paper towel and season them with paprika, garlic powder, onion powder, salt, and black pepper. Pour about a tablespoon of oil and massage the salmon cubes.
    2. Heat a heavy skillet with a tablespoon of oil, add the salmon cubes in a single layer, and cook for 4-5 minutes by flipping them often until crispy and golden. Transfer the cooked crispy salmon cubes to a plate and cook the remaining salmon.
    3. To the same skillet add the remaining oil and add garlic and ginger, saute for a minute.
    4. Stir in the soy sauce, rice vinegar, and honey. Simmer the sauce for 3-5 minutes until it thickens.
    5. Transfer the crispy salmon back to the skillet and toss it well with the sauce. Check for seasonings.
    6. Serve the salmon bites over the rice and enjoy.

    Notes

    • Ensure the salmon is well dried before seasoning for better crust.
    • Serve immediately for the best texture.
    • Can substitute honey with maple syrup for a different flavor.
    • Prep Time: 15 minutes
    • Cook Time: 15 minutes
    • Category: Main Dish
    • Method: Sautéing
    • Cuisine: Asian

    Nutrition

    • Serving Size: 1 serving
    • Calories: 350
    • Sugar: 20g
    • Sodium: 650mg
    • Fat: 18g
    • Saturated Fat: 3g
    • Unsaturated Fat: 15g
    • Trans Fat: 0g
    • Carbohydrates: 30g
    • Fiber: 1g
    • Protein: 25g
    • Cholesterol: 60mg

    Sharing is caring!

  • Greek Salad Cottage Cheese Bowl: A Refreshing Delight!

    Greek Salad Cottage Cheese Bowl: A Refreshing Delight!


    Introduction to Greek Salad Cottage Cheese Bowl

    Welcome to the world of vibrant flavors and refreshing textures! If you’re like me, you love quick solutions in the kitchen that don’t compromise on taste. Enter the Greek Salad Cottage Cheese Bowl—a delicious mix of creamy cottage cheese and crispy vegetables, perfect for a busy day or a light meal that impresses. Whether you’re juggling work, family, or just need a little pick-me-up, this bowl is here to brighten your table and your spirits. Let’s dive into this delightful recipe that’s as satisfying as it is easy!

    Why You’ll Love This Greek Salad Cottage Cheese Bowl

    This Greek Salad Cottage Cheese Bowl is a lifesaver for busy moms and professionals like us. It’s quick to prepare—ready in just 10 minutes. Each bite is a burst of flavor, making healthy eating feel indulgent. Plus, it’s a versatile dish that you can customize based on your family’s preferences. With its colorful ingredients, it’s not just a meal; it’s a feast for the eyes that sparks joy in every bowl!

    Ingredients for Greek Salad Cottage Cheese Bowl

    Gathering fresh ingredients is a crucial part of creating the perfect Greek Salad Cottage Cheese Bowl. Here’s what you’ll need to whip up this delightful dish:

    • Cottage cheese: This creamy base adds protein and a slight tang, making every bite satisfying.
    • Romaine lettuce: Crispy and fresh, it brings a delightful crunch and vibrant color to your bowl.
    • Kalamata olives: Their rich, briny flavor adds depth, providing that distinct Mediterranean flair.
    • Feta cheese: Crumbled feta offers a creamy, tangy contrast to the crisp veggies, elevating your bowl.
    • Cucumber: Diced for a refreshing crunch, it also adds hydration, which is always a bonus!
    • Cherry tomatoes: Sweet and juicy, these tomatoes provide pops of flavor and a splash of brightness.
    • Red onion: Thinly sliced, it adds a zesty bite. If you prefer a milder taste, soak in water before using.
    • Greek dressing: A drizzle of this enhances the flavors, tying all ingredients together beautifully.

    For an added crunch, consider including bell peppers or radishes. They not only contribute texture but also bring a lovely color contrast. If you’re short on time, pre-chopped vegetables from a supermarket can save you precious minutes in the kitchen!

    Feel free to adjust ingredients based on your taste. If you’re not a fan of olives, for instance, you might swap them for artichoke hearts. And remember, you can find exact measurements at the bottom of the article, perfect for printing out!

    How to Make Greek Salad Cottage Cheese Bowl

    Creating your Greek Salad Cottage Cheese Bowl is a breeze. Just follow these simple steps, and you’ll have a fresh, nutritious meal ready in no time!

    Step 1: Combine the Ingredients

    Start by taking a large mixing bowl. This is where the magic happens! Add the cottage cheese first; it will serve as the creamy, protein-packed base that holds everything together.

    Next, toss in the chopped romaine lettuce. This adds a crisp texture that makes each bite feel refreshing. Then, add the sliced kalamata olives. They bring a flavorful punch that reminds you of Mediterranean beaches.

    Now, crumble the feta cheese into the mix. Its tangy richness complements the other ingredients perfectly. Don’t forget the diced cucumber and halved cherry tomatoes; their sweetness balances the savory elements beautifully. Finally, toss in the thinly sliced red onion for that extra zing.

    Step 2: Drizzle with Dressing

    After combining your fresh vegetables and cottage cheese, it’s time to bring it all together with a drizzle of Greek dressing. I prefer to use a generous two tablespoons, but you can start with one and adjust to your taste.

    As you pour the dressing, imagine it cascading over the ingredients like a sunny drizzle of olive oil directly from a Grecian kitchen. The dressing will not only enhance the flavors but also make the salad visually appealing. Keep a watchful eye—it’s easy to overdo it, and you want to enjoy the balance of delicious flavors.

    Step 3: Toss to Combine

    With everything in the bowl, it’s time to mix! Using two large utensils or even your hands, gently toss the ingredients together. You want everything to be well coated without squishing the delicate cottage cheese or wilting the lettuce.

    This is the moment to savor the colors and textures—vibrant greens, deep purples, and the snowy white of the feta come together like a beautiful tapestry. Taste as you go! If you feel it needs a bit more flavor, add a pinch of salt or a bit more dressing. Serve immediately, and watch everyone swoon!

    Tips for Success

    • Always use fresh ingredients for the best flavor and nutrition.
    • Experiment with different dressings to find your family’s favorite twist.
    • Make the salad just before serving to keep the veggies crisp.
    • Chill your cottage cheese for added refreshment on hot days.
    • Don’t hesitate to get creative with toppings—nuts or seeds can add a delightful crunch!

    Equipment Needed

    • Large mixing bowl: Any bowl will do, but a glass or stainless steel one is great for easy cleaning.
    • Utensils: A sturdy spoon or mixing fork for tossing the ingredients together.
    • Measuring spoons: Essential for adding accurate amounts of dressing, though estimating works, too!
    • Cutting board and knife: For chopping those fresh veggies—keeping your knives sharp makes it easier!

    Variations of Greek Salad Cottage Cheese Bowl

    • Protein-packed: Add grilled chicken or shrimp for a heartier meal that’s still light and refreshing.
    • Vegetarian delight: Substitute cottage cheese with hummus for a creamy vegan option, still packed with flavor.
    • Herbed goodness: Incorporate fresh herbs like dill or parsley to enhance the Mediterranean flavors.
    • Spicy kick: Mix in some diced jalapeños or drizzle with hot sauce for those who love a little heat.
    • Whole grain boost: Serve over cooked quinoa or brown rice for an extra layer of texture and nutrition.

    Serving Suggestions for Greek Salad Cottage Cheese Bowl

    • Accompany with pita bread: Warm, fresh pita adds a lovely touch and makes for a perfect scoop.
    • Pair with a light white wine: A crisp Sauvignon Blanc enhances the Mediterranean vibe beautifully.
    • Garnish with fresh parsley: This adds a pop of color and freshness, making the dish even more inviting.
    • Serve chilled: Refrigerate the salad for about 30 minutes if you prefer a cooler meal on warm days.

    FAQs about Greek Salad Cottage Cheese Bowl

    Can I make this salad ahead of time?

    Absolutely! You can prep the ingredients in advance and store them separately for a short time. However, for the freshest taste, combine them just before serving. This keeps the vegetables crisp and the cottage cheese creamy!

    Is the Greek Salad Cottage Cheese Bowl vegetarian?

    Yes! This recipe is purely vegetarian, packed with fresh veggies and creamy cottage cheese. It’s a fantastic option for anyone looking to enjoy a light, healthy meal.

    Can I customize the ingredients to fit my dietary needs?

    Certainly! You can substitute or add any ingredients that suit your preferences. For instance, use a dairy-free cottage cheese alternative or add grilled chicken for extra protein. Personalizing this bowl makes it a delightful experience!

    How do I store leftovers?

    If you have leftovers, store them in an airtight container in the fridge for up to two days. To keep the freshness, try to combine only the portions you’ll eat earlier and leave the rest separate. This helps maintain the texture of your Greek Salad Cottage Cheese Bowl!

    What’s the best way to serve this dish for guests?

    For an impressive presentation, serve the Greek Salad Cottage Cheese Bowl in individual glass jars or bowls. This adds flair, shows off the colorful layers, and makes it easy for guests to enjoy. Trust me; it will be a hit!

    Final Thoughts

    Whipping up a Greek Salad Cottage Cheese Bowl is more than just making a meal—it’s about embracing the joys of fresh ingredients and bold flavors. Each bite not only nourishes the body but also lifts the spirit. Perfect for those bustling day-to-day schedules, this recipe brings a little Mediterranean sunshine to your table, giving you a moment of peace amid the chaos. So, whether you’re preparing it for your family or a quick solo lunch, I hope this bowl brings a smile to your face and warmth to your heart. Enjoy every delicious moment!


    Print

    clock clock iconcutlery cutlery iconflag flag iconfolder folder iconinstagram instagram iconpinterest pinterest iconfacebook facebook iconprint print iconsquares squares iconheart heart iconheart solid heart solid icon

    Description

    A refreshing and nutritious Greek Salad Cottage Cheese Bowl featuring fresh vegetables and creamy cottage cheese.


    • 1/2 cup cottage cheese
    • 1 cup romaine lettuce, chopped
    • 1/4 cup kalamata olives, sliced
    • 1/4 cup crumbled feta cheese
    • 1/2 cucumber, diced
    • 1/2 cup cherry tomatoes, halved
    • 1/4 red onion, thinly sliced
    • 2 tablespoons Greek dressing

    1. In a bowl, combine cottage cheese, romaine lettuce, olives, feta cheese, cucumber, cherry tomatoes, and red onion.
    2. Drizzle with Greek dressing.
    3. Toss gently to combine and serve immediately.

    Notes

    • For an added crunch, consider including bell peppers or radishes.
    • This salad can be made ahead of time but is best served fresh.
    • Feel free to adjust the ingredients based on your taste preferences.
    • Prep Time: 10 minutes
    • Cook Time: 0 minutes
    • Category: Salad
    • Method: Mixing
    • Cuisine: Greek

    Nutrition

    • Serving Size: 1 bowl
    • Calories: 220
    • Sugar: 4g
    • Sodium: 450mg
    • Fat: 12g
    • Saturated Fat: 4g
    • Unsaturated Fat: 8g
    • Trans Fat: 0g
    • Carbohydrates: 15g
    • Fiber: 3g
    • Protein: 15g
    • Cholesterol: 15mg

    Sharing is caring!